87

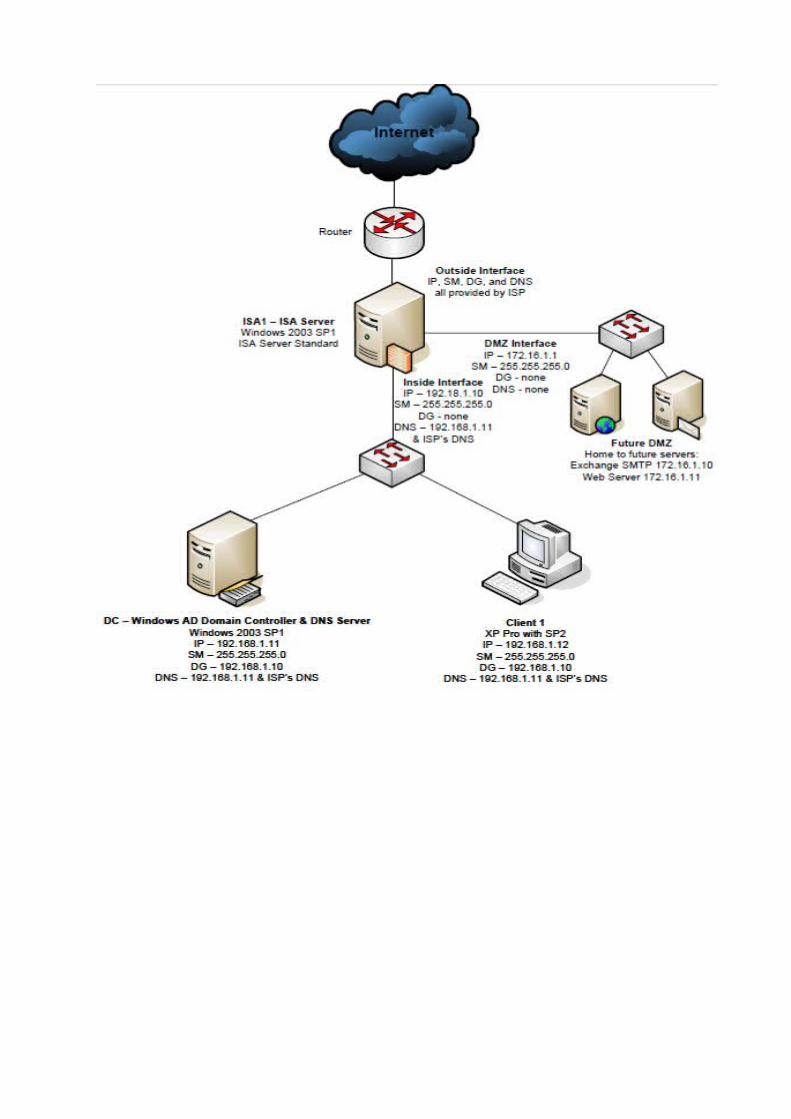

1. AD_DNS machine Configure TCP/IP and host name:
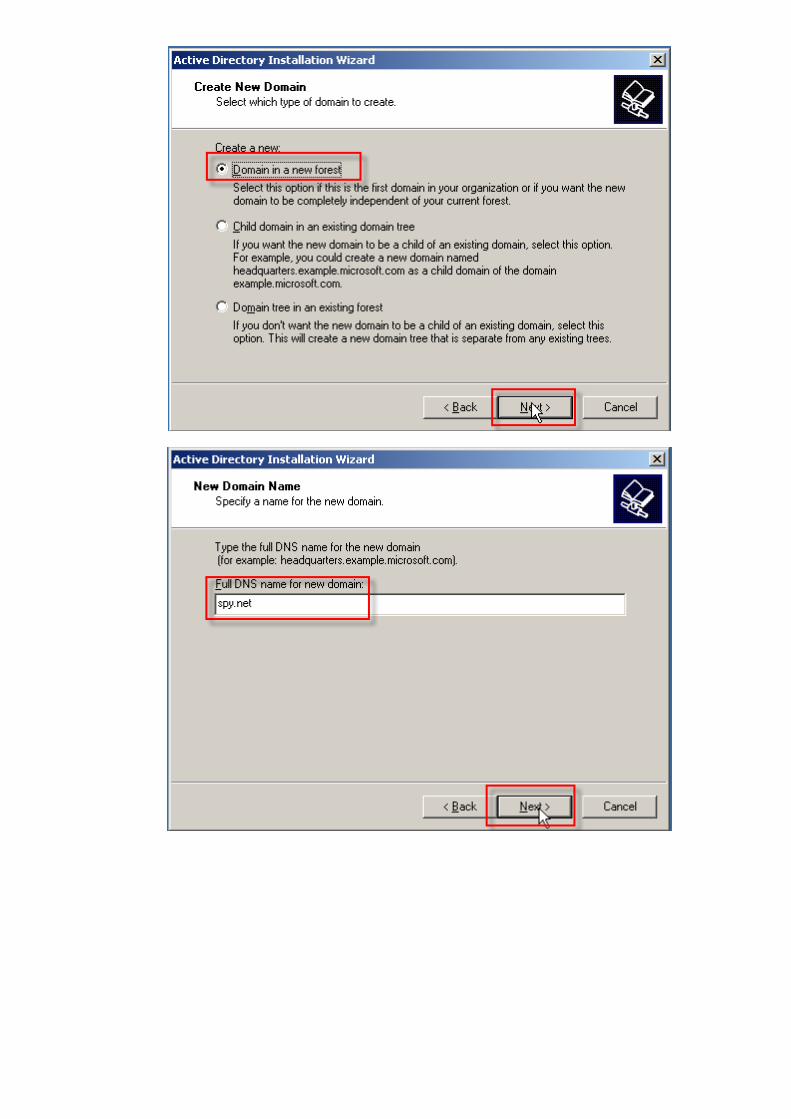
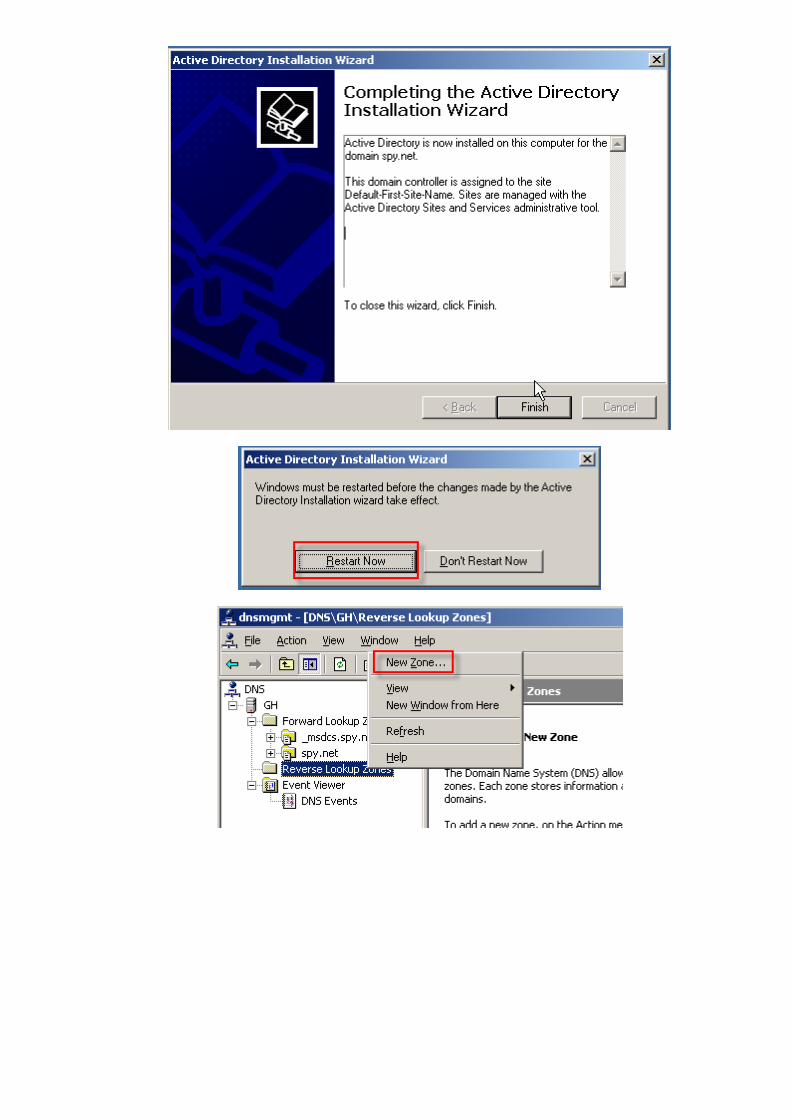
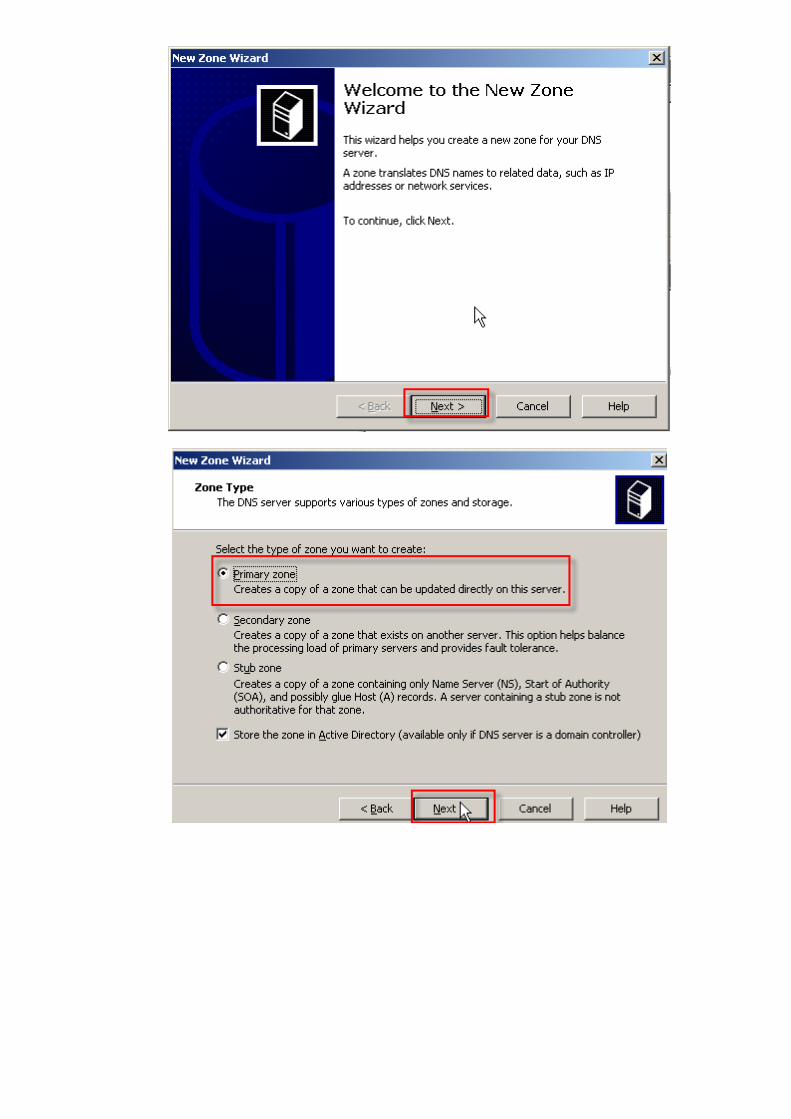
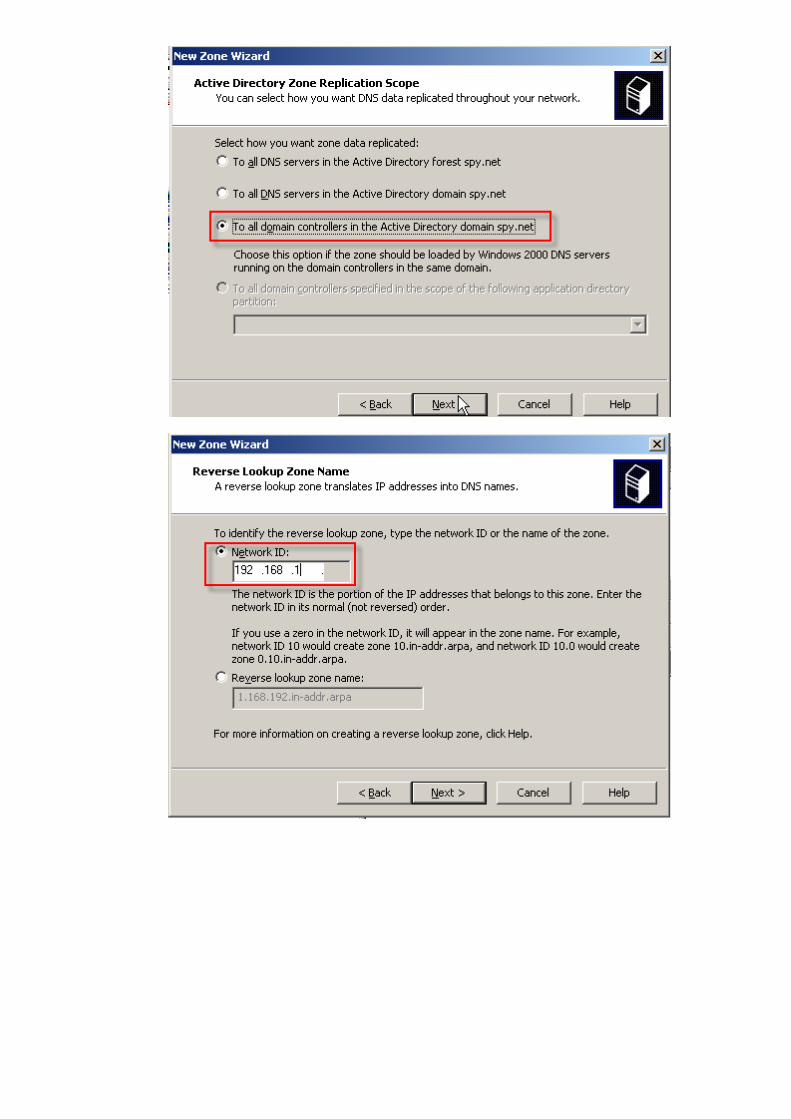
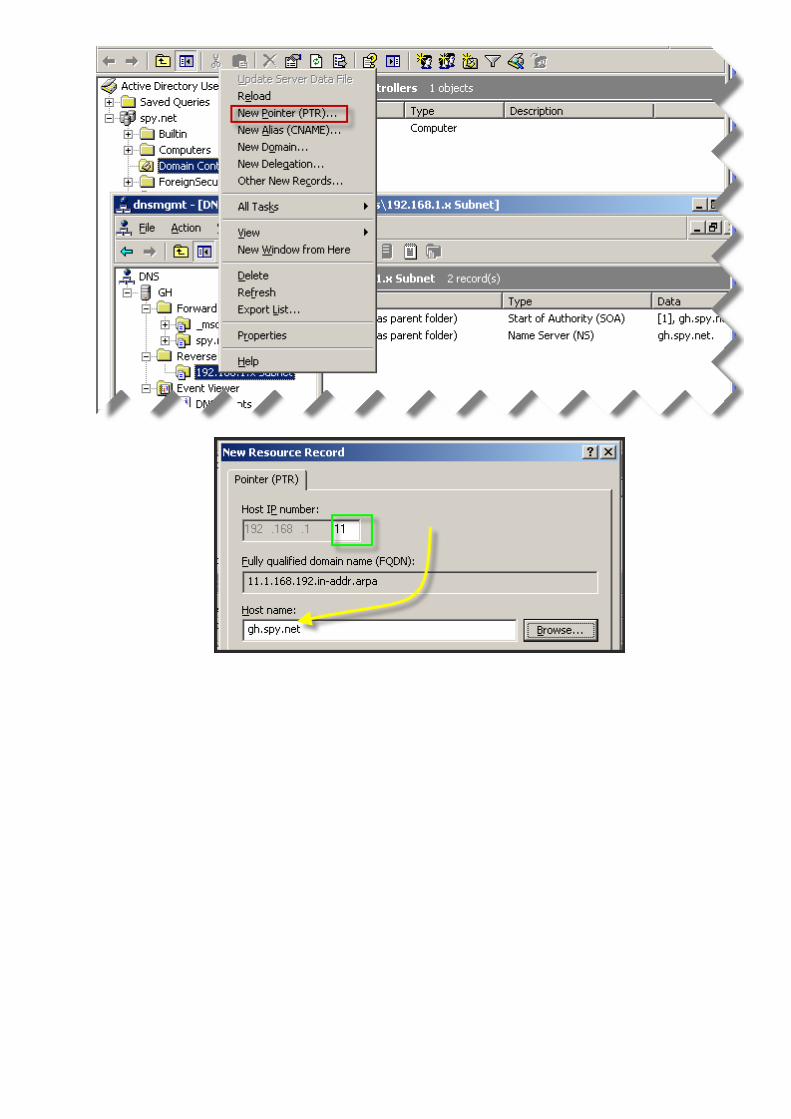
Install and configure AD and DNS


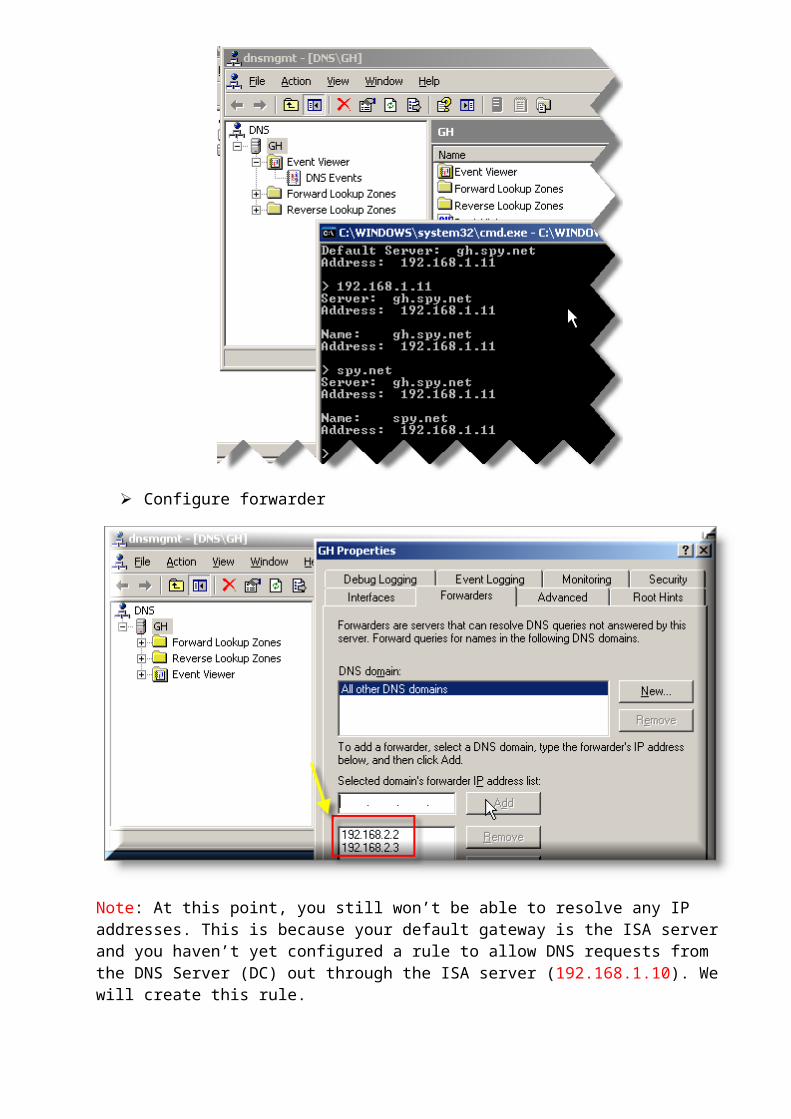
Configure forwarder
Note: At this point, you still won’t be able to resolve any IP addresses. This is because your default gateway is the ISA server and you haven’t yet configured a rule to allow DNS requests from the DNS Server (DC) out through the ISA server (192.168.1.10). We will create this rule.
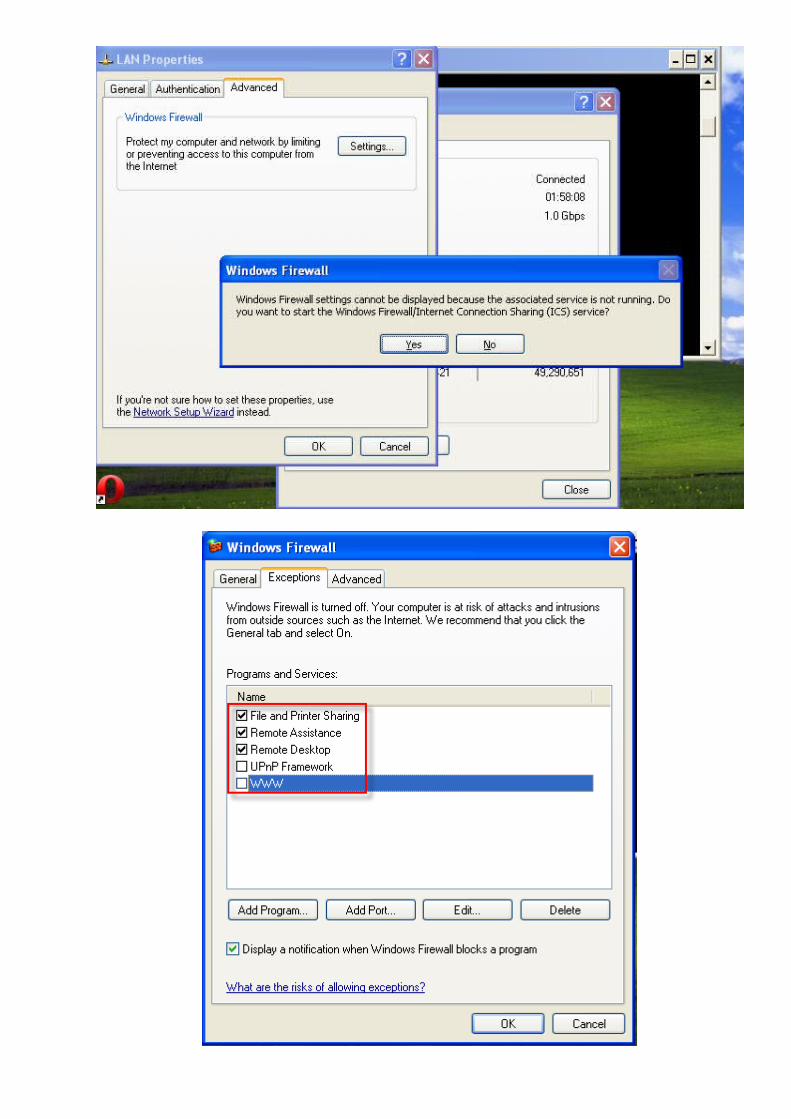
Disabling Windows Firewall On All Adaptors
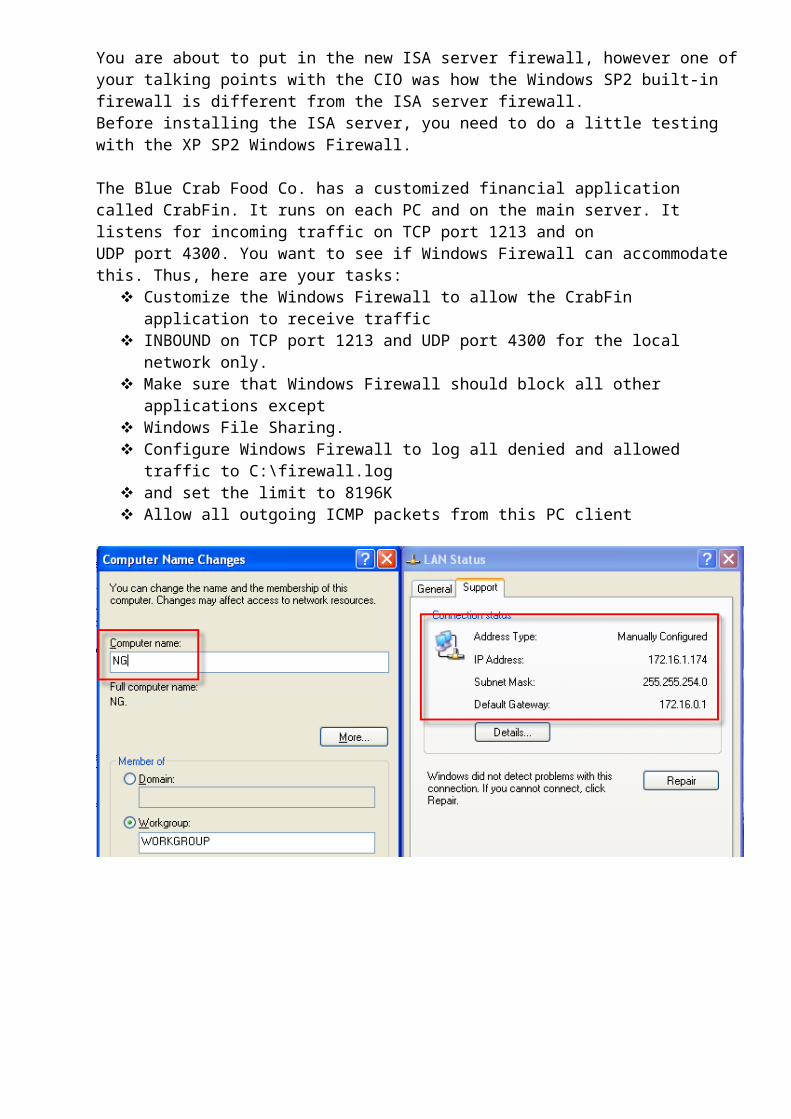
Windows XP Client-Side Firewall ScenarioYou are about to put in the new ISA server firewall, however one of your talking points with the CIO was how the Windows SP2 built-in firewall is different from the ISA server firewall.Before installing the ISA server, you need to do a little testing with the XP SP2 Windows Firewall.

The Blue Crab Food Co. has a customized financial application called CrabFin. It runs on each PC and on the main server. It listens for incoming traffic on TCP port 1213 and onUDP port 4300. You want to see if Windows Firewall can accommodate this. Thus, here are your tasks:
Customize the Windows Firewall to allow the CrabFin application to receive traffic INBOUND on TCP port 1213 and UDP port 4300 for the local network only. Make sure that Windows Firewall should block all other applications except Windows File Sharing. Configure Windows Firewall to log all denied and allowed traffic to C:\firewall.log and set the limit to 8196K Allow all outgoing ICMP packets from this PC client
Because the CrabFin application is a suite of programs that will use these ports, you will choose to use the Add Port option here. This way, these ports are always open and that will allow the suite of programs to receive inbound communications on those ports asneeded. Now, add the two ports we need for the CrabFin application. To do this, click Add Port.
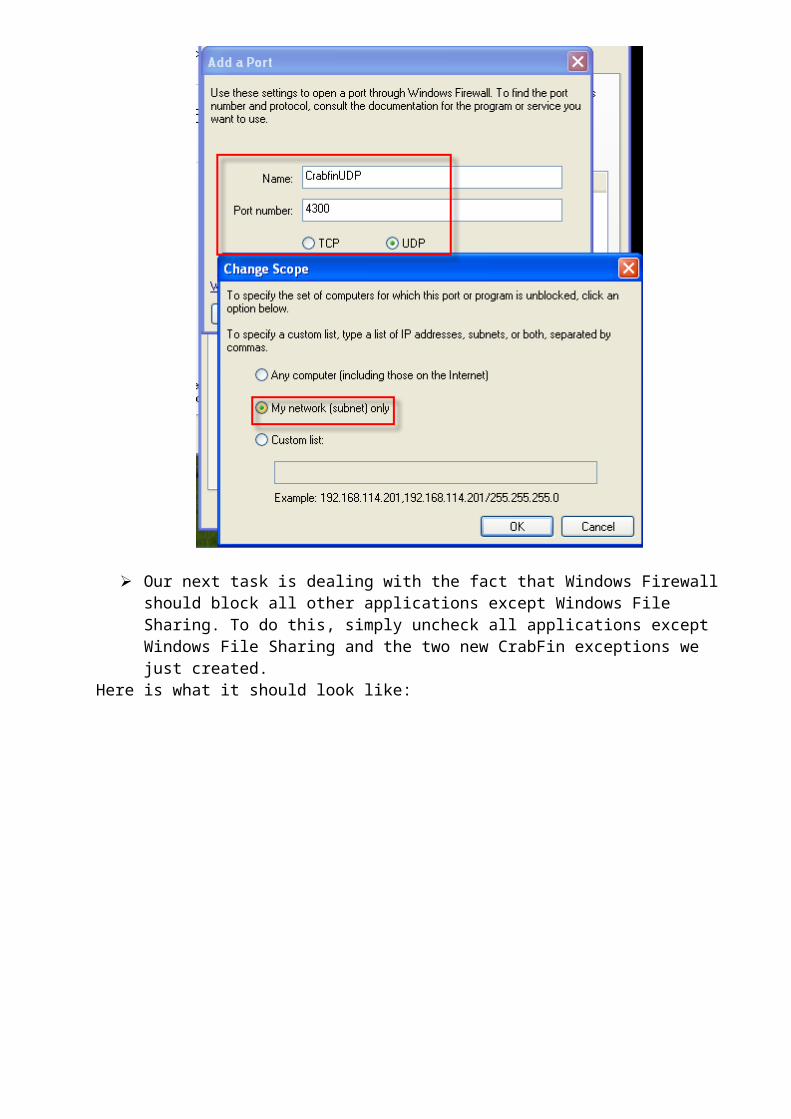
Fill in the Port name as CrabFin, the port number as 1213, and select TCP for the protocol. Now, click Change Scope because we want to limit this traffic to our local network only. On the Scope window, click My network (subnet) only, as seen below.

Now, go back in and repeat the process for the second port that needs access, UDP
4300. Click Add Port and fill in the required information.
Our next task is dealing with the fact that Windows Firewall should block all other applications except Windows File Sharing. To do this, simply uncheck all applications except Windows File Sharing and the two new CrabFin exceptions we just created.
Here is what it should look like:

Our third task is to configure Windows Firewall to log all denied and allowed traffic to C:\firewall.log and to set the limit to 8196K. To do this, click on the Advanced tab of the
Windows Firewall window. The Log Settings window will appear. On this window check the Log dropped packets and Log successful connections options. Change the name of the log
file to c:\firewall.log and set the size limit to 8196K (8MB).
Now click on the Settings button under the ICMP section. On the ICMP settings window, check all checkboxes that allow OUTGOING ICMP traffic. Note that the Windows
Firewall doesn’t control outbound traffic from other programs but can control certain types of outgoing ICMP traffic.
Testing
ZoneAlarm Client-Side Firewall Scenario
In this lab, your task is to replicate the same settings you configured on the WindowsFirewall under the ZoneAlam firewall. Those tasks are:
Customize the ZoneAlarm Firewall to allow the CrabFin application to receive traffic INBOUND on TCP port 1213 and UDP port 4300 for the local network only. Make sure that ZoneAlarm should block all other applications except Windows File Sharing.

Configure ZoneAlarm to log all denied and allowed traffic to C:\firewall.log. Allow all outgoing ICMP packets from this PC client.
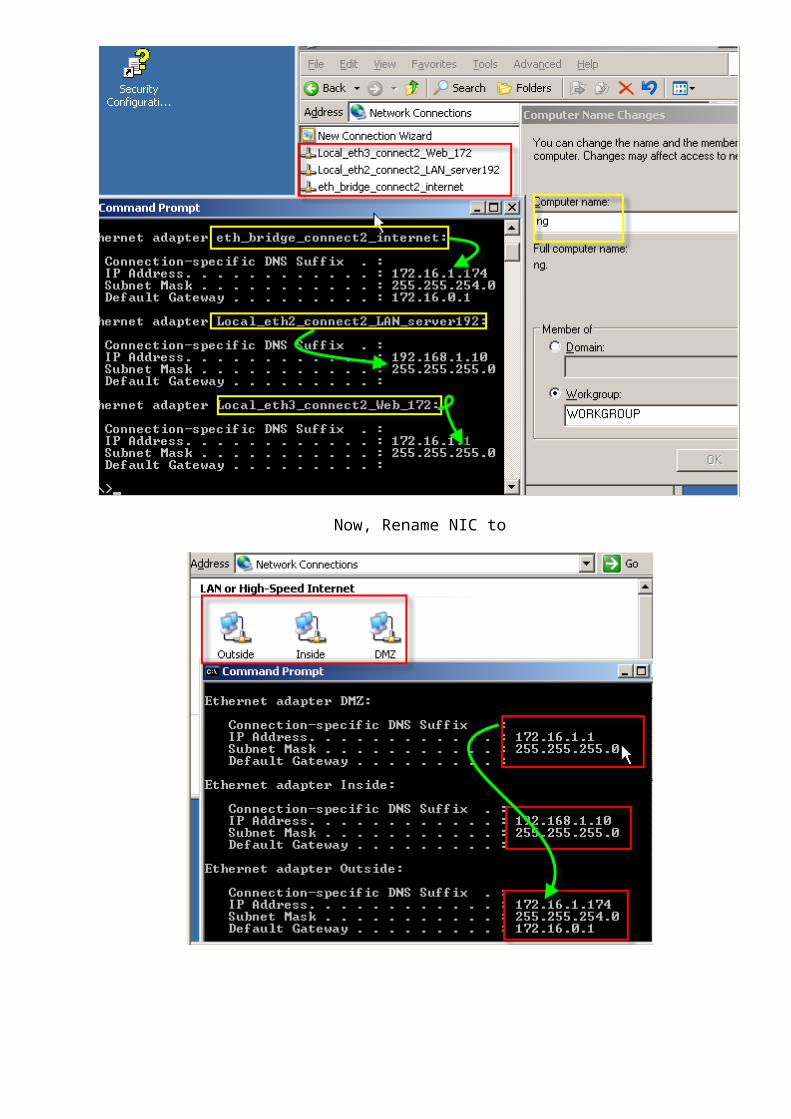
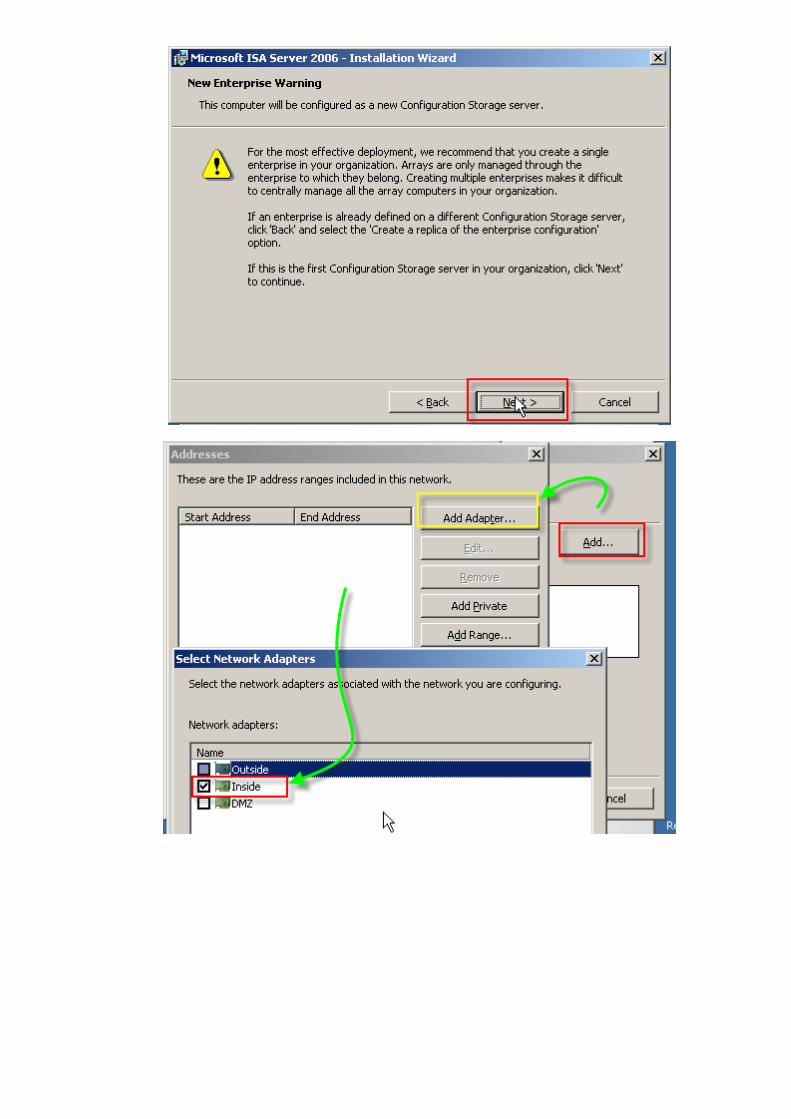
2. ISA Router machine
Configure TCP/IP and host name
Now, Rename NIC to


Join ISA Router to AD (spy.net)


3. Connecting to Internet
By default, ISA server will deny all access to the Internet. Thus, before a client will ever be able to connect to the Internet through the ISA server access for that client must be configured on the ISA server.
If you have other internal networks, besides the one specified in the internal network setup screen, you will have to add routes for those networks on the ISA server using the route command.
ISA firewall needs to be able to perform both internal and external DNS resolution, either by going to an internal DNS server that also does external forwarding or by having both an internal and an external DNS server configured.
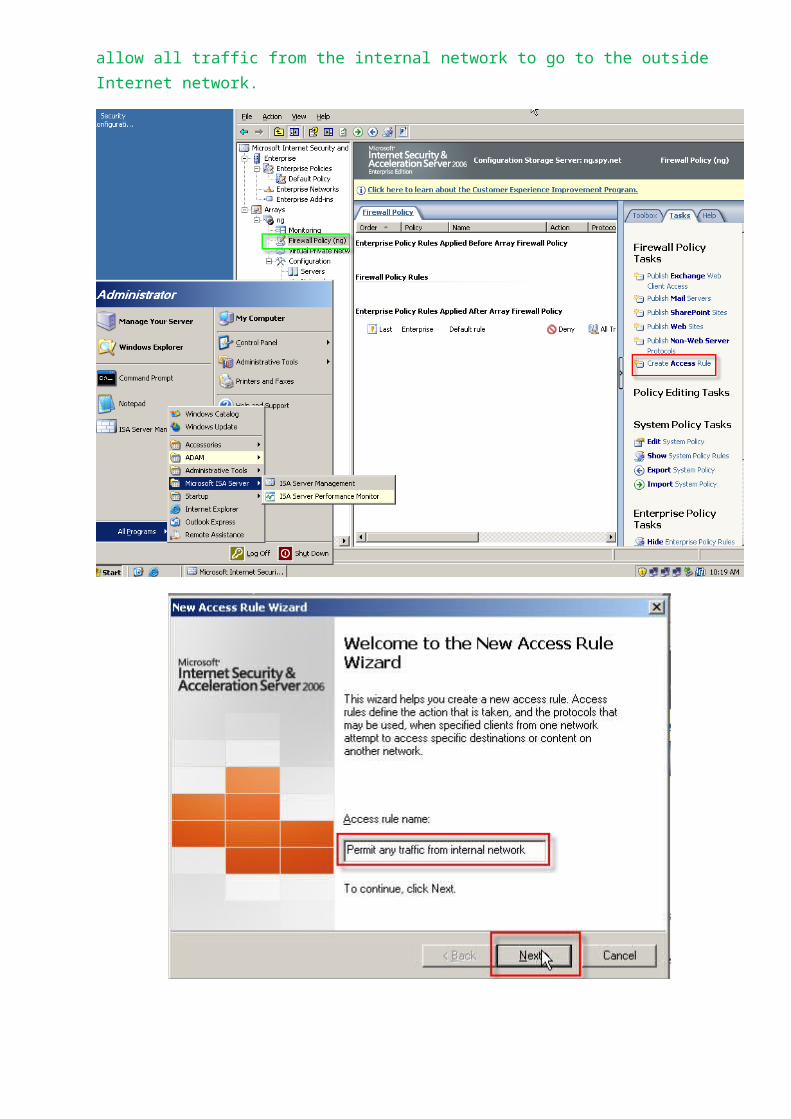
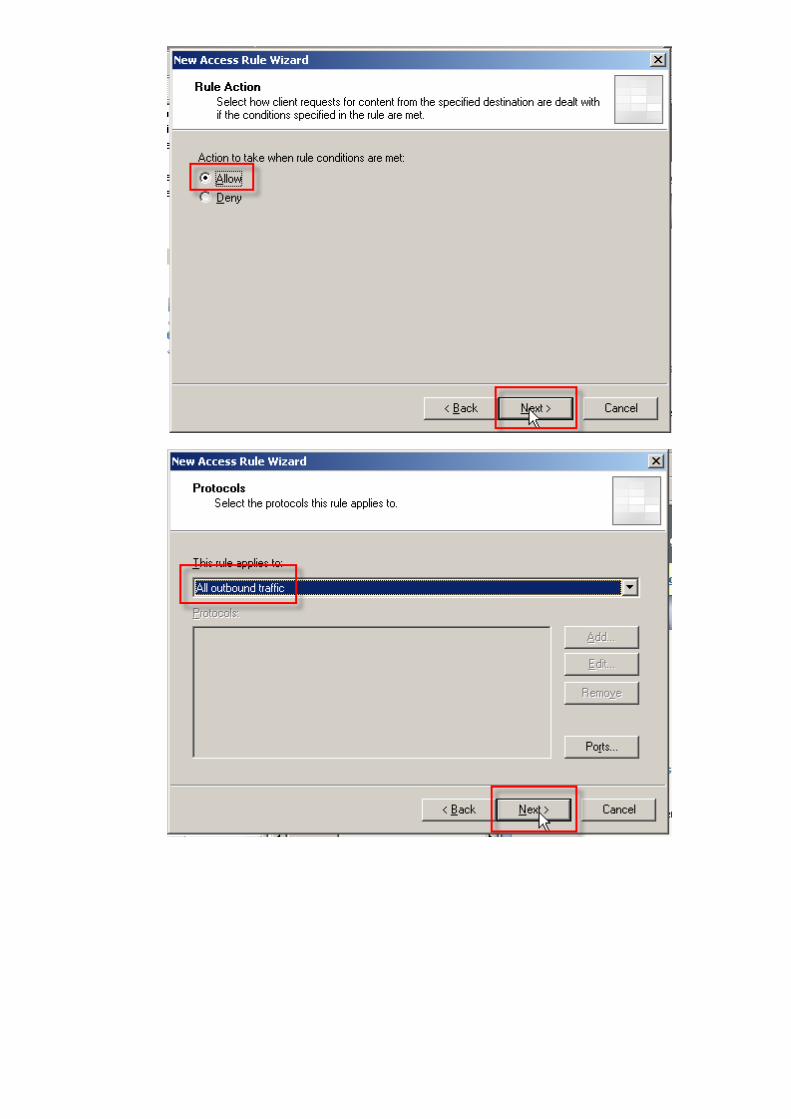
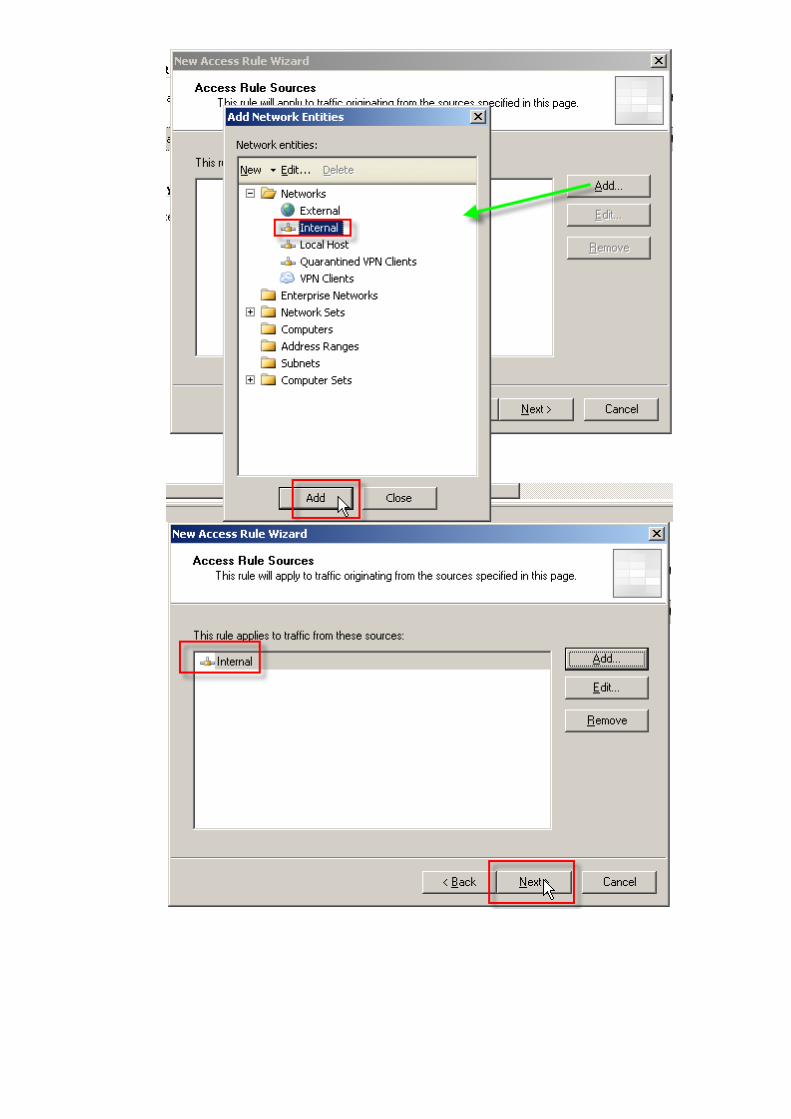
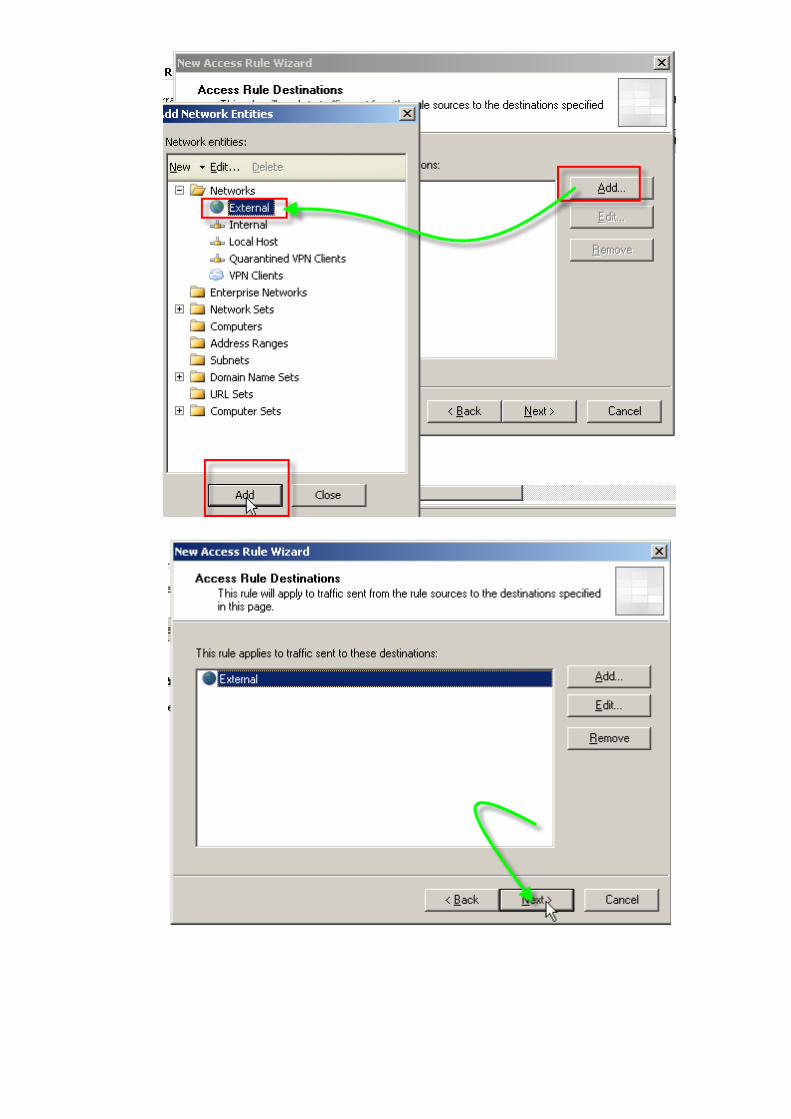
We want to take our client and have them connect to the Internet through the ISA server. We will use SecureNAT to allow the client to do this as it is the simplest method. As our firewall, by default, won’t allow any client traffic to pass through it, we need to create a rule to allow that. We will make a “permit any” rule to allow all traffic from the internal network to go to the outside Internet network.


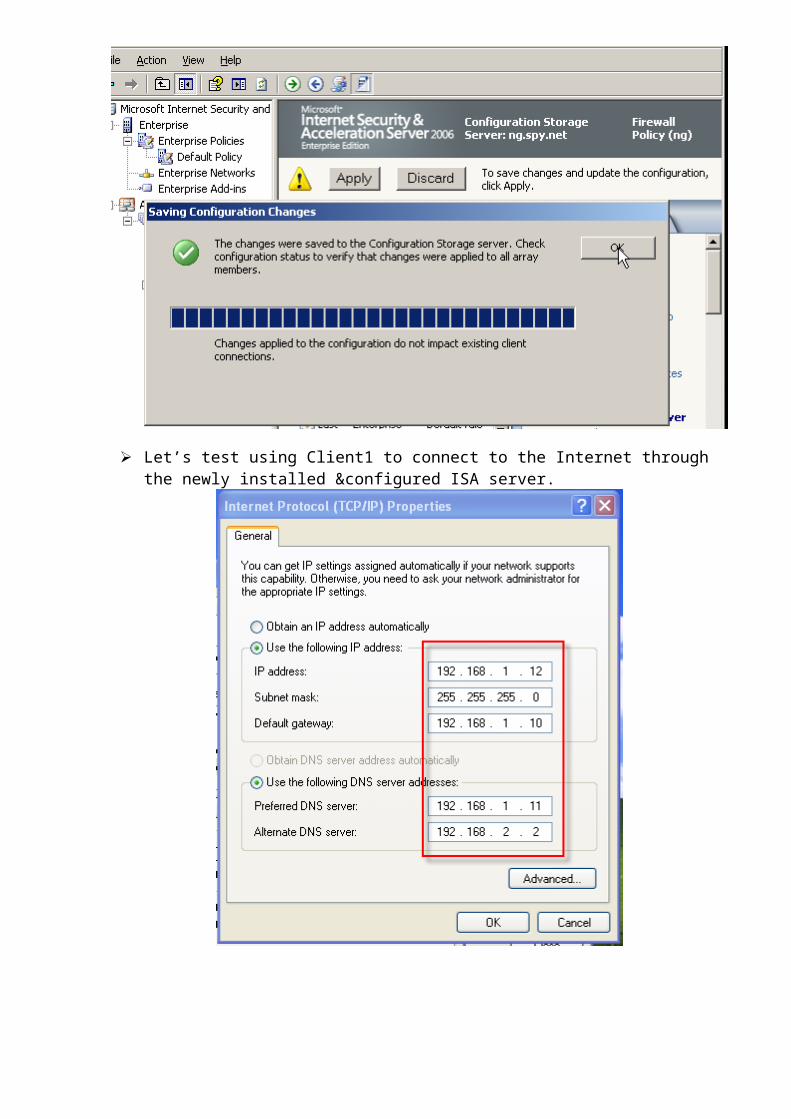
Let’s test using Client1 to connect to the Internet through the newly installed &configured ISA server.

Client access internet
Client cannot ping to ISA
To make sure client really use ISA or not, now I disconnect NIC connect from ISA to internet
Then, test client access internet
So, after tested we saw that client really across ISA server.

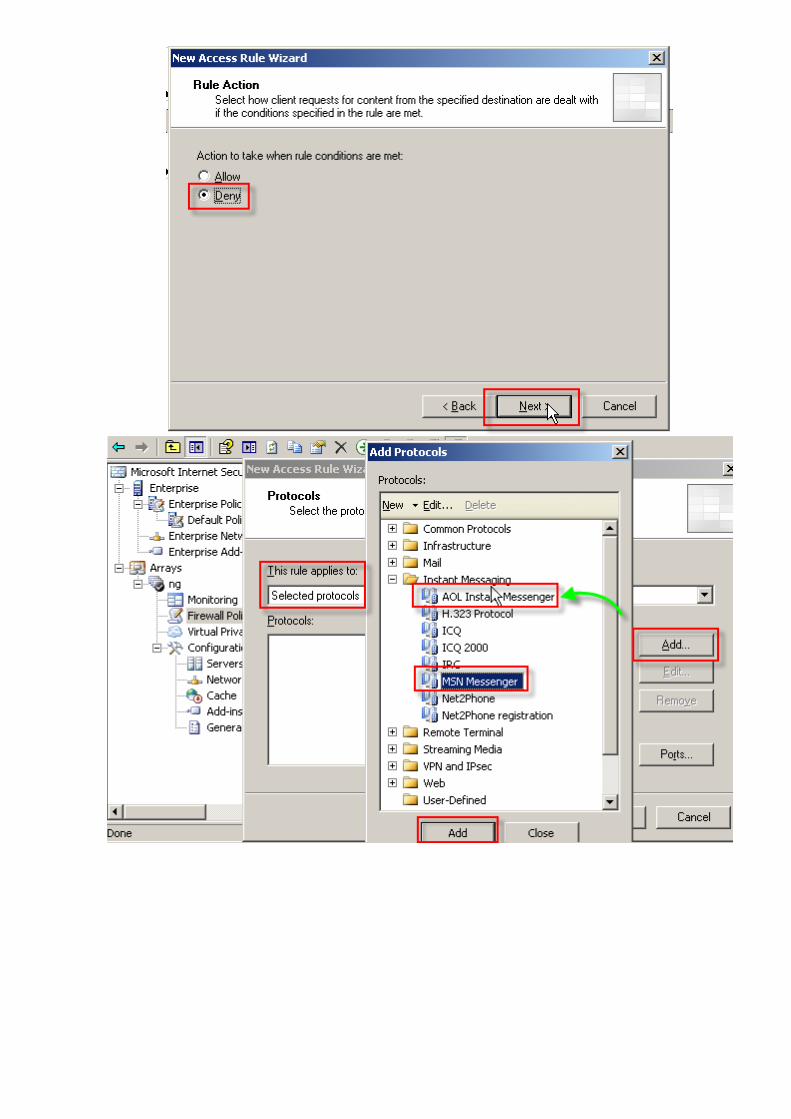
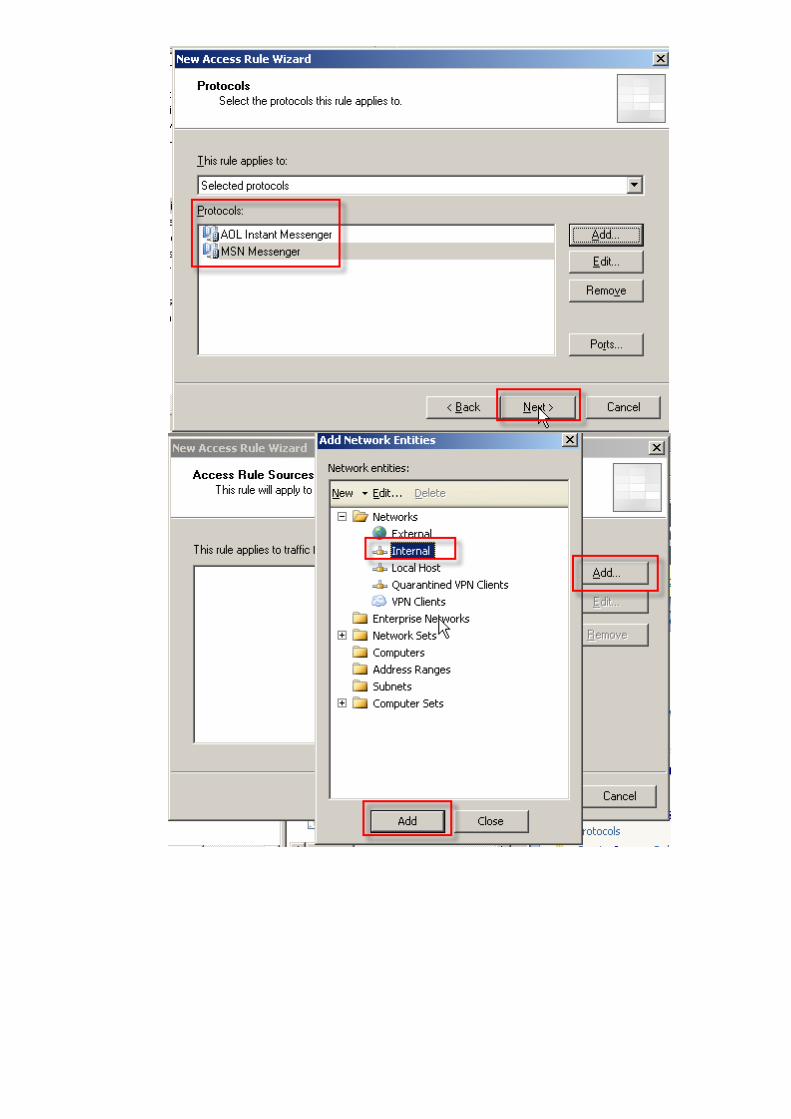
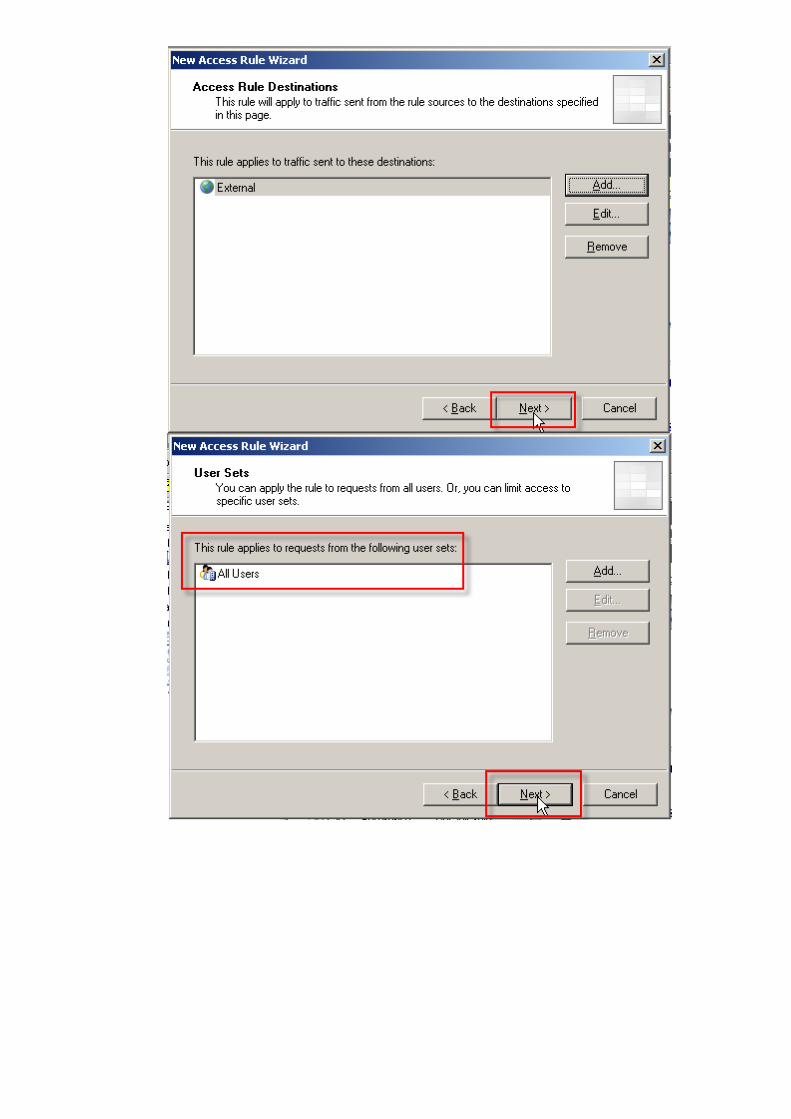
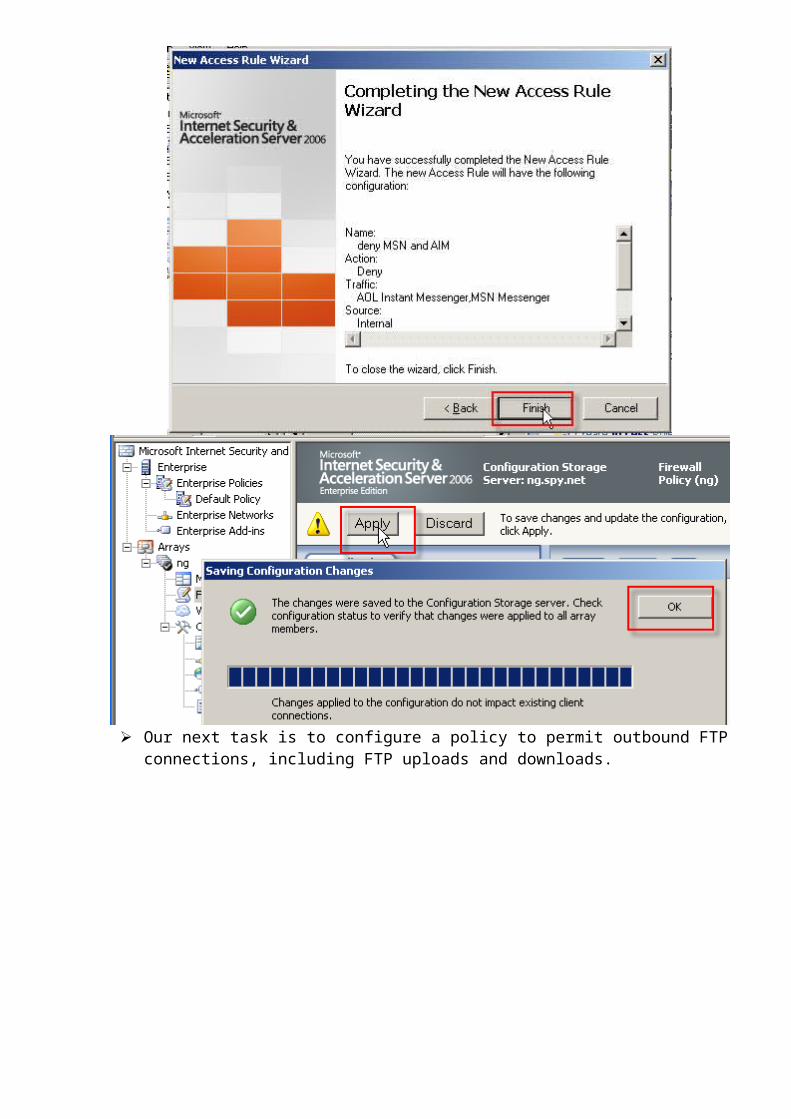
4. Configuring ISA Firewall Policies Understand firewall policies Configure a policy to deny MSN Messenger and AOL
AIM Configure a policy to permit outbound FTP
connections, Including FTP uploads and downloads. Configure a policy to permit HTTP only and to deny
executable downloads.Firewall policies are made up of three things - system policies, access rules and publishing rules. System policies are usually hidden but can be viewed by going to the Tasks tab in theFirewall Policy section, scrolling down to the System Policies Tasks section and clicking on Show System Policy Rules.Some things that you should know about access rules are:
• System policies are processed before access rules.• Access rules are processed in the order that they are listed. Their order is listed on the left
hand side of the list.• Be careful with deny all and permit all rules. Traffic processing stops at the point that a
condition is met. Thus, if http traffic is not specifically permitted in the list of rules, then it is denied. If http is initially permitted but is later denied, it is still permitted. If it is initially denied but later permitted, it is still denied.


Our next task is to configure a policy to permit outbound FTP connections, including FTP uploads and downloads.

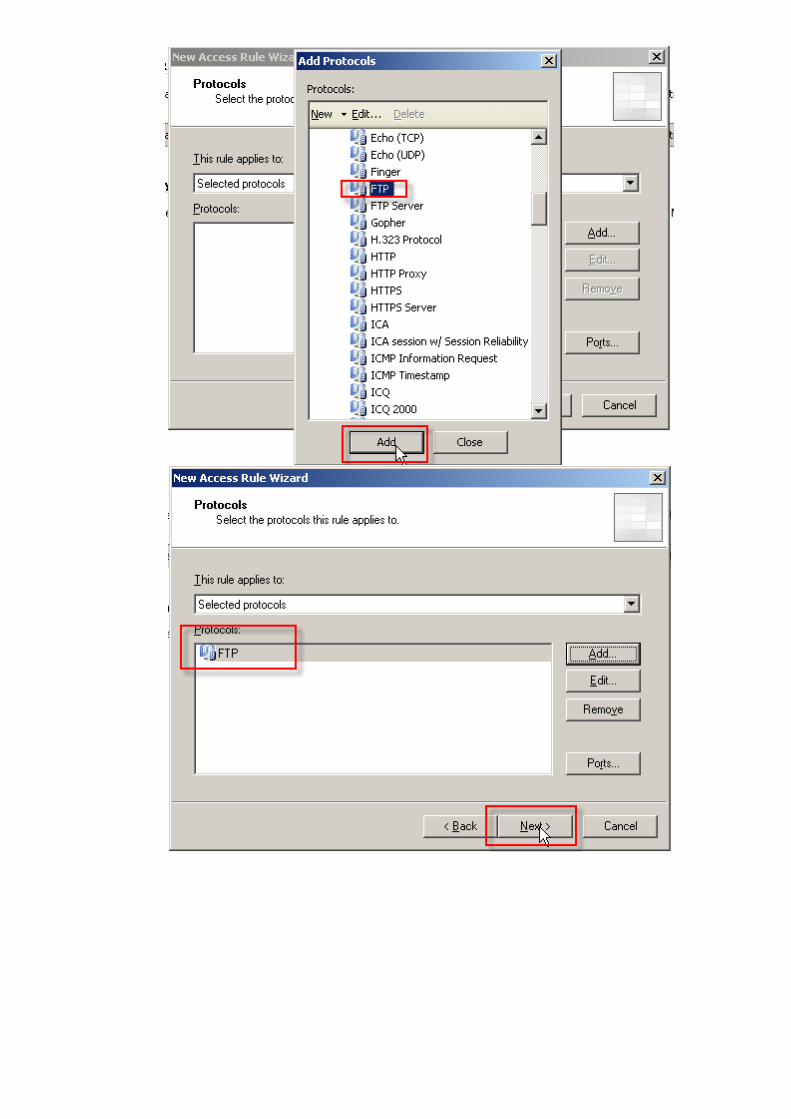
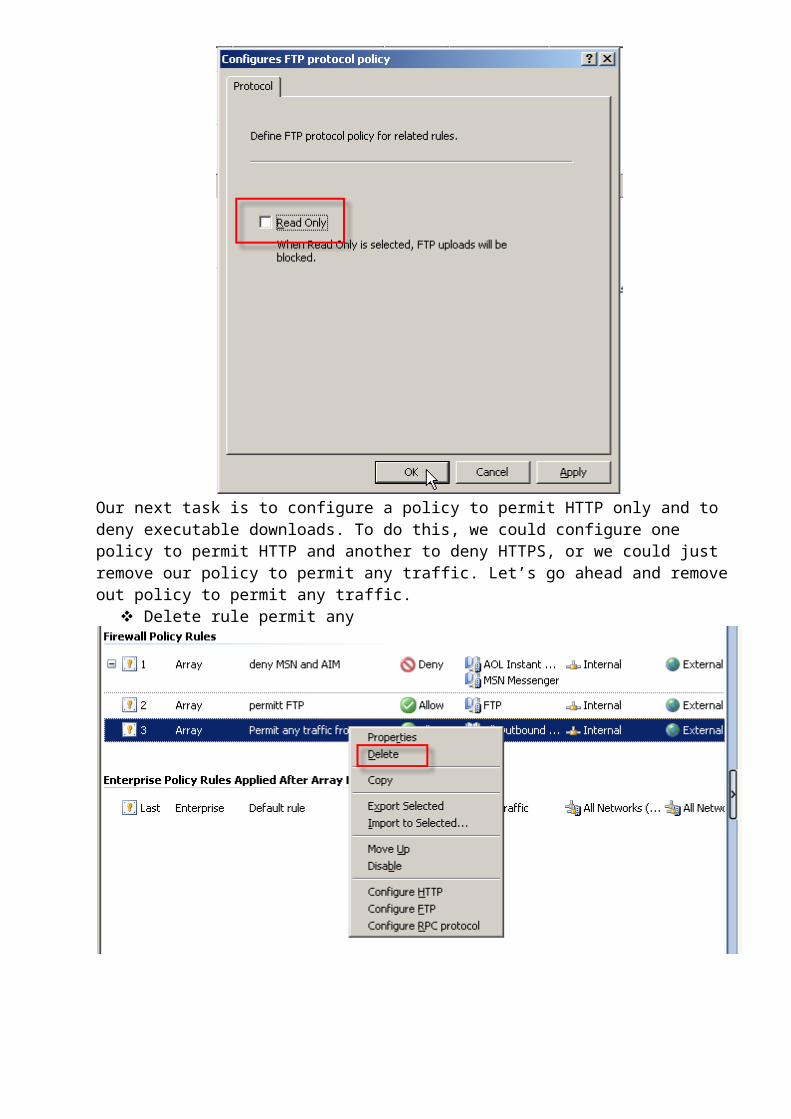
Now you have allowed FTP traffic outbound. However, if you were to use a FTP client and connect to a server, you will find that you can download something from that FTP server but that you won’t be able to upload a file from your client to the server (FTPGETs work but PUTs don’t). It is the behavior of ISA, by default, to restrict this. Note: don’t test this yet; wait until we are done with all the rules. As we need FTP uploads and downloads, go to the Firewall Policy screen and right click on your new permit FTP policy. The last choice is Configure FTP. Click on this choice.

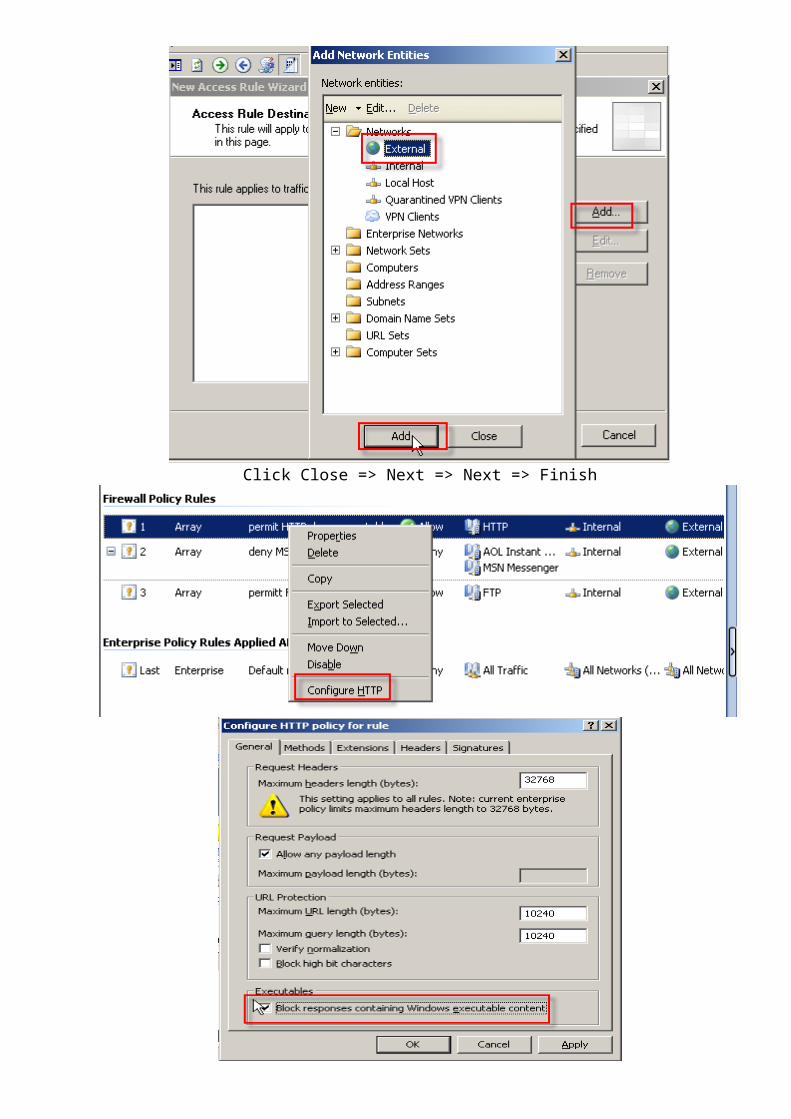
Our next task is to configure a policy to permit HTTP only and to deny executable downloads. To do this, we could configure one policy to permit HTTP and another to deny HTTPS, or we could just remove our policy to permit any traffic. Let’s go ahead and remove out policy to permit any traffic.
Delete rule permit any

Then click Next => Close => Next => Add =>
Click Close => Next => Add =>

Click Close => Next => Next => Finish

Click OK => Apply => OK
If you go to Client1 and attempt to test these new rules, you will find that you cannot resolve any DNS names to IP addresses. Do you know why this is? This is because we removed the permit any rule, to allow all traffic. Inside that traffic was DNS traffic from your DNS server. You need your DNS server to be able to resolve DNS requests so that you can get the IP address and then request a web page from a web server.
Create DNS rule for resolve name for client
Click Next
Click Close => Next => Add =>

Click OK => OK =>
Click Close => Next => Add

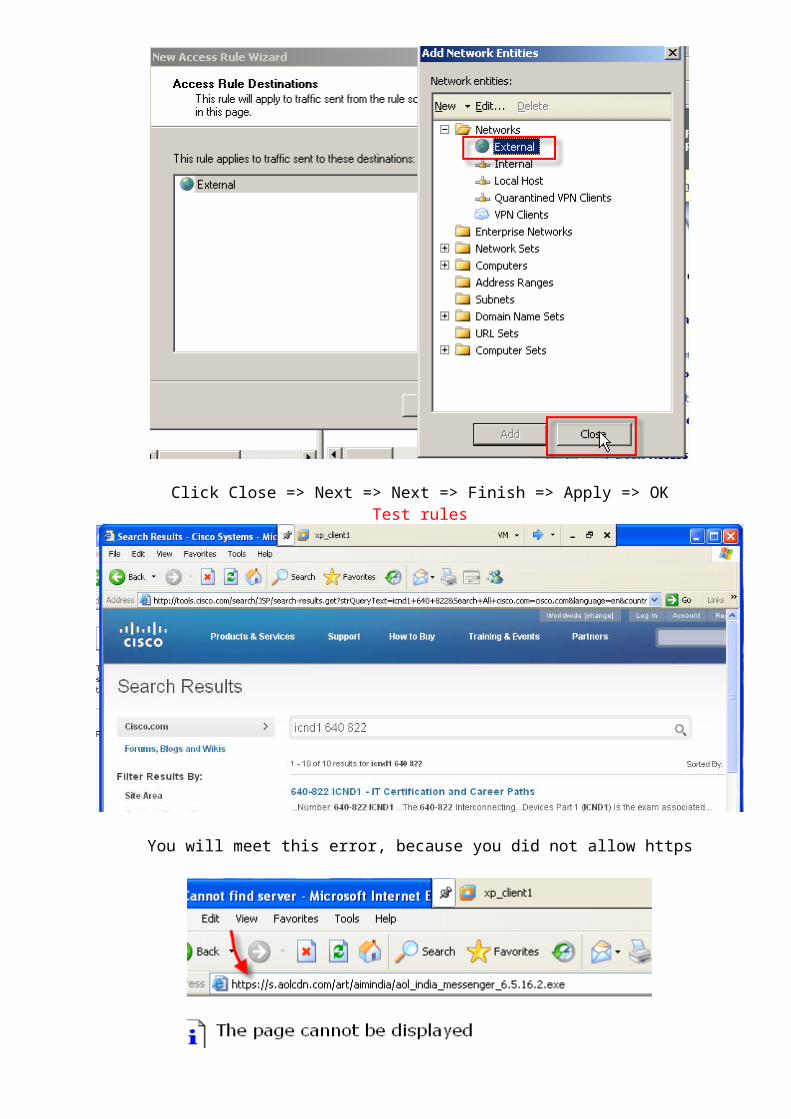
Click Close => Next => Next => Finish => Apply => OKTest rules
You will meet this error, because you did not allow https

You will meet error below during you visit http to download executabl0e files
5. ISA Clients and Controlling Web Access with AD User/Group Information Client access method
There are three different client access methods for a client to go through the ISA server.The three client access methods are:
1. SecureNAT: SecureNAT requires no setup on the client but also offers no user-based authentication or logging on the server.
2. Web Proxy: The web proxy client also offers full authentication and requires little authentication, but only works for web-browser applications.
3. Firewall client: The firewall client offers full logging and authentication but requires installation on each client.
For SecurNAT, I have created since the first rule, so all clients can access internet without proxy. In order to deny client to user secure NAT, we have to disable NAT. after this, all clients have to pass proxy.
Proxy ruleNow I have to create an access rule to allow traffic to flow from inside to outside and to make sure that the default gateway on the client pointed to the ISA Server. If you had a router on your LAN and other internal networks to which you would normally point your default gateway, you would need to tell ISA about those networks.
Restrict users to certain websites, certain web applications and to log those requests by username.
On the ISA server, expand the Configuration folder on the left hand side of the ISA Management console. Click on Networks. In the middle of the screen, make sure you are on the Networks tab and click on the Internal network. On the right hand side, under the Tasks tab, click Edit.
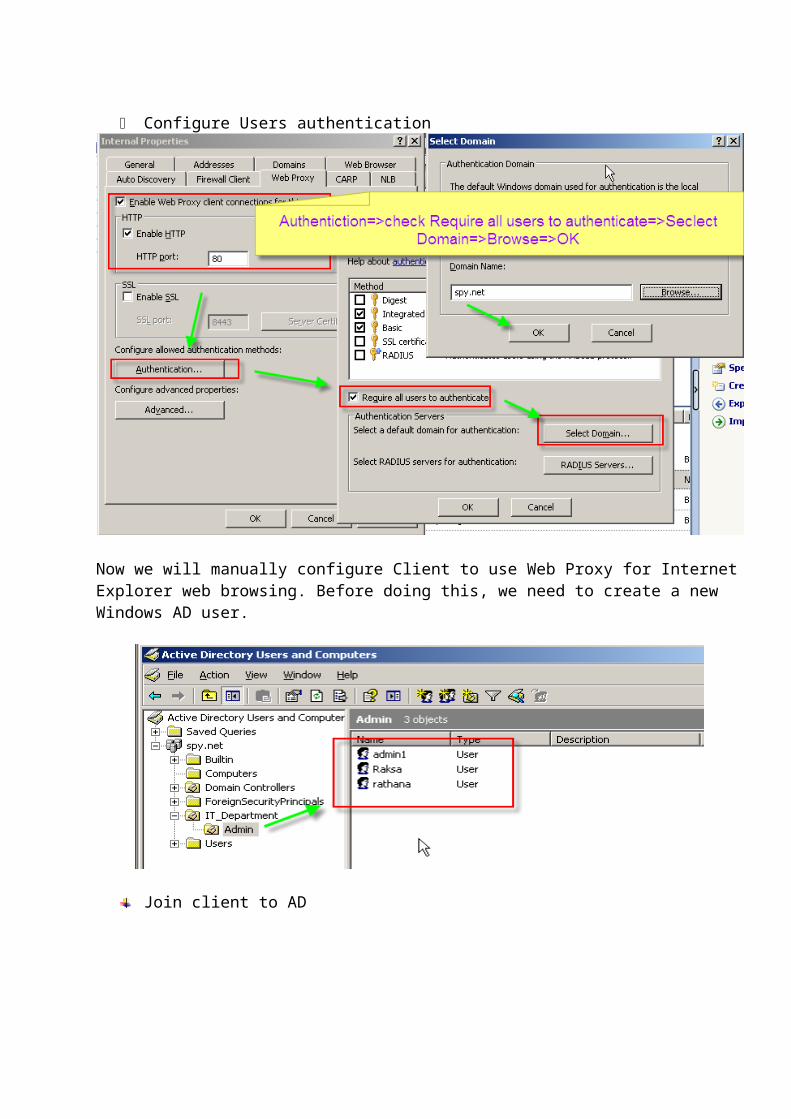
Go to the Web Proxy tab of the Internal Properties window. Notice that the Enable Web Proxy clients checkbox is already checked. Thus, web proxy is on by default but is set to port 80 then click OK => Apply

To allow non-window client to user ISA server:Click on Authentication click the checkbox for Basic authentication. You will get a warning that this allows transmission of passwords in clear text. Click on Yes. Now the Linux clients can use web proxy and will be prompted for a Windows username and password that they must enter for web browsing access.

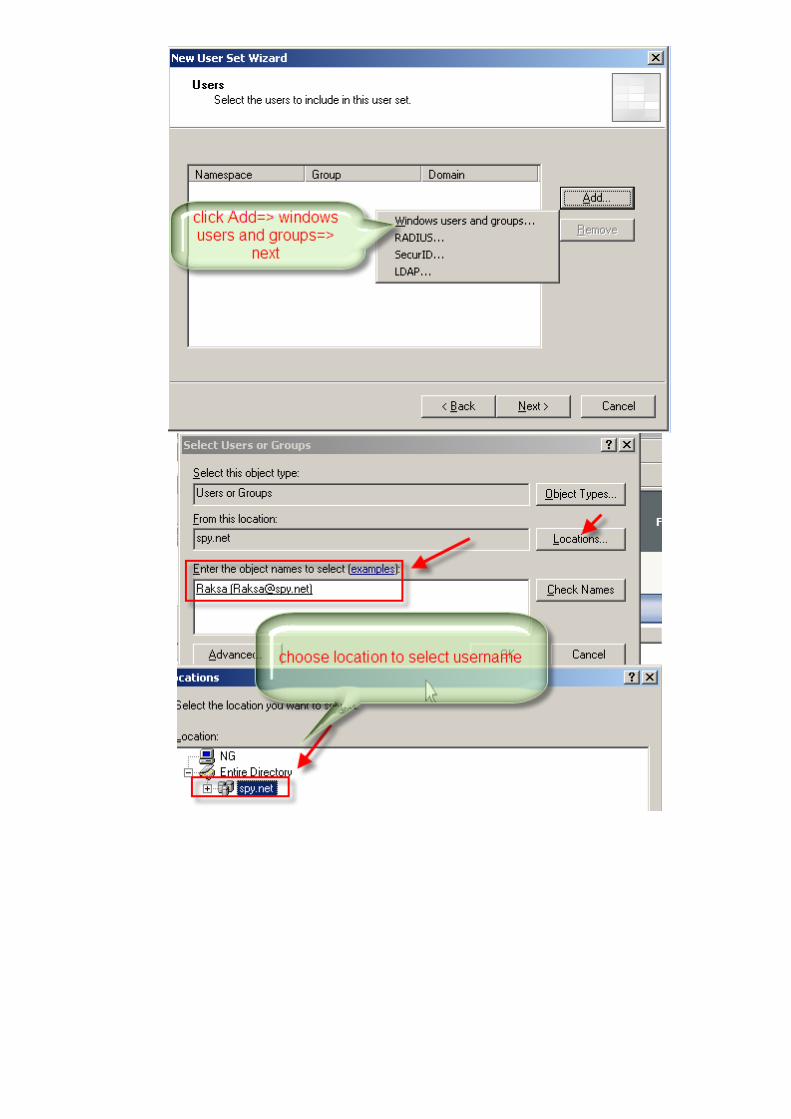
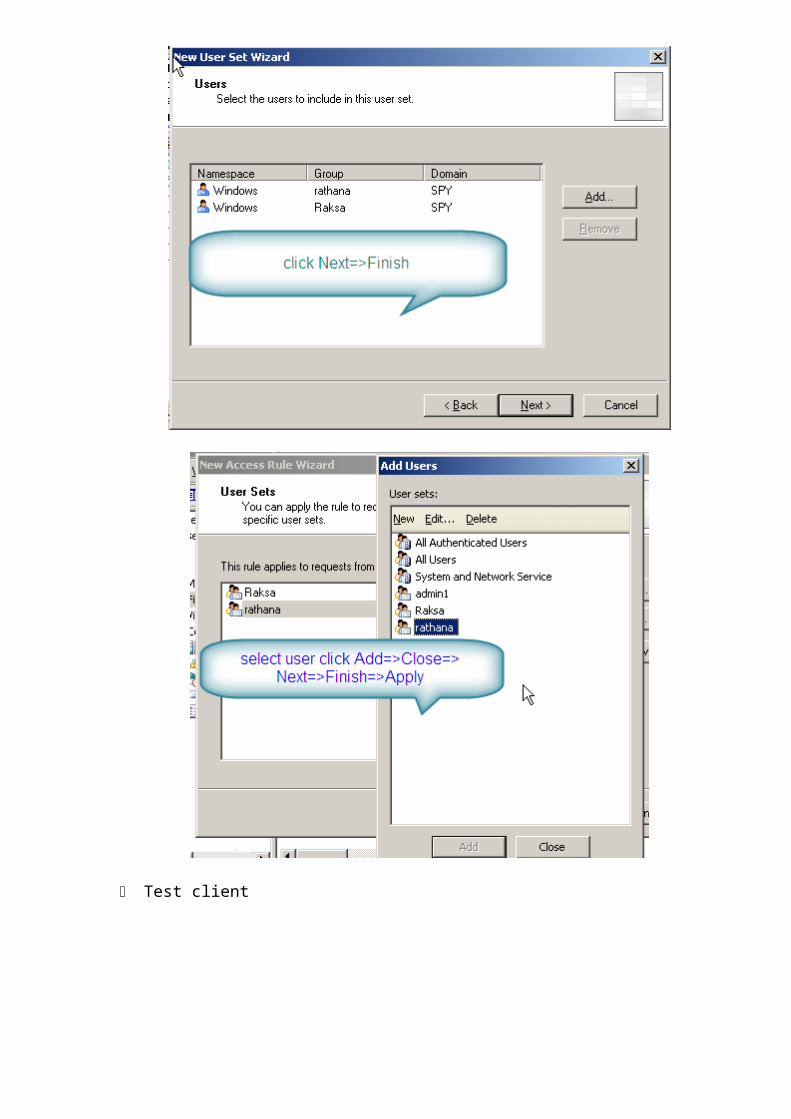
Configure Users authentication
Now we will manually configure Client to use Web Proxy for Internet Explorer web browsing. Before doing this, we need to create a new Windows AD user.
Join client to AD

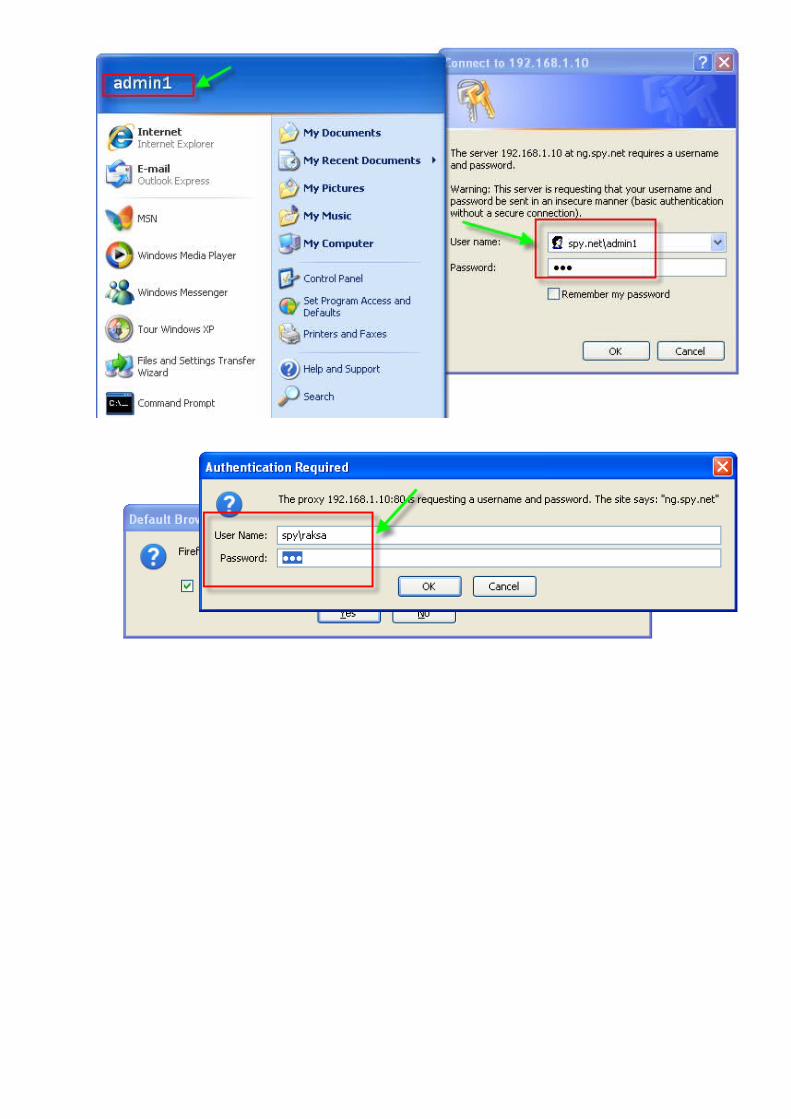
Log in as user admin1
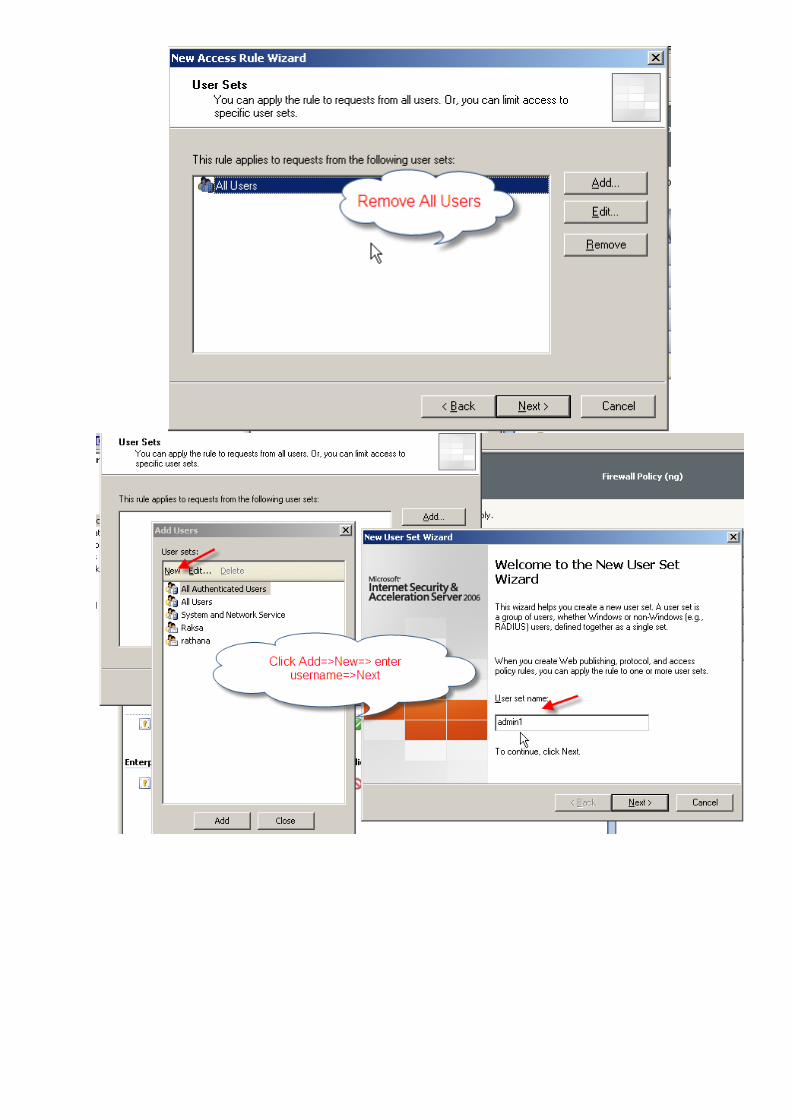
Firewall rules
Deny user Raksa in IT_Department to use youtub.com
Click Next=> select protocol => Add => choose HTTP => Add => Close =. Next => Add => choose Internal => Add => Close => Next => Add => Next =>


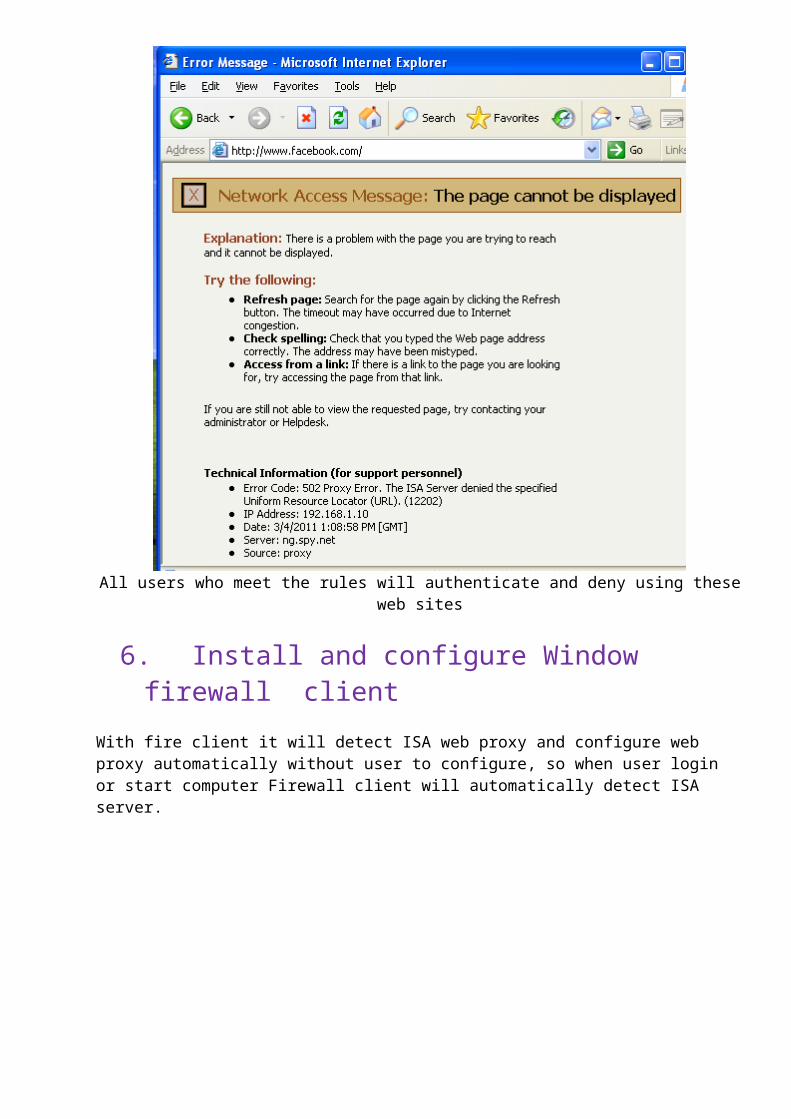
Test client

All users who meet the rules will authenticate and deny using these web sites
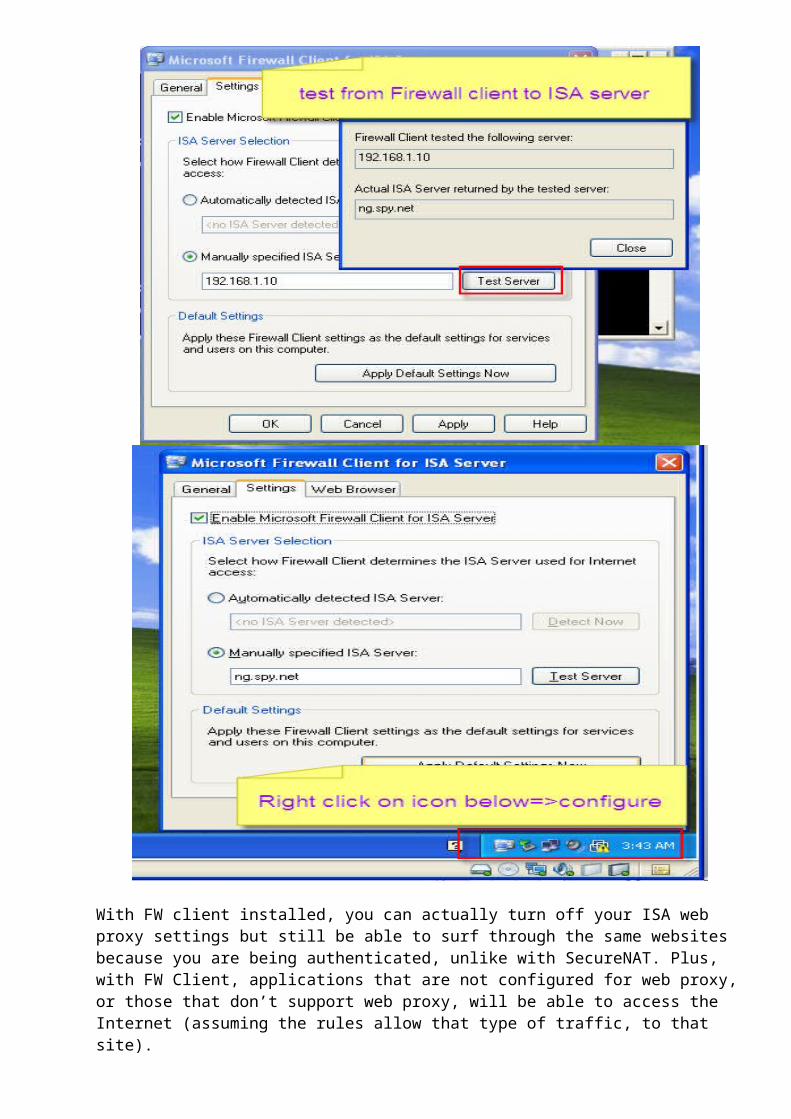
6. Install and configure Window firewall clientWith fire client it will detect ISA web proxy and configure web proxy automatically without user to configure, so when user login or start computer Firewall client will automatically detect ISA server.

With FW client installed, you can actually turn off your ISA web proxy settings but still be able to surf through the same websites because you are being authenticated, unlike with SecureNAT. Plus, with FW Client, applications that are not configured for web proxy, or those that don’t support web proxy, will be able to access the Internet (assuming the rules allow that type of traffic, to that site).
Test ISA server and Firewall ClientOn ISA server, we choose some option like below:
On client we will see like below:
7. Enable Auto discovery for Firewall client and Web Proxy client and test connectivity

You would like Firewall clients and Web Proxy clients to be able to automatically learn the name of the ISA server. Having to manually type in the name of the server on each PC and server can be very time consuming. Plus, you are concerned that the ISA server, suddenly a critical piece of your network infrastructure, may go down and that all Internet access would be lost. You feel that you could quickly take a spare PC with an extra NIC card, load Windows, ISA server, apply the backed-up configuration file and have the ISA server available again. However, you want the ability to quickly reroute all clients, including Firewall clients and Web Proxy clients, to the new server with its new name. Here comes ISA’s Autodiscovery to solve these problems. On ISA server
On DNS server


![this page%PDF-1.5 %µµµµ 1 0 obj >>> endobj 2 0 obj > endobj 3 0 obj >/XObject >/Font >/ProcSet[/PDF/Text/ImageB/ImageC/ImageI] >>/MediaBox[ 0 0 720 540] /Contents 4 0 R/Group >/Tabs/S/StructParents](https://static.documents.pub/doc/80x56/5abc38a67f8b9a441d8dcde0/translate-this-pagepdf-15-1-0-obj-endobj-2-0-obj-endobj-3-0-obj-xobject-font.jpg)

