206
Wave ISM 1.5 SP3 User Guide Wave ViewPoint Release 1.5 SP3 September 2009
Wave ISM 1.5 SP3
User GuideWave ViewPoint
Release 1.5 SP3 September 2009

© 2009 by Vertical Communications, Inc. All rights reserved.
Vertical Communications and the Vertical Communications logo and combinations thereof and Vertical ViewPoint and Wave Contact Center are trademarks of Vertical Communications, Inc. All other brand and product names are used for identification only and are the property of their respective holders.
LIMIT OF LIABILITY/DISCLAIMER OF WARRANTY
Vertical Communications, Inc. makes no representation or warranties with respect to the accuracy or completeness of the content of this publication and specifically disclaims any implied warranty of merchantability or fitness for any particular purpose, and shall not be liable for any loss of profit or any other commercial damage, including but not limited to, special, incidental, or consequential.
COPYRIGHT STATEMENT
This publication contains proprietary and confidential information of Vertical Communications, Inc. The contents of this document may not be disclosed, copied or translated by third parties, in any form, or by any means known, or not now known or conceived, without prior explicit written permission from Vertical Communications, Inc.
Vertical Communications, Inc. reserves the right to revise this publication and to make changes in content without notice.
Wave ViewPoint User GuideRelease 1.5 SP3 September 2009

R e v i s i o n H i s t o r y
Release Date Documentation Changes Page No.
1.5 SP3 09/09 Added sections “Call Transfer report” and “User Call Trends report” that describe 2 additional ViewPoint reports that are now available.
13-17, 13-24
1.5 SP2 05/09 Added important note on not using the ViewPoint Call Monitor to manage calls to a virtual extension.
5-5
Added steps to display ViewPoint Group tabs in the Contacts folder. 10-3
Added a new chapter ““Running Contact Center Reports” that describes call activity and phone usage reports available from the ViewPoint Tools menu.
13-1
1.5 11/08 Added the Call Monitor “Report a Problem” feature. C-2
Updated Appendix B with current command line arguments. B-1
Removed references to Exchange synchronization. --
Added a note that Call Waiting is not always supported. 12-4
Added “Flag a call” button in Call Monitor. 5-13
Added Extensions tabs section. 4-2
Revised screenshot in Groups chapter. 10-15
Revisions to Archive Recording Browser section. A-1
Added screenshot and description of Call Monitor Parties pane. 6-7
Changed “workgroup” to “group” throughout. --
Added Personal Status chapter. 3-1
Revised voicemail notification scheduling. 7-14
1.0 SP2 1/08 Added Customizing chapter. 12-1
Added Routing Lists section. 9-4
Added Call Rules chapter. 11-1
Added Revision History table. this page
1.0 10-07 Initial Release. ---
Wave ViewPoint User GuideRelease 1.5 SP3 September 2009

Release 1.5 SP3 September 2009

Contents
Contents
Chapter 1 Introducing Vertical WaveAbout Vertical Wave ViewPoint - - - - - - - - - - - - - - - - - - - - - 1-1Accessing Wave - - - - - - - - - - - - - - - - - - - - - - - - - - - - - - - 1-1
Using ViewPoint - - - - - - - - - - - - - - - - - - - - - - - - - - - - - - - - - - 1-1Using the Wave TAPI Service Provider and Contact Manager
Assistant - - - - - - - - - - - - - - - - - - - - - - - - - - - - - - - - - - - - - 1-2Using your phone - - - - - - - - - - - - - - - - - - - - - - - - - - - - - - - - - 1-2
Feature comparison table - - - - - - - - - - - - - - - - - - - - - - - - - 1-3Getting technical support - - - - - - - - - - - - - - - - - - - - - - - - - 1-3Wave documentation - - - - - - - - - - - - - - - - - - - - - - - - - - - - 1-4
Related reading - - - - - - - - - - - - - - - - - - - - - - - - - - - - - - - - - - 1-4Accessing Help - - - - - - - - - - - - - - - - - - - - - - - - - - - - - - - - - - 1-4
Chapter 2 Using ViewPointAbout ViewPoint - - - - - - - - - - - - - - - - - - - - - - - - - - - - - - - 2-1
Using ViewPoint remotely - - - - - - - - - - - - - - - - - - - - - - - - - - - 2-1Using ViewPoint in languages other than English - - - - - - - - - - 2-2
Logging on to ViewPoint - - - - - - - - - - - - - - - - - - - - - - - - - - 2-2Using ViewPoint with a different phone or Wave Server name - 2-3Using ViewPoint with another station - - - - - - - - - - - - - - - - - - - 2-5Changing your station, Wave Server name, or user name after
logging on - - - - - - - - - - - - - - - - - - - - - - - - - - - - - - - - - - - - 2-6Changing Your password - - - - - - - - - - - - - - - - - - - - - - - - - - - 2-6Logging on with command-line switches - - - - - - - - - - - - - - - - - 2-7
Exiting ViewPoint - - - - - - - - - - - - - - - - - - - - - - - - - - - - - - - 2-7Elements of the ViewPoint window - - - - - - - - - - - - - - - - - - 2-7
The Menu Bar - - - - - - - - - - - - - - - - - - - - - - - - - - - - - - - - - - - 2-8The Toolbar - - - - - - - - - - - - - - - - - - - - - - - - - - - - - - - - - - - - - 2-8The Navigation Pane - - - - - - - - - - - - - - - - - - - - - - - - - - - - - - 2-8The Status Bar - - - - - - - - - - - - - - - - - - - - - - - - - - - - - - - - - - 2-10
Wave ViewPoint User GuideRelease 1.5 SP3 September 2009

TOC-2Contents
Working in ViewPoint folders - - - - - - - - - - - - - - - - - - - - - 2-11Working with multiple Viewpoint folders at the same time - - - - 2-12Adjusting the Phonebook Pane layout in the Call Monitor - - - - 2-12Deleting voice messages and other items - - - - - - - - - - - - - - - 2-13Copying and pasting items - - - - - - - - - - - - - - - - - - - - - - - - - 2-14Dragging and dropping items - - - - - - - - - - - - - - - - - - - - - - - 2-14Printing items in folders - - - - - - - - - - - - - - - - - - - - - - - - - - - 2-16
Organizing items in folders - - - - - - - - - - - - - - - - - - - - - - - 2-16Public folders - - - - - - - - - - - - - - - - - - - - - - - - - - - - - - - - - - - 2-16Customizing columns - - - - - - - - - - - - - - - - - - - - - - - - - - - - - 2-17Viewing public folders - - - - - - - - - - - - - - - - - - - - - - - - - - - - - 2-18Managing the Deleted folder - - - - - - - - - - - - - - - - - - - - - - - - 2-18Using the audio controls - - - - - - - - - - - - - - - - - - - - - - - - - - - 2-19
Importing and exporting Wave items - - - - - - - - - - - - - - - - 2-21Importing and exporting contacts - - - - - - - - - - - - - - - - - - - - - 2-21Exporting ViewPoint recordings - - - - - - - - - - - - - - - - - - - - - - 2-25
Chapter 3 Using Personal StatusesAbout personal statuses - - - - - - - - - - - - - - - - - - - - - - - - - - 3-1
Available personal statuses - - - - - - - - - - - - - - - - - - - - - - - - - - 3-2Selecting a personal status - - - - - - - - - - - - - - - - - - - - - - - - 3-3
Selecting a personal status in Viewpoint - - - - - - - - - - - - - - - - - 3-3Selecting a personal status using your phone - - - - - - - - - - - - - 3-3
Changing the personal status of another user - - - - - - - - - - - 3-3
Chapter 4 Using the Extensions ListViewing Wave extensions - - - - - - - - - - - - - - - - - - - - - - - - - 4-1
Searching the Extensions list - - - - - - - - - - - - - - - - - - - - - - - - 4-2Extensions list tabs - - - - - - - - - - - - - - - - - - - - - - - - - - - - - - - 4-2Extensions list columns - - - - - - - - - - - - - - - - - - - - - - - - - - - - 4-3
Placing calls to an extension - - - - - - - - - - - - - - - - - - - - - - - 4-3Changing another user’s personal status from the Extensions list
4-3
Wave ViewPoint User GuideRelease 1.5 SP3 September 2009

TOC-3Contents
Chapter 5 Receiving and Handling Calls in ViewPointUsing the Call Monitor folder - - - - - - - - - - - - - - - - - - - - - - - 5-1
Call Monitor folder tabs - - - - - - - - - - - - - - - - - - - - - - - - - - - - - 5-2Call Monitor folder panes - - - - - - - - - - - - - - - - - - - - - - - - - - - 5-3Call Monitor folder columns - - - - - - - - - - - - - - - - - - - - - - - - - - 5-4
Displaying the Call Monitor folder automatically - - - - - - - - - 5-4Selecting and acting on a call in the Call Monitor folder - - - - 5-5
Call ownership - - - - - - - - - - - - - - - - - - - - - - - - - - - - - - - - - - - 5-5Double-clicking calls - - - - - - - - - - - - - - - - - - - - - - - - - - - - - - 5-5
Commands while a call is ringing - - - - - - - - - - - - - - - - - - - 5-6Taking the call - - - - - - - - - - - - - - - - - - - - - - - - - - - - - - - - - - 5-6Sending the call to voicemail - - - - - - - - - - - - - - - - - - - - - - - - - 5-6
Commands while you’re on a call - - - - - - - - - - - - - - - - - - - 5-7Putting a call on hold - - - - - - - - - - - - - - - - - - - - - - - - - - - - - - 5-7Transferring a call - - - - - - - - - - - - - - - - - - - - - - - - - - - - - - - - 5-8Adding notes to a call - - - - - - - - - - - - - - - - - - - - - - - - - - - - - 5-10Recording a call - - - - - - - - - - - - - - - - - - - - - - - - - - - - - - - - - 5-10Associating a call with a contact - - - - - - - - - - - - - - - - - - - - - 5-11Parking a call - - - - - - - - - - - - - - - - - - - - - - - - - - - - - - - - - - - 5-11Unparking a call - - - - - - - - - - - - - - - - - - - - - - - - - - - - - - - - - 5-12Sending a call to voicemail - - - - - - - - - - - - - - - - - - - - - - - - - 5-12Playing a caller's name over your speakers - - - - - - - - - - - - - 5-12Disconnecting a call while staying on the phone - - - - - - - - - - 5-12Entering an account code for a call - - - - - - - - - - - - - - - - - - - 5-13Flagging a problem call to report later - - - - - - - - - - - - - - - - - 5-13
Incoming call indicators - - - - - - - - - - - - - - - - - - - - - - - - - 5-14
Chapter 6 Placing Calls in ViewPointPlacing a call - - - - - - - - - - - - - - - - - - - - - - - - - - - - - - - - - - 6-1
Placing calls using the Dial bar - - - - - - - - - - - - - - - - - - - - - - - 6-2Using the Place Call To dialog - - - - - - - - - - - - - - - - - - - - - - - - 6-3Quick-dialing from ViewPoint folders - - - - - - - - - - - - - - - - - - - 6-5Placing calls using drag-and-drop - - - - - - - - - - - - - - - - - - - - - 6-6Placing calls using other contact managers - - - - - - - - - - - - - - 6-6
Checking a number - - - - - - - - - - - - - - - - - - - - - - - - - - - - - 6-6
Wave ViewPoint User GuideRelease 1.5 SP3 September 2009
TOC-4Contents
Redialing numbers and returning calls - - - - - - - - - - - - - - - - 6-7Creating conference calls - - - - - - - - - - - - - - - - - - - - - - - - - 6-7
Adding parties to a conference - - - - - - - - - - - - - - - - - - - - - - - 6-8Conferencing multiple active calls together - - - - - - - - - - - - - - - 6-9Ending a conference call - - - - - - - - - - - - - - - - - - - - - - - - - - - 6-10
Supervising other users’ calls - - - - - - - - - - - - - - - - - - - - - 6-10
Chapter 7 Managing Voice Messages in ViewPointAbout managing voice messages in ViewPoint - - - - - - - - - - 7-1
The Messages folder - - - - - - - - - - - - - - - - - - - - - - - - - - - - - - 7-2Archiving voice messages and call recordings - - - - - - - - - - - - 7-3Managing thousands of voice messages or call recordings - - - 7-3
Listening to your voice messages and call recordings - - - - - 7-4Listening to a voice message as it is being left - - - - - - - - - - - - 7-4
Handling your voice messages - - - - - - - - - - - - - - - - - - - - - 7-4Forwarding a voice message - - - - - - - - - - - - - - - - - - - - - - - - - 7-5Replying to a voice message - - - - - - - - - - - - - - - - - - - - - - - - - 7-5Calling back the person who left a voice message - - - - - - - - - - 7-6E-mailing a voice message - - - - - - - - - - - - - - - - - - - - - - - - - - 7-6Opening the contact record from a voice message - - - - - - - - - 7-6Deleting voice messages - - - - - - - - - - - - - - - - - - - - - - - - - - - 7-7Associating a voice message from “Unknown” with a contact - - 7-7Marking a voice message unheard - - - - - - - - - - - - - - - - - - - - 7-7Marking a voice message urgent or private - - - - - - - - - - - - - - - 7-7Adding notes to a voice message - - - - - - - - - - - - - - - - - - - - - 7-8
Managing call recordings - - - - - - - - - - - - - - - - - - - - - - - - - 7-8Managing your voicemail maximums - - - - - - - - - - - - - - - - - 7-8
Setting a maximum length for your voice messages - - - - - - - - 7-8Sending a message directly to a user’s voicemail - - - - - - - - 7-9Knowing when you have new voice messages - - - - - - - - - 7-10
Number displayed in the Navigation Pane - - - - - - - - - - - - - - 7-10Stutter dial tone - - - - - - - - - - - - - - - - - - - - - - - - - - - - - - - - - 7-10Message waiting light - - - - - - - - - - - - - - - - - - - - - - - - - - - - - 7-10Sound played - - - - - - - - - - - - - - - - - - - - - - - - - - - - - - - - - - 7-10E-mail, pager, and call notifications - - - - - - - - - - - - - - - - - - - 7-11
Wave ViewPoint User GuideRelease 1.5 SP3 September 2009

TOC-5Contents
Scheduling notifications - - - - - - - - - - - - - - - - - - - - - - - - - - - 7-14Managing voicemail greetings - - - - - - - - - - - - - - - - - - - - - 7-18
The Greetings folder - - - - - - - - - - - - - - - - - - - - - - - - - - - - - - 7-18Greeting hierarchy - - - - - - - - - - - - - - - - - - - - - - - - - - - - - - - 7-19Recording a new greeting - - - - - - - - - - - - - - - - - - - - - - - - - - 7-19E-mailing a greeting - - - - - - - - - - - - - - - - - - - - - - - - - - - - - - 7-20
Chapter 8 Using the Call Log FolderThe Call Log folder - - - - - - - - - - - - - - - - - - - - - - - - - - - - - 8-1
Call Log folder filters - - - - - - - - - - - - - - - - - - - - - - - - - - - - - - - 8-2Call Log folder columns - - - - - - - - - - - - - - - - - - - - - - - - - - - - 8-2Viewing call details - - - - - - - - - - - - - - - - - - - - - - - - - - - - - - - - 8-2
Taking notes on a Call Log entry - - - - - - - - - - - - - - - - - - - - 8-5Associating a call from “Unknown” with a contact - - - - - - - - 8-5Returning a call in the Call Log - - - - - - - - - - - - - - - - - - - - - 8-5Entering an account code for a Call Log entry - - - - - - - - - - 8-6Opening the contact record from a contact’s call - - - - - - - - - 8-6
Chapter 9 Call Forwarding and Routing ListsAbout call forwarding and routing lists - - - - - - - - - - - - - - - - 9-1Forwarding calls - - - - - - - - - - - - - - - - - - - - - - - - - - - - - - - 9-2
Turning forwarding on and off via the FWD button - - - - - - - - - - 9-4Call forwarding and voicemail - - - - - - - - - - - - - - - - - - - - - - - - 9-4
Using routing lists - - - - - - - - - - - - - - - - - - - - - - - - - - - - - - 9-4The Routing Lists folder - - - - - - - - - - - - - - - - - - - - - - - - - - - - 9-6Using the Routing List Wizard vs. the Routing List Editor - - - - - 9-7Creating a routing list using the Routing List Wizard - - - - - - - - 9-7Creating a routing list using the Routing List Editor - - - - - - - - - 9-9Handling calls differently if you do not answer or are busy - - - 9-11Using “Handle Busy Calls Differently” - - - - - - - - - - - - - - - - - - 9-13Routing calls to groups - - - - - - - - - - - - - - - - - - - - - - - - - - - - 9-13Using greetings with routing list final actions - - - - - - - - - - - - - 9-14
Wave ViewPoint User GuideRelease 1.5 SP3 September 2009

TOC-6Contents
Chapter 10 Managing Contacts and GroupsAbout contact management and Wave - - - - - - - - - - - - - - 10-1The Contacts folder - - - - - - - - - - - - - - - - - - - - - - - - - - - - 10-2
Searching the Contacts folder - - - - - - - - - - - - - - - - - - - - - - - 10-2Private and public contacts - - - - - - - - - - - - - - - - - - - - - - - - - 10-2Contacts folder tabs - - - - - - - - - - - - - - - - - - - - - - - - - - - - - - 10-3Changing double-click behavior - - - - - - - - - - - - - - - - - - - - - - 10-3
Managing contacts - - - - - - - - - - - - - - - - - - - - - - - - - - - - - 10-3Entering a new contact - - - - - - - - - - - - - - - - - - - - - - - - - - - - 10-4Placing calls to your contacts - - - - - - - - - - - - - - - - - - - - - - - 10-7
Teaching Wave to recognize your contacts - - - - - - - - - - - 10-7Identifying contacts by name - - - - - - - - - - - - - - - - - - - - - - - - 10-8Associating a call or Caller ID number with a contact - - - - - - - 10-9Understanding name and number on Caller ID - - - - - - - - - - 10-11Using contact PINs for guaranteed recognition - - - - - - - - - - 10-12
Opening contacts from within other folders - - - - - - - - - - - 10-12Using contacts maintained in another contact manager - - 10-13
Using the Wave Contact Manager Assistant - - - - - - - - - - - - 10-13Importing contacts from other contact managers into Wave - 10-13
Using ViewPoint Groups - - - - - - - - - - - - - - - - - - - - - - - - 10-14Personal and public Groups - - - - - - - - - - - - - - - - - - - - - - - 10-14The Groups folder - - - - - - - - - - - - - - - - - - - - - - - - - - - - - - 10-15Creating a Group - - - - - - - - - - - - - - - - - - - - - - - - - - - - - - - 10-16
Chapter 11 Using Call RulesAbout call rules - - - - - - - - - - - - - - - - - - - - - - - - - - - - - - - 11-1
Call rules overview - - - - - - - - - - - - - - - - - - - - - - - - - - - - - - - 11-1Distinguishing which incoming calls activate the call rule - - - - 11-1Examples of how you can use call rules - - - - - - - - - - - - - - - - 11-2
The Call Rules dialog - - - - - - - - - - - - - - - - - - - - - - - - - - - 11-3Enabling and disabling a call rule - - - - - - - - - - - - - - - - - - - - - 11-3Organizing the priority of call rules - - - - - - - - - - - - - - - - - - - - 11-3
Creating a new call rule- - - - - - - - - - - - - - - - - - - - - - - - - - 11-4Specifying people that trigger a call rule - - - - - - - - - - - - - - - - 11-6
Wave ViewPoint User GuideRelease 1.5 SP3 September 2009
TOC-7Contents
Specifying dates and times to trigger a call rule - - - - - - - - - - - 11-7Quickly creating call rules for contacts or groups - - - - - - - 11-9Call rule priority - - - - - - - - - - - - - - - - - - - - - - - - - - - - - - 11-10
How Wave resolves call rule conflicts - - - - - - - - - - - - - - - - - 11-10
Chapter 12 Customizing ViewPointAbout customizing ViewPoint - - - - - - - - - - - - - - - - - - - - - 12-1
Guide to the Options dialog - - - - - - - - - - - - - - - - - - - - - - - - - 12-1Customizing phone behavior - - - - - - - - - - - - - - - - - - - - - - 12-3
Recording a voice title - - - - - - - - - - - - - - - - - - - - - - - - - - - - 12-3Changing the language of phone command prompts - - - - - - - 12-3Customizing or turning off call waiting - - - - - - - - - - - - - - - - - 12-4Changing your personal operator - - - - - - - - - - - - - - - - - - - - - 12-4Customizing your listing in the dial-by-name directory - - - - - - 12-4Customizing how long your phone rings - - - - - - - - - - - - - - - - 12-5
Customizing incoming call behavior - - - - - - - - - - - - - - - - - 12-5Customizing voice message behavior - - - - - - - - - - - - - - - 12-6
Setting voice message playback order - - - - - - - - - - - - - - - - - 12-6Playing a sound when a new message arrives - - - - - - - - - - - 12-6
Customizing ViewPoint for operators - - - - - - - - - - - - - - - - 12-7Customizing the ViewPoint display - - - - - - - - - - - - - - - - - 12-7
Changing ViewPoint’s language - - - - - - - - - - - - - - - - - - - - - 12-7Defining double-click behavior in the Contacts folder - - - - - - - 12-8Customizing columns - - - - - - - - - - - - - - - - - - - - - - - - - - - - - 12-8
Other customization options - - - - - - - - - - - - - - - - - - - - - 12-10
Appendix A Using the Wave Archived Recording Browser
About the Wave Archived Recording Browser - - - - - - - - - - A-1Running the Archived Recording Browser - - - - - - - - - - - - - A-2Searching for recordings - - - - - - - - - - - - - - - - - - - - - - - - - A-3
Starting a new search - - - - - - - - - - - - - - - - - - - - - - - - - - - - - - A-3Saving your current search - - - - - - - - - - - - - - - - - - - - - - - - - - A-8Loading a saved search - - - - - - - - - - - - - - - - - - - - - - - - - - - - A-8
Wave ViewPoint User GuideRelease 1.5 SP3 September 2009
TOC-8Contents
Managing individual recordings - - - - - - - - - - - - - - - - - - - - - A-9Acting on archived call recordings - - - - - - - - - - - - - - - - - - A-10Checking the archive for missing audio files - - - - - - - - - - - A-12Purging archived recordings - - - - - - - - - - - - - - - - - - - - - - A-12
Appendix B Logging On with Command-Line Switches
About Viewpoint command line switches - - - - - - - - - - - - - - B-1ViewPoint command line switch reference - - - - - - - - - - - - - B-1
Using the /station command - - - - - - - - - - - - - - - - - - - - - - - - - B-2
Appendix C Reporting Problems
About the Problem Report Wizard - - - - - - - - - - - - - - - - - - - C-1Reporting a problem that involves a specific call - - - - - - - - - C-2Reporting other problems - - - - - - - - - - - - - - - - - - - - - - - - - C-2
Index
Wave ViewPoint User GuideRelease 1.5 SP3 September 2009
Chapter 1
Introducing Vertical Wave
Chapter Contents
About Vertical Wave ViewPoint
Vertical’s award-winning Wave ViewPoint integrates your phone and Windows PC to make your phone a much more powerful tool, dramatically expanding the ways in which you can place, receive, and manage your phone calls.
Accessing Wave
You can access Wave in any of the following ways. Each method is described below.• Wave ViewPoint• Wave TAPI Service Provider and Contact Manager Assistant• Your phone
Using ViewPointThis manual describes how to use ViewPoint, Wave’s easy-to-use Windows interface. With ViewPoint you can point and click to play voice messages and place calls, access contacts and users, and more. To jump right into using Wave ViewPoint, skip to Chapter 2.
About Vertical Wave ViewPoint . . . . . . . . . . . . . . . . . . . . . . . . . . . . . . . . . . . . . . 1-1Accessing Wave . . . . . . . . . . . . . . . . . . . . . . . . . . . . . . . . . . . . . . . . . . . . . . . . . 1-1Feature comparison table . . . . . . . . . . . . . . . . . . . . . . . . . . . . . . . . . . . . . . . . . . 1-3Getting technical support. . . . . . . . . . . . . . . . . . . . . . . . . . . . . . . . . . . . . . . . . . . 1-3Wave documentation. . . . . . . . . . . . . . . . . . . . . . . . . . . . . . . . . . . . . . . . . . . . . . 1-4
Wave ViewPoint User GuideRelease 1.5 SP3 September 2009
Accessing Wave 1-2Chapter 1: Introducing Vertical Wave
Using the Wave TAPI Service Provider and Contact Manager AssistantIf you make extensive use of contact management applications or customer relationship management software that are TAPI-compatible, such as Microsoft Outlook, GoldMine or GoldMine FrontOffice 2000, or Act!, you can install the Wave TAPI Service Provider and place Wave calls to contacts from those applications. You do not need to have Wave ViewPoint installed on your computer to use the TAPI Service Provider.The TAPI Service Provider links your contact management applications to your Wave phone, just as Wave ViewPoint is linked to your phone. After the TAPI Service Provider is installed, you can use your contact manager application’s Place Call feature to call its contacts using your Wave phone. Ask your Wave system administrator to install the Wave TAPI Service Provider, and then follow the instructions in your contact manager application for placing calls. You can also install the Wave Contact Manager Assistant (CMA) and receive screen-pops for calls that show the name, the Caller ID, and the time of day of the call. You do not need to have Wave ViewPoint installed on your computer to use the CMA.
Note: With Act!, you can receive screen-pops without installing the CMA. For more information, see the Wave TAPI Service Provider Help and the Wave Contact Manager Assistant Help.
Using your phoneVoice prompts guide you to enter Wave phone commands via your phone’s keypad. Depending on your phone type (SIP, digital, or analog), you can also use phone feature buttons or soft keys to access Wave features. For more information, see the Wave Phone User Guide, or the Wave Phone Quick Reference Guide specific to your phone type.
Wave ViewPoint User GuideRelease 1.5 SP3 September 2009

Feature comparison table 1-3Chapter 1: Introducing Vertical Wave
Feature comparison table
The following table shows the major features that are available in Wave, via ViewPoint, the phone menu prompts, or the Contact Manager Assistant (CMA). If your Wave system does not include some of these features, your Wave system administrator may have made them unavailable to you.
Getting technical support
Contact your Wave system administrator for technical support. For information on how to report problems, see Appendix C.You can get help through Wave documentation as described in the next section.
Feature ViewPoint Phone CMA
Managing voice messages Yes Yes No
Placing, receiving, and handling calls Yes Yes Some
Managing participants in conference calls Yes No No
Managing contacts Yes No Yes
Screen-pops for incoming calls Yes n/a Yes
Managing Groups Yes No No
Viewing the Extensions list Yes No No
Viewing the Call Log Yes No No
Recording greetings Yes Yes No
Forwarding calls Yes Yes No
Managing routing lists Yes No No
Managing call rules Yes No No
Changing the active greeting Yes Yes No
Changing the active routing list Yes No No
Wave ViewPoint User GuideRelease 1.5 SP3 September 2009

Wave documentation 1-4Chapter 1: Introducing Vertical Wave
Wave documentation
Related readingThe following documents are included with Vertical Wave in Acrobat format, and can be found on the Vertical Wave Documentation CD.For information about this version of Vertical Wave, including new features, known issues, and other late-breaking information, see the Release Notes included on the Documentation CD.
Manuals• Wave Phone User Guide Describes how to use digital phones, SIP phones, and analog
phones with Wave.
Quick Reference Guides• Wave Analog Phone Quick Reference Guide. Provides instructions for using analog phones
with Vertical Wave.• Wave Digital Phone Quick Reference Guide. Provides instructions for using Vertical Edge
digital phones.• Wave SIP Phone Quick Reference Guide. Provides instructions for using Vertical Wave SIP
phones.• Wave Voice Mail Quick Reference Guide. Provides instructions for using Vertical Wave
voicemail features.
Accessing HelpFrom any Wave dialog, you can press F1 or click Help to get context-sensitive Help describing the window and its individual fields.
Wave ViewPoint User GuideRelease 1.5 SP3 September 2009

Chapter 2
Using ViewPoint
Chapter Contents
About ViewPoint
ViewPoint provides a central place to manage your calls, voicemail, contacts and Wave account in an easy-to-use, graphical Windows interface. In ViewPoint you can quickly and easily drag and drop to transfer or conference calls, point and click to hear voice messages or call people back, set up call rules and “follow me” call forwarding to handle important callers, and more.See your Wave system administrator about installing ViewPoint on your computer.Without ViewPoint, you can still access many Wave functions by using the phone commands. For details, see the Wave Phone User Guide.
Using ViewPoint remotelyIf your office’s network is set up so you can log on remotely via a Virtual Private Network (VPN) connection, you can use ViewPoint as if you were on the network at your office. Contact your network administrator to see if you have VPN support and how to start VPN from your remote computer.ViewPoint will not run without a network connection to your Wave Server. Be sure you have an active VPN connection to your office before launching ViewPoint.
About ViewPoint . . . . . . . . . . . . . . . . . . . . . . . . . . . . . . . . . . . . . . . . . . . . . . . . . 2-1Logging on to ViewPoint . . . . . . . . . . . . . . . . . . . . . . . . . . . . . . . . . . . . . . . . . . . 2-2Exiting ViewPoint. . . . . . . . . . . . . . . . . . . . . . . . . . . . . . . . . . . . . . . . . . . . . . . . . 2-7Elements of the ViewPoint window . . . . . . . . . . . . . . . . . . . . . . . . . . . . . . . . . . . 2-7Working in ViewPoint folders. . . . . . . . . . . . . . . . . . . . . . . . . . . . . . . . . . . . . . . 2-11Organizing items in folders . . . . . . . . . . . . . . . . . . . . . . . . . . . . . . . . . . . . . . . . 2-16Importing and exporting Wave items . . . . . . . . . . . . . . . . . . . . . . . . . . . . . . . . . 2-21
Wave ViewPoint User GuideRelease 1.5 SP3 September 2009

Logging on to ViewPoint 2-2Chapter 2: Using ViewPoint
Using ViewPoint in languages other than EnglishYou can have the Wave ViewPoint interface display in Spanish, German, French Parisian or French Canadian. ViewPoint will automatically adjust to the proper language when your Windows language (as set in the Windows Control Panel) matches one of the supported languages. Alternatively, you can set the language manually when logging on by clicking Options, or do the following once ViewPoint is running: 1. Choose Tools > Options. The Options dialog opens.
2. Click the ViewPoint tab.
3. Choose the language you want from the Language drop-down list.
4. Click OK. You must restart ViewPoint for the change to take effect.
Logging on to ViewPoint
To use ViewPoint, you must log on using a valid Wave user account.
Note: Each running ViewPoint program is licensed. If you see a message stating that you have exceeded your ViewPoint licenses, you cannot log on. See your Wave system administrator for help if such a message appears.
To log on to ViewPoint
1. Choose Start > Programs > Vertical Wave ViewPoint > Wave ViewPoint. The ViewPoint Log On dialog opens.
2. Type your user name in the User Name field. If you do not know your user name, ask your Wave system administrator.
3. Type your numeric password in the Password field. Use the same password that you use to log into your Wave voicemail account using the phone.
Wave ViewPoint User GuideRelease 1.5 SP3 September 2009
Logging on to ViewPoint 2-3Chapter 2: Using ViewPoint
4. If you want to skip the process of logging on to the Wave ViewPoint in future sessions, check Automatically log on as this user.
Note: If you check Automatically log on as this user, anyone at your computer can open your ViewPoint program and listen to your voice messages, because ViewPoint will open without requiring a password.
5. If you need to change login options, click Options >>. See “Using ViewPoint with a different phone or Wave Server name” on page 2-3
6. Click OK. ViewPoint starts.
Resetting ViewPoint so that login is required
1. Choose Tools > Options. The Options dialog opens.
2. On the ViewPoint tab, uncheck Log on automatically.
3. Click OK.
Using ViewPoint with a different phone or Wave Server nameBy clicking Options >> in the ViewPoint Logon dialog, you can change the following login settings:• The associated phone. ViewPoint works best in conjunction with a phone, when you can
use the Place Call commands, make recordings, and more. ViewPoint can be associated with only one phone at a time. You change the associated phone whenever you want to use a different phone with ViewPoint (for example, your desktop computer has been moved to a different office).
You can also change the associated phone after logging on by selecting File > Use a different station.
• The Wave Server. ViewPoint connects to a specific Wave server. If multiple Waves are available on your network, you can change the one to which ViewPoint is connected. You must also change server name if the network name of its computer has changed.
Wave ViewPoint User GuideRelease 1.5 SP3 September 2009
Logging on to ViewPoint 2-4Chapter 2: Using ViewPoint
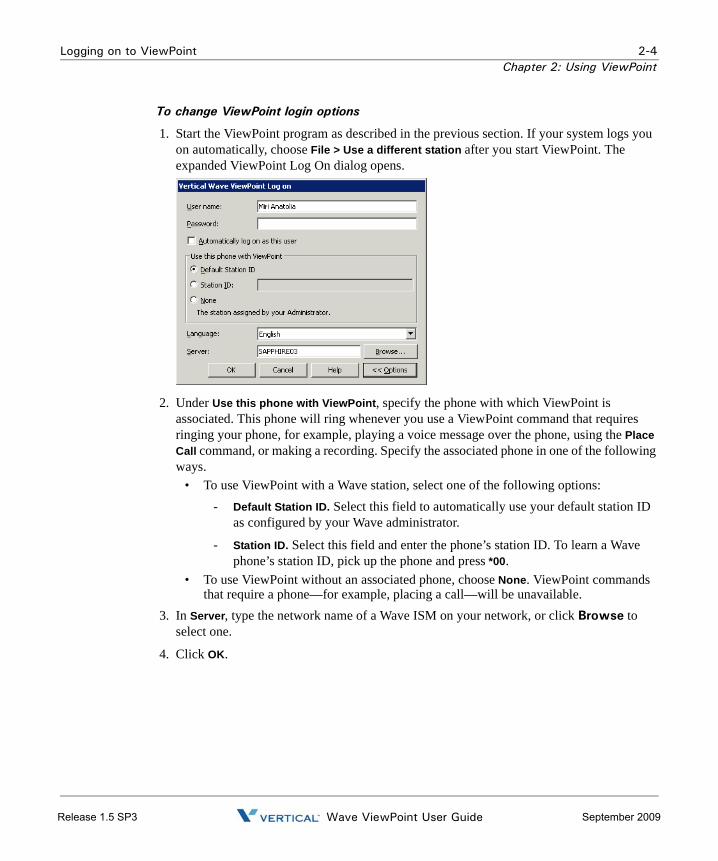
To change ViewPoint login options
1. Start the ViewPoint program as described in the previous section. If your system logs you on automatically, choose File > Use a different station after you start ViewPoint. The expanded ViewPoint Log On dialog opens.
2. Under Use this phone with ViewPoint, specify the phone with which ViewPoint is associated. This phone will ring whenever you use a ViewPoint command that requires ringing your phone, for example, playing a voice message over the phone, using the Place Call command, or making a recording. Specify the associated phone in one of the following ways.
• To use ViewPoint with a Wave station, select one of the following options:- Default Station ID. Select this field to automatically use your default station ID
as configured by your Wave administrator.
- Station ID. Select this field and enter the phone’s station ID. To learn a Wave phone’s station ID, pick up the phone and press *00.
• To use ViewPoint without an associated phone, choose None. ViewPoint commands that require a phone—for example, placing a call—will be unavailable.
3. In Server, type the network name of a Wave ISM on your network, or click Browse to select one.
4. Click OK.
Wave ViewPoint User GuideRelease 1.5 SP3 September 2009

Logging on to ViewPoint 2-5Chapter 2: Using ViewPoint
Using ViewPoint with another station Most Wave users have a default station ID, which represents the phone your Wave system administrator assigned to you (if you roam between phones your station ID may be 0). When you log on to ViewPoint specifying an associated phone other than your default station, the Select Your ViewPoint Phone dialog opens, enabling you to clarify which phone you want to use with ViewPoint.
To use ViewPoint with another station
1. In the Select Your ViewPoint Phone dialog, choose one of the following options:• Use station n as a visitor. This option appears only if you specified another user’s
station as your associated phone—for example, you are logging on at another user’s desk. The phone remains set for its normal user, but ViewPoint is set for you. Calls you place and receive using the phone use the normal user’s account (for example, the dialing permissions) and appear in the normal user’s Call Log.
However, calls you place and receive using ViewPoint commands use your account. Choose this option if you do not intend to use the phone extensively during this ViewPoint session.
• Use <this phone > to place and answer calls... . The phone (station or remote number) is set for you. Calls you place and receive using the phone use your account settings. Choose this option if you will be using the phone as your own during this ViewPoint session.
If you choose this option, you can also select Forward my calls to this station / number to receive calls to your own extension here. For more information about call forwarding, see “Forwarding calls” on page 9-2.
Wave ViewPoint User GuideRelease 1.5 SP3 September 2009

Logging on to ViewPoint 2-6Chapter 2: Using ViewPoint
• Use my default station. Your default station remains ViewPoint’s associated phone. Whenever you use a ViewPoint command that requires the phone—for example, to play a voice message—ViewPoint uses your default station. Choose this option only if your default station is nearby.
• I am not near a Wave phone. You log on with station ID 0, meaning that ViewPoint is not associated with a phone. ViewPoint commands that require a phone—for example, placing a call—are unavailable.
Note: When you run ViewPoint without an associated phone, the Call Monitor folder title bar displays “No associated phone” as a reminder.
2. Click OK. ViewPoint opens with the phone selection you made.
Changing your station, Wave Server name, or user name after logging onYou can log on as a different user, or with a different associated phone, without exiting and restarting the ViewPoint program. This feature makes it easy to log on to another user’s account from your ViewPoint, or to move ViewPoint from one phone to another. To log on to another user’s account, you must know the other user’s password.To log on as a different user, choose File > Log on as a different user. The Wave ViewPoint Log On dialog opens. See “Logging on to ViewPoint” on page 2-2.To change ViewPoint’s associated phone, choose File > Use a different station. The Wave ViewPoint Log On dialog opens with your name and password already entered and the Options showing.
Changing Your password
To change your password via ViewPoint
1. Choose Tools > Options. The Options dialog opens.
2. Click Change Password. The Change Password dialog opens.
3. Enter your current password under Old password, enter your new password under New password, and then retype your new password in the Verify new password field.
4. Click OK to close the Change Password dialog, and then click OK to close the Options dialog.
Wave ViewPoint User GuideRelease 1.5 SP3 September 2009

Exiting ViewPoint 2-7Chapter 2: Using ViewPoint
Logging on with command-line switchesYou can add switches to the Windows shortcut command line that starts ViewPoint. The command line switches enable you to run multiple copies of ViewPoint at once connected to different phones or Wave servers, log on using a particular station, and perform other tasks. See Appendix B for more information.
Exiting ViewPoint
To exit ViewPoint, choose File > Exit.
Elements of the ViewPoint window
ViewPoint window contains the following elements:• The menu bar• The toolbar• The navigation pane• The status bar• ViewPoint folder that is currently displayed (see “Working in ViewPoint folders” on
page 2-11)
Wave ViewPoint User GuideRelease 1.5 SP3 September 2009

Elements of the ViewPoint window 2-8Chapter 2: Using ViewPoint
The Menu BarThe menu bar, at the top of ViewPoint, provides access to Wave commands. Click each menu to see the commands that menu contains. Menu commands are referenced in this manual in the format File > New > Contact. You can drag the menu bar from its left edge to detach it.
The ToolbarThe toolbar, directly under the menu bar in each folder, provides single-click access to frequently used Wave commands. Some folders contain toolbar buttons that are not found in other folders. The following illustration shows the toolbar for the Messages folder.
In any folder, clicking the left-most toolbar button creates a new item for that folder. For example, in the Call Monitor, clicking the left-most button lets you place a new call:
You can also click the small arrow to the right of that button for a menu that lets you create any new ViewPoint item. The arrow is available in every folder.
The Navigation PaneThe navigation pane, on the left side of the ViewPoint window, gives you point-and-click access to ViewPoint’s folders. Click a folder in the navigation pane to open that folder in the ViewPoint main window.The navigation pane is made up of the Folders list and, below it, the navigation bar. You can expand the navigation bar or Favorite Folders list by dragging the separator bar between them. As you shrink the navigation bar, its icons minimize and appear at the bottom.
Wave ViewPoint User GuideRelease 1.5 SP3 September 2009
Elements of the ViewPoint window 2-9Chapter 2: Using ViewPoint
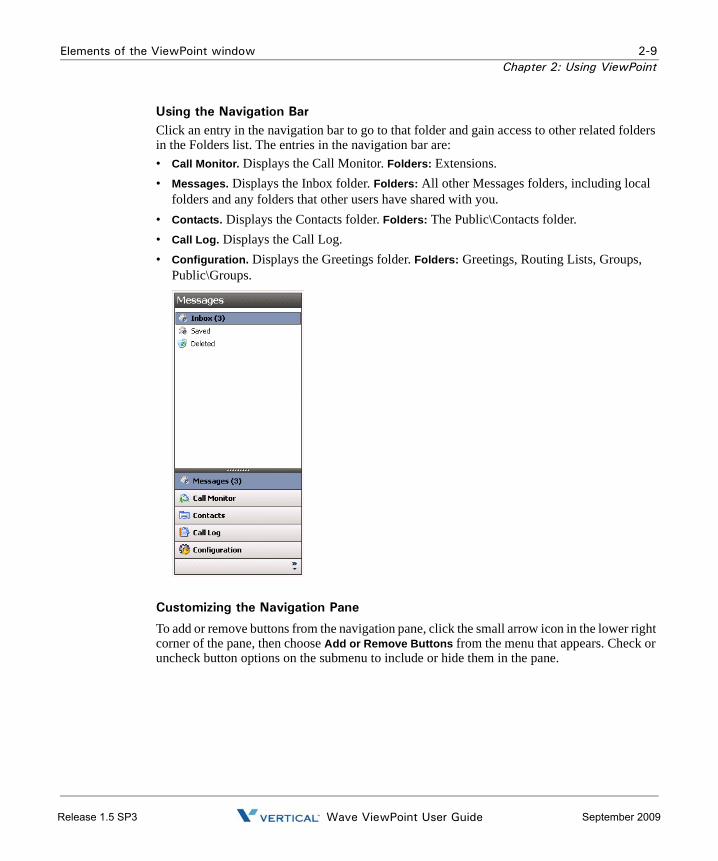
Using the Navigation BarClick an entry in the navigation bar to go to that folder and gain access to other related folders in the Folders list. The entries in the navigation bar are:• Call Monitor. Displays the Call Monitor. Folders: Extensions.• Messages. Displays the Inbox folder. Folders: All other Messages folders, including local
folders and any folders that other users have shared with you.• Contacts. Displays the Contacts folder. Folders: The Public\Contacts folder.• Call Log. Displays the Call Log.• Configuration. Displays the Greetings folder. Folders: Greetings, Routing Lists, Groups,
Public\Groups.
Customizing the Navigation Pane
To add or remove buttons from the navigation pane, click the small arrow icon in the lower right corner of the pane, then choose Add or Remove Buttons from the menu that appears. Check or uncheck button options on the submenu to include or hide them in the pane.
Wave ViewPoint User GuideRelease 1.5 SP3 September 2009

Elements of the ViewPoint window 2-10Chapter 2: Using ViewPoint
The Status BarThe status bar is located at the bottom of ViewPoint window.
The status bar gives you quick access to the following information: • Last caller. Lists the name (if available) and Caller ID of your last incoming call. You can
press F11 to place a call to that number.• Number of items. Number of items in the current folder. For example, if you have 18
contacts, the Contacts folder status bar displays “18 Items.” In any Messages folder, the status bar also indicates the number of Unheard messages.
• Name and extension. The name and extension of the user logged on to ViewPoint on this computer.
• Phone. If you see a Phone pane showing the name of another user, it indicates that user is logged in to your station. While that user is logged in, calls you place using the phone will be subject to that user’s dialing restrictions, and logged as coming from that user. To restore the station to yourself, pick up the phone and dial *00.
• Personal Status. The current personal status of the user logged on to ViewPoint. Click the personal status button to choose a different personal status. See Chapter 3 for information on personal statuses.
• Audio output. You can click these buttons to switch ViewPoint's audio output between your computer speakers and your phone. Audio output includes playing your voice messages. Click the arrow to the right of the button to switch your audio output. If you do not have a sound device, the speaker option may be disabled.
• Call forwarding. If the FWD button is bold and has a phone icon to the left, it means you are currently forwarding your calls. Hover your mouse over the button to display the forwarding number. You can also click the arrow to quickly select one of your personal numbers (which you can set via Tools > Options > My Numbers) as the forwarding number. Double-click the button to open the Call Forwarding dialog, in which you can change or turn off call forwarding. See “Forwarding calls” on page 9-2.
Wave ViewPoint User GuideRelease 1.5 SP3 September 2009
Working in ViewPoint folders 2-11Chapter 2: Using ViewPoint
Working in ViewPoint folders
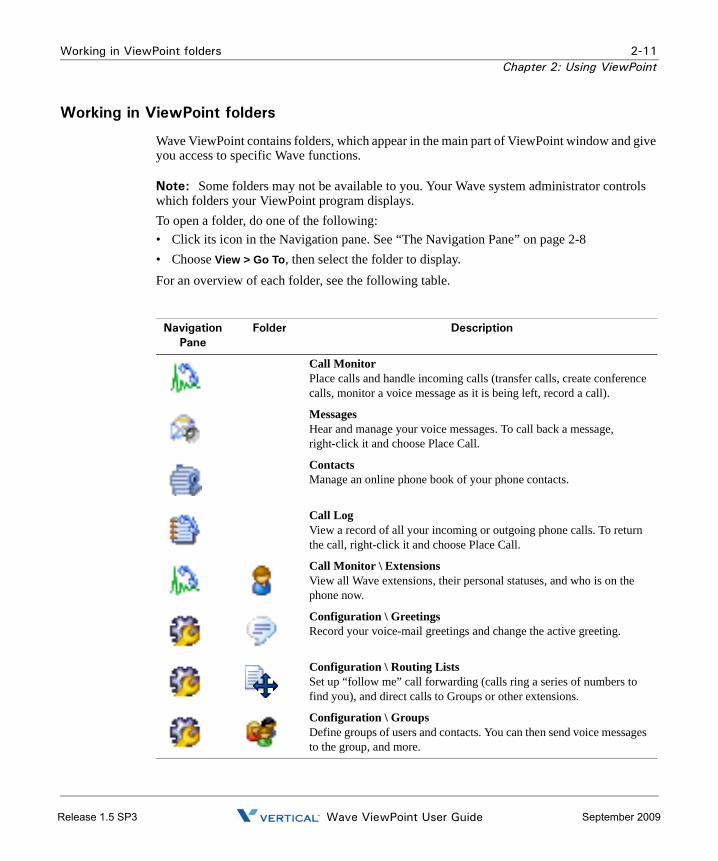
Wave ViewPoint contains folders, which appear in the main part of ViewPoint window and give you access to specific Wave functions.
Note: Some folders may not be available to you. Your Wave system administrator controls which folders your ViewPoint program displays.To open a folder, do one of the following:• Click its icon in the Navigation pane. See “The Navigation Pane” on page 2-8• Choose View > Go To, then select the folder to display.For an overview of each folder, see the following table.
Navigation Pane
Folder Description
Call MonitorPlace calls and handle incoming calls (transfer calls, create conference calls, monitor a voice message as it is being left, record a call).
MessagesHear and manage your voice messages. To call back a message, right-click it and choose Place Call.
ContactsManage an online phone book of your phone contacts.
Call Log View a record of all your incoming or outgoing phone calls. To return the call, right-click it and choose Place Call.
Call Monitor \ Extensions View all Wave extensions, their personal statuses, and who is on the phone now.
Configuration \ GreetingsRecord your voice-mail greetings and change the active greeting.
Configuration \ Routing ListsSet up “follow me” call forwarding (calls ring a series of numbers to find you), and direct calls to Groups or other extensions.
Configuration \ GroupsDefine groups of users and contacts. You can then send voice messages to the group, and more.
Wave ViewPoint User GuideRelease 1.5 SP3 September 2009
Working in ViewPoint folders 2-12Chapter 2: Using ViewPoint
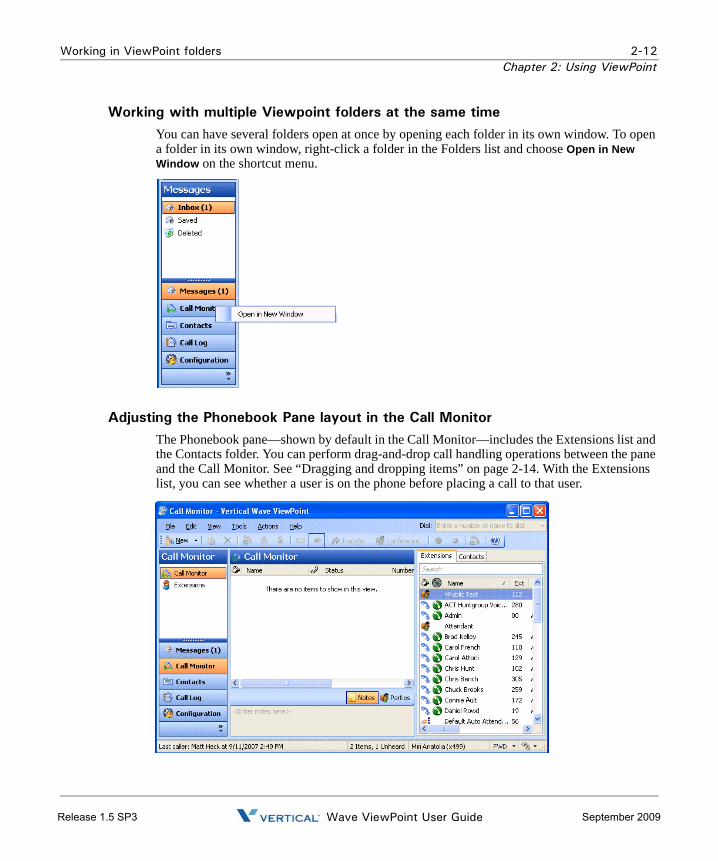
Working with multiple Viewpoint folders at the same timeYou can have several folders open at once by opening each folder in its own window. To open a folder in its own window, right-click a folder in the Folders list and choose Open in New Window on the shortcut menu.
Adjusting the Phonebook Pane layout in the Call MonitorThe Phonebook pane—shown by default in the Call Monitor—includes the Extensions list and the Contacts folder. You can perform drag-and-drop call handling operations between the pane and the Call Monitor. See “Dragging and dropping items” on page 2-14. With the Extensions list, you can see whether a user is on the phone before placing a call to that user.
Wave ViewPoint User GuideRelease 1.5 SP3 September 2009
Working in ViewPoint folders 2-13Chapter 2: Using ViewPoint
With the Phonebook pane open, click the appropriate tab to display the Extensions list or Contacts folder.To move the Phonebook Pane within the Call Monitor folder, choose View > PhoneBook Pane, and then select a location from the sub-menu.To remove the Phonebook Pane from the Call Monitor folder, choose View > Phonebook Pane > Off.
Deleting voice messages and other itemsTo delete a voice message from your Inbox, select it and then press Delete. The voice message moves to your Deleted folder. It will be permanently deleted from the Deleted folder according to the settings defined in Tools > Options.
To permanently delete a voice message from your Inbox
1. Select the voice message. To select more than one voice message, press Ctrl and select them.
2. Press Shift+Delete. A confirmation dialog opens.
3. Do one of the following:• Click Yes if you want the selected voice message to be permanently removed from
your computer. • Click No to keep the voice message in your Inbox.
To delete other items
1. In the folder in which the item appears, select the item. To select more than one item, press Ctrl and click each item that you want to delete.
2. Right-click the selected item and choose Delete on the shortcut menu. A confirmation dialog opens.
3. When you delete an item that is not a voice message, such as a greeting, the item is permanently and irretrievably removed from your computer. You cannot recover it after you delete it.
4. Click OK to permanently delete the item.
Wave ViewPoint User GuideRelease 1.5 SP3 September 2009
Working in ViewPoint folders 2-14Chapter 2: Using ViewPoint
Copying and pasting itemsCopying a row in any folder places a copy of the item in that row on the clipboard as text. This information can be pasted into other applications, such as a text program.Choose Edit > Copy to place a copy of selected items on your clipboard. Choose Edit > Paste to paste the items. Use this method to paste Call Log entries and voice message information into the Problem Report Wizard (See “About the Problem Report Wizard” on page C-1.).
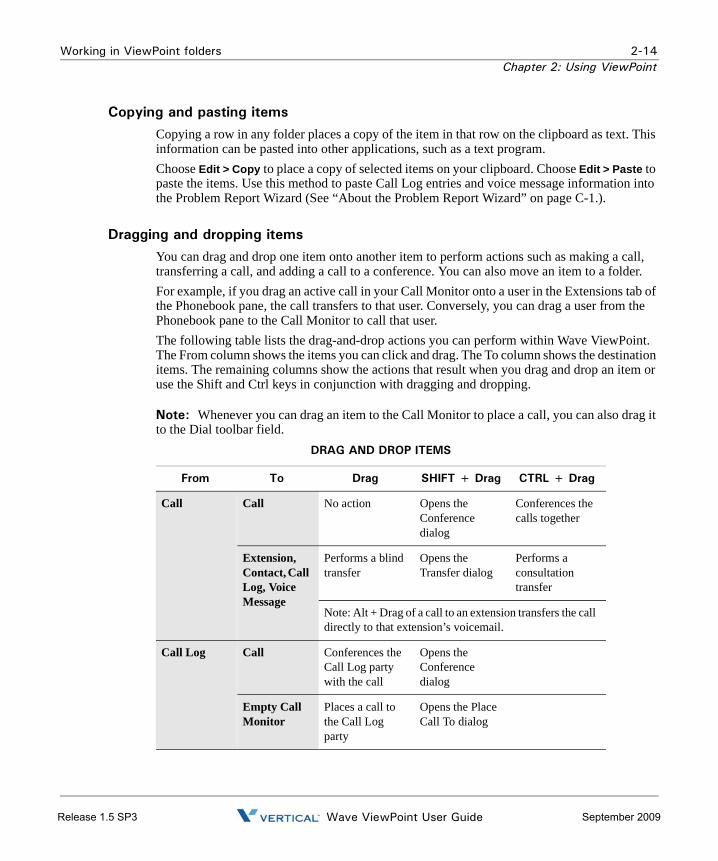
Dragging and dropping itemsYou can drag and drop one item onto another item to perform actions such as making a call, transferring a call, and adding a call to a conference. You can also move an item to a folder. For example, if you drag an active call in your Call Monitor onto a user in the Extensions tab of the Phonebook pane, the call transfers to that user. Conversely, you can drag a user from the Phonebook pane to the Call Monitor to call that user. The following table lists the drag-and-drop actions you can perform within Wave ViewPoint. The From column shows the items you can click and drag. The To column shows the destination items. The remaining columns show the actions that result when you drag and drop an item or use the Shift and Ctrl keys in conjunction with dragging and dropping.
Note: Whenever you can drag an item to the Call Monitor to place a call, you can also drag it to the Dial toolbar field.
DRAG AND DROP ITEMS
From To Drag SHIFT + Drag CTRL + Drag
Call Call No action Opens the Conference dialog
Conferences the calls together
Extension, Contact, Call Log, Voice Message
Performs a blind transfer
Opens the Transfer dialog
Performs a consultation transfer
Note: Alt + Drag of a call to an extension transfers the call directly to that extension’s voicemail.
Call Log Call Conferences the Call Log party with the call
Opens the Conference dialog
Empty Call Monitor
Places a call to the Call Log party
Opens the Place Call To dialog
Wave ViewPoint User GuideRelease 1.5 SP3 September 2009
Working in ViewPoint folders 2-15Chapter 2: Using ViewPoint
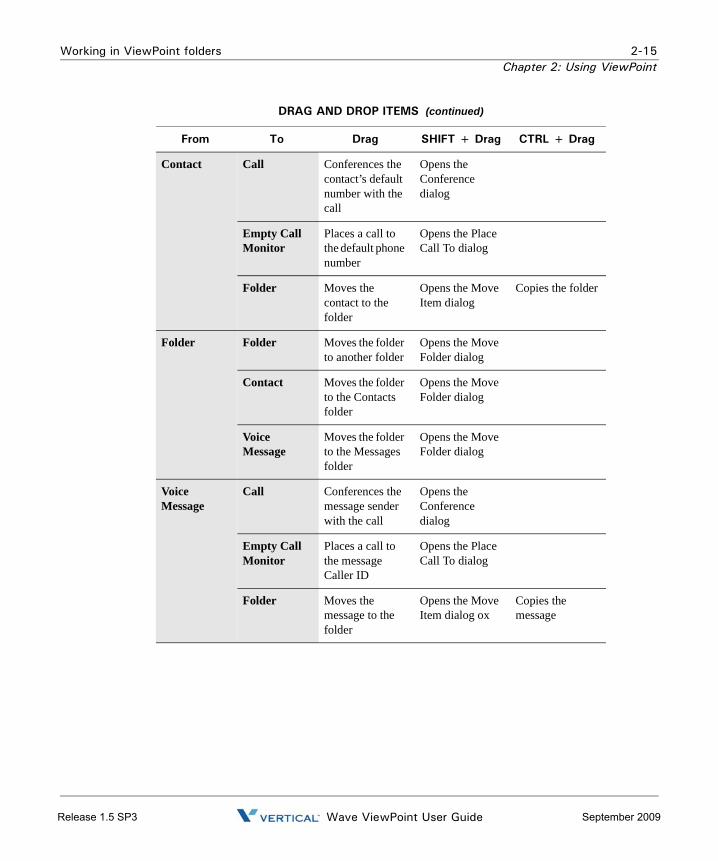
Contact Call Conferences the contact’s default number with the call
Opens the Conference dialog
Empty Call Monitor
Places a call to the default phone number
Opens the Place Call To dialog
Folder Moves the contact to the folder
Opens the Move Item dialog
Copies the folder
Folder Folder Moves the folder to another folder
Opens the Move Folder dialog
Contact Moves the folder to the Contacts folder
Opens the Move Folder dialog
Voice Message
Moves the folder to the Messages folder
Opens the Move Folder dialog
Voice Message
Call Conferences the message sender with the call
Opens the Conference dialog
Empty Call Monitor
Places a call to the message Caller ID
Opens the Place Call To dialog
Folder Moves the message to the folder
Opens the Move Item dialog ox
Copies the message
DRAG AND DROP ITEMS (continued)
From To Drag SHIFT + Drag CTRL + Drag
Wave ViewPoint User GuideRelease 1.5 SP3 September 2009

Organizing items in folders 2-16Chapter 2: Using ViewPoint
Printing items in foldersTo print the contents of a folder, choose File > Print. When you print a folder that contains several columns, you may need to change the orientation of the page to “landscape” so that all columns that appear in the folder are printed.
Organizing items in folders
The Messages folder contains one folder already created, the Saved folder. When you listen to a voice message on the phone and save it, the message is moved into the Saved folder.
Public foldersMost items you create or see in ViewPoint are stored in private folders so they are not shown when a different user logs into ViewPoint. However, ViewPoint also supports public Contacts and Groups folders that contain items that can seen by all ViewPoint users and edited by those with the proper permission. See “Viewing public folders” on page 2-18.
Extension Call Conferences the call
Opens the Conference dialog
Empty Call Monitor
Places the call Opens the Place Call To dialog
Text (for example, a phone number you copied from a web page)
Call Monitor Places a call to the number that was dropped
Opens the Place Call To dialog
DRAG AND DROP ITEMS (continued)
From To Drag SHIFT + Drag CTRL + Drag
Wave ViewPoint User GuideRelease 1.5 SP3 September 2009

Organizing items in folders 2-17Chapter 2: Using ViewPoint
Customizing columnsYou can choose to show or hide columns in a folder. You can also customize columns in a folder by moving, resizing, and resorting them. The changes you make to columns in a folder are saved when you exit ViewPoint.
Showing, hiding, and reordering columns
For each folder in ViewPoint, you can choose the columns that you want to see in the folder. Note that by default, some folders do not show all of the available columns.
To show, hide, or reorder columns in a ViewPoint folder
1. Choose View > Show Columns (or right-click the column header). The Show Columns dialog opens.
2. Do any of the following:• To move columns into or out of the folder, select them and click Add or Remove. You
can also drag and drop.• To reorder the columns in the folder, select the column in the Show these columns
list, and click the Up and Down arrows to move the column up or down in the list. 3. Click OK to save your changes.
Note: You can also reorder columns from within the folder by dragging the column headers. Dragging a column off the screen until an X displays removes that column.
Wave ViewPoint User GuideRelease 1.5 SP3 September 2009

Organizing items in folders 2-18Chapter 2: Using ViewPoint
Moving columns
To move a column, do either of the following:• In the folder, click the column header and then drag and drop it to a new location. • Use the Show Columns dialog to reorder the columns in a folder, as described above.
Resizing columns
To change a column’s width, in the folder click and drag the right-hand side of the column header.
Sorting the contents of a column
Click a column header to sort the items in a folder by the information in that column. Click the column header again to sort in the reverse order.The column in the folder that contains an arrow in its header is the column by which the display is currently sorted. The direction of the arrow indicates the sort order.
Viewing public foldersPublic folders contain items that all Wave users can view and use. For example, any user can view a public contact’s information or place a call to that contact.
Example:
Your company defines its departments as public Groups. All users in the company can view the members of those Groups.
Note: Items in public folders are not generally available for editing or deleting. You must have special permission to edit a public item.
Managing the Deleted folderThe Deleted folder contains voice messages that you have deleted from the Messages folder. Items in the Deleted folder continue to be stored in the limited space that has been allocated to you for your voice files. To regain space for more voice messages or other voice files, empty your Deleted folder.To view the contents of the Deleted folder, click it in the Folder List.
Wave ViewPoint User GuideRelease 1.5 SP3 September 2009

Organizing items in folders 2-19Chapter 2: Using ViewPoint
Emptying the Deleted folder
You can delete an item from the Deleted folder just as you would from any folder. When items are deleted from the Deleted folder, they are deleted permanently. To empty the Deleted folder, choose Tools > Empty Deleted Folder.
To empty the Deleted folder automatically
1. Choose Tools > Options. The Options dialog opens.
2. Click the Voice Messages \ Usage tab.
3. Choose one of the following options:• To delete all messages in the Deleted folder now, click Remove all items now. The
messages are deleted when you click OK to close the Options dialog.• To empty the Deleted folder automatically whenever you exit ViewPoint, check
Remove all items when exiting.• To remove old items automatically from the Deleted folder, check Periodically
remove old items, and then enter the age in days at which an item is automatically removed.
4. Click OK.
Using the audio controlsWave’s audio controls make it easy to create recordings and listen to recordings and voice messages.
These audio controls appear throughout ViewPoint in dialogs in which you can create recordings and listen to voice messages.
Wave ViewPoint User GuideRelease 1.5 SP3 September 2009
Organizing items in folders 2-20Chapter 2: Using ViewPoint
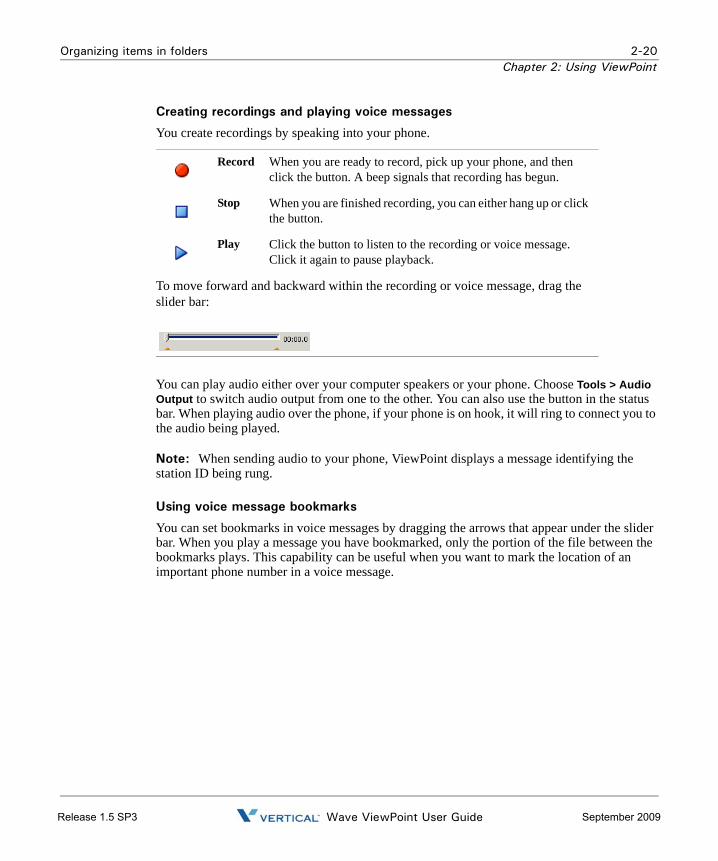
Creating recordings and playing voice messages
You can play audio either over your computer speakers or your phone. Choose Tools > Audio Output to switch audio output from one to the other. You can also use the button in the status bar. When playing audio over the phone, if your phone is on hook, it will ring to connect you to the audio being played.
Note: When sending audio to your phone, ViewPoint displays a message identifying the station ID being rung.
Using voice message bookmarks
You can set bookmarks in voice messages by dragging the arrows that appear under the slider bar. When you play a message you have bookmarked, only the portion of the file between the bookmarks plays. This capability can be useful when you want to mark the location of an important phone number in a voice message.
You create recordings by speaking into your phone.
Record When you are ready to record, pick up your phone, and then click the button. A beep signals that recording has begun.
Stop When you are finished recording, you can either hang up or click the button.
Play Click the button to listen to the recording or voice message. Click it again to pause playback.
To move forward and backward within the recording or voice message, drag the slider bar:
Wave ViewPoint User GuideRelease 1.5 SP3 September 2009
Importing and exporting Wave items 2-21Chapter 2: Using ViewPoint
Importing and exporting voice files
Importing and exporting Wave items
See the following topics for more about importing and exporting Wave items:• Contacts. See “Importing and exporting contacts” on page 2-21.• ViewPoint recordings (voice messages and call recordings). See page “Exporting
ViewPoint recordings” on page 2-25.• Archived call recordings. See “Acting on archived call recordings” on page A-10.
Importing and exporting contactsYou can import contacts into Wave:• From a CSV file generated via Wave• From a CSV file generated from another contact manager such as Microsoft OutlookYou can export contacts from Wave to a CSV file that you can import into another Wave ViewPoint, Outlook, GoldMine, FrontOffice 2000, Act!, or other contact management software.
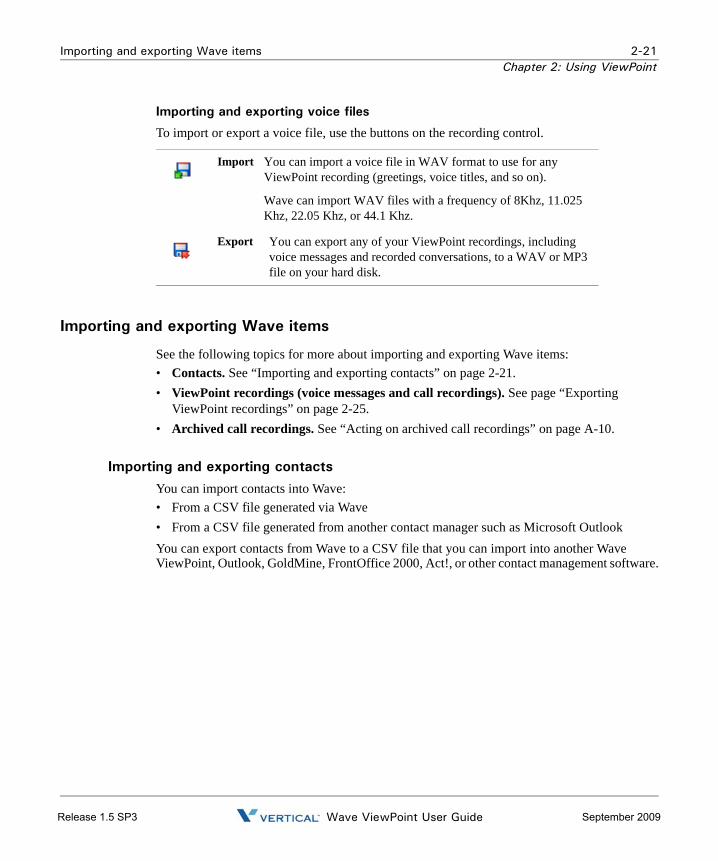
To import or export a voice file, use the buttons on the recording control.
Import You can import a voice file in WAV format to use for any ViewPoint recording (greetings, voice titles, and so on).
Wave can import WAV files with a frequency of 8Khz, 11.025 Khz, 22.05 Khz, or 44.1 Khz.
Export You can export any of your ViewPoint recordings, including voice messages and recorded conversations, to a WAV or MP3 file on your hard disk.
Wave ViewPoint User GuideRelease 1.5 SP3 September 2009

Importing and exporting Wave items 2-22Chapter 2: Using ViewPoint
To import contacts from a CSV file
1. Choose File > Import and Export. The Import and Export Wizard opens.
2. Select Import Contacts, and then click Next.
3. In File to Import, click Browse and select the CSV file that you want to import.
4. In Destination folder, select the Wave Contact folder into which you want to import the contacts in the CSV file.
5. Under Options, select one of the following:• Replace duplicates with items imported. If Wave finds a duplicate contact in the CSV
file, the contact from the file will replace the existing Wave contact.• Allow duplicates to be created. If Wave finds a duplicate contact in the CSV file, it
will import all contacts, even those that are duplicates of Wave contacts.• Do not import duplicate items. If Wave finds duplicate contacts in the CSV file, it will
not import them.
Wave ViewPoint User GuideRelease 1.5 SP3 September 2009

Importing and exporting Wave items 2-23Chapter 2: Using ViewPoint
6. Select Use phone numbers as caller identification for these contacts to add the imported contacts’ phone numbers to Wave’s list of Caller ID numbers so that contacts can be identified when they call. For more information, see “Teaching Wave to recognize your contacts” on page 10-7.
7. If you are importing a CSV file that was created by Wave or Outlook, go to step 10.
8. If you are importing contacts from another application and have not previously mapped the fields, click Map Custom Fields. The Map Custom Fields dialog opens using the default map, showing the first contact record to be imported, and how the existing fields will be mapped to Wave fields.
9. If you have saved a different map and want to use it, click Load Map and select it. Otherwise, map the fields manually as follows:
• Check First record contains field names at the bottom of the dialog if the CSV file’s first record consists of the names of fields. Then drag fields or values from the left pane (the CSV file) to the fields in the right pane (Wave contacts) in which you want the values to appear. Drag unwanted field mapping from the right pane to the left pane to clear them.
• Click Previous or Next to view other records in the CSV file to see how they will map.
Wave ViewPoint User GuideRelease 1.5 SP3 September 2009

Importing and exporting Wave items 2-24Chapter 2: Using ViewPoint
• Click Clear Map to remove all mapping from the right pane.• Click Default Map to restore the default mapping.• Click Save Map to save the current mapping to a new file (this can be useful if you
regularly import contacts from several different sources). If you do not click Save Map, the default map is saved when you click OK.
When you are finished mapping fields, click OK. Any changes to the default or custom map are saved for future importing.
10. Click Next in the Import and Export Wizard, and then click Finish. The contacts in the CSV file are imported.
Note: When text is imported from a CSV file, a comma in the text breaks the text between fields unless the text is within quotation marks.
To export contacts to a CSV file
1. Choose File > Import and Export. The Import and Export Wizard opens.
2. Under Choose an action to perform, select Export Contacts, and then click Next.
Wave ViewPoint User GuideRelease 1.5 SP3 September 2009

Importing and exporting Wave items 2-25Chapter 2: Using ViewPoint
3. In Save exported file as, browse to the folder in which you want to save the CSV file.
4. In Source folder, choose the Contacts file that you want to export, and then click Next.
5. Click Finish. The CSV file is exported.
Exporting ViewPoint recordingsYou can export voice messages and call recordings in WAV or MP3 format. 1. In the ViewPoint Messages folder, select the voice message or call recording.
2. Click the Export audio button.
3. Specify the target location.
4. Select WAV or MP3 from the Save as type drop-down list.
5. Click Save.
Note: If a call recording has already been archived, you must use the Archived Recording Browser to export it. See Appendix A.
Wave ViewPoint User GuideRelease 1.5 SP3 September 2009

Release 1.5 SP3 September 2009

Chapter 3
Using Personal Statuses
Chapter Contents
About personal statuses
Your personal status lets your colleagues know where you are and what you are doing. It also specifies how your calls are handled under specific circumstances. Changing your personal status is a quick way to change your call handling. For example, the Do Not Disturb status sends your incoming calls directly to voicemail without ringing your phone.
Note: To change your personal status, you must have permission to do so. If you cannot change your personal status, see your Wave system administrator.
About personal statuses. . . . . . . . . . . . . . . . . . . . . . . . . . . . . . . . . . . . . . . . . . . . . . . . . 3-1
Selecting a personal status . . . . . . . . . . . . . . . . . . . . . . . . . . . . . . . . . . . . . . . . . . . . . . 3-3
Changing the personal status of another user . . . . . . . . . . . . . . . . . . . . . . . . . . . . . . . . 3-3
Wave ViewPoint User GuideRelease 1.5 SP3 September 2009

About personal statuses 3-2Chapter 3: Using Personal Statuses
Available personal statusesThe following table lists the 5 personal statuses that are predefined for all users.
Icon Status Description
Available Lets people know that you are available to take calls. All calls ring your phone. You can turn call forwarding on if you want to take calls at a different location, for example, if you are working from home.
Do Not Disturb
Lets people know that you are not taking calls. No calls ring your phone. Calls are sent straight to the “unanswered” final action of your routing list (usually your voicemail). Note: You can create a call rule that overrides the Do Not Disturb personal status by allowing calls from specific people to ring your phone. See Chapter 11.
In a Meeting These three personal statuses let people know where you are when you are away from your desk. Like Do Not Disturb, these personal statuses send your calls directly to the “unanswered” final action of your routing list (usually your voicemail) without ringing your phone.Out of the
Office
On Vacation
Wave ViewPoint User GuideRelease 1.5 SP3 September 2009

Selecting a personal status 3-3Chapter 3: Using Personal Statuses
Selecting a personal status
This section explains how to select a personal status using ViewPoint or the phone.
Selecting a personal status in ViewpointThe ViewPoint status bar contains a button that shows your current personal status. Click that button to select a different personal status.
You can also use the Tools > Personal Status submenu.
Selecting a personal status using your phoneYou can select a personal status on the phone by logging on and press 6 1. You can select the Available personal status quickly by picking up the phone and pressing *50.
Changing the personal status of another user
You can change the personal status of another Wave user if you know that user’s password (or you can do it without entering a password if you have the appropriate permission). This feature is useful when users want to change their personal status but do not want to log on to Wave themselves. For example, a secretary can change the personal status for the boss, or the user who is acting as the Operator user can change the Operator’s personal status without logging on as the Operator user.
To change another user’s personal status in ViewPoint
1. In the Extensions list, right-click the user.
2. Choose Apply Personal Status and click a personal status.
3. If you do not have permission, you will be prompted for that user's password. Enter it and press OK if prompted.
Wave ViewPoint User GuideRelease 1.5 SP3 September 2009

Release 1.5 SP3 September 2009

Chapter 4
Using the Extensions List
Chapter Contents
Viewing Wave extensions
You can see all Wave extensions, along with information about the current status of each extension, in the Extensions list. You can use the Extensions list to quickly place calls to other Wave extensions or to change another user’s personal status if you have permission to do so.You can display the Extensions list in the Call Monitor for quick access, including drag-and-drop calling. See “Adjusting the Phonebook Pane layout in the Call Monitor” on page 2-12.A glance at the Extensions list can tell you:• A user’s extension number• Whether a user is currently on a call• A user’s current personal status• Whether a user has call forwarding turned on, and the location to which the calls are
forwarded• The extensions of your office’s auto attendants.
Viewing Wave extensions . . . . . . . . . . . . . . . . . . . . . . . . . . . . . . . . . . . . . . . . . . 4-1Placing calls to an extension . . . . . . . . . . . . . . . . . . . . . . . . . . . . . . . . . . . . . . . . 4-3Changing another user’s personal status from the Extensions list . . . . . . . . . . . 4-3
Wave ViewPoint User GuideRelease 1.5 SP3 September 2009

Viewing Wave extensions 4-2Chapter 4: Using the Extensions List
The Extensions list automatically updates in real time.
Searching the Extensions listTo find someone quickly, you can type their first or last name (fully or partially) in the Search field. The Extensions list displays all items whose first or last name begins with the entered text.
Extensions list tabsThe Extensions list can optionally contain tabs that display related groups of extensions. Tabs are located at the bottom of the Extensions list. Click each tab to view its contents.• All tab. This tab displays all Wave extensions. Note that your Wave system may be
configured to not show this tab.• Group tabs. The Extensions list can optionally display a tab for each public ViewPoint
Group of which you are a member, and a tab for any personal ViewPoint Groups that you created. Click a Group tab to see the extensions within that Group. See “Using ViewPoint Groups” on page 10-14.
Wave ViewPoint User GuideRelease 1.5 SP3 September 2009

Placing calls to an extension 4-3Chapter 4: Using the Extensions List
Showing, hiding, and reordering Extensions list tabs
To show or hide individual tabs, as well as choose their order, do the following: 1. In the Extensions list, choose View > Show Tabs. (You can also right-click anywhere in the
the Extensions list and then choose Show Tabs.)
2. Select a tab name and click Add or Remove to set up the Show these tabs in this order list. Use the up and down arrow buttons to arrange the order of tabs in the list.
3. Click OK. The specified tabs are displayed at the bottom of the Extensions list.
Extensions list columnsSome Extensions list columns are hidden by default. Press F1 for Help to see a complete list of columns with explanations. To show or hide columns, see “Customizing columns” on page 2-17.
Placing calls to an extension
To place a call to an extension, double-click the extension. If your phone is on hook, it rings to connect you to the call being placed.
Changing another user’s personal status from the Extensions list
From the Extensions list you can change another user’s personal status if you know that user’s password, or have the proper permission. For instructions, see “Changing the personal status of another user” on page 3-3.
Wave ViewPoint User GuideRelease 1.5 SP3 September 2009

Release 1.5 SP3 September 2009
Chapter 5
Receiving and Handling Calls in ViewPoint
Chapter Contents
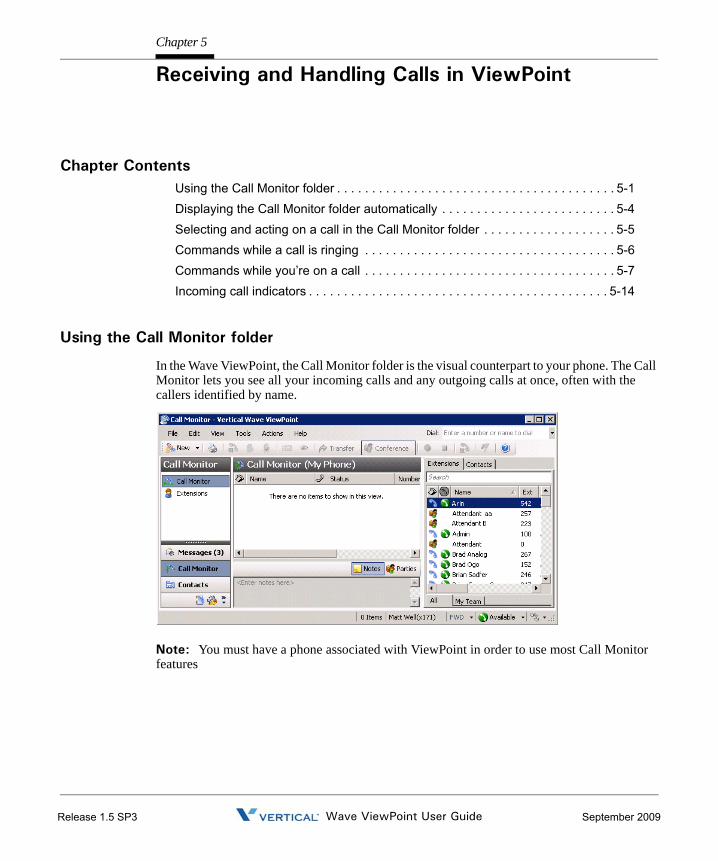
Using the Call Monitor folder
In the Wave ViewPoint, the Call Monitor folder is the visual counterpart to your phone. The Call Monitor lets you see all your incoming calls and any outgoing calls at once, often with the callers identified by name.
Note: You must have a phone associated with ViewPoint in order to use most Call Monitor features
Using the Call Monitor folder . . . . . . . . . . . . . . . . . . . . . . . . . . . . . . . . . . . . . . . . 5-1Displaying the Call Monitor folder automatically . . . . . . . . . . . . . . . . . . . . . . . . . 5-4Selecting and acting on a call in the Call Monitor folder . . . . . . . . . . . . . . . . . . . 5-5Commands while a call is ringing . . . . . . . . . . . . . . . . . . . . . . . . . . . . . . . . . . . . 5-6Commands while you’re on a call . . . . . . . . . . . . . . . . . . . . . . . . . . . . . . . . . . . . 5-7Incoming call indicators . . . . . . . . . . . . . . . . . . . . . . . . . . . . . . . . . . . . . . . . . . . 5-14
Wave ViewPoint User GuideRelease 1.5 SP3 September 2009
Using the Call Monitor folder 5-2Chapter 5: Receiving and Handling Calls in ViewPoint
In the Call Monitor folder you can:• See who is calling you and take the call or send it to voicemail• Click calls to transfer them, put them on hold, send them to voicemail, or perform other
actions• Move among multiple calls on hold with a click of the mouse• Record calls• Conference calls (including creating or starting a conference)Each row in the Call Monitor folder is an item that contains information about one call, or one party in a call. Conference calls appear in a special Conference pane that shows the parties other than yourself.For an explanation of Call Monitor folder columns, press F1 for online Help. For information about changing the Call Monitor folder columns that are displayed, see “Customizing columns” on page 12-8.
Call Monitor folder tabsFor most people, the Call Monitor folder contains one tab, called My Phone. However, the Call Monitor can display other tabs that group related calls. Click each tab to view the related call activity at your phone.• My Phone tab: This tab always appears in your Call Monitor folder and displays all calls to
or from your phone. This includes calls that are forwarded to your extension (in this case, the called party who forwarded the call is identified in the Owner column), and calls to your DID number if you have one.
• Parked tab: The Parked tab shows all current parked calls.
Wave ViewPoint User GuideRelease 1.5 SP3 September 2009

Using the Call Monitor folder 5-3Chapter 5: Receiving and Handling Calls in ViewPoint
Showing, hiding, and reordering Call Monitor tabsTo show or hide individual Call Monitor tabs, as well as choose their order, do the following: 1. Choose View > Show Tabs. (You can also right-click the Call Monitor column headers or
tabs.)
2. Select a tab name and click Add or Remove to show or hide it. Use the up and down arrow buttons to arrange the order of tabs.
3. Click OK.
Using the My Phone tab to handle callsThe My Phone tab appears if you have other tabs showing. After you answer a call, the Call Monitor automatically switches to the My Phone tab. It is the only tab from which you can perform call-handling commands on a call. If you select an active call in another tab, the call-handling commands are unavailable.
Call Monitor folder panesThe Call Monitor folder contains the following panes that you can hide or show:• The Phonebook Pane, which shows the Extensions list and the Contacts folder and enables
drag-and-drop call handling. See “Adjusting the Phonebook Pane layout in the Call Monitor” on page 2-12 and “Dragging and dropping items” on page 2-14.
• The Notes Pane, which enables you to type and add call notes. See “Adding notes to a call” on page 5-10.
• The Parties pane, which shows the parties in a conference call other than yourself.
Wave ViewPoint User GuideRelease 1.5 SP3 September 2009

Displaying the Call Monitor folder automatically 5-4Chapter 5: Receiving and Handling Calls in ViewPoint
Call Monitor folder columnsThe Call Monitor folder contains several columns that show detailed information about a call, such as Trunk Name and Target Station. Some of the columns are hidden by default. For an explanation of the columns, press F1 in the Call Monitor folder for its online Help. For instructions on hiding and showing columns, see “Customizing columns” on page 12-8.
Viewing a custom data column in the Call MonitorIf your Wave ISM is configured to display custom data (for example, a caller’s account number) in the Call Monitor, the custom data appears in one or more columns. You can view the available columns in the Show Columns dialog. You can hide and show custom data columns the same way you can hide and show normal columns (see “Customizing columns” on page 2-17.) Contact your Wave system administrator to see if any custom data columns are available in your Call Monitor folder.
Displaying the Call Monitor folder automatically
Wave can open the Call Monitor folder automatically in the following situations:• When you receive an incoming call• When you place or return calls from other ViewPoint foldersWhen the Call Monitor folder opens automatically, it appears in front of all other open windows on your computer.
To display the Call Monitor folder automatically
1. Choose Tools > Options. The Options dialog opens.
2. Click the ViewPoint \ Call Monitor tab.
3. Under Display Call Monitor in the following situations, check one or both of the following options:
• Placing new calls from Contacts or Extensions• Returning calls from Voice Messages or Call Log
4. To display the Call Monitor folder automatically on incoming calls, click the ViewPoint \ Call Alerts tab and check Display the Call Monitor.
5. Click OK.
Wave ViewPoint User GuideRelease 1.5 SP3 September 2009

Selecting and acting on a call in the Call Monitor folder 5-5Chapter 5: Receiving and Handling Calls in ViewPoint
Selecting and acting on a call in the Call Monitor folder
Click a call in the Call Monitor folder to select it. After it is selected, you can choose commands to apply to that call. To use a command on a call in the Call Monitor folder, do one of the following actions:• Right-click the call and choose a command on the shortcut menu. This option is often the
fastest way of choosing a command, but it may be difficult to do so during times when phone traffic is heavy. This is due to the fact that calls change position in the Call Monitor folder as new calls arrive and transferred calls leave the Call Monitor folder.
• Click a button on the toolbar.• Choose a command from the Actions menu.• Press Enter. This puts the selected call on hold, or retrieves it if it is already on hold.
Important: Do not use the ViewPoint Call Monitor to select and act on a call to a virtual extension—use the phone commands (as described in the Wave Phone User Guide) to control these calls. A virtual extension number can be assigned to a user who does not need a physical phone, for example because the user works on the road using a cell phone. Ask your system administrator if there are any virtual extensions assigned on your system.
Call ownershipIn the Call Monitor you can perform call-handling commands only on calls that you own. You own a call if you are the one who answered it. If you select a call that you do not own, the call-handling commands are unavailable.To determine who owns a call, look at the name in the Owner column.
Double-clicking calls Double-clicking in the Call Monitor folder has the following effects:• Double-clicking an active call puts it on hold.• Double-clicking any other type of call takes the call (connects you to the caller). This
includes incoming calls, calls on hold, parked calls, and calls to which you are listening while the caller leaves a message.
Wave ViewPoint User GuideRelease 1.5 SP3 September 2009

Commands while a call is ringing 5-6Chapter 5: Receiving and Handling Calls in ViewPoint
Commands while a call is ringing
While calls are ringing at your phone, the Call Monitor folder displays “Incoming Call.” If Wave can identify the caller, the item in the Call Monitor folder also displays the caller’s phone number and name, which enables you to screen your calls. (See “Teaching Wave to recognize your contacts” on page 10-7.) While calls are ringing, you can perform the following actions:• Take the call• Send the call to voicemail• Transfer the call without talking to the caller first
Taking the call If you are already on another call, select the incoming call and choose Actions > Take Call. Your current call is put on hold. You can easily move among multiple calls by choosing Take Call again.
Sending the call to voicemailSelect the call, and then choose Actions > Take Message. The call is sent to your voicemail.
Screening a voice message as it is being leftYou can listen to a voice message as the caller is leaving it and pick up the call if needed. To do so: 1. Select the call while it is ringing or while the caller is leaving a message.
2. Choose Actions > Screen Message.
3. Pick up your phone and listen to the message as it is being left. This is a one-way connection. The caller cannot hear you.
4. To interrupt the message and take the call, choose Actions > Take Call. You are connected to the caller.
You can also listen to a voice message as it is being left via the phone.
Wave ViewPoint User GuideRelease 1.5 SP3 September 2009
Commands while you’re on a call 5-7Chapter 5: Receiving and Handling Calls in ViewPoint
Commands while you’re on a callOnce you are on an active call, you can perform actions on that call, including the following:• Putting a call on hold. See page 5-7.• Transferring a call. See page 5-8.• Adding notes to a call. See page 5-10.• Recording a call. See page 5-10.• Including the call as part of a conference call. See page 5-9 for steps to transfer a call and
then conference all parties together. (Conferencing is described in more detail in Chapter 6.)• Associating a call with a contact. See page 5-11.• Parking a call. See page 5-11.• Sending a call to voicemail. See page 5-12.• Playing a caller's name over your speakers. See page 5-12.• Disconnecting a call while staying on the phone. See page 5-12.• Entering an account code for a call. See page 5-13.• Flagging a problem call to report later. See page 5-13.
Instructions for each of these commands appear in the following sections.
Note: To perform a Call Monitor command on a call, you must first select the call.
Putting a call on holdTo put a call on hold, select the call, and then choose Actions > Hold. Alternatively, double-click the call or select the call and press Enter.To retrieve the call from hold, select the call and either choose Actions > Take Call, double-click the call, or press Enter.You can put as many calls on hold at one time as you want. The Duration column in the Call Monitor folder shows how long each call has been waiting on hold.
Note: • Use Actions > Hold instead of the Hold button on your phone. When on hold, callers hear
music (if your system has music on hold), but they hear only silence if you use your phone’s Hold button.
• If you’re using a digital feature phone with multiple line appearances, you do not hear dial tone after putting a call on hold. To get dial tone, select an unoccupied line.
Wave ViewPoint User GuideRelease 1.5 SP3 September 2009

Commands while you’re on a call 5-8Chapter 5: Receiving and Handling Calls in ViewPoint
Ringback for calls on holdBy default, if you hang up with one or more calls on hold, Wave’s ringback feature rings your phone to remind you. When the call rings back, the call’s status in the Call Monitor changes to Ringing (On Hold). Talk to your Wave system administrator about configuring ringback behavior.
Transferring a callThe Call Monitor folder allows you to easily transfer a call to any party, either another Wave user or someone at an external phone number. You can look up users and contacts by name, and you can see in advance if an extension is busy. You can also transfer a call to an auto attendant or to a user’s voicemail.
Drag-and-drop transferringWith the Phonebook pane showing in the Call Monitor folder, you can drag a call from the Call Monitor to an extension to transfer the call to that extension, or to a contact’s name to transfer the call to the contact’s default number. For more information about drag-and-drop commands, see “Dragging and dropping items” on page 2-14. To show the Phonebook pane, see “Adjusting the Phonebook Pane layout in the Call Monitor” on page 2-12.
Blind, supervised, and direct-to-voicemail transfersYou can transfer a call in one of the following ways:• Blind transfer, sometimes called an unattended transfer. You transfer the call without first
speaking to the recipient. When the recipient answers the phone, the call is connected.
Note: Blind transfers occur automatically when transferring a ringing call, and when transferring to voicemail or an auto attendant.
• Supervised transfer, sometimes called an attended or consultation transfer. You speak to the transfer recipient first, while the caller is placed on hold. You can then complete the transfer, or conference the three of you together, or cancel the transfer and return to the caller.
• Direct to voicemail. You transfer the call directly to an extension’s voicemail.
To transfer a call
1. Select the call that you want to transfer.
2. Choose Actions > Transfer. The Transfer To dialog opens.
Wave ViewPoint User GuideRelease 1.5 SP3 September 2009
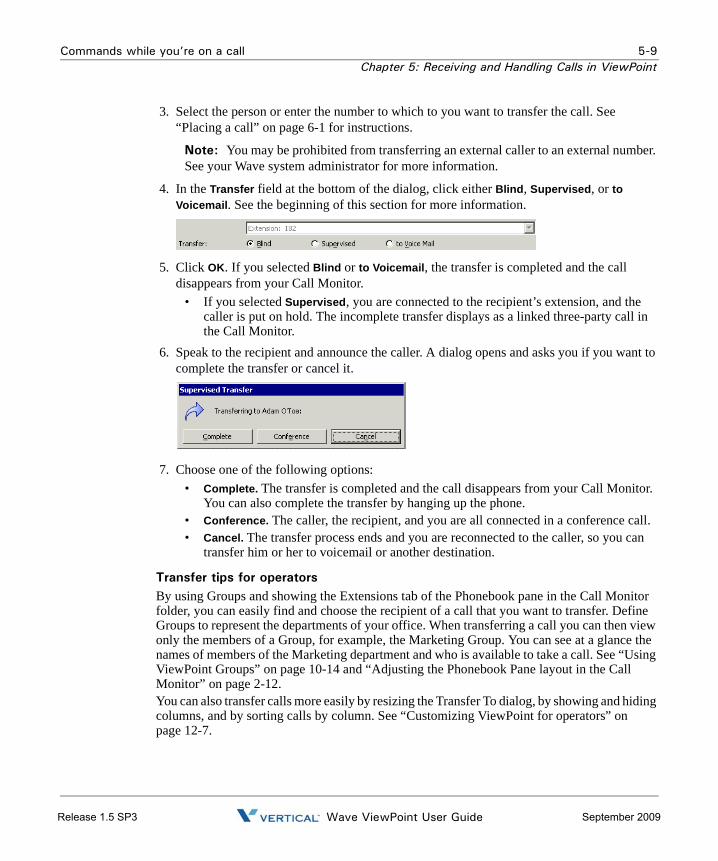
Commands while you’re on a call 5-9Chapter 5: Receiving and Handling Calls in ViewPoint
3. Select the person or enter the number to which to you want to transfer the call. See “Placing a call” on page 6-1 for instructions.
Note: You may be prohibited from transferring an external caller to an external number. See your Wave system administrator for more information.
4. In the Transfer field at the bottom of the dialog, click either Blind, Supervised, or to Voicemail. See the beginning of this section for more information.
5. Click OK. If you selected Blind or to Voicemail, the transfer is completed and the call disappears from your Call Monitor.
• If you selected Supervised, you are connected to the recipient’s extension, and the caller is put on hold. The incomplete transfer displays as a linked three-party call in the Call Monitor.
6. Speak to the recipient and announce the caller. A dialog opens and asks you if you want to complete the transfer or cancel it.
7. Choose one of the following options:• Complete. The transfer is completed and the call disappears from your Call Monitor.
You can also complete the transfer by hanging up the phone.• Conference. The caller, the recipient, and you are all connected in a conference call.• Cancel. The transfer process ends and you are reconnected to the caller, so you can
transfer him or her to voicemail or another destination.
Transfer tips for operatorsBy using Groups and showing the Extensions tab of the Phonebook pane in the Call Monitor folder, you can easily find and choose the recipient of a call that you want to transfer. Define Groups to represent the departments of your office. When transferring a call you can then view only the members of a Group, for example, the Marketing Group. You can see at a glance the names of members of the Marketing department and who is available to take a call. See “Using ViewPoint Groups” on page 10-14 and “Adjusting the Phonebook Pane layout in the Call Monitor” on page 2-12.You can also transfer calls more easily by resizing the Transfer To dialog, by showing and hiding columns, and by sorting calls by column. See “Customizing ViewPoint for operators” on page 12-7.
Wave ViewPoint User GuideRelease 1.5 SP3 September 2009

Commands while you’re on a call 5-10Chapter 5: Receiving and Handling Calls in ViewPoint
Adding notes to a callWhile a call is visible in your Call Monitor folder, you can type notes about the call in the Notes Pane. If the Notes Pane is not showing, click Notes in the bottom pane.If the call is transferred to someone else, notes that you created about the call are sent with the call (for example, you can add a note such as “Customer wants to track invoice #123987” before transferring the call to your shipping department). When the call is complete, you can view or edit the notes for the call in the Call Log folder (see Chapter 8, “Using the Call Log Folder” ).If the call is recorded or transferred to voicemail, you will see the notes associated with the recording.
Recording a callIf your Wave system administrator has given you the required permission, you can record your Wave conversations, including conference calls. By default, recordings appear in your Voicemail Inbox folder, although the system may be configured to send them to another extension’s Inbox. The maximum length of a single recording is equal to the total number of minutes available in your voice mailbox. By default this is 20 minutes, but your Wave administrator may have set a different limit.
Note: You cannot receive more voice messages when your voice mailbox is full. You should check your available mailbox space after recording any conversation to be sure that you have space for new voice messages. See “Managing your voicemail maximums” on page 7-8 for more information.
To record a call
1. During an active call, choose Actions > Start Recording. Wave starts to record the call. You may hear a regular beep while recording, depending on your system configuration.
2. To stop recording before the call is finished, choose Actions > Stop Recording.
To play a call you just recorded
1. Go to your Voicemail \ Inbox folder, or open another mailbox if your system is set up differently.
2. Select the recording.
3. Choose Actions > Play.
Wave ViewPoint User GuideRelease 1.5 SP3 September 2009

Commands while you’re on a call 5-11Chapter 5: Receiving and Handling Calls in ViewPoint
Using the phone commandsYou can start and stop recording your calls using the *16 phone command. You can also use the phone commands to listen to recordings in your Inbox. For more information, see the Wave Phone User Guide.
PrivacyIt is the responsibility of you and your Wave system administrator to comply with any federal or other applicable statutes regarding the recording of phone calls. Vertical Communications, Inc. disclaims any responsibility for failing to comply with such regulations.
Associating a call with a contactUnidentified calls appear in the Call Monitor folder as being from “Unknown.” You can associate a particular unidentified call with one of your contacts, so that the Call Monitor and Call Log folders display a name with the call. You can also permanently associate the call’s Caller ID phone number or text with the contact, so that Wave automatically identifies the contact on all subsequent calls from that phone.To associate a call with a contact, choose Actions > Associate. See “Associating a call or Caller ID number with a contact” on page 10-9.
Parking a callParking a call puts a call on hold and lets any Wave user retrieve it from any Wave phone or ViewPoint program in your office.
To park a call
1. In the Call Monitor, select the call you want to park.
2. Choose Actions > Park. The Status column in the Call Monitor folder displays “Parked on <orbit number>.
Note: To display parked calls in the Call Monitor, choose View > Show Tabs from the Call Monitor, and check Show all parked calls.
Ringback for parked callsBy default, if you hang up with one or more calls on hold, Wave’s ringback feature rings your phone to remind you. When the call rings back, the call’s status in the Call Monitor changes to Ringing (Parked). Talk to your Wave system administrator about configuring ringback behavior.
Wave ViewPoint User GuideRelease 1.5 SP3 September 2009

Commands while you’re on a call 5-12Chapter 5: Receiving and Handling Calls in ViewPoint
Unparking a callYou can retrieve a parked call from any Wave phone or from any PC running ViewPoint.
To answer a parked call from any ViewPoint program
1. Click Tools > Unpark. The Unpark dialog opens.
2. Select the call that you want to unpark and answer and click OK.You can also answer a parked call by picking up a Wave phone, pressing *53, and then entering the parking slot number.
Sending a call to voicemailTo send an active call to voicemail, choose Actions > Take Message.
Playing a caller's name over your speakersYou can play a recording of a caller’s name over your speakers at any time during a call by choosing Actions > Announce Caller.The recording that plays is either the caller’s voice title, if one has been recorded, or the caller’s answer to the call announcing prompt, “Please say your name.” If you choose Actions > Announce Caller and hear nothing, then either the caller has no voice title recorded, you have the call announcing prompt turned off, or the caller did not answer the prompt.
Disconnecting a call while staying on the phoneYou can disconnect a call without hanging up the phone. Select the call, and then choose Actions > Disconnect. This command is useful if:• You want to disconnect a single party in a conference call. Hanging up your phone would
disconnect you from the whole conference.• You are going to immediately dial another call. If you hang up and pick up your analog
phone too quickly, Wave can read that as a Flash command, which would put the call on hold instead of disconnecting it.
Wave ViewPoint User GuideRelease 1.5 SP3 September 2009

Commands while you’re on a call 5-13Chapter 5: Receiving and Handling Calls in ViewPoint
Entering an account code for a callWhile on a call, you can enter an account code for the call or change the one already entered. 1. Select the call, and then choose Actions > Enter Account Code.
2. Enter an account code. You can enter numbers, letters, or other characters.
3. Click OK.You can also enter an account code from the Call Log after the call is complete. See “Entering an account code for a Call Log entry” on page 8-6.
Flagging a problem call to report laterThe “Flag a Problem” button in the Call Monitor toolbar lets you click once to flag a problem call, for example, a call that is not displayed correctly in the Call Monitor, or a call in ViewPoint that doesn’t match the call on your phone. Any time after flagging calls, you can run the Problem Report Wizard once and gather the logs for all of the flagged calls. Flagging a call streamlines the process of using the Problem Report Wizard (see Appendix C) to report problems about individual calls to your system administrator. For example, a company operator might have too many calls coming in and cannot afford the time away to run the Problem Report Wizard for each individual call.
To flag a problem call
1. In the Call Monitor, select the problem call.
2. Click the “Flag a Problem” button on the toolbar.
3. If prompted in the Problem Notes dialog, enter notes about the problem, and then click OK. (By default, you will not be prompted to enter notes. To configure this behavior, contact your Vertical support representative.)
Wave ViewPoint User GuideRelease 1.5 SP3 September 2009
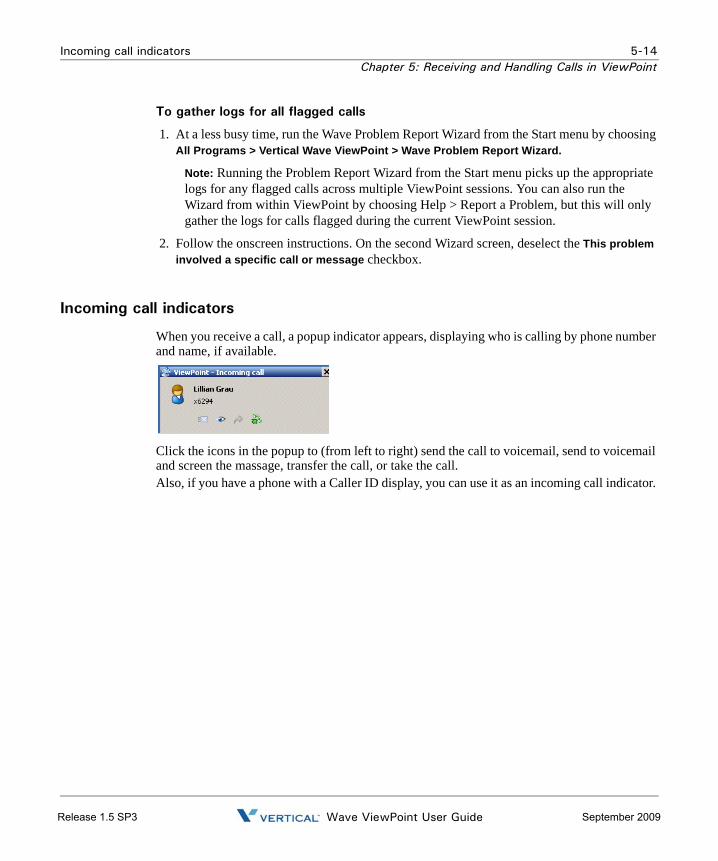
Incoming call indicators 5-14Chapter 5: Receiving and Handling Calls in ViewPoint
To gather logs for all flagged calls
1. At a less busy time, run the Wave Problem Report Wizard from the Start menu by choosing All Programs > Vertical Wave ViewPoint > Wave Problem Report Wizard.
Note: Running the Problem Report Wizard from the Start menu picks up the appropriate logs for any flagged calls across multiple ViewPoint sessions. You can also run the Wizard from within ViewPoint by choosing Help > Report a Problem, but this will only gather the logs for calls flagged during the current ViewPoint session.
2. Follow the onscreen instructions. On the second Wizard screen, deselect the This problem involved a specific call or message checkbox.
Incoming call indicators
When you receive a call, a popup indicator appears, displaying who is calling by phone number and name, if available.
Click the icons in the popup to (from left to right) send the call to voicemail, send to voicemail and screen the massage, transfer the call, or take the call.Also, if you have a phone with a Caller ID display, you can use it as an incoming call indicator.
Wave ViewPoint User GuideRelease 1.5 SP3 September 2009
Chapter 6
Placing Calls in ViewPoint
Chapter Contents
Placing a call
ViewPoint provides the following ways for you to place calls:• Placing calls using the Dial bar• Using the Place Call To dialog• Quick-dialing from ViewPoint folders• Placing calls using drag-and-drop• Placing calls using other contact managers
Placing calls with the phone on- or off-hookWhen placing calls from ViewPoint you can choose the command with the phone either on-hook or off-hook. If the phone is on-hook when you place a call, your phone rings immediately after you finish dialing the number. If the phone is off-hook when you place a call, you hear Wave dialing the number.
Placing a call . . . . . . . . . . . . . . . . . . . . . . . . . . . . . . . . . . . . . . . . . . . . . . . . . . . . 6-1Checking a number . . . . . . . . . . . . . . . . . . . . . . . . . . . . . . . . . . . . . . . . . . . . . . . 6-6Redialing numbers and returning calls . . . . . . . . . . . . . . . . . . . . . . . . . . . . . . . . 6-7Creating conference calls . . . . . . . . . . . . . . . . . . . . . . . . . . . . . . . . . . . . . . . . . . 6-7Supervising other users’ calls . . . . . . . . . . . . . . . . . . . . . . . . . . . . . . . . . . . . . . 6-10
Wave ViewPoint User GuideRelease 1.5 SP3 September 2009

Placing a call 6-2Chapter 6: Placing Calls in ViewPoint
Placing calls using the Dial barViewPoint has a Dial bar on the menu bar that you can use to place calls.
To place a call using the Dial bar
1. Type either of the following in the Dial bar:• The number to dial. If it is an external number, type the full number including area
code (10 digits in North America, for example 6173540600). Do not enter a Wave access code (such as 9). To dial international numbers enter + followed by the country code and the number, for example +44 020 7323 8299. Do not add the international access code (for example, 011 in North America).
Hyphens, spaces, periods and parentheses are allowed.• The name or partial name of a user, contact, or contact company name. Wave
searches all of the Contacts, Extensions, and Groups for a match. If only one match is found, the system places the call immediately. If there is more than one match, a dialog opens and you can select a name on the list and click Dial to place the call.
2. To specify an account code for the call, add a vertical bar character ( | ) after the number, followed by the account code.
3. Press Enter to place the call.• You can also drag-and-drop items into the Dial bar, including a text phone number
from another application. See “Placing calls using drag-and-drop” on page 6-6.
To redial a call using the Dial barClick the arrow on the right of the Dial bar for a list of recently dialed names and numbers. Click a number to redial it.
Wave ViewPoint User GuideRelease 1.5 SP3 September 2009
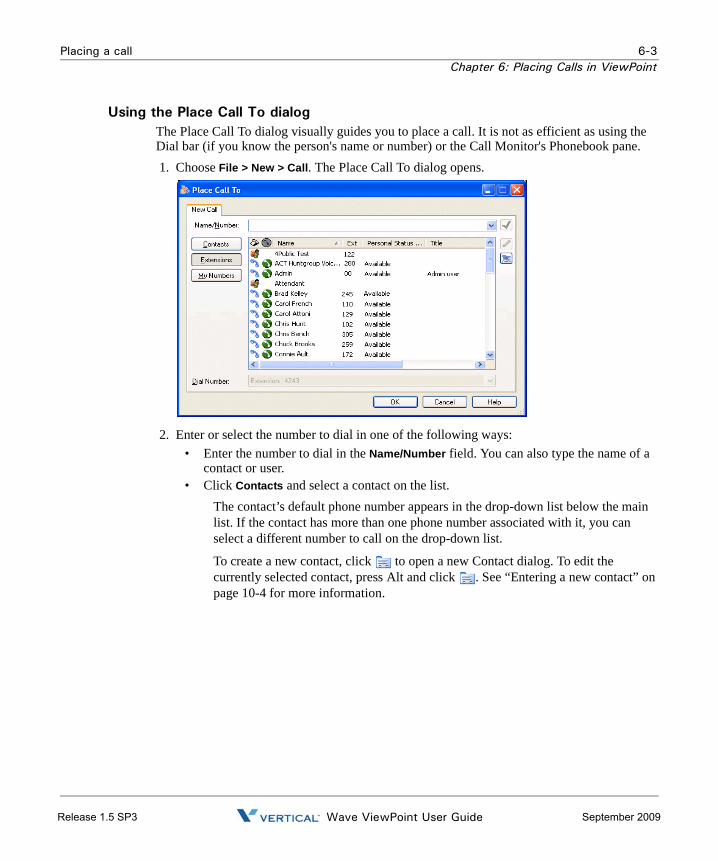
Placing a call 6-3Chapter 6: Placing Calls in ViewPoint
Using the Place Call To dialogThe Place Call To dialog visually guides you to place a call. It is not as efficient as using the Dial bar (if you know the person's name or number) or the Call Monitor's Phonebook pane. 1. Choose File > New > Call. The Place Call To dialog opens.
2. Enter or select the number to dial in one of the following ways: • Enter the number to dial in the Name/Number field. You can also type the name of a
contact or user. • Click Contacts and select a contact on the list.
The contact’s default phone number appears in the drop-down list below the main list. If the contact has more than one phone number associated with it, you can select a different number to call on the drop-down list.
To create a new contact, click to open a new Contact dialog. To edit the currently selected contact, press Alt and click . See “Entering a new contact” on page 10-4 for more information.
Wave ViewPoint User GuideRelease 1.5 SP3 September 2009

Placing a call 6-4Chapter 6: Placing Calls in ViewPoint
• Click Extensions and select an extension in the list. The list is identical to other Extensions lists in ViewPoint (see “Viewing Wave extensions” on page 4-1).
If the extension is a user with public numbers (My Numbers marked as public), you can choose one of those numbers from the drop-down list below the main list. See “Entering My Numbers” on page 6-4 for more about public numbers.
• Click My Numbers. To place a call to one of your own phone numbers, such as your home or mobile phone, select it on the list. You can double-click a blank category to enter a new number for it.
Note: To verify that the phone number is entered in a correct format, click .
3. To enter an account code for the call, type a vertical bar character ( | ) after the number, followed by the account code.
4. Click OK to place the call.
Note: Another way to place a call to a user is to double-click the user in the Extensions list.
Entering My NumbersYou can store your own phone numbers in your Wave account, such as your home number or your mobile phone number. When placing, forwarding, or transferring a call, you can click My Numbers and select one of your numbers.
To enter a number or address in the My Numbers list
1. Choose Tools > Options. The Options dialog opens.
2. Click the Personal \ My Numbers tab.
3. Click the type of number you want to enter or modify, for example Home or Mobile, then click Edit.
To delete a number, click it, then click Clear.
4. In the Number, Email, or IM address field, enter the phone number, email address or instant messaging address.
5. Check Public to make the number publicly available. This has the following effects:• Other users can quick-dial your public numbers (or make speed-dial shortcuts to
them) by right-clicking your name in their ViewPoint Extensions list. If unchecked, the number is kept private and does not appear on this right-click menu.
Wave ViewPoint User GuideRelease 1.5 SP3 September 2009

Placing a call 6-5Chapter 6: Placing Calls in ViewPoint
• When a call comes into Wave from one of your public numbers, your name appears in the From column, and can be used to identify you, for example by other users’ call rules. If unchecked, calls from the number display as from “Unknown.”
Note: In cases where the same number is defined in different places, Wave chooses the name to display by prioritizing as follows: (1) a user’s public number, (2) a public contact, (3) a private contact.
Note: Other programs can access to the number, for example, an ViewPoint Add-in that automatically dials certain numbers. If unchecked, other programs cannot read or access the number, though your system administrator can still view it.
6. Click OK to return to the Options dialog.
7. Click OK to close the Options dialog.
Quick-dialing from ViewPoint foldersIn certain ViewPoint folders you can quickly place calls by either right-clicking an item or selecting it and using the Actions menu. You can choose the following commands:• Speed Dial. Immediately places a call to the default number of the selected item. For a user,
it is his or her extension. For a contact, it is the contact’s default phone number.• Place Call. Opens a sub-menu that lets you choose from all the available numbers for the
selected item (for example, all of a contact’s numbers). You can also choose Other to open the Place Call To dialog with that item selected (see “Using the Place Call To dialog” on page 6-3).
You can quick-dial the following types of call from ViewPoint folders:
To quick-dial... Use this folder Notes
A user or other extension
Extensions (or the Extensions list in the Call Monitor’s Phonebook pane)
A caller (call back) Call Log Places a call to the Caller ID or callback number associated with the call.
A message (call back) Messages (Inbox or other folder)
Places a call to the Caller ID or callback number associated with the message.
A contact Contacts (or the Contacts list in the Call Monitor’s Phonebook pane)
Wave ViewPoint User GuideRelease 1.5 SP3 September 2009
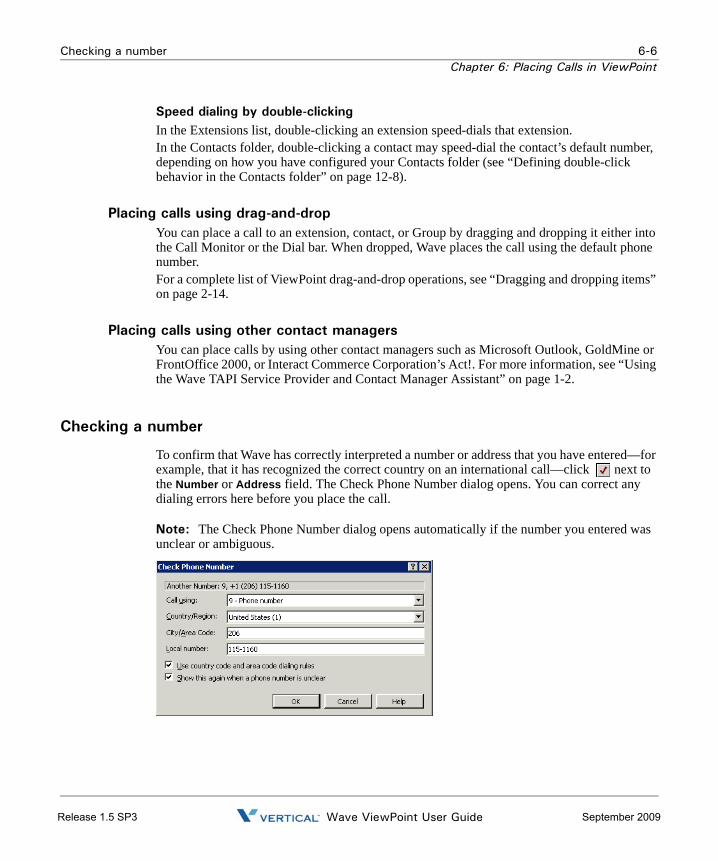
Checking a number 6-6Chapter 6: Placing Calls in ViewPoint
Speed dialing by double-clickingIn the Extensions list, double-clicking an extension speed-dials that extension.In the Contacts folder, double-clicking a contact may speed-dial the contact’s default number, depending on how you have configured your Contacts folder (see “Defining double-click behavior in the Contacts folder” on page 12-8).
Placing calls using drag-and-dropYou can place a call to an extension, contact, or Group by dragging and dropping it either into the Call Monitor or the Dial bar. When dropped, Wave places the call using the default phone number.For a complete list of ViewPoint drag-and-drop operations, see “Dragging and dropping items” on page 2-14.
Placing calls using other contact managersYou can place calls by using other contact managers such as Microsoft Outlook, GoldMine or FrontOffice 2000, or Interact Commerce Corporation’s Act!. For more information, see “Using the Wave TAPI Service Provider and Contact Manager Assistant” on page 1-2.
Checking a number
To confirm that Wave has correctly interpreted a number or address that you have entered—for example, that it has recognized the correct country on an international call—click next to the Number or Address field. The Check Phone Number dialog opens. You can correct any dialing errors here before you place the call.
Note: The Check Phone Number dialog opens automatically if the number you entered was unclear or ambiguous.
Wave ViewPoint User GuideRelease 1.5 SP3 September 2009
Redialing numbers and returning calls 6-7Chapter 6: Placing Calls in ViewPoint
To check a phone number
1. Under Call Using, make sure the appropriate dialing service is selected for the type of call.
2. Under Country/Region, make sure the correct country is selected.
3. Under City/Area code and Local number, confirm that Wave has interpreted the number correctly.
4. Select Use country code and area code dialing rules if you want Wave to apply dialing rules that determine if a number is a local or long-distance call. Clear it to have Wave dial the number exactly as entered, as if you had dialed it on the phone.
5. Click OK to close the Check Phone Number dialog.
Redialing numbers and returning calls
You can quickly perform the following dialing actions in ViewPoint:• Redial the last number you dialed. Press F12 on your keyboard. • Return the last call you received. Press F11 on your keyboard. The name of the last caller
and the phone number appear in the status bar at the bottom of ViewPoint window.Both these features are available from the File menu, including redial options for the last four calls you placed while ViewPoint was running. You can redial older calls from the Call Log.You can also redial and return calls using the Dial bar (see “Placing calls using the Dial bar” on page 6-2) or the phone commands (see the Wave Phone User Guide for more information).
Creating conference calls
Wave lets you easily conference multiple calls together. The Call Monitor folder treats a conference call as a single call. The maximum number of parties that can be in a single conference can be between 4 and 30, depending on your system's configuration. Ask your Wave system administrator for details. You can create a conference call by:• Adding parties one at a time to a call• Combining separate active calls into one
Wave ViewPoint User GuideRelease 1.5 SP3 September 2009
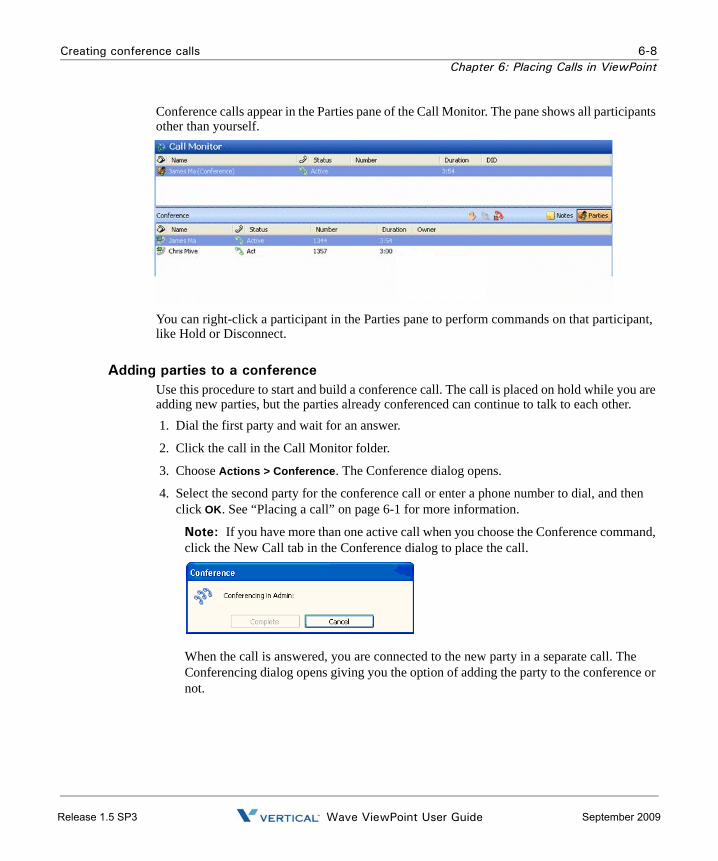
Creating conference calls 6-8Chapter 6: Placing Calls in ViewPoint
Conference calls appear in the Parties pane of the Call Monitor. The pane shows all participants other than yourself.
You can right-click a participant in the Parties pane to perform commands on that participant, like Hold or Disconnect.
Adding parties to a conferenceUse this procedure to start and build a conference call. The call is placed on hold while you are adding new parties, but the parties already conferenced can continue to talk to each other. 1. Dial the first party and wait for an answer.
2. Click the call in the Call Monitor folder.
3. Choose Actions > Conference. The Conference dialog opens.
4. Select the second party for the conference call or enter a phone number to dial, and then click OK. See “Placing a call” on page 6-1 for more information.
Note: If you have more than one active call when you choose the Conference command, click the New Call tab in the Conference dialog to place the call.
When the call is answered, you are connected to the new party in a separate call. The Conferencing dialog opens giving you the option of adding the party to the conference or not.
Wave ViewPoint User GuideRelease 1.5 SP3 September 2009

Creating conference calls 6-9Chapter 6: Placing Calls in ViewPoint
5. Determine whether you want to add the new party to the conference. Then click one of the following:
• Complete. The new party joins the conference call.• Cancel. The new party’s call is disconnected, and you return to the conference call.
6. Repeat steps 2-5 to add more parties to the conference.
Adding parties to a conference using drag-and-drop To drag and drop parties into a conference, you must have the Calls pane open in the Extensions or Contacts folder, or the Phonebook pane open in the Call Monitor folder. For more information, see “Adjusting the Phonebook Pane layout in the Call Monitor” on page 2-12 for instructions.Drag and drop parties to the conference as follows:• Using the Calls Pane in the Extensions or Contacts folder, you can drag users or contacts
onto the active call in the Calls Pane to automatically add them as parties to the conference. If you press Shift while you drag a user from the Extensions list, the Conference dialog opens and provides further options.
• Using the Phonebook Pane in the Call Monitor folder, you can create a conference call by pressing Shift and dragging and dropping a call, contact, or extension onto another call.
Note: For other drag-and-drop operations you can perform in ViewPoint, see “Dragging and dropping items” on page 2-14.
Conferencing multiple active calls togetherUse the following procedure when you have two or more separate existing calls that you want to conference together with yourself. Note that you cannot conference two conference calls together.
To conference separate existing calls together:
1. Select all the calls that you want to conference together. Press Ctrl on your computer keyboard as you select multiple calls.
2. Choose Actions > Conference. The selected calls are now conferenced with you.
Wave ViewPoint User GuideRelease 1.5 SP3 September 2009
Supervising other users’ calls 6-10Chapter 6: Placing Calls in ViewPoint
Ending a conference callA conference call normally ends when all parties hang up at roughly the same time. If you leave the conference call early, by default the conference call continues without you. The other participants can continue to talk, even if you started the conference and your company is paying for the outgoing calls used to create it. To terminate the call, each participant must hang up, or you must disconnect all parties.Your system may be configured to disconnect the conference when you leave.
Supervising other users’ calls
With the proper permissions, you can enter another user’s call as a third party without being invited. This is usually done by a manager to supervise the other user, or by an operator to briefly join someone's call to announce something that needs immediate attention.You can supervise calls in the following ways:• Monitor. You can listen to the other user’s call without being heard by the other parties in the
call.• Coach. You can speak to the other user without being heard by other parties in the call. The
other user is the only party to hear you. You hear all parties.• Join. You join the call as a full participant, able to hear and be heard by all parties in the
call. Essentially, you create a conference call by inviting yourself in.Each supervise command is available only if you have permission to use that command and the user is configured to allow being supervised with that command. Talk to your Wave system administrator about whether you can monitor, coach, and join other users’ calls, and which users you can supervise, if any.
Note: When supervising a call with multiple users, all other users in the call must be configured to allow being supervised with that mode. If even one user already in the call does not permit being supervised, you cannot supervise the call.Depending on your system setup, if the person you are supervising leaves the call—for example, transfers it to someone else—you are disconnected.
To supervise another user’s call using ViewPoint
1. Select one of the following:• A call in the Call Monitor.• A user in the Extensions list who is currently on a call.
2. Choose Actions > Supervise, and select the supervisor mode you want to use. The option is available only if both you and the other users in the call permit that supervisor mode.
Wave ViewPoint User GuideRelease 1.5 SP3 September 2009

Supervising other users’ calls 6-11Chapter 6: Placing Calls in ViewPoint
To supervise another user’s call using the phone
1. Pick up the phone and enter one of the following commands at the dial tone:• *57. Join.• *58. Coach.• *59. Monitor.
2. Enter the extension of the user whose call you want to monitor, coach, or join, followed by #.
3. Press 1 to confirm the extension, or press * to enter a different extension.
Note: You can enter the complete digit string rapidly without waiting for the prompts. For example, *58 102# 1 to coach extension 102.
4. Once connected to the call, you can use the following phone command options:• To change the supervising mode—for example, from monitoring to coaching—press
Flash, then enter the code for the new mode.• To supervise a different user, press Flash # to return to the dial tone, then begin again.
Wave ViewPoint User GuideRelease 1.5 SP3 September 2009

Release 1.5 SP3 September 2009
Chapter 7
Managing Voice Messages in ViewPoint
Chapter Contents
About managing voice messages in ViewPoint
You can manage your voice messages and call recordings in the Wave ViewPoint in the same way that you manage e-mail messages in your e-mail program. Your new voice messages or recordings appear in a list in your Inbox folder according to the time and the caller. You can listen to them in any order you want, and you can easily forward them, reply to them, or save them.For instructions on how to listen to voice messages or recordings using the phone commands, see the Wave Phone User Guide.
About managing voice messages in ViewPoint. . . . . . . . . . . . . . . . . . . . . . . . . . 7-1Listening to your voice messages and call recordings . . . . . . . . . . . . . . . . . . . . 7-4Handling your voice messages . . . . . . . . . . . . . . . . . . . . . . . . . . . . . . . . . . . . . . 7-4Managing call recordings. . . . . . . . . . . . . . . . . . . . . . . . . . . . . . . . . . . . . . . . . . . 7-8Managing your voicemail maximums . . . . . . . . . . . . . . . . . . . . . . . . . . . . . . . . . 7-8Sending a message directly to a user’s voicemail . . . . . . . . . . . . . . . . . . . . . . . . 7-9Knowing when you have new voice messages . . . . . . . . . . . . . . . . . . . . . . . . . 7-10Managing voicemail greetings . . . . . . . . . . . . . . . . . . . . . . . . . . . . . . . . . . . . . . 7-18
Wave ViewPoint User GuideRelease 1.5 SP3 September 2009

About managing voice messages in ViewPoint 7-2Chapter 7: Managing Voice Messages in ViewPoint
The Messages folderThe Messages folder is your complete voice mailbox. It contains your Inbox, Saved, and Deleted folders, which hold your voice messages as well as any call recordings sent to your mailbox. New messages appear in the Inbox folder. Use the audio controls above the status bar to play your voice messages. When you play a message, the audio bar shows elapsed message playback time in minutes and seconds.
Voice messages have the following display attributes:• Bold text indicates a new (Unheard) message.• FW: in the From column indicates a message that was forwarded to you.
Note: You can view the date on which a forwarded message was created by showing the Created column in the Messages folder. See “Customizing columns” on page 12-8.
• RE: in the From column indicates a message that was sent to you in reply to another message.
Wave ViewPoint User GuideRelease 1.5 SP3 September 2009

About managing voice messages in ViewPoint 7-3Chapter 7: Managing Voice Messages in ViewPoint
Messages foldersYou can store your voice messages in multiple folders. The Messages folder contains three predefined folders:• Inbox folder. New voice messages appear here. After you listen to them, they remain here
unless you move or delete them.• Saved folder. Saved messages appear here. When you save a message by using the phone
commands, it moves to the Saved folder.• Deleted folder. When you delete a voice message in ViewPoint, it is moved to the Deleted
folder. Voice messages deleted using the phone commands do not appear in the Deleted folder. To empty the Deleted folder, see “Emptying the Deleted folder” on page 2-19.
Note: The Inbox and Saved folders are the only voice message folders accessible through the phone commands. Voice messages in other folders are not accessible using the phone.
Viewing Custom DataMessages folders contains a Custom Data column that is hidden by default. By showing it you can view all custom data that your office might have associated with the call, for example, customer ID or caller priority. To show columns, choose View > Current View > Show Columns.
Archiving voice messages and call recordingsThe system may be set up to periodically archive your older voice messages and call recordings. If you find that your messages disappear from your voice mailbox, ask your Wave system administrator whether they have been archived. You can access archived messages using the Wave Archived Recording Browser (see Appendix A).
Managing thousands of voice messages or call recordingsIf you need to manage thousands or millions of messages or call recordings, you should have your Wave system administrator set up automatic archiving, or manually archive your messages. This eases the performance burden on ViewPoint and the Wave ISM, and you can still use the Archived Recording Browser to quickly review, search, and manage the recordings (see Appendix A).
Wave ViewPoint User GuideRelease 1.5 SP3 September 2009

Listening to your voice messages and call recordings 7-4Chapter 7: Managing Voice Messages in ViewPoint
Listening to your voice messages and call recordings
To listen to a voice message or call recording, double-click it in any Messages folder. For instructions on using the audio controls, see “Using the audio controls” on page 2-19.You can play the message or recording either over your computer's speakers or over your phone. Choose Tools > Audio Output to switch audio output from one to the other. You can also use the button on the right side of the status bar.
Note: You can open other ViewPoint folders while a message is playing and the message will continue to play. The message stops playing, however, if you open a folder with another audio control visible, for example, the Greetings folder.
Listening to a voice message as it is being leftTo listen to a voice message as the caller is leaving it, without being heard by the caller, see “Screening a voice message as it is being left” on page 5-6.
Handling your voice messages
You can perform the following tasks on a voice message using a few mouse clicks:• Forward it to other users. See page 7-5.• Reply to one or more users directly with a voice message of your own. See page 7-5.• Return the call, if the Caller ID or contact information is available. See page 7-6.• Export the voice message as a WAV or MP3 file. See page “Exporting ViewPoint
recordings” on page 2-25.• E-mail the voice message as a WAV or MP3 file attachment. See page 7-6.• Open the contact record of the contact who left the message. See page 7-6.• Call back the person who left you the message. See page 7-6.• Associate a message with a contact so the caller is recognized. See page 7-7.• Delete a voice message. See page 7-7.• Mark an existing message Private, Unheard, or Urgent. See page 7-7.• Add notes to an existing message. See page 7-8.• Send a new voice message to other users. See page 7-9.
Wave ViewPoint User GuideRelease 1.5 SP3 September 2009
Handling your voice messages 7-5Chapter 7: Managing Voice Messages in ViewPoint
Forwarding a voice messageYou can forward a voice message, except if it is marked Private, to one or more users. A copy of the message is sent directly to the voicemail of all recipients. You can also attach a recording of your own at the beginning of the forwarded message. For example, “Bob, this is Jim. I received this message and thought you would want to hear it.” Your recording precedes the forwarded message.
To forward a voice message
1. In any Messages folder, right-click a voice message that you want to forward and select Forward on the shortcut menu. The Forward Message dialog opens.
2. In the Available Users list, select the users or groups to whom you want to forward the message. Selecting a group forwards the message to all members of the group. Select multiple items by holding the Ctrl key while you select.
3. Click Add to move the selected users/groups to the Recipients list. 4. Optionally, record a short message that introduces the message you are forwarding. Use the
audio controls (for detailed instructions, see “Using the audio controls” on page 2-19). 5. Click Send. A copy of the selected voice message, preceded by your short introductory
message, is forwarded to the recipients. When recipients select the message, they can view (in the To field) a list of other users who received the same message. Users can reply to the sender or to all recipients.
Replying to a voice messageReplying to a voice message lets you send a recorded reply directly to the voicemail of the user who sent you the message. You can send the reply to other users as well. Select the message and choose Actions > Reply. Then perform steps 3-5 of “To forward a voice message” in the previous section.You can reply in this way only to a message left by another Wave user. You cannot send a message in reply to a message left by an external caller.
Note: Replying to a message sends a new message to another user's voicemail. To call back the person who left you the voice message, choose Actions > Place Call instead (see the next section).
To reply to all recipients of a message
1. Select the message.
2. Click Actions > Reply to all.
The recipients are listed in the Recipients pane of the Reply to Message dialog.
Wave ViewPoint User GuideRelease 1.5 SP3 September 2009

Handling your voice messages 7-6Chapter 7: Managing Voice Messages in ViewPoint
Calling back the person who left a voice messageYou can call back the person who left you a voice message by using the Wave Place Call or the Speed Dial command. Place Call lets you choose the number to call if several numbers are available. Speed Dial returns the call to the default number.
Note: On messages from unidentified callers, Wave places a call to the phone number from which the message originated. If the message was left by someone calling from an office (PBX) extension, you might not be able to connect to the correct party.
To call a person back
1. Select the voice message left by the person you want to call back.
2. On the Actions menu, choose Place Call or Speed Dial.
E-mailing a voice messageYou can e-mail a voice message as a WAV or MP3 file attachment to someone who is outside the Wave system.To e-mail a voice message, you must have an e-mail reader that supports MAPI installed on your computer, such as Microsoft Outlook or Eudora Pro.
To e-mail a voice message
1. Select the message you want to send by e-mail.
2. Choose File > Send To, and select the desired format for the Mail Recipient. Your MAPI mail ViewPoint Send dialog opens with the message attached.
3. Address and send the e-mail as you normally would.
Opening the contact record from a voice messageIf a voice message was left by an identified contact (see Chapter 10), you can open the contact record to view or change information about the contact. To do so, choose Actions > Open Contact.
Wave ViewPoint User GuideRelease 1.5 SP3 September 2009

Handling your voice messages 7-7Chapter 7: Managing Voice Messages in ViewPoint
Deleting voice messagesBy default, messages in the Deleted folder that are older than three days are permanently removed from Wave. For information about how to change the default, see “Emptying the Deleted folder” on page 2-19.
To move a voice message to the Deleted folder
1. Select the message.
2. Choose Edit > Delete. The message is moved to the Deleted folder. You can still play it or retrieve it if necessary.
Deleting a voice message permanentlyTo delete a message permanently, hold down the Shift key while you choose the Delete command. A message is also deleted permanently when you delete it from the Deleted folder or empty the Deleted folder. See “Managing the Deleted folder” on page 2-18.
Associating a voice message from “Unknown” with a contactA voice message that appears from “Unknown,” means that Wave could not identify the caller as a Wave contact or user (Caller ID, if present, is still shown in the Number column). You can associate the message with a contact, so that the correct name appears in the Call Monitor and so that Wave identifies the contact on subsequent calls from that phone. See “Associating a call or Caller ID number with a contact” on page 10-9 for complete instructions.
Marking a voice message unheardTo mark an old (heard) voice message as new (Unheard), select the message and then choose Actions > Mark As Unheard.
Marking a voice message urgent or privateYou can mark a voice message Urgent, Private, or both. Private messages cannot be forwarded, and users who share your mailbox cannot play them, reply to them, or call back the sender.The icons in the columns to the right of the envelope icon show whether a message is Urgent
or Private .• To mark a voice message Urgent, select the message and choose Actions > Urgent. Select
the command again to remove its Urgent status.• To mark a voice message Private, select the message and choose Actions > Mark As Private.
After a message is marked Private, it cannot be made not Private again.
Wave ViewPoint User GuideRelease 1.5 SP3 September 2009
Managing call recordings 7-8Chapter 7: Managing Voice Messages in ViewPoint
Adding notes to a voice messageTo add written notes to a voice message, click the message and type your notes in the Notes Pane at the bottom of the Messages folder. Notes that you enter during a recorded call are automatically saved with the recording in your Inbox.Any notes on a message accompany that message if it is forwarded to other users.
Hiding and showing notesTo hide or display the Notes Pane, choose View > Notes Pane. To hide the Notes column, see “Showing and hiding columns” on page 12-8.
Managing call recordings
The following types of call recordings can appear in your Inbox:• Recordings that you made yourself using the Call Monitor (see “Recording a call” on
page 5-10).• Recordings made automatically by the system. Usually such recordings are sent to the voice
mailbox of a Wave system administrator. If you are receiving such recordings in error, speak to your Wave system administrator.
You can listen to a call recording by double-clicking it, just as you listen to a voice message. Any command you can use on a voice message you can also use on a call recording.
Managing your voicemail maximums
Your voice mailbox has a limited amount of disk space (in minutes) to store your voice messages. In addition, your mailbox has a maximum length for any individual message (by default 180 seconds, or three minutes). You can change your maximum message length in Tools > Options > Voice Messages, but check with your Wave system administrator before increasing it.If you log on to Wave by using the phone commands and your mailbox is nearly full, Wave prompts you to empty your Deleted folder.
Setting a maximum length for your voice messagesYou can set a maximum length for voice messages. If a message exceeds the time limit, Wave sends the message. The default maximum is 180 seconds (three minutes). The highest maximum you can set is 300 seconds (5 minutes), unless your administrator changes the limit.
Note: Call recordings are not limited by message length, only by the size of your mailbox.
Wave ViewPoint User GuideRelease 1.5 SP3 September 2009
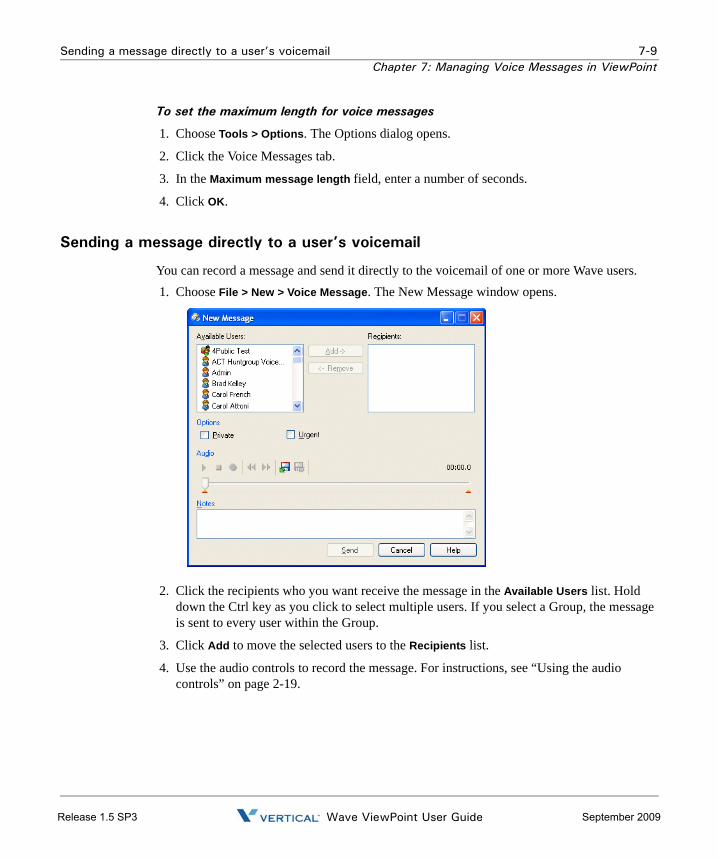
Sending a message directly to a user’s voicemail 7-9Chapter 7: Managing Voice Messages in ViewPoint
To set the maximum length for voice messages
1. Choose Tools > Options. The Options dialog opens.
2. Click the Voice Messages tab.
3. In the Maximum message length field, enter a number of seconds.
4. Click OK.
Sending a message directly to a user’s voicemail
You can record a message and send it directly to the voicemail of one or more Wave users. 1. Choose File > New > Voice Message. The New Message window opens.
2. Click the recipients who you want receive the message in the Available Users list. Hold down the Ctrl key as you click to select multiple users. If you select a Group, the message is sent to every user within the Group.
3. Click Add to move the selected users to the Recipients list.
4. Use the audio controls to record the message. For instructions, see “Using the audio controls” on page 2-19.
Wave ViewPoint User GuideRelease 1.5 SP3 September 2009
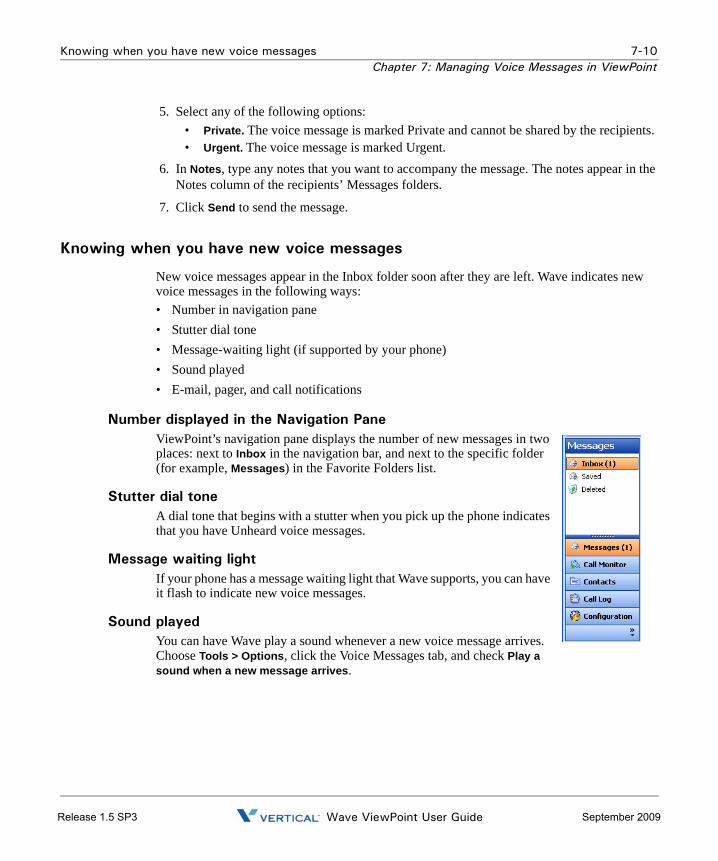
Knowing when you have new voice messages 7-10Chapter 7: Managing Voice Messages in ViewPoint
5. Select any of the following options:• Private. The voice message is marked Private and cannot be shared by the recipients.• Urgent. The voice message is marked Urgent.
6. In Notes, type any notes that you want to accompany the message. The notes appear in the Notes column of the recipients’ Messages folders.
7. Click Send to send the message.
Knowing when you have new voice messages
New voice messages appear in the Inbox folder soon after they are left. Wave indicates new voice messages in the following ways:• Number in navigation pane• Stutter dial tone• Message-waiting light (if supported by your phone)• Sound played• E-mail, pager, and call notifications
Number displayed in the Navigation PaneViewPoint’s navigation pane displays the number of new messages in two places: next to Inbox in the navigation bar, and next to the specific folder (for example, Messages) in the Favorite Folders list.
Stutter dial toneA dial tone that begins with a stutter when you pick up the phone indicates that you have Unheard voice messages.
Message waiting lightIf your phone has a message waiting light that Wave supports, you can have it flash to indicate new voice messages.
Sound playedYou can have Wave play a sound whenever a new voice message arrives. Choose Tools > Options, click the Voice Messages tab, and check Play a sound when a new message arrives.
Wave ViewPoint User GuideRelease 1.5 SP3 September 2009
Knowing when you have new voice messages 7-11Chapter 7: Managing Voice Messages in ViewPoint
E-mail, pager, and call notificationsWave can alert you by e-mail, page, or phone call whenever you receive a new voice message. This feature is handy if you are working at a remote location without ViewPoint. You can then call your office and hear your messages. Your Wave system administrator can set up e-mail, pager, and call notification for you.You can receive notification for all voice messages, or for urgent messages only. You can also receive notifications only on specific days or at specific times. See “Scheduling notifications” on page 7-14.Note the following:• For e-mail notification to work properly, the Wave ISM must be configured correctly. See
your Wave system administrator if you encounter any problems.• Notification is sent only for new voice messages, not new call recordings.
Setting up e-mail notificationE-mail notification messages include the caller's name (if available), the phone number at which the call originated, the extension at which the message was left, the message length, and any notes associated with the message. You can even have Wave attach the voice message itself to the e-mail as an audio file so that you can play it wherever you are.
To set up voice mail notification
1. Choose Tools > Options. The Options dialog opens.
2. Click the Voice Messages \ E-Mail Notification tab.
3. Select one of the following notification options on the drop-down list:• Do not send e-mail notifications. You do not receive e-mail notification of new voice
messages.• Send e-mail for all messages. You receive an e-mail notification whenever you
receive a new voice message.• Send e-mail for Urgent messages only. You receive an e-mail notification whenever
you receive a voice message marked Urgent. 4. In the E-mail address(es) field, type one or more e-mail addresses to which you want Wave
to send notifications. Separate addresses by semicolons.
Wave ViewPoint User GuideRelease 1.5 SP3 September 2009

Knowing when you have new voice messages 7-12Chapter 7: Managing Voice Messages in ViewPoint
5. To instruct Wave whether to attach the voice message to the e-mail as a WAV file, select one of the following options on the drop-down list:
• Do not attach voice message. Messages are not attached to the e-mail.• Attach voice message. Messages are attached to the e-mail and also appear in the
Inbox folder marked as new (Unheard).• Attach voice message and mark as heard. Messages are attached to the e-mail and
appear in the Inbox folder marked as old (heard).• Attach voice message and delete from Inbox. Messages are attached to the e-mail and
are moved to the Deleted folder. 6. Click OK.
Setting up pager notificationPager notifications can include the Caller ID of the voice message, the Wave extension that the caller dialed, and the length of the voice message.
To set up pager notification
1. Choose Tools > Options. The Options dialog opens.
2. Click the Voice Messages \ Pager Notification tab.
3. Select one of the following notification options on the drop-down list:• Do not send pager notifications. You do not receive pager notification of new voice
messages.• Send a page for all messages. You receive a page whenever you receive a new voice
message.• Send a page for Urgent messages only. You receive a page whenever you receive a
voice message marked Urgent. 4. In the Dial Sequence field, enter the dial string for your pager, including the phone number
of the paging service and your pager's PIN, if required. The dial string can contain any touch tone digit (0-9, *, #). You can enter commas to indicate 2-second pauses in the dial sequence.
You can also use the following special characters to add information to the page:• I or i sends the Caller ID number (for an external call) or Wave extension (for an
internal call).• E or e sends the Wave extension that the caller dialed.• L or l sends the length of the voice message in seconds.
Wave ViewPoint User GuideRelease 1.5 SP3 September 2009

Knowing when you have new voice messages 7-13Chapter 7: Managing Voice Messages in ViewPoint
For example, the dial sequence 18007771000,,,1245983#E causes Wave to dial your paging service, pause for 6 seconds, enter your pager’s PIN (1245983) followed by # to indicate end-of-PIN, enter your extension (the extension at which the voice message was left), and then hang up. Your pager would display only the extension, 103 for example.
5. Click OK.
Note: • If you receive only the last portion of the pager data that you specify, you may not
have placed enough pauses between the pager number to be dialed and the information to send. If this problem occurs, add more commas to the Dial Sequence field.
• Do not enter multiple stars (*) in a row in the pager string. Use only one star to send a dash. Multiple consecutive stars can terminate the page message.
Setting up call notificationsWave places notification calls to the number of your choice. The notification call says, “<voice title> has a new voice message from <caller’s voice title if available>. Press # to hear your message.” By pressing #, you can log onto the account and hear the new message, and even press 4 3 to call the person back.
To set up call notification
1. Choose Tools > Options. The Options dialog opens.
2. Click the Voice Messages \ Call Notification tab.
3. Select one of the following notification options from the drop-down list:• Do not place call notifications. Calls are not placed for new voice messages.• Place call for all messages. A call is placed whenever a new voice message arrives.• Place call for urgent messages only. A call is placed whenever a voice message
marked urgent arrives. 4. Enter the phone number to which notification calls are placed in the Number field. You can
also click to open the Notify Me via Call dialog, where you can select the number to call (see “Using the Place Call To dialog” on page 6-3).
5. Click OK.
Note: You can enter or change the phone number to which notification calls are sent using the phone commands. To do so, log on and press 6 4. By logging on from a remote phone, you can have call notifications sent to wherever you are.
Wave ViewPoint User GuideRelease 1.5 SP3 September 2009
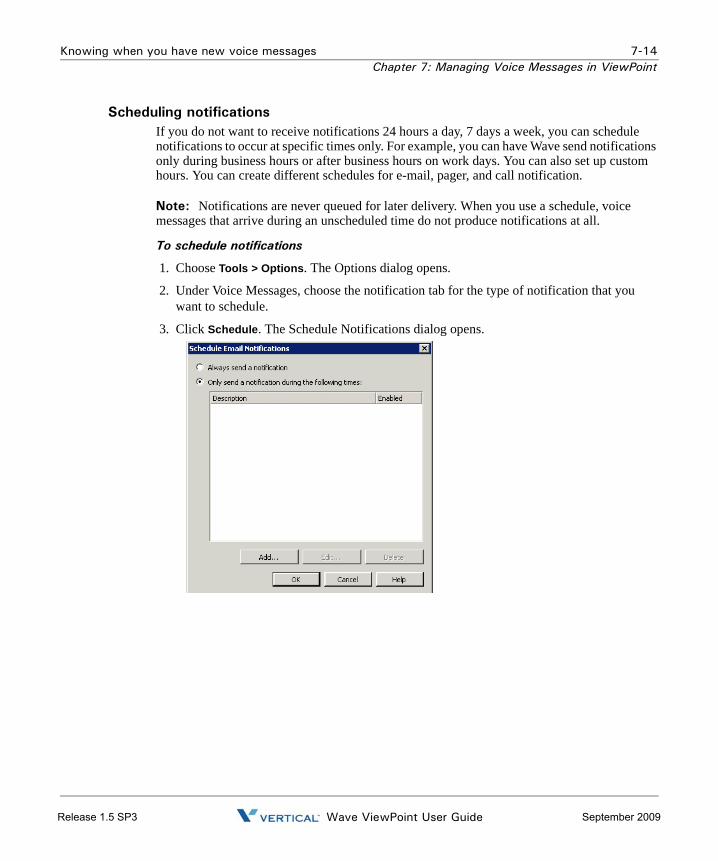
Knowing when you have new voice messages 7-14Chapter 7: Managing Voice Messages in ViewPoint
Scheduling notificationsIf you do not want to receive notifications 24 hours a day, 7 days a week, you can schedule notifications to occur at specific times only. For example, you can have Wave send notifications only during business hours or after business hours on work days. You can also set up custom hours. You can create different schedules for e-mail, pager, and call notification.
Note: Notifications are never queued for later delivery. When you use a schedule, voice messages that arrive during an unscheduled time do not produce notifications at all.
To schedule notifications
1. Choose Tools > Options. The Options dialog opens.
2. Under Voice Messages, choose the notification tab for the type of notification that you want to schedule.
3. Click Schedule. The Schedule Notifications dialog opens.
Wave ViewPoint User GuideRelease 1.5 SP3 September 2009
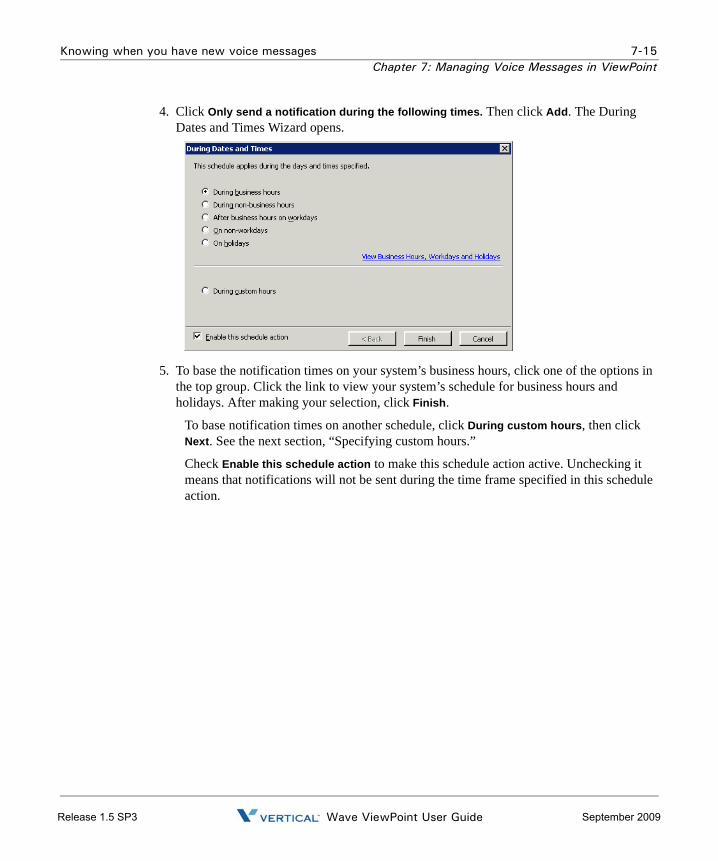
Knowing when you have new voice messages 7-15Chapter 7: Managing Voice Messages in ViewPoint
4. Click Only send a notification during the following times. Then click Add. The During Dates and Times Wizard opens.
5. To base the notification times on your system’s business hours, click one of the options in the top group. Click the link to view your system’s schedule for business hours and holidays. After making your selection, click Finish.
To base notification times on another schedule, click During custom hours, then click Next. See the next section, “Specifying custom hours.”
Check Enable this schedule action to make this schedule action active. Unchecking it means that notifications will not be sent during the time frame specified in this schedule action.
Wave ViewPoint User GuideRelease 1.5 SP3 September 2009
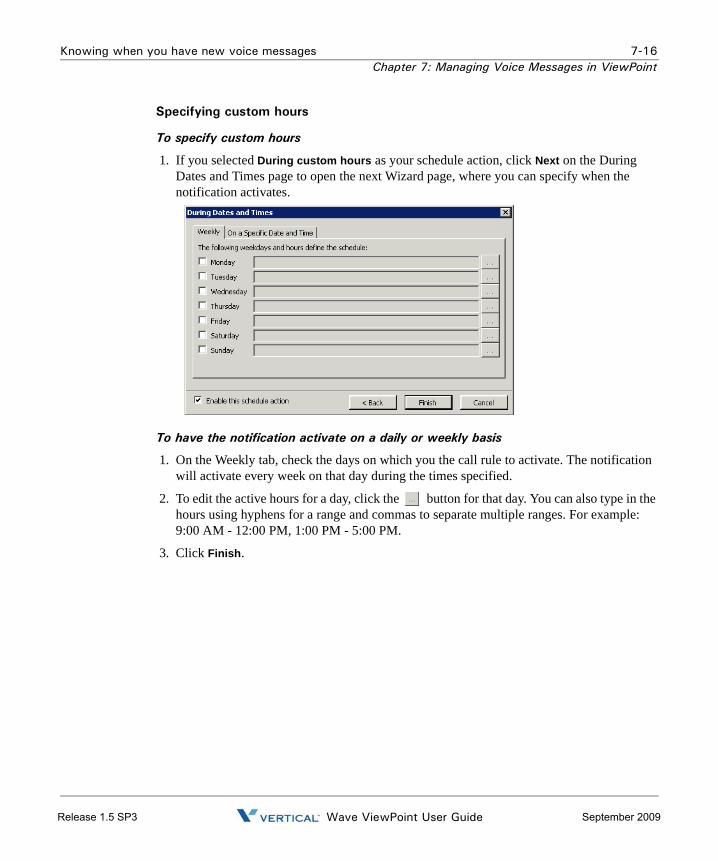
Knowing when you have new voice messages 7-16Chapter 7: Managing Voice Messages in ViewPoint
Specifying custom hours
To specify custom hours
1. If you selected During custom hours as your schedule action, click Next on the During Dates and Times page to open the next Wizard page, where you can specify when the notification activates.
To have the notification activate on a daily or weekly basis
1. On the Weekly tab, check the days on which you the call rule to activate. The notification will activate every week on that day during the times specified.
2. To edit the active hours for a day, click the button for that day. You can also type in the hours using hyphens for a range and commas to separate multiple ranges. For example: 9:00 AM - 12:00 PM, 1:00 PM - 5:00 PM.
3. Click Finish.
Wave ViewPoint User GuideRelease 1.5 SP3 September 2009
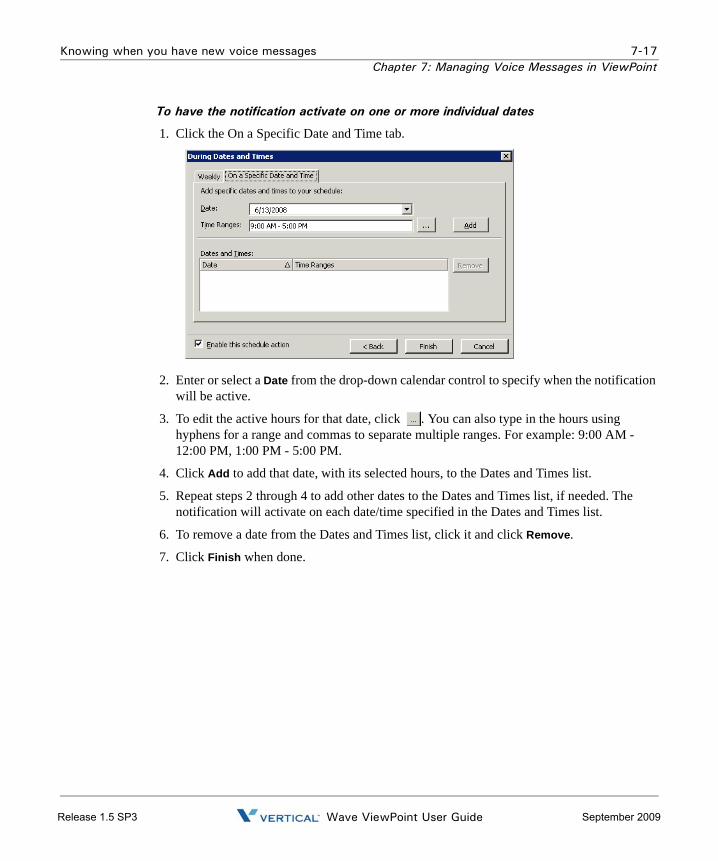
Knowing when you have new voice messages 7-17Chapter 7: Managing Voice Messages in ViewPoint
To have the notification activate on one or more individual dates
1. Click the On a Specific Date and Time tab.
2. Enter or select a Date from the drop-down calendar control to specify when the notification will be active.
3. To edit the active hours for that date, click . You can also type in the hours using hyphens for a range and commas to separate multiple ranges. For example: 9:00 AM - 12:00 PM, 1:00 PM - 5:00 PM.
4. Click Add to add that date, with its selected hours, to the Dates and Times list.
5. Repeat steps 2 through 4 to add other dates to the Dates and Times list, if needed. The notification will activate on each date/time specified in the Dates and Times list.
6. To remove a date from the Dates and Times list, click it and click Remove.
7. Click Finish when done.
Wave ViewPoint User GuideRelease 1.5 SP3 September 2009

Managing voicemail greetings 7-18Chapter 7: Managing Voice Messages in ViewPoint
Managing voicemail greetings
Greetings are recorded messages that callers hear when they reach your voicemail. For example, “This is Steve. I’m not at my desk at the moment, but leave me a message and I’ll get back to you soon.” With Wave you can record and store multiple greetings and specify when you want Wave to use each one. For example, you can have a normal greeting for everyday use, another greeting for extended absences, and a third greeting for vacations. You can also create and use custom greetings for individual callers (see Chapter 11).
Space for greetingsYou have a limited amount of disk space for greeting and voice title recordings. See your Wave system administrator to find out how much space has been allocated to you and how much you have used.
The Greetings folderThe Greetings folder lets you view and manage your greetings. To open the Greetings folder, click Configuration in the navigation bar, and then click Greetings.
Wave ViewPoint User GuideRelease 1.5 SP3 September 2009
Managing voicemail greetings 7-19Chapter 7: Managing Voice Messages in ViewPoint
The Greetings folder contains three sections:• The Greetings list. Your existing greetings appear here. • The Notes Pane. This pane displays the contents of the greeting. To hide or show the Notes
Pane, choose View > Notes Pane.• The audio controls. Use these controls to record a new greeting, import a greeting from
disk, or rerecord a selected greeting. See “Using the audio controls” on page 2-19.
The active greetingThe active greeting is the greeting that Wave plays by default when callers reach your voicemail. Only one greeting at a time can be the active greeting.
Greeting hierarchyA routing list, a call rule, and your active greeting can all specify a different greeting to play when the caller reaches the final action of your routing list (usually the final action is your voicemail). In cases of conflict, Wave uses the following rules:• If the routing list being followed specifies a greeting, that greeting plays, overriding all
other settings. • If the routing list does not specify a greeting, then Wave uses the standard hierarchy for
active settings.
Recording a new greeting
To record a new greeting
1. Choose File > New > Greeting. The Greeting dialog opens.
2. Enter a Name for the greeting.
3. In the Contents field, enter a description of the greeting. This description can be the text of the statements used in the greeting.
4. Record the greeting by using the audio controls. See “Using the audio controls” on page 2-19.
5. Click OK.To rerecord or edit an existing greeting, double-click the greeting in the Greetings folder and edit the greeting by using the audio controls.
Wave ViewPoint User GuideRelease 1.5 SP3 September 2009

Managing voicemail greetings 7-20Chapter 7: Managing Voice Messages in ViewPoint
E-mailing a greetingYou can e-mail a greeting as a WAV file attachment.
To e-mail a greeting
1. Select the greeting that you want to e-mail.
2. Choose File > Send To, and select the desired format for the Mail Recipient. Your MAPI mail ViewPoint Send dialog opens with the message attached.
3. Address and send the e-mail as you normally would.
Wave ViewPoint User GuideRelease 1.5 SP3 September 2009

Chapter 8
Using the Call Log Folder
Chapter Contents
The Call Log folder
The Call Log folder contains a record of all incoming and outgoing phone calls associated with your extension. Internal calls (calls between Wave users) may or may not be logged, depending on how your Wave system administrator set up the system.To open the Call Log folder, click its entry in the navigation bar.
The Call Log folder . . . . . . . . . . . . . . . . . . . . . . . . . . . . . . . . . . . . . . . . . . . . . . . 8-1Taking notes on a Call Log entry. . . . . . . . . . . . . . . . . . . . . . . . . . . . . . . . . . . . . 8-5Associating a call from “Unknown” with a contact . . . . . . . . . . . . . . . . . . . . . . . . 8-5Returning a call in the Call Log . . . . . . . . . . . . . . . . . . . . . . . . . . . . . . . . . . . . . . 8-5Entering an account code for a Call Log entry . . . . . . . . . . . . . . . . . . . . . . . . . . 8-6Opening the contact record from a contact’s call . . . . . . . . . . . . . . . . . . . . . . . . 8-6
Wave ViewPoint User GuideRelease 1.5 SP3 September 2009

The Call Log folder 8-2Chapter 8: Using the Call Log Folder
Call Log folder filtersThe Call Log folder toolbar contains the following drop-down lists that enable you to view only the calls you want.
Use either or both of the following:• Time filter. View the most recent calls according to the time frame you select. The time
frame begins at midnight for the range selected; for example, “1 day” shows calls since midnight of the current day, and “1 month” shows calls since midnight of this date last month.
• Inbound/outbound filter. View only inbound calls, only outbound calls, or both.
Call Log folder columnsPress F1 to see a description of the columns available in the Call Log. Many columns are hidden by default. You can view more information for a call in the following ways:• Double-click a call to view it in the Call Details dialog, in which more columns are
displayed. See the next section.• Add more columns to the Call Log folder itself. See “Customizing columns” on page 12-8.
Viewing call detailsYou can view more information about your calls by double-clicking a call in the Call Log folder. The Call Details dialog opens.
The Call Details dialog displays a separate line for each party in the call.
Note: The Call Details dialog shows current information about the parties in the call, while the Call Log folder shows the information as it was at the time of the call. Therefore the two can sometimes be different, for example, if the call was from a contact and you changed the contact’s name since the time of the call.
Wave ViewPoint User GuideRelease 1.5 SP3 September 2009

The Call Log folder 8-3Chapter 8: Using the Call Log Folder
Call Details Columns
Column Description
Indicates the incoming and outgoing components of the call, respectively.
Name Name of the parties in the call. On incoming calls, “Unknown” appears unless the user identified the caller as a contact. On outgoing calls, the user’s name appears.
Start Time Date and time that each party began participating in the call.
End Time Date and time that each party left the call.
Duration Duration of the call.
Answered Time Date and time that the call was answered.
Answered By Name of the users for whom this was an incoming call.
Account Code Account code associated with the call, if any. See “Entering an account code for a Call Log entry” on page 8-6.
Number On incoming lines, Caller ID name and number, if available. On outgoing lines, the number dialed. On a call to or from another Wave user, this field contains <NA>.
Number Type The type of number displayed in the Number column. Types are:
Phone: External phone numberInternet: Internet or IP network addressExtension: Internal extension
Access Code On outgoing calls and incoming calls over an IP gateway, the access code of the dialing service used to place the call.
DID On incoming lines, your Direct Inward Dial number if the caller used it to call you. DID is not applicable for outgoing lines.
Device On incoming lines, the trunk or station number at which the call was placed. On outgoing lines, your station number.
Wave ViewPoint User GuideRelease 1.5 SP3 September 2009

The Call Log folder 8-4Chapter 8: Using the Call Log Folder
Dial String Digits that Wave actually dialed over the trunk, which can be different than the digits Wave displays in a contact's phone number. For example, a dial string can contain an international or long-distance access code, least-cost routing information, or dialing prefix or suffix.
Left Message A check in this field indicates that the caller left a voice message.
Result How the call ended. The possible outcomes are:
Abandoned: The caller hung up before the call was answered.Connected: The call was answered.To voicemail: The call was sent to voicemail.Blind Transfer: A blind transfer sent the call to another extension.Supervised Transfer: A supervised transfer sent the call to another extension.Unknown: Wave was unable to identify the outcome of the call.Login: The user logged in to Wave at a remote phone.
Custom Data Custom data, if any, associated with the call. Custom data can be collected by IVR Plug-ins or Contact Center queues that prompt the caller for information.
Call Details Columns (continued)
Column Description
Wave ViewPoint User GuideRelease 1.5 SP3 September 2009

Taking notes on a Call Log entry 8-5Chapter 8: Using the Call Log Folder
Taking notes on a Call Log entry
By clicking Notes in the bottom pane, you can take notes on a Call Log entry. Notes can help identify a call in the list or summarize important information about a call. To take notes on a Call Log entry, select the entry, click in the Notes Pane, and then type your notes. When you are done, you can press Enter or click your mouse anywhere. The notes you just created appear in the Notes column for that Call Log entry.
Associating a call from “Unknown” with a contact
When a Call Log entry appears from “Unknown,” it means that Wave was unable to identify the caller as a Wave contact or user. You can associate the call with a contact, so that the correct name displays and Wave identifies the contact on subsequent calls from that phone.See “Associating a call or Caller ID number with a contact” on page 10-9 for complete instructions.
Returning a call in the Call Log
To return a call in the Call Log
1. Select the call in the Call Log folder that you want to return.
2. On the Actions menu, choose one of the following:• Place Call. This command lets you choose the number to dial from a submenu. If the
caller is a contact, you can choose the phone number to call from the list of the contact’s phone numbers. You can also choose to call by using the Caller ID number of the call.
• Speed Dial. This command places a call immediately to a user’s extension, a contact’s default number, or an unknown caller’s Caller ID number. You can also choose Speed Dial by double-clicking the call.
3. Click OK. Wave dials the number.
Wave ViewPoint User GuideRelease 1.5 SP3 September 2009

Entering an account code for a Call Log entry 8-6Chapter 8: Using the Call Log Folder
Entering an account code for a Call Log entry
You can enter an account code or change the one already entered for a call in the Call Log. You must have permission to view and edit the Call Log to enter or change account codes.
To enter an account code for a Call Log entry
1. Select the call, and then choose Actions > Enter Account Code.
2. Enter an account code. You can enter numbers, letters, or other characters.
3. Click OK.You can also enter an account code during a call using ViewPoint (see “Entering an account code for a call” on page 5-13) or the phone commands.
Opening the contact record from a contact’s call
If a call was identified as being from a contact, you can open the contact’s record to view or change information about that contact. To do so, select the call and choose Actions > Open Contact.
Wave ViewPoint User GuideRelease 1.5 SP3 September 2009

Chapter 9
Call Forwarding and Routing Lists
Chapter Contents
About call forwarding and routing lists
Vertical Wave provides two ways of receiving your calls at a phone other than your own, ensuring that you do not miss important calls when you are away from your desk:• Call forwarding. Your incoming calls ring at another phone. You can use another extension
or an external number (for example, your home phone number). Click Tools > Call Forwarding to forward your calls to another number (see “Forwarding calls” on page 9-2).
• Routing lists. Your incoming calls try a series of phone numbers until you answer at one of them. You can also specify how your calls are handled when you are on the phone or do not answer. Open the Routing Lists folder to create routing lists (see “Using routing lists” on page 9-4).
About call forwarding and routing lists. . . . . . . . . . . . . . . . . . . . . . . . . . . . . . . . . 9-1Forwarding calls . . . . . . . . . . . . . . . . . . . . . . . . . . . . . . . . . . . . . . . . . . . . . . . . . 9-2Using routing lists . . . . . . . . . . . . . . . . . . . . . . . . . . . . . . . . . . . . . . . . . . . . . . . . 9-4
Wave ViewPoint User GuideRelease 1.5 SP3 September 2009

Forwarding calls 9-2Chapter 9: Call Forwarding and Routing Lists
Forwarding callsTo turn call forwarding on:
1. Choose Tools > Call Forwarding. The Call Forwarding dialog opens.
2. Click On. 3. Enter or select the number to dial in one of the following ways:
• Enter the number to which calls are forwarded in the Name/Number field. You can also type the name of a contact or user.
• Click Extensions and select an extension on the list. You can also select an auto attendant, IVR Plug-in, or Group.
• Click Contacts and select a contact on the list. The contact’s default phone number appears in the drop-down list below the main list. If the contact has more than one phone number associated with it, you can select a different number on the drop-down list.
• To create a new contact, click to open a new Contact dialog. To edit the currently selected contact, press Alt and click . See “Entering a new contact” on page 10-4 for more information.
• To forward your calls to one of your own phone numbers, such as your home or mobile phone, click My Numbers and select it on the list. To edit your My Numbers list, click . See “Entering My Numbers” on page 6-4.
Wave ViewPoint User GuideRelease 1.5 SP3 September 2009
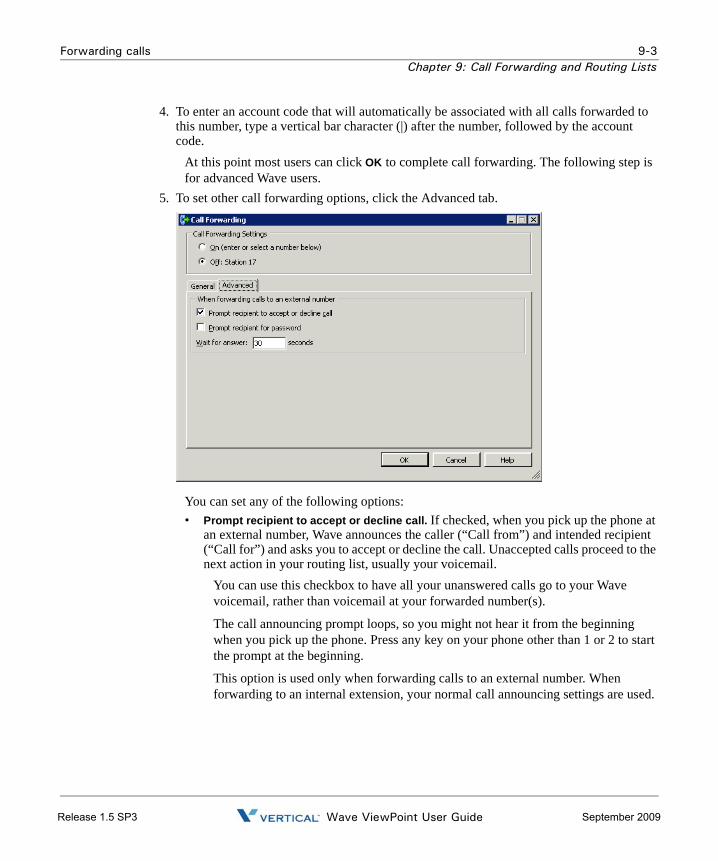
Forwarding calls 9-3Chapter 9: Call Forwarding and Routing Lists
4. To enter an account code that will automatically be associated with all calls forwarded to this number, type a vertical bar character (|) after the number, followed by the account code.
At this point most users can click OK to complete call forwarding. The following step is for advanced Wave users.
5. To set other call forwarding options, click the Advanced tab.
You can set any of the following options:• Prompt recipient to accept or decline call. If checked, when you pick up the phone at
an external number, Wave announces the caller (“Call from”) and intended recipient (“Call for”) and asks you to accept or decline the call. Unaccepted calls proceed to the next action in your routing list, usually your voicemail.
You can use this checkbox to have all your unanswered calls go to your Wave voicemail, rather than voicemail at your forwarded number(s).
The call announcing prompt loops, so you might not hear it from the beginning when you pick up the phone. Press any key on your phone other than 1 or 2 to start the prompt at the beginning.
This option is used only when forwarding calls to an external number. When forwarding to an internal extension, your normal call announcing settings are used.
Wave ViewPoint User GuideRelease 1.5 SP3 September 2009

Using routing lists 9-4Chapter 9: Call Forwarding and Routing Lists
• Prompt recipient for password. If checked, the person who picks up the phone hears, “Call for <your voice title>. Please connect me.” To be connected to the caller, you must enter your Wave password. Entering a password ensures that only you can receive your forwarded calls. This is useful when forwarding calls to a hotel or a company with an operator.
This option works only when calls are forwarded to an external number and when you have a voice title for yourself recorded. If you have not recorded a voice title, Wave ignores your selection of this option. For more about recording your voice title, see the Wave Phone User Guide.
• Wait for answer. Enter the length of time in seconds that you want a call to ring the forwarding number before going to proceeding to the next action on your routing list (usually your voicemail). If you are using the option Prompt recipient for password (described below) or Prompt recipient to accept or decline call (described later in this step), you should enter at least 30 seconds. If you enter less time, the call might be sent to your voicemail before you finish listening and responding to the prompts.
6. Click OK.
Turning forwarding on and off via the FWD buttonWhen your calls are forwarded, the FWD button in the status bar appears with an active forwarding icon . Click the button to open the Call Forwarding dialog to turn call forwarding on or off or make other changes. Click the down arrow on the FWD button to turn call forwarding off, or choose a different forwarding number.
Call forwarding and voicemailIf no one answers at your call forwarding location, the call is sent to your voicemail (unless you have specified a different behavior using a routing list or call rule.
Using routing lists
A routing list is a series of phone numbers that Wave dials when calls for you arrive. If you do not answer at one location, Wave proceeds to the next. For example, you can set up a routing list that tries you at your desk, then at your home, and finally at your mobile phone. A routing list also contains a final action that determines what happens if no one answers. Usually the caller is sent to your voicemail, but you can specify other final actions. For example, you can transfer calls to another extension, put callers on hold and try the series of numbers again, or hang up. You can specify a different final action for when you’re on the phone vs. when you’re away from your desk. For example, if your phone is busy you can play a voicemail greeting such as “I'm sorry I'm on the phone, please leave a message and I'll return your call as soon as possible.”
Wave ViewPoint User GuideRelease 1.5 SP3 September 2009

Using routing lists 9-5Chapter 9: Call Forwarding and Routing Lists
You can create as many routing lists as you want and make any one of them the active routing list at any time.
Important: To use a routing list with multiple numbers, you must check Prompt recipient to accept or decline call in your call forwarding setup (Tools > Call Forwarding, Advanced tab). If this is unchecked, calls that are unanswered at the first routing list step will be “answered” by voicemail, and will not proceed further.
Routing lists for individual callersBy using call rules, you can have Wave use a specific routing list for a specific caller or group of callers. For example, you can have a routing list for important customers that includes trying your mobile phone and another routing list for everyone else that only rings your extension. See Chapter 11 for more information.
How routing lists move from action to actionA routing list tries calling the next phone number in the series after it rings unanswered for a number of seconds that you specify.You can also have Wave prompt the recipient to accept or decline the call. In that case, the routing list moves on unless someone presses 1 to accept the call. You can choose to prompt the recipient at external phone numbers only. See “Creating a routing list using the Routing List Editor” on page 9-9 for more information.
Caller options while following a routing listWhen a routing list moves to the next action, Wave can alert the caller and offer the following choices:
• Press 1 or stay on the line to try the next number.• Press 2 to leave a voice message.• Press 3 to return to the auto attendant.• Press 0 to transfer to the Operator. If you have defined a personal Operator, the call
is transferred to that extension. If you have not defined a personal Operator, the call is transferred to your office’s Operator extension.
You can specify whether Wave offers these choices for each action in the routing list. See “Creating a routing list using the Routing List Editor” on page 9-9.
Wave ViewPoint User GuideRelease 1.5 SP3 September 2009
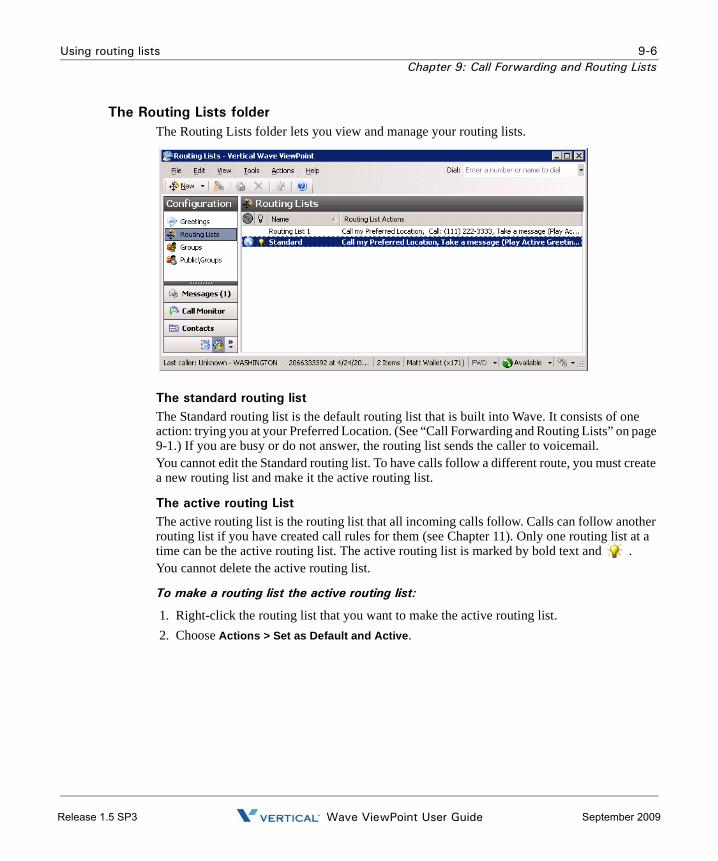
Using routing lists 9-6Chapter 9: Call Forwarding and Routing Lists
The Routing Lists folderThe Routing Lists folder lets you view and manage your routing lists.
The standard routing listThe Standard routing list is the default routing list that is built into Wave. It consists of one action: trying you at your Preferred Location. (See “Call Forwarding and Routing Lists” on page 9-1.) If you are busy or do not answer, the routing list sends the caller to voicemail.You cannot edit the Standard routing list. To have calls follow a different route, you must create a new routing list and make it the active routing list.
The active routing ListThe active routing list is the routing list that all incoming calls follow. Calls can follow another routing list if you have created call rules for them (see Chapter 11). Only one routing list at a time can be the active routing list. The active routing list is marked by bold text and .You cannot delete the active routing list.
To make a routing list the active routing list:
1. Right-click the routing list that you want to make the active routing list. 2. Choose Actions > Set as Default and Active.
Wave ViewPoint User GuideRelease 1.5 SP3 September 2009

Using routing lists 9-7Chapter 9: Call Forwarding and Routing Lists
Using the Routing List Wizard vs. the Routing List EditorWhen you create a new routing list, Wave offers two ways of proceeding: • The Routing List Wizard. For new users. The Wizard provides a simple interface to guide
you through the creation process.• The Routing List Editor. For advanced users. The editor gives you access to the full range
of routing list editing options.
Note: To skip this prompt when creating subsequent routing lists, check Do not prompt me again. Whichever choice you make will automatically occur for subsequent routing lists. To later change the choice or reactivate the prompt, choose Tools > Options, go to the ViewPoint tab, and change the New routing lists field.
Creating a routing list using the Routing List WizardChoose File > New > Routing List. If prompted to choose between the Wizard and the Editor, choose Routing List Wizard. Follow the on-screen prompts to create the type of routing list you want. For each Wizard page, you can press F1 for online Help.
Wave ViewPoint User GuideRelease 1.5 SP3 September 2009

Using routing lists 9-8Chapter 9: Call Forwarding and Routing Lists
Note: When you create a routing list using the Wizard that routes calls to an external number, the routing list uses the advanced settings (Prompt recipient for password, Prompt recipient to accept or decline call, Wait for answer) that you have specified for call forwarding. See “Forwarding calls” on page 9-2.
Wave ViewPoint User GuideRelease 1.5 SP3 September 2009
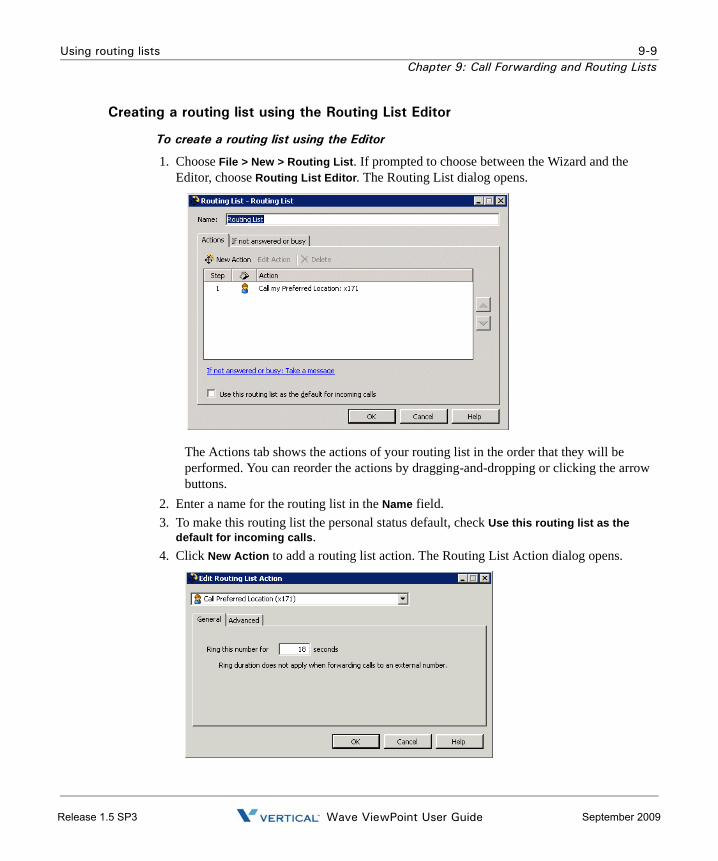
Using routing lists 9-9Chapter 9: Call Forwarding and Routing Lists
Creating a routing list using the Routing List Editor
To create a routing list using the Editor
1. Choose File > New > Routing List. If prompted to choose between the Wizard and the Editor, choose Routing List Editor. The Routing List dialog opens.
The Actions tab shows the actions of your routing list in the order that they will be performed. You can reorder the actions by dragging-and-dropping or clicking the arrow buttons.
2. Enter a name for the routing list in the Name field. 3. To make this routing list the personal status default, check Use this routing list as the
default for incoming calls. 4. Click New Action to add a routing list action. The Routing List Action dialog opens.
Wave ViewPoint User GuideRelease 1.5 SP3 September 2009

Using routing lists 9-10Chapter 9: Call Forwarding and Routing Lists
5. From the drop-down list, choose one of the following actions. The other elements in the dialog change depending on your selection.
• Call Preferred Location. This action sends calls to your Preferred Location phone, which is your station unless you have changed it (see “Call Forwarding and Routing Lists” on page 9-1). Specify the length of time the phone should ring in the Ring this phone for __ seconds field.
• Call Another Location. This action directs calls to the internal or external number that you specify. You can specify an internal number by entering the extension or the Wave user’s name. Click Browse to open the Place Call To dialog for assistance in selecting the call destination. For information about using this dialog, see “Placing a call” on page 6-1.
Specify the length of time the phone should ring in the Ring duration field.
Calls routed to another extension do not follow call forwarding or routing lists in effect at that extension. To send calls to another extension so that they follow that extension’s forwarding or routing list, use a final action of Transfer To extension.
• Call Group. This action directs calls to one or all members of a Group. For instructions on selecting a Method, see “Routing calls to groups” on page 9-13.
Specify the length of time the phone or phones should ring in the Ring duration field.
• Play Greeting. This action does not ring a phone, but instead plays the caller the greeting that you select on the Greeting drop-down list. You can also play a greeting as part of each action and before the final action. To record a new greeting from this dialog, click . See “Recording a new greeting” on page 7-19.
While any greeting is playing, the caller can press 0 to transfer to the Operator or 1 to leave a voice message. You might want your greeting to mention these options.
6. Click the Advanced tab to set additional options relating to the chosen action. See the next section, “Using the Advanced tab.”
7. Click OK to add this action to your routing list. The Routing List Action dialog closes, and the new action appears on the Actions tab of the Routing List dialog.
Wave ViewPoint User GuideRelease 1.5 SP3 September 2009

Using routing lists 9-11Chapter 9: Call Forwarding and Routing Lists
Using the Advanced tabClick the Advanced tab of the Routing List Action dialog to set additional options related to the action you’ve chosen. Depending on the action selected, not all of the following options may appear:• Ring this number for __ seconds. Enter the length of time in seconds that you want a call to
ring the number before proceeding to the next action on your routing list. • Prompt recipient to accept or decline call. Wave announces the caller (“Call from”) and the
intended recipient (“Call for”), and offers the option to accept or decline the call. Declined calls proceed to the next routing list action.
With this option checked, the call will not be connected unless someone presses 1 to accept it. For this reason, leave the field unchecked when routing to a pager.
• Prompt recipient for password. The person who answers the phone hears, “Call for <your voice title>. Please connect me.” To be connected to the caller, you must enter your Wave password. Using this option ensures that only you can receive your calls at the external phone number.
• Prompt caller before trying this action, Check to play the caller a message before the routing list tries this action. Select the message from the drop-down list. You can select one of your greetings or System menu to try the next location, which says “There was no answer at that location. To try the next location, press 1. To leave a message, press 2. To return to the main menu, press 3.” Click to create a new greeting.
Handling calls differently if you do not answer or are busyWhen you have finished creating the routing list’s actions, click the If not answered or busy tab of the Routing List dialog, to set the routing list’s final action. Final actions are performed on calls that are still unanswered after trying all the actions.Note: To specify different final actions for busy and no-answer states, see the next section, “Handling busy station calls differently than calls not answered.”
To specify a final action, make the following choices
• Play Greeting. Check to play a greeting before the final action, then choose the greeting from the drop-down list. For information about the System hold greeting, see the Pause and repeat final action in the following list.
Important: Under most circumstances you should select this check box and select Active as the greeting. For information, see “Using greetings with routing list final actions” on page 9-14.
Wave ViewPoint User GuideRelease 1.5 SP3 September 2009
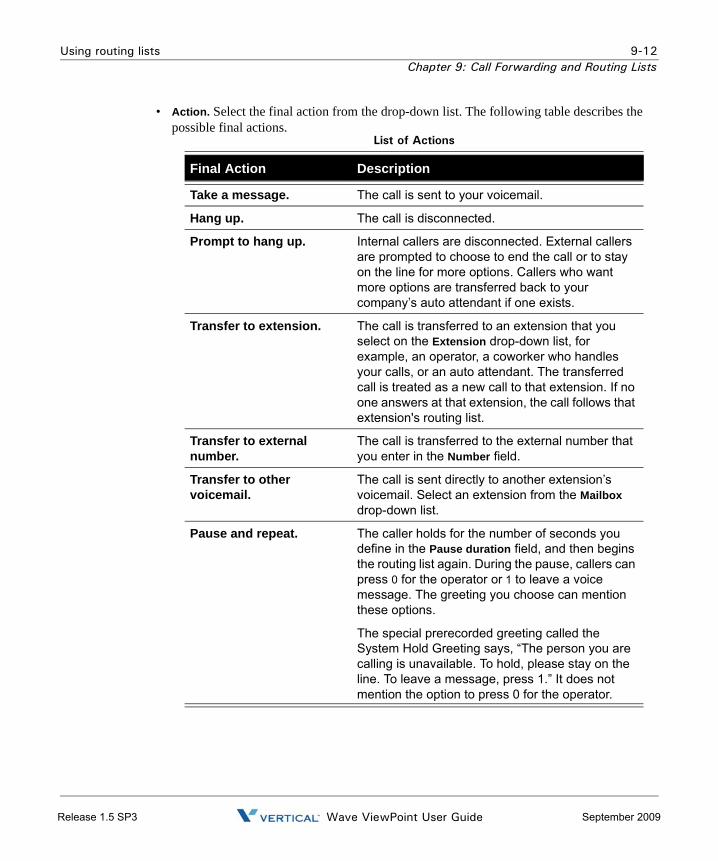
Using routing lists 9-12Chapter 9: Call Forwarding and Routing Lists
• Action. Select the final action from the drop-down list. The following table describes the possible final actions.
List of Actions
Final Action Description
Take a message. The call is sent to your voicemail.
Hang up. The call is disconnected.
Prompt to hang up. Internal callers are disconnected. External callers are prompted to choose to end the call or to stay on the line for more options. Callers who want more options are transferred back to your company’s auto attendant if one exists.
Transfer to extension. The call is transferred to an extension that you select on the Extension drop-down list, for example, an operator, a coworker who handles your calls, or an auto attendant. The transferred call is treated as a new call to that extension. If no one answers at that extension, the call follows that extension's routing list.
Transfer to external number.
The call is transferred to the external number that you enter in the Number field.
Transfer to other voicemail.
The call is sent directly to another extension’s voicemail. Select an extension from the Mailbox drop-down list.
Pause and repeat. The caller holds for the number of seconds you define in the Pause duration field, and then begins the routing list again. During the pause, callers can press 0 for the operator or 1 to leave a voice message. The greeting you choose can mention these options.
The special prerecorded greeting called the System Hold Greeting says, “The person you are calling is unavailable. To hold, please stay on the line. To leave a message, press 1.” It does not mention the option to press 0 for the operator.
Wave ViewPoint User GuideRelease 1.5 SP3 September 2009
Using routing lists 9-13Chapter 9: Call Forwarding and Routing Lists
Handling busy station calls differently than calls not answeredYou can optionally specify two final actions—one for situations when your station is busy, one for situations when each action rings and goes unanswered. This allows you to handle calls differently when you’re on a call vs. when you’re away from your phone(s). For example, you can have a special greeting that plays when you’re on a call, that says, “I'm on the phone right now, please leave a message.”To use this feature, check Handle busy calls differently, and specify a final action for when your line is busy. See the next section for additional information. If unchecked, the one final action is used in both situations.Note: Wave can detect a routing list action as “busy” only when it is a Wave station. External numbers and Groups cannot trigger the “busy” final action.
Using “Handle Busy Calls Differently”When you check Handle busy calls differently, the action you pick behaves differently from a normal final action. As soon as the routing list encounters a busy station, the final action triggers, skipping any subsequent actions. For example, if you have one action that tries your office station and a second that tries your cell phone, with Handle busy calls differently set to “Take a message,” and a call comes in while your station is busy, the call is sent to your voicemail without trying your cell phone.Note: If while you are on the phone you receive an incoming call on an available line appearance (for example, with call waiting or on a digital phone with multiple primary line appearances), the call goes to the “Final action if the station is busy” after the ring duration expires for your phone.
Routing calls to groupsA routing list action can send a call to Group by using the action Call Group. The first person in the Group to answer the call is connected to the caller. See “Creating a Group” on page 10-16 for instructions on creating a Group. When a routing list calls a Group, the only numbers called are contacts’ default numbers and users’ extensions. Note that users’ call forwarding is not followed. If you want to call a group that includes two numbers from one person (for instance, your desk phone and cell phone), you must define them as two members (for example, yourself as a user and a contact containing your cell phone).
To route calls to a Group as an action in an existing routing list
1. Double-click the routing list in the Routing Lists folder. The Routing List dialog for that routing list opens.
2. Click Add. The Routing List Action dialog opens.
Wave ViewPoint User GuideRelease 1.5 SP3 September 2009

Using routing lists 9-14Chapter 9: Call Forwarding and Routing Lists
3. In the Action field, select Call a Group. 4. Select a Group or click to create a new Group.
Note: Your system administrator may have defined a limit to the number of contacts in a group that’s called by a routing list. If you are unable to select a large group, talk to your system administrator.
5. Under Method, choose one of the following ways to ring the Group’s phones:• Sequentially from the top down. The call tries each user or contact in the Group in
order until it is answered, starting with the first. • Individually in a round robin. The call tries each user or contact in the Group in order
until it is answered, starting with the next member in line after the one who answered the preceding call.
• Simultaneously. The default numbers or Preferred Locations of all users and contacts in the Group ring simultaneously, and the call goes to the first who accepts it.
6. In the Ring duration field, specify the length of time each Group phone should ring before the call tries the next phone in the Group.
7. For any external numbers in the Group, you can choose Prompt recipient for password. When calling a Group, Prompt recipient to accept or decline call is automatically selected.
8. To play callers a message before they are routed to the Group, check Prompt caller before trying this action, and select the message on the Prompt drop-down list.
9. Click OK. You return to the Routing List dialog, in which the new routing list action appears in the Actions list.
10. Use the arrows next to the Actions list to reorder any actions in the routing list and then click OK.
Note: When routing calls to a Group, you also can use the Pause and repeat final action. This action keeps callers on hold until a member of the Group answers the call. Calls are answered in the order of longest hold time, or “first in, first out” (FIFO).
Using greetings with routing list final actionsFor most routing lists, you should check Play greeting before the final action and select Active. This ensures that callers who reach the routing list’s final action (for example, your voicemail) hear a greeting. It also allows the greeting to change based on your other settings. For example, you can use a call rule to play a different greeting when your friend Jim calls (see Chapter 11), or have a different greeting play when you select the personal status On Vacation.If you select a specific greeting under Play greeting, that greeting overrides the active greeting and plays to all callers who reach the final action of the routing list, even if a different greeting is specified in a call rule or personal status.If you clear the Play greeting checkbox, no greeting plays to callers who reach the final action of this routing list, even if a greeting is specified in a call rule or personal status. If the final action is Take a Message, callers who reach your voicemail hear only the beep that signals that recording has begun.
Wave ViewPoint User GuideRelease 1.5 SP3 September 2009
Using routing lists 9-15Chapter 9: Call Forwarding and Routing Lists
When to use a specific greeting with a routing listIt is highly recommended that you select a specific greeting to play if your routing list’s final action is not ‘Take a Message.” In such a case, you want to be sure that the greeting that callers hear matches the action that is about to happen. Examples of greetings for other final actions are the following:• Hang Up. “I’m sorry you couldn’t find me. I’m not taking messages at the moment.
Good-bye.”• Transfer to extension. “I’m sorry you couldn’t find me. I’m transferring you now to my
administrative assistant.” • Pause and repeat. “The person you are calling is unavailable. To hold, please stay on the
line. To leave a message, press 1.” This is the text of the System Hold Greeting, a greeting provided with Wave for just this circumstance. You can also record your own version. See “Recording a new greeting” on page 7-19.
Wave ViewPoint User GuideRelease 1.5 SP3 September 2009

Release 1.5 SP3 September 2009

Chapter 10
Managing Contacts and Groups
Chapter Contents
About contact management and Wave
ViewPoint’s Contacts folder provides you with an online phone book of your phone contacts in which you can enter the names, phone numbers, and other information about people you talk with frequently on the phone. After you enter contacts, you can place calls to them with a few clicks of the mouse.This chapter describes the Contacts folder and then explains the following aspects of working with contacts:• Managing contacts• Teaching Wave to recognize your contacts• Using ViewPoint Groups
About contact management and Wave . . . . . . . . . . . . . . . . . . . . . . . . . . . . . . . 10-1The Contacts folder . . . . . . . . . . . . . . . . . . . . . . . . . . . . . . . . . . . . . . . . . . . . . . 10-2Managing contacts . . . . . . . . . . . . . . . . . . . . . . . . . . . . . . . . . . . . . . . . . . . . . . 10-3Teaching Wave to recognize your contacts. . . . . . . . . . . . . . . . . . . . . . . . . . . . 10-7Opening contacts from within other folders . . . . . . . . . . . . . . . . . . . . . . . . . . . 10-12Using contacts maintained in another contact manager . . . . . . . . . . . . . . . . . 10-13Using ViewPoint Groups . . . . . . . . . . . . . . . . . . . . . . . . . . . . . . . . . . . . . . . . . 10-14
Wave ViewPoint User GuideRelease 1.5 SP3 September 2009

The Contacts folder 10-2Chapter 10: Managing Contacts and Groups
The Contacts folder
To open the Contacts folder, click its icon in the navigation bar.
Searching the Contacts folderTo find someone quickly, you can type their first or last name (fully or partially) in the Search field. The Contacts folder displays all items whose first or last name begins with the entered text.
Private and public contactsIn Wave, contacts can be private or public:• Private contacts are your own personal contacts. These contacts appear only in the
Contacts folder of your ViewPoint on your computer. Other users cannot see your contacts unless you explicitly share your Contacts folder with them.
• Public contacts are available to all users in your office. When public contacts call your office, Wave identifies them no matter which extension or user they are calling.
Public contacts contained in the Public\Contacts folder and can also be accessed via the Phonebook pane's Contacts tab, and by choosing Actions > Place Call. To enter or edit a public contact, you must have public contact editing permissions. If you do not have those permissions, you can view and place a call to public contacts, but you cannot edit them.
Wave ViewPoint User GuideRelease 1.5 SP3 September 2009
Managing contacts 10-3Chapter 10: Managing Contacts and Groups
Viewing shared contactsTo view contacts that another user has shared with you, click that user’s name under Public Folders in the Folder List and click the Contacts folder.
Contacts folder tabsThe Contacts folder can optionally contain tabs that display related groups of extensions. Tabs are located at the bottom of the Contacts folder. Click each tab to view its contents.• All tab.
• In the Contacts folder, the All tab displays all of your personal contacts. • In the Public\Contacts folder, the All tab displays all public contacts.
• Group tabs. The Contacts folder can optionally display a tab for each public ViewPoint Group of which you are a member, and a tab for any personal ViewPoint Groups that you created. Click a Group tab to see the extensions within that Group. See “Using ViewPoint Groups” on page 10-14.
Showing, hiding, and reordering Contacts folder tabs
To show or hide individual tabs, as well as choose their order
1. In the Contacts folder, choose View > Show Tabs. (You can also right-click anywhere in the the Contacts pane and then choose Show Tabs.)
2. Select a tab name and click Add or Remove to set up the Show these tabs in this order list. Use the up and down arrow buttons to arrange the order of tabs in the list.
3. Click OK. The specified tabs are displayed at the bottom of the Contacts folder.
Changing double-click behaviorYou can choose whether double-clicking a contact opens the contact for editing or places a call to the contact. See “Defining double-click behavior in the Contacts folder” on page 12-8 for more information.
Managing contacts
You can manage your contacts using Wave ViewPoint, or you can use another contact manager application or customer relationship management program with Wave if you prefer. You can also import contacts from other contact managers into Wave. See “Importing contacts from other contact managers into Wave” on page 10-13.
Wave ViewPoint User GuideRelease 1.5 SP3 September 2009
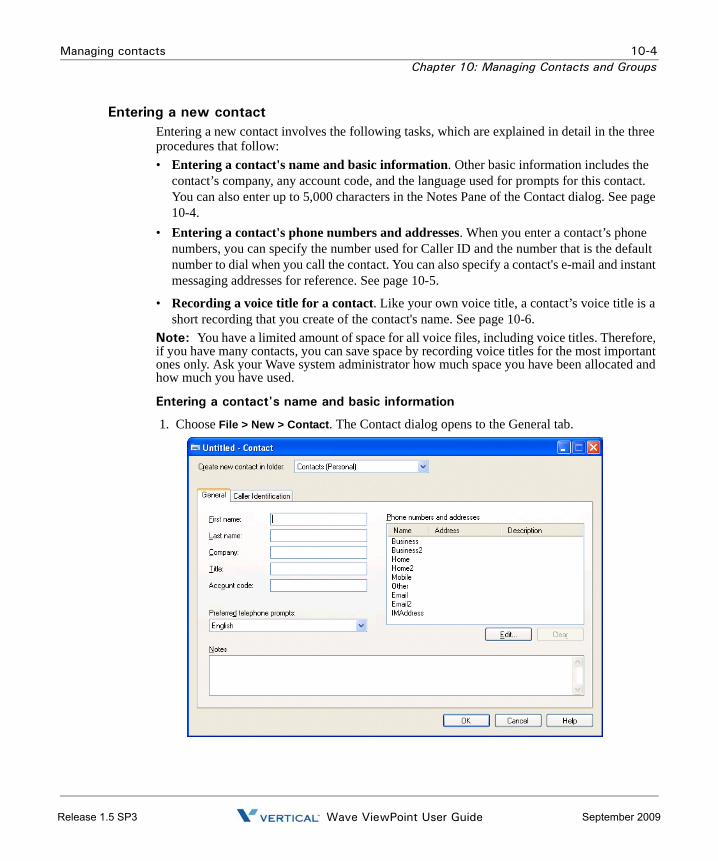
Managing contacts 10-4Chapter 10: Managing Contacts and Groups
Entering a new contactEntering a new contact involves the following tasks, which are explained in detail in the three procedures that follow:• Entering a contact's name and basic information. Other basic information includes the
contact’s company, any account code, and the language used for prompts for this contact. You can also enter up to 5,000 characters in the Notes Pane of the Contact dialog. See page 10-4.
• Entering a contact's phone numbers and addresses. When you enter a contact’s phone numbers, you can specify the number used for Caller ID and the number that is the default number to dial when you call the contact. You can also specify a contact's e-mail and instant messaging addresses for reference. See page 10-5.
• Recording a voice title for a contact. Like your own voice title, a contact’s voice title is a short recording that you create of the contact's name. See page 10-6.
Note: You have a limited amount of space for all voice files, including voice titles. Therefore, if you have many contacts, you can save space by recording voice titles for the most important ones only. Ask your Wave system administrator how much space you have been allocated and how much you have used.
Entering a contact's name and basic information
1. Choose File > New > Contact. The Contact dialog opens to the General tab.
Wave ViewPoint User GuideRelease 1.5 SP3 September 2009
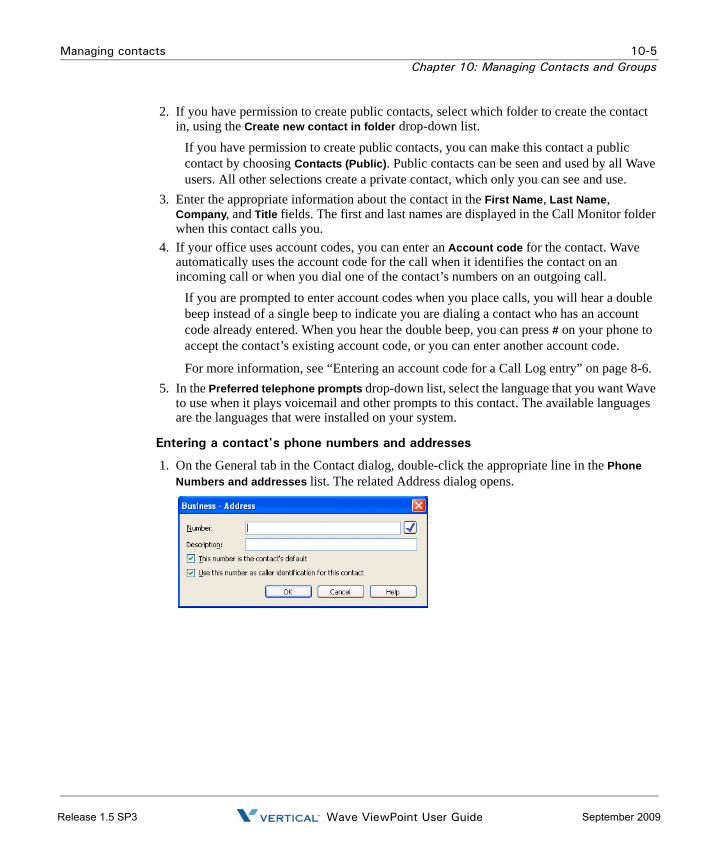
Managing contacts 10-5Chapter 10: Managing Contacts and Groups
2. If you have permission to create public contacts, select which folder to create the contact in, using the Create new contact in folder drop-down list.
If you have permission to create public contacts, you can make this contact a public contact by choosing Contacts (Public). Public contacts can be seen and used by all Wave users. All other selections create a private contact, which only you can see and use.
3. Enter the appropriate information about the contact in the First Name, Last Name, Company, and Title fields. The first and last names are displayed in the Call Monitor folder when this contact calls you.
4. If your office uses account codes, you can enter an Account code for the contact. Wave automatically uses the account code for the call when it identifies the contact on an incoming call or when you dial one of the contact’s numbers on an outgoing call.
If you are prompted to enter account codes when you place calls, you will hear a double beep instead of a single beep to indicate you are dialing a contact who has an account code already entered. When you hear the double beep, you can press # on your phone to accept the contact’s existing account code, or you can enter another account code.
For more information, see “Entering an account code for a Call Log entry” on page 8-6. 5. In the Preferred telephone prompts drop-down list, select the language that you want Wave
to use when it plays voicemail and other prompts to this contact. The available languages are the languages that were installed on your system.
Entering a contact's phone numbers and addresses
1. On the General tab in the Contact dialog, double-click the appropriate line in the Phone Numbers and addresses list. The related Address dialog opens.
Wave ViewPoint User GuideRelease 1.5 SP3 September 2009

Managing contacts 10-6Chapter 10: Managing Contacts and Groups
• For Business, Home, Mobile, or Other., enter the following information:• Number: Enter the phone number to dial for the contact.
• This number is the contact’s default: Select this checkbox if this is the phone number you dial most frequently to reach the contact. The number you choose as the default is slightly faster to select when you place calls.
• Use this number as caller identification for this contact: Select this checkbox if you want Wave to identify calls from this number as calls from the contact. Checking this box adds the phone number to the contact’s Incoming Caller ID list (see “Teaching Wave to recognize your contacts” on page 10-7). If this option is unchecked, calls from this number appear in the Call Monitor and Call Log folders as being from “Unknown.”
• For Email or IMaddress. Enter the e-mail or instant message address for the contact. You can enter notes about the address in the Description field.
2. Enter notes about the phone number or address in the Description field. For example, for a business number, this is a good place to enter the contact’s extension.
3. Click OK to close the Phone Number dialog. 4. To enter more phone numbers or addresses for this contact, repeat steps 1-3 for the other
categories in the Phone numbers and addresses list. 5. Click OK to close the Contact dialog. The new contact now appears in the Contacts folder.
Recording a voice title for a contact
1. In the Contacts folder, select the contact for whom you want to record a voice title and choose File > Open.
2. In the Contact dialog, click the Caller Identification tab. 3. Record the Voice Title by using the audio controls. See “Using the audio controls” on
page 2-19 for instructions. 4. Click OK.
Notes:
• Wave can play the voice titles of contacts over your computer speakers automatically when those contacts call. See “Customizing incoming call behavior” on page 12-5 for more information.
• Wave can also capture the names of contacts in the voices of the contacts when they respond to the call announcing prompt. Wave can then use those recordings as voice titles. See “Associating a call or Caller ID number with a contact” on page 10-10 for more information.
Wave ViewPoint User GuideRelease 1.5 SP3 September 2009
Teaching Wave to recognize your contacts 10-7Chapter 10: Managing Contacts and Groups
Placing calls to your contactsYou can place a call to a contact with a phone number using ViewPoint. See “Placing a call” on page 6-1 for instructions.
Teaching Wave to recognize your contacts
Wave’s more advanced features depend on Wave recognizing your contacts. You can teach Wave to recognize your contacts in the following ways:• By recognizing the Caller ID number or name of the contact’s phone.• By recognizing a special number you give to the contact to dial after your extension, called
a Contact PIN. By using Contact PINs, Wave can recognize contacts regardless of the phone they use to call.
Note: Wave automatically identifies other Wave users when they call from their stations or their public numbers.The benefits of having Wave recognize contacts include:• Their names appear in the Call Monitor while the phone is ringing to let you know who is
calling.• Their names are displayed on your Caller ID phone, if you have one.• Their names appear in the Call Log and Messages folders, so that you can easily see
contacts in your phone record and quickly call them back.• You can hear your contact's name announced over your phone or PC speakers—without
forcing your callers to say their name every time they call—by saving a recorded voice title with the contact.
• You can use call rules to set up individualized call handling for them, such as playing a unique voicemail greeting or routing their calls according to a specific routing list (see Chapter 11).
One form of identification, Caller ID from the phone company, is available automatically for every call. The phone number and Caller ID name of the caller appear in the Number column of the Call Monitor, the Call Log, and the Messages folders.
Wave ViewPoint User GuideRelease 1.5 SP3 September 2009
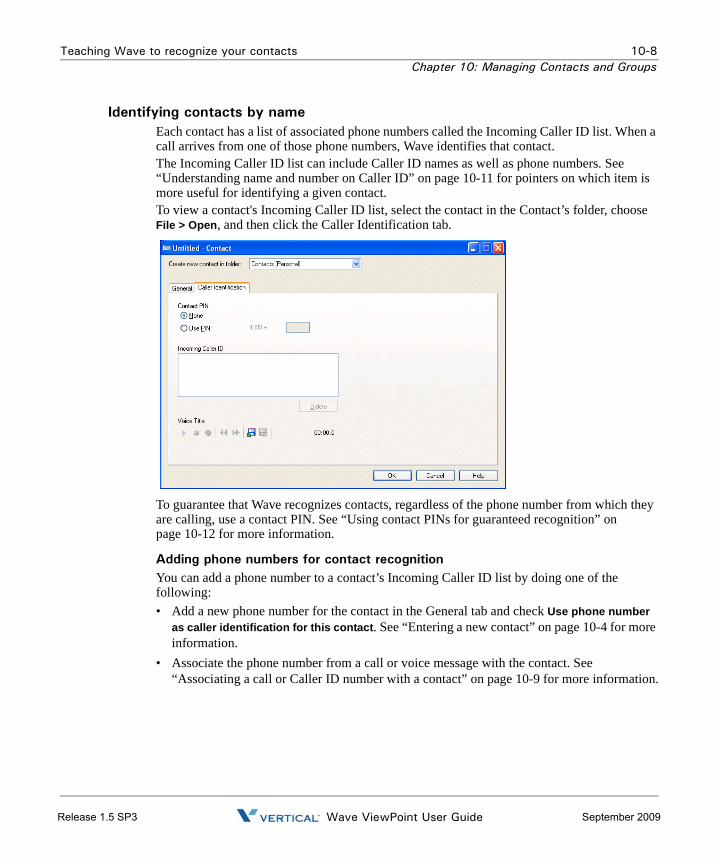
Teaching Wave to recognize your contacts 10-8Chapter 10: Managing Contacts and Groups
Identifying contacts by nameEach contact has a list of associated phone numbers called the Incoming Caller ID list. When a call arrives from one of those phone numbers, Wave identifies that contact.The Incoming Caller ID list can include Caller ID names as well as phone numbers. See “Understanding name and number on Caller ID” on page 10-11 for pointers on which item is more useful for identifying a given contact.To view a contact's Incoming Caller ID list, select the contact in the Contact’s folder, choose File > Open, and then click the Caller Identification tab.
To guarantee that Wave recognizes contacts, regardless of the phone number from which they are calling, use a contact PIN. See “Using contact PINs for guaranteed recognition” on page 10-12 for more information.
Adding phone numbers for contact recognitionYou can add a phone number to a contact’s Incoming Caller ID list by doing one of the following:• Add a new phone number for the contact in the General tab and check Use phone number
as caller identification for this contact. See “Entering a new contact” on page 10-4 for more information.
• Associate the phone number from a call or voice message with the contact. See “Associating a call or Caller ID number with a contact” on page 10-9 for more information.
Wave ViewPoint User GuideRelease 1.5 SP3 September 2009

Teaching Wave to recognize your contacts 10-9Chapter 10: Managing Contacts and Groups
Deleting a number from the Incoming Caller ID listIf Wave wrongly identifies a contact as the caller, it is likely that the Incoming Caller ID list for that contact includes an incorrect phone number. You can prevent further misidentification by deleting the phone number from the list.
To delete a number from the Incoming Caller ID list
1. Double-click the contact from whom you want to delete a phone number. The Contact dialog opens.
2. Click the Caller Identification tab. 3. In the Incoming Caller ID list, select the incorrect phone number. 4. Click Delete and then click OK.
Associating a call or Caller ID number with a contactIf Wave shows a caller’s name as “Unknown,” but you know who the caller is, you can associate the call with one of your contacts. Doing this replaces “Unknown” with the contact’s name.You can also associate the Caller ID number or the name from the call with a contact. Doing this adds the number to the contact’s Incoming Caller ID list. Future calls from that phone show that contact as the caller. In this way you can “teach” Wave to recognize the people who call you.For example, the following illustration shows a voice message before association, showing “Unknown” as the caller.
The next illustration shows the same message after you associate it with your contact Nathaniel Chestnut.
You can teach Wave to recognize a caller by Caller ID name instead of the phone number. This can be useful, for example, if the contact calls from a company with a PBX that randomly assigns phone numbers to trunks but uses a Caller ID name that remains the same.Note: You cannot associate a phone number or Caller ID text with a public contact unless you have permissions to edit public contacts. You can, however, label an individual call as being from a public contact.
Wave ViewPoint User GuideRelease 1.5 SP3 September 2009
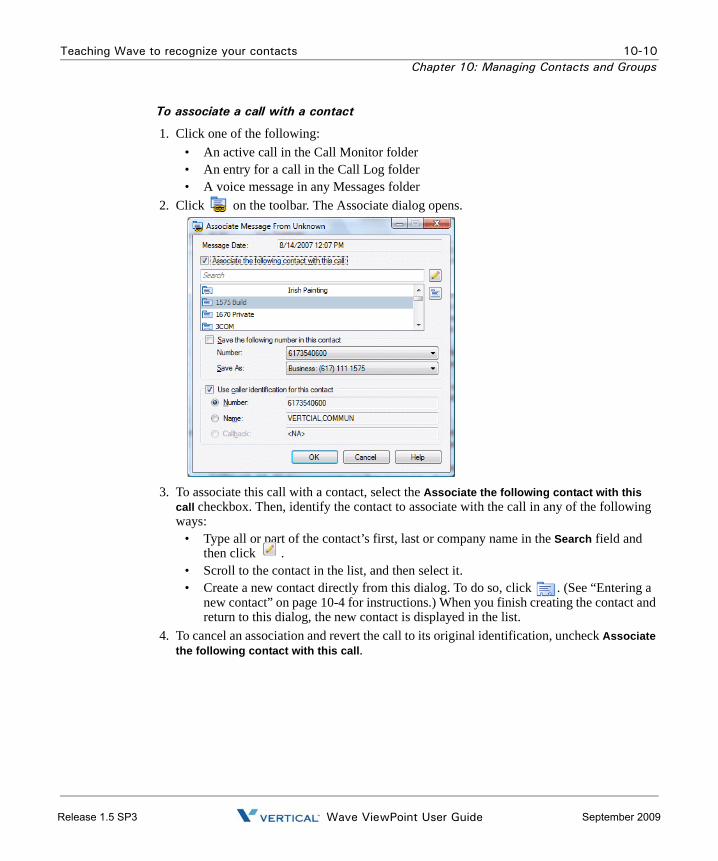
Teaching Wave to recognize your contacts 10-10Chapter 10: Managing Contacts and Groups
To associate a call with a contact
1. Click one of the following:• An active call in the Call Monitor folder• An entry for a call in the Call Log folder• A voice message in any Messages folder
2. Click on the toolbar. The Associate dialog opens.
3. To associate this call with a contact, select the Associate the following contact with this call checkbox. Then, identify the contact to associate with the call in any of the following ways:
• Type all or part of the contact’s first, last or company name in the Search field and then click .
• Scroll to the contact in the list, and then select it.• Create a new contact directly from this dialog. To do so, click . (See “Entering a
new contact” on page 10-4 for instructions.) When you finish creating the contact and return to this dialog, the new contact is displayed in the list.
4. To cancel an association and revert the call to its original identification, uncheck Associate the following contact with this call.
Wave ViewPoint User GuideRelease 1.5 SP3 September 2009
Teaching Wave to recognize your contacts 10-11Chapter 10: Managing Contacts and Groups
5. If the call came from a phone number that is new for this contact, you can add the new number to the contact’s phone number list now. To do so, check Save the following number in this contact, and then select the phone number category to save it as via the Save As drop-down list.
6. If you want only to label the individual call or voice message with the contact’s name, deselect the Use caller identification for this contact checkbox.
If you want Wave to associate all subsequent calls from that phone with the contact, check Use caller identification for this contact and select one of the following:• Number. Wave uses the phone number to recognize subsequent calls.• Name. Wave uses the Caller ID text to recognize subsequent calls.• Callback. Wave uses the callback number entered by the caller. (This option is only
available if the caller entered a callback number.)See the next section for more information.
7. Click OK.
Understanding name and number on Caller IDWhen you receive a call, Wave receives two pieces of information about where the call originated: the phone number and the Caller ID name. You can associate either of these items with a contact. Depending on where the call originated, one item may work better than the other, as the following examples illustrate:• If the call is from a home phone (for example, ANTANDER,LOU - 6178380405). In this case,
where both the number and name are unique, either could be used for association.• If the call is from a company with many phone lines (for example, Vertical Comm -
6175641121). In this case the phone number may change with every call, because the office’s PBX system uses a random trunk for all outgoing calls. The Caller ID name, however, remains constant, so you should use that for association.
• If the call is from a standardized Caller ID name (for example, california - 7605550807). In cases where the Caller ID name is standardized for many different phones, you should use the phone number for association.
Wave ViewPoint User GuideRelease 1.5 SP3 September 2009

Opening contacts from within other folders 10-12Chapter 10: Managing Contacts and Groups
Using contact PINs for guaranteed recognitionContact PINs provide a guaranteed way for callers to be recognized by Wave whenever they call. A contact with a PIN can call from any phone number and be identified by Wave.Contact PINs are unique numbers that you give out to contacts. Contacts add their PINs to your extension when they call you. Note: You cannot enter a contact PIN for a public contact.
Examples:
• Your extension is 177, and you give Mr. Jones a contact PIN of 55. Mr. Jones calls your office, and when prompted to enter your extension, he types in 17755. Wave is thus assured of identifying this call as coming from Mr. Jones.
• If you have a car for sale, you could advertise it in the paper with your extension plus a contact PIN (for example, “Call me at ext. 17756”). Set up the contact as “Car buyer” with a PIN of 56. Now when anyone calls about the ad, it appears as from “Car buyer” in your Call Monitor.
To enter a contact PIN
1. In the Contacts folder, double-click the contact for whom you want to create a contact PIN. The Contact dialog opens.
2. Click the Caller Identification tab. 3. Under Contact PIN, enter the number that you intend to give to this contact. If the contact
PIN you entered conflicts with one already created, Wave prompts you to enter a different number.
4. Click OK.
Opening contacts from within other folders
After an incoming call has been identified as coming from a contact, you can easily open the contact record from a Messages folder (if the contact left a voice message) or the Call Log folder. Select the call or voice message, and then choose Actions > Open Contact.
Wave ViewPoint User GuideRelease 1.5 SP3 September 2009
Using contacts maintained in another contact manager 10-13Chapter 10: Managing Contacts and Groups
Using contacts maintained in another contact manager
If you make extensive use of another TAPI-compatible contact manager or customer relationship management application such as Microsoft Outlook, GoldMine or FrontOffice 2000, or Interact Commerce Corporation’s Act!, you can place Wave calls to your contacts from those applications by using the Wave TAPI Service Provider. See your Wave system administrator about installing the TAPI Service Provider, and then follow your contact manager’s instructions for placing calls. Calls placed by other applications still appear in your Wave Call Log and Call Monitor folders.You can also install the Wave Contact Manager Assistant (CMA) and receive screen-pops showing the name, the Caller ID, and the time of day of the call. Act! users can receive screen-pops without installing the CMA. You do not need to have the Wave ViewPoint installed to use the TAPI Service Provider or the CMA.
Using the Wave Contact Manager AssistantThe Contact Manager Assistant enables Outlook, GoldMine, or FrontOffice 2000 contact managers to pop up contact information automatically when contacts in one of your contact managers call. Wave recognizes the incoming Caller ID number, Caller ID, or name.
To run the Contact Manager Assistant
1. Choose Start > Programs > Vertical Wave > Contact Manager Assistant. The program starts and runs in the background.
2. Right-click in the system tray for a shortcut menu of commands that you can use to configure and personalize the program. For further instructions, see the CMA’s online Help.
Importing contacts from other contact managers into WaveYou can export contacts from other contact managers and import them into Wave.
Exporting contacts from Microsoft OutlookThe following instructions show how to export contacts from Microsoft Outlook: 1. In Outlook, Select File > Import and Export. 2. Select Export to a file from the list and click Next. 3. Select Comma Separated Values (Windows) and click Next. 4. Select a folder in which to store the contacts file and click Next. 5. Enter a filename and click Next. 6. Click Finish.
Wave ViewPoint User GuideRelease 1.5 SP3 September 2009
Using ViewPoint Groups 10-14Chapter 10: Managing Contacts and Groups
Importing contacts into WaveSee “Importing and exporting Wave items” on page 2-21.
Using ViewPoint Groups
A ViewPoint Group is a group of related extensions or contacts. Extensions in Wave include users and auto attendants. With a Group you can:• Send, reply, or forward a voice message to the Group. All users with voice mailboxes in the
Group receive the message at once. See “Sending a message directly to a user’s voicemail” on page 7-9.
• Create a call rule for the Group. Incoming calls from any user or contact in the Group are handled according to the call rule. For example, you can have a custom voicemail greeting that plays for all the members in your “VIP group.” See Chapter 11 for more information.
• View any extension in your Group when transferring calls, which makes it easier to pick the right recipient. You can set any Group to appear as a tab in the Extensions section of the Transfer To dialog. For example, you can define the members of your Sales department as a Group, including a Station Hunt Group or a special Sales auto attendant. When you have a call for the Sales department, you can click the Sales tab and see all the department members at a glance, along with their current personal statuses. See “Transferring a call” on page 5-8, and “Extensions list tabs” on page 4-2.
• Create a routing list that distributes calls to the users and contacts in a Group according to the distribution algorithm you choose. See “Routing calls to groups” on page 9-13.
Personal and public GroupsGenerally, the Groups you will create in Wave are personal Groups. Only you can see the personal Groups that you create. Other users cannot see Groups that you create. Public Groups, which are accessible to all Wave users who have permission to see them, can only be created in ViewPoint if you have the proper permission.
Wave ViewPoint User GuideRelease 1.5 SP3 September 2009
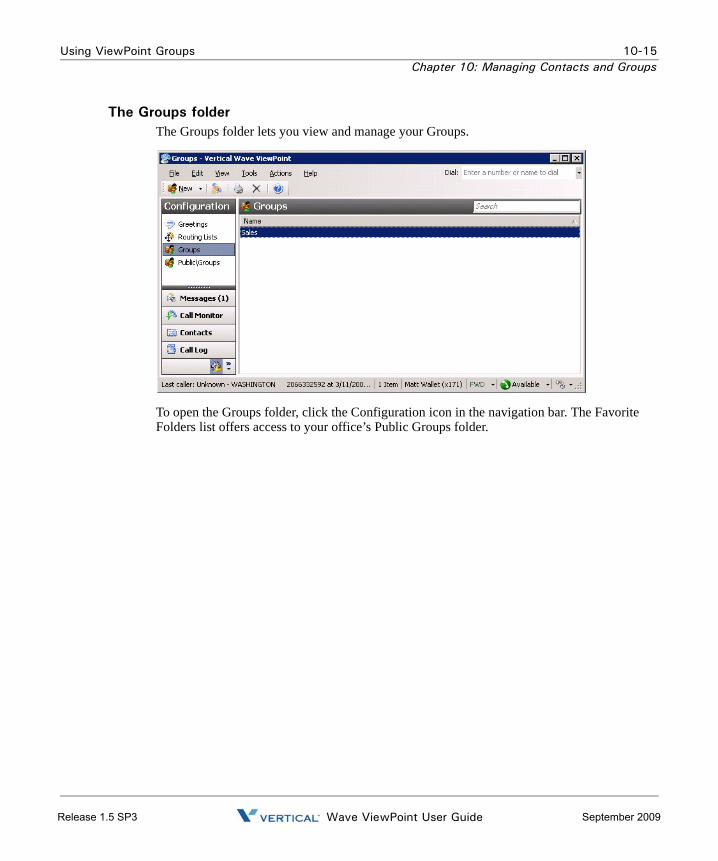
Using ViewPoint Groups 10-15Chapter 10: Managing Contacts and Groups
The Groups folderThe Groups folder lets you view and manage your Groups.
To open the Groups folder, click the Configuration icon in the navigation bar. The Favorite Folders list offers access to your office’s Public Groups folder.
Wave ViewPoint User GuideRelease 1.5 SP3 September 2009

Using ViewPoint Groups 10-16Chapter 10: Managing Contacts and Groups
Creating a Group
To create a new Group
1. Choose File > New > Group. The Group dialog opens.
2. Enter a Name for the Group and any Notes to describe the Group. 3. Add one or more members to the Group by selecting the category in Show, then selecting
the item from the list, then clicking Add. (You can also drag-and-drop.) Press Ctrl to select multiple names from the list. The members you selected appear in the Members list. Use the arrows next to the list to arrange the order of the members. Click Remove to delete members from the list.
Note: The order of the Group is important only if you have set up a routing list to route calls to it according to the Top Down or Round Robin algorithms. See “Routing calls to groups” on page 9-13. You can reorder the members by dragging-and-dropping or by clicking the arrow buttons.
4. Click OK.Each ViewPoint Group can appear as a tab in your Extensions list. For more information, see “Extensions list tabs” on page 4-2.
Wave ViewPoint User GuideRelease 1.5 SP3 September 2009
Chapter 11
Using Call Rules
Chapter Contents
About call rules
Wave call rules enable you to handle specific incoming calls differently from other calls. For example, you can create a call rule for your friend Jim so that he is routed to your cell phone and hears a special voicemail greeting whenever he calls. A call rule can trigger on calls from specific people and/or the dates and times that the call is received.
Call rules overviewTo create a call rule, you determine two things: • Which incoming calls activate the call rule• How the call rule handles those calls differently than calls that do not match a call rule
Distinguishing which incoming calls activate the call ruleYou can distinguish which incoming calls are handled by a call rule by using one or both of the following conditions:• People or Group condition. The rule activates depending on who is calling. In addition to
having call rules for individual callers, you can have call rules that apply to all internal callers, all external callers, unidentified callers, or any member of a Group.
Example: A call rule for your important client Jim activates whenever Jim calls.• Dates/Times condition. The rule activates depending on when the call arrives. You can
handle calls differently during business hours, after business hours, and at specific dates or times.
Example: A call rule handles all incoming calls after business hours.
About call rules . . . . . . . . . . . . . . . . . . . . . . . . . . . . . . . . . . . . . . . . . . . . . . . . . 11-1The Call Rules dialog . . . . . . . . . . . . . . . . . . . . . . . . . . . . . . . . . . . . . . . . . . . . 11-3Creating a new call rule . . . . . . . . . . . . . . . . . . . . . . . . . . . . . . . . . . . . . . . . . . 11-4Quickly creating call rules for contacts or groups . . . . . . . . . . . . . . . . . . . . . . . 11-9Call rule priority. . . . . . . . . . . . . . . . . . . . . . . . . . . . . . . . . . . . . . . . . . . . . . . . 11-10
Wave ViewPoint User GuideRelease 1.5 SP3 September 2009
About call rules 11-2Chapter 11: Using Call Rules
When you combine caller and schedule conditions, the call rule handles calls only when both conditions are met. For example, a call rule for your client Jim after business hours handles only calls from Jim that occur after business hours. If Jim calls during business hours, the call rule does not activate. Likewise, if anyone other than Jim calls after business hours, the call rule does not activate.
Determining how the call rule handles callsA matching call rule can handle incoming calls differently than other calls in the following ways:• Greeting. You can choose which greeting plays if the caller reaches your voicemail.• Routing List. You can choose which routing list the call follows.• Send to voicemail. You can send the call straight to voicemail without ringing your phone,
as if you were in Do Not Disturb status.• Always ring. You can override Do Not Disturb so that the call always rings your phone.
Examples of how you can use call rules• Calls from your “Prospects” Group can follow a routing list that tries you at several
locations in the office during business hours.• During your lunch hour, you can have a special “At lunch” greeting that plays to callers
before sending them to voicemail.• You can have the privacy of Do Not Disturb activate automatically every day at 6:00 pm,
but only for internal callers.• You can create a contact called “Nuisance Callers” and associate the phone numbers of
salespeople with that contact. Those callers can follow a routing list that plays a greeting and then hangs up without ringing your phone. The greeting can say, “I’m sorry. I don’t accept calls from salespeople during business hours.”
Wave ViewPoint User GuideRelease 1.5 SP3 September 2009

The Call Rules dialog 11-3Chapter 11: Using Call Rules
The Call Rules dialog
The Call Rules dialog lets you view and manage your call rules. To open the Call Rules dialog, choose Tools > Call Rules.
The top pane of the Call Rules dialog displays the call rules you have created. Call rules that are active display with a check mark in the Enabled column. Click a call rule to see its description in the bottom pane. You can click the links in the bottom pane description to edit elements of the selected call rule.
Enabling and disabling a call ruleTo disable a call rule, select it in the top pane and click Disable. Disabled call rules are not used. To enable it again, click Enable.
Organizing the priority of call rulesCall rules are listed in the top pane in order of priority, with the highest-priority call rule on top. To change a call rule’s priority, select it and move it in the list by clicking Move Up or Move Down.See “Call rule priority” on page 11-10 for more information.
Wave ViewPoint User GuideRelease 1.5 SP3 September 2009
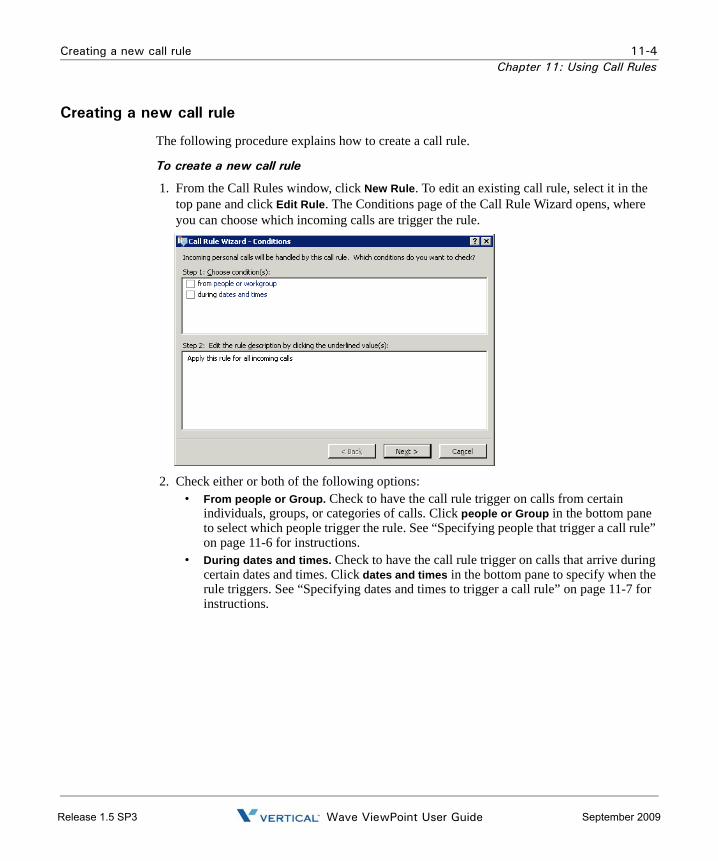
Creating a new call rule 11-4Chapter 11: Using Call Rules
Creating a new call rule
The following procedure explains how to create a call rule.
To create a new call rule
1. From the Call Rules window, click New Rule. To edit an existing call rule, select it in the top pane and click Edit Rule. The Conditions page of the Call Rule Wizard opens, where you can choose which incoming calls are trigger the rule.
2. Check either or both of the following options:• From people or Group. Check to have the call rule trigger on calls from certain
individuals, groups, or categories of calls. Click people or Group in the bottom pane to select which people trigger the rule. See “Specifying people that trigger a call rule” on page 11-6 for instructions.
• During dates and times. Check to have the call rule trigger on calls that arrive during certain dates and times. Click dates and times in the bottom pane to specify when the rule triggers. See “Specifying dates and times to trigger a call rule” on page 11-7 for instructions.
Wave ViewPoint User GuideRelease 1.5 SP3 September 2009
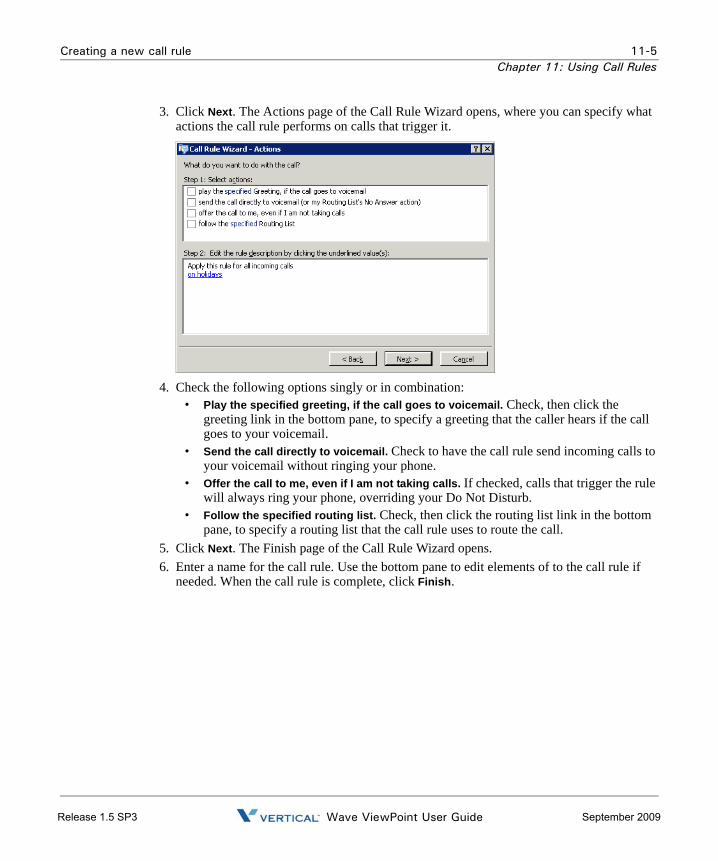
Creating a new call rule 11-5Chapter 11: Using Call Rules
3. Click Next. The Actions page of the Call Rule Wizard opens, where you can specify what actions the call rule performs on calls that trigger it.
4. Check the following options singly or in combination:• Play the specified greeting, if the call goes to voicemail. Check, then click the
greeting link in the bottom pane, to specify a greeting that the caller hears if the call goes to your voicemail.
• Send the call directly to voicemail. Check to have the call rule send incoming calls to your voicemail without ringing your phone.
• Offer the call to me, even if I am not taking calls. If checked, calls that trigger the rule will always ring your phone, overriding your Do Not Disturb.
• Follow the specified routing list. Check, then click the routing list link in the bottom pane, to specify a routing list that the call rule uses to route the call.
5. Click Next. The Finish page of the Call Rule Wizard opens. 6. Enter a name for the call rule. Use the bottom pane to edit elements of to the call rule if
needed. When the call rule is complete, click Finish.
Wave ViewPoint User GuideRelease 1.5 SP3 September 2009

Creating a new call rule 11-6Chapter 11: Using Call Rules
Specifying people that trigger a call ruleIf you check From people or Group on the Condition page of the Call Rule Wizard, click people or Group in the bottom pane to specify which callers trigger the call rule. The From People or Group dialog opens.
From the This call rule will apply to drop-down list, choose one of the following options:• The selected contact/user/Group. Click an item in the list. Type the beginning of the name
in the Search field to narrow the search. The call rule triggers on all calls from the selected contact, user, or Group member.
• All internal callers. The call rule triggers on all calls from within the Wave system.• All external callers. The call rule triggers on all calls from outside the Wave system.• All “Unknown” callers. The call rule triggers on all external calls not associated with a
personal or public Wave contact.• All “Unknown” callers without Caller ID name and number. The call rule triggers on external
calls that are not associated with a personal or public Wave contact, and also do not have a Caller ID name and number.
Wave ViewPoint User GuideRelease 1.5 SP3 September 2009
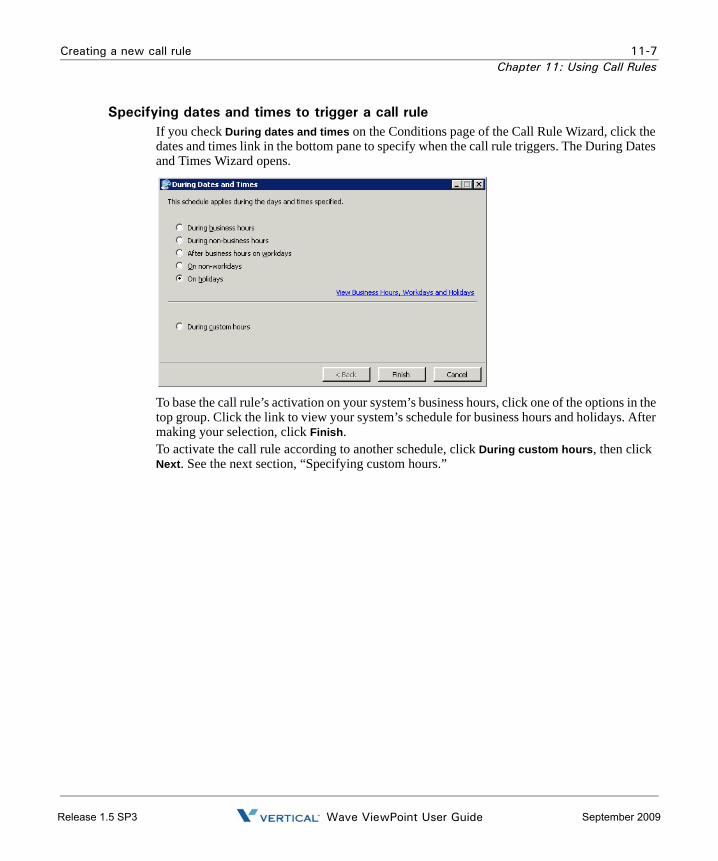
Creating a new call rule 11-7Chapter 11: Using Call Rules
Specifying dates and times to trigger a call ruleIf you check During dates and times on the Conditions page of the Call Rule Wizard, click the dates and times link in the bottom pane to specify when the call rule triggers. The During Dates and Times Wizard opens.
To base the call rule’s activation on your system’s business hours, click one of the options in the top group. Click the link to view your system’s schedule for business hours and holidays. After making your selection, click Finish.To activate the call rule according to another schedule, click During custom hours, then click Next. See the next section, “Specifying custom hours.”
Wave ViewPoint User GuideRelease 1.5 SP3 September 2009

Creating a new call rule 11-8Chapter 11: Using Call Rules
Specifying custom hoursIf you selected During custom hours as your schedule condition, click Next on the During Dates and Times page to open the next Wizard page, where you can specify when the call rule activates.
To have the call rule activate on a daily or weekly basis
1. On the Weekly tab, check the days on which you the call rule to activate. The call rule will activate every week on that day during the times specified.
2. To edit the active hours for a day, click the button for that day. You can also type in the hours using hyphens for a range and commas to separate multiple ranges. For example: 9:00 AM - 12:00 PM, 1:00 PM - 5:00 PM.
3. Click Finish.
Wave ViewPoint User GuideRelease 1.5 SP3 September 2009

Quickly creating call rules for contacts or groups 11-9Chapter 11: Using Call Rules
To have the call rule activate on one or more individual dates
1. Click the On a Specific Date and Time tab.
2. Enter a Date on which the call rule will be active. 3. To edit the active hours for that date, click . You can also type in the hours using
hyphens for a range and commas to separate multiple ranges. For example: 9:00 AM - 12:00 PM, 1:00 PM - 5:00 PM.
4. Click Add to add that date, with its selected hours, to the Dates and Times list. 5. Repeat steps 2 through 4 to add other dates to the Dates and Times list, if needed. The call
rule will activate on each date/time specified in the Dates and Times list. 6. To remove a date from the Dates and Times list, click it and click Remove. 7. Click Finish when done.
Quickly creating call rules for contacts or groups
To quickly create a call rule that triggers on calls from a contact or a member of a Group, do the following: 1. Select the contact or Group in the appropriate ViewPoint folder. 2. Choose Actions > Create Call Rule. The Call Rule Wizard opens with that contact or Group already entered. See “Creating a new call rule” on page 11-4 for further instructions.
Wave ViewPoint User GuideRelease 1.5 SP3 September 2009

Call rule priority 11-10Chapter 11: Using Call Rules
Call rule priority
Wave handles incoming calls according to the priority of your call rules. The call rules in the Call Rules window are ordered from the top down. If two call rules apply to the same call, the call rule highest in the list is the one used. You can create multiple call rules that contain similar caller and schedule conditions, and then prioritize them to ensure that the correct greeting and routing list are used for calls. For example, if you create a call rule for a Group, but want calls from a certain individual within that Group to be handled differently, you can create a call rule for that individual and give it a higher priority than the Group’s call rule.
To set the priority of a call rule
1. Select a call rule in the Call Rules window. 2. Click Move Up or Move Down to move the call rule to a higher or lower priority position.
How Wave resolves call rule conflictsWhen a call is subject to multiple call rules, the actions taken (greeting, routing list, etc.) are determined by the highest call rule in the list for which an action is selected. If the highest rule sets an action, that action is used. But if it has an unselected action, while a lower rule sets that action, the action from the lower rule is used. This can result in actions from different call rules being used on a single call.Example: A call rule for Paul plays a custom greeting, but leaves the routing list action unselected. Paul is also a member of the Sales Group, for which you have a lower call rule that specifies a routing list to follow. When Paul calls, Wave plays the custom greeting from the higher call rule, and uses the routing list from the lower call rule.
Wave ViewPoint User GuideRelease 1.5 SP3 September 2009
Chapter 12
Customizing ViewPoint
Chapter Contents
About customizing ViewPoint
You can customize ViewPoint and your Wave account to suit the way you work.Most customization options presented in this chapter are set in the Options dialog, accessed by choosing Tools > Options. Your Wave system administrator may have made some or all tabs of the Options dialog unavailable to you. See your system administrator if you cannot access a particular option that is described in this chapter.
Guide to the Options dialogNote: Depending on your system configuration, some Options tabs may not be visible to you. See your system administrator to see whether a given feature is turned on.Use the following table to locate instructions for the fields in the Options dialog.
About customizing ViewPoint . . . . . . . . . . . . . . . . . . . . . . . . . . . . . . . . . . . . . . 12-1Customizing phone behavior . . . . . . . . . . . . . . . . . . . . . . . . . . . . . . . . . . . . . . 12-3Customizing incoming call behavior . . . . . . . . . . . . . . . . . . . . . . . . . . . . . . . . . 12-5Customizing voice message behavior . . . . . . . . . . . . . . . . . . . . . . . . . . . . . . . 12-6Customizing ViewPoint for operators . . . . . . . . . . . . . . . . . . . . . . . . . . . . . . . . 12-7Customizing the ViewPoint display. . . . . . . . . . . . . . . . . . . . . . . . . . . . . . . . . . 12-7Other customization options . . . . . . . . . . . . . . . . . . . . . . . . . . . . . . . . . . . . . . 12-10
Options dialog Fields
Tab Field See...
Personal Voice Title “Recording a voice title” on page 12-3Telephone Prompts “Changing the language of phone com-
mand prompts” on page 12-3Personal Operator “Changing your personal operator” on
page 12-4\My Numbers “Entering My Numbers” on page 6-4Phone Default Ring Duration “Customizing how long your phone
rings” on page 12-5Enable Call Waiting “Customizing or turning off call wait-
ing” on page 12-4
Wave ViewPoint User GuideRelease 1.5 SP3 September 2009

About customizing ViewPoint 12-2Chapter 12: Customizing ViewPoint
Voice Messages Maximum message length “Setting a maximum length for your voice messages” on page 7-8
Voice message playback order
“Setting voice message playback order” on page 12-6
Play a sound... “Playing a sound when a new message arrives” on page 12-6
\ Usage Usage “Managing your voicemail maximums” on page 7-8
Remove Items from Deleted folder
“Managing the Deleted folder” on page 2-18
\ E-Mail Notification “Setting up e-mail notification” on page 7-11
\ Pager Notification “Setting up pager notification” on page 7-12
\ Call Notification “Setting up call notifications” on page 7-13
ViewPoint Log on automatically “Resetting ViewPoint so that login is required” on page 2-3
Double clicking contacts... “Defining double-click behavior in the Contacts folder” on page 12-8
Language\ Call Monitor Display Call Monitor... “Displaying the Call Monitor folder
automatically” on page 5-4\ Call Alerts “Customizing incoming call behavior”
on page 12-5
Options dialog Fields (continued)
Tab Field See...
Wave ViewPoint User GuideRelease 1.5 SP3 September 2009

Customizing phone behavior 12-3Chapter 12: Customizing ViewPoint
Customizing phone behavior
The options described in this section allow you to customize your interaction with Wave on the phone. These options include:• Recording a voice title. See this page.• Changing the language of phone command prompts. See page 12-3.• Customizing or turning off call waiting. See page 12-4.• Changing your personal operator. See page 12-4• Customizing your listing in the dial-by-name directory. See page 12-4• Customizing how long your phone rings. See page 12-5.
Recording a voice titleA voice title is a short recording of just your name that Wave fits into its own recorded prompts.
To record a voice title in ViewPoint
1. Choose Tools > Options. The Options dialog opens. 2. On the Personal tab, use the audio controls for Voice Title to record your voice title. See
“Using the audio controls” on page 2-19 for more information. 3. Click OK.You have a limited amount of space for your voice title, your contacts’ voice titles, your greetings, and recorded conversations. Ask your Wave system administrator how much space you have been allocated and how much you have used.
Changing the language of phone command promptsWave can play the phone command prompts in any language that was installed with Wave. Whenever you log on or press Flash (on an analog phone), the prompts are played in the language you choose.
To change the phone commands language
1. Choose Tools > Options. The Options dialog opens. 2. On the Personal tab, select the language that you want on the Telephone prompts
drop-down list. All languages that were installed with Wave appear on the list. 3. Click OK. You will be prompted to restart ViewPoint.
Wave ViewPoint User GuideRelease 1.5 SP3 September 2009

Customizing phone behavior 12-4Chapter 12: Customizing ViewPoint
Customizing or turning off call waitingWith call waiting turned off, incoming calls that arrive while you are on the phone go directly to your voicemail.However, if call waiting is turned off, you can easily intercept an incoming call visually in your Call Monitor folder. See Chapter 5 for more information.Note: Call Waiting can only be customized if your phone supports it.
To customize call waiting or turn it off
1. Choose Tools > Options. The Options dialog opens. 2. On the Phone tab, check Enable call waiting if you want to use call waiting. Uncheck it if
you want to turn call waiting off. 3. Click OK.
Changing your personal operatorCallers who reach your voicemail can always press 0. By default, 0 transfers them to your system’s Operator, but you can transfer them to any other extension, for example, your company’s auto attendant.
To change the extension to which callers transfer when they press 0
1. Choose Tools > Options. The Options dialog opens. 2. On the Personal tab, choose an extension on the Personal Operator drop-down list. 3. Click OK.
Customizing your listing in the dial-by-name directoryThe dial-by-name directory lets callers dial a user by entering the first few letters of the user’s name. Callers who know your name but not your extension can find you quickly in the dial-by-name directory. You can remove your name from the dial-by-name directory if you want only callers who know your extension to call you. You can also specify whether or not the dial-by-name directory reads your extension to callers.
To customize your dial-by-name listing
1. Choose Tools > Options. The Options dialog opens. 2. On the Personal tab, uncheck List in dial-by-name directory to remove yourself from the
directory. If checked, callers can dial you by name.
Wave ViewPoint User GuideRelease 1.5 SP3 September 2009

Customizing incoming call behavior 12-5Chapter 12: Customizing ViewPoint
3. If you choose to be listed in the dial-by-name directory, you can check Play extension to the caller to have Wave read your extension to callers who find you by using the dial-by-name directory. Callers hear “Transferring to <your voice title> at extension <your extension>.”
If unchecked, callers who find you by using the dial-by-name directory hear only “Transferring to <your voice title>.”
4. Click OK.
Customizing how long your phone ringsYou can specify how long a call rings your phone before it proceeds to your voicemail. Ring duration for call forwarding is determined elsewhere.
To specify how long your phone rings
1. Choose Tools > Options.The Options dialog opens. 2. Click the Phone tab. 3. In the Default ring duration field, enter the number of seconds your phone should ring
before a call is sent to your voicemail.The ring duration you enter here can be overridden by the ring duration specified in a personal status.
Note: By default the minimum ring duration is 5 seconds and the maximum is 120 seconds. Your system administrator can extend the possible range from 1 to 999 seconds.
4. Click OK.Note: Caller ID is transmitted between the first and second ring. If your phone supports Caller ID, you may want to increase this setting so that there is enough time for Caller ID to be displayed and read before the call is sent to your voicemail.
Customizing incoming call behavior
You can set various call alert behaviors to occur when you receive an incoming call. If you have Call Monitor tabs other than “My Phone,” you can set call alerts separately for each tab-category of calls (see “Call Monitor folder tabs” on page 5-2). For example, you can have the ViewPoint title bar flash only on calls for your colleague whose Call Monitor you are sharing.
To set call alerts
1. Choose Tools > Options. The Options dialog opens. 2. Click the ViewPoint \ Call Alerts tab.
Wave ViewPoint User GuideRelease 1.5 SP3 September 2009
Customizing voice message behavior 12-6Chapter 12: Customizing ViewPoint
3. Use the drop-down list to choose the category of incoming call for which you want to set call alerts. The categories correspond to your Call Monitor tabs. You can set alerts differently for each category. To set alerts that trigger on all incoming calls, select “For all incoming calls.”
Note: With “For all incoming calls” selected, a half-selection mark indicates that the option is selected in another category.
4. Select any of the following options:• Display a pop-up notification window. A pop-up window appears showing call
information and allowing you to act on the call.• Play the caller’s name over the speakers. Announces the caller's name over your
computer speakers if the recording is available. Wave users and identified contacts are announced if they have voice titles already recorded.
• Flash the title bar. Flashes ViewPoint’s title bar.• Display the Call Monitor. Brings ViewPoint to the front of your desktop with the Call
Monitor showing when a call arrives. If you are actively working in another folder, ViewPoint opens the Call Monitor folder.
5. Click OK.
Customizing voice message behavior
You can customize use of stutter dial tone, the message waiting light, and the order in which you hear your voice messages. For example, you can hear your Unheard (new) messages in the order newest to oldest, and then you can hear your heard (old) messages in the order oldest to newest.
Setting voice message playback order
To set voice message playback order
1. Choose Tools > Options. The Options dialog opens. 2. Click the Voice Messages tab. 3. Under Voice message playback order, choose the order you prefer. 4. Click OK.
Playing a sound when a new message arrives
To play a sound when a new message arrives
1. Choose Tools > Options. The Options dialog opens. 2. Click the Voice Messages tab.
Wave ViewPoint User GuideRelease 1.5 SP3 September 2009
Customizing ViewPoint for operators 12-7Chapter 12: Customizing ViewPoint
3. Check Play a sound when a new message arrives. 4. Click OK.
Note: The sound file played is Chord.wav, located in the Wave ViewPoint directory (by default C:\Program Files\Wave\Client). To play a custom sound file, name it Chord.wav and place it in that directory.
Customizing ViewPoint for operators
If you are an Operator user, you can use the following options to make your tasks easier and faster:• Transfer calls by dragging-and-dropping to the Phonebook pane. If you display the
Phonebook pane in the Call Monitor folder, you can transfer a call by dragging it from the Call Monitor to a contact or an extension. This action performs a blind transfer. See “Adjusting the Phonebook Pane layout in the Call Monitor” on page 2-12 and “Dragging and dropping items” on page 2-14.
• Resize the Transfer To dialog. You can make the Transfer To dialog larger so that you can see more users and more columns at a glance. Wave remembers the new size of the Transfer To dialog whenever you open it.
• View users by Group. In the Extensions list and Transfer To dialog, each Group can be represented by a tab that lists its members. You can create Groups that represent the departments of your office, so that when transferring calls, you can see at a glance all the users in a given department. For example, if you have to transfer a call to Sales, you can click the Sales tab (for the Sales Group) and see all the members of the Sales department and their current personal statuses. See “Extensions list tabs” on page 4-2.
• Manage all parked calls together. Right-click any Call Monitor tab, choose Show Tabs, and add the Parked tab.
Customizing the ViewPoint display
You can customize your ViewPoint display in any of the following ways.
Changing ViewPoint’s languageYou can change the language of the ViewPoint user interface. To do so: 1. Choose Tools > Options. The Options dialog opens. 2. Click the ViewPoint tab. 3. Select the desired language from the Language drop-down list. 4. Click OK. You must restart ViewPoint for the change to take effect.
Wave ViewPoint User GuideRelease 1.5 SP3 September 2009

Customizing the ViewPoint display 12-8Chapter 12: Customizing ViewPoint
Defining double-click behavior in the Contacts folderDouble-clicking a contact lets you either edit the information for the contact or place a call to the contact. To set double-click behavior
1. Choose Tools > Options. The Options dialog opens. 2. Click the ViewPoint tab. 3. Under Double clicking contacts behavior, select the desired behavior. 4. Click OK.
Customizing columnsYou can choose to show or hide columns in a folder. You can also customize columns in a folder by moving, resizing, and sorting them. The changes you make to columns in a folder are saved when you exit ViewPoint.Showing and hiding columnsFor each folder in ViewPoint, you can choose the columns that you want to see in the folder. Some folders do not show all the available columns by default.
To show or hide columns in a ViewPoint folder
1. Choose View > Current View > Show Columns. You can also right-click in the folder and select Show Columns. The Show Columns dialog opens. For an explanation of the columns, click Help.
Wave ViewPoint User GuideRelease 1.5 SP3 September 2009

Customizing the ViewPoint display 12-9Chapter 12: Customizing ViewPoint
2. Do any of the following:• In the Available columns list, select a column and click Add to show it. • In the Show these columns in this order list, select a column and click Remove to
hide it.• Use the arrows to arrange the columns in the left-to-right order you want. The highest
columns appear furthest to the left.You can also drag and drop to move columns between panes and reorder them.
3. Click OK.
Moving columnsTo move a column, click its header and then drag and drop it to a new location. You can also move columns by using the Show Columns dialog (see the previous section).
Resizing columnsYou can change column widths by dragging the sides of the column headers.
Sorting by columnClick a column header to sort the items in a folder by the information in that column. Click the column header again to sort in the reverse order.The column in the folder that contains an arrow is the column by which the display is currently sorted. The direction of the arrow indicates the order.
Wave ViewPoint User GuideRelease 1.5 SP3 September 2009
Other customization options 12-10Chapter 12: Customizing ViewPoint
Other customization options
The following table refers you to customization options described elsewhere in this manual.
Feature Description See
Recording greetings Create recordings that callers hear when they reach your voicemail.
page 7-18
Automatically logging on Log on to ViewPoint without needing to enter your password.
page 2-2
Displaying the Call Monitor folder automatically
Bring ViewPoint to the front with the Call Monitor showing when you place calls from ViewPoint.
page 5-4
Setting e-mail and pager notifica-tion
Receive an e-mail message or a page whenever you have new voice messages.
page 7-11
Setting deletion options Choose how voice messages are perma-nently deleted from the Deleted folder.
page 2-18
Wave ViewPoint User GuideRelease 1.5 SP3 September 2009
R
Chapter 13
13. Running Contact Center Reports
CHAPTER CONTENTS
Important: The full Wave Contact Center has not yet been officially released. However, you can use the Contact Center Reporter now to report on non-queue call activity and phone usage. The available reports are listed on the next page, and are described in more detail on page 13-15. Once Wave Contact Center is generally available, additional reports will be available.
About the Contact Center Reporter
The Contact Center Reporter allows you to run more than a dozen detailed reports on call activity and phone usage in Wave. You run reports on both queue calls and activity that has nothing to do with queues, such as general user and trunk usage. By carefully tracking the relevant call activity, you can quickly identify how effectively your phone system is being used by agents, queues, or trunks.
With the Contact Center Reporter, you can also analyze general system data not related to call distribution systems, such as the activity on your trunks.
You can configure each report to show information over any time period, from a single day to months or even years.
About the Contact Center Reporter . . . . . . . . . . . . . . . . . . . . . . . . . . . . . . . . . 13-1Running a report . . . . . . . . . . . . . . . . . . . . . . . . . . . . . . . . . . . . . . . . . . . . . . . 13-3Setting Reporter options . . . . . . . . . . . . . . . . . . . . . . . . . . . . . . . . . . . . . . . . . 13-7Using Excel tabs to view report results . . . . . . . . . . . . . . . . . . . . . . . . . . . . . 13-11Printing and scheduling reports with the Report Runner . . . . . . . . . . . . . . . . 13-12Available reports overview . . . . . . . . . . . . . . . . . . . . . . . . . . . . . . . . . . . . . . . 13-15Individual report descriptions . . . . . . . . . . . . . . . . . . . . . . . . . . .beginning on 13-16
Wave ViewPoint User Guideelease 1.5 SP3 September 2009
About the Contact Center Reporter 13-2Chapter 13: Running Contact Center Reports
Note the following:
• You cannot run reports on time periods for which you have archived the Call Log. Archiving removes information from the Wave database and makes it unavailable for reports.
• If you are running the Contact Center Reporter on a computer other than the Wave Server, make sure that the clocks on the two computers are synchronized. All report times and dates are based on the clock of the local PC.
Contact Center Reporter requirements
To run the Contact Center Reporter, you need the following:
• Microsoft Excel 2003 SP3 or higher must be installed on the ViewPoint PC.
• Wave permission to run reports. You must have the permission Access Contact Center Reporter set to Allow. See Chapter 11 in the Wave Global Administrator Guide for instructions on setting permissions.
• A Contact Center Reporter license is required to run many reports. However, you do not need a Contact Center Reporter license to run the following reports:
• Call Log report
• Call Transfer report
• Grouped Service Level report
• Outbound Call Comparison report
• Outbound Calls By Phone Number report
• Outbound Long Distance Summary report
• Unanswered During Business Hours report
• User Call Trends report
• To avoid a potential error when running reports, you must obtain the following updates from the Microsoft Download Center (www.microsoft.com/downloads) and install them on the ViewPoint PC:
• KB955466 (Excel 2003 update)
• KB907417 (Office 2003 update)
Wave ViewPoint User GuideRelease 1.5 SP3 September 2009
Running a report 13-3Chapter 13: Running Contact Center Reports
R
Running a report
The following steps describe how to start the Contact Center Reporter and run a report.
Note: To run some reports, you must first define general Reporter options. See “Setting general Reporter options” on page 13-8.
To run a Contact Center report
1 In ViewPoint, choose Tools > Reports. The Contact Center Reporter dialog opens.
2 Click the name of the report that you want to run. The report template opens in Microsoft Excel and shows data according to the options most recently selected for that report.
If the following prompt regarding macros appears while Excel is opening, check Always trust macros from this source. Then click Enable Macros.
3 The Options dialog for the selected report opens. If it does not, click on the Excel Reporter toolbar. (See “Using the Contact Center Reporter toolbar in Excel” on page 13-4.)
4 In the Options dialog, modify the report parameters to focus on the time period or other information that you are interested in. See “Setting individual report options” on page 13-10 for more information.
5 Click OK. The report runs and is displayed in Excel. Use Excel’s options to view the report in graphical or spreadsheet format.
6 The Reporter dialog remains open. To run another report, click another report name.
Wave ViewPoint User Guideelease 1.5 SP3 September 2009

Running a report 13-4Chapter 13: Running Contact Center Reports
Viewing report headers and footers
You must have a printer installed on your computer in order to view the headers and footers on reports. The headers and footers include such data as report title, agent and queue name, date range, date printed, and the days of the week for the report. If you do not have a printer (local or network) configured on your computer, the headers and footers will be blank.
Using the Contact Center Reporter toolbar in Excel
Wave makes Contact Center Reporter options available to you from within Excel on the Reporter toolbar. To display the Contact Center Reporter Toolbar in Excel, choose View > Toolbars > Contact Center Reporter Toolbar.
Note: For the Contact Center Reporter toolbar to be available, you must have opened a report from the Contact Center Reporter dialog.
The Contact Center Reporter toolbar offers buttons for the commands listed in the following table.
Contact Center Reporter toolbar buttons
New Wave Report. Opens the Reporter dialog or brings it to the front if it is already open, so that you can select a report to run. See “Running a report” on page 13-3.
Export without Macros. Saves the report so that it can be opened in Excel on any PC. Reports saved with macros can be opened only on PCs with Wave applications installed.
Report Options. Opens the Report Options dialog for the report cur-rently showing, so that you can change the report parameters and run the report again.
Refresh Report. Runs the report again with the same options as were used to generate the current report. Use to update the report with the latest data.
Help. Opens the Contact Center Reporter online Help.
Wave ViewPoint User GuideRelease 1.5 SP3 September 2009

Running a report 13-5Chapter 13: Running Contact Center Reports
R
Shared and local reports
Reports can be either shared or local, as follows:
• Shared reports are stored on the Vertical Wave Server and can be run from any ViewPoint PC. Shared reports are indicated in the Reporter dialog by (blank report) or (report with data) in the Shared/Data column.
The default path for shared reports on the Wave Server is: C:\Program Files\Vertical Wave Server\Reports
• Local reports are stored on the ViewPoint PC itself, and can only be run from that PC. Local reports are indicated in the Reporter dialog by in the Shared/Data column.
The default path for local reports is: C:\Program Files\Vertical Wave\ViewPoint\Reporter\Reports
The reports that come with Wave are all shared reports.
To share a local report
1 Select the report in the Reporter dialog.
2 Choose File > Share.
After sharing a report, click the Refresh Report button on the Reporter dialog toolbar to see the shared report in the Reporter dialog.
Wave ViewPoint User Guideelease 1.5 SP3 September 2009

Running a report 13-6Chapter 13: Running Contact Center Reports
Reporting on internal calls
You can optionally include internal (station-to-station) call information in your reports.
To specify whether or not to log internal calls
1 In the Administrator, choose Tools > System Settings.
2 Click the Call Log tab.
3 To log internal calls, select the Log internal calls checkbox. To stop logging internal calls, deselect the check box.
4 Click OK.
Wave ViewPoint User GuideRelease 1.5 SP3 September 2009
Setting Reporter options 13-7Chapter 13: Running Contact Center Reports
R
Reporting on outbound Contact Center calls
For agents’ outbound calls to appear in reports, the agents must mark their outbound calls as calls that are placed from the Contact Center. See “Placing calls from a queue vs. calling as user” on page 5-9 and “Placing ACD workgroup calls” on page 7-18.
Backups of original reports
Because a user can accidentally overwrite a shared report by sharing one of his own reports with the same name, backup copies of the original Wave report templates are provided in the Reports_backup directory in the Wave Server directory.
Do not modify Contact Center report templates!
Important: Wave maintains report template (.XLT) files on the ViewPoint PC for its internal use. Do not modify these as a means of editing the Wave reports. If you do, your changes will be lost, because Wave regularly overwrites the reports. To modify a report template, save the XLT file with a different name so that it is not overwritten by the Reporter.
Setting Reporter options
You set Reporter options in several ways:
• Setting general Reporter options. See page 13-8.
• Setting individual report options. See page 13-10.
Wave ViewPoint User Guideelease 1.5 SP3 September 2009
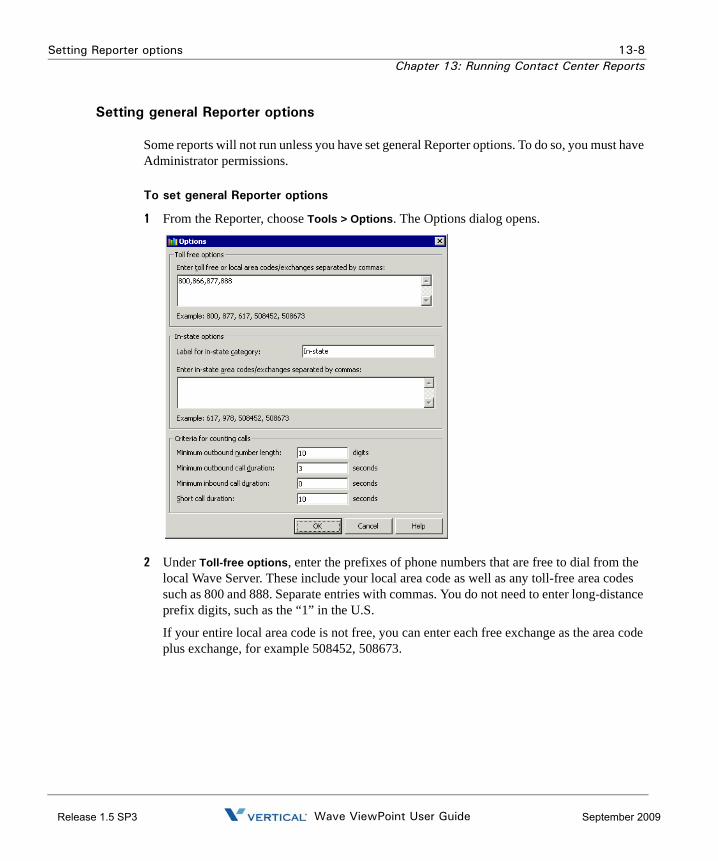
Setting Reporter options 13-8Chapter 13: Running Contact Center Reports
Setting general Reporter options
Some reports will not run unless you have set general Reporter options. To do so, you must have Administrator permissions.
To set general Reporter options
1 From the Reporter, choose Tools > Options. The Options dialog opens.
2 Under Toll-free options, enter the prefixes of phone numbers that are free to dial from the local Wave Server. These include your local area code as well as any toll-free area codes such as 800 and 888. Separate entries with commas. You do not need to enter long-distance prefix digits, such as the “1” in the U.S.
If your entire local area code is not free, you can enter each free exchange as the area code plus exchange, for example 508452, 508673.
Wave ViewPoint User GuideRelease 1.5 SP3 September 2009

Setting Reporter options 13-9Chapter 13: Running Contact Center Reports
R
3 Under In-state options, use the following fields to define how in-state calls appear on the outbound call reports:
• Label for in-state category. Type the name for in-state calls that will appear on the x-axis of reports that use this option.
• Enter in-state... Enter a list of area code and exchanges that are in your State but not free, for example area codes in your State other than your local one. You do not need to enter long-distance prefix digits, such as the “1” in the U.S.
4 Under Criteria for counting outbound calls, use the following fields to define which calls are counted in various report categories:
• Minimum outbound number length. In North America this field should be left at 10 so that the reports pick up all long-distance calls. Further filtering, for example for the Outbound Long Distance Summary report, will be provided by the toll-free and in-state fields above.
• Minimum inbound/outbound call duration. These two fields ensure that the reports count only calls that were connected. You can adjust the setting as desired. A setting of 1 second is generally sufficient to include all connected calls.
• Short call duration. Enter the number of seconds at or below which a call is considered a “short call” by various reports, such as the Agent Performance by Skill report.
5 Click OK.
Wave ViewPoint User Guideelease 1.5 SP3 September 2009
Setting Reporter options 13-10Chapter 13: Running Contact Center Reports
Setting individual report options
The Options dialog appears automatically whenever you run a report, letting you specify the parameters for the report. You can also click Report Options on the Reporter toolbar to change a report’s parameters and run it again, for example, with a different date range.
The following options are available for most reports:
• Queue. Select the queue on which you want to run the report.
• Agent. Select the agent on whom you want to run the report.
• Period. Select the time frame for which you want to report. Use the Start and End fields for custom time frames.
• Interval. Select the length of time reflected by the report, such as hours, days, or months. The time periods appear on the x-axis of the report.
Click OK in the Report Options dialog to run the report according to the options that you selected.
Wave ViewPoint User GuideRelease 1.5 SP3 September 2009
Using Excel tabs to view report results 13-11Chapter 13: Running Contact Center Reports
R
Using Excel tabs to view report results
Most Wave reports contain the following tabs in Excel:
• Report. A graphical presentation of the data.
• Data. A numerical presentation of the data.
• Report Options. A worksheet showing the options selected for the report.
Totals on the Data tab
Sometimes totals on the Data tab appear to be inaccurate. This is usually due to the way Excel presents numbers, rounding them to the number of displayed digits. The total is always formed by taking the sum of the complete numbers, then rounding. For example:
Using the Report Options tab in Excel
Most users should not try to change the report parameters by changing the data on the Report Options tab. Instead, click Report Options on the Reporter toolbar and enter new parameters in the Options dialog, as described earlier in this section.
The Report Options tab in Excel is for those who want to print out the full workbook, with a record of the selected options. Macro writers and other skilled spreadsheet users can also use the tab to generate reports without using the Report Options dialog.
Displayed numbers Complete numbers
6.475.87
6.46505.8699
Totals 12.33 12.3349
Wave ViewPoint User Guideelease 1.5 SP3 September 2009

Printing and scheduling reports with the Report Runner 13-12Chapter 13: Running Contact Center Reports
Printing and scheduling reports with the Report Runner
The Report Runner enables you to create a desktop shortcut for running and printing a report. You can then run the report just by clicking the shortcut. You can choose whether to send the report to a printer or a file.
You can also use the Windows Task Scheduler to run the Report Runner at any time and interval you choose. See Windows Online Help for the Task Scheduler for more information.
To create a Report Runner shortcut for running a report
1 Create a shortcut to the Report Runner file, Tvrrun.exe. The default location for the Report Runner file is:C:\Program Files\Vertical Wave\ViewPoint\Reporter\TVRRun\Tvrrun.exe
For instructions on creating a shortcut, see your Microsoft Windows documentation.
2 Right-click the shortcut and choose Properties.
3 In the Target field, add the following after the path:• The path to the XLS file of the report you want to run.• (optional) -C to send the chart report to your default printer.• (optional) -T to send the data report to your default printer.• (optional) -S <output file> to print the report to a file. If you do not specify an output
file, the new report overwrites the source XLS file. Note: Do not use quotes around the file path.
See the next section for examples of the Target statement.
4 To set report options, such as queue name or selected hours, use the Report Options tab in your saved XLS spreadsheet file. See “Using the Report Options tab in Excel” on page 13-11.
5 Click OK.
Wave ViewPoint User GuideRelease 1.5 SP3 September 2009
Printing and scheduling reports with the Report Runner 13-13Chapter 13: Running Contact Center Reports
R
Examples of the shortcut Target statement
The following are examples of how the shortcut’s Target field might look:
• C:\Program Files\Vertical Wave\ViewPoint\Reporter\TVRRun\Tvrrun.exe C:\Program Files\Vertical Wave\ViewPoint\Reporter\Reports\Wait by Outcome1.xls -C
The chart for the Wait by Outcome1.xls report is sent to the printer.• C:\Program Files\Vertical Wave\ViewPoint\Reporter\TVRRun\
Tvrrun.exe C:\Program Files\Vertical Wave\ViewPoint\Reporter\Reports\Trunk Performance.xls -C -T
The chart and the data sheet for the Trunk Performance Report are sent to the printer.• C:\Program Files\Vertical Wave\ViewPoint\Reporter\TVRRun\
Tvrrun.exe C:\Program Files\Vertical Wave\ViewPoint\Reporter\Reports\User Activity.xls -S
The XLS file of the User Activity report is overwritten with the new report.• C:\Program Files\Vertical Wave\ViewPoint\Reporter\TVRRun\
Tvrrun.exe C:\Program Files\Vertical Wave\ViewPoint\Reporter\Reports\User Activity.xls -S C:\Program Files\Vertical Wave\ViewPoint\Reporter\Reports\Fred_Sanders.xls
The User Activity report is written to the file Fred_Sanders.xls in the Reports directory (Note no quotes around the file path).
Using the Report Runner
When running or scheduling reports automatically with the Report Runner, you must do the following:
1 Run the report manually for the user you want and for the period you want.
2 Clear all sheets except for the “Report Options” sheet. (Click the top left cell to select all, then press Delete.)
Wave ViewPoint User Guideelease 1.5 SP3 September 2009
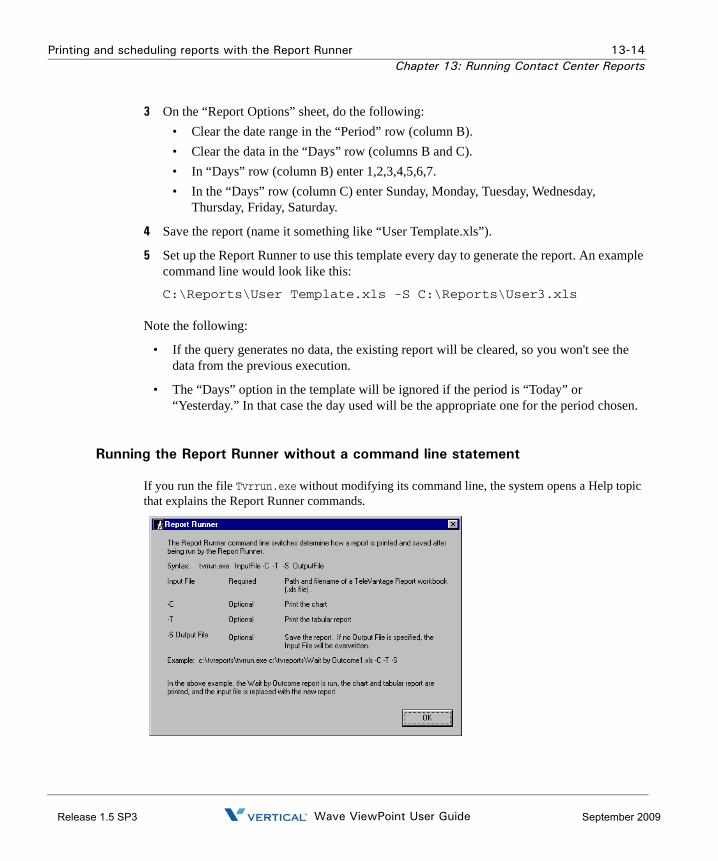
Printing and scheduling reports with the Report Runner 13-14Chapter 13: Running Contact Center Reports
3 On the “Report Options” sheet, do the following:• Clear the date range in the “Period” row (column B).• Clear the data in the “Days” row (columns B and C).• In “Days” row (column B) enter 1,2,3,4,5,6,7.• In the “Days” row (column C) enter Sunday, Monday, Tuesday, Wednesday,
Thursday, Friday, Saturday.
4 Save the report (name it something like “User Template.xls”).
5 Set up the Report Runner to use this template every day to generate the report. An example command line would look like this:
C:\Reports\User Template.xls -S C:\Reports\User3.xls
Note the following:
• If the query generates no data, the existing report will be cleared, so you won't see the data from the previous execution.
• The “Days” option in the template will be ignored if the period is “Today” or “Yesterday.” In that case the day used will be the appropriate one for the period chosen.
Running the Report Runner without a command line statement
If you run the file Tvrrun.exe without modifying its command line, the system opens a Help topic that explains the Report Runner commands.
Wave ViewPoint User GuideRelease 1.5 SP3 September 2009
Available reports overview 13-15Chapter 13: Running Contact Center Reports
R
Available reports overview
You can produce the reports listed in the following table. For detailed examples of the reports, see the sections referenced in the table.
Contact Center Reports
Name Description
Call Log report(see page 13-16)
By any time interval, shows all the information that appears in the Call Log for the entire system or the selected user or queue, in a spreadsheet form that is easy to sort or filter.
Call Transfer report(see page 13-17)
By any time interval, reports on all of the calls that a user or queue trans-ferred to other entities.
Grouped Service Level report(see page 13-18)
By five-second increments, shows wait time for all external calls that were answered by a user.
Outbound Call Compari-son report(see page 13-19)
Shows the number and duration of outbound calls in the following catego-ries: In-state, Toll-free, and Other.
Outbound Calls by Phone Number report(see page 13-20)
Shows the number and duration of outbound calls placed to prefixes that you specify, for example 800 or 212.
Outbound Long Distance Summary report(see page 13-21)
By any time interval, shows your outbound long-distance phone traffic and estimates your phone bill.
Unanswered Calls During Business Hours report(see page 13-23)
By any time interval, shows external inbound calls during your Wave busi-ness hours that were not answered by a user.
User Call Trends report(see page 13-24)
Shows the number of calls a user made or received and the user’s average talk time.
Wave ViewPoint User Guideelease 1.5 SP3 September 2009
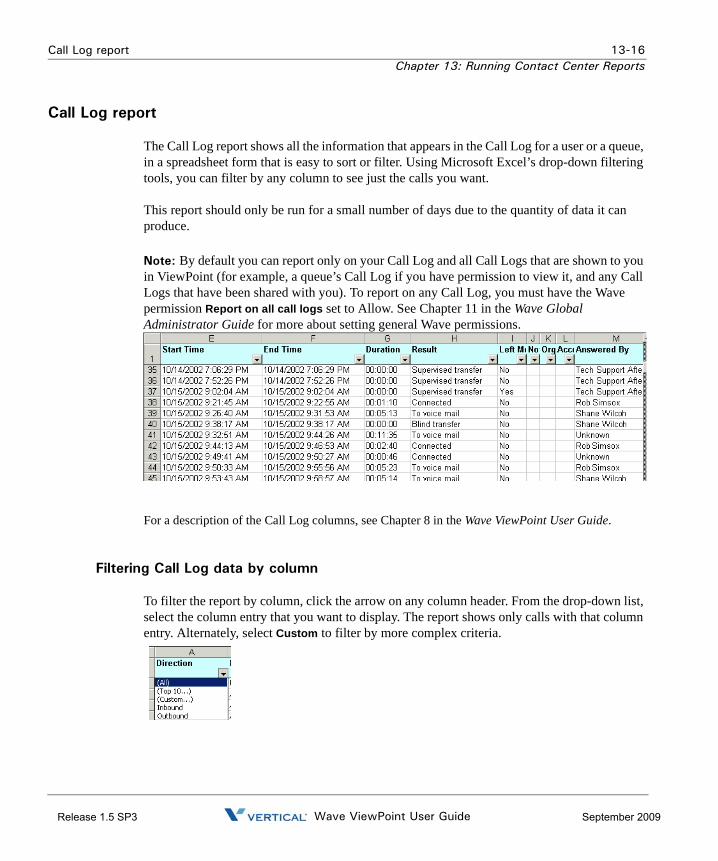
Call Log report 13-16Chapter 13: Running Contact Center Reports
Call Log report
The Call Log report shows all the information that appears in the Call Log for a user or a queue, in a spreadsheet form that is easy to sort or filter. Using Microsoft Excel’s drop-down filtering tools, you can filter by any column to see just the calls you want.
This report should only be run for a small number of days due to the quantity of data it can produce.
Note: By default you can report only on your Call Log and all Call Logs that are shown to you in ViewPoint (for example, a queue’s Call Log if you have permission to view it, and any Call Logs that have been shared with you). To report on any Call Log, you must have the Wave permission Report on all call logs set to Allow. See Chapter 11 in the Wave Global Administrator Guide for more about setting general Wave permissions.
For a description of the Call Log columns, see Chapter 8 in the Wave ViewPoint User Guide.
Filtering Call Log data by column
To filter the report by column, click the arrow on any column header. From the drop-down list, select the column entry that you want to display. The report shows only calls with that column entry. Alternately, select Custom to filter by more complex criteria.
Wave ViewPoint User GuideRelease 1.5 SP3 September 2009
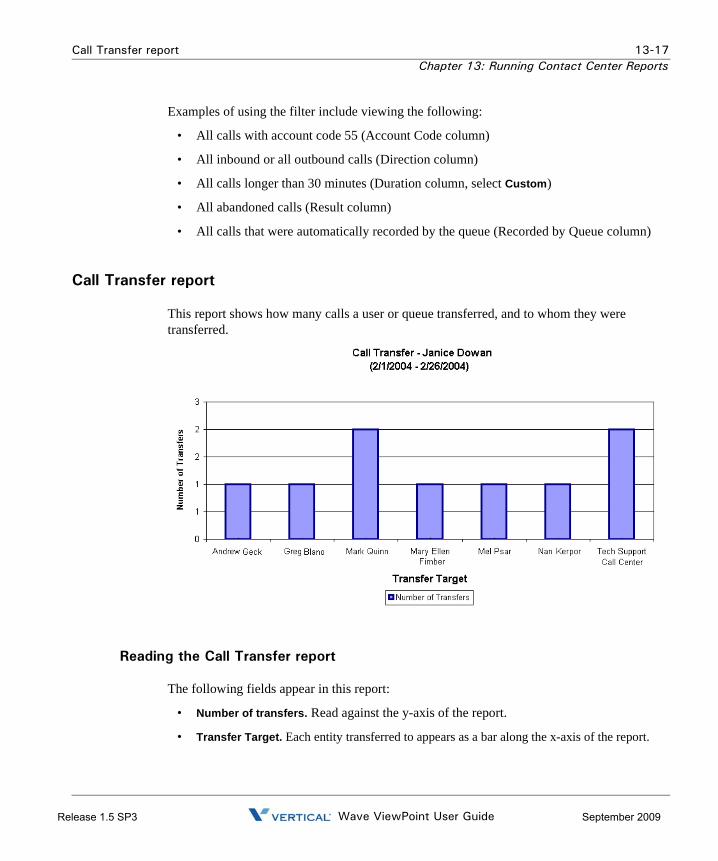
Call Transfer report 13-17Chapter 13: Running Contact Center Reports
R
Examples of using the filter include viewing the following:
• All calls with account code 55 (Account Code column)
• All inbound or all outbound calls (Direction column)
• All calls longer than 30 minutes (Duration column, select Custom)
• All abandoned calls (Result column)
• All calls that were automatically recorded by the queue (Recorded by Queue column)
Call Transfer report
This report shows how many calls a user or queue transferred, and to whom they were transferred.
Reading the Call Transfer report
The following fields appear in this report:
• Number of transfers. Read against the y-axis of the report.
• Transfer Target. Each entity transferred to appears as a bar along the x-axis of the report.
Wave ViewPoint User Guideelease 1.5 SP3 September 2009
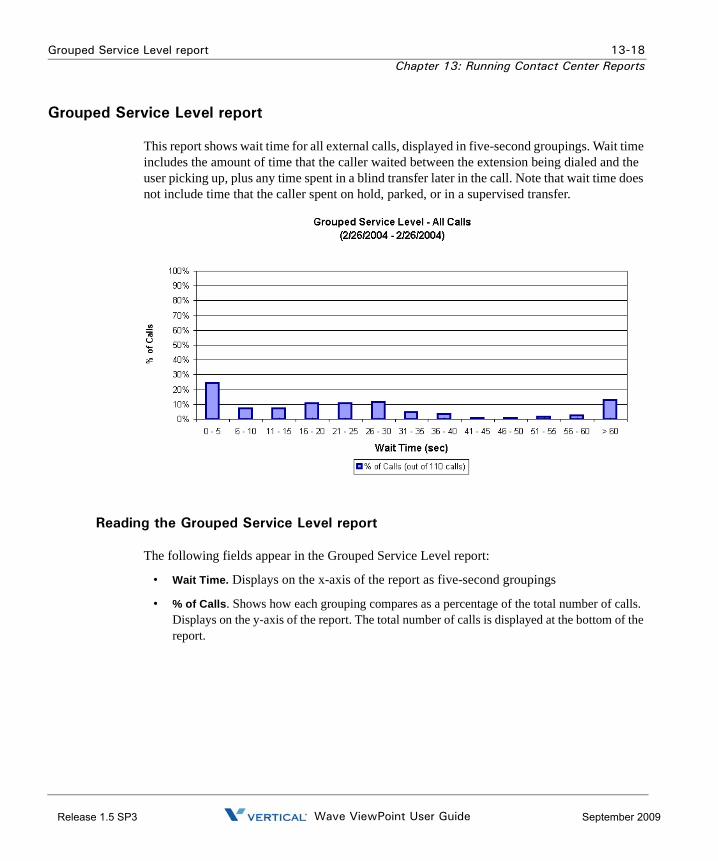
Grouped Service Level report 13-18Chapter 13: Running Contact Center Reports
Grouped Service Level report
This report shows wait time for all external calls, displayed in five-second groupings. Wait time includes the amount of time that the caller waited between the extension being dialed and the user picking up, plus any time spent in a blind transfer later in the call. Note that wait time does not include time that the caller spent on hold, parked, or in a supervised transfer.
Reading the Grouped Service Level report
The following fields appear in the Grouped Service Level report:
• Wait Time. Displays on the x-axis of the report as five-second groupings
• % of Calls. Shows how each grouping compares as a percentage of the total number of calls. Displays on the y-axis of the report. The total number of calls is displayed at the bottom of the report.
Wave ViewPoint User GuideRelease 1.5 SP3 September 2009
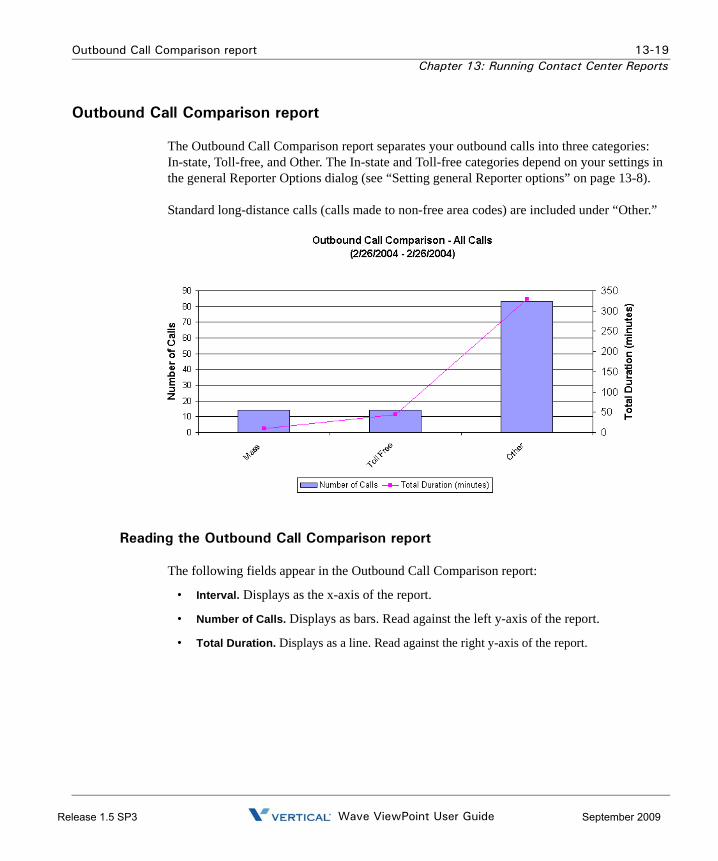
Outbound Call Comparison report 13-19Chapter 13: Running Contact Center Reports
R
Outbound Call Comparison report
The Outbound Call Comparison report separates your outbound calls into three categories: In-state, Toll-free, and Other. The In-state and Toll-free categories depend on your settings in the general Reporter Options dialog (see “Setting general Reporter options” on page 13-8).
Standard long-distance calls (calls made to non-free area codes) are included under “Other.”
Reading the Outbound Call Comparison report
The following fields appear in the Outbound Call Comparison report:
• Interval. Displays as the x-axis of the report.
• Number of Calls. Displays as bars. Read against the left y-axis of the report.
• Total Duration. Displays as a line. Read against the right y-axis of the report.
Wave ViewPoint User Guideelease 1.5 SP3 September 2009
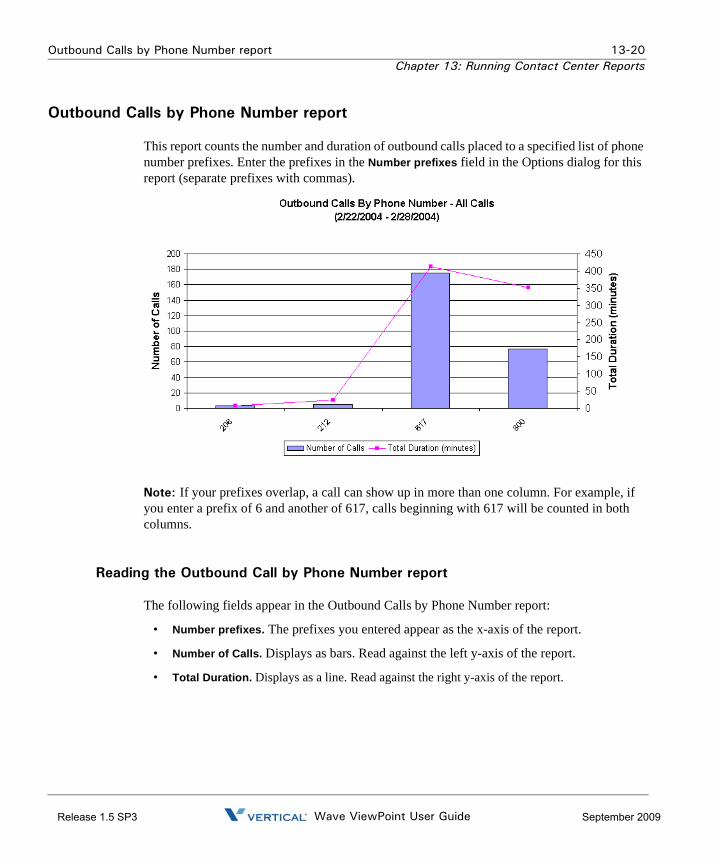
Outbound Calls by Phone Number report 13-20Chapter 13: Running Contact Center Reports
Outbound Calls by Phone Number report
This report counts the number and duration of outbound calls placed to a specified list of phone number prefixes. Enter the prefixes in the Number prefixes field in the Options dialog for this report (separate prefixes with commas).
Note: If your prefixes overlap, a call can show up in more than one column. For example, if you enter a prefix of 6 and another of 617, calls beginning with 617 will be counted in both columns.
Reading the Outbound Call by Phone Number report
The following fields appear in the Outbound Calls by Phone Number report:
• Number prefixes. The prefixes you entered appear as the x-axis of the report.
• Number of Calls. Displays as bars. Read against the left y-axis of the report.
• Total Duration. Displays as a line. Read against the right y-axis of the report.
Wave ViewPoint User GuideRelease 1.5 SP3 September 2009
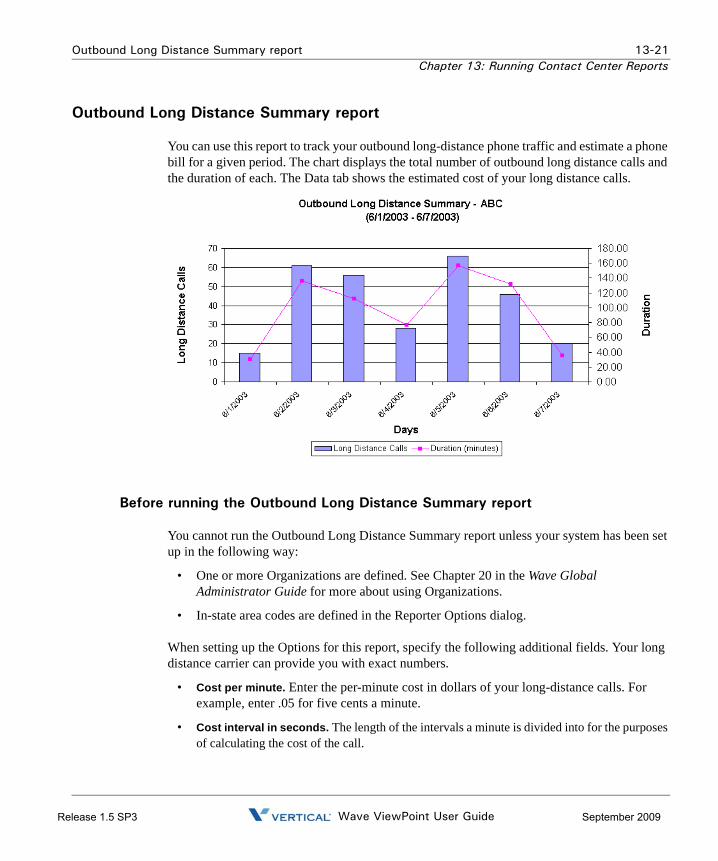
Outbound Long Distance Summary report 13-21Chapter 13: Running Contact Center Reports
R
Outbound Long Distance Summary report
You can use this report to track your outbound long-distance phone traffic and estimate a phone bill for a given period. The chart displays the total number of outbound long distance calls and the duration of each. The Data tab shows the estimated cost of your long distance calls.
Before running the Outbound Long Distance Summary report
You cannot run the Outbound Long Distance Summary report unless your system has been set up in the following way:
• One or more Organizations are defined. See Chapter 20 in the Wave Global Administrator Guide for more about using Organizations.
• In-state area codes are defined in the Reporter Options dialog.
When setting up the Options for this report, specify the following additional fields. Your long distance carrier can provide you with exact numbers.
• Cost per minute. Enter the per-minute cost in dollars of your long-distance calls. For example, enter .05 for five cents a minute.
• Cost interval in seconds. The length of the intervals a minute is divided into for the purposes of calculating the cost of the call.
Wave ViewPoint User Guideelease 1.5 SP3 September 2009

Outbound Long Distance Summary report 13-22Chapter 13: Running Contact Center Reports
Reading the Outbound Long Distance Summary report
The following fields appear on the Outbound Long Distance Summary report:
• Interval. Displays along the x-axis of the report.
• Long Distance Calls. All outbound trunk calls whose numbers do not begin with any of the digit sequences listed in the Toll free options field in the Reporter Options dialog. Displays as bars. Read against the left y-axis of the report.
• Duration. Displays as a line. Read against the right y-axis of the report.
The following fields appear on the Data tab of this report. Each is totaled at the bottom.
• Interval. The time interval chosen.
• Outbound calls. The total number of outbound trunk calls, long distance or otherwise. Note that to count as an outbound call, a call must match the Criteria for counting outbound calls defined in the Reporter Options dialog (see “Setting general Reporter options” on page 13-8).
• Long distance calls. The total number of long distance calls.
• Duration. The total duration of long distance calls for each interval.
• Cost. The total cost of long distance calls for each interval, based on the Cost per minute and Cost interval in seconds data you entered.
Wave ViewPoint User GuideRelease 1.5 SP3 September 2009

Unanswered Calls During Business Hours report 13-23Chapter 13: Running Contact Center Reports
R
Unanswered Calls During Business Hours report
The Unanswered Calls report shows external inbound calls during your Wave business hours that were not answered by a user. This includes calls that were answered by another extension type, such as an auto attendant, but never picked up by a user.
Note: The report counts calls that show a Result of “Abandoned” or “To voicemail” in the Call Log. Because of this, calls that a user answered and then sent to voicemail count as unanswered.
Reading the Unanswered Calls During Business Hours report
The following fields appear on the Report tab of the Unanswered Calls During Business Hours report:
• Time interval. Displays as the x-axis of the report.
• Unanswered Calls. Total number of unanswered calls. Displays as stacked bars. Read against the left y-axis of the report.
• % Unanswered Calls. Unanswered calls as a percentage of all calls. Displays as a line. Read against the right y-axis of the report.
Wave ViewPoint User Guideelease 1.5 SP3 September 2009

User Call Trends report 13-24Chapter 13: Running Contact Center Reports
User Call Trends report
The User Call Trends report displays the number of inbound calls a user received and outbound calls the user placed, with the average talk time for each category.
Reading the User Call Trends report
The following fields appear in this report:
• Time interval. Displays as the x-axis of the report.
• Calls. The number of calls. Displays as the y-axis of the report.
• Inbound calls / Outbound calls. Displays as different-colored bars.
• Average talk time Inbound/Outbound. In minutes. Displays as two lines.
Wave ViewPoint User GuideRelease 1.5 SP3 September 2009

Appendix A
Using the Wave Archived Recording Browser
Appendix Contents
About the Wave Archived Recording Browser
The Wave Archived Recording Browser is a tool for listening to and managing thousands of mailbox recordings (voice messages or call recordings) that have been archived by Wave. You can search for recordings using a variety of criteria, edit or delete recordings, flag recordings for follow up, or restore them to the appropriate Inbox or other folder from which they were archived.
About the Wave Archived Recording Browser . . . . . . . . . . . . . . . . . . . . . . . . . .A-1Running the Archived Recording Browser. . . . . . . . . . . . . . . . . . . . . . . . . . . . . .A-2Searching for recordings . . . . . . . . . . . . . . . . . . . . . . . . . . . . . . . . . . . . . . . . . . .A-3Managing individual recordings . . . . . . . . . . . . . . . . . . . . . . . . . . . . . . . . . . . . . .A-9Acting on archived call recordings. . . . . . . . . . . . . . . . . . . . . . . . . . . . . . . . . . .A-10Checking the archive for missing audio files . . . . . . . . . . . . . . . . . . . . . . . . . . .A-12Purging archived recordings . . . . . . . . . . . . . . . . . . . . . . . . . . . . . . . . . . . . . . .A-12
Wave ViewPoint User GuideRelease 1.5 SP3 September 2009

Running the Archived Recording Browser A-2Appendix A: Using the Wave Archived Recording Browser
Running the Archived Recording Browser
In order to use the Archive Recording Browser, you must know the network location of the archive and have network access to that location. See your Wave system administrator for details.
To run the Archived Recording Browser
1. Choose Start > Programs > Vertical Wave > Wave Archived Recording Browser. The Wave Archived Recording Browser dialog opens:
2. Enter your archive user User Name and Password. These can be different than your Wave user name and password—ask your Wave system administrator for the user name and password to use.
3. To log on to a different archive PC, enter that PC’s name or IP address in the Server text box.
4. Click OK.
After using the Archived Recording Browser, to log on as another archive user (for example, as a user with different access privileges), click File > Log On as a Different User, and then enter that archive user’s User Name and Password.
Wave ViewPoint User GuideRelease 1.5 SP3 September 2009
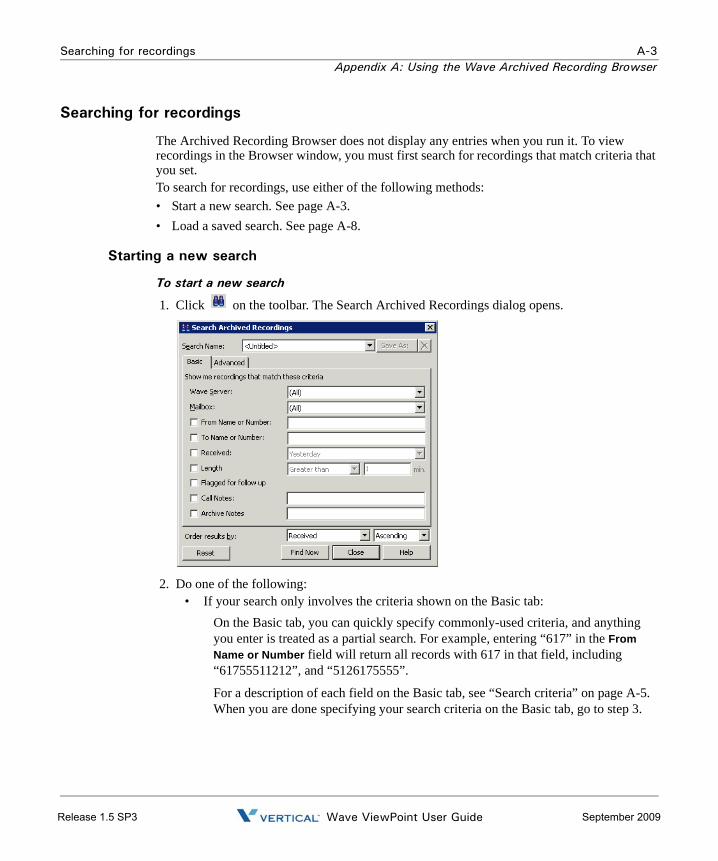
Searching for recordings A-3Appendix A: Using the Wave Archived Recording Browser
Searching for recordings
The Archived Recording Browser does not display any entries when you run it. To view recordings in the Browser window, you must first search for recordings that match criteria that you set.To search for recordings, use either of the following methods:• Start a new search. See page A-3.• Load a saved search. See page A-8.
Starting a new search
To start a new search
1. Click on the toolbar. The Search Archived Recordings dialog opens.
2. Do one of the following:• If your search only involves the criteria shown on the Basic tab:
On the Basic tab, you can quickly specify commonly-used criteria, and anything you enter is treated as a partial search. For example, entering “617” in the From Name or Number field will return all records with 617 in that field, including “61755511212”, and “5126175555”.
For a description of each field on the Basic tab, see “Search criteria” on page A-5. When you are done specifying your search criteria on the Basic tab, go to step 3.
Wave ViewPoint User GuideRelease 1.5 SP3 September 2009

Searching for recordings A-4Appendix A: Using the Wave Archived Recording Browser
• If you want to specify more complex search criteria:Click the Advanced tab to search on additional fields in the mailbox recording’s Call Log entry, or to define more complex search criteria than you can specify on the Basic tab.
For a description of each field on the Advanced tab, see “Search criteria” on page A-5.
Click Add to List after defining each entry. To remove an entry from the list, select it and then click Remove.
3. On either tab, you can specify how the results will be sorted. From the Order results by drop-down lists, select the Browser column on which to sort the search results. Then select Ascending or Descending from the drop-down list to specify how to sort the contents of that column.
Note: Search results can also be sorted by clicking any column header in the Archived Recording Browser.
4. When you are done specifying your search criteria on either tab, do any of the following:• To execute the search, click Find Now.• To reuse the search criteria again at a later time, click Save As. In the Save Search As
dialog, Enter a name for your search and then click Save.• To reset the contents of the Search Archived Recordings dialog to the default settings,
click Reset.
Wave ViewPoint User GuideRelease 1.5 SP3 September 2009

Searching for recordings A-5Appendix A: Using the Wave Archived Recording Browser
Search criteriaThe following table describes the search criteria that you can set up on either the Basic or Advanced tab in the Search Archived Recordings dialog:
Search Criteria
Tab Field Description
Basic Wave Server If your system archives mailbox recordings from more than one Wave Server, you can search all of the Servers, or select a specific Server from the drop-down list.
Mailbox You can search all users’ mailbox folders, or select a specific user from the drop-down list.
From Name or Number
To search for recordings related to calls from a specific user or number, select this checkbox, and then enter all or part of the user’s name (for example, “Janice” or “Jan”) or phone number (for example, “17815551212”, or “781”.) To search for calls from an external caller, enter “Unknown”.
To Name or Number
To search for recordings related to calls placed to a specific user or number, select this checkbox, and then enter all or part of the user’s name or phone number.
Received To limit your search to a specific time period, select this checkbox, and then select a time period from the drop-down list (for example, “Yesterday” or “Last 3 months”.) If you select “Specific date”, enter the date in the text box using the format provided, or click to select a date from a calendar.
Length To search for recordings of a specific length, select this checkbox. Select an option from the drop-down list, and then enter the number of minutes in the text box (for example, “Within 30 sec.of 5 minutes”.)
Note: To enter seconds, use the hh:ss format or decimal places. For example, to indicate 1 minute 30 seconds, enter either “1:30” or “1.5”.
Flagged for follow up
To search for recordings that were previously flagged for follow up, select this checkbox.
Call Notes To search for recordings that contain a specific text string in the Call Notes field, select the checkbox, and then enter the string in the text box.
Archive Notes To search for recordings that contain a specific text string in the Archive Notes field, select this checkbox, and then enter the string in the text box.
Wave ViewPoint User GuideRelease 1.5 SP3 September 2009
Searching for recordings A-6Appendix A: Using the Wave Archived Recording Browser
Advanced Show me recordings that match these criteria
Lists one or more criteria that you specify on the Advanced tab. To remove an entry from the criteria list, select it and then click Remove.
Define more criteria
To add an entry to the criteria list, select a Field and Condi-tion from the drop-down lists, and then select a Value from the drop-down list or enter it in the text box (for example, “Account Code Equals 1074”.)
To search for recordings that match one of several values in a single field, select the condition Or. When you use Or, you must specify the complete field contents that you are search-ing for, as in:“From Or Nancy Jones OR Pete Smith OR Irene Orleans”.
Field Field on which the search criteria is based. For a description of each field, see “Using the Call Log view” in Chapter 22 in the Wave Global Administrator Guide.
Condition Select any of the following conditions.
Equals, Does not equal
Use to search based on the exact contents of a field. For example, to search for record-ings of calls from Kevin McDonough, add the criteria “From Equals Kevin McDon-ough”.
Note that when you use Equals and Does not equal, you cannot search based on part of the field’s contents—the criteria “From Equals Irene” would not return any matches.
Equals is the only valid condition for some fields (Flagged for follow-up, Message Heard, Call Direction, Call Result, Left Message, and Recorded By.) For these fields, select one of the values offered in the drop-down list, for example, “Call Result Equals Left Message”.
Search Criteria (continued)
Tab Field Description
Wave ViewPoint User GuideRelease 1.5 SP3 September 2009
Searching for recordings A-7Appendix A: Using the Wave Archived Recording Browser
Greater than, Less than
Use to search based on the numeric contents of a field. For example, to search for recordings of calls that were on hold for more than 10 minutes, add the criteria “Hold Time Greater than 10”.
Between Use to search based on a range of values for a field. For example, to search for recordings of calls that lasted more than 10 but less than 20 minutes, add the criteria “Call Duration Between 10 and 20”.
Or Use to search for recordings based on two or more values for a field. For example, to search for recordings of calls from several callers, add a criteria like “From Or Nancy Jones OR Pete Smith OR Irene Orleans”.
Like Use to search based on wildcard characters that represent one or more characters.
Use a question mark (?) to represent a single alphanumeric character. For example, to search for recordings of calls from the 617 area code and 555 exchange, add the criteria, “Number Like 617555????”.
Use an asterisk (*) to represent one or more alphanumeric characters. For example, to search for recordings of calls from anyone with a first name of Nancy, add the criteria “From Like Nancy”.
You can combine wildcard characters in a single search criteria. For example, to search for recordings from calls from an area code that begins with 8 and has the 555 exchange, add the criteria “Number Like “8??555*”.
Note that if you want to search for the actual character * or ?, use the Equals or Does not equal condition.
Search Criteria (continued)
Tab Field Description
Wave ViewPoint User GuideRelease 1.5 SP3 September 2009

Searching for recordings A-8Appendix A: Using the Wave Archived Recording Browser
Saving your current searchThere are two ways to save your current search criteria in order to search using the same criteria at a later time: 1. In the Search Archived Recordings dialog, click Save As.
-or-
In the Browser, click on the toolbar.
The Save Search As dialog opens.
2. Enter a name for your search and then click Save.
Loading a saved searchTo load a saved search, select it in the drop-down list on the toolbar. To change the search criteria for a saved search, select it and then choose Tools > Find. The Search Archived Recordings dialog opens where you can make your changes.
Contains Use to search based on a portion of a field. For example, to search for recordings of calls where 555 appears anywhere in the number, add the criteria “Number Contains 555”.
Value Field contents for which to search. Note that when searching on the contents of a time-based fields (Call Duration, Hold Time, and so forth), the value is always entered in minutes.
Search Criteria (continued)
Tab Field Description
Wave ViewPoint User GuideRelease 1.5 SP3 September 2009

Managing individual recordings A-9Appendix A: Using the Wave Archived Recording Browser
Managing individual recordings
Mailbox recordings that match your search criteria are displayed in the Browser.
The following information is displayed for each recording:• If , recording has been flagged for follow-up.• Identifies the recording type:
• Voice message• Call recording
• Server. Wave Server from which the recording was archived.• Mailbox. User’s mailbox folder from which the recording was archived. If you restore the
recording, it will be returned to this mailbox.• From. Name of the person who placed the call. On incoming calls, “Unknown” is displayed
unless the user identified the caller as a contact. On outgoing calls, this column contains the user’s name.
• Received. Date and time when a voice message was left, or a call recorded.• Length. Length of the recording in minutes:seconds format.• Number. On incoming calls, the extension, Caller ID name and number (if available), or
external number that was dialed. On outgoing calls, the extension or external number that was dialed.
Wave ViewPoint User GuideRelease 1.5 SP3 September 2009
Acting on archived call recordings A-10Appendix A: Using the Wave Archived Recording Browser
• Created. Date and time when the mailbox recording was archived.• Custom Data. Custom data, if any, associated with the call.• Notes. Starting text of any notes added to a voice message or call recording via the Call
Monitor or Call Log. The complete notes appear in the Call Notes pane at the bottom of the Browser. For a call recording, Wave automatically adds information about the stations and/or trunks involved in the call.
If you make changes to Call Notes via the Archived Recording Browser, those changes are included if you restore the recording to its original Inbox or other folder, but the Call Log notes remain unchanged.
• Archive Notes. Notes added to the archived recording via the Archived Recording Browser. Archive notes are maintained only in the archive, and are not included if the recording is restored to its original Inbox or other folder.
Acting on archived call recordings
To act on archived recordings:
1. Adjust the display in any of the following ways:• Click on any column heading to sort the search results on that column. You can type
characters or words to jump to the first matching record in the sorted column that begins with that text.
• Enter a number in the Recordings text box at the top right of the Browser and press Enter to go to that entry in the list. Use the buttons to browse through the search results.
• To change the number of entries displayed per page, choose Tools > Options. In the Options dialog, enter the Number of recordings to display per page.
2. Click an archived file to select it. You can perform the following actions on a selected file:• Play. Double-click any column except the first column to play the recording, or use
the audio controls at the bottom of the Browser. To set a bookmark while listening to a recording, click and drag the orange triangle
under the progress indicator at the bottom of the Browser. The next time that you play the recording, playback will start at the bookmark location.
Wave ViewPoint User GuideRelease 1.5 SP3 September 2009

Acting on archived call recordings A-11Appendix A: Using the Wave Archived Recording Browser
• Open Call Log Details. Click on the toolbar to view details about the Call Log entry associated with the mailbox recording.
Note: You can view Call Log details for all call recordings, and for voice messages that were left by a caller via the Wave phone commands. Internal voice messages will only have associated Call Log details if internal (station-to-station) call logging is turned on via Tools > System Settings > Call Log tab in the TV Admin applet in the Wave Remote Management Console. Voice messages sent directly to a user’s voice mailbox by another user via ViewPoint do not have any associated Call Log details.
• Flag recording. Double-click the first column for a recording to flag the selected recording for follow up. Double-click it again to remove the flag. (You can also use the Flag this recording for follow-up checkbox for the selected recording.)
• Add notes. To add new notes or edit existing notes to the selected recording, type in the Call Notes or Archive Notes panes.
• Restore recording. Click on the toolbar to move the selected recording back to the mailbox from which it was archived. It also stays in the archive until purged.
• Export recording. Click , one of the audio controls at the bottom of the Browser, to export one or more selected recordings to a location on a hard drive other than the folders from which they were archived. (Exported recordings are not deleted from the archive folder.)
Wave ViewPoint User GuideRelease 1.5 SP3 September 2009

Checking the archive for missing audio files A-12Appendix A: Using the Wave Archived Recording Browser
• Refresh. Click on the toolbar to refresh the list of mailbox recordings displayed in the Browser.
• Delete recording. Click on the toolbar to delete one or more selected recordings from the archive folder. (To delete recordings based on criteria that you set, see “Purging archived recordings” on page A-12.)
Checking the archive for missing audio files
When you check the archive for missing audio files, all archive database entries that do not have a corresponding audio file in the archive folder are deleted from the database.
To check the archive for missing audio files
1. Choose Tools > Check Archive. Note: If this option is not available, ask your Wave system administrator to grant you Archive Admin privileges.
2. Click OK at the warning message to check the archive.
Purging archived recordings
You must have Administrator privileges to perform this operation. When you purge archived recordings, all mailbox recordings in the archive folder that match the criteria that you set are deleted permanently, as well as the corresponding archive database entries.
Wave ViewPoint User GuideRelease 1.5 SP3 September 2009

Purging archived recordings A-13Appendix A: Using the Wave Archived Recording Browser
To purge archived recordings
1. Choose Tools > Purge Recordings. Note: If this option is not available, ask your Wave system administrator to grant you Archive Admin privileges. The Purge Archived Recordings dialog opens:
2. Specify the recordings that you want to delete from the archive. Selecting recordings to purge works the same as using the Basic tab to search for recordings. See “Search Criteria” on page A-5 for a description of each field.
3. Click Delete to purge mailbox recordings that match your criteria from the archive. Click OK at the warning message to confirm the purge.
Wave ViewPoint User GuideRelease 1.5 SP3 September 2009

Release 1.5 SP3 September 2009

Appendix B
Logging On with Command-Line Switches
Appendix Contents
About Viewpoint command line switches
You can add various switches to the command line that ViewPoint shortcut uses to start ViewPoint. To change the command line, right-click ViewPoint shortcut icon, choose Properties, and then click the Shortcut tab. The Target field shows the command line.Add switches to the end of the command line (after the quote mark) with a space before the switch. You can add multiple switches separated by spaces. For example:“C:\Program Files\Vertical Wave\ViewPoint\Vertical.Wave.ViewPoint.exe” /Server:Wave /station=77
ViewPoint command line switch reference
The ViewPoint command line switches include the following:• /allowmultiple. Enables you to run multiple instances of ViewPoint at the same time on your
computer.• /Server. Syntax: /server:<servername>. Example: /server:Wave. Runs ViewPoint against
a specific Wave Server on your network. This is useful when you want to have one ViewPoint session using a Server other than the one your ViewPoint runs against by default.
• /user /password. Syntax: /user:<username> /password:<password>. Example: /user:Neil Pratt /password:2112. (The two switches can be used separately.) Use to automatically log on to ViewPoint as a specific user. With both /user and /password present, ViewPoint skips the Logon dialog.
About Viewpoint command line switches . . . . . . . . . . . . . . . . . . . . . . . . . . . . . .B-1ViewPoint command line switch reference . . . . . . . . . . . . . . . . . . . . . . . . . . . . .B-1
Wave ViewPoint User GuideRelease 1.5 SP3 September 2009

ViewPoint command line switch reference B-2Appendix B: Logging On with Command-Line Switches
• /language. Syntax: /language=<language directory name>. Changes the ViewPoint interface language to any installed language. (A list of installed languages appears in the Language drop-down in the ViewPoint Log On dialog. See page 2-4). Specify one of the language directory names found in your C:\Program Files\Vertical Wave\ViewPoint directory. For example, the four languages installed with ViewPoint 1.5 are de (Deutsch), es (Espanol), fr (Francais), and fr-ca (Francais - Canada). You would use /language=de to start ViewPoint with a German (Deutsch) language interface.
• /station. See the next section, “Using the /station command.”
Using the /station commandThe /station command associates ViewPoint with a specific phone. You can use this switch to set up various ViewPoint shortcuts for different phones, so you don’t have to wait for ViewPoint to launch, then choose File > Use a different station, and wait for it to launch again.
Syntax/station:<station number/default station>
For <station number>, specify a station ID, for example /station:77.
For <default station>, enter either of the following: /station:default ; /station:-1.
Wave ViewPoint User GuideRelease 1.5 SP3 September 2009
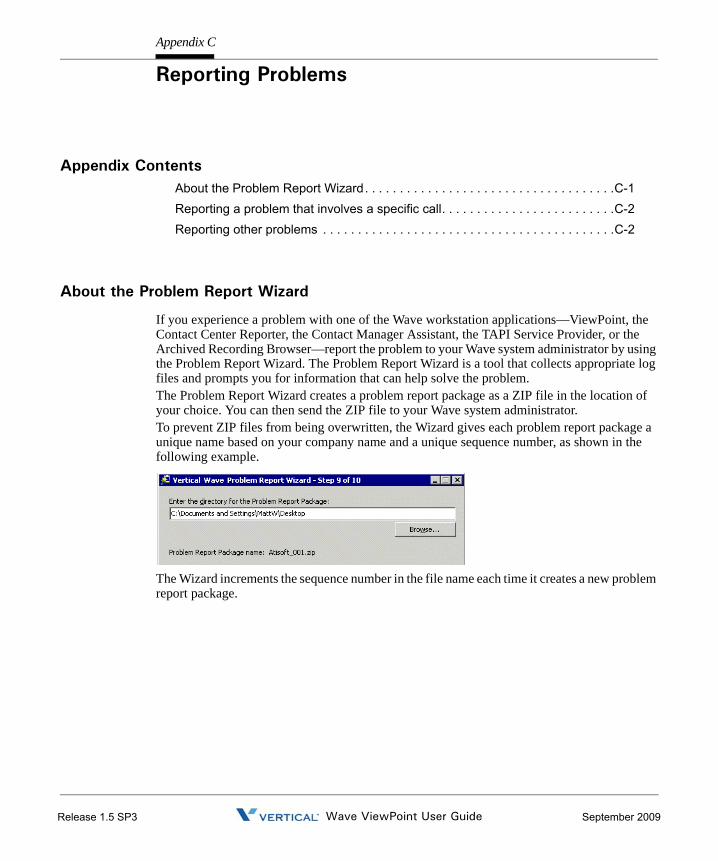
Appendix C
Reporting Problems
Appendix Contents
About the Problem Report Wizard
If you experience a problem with one of the Wave workstation applications—ViewPoint, the Contact Center Reporter, the Contact Manager Assistant, the TAPI Service Provider, or the Archived Recording Browser—report the problem to your Wave system administrator by using the Problem Report Wizard. The Problem Report Wizard is a tool that collects appropriate log files and prompts you for information that can help solve the problem. The Problem Report Wizard creates a problem report package as a ZIP file in the location of your choice. You can then send the ZIP file to your Wave system administrator.To prevent ZIP files from being overwritten, the Wizard gives each problem report package a unique name based on your company name and a unique sequence number, as shown in the following example.
The Wizard increments the sequence number in the file name each time it creates a new problem report package.
About the Problem Report Wizard. . . . . . . . . . . . . . . . . . . . . . . . . . . . . . . . . . . .C-1Reporting a problem that involves a specific call. . . . . . . . . . . . . . . . . . . . . . . . .C-2Reporting other problems . . . . . . . . . . . . . . . . . . . . . . . . . . . . . . . . . . . . . . . . . .C-2
Wave ViewPoint User GuideRelease 1.5 SP3 September 2009

Reporting a problem that involves a specific call C-2Appendix C: Reporting Problems
Reporting a problem that involves a specific call
If you encountered a problem that involved a call, there are two ways to report it:
To report a problem via an active call in the Call Monitor
1. Select the problem call in the Call Monitor. 2. Choose Actions > Report a Problem. The Problem Report Wizard opens with details about
the call already entered. 3. Complete the Problem Report Wizard screens.
To report a problem via a call record in the Call Log
1. In ViewPoint, go to the Call Log folder and select the call during which the problem occurred.
2. Choose Actions > Report a Problem. The Problem Report Wizard opens with details about the call already entered.
3. Complete the Problem Report Wizard screens.
Reporting other problems
If your problem does not involve a specific call, run the Problem Report Wizard as follows: 1. Do one of the following:
• From ViewPoint, choose Help > Report a Problem.• Run the file C:\Program Files\Common Files\Vertical\Wave\TVPRWizard.exe.
2. Answer the questions presented in each Wizard window. 3. Optionally, check Send Problem Report Package via e-mail in the final window to e-mail
the problem report package to your Wave system administrator. It can be helpful to include in your e-mail the time at which the problem occurred, as closely as you can identify it.
Note: Because a problem report package can be large, after you send it to your Wave system administrator, you should delete it from your system to regain disk space.
Wave ViewPoint User GuideRelease 1.5 SP3 September 2009

Index
Symbols*50 (select Available personal status), 3-3F11 (return your last call), 6-7F12 (redial your last call), 6-7, (comma, for pauses in page strings), 7-12
Numbers0 (transfer to Operator)
changing destination of transfer, 12-4from greeting, 9-10from routing list, 9-5while on hold with Pause and Repeat, 9-12
Aaccessing Wave, 1-1account codes
entering for contacts, 10-5account codes, entering
during a call, 5-13using the dial bar, 6-2when placing a call, 6-4
Act!, 1-2active greeting, 7-19active routing list, 9-6All tab
in Extensions list, 4-2, 10-3answering calls
Call Monitor foldercommands
answer, 5-6answering calls, opening Call Monitor
automatically, 5-4archive database, checking for missing audio files,
A-12Archived Recording Browser
about, A-1acting on recordings, A-10adding notes to recordings, A-11browsing search results, A-10changing number of entries per page, A-10checking archive for missing audio files, A-12deleting recordings, A-12exporting recordings, A-11flagging recordings for follow-up, A-11loading saved search, A-8logging on, A-2managing recordings, A-9opening Call Log details for recordings, A-11playing recordings, A-10purging recordings, A-12refreshing search results, A-12restoring recordings to Servers, A-11running, A-2saving current search, A-8searching for recordings, A-3sorting search results, A-10specifying search criteria, A-5
archived recordingsmanaging individual recordings, A-9purging, A-12searching for, A-3
archived voicemail, 7-3associating
from a Call Log entry, 8-5from an active call, 5-11from voicemail, 7-7
audio controls, using, 2-19audio output, changing, 2-10
Wave ViewPoint User GuideRelease 1.5 SP3 September 2009

Index IND-2
Bbackup reports, 13-7beep, with call waiting, 12-4blind transfers, 5-8bookmarks for voicemail, 2-20busy, handling calls when, 9-13
Ccallback number, using to identify contacts, 10-11Call Center Reporter
overview, 13-1requirements, 13-2using Excel toolbar, 13-4
caller IDincluding with pager notification, 7-12selecting name or number as contact
identification, 10-11used to identify contacts, 10-8
calling backa Call Log entry, 8-5, 8-6, 9-9voicemail, 7-6your last caller, 6-7
Call Log folderoverview, 8-1adding notes to calls in, 8-5associating a call with a contact, 8-5filters for, 8-2opening a contact record from, 8-6returning calls from, 8-5, 8-6, 9-9viewing additional call details, 8-2
Call Log report, 13-16Call Monitor folder
overview, 5-1adding Phonebook pane to, 2-12commands
associate with contact, 5-11disconnect, 5-12park, 5-11
play caller’s name, 5-12put on hold, 5-7record call, 5-10send incoming call to voicemail, 5-6take call, 5-6transfer, 5-8unpark, 5-12
displaying on incoming calls, 12-6double-clicking in, 5-5opening automatically, 5-4ownership of calls in, 5-5panes in, 5-3selecting calls in, 5-5tabs
overview, 5-2showing and hiding, 4-3, 5-3, 10-3
call notification of voicemail, 7-11call ownership, 5-5call rules
overview, 11-1creating, 11-4examples of, 11-2how system resolves conflicts, 11-10organizing by priority, 11-10
Call Rules window, 11-3calls
answering, 5-6associating with a contact, 5-11checking a phone number to dial, 6-6conferencing, 6-7
using drag-and-drop, 6-9disconnecting without hanging up, 5-12forwarding
as displayed in Extensions list, 4-1prompting for password, 9-4prompting to accept or decline, 9-3status bar button for, 2-10turning on or off, 9-2and voicemail, 9-4when logging on, 2-5
handling differently when busy, 9-13
Wave ViewPoint User GuideRelease 1.5 SP3 September 2009
Index IND-3
handling individual ones differently, 11-1hold, 5-7indications of incoming, 5-14notification of voicemail, 7-11parking, 5-11placing
overview, 6-1from Extensions list, 4-3from other contact manager applications, 1-2quickly from ViewPoint folders, 6-5to contacts, 6-3to extensions, 6-4to My Numbers, 6-4using the toolbar’s dial field, 6-2
recording, 5-10screening with ViewPoint, 5-6selecting in Call Monitor, 5-5sending incoming to voicemail, 5-6taking notes on, 5-10transferring, 5-8
using drag-and-drop, 5-8unparking, 5-12
Call Transfer report, 13-17call waiting
customizing, 12-4turning off, 12-4
checking numbers, 6-6coaching users’ calls, 6-10columns
moving and resizing, 12-9showing and hiding, 12-8sorting by, 12-9
conference callscreating, 6-7using drag-and-drop, 6-9
Contact Manager Assistant, 10-13contacts
overview, 10-1account codes for, 10-5adding and deleting phone numbers for
identification, 10-8associating "Unknown" callers with, 10-9benefits of recognition, 10-7default phone number, 10-6deleting phone numbers used for identification,
10-9entering, 10-4entering phone numbers for, 10-5identifying by caller ID, 10-8importing and exporting, 2-21in other contact manager applications, 10-13phone prompt language for, 10-5PINs for, 10-12placing calls to, 6-3private and public, 10-2recording voice titles for, 10-6searching for, 10-2
Contacts folderadding as a pane in Call Monitor, 2-12double-click behavior in, 12-8
copying and pasting ViewPoint items, 2-14CSV files, importing and exporting, 2-21custom data, viewing, 5-4custom hours, for call rules, 7-16, 11-8
Ddefault phone number, for contacts, 10-6default station, changing, 2-6Deleted folder, 2-18deleting ViewPoint items, 2-13deleting voicemail, 2-13dial bar, 6-2dial-by-name, customizing your listing in, 12-4dialing. See placing callsdisconnecting calls without hanging up, 5-12distribution algorithms for routing calls to groups,
9-14documentation, 1-4
Wave ViewPoint User GuideRelease 1.5 SP3 September 2009

Index IND-4
drag-and-drop, in ViewPoint, 2-14drag-and-drop transferring, 5-8
EE, special character in page strings, 7-12e-mailing greetings, 7-20e-mailing voicemail, 7-6e-mail notification of voicemail, 7-11emptying the Deleted folder, 2-18ending calls without hanging up, 5-12Examples
printing reports with Report Runner, 13-13Excel, using reports toolbar in, 13-4exiting ViewPoint, 2-7exporting
contacts, 2-21Extensions list, 2-25voice files, 2-21
extensions, placing calls to, 6-4Extensions list
overview, 4-1adding as pane in Call Monitor, 2-12exporting, 2-25tabs in, 4-2, 10-3
FF11 (return your last call), 6-7F12 (redial your last call), 6-7feature comparison table, 1-3final actions in routing lists, 9-12folders
overview, 2-16columns in, 12-8for voicemail, 7-3opening in new windows, 2-12private and public, 2-16
sorting by column, 12-9Folders list, 2-8forwarding calls
as displayed in Extensions list, 4-1prompting for password, 9-4prompting to accept or decline, 9-3status bar button for, 2-10turning on or off, 9-2and voicemail, 9-4when logging on, 2-5
forwarding voicemail, 7-5FrontOffice 2000, 1-2FWD button on status bar, 2-10
GGoldMine, 1-2greetings
overview, 7-18active, 7-19e-mailing, 7-20for when you’re on the phone, 9-13hierarchy for, 7-19recording, 7-19System Hold Greeting, 9-12used with
routing list final actions, 9-14routing lists as an action, 9-10
Greetings folder, 7-18Grouped Service Level report, 13-18groups
overview, 10-14benefits of using, 10-14personal and public, 10-14routing calls to, 9-13
groups folder, 10-15
Wave ViewPoint User GuideRelease 1.5 SP3 September 2009

Index IND-5
Hheaders and footers, viewing in reports, 13-4Help, online, 1-4hiding columns, 12-8hold
putting calls on, 5-7retrieving from other phones (call parking), 5-11
II, special character in page strings, 7-12identifying contacts
adding and deleting phone numbers for, 10-8by caller ID, 10-8by PIN, 10-12
importingcontacts, 2-21voice files, 2-21
Jjoining users’ calls, 6-10
LL, special character in page strings, 7-12language, changing, 12-7local reports, 13-5logging on
as a visitor, 2-5changing default station, 2-6skipping, 2-3to ViewPoint with another phone, 2-5with command line switches, B-1with new options, 2-6
logging on to ViewPoint, 2-2
Mmenu bar, 2-8message waiting light, enabling and disabling, 7-10Microsoft Outlook, 1-2monitoring users’ calls, 6-10My Numbers
entering, 6-4placing calls to, 6-4
My Phone tab in Call Monitor, 5-2
Nnames
of callers displayed in Call Monitor, 5-6playing caller’s over speakers, 5-12playing caller’s over speakers automatically,
12-6yours in dial-by-name directory, 12-4
navigation pane, 2-8notes
adding to active calls, 5-10adding to calls in Call Log, 8-5adding to voicemail, 7-8
notifications of new voicemail, 7-11
Oonline Help, 1-4Operators
changing your personal one, 12-4customizing ViewPoint for, 12-7
Options dialog, guide to, 12-1orbit number, 5-11Outbound Call Comparison report, 13-19Outbound Calls by Phone Number report, 13-20Outbound Long Distance Summary report, 13-21Outlook, 1-2
Wave ViewPoint User GuideRelease 1.5 SP3 September 2009
Index IND-6
ownership of calls in the Call Monitor, 5-5
Ppager notification of voicemail, 7-11page string, special characters for, 7-12panes
in Call Monitor folder, 5-3Phonebook, 2-12
parked calls, 5-11parked calls, Call Monitor tab for, 4-3, 5-3, 10-3parking calls, 5-11password
changing, 2-6prompting for in routing lists, 9-11prompting for when forwarding calls, 9-4resetting if you have turned off, 2-3skipping entry at logon, 2-3
pasting ViewPoint items, 2-14Pause and repeat, routing list final action, 9-12personal status
overview, 3-1changing another user’s, 3-3list of pre-defined, 3-2viewing in Extensions list, 4-1
phoneaudio output from, 2-10changing ViewPoint’s, 2-3
phone commands, selecting language of, 12-3phone notifications for new voicemail, 7-13phone numbers, checking, 6-6"Phone" pane on status bar, 2-10PINs, for contacts, 10-12Place Call command, 6-5placing calls
from Extensions list, 4-3from other contact manager applications, 1-2quickly from ViewPoint folders, 6-5
to contacts, 6-3to extensions, 6-4to My Numbers, 6-4using the dial bar, 6-2
priorityof call rules, 11-10of greetings, 7-19
privatecontacts, 10-2folders, 2-16groups, 10-14voicemail, 7-7
Problem Report Wizard, C-1problems, reporting, C-1prompts
changing language of for contacts, 10-5for password with call forwarding, 9-4for password with routing lists, 9-11selecting language of, 12-3to accept or decline calls from routing lists, 9-11to accept or decline forwarded calls, 9-3to callers following routing lists, 9-11
publiccontacts, 10-2folders, 2-16groups, 10-14My Numbers, 6-4
purging archived recordings, A-12
Rrecording calls, 5-10recordings, how to make and play, 2-19redialing your last call, 6-7replying to voicemail, 7-5reporting problems, C-1reports
overview, 13-1backups for, 13-7
Wave ViewPoint User GuideRelease 1.5 SP3 September 2009
Index IND-7
Call Log, 13-16Call Transfer, 13-17Grouped Service Level, 13-18options for, 13-10Outbound Call Comparison, 13-19Outbound Calls by Phone Number, 13-20Outbound Long Distance Summary, 13-21running, 13-3shared and local, 13-5Unanswered Calls During Business Hours, 13-23using Excel toolbar to run, 13-4viewing headers and footers, 13-4
returning your last call, 6-7ringback, 5-11
for calls on hold, 5-8ringer, customizing duration of ringing, 12-5routing lists
overview, 9-4active, 9-6caller options while following, 9-5creating, 9-9final actions for, 9-12greetings and final actions, 9-14prompting for password, 9-11prompting to accept or decline, 9-11routing calls to groups, 9-13Standard, 9-6when station is busy, 9-13
Routing Lists folder, 9-6Routing List Wizard, using, 9-7
Sscheduling
call rules, 11-7notifications of voicemail, 7-14
screeningcalls, 5-6voicemail, 5-6
screen-pops for calls, 1-2
searching for contacts, 10-2Server, changing ViewPoint’s, 2-3shared reports, 13-5showing columns, 12-8speakers, audio output from, 2-10Speed Dial command, 6-5Standard routing list, 9-6status bar, 2-10stutter dial tone, turning on and off, 7-10supervised transfers, 5-8supervising users’ calls, 6-10support, technical, 1-3System Hold Greeting, 9-12
Ttabs
in Call Monitor folder, 5-2in Extensions list, 4-2, 10-3
TAPI Service Provideroverview, 1-2using from other contact manager applications,
10-13technical support, 1-3title bar, flashing on incoming calls, 12-6toolbar
overview, 2-8dial field on, 6-2
toolbar, for reports, using in Microsoft Excel, 13-4transferring calls, 5-8
using drag-and-drop, 5-8triangles in audio controls, 2-20
UUnanswered Calls During Business Hours report,
13-23
Wave ViewPoint User GuideRelease 1.5 SP3 September 2009

Index IND-8
"Unknown" callers, associating with contacts, 10-9unparking calls, 5-12urgent voicemail, 7-7
VViewPoint
changing Server and phone, 2-3columns in, 12-8customizing for Operators, 12-7exiting, 2-7layout, 2-7logging on, 2-2reporting problems with, C-1starting using with command line switches, B-1using drag-and-drop in, 2-14
visitor, logging on as, 2-5voice files
importing and exporting, 2-21recording and playing, 2-19
voicemailoverview, 7-1adding notes to, 7-8associating with a contact, 7-7bookmarks, 2-20and call forwarding, 9-4
calling back, 7-6deleting, 2-13disappearing from ViewPoint, 7-3e-mailing, 7-6folders, 7-3forwarding, 7-5heard, 7-7listening to, 7-4listening to while caller leaves, 5-6new, indications of, 7-10notification of, 7-11playback order of, 12-6playing a sound for, 12-6private, 7-7replying to, 7-5scheduling notifications, 7-14screening, 5-6sending, 7-9sending a call directly to, 5-6setting maximum length of, 7-8unheard, 7-7urgent, 7-7viewing contact record for, 7-6
voicemail folder, 7-2voice titles
recording for contacts, 10-6recording for yourself, 12-3
Wave ViewPoint User GuideRelease 1.5 SP3 September 2009

Index IND-9
Wwindows, opening folders in new, 2-12Wizard for routing lists, using, 9-7
Wave ViewPoint User GuideRelease 1.5 SP3 September 2009

Release 1.5 SP3 September 2009


![Viewpoint MDNW user guide 2 FINAL[4] · kiosks and tablets, ViewPoint survey app on secured tablets; SMS texts or smartphone surveys, online surveys via email or website or paper](https://static.documents.pub/doc/80x56/5f52294336fe5c345a492203/viewpoint-mdnw-user-guide-2-final4-kiosks-and-tablets-viewpoint-survey-app-on.jpg)


