57
Student and Instructor Free ALEKS Corporation 15460 Laguna Canyon Road, Irvine, CA 92618 www.aleks.com

Student and Instructor Free Trial TourALEKS Corporation
15460 Laguna Canyon Road, Irvine, CA 92618www.aleks.com

Welcome!
ALEKS® (Assessment and LEarning in Knowledge Spaces) is a research-based, online math program that provides students with a completely personalized learning path tailored to their exact needs.
ALEKS offers: Precise and reliable diagnostic and progress monitoring assessments; Targeted, self-paced instruction that fills students’ knowledge gaps; Algorithmically-generated open-response questions requiring authentic input; Immediate feedback and detailed explanations of problems; Pedagogically-sound, rigorous content aligned to state and Common Core standards; Fully bilingual content and interface in both English and Spanish; ALEKS QuickTables to support and improve basic math fact fluency and mastery.
ALEKS’ unique, proprietary artificial intelligence (A.I.) distinguishes it from the other digital course offerings available in today’s K-12 market. The ALEKS A.I. determines, in real-time, what students know, do not know, and most importantly, what students are ready to learn. With its continuously updated understanding of each student’s current knowledge, ALEKS provides a truly personalized learning path that adapts to each student’s educational needs, accelerating a student’s learning momentum and making learning more effective and efficient. Furthermore, a continuous cycle of learning and assessment in ALEKS ensures that students retain what they learn and truly master course material.
No other educational product delivers instruction on the topics that the student is precisely ready to learn.
ALEKS also makes a plethora of detailed, instructionally-actionable data available in real time for educators at every level, including progress reports, diagnostic analyses of individual students and groups, and other student performance and learning management information. Individual learners may view reports of their own progress at all times.
This is your guide to the ALEKS Student and Instructor Free Trial Accounts. By following the instructions in this tour, you will be guided through a comprehensive overview of ALEKS from the perspectives of both a student and an instructor.
The ALEKS Free Trial accounts for students and instructors used in this tour can be accessed anytime at www.aleks.com/free_trial/instructor.

We will begin our tour with the ALEKS Student Account Free Trial.
ALEKS Student Account Free Trial
Step 1. Go to www.aleks.com and click on the “Free Trial” link located on the left-hand side of the ALEKS homepage.
Step 2. Click on the “Begin Trial” button in the “Instructors & Administrators” box on the right-hand side.

Step 3. In the “Explore Student Module” box, click on the “Try ALEKS Now” button.
Step 4. Accept the ALEKS User Agreement and then click the “Continue” button.
Step 5. On the Personal Information page, select “K-12” from the “Choose your market” drop down menu, then populate the red-boxed fields with the information below (we have limited the number of fields you will need to complete as a reviewer if you enter the information exactly as shown).

Step 6. On the “Free Trial Account Creation” page, type “solve” into the first box and then type “answers” into the second box. Entering “solve” and “answers” in the Free Trial Account will give you a “Solve” button that will allow you to complete ALEKS math problems without having to work out the solutions yourself. Of course, you may solve any of the problems you wish. This shortcut is available only for expediting this review. Students will never have access to the solve button in a regular ALEKS student account.
Note: If you would like to exit out of the Free Trial at any time and return later, you will need to save the Login Name and Password generated for you by ALEKS.
Step 7. Once you arrive at the ALEKS Student Module landing page, select “Try the New Student Module” to begin.

Step 8. Upon first login into the Student Module, ALEKS will provide a brief walkthrough of the program, including an introduction to what ALEKS is and how to navigate through the interface. Please follow the onscreen prompts to navigate through the introduction pages.
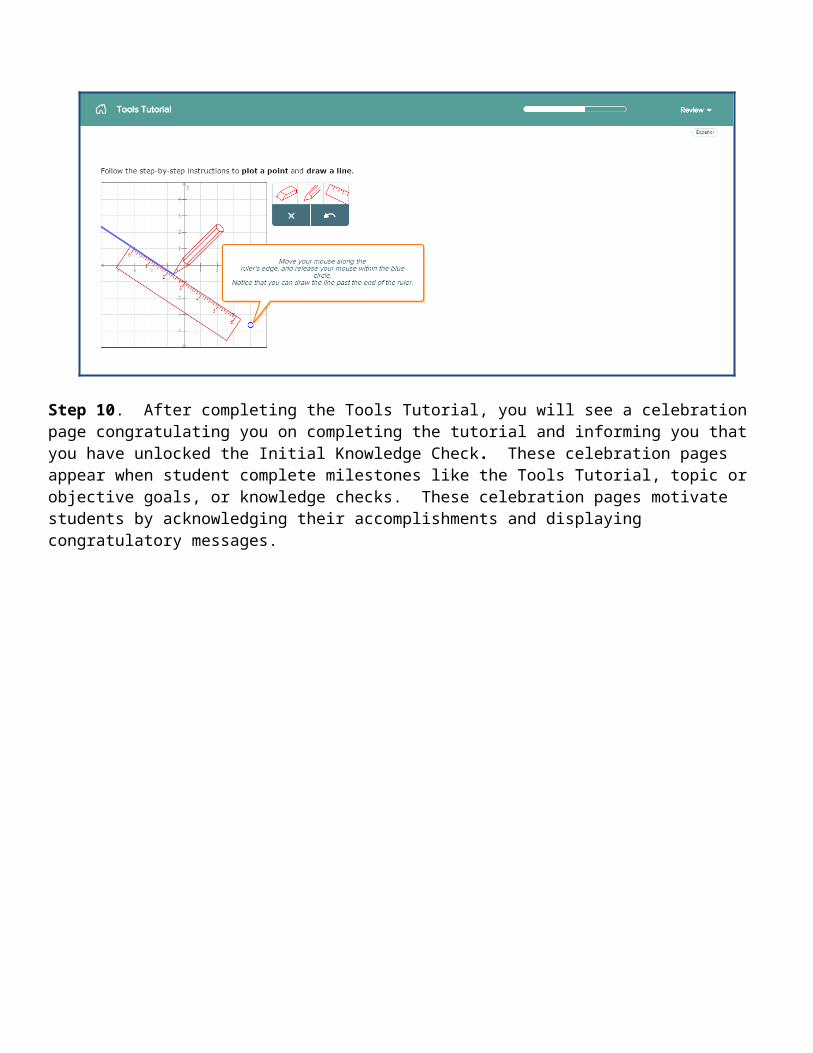
Step 9. Once you complete the introduction, you will be prompted to take the Tools Tutorial. Because ALEKS requires free response and authentic mathematical input, students are expected to work out the problems with paper and pencil and then enter their final answers in ALEKS. The Tools Tutorial adapts to each ALEKS course and provides students with an overview of the specific tools they will need to use in the course.
Please follow the onscreen instructions provided in the tutorial. You may continue the tutorial to the end or select the “Skip Tutorial” button in the lower right portion of the screen to skip the remainder of the tutorial and to proceed to the next section.

Step 10. After completing the Tools Tutorial, you will see a celebration page congratulating you on completing the tutorial and informing you that you have unlocked the Initial Knowledge Check. These celebration pages appear when student complete milestones like the Tools Tutorial, topic or objective goals, or knowledge checks. These celebration pages motivate students by acknowledging their accomplishments and displaying congratulatory messages.

Step 11. After the Tools Tutorial, you will be prompted to begin the Initial Knowledge Check. The Initial Knowledge Check is a diagnostic assessment designed to determine a student’s initial knowledge of the course at a detailed topic level and to give the ALEKS A.I. the information required to decide which topics it should present to students first in their learning path.
In order for the student’s learning to be as meaningful and accurate as possible, the information gathered by the Initial Knowledge Check should be the truest picture of the student’s knowledge. Therefore, assessment questions are free-response, and ALEKS neither times nor grades the knowledge check – two factors that often influence adversely how a student responds on an assessment. If students become tired or lose focus during the course of the knowledge check, they can take a break by logging out. When they return to ALEKS, the system will return them to the same place they left.
Select “Start Knowledge Check” to begin.
Step 12. Before you begin the Initial Knowledge Check, you will be presented with several animated introduction pages. These introduction pages provide quick tips on how to complete the Initial Knowledge Check.
Step 13. Once you have navigated through the introduction pages, you will see an example from the Initial Knowledge Check with quick tips to describe how to use the “I Don’t Know” and the calculator buttons (when available) on the page. Selecting the “Start Knowledge Check” button begins the Initial Knowledge Check.
Step 14. ALEKS chooses the first question of the Initial Knowledge Check from within the course syllabus. Depending on how a student responds, the ALEKS A.I. adjusts subsequent questions. Because knowledge varies from student to student, no two students will take the same knowledge check. In about 20 30 ‐questions, the ALEKS Initial Knowledge Check determines what the student knows, does not know, and most importantly, what the student is ready to learn. ALEKS is the only educational product that delivers instruction on the topics that a student is precisely ready to learn right now.
During the demonstration, you may answer the knowledge check questions on your own by entering an answer or you can use the “Solve” button to have ALEKS enter the correct answer for you. Once you solve a problem, click “Submit.” Remember, students will never have access to the solve button or to the skip button in a regular ALEKS account.

Step 15. Because students are being assessed over the entire course, it is common for students to see a problem in their Initial Knowledge Check that is new to them or that they do not remember how to solve. When this occurs, students should use the “I Don’t Know” button.
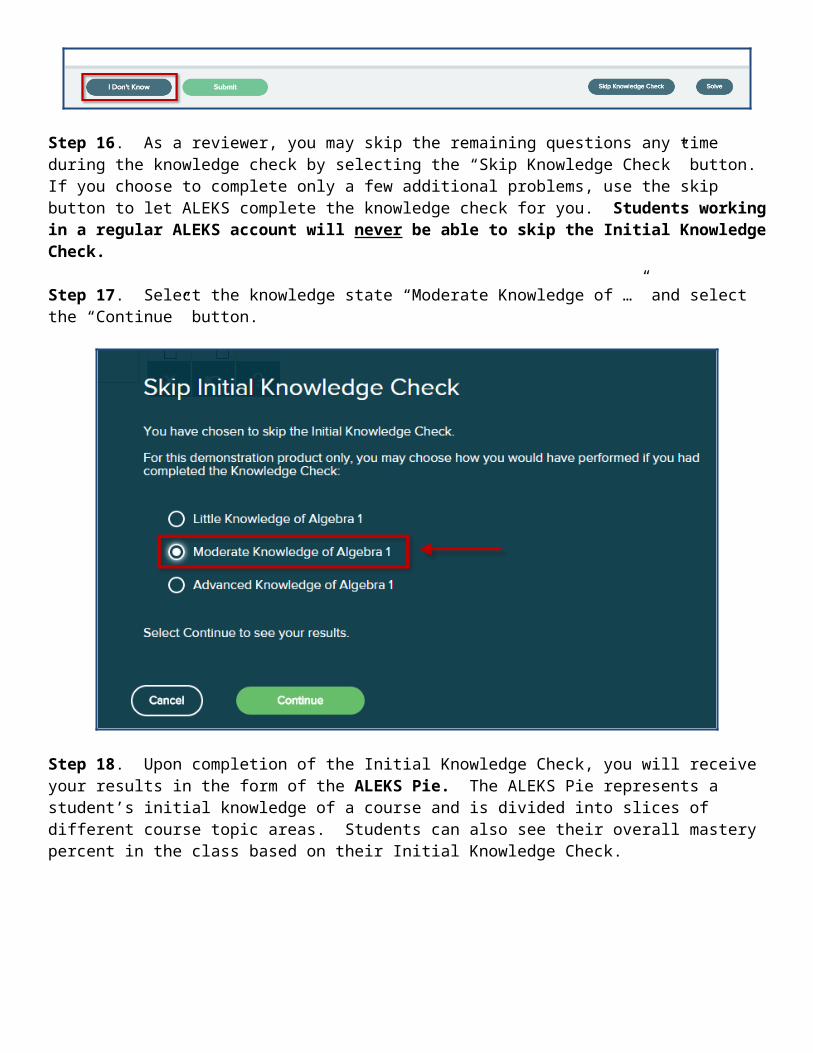
Step 16. As a reviewer, you may skip the remaining questions any time during the knowledge check by selecting the “Skip Knowledge Check” button. If you choose to complete only a few additional problems, use the skip button to let ALEKS complete the knowledge check for you. Students working in a regular ALEKS account will never be able to skip the Initial Knowledge Check.
Step 17. Select the knowledge state “Moderate Knowledge of …” and select the “Continue” button.

Step 18. Upon completion of the Initial Knowledge Check, you will receive your results in the form of the ALEKS Pie. The ALEKS Pie represents a student’s initial knowledge of a course and is divided into slices of different course topic areas. Students can also see their overall mastery percent in the class based on their Initial Knowledge Check.

Select the “Continue” button to go to the Student Account Homepage.
Step 19. From the Student Account Homepage, you will be given a brief introduction to the layout of the student account. Quick tips describe how to access features on the homepage. For example, selecting a slice in the ALEKS Pie will open more information about the slice, including the number of topics mastered, learned, and remaining.
A toggle sets the default view to the Timeline or ALEKS Pie. The Timeline offers transparency about student progress in Learning Mode and is a roadmap for students to understand how to achieve learning goals and reach milestones.
Continue following the prompts on the screen to complete the introduction tutorial.

Step 20. Once you have completed the introduction, you will be prompted to get started on your personalized learning path through the ALEKS Learning Mode.
Select the “Start My Path” button to begin.
In the Learning Mode, students practice Ready to Learn Topics and can also review previously learned or mastered topics. Each practice problem is algorithmically-generated and ALEKS does not use question banks; therefore each instance of a practice problem is unique for every student.
The first topic the student is presented with is the topic they are most ready to learn right now.
Step 21. Before starting to work on a topic, you will see a learning page that provides an example of the problem and explains how to solve it. The Learning Page (and Explanation Page) can also contain learning resources (i.e., the tools on the right side of the page).
ALEKS explanations provide detailed steps to solving a problem with helpful commentary. Even though ALEKS offers an infinite number of possible problem instances, ALEKS explanations will always match the problem the student is currently viewing or working on. In some cases, an alternative or more detailed explanation is also available.
Step 22. Mathematical terms in the problem and explanation are linked to the ALEKS Dictionary so that students can easily access the definition and build their mathematical vocabulary. Please click on any hyperlinked term to access the ALEKS Dictionary.

Step 23. ALEKS is fully bilingual in English and Spanish. In ALEKS, students can switch between English and Spanish using the language button at any time. The entire ALEKS Student Module (interface and all content) will be translated. Translations in ALEKS are provided by bilingual mathematicians and educators. Use the language button now to switch back and forth from English to Spanish.
Step 24. Once you have read through the explanation, select the “Start” button at the bottom of the page to begin working on the first problem in the topic.
Step 25. Once you select “Start,” you will be taken to the first problem of the topic. Remember, each problem is algorithmically-generated and ALEKS does not use question banks; therefore each instance of a practice problem is unique for every student.
You can solve the first problem with the “Solve” button and select “Check” to submit your answer. On the next screen, you will receive feedback. Remember, students working in a regular ALEKS account will never have access to the solve or skip buttons.

Step 26. When students answer a problem in Learning Mode, they can immediately see how they performed. The progress indicator in the top-right corner displays messages and a counter to show when problems are answered right or wrong. Students will also see intuitive feedback displayed directly above the problem.
Select the “Next” button at the bottom of the page to be taken to the next problem.

Step 27. For the next practice problem, select the “Solve” button to get this problem correct once again and select “Check” to submit your answer.
If a student answers two problems in a row correctly without using the Explanation button/page, double credit is received and the progress indicator will grow by two bars.

The progress indicator and problems in Learning Mode are based on a point system. ALEKS considers a topic learned when a student achieves a total of 5 points per topic. The bars in the progress indicator represent how many problems the student needs to answer correctly in a row before the topic is considered learned. After students learn a topic, they will then be moved on to the next Ready to Learn Topic. This is helpful for students as they can visually see how close they are to achieving their goal. Students receive one point for each correct answer, and one point subtracted for each incorrect answer.
Step 28. If the student gets a problem incorrect, the progress indicator will lose a bar. If students need assistance, they can use the “Explanation” button to get a detailed explanation tailored to that exact problem. Otherwise, they can correct any mistakes and re-submit their answer using the “Re-Check” button.
If the student gets the problem correct, the progress indicator will regain the bar it lost. If the answer is incorrect once again, additional feedback is provided and the Explanation page for the current problem is shown.
Step 29. Keep working on problems until you have learned the topic and your progress indicator is full. Remember, you can use the “Solve” button to quickly work through the problems.

Once your progress indicator is full, click “Next” to continue.
Step 30. Once you have learned that topic, you will see a celebration page highlighting your success. To continue working on your next Ready to Learn Topic, select the “Continue My Path” button.

Step 31. In Learning Mode, students can access their Ready to Learn Topics from the Topic Carousel, which can be found by selecting the downward arrow tab.
Topics are sorted from easiest to hardest so students first work on topics with the highest likelihood of being learned and retained. Each topic has its own card containing the slice name, the topic name, and attributes (if any). The Topic Carousel shows three cards at a time and is easy to scroll through by using the scroll bar or back/forward arrow.

Topics can be switched at any time by selecting a new topic card in the Topic Carousel. After selecting a card, a sample problem is available for preview in the bottom half of the window. Students can begin working on the new topic after selecting “Start” from the Learning Page. Switching topics mid-way through working on a topic will not cause students to lose their work. ALEKS remembers the progress made on the topic and the next time students return to that topic, they can resume where they left off.
The Topic Carousel is also useful for filtering specific topics, reordering topics in the carousel, or filtering topics by specific attributes, such as videos, instructor resources, needs more practice, goal topic, etc. Students can also enter words to search for topics by name.
You can continue working on Ready to Learn Topics or you can select the “Home” icon in the upper-left corner of the page to return to the Student Account Homepage.
Step 32. After students work in Learning Mode, their learned topic count will increase on their progress bar. The student can also see their current mastery count and the number of topics they have remaining.

Step 33. ALEKS periodically prompts students to take knowledge checks to monitor learning retention and to confirm mastery of topics learned. Depending on the setup the ALEKS class, the timing of knowledge checks will vary. For example, a knowledge check may occur when enough progress has been made in Learning Mode (generally, after learning 20 topics and spending 5 hours in ALEKS).
Students can always see when their next knowledge check will occur by viewing the Knowledge Check Indicator. This indicator allows students to check when their next knowledge check will occur so that they are not surprised and have time to prepare for it. Selecting the icon expands the box and displays information about the upcoming knowledge check, including the number of topics that must be completed and the time spent in ALEKS before a knowledge check triggers.
After completing a knowledge check, students may lose topics from their mastery count. This is normal as the knowledge check is meant to ensure learning retention, and students may not retain everything they learn. The topics in the ALEKS Pie are updated after a knowledge check to show the student’s current knowledge state. The topics lost in Knowledge Check are tagged as “Needs More Practice” in the Topic Carousel. In general, ALEKS will automatically queue up these topics in the beginning of the Topic Carousel to help students quickly relearn them.
Step 34. Now, let’s look at a few additional features available in the Student Account. The following features are available from the Student Account Homepage via the Main Menu.

Worksheet: Students can generate a 16 question printable worksheet that is personalized based on what the ‐student has recently learned. Worksheets can be used to support learning in environments where the student does not have reliable or consistent access to a computer. The answer key for each individualized worksheet is sent to the instructor (labeled with the student’s name and date) via the ALEKS Message Center.
Reports: Students can access their own individual reports through their student account. Reports provide students with reflection on how they performed on past activities and allow them to see their class progress. Popular reports viewed are the ALEKS Pie, Progress, Time and Topic, and Progress in Learning Mode reports.
Message Center: Students and instructors have access to the ALEKS Message Center. This is where messages can be sent and received from student to instructor and ALEKS Customer Support (if applicable). Students can send a message to their instructor to ask for help and ALEKS automatically attaches the problem they are working on to the message.
Step 35. When enabled in an ALEKS course, QuickTables can also be accessed from the Main Menu. ALEKS QuickTables is a research-based, math fact mastery tool for facilitating the rapid memorization of multiplication, division, addition, and subtraction facts. QuickTables is complimentary and it can be added to any ALEKS course. For a tour of ALEKS QuickTables, please visit www.aleks.com/k12/qt_tour.
Step 36. This concludes the review of the student side of ALEKS. Select the “Hi, [Name]!” menu from the upper-right portion of the page, and then select “Log In Again” on the next page to be taken to the homepage.

Let’s continue our tour with the ALEKS Instructor Account.
ALEKS helps educators build their students’ foundational math knowledge and confidence by differentiating instruction, targeting gaps in student knowledge, and providing detailed, real-time data. Educators can count on ALEKS to provide personalized learning paths for each student.
The real-time reporting and management tools available allow instructors to spend more time in small-group and one-on-one instruction with struggling students, focus on topics the class is ready to learn, and track student progress toward mastering the Common Core and individual state standards. For example, instructors can select their teaching methods using the data stored in the Instructor Module, develop lessons using ALEKS problems, or create a research assignment based on the topics students have recently learned. ALEKS facilitates a more efficient and effective learning and teaching experience.
By using the ALEKS Instructor Module, educators can monitor student progress and identify their needs in ALEKS. The module houses ALEKS reports, class administration tools, a wizard where instructors can create assignments, worksheets and assessments, and a QuickTables reporting and tools section. The Instructor Module is entirely web-based and available 24/7.
ALEKS Instructor/Administrator Free Trial Account
Step 1. Go to www.aleks.com and click on the “Free Trial” link located on the left-hand side of the ALEKS homepage.

Step 2. Click on the “Begin Trial” button in the “Instructors & Administrators” box on the right-hand side.
Step 3. In the “Explore Instructor Module” box, click on the “Try ALEKS Now” button.
Step 4. Accept the ALEKS User Agreement and click the “Continue” button.
Step 5. On the Personal Information page, select “K-12” from the “Choose your market” drop-down menu and populate all fields with the information below.

Choosing your state from the drop-down list will activate your state standards for this free trial account. ALEKS is aligned to all state standards and the CCSS for Mathematics.
Step 6. On the Welcome to ALEKS page, click on the “Take Tour” button to begin.
Step 7. The first thing that will appear when you access the Instructor Module is the guided tour. Please follow the instructions as they appear on the screen to get acquainted with the basic navigation of the module.

To get an in-depth overview of the different tools and features available in the Instructor Module, download the “Reference Guide” from the “Hello (Name)” drop-down menu located at the top of the screen.
Step 8. The Instructor Module dashboards and sub-navigation menus offer immediate access to key components of your account based on which tab you are working in (e.g., instructor, class, or student). Dashboards are snapshots that provide a quick overview of important data applicable to each level. Each dashboard consists of 5-12 dynamic tiles that update when navigating to the dashboard. Dashboard tiles can also be rearranged to reflect a user’s preferred layout.
Let’s briefly review the location of dashboards and sub-navigation menus.
Sub-Navigation Menu

Dashboard
Step 9. Click on the “Class” drop-down menu and select a class.
Please note that the full list of classes is available in the Free Trial account. Once a school or district adopts ALEKS, only the classes that instructors or administrators create will appear in their ALEKS Instructor Module. If you are an instructor or administrator with responsibility over multiple classes, you can always use the “Class” tab to move between the classes you have created.
Click or hover over each sub-navigation link for additional menu options.

Step 10. While in the class-level tab, hover or click on “Class Administration” menu and select “Class Summary.”
The Class Summary contains many different class settings, such as content customization (textbook integration and custom objectives), syllabus and standards, instructor-created resources, student groups, share class access, and more. You can explore any of the sections of the Class Summary by selecting the “Edit” link within the section.

Step 11. Next, let’s look at ALEKS Reports. ALEKS makes a plethora of detailed information available in real time to every instructor and administrator at all levels – from the district to the class to the individual student. Virtually all progress reports, diagnostic analyses of individual students and groups, and other learning management information are instantaneously available to educators (and, where appropriate, parents). Progress can be evaluated relative to the curriculum and mathematics standards. Using ALEKS Reports, educators have access to accurate, instructionally-actionable data to target and adapt instruction, in response to student’s academic needs.
To view reports for a class, make sure that you are on the “Class” tab. You can verify this by noting the class selected in the class-level tab. Hover or click on the “Reports” link in the sub-navigation menu.
We will be exploring four ALEKS reports: ALEKS Pie, Progress, and Time & Topic.
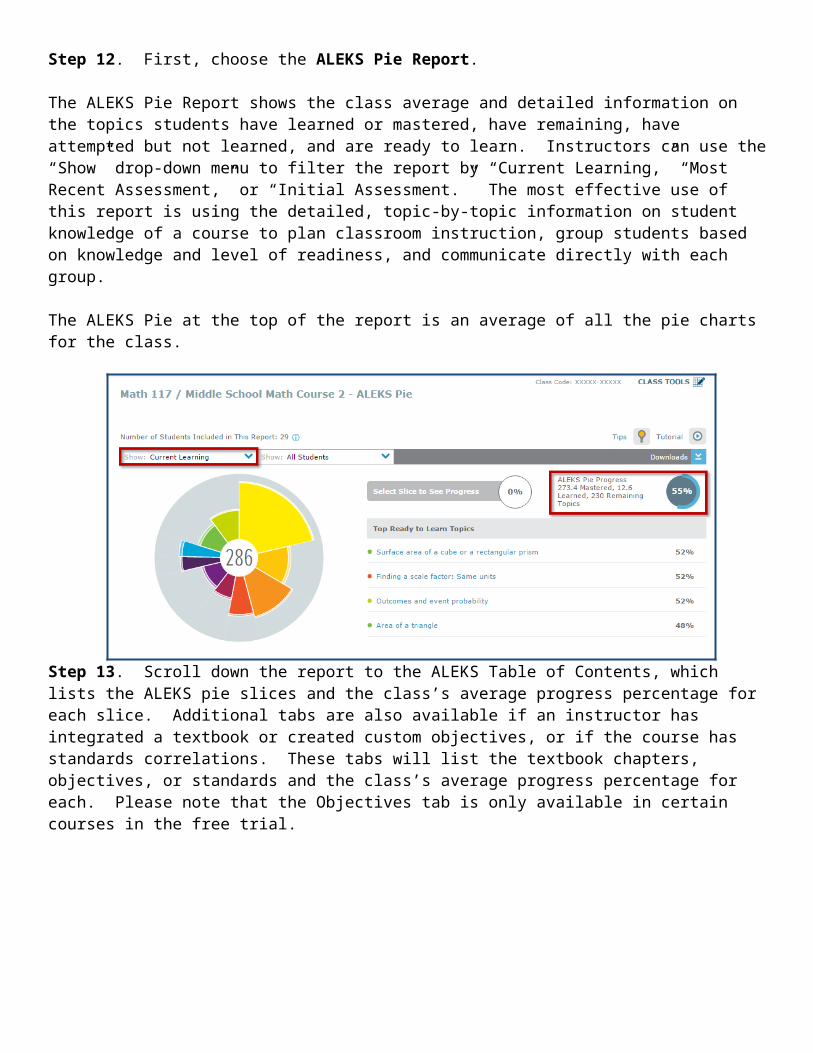
Step 12. First, choose the ALEKS Pie Report.
The ALEKS Pie Report shows the class average and detailed information on the topics students have learned or mastered, have remaining, have attempted but not learned, and are ready to learn. Instructors can use the “Show” drop-down menu to filter the report by “Current Learning,” “Most Recent Assessment,” or “Initial Assessment.” The most effective use of this report is using the detailed, topic-by-topic information on student knowledge of a course to plan classroom instruction, group students based on knowledge and level of readiness, and communicate directly with each group.
The ALEKS Pie at the top of the report is an average of all the pie charts for the class.

Step 13. Scroll down the report to the ALEKS Table of Contents, which lists the ALEKS pie slices and the class’s average progress percentage for each slice. Additional tabs are also available if an instructor has integrated a textbook or created custom objectives, or if the course has standards correlations. These tabs will list the textbook chapters, objectives, or standards and the class’s average progress percentage for each. Please note that the Objectives tab is only available in certain courses in the free trial.
Step 14. Click on a progress percentage link or pie slice to view all topics for that slice, as well as the percentage of students who have made progress toward that topic (learned or mastered), have the topic remaining, have attempted but not yet learned that topic, and those that are ready to learn each topic.
Step 15. Click on one of the percentage links in the Ready to Learn category to see a list of the students who are ready to learn that particular topic. Instructors can use this feature to create learning groups.

Step 16. Instructors can also send a message to students directly from the ALEKS Pie Report. Click on the “Message Students” link.
The ALEKS Message Center will then open up with a blank message to the selected recipients. The messaging system provides instructors with a fully developed math palette that allows them to clearly communicate math concepts to students via e-mail. Instructors can also attach documents to messages.
Step 17. Instructors can also generate a sample problem by selecting the hyperlinked topic name directly from the report. These problems can be used for warm-up activities or can be incorporated into classroom instruction.

Step 18. Selecting the “Standards” tab in the ALEKS Pie Report allows instructors to see a detailed overview of how their students are doing in relation to the selected standards for the class (if applicable). Instructors can see a breakdown of the class contents by standards strand, as well as by individual standard.
Selecting a progress percentage link or standards strand allows instructors to view all ALEKS topics correlated to a specific standard, as well as the percentage of students who have made progress toward those topics (learned or mastered), have the topics remaining, have attempted but not yet learned those topics, and those that are ready to learn each topic.

For even more detailed reporting on standards progress, you can view the Standards Report.
Step 19. Next, let’s view the Progress Bar Report. Hover or click on the “Reporting” link under the class level sub-navigation bar and choose “Progress.”
The Progress Report shows overall student progress from Knowledge Checks (assessments) and Learning Mode, as well as average learning rates. This report can be used to monitor student progress and to compare important data points, such as growth over time and course mastery.
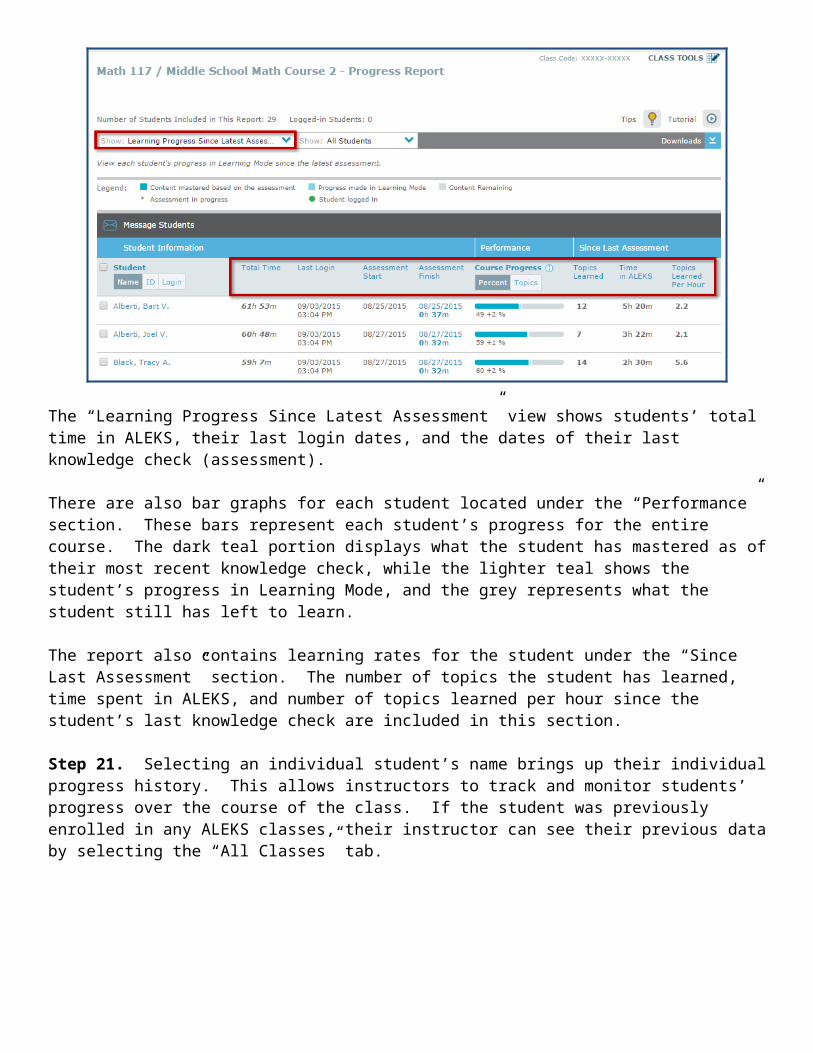
Step 20. The default view is set to “Learning Progress Since Latest Assessment.” If you would like to view the progress history for any other time period, choose an option from the “Show” menu.
The “Learning Progress Since Latest Assessment” view shows students’ total time in ALEKS, their last login dates, and the dates of their last knowledge check (assessment).
There are also bar graphs for each student located under the “Performance” section. These bars represent each student’s progress for the entire course. The dark teal portion displays what the student has mastered as of their most recent knowledge check, while the lighter teal shows the student’s progress in Learning Mode, and the grey represents what the student still has left to learn.

The report also contains learning rates for the student under the “Since Last Assessment” section. The number of topics the student has learned, time spent in ALEKS, and number of topics learned per hour since the student’s last knowledge check are included in this section.
Step 21. Selecting an individual student’s name brings up their individual progress history. This allows instructors to track and monitor students’ progress over the course of the class. If the student was previously enrolled in any ALEKS classes, their instructor can see their previous data by selecting the “All Classes” tab.
Step 22. Finally, let’s view the Time and Topic Report. If you were previously viewing an individual student’s reports, click on the Class tab to go back to the class-level reporting. Then, hover or click on the “Reporting” link under the class level sub-navigation menu and choose “Time & Topic.”
Step 23. The class-level Time and Topic Report shows a daily breakdown of how students are spending their time in ALEKS. With this report, instructors can easily track time on task and get a clear picture of each student’s learning behaviors and study habits.

The class-level Time and Topic Report can be run with up to 20 weeks of data. To run a report for a custom date range, click on the “Change Date Range” link and select a “From Date” and a “To Date,” or click on the check box next to the desired time interval. Finally, click on the “Compute” button.
Step 24. Scroll down the report to view: the total time spent by each student in ALEKS; the total time each student has spent in ALEKS on school premises (this feature is only available if schools give ALEKS the IP addresses of the computers used); the time each student has spent in ALEKS for each day of the date range selected; and the number of topics learned over the number attempted.

Step 25. To view a detailed Time and Topic Report for a single student, click on a student’s name.

Step 26. The individual Time and Topic Report can be viewed in any time interval up to 180 days. This report displays for the date range selected: the total time the student has spent working in ALEKS; the number of topics the student learned; the number of topics attempted; and student performance on knowledge checks.
Step 27. Instructors can hover over a date’s bar graph to see how much time the student has spent in ALEKS during that day, as well as the number of topics learned and attempted.
Step 28. Click on a specific date’s bar graph to access the Learning Sequence Log. With the Learning Sequence Log, instructors can see a detailed log of how students work in ALEKS, including each topic they attempt and how they work through each problem.
Step 29. You can click on any of icons in the Learning Sequence Log to see exactly how the student answered a problem within a topic. The green “check mark” icon means the student got the problem correct; the red “x” icon means the student got the problem incorrect; and the grey “paper” icon means the student used the Explanation button. Instructors can also see how long the student worked on the problem, and clicking on the “magnifying glass” icon allows you to see the exact answer the student submitted.

Step 30. The last portion of the Instructor Module we will review is the Assignments menu, where instructors can create, schedule, and edit optional homework, quizzes, tests, and knowledge checks. Instructors can also create and manage individualized worksheets for students and set learning goals for the class.
If you were previously viewing an individual student’s reports, click on the Class tab to go back to the class-level. Then, hover or click on the “Assignments” link under the class level sub-navigation menu and choose “Assignments.”
Step 31. The ALEKS Assignments feature uses the ALEKS platform, ALEKS algorithmically-generated content, and automatic grading. However, students’ assignment results do not change their individual ALEKS Pies or learning paths. Instructors can use assignments for other instructional purposes, such as preparing students for upcoming exams, reinforcing certain subjects, or gauging their students’ knowledge of particular course topics. Additionally, unlike ALEKS Knowledge Checks, ALEKS Assignments do not utilize ALEKS’ artificial intelligence for the delineation of student knowledge. Therefore, assignment results may not be an indicator of a student’s overall knowledge of the subject.
ALEKS Knowledge Checks (which happen automatically at regular intervals of progress) will efficiently assess a student’s overall knowledge of the subject, determine exactly what each student is ready to learn, and adjust the ALEKS Pie or learning path accordingly.
Step 32. Select the “New Assignment” button to create a new assignment (or learning goal), then select “Homework” to begin.

Step 33. First, enter a name for your assignment. Any assignment an instructor creates is given a default title (e.g., Homework 1), but the instructor can enter any desired name in the “Name” box. There are a variety of other options available to the instructor in Step 1 to customize how the assignment is made available to students (e.g., time limit, start and end dates, etc.).
Step 34. To add questions to the assignment, you must choose the ALEKS topics (or State Standards topics) that you want to include in Step 2. To create an assignment based on ALEKS topics from the ALEKS Table of Content (pie slices), choose the “Default View” tab and expand the folders beneath the tab to see these topics. Add questions to the assignment either by dragging topics from the left-hand window into the right-hand window, or by highlighting topics in the left-hand window and clicking on the "Add” button. Instructors can also use the “Shift” and “Control” keys to add multiple topics at one time. Use the “Remove” button to remove any unwanted topics.

Step 35. Steps 3-5 provide instructors with more custom assignment options, including gradebook settings and advanced options. You can also visually adjust a grading scale for this assignment and add new grading terms.
Step 36. Once you are finished customizing the assignment settings to your liking, click on the “Save” button at the bottom of the screen to return to the “Manage Assignments” page.
Step 37. Next, select the “New Assignment” button to create a new learning goal (Pie Progress Goal, Time Goal, or Topic Goal), then select “Time Goal” to begin.
ALEKS gives instructors the ability to create learning goals for students through the Assignments menu. Learning goals allow instructors to set goals for students based on their Pie progress, topic mastery, and time spent in ALEKS. These goals can be set as one-time or recurring goals and instructors can choose to award points based on “all or nothing” or partial credit by percentage completed.

Step 38. For goal type, select “Recurring.” You can then name your time goal (e.g., Weekly Time Goal) and set when you would like the goal to repeat (weekly or every 2 weeks). Instructors can also choose which day of the week the goal is due, as well as the start and end dates for the goal.
Finally, the instructor can set the amount of time students will be required to spend in ALEKS to meet the goal (e.g., 2 hours and 30 minutes) and how they want to award points.
Step 39. Once you are finished customizing the learning goal settings to your liking, click on the “Save” button at the bottom of the screen.
** Please note that your changes will not be saved in free trial. **
This concludes the tour of the ALEKS Free Trial Student and Instructor Accounts. Feel free to continue to explore the student and/or instructor account using the login process explained in the beginning of this tour.
When you are finished exploring, click on the drop-down menu marked “Hello [Name]” in the upper-right corner of the page and select “Log Out.”
Then, on the following page, click on the “Back to Home Page” link to return to www.aleks.com.
If you would like to start over with a new Free Trial Account, please sign up again following the steps described above.


