45
QAdhoc DSD QUERY MENU (ad hoc component) Information Technology Services UA Help Desk and Training [email protected]

QAdhoc D S D Q U E R Y M E N U
( a d h o c c o m p o n e n t )
Information Technology ServicesUA Help Desk and Training
DSD Query Menu (QAdhoc)
Table of Contents
TABLE OF CONTENTS...................2
INTRODUCTION.......................................2
What is QAdhoc?...................................................2What QAdhoc is NOT!..................................2Keeping Current...............................................2System Requirements.....................................3(or “What you need to run QADHOC”).................3Secure Access....................................................3Offering Suggestions......................................3
LOGGING “ON” TO QADHOC.....4
Important Note.....................................................4QMenu/QAdhoc “Tickets”...........................5How To Handle Expired Tickets During Active Query Session 5Starting QAdhoc...............................................6
LOGGING “OFF”......................................7
RESETTING YOUR WEBCODE. .8
Important Note:......................................................8
SELECTING A VIEW CATEGORY 9
SELECTING A VIEW...........................10
REVIEWING ONLINE DOCUMENTATION OR “METADATA” 11
User Authorized..............................................12Object Name, Type and Associated Roles12Data Sources.........................................................12Fields Requiring Conditions.................................12Description.......................................................13
RETRIEVING QUERY PARAMETER FORM 14
BUILDING A SIMPLE QUERY. . .15
HOW TO TIPS............................................16
Extract Results to a File........................................16Use Radio Buttons for HEADERS.......................16Use RETRIEVE ONLY DISTINCT ROWS Checkbox 17Use Other Features...............................................17
ADDITIONAL DETAIL SELECTION CRITERIA 18
EXECUTING A SIMPLE QUERY19
VIEWING QUERY OUTPUT.........21
Important Note:....................................................21
UA Help Desk and Training—Providing consultation, solutions and training for University computing needs.1

DSD Query Menu (QAdhoc)
TROUBLESHOOTING........................22
CREATING AGGREGATE FIELDS 24
SAVING AND PRINTING YOUR QUERY REPORT 27
Printing Query Output..................................27Office97 (Excel97)...............................................28Office2000 (Excel 2000)......................................28
LEARNING MORE ABOUT QMENU/QADHOC DATA 29
Data Sources....................................................29
APPENDIX.....................................................30
UAF Access..........................................................30Statewide Access..................................................30QMenu/QAdhoc Training Support Contact Numbers 30Problem Reports: Reporting Problems Once You Know How QMenu/QAdhoc Works 31Requests for New DSD QAdhoc Views...............31QMenu/QAdhoc-Related Bookmarks..................31UA Help Desk and Training Homepage..............31Accessing QMenu & QAdhoc..............................31QAdhoc Help........................................................31Decision Support Database Homepage................31
UA Help Desk and Training—Providing consultation, solutions and training for University computing needs.1

Introduction
What is QAdhoc?
QAdhoc is the ad hoc query component of the DSD QUERY MENU (QMenu) which is an Oracle Web Application Server interface to the University of Alaska Decision Support Database (i.e. 'RPTS', 'data warehouse'). University of Alaska staff and faculty members use QAdhoc when no preexisting QMenu query matches their information needs.
QAdhoc facilitates the retrieval of batches of records meeting user-supplied criteria from predefined "views" of administrative information. QAdhoc defaults to batch retrievals of 150 records at a time. However you may change the batch value or elect to retrieve all records in a single pass.
WARNING: QAdhoc does not know how much memory is available to your browser or how large a document it can successfully load. It is your responsibility to ensure you do not attempt to retrieve more information than your browser can handle. Counting rows is a good idea. The number of qualifying rows multiplied by the number of characters expected in the selected columns is a rough calculation for the size of the resulting html document, which will be returned to your browser.
Individuals needing to retrieve large quantities of records may find QAdhoc inconvenient to use and should investigate other ad hoc query tools. Individuals retrieving only a few hundred records will not be hampered by your Web browser’s record retrieval limitation.
What QAdhoc is NOT!
QAdhoc is not a full-featured ad hoc query tool. QAdhoc queries are limited to predefined "views" of administrative data that are registered with the QMenu application. Within those views, you have limited ability to query, sort and display output.
Keeping CurrentBecause QMenu and QAdhoc access the Decision Support Database rather than the live production system, it is important to keep appraised of the status of the RPTS database. Data in RPTS is refreshed on a periodic basis and may not be current at the time your query is submitted. Both QMenu and QAdhoc display important online documentation (metadata) describing the selected query or view and indicating the age of data sources used by the query or view.
The DSD-L list is the primary medium of communication between QAdhoc developers and its user community. DSD-L list members receive proactive notification of RPTS database status, including changes and additions to QMenu queries and QAdhoc views. Subscribe to DSD-L so that you too can keep current.
System Requirements(or “What you need to run QADHOC”)
You will need the following in order to access and use QAdhoc: Internet browser software such as Netscape Navigator (version 3.01 or greater) or another Web browser that supports HTML frames and Javascript to the same degree as Netscape Navigator version 3.01, is required to access QMenu. The number of browser windows that may be open concurrently and the size of the HTML documents displayable by the browser are limited by the amount of memory available to the browser software—more memory is better.
QAdhoc uses the Internet browser’s network connection when submitting query requests; therefore the computer must be Internet-connected. In addition, users must have a University of Alaska RPTS database account and QAdhoc web access code.
Secure Access
To access QAdhoc, login to QMenu. This requires a Userid and Webcode. Userid is an Oracle RPTS database account id. Webcode is a special code used only during QMenu login; it is not a RPTS password. Request access through your University of Alaska Administrative Account Maintenance Coordinator.
Offering Suggestions
A SUGGESTIONS BOX button is available on the request page that follows a successful logon. You are encouraged to click on this button whenever you wish to send suggestions for changes or improvements to QMenu or QAdhoc.
Logging “ON” to QAdhoc
Since QAdhoc is a component of the DSD Query Menu (QMenu), you must login to QMenu in order to use QAdhoc. Start your Internet browser and load the following URL:
http://qmenu.alaska.eduShortcut:To add QMenu to your personal toolbar:1. Save QMenu URL as
a bookmark.2. Select Bookmarks
from the Communicator pulldown list.
3. Select Edit bookmarks.
4. Click and drag the QMenu URL to your personal toolbar folder.
5. Select close from the file pulldown menu.
6. Click the DSD Query Menu(RPTS) icon on your toolbar.
1. Click in the Userid field located in the login frame. 2. Enter your RPTS database user ID.3. Press TAB to move to the Webcode field. 4. Enter your QMenu Webcode (not your RPTS database password).5. Click the LOGIN button.
Important NoteInitial QMenu Webcode is the letter ‘S’ followed by the 9 digits of your SSN (e.g. S123456789).

QMenu responds with its standard display featuring pick boxes for “Categories” of QMenu reports, a “Queries” pick box to display the Queries associated with each of the QMenu categories, and a line specifying when the current QMenu session will time out.
QMenu/QAdhoc “Tickets”
The QMenu/QAdhoc web interface to the Decision Support Database (DSD, RPTS) incorporates the use of session “tickets”. When you login to QMenu, you will be granted a session “ticket,” which is valid for one hour. When your “ticket” expires, you will be required to reconnect before you can continue with your query activity. This feature of QMenu security is intended to help insure that only authorized users are accessing University of Alaska data via the web.
How To Handle Expired Tickets During Active Query Session
If your ticket “expires” after you’ve clicked the FETCH MORE RECORDS button from the output window of active query, locate the main window for QMenu/QAdhoc and click the RECONNECT button. After logging in, return the output window of your active query and click the BACK button on the tool bar. Once the output from your last successful query is displayed, click the FETCH MORE RECORDS button. Although the main QMenu window no longer displays your query form and input parameters, the output window from your active query will still be able to FETCH MORE RECORDS.

Starting QAdhoc
The QMenu selection frame includes a QAdhoc button that activates QMenu’s ad hoc component.
Click the QAdhoc button to load QAdhoc.
When QAdhoc is loaded, the QMenu icon is replaced with a QAdhoc icon and the Queries selection list becomes a Views selection list. These changes are visual indications that you are now in the ad hoc component of QMenu. Notice that the QAdhoc button has been replaced with a QMenu button, allowing you to toggle between QAdhoc and QMenu.

Logging “OFF”
To terminate QAdhoc yet keep your Internet browser session open, click the RECONNECT button.
Suggestions
Note the SUGGESTIONS BOX button. You are encouraged to click on this button whenever you wish to send suggestions for changes or improvements to QMenu or QAdhoc.
Important NoteClosing all QMenu windows does not serve the same purpose as the RECONNECT button. Both userid and webcode are stored in your browser’s memory and remain there until either QMenu or the browser software is terminated. Prior to one of those two events, anyone sitting at your machine is able to submit QMenu queries using your login. To prevent this breach in security, select the RECONNECT button or quit your browser session.

Resetting Your Webcode
Reset your Webcode after logging into QMenu for the first time. QMenu Webcode should not be set to be identical to your Banner production password.
Important Note: Case is critical when keying in a new web code and confirming the new web code you just keyed in. It is essential that you type the new web code and the confirmation exactly the same way.
1. Click the WEBCODE RESET button located in the top frame next to the logout button.
2. Complete the “Webcode Reset Parameter Form,” supplying the following:
User ID for RPTS Old QMenu Web Code New QMenu Web Code Confirmation of New QMenu Web Code
3. Click the WEBCODE RESET button in the parameter form. The following Java alert message is displayed:
4. Click OK or CANCEL to continue or cancel this request.

Selecting a View Category
The QADHOC interface consists of a two-section (frame) window. The top frame of QADHOC is used for query selection. Changing the query “category” causes QADHOC to repaint the window with refreshed category and query lists.
Click in the Categories picklist and highlight an entry to select a query category.

Selecting a View
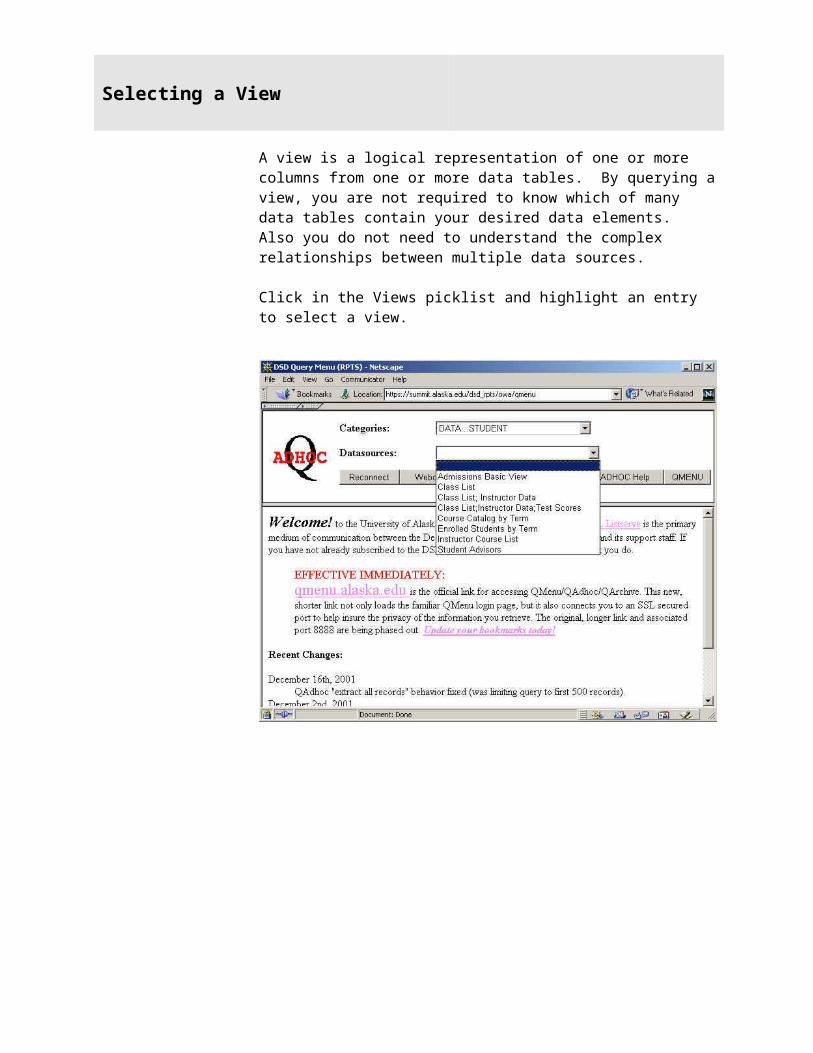
A view is a logical representation of one or more columns from one or more data tables. By querying a view, you are not required to know which of many data tables contain your desired data elements. Also you do not need to understand the complex relationships between multiple data sources.
Click in the Views picklist and highlight an entry to select a view.

Reviewing Online Documentation or “Metadata”
The bottom frame of the QAdhoc window displays view “metadata” and parameter forms. Changing your view selection causes QAdhoc to display metadata for the newly selected view. The resulting display includes the names and ages of the data sources used in the view and other information about the view. The metadata display for a selected view contains valuable information. Do not ignore this screen!

User Authorized
The User Authorized section of the metadata indicates whether you can successfully execute a query against the view to retrieve data. Although policy allows us to display metadata to any data warehouse user, access to the information delivered by a query is subject to the "need to know" test. If you are authorized to retrieve data via the selected view, a button labeled "Get Adhoc Form" is displayed. If you are not authorized, the words "ACCESS DENIED: see ‘Associated Roles’ below." are returned.
Object Name, Type and Associated Roles
Displays the actual name of the query (which may not be the same as the title displayed in the parameter form). States that the object is a “view.” Lists associated Oracle security role(s) that constrain who may query the view.
Data Sources
The list of data sources provides important information about the age of data, which will be used to generate the query output. In a data warehouse (or data store) the information is most likely not as current as the production system. Just how old that data is should play a role in how much you depend on the output from the query.
Fields Requiring ConditionsNote: If required selection criteria are missing, QADHOC will display this Java Alert message: Form contains fields requiring conditions.
.
Lists the names of fields in the view for which you must provide selection criteria. By requiring selection criteria, QAdhoc helps insure that your queries use underlying table indexes and so run reasonably efficiently.

Description
Displays a brief description and statement of purpose for the view. As the descriptive text is improved over time, this section of the metadata may contain information about the types of data found in various fields of the view.
A vertical scroll bar is displayed in the lower frame of the QAdhoc interface, if metadata can not be fully displayed. Click within the scroll bar to reposition the metadata display.
Retrieving Query Parameter Form
Before a query may be submitted, the associated query parameter form must be retrieved and completed. Parameter forms allow limited query customization so that only records meeting query criteria are displayed in the query output.
If you are authorized to query the view, click the GET ADHOC FORM button in the metadata display to retrieve the query parameter form.

Building a Simple Query
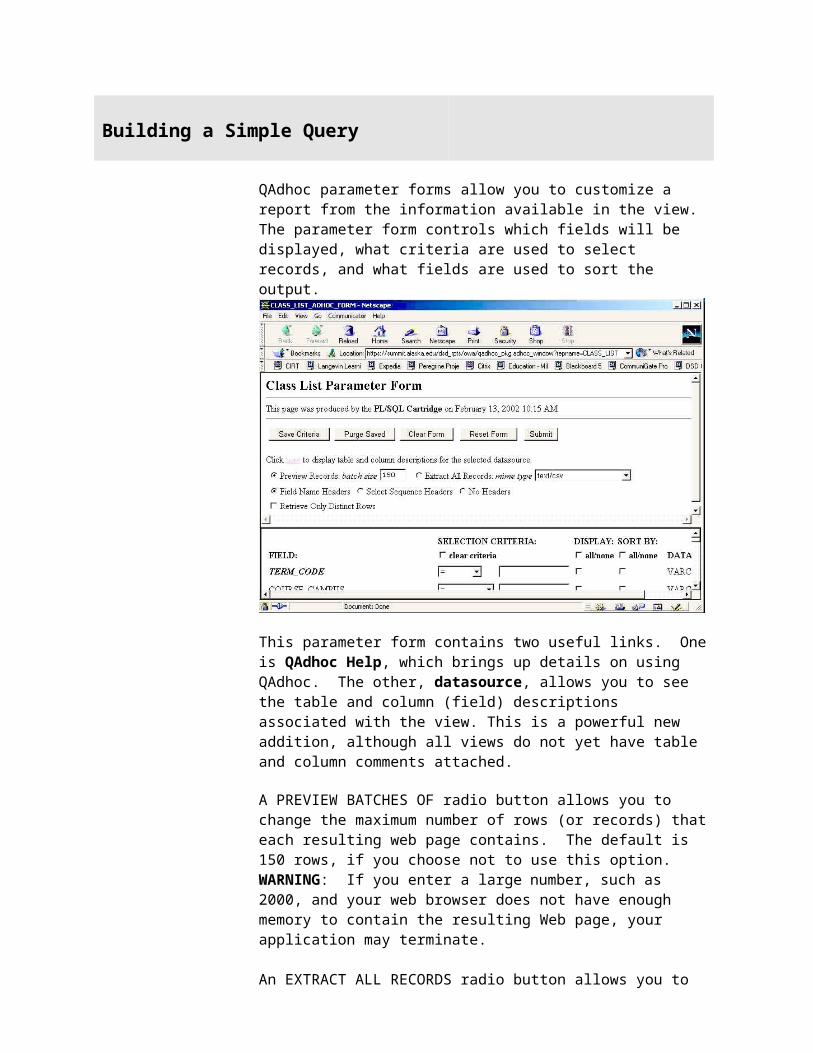
QAdhoc parameter forms allow you to customize a report from the information available in the view. The parameter form controls which fields will be displayed, what criteria are used to select records, and what fields are used to sort the output.
This parameter form contains two useful links. One is QAdhoc Help, which brings up details on using QAdhoc. The other, datasource, allows you to see the table and column (field) descriptions associated with the view. This is a powerful new addition, although all views do not yet have table and column comments attached.
A PREVIEW BATCHES OF radio button allows you to change the maximum number of rows (or records) that each resulting web page contains. The default is 150 rows, if you choose not to use this option. WARNING: If you enter a large number, such as 2000, and your web browser does not have enough memory to contain the resulting Web page, your application may terminate.
An EXTRACT ALL RECORDS radio button allows you to export the query results to a file. This will export to a file all records that match the conditions you enter.

How to tips
Note: If after changing MIME type as in Step 5, you still are unable to export your file successfully into Excel please contact us via e-mail at [email protected].
Extract Results to a File
An EXTRACT ALL RECORDS radio button allows you to export the query results to a file. This will export to a file all records that match the conditions you enter. This is used in conjunction with Excel. You may need to change your preferences to take advantage of the ability to retrieve all records. Your browser needs to associate the MIME type text/csv correctly with a helper application in Excel.
Follow these steps to set up your Web browser to save exported data as an Excel file.
1. Go to the Edit menu in Netscape.2. Select preferences3. Expand the Navigator category, and4. Choose the Application tab.5. In the Description list, select Microsoft Excel Separated
Values File. If anything is in the MIME type block other than “CSV”,
click on edit and remove any extension listed. Exit the dialog box by clicking “OK”.
6. 1st time running the Export, you will get the Unknown File Type window which will give you the four options: “More Info”, “Pick App”, “Save File”, and “Cancel”; select “Pick App”. When the Configure External Viewer window comes back
up select “Browse” Find the executable file for Microsoft Excel and double
click on the file. This will bring you back to the main Configure External Viewer Screen. You should see the path to the Excel executable file.
Click on “OK” to save your set up.You will get the “Warning. There is a possible Security Hazard here.” screen. Click in the “Open it” screen to export your information into Excel.
Use Radio Buttons for HEADERS The FIELD NAME HEADERS Radio Button allows you to select what the column headings are in your resulting report. This is the default it will return the column heading as listed under the FIELD section of the Parameter Form.

The SELECT SEQUENCE HEADERS Radio Button allows you to show the column headings in your resulting report as a numbered field; the number corresponds to the order in which you selected the fields for display.
The NO HEADERS Radio Button allows you to choose not to have column headings on your resulting report.
Use RETRIEVE ONLY DISTINCT ROWS CheckboxThe RETRIEVE ONLY DISTINCT ROWS checkbox allows you to remove all duplicates from your report.
Use Other FeaturesThe RESET FORM button clears the form, returning it to its original state.The SUBMIT button submits the query for execution after the user's input has been validated.
The next section of the Parameter Form is where you build your question. You create your own report by entering information into the SELECTION CRITERIA for the specific FIELDS you wish to query on, and choosing the information to DISPLAY on your report and the way you want it SORTED. The FIELD column lists the available fields to use in your report.
SELECTION CRITERIA: Made up of “operator” picklists and “value” input fields. The combination of field name, operator and value are used to build selection criteria that limit records returned by your query.
Operators like =, >, <, and <> are familiar to many people. These operators, and most others, require a comparison value to the right of the operator. By default, the equals (=) operator followed by a blank input field value is ignored by QAdhoc when building your query. Other operators require multiple or no comparison values. In addition, your comparison value must be properly delimited. Character strings must be delimited with single quotes. Numeric values require no delimiters. Date values are treated as character strings and must be delimited with single quotes and formatted as ‘DD-MON-YY’ (e.g. ‘01-JAN-98’).
The DISPLAY checkboxes allow you to choose whether to show this information on your report. The "all/none" checkbox is a toggle which you can use to turn all the boxes on or off.
The SORT checkboxes allow you to order the results. The first checkbox you select is the main sort; additional choices result in sorting within the main sort. For example if you choose to sort by STUDENT_NAME_LAST and then select the checkbox to sort by STUDENT_NAME_FIRST the resulting rows will be alphabetized by last name and then if there are duplicate last names those rows will be ordered alphabetically by first name.

Additional Detail Selection Criteria
With this new feature, you will be able to run a report once, versus running it four times and then combining the results of those four runs into one report.
ADDITIONAL DETAIL SELECTION CRITERIA: At the bottom of the parameter form is a freeform text box, where you may enter additional selection criteria. This is where you can enter OR logic, which you cannot enter in the normal selection criteria area. This is a very powerful addition. Without this box, your query is based only on the AND conjunction. "Show me this AND this AND this…. Now you can ask questions using OR logic. "Show me this AND this OR this OR this.”
Important Note
QAdhoc queries look for a case-sensitive match to the values supplied in your selection criteria. If, for example, you supply uppercase values in your selection criteria, where data storage is in mixed (upper and lower) case, you will find no match and will retrieve no records.
Executing a Simple Query
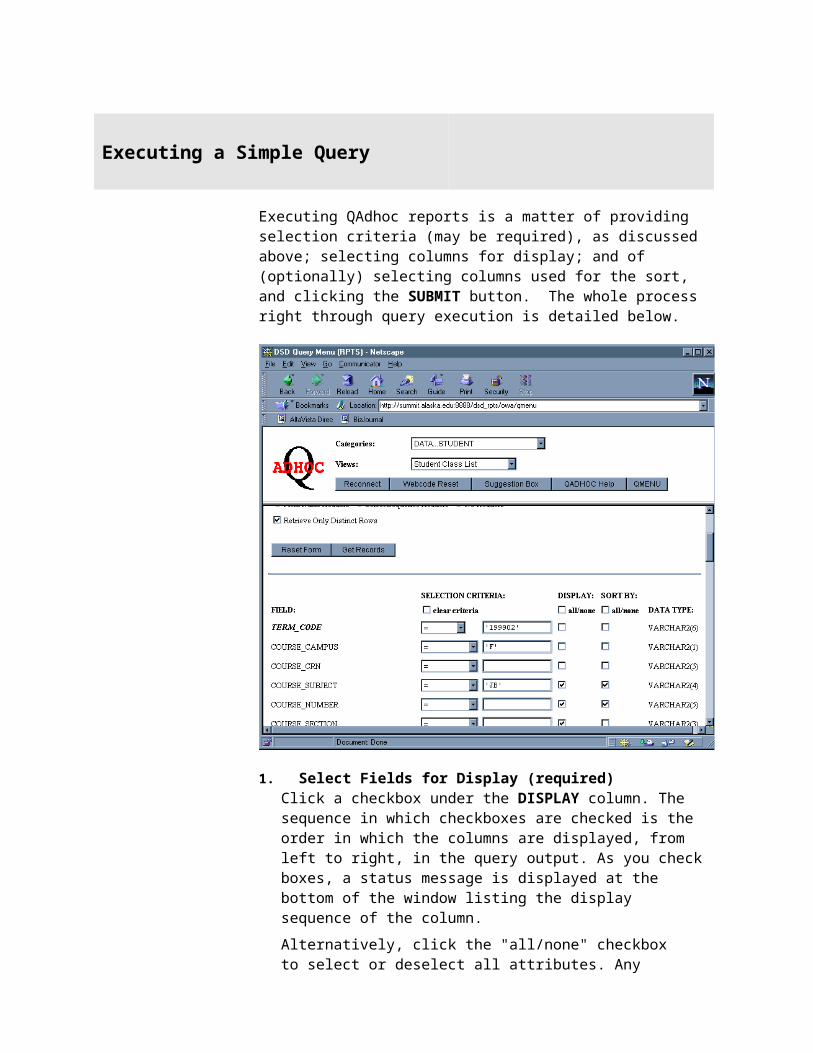
Executing QAdhoc reports is a matter of providing selection criteria (may be required), as discussed above; selecting columns for display; and of (optionally) selecting columns used for the sort, and clicking the SUBMIT button. The whole process right through query execution is detailed below.
1. Select Fields for Display (required)Click a checkbox under the DISPLAY column. The sequence in which checkboxes are checked is the order in which the columns are displayed, from left to right, in the query output. As you check boxes, a status message is displayed at the bottom of the window listing the display sequence of the column.Alternatively, click the "all/none" checkbox to select or deselect all attributes. Any fields not already selected will be added to your select list in the order they appear from top to bottom of the window (or all checkboxes will be unchecked).

Note: The data stored in Oracle views may be case sensitive. When providing a value for a limiting condition, be sure to use proper case (upper vs. lower vs. mixed).
2. Select Fields for Sorting (optional)Click checkboxes under SORT BY column. The sequence in which the checkboxes are checked determines the sort order of your query output. As you check boxes, a status message is displayed at the bottom of the window listing the sort sequence of the column.Alternatively, click the "all/none" checkbox to select or deselect all attributes. While this is a convenient way to get rid of selected sort columns, selecting all columns does not generally result in a meaningful sort.
3. Provide Selection Criteria (may be required)Select an operator from the pick list adjacent to a field you will use to limit the rows returned by your query. Enter the limiting value in the input field to the right of the operator pick list.Most QAdhoc views require the user to limit the output of the query. Columns requiring limiting conditions are bolded and italicized.
4. Click the SUBMIT button.

Viewing Query Output
QAdhoc will verify that you have selected at least one field and that you have provided required selection criteria. Once this minimal validation is performed, the query is executed. Output from the query is written to a separate window - one window per view. Rerunning the same query with new criteria overwrites the data displayed in that view's window
Important Note: Under some operating systems, it may be necessary to select the view’s output window from the browser’s Communicator menu. It may not be the active window, when the query execution is complete.
The SQL (structured query language) used to query the view is displayed at the top of the first page of the query output. Subsequent pages do not contain the SQL text.
At the bottom of each page of the query output is a CLOSE WINDOW button and (possibly) FETCH NEXT 150 RECORDS button. The CLOSE WINDOW button serves the same purpose as the window “close box” in the Windows and Macintosh operating systems. The FETCH NEXT 150 RECORDS button is used to retrieve additional records matching the query criteria and appears only when there are additional records to be retrieved.

Troubleshooting
QAdhoc parameter forms are simple HTML documents with limited ability to validate your input prior to executing a query. It is possible for you to submit a query that returns an error message rather than data. The most common cause of error messages in the query output window is bad syntax in your selection criteria. (Note: The ITS “SQL Reference Handout” gives fuller details, relating to this section.)
Bad syntax: Field = 'value (missing ending single quote delimiter)
Good syntax: Field = 'value1’
Bad syntax: Field between 'value1' (‘between’ requires 2 values separated by ‘and’)
Good syntax: Field between 'value 1' and 'value2'
Bad syntax: Field = 01-JAN-98 (date field values require quotes) Good syntax: Field = ‘01-JAN-98’

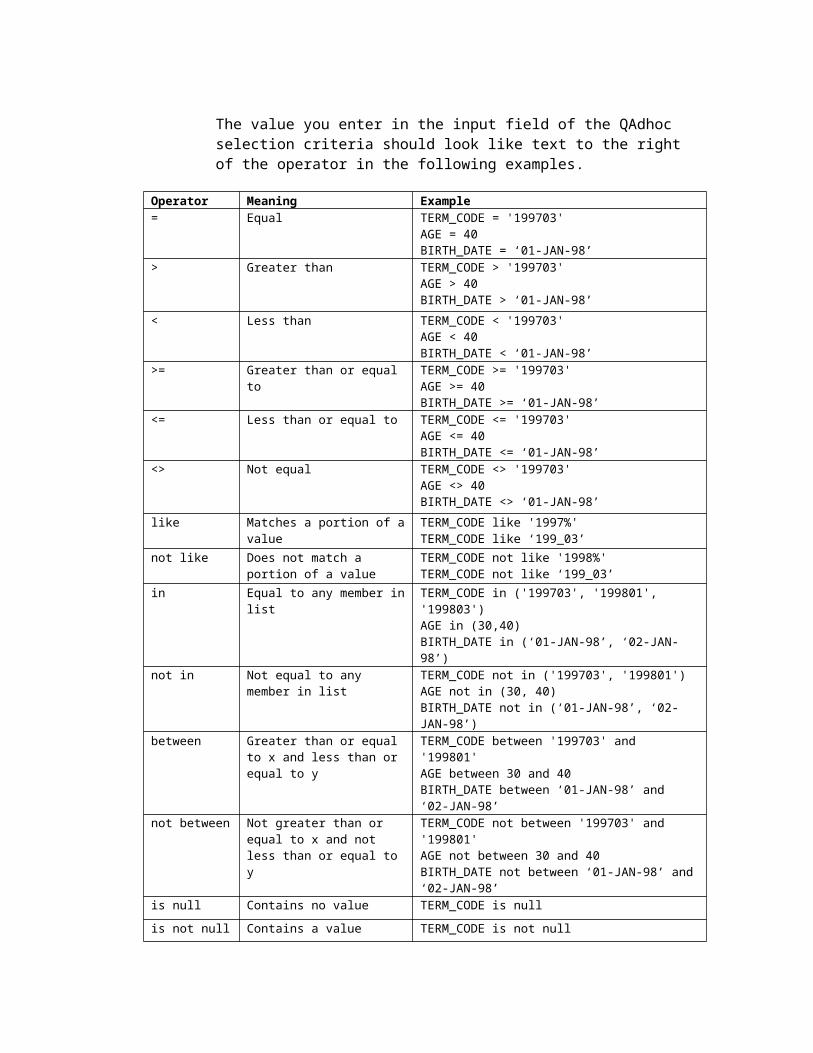
The value you enter in the input field of the QAdhoc selection criteria should look like text to the right of the operator in the following examples.
Operator Meaning Example = Equal TERM_CODE = '199703'
AGE = 40BIRTH_DATE = ‘01-JAN-98’
> Greater than TERM_CODE > '199703'AGE > 40BIRTH_DATE > ‘01-JAN-98’
< Less than TERM_CODE < '199703'AGE < 40BIRTH_DATE < ‘01-JAN-98’
>= Greater than or equal to
TERM_CODE >= '199703'AGE >= 40BIRTH_DATE >= ‘01-JAN-98’
<= Less than or equal to TERM_CODE <= '199703'AGE <= 40BIRTH_DATE <= ‘01-JAN-98’
<> Not equal TERM_CODE <> '199703'AGE <> 40BIRTH_DATE <> ‘01-JAN-98’
like Matches a portion of a value
TERM_CODE like '1997%'TERM_CODE like ‘199_03’
not like Does not match a portion of a value
TERM_CODE not like '1998%'TERM_CODE not like ‘199_03’
in Equal to any member in list
TERM_CODE in ('199703', '199801', '199803')AGE in (30,40)BIRTH_DATE in (‘01-JAN-98’, ‘02-JAN-98’)
not in Not equal to any member in list
TERM_CODE not in ('199703', '199801')AGE not in (30, 40)BIRTH_DATE not in (‘01-JAN-98’, ‘02-JAN-98’)
between Greater than or equal to x and less than or equal to y
TERM_CODE between '199703' and '199801'AGE between 30 and 40BIRTH_DATE between ‘01-JAN-98’ and ‘02-JAN-98’
not between Not greater than or equal to x and not less than or equal to y
TERM_CODE not between '199703' and '199801'AGE not between 30 and 40BIRTH_DATE not between ‘01-JAN-98’ and ‘02-JAN-98’
is null Contains no value TERM_CODE is null
is not null Contains a value TERM_CODE is not null

Creating Aggregate Fields
QAdhoc generates aggregate query output if it sees that you have defined your own field utilizing one of seven aggregate functions: count(), sum(), max(), min(), avg(), stddev() and variance(). When aggregation occurs, one row of output is generated for every unique combination of values found in fields selected for display.
Note: If any of the courses are team taught you will receive an incorrect count. In order to not get a duplicate student count for classes that are team taught you need to use
Count(distinct student_id).
Aggregation occurs only if the user-defined field containing the aggregate function is either selected for display or used in selection criteria. If the user-defined field is neither selected for display nor used in selection criteria, QAdhoc ignores it and the resulting output contains detail, not aggregate records.
One useful example of an aggregate query is a count of records. This example uses the STUDENT ‘Enrolled Students by Term’ view and counts

records by term and primary degree for term 199901 at the Fairbanks campus.
1. Select Fields for Display Click the Display checkbox associated with the PRIMARY_DEGREE_CODE field.
2. Provide Selection Criteria Enter ‘199903’ in the input field for the TERM_CODE selection criteria. Enter ‘F’ in the input field for the PRIMARY_DEGREE_CAMPUS and ‘Y’ in the ENROLLED_IND selection criteria. (The example below shows the upper portion of the Web page.)
3. Create and Select for Display Field Which Counts RecordsEnter COUNT(*) in an empty user defined field input box. When entering the text defining the field, do not enclose the text in quotes. (The example below shows the lower portion of the Web page – you may need to scroll up and down to see the whole page.) Asterisk means count each record returned by query.Click the DISPLAY checkbox associated with the COUNT(*) field.
4. Execute the Query Click the SUBMIT button.
Each row in the output from an aggregate query will be unique (no two rows the same). In this example students are grouped and counted by PRIMARY_DEGREE_CODE.

Saving and Printing Your Query Report
Printing Query Output
QAdhoc output exists within the world of your Internet browser. If your PC is connected to a printer – either directly or via a network - then QAdhoc output may be printed from the output window.
Before printing, you may want to check your browser’s print properties. Depending on the width of the query output, it may be desirable to print in “landscape” mode and to change the scale of the report, sizing it down so that all output columns will fit on one printed page.
Refer to your Internet browser documentation for help with printing.
Important NotePrint properties and the type and size of font used to display query output are a function of the selected printer and of the browser software. How QAdhoc output looks on screen or when printed is largely a function of selected browser options.

Office97 (Excel97)
The following procedure works to export QMENU output from Netscape 3.01 or higher (PC or MAC) and then into Excel97.
1. Submit your query from the DSD QMENU2. Select Save As from the File pull down menu3. Enter a File Name4. Accept the default HTML file type or specifically change the “Save as
type” to be HTML5. Open your saved file in Excel6. Excel97 will display the file as it appeared in the DSD QMENU7. Report should display in formatted form but minor changes could be
necessary
Office2000 (Excel 2000)The following procedure works to export QMenu output from Netscape 3.01 or higher (PC or MAC) and then into Excel2000.
1. Submit your query from the DSD QMENU2. Select Save As from the file pull down menu3. Enter a file name4. Accept the default HTML file type or specifically change the “Save as
type” to be HTML5. Open your saved file in Excel6. Excel2000 will display the file as it appeared in the DSD QMENU. 7. Report should display in formatted form but minor changes could be
necessary

Learning More About QMenu/QAdhoc Data
Data Sources
When you are unfamiliar with the potential contents of a parameter field, you should refer to the validation tables. Validation tables begin with STV for Student, TTV for Accounts Receivable, FTV for Finance, PTV for Payroll, NTV for HR Position Control, GTV for General, and RTV for Financial Aid (future). If the name of the field has the word code in it, generally it will have a validation table associated with it. For example, Subject Code validation table is STVSUBJ; Organization Code is FTVORGN, etc. More information on validation tables is available in the QAdhoc training session and documentation.
To find the name of a validation table in Banner, simply tab to the field in Banner, press <help> function key to bring up the help screen for that field. The first line will tell you the name of the table and the column name within that table. For example, on Banner form SSASECT, tab to the TERM field and press the <help> function key. This brings up the help screen and the top line shows SSASECT_TERM_CODE. From this information you are reasonably certain the validation table is STVTERM. You can key in STVTERM in Banner and you will see a listing of the term codes and there associated descriptions for those codes.
General information for names, addresses, and biographical demographic information will be found in the STV validation tables. Validation tables are not updated frequently—because they contain a listing of all of the possible choices IE ‘F’ for the Fairbanks campus or ‘A’ for the Anchorage campus as a campus code—which do not change often.
Important NoteYou can easily determine validation tables by the third character in the name of the data source as listed in the metadata for each query. For example, the Class List query under the REPORTS… STUDENT category has the following data sources. The last in the list is STVRSTS, which has ‘V’ as the third character.
(snapshot) SCBCRSE last refreshed Sep 07th 1998 at 17:58:45 ...(snapshot) STVRSTS last refreshed Sep 02nd 1998 at 02:44:00

Appendix
UAF Access
Access to the various kinds of University data for the UAF campus, may be obtained by contacting your security coordinator. Requests for access go to your local security coordinator. If you do not know the name of your security coordinator, please contact your supervisor for this information.
For help with this tool or problem reporting, please contact the UA Help Desk and Training at [email protected] or by phone at 474-6306
Installation DC & CAssistance 474-6564
Statewide Access
Access to the various kinds of University data for the Statewide campus may be obtained by contacting:
Access Type Finance, Human Resources & Student Contact Raye Ann RobinsonDepartment SW Financial SystemsPhone 474-7971
For help with this tool or problem reporting, please contact the UA Help Desk and Training at [email protected] or by phone at 474-6306.
474-6969
QMenu/QAdhoc Training Support Contact Numbers
Lori Merdes, Manager [email protected](907) 474-5310
Martin Miller, Sr. IT Trainer/Customer Support [email protected](907) 474-6678
Michelle Buhr, IT Trainer/Customer Support [email protected](907) 474-6261
General training inquiries should go to [email protected]
Problem Reports: Reporting Problems Once You Know How QMenu/QAdhoc Works
UA Help Desk: Fairbanks (907) 474-6306Outside Fairbanks (800) 478-8226
Requests for New DSD QAdhoc Views
If you would like to see a new query in the DSD QMenu, please send your suggestion through the SUGGESTION button within QMenu.
QMenu/QAdhoc-Related Bookmarks
UA Help Desk and Training Homepagehttp://www.alaska.edu/its/hat
DSD Query Menu QMenu/QAdhoc Training Schedule Documentation
Accessing QMenu & QAdhochttp://qmenu.alaska.edu/
QAdhoc HelpOnce you are within the QMenu system you may click on the “QMENU HELP” button to learn more about this product.https://summit.alaska.edu/prod-htm/qmenuhelp.html
Decision Support Database Homepagehttp://www.alaska.edu/UA/DSD
Document generated: 6/6/98 Updated: 2/13/2002


