49
CSI Technologies’ Vigil Client Software - User’s Guide Page 1 Vigil Client Software Version 4.00 User’s Guide

CSI Technologies’ Vigil Client Software - User’s Guide Page 1
Vigil Client Software Version 4.00
User’s Guide
CSI Technologies’ Vigil Client Software - User’s Guide Page 2
Table of Contents 1 Introduction....................................................................................................4 2 System Requirements ...................................................................................5 3 Features ........................................................................................................6 4 Installation .....................................................................................................7 5 Operation.......................................................................................................8
5.1 Servers Screen.......................................................................................9 5.1.1 Add server .....................................................................................10 5.1.2 Edit server .....................................................................................11 5.1.3 DVR Settings.................................................................................11 5.1.4 Remote Register............................................................................22
5.2 Groups..................................................................................................22 5.3 Live Viewer ...........................................................................................23
5.3.1 Movement and Alarms...................................................................24 5.3.2 Live Video Options ........................................................................24 5.3.3 Camera Control .............................................................................24 5.3.4 Live Data .......................................................................................26
5.4 Search Footage ....................................................................................27 5.4.1 Playback Footage..........................................................................29 5.4.2 Using the Playback Screen Controls .............................................30 5.4.3 Frame De-interlacing .....................................................................31 5.4.4 Smart Search ................................................................................31 5.4.5 Visual Tracking..............................................................................32 5.4.6 Zoom .............................................................................................33 5.4.7 Adjust Image .................................................................................33 5.4.8 Markers .........................................................................................34 5.4.9 Search Data ..................................................................................34 5.4.10 Save or Print Data .........................................................................35 5.4.11 Save Image ...................................................................................35 5.4.12 Print Image ....................................................................................36 5.4.13 Save video clip ..............................................................................36
5.5 Settings.................................................................................................36 5.5.1 Startup...........................................................................................37 5.5.2 Search / Playback..........................................................................38 5.5.3 Alarms ...........................................................................................38 5.5.4 Hardware.......................................................................................39 5.5.5 Destinations...................................................................................39
5.6 Server Alarms.......................................................................................40 5.7 Exports .................................................................................................40 5.8 Site Map ...............................................................................................41
6 Authentication..............................................................................................43 7 Local Software Update ................................................................................44 8 Site Map Designer .......................................................................................45 9 Language Switcher ......................................................................................47 10 Troubleshooting .......................................................................................48

CSI Technologies’ Vigil Client Software - User’s Guide Page 3
11 Contact Information..................................................................................49
CSI Technologies’ Vigil Client Software - User’s Guide Page 4
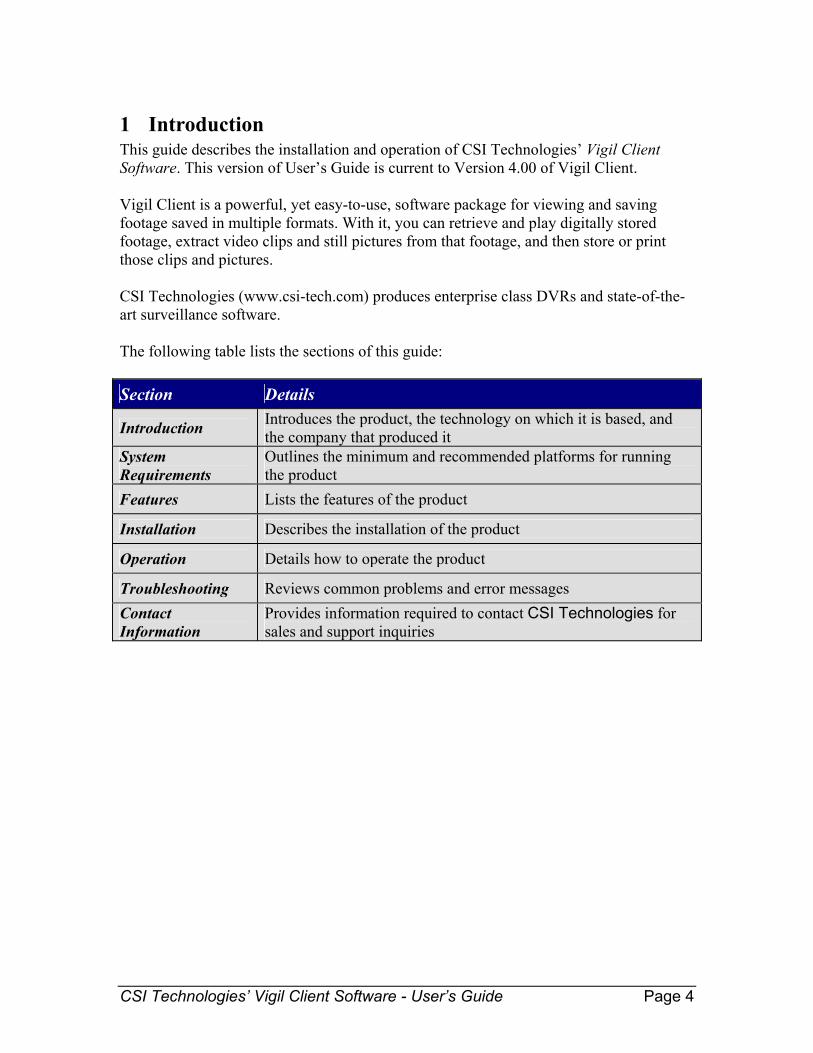
1 Introduction This guide describes the installation and operation of CSI Technologies’ Vigil Client Software. This version of User’s Guide is current to Version 4.00 of Vigil Client. Vigil Client is a powerful, yet easy-to-use, software package for viewing and saving footage saved in multiple formats. With it, you can retrieve and play digitally stored footage, extract video clips and still pictures from that footage, and then store or print those clips and pictures. CSI Technologies (www.csi-tech.com) produces enterprise class DVRs and state-of-the-art surveillance software. The following table lists the sections of this guide: Section Details
Introduction Introduces the product, the technology on which it is based, and the company that produced it
System Requirements
Outlines the minimum and recommended platforms for running the product
Features Lists the features of the product
Installation Describes the installation of the product
Operation Details how to operate the product
Troubleshooting Reviews common problems and error messages Contact Information
Provides information required to contact CSI Technologies for sales and support inquiries

CSI Technologies’ Vigil Client Software - User’s Guide Page 5
2 System Requirements The following table outlines the minimum and recommended platforms for running Vigil Client.
PC Feature Minimum Recommended
Operating System Windows 98 Windows 2000
CPU 850 MHZ 1.5 GHZ
RAM 256 Mb 256 Mb
HDD size 5 Gb 10 Gb
HDD transfer rate DMA66 DMA 133 MHZ

CSI Technologies’ Vigil Client Software - User’s Guide Page 6
3 Features This section describes the features of Vigil Client. Vigil Feature Details
Search Retrieve a list of stored footage for specified cameras from a start date/time to an end date/time
Quick Search Retrieve a list of all footage for the past 1 – 8 hours
Regular Playback Scan through recorded footage using Play/Pause buttons
Scroll-bar Playback Use a scroll-bar to locate footage by dragging to a desired location, or skim ahead or back 1 or 10 frames per click
Current Frame See the frame number, frame count, frame size (in Kb), and frame time/date for the currently displayed frame
Video Cueing Cue video to a specified date/time or frame number
Save Footage Save the currently displayed video footage in AVI or MJPG format
Save Picture Save the currently displayed frame in JPEG or BMP format
Full Screen View footage or pictures at their full resolution with the click of a button
Live Viewer View up to 16 video feeds at once; see the site name, camera name, and local time/date for each live video feed; with the client/server, view feeds for multiple sites at once
CSI Technologies’ Vigil Client Software - User’s Guide Page 7
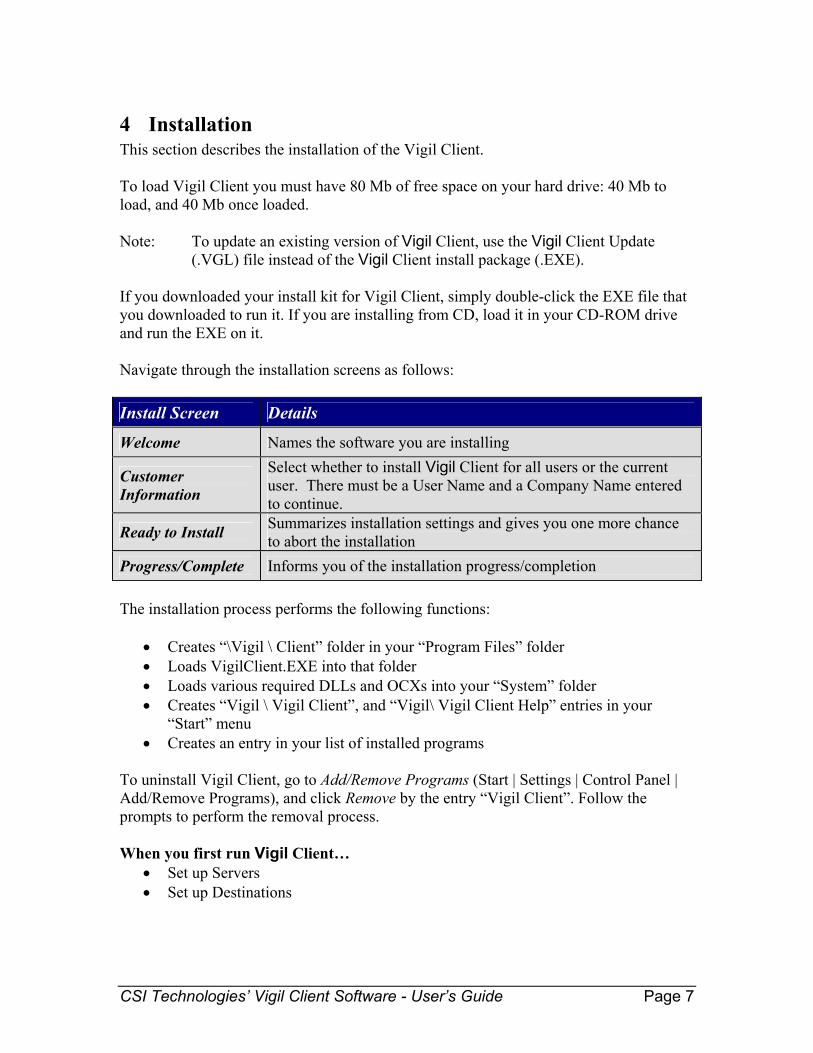
4 Installation This section describes the installation of the Vigil Client. To load Vigil Client you must have 80 Mb of free space on your hard drive: 40 Mb to load, and 40 Mb once loaded. Note: To update an existing version of Vigil Client, use the Vigil Client Update
(.VGL) file instead of the Vigil Client install package (.EXE). If you downloaded your install kit for Vigil Client, simply double-click the EXE file that you downloaded to run it. If you are installing from CD, load it in your CD-ROM drive and run the EXE on it. Navigate through the installation screens as follows: Install Screen Details
Welcome Names the software you are installing
Customer Information
Select whether to install Vigil Client for all users or the current user. There must be a User Name and a Company Name entered to continue.
Ready to Install Summarizes installation settings and gives you one more chance to abort the installation
Progress/Complete Informs you of the installation progress/completion The installation process performs the following functions:
• Creates “\Vigil \ Client” folder in your “Program Files” folder • Loads VigilClient.EXE into that folder • Loads various required DLLs and OCXs into your “System” folder • Creates “Vigil \ Vigil Client”, and “Vigil\ Vigil Client Help” entries in your
“Start” menu • Creates an entry in your list of installed programs
To uninstall Vigil Client, go to Add/Remove Programs (Start | Settings | Control Panel | Add/Remove Programs), and click Remove by the entry “Vigil Client”. Follow the prompts to perform the removal process. When you first run Vigil Client…
• Set up Servers • Set up Destinations

CSI Technologies’ Vigil Client Software - User’s Guide Page 8
5 Operation This section describes the operation of Vigil Client. Here is the main window of Vigil Client
The main functions of Vigil Client are listed below and discussed following the list:
• Servers Screen • Sites • Live Viewer • Search • Playback • Settings • Exports

CSI Technologies’ Vigil Client Software - User’s Guide Page 9
5.1 Servers Screen A “server” in this context is a DVR PC running Vigil Server. The purpose of setting up servers is to make connecting to local and remote Vigil servers quicker and simpler: no need to remember IP addresses or DNS names, simply use the name by which you know your Vigil server. You can Add new servers or view, Edit, or Remove existing ones.
To open the Servers screen, click the Servers button or select View | Servers from the menu.
• Connect All – To connect to all sites, click the “Connect All” button. This feature connects each site one by one from the top of the list to the bottom. If a server doesn’t have a username and password entered in the settings, it will prompt for the username and password.
• Connect – To connect to a server, click the server name then click “Connect”. This will prompt you for a Username and Password if one has not been entered in the settings. Connected sites display a green “connected” icon: the icon appears as unlocked if the user logged in has administrator privileges; the icon appears as locked if the user logged in does not have administrator privileges. Sites that are not connected display a red “disconnected” icon . Once a site is connected using an administrator login, the DVR Settings of that site can be viewed/changed by clicking the “Settings” button.
• Connect As… – Click the “Connect As...” button to bypass the auto login username and password configured in the settings or to connect as a different user.
• Disconnect – To Disconnect from a server, click the server name to select it, then click “Disconnect”
• Add - To Add a server, click “Add” and follow the steps in the “Add server” subsection below.

CSI Technologies’ Vigil Client Software - User’s Guide Page 10
• Remove - To Remove a server, click on the server name then click “Remove”, and click “OK” to the “Are you sure …” dialog that appears.
• Edit - To Edit a server, click the server name then click “Edit”, and follow the steps in the “Edit server” subsection below.
• DVR Settings - To view/change the DVR Settings, first connect to the site (see above) and then click the server name then click the “Settings” button and follow the directions in the “DVR Settings” subsection below.
• Remote Register – To open the registration screen of the remote DVR, click the “Remote Register” button. To register the remote DVR, follow the directions in the “Remote Register” subsection below.
5.1.1 Add server To add a new server, follow these steps:
1. In the “Servers” window, click the “Add” button 2. Enter a description for the server (e.g. “Head Office”) 3. Enter the IP address or DNS name of the server (e.g. “24.108.160.226”)
To connect to a Dialup site, leave the DNS name section blank and tick the “Use Dialup” checkbox, then select the dialup connection from the dropdown list. Note: At least one Windows dialup connection must be set up for “Use Dialup” to be selected.
4. If you want to login automatically, enter the username and default password in the Username and Password sections. Note: The default administrator login is username “administrator” and password “123”. The default user login is username “user” and password “123”.
5. If the Server is not using default TCP/IP ports, click the button to change the TCP/IP ports to the ports being used by the Server. See TCP/IP Ports section below.
6. Live Overlay – Tick “Use Live Overlay from Video Capture Card” to enable this feature. Select the input number from the dropdown list. For this feature to function properly, Live Overlay must be enabled in the Settings > Hardware section, and the Capture Card drivers must be correctly installed.
7. Click “OK” to save the new site
5.1.1.1 TCP/IP Ports To open the TCP/IP Ports screen, on the Edit Server screen, click the button.

CSI Technologies’ Vigil Client Software - User’s Guide Page 11
− For the Client software to connect properly to the Server, the TCP/IP Ports in the
Client software must match the TCP/IP Ports on the Server. − To change the TCP/IP Ports: select a preset number from the dropdown list; enter
in the Data Port and then click the “Get Settings” button; or enter the ports in manually.
− Reset to Defaults – Click to reset the ports to the default settings. − Get Settings – Retrieves the settings from the server. Enter the Data Port, and
then click the “Get Settings” button to retrieve the other ports from the server.
5.1.2 Edit server To edit a server, follow these steps:
1. In the “Servers” window, click on the server name then click Edit” 2. Other steps are the same as for Add server (above) 3. Click or “OK” to save the changes to the server over top of the previous
configuration 4. Click “Cancel” to close without saving changes
5.1.3 DVR Settings In the “Servers” window, connect to the server (see above). Once the server is connected, the icon beside it will be green and “unlocked” . Click on the server name then click “Settings”. It may take a moment for the settings screen to load the server information.
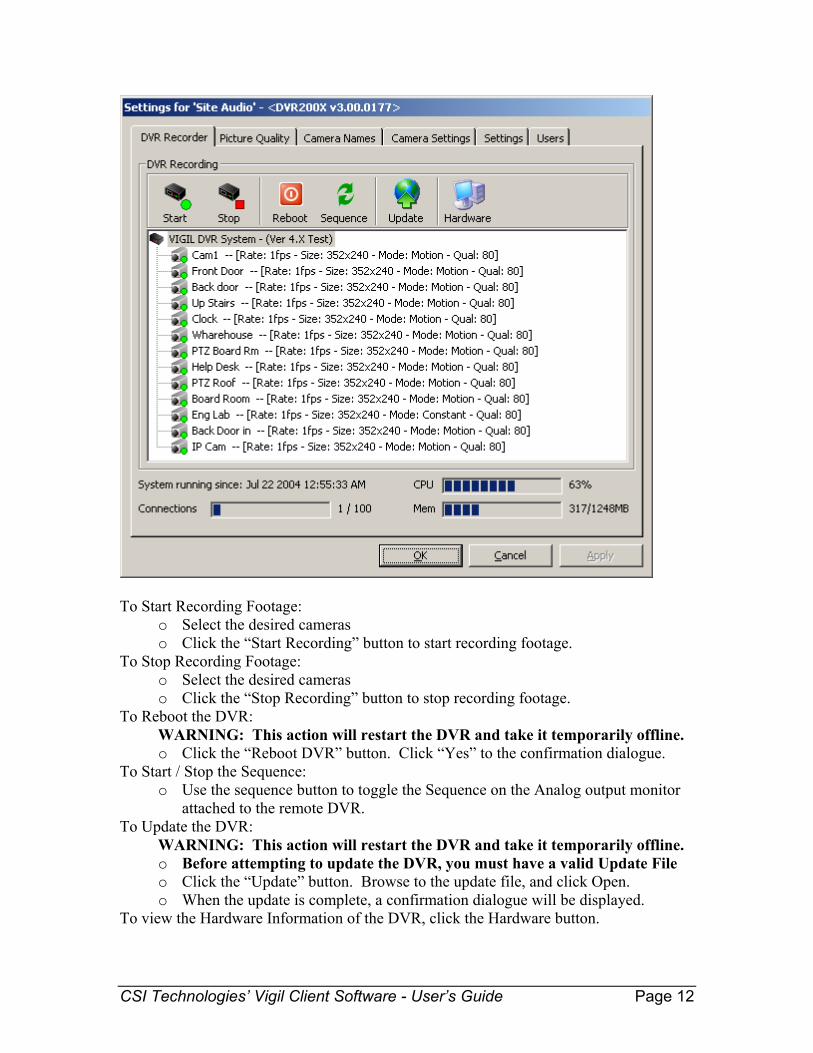
5.1.3.1 DVR Recorder The Recorder Controls screen allows you to control which cameras are recording footage.
CSI Technologies’ Vigil Client Software - User’s Guide Page 12
To Start Recording Footage:
o Select the desired cameras o Click the “Start Recording” button to start recording footage.
To Stop Recording Footage: o Select the desired cameras o Click the “Stop Recording” button to stop recording footage.
To Reboot the DVR: WARNING: This action will restart the DVR and take it temporarily offline. o Click the “Reboot DVR” button. Click “Yes” to the confirmation dialogue.
To Start / Stop the Sequence: o Use the sequence button to toggle the Sequence on the Analog output monitor
attached to the remote DVR. To Update the DVR:
WARNING: This action will restart the DVR and take it temporarily offline. o Before attempting to update the DVR, you must have a valid Update File o Click the “Update” button. Browse to the update file, and click Open. o When the update is complete, a confirmation dialogue will be displayed.
To view the Hardware Information of the DVR, click the Hardware button.
CSI Technologies’ Vigil Client Software - User’s Guide Page 13
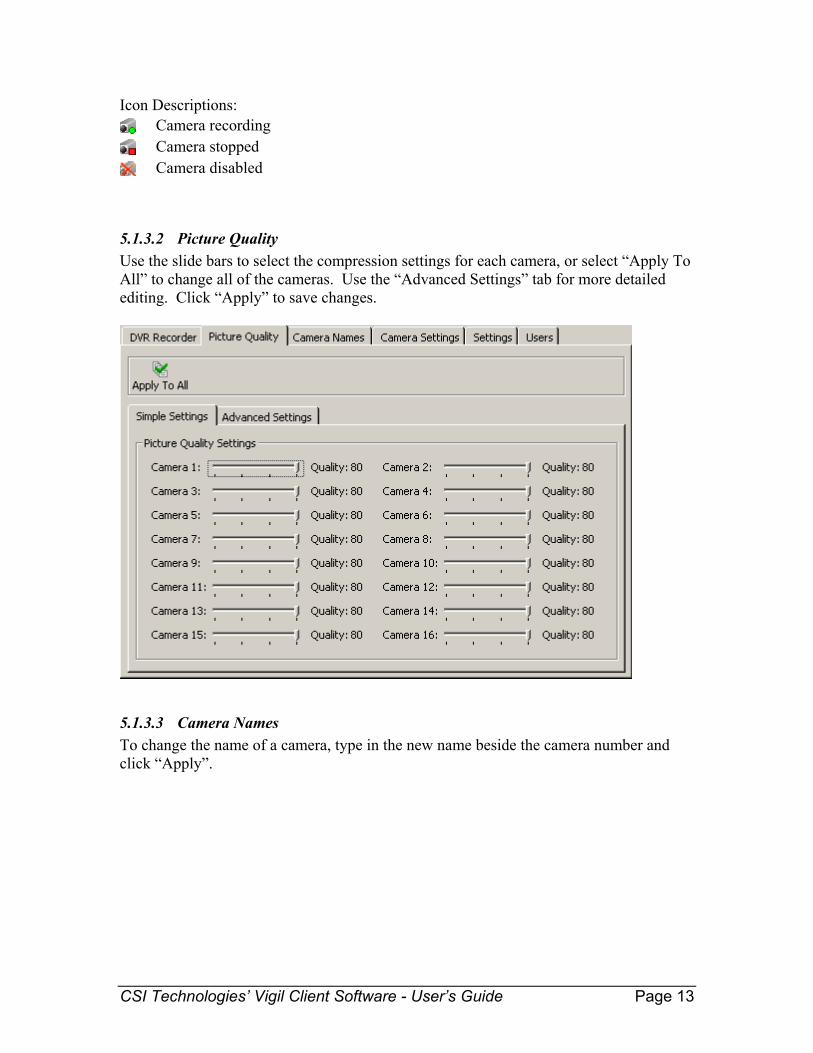
Icon Descriptions: Camera recording Camera stopped Camera disabled
5.1.3.2 Picture Quality Use the slide bars to select the compression settings for each camera, or select “Apply To All” to change all of the cameras. Use the “Advanced Settings” tab for more detailed editing. Click “Apply” to save changes.
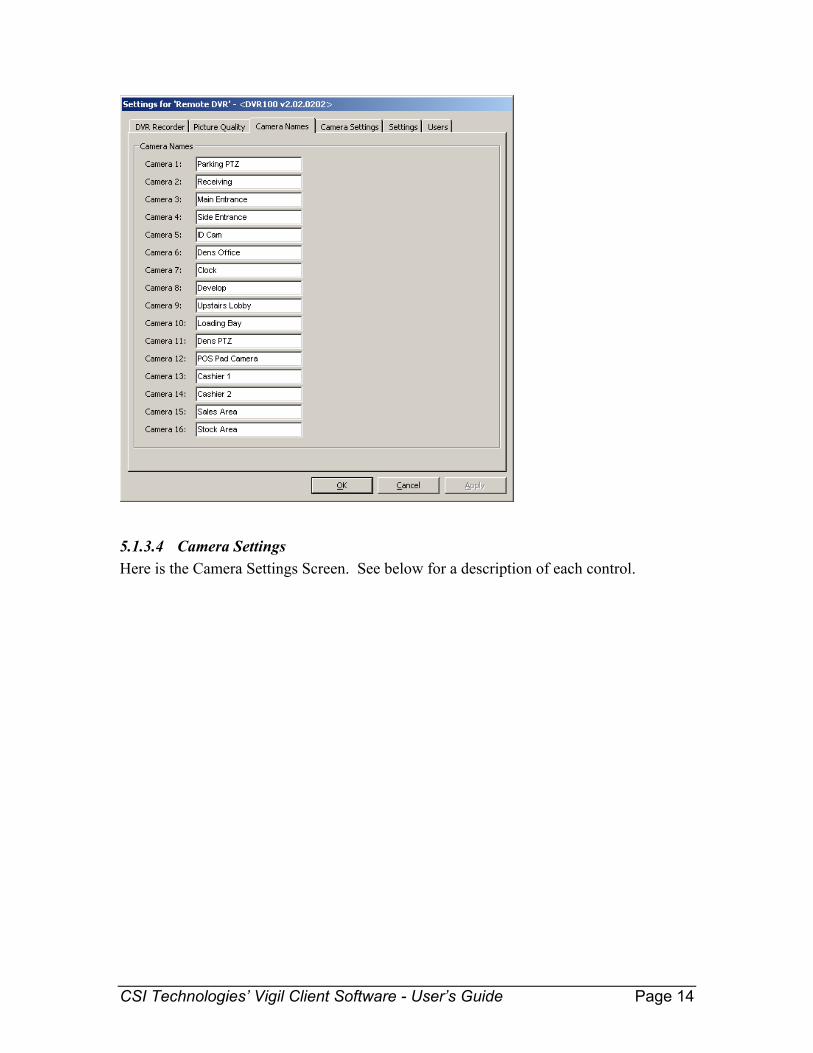
5.1.3.3 Camera Names To change the name of a camera, type in the new name beside the camera number and click “Apply”.
CSI Technologies’ Vigil Client Software - User’s Guide Page 14
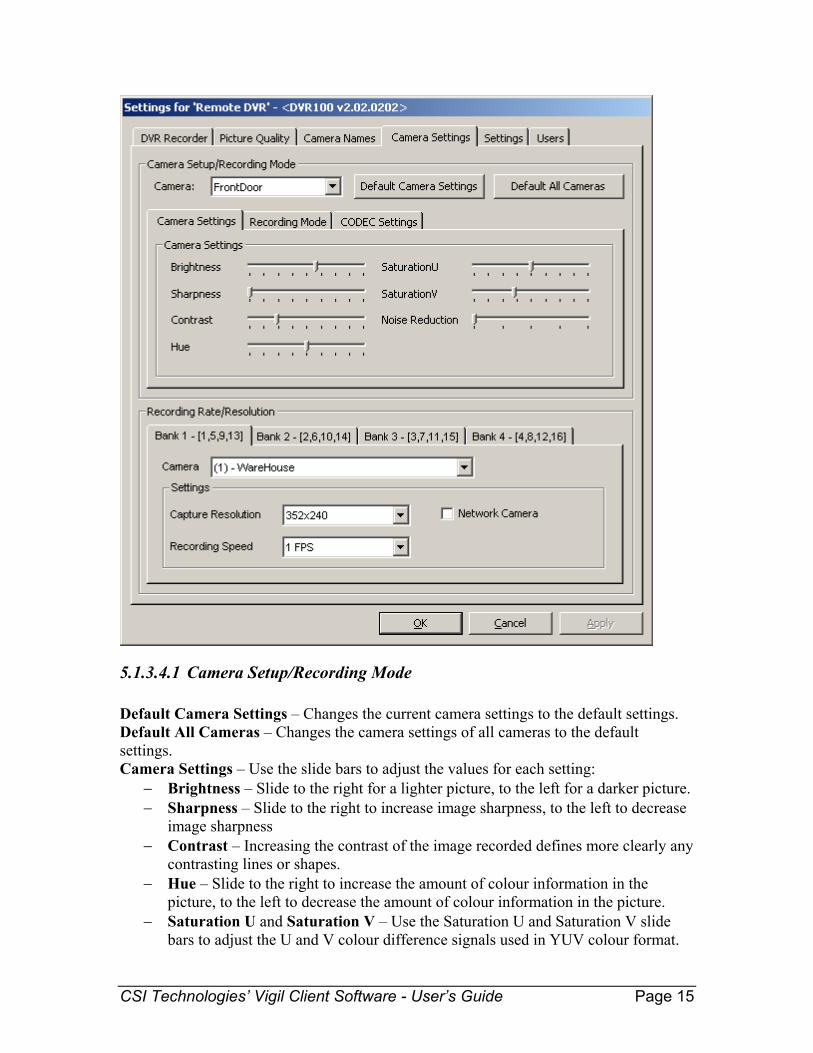
5.1.3.4 Camera Settings Here is the Camera Settings Screen. See below for a description of each control.
CSI Technologies’ Vigil Client Software - User’s Guide Page 15
5.1.3.4.1 Camera Setup/Recording Mode Default Camera Settings – Changes the current camera settings to the default settings. Default All Cameras – Changes the camera settings of all cameras to the default settings. Camera Settings – Use the slide bars to adjust the values for each setting:
− Brightness – Slide to the right for a lighter picture, to the left for a darker picture. − Sharpness – Slide to the right to increase image sharpness, to the left to decrease
image sharpness − Contrast – Increasing the contrast of the image recorded defines more clearly any
contrasting lines or shapes. − Hue – Slide to the right to increase the amount of colour information in the
picture, to the left to decrease the amount of colour information in the picture. − Saturation U and Saturation V – Use the Saturation U and Saturation V slide
bars to adjust the U and V colour difference signals used in YUV colour format.
CSI Technologies’ Vigil Client Software - User’s Guide Page 16
− Noise Reduction – Used to reduce video noise on grainy video images. CAUTION: If this value it is set too high it may have detrimental effects under certain conditions. This should be adjusted only by a qualified technician.
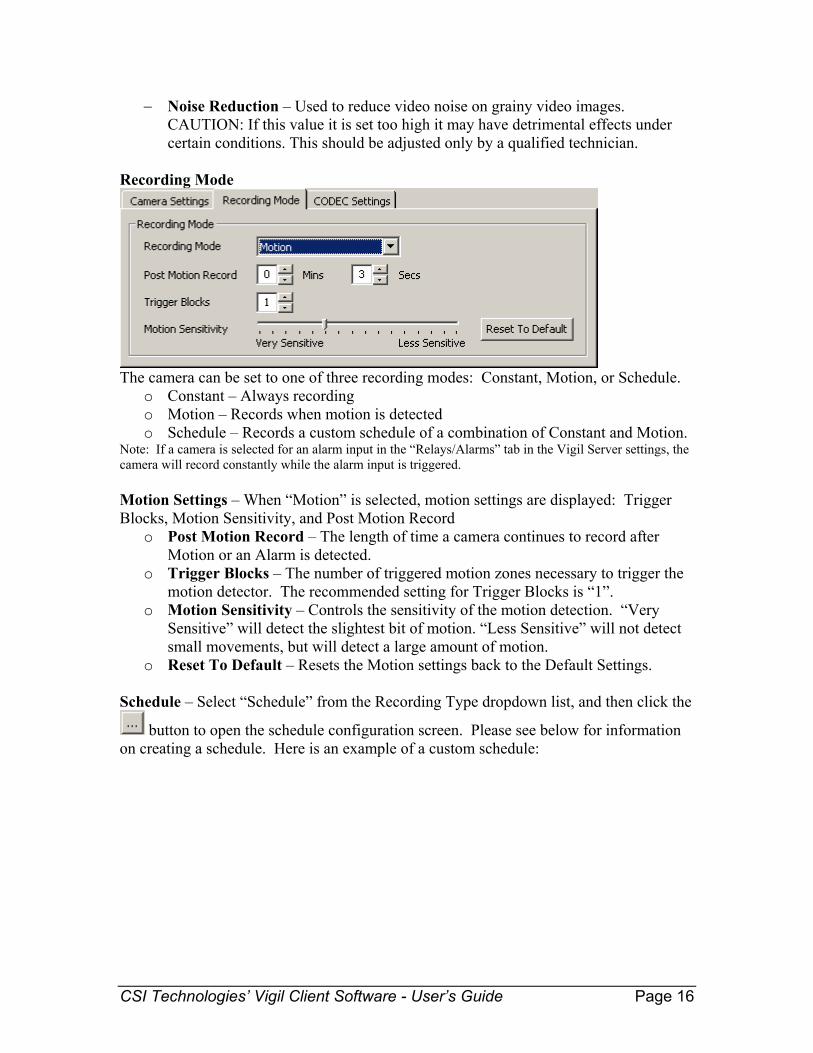
Recording Mode
The camera can be set to one of three recording modes: Constant, Motion, or Schedule.
o Constant – Always recording o Motion – Records when motion is detected o Schedule – Records a custom schedule of a combination of Constant and Motion.
Note: If a camera is selected for an alarm input in the “Relays/Alarms” tab in the Vigil Server settings, the camera will record constantly while the alarm input is triggered. Motion Settings – When “Motion” is selected, motion settings are displayed: Trigger Blocks, Motion Sensitivity, and Post Motion Record
o Post Motion Record – The length of time a camera continues to record after Motion or an Alarm is detected.
o Trigger Blocks – The number of triggered motion zones necessary to trigger the motion detector. The recommended setting for Trigger Blocks is “1”.
o Motion Sensitivity – Controls the sensitivity of the motion detection. “Very Sensitive” will detect the slightest bit of motion. “Less Sensitive” will not detect small movements, but will detect a large amount of motion.
o Reset To Default – Resets the Motion settings back to the Default Settings. Schedule – Select “Schedule” from the Recording Type dropdown list, and then click the
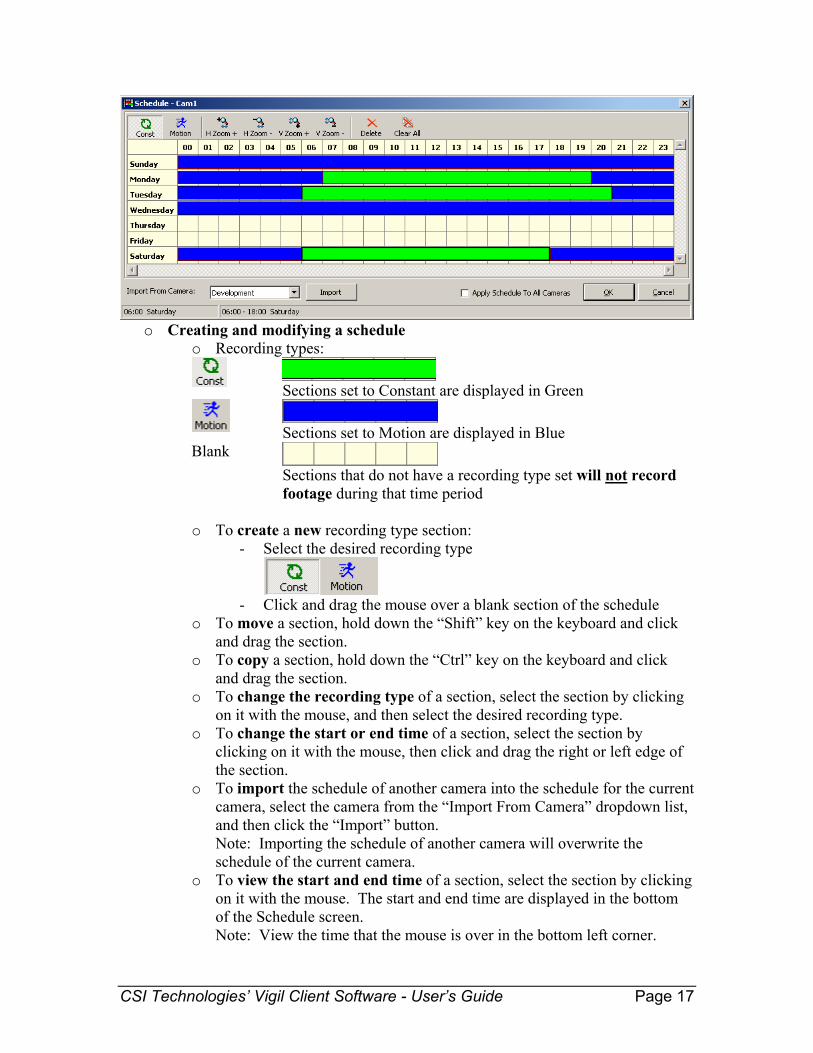
button to open the schedule configuration screen. Please see below for information on creating a schedule. Here is an example of a custom schedule:
CSI Technologies’ Vigil Client Software - User’s Guide Page 17
o Creating and modifying a schedule
o Recording types:
Sections set to Constant are displayed in Green
Sections set to Motion are displayed in Blue
Blank Sections that do not have a recording type set will not record footage during that time period
o To create a new recording type section:
- Select the desired recording type
- Click and drag the mouse over a blank section of the schedule
o To move a section, hold down the “Shift” key on the keyboard and click and drag the section.
o To copy a section, hold down the “Ctrl” key on the keyboard and click and drag the section.
o To change the recording type of a section, select the section by clicking on it with the mouse, and then select the desired recording type.
o To change the start or end time of a section, select the section by clicking on it with the mouse, then click and drag the right or left edge of the section.
o To import the schedule of another camera into the schedule for the current camera, select the camera from the “Import From Camera” dropdown list, and then click the “Import” button. Note: Importing the schedule of another camera will overwrite the schedule of the current camera.
o To view the start and end time of a section, select the section by clicking on it with the mouse. The start and end time are displayed in the bottom of the Schedule screen. Note: View the time that the mouse is over in the bottom left corner.
CSI Technologies’ Vigil Client Software - User’s Guide Page 18
o Use the Zoom in/out buttons to select more specific camera start times. As the schedule is zoomed in, a more specific time selection becomes available.
o To delete a section, select the section by clicking it with the mouse, then click the “Delete” button on the toolbar.
o The “Apply Schedule To All Cameras” checkbox will apply the schedule to all cameras. Note: This does not change all cameras to Schedule recording mode. Cameras that are not set to Schedule mode will continue to record in the selected recording mode.
o To clear the schedule, click the “Clear All” button on the toolbar. o When you are done modifying the Schedule, click OK to save changes
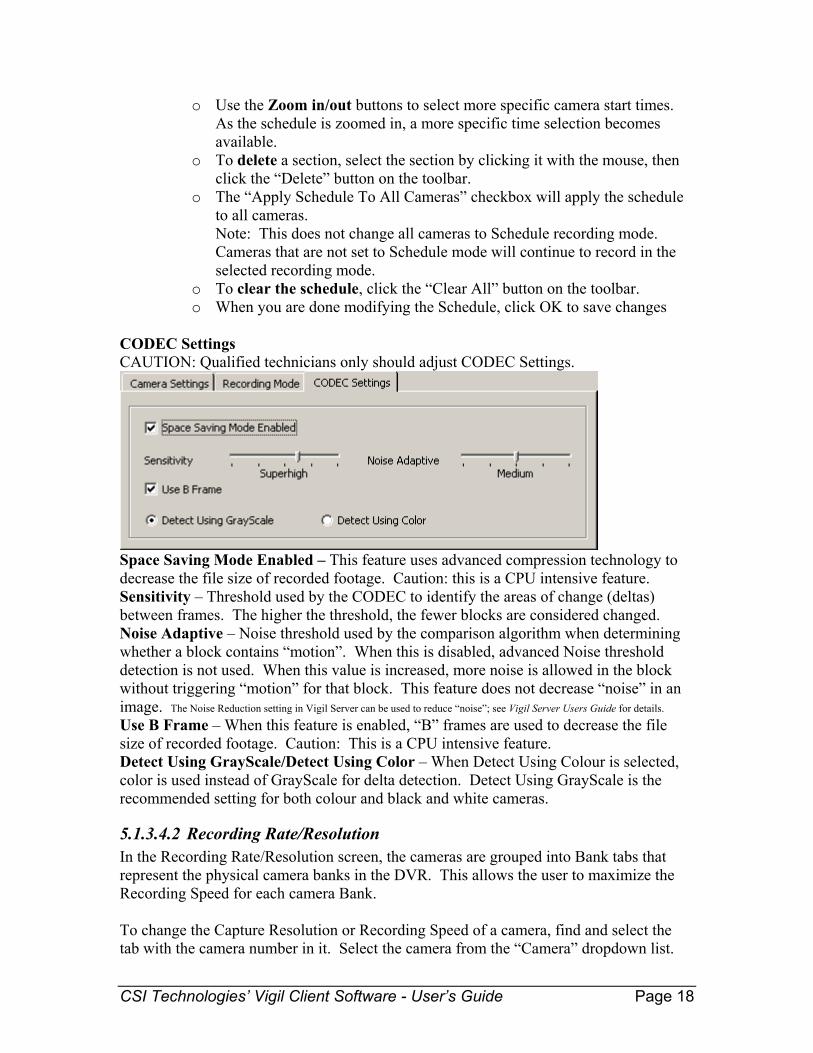
CODEC Settings CAUTION: Qualified technicians only should adjust CODEC Settings.
Space Saving Mode Enabled – This feature uses advanced compression technology to decrease the file size of recorded footage. Caution: this is a CPU intensive feature. Sensitivity – Threshold used by the CODEC to identify the areas of change (deltas) between frames. The higher the threshold, the fewer blocks are considered changed. Noise Adaptive – Noise threshold used by the comparison algorithm when determining whether a block contains “motion”. When this is disabled, advanced Noise threshold detection is not used. When this value is increased, more noise is allowed in the block without triggering “motion” for that block. This feature does not decrease “noise” in an image. The Noise Reduction setting in Vigil Server can be used to reduce “noise”; see Vigil Server Users Guide for details. Use B Frame – When this feature is enabled, “B” frames are used to decrease the file size of recorded footage. Caution: This is a CPU intensive feature. Detect Using GrayScale/Detect Using Color – When Detect Using Colour is selected, color is used instead of GrayScale for delta detection. Detect Using GrayScale is the recommended setting for both colour and black and white cameras.
5.1.3.4.2 Recording Rate/Resolution In the Recording Rate/Resolution screen, the cameras are grouped into Bank tabs that represent the physical camera banks in the DVR. This allows the user to maximize the Recording Speed for each camera Bank. To change the Capture Resolution or Recording Speed of a camera, find and select the tab with the camera number in it. Select the camera from the “Camera” dropdown list.
CSI Technologies’ Vigil Client Software - User’s Guide Page 19
Use the “Capture Resolution” and “Recording Speed” dropdown lists to modify the settings. Tick the Network Camera checkbox if this is a network camera; Vigil Server is able to use the input from one or many network cameras connected to the LAN or WAN of the Vigil Server System. Note: the Network Camera feature disables the physical camera input in the Video Capture card. Click “Apply” to save changes.
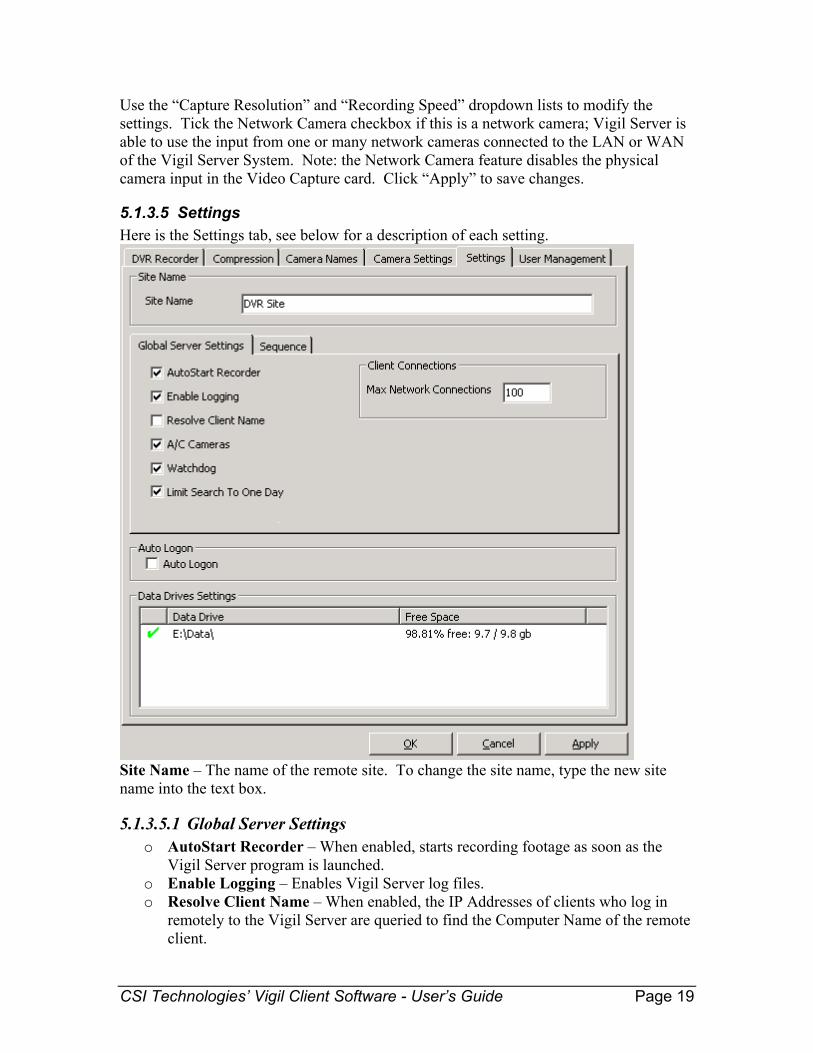
5.1.3.5 Settings Here is the Settings tab, see below for a description of each setting.
Site Name – The name of the remote site. To change the site name, type the new site name into the text box.
5.1.3.5.1 Global Server Settings o AutoStart Recorder – When enabled, starts recording footage as soon as the
Vigil Server program is launched. o Enable Logging – Enables Vigil Server log files. o Resolve Client Name – When enabled, the IP Addresses of clients who log in
remotely to the Vigil Server are queried to find the Computer Name of the remote client.
CSI Technologies’ Vigil Client Software - User’s Guide Page 20
o AC Cameras – When AC Cameras is Enabled, Vigil is set up to record footage from AC cameras. When AC Cameras is disabled, Vigil is set up to record footage from DC cameras.
o Watchdog – When enabled, the Watchdog hardware on the video capture board checks to make sure Vigil Server is responsive. If it becomes unresponsive, the DVR is rebooted. Note: If the Watchdog hardware on the DVR has not been set up correctly, this feature will not be functional.
o Limit Search To One Day – When ticked, Vigil Server will allow only one-day searches.
o Max Network Connections – The maximum number of connections allowed remote access to Vigil Server at one time. Note: Each Live window, playback window and settings screen takes up one or two “connections” to the Server. A minimum “Max Network Connections” setting of 20 is recommended.
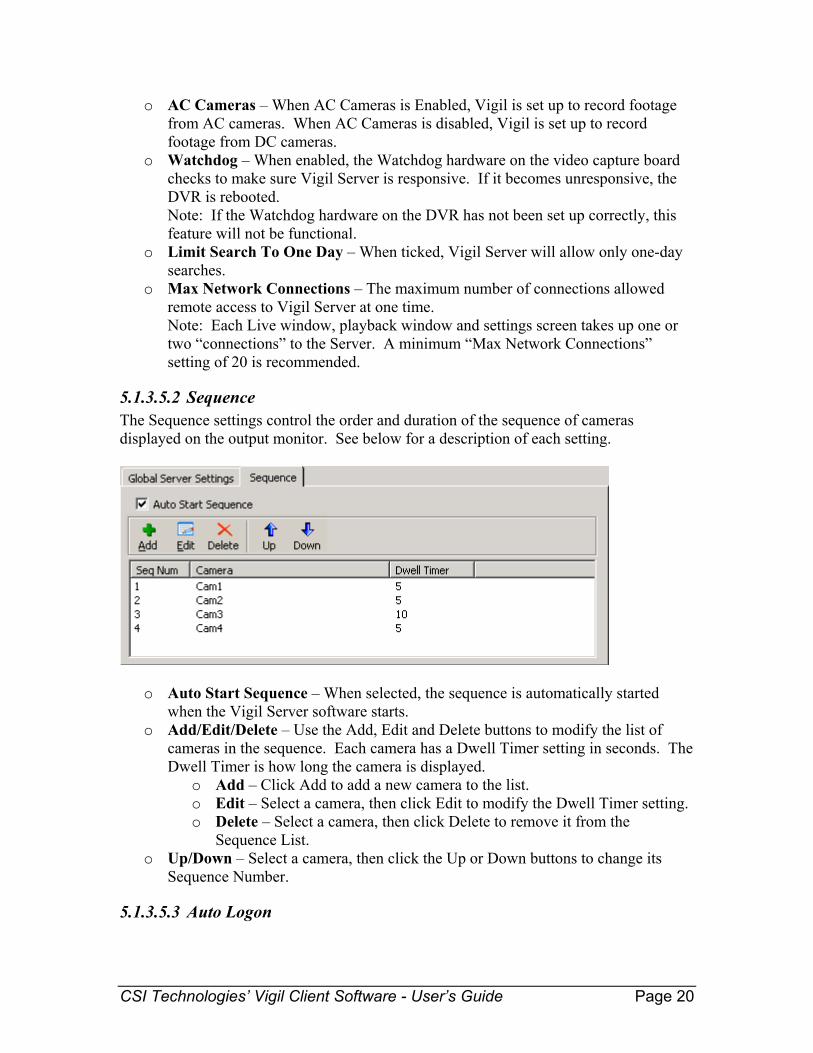
5.1.3.5.2 Sequence The Sequence settings control the order and duration of the sequence of cameras displayed on the output monitor. See below for a description of each setting.
o Auto Start Sequence – When selected, the sequence is automatically started when the Vigil Server software starts.
o Add/Edit/Delete – Use the Add, Edit and Delete buttons to modify the list of cameras in the sequence. Each camera has a Dwell Timer setting in seconds. The Dwell Timer is how long the camera is displayed.
o Add – Click Add to add a new camera to the list. o Edit – Select a camera, then click Edit to modify the Dwell Timer setting. o Delete – Select a camera, then click Delete to remove it from the
Sequence List. o Up/Down – Select a camera, then click the Up or Down buttons to change its
Sequence Number.
5.1.3.5.3 Auto Logon
CSI Technologies’ Vigil Client Software - User’s Guide Page 21
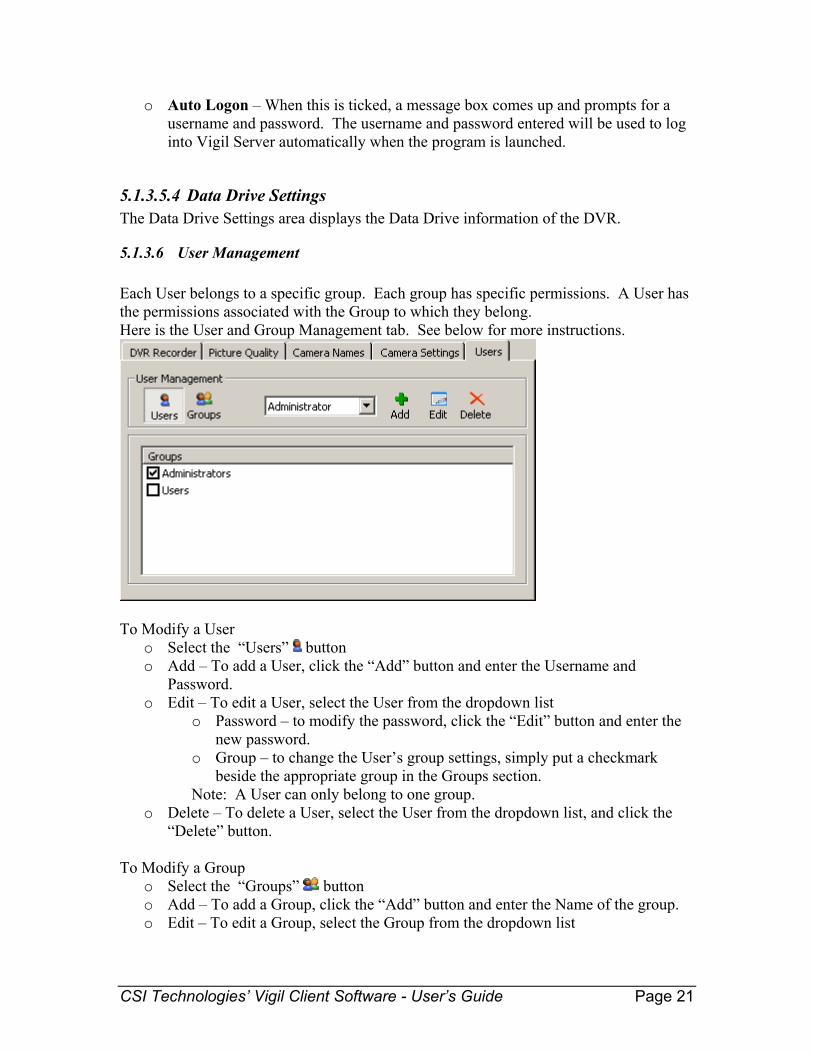
o Auto Logon – When this is ticked, a message box comes up and prompts for a username and password. The username and password entered will be used to log into Vigil Server automatically when the program is launched.
5.1.3.5.4 Data Drive Settings The Data Drive Settings area displays the Data Drive information of the DVR.
5.1.3.6 User Management Each User belongs to a specific group. Each group has specific permissions. A User has the permissions associated with the Group to which they belong. Here is the User and Group Management tab. See below for more instructions.
To Modify a User
o Select the “Users” button o Add – To add a User, click the “Add” button and enter the Username and
Password. o Edit – To edit a User, select the User from the dropdown list
o Password – to modify the password, click the “Edit” button and enter the new password.
o Group – to change the User’s group settings, simply put a checkmark beside the appropriate group in the Groups section.
Note: A User can only belong to one group. o Delete – To delete a User, select the User from the dropdown list, and click the
“Delete” button. To Modify a Group
o Select the “Groups” button o Add – To add a Group, click the “Add” button and enter the Name of the group. o Edit – To edit a Group, select the Group from the dropdown list

CSI Technologies’ Vigil Client Software - User’s Guide Page 22
o Permissions – to change the Group’s permissions, simply put a checkmark beside the appropriate permissions in the Permissions section.
o Delete – To delete a Group, select the Group from the dropdown list, and click the “Delete” button.
5.1.4 Remote Register To register the remote Vigil Server: In the Servers screen, connect to the site and click the “Remote Register” button. This will open the remote registration screen:
Write down the Serial Number from the Registration screen. Send the Serial Number, your name, company name, and contact information to CSI Technologies at [email protected]. CSI Technologies will contact you with a Registration Key. Once you have received a Registration Key,
1. Select the Module from the “Unregistered Modules” dropdown list. 2. Enter the Registration Key 3. Click “Register” 4. Click “OK” to the confirmation 5. Repeat steps 1 – 4 for each module you wish to register.
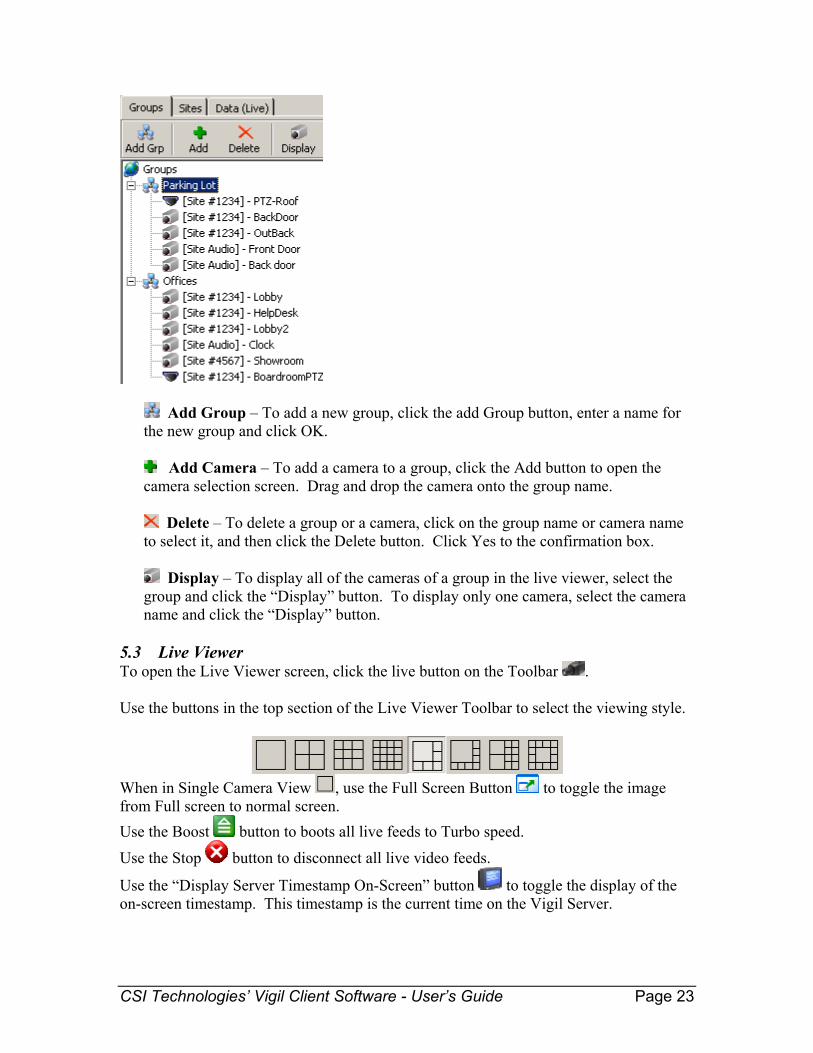
5.2 Groups Cameras can be grouped by site or custom group. To view sites by group, click the “Groups” tab.
CSI Technologies’ Vigil Client Software - User’s Guide Page 23
Add Group – To add a new group, click the add Group button, enter a name for the new group and click OK.
Add Camera – To add a camera to a group, click the Add button to open the
camera selection screen. Drag and drop the camera onto the group name.
Delete – To delete a group or a camera, click on the group name or camera name to select it, and then click the Delete button. Click Yes to the confirmation box.
Display – To display all of the cameras of a group in the live viewer, select the
group and click the “Display” button. To display only one camera, select the camera name and click the “Display” button.
5.3 Live Viewer To open the Live Viewer screen, click the live button on the Toolbar . Use the buttons in the top section of the Live Viewer Toolbar to select the viewing style.
When in Single Camera View , use the Full Screen Button to toggle the image from Full screen to normal screen. Use the Boost button to boots all live feeds to Turbo speed.
Use the Stop button to disconnect all live video feeds.
Use the “Display Server Timestamp On-Screen” button to toggle the display of the on-screen timestamp. This timestamp is the current time on the Vigil Server.

CSI Technologies’ Vigil Client Software - User’s Guide Page 24
To change the currently displayed cameras, drag and drop the desired camera onto the display grid. To clear a grid section, right click on the grid section and “STOP”. Note: This does not affect the recording settings. Right click on an image and select Copy to copy the image to the Windows Clipboard.
5.3.1 Movement and Alarms When there is movement or an alarm detected for a camera, the frame under the streaming video and the quick access button for that camera are appropriately colored.
o For Alarms, the frame is coloured Red o For Motion, the frame is coloured Blue o For the Post Motion Record period after motion or alarm has occurred, the frame
is colored Yellow o For a camera set to Constant Recording, the frame is coloured Green
5.3.2 Live Video Options Right click on a video stream to open the options for that stream. Live video streams have the following options: Zoom – Click to open the Zoom control. Using the mouse, left click on the image to Zoom in, right click on the image to Zoom out. Copy – Click Copy to copy the image to the Windows Clipboard. Stop – to stop streaming video Speed – Use this option to select the speed of the image being streamed. Select the desired live speed from the following choices: Slow, Medium, Fast, Turbo, or Maximum. Relays – The relays option controls “relay” outputs on the Vigil Server DVR. Check a relay to close that relay output on the DVR, or uncheck a relay number to open that relay output on the DVR. Quick Search - Quickly review recently recorded footage. Select from One, Five or Ten Minutes. Clicking on a Quick Search option automatically searches the requested camera and time, opens the Playback window and begins playback.
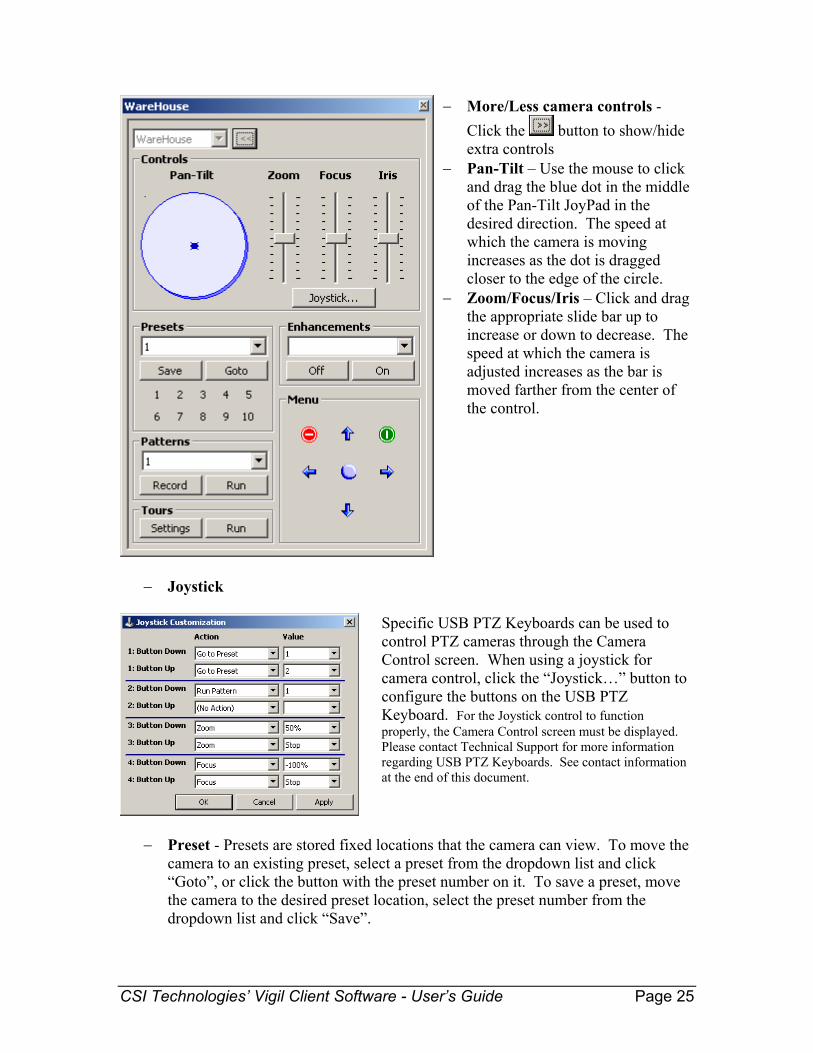
5.3.3 Camera Control If a camera with additional features is being displayed on the live screen, open it in single camera view to open the Camera Controller screen for that camera. Here is the screen displaying the camera controls. See below for a description of each control.
CSI Technologies’ Vigil Client Software - User’s Guide Page 25
− More/Less camera controls - Click the button to show/hide extra controls
− Pan-Tilt – Use the mouse to click and drag the blue dot in the middle of the Pan-Tilt JoyPad in the desired direction. The speed at which the camera is moving increases as the dot is dragged closer to the edge of the circle.
− Zoom/Focus/Iris – Click and drag the appropriate slide bar up to increase or down to decrease. The speed at which the camera is adjusted increases as the bar is moved farther from the center of the control.
− Joystick
Specific USB PTZ Keyboards can be used to control PTZ cameras through the Camera Control screen. When using a joystick for camera control, click the “Joystick…” button to configure the buttons on the USB PTZ Keyboard. For the Joystick control to function properly, the Camera Control screen must be displayed. Please contact Technical Support for more information regarding USB PTZ Keyboards. See contact information at the end of this document.
− Preset - Presets are stored fixed locations that the camera can view. To move the
camera to an existing preset, select a preset from the dropdown list and click “Goto”, or click the button with the preset number on it. To save a preset, move the camera to the desired preset location, select the preset number from the dropdown list and click “Save”.

CSI Technologies’ Vigil Client Software - User’s Guide Page 26
− Patterns - Controls the saved pattern of movement of the selected camera. Camera Patterns are stored within the camera.
a. Run – To run the existing pattern, click the Run button b. Record new Pattern –
i. Record - Start recording a new pattern. This will overwrite the existing saved pattern. After clicking Record, use the other Camera Control buttons to navigate the camera in the desired pattern.
ii. Stop - Click “Stop” when you are done recording the pattern. − Tours – A Tour is a sequence of camera presets run through Vigil. Tour settings
are stored within Vigil Server. Settings – Click on the Settings button to open the Tour Sequence Settings screen. Each preset is displayed for the number of seconds specified in the Dwell Time section. i. To Add a preset to the tour, click “Add” and
specify the preset number and Dwell Time. ii. To remove a preset from the tour, select the
preset and click “Delete” Run – To run the tour, click the Run button
− Enhancements – Select enhancement tool from the dropdown list. Use the “Off”
and “On” buttons to control.
− Menu - Press the menu on button to display the camera’s menu (this may take a moment to appear). Use the Up and Down arrow buttons to navigate the
menu and the select button to select a menu option. To exit the menu, click the Exit button , or navigate to the “Exit” option displayed and click the select button.
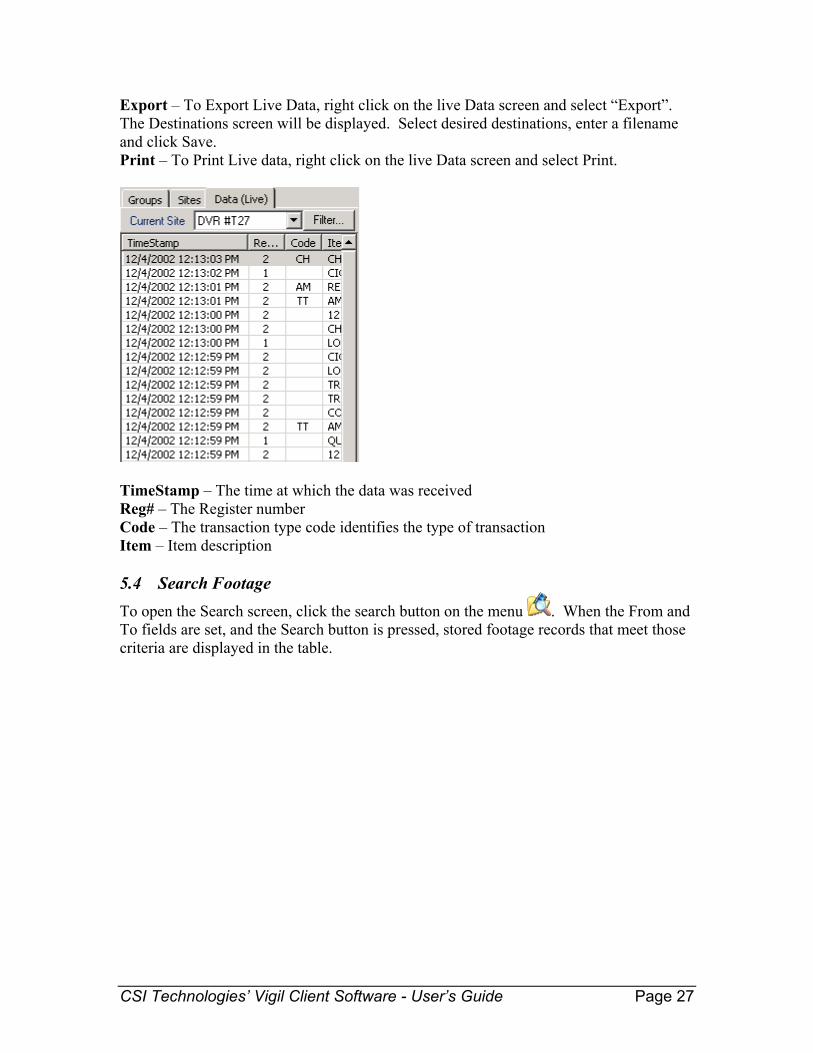
5.3.4 Live Data To view Live Data, click the Data (Live) tab. The Data (Live) screen displays live data received from the Vigil Server. See below for a description of each Data field. Current Site – Use the Current Site dropdown list to change the DVR site displaying live data. Filter Live Data
To filter live data by Register Number, click the “Filter…” button at the top of the live Data tab. Enter in the Register Number, or leave it blank to view data from all Data Terminals, and click OK.
CSI Technologies’ Vigil Client Software - User’s Guide Page 27
Export – To Export Live Data, right click on the live Data screen and select “Export”. The Destinations screen will be displayed. Select desired destinations, enter a filename and click Save. Print – To Print Live data, right click on the live Data screen and select Print.
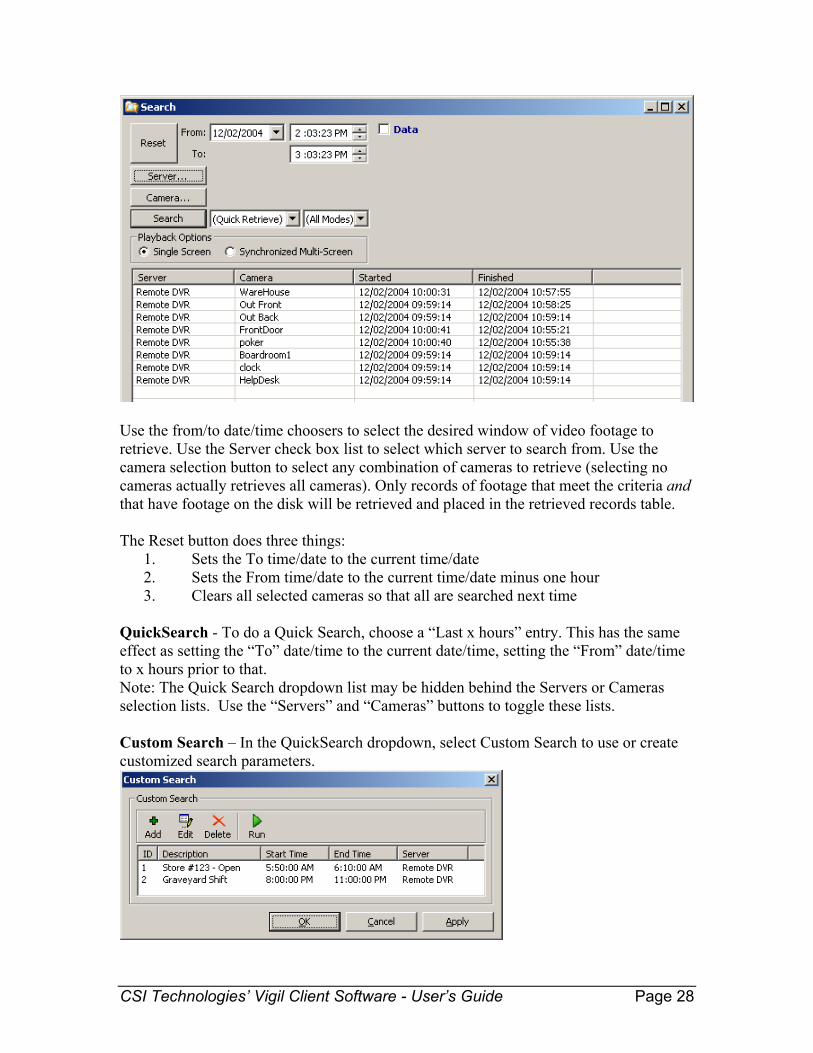
TimeStamp – The time at which the data was received Reg# – The Register number Code – The transaction type code identifies the type of transaction Item – Item description 5.4 Search Footage To open the Search screen, click the search button on the menu . When the From and To fields are set, and the Search button is pressed, stored footage records that meet those criteria are displayed in the table.
CSI Technologies’ Vigil Client Software - User’s Guide Page 28
Use the from/to date/time choosers to select the desired window of video footage to retrieve. Use the Server check box list to select which server to search from. Use the camera selection button to select any combination of cameras to retrieve (selecting no cameras actually retrieves all cameras). Only records of footage that meet the criteria and that have footage on the disk will be retrieved and placed in the retrieved records table. The Reset button does three things:
1. Sets the To time/date to the current time/date 2. Sets the From time/date to the current time/date minus one hour 3. Clears all selected cameras so that all are searched next time
QuickSearch - To do a Quick Search, choose a “Last x hours” entry. This has the same effect as setting the “To” date/time to the current date/time, setting the “From” date/time to x hours prior to that. Note: The Quick Search dropdown list may be hidden behind the Servers or Cameras selection lists. Use the “Servers” and “Cameras” buttons to toggle these lists. Custom Search – In the QuickSearch dropdown, select Custom Search to use or create customized search parameters.

CSI Technologies’ Vigil Client Software - User’s Guide Page 29
To Run a custom search, select the custom search description and click “Run”. To Add a new custom search, click “Add”. To Edit a custom search, select the custom search description and click “Edit”. Add/Edit Custom Search:
Server – The server that will be used when searching for specified criteria. The Server must be currently connected for it to be listed in the Server dropdown. Description – Custom Search description. Start Time / End Time – The Start Time and End Time that will be searched. Cameras – Tick the cameras to search, or tick “All Cameras” Data – The custom search will include the data criteria specified.
Search by Mode – Motion/Constant/Alarm/All Modes To search footage of a specific mode, select the mode from the dropdown list. Choose from: “All Modes” Searches all video footage “Constant” Searches only footage recorded in “Constant” recording mode “Motion” Searches only footage recorded in “Motion” recording mode “Alarm” Searches only footage with “Alarm” attributes Note: The Search Type dropdown list may be hidden behind the Servers or Cameras selection lists. Use the “Servers” and “Cameras” buttons to toggle these lists.
5.4.1 Playback Footage To play footage, select either “Single Screen” for single camera playback, or select “Synchronized Multi-Screen” for synchronized playback with up to four cameras. Double-click on the desired record in the searched footage table, and it will open in the video playback window and begin playing. To control playback, use the scrollbar or the Pause/Play buttons below the video window. The current frame information is displayed between the video window and the scroll bar. The current frame information lists the current playback status, the date and time of the current frame, the camera name, the resolution at which the frame was recorded, the current frame, and the total number of frames. Synchronized Multi-Screen Playback: Select “Synchronized Multi-Screen” to playback up to 4 cameras simultaneously. Once the playback window is open, right click on an empty playback quadrant and select a camera to open it in the playback window. To remove a camera from the display quadrant, right click on the camera and click Remove. To play back a different camera, first remove it, then right click on the empty quadrant and select a different camera name. When using the playback controls, see Using the Playback Screen Controls below, the playback

CSI Technologies’ Vigil Client Software - User’s Guide Page 30
controls are always controlling the quadrant that is currently in focus. If no quadrant is in focus, the first filled quadrant is used as the quadrant in focus. When moving through footage in multi-screen view, the quadrant in focus is moved to the next frame and the other three quadrants are cued to the closest time that matches the time in the quadrant that is in focus. Use the individual scroll bars to move through footage, or select a quadrant and use the detailed playback controls.
5.4.2 Using the Playback Screen Controls Variable Speed Playback
Fast Backward Fast forward
Click and drag the variable speed playback slide-bar to change how fast the footage is played back. Playback up to every fifth second of footage. The Variable Speed playback tool tip displays the number of times faster the variable speed playback is than the Fast Backward or Fast Forward buttons.
Fast Backward Fast Forward
Click and hold down the Fast Backward or Fast Forward button to playback as quickly

CSI Technologies’ Vigil Client Software - User’s Guide Page 31
as possible without skipping any frames. To Beginning/To
End Skips to the very beginning/very end of the video clip.
Backward / Forward
- If clicked while Playing the clip, skips one 10th of the clip. - While Paused or Stopped, click to playback frame by frame.
Play Backwards Play the video clip backwards. Pause Pause the video clip. Play Play the video clip.
Stretch Playback Image.
Stretches the playback image to fill the playback window. Footage is automatically displayed in the resolution at which it was recorded. Note: Footage recorded in 704x480 mode is scaled down to fit the playback window.
Export/Save Click to Save a still image in JPG or BMP format, or to save a video clip in AVI or MJPG format. Refer to Save Image and Save Video Clip sections for details.
Print Click the Print button to print the current image.
Cue Frame To cue the video to a specific frame, enter the frame number in the box beside the Cue button and click Cue.
Copy Right click on the image and select Copy to
copy the image to the Windows Clipboard.
5.4.3 Frame De-interlacing
Frame De-interlacing applies only to DVR480 Series DVRs running Vigil Server version 2.03.0000 and higher, recording at Resolution 704x480. When Paused in the Vigil Playback screen, use the Frame De-interlacing feature to toggle between “F” - Full Field, “AF” – A Field, and “BF” – B Field. Click on the “F” button to toggle between frame types or use the dropdown arrow to select the frame type.
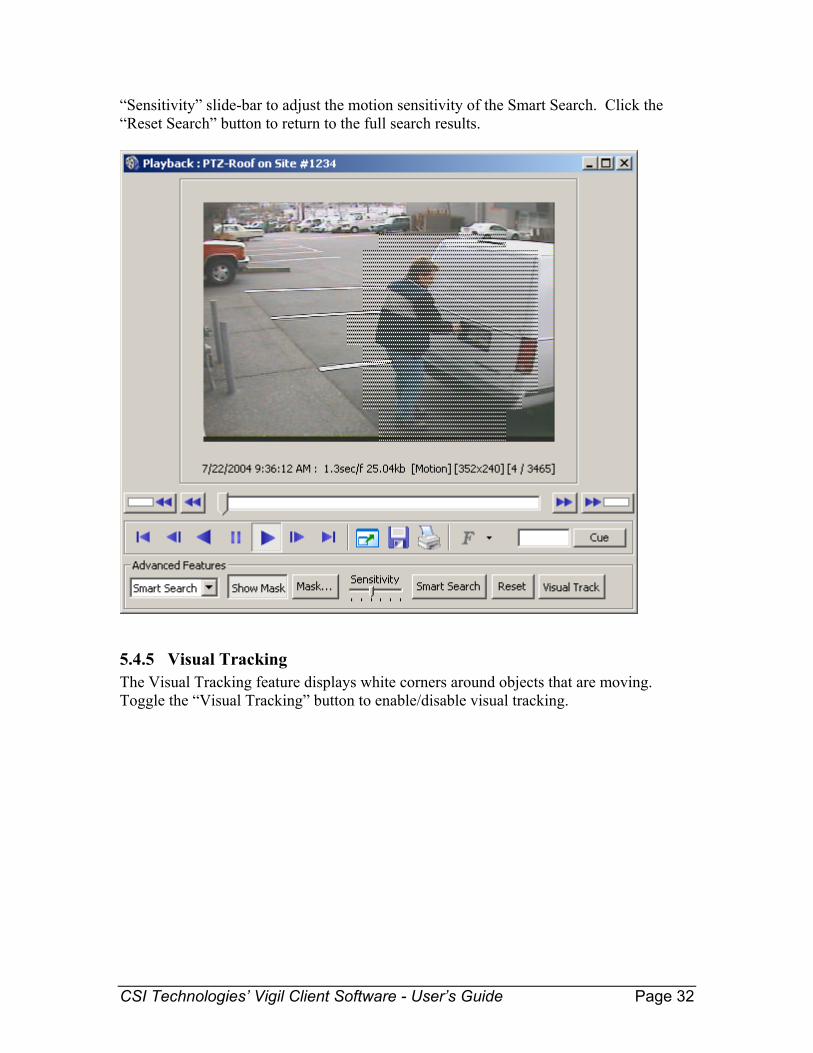
5.4.4 Smart Search To perform a Smart Search, select the search area by clicking on the image with the mouse. The shaded sections of the image will be searched for motion. Click the “Mask…” button to Clear the selection, Select all or Invert the current selection. Click the “Smart Search” button to search for motion within the selected area. Use the
CSI Technologies’ Vigil Client Software - User’s Guide Page 32
“Sensitivity” slide-bar to adjust the motion sensitivity of the Smart Search. Click the “Reset Search” button to return to the full search results.
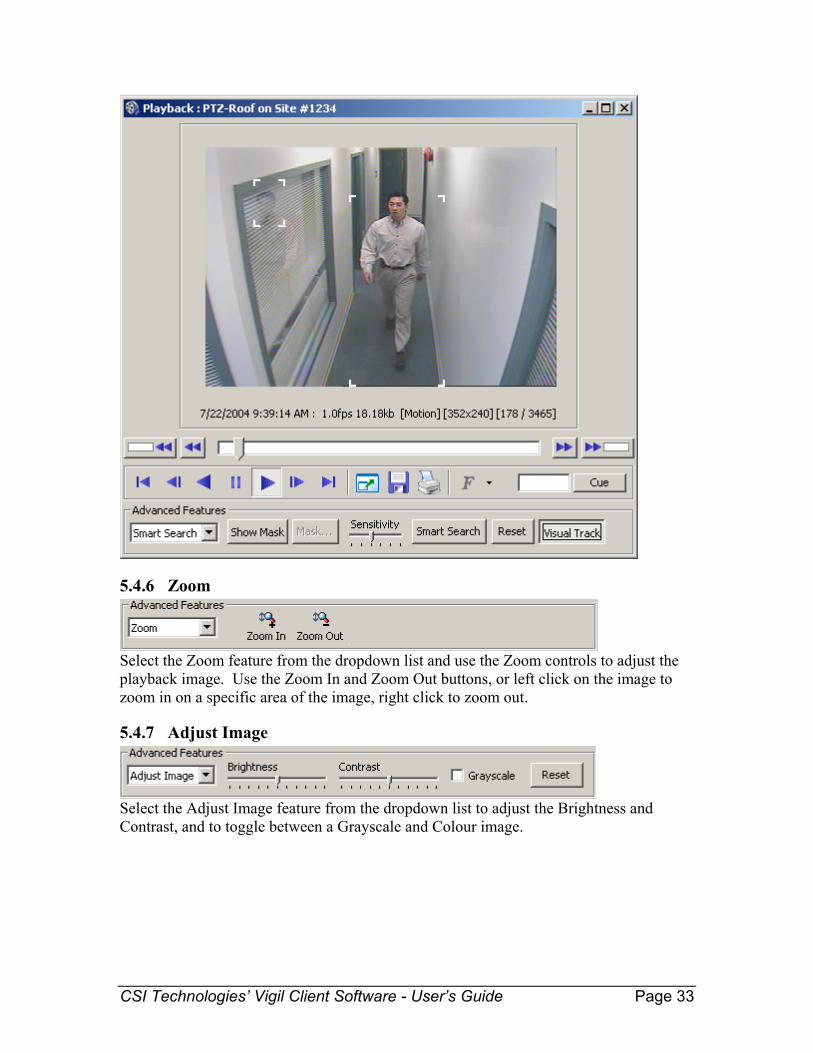
5.4.5 Visual Tracking The Visual Tracking feature displays white corners around objects that are moving. Toggle the “Visual Tracking” button to enable/disable visual tracking.
CSI Technologies’ Vigil Client Software - User’s Guide Page 33
5.4.6 Zoom
Select the Zoom feature from the dropdown list and use the Zoom controls to adjust the playback image. Use the Zoom In and Zoom Out buttons, or left click on the image to zoom in on a specific area of the image, right click to zoom out.
5.4.7 Adjust Image
Select the Adjust Image feature from the dropdown list to adjust the Brightness and Contrast, and to toggle between a Grayscale and Colour image.

CSI Technologies’ Vigil Client Software - User’s Guide Page 34
5.4.8 Markers
Select the Markers feature from the dropdown list to enable footage Markers. Footage Markers are used to select a sub-section of video footage within the displayed footage. Select the frame where the marker will start and click “Start Range”, then navigate to the frame where the marker will end and click “End Range”. When saving video footage, only the marked section is exported. In Synchronized Multi-screen view, use markers to select different time/date sections of video footage to export for each camera. Use the Markers feature “View” button to view only the marked footage.
5.4.9 Search Data To search Data, tick the “Data” checkbox. This will bring up the “Data Capture Search Criteria” section. To search for specific data, enter the search criteria in the “Data Capture Search Criteria” section. Once the Search Criteria has been entered, click “Search” to retrieve video footage and data.
Video clips are listed in the search window and Data items are listed in the Data Search tab. Click on a video clip to open it in the playback window. As the video clip plays, the closest Data item is highlighted.

CSI Technologies’ Vigil Client Software - User’s Guide Page 35
5.4.10 Save or Print Data Search and view Data as previously described. o To Print Data to the Windows Default Printer, right click on the Data records and
select “Print” o To Save Data to a preset Destination, right click on the Data records and select
“Export”. Select the destination folder and enter a file name, then click Save.
5.4.11 Save Image To save an image as a Bitmap (BMP) or JPG file, follow these steps:
1. Search and play footage as previously described 2. Go to the frame of the footage using the playback controls 3. To save the current frame, click the Export button . 4. Select “Bitmap” to save the image in Bitmap (BMP) format
a. Select the destination folder b. Enter the filename c. Click “Save” when finished d. Click “Cancel” to exit
OR Select “JPG” to save the image in JPG format a. Select the destination folder
CSI Technologies’ Vigil Client Software - User’s Guide Page 36
Note: To change the drive, select it from the dropdown list under the folder tree
b. Select the quality using the slide bar Note: A lower quality image has a smaller file size and less image detail. A higher quality image has a larger file size and a more detailed image.
c. Enter the filename d. Click “Save” when finished e. Click “Cancel” to return to the Playback screen
5.4.12 Print Image To print an image, follow these steps:
1. Search and play footage as previously described 2. Go to the frame of the footage using the playback controls and click Pause
3. To print the current frame, click the Print button. 4. The image is sent to the Default printer 5. Click Ok to the message: “Selected still image has been sent to printer”
5.4.13 Save video clip To save a video clip, follow these steps:
1. Search and play footage as previously described 2. To save the current clip, click the Export button: 3. Select “AVI” to save the clip in AVI format or select “MJPG” to save the clip in
MJPG format. 4. Select the destination folder 5. Enter the filename
It is a good idea to enter the date as part of the filename: e.g. robbery_Jan_28_02_FrontDoorCam
6. Click “Save” when finished 7. Click “Cancel” to return to the Playback screen without saving
5.5 Settings

CSI Technologies’ Vigil Client Software - User’s Guide Page 37
5.5.1 Startup Auto Logon – When ticked, Vigil Client connects to all Servers when it is launched. Show Splash Screen – When ticked, the Vigil Client splash screen is displayed when the program is launched. Client Login – When Client Login is enabled, a username and password is required when launching Vigil Client. Specify the username and password in the “Change Login” screen. The default username is “user” and the default password is “123”.

CSI Technologies’ Vigil Client Software - User’s Guide Page 38
5.5.2 Search / Playback
Playback/Live Video Streams – Tick the checkbox to allow Vigil Client to stream live and playback streams simultaneously. To conserve server resources, leave this box unchecked. Click OK to save changes. Quick Retrieve Short Intervals – When selected, the Quick Retrieve dropdown list in the Search screen displays short intervals of 15 and 30 minutes as well as the regular selection. Data Search History – In the Search screen, in the Data Capture Search Criteria section, previously searched items are remembered and are listed in the Items dropdown list. Use the arrows to select how many search items will be remembered. Footage Search Connection Timeout – When searching video footage, select how many minutes to wait for results from the Server before displaying a Connection Timeout message.
5.5.3 Alarms Automatically Display Inbound Alarms From Server – When Ticked, inbound alarms from Vigil Server are automatically displayed in the Alarms window. Audio Notification – Select “Audio Notification” for the system to beep or play a Wave file when an incoming alarm is displayed. If Wave File is selected, use the button to browse to the Wave file that will be played. Click the Preview button to listen to the selected Wave file.
CSI Technologies’ Vigil Client Software - User’s Guide Page 39
5.5.4 Hardware Live Overlay – If the Vigil Client PC has a Video Capture card that supports live overlay, tick to use the live overlay to be able to view live overlay from the Video Capture card. Select the Video Capture card type from the dropdown list. For more information, please contact [email protected]. Use Direct Draw – When selected, if the Client PC supports DirectDraw, the Vigil Client program will produce a better quality picture with faster rendering.
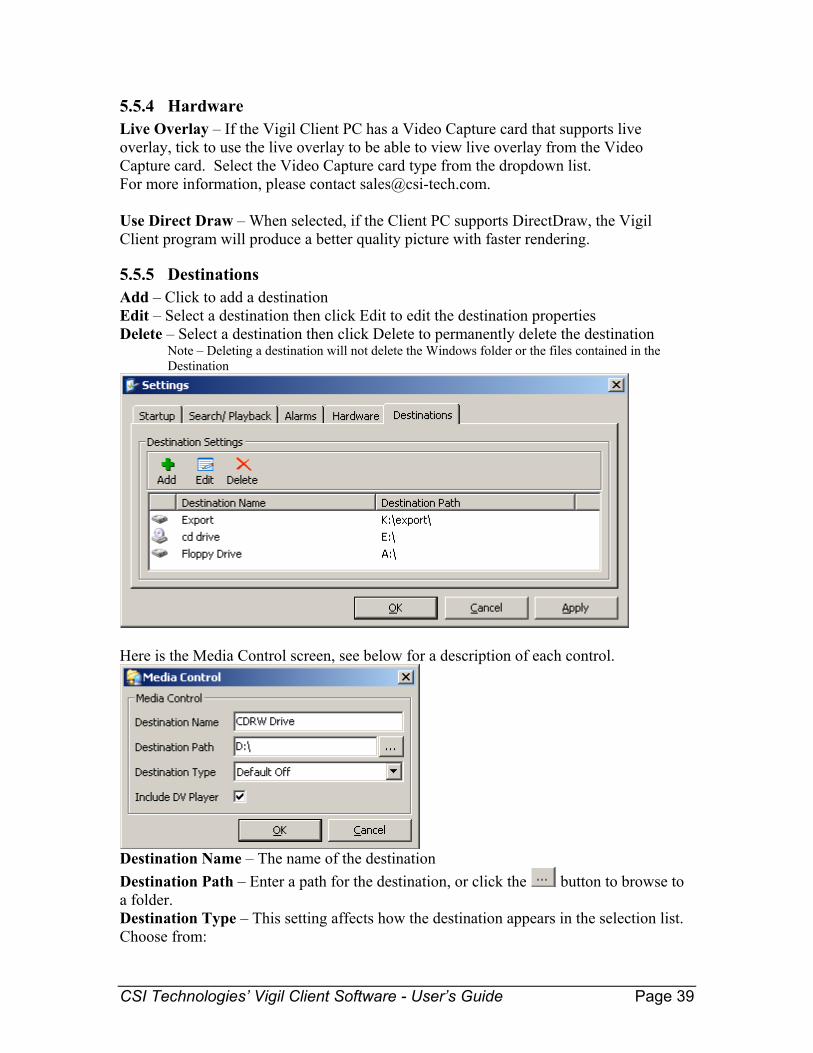
5.5.5 Destinations Add – Click to add a destination Edit – Select a destination then click Edit to edit the destination properties Delete – Select a destination then click Delete to permanently delete the destination
Note – Deleting a destination will not delete the Windows folder or the files contained in the Destination
Here is the Media Control screen, see below for a description of each control.
Destination Name – The name of the destination Destination Path – Enter a path for the destination, or click the button to browse to a folder. Destination Type – This setting affects how the destination appears in the selection list. Choose from:
CSI Technologies’ Vigil Client Software - User’s Guide Page 40
“Default On” – by default, the destination checkbox is ticked “Default Off” – by default, the destination checkbox is not ticked “Silent Send” – all footage and still images that are saved are silently sent to this destination as well.
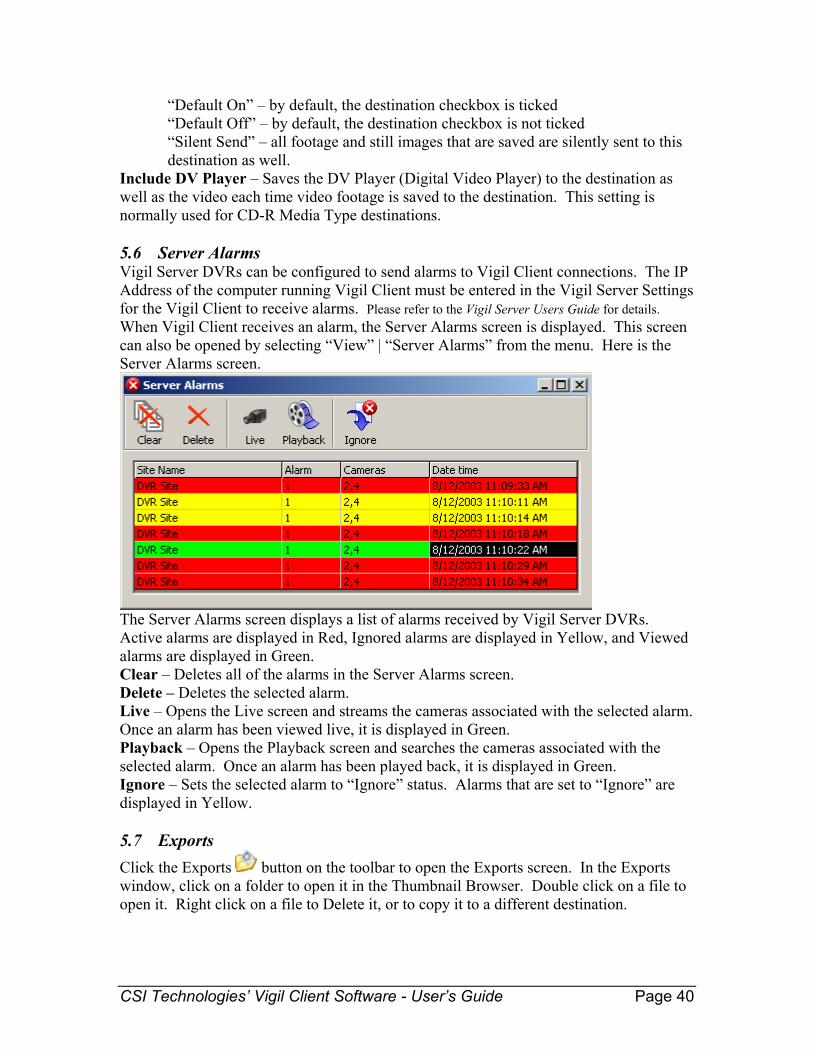
Include DV Player – Saves the DV Player (Digital Video Player) to the destination as well as the video each time video footage is saved to the destination. This setting is normally used for CD-R Media Type destinations. 5.6 Server Alarms Vigil Server DVRs can be configured to send alarms to Vigil Client connections. The IP Address of the computer running Vigil Client must be entered in the Vigil Server Settings for the Vigil Client to receive alarms. Please refer to the Vigil Server Users Guide for details. When Vigil Client receives an alarm, the Server Alarms screen is displayed. This screen can also be opened by selecting “View” | “Server Alarms” from the menu. Here is the Server Alarms screen.
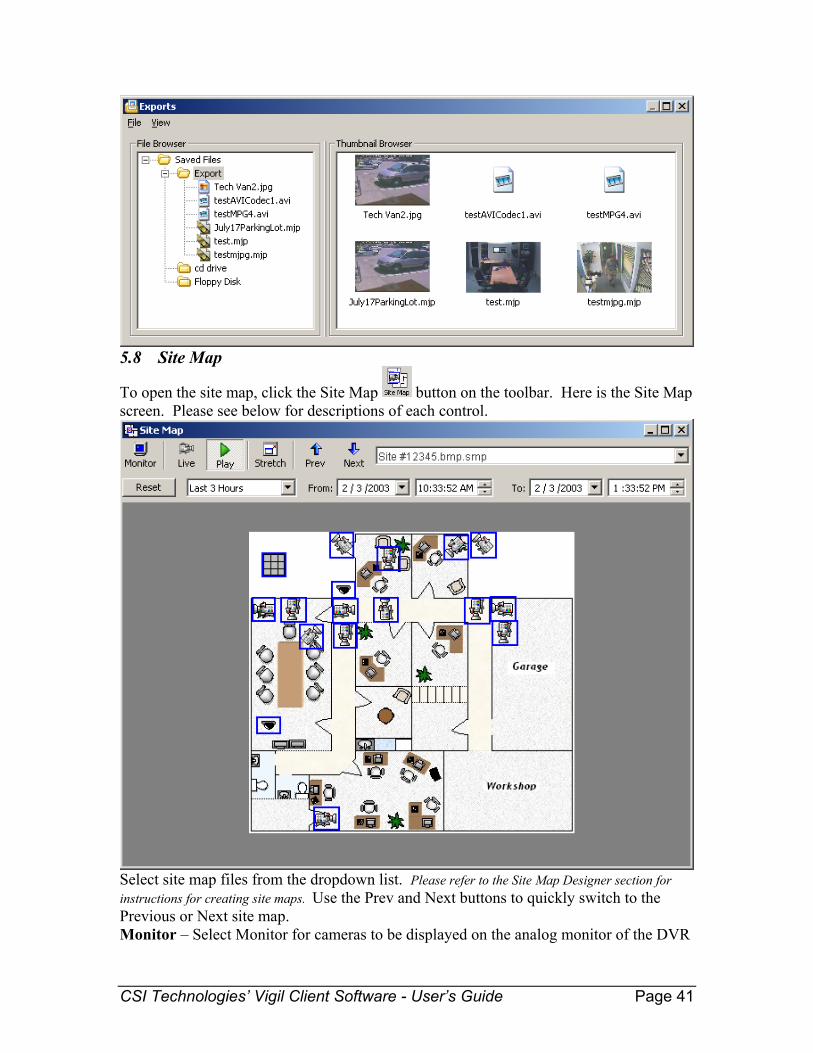
The Server Alarms screen displays a list of alarms received by Vigil Server DVRs. Active alarms are displayed in Red, Ignored alarms are displayed in Yellow, and Viewed alarms are displayed in Green. Clear – Deletes all of the alarms in the Server Alarms screen. Delete – Deletes the selected alarm. Live – Opens the Live screen and streams the cameras associated with the selected alarm. Once an alarm has been viewed live, it is displayed in Green. Playback – Opens the Playback screen and searches the cameras associated with the selected alarm. Once an alarm has been played back, it is displayed in Green. Ignore – Sets the selected alarm to “Ignore” status. Alarms that are set to “Ignore” are displayed in Yellow. 5.7 Exports Click the Exports button on the toolbar to open the Exports screen. In the Exports window, click on a folder to open it in the Thumbnail Browser. Double click on a file to open it. Right click on a file to Delete it, or to copy it to a different destination.
CSI Technologies’ Vigil Client Software - User’s Guide Page 41
5.8 Site Map
To open the site map, click the Site Map button on the toolbar. Here is the Site Map screen. Please see below for descriptions of each control.
Select site map files from the dropdown list. Please refer to the Site Map Designer section for instructions for creating site maps. Use the Prev and Next buttons to quickly switch to the Previous or Next site map. Monitor – Select Monitor for cameras to be displayed on the analog monitor of the DVR
CSI Technologies’ Vigil Client Software - User’s Guide Page 42
Live – Select Live for cameras to be displayed on the live screen. Play – Use the “Play” button to toggle the play options.
Reset – Resets the search controls to the past hour for the current date and time. QuickRetrieve – The QuickRetrieve dropdown has the same effect as setting the “To” date/time to the current date/time, and setting the “From” date/time to x hours prior to that. From / To – Use the from/to date/time choosers to select the desired window of video footage to retrieve.
Stretch – Use the Stretch button to toggle the site map between full screen and original size.
– Click on a camera icon to display it using the currently selected feature (Monitor, Live or Play)
– Click on a grid icon to display multiple cameras.
CSI Technologies’ Vigil Client Software - User’s Guide Page 43
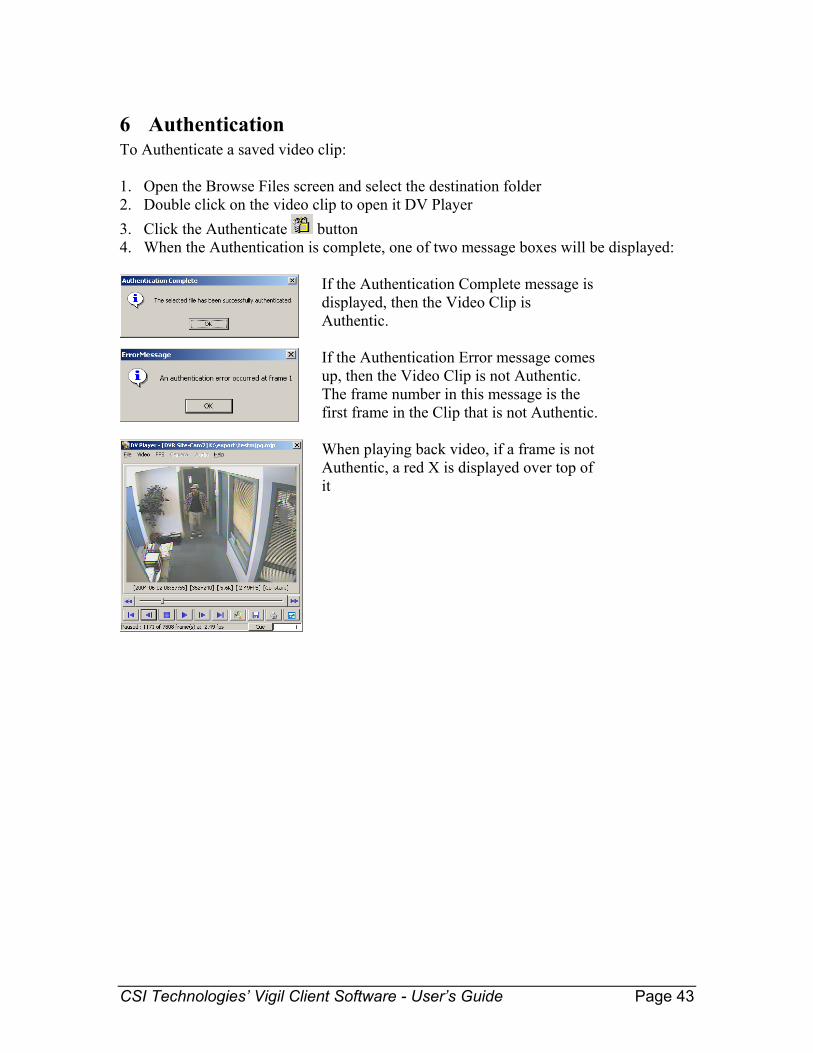
6 Authentication To Authenticate a saved video clip: 1. Open the Browse Files screen and select the destination folder 2. Double click on the video clip to open it DV Player 3. Click the Authenticate button 4. When the Authentication is complete, one of two message boxes will be displayed:
If the Authentication Complete message is displayed, then the Video Clip is Authentic.
If the Authentication Error message comes up, then the Video Clip is not Authentic. The frame number in this message is the first frame in the Clip that is not Authentic.
When playing back video, if a frame is not Authentic, a red X is displayed over top of it
CSI Technologies’ Vigil Client Software - User’s Guide Page 44
7 Local Software Update Before attempting a software update, you must have a valid Update File To update the local Vigil Client software:
o Exit the Vigil Client software o In the Start menu, select “Start” | “Programs” | “Vigil” | “Update” o Browse to the Vigil Client .VGL update file o Click Open o Wait for the update to complete
CSI Technologies’ Vigil Client Software - User’s Guide Page 45
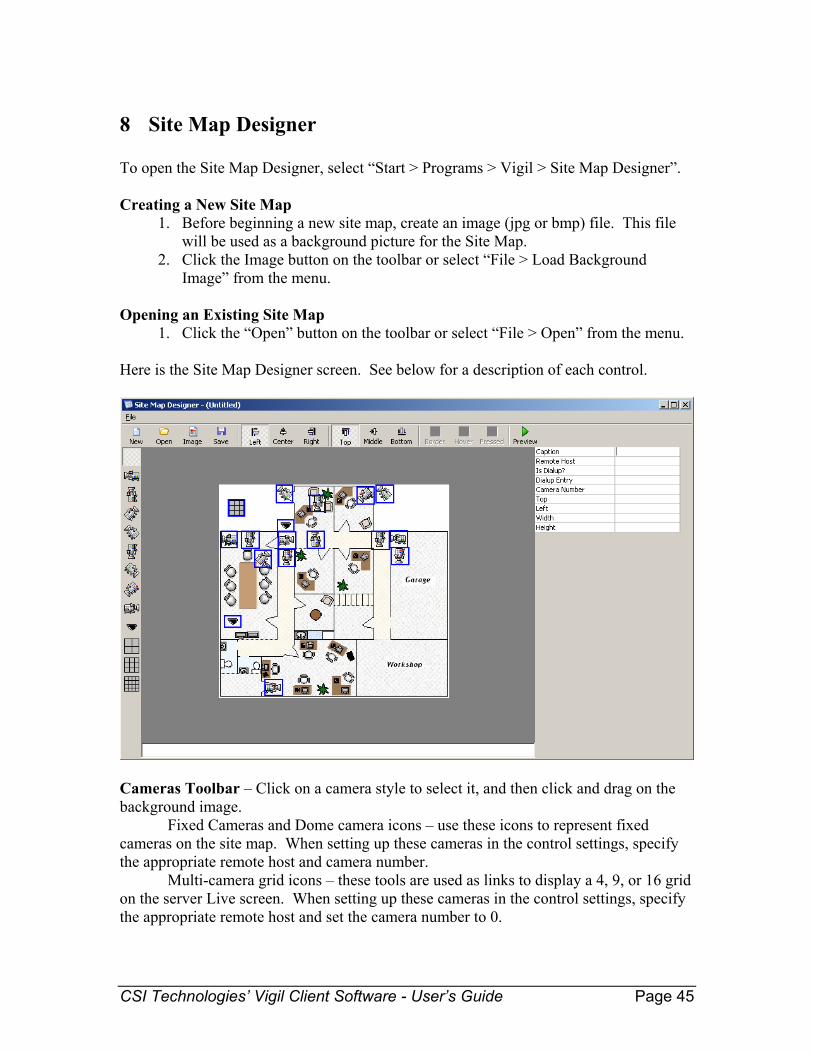
8 Site Map Designer To open the Site Map Designer, select “Start > Programs > Vigil > Site Map Designer”. Creating a New Site Map
1. Before beginning a new site map, create an image (jpg or bmp) file. This file will be used as a background picture for the Site Map.
2. Click the Image button on the toolbar or select “File > Load Background Image” from the menu.
Opening an Existing Site Map
1. Click the “Open” button on the toolbar or select “File > Open” from the menu. Here is the Site Map Designer screen. See below for a description of each control.
Cameras Toolbar – Click on a camera style to select it, and then click and drag on the background image. Fixed Cameras and Dome camera icons – use these icons to represent fixed cameras on the site map. When setting up these cameras in the control settings, specify the appropriate remote host and camera number. Multi-camera grid icons – these tools are used as links to display a 4, 9, or 16 grid on the server Live screen. When setting up these cameras in the control settings, specify the appropriate remote host and set the camera number to 0.
CSI Technologies’ Vigil Client Software - User’s Guide Page 46
Positions Toolbar – Select a camera on the image, and then use the Position toolbar to change the position of the camera within the selection square. Colour Toolbar – Select a camera on the map, and then use the colour selection buttons to change the colour of the image selection square. Control Settings (top right): Press the Enter key on the keyboard after each setting has been changed. Caption: The text that is displayed when the mouse is moved over the camera. Remote Host: The IP Address of the DVR site. Is Dialup?: Is this a dialup connection? Dialup Entry: For dialup connections only. Camera Number: The camera number of the selected camera (camera controls only) Top/Left/Width/Height: Size and position of the control. Runtime: Click the Runtime button to view the Site Map in runtime mode. Save: To Save a Site Map, click the Save button from the toolbar or select “File > Save As…” from the menu. Site map files must be stored in the “C:\Program Files\Vigil\Client” directory.
CSI Technologies’ Vigil Client Software - User’s Guide Page 47
9 Language Switcher To switch to a different language:
o Exit Vigil Client o In the start menu, select “Start | Programs | Vigil | Language Switcher” o Select the desired language from the dropdown list o Click “Switch” o Click “Close”
CSI Technologies’ Vigil Client Software - User’s Guide Page 48
10 Troubleshooting This section reviews common problems and error messages of Vigil Client.
• Make sure you have recently rebooted (Start | Shutdown | Restart) • Make sure the server you are connected to has a valid license key • Make sure you have the latest version of the Client and Server software • If the live and playback images are not being displayed properly, please ensure
that the Use DirectDraw feature in the Vigil Client Settings screen is disabled.
CSI Technologies’ Vigil Client Software - User’s Guide Page 49
11 Contact Information CSI Technologies has offices in Victoria, and a web-presence at www.csi-tech.com. Please contact us by e-mail at either [email protected] (sales) or [email protected] (technical support), or using the following contact information: Victoria (Head Office) #16 – 6782 Veyaness Road Victoria, BC V8M 2C2 Tel: (888) 543-5553 (Toll free North America) (250) 652-3406 (Canada)


