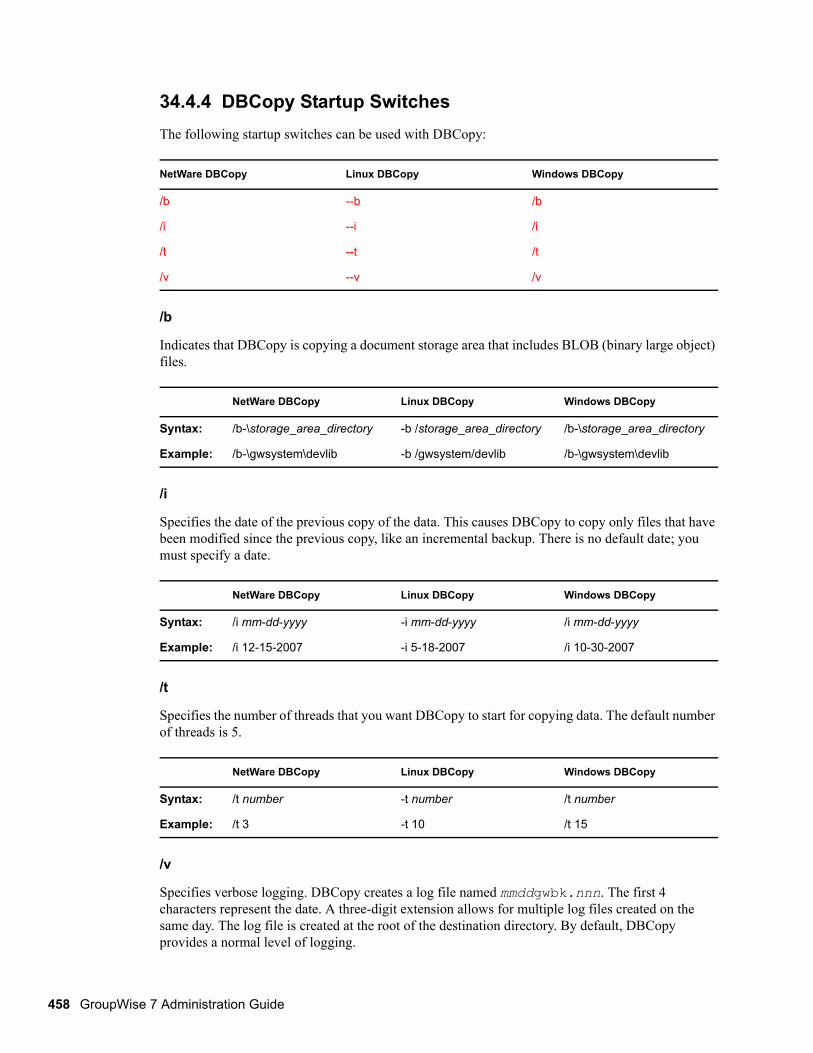
Databases VIII novdocx (en) 11 December 2007 371 VIIIDatabases Chapter 25, “Understanding GroupWise Databases,” on page 373 Chapter 26, “Maintaining Domain and Post Office Databases,” on page 377 Chapter 27, “Maintaining User/Resource and Message Databases,” on page 385 Chapter 28, “Maintaining Library Databases and Documents,” on page 391 Chapter 29, “Synchronizing Database Information,” on page 395 Chapter 30, “Managing Database Disk Space,” on page 399 Chapter 31, “Backing Up GroupWise Databases,” on page 407 Chapter 32, “Restoring GroupWise Databases from Backup,” on page 411 Chapter 33, “Retaining User Messages,” on page 419 Chapter 34, “Standalone Database Maintenance Programs,” on page 423
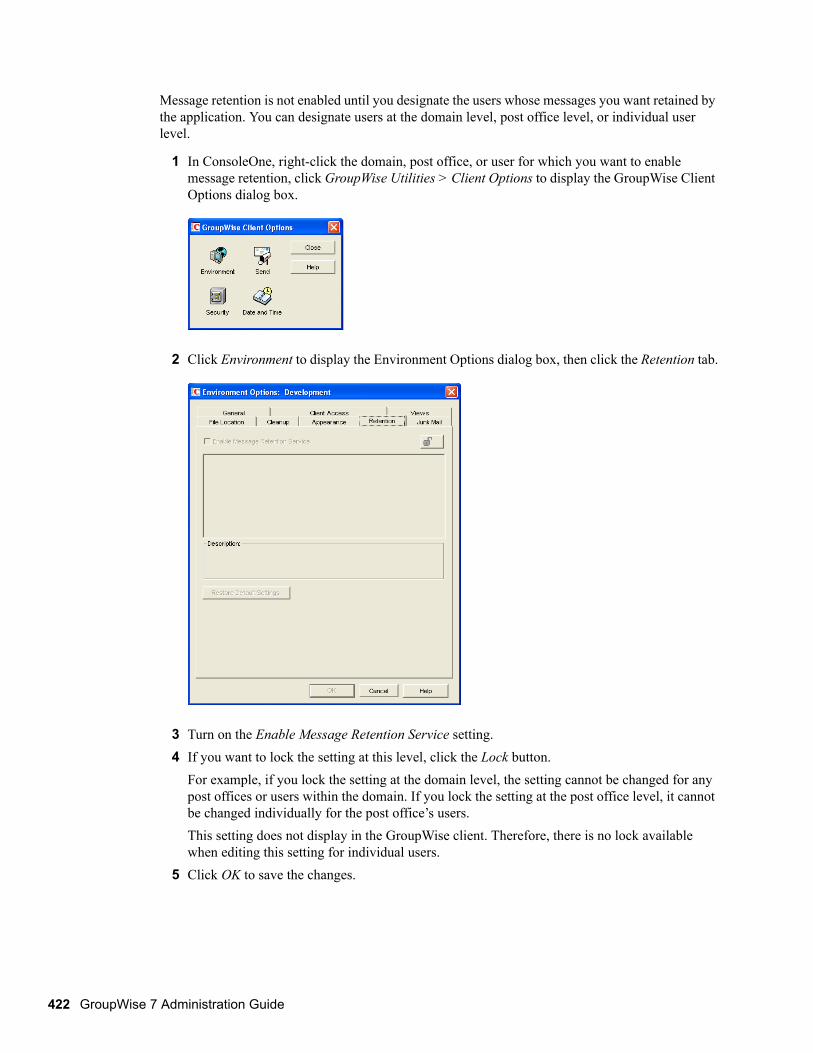
Transcript
IIInovdocx (en) 11 D
ecember 2007
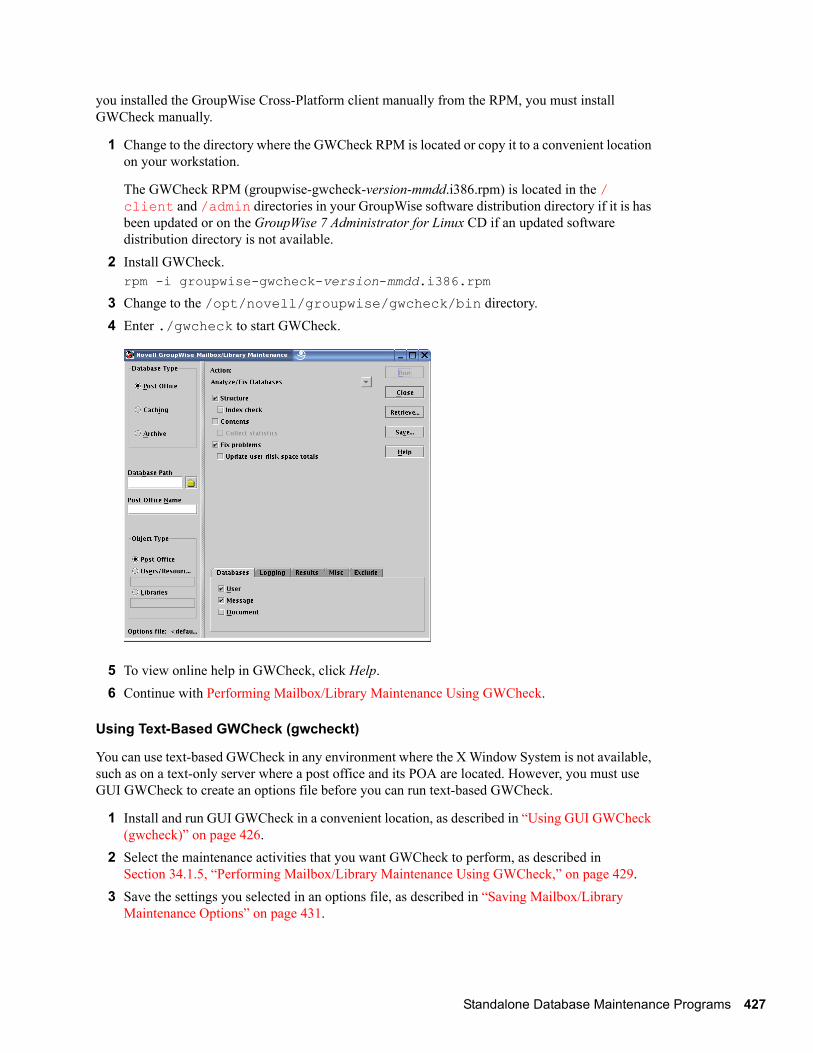
VVIIIDatabases
Chapter 25, “Understanding GroupWise Databases,” on page 373Chapter 26, “Maintaining Domain and Post Office Databases,” on page 377Chapter 27, “Maintaining User/Resource and Message Databases,” on page 385Chapter 28, “Maintaining Library Databases and Documents,” on page 391Chapter 29, “Synchronizing Database Information,” on page 395Chapter 30, “Managing Database Disk Space,” on page 399Chapter 31, “Backing Up GroupWise Databases,” on page 407Chapter 32, “Restoring GroupWise Databases from Backup,” on page 411Chapter 33, “Retaining User Messages,” on page 419Chapter 34, “Standalone Database Maintenance Programs,” on page 423
Databases 371
372 GroupWise
novdocx (en) 11 Decem
ber 2007
7 Administration Guide
25novdocx (en) 11 D
ecember 2007
25Understanding GroupWise Databases
Your GroupWise® system includes numerous databases where vital information is stored.
Section 25.1, “Domain Databases,” on page 373Section 25.2, “Post Office Databases,” on page 373Section 25.3, “User Databases,” on page 374Section 25.4, “Message Databases,” on page 374Section 25.5, “Library Databases,” on page 374Section 25.6, “Guardian Databases,” on page 375
25.1 Domain DatabasesThe domain database (wpdomain.db) in each domain contains all administrative information for the domain, including:
Address information about all GroupWise objects (such as users and resources), post offices, and gateways in the domainSystem configuration and linking information for the domain’s MTAAddress and message routing information to other domains
The first domain you create is the primary domain. In the primary domain, the wpdomain.db file contains all administrative information for your entire GroupWise system (all domains, post offices, users, and so on). Because the wpdomain.db file in the primary domain is so crucial, you should back it up regularly and keep it secure. See Section 31.1, “Backing Up a Domain,” on page 407.
You can re-create your entire GroupWise system from the primary domain wpdomain.db file; however, if the primary domain wpdomain.db file becomes unusable, you can no longer make administrative updates to your GroupWise system.
Every domain you create after the primary domain is a secondary domain. The contents of secondary domains are automatically synchronized with the primary domain.
For the location of the domain database, see “Domain Directory” in GroupWise 7 Troubleshooting 3: Message Flow and Directory Structure. For additional domain information, see Section 40.3, “Information Stored in the Domain,” on page 606.
25.2 Post Office DatabasesThe post office database (wphost.db) in each post office contains all administrative information for the post office, including a copy of the GroupWise Address Book. This information is necessary for users to send messages to others in the GroupWise system.
For the location of the post office database, see “Post Office Directory” in GroupWise 7 Troubleshooting 3: Message Flow and Directory Structure. For more post office information, see Section 35.3, “Information Stored in the Post Office,” on page 464.
Understanding GroupWise Databases 373
374 GroupWise
novdocx (en) 11 Decem
ber 2007
25.3 User DatabasesEach member of the post office has a personal database (userxxx.db) that represents the user’s mailbox. The user database contains the following:
Message header informationPointers to messagesPersonal groupsPersonal address booksRules
When a member of another post office shares a folder with one or more members of the local post office, a “prime user” database (puxxxxx.db) is created to store the shared information. The “prime user” is the owner of the shared information.
Local user databases and prime user databases are stored in the ofuser directory in the post office.
Because resources are addressable just like users, resources also have user databases.
For the location of user databases in the post office, see “Post Office Directory” in GroupWise 7 Troubleshooting 3: Message Flow and Directory Structure. For more post office information, see Section 35.3, “Information Stored in the Post Office,” on page 464.
25.4 Message DatabasesEach member of the post office is assigned to a message database (msgnnn.db) where the body portions of messages are stored. Many users in a post office share a single message database. There can be as many as 255 message databases in the post office (numbered from 0 to 254). Message databases are stored in the ofmsg directory in the post office.
Outgoing messages from local senders are stored in the message database assigned to each sender. Incoming messages from users in other post offices are stored in the message database with the same name as the message database assigned to the sender in his or her own post office. In each case, only one copy of the message is stored in the post office, no matter how many members of the post office it is addressed to.
For the location of message databases in the post office, see “Post Office Directory” in GroupWise 7 Troubleshooting 3: Message Flow and Directory Structure. For more post office information, see Section 35.3, “Information Stored in the Post Office,” on page 464.
25.5 Library DatabasesA library is a collection of documents and document properties stored in a database system that can be managed and searched. You do not need to set up libraries unless you are using GroupWise Document Management Services (DMS). See Part VII, “Libraries and Documents,” on page 291.
The databases for managing libraries are stored in the gwdms directory and its subdirectories in the post office.
The dmsh.db file is a database shared by all libraries in the post office. It contains information about where each library in the post office is located.
7 Administration Guide
novdocx (en) 11 Decem
ber 2007
Each library has its own subdirectory in the gwdms directory. In each library directory, the dmxxnn01-FF.db files contain information specific to that library, such as document properties and what users have rights to access the library.
For the location of library databases in the post office, see “Post Office Directory” in GroupWise 7 Troubleshooting 3: Message Flow and Directory Structure. For more post office information, see Section 35.3, “Information Stored in the Post Office,” on page 464.
The actual documents in a library are not kept in the library databases. They are kept in a document storage area, which consists of a series of directories for storing documents. Documents are encrypted and stored in BLOBs (binary large objects) to make document management easier. A document, its versions, and related objects are stored together in the same BLOB.
A document storage area might be located in the post office itself, or in some other location where more storage space is available. If it is located in the post office, the document storage area can never be moved. Therefore, storing documents in the post office directory structure is not usually recommended. If it is stored outside the post office, a document storage area can be moved when additional disk space is required.
See Chapter 22, “Creating and Managing Libraries,” on page 299 and Chapter 23, “Creating and Managing Documents,” on page 335 for more information about Document Management Services.
25.6 Guardian DatabasesThe guardian database (ngwguard.db) serves as the master copy of the data dictionary information for the following subordinate databases in the post office:
User databases (userxxx.db)Message databases (msgnnn.db)Prime user databases (puxxxxx.db)Library databases (dmsh.db and dmxxnn01-FF.db)
The guardian database is vital to GroupWise functioning. Therefore, the POA has an automated back-up and roll-forward process to protect it. The POA keeps a known good copy of the guardian database called ngwguard.fbk. Whenever it modifies the ngwguard.db file, the POA also records the transaction in the roll-forward transaction log called ngwguard.rfl. If the POA detects damage to the ngwguard.db file on startup or during a write transaction, it goes back to the ngwguard.fbk file (the “fall back” copy) and applies the transactions recorded in the ngwguard.rfl file to create a new, valid and up-to-date ngwguard.db.
In addition to the POA back-up and roll-forward process, you should still back up the ngwguard.db, ngwguard.fbk, and ngwguard.rfl files regularly to protect against media failure. Without a valid ngwguard.db file, you cannot access your e-mail. With current ngwguard.fbk and ngwguard.rfl files, a valid ngwguard.db file can be rebuilt should the need arise.
The ngwguard.dc file is the structural template for building the guardian database and its subordinate databases. Also called a dictionary file, the ngwguard.dc file contains schema information, such as data types and record indexes. If this dictionary file is missing, no additional databases can be created in the post office.
Understanding GroupWise Databases 375
376 GroupWise
novdocx (en) 11 Decem
ber 2007
7 Administration Guide
26novdocx (en) 11 D
ecember 2007
26Maintaining Domain and Post Office Databases
Occasionally, it is necessary to perform maintenance tasks on domain databases (wpdomain.db) or post office databases (wphost.db). The frequency depends on the reliability of your network and your own experience of how often problems are likely to occur. The following tasks help you maintain the integrity of your domain and post office databases:
Section 26.1, “Validating Domain or Post Office Databases,” on page 377Section 26.2, “Recovering Domain or Post Office Databases,” on page 378Section 26.3, “Rebuilding Domain or Post Office Databases,” on page 381Section 26.4, “Rebuilding Database Indexes,” on page 383
NOTE: Unfortunately, damage to databases cannot be prevented. A power outage can occur in the middle of a write to a database. A hard drive can fail. However, the GroupWise® tools for repairing damaged databases are very effective and should be able to resolve most damage to GroupWise databases.
To further protect your GroupWise system against loss of domain and post office information, see Chapter 31, “Backing Up GroupWise Databases,” on page 407 and Chapter 32, “Restoring GroupWise Databases from Backup,” on page 411.
To ensure that the same information exists in all domain and post office databases throughout your GroupWise system, see Section 29.5, “Synchronizing the Primary Domain from a Secondary Domain,” on page 398, Section 29.4, “Synchronizing a Secondary Domain,” on page 397, and Section 29.2, “Synchronizing a Post Office,” on page 396.
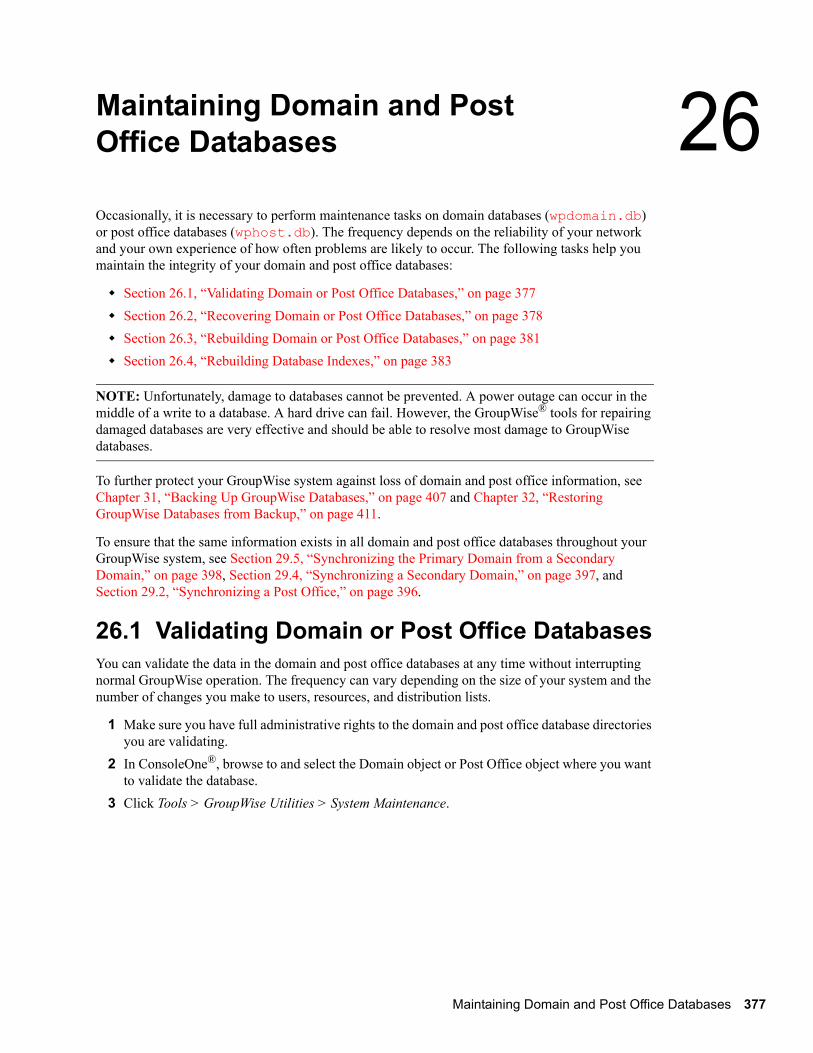
26.1 Validating Domain or Post Office DatabasesYou can validate the data in the domain and post office databases at any time without interrupting normal GroupWise operation. The frequency can vary depending on the size of your system and the number of changes you make to users, resources, and distribution lists.
1 Make sure you have full administrative rights to the domain and post office database directories you are validating.
2 In ConsoleOne®, browse to and select the Domain object or Post Office object where you want to validate the database.
3 Click Tools > GroupWise Utilities > System Maintenance.
Maintaining Domain and Post Office Databases 377
378 GroupWise
novdocx (en) 11 Decem
ber 2007
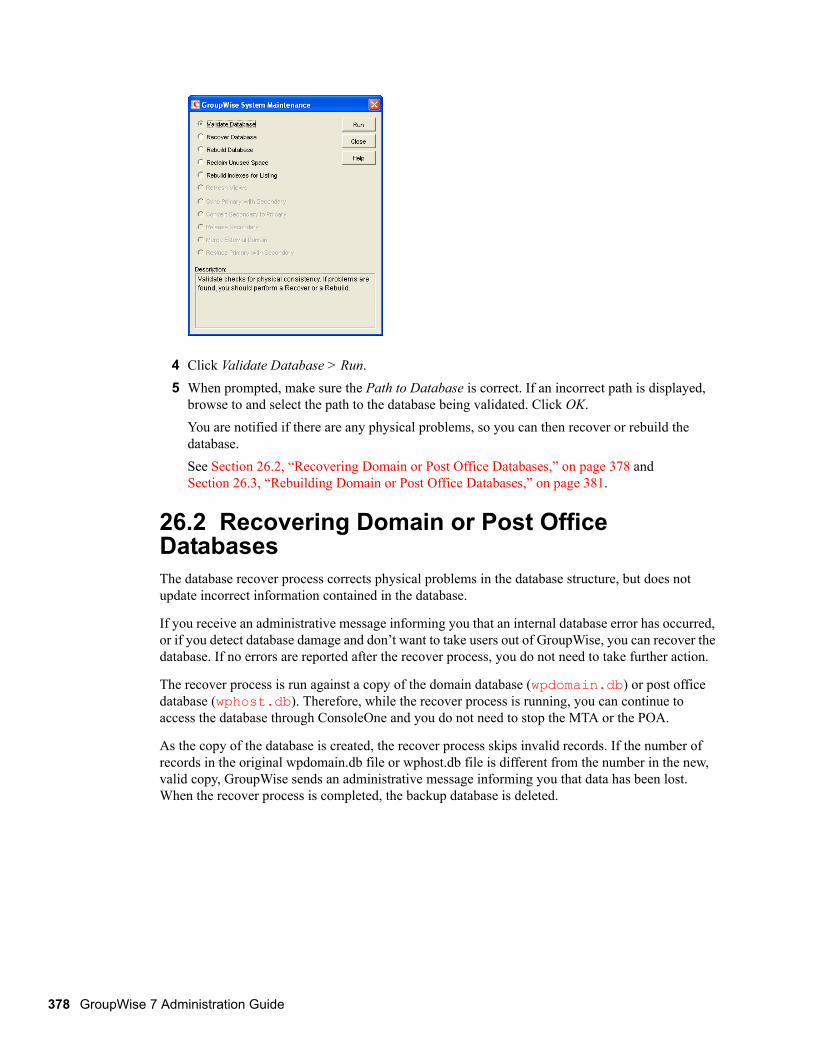
4 Click Validate Database > Run.5 When prompted, make sure the Path to Database is correct. If an incorrect path is displayed,
browse to and select the path to the database being validated. Click OK.You are notified if there are any physical problems, so you can then recover or rebuild the database. See Section 26.2, “Recovering Domain or Post Office Databases,” on page 378 and Section 26.3, “Rebuilding Domain or Post Office Databases,” on page 381.
26.2 Recovering Domain or Post Office DatabasesThe database recover process corrects physical problems in the database structure, but does not update incorrect information contained in the database.
If you receive an administrative message informing you that an internal database error has occurred, or if you detect database damage and don’t want to take users out of GroupWise, you can recover the database. If no errors are reported after the recover process, you do not need to take further action.
The recover process is run against a copy of the domain database (wpdomain.db) or post office database (wphost.db). Therefore, while the recover process is running, you can continue to access the database through ConsoleOne and you do not need to stop the MTA or the POA.
As the copy of the database is created, the recover process skips invalid records. If the number of records in the original wpdomain.db file or wphost.db file is different from the number in the new, valid copy, GroupWise sends an administrative message informing you that data has been lost. When the recover process is completed, the backup database is deleted.
7 Administration Guide
novdocx (en) 11 Decem
ber 2007
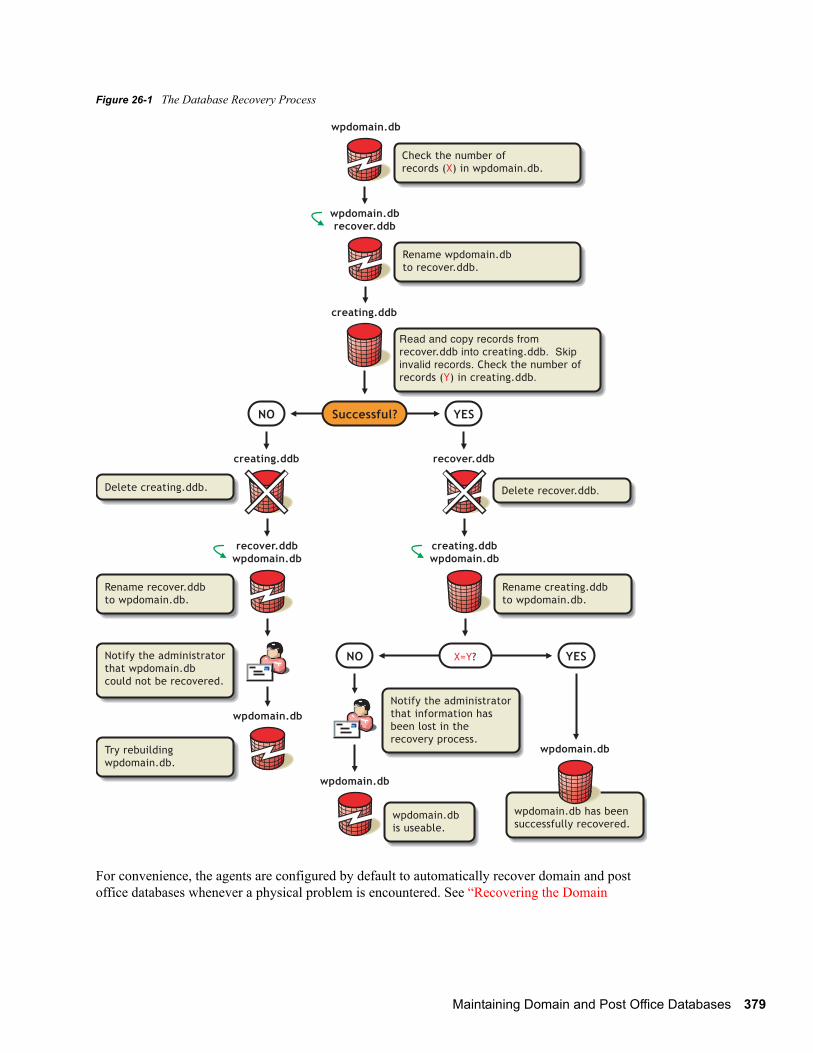
Figure 26-1 The Database Recovery Process
For convenience, the agents are configured by default to automatically recover domain and post office databases whenever a physical problem is encountered. See “Recovering the Domain
Successful?
creating.ddb
NO YES
creating.ddb
Read and copy records from recover.ddb into creating.ddb. Skip invalid records. Check the number of records (Y) in creating.ddb.
Delete creating.ddb.
creating.ddbwpdomain.db
Try rebuilding wpdomain.db.
Notify the administratorthat wpdomain.dbcould not be recovered.
Rename recover.ddb to wpdomain.db.
Delete recover.ddb.
wpdomain.db
Rename creating.ddb to wpdomain.db.
wpdomain.db has beensuccessfully recovered.
wpdomain.db
Check the number of records (X) in wpdomain.db.
wpdomain.dbrecover.ddb
Rename wpdomain.dbto recover.ddb.
recover.ddb
recover.ddbwpdomain.db
X=Y?NO YES
wpdomain.db is useable.
Notify the administratorthat information has been lost in the recovery process.
wpdomain.db
wpdomain.db
Maintaining Domain and Post Office Databases 379
380 GroupWise
novdocx (en) 11 Decem
ber 2007
Database Automatically or Immediately” on page 654 and “Recovering the Post Office Database Automatically or Immediately” on page 526.
To recover a specific database in ConsoleOne:
1 Make sure you have network access to the domain or post office directory for the database you are recovering.
If you have administration rights in the primary domain, you can recover the primary domain database, the post office databases in the primary domain, and any secondary domain databases.
From a secondary domain, you can recover the secondary domain database and the post office databases in the secondary domain.
2 Make sure you have sufficient disk space for the copy of the database that is created during recovery.
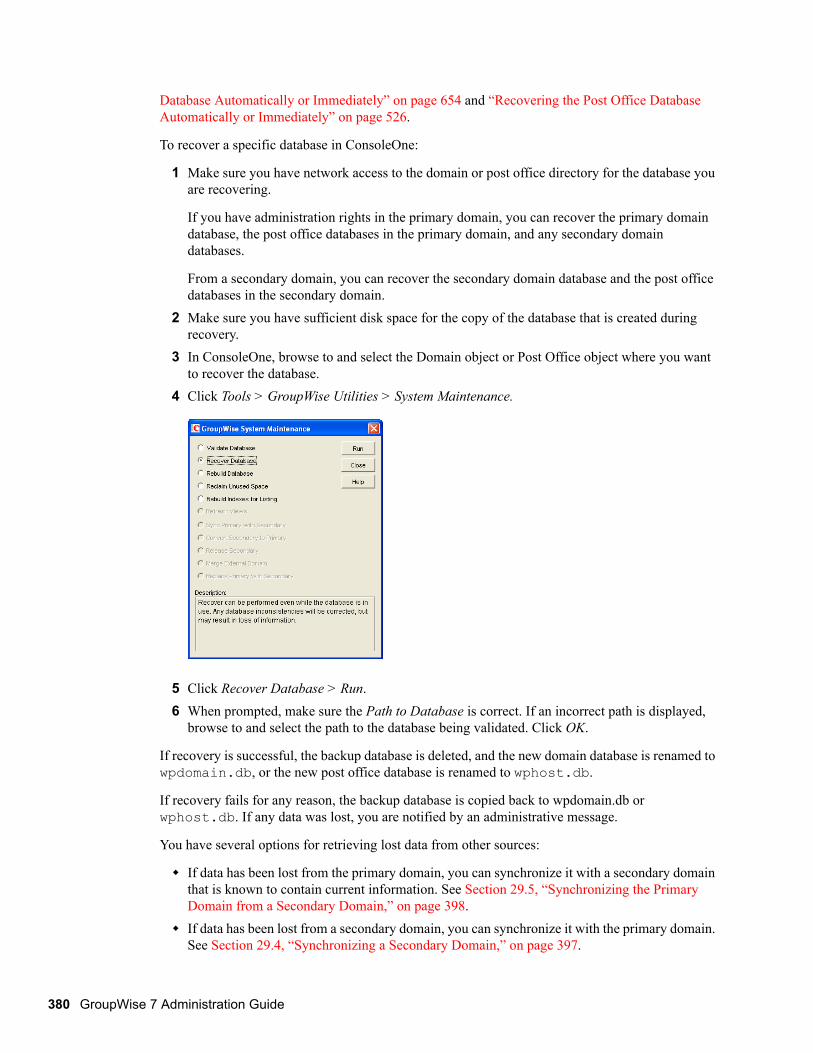
3 In ConsoleOne, browse to and select the Domain object or Post Office object where you want to recover the database.
4 Click Tools > GroupWise Utilities > System Maintenance.
5 Click Recover Database > Run.6 When prompted, make sure the Path to Database is correct. If an incorrect path is displayed,
browse to and select the path to the database being validated. Click OK.
If recovery is successful, the backup database is deleted, and the new domain database is renamed to wpdomain.db, or the new post office database is renamed to wphost.db.
If recovery fails for any reason, the backup database is copied back to wpdomain.db or wphost.db. If any data was lost, you are notified by an administrative message.
You have several options for retrieving lost data from other sources:
If data has been lost from the primary domain, you can synchronize it with a secondary domain that is known to contain current information. See Section 29.5, “Synchronizing the Primary Domain from a Secondary Domain,” on page 398.If data has been lost from a secondary domain, you can synchronize it with the primary domain. See Section 29.4, “Synchronizing a Secondary Domain,” on page 397.
7 Administration Guide
novdocx (en) 11 Decem
ber 2007
You can also rebuild the database at a later time when you have exclusive access to the database where the data has been lost. See Section 26.3, “Rebuilding Domain or Post Office Databases,” on page 381.
26.3 Rebuilding Domain or Post Office DatabasesIn addition to correcting the physical problems resolved by the database recover process, the rebuild process updates user and object information in a domain database (wpdomain.db) or post office database (wphost.db). However, the process requires that no users or GroupWise agents (MTA or POA) have access to the database during the rebuild process.
You should rebuild a domain or post office database if you encounter any of the following conditions:
Objects are not being replicated between domains.The agent that writes to the database went down unexpectedly.The server where the database resides went down unexpectedly.You receive an administrative message informing you that an internal database error has occurred or there is database damage and you think there might be data loss.You ran the recover database process and received a notification of data loss.
When you rebuild a secondary domain database, information is retrieved from the primary domain. When you rebuild a post office database, information is retrieved from the domain it belongs to.
During the rebuild process, a backup of the domain or post office database is created as well as a new wpdomain.db or wphost.db. The records from the primary domain database are copied into the new wpdomain.db. There should not be any data loss. When the rebuild process is complete, the temporary database and the backup database are deleted.
Maintaining Domain and Post Office Databases 381
382 GroupWise
novdocx (en) 11 Decem
ber 2007
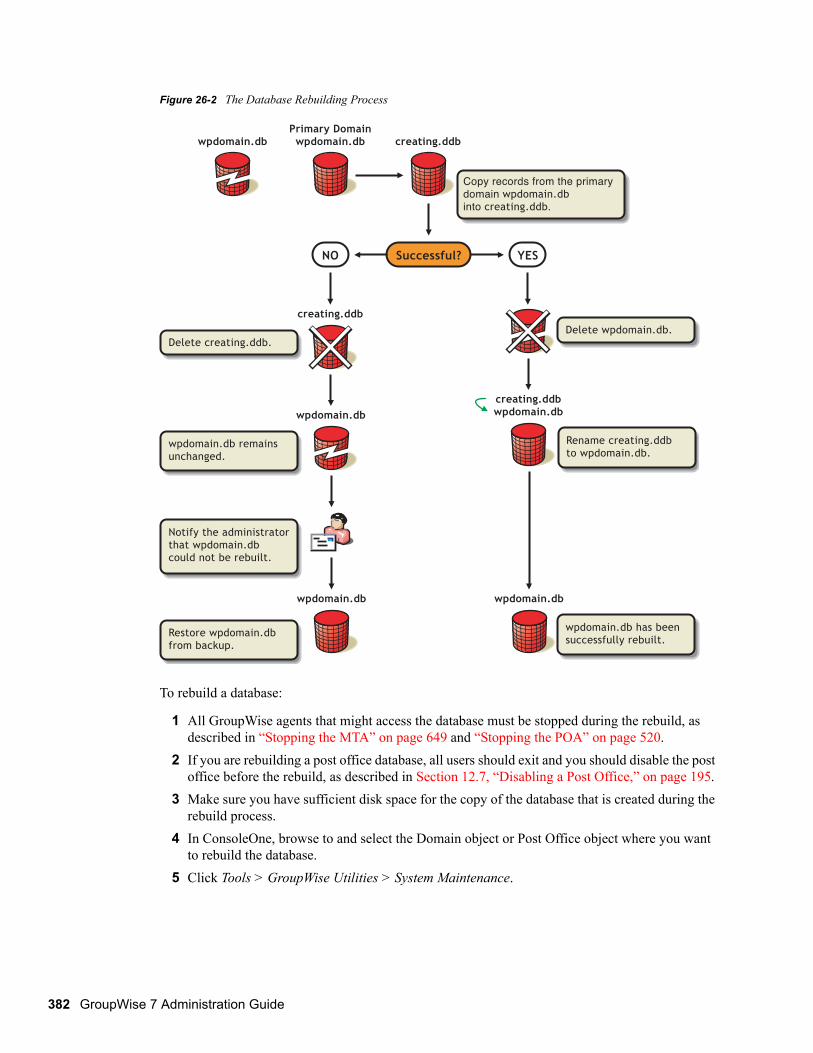
Figure 26-2 The Database Rebuilding Process
To rebuild a database:
1 All GroupWise agents that might access the database must be stopped during the rebuild, as described in “Stopping the MTA” on page 649 and “Stopping the POA” on page 520.
2 If you are rebuilding a post office database, all users should exit and you should disable the post office before the rebuild, as described in Section 12.7, “Disabling a Post Office,” on page 195.
3 Make sure you have sufficient disk space for the copy of the database that is created during the rebuild process.
4 In ConsoleOne, browse to and select the Domain object or Post Office object where you want to rebuild the database.
5 Click Tools > GroupWise Utilities > System Maintenance.
Primary Domainwpdomain.db
wpdomain.db
Successful?
creating.ddb
NO YES
creating.ddb
Copy records from the primary domain wpdomain.db
into creating.ddb.
Delete creating.ddb.
wpdomain.db
creating.ddbwpdomain.db
wpdomain.db
Restore wpdomain.db
from backup.
Notify the administrator
that wpdomain.db
could not be rebuilt.
wpdomain.db remains
unchanged.
Delete wpdomain.db.
wpdomain.db
Rename creating.ddb
to wpdomain.db.
wpdomain.db has been
successfully rebuilt.
7 Administration Guide
novdocx (en) 11 Decem
ber 2007
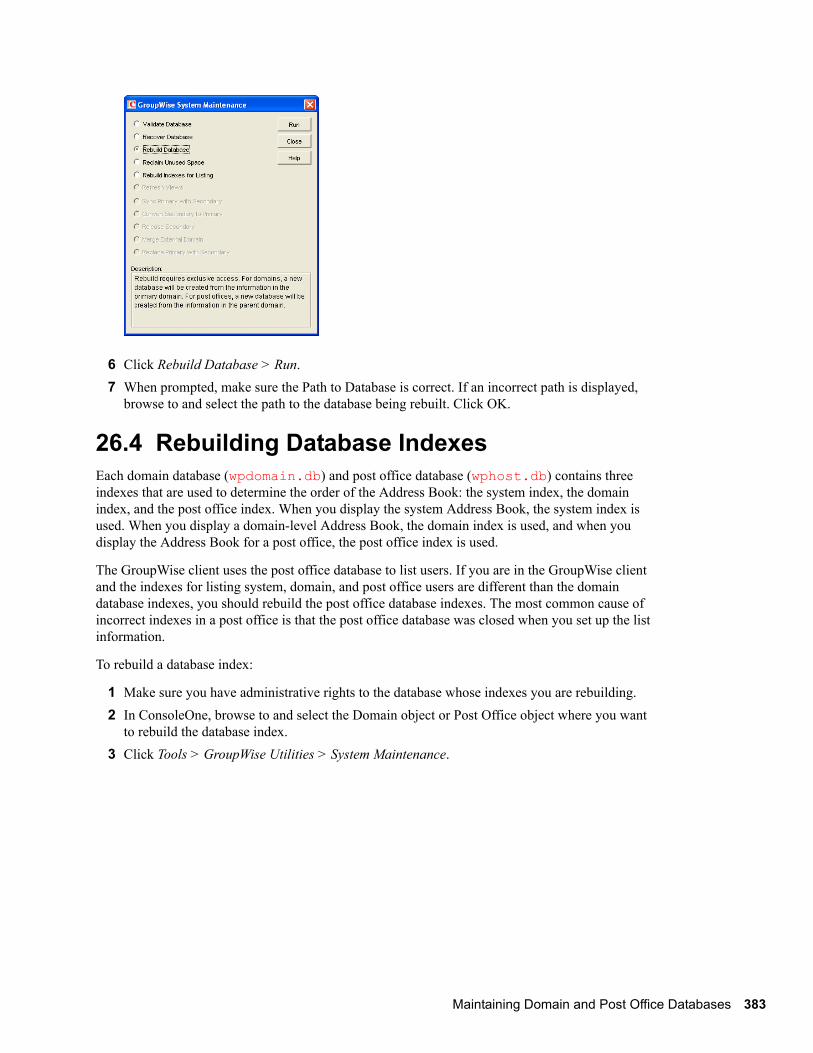
6 Click Rebuild Database > Run.7 When prompted, make sure the Path to Database is correct. If an incorrect path is displayed,
browse to and select the path to the database being rebuilt. Click OK.
26.4 Rebuilding Database IndexesEach domain database (wpdomain.db) and post office database (wphost.db) contains three indexes that are used to determine the order of the Address Book: the system index, the domain index, and the post office index. When you display the system Address Book, the system index is used. When you display a domain-level Address Book, the domain index is used, and when you display the Address Book for a post office, the post office index is used.
The GroupWise client uses the post office database to list users. If you are in the GroupWise client and the indexes for listing system, domain, and post office users are different than the domain database indexes, you should rebuild the post office database indexes. The most common cause of incorrect indexes in a post office is that the post office database was closed when you set up the list information.
To rebuild a database index:
1 Make sure you have administrative rights to the database whose indexes you are rebuilding.2 In ConsoleOne, browse to and select the Domain object or Post Office object where you want
to rebuild the database index.3 Click Tools > GroupWise Utilities > System Maintenance.
Maintaining Domain and Post Office Databases 383
384 GroupWise
novdocx (en) 11 Decem
ber 2007
4 Select Rebuild Indexes for Listing, then click Run. 5 When prompted, make sure the Path to Database is correct. If an incorrect path is displayed,
browse to and select the path to the database being whose indexes are being rebuilt. Click OK.
7 Administration Guide
27novdocx (en) 11 D
ecember 2007
27Maintaining User/Resource and Message Databases
It is sometimes necessary to perform maintenance tasks on user and resource databases (userxxx.db) and message databases (msgnnn.db). The frequency depends on the reliability of your network and your own experience of how often problems are likely to occur. The following tasks help you maintain the integrity of your user and message databases.
Section 27.1, “Analyzing and Fixing User and Message Databases,” on page 385Section 27.2, “Performing a Structural Rebuild of a User Database,” on page 387Section 27.3, “Re-creating a User Database,” on page 388
NOTE: Unfortunately, damage to databases cannot be prevented. A power outage can occur in the middle of a write to a database. A hard drive can fail. However, the GroupWise® tools for repairing damaged databases are very effective and should be able to resolve most damage to GroupWise databases.
To further protect your GroupWise users against loss of mailbox contents, see Chapter 31, “Backing Up GroupWise Databases,” on page 407 and Chapter 32, “Restoring GroupWise Databases from Backup,” on page 411.
To ensure that the same information exists for users and messages throughout your GroupWise system, see Section 29.1, “Synchronizing Individual Users or Resources,” on page 395.
27.1 Analyzing and Fixing User and Message DatabasesThe Analyze/Fix option of Mailbox/Library Maintenance looks for problems and errors in user and resource databases (userxxx.db) and/or message databases (msgnnn.db) and then fixes them if you select the Fix Problems option. You can analyze databases individually or you can analyze all user, resource, and/or message databases in one or more post offices.
To analyze and repair user, resource, and/or message databases:
1 In ConsoleOne®, browse to and select one or more User or Resource objects to check individual users or resources.
or
Browse to and select one or more Post Office objects to select all user and/or message databases in the post office.
Maintaining User/Resource and Message Databases 385
386 GroupWise
novdocx (en) 11 Decem
ber 2007
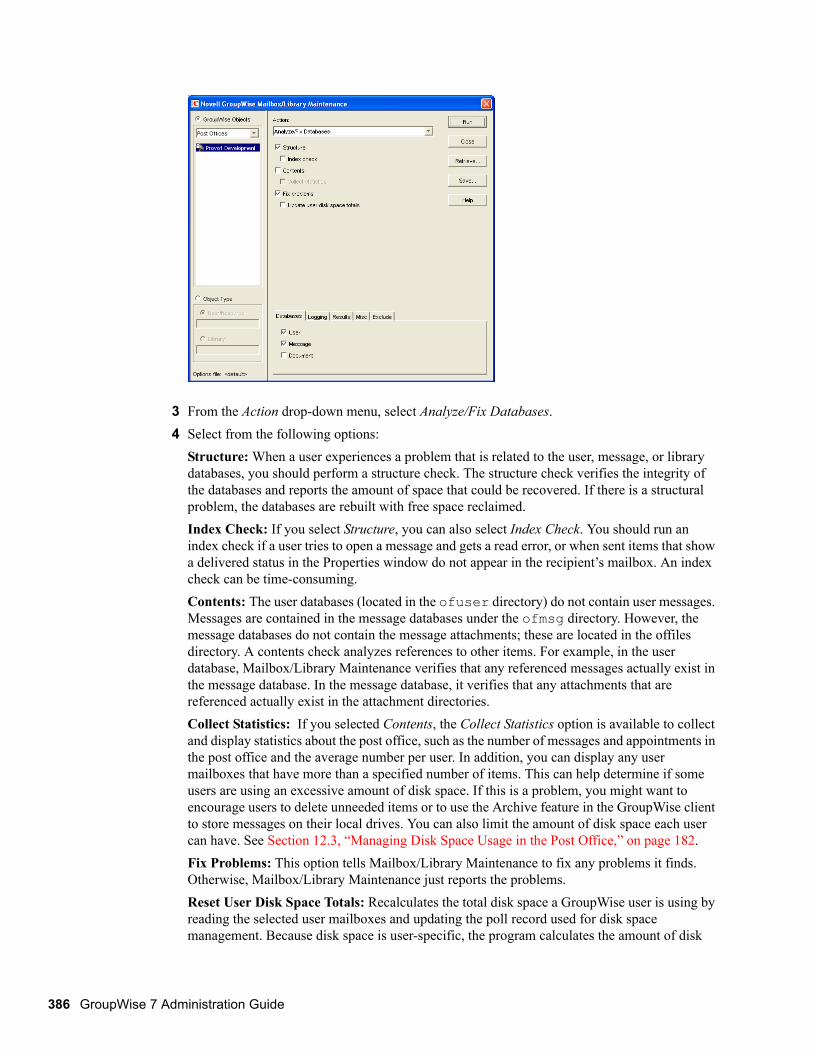
3 From the Action drop-down menu, select Analyze/Fix Databases.4 Select from the following options:
Structure: When a user experiences a problem that is related to the user, message, or library databases, you should perform a structure check. The structure check verifies the integrity of the databases and reports the amount of space that could be recovered. If there is a structural problem, the databases are rebuilt with free space reclaimed.Index Check: If you select Structure, you can also select Index Check. You should run an index check if a user tries to open a message and gets a read error, or when sent items that show a delivered status in the Properties window do not appear in the recipient’s mailbox. An index check can be time-consuming.Contents: The user databases (located in the ofuser directory) do not contain user messages. Messages are contained in the message databases under the ofmsg directory. However, the message databases do not contain the message attachments; these are located in the offiles directory. A contents check analyzes references to other items. For example, in the user database, Mailbox/Library Maintenance verifies that any referenced messages actually exist in the message database. In the message database, it verifies that any attachments that are referenced actually exist in the attachment directories. Collect Statistics: If you selected Contents, the Collect Statistics option is available to collect and display statistics about the post office, such as the number of messages and appointments in the post office and the average number per user. In addition, you can display any user mailboxes that have more than a specified number of items. This can help determine if some users are using an excessive amount of disk space. If this is a problem, you might want to encourage users to delete unneeded items or to use the Archive feature in the GroupWise client to store messages on their local drives. You can also limit the amount of disk space each user can have. See Section 12.3, “Managing Disk Space Usage in the Post Office,” on page 182.Fix Problems: This option tells Mailbox/Library Maintenance to fix any problems it finds. Otherwise, Mailbox/Library Maintenance just reports the problems.Reset User Disk Space Totals: Recalculates the total disk space a GroupWise user is using by reading the selected user mailboxes and updating the poll record used for disk space management. Because disk space is user-specific, the program calculates the amount of disk
7 Administration Guide
novdocx (en) 11 Decem
ber 2007
space in use by the user in the user databases, in any of the message databases, and in the attachment directory. Disk space limitations do not take into account the disk space used in document libraries. This option is usually run if the user totals are not being reflected correctly.
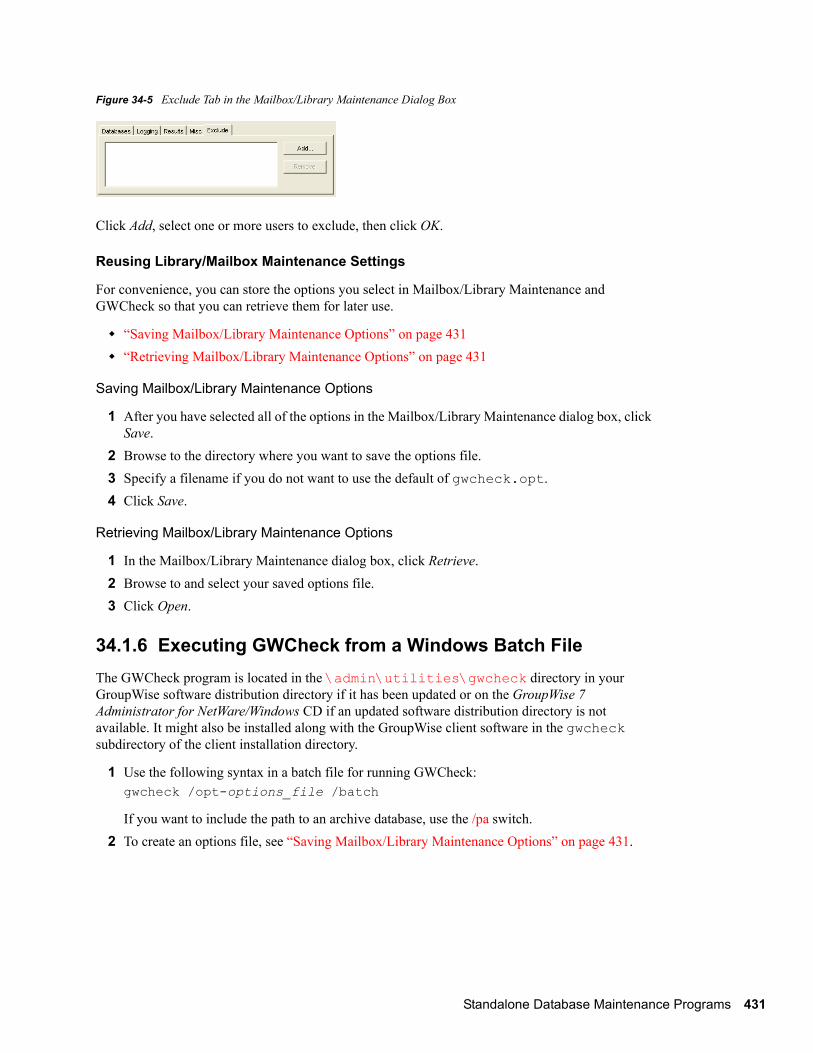
5 Using the tabs at the bottom of the Mailbox/Library Maintenance dialog box, set the following options:
“Databases” on page 429“Logging” on page 429“Results” on page 430“Misc” on page 430“Exclude” on page 430Selected options can be saved for repeated use. See “Saving Mailbox/Library Maintenance Options” on page 431.
6 Click Run to perform the Analyze/Fix operation.
Analyze/Fix can also be run using the standalone GroupWise Check program. See Section 34.1, “GroupWise Check,” on page 423. It can also be scheduled to run on a regular basis by properly configuring the POA. See Section 36.4.1, “Scheduling Database Maintenance,” on page 507.
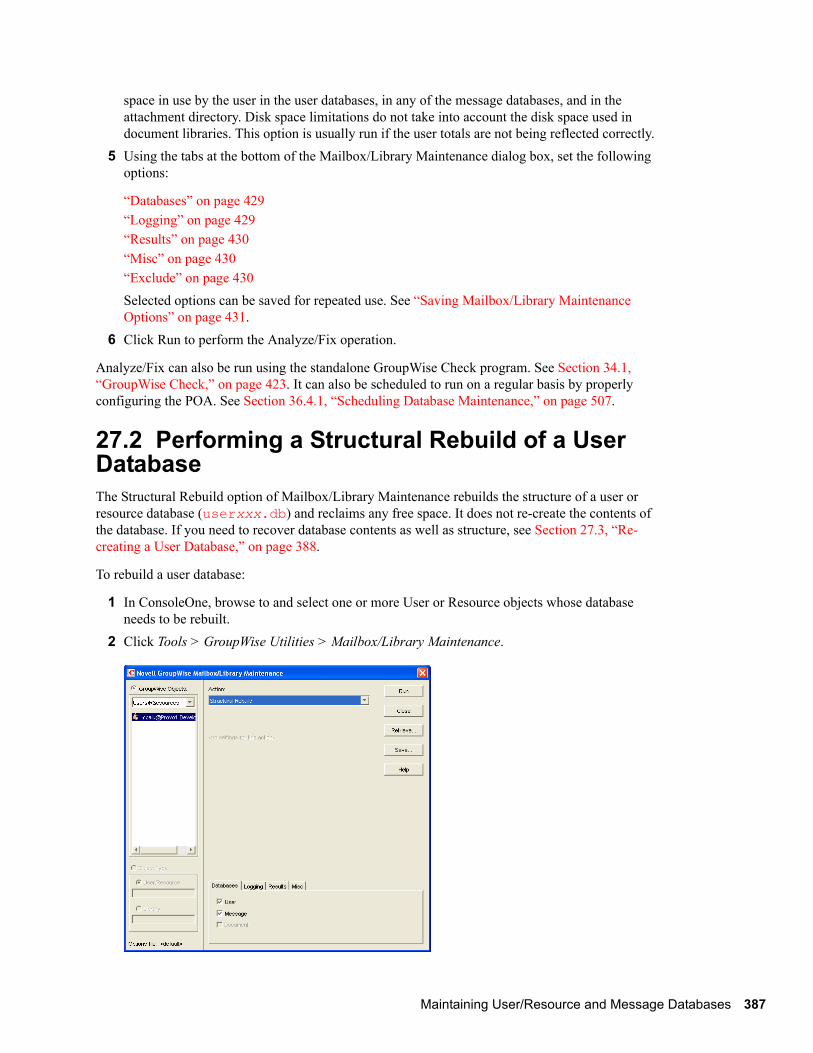
27.2 Performing a Structural Rebuild of a User DatabaseThe Structural Rebuild option of Mailbox/Library Maintenance rebuilds the structure of a user or resource database (userxxx.db) and reclaims any free space. It does not re-create the contents of the database. If you need to recover database contents as well as structure, see Section 27.3, “Re-creating a User Database,” on page 388.
To rebuild a user database:
1 In ConsoleOne, browse to and select one or more User or Resource objects whose database needs to be rebuilt.
Maintaining User/Resource and Message Databases 387
388 GroupWise
novdocx (en) 11 Decem
ber 2007
3 From the Action drop-down list, select Structural Rebuild.4 Using the tabs at the bottom of the Mailbox/Library Maintenance dialog box, set the following
options:
“Databases” on page 429“Logging” on page 429“Results” on page 430“Misc” on page 430Selected options can be saved for repeated use. See “Saving Mailbox/Library Maintenance Options” on page 431.
5 Click Run to perform a structural rebuild of the user database.
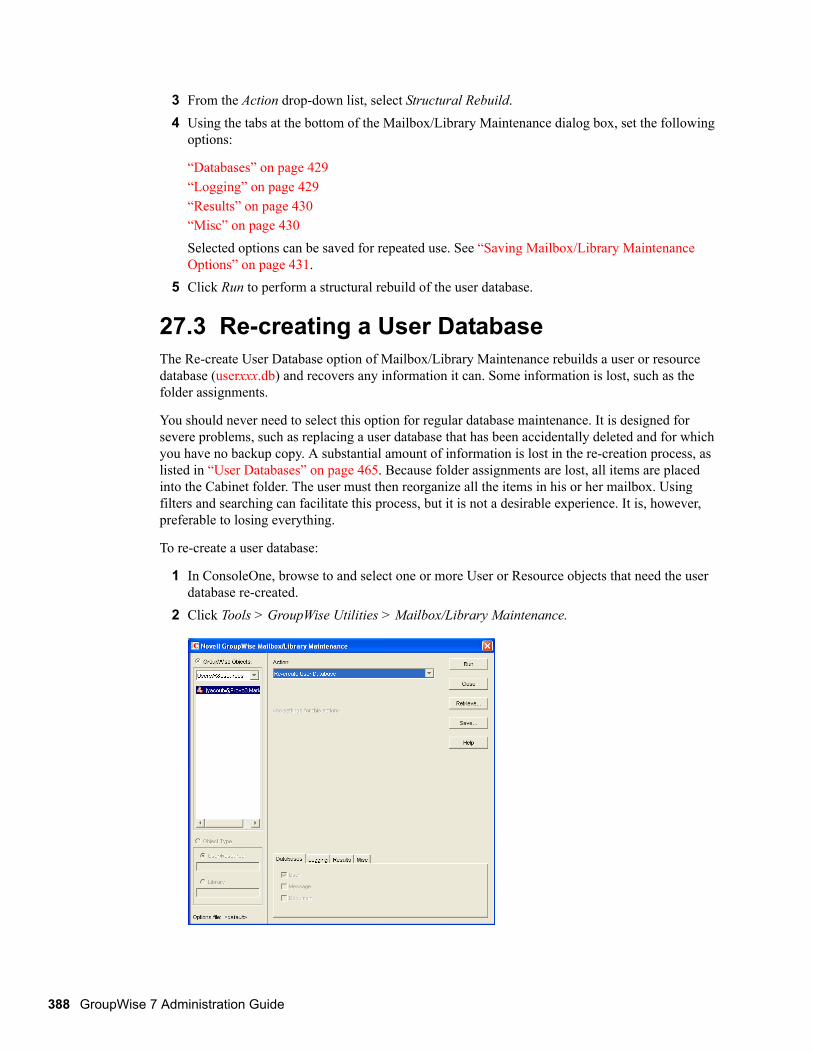
27.3 Re-creating a User DatabaseThe Re-create User Database option of Mailbox/Library Maintenance rebuilds a user or resource database (userxxx.db) and recovers any information it can. Some information is lost, such as the folder assignments.
You should never need to select this option for regular database maintenance. It is designed for severe problems, such as replacing a user database that has been accidentally deleted and for which you have no backup copy. A substantial amount of information is lost in the re-creation process, as listed in “User Databases” on page 465. Because folder assignments are lost, all items are placed into the Cabinet folder. The user must then reorganize all the items in his or her mailbox. Using filters and searching can facilitate this process, but it is not a desirable experience. It is, however, preferable to losing everything.
To re-create a user database:
1 In ConsoleOne, browse to and select one or more User or Resource objects that need the user database re-created.
3 From the Action drop-down list, select Re-create User Database.4 Using the tabs at the bottom of the Mailbox/Library Maintenance dialog box, set the following
options:
“Databases” on page 429“Logging” on page 429“Results” on page 430“Misc” on page 430Selected options can be saved for repeated use. See “Saving Mailbox/Library Maintenance Options” on page 431.
5 Click Run to re-create the user database.
Maintaining User/Resource and Message Databases 389
390 GroupWise
novdocx (en) 11 Decem
ber 2007
7 Administration Guide
28novdocx (en) 11 D
ecember 2007
28Maintaining Library Databases and Documents
GroupWise® Document Management Services (DMS) uses libraries as repositories for documents. For a review of library database structure, see Section 25.5, “Library Databases,” on page 374.
Section 28.1, “Analyzing and Fixing Databases for Libraries and Documents,” on page 391Section 28.2, “Analyzing and Fixing Library and Document Information,” on page 392
NOTE: Unfortunately, damage to databases cannot be prevented. A power outage can occur in the middle of a write to a database. A hard drive can fail. However, the GroupWise tools for repairing damaged databases are very effective and should be able to resolve most damage to GroupWise databases.
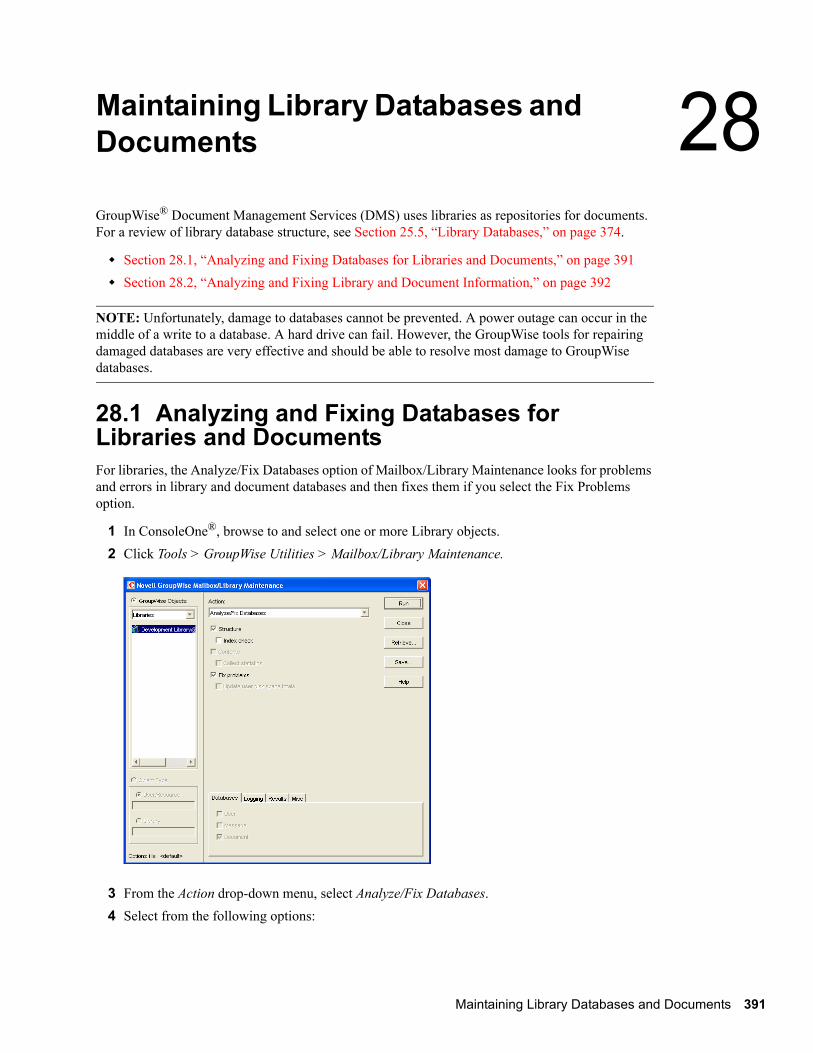
28.1 Analyzing and Fixing Databases for Libraries and DocumentsFor libraries, the Analyze/Fix Databases option of Mailbox/Library Maintenance looks for problems and errors in library and document databases and then fixes them if you select the Fix Problems option.
1 In ConsoleOne®, browse to and select one or more Library objects.2 Click Tools > GroupWise Utilities > Mailbox/Library Maintenance.
3 From the Action drop-down menu, select Analyze/Fix Databases.4 Select from the following options:
Maintaining Library Databases and Documents 391
392 GroupWise
novdocx (en) 11 Decem
ber 2007
Structure: When a user experiences a problem that is related to the library databases, you should perform a structure check. The structure check verifies the integrity of the databases and reports the amount of space that could be recovered. If there is a structural problem, the databases are rebuilt with free space reclaimed.Index Check: If you select Structure, you can also select Index Check. An index check can be time-consuming.Contents: The library database (located in the gwdms directory of the post office) does not contain documents. Documents are stored in the lib0000-FF directories. A contents check analyzes references from libraries to documents. Collect Statistics: If you selected Contents, the Collect Statistics option is available to collect and display statistics about the library, such as the number and size of documents.Fix Problems: This option tells Mailbox/Library Maintenance to fix any problems it finds. Otherwise, Mailbox/Library Maintenance just reports the problems.
5 Using the tabs at the bottom of the Mailbox/Library Maintenance dialog box, set the following options:
“Databases” on page 429“Logging” on page 429“Results” on page 430“Misc” on page 430Selected options can be saved for repeated use. See “Saving Mailbox/Library Maintenance Options” on page 431.
6 Click Run to perform the Analyze/Fix Databases operation on the library.
Analyze/Fix Databases can also be run using the standalone GroupWise Check program. See Section 34.1, “GroupWise Check,” on page 423. It can also be scheduled to run on a regular basis by properly configuring the POA. See Section 36.4.1, “Scheduling Database Maintenance,” on page 507.
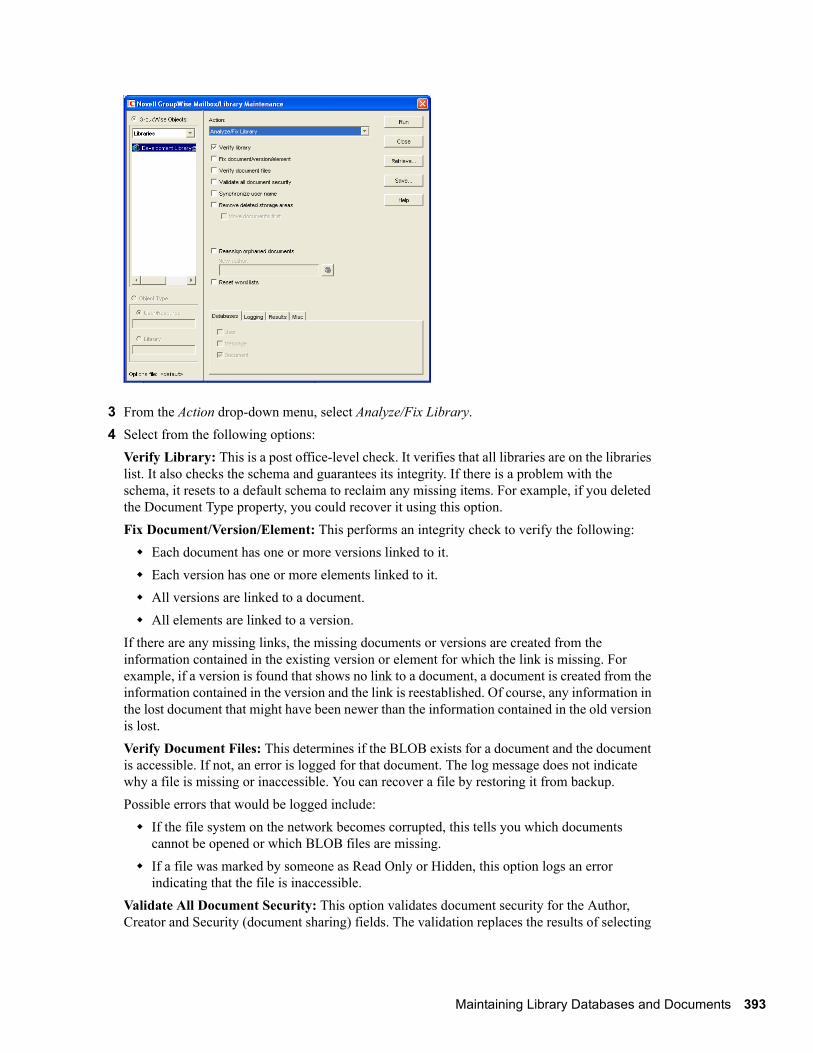
28.2 Analyzing and Fixing Library and Document InformationThe Analyze/Fix Library option of Mailbox/Library Maintenance performs more library-specific functions than Analyze/Fix Databases. For all options except Verify Library, all documents in each of the selected library databases are checked. This can be a time-consuming process. Therefore, if you intend to select more than one of the Analyze/Fix Library options, you can save time by selecting each of them before clicking Run. This causes all selected options to be run against each document, which is faster than running each option individually against all documents.
To validate library databases:
1 In ConsoleOne, browse to and select one or more Post Office objects where you want to validate libraries.
3 From the Action drop-down menu, select Analyze/Fix Library.4 Select from the following options:
Verify Library: This is a post office-level check. It verifies that all libraries are on the libraries list. It also checks the schema and guarantees its integrity. If there is a problem with the schema, it resets to a default schema to reclaim any missing items. For example, if you deleted the Document Type property, you could recover it using this option.Fix Document/Version/Element: This performs an integrity check to verify the following:
Each document has one or more versions linked to it.Each version has one or more elements linked to it.All versions are linked to a document. All elements are linked to a version.
If there are any missing links, the missing documents or versions are created from the information contained in the existing version or element for which the link is missing. For example, if a version is found that shows no link to a document, a document is created from the information contained in the version and the link is reestablished. Of course, any information in the lost document that might have been newer than the information contained in the old version is lost.Verify Document Files: This determines if the BLOB exists for a document and the document is accessible. If not, an error is logged for that document. The log message does not indicate why a file is missing or inaccessible. You can recover a file by restoring it from backup.Possible errors that would be logged include:
If the file system on the network becomes corrupted, this tells you which documents cannot be opened or which BLOB files are missing. If a file was marked by someone as Read Only or Hidden, this option logs an error indicating that the file is inaccessible.
Validate All Document Security: This option validates document security for the Author, Creator and Security (document sharing) fields. The validation replaces the results of selecting
Maintaining Library Databases and Documents 393
394 GroupWise
novdocx (en) 11 Decem
ber 2007
the Validate Author/Creator Security option, and is more thorough. Therefore, you only need to select one option or the other.Synchronize User Name: The Author and Creator fields display users’ full names, not unique IDs. If a user’s name is changed, such as for marriage, this option verifies that the user’s name on document and version records is the same as the user’s current display name. In other words, the Author and Creator fields in documents and versions are updated to the user’s newer name.Remove Deleted Storage Areas: When you delete a document storage area in the Storage Areas page of a library’s details dialog box, the document storage area and the documents stored there remain on the system. Deleting the storage area from the library only means that new documents are not stored there. The documents there continue to be available to users.If you want to also remove the document storage area from the system, you have two options: delete the storage area and its documents, or first move the documents and then delete the storage area. The first option is not advisable, but exists so that if you have moved all of the documents that can be moved, but some corrupted documents are left behind, you can force the document storage area to be deleted.You should normally select Move Documents First so that users continue to have access to those documents from a different document storage area. With this option, all BLOBs in the library are checked to see which documents are in the area being deleted.Reassign Orphaned Documents: Documents can occasionally become orphaned (unattached to a user). For example, this can happen when a user leaves your organization and the user object is removed. All documents belonging to that user are no longer available in GroupWise searches and cannot be accessed by anyone (document security is controlled by the user listed in the Author and Creator fields). This option lets you reassign these documents to another user. You must select a new author from the browser menu after checking this option. The new author you designate has access to all orphaned documents in this library.Reset Word Lists: Documents stored in a library are indexed and inserted into a generated word list. This allows users to search for a document by keywords as well as any word contained within a document. The document library word list might become outdated and if this occurs, the word list must be regenerated. This option allows the program to regenerate the document library word list the next time an index operation is performed.
5 Using the tabs at the bottom of the Mailbox/Library Maintenance dialog box, set the following options:
“Databases” on page 429“Logging” on page 429“Results” on page 430“Misc” on page 430Selected options can be saved for repeated use. See “Saving Mailbox/Library Maintenance Options” on page 431.
6 Click Run to perform the Analyze/Fix Library operation.
Analyze/Fix Library can also be run using the standalone GroupWise Check program. See Section 34.1, “GroupWise Check,” on page 423. It can also be scheduled to run on a regular basis by properly configuring the POA. See Section 36.4.1, “Scheduling Database Maintenance,” on page 507.
7 Administration Guide
29novdocx (en) 11 D
ecember 2007
29Synchronizing Database Information
In general, synchronization of object information throughout your GroupWise® system occurs automatically. Whenever you add, delete, or modify a GroupWise object, the information is automatically replicated to all appropriate databases. Ideally, each domain database (wpdomain.db) in your system contains original records for all objects it owns and accurately replicated records for all objects owned by other domains. However, because unavoidable events such as power outages and hardware problems can disrupt network connectivity, information in various databases might get out of sync.
If you think you have a synchronization problem, especially soon after adding, deleting, or modifying objects, it is wise to check Pending Operations to make sure your changes have been processed. See Section 4.5, “Pending Operations,” on page 60. When waiting for replication to take place, patience is a virtue.
When information differs between the original record and a replicated record, the original record is considered correct. If you perform synchronization from the owning domain, the owning domain notifies the primary domain of the correct information, then the primary domain broadcasts the correct information to all secondary domains. Therefore, the best place to perform synchronization is from the domain that owns the object that is out of sync. The next best place to perform synchronization is from the primary domain, because the primary domain sends a request to the owning domain for the correct information, then broadcasts the correct information to all secondary domains.
Any GroupWise object can be synchronized:
Section 29.1, “Synchronizing Individual Users or Resources,” on page 395Section 29.2, “Synchronizing a Post Office,” on page 396Section 29.3, “Synchronizing a Library,” on page 397Section 29.4, “Synchronizing a Secondary Domain,” on page 397Section 29.5, “Synchronizing the Primary Domain from a Secondary Domain,” on page 398
29.1 Synchronizing Individual Users or ResourcesMost often, you will notice a synchronization problem when a user has trouble sending a message. Symptoms include:
The sender receives a “user is undeliverable” message.A new user or resource created in ConsoleOne® does not appear in the Address Book in some or all post offices.User or resource information is incorrect in the Address Book but correct in ConsoleOne.
Synchronizing Database Information 395
396 GroupWise
novdocx (en) 11 Decem
ber 2007
A user or resource is listed in the Address Book as belonging to one post office but actually belongs to another.
To synchronize individual User and/or Resource objects:
1 In ConsoleOne, connect to the domain that owns the users and/or resources, as described in Section 9.1, “Connecting to a Domain,” on page 127.
or
Connect to the primary domain.2 Browse to and right-click one or more User or Resource objects to synchronize, then click
Properties.3 Make sure the correct information appears on the object’s Identification page, then click
Cancel.4 Repeat Step 2 and Step 3 for each user or resource you need to synchronize.5 Select each User or Resource object, then click Tools > GroupWise Utilities > Synchronize.6 When you are asked whether to proceed, click Yes.
Current, correct information is then replicated throughout your GroupWise system.If many User or Resource objects are being synchronized, you can check progress by viewing pending operations. See Section 4.5, “Pending Operations,” on page 60.After synchronization is complete, you can verify that it was successful by checking the synchronized objects in Address Books and several post offices in your GroupWise system.
If there are indications that a large number of User or Resource objects need to be synchronized, rebuilding the post office database (wphost.db) can be preferable to synchronizing individual objects. However, this process requires exclusive access to the post office database. See Section 26.3, “Rebuilding Domain or Post Office Databases,” on page 381.
Occasionally, GroupWise user information can get out of sync with Novell® eDirectoryTM user information. This requires a different type of synchronization process. See Section 41.4.1, “Using eDirectory User Synchronization,” on page 638.
29.2 Synchronizing a Post OfficeIf information for a particular post office does not display the same throughout your GroupWise system, you can synchronize the post office.
1 In ConsoleOne, connect to the domain that owns the post office, as described in Section 9.1, “Connecting to a Domain,” on page 127.
or
Connect to the primary domain.2 Browse to and right-click the Post Office object to synchronize, then click Properties.3 Make sure the correct information appears on the post office Identification page, then click
Cancel.4 Select the Post Office object, then click Tools > GroupWise Utilities > Synchronize.5 When you are asked whether to proceed, click Yes.
7 Administration Guide
novdocx (en) 11 Decem
ber 2007
Current, correct post office information is then replicated throughout your GroupWise system.After synchronization is complete, you can verify that it was successful by checking the post office information when connected to different domains in your GroupWise system.
See also Section 26.3, “Rebuilding Domain or Post Office Databases,” on page 381.
29.3 Synchronizing a LibraryIf information for a library does not display the same throughout your GroupWise system, you can synchronize the library.
1 In ConsoleOne, connect to the domain that owns the library, as described in Section 9.1, “Connecting to a Domain,” on page 127.
or
Connect to the primary domain.2 Browse to and right-click the Library object to synchronize, then click Properties.3 Make sure the correct information appears on the library Identification page, then click Cancel.4 Select the Library object, then click Tools > GroupWise Utilities > Synchronize.5 When you are asked whether to proceed, click Yes.
Current, correct library information is then replicated throughout your GroupWise system.After synchronization is complete, you can verify that it was successful by checking the library information when connected to different domains in your GroupWise system.
See also Section 28.2, “Analyzing and Fixing Library and Document Information,” on page 392.
29.4 Synchronizing a Secondary DomainIf information for a particular secondary domain does not display the same throughout your GroupWise system, you can synchronize the secondary domain.
1 In ConsoleOne, connect to the primary domain, as described in Section 9.1, “Connecting to a Domain,” on page 127.
2 If there is any doubt about the correctness of that secondary domain’s information as stored in the primary domain database, synchronize the primary domain with the secondary domain before proceeding, as described in Section 29.5, “Synchronizing the Primary Domain from a Secondary Domain,” on page 398.
3 Browse to and right-click the Domain object to synchronize, then click Properties.4 Make sure the correct information appears on the domain Identification page, then click
Cancel.5 Select the Domain object, then click Tools > GroupWise Utilities > Synchronize.6 When you are asked whether to proceed, click Yes.
Current, correct domain information for the secondary domain is then replicated throughout your GroupWise system.After synchronization is complete, you can verify that it was successful by checking the domain information when connected to different domains in your GroupWise system.
Synchronizing Database Information 397
398 GroupWise
novdocx (en) 11 Decem
ber 2007
See also Section 26.3, “Rebuilding Domain or Post Office Databases,” on page 381.
29.5 Synchronizing the Primary Domain from a Secondary DomainInformation about a secondary domain stored in the secondary domain database is considered more current and correct than information about that secondary domain stored in the primary domain database. If the primary domain database contains out-of-date information, you can synchronize the primary domain from the secondary domain.
When you synchronize the primary domain database from a secondary domain database, any records the secondary domain owns, such as post offices or users added to the secondary domain, are replicated from the secondary domain database to the primary domain database.
To synchronize the primary domain from a secondary domain:
1 You must have administrative rights to the primary domain directory and the secondary domain directory from which the primary domain is being synchronized.
2 In ConsoleOne, browse to and select the Domain object of the secondary domain whose database you want to use to synchronize the primary domain database.
3 Click Tools > GroupWise Utilities > System Maintenance.
4 Select Sync Primary with Secondary, then click Run.5 When prompted, make sure the Path to Database is correct. If an incorrect path is displayed,
browse to and select the path to the database being validated. Click OK.
To make sure the primary domain database is totally up-to-date, repeat the procedure for each secondary domain in your system.
7 Administration Guide
30novdocx (en) 11 D
ecember 2007
30Managing Database Disk Space
One of the most common maintenance issues in a growing system is running out of disk space. In addition to sending messages, users tend to use GroupWise® for all sorts of communication, such as transferring large files. Library documents created with Document Management Services (DMS) can use huge amounts of disk space. Archived library documents can also quickly use up disk space assigned to the post office, where space is usually limited.
You should let your users know about the archive and auto-delete features of GroupWise mail, or set client options in ConsoleOne® to automatically archive or delete. See Chapter 65, “Setting Defaults for the GroupWise Client Options,” on page 1045.
Section 30.1, “Gathering Mailbox Statistics,” on page 399Section 30.2, “Reducing the Size of User and Message Databases,” on page 401Section 30.3, “Reclaiming Disk Space in Domain and Post Office Databases,” on page 403Section 30.4, “Reducing the Size of Libraries and Document Storage Areas,” on page 404
See also Section 12.3, “Managing Disk Space Usage in the Post Office,” on page 182.
30.1 Gathering Mailbox StatisticsIf you have some users who don’t like to throw anything away, you might want to monitor the size of their mailboxes and, where appropriate, suggest voluntary cleanup. You can assess e-mail retention by the number of messages, age of messages, or size of user databases.
The Mailbox Statistics option in Mailbox/Library Maintenance collects and displays statistics about the post office, such as the number of messages and appointments in the post office and the average number per user. It is valid only for user databases. In addition, you can display any user mailboxes that have more than a specified number of items. This can help determine which users might be using an excessive amount of file server disk space.
To gather mailbox statistics:
1 In ConsoleOne, browse to and select one or more User or Resource objects or one or more Post Office objects.
3 From the Action drop-down menu, select Mailbox Statistics.4 Select Mailbox Statistics.
Mailbox Statistics: Specify a maximum number of items to see a report showing each user whose mailbox has more items in it than the number you specify.orSelect Expire Statistics.Expire Statistics: Select one of the following:
Items Older Than: Shows how many items are older than the number of days you specify. Downloaded Items Older Than: Shows how many items have been downloaded to users’ GroupWise Caching or Remote mailboxes that are older than the number of days you specify. This does not include items that have been downloaded to non-GroupWise mailboxes (for example, POP and IMAP accounts).Items Larger Than: Shows how many items are larger than the size you specify.Reduce Mailbox To: Shows how many items need to be expired before the mailbox would be reduced to the size you specify. Older, larger items are expired before newer, smaller items.Reduce Mailbox to Limited Size: Shows how many items need to be expired before the mailbox is the size specified using the Disk Space Management feature under Client Options, as described in Section 12.3.2, “Setting Mailbox Size Limits,” on page 183.
When items meet your selected expire criteria, they are subject to being removed from the mailbox when you use the Expire/Reduce Messages action as described in Section 30.2, “Reducing the Size of User and Message Databases,” on page 401.
5 In the Include box, select Received Items, Sent Items, Calendar Items, Only Backed-Up Items, and/or Only Retained Items to specify the types of items to gather statistics for.The Only Backed-Up Items option interacts with the Do Not Purge Items Until They Are Backed Up setting under Tools > GroupWise Utilities > Client Options > Environment Options > Cleanup. If items are not allowed to be deleted before they are backed up, then they cannot
7 Administration Guide
novdocx (en) 11 Decem
ber 2007
be deleted during an Expire/Reduce operation. For more information, see “Environment Options: Cleanup” on page 1057.The Only Retained Items option interacts with third-party message retention applications, as described in Chapter 33, “Retaining User Messages,” on page 419.
6 Using the tabs at the bottom of the Mailbox/Library Maintenance dialog box, set the following options:
“Databases” on page 429“Logging” on page 429“Results” on page 430“Misc” on page 430“Exclude” on page 430Selected options can be saved for repeated use. See “Saving Mailbox/Library Maintenance Options” on page 431.By default, the mailbox statistics are sent to the domain administrator, as designated in Section 42.7, “Notifying the Domain Administrator,” on page 671.
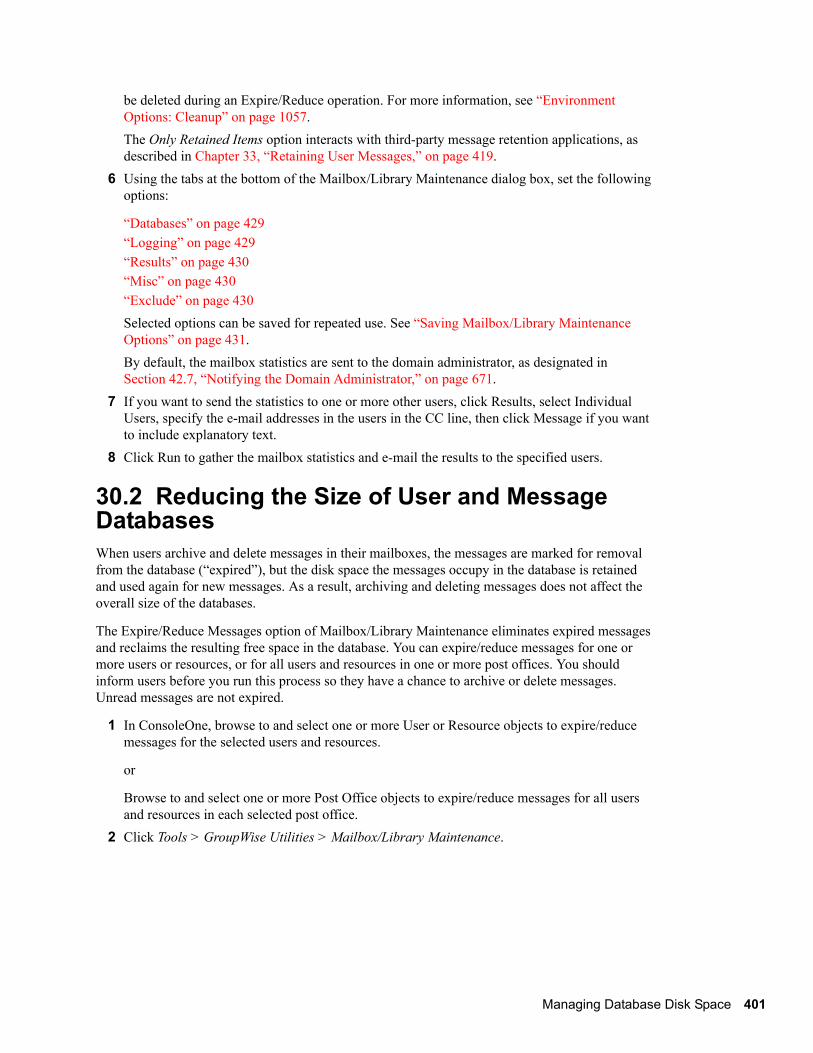
7 If you want to send the statistics to one or more other users, click Results, select Individual Users, specify the e-mail addresses in the users in the CC line, then click Message if you want to include explanatory text.
8 Click Run to gather the mailbox statistics and e-mail the results to the specified users.
30.2 Reducing the Size of User and Message DatabasesWhen users archive and delete messages in their mailboxes, the messages are marked for removal from the database (“expired”), but the disk space the messages occupy in the database is retained and used again for new messages. As a result, archiving and deleting messages does not affect the overall size of the databases.
The Expire/Reduce Messages option of Mailbox/Library Maintenance eliminates expired messages and reclaims the resulting free space in the database. You can expire/reduce messages for one or more users or resources, or for all users and resources in one or more post offices. You should inform users before you run this process so they have a chance to archive or delete messages. Unread messages are not expired.
1 In ConsoleOne, browse to and select one or more User or Resource objects to expire/reduce messages for the selected users and resources.
or
Browse to and select one or more Post Office objects to expire/reduce messages for all users and resources in each selected post office.
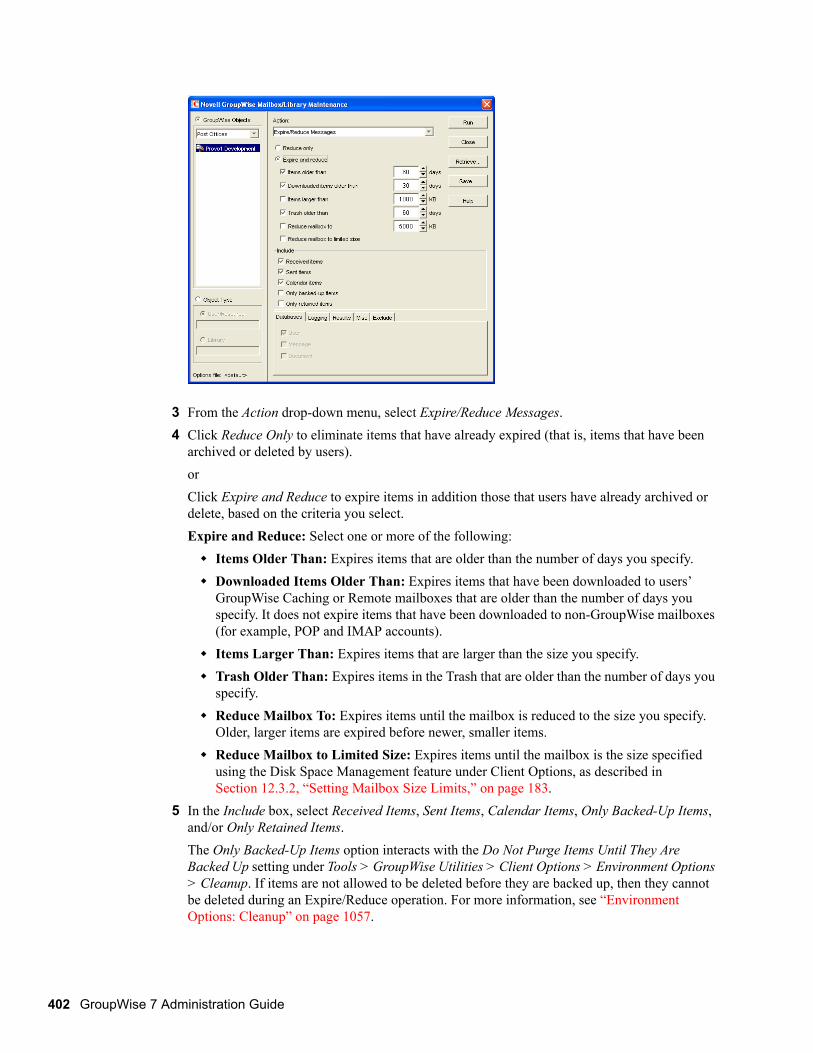
3 From the Action drop-down menu, select Expire/Reduce Messages.4 Click Reduce Only to eliminate items that have already expired (that is, items that have been
archived or deleted by users).orClick Expire and Reduce to expire items in addition those that users have already archived or delete, based on the criteria you select.Expire and Reduce: Select one or more of the following:
Items Older Than: Expires items that are older than the number of days you specify. Downloaded Items Older Than: Expires items that have been downloaded to users’ GroupWise Caching or Remote mailboxes that are older than the number of days you specify. It does not expire items that have been downloaded to non-GroupWise mailboxes (for example, POP and IMAP accounts).Items Larger Than: Expires items that are larger than the size you specify.Trash Older Than: Expires items in the Trash that are older than the number of days you specify.Reduce Mailbox To: Expires items until the mailbox is reduced to the size you specify. Older, larger items are expired before newer, smaller items.Reduce Mailbox to Limited Size: Expires items until the mailbox is the size specified using the Disk Space Management feature under Client Options, as described in Section 12.3.2, “Setting Mailbox Size Limits,” on page 183.
5 In the Include box, select Received Items, Sent Items, Calendar Items, Only Backed-Up Items, and/or Only Retained Items.The Only Backed-Up Items option interacts with the Do Not Purge Items Until They Are Backed Up setting under Tools > GroupWise Utilities > Client Options > Environment Options > Cleanup. If items are not allowed to be deleted before they are backed up, then they cannot be deleted during an Expire/Reduce operation. For more information, see “Environment Options: Cleanup” on page 1057.
7 Administration Guide
novdocx (en) 11 Decem
ber 2007
The Only Retained Items option interacts with third-party message retention applications, as described in Chapter 33, “Retaining User Messages,” on page 419.You might want to notify users of the types of items that will be deleted.
6 Using the tabs at the bottom of the Mailbox/Library Maintenance dialog box, set the following options:
“Databases” on page 429“Logging” on page 429“Results” on page 430“Misc” on page 430“Exclude” on page 430Selected options can be saved for repeated use. See “Saving Mailbox/Library Maintenance Options” on page 431.
7 Click Run to perform the Expire/Reduce Messages operation.
For additional disk space management assistance, see Section 12.3, “Managing Disk Space Usage in the Post Office,” on page 182.
30.3 Reclaiming Disk Space in Domain and Post Office DatabasesAs you add information to your system, the domain databases (wpdomain.db) and post office databases (wphost.db) increase in size. If you delete information, the space created in the databases for the information is not immediately recovered. GroupWise will use the free space before requiring more disk space; however, if you have deleted a large amount of information, you might want to reclaim unused database space. If you have frequent changes to your users, especially deletions, you should occasionally reclaim disk space.
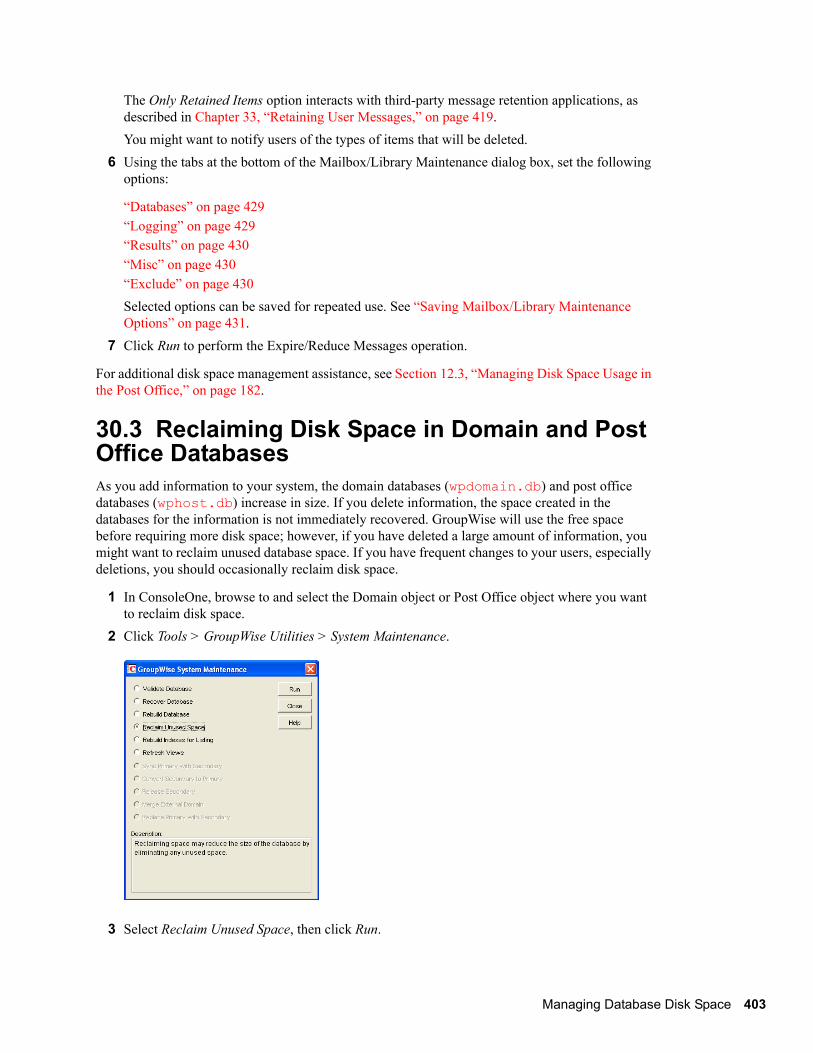
1 In ConsoleOne, browse to and select the Domain object or Post Office object where you want to reclaim disk space.
2 Click Tools > GroupWise Utilities > System Maintenance.
3 Select Reclaim Unused Space, then click Run.
Managing Database Disk Space 403
404 GroupWise
novdocx (en) 11 Decem
ber 2007
4 When prompted, make sure the Path to Database is correct. If an incorrect path is displayed, browse to and select the path to the database where you want to reclaim disk space. Click OK.
30.4 Reducing the Size of Libraries and Document Storage AreasThe amount of disk space you allow at each post office for your library databases varies according to the GroupWise features they use.
If you are using GroupWise Document Management Services, you must determine storage requirements for your documents. If you feel your current disk space usage by documents is not representative of your long-term requirements, you can estimate the disk space users need for documents by multiplying an average document size by the average number of documents per user by the total number of users in the post office.
For example, the typical document size is 50 KB. Each user owns about 50 documents and there are 100 users on your post office.
Sample Calculation: 50 KB (document size)
x 50 documents (per user)x 100 users-----
2.5 GB of disk space
Be sure to allow your libraries room to grow.
When room to grow is no longer available, the following tasks help you make the best use of available disk space:
Section 30.4.1, “Archiving and Deleting Documents,” on page 404Section 30.4.2, “Deleting Activity Logs,” on page 405
See also Section 23.4.2, “Backing Up and Restoring Archived Documents,” on page 360.
30.4.1 Archiving and Deleting DocumentsDocuments can be archived, retained indefinitely, or simply deleted. The document type property determines a document’s disposition (archive, delete, or retain). The document life property determines when it can be archived or deleted. When you run the Archive/Delete Documents option of Mailbox/Library Maintenance, documents in the selected libraries that have reached their document life dates are either deleted or archived.
Documents that have reached their document life and been marked for deletion in the document type are simply deleted from the library, after which the document and its property information can no longer be found by any search. You can recover deleted documents from database backups.
When documents are archived, their BLOBs are moved to archive directories. These directories are named arnnnnnn (where nnnnnn is an incremented integer with leading zeros), and are automatically created as needed. They are sometimes referred to as archive sets. The archive directories are located at post_office_directory\gwdms\lib01-FF\archive. When a document is archived, GroupWise determines if the document BLOB fits in the current archive
7 Administration Guide
novdocx (en) 11 Decem
ber 2007
directory. If the BLOB does not fit, another archive directory is created and the BLOB is archived there.
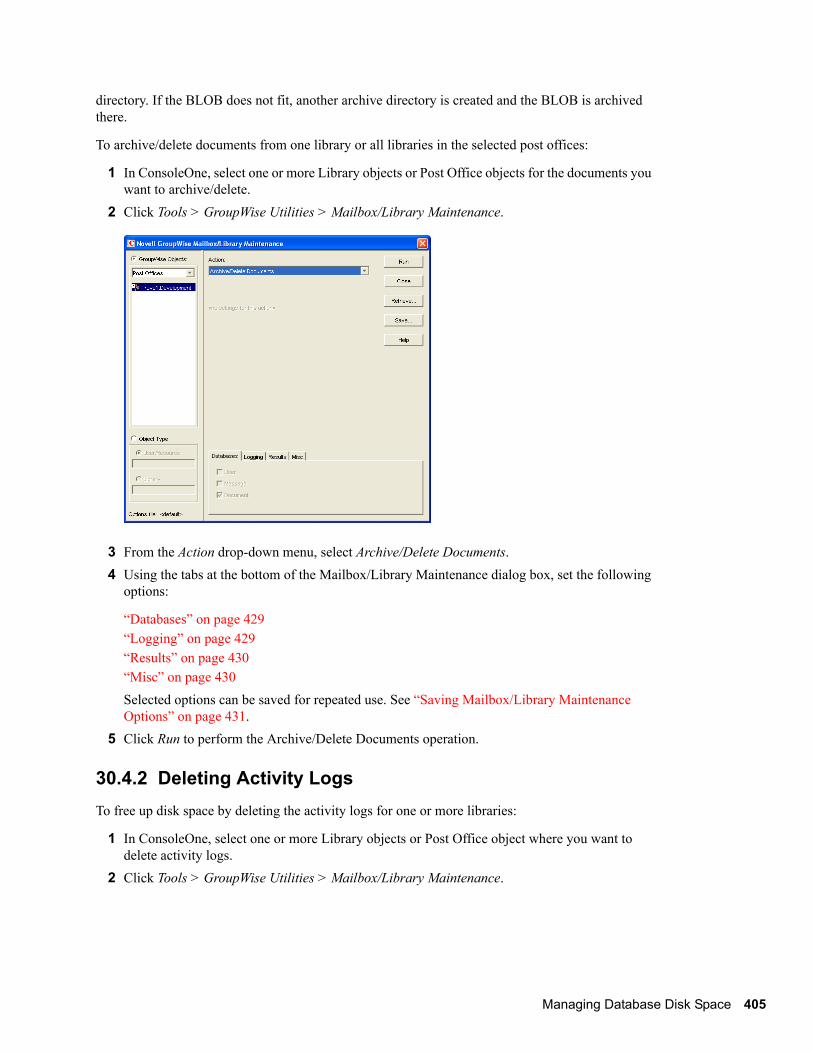
To archive/delete documents from one library or all libraries in the selected post offices:
1 In ConsoleOne, select one or more Library objects or Post Office objects for the documents you want to archive/delete.
3 From the Action drop-down menu, select Archive/Delete Documents.4 Using the tabs at the bottom of the Mailbox/Library Maintenance dialog box, set the following
options:
“Databases” on page 429“Logging” on page 429“Results” on page 430“Misc” on page 430Selected options can be saved for repeated use. See “Saving Mailbox/Library Maintenance Options” on page 431.
5 Click Run to perform the Archive/Delete Documents operation.
30.4.2 Deleting Activity LogsTo free up disk space by deleting the activity logs for one or more libraries:
1 In ConsoleOne, select one or more Library objects or Post Office object where you want to delete activity logs.
3 From the Action drop-down menu, select Delete Activity Logs.4 Specify the number of days in the Delete Activity Logs Older Than field. The default is 60 days.5 Using the tabs at the bottom of the Mailbox/Library Maintenance dialog box, set the following
options:
“Databases” on page 429“Logging” on page 429“Results” on page 430“Misc” on page 430Selected options can be saved for repeated use. See “Saving Mailbox/Library Maintenance Options” on page 431.
6 Click Run to delete unneeded activity logs.
7 Administration Guide
31novdocx (en) 11 D
ecember 2007
31Backing Up GroupWise Databases
You should back up GroupWise® databases regularly so that if a database sustains damage that cannot be repaired using the GroupWise database maintenance tools, you can still recover with minimum data loss. Backup procedures vary by platform:
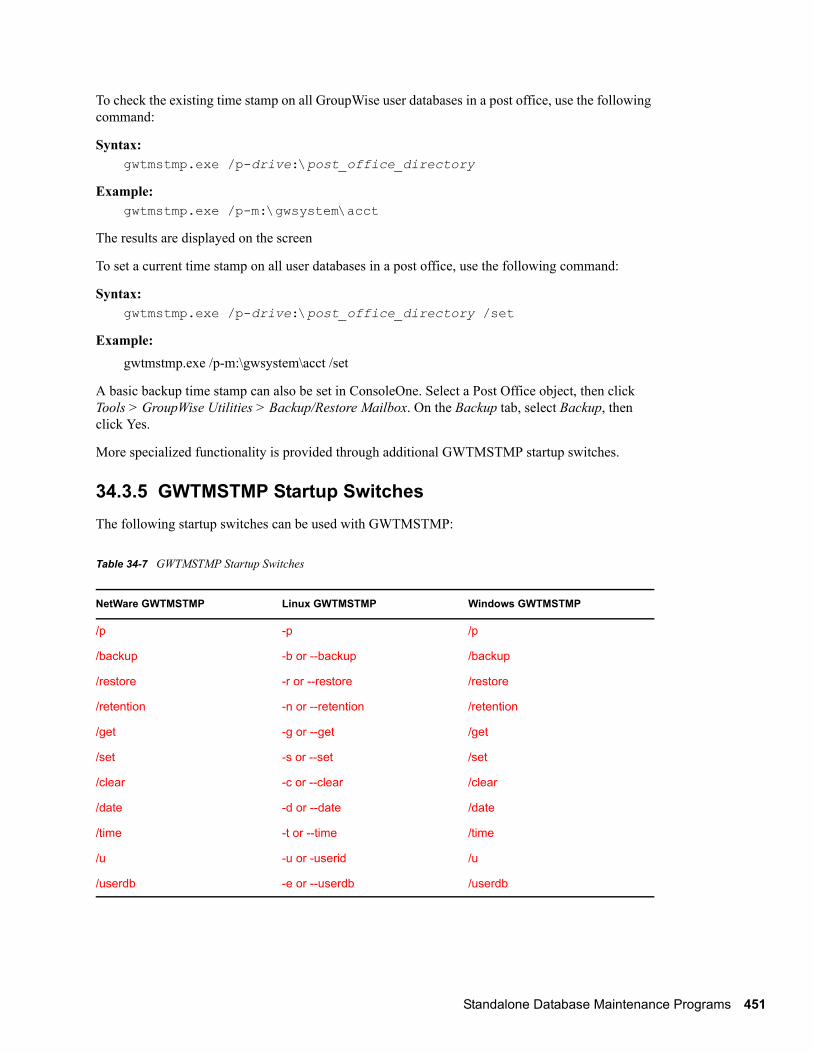
Table 31-1 Backup Procedures by Platform
Section 31.1, “Backing Up a Domain,” on page 407Section 31.2, “Backing Up a Post Office,” on page 407Section 31.3, “Backing Up a Library and Its Documents,” on page 408Section 31.4, “Backing Up Individual Databases,” on page 409
31.1 Backing Up a DomainAll critical domain-level information is stored in the domain database (wpdomain.db). Use your backup software of choice to back up each domain database to a secure location. If your backup software cannot handle open files, stop the MTA for the domain while the backup of the domain database takes place or copy the domain directory to a temporary location and back up the static copy.
See also Section 32.1, “Restoring a Domain,” on page 411.
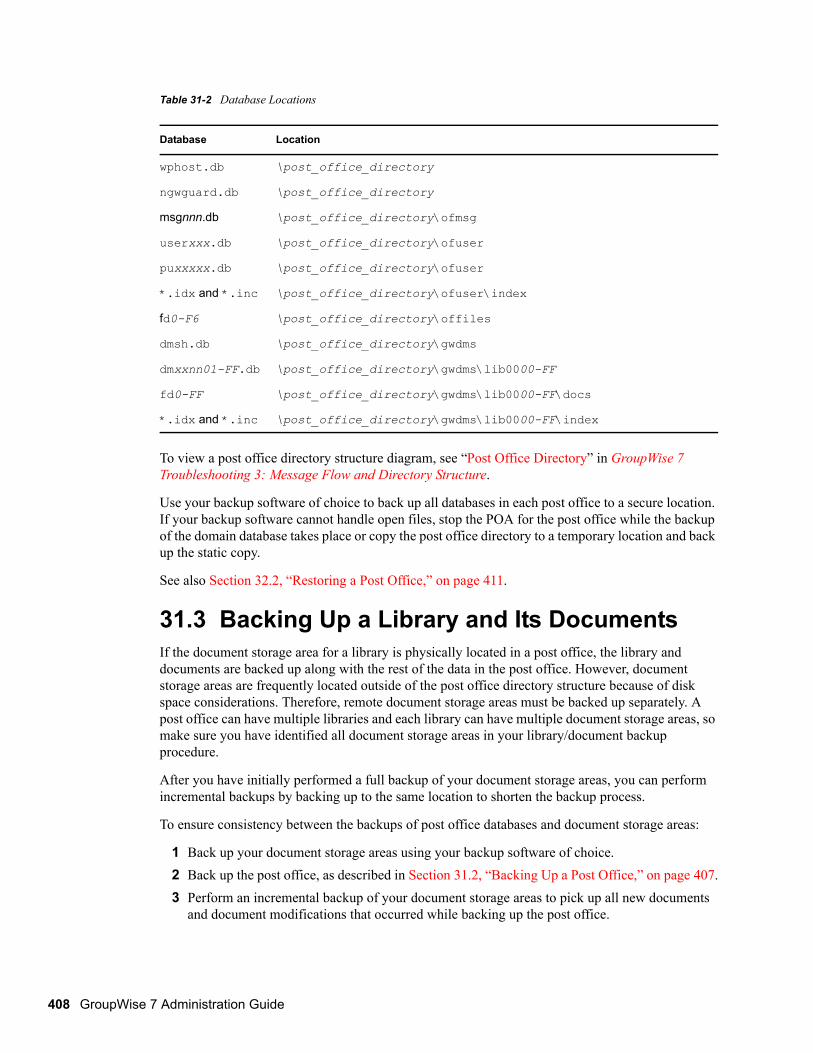
31.2 Backing Up a Post OfficeCritical post office-level information is stored in many different databases. The table below summarizes the databases and their locations:
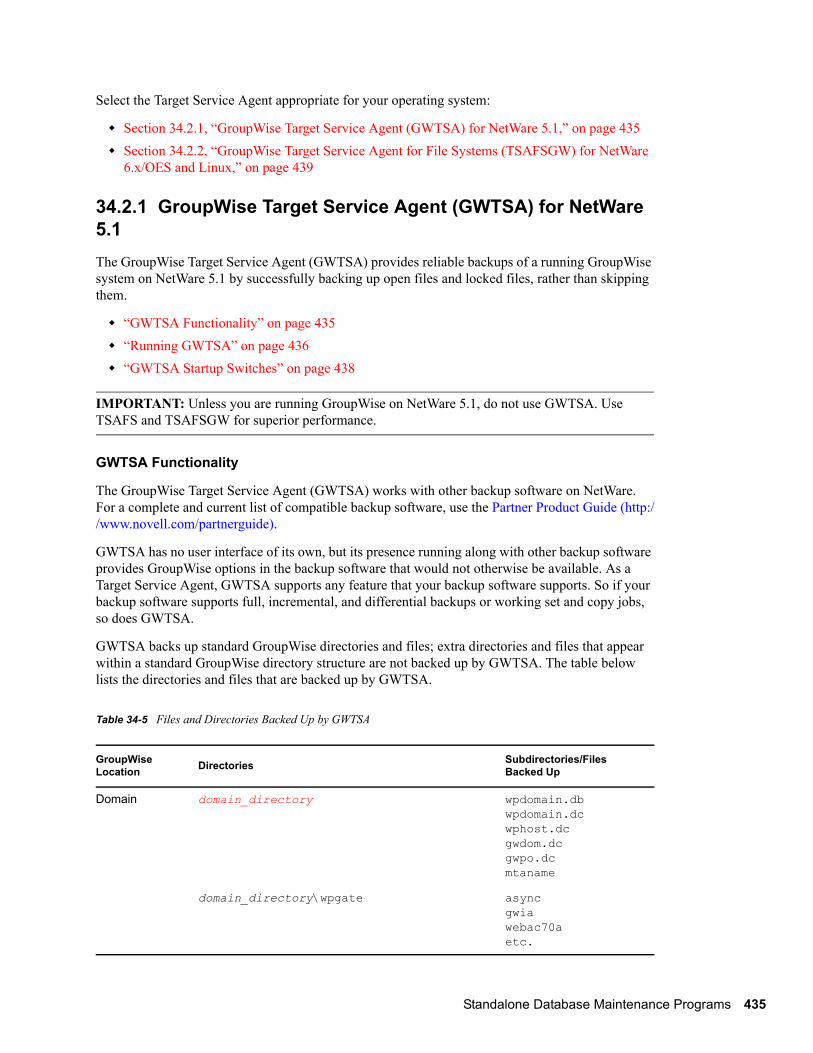
NetWare: Use a Target Service Agent (GWTSA on NetWare® 5.1 or TSAFSGW on NetWare 6.x/OES) with a supported backup program or other backup software of choice to back up GroupWise databases to a secure location. For details about how to use a Target Service Agent, see Section 34.2, “Target Service Agents,” on page 434.
Linux: Use a Target Service Agent (TSAFSGW) with a supported backup program or other backup software of choice to back up GroupWise databases to a secure location. For a list of compatible products, see the Novell Open Enterprise Server Partner Support site (http://www.novell.com/products/openenterpriseserver/partners). For details about how to use a Target Service Agent, see Section 34.2, “Target Service Agents,” on page 434.
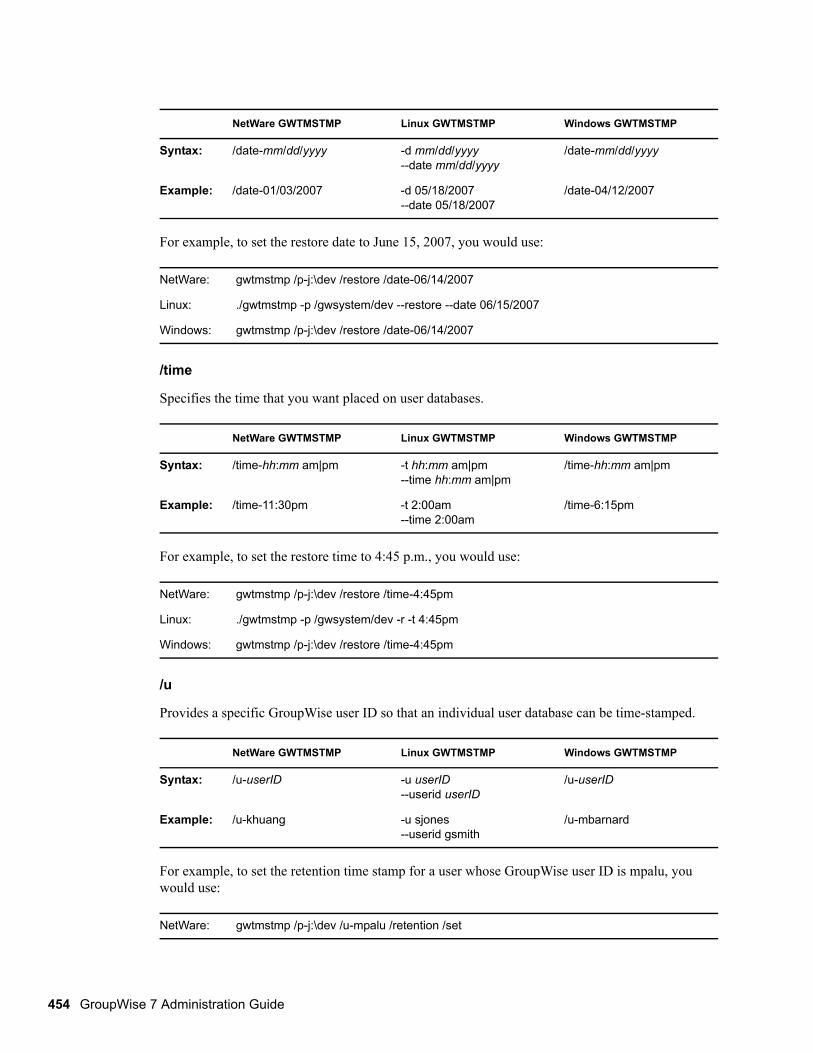
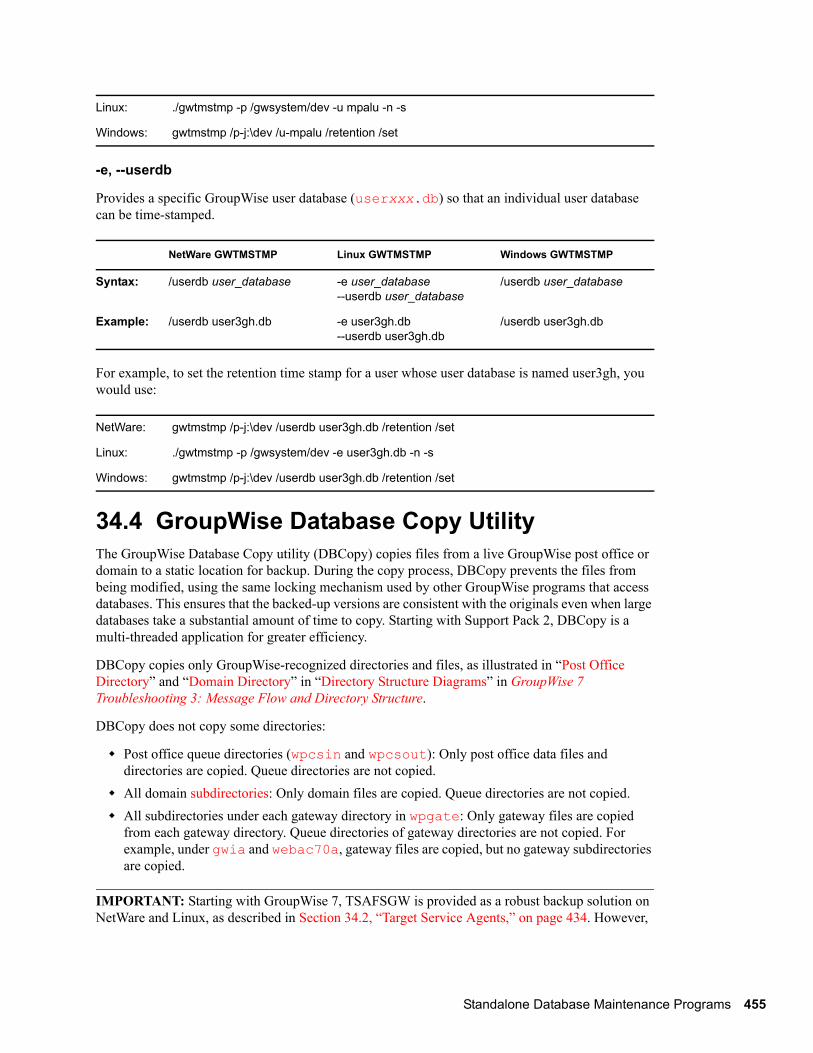
Windows: Use your backup software of choice to back up GroupWise databases to a secure location. For a list of compatible products, see the Partner Product Guide (http://www.novell.com/partnerguide). You can also use the GroupWise Database Copy utility (DBCopy) and the GroupWise Time Stamp utility (GWTMSTMP) to assist with backups. For details about how to use these utilities, see Section 34, “Standalone Database Maintenance Programs,” on page 423.
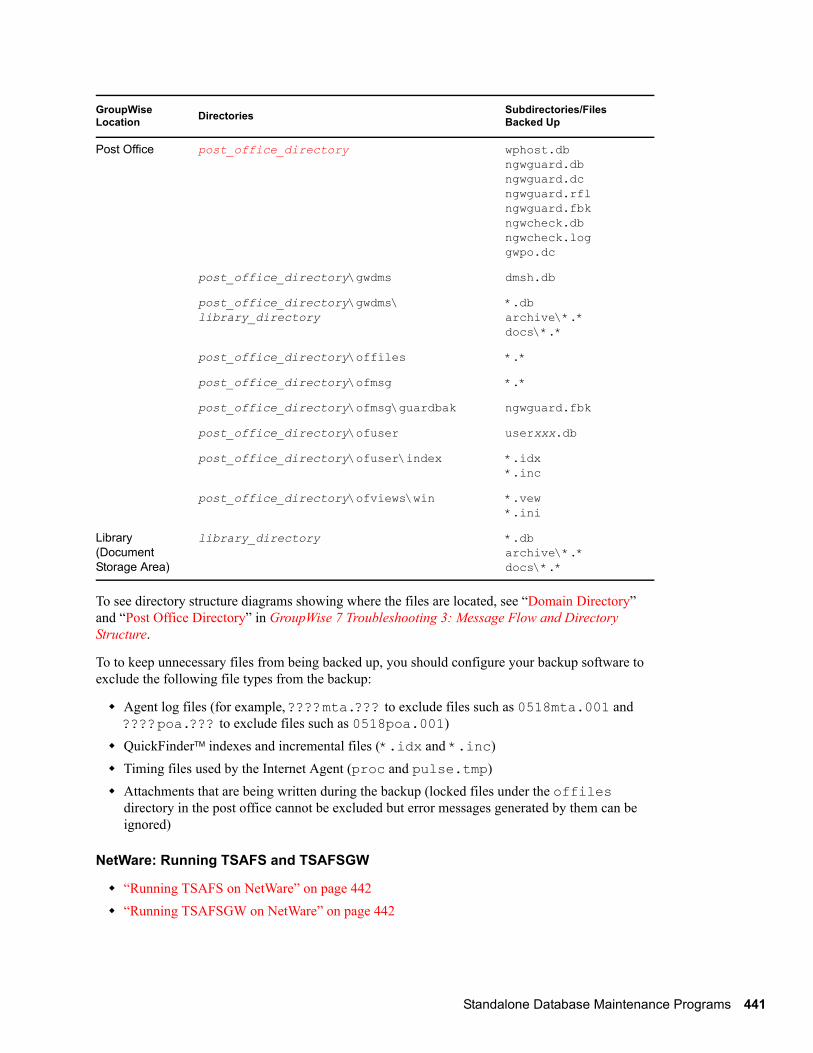
To view a post office directory structure diagram, see “Post Office Directory” in GroupWise 7 Troubleshooting 3: Message Flow and Directory Structure.
Use your backup software of choice to back up all databases in each post office to a secure location. If your backup software cannot handle open files, stop the POA for the post office while the backup of the domain database takes place or copy the post office directory to a temporary location and back up the static copy.
See also Section 32.2, “Restoring a Post Office,” on page 411.
31.3 Backing Up a Library and Its DocumentsIf the document storage area for a library is physically located in a post office, the library and documents are backed up along with the rest of the data in the post office. However, document storage areas are frequently located outside of the post office directory structure because of disk space considerations. Therefore, remote document storage areas must be backed up separately. A post office can have multiple libraries and each library can have multiple document storage areas, so make sure you have identified all document storage areas in your library/document backup procedure.
After you have initially performed a full backup of your document storage areas, you can perform incremental backups by backing up to the same location to shorten the backup process.
To ensure consistency between the backups of post office databases and document storage areas:
1 Back up your document storage areas using your backup software of choice.2 Back up the post office, as described in Section 31.2, “Backing Up a Post Office,” on page 407.3 Perform an incremental backup of your document storage areas to pick up all new documents
and document modifications that occurred while backing up the post office.
Database Location
wphost.db \post_office_directory
ngwguard.db \post_office_directory
msgnnn.db \post_office_directory\ofmsg
userxxx.db \post_office_directory\ofuser
puxxxxx.db \post_office_directory\ofuser
*.idx and *.inc \post_office_directory\ofuser\index
*.idx and *.inc \post_office_directory\gwdms\lib0000-FF\index
7 Administration Guide
novdocx (en) 11 Decem
ber 2007
You should need to restore data in a document storage area only if files have been damaged or become inaccessible due to a hard disk failure.
See also Section 32.3, “Restoring a Library,” on page 412.
31.4 Backing Up Individual DatabasesIf you need to back up individual databases separately from backing up a post office, you can use your backup software of choice.
See also Section 32.4, “Restoring an Individual Database,” on page 412.
Backing Up GroupWise Databases 409
410 GroupWise
novdocx (en) 11 Decem
ber 2007
7 Administration Guide
32novdocx (en) 11 D
ecember 2007
32Restoring GroupWise Databases from Backup
Database damage can usually be repaired using the database maintenance tools provided with GroupWise®. Only very occasionally should you need to restore databases from backup.
Section 32.1, “Restoring a Domain,” on page 411Section 32.2, “Restoring a Post Office,” on page 411Section 32.3, “Restoring a Library,” on page 412Section 32.4, “Restoring an Individual Database,” on page 412Section 32.5, “Restoring Deleted Mailbox Items,” on page 413Section 32.6, “Recovering Deleted GroupWise Accounts,” on page 416
32.1 Restoring a DomainTypically, damage to the domain database (wpdomain.db) can be repaired using the database maintenance tools provided in ConsoleOne®, as described in Chapter 26, “Maintaining Domain and Post Office Databases,” on page 377.
If damage to the domain database is so severe that rebuilding the database is not possible:
1 Stop the MTA for the domain.2 Use the backup software for your platform, as listed in Section 31.1, “Backing Up a Domain,”
on page 407, to restore the domain database into the domain directory.3 Restart the MTA for the domain.4 To update the restored domain database with administrative changes made since it was backed
up, synchronize the restored domain database with the primary domain database, as described in Section 29.4, “Synchronizing a Secondary Domain,” on page 397. If the restored domain database is for the primary domain, see Section 29.5, “Synchronizing the Primary Domain from a Secondary Domain,” on page 398.
32.2 Restoring a Post OfficeTypically, damage to databases in a post office can be repaired using the database maintenance tools provided in ConsoleOne or using GroupWise Check (GWCheck). See Chapter 26, “Maintaining Domain and Post Office Databases,” on page 377, Chapter 27, “Maintaining User/Resource and Message Databases,” on page 385, and Section 34.1, “GroupWise Check,” on page 423.
If damage to the post office was so severe that rebuilding databases is not possible:
1 Stop the POA for the post office.2 Use the backup software for your platform, as listed in Section 31.2, “Backing Up a Post
Office,” on page 407, to restore the various databases into their proper locations in the post office directory.
Restoring GroupWise Databases from Backup 411
412 GroupWise
novdocx (en) 11 Decem
ber 2007
3 If you do not use GWTSA or TSAFSGW to restore the post office, time-stamp the restored user databases so that old items are not automatically purged during nightly maintenance.3a In ConsoleOne, browse to and select the Post Office object, then click Tools > GroupWise
Utilities > Backup/Restore Mailbox.3b On the Backup tab, select Restore, then click Yes.
4 Restart the POA for the post office.5 To update the restored post office database (wphost.db) with the most current information
stored in the domain database, rebuild the post office database, as described in Section 26.3, “Rebuilding Domain or Post Office Databases,” on page 381.
6 To update other restored databases such as user databases (userxxx.db) and message databases (msgnnn.db) with the most current information stored in other post offices, run Analyze/Fix Databases with Contents selected, as described in Section 27.1, “Analyzing and Fixing User and Message Databases,” on page 385.
32.3 Restoring a LibraryTypically, damage to library databases (dmsh.db and others) can be repaired using the database maintenance tools provided in ConsoleOne or using GroupWise Check (GWCheck). See Chapter 28, “Maintaining Library Databases and Documents,” on page 391 and Section 34.1, “GroupWise Check,” on page 423.
If damage to the library is so severe that rebuilding databases is not possible:
1 Stop the POA that services the library.2 Use the backup software for your platform, as listed in Section 31.3, “Backing Up a Library
and Its Documents,” on page 408, to restore the library.3 Restart the POA.4 To update the restored library databases with the most current information stored in other post
offices:4a In ConsoleOne, run Analyze/Fix Databases with Contents selected.4b Run Analyze/Fix Library.
For more information, see Section 28.2, “Analyzing and Fixing Library and Document Information,” on page 392.
32.4 Restoring an Individual DatabaseTypically, damage to user and resource databases (userxxx.db) and message databases (msgnnn.db) can be repaired using the database maintenance tools provided in ConsoleOne or using GroupWise Check (GWCheck). See Chapter 27, “Maintaining User/Resource and Message Databases,” on page 385 and Section 34.1, “GroupWise Check,” on page 423.
If damage to an individual database is so severe that repair is not possible:
1 Make sure the user to whom the affected database belongs is not running the GroupWise client.2 Use your backup software of choice to restore the database into the proper location in the post
office directory.
7 Administration Guide
novdocx (en) 11 Decem
ber 2007
User databases are stored in the ofuser subdirectory in the post office. Message databases are stored in the ofmsg subdirectory.
3 To update the restored database with the most current information available, run Analyze/Fix Databases with Contents selected, as described in Section 27.1, “Analyzing and Fixing User and Message Databases,” on page 385.
32.5 Restoring Deleted Mailbox ItemsWith proper planning, you can assist users in retrieving accidentally deleted items and items that became unavailable because of database damage.
Section 32.5.1, “Setting Up a Restore Area,” on page 413Section 32.5.2, “Restoring a User’s Mailbox Items,” on page 415Section 32.5.3, “Letting Client Users Restore Their Own Mailbox Items,” on page 416
32.5.1 Setting Up a Restore AreaA restore area is only as useful as the post office data that is backed up regularly. Make sure you are backing up every GroupWise post office regularly, as described in Section 31.2, “Backing Up a Post Office,” on page 407.
A restore area is a location you designate to hold a backup copy of a post office so that you or GroupWise Windows client users can access it to retrieve mailbox items that are unavailable in your live GroupWise system.
To set up a restore area:
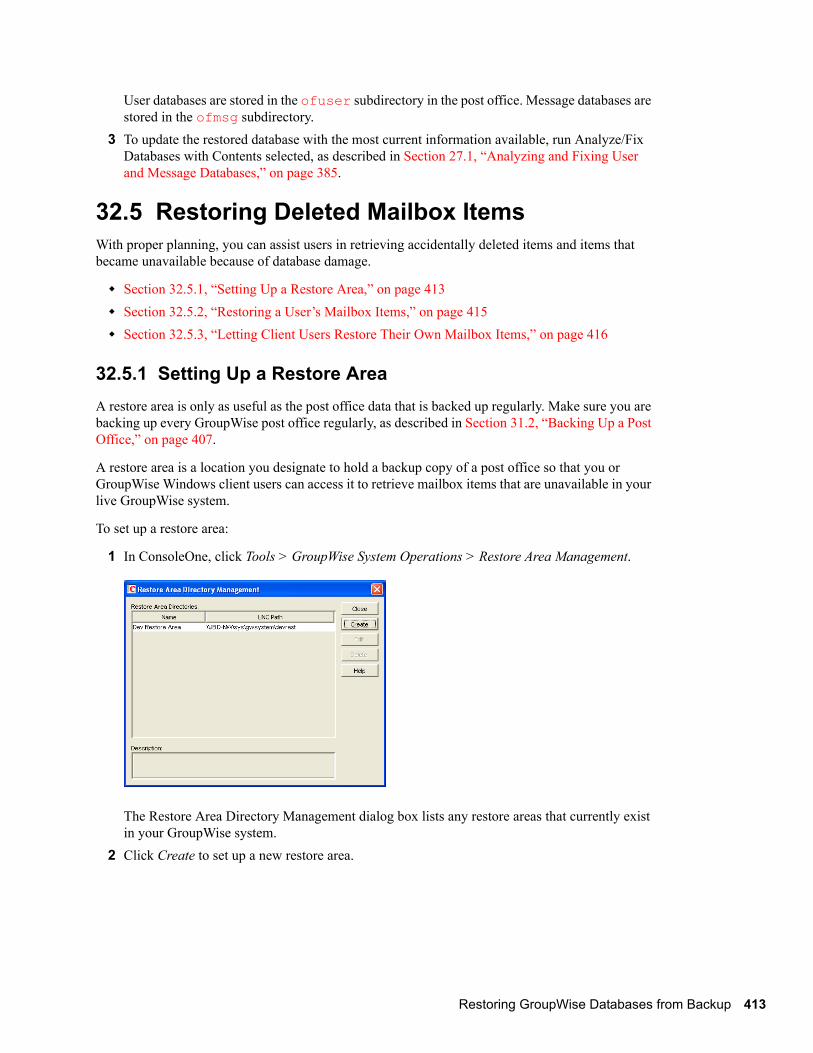
1 In ConsoleOne, click Tools > GroupWise System Operations > Restore Area Management.
The Restore Area Directory Management dialog box lists any restore areas that currently exist in your GroupWise system.
2 Click Create to set up a new restore area.
Restoring GroupWise Databases from Backup 413
414 GroupWise
novdocx (en) 11 Decem
ber 2007
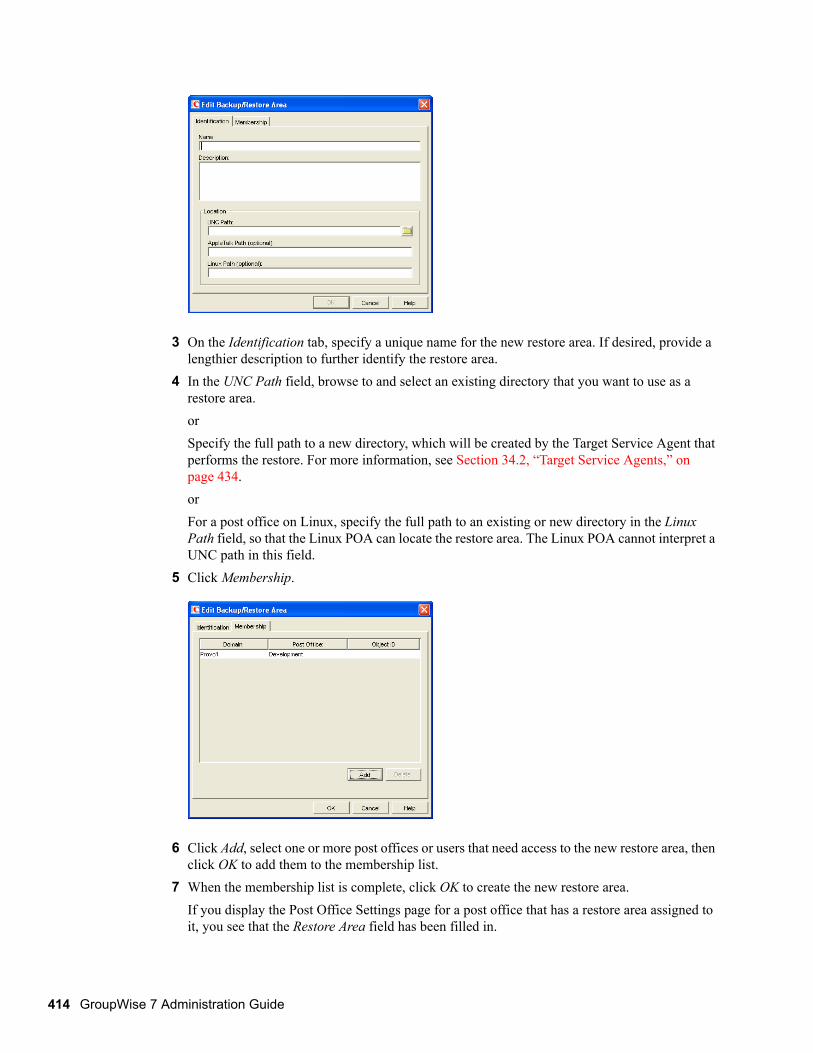
3 On the Identification tab, specify a unique name for the new restore area. If desired, provide a lengthier description to further identify the restore area.
4 In the UNC Path field, browse to and select an existing directory that you want to use as a restore area.orSpecify the full path to a new directory, which will be created by the Target Service Agent that performs the restore. For more information, see Section 34.2, “Target Service Agents,” on page 434.orFor a post office on Linux, specify the full path to an existing or new directory in the Linux Path field, so that the Linux POA can locate the restore area. The Linux POA cannot interpret a UNC path in this field.
5 Click Membership.
6 Click Add, select one or more post offices or users that need access to the new restore area, then click OK to add them to the membership list.
7 When the membership list is complete, click OK to create the new restore area. If you display the Post Office Settings page for a post office that has a restore area assigned to it, you see that the Restore Area field has been filled in.
7 Administration Guide
novdocx (en) 11 Decem
ber 2007
8 Use the backup software for your platform, as listed in Section 31.2, “Backing Up a Post Office,” on page 407, to restore a backup copy of the post office into the restore area.
9 Grant the POA Read, Write, and File Scan rights to the restore area.10 If the restore area is located on a different server from where the post office directory is located,
provide the POA with a username and password for logging in to the remote server.You can provide that information using the Remote User Name and Password fields on the Post Office object’s Post Office Settings page, using the /user and /password startup switches, or using the /dn startup switch.If you want users to be able to retrieve individual items themselves, you can grant users Read, Write, and File Scan rights to the restore area. However, if the GroupWise client is unable to connect directly to the restore area, it requests the information from the POA, so user access rights are not required.
11 Continue with Section 32.5.2, “Restoring a User’s Mailbox Items,” on page 415 or Section 32.5.3, “Letting Client Users Restore Their Own Mailbox Items,” on page 416 as needed.
32.5.2 Restoring a User’s Mailbox ItemsAfter you have set up a restore area and placed a backup copy of a post office into it, you can restore a user’s mailbox items for the user.
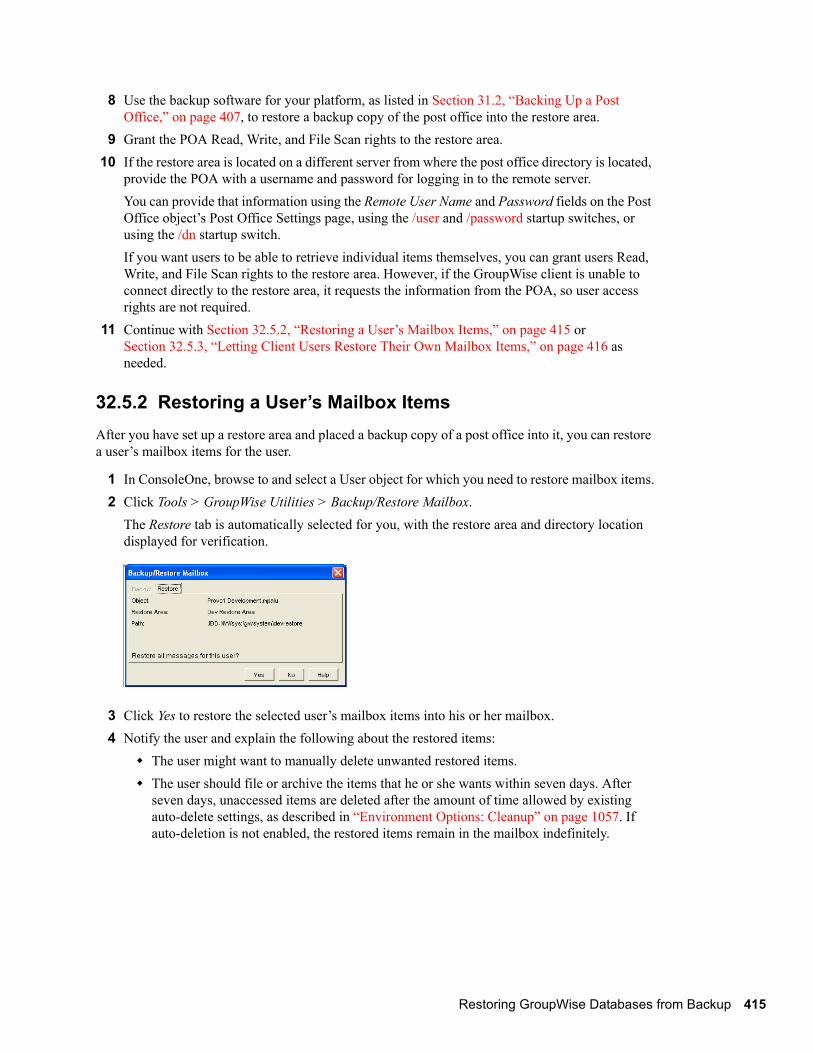
1 In ConsoleOne, browse to and select a User object for which you need to restore mailbox items.2 Click Tools > GroupWise Utilities > Backup/Restore Mailbox.
The Restore tab is automatically selected for you, with the restore area and directory location displayed for verification.
3 Click Yes to restore the selected user’s mailbox items into his or her mailbox.4 Notify the user and explain the following about the restored items:
The user might want to manually delete unwanted restored items.The user should file or archive the items that he or she wants within seven days. After seven days, unaccessed items are deleted after the amount of time allowed by existing auto-delete settings, as described in “Environment Options: Cleanup” on page 1057. If auto-deletion is not enabled, the restored items remain in the mailbox indefinitely.
Restoring GroupWise Databases from Backup 415
416 GroupWise
novdocx (en) 11 Decem
ber 2007
32.5.3 Letting Client Users Restore Their Own Mailbox ItemsAfter you have set up a restore area and given client users access to it, users can selectively restore individual items into their mailboxes. This saves you the work of restoring mailbox items for users and it also saves users the work of deleting unwanted restored items.
After a restore area has been set up:
1 In the GroupWise client, click File > Open Backup.2 Browse to and select the restore area directory, then click OK.3 In the Password field, type your GroupWise password, then click OK to access the backup
copy of your mailbox.4 Retrieve individual items as needed.
The backup copy of your mailbox offers basic features such as Read, Search, and Undelete so that you can locate and retrieve the items you need.
5 When you are finished restoring items to your live mailbox, click File > Open Backup again to remove the check mark from the Open Backup option and return to your live mailbox.
32.6 Recovering Deleted GroupWise AccountsIf you have a reliable backup procedure in place, as described in Chapter 31, “Backing Up GroupWise Databases,” on page 407, you can restore recently deleted GroupWise user and resource accounts.
1 Make available a backup copy of a domain database (wpdomain.db) where the deleted GroupWise account still exists.
3 Browse to and select the backup copy of the domain database.4 Select the user or resource that you need to recover the account for.5 Click Next.
7 Administration Guide
novdocx (en) 11 Decem
ber 2007
6 If desired, click Save to Clipboard, paste it into a file, then save or print it.7 Click Next.
8 Click Finish.At this point, you have restored the user’s or resource’s GroupWise account into the GroupWise system. However, this does not restore ownership of resources, nor does the account’s mailbox contain any item at this point.
9 If the restored user owned resources, manually restore the ownership, as described in Section 16.1, “Changing a Resource’s Owner,” on page 253
10 To restore the contents of the account’s mailbox, follow the instructions in Section 32.5, “Restoring Deleted Mailbox Items,” on page 413.
Restoring GroupWise Databases from Backup 417
418 GroupWise
novdocx (en) 11 Decem
ber 2007
7 Administration Guide
33novdocx (en) 11 D
ecember 2007
33Retaining User Messages
GroupWise® enables you to retain user messages until they have been copied from message databases to another storage location. This means that a user cannot perform any action, such as emptying the mailbox Trash, that results in a message being removed from the message database before it has been copied.
Message retention primarily consists of three activities: 1) not allowing users to remove messages until they have been retained, 2) retaining the messages by copying them from message databases to another location, and 3) time-stamping the retained messages so that they can be subsequently deleted.
GroupWise supplies the ability to not allow users to remove messages until they’ve been retained. It also provides methods for message retention applications to securely access user mailboxes and copy messages. However, it does not provide the message retention application. You must develop or purchase a third-party (non-GroupWise) application that performs this service.
Section 33.1, “How Message Retention Works,” on page 419Section 33.2, “Acquiring a Message Retention Application,” on page 421Section 33.3, “Enabling Message Retention,” on page 421
33.1 How Message Retention WorksTo understand how message retention works, you need to understand what GroupWise does and what the message retention application does, as explained in the following sections:
Section 33.1.1, “What GroupWise Does,” on page 419Section 33.1.2, “What the Message Retention Application Does,” on page 420
33.1.1 What GroupWise DoesDuring installation of the message retention application, the application uses the GroupWise Trusted Application API to create a trusted application record in the GroupWise system. The trusted application record includes a flag that designates it as a message retention application. This flag is surfaced through the trusted application’s Provides Message Retention Service setting in ConsoleOne (Tools > GroupWise System Operations > Trusted Applications > Edit).
Figure 33-1 Edit Trusted Application Dialog Box with the Provides Message Retention Service Setting Turned On
Retaining User Messages 419
420 GroupWise
novdocx (en) 11 Decem
ber 2007
When ConsoleOne reads a trusted application record that has the Provides Message Retention Service setting turned on, it adds a Retention tab to the GroupWise Client Environment Options (Tools > GroupWise Utilities > Client Options > Environment).
Figure 33-2 Environment Options Dialog Box with the Retention Tab Open
You use this Retention tab to enable message retention at the domain, post office, or user level, meaning that you can enable it for all users in a domain, all users in a post office, or individual users.
Turning on message retention alters the GroupWise client purge behavior by preventing a user from purging any messages from his or her mailbox that have not yet been retained.
33.1.2 What the Message Retention Application DoesDifferent message retention applications might vary slightly in their approach to retaining messages. This section provides a general approach to message retention.
To determine whether or not mailbox messages have been retained, the message retention application adds a time stamp to the mailbox. The message retention application can use the GroupWise Object API or GroupWise IMAP support to write (and read) the time stamp. In addition, you can use the GroupWise Time Stamp Utility (page 448) to manually set the time stamp.
The time stamp represents the most recent date and time that message retention was completed for the mailbox. Messages delivered after the time stamp cannot be purged until they have been retained. This requires that the message retention application retain items chronologically, oldest to newest. For example, assume a mailbox has a message retention time stamp of May 7, 2007 12:00:00. The mailbox has three folders with a total of seven messages:
7 Administration Guide
novdocx (en) 11 Decem
ber 2007
Figure 33-3 Three Folders with Seven Messages
The message retention application reads the existing time stamp (May 7, 2007 12:00:00) and selects a time between that time and the current time. For example, suppose the current time is May 9, 2007 14:00:00. The message retention application could choose May 8, 2007 12:00:00 as the new time stamp. It would then retain any messages delivered between the existing time stamp (May 7, 2007 12:00:00) and the new time stamp (May 8, 2007, 12:00:00).
In the above example, messages 1, 4, and 6 are older than the existing time stamp (May 7, 2007 12:00:00). The message retention application would not retain these messages again, assuming that they had already been safely retained. Messages 2 and 5 have dates that fall between the existing time stamp (May 7, 2007 12:00:00) and the new time stamp (May 8, 2007, 12:00:00) so they would be retained. Messages 3 and 7 have dates that fall after the new time stamp (May 8, 2007, 12:00:00) so they would not be retained until the next time the message retention application ran against the mailbox.
33.2 Acquiring a Message Retention ApplicationIf you do not already have a message retention application to use with GroupWise, you have two options: 1) you can purchase an application from a GroupWise partner or 2) you can develop your own application.
For information about GroupWise partners that provide message (e-mail) retention applications, see the Partner Product Guide (http://www.novell.com/partnerguide).
For information about developing a message retention application, see the GroupWise Object API and GroupWise Trusted Application API documentation at the Novell Developer Kit Web site (http://developer.novell.com/wiki/index.php/Category:Novell_Developer_Kit).
33.3 Enabling Message RetentionThis section assumes that you’ve installed a message retention application as a GroupWise trusted application and that it is configured to provide a message retention service. If not, see Section 4.12, “Trusted Applications,” on page 69.
Message retention is not enabled until you designate the users whose messages you want retained by the application. You can designate users at the domain level, post office level, or individual user level.
1 In ConsoleOne, right-click the domain, post office, or user for which you want to enable message retention, click GroupWise Utilities > Client Options to display the GroupWise Client Options dialog box.
2 Click Environment to display the Environment Options dialog box, then click the Retention tab.
3 Turn on the Enable Message Retention Service setting.4 If you want to lock the setting at this level, click the Lock button.
For example, if you lock the setting at the domain level, the setting cannot be changed for any post offices or users within the domain. If you lock the setting at the post office level, it cannot be changed individually for the post office’s users.This setting does not display in the GroupWise client. Therefore, there is no lock available when editing this setting for individual users.
5 Click OK to save the changes.
7 Administration Guide
34novdocx (en) 11 D
ecember 2007
34Standalone Database Maintenance Programs
Some aspects of GroupWise® database maintenance are performed by standalone maintenance programs that can be incorporated into batch files along with other system maintenance programs.
Section 34.1, “GroupWise Check,” on page 423Section 34.2, “Target Service Agents,” on page 434Section 34.3, “GroupWise Time Stamp Utility,” on page 448Section 34.4, “GroupWise Database Copy Utility,” on page 455
34.1 GroupWise CheckGroupWise Check (GWCheck) is a tool provided for GroupWise to check and repair GroupWise user, message, library, and resource databases without using ConsoleOne®. In addition to checking post office, user, and library databases, it also checks users’ remote, caching, and archive databases.
The GWCheck utility runs on Windows, Linux, and Macintosh. You should match the platform of GWCheck to the platform where the databases are located. Windows GWCheck processes databases on NetWare® and Windows. Linux GWCheck processes databases on Linux. Macintosh GWCheck processes databases on Macintosh. GWCheck should not be used to process databases that are located across a connection between different platforms (for example, between NetWare or Windows and Linux).
Section 34.1.1, “GWCheck Functionality,” on page 423Section 34.1.2, “Using GWCheck on Windows,” on page 425Section 34.1.3, “Using GWCheck on Linux,” on page 426Section 34.1.4, “Using GWCheck on Macintosh,” on page 428Section 34.1.5, “Performing Mailbox/Library Maintenance Using GWCheck,” on page 429Section 34.1.6, “Executing GWCheck from a Windows Batch File,” on page 431Section 34.1.7, “Executing GWCheck from a Linux Script,” on page 432Section 34.1.8, “GWCheck Startup Switches,” on page 432
34.1.1 GWCheck FunctionalityThe GWCheck utility begins by comparing three databases.
Standalone Database Maintenance Programs 423
424 GroupWise
novdocx (en) 11 Decem
ber 2007
Table 34-1 Three Databases That GWCheck Compares
After GWCheck makes the database comparisons, it begins processing according to the databases selected and any inconsistencies found.
Case 1 - Missing Entry in the Post Office Database (wphost.db)
In this example, a contents check is run either against all users on the post office or against one user, “ABC.” GWCheck does not find the FID of one or more users.
Table 34-2 Missing Entry in Wphost.db
GWCheck removes the entry from ngwguard.db, deletes userabc.db and systematically deletes all of the user’s messages from the message databases that are not still being referenced by other users. If the user has been deleted, GWCheck cleans up after that user.
WARNING: If a post office database becomes damaged so some users are unable to log in, GWCheck should not be run until the post office has been rebuilt. For more information, see Section 26.3, “Rebuilding Domain or Post Office Databases,” on page 381.
Case 2 - Missing Entry in the Guardian Database (ngwguard.db)
In this example, a GWCheck is run either against all users on the post office or against one user, “ABC.” A user’s FID is found and the user’s database is found in the post office, but the user is missing in ngwguard.db.
Table 34-3 Missing Entry in Ngwguard.db
WPHOST.DB NGWGUARD.DB FILE SYSTEM
The post office database (wphost.db) is checked for the file ID (FID) of the selected user.
The guardian database (ngwguard.db) is checked to find out if this user database has been created.
The file system for this post office is checked to see if the user database (userxxx.db) for this user exists.
WPHOST.DB NGWGUARD.DB FILE SYSTEM
? userabc.db userabc.db
No entry for this user is found in the post office database (wphost.db).
An entry is found in the guardian database (ngwguard.db), indicating that the user has been deleted.
Also, a user database (userxxx.db) for this user is found in the ofuser directory.
WPHOST.DB NGWGUARD.DB FILE SYSTEM
FID abc ? userabc.db
The user appears in the post office database (wphost.db).
The guardian database (ngwguard.db) shows no user database for this user.
A user database (userxxx.db) for the user does exist in the ofuser directory.
7 Administration Guide
novdocx (en) 11 Decem
ber 2007
GWCheck creates the user in ngwguard.db, using database userabc.db. Even if ngwguard.db is damaged, it is unlikely that data is lost.
Case 3 - Missing User Database (userxxx.db)
In this example, a GWCheck is run either against all users on the post office or against one user, “ABC.” The user’s FID is found, as well as the user’s record in ngwguard.db. However, the user’s database is not found.
Table 34-4 Missing Entry in Userxxx.db
GWCheck takes action depending on what options are selected.
Contents Check: GWCheck deletes all of this user’s messages from the message databases if they are not referenced by other users.
Structural Rebuild: GWCheck creates a blank user database for this user. Existing messages for this user are ignored.
Re-create User Database: GWCheck creates a blank user database for this user and populates it with messages in the message databases that have been sent to or from this user.
WARNING: If a user database has been deleted, do not run a Contents Check until after a Structural Rebuild or Re-create User Database has been run for that user. For more information, see Section 27.2, “Performing a Structural Rebuild of a User Database,” on page 387 and Section 27.3, “Re-creating a User Database,” on page 388.
34.1.2 Using GWCheck on WindowsYou can use GWCheck on any Windows NT/2000/XP workstation.
As an administrator, you can run GWCheck for databases in any post office accessible from the workstation where GWCheck is installed. The GWCheck program performs all database maintenance itself, rather than handing off a task to the POA as ConsoleOne® would do to perform database maintenance.
Depending on how GWCheck is installed, users can have a Repair Mailbox item on the GroupWise Windows client Tools menu that enables them to run GWCheck from the client. If the GWCheck program is available to users, users can perform database maintenance on their Remote, Caching, and archive mailboxes, which are not accessible from ConsoleOne.
For the Repair Mailbox item to display on the GroupWise Windows client Tools menu, the following files must be installed in the GroupWise directory; by default, this is c:\novell\groupwise.
gwcheck.exe
WPHOST.DB NGWGUARD.DB FILE SYSTEM
FID abc userabc.db ?
The user is found in the post office database (wphost.db).
The user is found in the guardian database (ngwguard.db).
No user database (userxxx.db) is found in the ofuser directory.
Standalone Database Maintenance Programs 425
426 GroupWise
novdocx (en) 11 Decem
ber 2007
gwchkxx.dll (Replace xx with your language code)gwchkxx.chm (Replace xx with your language code)
The GroupWise administrator can install these files by using SetupIP to install the GroupWise Windows client, and selecting to install and enable GWCheck. The default for SetupIP is to install GWCheck, but not enable GWCheck. The files are then copied to the \novell\groupwise\gwcheck directory. For additional information about SetupIP and GWCheck, see “[GWCHECK]” on page 1087.
If the client was installed from the installation program on the CD or the defaults are chosen for SetupIP, the client user needs to copy the files from the GWCheck directory (\novell\groupwise\gwcheck) to the main GroupWise directory (\novell\groupwise\).
To run GWCheck:
1 From the Start menu, click Run, then browse to and double-click gwcheck.exe.
2 To view online help in GWCheck, click Help.3 Continue with Section 34.1.5, “Performing Mailbox/Library Maintenance Using GWCheck,”
on page 429.
34.1.3 Using GWCheck on LinuxTwo versions of GWCheck are available on Linux, one for a graphical user interface (GUI) environment and one for a text-only environment.
“Using GUI GWCheck (gwcheck)” on page 426“Using Text-Based GWCheck (gwcheckt)” on page 427
Using GUI GWCheck (gwcheck)
You can use GUI GWCheck on any Linux workstation where you can run the Cross-Platform client. By default, GWCheck is installed with the client when using the GroupWise installation program. If
7 Administration Guide
novdocx (en) 11 Decem
ber 2007
you installed the GroupWise Cross-Platform client manually from the RPM, you must install GWCheck manually.
1 Change to the directory where the GWCheck RPM is located or copy it to a convenient location on your workstation.
The GWCheck RPM (groupwise-gwcheck-version-mmdd.i386.rpm) is located in the /client and /admin directories in your GroupWise software distribution directory if it is has been updated or on the GroupWise 7 Administrator for Linux CD if an updated software distribution directory is not available.
3 Change to the /opt/novell/groupwise/gwcheck/bin directory. 4 Enter ./gwcheck to start GWCheck.
5 To view online help in GWCheck, click Help.6 Continue with Performing Mailbox/Library Maintenance Using GWCheck.
Using Text-Based GWCheck (gwcheckt)
You can use text-based GWCheck in any environment where the X Window System is not available, such as on a text-only server where a post office and its POA are located. However, you must use GUI GWCheck to create an options file before you can run text-based GWCheck.
1 Install and run GUI GWCheck in a convenient location, as described in “Using GUI GWCheck (gwcheck)” on page 426.
2 Select the maintenance activities that you want GWCheck to perform, as described in Section 34.1.5, “Performing Mailbox/Library Maintenance Using GWCheck,” on page 429.
3 Save the settings you selected in an options file, as described in “Saving Mailbox/Library Maintenance Options” on page 431.
Standalone Database Maintenance Programs 427
428 GroupWise
novdocx (en) 11 Decem
ber 2007
The default options filename is gwcheck.opt. By default, it is saved in your home directory, but you can select a different filename and directory as needed when you save the file.
4 Copy the GWCheck RPM to a convenient location on the text-only server.5 Install GWCheck on the text-only server.rpm -i groupwise-gwcheck-version-mmdd.i386.rpm
6 Copy the GWCheck options file you created in Step 3 to a convenient location on the text-only server.
7 Change to the /opt/novell/groupwise/gwcheck/bin directory. 8 Enter ./gwcheckt options_file to run text-based GWCheck.
If you did not copy the options file to your home directory on the text-only server, specify the full path to the options file.
Over time, a collection of options files might accumulate. To see what maintenance activities a specific options file performs, use ./gwcheckt options_file --dump.
34.1.4 Using GWCheck on MacintoshYou can use GWCheck on any Macintosh workstation where you can run the Cross-Platform client. By default, GWCheck is installed along with the client.
1 In a terminal window, change to the ~/Desktop/GroupWise.app/Contents/Resources/gwcheck directory.
2 Enter ./gwcheck to start GWCheck.
3 To view online help in GWCheck, click Help.4 Continue with Performing Mailbox/Library Maintenance Using GWCheck.
7 Administration Guide
novdocx (en) 11 Decem
ber 2007
34.1.5 Performing Mailbox/Library Maintenance Using GWCheckWith only a few differences in interface functionality, as described in the online help, you can perform the same maintenance activities in GWCheck as you can in Mailbox/Library Maintenance in ConsoleOne:
“Using Mailbox/Library Maintenance Tab Options” on page 429“Reusing Library/Mailbox Maintenance Settings” on page 431
Using Mailbox/Library Maintenance Tab Options
Both GWCheck and Mailbox/Library Maintenance in ConsoleOne use tab options to control the checking process.
“Databases” on page 429“Logging” on page 429“Results” on page 430“Misc” on page 430“Exclude” on page 430
Databases
To select the types of database to perform the Mailbox/Library Maintenance check on, click Databases.
Figure 34-1 Databases Tab in the Mailbox/Library Maintenance Dialog Box
Depending on the object type and action already selected in the main window, some database types might be unavailable. If all the database types are unavailable, then one or more database types have been preselected for you.
You can perform an action on the following databases when the type is not unavailable:
User: Checks the user databases.Message Databases: Checks the message databases.Document: Checks the library and document properties databases.
Logging
To specify the name of the file where you want the results of the MailBox/Library Maintenance check to be stored, click Logging.
Standalone Database Maintenance Programs 429
430 GroupWise
novdocx (en) 11 Decem
ber 2007
Figure 34-2 Logging Tab in the Mailbox/Library Maintenance Dialog Box
Specify a filename. By default, the file is created in the post_office_directory\wpcsout\ofs directory.
Click Verbose Logging to log detailed information. Verbose logging might produce large log files and slow execution.
This file is sent to the users selected on the Results tab.
Results
To select users to receive the results of the Mailbox/Library Maintenance check, click Results.
Figure 34-3 Results Tab in the Mailbox/Library Maintenance Dialog Box
Select Administrator to send the results to the user defined as the GroupWise domain administrator. Select Individual Users to send each user the results that pertain to him or her. Click Message to include a message with the results file.
Misc
If you need to run a Mailbox/Library Maintenance check with special options provided by Novell® Support, click Misc.
Figure 34-4 Misc. Tab in the Mailbox/Library Maintenance Dialog Box
Use the Support Options field to specify command line parameters. Support options are typically obtained from Novell Support representatives when you need assistance resolving specific database problems. Search the Novell Support Knowledgebase (http://www.novell.com/support/supportcentral) for TIDs and Support Pack Readmes that list support options. Make sure that you clearly understand what the Support options do before you use them.
Exclude
If you want to exclude certain users in the selected post office from having the Mailbox/Library Maintenance check performed on their databases, click Exclude.
Figure 34-5 Exclude Tab in the Mailbox/Library Maintenance Dialog Box
Click Add, select one or more users to exclude, then click OK.
Reusing Library/Mailbox Maintenance Settings
For convenience, you can store the options you select in Mailbox/Library Maintenance and GWCheck so that you can retrieve them for later use.
“Saving Mailbox/Library Maintenance Options” on page 431“Retrieving Mailbox/Library Maintenance Options” on page 431
Saving Mailbox/Library Maintenance Options
1 After you have selected all of the options in the Mailbox/Library Maintenance dialog box, click Save.
2 Browse to the directory where you want to save the options file.3 Specify a filename if you do not want to use the default of gwcheck.opt.4 Click Save.
Retrieving Mailbox/Library Maintenance Options
1 In the Mailbox/Library Maintenance dialog box, click Retrieve.2 Browse to and select your saved options file.3 Click Open.
34.1.6 Executing GWCheck from a Windows Batch FileThe GWCheck program is located in the \admin\utilities\gwcheck directory in your GroupWise software distribution directory if it has been updated or on the GroupWise 7 Administrator for NetWare/Windows CD if an updated software distribution directory is not available. It might also be installed along with the GroupWise client software in the gwcheck subdirectory of the client installation directory.
1 Use the following syntax in a batch file for running GWCheck:gwcheck /opt-options_file /batch
If you want to include the path to an archive database, use the /pa switch.2 To create an options file, see “Saving Mailbox/Library Maintenance Options” on page 431.
Standalone Database Maintenance Programs 431
432 GroupWise
novdocx (en) 11 Decem
ber 2007
34.1.7 Executing GWCheck from a Linux ScriptThe GWCheck program is located in the /admin directory in your GroupWise software distribution directory if it has been updated or on the GroupWise 7 Administrator for Linux CD if an updated software distribution directory is not available.
1 Make sure that GWCheck has been installed, as described in Section 34.1.3, “Using GWCheck on Linux,” on page 426
2 Create a script to execute GWCheck using the following syntax:/opt/novell/groupwise/gwcheck/bin/gwcheck --opt options_file --batch
If you did not create the options file in your home directory, specify the full path to the options file.If you want to include the path to an archive database, use the --pa switch.
3 To create an options file, see “Saving Mailbox/Library Maintenance Options” on page 431.
34.1.8 GWCheck Startup SwitchesThe following startup switches can be used with GWCheck:
/batch
Indicates that you want to run GWCheck without a user interface. Because you do not provide the desired options from the interface, you must provide an options file.
For example, to specify that you want GWCheck to run in batch mode, you would use:
/lang
Specifies the language to run GWCheck in, using a two-letter language code as listed below. You must install GWCheck in the selected language in order for it to display in the selected language.
Linux GWCheck Windows GWCheck
--batch /batch
--lang /lang
--opt /opt
--pa /pa
--pr /pr
Linux GWCheck Windows GWCheck
Syntax: --batch /batch
Linux: ./gwcheck --opt gwcheck.opt --batch
Windows: gwcheck /opt-gwcheck.opt /batch
7 Administration Guide
novdocx (en) 11 Decem
ber 2007
The table below lists the valid language codes. Contact your local Novell sales office for information about language availability.
For example, to specify that you want GWCheck to run in Spanish, you would use:
/opt
Specifies a database maintenance options file created in a GWCheck session. This starts GWCheck with the same options settings as the session in which the options file was created. If the options file is located in the same directory as the GWCheck program, you can specify just the filename. If it is in a different directory, you must specify the full pathname.
For example, to start GWCheck with saved settings, you would use:
For example, to specify the archive mailbox that a user keeps is his or her home directory, you would use:
/pr
Specifies the path to a Remote mailbox.
For example, to specify the Remote mailbox that a user keeps on a computer at home, you would use:
34.2 Target Service AgentsA Target Service Agent (TSA) helps generic backup software back up specialized data located on any “target.” A target is a specific location where data is stored, such as a NetWare® file system, a Linux file system, an eDirectoryTM database, or a collection of GroupWise databases. A target could also be an application that provides data to be backed up. A TSA is specialized to scan, read, and write the specific types of data available at the target. A TSA serves as an intermediary between specific data types and a general backup engine.
GroupWise Target Service Agent (GWTSA) has long been included with GroupWise and must be used to back up GroupWise data stored on NetWare 5.1 servers. It is specialized to back up specific GroupWise data types, such as domains and post offices.GroupWise Target Service Agent for File Systems (TSAFSGW) is available on NetWare 6.x (but not on earlier versions of NetWare) and on Linux. It builds on the capabilities of the standard Target Service Agent for File Systems (TSAFS) to provide more robust GroupWise backup capabilities.
Select the Target Service Agent appropriate for your operating system:
Section 34.2.1, “GroupWise Target Service Agent (GWTSA) for NetWare 5.1,” on page 435Section 34.2.2, “GroupWise Target Service Agent for File Systems (TSAFSGW) for NetWare 6.x/OES and Linux,” on page 439
34.2.1 GroupWise Target Service Agent (GWTSA) for NetWare 5.1The GroupWise Target Service Agent (GWTSA) provides reliable backups of a running GroupWise system on NetWare 5.1 by successfully backing up open files and locked files, rather than skipping them.
“GWTSA Functionality” on page 435“Running GWTSA” on page 436“GWTSA Startup Switches” on page 438
IMPORTANT: Unless you are running GroupWise on NetWare 5.1, do not use GWTSA. Use TSAFS and TSAFSGW for superior performance.
GWTSA Functionality
The GroupWise Target Service Agent (GWTSA) works with other backup software on NetWare. For a complete and current list of compatible backup software, use the Partner Product Guide (http://www.novell.com/partnerguide).
GWTSA has no user interface of its own, but its presence running along with other backup software provides GroupWise options in the backup software that would not otherwise be available. As a Target Service Agent, GWTSA supports any feature that your backup software supports. So if your backup software supports full, incremental, and differential backups or working set and copy jobs, so does GWTSA.
GWTSA backs up standard GroupWise directories and files; extra directories and files that appear within a standard GroupWise directory structure are not backed up by GWTSA. The table below lists the directories and files that are backed up by GWTSA.
Table 34-5 Files and Directories Backed Up by GWTSA
To see directory structure diagrams showing where the files are located, see “Domain Directory” and “Post Office Directory” in GroupWise 7 Troubleshooting 3: Message Flow and Directory Structure.
GWTSA automatically time-stamps all backed-up user databases (userxxx.db), so that the Allow Purge of Items Not Backed Up option described in “Environment Options: Cleanup” on page 1057 can function to safeguard users’ deleted items against being purged from your GroupWise system before they have been backed up.
IMPORTANT: If you decide not to use GWTSA, user databases must be time-stamped as a separate process in order for the purge control environment option to work properly. For instructions, see Section 34.3, “GroupWise Time Stamp Utility,” on page 448.
Running GWTSA
GWTSA should be used on NetWare 5.1 only. The gwtsa.nlm program file is automatically installed along with the GroupWise agents (POA and MTA).
During agent installation, a gwtsa.ncf file is created in the directory where you installed the agents. By default, it loads gwtsa.nlm and provides a /home switch for each domain and post office you selected to be serviced by the MTA and POA. For example:
Post Office post_office_directory wphost.dbngwguard.dbngwguard.dcngwguard.rflngwguard.fbkngwcheck.dbngwcheck.loggwpo.dc
NOTE: The example is formatted for readability. In the gwtsa.ncf file, the command is a single line of text.
You can also add instances of the /home switch to point to restore areas for post offices or to other temporary locations where you want to restore data.
By default, GWTSA places temporary files in the sys:\system\temp directory during the backup process. This minimizes the time that the backup process locks the live GroupWise databases so that the GroupWise agents continue to run smoothly during the backup. If necessary, use the /tempdir switch to specify an alternate location where more disk space is available for temporary files. Additional configuration of GWTSA can be done using other startup switches. See “GWTSA Startup Switches” on page 438 for a complete list.
To start GWTSA immediately:
1 Run the gwtsa.ncf file at the NetWare server console.
To start GWTSA automatically each time you restart the server:
1 Add a gwtsa.ncf line to the autoexec.ncf file.
With GWTSA running, you are ready to back up GroupWise data with Novell Storage Management ServicesTM (SMS), as described in Backup and Restore Services (Storage Management Services) on the NetWare 5.1 Documentation Web site (http://www.novell.com/documentation/nw51), and compatible backup software, as listed in the Partner Product Guide (http://www.novell.com/partnerguide).
Backing Up Remote Domains and Post Offices If the domains and post offices to back up are located on a different server from where the GroupWise agents run, you must copy GWTSA (gwtsa.nlm), along with the GroupWise agent engine (gwenn5.nlm), to the server where the data resides and run it there.
GWTSA Startup Switches
The following startup switches can be used with GWTSA:
/home/ll/log/tempdir/vserver
/home
Specifies the GroupWise location to back up or restore to. Multiple instances of the /home switch are typical. Use a /home switch for each domain and post office to back up. Also use a /home switch for each post office restore area and any other temporary location to which you want to restore GroupWise data outside the standard GroupWise directory structure.
Example: /home-sys:\gwsystem\dev
/ll
Sets the log level to determine how much information is written to GWTSA log file. Use n for Normal and v for Verbose.
Example: /ll-v
/log
Turns on logging and displays a logging screen. By default, logging is turned off. When you turn logging on, a gwtsa.log file is created in the sys:\system\tsa directory.
Example: /log
/tempdir
Specifies where GWTSA places its temporary files during the backup process. The default is the sys:\system\tsa\temp directory.
Example: /tempdir-vol1:\temp
/vserver
Specifies the name of a virtual server in a NetWare cluster. See “Backing Up a GroupWise System in a NetWare Cluster” in “Novell Cluster Services on NetWare” in the GroupWise 7 Interoperability Guide.
7 Administration Guide
novdocx (en) 11 Decem
ber 2007
34.2.2 GroupWise Target Service Agent for File Systems (TSAFSGW) for NetWare 6.x/OES and Linux The GroupWise Target Service Agent for File Systems (TSAFSGW) builds on the standard capabilities of the Target Service Agent for File Systems (TSAFS) to provide robust GroupWise backup capabilities. It functions like a GroupWise-specific translator between the standard capabilities of TSAFS and the standard capabilities of your backup software of choice.
“System Requirements” on page 439“TSAFS Functionality” on page 439“TSAFSGW Functionality” on page 440“NetWare: Running TSAFS and TSAFSGW” on page 441“Linux: Running TSAFS and TSAFSGW” on page 444“TSAFSGW Startup Switches” on page 447
System Requirements
TSAFS and TSAFSGW are available on NetWare 6.x and Novell Open Enterprise Server (OES) NetWare. They are also available with the Storage Management Services (SMS) package on SUSE® Linux Enterprise Server (SLES) 9 and OES Linux.
TSAFS Functionality
The latest version of Target Service Agent for File Systems (TSAFS) includes enhancements that earlier versions of TSAFS did not include:
Supports GroupWise database lock/backup/unlock functionality so that you can back up a running GroupWise systemProvides time stamping of GroupWise 6.5.3 and later user databases (userxxx.db), so that the Allow Purge of Items Not Backed Up option described in “Environment Options: Cleanup” on page 1057 can function to safeguard users’ deleted items against being purged from your GroupWise system before they have been backed up
IMPORTANT: If you decide not to use TSAFS, user databases must be time-stamped as a separate process after you run your backups in order for the Allow Purge of Items Not Backed Up option described in Section , “Environment Options: Cleanup,” on page 1057 to work properly. For instructions, see Section 34.3, “GroupWise Time Stamp Utility,” on page 448.
Supports backups of clustered servers so that the backup job continues on failoverUses a read-ahead, data caching mechanism to improve backup performance
Make sure you have the latest version of TSAFS for your operating system.
NetWare: The latest version of TSAFS ships with NetWare and its Support Packs. Updates to SMS and TSAFS that occur between NetWare Support Packs can be downloaded from the Novell Support Web site (http://www.novell.com/support/supportcentral). Search for tsa5up??.exe to find the latest version.
Linux: The latest version of TSAFS ships with OES Linux and GroupWise 7.x.
For complete details about TSAFS on NetWare and Linux, see the Storage Management Services Administration Guide on the Novell Open Enterprise Server Documentation Web site (http://www.novell.com/documentation/oes). You can use TSAFS as it ships with your operating system to back up GroupWise data, or you can enhance its functionality by using TSAFSGW along with it.
TSAFSGW Functionality
TSAFS for GroupWise (TSAFSGW) works with TSAFS and other backup software on NetWare and Linux. For a complete and current list of compatible backup software, use the Partner Product Guide (http://www.novell.com/partnerguide).
Like TSAFS, TSAFSGW has no user interface of its own, but its presence running along with other backup software provides GroupWise options in the backup software that would not otherwise be available. As a Target Service Agent, TSAFSGW supports any feature that your backup software supports. So if your backup software supports full, incremental, and differential backups or working set and copy jobs, so does TSAFSGW. If TSAFS is not already running when you start TSAFSGW, TSAFSGW starts it for you.
TSAFSGW backs up all directories and files at the locations you specify using the /home switch when you start TSAFSGW. The table below lists the standard GroupWise directories and files that you want to have backed up by TSAFSGW.
Table 34-6 Files and Directories Backed Up by TSAFSGW
To see directory structure diagrams showing where the files are located, see “Domain Directory” and “Post Office Directory” in GroupWise 7 Troubleshooting 3: Message Flow and Directory Structure.
To to keep unnecessary files from being backed up, you should configure your backup software to exclude the following file types from the backup:
Agent log files (for example, ????mta.??? to exclude files such as 0518mta.001 and ????poa.??? to exclude files such as 0518poa.001)QuickFinderTM indexes and incremental files (*.idx and *.inc)Timing files used by the Internet Agent (proc and pulse.tmp)Attachments that are being written during the backup (locked files under the offiles directory in the post office cannot be excluded but error messages generated by them can be ignored)
NetWare: Running TSAFS and TSAFSGW
“Running TSAFS on NetWare” on page 442“Running TSAFSGW on NetWare” on page 442
Post Office post_office_directory wphost.dbngwguard.dbngwguard.dcngwguard.rflngwguard.fbkngwcheck.dbngwcheck.loggwpo.dc
1 At your NetWare server console, unload TSAFS.2 Use the following command to start TSAFS with GroupWise functionality:load tsafs /EnableGW=True
The switch setting is saved in a configuration file (sys:\etc\sms\tsa.cfg), so that you do not need to include the switch when you load tsafs.nlm in the future.If you need to run TSAFS without GroupWise functionality in the future, unload TSAFS, then reload using:load tsafs /EnableGW=False
3 To verify that TSAFS is running with GroupWise functionality, use the following command:tsafs
4 Scroll down to the /EnableGW entry and look for a value of True.5 If you want to start TSAFS automatically each time you restart the server, load tsafs.nlm in
the autoexec.ncf file.
NOTE: Starting with NetWare 6.5 Support Pack 4, GroupWise functionality is always enabled and you do not need to use the /EnableGW switch.
6 Continue with “Running TSAFSGW on NetWare” on page 442.
Running TSAFSGW on NetWare
The tsafsgw.nlm program file is automatically installed along with the GroupWise agents (POA and MTA). During agent installation, a tsafsgw.ncf file is created in the directory where you installed the agents. By default, it loads tsafsgw.nlm and provides a /home switch for each domain and post office you selected to be serviced by the MTA and POA. For example:
NOTE: The example is formatted for readability. In the tsafsgw.ncf file, the command is a single line of text.
For each /home switch that specifies a GroupWise domain or post office directory, TSAFSGW can determine what types of GroupWise objects are available at that location. TSAFSGW recognizes four GroupWise object types:
Domain [DOM]Post office [PO]Library [DMS] (for “document management services”)Remote document storage area [BLB] (for “blob,” meaning a compressed document file)
For example, if you provide a /home switch pointing to a directory that contains a post office named Development, and if this post office has two libraries named Design (located in the lib0001 subdirectory of the post office) and Training (located in the lib0002 subdirectory of the post office), and if the libraries store documents in storage areas at \gwdms\design_store and \gwdms\training_store, TSAFSGW can provide the following list of directory names to your backup program for display:[PO] development[DMS] lib0001[BLB] design_store[DMS] lib0002[BLB] training_store
You can then easily select what you want to back up.
You can also add instances of the /home switch to point to restore areas for post offices or to other temporary locations where you want to restore data.
By default, TSAFSGW copies each database to back up into the sys:\system\tsa\temp directory during the backup process. Because it takes less time to copy each database than it does to transfer it to the backup medium, this procedure minimizes the time that the backup process locks each live GroupWise database. Therefore, the GroupWise agents can continue to run smoothly during the backup. If necessary, use the /tempdir switch to specify an alternate location where more disk space is available. You need sufficient disk space to accommodate the largest database, but not the entire domain or post office.
To start TSAFSGW immediately:
1 Run the tsafsgw.ncf file at the NetWare server console.
To start TSAFSGW automatically each time you restart the server:
1 Add a tsafsgw.ncf line to the autoexec.ncf file.
With TSAFSGW running, you are ready to back up GroupWise data with Novell Storage Management Services (SMS), as described in Storage Management Services Administration Guide
Standalone Database Maintenance Programs 443
444 GroupWise
novdocx (en) 11 Decem
ber 2007
on the Novell Open Enterprise Server Documentation Web site (http://www.novell.com/documentation/oes), and compatible backup software, as listed in Partner Product Guide (http://www.novell.com/partnerguide).
Backing up Remote Domains and Post Offices
If the domains and post offices to back up are located on a different server from where the GroupWise agents run, you must copy TSAFSGW (tsafsgw.nlm), along with the GroupWise agent engine (gwenn5.nlm), to the server where the data resides and run it there.
Linux: Running TSAFS and TSAFSGW
“Running TSAFS on Linux” on page 444“Running TSAFSGW on Linux” on page 445
Running TSAFS on Linux
TSAFS might already be available on your Linux server.
If you are running OES Linux, TSAFS was installed along with the novell-sms package when you installed OES Linux. If you are running SLES 9, you can copy the novell-sms RPM from the agents/linux directory of the GroupWise 7 Administrator for Linux CD or from the GroupWise software distribution directory to the server where you want to set up backups, then use the following command to install it on SLES 9:rpm -ivh novell-sms-1.0.0-nn.i586.rpm
After the novell-sms package is installed, use the following command to start the smdr daemon:/etc/init.d/novell-smdrd start
To verify that the daemon is running, use the following command:/opt/novell/sms/bin/smsconfig -t
When you install the novell-sms package, your system is configured to start the smdr daemon automatically each time your system restarts.
To run TSAFS with GroupWise functionality:
1 Make sure you are logged in as root.2 Change to the directory where the SMS executables are located.cd /opt/novell/sms/bin
3 Stop TSAFS../smsconfig -u tsafs
4 Start TSAFS with GroupWise functionality../smsconfig -l tsafs --EnableGW
5 To verify that TSAFS is running with GroupWise functionality, use:./smsconfig -t
Results should include:The loaded TSAs are:tsafs --EnableGW
NOTE: On the latest version of Novell Open Enterprise Server, GroupWise functionality is always enabled and you do not need to use the --EnableGW switch.
6 To make GroupWise functionality the default, modify the SMS configuration file:6a Change to the directory where the SMS configuration file is located.
cd /etc/opt/novell/sms
6b In a text editor, open the smdrd.conf file.6c Change the following line:
autoload: tsafs
to:autoload: tsafs --EnableGW
6d Save the file and exit.7 Continue with Running TSAFSGW on Linux.
Running TSAFSGW on Linux
Because TSAFSGW depends on SMS, you use the smsconfig command in the /opt/novell/sms/bin directory, along with one or more --home switches, to specify the domains and post offices to back up.
1 Make sure you are logged in as root.2 Change to the directory where the SMS executables are located:cd /opt/novell/sms/bin
3 Use the following command to specify GroupWise locations to back up: Syntax:
NOTE: The example is formatted for readability. The command is a single line of text.
For each --home switch that specifies a GroupWise domain or post office directory, TSAFSGW can determine what types of GroupWise objects are available at that location. TSAFSGW recognizes four GroupWise object types:
Domain [DOM]Post office [PO]Library [DMS] (for “document management services”)Remote document storage area [BLB] (for “blob,” meaning a compressed document file)
For example, if you provide a --home switch pointing to a directory that contains a post office named Development, and if this post office has two libraries named Design (located in the lib0001 subdirectory of the post office) and Training (located in the lib0002 subdirectory of the post office), and if the libraries store documents in storage areas at /gwdms/design_store and /gwdms/training_store, TSAFSGW can provide the following list to your backup program for display:[PO] Development[DMS] LIB0001[BLB] DESIGN_STORE[DMS] LIB0002[BLB] TRAINING_STORE
NOTE: For libraries and document storage areas, TSAFSGW provides the directory name rather than the object name.
You can then easily select what you want to back up.You can also add instances of the --home switch to point to restore areas for post offices or to other temporary locations where you want to restore data. By default, TSAFSGW places each database to back up in the /tmp directory during the backup process. Because it takes less time to copy each database than it does to transfer it to the backup medium, this procedure minimizes the time that the backup process locks each live GroupWise database. Therefore, the GroupWise agents continue to run smoothly during the backup. If necessary, use the --tempdir switch to specify an alternate location where more disk space is available. You need sufficient disk space to accommodate the largest database, but not the entire domain or post office.
4 To verify what TSAs are currently running, use the following command:./smsconfig -t
5 To establish the specified GroupWise locations as defaults for automatic backups in the future, modify the SMS configuration file:5a Change to the directory where the SMS configuration file is located.
cd /etc/opt/novell/sms
5b In a text editor, open the smdrd.conf file.5c Locate the following line:
autoload: tsafs --EnableGW
7 Administration Guide
novdocx (en) 11 Decem
ber 2007
5d Add another line beneath it for TSAFSGW:autoload: tsafsgw --home /domain_directory
--home /post_office_directory
NOTE: The example is formatted for readability. The entry is a single line of text.
5e Save the file and exit.
With TSAFSGW running, you are ready to back up GroupWise data with Novell Storage Management Services (SMS), as described in Storage Management Services Administration Guide on the Novell Open Enterprise Server Documentation Web site (http://www.novell.com/documentation/oes), and compatible backup software, as listed in Partner Product Guide (http://www.novell.com/partnerguide).
Backing Up Remote Domains and Post Offices If the domains and post offices to back up are located on a different server from where the agents are installed, that target server must meet the following requirements in order for successful backups to take place:
The novell-sms package must be installed and running on the target server, as described in Section , “Running TSAFS on Linux,” on page 444.The libtsafsgw.so.version_number file that is installed with the agents to /opt/novell/groupwise/agents/lib must be copied to /opt/novell/lib on the target server.
A symbolic link must be created from libtsafsgw.so to libtsafsgw.so.version_number on the target server. You can use the following command in the /opt/novell/lib directory to create the symbolic link: ln -s libtsafsgw.so.version_number libtsafsgw.so
After these requirements are met on the target server where a domain or post office is located but no agents are installed, you can follow the instructions in “Running TSAFSGW on Linux” on page 445 to back up the domain or post office.
TSAFSGW Startup Switches
The following startup switches can be used with TSAFSGW on NetWare and Linux:
To tune backup performance, use the startup switches provided for TSAFS as described in Storage Management Services Administration Guide on the Novell Open Enterprise Server Documentation Web site (http://www.novell.com/documentation/oes).
/home
Specifies the GroupWise location to back up or restore to. Multiple instances of the /home switch are typical. Use a /home switch for each domain and post office to back up. Also use a /home switch for each post office restore area and any other temporary location to which you want to restore GroupWise data outside the standard GroupWise directory structure.
For example, to back up a domain and a post office, you would use:
/tempdir
Specifies where TSAFSGW places files during the backup process. You need sufficient disk space to accommodate the largest database, but not the entire domain or post office. The default locations are platform specific:
For example, to change the temporary directory, you would use:
34.3 GroupWise Time Stamp UtilityYou can use the GroupWise Time Stamp (GWTMSTMP) utility to ensure that GroupWise user databases include the dates when they were last backed up, restored, and retained.
The following sections provide information about the utility:
Section 34.3.1, “GWTMSTMP Functionality,” on page 449Section 34.3.2, “Running GWTMSTMP on NetWare,” on page 449Section 34.3.3, “Running GWTMSTMP on Linux,” on page 450Section 34.3.4, “Running GWTMSTMP on Windows,” on page 450Section 34.3.5, “GWTMSTMP Startup Switches,” on page 451
Linux --home /gwsystem/provo1 --home /gwsystem/dev
NetWare: sys:\system\tsa\temp
Linux: /tmp
NetWare TSAFSGW Linux TSAFSGW
Syntax: /tempdir- path --tempdir path
NetWare: /tempdir-vol1:\temp
Linux: --tempdir /gw/temp
7 Administration Guide
novdocx (en) 11 Decem
ber 2007
34.3.1 GWTMSTMP FunctionalityGWTMSTMP places date and time information on user databases (userxxx.db) in order to support message backup, restore, and retention. No other databases are affected. You can run GWTMSTMP on all user databases in a post office or on a single user database.
Backup
To ensure thorough user database backups, you can make sure that deleted items are not purged from users’ databases until they have been backed up. Two conditions must be met in order to provide this level of protection against loss of deleted items:
The Allow Purge of Items Not Backed Up option must be deselected in ConsoleOne, as described in “Environment Options: Cleanup” on page 1057.User databases (userxxx.db) must be time-stamped every time a backup is performed so that items can be purged only after being backed up.
If you use GWTSA on NetWare 5.1 or TSAFS on NetWare 6.x/OES or Linux to back up user databases, the backup time stamp is automatically added as part of the backup process. However, if you do not use GWTSA or TSAFS, you must use GWTMSTMP to make sure that user databases are time-stamped so that items will not be prematurely purged.
Restore
If you use the GWTSA on NetWare 5.1 or TSAFS on NetWare 6.x/OES or Linux to restore a mailbox, the restore time stamp is automatically added as part of the restore process. However, if you do not use GWTSA or TSAFS, you can use GWTMSTMP to add the restore time stamp to the database. The restore time stamp is not required for any GroupWise feature to work properly. Its primary purpose is informational.
Retention
If you use a message retention application (see Chapter 33, “Retaining User Messages,” on page 419), the application should automatically add the retention time stamp after retaining the database’s messages. Any messages with dates that are newer than the retention time stamp cannot be purged from the database.
You can also use GWTMSTMP to manually add a retention time stamp.
34.3.2 Running GWTMSTMP on NetWareThe GWTMSTMP program (gwtmstmp.nlm) is installed into the same directory where you installed the GroupWise agents (POA and MTA). You can copy it to additional locations if needed.
To check the existing time stamp on all GroupWise user databases in a post office, use the following command:
A basic backup time stamp can also be set in ConsoleOne. Select a Post Office object, then click Tools > GroupWise Utilities > Backup/Restore Mailbox. On the Backup tab, select Backup, then click Yes.
More specialized functionality is provided through additional GWTMSTMP startup switches. See Section 34.3.5, “GWTMSTMP Startup Switches,” on page 451.
34.3.3 Running GWTMSTMP on LinuxThe GWTMSTMP executable (gwtmstmp) is installed into the bin and lib subdirectories of /opt/novell/groupwise/agents along with the GroupWise agents (POA and MTA). You can copy it to additional locations if needed.
To check the existing time stamp on all GroupWise user databases in a post office, use the following command:
Syntax: ./gwtmstmp -p /post_office_directory
Example: ./gwtmstmp -p /gwsystem/acct
The results are displayed on the screen.
To set a current time stamp on all user databases in a post office, use the following command:
A basic backup time stamp can also be set in ConsoleOne. Select a Post Office object, then click Tools > GroupWise Utilities > Backup/Restore Mailbox. On the Backup tab, select Backup, then click Yes.
More specialized functionality is provided through additional GWTMSTMP startup switches. See Section 34.3.5, “GWTMSTMP Startup Switches,” on page 451.
34.3.4 Running GWTMSTMP on WindowsThe GWTMSTMP program file (gwtmstmp.exe) is installed into the same directory where you installed the GroupWise agents (POA and MTA). You can copy it to additional locations if needed.
7 Administration Guide
novdocx (en) 11 Decem
ber 2007
To check the existing time stamp on all GroupWise user databases in a post office, use the following command:
A basic backup time stamp can also be set in ConsoleOne. Select a Post Office object, then click Tools > GroupWise Utilities > Backup/Restore Mailbox. On the Backup tab, select Backup, then click Yes.
More specialized functionality is provided through additional GWTMSTMP startup switches.
34.3.5 GWTMSTMP Startup SwitchesThe following startup switches can be used with GWTMSTMP:
Table 34-7 GWTMSTMP Startup Switches
NetWare GWTMSTMP Linux GWTMSTMP Windows GWTMSTMP
/p -p /p
/backup -b or --backup /backup
/restore -r or --restore /restore
/retention -n or --retention /retention
/get -g or --get /get
/set -s or --set /set
/clear -c or --clear /clear
/date -d or --date /date
/time -t or --time /time
/u -u or -userid /u
/userdb -e or --userdb /userdb
Standalone Database Maintenance Programs 451
452 GroupWise
novdocx (en) 11 Decem
ber 2007
/p
Specifies the post office directory where the user databases to time-stamp are located. This switch is required.
/backup, /restore, and /retention
Specifies the time stamp on which to perform the operation. If no time stamp is specified, the operation is performed on the backup time stamp.
For example, to set the restore time stamp, you would use:
/get
Lists existing backup, restore, and retention time stamp information for user databases. If no time stamps are set, no times are displayed.
For example:
If no other operational switch is used, /get is assumed. The following example returns the same results as the above example:
Provides a specific GroupWise user database (userxxx.db) so that an individual user database can be time-stamped.
For example, to set the retention time stamp for a user whose user database is named user3gh, you would use:
34.4 GroupWise Database Copy UtilityThe GroupWise Database Copy utility (DBCopy) copies files from a live GroupWise post office or domain to a static location for backup. During the copy process, DBCopy prevents the files from being modified, using the same locking mechanism used by other GroupWise programs that access databases. This ensures that the backed-up versions are consistent with the originals even when large databases take a substantial amount of time to copy. Starting with Support Pack 2, DBCopy is a multi-threaded application for greater efficiency.
DBCopy copies only GroupWise-recognized directories and files, as illustrated in “Post Office Directory” and “Domain Directory” in “Directory Structure Diagrams” in GroupWise 7 Troubleshooting 3: Message Flow and Directory Structure.
DBCopy does not copy some directories:
Post office queue directories (wpcsin and wpcsout): Only post office data files and directories are copied. Queue directories are not copied.All domain subdirectories: Only domain files are copied. Queue directories are not copied.All subdirectories under each gateway directory in wpgate: Only gateway files are copied from each gateway directory. Queue directories of gateway directories are not copied. For example, under gwia and webac70a, gateway files are copied, but no gateway subdirectories are copied.
IMPORTANT: Starting with GroupWise 7, TSAFSGW is provided as a robust backup solution on NetWare and Linux, as described in Section 34.2, “Target Service Agents,” on page 434. However,
if you do not want to use TSAFSGW, you can use DBCopy in conjunction with your backup software of choice to back up your GroupWise system.
Section 34.4.1, “Using DBCopy on NetWare,” on page 456Section 34.4.2, “Using DBCopy on Linux,” on page 456Section 34.4.3, “Using DBCopy on Windows,” on page 457Section 34.4.4, “DBCopy Startup Switches,” on page 458
DBCopy can also be useful for moving domains and post office from NetWare or Windows to Linux. For more information, see “Migration” in the GroupWise 7 Installation Guide.
34.4.1 Using DBCopy on NetWare1 At a command prompt, change to the directory where you installed the GroupWise agents
(typically sys:\system).2 Use the following command to back up a post office:dbcopy.nlm \post_office_directory \destination_directory
orUse the following command to back up a domain:dbcopy.nlm \domain_directory \destination_directory
orUse the following command to back up a remote document storage area:dbcopy.nlm /b \storage_area_directory
You can include the /i switch in any of these commands to provide the date (mm-dd-yyyy) of the previous copy. This causes DBCopy to copy only files that have been modified since the previous copy, like an incremental backup. DBCopy creates a log file named mmddgwbk.nnn. The first 4 characters represent the date. A three-digit extension allows for multiple log files created on the same day. The log file is created at the root of the destination directory. Include the /v switch in the dbcopy command to enable verbose logging for the backup.
3 After DBCopy has finished copying the post office, domain, or remote document storage area, use your backup software of choice to back up the static copy of the data.
4 After the backup has finished, delete the static copy of the data to conserve disk space.
34.4.2 Using DBCopy on Linux1 Change to the directory where the DBCopy RPM is located or copy it to a convenient location
on your workstation.
The DBCopy RPM (groupwise-dbcopy-version-mmdd.i386.rpm) is located in the /admin directory in your GroupWise software distribution directory if you have created one or on the GroupWise 7 Administrator for Linux CD.
orUse the following command to back up a domain:./dbcopy /domain_directory /destination_directory
orUse the following command to back up a remote document storage area:./dbcopy -b /storage_area_directory
You can include the -i switch in any of these commands to provide the date (mm-dd-yyyy) of the previous copy. This causes DBCopy to copy only files that have been modified since the previous copy, like an incremental backup. DBCopy creates a log file named mmddgwbk.nnn. The first 4 characters represent the date. A three-digit extension allows for multiple log files created on the same day. The log file is created at the root of the destination directory. Include the -v switch in the dbcopy command to enable verbose logging for the backup.
5 After DBCopy has finished copying the post office, domain, or remote document storage area, use your backup software of choice to back up the static copy of the data.
6 After the backup has finished, delete the static copy of the data to conserve disk space.
You might find it helpful to set up a cron job to run DBCopy regularly at a time of day when your system is not busy.
34.4.3 Using DBCopy on Windows1 At a command prompt, change to the directory where you installed the GroupWise agents
(typically c:\grpwise).2 Use the following command to back up a post office:dbcopy.exe \post_office_directory \destination_directory
orUse the following command to back up a domain:dbcopy.exe \domain_directory \destination_directory
orUse the following command to back up a remote document storage area:dbcopy.exe /b \storage_area_directory
You can include the /i switch in any of these commands to provide the date (mm-dd-yyyy) of the previous copy. This causes DBCopy to copy only files that have been modified since the previous copy, like an incremental backup. DBCopy creates a log file named mmddgwbk.nnn. The first 4 characters represent the date. A three-digit extension allows for multiple log files created on the same day. The log file is created at the root of the destination directory. Include the /v switch in the dbcopy command to enable verbose logging for the backup.
3 After DBCopy has finished copying the post office, domain, or remote document storage area, use your backup software of choice to back up the static copy of the data.
4 After the backup has finished, delete the static copy of the data to conserve disk space.
Standalone Database Maintenance Programs 457
458 GroupWise
novdocx (en) 11 Decem
ber 2007
34.4.4 DBCopy Startup SwitchesThe following startup switches can be used with DBCopy:
/b
Indicates that DBCopy is copying a document storage area that includes BLOB (binary large object) files.
/i
Specifies the date of the previous copy of the data. This causes DBCopy to copy only files that have been modified since the previous copy, like an incremental backup. There is no default date; you must specify a date.
/t
Specifies the number of threads that you want DBCopy to start for copying data. The default number of threads is 5.
/v
Specifies verbose logging. DBCopy creates a log file named mmddgwbk.nnn. The first 4 characters represent the date. A three-digit extension allows for multiple log files created on the same day. The log file is created at the root of the destination directory. By default, DBCopy provides a normal level of logging.