60
VIRTUAL CLASSROOM IN DJANGO WEB DEVELOPMENT Klimčíková Lucia Bachelor’s Thesis May 2011 Degree Programme in Information Technology (School of Technology)

ŀ
VIRTUAL CLASSROOM IN DJANGO WEB
DEVELOPMENT
Klimčíková Lucia
Bachelor’s Thesis
May 2011
Degree Programme in Information Technology
(School of Technology)

∸Ƌ
Author(s)
KLIMČÍKOVÁ, Lucia
Type of publication
Bachelor´s Thesis
Date
16.5.2011
Pages
60
Language
English
Confidential
( ) Until
Permission for web
publication
( X )
Title
VIRTUAL CLASSROOM IN DJANGO WEB DEVELOPMENT
Degree Programme
Information technology
Tutor(s)
MIESKOLAINEN, Matti
Assigned by
Ixonos Plc
Abstract
The idea of the virtual classroom is not new. There are already many institutions which
provide this modern educational method. The assignment of the Virtual classroom was
derived from the original project assigned by Ixonos Company, because the detailed
information about this project cannot be provided in this thesis due to the Non-
disclosure agreement with the company. One part of the whole company project was
the development of the basic web services for the different purposes. To leave the
information non-disclosure, the purpose of the application was modified and the goal
of the thesis project was to develop the web service for the Virtual classroom.
In the beginning of the thesis, the development process is briefly described and the
requirements for the project are listed.
Virtual classroom implementation requires using a great number of methods used in
web technologies. Therefore, the significant part of the thesis is devoted to the
theoretical description of these methods and their practical utilization.
Last parts of the thesis describe the implementation itself, as well as the testing process
of this application.
In the conclusion, the reasons and utilizations of the thesis are summarized as well as
the author’s personal experience.
Keywords
Django, JavaScript, web, virtual classroom, student’s page, teacher’s page
Miscellaneous

ŀ1
CONTENTS LIST OF FIGURES ........................................................................................................ 2
TERMS ........................................................................................................................... 3
1 INTRODUCTION .................................................................................................. 4
2 IXONOS ................................................................................................................. 5
3 REQUIREMENTS AND SPECIFICATIONS ....................................................... 7
4 DJANGO WEB DEVELOPMENT FRAMEWORK ............................................. 9
5 BASIC DJANGO APPLICATIONS .................................................................... 14
5.1 Creation of Django project ............................................................................ 14
5.2 First web page ................................................................................................ 18
5.3 Html and JavaScript....................................................................................... 24
5.3.1 JavaScript in general .............................................................................. 24
5.3.2 Applying of JavaScript ........................................................................... 26
5.3.3 Loading of images .................................................................................. 28
5.4 AJAX ............................................................................................................. 29
5.4.1 Text updates ........................................................................................... 30
5.4.2 AJAX Source code ................................................................................. 31
5.4.3 Dynamic context .................................................................................... 33
5.4.4 Timer ...................................................................................................... 34
5.4.5 JSON ...................................................................................................... 35
5.4.6 Request with the data ............................................................................. 37
5.5 HTML forms and Django .............................................................................. 38
5.6 Templates and parameters ............................................................................. 39
6 VIRTUAL CLASSROOM IMPLEMENTATION ............................................... 41
6.1 Project modules ............................................................................................. 41
6.2 Communication ............................................................................................. 43
6.3 Django templates, URLs and views used in the final implementation:......... 50
6.4 Student registration ........................................................................................ 53
6.5 Adding new users .......................................................................................... 54
7 TESTING .............................................................................................................. 55
8 CONCLUSION ..................................................................................................... 57
REFERENCES ............................................................................................................. 58
�Ƌ
2
LIST OF FIGURES
FIGURE 1 Implementation of MVC pattern by Django .............................................. 12
FIGURE 3 Welcome to Django page ........................................................................... 15
FIGURE 2 The output of the runserver command ....................................................... 15
FIGURE 4: Page generated by myFirstView function ................................................. 20
FIGURE 5: The displayed page after typing URL /app/1 ............................................ 22
FIGURE 6: The displayed page after typing URL /app/222 ........................................ 22
FIGURE 7: The page design using Django template ................................................... 24
FIGURE 8: Client script principle ............................................................................... 25
FIGURE 9: JavaScript example – start page ................................................................ 27
FIGURE 10: JavaScript example – after each button is clicked .................................. 28
FIGURE 11: Principle of AJAX .................................................................................. 31
FIGURE 12: Demonstration of the requested view ..................................................... 33
FIGURE 13: Updated page after button click .............................................................. 33
FIGURE 14 Communication diagram – student part ................................................... 44
FIGURE 15 Communication diagram – teacher part ................................................... 44
FIGURE 16: Communication diagram – teacher part .................................................. 47
FIGURE 17: Communication diagram – student part .................................................. 49
FIGURE 18 Screenshot of the teacher’s page .............................................................. 52
FIGURE 19 Screenshot of the student’s main page ..................................................... 52
FIGURE 20 Layout of page for registration - after inserting the wrong username ..... 53
FIGURE 21 Layout of the page for the adding of new records to the student’s
database ........................................................................................................................ 54

�Ƌ
3
TERMS
Localhost (logical loop)
In computer terminology it means the reference to the currently used computer.
The reserved IP address for loopback is 127.0.0.1 in IPv4, or: 1 in IPv6.
Database
A collection of structured data or information usually in a digital form - stored in the
system of computer. The information is stored in such format that some program or
person can use a query language to obtain this information.
HTTP 404
The standard code which represents the response from the server. The code 404
indicates that the server cannot find the file which was requested by the client. It does
not mean that the client was not table to communicate with the server, it is related to
the server resources.
DOM
(Document Object Model) is an object-oriented representation of the XML or HTML
document which can be further processed and the result can be presented.

�Ƌ
4
1 INTRODUCTION
The content of this thesis was based on the activities, tasks and projects realized by the
project team during the practical training at Ixonos Finland Plc. This team consisted of
three trainees, one senior programmer and the project manager. The projects
developed by this team were the internal company projects, intended for the
demonstration of the possible real company project in the future - the project
demanded by some real customer. The task was to create three applications on which
it was possible to present the new idea of the company and to prove that its realization
is possible. The created demonstrations were presented to the representatives of the
company. Searching for the possible customers and eventually feedback from them
will be the next process for the representatives of the company and therefore the
results are at this time not known for the developing team.
The goal of the projects was to make a communication of different applications for
concrete purposes. The whole project had a complicated architecture.
It consisted of three main parts, but detailed information about them cannot be
provided in this thesis due to the Non-disclosure agreement with the company. The
specification of the presented demos cannot be published either and therefore the
specification of the final project, described in this thesis, had to be largely modified.
The focus of the thesis is on one part of the whole company project and that is the
development of the basic web services for the different purposes. These services were
provided and powered by Django web framework. As in every technology, there is
also the large theoretical background in Django and therefore information had to be
gathered to be able to use it correctly and effectively. For this reason, the significant
part of the thesis is devoted to the theoretical description. However, every theory also
focuses on some practical example.
The modified project for the thesis represents the combination of the Django abilities,
programming in Python language and web technologies and methods. All used
methods and technologies in the project are described more in details and the possible
uses of them from different points of view are also presented in the thesis. The final
project is the demonstration of the possible combination of all these methods in one
larger application.

�Ƌ
5
2 IXONOS
2.1 Company description
“Ixonos is an ICT services company creating innovative solutions for mobility, social
media and digital services. Together with their customers they develop products and
services which let people enjoy inspiring digital experience, anyplace, anytime. Their
client organizations benefit from new business opportunities and new productivity.
They strive to be the strategic partner for leading innovators, offering services that
range from concept design, consulting and project management to software
development and maintenance.
The clientele of Ixonos comprises globally leading mobile and Smartphone
manufacturers, network vendors and telecom carriers as well as Finnish finance,
industry and service sector companies and public administration organizations. The
Ixonos offices are in Finland, China, Denmark, Estonia, Germany, Great Britain,
Slovakia and the U.S. Ixonos Plc is listed on NASDAQ OMX Helsinki Ltd. The
company’s turnover in 2010 was 84.9 million euro and operating profit 5.3 million
euro. (Ixonos Plc company website)”
2.2 Development process
In the development process of the realized projects punctual planning was required.
The whole project was divided to smaller parts and time estimation of the individual
parts was needed either. The used methodology of the software development was
SCRUM agile. This process included daily scrum meetings and demonstration of the
done work after every second week.
Scrum development
“Scrum is an iterative, incremental framework for project management often seen in
agile software development, a type of software engineering. Although the Scrum
approach was originally suggested for managing product development projects, its use

�Ƌ
6
has focused on the management of software development projects, and it can be used
to run software maintenance teams or as a general project/program management
approach. (Wikipedia – Scrum development)”
A typical model of the Scrum method is a smaller team of developers assumed, for
example seven members.
The Scrum team consists of three main roles:
- Scrum Master - His position is close to the normal project manager position,
but in scrum is this name not used. His task is to search for the needed
resources and to ensure the development is as fluent as possible.
- Product owner - This position represents the customer, who ordered the
product and his needs
- Team of the developers - These are people developing the software, the
teamwork is very important, however, each member has a high degree of
independence and acts always for himself.
Working in the Scrum model is divided into iterations called sprints, which usually
take between one and four weeks. The beginning of each sprint begins with the
choosing of the requirements that will be performed in the appropriate iteration. These
requirements are made clear for the whole team every day in the Scrum meetings.
Every team member has to briefly say what he did the previous day and his plans for
the current day. The duration of the Scrum meeting is usually 15-20 minutes. The
result of the sprint is the simple functional demonstration of the appropriate part of the
whole project.
All project requirements are gathered in product backlog, the large, unstructured board
(which can also be virtual). This is one of the main advantages of the Scrum – all
requirements are in one place and they do not need to be organized into a hierarchy,
which is the approach used in other methods.
Another instrument is a sprint backlog belonging to one particular spring, which also
contains the requirements, but in smaller numbers.
�Ƌ
7
3 REQUIREMENTS AND SPECIFICATIONS
The use of different web methods and their combination with the web development in
Django framework it presented in the implementation of the web service for “Virtual
classroom”. The base of the virtual classroom is delegated by one web page of the
teacher and any amount of the student’s web pages.
The requirements for the teacher’s page:
1. The teacher page contains the buttons responsible for displaying or changing
of the picture on the student’s page
2. The teacher page contains the text field intended for the display of this text on
every student page
The requirements for the student’s page:
1. Every student has to log in using a login form before seeing the main student’s
page
2. The main student’s page contains the image field which can be changed
according to the signals from the teacher page
3. The main student’s page contains the text field which can be changed
according to the text written in the teacher’s page
More requirements:
- The teacher has the ability to create new student’s accounts. Only students
having this account can be logged to the system and see the main student’s
page.
- Each student can be logged only once – it is not possible to see more than one
page of every student.
�Ƌ
8
- The student name is displayed on his or her main page.
Methods and technologies:
- Python programming language
- JavaScript
- AJAX method
- tools and options of Django framework – in this implementation also django forms and database were used in addition to the basic and necessary tools
Following chapters of the thesis focus on the description of the individual methods and strategies of the project and on the mutual collaboration of some of them.

�Ƌ
9
4 DJANGO WEB DEVELOPMENT FRAMEWORK
4.1 What is framework?
With the arrival of dynamic content web sites the amazing boom of the PHP language
began. The things which contributed to that were easy deployment on the server
because of the amount of offered web hosting services, a broad base of developers and
with them the availability of educational materials and code fragments. However, like
everything, this language has its pitfalls as well. Its ease of use may encourage sloppy,
incorrectly designed and repetitive code.
The solution for these and many other problems are frameworks.
Framework is a software structure that is designated to support development and
organization of other software projects. The aim of a framework is to take the typical
problems of the specific area to facilitate the development so that designers and
developers can concentrate on their certain tasks only. For example, the developers of
the web page for the bank may focus on the account operations rather than on caring
about ensuring of perfect navigation between pages.
Frameworks are a special case of software libraries: they are reusable abstractions of
code wrapped in a well-defined Application programming interface (API).

�Ƌ
10
4.2 The philosophies of Django framework
Django framework philosophies are listed below as follows:
Less code
The more code the more errors. This means that the amount of code should be
minimized, which will ultimately accelerate the development.
Less duplication (DRY principle = Don't Repeat Yourself)
This principle tells that redundancy should be avoided. Each application’s
functionality should be only at one place, which not only reduces the amount of code,
but it also contributes to the clarifications on the entire application.
Better explicitly than implicitly
In other words, the framework should not make a great number of complicated tricks
behind the developer's back. Therefore if some change in the core of framework is
needed, it should not be a problem. Magic is worth using only if it creates a huge
convenience which cannot be achieved in other ways.
Consistency
The framework should be consistent at all levels, so if one idea is used in one level, it
should be followed everywhere.
Loose coupling
The idea is that each element of the framework is as far as possible independent from
the others. The various layers of the framework should not “know” about each other
unless absolutely necessary. This principle allows easily changing the whole parts of
the code and their replacement by others. For example, the template system knows
nothing about Web requests, the database layer knows nothing about data display and
the view system does not care which template system a programmer uses.

㥰Ƌ
11
4.3 How Django works
Django is designed to encourage loose coupling and strict separation between pieces
of an application. Each distinct piece of a Django-powered web application has a
single key purpose and can be changed independently without affecting the other
pieces. To follow this approach, Django uses a pattern called MVC.
MVC - Model-View-Controller pattern of software architecture - is a way of
developing software which separates three basic layers of software application (see
figure 1):
• data access layer
- includes code for defining and accessing data → the “Model”
• business layer
- part of the system that selects what to display and how to display it - the “View”
• presentation layer
- request-routing logic, this refers to the part of the system that decides which view
to use, depending on user input and accessing the model as needed → “Controller”
Django uses this pattern; however it implements it by itself and that means slightly
differently, but still with following the idea of layers separating:
• data access layer
- is handled by Django’s database layer
• business layer
- this layer in Django framework delegates a system of templates and functions
determining which template will be used for displaying particular data (view
functions - views)
• presentation layer
- this layer is responsible for calling of appropriate function for the given URL
㥰Ƌ
12
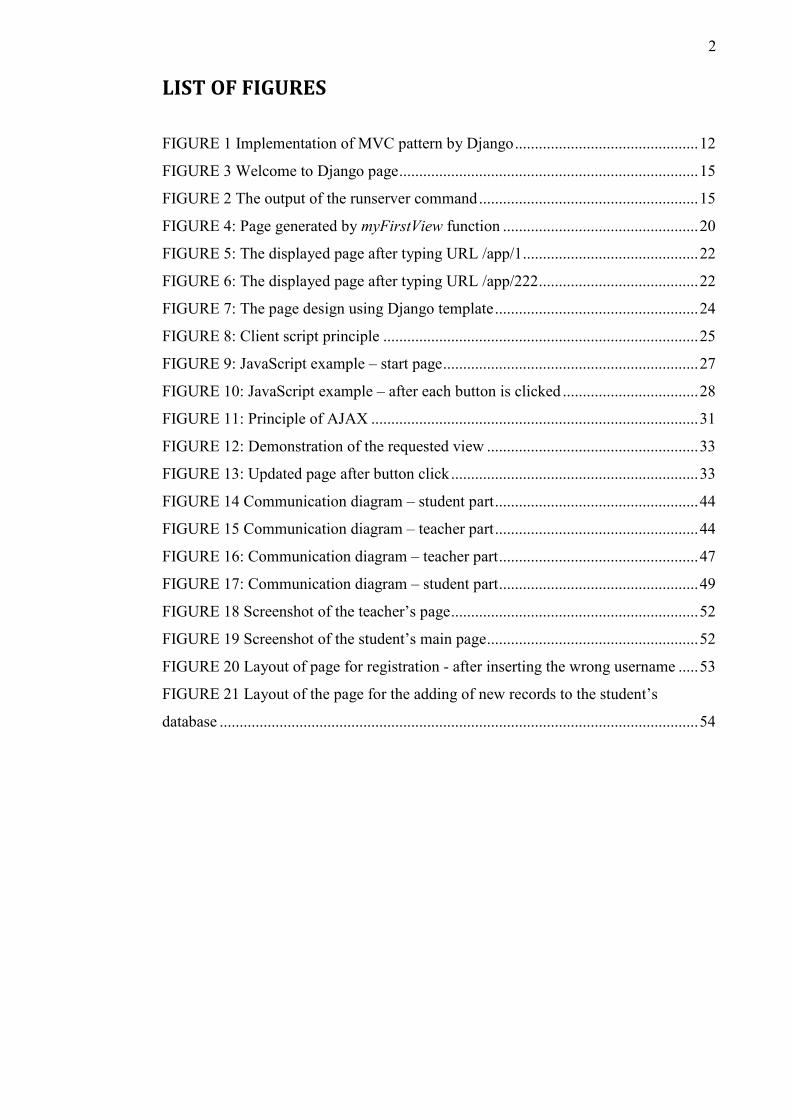
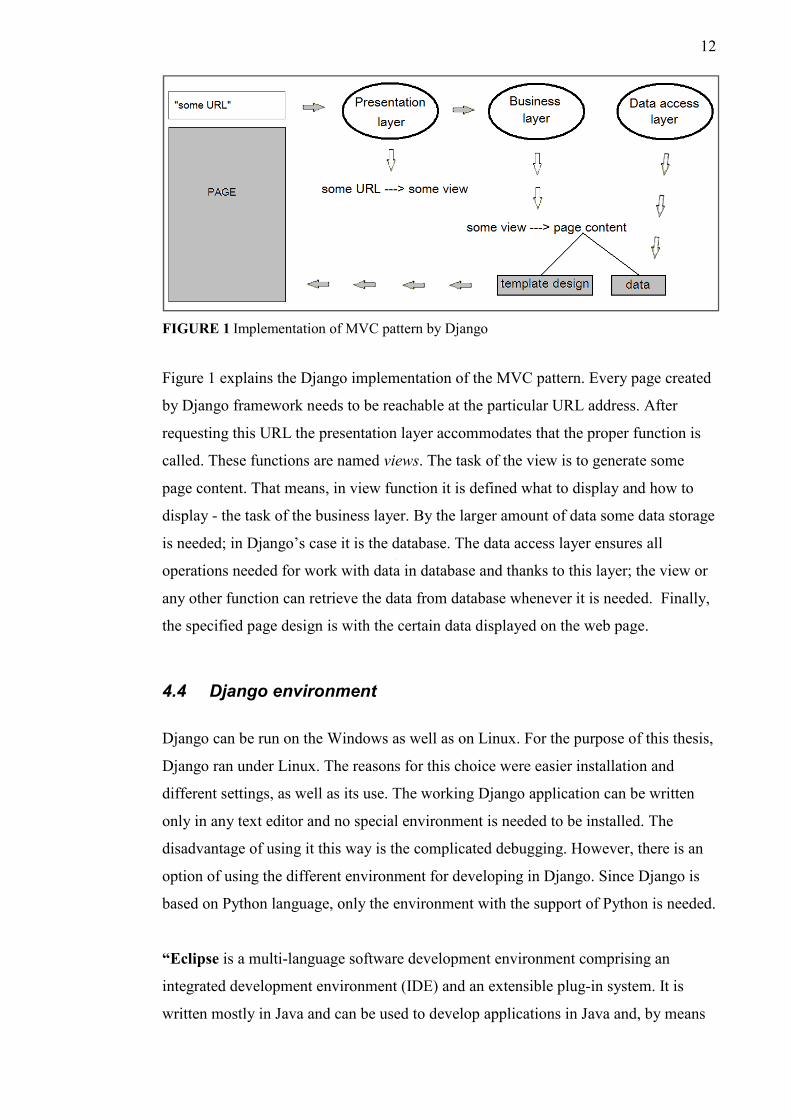
FIGURE 1 Implementation of MVC pattern by Django
Figure 1 explains the Django implementation of the MVC pattern. Every page created
by Django framework needs to be reachable at the particular URL address. After
requesting this URL the presentation layer accommodates that the proper function is
called. These functions are named views. The task of the view is to generate some
page content. That means, in view function it is defined what to display and how to
display - the task of the business layer. By the larger amount of data some data storage
is needed; in Django’s case it is the database. The data access layer ensures all
operations needed for work with data in database and thanks to this layer; the view or
any other function can retrieve the data from database whenever it is needed. Finally,
the specified page design is with the certain data displayed on the web page.
4.4 Django environment
Django can be run on the Windows as well as on Linux. For the purpose of this thesis,
Django ran under Linux. The reasons for this choice were easier installation and
different settings, as well as its use. The working Django application can be written
only in any text editor and no special environment is needed to be installed. The
disadvantage of using it this way is the complicated debugging. However, there is an
option of using the different environment for developing in Django. Since Django is
based on Python language, only the environment with the support of Python is needed.
“Eclipse is a multi-language software development environment comprising an
integrated development environment (IDE) and an extensible plug-in system. It is
written mostly in Java and can be used to develop applications in Java and, by means

ʆ
13
of various plug-ins, other programming languages including C, C++, Perl, Python,
PHP and many others. (Wikipedia – Eclipse environment)”
For development of the project for this thesis, Eclipse IDE for Java EE Developers
was used.
To ensure running of the Django project from Eclipse environment, it has to be
configured for Python – with the installing of the PyDev plug-in for Eclipse. There are
more options how to manage it, and one way is described on the following web page:
http://www.rose-hulman.edu/class/csse/resources/Eclipse/eclipse-python-configuration.htm
Of course, the installation of Django is required. This is described in the next
subchapter.
Usually, one more step is needed to run Django application from Eclipse, and that is
to set the location of the Python interpreter. This location can depend on the Python
installation; however, generally it is located in /usr/bin/python2.6.
4.5 Installing of Django
The installation under Linux Ubuntu is an easy issue. All that is needed to be able to
run Django application is to install Python-Django package that belongs to the official
Ubuntu packages.
The command for installing it is given below:
sudo apt-get install python-django
4.6 Database settings
A database-driven web site is the web site where the database is the key instrument
and the data for the pages are mainly gained from the database. By developing of this
type of the web site in Django, the database needs to be set up because Django
database layer is not set by default. This setting requires that the database server is
already configured. Django supports four database engines: PostgreSQL, SQLite 3,
MySQL and Oracle. In case of the project for this thesis, the SQLite 3 database was
used, because it is already imported in Ubuntu. Every Django project contains one
special file intended for different settings - including also database settings. The
Django files and individual settings are described later.
�Ƌ
5 BASIC DJANGO
5.1 Creation of The easiest way to create
and the following command:
This creates a new project folder, containing
� __init__.py
This is an empty file that tells Python that this
Python package.
� manage.py
This module is intended
ways. It is only
� settings.py
In this file there
� urls.py
Contains the URL declarations for this
These files, created by
application, despite their relatively small size
The file manage.py
can be used with the execution
only one command
lightweight Web server for
After typing the command:
python manage.py runserver
DJANGO APPLICATIONS
Creation of Django project
The easiest way to create a new complete functional Django project is using
following command:
new project folder, containing four basic files:
This is an empty file that tells Python that this directory sho
Python package.
This module is intended for interaction with this Django project
t is only a command-line utility, not intended for modification
there are the settings/configuration specified for this
he URL declarations for this Django project.
These files, created by Django automatically, already constitute a working
application, despite their relatively small size.
manage.py is a command-line utility. There are different
can be used with the execution of this file. Now, at the beginning of making
only one command is needed and that is the runserver. With this command a
lightweight Web server for development is started.
After typing the command:
python manage.py runserver
14
project is using a terminal
directory should be considered a
project in various
modification.
for this Django project.
automatically, already constitute a working Django
different commands which
nning of making a project,
. With this command a

�Ƌ
the following output is displayed:
This output means that the development web server is running
possible to see the information about
location of the server. It can be verified by typing this address as the
browser:
FIGURE 3 Welcome to Django
The positive output proves
lightweight Web server written purely in Python. This is the
applications, because now
with configuring a production server (for example Apache, Lighttpd
Next, runserver command is to be discussed
on port 8000 and it is lis
can be can reached on
The server can be started on any other port
easy realized by passing it as a command
python m
FIGURE 2 The output of the runserver command
output is displayed:
means that the development web server is running successfully. It is
le to see the information about IP address and port and what is the reachable
location of the server. It can be verified by typing this address as the
Welcome to Django page
sitive output proves the running of the Django development server, a
lightweight Web server written purely in Python. This is the major
applications, because now issues can be developed rapidly, without having to deal
with configuring a production server (for example Apache, Lighttpd
Next, runserver command is to be discussed. The default command starts the server
on port 8000 and it is listening only for local connections, which
can be can reached on localhost address (127.0.0.1).
an be started on any other port. The changing of the
easy realized by passing it as a command-line argument, for example:
python manage.py runserver 8080
The output of the runserver command
15
successfully. It is
what is the reachable
location of the server. It can be verified by typing this address as the URL to the
development server, a
major benefit of Django
can be developed rapidly, without having to deal
with configuring a production server (for example Apache, Lighttpd, etc).
. The default command starts the server
ich means, this server
the server's port can be
line argument, for example:

�Ƌ
16
After that, the development server runs on port 8080, but still only on the localhost.
When allowing of non-local connections is needed, the specification of the IP address
is required. This can be especially helpful if sharing of a development site with other
members of the team is needed.
In that case, this command is used for running the server:
python manage.py runserver 0.0.0.0:8000
The IP address 0.0.0.0 tells the server to listen on any network interface, thus the
server is now reachable from any computer which is connected to the same network as
the computer where the server is running. By visiting the IP address of that computer
(for example 192.168.104.23:8000) the Django site is again successfully displayed.
In this thesis project different web pages were to be created.
The first goal was to create a simple web page that outputs some message. The page
was created with “Fantastic, my first web page is here!”
By every publishing of the web pages, the specification of two components is needed:
1. The content of the page - the string "Fantastic, my first web page is here!"
2. its URL
The way how to do it in Django is as follows:
1. The contents of the page are produced by a view function
2. the URL is specified in a URLconf
For the first point a file was needed, where the views function could be written. In
Django there is the file views.py intended for this reason. The empty file with this
name could be created within the webService directory and then the functions written
there. There is also another option – to create new Django application which will
include this file views.py automatically.
The difference between terms “Project” and “Application” is that an application (app)
in Django is a Web application that does something, for example, it shows actual date
and time, there can be the application for uploading files to the account on a server, a
simple poll app or teacher app for controlling of students' browsers. A project is an
�Ƌ
instance of a certain set of
project can consist of multiple apps and one app can be located in multiple projects.
Django provides an
named app inside of the project directory,
This command creates
modules, the purpose of which will
� __init__.py
� views.py
� models.py
� tests.py
To achieve that this application
needed to be done, and that
option for this setting c
INSTALLED_APPS. The name of the new applicati
this case it was 'app
contains some its default
included for the common case, but
are not needed, they can
Purpose of models
In modern Web applications, the
the background, a database
some data out of it, and displays that data on a
database-driven Web sites in
database queries using functions written in
The file models.py is for defining of
models. Every class in models is translated as a CREATE TABLE in
instance of a certain set of Django apps, plus the configuration for those apps.
project can consist of multiple apps and one app can be located in multiple projects.
an easy way to create a new application. To create the application
inside of the project directory, it only needed a typed text
creates a new folder named app, automatically containing next
purpose of which will be written more about later:
To achieve that this application is recognized from the Django project, one more thing
, and that was adding this application to installed applications
setting can be found in settings.py file under name
INSTALLED_APPS. The name of the new application has to be added to this list;
app'. This list usually contains already some values, because
contains some its default INSTALLED_APPS, the default applications
included for the common case, but they are not useful for everybody.
are not needed, they can be deleted from INSTALLED_APPS.
Purpose of models
n modern Web applications, the logic often involves interacting with a
database-driven Web site connects to a database server, retrieves
some data out of it, and displays that data on a web page. It is possible to make good
Web sites in Django. There are powerful tools in it for
database queries using functions written in Python.
The file models.py is for defining of models, which are used for defining of database
models. Every class in models is translated as a CREATE TABLE in
17
apps, plus the configuration for those apps. A
project can consist of multiple apps and one app can be located in multiple projects.
ion. To create the application
it only needed a typed text in the terminal:
new folder named app, automatically containing next four
project, one more thing
g this application to installed applications. The
n be found in settings.py file under name
on has to be added to this list; in
. This list usually contains already some values, because Django
, the default applications which are
they are not useful for everybody. If some of them
logic often involves interacting with a database. In
connects to a database server, retrieves
eb page. It is possible to make good
powerful tools in it for performing
which are used for defining of database
models. Every class in models is translated as a CREATE TABLE in the database.

�Ƌ
18
The purpose of using models is connected to the fact that Django follows the DRY
principle mentioned before. The data access layer is represented by models. The goal
of using this layer is to define the data model in one place and automatically derive
things from it.
For database setup in Django project several settings and configurations were needed.
First, Django has to know, which database server should be used and how to connect
to it. As mentioned in chapter 4.7, from more database engines supported by Django,
SQLite 3 was used for this thesis, because this does not require any setup, and because
SQLite uses standalone files on the file system to store its data. The procedure of the
database configuring is as follows:
1. In the file settings.py, the engine and name of the used database has to be set up:
DATABASE_ENGINE = 'sqlite3'
DATABASE_NAME = 'appDatabase'
2. Typing of command:
python manage.py syncdb
This command ensures that all necessary database tables are created. The necessary
tables are tables for all apps in INSTALLED_APPS. The appropriate table is created
only if it has not been created yet. Without having any application with the models
definitions, only tables of Django default applications (mentioned in
INSTALLED_APPS description) are created.
5.2 First web page views.py
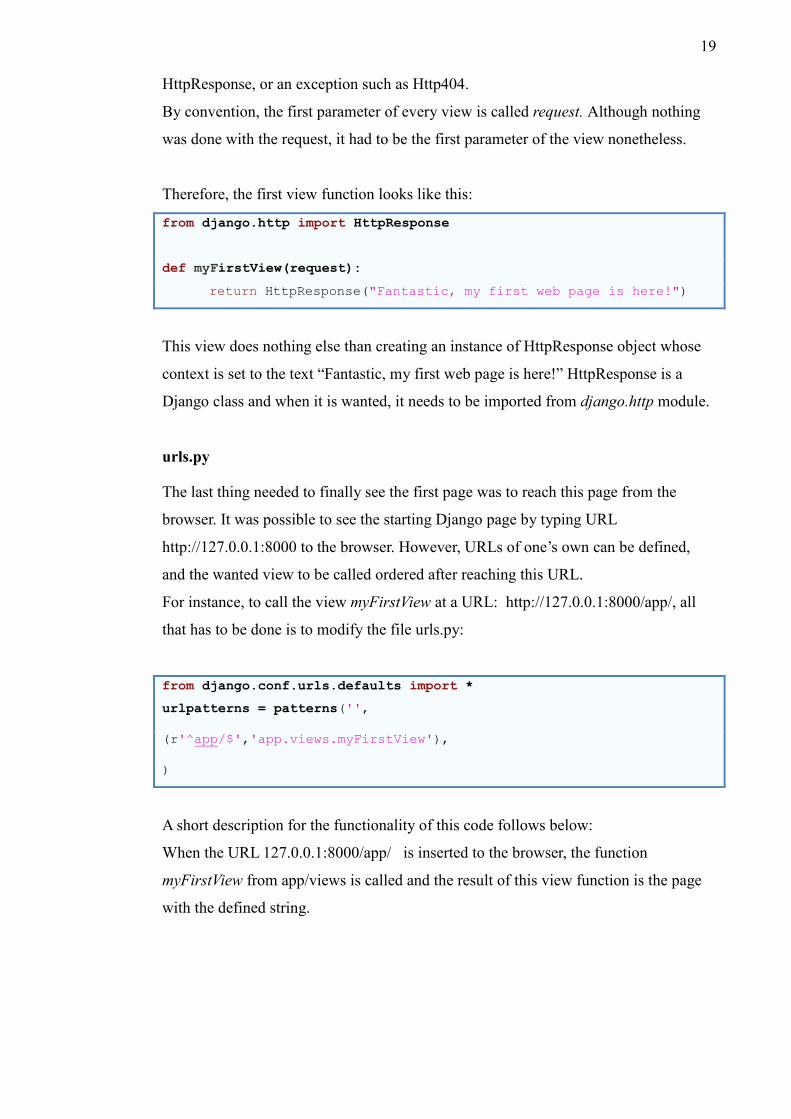
The Django view is a Python function where it was ensured that the page with the
wanted string will be displayed. It takes an HttpRequest as its first parameter (every
view has to contain at least this parameter) and returns an instance of HttpResponse
object containing the content for the requested page. All that Django wants is this
�Ƌ
19
HttpResponse, or an exception such as Http404.
By convention, the first parameter of every view is called request. Although nothing
was done with the request, it had to be the first parameter of the view nonetheless.
Therefore, the first view function looks like this:
from django.http import HttpResponse
def myFirstView(request):
return HttpResponse("Fantastic, my first web page is here!")
This view does nothing else than creating an instance of HttpResponse object whose
context is set to the text “Fantastic, my first web page is here!” HttpResponse is a
Django class and when it is wanted, it needs to be imported from django.http module.
urls.py
The last thing needed to finally see the first page was to reach this page from the
browser. It was possible to see the starting Django page by typing URL
http://127.0.0.1:8000 to the browser. However, URLs of one’s own can be defined,
and the wanted view to be called ordered after reaching this URL.
For instance, to call the view myFirstView at a URL: http://127.0.0.1:8000/app/, all
that has to be done is to modify the file urls.py:
from django.conf.urls.defaults import *
urlpatterns = patterns('',
(r'^app/$','app.views.myFirstView'),
)
A short description for the functionality of this code follows below:
When the URL 127.0.0.1:8000/app/ is inserted to the browser, the function
myFirstView from app/views is called and the result of this view function is the page
with the defined string.
�Ƌ
20
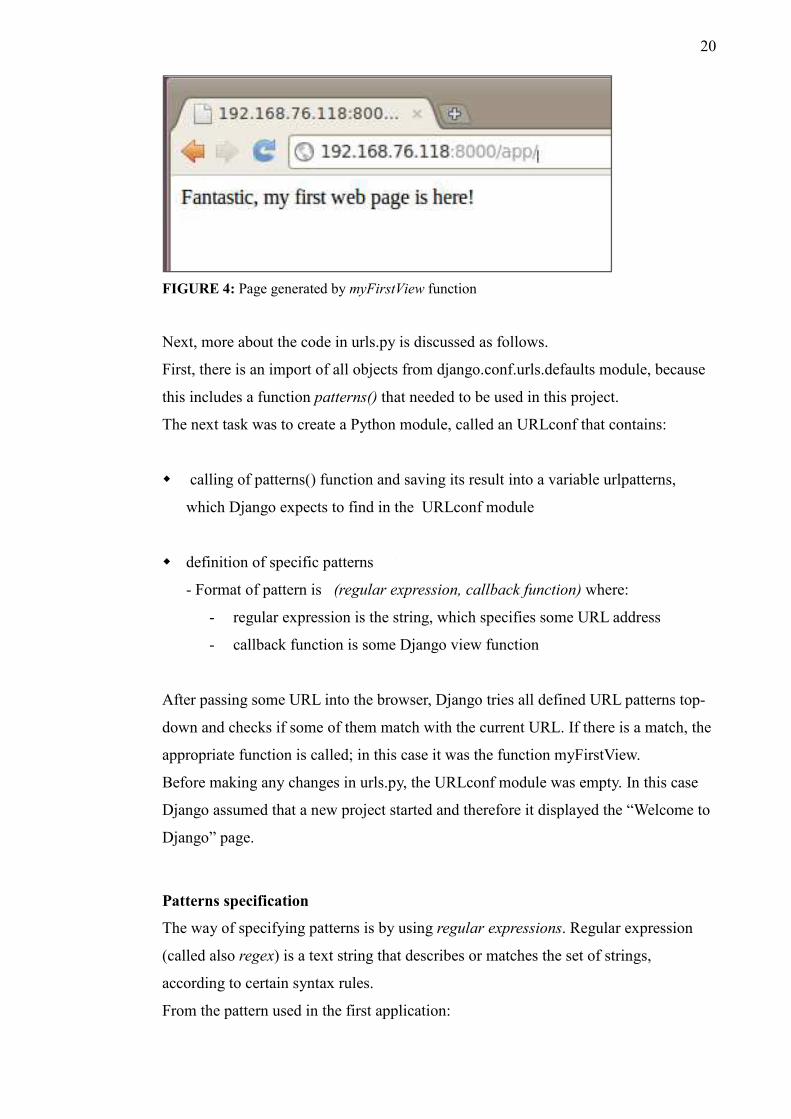
FIGURE 4: Page generated by myFirstView function
Next, more about the code in urls.py is discussed as follows.
First, there is an import of all objects from django.conf.urls.defaults module, because
this includes a function patterns() that needed to be used in this project.
The next task was to create a Python module, called an URLconf that contains:
� calling of patterns() function and saving its result into a variable urlpatterns,
which Django expects to find in the URLconf module
� definition of specific patterns
- Format of pattern is (regular expression, callback function) where:
- regular expression is the string, which specifies some URL address
- callback function is some Django view function
After passing some URL into the browser, Django tries all defined URL patterns top-
down and checks if some of them match with the current URL. If there is a match, the
appropriate function is called; in this case it was the function myFirstView.
Before making any changes in urls.py, the URLconf module was empty. In this case
Django assumed that a new project started and therefore it displayed the “Welcome to
Django” page.
Patterns specification
The way of specifying patterns is by using regular expressions. Regular expression
(called also regex) is a text string that describes or matches the set of strings,
according to certain syntax rules.
From the pattern used in the first application:

�Ƌ
21
(r'^app/$','app.views.myFirstView')
Regular expression is this part: r'^app/$'
Every symbol in regular expression means anything else, and matches different URLs.
The r character in front of the regular expression string tells Python that the string is a
“raw string”. This means that its contents should not interpret backslashes, because in
normal Python strings, the backslash is understood as special character. For this
reason, it is better to use raw strings in every definition of a regular expression in
Python.
The meanings of some symbols are illustrated below:
TABLE 1 Symbols from the regular expressions
1. ^ start of string
2. $ end of string
3. /accurate string Specification of the certain text string that should be usef for URL match
4. . (dot) or \D Any singe character
5. \d Any single digit
6. + One or more of the previous expression (e.g., \d+ matches one or more digits)
TABLE 2 Examples of the regular expressions
1. and 2. For instance, ^$ - matches the empty string => it matches with the URL as http://127.0.0.1:8000/
3. - the expression r'^app/$' will match with
urlhttp://127.0.0.1:8000/app
- the beginning of the URL depends on the IP and port
on which is Django server running, so it holds
generally this way: addr/some string where addr
includes server IP and port
4. r'^.$ matches: addr/k addr/+
5. r'^\d$ matches addr/5 addr/4
6. r'^app/\d+$' matches http://127.0.0.1:8000/app/154543, but also http://127.0.0.1:8000/app/1

�Ƌ
22
7. Using some value as a parameter:
This is realized by specification of this kind of expression: r'^app/(?P<app_id>\d+)/$'
The view called after matching this pattern looks like:
def parameter(request,app_id):
return HttpResponse("Passed parameter was: %s "%app_id)
app_id is parameter, whose value is used in the definition of the view. How it looks in
practice is illustrated in Figure 6:
FIGURE 5: The displayed page after typing URL /app/1
FIGURE 6: The displayed page after typing URL /app/222

㥰Ƌ
23
Templates
Templates are used to create views that look much nicer than the first page in the
author’s project with simple text whose design is hard-coded in the view. To solve this
problem Django's template system is used, whose idea is to separate the design from
Python.
The template is an HTML page, which defines the design of the displayed page after
calling the appropriate view. The location of the templates has to be set in the file
settings.py:
TEMPLATE_DIRS=(
"/home/administrator/workspace/myTemplates"
)
This path defines the location of the templates directory. It was considered that there
can be more different apps in the whole project, and every app can have its own
templates. Therefore, in this myTemplates folder the subdirectory app was created
where all templates for this application will be.
Loading template from the view:
from django.http import HttpResponse
from django.template import Context,loader
def loadTemplate(request):
t = loader.get_template('app/first.html')
c = Context({})
return HttpResponse(t.render(c))
This piece of code is described below as follows:
� It creates a Template object
� It calls the render() method of the Template object with a given set of
variables (the context). This returns a fully rendered template as a string, with
all of the variables. When no variables are needed, the empty context can be
used.
�Ƌ
24
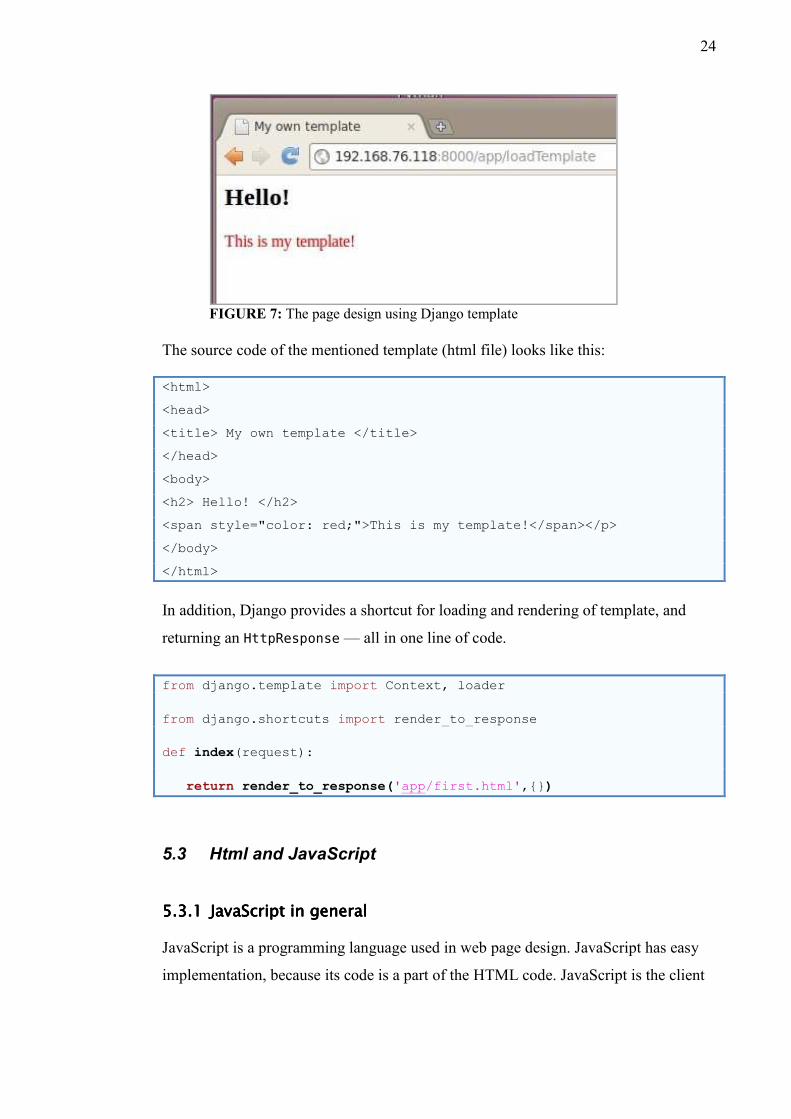
FIGURE 7: The page design using Django template
The source code of the mentioned template (html file) looks like this:
<html>
<head>
<title> My own template </title>
</head>
<body>
<h2> Hello! </h2>
<span style="color: red;">This is my template!</span></p>
</body>
</html>
In addition, Django provides a shortcut for loading and rendering of template, and
returning an HttpResponse — all in one line of code.
from django.template import Context, loader
from django.shortcuts import render_to_response
def index(request):
return render_to_response('app/first.html',{})
5.3 Html and JavaScript
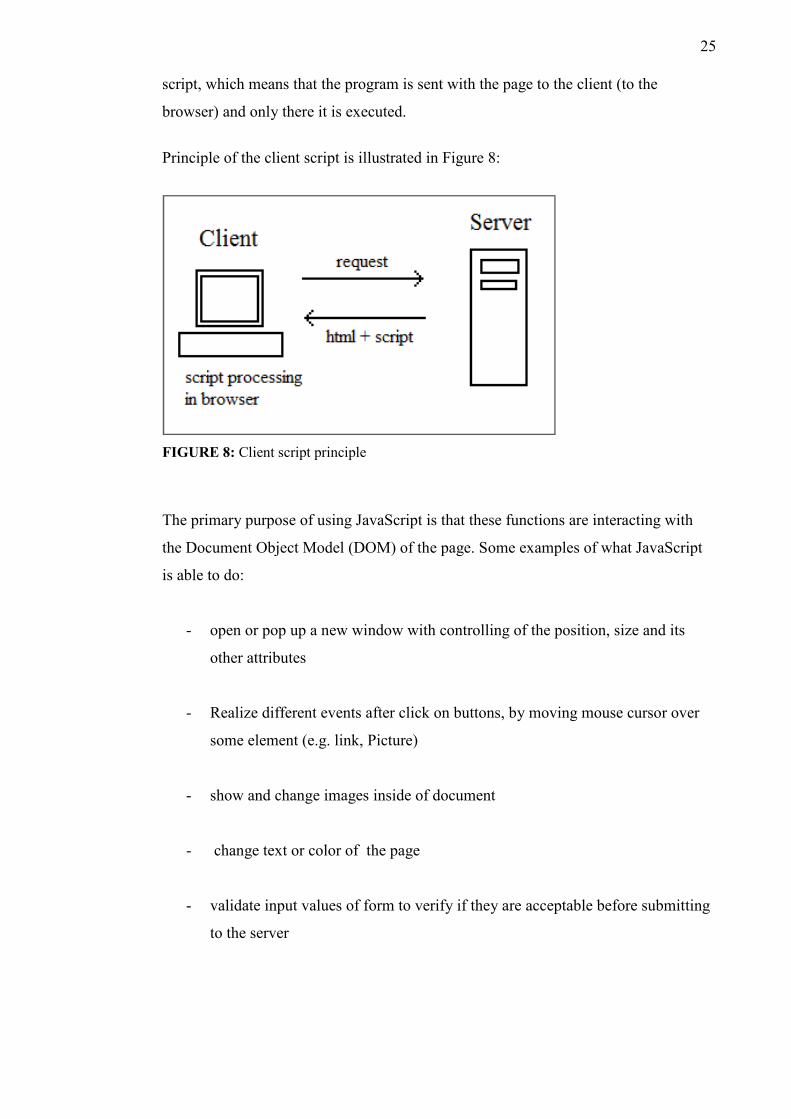
5.3.15.3.15.3.15.3.1 JavaScriptJavaScriptJavaScriptJavaScript in in in in generalgeneralgeneralgeneral JavaScript is a programming language used in web page design. JavaScript has easy
implementation, because its code is a part of the HTML code. JavaScript is the client
�Ƌ
25
script, which means that the program is sent with the page to the client (to the
browser) and only there it is executed.
Principle of the client script is illustrated in Figure 8:
FIGURE 8: Client script principle
The primary purpose of using JavaScript is that these functions are interacting with
the Document Object Model (DOM) of the page. Some examples of what JavaScript
is able to do:
- open or pop up a new window with controlling of the position, size and its
other attributes
- Realize different events after click on buttons, by moving mouse cursor over
some element (e.g. link, Picture)
- show and change images inside of document
- change text or color of the page
- validate input values of form to verify if they are acceptable before submitting
to the server

�Ƌ
26
5.3.25.3.25.3.25.3.2 Applying of Applying of Applying of Applying of JavaScriptJavaScriptJavaScriptJavaScript In the next example is shown, how JavaScript can be used inside of the HTML code;
<html>
<head>
<title>JavaScript examples </title>
</head>
<title>Student page </title>
<script type="text/JavaScript">
function redBG() {
document.bgColor = '#FF0000';
}
function text() {
document.getElementById("myDiv").innerHTML = "Hello!"
}
function picture() {
document.image.src ="/themedia/monkey.jpg/"
}
</script>
<body>
<INPUT type="BUTTON" value="background" ONCLICK='JavaScript:redBG()'>
<INPUT type="BUTTON" value="picture" ONCLICK='JavaScript:picture()'>
<INPUT type="BUTTON" value="text" ONCLICK='JavaScript:text()'>
<br><br><br>
Text: <div id="myDiv"></div>
<br><br><br>
<img src="" name="image">
</body>
</html>
ExplanationExplanationExplanationExplanation of this codeof this codeof this codeof this code • The script part starts with the tag <script type="text/JavaScript"> which is the
signal that the next code will have not HTML syntax, but the syntax of JavaScript.

�Ƌ
27
• Body of the HTML code contains three buttons; each of them calls the appropriate
JavaScript function after click on that.
• Every function has some different effect on the page content:
1. redBG() – background of page is changed to red
2. text() – to the position of document where divider is defined, the string
“Hello” is inserted
The <div> tag defines a division or a section in an HTML document:
<div id="myDiv"></div>
This divider is then reachable using its ID – in this case it is myDiv. Thus, it is
possible to update the part of page from any function.
3. Picture() - the source of defined picture in HTML code is set
OutputsOutputsOutputsOutputs of of of of the JavaScript codethe JavaScript codethe JavaScript codethe JavaScript code After loading of the page, before clicking on any button:
FIGURE 9: JavaScript example – start page

�Ƌ
28
After clicking each button:
FIGURE 10: JavaScript example – after each button is clicked
The second and third function of buttons was used also in the virtual classroom
implementation but with the difference that the buttons are located on the teacher’s
page, and the actual function is performed on the students’ pages.
5.3.35.3.35.3.35.3.3 LLLLoading of oading of oading of oading of imagesimagesimagesimages
By starting the HTML page without Django server, it is possible to load a picture from
the hard disk. In that case, the source of the assigned picture can be just a path to the
directory, where this picture is situated. However, Django server cannot reach the
local folders or in other words, Django itself does not serve static (media) files, such
as images or video. The location of the asked picture has to be somewhere in “Django
server” - and this location is determined by the URL address.
In practice this means, that some special URL address has to be defined- the address
from which it will be possible to serve media files. To accomplish the last requirement
the.views.static.serve() can be used.
In urls.py, a new pattern definition is needed:

�Ƌ
29
From django.conf import settings #Used to find MEDIA_ROOT
(r'^themedia/(?P<path>.*)$', 'django.views.static.serve',
{'document_root': settings.MEDIA_ROOT}),
The settings module has to be imported, because it is used later.
This pattern means that after visiting the URL addr/themedia/somePath.pictureName,
instead of the calling of view from app/views, the serve() view is called. The required
parameter is document_root that determines the path to the folder where the static files
are located. From this moment, this folder will be considered as the location in web
server.
With the given settings.MEDIA_ROOT Django knows that the path should be
found in settings.py file, by MEDIA_ROOT definition. Here is an example of the
given path:
MEDIA_ROOT = '/home/administrator/Desktop/media/app'
Now it is possible to access every media at the URL:
http://192.168.76.118:8000/themedia/[subfolders]/NAME
For instance, when the folder Desktop/media/app contains the image “monkey.jpg”,
this picture can be accessed by URL:
http://192.168.76.118:8000/themedia/monkey.jpg
Inside of the template file, it is not necessary to write the whole URL address in
HTML file:
document.image.src ="/themedia/monkey.jpg/"
This string will be automatically added to the actual URL address.
5.4 AJAX Working in a network environment is a time-consuming operation. In web application
environment it is necessary to give users the impression that the server responds to
their requests adequately fast. If users need to wait for the first response more than

�Ƌ
30
three seconds, most people leave the page. For this reason, the longer-time operations
are in the web environments implemented through AJAX - Asynchronous JavaScript
and XML. By the first request to server, the respond with the basic structure of the
web page is returned as fast as possible. Consequently, using mentioned AJAX, the
series of asynchronous requests and responses are carried out, that add data to this
page. The application seems then for the users to be much faster.
The basis of AJAX is the XMLHttpRequest object that is used to exchange data with a
server behind the scenes. This means that it is possible to update parts of a web page,
without reloading the whole page.
5.4.15.4.15.4.15.4.1 Text updatesText updatesText updatesText updates
In this section, changes of the text in an HTML document are analyzed more in
details. In the previous demonstration the text() function was responsible for
appending the string to the page. This certain string was given directly inside of this
function:
function text() {
document.getElementById("myDiv").innerHTML = "Hello!"
This hard-passing is generally not so useful. When a different string should be added
to the page, the next function for that string would be needed, because of which it is
obvious, how ineffective this approach is. There are many different ways how to
update the context of a page more effectively (depending also on used framework and
requirements of application). The focus in the thesis is on the way how to use AJAX
and Django views.
The idea was to update the content of the current page with the content of the second
page. As mentioned before, the context of the page is given in Django by the view,
thus the JavaScript in the current page needs to find the content from one of the
defined views. To achieve this goal, the AJAX XMLHttpRequest object needs to be
created and sent to the server. This request is then processed in the servers, the
response is created and data are sent back to the client side.

�Ƌ
31
FIGURE 11: Principle of AJAX
5.4.25.4.25.4.25.4.2 AJAX AJAX AJAX AJAX Source codeSource codeSource codeSource code XMLHttpRequest has useful methods that are used to create and send requests to the
server. Next, they are described more in detail.
“open (GET/POST, URL, True/False) - specifies the parameters of request
� GET or POST is the type of request
� True/False is the sign that specifies if the request should be handled
asynchronously (TRUE) or synchronously (FALSE) – in this case, the
executing of JavaScript will not be realized, until the server response is ready.
That can cause major problems in case the server is slow or busy because the
application can be hanged or stopped. For this reason, it is better to use
synchronous handling. The Http request has onreadystatechange event where
it is possible to specify a function that is executed when the response is ready.
send() - Sends the request to the server.
(w3schools, the world’s largest web development site)”
�Ƌ
32
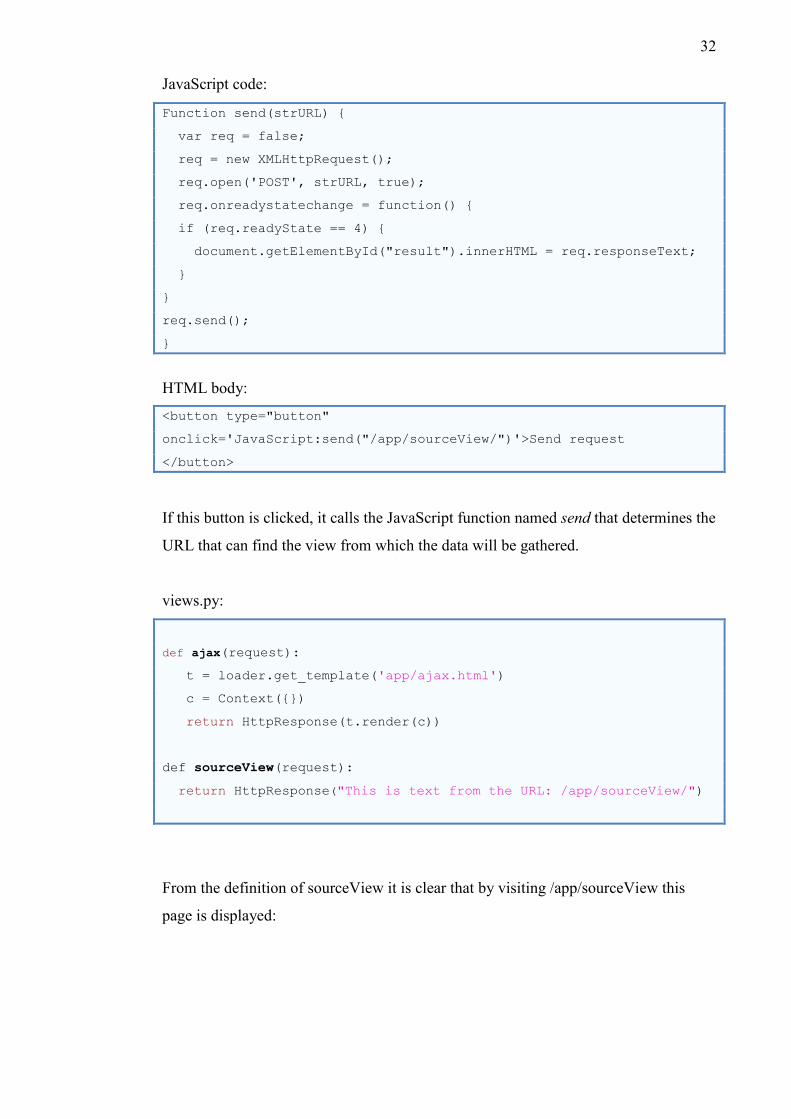
JavaScript code:
Function send(strURL) {
var req = false;
req = new XMLHttpRequest();
req.open('POST', strURL, true);
req.onreadystatechange = function() {
if (req.readyState == 4) {
document.getElementById("result").innerHTML = req.responseText;
}
}
req.send();
}
HTML body:
<button type="button"
onclick='JavaScript:send("/app/sourceView/")'>Send request
</button>
If this button is clicked, it calls the JavaScript function named send that determines the
URL that can find the view from which the data will be gathered.
views.py:
def ajax(request):
t = loader.get_template('app/ajax.html')
c = Context({})
return HttpResponse(t.render(c))
def sourceView(request):
return HttpResponse("This is text from the URL: /app/sourceView/")
From the definition of sourceView it is clear that by visiting /app/sourceView this
page is displayed:

�Ƌ
33
FIGURE 12: Demonstration of the requested view
By visiting Ajax page and after a button click, exactly this text is appended to the
current page.
FIGURE 13: Updated page after button click
5.4.35.4.35.4.35.4.3 Dynamic contextDynamic contextDynamic contextDynamic context At this point, the text is not placed directly in JavaScript function, but this function is
getting this text from the view. However, there is one problem - the content of this
view is still static. The HttpResponse is already set and the content of the requested
view will be from this moment still the same. To change it to the dynamic view, its
content needs to be gathered from some changeful source.
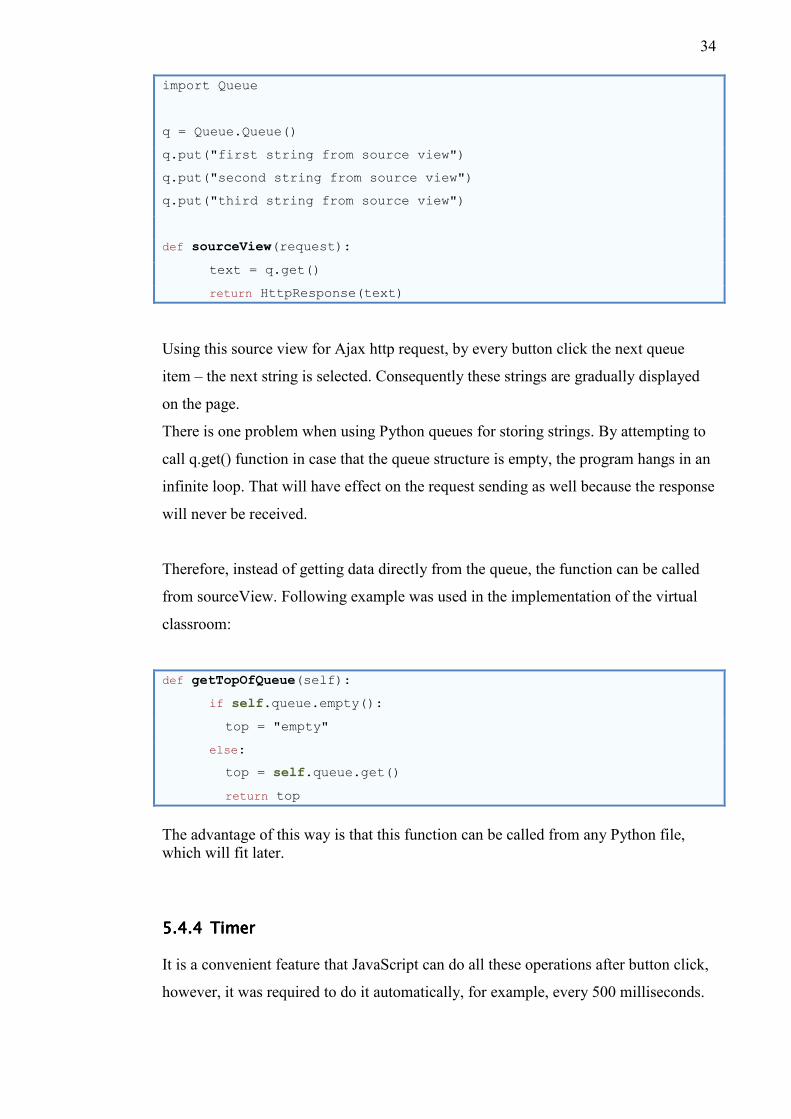
Example: Different strings are stored in the python Queue structure.
By every calling of the view, the top of this queue is popped and this obtained string
value is passed to the HttpResponse object. The result is that by each click on send
request button, the page is updated by different texts. The values of the queue could be
set from any other function. The opposite functionality of the get() function of Queue
is the function put() that adds values to this structure.
Ć
34
import Queue
q = Queue.Queue()
q.put("first string from source view")
q.put("second string from source view")
q.put("third string from source view")
def sourceView(request):
text = q.get()
return HttpResponse(text)
Using this source view for Ajax http request, by every button click the next queue
item – the next string is selected. Consequently these strings are gradually displayed
on the page.
There is one problem when using Python queues for storing strings. By attempting to
call q.get() function in case that the queue structure is empty, the program hangs in an
infinite loop. That will have effect on the request sending as well because the response
will never be received.
Therefore, instead of getting data directly from the queue, the function can be called
from sourceView. Following example was used in the implementation of the virtual
classroom:
def getTopOfQueue(self):
if self.queue.empty():
top = "empty"
else:
top = self.queue.get()
return top
The advantage of this way is that this function can be called from any Python file, which will fit later.
5.4.45.4.45.4.45.4.4 TimerTimerTimerTimer It is a convenient feature that JavaScript can do all these operations after button click,
however, it was required to do it automatically, for example, every 500 milliseconds.

�Ƌ
35
The way how to use timer in JavaScript is to add only two lines of code to the function
creating the Http request:
var t=setTimeout("start()",500);
function send() {
:
:
req.send();
t=setTimeout("start()",500);
}
5.4.55.4.55.4.55.4.5 JSONJSONJSONJSON
By the taking a look back to the example for the applying of JavaScript there is one
problem found. This problem is related to the efficiency of the used approach. To
accomplish three different issues, three different functions were used. Every function
was called after click to the appropriate button. However, by considering the
functionality of the student page of the virtual classroom implementation, the
approach should be different:
JavaScript inside of the html code sends the request, obtains the data from the
requested view and according to this content makes the appropriate action. That
means, JavaScript is supposed to recognize what exact data were received. This
concept totally changed the logic used in the previous examples, because the received
data are not used directly – the gained string is not displayed in the current page, but
used to distinguish between different commands from the queue. The way how
JavaScript is able to recognize the received data is to put this data to the special
structure called the JSON object.
“JSON (JavaScript Object Notation) is a lightweight data-interchange format. It is
easy for humans to read and write. It is easy for machines to parse and generate. JSON
is a text format that is completely language independent but uses conventions that are
familiar to programmers of the C-family of languages, including C, C++, C#, Java,
JavaScript, Perl, Python, and many others. These properties make JSON an ideal data-
interchange language. (Introducing JSON)”

�Ƌ
36
JSON is built on two structures:
1. A collection of the name/value pairs. This can be realized as an object, record
or others structures depending on the implemented language.
The form of the JSON is in this case as follows:
{cmd1:'11', cmd2:'12'}"
2. An ordered list of values. In most languages, this is realized as an array, vector
or list.
The form of the JSON is in this case more complicated:
{cmd:
[ {value:'11'},
{value:'12'},
{value:'13'} ]
}
For the implementation of the virtual classroom project, the first form of JSON was
sufficient. The name of the pair in this case is cmd and it represents the command
issued from the teacher. The value of the JSON structure represents the command
string. According to this string, the appropriate JavaScript function is triggered in the
student’s page. In the code below is shown how the comparison and the recognition of
the different commands in JavaScript can be realized. JStext is the defined JSON
object according to the first form. It can be assigned directly in the JavaScript, read
from the external file, or, as in the virtual classroom project, gained from some view:
var JStext = req.responseText
var data = eval("(" + JStext + ")");
if (data.cmd == "11"){
document.bgColor = #FF00FF
}
�Ƌ
37
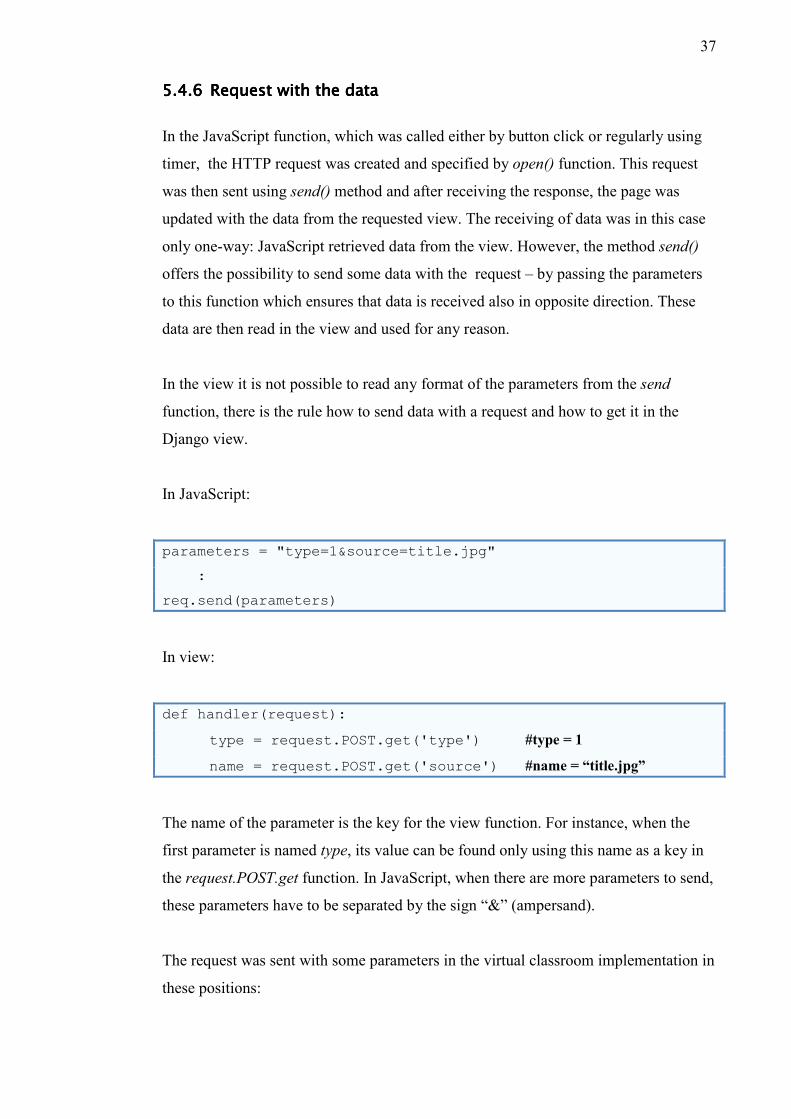
5.4.65.4.65.4.65.4.6 Request with Request with Request with Request with the datathe datathe datathe data
In the JavaScript function, which was called either by button click or regularly using
timer, the HTTP request was created and specified by open() function. This request
was then sent using send() method and after receiving the response, the page was
updated with the data from the requested view. The receiving of data was in this case
only one-way: JavaScript retrieved data from the view. However, the method send()
offers the possibility to send some data with the request – by passing the parameters
to this function which ensures that data is received also in opposite direction. These
data are then read in the view and used for any reason.
In the view it is not possible to read any format of the parameters from the send
function, there is the rule how to send data with a request and how to get it in the
Django view.
In JavaScript:
parameters = "type=1&source=title.jpg"
:
req.send(parameters)
In view:
def handler(request):
type = request.POST.get('type') #type = 1
name = request.POST.get('source') #name = “title.jpg”
The name of the parameter is the key for the view function. For instance, when the
first parameter is named type, its value can be found only using this name as a key in
the request.POST.get function. In JavaScript, when there are more parameters to send,
these parameters have to be separated by the sign “&” (ampersand).
The request was sent with some parameters in the virtual classroom implementation in
these positions:
�Ƌ
38
1. In JavaScript of the teacher’s page to specify the sending command.
2. In JavaScript of the student’s page where the user name of the appropriate
student has to be sent, because commands are stored in the queues defined for
each student separately.
5.5 HTML forms and Django HTML forms are used to pass data to a server. A form can contain input elements like
text fields, radio-buttons, checkboxes, submit buttons and any others. A form can also
contain lists selection, legend, label elements and more.
By using form in web page, two issues are required:
1. Adding the form to the HTML page. For the simple form, only few HTML tags
are needed. To create an HTML form, the <form> tag is used. Next code depends
on the type and its purpose.
2. Ensuring the functionality of the form. Generally, the script or program is needed,
which is able to serve the appropriate form. In Django, there are the implemented
functions which are intended for serving forms.
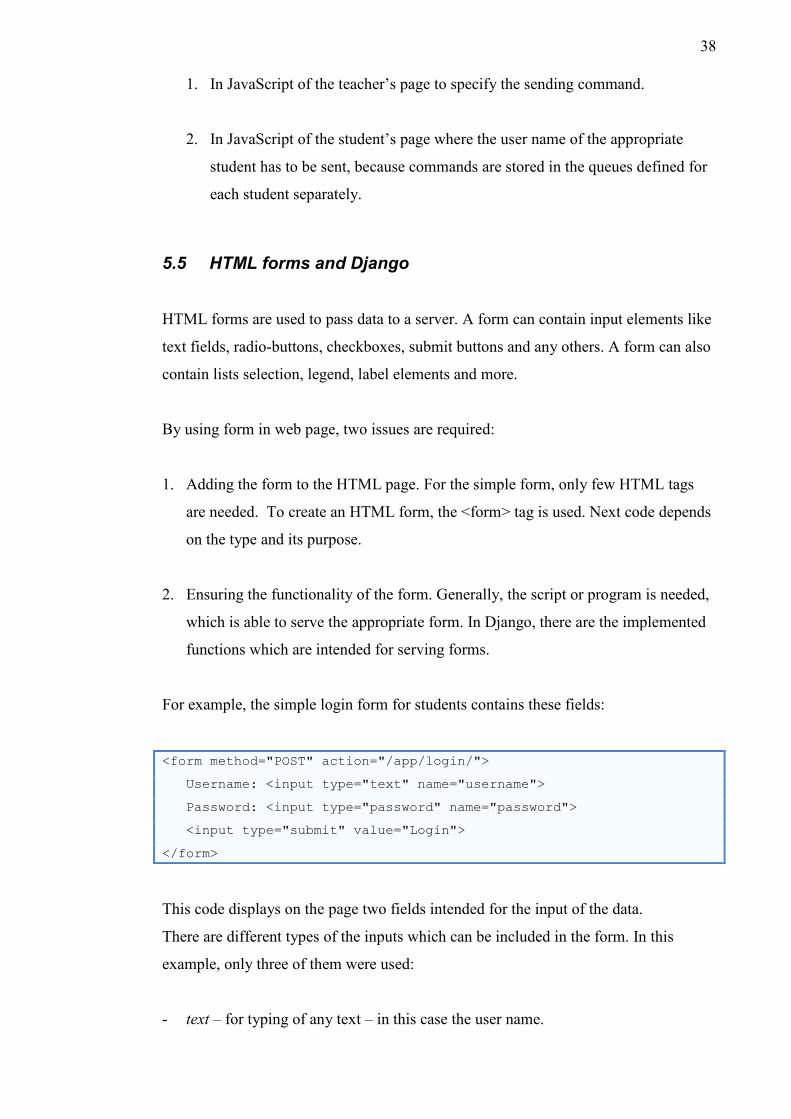
For example, the simple login form for students contains these fields:
<form method="POST" action="/app/login/">
Username: <input type="text" name="username">
Password: <input type="password" name="password">
<input type="submit" value="Login">
</form>
This code displays on the page two fields intended for the input of the data.
There are different types of the inputs which can be included in the form. In this
example, only three of them were used:
- text – for typing of any text – in this case the user name.

�Ƌ
39
- password - it varies from the text type in that instead of displaying the typed text,
only some signs are visible, like it is common by typing of passwords to any
system
- submit – this is the necessary input in every form. It represents the confirming
button. After clicking on it, the data inserted in the form are sent to the server. The
data are next processed by the view function on the server. The name of this view
is determined from the assigned action parameter of the form.
The way how to get the passed values of these fields in the given view is similar to
getting values of the parameters from HTTP request in AJAX:
userName = request.POST.get('username')
passw = request.POST.get('password')
Titles 'username' and 'password' have to be contained in the appropriate
input field of the form in the name parameter: name="username".
The variables username and passw now contain the given name and password. The
view is then responsible for the following use of these variables as needed.
5.6 Templates and parameters
Previous examples described the way how the values given in the form or in
JavaScript can be determined in the views. This was the way how to get values from
the template to the view because form and JavaScript are the parts of the template.
Sometimes, there are cases, when the opposite way is needed- when the values of
variables in the view have to be used in the JavaScript or HTML code. In chapter 5.2,
in the description of the different regular expression one example was already shown.
The value was given directly in the URL and this value was then added to the string
displayed on the page:
def parameter(request,app_id):
return HttpResponse("Passed parameter was: %s "%app_id)

�Ƌ
40
Variable does not need to be defined only in the URL. The definition can be directly
in the view.
The previous view did not use any template for the displayed page. The following
code shows how some variable or value can be added to the template:
def parameter(request, app_id):
t = loader.get_template('app/myTemplate.html')
c = Context({'view_var': "Hello!", 'url_var': app_id})
return HttpResponse(t.render(c))
Context represents the set of variables which will be recognized by the template. In
this example, two new variables were created. Their values can be then determined
under these names in the template:
- view_var – its value is the string “Hello”
- url_var – its value is the same as the value of the app_id determided from the
given URL.
An example of using these variables in the templates is illustrated below as follows:
In the body of the HTML page:
<p>Your message was: {{view_var}}.</p>
<p> Parameter in the view was {{url_view}}.</p>
In the JavaScript:
function parameters(){
message = "{{view_var}}"
document.getElementById("myDiv").innerHTML = message
}

�Ƌ
41
6 VIRTUAL CLASSROOM IMPLEMENTATION
The implementation of the virtual classroom program is based on the mutual
collaboration of the methods and Django tools described in the previous chapters.
Following list represents the key functionality of the virtual classroom:
- Registration of the students
- Creating of new students’ accounts
- Accepting of the different types of commands from the teacher page
- Storing of the commands
- Delivering of the commands to the all student’s pages
- Execution of the commands according to their type
6.1 Project modules
The functionality of the virtual classroom is ensured by:
- templates representing the user interface and including the JavaScripts which
ensure communication with the view functions
- views functions defined in the views.py module
- one module called mainModule which cares about the logic of:
o determining the types of the incoming commands from teacher
o storing of the commands
o adding of new students

�Ƌ
42
- module Student which represents the structure for storing of commands for every
student
MMMMainModuleainModuleainModuleainModule classclassclassclass
The reason of having the separate module for the general logical issues is that in the
correctly designed architecture of the software, data management should be separated
from business logic. The advantage of this approach is easier replacement of the
methods. The mainModule contains a class with few methods. One of them is
responsible for the recognition of the type of incoming commands and calls another
method which ensures pushing these commands to the queue. The commands can be
received from any source. In this implementation, the commands are received from
the JavaScript – from the page. However, the source of the commands can be any
other module or even other application. All that is required from this source program
is to know the interface for the communication with the mainModule.Actually, this
was the most modified part of the right project created in company. The logical part in
mainModule was derived from it but the source of the commands was totally different.
On the other hand, the mainModule is also responsible for the storing of the
commands. These are then taken out by the Django view and the command has effect
on the page content. The effect of the commands is also replaceable. The views are
nothing else that functions and commands are simple strings or numbers, which means
that they are applicable anywhere.
The next advantage of the approach where the logic is separated from the views and
data is that the particular issues can be tested separately without too much effort. For
example, the part of the issuing of a command from teacher browser and its adding to
the queue can be implemented and tested independently from the functions of the
students’ pages. The same is true for the student’s page. The commands can be wrung
into the queue directly in the view, it is not necessary to have a functional system of
pushing these commands to the queue by teacher.
�Ƌ
43
Student classStudent classStudent classStudent class
This class is responsible for storing commands for every new logged student. The
attributes of the student class are:
• the name of the student
• the queue of commands
This class is used by the mainModule method which is responsible for creating of the
list of all logged students. The content of this list is changed depending on the actual
users. The registration data of students are stored at the different place – in the
database.
6.2 Communication
Communication between teacher's and student's page is assured by using of queue of
commands. The task of the teacher's part is to insert commands to this queue and the
task of the student’s part is to select them from this queue. The process of the
implementation of these tasks had two main phases:
A. The first implementation considered only one user – the issue was to ensure the
basic communication between two sides - the controlling page of the teacher and
the student page.
B. The second implementation included the storing of the student's data and
registration of the students. The command issued by the teacher had to be received
to all students which were logged in.
Following diagrams present the processes of the inserting/selecting commands to/from
the queue considering only simpler implementation with only one student:

�Ƌ
44
FIGURE 14 Communication diagram – student part
FIGURE 15 Communication diagram – teacher part
BriefBriefBriefBrief description of the teacher’s partdescription of the teacher’s partdescription of the teacher’s partdescription of the teacher’s part::::
• An HTTP request is sent from the teacher’s HTML template
• This request is then forwarded to the handleRequests method of the
mainModule which is responsible for the logical part of command recognizing
sd communication diagram STUDENT
Student's page
Queue MainModule
v iews1: send request(URL)
2: get command for student :cmdString
3: get top :cmdString
4: send response(JSON)
sd Communication diagram TEACHER
Teacher's page v iews
mainModuleQueue
1: send request(URL, command)
2: forward(request)
3: determine type(request)
3.1: find the number for queue
4: add command(cmdString)

�Ƌ
45
• This method finds the type of the command and others data according to the
type, decides about the string which will be inserted to the queue
• Adds the command string to the queue
Command Command Command Command stringstringstringstring
This string should represent the command distinguishable by the student’s pages. In
the implementation, the string consists of two parts – a number which represents the
number of the command and the other string that can be the name of the image, some
text, etc. The first part – the number is different from the initial type of commands.
The reason is to avoid potential misunderstandings, because the numbers do not have
to be the same. The student’s and teacher’s logic are two separate parts. The interface
between them is mentioned handleRequests method. JavaScript of the student’s page
does not need to know how the commands are implemented in the teacher’s page
functions.
BriefBriefBriefBrief ddddescription of the student’s partescription of the student’s partescription of the student’s partescription of the student’s part::::
• An HTTP request for the view is sent from JavaScript of teacher’s template
• This view creates an JSON Object which is sent as the response back to the
JavaScript
• Created JSON Object contains the command string selected from the queue
• This string is selected by the mainModule using the method for the getting of
the top of the implemented queue
The most important difference between this implementation and the second one
(which is also the final implementation) was the location of the Queue structure. By
considering only one student, the queue was implemented directly in the mainModule.
This queue contained the strings intended for the only one student’s page. When the
�Ƌ
46
command string is selected from the queue, this item is deleted. This system ensures
that the newest commands are delivered to the student’s JavaScript.
In the final implementation, where the system has to accept any amount of the
students, one queue was not sufficient. The reason is deleting of the selected
commands from this queue. When one student selected the command, the second
student had no opportunity to select the same command. This problem could be solved
in different ways, two proposals suggested in this project were:
- Creating some shared queue where all students have an access to that and the
selected commands are not deleted. Required issues for this way were:
o To ensure some system for finding and using the newest commands which
were not already used for the appropriate student.
o To delete the commands used by all actually logged students with the
remembering of the count of logged students
- Creating the queue for every logged student. Required issues for this way were:
o To create the list of the logged students
o To create some structure for every student which contains any ID of the
student and the queue for this student
After comparing these two ways from different aspects, the second way was selected
for the final implementation. The list of command was defined in the mainModule and
the structure for every student was created using the mentioned class Student.
6.2.1 Issuing command from the teacher and inserting it to the queue in the
final implementation
The process of the issuing command from teacher and its way to the queues in the
final implementation is shown in the following diagrams:

�Ƌ
47
FIGURE 16: Communication diagram – teacher part
Individual issues in this communication:
1. Send request for the view
In the JavaScript in the teacher’s page, an HTTP request is created. Requested
URL is: /app/control/handler/ which ensures that the view controlHandler is
called. Parameters of the request: type – number which represents the type of the
command and source – contains the appropriate contents of the command. The
values of both parameters are gained from the onClick() method of the clicked
button. For instance, the type = 3 involves the commands responsible for
displaying of the specific image. The source of this type of command is the name
of the picture which should be displayed. There can be some command which does
not need to contain the source parameter. This is the major benefit of the
JavaScript function – when the expected parameter is not included in the calling of
this function, no exception is fetched, instead of that, the value of the missing
parameter is set to the UNDEFINED which does not cause any error.
sd communication diagram TEACHER
Teacher's page v iews
mainModule
Queue
Student
1: send request(URL, command)
2: forward(request)
3: find in l ist(name)
4: add command(name)
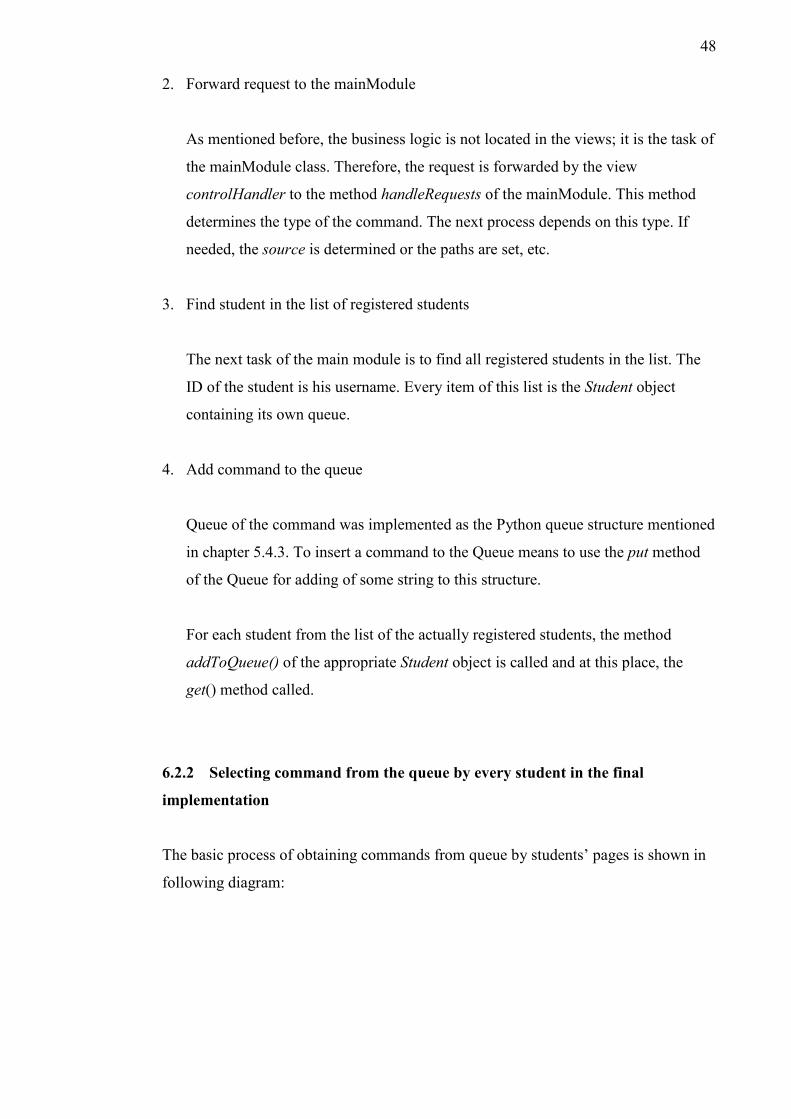
�Ƌ
48
2. Forward request to the mainModule
As mentioned before, the business logic is not located in the views; it is the task of
the mainModule class. Therefore, the request is forwarded by the view
controlHandler to the method handleRequests of the mainModule. This method
determines the type of the command. The next process depends on this type. If
needed, the source is determined or the paths are set, etc.
3. Find student in the list of registered students
The next task of the main module is to find all registered students in the list. The
ID of the student is his username. Every item of this list is the Student object
containing its own queue.
4. Add command to the queue
Queue of the command was implemented as the Python queue structure mentioned
in chapter 5.4.3. To insert a command to the Queue means to use the put method
of the Queue for adding of some string to this structure.
For each student from the list of the actually registered students, the method
addToQueue() of the appropriate Student object is called and at this place, the
get() method called.
6.2.2 Selecting command from the queue by every student in the final
implementation
The basic process of obtaining commands from queue by students’ pages is shown in
following diagram:
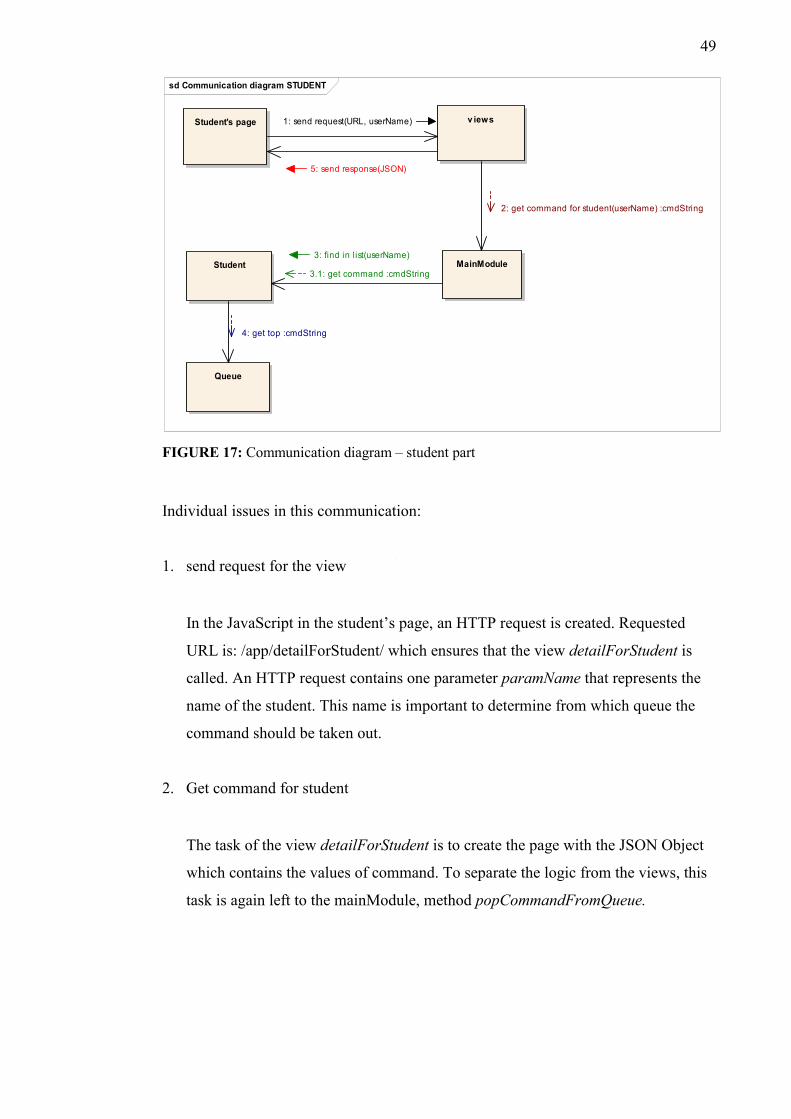
�Ƌ
49
FIGURE 17: Communication diagram – student part
Individual issues in this communication:
1. send request for the view
In the JavaScript in the student’s page, an HTTP request is created. Requested
URL is: /app/detailForStudent/ which ensures that the view detailForStudent is
called. An HTTP request contains one parameter paramName that represents the
name of the student. This name is important to determine from which queue the
command should be taken out.
2. Get command for student
The task of the view detailForStudent is to create the page with the JSON Object
which contains the values of command. To separate the logic from the views, this
task is again left to the mainModule, method popCommandFromQueue.
sd Communication diagram STUDENT
Student's page
Queue
MainModule
v iews
Student
1: send request(URL, userName)
2: get command for student(userName) :cmdString
3: find in list(userName)
3.1: get command :cmdString
4: get top :cmdString
5: send response(JSON)
�Ƌ
50
3. Find student in list
The task of the popCommandFromQueue method is to return the newest command
from the queue of the student from which the request was sent. To find the queue,
the student’s userName has to be found in the list of the registered students.
4. Get top of the queue
To select command from the Queue means to use the get() method of the
implemented python Queue which returns the last item of the Queue and deletes it.
5. Send response
The gained value in the get method is then used in the view to create HTTP
Response with the JSON Object containing the command string. JSON is then
parsed by the JavaScript and according to the content if the command string, the
content of the page is changed.
6.3 Django templates, URLs and views used in the final implementation:
Templates (HTML files)Templates (HTML files)Templates (HTML files)Templates (HTML files)
• login - intended for registration of the students to be able to see the main student’s
page.
• addUsers - intended for adding new students to the database
• student - the main student’s page with the pictures and texts from the teacher.
• teacher - the page from which the student’s pages are controlled.
�Ƌ
51
URLsURLsURLsURLs
The templates noted above, which are utilized by the pages used by students are
reachable on these Django URL addresses:
- app/login/
- registration form
- after successful registration, the page is redirected to the main
student’s page
URL addresses intended for pages used by teacher:
- app/control/ - main teacher’s page
- app/addUsers/ - form for adding of new students
ViewsViewsViewsViews
1. Controller – displays the teacher’s page
2. controlHandler – resends the request to the mainModule where the request is
processed
3. login – ensures the functionality of the registration form - verifies the given
student’s data
4. detailForStudent
- determines the name of the student from the request
- pops the command from the queue of the appropriate student
- creates the JSON object containing this command
5. addUsers
- ensures the functionality of the form for adding new users
- determines the given values and if this user is not already in the database,
creates new database record for this student
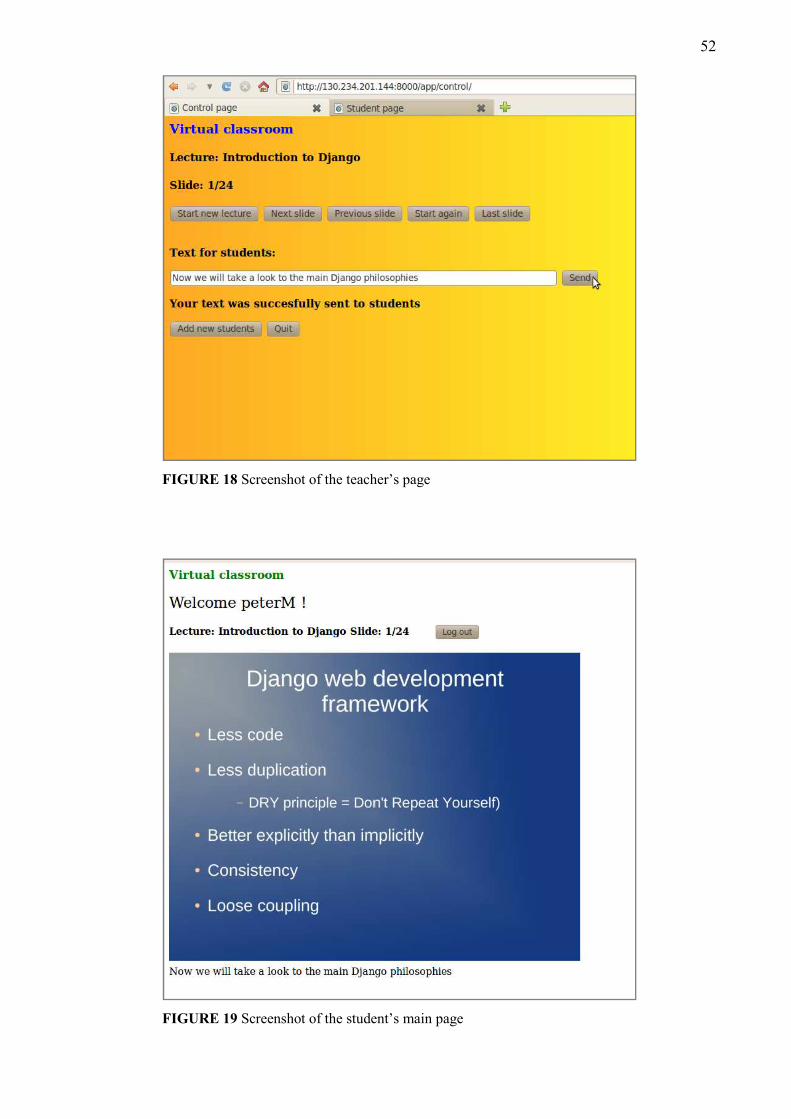
�Ƌ
52
FIGURE 18 Screenshot of the teacher’s page
FIGURE 19 Screenshot of the student’s main page

�Ƌ
53
6.4 Student registration
Every student has to make a registration before having access to the main page. The
login template is intended for this registration. The content of this template is:
• form with the input fields for the name and password
• JavaScript which determines the text value which is displayed on the page in
case that there was some error by logging
The URL specified in action parameter of the form refers to the view login. Its task is
to check up the given username and password. The page is redirected to the main
student page in case that following conditions are met:
1. the given user name is included in the student’s database
2. the given password suits the appropriate student name
In case that any of these conditions is not met, the warning about the appropriate issue
is displayed. When the main page is displayed, the name of the appropriate student is
displayed on this page.
FIGURE 20 Layout of page for registration - after inserting the wrong username

�Ƌ
54
6.5 Adding new users
To add a new record about the student who will be allowed to use virtual classroom,
this new data has to be added to the database of the students. The template addUsers
is intended for this need. Parts of this template are:
• form with the name and password input field
• JavaScript which determines the warning text value which is displayed on the
page if needed
The URL specified in action parameter of the form refers to the view addUsers. The
task of this view is to check if the given username already exists, because every
username can occur in the student’s database only once. If the name is not in the
database, the new record with the given data is created.
FIGURE 21 Layout of the page for the adding of new records to the student’s database
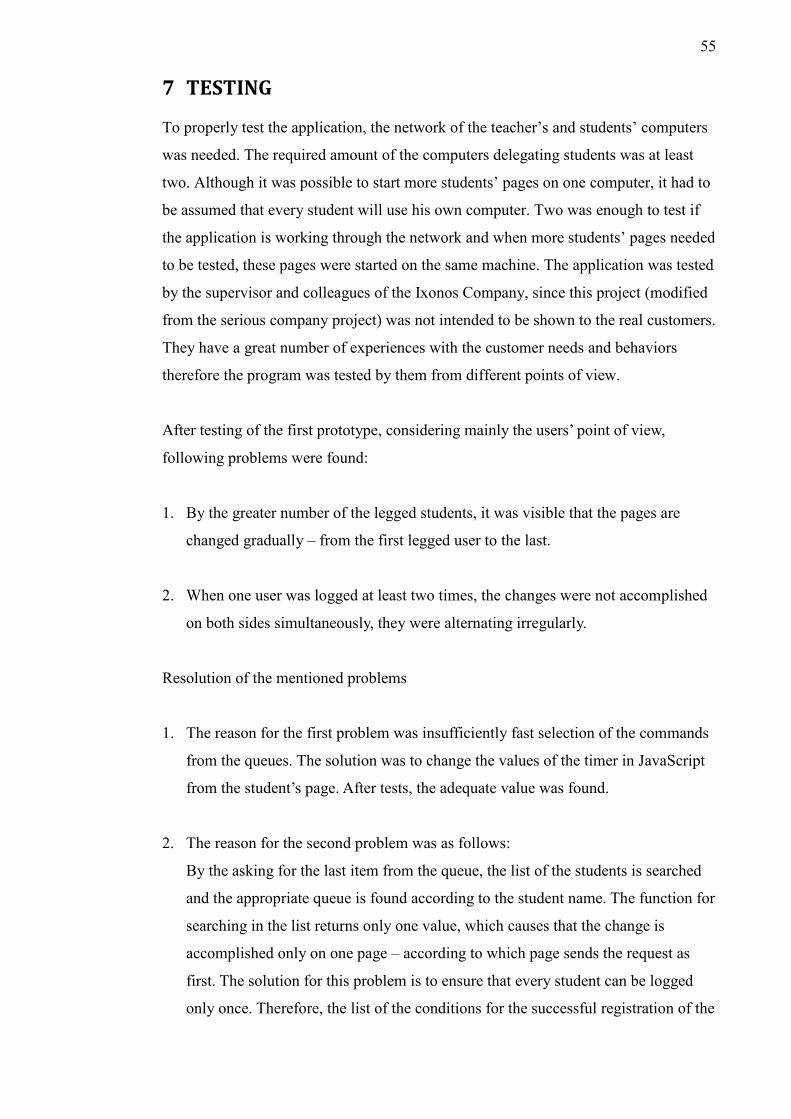
�Ƌ
55
7 TESTING To properly test the application, the network of the teacher’s and students’ computers
was needed. The required amount of the computers delegating students was at least
two. Although it was possible to start more students’ pages on one computer, it had to
be assumed that every student will use his own computer. Two was enough to test if
the application is working through the network and when more students’ pages needed
to be tested, these pages were started on the same machine. The application was tested
by the supervisor and colleagues of the Ixonos Company, since this project (modified
from the serious company project) was not intended to be shown to the real customers.
They have a great number of experiences with the customer needs and behaviors
therefore the program was tested by them from different points of view.
After testing of the first prototype, considering mainly the users’ point of view,
following problems were found:
1. By the greater number of the legged students, it was visible that the pages are
changed gradually – from the first legged user to the last.
2. When one user was logged at least two times, the changes were not accomplished
on both sides simultaneously, they were alternating irregularly.
Resolution of the mentioned problems
1. The reason for the first problem was insufficiently fast selection of the commands
from the queues. The solution was to change the values of the timer in JavaScript
from the student’s page. After tests, the adequate value was found.
2. The reason for the second problem was as follows:
By the asking for the last item from the queue, the list of the students is searched
and the appropriate queue is found according to the student name. The function for
searching in the list returns only one value, which causes that the change is
accomplished only on one page – according to which page sends the request as
first. The solution for this problem is to ensure that every student can be logged
only once. Therefore, the list of the conditions for the successful registration of the
�Ƌ
56
student was updated:
1. the given user name is included in the student’s database
2. the given password suits the appropriate student name
3. the student is not already logged
After next testing, one more weakness of the project was found:
It does not have to be visible for every user, but regarding the programming and
technical part, there is nothing to ensure the logging out of the students after suddenly
closing of the browser. The student is not logged out, but the only way how to get to
the main page again is to login again – which is not possible, because of the third
condition in the login function.
Possible solutions
1. After closing the page, no more requests are sent. There could be some method
which would be regularly checking the amount of the incoming requests for every
student in the list of logged students. In case that there was no request in some
time limit, the appropriate student can be deleted from the list. By the setting of
the adequate limit, this could assure that by the next student’s attempt and the
login will be successful.
2. There is some way how to create cookies in Django. By definition of the time of
the expiration, it is possible to find out that the browser was closed. After
determining of the closed browser of any student, the appropriate student will be
deleted from the list.

�Ƌ
57
8 CONCLUSION
The idea of the virtual classroom is not new. There are already many institutions
which provide this modern educational system. The reason of creating this
implementation was that the basically its functionality was the closest to the
functionality of the initial project assigned by the supervisor of the company. The
utilization of the initial project is undoubted; however, it could not be mentioned in
the concept of thesis.
The implementation of the virtual classroom was based on that project; it uses the
same methods for communication between project modules, same environment and
same modern technologies. As mentioned in the introduction, this project
demonstrates only the combination of all used methods into one larger application.
The actual utilization of that application is not very large at this point; however, it
could be used as a base for the next possible projects created in the Django framework
or the applications where web technologies are needed. After getting the assignment
in the company, the most time-consuming part was gaining of information about
technologies. The next long step was to search the way how to effectively and
logically combine the theoretical issues in the project. With the help of this thesis, this
and many similar projects could be easier to implement.
The demonstration of the original project created in Ixonos Company was presented to
the representatives of the different companies which are considered as the potential
customers. The feedbacks were positive and there the whole application will be
further developed, although the particular steps of the next process are still open.
My personal experience was very positive. In company I got the opportunity to create
useful applications which can potentially be used in the future. I improved my basic
programming knowledge and learnt about great number of new technologies. The
participation in the company development process and team working is a great
experience for my further work life. I learnt how to plan different tasks and I found
my own weaknesses which I can improve. The realized implementations in Django
framework made me perfectly familiar with the web development and web
technologies.

�Ƌ
58
REFERENCES
Introducing JSON, Referred to on April 25, 2011 http://www.json.org/ Ixonos Plc company website, Referred to on May 02, 2011 http://www.ixonos.com/ Wikipedia – Eclipse environment, Referred to on May 02, 2011 http://en.wikipedia.org/wiki/Eclipse_%28software%29 Wikipedia – Scrum development, Referred to on April 28, 2011 http://en.wikipedia.org/wiki/Scrum_%28development%29 W3schools, the world’s largest web development site, Referred to on April 21, 2011 http://www.w3schools.com


