187
Virtual Genesys User Guide Revision 2.0.0 -- July 2007 Copyright © 2007 Marketing Systems Group

Virtual Genesys User Guide
Revision 2.0.0 -- July 2007
Copyright © 2007 Marketing Systems Group
Virtual Genesys User Guide
ii
Copyright Notice Copyright © 2007 Marketing Systems Group. All Rights Reserved. Information in this document is provided in connection with Marketing Systems Group products. No License, express or implied, to any intellectual property rights is granted by this document. This document as well as the software described in it is furnished under license and may only be used or copied in accordance with the terms of the license. The information in this manual is furnished for informational use only, is subject to change without notice, and should not be construed as a commitment by Marketing Systems Group. Marketing Systems Group assumes no responsibility or liability for any errors or inaccuracies that may appear in this document or any software that may be provided in association with this document. Except as permitted by such license, no part of this document may be reproduced, stored in a retrieval system, in any form or by any means without express written consent of Marketing Systems Group. Some names, products, and services mentioned herein are the trademarks or registered trademarks of Marketing Systems Group in the United States or other countries. Other names and brands may be claimed as the property of others. Marketing Systems Group 565 Virginia Drive Fort Washington, PA 19034 U.S.A. Published July 2007

iii
Table Of Contents Virtual Genesys System Overview .................................................................... v What is Virtual Genesys? ............................................................................... v Projects and Cells ......................................................................................... v Help ........................................................................................................... v
Installing and Running Virtual Genesys ............................................................. 1 Installing Virtual Genesys .............................................................................. 1 Running Virtual Genesys................................................................................ 3
Virtual Genesys toolbar................................................................................... 5 Virtual Genesys toolbar buttons ...................................................................... 5
Working with Projects ..................................................................................... 7 Project Overview .......................................................................................... 7 Create New Project ....................................................................................... 8 Open Existing Project .................................................................................... 9 Close Current Project ...................................................................................10 View Existing Project....................................................................................11 Delete Existing Project .................................................................................14
Working with Cells ........................................................................................16 Cell Overview..............................................................................................16 Create New Cell ..........................................................................................18 Open Existing Cell .......................................................................................21 Close Current Cell........................................................................................23 View Existing Cell ........................................................................................24 Delete Existing Cell ......................................................................................27
Defining a Sampling Frame by Geographies ......................................................29 Define a Geographic Sampling Frame .............................................................29 Define a National Sampling Frame .................................................................30 Define a Non-National Sampling Frame...........................................................34 Define a Sampling Frame by ADI ...................................................................38 Define a Sampling Frame by Area Code ..........................................................40 Define a Sampling Frame by Area Code/Exchange............................................42 Define a Sampling Frame by Census Division...................................................47 Define a Sampling Frame by Census Region ....................................................49 Define a Sampling Frame by Core-Based Statistical Areas .................................51 Define a Sampling Frame by County...............................................................54 Define a Sampling Frame by Nielsen DMA Market.............................................58 Define a Sampling Frame by Metropolitan Areas (Old).......................................60 Define a Sampling Frame by Nielsen County Size .............................................63 Define a Sampling Frame by State .................................................................65 Define a Sampling Frame by Time Zone..........................................................67
Defining a Sampling Frame by ZIP Codes .........................................................69 Define the ZIP Code Area .............................................................................69 Create a Coverage Report.............................................................................72 Apply a Cutoff .............................................................................................73 Cutoff Manager ...........................................................................................75 Some ZIP codes were not added....................................................................77
Defining a Sampling Frame by Enhanced Geography ..........................................78 Define the Geographic Area ..........................................................................78 Create the Coverage Report ..........................................................................81
Virtual Genesys User Guide
iv
Cutoff Manager ...........................................................................................85 Defining a Sampling Frame by Congressional Districts ........................................88 Define the Congressional District ...................................................................88 Create Coverage Report ...............................................................................91 Cutoff Manager ...........................................................................................95
Overlaying Demographics...............................................................................99 Demographic Distribution .............................................................................99 Demographic Median....................................................................................99 Target Exchanges by using Demographic Distribution .......................................99 Cutoff Manager .........................................................................................102 Categories and Breaks ...............................................................................103 Target Exchanges by using Median Demographic Values..................................104
Overlaying PRIZM Codes ..............................................................................106 Define Cutoff & PRIZM Reports ....................................................................110 Cutoff Manager .........................................................................................112
Generation of Sample ..................................................................................115 Calculate Cell Statistics ..............................................................................116 Total HH as MOS .......................................................................................118 Target HH as MOS .....................................................................................118 Adjust the MOS for a Cell............................................................................119 Specify Sample Parameters, Generating Sample ............................................120 Additional Parameters ................................................................................122 After Generation Parameters are Defined, Generate the Sample .......................127
Default System Settings...............................................................................129 To Change the Database Version Temporarily ................................................130 To Change the Measure of Size Temporarily ..................................................131 To Change the Measure of Size Permanently .................................................132 To Change the Generation Method Permanently .............................................133 To Change Exchange Types Permanently ......................................................134 To Change Sample Formats Permanently ......................................................135 To Change the Working Bank Threshold Permanently......................................145
Utilities......................................................................................................146 View Code Book ........................................................................................146 View Database ..........................................................................................147 View Exchange Information.........................................................................147 View Database Information for a Defined Area ...............................................151 Re-create Sample File ................................................................................155 Store to Database .....................................................................................159 Append Data.............................................................................................162
Glossary ....................................................................................................168 Index ........................................................................................................177

v
Virtual Genesys System Overview
What is Virtual Genesys? Virtual Genesys enables any user with web access to design, manage, and generate Random Digit Dialing (RDD) samples. Virtual Genesys was built on the Genesys v2.0 desktop version to support the sampling and list provision side -- Listed Households (LHH) & Business -- of Marketing Systems Group business. Additional features will include the ability to specify and generate counts for LHH or business samples, and order and receive lists of telephone numbers 24x7.
Projects and Cells Virtual Genesys makes use of projects and cells to define and organize sample parameters, as well as related information including generated sample. The project is created first, and is used to capture and track detailed information associated with a particular sample generation job or client. Cells are then created within the project and are used to define the sampling frame and pull the actual sample. Multiple projects, in addition to multiple cells within each project, can also be created.
Help
Every window in Virtual Genesys offers some sort of Help. is found at the
bottom of many and dialog boxes, windows, and messages. This Help button, , is
scattered throughout. This Help button, , is found in the top right corner of many windows. Click on it, then click inside the problematic field in the same window. This Help does not work for all fields.
1
Installing and Running Virtual Genesys
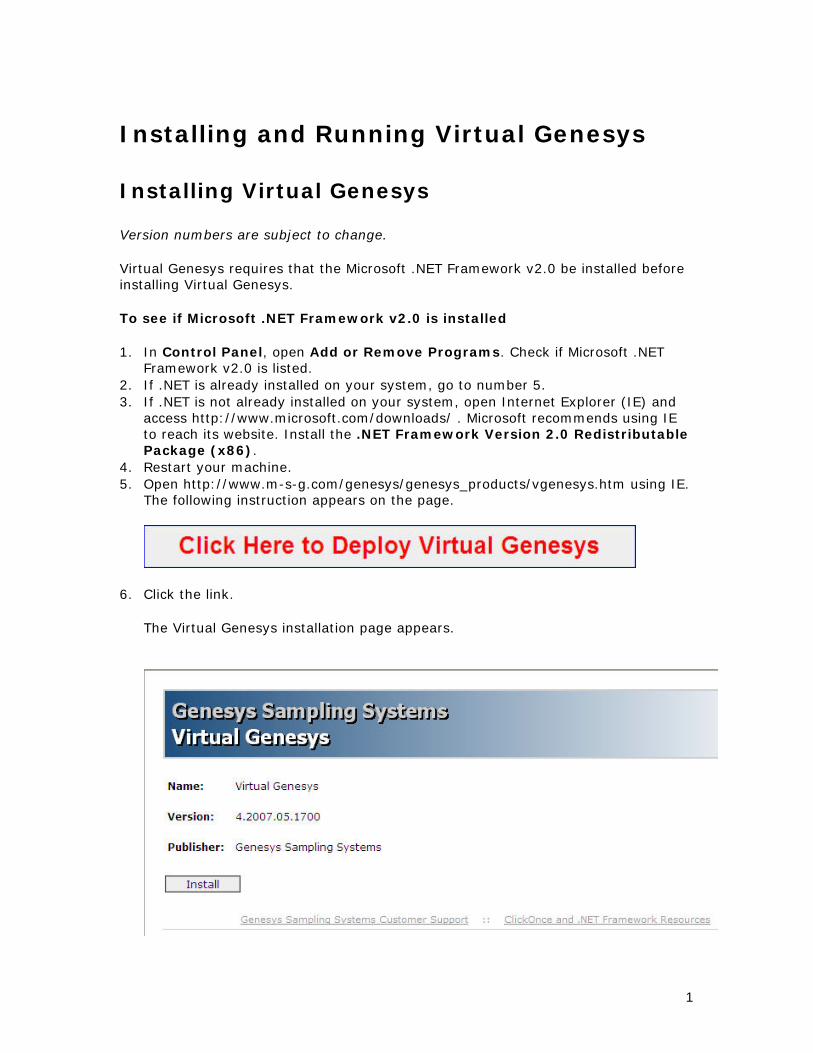
Installing Virtual Genesys Version numbers are subject to change. Virtual Genesys requires that the Microsoft .NET Framework v2.0 be installed before installing Virtual Genesys. To see if Microsoft .NET Framework v2.0 is installed 1. In Control Panel, open Add or Remove Programs. Check if Microsoft .NET
Framework v2.0 is listed. 2. If .NET is already installed on your system, go to number 5. 3. If .NET is not already installed on your system, open Internet Explorer (IE) and
access http://www.microsoft.com/downloads/ . Microsoft recommends using IE to reach its website. Install the .NET Framework Version 2.0 Redistributable Package (x86).
4. Restart your machine. 5. Open http://www.m-s-g.com/genesys/genesys_products/vgenesys.htm using IE.
The following instruction appears on the page.
6. Click the link.
The Virtual Genesys installation page appears.

Virtual Genesys User Guide
2
7. Click Install .
Virtual Genesys installs.
Next, Virtual Genesys launches.
Then, Virtual Genesys loads.

Virtual Genesys User Guide
3
The final window displays the Virtual Genesys menu and toolbar.
Running Virtual Genesys After Virtual Genesys is installed, it creates a shortcut on the Start menu, under Programs or All Programs. Depending upon your settings or your version of Windows, you may see Programs or All Programs when you click Start. This documentation uses the standard Programs to provide navigation information.
The blue icon appears under Genesys Sampling Systems. When updates for Virtual Genesys are published, the program automatically updates itself prior to running. To exit Virtual Genesys
• On the Client menu, click Exit Virtual Genesys.

Virtual Genesys User Guide
4
This message appears.
( Click Yes or No . )
Virtual Genesys User Guide
5
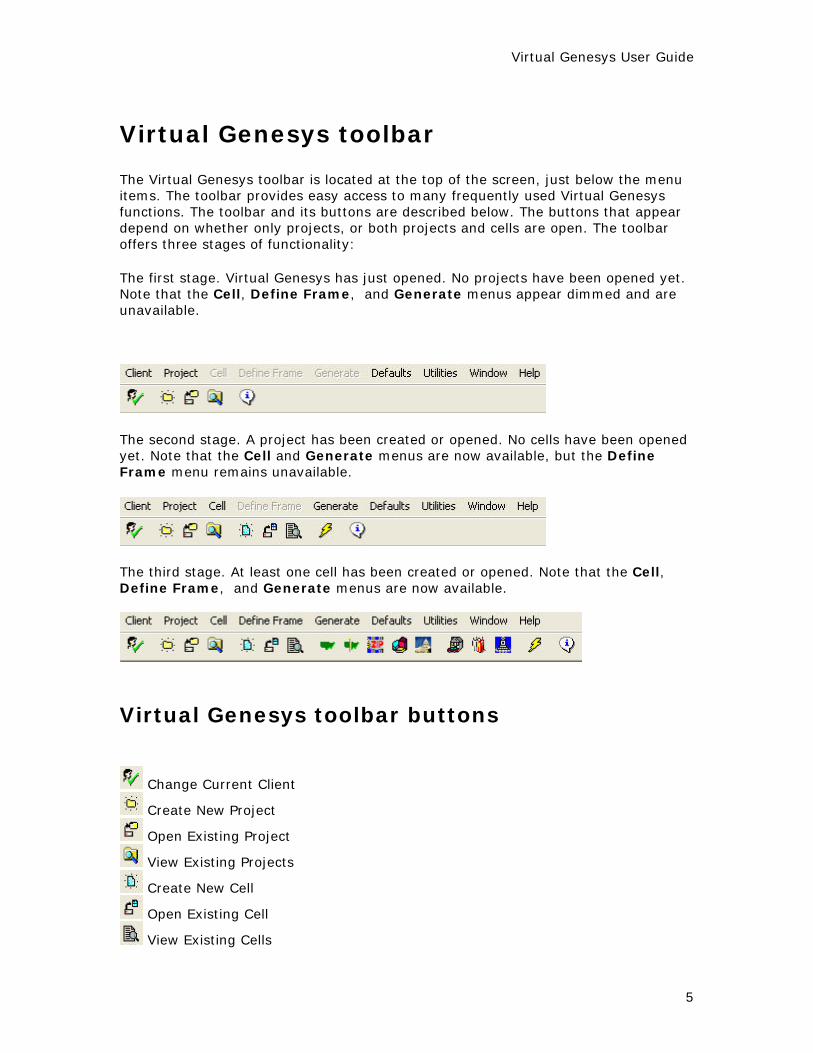
Virtual Genesys toolbar The Virtual Genesys toolbar is located at the top of the screen, just below the menu items. The toolbar provides easy access to many frequently used Virtual Genesys functions. The toolbar and its buttons are described below. The buttons that appear depend on whether only projects, or both projects and cells are open. The toolbar offers three stages of functionality: The first stage. Virtual Genesys has just opened. No projects have been opened yet. Note that the Cell, Define Frame, and Generate menus appear dimmed and are unavailable.
The second stage. A project has been created or opened. No cells have been opened yet. Note that the Cell and Generate menus are now available, but the Define Frame menu remains unavailable.
The third stage. At least one cell has been created or opened. Note that the Cell, Define Frame, and Generate menus are now available.
Virtual Genesys toolbar buttons
Change Current Client
Create New Project
Open Existing Project
View Existing Projects
Create New Cell
Open Existing Cell
View Existing Cells

Virtual Genesys User Guide
6
Define National Geography
Define Non-National Geography
Define ZIP Code
Define Enhanced Geography
Define Congressional Districts
Demographic
Demographic Median Targets
PRIZM Code
Generate
About Virtual Genesys

Virtual Genesys User Guide
7
Working with Projects
Project Overview The first step in beginning the sampling process is to create a project. Only one project can be open or active at a time. Genesys provides a number of fields for capturing and tracking information about a project. The Create New Project dialog box captures default, required, and optional information. Project Date is default information. This information appears when the dialog box is displayed and can't be modified here. Project ID is required information necessary to create a project. Project Name, Client, Account Executive, and Description are optional. These fields can be modified. Client: This field can be used for the client sponsoring this project. Account Executive: This field can be used for the project's account executive, the manager, project director, or anyone associated with the project. Project Description: This field allows for a detailed description of the project, including the number of interviews, geography of the sample, and interviewing dates. Text automatically wraps to the next line. Pressing ENTER completes the Create New Project process and opens the new project. After reviewing the
information, open the project by clicking OK or pressing ENTER.
Virtual Genesys User Guide
8
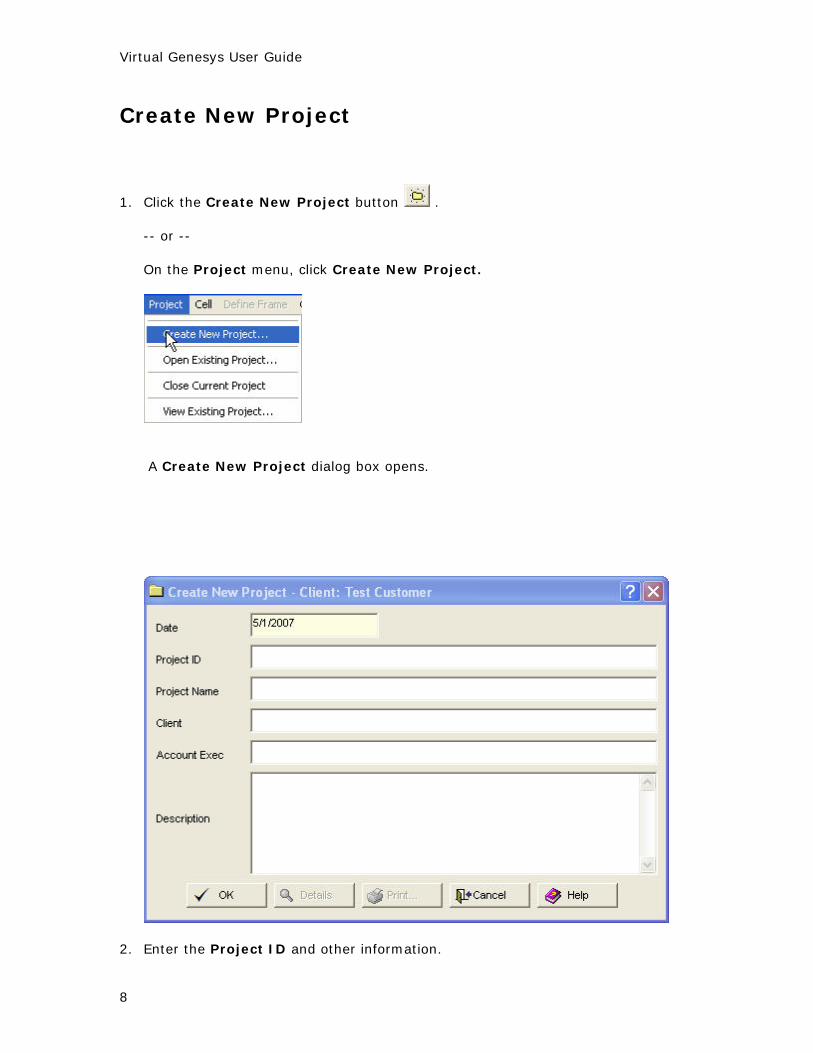
Create New Project
1. Click the Create New Project button .
-- or --
On the Project menu, click Create New Project.
A Create New Project dialog box opens.
2. Enter the Project ID and other information.

Virtual Genesys User Guide
9
3. Click OK to create the project. The project name appears in the Virtual Genesys title bar.
Open Existing Project
1. Click the Open Existing Project button .
-- or --
On the Project menu, click Open Existing Project.
An Open Existing Project dialog box opens.

Virtual Genesys User Guide
10
It may be necessary to scroll through the window to find a particular project. Use the Sorted by feature to arrange projects by Project ID or Latest Date.
2. Click a project and click Open .
Another Open Existing Project dialog box opens.
3. Click OK . The name of the project appears in the Virtual Genesys title bar.
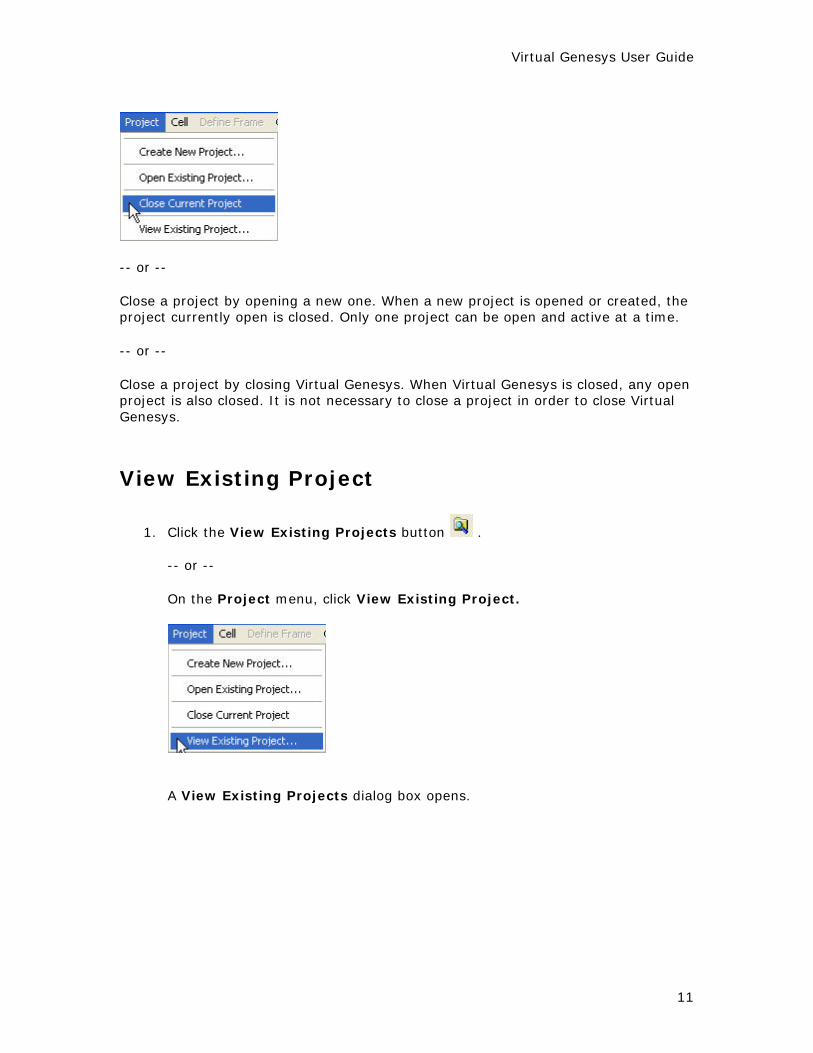
Close Current Project On the Project menu, click Close Current Project.
Virtual Genesys User Guide
11
-- or -- Close a project by opening a new one. When a new project is opened or created, the project currently open is closed. Only one project can be open and active at a time. -- or -- Close a project by closing Virtual Genesys. When Virtual Genesys is closed, any open project is also closed. It is not necessary to close a project in order to close Virtual Genesys.
View Existing Project
1. Click the View Existing Projects button .
-- or --
On the Project menu, click View Existing Project.
A View Existing Projects dialog box opens.

Virtual Genesys User Guide
12
Click on any column header (ID, Name, Creation Date, Description) to sort the projects on that column name. Click again on the same column header to change the direction of the sort (ascending or descending).
2. Select the project to be viewed by clicking its ID.
3. Click Details .
A Project Detail dialog box opens.
Virtual Genesys User Guide
13
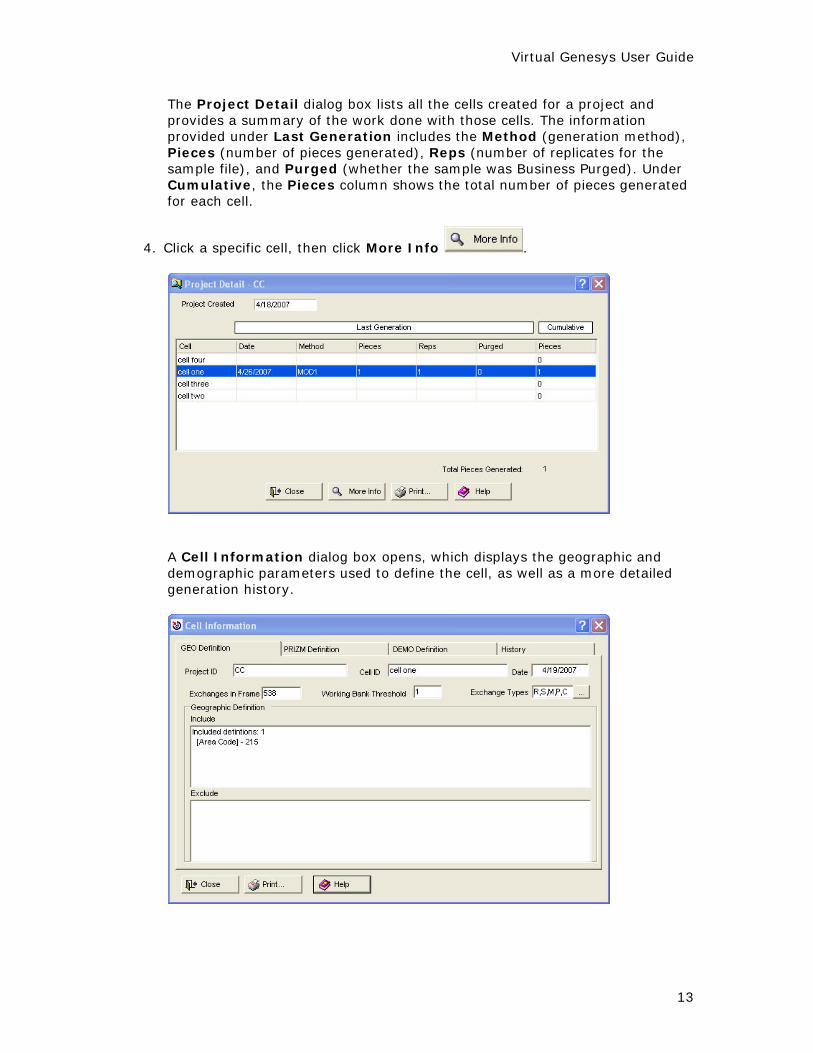
The Project Detail dialog box lists all the cells created for a project and provides a summary of the work done with those cells. The information provided under Last Generation includes the Method (generation method), Pieces (number of pieces generated), Reps (number of replicates for the sample file), and Purged (whether the sample was Business Purged). Under Cumulative, the Pieces column shows the total number of pieces generated for each cell.
4. Click a specific cell, then click More Info .
A Cell Information dialog box opens, which displays the geographic and demographic parameters used to define the cell, as well as a more detailed generation history.

Virtual Genesys User Guide
14
Delete Existing Project
1. Click the View Existing Projects button .
-- or --
On the Project menu, click View Existing Project.
A View Existing Projects dialog box opens, which lists all projects for the current client.
Projects can be sorted by any of the column names (ID, Name, Creation Date, Description) by clicking once on that column header. Click again on the same column header to change the direction of the sort (ascending or descending).
2. Select the project to be deleted by clicking its ID.

Virtual Genesys User Guide
15
3. Click Delete . A confirmation message appears.
4. Click Yes . The project has been deleted.

Virtual Genesys User Guide
16
Working with Cells
Cell Overview Once a project has been created, the next step is to create at least one cell in that project. A cell would be created for each quota group or each separate geography that will be sampled. Suppose a study contains a quota of 100 completes in the New York MSA (Metropolitan Statistical Area) and 100 completes in the Los Angeles MSA. A cell could be created for each MSA. A sample is pulled in proportion to the geography. If the MSAs were combined into one cell, then the numbers would be pulled proportionately, but not equally. Separating the geographies into two cells allows control over the number of records generated for each quota group. As with creating a project, three types of information are captured and tracked. The first type is default or system information, which is automatically supplied by Genesys in the cell dialog box. The Project ID, Cell Date, and DB Version are the first type, they are automatically supplied by the system, and can't be modified in the dialog box. The Cell ID is the second type, which is required information that is necessary to create the cell. The Cell Name and Description are the third type, which is optional information used for descriptive purposes. Cell ID (required) The Cell stores sampling information. The Cell ID, which allows up to 32 alphanumeric characters, is used to name the cell. To make the Cell ID easily identifiable, try using an abbreviation of the cell geography. Project ID (default/system) The Project ID is the project in which the cell is being created. Cell Date (default/system) The date field captures and displays the date the cell was created. DB Version (default/system) The Database Version references the current version of the Virtual Genesys Database. This database is updated quarterly. The version number can be used to track when a cell was created and if the current database is being accessed. Cell Name (optional) The name field allows the user to document information about the cell. This field allows up to 50 alphanumeric characters. Description (optional) The description stores details about the cell. Text automatically wraps. The cell will be created and opened after ENTER is pressed. This information is displayed when the cell opens afterwards. This field allows up to 100 alphanumeric characters.

Virtual Genesys User Guide
17
OK
Clicking OK creates and opens the cell. Print
Once a cell has been created, clicking Print opens the print dialog box. Cancel
Clicking Cancel closes the dialog box and cancels all operations performed since the time it was opened. Any changes made will be undone. All settings will revert to the state they were in before the box was opened.

Virtual Genesys User Guide
18
Create New Cell
1. Click the Create New Cell button .
-- or --
On the Cell menu, click Create New Cell.
A Create New Cell dialog box opens.
Required fields are automatically filled in and have a yellow background. Optional fields have a white background.
2. Type the Cell ID.
Virtual Genesys User Guide
19
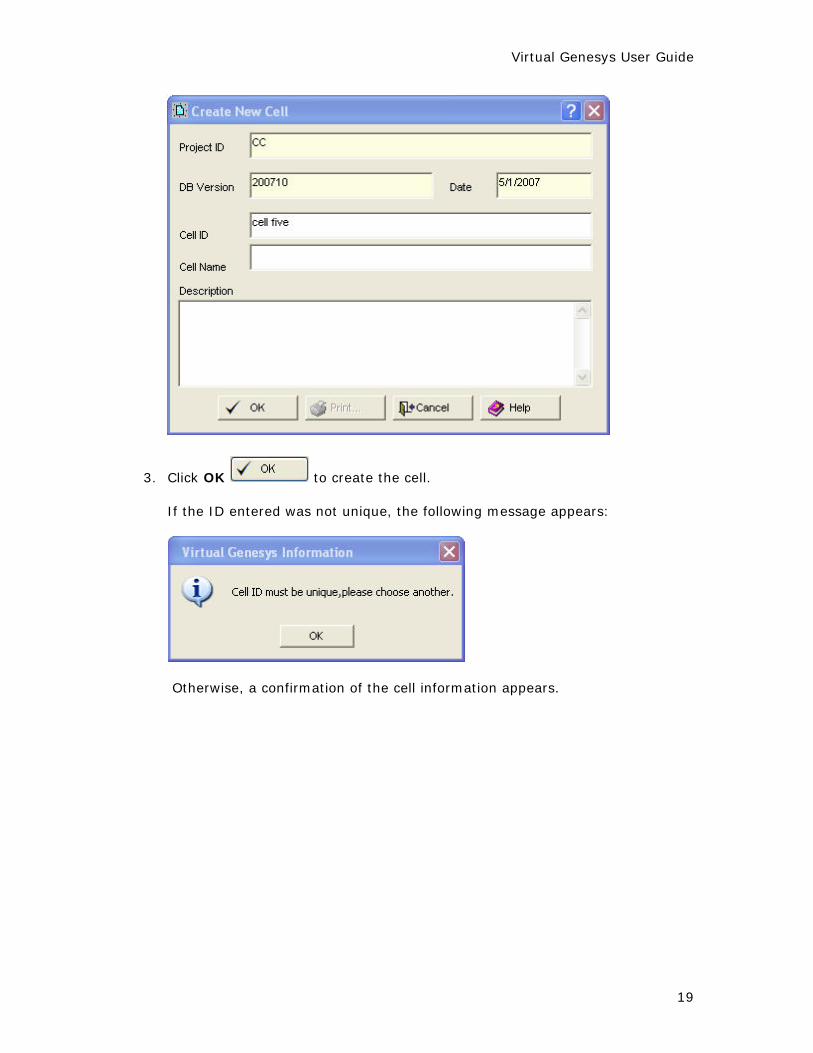
3. Click OK to create the cell.
If the ID entered was not unique, the following message appears:
Otherwise, a confirmation of the cell information appears.

Virtual Genesys User Guide
20

Virtual Genesys User Guide
21
Open Existing Cell
1. Click the Open Existing Cell button .
-- or --
On the Cell menu, click Open Existing Cell.
An Open Existing Cell dialog box opens.
If necessary, use the Sorted by feature to arrange the cells according to Latest Date or Cell ID.
2. Click the cell to be opened, then click Open .
A second Open Existing Cell dialog box opens.

Virtual Genesys User Guide
22
3. Click OK to open the cell.
The standard cell dialog box opens.
Note: More than one cell may be OPEN at any time, but only one cell may be ACTIVE at a time. The active cell window has focus and is in the foreground.

Virtual Genesys User Guide
23
Close Current Cell
1. On the Cell menu, click Close Current Cell.
2. Click the Close button in the top right corner of the cell window. When a project is closed, any open cells are automatically closed. Also, when Virtual Genesys is closed, all open cells are closed, along with the current open project.

Virtual Genesys User Guide
24
View Existing Cell Use the View Existing Cell option to see detailed information (the geography, demographic overlay, and sample generation history) about cells created for a project.
1. Click the View Existing Cells button .
-- or --
On the Cell menu, click View Existing Cell.
A View Existing Cells dialog box opens, which lists all cells created for the current open project.
2. Click once on a column header to sort cells on any of the column names -- ID, Name, Creation Date, Description. Click again on the same column header to change the direction of the sort (ascending or descending).
3. To view specific details for a cell, click in the cell row to select it, then click
Details .

Virtual Genesys User Guide
25
A Cell Information dialog box opens. The GEO Definition tab is selected.
The GEO, DEMO, and PRIZM Definition tabs show the parameters used to define the cell. In the above example, "[Area 1] - 19426,Pennsylvania" was used to define the geographic area included for the cell. If an area had been excluded, it would have been displayed in the Exclude box.

Virtual Genesys User Guide
26
Click the History tab.
History displays the information recorded each time a sample is generated for that cell: • Date generated • Time generated • Database Version used • Method of generation • Ps Written -- number of pieces generated • Ps Removed -- number of pieces removed • Rep Number -- number of replicates • Start Rep -- starting replicate number • BP -- if the sample was Business Purged • Ps Purged -- how many pieces were purged • WB -- the Working Bank threshold used

Virtual Genesys User Guide
27
Delete Existing Cell NOTE: Once a cell is deleted, it is permanently removed from the system. It is no longer accessible or retrievable.
1. Click the View Existing Cells button .
-- or --
On the Cell menu, click View Existing Cell.
A View Existing Cells dialog box opens, which lists all cells created in the current open project.
2. Click a column header to sort cells on any column name -- ID, Name, Creation Date, Description. Click again on the same column header to change the direction of the sort (ascending or descending).
3. Select the cell to be deleted by clicking in its ID column.

Virtual Genesys User Guide
28
4. Click Delete . 5. A confirmation message appears.
6. Click Yes . The cell has been deleted.

Virtual Genesys User Guide
29
Defining a Sampling Frame by Geographies Define a Geographic Sampling Frame Once a cell has been created, the next step is to define its geographic sampling frame. Five definitions shape the sampling frame of a cell:
1. National 2. Non-National 3. ZIP Code 4. Enhanced Geography 5. Congressional District
Each definition encompasses a unique geographic parameter or set of parameters. To define the sampling frame for a cell, the cell must be open and active. In a project, more than one cell can be open, but only the cell on top will be used. In a Define Sampling Frame dialog box, the name of the cell appears in the title bar, identifying the active cell being defined. The Exchange Types and Working Bank information can be set for each cell.

Virtual Genesys User Guide
30
Define a National Sampling Frame Options exist for 48 and 50 states, both with and without Washington, D.C. To define a national sampling frame
1. Create a new project or open an existing project. 2. Create a new cell.
3. Click the Define National Geography button .
-- or --
On the Define Frame menu, point to Define Geographic, then click National Selection.
A Define National Geography Frame dialog box opens.

Virtual Genesys User Guide
31
As the cell is defined, Pull , View Exch , and Print
become available.
4. Select items from the list on the left, then click Add .
5. Set the Exchange Types and WB Threshold as needed.
6. To set the Exchange Types, click the adjacent Elipsis button .
A View Exchanges dialog box opens.

Virtual Genesys User Guide
32
7. Select options from the Database Variables group box. To view or save the
data, click View or Save As , which are located in
the Quick Exchanges group box. Click OK . 8. For the WB (Working Bank) Threshold, type a number.
9. Click Pull to retrieve the corresponding exchanges. A message will display the number of exchanges that were pulled for the defined area.
(Click OK .)
10. Click Print to open a Geographic Definition Report.

Virtual Genesys User Guide
33
11. Click Close to close the Define National Geography Frame dialog box.

Virtual Genesys User Guide
34
Define a Non-National Sampling Frame To define a non-national sampling frame
1. Click the Define Non-National Geography button .
-- or --
On the Define Frame menu, point to Define Geographic.
2. Click a parameter other than National Selection, such as State.
A Non-National Geographic Frame dialog box opens. The State tab is selected.

Virtual Genesys User Guide
35
Include , Include All , Exclude ,
Exclude All , Remove , and Remove All
are provided for convenience.
Move between different geographic definitions by clicking on different tabs. The left box displays the individual parameters available within the geographic definitions.
3. Define the cell's geography.
To select an item and move it into the Included box
1. Type the first character or two of the item into Quick Search box. 2. Do one of the following:
• Click the item to select it. Click Include . • Double-click the item.
Multiple selections can be made in a few ways:
For non-successive items:
1. Select the first item by clicking it. 2. Then, while holding down the CTRL key, scroll to the other items and
click them.
For successive items, do one of the following:
• Select the first item, hold down the SHIFT key, scroll down, then click the last item.
• Select the first item, then drag down to the last item.

Virtual Genesys User Guide
36
Note: Items can be excluded by placing them in the Excluded box. Click
Exclude or Exclude All .
4. After the cell has been defined, including Exchange Types
and WB (Working Bank) Threshold , click Pull to retrieve the corresponding exchanges.
A message displays the number of exchanges pulled that serve the defined geographic area.
(Click OK .)
5. The exchanges pulled can be viewed by clicking View Exch .
A View Exchanges dialog box opens.
6. Select options from the Database Variables group box. To view or save the
data, click View or Save As , which are located in
the Quick Exchanges group box. Click OK .
Virtual Genesys User Guide
37
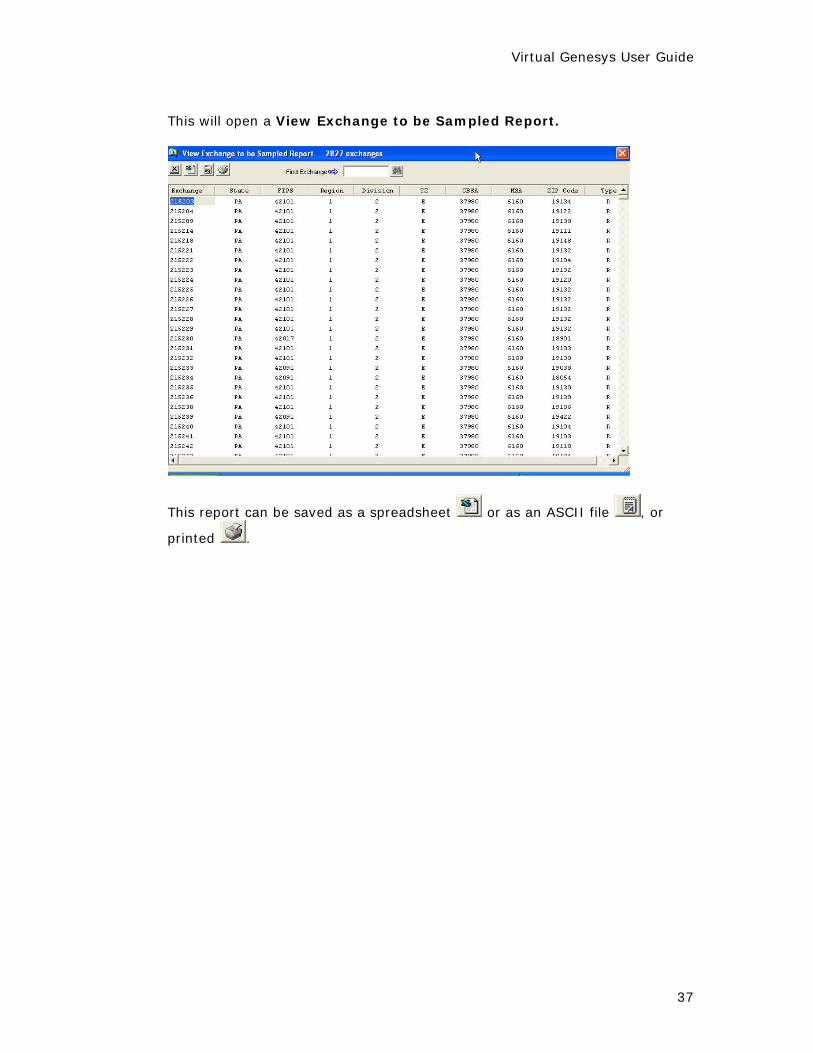
This will open a View Exchange to be Sampled Report.
This report can be saved as a spreadsheet or as an ASCII file , or
printed .

Virtual Genesys User Guide
38
Define a Sampling Frame by ADI
1. Create a new project or open an existing project. 2. Create a new cell. 3. From the Define Frame menu, point to Define Geographic, then click ADI
(Area of Dominant Influence).
A Define Non-National Geographic Frame dialog box opens.
The Arbitron ADI tab is selected. The cell name is displayed in the title bar.

Virtual Genesys User Guide
39
Include , Include All , Exclude ,
Exclude All , Remove , and Remove All
are provided for convenience.
3. Define the cell's geography.
To select an ADI and move it into the Included box
1. Type the first character or two of the item into Quick Search box. 2. Do one of the following:
• Click once on the item, then click Include . • Click twice (double-click) on the item.
4. After a cell has been defined, including the Exchange Types
and WB (Working Bank) Threshold , click Pull to retrieve the corresponding exchanges.
A message will display the number of exchanges pulled that serve the defined geographic area.
(Click OK .)
5. Click Close , click View Exch for a View
Exchanges dialog box, or click Print to open a Geographic Definition Report for printing.

Virtual Genesys User Guide
40
Define a Sampling Frame by Area Code
1. Create a new project or open an existing project. 2. Create a new cell. 3. From the Define Frame menu, point to Define Geographic, then click Area
Code.
A Define Non-National Geographic Frame dialog box opens.
The Area Code tab is selected. The cell name is displayed in the title bar.

Virtual Genesys User Guide
41
Include , Include All , Exclude ,
Exclude All , Remove , and Remove All
are provided for convenience.
4. Define the cell's geography.
To select an Area Code and move it into the Included box
1. Type the first character or two of the item into Quick Search box. 2. Do one of the following:
• Click once on the item, then click Include . • Click twice (double-click) on the item.
5. After the cell has been defined, including Exchange Types
and WB (Working Bank) Threshold , click Pull to retrieve the corresponding exchanges.
6. A message displays the number of exchanges pulled that serve the defined geographic area.
(Click OK . )
7. Click Close , click View Exch for a View
Exchanges dialog box, or click Print to open a Geographic Definition Report for printing.

Virtual Genesys User Guide
42
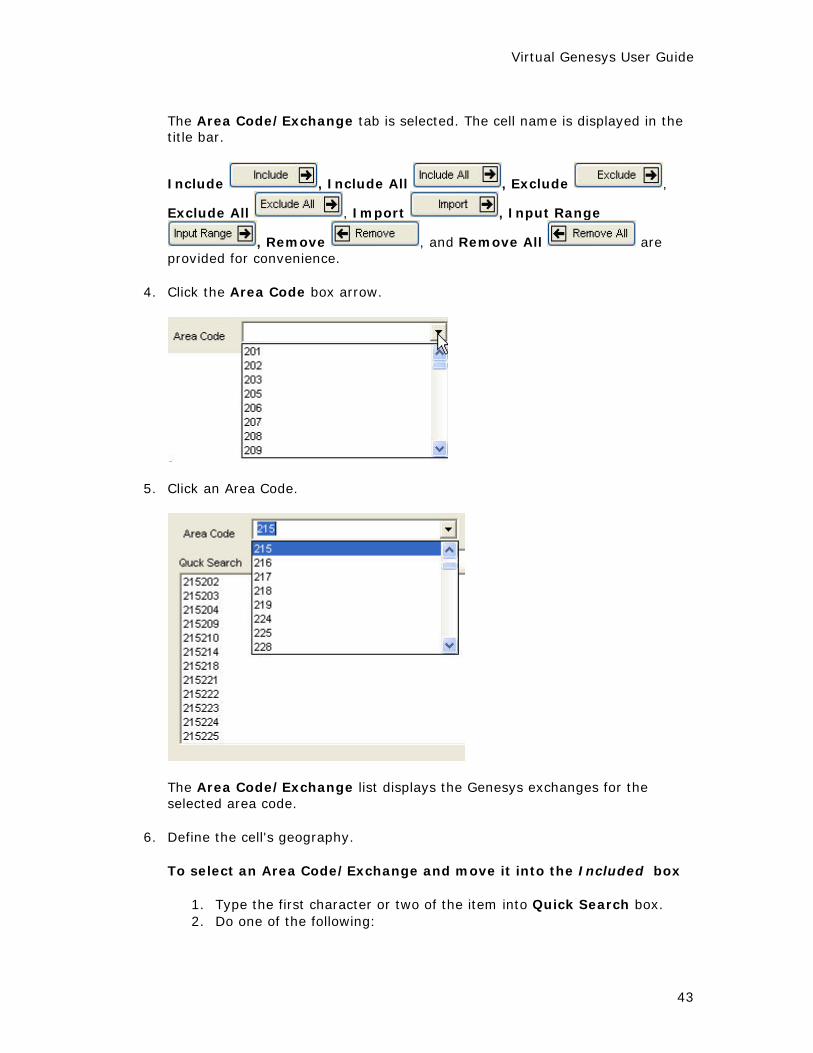
Define a Sampling Frame by Area Code/Exchange
1. Create a new project or open an existing project. 2. Create a new cell. 3. On the Define Frame menu, point to Define Geographic, then click Area
Code/Exchange.
A Define Non-National Geographic Frame dialog box opens.
Virtual Genesys User Guide
43
The Area Code/Exchange tab is selected. The cell name is displayed in the title bar.
Include , Include All , Exclude ,
Exclude All , Import , Input Range
, Remove , and Remove All are provided for convenience.
4. Click the Area Code box arrow.
5. Click an Area Code.
The Area Code/Exchange list displays the Genesys exchanges for the selected area code.
6. Define the cell's geography.
To select an Area Code/Exchange and move it into the Included box
1. Type the first character or two of the item into Quick Search box. 2. Do one of the following:

Virtual Genesys User Guide
44
• Click once on the item, then click Include . • Click twice (double-click) on the item.
7. To import a text file that contains a list of Area Code/Exchange
combinations, click Import .
An Import Area Code/Exchange dialog box opens.
8. Click Browse to locate the import file.
9. Click Include or Exclude to indicate whether the Area Code/Exchange combinations being imported should be included or excluded.
10. The Area Code/Exchange combinations should begin at the same position on each line of the import file. Type this position number into the Area
Virtual Genesys User Guide
45
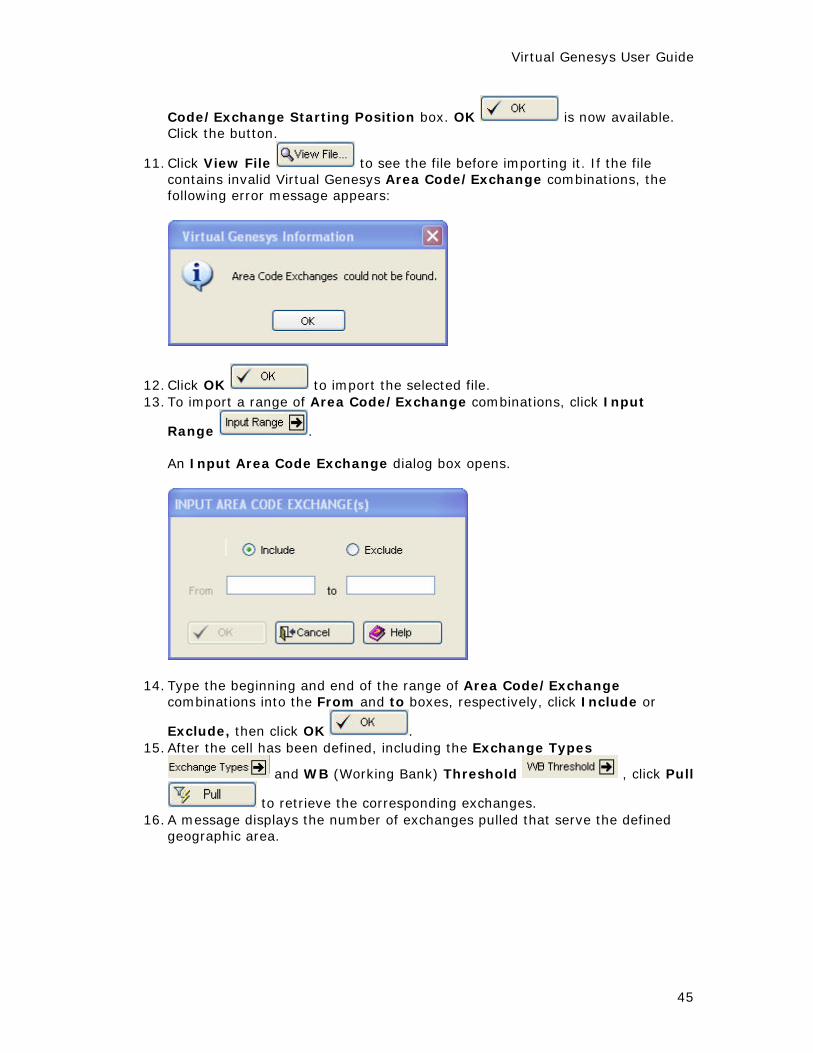
Code/Exchange Starting Position box. OK is now available. Click the button.
11. Click View File to see the file before importing it. If the file contains invalid Virtual Genesys Area Code/Exchange combinations, the following error message appears:
12. Click OK to import the selected file. 13. To import a range of Area Code/Exchange combinations, click Input
Range .
An Input Area Code Exchange dialog box opens.
14. Type the beginning and end of the range of Area Code/Exchange combinations into the From and to boxes, respectively, click Include or
Exclude, then click OK . 15. After the cell has been defined, including the Exchange Types
and WB (Working Bank) Threshold , click Pull
to retrieve the corresponding exchanges. 16. A message displays the number of exchanges pulled that serve the defined
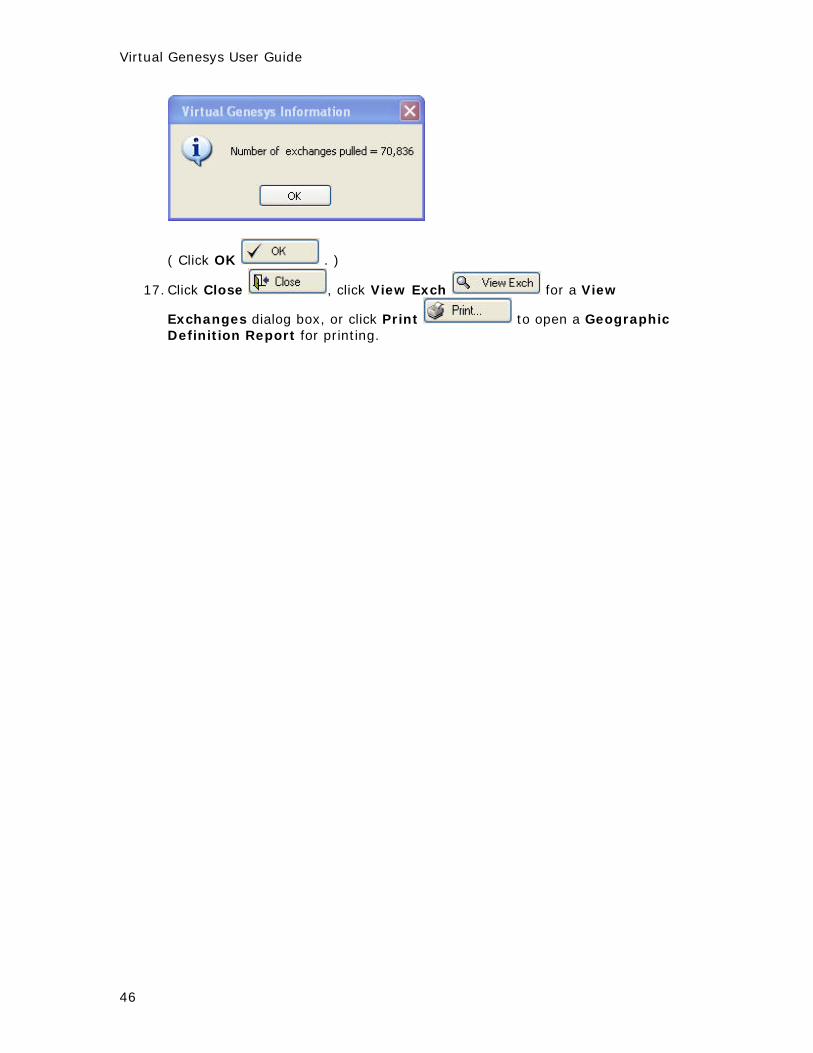
geographic area.
Virtual Genesys User Guide
46
( Click OK . )
17. Click Close , click View Exch for a View
Exchanges dialog box, or click Print to open a Geographic Definition Report for printing.

Virtual Genesys User Guide
47
Define a Sampling Frame by Census Division
1. Create a new project or open an existing project. 2. Create a new cell. 3. On the Define Frame menu, point to Define Geographic, then click Census
Division.
A Define Non-National Geographic Frame dialog box opens.
The Census Division tab is selected. The cell name is displayed in the title bar.

Virtual Genesys User Guide
48
Include , Include All , Exclude ,
Exclude All , Remove , and Remove All
are provided for convenience.
4. Define the cell's geography.
To select a Census Division and move it into the Included box
1. Type the first character or two of the item into Quick Search box. 2. Do one of the following:
• Click once on the item, then click Include . • Click twice (double-click) on the item.
5. After the cell has been defined, including Exchange Types
and WB (Working Bank) Threshold , click Pull to retrieve the corresponding exchanges.
6. A message will display the number of exchanges pulled that serve the defined geographic area.
( Click OK . )
7. Click Close , click View Exch for a View
Exchanges dialog box, or click Print to open a Geographic Definition Report for printing.

Virtual Genesys User Guide
49
Define a Sampling Frame by Census Region
1. Create a new project or open an existing project. 2. Create a new cell. 3. On the Define Frame menu, point to Define Geographic, then click Census
Region.
A Define Non-National Geographic Frame dialog box opens.
The Census Region tab is selected. The cell name is displayed in the title bar.
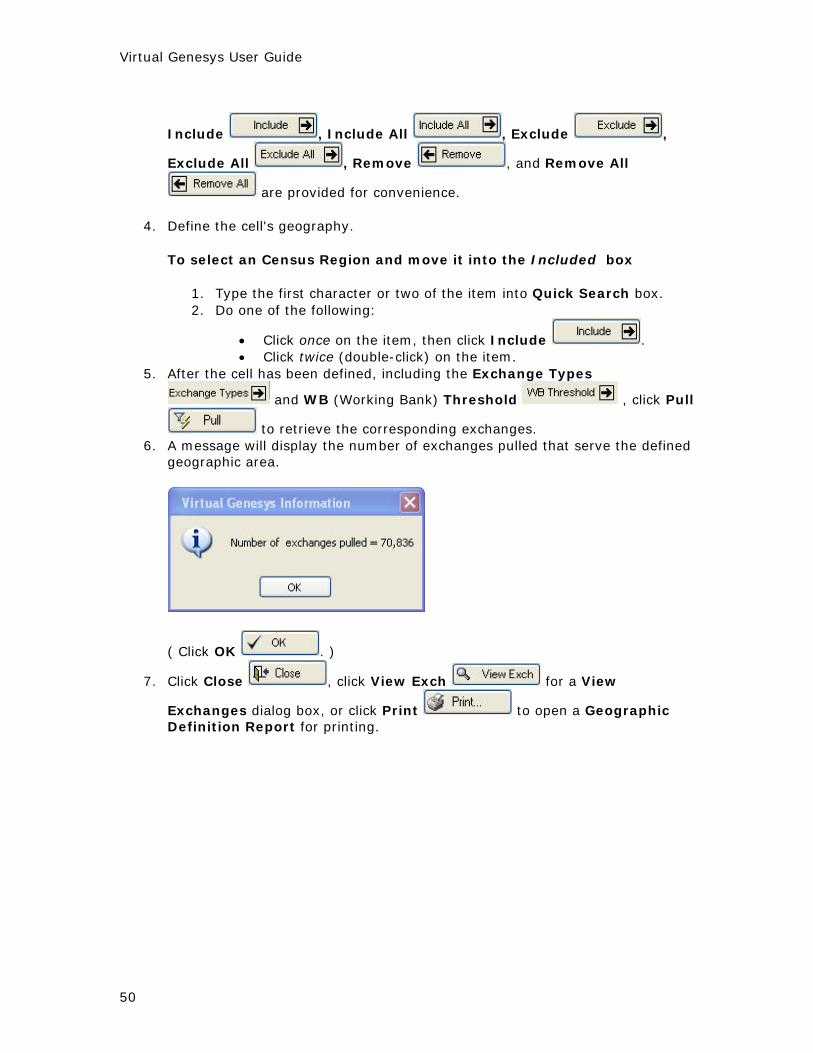
Virtual Genesys User Guide
50
Include , Include All , Exclude ,
Exclude All , Remove , and Remove All
are provided for convenience.
4. Define the cell's geography.
To select an Census Region and move it into the Included box
1. Type the first character or two of the item into Quick Search box. 2. Do one of the following:
• Click once on the item, then click Include . • Click twice (double-click) on the item.
5. After the cell has been defined, including the Exchange Types
and WB (Working Bank) Threshold , click Pull
to retrieve the corresponding exchanges. 6. A message will display the number of exchanges pulled that serve the defined
geographic area.
( Click OK . )
7. Click Close , click View Exch for a View
Exchanges dialog box, or click Print to open a Geographic Definition Report for printing.

Virtual Genesys User Guide
51
Define a Sampling Frame by Core-Based Statistical Areas
1. Create a new project or open an existing project. 2. Create a new cell. 3. On the Define Frame menu, point to Define Geographic, then to Core-
Based Statistical Areas. Five options will appear on a submenu.
Click one of the options from the submenu: a. Combined Statistical Areas b. MET Status Code (MCSA) c. MET Status Code (MSA) d. Metro Statistical Areas/Divisions e. Micro Statistical Areas
A Define Non-National Geographic Frame dialog box opens.

Virtual Genesys User Guide
52
The Core-Based Statistical Areas tab is selected. The cell name is displayed in the title bar.
Include , Include All , Exclude ,
Exclude All , Remove , and Remove All
are provided for convenience.
4. The Core-Based Statistical Area initially selected is listed in the CBSA box. To select a different area, click on the arrow adjacent to this box. The five areas are listed. The area initially selected is highlighted. Click to select a different area.
5. Define the cell's geography.
To select a Core-Based Statistical Area and move it into the Included box
1. Type the first character or two of the item into Quick Search box. 2. Do one of the following:
• Click once on the item, then click Include . • Click twice (double-click) on the item.
Virtual Genesys User Guide
53
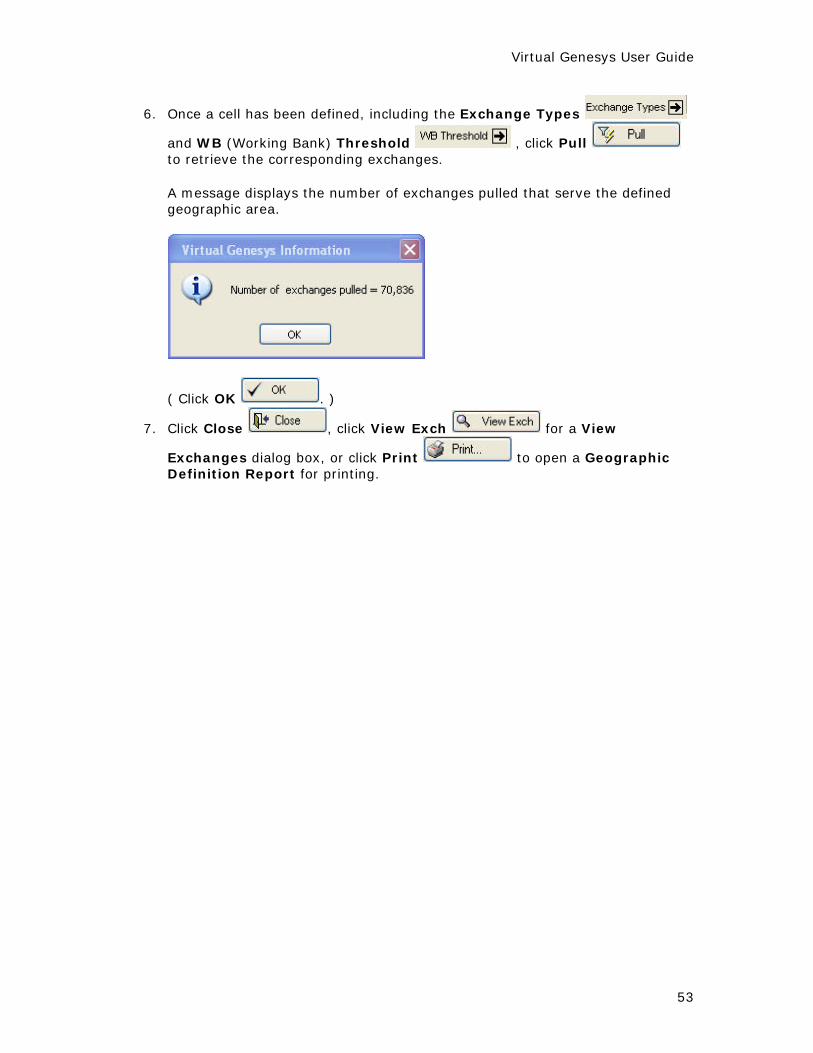
6. Once a cell has been defined, including the Exchange Types
and WB (Working Bank) Threshold , click Pull to retrieve the corresponding exchanges.
A message displays the number of exchanges pulled that serve the defined geographic area.
( Click OK . )
7. Click Close , click View Exch for a View
Exchanges dialog box, or click Print to open a Geographic Definition Report for printing.

Virtual Genesys User Guide
54
Define a Sampling Frame by County
1. Create a new project or open an existing project. 2. Create a new cell. 3. On the Define Frame menu, point to Define Geographic, then click
County.
A Define Non-National Geographic Sampling Frame dialog box opens.
The County tab is selected. The cell name is displayed in the title bar.

Virtual Genesys User Guide
55
Include , Include All , Exclude ,
Exclude All , Import , Input Range
, Remove , and Remove All are provided for convenience.
4. Click the arrow adjacent to the State box, then click a state.
This will provide a list of counties belonging to the state.
5. Define the cell's geography.
To select a County and move it into the Included box
1. Type the first character or two of the item into Quick Search box. 2. Do one of the following:
• Click once on the item, then click Include . • Click twice (double-click) on the item.
6. To import a text file that contains a list of County FIPS (Federal Information
Processing Standards) Codes, click Import .
An Import County FIPS Code dialog box opens.

Virtual Genesys User Guide
56
Click Browse to locate the import file. The County FIPS Codes should begin at the same position on each line of the import file. Type this position number into the County FIPS Starting Position box.
Click OK .
7. Click Input Range to import a range of County FIPS Codes.
An Input County FIPS Codes dialog box appears.
Click Include or Exclude to indicate whether the County FIPS Codes being imported are to be included or excluded. Type the beginning and end of the range of County FIPS Codes being imported into the From and to boxes.
Click the OK to import the selected file. 8. After the cell has been defined, including the Exchange Types
and WB (Working Bank) Threshold , click Pull
to retrieve the corresponding exchanges. 9. A message displays the number of exchanges pulled that serve the defined
geographic area.

Virtual Genesys User Guide
57
( Click OK . )
10. Click Close , click View Exch for a View
Exchanges dialog box, or click Print to open a Geographic Definition Report for printing.

Virtual Genesys User Guide
58
Define a Sampling Frame by Nielsen DMA Market
1. Create a new project or open an existing project. 2. Create a new cell. 3. On the Define Frame menu, point to Define Geographic, then click DMA.
A Define Non-National Geographic Sampling Frame dialog box opens.
The Nielsen DMA tab is selected. The cell name is displayed in the title bar.
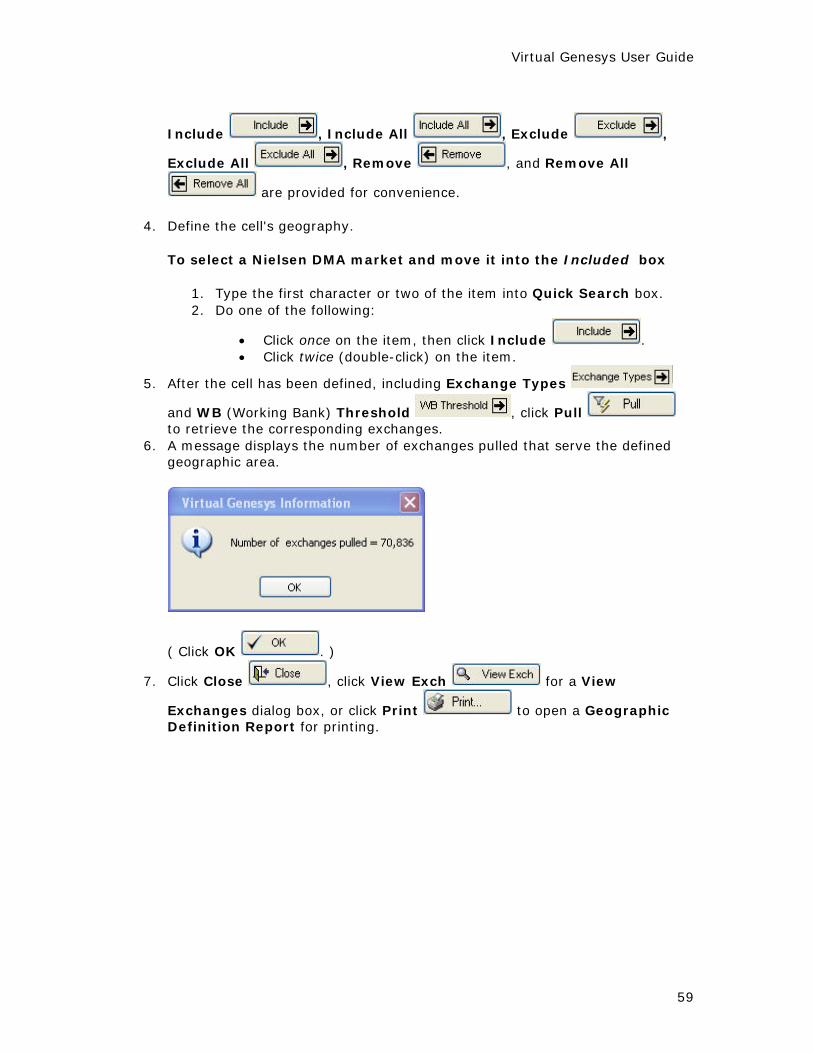
Virtual Genesys User Guide
59
Include , Include All , Exclude ,
Exclude All , Remove , and Remove All
are provided for convenience.
4. Define the cell's geography.
To select a Nielsen DMA market and move it into the Included box
1. Type the first character or two of the item into Quick Search box. 2. Do one of the following:
• Click once on the item, then click Include . • Click twice (double-click) on the item.
5. After the cell has been defined, including Exchange Types
and WB (Working Bank) Threshold , click Pull to retrieve the corresponding exchanges.
6. A message displays the number of exchanges pulled that serve the defined geographic area.
( Click OK . )
7. Click Close , click View Exch for a View
Exchanges dialog box, or click Print to open a Geographic Definition Report for printing.

Virtual Genesys User Guide
60
Define a Sampling Frame by Metropolitan Areas (Old)
1. Create a new project or open an existing project. 2. Create a new cell. 3. On the Define Frame menu, point to Define Geographic, then to
Metropolitan Areas (OLD). Two options appear on a submenu: Met Status Code and Metro/Primary Metro Statistical Areas.
4. Click Met Status Code.
A Define Non-National Geographic Frame dialog box opens with MET Status displayed in the MSA (Metro Statistical Areas) box.

Virtual Genesys User Guide
61
The Metropolitan Areas (OLD) tab is selected. The cell name is displayed in the title bar.
Include , Include All , Exclude ,
Exclude All , Remove , and Remove All
are provided for convenience.
5. Click Metro/Primary Metro Statistical Area.
A Define Non-National Geographic Frame dialog box opens with Metro/Primary Metro Statistical Areas displayed in the MSA (Metro Statistical Areas) box.
The Metropolitan Areas (OLD) tab is selected. The cell name is displayed in the title bar.
Include All , Exclude , Exclude All ,
Remove , and Remove All are provided for convenience.
6. Define the cell's geography.
To select a Metropolitan Area and move it into the Included box
1. Type the first character or two of the item into Quick Search box. 2. Do one of the following:
• Click once on the item, then click Include . • Click twice (double-click) on the item.

Virtual Genesys User Guide
62
7. After a cell has been defined, including the Exchange Types
and WB (Working Bank) Threshold , click Pull to retrieve the corresponding exchanges.
8. A message displays the number of exchanges pulled that serve the defined geographic area.
( Click OK . )
9. Click Close , click View Exch for a View
Exchanges dialog box, or click Print to open a Geographic Definition Report for printing.

Virtual Genesys User Guide
63
Define a Sampling Frame by Nielsen County Size
1. Create a new project or open an existing project. 2. Create a new cell. 3. On the Define Frame menu, point to Define Geographic, then click
Nielsen County Size.
A Define Non-National Geographic Frame dialog box opens.

Virtual Genesys User Guide
64
The Nielsen County Size tab is selected. The cell name is displayed in the title bar.
Include , Include All , Exclude ,
Exclude All , Remove , and Remove All
are provided for convenience.
4. Define the cell's geography.
To select a Nielsen County Size and move it into the Included box
1. Type the first character or two of the item into Quick Search box. 2. Do one of the following:
• Click once on the item, then click Include . • Click twice (double-click) on the item.
5. After a cell has been defined, including the Exchange Types
and WB (Working Bank) Threshold , click Pull to retrieve the corresponding exchanges.
6. A message displays the number of exchanges pulled that serve the defined geographic area.
( Click OK . )
7. Click Close , click View Exch for a View
Exchanges dialog box, or click Print to open a Geographic Definition Report for printing.

Virtual Genesys User Guide
65
Define a Sampling Frame by State
1. Create a new project or open an existing project. 2. Create a new cell. 3. On the Define Frame menu, point to Define Geographic, then click State.
A Define Non-National Geographic Frame dialog box opens.
The State tab is selected. The cell name is displayed in the title bar.

Virtual Genesys User Guide
66
Include , Include All , Exclude ,
Exclude All , Remove , and Remove All
are provided for convenience.
4. Define the cell's geography.
To select a State and move it into the Included box
1. Type the first character or two of the item into Quick Search box. 2. Do one of the following:
• Click once on the item, then click Include . • Click twice (double-click) on the item.
5. Once a cell has been defined, including the Exchange Types
and WB (Working Bank) Threshold , click Pull to retrieve the corresponding exchanges.
6. A message will display the number of exchanges pulled that serve the defined geographic area.
( Click OK . )
7. Click Close , click View Exch for a View
Exchanges dialog box, or click Print to open a Geographic Definition Report for printing.

Virtual Genesys User Guide
67
Define a Sampling Frame by Time Zone
1. Create a new project or open an existing project. 2. Create a new cell. 3. On the Define Frame menu, point to Define Geographic, then click Time
Zone.
A Define Non-National Geographic Frame dialog box opens.
The Time Zone tab is selected. The cell name is displayed in the title bar.
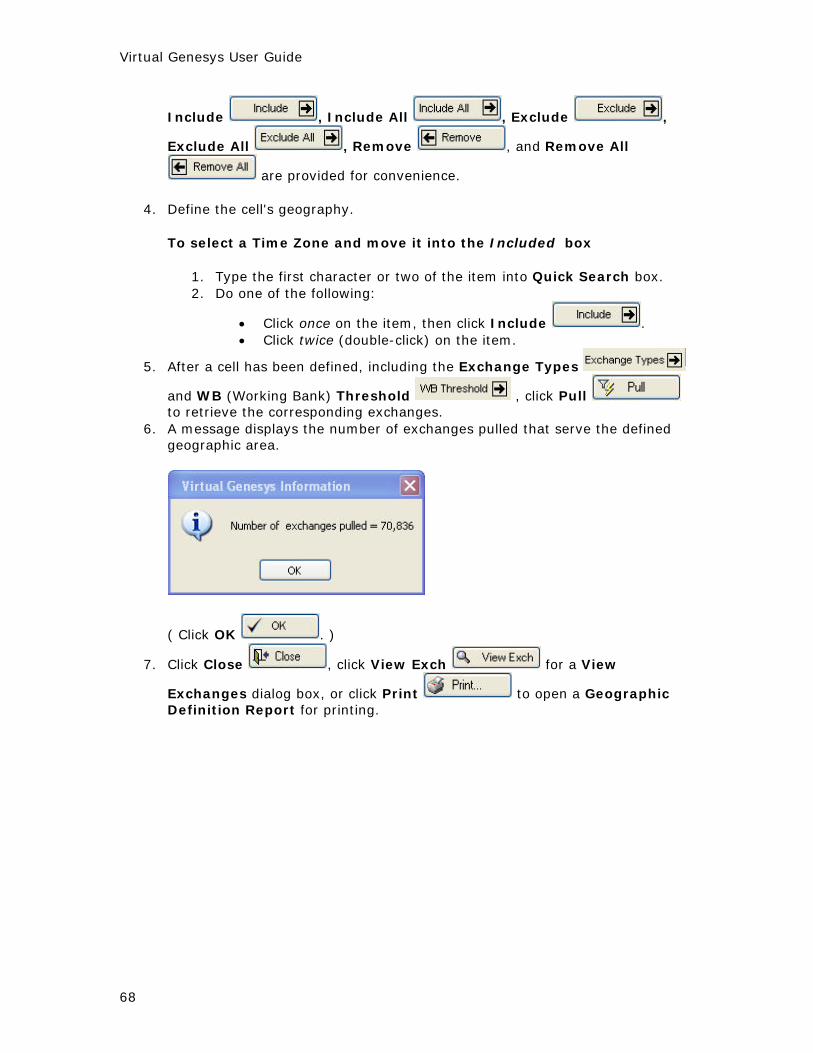
Virtual Genesys User Guide
68
Include , Include All , Exclude ,
Exclude All , Remove , and Remove All
are provided for convenience.
4. Define the cell's geography.
To select a Time Zone and move it into the Included box
1. Type the first character or two of the item into Quick Search box. 2. Do one of the following:
• Click once on the item, then click Include . • Click twice (double-click) on the item.
5. After a cell has been defined, including the Exchange Types
and WB (Working Bank) Threshold , click Pull to retrieve the corresponding exchanges.
6. A message displays the number of exchanges pulled that serve the defined geographic area.
( Click OK . )
7. Click Close , click View Exch for a View
Exchanges dialog box, or click Print to open a Geographic Definition Report for printing.
Virtual Genesys User Guide
69
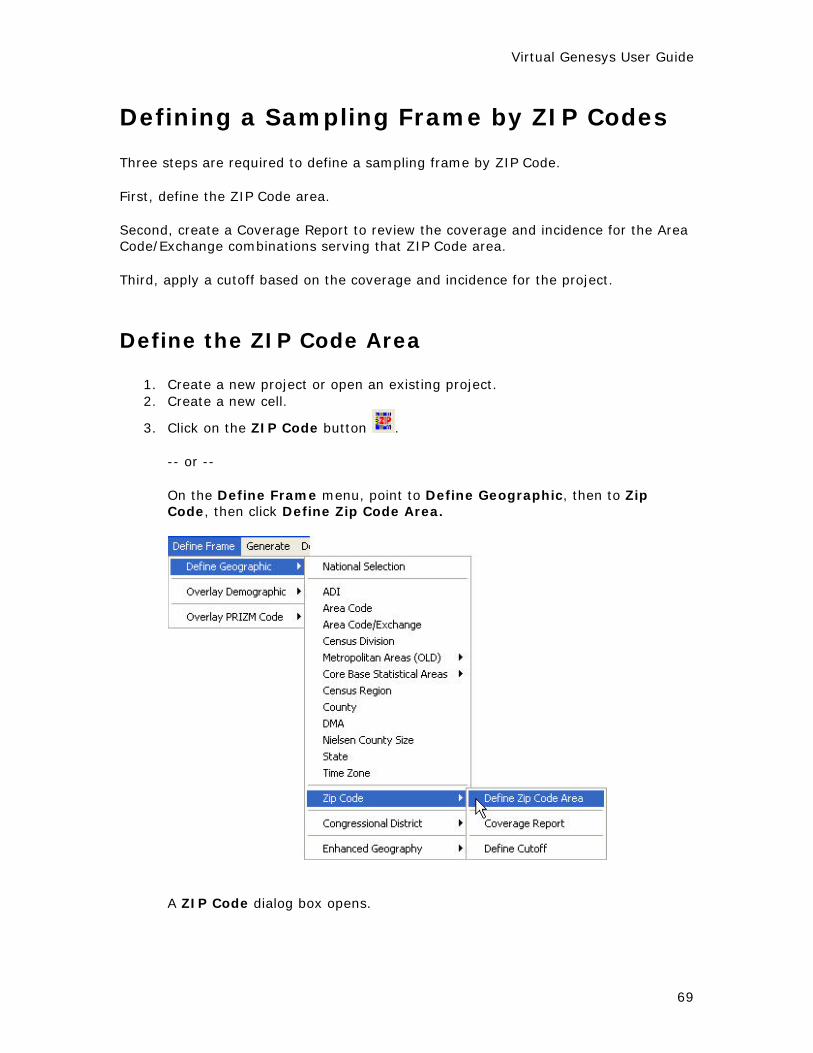
Defining a Sampling Frame by ZIP Codes Three steps are required to define a sampling frame by ZIP Code. First, define the ZIP Code area. Second, create a Coverage Report to review the coverage and incidence for the Area Code/Exchange combinations serving that ZIP Code area. Third, apply a cutoff based on the coverage and incidence for the project.
Define the ZIP Code Area
1. Create a new project or open an existing project. 2. Create a new cell.
3. Click on the ZIP Code button .
-- or --
On the Define Frame menu, point to Define Geographic, then to Zip Code, then click Define Zip Code Area.
A ZIP Code dialog box opens.

Virtual Genesys User Guide
70
The Define Area tab is selected. The cell name is displayed in the title bar.
Add , Add All , Import , Input Range
, Remove , and Remove All are provided for convenience.
4. Define the cell's geography.
To select a ZIP Code and move it into the Included box
a. Select a number, 1 through 5, in the Area box. Area means Area
Code/Exchange combinations. The numbers mean that 1 contains Area Code/Exchange combinations primary to that ZIP Code, 2 contains Area Code/Exchange combinations secondary to that ZIP Code, and so forth.
b. Select a state in the State box. This generates a list of states. c. Do one of the following:
• Click once on an item, then click Include . -- or --
• Click twice (double-click) on an item.
5. After a cell is defined, including the Exchange Types and WB
(Working Bank) Threshold , click Pull to retrieve the corresponding exchanges.
6. A message displays the number of exchanges pulled that serve the defined geographic area.

Virtual Genesys User Guide
71
( Click OK . )
7. Click Close to close, click View Exch for a View
Exchanges dialog box, or click Print to open a Geographic Definition Report for printing.
To define ZIP Code Areas by providing a range of ZIP Codes
1. Click Input Range .
An Input Zip Codes dialog box opens.
2. Type the beginning and end numbers of the ZIP Code range into the From
and to boxes, respectively, and click OK .

Virtual Genesys User Guide
72
To define the ZIP Code Area by importing a text file containing a list of ZIP Codes
1. Click Import .
An Import ZIP Code dialog box opens.
2. Click Browse to locate the import file. 3. The ZIP Codes should begin at the same position in each line of the file. Type
that position number into the ZIP Code Starting Position box.
4. Click View File to see the file before importing it.
5. Click OK to import the ZIP Codes from the selected file.
A message may say some of the ZIP Codes were not added.
Create a Coverage Report From the ZIP CODE dialog box, click the Create Coverage Report & Define Cutoff tab.
In the Virtual Genesys - ZIP Code Reports group box, the options for Coverage Report and Display Exchanges to be Sampled only are both selected by default. Reports detailing either the Percent of ZIP Code Compromising the Frame or the Percent of ZIP Code Included in Frame can also be selected. The coverage report can include only those exchanges that are to be sampled. Select the Report Format
from the list; PDF, XLS, or HTM. Click Run to create and view the ZIP Code Reports.
Virtual Genesys User Guide
73
Click Close , or click View Exch for a View Exchanges dialog box.
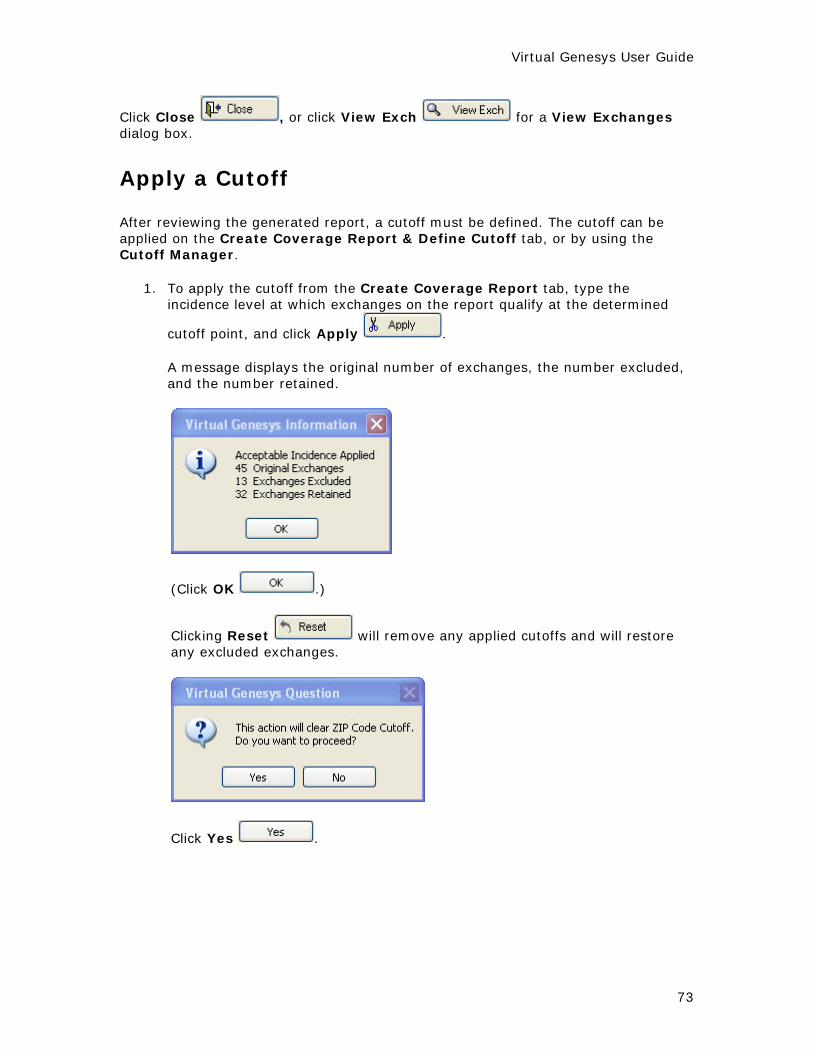
Apply a Cutoff After reviewing the generated report, a cutoff must be defined. The cutoff can be applied on the Create Coverage Report & Define Cutoff tab, or by using the Cutoff Manager.
1. To apply the cutoff from the Create Coverage Report tab, type the incidence level at which exchanges on the report qualify at the determined
cutoff point, and click Apply .
A message displays the original number of exchanges, the number excluded, and the number retained.
(Click OK .)
Clicking Reset will remove any applied cutoffs and will restore any excluded exchanges.
Click Yes .

Virtual Genesys User Guide
74
(Click OK .)
Click History to generate a history of applied cutoffs.
(Click OK .)
After running the coverage report and applying the cutoff, the exchanges
pulled can be viewed by clicking View Exch .
A View Exchanges dialog box opens.
Virtual Genesys User Guide
75
From the Database Variables group box, select the variables to be included in the Exchange Report.
If the report should include only those exchanges to be sampled, then click the Display Exchanges to be Sampled only check box.
In the Quick Exchanges group box, View and Save As
allow the data to be viewed or saved.
Click OK .
The resulting Exchange Report can be printed, or saved as an Excel spreadsheet or ASCII file.
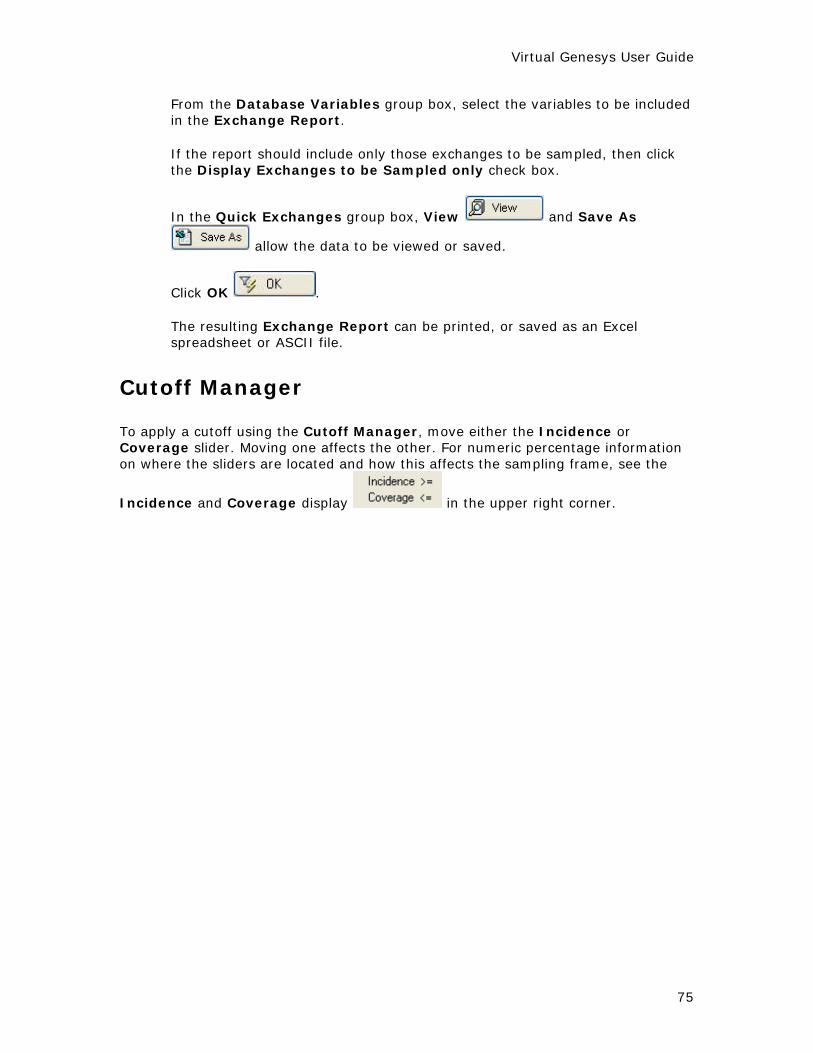
Cutoff Manager To apply a cutoff using the Cutoff Manager, move either the Incidence or Coverage slider. Moving one affects the other. For numeric percentage information on where the sliders are located and how this affects the sampling frame, see the
Incidence and Coverage display in the upper right corner.

Virtual Genesys User Guide
76
Click Apply to select a cutoff.
Click Reset to remove any previously applied cutoff.
Click History to display any cutoff that is currently being applied.
Click Details provides a report on incidence, coverage, and the ZIP Codes included and excluded from the sampling frame.
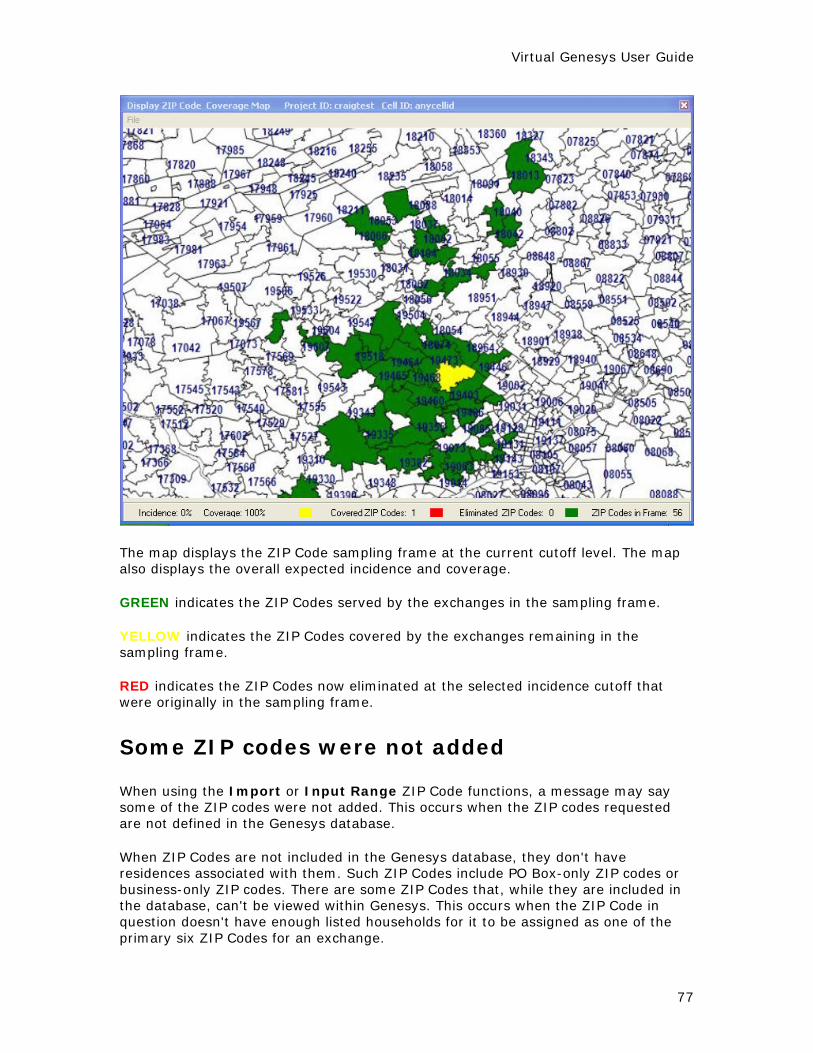
Click View Map to see a ZIP Code map. A Display ZIP Code Coverage Map opens.
Virtual Genesys User Guide
77
The map displays the ZIP Code sampling frame at the current cutoff level. The map also displays the overall expected incidence and coverage. GREEN indicates the ZIP Codes served by the exchanges in the sampling frame. YELLOW indicates the ZIP Codes covered by the exchanges remaining in the sampling frame. RED indicates the ZIP Codes now eliminated at the selected incidence cutoff that were originally in the sampling frame.
Some ZIP codes were not added When using the Import or Input Range ZIP Code functions, a message may say some of the ZIP codes were not added. This occurs when the ZIP codes requested are not defined in the Genesys database. When ZIP Codes are not included in the Genesys database, they don't have residences associated with them. Such ZIP Codes include PO Box-only ZIP codes or business-only ZIP codes. There are some ZIP Codes that, while they are included in the database, can't be viewed within Genesys. This occurs when the ZIP Code in question doesn't have enough listed households for it to be assigned as one of the primary six ZIP Codes for an exchange.
Virtual Genesys User Guide
78
Defining a Sampling Frame by Enhanced Geography This module allows the user to define a cell's geography by ANY combination of Counties, ZIP Codes, and or Census Tracts. The first step in this process is to define the Geographic Area itself. The second step is to create a coverage report to review the coverage and incidence of the Area Code/Exchange combinations serving the geographic area. The third and final step is to apply a cutoff to select the exchanges for the project.
Define the Geographic Area
1. Create a new project or open an existing project. 2. Create a new cell and define the geography, or open an existing cell with
predefined geography.
3. Click the Enhanced Geography button .
-- or --
On the Define Frame menu, point to Define Geographic, then to Enhanced Geography, and then click Define Geographic Area.

Virtual Genesys User Guide
79
An Enhanced Geography dialog box opens.
The Define Area tab is selected.
4. Click Define.

Virtual Genesys User Guide
80
Then click County, ZIP Code, or Census Tract.
5. For County, select the state and counties to be included in the sampling
frame, and then click Include . 6. For ZIP Code, select the state and ZIP Codes to be included in the sampling
frame, and then click Include . 7. For Census Tract, select the State, County, and Census Tracts to be included
in the sampling frame, and then click Include . Repeat Steps 5, 6, and 7 until all geographic components for the sampling frame have been included.

Virtual Genesys User Guide
81
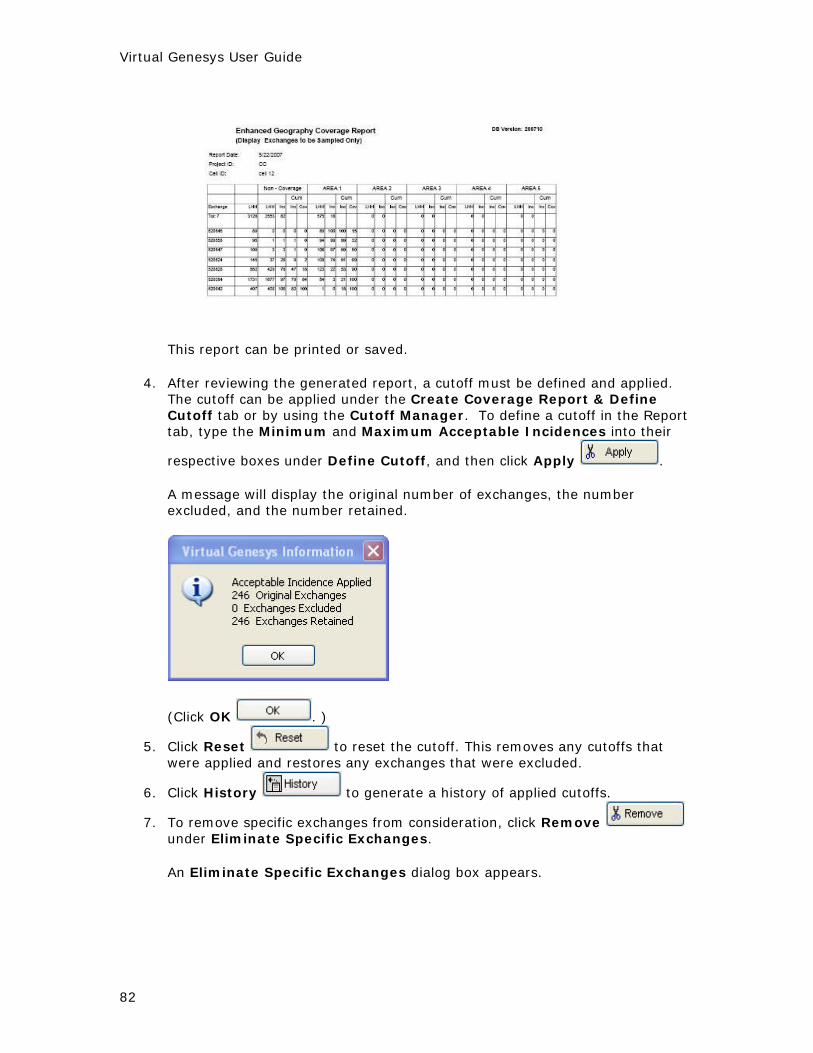
Create the Coverage Report
1. Click the Create Coverage Report & Define Cutoff tab.
Exclude OSLOs is checked by default.
Display Exchanges to be Sampled only
is also checked by default.
2. Click Select Report Format and select a format (PDF, XLS, or HTM) .
3. To Create a Coverage Report ,
click Run .
An Enhanced Geography Coverage Report opens.
Virtual Genesys User Guide
82
This report can be printed or saved.
4. After reviewing the generated report, a cutoff must be defined and applied. The cutoff can be applied under the Create Coverage Report & Define Cutoff tab or by using the Cutoff Manager. To define a cutoff in the Report tab, type the Minimum and Maximum Acceptable Incidences into their
respective boxes under Define Cutoff, and then click Apply .
A message will display the original number of exchanges, the number excluded, and the number retained.
(Click OK . )
5. Click Reset to reset the cutoff. This removes any cutoffs that were applied and restores any exchanges that were excluded.
6. Click History to generate a history of applied cutoffs.
7. To remove specific exchanges from consideration, click Remove under Eliminate Specific Exchanges.
An Eliminate Specific Exchanges dialog box appears.

Virtual Genesys User Guide
83
8. Eliminate an exchange by clicking on it and then clicking Add . (Double-clicking by itself on the exchange will not work here.)
A confirmation appears.
(Click OK .)
9. To save this configuration, click Save . 10. To close the Eliminate Specific Exchanges dialog box, click Close
. 11. To view exchanges that were removed from consideration, click View
.
A View Exchanges dialog box appears.

Virtual Genesys User Guide
84
In the Database Variables group box, select the variables.
An Eliminated Exchanges Report opens.
This report may be printed, or saved as an RTF (Rich Text Format) or ASCII file.
12. To restore exchanges that were removed from consideration, click Restore
.
The following message appears.

Virtual Genesys User Guide
85
(Click Yes or No . )
13. Click Close to close the Eliminate Specific Exchanges dialog box.
14. To view the exchanges, click View .
The following report opens.
This report may be printed, or saved as an RTF (Rich Text Format) or ASCII file.
Cutoff Manager To apply a cutoff using the Cutoff Manager, move either the Incidence or Coverage slider. Moving one affects the other. For numeric percentage information on where the sliders are located and how this affects the sampling frame, see the
Incidence and Coverage display in the upper right corner.

Virtual Genesys User Guide
86
1. Click Apply .
The following message appears.
Virtual Genesys User Guide
87
(Click OK .)
2. Click Reset to reset the cutoff. This removes any cutoffs that were applied and restores any exchanges that were excluded.
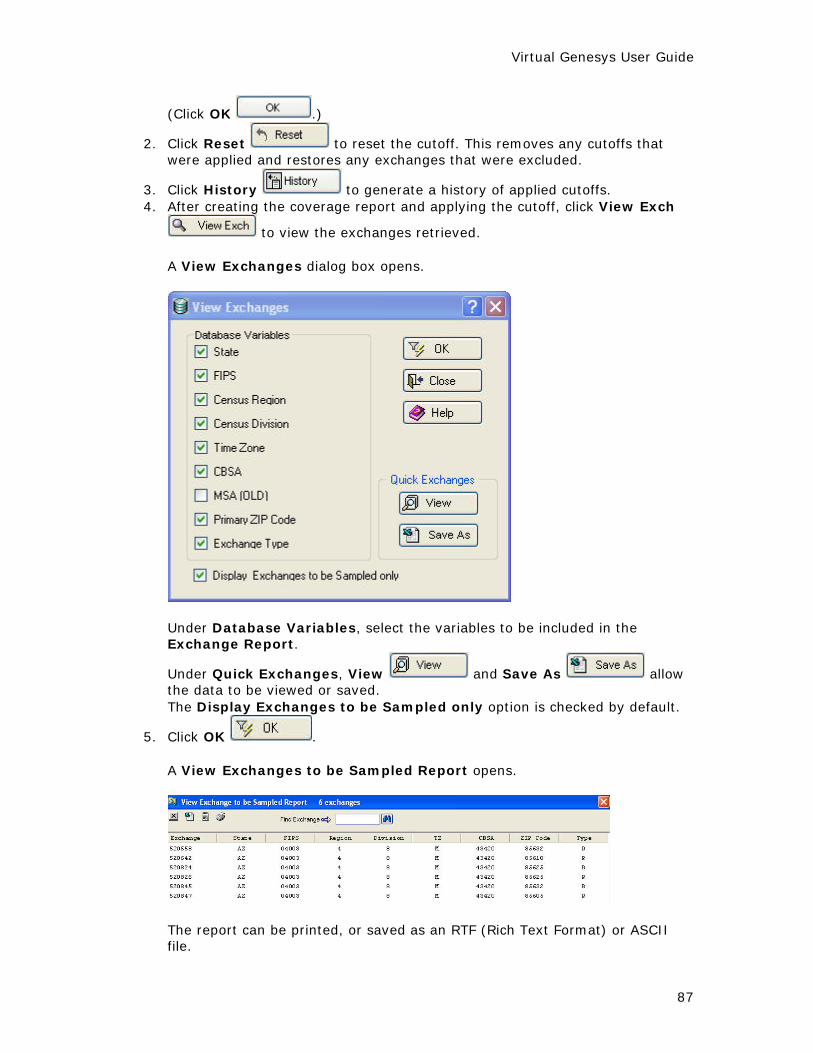
3. Click History to generate a history of applied cutoffs. 4. After creating the coverage report and applying the cutoff, click View Exch
to view the exchanges retrieved.
A View Exchanges dialog box opens.
Under Database Variables, select the variables to be included in the Exchange Report.
Under Quick Exchanges, View and Save As allow the data to be viewed or saved. The Display Exchanges to be Sampled only option is checked by default.
5. Click OK .
A View Exchanges to be Sampled Report opens.
The report can be printed, or saved as an RTF (Rich Text Format) or ASCII file.

Virtual Genesys User Guide
88
Defining a Sampling Frame by Congressional Districts Three steps are required to define a sampling frame by Congressional District. First, define the Congressional District area. Second, create a Coverage Report to review the coverage and incidence of the Area Code/Exchange combinations serving the congressional district area. Third, apply a cutoff based on the coverage and incidence for the project.
Define the Congressional District
1. Create a new project or open an existing project. 2. Create a new cell and define the geography, or open an existing cell with
predefined geography.
3. Click the Define Congressional Districts button .
-- or --
On the Define Frame menu, point to Define Geography, then to Congressional District, then click Define Congressional District Area.

Virtual Genesys User Guide
89
A Congressional Districts dialog box opens at the Define Area tab.

Virtual Genesys User Guide
90
The cell name is displayed in the title bar.
Add , Add All , Remove , and
Remove All are provided for convenience.
4. Define the cell's geography.
To select a Congressional District Area and move it into the Included box
a. Select a number, 1 through 5, in the Area box. Area means Congressional
District Area. The numbers mean that 1 contains Congressional District Areas primary to that State, 2 contains Congressional District Areas secondary to that State, and so forth.
b. Select a state in the State box. This generates a list of states. c. Do one of the following:
• Click once on an item, then click Include . -- or --
• Click twice (double-click) on an item.

Virtual Genesys User Guide
91
5. After a cell is defined, including the Exchange Types and
WB (Working Bank) Threshold , click Pull to retrieve the corresponding exchanges.
6. A message displays the number of exchanges pulled that serve the defined geographic area.
( Click OK . )
7. Click Close , click View Exch for a View
Exchanges dialog box, or click Print to open a Geographic Definition Report for printing.
Create Coverage Report
1. Click the Create Coverage Report & Define Cutoff tab.

Virtual Genesys User Guide
92
2. The Display Exchanges to be Sampled only check box is selected by default.
3. Under Select Report Format, select the format in which to create the report.
4. Click Run to create a Congressional District Coverage Report.

Virtual Genesys User Guide
93
5. After reviewing the generated report, a cutoff must be defined and applied. The cutoff can be applied under the Create Coverage Report & Define Cutoff tab or by using the Cutoff Manager. To define a cutoff in the Report tab, type the Minimum and Maximum Acceptable Incidences into their
respective boxes under Define Cutoff, and then click Apply .
A message will display the original number of exchanges, the number excluded, and the number retained.

Virtual Genesys User Guide
94
(Click OK . )
6. Click Reset to reset the cutoffs. This removes any applied cutoffs and restores any exchanges that were excluded.
7. Click History to generate a history of applied cutoffs.
8. To remove specific exchanges from consideration, click Remove under Eliminate Specific Exchanges.
An Eliminate Specific Exchanges dialog box appears.
9. To restore exchanges that were previously removed from consideration, click
Restore .
A message appears.

Virtual Genesys User Guide
95
(Click Yes or No . ) 10. To see exchanges that were removed from consideration, click View
.
An Eliminated Exchanges Report opens.
This report may be printed, or saved as an RTF (Rich Text Format) or ASCII file.
Cutoff Manager
To apply a cutoff using the Cutoff Manager, move either the Incidence or Coverage slider. Moving one slider affects the other. For numeric information on where the sliders are located and how this affects your sampling frame, see the Incidence and Coverage display in the upper right
corner .

Virtual Genesys User Guide
96
1. Click Apply .
A message will display the original number of exchanges, the number excluded, and the number retained.
(Click OK .)
2. Click Reset to reset the cutoff. This removes any cutoffs that were applied and restores any exchanges that were excluded.
3. Click History to generate a history of applied cutoffs.

Virtual Genesys User Guide
97
4. After creating the coverage report and applying the cutoff, click View Exch
to view the exchanges retrieved.
A View Exchanges dialog box opens.
5. Under Database Variables, select the variables to be included in the
Exchange Report.
Under Quick Exchanges, View and Save As allow the data to be viewed or saved.
The Display Exchanges to be Sampled only option is checked by default.
6. Click OK .
A View Exchanges to be Sampled Report opens.

Virtual Genesys User Guide
98
This report can be printed, or saved as an Excel spreadsheet or ASCII file.
Virtual Genesys User Guide
99
Overlaying Demographics The Demographic module provides the ability to narrow the set of exchanges that defines the sampling frame by including only those that meet specific demographic criteria. Demographic distributions and demographic medians are the two ways of targeting demographics in Virtual Genesys.
Demographic Distribution A demographic distribution report targets one of the following five demographic categories:
1. Age of Population (Age) 2. Race of Population (Race) 3. Household Income (Income) 4. Percent of Housing Occupancy (Home) 5. Percent of College Graduates (Education)
The report classifies each exchange into 5 percent incidence breaks based on the exchange's distribution of households across the selected demographic. This incidence can be changed to 1 percent in the report by selecting the 1% Increments check box. A cutoff is then applied on the set of exchanges that best suits the objectives of the project.
Demographic Median A demographic median report selects exchanges by targeting one of the following four median demographic values assigned to each exchange:
1. Average Rent 2. Median Income 3. Median Home Value 4. Median Years of Education
Exchanges are selected by specifying a range of values for the selected variable that best suits the objectives of the project.
Target Exchanges by using Demographic Distribution Each demographic category is broken down into several variables and their ranges. See table of Categories and Breaks. To perform a demographic overlay:
1. Create a new project or open an existing one. 2. Create a new cell and define the geography, or open an existing cell with
predefined geography.
3. Click the Demographic button .
-- or --
Virtual Genesys User Guide
100
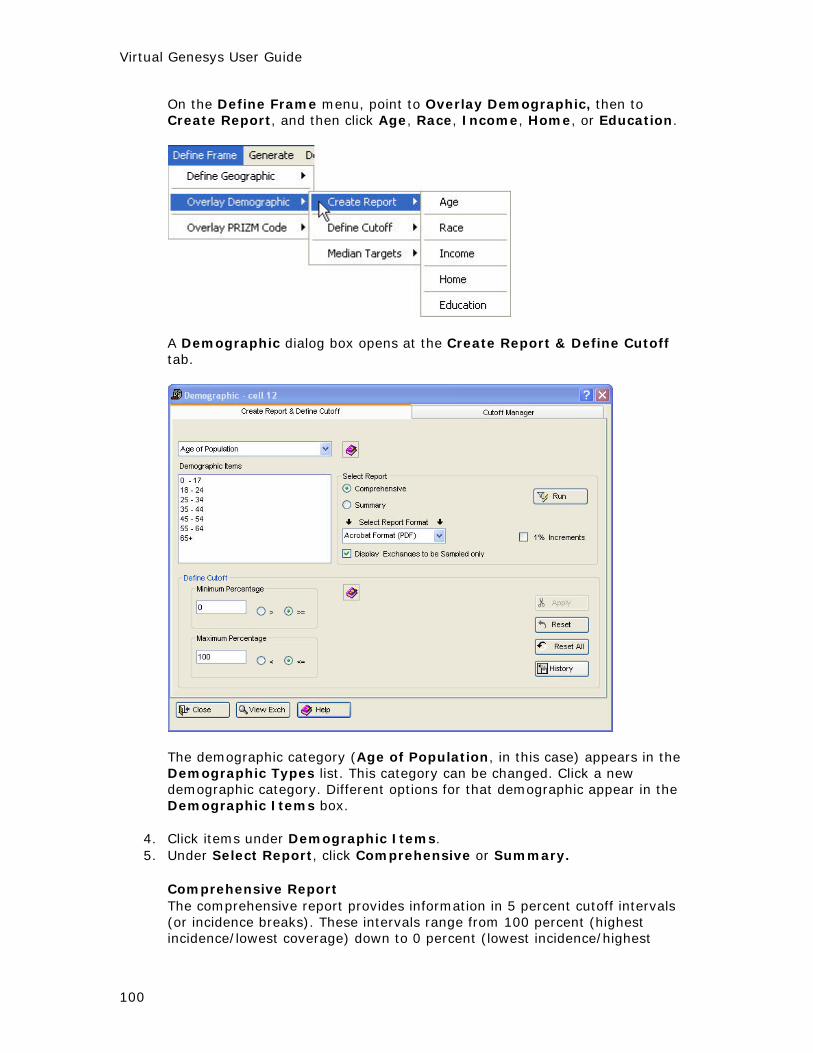
On the Define Frame menu, point to Overlay Demographic, then to Create Report, and then click Age, Race, Income, Home, or Education.
A Demographic dialog box opens at the Create Report & Define Cutoff tab.
The demographic category (Age of Population, in this case) appears in the Demographic Types list. This category can be changed. Click a new demographic category. Different options for that demographic appear in the Demographic Items box.
4. Click items under Demographic Items. 5. Under Select Report, click Comprehensive or Summary.
Comprehensive Report The comprehensive report provides information in 5 percent cutoff intervals (or incidence breaks). These intervals range from 100 percent (highest incidence/lowest coverage) down to 0 percent (lowest incidence/highest

Virtual Genesys User Guide
101
coverage). The 5 percent cutoff interval is the default. The cutoff interval can be changed to 1 percent in the report by selecting the 1% Increments check box. The comprehensive report provides the following information:
• Number of Exchanges: Lists the number and percent of exchanges
that are included in the frame at the individual cutoff level. • Cumulative Exchanges: Lists the total number of exchanges at the
specific cutoff level. • Target: Provides the estimated number of target households, coverage,
and incidence at the individual cutoff level. • Cumulative Target: Provides the total estimated number of target
households, cumulative coverage, and cumulative incidence. These are the figures of most importance in determining where a cutoff should be applied.
• Non-Target: Lists the estimated number of non-target households, coverage, and incidence at the individual cutoff level.
• Cumulative Non-Target: Provides the total estimated number of non-target households, coverage, and incidence at the specific cutoff level.
• Household: Lists the number of total households and coverage at the individual cutoff level.
• Cumulative Households: Provides the total number of total households and coverage at the specific cutoff level.
Summary Report The summary report lists the cumulative incidence and coverage figures for each of the 5 percent cutoff intervals. This cutoff interval is the default. The cutoff can be changed to 1 percent in the report by selecting the 1% Increments check box.
6. Click Select Report Format and select a format (PDF, XLS, or HTM).
7. Click Run to compile the report. 8. A cutoff value must be defined once the demographic distribution report has
been reviewed. A cutoff can be defined and applied on either the Create Report & Define Cutoff tab or the Cutoff Manager tab.
9. On the Create Report & Define Cutoff tab, type the minimum acceptable percentage.
10. Type the maximum acceptable percentage. The default value is 100.
11. Click Apply . A message displays the original number of exchanges, the number excluded, and the number retained.
12. Click Reset to remove the demographic overlay for the current
category. Click Reset All to remove the demographic overlay for

Virtual Genesys User Guide
102
all categories. Both actions restore any exchanges that were excluded for the respective overlay.
13. Click History to generate a history of applied demographic overlays.
Cutoff Manager To use the Cutoff Manager, move either the Cutoff or Coverage slider. Moving one affects the other. For numeric percentage information on where the sliders are located and how this affects the sampling frame, see the Incidence and Coverage
display in the upper right corner.
1. Click Apply .
A message will display the original number of exchanges, the number excluded, and the number retained.

Virtual Genesys User Guide
103
2. Click Reset to remove the demographic overlay for the current
category. Click Reset All to remove the demographic overlay for all categories. Both actions will restore any exchanges that were excluded for the respective overlay.
3. Click History to generate a history of applied demographic overlays.
4. Click Print to print an image of the overlay.
Categories and Breaks Age and Race demographics are population-based variables derived from current year estimates. The Income and Housing Occupancy demographics are household-based variables derived from current year estimates. Percent College Graduates is based on a population at least 18 years old.
Age Income Race Percent Housing Occupancy
Education
0-17
0 < 10,000
Asian/Pacific Islander
Owner-Occupied
Percent College Grads
18-24
10,000 < 15,000
Black (non-Hispanic)
Rented/Other
25-34
15,000 < 25,000
Hispanic
35-44
25,000 < 35,000
White (non-Hispanic)
45-54
35,000 < 50,000
55-64
50,000 < 75,000
65 75,000

Virtual Genesys User Guide
104
Plus < 100,000
100,000 Plus
Target Exchanges by using Median Demographic Values To select exchanges by targeting one of the median demographic values:
1. Create a new project or open an existing one. 2. Create a new cell and define the geography, or open an existing cell with
predefined geography.
3. Click the Demographic Median Targets button .
-- or --
On the Define Frame menu, point to Overlay Demographic, then to Median Targets, and then click Rent, Income, Home Value, or Years of Education.
4. Type the minimum and maximum values into the Minimum $ and Maximum $ boxes.

Virtual Genesys User Guide
105
Apply appears dimmed until Minimum $ and Maximum $ are
filled in. Apply then becomes available.
5. Click Apply .
A message displays the original number of exchanges, the number excluded, and the number retained.
( Click OK .)
6. Click Reset to remove the demographic overlay for the current
category. Click Reset All to remove the demographic overlay for all categories. Both actions restore any exchanges excluded for the respective
overlay. Click History to generate a history of applied demographic overlays.
7. Click Close to close the Demographic Median Target dialog box.

Virtual Genesys User Guide
106
Overlaying PRIZM Codes The PRIZM module defines the sampling frame by including only those exchanges that meet the criteria of a specific PRIZM cluster. First, select a set of cluster codes for an existing geographic cell. Second, generate a PRIZM coverage report. A cutoff is then applied based on the coverage and incidence for the project. The PRIZM cluster system is a social-economic coding scheme consisting of 66 cluster codes developed and maintained by www.Claritas.com (a marketing information resources company). The Virtual Genesys PRIZM module maintains a household distribution across these 66 cluster codes for each residential exchange. To perform a PRIZM overlay
1. Create a new project or open an existing project. 2. Create a new cell and define the geography, or open an existing cell with the
geography already defined.
3. Click the PRIZM Code button .
-- or --
On the Define Frame menu, point to Overlay PRIZM Code, then click Create Report.
A PRIZM Code dialog box opens.

Virtual Genesys User Guide
107
The Create Report tab is selected. The cell name is displayed in the title bar.
Add , Add All , Remove , and
Remove All are provided for convenience.
4. Define the cell's geography.
To select a PRIZM Code and move it into the Included box
Use the first box to select a number, 1 through 3. The number 1 contains PRIZM Codes primary to that State, 2 contains PRIZM Codes secondary to that State, and so forth.
Use the second box to search for a PRIZM Code. Type in the first character or two.

Virtual Genesys User Guide
108
Do one of the following:
• Click once on an item, then click Include . • Click twice (double-click) on an item.
5. Repeat for all PRIZM Codes being added. 6. The Display Exchanges to be Sampled only check box is selected by default.
7. Click Select Report Format to select a format for the report (PDF, XLS, or HTM)
.
8. Click Run to create the report. A PRIZM Coverage Report opens.

Virtual Genesys User Guide
109
9. After reviewing the generated report, a cutoff must be defined and applied. The
cutoff can be applied under the Define Cutoff & PRIZM Reports tab or by using the Cutoff Manager. To define a cutoff in the Reports tab, type the Minimum and Maximum Acceptable Incidences into their respective boxes,
or accept the defaults, and then click Apply .
A message displays the number of original exchanges, the number excluded, and the number retained.
(Click OK .)

Virtual Genesys User Guide
110
Define Cutoff & PRIZM Reports
1. Click the Define Cutoff & PRIZM Reports tab.
2. Type the Minimum and Maximum Acceptable Incidences into their respective
boxes, or accept the defaults.
3. Click Apply .
A message displays the original number of exchanges, the number excluded, and the number retained.
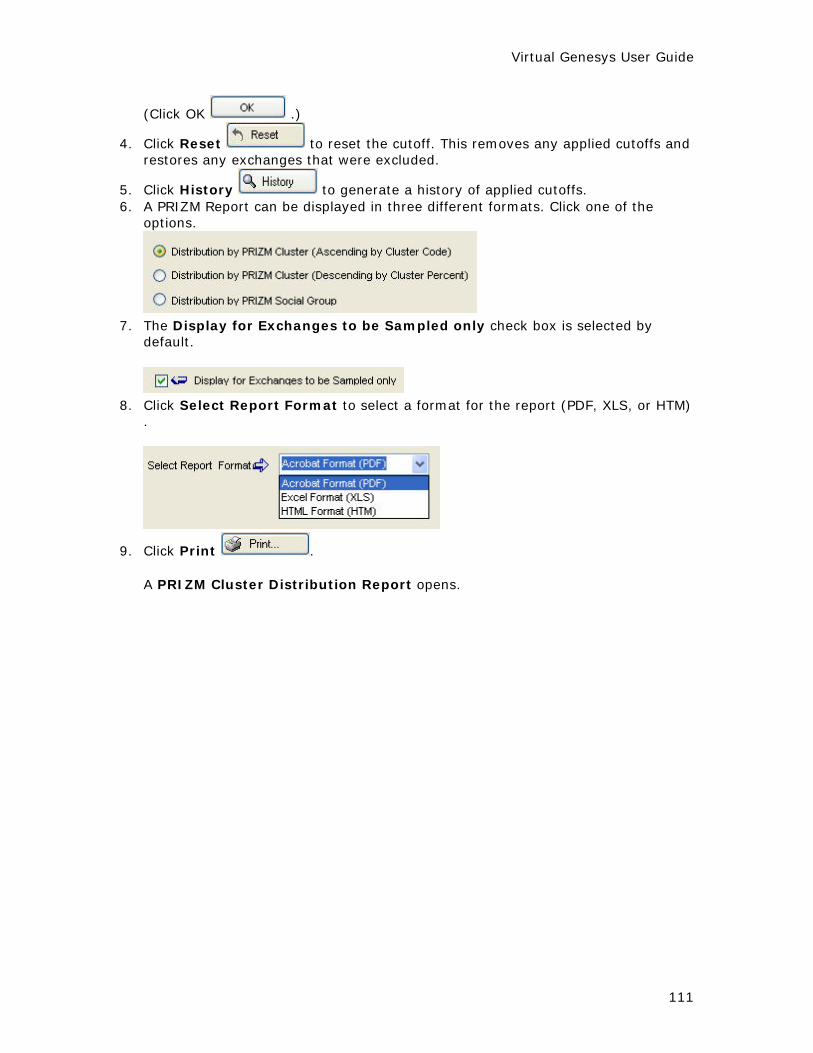
Virtual Genesys User Guide
111
(Click OK .)
4. Click Reset to reset the cutoff. This removes any applied cutoffs and restores any exchanges that were excluded.
5. Click History to generate a history of applied cutoffs. 6. A PRIZM Report can be displayed in three different formats. Click one of the
options.
7. The Display for Exchanges to be Sampled only check box is selected by
default.
8. Click Select Report Format to select a format for the report (PDF, XLS, or HTM)
.
9. Click Print .
A PRIZM Cluster Distribution Report opens.

Virtual Genesys User Guide
112
Cutoff Manager To apply a cutoff using the Cutoff Manager, move either the Incidence or Coverage slider. Moving one affects the other. For numeric percentage information on where the sliders are located and how this affects the sampling frame, see the
Incidence and Coverage display in the upper right corner.

Virtual Genesys User Guide
113
1. Click Apply .
A message displays the original number of exchanges, the number excluded, and the number retained.
( Click OK .)
2. Click Reset to remove the demographic overlay for the current category.
3. Click History to generate a history of applied demographic overlays. 4. After creating the coverage report and applying the cutoff, click View Exch
to view the exchanges retrieved.
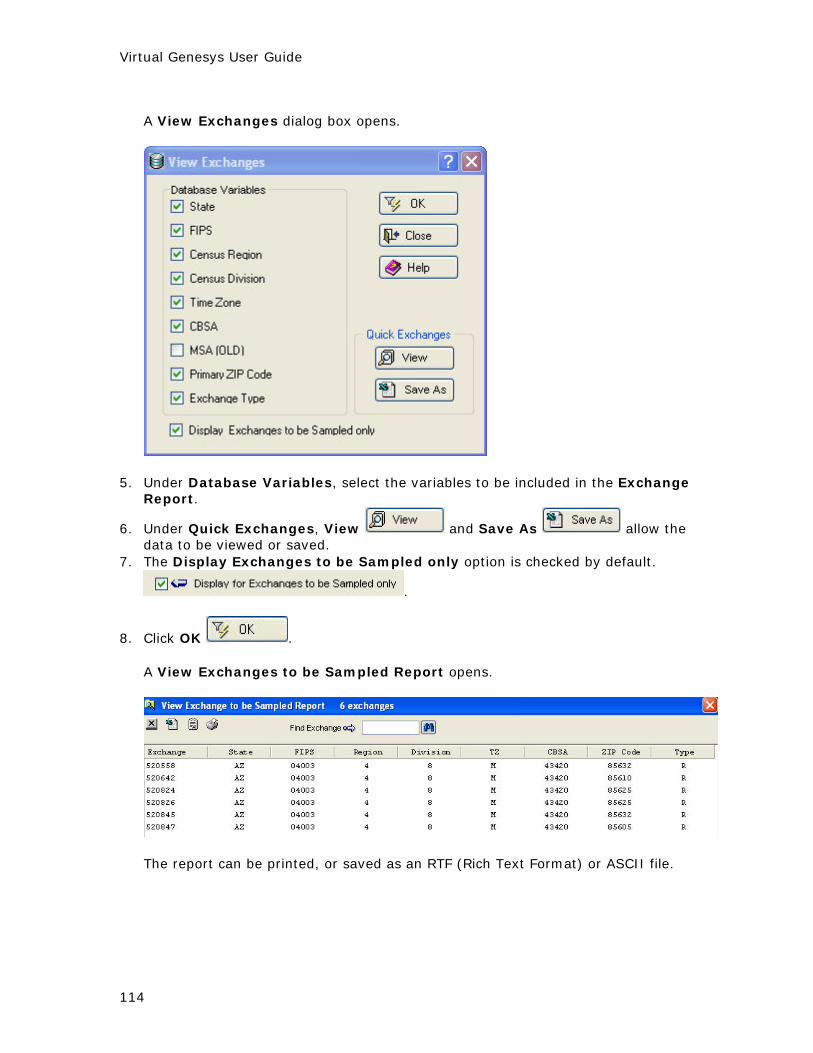
Virtual Genesys User Guide
114
A View Exchanges dialog box opens.
5. Under Database Variables, select the variables to be included in the Exchange
Report.
6. Under Quick Exchanges, View and Save As allow the data to be viewed or saved.
7. The Display Exchanges to be Sampled only option is checked by default.
.
8. Click OK .
A View Exchanges to be Sampled Report opens.
The report can be printed, or saved as an RTF (Rich Text Format) or ASCII file.
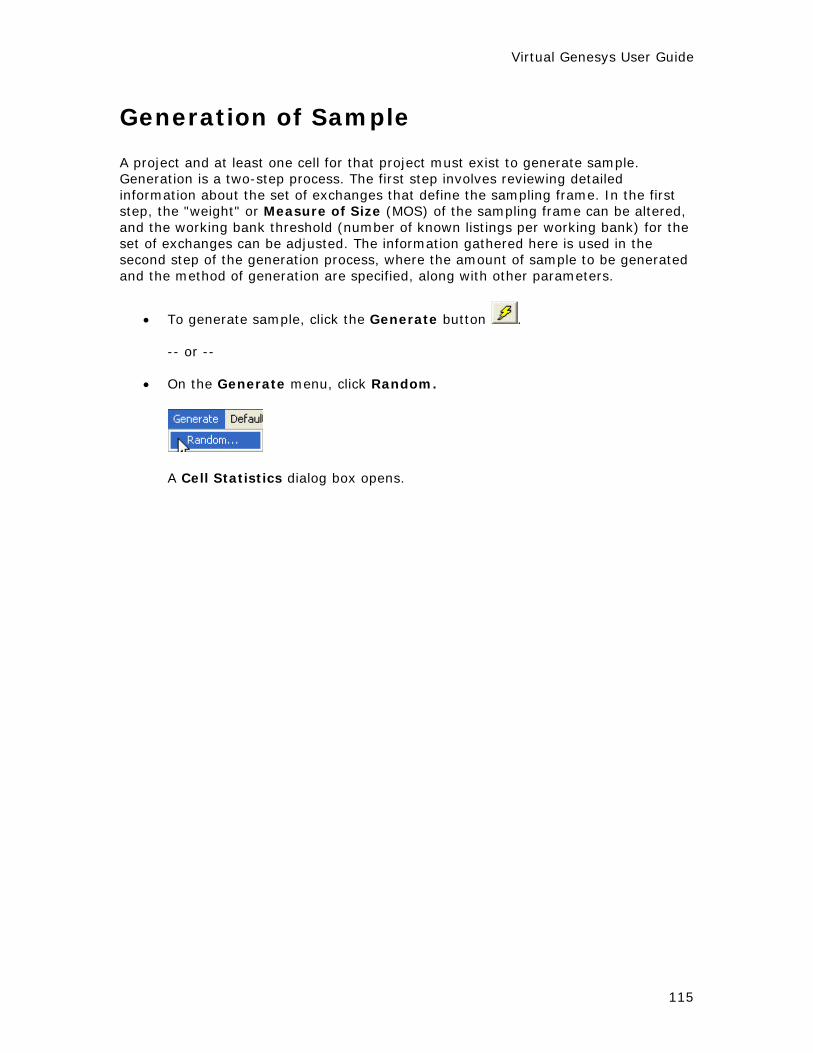
Virtual Genesys User Guide
115
Generation of Sample A project and at least one cell for that project must exist to generate sample. Generation is a two-step process. The first step involves reviewing detailed information about the set of exchanges that define the sampling frame. In the first step, the "weight" or Measure of Size (MOS) of the sampling frame can be altered, and the working bank threshold (number of known listings per working bank) for the set of exchanges can be adjusted. The information gathered here is used in the second step of the generation process, where the amount of sample to be generated and the method of generation are specified, along with other parameters.
• To generate sample, click the Generate button .
-- or --
• On the Generate menu, click Random.
A Cell Statistics dialog box opens.
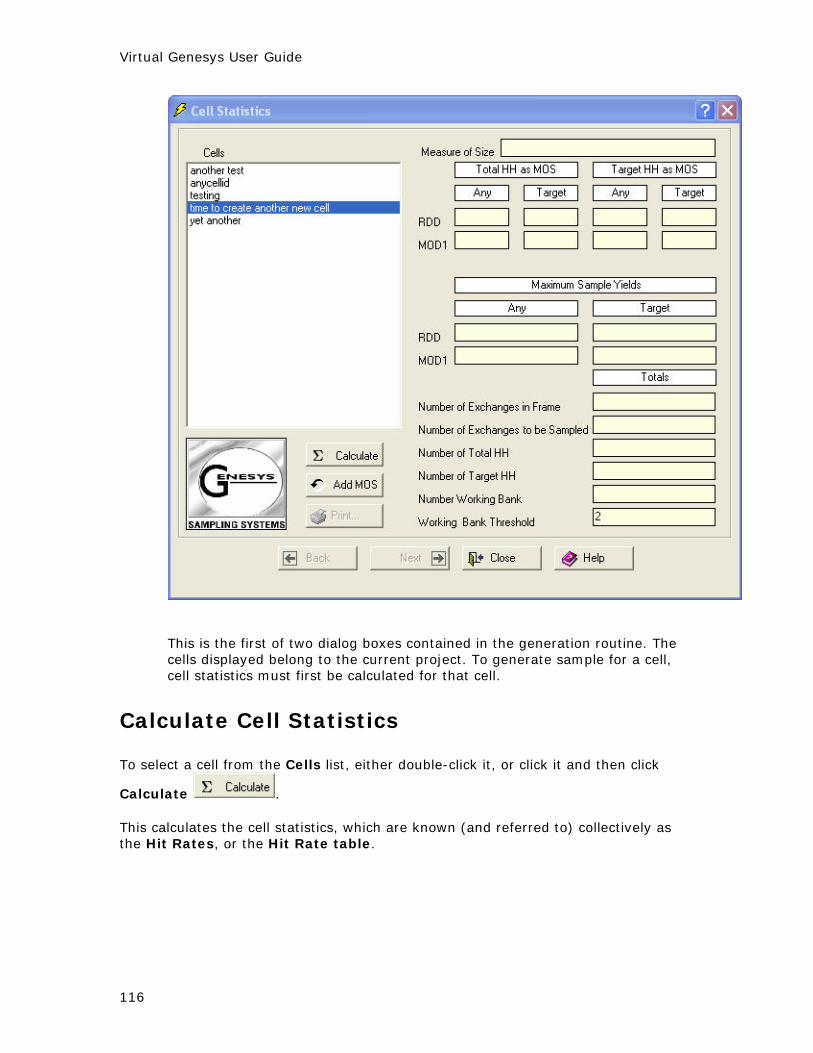
Virtual Genesys User Guide
116
This is the first of two dialog boxes contained in the generation routine. The cells displayed belong to the current project. To generate sample for a cell, cell statistics must first be calculated for that cell.
Calculate Cell Statistics To select a cell from the Cells list, either double-click it, or click it and then click
Calculate . This calculates the cell statistics, which are known (and referred to) collectively as the Hit Rates, or the Hit Rate table.

Virtual Genesys User Guide
117
The Hit Rate table provides estimated Household Hit Rates (and incidence rates for targeted and small-area frames) for RDD and MOD1, the two Virtual Genesys generation methods. The hit rates will vary based on the MOS used and the method of generation selected. Refer to Genesys Sampling System Methodology (Marketing Systems Group, REV. 8/97) for a detailed description of the generation methodologies and the affects of adjusting the Measure of Size. The first part of the Hit Rate table consists of four columns of data grouped under Total Households.

Virtual Genesys User Guide
118
These figures are an estimate of the percentage of the generated sample that will yield a household contact, prior to any additional screening. The four columns in the Hit Rate table are divided into one set of Any and Target columns under Total HH as MOS and another set of Any and Target columns under Target HH as MOS. (HH stands for households.)
Total HH as MOS Any: Represents an estimated percentage of the sample that is composed of households. For MOD1, the MOS is Total Households. Target: Represents an estimated percentage of the sample that will be a specific type of household based on the MOS. For MOD1, the MOS is Total Households. (For example, the exchanges are sampled based on the number of Total Households they serve.)
Target HH as MOS Any: Represents an estimated percentage of the sample that is composed of households. For the Modified Methods, the MOS is Target Households, and the exchanges are sampled based on the number of Target Households they serve. Target: Represents an estimated percentage of the sample that will not only be a household, but will also be the type of household specified. For the modified methods, the MOS is Target Households, and the exchanges are sampled based on the number of Target Households they serve. The second section of the Hit Rate table shows the Maximum Sample Yields for each generation method.
This is the maximum number of 10-digit phone numbers that can be generated from the selected cell. The maximum sample yields vary based on the generation method used (RDD or MOD1) and whether the MOS is Total Households (Any) or Target Households. With the RDD method, the Maximum Sample Yields are always based on the total number of working banks. This figure is calculated by multiplying Working Banks by 100. With MOD1 method, the Maximum Sample Yields will always be less than with the RDD method, because telephone numbers have unequal probabilities of selection with these methodologies.
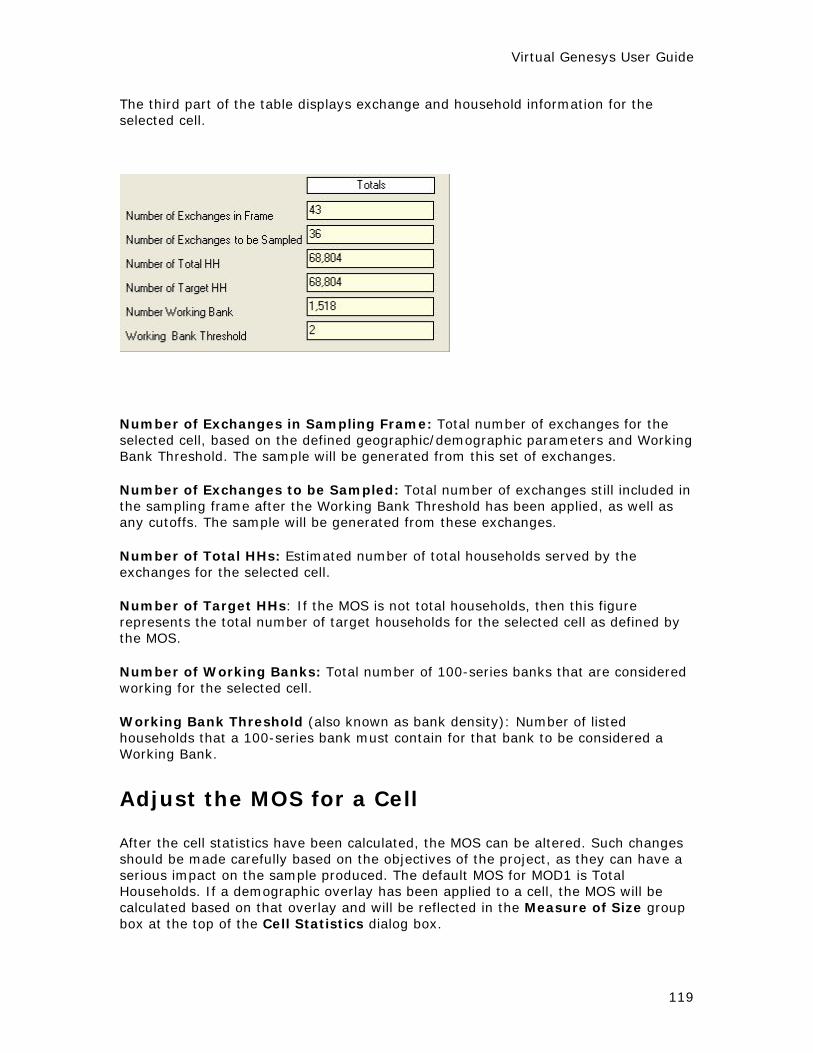
Virtual Genesys User Guide
119
The third part of the table displays exchange and household information for the selected cell.
Number of Exchanges in Sampling Frame: Total number of exchanges for the selected cell, based on the defined geographic/demographic parameters and Working Bank Threshold. The sample will be generated from this set of exchanges. Number of Exchanges to be Sampled: Total number of exchanges still included in the sampling frame after the Working Bank Threshold has been applied, as well as any cutoffs. The sample will be generated from these exchanges. Number of Total HHs: Estimated number of total households served by the exchanges for the selected cell. Number of Target HHs: If the MOS is not total households, then this figure represents the total number of target households for the selected cell as defined by the MOS. Number of Working Banks: Total number of 100-series banks that are considered working for the selected cell. Working Bank Threshold (also known as bank density): Number of listed households that a 100-series bank must contain for that bank to be considered a Working Bank.
Adjust the MOS for a Cell After the cell statistics have been calculated, the MOS can be altered. Such changes should be made carefully based on the objectives of the project, as they can have a serious impact on the sample produced. The default MOS for MOD1 is Total Households. If a demographic overlay has been applied to a cell, the MOS will be calculated based on that overlay and will be reflected in the Measure of Size group box at the top of the Cell Statistics dialog box.

Virtual Genesys User Guide
120
1. Click Add MOS .
A Measure of Size dialog box opens.
2. Click the demographic category you want to use as your Measure of Size. The ranges for some of the demographic categories will appear in the list on the right. Click the ranges to be used. Select as many ranges as needed.
3. Click OK . A message will appear regarding any changes. New cell statistics will be calculated. The Hit Rate table will be updated to reflect the new MOS.
4. Click Next to move from Cell Statistics to Generate, which contains a number of fields that define the final output specifications for the sample.
Once the Hit Rate table has been populated, and the MOS and Working Bank Threshold have been set, the next step is to generate numbers.
Specify Sample Parameters, Generating Sample In the Generate dialog box, look under the Generation Parameters group box.
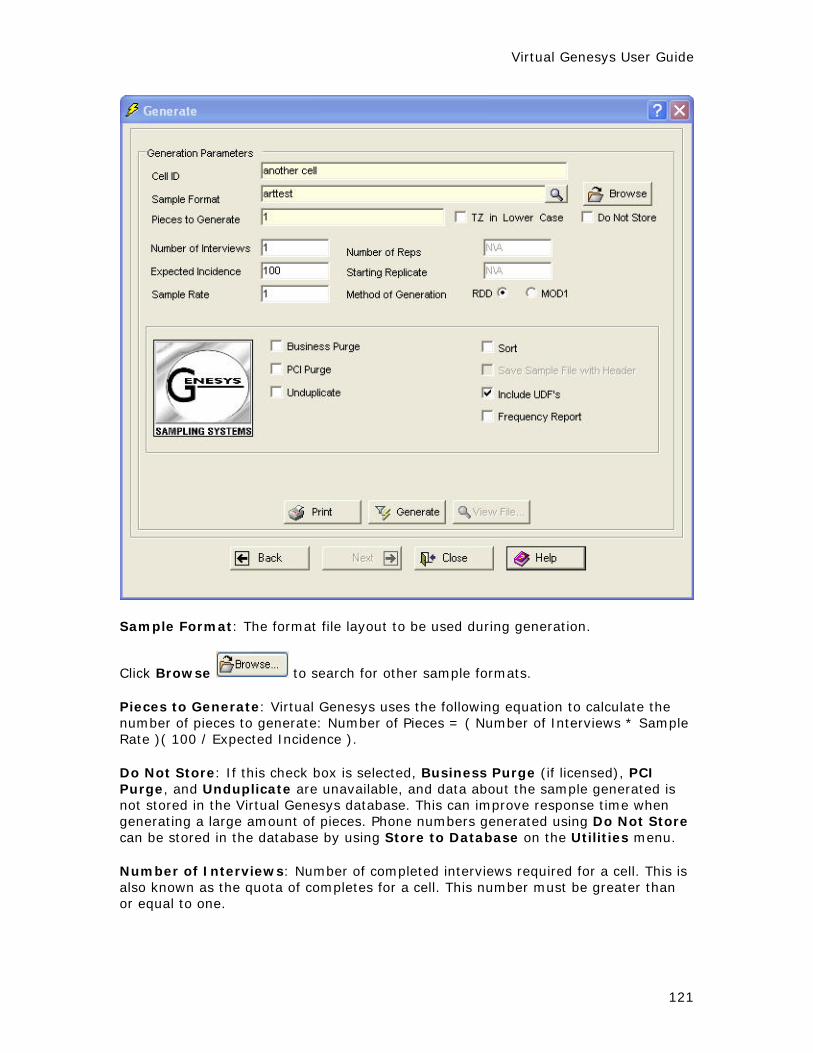
Virtual Genesys User Guide
121
Sample Format: The format file layout to be used during generation.
Click Browse to search for other sample formats. Pieces to Generate: Virtual Genesys uses the following equation to calculate the number of pieces to generate: Number of Pieces = ( Number of Interviews * Sample Rate )( 100 / Expected Incidence ). Do Not Store: If this check box is selected, Business Purge (if licensed), PCI Purge, and Unduplicate are unavailable, and data about the sample generated is not stored in the Virtual Genesys database. This can improve response time when generating a large amount of pieces. Phone numbers generated using Do Not Store can be stored in the database by using Store to Database on the Utilities menu. Number of Interviews: Number of completed interviews required for a cell. This is also known as the quota of completes for a cell. This number must be greater than or equal to one.

Virtual Genesys User Guide
122
Expected Incidence: This incidence rate is the estimated percent of household contacts that will qualify for the survey (based on any screening questions in the survey document). The incidence rate is entered as a whole number with up to one decimal place. This number can range from 0.5 to 100.0. Sample Rate: Number of sample pieces needed to obtain a completed screen. A screen is defined as someone who will answer your qualifying questions, even though they may not qualify for the survey. To determine what the sample rate should be, take into account the Hit Rate (for example, what percentage of the sample will be households), the expected refusal rate, and any call rules (reflecting no-answers, callbacks, busy signals, etc.). The sampling rate is entered as a whole number with up to one decimal place. The number can range from 1.0 to 100.0. Number of Reps (Replicates): A replicate is a representative subset of the entire sample file, where each of these subsets is representative of the original sample file. For example, if 10 percent of your entire sample file was in California, then 10 percent of the phone number in each replicate will also be in California. The number of replicates is entered as a whole number (no decimals). Numbers can range from one to 999. The number of replicates entered must be less than or equal to the number of pieces that will be generated. Starting Replicate: The default is one. Unless this is changed, the replicate number assignment will begin with one. For example, if the number of replicates specified is 10 and the starting replicate number is one, then the sample will be put in 10 replicates numbered one to 10. For another example, if the number of replicates specified is 10, but the starting replicate number is set to five, then the sample file will be put into 10 replicates numbered five to 14. This option to change the starting replicate number is valuable when generating additional sample for a particular cell. Method of Generation: There are two generation methods to choose from when generating random-digit-dialing (RDD) samples in Virtual Genesys. The standard Virtual Genesys RDD methodology produces a strict single stage, EPSEM (Equal Probability of Selection Method) sample of residential telephone numbers. In other words, a Virtual Genesys RDD sample ensures an equal and known probability of selection for every residential telephone number in the sampling frame. In some situations, a sampling methodology other than a strict EPSEM RDD may prove beneficial. Virtual Genesys provides an alternative RDD procedure that results in probability samples of telephone households. This method is more efficient in that it yields slightly higher proportions of households than a strict RDD methodology. While an EPSEM assigns a known and equal probability of selection to each telephone number, modified generation procedures provide a known but unequal probability of selection. The MOD1 sample generation method increases efficiency by over-sampling telephone exchanges with higher densities of households, and decreases the sampling rate in those with lower densities. PCI Purging and Business Purging (if licensed) are additional options that may be specified.
Additional Parameters
• Business Purge: If licensed, this option is provided to users who choose to remove business phone numbers from their sample file.

Virtual Genesys User Guide
123
• PCI Purge: This option is provided to users who choose to remove certain numbers from their sample file. Private Citizens Incorporated (PCI) is a database of respondents who do not wish to be called by market researchers or telemarketers.
• Purge against NeuStar Database: If licensed, this option (which may be unavailable and appear dimmed) is provided to users who choose to remove certain numbers from their sample file. NeuStar is a database of wireline (landline) phone numbers that have been ported to cell phones.
• Unduplicate: Compares telephone numbers against previously generated samples or a known ASCII file, and removes duplicate records from the generated sample. In the Generate Dialog Box, select Unduplicate. Two check boxes and a list will appear adjacent to the Unduplicate check box. Comparison File and Replace Purged Numbers are the two check boxes. DB Data is the list.
Click the arrow for DB Data. Current Cell, Current Project, All Available, and Given Time Frame will appear as options.
If Given Time Frame is clicked, a Time Frame Selection dialog box appears, allowing a date range to be selected.
An available date range appears. Select the From and to dates and click OK
.

Virtual Genesys User Guide
124
The date range should now be displayed in the Generate dialog box and
should look something like this: .
The date range is now displayed.
Sort: Enables the user to sort their sample file by any field that was included in the Sample Format layout. Multiple fields can be specified. The fields' sorting order and ascending or descending direction may also be specified. Select Sort.
A Select Sorting Fields dialog box opens.

Virtual Genesys User Guide
125
Select the Sorting Fields in the order in which they should appear, or select Randomize Sort. In the Select Sorting Fields dialog box above, Time Zone was clicked first, Primary City, second, and ADI (Area of Dominant Influence) Code, third. This order appears in the Order column. Select ascending or descending by clicking in the Direction column for the field. If the direction is ascending (Asc), clicking there will change it to descending (Desc), and visa versa.
Save Sample File with Header: Includes the Sample Format field headers in the Sample file. This option is available ONLY for sample formats that use commas and tabs as delimiters. It will otherwise be unavailable and will appear dimmed.
Include UDFs: UDF stands for User-Defined Field. If the Sample Format (listed at the top of the dialog box) contains a UDF, this check box is selected. If there is no UDF in the Sample Format, this option will be unavailable and will appear dimmed. Select Include UDFs.
A User Defined Fields dialog box opens.
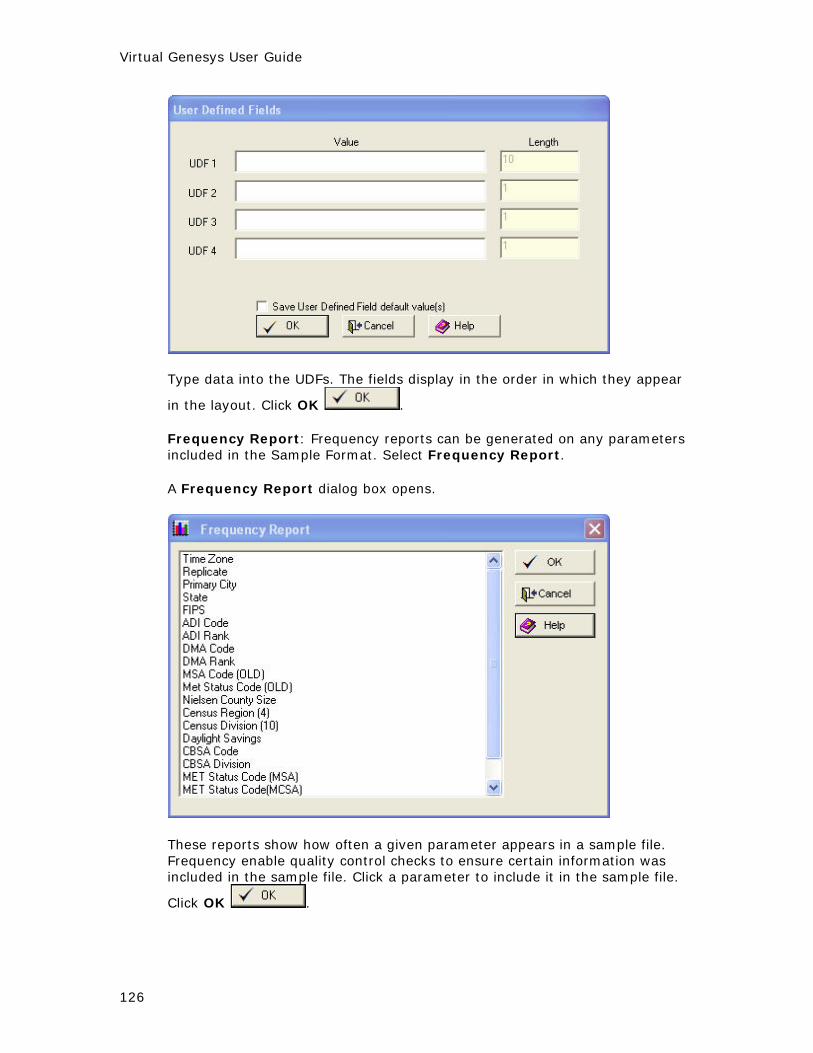
Virtual Genesys User Guide
126
Type data into the UDFs. The fields display in the order in which they appear
in the layout. Click OK .
Frequency Report: Frequency reports can be generated on any parameters included in the Sample Format. Select Frequency Report.
A Frequency Report dialog box opens.
These reports show how often a given parameter appears in a sample file. Frequency enable quality control checks to ensure certain information was included in the sample file. Click a parameter to include it in the sample file.
Click OK .

Virtual Genesys User Guide
127
After Generation Parameters are Defined, Generate the Sample To start generation
1. Click the Generate button . A Save As dialog box opens.
2. Name the file and select a directory where it will be stored. By default, Virtual Genesys will open the directory where the last sample file was stored. Type a
file name, click Save , and generation will commence.
When sample generation is complete, a message will appear, indicating how much sample was generated.
If PCI Purge or Business Purge (if licensed) was selected, the number of pieces removed from the sample will also be displayed here.
3. Click Yes to see the Virtual Genesys Generation Report.
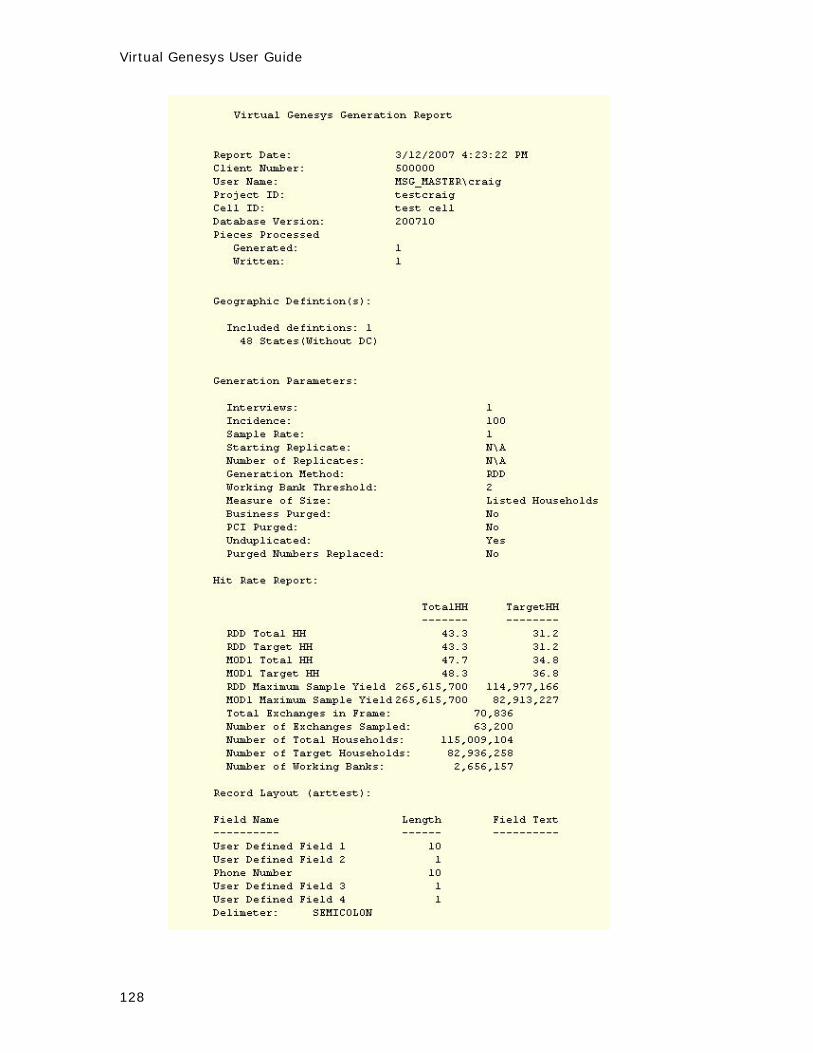
Virtual Genesys User Guide
128

Virtual Genesys User Guide
129
4. The sample generation process can be stopped by clicking Stop Generation
, which appears only during the actual sample generation. The button will appear at the bottom of the Generate dialog box:
5. If Stop Generation is clicked, a confirmation message appears.
6. To stop generation, click Yes . Another message appears.
-- or --
Click No . Generation finishes and a different message appears.
A sample of a Virtual Genesys Generation Report was provided earlier.
Default System Settings
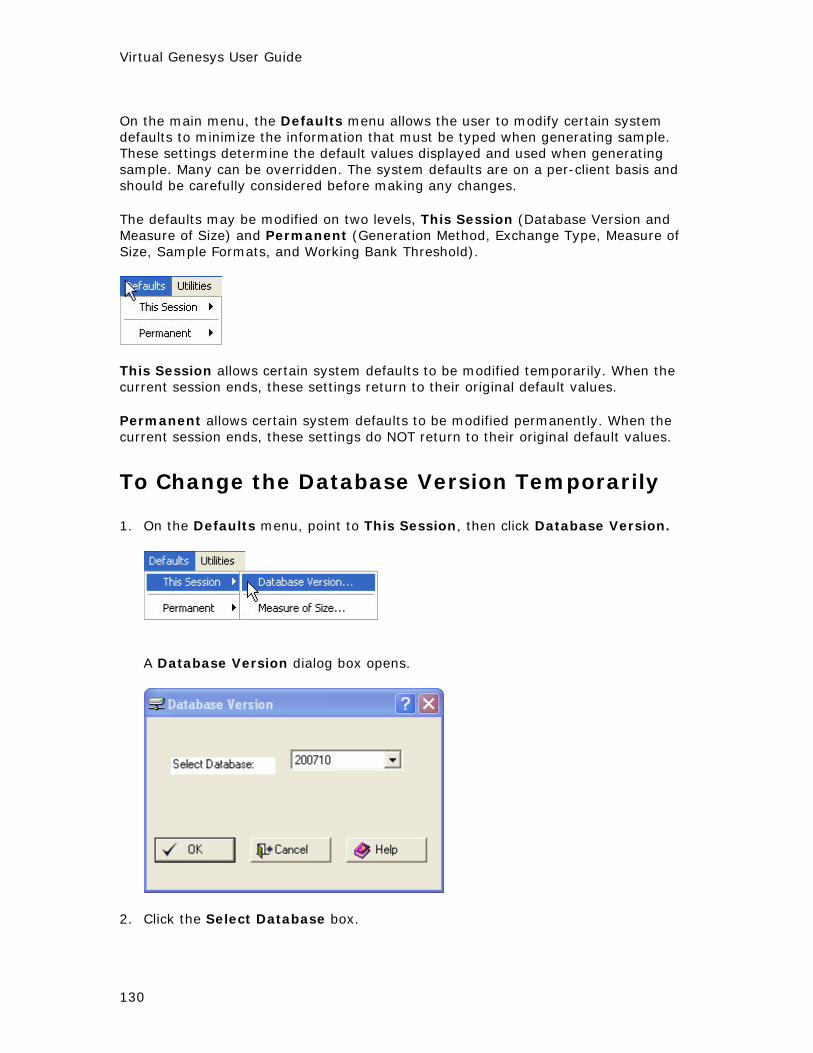
Virtual Genesys User Guide
130
On the main menu, the Defaults menu allows the user to modify certain system defaults to minimize the information that must be typed when generating sample. These settings determine the default values displayed and used when generating sample. Many can be overridden. The system defaults are on a per-client basis and should be carefully considered before making any changes. The defaults may be modified on two levels, This Session (Database Version and Measure of Size) and Permanent (Generation Method, Exchange Type, Measure of Size, Sample Formats, and Working Bank Threshold).
This Session allows certain system defaults to be modified temporarily. When the current session ends, these settings return to their original default values. Permanent allows certain system defaults to be modified permanently. When the current session ends, these settings do NOT return to their original default values.
To Change the Database Version Temporarily 1. On the Defaults menu, point to This Session, then click Database Version.
A Database Version dialog box opens.
2. Click the Select Database box.
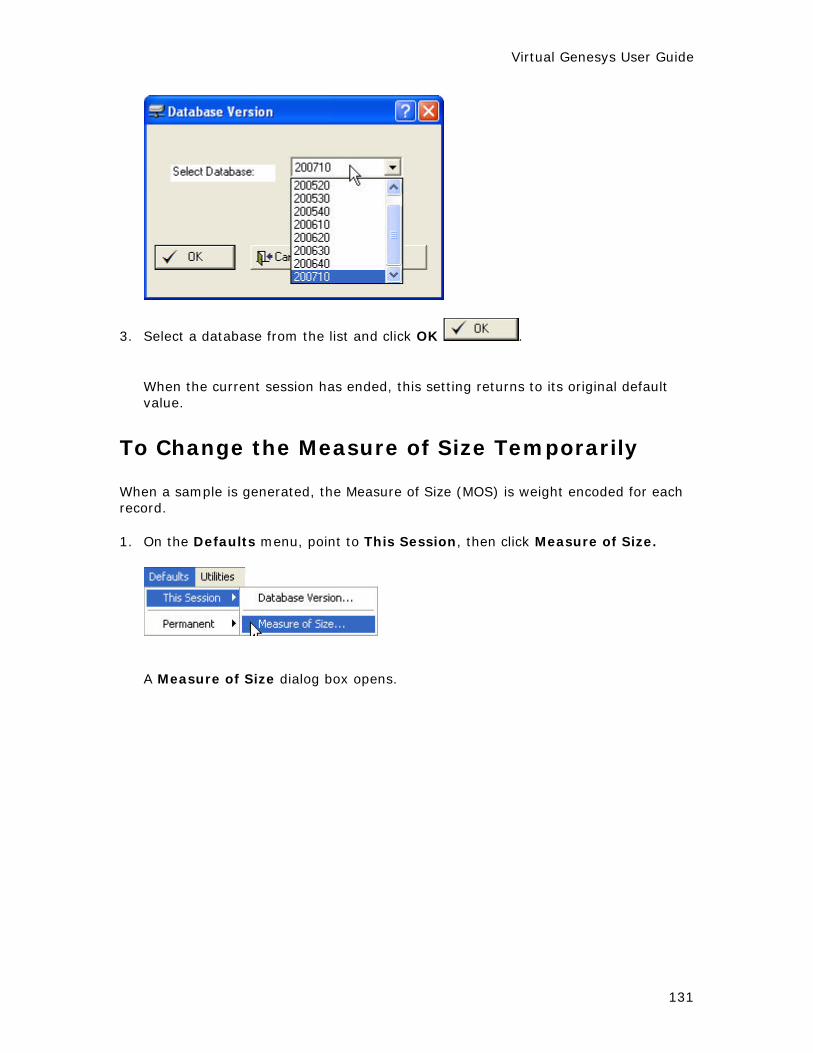
Virtual Genesys User Guide
131
3. Select a database from the list and click OK .
When the current session has ended, this setting returns to its original default value.
To Change the Measure of Size Temporarily When a sample is generated, the Measure of Size (MOS) is weight encoded for each record. 1. On the Defaults menu, point to This Session, then click Measure of Size.
A Measure of Size dialog box opens.

Virtual Genesys User Guide
132
2. Click a MOS variable, then click OK to save the changes and close the window.
To Change the Measure of Size Permanently When a sample is generated, the Measure of Size is weight encoded for each record. The permanent default setting can be set to either Total Households or Listed Households. 1. On the Defaults menu, point to Permanent, then click Measure of Size.
A message asks if a change was requested.

Virtual Genesys User Guide
133
Click Yes or No .
To Change the Generation Method Permanently The Generation Method will set the default generation to either RDD (random-digit-dialing) or MOD1 (modified RDD). 1. On the Defaults menu, point to Permanent, then click Generation Method.
A message asks if a change was requested.
2. Click Yes or No .
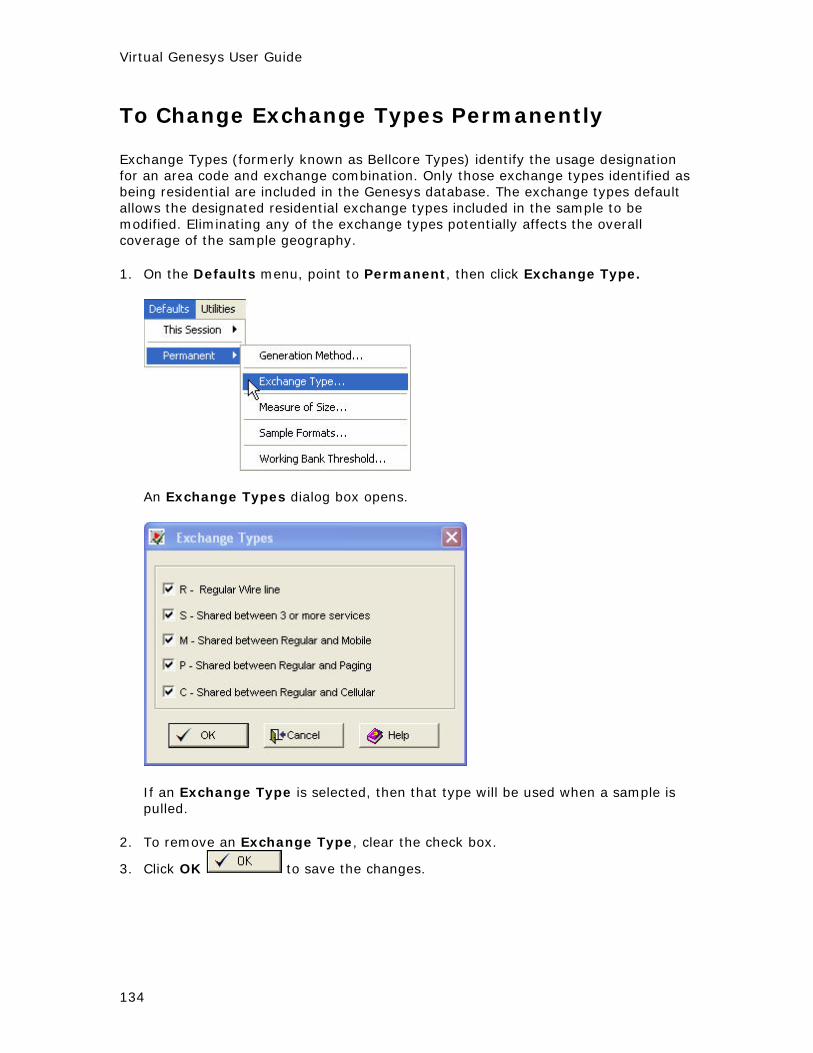
Virtual Genesys User Guide
134
To Change Exchange Types Permanently Exchange Types (formerly known as Bellcore Types) identify the usage designation for an area code and exchange combination. Only those exchange types identified as being residential are included in the Genesys database. The exchange types default allows the designated residential exchange types included in the sample to be modified. Eliminating any of the exchange types potentially affects the overall coverage of the sample geography. 1. On the Defaults menu, point to Permanent, then click Exchange Type.
An Exchange Types dialog box opens.
If an Exchange Type is selected, then that type will be used when a sample is pulled.
2. To remove an Exchange Type, clear the check box.
3. Click OK to save the changes.

Virtual Genesys User Guide
135
To Change Sample Formats Permanently Use the Sample Format menu to define and customize sample formats. Sample formats can be created for each client and each study. The Telephone Number should be the first variable in the sample format and it should start in column one. This is recommended because the Telephone Number is the only required field for sample formats. The Default Sample Format becomes the default format during generation. The sample format used during generation can be changed only on the generation screen, or by changing the default sample format. To Create a Sample Format
1. On the Defaults menu, point to Permanent, then click Sample Formats.
A Sample Formats dialog box opens.

Virtual Genesys User Guide
136
Sort the list using Sort Order in the bottom right corner. Select Date Asc or Name Asc ("Asc" means ascending order).
2. Click New .
A New Format dialog box opens.

Virtual Genesys User Guide
137
3. Click the Format Layout Name box and type the name of the new format. 4. Select the items to include in the sample layout from the list on the left.
• Double-click on a variable, or click on a variable and click Append
, to place the new variable at the end of the new format.
• Click on a variable and click Insert to place the new variable before the selected variable.
• Look in the bottom right corner for the Field Delimiter group box. Click the delimiter (Space, Tab, None, Comma, Semicolon, or Other) that is to be used to separate fields in the layout. None is the default delimiter.
5. Click Save to save the format layout. 6. Close the box.

Virtual Genesys User Guide
138
To change an existing Sample Format 1. On the Defaults menu, point to Permanent, then click Sample Formats.
2. Click the layout to be modified from the Sample Format list and then click Edit
. 3. Append variables from a Sample Format list to the end of a Sample Format in
two ways. Do one of the following: • Double-click the item.
-- or --
• Click the item and then click Append . 4. To insert a variable into a Sample Format:
a. In the list on the RIGHT, click on an item. The new variable will be placed BEFORE this item.
b. In the list on the LEFT, click on a variable to insert, then click Insert
. The new variable will be placed BEFORE the item selected in step a.
5. To remove an item from a Sample Format, click the variable in the list on the
right, then click Remove . To modify starting columns in a Sample Format 1. On the Defaults menu, point to Permanent, then click Sample Formats.

Virtual Genesys User Guide
139
A Sample Formats dialog box opens.
2. Click the Sample Format to be modified and then click Edit .
An Edit Sample Format dialog box opens.

Virtual Genesys User Guide
140
NOTE: The field delimiter is located in the Field Delimiter group box in the bottom right corner of the Edit Sample Format dialog box. The field delimiter must be set to None in order to modify the starting columns of a field.
3. In the Edit Sample Format dialog box, in the list on the right, click a field to
modify its starting position, and then click Edit .
A Field Attributes dialog box opens.
Field displays the name of the field selected. Starting Position displays where that field starts. Field Length displays the length of the field selected.

Virtual Genesys User Guide
141
4. Enter the value of the new column in which the field is to start and click OK
. 5. The field will now start in the column specified. All fields following will
automatically adjust to reflect the change.
6. Click Save to permanently save the changes. A message confirms the changes.
7. Close the dialog box. To set a default Sample Format 1. On the Defaults menu, point to Permanent, and then click Sample Formats.
A Sample Formats dialog box opens.

Virtual Genesys User Guide
142
2. The current Sample Format is displayed in the Default box. 3. To set another format layout as the default, click the layout in the list, then click
Set Default . The Default box displays that layout as the default. User-Defined Fields in a Sample Format User-Defined Fields (UDFs) in a Sample Format allow users to define their own fields and corresponding values to add to sample files during generation. For example, to append a value of “01” to each sample record, a UDF with that value could be specified in the sample format file. During sample generation, each record would have the value from the UDF field encoded into the sample record. A Sample Format supports up to five UDFs. During the generation specification phase, prompts appear when the data should be added to the UDF. This occurs for every UDF defined in the sample format. UDFs can vary from one to 20 columns. To Add UDFs to the End of an Existing Sample Format 1. On the Defaults menu, point to Permanent, and click Sample Formats.

Virtual Genesys User Guide
143
A Sample Formats dialog box opens.
2. Select a Sample Format from the list on the left and click Edit .
Remember, the Field Delimiter must be set to None for Edit to be available.
An Edit Sample Format dialog box opens.

Virtual Genesys User Guide
144
3. Scroll to the bottom of the list box on the left until User-Defined Fields 1
through 5 appear.
4. Click on the appropriate UDF and then click Append .
A UDF Fields Attributes dialog box opens.
5. Type a Starting Position and Field Length for the field.
6. Click OK to have the field appended to the end of the Sample Format.

Virtual Genesys User Guide
145
Otherwise, click Cancel .
To Change the Working Bank Threshold Permanently The Working Bank Threshold is the number of listed households required for a Working Bank to be active and eligible for inclusion when a sample is generated. The Working Bank Threshold accepts values from 1 to 15. The lower the Working Bank Threshold, the higher the coverage will be in the generated sample. Virtual Genesys uses this default during sampling frame definitions, and it can always be modified. To modify the Working Bank Threshold 1. On the Defaults menu, point to Permanent, then click Working Bank
Threshold.
A Working Bank Threshold dialog box opens.
2. Select a value and click OK .

Virtual Genesys User Guide
146
Utilities Virtual Genesys provides a number of pre-compiled reports (Code Books) for reference purposes. These reports are available online, and can be viewed, printed, or saved. Reports marked with an asterisk (*) are available in PDF format. The reports available are:
1. ADI (Area of Dominant Influence) • Detail* • Summary by Code • Summary by Name • Summary by Rank
2. CBSA (Core-Based Statistical Area) • CSA (Combined Statistical Area) Detail* • CSA Summary • MCSA (Micropolitan Statistical Area) Detail* • MCSA Summary • MSA (Metropolitan Statistical Area) Detail* • MSA Summary
3. Census Region / Division 4. County 5. DMA (Designated Market Area)
• Detail* • Summary by Code • Summary by Name • Summary by Rank
6. MSA (Metropolitan Statistical Area) • Detail (Old)* • Summary (Old)
7. PRIZM (if licensed) • Codes and Descriptions
8. State* 9. Time Zone*
View Code Book
1. On the Utilities menu, click View Code Book.

Virtual Genesys User Guide
147
A View Code Book dialog box opens.
2. Click a report and click View . The report may then be printed or saved.
View Database The View Database utility allows the user to view all geographic and demographic parameters for an exchange or defined geographic area.
View Exchange Information
1. On the Utilities menu, point to View Database, then click Exchange.
A View Exchange dialog box opens.

Virtual Genesys User Guide
148
2. Type an Area Code/Exchange, no spaces.
3. Click View .
The following message opens ON TOP of View Exchange.
4. To see the PDF Exchange Report, click Yes .

Virtual Genesys User Guide
149
For the HTML report, click No . View Exchange returns to focus.
5. Put the pointer on View and right-click.
6. Click on HTML Format (HTM) to change the report format from PDF to HTML.

Virtual Genesys User Guide
150
7. Click on View again.
The following new message opens ON TOP of View Exchange.
8. To see the HTM Exchange Report, click Yes .

Virtual Genesys User Guide
151
Note: Microsoft Internet Explorer (IE) should be used to view the HTM Exchange Report. Mozilla Firefox does not appear to render the page properly.
View Database Information for a Defined Area
1. On the Utilities menu, point to View Database, then click Summary.

Virtual Genesys User Guide
152
This will open a View Database Information for a Defined Area dialog box.
2. To find the project that contains the cell for which the Exchange Report will be
run, click the Browse next to the Project ID field.
This will open a Select Existing Project dialog box ON TOP of the previous box.

Virtual Genesys User Guide
153
2. Click a project and click OK . The box will close. The View Database Information for a Defined Area dialog box will come back into focus.
3. To find the cell for which the Exchange Report will be run, click the Browse
next to the Cell ID field.
This will open a Select Existing Cell dialog box ON TOP of the previous box.
4. Click a cell and click OK . The box will close.
The View Database Information for a Defined Area dialog box will return to focus.

Virtual Genesys User Guide
154
Four types of reports can be generated from the options under the Select Report's Option group box:
a. Summary Exchanges Report (Total in Frame): Displays
cumulative totals for each field in the report based on the total in the sampling frame.
b. Exchange Summary Report (To be Sampled): Displays cumulative totals for each field in the report based only on the exchanges to be sampled.
c. Exchange Detail Report (Total in Frame): Displays results on every exchange in the sampling frame for each field in the report based on the total number of exchanges in the sampling frame.
d. Exchange Detail Report (To be Sampled): Displays results only on those exchanges to be sampled for each field in the report on the sampled exchanges only.
5. After the report type selection has been made, click View to see the report in PDF, Excel, or HTML format.
To change the current default format, right-click on View .
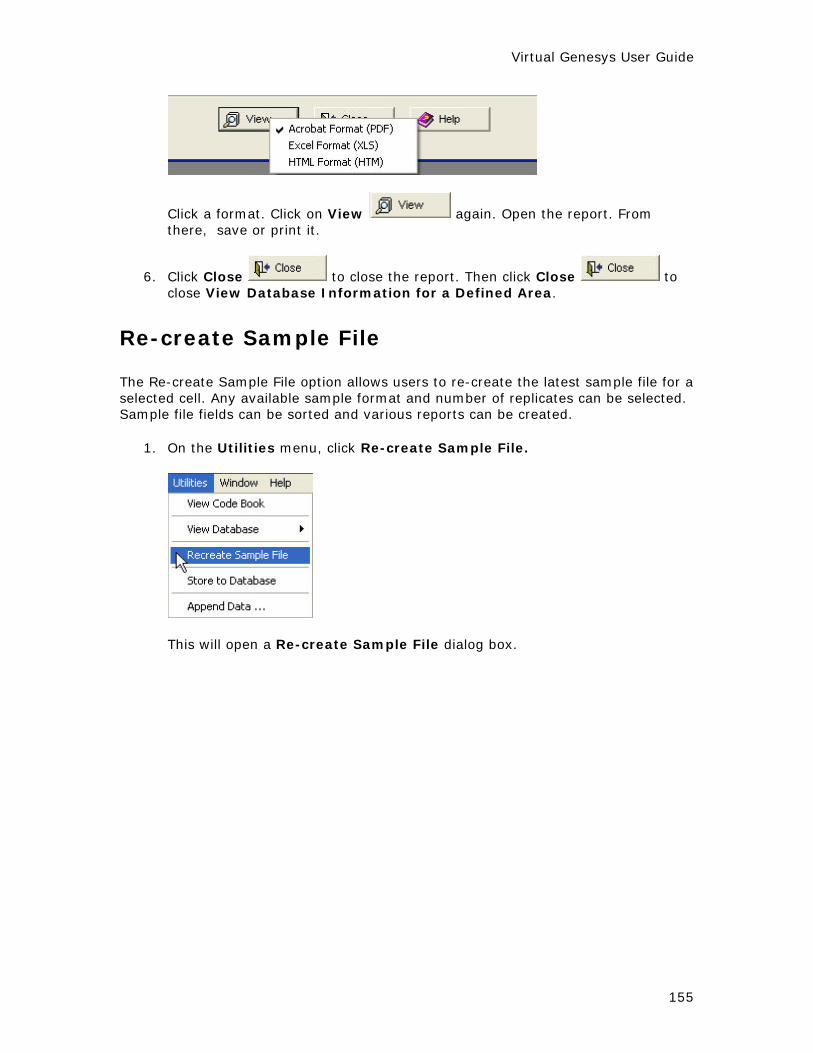
Virtual Genesys User Guide
155
Click a format. Click on View again. Open the report. From there, save or print it.
6. Click Close to close the report. Then click Close to close View Database Information for a Defined Area.
Re-create Sample File The Re-create Sample File option allows users to re-create the latest sample file for a selected cell. Any available sample format and number of replicates can be selected. Sample file fields can be sorted and various reports can be created.
1. On the Utilities menu, click Re-create Sample File.
This will open a Re-create Sample File dialog box.

Virtual Genesys User Guide
156
2. In the Select Project and Cell group box, click Browse to find the Project ID and Cell ID that contain the sample file to be recreated.
3. In the Generation Parameters group box, click Browse to find the Sample Format. To view a sample format layout, click Browse, click a file, and then click OK. This will populate the Sample Format section with the selected Sample Format. Click the button to view the Sample Format.
4. After selecting the project, cell, and sample format, you can change the Number of Reps and the Starting Replicate.
5. Click Sort and Frequency Reports. If the selected Sample Format includes UDFs, the Include UDFs check box will become available. That check box is currently unavailable and appears dimmed.
6. In the Create Generation Reports group box, click a report type. Select either Hit Rate Report or Generations Parameter Report. Click Print to open the selected report for printing.
7. Once the fields in the Re-create Sample File dialog box have been populated, it will look similar to this:

Virtual Genesys User Guide
157
8. Click Run to re-create the sample file.
9. You may be prompted to select the fields by which to sort.
Make your selection and click OK . 10. You will be prompted to name the re-created sample file and save it.
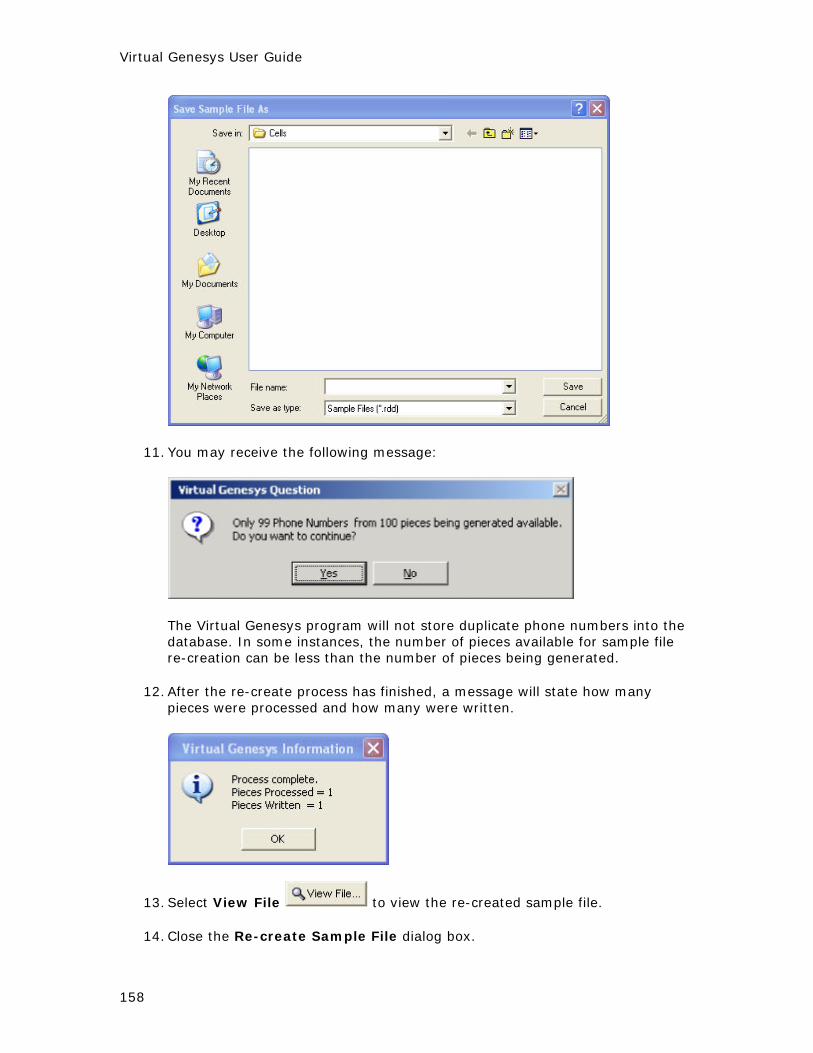
Virtual Genesys User Guide
158
11. You may receive the following message:
The Virtual Genesys program will not store duplicate phone numbers into the database. In some instances, the number of pieces available for sample file re-creation can be less than the number of pieces being generated.
12. After the re-create process has finished, a message will state how many
pieces were processed and how many were written.
13. Select View File to view the re-created sample file.
14. Close the Re-create Sample File dialog box.

Virtual Genesys User Guide
159
Store to Database This utility allows the user to store phone numbers in a database. This will also allow the user to store phone numbers from Genesys sample files that were generated using the Do Not Store option. The database can then be used for unduplicating. ASCII or delimited files are the two types of files that can be used to store phone numbers.
1. On the Utilities menu, click Store to Database.
This will open a Store Phone Numbers dialog box.
2. Click Browse to find the file containing the phone numbers that will be stored in the database.
a. If the file is ASCII (American Standard Code for Information
Interchange), such as a Genesys sample file (*.smp), the dialog box will look something like this:

Virtual Genesys User Guide
160
The sample file is open and a portion of the file can be viewed. By default, the first 10 digits are highlighted as the phone number, and the Phone Starting Position is populated. If this is not correct, use the LEFT and RIGHT ARROW keys to select the correct starting position. The Phone Starting Position will change automatically.
b. If the file is delimited, the Store Phone Numbers dialog box will
look something like this:
The delimited file is open and a portion of the file can be viewed. The file will list the field names and values. By default, the program will look for the phone number in the first field.
If the phone number is not in the first field, the phone number must be manually located. Type the phone number's field number in the Field Number box. Type the starting position for the phone number (where the exchange begins) in the Phone Starting Position box.
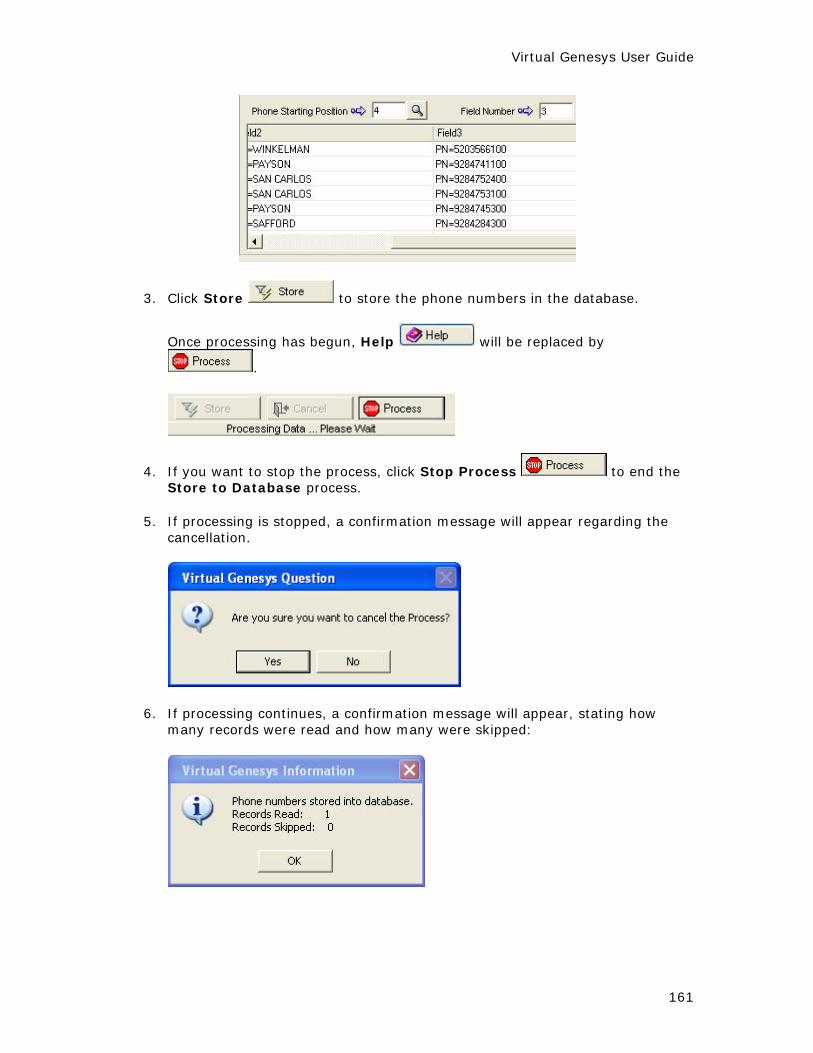
Virtual Genesys User Guide
161
3. Click Store to store the phone numbers in the database.
Once processing has begun, Help will be replaced by
.
4. If you want to stop the process, click Stop Process to end the Store to Database process.
5. If processing is stopped, a confirmation message will appear regarding the
cancellation.
6. If processing continues, a confirmation message will appear, stating how many records were read and how many were skipped:

Virtual Genesys User Guide
162
Append Data Append Data allows data to be appended to ASCII and delimited files. The file must contain either the 10-digit phone number, or the area code and exchange -- referred to as the NPA-NXX (area code plus exchanges). North American phone numbers begin with the format NPA-NXX, where NPA is the three-digit Numbering Plan Area (area code) and NXX identifies the central office exchange allocated within the NPAs.
1. On the Utilities menu, click Append Data.
This will open an Append Data -- Input Parameters Selection dialog box.
2. Click Browse to locate the file, which will be either an ASCII or a delimited file.
a. If an ASCII file is selected, the file name will populate the Please
Select Sample File box. This will locate the 10-digit phone number or the NPA-NXX, which is the area code and exchange.
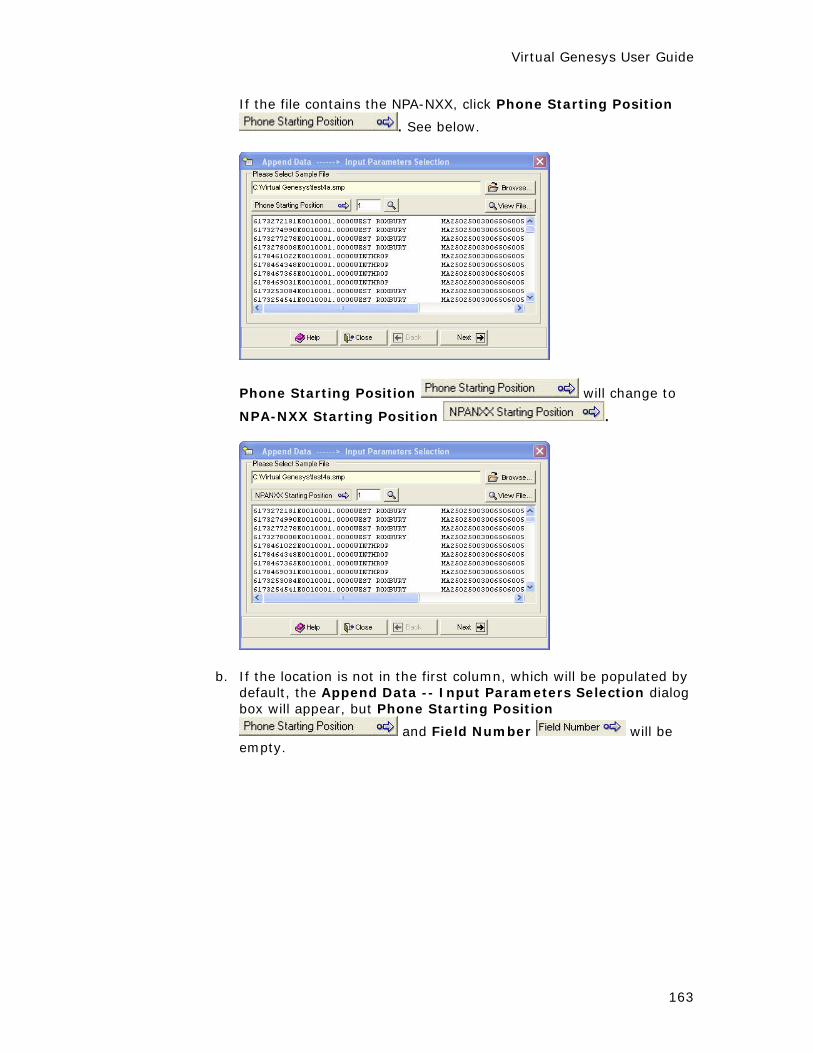
Virtual Genesys User Guide
163
If the file contains the NPA-NXX, click Phone Starting Position
. See below.
Phone Starting Position will change to
NPA-NXX Starting Position .
b. If the location is not in the first column, which will be populated by default, the Append Data -- Input Parameters Selection dialog box will appear, but Phone Starting Position
and Field Number will be empty.
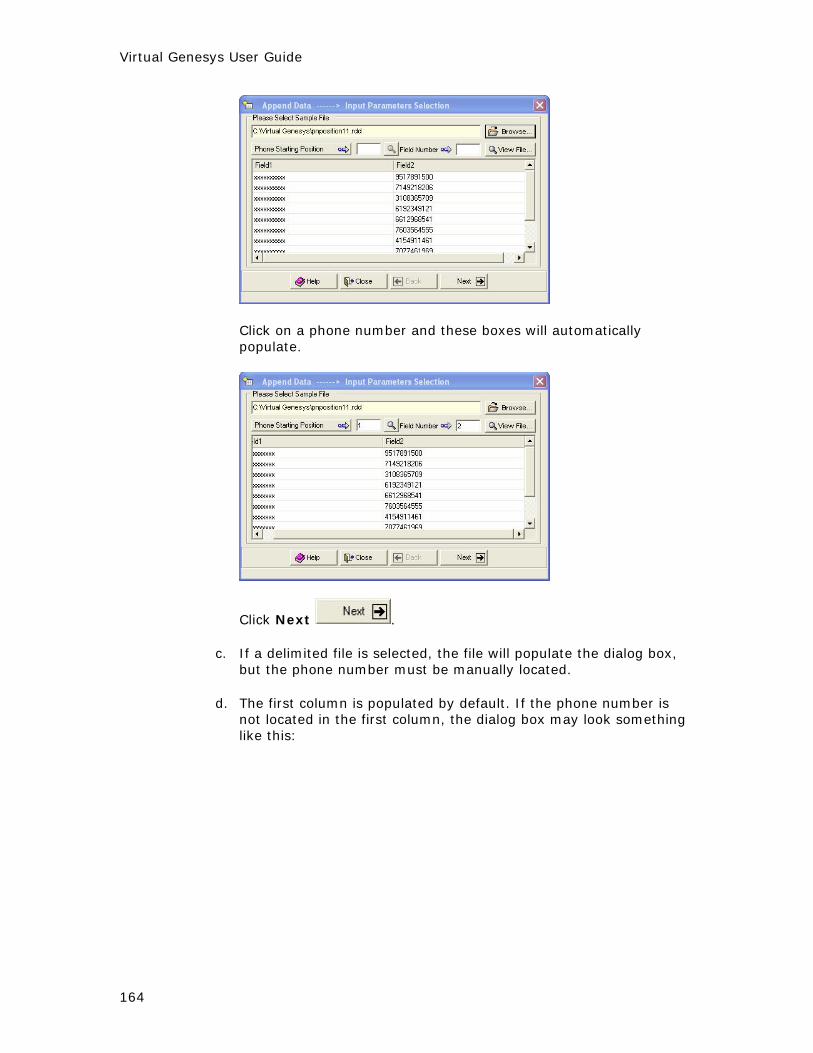
Virtual Genesys User Guide
164
Click on a phone number and these boxes will automatically populate.
Click Next .
c. If a delimited file is selected, the file will populate the dialog box, but the phone number must be manually located.
d. The first column is populated by default. If the phone number is
not located in the first column, the dialog box may look something like this:

Virtual Genesys User Guide
165
The Phone Starting Position and Field Number boxes will be empty. Click the phone number and the boxes will populate.
Click Next .
This opens an Append Data -- Select Fields to Append dialog box.

Virtual Genesys User Guide
166
3. Decide which fields to append by selecting the check boxes next to the Field Name. The order in which the fields will be appended is shown in the Order column.
If the order is incorrect, clear the check boxes and select the fields in the correct order.
Click Next .
This opens an Append Data -- Set Output Parameters dialog box.
4. Click Save As to name and save the file.

Virtual Genesys User Guide
167
If changes are needed, click Back to go back and make the changes.
If changes are not needed, click Append .
5. If you want to end it, click Stop Process to stop the Store to Database process.
If processing is stopped, a confirmation message will appearing regarding the cancellation.
6. When the append is done, a message will appear with how many records
were appended.

168
Glossary
A Account Executive: The Account Executive field can be used to document the name
of the account executive for the project or the manager, project director, or anyone associated with the project.
Area of Dominant Influence: An Area of Dominant Influence (ADI) is an area of television coverage. ADIs are defined by counties based on surveys of television viewers conducted by the Arbitron Company. From the surveys, a determination is made as to which city's television stations are being viewed by a statistically significant majority of households in a county. The county is subsequently assigned to that ADI. There are over 200 ADIs in the U.S. Due to topography, television signals may not reach all parts of a county resulting in some counties being split and assigned to two or more ADIs.
ASCII: American Standard Code for Information Interchange.
B Block Groups: A Block Group is an area consisting of groups of Blocks. The first
digit in the Block Number identifies the Block Group. For example, Block Group 3 consists of all Blocks in the range 300 to 399. There are about 230,000 Block Groups in the U.S. Aggregations of Block Groups create Census Tracts and Block Numbering Areas.
Block Numbering Areas: In non-metropolitan counties, the Census Bureau has created Block Numbering Areas (BNA). A BNA is an area equivalent to a Census Tract, and like Census Tracts, they do not cross county boundaries, but may cross city, town, or township boundaries. There are about 12,000 BNAs nationwide. Prior to the 1990 Census, BNAs did not exist in all non-metropolitan counties. With the 1990 Census, there are now Census Tracts or BNAs that cover the entire U.S.
Blocks: The smallest level of geography used by the Census Bureau to report and collect Census Data is a Block. A Block is an area about the size of a city clock. For the 1990 Census there were approximately 8 million Blocks. Due to confidentiality problems associated with reporting data at this level, and the large file size created by Block level statistics, some Census information is not available for Blocks. Blocks are identified with three-digit numbers in a range from 100 to 999.
Business Purge: If licensed, this option is provided to Genesys users who choose to remove business phone numbers from their sample file.
C Carrier Route: A Carrier Route is the specific delivery route followed by an U.S.
Postal Service Mail Carrier. Bulk mailers who send large volumes of mail are required to sort by Carrier Route and append an additional two digits to the ZIP+4 code. The additional two digits indicate the Delivery Point, which is the actual stop on the Mail Carrier's Route.

Glossary
169
Cell ID: Cell ID is used to name the cell that will store the sampling information. Minimum number of characters is one and the maximum is 32 characters. Cell ID accepts alphanumeric characters, so make the Cell ID easily identifiable. We suggest using an abbreviated form of the cell geography.
Cell Name: Cell Name allows the user to type detailed information about the cell. This field allows up to 50 alphanumeric characters.
Census Tracts: A Census Tract is an area used by the U.S. Bureau of the Census to collect and tabulate Census data. A tract generally contains between 2500 and 8000 persons. Census Tracts do not cross County boundaries, but can cross city, township, and town boundaries. Census Tract boundaries usually remain permanent for about 10 years and change only at the onset of the decennial Census. Boundary changes that occurred between the1980 and 1990 Censuses include tracts being split into two or more tracts, tracts that were combined or aggregated, and the creation of new tracts. There are approximately 50,000 Census Tracts in the U.S. Census Tract numbering consists of a four-digit number with a two-digit suffix, such as 1016.01 and have a Range from 0001.00 to 9499.99. A suffix of .99 indicates a tract containing the population aboard one or more civilian or military ships, but containing no households. Suffixes between .80 and .98 identify 1990 Census Tracts that were revised or created between the time the 1990 Census was collected (Pre-Census) and when it was tabulated (Post-Census). A tract with a suffix of .80 through .98 have very few if any households or population. Additionally, .80 through .98 suffixes did not exist during the data collection phase of the 1990 Census and may be missing from databases using Pre-Census geographic information. Census Tracts exist only in counties in Metropolitan Areas and in other densely populated counties.
Client: The Client field can be used to document the name of the client sponsoring the project.
Congressional District: A Congressional District is a geographic area represented by an elected member of the U.S. House of Representatives. There are 435 Congressional Districts in the U.S., which are apportioned to each state based on their 1990 Census population. The states create Congressional Districts by aggregating Census Blocks, or Voting Districts. A Congressional District on average contains approximately 570,000 people. The 103rd Congress, which took office in January of 1993, is the first to represent Congressional Districts created using data from the 1990 Census. Congressional Districts can cross city, town, township, and county boundaries, but do not cross state boundaries. Congressional Districts in rural parts of states maybe made up of whole counties, while those in urban and suburban areas tend to split counties, cities, etc.
Core-Based Statistical Areas: Metropolitan Areas generally consist of a population nucleus and the surrounding area that has an economic and social relationship with the nucleus. The Office of Management and Budget defines metropolitan areas and has set the standards for Core-Based Statistical Areas. Analyzing population and commuting data collected during the 2000 Census developed the standards for CBSAs. CBSAs consist of at least one central county containing an Incorporated Place or Census Designated Place with a population of at least 10,000. CBSAs will include adjacent counties if at least 25 percent of the employed residents of that county work in the central county and/or 25 percent of the workers in the adjacent county reside in the
Virtual Genesys User Guide
170
central county of the CBSA. All CBSAs are defined at the county level except for those that are located in the six New England states. These CBSAs are known as New England City and Town Areas (NECTA) and are defined by cities and towns. CBSAs are divided into Metropolitan Statistical Areas and Micropolitan Statistical Areas. CBSAs incorporate a new five-digit-coding scheme, unique across both Micropolitan and Metropolitan Statistical Areas.
D Date: Date is a default field that captures the date the cell was created. If the cell is
opened later, the date displayed is the date the cell was created.
DB Version: DB Version refers to the Genesys Database version. The Genesys database is updated quarterly. The version can be used to track cell creation and current database access.
Description: Cell Description is provided to capture details about the cell. Text automatically wraps. Once the Enter or Return key is pressed, then the cell will be created and opened. Information contained in this box is displayed when the cell is opened later. This field allows up to 100 alphanumeric characters.
Designated Market Area: Designated Market Areas (DMAs) are areas of television coverage similar to ADIs except they are based on surveys conducted by the A.C. Nielsen Company. Like ADIs, DMAs are county based and some counties are split. There are over 200 DMAs in the U.S.
Designated Marketing Area Code: A three-digit number assigned by Nielsen Media Research and used for identification. Each Designated Marketing Area (DMA) has a unique code.
DMA: Designated Market Areas (DMAs) are areas of television coverage similar to ADIs except they are based on surveys conducted by the A.C. Nielsen Company. Like ADIs, DMAs are county based and some counties are split. There are over 200 DMAs in the U.S.
DMA Code: A three-digit number assigned by Nielsen Media Research and used for identification. Each Designated Marketing Area (DMA) has a unique code.
Do Not Store: With this feature selected, the PCI Purge and Business Purge (if licensed) and Unduplicate features are unavailable, and data about the sample generated is not stored in the Virtual Genesys database. This can improve response time when generating a large amount of pieces. Phone numbers generated using the Do Not Store feature can subsequently be stored into database by using the Store to Database feature available from the Utilities menu.
E EPSEM: Equal Probability of Selection Method.
Expected Incidence: This incidence rate is the estimated percent of household contacts that will qualify for the survey (based on any screening questions in the survey document). The incidence rate is entered as a whole number with up to one decimal place. Accepted ranges are 0.5 to 100.0.
Glossary
171
F FIPS State/County Code: Every county in the U.S. has a unique FIPS (Federal
Information Processing Standards) Code, assigned by the Federal Government. The FIPS Code is always five digits long, where the first two digits signify the state and the last three digits signify the county.
H History Button: History Button generates a history of applied demographic
overlays.
M Measure of Size: In surveys, "Measure of Size" (MOS) is the count of units in a
sampling frame that is used to select, usually first-stage sample units, with probability proportionate to size. In a pure EPSEM (Equal Probability of Selection Method) RDD sample, each number has an equal probability of selection. In a modified selection, a weight or MOS can be place on selection probability, thus making the chances greater of selecting a certain type of household.
Method of Generation: The two generation methods to choose from when generating random digit dialing samples in Virtual Genesys are RDD and MOD1. The standard Virtual Genesys RDD methodology produces a strict single stage, EPSEM (Equal Probability of Selection Method) sample of residential telephone numbers. In other words, a Virtual Genesys RDD sample ensures an equal and known probability of selection for every residential telephone number in the sampling frame. In some situations, a sampling methodology other than a strict EPSEM RDD may prove beneficial. Virtual Genesys provides an alternative RDD procedure that results in probability samples of telephone households. This method is more efficient in that it yields slightly higher proportions of households than a strict RDD methodology. While an EPSEM assigns a known and equal probability of selection to each telephone number, modified generation procedures provide a known but unequal probability of selection. The MOD1 sample generation method increases efficiency by over-sampling telephone exchanges with higher densities of households, and decreases the sampling rate in those with lower densities. PCI purging (if licensed) are additional options that may be specified.
Metro Status Code: The Metro Status Code (MET) code is a one-digit code assigned by MSG. It takes the exchange and describes the area in relationship to the MSA.
Metropolitan Areas: Are as defined by the Federal Office of Management and Budget (OMB) as of June 30, 1999. They are Consolidated Metropolitan Statistical Areas (CMSAs) or Metropolitan Statistical Areas (MSAs) or New England County Metropolitan Areas (NECMAs). The New York CMSA is defined to include all of Fairfield and New Haven counties in Connecticut as its New England component.

Virtual Genesys User Guide
172
Metropolitan Statistical Area: A Core-Based Statistical Area associated with at least one urbanized area that has a population of 50,000 (based on the 2000 Census). The Metropolitan Statistical Area (MSA) comprises the central county or counties containing the core, plus adjacent outlying counties that have a high degree of social and economic integration with the central county as measured through commuting. As of June 6, 2003, there are 362 Metropolitan Statistical Areas in 1,090 counties and account for 83% of the US population. Forty-nine of these MSAs are new and there are some changes in the county composition for the old MSAs. The basic concept of a metropolitan area (MA) is one of a population nucleus and the surrounding territory that has an economic and social relationship with the nucleus. The Office of Management and Budget defines metropolitan Areas. In most of the U.S., MAs are defined by county. In order for an area to be designated metropolitan, a Central County must first be established. A Central County is a county that contains a Central City of at least 50,000 people. In addition, counties contiguous to the Central County can also be designated metropolitan, if commuting patterns indicate an economic relationship with the Central County and, if population density requirements are met. A county may also be designated an MA if it contains a Census defined Urbanized Area of 50,000 or more people and has a total MA population (including surrounding counties) of at least 100,000. If an MA, as defined above, has more than 1 million people, and if commuting patterns indicate an economic relationship with adjacent MAs, an extended metropolitan area is designated and is referred to as a Consolidated Metropolitan Statistical Area (CMSA). The component MAs that make up the CMSA are referred to as Primary Metropolitan Statistical Areas (PMSA). All other MAs in the U.S. that are not components of CMSAs are subsequently called Metropolitan Statistical Areas (MSA). In New England, towns and cities have created governmental and administrative powers rather than counties. Therefore, in New England, MAs are defined by Towns and Cities, and the MA standards are different from the County-based standards used in the rest of the U.S. In order to normalize the MA definition, the Office of Management and Budget has established New England County Metropolitan Areas (NECMA). There are over 300 Metropolitan Areas in the US. An MA is identified with a four-digit FIPS code. If the fourth digit of the FIPS code is a "3," it signifies that the MA is a NECMA. If the fourth digit of the FIPS code is a "2," it signifies that the MA is a CMSA.
Micropolitan Statistical Area: A Core-Based Statistical Area with at least one urban cluster that has a population of 10,000, but less than 50,000 (based on the 2000 Census). The Micropolitan Statistical Area comprises the central county or counties containing the core, plus adjacent outlying counties that have a high degree of social and economic integration with the central county as measured through commuting. As of June 6, 2003, there are 560 Micropolitan Statistical Areas (all new) in 674 counties and account for 10% of the US population. Some of the larger Metropolitan Statistical Areas are subdivided into Metropolitan Divisions. In these instances, the Metropolitan Divisions tend to mirror the “old” MSA geography. These larger Metropolitan Statistical Areas are similar in geographic composition to the “old” Consolidated Metropolitan Statistical Areas (CMSA).
Minor Civil Division: Minor Civil Divisions (MCDs) exist only in 28 states of the U.S. MCDs have legal boundaries and are known under various terms, including towns, townships, boroughs, and cities. Census Tract boundaries generally

Glossary
173
correspond to MCD boundaries, but Census Tract boundaries may cross and can include more than one MCD. In states without MCDs, the Census Bureau has created Census County Divisions (CCD). A CCD is an area created using combinations of Census Tracts. It has no legal boundaries and functions primarily for the collection and tabulation of Census statistics. There are 30,000 MCDs and 5,000 CCDs in the U.S.
MOS: In surveys, 'Measure of Size' is the count of units in a sampling frame that is used to select, usually first-stage sample units, with probability proportionate to size. In a pure EPSEM RDD sample, each number has an equal probability of selection. In a modified selection, a weight or MOS can be place on selection probability, thus making the chances greater of selecting a certain type of household.
N Neilsen Media Research County Size Definitions: 'A' = All counties in the largest
metropolitan areas, which together account for 40 percent of U.S. households. 'B' = All counties in the next largest set of metropolitan areas, which together account for 30 percent of U.S. households. No non-metropolitan counties are large enough to qualify as A or B counties. 'C' = All counties in the next largest set of areas, including both metropolitan and non-metropolitan counties, which account for 15 percent of U.S. households. 'D' = All remaining counties.
Nielsen County Size: Nielsen County Size is a one-digit code assigned by A.C. Nielsen.
NPA-NXX: North American phone numbers begin with the format NPA-NXX, where NPA is the three-digit Numbering Plan Area (area code) and NXX identifies the central office exchange allocated within the NPAs.
Number of Exchanges in Frame: The total number of exchanges for a selected cell, based on the defined geographic/demographic parameters and Working Bank Threshold. The sample will be generated from the set of exchanges.
Number of Interviews: The number of completed interviews required for a cell. This is also known as the quota of completes for this cell. This number must be greater than or equal to one.
Number of Reps: A replicate is a representative subset of the entire sample file, where each of these subsets is representative of the original sample file. For example, if 10 percent of your entire sample file was in California, then 10 percent of the phone number in each replicate will also be in California. The number of replicates is entered as a whole number (no decimals). Accepted ranges are one to 999. The number of replicates entered must be less than or equal to the number of pieces that will be generated.
Number of Total Households: The estimated number of total households served by the exchanges for a selected cell.
Number of Working Banks: Total number of 100-series banks that are considered working for a selected cell.
O

Virtual Genesys User Guide
174
OSLO: OLSO means Outside Scheme Limits. An OSLO in a telephone number appearing in a white page telephone directory without a complete address, most because the household requested that their address be omitted entirely. Donnelley imputes the FIPS and ZIP Code for that household, utilizing the primary community served by the NPA-NXX. When making these assignments, the FIPS Code for the community is assigned to the OSLO record, while the lowest sequence ZIP Code for that same community is assigned.
P PCI Purge: This option is provided to Genesys users who choose to remove these
numbers from their sample file. Private Citizens Incorporated (PCI) is a database of respondents who do not wish to be called by market researchers or telemarketers.
Pieces to Generate: Virtual Genesys uses the following equation to calculate the number of pieces to generate: Number of Pieces = ( Number of Interviews * Sample Rate )( 100 / Expected Incidence )
Place: Place is defined as an incorporated place with an active government and with defined geographic boundaries such as a city, town, village, etc. Places may be subdivisions of MCDs. In some situations, they are the same as MCDs. In addition, the Census Bureau recognizes unincorporated places that have no defined boundaries or government. These are known as Census Designated Places (CDP). There may be a relationship between place boundaries and Census Tract boundaries, but tract and place boundaries do not necessarily correspond. There are 23,000 places in the U.S.
PRIZM Codes: The PRIZM cluster system is a social-economic coding scheme consisting of 66 cluster codes developed and maintained by Claritas. The Virtual Genesys PRIZM module consists of 66 cluster codes distributed across households for each residential exchange.
Project Date: This field captures the date the project was created. This field cannot be set or changed by the user. If the project is opened later, the creation date of the project will be displayed.
Project Description: The Description field allows for a detailed description of the project. A variety of information can be entered into this field including topic of the project, number of interviews, geography of the sample, interviewing dates, etc. Text entered automatically wraps to the next line. Pressing Enter or Return completes the Create New Project process and opens the new project. After reviewing the information presented, the user will be able to open the project by clicking OK or Enter.
Project ID: The user must supply a Project ID to create a project. The Project ID must be at least one character long. The maximum is 32 alphanumeric characters.
Project Name: Project Name is an optional text field available to capture the name of the project.
R

Glossary
175
Random Digit Dialing: Random Digit Dialing (RDD): Using a computer and algorithms to generate a truly random, non-directory-based sample.
Replicate: A replicate is a representative subset of the entire sample file, where each of these subsets is representative of the original sample file. For example, if 10 percent of your entire sample file was in California, then 10 percent of the phone numbers in each replicate will also be in California.
S Sample Format: The format file layout to be used during generation.
Sample Rate: Sample Rate is the number of sample pieces needed to obtain a completed screen.
Sampling Frame: Sampling frame is the listing of the accessible population from which the sample is drawn.
Screen: A screen is someone who will answer the qualifying questions, even though they may not qualify for the survey.
SMP: Genesys sample file extension is *.smp.
Starting Replicate: The Starting Replicate number default is one, and unless this is changed, the replicate number assignment will begin with one. For example, if the number of replicates specified is 10 and the starting replicate number is one, then the sample will be put in 10 replicates numbered one to 10. For another example, if the number of replicates specified is 10, but the starting replicate number is set to five, then the sample file will be put into 10 replicates, numbered five to 14. This option to change the starting replicate number is valuable when generating additional sample for a particular cell.
U Unduplicate: Compares telephone numbers against previously generated samples
or a known ASCII file and removes duplicate records from the generated sample.
User-Defined Fields: User-Defined Fields (UDFs) allow users to define their own variables to add to sample files during generation.
V Virtual Genesys: Built on the Genesys v2.0 desktop version to support the
sampling and list provision side --Listed Households (LHH) & Business -- of Marketing Systems Group business, Virtual Genesys enables any user with web access to design, manage, and generate Random Digit Dialing (RDD) samples. Additional features will include the ability to specify and generate counts for LHH or business samples, and to order and receive lists of telephone numbers 24x7.
W Working Bank Threshold: Number of listed households a 100-series bank must
contain to be considered a Working Bank.

Virtual Genesys User Guide
176
Z ZIP Code: ZIP is an acronym for Zone Improvement Plan. The U.S. Postal Service
introduced ZIP codes in the early 1960s as a means of improving mail delivery. ZIP code boundaries change often and can cross city, town, township, and county boundaries, and in rare situations cross state boundaries. There are roughly 40,000 ZIP codes in the U.S. However, approximately 10,000 ZIP codes are non-delivery ZIPs consisting of Post Offices with P.O. Boxes only and businesses or office buildings with high volumes of mail. Non-delivery ZIP codes do not have any households or population associated with them. ZIP codes are five-digit numbers and occur in a range from 01001 to 99999. The first digit indicates one of 10 geographic regions of the U.S. The next two digits indicate smaller geographic regions within a State. The first three numbers combined are the Sectional Center Facility (SCF), which is a facility where mail is sorted before it is sent on to local Post Offices. The fourth and fifth digits of the ZIP code identify the local Post Office.
ZIP+4: ZIP+4 codes are a four-digit suffix to ZIP codes that allow for more detailed sorting of mail. The first two digits of the +4 code are a Section, which may be a group of streets, several city blocks, a housing development, an apartment complex, or an office building, etc. The last two digits are the Delivery Segment, which indicate a hundred block range, a side of a street, a floor of an office building, a building in an apartment complex, or a post office box, etc. There are over 25 million ZIP+4 codes in the U.S.

177
Index 6 66 cluster codes .........................105 A About Virtual Genesys .................... 5 Account Executive.......................... 7 Add............................ 1, 69, 88, 105 Add All ........................... 69, 88, 105 ADI (Area of Dominant Influence) ..38,
145 Adjust the MOS for a Cell .............114 Age
Population.................................98 Age.............................................88 Age.............................................98 Age of Population..........................88 All Programs.................................. 1 Alphanumeric ...............................16 Append Data ..............................145 Apply ............................. 69, 88, 105 Apply a Cutoff ........................ 69, 88 Arbitron ADI.................................38 Area Code.............................. 40, 42 Area Code/Exchange ..........42, 69, 88 Area Code/Exchanges....................69 Area of Dominant Influence ............38 Ascending ....................... 11, 14, 129 ASCII ........................34, 69, 88, 145 Asian/Pacific.................................98 Asterisk .....................................145 Average Rent ...............................88 B Bellcore Types ............................129 Blue Virtual Genesys icon ................ 1 BP ..............................................24 Browse ........................... 42, 54, 145 Browser........................................ 1 Business Purge ...........................114 Business Purged .............. 11, 24, 114 Buttons ........................................ 5 C Calculate Cell Statistics ................114 Cancel.........................................16 CBSA .................................. 51, 145 CBSA (Core-Based Statistical Area) 51,
145 Cell ....v, 5, 11, 18, 21, 24, 27, 29, 30,
34, 38, 40, 42, 47, 49, 51, 54, 58,
60, 63, 65, 67, 69, 88, 105, 114, 145
Cell ID............................ 18, 21, 145 Cell Information.................11, 18, 24 Cell Name ....................................16 Cell Overview ...............................16 Cell statistics ..............................114 Cells.................................... 24, 114 Census Division .................... 47, 145 Census Region...................... 49, 145 Census Tract ................................69 Census Tracts...............................69 Change Current Client .................... 5 Client ........................................... 7 Close Current Project.....................10 Code Books................................145 Codebook ..................................145 College Graduates.........................98 Combined Statistical Areas ...........145 Combined Statistical Areas (CSA) ....51 Comparison File ..........................114 Comprehensive Report...................88 Congressional...............................88 Congressional District .............. 29, 88 Congressional District Coverage Report
...............................................88 Congressional Districts...............5, 88 Control Panel................................. 1 Copyright....................................... i Copyright Notice ............................ v Core-Based Statistical Areas ... 51, 145 Core-Based Statistical Areas (CBSA) 51 Counties ......................................69 County ........................... 54, 69, 145 County FIPS .................................54 County FIPS Codes........................54 Coverage Report ..................... 69, 88 Coverage Slider ............... 69, 88, 105 Create Generation Reports ...........145 Create New Cell .................. 5, 16, 18 Create New Project......................5, 8 Create Report .................. 88, 98, 105 Creation Date .............. 11, 14, 24, 27 CSA ..........................................145 CSA Summary ............................145 Cumulative Exchanges ...................88 Cumulative Households..................88 Cumulative Non-Target ............ 88, 98

Virtual Genesys User Guide
178
Cumulative Pieces (number of pieces generated for each cell) ..............11
Cumulative Target................... 88, 98 Cutoff
Apply .......................................69 applying ...................................69
Cutoff..........................................69 Cutoff..........................................88 Cutoff Manager...........69, 88, 98, 105 Cutoff Slider.................................88 D Database .....................................69 Database Version.................. 16, 129 Database Version used ..................24 Date Asc....................................129 Date Ascending...........................129 Date generated.............................24 DB ............................................114 DB Data.....................................114 DB Version...................................16 Default information ........................ 7 Default System Settings...............129 Default/system.............................16 Defaults.....................................129 Define a Geographic Sampling Frame
...............................................29 Define a National Sampling Frame...30 Define a Non-National Sampling Frame
...............................................34 Define a Sampling Frame by ADI.....38 Define a Sampling Frame by Area
Code ........................................40 Define a Sampling Frame by Area
Code/Exchange..........................42 Define a Sampling Frame by Census
Division ....................................47 Define a Sampling Frame by Census
Region......................................49 Define a Sampling Frame by Core-
Based Statistical Areas................51 Define a Sampling Frame by County 54 Define a Sampling Frame by
Metropolitan Areas .....................60 Define a Sampling Frame by Nielsen
County Size...............................63 Define a Sampling Frame by Nielsen
DMA Market ..............................58 Define a Sampling Frame by State...65 Define a Sampling Frame by Time
Zone ........................................67 Define Congressional District Area ...88
Define Congressional Districts .....5, 88 Define Cutoff ................................88 Define Enhanced Geography ............ 5 Define Frame5, 30, 34, 38, 40, 42, 47,
49, 51, 54, 58, 60, 63, 65, 67, 69, 88, 105
Define Frame menu................. 47, 54 Define Geographic..30, 34, 38, 40, 42,
47, 49, 51, 54, 58, 60, 63, 65, 67, 69
Define Geographic Area .................69 Define Geography .........................88 Define National Geography .........5, 30 Define National Geography Frame ...30 Define Non-National Geographic Frame
.. 38, 40, 42, 47, 49, 51, 54, 58, 60, 63, 65, 67
Define Non-National Geography ..5, 34 Define Sampling Frame..................29 Define the Congressional District .....88 Define the Geographic Area ............69 Define the ZIP Code Area ...............69 Define ZIP Code............................. 5 Defining a Sampling Frame by
Congressional Districts................88 Defining a Sampling Frame by
Enhanced Geography..................69 Defining a Sampling Frame by ZIP
Codes.......................................69 Delete .........................................27 Delete Existing Cell .......................27 Delete Existing Project ...................14 DEMO Definition...................... 11, 24 Demographic............................5, 88 Demographic Distribution ...............88 Demographic Median .....................88 Demographic Median Targets......5, 88 Demographic overlay............. 24, 114 Demographics ............................114 Descending ............................ 11, 14 Description......... 7, 11, 14, 16, 24, 27 Designated Market Area ...............145 Details................................... 24, 69 Dimmed ................................ 5, 114 Display Exchanges to be Sampled only
.................................. 69, 88, 105 Display ZIP Code Coverage Map ......69 DMA.................................... 58, 145 DMA (Designated Market Area) .....145 DMA Market .................................58 Do Not Store .......................114, 145

Index
179
Double-click .................................54 E Edit Sample Format.....................129 Education ....................................88 Eliminate Specific Exchanges .... 69, 88 Elipsis .........................................30 Enhanced Geography........... 5, 29, 69 ENTER.....................................7, 16 EPSEM.......................................114 EPSEM (Equal Probability of Selection
Method)..................................114 Equal Probability of Selection Method
.............................................114 Excel................................... 69, 145 Exch ...........................................54 Exchange........................ 54, 60, 145 Exchange Detail Report................145 Exchange Report.............. 69, 88, 105 Exchange Summary Report ..........145 Exchange Type ...........................129 Exchange Types29, 30, 34, 38, 40, 42,
47, 49, 51, 54, 58, 60, 63, 65, 67, 69, 88, 129
Exclude 24, 34, 38, 40, 42, 47, 49, 51, 54, 58, 60, 63, 65, 67
Exclude All . 34, 38, 40, 42, 47, 49, 51, 54, 58, 60, 63, 65, 67
Exclude OSLOs .............................69 Exit Virtual Genesys ....................... 1 Expected Incidence .....................114 F Field delimiter ............................129 FIPS (Federal Information Processing
Standards)................................54 Format Layout Name ...................129 Fort Washington ............................ v Frequency Report........................114 G Generate ............................... 5, 114 Generation.................................129 Generation Method...............114, 129 Generation of Sample ..................114 Generation Parameters ................145 Generations Parameter Report ......145 Genesys Sampling Systems ............. 1 Genesys Toolbar Buttons................. 5 GEO Definition........................ 11, 24 Geographic ............................ 54, 58 Geographic Definition Report ..........30 Geographic Frame..34, 38, 40, 42, 47,
49, 51, 60, 63, 65, 67
Geography ...5, 16, 30, 47, 49, 54, 67, 69, 88
GREEN ........................................69 H Header ........................................14 HH............................................114 Hispanic.......................................98 History ................ 11, 24, 69, 88, 105 Hit Rate table .............................114 Home ..........................................88 Home Value ........................... 88, 98 Household..................v, 88, 114, 129 Household Income .................. 88, 98 How to Define a Geographic Frame.34,
40, 49, 54, 67 HTM............................... 69, 98, 145 HTML ........................................145 HTML Format..............................145 I ID.........................11, 14, 16, 24, 27 IE 1, 145 Import
Input Range ..............................54 Import.........................................42 Import.........................................54 Import.........................................69 Import County FIPS Code...............54 Import ZIP Code ...........................69 Incidence............................. 69, 114 Incidence level .............................69 Incidence Slider .................... 69, 105 Include.34, 38, 40, 42, 47, 49, 51, 54,
58, 60, 63, 65, 67, 69 Include All.. 34, 38, 40, 42, 47, 49, 51,
54, 58, 60, 63, 65, 67 Included ................................ 54, 58 Income.................................. 88, 98 Input Range ......................42, 54, 69 Input Zip Codes ............................69 Install .......................................... 1 Installing and Running Virtual Genesys
................................................ 1 Internet Explorer .................... 1, 145 Introduction .................................. v L Landline.....................................114 Last Generation ............................11 Latest Date ..................................21 LHH ............................................. v Licensed ....................................114 Listed Households ................... v, 129

Virtual Genesys User Guide
180
M Map ............................................69 Marketing Systems Group ............... v Maximum $..................................88 Maximum Acceptable Incidences .....88 Maximum Sample Yields ..............114 MCSA .................................. 51, 145 MCSA Summary..........................145 Measure of Size ...................114, 129 Median Demographic Values ...........98 Median Home Value................. 88, 98 Median Income ....................... 88, 98 Median Targets ....................... 88, 98 Median Years of Education..............88 MET ............................................60 MET Status Code..................... 51, 60 MET Status Code (MCSA) ...............51 MET Status Code (MSA) .................51 Method (generation method) ..........11 Method of generation............. 24, 114 Metro Statistical Areas ...................60 Metro Statistical Areas/Divisions......51 Metro/Primary Metro Statistical Area60 Metro/Primary Metro Statistical Areas
...............................................60 Metropolitan Areas ........................60 Metropolitan Statistical Area ... 16, 145 Micro Statistical Areas ...................51 Micropolitan Statistical Area..........145 Microsoft ...................................... 1 Microsoft .NET Framework v2.0........ 1 Microsoft .NET Framework Version 2.0
................................................ 1 Microsoft Internet Explorer ...........145 Minimum $...................................88 MOD1.................................114, 129 Modified RDD .............................129 MOS...................................114, 129 Mozilla Firefox ............................145 MSA.................................... 51, 145 MSA (Metro Statistical Areas) .........60 MSA (Metropolitan Statistical Area).60,
145 MSA Summary............................145 Multiple selections.........................34 N Name ......................... 11, 14, 24, 27 Name Asc ..................................129 National...................................5, 29 National Selection ................... 30, 34 Nielsen .................................. 58, 63
Nielsen County Size.......................63 Nielsen DMA.................................58 Nielsen DMA Market ......................58 No-answers................................114 Non-Hispanic................................98 Non-National 5, 29, 34, 38, 40, 42, 47,
49, 51, 54, 58, 60, 63, 65 Non-National Geographic Frame......34 Non-National Sampling Frame.........34 Non-successive.............................34 Non-Target ............................ 88, 98 NPA-NXX ...................................145 Number
Exchanges in Sampling Frame....114 pieces generated........................24 replicates.......................... 24, 114 Target HHs..............................114 Total HHs................................114 working banks .........................114
Number .......................................24 Number .....................................114 Number of Exchanges....................88 Number of Exchanges in Sampling
Frame ....................................114 Number of Exchanges to be Sampled
.............................................114 Number of Interviews ..................114 number of known listings per working
bank ......................................114 Number of Pieces Generated...........24 Number of pieces removed .............24 Number of replicates .....................24 Number of Replicates for the Sample
File ..........................................11 Number of Reps (Replicates)..114, 145 Number of Target HHs .................114 Number of Total HHs ...................114 Number of Working Banks ............114 Numbering Plan Area...................145 O OK ........................................ 16, 18 Open................................16, 24, 54 Open Existing Cell .....................5, 21 Open Existing Project...................... 5 Overlay Demographic ....................88 Overlay PRIZM Code....................105 Overlaying Demographics...............88 Overlaying PRIZM Codes ..............105 Owner-Occupied ...........................98 P Parameters ..................................24

Index
181
PCI Purge ..................................114 PDF................................ 69, 98, 145 PDF format ................................145 Percent of College Graduates ..........88 Percent of ZIP Code Compromising the
Frame ......................................69 Percent of ZIP Code Included in Frame
...............................................69 Permanent .................................129 Pieces .......................................114 Pieces (number of pieces generated)11 Pieces (Ps)
Pieces (Ps) Removed ..................24 Pieces (Ps) Written.....................24
Pieces (Ps) ...................................24 Pieces generated...........................24 pieces purged...............................24 Pieces removed ............................24 Pieces to Generate ......................114 Pieces Written ..............................24 PO Box-only ZIP codes...................69 Primary City ...............................114 Print............................................16 Private Citizens Incorporated ........114 PRIZM ................................105, 145 PRIZM Code .................................. 5 PRIZM Definition ..................... 11, 24 PRIZM Reports............................105 Programs...................................... 1 Project Date .................................. 7 Project Description ......................... 7 Project Detail ...............................11 Project ID ............................ 7, 8, 16 Project Name ................................ 7 Project Overview............................ 7 Ps Purged ....................................24 Ps Written....................................24 Pull .........................v, 16, 54, 69, 88 Purge against NeuStar Database ...114 Purged (whether the sample was
Business Purged) .......................11 Q Quarterly .....................................16 Quick Exchanges...........................69 Quota..........................................16 Quota group.................................16 R Race ...........................................88 Race of Population ........................88 Random.....................................114 Random-digit-dialing
RDD.......................................... v Random-digit-dialing ...................... v RDD...................................... v, 114 RDD methodology .......................114 Recreate Sample File ...................145 Re-create Sample File..................145 RED ............................................69 Remove
Reset .......................................69 Remove. 1, 34, 38, 40, 42, 47, 49, 51,
54, 58, 60, 63, 65, 67 Remove.......................................69 Remove.......................................88 Remove.....................................105 Remove All. 34, 38, 40, 42, 47, 49, 51,
54, 58, 60, 63, 65, 67, 69, 88, 105 Rent............................................88 Rep Number.................................24 Replace Purged Numbers .............114 Replicates ............................ 24, 114 Report Format ...................... 69, 105 Reps (number of replicates for the
sample file) ...............................11 Reset ........................69, 88, 98, 105 Reset All
remove.....................................98 Reset All ......................................88 Reset All ......................................98 Residential ..........................105, 129 Restart ......................................... 1 Rights .......................................... v RTF...........................................105 S Sample.................................. 47, 69 Sample format.....................114, 129 Sample Format layout..................114 Sample Formats..........................129 Sample Rate...............................114 Sample record ............................129 Sampling frame . v, 29, 30, 38, 40, 42,
47, 49, 51, 54, 58, 60, 63, 65, 67, 69, 88, 98, 105, 114, 129
Select Existing Cell ......................145 Slider ........................69, 88, 98, 105 Social-economic..........................105 Some ZIP codes were not added .....69 Sorted by.....................................21 Spreadsheet........................... 34, 88 Start ..................................... 1, 129 Start Rep .....................................24 Starting Replicate........... 24, 114, 145

Virtual Genesys User Guide
182
starting replicate number ...............24 State....v, 30, 34, 54, 65, 69, 88, 105,
145 Stop Generation..........................114 Stop Process ..............................145 Store Phone Numbers..................145 Store to Database ................114, 145 Submenu............................... 51, 60 Successive ...................................34 Summary by Code ......................145 Summary by Name .....................145 Summary by Rank ......................145 Summary Exchanges Report .........145 Summary Report .................... 88, 98 System Overview........................... v T Target .........................................88 Target HH ..................................114 Target HH as MOS.......................114 Target Households ......................114 This Session...............................129 Threshold .. 30, 34, 38, 40, 42, 47, 49,
51, 54, 58, 60, 63, 65, 67, 69, 88, 114, 129
Time generated ............................24 Time Zone .................... 67, 114, 145 Title bar38, 40, 42, 47, 49, 51, 54, 58,
60, 63, 65, 67, 69, 88, 105 Toolbar......................................... 5 Total HH ....................................114 Total HH as MOS.........................114 Total Households .................114, 129 U UDF ............................114, 129, 145 UDFs.........................................129 Unavailable ..................... 5, 114, 145 Unduplicate................................114 Unduplicating .............................145 User Guide..................................... i User-Defined Field.......................114 User-Defined Fields .....................129 Utilities...............................114, 145 V View Code Book..........................145
View Database............................145 View Database Information for a
Defined Area ...........................145 View Exchange to be Sampled Report
...............................................34 View Exchanges to be Sampled Report
.............................................105 View Existing Cell.................... 24, 27 View Existing Cells .............. 5, 24, 27 View Existing Project ............... 11, 14 View Existing Projects.......... 5, 11, 14 View Map.....................................69 Virginia Drive ................................ v Virtual Genesys .. i, v, 1, 5, 10, 11, 54,
98, 129 Virtual Genesys Database...............16 Virtual Genesys functions ................ 5 Virtual Genesys Generation Report 114 Virtual Genesys title bar.................. 8 Virtual Genesys toolbar ................... 5 W WB 24, 30, 34, 38, 40, 42, 47, 49, 51,
54, 58, 60, 63, 65, 67, 69, 88 WB Threshold .. 30, 34, 38, 42, 47, 49,
51, 58, 60, 63, 65, 67, 69, 88 White background .........................18 Wireline .....................................114 Working Bank.. 29, 30, 34, 38, 40, 42,
47, 49, 51, 54, 58, 60, 63, 65, 67, 69, 88, 114
Working Bank Threshold . 24, 114, 129 Working With Cells ..16, 18, 21, 24, 27 Working with Projects . 7, 8, 10, 11, 14 Www.Claritas.com.......................105 X XLS....................................... 69, 98 Y Years of Education ........................88 YELLOW.......................................69 Yellow background ........................18 Z ZIP Code ........................... 5, 29, 69 ZIP Code Reports ..........................69 ZIP Codes ....................................69


