58
Virtual Storage Console, VASA Provider, and Storage Replication Adapter for VMware ® vSphere Deployment and Setup Guide For 9.7 Release
Virtual Storage Console, VASA Provider, and
Storage Replication Adapter for VMware®
vSphere
Deployment and Setup Guide
For 9.7 Release

First edition (November 2020)
© Copyright Lenovo 2020.
LIMITED AND RESTRICTED RIGHTS NOTICE: If data or software is delivered pursuant to a General Services
Administration (GSA) contract, use, reproduction, or disclosure is subject to restrictions set forth in Contract No.
GS-35F-05925
Contents
Chapter 1. Overview of the virtual appliance for VSC, VASA Provider, and SRA. . . . . . . . . . . . . . . . . . . . 1
Chapter 2. Deployment workflow for new users of VSC, VASA Provider, and SRA virtual appliance . . . . . . . . . . 3Deployment workflow for existing users of VSC, VASA Provider, and SRA . . . . . . . . . . . . 3
Chapter 3. Requirements for deploying the virtual appliance for VSC, VASA Provider, and SRA . . . . . . . . . 5Port requirements for VSC. . . . . . . . . . . . 5
Space and sizing requirements for the virtual appliance for VSC, VASA Provider, and SRA . . . . 5
Supported storage system, licensing, and applications for the virtual appliance for VSC, VASA Provider, and SRA . . . . . . . . . . . . 6
Considerations and requirements for deploying the virtual appliance for VSC, VASA Provider, and SRA . . . . . . . . . . . . . . . . . . . . 6
Chapter 4. Deploying or upgrading VSC, VASA Provider, and SRA . . . . . . 9How to download the virtual appliance for VSC, VASA Provider, and SRA . . . . . . . . . . . . 9
Deploying the virtual appliance for VSC, VASA Provider, and SRA . . . . . . . . . . . . . . . 9
Deployment customization considerations . . 11
Enabling VASA Provider for configuring virtual datastores . . . . . . . . . . . . . . . . . 11
Registering OnCommand API Services with the virtual appliance for VSC, VASA Provider, and SRA . . . . . . . . . . . . . . . . 12
Installing the NFS VAAI plug-in . . . . . . . . . 13
Enabling Storage Replication Adapter . . . . . . 13
Configuring SRA on the SRM Appliance . . . 14
Updating Storage Replication Adapter (SRA) credentials . . . . . . . . . . . . . . . 15
Migration of Windows SRM to SRM Appliance . . . 15
Upgrading to the 9.7 virtual appliance for VSC, VASA Provider, and SRA . . . . . . . . . . . 15
Chapter 5. Configuring your Virtual Storage Console for VMware vSphere environment . . . . . . . . . . . . . . 17Configuring ESXi server multipathing and timeout settings . . . . . . . . . . . . . . . . . . 17
ESXi host values set using Virtual Storage Console for VMware vSphere. . . . . . . . 18
Configuring guest operating system scripts . . 19
Regenerating an SSL certificate for Virtual Storage Console . . . . . . . . . . . . . . . . . . 20
Requirements for registering VSC in multiple vCenter Servers environment . . . . . . . . . 21
Configuring the VSC preferences files . . . . . . 21
Setting IPv4 or IPv6 . . . . . . . . . . . 22
Enabling datastore mounting across different subnets . . . . . . . . . . . . . . . . . . 22
Accessing the maintenance console options of the virtual appliance for VSC, VASA Provider, and SRA . . . . . . . . . . . . . . . . . . . 23
Changing the administrator password . . . . . . 25
Configuring high availability for the virtual appliance for VSC, VASA Provider, and SRA . . . 25
VMware vSphere HA . . . . . . . . . . . 26
VMware vSphere Fault Tolerance . . . . . . 26
MetroCluster configurations supported by the virtual appliance for VSC, VASA Provider, and SRA . . . . . . . . . . . . . . . . . . . 27
Chapter 6. Configuring your Virtual Storage Console for VMware vSphere storage system environment . . . . . 29Setting default credentials for storage systems . . 29
Adding storage systems to VSC . . . . . . . . 30
Discovering storage systems and hosts . . . . . 31
Refreshing the storage system display . . . . . . 31
Chapter 7. vCenter Server role- based access control features in VSC for VMware vSphere . . . . . . . . . . . . 33Components of vCenter Server permissions. . . . 33
Key points about assigning and modifying permissions for vCenter Server . . . . . . . . . 34
Standard roles packaged with the virtual appliance for VSC, VASA Provider, and SRA. . . . . . . . 35
Guidelines for using VSC standard roles . . . 36
Privileges required for VSC tasks . . . . . . . . 36
Product-level privilege required by VSC for VMware vSphere . . . . . . . . . . . . 37
ONTAP role-based access control for the virtual appliance for VSC, VASA Provider, and SRA . . . . . . . . . . . . . . . . . 37
Recommended ONTAP roles when using VSC for VMware vSphere . . . . . . . . . . . 38
How to configure ONTAP role-based access control for VSC for VMware vSphere . . . . . 39
Configuring user roles and privileges . . . . . 40
© Copyright Lenovo 2020 i
Chapter 8. Configuring Storage Replication Adapter for disaster recovery . . . . . . . . . . . . . . . . 41Configuring Storage Replication Adapter for SAN environment . . . . . . . . . . . . . . . . 41
Configuring Storage Replication Adapter for NAS environment . . . . . . . . . . . . . . . . 41
Configuration of Storage Replication Adapter for highly scaled environment. . . . . . . . . . . 42
Chapter 9. Troubleshooting issues with the virtual appliance for VSC, VASA Provider, and SRA . . . . . . . . . . . 43Cleaning the vSphere cached downloaded plug-in packages . . . . . . . . . . . . . . . . . 43
Uninstall does not remove standard VSC roles . . . 44
Virtual Storage Console and VASA Provider log files . . . . . . . . . . . . . . . . . . . 45
VSC and VASA Provider services restart in highly scaled environments . . . . . . . . . . . . . 45
Configuring VASA Provider to work with SSH . . . 45
Configuring the virtual appliance for VSC, VASA Provider, and SRA to use SSH for remote diag access . . . . . . . . . . . . . . . . . . 46
SRA installation fails with script error . . . . . . 46
SRA fails to perform optimally in a highly scaled environment . . . . . . . . . . . . . . . . 47
Unable to install the SRA plug-in . . . . . . . . 47
Lenovo Storage Replication Adapter for ONTAP does not appear on the Site Recovery Manager Appliance . . . . . . . . . . . . . . . . . 47
Error during fresh deployment of virtual appliance for VSC, VASA Provider, and SRA. . . . . . . . 48
Appendix A. Contacting Support . . . 49
Appendix B. Notices. . . . . . . . . . 51Trademarks . . . . . . . . . . . . . . . . 52
ii Virtual Storage Console, VASA Provider, and Storage Replication Adapter for VMware® vSphere Deployment and Setup Guide
Chapter 1. Overview of the virtual appliance for VSC, VASA Provider, and SRA
The virtual appliance for Virtual Storage Console (VSC), VASA Provider, and Storage Replication Adapter (SRA) provides end-to-end life cycle management for virtual machines in VMware environments that use Lenovo storage systems. It simplifies storage and data management for VMware environments by enabling administrators to directly manage storage within the vCenter Server.
With vSphere 6.5, VMware introduced a new HTML5-based client called vSphere Client. The 9.6 release of
the virtual appliance for VSC, VASA Provider, and SRA supports only vSphere Client. The virtual appliance
for VSC, VASA Provider, and SRA integrates with vSphere Client and enables you to use single sign-on
(SSO) services. In an environment with multiple vCenter Server instances, each vCenter Server instance that
you want to manage must have its own registered instance of VSC.
Each component in the virtual appliance for VSC, VASA Provider, and SRA provides capabilities to help
manage your storage more efficiently.
Virtual Storage Console (VSC)
VSC enables you to perform the following tasks:
• Add storage controllers, assign credentials, and set up permissions for storage controllers to VSC that
both SRA and VASA Provider can leverage
• Provision datastores
• Monitor the performance of the datastores and virtual machines in your vCenter Server environment
• Control administrator access to the vCenter Server objects by using role-based access control (RBAC) at
two levels:
– vSphere objects, such as virtual machines and datastoresThese objects are managed by using the
vCenter Server RBAC.
– ONTAP storage The storage systems are managed by using ONTAP RBAC.
• View and update the host settings of the ESXi hosts that are connected to Lenovo storage
VSC provisioning operations benefit from using the NFS Plug-in for VMware VMware vStorage APIs for Array
Integration (VAAI). The NFS Plug-in for VAAI is a software library that integrates the VMware Virtual Disk
Libraries that are installed on the ESXi host. The VMware VAAI package enables the offloading of certain
tasks from the physical hosts to the storage array. You can perform tasks such as thin provisioning and
hardware acceleration at the array level to reduce the workload on the ESXi hosts. The copy offload feature
and space reservation feature improve the performance of VSC operations.
The NetApp NFS Plug-in for VAAI is not shipped with VSC. But you can download the plug-in installation
package and obtain the instructions for installing the plug-in from the Lenovo Support Site.
VASA Provider
VASA Provider for ONTAP uses VMware vSphere APIs for Storage Awareness (VASA) to send information
about storage used by VMware vSphere to the vCenter Server. The virtual appliance for VSC, VASA Provider,
and SRA, VASA Provider is integrated with VSC and VASA Provider enables you to perform the following
tasks:
• Provision VMware Virtual Volumes (vVols) datastores
• Create and use storage capability profiles that define different storage service level objectives (SLOs) for
your environment
• Verify for compliance between the datastores and the storage capability profiles
© Copyright Lenovo 2020 1

• Set alarms to warn you when volumes and aggregates are approaching the threshold limits
• Monitor the performance of virtual machine disks (VMDKs) and the virtual machines that are created on
vVols datastores
If you are using ONTAP 9.6 or earlier, then VASA Provider communicates with the vCenter Server by using
VASA APIs and communicates with ONTAP by using Lenovo APIs called ZAPIs. To view the vVol dashboard
for ONTAP 9.6 and earlier, you must have installed and registered OnCommand API Services with your
vCenter Server. If you are using ONTAP 9.7, then you do not require OnCommand API Services to be
registered with VASA Provider to view the vVol dashboard.
Note: For ONTAP 9.6 and earlier, VASA Provider requires a dedicated instance of OnCommand API
Services. One instance of OnCommand API Services cannot be shared with multiple VASA Provider
instances.
Storage Replication Adapter (SRA)
When SRA is enabled and used in conjunction with VMware Site Recovery Manager (SRM), you can recover
the vCenter Server datastores and virtual machines in the event of a failure. SRA enables you to configure
protected sites and recovery sites in your environment for disaster recovery in the event of a failure.
2 Virtual Storage Console, VASA Provider, and Storage Replication Adapter for VMware® vSphere Deployment and Setup Guide
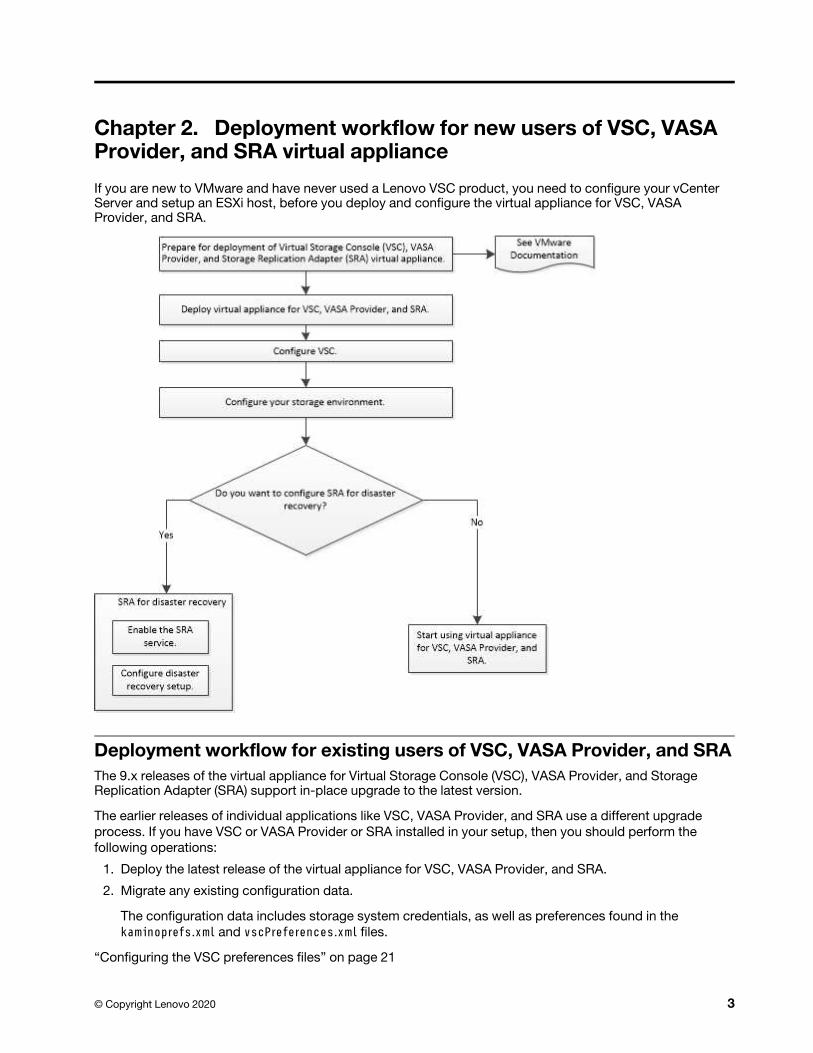
Chapter 2. Deployment workflow for new users of VSC, VASA Provider, and SRA virtual appliance
If you are new to VMware and have never used a Lenovo VSC product, you need to configure your vCenter Server and setup an ESXi host, before you deploy and configure the virtual appliance for VSC, VASA Provider, and SRA.
Deployment workflow for existing users of VSC, VASA Provider, and SRA
The 9.x releases of the virtual appliance for Virtual Storage Console (VSC), VASA Provider, and Storage Replication Adapter (SRA) support in-place upgrade to the latest version.
The earlier releases of individual applications like VSC, VASA Provider, and SRA use a different upgrade
process. If you have VSC or VASA Provider or SRA installed in your setup, then you should perform the
following operations:
1. Deploy the latest release of the virtual appliance for VSC, VASA Provider, and SRA.
2. Migrate any existing configuration data.
The configuration data includes storage system credentials, as well as preferences found in the
kaminoprefs.xml and vscPreferences.xml files.
“Configuring the VSC preferences files” on page 21
© Copyright Lenovo 2020 3
In many cases, you might not need to migrate configuration data. However, if you have customized the
preferences files earlier, you might want to review them and make similar changes to the newly deployed
virtual appliance. You can perform the following:
• Add the storage systems to the newly deployed virtual appliance and specify the credentials as you add
them.
These SRA releases also use the VASA Provider, so you must unregister VASA Provider and then deploy the
latest version of the virtual appliance for VSC, VASA Provider, and SRA. The previous release of the server (. ova) can be removed when the upgrade is complete.
For any SRA upgrade, the SRA software (the adapter on the Site Recovery Manager server, installed by the . msi file) should be removed from the Site Recovery Manager server. You can use the Windows system
control panel to uninstall the software and then install the latest SRA software on the SRA server using the . msi file.
If you have the VASA Provider deployment, then after the upgrade from existing setup, you must configure
the memory size for your virtual appliance to be 12GB using the Edit Settings option. You must also modify
the virtual memory reservation. The virtual machine must be powered off to modify the memory size.
If you are going to deploy the latest release of the virtual appliance, you must see the topic “Requirements for
deploying the virtual appliance for VSC, VASA Provider, and SRA.” The topic “Upgrading to the 9.6 release of
the virtual appliance for VSC, VASA Provider, and SRA” has information on performing an in-place upgrade.
4 Virtual Storage Console, VASA Provider, and Storage Replication Adapter for VMware® vSphere Deployment and Setup Guide
Chapter 3. Requirements for deploying the virtual appliance for VSC, VASA Provider, and SRA
You should be aware of the deployment requirements before deploying the virtual appliance for Virtual Storage Console (VSC), VASA Provider, and Storage Replication Adapter (SRA), and you should decide the tasks that you want to perform. Based on your tasks, you can choose the deployment model for deploying the virtual appliance for VSC, VASA Provider, and SRA.
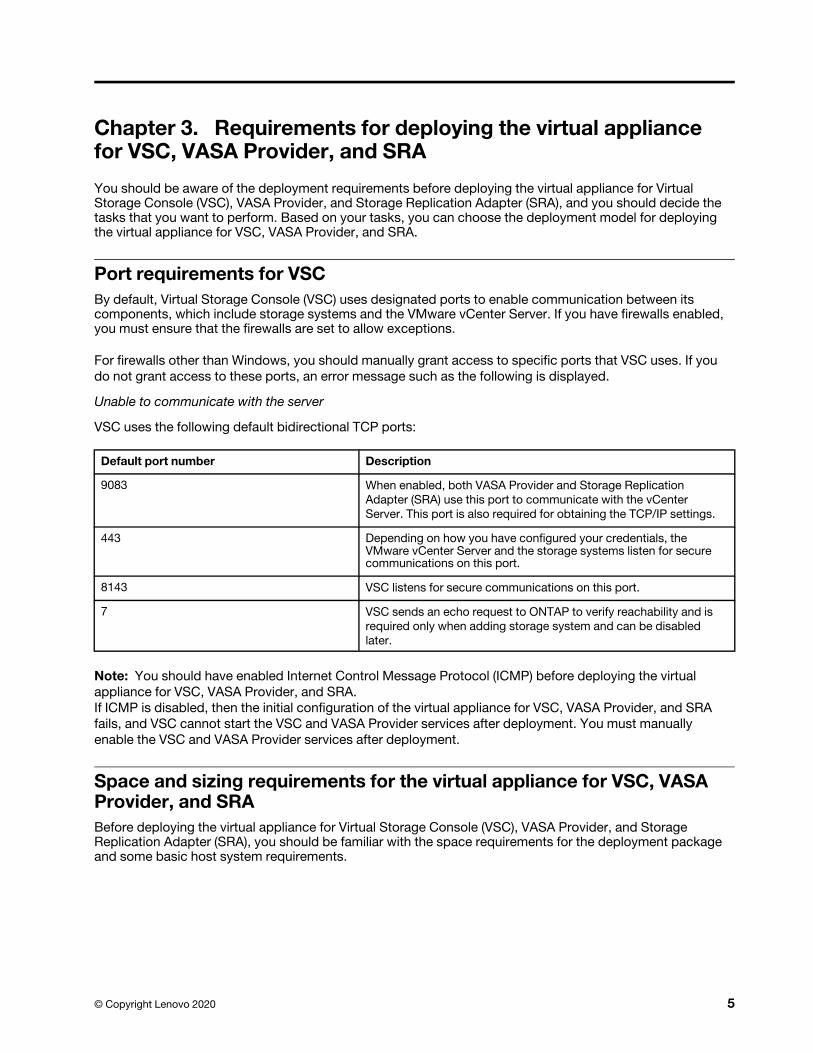
Port requirements for VSC
By default, Virtual Storage Console (VSC) uses designated ports to enable communication between its components, which include storage systems and the VMware vCenter Server. If you have firewalls enabled, you must ensure that the firewalls are set to allow exceptions.
For firewalls other than Windows, you should manually grant access to specific ports that VSC uses. If you
do not grant access to these ports, an error message such as the following is displayed.
Unable to communicate with the server
VSC uses the following default bidirectional TCP ports:
Default port number Description
9083 When enabled, both VASA Provider and Storage Replication
Adapter (SRA) use this port to communicate with the vCenter
Server. This port is also required for obtaining the TCP/IP settings.
443 Depending on how you have configured your credentials, the VMware vCenter Server and the storage systems listen for secure communications on this port.
8143 VSC listens for secure communications on this port.
7 VSC sends an echo request to ONTAP to verify reachability and is
required only when adding storage system and can be disabled
later.
Note: You should have enabled Internet Control Message Protocol (ICMP) before deploying the virtual
appliance for VSC, VASA Provider, and SRA.
If ICMP is disabled, then the initial configuration of the virtual appliance for VSC, VASA Provider, and SRA
fails, and VSC cannot start the VSC and VASA Provider services after deployment. You must manually
enable the VSC and VASA Provider services after deployment.
Space and sizing requirements for the virtual appliance for VSC, VASA Provider, and SRA
Before deploying the virtual appliance for Virtual Storage Console (VSC), VASA Provider, and Storage Replication Adapter (SRA), you should be familiar with the space requirements for the deployment package and some basic host system requirements.
© Copyright Lenovo 2020 5
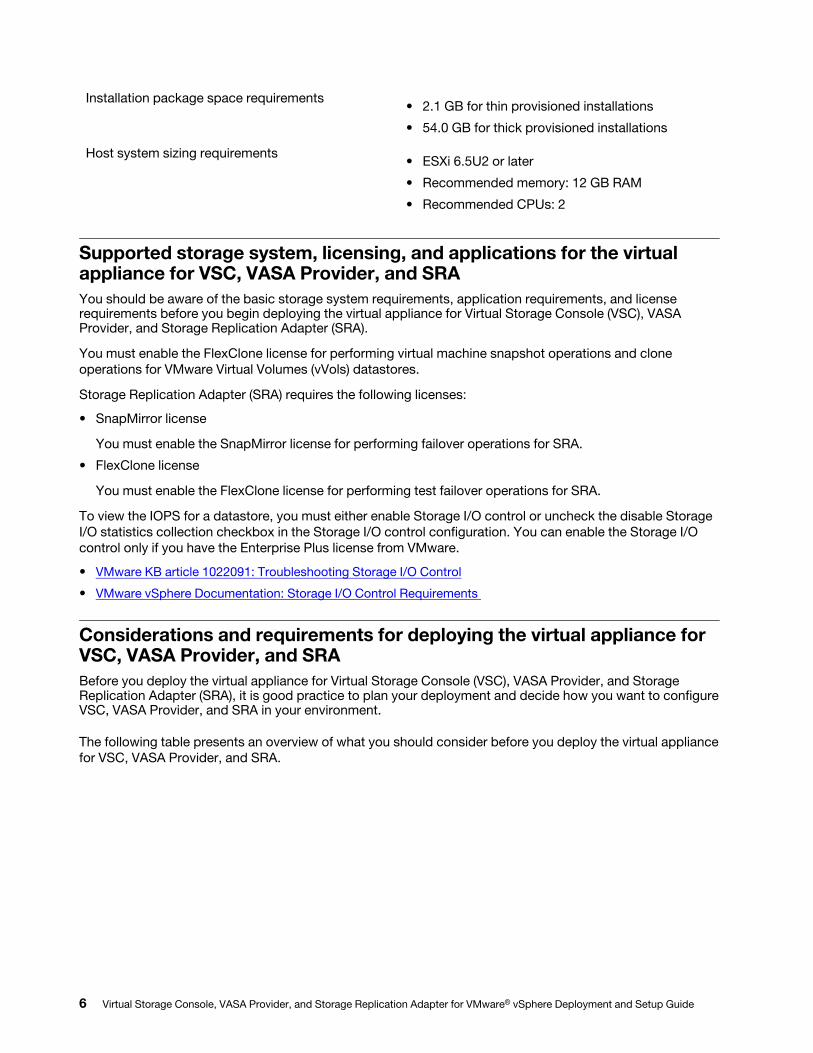
Installation package space requirements• 2.1 GB for thin provisioned installations
• 54.0 GB for thick provisioned installations
Host system sizing requirements• ESXi 6.5U2 or later
• Recommended memory: 12 GB RAM
• Recommended CPUs: 2
Supported storage system, licensing, and applications for the virtual appliance for VSC, VASA Provider, and SRA
You should be aware of the basic storage system requirements, application requirements, and license requirements before you begin deploying the virtual appliance for Virtual Storage Console (VSC), VASA Provider, and Storage Replication Adapter (SRA).
You must enable the FlexClone license for performing virtual machine snapshot operations and clone
operations for VMware Virtual Volumes (vVols) datastores.
Storage Replication Adapter (SRA) requires the following licenses:
• SnapMirror license
You must enable the SnapMirror license for performing failover operations for SRA.
• FlexClone license
You must enable the FlexClone license for performing test failover operations for SRA.
To view the IOPS for a datastore, you must either enable Storage I/O control or uncheck the disable Storage
I/O statistics collection checkbox in the Storage I/O control configuration. You can enable the Storage I/O
control only if you have the Enterprise Plus license from VMware.
• VMware KB article 1022091: Troubleshooting Storage I/O Control
• VMware vSphere Documentation: Storage I/O Control Requirements
Considerations and requirements for deploying the virtual appliance for VSC, VASA Provider, and SRA
Before you deploy the virtual appliance for Virtual Storage Console (VSC), VASA Provider, and Storage Replication Adapter (SRA), it is good practice to plan your deployment and decide how you want to configure VSC, VASA Provider, and SRA in your environment.
The following table presents an overview of what you should consider before you deploy the virtual appliance
for VSC, VASA Provider, and SRA.
6 Virtual Storage Console, VASA Provider, and Storage Replication Adapter for VMware® vSphere Deployment and Setup Guide
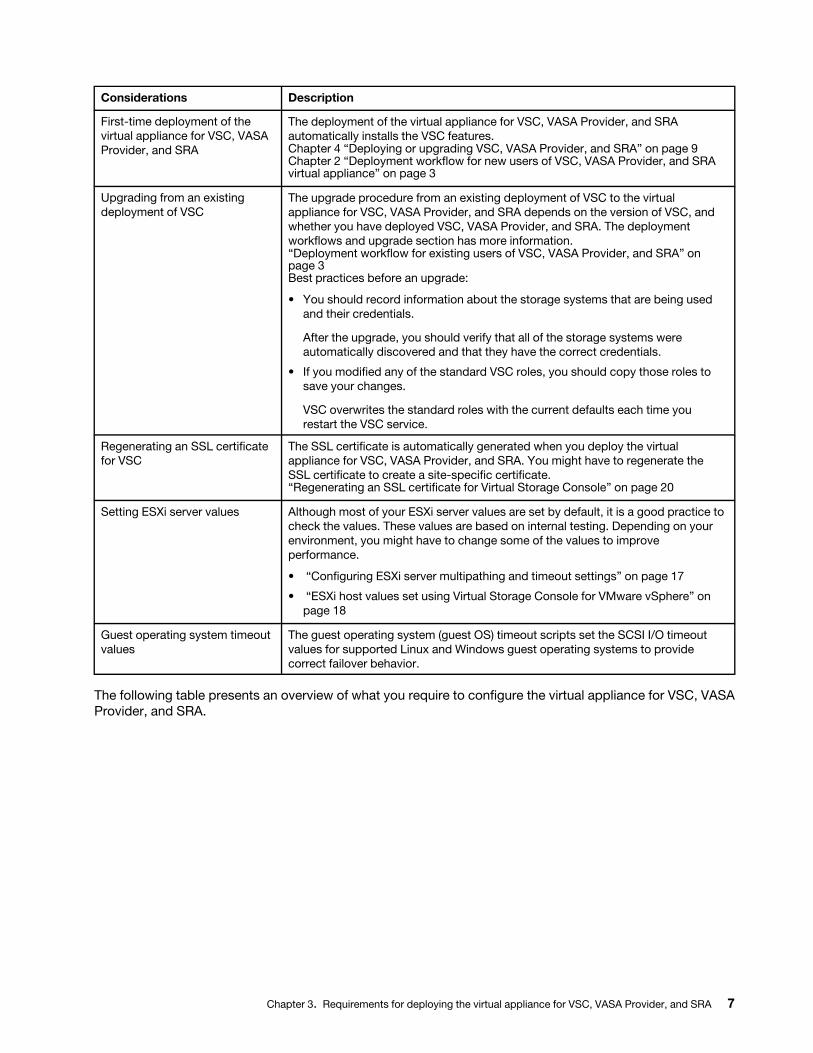
Considerations Description
First-time deployment of the
virtual appliance for VSC, VASA
Provider, and SRA
The deployment of the virtual appliance for VSC, VASA Provider, and SRA
automatically installs the VSC features. Chapter 4 “Deploying or upgrading VSC, VASA Provider, and SRA” on page 9Chapter 2 “Deployment workflow for new users of VSC, VASA Provider, and SRA virtual appliance” on page 3
Upgrading from an existing
deployment of VSC
The upgrade procedure from an existing deployment of VSC to the virtual
appliance for VSC, VASA Provider, and SRA depends on the version of VSC, and
whether you have deployed VSC, VASA Provider, and SRA. The deployment
workflows and upgrade section has more information. “Deployment workflow for existing users of VSC, VASA Provider, and SRA” on page 3Best practices before an upgrade:
• You should record information about the storage systems that are being used
and their credentials.
After the upgrade, you should verify that all of the storage systems were
automatically discovered and that they have the correct credentials.
• If you modified any of the standard VSC roles, you should copy those roles to
save your changes.
VSC overwrites the standard roles with the current defaults each time you
restart the VSC service.
Regenerating an SSL certificate
for VSC
The SSL certificate is automatically generated when you deploy the virtual
appliance for VSC, VASA Provider, and SRA. You might have to regenerate the
SSL certificate to create a site-specific certificate. “Regenerating an SSL certificate for Virtual Storage Console” on page 20
Setting ESXi server values Although most of your ESXi server values are set by default, it is a good practice to
check the values. These values are based on internal testing. Depending on your
environment, you might have to change some of the values to improve
performance.
• “Configuring ESXi server multipathing and timeout settings” on page 17
• “ESXi host values set using Virtual Storage Console for VMware vSphere” on
page 18
Guest operating system timeout
values
The guest operating system (guest OS) timeout scripts set the SCSI I/O timeout
values for supported Linux and Windows guest operating systems to provide
correct failover behavior.
The following table presents an overview of what you require to configure the virtual appliance for VSC, VASA
Provider, and SRA.
Chapter 3. Requirements for deploying the virtual appliance for VSC, VASA Provider, and SRA 7

Considerations Description
Requirements of role-based
access control (RBAC)
VSC supports both vCenter Server RBAC and ONTAP RBAC. The account used to register VSC to vCenter Server (using https://<appliance_ ip>:8143/Register.html) must be a vCenter Server administrator (assigned to the vCenter Server administrator or administrator role). If you plan to run VSC as an administrator, you must have all of the required permissions and privileges for all of the tasks.If your company requires that you restrict access to vSphere objects, you can create and assign standard VSC roles to users to meet the vCenter Server requirements.You can create the recommended ONTAP roles by using ThinkSystem Storage Manager for DM Series using the JSON file provided with the virtual appliance for VSC, VASA Provider, and SRA.If a user attempts to perform a task without the correct privileges and permissions, the task options are grayed out.
• “Standard roles packaged with the virtual appliance for VSC, VASA Provider,
and SRA” on page 35
• “Recommended ONTAP roles when using VSC for VMware vSphere” on page
38
ONTAP version Your storage systems must be running ONTAP 9.5, 9.6, or 9.7.
Storage capability profiles To use storage capability profiles or to set up alarms, you must enable VASA
Provider for ONTAP. After you enable VASA Provider, you can configure VMware
Virtual Volumes (vVols) datastores, and you can create and manage storage
capability profiles and alarms. The alarms warn you when a volume or an aggregate is at nearly full capacity or when a datastore is no longer in compliance with the associated storage capability profile.
8 Virtual Storage Console, VASA Provider, and Storage Replication Adapter for VMware® vSphere Deployment and Setup Guide
Chapter 4. Deploying or upgrading VSC, VASA Provider, and SRA
You must download and deploy the virtual appliance for VSC, VASA Provider, and SRA in your VMware vSphere environment, and then configure the required applications based on the tasks you want to perform using VSC, VASA Provider, and SRAVSC, VASA Provider, and SRA.
How to download the virtual appliance for VSC, VASA Provider, and SRA
You can download the .ova file for the virtual appliance for Virtual Storage Console, VASA Provider, and Storage Replication Adapter from the Lenovo Support Site.
The .ova file includes VSC, VASA Provider, and SRA. When the deployment is complete, all the three
products are installed in your environment. By default, VSC starts working as soon as you decide on the
subsequent deployment model and choose whether to enable VASA Provider and SRA based on your
requirements.
You can download the virtual appliance for VSC, VASA Provider, and SRA from the Lenovo Support Site by
using any of the following software download pages depending on your requirement.
If you want to enable SRA in your deployment of the virtual appliance for VSC, VASA Provider, and SRA, then
you must have installed the SRA plug-in on the Site Recovery Manager (SRM) server. You can download the
installation file for the SRA plug-in from the Storage Replication Adapter for ONTAP menu in the Software
Downloads section.
Deploying the virtual appliance for VSC, VASA Provider, and SRA
You should deploy the virtual appliance for Virtual Storage Console (VSC), VASA Provider, and Storage Replication Adapter (SRA) in your environment, and specify the required parameters, to be able to use the appliance.
BBeeffoorree yyoouu bbeeggiinn
• You must be running a supported release of vCenter Server.
Note: The virtual appliance for VSC, VASA Provider, and SRA can be registered either with a Windows
deployment of vCenter Server or a VMware vCenter Server Virtual Appliance (vCSA) deployment.
• You must have configured and set up your vCenter Server environment.
• You must have set up an ESXi host for your virtual machine.
• You must have downloaded the .ova file.
• You must have the administrator login credentials for your vCenter Server instance.
• You must have logged out of and closed all of the browser sessions of vSphere Client, and deleted the
browser cache to avoid any browser cache issue during the deployment of the virtual appliance for VSC,
VASA Provider, and SRA.
“Cleaning the vSphere cached downloaded plug-in packages” on page 43
• You must have enabled Internet Control Message Protocol (ICMP).
If ICMP is disabled, then the initial configuration of the virtual appliance for VSC, VASA Provider, and SRA
fails, and VSC cannot start the VSC and VASA Provider services after deployment. You must manually
enable the VSC and VASA Provider services after deployment.
AAbboouutt tthhiiss ttaasskk
© Copyright Lenovo 2020 9
If you are deploying a fresh installation of the virtual appliance for VSC, VASA Provider, and SRA, then VASA Provider is enabled by default. But in case of an upgrade from an earlier release of the virtual appliance, the state of VASA Provider is retained and you might need to enable VASA Provider manually.
“Enabling VASA Provider for configuring virtual datastores” on page 11
PPrroocceedduurree
Step 1. Log in to the vSphere Client.
Step 2. Select Home ➙ Host & Clusters.Step 3. Right-click the required datacenter, and then click Deploy OVA template.
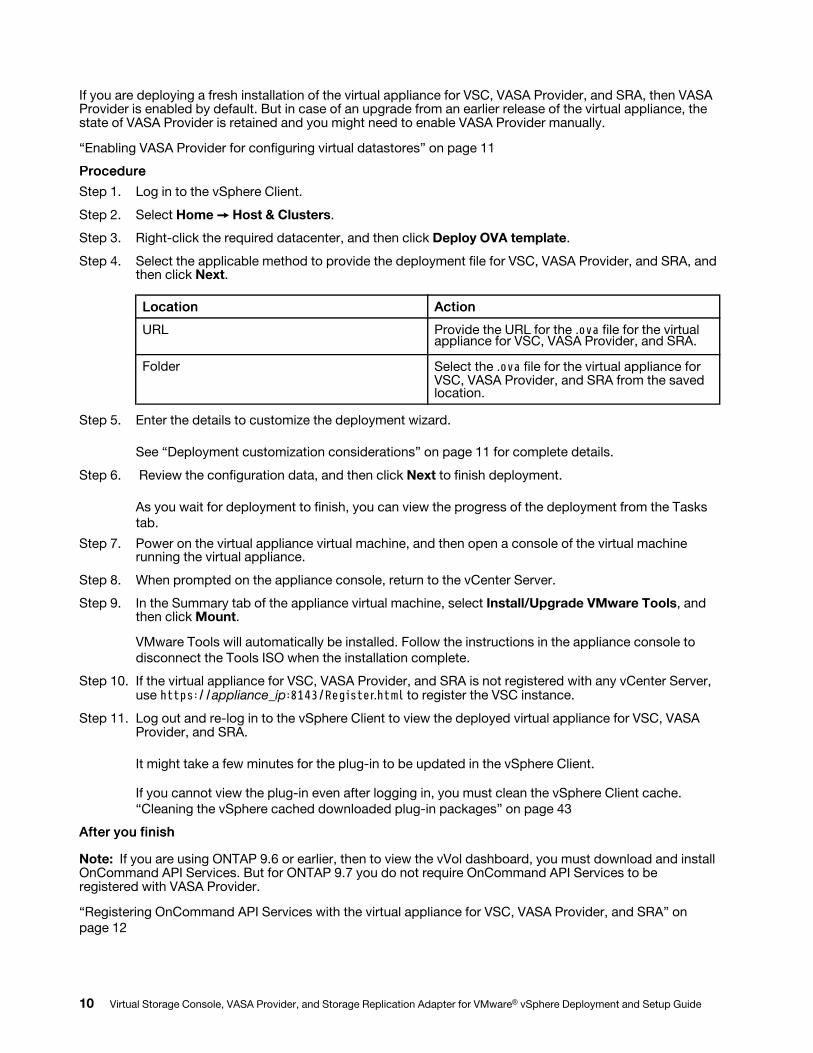
Step 4. Select the applicable method to provide the deployment file for VSC, VASA Provider, and SRA, and then click Next.
LLooccaattiioonn AAccttiioonn
URL Provide the URL for the .ova file for the virtual appliance for VSC, VASA Provider, and SRA.
Folder Select the .ova file for the virtual appliance for VSC, VASA Provider, and SRA from the saved location.
Step 5. Enter the details to customize the deployment wizard.
See “Deployment customization considerations” on page 11 for complete details.
Step 6. Review the configuration data, and then click Next to finish deployment.
As you wait for deployment to finish, you can view the progress of the deployment from the Tasks
tab.
Step 7. Power on the virtual appliance virtual machine, and then open a console of the virtual machine running the virtual appliance.
Step 8. When prompted on the appliance console, return to the vCenter Server.
Step 9. In the Summary tab of the appliance virtual machine, select Install/Upgrade VMware Tools, and then click Mount.
VMware Tools will automatically be installed. Follow the instructions in the appliance console to
disconnect the Tools ISO when the installation complete.
Step 10. If the virtual appliance for VSC, VASA Provider, and SRA is not registered with any vCenter Server, use https://appliance_ip:8143/Register.html to register the VSC instance.
Step 11. Log out and re-log in to the vSphere Client to view the deployed virtual appliance for VSC, VASA Provider, and SRA.
It might take a few minutes for the plug-in to be updated in the vSphere Client.
If you cannot view the plug-in even after logging in, you must clean the vSphere Client cache.
“Cleaning the vSphere cached downloaded plug-in packages” on page 43
AAfftteerr yyoouu ffiinniisshh
Note: If you are using ONTAP 9.6 or earlier, then to view the vVol dashboard, you must download and install OnCommand API Services. But for ONTAP 9.7 you do not require OnCommand API Services to be registered with VASA Provider.
“Registering OnCommand API Services with the virtual appliance for VSC, VASA Provider, and SRA” on
page 12
10 Virtual Storage Console, VASA Provider, and Storage Replication Adapter for VMware® vSphere Deployment and Setup Guide
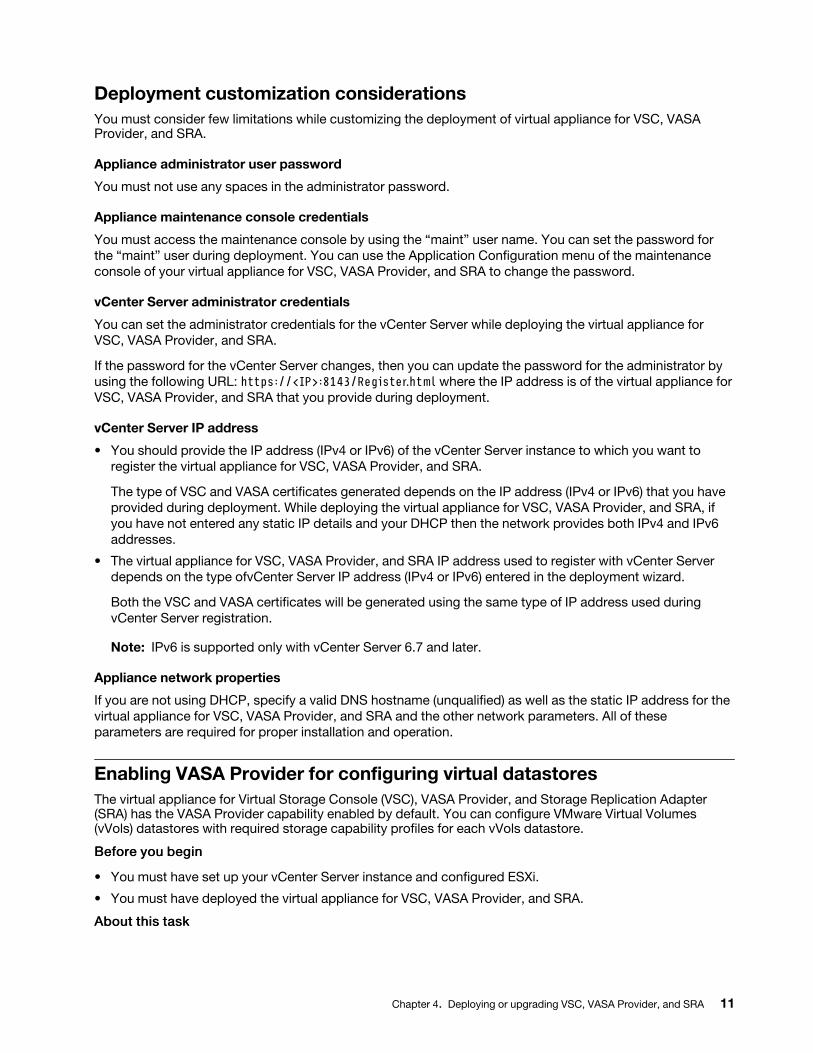
Deployment customization considerations
You must consider few limitations while customizing the deployment of virtual appliance for VSC, VASA Provider, and SRA.
Appliance administrator user password
You must not use any spaces in the administrator password.
Appliance maintenance console credentials
You must access the maintenance console by using the “maint” user name. You can set the password for
the “maint” user during deployment. You can use the Application Configuration menu of the maintenance
console of your virtual appliance for VSC, VASA Provider, and SRA to change the password.
vCenter Server administrator credentials
You can set the administrator credentials for the vCenter Server while deploying the virtual appliance for
VSC, VASA Provider, and SRA.
If the password for the vCenter Server changes, then you can update the password for the administrator by
using the following URL: https://<IP>:8143/Register.html where the IP address is of the virtual appliance for VSC, VASA Provider, and SRA that you provide during deployment.
vCenter Server IP address
• You should provide the IP address (IPv4 or IPv6) of the vCenter Server instance to which you want to
register the virtual appliance for VSC, VASA Provider, and SRA.
The type of VSC and VASA certificates generated depends on the IP address (IPv4 or IPv6) that you have
provided during deployment. While deploying the virtual appliance for VSC, VASA Provider, and SRA, if
you have not entered any static IP details and your DHCP then the network provides both IPv4 and IPv6
addresses.
• The virtual appliance for VSC, VASA Provider, and SRA IP address used to register with vCenter Server
depends on the type ofvCenter Server IP address (IPv4 or IPv6) entered in the deployment wizard.
Both the VSC and VASA certificates will be generated using the same type of IP address used during
vCenter Server registration.
Note: IPv6 is supported only with vCenter Server 6.7 and later.
Appliance network properties
If you are not using DHCP, specify a valid DNS hostname (unqualified) as well as the static IP address for the
virtual appliance for VSC, VASA Provider, and SRA and the other network parameters. All of these
parameters are required for proper installation and operation.
Enabling VASA Provider for configuring virtual datastores
The virtual appliance for Virtual Storage Console (VSC), VASA Provider, and Storage Replication Adapter (SRA) has the VASA Provider capability enabled by default. You can configure VMware Virtual Volumes (vVols) datastores with required storage capability profiles for each vVols datastore.
BBeeffoorree yyoouu bbeeggiinn
• You must have set up your vCenter Server instance and configured ESXi.
• You must have deployed the virtual appliance for VSC, VASA Provider, and SRA.
AAbboouutt tthhiiss ttaasskk
Chapter 4. Deploying or upgrading VSC, VASA Provider, and SRA 11
If the VASA Provider capability is disabled before upgrading to the 9.7 release of the virtual appliance for Virtual Storage Console (VSC), VASA Provider, and Storage Replication Adapter (SRA), the VASA Provider capability remains disabled after the upgrade.
PPrroocceedduurree
Step 1. Log in to the web user interface of VMware vSphere.
Step 2. From the vSphere Client, click Menu ➙ Virtual Storage Console.Step 3. Click Settings.
Step 4. Click Manage Capabilities in the Administrative Settings tab.
Step 5. In the Manage Capabilities dialog box, select the VASA Provider extension to enable.
Step 6. Enter the IP address of the virtual appliance for VSC, VASA Provider, and SRA and the administrator password, and then click Apply.
AAfftteerr yyoouu ffiinniisshh
If you are using ONTAP 9.6 or earlier clusters, then you must register OnCommand API Services with VASA Provider to get details of vVols datastores and virtual machines used in the SAN vVols VM and SAN vVols datastore reports. But if you are using ONTAP 9.7 or later, then you do not need to register OnCommand API Services with VASA Provider.
Registering OnCommand API Services with the virtual appliance for VSC, VASA Provider, and SRA
If you are using ONTAP 9.6 or earlier, then the vVol dashboard can display the details of VMware Virtual Volumes (vVols) datastores and virtual machines only if you have registered OnCommand API Services for VASA Provider to obtain data for the vVols VM and datastore reports.
BBeeffoorree yyoouu bbeeggiinn
You must have downloaded OnCommand API Services 2.2 or later from the Lenovo Support Site.
Note: The vVol dashboard displays performance metrics only when the SAN vVols datastores and virtual machines are configured using ONTAP 9.4 or later.
PPrroocceedduurree
Step 1. From the Virtual Storage Console (VSC) Home page, click Settings.
Step 2. Click Manage Extension in the Administrative Settings tab.
Step 3. Use the Register OnCommand API Services slider to enable OnCommand API Services.
Step 4. Enter the IP address, service port, and credentials for OnCommand API Services.
You can also use the Manage VASA Provider Extensions dialog box for the following modifications:
• To update OnCommand API Services registration when there is any change to the credentials.
• To unregister OnCommand API Services when you no longer require the vVol dashboard.
You must clear the Register OnCommand API Services checkbox to remove the OnCommand
API Services registration for VASA Provider.
Step 5. Click Apply.
The vVol dashboard displays the metrics for ONTAP 9.6 or earlier SAN vVol datastores only after
the registration of OnCommand API Services is complete.
12 Virtual Storage Console, VASA Provider, and Storage Replication Adapter for VMware® vSphere Deployment and Setup Guide
Installing the NFS VAAI plug-in
You can install the Lenovo NFS Plug-in for VMware vStorage APIs for Array Integration (VAAI) using the GUI of the virtual appliance for Virtual Storage Console (VSC), VASA Provider, and Storage Replication Adapter (SRA).
BBeeffoorree yyoouu bbeeggiinn
• You must have downloaded the installation package for the NFS Plug-in for VAAI (.vib) from the Lenovo Support Site.
Lenovo Support
• You must have installed ESXi host 6.5 or later and ONTAP 9.4 or later.
• You must have powered on the ESXi host and mounted an NFS datastore.
• You must have set the values of the DataMover.HardwareAcceleratedMove, DataMover.
HardwareAcceleratedInit, and VMFS3.HardwareAcceleratedLocking host settings to “1”.
These values are set automatically on the ESXi host when the Recommended Settings dialog box is
updated.
• You must have enabled the vstorage option on the storage virtual machine (SVM) by using the vserver nfs modify -vserver vserver_name -vstorage enabled command.
PPrroocceedduurree
Step 1. Rename the .vib file that you downloaded from the Lenovo Support Site to NetAppNasPlugin.vib to match the predefined name that VSC uses.
Step 2. Click Settings in the VSC home page.
Step 3. Click NFS VAAI Tools tab.
Step 4. Click Change in the Existing version section.
Step 5. Browse and select the renamed .vib file, and then click Upload to upload the file to the virtual appliance.
Step 6. In the Install on ESXi Hosts section, select the ESXi host on which you want to install the NFS VAAI plug-in, and then click Install.
You should follow the on-screen instructions to complete the installation. You can monitor the
installation progress in the Tasks section of vSphere Web Client.
Step 7. Reboot the ESXi host after the installation finishes.
When you reboot the ESXi host, VSC automatically detects the NFS VAAI plug-in. You do not have
to perform additional steps to enable the plug-in.
Enabling Storage Replication Adapter
The virtual appliance for Virtual Storage Console (VSC), VASA Provider, and Storage Replication Adapter (SRA) provides the option to enable the SRA capability to be used with VSC to configure disaster recovery.
BBeeffoorree yyoouu bbeeggiinn
• You must have set up your vCenter Server instance and configured ESXi.
• You must have deployed the virtual appliance for VSC, VASA Provider, and SRA.
• You must have downloaded the .msi file for the SRA plug-in, or the .tar.gz file for SRM appliance only if
you want to configure the Site Recovery Manager (SRM) disaster recovery solution.
Site Recovery Manager Installation and Configuration Site Recovery Manager 8.2 has more information.
Chapter 4. Deploying or upgrading VSC, VASA Provider, and SRA 13
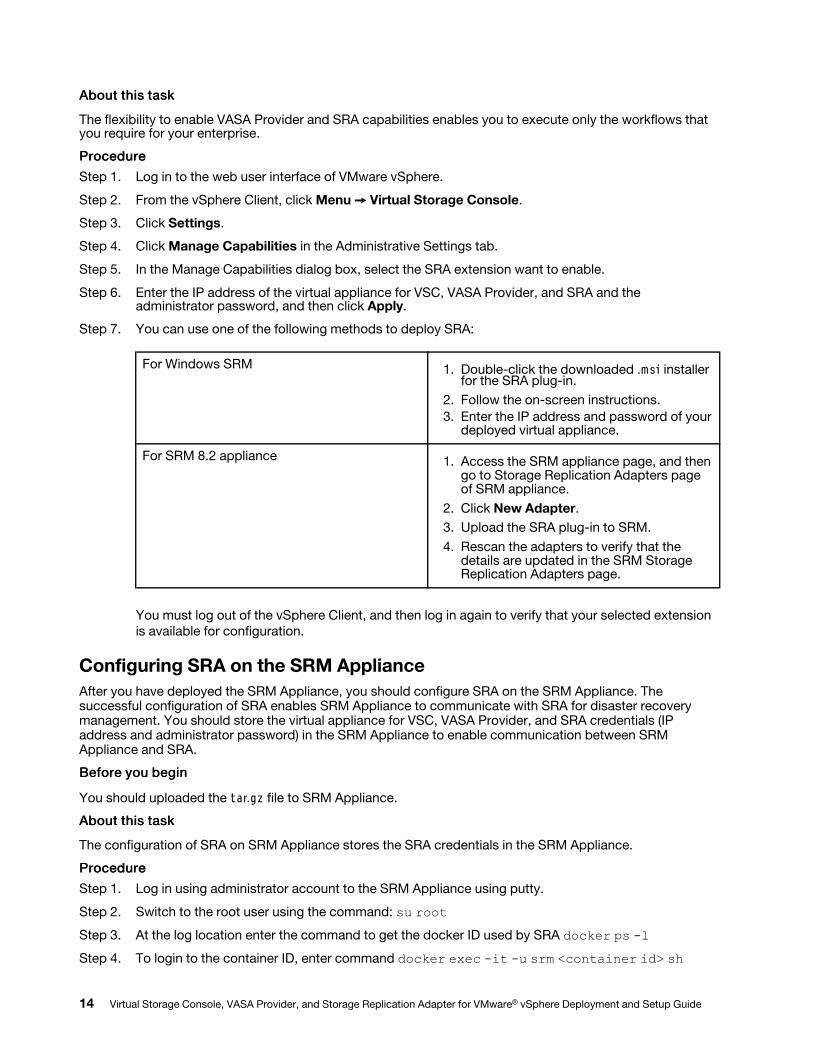
AAbboouutt tthhiiss ttaasskk
The flexibility to enable VASA Provider and SRA capabilities enables you to execute only the workflows that you require for your enterprise.
PPrroocceedduurree
Step 1. Log in to the web user interface of VMware vSphere.
Step 2. From the vSphere Client, click Menu ➙ Virtual Storage Console.Step 3. Click Settings.
Step 4. Click Manage Capabilities in the Administrative Settings tab.
Step 5. In the Manage Capabilities dialog box, select the SRA extension want to enable.
Step 6. Enter the IP address of the virtual appliance for VSC, VASA Provider, and SRA and the administrator password, and then click Apply.
Step 7. You can use one of the following methods to deploy SRA:
For Windows SRM 1. Double-click the downloaded .msi installer for the SRA plug-in.
2. Follow the on-screen instructions.
3. Enter the IP address and password of your deployed virtual appliance.
For SRM 8.2 appliance 1. Access the SRM appliance page, and then go to Storage Replication Adapters page of SRM appliance.
2. Click New Adapter.
3. Upload the SRA plug-in to SRM.
4. Rescan the adapters to verify that the details are updated in the SRM Storage Replication Adapters page.
You must log out of the vSphere Client, and then log in again to verify that your selected extension
is available for configuration.
Configuring SRA on the SRM Appliance
After you have deployed the SRM Appliance, you should configure SRA on the SRM Appliance. The successful configuration of SRA enables SRM Appliance to communicate with SRA for disaster recovery management. You should store the virtual appliance for VSC, VASA Provider, and SRA credentials (IP address and administrator password) in the SRM Appliance to enable communication between SRM Appliance and SRA.
BBeeffoorree yyoouu bbeeggiinn
You should uploaded the tar.gz file to SRM Appliance.
AAbboouutt tthhiiss ttaasskk
The configuration of SRA on SRM Appliance stores the SRA credentials in the SRM Appliance.
PPrroocceedduurree
Step 1. Log in using administrator account to the SRM Appliance using putty.
Step 2. Switch to the root user using the command: su rootStep 3. At the log location enter the command to get the docker ID used by SRA docker ps -lStep 4. To login to the container ID, enter command docker exec -it -u srm <container id> sh
14 Virtual Storage Console, VASA Provider, and Storage Replication Adapter for VMware® vSphere Deployment and Setup Guide

Step 5. Configure SRM with the virtual appliance for VSC, VASA Provider, and SRA IP address and password using the command: perl command.pl -I <va-IP> administrator <va-password>
A success message confirming that the storage credentials are stored is displayed. SRA can
communicate with SRA server using the provided IP address, port and credentials.
Updating Storage Replication Adapter (SRA) credentials
For SRM to communicate with SRA, you should update SRA credentials on the SRM server if you have modified the credentials.
BBeeffoorree yyoouu bbeeggiinn
You should have executed the steps mentioned in the topic "Configuring SRA on SRM appliance".
“Configuring SRA on the SRM Appliance” on page 14
PPrroocceedduurree
Step 1. Delete the contents of the /srm/sra/confdirectory using:
a. cd /srm/sra/conf
b. rm -rf *
Step 2. Execute the perl command to configure SRA with the new credentials:
a. cd /srm/sra/
b. perl command.pl -I <va-IP> administrator <va-password>
Migration of Windows SRM to SRM Appliance
If you are using Windows based Site Recovery Manager(SRM) for disaster recovery and you want to use the 8.2 SRM Appliance for the same setup, then you should migrate your Windows disaster recovery setup to the appliance based SRM.
The steps involved in the migration of the disaster recovery are:
1. Upgrading your existing virtual appliance for VSC, VASA Provider, and SRA to the 9.7 version
“Upgrading to the 9.7 virtual appliance for VSC, VASA Provider, and SRA” on page 15
2. Migrating Windows based Storage Replication Adapter to Appliance based SRA
3. Migrating Windows SRM data to SRM Appliance
See Migrate from Site Recovery Manager for Windows to Site Recovery Manager Virtual Appliance for detailed
steps.
Upgrading to the 9.7 virtual appliance for VSC, VASA Provider, and SRA
You can perform an in-place upgrade to the 9.7 release of the virtual appliance for Virtual Storage Console (VSC), VASA Provider, and Storage Replication Adapter (SRA) from your existing setup following the instructions provided here.
BBeeffoorree yyoouu bbeeggiinn
• You must have downloaded the .iso file for the 9.7 release of the virtual appliance for VSC, VASA Provider, and SRA.
• You must have reserved at least 12 GB of RAM for the virtual appliance for VSC, VASA Provider, and SRA
to work optimally after the upgrade.
• You must clean the vSphere Client browser cache.
“Cleaning the vSphere cached downloaded plug-in packages” on page 43
AAbboouutt tthhiiss ttaasskk
Chapter 4. Deploying or upgrading VSC, VASA Provider, and SRA 15

The status of VASA Provider from the existing deployment is retained after the upgrade. You should manually enable or disable VASA Provider based on your requirement after you upgrade. However, it is best to enabling the VASA Provider even if VMware Virtual Volumes (vVols) are not in use, as it enables storage capability profiles for traditional datastore provisioning, and storage alarms.
Note: You can perform an in-place upgrade to the 9.7 release of the virtual appliance only from your existing version of virtual appliance for VSC, VASA Provider, and SRA.
PPrroocceedduurree
Step 1. Mount the downloaded .iso file to the virtual appliance:
a. Click Edit Settings ➙ DVD/CD-ROM Drive.b. Select Datastore ISO file from the drop-down list.
c. Browse to and select the downloaded .iso file, and then select the Connect at power on checkbox.
Step 2. Access the Summary tab of your deployed virtual appliance.
Step 3. Click to start the maintenance console.
Step 4. At the “Main Menu” prompt, enter option 2 for System Configuration, and then enter option 8 for Upgrade.
After the upgrade finishes, the virtual appliance restarts. The virtual appliance for VSC, VASA
Provider, and SRA is registered to the vCenter Server with the same IP address as before the
upgrade.
Step 5. If you want the virtual appliance for VSC, VASA Provider, and SRA to be registered with the vCenter Server with the IPv6 address, then you must perform the following:
a. Unregister the virtual appliance for VSC, VASA Provider, and SRA.
b. Register the IPv6 address of the virtual appliance for VSC, VASA Provider, and SRA to vCenter Server using the Register page.
c. Regenerate VSC and VASA Provider certificates after the registration.
Important: IPv6 is supported only with vCenter Server 6.7 and later.
Step 6. Log out and re-login to the vSphere Client to view the deployed virtual appliance for VSC, VASA Provider, and SRA.
a. Log out from your existing vSphere web client or vSphere Client and close the window.
b. Log in to the vSphere Client.
It might take a few minutes for the plug-in to be updated in the vSphere Client.
16 Virtual Storage Console, VASA Provider, and Storage Replication Adapter for VMware® vSphere Deployment and Setup Guide
Chapter 5. Configuring your Virtual Storage Console for VMware vSphere environment
Virtual Storage Console (VSC) supports numerous environments. Some of the features in these environments might require additional configuration.
You might have to perform some of the following tasks to configure your ESXi hosts, guest operating
systems, and VSC:
• Verifying your ESXi host settings, including the UNMAP settings
• Adding timeout values for guest operating systems
• Regenerating the VSC SSL certificate
• Creating storage capability profiles and threshold alarms
• Modifying the preferences file to enable the mounting of datastores across different subnets
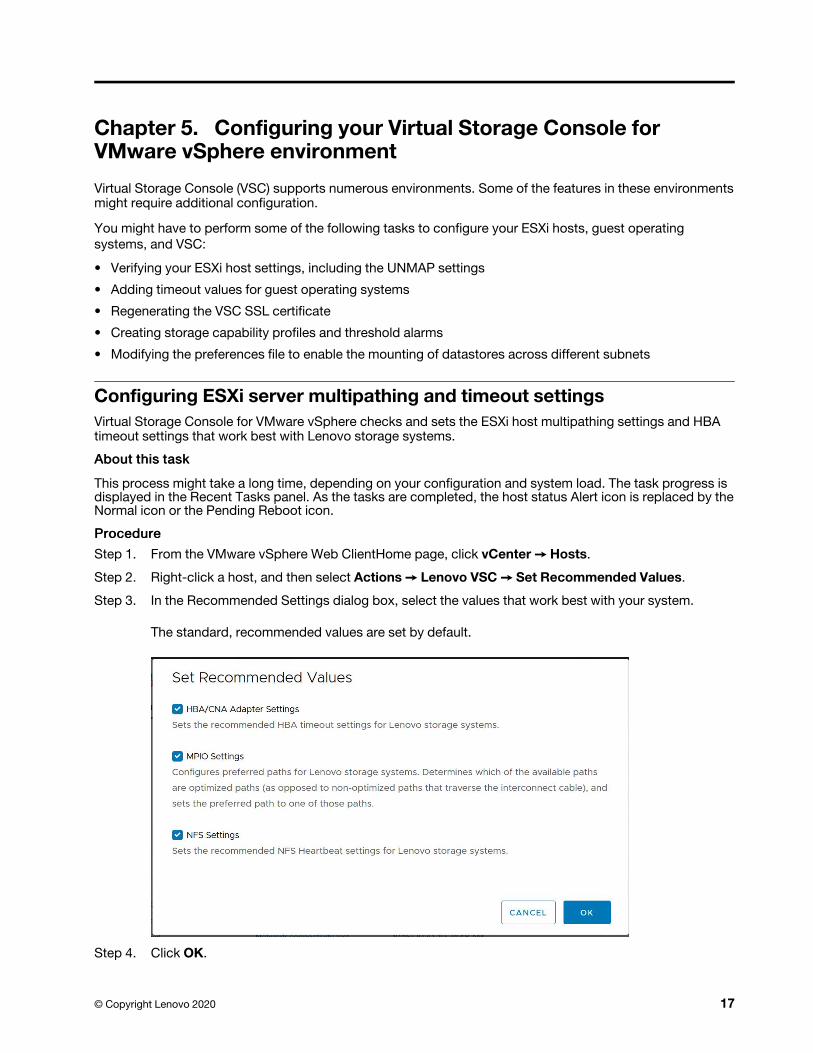
Configuring ESXi server multipathing and timeout settings
Virtual Storage Console for VMware vSphere checks and sets the ESXi host multipathing settings and HBA timeout settings that work best with Lenovo storage systems.
AAbboouutt tthhiiss ttaasskk
This process might take a long time, depending on your configuration and system load. The task progress is displayed in the Recent Tasks panel. As the tasks are completed, the host status Alert icon is replaced by the Normal icon or the Pending Reboot icon.
PPrroocceedduurree
Step 1. From the VMware vSphere Web ClientHome page, click vCenter ➙ Hosts.Step 2. Right-click a host, and then select Actions ➙ Lenovo VSC ➙ Set Recommended Values.Step 3. In the Recommended Settings dialog box, select the values that work best with your system.
The standard, recommended values are set by default.
Step 4. Click OK.
© Copyright Lenovo 2020 17
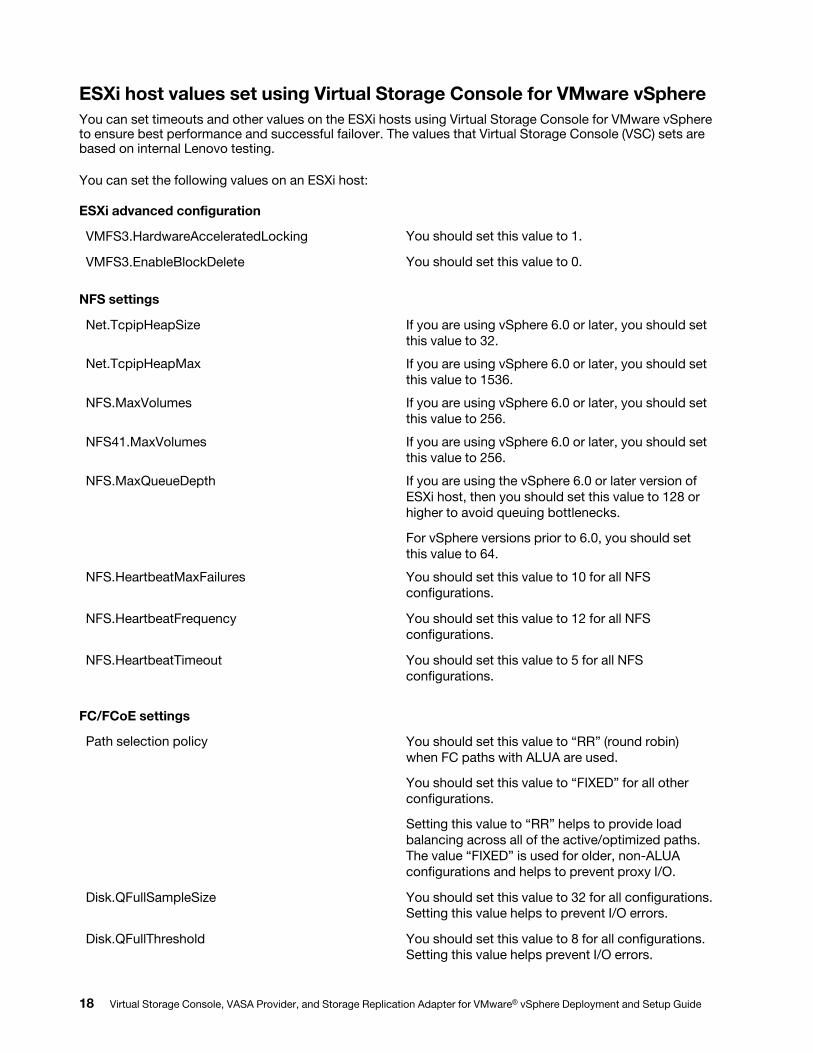
ESXi host values set using Virtual Storage Console for VMware vSphere
You can set timeouts and other values on the ESXi hosts using Virtual Storage Console for VMware vSphere to ensure best performance and successful failover. The values that Virtual Storage Console (VSC) sets are based on internal Lenovo testing.
You can set the following values on an ESXi host:
ESXi advanced configuration
VMFS3.HardwareAcceleratedLocking You should set this value to 1.
VMFS3.EnableBlockDelete You should set this value to 0.
NFS settings
Net.TcpipHeapSize If you are using vSphere 6.0 or later, you should set
this value to 32.
Net.TcpipHeapMax If you are using vSphere 6.0 or later, you should set
this value to 1536.
NFS.MaxVolumes If you are using vSphere 6.0 or later, you should set
this value to 256.
NFS41.MaxVolumes If you are using vSphere 6.0 or later, you should set
this value to 256.
NFS.MaxQueueDepth If you are using the vSphere 6.0 or later version of
ESXi host, then you should set this value to 128 or
higher to avoid queuing bottlenecks.
For vSphere versions prior to 6.0, you should set
this value to 64.
NFS.HeartbeatMaxFailures You should set this value to 10 for all NFS
configurations.
NFS.HeartbeatFrequency You should set this value to 12 for all NFS
configurations.
NFS.HeartbeatTimeout You should set this value to 5 for all NFS
configurations.
FC/FCoE settings
Path selection policy You should set this value to “RR” (round robin)
when FC paths with ALUA are used.
You should set this value to “FIXED” for all other
configurations.
Setting this value to “RR” helps to provide load
balancing across all of the active/optimized paths.
The value “FIXED” is used for older, non-ALUA
configurations and helps to prevent proxy I/O.
Disk.QFullSampleSize You should set this value to 32 for all configurations.
Setting this value helps to prevent I/O errors.
Disk.QFullThreshold You should set this value to 8 for all configurations.
Setting this value helps prevent I/O errors.
18 Virtual Storage Console, VASA Provider, and Storage Replication Adapter for VMware® vSphere Deployment and Setup Guide
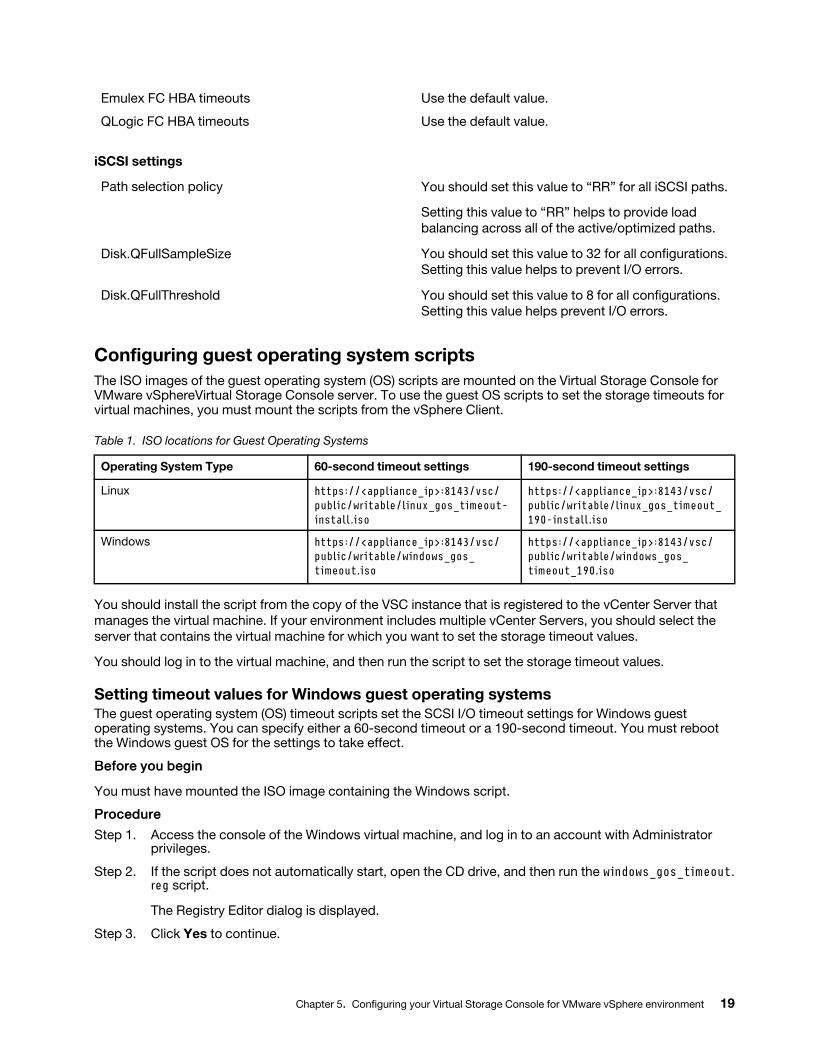
Emulex FC HBA timeouts Use the default value.
QLogic FC HBA timeouts Use the default value.
iSCSI settings
Path selection policy You should set this value to “RR” for all iSCSI paths.
Setting this value to “RR” helps to provide load
balancing across all of the active/optimized paths.
Disk.QFullSampleSize You should set this value to 32 for all configurations.
Setting this value helps to prevent I/O errors.
Disk.QFullThreshold You should set this value to 8 for all configurations.
Setting this value helps prevent I/O errors.
Configuring guest operating system scripts
The ISO images of the guest operating system (OS) scripts are mounted on the Virtual Storage Console for VMware vSphereVirtual Storage Console server. To use the guest OS scripts to set the storage timeouts for virtual machines, you must mount the scripts from the vSphere Client.
Table 1. ISO locations for Guest Operating Systems
Operating System Type 60-second timeout settings 190-second timeout settings
Linux https://<appliance_ip>:8143/vsc/ public/writable/linux_gos_timeout- install.iso
https://<appliance_ip>:8143/vsc/ public/writable/linux_gos_timeout_ 190-install.iso
Windows https://<appliance_ip>:8143/vsc/ public/writable/windows_gos_ timeout.iso
https://<appliance_ip>:8143/vsc/ public/writable/windows_gos_ timeout_190.iso
You should install the script from the copy of the VSC instance that is registered to the vCenter Server that
manages the virtual machine. If your environment includes multiple vCenter Servers, you should select the
server that contains the virtual machine for which you want to set the storage timeout values.
You should log in to the virtual machine, and then run the script to set the storage timeout values.
Setting timeout values for Windows guest operating systems
The guest operating system (OS) timeout scripts set the SCSI I/O timeout settings for Windows guest operating systems. You can specify either a 60-second timeout or a 190-second timeout. You must reboot the Windows guest OS for the settings to take effect.
BBeeffoorree yyoouu bbeeggiinn
You must have mounted the ISO image containing the Windows script.
PPrroocceedduurree
Step 1. Access the console of the Windows virtual machine, and log in to an account with Administrator privileges.
Step 2. If the script does not automatically start, open the CD drive, and then run the windows_gos_timeout. reg script.
The Registry Editor dialog is displayed.
Step 3. Click Yes to continue.
Chapter 5. Configuring your Virtual Storage Console for VMware vSphere environment 19
The following message is displayed: The keys and values contained in D:\windows_gos_timeout.reg have been successfully added to the registry.
Step 4. Reboot the Windows guest OS.
Step 5. Unmount the ISO image.
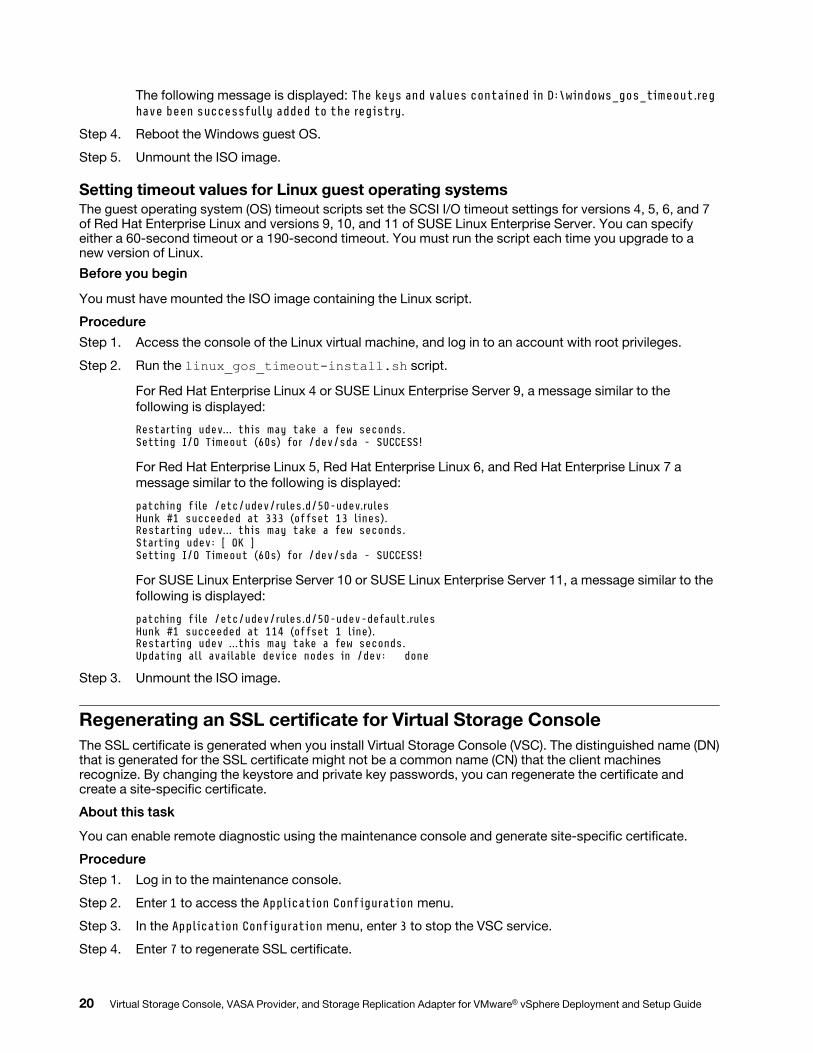
Setting timeout values for Linux guest operating systems
The guest operating system (OS) timeout scripts set the SCSI I/O timeout settings for versions 4, 5, 6, and 7 of Red Hat Enterprise Linux and versions 9, 10, and 11 of SUSE Linux Enterprise Server. You can specify either a 60-second timeout or a 190-second timeout. You must run the script each time you upgrade to a new version of Linux.
BBeeffoorree yyoouu bbeeggiinn
You must have mounted the ISO image containing the Linux script.
PPrroocceedduurree
Step 1. Access the console of the Linux virtual machine, and log in to an account with root privileges.
Step 2. Run the linux_gos_timeout-install.sh script. For Red Hat Enterprise Linux 4 or SUSE Linux Enterprise Server 9, a message similar to the
following is displayed:
Restarting udev... this may take a few seconds.Setting I/O Timeout (60s) for /dev/sda - SUCCESS!
For Red Hat Enterprise Linux 5, Red Hat Enterprise Linux 6, and Red Hat Enterprise Linux 7 a
message similar to the following is displayed:
patching file /etc/udev/rules.d/50-udev.rulesHunk #1 succeeded at 333 (offset 13 lines).Restarting udev... this may take a few seconds.Starting udev: [ OK ]Setting I/O Timeout (60s) for /dev/sda - SUCCESS!
For SUSE Linux Enterprise Server 10 or SUSE Linux Enterprise Server 11, a message similar to the
following is displayed:
patching file /etc/udev/rules.d/50-udev-default.rulesHunk #1 succeeded at 114 (offset 1 line).Restarting udev ...this may take a few seconds.Updating all available device nodes in /dev: done
Step 3. Unmount the ISO image.
Regenerating an SSL certificate for Virtual Storage Console
The SSL certificate is generated when you install Virtual Storage Console (VSC). The distinguished name (DN) that is generated for the SSL certificate might not be a common name (CN) that the client machines recognize. By changing the keystore and private key passwords, you can regenerate the certificate and create a site-specific certificate.
AAbboouutt tthhiiss ttaasskk
You can enable remote diagnostic using the maintenance console and generate site-specific certificate.
PPrroocceedduurree
Step 1. Log in to the maintenance console.
Step 2. Enter 1 to access the Application Configuration menu.
Step 3. In the Application Configuration menu, enter 3 to stop the VSC service.
Step 4. Enter 7 to regenerate SSL certificate.
20 Virtual Storage Console, VASA Provider, and Storage Replication Adapter for VMware® vSphere Deployment and Setup Guide
Requirements for registering VSC in multiple vCenter Servers environment
If you are using Virtual Storage Console for VMware vSphere in an environment where a single VMware vSphere HTML5 client. is managing multiple vCenter Server instances, you must register one instance of VSC with each vCenter Server so that there is a 1:1 pairing between VSC and the vCenter Server. Doing this enables you to manage all of the servers running vCenter 6.0 or later in both linked mode and non-linked mode from a single vSphere HTML5 client.
Note: If you want to use VSC with a vCenter Server, then you must have set up or registered one VSC instance for every vCenter Server instance that you want to manage. Each registered VSC instance must be of the same version.
Linked mode is installed automatically during the vCenter Server deployment. Linked mode uses Microsoft
Active Directory Application Mode (ADAM) to store and synchronize data across multiple vCenter Server
systems.
Using the vSphere HTML5 client to perform VSC tasks across multiple vCenter Servers requires the
following:
• Each vCenter Server in the VMware inventory that you want to manage must have a single VSC server
registered with it in a unique 1:1 pairing.
For example, you can have VSC server A registered to vCenter Server A, VSC server B registered to
vCenter Server B, VSC server C registered to vCenter Server C, and so on.
You cannot have VSC server A registered to both vCenter Server A and vCenter Server B.
If a VMware inventory includes a vCenter Server that does not have a VSC server registered to it, but there
are one or more vCenter Servers that are registered with VSC, then you can view the instances of VSC and
perform VSC operations for the vCenter Servers that have VSC registered.
• You must have the VSC-specific View privilege for each vCenter Server that is registered to the single
sign-on (SSO).
You must also have the correct RBAC permissions.
When you are performing a task that requires you to specify a vCenter Server, the vCenter Server drop-
down box displays the available vCenter Servers in alphanumeric order. The default vCenter Server is always
the first server in the drop-down list.
If the location of the storage is known (for example, when you use the Provisioning wizard and the datastore
is on a host managed by a specific vCenter Server), the vCenter Server list is displayed as a read-only option.
This happens only when you use the right-click option to select an item in the vSphere Web Client.
VSC warns you when you attempt to select an object that it does not manage.
You can filter storage systems based on a specific vCenter Server from the VSC summary page. A summary
page appears for every VSC instance that is registered with a vCenter Server. You can manage the storage
systems that are associated with a specific VSC instance and vCenter Server, but you should keep the
registration information for each storage system separate if you are running multiple instances of VSC.
Configuring the VSC preferences files
The preferences files contain settings that control Virtual Storage Console for VMware vSphere operations. Under most circumstances, you do not have to modify the settings in these files. It is helpful to know which preference files Virtual Storage Console (VSC) uses.
VSC has several preference files. These files include entry keys and values that determine how VSC performs
various operations. The following are some of the preference files that VSC uses:
Chapter 5. Configuring your Virtual Storage Console for VMware vSphere environment 21
/opt/netapp/vscserver/etc/kamino/kaminoprefs.xml
/opt/netapp/vscserver/etc/vsc/vscPreferences.xml
You might have to modify the preferences files in certain situations. For example, if you use iSCSI or NFS and
the subnet is different between your ESXi hosts and your storage system, you have to modify the
preferences files. If you do not modify the settings in the preferences file, datastore provisioning fails
because VSC cannot mount the datastore.
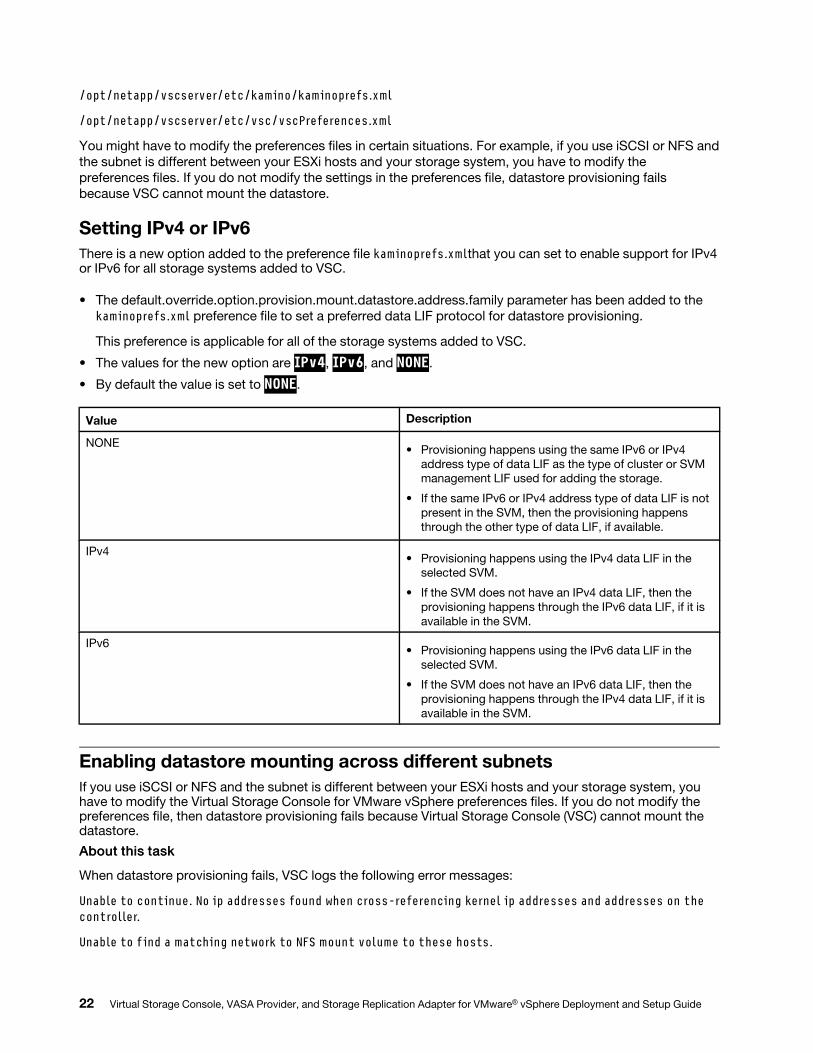
Setting IPv4 or IPv6
There is a new option added to the preference file kaminoprefs.xmlthat you can set to enable support for IPv4 or IPv6 for all storage systems added to VSC.
• The default.override.option.provision.mount.datastore.address.family parameter has been added to the
kaminoprefs.xml preference file to set a preferred data LIF protocol for datastore provisioning.
This preference is applicable for all of the storage systems added to VSC.
• The values for the new option are IPv4, IPv6, and NONE.• By default the value is set to NONE.
Value Description
NONE• Provisioning happens using the same IPv6 or IPv4
address type of data LIF as the type of cluster or SVM
management LIF used for adding the storage.
• If the same IPv6 or IPv4 address type of data LIF is not
present in the SVM, then the provisioning happens
through the other type of data LIF, if available.
IPv4• Provisioning happens using the IPv4 data LIF in the
selected SVM.
• If the SVM does not have an IPv4 data LIF, then the
provisioning happens through the IPv6 data LIF, if it is
available in the SVM.
IPv6• Provisioning happens using the IPv6 data LIF in the
selected SVM.
• If the SVM does not have an IPv6 data LIF, then the
provisioning happens through the IPv4 data LIF, if it is
available in the SVM.
Enabling datastore mounting across different subnets
If you use iSCSI or NFS and the subnet is different between your ESXi hosts and your storage system, you have to modify the Virtual Storage Console for VMware vSphere preferences files. If you do not modify the preferences file, then datastore provisioning fails because Virtual Storage Console (VSC) cannot mount the datastore.
AAbboouutt tthhiiss ttaasskk
When datastore provisioning fails, VSC logs the following error messages:
Unable to continue. No ip addresses found when cross-referencing kernel ip addresses and addresses on the controller.
Unable to find a matching network to NFS mount volume to these hosts.
22 Virtual Storage Console, VASA Provider, and Storage Replication Adapter for VMware® vSphere Deployment and Setup Guide
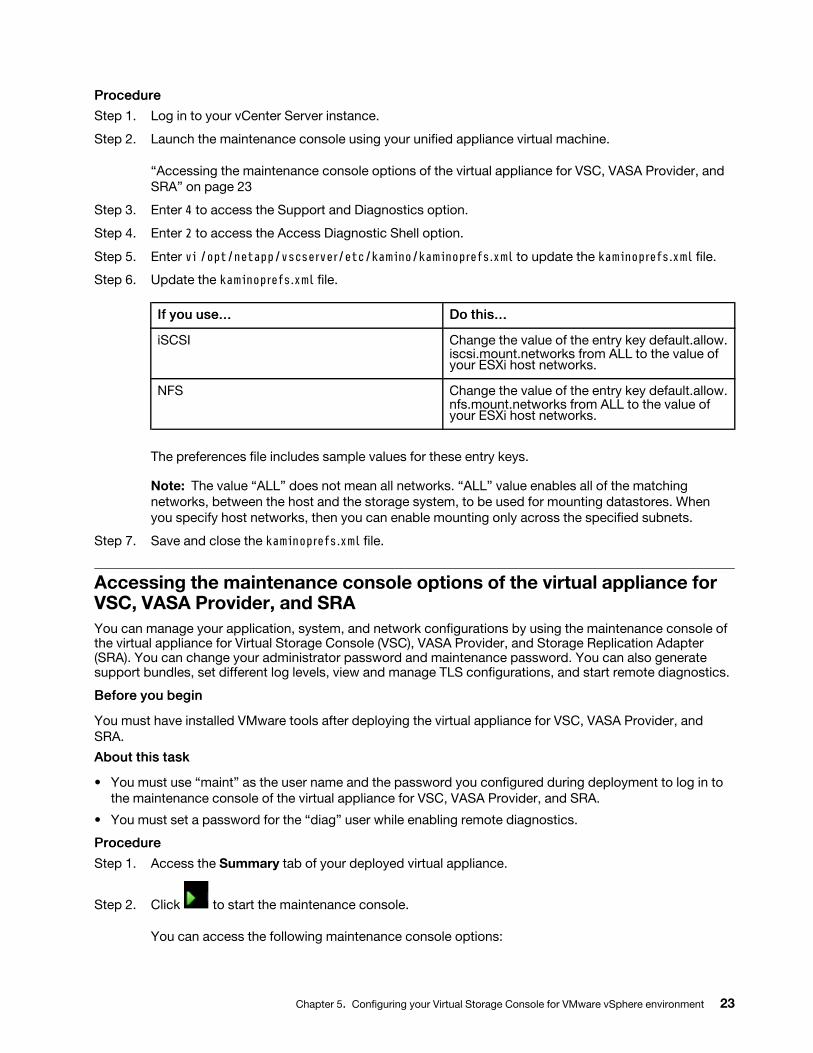
PPrroocceedduurree
Step 1. Log in to your vCenter Server instance.
Step 2. Launch the maintenance console using your unified appliance virtual machine.
“Accessing the maintenance console options of the virtual appliance for VSC, VASA Provider, and
SRA” on page 23
Step 3. Enter 4 to access the Support and Diagnostics option.
Step 4. Enter 2 to access the Access Diagnostic Shell option.
Step 5. Enter vi /opt/netapp/vscserver/etc/kamino/kaminoprefs.xml to update the kaminoprefs.xml file.
Step 6. Update the kaminoprefs.xml file.
IIff yyoouu uussee...... DDoo tthhiiss......
iSCSI Change the value of the entry key default.allow. iscsi.mount.networks from ALL to the value of your ESXi host networks.
NFS Change the value of the entry key default.allow. nfs.mount.networks from ALL to the value of your ESXi host networks.
The preferences file includes sample values for these entry keys.
Note: The value “ALL” does not mean all networks. “ALL” value enables all of the matching
networks, between the host and the storage system, to be used for mounting datastores. When
you specify host networks, then you can enable mounting only across the specified subnets.
Step 7. Save and close the kaminoprefs.xml file.
Accessing the maintenance console options of the virtual appliance for VSC, VASA Provider, and SRA
You can manage your application, system, and network configurations by using the maintenance console of the virtual appliance for Virtual Storage Console (VSC), VASA Provider, and Storage Replication Adapter (SRA). You can change your administrator password and maintenance password. You can also generate support bundles, set different log levels, view and manage TLS configurations, and start remote diagnostics.
BBeeffoorree yyoouu bbeeggiinn
You must have installed VMware tools after deploying the virtual appliance for VSC, VASA Provider, and
SRA.
AAbboouutt tthhiiss ttaasskk
• You must use “maint” as the user name and the password you configured during deployment to log in to
the maintenance console of the virtual appliance for VSC, VASA Provider, and SRA.
• You must set a password for the “diag” user while enabling remote diagnostics.
PPrroocceedduurree
Step 1. Access the Summary tab of your deployed virtual appliance.
Step 2. Click to start the maintenance console.
You can access the following maintenance console options:
Chapter 5. Configuring your Virtual Storage Console for VMware vSphere environment 23
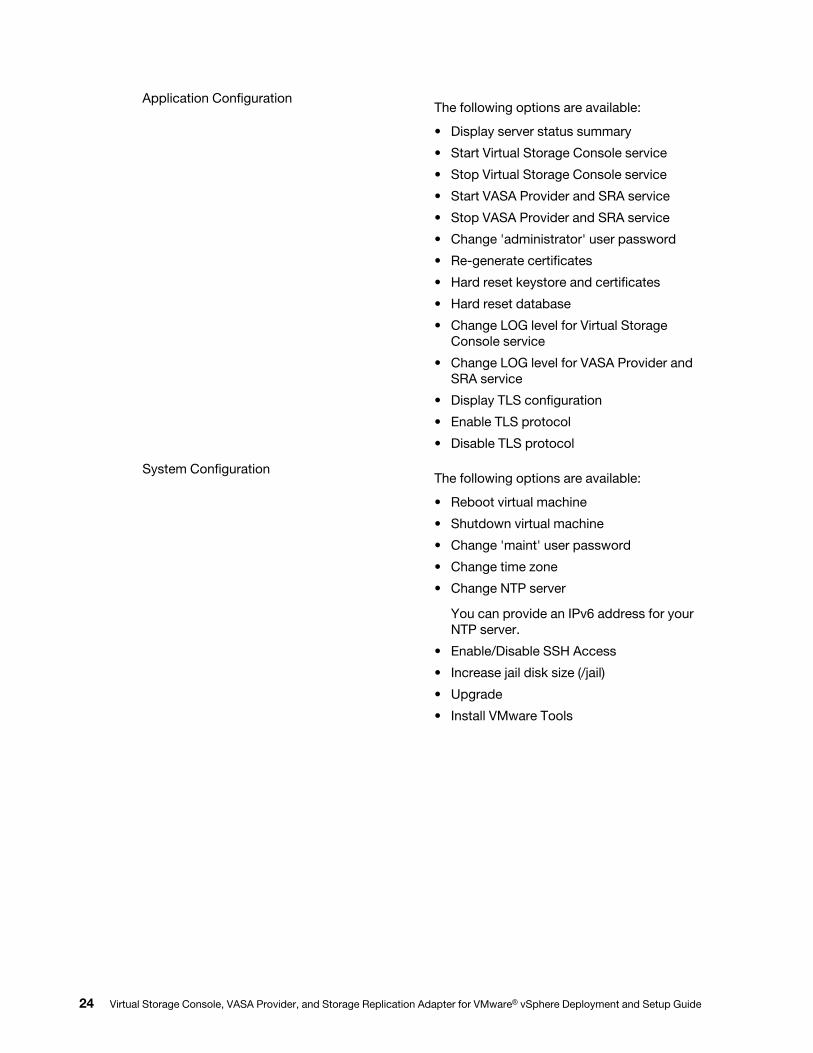
Application ConfigurationThe following options are available:
• Display server status summary
• Start Virtual Storage Console service
• Stop Virtual Storage Console service
• Start VASA Provider and SRA service
• Stop VASA Provider and SRA service
• Change 'administrator' user password
• Re-generate certificates
• Hard reset keystore and certificates
• Hard reset database
• Change LOG level for Virtual Storage
Console service
• Change LOG level for VASA Provider and
SRA service
• Display TLS configuration
• Enable TLS protocol
• Disable TLS protocol
System ConfigurationThe following options are available:
• Reboot virtual machine
• Shutdown virtual machine
• Change 'maint' user password
• Change time zone
• Change NTP server
You can provide an IPv6 address for your
NTP server.
• Enable/Disable SSH Access
• Increase jail disk size (/jail)
• Upgrade
• Install VMware Tools
24 Virtual Storage Console, VASA Provider, and Storage Replication Adapter for VMware® vSphere Deployment and Setup Guide
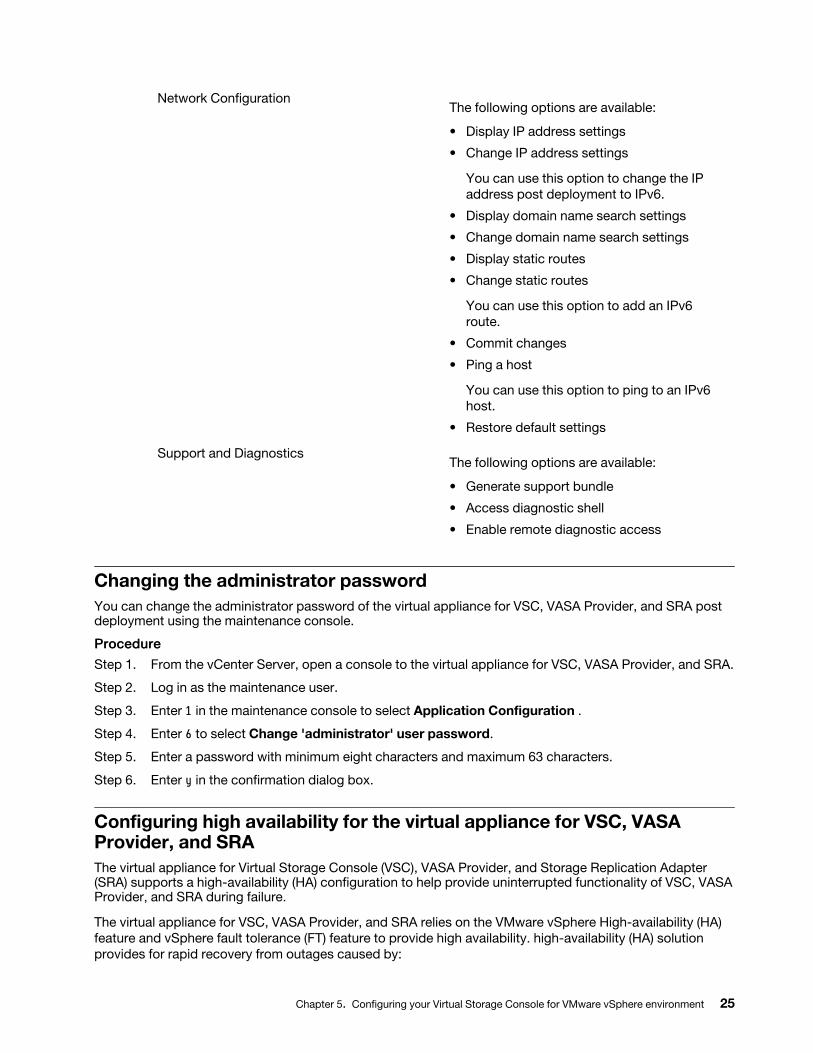
Network ConfigurationThe following options are available:
• Display IP address settings
• Change IP address settings
You can use this option to change the IP
address post deployment to IPv6.
• Display domain name search settings
• Change domain name search settings
• Display static routes
• Change static routes
You can use this option to add an IPv6
route.
• Commit changes
• Ping a host
You can use this option to ping to an IPv6
host.
• Restore default settings
Support and DiagnosticsThe following options are available:
• Generate support bundle
• Access diagnostic shell
• Enable remote diagnostic access
Changing the administrator password
You can change the administrator password of the virtual appliance for VSC, VASA Provider, and SRA post deployment using the maintenance console.
PPrroocceedduurree
Step 1. From the vCenter Server, open a console to the virtual appliance for VSC, VASA Provider, and SRA.
Step 2. Log in as the maintenance user.
Step 3. Enter 1 in the maintenance console to select Application Configuration .
Step 4. Enter 6 to select Change 'administrator' user password.
Step 5. Enter a password with minimum eight characters and maximum 63 characters.
Step 6. Enter y in the confirmation dialog box.
Configuring high availability for the virtual appliance for VSC, VASA Provider, and SRA
The virtual appliance for Virtual Storage Console (VSC), VASA Provider, and Storage Replication Adapter (SRA) supports a high-availability (HA) configuration to help provide uninterrupted functionality of VSC, VASA Provider, and SRA during failure.
The virtual appliance for VSC, VASA Provider, and SRA relies on the VMware vSphere High-availability (HA)
feature and vSphere fault tolerance (FT) feature to provide high availability. high-availability (HA) solution
provides for rapid recovery from outages caused by:
Chapter 5. Configuring your Virtual Storage Console for VMware vSphere environment 25
• Host failure
• Network failure
• Virtual machine failure (Guest OS failure)
• Application (VSC, VASA Provider, and SRA) crash
No additional configuration is required on the virtual appliance to provide high availability. Only the vCenter
Server and ESXi hosts must be configured with the VMware vSphere HA feature or the vSphere FT feature
based on their requirements. Both HA and FT require clustered hosts together with shared storage. FT has
additional requirements and limitations.
In addition to the VMware vSphere HA solution and vSphere FT solution, the virtual appliance also helps
keep the VSC, VASA Provider, and SRA services running at all times. The virtual appliance watchdog
process periodically monitors all three services, and restarts them automatically when any kind of failure is
detected. This helps to prevent application failures.
Note: vCenter HA is not supported by virtual appliance for VSC, VASA Provider, and SRA.
VMware vSphere HA
You can configure your vSphere environment where the virtual appliance for Virtual Storage Console (VSC), VASA Provider, and Storage Replication Adapter (SRA) is deployed for high availability (HA). The VMware HA feature provides failover protection from hardware failures and operating system failures in virtual environments.
The VMware HA feature monitors virtual machines to detect operating system failures and hardware failures.
When a failure is detected, the VMware HA feature restarts the virtual machines on the other physical servers
in the resource pool. Manual intervention is not required when a server failure is detected.
The procedure to configure VMware HA depend on the version of your vCenter Server. For example, you can
use the following reference link and select the required vCenter Server version to view the steps to configure
VMware HA.
VMware vSphere Documentation: Creating and Using vSphere HA Clusters
VMware vSphere Fault Tolerance
The VMware vSphere Fault Tolerance (FT) feature provides high availability (HA) at a higher level and enables you to protect virtual machines without any loss of data or connections. You must enable or disable vSphere FT for the virtual appliance for VSC, VASA Provider, and SRA from your vCenter Server.
Ensure your vSphere license supports FT with the number of vCPUs needed for the virtual appliance in your
environment (at least 2 vCPUs; 4 vCPUs for large scale environments).
vSphere FT enables virtual machines to operate continuously even during server failures. When vSphere FT
is enabled on a virtual machine, a copy of the primary virtual machine is automatically created on another
host (the secondary virtual machine) that is selected by Distributed Resource Scheduler (DRS). If DRS is not
enabled, the target host is selected from the available hosts. vSphere FT operates the primary virtual
machine and secondary virtual machine in lockstep mode, with each mirroring the execution state of the
primary virtual machine to the secondary virtual machine.
When there is a hardware failure that causes the primary virtual machine to fail, the secondary virtual
machine immediately picks up where the primary virtual machine stopped. The secondary virtual machine
continues to run without any loss of network connections, transactions, or data.
Your system must meet the CPU requirements, virtual machine limit requirements, and licensing
requirements for configuring vSphere FT for your vCenter Server instance.
The procedure to configure HA depend on the version of your vCenter Server. For example, you can use the
following reference link and select the required vCenter Server version to view the steps to configure HA.
26 Virtual Storage Console, VASA Provider, and Storage Replication Adapter for VMware® vSphere Deployment and Setup Guide
VMware vSphere Documentation: Fault Tolerance Requirements, Limits, and Licensing
MetroCluster configurations supported by the virtual appliance for VSC, VASA Provider, and SRA
The virtual appliance for Virtual Storage Console (VSC), VASA Provider, and Storage Replication Adapter (SRA) supports environments that use MetroCluster IP and FC configurations for ONTAP. Most of this support is automatic. However, you might notice a few differences when you use a MetroCluster environment with VSC and VASA Provider.
MetroCluster configurations and VSC
You must ensure that VSC discovers the storage system controllers at the primary site and the secondary
site. Typically, VSC automatically discovers storage controllers. If you are using a cluster management LIF,
then it is a good practice to verify that VSC has discovered the clusters at both sites. Otherwise, you can
manually add the storage controllers to VSC. You can also modify the user name and password pairs that
VSC uses to connect to the storage controllers.
When a switchover occurs, the SVMs on the secondary site take over. These SVMs have the “-mc” suffix
appended to their names. If a switchover operation occurs while you are performing operations such as
provisioning a datastore, the name of the SVM where the datastore resides is changed to include the “-mc”
suffix. This suffix is dropped when the switchback occurs, and the SVMs on the primary site resume control.
Note: If you have added direct SVMs with MetroCluster configuration to VSC, then after switchover, the
change in the SVM name (the addition of the “-mc” suffix) is not reflected. All other switchover operations
continue to execute normally.
When a switchover or switchback occurs, VSC might take a few minutes to automatically detect and
discover the clusters. If this happens while you are performing a VSC operation such as provisioning a
datastore, you might experience a delay.
MetroCluster configurations and VASA Provider
VASA Provider automatically supports environments that use MetroCluster configurations. The switchover is
transparent in VASA Provider environments. You cannot add direct SVMs to VASA Provider.
Note: VASA Provider does not append the “-mc” suffix to the names of the SVMs on the secondary site after
a switchover.
MetroCluster configurations and SRA
SRA does not support MetroCluster configurations.
Chapter 5. Configuring your Virtual Storage Console for VMware vSphere environment 27

28 Virtual Storage Console, VASA Provider, and Storage Replication Adapter for VMware® vSphere Deployment and Setup Guide
Chapter 6. Configuring your Virtual Storage Console for VMware vSphere storage system environment
Virtual Storage Console for VMware vSphere provides a single mechanism to discover storage systems and to set the storage credentials. The credentials provide the ONTAP permissions that are required to enable Virtual Storage Console (VSC) users to perform tasks by using the storage systems.
Before VSC can display and manage the storage resources, VSC must discover the storage systems. As part
of the discovery process, you must supply the ONTAP credentials for your storage systems. These are the
privileges (or roles) that are associated with the user name and password pair that is assigned to each
storage system. These user name and password pairs use ONTAP role-based access control (RBAC) and
must be set up from within ONTAP. You cannot change these credentials from within VSC. You can define
ONTAP RBAC roles by using ThinkSystem Storage Manager for DM Series.
Note: If you log in as an administrator, you automatically have all of the privileges for that storage system.
When you add a storage system to VSC, you must supply an IP address for the storage system and the user
name and password pair that is associated with that system. You can set up default credentials that VSC will
use during the storage system discovery process, or you can manually enter credentials when the storage
system is discovered. The details of the storage system that is added to VSC are automatically pushed to the
extensions that you enable in your deployment. You do not have to manually add storage to VASA Provider
and Storage Replication Adapter (SRA). Both VSC and SRA support the addition of credentials at the cluster
level and storage virtual machine (SVM) level. VASA Provider supports only cluster-level credentials for
adding storage systems.
If your environment includes multiple vCenter Server instances, when you add a storage system to VSC from
the Storage Systems page, the Add Storage System dialog box displays a vCenter Server box where you can
specify to which vCenter Server instance the storage system is to be added. If you add a storage system by
right-clicking a datacenter name, you do not have the option to specify a vCenter Server instance because
the server is already associated with that datacenter.
Discovery happens in one of the following ways. In each case, you must supply credentials for any newly
discovered storage system.
• When the VSC service starts, VSC begins its automatic background discovery process.
• You can click the REDISCOVER All button in the Storage Systems page, or on a host or datacenter to
select it from the Actions menu (Actions ➙ Lenovo VSC ➙ Update Host and Storage Data). You can also click DISCOVER on the Getting Started tab of Overview section.
All of the VSC features require specific permissions to perform tasks. You can limit what users can do based
on the credentials that are associated with the ONTAP role. All of the users that have the same storage
system user name and password pair share the same set of storage system credentials and can perform the
same operations.
Setting default credentials for storage systems
You can use Virtual Storage Console for VMware vSphere to set default credentials for a storage system in your vCenter Server.
BBeeffoorree yyoouu bbeeggiinn
You must have selected the vCenter Server that you want to use for creating default credentials.
AAbboouutt tthhiiss ttaasskk
© Copyright Lenovo 2020 29

If you set up default credentials for storage systems, Virtual Storage Console (VSC) uses these credentials to log in to a storage system that VSC has just discovered. If the default credentials do not work, you must manually log in to the storage system. VSC and SRA support addition of storage system credentials at the cluster level or the SVM level. But VASA Provider will only work with cluster level credentials.
PPrroocceedduurree
Step 1. On the VSC Home page, click Settings ➙ Administrative Settings ➙ Configure Default Credentials for Storage System.
Step 2. In the Storage System Default Credentials dialog box, enter the user name and password for the storage system.
Storage controller credentials are assigned in ONTAP based on the user name and password pair.
The storage controller credentials can either be the administrator account or a custom account that
uses role-based access control (RBAC).
You cannot use VSC to change the roles that are associated with the user name and password pair
of the storage controller. To modify or create a new ONTAP user role for use with the virtual
appliance for VSC, VASA Provider, and SRA, you can use Storage Manager.
See the “Configuring user roles and privileges” section in the Virtual Storage Console, VASA
Provider, and Storage Replication Adapter for VMware® vSphere Deployment and Setup Guide For
9.7 Release.
Step 3. Click OK to save the default credentials.
AAfftteerr yyoouu ffiinniisshh
If you updated the storage system credentials because a storage system reported “Authentication Failure” status, you should click the REDISCOVER ALL option available on the Storage Systems page. When you do this, VSC tries to connect to the storage system by using the new credentials.
Adding storage systems to VSC
You can manually add storage system to Virtual Storage Console (VSC).
AAbboouutt tthhiiss ttaasskk
Each time you start Virtual Storage Console (VSC) or select the REDISCOVER All option, VSC automatically discovers the available storage systems.
PPrroocceedduurree
Step 1. Add a storage system to VSC by using the VSC home page:
Click Storage Systems ➙ Add.
Click Overview ➙ Getting Started, and then click ADD button under Add Storage System.Step 2. In the Add Storage System dialog box, enter the management IP address and credentials for that
storage system.
You can also add storage systems using the IPv6 address of the cluster or SVM. You can also
change the defaults for TLS and the port number in this dialog box.
When you add storage from the VSC Storage System page, you must also specify the vCenter
Server instance where the storage will be located. The Add Storage System dialog box provides a
drop-down list of the available vCenter Server instances. VSC does not display this option if you
are adding storage to a datacenter that is already associated with a vCenter Server instance.
Step 3. Click OK after you have added all of the required information.
30 Virtual Storage Console, VASA Provider, and Storage Replication Adapter for VMware® vSphere Deployment and Setup Guide
Discovering storage systems and hosts
When you first run Virtual Storage Console (VSC) in a vSphere Client, VSC discovers the ESXi hosts, their LUNs and NFS exports, and the Lenovo storage systems that own those LUNs and exports.
BBeeffoorree yyoouu bbeeggiinn
• All of the ESXi hosts must be powered on and connected.
• All the storage virtual machines (SVMs) to be discovered must be running, and each cluster node must
have at least one data LIF configured for the storage protocol in use (NFS, iSCSI or FC).
AAbboouutt tthhiiss ttaasskk
You can discover new storage systems or update information about existing storage systems to obtain the latest capacity and configuration information at any time. You can also modify the credentials that VSC uses to log in to the storage systems.
While discovering the storage systems, VSCcollects information from the ESXi hosts that are managed by
the vCenter Server instance.
PPrroocceedduurree
Step 1. From the vSphere Client Home page, select Hosts and Clusters.
Step 2. Right-click the required datacenter, and then select Lenovo VSC ➙ Update Host and Storage Data.
VSC displays a Confirm dialog box that informs you that this operation might take a long time.
Step 3. Click OK.
Step 4. Select the discovered storage controllers that have the status “Authentication Failure”, and then click ACTIONS ➙ Modify.
Step 5. Fill in the required information in the Modify Storage System dialog box.
Step 6. Repeat steps 4 and 5 for all storage controllers with “Authentication Failure” status.
AAfftteerr yyoouu ffiinniisshh
After the discovery process is complete, perform the following:
• Use VSC to configure ESXi host settings for hosts that display the Alert icon in the Adapter Settings
column, the MPIO Settings column, or the NFS Settings column.
• Provide the storage system credentials.
Refreshing the storage system display
You can use the update feature that is provided by Virtual Storage Console for VMware vSphere to refresh the information about storage systems and to force Virtual Storage Console (VSC) to discover storage systems.
AAbboouutt tthhiiss ttaasskk
The “refresh” option is useful if you changed the default credentials for the storage systems after receiving an authentication error. You should always perform an update operation if you changed the storage system credentials after the storage system reported an “Authentication Failure Status”. During the update operation, VSC tries to connect to the storage system by using the new credentials.
Depending on your system setup, this task can take a long time to complete.
PPrroocceedduurree
Step 1. On the VMware vSphere Client Home page, click Storage Systems.
Step 2. Start the update:
Chapter 6. Configuring your Virtual Storage Console for VMware vSphere storage system environment 31
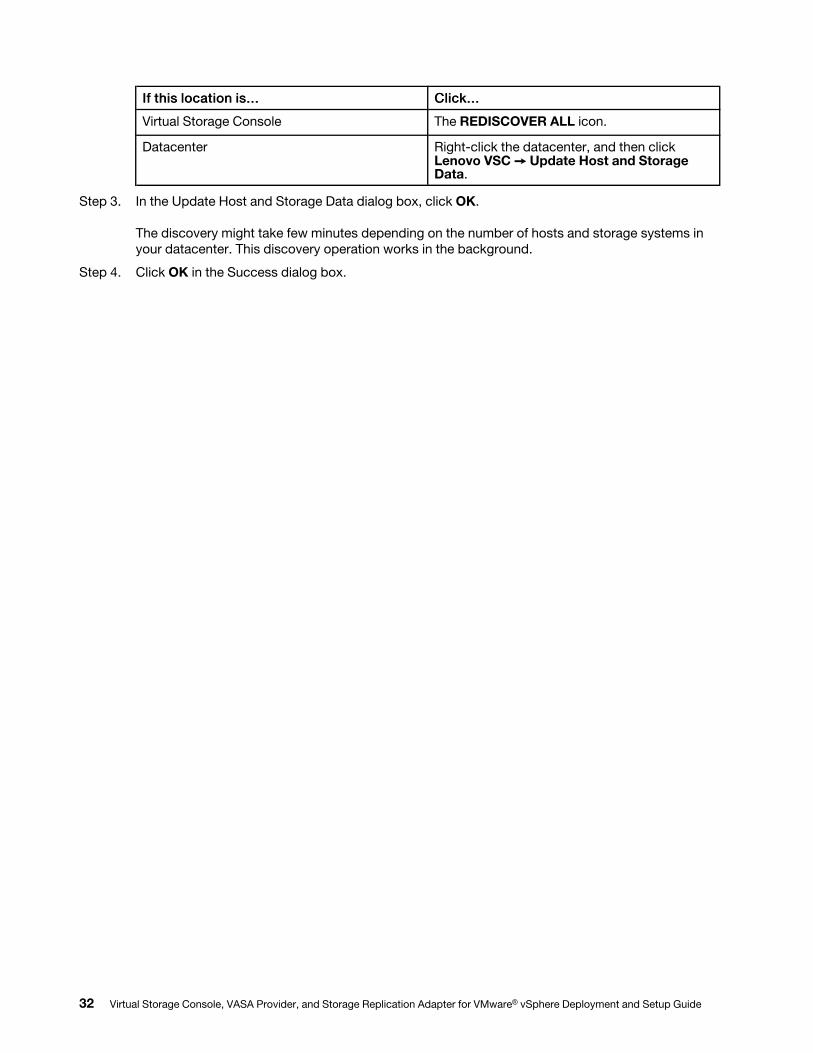
IIff tthhiiss llooccaattiioonn iiss...... CClliicckk......
Virtual Storage Console The REDISCOVER ALL icon.
Datacenter Right-click the datacenter, and then click Lenovo VSC ➙ Update Host and Storage Data.
Step 3. In the Update Host and Storage Data dialog box, click OK.
The discovery might take few minutes depending on the number of hosts and storage systems in
your datacenter. This discovery operation works in the background.
Step 4. Click OK in the Success dialog box.
32 Virtual Storage Console, VASA Provider, and Storage Replication Adapter for VMware® vSphere Deployment and Setup Guide
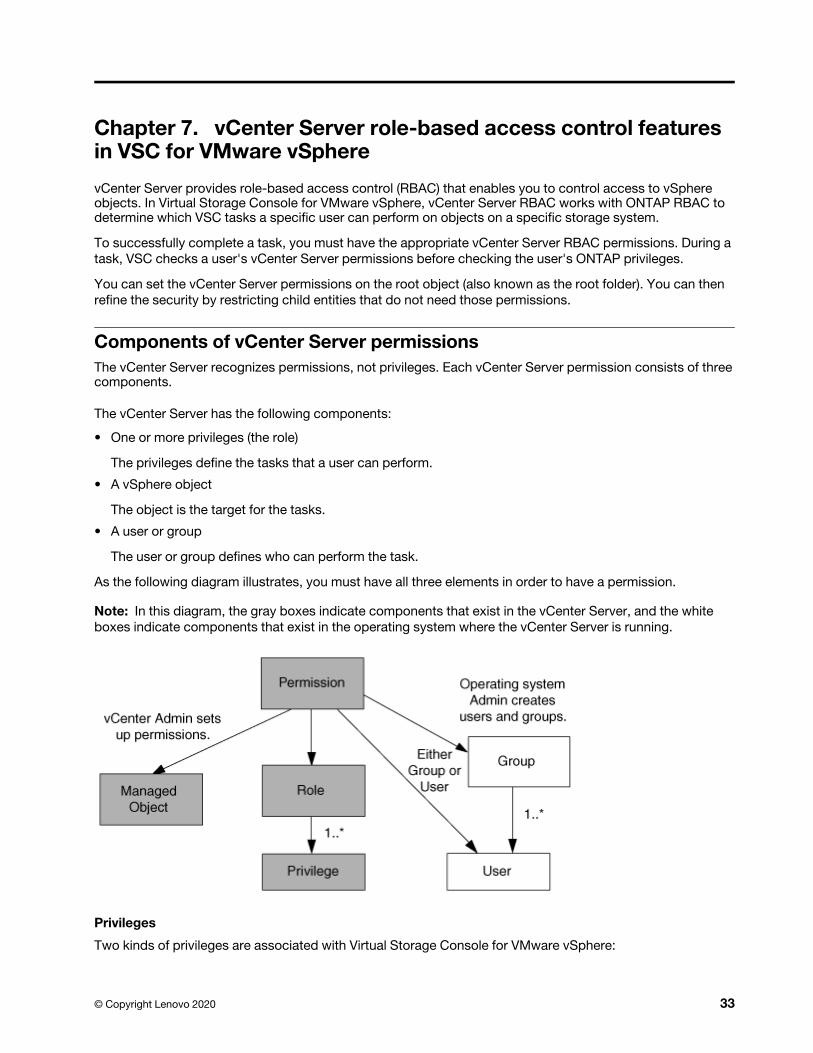
Chapter 7. vCenter Server role-based access control features in VSC for VMware vSphere
vCenter Server provides role-based access control (RBAC) that enables you to control access to vSphere objects. In Virtual Storage Console for VMware vSphere, vCenter Server RBAC works with ONTAP RBAC to determine which VSC tasks a specific user can perform on objects on a specific storage system.
To successfully complete a task, you must have the appropriate vCenter Server RBAC permissions. During a
task, VSC checks a user's vCenter Server permissions before checking the user's ONTAP privileges.
You can set the vCenter Server permissions on the root object (also known as the root folder). You can then
refine the security by restricting child entities that do not need those permissions.
Components of vCenter Server permissions
The vCenter Server recognizes permissions, not privileges. Each vCenter Server permission consists of three components.
The vCenter Server has the following components:
• One or more privileges (the role)
The privileges define the tasks that a user can perform.
• A vSphere object
The object is the target for the tasks.
• A user or group
The user or group defines who can perform the task.
As the following diagram illustrates, you must have all three elements in order to have a permission.
Note: In this diagram, the gray boxes indicate components that exist in the vCenter Server, and the white
boxes indicate components that exist in the operating system where the vCenter Server is running.
Privileges
Two kinds of privileges are associated with Virtual Storage Console for VMware vSphere:
© Copyright Lenovo 2020 33
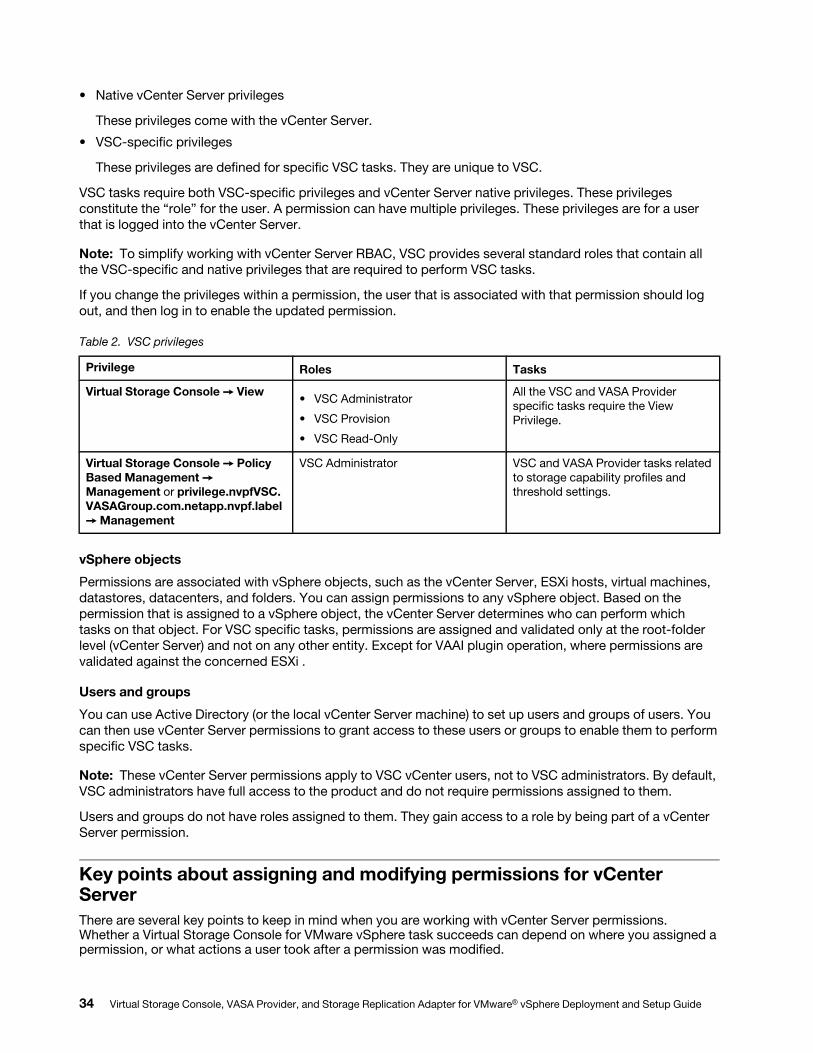
• Native vCenter Server privileges
These privileges come with the vCenter Server.
• VSC-specific privileges
These privileges are defined for specific VSC tasks. They are unique to VSC.
VSC tasks require both VSC-specific privileges and vCenter Server native privileges. These privileges
constitute the “role” for the user. A permission can have multiple privileges. These privileges are for a user
that is logged into the vCenter Server.
Note: To simplify working with vCenter Server RBAC, VSC provides several standard roles that contain all
the VSC-specific and native privileges that are required to perform VSC tasks.
If you change the privileges within a permission, the user that is associated with that permission should log
out, and then log in to enable the updated permission.
Table 2. VSC privileges
Privilege Roles Tasks
Virtual Storage Console ➙ View • VSC Administrator
• VSC Provision
• VSC Read-Only
All the VSC and VASA Provider
specific tasks require the View
Privilege.
Virtual Storage Console ➙ Policy Based Management ➙ Management or privilege.nvpfVSC.
VASAGroup.com.netapp.nvpf.label
➙ Management
VSC Administrator VSC and VASA Provider tasks related
to storage capability profiles and
threshold settings.
vSphere objects
Permissions are associated with vSphere objects, such as the vCenter Server, ESXi hosts, virtual machines,
datastores, datacenters, and folders. You can assign permissions to any vSphere object. Based on the
permission that is assigned to a vSphere object, the vCenter Server determines who can perform which
tasks on that object. For VSC specific tasks, permissions are assigned and validated only at the root-folder
level (vCenter Server) and not on any other entity. Except for VAAI plugin operation, where permissions are
validated against the concerned ESXi .
Users and groups
You can use Active Directory (or the local vCenter Server machine) to set up users and groups of users. You
can then use vCenter Server permissions to grant access to these users or groups to enable them to perform
specific VSC tasks.
Note: These vCenter Server permissions apply to VSC vCenter users, not to VSC administrators. By default,
VSC administrators have full access to the product and do not require permissions assigned to them.
Users and groups do not have roles assigned to them. They gain access to a role by being part of a vCenter
Server permission.
Key points about assigning and modifying permissions for vCenter Server
There are several key points to keep in mind when you are working with vCenter Server permissions. Whether a Virtual Storage Console for VMware vSphere task succeeds can depend on where you assigned a permission, or what actions a user took after a permission was modified.
34 Virtual Storage Console, VASA Provider, and Storage Replication Adapter for VMware® vSphere Deployment and Setup Guide
You only need to set up vCenter Server permissions if you want to limit access to vSphere objects and tasks.
Otherwise, you can log in as an administrator. This login automatically allows you to access all vSphere
objects.
Assigning permissions
Where you assign a permission determines the VSC tasks that a user can perform.
Sometimes, to ensure the completion of a task, you must assign the permission at a higher level, such as the
root object. This is the case when a task requires a privilege that does not apply to a specific vSphere object
(for example, tracking the task) or when a required privilege applies to a non-vSphere object (for example, a
storage system).
In these cases, you can set up a permission so that it is inherited by the child entities. You can also assign
other permissions to the child entities. The permission assigned to a child entity always overrides the
permission inherited from the parent entity. This means that you can permissions to a child entity as a way to
restrict the scope of a permission that was assigned to a root object and inherited by the child entity.
Tip: Unless your company's security policies require more restrictive permissions, it is a good practice to
assign permissions to the root object (also referred to as the root folder).
Permissions and non-vSphere objects
The permission that you create are applied to a non-vSphere object. For example, a storage system is not a
vSphere object. If a privilege applies to a storage system, you must assign the permission containing that
privilege to the VSC root object because there is no vSphere object to which you can assign it.
For example, any permission that includes a privilege such as the VSC privilege "Add/Modify/Skip storage
systems" must be assigned at the root object level.
Modifying permissions
You can modify one permission at any time.
If you change the privileges within a permission, the user associated with that permission should log out and
then log back in to enable the updated permission.
Standard roles packaged with the virtual appliance for VSC, VASA Provider, and SRA
To simplify working with vCenter Server privileges and role-based access control (RBAC), Virtual Storage Console (VSC) provides standard VSC roles that enable you to perform key VSC tasks. There is also a read- only role that enables you to view VSC information, but not perform any tasks.
The standard VSC roles have both the required VSC-specific privileges and the native vCenter Server
privileges that are required for users to perform VSC tasks. In addition, the roles are set up so that they have
the required privileges across all supported versions of the vCenter Server.
As an administrator, you can assign these roles to users, as required.
Note: When you upgrade VSC to the latest version, the standard roles are automatically upgraded to work with the new version of VSC.
You can view the VSC standard roles by clicking Roles on the vSphere ClientHome page.
The roles that VSC provides enable you to perform the following tasks:
Chapter 7. vCenter Server role-based access control features in VSC for VMware vSphere 35
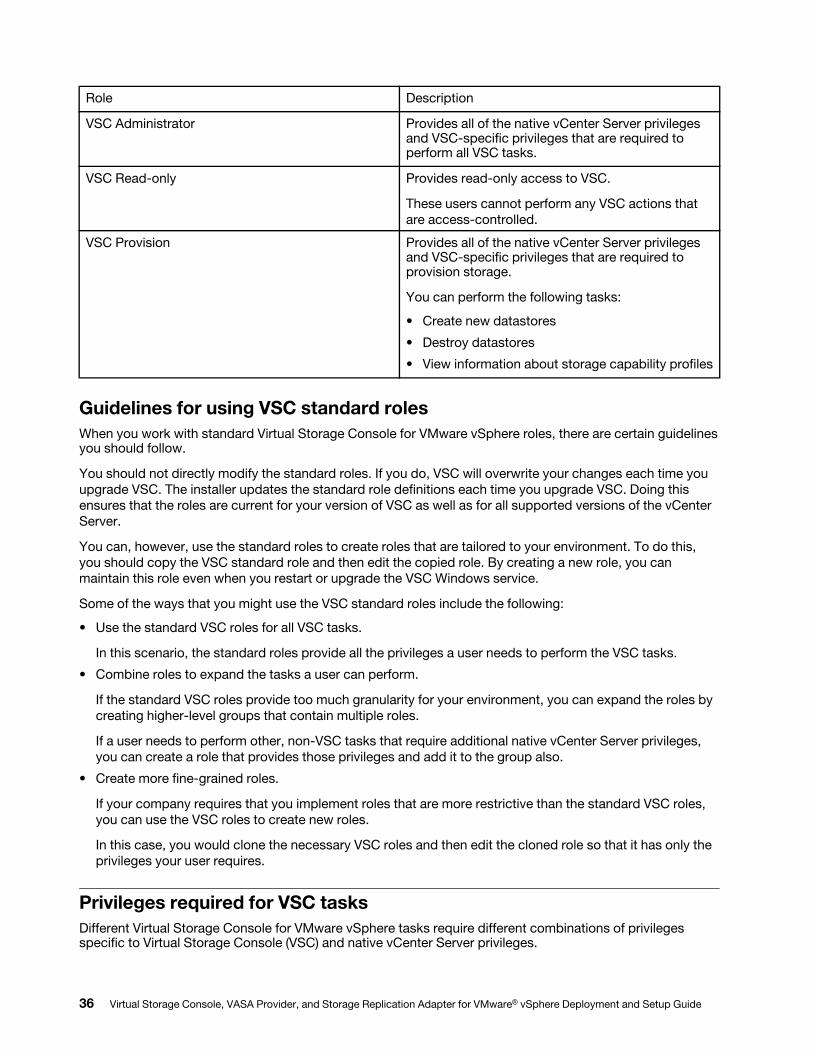
Role Description
VSC Administrator Provides all of the native vCenter Server privileges and VSC-specific privileges that are required to perform all VSC tasks.
VSC Read-only Provides read-only access to VSC.
These users cannot perform any VSC actions that
are access-controlled.
VSC Provision Provides all of the native vCenter Server privileges and VSC-specific privileges that are required to provision storage.
You can perform the following tasks:
• Create new datastores
• Destroy datastores
• View information about storage capability profiles
Guidelines for using VSC standard roles
When you work with standard Virtual Storage Console for VMware vSphere roles, there are certain guidelines you should follow.
You should not directly modify the standard roles. If you do, VSC will overwrite your changes each time you
upgrade VSC. The installer updates the standard role definitions each time you upgrade VSC. Doing this
ensures that the roles are current for your version of VSC as well as for all supported versions of the vCenter
Server.
You can, however, use the standard roles to create roles that are tailored to your environment. To do this,
you should copy the VSC standard role and then edit the copied role. By creating a new role, you can
maintain this role even when you restart or upgrade the VSC Windows service.
Some of the ways that you might use the VSC standard roles include the following:
• Use the standard VSC roles for all VSC tasks.
In this scenario, the standard roles provide all the privileges a user needs to perform the VSC tasks.
• Combine roles to expand the tasks a user can perform.
If the standard VSC roles provide too much granularity for your environment, you can expand the roles by
creating higher-level groups that contain multiple roles.
If a user needs to perform other, non-VSC tasks that require additional native vCenter Server privileges,
you can create a role that provides those privileges and add it to the group also.
• Create more fine-grained roles.
If your company requires that you implement roles that are more restrictive than the standard VSC roles,
you can use the VSC roles to create new roles.
In this case, you would clone the necessary VSC roles and then edit the cloned role so that it has only the
privileges your user requires.
Privileges required for VSC tasks
Different Virtual Storage Console for VMware vSphere tasks require different combinations of privileges specific to Virtual Storage Console (VSC) and native vCenter Server privileges.
36 Virtual Storage Console, VASA Provider, and Storage Replication Adapter for VMware® vSphere Deployment and Setup Guide
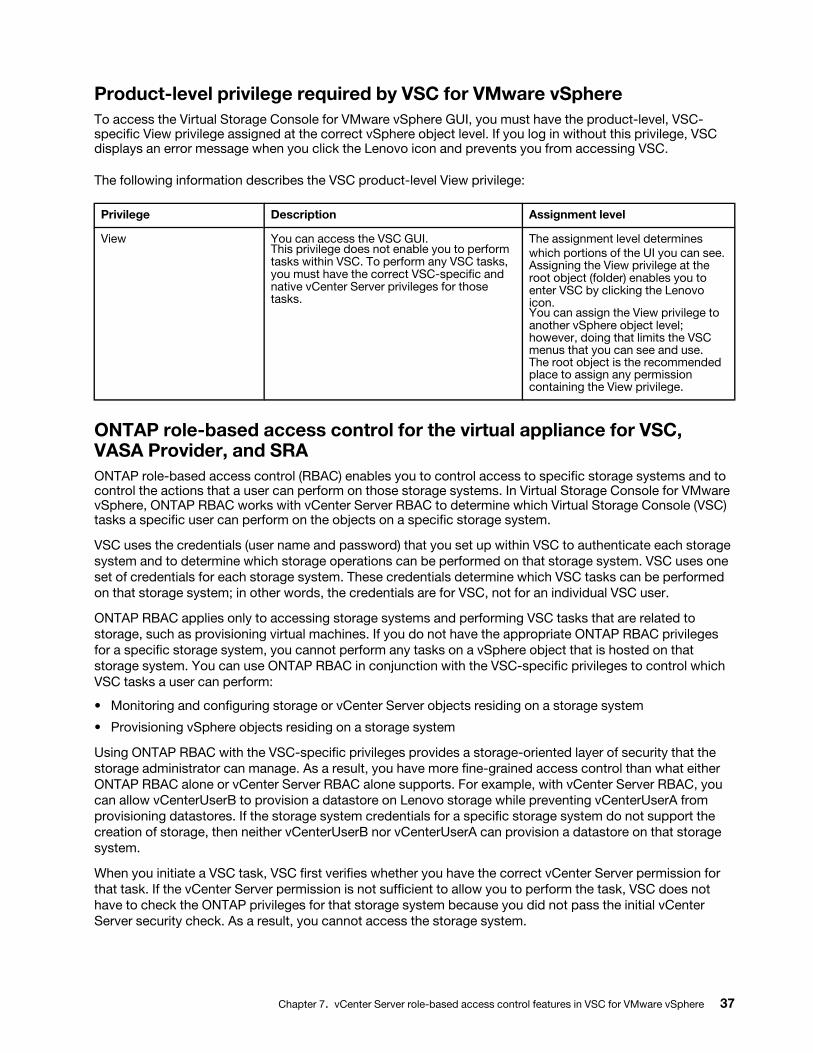
Product-level privilege required by VSC for VMware vSphere
To access the Virtual Storage Console for VMware vSphere GUI, you must have the product-level, VSC- specific View privilege assigned at the correct vSphere object level. If you log in without this privilege, VSC displays an error message when you click the Lenovo icon and prevents you from accessing VSC.
The following information describes the VSC product-level View privilege:
Privilege Description Assignment level
View You can access the VSC GUI. This privilege does not enable you to perform tasks within VSC. To perform any VSC tasks, you must have the correct VSC-specific and native vCenter Server privileges for those tasks.
The assignment level determines
which portions of the UI you can see. Assigning the View privilege at the root object (folder) enables you to enter VSC by clicking the Lenovo icon.You can assign the View privilege to another vSphere object level; however, doing that limits the VSC menus that you can see and use.The root object is the recommended place to assign any permission containing the View privilege.
ONTAP role-based access control for the virtual appliance for VSC, VASA Provider, and SRA
ONTAP role-based access control (RBAC) enables you to control access to specific storage systems and to control the actions that a user can perform on those storage systems. In Virtual Storage Console for VMware vSphere, ONTAP RBAC works with vCenter Server RBAC to determine which Virtual Storage Console (VSC) tasks a specific user can perform on the objects on a specific storage system.
VSC uses the credentials (user name and password) that you set up within VSC to authenticate each storage
system and to determine which storage operations can be performed on that storage system. VSC uses one
set of credentials for each storage system. These credentials determine which VSC tasks can be performed
on that storage system; in other words, the credentials are for VSC, not for an individual VSC user.
ONTAP RBAC applies only to accessing storage systems and performing VSC tasks that are related to
storage, such as provisioning virtual machines. If you do not have the appropriate ONTAP RBAC privileges
for a specific storage system, you cannot perform any tasks on a vSphere object that is hosted on that
storage system. You can use ONTAP RBAC in conjunction with the VSC-specific privileges to control which
VSC tasks a user can perform:
• Monitoring and configuring storage or vCenter Server objects residing on a storage system
• Provisioning vSphere objects residing on a storage system
Using ONTAP RBAC with the VSC-specific privileges provides a storage-oriented layer of security that the
storage administrator can manage. As a result, you have more fine-grained access control than what either
ONTAP RBAC alone or vCenter Server RBAC alone supports. For example, with vCenter Server RBAC, you
can allow vCenterUserB to provision a datastore on Lenovo storage while preventing vCenterUserA from
provisioning datastores. If the storage system credentials for a specific storage system do not support the
creation of storage, then neither vCenterUserB nor vCenterUserA can provision a datastore on that storage
system.
When you initiate a VSC task, VSC first verifies whether you have the correct vCenter Server permission for
that task. If the vCenter Server permission is not sufficient to allow you to perform the task, VSC does not
have to check the ONTAP privileges for that storage system because you did not pass the initial vCenter
Server security check. As a result, you cannot access the storage system.
Chapter 7. vCenter Server role-based access control features in VSC for VMware vSphere 37
If the vCenter Server permission is sufficient, VSC then checks the ONTAP RBAC privileges (your ONTAP
role) that are associated with the storage system credentials (the user name and password) to determine
whether you have sufficient privileges to perform the storage operations that are required by that VSC task
on that storage system. If you have the correct ONTAP privileges, you can access the storage system and
perform the VSC task. The ONTAP roles determine the VSC tasks that you can perform on the storage
system.
Each storage system has one set of ONTAP privileges associated with it.
Using both ONTAP RBAC and vCenter Server RBAC provides the following benefits:
• Security
The administrator can control which users can perform which tasks at a fine-grained vCenter Server
object level and at a storage system level.
• Audit information
In many cases, VSC provides an audit trail on the storage system that enables you to track events back to
the vCenter Server user who performed the storage modifications.
• Usability
You can maintain all of the controller credentials in one place.
Recommended ONTAP roles when using VSC for VMware vSphere
You can set up several recommended ONTAP roles for working with Virtual Storage Console for VMware vSphere and role-based access control (RBAC). These roles contain the ONTAP privileges that are required to perform the required storage operations that are executed by the Virtual Storage Console (VSC) tasks.
To create new user roles, you must log in as an administrator on storage systems running ONTAP. You can
create ONTAP roles using one of the following:
• ThinkSystem Storage Manager for DM Series 9.7 or later
“Configuring user roles and privileges” on page 40
• RBAC User Creator for ONTAP tool (if using ONTAP 9.6 or earlier)
Each ONTAP role has an associated user name and password pair, which constitute the credentials of the
role. If you do not log in by using these credentials, you cannot access the storage operations that are
associated with the role.
As a security measure, the VSC-specific ONTAP roles are ordered hierarchically. This means that the first
role is the most restrictive role and has only the privileges that are associated with the most basic set of VSC
storage operations. The next role includes both its own privileges and all of the privileges that are associated
with the previous role. Each additional role is less restrictive with regard to the supported storage operations.
The following are some of the recommended ONTAP RBAC roles when using VSC. After you create these
roles, you can assign the roles to users who have to perform tasks related to storage, such as provisioning
virtual machines.
1. Discovery
This role enables you to add storage systems.
2. Create Storage
This role enables you to create storage. This role also includes all of the privileges that are associated with the Discovery role.
3. Modify Storage
This role enables you to modify storage. This role also includes all of the privileges that are associated with the Discovery role and the Create Storage role.
38 Virtual Storage Console, VASA Provider, and Storage Replication Adapter for VMware® vSphere Deployment and Setup Guide
4. Destroy Storage
This role enables you to destroy storage. This role also includes all of the privileges that are associated with the Discovery role, the Create Storage role, and the Modify Storage role.
If you are using VASA Provider for ONTAP, you should also set up a policy-based management (PBM) role.
This role enables you to manage storage by using storage policies. This role requires that you also set up the
“Discovery” role.
How to configure ONTAP role-based access control for VSC for VMware vSphere
You must configure ONTAP role-based access control (RBAC) on the storage system if you want to use role- based access control with Virtual Storage Console for VMware vSphere (VSC). You can create one or more custom user accounts with limited access privileges with the ONTAP RBAC feature.
VSC and SRA can access storage systems at either the cluster level or the storage virtual machine (SVM)
SVM level. If you are adding storage systems at the cluster level, then you must provide the credentials of the
admin user to provide all of the required capabilities. If you are adding storage systems by directly adding
SVM details, you must be aware that the “vsadmin” user does not have all of the required roles and
capabilities to perform certain tasks.
VASA Provider can access storage systems only at the cluster level. If VASA Provider is required for a
particular storage controller, then the storage system must be added to VSC at the cluster level even if you
are using VSC or SRA.
To create a new user and to connect a cluster or an SVM to VSC, VASA Provider, and SRA, you should
perform the following:
• Create a cluster administrator or an SVM administrator role
Notes: You can use one of the following to create these roles:
– ThinkSystem Storage Manager for DM Series 9.7 or later
“Configuring user roles and privileges” on page 40
– RBAC User Creator for ONTAP tool (if using ONTAP 9.6 or earlier)
• Create users with the role assigned and the appropriate application set using ONTAP
You require these storage system credentials to configure the storage systems for VSC. You can
configure storage systems for VSC by entering the credentials in VSC. Each time you log in to a storage
system with these credentials, you will have permissions to the VSC functions that you had set up in
ONTAP while creating the credentials.
• Add the storage system to VSC and provide the credentials of the user that you just created
VSC roles
VSC classifies the ONTAP privileges into the following set of VSC roles:
• Discovery
Enables the discovery of all of the connected storage controllers
• Create Storage
Enables the creation of volumes and logical unit number (LUNs)
• Modify Storage
Enables the resizing and deduplication of storage systems
• Destroy Storage
Chapter 7. vCenter Server role-based access control features in VSC for VMware vSphere 39
Enables the destruction of volumes and LUNs
VASA Provider roles
You can create only Policy Based Management at the cluster level. This role enables policy-based
management of storage using storage capabilities profiles.
SRA roles
SRA classifies the ONTAP privileges into a SAN or NAS role at either the cluster level or the SVM level. This
enables users to run SRM operations.
Note: You must refer to the Lenovo knowledge base articles if you want to manually configure roles and
privileges using ONTAP commands.
VSC performs an initial privilege validation of ONTAP RBAC roles when you add the cluster to VSC. If you
have added a direct SVM storage IP, then VSC does not perform the initial validation. VSC checks and
enforces the privileges later in the task workflow.
Configuring user roles and privileges
You can configure new user roles for managing storage systems using the JSON file provided with the virtual appliance for VSC, VASA Provider, and SRA and ThinkSystem Storage Manager for DM Series.
BBeeffoorree yyoouu bbeeggiinn
• You should have downloaded the ONTAP Privileges file from the virtual appliance for VSC, VASA Provider,
and SRA using https://{virtual_appliance_IP}:9083/vsc/config/VSC_ONTAP_User_Privileges.zip.
• You should have configured ThinkSystem Storage Manager for DM Series 9.7.
• You should have logged in with administrator privileges for the storage system.
PPrroocceedduurree
Step 1. Unzip the downloaded file: https://{virtual_appliance_IP}:9083/vsc/config/VSC_ONTAP_User_ Privileges.zip
Step 2. Access ThinkSystem Storage Manager for DM Series.
Step 3. Click CLUSTER ➙ Settings ➙ Users and Roles.Step 4. Click Add User.
Step 5. In the Add User dialog box, select Virtualization products.
Step 6. Click Browse to select and upload the ONTAP Privileges JSON file.
The PRODUCT field is auto populated.
Step 7. Select the required capability from the PRODUCT CAPABILITY drop-down menu.
The ROLE field is auto populated based on the product capability selected.
Step 8. Enter the required username and password.
Step 9. Select the privileges (Discovery, Create Storage, Modify Storage, Destroy Storage) required for the user, and then click Add.
RReessuulltt
The new role and user is added and you can see the detailed privileges under the role that you have configured.
40 Virtual Storage Console, VASA Provider, and Storage Replication Adapter for VMware® vSphere Deployment and Setup Guide
Chapter 8. Configuring Storage Replication Adapter for disaster recovery
If you want to configure your vCenter Server for disaster recovery, you must enable Storage Replication Adapter (SRA) after you deploy the virtual appliance for Virtual Storage Console (VSC), VASA Provider, and Storage Replication Adapter (SRA). The deployment of the virtual appliance installs VSC by default. You must enable SRA for your vCenter Server after the deployment of the virtual appliance.
Configuring Storage Replication Adapter for SAN environment
You must set up the storage systems before running Storage Replication Adapter (SRA) for Site Recovery Manager (SRM).
BBeeffoorree yyoouu bbeeggiinn
You must have installed the following programs on the protected site and the recovery site:
• SRM
Documentation about installing SRM is on the VMware site.
VMware Site Recovery Manager Documentation
• SRA
The adapter is installed either on SRM.
PPrroocceedduurree
Step 1. Verify that the primary ESXi hosts are connected to the LUNs in the primary storage system on the protected site.
Step 2. Verify that the LUNS are in igroups that have the ostype option set to vmware on the primary storage system.
Step 3. Verify that the ESXi hosts at the recovery site have appropriate FC or iSCSI connectivity to the storage virtual machine (SVM).
You can do this either by verifying that the ESXi hosts have local LUNs connected on the SVM or by
using the fcp show initiators command or the iscsi show initiators command on the SVMs.
Configuring Storage Replication Adapter for NAS environment
You must configure the storage systems before running Storage Replication Adapter (SRA) for VMware vCenter Site Recovery Manager (SRM).
BBeeffoorree yyoouu bbeeggiinn
You must have installed the following programs on the protected site and the recovery site:
• SRM
Documentation about installing SRM can be found on the VMware site.
VMware Site Recovery Manager Documentation
• SRA
The adapter is installed on SRM and the SRA server.
PPrroocceedduurree
© Copyright Lenovo 2020 41
Step 1. Verify that the datastores at the protected site contain virtual machines that are registered with vCenter Server.
Step 2. Verify that the ESXi hosts at the protected site have mounted the NFS exports volumes from the storage virtual machine (SVM).
Step 3. Verify that valid addresses such as the IP address, host name, or FQDN on which the NFS exports are present are specified in the NFS Addresses field when using the Array Manager wizard to add arrays to SRM.
Step 4. Use the ping command on each ESXi host at the recovery site to verify that the host has a VMkernel port that can access the IP addresses that are used to serve NFS exports from the SVM.
Configuration of Storage Replication Adapter for highly scaled environment
You must configure the storage timeout intervals per the recommended settings for Storage Replication Adapter (SRA) to perform optimally in highly scaled environments.
Storage Provider settings
• You must increase the value of the StorageProvider.resignatureTimeout setting from 900 seconds to
12000 seconds.
• You must enable the StorageProvider.autoResignatureMode option.
See VMware documentation for more information on modifying Storage Provider settings.
VMware vSphere Documentation: Change Storage Provider Settings
Storage settings
You must set the value of the storage.commandTimeout timeout interval for highly scaled environments to
12,000 seconds.
Note: The timeout interval specified is the maximum value. You do not need to wait for the maximum
timeout to be reached. Most commands finish within the set maximum timeout interval.
VMware documentation on modifying SAN Provider settings has more information.
Vmware Site Recovery Manager Documentation: Change Storage Settings
42 Virtual Storage Console, VASA Provider, and Storage Replication Adapter for VMware® vSphere Deployment and Setup Guide
Chapter 9. Troubleshooting issues with the virtual appliance for VSC, VASA Provider, and SRA
If you encounter unexpected behavior during the installation or configuration of the virtual appliance for Virtual Storage Console (VSC), VASA Provider, and Storage Replication Adapter (SRA), then you can follow specific troubleshooting procedures to identify and resolve the cause of such issues.
Cleaning the vSphere cached downloaded plug-in packages
If plug-ins are not updated automatically after deploying or upgrading the virtual appliance for VSC, VASA Provider, and SRA, you should clean up the cached download plug-in packages on the browser and on the vCenter Server to resolve vCenter Server plug-in issues.
PPrroocceedduurree
Step 1. Logout from your existing vSphere web client or vSphere Client.
Step 2. Remove the browser cache.
Step 3. Remove the vSphere Client cached plug-in packages.
© Copyright Lenovo 2020 43
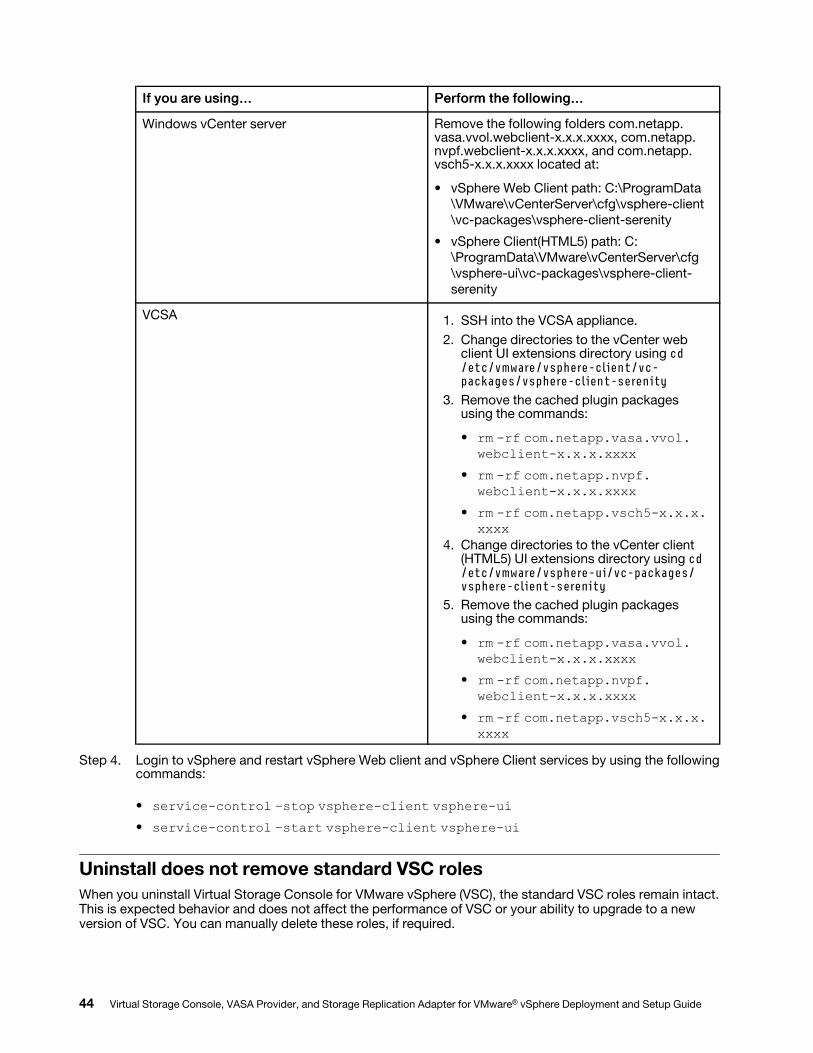
IIff yyoouu aarree uussiinngg...... PPeerrffoorrmm tthhee ffoolllloowwiinngg......
Windows vCenter server Remove the following folders com.netapp. vasa.vvol.webclient-x.x.x.xxxx, com.netapp. nvpf.webclient-x.x.x.xxxx, and com.netapp. vsch5-x.x.x.xxxx located at:
• vSphere Web Client path: C:\ProgramData
\VMware\vCenterServer\cfg\vsphere-client
\vc-packages\vsphere-client-serenity
• vSphere Client(HTML5) path: C:
\ProgramData\VMware\vCenterServer\cfg
\vsphere-ui\vc-packages\vsphere-client-
serenity
VCSA 1. SSH into the VCSA appliance.
2. Change directories to the vCenter web client UI extensions directory using cd /etc/vmware/vsphere-client/vc- packages/vsphere-client-serenity
3. Remove the cached plugin packages using the commands:
• rm -rf com.netapp.vasa.vvol. webclient-x.x.x.xxxx
• rm -rf com.netapp.nvpf. webclient-x.x.x.xxxx
• rm -rf com.netapp.vsch5-x.x.x. xxxx
4. Change directories to the vCenter client (HTML5) UI extensions directory using cd /etc/vmware/vsphere-ui/vc-packages/ vsphere-client-serenity
5. Remove the cached plugin packages using the commands:
• rm -rf com.netapp.vasa.vvol. webclient-x.x.x.xxxx
• rm -rf com.netapp.nvpf. webclient-x.x.x.xxxx
• rm -rf com.netapp.vsch5-x.x.x. xxxx
Step 4. Login to vSphere and restart vSphere Web client and vSphere Client services by using the following commands:
• service-control –stop vsphere-client vsphere-ui• service-control –start vsphere-client vsphere-ui
Uninstall does not remove standard VSC roles
When you uninstall Virtual Storage Console for VMware vSphere (VSC), the standard VSC roles remain intact. This is expected behavior and does not affect the performance of VSC or your ability to upgrade to a new version of VSC. You can manually delete these roles, if required.
44 Virtual Storage Console, VASA Provider, and Storage Replication Adapter for VMware® vSphere Deployment and Setup Guide
While the uninstall operation does not remove the VSC roles, the uninstall operation removes the localized
names for the VSC-specific privileges and appends the following prefix to them: “XXX missing privilege”. For
example, if you open the vSphere Edit Role dialog box after you install VSC, you will see the VSC-specific
privileges listed as XXX missing privilege.<privilege name>.label not found XXX.This behavior happens because the vCenter Server does not provide an option to remove privileges.
When you reinstall VSC or upgrade to a newer version of VSC, all of the standard VSC roles and VSC-
specific privileges are restored.
Virtual Storage Console and VASA Provider log files
You can check the log files in the /opt/netapp/vscserver/log directory and the /opt/netapp/vpserver/log directory when you encounter errors.
The following three log files can be helpful in identifying problems:
• cxf.log, containing information about API traffic into and out of VASA Provider
• kaminoPrefs.xml, containing information about VSC settings
• vvolvp.log, containing all log information about VASA Provider
The maintenance menu of the virtual appliance for Virtual Storage Console (VSC), VASA Provider, and
Storage Replication Adapter (SRA) enables you to set different log levels for your requirement. The following
log levels are available:
• Info
• Debug
• Error
• Trace
When you set the log levels, the following files are updated:
• VSC server: kamino.log and vvolvp.log
• VASA Provider server: vvolvp.log, error.log, and netapp.log
In addition, the VASA Provider web command-line interface (CLI) page contains the API calls that were
made, the errors that were returned, and several performance-related counters. The web CLI page is located
at https://<IP_address_or_hostname>:9083/stats.
VSC and VASA Provider services restart in highly scaled environments
Issue
The virtual appliance for VSC, VASA Provider, and SRA might fail to perform optimally in a highly scaled
environment, and you might notice issues such as VSC and VASA Provider services frequently restarting.
Corrective action
Modify the RAM and heap memory requirements for the virtual appliance for VSC, VASA Provider, and SRA.
Configuring VASA Provider to work with SSH
You can set up VASA Provider to use SSH for secure access by configuring the virtual appliance for Virtual Storage Console (VSC), VASA Provider, and Storage Replication Adapter (SRA).
AAbboouutt tthhiiss ttaasskk
Chapter 9. Troubleshooting issues with the virtual appliance for VSC, VASA Provider, and SRA 45

When you configure SSH, you must log in as the maintenance user. This is because root access to VASA Provider has been disabled. If you use other login credentials, you cannot use SSH to access VASA Provider.
PPrroocceedduurree
Step 1. From the vCenter Server, open a console to the virtual appliance for VSC, VASA Provider, and SRA.
Step 2. Log in as the maintenance user.
Step 3. Enter 3 to select System Configuration.
Step 4. Enter 6 to select Enable SSH Access.
Step 5. Enter y in the confirmation dialog box.
Configuring the virtual appliance for VSC, VASA Provider, and SRA to use SSH for remote diag access
You can configure virtual appliance for Virtual Storage Console (VSC), VASA Provider, and Storage Replication Adapter (SRA) to enable SSH access for the diag user.
BBeeffoorree yyoouu bbeeggiinn
The VASA Provider extension must be enabled for your vCenter Server instance.
AAbboouutt tthhiiss ttaasskk
Using SSH to access the diag user has the following limitations:
• You are allowed only one login per activation of SSH.
• SSH access to the diag user is disabled when one of the following happens:
– The time expires.
The login session remains valid only until midnight the next day.
– You log in as a diag user again using SSH.
PPrroocceedduurree
Step 1. From the vCenter Server, open a console to VASA Provider.
Step 2. Log in as the maint user.
Step 3. Enter 4 to select Support and Diagnostics.
Step 4. Enter 3 to select Enable remote diagnostics access.
Step 5. Enter y in the Confirmation dialog box to enable remote diagnostic access.
Step 6. Enter a password for remote diagnostic access.
SRA installation fails with script error
Issue
Storage Replication Adapter (SRA) installation on Windows 2008 R2 fails with an invalid credentials error.
Cause
The error might occur because of different versions of Transport Layer Security (TLS) being enabled on the
virtual appliance for VSC, VASA Provider, and SRA and Windows 2008 R2.
46 Virtual Storage Console, VASA Provider, and Storage Replication Adapter for VMware® vSphere Deployment and Setup Guide
Corrective action
If you are trying to install SRA on Windows 2008 R2, then you must enable TLSv1.0 for the virtual appliance
for VSC, VASA Provider, and SRA using the following steps in the maintenance console:
1. Login to the maintenance console using the “maint” user credentials.
2. From the main menu, select 1 for the Application configuration menu.
3. Enter 13 in the Application configuration menu to select Enable TLS Protocol from the Application
Configuration menu.
4. Select TLSv1 in the TLS protocol list.
VSC and VASA Provider services are restarted and TLSv1.0 is enabled.
You can also enable TLSv1.2 on Windows 2008 R2.
SRA fails to perform optimally in a highly scaled environment
Issue
SRA fails to perform optimally in a highly scaled environment (if running VMware specified maximum limits
like 250 PGs, 250 RPs, 5000 VMs), and you might notice issues such as a timeout error or a ONTAP timeout.
Corrective action
You must modify the timeout intervals.
“Configuration of Storage Replication Adapter for highly scaled environment” on page 42
Note: You can also modify the memory settings for scale and performance of your virtual appliance for VSC,
VASA Provider, and SRA in highly scaled setups.
Unable to install the SRA plug-in
Issue
During the installation of the Storage Replication Adapter (SRA) plug-in, the system stops at the server IP
address and password screen with the following error message: “The credentials you entered are not valid.
Please enter a valid hostname and password.”
Cause
The error might occur due to one of the following reasons:
• You entered incorrect administrator credentials.
• The WinHTTP proxy settings are incorrect.
Corrective action
• Verify your administrator credentials.
Lenovo Storage Replication Adapter for ONTAP does not appear on the Site Recovery Manager Appliance
Issue
Lenovo Storage Replication Adapter (SRA) does not appear on the Site Recovery Manager (SRM) Appliance
interface after uploading and configuring SRA.
Chapter 9. Troubleshooting issues with the virtual appliance for VSC, VASA Provider, and SRA 47

Cause
There is no error displayed when wrong SRA credentials (username or password) are used to configure SRA
using the following command.
perl command.pl -I <sra-server-ip> <vp_username> <vp_passwd>
Corrective action
Update the configuration details of SRA using following command: perl command.pl -U <sra-server- ip> <vp_username> <vp_passwd>
Error during fresh deployment of virtual appliance for VSC, VASA Provider, and SRA
Issue
Error log “vmware tools OVF vCenter configuration not found” is displayed during fresh deployment of virtual
appliance for VSC, VASA Provider, and SRA when invalid vCenter ServerIPv4 address is used.
Cause
Virtual appliance for VSC, VASA Provider, and SRA supports IPv4 and IPv6 addresses. If the user provides
an IPv4 address for vCenter Server that is not available in the network and there is no IPv6 address provided,
then these logger messages are displayed on the maintenance console.
Corrective action
You should perform the following to remove the error:
1. Log in to the maintenance console.
2. Access the diagnostic shell.
3. Change the user from “diag” to “root” using sudo sucommand.4. Edit the interface file using vi editor vi /etc/network/interface.
5. Remove the entry for “inet6”.
6. Save the file and reboot the virtual appliance for VSC, VASA Provider, and SRA.
After rebooting the virtual appliance, there are no error messages observed.
48 Virtual Storage Console, VASA Provider, and Storage Replication Adapter for VMware® vSphere Deployment and Setup Guide
Appendix A. Contacting Support
You can contact Support to obtain help for your issue.
You can receive hardware service through a Lenovo Authorized Service Provider. To locate a service
provider authorized by Lenovo to provide warranty service, go to https://datacentersupport.lenovo.com/ serviceprovider and use filter searching for different countries. For Lenovo support telephone numbers, see https://datacentersupport.lenovo.com/supportphonelist for your region support details.
© Copyright Lenovo 2020 49

50 Virtual Storage Console, VASA Provider, and Storage Replication Adapter for VMware® vSphere Deployment and Setup Guide

Appendix B. Notices
Lenovo may not offer the products, services, or features discussed in this document in all countries. Consult your local Lenovo representative for information on the products and services currently available in your area.
Any reference to a Lenovo product, program, or service is not intended to state or imply that only that
Lenovo product, program, or service may be used. Any functionally equivalent product, program, or service
that does not infringe any Lenovo intellectual property right may be used instead. However, it is the user's
responsibility to evaluate and verify the operation of any other product, program, or service.
Lenovo may have patents or pending patent applications covering subject matter described in this
document. The furnishing of this document is not an offer and does not provide a license under any patents
or patent applications. You can send inquiries in writing to the following:
Lenovo (United States), Inc.
8001 Development Drive
Morrisville, NC 27560
U.S.A.
Attention: Lenovo Director of Licensing
LENOVO PROVIDES THIS PUBLICATION “AS IS” WITHOUT WARRANTY OF ANY KIND, EITHER EXPRESS
OR IMPLIED, INCLUDING, BUT NOT LIMITED TO, THE IMPLIED WARRANTIES OF NON-INFRINGEMENT,
MERCHANTABILITY OR FITNESS FOR A PARTICULAR PURPOSE. Some jurisdictions do not allow
disclaimer of express or implied warranties in certain transactions, therefore, this statement may not apply to
you.
This information could include technical inaccuracies or typographical errors. Changes are periodically made
to the information herein; these changes will be incorporated in new editions of the publication. Lenovo may
make improvements and/or changes in the product(s) and/or the program(s) described in this publication at
any time without notice.
The products described in this document are not intended for use in implantation or other life support
applications where malfunction may result in injury or death to persons. The information contained in this
document does not affect or change Lenovo product specifications or warranties. Nothing in this document
shall operate as an express or implied license or indemnity under the intellectual property rights of Lenovo or
third parties. All information contained in this document was obtained in specific environments and is
presented as an illustration. The result obtained in other operating environments may vary.
Lenovo may use or distribute any of the information you supply in any way it believes appropriate without
incurring any obligation to you.
Any references in this publication to non-Lenovo Web sites are provided for convenience only and do not in
any manner serve as an endorsement of those Web sites. The materials at those Web sites are not part of the
materials for this Lenovo product, and use of those Web sites is at your own risk.
Any performance data contained herein was determined in a controlled environment. Therefore, the result
obtained in other operating environments may vary significantly. Some measurements may have been made
on development-level systems and there is no guarantee that these measurements will be the same on
generally available systems. Furthermore, some measurements may have been estimated through
extrapolation. Actual results may vary. Users of this document should verify the applicable data for their
specific environment.
© Copyright Lenovo 2020 51
Trademarks
LENOVO, LENOVO logo, and THINKSYSTEM are trademarks of Lenovo. All other trademarks are the property of their respective owners. © 2020 Lenovo.
52 Virtual Storage Console, VASA Provider, and Storage Replication Adapter for VMware® vSphere Deployment and Setup Guide