Virtualizing your Datacenter with Windows Server 2012 R2 & System Center 2012 R2 Part 2 Hands-On Lab | Step-by-Step Guide For the VMs the following credentials: Username: Contoso\Administrator Password: Passw0rd! Lab version: 2.0.1 Last updated: November 6, 2013
Transcript
Virtualizing your Datacenter
with Windows Server 2012
R2 & System Center 2012 R2
Part 2
Hands-On Lab | Step-by-Step Guide
For the VMs the following credentials:
Username: Contoso\Administrator
Password: Passw0rd!
Lab version: 2.0.1 Last updated: November 6, 2013
2
Important: these VMs were built using evaluation software. To ensure that the labs continue to function after the evaluation period has expired, hosters will start the VMs from a saved state and so the VMs will not resync their time unless they are rebooted. Avoid rebooting any VMs during this lab.
Please share any feedback with the IT Camps Planning Team: [email protected]
EXERCISE 9.1: CREATE A VM TEMPLATE .................................... 51
EXERCISE 9.2: REVIEW A SQL SERVER PROFILE ...................... 59
EXERCISE 9.3: REVIEW A WEB APPLICATION PROFILE ............ 65
EXERCISE 9.4: CREATE A VM FROM A TEMPLATE ..................... 69
LAB 10: SERVICE TEMPLATES ..................................................... 72
EXERCISE 10.1: CREATE A SERVICE TEMPLATE ........................ 72
EXERCISE 10.2: DEPLOY A SERVICE TEMPLATE ........................ 79
LAB 11: PRIVATE CLOUDS & USER ROLES ................................ 81
3
EXERCISE 11.1: CREATE A USER ROLE ...................................... 81
EXERCISE 11.2: CREATE A PRIVATE CLOUD .............................. 86
EXERCISE 11.3: DELEGATE ACCESS TO A CLOUD .................... 89
4
Lab Timing The following table shows the estimated time to complete each lab and task.
Title Estimated Time (V 2.0) Lab 1: Virtual Machine Storage
Exercise 1.1: Configure a Storage Pool 5
Exercise 1.2: Configure a Storage Space 5
Exercise 1.3: Manage a File Server 10
Exercise 1.4: Manage a Storage Area Network 5
Lab 2: Virtual Machine Networking
Exercise 2.1: Configure a Host NIC Team 5
Exercise 2.2: Manage Hyper-V Hosts 5
Exercise 2.3: Creating a Virtual Switch 5
Lab 3: Advanced Virtual Machine Networking
Exercise 3.1: Create a Logical Network 5
Exercise 3.2: Apply a Logical Networks 5
Exercise 3.3: Create a Port Profile & Classification 5
Exercise 3.4: Create & Apply a Logical Switch 10
Lab 4: Virtual Machine Clustering & Resiliency
Exercise 4.1: Create Shared Storage over SMB 5
Exercise 4.2: Build a Hyper-V Cluster 10
Exercise 4.3: Assign Shared Storage using iSCSI 10
Exercise 4.4: Optimize a Cluster 5
Exercise 4.5: Configure Cluster Patching 10
Lab 5: Virtual Machine Configuration
Exercise 5.1: Create a Generation 1 VM 5
Exercise 5.2: Create a VM with PowerShell 5
Exercise 5.3: Create a Generation 2 VM 5
Lab 6: Virtual Machine Mobility
Exercise 6.1: Configure Hosts for Migration 5
Exercise 6.2: Test a VM Migration 5
Exercise 6.3: Test a Storage Migration 5
Exercise 6.4: Test a Shared Nothing Live Migration 5
Lab 7: Virtual Machine Replication & Protection
Exercise 7.1: Configure a Hyper-V Replica 5
Exercise 7.2: Configure a Hyper-V Replica Broker 5
Exercise 7.3: Replicate a VM 5
Lab 8: Network Virtualization
Exercise 8.1: Create a VM Network 10
Exercise 8.2: Assign a VM Network 5
Lab 9: Virtual Machine Templates
Exercise 9.1: Create a VM Template 10
Exercise 9.2: Review a SQL Server Profile 5
Exercise 9.3: Review a Web Application Profile 5
Exercise 9.4: Create a VM from a Template 5
Lab 10: Service Templates
Exercise 10.1: Create a Service Template 10
Exercise 10.2: Deploy a Service Template 5
Lab 11: Private Clouds & User Roles
Exercise 11.1: Create a User Role 5
Exercise 11.2: Create a Private Cloud 5
Exercise 11.3: Delegate Access to a Cloud 5
Total 225 minutes (3:45 hours)
5
Lab 5: Virtual Machine Configuration Estimated time to complete Lab 5: 15 minutes
Exercise 5.1: Create a Generation 1 VM In this exercise System Center 2012 R2 Virtual Machine Manager will be used to create and deploy a virtual machine. During this process different hardware characteristics of the VMs will be reviewed, including Dynamic Memory, network settings, and Availability Sets. Additionally VMM will be used to generate reusable PowerShell scripts which can be used to accelerate future VM deployment.
Estimated time to complete: 5 minutes
Perform the following on SCVMM01
1. Open the Virtual Machine Manager Console. If the Connect to Server window appear, ensure Use current Microsoft Windows session identity is selected, and click Connect.
2. Select the VMs and Services workspace.
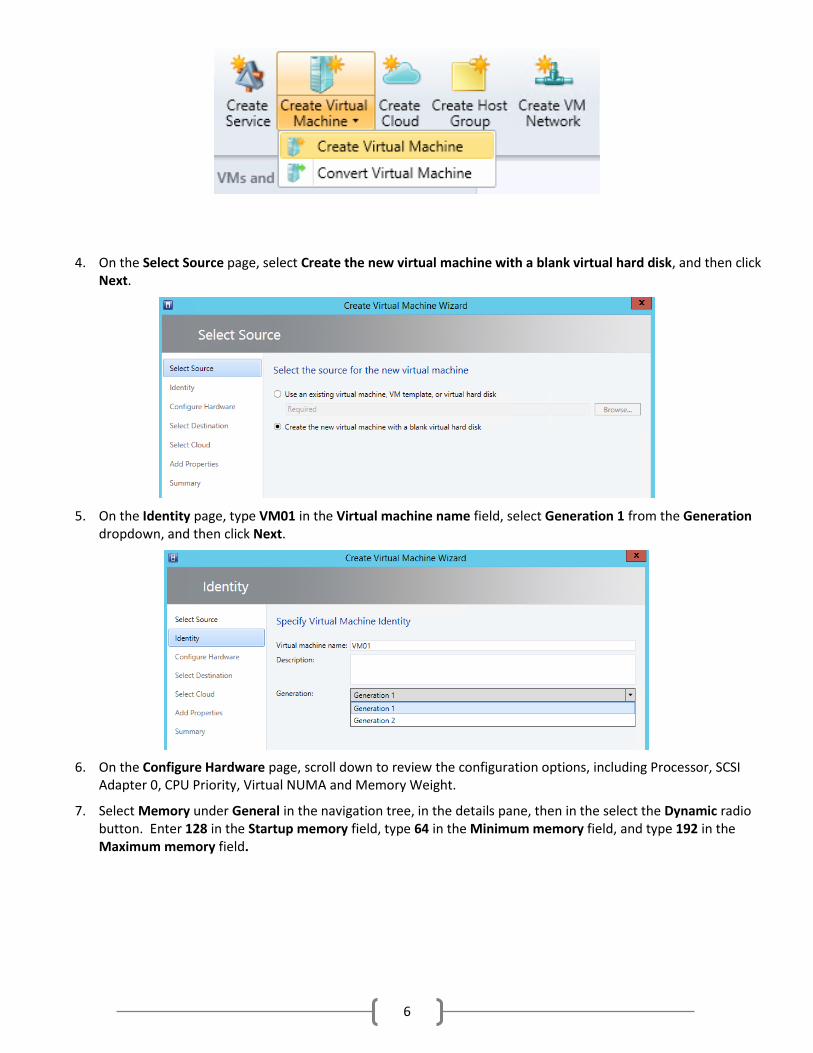
3. On the ribbon, click Create Virtual Machine, and then select Create Virtual Machine.
6
4. On the Select Source page, select Create the new virtual machine with a blank virtual hard disk, and then click Next.
5. On the Identity page, type VM01 in the Virtual machine name field, select Generation 1 from the Generation dropdown, and then click Next.
6. On the Configure Hardware page, scroll down to review the configuration options, including Processor, SCSI Adapter 0, CPU Priority, Virtual NUMA and Memory Weight.
7. Select Memory under General in the navigation tree, in the details pane, then in the select the Dynamic radio button. Enter 128 in the Startup memory field, type 64 in the Minimum memory field, and type 192 in the Maximum memory field.
7
8. On the Configure Hardware page, select VM01_disk_1 under Bus Configuration | IDE Devices in the navigation tree. Change the Size (GB) value to 5 GB. Leave all other default settings.
9. On the Configure Hardware page, scroll down in the navigation pane and select Network Adapter 1 under Network Adapters.
10. In the results pane, under Connectivity, select the Connect to a VM network radio button, and click Browse.
8
11. In the Select a VM Network window, select Contoso LAN, and then click OK.
12. In the Network Adapter 1 details pane, under Port Profile, select Contoso Standard Port from the Classification dropdown.
13. On the Configure Hardware page, select Availability under Advanced in the navigation pane.
14. In the Availability detail pane, click the Make this virtual machine highly available check box.
15. In the Availability detail pane, click Manage availability sets. An Availability Set is a group of VMs that distribute themselves across different hosts as evenly as possible. This type of anti-affinity can be used to keep VMs with identical server roles (such as virtualized DCs or guest cluster nodes) on different hosts to avoid a single point of failure.
16. In the Manage Availability Sets window, click Create.
9
17. In the Create Availability Set window, type Lab Availability Set in the Name field, and then click OK.
18. In the Manage Availability Sets window, click OK.
19. On the Configure Hardware page, click Next.
20. On the Select Destination page, ensure that the Destination is All Hosts, and then click Next.
21. VMM scans each host for its current resource usage across CPU, Memory, Disk and Network, and ranks each host based on these factors and the expected needs of the VM, using a feature called Intelligent Placement. On the Select Host page, select HYPER-V01, and then click Next.
22. On the Configure Settings page, accept the defaults, and then click Next.
10
23. On the Add Properties page, make the following changes using the drop down lists and entry boxes, then click Next:
Select an action to perform automatically when the virtualization server starts: Turn on the virtual machine if it was running when the physical server stopped
Delay start up (seconds): 10
Action to take when the virtualization server stops: Shut down guest OS
Specify the operating system you will install in the virtual machine: Windows Server 2012 R2 Datacenter
24. On the Summary page, review the settings. They should match those in the screenshot below.
25. Ensure that the Start the virtual machine after deploying it is not selected, then click View Script.
26. Click File and select Save As.
27. Change the file name to DeployVM.ps1, using the Save as type dropdown, select All Files.
28. Navigate so that location to save the file is E:\VMMLibrary, and then click Save.
11
29. Close Notepad and click Create.
30. In the Jobs window, select the running Create virtual machine job and review the job details at the bottom of the page.
31. When the Job finishes running, close the Jobs window.
12
Exercise 5.2: Create a VM with PowerShell In this exercise the PowerShell script that was created in the previous exercise will be modified, then executed to quickly deploy a new VM. This shows how VMM’s capabilities can be accelerated the use of PowerShell.
Estimated time to complete: 5 minutes
Perform the following on SCVMM01
1. Right-click on the PowerShell icon on the taskbar, then select Run ISE as Administrator. PowerShell ISE (Integrated Scripting Library) is a scripting center for writing, testing and debugging commands.
2. In the prompt, type Set-ExecutionPolicy Unrestricted -Force, then press Enter.
3. Select Open and navigate to E:\VMMLibrary and select DeployVM.ps1.
13
4. Select Edit | Replace in Script.
5. In the Find What field, type VM01, in the Replace with field, type VM02, and then click Replace All.
6. Save the file.
7. Click Run (green triangle) from the upper ribbon. The PowerShell script will run, but it may take a few moments to start.
8. Once the script is complete a new PowerShell prompt will appear. Close PowerShell ISE.
14
9. Open the Virtual Machine Manager Console. If the Connect to Server window appear, ensure Use current Microsoft Windows session identity is selected, and click Connect.
10. Select the VMs and Services workspace, and then select CLUSTER1.
11. Note that VM02 is being created with an identical configuration as VM01. Since both VMs are in the same availability set called Lab Availability Set they will be distributed across different hosts.
12. Select the Library workspace.
13. Expand Library Servers, and click on SCVMM01.contoso.com.
14. Right-click SCVMM01.contoso.com, and select Refresh. DeployVM.ps1 should appear in the Physical Library Objects details pane.
15
15. Select DeployVM.ps1, on the ribbon, click View File. Notepad will open.
16. Close Notepad.
16
Exercise 5.3: Create a Generation 2 VM In this exercise a new VM will be deployed as a “Generation 2” Hyper-V virtual machine. The process is similar to deploying a traditional VM, however there are differences which will be noted, specifically with the VM hardware. Generation 2 VMs also have unique features such as supporting UEFI firmware and Secure Boot.
Estimated time to complete: 5 minutes
Perform the following on SCVMM01
1. Open the Virtual Machine Manager Console. If the Connect to Server window appear, ensure Use current Microsoft Windows session identity is selected, and click Connect.
2. Select the VMs and Services workspace.
3. On the ribbon, click Create Virtual Machine, and then select Create Virtual Machine.
4. On the Select Source page, click Create the new virtual machine with a blank virtual hard disk, and then click Next.
17
5. On the Identity page, type VM03 in the Virtual machine name field, from the Generation dropdown select Generation 2, and read the information at the bottom of the page. Click Next.
6. On the Configure Hardware page, scroll down to review the reduced number of configuration options available with a Generation 2 Virtual Machine. This is because Generation 2 Virtual Machines have standardized the virtualized hardware, removing such components as legacy NICs.
7. Select Memory under General in the navigation tree, in the details pane, select the Dynamic radio button, type 128 in the Startup memory field, type 64 in the Minimum memory field, and type 192 in the Maximum memory field.
8. On the Configure Hardware page, select VM03_disk_1 under Bus Configuration | SCSI Adapter 0 in the navigation tree. Change the Size (GB) value to 5 GB. Leave all other default settings.
18
9. On the Configure Hardware page, select Availability under Advanced in the navigation pane.
10. In the Availability detail pane, click the Make this virtual machine highly available check box.
11. In the Availability detail pane, click Manage availability sets.
12. In the Manage availability sets window, under Available Properties, select Lab Availability Set, click Add, and then click OK.
19
13. In the Availability detail pane, change the Virtual machine priority to High.
14. On the Configure Hardware page, under Advanced in the navigation pane, select Firmware. Note that Generation 2 virtual machines boot from UEFI firmware, which supports Secure Boot. Secure Boot helps to protect against the booting of unauthorized or compromised operating systems. Click Next.
15. On the Select Destination page, ensure that the Destination is All Hosts, and click Next.
20
16. On the Select Host page, notice there is a warning next to the hosts. Select HYPER-V01, and click the Rating Explanation tab. This recommends that the VM is not placed on HYPER-V01 because another VM that it is part of the Lab Availability Set is already on that same host. VMM will actively move running virtual machines to different hosts to maintain availability sets.
17. Select HYPER-V02, and click Next.
18. On the Configure Settings page, accept the defaults, and click Next.
19. On the Select Networks page, accept the defaults, and click Next.
20. On the Add Properties page, click Next.
21. On the Summary page, review the settings. They should match those in the screenshot below.
22. Ensure that Start the virtual machine after deploying it is not selected, and click Create.
23. In the Jobs window, select the running Create virtual machine job and review the job details at the bottom of the page.
24. When the Job finishes running, close the Jobs window.
------------------------------------------------------------END OF LAB 5------------------------------------------------------------
21
Lab 6: Virtual Machine Mobility Estimated time to complete Lab 6: 20 minutes
Exercise 6.1: Configure Hosts for Migration Estimated time to complete: 5 minutes
In this exercise System Center 2012 R2 Virtual Machine Manager will prepare the Hyper-V hosts to support virtual machine live migration, which moves running VMs between hosts with no downtime. This includes enabling the hosts for migrations, setting authentication protocols, and configuring the maximum numbers of migrations.
Estimated time to complete: 5 minutes
Perform the following on SCVMM01
1. Open the Virtual Machine Manager Console. If the Connect to Server window appear, ensure Use current Microsoft Windows session identity is selected, and click Connect.
2. Select the VMs and Services workspace.
3. Expand All Hosts | CLUSTER1, and select HYPER-V01.
4. Right-click HYPER-V01, and select Properties.
5. In the HYPER-V01.contoso.com Properties window, click the Migration Settings tab.
6. Under Live storage migration, change the Maximum numbers of simultaneous live storage migrations to 4.
22
7. Under Live migration settings, ensure that Turn on incoming and outgoing live migrations is enabled, and change the Maximum numbers of simultaneous live migrations value to 10.
8. Under Performance option, review the options, and ensure that Use compression is selected.
9. Under Authentication protocol, select Use Kerberos.
10. Under Incoming live migration settings, ensure the Use the following IP subnets is selected. In the list of IP subnets, select 15.15.15.5/32, and click Move up until this IP subnet is at the top of the list. This ensures this network is prioritized for Live Migration. Click OK.
11. Repeat steps 4 to 10 with HYPER-V02.
23
Exercise 6.2: Test a VM Migration In this exercise VMM will perform a migration. Since the Hyper-V hosts are already virtualized, it is not possible to start the VMs so they are not actually running “live”, however the steps that would be performed are identical. This lab migrates the memory of the VM from one host to another host.
Estimated time to complete: 5 minutes
Perform the following on SCVMM01
1. Open the Virtual Machine Manager Console. If the Connect to Server window appear, ensure Use current Microsoft Windows session identity is selected, and click Connect.
2. Select the VMs and Services workspace.
3. Expand All Hosts | CLUSTER1, and select HYPER-V01.
4. In the detail pane, right-click VM01 listed on that host and select Migrate Virtual Machine.
5. The Migrate VM Wizard opens and automatically assess the target hosts available for migration.
24
6. Since the VM is currently on HYPER-V01, select HYPER-V02 from the list of hosts. Notice the warning about the Lab Availability Set, as VM03 resides on HYPER-V02 already. Click Next.
7. On the Summary page, ensure the settings match those in the image below, and then click Move.
8. The Jobs window opens. Observe the migration of the virtual machine from HYPER-V01 to HYPER-V02. Close the Jobs window.
9. Repeat step 4-8 on VM02.
10. Return to the VMs and Services workspace and select HYPER-V02. Note that the VM which was migrated is now on this host.
25
Exercise 6.3: Test a Storage Migration In this exercise the VM will remain on the same host, but VMM will move the VM’s storage components (virtual disk, configuration files, etc.) from one location to another. Storage Migration helps with SAN management and maintenance.
Estimated time to complete: 5 minutes
Perform the following on SCVMM01
1. Open the Virtual Machine Manager Console. If the Connect to Server window appear, ensure Use current Microsoft Windows session identity is selected, and click Connect.
2. Select the VMs and Services workspace.
3. Expand All Hosts, and select CLUSTER1.
4. Right-click VM01, and select Migrate Storage. The Migrate Storage wizard will open.
26
5. On the Select Path page, under Storage location for VM configuration, click Browse.
6. The VM and associated disks currently resides on VMShare1. In the Select Destination Folder window, expand Cluster Shared Volumes, select [Cluster Disk 1] CSV01, and click OK. This will move the VMs files from SMB 3.0 based storage to iSCSI SAN storage.
7. On the Select Path page, ensure that Automatically Place all VHDs with the configuration is selected, and then click Next.
8. On the Summary page, ensure the settings match those in the image below, and click Move.
9. The Jobs window opens. Observe the migration of the virtual machine storage. This process will complete relatively quickly because the size of the virtual disk is small. Close the Jobs window.
27
Exercise 6.4: Test a Shared Nothing Live Migration In this exercise a VM that running on a cluster will be live migrated to a standalone, including moving its related disks and files on an iSCSI SAN to the host’s locally attached storage. This is known as a Shared Nothing Live Migration, and enables IT admins to have complete flexibility for moving VMs around from location to location. The VM’s memory state and storage are both moved with no interruption to the running virtual machine.
Estimated time to complete: 5 minutes
Perform the following on SCVMM01
1. Open the Virtual Machine Manager Console. If the Connect to Server window appear, ensure Use current Microsoft Windows session identity is selected, and click Connect.
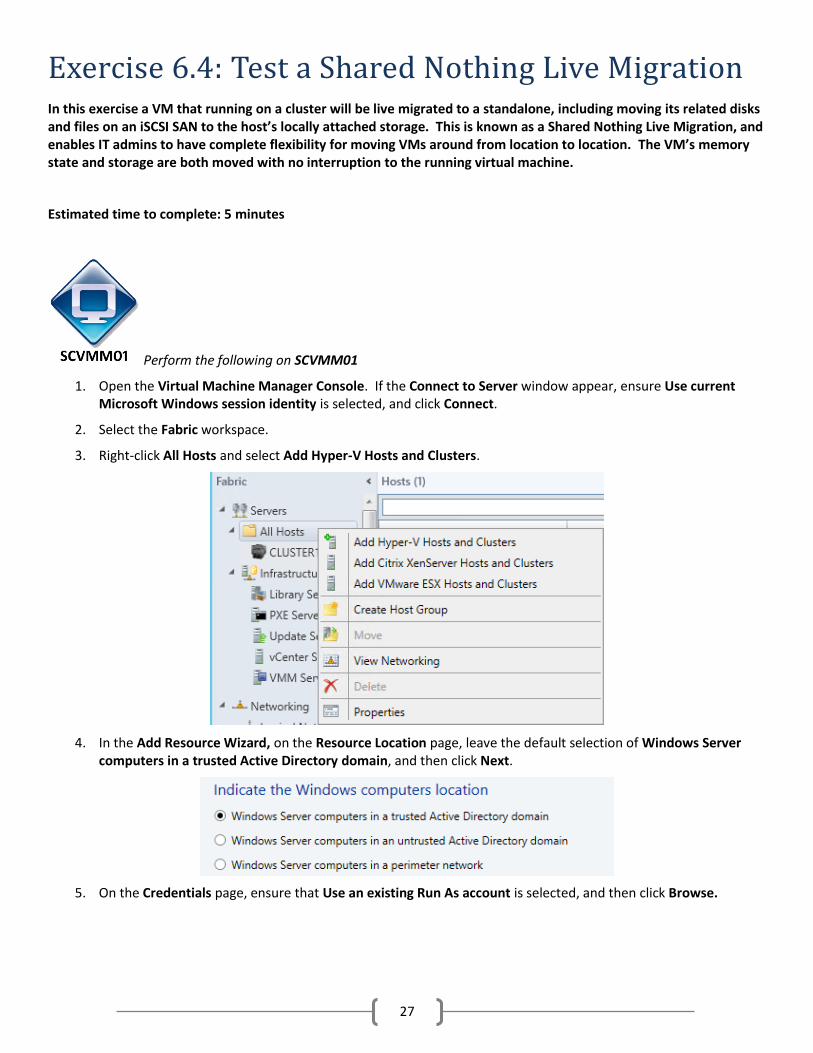
2. Select the Fabric workspace.
3. Right-click All Hosts and select Add Hyper-V Hosts and Clusters.
4. In the Add Resource Wizard, on the Resource Location page, leave the default selection of Windows Server computers in a trusted Active Directory domain, and then click Next.
5. On the Credentials page, ensure that Use an existing Run As account is selected, and then click Browse.
28
6. In the Select a Run As Account window, select VMM Admin, and then click OK.
7. On the Credentials page, click Next.
8. On the Discovery Scope page, ensure that Specify Windows Server computers by names is selected, and type SCVMM01 in the Computer names box. Ensure that Skip AD verification box is not selected, and then click Next.
9. The wizard will scan for SCVMM01. If the computer is not discovered, click OK, then click Refresh.
10. On the Target resources page, select SCVMM01, and then click Next.
29
11. If a warning appears, click OK, this is safe to ignore.
12. On the Host Settings page, accept the defaults, and then click Next.
13. On the Summary page, ensure the settings match those of the screenshot below, and then click Finish.
14. The Jobs window opens and the Add virtual machine host job begins. This will take several moments to complete. The job will complete with a warning. This is expected. When the job completes, close the Jobs window.
15. Close the Virtual Machine Manager Console, then open the Virtual Machine Manager Console. If the Connect to Server window appear, ensure Use current Microsoft Windows session identity is selected, and click Connect. Since VMM is add itself under management, the management server needs to be refreshed.
16. Select the Fabric workspace.
17. Expand Servers and click on All Hosts.
18. Right-click SCVMM01 and select Properties.
30
19. In the SCVMM01.contoso.com Properties window, click the Storage tab.
20. Under Disk, select PHYSICALDRIVE1, which should be 40 GB.
21. Under Logical unit, for Classification, select Gold Tier from the dropdown.
22. Select the Migration Settings tab.
23. Check the box for Turn on incoming and outgoing live migrations.
24. Under Authentication protocol, select Use Kerberos, and then click OK.
31
25. Select the VMs and Services workspace.
26. In the navigation pane, under All Hosts, select CLUSTER1.
27. Right-click VM03 and select Migrate Virtual Machine. The Migrate VM Wizard will appear.
32
28. Notice that of the 3 available hosts, only 2 have star ratings. Click SCVMM01 and click the Rating Explanation tab to read why this host is not recommended for placement.
29. Click to clear the Make this VM highly available box at the top of the wizard. The ratings are recalculated. Review the Ratings Explanation once again.
30. SCVMM01 is now at the top of the list. Select SCVMM01, and then click Next.
31. On the Select Path page, ensure that E:\ is listed as the Storage location for VM configuration, and that Automatically place all VHDs with the configuration is selected, and then click Next.
33
32. On the Select Networks page, accept the defaults, and then click Next. SCVMM01 has no networks set up at this time.
33. On the Summary page, check that the settings match those of the screenshot below.
34. Ensure that Start the virtual machine after deploying it is not selected, and click Move.
35. In the Jobs window, observe the job that is running and review the job details at the bottom of the page.
36. When the job finishes, close the Jobs window.
37. Minimize the Virtual Machine Manager console.
------------------------------------------------------------END OF LAB 6------------------------------------------------------------
34
Lab 7: Virtual Machine Replication & Protection Estimated time to complete Lab 7: 15 minutes
Exercise 7.1: Configure a Hyper-V Replica In this exercise the Windows Server 2012 R2 Hyper-V Replica feature will be configured. Hyper-V Replica provides in-box asynchronous replication of the VMs VHD file between different locations, providing a disaster recovery solution. Replication can occur every 30 seconds, 5 minutes, or 15 minutes. After an incident the VMs can quickly be restarted in the secondary location.
Estimated time to complete: 5 minutes
Perform the following on SCVMM01
1. Start Hyper-V Manager.
2. In the navigation pane, select SCVMM01, and in the Actions pane click Hyper-V Settings.
35
3. Under the Server settings, select Replication Configuration.
4. Click Enable this computer as a Replica server and select Use Kerberos (HTTP).
5. Under Authorization and Storage click Allow replication from any authenticated server and change the default storage location to E:\.
6. Click Apply.
7. On the Settings notification, click OK. This firewall port has already been enabled for this lab.
8. Click OK. Close Hyper-V Manager.
36
Exercise 7.2: Configure a Hyper-V Replica Broker In this exercise the Hyper-V Replica Broker will be configured. The Hyper-V Replica Broker is a clustered role that makes the Hyper-V Replica replication process highly-available, so that replication will always happen as long as the cluster is online. Replication can happen between clusters, between standalone hosts or between a cluster and a standalone host, however it cannot take place between nodes within a single cluster.
Estimated time to complete: 5 minutes
Perform the following on SCVMM01
Start Failover Cluster Manager. If CLUSTER1.contoso.com does not appear, then you need to go to the ‘Server
Manager, then All Servers, then right click Hyper-V01 and open Failover Cluster manager.
1.
2. In the navigation pane, expand CLUSTER1.contoso.com, right-click Roles and click Configure Role.
37
3. On the Before You Begin page, click Next.
4. On the Select Role page, select Hyper-V Replica Broker, and then click Next.
5. On the Client Access Point page, in the Name field, type HVRB.
6. In the Address column, select the Click here to type an address field and complete the IP address as follows 192.168.1.101, and then click Next.
7. On the Confirmation page, check that the configuration matches the screenshot below, and then click Next.
8. After the wizard completes successfully, click Finish.
9. After a few seconds, the status of the Hyper-V Replica Broker Role will change from Pending to Running.
10. Right-click HVRB and select Replication Settings.
38
11. In the Hyper-V Replica Broker Configuration window, click Enable this cluster as a Replica server, click Use Kerberos (HTTP).
12. Under Authorization and storage, click Allow replication from any authenticated server and type \\FS01.contoso.com\VMShare2 in the Specify the default location to store Replica files field.
13. Click OK, and on the firewall warning, click OK. This firewall port has already been enabled for this lab.
39
Exercise 7.3: Replicate a VM In this exercise replication for a virtual machine will be enabled, then other replication settings will be configured. After the initial replication has happened, if there is a disaster then this VM can be recovered at the secondary location.
Estimated time to complete: 5 minutes
Perform the following on SCVMM01
1. Open Failover Cluster Manager.
2. Expand CLUSTER1.contoso.com and click Roles.
3. Right-click SCVMM VM01 Resources, point to Replication, and select Enable Replication.
4. On the Before You Begin page, click Next.
5. On the Specify Replica Server page, type SCVMM01 in the Replica server field, and then click Next.
40
6. On the Specify Connection Parameters page, accept the defaults, and then click Next.
7. On the Choose Replication VHDs page, ensure the VHDX file is selected, and then click Next.
8. On the Configure Replication Frequency page, expand the dropdown to review the options, select 5 minutes, and then click Next.
9. On the Configure Additional Recovery Points page, ensure that Maintain only the latest recovery point is selected, and then click Next.
41
10. On the Choose Initial Replication Method page, ensure that Send Initial Copy Over the Network and Start replication immediately are selected, and then click Next.
11. On the Summary page, ensure the settings are the same as the screenshot below, and click Finish.
12. On the Replication enabled notification, click Close.
13. From Failover Cluster Manager, right-click SCVMM VM01 Resources, point to Replication, and review the options that are available, such as a Planned Failover. This can be used if the VMs need to be moved to the alternative location for maintenance or in preparation of a disaster. Do not select any items from this menu.
14. Minimize Failover Cluster Manager and start Hyper-V Manager.
15. Select SCVMM01 from the navigation pane.
16. Click VM01, and at the bottom of Hyper-V Manager, click the Replication tab. Observe some of the information, such as the primary and destination servers and the last time synchronization.
42
17. Right-click VM01, point to Replication, and review the options that are available. Notice the option to Failover the VM (if the primary site was unavailable), or even Test Failover, in order to prepare and test for a potential disaster on the primary site. There is also an option to Extend Replication, which extend the replication of this Replica to a third site.
18. From the Replication menu, select View Replication Health.
19. Review this information, then click Close.
20. Right-click VM01 and click Settings.
43
21. In the navigation pane, expand the VM01 network adapter, and select Failover TCP/IP.
22. Under IPv4 TCP/IP settings, select the Use the following IPv4 address scheme for the virtual machine, and configure the following settings to be injected into the VM upon failover to the second site:
IPv4 Address: 100.100.100.100
Subnet mask: 255.255.255.0
23. Click OK to close the VM01 settings.
24. Close Hyper-V Manager and Failover Cluster Manager.
------------------------------------------------------------END OF LAB 7------------------------------------------------------------
44
Lab 8: Network Virtualization Estimated time to complete Lab 8: 15 minutes
Exercise 8.1: Create a VM Network In this exercise System Center 2012 R2 Virtual Machine Manager will create a Virtual Network, or VM Network. This will use Hyper-V Network Virtualization to provide isolation between VMs by leveraging the Logical Switch and Logical Networks that were previously created.
Estimated time to complete: 10 minutes
Perform the following on SCVMM01
1. Open the Virtual Machine Manager Console. If the Connect to Server window appear, ensure Use current Microsoft Windows session identity is selected, and click Connect.
2. Select the VMs and Services workspace.
3. On the navigation pane, right-click VM Networks and select Create VM Network.
4. In the Create VM Network Wizard, on the Name page, type Development VMs in the Name field, and ensure that the Logical network selected is Contoso LAN, and then click Next.
45
5. On the Isolation page, select Isolate using Hyper-V network virtualization, and then click Next.
6. On the VM Subnets page, click Add.
7. Under VM subnet, type Development LAN in the Name field, type 192.168.6.0/24 in the Subnet field, and then click Next.
8. On the Connectivity page, read the connectivity message, and then click Next.
9. On the Summary page, ensure the details match the screenshot below, and then click Finish.
46
10. The Jobs window opens. Observe the completed jobs, and then close the Jobs window.
11. Repeat Steps 3 through 9 with the following details:
Name: Test VMs
Logical Network: Contoso LAN
Isolation: Isolate using Hyper-V network virtualization
VM Subnets:
o Name: Test LAN
o Subnet: 192.168.6.0/24
Gateway: No connectivity
12. Under the VM Networks and IP Pools, right-click Development VMs VM Network and select Create IP Pool.
13. In the Create Static IP Pool Wizard, on the Name page, type Development IP Pool in the Name field. Ensure the VM Network is Development VMs and the VM Subnet is Development LAN (192.168.6.0/24), and then click Next.
14. On the IP address range page, change the Ending IP address: to 192.168.6.50, and then click Next.
15. On the Gateway page, leave the entry blank and click Next.
16. On the DNS page, leave the entry blank and click Next.
17. On the WINS page, leave the entry blank and click Next.
47
18. On the Summary screen, ensure the settings match the screenshot below, and then click Finish.
19. The Jobs window opens. Observe the completed job, and then close the Jobs window.
20. Repeat steps 11 to 18 for the Test VMs VM Network, with the following settings:
Name: Test IP Pool
VM Network: Test VMs
VM Subnet: Test LAN (192.168.6.0/24)
IP Address Range: Ending IP Address: 192.168.6.50
Gateway, DNS, WINS: Leave Default
48
Exercise 8.2: Assign a VM Network In this exercise VMM will assign the newly created VM Networks to the existing virtual machines. If the VMs were running then VMM would automatically assign an appropriate IP address to the VM’s vNIC from its IP Pool. Since the VMs are inside VM Networks they are isolated from one another.
Estimated time to complete: 5 minutes
Perform the following on SCVMM01
1. Open the Virtual Machine Manager Console. If the Connect to Server window appear, ensure Use current Microsoft Windows session identity is selected, and click Connect.
2. Select the VMs and Services workspace.
3. In the navigation pane, select All Hosts.
4. From the ribbon navigation, click Home and then click VMs.
5. Right-click on VM01 and select Properties.
49
6. In the VM01 Properties window, click the Hardware Configuration tab.
7. Select Network Adapter 1.
8. Under Connectivity, next to Connected to a VM network click Browse.
9. In the Select a VM Network window, select Development VMs, and click OK. The VM subnet will automatically be changed because there is only a single VM Subnet as part of that VM Network.
50
10. In the VM01 Properties window, click OK.
11. Repeat Steps 5 to 10 for VM02, with the following information, and then click OK.
Connected to VM Network: Test VMs
VM Subnet: Test LAN
12. Right-click on VM01 and choose Properties.
13. In the VM01 Properties window, select the Hardware Configuration tab.
14. Select Network Adapter 1.
15. At the bottom of the details pane, click Connection Details.
16. In the Connection Details window, notice that VMM has automatically allocated an IP address from the Development IP Pool, within the Development VMs VM Network. Click OK to close the window.
17. Click OK to close VM01 Properties.
------------------------------------------------------------END OF LAB 8------------------------------------------------------------
51
Lab 9: Virtual Machine Templates Estimated time to complete Lab 9: 25 minutes
Exercise 9.1: Create a VM Template In this exercise System Center 2012 R2 will create a template that can be used to standardize and accelerate the deployment of VMs into the environment. Templates combine a number of different building blocks, including a hardware configuration, guest OS configuration, application level configuration and additional settings. Templates can be created from nothing, or from existing VMs, virtual disks, or other templates.
Estimated time to complete: 10 minutes
Perform the following on SCVMM01
1. Open the Virtual Machine Manager Console. If the Connect to Server window appear, ensure Use current Microsoft Windows session identity is selected, and click Connect.
2. Select the Library workspace.
3. In the navigation pane, select Templates.
4. Click Create VM Template on the ribbon.
5. On the Select a Source page, ensure that Use an existing VM template or a virtual hard disk stored in the library is selected, and then click Browse.
52
6. In the Select VM Template Source window, select WS2012R2, and then click OK. Do not select any of the other VHDX files.
7. On the Select Source page, click Next.
8. On the Identity page, type VM Template in the VM Template name field, select Generation 1 from the dropdown, and then click Next.
9. On the Configure Hardware page, in the Compatibility detail pane, select Hyper-V.
10. On the Configure Hardware page, under the General workspace, click Memory.
53
11. In the Memory detail pane, click Dynamic, type 128 in the Startup memory field, type 64 in the Minimum memory field, and type 192 in the Maximum memory field.
12. On the Configure Hardware page, scroll down to the Bus Configuration workspace, and select WS2012R2.
13. In the WS2012R2 details pane, select Silver Tier from the Classification dropdown.
14. On the Configure Hardware page, scroll down to the Network Adapters workspace, and select Network Adapter 1.
54
15. In the Network Adapter 1 details pane, under Connectivity, click Connect to a VM network, and click Browse.
16. In the Select a VM Network window, select Development VMs, and then click OK.
17. Under Connectivity, select Development LAN from the VM subnet dropdown.
18. Under IP Address, select Static IP (from a static IP Pool), and ensure IPv4 only is selected for the IP protocol version.
19. Under Port Profile, select Bandwidth - Low from the Classification dropdown.
20. On the Configure Hardware page, select Availability under Advanced in the navigation pane.
21. In the Availability detail pane, select the Make this virtual machine highly available check box.
22. On the Configure Hardware page, click Save as.
23. In the New Hardware Profile window, type Lab Hardware Profile in the Name field.
24. Click the Hardware Profile tab. Review the settings, and then click OK.
25. On the Configure Hardware page, click Next.
55
26. On the Configure Operating System page, select the Identity Information workspace under General Settings, type DevVM## in the Computer name field. This will increment the number in the name of the VM, such as DevVM01, DevVM02, etc.
27. Select the Admin Password workspace, click Select a Run As account for the local administrator account and click Browse.
28. In the Select a Run As account window, select VMM Admin and then click OK.
29. Select the Roles workspace under Roles and Features.
56
30. In the details pane, scroll down to Web Server (IIS) and select the following:
31. In the detail pane, scroll down to Web Server and select the following:
32. Select the Features workspace under Roles and Features. In the Feature details pane, select the following:
33. Select the Domain / Workgroup workspace under Networking, click Domain and type contoso.com in the Domain field.
34. Select the Run As account to use for joining the domain, and then click Browse.
57
35. In the Select a Run As account dialog, select Domain Join and click OK.
36. Select the Answer File workspace under Scripts, review the options in the details pane, and then click Next.
37. On the Application Configuration page, leave the default settings, and then click Next.
58
38. On the SQL Server Configuration page, leave the default settings, and then click Next.
39. On the Summary page, review the settings and click Create.
40. The Jobs window opens. Observe the completed jobs, and then close the Jobs window.
59
Exercise 9.2: Review a SQL Server Profile In this exercise a pre-created SQL Server Profile will be reviewed. SQL Server profiles provide instructions for customizing an instance of SQL Server for a SQL Server Data Application Tier (DAC) when deploying a virtual machine as part of a service. A service is a collection of virtual machines that may represent a multi-tiered enterprise application.
Estimated time to complete: 5 minutes
Perform the following on SCVMM01
1. Open the Virtual Machine Manager Console. If the Connect to Server window appear, ensure Use current Microsoft Windows session identity is selected, and click Connect.
2. Select the Library workspace.
3. In the navigation pane, select Templates.
4. In the details pane, right-click on PetShop Data Tier, and click Properties.
5. On the PetShop Data Tier Properties page, click the Hardware Configuration tab.
60
6. Under Bus Configuration | IDE Devices, select the SQL Server VM Template VHDX, and select Silver Tier from the Classification dropdown.
7. Under Network Adapters, select Network Adapter 1.
8. In the Network Adapter 1 details pane, under Connectivity, select Connect to a VM network, and then click Browse.
9. In the Select a VM Network window, select Development VMs, and then click OK.
61
10. Select Development LAN from the VM subnet dropdown.
11. Under IP Address, ensure that Static IP (from a static IP Pool) and IPv4 only are selected.
12. Under Port Profile, select the Bandwidth - High from the Classification dropdown.
13. Select the SQL Server Configuration workspace.
14. On the SQL Server configuration page, from the SQL Server profile dropdown, select SQL Server Profile.
15. On the SQL Server configuration page, select SQL Server Deployment, and review the settings in the details pane.
62
16. On the SQL Server configuration page, select the Configuration workspace, and review the settings in the details pane. Note: The Media Source is a path within the VHD(X) file attached to this template, where the SQL media files are stored. The accounts will be created as SQL Server administrators.
17. On the SQL Server configuration page, select the Service Accounts workspace, and review the settings in the details pane.
18. In the PetShop Data Tier Properties window, select Application Configuration.
19. From the Application profile dropdown, select SQL DAC Application Profile.
20. Select the first SQL Server Data workspace, and review the settings in the details pane. Note that these settings include DAC packages containing the database schema and some server-level objects required in order to support the database, like logins. The DAC does not include the data inside a database. This Application Configuration is pointing at a number of DACs residing in the VMM’s library.
63
21. Compare the Application Configuration data to the screenshot below. If there is an inconsistency click OK to close the PetShop Data Tier Properties window, and reopen it to refresh the view.
22. Directly below SQL Server Data, select SQL Server Scripts. VMM will automate these two scripts that will run along with this DAC, in their deployment order.
23. In the SQL Server Scripts details pane, select CreateDBLogin, and then click Edit.
24. In the SQL Server Scripts Properties window, review the settings, then click OK.
64
25. Directly below SQL Server Scripts, select Pre-install 1, and review the settings in the details pane. In this case, a pre-installation action runs which launches cmd.exe, passes parameters to it, and then calls another script file.
26. In the PetShop Data Tier Properties window, click OK.
65
Exercise 9.3: Review a Web Application Profile In this exercise an Application Profile for a web server will be reviewed. This enables IT admins and developers to rapidly deploy standardized web servers and pre-defined web sites.
Estimated time to complete: 5 minutes
Perform the following on SCVMM01
1. Open the Virtual Machine Manager Console. If the Connect to Server window appear, ensure Use current Microsoft Windows session identity is selected, and click Connect.
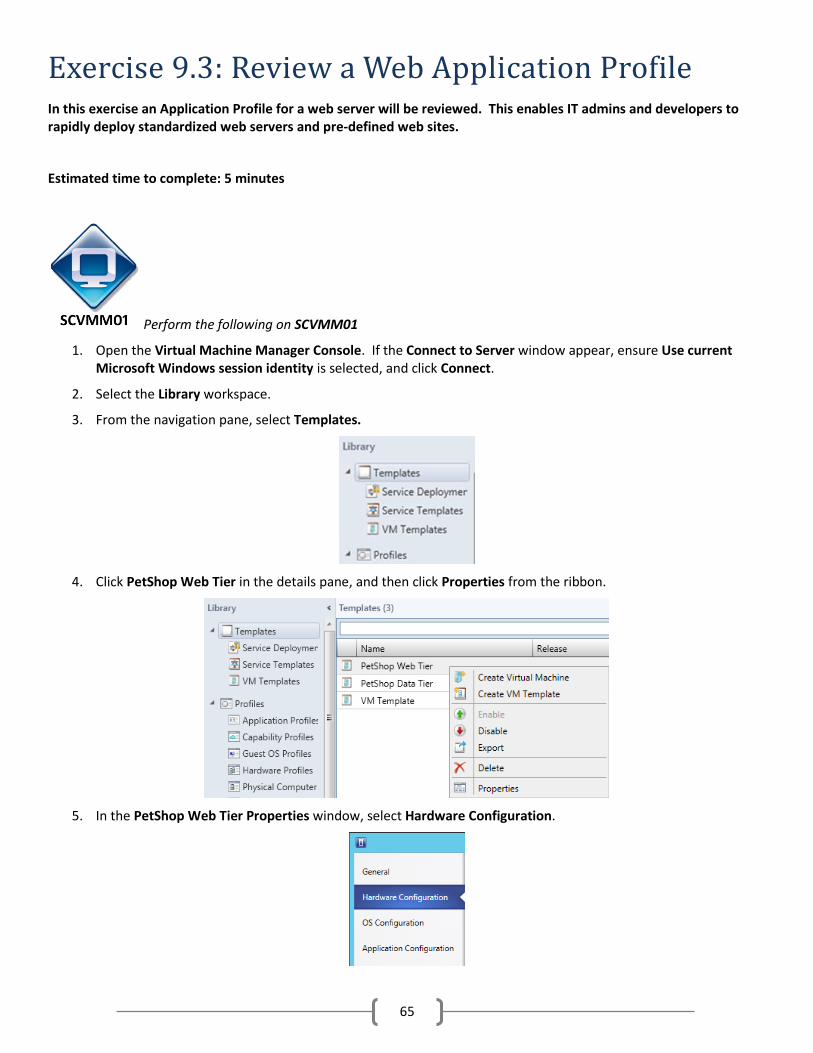
2. Select the Library workspace.
3. From the navigation pane, select Templates.
4. Click PetShop Web Tier in the details pane, and then click Properties from the ribbon.
5. In the PetShop Web Tier Properties window, select Hardware Configuration.
66
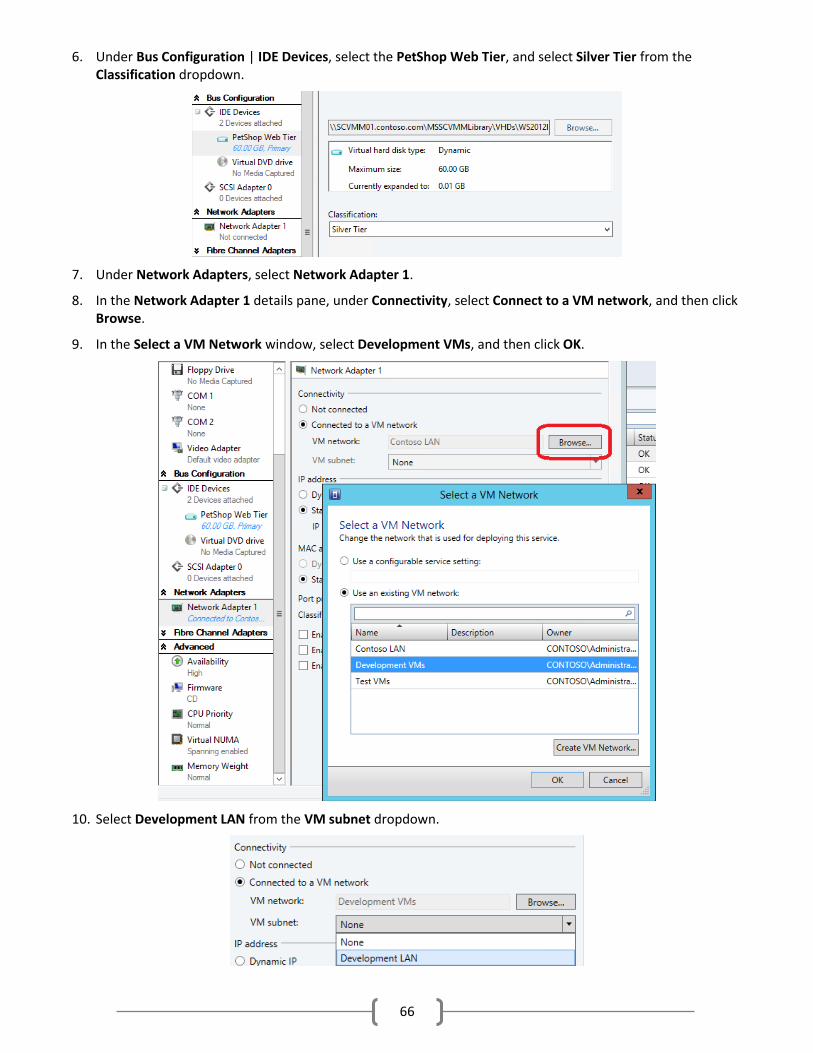
6. Under Bus Configuration | IDE Devices, select the PetShop Web Tier, and select Silver Tier from the Classification dropdown.
7. Under Network Adapters, select Network Adapter 1.
8. In the Network Adapter 1 details pane, under Connectivity, select Connect to a VM network, and then click Browse.
9. In the Select a VM Network window, select Development VMs, and then click OK.
10. Select Development LAN from the VM subnet dropdown.
67
11. Under IP Address, ensure that Static IP (from a static IP Pool) and IPv4 only are selected.
12. Under Port Profile, select the Bandwidth - Medium from the Classification dropdown.
13. Select the Application Configuration workspace.
14. From the Application profile dropdown, select PetShop Web Application Profile.
15. Select Web Application.
68
16. Review the details pane. The Web Application is contained within a Web Deploy package. Web Deploy (msdeploy) simplifies the deployment of Web applications and Web sites to IIS servers. Administrators can use Web Deploy to synchronize IIS servers or to migrate to newer versions of IIS. Web Deploy Tool also enables administrators and delegated users to use IIS Manager to deploy ASP.NET and PHP applications to an IIS server. If the Application Configuration is not identical to the screenshot below, close, then reopen the PetShop Web Tier Properties window to refresh the view.
17. Under Scripts, click Pre-install 1.
18. Review the details. Part of the pre-install process VMM is going to run cmd.exe and deploy the Web Deploy capability inside the Guest OS, before applying the specific Web Deploy files and settings to transform this Windows Server into a fully functional IIS Server with pre-configured web site(s).
19. In the PetShop Web Tier Properties window, click OK.
69
Exercise 9.4: Create a VM from a Template In this exercise a VM will be deployed from the newly created template. This process enables the standardized and accelerated deployment of VMs from a known configuration source and speeds up the deployment process, as compared to specifying each configuration item individually.
Estimated time to complete: 5 minutes
Perform the following on SCVMM01
1. Open the Virtual Machine Manager Console. If the Connect to Server window appear, ensure Use current Microsoft Windows session identity is selected, and click Connect.
2. Select the Library workspace.
3. In the navigation pane, select Templates.
4. In the details pane, right-click VM Template and click Create Virtual Machine.
5. Click OK to dismiss the warning.
70
6. On the Identity page, type VM04 in the Virtual machine name field, and then click Next.
7. On the Configure Hardware page, review the settings, and then click Next.
8. On the Configure Operating System page, review the settings, and then click Next.
9. On the Select Destination page, review the settings, and then click Next.
10. On the Select Host page, select HYPER-V02, and then click Next.
11. On the Configure Settings page, click Virtual Machine Location, and next to the Virtual machine path field, click Browse.
12. In the Select a Destination Folder window, expand File Shares, select \\FS01.contoso.com\VMShare1, and then click OK.
71
13. On the Configure Settings page, select Network Adapter 0 under Networking, and review the settings.
14. On the Configure Settings page, select Virtual Hard Disk under Machine Resources, and next to Destination Path click Browse.
15. In the Select a Destination Folder window, expand File Shares, select \\FS01.contoso.com\VMShare1, and then click OK.
16. On the Configure Settings page, click Next.
17. On the Add Properties page, accept the default settings, and then click Next.
18. On the Summary page, review the settings, and then click Create.
Note: The deployment will fail, and this is expected in this virtualized lab environment. This lab is built using virtual machines. It is not possible to run VMs within Hyper-V VMs (“nested virtualization”). A user can create and configure VMs, but cannot start the VM.
19. Close the Jobs window.
------------------------------------------------------------END OF LAB 9------------------------------------------------------------
72
Lab 10: Service Templates Estimated time to complete Lab 10: 15 minutes
Exercise 10.1: Create a Service Template In this exercise System Center 2012 R2 will create a Service Template. In VMM a service is a collection of virtual machines that may represent a multi-tiered enterprise application. These virtual machines are configured and deployed together, and then they are managed as a single entity. For example, a multi-tier line-of-business application could consist of a database backend, an application tier, and a web frontend. Each of these tiers can also be scaled to meet increasing or decreasing demand.
Estimated time to complete: 10 minutes
Perform the following on SCVMM01
1. Open the Virtual Machine Manager Console. If the Connect to Server window appear, ensure Use current Microsoft Windows session identity is selected, and click Connect.
2. Select the Library workspace.
3. Expand Library Servers, right-click SCVMM01.contoso.com, and then click Properties.
73
4. In the SCVMM01.contoso.com Properties window, select All Hosts from the Host Group dropdown.
5. Select all of the VM networks, ensure that Allow unencrypted BITS transfers is selected, and then click Browse.
6. In the Select a Run As Account window, click Create Run As Account.
7. In the Create Run As Account window, ensure that Validate domain credentials is selected, type the following, and then click OK:
Name: Library Admin
User Name: contoso\administrator
Password: Passw0rd!
Confirm password: Passw0rd!
74
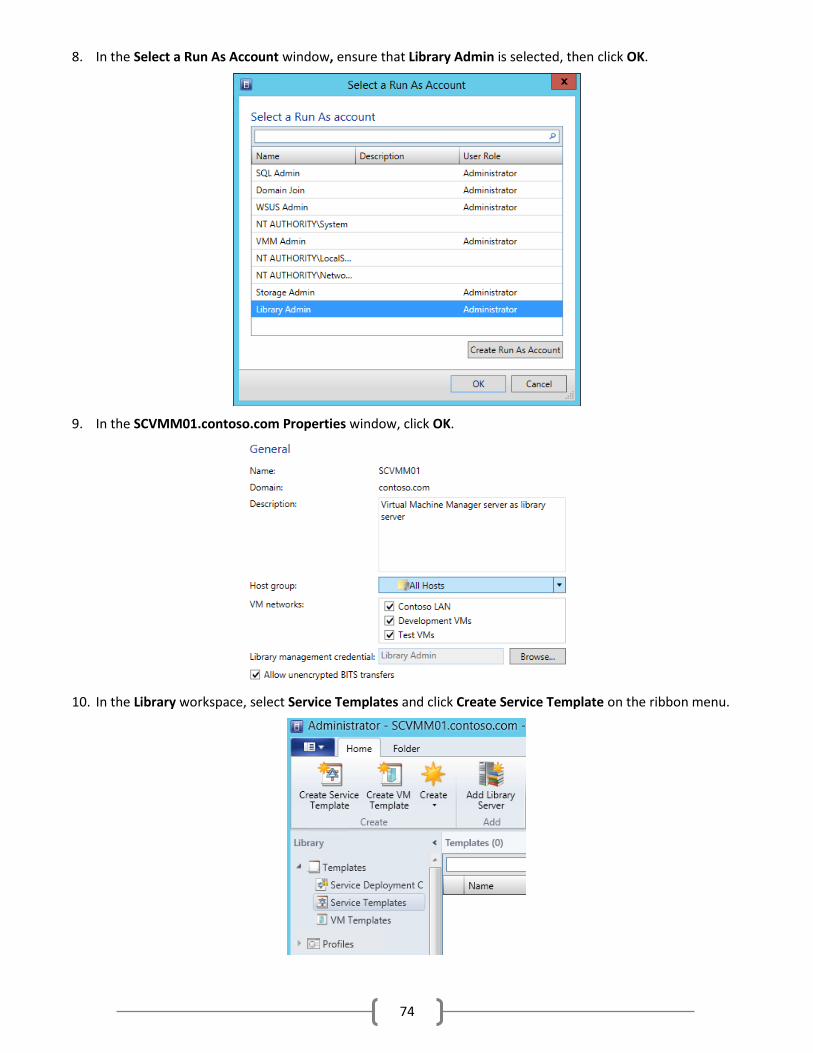
8. In the Select a Run As Account window, ensure that Library Admin is selected, then click OK.
9. In the SCVMM01.contoso.com Properties window, click OK.
10. In the Library workspace, select Service Templates and click Create Service Template on the ribbon menu.
75
11. In the New Service Template window, type PetShop in the Name field, and type 1.0 in the Release field. Select Two Tier Application (v1.0), and then click OK.
12. Maximize the Service Template Designer.
13. From the VM Templates pane on the navigation pane, drag Pet Shop Web Tier to the First Tier box.
76
14. From the VM Templates pane, drag PetShop Data Tier to the Second Tier box.
15. In the top left of the ribbon, click Save and Validate.
16. Double-click PetShop Web Tier – Machine Tier 1 to open the Properties.
17. Review the information on the General page. Notice that this tier can be scaled out, and currently has a default instance (number of VMs) count of 1, and a maximum of 5 VMs that this tier can scale to. The administrator can define the deployment order of this tier, in relation to other tiers, and in which order the tiers are serviced.
77
18. Change the Preferred deployment order to 2 and the Preferred servicing order to 2, and then click OK to close the Properties window.
19. In the top left of the ribbon, click Save and Validate.
20. Click on PetShop Data Tier – Machine Tier 1 in the main Service Template Designer, and review the alert details at the bottom of the window.
21. Double-click PetShop Data Tier – Machine Tier 1 Properties page, uncheck This machine tier can be scaled out, then click OK.
22. In the top left of the ribbon, click Save and Validate, and then close the Service Template Designer.
78
23. In the Templates detail pane, select PetShop, and, on the ribbon, click Publish.
79
Exercise 10.2: Deploy a Service Template In this exercise a service will be deployed from a Service Template. Note that the deployment will fail, and this is expected in this virtualized lab environment. This lab is built using virtual machines and it is not possible to run VMs within Hyper-V VMs (“nested virtualization”). A user can create and configure VMs, but they cannot start them.
Estimated time to complete: 5 minutes
Perform the following on SCVMM01
1. Open the Virtual Machine Manager Console. If the Connect to Server window appear, ensure Use current Microsoft Windows session identity is selected, and click Connect.
2. Select the Library workspace.
3. In the Library workspace, select Templates.
4. From the Templates details pane, right-click on PetShop and then click Configure Deployment.
5. Type PetShop 1.0 in the Name field, ensure that All Hosts is selected from the Destination dropdown, and then click OK.
80
6. The Deploy Service – PetShop 1.0 window opens.
7. Maximize the window, and then click Refresh Preview from the top left of the ribbon.
8. The Placing Service dialog box appears temporarily while the preview is refreshed. Once complete, the service should have suitable host(s) defined. If any warnings remain, click the Refresh Preview button on the ribbon.
9. Click Deploy Service on the ribbon.
10. In the Deploy service window, click Deploy.
Note: The deployment will fail, and this is expected in this virtualized lab environment. This lab is built using virtual machines. It is not possible to run VMs within Hyper-V VMs (“nested virtualization”). A user can create and configure VMs, but cannot start the VM.
11. The Jobs window opens. Review the executing job then close the Jobs window.
12. Select the VMs and Services workspace.
13. Select All Hosts from the navigation pane, and ensure that Virtual Machine tab above the ribbon is selected. There will be a list of newly created VM with a Status of Creation Failed. This failure is expected due to limitations of the virtualized lab environment.
------------------------------------------------------------END OF LAB 10------------------------------------------------------------
81
Lab 11: Private Clouds & User Roles Estimated time to complete Lab 11: 15 minutes
Exercise 11.1: Create a User Role In this exercise System Center 2012 R2 Virtual Machine Manager will create a Self-Service User Role for a member of the Development team. This account will have certain permissions and restrictions assigned to it.
Estimated time to complete: 5 minutes
Perform the following on SCVMM01
1. Open the Virtual Machine Manager Console. If the Connect to Server window appear, ensure Use current Microsoft Windows session identity is selected, and click Connect.
2. Select the Settings workspace.
3. Expand Security | User Roles and, on the ribbon, click Create User Role.
4. On the Name and description page, type Development User in the Name field, and then click Next.
82
5. On the Profile page, select Application Administrator (Self-Service User), and then click Next.
6. On the Members page, click Add
7. Type in devuser in the Enter the object names to select box, click Check Names, and then click OK. This should resolve to CONTOSO\devuser.
8. On the Members page, ensure that CONTOSO\devuser is listed, and then click Next.
9. On the Scope page, note that there are currently no clouds, and then click Next.
10. On the Networking page, click Add.
83
11. Select Development VMs, and click OK.
12. On the Networking page, ensure that Development VMs is listed, and then click Next.
13. On the Resources page, click Add.
14. Select PetShop from the Type: Service Template node, then click OK.
84
15. Back on the Resources page, ensure that PetShop is listed, and then click Next.
16. On the Permissions page, select Deploy (From template only), Local Administrator, Pause and resume, Remote connection, Shut down, Start and Stop, then click Next.
17. On the Run As accounts page, click Add.
18. In the Select a Run As account window, select VMM Admin, and then click OK.
85
19. On the Run As accounts page, confirm VMM Admin is listed, and then click Next.
20. On the Summary screen, ensure the settings match those in the screenshot below, and then click Finish.
21. The Jobs window opens. Observe the completed job, and then close the Jobs window.
86
Exercise 11.2: Create a Private Cloud In this exercise a Cloud will be created. In VMM the private cloud is deployed to pool an organization’s own hardware to leverage the advantages of the private cloud computing model. Through VMM, an organization can manage the private cloud definition, control access to the private cloud and its underlying physical resources.
Estimated time to complete: 5 minutes
Perform the following on SCVMM01
1. Open the Virtual Machine Manager Console. If the Connect to Server window appear, ensure Use current Microsoft Windows session identity is selected, and click Connect.
2. Select the VMs and Services workspace.
3. On the ribbon, click Create Cloud.
4. On the General page, type Development Cloud in the Name field, and then click Next.
5. On the Resources page, select All Hosts, and then click Next.
6. On the Logical Networks page, click Contoso LAN, and then click Next.
87
7. On the Load Balancers page, accept the default, and then click Next.
8. On the VIP Templates page, click Next.
9. On the Port Classifications page, select Bandwidth – Low and Contoso Standard Port, and then click Next.
10. On the Storage page, select Gold Tier and Silver Tier, and then click Next.
11. On the Library page, accept the default, and then click Next.
12. On the Capacity page, uncheck all the Use Maximum checkboxes, enter the following values, and then click Next.
Change the Assigned Capacity for Virtual CPUs to 4
Change the Assigned Capacity for Memory to 1
Change the Assigned Capacity for Storage to 200
Change the Assigned Capacity for Custom quota to 10
Change the Assigned Capacity for Virtual machines to 4
88
13. On the Capability Profiles page, select Hyper-V, and then click Next.
14. On the Summary page, ensure the settings match those in the screenshot below, and then click Finish.
15. The Jobs window opens. Observe the completed jobs, and then close the Jobs window.
89
Exercise 11.3: Delegate Access to a Cloud In this exercise access privileges will be assigned to the newly created cloud for the Development User role. The Development User will then log into VMM and observe the limited management scope that this user role has.
Estimated time to complete: 5 minutes
Perform the following on SCVMM01
1. Open the Virtual Machine Manager Console. If the Connect to Server window appear, ensure Use current Microsoft Windows session identity is selected, and click Connect.
2. Select the VMs and Services workspace.
3. Expand Clouds, right-click Development Cloud, and then click Assign Cloud.
4. In the Use an existing user role dropdown, select Development Users – Self-Service user, and then click OK.
90
5. In the Development User Properties window, click the Quotas for the Dev Cloud tab.
6. In the Role level quotas section, deselect all of the Use Maximum check boxes.
7. In the Member level quotas section, deselect all of the Use Maximum check boxes.
91
8. In the Member level quotas section, change the Virtual CPUs Assigned Quota to 2 and Virtual machines Assigned Quota to 2.
9. In the Development User Properties window, click Permissions, and then click the Development Cloud.
10. Select Save, and then click OK. These settings allow IT to provide granular control on a cloud-by-cloud basis, in addition to cross-cloud controls at a global level.
92
11. In the top left of the Virtual Machine Manager Console, click File, and then click Open New Connection.
12. In the Connect to Server page, select Specify credentials, and enter the following credentials and click Connect.
User name: contoso\devuser
Password: Passw0rd!
13. There will now be two Virtual Machine Manager Console windows open. To identify which is the correct window, look in the top left corner. Ensure that the connection is using Development User – SCVMM01.contoso.com.
14. Select the VMs and Services workspace. Notice that the Fabric workspace is not available to the Development User user role. This is by design so that this user can focus on their VMs and applications, but not the underlying infrastructure.
15. Expand Clouds | Development Cloud, and then, on the navigation ribbon, click Overview.
93
16. On the ribbon, click Create Virtual Machine, and then select Create Virtual Machine.
17. On the Select Source page, select Create the new virtual machine with a blank hard disk, and then click Next.
18. On the Identity page, type VM05 in the Virtual machine name field, and then click Next.
19. On the Configure Hardware page, accept the defaults, and then click Next. An error message will appear because Development User does not have permission to create a new VM unless it comes from a template.
20. Click OK to close the error window, and click Cancel to exit the Create Virtual Machine Wizard.
21. Click Yes to confirm the cancellation.
22. Select the Library workspace.
94
23. From the navigation pane, click Templates, select PetShop in the details pane, and then click Configure Deployment on the ribbon.
24. Type Development PetShop in the Name field. Notice, the only destination that available in the dropdown is Development Cloud.
25. Click OK.
26. The Deploy Service – Development PetShop window will open. Maximize the window, and then click Refresh Preview in the top left of the ribbon.
27. The Placing Service dialog box will appear. Once complete, the service should have suitable host(s) defined.
30. Note that placement provides the Development Cloud instead of the specific hosts as it had in previous exercises, so the Development User only knows whether the cloud is suitable, but the underlying servers are hidden. Click OK.
31. Click Deploy Service on the ribbon, and in the Deploy service dialog, click Deploy.
Note: The deployment will fail, and this is expected in this virtualized lab environment. This lab is built using virtual machines. It is not possible to run VMs within Hyper-V VMs (“nested virtualization”). A user can create and configure VMs, but cannot start the VM.
32. The Jobs window opens. Observe the completed job, and then close the Jobs window.
33. Close Deploy Service – Development PetShop page, and click Save at the Close window prompt. This will keep the configuration for future use.
34. From the Virtual Machine Manage Console, using the Development User user role, navigate to the VMs and Services workspace, then select Clouds from the navigation pane.
35. On the upper ribbon, click Services to see this service deployment.
------------------------------------------------------------END OF ALL LABS------------------------------------------------------------