78
Visualint Line User Manual Version 7.01

Visualint Line
User ManualVersion 7.01

Contents
1. Installation..................................................................................................................6 1.1 Setup....................................................................................................................6
1.2. Software Update and Uninstall...........................................................................8
2. Login...........................................................................................................................93. Surveillance Interface...............................................................................................124. Manage.....................................................................................................................16 4.1. Client Settings....................................................................................................16
4.1.1. General Settings..........................................................................................17
4.1.2. Proxy Server................................................................................................19
4.1.3 Multi-monitor Setup....................................................................................19
4.1.4. Hotkeys.......................................................................................................21
4.1.5. Joystick........................................................................................................21
4.2. Video Recording Mode......................................................................................23
4.2.1. General Settings..........................................................................................23
4.2.2 Motion Detection........................................................................................26
4.2.3. Privacy Mask...............................................................................................27
4.2.4. Information.................................................................................................28
4.3. Audio.................................................................................................................29
4.3.1. Audio Settings.............................................................................................29
4.4. Network.............................................................................................................30
4.5. Archives............................................................................................................31
4.6. Users..................................................................................................................32
4.6.1 Adding and Deleting Users..........................................................................32
- 2 -

4.6.2 User Permissions.........................................................................................33
4.6.3. Available Devices........................................................................................34
4.6.4 Screen Division.............................................................................................35
4.7. Event Log...........................................................................................................36
4.8. PTZ.....................................................................................................................37
4.8.1 Adding and Deleting PTZ Devices................................................................37
4.8.2 PTZ Settings..................................................................................................38
4.8.3 Preset Patrol................................................................................................41
4.9. Reactions...........................................................................................................41
4.9.1 Reaction Options.........................................................................................42
4.9.2 Time Settings...............................................................................................43
4.9.3 Condition Settings........................................................................................43
4.9.4 Reaction.......................................................................................................44
4.9.5 Transfer Settings..........................................................................................55
5. Custom Archive Events.............................................................................................576. Playback....................................................................................................................58
6.1. Playback in Observer.........................................................................................61
6.2. Export................................................................................................................62
6.3. Archive Event Playback.....................................................................................63
7. Web Client................................................................................................................648. Visualint Line Lite.....................................................................................................65
8.1 Settings...........................................................................................................66
9. Mobile Clients..........................................................................................................6910. IP Cameras...........................................................................................................70
10.1. IP Camera Activation......................................................................................70
10.2. Connecting an IP Camera...............................................................................71
10.3. Analog to IP Camera Conversion....................................................................74
10.5. Activation Notes.............................................................................................74
11. FAQs .....................................................................................................................75
- 3 -

11.1. PTZ Camera Connection................................................................................75
11.2. Server Groups................................................................................................77
11.3. Extranet Access and Port Mapping...............................................................77
- 4 -

Introduction
Line is a powerful comprehensive security management suite with tools for operating
local and remote video surveillance equipment in real-time. With its easy to use
interface, Line may be used for either individual home surveillance, or centralized
management. Computers installed with a video capture card or IP camera virtual
channel can be used as a video surveillance server. Line supports up to 8 monitors for
multi-monitor display output, with each monitor capable of supporting up to 64 video
channels, allowing up to 512 video channels to be viewed simultaneously.
Line software suite is comprised of three components:
Observer
Client software used for video surveillance, playback and management.
Observer is used to view live video, playback recorded video, and
manage the surveillance server settings.
Kernel
The Kernel module is used for video recording, alarms, reactions, and
networking surveillance. The Kernel server-side software should be
installed alongside the client-side Observer module. During installation,
Kernel will be configured to launch automatically at system startup and
will run in the background as a Windows service. Kernel comes
preconfigured, and settings can be changed via Observer.
- 5 -

1. InstallationInsert the visualint installation CD and wait for it to run. If the installer does not run
automatically, click on My Computer, navigate to the CD or DVD drive, right-click and
select Open, then double-click on the Setup file. Both 32-bit and 64-bit versions of
Windows 2000, XP, Vista, and 7 are supported by Line.
1.1. Setup1. When running the setup the software version will be shown. Click Next.
2. After reading and accepting the License Agreement, click I Agree to continue.
- 6 -
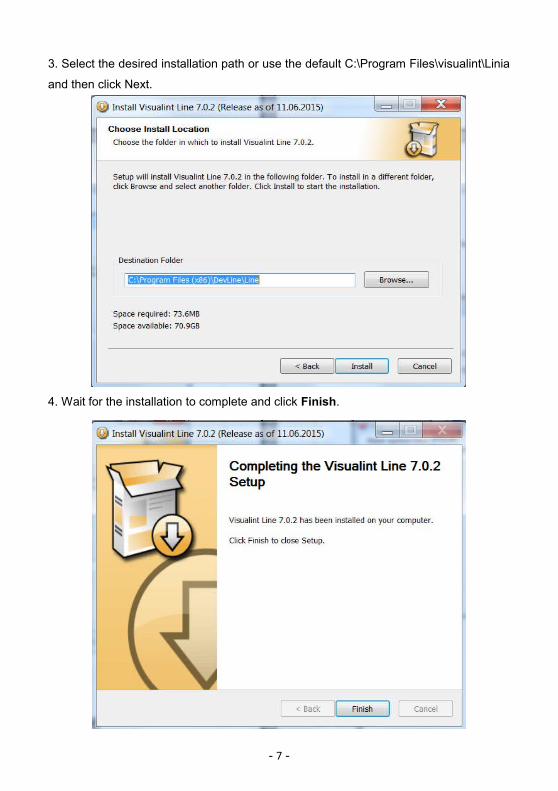
3. Select the desired installation path or use the default C:\Program Files\visualint\Linia
and then click Next.
4. Wait for the installation to complete and click Finish.
- 7 -

1.2. Software Update and Uninstall1. Before updating Line it should first be uninstalled in order to prevent any conflicts,
and ensure the new version works correctly. To uninstall, click the
Windows Start Menu, select All Programs, find the Line folder and
expand it, and click on the Uninstall icon.
2. Follow the onscreen instructions to uninstall Line. It is recommended that you leave
the Preferences box checked if you plan to update to a newer version.
2. Login1. Start the Observer module using one of the two following methods:
- 8 -

a. Double-click the icon on the Desktop.
b. Go to the Windows Start Menu, select All Programs, find the Line folder and expand
it, and then click on Observer.
2. When the Observer window appears, click Connect to Servers to bring up the server
login window.
Connect to servers Displays local or remote servers the client can login to.
Manage
The Manage menu lets the user configure the settings. Options
include General Settings, Networking Settings, Monitors, Hotkeys
etc. The Manage menu can be accessed without being logged in
to a server.
PlaybackUsed to login to the Playback interface directly to watch recorded
video footage.
3. Click the Connect to Servers icon to access the Network Connections dialog. The
Network Connections menu is used to search and add servers on the LAN and
internet. Groups can be used to manage multiple related servers, set automatic logins,
and configure proxy servers. Kernel, the server-side software does not need to search
- 9 -

as the local servers will be added automatically; however, the client-side software
(Observer) must search for servers.
1
Searches the local area network and identifies any available servers
automatically. Computers installed with a video capture card or virtual IP channel
will be discovered using the Auto Search function.
2Manually search for a server. Enter the domain name or IP address and port
number of the server and press Search.
3
Display server and group settings. When multiple servers are available you may
create groups of servers for better organization. For more information, see
Section 11.1.
4
Clicking on a server will bring up the server settings on the right. Users may
change the Server name which is displayed when logging in on the local
computer. Changing the Server name only affects the name of this machine, and
does not affect the server itself. Users may only login when the correct server
address and port number have been entered.
5
Set the default user account and select whether or not to connect automatically.
For more information, see
11.1.
- 10 -

6 Automatically connect to the selected server when Observer starts.
7 Stop attempting to connect when the Timeout limit is reached.
8 Close the Network Connections window.
9 Connect to the selected server.
4. Right-click on a server to display the submenu. Options include: Connect, Refresh,
Auto connect, Change user, Combine into group, Rename, Delete.
5. To connect to a server, click Connect from the submenu which will bring up the login
dialog. The default account is admin and the password is the device’s serial number.
- 11 -

Note: After restarting the computer with the video capture card and surveillance
software installed, the Kernel video capture module will run automatically in the
background. The default recording settings for EFFIO cards is HD1 960x288 8 FPS
and 1280x720 12 FPS for AHD-M cards. The default recording mode is Motion
detection.
3. Surveillance Interface
Observer is an application for real-time local and remote video surveillance, playback
and camera management. Observer can be used to make adjustments to the server
program (Kernel) which automatically handles video and sound recording, alarms, and
reacts to custom events. Kernel runs automatically in the background at system startup
and will function even without starting the Observer module.
At the top of the Observer window is a toolbar containing common functions; window
size and screen division profiles can be adjusted to give the user a customized layout.
Right-clicking a blank area of the toolbar brings up a menu with two additional options.
Users are able to hide the toolbar items text by unchecking the Show text beside icons
option, and automatically hide the toolbar when the mouse is outside of the toolbar
using the Hide toolbar option. Additionally, when the Observer window is maximized,
an icon will appear on the right-hand side of the toolbar which can also be used to
show and hide the toolbar.
- 12 -
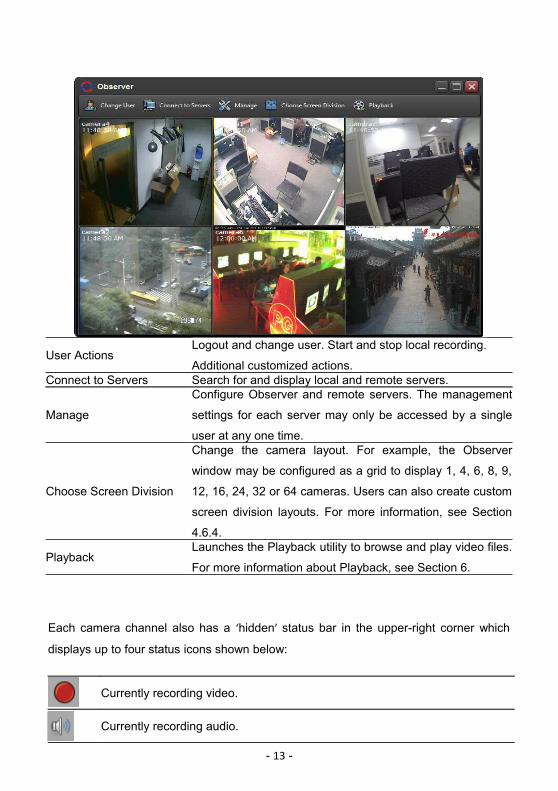
User ActionsLogout and change user. Start and stop local recording.
Additional customized actions.Connect to Servers Search for and display local and remote servers.
Manage
Configure Observer and remote servers. The management
settings for each server may only be accessed by a single
user at any one time.
Choose Screen Division
Change the camera layout. For example, the Observer
window may be configured as a grid to display 1, 4, 6, 8, 9,
12, 16, 24, 32 or 64 cameras. Users can also create custom
screen division layouts. For more information, see Section
4.6.4.
PlaybackLaunches the Playback utility to browse and play video files.
For more information about Playback, see Section 6.
Each camera channel also has a ‘hidden’ status bar in the upper-right corner which
displays up to four status icons shown below:
Currently recording video.
Currently recording audio.
- 13 -

Zoomed in on an area of the picture.
Motion detection running.
For more information about icon display, see Section 4.2.1.
Right-clicking any of the video channels displays a popup menu providing quick access
to common settings:
No Camera Do not display any cameras in this cell.
<Server Name>If multiple servers are connected, the user can select a camera
from any server to be displayed in this cell.Enable and disable sub
stream
Set the default video stream for a particular cell in a screen
division.
Create Archive Event
Add labels to the recorded video allowing you to search for
them in the Playback module. For more information, see
Section 5 and 6.3.Manage Shortcut to the management section for this camera.
When a camera is selected, a set of icons will appear at the bottom of that cell. There
are seven items total items; however, this number may vary depending on the camera
settings and user’s permissions. The items and their usage is as follows:
- 14 -
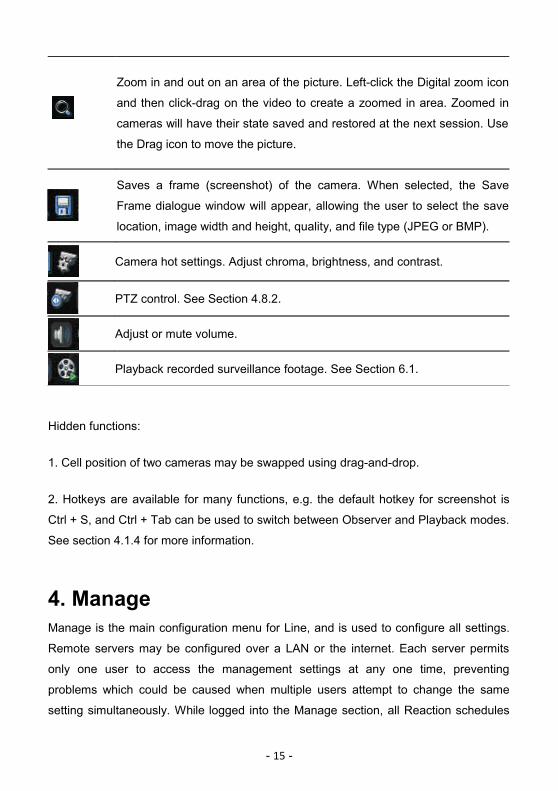
Zoom in and out on an area of the picture. Left-click the Digital zoom icon
and then click-drag on the video to create a zoomed in area. Zoomed in
cameras will have their state saved and restored at the next session. Use
the Drag icon to move the picture.
Saves a frame (screenshot) of the camera. When selected, the Save
Frame dialogue window will appear, allowing the user to select the save
location, image width and height, quality, and file type (JPEG or BMP).
Camera hot settings. Adjust chroma, brightness, and contrast.
PTZ control. See Section 4.8.2.
Adjust or mute volume.
Playback recorded surveillance footage. See Section 6.1.
Hidden functions:
1. Cell position of two cameras may be swapped using drag-and-drop.
2. Hotkeys are available for many functions, e.g. the default hotkey for screenshot is
Ctrl + S, and Ctrl + Tab can be used to switch between Observer and Playback modes.
See section 4.1.4 for more information.
4. ManageManage is the main configuration menu for Line, and is used to configure all settings.
Remote servers may be configured over a LAN or the internet. Each server permits
only one user to access the management settings at any one time, preventing
problems which could be caused when multiple users attempt to change the same
setting simultaneously. While logged into the Manage section, all Reaction schedules
- 15 -
will be paused. To access the Manage interface, click the Manage button on the
Observer toolbar, or right-click one of the video feeds and select Manage.
4.1. Client SettingsClient Settings is used to configure the window display, proxy server, monitors, and
hotkeys for the client software. Changes to the Client Settings will not affect the server
software.
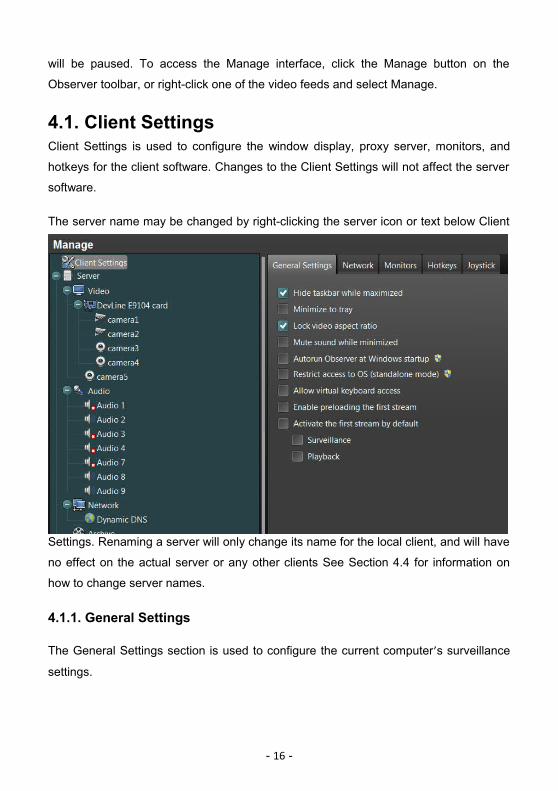
The server name may be changed by right-clicking the server icon or text below Client
Settings. Renaming a server will only change its name for the local client, and will have
no effect on the actual server or any other clients See Section 4.4 for information on
how to change server names.
4.1.1. General Settings
The General Settings section is used to configure the current computer’s surveillance
settings.
- 16 -

Hide taskbar while
maximized
Automatically hides the Windows Taskbar while the Observer
window is maximized.
Minimize to tray
If checked, Observer will appear in the notification area of the
Windows Taskbar while minimized.
If unchecked, Observer will be shown in the Windows Taskbar
while minimized.
Lock video aspect
ratio
If checked, the camera’s original aspect ratio will be kept,
regardless of the display area dimension.
If unchecked, the camera video footage will be stretched to fit the
display area.
Mute sound while
minimizedMutes all sound while the Observer window is minimized.
- 17 -

Autorun Observer at
Windows startup
Automatically runs Observer when the computer starts. If auto
login is desired, set a username and password when logging into
the server. Note: this option differs from Standalone Mode in that
Windows shortcuts and other program are still accessible.
Restrict access to
OS (standalone
mode)
With Standalone mode selected, all access to the operating
system is disabled, meaning the user cannot use any other
programs on the system. In order for Standalone mode to
function correctly, the computer must be restarted (via the power
switch) after enabling this option. Standalone mode enables a
computer to function as a dedicated embedded hard disk VCR.
Allow virtual
keyboard access
With this option selected, the Windows virtual keyboard will be
accessible to the user while Standalone mode is enabled.Enable preloading
the main streamPreload mainstream if mouse over camera or camera selected.
Activate the
mainstream by
default
If checked, Observer will display the mainstream for cameras in
all screen division cells.
Password protect
clients settings
Client settings may be restricted, requiring a password to be
entered before they can be modified. Enabling this feature will
not have any effect on other settings or Reactions.
4.1.2. Proxy Server
If you use a proxy server to access the internet and wish to connect to a video server
using Line, you may do so in the Network section Client Settings.
- 18 -

Contact your system administrator if you are unsure about your proxy server details.
4.1.3 Multi-monitor Setup
To use multiple monitors with Line, connect the monitors to the system, ensure they
are switched on, and navigate to the Monitors in Client Settings.
Multi-monitor setups require a compatible video card. For surveillance and playback on
two monitors, a dual-output video is required. For four monitors, two dual-output video
cards should be installed. When using a multi-monitor configuration, each monitor may
have a different resolution.
Display modes:
- 19 -

To configure the display mode for a selected monitor, left-click on the dropdown menu
and select a display mode from the list.
Disabled: The selected monitor will not be used with Line.
Surveillance: Enable the selected monitor for video surveillance. Each monitor in
surveillance mode can support up to 64 video channels, for a total of 512 per client.
Full Screen: Double-clicking on a camera will display the video in full screen on this
monitor.
Alarm Monitor: With motion detection configured, any camera where motion is
detected will be displayed in full screen on this monitor. For more information on
motion detection, see Section 4.2.2.
4.1.4. Hotkeys
Line includes the ability to assign hotkeys to common actions, making it easier and
more convenient to operate the surveillance equipment.
- 20 -

Delete Remove the assigned hotkey for the selected function.Reset Restore the default hotkey for the selected function.Reset All Restore the default hotkey for all functions.Apply Assign a new key combination for the selected function.
4.1.5. Joystick
To use a joystick for PTZ control, connect the joystick to the client machine runningObserver and select the device from the drop down menu. Here you will be able tocalibrate the device, adjust the sensitivity, and configure how it will control PTZdevices.
- 21 -

- 22 -

4.2. Video Recording Mode
4.2.1. General Settings
The General Settings section allows to you make changes to a camera’s appearance
such as color, chroma, brightness, display resolution, compression method, camera
name and time overlay, and recording status (always, off, motion detection). For video
channels coming from capture cards, you can change analog input to digital input for IP
cameras. See Section 10.3 for details.
Cameras can be renamed,
switched on/off, and
converted to an IP camera
through the popup menu
accessible by right-clicking
on the camera name in the
list located on the left side of
the Observer window.
- 23 -

The General Settings menu lets users set parameters for any camera on local or
remote servers.
Mainstream
Switch on camera When deselected, switches off this video input.Resolution Select from available camera resolutions
Capture FPSChanges the number of frames per second the camera
captures. A value of 1 to 25 is available for each video channel.
Recording FPSFrames per second for recorded video surveillance. A value of 1
to 25 is available for each video channel.
Recording mode
You may select one of three recording modes: Off, which
disables recording on this video channel, Always, which will
record video always, and Motion detection, which will only start
recording when motion is detected.
Compression
Select the video recording compression method. M-JPEG
results in high quality video recordings with large file sizes.
H.264 produces lower quality video recordings but has much
smaller file sizes.Option Choose a bitrate optionQuality Adjust the picture qualityBitrate Manually enter the bitrate for this camera
- 24 -

Video chroma, brightness, and contrast can be adjusted from within the General
Settings window. Right-clicking on the camera preview box displays a popup menu
with overlay settings for the camera. Camera name, date, and time overlays can be
enabled and disabled, and moved to a different position using drag-and-drop. Font
size, color, and tracking lines can be configured, and indicator icons for Digital zoom,
Record, Motion detection, and Sound can be enabled and disabled.
At the bottom of the window you can choose to apply the settings of the current camera
to all cameras or to selected cameras in a list.
Apply to AllCopy the current video settings to all cameras on the current
server.
Apply to SelectedCopy the current video settings to the selected cameras on the
current server.Camera name Change the camera name.Change to IP Convert this camera to an IP camera.
- 25 -

4.2.2 Motion Detection
Motion detection allows users to setup hotspots on selected areas of video and trigger
events when motion is detected. The default motion detection zone covers the entire
video area. If you wish to change this to a different size and location, you may do so by
left-clicking and dragging the edge of the red rectangle, and reposition it using drag-
and-drop. Motion detection zones can be deleted by right-clicking on the zone and
selecting Delete from the popup menu. Each camera can have multiple motion
detection zones configured; left-click on an empty area of the video and drag the
mouse to create a new motion detection zone.
Multiple zones
Multiple motion detection zones may be created for each
camera, and users can specify unique names for individual
zones.
Tracking
Tracking causes Line to draw a contour around moving objects,
helping draw attention to them.
Reactions
Reactions enable users to set custom events to trigger when
motion is detected. For information about Reactions, see Section
4.9.
- 26 -

Record
Line is able to record for up to 5 seconds before and after motion
is detected. For example: setting the start time to 3 seconds and
the end time to 5 seconds, Line will start recording 3 seconds
before motion is detected, and finish recording 5 seconds
afterwards.Duration specifies the length of time detected motion
must occur for before it will be registered as a motion detection
event.
Object size
Allows you to specify the size of object that will be captured by
the motion detector. A smaller object size will capture smaller
movements.
4.2.3. Privacy Mask
Privacy mask allows you to set areas of the camera image which will be masked,meaning they won’t be viewable in live and recorded video. This can be especiallyuseful in situations where privacy is a concern. Configuring a privacy mask is very
similar to configuring a motion detection zone.
To create a new privacy mask, simply hold the left mouse button and drag therectangle to the desired size and location, and then release the left mouse button.
- 27 -

Once you have created a privacy mask you can move it by left-click-drag or remove itby right-clicking on the privacy mask and selecting Remove.
4.2.4. InformationObserver has the ability to display detailed information regarding the camerasprotocol, model, firmware, stream details, status, PTZ support, and RTSP links.
Select the information tab under the camera settings to view this information. Pleasenote that not all information is available for every camera model.
- 28 -

4.3. Audio
4.3.1 Audio Settings
Audio input is synchronized with video and is taken from the video capture card or IP
camera. Audio input is software assigned to the camera channel. Audio recording can
be set to Off, Always, or Threshold. Threshold mode enables you to set a decibel
threshold which will trigger recording when the threshold is reached.
To change the name of an audio channel, right-click on the speaker icon and click
Rename. Audio channels
may also be switched on or off via the right-click menu.
When an audio device is connected, the sound pressure level will be detected and
displayed on the audio threshold slider. Drag the audio threshold slider to change the
- 29 -

threshold level. When the sound is higher than the configured threshold, a Reaction will
be triggered (audio threshold can also be configured in audio settings). See Section 4.9
for more information on Reactions.
4.4. NetworkThe network section is used to specific server names, network communication ports,
and IP addresses. Line has a whitelist function which allows you to block server access
for all IP addresses except those explicitly configured. If you add an IP address in the
network settings, only computers in the Valid IP addresses list will be able to connect
to the server. It is highly recommended that you have physical access to the video
surveillance server when configuring network settings and that you test that newly
added servers have access after adding them to the valid IP addresses list. If you set
the IP address incorrectly, other computers may not be able to access the server.
Note: the localhost address (127.0.01) will not be blocked.
Observer ports For surveillance via client software Line (Windows only).
Web server portsFor internet browsers and mobile devices (Java, Windows Mobile,iOS, and Android). For more information about port mapping, seeSection 9
- 30 -

4.5. ArchivesThe Archive section is used to configure the location recorded video surveillance is
stored. From here you can add and remove recording locations and set the free space
limit.
If the used disk space exceeds the limit, old video files will be overwritten as and whenmore space is required.
Click on the ‘Connect to network disk’ to view available network storage devices whichare available for recording to the Archive.
Line also provides a software RAID implementation making it possible to configure
exactly which cameras are stored to which disk, which can be useful when there are a
large number of high-resolution or high frame rate cameras as performance may
otherwise be hindered by disk write speed limitations.
- 31 -

4.6. UsersAdministrators are able to create new user accounts and give them certain privileges.
The main administrator account (default username is admin and the password is
the device’s serial number) cannot be deleted or have permissions removed,
however, the administrator may change their own username and password.
Ensure the administrator account password is kept confidential.
4.6.1 Adding and Deleting Users
1. New users can also be added by right-clicking and selecting Add User.
After clicking Add User, the New User dialog will open, prompting you to enter a
username and password, and select the user type (Administrator, Supervisor, Guard)
for the new user account.
- 32 -

User accounts can also be deleted or renamed by right-clicking and
selecting Rename/Delete User. The default administrator account cannot be deleted.
4.6.2 User Permissions
Administrators are able to configure different permissions for each user, with each user
being able to change their own password. The default user “admin” cannot be deleted.
- 33 -

Username and password for the selected user may be changed by clicking Change
username and password.
The default “admin” account has full user permissions which cannot be changed
(except for the username and password). Users are able to create additional
administrator accounts which by default have full user permissions, but these can be
changed by the master administrator (admin).
4.6.3. Available Devices
Administrators are able to grant and revoke access to various devices on a per user
basis, and set the number of cameras and audio channels which can be monitored by
a given user.
Checked cameras are viewable by the selected user; unchecked cameras will not be
displayed in Line when the selected user logs in. For example, if only camera1 is
checked, the selected user will only be able to view and configure camera1; other
cameras will not appear in the Video settings window.
- 34 -

4.6.4 Screen Division
Line allows you to customize the size, shape, and position of cameras in the Playback
surveillance window for different users. If multiple monitors are connected, each screen
may have a different layout.
1. New screen divisions can be created by clicking the button, or right clicking on
any black space inside the Screen Division window. In the Screen Division Editor, click
the button to create a predefine grid on the canvas, and resize the cells by
dragging the sides and corners. New cells can be created by holding left-click and
dragging the mouse to the desired size. To delete or merge two cells, right click on a
cell to bring up the menu.
- 35 -

2. Unwanted screen divisions can be deleted by selecting the screen division and
clicking the icon. To edit a screen division, right-click on it and select Edit. Screen
division may also be renamed in the same way, and selected chosen as the default by
clicking the Default screen division option.
4.7. Event LogThe Line Event Log shows all operations performed by the system and users.The Event Log contains a search function which allows the user to search for a specifictext string which will be filtered. For example, searching for “admin” will display only
events which contain the text “admin.”
Checking the Advanced settings box will display additional search filters which can beused to filter operations based on specific components of Line, such as ReactionSettings, Web Server, and PTZ Devices.
- 36 -

4.8 PTZPTZ or pan-tilt-zoom allows remote directional and zoom control on selected cameras.
Before PTZ can be used, the PTZ compatible device must be added to Line.
4.8.1 Adding and Deleting PTZ Devices
1. Click on Add PTZ Device to display the Select Camera window, and select a PTZ
compatible camera from the list.
PTZ cameras can also be added by right-clicking the icon and
selecting Add camera.
2. PTZ cameras can be removed by right-clicking the camera under PTZ Devices and
selecting Delete.
- 37 -

4.8.2 PTZ Settings
Before you can use a PTZ camera or dome camera (high/medium speed dome) it must
first be configured. Select the camera from the device list and set the communication
port, baud rate, PTZ protocol, and address. Ensure the camera is correctly connected
to the computer and that the settings are correct, and then click one of the control
arrows below the camera video display to confirm the camera can be controlled using
PTZ functions. To configure the camera’s surveillance location, select a preset icon
(e.g. Preset 1), and use the PTZ control arrows and zoom feature to position the
camera as desired. Once the camera has been positioned, click the Save button.
Settings for PTZ devices can be accessed via: Manage->Visualint Line server->PTZ
devices.
- 38 -

After adding a PTZ camera, the PTZ protocols must be configured. For the correct PTZ
settings for your device, refer to the camera’s user manual or contact the provider. The
port number, baud rate, protocol, and address must be configured in Line.
3. To Save Preset using the PTZ control arrows, zoom, and focus, move the camera to
the desired position, and click the Save button. Once a preset is saved, a small image
of the saved camera location will appear above the preset name.
4. To delete a preset, select it from the Presets list, and click the Delete button below.
Alternatively, right-click on a preset image and select Delete from the popup menu.5.
- 39 -

5. To move the camera from the preview window, select the desired camera and hold
the left mouse button and drag the mouse in the desired direction. While moving a PTZ
camera, four small directional arrows will appear in the center of the screen. The
mouse wheel may be used to zoom in and out on a PTZ device.
Click the PTZ control icon at the bottom of the video feed to display the PTZ Device
Control Panel. From here you move the camera using the onscreen arrows, and select
saved presets.
- 40 -

4.8.3 Preset Patrol
Click Create New Patrol on the preset Patrol menu and a new window will appear. Add
one or more presets and set the duration the camera will stay on each preset, and then
click Apply. Preset duration can range from 1 second up to 1 hour, and each preset
can have a different duration. Preset patrols should be used with the Reaction function,
and multiple preset groups can be configured to trigger when a Reaction occurs. For
Reaction details, see Section 4.9.
4.9. ReactionsReaction is a built in function which allows Line to monitor for certain events and triggercustomized responses when certain conditions are met. Reactions help improvesurveillance efficiency by automating common tasks for you, for example:
-When motion is detected on PTZ camera, display the camera and start a custompatrol;-Trigger an audio alarm when motion is detected;-Start recording video footage from a camera when the audio threshold is reached.
Multiple Reactions may be configured independently, and can be configured to only beactive on specific days or between certain times. All configured Reactions can beviewed in the main Reaction tab.
- 41 -

4.9.1 Reaction Options
There are four buttons found at the bottom of the Reaction window: Create New
Reaction, Delete Selected Reactions, Undo, and Redo.
To edit an existing Reaction, double-click on the Reaction in the list, or right-click on it
and then select Edit from the popup menu.
Settings for the three Reaction headings (Time, Conditions, and Actions) can be added
by clicking the Add button. In the Create Reaction window you can create and edit
Reaction settings, and activate it by clicking Create.
- 42 -

4.9.2 Time Settings
Set one or more time intervals to choose when the Reaction will be active. Since the
time unit is 24 hours, if you wish to set the Reaction time spanning two days, you must
create two separate time intervals. For example: a Reaction active between 20:00 and
06:00 should be configured with time intervals; 20:00 – 24:00, and 00:00 to 06:00.
4.9.3 Condition Settings
The Reaction Condition refers to the event which will trigger the Reaction. There are
three Conditions to choose from:
Motion
detection
Add one or more motion detection zones for any camera. When motion
is detected, the Reaction will trigger the specified Action.
Signal lossThe specified Action will be triggered when signal is lost on any of the
specified cameras.
- 43 -
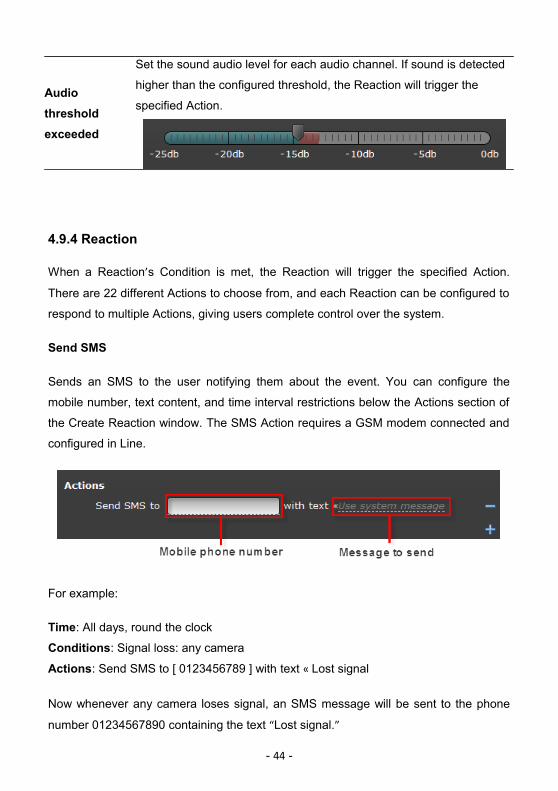
Audio
threshold
exceeded
Set the sound audio level for each audio channel. If sound is detected
higher than the configured threshold, the Reaction will trigger the
specified Action.
4.9.4 Reaction
When a Reaction’s Condition is met, the Reaction will trigger the specified Action.
There are 22 different Actions to choose from, and each Reaction can be configured to
respond to multiple Actions, giving users complete control over the system.
Send SMS
Sends an SMS to the user notifying them about the event. You can configure the
mobile number, text content, and time interval restrictions below the Actions section of
the Create Reaction window. The SMS Action requires a GSM modem connected and
configured in Line.
For example:
Time: All days, round the clock
Conditions: Signal loss: any camera
Actions: Send SMS to [ 0123456789 ] with text « Lost signal
Now whenever any camera loses signal, an SMS message will be sent to the phone
number 01234567890 containing the text “Lost signal.”
- 44 -

Save frame
Saves the current image frame for one or many cameras to the computer’s hard disk.
You can set the image size, path, and adjust the time interval.
For example:
Time: All days, round the clock
Conditions: Motion detection: any motion detection zone, any camera
Actions: Save frame(JPEG, 720x576) as C:\temp\<automatically generate
filename>.jpg for All cameras. Not again for 10 sec.
This will save a JPEG frame for all cameras with an automatically generated filename
at 720x576 resolution to C:\temp when there is motion detected on any camera. This
Action will not occur more than once every 10 seconds.
- 45 -

Upload frame to FTP server
Upload the current image frame for one or many cameras to an FTP server. You can
set the image size, path, and adjust the time interval. Uploading images to an FTP
server can allow images to be viewed from more than one location. The FTP server
settings must be configured in order for FTP upload to work. See Section 4.9.5 for FTP
settings.
Reaction can be configured to send the current image frame for one or many cameras
to an email address. You can set the image size, recipient address, message, and time
interval.
- 46 -

For example: if the location of the camera is unattended, you can set the time interval
between 20:00 to 07:00 where any motion detection will trigger the Reaction to send an
email containing an image of all cameras.
Sound alarm
Play a sound file when the Reaction’s Condition is met. Playback sound file and time
interval can both be configured.
- 47 -
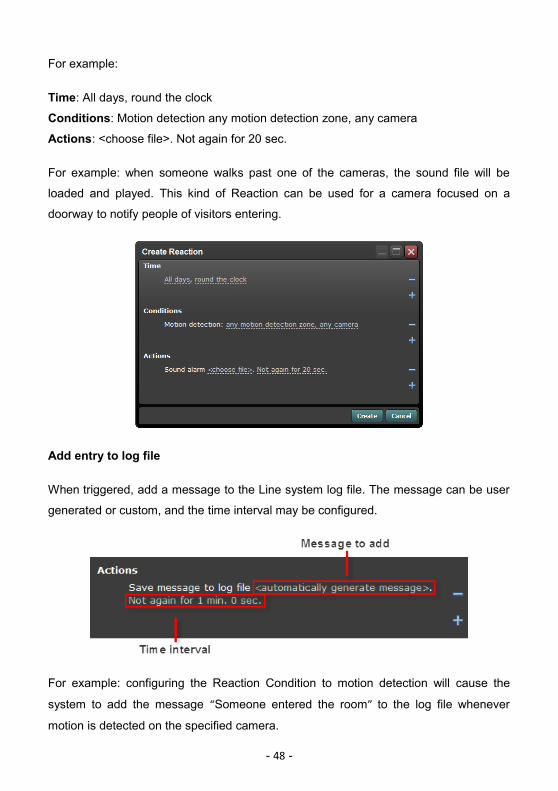
For example:
Time: All days, round the clock
Conditions: Motion detection any motion detection zone, any camera
Actions: <choose file>. Not again for 20 sec.
For example: when someone walks past one of the cameras, the sound file will be
loaded and played. This kind of Reaction can be used for a camera focused on a
doorway to notify people of visitors entering.
Add entry to log file
When triggered, add a message to the Line system log file. The message can be user
generated or custom, and the time interval may be configured.
For example: configuring the Reaction Condition to motion detection will cause the
system to add the message “Someone entered the room” to the log file whenever
motion is detected on the specified camera.
- 48 -

Go to camera preset
When the specified Condition is met, move the chosen camera to a new preset.
For example: a microphone and camera are installed in an office; when the sound level
in the office exceeds the audio threshold, camera1 will load preset no.1 for 5 seconds,
moving the camera to the location defined by the preset. This Reaction Action requires
compatible PTZ camera.
- 49 -

PTZ patrol
Reaction can be configured to start a user defined PTZ patrol when triggered.
Before you can use the PTZ patrol Reaction you must first configure a PTZ compatible
device and create a PTZ patrol path. For information on creating PTZ patrols, see
Section 4.8.3.
- 50 -

To ensure the patrol moves to each preset location before the sequence ends, set the
Action “time interval” greater than the sum of all preset durations.
Adjust camera settings
Camera settings can be adjusted when an event is triggered by Reaction.
a. Adjust camera brightness, contrast, and chroma, and switch camera on/off
- 51 -

b. Set the camera compression method, recording mode, quality, and resolution
- 52 -

c. Set the capture rate (FPS), recording rate (FPS), and network transfer rate (FPS).
For example:
Time: All days, 00:00 – 06:00
Conditions: Unconditionally (don’t add any Conditions)
Actions: Set recording rate (FPS) to 25 FPS for All cameras
In this instance, the camera will record at 8 FPS normally, and start recording at 25
FPS if motion is detected. This configuration allow for high video recording quality
- 53 -

d. Motion detection sensitivity and tracking
Reaction can modify the motion detection sensitivity and enable/disable the tracking
feature when specific Conditions occur. You can create Reactions for multiple motion
detection schedules at different time periods using the motion detection Action.
Microphone settings
Specific microphones can be switched on/off and their recording mode changed.
For example: a camera and microphone are installed in a meeting room; when
someone enters the room or movement is detected, switch on audio recording for 1
- 54 -

minute. Once the 1 minute has elapsed, if no movement is detected, switch the audio
off again.
4.9.5 Transfer Settings
In order for Reactions to use SMS, FTP, and email, the transfer settings must first be
configured. Installation, maintenance, and technical support for third-party devices and
services are not covered by visualint support, and any issues relating to these services
should be directed to the supplier or your system administrator.
FTP
To use the FTP transfer you must first have an FTP server or an account with FTP
access. If you do not know your FTP details, contact your system administrator or FTP
provider.
- 55 -

SMTP
In order for emails to be sent from Reactions, a valid SMTP server must be configured
in the Transfer Settings. If you do not know the SMTP details, contact your email
provider.
SMS
To use the SMS notification Reaction you must have a GSM modem connected to the
surveillance server. For the port and baud rate, refer to the GSM modem user manual
or contact the manufacturer.
- 56 -
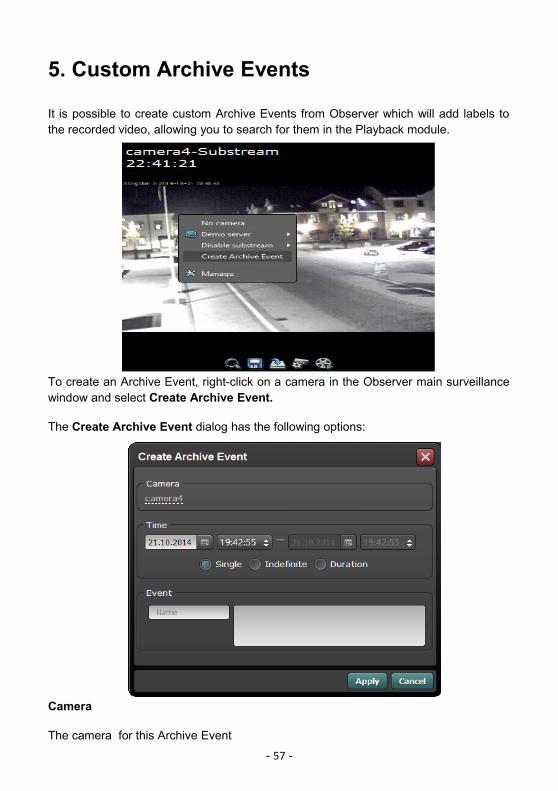
5. Custom Archive Events
It is possible to create custom Archive Events from Observer which will add labels tothe recorded video, allowing you to search for them in the Playback module.
To create an Archive Event, right-click on a camera in the Observer main surveillancewindow and select Create Archive Event.
The Create Archive Event dialog has the following options:
Camera
The camera for this Archive Event
- 57 -
Time
The time the event is active. Single will simply add the Archive Event at this point in time, Indefinite will start the Archive Event at this point in time and will need to be manually stopped later, Duration allows you to specify a duration the Archive Event will be present in the archive.
Event
The first box contains the name of the Archive Event, and the second, larger box is for the custom Archive Event data.
After you have filled in the Archive Event information, click Apply to confirm.
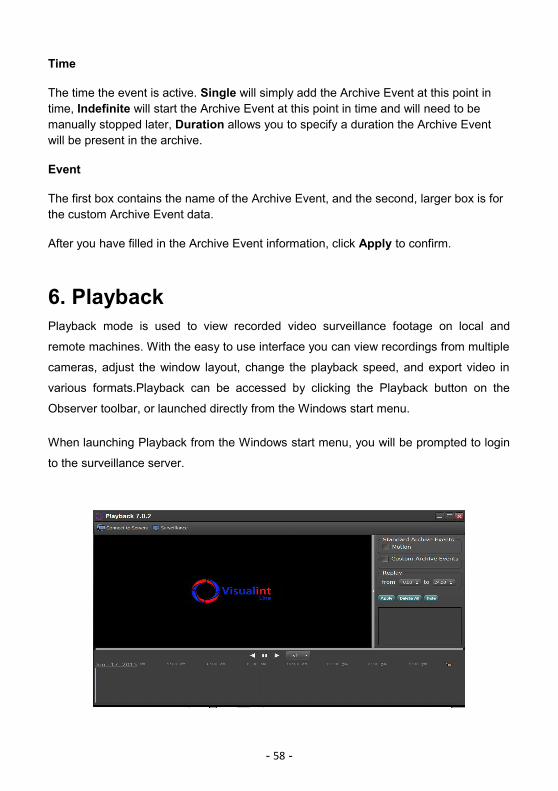
6. PlaybackPlayback mode is used to view recorded video surveillance footage on local and
remote machines. With the easy to use interface you can view recordings from multiple
cameras, adjust the window layout, change the playback speed, and export video in
various formats.Playback can be accessed by clicking the Playback button on the
Observer toolbar, or launched directly from the Windows start menu.
When launching Playback from the Windows start menu, you will be prompted to login
to the surveillance server.
- 58 -

Once connected, you can select the recording date from the Select Date dialog. After
selecting the date, the video playback window will become active.
- 59 -

1Video playback controls: play forwards, backwards, and pause video
playback.2 Playback speed. Select the video playback speed between -32x and +32x
3
The Playback working panel consists of four parts:a. The camera pane showing the status of all cameras and audio devices.b. Video and audio recording timelinec. Recorded date timeline: aqua for video, blue for audio. To change the recording date without opening the Select Date dialog, left-click and drag the timeline left or right.d. Current playback position is shown as a vertical yellow line.
4The padlock icon is used to lock the playback position to the center of the timeline.
5The popup menu displayed when right-clicking on a cell can be used to assign a camera to that cell.
6
Selecting a cell will display the control panel forthat camera. Functions include: Original size,Zoom in, Zoom out, Drag, Save frame, andDecompose frames.
Clicking the decompose frames icon will displaythe most recent 25 frames, allowing you to select the clearest images and save them to disk.
- 60 -

Menu bar functions
Change User: Login as a different user.
Connect to Servers: Open the Network Connections window and connect
to a different surveillance server.Choose Screen Division: open the Choose Screen Division window to
configure the window layout.Export Data: Export recorded video from local and remote surveillance
servers to a specified directory. You can select the date and time,
encoding type, and camera overlay information for exported video.
Export allows you to export footage from either a single camera or multiple
cameras at a time.Select Folders for Playback: Select a custom folder for video playback from
a local or network drive.
Select Date: Select the video surveillance recording date.
Surveillance: Switch to surveillance mode.
Hidden
Controls
The position of two cameras may be changed using drag-and-drop.
Hotkeys are also usable in Playback mode; for example, the default hotkey
for screenshot is Ctrl + S, and Ctrl + Tab can be used to switch to
surveillance mode. For more information on hotkeys, see Section 4.1.4.
6.1. Playback in ObserverRecorded video surveillance for individual cameras can be quickly viewed in the
Observer window without the need to switch to the full Playback surveillance mode. To
use the embedded playback feature, select a camera in the Observer window and then
click the Playback icon.
- 61 -

The Playback toolbar can be used to play recorded video forward and backward,
pause, change playback speed, zoom in and out, and save the current frame.
Above the timeline are two icons; the padlock is used to lock the playback position to
the center of the timeline, and the paperclip keeps the Playback toolbar displayed
when another camera is selected.
6.2 Export
The Playback module includes the ability toexport video data in 3 different modes.
Single
Export video from a single camera into one file.
Multiple
Export video from multiple cameras with aseparate video file for each camera.
Combined
Export video from multiple cameras into a singlecombined video file.
All export modes allow you to customize theexport parameters including the Begin and Endtimes, audio/video streams, video codec, andthe export destination.
- 62 -

6.3 Archive Event PlaybackIf you have created custom ArchiveEvents, it is possible to search for themin the Playback module and view them inthe event log.
Check the Custom Archive Eventscheckbox to enable this mode, click NewFilter, and enter the name of the ArchiveEvent to search for in the small popupbox. Once you have added one or moreArchive Events, click the Apply button tosearch for them in the video archive.
A list of Archive Events matching theinputted data will be displayed in a listunder the Archive Event search area.Clicking on the Archive Event will takeyou to that time in the video file, andby right-clicking on the Archive Eventyou will be able to export the video atthe time the Archive Event wascreated for.
- 63 -

7. Web Client
Line comes with a built-in webserver which allows users to connect to the surveillance
server and view live video from any Flash enabled web browser.
1. Launch the web browser and enter the domain name or IP address of the
surveillance server in the address bar. If necessary, the webpage will automatically
download the Flash plugin. When the download is complete, the Line Authorization
page will be displayed. For more information please visit our website:
http://visualint.net/
- 64 -

8. Visualint Line LiteLine Lite is a compact desktop surveillance camera preview tool which can be used tomonitor the most important surveillance camera right from your desktop. The figurebelow shows Line Lite in action.
To change the current camera, right-click on the Line Lite window and select the camera from the popup menu.
- 65 -
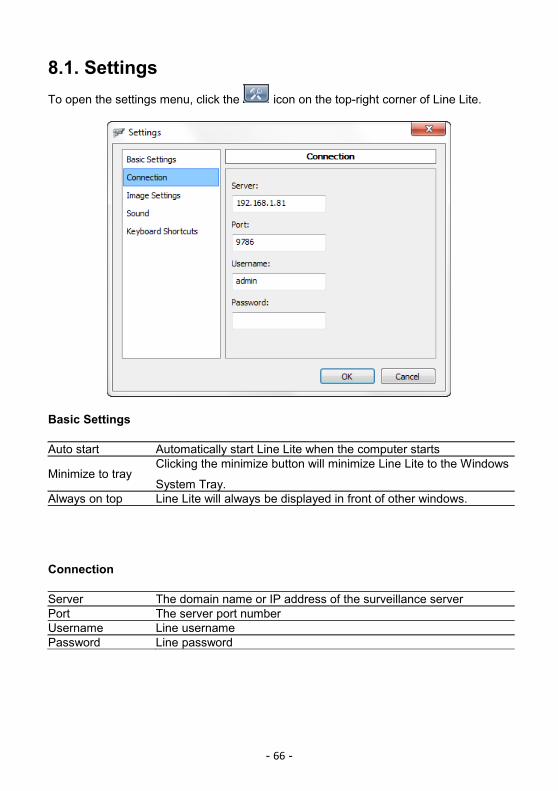
8.1. Settings
To open the settings menu, click the icon on the top-right corner of Line Lite.
Basic Settings
Auto start Automatically start Line Lite when the computer starts
Minimize to trayClicking the minimize button will minimize Line Lite to the Windows
System Tray.Always on top Line Lite will always be displayed in front of other windows.
Connection
Server The domain name or IP address of the surveillance serverPort The server port numberUsername Line usernamePassword Line password
- 66 -

To connect to a server for the first time, enter the desired server settings and restart
Line Lite. When Line Lite launches, click on the camera icon ( ) in the top-left ofthe window to enable video. The figure bellows shows the Line Lite window afterlogging in to a new surveillance server.
Image Settings
Resolution Change the camera resolution or use the default setting.
Keep aspect ratioDo not change the camera aspect ratio when resizing the Line Lite
window.
Quality
Move the slider to adjust the camera image quality. Moving the
slider to the right increases the quality, while moving the slider to
the left decreases the quality. Check the Default settings box to use
the default quality settings.Frame rate Change the camera frame rate.
Transparency
The Line Lite window can be made partially transparent by sliding
changing the slider. Moving the slider to the right increases
transparency.
- 67 -

Sound
VolumeMove the slider to the right to increase the sound volume. Check
the Mute box to disable sound.
QualitySound quality can be increased by moving the slider to the right, or
decreased by sliding to the left.
Keyboard Shortcuts
Line Lite allows you to create keyboard shortcuts for common tasks such asminimize/maximize, switch to previous camera, switch to next camera, and switchsound on/off. Keyboard shortcuts can be created as follows:
1. Select on an Action from the list.2. Click on the input box to the left of the Assign button.3. Enter your desired key combination (e.g. Ctrl + M).4. Click the Assign button.
To remove a previously configured keyboard shortcut, select the keyboard shortcut andclick the Clear button.
- 68 -

9. Mobile ClientsThe Visualint Line mobile client is available for Apple iOS, Android, and Windows Phone
devices. Search for “Visualint Line” in the Apple App Store, Google Play, or Windows
Phone Store on your mobile device to download the Visualint Line mobile client. Visit
http://visualint.net/mobile-client.html for more details about the Visualint Line
mobile clients.
iPhone & iPad
Android
- 69 -

10. IP CamerasLine Hybrid IP systems allow users to connect both analog, AHD-M and IP cameras forvideo surveillance. If you only have IP cameras, a pure IP camera HD surveillancesystem can be configured without the need for a dedicated video capture card usingthe Line IP product range. If using a Line Hybrid IP product, you can convert an analogvideo channel to an IP channel creating a hybrid surveillance system.
Line IP currently supports 3078 devices from 105 different manufacturers , and wecontinue to update our supported product range. For more information aboutcompatibility, please visit http://www.visualint.net/
10.1 IP Camera ActivationFirst insert the CD into the CD-ROM drive of the surveillance server and install LineSurveillance System. For instructions on installation, see Section1. The latest versionof Line can be downloaded from www.visualint.net. During installation you may beasked by your antivirus software if you wish to allow Line to make changes to yoursystem.
Open the activation tool from the Windows Start Menu->All programs-> Visualint Line7.x->Line IP activation.
Please follow the requests of activation tool.
Wait for the activation software to contact the visualint server. When complete, you willbe shown a message notifying you that the activation has been successful.
- 70 -

If activation fails, check that the computer is connected to the internet and that theserial number entered is correct. If activation fails after taking these steps, pleasecontact visualint technical support.
10.2. Connecting an IP Camera
Launch Line management and navigate to Video:
- 71 -

Select one of the available cameras from the list and then click Connection Settings onthe right of the window. If the IP camera and server are on the same network you canuse the Find Cameras button to scan for available cameras. If the camera is not on thesame network or cannot be found automatically, enter the hostname or IP address,port, username, and password into the Connect to camera dialog and click Apply.
After applying the settings, the IP camera video feed will be shown in the GeneralSettings window. Click Save and Exit to finish.
If you are adding multiple cameras at the same time, you can add them in one easy step rather than entering each camera manually. Click on the ‘Video’ tree in under yourserver to access this option.
Enter the IP address range for the cameras ad click ‘Add’ and Observer will add
multiple cameras at once. To access each camera’s settings, click the pencil icon
under the ‘Settings’ column.
Line 7.x and above allows you to connect your cameras in dualstream mode, drastically reducing the CPU usage and network bandwidth, enabling you to connect even more cameras per server. In dualstream mode, Line will receive two video streams from the camera: the mainstream, a high-resolution full-quality stream, and a substream, a low-resolution lower quality stream. The low-resolution substream will be displayed in Observer by default, and will switch to the high-resolution mainstream when double-clicking on a camera to enter full-screen mode. The image below shows the camera connection dialog with the substream. After checking the Enable substream box, you can opt to allow Line to automatically get the substream RTSP
- 72 -

link (not supported by all cameras), or alternatively enter the camera’s RTSP substream URL manually.
After configuring thesubstream details you will beable to see both streamsside-by-side in the camera’sGeneral Settings. Substreamsettings work in much thesame way as the mainstreamsettings; although not allfeatures are available for alldevices.
To enable the substreamdisplay in Observer, right-clickon a camera cell and selectthe Enable substreamoptions. You will notice adifference in image resolutionand quality between full-screen and non-full-screenmode in Observer, butprovided you have enabledrecording on the mainstream, video will be recorded with the high-resolution full qualityof the mainstream.
- 73 -

10.3. Analog to IP Camera ConversionIf you are using a Line Hybrid IP solution, you can convert an analog camera slot to anIP camera. To convert an analog camera to an IP camera, right-click on the cameraunder Video and select Change to IP camera. To change an IP camera back to analog,right-click on the camera and select Change to Analog Feed.
10.4. Activation Notes1. Please keep your serial number safe. visualint is unable to replace lost serialnumbers.
2. Activating Line IP online will tie the serial number to the computer hardware.Reactivating the serial number on a different computer will tie the serial number to thenew computer.
3. If you change hardware more than three times, the serial number will be bound tothe last registered computer, so care should be taken when selecting hardware for yoursurveillance system. Suspicious activity relating to online registration may result in theserial number being rejected.
4. If activation fails, check that the computer is connected to the internet and that theserial number entered is correct. If activation fails after taking these steps, pleasecontact Visualint technical support.
- 74 -

11. FAQs
11.1 Server GroupsMultiple servers can be categorized together to create server groups:
Search for servers using the IP address and port, or click the Auto Search button.
Create a server group by right-clicking on one of the servers and selecting Combine
into group. Line will create a group automatically from the selected server and you will
be prompted to give the new group a name. Groups can also be created by right-
clicking on the green background of the window and selecting Create group. Right-
clicking on a group will display a popup menu allowing you to delete, rename, and set
the screen division for the server group.
Screen divisions
- 75 -

Setting a default screen division for a server group will cause the chosen layout to load
at each login, meaning it does not have to be configured each time. This option is
especially useful when multiple monitors are used, as it permits different screen
division layouts for each monitor.
Auto connect
Line can be configured to automatically connect and login to all servers in a group
when the program starts. To enable auto connect, right-click on a server group and
select Auto connect from the popup menu. In order for auto connect to work for a
server group, the username and password for each server in the group must be
configured. For each server in the group, select the name and then expand the
Network Connections window by clicking the arrow on the right side of the window.
From here you can configure the user login. Alternatively, right-click on a server name
in the Network Connections window and select Change user from the popup menu.
- 76 -

11.2. PTZ Camera ConnectionPTZ cameras can be connected using a USB to RS485 converter cable:
1. Connect the camera to the power supply.
2. Connect the USB to RS485 converter to the computer.
3. Install the driver for the USB to RS485 converter.
4. Connect the camera to the USB to RS485 converter.
5. Switch the operating mode to full duplex or half duplex. Refer to the PTZ cameramanual for more information.
6. Set the Baud rate, Protocol, and Address under PTZ Devices in Line.
11.3. Extranet Access and Port MappingTo configure extranet access and port mapping, navigate to Network via:
The Network window shows the Observer port, Playback port, and Webserver port
which can be modified by the user.
When changing port numbers, ensure that they are mapped correctly on the router
connected to the surveillance server:
1. Switch off the router, wait 30 seconds, and switch it back on.
2. Open a web browser and enter the router IP address. To find the router IP address,check the router manual or contact your system administrator.
- 77 -

3. Login to the router interface and navigate to port mapping/port forwarding.
4. Map the ports on the router to the ones configured in the Line Network settingsshown above.
Once the ports have been mapped, users
will be able to access the server using the
domain name or IP address of the ADSL
connection. You can check the status of
your surveillance server on our website at
http://www.visualint.net/
- 78 -


