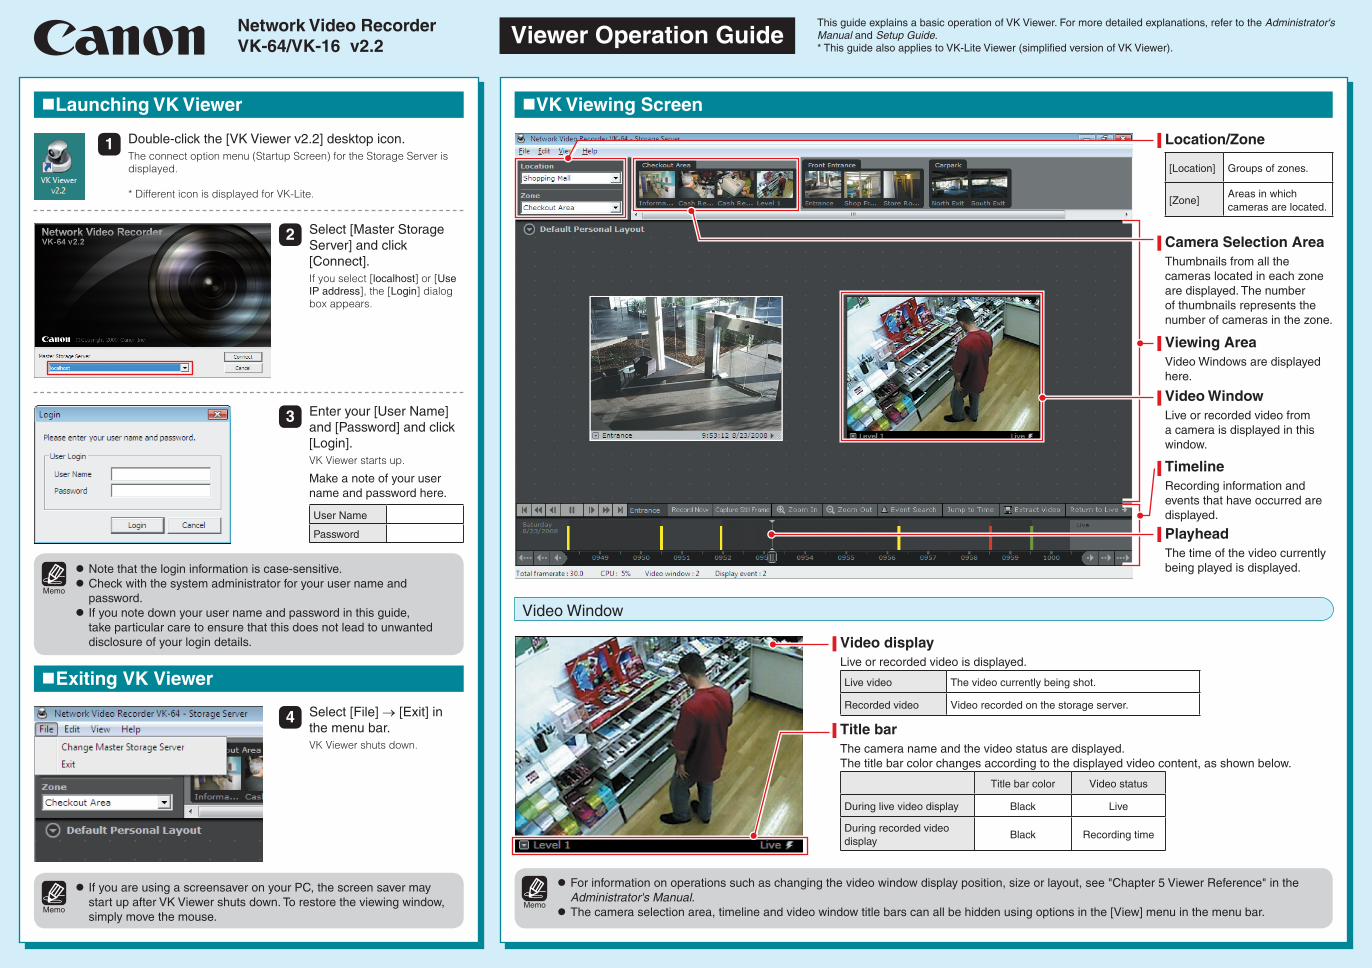
Network Video Recorder VK-64/VK-16 v2.2 Viewer Operation Guide This guide explains a basic operation of VK Viewer. For more detailed explanations, refer to the Administrator's Manual and Setup Guide. * This guide also applies to VK-Lite Viewer (simplified version of VK Viewer). Location/Zone [Location] Groups of zones. [Zone] Areas in which cameras are located. Camera Selection Area Thumbnails from all the cameras located in each zone are displayed. The number of thumbnails represents the number of cameras in the zone. Video Window Live or recorded video from a camera is displayed in this window. Viewing Area Video Windows are displayed here. Timeline Recording information and events that have occurred are displayed. Playhead The time of the video currently being played is displayed. Launching VK Viewer 1 2 4 3 Double-click the [VK Viewer v2.2] desktop icon. The connect option menu (Startup Screen) for the Storage Server is displayed. * Different icon is displayed for VK-Lite. Select [Master Storage Server] and click [Connect]. If you select [localhost] or [Use IP address], the [Login] dialog box appears. Enter your [User Name] and [Password] and click [Login]. VK Viewer starts up. Make a note of your user name and password here. User Name Password Select [File] → [Exit] in the menu bar. VK Viewer shuts down. Memo Note that the login information is case-sensitive. Check with the system administrator for your user name and password. If you note down your user name and password in this guide, take particular care to ensure that this does not lead to unwanted disclosure of your login details. Exiting VK Viewer Memo If you are using a screensaver on your PC, the screen saver may start up after VK Viewer shuts down. To restore the viewing window, simply move the mouse. VK Viewing Screen Memo For information on operations such as changing the video window display position, size or layout, see "Chapter 5 Viewer Reference" in the Administrator's Manual. The camera selection area, timeline and video window title bars can all be hidden using options in the [View] menu in the menu bar. Video Window Video display Live or recorded video is displayed. Live video The video currently being shot. Recorded video Video recorded on the storage server. Title bar The camera name and the video status are displayed. The title bar color changes according to the displayed video content, as shown below. Title bar color Video status During live video display Black Live During recorded video display Black Recording time
Transcript
Network Video RecorderVK-64/VK-16 v2.2 Viewer Operation Guide
This guide explains a basic operation of VK Viewer. For more detailed explanations, refer to the Administrator's Manual and Setup Guide.* This guide also applies to VK-Lite Viewer (simplified version of VK Viewer).
Location/Zone
[Location] Groups of zones.
[Zone]Areas in which cameras are located.
Camera Selection AreaThumbnails from all the cameras located in each zone are displayed. The number of thumbnails represents the number of cameras in the zone.
Video WindowLive or recorded video from a camera is displayed in this window.
Viewing AreaVideo Windows are displayed here.
TimelineRecording information and events that have occurred are displayed.
PlayheadThe time of the video currently being played is displayed.
Launching VK Viewer
1
2
4
3
Double-click the [VK Viewer v2.2] desktop icon.The connect option menu (Startup Screen) for the Storage Server is displayed.
* Different icon is displayed for VK-Lite.
Select [Master Storage Server] and click [Connect].If you select [localhost] or [Use IP address], the [Login] dialog box appears.
Enter your [User Name] and [Password] and click [Login].VK Viewer starts up.
Make a note of your user name and password here.
User Name
Password
Select [File] → [Exit] in the menu bar.VK Viewer shuts down.
Memo
Note that the login information is case-sensitive.Check with the system administrator for your user name and password.If you note down your user name and password in this guide, take particular care to ensure that this does not lead to unwanted disclosure of your login details.
Exiting VK Viewer
Memo
If you are using a screensaver on your PC, the screen saver may start up after VK Viewer shuts down. To restore the viewing window, simply move the mouse.
VK Viewing Screen
Memo
For information on operations such as changing the video window display position, size or layout, see "Chapter 5 Viewer Reference" in the Administrator's Manual.The camera selection area, timeline and video window title bars can all be hidden using options in the [View] menu in the menu bar.
Video Window
Video displayLive or recorded video is displayed.
Live video The video currently being shot.
Recorded video Video recorded on the storage server.
Title barThe camera name and the video status are displayed.The title bar color changes according to the displayed video content, as shown below.
Title bar color Video status
During live video display Black Live
During recorded video display
Black Recording time
COPY
Controlling A Camera
2 Select [View] → [Camera Control] in the menu bar.The [Camera Control] panel appears.
3 Click [Get Control] in the [Camera Control] panel.Once you have the camera control, all the buttons in the [Camera Control] panel become active.
Memo
For details, see "Chapter 5 Viewer Reference" in the Administrator's Manual.If you have the camera control and do not make any changes for 30 seconds, a message appears saying "Control will be lost in 10 seconds". You will then lose the control if it is left for another 10 seconds.To control a camera while it is recording, check with the administrator and review the procedure beforehand.
Playing Recorded Video
1 Click a video window of the camera you want to play.
3 Click the time you want to play.The recorded video appears in the selected video window.
2 Click and drag the time bar to the left or right to change the playback time.
1 Click a video window of the camera you want to play.
Rewind Play/Pause Fast forward
2 Click [Jump to Time].The [Jump To Time] dialog box appears.
3 Select a date and time and click [OK].The recorded video appears in the selected video window.
Memo
If a message appears saying "Can't get camera control", system administration privileges of other Viewers of tools may be controlling the camera. Contact the administrator.Depending on your camera, some functions may be unavailable. For more details, see Administrator's Manual.
Memo
Rewind and nudge back cannot be used when viewing recorded MPEG-4 video. *MPEG-4 video cannot be recorded with VK-Lite.QuickTime version 6.5.1 or later is recommended.On Windows Vista, videos cannot be saved into the Program Files folder or Windows folder on the system drive.
Jump to next event
You can use these controls to play, pause, rewind, fast forward, nudge forward or back and jump to the previous or next event. You can also change the rewind and fast forward speeds sequentially from 1x → 2x → 5x → 10x.
This button switches the video display from recorded video back to live video.
You can save recorded videos to any location in .mov format.The saved videos can then be viewed in QuickTime Player or any other player that supports the .mov format.
File-Saving format QuickTime (file extension: mov)
Recording duration Max. 1 hourThese controls change the level of detail shown in the timeline.
[Zoom In] To view the timeline in more detail.
[Zoom Out] To view the entire timeline at once.
Jump to previous event Nudge forward
Pan (left/right) and Tilt (up/down)These controls move the PT camera in the direction of the arrows.Pan and tilt either by briefly clicking an arrow, or by clicking and holding the arrow.
ZoomClick and drag the zoom slider to zoom in or out.
Pan/Tilt/Zoom speedSet the camera pan/tilt, and zoom speed.
Pan/Tilt/Zoom Control
Adjusting/Saving Played Video
1 Click a video window for the camera you want to control.
[Preset]Choose one of preset positions from a list.


![3_DIPLOMA_UA_2006_130415SO3 [en] {VK}](https://static.documents.pub/doc/80x56/58a9e76a1a28ab36018b4b51/3diplomaua2006130415so3-en-vk.jpg)


