55


unicafuniversity.com
Introduction to Online Resources
Student
Guide By
UNICAF University
Date: 12. March. 2018 Page | 1 - 54

unicafuniversity.com
Introduction to Online Resources
Table of Contents 1) Introduction 4
2) Student Panel (SIS) 4
2.1) Student Panel (SIS) Login 4
2.1.1) Definitions 4
2.1.2) Registration Email 5
2.1.3) Login Instructions 6
2.1.4) First Time Log In 7
2.1.5) Login Errors 7
2.2) SIS Password Reset 8
2.3) Module Registration 11
2.3.1) Financial Information 11
2.3.2) Pre-Registering for a Module 14
2.3.3) Enrolling for a module 19
2.3.4) What to Consider After a Successful Module Registration 21
3) VLE Browser Support 22
4) VLE Login Page 23
4.1) Login Instructions 23
4.2) Logging in for the first time 24
5) Using the VLE 26
6) Home Page 27
7) Administration Block 28
8) Navigation Block 29
8.1) My Courses – Course navigation explained 30
9) Student Area 31
10) Main Course Block 32
11) Course Contacts Block 34
12) E-Book Block 35
13) Calendar 35
13.1) Add Events to the Calendar (User events) 36
13.2) View the Events 38
14) Messages 39
Date: 12. March. 2018 Page | 2 - 54

unicafuniversity.com
Introduction to Online Resources
14.1) Unread Messages 39
14.2) Contacts 40
14.3) Compose New Message 40
14.4) Message Navigation 41
14.5) Add, Remove, and Block Users 41
14.5.1) Add a user to your contact list 41
14.5.2) Remove and Block a User 42
14.6) Settings 43
15) Accepting the Turnitin Agreement 44
16) Assignments 45
16.1) Submit an Assignment 45
16.2) Submission notifications 47
16.3) Viewing the Similarity Report 48
17) Forum 49
17.1) Get familiar with the VLE forum 49
17.1.1) Main Area 49
17.1.2) Auto save 50
17.2) Using VLE forum 51
17.2.1) Creating new thread 51
17.2.2) Edit thread 52
17.2.3) Thread navigating 52
17.2.4) Reply to post 53
17.3) Subscription 53
17.3.1) Forum subscription 53
17.3.2) Thread subscription 53
18) Contact Information 54
Date: 12. March. 2018 Page | 3 - 54

unicafuniversity.com
Introduction to Online Resources
1) Introduction The main aim of this guide is to provide students with an introduction to the University’s online
resources and more specifically to the Student Panel (SIS) and the Virtual Learning Environment (VLE).
Our university is using a virtual learning environment called Moodle to model authentic, real-world
education by integrating a set of virtual concepts for classes, examinations, resources, etc.
The guide uses pictures with captions for a better understanding of what is being described. When
arrows and numbers appear near the pictures, simply follow the sequence in the description. All pictures
are identified by their topic name and number; some instructions can refer to picture number.
Course shells are arranged in a three-column format. The two outside columns are for small boxes.
Moodle calls them blocks. Blocks can be interactive, or they can contain useful and important
information. The third, center column allows for viewing of the entire site.
2) Student Panel (SIS) The student panel is accessible at https://sis-uu.unicaf.org and provides students with an easy-to-use
interface for managing important student tasks such as:
● My page
● Modules
● Student
● Finance
● Transcript
● Feedback
● Suggestion Box
● Help Services
2.1) Student Panel (SIS) Login
This section offers guidance with the process of signing in to the Student Panel (SIS) account.
2.1.1) Definitions
Username: It is the personal email address used to register with us.
Password: It is the password sent to you via email after enrollment completion as advised by the
admission’s adviser. Make sure to check spam/junk folders in case the password was routed to these
folders.
Date: 12. March. 2018 Page | 4 - 54
unicafuniversity.com
Introduction to Online Resources
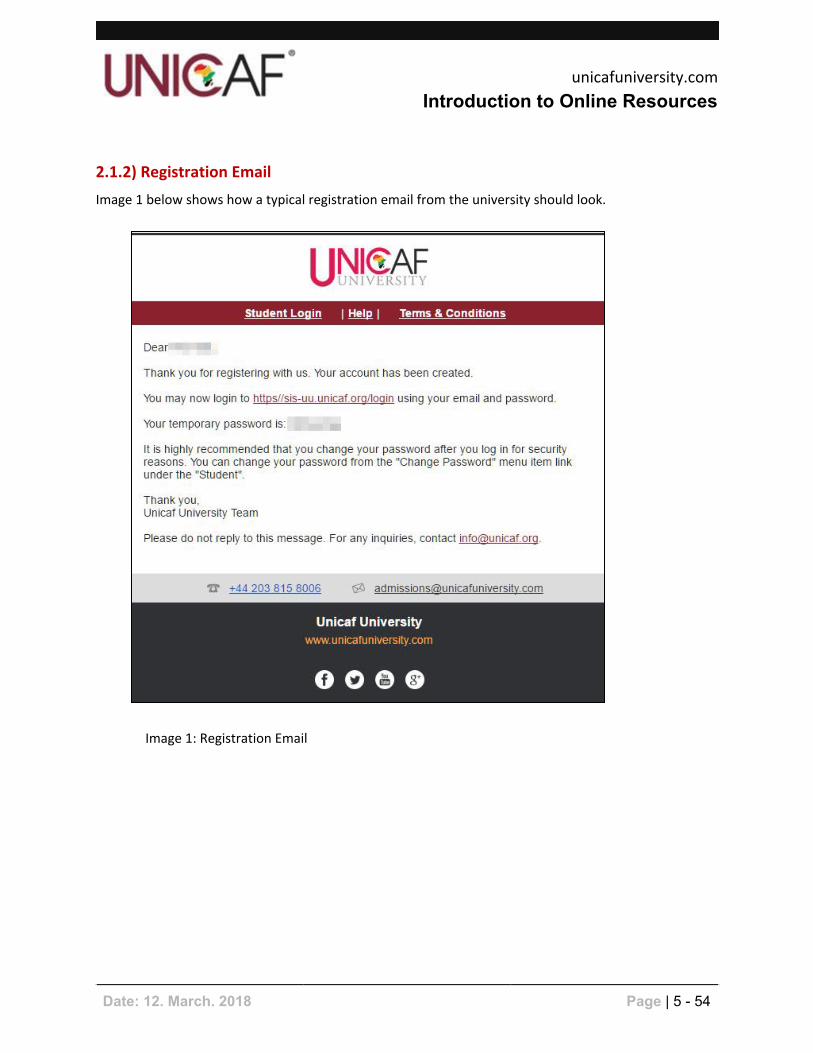
2.1.2) Registration Email
Image 1 below shows how a typical registration email from the university should look.
Image 1: Registration Email
Date: 12. March. 2018 Page | 5 - 54

unicafuniversity.com
Introduction to Online Resources
2.1.3) Login Instructions
a) Navigate to https://sis-uu.unicaf.org
You should be automatically redirected to the
URL below: sis-uu.unicaf.org
You will then be presented with the login area in
the middle of the page which requests your
username and password (see image 1).
Image 1: Login Instructions
b) Enter the correct username and password as defined in the Definitions (2.1.1) section above, and
click the Login button.
After using the correct username and password and clicking the Login button, you will be presented
with the front page of the Student Panel, which should look similar to Image 2 below.
Image 2: Login Instructions
Date: 12. March. 2018 Page | 6 - 54

unicafuniversity.com
Introduction to Online Resources
2.1.4) First Time Log In
When you log in for the first time you, will need to complete the following 5 steps:
● Confirm your intended programme of study with the preferred start date;
● Complete your personal information;
● Provide your contact information;
● Include additional information; and
● Check the admission requirements.
Your next steps:
● Upload the required academic documents;
● If you wish to apply for a scholarship please click on the "Apply for a scholarship" button;
● Submit the payment application fee;
● If your application is successful, an offer letter will be issued; and
● When you have received the Offer Letter you should proceed to pay your deposit by clicking on
the "Pay Deposit" button.
2.1.5) Login Errors
If you are unable to log in into your account, make sure that:
a) You are using the personal email address with which you registered as username.
b) You are using the correct password sent to you in the registration email. It is the password sent to you
via email. Make sure to check your spam/junk folder.
c) You are entering your password with upper and lower case letters where needed. All passwords are
case sensitive.
d) If you are copying and pasting the password, make sure that no spaces/empty space is being copied. e) You are using the correct URL: sis-uu.unicaf.org
If you are already doing all of the above and are still facing issues, you may use the Password Manager
which is available in the Login Area of the Student Panel (SIS) as a link, or navigate directly to
sis-uu.unicaf.org/pmanager.
Important Notes: The Password Manager allows you to change or reset your password.
1. The new password can be used to log on to the University’s Student Panel (SIS).
2. Please bear in mind that Virtual Learning Environment accounts are automatically created
only for students with at least one registered module.
3. If a student has not registered to at least one module yet (current or past module), then
access to the VLE is not provided at that point.
Date: 12. March. 2018 Page | 7 - 54

unicafuniversity.com
Introduction to Online Resources
2.2) SIS Password Reset
At the Login page: https://sis-uu.unicaf.org click on the ‘click here’ link (see image 1) to navigate to the
Password Manager.
Image 1: Password Reset
Then, you will be connected to https://sis-uu.unicaf.org/pmanager , where you will see a screen just like
the one below:
Image 2: Password Reset
1. Type in the email you used when you registered with us.
2. Use the refresh button only when you don’t see the numbers in the image.
3. Type in the numbers that you see in the image above.
4. Finish by clicking on the “Submit” button.
Date: 12. March. 2018 Page | 8 - 54

unicafuniversity.com
Introduction to Online Resources
If you typed in everything correctly, you will see a message just like the one below.
Image 3: Password Reset
Next, check your inbox/spam box for an email for further instructions; it should look just like image 4.
Image 4: Password Reset
1. Select the alphanumeric characters shown by arrow 1 without any spaces on either side. Right-click
with your mouse and select “Copy”.
2. Click on the link to which arrow 2 is pointing.
Date: 12. March. 2018 Page | 9 - 54

unicafuniversity.com
Introduction to Online Resources
When the new page opens, you will see a form just like the one below.
Image 5: Password Reset
1. Right click with your mouse and choose paste.
2. Type in the email you used when you registered with us.
3. Type in your new password (should be at least 8 characters long).
4. Type in your new password again.
5. Type in the numbers you see in the image above.
6. Click on the “Submit” button when you have finished.
If you typed in everything correctly, you should see a success message. Now you can login using your
new password.
Image 6: Password Reset
Date: 12. March. 2018 Page | 10 - 54

unicafuniversity.com
Introduction to Online Resources
2.3) Module Registration
This section will guide you on how to pre-register and finally enrol for a module by using the University’s
Student Panel.
2.3.1) Financial Information
Before commencing with the instructions for the module registration, it is important to make sure that
you do not have any overdue instalments in your account. You may check your instalments’ status by
selecting the My Payment Plan option through the Student Panel’s menu. (see image 1).
Image 1: Financial Information
In case an overdue instalment exists, it will be displayed in red and its status will display “Overdue.”
When an overdue instalment exists, a student will not be able to register for a module, therefore he/she
must use the Make Payment option in order to pay the overdue amount.
Date: 12. March. 2018 Page | 11 - 54

unicafuniversity.com
Introduction to Online Resources
Students can also check their Current and Available Balance through the block located on the top right
side of the Student Panel account as shown below:
Image 2: Financial Information
Finally, a statement of account is available by selecting the Statement of Account option through the left
main menu. The statement of account can be exported in a PDF format by clicking on the Download
Statement button as shown below (red arrow):
Image 3: Financial Information
The PDF Statement (shown below) displays all the transactions made in a student account.
On the debit side it shows module orders and how much each module costs.
On the credit side it shows the scholarships for each module plus deposits made.
It does not matter if the Total Balance is positive or negative. At the bottom of the page, the box
Remaining Due Balance shows the date and the amount of the next payment as well as any outstanding
instalments that exist.
Date: 12. March. 2018 Page | 12 - 54

unicafuniversity.com
Introduction to Online Resources
Image 4: Financial Information
Date: 12. March. 2018 Page | 13 - 54

unicafuniversity.com
Introduction to Online Resources
2.3.2) Pre-Registering for a Module
Registering for a new module is a very easy task and should take just a couple of minutes if the above
conditions are met. Pre-registration to a module is needed before you can successfully enrol to a
module. To pre-register for a module, follow these steps:
a) Log in into your account.
b) Navigate to the Modules section through the navigation menu on the left side of the screen.
Click on Modules tab. You should see a list with all of the modules in your academic programme.
The next available course is the one that it is highlighted. You can distinguish the modules with
open offers by checking the Offers column on the far right side of the screen. The button View
Offers is enabled for modules with open offers.
Image 1: Pre-Registering for a Module
Date: 12. March. 2018 Page | 14 - 54

unicafuniversity.com
Introduction to Online Resources
c) Click on button to view the available offers for a particular module.
Image 2: Pre-Registering for a Module
d) Click on button to view offers’ further details and proceed with the
pre-registration.
Image 3: Pre-Registering for a Module
Date: 12. March. 2018 Page | 15 - 54

unicafuniversity.com
Introduction to Online Resources
There are courses that have pre-requisites and you will need to complete them before you can
register. To check the “Module Prerequisites” for a module click on the module name to view the “Module
Details”.
Image 4: Pre-Registering for a Module
Click the blue arrow in the Module Prerequisites section to view module’s prerequisites. Once you
complete a prerequisite it will be checked. (See image 5)
Image 5: Pre-Registering for a Module
e) Click on the button to complete your pre-registration.
If there are no financial issues involved and any prerequisites of the module are completed, you
should view a message of success (see image 6), otherwise a descriptive error message will be
provided (see image 7 for an example).
Image 6: Pre-Registering for a Module
Date: 12. March. 2018 Page | 16 - 54

unicafuniversity.com
Introduction to Online Resources
Image 7: Pre-Registering for a Module
f) In case of a successful pre-registration, you should receive an email containing your module
details and enrolment dates. Successful pre-registrations are provided at Modules section on
navigation menu on the left side of the screen, on My Pre-Registrations tab.
On pre-registration, no money are deducted from your account, the module’s amount is blocked
and will be deducted upon enrolment. You can check your balance, where current balance is the
current amount on your account, and available balance is the amount available to spend.
Image 8: Pre-Registering for a Module
If you click at your available balance you will be able to view the amount on hold and why amount is
hold.
Image 9: Pre-Registering for a Module
Date: 12. March. 2018 Page | 17 - 54

unicafuniversity.com
Introduction to Online Resources
Next step is to enrol to the module during enrolment period.
Image 10: Pre-Registering for a Module
You have the chance to cancel your pre-registration before the enrolment period start by clicking on
cancel button next to the pre-registered offer.
Image 11: Pre-Registering for a Module
If you cancel your pre-registration, the module’s amount will be unblocked.
Date: 12. March. 2018 Page | 18 - 54

unicafuniversity.com
Introduction to Online Resources
2.3.3) Enrolling for a module
You will be able to enrol to a module only at the case that you pre-registered for the module. To enrol
for a module, follow these steps:
a) Log in into your account.
Navigate to the Modules section through the navigation menu on the left side of the screen. Click on My
Pre-registrations tab. You should see a list with your pre-registrations.
Image 1: Enrolling for a module
b) During enrolment period you will be able to enrol to the module. Click the button.
Offer details are provided.
Image 2: Enrolling for a module:
Date: 12. March. 2018 Page | 19 - 54

unicafuniversity.com
Introduction to Online Resources
c) Click on button to complete your enrolment.
If there is a place to enrol to the class a success message will be provided (see image 3) and an email
with module’s offer details will sent to you, otherwise a descriptive error message will be provided.
Image 3: Enrolling for a module
● Navigate to the Modules section through the navigation menu on the left side of the screen.
● Click on My Enrolments tab to view all of your successful enrolments.
● Click on to view all offer’s details such as dates, price and grade.
Image 4: Enrolling for a module
You can access VLE simply clicking on button.
Date: 12. March. 2018 Page | 20 - 54

unicafuniversity.com
Introduction to Online Resources
2.3.4) What to Consider After a Successful Module Registration
There are four things to take under consideration upon a successful module registration:
1. To enter the Virtual Learning Environment (VLE) navigate to Modules tab and click My
Enrolments from the navigation at left. Every offer you are enrolled to has a relevant link for the
VLE. Click on the button at desired offer and then click on the button to
access VLE (Alternatively, you may log in to the University’s VLE using https://vle-uu.unicaf.org).
2. You will also receive another email with your credentials for the VLE platform. Please make sure
that you do not leave any spaces when you copy and paste your password.
3. You will be able to access your module from the starting date of the module.
4. If you don’t cancel your pre-registration before enrolment period starts, you will be enrolled
automatically.
Date: 12. March. 2018 Page | 21 - 54

unicafuniversity.com
Introduction to Online Resources
3) VLE Browser Support
Browser Minimum
version
Recommended
version
Notes
Google Chrome 30.0 Latest Recommended.
Mozilla Firefox 25.0 Latest
Apple Safari 6 Latest
Microsoft
Internet Explorer
9 Latest Version 10 is required for drag-and-drop
upload of content from outside the
browser into Moodle
Date: 12. March. 2018 Page | 22 - 54

unicafuniversity.com
Introduction to Online Resources
4) VLE Login Page The login page appears after you navigate to https://vle-uu.unicaf.org . At this point, you are not logged
into the system.
Access to VLE is granted to whomever has been registered to any module at least once.
Image 1: VLE Login Page
4.1) Login Instructions
a) Make sure that you are using your *email address as your username and that you are using the
correct password.
b) Then click on “Log in” button.
Important Notes: *Use the email address that you used when you registered at our university. If you forgot your VLE password, you can reset it by using the “Forgot your password?” link located on the login page.
Date: 12. March. 2018 Page | 23 - 54

unicafuniversity.com
Introduction to Online Resources
4.2) Logging in for the first time
1.From the email you have received, Highlight and right click on the password and click on
copy (See below image for reference)
·
Image 1: Logging in for the first time
Date: 12. March. 2018 Page | 24 - 54

unicafuniversity.com
Introduction to Online Resources
Image 2: Logging in for the first time
● Enter your email address in the first box
● Paste the password you copied from your email to the password box (To paste you need to right
click in the box and click on paste) ● Click Log in
2.When Logging in for the first time you will be asked to change your password
Image 3: Logging in for the first time
● In the Current password box, right click and click on Paste. Make sure there are no
spaces before or after the password when you copy and paste it.
● In the new password box insert your new password which needs to follow the below
criteria
The password must have at least 8 characters, at least 1 digit(s), at least 1 lower case letter(s), at least
1 upper case letter(s)
● Type the password again to confirm it in the next box (new password (again)
● Click on save changes
Date: 12. March. 2018 Page | 25 - 54

unicafuniversity.com
Introduction to Online Resources
5) Using the VLE Did you know that you can customize the view of the VLE according to your needs?
You can roll-up or roll-down the blocks hiding the content and leaving just the title visible.
1) By clicking on the (^) sign, the block will roll up.
2) By clicking the (v) sign, the block will roll down.
Or, you can remove all the blocks to focus on the main area. You can do this by clicking on the
button, which is located on the upper right corner of the course shell. But do not forget to
recover the blocks back by clicking on the button.
Date: 12. March. 2018 Page | 26 - 54
unicafuniversity.com
Introduction to Online Resources
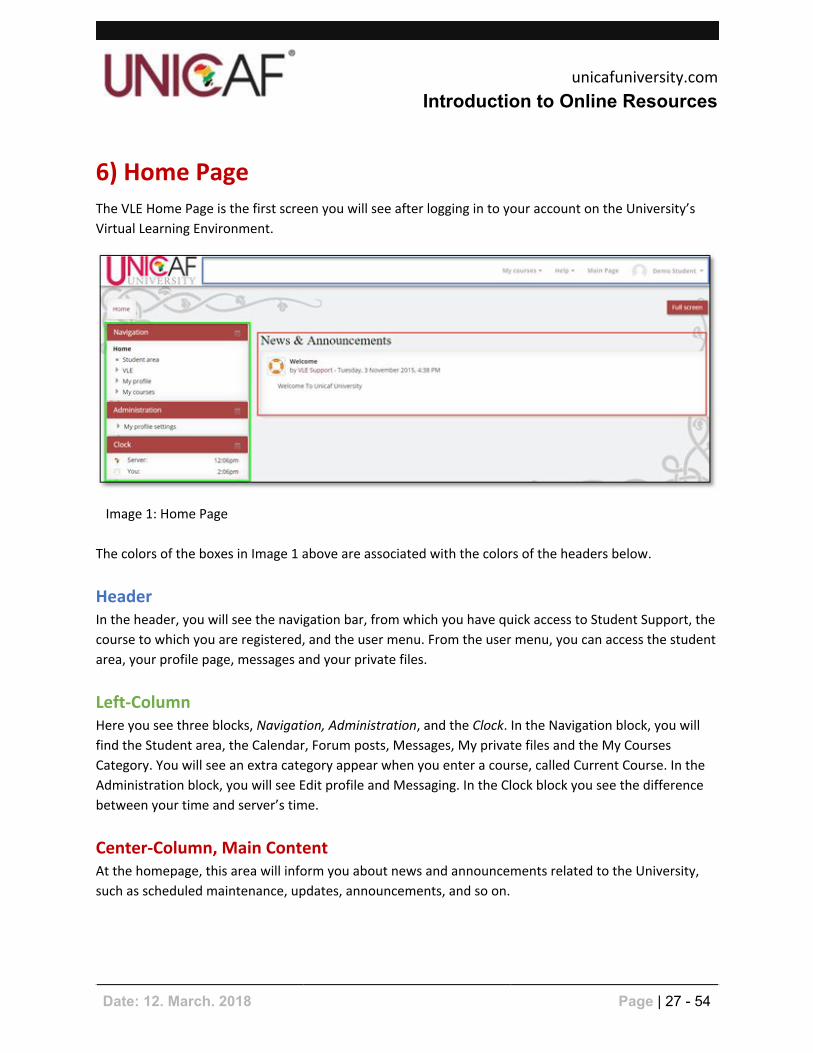
6) Home Page The VLE Home Page is the first screen you will see after logging in to your account on the University’s
Virtual Learning Environment.
Image 1: Home Page
The colors of the boxes in Image 1 above are associated with the colors of the headers below.
Header In the header, you will see the navigation bar, from which you have quick access to Student Support, the
course to which you are registered, and the user menu. From the user menu, you can access the student
area, your profile page, messages and your private files.
Left-Column Here you see three blocks, Navigation, Administration, and the Clock. In the Navigation block, you will
find the Student area, the Calendar, Forum posts, Messages, My private files and the My Courses
Category. You will see an extra category appear when you enter a course, called Current Course. In the
Administration block, you will see Edit profile and Messaging. In the Clock block you see the difference
between your time and server’s time.
Center-Column, Main Content At the homepage, this area will inform you about news and announcements related to the University,
such as scheduled maintenance, updates, announcements, and so on.
Date: 12. March. 2018 Page | 27 - 54

unicafuniversity.com
Introduction to Online Resources
7) Administration Block The Administration Block can have different content depending on the currently active page. The default
content of this block when the active page is the Front page or course overview page is the following:
Image 1: Administration Block
1) My profile
a) Edit profile Update your profile change your timezone, your preferences, upload your photo, etc.
b) Messaging Configure methods for incoming message notifications.
Date: 12. March. 2018 Page | 28 - 54

unicafuniversity.com
Introduction to Online Resources
8) Navigation Block The Navigation Block is used for the main navigation across the
VLE. It contains categories, subcategories and links.
Image 1: Navigation Block
Navigation Links Description
1) Home View news and announcements.
2) Student area A brief overview of the course.
3) VLE
● Calendar You can view deadlines for assignments and
quizzes, chat times and other course events.
4) My profile
● Forum posts
● Discussions View all the posts you have made in discussion
forums.
● Messages Your contacts, messages and notifications.
● My private files Your private space for uploading and
managing a set of files.
5) My courses
● Module code name to which you
are currently registered, if any.
Access to the module to which you are
currently registered.
Date: 12. March. 2018 Page | 29 - 54

unicafuniversity.com
Introduction to Online Resources
8.1) My Courses – Course navigation explained
Your course explained in detail.
1. Your course code name expanded.
2. Course participants list - participants are the teachers and students
who are part of the course.
3. Course Sections - all the courses are divided into sections for better
organization of material.
4. Section – ‘Assessment Point-Self Assessment’ expanded. This is a quick
way of accessing the course activity or resource.
Image 1: My Courses - Course navigation explained
Date: 12. March. 2018 Page | 30 - 54

unicafuniversity.com
Introduction to Online Resources
9) Student Area The student area includes a quick overview of the current course(s) on which you are enrolled.
Image 1: Student Area
Date: 12. March. 2018 Page | 31 - 54
unicafuniversity.com
Introduction to Online Resources
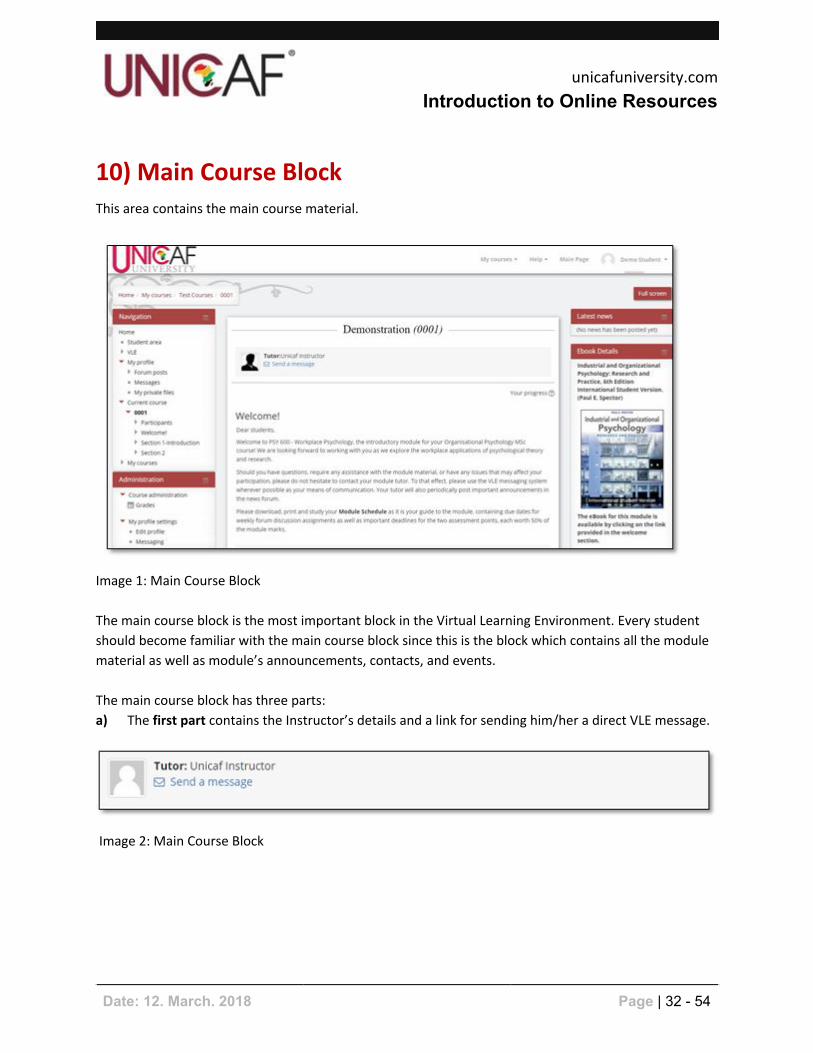
10) Main Course Block This area contains the main course material.
Image 1: Main Course Block
The main course block is the most important block in the Virtual Learning Environment. Every student
should become familiar with the main course block since this is the block which contains all the module
material as well as module’s announcements, contacts, and events.
The main course block has three parts:
a) The first part contains the Instructor’s details and a link for sending him/her a direct VLE message.
Image 2: Main Course Block
Date: 12. March. 2018 Page | 32 - 54

unicafuniversity.com
Introduction to Online Resources
b) The second part of the main course block is the general introduction message accompanied by the
introductory material to the course.
Image 3: Main Course Block
c) The third and final part is the topic section. Each topic is easily identified by the distinctive
background color behind each topic’s title. The user has the option to open or close all topics at once by
using the buttons shown in the image below. Each section has its own introductory text and a number of
different types of files such as PDF’s, audio recordings, videos, presentations, word documents, text
files, and links to other sites.
Image 4: Main Course Block
Date: 12. March. 2018 Page | 33 - 54

unicafuniversity.com
Introduction to Online Resources
11) Course Contacts Block The Course Contact block works in concert with the VLE messaging system.
The main purpose of the Course Contacts block is to provide an easy way to communicate with fellow
students and the Instructor. This block is only located in the module area (right bottom corner) since
each course has different participants.
Image 1: Course Contacts Block
Course Contact Icons Explained
1) Email Send emails directly from VLE
2) Messaging VLE instant messaging system
3) User Status Online Indicates when a user is online
4) User Status Offline Indicates when a user is offline
In order to send a VLE message to a contact, you have to click on the (2) dialog icon located under each
contact’s name. A new page will open (see 14.3.Compose New Message) where you can compose the
message and click on the Send Message button.
The only difference between sending messages and sending emails is that you need to click on (1) the
envelope icon instead of the message icon, should you wish to send an email.
Date: 12. March. 2018 Page | 34 - 54
unicafuniversity.com
Introduction to Online Resources
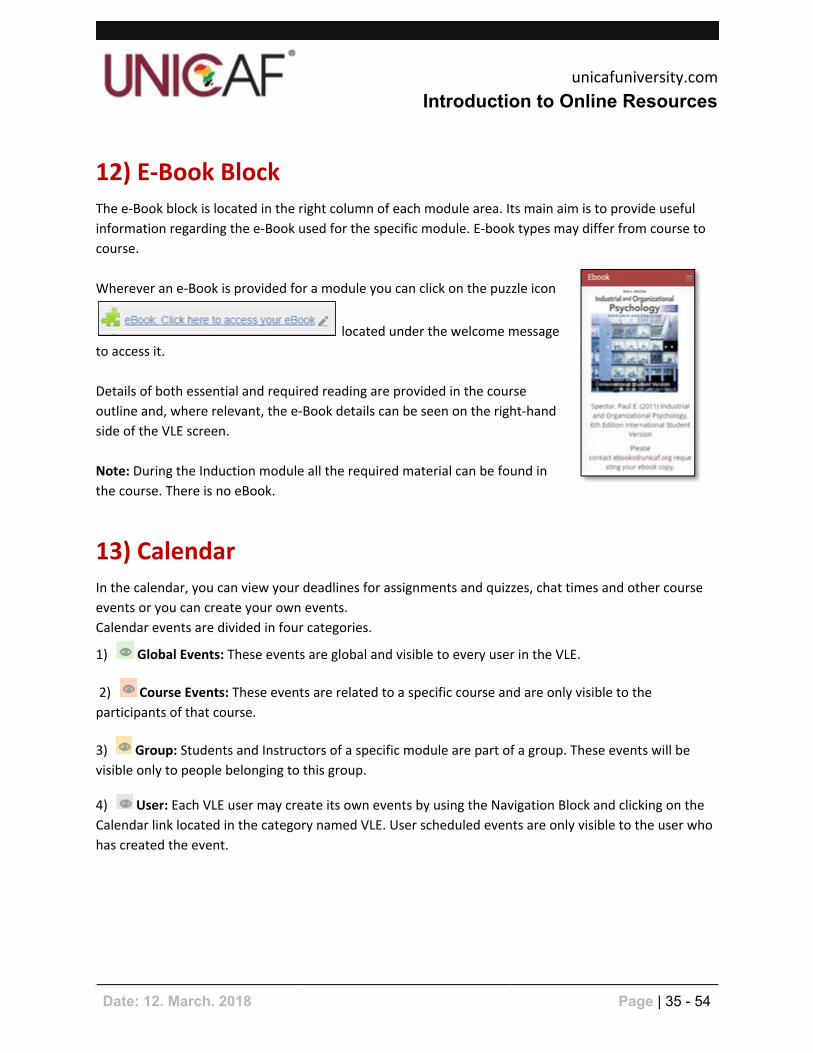
12) E-Book Block The e-Book block is located in the right column of each module area. Its main aim is to provide useful
information regarding the e-Book used for the specific module. E-book types may differ from course to
course.
Wherever an e-Book is provided for a module you can click on the puzzle icon
located under the welcome message
to access it.
Details of both essential and required reading are provided in the course
outline and, where relevant, the e-Book details can be seen on the right-hand
side of the VLE screen.
Note: During the Induction module all the required material can be found in
the course. There is no eBook.
13) Calendar In the calendar, you can view your deadlines for assignments and quizzes, chat times and other course
events or you can create your own events.
Calendar events are divided in four categories.
1) Global Events: These events are global and visible to every user in the VLE.
2) Course Events: These events are related to a specific course and are only visible to the
participants of that course.
3) Group: Students and Instructors of a specific module are part of a group. These events will be
visible only to people belonging to this group.
4) User: Each VLE user may create its own events by using the Navigation Block and clicking on the
Calendar link located in the category named VLE. User scheduled events are only visible to the user who
has created the event.
Date: 12. March. 2018 Page | 35 - 54

unicafuniversity.com
Introduction to Online Resources
13.1) Add Events to the Calendar (User events)
To open the calendar, first click on the ‘Calendar’ link from the navigation block, then, secondly click on
the ‘New event’.
Image 1: Add Events to the Calendar (User events)
Step by step of creating a new event.
Image 2: Add Events to the Calendar (User events)
Date: 12. March. 2018 Page | 36 - 54

unicafuniversity.com
Introduction to Online Resources
General
1) Type of event You are allowed to create only 'user' events.
2) Event title Type in the title of the event.
3) Description It's optional, but you can describe the event as well.
4) Date Start date of the event.
Duration
5) Without duration Instant event, no continuation
6) Until Specify the date by which the event should end
7) Duration in minutes Specify the minutes by when the event should end
Repeated events
8) Repeat this event Check the box if you wish the event to repeat on a
weekly basis
9) Repeat weekly, creating all
together
Specify how many weeks the should the event last or
repeat itself
10) Save changes Click to create the event
Date: 12. March. 2018 Page | 37 - 54

unicafuniversity.com
Introduction to Online Resources
13.2) View the Events
Click on ‘Student Area’ from the Navigation block. There you will see two blocks with which you can
interact.
Calendar Block (Image 1). As you can see from the image, we have
scheduled the event on 27-Jul-15, that’s why the ‘27’ on Monday is
highlighted.
1) Hover with your mouse over the highlighted day. In this case, it’s
‘27’.
2) A label should appear. Click on the event name as the image
shows, to view more details about the event.
Image 1: View the Events
Upcoming Events Block (Image 2). As the name of the block suggests,
you are able to view upcoming events. As you see on the image, our
event starts “Today” and lasts for 2 hours.
3) Navigate to the calendar and view all the upcoming events.
4) Create New Event takes you straight to ‘#13.1.Add Events to the
Calendar (User events)|image 1’.
Image 2: View the Events
Date: 12. March. 2018 Page | 38 - 54
unicafuniversity.com
Introduction to Online Resources
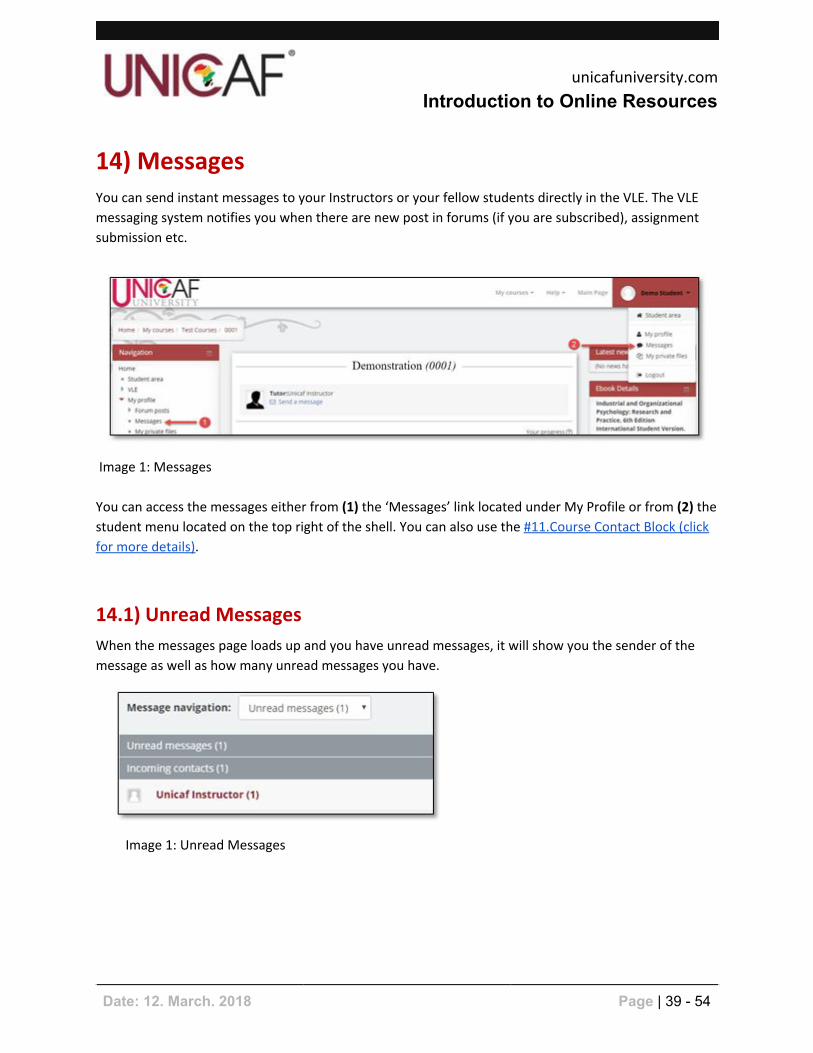
14) Messages You can send instant messages to your Instructors or your fellow students directly in the VLE. The VLE
messaging system notifies you when there are new post in forums (if you are subscribed), assignment
submission etc.
Image 1: Messages
You can access the messages either from (1) the ‘Messages’ link located under My Profile or from (2) the
student menu located on the top right of the shell. You can also use the #11.Course Contact Block (click
for more details).
14.1) Unread Messages
When the messages page loads up and you have unread messages, it will show you the sender of the
message as well as how many unread messages you have.
Image 1: Unread Messages
Date: 12. March. 2018 Page | 39 - 54

unicafuniversity.com
Introduction to Online Resources
14.2) Contacts
If you don’t have unread messages, you will be shown the contact list.
Image 1: Contacts
14.3) Compose New Message
To send a VLE message first navigate to your module and locate the “Course Contacts” block on the
bottom right-hand side of the module. Then click on the text bubble icon next to the person you
would like to send a message. See #11.Course Contacts Block explain in more details the functions of
“Course Contacts” block.
Type the message in the text field, then click the ‘Send message’ button. A copy of your message will
appear above the text field.
Image 1: Compose New Message
Date: 12. March. 2018 Page | 40 - 54

unicafuniversity.com
Introduction to Online Resources
14.4) Message Navigation
In message navigation section, you
will find your Contacts list, recent
conversations and notifications.
*If you have blocked someone, an
extra notice will appear at the end of
the list named ‘Blocked Users.’
Image 1: Message Navigation
14.5) Add, Remove, and Block Users
14.5.1) Add a user to your contact list
To add someone to your contact list click on the “Add contact” (1) when you are sending him/her a
message, Chapter 14.3. Also, from the same place you can add this user to the block list by clicking the
“Block contact” (2) link.
Image 1: Add a user to your contact list
Date: 12. March. 2018 Page | 41 - 54

unicafuniversity.com
Introduction to Online Resources
14.5.2) Remove and Block a User
To remove someone from your contact list, first, click on “Messages” as Chapter 14 describes. Then on
the name of the person you want to be removed. Now click on the ‘X’ icon (1) or the “Remove contact”
(1) link.
To block someone from sending you messages, click on the forbidden icon (2) or the “Block contact” (2)
link.
You can also, click on the text bubble icon (3) or the “All messages” (3) tab to view the conversation with
that user.
Image 1: Remove and Block a User
Date: 12. March. 2018 Page | 42 - 54

unicafuniversity.com
Introduction to Online Resources
14.6) Settings
Click on messages in the administration block.
Image 1: Settings
Here, you are able to specify in which cases as well how you want to receive your messages.
Image 2: Settings
For example, in the screenshot labeled Image 2, you can configure personal messages between yourself
and your fellow students. In this case, the email check box is unchecked when you are logged in. When
you are offline, this box is checked, which means that you will receive a notification in your email that
you have a personal message in the VLE. This only happens when you are offline. Pop-up notifications
will pop up whether you are online or offline.
At the end of the page, you will see a General settings tab, image (Image 3)
1. Alerts you with a sound when
popup notifications are displayed. 2. By checking this box, you are
blocking everyone who is not in your
contact list.
3. Disables all notifications except
those marked as "forced" by the site
administrator.
Image 3: Settings
When you are done updating your settings, don’t forget to click on “Update profile.”
Date: 12. March. 2018 Page | 43 - 54
unicafuniversity.com
Introduction to Online Resources
15) Accepting the Turnitin Agreement If you haven’t accepted the Turnitin agreement before, you will need to accept it (this is done only once)
to proceed with the upload and the submission of your document.
After you click on the “Add submission” button in the assignment activity.
You will see the following message:
Image 1: Accepting the Turnitin Agreement
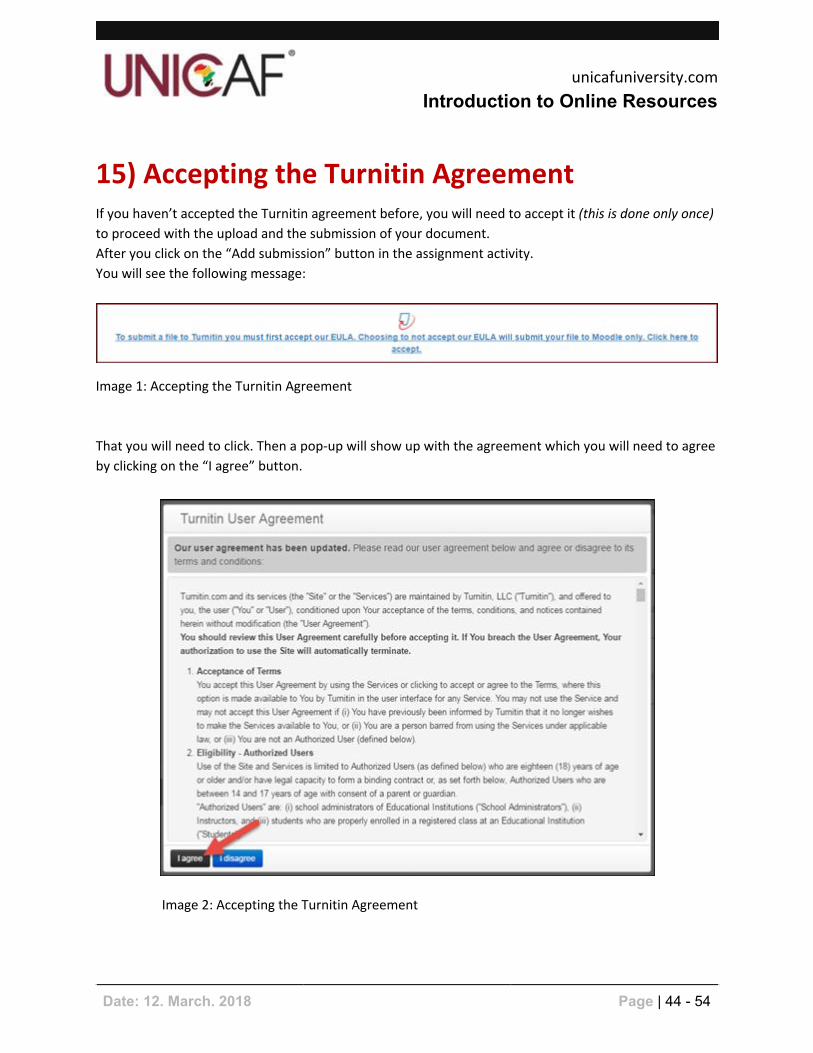
That you will need to click. Then a pop-up will show up with the agreement which you will need to agree
by clicking on the “I agree” button.
Image 2: Accepting the Turnitin Agreement
Date: 12. March. 2018 Page | 44 - 54

unicafuniversity.com
Introduction to Online Resources
16) Assignments
Important note: In case a student is unable to upload his/her assignment on the VLE, he/she must immediately send an email to his/her tutor informing him/her about the technical issues and attaching the assignment file as a proof of evidence. The student should also contact the Technical Team informing them about the technical issue. Please be as descriptive as possible when reporting the issue.
16.1) Submit an Assignment
Step 1: Click on the assignment link.
You should then see a screen similar to the image below.
Step 2: Click the “Add submission” button (1) to bring up the file upload page. (Image: 1)
Image 1: Submit an Assignment
Step 3: Upload and save the file. (Note: Saving your file is not considered that you have submitted for
marking). (Image: 3)
There are two ways to upload a file. First one is to browse for a file (1) and the second is to
drag-and-drop the file (2) from your desktop or folder to the big blue arrow where it says “You can drag
and drop files to add them”.
When the upload completes and your file(s) appear in the Files area, click the “Save changes” button
(3).
Date: 12. March. 2018 Page | 45 - 54

unicafuniversity.com
Introduction to Online Resources
Image 2: Submit an Assignment
Step 4: Revise, edit or submit. (Image: 3)
Your document has been saved as a draft (1). That means you have the opportunity to revise your
document until the due date. Please do not forget to submit for marking before the due date. When
you submit the document, your tutor will know that it’s ready for marking.
If the assignment link has Turnitin enabled, your document will be checked for plagiarism. You should
see the “Turnitin status: Pending” below the document that you have uploaded (2). Come back later to
see your “Turnitin status”, if the similarity report is too high you can edit your submission until you will
be satisfied with the result.
To edit your submission click “Edit submission” (3). This will take you back to “Step 3”. Now to delete
your file, click on it then click the delete button and then update button.
When you finish with the revision you must finalize your submission. To submit your document for
marking, click “Submit assignment” (4) button.
Image 3: Submit an Assignment
Date: 12. March. 2018 Page | 46 - 54

unicafuniversity.com
Introduction to Online Resources
Step 5: Final Step. (Image: 4)
And lastly, click the “Continue” button. Once finalized, you will not be able to make any more changes.
Image 4: Submit an Assignment
16.2) Submission notifications Upon successful submission you should receive in your email a receipt that the assignment has been
successfully submitted.
Image 1: Submission notifications
If the assignment has Turnitin enabled, you will also receive “Turnitin Digital Receipt”. (Image: 2)
Image 2: Submission notifications
Date: 12. March. 2018 Page | 47 - 54

unicafuniversity.com
Introduction to Online Resources
16.3) Viewing the Similarity Report
Click on the assignment link that you previously have uploaded and saved your assignment and you
should see the similarity report (1) below your assignment. You can also click on the similarity report (1)
to view the full report. (Image 1)
Image 1: Viewing the Similarity Report
Date: 12. March. 2018 Page | 48 - 54

unicafuniversity.com
Introduction to Online Resources
17) Forum The forum activity module enables participants to have asynchronous discussions i.e. discussions that
take place over an extended period of time. The “News Forum” though it’s an exception, due to it’s not
made for discussions but for informing students relatively to the course, about different announcements
and news’s, used just by the teachers. Hence you may not reply nor create a discussion in there.
A single discussion is also called a "thread", or topic.
17.1) Get familiar with the VLE forum
Forum Icon:
Forum name can be anything (Assignment 1 for instance).
17.1.1) Main Area
To enter the forum main area click on the forum activity.
After you click on the forum link you will see a screen similar the image 1 below.
1. Button for adding new thread to the forum.
2. This is the search engine of the forum.
3. The settings of the forum.
4. Title of the thread (click to open).
5. Author of the thread.
6. Shows how many replies the thread has.
7. Shows how many unread posts you have.
8. The dot icon indicates you are not subscribed to the thread, you can click on it to get subscribed.
9. The mail icon indicates you are subscribed to the thread, you can click to unsubscribe.
Date: 12. March. 2018 Page | 49 - 54

unicafuniversity.com
Introduction to Online Resources
Image 1: Main Area
17.1.2) Auto save
While you are writing new thread, you may notice every minute below the text editor a notification
appears and informs you the thread you are writing got saved. To retrieve the saved
thread, simply start a new thread, you will see your thread recovered and the notification below the text
editor .
Date: 12. March. 2018 Page | 50 - 54

unicafuniversity.com
Introduction to Online Resources
17.2) Using VLE forum
17.2.1) Creating new thread
While you are in the forum main page click on the button.
1. Write your threads title.
2. Write your message.
3. Choose whether you want
to be subscribed to your own
thread and receive
notifications when someone
replies back, or to be
unsubscribed and to not
receive any notification about
this thread (not
recommended).
4. Here you can attach a file
to your thread by simply
dragging and dropping into
the upload box area,
considering the restrictions of
curse, mentioned above the
upload box.
5. And finally when you done
click on the “Post to forum”
button.
Image 1: Creating new thread
You will see a success message informing you that you have 30 minutes if you want to make changes to
your post.
Image 2: Creating new thread
Date: 12. March. 2018 Page | 51 - 54

unicafuniversity.com
Introduction to Online Resources
17.2.2) Edit thread
In case you want to edit your post and you still have time, first you need to open the thread. Click on
title (1) to open the post.
Image 1: Edit thread
Then at the bottom right-hand corner of your post, you will see Edit, Delete and Reply. Click on edit link
and you will see #17.2.1.Creating new thread|image 1 from above.
Image 2: Edit thread
17.2.3) Thread navigating
To open a thread you need to click on its title when in main forum area.
1. This is the title of the forum.
2. This is the title of
the thread.
3. Here you can
subscribe to the
current thread.
4. Navigate to
previous thread.
5. Change the way
how you view the
thread.
6. Here you click to
reply to that post.
Image 1: Thread navigating
Date: 12. March. 2018 Page | 52 - 54

unicafuniversity.com
Introduction to Online Resources
17.2.4) Reply to post
At the bottom right-hand corner of the post you can see the reply link. By clicking on it you will get
navigated to page with a text editor. The process for replying it’s the same as creating new thread.
17.3) Subscription
You can subscribe either to the whole forum and receive notifications from all of the threads or you can
subscribe to one or multiples individual threads of your interest (recommended).
17.3.1) Forum subscription
First you need to be located in the forum, then you can click the “Subscribe to this forum” link, which is
located under forum administration in the administration block.
The link will change to “Unsubscribe from this forum”, and
of curse by clicking it again, you will be unsubscribed.
Image 1: Forum subscription
17.3.2) Thread subscription
To subscribe to an individual discussion you need to click on the dot icon at the end of the line of the
discussion, how we show on image 1 below.
Image 1: Thread subscription
To unsubscribe you need to click on the mail icon, like image 2 below indicates.
Image 2: Thread subscription
Date: 12. March. 2018 Page | 53 - 54

unicafuniversity.com
Introduction to Online Resources
18) Contact Information
Support department for general issues. [email protected]
e-Book department. [email protected]
For any technical-related issues, you may
contact the VLE Technical Support Team at the
following email address:
Please allow 24 to 48 hours (during working days) for a reply.
Date: 12. March. 2018 Page | 54 - 54


