User Guide 1. From your Internet browser, enter the following URL: http://selfcare.ucc.ny.gov 2. Choose End User Self Care. 3. Enter your username and password: a. Username: Enter your LDAP user ID. (same ID used to logon to your PC) Examples: dallen or 0zm438 b. Password: Cisco123 4. Click Login. Logging In Voice Services Self Care Portal Note that your name will appear at the top, in the blue menu bar. The most commonly used options are: Password Voicemail My Phones Busy Lamps Abbreviated/Speed Dial Call Forwarding Change ring time, in seconds Personal Directory Welcome to the Self Care Portal SCG (Revised 9/27/2013)
Transcript
1
Us
er
Gu
ide
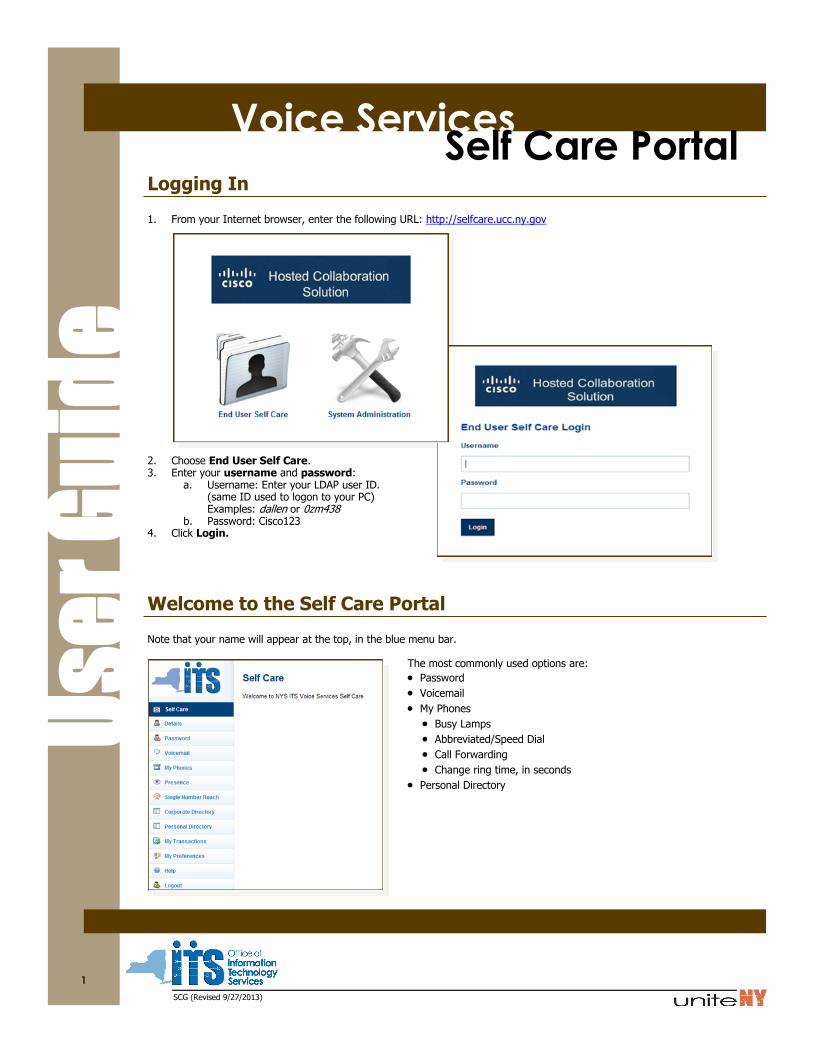
1. From your Internet browser, enter the following URL: http://selfcare.ucc.ny.gov
2. Choose End User Self Care. 3. Enter your username and password:
a. Username: Enter your LDAP user ID. (same ID used to logon to your PC) Examples: dallen or 0zm438
b. Password: Cisco123 4. Click Login.
Logging In
Voice Services Self Care Portal
Note that your name will appear at the top, in the blue menu bar. The most commonly used options are:
Password Voicemail My Phones
Busy Lamps Abbreviated/Speed Dial Call Forwarding Change ring time, in seconds
2. Enter Current Voicemail PIN. 3. Enter New Voicemail PIN, and Confirm. 4. Click Change. Voicemail PIN is changed.
Change Voicemail PIN
Voice Services Self Care Portal
4
Us
er
Gu
ide
My Phones Menu Functions Busy Lamps Abbreviated/Speed Dials Common Line Settings To Add a Busy Lamp: 1. Select My Phones from the Self Care Menu. 2. Remaining on the Phone tab, click the appropriate link under the Unique Device Name column.
3. On the Phone Details page, click Busy Lamps.
4. To Add busy lamps, click Add on the Busy Lamps page.
My Phones Menu
Voice Services Self Care Portal
5
Us
er
Gu
ide
5. On the Add Busy Lamp page, select Busy Lamp Number. (Number 1 indicates the first available button after those
already configured on your phone.)
6. Enter a value in the Label field. This label will appear on your phone. 7. Enter the number in one of two fields:
a. Telephone Number: Populated with phone numbers within your cluster. Select one from the drop-down list. b. Destination: If the number does not appear in the field above, enter the 10-digit number here.
8. Check the Call Pickup box if the number is in your call pickup group, which allows you to pickup the call using only the Busy Lamp button.
9. Click Add. Your phone will reboot, and you will see the label on your set display. 10. To place a call to one of your Busy Lamp numbers, press
the corresponding Busy Lamp button. 11. To pick up a call from a Busy Lamp number in your Call
Pickup group, press the flashing Busy Lamp button. (The Call Pickup box should have been checked when creating the Busy Lamp.)
Voice Services Self Care Portal
My Phones Menu
6
Us
er
Gu
ide
To Delete a Busy Lamp: 1. On the Busy Lamps page, click the Delete link for the busy lamp to be deleted.
2. On the next page, confirm your selection by clicking Delete.
3. Busy lamp is deleted.
Voice Services Self Care Portal
My Phones Menu
7
Us
er
Gu
ide
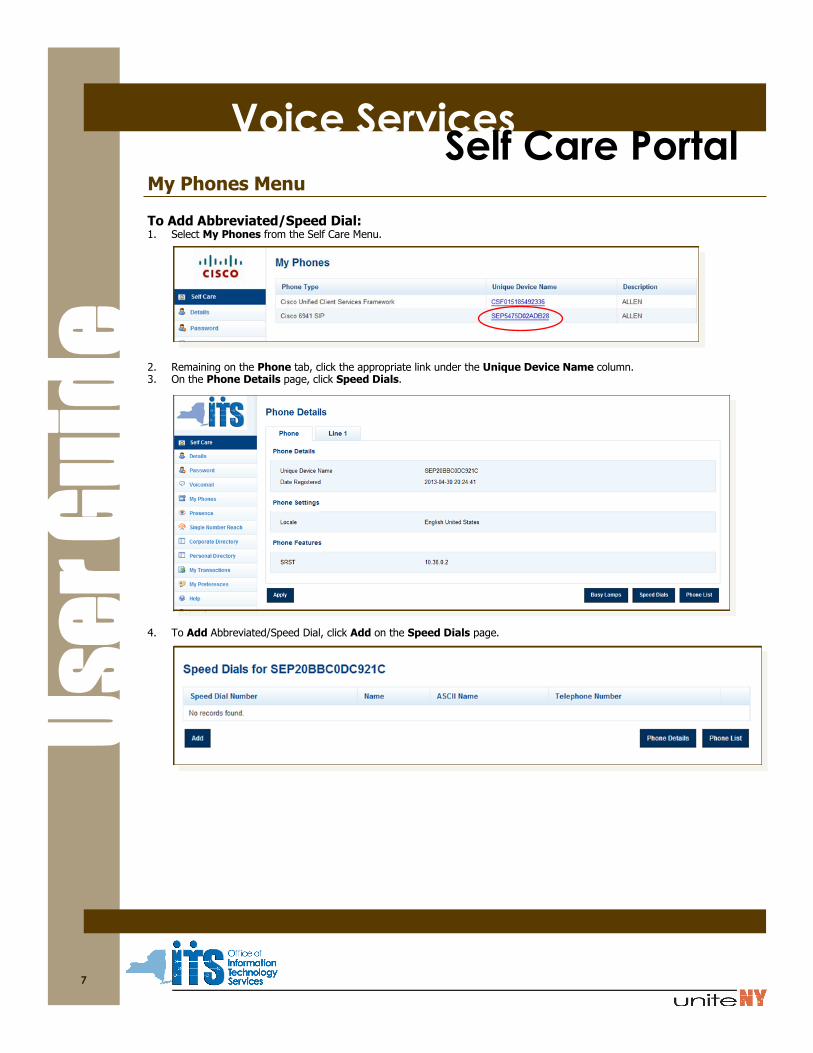
To Add Abbreviated/Speed Dial: 1. Select My Phones from the Self Care Menu.
2. Remaining on the Phone tab, click the appropriate link under the Unique Device Name column. 3. On the Phone Details page, click Speed Dials.
4. To Add Abbreviated/Speed Dial, click Add on the Speed Dials page.
My Phones Menu
Voice Services Self Care Portal
8
Us
er
Gu
ide
5. On the Add a Speed Dial page:
6. Enter the Speed Dial number (1-99). 7. Enter a label. 8. Enter the 10-digit phone number, 9. Click Add.
6. Abbreviated/Speed Dial has been added.
My Phones Menu
Voice Services Self Care Portal
9
Us
er
Gu
ide
To Delete Abbreviated/Speed Dial: 1. On the Speed Dials page, click the Delete link for the busy lamp to be deleted.
2. On the next page, confirm your selection by clicking Delete.
3. Abbreviated/Speed Dial is deleted.
My Phones Menu
Voice Services Self Care Portal
10
Us
er
Gu
ide
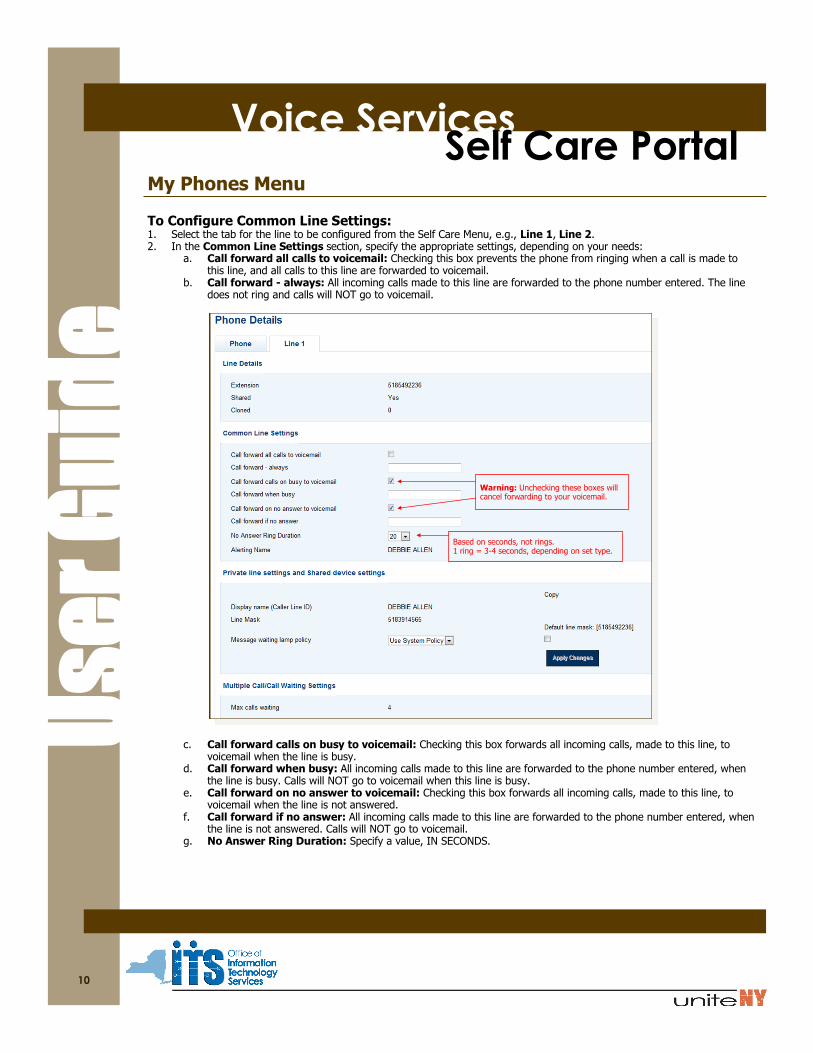
To Configure Common Line Settings: 1. Select the tab for the line to be configured from the Self Care Menu, e.g., Line 1, Line 2. 2. In the Common Line Settings section, specify the appropriate settings, depending on your needs:
a. Call forward all calls to voicemail: Checking this box prevents the phone from ringing when a call is made to this line, and all calls to this line are forwarded to voicemail.
b. Call forward - always: All incoming calls made to this line are forwarded to the phone number entered. The line does not ring and calls will NOT go to voicemail.
c. Call forward calls on busy to voicemail: Checking this box forwards all incoming calls, made to this line, to voicemail when the line is busy.
d. Call forward when busy: All incoming calls made to this line are forwarded to the phone number entered, when the line is busy. Calls will NOT go to voicemail when this line is busy.
e. Call forward on no answer to voicemail: Checking this box forwards all incoming calls, made to this line, to voicemail when the line is not answered.
f. Call forward if no answer: All incoming calls made to this line are forwarded to the phone number entered, when the line is not answered. Calls will NOT go to voicemail.
g. No Answer Ring Duration: Specify a value, IN SECONDS.
My Phones Menu
Voice Services Self Care Portal
Based on seconds, not rings. 1 ring = 3-4 seconds, depending on set type.
Warning: Unchecking these boxes will cancel forwarding to your voicemail.
11
Us
er
Gu
ide
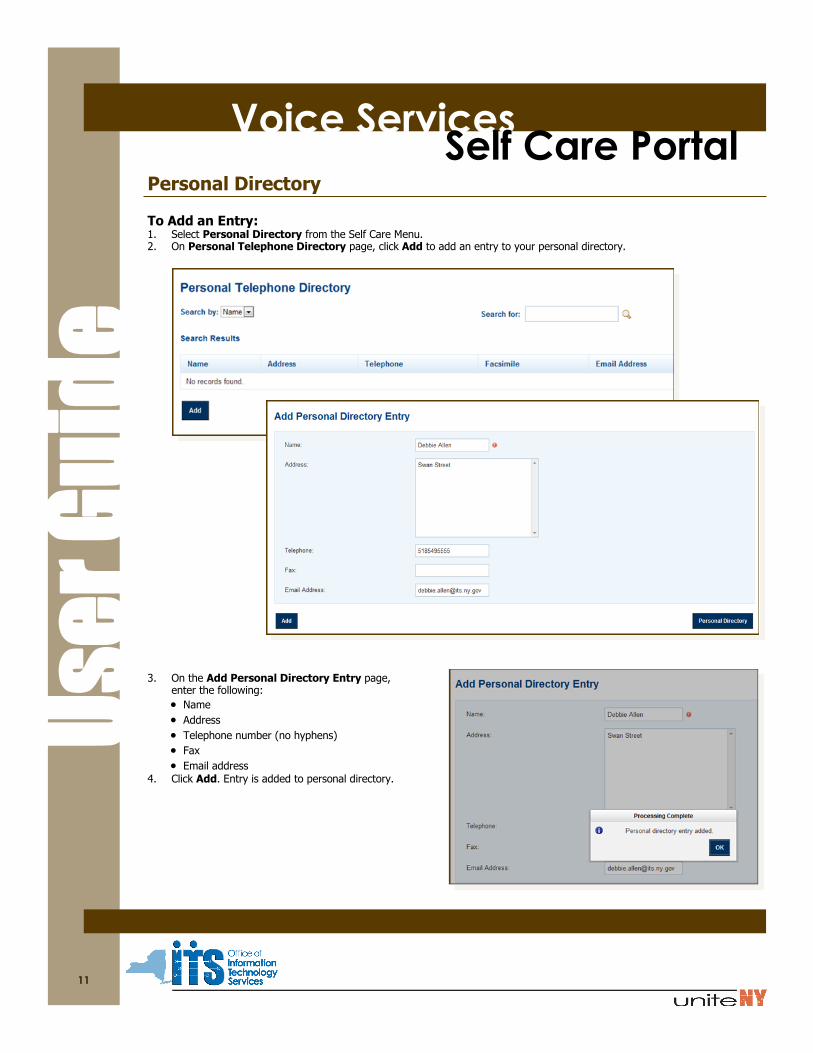
To Add an Entry: 1. Select Personal Directory from the Self Care Menu. 2. On Personal Telephone Directory page, click Add to add an entry to your personal directory.
3. On the Add Personal Directory Entry page, enter the following:
Name
Address
Telephone number (no hyphens)
Fax
Email address 4. Click Add. Entry is added to personal directory.
Personal Directory
Voice Services Self Care Portal
12
Us
er
Gu
ide
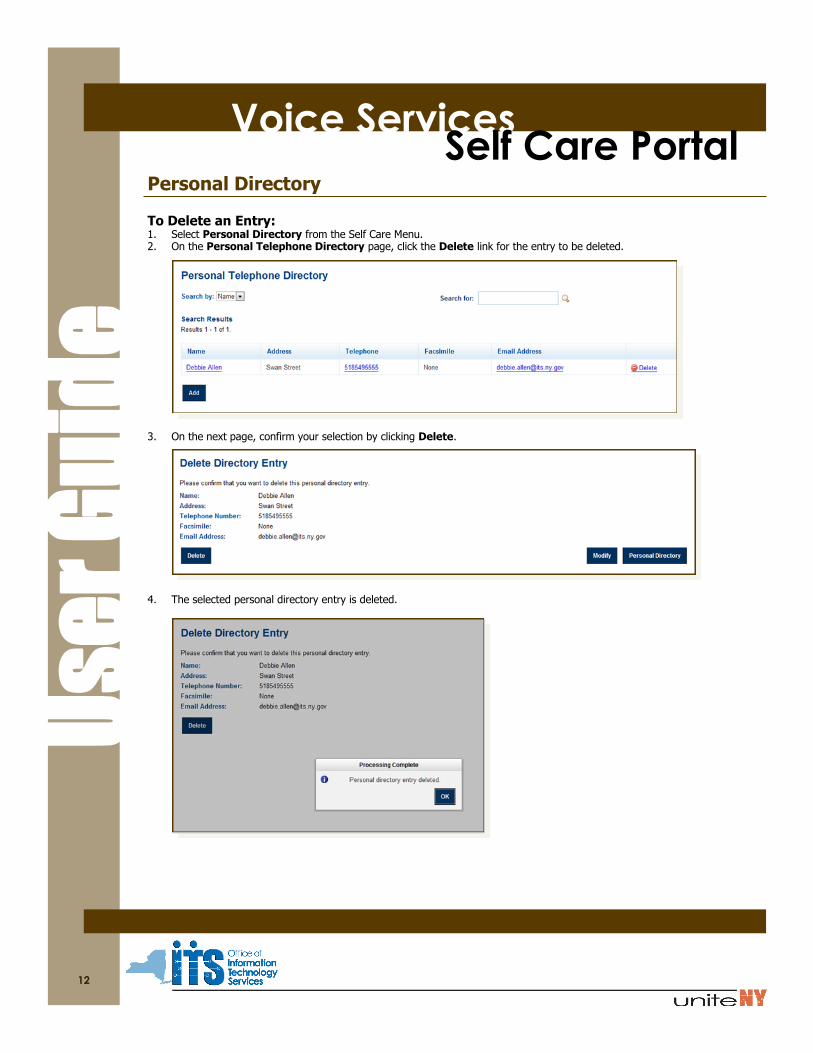
To Delete an Entry: 1. Select Personal Directory from the Self Care Menu. 2. On the Personal Telephone Directory page, click the Delete link for the entry to be deleted.
3. On the next page, confirm your selection by clicking Delete.
4. The selected personal directory entry is deleted.