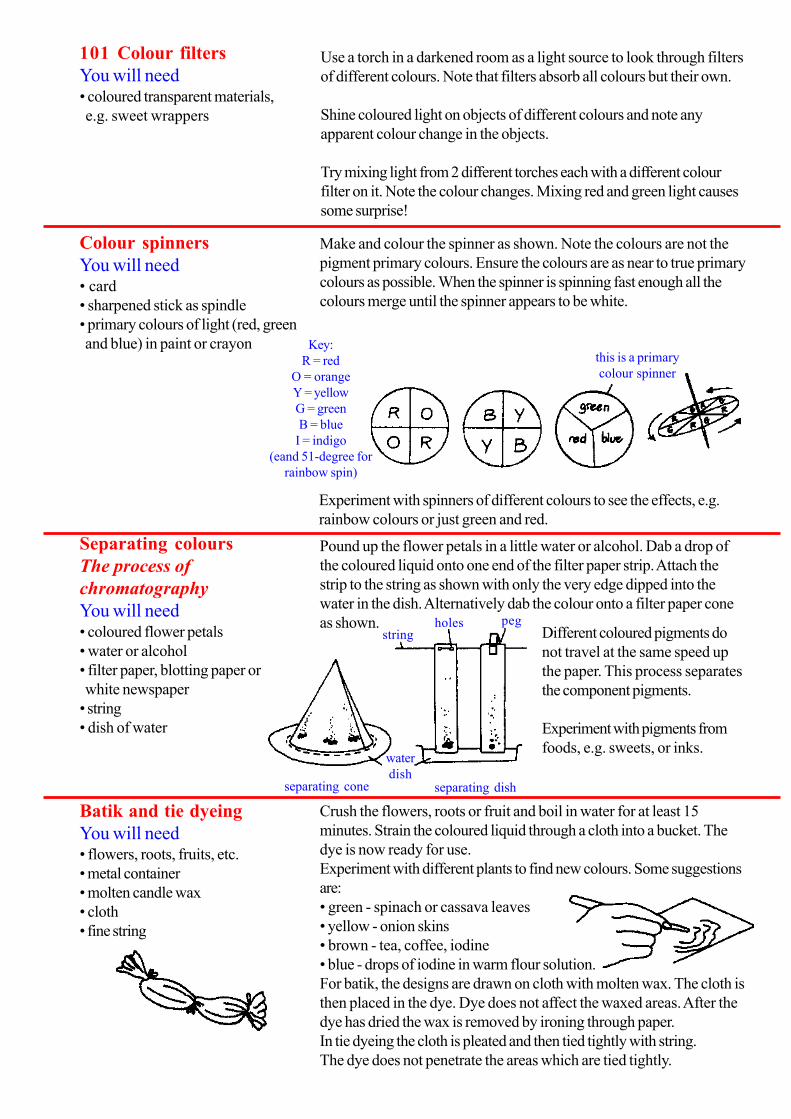
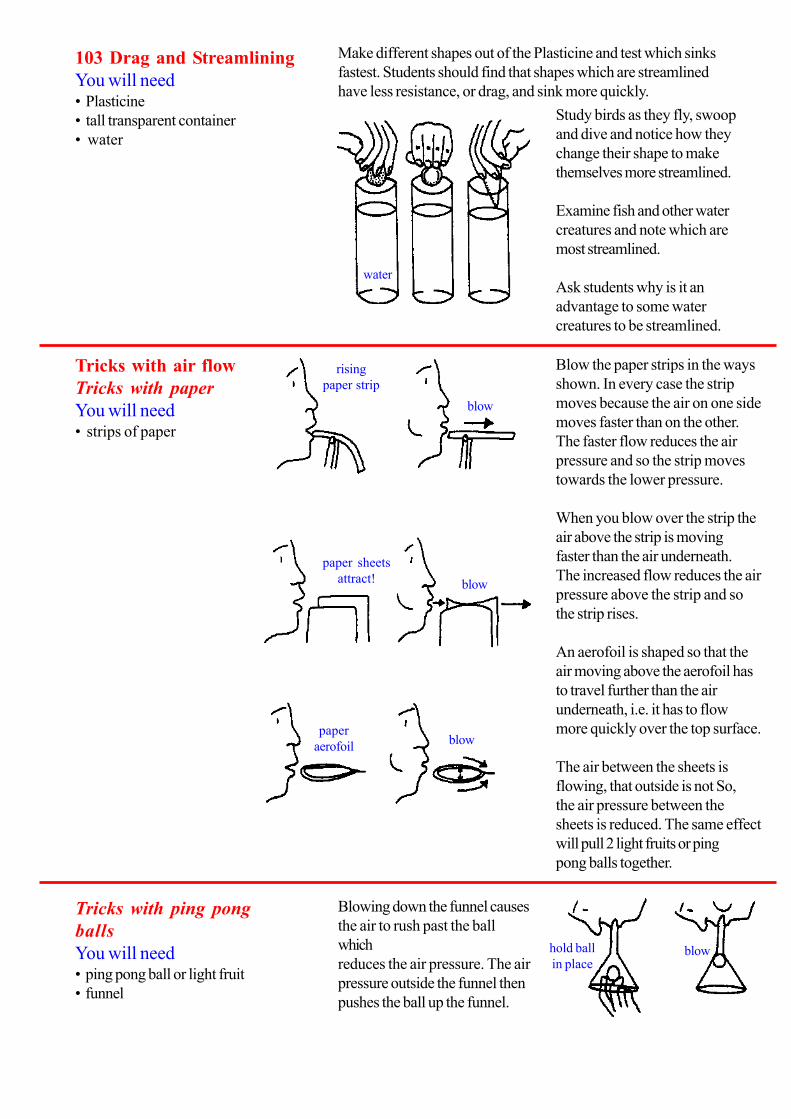
Page 1
VSO The Science Teachers’ Handbook
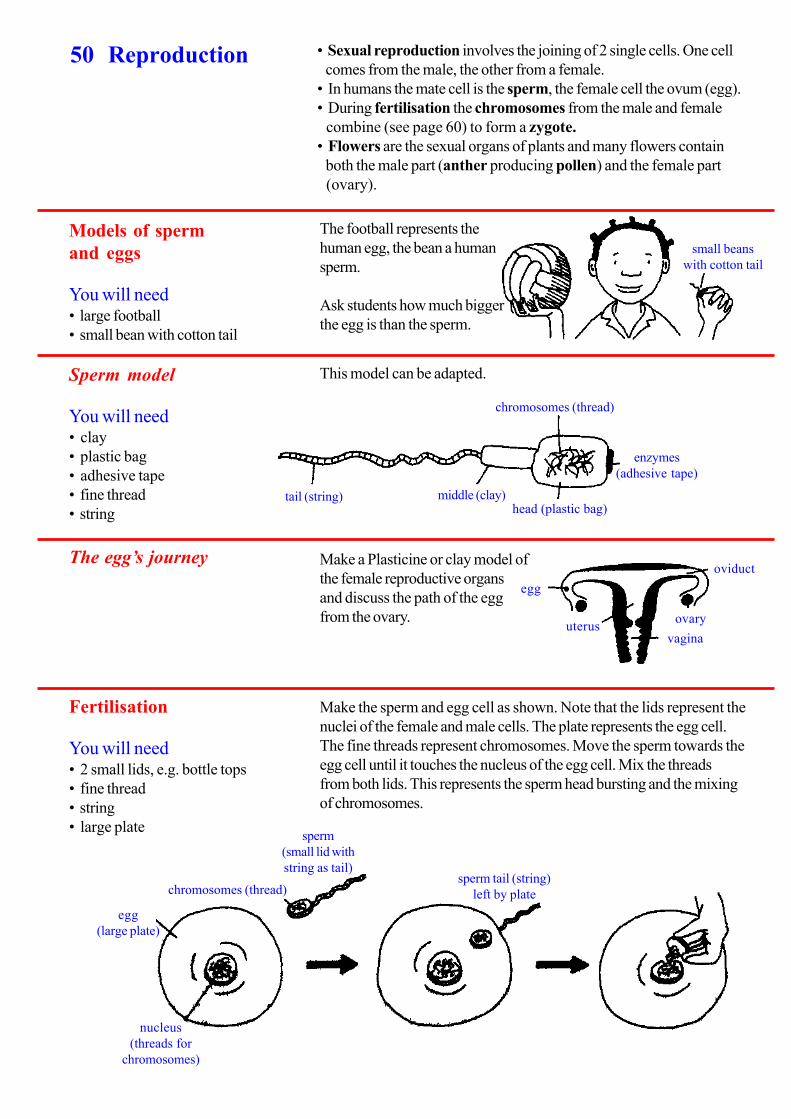
Ideas and Activities for Every Classroom
Andy Byers, Ann Child, Chris Lane
Voluntary Services Overseas 317 Putney Bridge Road, London
Requests for permission to reproduce more than ten (10) pages of this book for non-commercial
purposes without incurring a fee should be sent to VSO.
Contents
4 Introduction
6 How to use this book
8 Getting the best out of the material
Teaching practice
10 Developing new ideas
12 Classroom and community
14 Blackboard skills
16 Visual aids
20 Copying and duplicating
Science ideas
22 Cells and tissues
24 Diffusion and osmosis
26 Foods and food tests
28 Alimentary canal and digestion
30 Blood
32 Heart and blood circulation
34 Breathing
36 Respiration
38 Photosynthesis
40 Plant transport and transpiration
42 Support and movement
44 Paper skeleton
46 Senses and responses - plants
48 Senses and responses - animals
50 Reproduction
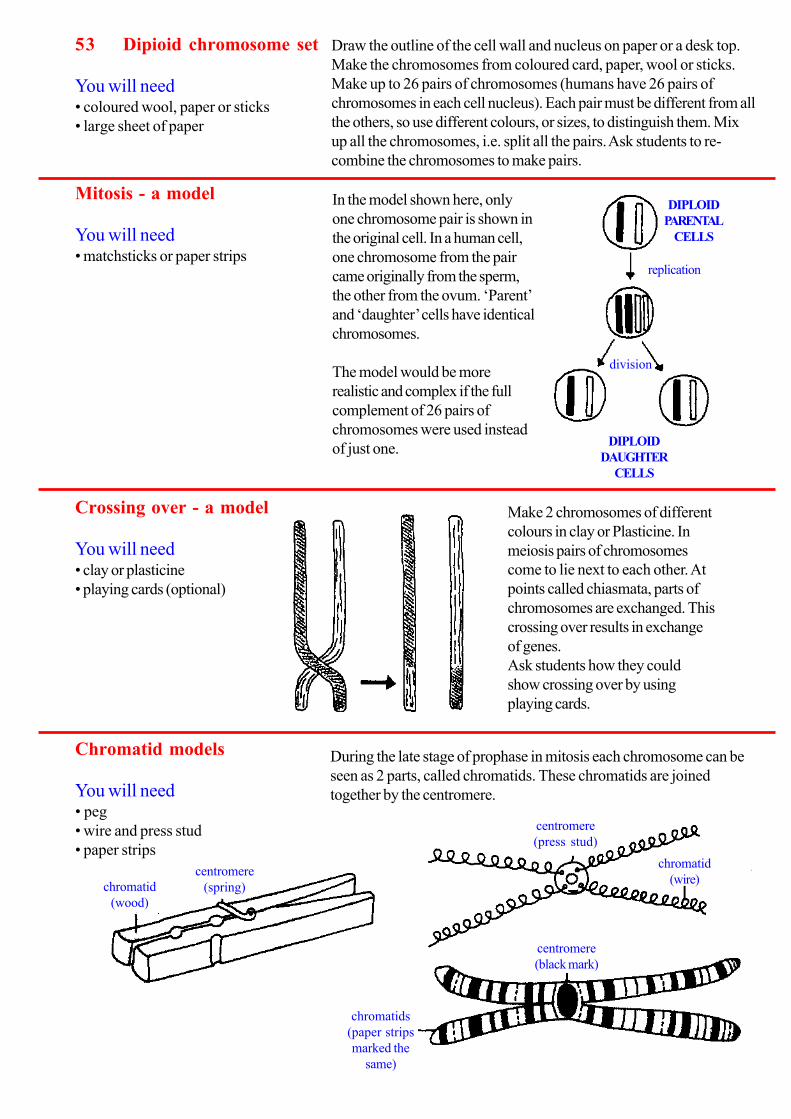
52 Genetics
54 Ecology and ecosystems
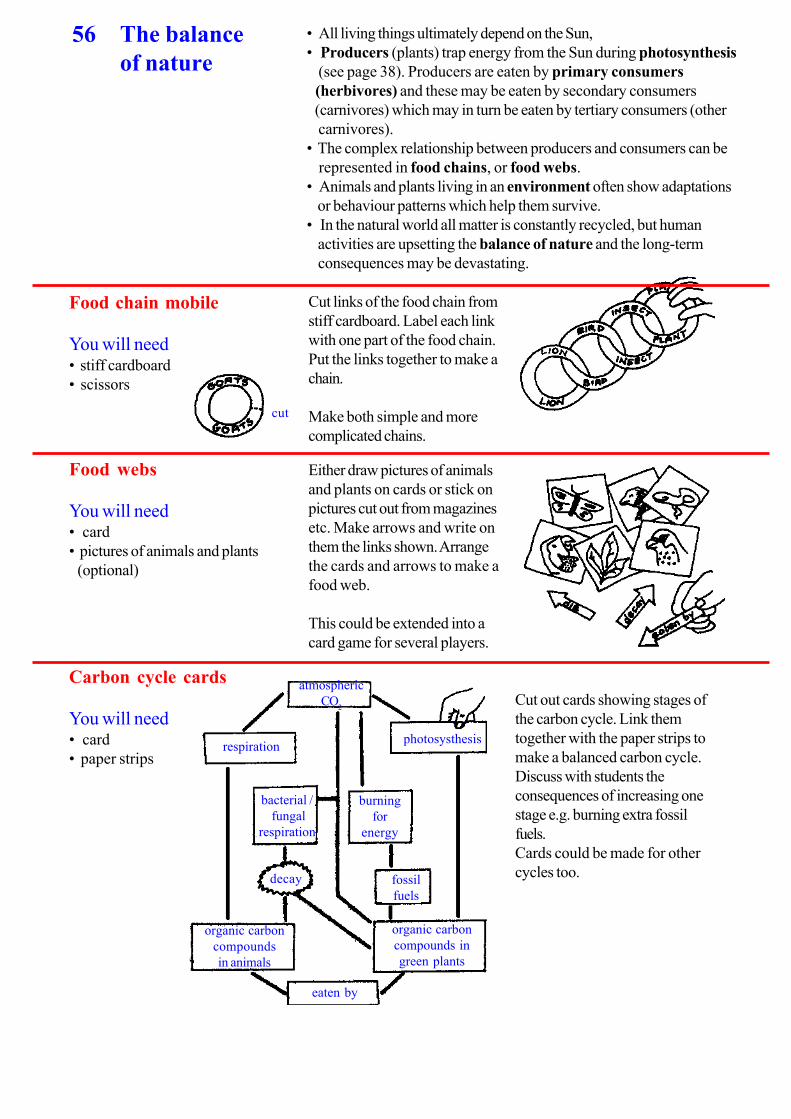
56 The balance of nature
58 Health matters
60 Raw materials
62 Separating mixtures
64 Metals
66 Elements and compounds
68 States of matter
70 Speeding up reactions
72 Acids and bases
74 Magnetism
76 Electricity
80 Electric motors
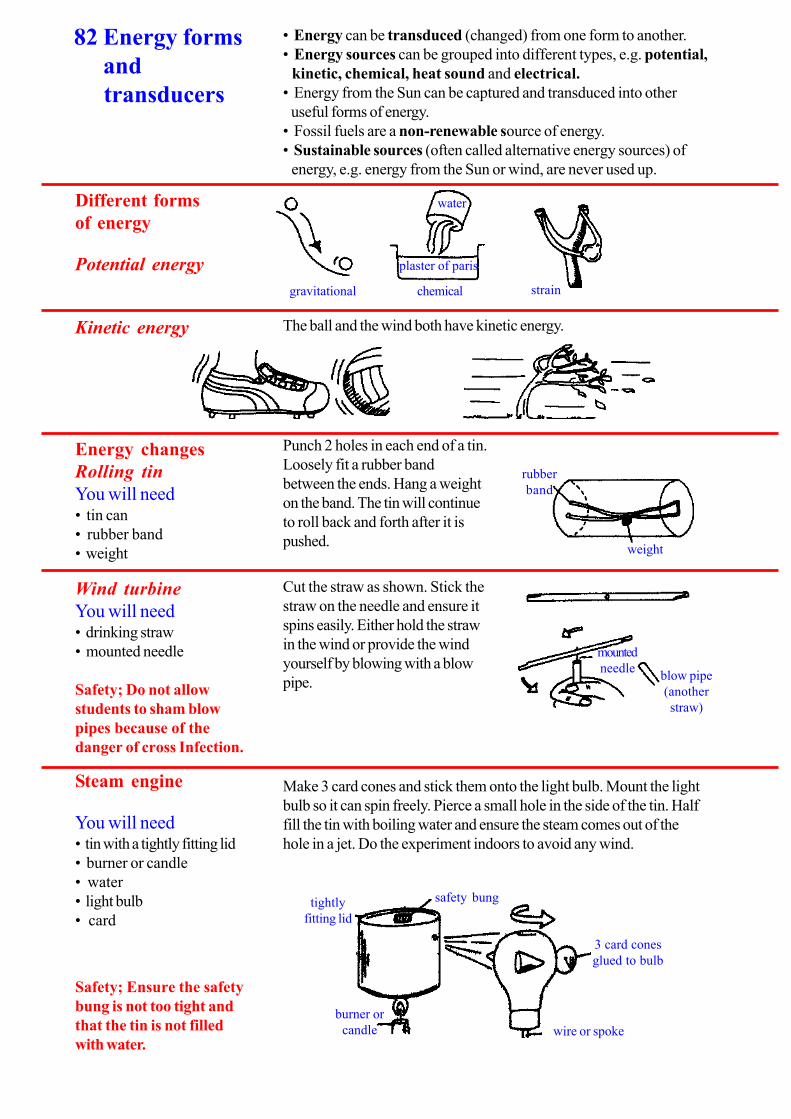
82 Energy forms and transducers
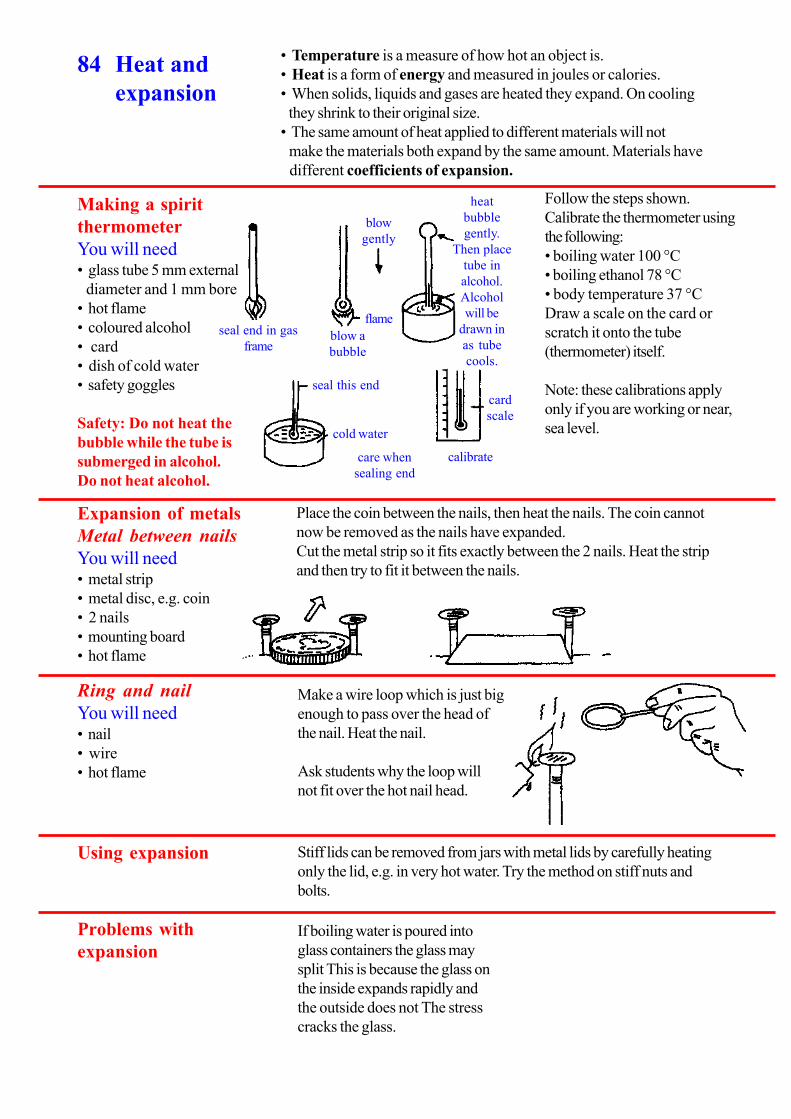
84 Heat and expansion
86 Heat
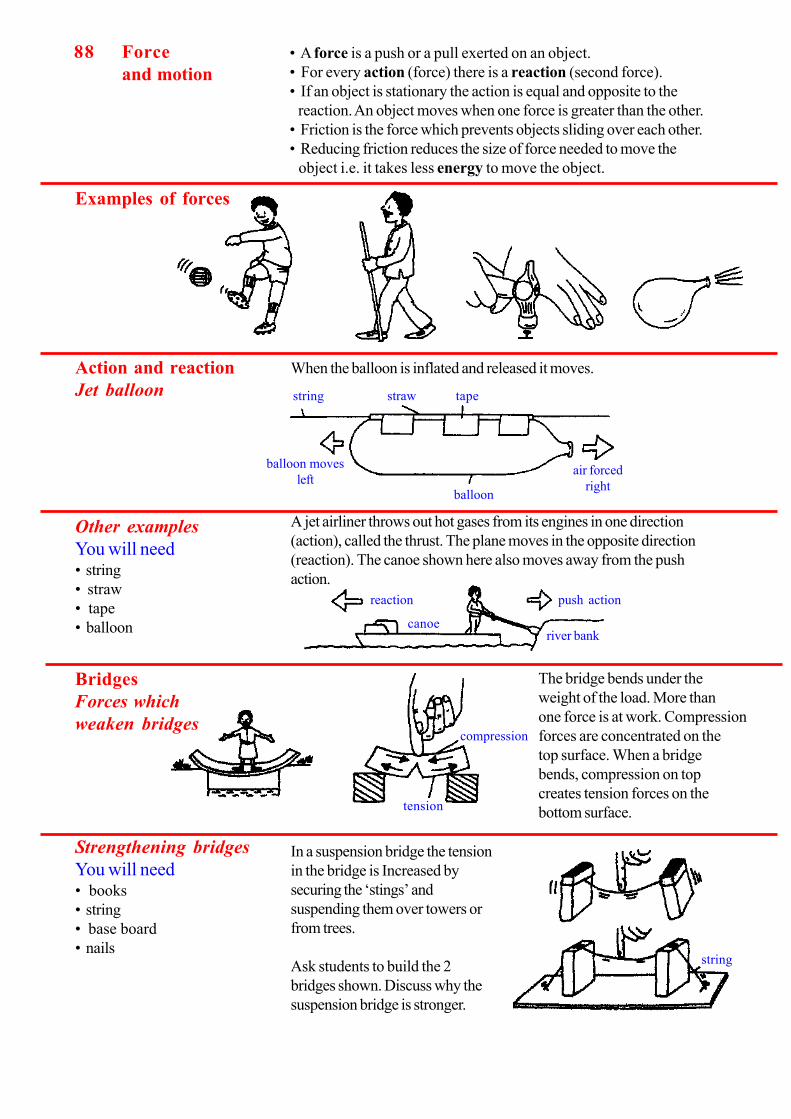
88 Force and motion
92 Levers, pulleys and machines
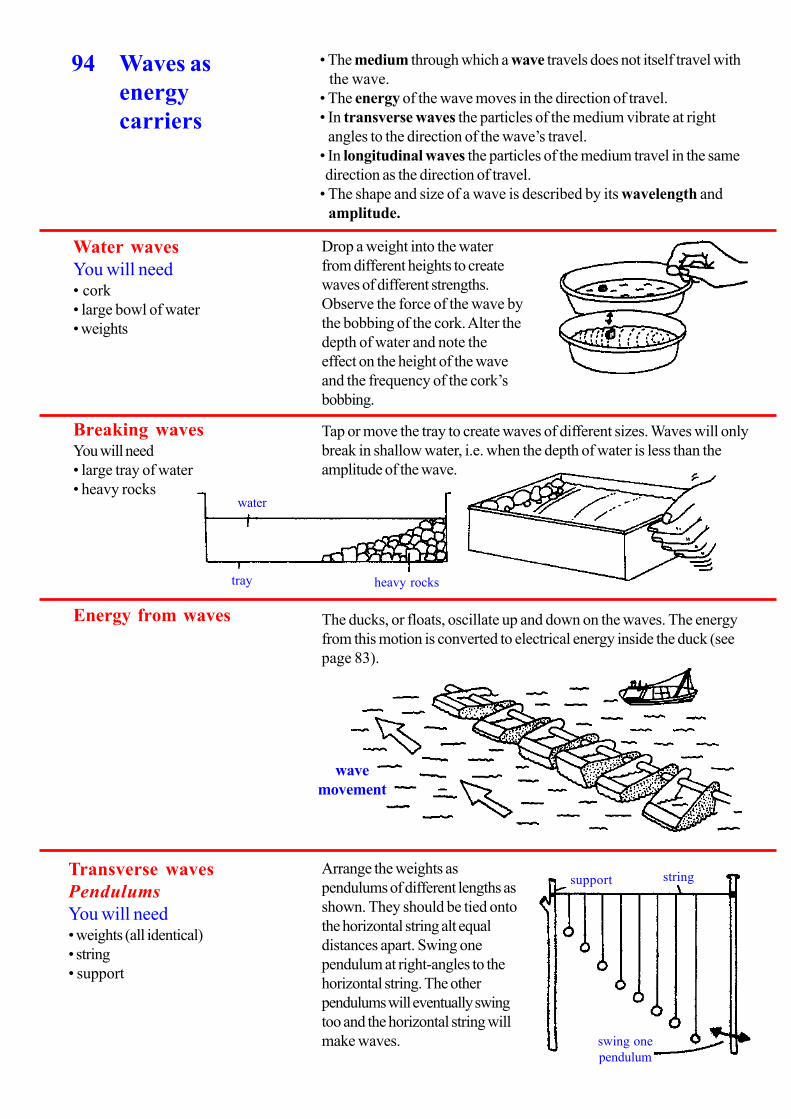
94 Waves as energy carriers
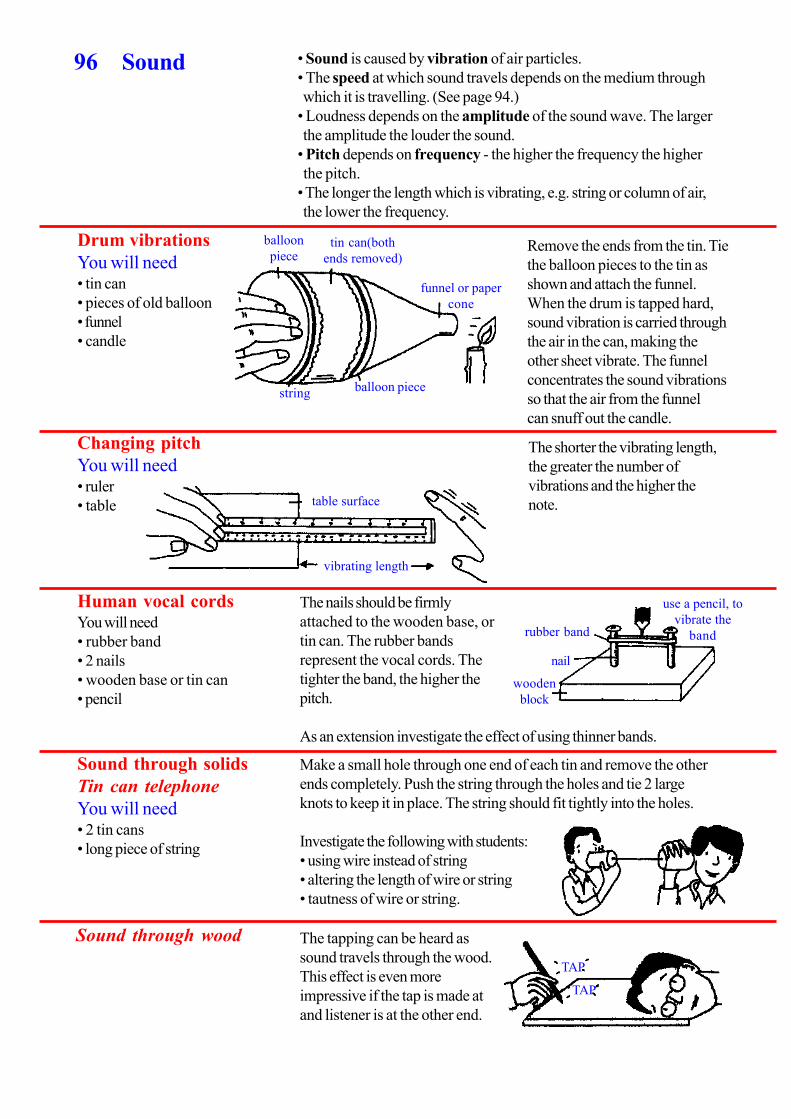
96 Sound
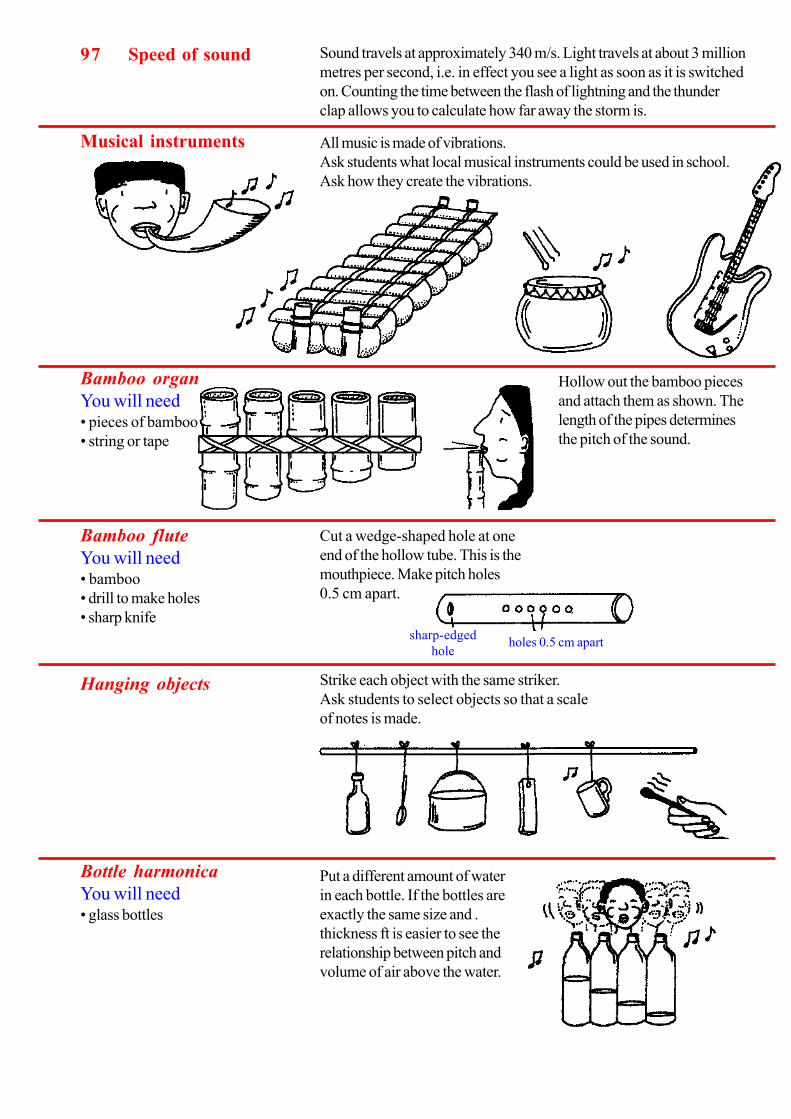
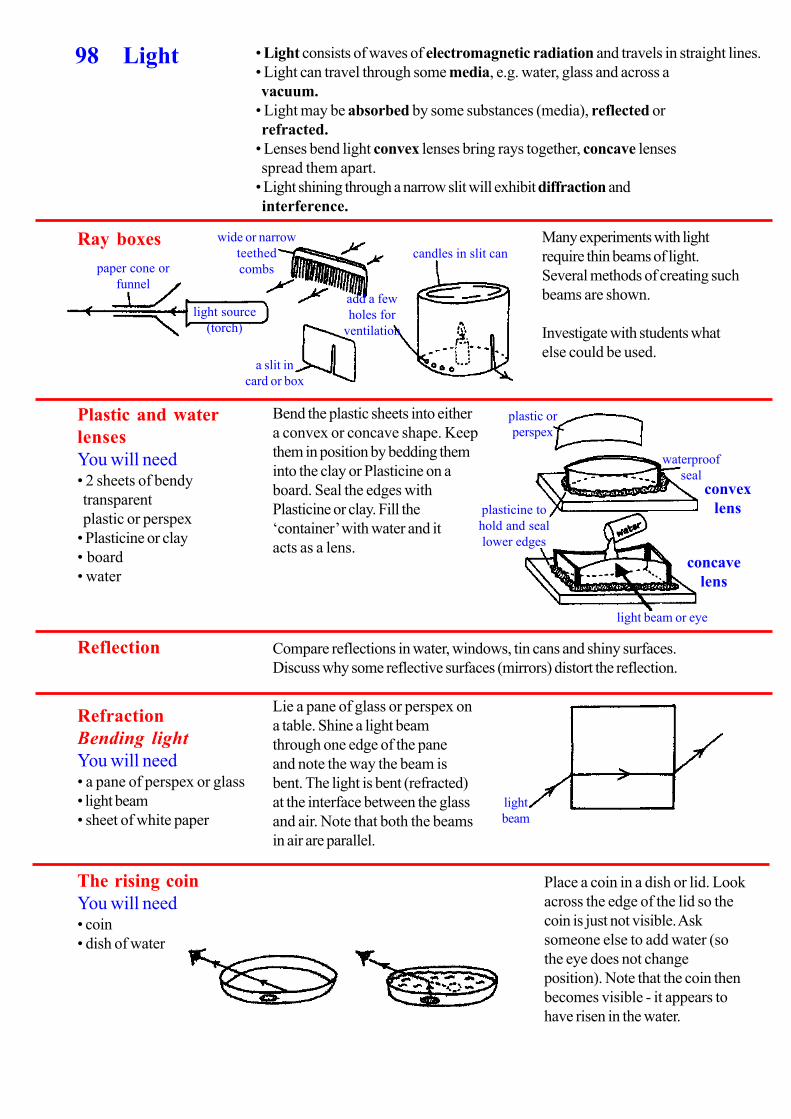
98 Light
100 Colour
102 Fluids and flying
Materials and equipment
104 Making up chemicals; preparing gases
106 Laboratory equipment
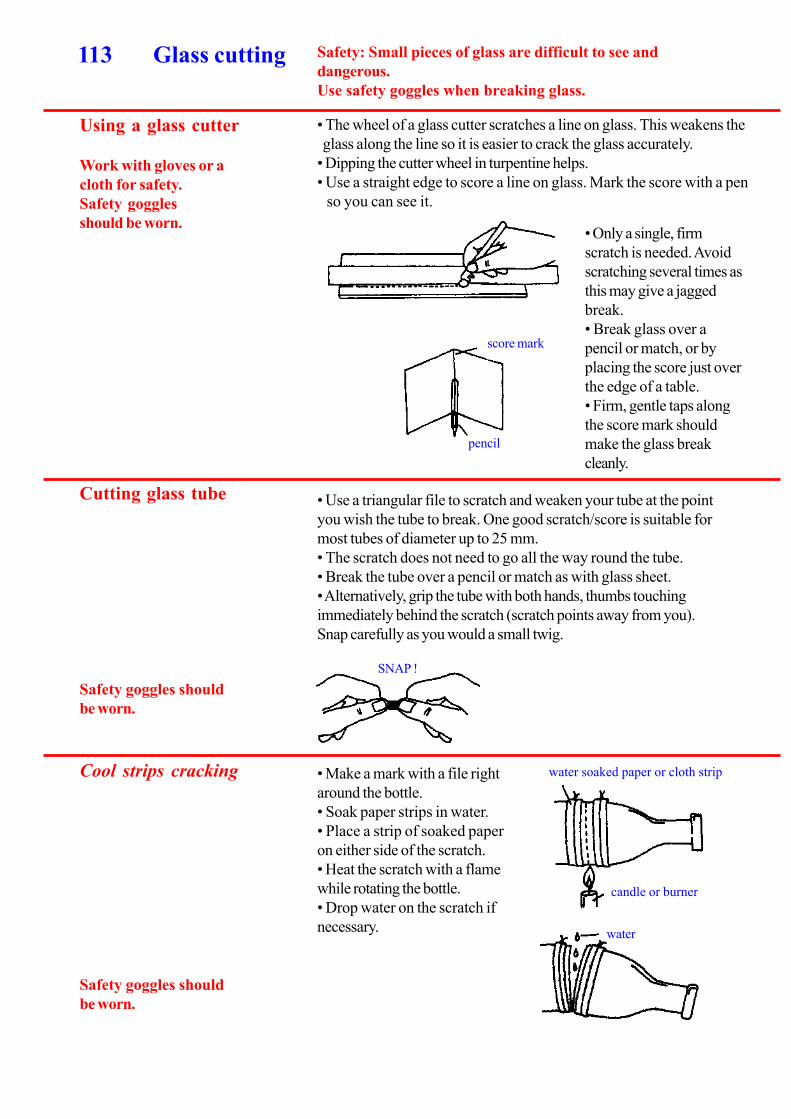
113 Glass cutting
114 Magnifying and microscopes
116 Burners
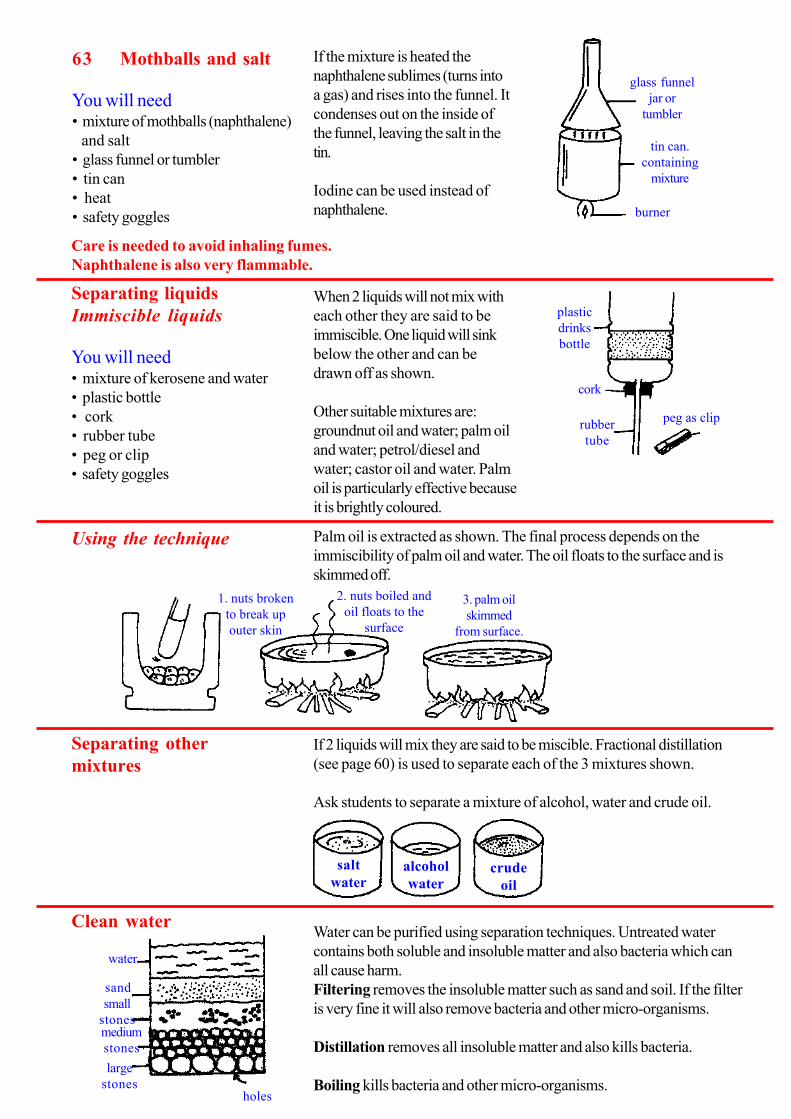
118 Joins and adhesives
120 Modelling materials
122 Collecting and displaying
124 Storage
126 Local sources of chemicals
Page 2
Teaching is a challenging and time consuming activity. Teachers are constantly looking for new
ideas and practical work for science subjects. Many have to teach new or unfamiliar topics
with limited time to plan and try out suitable activities. Pupils usually hope that science will
offer exciting activities or experiments and science teachers face the challenge of meeting these
expectations.
This book has been compiled by VSO to bring together successful practical ideas used by
teachers all over the world. These ideas have been developed and adapted over many years
by VSO teachers and their national colleagues working together in schools throughout Africa,
Asia, the Caribbean and the Pacific. Based on this depth and breadth of experience, this text
shows how to demonstrate science in action in dear and exciting ways, even when time and
resources are limited.
In order to make the ideas in this book as practical and relevant as possible to the needs of
teachers and teacher trainers, the book has been widely tested. Teachers in secondary and
junior secondary schools, in workshops and in curriculum development units In more than 20
countries worldwide have trialled and commented on drafts and improved the final contents.
The ideas and activities in this book are presented to show what is possible and to encourage
teachers to use them as starting points. They should be modified according to what is available
and appropriate in local circumstances. This book is designed to be used as a resource
alongside other materials. It is not a textbook.
I have to pay for
every equipment
that gets broken.
I can’t think of any
practical activities for the
genetics topic.
Pupils do not do any
science before secondary
school- they find it hard and
irrelevant.
I don’t have enough sets of
equipment to do practical work.
We’ve got lots of fancy equipment
but the pupils seem intimidated by it
in case it gets broken.
4 Introduction
Why has this book been compiled?
Page 3
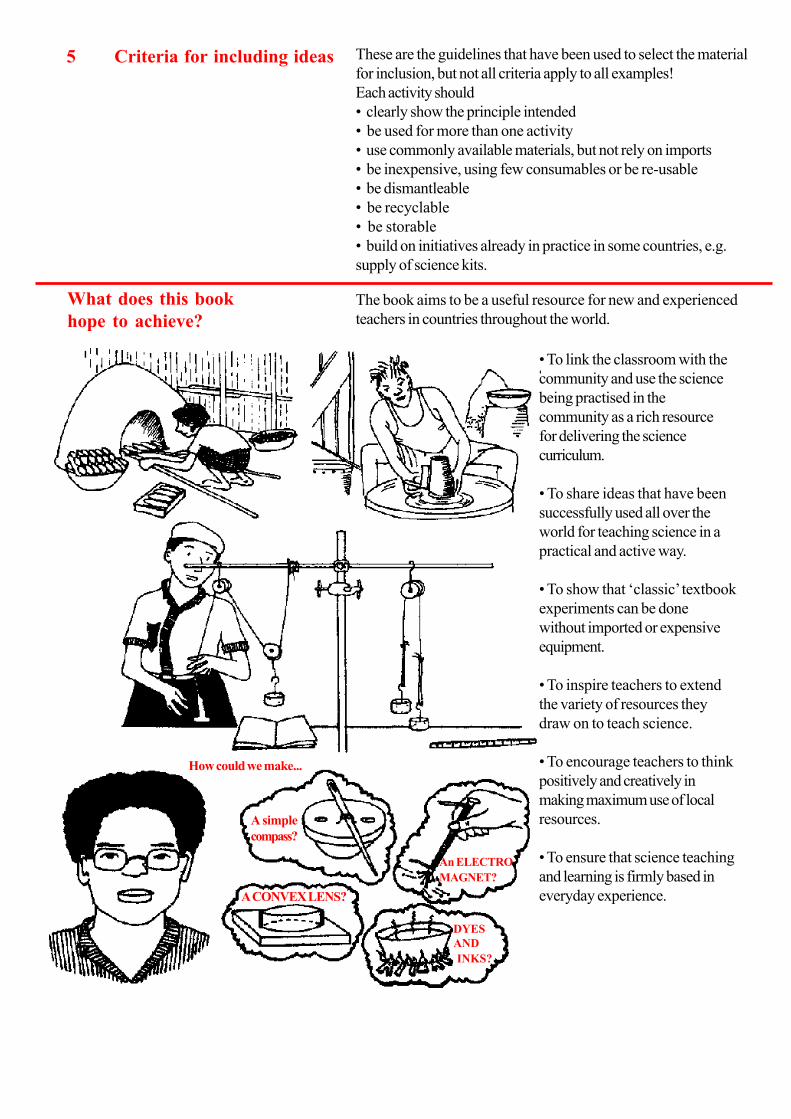
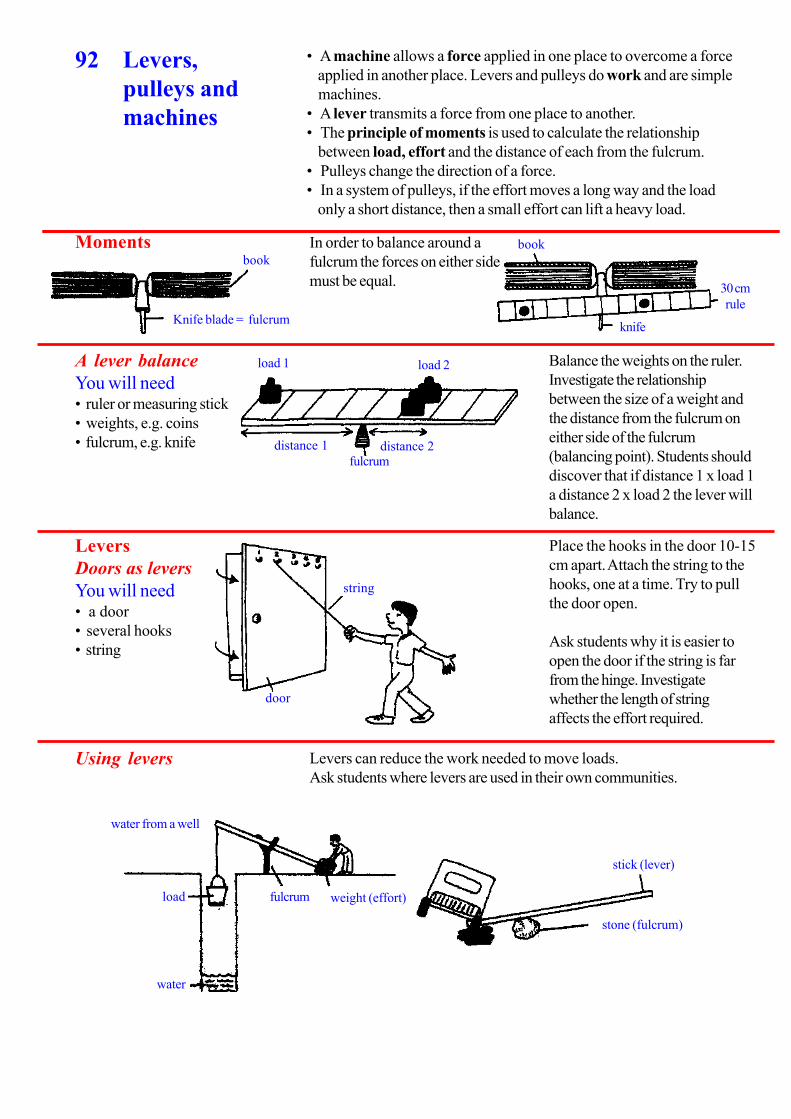
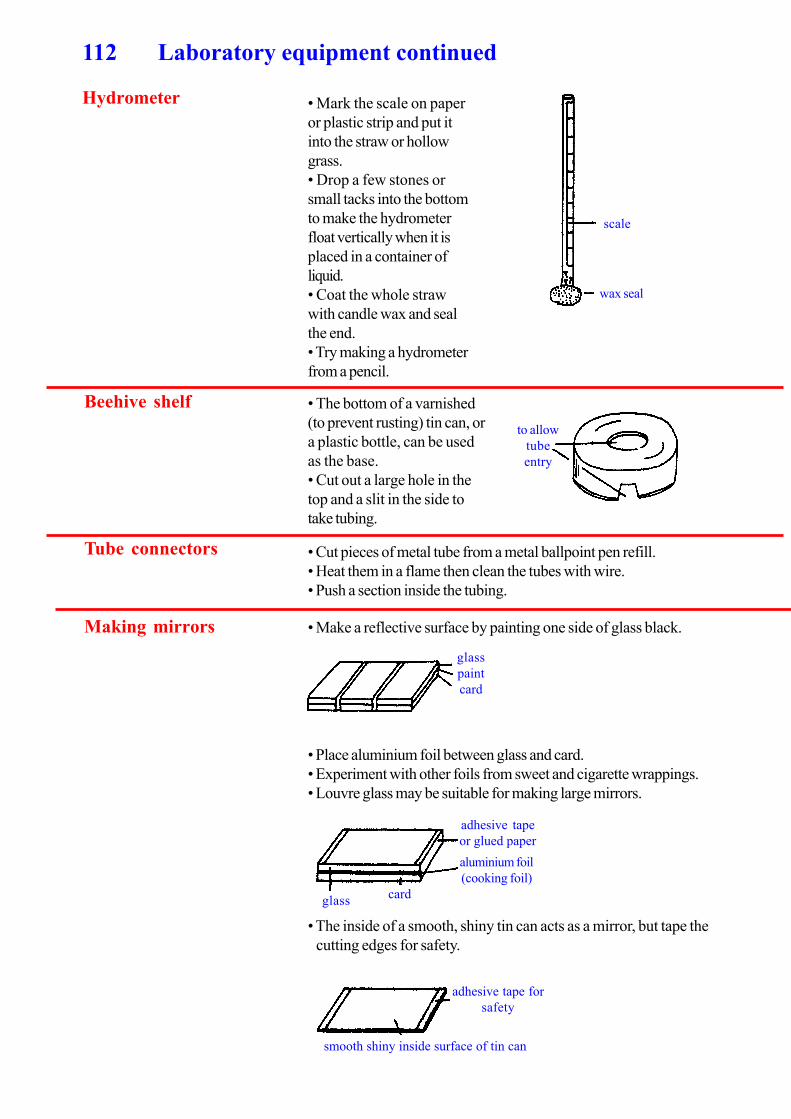
5 Criteria for including ideas These are the guidelines that have been used to select the material
for inclusion, but not all criteria apply to all examples!
Each activity should
• clearly show the principle intended
• be used for more than one activity
• use commonly available materials, but not rely on imports
• be inexpensive, using few consumables or be re-usable
• be dismantleable
• be recyclable
• be storable
• build on initiatives already in practice in some countries, e.g.
supply of science kits.
What does this book
hope to achieve?
The book aims to be a useful resource for new and experienced
teachers in countries throughout the world.
• To link the classroom with the
community and use the science
being practised in the
community as a rich resource
for delivering the science
curriculum.
• To share ideas that have been
successfully used all over the
world for teaching science in a
practical and active way.
• To show that ‘classic’ textbook
experiments can be done
without imported or expensive
equipment.
• To inspire teachers to extend
the variety of resources they
draw on to teach science.
• To encourage teachers to think
positively and creatively in
making maximum use of local
resources.
• To ensure that science teaching
and learning is firmly based in
everyday experience.
How could we make...
A simple
compass?
An ELECTRO
MAGNET?
A CONVEX LENS?
DYES
AND
INKS?
Page 4
8 Getting the
best out of
the material
The material in this book should be used in addition to the resources
already available, such as textbooks, exam papers, the syllabus, local
environment and colleagues. You will need to select items that are
relevant to the teaming objectives of the students.
The book is divided into 3 main sections: teaching practice, science
ideas, materials and equipment.
Teaching practice This section gives information on classroom management and advice
on the use of visual aids and other resources.
Try out new ideas first • It is essential to check new ideas thoroughly in advance to ensure that
they work and are safe. If possible work with a colleague and share ideas
as well as the equipment with each other.
• If you do not have exactly the materials suggested, try alternatives.
• Trying out an idea yourself may help clarify how it can be adapted for
teaching at different levels.
Maximise equipment If 4 or 5 sets of equipment are available, divide the class into 2 or 3 groups.
Each group can then work on an activity for a set time before moving on to
the next one. One activity could be a written exercise.
If only 1 or 2 sets of equipment are available consider having a ‘circus’
of 6-8 different activities that students move around. They could spend
only 5-10 minutes at each one. The advantage of such a system is that
you make full use of limited resources, but it does require considerable
advance preparation and good classroom management.
Use resources fully Make good use of the resources available. Search the local, national and
worldwide community for examples that apply to the topic and make full
use of textbooks, newspapers, articles and exam papers.
Take the trouble to find locally based examples of scientific methods and
processes in use and also situations where scientific ideas are being
applied at industrial level.
Many teachers find it invaluable to meet with colleagues to share ideas
and try out new suggestions. Is this possible in your area? Could you
become involved in teachers’ workshops?
Science ideas Each spread is a collection of ideas on
one topic. The sequence of material is not
intended to suggest a progression
although linked ideas are grouped
together.
Each spread begins with a brief
introduction identifying the key concepts
being explored.
Where a topic links in with another, or
depends upon understanding of another
area, crops references are giwnu In your
own scheme of work you could develop
manyy more cross refrences so that, in
effect, you have developed a route
through the book.
Page 5
9 Materials and
equipmentThis section gives ideas on sources of chemicals and how to make
laboratory equipment from everyday items.
Before making new equipment check that it is worth investing the time and
energy required. The criteria for including new ideas given on page 4 may
provide a checklist to decide how useful the equipment
is. How many criteria can you answer yes to? Which are the most
important criteria in your situation?
Another thing to do before you make any equipment is to identify, possibly
by a list the materials that could be used to make the specific equipment
you need. If you ask students, friends and shopkeepers to donate things
they do not need, you will have a good supply of materials when you want
to make something.
Safety goggles
You will need:• cardboard, cloth
or foam - for padding
• glue, Sellotape,
masking tape, string
• transparent plastic,
ideally Melamex
Make the goggles as shown.
How will you use sun
glasses as safety glasses?
We’ll
change
the
dark
plastic
for
clear.
Cut the transparent plastic from
bottles, bags or packaging.
Use cloth foam as
padding
Cheap
and
safe!
OR
try out lots of
different designs.
padding
my own
design
OR
a simple way to
protect eyes is
with a glass or
plastic piece.
Safety Some experiments and equipment can be dangerous if not
handled properly. Teachers should familiarise themselves with
laboratory safety guidelines and take note of safety warnings in
the book. Some experiments, especially those flagged by the
safety warning shown on the left, may be more appropriate as
demonstrations by the teacher.
Particular areas of risk are
• use of chemicals
• heating and cutting glass
• fire
• cross infection, e.g. by sharing apparatus such as straws or
blowpipes, or by using unsterilised syringes rather than new or
sterile ones.
Extra care is needed when using improvised equipment and all
potential risks must be assessed before such equipment is used
in an experiment.
While all material has been carefully vetted by experts, neither
VSO nor thePublishers accept liability for accidents of any kind.
Page 6
10 Developing new ideas
Do not feel you should rely entirely on your own resources to develop
new ideas, involve students and other teachers. Here are some
suggestions on how you could involve other people.
Mini-experiments• Smaller scale experiments use up less of your valuable chemicals.
• Spoons and bottle tops are not expensive and are easier to replace
than specialised equipment.
• Do you really need large vessels?
• Mini-experiments mean more students can carry out experiments
themselves.
Involving students
• Students could collect objects for the science department.
• Students could make models or equipment for use in other classes.
• Students could ‘act out’ a concept or sequence. Some examples are
shown below.
• Involve students in evaluating scientific ideas in the context of their
own communities. For example, what are their perceptions of science
and technology?
We were
allowed to
look through
books for
ideas.
bones of a limb
convection
radiation
conduction
energy transfer
(ball = energy
SUN
planets
motion of the planets
acting
chemistry
Water ( H + O + H = H2O)
Page 7
11 Ideas from publications
• Looking through library books and textbooks can give you lots of
ideas to use in the classroom.
• Magazines and newspapers may give up to date material.
• There will be other local publications which you could use.
• Encourage students to make full use of their printed resources.
101 uses
branched stick
vessel
Exchanging ideas with other teachers will build up a large selection of
ideas for everyone to draw on. It may be useful to have teachers’
workshops to develop new ideas and make new equipment. Here is an
example of such a workshop project. Students might enjoy the
challenge too.
How many uses can we find
for this tin? Let’s list them.
WORKSHOP TASK
“Make a stand for a vessel.”
Use any of the materials.
sand or soil
thick wire
string
sticks
bottle
pins
nails thread
corks
fruits
BRANCHED
STICK
STAND
wire
soil / sand
filled
container
stick wire hookplastic
tube
sand wire
around
vessel
neck
vessel
burner
First thing is to
look at what we
can use.
Stones can be
used to make base
heavier.
A large heavier
container makes a
more stable base.
How many
methods can
I find which
are the best?
drive
stand
wiresthrough
the
corks
sand-filled bottle
two bottle: two stands
CORK AND SPOKE STAND
bicycle
spoke
or stick
corks
large
sand
filled
container
sand
filled
bottle
vessel
Page 8
12 Classroom and community
New teacher in the community • Explore the area with teachers who live locally.
• Get to know local technologies, e.g. pottery, bakery.
• Take a notebook and /or camera to record interesting things
which may be of use in teaching.
• Get to know the local names for objects, processes etc.
• Discover where materials and plants are situated which may
be useful during the year.
New class• Ask the students to identify what happens in the
community which could be described as science.
• A valuable starting point is to ask students to describe their
daily routine. When the routine is examined specific events
can be identified and developed more easily.
Health and safety• Health and personal hygiene have an important part to play
in science education. Here are some examples of starting
points.
• Inoculation of a vaccine into the body to give immunity.
• Sleeping in an unventilated room with a wood or charcoal
stove may lead to carbon monoxide poisoning. The
colourless and odourless gas, carbon monoxide, combine
300 times more readily with haemoglobin than oxygen does.
(See page 30)
Science in the home• One of the most useful aspects of the community often
ignored in science lessons is the home. Here are some
starting points.
• Mixing chemicals, e.g. when preparing foods.
• Stimulation of the production of saliva by smell.
• Using soaps and detergents to break down dirt and fats on
clothing.
• Foods going mouldy as a result of bacterial or fungal growth.
Guest speakers• Invite local craft workers to talk to a class or the science
club.
• Remember these people may not be used to speaking to
large groups. Be patient and help if necessary.
• Arrange visits to places of work, where craft workers could
explain their jobs in familiar surroundings.
• Build up a register of people wilting to talk or visit the
school.
It is well established that the choice of learning context has a strong
effect on student performance. It can even affect the way in which we
view our own community. Try to use your local resources to the full
and ensure ideas are not presented in a purely theoretical way. Using
local examples and local situations to provide illustrations or analogies
of science at work will help to bring the subject alive and so motivate
students to learn.
Page 9
13 Science in the community
Identify local industries which could provide a context for science
lessons. Could you develop a science lesson by simulating a local
industry in class? Here is an example:
• In many communities plant dyes are made from flowers,
roots or fruits. They are collected, crushed and then often
boiled for some time before being sieved.
• Batik designs are drawn on cloth using molten wax. The cloth
is then dyed, but the dye does not reach the waxed areas.
Dyes can also be resisted by tying the fabric tightly.
A Science corner
• A table pushed into a corner can be the start of a science
corner in the classroom.
• A few nails or strips of wood can be added above the table
to hang posters and specimens from.
• The corner could be the focus for science club activities.
Community
Science
Page 10
• If you are right-handed, arrange text on the blackboard so it
develops from left to right (vice versa if you are left-handed).
• Divide the blackboard into 2 or 3 fields which are each similar in
shape to pupils’ books.
14 Blackboard skills
Presentation
• Untidy presentation encourages untidy work from students.
Field1 Field 2 Field 3
CHALK DUST EVERYWHERE CHALK DUST DRAWN DOWN CHALK DUST PULLED TO RIGHT
Atoms
a)
b)
c)
Nucleus
a)
b)
Homework
Atoms
Keep part
for rough
work and
spellings.
NucleusElectron
Proton60%
• Underline headings and essential terms and statements. Leave space
round diagrams. Put summaries in bold or coloured frames.
Cleaning the blackboard
Page 11
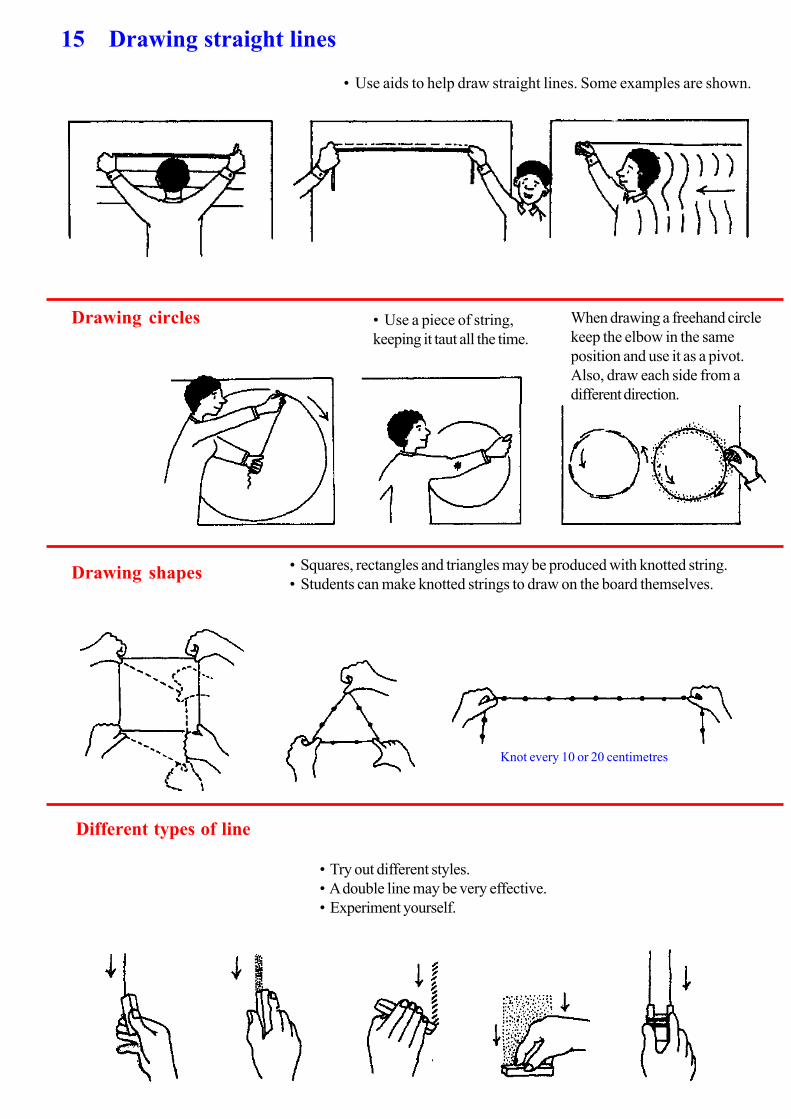
15 Drawing straight lines
• Use aids to help draw straight lines. Some examples are shown.
Drawing circles
Drawing shapes
When drawing a freehand circle
keep the elbow in the same
position and use it as a pivot.
Also, draw each side from a
different direction.
• Use a piece of string,
keeping it taut all the time.
• Squares, rectangles and triangles may be produced with knotted string.
• Students can make knotted strings to draw on the board themselves.
Knot every 10 or 20 centimetres
Different types of line
• Try out different styles.
• A double line may be very effective.
• Experiment yourself.
Page 12
16 Visual aids
Cardboard box display
• Pin display work on the sides of the box.
• Sew or tape cardboard sheets together to
make a box (see page 118).
• A box can show 8 sides.
Display beams and hooks
Display charts
• Make a beam supported by 2 nails or loops of wire.
It can be hung on the wall, or suspended from a beam.
• Hooks of wire allow easy and swift display.
• Display charts can be made
from durable cement bags,
cloth, cardboard boxes, sleeping
mats and blankets.
• To make the chart hang flat
attach a strip of wood to the
top and either another strip of
wood or weights to the bottom.
• Strips at top and bottom will
strengthen the chart and make
it last longer.
• Attach items to be displayed to
the chart wtth office pins, cactus
needles or sharpened
matchsticks.
nailOrganic
compounds
of oxygen
ALCOHOLS
Organic
compounds
of oxygen
ALDEHYDES
STORAGE OF
DISPLAY
ITEMS
Page 13
17 Zigzags
Zigzag multiboard • A portable zigzag board can hold and display many itmes.
Flannel
channel
Plastic
surfaceblackboard transparent
flip
pin chart flannel
board
string board envelope
for pieces
Zigzag board portability • Fold the outer wings in, then
close the board.
handles fo
string,
rope or
cloth strips
• The boards can be made from
plywood, hardwood or
cardboard.
• Fastenings can be made from
many materials.
strings or wires with
cloth strips as patches
for strength
rubber strip belt
Zigzag variations • Experiment with different angles and presentation techniques.
• Try different combinations in one board.
double-faced
flannel
board
double or
triple
faced
hanging
board
Flannel/cloth boards • To keep pictures firmly on a cloth or flannel board, attach a small
piece of sandpaper to the reverse side of the picture. Press the picture
onto the board.
• Alternatively, sprinkle sand on a lightly glued area on the back of the
picture to give a sandpaper effect.
• You will need polythene sheets, a bar of wood and some nails or pins.
• You can put together as many sheets as you want (see page 33).
• Lift up different sheets to show the combinations you want.
See-through flip sheets
Can you label
this plant?
1.draw the base drawing. 2. write the labels on
the other sheet.
3. the two drawings
lying one over the other.
4. using the flip chart.
Can you label
this plant?
Can you label
this plant?
Page 14
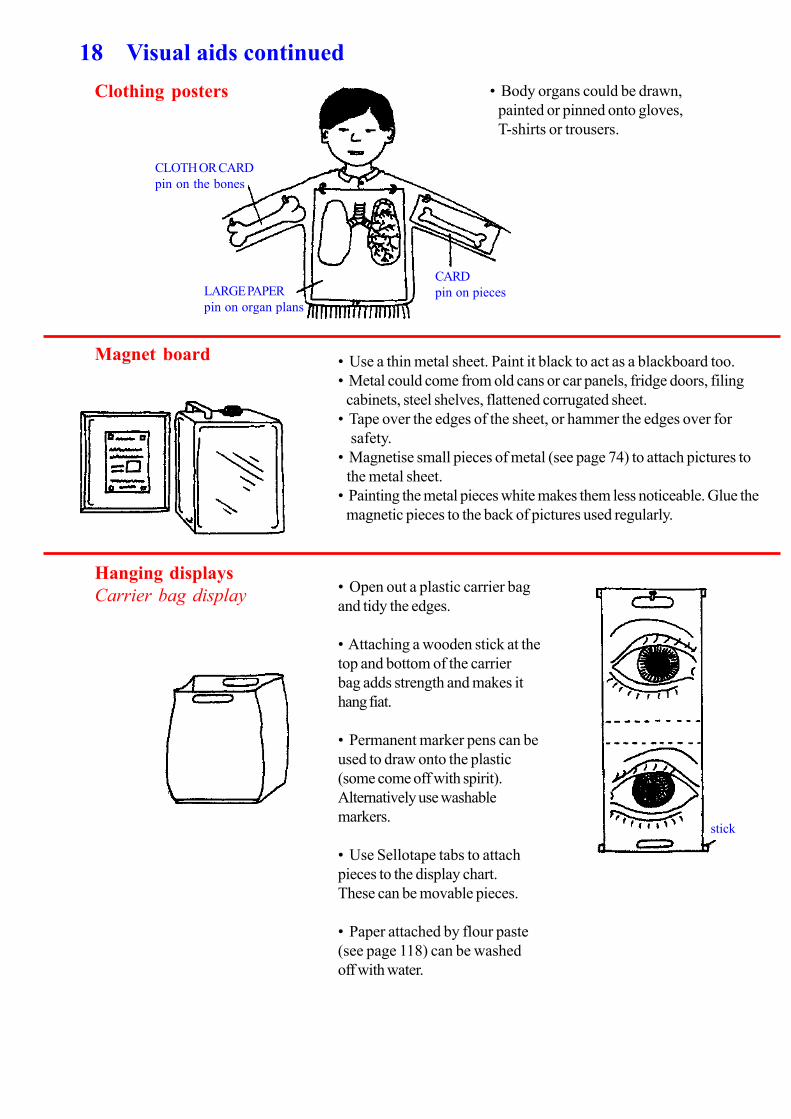
18 Visual aids continued
• Body organs could be drawn,
painted or pinned onto gloves,
T-shirts or trousers.
Clothing posters
CLOTH OR CARD
pin on the bones
LARGE PAPER
pin on organ plans
CARD
pin on pieces
Magnet board • Use a thin metal sheet. Paint it black to act as a blackboard too.
• Metal could come from old cans or car panels, fridge doors, filing
cabinets, steel shelves, flattened corrugated sheet.
• Tape over the edges of the sheet, or hammer the edges over for
safety.
• Magnetise small pieces of metal (see page 74) to attach pictures to
the metal sheet.
• Painting the metal pieces white makes them less noticeable. Glue the
magnetic pieces to the back of pictures used regularly.
Hanging displays
Carrier bag display• Open out a plastic carrier bag
and tidy the edges.
• Attaching a wooden stick at the
top and bottom of the carrier
bag adds strength and makes it
hang fiat.
• Permanent marker pens can be
used to draw onto the plastic
(some come off with spirit).
Alternatively use washable
markers.
• Use Sellotape tabs to attach
pieces to the display chart.
These can be movable pieces.
• Paper attached by flour paste
(see page 118) can be washed
off with water.
stick
Page 15
stick
19 Hanging mats
Hanging mats
branch
bacteria
string or cloth strips stick
string, elastic, cloth
string boards or - on blackboardstringed cardboard box or sheet
drinking
straw
hollow
grass
egg sperm
wire or paper clip
• Hanging mats can be made
from heavy cloth, sleeping mats
or even carpet.
• Attach sticks to the top and
bottom to give extra strength.
• Attach pictures or posters with
tailor or office pins, sharpened
matchsticks or palm frond vanes
(‘broom pieces’).
String display lines • String can be used in many ways to display items.
Some ideas are given here.
• Hollow tubes, e.g. drinking
straws, or paper clips will allow
the display to slide up and
down the string.
Templates and stencils
Blackboard and book
templates
• Templates can be cut from hardboard, plywood or cardboard.
• Collect basic and elaborate shapes for quick; uniform and accurate
reproduction.
• Put a hole in blackboard templates so they can be hung up for
storage.
card or paper
Stencils • Draw the shape onto cardboard then punch guideline holes through
the cardboard, following the outline of the drawing.
• Pin or hold the stencil against
the blackboard or wall
• Dust over the holes with chalk.
• Remove the stencil and simply join the
dots to reproduce maps, charts and
diagrams on a large scale.
Page 16
20 Copying and duplicating
Jelly duplicating
Making the jelly
You will need:• 1 packet gelatin (11 g)
• 1 cup hotting water
• 2 teaspoons sugar
• 50 ml glycerin / glycerol
• This recipe should be adapted to local conditions. Try less water in
hotter climates to help the jelly set and more sugar to act as a
preservative.
• Work quickly through all the stages.
• Mix all the ingredients into the boiling water and stir well until they
have dissolved.
• Pour the liquid into a shallow tray large enough to take A4 paper.
• Remove any bubbles.
• Leave the liquid to cool and set in the tray.
• Prepare the original as shown.
• Wet the jelly surface slightly
with a sponge.
• Bend one corner of the original
down so you have a ‘flap’ to
hold it.
• Place the original face down on
the jelly and leave it for 2-3
minutes then remove it from
the jelly.
• Bend one corner of the copy
paper (to make a lifting flap)
and place the paper on the ink-
impregnated jelly.
• Remove the copy paper after a
few seconds.
• It is possible to duplicate 20-30
times.
• Allow the impregnated jelly to sit for 12 hours before re-use. The ink
then soaks in and the jelly can be re-used.
• Melt a used jelly down and the ink diffuses throughout the jelly. The
jelly can then be re-used. Melt jelly over water, never with a direct
flame.
• Make stencils {like a Banda original) on any paper except newsprint.
• Smooth, glossy, strong paper is good even if printed on.
• Purple and red pens often work best but this may not be true for all
types of inks.
• Try commercially produced jelly too.
• Brush or dab a little turpentine onto a sheet of white paper.
• Work swiftly when doing this because turpentine evaporates quickly.
Duplicating
Jelly copier hints
Making tracing paper
write on this paper
press hard plain paper
this will be
your original banda paper carbon
face down
press down
stick
heat over
water
Page 17
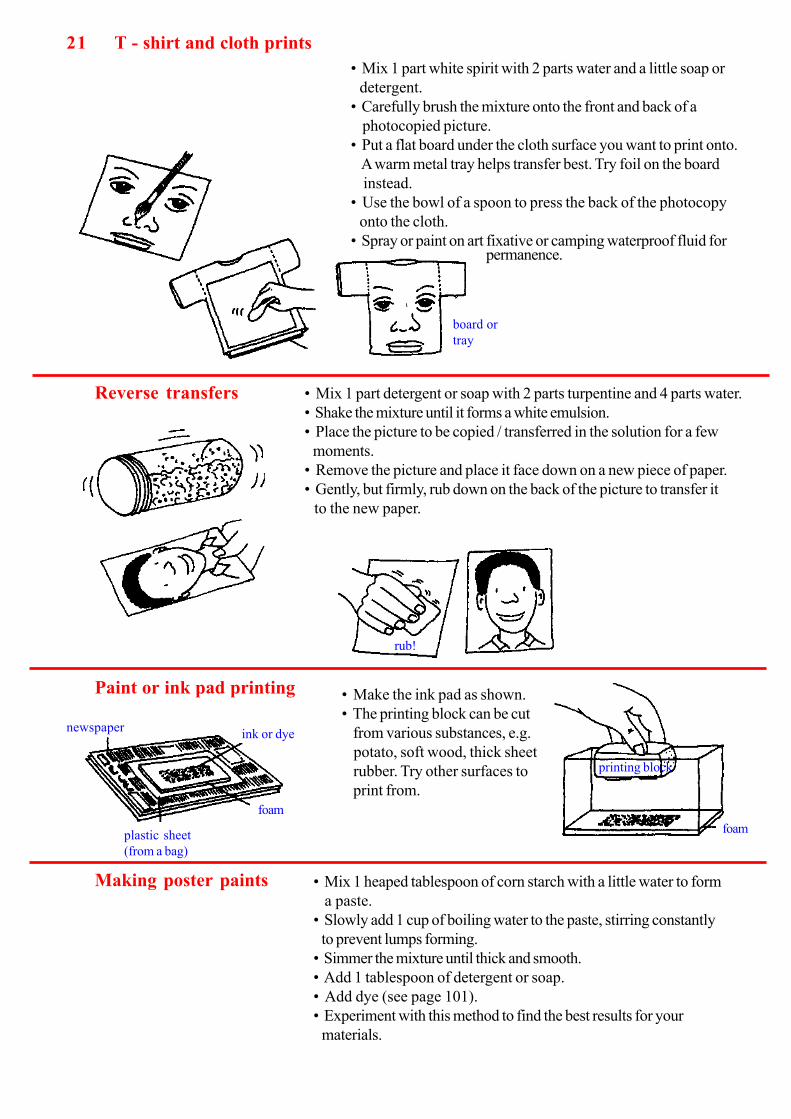
21 T - shirt and cloth prints
• Mix 1 part white spirit with 2 parts water and a little soap or
detergent.
• Carefully brush the mixture onto the front and back of a
photocopied picture.
• Put a flat board under the cloth surface you want to print onto.
A warm metal tray helps transfer best. Try foil on the board
instead.
• Use the bowl of a spoon to press the back of the photocopy
onto the cloth.
• Spray or paint on art fixative or camping waterproof fluid forpermanence.
Reverse transfers • Mix 1 part detergent or soap with 2 parts turpentine and 4 parts water.
• Shake the mixture until it forms a white emulsion.
• Place the picture to be copied / transferred in the solution for a few
moments.
• Remove the picture and place it face down on a new piece of paper.
• Gently, but firmly, rub down on the back of the picture to transfer it
to the new paper.
Paint or ink pad printing • Make the ink pad as shown.
• The printing block can be cut
from various substances, e.g.
potato, soft wood, thick sheet
rubber. Try other surfaces to
print from.
Making poster paints • Mix 1 heaped tablespoon of corn starch with a little water to form
a paste.
• Slowly add 1 cup of boiling water to the paste, stirring constantly
to prevent lumps forming.
• Simmer the mixture until thick and smooth.
• Add 1 tablespoon of detergent or soap.
• Add dye (see page 101).
• Experiment with this method to find the best results for your
materials.
board or
tray
rub!
newspaper
plastic sheet
(from a bag)
foam
ink or dye
printing block
foam
Page 18
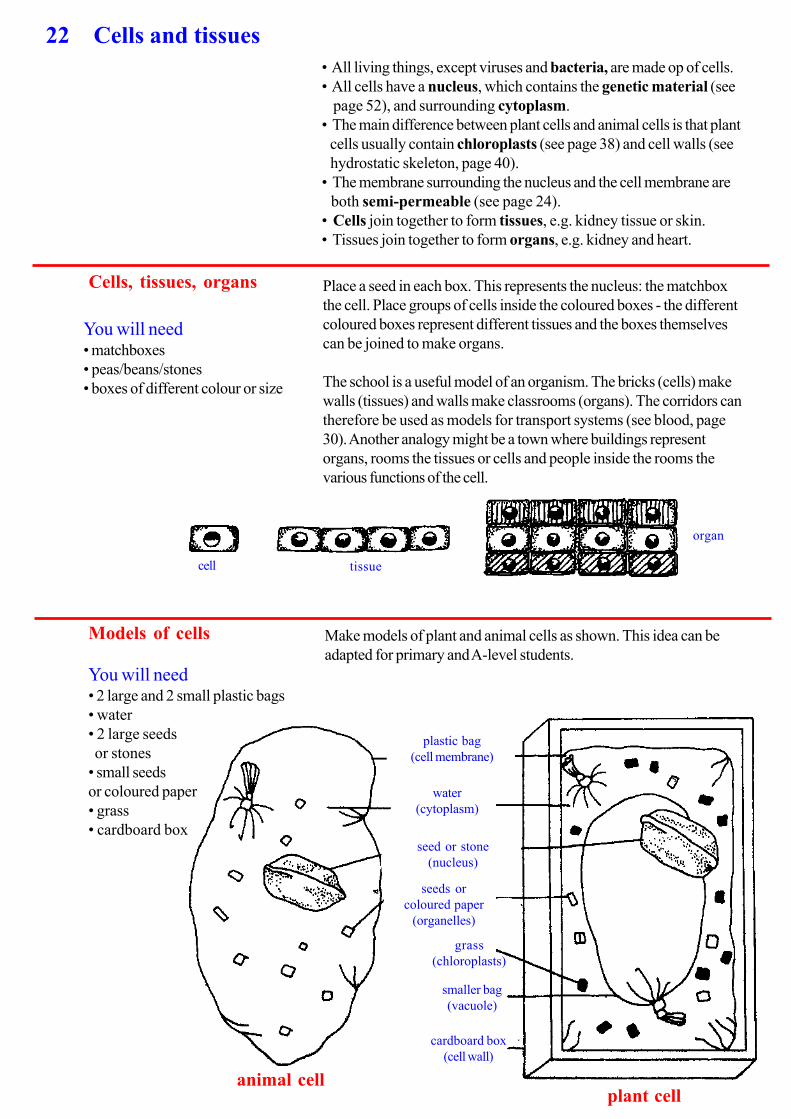
22 Cells and tissues
• All living things, except viruses and bacteria, are made op of cells.
• All cells have a nucleus, which contains the genetic material (see
page 52), and surrounding cytoplasm.
• The main difference between plant cells and animal cells is that plant
cells usually contain chloroplasts (see page 38) and cell walls (see
hydrostatic skeleton, page 40).
• The membrane surrounding the nucleus and the cell membrane are
both semi-permeable (see page 24).
• Cells join together to form tissues, e.g. kidney tissue or skin.
• Tissues join together to form organs, e.g. kidney and heart.
Cells, tissues, organs
You will need• matchboxes
• peas/beans/stones
• boxes of different colour or size
Place a seed in each box. This represents the nucleus: the matchbox
the cell. Place groups of cells inside the coloured boxes - the different
coloured boxes represent different tissues and the boxes themselves
can be joined to make organs.
The school is a useful model of an organism. The bricks (cells) make
walls (tissues) and walls make classrooms (organs). The corridors can
therefore be used as models for transport systems (see blood, page
30). Another analogy might be a town where buildings represent
organs, rooms the tissues or cells and people inside the rooms the
various functions of the cell.
Models of cells
You will need• 2 large and 2 small plastic bags
• water
• 2 large seeds
or stones
• small seeds
or coloured paper
• grass
• cardboard box
Make models of plant and animal cells as shown. This idea can be
adapted for primary and A-level students.
cell tissue
organ
plastic bag
(cell membrane)
water
(cytoplasm)
seed or stone
(nucleus)
seeds or
coloured paper
(organelles)
grass
(chloroplasts)
smaller bag
(vacuole)
cardboard box
(cell wall)
animal cellplant cell
Page 19
23 Simple home made microscope
You will need• soft drinks can
• small fern e.g. from a pen-torch
bulb (see page 115)
• aluminium strip
• small mirror
• piece of glass
• rubber bandlens from pen torch bulb
held in hole by tape
specimen
in water
light hits specimen
through can pull
opening
piece of glass
right-angled aluminium
strip help by a loop of
tin or an elastic band
Cut away side form
flap to hold mirror or
shining side of can
piece of
skin
cover-slip lowered
gently
Make the microscope as shown.
Some care is needed in
positioning the lens in the hole
made for it in the aluminium
strip. The inside of the can may be
painted black. Such a microscope
is quite adequate for looking at
cells.
Looking at cells
You will need• an onion
• pin or needle
• glass
• cover slip
• tweezers (see page 110)
• iodine solution
Cells from an onion bulb are
particularly easy to see, but other
similar bulbs may be used instead.
Cut a slice of onion and gently
peel off a piece of the thin inner
surface skin layer. With a
pin / needle place a piece of ‘skin’
in a water drop on a piece of
glass. Stain the ‘skin’ with a drop
of iodine solution. Lower a cover
slip onto the specimen taking care
not to let in any air bubbles. (The
thin plastic used in display
packaging is very good for cover-
slips.) Now view the prepared
slide through the microscope (see
cell structures page 22).
How many cells
in a human?This activity is a useful way of explaining to students how small and
numerous cells are. If you use sand to represent ceils, you need to point
out that each grain is several thousand times larger than a human cell.
Ask students to estimate how many grains of sand would be needed to
make a model pf a person. They could make estimates by counting how
many spoonfuls are needed to make a human and then estimating the
grains in a spoonful.
Ask students to make a dot with a sharp pencil and point out that the
largest human cell, the ovum, is smaller than this.
Page 20
24 Diffusion and • Diffusion is the process by which molecules move from an area of
high concentration to one of low concentration.
• A semi-permeable membrane allows only small molecules to pass
through it
• Osmosis is the net flow of water across a semi-permeable
membrane from the area of low concentration of the solute to that of
higher concentration of the solute.
• Osmosis can be thought of as a special case of diffusion because,
although all molecules may ‘want’ to move until their concentrations
either side of the membrane are equal, only the small water
molecules can pass through the semi-permeable membrane.
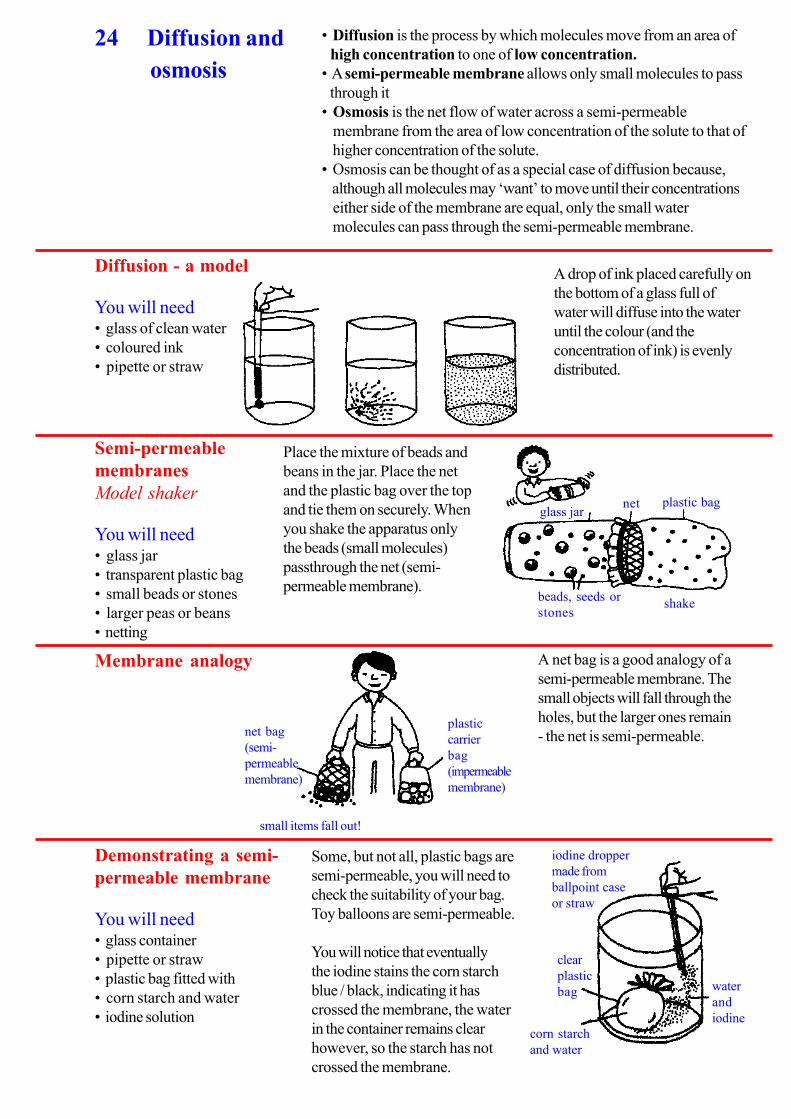
Diffusion - a model
You will need• glass of clean water
• coloured ink
• pipette or straw
A drop of ink placed carefully on
the bottom of a glass full of
water will diffuse into the water
until the colour (and the
concentration of ink) is evenly
distributed.
glass jarnet plastic bag
beads, seeds or
stones
net bag
(semi-
permeable
membrane)
small items fall out!
plastic
carrier
bag
(impermeable
membrane)
Semi-permeable
membranes
Model shaker
You will need• glass jar
• transparent plastic bag
• small beads or stones
• larger peas or beans
• netting
Place the mixture of beads and
beans in the jar. Place the net
and the plastic bag over the top
and tie them on securely. When
you shake the apparatus only
the beads (small molecules)
passthrough the net (semi-
permeable membrane).
Membrane analogy A net bag is a good analogy of a
semi-permeable membrane. The
small objects will fall through the
holes, but the larger ones remain
- the net is semi-permeable.
osmosis
iodine dropper
made from
ballpoint case
or straw
clear
plastic
bag
corn starch
and water
water
and
iodine
Demonstrating a semi-
permeable membrane
You will need• glass container
• pipette or straw
• plastic bag fitted with
• corn starch and water
• iodine solution
Some, but not all, plastic bags are
semi-permeable, you will need to
check the suitability of your bag.
Toy balloons are semi-permeable.
You will notice that eventually
the iodine stains the corn starch
blue / black, indicating it has
crossed the membrane, the water
in the container remains clear
however, so the starch has not
crossed the membrane.
shake
Page 21
25 OsmosisOsmosis with eggs
You will need• empty eggshell
• strong salt solution
• jar containing water
thick adhesive or
rubber tape
balloon inflated
cells turgid
stoma open
some air released
cells flaccid
stoma closed
water
strong
salt or
sugar
solution
in bottom
of egg
shell
removed
around the
air pocket
leaving the
membrane
Remove the hard outer shell at
one end of .the eggshell. This will
expose the inner membrane. Half
fill the egg with salt solution and
place it in the jar so that the
water level is above the exposed
membrane and leave for a couple
of hours. You will see the level of
the solution inside the egg rises,
indicating water has crossed the
membrane, i.e. osmosis has occurred.
Ask students to use sugar solution instead of salt and discuss their
results.
Ask what happens if they put salt solution in the jar as well as the egg.
Investigate with students what happens if the salt solutions inside and
outside the egg are of different concentrations.
Osmosis in dead and
living tissues
You will need• yam, paw paw or potato
• strong sugar solution
• dish of water
Cut the yam or paw paw in half
and boil one piece. When it has
cooled, hollow out the centre of
both pieces of yam and half fill
the hollows with the sugar solution.
Peel the lower half of both
yams and then place the pieces in
a dish of water for an hour or so.
Water will only enter the
unboiled yam, if it enters both
you need to boil the yam longer.
Investigate with students how boiling affects
the semi-permeable membranes of the yam.
Ask students which yam has living cells in it
and also to explain what happens if they do
not peel the yams.
Guard cells -
osmosis in practice
You will need• 2 stretched long balloons
• thick adhesive or rubber tape
• rubber band
salt solution
peeled
area
unboiled yam
water
Guard cells become turgid or
flaccid due to changes in osmotic
pressure. This can be seen with a
microscope or demonstrated
using balloons.
Stick the adhesive tape down one
side of each balloon as shown.
When the balloons are both fully
inflated (turgid) the ‘stoma’ is
open. If you let out some of the
air, i.e. the ‘guard cells’ become
flaccid, the ‘stoma’ closes.
Osmosis in the kitchen
You will need• dried seeds or fruit to soak
• suitable container
• water
• salt solution
When dried fruits or seeds such as figs, apricots, peas or beans are
soaked in water they swell up as water is absorbed by osmosis.
Ask students to see whether the same thing happens with salt solution.
Ask whether the concentration of the salt solution affects the swelling,
Ask why cooks often put salt onto sliced vegetables before cooking.
rubber
band
two stretched
balloons
Page 22
26 Foods and
food tests
• Foods are divided into 3 groups: carbohydrates, fats and proteins.
• A healthy human diet requires a balanced diet.
• Many foods are rich in only 1 or 2 food types, e.g. bread is almost
entirely the carbohydrate starch.
• During digestion the large molecules are broken down into their
smaller component molecules by enzymes.
• Only small molecules can pass through the semi-permeable wall of
the alimentary canal (see semi-permeable membranes page 24).
Sorting foods
You will need• a selection of foods or
pictures of foods
Ask students to sort the foods into the three main groups. Then ask
them to identify the main use of each type, e.g. carbohydrates and fats
for energy, protein for growth etc.
Ask students to research the effects of insufficient minerals or vitamins.
Ask students to group foods by function, e.g. high energy foods, foods
which require little digestion.
Fats and Oils — the lipids
You will need• card
• scissors
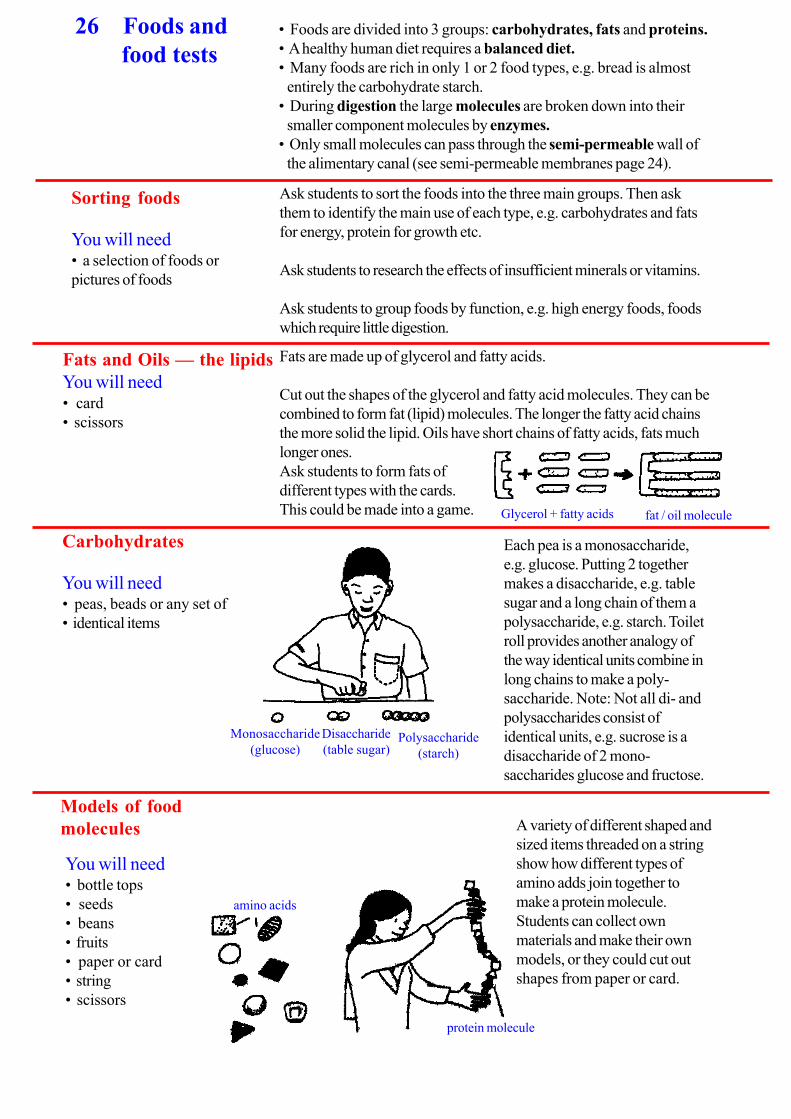
Fats are made up of glycerol and fatty acids.
Cut out the shapes of the glycerol and fatty acid molecules. They can be
combined to form fat (lipid) molecules. The longer the fatty acid chains
the more solid the lipid. Oils have short chains of fatty acids, fats much
longer ones.
Ask students to form fats of
different types with the cards.
This could be made into a game. Glycerol + fatty acids fat / oil molecule
Monosaccharide
(glucose)
Disaccharide
(table sugar)Polysaccharide
(starch)
amino acids
protein molecule
Carbohydrates
You will need• peas, beads or any set of
• identical items
Each pea is a monosaccharide,
e.g. glucose. Putting 2 together
makes a disaccharide, e.g. table
sugar and a long chain of them a
polysaccharide, e.g. starch. Toilet
roll provides another analogy of
the way identical units combine in
long chains to make a poly-
saccharide. Note: Not all di- and
polysaccharides consist of
identical units, e.g. sucrose is a
disaccharide of 2 mono-
saccharides glucose and fructose.
Models of food
molecules A variety of different shaped and
sized items threaded on a string
show how different types of
amino adds join together to
make a protein molecule.
Students can collect own
materials and make their own
models, or they could cut out
shapes from paper or card.
You will need• bottle tops
• seeds
• beans
• fruits
• paper or card
• string
• scissors
Page 23
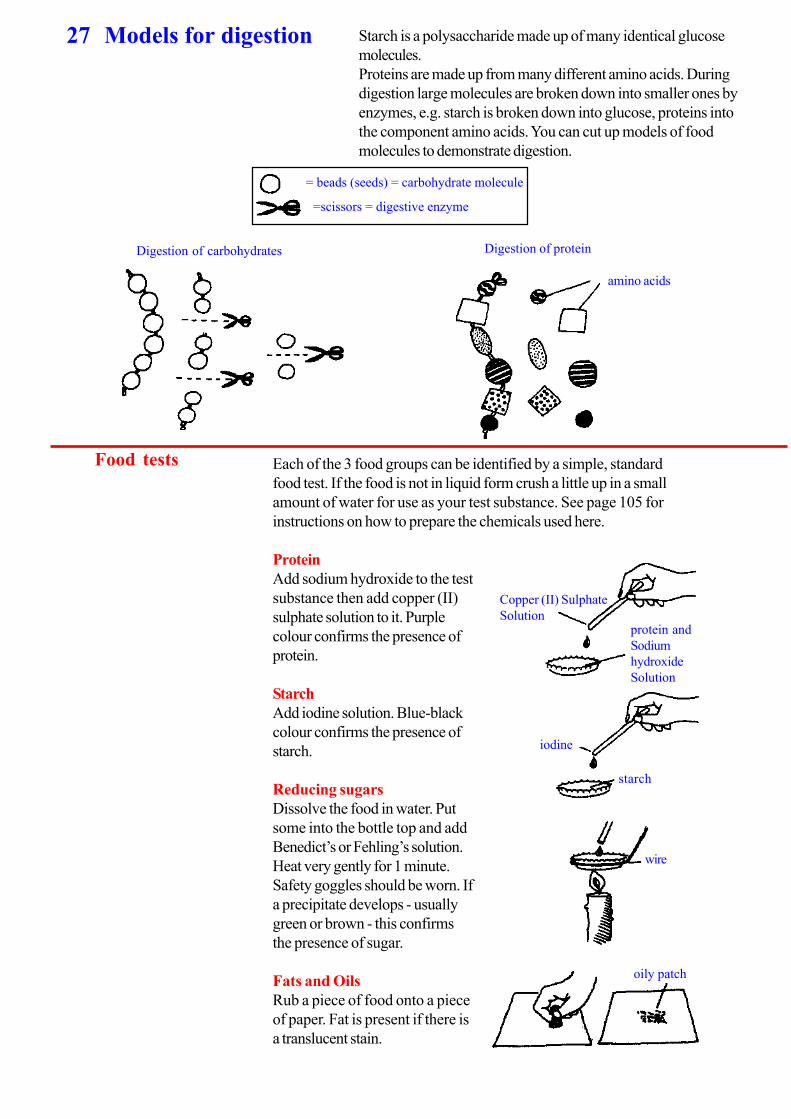
27 Models for digestion
= beads (seeds) = carbohydrate molecule
=scissors = digestive enzyme
Digestion of protein
amino acids
Digestion of carbohydrates
Copper (II) Sulphate
Solutionprotein and
Sodium
hydroxide
Solution
iodine
starch
wire
oily patch
Starch is a polysaccharide made up of many identical glucose
molecules.
Proteins are made up from many different amino acids. During
digestion large molecules are broken down into smaller ones by
enzymes, e.g. starch is broken down into glucose, proteins into
the component amino acids. You can cut up models of food
molecules to demonstrate digestion.
Food tests Each of the 3 food groups can be identified by a simple, standard
food test. If the food is not in liquid form crush a little up in a small
amount of water for use as your test substance. See page 105 for
instructions on how to prepare the chemicals used here.
Protein
Add sodium hydroxide to the test
substance then add copper (II)
sulphate solution to it. Purple
colour confirms the presence of
protein.
Starch
Add iodine solution. Blue-black
colour confirms the presence of
starch.
Reducing sugars
Dissolve the food in water. Put
some into the bottle top and add
Benedict’s or Fehling’s solution.
Heat very gently for 1 minute.
Safety goggles should be worn. If
a precipitate develops - usually
green or brown - this confirms
the presence of sugar.
Fats and Oils
Rub a piece of food onto a piece
of paper. Fat is present if there is
a translucent stain.
Page 24
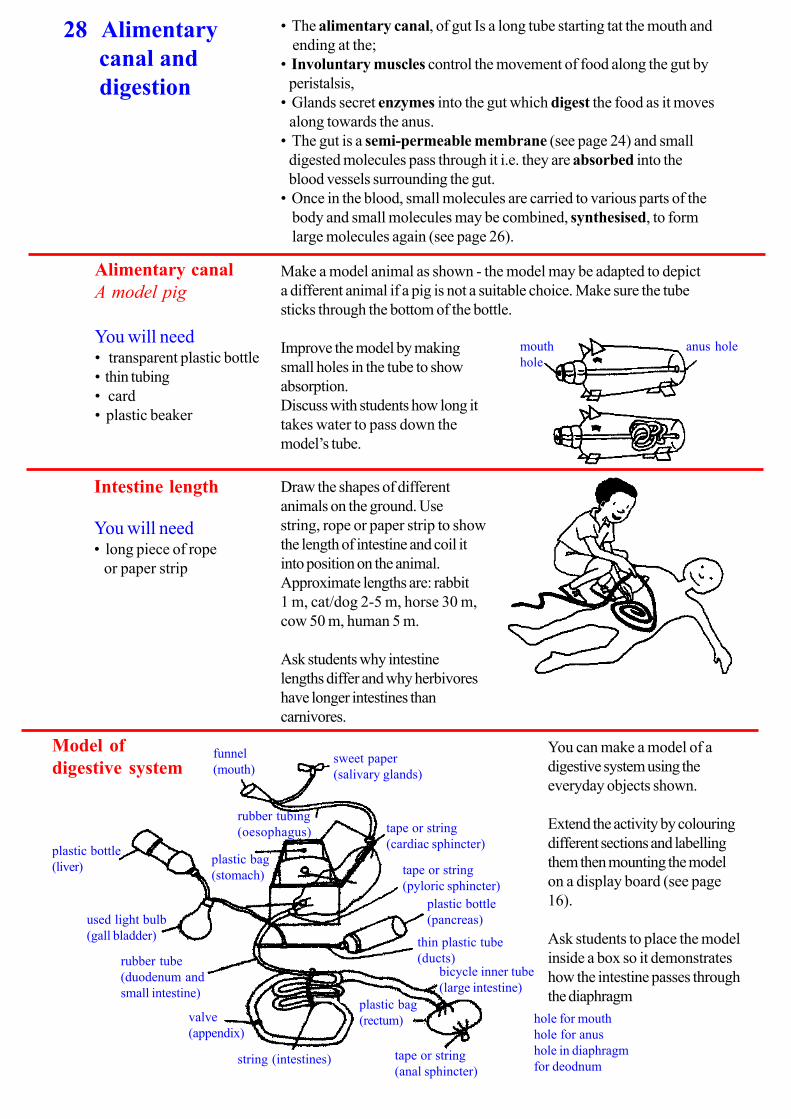
28 Alimentary
canal and
digestion
mouth
hole
anus hole
plastic bottle
(liver)
used light bulb
(gall bladder)
rubber tube
(duodenum and
small intestine)
valve
(appendix)
string (intestines)
plastic bag
(rectum)
tape or string
(anal sphincter)
bicycle inner tube
(large intestine)
thin plastic tube
(ducts)
plastic bottle
(pancreas)
tape or string
(pyloric sphincter)
tape or string
(cardiac sphincter)
sweet paper
(salivary glands)
funnel
(mouth)
rubber tubing
(oesophagus)
plastic bag
(stomach)
• The alimentary canal, of gut Is a long tube starting tat the mouth and
ending at the;
• Involuntary muscles control the movement of food along the gut by
peristalsis,
• Glands secret enzymes into the gut which digest the food as it moves
along towards the anus.
• The gut is a semi-permeable membrane (see page 24) and small
digested molecules pass through it i.e. they are absorbed into the
blood vessels surrounding the gut.
• Once in the blood, small molecules are carried to various parts of the
body and small molecules may be combined, synthesised, to form
large molecules again (see page 26).
Alimentary canal
A model pig
You will need• transparent plastic bottle
• thin tubing
• card
• plastic beaker
Make a model animal as shown - the model may be adapted to depict
a different animal if a pig is not a suitable choice. Make sure the tube
sticks through the bottom of the bottle.
Improve the model by making
small holes in the tube to show
absorption.
Discuss with students how long it
takes water to pass down the
model’s tube.
Intestine length
You will need• long piece of rope
or paper strip
Draw the shapes of different
animals on the ground. Use
string, rope or paper strip to show
the length of intestine and coil it
into position on the animal.
Approximate lengths are: rabbit
1 m, cat/dog 2-5 m, horse 30 m,
cow 50 m, human 5 m.
Ask students why intestine
lengths differ and why herbivores
have longer intestines than
carnivores.
Model of
digestive system
You can make a model of a
digestive system using the
everyday objects shown.
Extend the activity by colouring
different sections and labelling
them then mounting the model
on a display board (see page
16).
Ask students to place the model
inside a box so it demonstrates
how the intestine passes through
the diaphragm
hole for mouth
hole for anus
hole in diaphragm
for deodnum
Page 25
29 A model of peristalsis
You will need• a balloon
• rubber tubing
• ball or seedrubber or plastic tube
orange or seedmove the gripped hand
along the tube
large items
fall through
Food is moved by the contraction
of the muscular walls of the gut.
A balloon gripped with the hand
pushes air along. You can also
move an object along a tube by
squeezing behind the ‘food’ ball.
Ask students how else they could
make models, e.g. using a bicycle
inner tube.
A model of absorption
You will need• an old shirt sleeve
• small objects, e.g. peas
Place the shirt sleeve over a container to catch the water as it drips
through. Pour the mixture of water and peas down the tube. Water
will leak out, but the peas (undigested food) pass straight down. You
may need to tie off the end of the sleeve to slow the process down.
Ask students to improve the model, e.g. by using several layers of
newspaper instead of a shirt sleeve. (Not all ideas will work well, so
test them.)
Extend the activity by using a semi-permeable plastic bag for the gut.
Pour starch and sugar into the tube and test to see what passed
through (see page 26).
Digestion of starch
Chewing
You will need• different types of food
Ask students to chew different types of food for a long time before
swallowing. They should notice that starchy foods seem to get sweeter
as the saliva digests the starch to sugars.
Ask students why starchy foods taste sweet after long chewing.
Enzyme action
You will need• filter paper
• matchsticks
• starch solution
• iodine solution
Safety.Make sure
students do not share
matchsticks, doing so
could pass on infections.
Soak filter paper in starch
solution. Ask students to use
saliva on a matchstick to write
their names on the treated paper.
Dip the filter paper in dilute
iodine solution.
Ask students what causes the
name to appear on the paper.
Enzymes -protease activity
You will need• strips of exposed film
• pineapple or papaya juice
• gelatin
Dip the strips of film in a fresh solution of pineapple juice or pounded
papaya. You will see that the solution breaks down the gelatin
coating containing the black silver salts and the plastic is left dear.
Ask students the following questions.
What happens to a piece of
gelatin left In the juices?
What happens if you pour the
pineapple or paw paw juice over
boiled egg white or meat and
leave it for some time?
Why is pawpaw called a meat
tenderiser? What does it do to
meat?
Page 26
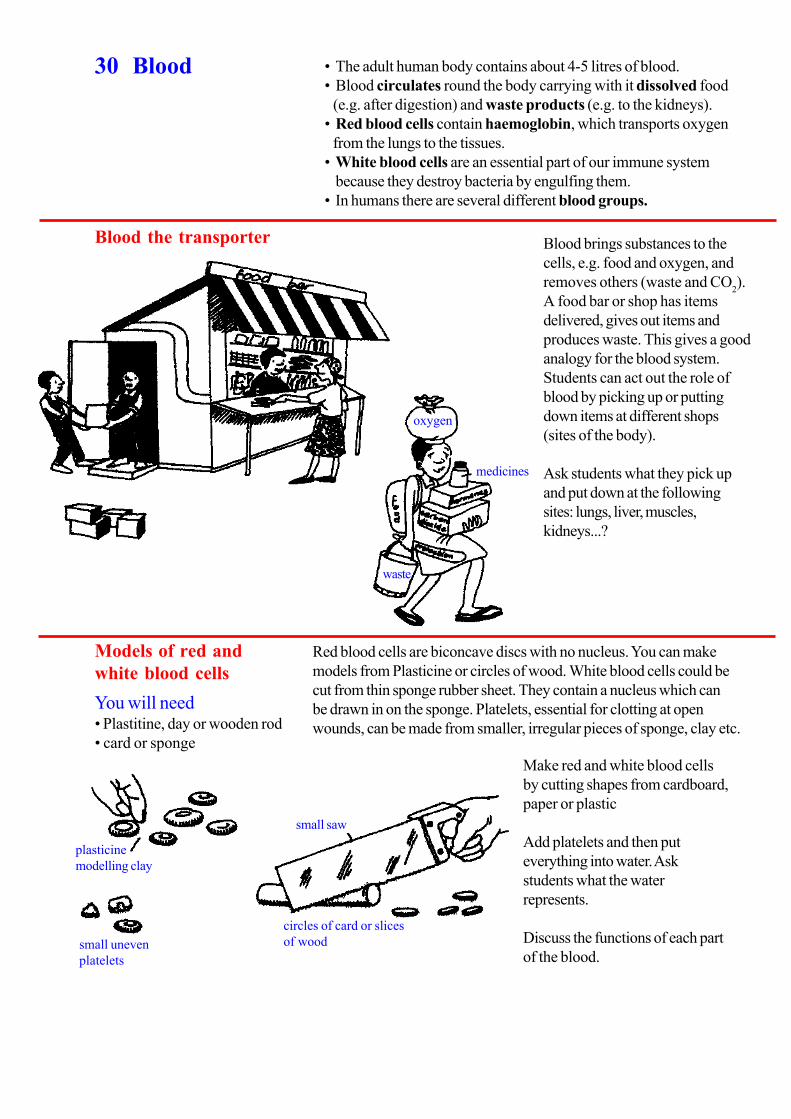
30 Blood
oxygen
medicines
waste
• The adult human body contains about 4-5 litres of blood.
• Blood circulates round the body carrying with it dissolved food
(e.g. after digestion) and waste products (e.g. to the kidneys).
• Red blood cells contain haemoglobin, which transports oxygen
from the lungs to the tissues.
• White blood cells are an essential part of our immune system
because they destroy bacteria by engulfing them.
• In humans there are several different blood groups.
Blood the transporter Blood brings substances to the
cells, e.g. food and oxygen, and
removes others (waste and CO2).
A food bar or shop has items
delivered, gives out items and
produces waste. This gives a good
analogy for the blood system.
Students can act out the role of
blood by picking up or putting
down items at different shops
(sites of the body).
Ask students what they pick up
and put down at the following
sites: lungs, liver, muscles,
kidneys...?
plasticine
modelling clay
small uneven
platelets
small saw
circles of card or slices
of wood
Models of red and
white blood cells
You will need• Plastitine, day or wooden rod
• card or sponge
Red blood cells are biconcave discs with no nucleus. You can make
models from Plasticine or circles of wood. White blood cells could be
cut from thin sponge rubber sheet. They contain a nucleus which can
be drawn in on the sponge. Platelets, essential for clotting at open
wounds, can be made from smaller, irregular pieces of sponge, clay etc.
Make red and white blood cells
by cutting shapes from cardboard,
paper or plastic
Add platelets and then put
everything into water. Ask
students what the water
represents.
Discuss the functions of each part
of the blood.
Page 27
31 Engulfing model
You will need• clear water-fitted plastic bag
or cloth
• stone or bean
plastic bag
bean
(nucleus)
stone (bacteria)cloth
(white blood cell)
blood
groupblood
group
donor donor
patientpatient
= blood
clots
= safe
transfusion
Partly fill a clear plastic bag with
water. Put a stone or bean inside
to represent the nucleus. By
shaping the bag, the action of a
white blood cell engulfing a
foreign body can be
demonstrated. You could use a
cloth, handkerchief or blanket as
a white blood cell. Shape the
cloth to show the pseudopodia
surrounding the foreign body.
Transfusion games
Transfusion checkers
You will need• 2 types of bottle tops or counters
• card
• coloured pens
Draw out a base grid as shown. Use 2 types of bottletop or counter to
show ‘safe’ or ‘clot’ transfusion.
Ask students to place the tops on the correct squares.
Ask students if they can think of an easy way to remember the
formation.
Ask students to identify which blood groups are compatible.
“clot !”“safe !”
Transfusion card game
You will need• card
Cut out 20 cards and label 5 for each blood group. The dealer shuffles
the pack face down on the table and then turns up one card face up.
This is the patient’s blood group. The next card turned over is the
donor’s blood group. If a transfusion is possible, players must call ‘safe’.
If a transfusion would be dangerous they call ‘clot. The first player to
call correctly wins the 2 cards. The player with the most cards wins the
game.
Page 28
32 Heart and
blood
circulation
rolled newspaper
plastic
bottle or
funnel
rubber tube
the top
of a
plastic
bottle
• Blood fills the small tubes -veins, arteries and tiny capillaries-which
form the blood system.
• Blood is circulated by the pumping action of the heart.
• Valves in the veins and heart ensure blood circulates in only one
direction.
• During exercise the heart beat increases and the blood circulates
more quickly.
• We can detect the heart beat either by listening to the heart itself, or
by feeling the pulse.
Measuring the pulse Students can listen to their own pulse beat. Putting their fingers in
their ears cuts out external noise. The muffled rhythmic pulse beat can
then be heard.
There are various places on the body where the pulse may be taken.
They are (a) under the ear beside the angle of the jaw, (b) at the wrists,
(c) at the temple, (d) behind the collar bone.
Ask students to find the pulse of a partner. If they have difficulty, they
should move their fingers around or apply a little more pressure.
Students could compare their partner’s pulse rate before and after
exercise.
Making a stethoscope
You will need• newspaper or the top of
a plastic bottle or a funnel
and rubber tube
hands (heart)
tube
(blood vessel)
bucket
(body tissue)
A stethoscope focuses the sound
of the heart. You can make one
by using the materials shown.
Place the stethoscope against the
ribs or back and then listen to the
heartbeat.
The heart
Heart pump motion
You will need• 2 buckets
or bowl
• rubber / plastic tube
Open and close your hands as
shown while they are in a bucket
or bowl of water. Now hold a
rubber tube as shown. Open and
close the palms again. Opening
and closing of the palms
represents the relaxation and
contraction of the heart muscles.
paper
valve
deoxygenated blood
from body to lungs
oxygenated blood
from lungs to body
Heart model
You will need• cardboard box
• thin paper
• glue
Make a model of the heart from a
cardboard box as shown. Thin
paper is used for the valves.
Discuss the importance of valves
At the pump action of the heart.
Page 29
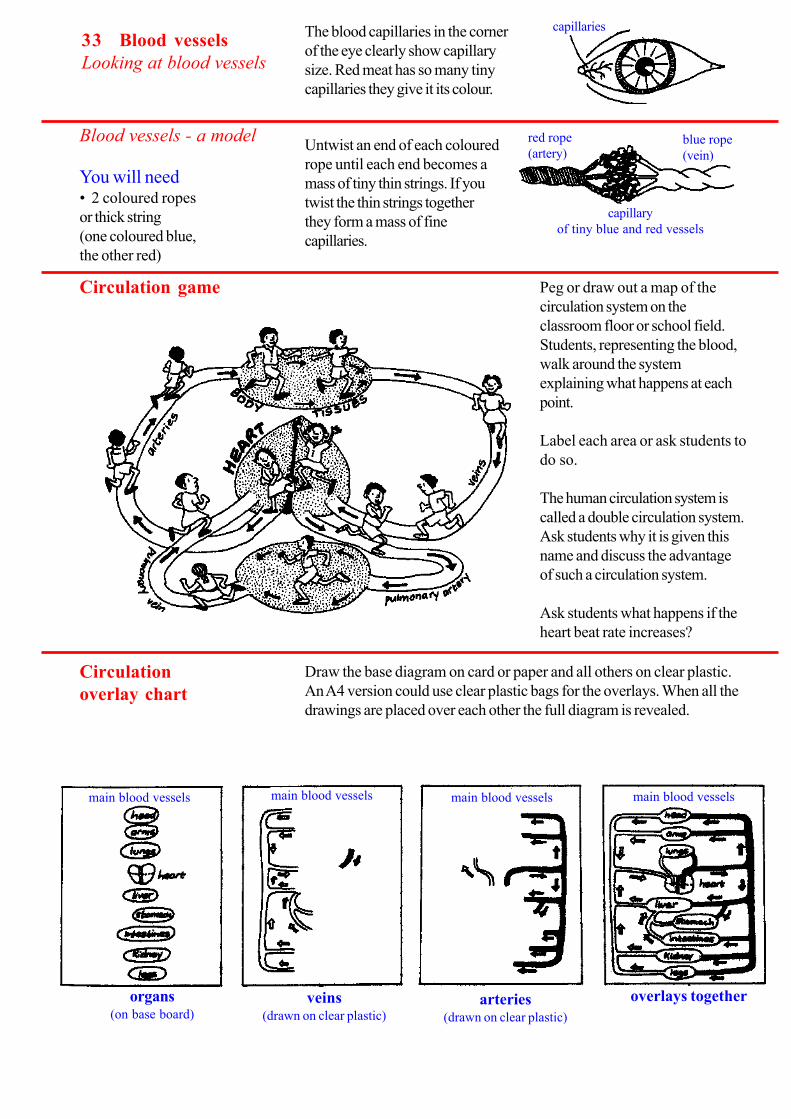
33 Blood vessels
Looking at blood vessels
main blood vessels main blood vessels main blood vessels main blood vessels
organs(on base board)
veins(drawn on clear plastic)
arteries(drawn on clear plastic)
overlays together
red rope
(artery)blue rope
(vein)
capillary
of tiny blue and red vessels
capillariesThe blood capillaries in the corner
of the eye clearly show capillary
size. Red meat has so many tiny
capillaries they give it its colour.
Blood vessels - a model
You will need• 2 coloured ropes
or thick string
(one coloured blue,
the other red)
Untwist an end of each coloured
rope until each end becomes a
mass of tiny thin strings. If you
twist the thin strings together
they form a mass of fine
capillaries.
Circulation game Peg or draw out a map of the
circulation system on the
classroom floor or school field.
Students, representing the blood,
walk around the system
explaining what happens at each
point.
Label each area or ask students to
do so.
The human circulation system is
called a double circulation system.
Ask students why it is given this
name and discuss the advantage
of such a circulation system.
Ask students what happens if the
heart beat rate increases?
Circulation
overlay chart
Draw the base diagram on card or paper and all others on clear plastic.
An A4 version could use clear plastic bags for the overlays. When all the
drawings are placed over each other the full diagram is revealed.
Page 30
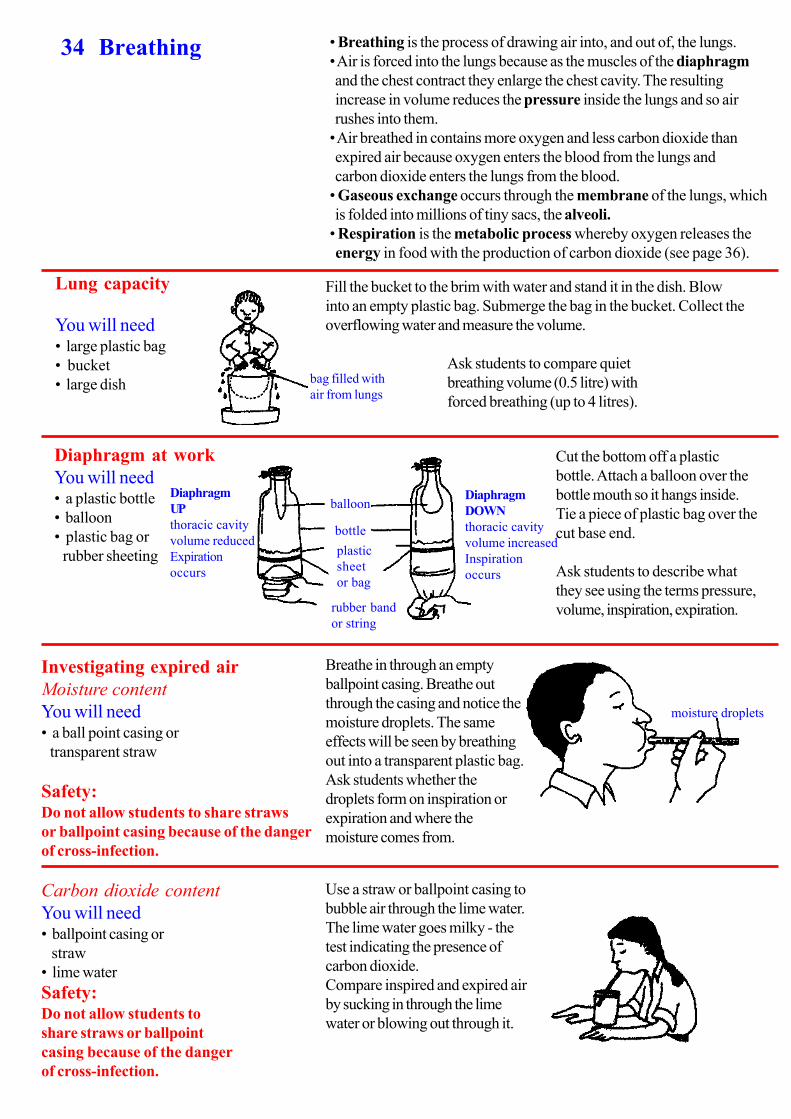
34 Breathing
bag filled with
air from lungs
• Breathing is the process of drawing air into, and out of, the lungs.
• Air is forced into the lungs because as the muscles of the diaphragm
and the chest contract they enlarge the chest cavity. The resulting
increase in volume reduces the pressure inside the lungs and so air
rushes into them.
• Air breathed in contains more oxygen and less carbon dioxide than
expired air because oxygen enters the blood from the lungs and
carbon dioxide enters the lungs from the blood.
• Gaseous exchange occurs through the membrane of the lungs, which
is folded into millions of tiny sacs, the alveoli.
• Respiration is the metabolic process whereby oxygen releases the
energy in food with the production of carbon dioxide (see page 36).
Lung capacity
You will need• large plastic bag
• bucket
• large dish
Fill the bucket to the brim with water and stand it in the dish. Blow
into an empty plastic bag. Submerge the bag in the bucket. Collect the
overflowing water and measure the volume.
Ask students to compare quiet
breathing volume (0.5 litre) with
forced breathing (up to 4 litres).
Diaphragm
UP
thoracic cavity
volume reduced
Expiration
occurs
balloon
bottle
plastic
sheet
or bag
rubber band
or string
Diaphragm
DOWN
thoracic cavity
volume increased
Inspiration
occurs
Diaphragm at work
You will need• a plastic bottle
• balloon
• plastic bag or
rubber sheeting
Cut the bottom off a plastic
bottle. Attach a balloon over the
bottle mouth so it hangs inside.
Tie a piece of plastic bag over the
cut base end.
Ask students to describe what
they see using the terms pressure,
volume, inspiration, expiration.
moisture droplets
Investigating expired air
Moisture content
You will need• a ball point casing or
transparent straw
Safety:Do not allow students to share straws
or ballpoint casing because of the danger
of cross-infection.
Breathe in through an empty
ballpoint casing. Breathe out
through the casing and notice the
moisture droplets. The same
effects will be seen by breathing
out into a transparent plastic bag.
Ask students whether the
droplets form on inspiration or
expiration and where the
moisture comes from.
Carbon dioxide content
You will need• ballpoint casing or
straw
• lime water
Safety:Do not allow students to
share straws or ballpoint
casing because of the danger
of cross-infection.
Use a straw or ballpoint casing to
bubble air through the lime water.
The lime water goes milky - the
test indicating the presence of
carbon dioxide.
Compare inspired and expired air
by sucking in through the lime
water or blowing out through it.
Page 31
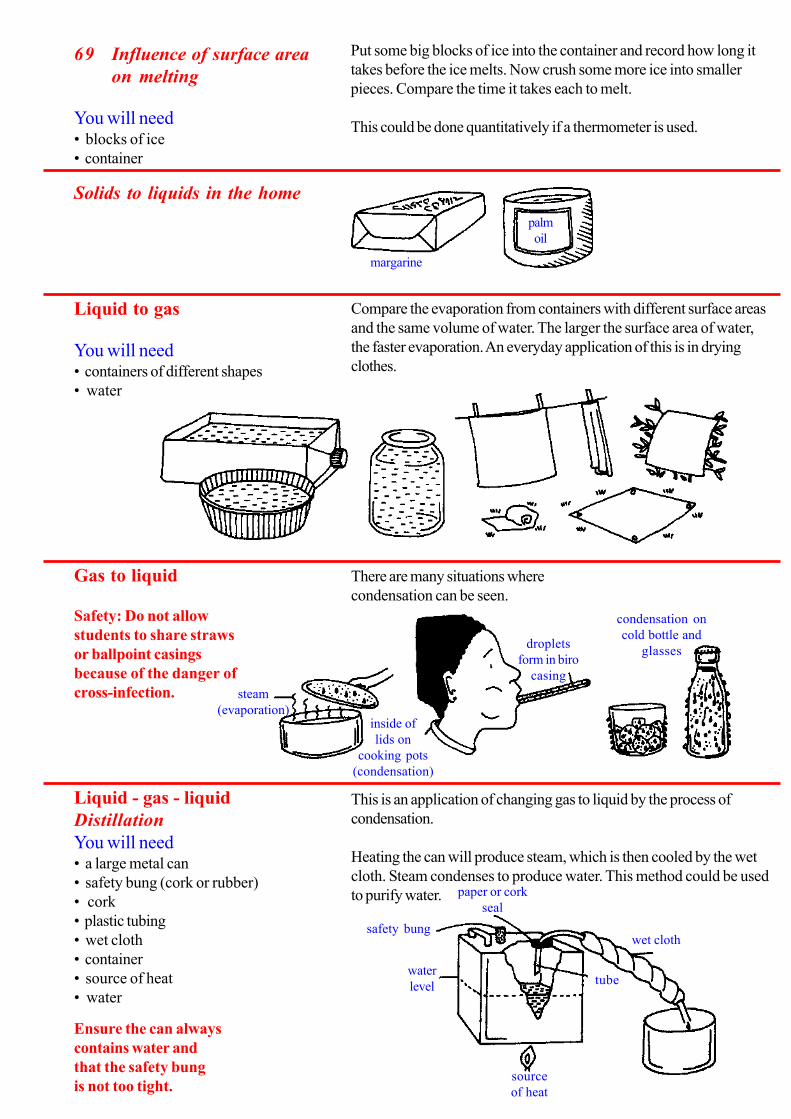
35 Surface area increase
You will need• paper
• scissors
knot
blue painted
capillaries
inflated balloon
red
painted
capillaries
Draw a circle on the ground to represent a lung. Find the circumference
of the ‘lungs’, i.e. its surface area. Cut out many smaller circles to
represent the air sacs. There are about 350 million air sacs in each
human lung.
Ask students how many small circles can be fitted into the large circle.
What is the total circumference of all the small circles?
What effect does dividing the lung into air sacs have on the surface
area of the lung?
Model of an alveolus
You will need• red and blue paint or
waterproof markers
• inflated balloon
Use paint or waterproof markers
to draw the blood vessels of the
air sac or alveolus. The red vessels
carry oxygenated blood, the blue
vessels carry deoxygenated blood.
blood from body
(more CO2
less O2 )
upturned top
= deoxygenated
red blood cell
stones
(oxygen)
capillary
small seeds
(carbon dioxide)
top with stone
in = oxygenated
blood cell
blood from body
(less CO2
more O2 )
AIR
IN
AIR
OUT
plasma gives
up CO2
Red blood cells
take up O2
Gaseous exchange
board game
You will need• large sheet of paper
• bottle tops
• seeds
• stones
Draw the capillary and alveolus as
shown. Students arrange the
stones (oxygen), seeds (carbon
dioxide) and bottle tops (red
blood cells) on the drawing. The
stones can be carried by
overturned bottle tops, but the
seeds can only move in the
plasma.
Gaseous exchange game
You will need• cards or pamper marked with the
letters R, P, O, CO2
The table represents the alveolus.
Students wear either an ‘R’ or ‘P’
card and so act as red blood cells
(R) or plasma (P). When going
round the table the ‘R’ students
pick up cards with ‘O2’ (oxygen)
on. The ‘P’ students put down the
‘CO2’ (carbon dioxide) cards.
As an extension, link this with the
circulation game - see page 33.
Page 32
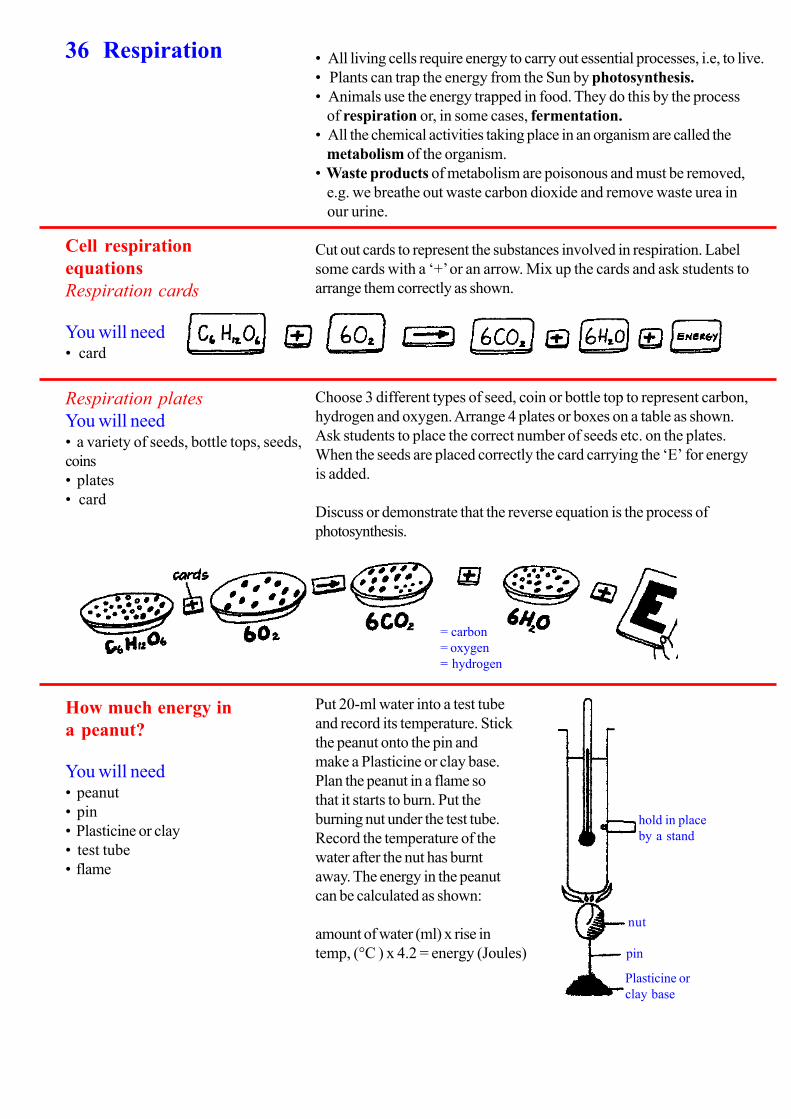
36 Respiration • All living cells require energy to carry out essential processes, i.e, to live.
• Plants can trap the energy from the Sun by photosynthesis.
• Animals use the energy trapped in food. They do this by the process
of respiration or, in some cases, fermentation.
• All the chemical activities taking place in an organism are called the
metabolism of the organism.
• Waste products of metabolism are poisonous and must be removed,
e.g. we breathe out waste carbon dioxide and remove waste urea in
our urine.
Cell respiration
equations
Respiration cards
You will need• card
Cut out cards to represent the substances involved in respiration. Label
some cards with a ‘+’ or an arrow. Mix up the cards and ask students to
arrange them correctly as shown.
= carbon
= oxygen
= hydrogen
Respiration plates
You will need• a variety of seeds, bottle tops, seeds,
coins
• plates
• card
Choose 3 different types of seed, coin or bottle top to represent carbon,
hydrogen and oxygen. Arrange 4 plates or boxes on a table as shown.
Ask students to place the correct number of seeds etc. on the plates.
When the seeds are placed correctly the card carrying the ‘E’ for energy
is added.
Discuss or demonstrate that the reverse equation is the process of
photosynthesis.
How much energy in
a peanut?
You will need• peanut
• pin
• Plasticine or clay
• test tube
• flame
Put 20-ml water into a test tube
and record its temperature. Stick
the peanut onto the pin and
make a Plasticine or clay base.
Plan the peanut in a flame so
that it starts to burn. Put the
burning nut under the test tube.
Record the temperature of the
water after the nut has burnt
away. The energy in the peanut
can be calculated as shown:
amount of water (ml) x rise in
temp, (°C ) x 4.2 = energy (Joules)
hold in place
by a stand
nut
pin
Plasticine or
clay base
Page 33
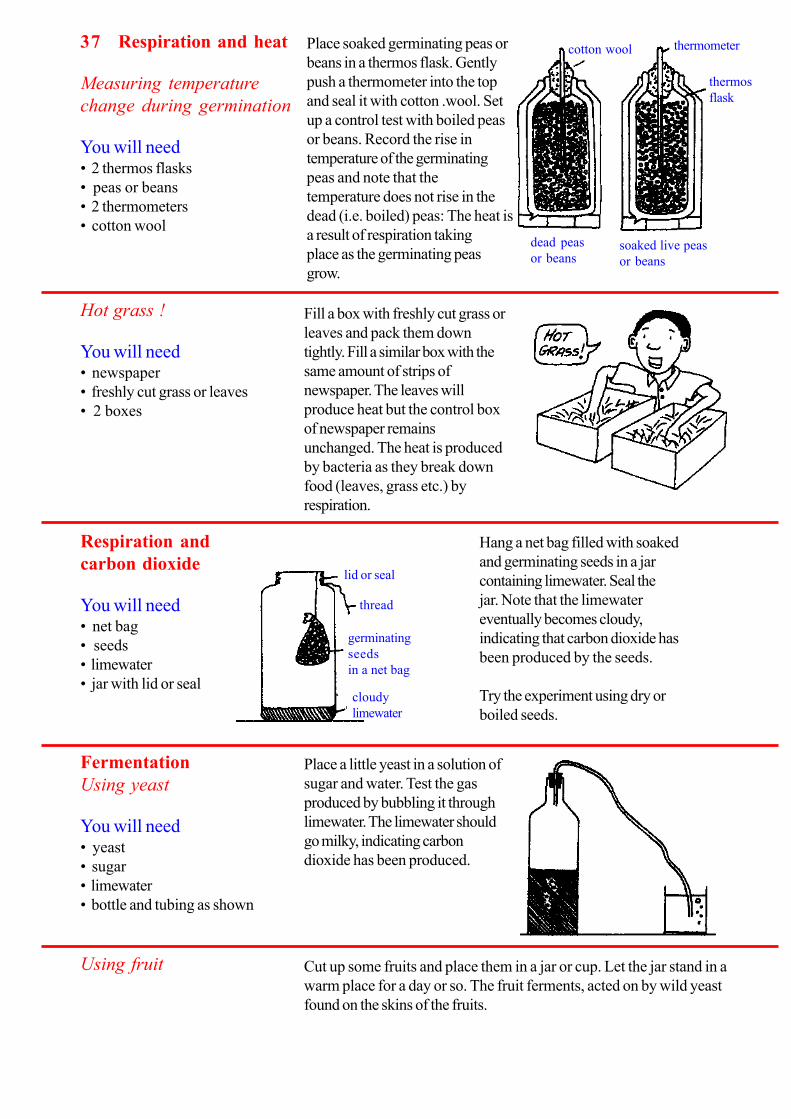
37 Respiration and heat
Measuring temperature
change during germination
You will need• 2 thermos flasks
• peas or beans
• 2 thermometers
• cotton wool
thermos
flask
thermometercotton wool
dead peas
or beanssoaked live peas
or beans
Place soaked germinating peas or
beans in a thermos flask. Gently
push a thermometer into the top
and seal it with cotton .wool. Set
up a control test with boiled peas
or beans. Record the rise in
temperature of the germinating
peas and note that the
temperature does not rise in the
dead (i.e. boiled) peas: The heat is
a result of respiration taking
place as the germinating peas
grow.
Hot grass !
You will need• newspaper
• freshly cut grass or leaves
• 2 boxes
Fill a box with freshly cut grass or
leaves and pack them down
tightly. Fill a similar box with the
same amount of strips of
newspaper. The leaves will
produce heat but the control box
of newspaper remains
unchanged. The heat is produced
by bacteria as they break down
food (leaves, grass etc.) by
respiration.
Respiration and
carbon dioxide
You will need• net bag
• seeds
• limewater
• jar with lid or seal
lid or seal
thread
germinating
seeds
in a net bag
cloudy
limewater
Hang a net bag filled with soaked
and germinating seeds in a jar
containing limewater. Seal the
jar. Note that the limewater
eventually becomes cloudy,
indicating that carbon dioxide has
been produced by the seeds.
Try the experiment using dry or
boiled seeds.
Fermentation
Using yeast
You will need• yeast
• sugar
• limewater
• bottle and tubing as shown
Place a little yeast in a solution of
sugar and water. Test the gas
produced by bubbling it through
limewater. The limewater should
go milky, indicating carbon
dioxide has been produced.
Using fruit Cut up some fruits and place them in a jar or cup. Let the jar stand in a
warm place for a day or so. The fruit ferments, acted on by wild yeast
found on the skins of the fruits.
Page 34
38 Photosynthesis
bend together
squeeze to shape
cutilcle
upper epidermis
palisade cell
chloroplasts
spony tissue
air space
lower epidermis
cuticlestomata
• Plants make their food by photosynthesis.
• During photosynthesis carbon dioxide and water, in the presence of
tight and chlorophyll, are changed into glucose and oxygen,
• The glucose is changed to starch so the presence of starch indicates
photosynthesis has occurred.
• In most plants a green pigment called chlorophyll is essential for
photosynthesis to occur.
• Chlorophyll is found in the chloroplasts and these are more
concentrated in particular cells, e.g. in the leaves.
Leaf structure
Leaf cells
You will need• strips of paper
• box (optional)
Construct the different types of cells in the leaf from paper strips.
Arrange the ‘cells’ in a leaf. This is easier if you put them into a
surround or a box with sides. Pieces of grass can be used to represent
chloroplasts.
Making a model leaf
You will need• box
• coloured crayons or paints
Paint or draw on the sides, top
and bottom of a box. Remember
that the inner surface of a printed
box has a blank surface! It is
easier to do the drawing with the
box opened out flat and then
reglue it into shape.
Exploring
photosynthesisThe chemical equation for photosynthesis is
6C02 + 6H
20 ---------- C
6 H
12 O
6 + 60
2 in the presence of chlorophyll
Photosynthesis made easy
sunlight
light
energycarbon
dioxide
oxygen
chlorophyll
water
glucose
Draw and cut out cards of the
shapes shown and then arrange
them to show the chemical
process of photosynthesis.
Page 35
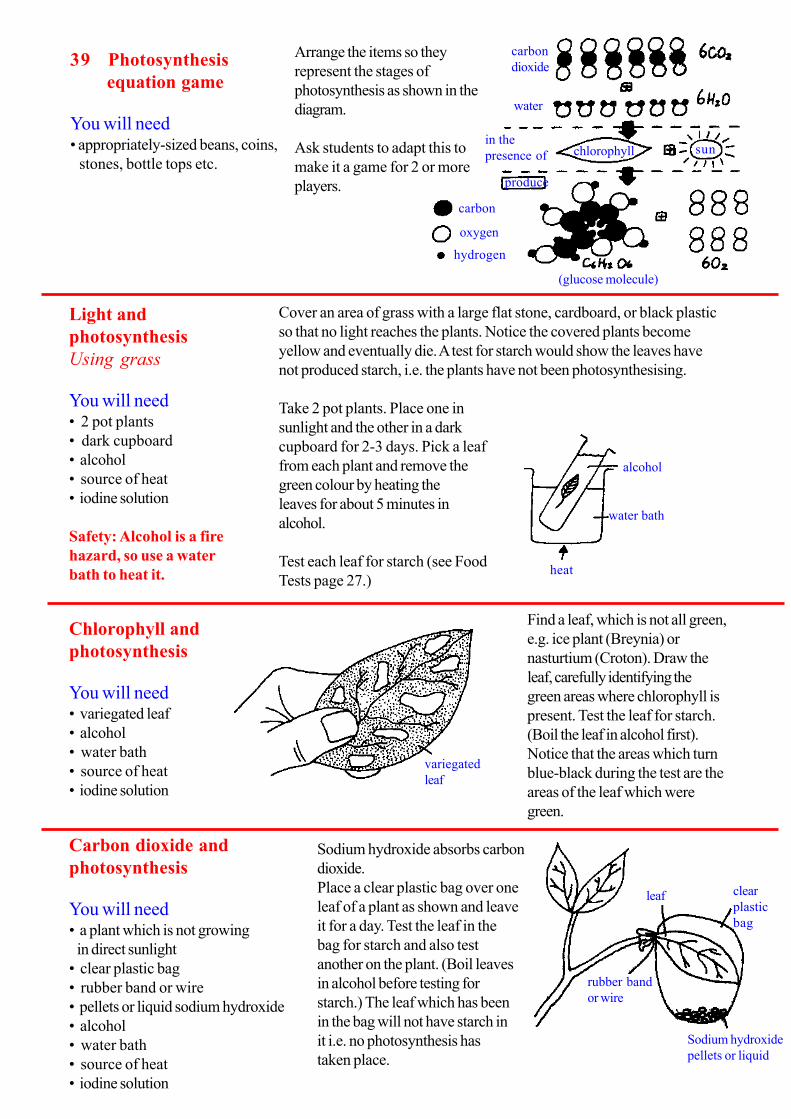
39 Photosynthesis
equation game
You will need• appropriately-sized beans, coins,
stones, bottle tops etc.
water bath
alcohol
heat
leaf clear
plastic
bag
Sodium hydroxide
pellets or liquid
rubber band
or wire
carbon
dioxide
water
in the
presence of chlorophyll sun
produce
(glucose molecule)
carbon
oxygen
hydrogen
Arrange the items so they
represent the stages of
photosynthesis as shown in the
diagram.
Ask students to adapt this to
make it a game for 2 or more
players.
Light and
photosynthesis
Using grass
You will need• 2 pot plants
• dark cupboard
• alcohol
• source of heat
• iodine solution
Safety: Alcohol is a fire
hazard, so use a water
bath to heat it.
Cover an area of grass with a large flat stone, cardboard, or black plastic
so that no light reaches the plants. Notice the covered plants become
yellow and eventually die. A test for starch would show the leaves have
not produced starch, i.e. the plants have not been photosynthesising.
Take 2 pot plants. Place one in
sunlight and the other in a dark
cupboard for 2-3 days. Pick a leaf
from each plant and remove the
green colour by heating the
leaves for about 5 minutes in
alcohol.
Test each leaf for starch (see Food
Tests page 27.)
variegated
leaf
Chlorophyll and
photosynthesis
You will need• variegated leaf
• alcohol
• water bath
• source of heat
• iodine solution
Find a leaf, which is not all green,
e.g. ice plant (Breynia) or
nasturtium (Croton). Draw the
leaf, carefully identifying the
green areas where chlorophyll is
present. Test the leaf for starch.
(Boil the leaf in alcohol first).
Notice that the areas which turn
blue-black during the test are the
areas of the leaf which were
green.
Carbon dioxide and
photosynthesis
You will need• a plant which is not growing
in direct sunlight
• clear plastic bag
• rubber band or wire
• pellets or liquid sodium hydroxide
• alcohol
• water bath
• source of heat
• iodine solution
Sodium hydroxide absorbs carbon
dioxide.
Place a clear plastic bag over one
leaf of a plant as shown and leave
it for a day. Test the leaf in the
bag for starch and also test
another on the plant. (Boil leaves
in alcohol before testing for
starch.) The leaf which has been
in the bag will not have starch in
it i.e. no photosynthesis has
taken place.
Page 36
40 Plant
transport and
transpiration
dicotyledonmonocotyledon
ungreased leaf
droplets
plastic bag
fewer
dropletsgreased leaf
• Plants have hydrostatic skeletons, i. e. it is the pressure of water in
the cells which keeps the plant rigid.
• Water enters through the roots and moves through the xylem vessels up
to the leaves where it is lost through small holes, the stomata.
• Food, made in the leaves, is transported in the phloem to other parts
of the plant.
• Essential nutrients are absorbed through the roots by active
transport and then carried to other parts of the plant in the xylem.
Leaf structures
You will need• a variety of different types of leaves
• sheet of dean white paper
• paint or ink
Examine the different types of
leaves and notice in particular the
patterns of the leaf veins. Make
leaf prints by lightly painting or
inking the surface of a leaf,
placing a piece of paper on top
and then pressing down lightly.
Students could make a leaf-print
collection.
guard cell
stoma
Looking at stomata
The distribution of stomata
cm leaves
You will need• glass container full of hot water
(not as hot as boiling)
• a variety of leaves
Place a leaf in hot water. Bubbles come from the stomata as the air in
the leaf expands. Look at different types of leaves and notice the
distribution of the bubbles, i.e. the stomata.
Students will see that in monocotyledons the bubbles emerge from
both sides of the leaf. Investigate whether this is true for other types of
leaf too.
Examining stomata in detail
You will need• leaves
• microscope
• microscope slides
• nail varnish (optional)
Snap a leaf in half and carefully
peel off a portion of the lower
epidermis. Place the epidermis on
a slide and examine it under a
microscope. The curved guard
cells will be clearly visible.
Alternatively, lightly coat the
underside of a leaf with clear nail
varnish. After it has dried peel it
off and the impression of the cells
will remain in the nail varnish.
Note that this will work better
with some leaves than others.
Transpiration
You will need• potted plant
• 2 small plastic bags
• string
• grease or Vaseline
Water loss through transpiration
is clearly visible in transplanted
seedlings on a hot day.
You can demonstrate that the
water is lost through the stomata
by comparing greyed and
un-greased leaves. Grease both
sides of one leaf and place a
separate plastic bag around each
leaf. Compare the amount of
water In the plastic bags later.
Page 37
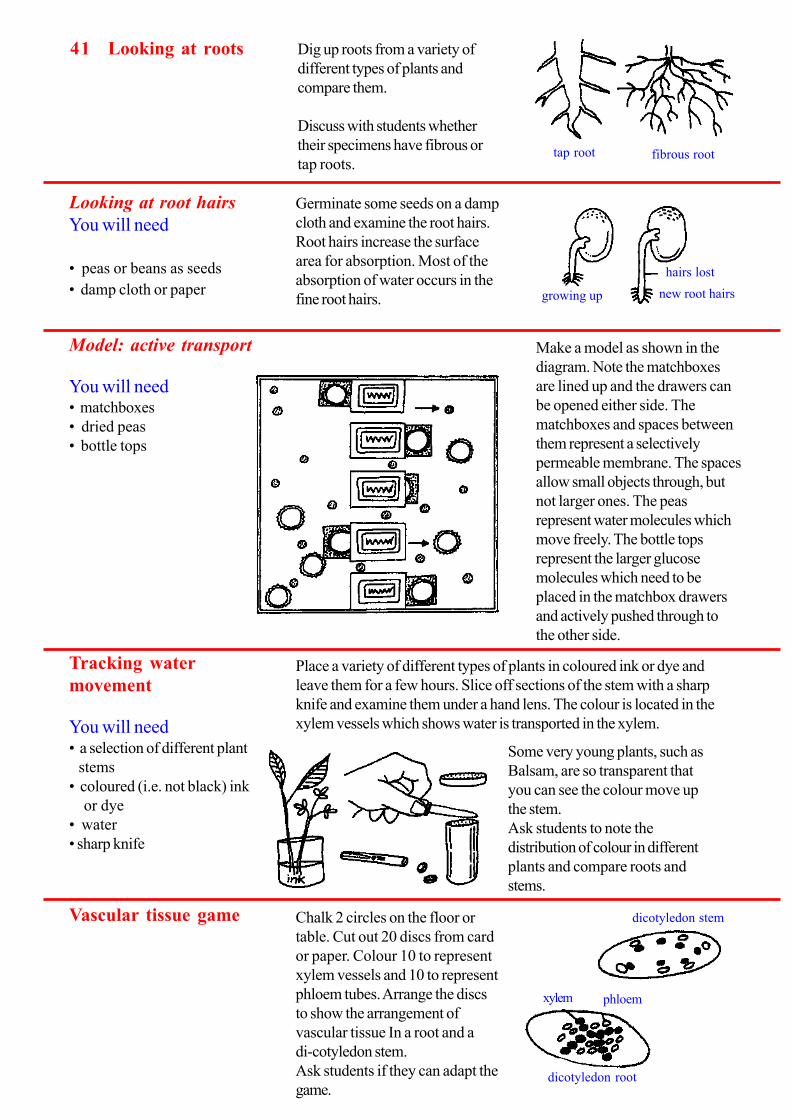
41 Looking at roots
tap root fibrous root
growing up
hairs lost
new root hairs
Dig up roots from a variety of
different types of plants and
compare them.
Discuss with students whether
their specimens have fibrous or
tap roots.
Looking at root hairs
You will need
• peas or beans as seeds
• damp cloth or paper
Germinate some seeds on a damp
cloth and examine the root hairs.
Root hairs increase the surface
area for absorption. Most of the
absorption of water occurs in the
fine root hairs.
dicotyledon stem
xylem phloem
dicotyledon root
Model: active transport
You will need• matchboxes
• dried peas
• bottle tops
Make a model as shown in the
diagram. Note the matchboxes
are lined up and the drawers can
be opened either side. The
matchboxes and spaces between
them represent a selectively
permeable membrane. The spaces
allow small objects through, but
not larger ones. The peas
represent water molecules which
move freely. The bottle tops
represent the larger glucose
molecules which need to be
placed in the matchbox drawers
and actively pushed through to
the other side.
Tracking water
movement
You will need• a selection of different plant
stems
• coloured (i.e. not black) ink
or dye
• water
• sharp knife
Place a variety of different types of plants in coloured ink or dye and
leave them for a few hours. Slice off sections of the stem with a sharp
knife and examine them under a hand lens. The colour is located in the
xylem vessels which shows water is transported in the xylem.
Some very young plants, such as
Balsam, are so transparent that
you can see the colour move up
the stem.
Ask students to note the
distribution of colour in different
plants and compare roots and
stems.
Vascular tissue game Chalk 2 circles on the floor or
table. Cut out 20 discs from card
or paper. Colour 10 to represent
xylem vessels and 10 to represent
phloem tubes. Arrange the discs
to show the arrangement of
vascular tissue In a root and a
di-cotyledon stem.
Ask students if they can adapt the
game.
Page 38
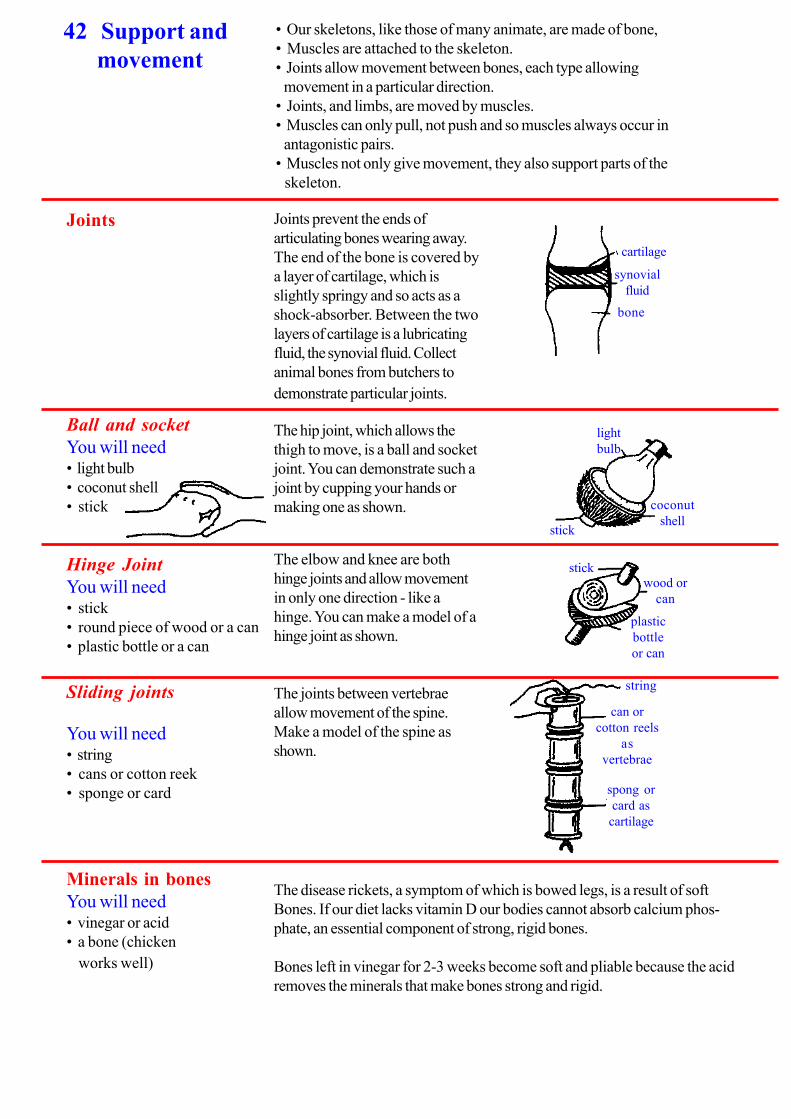
42 Support and
movement
cartilage
synovial
fluid
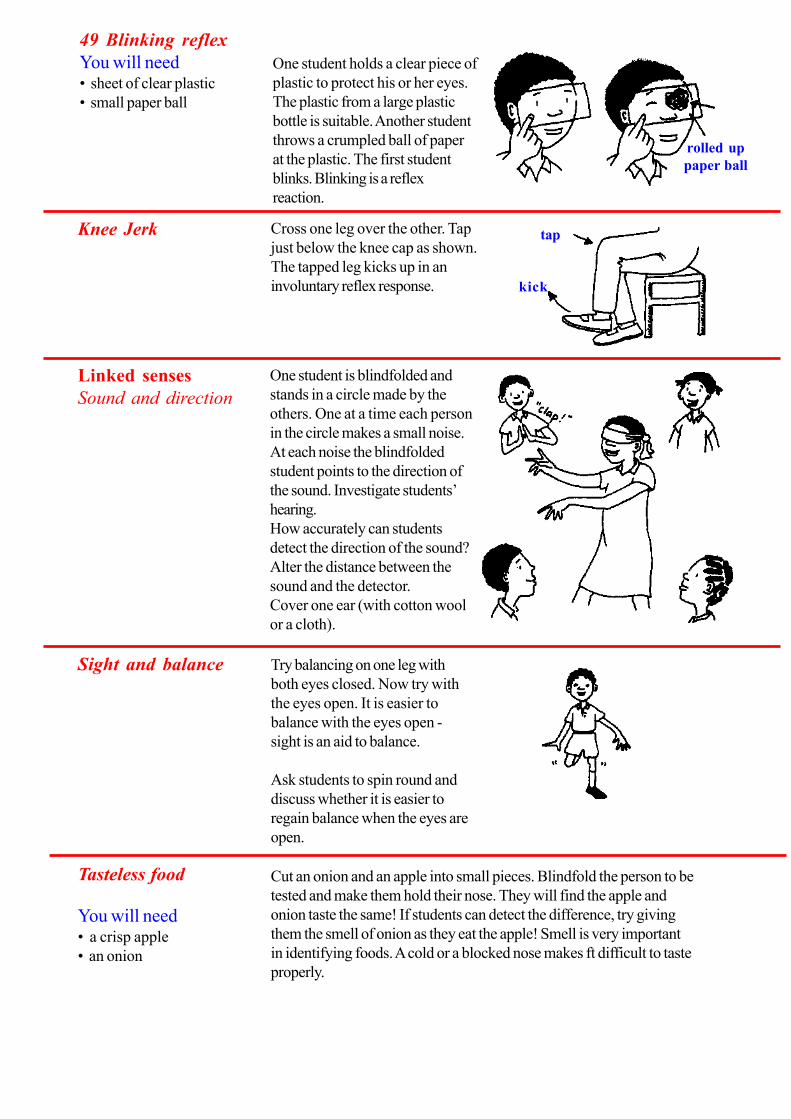
bone
• Our skeletons, like those of many animate, are made of bone,
• Muscles are attached to the skeleton.
• Joints allow movement between bones, each type allowing
movement in a particular direction.
• Joints, and limbs, are moved by muscles.
• Muscles can only pull, not push and so muscles always occur in
antagonistic pairs.
• Muscles not only give movement, they also support parts of the
skeleton.
Joints Joints prevent the ends of
articulating bones wearing away.
The end of the bone is covered by
a layer of cartilage, which is
slightly springy and so acts as a
shock-absorber. Between the two
layers of cartilage is a lubricating
fluid, the synovial fluid. Collect
animal bones from butchers to
demonstrate particular joints.
Ball and socket
You will need• light bulb
• coconut shell
• stick
The hip joint, which allows the
thigh to move, is a ball and socket
joint. You can demonstrate such a
joint by cupping your hands or
making one as shown.
Hinge Joint
You will need• stick
• round piece of wood or a can
• plastic bottle or a can
The elbow and knee are both
hinge joints and allow movement
in only one direction - like a
hinge. You can make a model of a
hinge joint as shown.
Sliding joints
You will need• string
• cans or cotton reek
• sponge or card
light
bulb
coconut
shellstick
stickwood or
can
plastic
bottle
or can
string
can or
cotton reels
as
vertebrae
spong or
card as
cartilage
The joints between vertebrae
allow movement of the spine.
Make a model of the spine as
shown.
Minerals in bones
You will need• vinegar or acid
• a bone (chicken
works well)
The disease rickets, a symptom of which is bowed legs, is a result of soft
Bones. If our diet lacks vitamin D our bodies cannot absorb calcium phos-
phate, an essential component of strong, rigid bones.
Bones left in vinegar for 2-3 weeks become soft and pliable because the acid
removes the minerals that make bones strong and rigid.
Page 39
43 The forearm as a lever
You will need• wood or card
• string
• 2 strong straight sticks
biceps of
string
forearm
shoulder
blade of
wood or
cardtriceps of
string
scale
sand-filled
with tins
weight
large stick
support
rubber
strip
movable
joint
Make a model of the forearm as
shown and notice that the arm
can only be bent by shortening
one ‘muscle’ at a time.
Ask students to make one
model using rubber bands
instead of string.
The effect of load
on muscle
You will need• 2 tins filled with sand
• ruler or scale
• rubber strip
• 2 strong sticks
• weights
Make a model arm as shown. Use a light weight to begin with and then
increase the load.
Discuss what happens to the
muscle as you increase the load
(weights) on the lever (arm) and
the effect of the position of the
weight on the ‘arm’.
Students should move their arms
to correspond to the model.
Discuss with them where they
usually carry loads on their arms
and why.
tendon tweezers
dog
cat
sheep
cow
human
Tendons
You will need• chicken’s foot
• tweezers
Muscles are attached to bones by
tendons. Some tendons may be
quite long. Demonstrate how
tendons pull on a joint by looking
at a chicken’s foot.
Expose the white, string-like
tendons around the cut of the
chicken’s foot. Pull each tendon,
one at a time and discuss the
resulting action of the toes.
Support of the
spinal column
The diagrams below show the position of the spinal column in relation
to the legs.
Ask students to load the
‘backbone’ by adding weights
to it and discuss the effect on
the joints.
Discuss the role of muscles in
maintaining the posture of
each animal.
Muscles work in pairs
You will need• rod
• rope or thick string
• small tin or chalk mark on floor
Tie the string to the rod as shown
and ask pairs of students to
manoeuvre the stick into the tin,
or onto a chalk mark on the floor.
The rope can only pull the rod,
not push it. Muscles can only pull
too.
Use a pencil for a desk-sized
model
Page 40
44 Paper
skeleton
To make the paper skeleton
shown here you will need 8 pages
of A4 paper or pages from a large
writing book used by students.
Fold and cut out the shapes as
illustrated for each part of the
body. The final result should look
like the one shown.
SkullCut around the dotted line after
drawing. The teeth and mouth
can be cut without removing any
paper.
skull
fold in half
pelvis
Pelvis and
shoulder bladesDraw half of the pelvis and cut out the basic shape
when the paper is folded. Cut out shoulder blades in
the same way using an extra piece of paper.
Page 41
45 Limbs
fold 1
fold 2
lower
limbsupper
limbs
The lower limbs are cut out from one piece of paper. The upper limb
all fit onto another piece.
Rib cage Fold the paper twice and then cut along alternate lines. Use a ruler to
measure accurately if you want to have the exact number of ribs. You
can cut the ribs out of the paper lengthwise instead.
Backbone Cut out 2 strips for the backbone
to give extra strength. Stick one
piece to each side of the skeleton.
Hands and feet Fold the paper in half and ask students to draw around a hand. Use
another piece of paper for the feet.
More ideas• The bones of the feet and hands may be drawn onto the paper
outlines.
• The paper limb bones can be shaped to add greater realism.
• Pin or staple the skeleton together or mount it on a hanging mat
(see page 19).
Page 42
46 Senses and
responses - plants
after one week
soil
grow to
light
no sideways
movement
seedling foil cap
hole
cardboard box soil
• Plants respond to certain stimuli either by nastic movements or
tropisms.
• Parts of some plants move in response to light or touch, e.g. petals
close at night. Such movements are called nastic movements.
• Shoots and roots respond to stimuli by growing. These movements
are called tropisms.
• The most obvious difference between tropisms and nastic move-
ments is that tropisms take longer to happen
Geotropism -
movement with gravity
Shoots
Lean a pot plant at an angle.
Leave it for a week. Notice that
after this time the leaves turn
upwards.
crumpled damp
newspaper
bean
glass
Roots
You will need• damp newspaper
• beans
• glass jar
Put several seeds between the jar and the newspaper as shown. The
seeds should be placed at different angles. The root will always grow
downwards, towards gravity, and the shoot upwards.
Ask students if they think it
matters which way up seeds are
planted and why before they do
the experiment
After the experiment ask if the
experiment supports the students’
original views.
hole
card board dividers
cardboard box
plant grows around
barriers towards light
plant emerges
from hole
Phototropism Farmers and gardeners see leaves turning to the Sun after disturbance
or transplanting. Place a house plant next to a window letting in
sunlight. Leave it for a few days. Now rotate the pot and note the
position of the leaves. Examine the plant over the next few days. The
leaves turn towards the light as the plant grows.
Find the light maze
You will need• cardboard box
• seedlings in small pots
Make a light maze box as shown. Lift the lid daily to watch progress.
Sensitive stem tips
You will need• maize seedlings
• tin foil, sweet or
cigarette paper
• cardboard box
Cover the stem tips of the seedlings in one pot. To make the cap, roll
the foil around the end of a matchstick. The foil must prevent sunlight
reaching the tip. Compare the growth of the normal seedlings with
those covered by foil caps. Put both pots of
seedlings into the box. The seedlings without caps
grow towards the hole, i.e. towards the light.
The seedlings covered by caps grow straight up.
This shows that only the growing tip is phototropic.
Page 43
47 Hydrotropism-
movement towards
water
Porous pot
You will need• a large dish
• a porous pot
• soil
• water
• seedlings
porous pot of
water
dish
filled with
soil
soil
moist soil
box or tin
empty saucer
roots grow to side
wire mesh
Searching for water
You will need• an empty box or tin
• fine mesh, e.g. mosquito net
• beans or peas
• soil
• saucer
Cut a hole in the bottom of a tin or box. Fit a piece of wire netting
(mosquito net) over the hole. Cover the netting with 2-3 cm of moist
soil and plant one or two beans. Place the tin or box over an empty
dish or saucer. The roots grow down at first (responding to gravity) but
they turn to the side, searching for water. Now repeat the experiment
with water in the saucer.
Temperature affects
growth
You will need• beans
• 2 glass containers
• damp newspaper
• cold place (fridge)
Grow one glass of beans at room
temperature. Keep the other glass
as cool as possible. The cool
beans will grow more slowly. In a
fridge they may not grow at all.
Simple hothouses
You will need• plastic bags
• wire or stick supports
• plastic bottles
Hothouses are warmer than the
outside air and so crops, such as
lettuce or tomatoes will grow
faster.
Use plastic bags supported by
sticks or wire to form a hothouse
over any container.
Cut a door in a plastic bottle and
plant seeds inside the mini-
hothouse.
Nastic movements Look out for the following plant movements in your environment.
• Petals of flowers closing when it gets dark.
• Petals of flowers opening when it gets dark, e.g. Moonflower. (These
flowers are often pollinated by night-flying insects.)
• Plants like Mimosa pudica (Sensitive Plant) which close up their leaves
if touched lightly. If Mimosa Is touched heavily the whole plant
collapses.
• Plants which fold their compound leaves in a definite way, e.g.
Sensitive Plant and Oxalis.
plastic bag
support sticks
door seal with
adhesive
tape
Fill the porous pot with water as shown. The seedlings’ roots will grow
towards the porous pot.
Try this with empty porous pot.
Page 44
48 Senses and
responses - animals
bitter
sour
salt
sweet
• Sense organs detect stimuli, e.g. the ear detects sound.
• Nerves carry impulses from receptors to the brain or spinal cord.
• A reflex action is an involuntary, very fast response to a stimulus.
• We often use several senses together, e.g. smell with taste. The sense
of sight affects our balance.
Taste map
You will need• prepared taste solutions
• glass rods or matchsticks
Prepare the 4 taste solutions as follows.
• Bitter - lemon peel, chloroquin (1 malaria tablet dissolved in a cup of
water, but test before use), strong cold tea
• Sour - vinegar or lime juice
• Salt - salt dissolved in water
• Sweet - sugar dissolved in water
Use the solutions to map out the
areas of taste on the tongue.
Glass rods or matchsticks dipped
into each solution allow a single
drop to be placed accurately. The
areas students should find are
shown opposite.
Ensure students are made aware of health hazards from
using unclean or shared solutions. Rods or matchsticks
should never be shared.
a nerve fibre nerve sheath
axon
sheath (paper)
bundle of
nerve fibrespencils
outer sheath (newspaper)
cross-section through the nerve
in bright
light
in dim
light
Nerve model Use sticks, straws or grasses as substitutes for pencils.
Reflex actions
Light and the eyeCover one eye and look into a
bright tight. After the uncovered
eye has adjusted to the light
uncover the other eye. Quickly
compare the sizes of the pupils in
each eye. The size of the pupil is
adjusted by a reflex action. In
bright light the circular muscles of
the iris diaphragm contract and
the pupil becomes smaller.
Page 45
49 Blinking reflex
You will need• sheet of clear plastic
• small paper ball
rolled up
paper ball
tap
kick
One student holds a clear piece of
plastic to protect his or her eyes.
The plastic from a large plastic
bottle is suitable. Another student
throws a crumpled ball of paper
at the plastic. The first student
blinks. Blinking is a reflex
reaction.
Knee Jerk Cross one leg over the other. Tap
just below the knee cap as shown.
The tapped leg kicks up in an
involuntary reflex response.
Linked senses
Sound and direction
One student is blindfolded and
stands in a circle made by the
others. One at a time each person
in the circle makes a small noise.
At each noise the blindfolded
student points to the direction of
the sound. Investigate students’
hearing.
How accurately can students
detect the direction of the sound?
Alter the distance between the
sound and the detector.
Cover one ear (with cotton wool
or a cloth).
Sight and balance Try balancing on one leg with
both eyes closed. Now try with
the eyes open. It is easier to
balance with the eyes open -
sight is an aid to balance.
Ask students to spin round and
discuss whether it is easier to
regain balance when the eyes are
open.
Tasteless food
You will need• a crisp apple
• an onion
Cut an onion and an apple into small pieces. Blindfold the person to be
tested and make them hold their nose. They will find the apple and
onion taste the same! If students can detect the difference, try giving
them the smell of onion as they eat the apple! Smell is very important
in identifying foods. A cold or a blocked nose makes ft difficult to taste
properly.
Page 46
50 Reproduction
egg
(large plate)
nucleus
(threads for
chromosomes)
chromosomes (thread)
sperm
(small lid with
string as tail)sperm tail (string)
left by plate
• Sexual reproduction involves the joining of 2 single cells. One cell
comes from the male, the other from a female.
• In humans the mate cell is the sperm, the female cell the ovum (egg).
• During fertilisation the chromosomes from the male and female
combine (see page 60) to form a zygote.
• Flowers are the sexual organs of plants and many flowers contain
both the male part (anther producing pollen) and the female part
(ovary).
small beans
with cotton tail
Models of sperm
and eggs
You will need• large football
• small bean with cotton tail
The football represents the
human egg, the bean a human
sperm.
Ask students how much bigger
the egg is than the sperm.
chromosomes (thread)
tail (string) middle (clay)head (plastic bag)
enzymes
(adhesive tape)
egg
uterus
oviduct
ovary
vagina
Sperm model
You will need• clay
• plastic bag
• adhesive tape
• fine thread
• string
This model can be adapted.
The egg’s journey Make a Plasticine or clay model of
the female reproductive organs
and discuss the path of the egg
from the ovary.
Fertilisation
You will need• 2 small lids, e.g. bottle tops
• fine thread
• string
• large plate
Make the sperm and egg cell as shown. Note that the lids represent the
nuclei of the female and male cells. The plate represents the egg cell.
The fine threads represent chromosomes. Move the sperm towards the
egg cell until it touches the nucleus of the egg cell. Mix the threads
from both lids. This represents the sperm head bursting and the mixing
of chromosomes.
Page 47
51 Models of embryo
development
At the time of fertilisation the zygote is the size of the smallest dot a
pencil can make. (Smaller than a full stop). It is 0.2 mm in diameter.
After 2 weeks the embryo is large enough to be represented by clay or
Plasticine models. The sizes are as follows:
• 2 weeks old - embryo a ball 1-1.5 mm in diameter
• 3 weeks old - embryo 2.5 mm and umbilical cord formed
• 5 weeks old - embryo still only 5 mm long
• 8 weeks old - now called a foetus 30 mm long and with all human
features.
Use toy dolls to explain the functions of the umbilical cord and the
placenta.
baby
unprotected
by fluid
aminion
(bag)
foetus
(doll)
amniotic
fluid
(water)baby protected by fluid
Protection-
the amniotic sac
You will need• doll
• transparent plastic bag
• water
Place a plastic doll into an empty,
clear plastic bag. Pass the doll
around the class. Fill the plastic
bag with water, place the doll
inside and knot the opening so it
is sealed. Pass the water-filled bag
around and discuss with students
what protects a baby inside the
mother.
petals
sepals
male parts
clay or
plasticine
wire or stick
stamens
stigma (clay)
style (clay)
ovary (clay)
ovule (stone)
stick
female partsstalk (stick)
Flower structure
You will need• card or plastic
• sticks and stones
• paper
• clay or Plasticine
Make the major parts of a flower from card or plastic, sticks and clay.
Petals can be made from paper.
Ask students to develop the idea.
Look at a variety of flowers, fruit and seeds from the local environment
Anthers and pollen
You will need• paper
• sticks
pollen
grains
attach
2 sheets
to the
stick
this end
could be
sealed
bursting
anther
Make a model of an anther as shown. Lightly glue small pieces of card
or stick onto paper to represent pollen. Alternatively draw circles to
represent the pollen. When the paper is folded it represents anthers
full of pollen. They are ready to burst open and shed pollen into the
wind or onto insects.
Examine the anthers from different flowers with a magnifier (see page
114).
Page 48
52 Genetics
base pair
• The nucleus of every cell {except gametes) contains 2 sets of identical
chromosomes of DNA. Such cells are diploid.
• Sperm and egg cells (gametes) contain only one set of chromosomes
- they are haploid. They are produced by meiosis.
• When a sperm fertilises the egg the new individual has one set of
chromosomes from each parent.
• When cells divide (mitosis) the chromosomes divide too and genetic
material, the genes, combine in different ways. This recombination
alters the effect of genes.
DNA zip model
You will need• a zip
DNA is wound in a double helix.
The strands of the helix are chains
of sugars and phosphates. The 2
strands of the helix are linked
together by bridges made of pairs
of organic nitrogenous bases
which are joined to the sugar
molecules. A zip provides a good
visual analogy.
zip showing DNA coupling
twisted zip DNA model
DNA helix model
You will need• card or paper strips
• 4 colours
A gene can have a sequence of up
to 1000 base pairs in a DNA
molecule. Make your helix model
from strips of strong card or
paper. It should be strong enough
to twist as shown.
female male
G C
A T
Sex determination
You will need• card
Cut out two shapes, one to
represent a male (labelled XY)the
other a female (labelled XX). Cut
out 4 small circles. Label 3 of
them X and label the other Y.
These shapes represent the
gametes. Move sperm and eggs
together to represent fertilisation
and sex determination.
Genetic code gameThere are always 4 kinds of base
in a DNA molecule. These bases
always combine in the same pairs:
thymine with adenine and
cytosinne with guanine.
Cut out pieces of card to
represent the paired bases.
Students must match the bases to
“zip up’ the DNA molecule.
This model could be developed to
include RNA.
Page 49
53 Dipioid chromosome set
You will need• coloured wool, paper or sticks
• large sheet of paper
DIPLOID
PARENTAL
CELLS
replication
division
DIPLOID
DAUGHTER
CELLS
Draw the outline of the cell wall and nucleus on paper or a desk top.
Make the chromosomes from coloured card, paper, wool or sticks.
Make up to 26 pairs of chromosomes (humans have 26 pairs of
chromosomes in each cell nucleus). Each pair must be different from all
the others, so use different colours, or sizes, to distinguish them. Mix
up all the chromosomes, i.e. split all the pairs. Ask students to re-
combine the chromosomes to make pairs.
Mitosis - a model
You will need• matchsticks or paper strips
In the model shown here, only
one chromosome pair is shown in
the original cell. In a human cell,
one chromosome from the pair
came originally from the sperm,
the other from the ovum. ‘Parent’
and ‘daughter’ cells have identical
chromosomes.
The model would be more
realistic and complex if the full
complement of 26 pairs of
chromosomes were used instead
of just one.
chromatid
(wood)
centromere
(press stud)
chromatid
(wire)
centromere
(black mark)
chromatids
(paper strips
marked the
same)
centromere
(spring)
Crossing over - a model
You will need• clay or plasticine
• playing cards (optional)
Make 2 chromosomes of different
colours in clay or Plasticine. In
meiosis pairs of chromosomes
come to lie next to each other. At
points called chiasmata, parts of
chromosomes are exchanged. This
crossing over results in exchange
of genes.
Ask students how they could
show crossing over by using
playing cards.
Chromatid models
You will need• peg
• wire and press stud
• paper strips
During the late stage of prophase in mitosis each chromosome can be
seen as 2 parts, called chromatids. These chromatids are joined
together by the centromere.
Page 50
54 Ecology and
ecosystems
newspaper
boards stone / weight
book
IntroductionWhat is your aim
and why Method
What you did. Also
where and how
Results and
Observations
Conclusions
tape
knotted
rope or
string marked measuring sticks
an even stride
three sticks
useful for uneven ground
measuring wheel
• Ecology is the study of organisms in their environment.
• A community of organisms, i.e. plants, animals, micro-
organisms, is an ecosystem.
• A natural ecosystem is an area not affected by human activities.
• This section gives ideas on how to collect and record organisms in
their ecosystems.
Recording and measuring When you visit a natural
ecosystem try not to disturb the
animals and plants too much.
Write clear records of what you
discover on the spot. One
recording method is shown here
together with useful equipment.
Plant press
You will need• old newspapers
• heavy weights
• 2 flat boards
bottle or
jar
suck in
air
bent
tube
rubber
tube
gauze or
cloth cover
Collect samples of local plants. Find out the local and scientific names
and label the specimens. Place each specimen between pages of
newspaper. Place the boards on either side of the newspaper stack and
put a heavy weight on top.
Collecting small insects
You will need• small bottle or jar
• wide bent tube
• rubber tube
• gauze and fine cloth
• rubber bung with 2 holes
Place the tube near the insect.
Suck in air through the rubber
tube and the insect near the
mouth of the bent tube will be
drawn into the bottle. The tubes
can be made from bent straws or
from a ballpoint casing bent in
heat.
Safety:
Do not allow students to share tubes
because of the danger of cross-infection.
Page 51
55 Measuring tree height
You will need• a stick or pencil
1
2
1 2
Line up the top of the tree with the top of the stick (point 1). Move the
fingers to the bottom of the tree (point 2). Turn the stick, keeping the
finger in exactly the same place on the stick. Ask a student to walk
from the base of the tree until you shout ‘stop’. Measure the distance
of the student from the base of the tree.
Beating a tree Put a newspaper or large white cloth under a tree or bush. Beat the
branches with a long stick being careful not to cause any damage. The
creatures fall onto the paper. Examine and record what you find. If you
take creatures away for study return them to where you found them
afterwards.
Check nothing dangerous is living in the tree before you beat
it or there may be a few surprises! Do not damage the tree or
bush.
streamold path
twisted
wire
wires
connected
by rubber
tubes
Line transect survey
You will need• long piece of string
• 2 pegs or heavy stones
Stretch a length of string between 2 pegs. Make a list of all species of
plant which touch the string or lie under it. Make an elevation drawing
(to scale) of each line transect. Compare transects in different locations.
Sampling squares
You will need• cardboard or wood
• wire
• rubber tube (optional)
Squares can be made in various ways and various sizes. A square of 1
metre works well. After throwing or placing the square on the ground,
record the names or descriptions of organisms found in the square. Use
the square to sample species in different locations around the school.
Page 52
56 The balance
of nature
cut
• All living things ultimately depend on the Sun,
• Producers (plants) trap energy from the Sun during photosynthesis
(see page 38). Producers are eaten by primary consumers
(herbivores) and these may be eaten by secondary consumers
(carnivores) which may in turn be eaten by tertiary consumers (other
carnivores).
• The complex relationship between producers and consumers can be
represented in food chains, or food webs.
• Animals and plants living in an environment often show adaptations
or behaviour patterns which help them survive.
• In the natural world all matter is constantly recycled, but human
activities are upsetting the balance of nature and the long-term
consequences may be devastating.
Food chain mobile
You will need• stiff cardboard
• scissors
Cut links of the food chain from
stiff cardboard. Label each link
with one part of the food chain.
Put the links together to make a
chain.
Make both simple and more
complicated chains.
Food webs
You will need• card
• pictures of animals and plants
(optional)
Either draw pictures of animals
and plants on cards or stick on
pictures cut out from magazines
etc. Make arrows and write on
them the links shown. Arrange
the cards and arrows to make a
food web.
This could be extended into a
card game for several players.
Carbon cycle cards
You will need• card
• paper strips
atmospheric
CO2
respiration
organic carbon
compounds
in animals
eaten by
organic carbon
compounds in
green plants
fossil
fuels
burning
for
energy
photosysthesis
bacterial /
fungal
respiration
decay
Cut out cards showing stages of
the carbon cycle. Link them
together with the paper strips to
make a balanced carbon cycle.
Discuss with students the
consequences of increasing one
stage e.g. burning extra fossil
fuels.
Cards could be made for other
cycles too.
Page 53
57 Camouflage
Disappearing moths
You will need• newspaper
• white paper
Cut moth shapes from newspaper
and white paper. Place both types
of moth onto newspaper, and
then onto white paper. Note
which moths are easier to see.
brown red yellow green
Camouflage and protection
You will need• a long piece of string
• 4 pegs
• matchsticks
Mark out an area of grass with
the string and pegs. Colour the
matchsticks with different inks or
paints. Make some the same
colour as the grass and others in
very bright colours. Drop the
matches over the area of grass.
Which matches are easiest to
find?
Discuss with students why
camouflage would be an
advantage to a small maggot and
why it would help a predator too.
Survival behaviour
You will need• 2 glass plates or petri dishes
• maggots
• dry and damp paper
• black paint
lid plate
maggots
two glass plates
Maggots die if left in hot
sunshine because they dehydrate.
You can demonstrate how
behaviour aids survival.
Reactions to light Paint or cover one half of each of
the plates. Put the plates together
so that half is dark and half in
bright light. Put 10 maggots into
the centre of the bottom plate
and put the lid’ back. Count how
many maggots are in each side
every 10 minutes.
dry paper
damp paper
gap
Reactions to humidity Put dry filter paper on one side of
a plate and damp paper on the
other. Put a plate on top and
cover it with a cloth so it is dark
underneath. Count how many
maggots are on each side every
10 minutes.
Investigate several conditions at
once. For example, put damp
filter paper on one half of the 2
plates. Is the result the same if
both plates are in sunlight? Which
is more Important dampness or
darkness, i.e. do maggots prefer
light and damp or dark and dry?
Page 54
58 Health
matters
• Diseases caused by micro-organisms (viruses and bacteria) spread by
close contact, e.g. HIV, or through the air or water, e.g. ‘flu and
coughs’..
• Some diseases are not caused by micro-organisms, but by unhealthy
habits such as smoking.
• Severe diarrhoea is often fatal to babies because it causes
dehydration and toss of electrolytes.
• HIV is a virus which, in time, leads to AIDS.
Coughs and sneezes
spread diseases
clay or
plasticine
matches
ACHOO ! ACHOO !
ACHOO !
ACHOO !
cigarette in
large hole
clip syringes together
syringe 1
filter or newspaper
syringe 2
Smoking and health
You will need• 2 syringes
• filter or newspaper
• cigarette
Remove the needle end from one syringe (syringe 2). Remove the
plunger from the other syringe (syringe 1) and make a larger hole in
the needle end. Join the syringes as shown. Place a piece of filter paper
or newspaper between the 2 syringes. Place the cigarette in syringe 1
and light it. Draw air through the cigarette several times and you will
see a dark stain spreading across the filter paper. This is tar from the
cigarette.
Ask students what happens to the tar if a person smokes the cigarette
and discuss its effect on health.
Safety: It is essential any
syringes are sterile when
first used hi this
“ mouth”
small hole
with cork
(urine)
large hole
sealed with
a cork
(anus)
The dangers of
dehydration
Water baby
You will need• plastic bottle, can or gourd
• 2 corks
• water
Make a model baby from the bottle, can or gourd. The hole in the top
represents the mouth. Put 2 holes in the bottom of the container. Make
a small hole to represent water loss through urine. Make a large hole
to represent the anus. Put corks in both these holes. Fill the ‘baby’ with
water.
Remove the smaller plug and
water will be lost slowly.
However, diarrhoea can cause
severe loss of water, as removing
the larger plug illustrates. Water
lost through the holes can only be
replaced through the ‘mouth’. If
more water is lost than is taken in
dehydration occurs and this can
be fatal, especially in small babies.
Page 55
59 The ORS miracle Dehydration caused by diarrhoea is probably the biggest killer of
children in today’s world. Our bodies need water to function normally,
but we also need a particular concentration of essential electrolytes,
e.g. sodium and potassium. These electrolytes are lost in diarrhoea and
they must be replaced. Drinking water alone will not save the life of a
person who is dehydrated and has lost too many electrolytes. To
replace some essential electrolytes and water, the baby, or adult
should gently be made to drink the Oral Rehydration Solution (ORS)
shown here.
Note: This is an emergency solution and does not contain
all electrolytes. A severely dehydrated baby may need a
more complex solution if diarrhoea persists.
The aids epidemic
HIV acting
You will need• cards
• pins or tape to attach cards
Make cards to attach to students. They should contain a mixture of the
following - HIV; diseases, e.g. TB, diarrhoea; white blood cell. One of
the pupils should represent the human body. Several ‘white blood cells’
should be protecting one ‘body’ to begin with. Ask students to act out
the spread of HIV.
White blood cells protect the
body from diseases. HIV knocks
out the white blood cells and so
they can no longer protect the
body. This leaves the body open
to attack by germs of all kinds.
Eventually the body is overcome
by diseases which are normally
not fatal.
NO !
mixing
fluids =
sexual
contact
Passing on HIV
You will need• cards
• starch solution
• iodine solution
On the cards write down some sexual case histories. Give each student
a card at random. The owner of the card is to follow the behaviour
indicated on the card, e.g. faithful to one partner, many partners, no
partners. Give a few of the students a cup of starch solution and, give
all the others a cup of water. Ask students to follow the case history of
the cards and to mix the contents of their cups when they have a
partner - mixing represents sexual contact. At some
poin t
‘HIV test’ the
contents of the cups using a few drops
of iodine solution. If the
solution goes dark then it means there
is starch (representing HIV) in
the cup.
Discuss how fast the virus
dissolve:
sugar
teaspoons
x 8
and
salt
teaspoons
x 1
and
1 litre of
clean
water
Page 56
60 Raw materials
carbon / graphite
(from dry cell)
zinc
(dry cell)
iron
(nail or sheet)
aluminium
(drinks can or foil)
lead
(car battery)copper
(insulated wire or sheets)
• The atoms or molecules of raw materials are processed to make new
substances.
• New substances can be made by combining two elements or by
breaking down compounds.
• Some of the key processes are shown here: electrolysis, fractional
distillation, cracking and polymerisation.
Electrolysis
Electrodes
During electrolysis electricity passes through a liquid and decomposes it.
Electrolytes and electrodes
clothes peg
electrode
nail from stand
or across top of
jar
electrolyte
card, wood
or paper
over jar
opening
plastic
bottle
(bottom cut off)
cork
gas
electrode
(carbon rod)
wire hook
holder
electrode
as own
holder
Electrode holders
You will need• clothes peg
• copper strip
• iron nail
• copper sulphate solution
• dry cell
• safety goggles
Electrodes
+ dry cell -
copper wire
insulation
cut across
iron nail
cathode -
copper (II)
sulphate solution
copper anode +
Electroplating Make sure the nail is the cathode
- it must be wired up to the
negative terminal of the dry cell.
The copper strip then becomes
the anode. After current has
flowed for a time the nail
becomes pinkish as copper b
deposited on rt. The nail is being
electroplated with copper.
Page 57
61 Refining oil
Fractional distillation of
crude oil
You will need• 2 test tubes
• rubber bung
• plastic tube
• safety goggles
Care is needed with
inflammable substances.
Cracking
You will need• boiling tube
• broken pottery
• bung with plastic tube
• plastic bottle
• large dish of water
• safety goggles
hydrogen double bond
plastic tube
cork
sand as
anti-bumping
granules
vessel
test
tube
plastic
bottleheat resistant
wool soaked in
castor oil cork
heat
broken
pottery
water
rubber
paint
varnishplastics
synthetic
fibres
Put the crude oil into one test tube.
Add sand and then seal the tube with
the bung and plastic tube. When the
crude oil is heated vapours will come
off the various fractions. With careful
control of temperature the fractions
can be separated.
If crude oil is unavailable then the
following is a successful mixture:
1 part diesel
1 part kerosene
1 part duplicator spirit
0.5 parts sump oil (for colour)
Set up the apparatus as shown.
Cracking is the process by which
large hydrocarbon molecules are
broken down into smaller ones.
Castor oil ‘cracks’ over a broken
tea cup or flower pot into a gas
which can be collected in the
plastic bottle. The gas burns well.
Cracking needs a lot of
heat A gas burner may
be best Do not use test
tubes or light bulbs. It is
essential to use a hardened glass
boiling tube.
Polymerisation This is the process where many individual small molecules link together
by covalent bonds to form larger molecules. Some well known polymer
substances are illustrated below.
Acting out polymerisation The small molecule is ethene which polymerises to poly(ethene) - often
called polythene.
Page 58
62 Separating
mixtures
filter
paperwire frame
to support
clothfilter
funnel
OR
cloth
jar
• A mixture consists of 2 or more substances which are not chemically
bound together - the substances can be separated from each other.
• Pure substances contain only one type of molecule (or atom in the
case of pure elements). Some of the techniques used to separate the
substances in a mixture are shown here.
• Separation techniques are often used to purify one of the substances
in a mixture.
Filtration
You will need• glass container
• filter funnel and filter paper OR
• cloth and wire support
Set up the apparatus as shown.
Investigate which types of cloth
and paper work best. Try
colourless newspaper (i.e. a part
with no printing in on it), paper
towel and toilet tissue.
1. peeled ginger beaten
to a pulp2. ginger mixed with
water in a bucket3. strain mixture
throgh a cloth4. ginger beer
sugar
lime juice
jar
water
salt and
sand mixture
paper in
funnel
filtrate
tin cancandle
bottle top
twisted wire
stand
magnet
covered
with paper
iron and
sulpur
Using filtration Ginger beer is made using filtration.
Separating solids
Sand and salt
You will need• a mixture of salt and sand
• container
• filtering apparatus
• bottle top and support
• heat
If one of the 2 solids dissolves in water and the other does not, the
solids can be separated quite easily, e.g. salt can be separated from
sand. First water is added to the mixture - the salt dissolves. The
sandy liquid is then filtered. The filtrate is then evaporated to leave
behind pure salt. A small amount of filtrate can be evaporated as
shown.
Iron and sulphur
You will need• iron and sulphur mixture
• magnet
Cover the magnet with paper.
The magnet with attract only the
iron, leaving sulphur behind.
Page 59
63 Mothballs and salt
You will need• mixture of mothballs (naphthalene)
and salt
• glass funnel or tumbler
• tin can
• heat
• safety goggles
If the mixture is heated the
naphthalene sublimes (turns into
a gas) and rises into the funnel. It
condenses out on the inside of
the funnel, leaving the salt in the
tin.
Iodine can be used instead of
naphthalene.
Care is needed to avoid inhaling fumes.
Naphthalene is also very flammable.
glass funnel
jar or
tumbler
tin can.
containing
mixture
burner
Separating liquids
Immiscible liquids
You will need• mixture of kerosene and water
• plastic bottle
• cork
• rubber tube
• peg or clip
• safety goggles
When 2 liquids will not mix with
each other they are said to be
immiscible. One liquid will sink
below the other and can be
drawn off as shown.
Other suitable mixtures are:
groundnut oil and water; palm oil
and water; petrol/diesel and
water; castor oil and water. Palm
oil is particularly effective because
it is brightly coloured.
1. nuts broken
to break up
outer skin
2. nuts boiled and
oil floats to the
surface
3. palm oil
skimmed
from surface.
plastic
drinks
bottle
cork
rubber
tube
peg as clip
Using the technique Palm oil is extracted as shown. The final process depends on the
immiscibility of palm oil and water. The oil floats to the surface and is
skimmed off.
salt
wateralcohol
watercrude
oil
Separating other
mixtures
If 2 liquids will mix they are said to be miscible. Fractional distillation
(see page 60) is used to separate each of the 3 mixtures shown.
Ask students to separate a mixture of alcohol, water and crude oil.
holes
water
sand
small
stonesmedium
stones
large
stones
Clean waterWater can be purified using separation techniques. Untreated water
contains both soluble and insoluble matter and also bacteria which can
all cause harm.
Filtering removes the insoluble matter such as sand and soil. If the filter
is very fine it will also remove bacteria and other micro-organisms.
Distillation removes all insoluble matter and also kills bacteria.
Boiling kills bacteria and other micro-organisms.
Page 60
64 Metals
use a
hammer
or stone
• All elements are either metals or non-metals.
• Metals have particular chemical and physical properties, e.g. they are
all solid at room temperature except mercury and many of them react
with acid to form hydrogen.
• Metals can be placed in a sequence according to their reactivity -
called the reactivity series.
• Iron is one of the most widely used metals, but it oxidises in damp
conditions - it corrodes or rusts.
Properties of metals
Malleability
You will need• hammer or large stone
• samples of metals
Hammer the metals.
Discuss the meaning of the word
malleable and the effect of heat
and cold on different metals and
their malleability.
dry cell
Ductility
You will need• supports
• metal wire
• weights
Suspend the wire between
supports and hang a weight onto
the free end. One method is
illustrated. Measure the length of
the wire. Add weights and the
wire will stretch.
As an extension, compare the
ductility of wires made from
different metals.
Conductivity
You will need• dry cell
• wire
• tight bulb
• metal samples
• non-metal samples
Set up the circuit shown. All
metals will conduct electricity.
Investigate if any non-metals
conduct electricity.
Reactivity series of
metals
You will need• glass sheet
• large sheet of paper
• metals (small pieces which must be
clean), e.g. magnesium ribbon, zinc
granules, lead shot or sheet,
copper sheet,
iron filings
• solution containing metal ions,
e.g. copper (II) sulphate - Cu 2+
iron (II) sulphate - Fe2+
magnesium sulphate - Mg2+
zinc sulphate - Zn2+
lead nitrate - Pb2+
paper
grid
below
glass
sheet
metal samples
drop solutions onto
each area using a
straw or ballpoint
casing pipette
Mark the sheet of paper to make
a grid as shown. Place the glass
sheet over the paper grid. Place
the metals on the right squares.
Add 2-3 drops of one of the
solutions to each of the metals
and observe any change. If a
black coating forms on the metal
it indicates that the metal ions are
being displaced from the solution
and deposited onto the metal.
Page 61
65 Growing metal crystals
You will need• lead acetate (ethanoate)
• rainwater
• zinc strip
• glass container
• stick or nail
stick or nail
strip of zinclead acetate
dissolved
in rain
water
sealed open open
boiled
water
boiled
water
tap
water
Add 4 spatulas of lead acetate
(powder), or lead nitrate powder
to half a cup of water. Suspend
the strip of zinc in the lead
acetate solution. After a few days,
crystals grow on the plate.
Corrosion (rusting)
Rusty nails
You will need• 3 containers
• 3 iron nails
• bung/cork
• boiled water
• tap water
Place a nail in each of the
containers and leave for a day.
The only nail which does not rust
is the one in the sealed jar of
boiled water. Boiling the water
removes the oxygen and sealing it
prevents oxygen from the air
dissolving in it.
salt water sand + water
tap water
oil covered
nail
damp
steel
wool
Oil-covered nails
You will need• 3 nails
• 3 containers
• oil
• salt water
• tap water
• sand and water
Cover all the nails with oil and
place one in each of the
containers. Leave them for a day.
Note whether the oil has
protected the nails from rusting.
Shake up the containers, so the
sand rubs against the nail and
discuss the effect this has on the
speed of rusting.
Investigating rusting
Tin cans
You will need• old tin can
• oil
Make 2 large scratches on the surface of a tin can (not an aluminium
can often used for drinks). Put a thin layer of oil onto one scratch.
Leave the tin exposed to the air for a few days. Note which scratch
rusts.
Steel wool
You will need• steel wool
• candle
• 2 glass
containers
Wet the steel wool and place some in each container. Seal one
container. Place a lighted candle in the other container. When the
candle has burnt for several minutes seal the container with a lid. The
candle will go out eventually. Leave both containers for 2 days. The
steel wool in the container with the candle should not rust as much
because oxygen has been removed by the candle.
Discuss with students what factors are needed for rusting to take place.
Also discuss how rusting can be prevented.
Preventing Corrosion Rusting of iron can be prevented in various ways.
Stainless steel is an alloy of iron and chromium which does not rust
or stain.
Paint protects metal, e.g. car paintwork protects the bodywork from
corrosion.
Oil, like paint prevents water and oxygen reaching the surface of the
metal. Oil also lubricates machine parts and so prevents scratching
and wear.
Page 62
66 Elements
and compounds
bottle caps
neutron proton electronhydrogen
(note: no
neutron)
• Elements contain only one type of atom.
• Compounds are made of 2 or more different types of atom.
• Atoms consist of protons, electrons and neutrons.
• Electrons are arranged in electron shells round the nucleus.
• The particles of a substance are held together by attractive forces
called bonds.
• The arrangement of particles is different in different materials, e.g.
crystal particles are arranged in a lattice.
Models of AtomsAll atoms contain a nucleus
(protons and neutrons) and
electrons. Draw circles on desks or
floors to represent the electron
shells. Alternatively use students
to represent the electron shells.
O H Na Fe
O
H H
H2O
orange sticks plasticine orange
use different colours
for carbon and oxygen
graphite
stickswire
fruits, clay
or pith
Models of molecules
Bottle top models
You will need• bottle tops
• matchsticks
Mark the bottle tops on the underside with a pen or paint. Matchsticks
form the bonds. Try to make ail the examples in your textbook.
3-D models
You will need• small round objects, e.g. fruits,
seeds, plasticine, corks, foam pieces
• wire, string, sticks or matchsticks
Use the wire, string etc for the
bonds and the fruits etc. for the
atoms. More sophisticated 3-D
models can be made using foam
for atoms and matchsticks for
bonds. Colour-coding the atoms
of elements is also helpful.
Models of crystals
Crystal lattices
You will need• fruits, Plasticine, clay
• wire and sticks
Make 3-dimensional models of
crystals to show how the particles
fit together. Look at textbooks
for the crystal structures.
Lattice packing structures
You will need• small balls (must all be the same size),
e.g. beads or peas.
• clay
mark clay into a
grid for equal,
sized pieces 3 - D lattice
Lattice packing structures can be
illustrated by allowing balls to
settle In a container. They settle
in an ordered pattern and are as
close together as possible. Mark
clay in a lattice pattern by scoring
equal sized pieces.
Page 63
67 Bubble raft model
You will need• soapy water
• fine plastic tube
• shallow dish
Safety: Do not allow
students to share tubing
because of the danger of
cross-infection.
blow steadily
very fine tube
shallow
dishsoap bubbles
Put the soapy water into a
shallow dish and blow. Tiny
bubbles will form and pack tightly
together in a lattice. The bubbles
represent particles. The atoms of
metals are arranged in this
pattern.
Extend the activity by asking
students what the ‘faults’ in the
pattern could represent.
wire
supportsulphur
bottle top
2 drops
water
bottle top
powdered aluminium
and powdered
iodine
aluminium iodide
hydrogen fills
the test tube
bottle
or tube
metal
and acid
hydrogen ignited
to form water
Making compounds
from elements
Making sulphur dioxide
You will need• combustion spoon
• sulphur
• heat
• safety goggles
Safety: Sulphur dioxide
is poisonous.
Heat the sulphur on the spoon
and observe that it burns, with a
blue flame and simply
‘disappears’. The element sulphur
has combined with oxygen in the
air to make the compound
sulphur dioxide. It has a
characteristic smell.
Making aluminium iodide
You will need• powdered aluminium
• powdered iodine
• bottle top
• safety goggles
Safety: Poisonous iodine
vapour may be given off,
so perform the
experiment outdoors or
in a fume cupboard.
Add 2-3 drops of water to make
aluminium iodide which is grey black.
Making hydrogen
You will need• a metal
• a dilute acid
• test tube
• bottle with bung
• safety goggles
Only use small quantities
of metal and acid. Do not
perform the experiment
near an open flame.
Always point test tubes
Away from people.
Do not use metals that are
more reactive than magnesium.
Set up the apparatus as shown,
adding the acid to the metal.
(Magnesium and dilute
hydrochloric acid work well.)
Hydrogen fills up the test tube,
displacing the air in the tube
downwards. Demonstrate the gas
is hydrogen by lighting it.
Page 64
68 States of
matter
• The 3 states of matter are: solid, liquid and gas.
• Substances can be changed from one state to another by heating or
cooling, e.g. ice to water to steam.
• Molecules are always moving. Molecules in solids only vibrate, in
liquids they move freely, in gas they move around fast.
• If molecules are heated they move around more. A solid melts
because the molecules vibrate so much that in the end they break
away from each other and start to move freely - the solid melts.
• If a gas is cooled the gas molecules slow down and eventually the
gas becomes a liquid - it condenses.
Introducing states
of matter
Look for analogies in everyday
life, e.g. bus stop, school
assembly, places of worship.
solid (in bus)liquid (queue)
gas
solid
turn
liquid
shake
gas
A model for states of matter
You will need• a bottle
• seeds or stones
A bottle with seeds or stones will act as a model.
Solid to liquid
Comparing melting points
You will need• wax
• sulphur
• salt
• 3 bottle tops
• safety goggles
Compare the time (and so the amount of heat) needed to melt equal
amounts of wax, sulphur and salt.
Try other substances.
Some substances, e.g. waxes, are highly flammable when
melted as they vaporise at low temperatures
thermometer
tin can
stirrer
wax
heat source
Determining melting point
You will need• tin can
• thermometer
• stirrer
Gently melt the wax. Stir it
continuously and ensure the
thermometer does not rest on the
bottom of the tin. Record the
temperature at which all the wax
has melted. You should notice that
the temperature remains constant
until all wax has melted. The
temperature will then rise. The
point at which the temperature
changes is the melting point.
It would be safer to use
a water bath in order to
prevent the wax getting
too hot and catching fire.
Page 65
69 Influence of surface area
on melting
You will need• blocks of ice
• container
margarine
palm
oil
steam
(evaporation)inside of
lids on
cooking pots
(condensation)
droplets
form in biro
casing
condensation on
cold bottle and
glasses
paper or cork
seal
water
level
wet cloth
tube
source
of heat
Put some big blocks of ice into the container and record how long it
takes before the ice melts. Now crush some more ice into smaller
pieces. Compare the time it takes each to melt.
This could be done quantitatively if a thermometer is used.
Solids to liquids in the home
safety bung
Liquid to gas
You will need• containers of different shapes
• water
Compare the evaporation from containers with different surface areas
and the same volume of water. The larger the surface area of water,
the faster evaporation. An everyday application of this is in drying
clothes.
Gas to liquid
Safety: Do not allow
students to share straws
or ballpoint casings
because of the danger of
cross-infection.
There are many situations where
condensation can be seen.
Liquid - gas - liquid
Distillation
You will need• a large metal can
• safety bung (cork or rubber)
• cork
• plastic tubing
• wet cloth
• container
• source of heat
• water
This is an application of changing gas to liquid by the process of
condensation.
Heating the can will produce steam, which is then cooled by the wet
cloth. Steam condenses to produce water. This method could be used
to purify water.
Ensure the can always
contains water and
that the safety bung
is not too tight.
Page 66
70 Speeding up
reactions
The rate of a chemical reaction depends on many factors. Some
examples are given below.
• Increasing the surface area of reactants (starting materials) increases
the rate of reaction.
• The higher the temperature, the faster a reaction proceeds.
• The higher the concentration of reactants, the faster the reaction
proceeds.
• The rate of reaction slows down as the concentration of the
product(s) increases.
• Catalysts or enzymes (biological catalysts) speed up reactions.
Some reactions proceed so slowly without a catalyst that they do not
seem to take place at all.
limestone
acid
plastic bottle
calibrated
transparent
bottle
water
Sugar and water
Investigating surface area
You will need• card
• scissors
• sugar cubes
Students can find the surface area
of the cube by drawing around
the cube’s faces.
Investigate with students the
relationship between volume and
surface area by doubling and
tripling the volume.
Sugar and water
You will need• sugar cubes
• water
Drop a sugar cube into one container. Drop a crushed sugar cube into
another. Note which dissolves fastest. Ask students why this is so.
Extend the activity by investigating the effect of raising or lowering the
temperature on the speed of dissolving. Link this to cooking.
Limestone and acid
You will need• limestone or crushed shells
• acid
• thermometer
• safety goggles
Add the limestone to the acid and
note the speed of the reaction.
The faster the reaction the faster
the limestone will fizz.
After one factor after another
and observe the effect on the rate
of reaction. For example: crush
the limestone; dilute the acid;
increase or decrease the
temperature of the acid.
Measuring rate of
gas evolution
You will need• flexible bootie
• plastic tube
• graduated measuring
cylinder or bottle
• safety goggles
The apparatus can be used to remove known quantities of gas from
the collecting bottle. Alternatively if gas is simply collected in a large
enough calibrated bottle there is no need to remove gas.
Page 67
71 Baking powder and acid
You will need• baking powder
• vinegar or dilute acid
• safety goggles
baking
powder
Add baking powder to the acid. The mixture will fizz as carbon dioxide
is produced. The more violent the fizzing, the faster the reaction. Alter
one factor at a time and discuss why the rate of reaction changes. For
example, alter the concentration of reactants and the temperature.
This experiment could be quantitative if the gas were collected and
measured.
Hydrogen peroxide
With an enzyme
You will need• hydrogen peroxide
• soap or detergent
• large container
• enzyme
• safety goggles
Enzymes from crushed potato, liver or yeast are suitable. Place a small
piece of raw potato or liver in the mixture. If the potato is hard, it may
help to crush it first. If using dried yeast, activate it (follow instructions
on the packet).
As oxygen is produced, foam is produced on the surface. The height of
the foam can be used as a measure of the speed of reaction. Investigate
changes in the speed of reaction caused by adding more of the raw
potato or liver. This increases the amount of the active enzyme
peroxidase. Alternatively, try adding more soap.
enzymes
hydrogen
peroxide
with soap
or detergent
collecting
bottle
hydrogen
peroxide and
paste
injection bottle
With a chemical catalyst
You will need• manganese(IV) oxide
• hydrogen peroxide
• injection bottle
• collecting bottle and tube
• safety goggles
Manganese(IV) oxide is the black
paste in dry cells.
Mix the reactants and collect the
gas (oxygen) over water. This
reaction is suitable for
investigating
• concentration
• effect of a catalyst
Page 68
72 Acids
and bases
• Acidity and alkalinity is measured in pH. A pH of 7 is neutral, less than
7 is acid, greater than 7 alkali.
• An alkali is a solution of a base in water. Not all bases are soluble in
water.
• Indicators are chemicals whose colour depends on whether they are
in an acid or alkali solution. They can be used to measure pH.
• Acids react with metals, bases and carbonates to form salts.
• Acids are neutralised when they are ‘used up’ in a reaction, e.g. an
alkali can neutralise an acid, but if too much is added the solution
will then be alkaline not neutral.
Making indicators Many red, violet yellow or pink flowers or fruits and leaves can be used
as indicators. They should be crushed with water or colourless spirit.
Spirit-based indicators are more stable. Boiling improves the extraction
of colour.
Students could investigate which local flowers, leaves etc. produce the
most effective indicators.
The accuracy of home-made indicators could be compared with
commercially produced indicators such as litmus or methyl orange.
ACIDS & BASES
orange
lemon
vinegar
bicarbonate
of soda
toothpaste indigestion
tablet
cleaning
fluid
(ammonia)
wood ash
car battery
fluid
grapefruit
sulphur
dioxide
burning
fossil
fuel
nitrogen
dioxide
chemical
reaction in
clouds
acid
rain
reaction can be done
on a spoon
Every-day acids
and basesMany substances in everyday life
are either acids or alkalis. Some
examples are shown here.
Ask students to test some of these
items so they can identify the
acids and alkalis using indicators.
Acid rain Pollution e.g. from power
stations, factories and cars is
carried in the wind. The acid rain
may fall a long way from the
cause of the pollution - often in a
different country.
Making salts
Acid and carbonate
You will need• hydrochloric acid
• lime stone
• baking powder
• egg shells
• safety goggles
Mix the hydrochloric acid with
each of the other substances,
which are all carbonates. In each
case the mixture will bubble and
froth (showing a reaction is
taking place) and then the liquid
clears, The add has combined
with the carbonate to produce a
salt in this case sodium chloride
or common, table salt.
Page 69
73 Acid and metal
You will need• dilute acid
• samples of metals
plastic
syringe
solution of
potash
and indicator
spoonful of
vinegar
saturated
salt solution
coal, or
porous rocks
Metals will react with the acid
and appear to be ‘eaten away”.
The stronger the acid the more
obvious the reaction. If dilute
solutions are used the reaction
may take several days to be
obvious.
Changes in pH can be observed by
putting an indicator into the acid.
Acid and alkali
You will need• solution of potash
• vinegar
• indicator
• transparent container
• safety goggles
Add wood ash to water, stir and then filter. The clear solution is a
solution of potash (potassium carbonate). Add enough indicator for the
colour to be obvious. Add the vinegar slowly until the colour of the
indicator changes. The amount of acid required to cause a complete
colour change is the quantity which neutralises the alkali. If more acid
is added the solution will become acid.
The experiment can be done quantitatively, as a titration.
Bee stings Bee stings are acid. To soothe the
pain, a weak alkaline solution is
used to neutralise the acid of the
sting.
Growing salt crystals
You will need• Epsom salts (magnesium sulphate)
• magnifying glass
• glass dish
Dissolve some Epsom salts in
water. Pour a few drops into a
shallow glass dish and put it into
sunlight to evaporate. Examine
the crystals which form with a
magnifying glass.
A salt garden
You will need• vinegar
• salt
• coal, porous rocks
or broken pottery
Make a saturated salt solution. To
do this dissolve salt (common
table or cooking salt) in water
until no more will dissolve. The
solution is then a saturated
solution. Gently add a spoonful of
vinegar to the surface of the
solution. After a few days delicate
crystals form around the rough
surfaces of the rocks or pottery.
Be careful not to disturb the
liquid or the effect will not be as
dramatic
Page 70
74 Magnetism
becomes
north
becomes
south
• Magnetism is the force by which iron, cobalt and nickel attract other
metals. Unless they are magnetised metals cannot attract other
• Magnets have north and south poles (ends). If a magnet is suspended
freely it will align with the Earth’s magnetic field, i.e. with the
magnetic North and South Poles.
• If 2 magnets are brought close together, the like poles will repel each
other, unlike poles will attract. (See static charge page 76.)
• Magnets can be created either by using another magnet or by using
electricity.
Magnetising objects
Making a big magnet
You will need• an iron bar
• hammer
• two strong magnets
Hit the iron bar several times on
one end between two strong
magnets lined up north-south.
This will magnetise the bar, Test it
by picking up small nails. (Try
pointing the bar in a north-south
direction while hitting it.)
Magnetising iron or steel
You will need• a bar-shaped magnet
• nail (iron or steel)
Stroke the nail from end to end
with one end of the magnet.
dry cell
rubber
band
Magnetism from electricity
You will need• dry cell
• insulated copper wire
• iron nail
• small nails or pins
Make about 50 turns of wire
around the nail. Connect the wire
to the dry cell. Pick up pins with
the magnetised nail.
Vary the number of turns of wire
and investigate the effect on the
strength of the magnet.
Investigating lines of force
Using nails
You will need• bar magnet
• glass
• small nails or pins
Place the glass over the magnet
and let the nails fall onto it one at
a time. The nails make a pattern
following the lines of force.
Using a compass
You will need• a compass
• faulted copper wire
• dry cell
= direction of electric current
Connect the coiled wire to the
cell. Move the compass and
record changes in the direction of
the pointer. The pointer aligns
along the lines of magnetic force
and these can be followed or traced.
Page 71
75 Magnetism through
materials
You will need• glass container
• paper
• nails or pins
• water
iron
filings
magnet
under
paper
cut
straws
salt
water
thin threadwire
north south
dish of
water
magnetised
needlecard or
paper raft
magnetised
needle
round faced
button
branched
stick
thread
magnetised
needlesand filled
container
Put the nails inside the container
and test if they are still attracted
to a magnet held outside the glass.
Put water in the container
and test again.
As an extension, test different
materials to see which allow
magnetism through. Also test
materials of different thickness.
Looking at magnetic fields
You will need• thin card
• iron filings
• large magnet
• spray apparatus shown
Safety: Do not allow
students to share straws
because of the danger of
cross-infection.
Put the magnet under the card
and sprinkle iron filings on top of
the card. Tap the card gently if
the pattern is not clear. Once the
pattern has settled, spray salt
water over the iron filings.
Repeat after several hours and
leave overnight. A rust print will
develop.
Earth’s magnetic field
You will need• a fine bar magnet
• thin thread
• support (non-metallic)
Use iron or steel wire to make
the bar magnet. Old coat hanger
wire works well (unless it is
aluminium!). Suspend the
magnet and leave it overnight.
The wire will point north-south
in the morning. Beware of air
movements.
Compasses
Water compass
You will need• non-metallic dish of water
• magnetised needle
• paper or thin card
Rest the needle on the card and
float the card on the water.
Leave the paper to float freely
and it will eventually align
north-south.
Try other types of raft, e.g. corks.
Button compass
You will need• magnetised needle
• round-faced button
Place the button on a smooth surface and note that it will align
north-south. The button must be able to move very freely for the force
of magnetism to overcome that of friction.
Ask students to identify the north
and south poles of the needle.
Using a bar magnet ask them to
test that like poles repel each
other, opposites attract.
Suspended compass
You will need• branched stick
• fine thread
• magnetised needle
• sand-fitted non-metallic container
The needle will eventually align
with the Earth’s magnetic poles,
i.e. north-south.
Page 72
76 Electricity
paper pieces
wooden stick
silk or fine
thread
ping-pong ball
charged comb
pith ball
mounted
needle paper strip
(10cm x 2 cm)
sand-filled can
loop of wire covered with
cigarette packet foil
cork or wood insulator
thin steel wire or nail
light bulb with filament removed.
leaves of thin foil from
cigarette packplastic
spacer
copper wirebase made from jar lid
• Static electricity is a charge which can be created on a surface. Static
electricity can be either negative or positive depending on the
materials used to create the charge.
• Static electricity attracts oppositely-charged materials and repels
materials with a similar charge (see magnetism page 74).
• Electricity is a flow of charge. A circuit has to be complete for
electricity to flow.
• Electricity can be made by electrolysis.
Static electricity
Creating a charge
You will need• plastic comb or ball point casing
• wool or nylon
• paper
Add charge to the comb or
ballpoint casing by rubbing on
wool or nylon. Tear the paper
into small pieces. Hold the comb
or ballpoint casing above the
paper. The paper is attracted to
the ‘charged’ plastic and sticks
to it.
Try salt and pepper instead of paper.
Observing the effects
of charge
You will need• fine thread (ideally silk)
• pith or polystyrene ball, ping pong
ball or puffed rice grain
• wooden support
• charged comb
Suspend the ball(s) by the fine thread from a wooden stick. Hold a
charged comb near the ball and notice that the ball is either repelled
or attracted by the comb. A pith ball can be made by using pith from
the inside of a suitable plant stem. Dry the pith and press into balls.
(Balls of 5 mm diameter work well.)
As an extension, suspend 2
inflated, charged balloons near
to each other on the stick. Also
charge a comb by rubbing on
wool and then hold it near water
running slowly from a tap or a
hole in a can. In both cases, ask
students to note what they see
and explain why it happens in
terms of charge.
Simple detector
You will need• sand filled can
• mounted needle
• paper strip
• charged comb
Mount the needle as shown and balance the paper strip. When a
charged object is held near to the paper the paper moves. It is affected
by the static electricity on the comb.
Ask students to note which
direction the paper moves. Ask
whether the movement indicates
the object has the same or
opposite charge to the paper.
Light bulb electroscope
You will need• light bulb
• wire
• fine foil, e.g. cigarette foil
• thin hard plastic sheet.
• support e.g. jar lid
Make the apparatus as shown.
When a charged object is
brought close to the loop of wire
at the top of the light bulb the
foil will move. You maybe able
to see whether the foil moves
away from, or towards the
object.
Page 73
77 Making electricity
Simple cells
You will need• a jar
• dilute acid, e.g. sulphuric acid
• 2 metals, e.g. copper and zinc
• voltmeter
• safety goggles
zinc copper
lemon how
many ?
orbrass
drawing pin OR steel paper
clip
steel contacts
card or metal
outer case
zinc casing
paper
carbon rod
electrolyte
(manganese
dioxide
and carbon)
steel contacts
Set up the apparatus as shown.
This experiment is useful to
investigate the reactivity series
(see page 64). The further the
metals are apart in the reactivity
series the bigger the voltage.
metal A metal B
jar
dilute
acid
(electrolyte)
Electricity from fruit
You will need• citrus fruit e.g. lemon
• zinc strip
• copper strip
• copper wire
• torch light bulb
Make the circuit shown. Make
sure the electrodes (metal strips,
drawing pins or paper clips) do
not touch. Any citrus fruit has
acidic juice and so could be used
in this experiment.
Ask students to see if using
several fruits in series produces
more electricity - indicated by
the bulb shining more brightly.
Inside cells and
batteries
A cell has 2 electrodes only. A
battery is, strictly speaking, a
group of cells. Confusingly, what
is often called a battery in a shop
is, in fact, a cell!
Inside a cell
You will need• an old dry cell (often called
a battery)
• safety goggles
Car batteries Car batteries contain lead plates as the electrodes and sulphuric acid as
the electrolyte. The electrodes are in pairs.
Investigate why electricity is produced, since both electrodes in a pair
are made from lead.Acid from car batteries is
very strong and will
cause skin burns.
Safety first Care must be
taken white cutting
through the cell.
Remove the outer coating and cut the inside in half so the components
can be seen clearly. Many of the contents can be useful.
Ask students to identify the electrolyte, the cathode and the anode.
Page 74
78 Electricity continuedMaking equipment
Circuit boards
You will need• nails
• board
nail
board
heavy wire bent strips of can using bottletop
as stand
split pencil
dry cell
metal strip
fold
about 2 cms
wire switch
paper clip switch
two way switch
Light bulb holders
You will need• heavy wire
• bent strips of metal, e.g. from a can
• bottle tops
Switches
You will need• nails or drawing pins
• small boards
• wire
• paperclips
Three nails and a clip will make a two-way switch.
Rheostat
You will need• dry cell
• metal strip
• pencil
• wire
• torch light bulb
When the lever is moved to the
left along the graphite of the
pencil ‘lead’ the torch bulb burns
more brightly.
Wires Find wires in old radios or other equipment. Use aluminium foil
wrapped over thin wire to make it thicker.
Page 75
79 Useful analogies
Switches
a switch
two-way
switch
faster pace
flow
narrower
river
The drawbridge acts as a switch.
The plank can only be in one of
two positions. It is analogous to a
two-way switch.
Circuits in series If the bridge breaks, the flow stops, i.e. if one component breaks, the
circuit is incomplete and electricity cannot flow.
Circuits in parallel If one bridge breaks the race can go on, i.e. if one component fails
there is still an alternative route for the electricity to flow.
Water as an analogy
for electricity
The river (electricity) flows through
the narrow and the wide
part of the river. However, where the
river is narrow the amount of
water flowing (the current) is smaller,
but the resistance or
power is greater, while the voltage
stays the same.
A dam acts like a switch. Unless the
dam is opened no water can flow.
Investigating a torch
You will need• torch or flashlight
Take the torch apart. Identify the function of each of the parts, e.g.
identify the conductors, insulators, switch, etc. Discuss how the torch
works as it is reassembled.
Page 76
80 Electric
motors
current
support loop
from dry
cell
copper
wire
magnet
wooden base
to
dry
cell
wire loop
nail
crossed
pins
bent paper clips
or wire
drawing
pins
holed metal
strip
• Electricity flowing through a wire creates a magnetic field around the
wire.
• If electricity is passed through a coil of wire, the coil acts like a
magnet with north and south poles.
• Magnetic forces of like charge (poles) repel each other, while
opposite charges (poles) attract each other.
• Reversing the direction of the electric current reverses the direction
of the magnetic field.
Compass and
electromagnet
You will need• a compass
• electromagnet (see page 74)
Place the electromagnet close to a
compass needle. Turn the current
to the electromagnet on and off.
If the current flows with no
break, the compass needle moves
and then stays still. When the
current is switched off, the needle
returns to its previous position.
Magnet and movable
conductor
You will need• copper wire
• bar magnet
• 2 nails
• wooden base
• support wire
Set up the apparatus as shown. When a current is passed through the
copper wire, the wire moves. Make sure the copper wire is clean and
that the ends in contact with the loops make a good connection. If
contact or the reaction is poor then try altering the shape of the
support loops.
Experiment with the apparatus by
reversing the magnet poles, then
reverse the direction of the
current Also try using wire of
different thickness.
Making electric motors In a simple motor a coil is made to spin round. If the spinning coil is
attached to wheels, for example, the wheels would turn when the coil
turned.
Coil mountings
You will need• materials for support loops
• copper wire
Coils can be supported in many ways. Some are shown here.
Page 77
81 Magnet mountings
You will need• mounting materials
• 2 bar magnets
strip
touch
pins
strips of metalbent flexible wire
wire touches
coil end
scratch
each side
of enamel
off
make coil with
turns round a
dry cell.
nails
tape or
wire
magnet
plasticine
The magnets must be supported on either side of the coil. Two
methods are shown here. A wooden base board could be made to
mount the magnets permanently.
pin or small nail
spindlecorks
bare contact
wirewire coil
end
tape
tape
spindle
coil end wire
bare wire
spindle
Coils Experiment with different sizes,
shapes and turns of coil. Wind a
coil around a matchbox or ruler
to give shape, or use a cork as
shown. Note the methods for
ending the coils.
Brushes (contacts)
You will need• 2 pins or small nails
• strips of thin metal
• fine flexible wire
As the coil spins it will be
constantly breaking and re-
forming an electrical circuit. It is
essential that the coil makes good
contact with the brushes to keep
the coil spinning. Experiment with
strips of metal or fine wire as
brushes. Some methods are shown.
dry cell
inner
copper
core
plastic
coating
coil supports
pencil
stick or
paper clip
taped to
magnet
as supportelastic band
Marson Can Motor
You will need• 2 bar magnets
• 2 pencils or sticks
• wire for coil supports
• f ine wire for coil and
circuit
• dry cell
• elastic band
Make coil supports by twisting
wire around a pencil to give the
shape of the hole. Make the coil
by shaping it around the dry cell.
If the coil wire is insulated,
remove the plastic layer at each
end so it runs smoothly in the
supports. Attach the magnets and
coil supports as shown. If the coil
does not spin well try reversing
the direction of the current.
Page 78
82 Energy forms
and
transducers
• Energy can be transduced (changed) from one form to another.
• Energy sources can be grouped into different types, e.g. potential,
kinetic, chemical, heat sound and electrical.
• Energy from the Sun can be captured and transduced into other
useful forms of energy.
• Fossil fuels are a non-renewable source of energy.
• Sustainable sources (often called alternative energy sources) of
energy, e.g. energy from the Sun or wind, are never used up.
Different forms
of energy
Potential energy
gravitational
water
plaster of paris
chemical strain
Kinetic energy The ball and the wind both have kinetic energy.
rubber
band
weight
mounted
needleblow pipe
(another
straw)
tightly
fitting lid
safety bung
burner or
candle
3 card cones
glued to bulb
wire or spoke
Energy changes
Rolling tin
You will need• tin can
• rubber band
• weight
Punch 2 holes in each end of a tin.
Loosely fit a rubber band
between the ends. Hang a weight
on the band. The tin will continue
to roll back and forth after it is
pushed.
Wind turbine
You will need• drinking straw
• mounted needle
Safety; Do not allow
students to sham blow
pipes because of the
danger of cross Infection.
Cut the straw as shown. Stick the
straw on the needle and ensure it
spins easily. Either hold the straw
in the wind or provide the wind
yourself by blowing with a blow
pipe.
Steam engine
You will need• tin with a tightly fitting lid
• burner or candle
• water
• light bulb
• card
Make 3 card cones and stick them onto the light bulb. Mount the light
bulb so it can spin freely. Pierce a small hole in the side of the tin. Half
fill the tin with boiling water and ensure the steam comes out of the
hole in a jet. Do the experiment indoors to avoid any wind.
Safety; Ensure the safety
bung is not too tight and
that the tin is not filled
with water.
Page 79
83 Sustainable sources
of energy
Water power
SUN
black
paper
thermometer
matchboxes
silver
paper
thermometer
photocells
convert light
to electricity
solar panels
trap the heat energy
from the sun
photosynthesis
plants use sun’s
energy to make food
direct heating
some animals use the
heat of the sun to
activitate them
eg. iguana, lizards, snakes
evaporation
sun’s heat evaporates
water
to form clouds and rain
weather
sun’s heat stirs up the
atmosphere causing wind
and waves
The kinetic energy from water at
a waterfall can turn a turbine and
so generate electricity. The water
can also drive a wheel and so
machinery.
Wind and wave powerWindmills and wind turbines can
harness wind power. A float
bobbing up and down on waves
can be used to drive a turbine to
generate electricity.
Energy from the Sun
Using tins
You will need• 2 tins with lids
• black paint
• water
• sunshine!
Paint one tin black, the other
should be white or shiny metal.
Put equal amounts of water at
the same temperature into both
tins. Put the lids on and leave
them in the sunshine. After 15
minutes compare the
temperatures.
SUN
black
lidblack
lid
white
lid
white
lid
Using matchboxes
You will need• 2 matchboxes
• silver and black paper
• 2 thermometers
Put the thermometers inside the 2 matchboxes and leave them in the
sunshine. The temperature inside the black box will be higher than
inside the silver box. This is because the dark colour absorbs the heat of
the Sun, the silver reflects it.
Uses of the Sun’s energy
The greenhouse effect
You will need• 2 cups of water
• large glass container
with lid
Put the same amount of water into both cups. Put one cup under the
glass container. This is now a mini-greenhouse. Leave both cups in the
sunshine for 1 hour and then measure the temperature of the water in
both. The cup in the ‘greenhouse’ will be hotter. The Sun’s heat is
trapped by the glass. Burning fossil fuels produces gases such as carbon
dioxide which form a layer around the Earth. They trap the heat of the
Sun and so act like a greenhouse. This is called the greenhouse effect.
Page 80
84 Heat and
expansion
• Temperature is a measure of how hot an object is.
• Heat is a form of energy and measured in joules or calories.
• When solids, liquids and gases are heated they expand. On cooling
they shrink to their original size.
• The same amount of heat applied to different materials will not
make the materials both expand by the same amount. Materials have
different coefficients of expansion.
seal end in gas
frameblow a
bubble
blow
gently
flame
heat
bubble
gently.
Then place
tube in
alcohol.
Alcohol
will be
drawn in
as tube
cools.
seal this end
cold water
care when
sealing end
calibrate
card
scale
Making a spirit
thermometer
You will need• glass tube 5 mm external
diameter and 1 mm bore
• hot flame
• coloured alcohol
• card
• dish of cold water
• safety goggles
Safety: Do not heat the
bubble while the tube is
submerged in alcohol.
Do not heat alcohol.
Follow the steps shown.
Calibrate the thermometer using
the following:
• boiling water 100 °C
• boiling ethanol 78 °C
• body temperature 37 °C
Draw a scale on the card or
scratch it onto the tube
(thermometer) itself.
Note: these calibrations apply
only if you are working or near,
sea level.
Expansion of metals
Metal between nails
You will need• metal strip
• metal disc, e.g. coin
• 2 nails
• mounting board
• hot flame
Place the coin between the nails, then heat the nails. The coin cannot
now be removed as the nails have expanded.
Cut the metal strip so it fits exactly between the 2 nails. Heat the strip
and then try to fit it between the nails.
Ring and nail
You will need• nail
• wire
• hot flame
Make a wire loop which is just big
enough to pass over the head of
the nail. Heat the nail.
Ask students why the loop will
not fit over the hot nail head.
Using expansion Stiff lids can be removed from jars with metal lids by carefully heating
only the lid, e.g. in very hot water. Try the method on stiff nuts and
bolts.
Problems with
expansion
If boiling water is poured into
glass containers the glass may
split This is because the glass on
the inside expands rapidly and
the outside does not The stress
cracks the glass.
Page 81
85 Allowing for expansion Steam and oil pipelines in hot
countries often have loops to
allow for expansion and
contraction.
Slabs on a concrete road have
gaps between them to allow the
slabs to expand in the heat. Tar is
put into the gaps because it is
flexible.
cork
bicycle spoke
or metal strip
tooth pick or
round stick paper
indicator
arrow
guideline on
bottle
Measuring expansion
You will need• two bottles
• a cork
• bicycle spoke
• candle
• toothpick or round stick
• paper
Push the spoke or metal strip into
the cork so it is held firmly.
Arrange the rest of the
equipment as shown. As the
metal is heated it expands and
the indicator moves.
Students could compare the
expansion of different metals and
different thicknesses of metal.
Expansion of liquids
Bottle fountain
You will need• bottle made of thin glass
• bung with central tube,
e.g. biro casing
The container must be completely
full of liquid, so a little of it is just
visible at the bottom of the tube.
When the bottle is held tightly,
heat from the hands makes the
liquid rise up the tube, indicating
the liquid has expanded.
Liquid thermometers
heating water
The mercury or alcohol expands
and contracts according to its
temperature.
Page 82
86 Heat
cut out paper or foil
paper or foil
windmill
string
wire
air flow draws
smoke down
paper
smoke
convection currents
brings up smoke
glass
fronted
box
card tube
or toilet roll
tubevent
hole candle
paper bag
water
• Heat moves by convection, conduction and radiation.
• In convection and conduction heat is carried by molecules, e.g. of
water or air.
• Radiant heat is a form of electromagnetic radiation, it is infrared.
• Radiant heat can move through a vacuum, whereas conduction and
convection need a medium (water, metal, etc.).
Convection in air
Convection detectors
You will need• paper
• tin foil
• wire
• string
• candle
Make the convection detectors
illustrated. If they are held above
a candle they will turn round.
Ask students to make their own
designs.
Ventilation system
You will need• glass-fronted box
• 2 cardboard tubes
• candle
• smoking rag or paper
Make 2 holes in the top of the
box and push in the cardboard
tubes. Place the candle under one
of the tubes. When the candle is
lit, smoke will be drawn into the
other tube.
Discuss with students how this
principle might be used to
ventilate a room, or to draw in
cool air to a container.
Hot air balloons
You will need• lightweight paper bag
• candle
• cardboard tube
If the bag is held over the candle
it will rise as the air inside heats
up. This is because warm air is
lighter than cool air.
Students could design their own
hot air balloons and test which
flies highest.
Ask students why the top of the
oven is the hottest part.
Convection in water
You will need• sawdust
• glass container
• candle
Put water and a small amount of sawdust in the container. As the
container is heated the convection currents will be visible.
Discuss with students the application of this principle to domestic hot-
water systems, and to land and sea breezes.
Studying heat
conduction
Speed of conduction
You will need• candle
• metal rod
• small stones, pins or seeds
Use candle wax to stick small stones onto the metal rod at regular
intervals. Put a cloth or handle (e.g. maize core) around one end of the
rod. When the rod is held in the flame the stones will drop off as that
part of the rod gets hot.
Page 83
87 Measuring
conduction rates
You will need• wires or rods of different metals
• candle
• small stones, pins or seeds
lens
shiny
canblack
can
white
can
water
paper
coin
paper
cloth over
coin
Stick small stones along the wires
using candle wax. Hold the wires
in the flame and record the time
each of the stones drops off each
rod/wire, i.e. the speed of
conduction.
Results could be recorded on a
graph.
Radiation
Observing radiation
Glass windows block any
movement of air. Therefore the
heat is carried into a classroom
by radiation.
Focussing radiation
You will need• convex lens
• paper
Focus the rays of the Sun onto
paper until it catches fire.
As an extension, discuss how this
is used in a solar oven.
Radiation from surfaces
You will need• shiny can
• black can
• white can
• hot water
• thermometer
Fill all 3 cans with the same
volume of hot water. Cover them
with lids and stand them in a cool
place. Record the temperature of
the water in each can every 5
minutes. Black surfaces both
absorb and radiate heat more
quickly than shiny or white
surfaces.
Amazing tricks
Paper pan
The pan will not burn as the
temperature of the paper never
rises above 100°C
Non-burning paper A coin on a piece of paper
conducts heat away before the
paper burns.
Fireproof material A coin conducts heat away before
the cloth can burn. Do not use
synthetic materials as many melt
at quite low temperatures!
Page 84
88 Force
and motion
balloon moves
left
string straw tape
balloon
air forced
right
reaction push action
canoeriver bank
compression
tension
string
• A force is a push or a pull exerted on an object.
• For every action (force) there is a reaction (second force).
• If an object is stationary the action is equal and opposite to the
reaction. An object moves when one force is greater than the other.
• Friction is the force which prevents objects sliding over each other.
• Reducing friction reduces the size of force needed to move the
object i.e. it takes less energy to move the object.
Examples of forces
Action and reaction
Jet balloon
When the balloon is inflated and released it moves.
Other examples
You will need• string
• straw
• tape
• balloon
A jet airliner throws out hot gases from its engines in one direction
(action), called the thrust. The plane moves in the opposite direction
(reaction). The canoe shown here also moves away from the push
action.
Bridges
Forces which
weaken bridges
The bridge bends under the
weight of the load. More than
one force is at work. Compression
forces are concentrated on the
top surface. When a bridge
bends, compression on top
creates tension forces on the
bottom surface.
Strengthening bridges
You will need• books
• string
• base board
• nails
In a suspension bridge the tension
in the bridge is Increased by
securing the ‘stings’ and
suspending them over towers or
from trees.
Ask students to build the 2
bridges shown. Discuss why the
suspension bridge is stronger.
Page 85
89 Friction
Useful friction
shoe soles
increase
friction
sandpaper
ball and goalkeeping
gloves
knots
car tyres and
road surface
pull
pencil roller
tin
marbles
tin
glass
moves
tap
Problems with friction Friction causes
• bald tyres on cars
• wear in car engine parts
• wear in rope bridges
• soles of shoes to wear out.
Reducing friction
Model truck
You will need• brick or heavy book
• pencils or marbles
Pencils and marbles are both
rollers and so reduce friction.
As an extension use a force meter
to measure and compare
frictional forces using different
loads and identify ways of
reducing friction.
Ball bearings and oil
You will need• marbles
• oil
• 2 tins
First test the effect of oil by
putting a little between finger
and thumb and noting how they
slip over each other.
Put oil onto the marbles and note
how easily the top tin turns on
the lower one. The rolling of the
balls and the lubrication of the oil
both reduce friction. The marbles
are acting as ball bearings. Many
engines have ball bearings.
Water as a lubricant
You will need• a sheet of glass
• glass tumbler
• water from a tap
Leave a little water in the glass
before inverting it. The glass
floats on a cushion of air and
water like a hovercraft.
Page 86
90 Force and
motion
continued
hooked spring enddrinking straw
paper scale
steel spring
hooked spring endweight
centrifugal forceweight
centripetal force
ballpoint
casing
marker clip
scissorsstringweight
water
stones or
sand
long
strings
31 2
• Force is measured by a force meter. The unit of force is a newton.
• Weight = mass x force of gravity. On Earth a mass of 1 kg has a
weight of 1 kg, but on the Moon a mass of 1 kg would weigh less
than 1 kg because the force of gravity is less.
• Inertia is the tendency to resist movement. It depends only on mass,
not on weight.
• Motion is movement and can be described in different ways, e.g.
speed, velocity, acceleration.
• Speed is the rate of change of position; velocity is speed in one
direction.
• Momentum is the tendency to continue moving in the same
direction. It can be passed on from one body to another.
Momentum = mass x velocity.
Making a force meter
You will need• drinking straw
• wire
• steel spring
Make the spring by winding the
wire around a rod of the same
diameter as the straw.
Alternatively make the spring by
attaching one end of the wire to
a drill and twisting it. Make the
diameter of the spring slightly
smaller at one end so it will grip
the straw. Calibrate the spring by
using known weights.
Centripetal and
centrifugal forces
Spinning forces
You will need• string
• 2-weights
• ball point casing
• paper clip
• scissors
Put the casing onto the string and
attach a weight to each end of
the string. Note what happens to
the clip if the weight is spun
faster. Cut the string in mid-spin
and note what happens.
Inertia and momentum
Tin can pendulums
You will need• 2 buckets
• long strings or rope
• water, sand or stones
Hang each of the buckets from a
long string. Inertia has to be
overcome to start a bucket
swinging.
Ask students which bucket needs
most force to start ft swinging
and why.
Bumping bottles
You will need• wooden support
• string
• 2 bottles
The bottles are smooth and
hardly touch as the momentum is
transferred from one bottle to
the other. Momentum is
conserved.
Page 87
91 Amazing examples
Coin and paper
You will need• coin
• thin card
pin
ink
paper
strip
cup held by stand
weighted
vehicle
board
pile of books to vary height
Flick the card away. The inertia
keeps the coin in place. Try the
same trick with the card over a jar
or glass. A heavy coin works best.
Pile of books or coins
You will need• pile of coins
• pile of books
Try to remove the bottom book without upsetting the pile. Impossible?
To remove the bottom coin from a pile, flick another coin at it. The
momentum of the flicked coin is transferred to the bottom of the pile.
The momentum overcomes inertia.
Dropping fruit
You will need• apple or similar fruit
• knife
The farther the fall, the greater
the momentum and the deeper
the cut.
Measuring motion
Making the vehicle
You will need• block of wood
• bottle or box
• cotton reels or bottle tops
• wire
• matchboxes
• sand
Make the wheels using, e.g. bottle tops, cotton reels. Attach these to
the wooden base. Attach the box or bottle to the wooden base. Make
standard weights by adding the same amount of sand to each of the
matchboxes.
A child’s toy car would be a ready-made alternative.
Making the timing cup
You will need• container
• dilute ink
• cotton string
• pin
Pierce a small hole in the bottom
of the cup and seal it with the
pin. Fill the cup with ink. When
the pin is pulled out the ink will
fall from the cup in regular drops.
You will need to experiment a bit
so the drops fall regularly and fast
enough.
Test slope
You will need• long, thin strips of paper
• pile of books
• board
Pile the books to make slopes of
different heights. Attach the
ticker tape to the weighted
vehicle. When the vehicle is
released, pull out the timer cup
string. Make sure the ink does not
damage the books.
Ask students to measure the
velocity of the vehicle while
altering either the loads in it or
the height and angle of the test
slope. This could be done
qualitatively and results recorded
on graphs.
Page 88
92 Levers,
pulleys and
machines
book
knife
30 cm
rule
book
Knife blade = fulcrum
load 1 load 2
distance 1 distance 2fulcrum
string
door
water from a well
load
water
fulcrum weight (effort)
stick (lever)
stone (fulcrum)
• A machine allows a force applied in one place to overcome a force
applied in another place. Levers and pulleys do work and are simple
machines.
• A lever transmits a force from one place to another.
• The principle of moments is used to calculate the relationship
between load, effort and the distance of each from the fulcrum.
• Pulleys change the direction of a force.
• In a system of pulleys, if the effort moves a long way and the load
only a short distance, then a small effort can lift a heavy load.
Moments In order to balance around a
fulcrum the forces on either side
must be equal.
A lever balance
You will need• ruler or measuring stick
• weights, e.g. coins
• fulcrum, e.g. knife
Balance the weights on the ruler.
Investigate the relationship
between the size of a weight and
the distance from the fulcrum on
either side of the fulcrum
(balancing point). Students should
discover that if distance 1 x load 1
a distance 2 x load 2 the lever will
balance.
Levers
Doors as levers
You will need• a door
• several hooks
• string
Place the hooks in the door 10-15
cm apart. Attach the string to the
hooks, one at a time. Try to pull
the door open.
Ask students why it is easier to
open the door if the string is far
from the hinge. Investigate
whether the length of string
affects the effort required.
Using levers Levers can reduce the work needed to move loads.
Ask students where levers are used in their own communities.
Page 89
93 Pulleys
Simple pulleysbent nail twisted wire
coat hanger wire
and cotton reel
metal washers
can assist
turning
wood support
pulley holder
nail holes
to attach
to support
metal packing strip
bend here
axle hole
metal washer
pin or spoke
as axle
corks glued
togethershaped edges
pulleysupport
bucket
well entrance
Making a pulley and holder
You will need• 2 corks
• 2 pins or nails
• strong glue
• 2 metal strips, e.g. packing strips
• wood support
• 2 washers
Shape the corks slightly so the string runs smoothly. Drill holes into the
metal strips and attach them to the wooden support. Washers will
reduce friction and so aid turning.
nail
PULL
string
coat
hanger
wire
weight
A pulley system
You will need• 2 cotton reels
• long string
• strong wire, e.g. coat hanger wire
• support
• strong nail
• weights
Make the pulley system shown.
Weights can be put into a plastic
bag which is then hung from the
hook. Accurate weights can be
made by filling a bag with known
volumes of water (1 cm3 weighs 1
gram).
Ask students to investigate the
effort needed to lift loads of
different weights using 1,2 or 3
pulleys.
Discuss the relationship between
distance moved by the effort
compared to that moved by the
load and also the effort required
to lift the load. This could be
done quantitatively using known
weights far load and effort and
recording on a graph.
Uses of pulleys Ask students where they have
seen pulleys used and why they
reduce the work of lifting loads.
Page 90
94 Waves as
energy
carriers
water
tray heavy rocks
wave
movement
support string
swing one
pendulum
• The medium through which a wave travels does not itself travel with
the wave.
• The energy of the wave moves in the direction of travel.
• In transverse waves the particles of the medium vibrate at right
angles to the direction of the wave’s travel.
• In longitudinal waves the particles of the medium travel in the same
direction as the direction of travel.
• The shape and size of a wave is described by its wavelength and
amplitude.
Water waves
You will need• cork
• large bowl of water
• weights
Drop a weight into the water
from different heights to create
waves of different strengths.
Observe the force of the wave by
the bobbing of the cork. Alter the
depth of water and note the
effect on the height of the wave
and the frequency of the cork’s
bobbing.
Breaking wavesYou will need
• large tray of water
• heavy rocks
Tap or move the tray to create waves of different sizes. Waves will only
break in shallow water, i.e. when the depth of water is less than the
amplitude of the wave.
Energy from waves The ducks, or floats, oscillate up and down on the waves. The energy
from this motion is converted to electrical energy inside the duck (see
page 83).
Transverse waves
Pendulums
You will need• weights (all identical)
• string
• support
Arrange the weights as
pendulums of different lengths as
shown. They should be tied onto
the horizontal string alt equal
distances apart. Swing one
pendulum at right-angles to the
horizontal string. The other
pendulums will eventually swing
too and the horizontal string will
make waves.
Page 91
95 Mexican wave
clear glass
sheet
bent wire
attached by
nail to
support
boxmirror
supported to
correct angle
sunlight
enters through
hole
water proof
frame
ripple
tank
projectorsprojected image
P
U
S
H
The longer the line of students the more impressive this is. However,
is not easy to see the wave if you are a part of it!
Flick-sticks
You will need• straws or sticks
• rubber or paper strip or
adhesive tape
• glue
Cut the straws or sticks so they are all the same length. Glue them to
the tape. A tape of 3 metres is a good classroom size. Adhesive tape
means there is no need to glue, but unless the sticks/straws are light
they may fall off. Rubber strip, e.g. from a tyre inner tube, is strong
enough to last well. Twist or flick the strip to set off waves.
Experiment with students by
altering, for example, the length
of sticks or strip until really good
waves can be created.
Ripple tank
You will need• sheet of glass
• wooden, plastic or glass strips
• waterproof glue
• large box
• mirror
• wooden support
• wire
• string
• small cork
Glue the strips to the glass sheet
(using suitable waterproof glue)
to create a shallow glass-
bottomed dish. Arrange the
mirror in the box so that it can
direct light up through the glass
and project an image of the
ripples on a wall. Ensure the
water is still. To create circular
waves dip the cork once into the
water, or tap the support.
Longitudinal waves
You will need• marbles or coins
A line of students can
demonstrate a longitudinal wave.
The student should suddenly push
the student in front as soon as
he/she feels the push from the
person behind.
The same principle can be
demonstrated with marbles or
coins. (See also momentum,
page 90.)
Page 92
96 Sound
balloon
piecetin can(both
ends removed)
funnel or paper
cone
balloon piecestring
table surface
vibrating length
rubber band
nail
wooden
block
use a pencil, to
vibrate the
band
TAP
TAP
• Sound is caused by vibration of air particles.
• The speed at which sound travels depends on the medium through
which it is travelling. (See page 94.)
• Loudness depends on the amplitude of the sound wave. The larger
the amplitude the louder the sound.
• Pitch depends on frequency - the higher the frequency the higher
the pitch.
• The longer the length which is vibrating, e.g. string or column of air,
the lower the frequency.
Drum vibrations
You will need• tin can
• pieces of old balloon
• funnel
• candle
Remove the ends from the tin. Tie
the balloon pieces to the tin as
shown and attach the funnel.
When the drum is tapped hard,
sound vibration is carried through
the air in the can, making the
other sheet vibrate. The funnel
concentrates the sound vibrations
so that the air from the funnel
can snuff out the candle.
Changing pitch
You will need• ruler
• table
The shorter the vibrating length,
the greater the number of
vibrations and the higher the
note.
Human vocal cordsYou will need
• rubber band
• 2 nails
• wooden base or tin can
• pencil
The nails should be firmly
attached to the wooden base, or
tin can. The rubber bands
represent the vocal cords. The
tighter the band, the higher the
pitch.
As an extension investigate the effect of using thinner bands.
Sound through solids
Tin can telephone
You will need• 2 tin cans
• long piece of string
Make a small hole through one end of each tin and remove the other
ends completely. Push the string through the holes and tie 2 large
knots to keep it in place. The string should fit tightly into the holes.
Investigate the following with students:
• using wire instead of string
• altering the length of wire or string
• tautness of wire or string.
Sound through wood The tapping can be heard as
sound travels through the wood.
This effect is even more
impressive if the tap is made at
and listener is at the other end.
Page 93
97 Speed of sound
sharp-edged
holeholes 0.5 cm apart
Sound travels at approximately 340 m/s. Light travels at about 3 million
metres per second, i.e. in effect you see a light as soon as it is switched
on. Counting the time between the flash of lightning and the thunder
clap allows you to calculate how far away the storm is.
Musical instruments All music is made of vibrations.
Ask students what local musical instruments could be used in school.
Ask how they create the vibrations.
Bamboo organ
You will need• pieces of bamboo
• string or tape
Hollow out the bamboo pieces
and attach them as shown. The
length of the pipes determines
the pitch of the sound.
Bamboo flute
You will need• bamboo
• drill to make holes
• sharp knife
Cut a wedge-shaped hole at one
end of the hollow tube. This is the
mouthpiece. Make pitch holes
0.5 cm apart.
Hanging objects Strike each object with the same striker.
Ask students to select objects so that a scale
of notes is made.
Bottle harmonica
You will need• glass bottles
Put a different amount of water
in each bottle. If the bottles are
exactly the same size and .
thickness ft is easier to see the
relationship between pitch and
volume of air above the water.
Page 94
98 Light
paper cone or
funnel
light source
(torch)
wide or narrow
teethed
combs
a slit in
card or box
add a few
holes for
ventilation
candles in slit can
plastic or
perspex
waterproof
sealconvex
lens
concave
lens
light beam or eye
plasticine to
hold and seal
lower edges
light
beam
• Light consists of waves of electromagnetic radiation and travels in straight lines.
• Light can travel through some media, e.g. water, glass and across a
vacuum.
• Light may be absorbed by some substances (media), reflected or
refracted.
• Lenses bend light convex lenses bring rays together, concave lenses
spread them apart.
• Light shining through a narrow slit will exhibit diffraction and
interference.
Ray boxes Many experiments with light
require thin beams of light.
Several methods of creating such
beams are shown.
Investigate with students what
else could be used.
Plastic and water
lenses
You will need• 2 sheets of bendy
transparent
plastic or perspex
• Plasticine or clay
• board
• water
Bend the plastic sheets into either
a convex or concave shape. Keep
them in position by bedding them
into the clay or Plasticine on a
board. Seal the edges with
Plasticine or clay. Fill the
‘container’ with water and it
acts as a lens.
Reflection Compare reflections in water, windows, tin cans and shiny surfaces.
Discuss why some reflective surfaces (mirrors) distort the reflection.
Refraction
Bending light
You will need• a pane of perspex or glass
• light beam
• sheet of white paper
Lie a pane of glass or perspex on
a table. Shine a light beam
through one edge of the pane
and note the way the beam is
bent. The light is bent (refracted)
at the interface between the glass
and air. Note that both the beams
in air are parallel.
The rising coin
You will need• coin
• dish of water
Place a coin in a dish or lid. Look
across the edge of the lid so the
coin is just not visible. Ask
someone else to add water (so
the eye does not change
position). Note that the coin then
becomes visible - it appears to
have risen in the water.
Page 95
99 Reflection and
refraction
close one
eye
slits
dark lightproof
paper
small
pinhole
greaseproof
paper
lightproof
box
tube or rolled paper
at viewing end
greaseproof
paper over
open end of
tin can
small pinhole
mirrors set
at 45-degreesopening
mirror
mirror
cardboard or
wooden box
opening
greaseproof
paper
rubber band
Light entering through shutters can be seen as fine rays. The dust
particles in the air reflect some of the light that falls on them and they
seem to shine.
The sun shines through tiny droplets of water in the sky. The light is
reflected and refracted in every direction. Light seems to be all around
us, not just a single large ray from the Sun.
Diffraction and
interference
Put 2 fingers close together, leaving a very small gap. Bring the fingers
very close to one eye, closing the other eye, and an interference
pattern of vertical black lines can be seen in the gap between the fingers.
The same effect can be achieved
if 2 slits are cut in a piece of paper
(cut or score the paper with a
sharp edge, e.g. scissors or razor
blade). The slits should be very
close together and about the
length of the index finger.
Pinhole cameras
You will need• cardboard tube, or tin, or
lightproof box
• greaseproof paper
• dark, lightproof paper
• pin
Make the cameras as shown. The pinhole should be small. The image is
seen on the greaseproof paper. Ask students to note the image is
upside down and is smaller than the original object being viewed.
Periscope
You will need• 2 mirrors
• cardboard tube or long box
• tape
• scissors
Make the periscope as shown.
Experiment with tubes and tin
cans to make periscopes of
different heights and shapes.
Kaleidoscope
You will need• 3 mirrors
• rubber bands
• cardboard
• tracing or greaseproof paper
• small coloured objects
Hold the mirrors together with
the reflective sides pointing
inwards. Wrap them in cardboard
and fix with rubber bands. Seal
one end with tracing paper or
greaseproof paper. Put some
pieces of grass or small coloured
objects inside the tube and view.
Page 96
100 Colour
water
adhesive tape
glass
plasticine or
wax base
vaseline seal
wire loops
light
beam
water mirror
tray
• White light (the light all around us) can be split into its component
colours by, e.g. a prism or water drops.
• White light splits up because its component colours travel at slightly
different speeds. Red light bends least, indigo most.
• Filters absorb, and so remove, light of particular colours or
wavelenghts.
• The colour of a substance depends on what wavelengths are
absorbed by the substance. A red object, for example, looks red
because all colours other than red are absorbed by the substance.
• Mixing coloured lights produces different effects to mixing the same
colours as pigments, e.g. red and green light will produce yellow
light.
• Primary colours are those which are needed to create all other
colours. They are red, yellow and blue, for pigments, but red, green
and blue for light.
Breaking up light
Water prism
You will need• 3 small sheets of glass
• adhesive tape
• Plasticine
• Vaseline
Stick the 3 pieces of glass
together with tape. Use Vaseline
along the joints to make them
watertight. Push the prism into a
base of Plasticine or candle wax
so it is watertight. Fill the prism
with water.
Investigate how the prism breaks
up light into the colours of the
rainbow by shining a beam of
light through it (See page 98.)
Soap bubbles
You will need• detergent or soap
• water
• sugar
• wire
Bubbles refract the light as it passes through them. They split light into the
component colours. Dip the wire shapes into a soap solution and
blow steadily through the loop. Make the soap solution as follows. Mix
3/4 tablespoons of soap powder with 4 cups of hot water. Leave the
mixture to stand for 3 days, then add a large spoonful of sugar.
Investigate with students whether the shape of the
wire affects the bubbles.
Mirrors and water
You will need• tray of water
• mirror
Angle the mirror in the dish of water. Direct a beam of light (see page
98), or sunlight, through the water and onto the mirror. Project the
light onto a piece of white card or a wall. The angle of the mirror and
the water together act as a kind of prism.
Place a convex lens in front of the
white paper and direct the
rainbow beam through it. Note
that the rainbow pattern on the
paper disappears because the
‘rainbow’ has been refracted
again and the colours
recombined.
Page 97
101 Colour filters
You will need• coloured transparent materials,
e.g. sweet wrappers
this is a primary
colour spinner
separating dish
stringholes peg
water
dishseparating cone
Use a torch in a darkened room as a light source to look through filters
of different colours. Note that filters absorb all colours but their own.
Shine coloured light on objects of different colours and note any
apparent colour change in the objects.
Try mixing light from 2 different torches each with a different colour
filter on it. Note the colour changes. Mixing red and green light causes
some surprise!
Key:
R = red
O = orange
Y = yellow
G = green
B = blue
I = indigo
(eand 51-degree for
rainbow spin)
Colour spinners
You will need• card
• sharpened stick as spindle
• primary colours of light (red, green
and blue) in paint or crayon
Make and colour the spinner as shown. Note the colours are not the
pigment primary colours. Ensure the colours are as near to true primary
colours as possible. When the spinner is spinning fast enough all the
colours merge until the spinner appears to be white.
Experiment with spinners of different colours to see the effects, e.g.
rainbow colours or just green and red.
Separating colours
The process of
chromatography
You will need• coloured flower petals
• water or alcohol
• filter paper, blotting paper or
white newspaper
• string
• dish of water
Pound up the flower petals in a little water or alcohol. Dab a drop of
the coloured liquid onto one end of the filter paper strip. Attach the
strip to the string as shown with only the very edge dipped into the
water in the dish. Alternatively dab the colour onto a filter paper cone
as shown.Different coloured pigments do
not travel at the same speed up
the paper. This process separates
the component pigments.
Experiment with pigments from
foods, e.g. sweets, or inks.
Batik and tie dyeing
You will need• flowers, roots, fruits, etc.
• metal container
• molten candle wax
• cloth
• fine string
Crush the flowers, roots or fruit and boil in water for at least 15
minutes. Strain the coloured liquid through a cloth into a bucket. The
dye is now ready for use.
Experiment with different plants to find new colours. Some suggestions
are:
• green - spinach or cassava leaves
• yellow - onion skins
• brown - tea, coffee, iodine
• blue - drops of iodine in warm flour solution.
For batik, the designs are drawn on cloth with molten wax. The cloth is
then placed in the dye. Dye does not affect the waxed areas. After the
dye has dried the wax is removed by ironing through paper.
In tie dyeing the cloth is pleated and then tied tightly with string.
The dye does not penetrate the areas which are tied tightly.
Page 98
102 Fluids
and flying
• Fluids, e.g. water and air, push against (resist) anything moving through them.
In the case of air this is called the air resistance.
• Objects are propelled through air and water by using their resistance as the
reaction to the force of propulsion (thrust). (See page 88.)
• As air moves it causes changes in air pressure. A fast flow of air causes a drop
in air pressure.
• Streamlining reduces turbulence or drag and so streamlined objects require
less energy to move.
Air resistance
Parachutes
You will need
• newspaper
• cotton material, e.g.
handkerchief
• Plasticine
A flat sheet of newspaper falls slowly, a crumpled up one faster. This is
because the surface area for air resistance is greater in the sheet.
Experiment with newspaper and note the more crumpled it is the more
likely it is not to get blown off course.Make parachutes and investi-
gate the effect of varying the
Plasticine weight
Make a small hole in the top of
the parachute. Ask students if it
flies better and why.plasticine tie glue or tape
strings to corners
Natural seed
parachutes
Find local seeds which have
parachute devices.
Discuss with students why it is an
advantage to a seed to have a
parachute.
Helicopter
You will need• card
• scissors
Make ‘helicopters’ from the
card as shown. Experiment with
different wing shapes and
lengths.
Investigate which wing shape
will ‘fly’ furthest from a testing
place.
water
rubber
tubingwater flow
Forces in boats
Thrust
You will need• plastic container
• rubber tubing
• funnel
Make the ‘glug-glug-tug’ as
shown. As water is poured into
the funnel, the tug moves
forward.
Experiment with different
materials, e.g. polystyrene
drinking cups, ballpoint casings,
to produce the fastest tug.
stonedirection of boat’s
movement
Moving in small boats Water is pushed backwards while
the boat or canoe moves
forwards.
As the stone is thrown, the boat
moves in the opposite direction.
Discuss the forces at work in
these
2 examples using ideas of reaction
and action. (See page 88.)
Page 99
103 Drag and Streamlining
You will need• Plasticine
• tall transparent container
• water
Make different shapes out of the Plasticine and test which sinks
fastest. Students should find that shapes which are streamlined
have less resistance, or drag, and sink more quickly.
Study birds as they fly, swoop
and dive and notice how they
change their shape to make
themselves more streamlined.
Examine fish and other water
creatures and note which are
most streamlined.
Ask students why is it an
advantage to some water
creatures to be streamlined.
water
rising
paper strip
blow
paper sheets
attract! blow
paper
aerofoilblow
Tricks with air flow
Tricks with paper
You will need• strips of paper
Blow the paper strips in the ways
shown. In every case the strip
moves because the air on one side
moves faster than on the other.
The faster flow reduces the air
pressure and so the strip moves
towards the lower pressure.
When you blow over the strip the
air above the strip is moving
faster than the air underneath.
The increased flow reduces the air
pressure above the strip and so
the strip rises.
An aerofoil is shaped so that the
air moving above the aerofoil has
to travel further than the air
underneath, i.e. it has to flow
more quickly over the top surface.
The air between the sheets is
flowing, that outside is not So,
the air pressure between the
sheets is reduced. The same effect
will pull 2 light fruits or ping
pong balls together.
hold ball
in placeblow
Tricks with ping pong
balls
You will need• ping pong ball or light fruit
• funnel
Blowing down the funnel causes
the air to rush past the ball
which
reduces the air pressure. The air
pressure outside the funnel then
pushes the ball up the funnel.
Page 100
104 MATERIALS AND EQUIPMENT
Making up chemicals,
preparing gases
SAFETY: Wear safety goggles, when preparing chemicals.
Note: Always use clean water when preparing solutions. Use distilled
water or rain water.
Refer to page 126 for local sources of chemicals.
Limewater • Mix lime in the water. Add 10 g of lime (CaO or Ca (OH)2) to 1 litre
of water.
• Allow it to settle.
• Decant off the clear liquid. This is limewater.
• Store limewater in a tightly stoppered bottle or jar to prevent
absorption of CO2
from the air.
Sodium hydroxide
solution
Slowly dissolve 330 g of solid sodium hydroxide in 500 cm3
water
and dilute to 1 litre.
Benedict’s solution • Make 2 solutions A and B then mix the 2 together to make Benedict’s
solution.
Solution A
• Dissolve 100 g anhydrous sodium carbonate and 173 g sodium
citrate in 800 cm3 water.
• You may need to heat the mixture.
• Filter if necessary - a precipitate may form.
Solution B
• Dissolve 17.3 g copper(II) sulphate in 100 cm3 of water.
• Dilute to 150 cm3.
Mixing solutions
• Mix together all solution A and all solution B, then dilute to make up
to one litre.
Fehling’s solution • Make 2 solutions A and B which are then mixed.
Solution A (copper(II) sulphate solution)
• Dissolve 34.7 g of copper sulphate in 500 cm3 water.
Solution B (alkaline tartrate solution)
• Dissolve 173 g of potassium sodium tartrate (Rochelle salts) and 50 g
of sodium hydroxide in water.
• Dilute when cold to 500 cm3.
Mixing solutions
Mix equal volumes of solutions A and B when needed.
Biuret’s solution • Make a copper (II) sulphate solution by dissolving 37.4 g copper(II)
sulphate in 500 cm3 water.
• Make sodium Hydroxide solution as described above.
• Mix equal volumes of the solutions when needed.
Page 101
105 Preparing gases
Carbon dioxide
puts out lighted
splint or match
balloon
yeast and
sugar solution
A test for cartoon dioxide is that it
will put out a lighted splint or
match and will turn limewater
milky.
1. Mix together vinegar and ashes
or vinegar and soda
(bicarbonate of soda, baking
soda or baking powder).
2. Add water to Andrew’s Liver
Salts.
3. Mix yeast and sugar solution
and keep them warm. The
carbon dioxide will fill the
balloon, the alcohol simply
dissolves in the water.
ChlorineChlorine is a poisonous gas.
chlorine
potassium permanganate
and hydrochloric acid
•dissolve potassium permanganate in concentrated
hydrochloric acid.
• Use 5 cm3 concentrated acid to 1 spatula of
potassium manganate(VII).
Safety: Concentrated hydrochloric acid
burns. Safety goggles
should be worn when using it.
• Skin contact - wash with plenty of water.
• Eyes - wash the eye immediately with
large quantities of water.
hydrogen
zinc (from dry cells)
and hydrochloric acid
Hydrogen • Dissolve zinc (from dry cells) in
hydrochloric acid. Hydrogen gas
is produced.
Safety: Concentrated hydrochloric acid burns. Safety goggles
should be worn when using it.
• Skin contact - wash with plenty of water.
• Eyes - wash the eye immediately with large quantities of water.
Oxygen
relights a glowing splint
or match
oxygen
potassium
permanganate
heat
A test for oxygen is that it will
relight a glowing splint or match.
• Mix manganese dioxide with
hydrogen peroxide. Oxygen is
produced.
• Alternatively heat potassium
manganate(VII)
Safety goggles should be worn.
Page 102
106 Laboratory
Equipment
tin can
plate
saucer
spooncup
pan
glass
baking tin
plastic bowl
funnel
cut out
circles
fold in
half
fold again
filter
paper
The following pages show how teachers can make substitute equipment,
when standard laboratory equipment is unavailable. Home-made equip-
ment may not always be quite as effective or as safe as commercially
produced, standard equipment and teachers should be particularly
careful about safety when such equipment is used. Take extra care if
used by students rather than in a demonstration by the teacher. Ensure
students wear safety goggles when they use homemade equipment just in
case it fails.
funnel
tubes
beakers and
dishes
Using what is available • How many experiments can be carried out with everyday items?
Multipurpose bottle
paper strip
holder wood
clothes
pegtest
tube
plastic bag
with hole in
one corner tin or plastic
funnels from
the market
funnels cut from
glass or plastic
bottles
funnel of
rolled paper
or card
Test tube holders • Folded paper strips, strips of
card or clothes pegs all work
well.
• Form a wire test tube holder
by shaping a piece of wire
round a piece of wood the
same size(diameter) as your
test tube.
Funnels If a paper funnel is covered with foil its life is extended.
Filter paper Test different types of paper - not printed papers because the colours
may run. (Use cement bags, copy paper, etc.)
Page 103
107 Beakers
ballpoint casing
also bent by
heatinner ink tube of
ballpoint refill
flexible and other
drinking strawss
Cups, glasses, jars and bottles are useful for experiments at
room temperature.
Safety: Such containers
may shatter If they get hot.
If the container has
to be heated, standard
laboratory equipment
must be used.
Light bulbs as
multipurpose containers
• Fused electric light bulbs can be used as containers.
• They should never be heated as they may explode.
opening the bulb
emptying the bulb
Opening and emptying
the bulb
• Always wrap the bulb in a thick cloth for safety when working on it.
• Rub the base over a rough surface (cement or stone) to weaken the
seal.
• Alternatively, use a pair of pincers to remove the seal.
• A nail can be used to open and clean out remains of the seal.
• The filament and rest of contents come out easily.
• File the opening smooth if needed.
Using the container • A bored bung/cork with an attached
rubber tube may be added.
• Do not use if contents will get hot.
Never heat in a flame.
Tubes
Glass tube substitute
• Everyday items can be adapted for use as tubes.
U- tubes • Use bent plastic pipe or hosepipe.
• Ball point casing will bend if heated gently.
Page 104
108 Laboratory equipment continued
rubber tube
fine metal
tube
wire
bottletop
connection
tube
infusion tube
cut open plastic container
plastic dishes
cut down
plastic
bottles
or cans
bucket
Blowpipe
Safety: Use safety
goggles when using
a blowpipe
• This will allow you to produce a higher
temperature flame or a directed flame.
• A fine, heat proof tube is used to blow the
flame from a burner.
• The metal refills found inside some ballpoint
pens work well.
Combustion spoon • This is used to heat small quantities
of material in a flame.
• Ensure the bottle top is clean and the
inner plastic seal removed.
• Wrap the wire around the bottle top
to form a cradle for it.
Crucible • This is used to heat material to a high
temperature.
• Place the material in one spoon and
then wire 2 spoons together.
Gas generator
You will need• a small bottle or
similar container
• a small piece of a
ballpoint inner tube
• wider flexible tube
• Make sure the tube does not become blocked.
• Never use concentrated acids or hydroxides in the apparatus.
• Use only small quantities of substances in the apparatus.
Bell jar and trough • Bell jars can be made from large plastic
bottles if the bottom is
removed.
• Note plastic will only be suitable for some
experiments.
• Troughs can be made from any
vessel which is large enough.
• Large plastic containers are useful.
Page 105
109 Stirrers
dish
wire
twistsisal
sand filled
cup or
glass
holesupturned cardboard
box upturned tin
with holes
wooden
spoon
wooden stick
ballpoint casing
• These should be made from mate-
rials which do not carry heat so they
can be used for hot materials.
• Select materials carefully when
heated substances are involved.
bent strip of metal
or aluminium foil
medicine spoon
ordinary plastic or stainless steel spoonsknife
card or
plastic cut pieces baby milk powder
scoop
Spatulas • Ordinary plastic spoons
are useful, but there are
many alternatives.
Stoppers and corks • These can be cut and shaped from soft woods, maize cobs, cork or pieces of
rubber.
• Sand or file to shape.
• Explore the market place - rubber tops from a variety of bottles may
be available.
• Can you use the cork or bung in its original bottle for your experiment?
Wire gauze • A tin lid with holes in it will work.
• Try wire mosquito netting.
Pestle and mortar • A flat grinding stone works very well.
• You can crush items using the back of a
spoon.
• Try using different sized spoons - one as a
pestle the other as a mortar, and crushing
material between them.
Test tube brush • Put a little sand in the test tube
as an abrasive. Move the sand
around with a stick. Or make a
brush as shown.
Test tube rack • Experiment with your own ideas.
Page 106
110 Laboratory equipment continued
Droppers
paper strip
wire
wood
cover air hole
• Droppers from medicine bottles.
• Ballpoint casing with a bulb made
from rubber tube.
• Could you adapt a fountain pen?
Tongs and forceps • Metal packing strip can be bent
and then cut with tin snips.
Tripods • Thin wire can be used to join
together pieces of galvanised wire.
• The bottom may be removed from a
metal can and the sides cut with tin
snips to leave 3 legs.
• 3 legs are more stable than 4.
• Experiment with your own ideas.
Supports for apparatus
Funnel holder
A large loop of wire makes a good
base for the support.
Wire supports • Use a piece of wood the same
diameter as your test tubes to
prepare supports.
rough stick can
be shaped
biro casing - a needle mount
pin or needle handle -
on eraser (rubber)
Pipettes • Glass rods, straws and ballpoint
pen casings can all be used.
• The larger bore, transparent
tube of a ballpoint casing can be
calibrated with ‘scratch’ marks.
Handles
Page 107
111 Measuring tools
newspaper strip
card
strip
from
boxes
metre rule from cloth strip
split bamboo or palm branch
(by guinea corn stalks / other grasses)knotted strings (every 10cms)
• Students can make these themselves.
• Metre rules can be made from
various items.
Measuring cylinders
Safety: These tubes
cannot be used with
organic solvents.
• Cut an empty fluorescent light tube to length.
• Seal one end with a lid containing wax, tar, cement or adhesives (see
page 118).
• After drying, graduate using a standard measuring device or a
syringe.
• Sterilised syringes are suitable for measuring small quantities.
• Plastic syringes may dissolve in some substances.
Sterilising: Boil hard for 15 minutes in boiling water.
sealer
lid
Calibrating cylinders • Jars, tumblers and cut down bottles (see page 113) can all be used as
measuring devices.
• Grind graduation lines on glass bottles with a glass cutter or
triangular file.
• Scratch marks on plastic vessels or use spirit markers or tape.
• Marker inks can be made by mixing 2 parts borax with 10 of water,
then mixing this with 6 parts of alcohol and 1 of shellac or varnish.
measuring
vessel
measuring
vessel
plastic bottle
with bottom
removedirregular
solid
(eg stone)
water level
biro casing or
glass tube
cork
Overflow bottles
and cans• The simplest device is to put one
container inside another, larger one. Fill
the smaller one with water, put in the
solid and measure the water which
overflows.
• An overflow can is made by cutting 2
slits at the top of the can and bending
the strip forward to form a spout.
• In the overflow bottle, the water is
level with the top of the biro casing until
the object is put in. It is useful, there-
fore, to be able to move the biro casing
up and down.
Page 108
112 Laboratory equipment continued
Hydrometer
scale
wax seal
to allow
tube
entry
glass
paint
card
adhesive tape
or glued paper
aluminium foil
(cooking foil)
glasscard
adhesive tape for
safety
smooth shiny inside surface of tin can
• Mark the scale on paper
or plastic strip and put it
into the straw or hollow
grass.
• Drop a few stones or
small tacks into the bottom
to make the hydrometer
float vertically when it is
placed in a container of
liquid.
• Coat the whole straw
with candle wax and seal
the end.
• Try making a hydrometer
from a pencil.
Beehive shelf • The bottom of a varnished
(to prevent rusting) tin can, or
a plastic bottle, can be used
as the base.
• Cut out a large hole in the
top and a slit in the side to
take tubing.
Tube connectors • Cut pieces of metal tube from a metal ballpoint pen refill.
• Heat them in a flame then clean the tubes with wire.
• Push a section inside the tubing.
Making mirrors • Make a reflective surface by painting one side of glass black.
• Place aluminium foil between glass and card.
• Experiment with other foils from sweet and cigarette wrappings.
• Louvre glass may be suitable for making large mirrors.
• The inside of a smooth, shiny tin can acts as a mirror, but tape the
cutting edges for safety.
Page 109
113 Glass cutting
score mark
pencil
SNAP !
water
water soaked paper or cloth strip
candle or burner
Safety: Small pieces of glass are difficult to see and
dangerous.
Use safety goggles when breaking glass.
Using a glass cutter
Work with gloves or a
cloth for safety.
Safety goggles
should be worn.
• The wheel of a glass cutter scratches a line on glass. This weakens the
glass along the line so it is easier to crack the glass accurately.
• Dipping the cutter wheel in turpentine helps.
• Use a straight edge to score a line on glass. Mark the score with a pen
so you can see it.
• Only a single, firm
scratch is needed. Avoid
scratching several times as
this may give a jagged
break.
• Break glass over a
pencil or match, or by
placing the score just over
the edge of a table.
• Firm, gentle taps along
the score mark should
make the glass break
cleanly.
Cutting glass tube • Use a triangular file to scratch and weaken your tube at the point
you wish the tube to break. One good scratch/score is suitable for
most tubes of diameter up to 25 mm.
• The scratch does not need to go all the way round the tube.
• Break the tube over a pencil or match as with glass sheet.
• Alternatively, grip the tube with both hands, thumbs touching
immediately behind the scratch (scratch points away from you).
Snap carefully as you would a small twig.
Safety goggles should
be worn.
Cool strips cracking • Make a mark with a file right
around the bottle.
• Soak paper strips in water.
• Place a strip of soaked paper
on either side of the scratch.
• Heat the scratch with a flame
while rotating the bottle.
• Drop water on the scratch if
necessary.
Safety goggles should
be worn.
Page 110
114 Magnifying
and microscopes
Empty light bulbs
object
water
object
bad drop
good drop
waterobject
checking magnification
• Varying the amount of
water in the bulb alters the
magnification.
Water drop • Make a hole in a piece of card
or foil which will ‘hold’ a drop
of water in it.
• When using drops to magnify,
try to get the most efficient
shape. The larger the drop the
better.
• Experiment with different
materials to find which gives the
best drop.
• The wire ring from a broken
light bulb filament will also hold
a drop of water well.
Curved glass • Putting water into curved glass
alters the magnification.
• Experiment with different
depths of water.
Clear-container
magnifiers
• Any of these containers filled with water will make good
magnifiers.
• A clear marble magnifies. Try marbles of different sizes.
Page 111
115 Old lenses
Spectacles
lens card
water
drop
object
water drop
booksglass
card hole
mirror (angled)
• Experiment with lenses of old and new spectacles - even
broken spectacles have their uses!
Pencil torch bulb lens
Safety: Beware of
tiny bits of glass.
• Remove the lens of the bulb with a triangular file or,
as carefully as possible, with scissors or a knife.
• Mount the lens in a hole in a piece of cardboard.
• The lens will be held in position if the bottom of the
hole is smaller than the top, or it can be held in place
by tape.
Simple compound
microscope• Using 2 lenses together allows
much greater magnification.
• Use a hand lens to make a
water drop into a more powerful
magnifier.
• Try using a hand lens with a
lens from a torch bulb to make
another simple compound
microscope.
Card bridge microscope
Safety: Ensure the mirror
does not reflect direct
sunlight into the eye.
• Place a water drop in the card
‘bridge’.
• Place this on a sheet of glass
as shown.
• Place the object you are
looking at on the glass. This
arrangement is most suitable for
thin items, e.g. sections of
leaves.
• Experiment with the angle of
the mirror so that light shines up
through the specimen.
• Use this arrangement with a
hand lens to produce a com-
pound microscope.
Slides and cover slips • Small specimens will be clearer if placed on a slide and covered by a
cover slip.
• Slides can be made from glass or transparent plastic
• Cover slips may be round or square and can foe made from thin, stiff,
transparent plastic like that used in display
packaging.
• The glass from some torches makes a
good slide and can be put back into the
torch after use.
Page 112
116 Burners
wax or
fat soaked
wick
holes
wax or fat
around
wicks
wick
metal tube
bottle top
cork
wick
ink bottle
fuel
bike valve wick
tin with lid
containing
spirit
(coffee tin)
Safety warning: All burners are potentially dangerous.
• Never use petrol in any burners.
• Only refill burners when they are cold.
• Do not make large spirit burners.
• Use small quantities of fuel.
• Wear safety goggles.
Candle burner• Fix 3 or 4 candles onto a dish,
lid or piece of wood.
• Vary the heat by using 1, 2, 3
or 4 candles for efficiency.
Fat or wax burner • Soak the wicks in fat or wax
first.
• Push the wicks through holes
made in card or tin.
• Float the card or tin, with the
wicks in place, in a dish of
molten wax or fat.
Simple spirit burner
Valve spirit burner • Push the wick through the bike
valve which itself fits tightly into
the lid of the tin.
• What burners are available
locally?
• Could you adapt the local
burner?
Page 113
117 Mini charcoal burners
can
holes in
bottom
tin with
rim at
top
air hole
one-can
versionvessel support
wires
two-can
version
air enters through
opening
perforated
tin as
charcoal support air enters through
opening
charcoal support wires
• The two-can version is easier to make, but you will need to
experiment with different sizes and types of tin cans.
• Ensure the container does not fit too tightly into the top can.
Wire supports may help.
• The temperature of the charcoal depends on the amount of air
flowing through it and the amount of charcoal used.
bottle top
inner and
outer tubes
perforations
wick
fuel container
Simple sootless
kerosene burners
The Pakistan model
Temperature of different
types of heating source
Type Average Flame High Point
Temp degree-C Temp
degree-C
Candle 650 700
Kerosene burner 650 800
Alcohol burner 650 800
Matches 600 650
Bunsen burner 1400 1500
Candle and blowpipe 800
Alcohol Burner
With blowpipe 1000
Page 114
118 Joint and
adhesives
cardboard
wood piece
string,
wire or
wool
card piece
to stop wire
ripping boardtape across
hole and peg
paste
flour
Joining things • Make holes with a nail, resting
the surface on a piece of wood.
• Could you use the hinged
corners of boxes? Think before
you cut!
• A strip of adhesive tape, pasted
paper or doth stuck to the
inside and outside of the comer
makes a secure join.
• String, wire or wool can be used
to join comers.
• Find your own method.
Cardboard joints • In the hole and peg technique, a long peg can be stuck down at the
back for extra strength.
• Never cut the slot deeper than half way for an interlocking slot joint.
Flour paste • Sift flour to remove lumps. Maize, wheat and cassava flours are all
suitable.
• Mix the flour with water a little at a time to avoid lumps. It should be
the consistency of thin cream.
• Cook the mixture gently until it thickens. Keep stirring to ensure the
paste remains smooth and of even texture.
• Allow the paste to cool.
• Add insecticide to the paste if needed.
• Store in a clearly labelled container with a good lid, preferably in a
cool place.
• Cold method paste b made by simply stirring sifted flour into water.
Page 115
119 Polystyrene cement
Danger Fire hazard
flammable.
petrol
cloth
paste
vinegar or
lemon juice
(40 ml)
milk (1
litre)
heat
water
(cup)
hot water
bath
melting glue
• Dissolve polystyrene
casings, or styrofoam packing
material in a little petrol.
• Natural rubber dissolved in
petrol will make ‘rubber
solution’ - another glue.
Rice paste • Cook 1 part rice (white rice is better than brown for paste) with 3
parts water.
• Strain off excess water.
• Rice thickens as it cools.
• Squeeze the wet sticky rice through open-weave cloth.
• Squeezing breaks down the rice grains so they form a paste. The
paste may be thinned down with water if necessary.
• The water which is squeezed out is also an effective light adhesive.
Casein glue • Mix milk with vinegar or lemon
juice. Add just enough vinegar
or lemon juice to curdle the
milk. The amounts will vary
according to the type of milk
used.
• Heat while stirring
continuously. Soft lumps will
form.
• Strain out the lumps using a
cloth.
• Add a teaspoon of sodium
hydrogen carbonate
(bicarbonate of soda) to the
lumps and mix with a little
water to produce casein glue.
Fish or animal glues These glues are made traditionally by boiling a soup of water, skins
bones and sinews. However, they dissolve in water, so may not be
effective in a climate which is both hot and humid. They work best in
dry climates.
• These glues may be found in markets as brown blocks (a bit like toffee).
• Melt the block gently using a
water bath.
• Use the glue when it is hot and
runny.
• This type of glue is used for
sticking wood in furniture-
making and for attaching labels
to food cans.
Page 116
120 Modelling
materials
Papier Mache
crumpled core
pasted strips
landscape model
on board base
vegetable oil
melted
wax
turpentine
• Soak pieces of paper or card in
water for half a day.
• Mash, grind, stir or pound the
mix to a smooth fine pulp.
• Squeeze or press out excess
water.
• Mix in a little flour paste (see
page 118) and work the
material into a sticky modelling
consistency.
Papier Mache layering • Soak small pieces, or narrow
strips, of newspaper in paste.
• Use crumpled newspaper as a
core or skeleton for the model.
• Build up the model in layers of
strips and pieces.
• After drying, sandpaper smooth
and paint or varnish.
Modelling clay • Dig out or collect your clay. Seek local advice on where to find
suitable deposits.
• Add water and stir to a creamy consistency.
• Filter through cloth or a sieve.
• Allow the filtered material to settle.
• Decant excess water.
• Dry the filtered material on newspaper until it becomes a powder.
• Mix in glycerine to give a plastic texture.
• Knead well and-add Vaseline to soften if necessary.
• Adding paste (see page 118) to the clay helps stop it cracking as it dries.
Modelling wax • Melt 10 parts wax. (Ordinary
wax candles work well.)
• Slowly add 2 parts turpentine,
or turpentine substitute, to the
melted wax. This makes it
malleable.
• Add one part edible oil to the mixture.
• Add colouring if available.
Page 117
121 Modelling dough
sift !
plaster
sand
paste
• Mix together the following
2 cups flour
1 cup salt
2 teaspoons cream of tartar
2 tablespoons edible oil
• Add colouring if you wish.
• Warm ingredients in a pan gently until they thicken.
• Cool and store in a sealed container.
Plaster of Paris • Prepare the mould or item to be copied by covering
with Vaseline.
• Steadily sift Plaster of Paris into water until powder
no longer sinks.
• Add a little more powder and stir to a thick, creamy
consistency.
• Pour the plaster into the ready-prepared mould or over the
item.
• After the Plaster of Paris has set hard, shape the edges with a
knife and sandpaper smooth.
• Paint and/or varnish.
Note: For quicker setting add salt; for slower setting add
vinegar.
Paste and sand ‘cement’ • Mix evenly together dry sand
and flour paste (see page 118)
or commercial glue.
• The wet cement moulds very
easily and dries hard.
Paste and sawdust ‘cement’ • Prepare as paste and sand, but
use sawdust instead of sand.
Page 118
122 Collecting and
displaying
torch
funnel
made
from
plastic
bottle
soil
gauze
jar
soil creatures
animal’s collect here
net
jar
Pitfall trapswood, stone
or board
stone or weight
stone
• Make a few holes in the bottom
of a tin to let water escape.
• Bury the tin up to its rim in the
soil.
• Cover the tin to keep out rain.
• Try out different types of food
as bait.
• Check the trap regularly and
remove it when finished with!
Soil life • Collect a sample of soil and
place it in a funnel with a piece
of gauze across its neck.
• Shine a bright light down onto
the soil.
• Soil organisms usually prefer
dark, damp and cool conditions
so the heat and light drives
them downwards until they
drop into the collecting jar.
• Return organisms to the soil
after examination, as many may
dehydrate and die.
Collecting nets • Collecting nets can be made easily from sticks, some wire and
mosquito netting.
• For collecting small water creatures use a fine net with a small jar
attached to the blind end as shown.
• River nets can be used to catch small animals disturbed from stones
and mud by a stick.
Collecting and labelling • Wherever possible try to identify any plants or animals you collect.
• Leaves and flowers can be dried in a press and then fixed to paper
with glue or tape.
• A thick loose-leaf file may be best for final display of plant specimens.
• Try to label all specimens as shown below.
SPECIMEN: leaf
NAME: mango
LOCAL NAME: mwembe
LOCALITY: Mzumbe, Morogoro
HABITAT: Mihigo’s garden
DATE: 2nd August 1993
Page 119
123 Studying and
displaying
Here are a few suggestions which may be useful if you wish to study
animals over a period of time.
Worm jar • Fill a plastic or glass vessel with soil and add the
worms.
• Wrap black or dark paper
around the jar to keep light
away from the burrowing
worms.
• Remove the paper to reveal the
burrows.
• Make sure the soil is kept moist
and never dries out.
mesh or cloth
soil
filled
glass vessel
black paper
fine netting
plant
water
fine gauze
sand
cardboard box
window
clear plastic
water
Flying insect cage • Insects can be kept in many
types of cage.
• Mosquitoes and other insects
benefit from having water,
vegetation and room to fly. The
cage shown provides all these.
Reptile cage • What would you need to add to
this jar to make it suitable for
keeping and observing lizards
or other reptiles?
Aquarium box • Cut viewing windows in the
sides of a box.
• Line the box with a large sheet
of transparent plastic and fill it
with water.
• Attach the plastic firmly,
making sure it does not slip
down from around the rim of
the box.
Caring for animals• Always treat animals with care.
• Some animals are dangerous,
some scare easily.
• After study return animals to
the place you found them.
Page 120
124 Storage
Card and picture boxes • Select suitably-shaped boxes.
• Cards and pictures can be stored
in all sorts of boxes. Store
according to syllabus topic or
alphabetically.
• Dividers and compartments can
be made from cardboard.
hair clipcloths
pegclip
Matchbox drawers • Drawers to store small items can
be made from matchboxes
glued together as shown.
• Small pieces of string, wire or
buttons can be used as handles.
Dividing boxes • Cut down the sides of boxes for
displays.
• Samples can be sorted, then
displayed or stored in cardboard
boxes as shown.
• The flaps from the top of the
box may be cut off and used as
dividers for the same box.
Envelopes and bags • Envelopes and bags of different
sizes can be used for storage.
Clearly label all containers.
Page 121
125 Tins, cups
and botttes• Tins, cups and bottles make good storage containers. Some item do
not need lids, others do.
Reagent and
Winchester bottles
• Winchester bottles can be replaced by any big bottle, but check that
the container does not dissolve in the substance first! Dangerous
substances, such as acids and alkalis, should always be kept in strong
containers such as glass or suitable plastic.
• Reagents can safely be stored in used jam jars, perfume and scent
bottles or film containers.
• Always identify the contents with a clear label.
• Search the market for ideas.
my
posters
always
get so
creased
and
messy !
Writ-
ing
book
a writing
book
take out
the
staples
join
sheets
end
to
end
(or
side
to
side)
about 20 sheets per book
Folding and
storing posters• Make your posters fold into the size of a book. It is easier if the
poster is made from paper of the right size.
• After use, fold the poster along the original ‘book folds’ and store in
a cover.
end