English Français Español Italiano Deutsch Nederlands Language select / Sélection de la langue / Selección de idioma / Selezione lingua / Sprachauswahl / Taal selecteren / Выбор языка VSX-S520D VSX-S520 Русский
Transcript
English Français Español
Italiano Deutsch Nederlands
Language select / Sélection de la langue / Selección de idioma / Selezione lingua / Sprachauswahl / Taal selecteren / Выбор языка
VSX-S520DVSX-S520
Русский
EN
Before StartWhat's in the box .................................................................... 2Part NamesFront Panel ............................................................................. 3Rear Panel .............................................................................. 4Remote Controller .................................................................. 6Display .................................................................................... 7Install1. Connect the Speakers ........................................................ 82. Connect the TV ..................................................................113. Connect the HDMI AV Components ................................. 124. Connect the Audio Components ....................................... 135. Connect Other Cables ...................................................... 14Initial SetupInitial Setup with Auto Start-up Wizard ................................. 15PlaybackAV Component Playback ...................................................... 18Internet Radio ....................................................................... 19Spotify ................................................................................... 21Music Server ......................................................................... 22USB Storage Device ............................................................. 24AirPlay® ................................................................................ 26BLUETOOTH® Playback ...................................................... 27Listening to the FM/DAB Radio ............................................ 28Listening Modes ................................................................... 31AV Adjust .............................................................................. 40Advanced SetupSystem Setup ........................................................................ 42MCACC ................................................................................. 51Network/Bluetooth ................................................................. 54Firmware UpdateFirmware Update .................................................................. 57OthersTroubleshooting .................................................................... 60General Specifications .......................................................... 65About HDMI .......................................................................... 67License and Trademark Information ..................................... 68
> Before Start > Part Names > Install > Initial Setup > Playback
Advanced Setup | Firmware Update | Others
AV RECEIVER
VSX-S520DVSX-S520Instruction Manual
2
> Before
Advanced Setup | Firmware Update | Others
EN
Before StartWhat
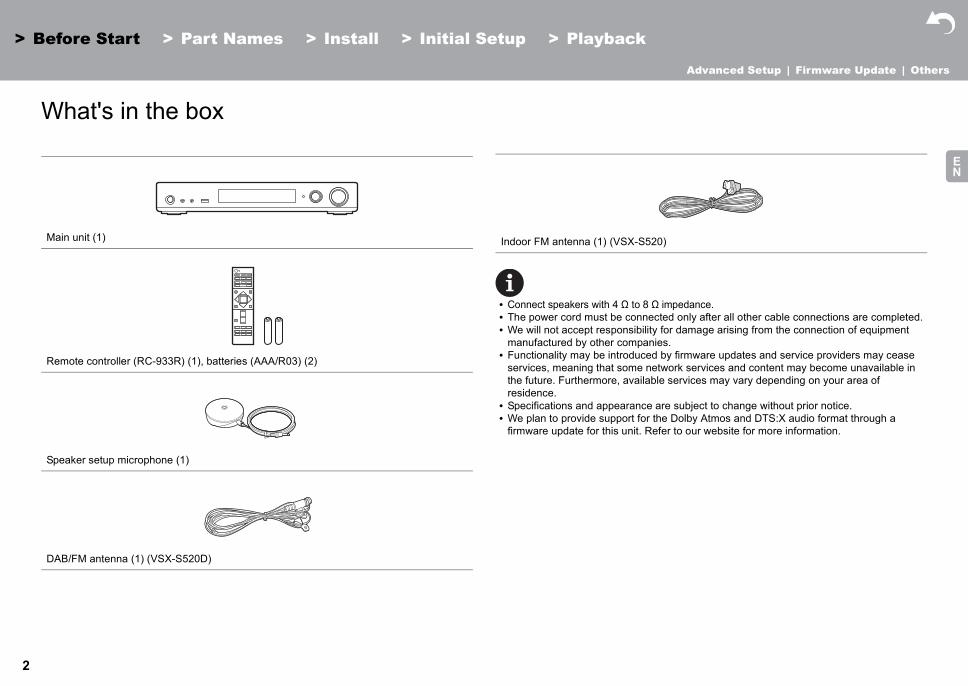
impedance. ed only after all other cable connections are completed.for damage arising from the connection of equipment s.by firmware updates and service providers may cease work services and content may become unavailable in services may vary depending on your area of
re subject to change without prior notice.e Dolby Atmos and DTS:X audio format through a er to our website for more information.
Main unit
Remote c
Speaker s
DAB/FM a
)
Start
's in t
(1)
ontroller (RC
etup microph
ntenna (1) (
> Part Names > Install > Initial Setup > Playback
he box
0 Connect speakers with 4 Ω to 8 Ω 0 The power cord must be connect0 We will not accept responsibility
manufactured by other companie0 Functionality may be introduced
services, meaning that some netthe future. Furthermore, availableresidence.0 Specifications and appearance a0 We plan to provide support for th
firmware update for this unit. Ref
-933R) (1), batteries (AAA/R03) (2)
one (1)
VSX-S520D)
Indoor FM antenna (1) (VSX-S520
> Before
Advanced Setup | Firmware Update | Others
3
EN
Part NamesFront
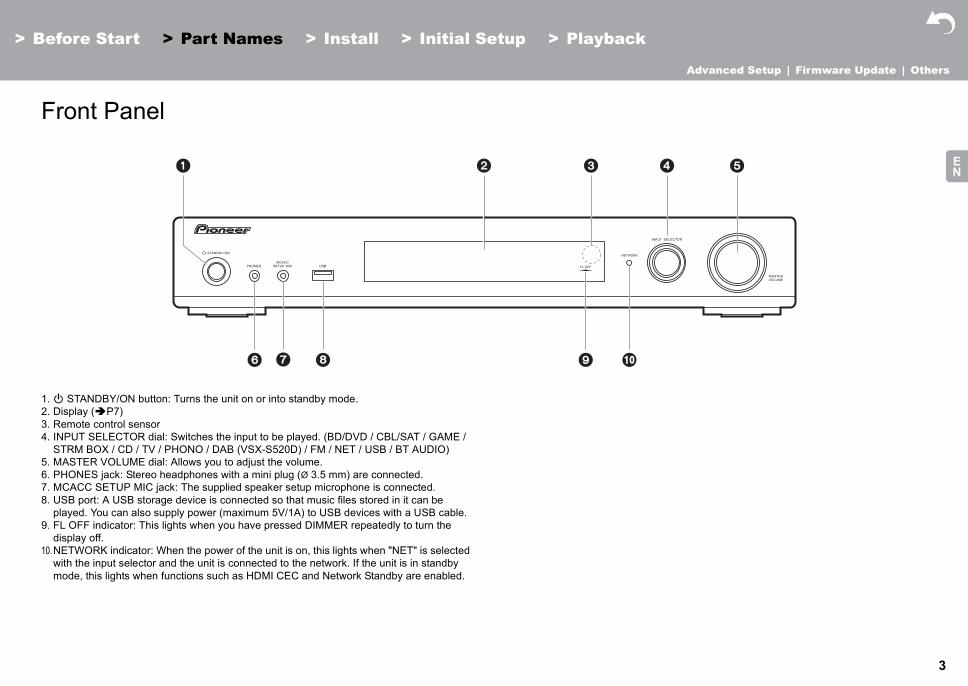
1. Í STAN2. Display (3. Remote 4. INPUT S
STRM B5. MASTER6. PHONES7. MCACC8. USB por
played. Y9. FL OFF
display o10.NETWO
with the mode, th
Start
Pane
DBY/ON butP7)
control sensELECTOR dOX / CD / TV VOLUME d jack: Stere
orial: Switches the input to be played. (BD/DVD / CBL/SAT / GAME / / PHONO / DAB (VSX-S520D) / FM / NET / USB / BT AUDIO)ial: Allows you to adjust the volume.
o headphones with a mini plug (Ø 3.5 mm) are connected. jack: The supplied speaker setup microphone is connected.rage device is connected so that music files stored in it can be supply power (maximum 5V/1A) to USB devices with a USB cable.is lights when you have pressed DIMMER repeatedly to turn the
: When the power of the unit is on, this lights when "NET" is selected r and the unit is connected to the network. If the unit is in standby n functions such as HDMI CEC and Network Standby are enabled.
4
> Before
Advanced Setup | Firmware Update | Others
EN
Rear
1. ANTENN2. Wireless
device. Tforce it b
3. AUDIO I4. SIGNAL5. DIGITAL
with a di6. Power co7. NETWO8. HDMI OU
TV.9. HDMI IN
AV comp10.SPEAKE11. SUBWO
180°
90°
VSX-S5
Start
Pane
A DAB / FM antenna: Rahe diagram eyond this raN jacks: Inpu GND termin IN OPTICALgital optical crd
RK port: ConT jack: Con
jacks: Inputonent.RS terminalOFER PRE
20D
> Part Names > Install > Initial Setup > Playback
l
jack: Connect the supplied antenna.ise for Wi-Fi connection or when using a BLUETOOTH enabled shows the movable range for the wireless antenna. Do not try to nge otherwise you may break it.t AV component audio signals with an analog audio cable.al: The ground wire of the turntable is connected./COAXIAL jacks: Input TV or AV component digital audio signals able or digital coaxial cable.
nect to the network with an Ethernet cable.nect a HDMI cable to transfer video signals and audio signals to a
video signals and audio signals with a HDMI cable connected to an
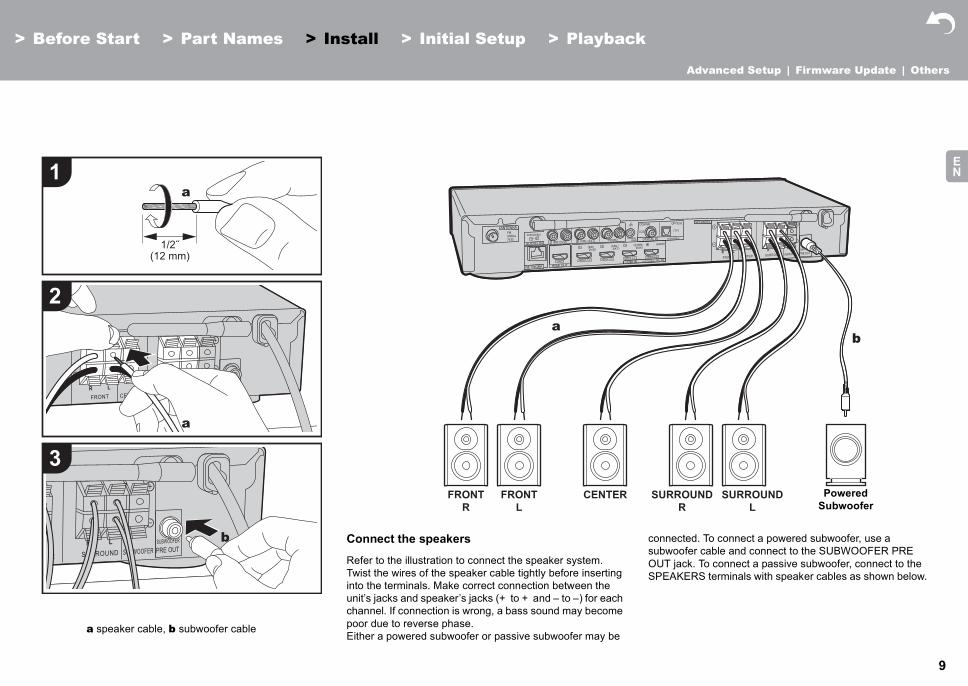
s: Connect speakers or passive subwoofers with speaker cables.OUT jack: Connect a powered subwoofer with a subwoofer cable.
> Before
Advanced Setup | Firmware Update | Others
5
EN
1. ANTENN2. Wireless
device. Tforce it b
3. AUDIO I4. SIGNAL5. DIGITAL
with a di6. Power co7. NETWO8. HDMI OU
TV.9. HDMI IN
AV comp10.SPEAKE11. SUBWO
180°
90°
VSX-S5
Start
A FM UNBA antenna: Rahe diagram eyond this raN jacks: Inpu GND termin IN OPTICALgital optical crd
RK port: ConT jack: Con
jacks: Inputonent.RS terminalOFER PRE
20
> Part Names > Install > Initial Setup > Playback
L 75h jack: Connect the supplied antenna.ise for Wi-Fi connection or when using a BLUETOOTH enabled shows the movable range for the wireless antenna. Do not try to nge otherwise you may break it.t AV component audio signals with an analog audio cable.al: The ground wire of the turntable is connected./COAXIAL jacks: Input TV or AV component digital audio signals able or digital coaxial cable.
nect to the network with an Ethernet cable.nect a HDMI cable to transfer video signals and audio signals to a
video signals and audio signals with a HDMI cable connected to an
s: Connect speakers or passive subwoofers with speaker cables.OUT jack: Connect a powered subwoofer with a subwoofer cable.
6
> Before
Advanced Setup | Firmware Update | Others
EN
Remo
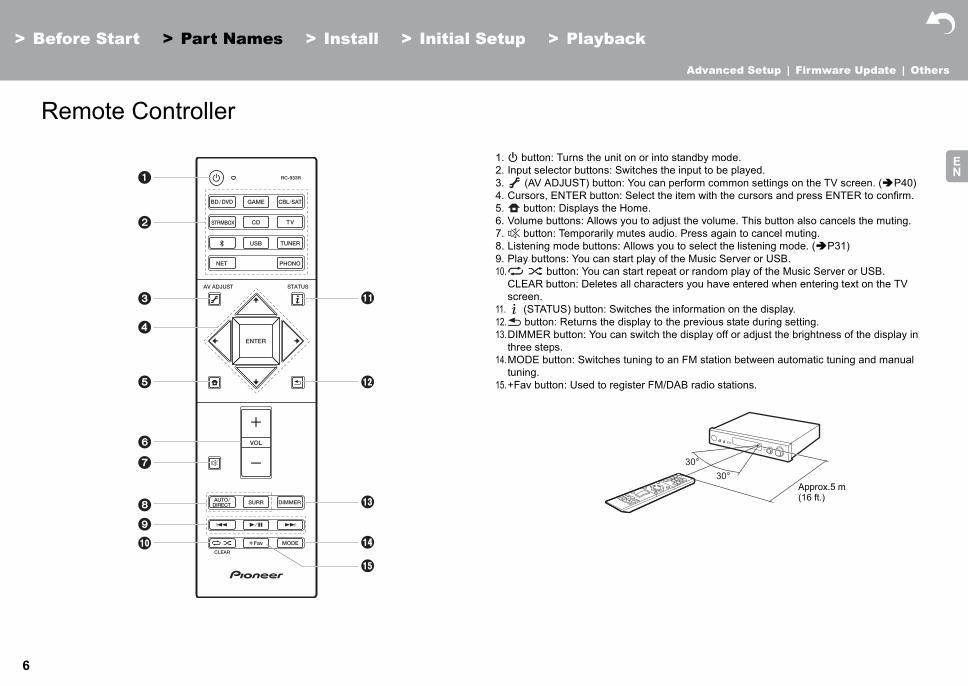
to standby mode.the input to be played.n perform common settings on the TV screen. ( P40)he item with the cursors and press ENTER to confirm.
just the volume. This button also cancels the muting.dio. Press again to cancel muting.ou to select the listening mode. ( P31)f the Music Server or USB.
eat or random play of the Music Server or USB.cters you have entered when entering text on the TV
e information on the display. the previous state during setting.the display off or adjust the brightness of the display in
an FM station between automatic tuning and manual
/DAB radio stations.
30°30°
Approx.5 m (16 ft.)
Start
te Co
> Part Names > Install > Initial Setup > Playback
ntroller
1. Í button: Turns the unit on or in2. Input selector buttons: Switches 3. (AV ADJUST) button: You ca4. Cursors, ENTER button: Select t5. button: Displays the Home.6. Volume buttons: Allows you to ad7. button: Temporarily mutes au8. Listening mode buttons: Allows y9. Play buttons: You can start play o10. button: You can start rep
CLEAR button: Deletes all charascreen.
11. (STATUS) button: Switches th12. button: Returns the display to13.DIMMER button: You can switch
three steps.14.MODE button: Switches tuning to
tuning.15.+Fav button: Used to register FM
> Before
Advanced Setup | Firmware Update | Others
7
EN
Displ
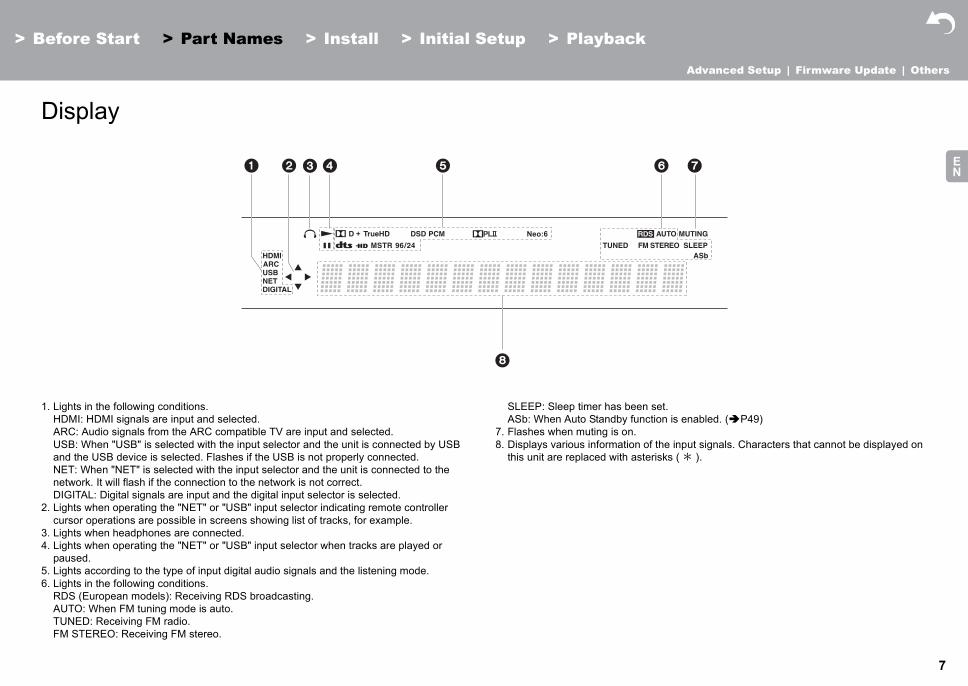
1. Lights inHDMI: HARC: AuUSB: Whand the UNET: Whnetwork.DIGITAL
2. Lights wcursor op
3. Lights w4. Lights w
paused.5. Lights ac6. Lights in
RDS (EuAUTO: WTUNED:FM STE
t.n is enabled. ( P49)
e input signals. Characters that cannot be displayed on ks (* ).
Start
ay
the followingDMI signals dio signals fen "USB" isSB device i
en "NET" is It will flash i: Digital signhen operatinerations are
hen headphohen operatin
cording to th the followingropean modhen FM tun
Receiving FREO: Receiv
> Part Names > Install > Initial Setup > Playback
conditions.are input and selected.rom the ARC compatible TV are input and selected. selected with the input selector and the unit is connected by USB s selected. Flashes if the USB is not properly connected. selected with the input selector and the unit is connected to the f the connection to the network is not correct.als are input and the digital input selector is selected.g the "NET" or "USB" input selector indicating remote controller possible in screens showing list of tracks, for example.nes are connected.g the "NET" or "USB" input selector when tracks are played or
e type of input digital audio signals and the listening mode. conditions.els): Receiving RDS broadcasting.ing mode is auto.M radio.ing FM stereo.
SLEEP: Sleep timer has been seASb: When Auto Standby functio
7. Flashes when muting is on.8. Displays various information of th
this unit are replaced with asteris
Neo:6
8
> Before
Advanced Setup | Firmware Update | Others
EN
Install1. Co
12 F3 C45 S6 S
tall the speakers
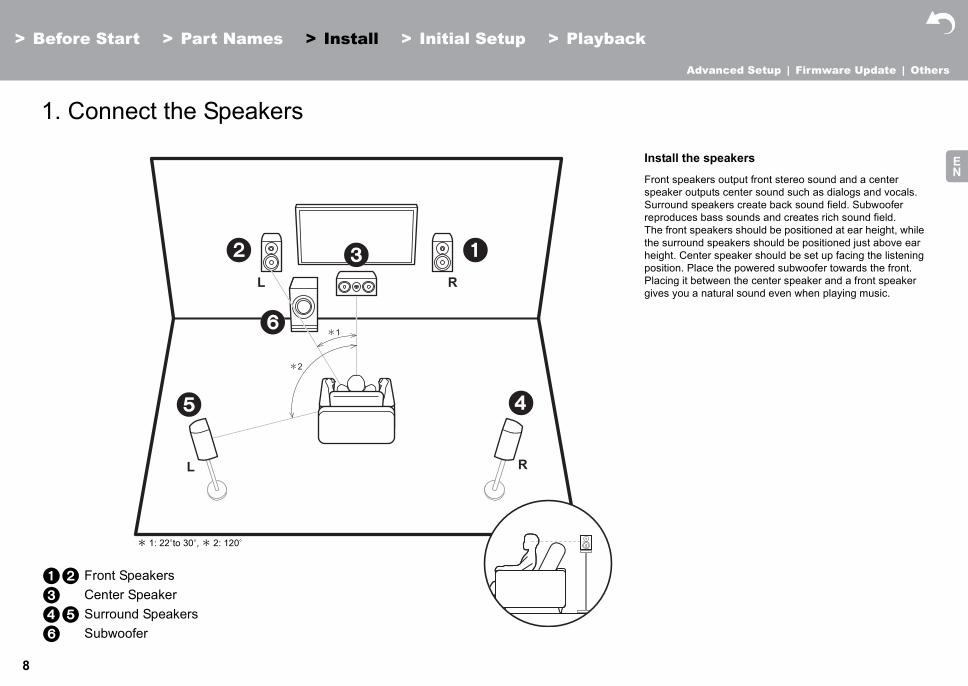
nt speakers output front stereo sound and a center aker outputs center sound such as dialogs and vocals. round speakers create back sound field. Subwoofer roduces bass sounds and creates rich sound field. front speakers should be positioned at ear height, while surround speakers should be positioned just above ear ht. Center speaker should be set up facing the listening ition. Place the powered subwoofer towards the front. cing it between the center speaker and a front speaker s you a natural sound even when playing music.
Start
nnect
* 1
ront Speakenter Speurround Subwoofer
*1
*2
R
R
L
L
: 22eto 30e, * 2: 120e
ersakerpeakers
heigposPlagive
> Part Names > Install > Initial Setup > Playback
the Speakers
Ins
FrospeSurrepThethe
9
> Before
Advanced Setup | Firmware Update | Others
EN
a
1
2
3
b
RROUNDR
SURROUNDL
Powered Subwoofer
nected. To connect a powered subwoofer, use a woofer cable and connect to the SUBWOOFER PRE T jack. To connect a passive subwoofer, connect to the EAKERS terminals with speaker cables as shown below.
Start
speaker cab
(
le, b subwoofer cable
Refer to the illustration to connect the speaker system.Twist the wires of the speaker cable tightly before inserting into the terminals. Make correct connection between the unit’s jacks and speaker’s jacks (+ to + and – to –) for each channel. If connection is wrong, a bass sound may become poor due to reverse phase.Either a powered subwoofer or passive subwoofer may be
OUSP
> Part Names > Install > Initial Setup
1/2˝12 mm)
a
a
b
FRONTR
FRONTL
Connect the speakers
> Playback
a
SUCENTER
consub
10
> Before Start
Advanced Setup | Firmware Update | Others
EN
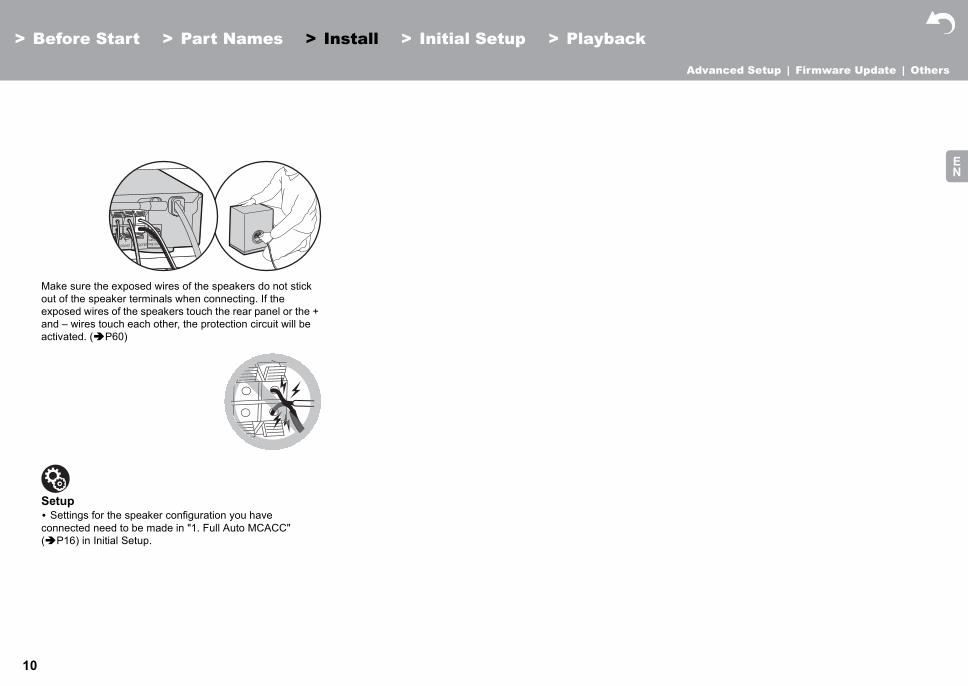
Make sure the exposeout of the speaker termexposed wires of the sand – wires touch eacactivated. ( P60)
Setup0 Settings for the speaconnected need to be( P16) in Initial Setu
> Part Names > Install > Initial Setup > Playback
d wires of the speakers do not stick inals when connecting. If the
peakers touch the rear panel or the + h other, the protection circuit will be
ker configuration you have made in "1. Full Auto MCACC" p.
11
> Before
Advanced Setup | Firmware Update | Others
EN
2. Co
a
1ARC TV
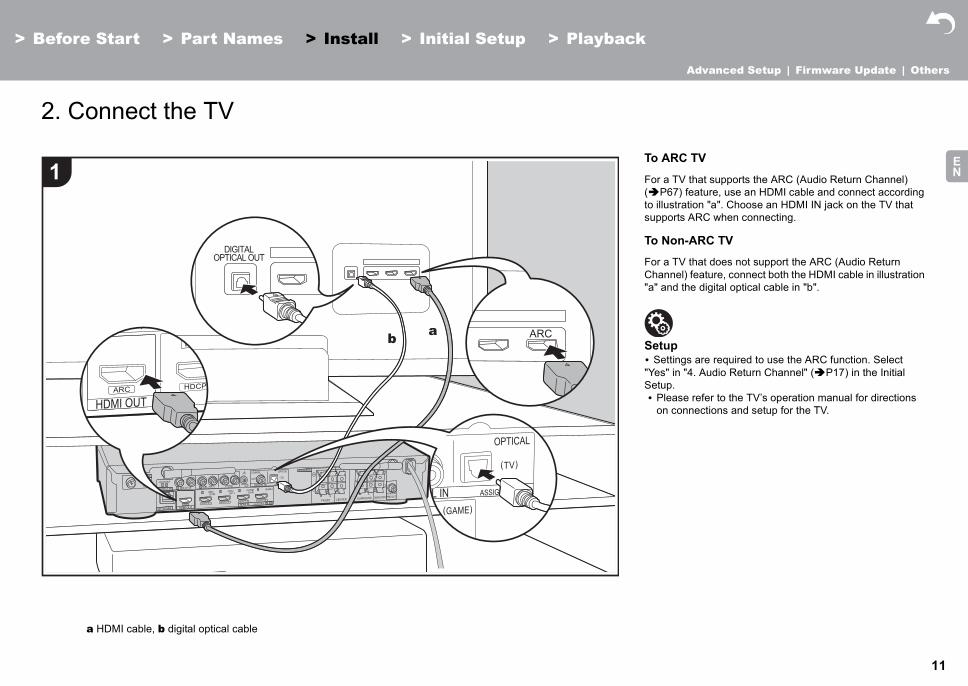
a TV that supports the ARC (Audio Return Channel) P67) feature, use an HDMI cable and connect according lustration "a". Choose an HDMI IN jack on the TV that ports ARC when connecting.
Non-ARC TV
a TV that does not support the ARC (Audio Return nnel) feature, connect both the HDMI cable in illustration
and the digital optical cable in "b".
upettings are required to use the ARC function. Select s" in "4. Audio Return Channel" ( P17) in the Initial up.lease refer to the TV’s operation manual for directions n connections and setup for the TV.
Start
nnect
HDMI cable
, b digital optical cable
ab
OPTICAL OUT ForCha"a"
Set0 S"YeSet0 P
o
> Part Names > Install > Initial Setup > Playback
the TV
DIGITAL
To
For(to ilsup
To
12
> Before
Advanced Setup | Firmware Update | Others
EN
3. Co
a
HDMI OUT
1
GAMEStreaming media player
tupSettings are required to use the HDMI CEC and HDMI Standby Through features. ( P47, 48) Make settings after all connections are complete. To enjoy digital surround sound including Dolby Digital, audio output should be set to "Bitstream output" on the connected Blu-ray Disc player or other device.
Start
nnect
HDMI cable
the HDMI Standby Through feature which allows you to play video and audio from AV components on the TV even when this unit is in standby mode. ( P67)0 To play 4K or 1080p video, use the high speed HDMI
cable.
0
> Part Names > Install > Initial Se
the HDMI AV Components
e.g. BD
a BD/DVD
This is an example of connectthat has an HDMI jack. With cocomponent that conforms withElectronics Control) standard, the HDMI CEC feature that link
tup > Playback
a
Cable/Satellite set-top box
ion with an AV component nnection to an AV
the CEC (Consumer you can use features such as s with the input selector, and
Se0
13
> Before
Advanced Setup | Firmware Update | Others
EN
4. Co
a
Tur
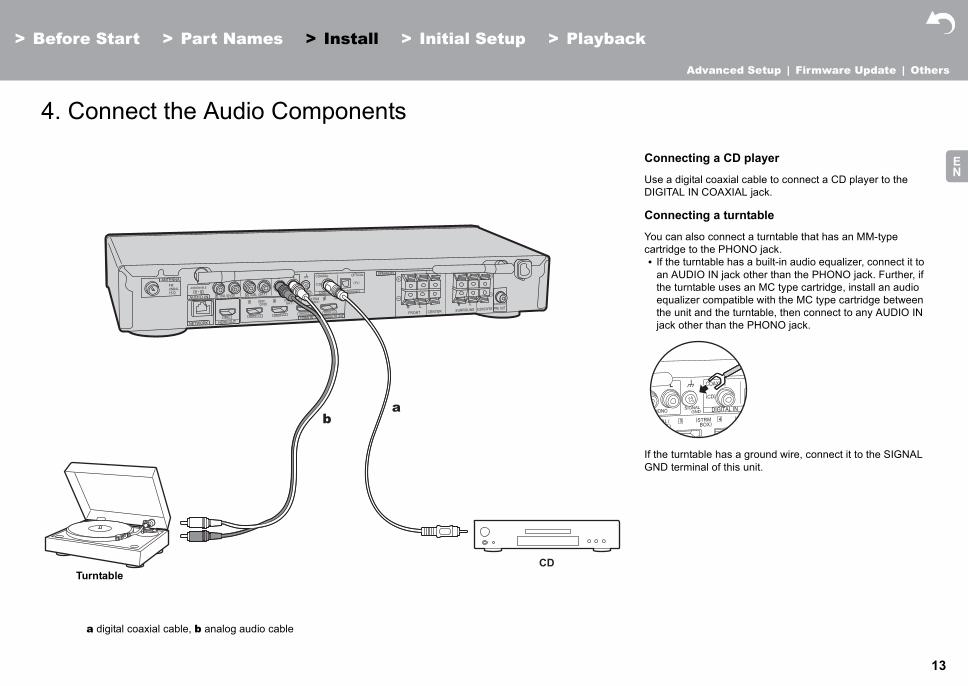
nnecting a CD player
a digital coaxial cable to connect a CD player to the ITAL IN COAXIAL jack.
nnecting a turntable
can also connect a turntable that has an MM-type ridge to the PHONO jack. the turntable has a built-in audio equalizer, connect it to n AUDIO IN jack other than the PHONO jack. Further, if e turntable uses an MC type cartridge, install an audio qualizer compatible with the MC type cartridge between e unit and the turntable, then connect to any AUDIO IN ck other than the PHONO jack.
e turntable has a ground wire, connect it to the SIGNAL D terminal of this unit.
Start
nnect
digital coaxi
ntable
al cable, b analog audio cable
CD
ab
0 Ifathethja
If thGN
> Part Names > Install > Initial Setup > Playback
the Audio Components
Co
UseDIG
Co
Youcart
14
> Before
Advanced Setup | Firmware Update | Others
EN
5. Co
a
1
2
VSX-S5
tenna Hookup
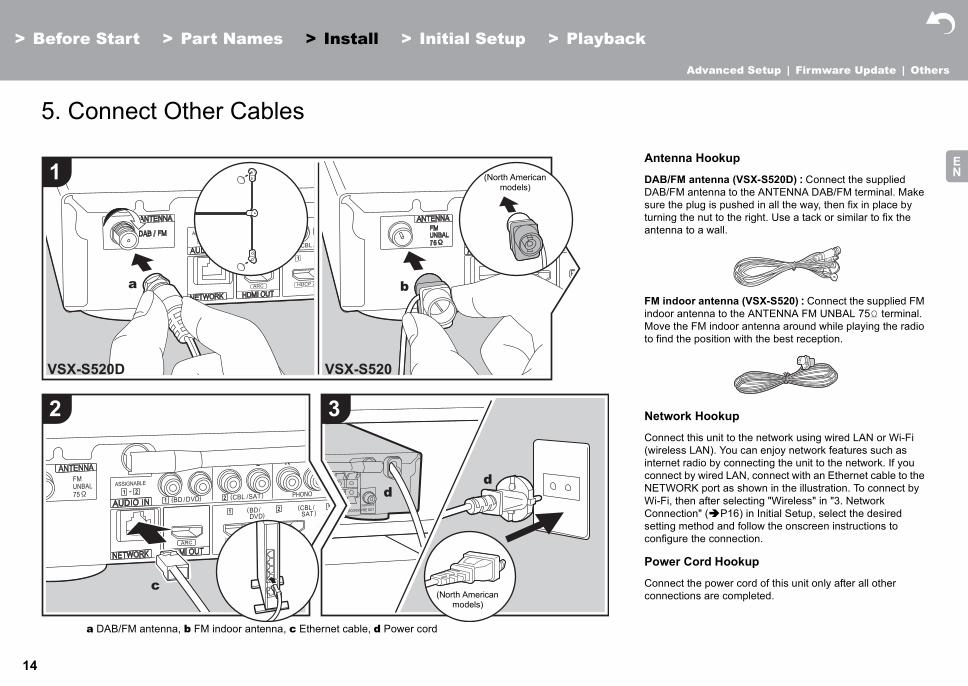
/FM antenna (VSX-S520D) : Connect the supplied /FM antenna to the ANTENNA DAB/FM terminal. Make the plug is pushed in all the way, then fix in place by ing the nut to the right. Use a tack or similar to fix the nna to a wall.
indoor antenna (VSX-S520) : Connect the supplied FM or antenna to the ANTENNA FM UNBAL 75h terminal. e the FM indoor antenna around while playing the radio nd the position with the best reception.
twork Hookup
nect this unit to the network using wired LAN or Wi-Fi eless LAN). You can enjoy network features such as rnet radio by connecting the unit to the network. If you nect by wired LAN, connect with an Ethernet cable to the WORK port as shown in the illustration. To connect by
Fi, then after selecting "Wireless" in "3. Network nection" ( P16) in Initial Setup, select the desired ing method and follow the onscreen instructions to figure the connection.
er Cord Hookup
nect the power cord of this unit only after all other nections are completed.
Start
nnect
DAB/FM an
a
20D
tenna, b FM indoor antenna, c Ethernet cable, d Power cord
dd
3
c
b
VSX-S520
(North American models)
FMindoMovto fi
Ne
Con(wirinteconNETWi-Consettcon
Pow
Concon
> Part Names > Install > Initial Setup > Playback
Other Cables
(North American models)
An
DABDABsureturnante
15
> Before
Advanced Setup | Firmware Update | Others
EN
Initial SetupInitia
1
3
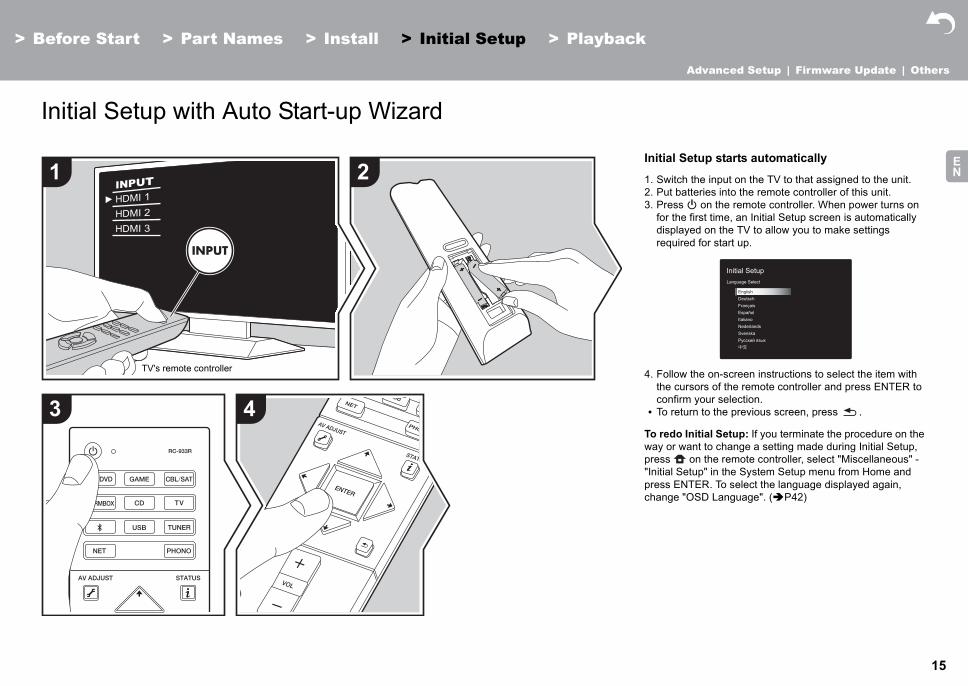
ial Setup starts automatically
witch the input on the TV to that assigned to the unit.ut batteries into the remote controller of this unit.ress Í on the remote controller. When power turns on r the first time, an Initial Setup screen is automatically isplayed on the TV to allow you to make settings equired for start up.
ollow the on-screen instructions to select the item with e cursors of the remote controller and press ENTER to
onfirm your selection.o return to the previous screen, press .
edo Initial Setup: If you terminate the procedure on the or want to change a setting made during Initial Setup,
ss on the remote controller, select "Miscellaneous" - ial Setup" in the System Setup menu from Home and ss ENTER. To select the language displayed again, nge "OSD Language". ( P42)
Initial SetupLanguage Select
English Deutsch Français Español Italiano Nederlands Svenska Русский язык 中文
Start
l Setu
TV
4
's remote controller 4. Fthc0 T
To rwaypre"Initprecha
> Part Names > Install > Initial Setup > Playback
p with Auto Start-up Wizard
2Init
1. S2. P3. P
fodr
16
> Before Start
Advanced Setup | Firmware Update | Others
EN
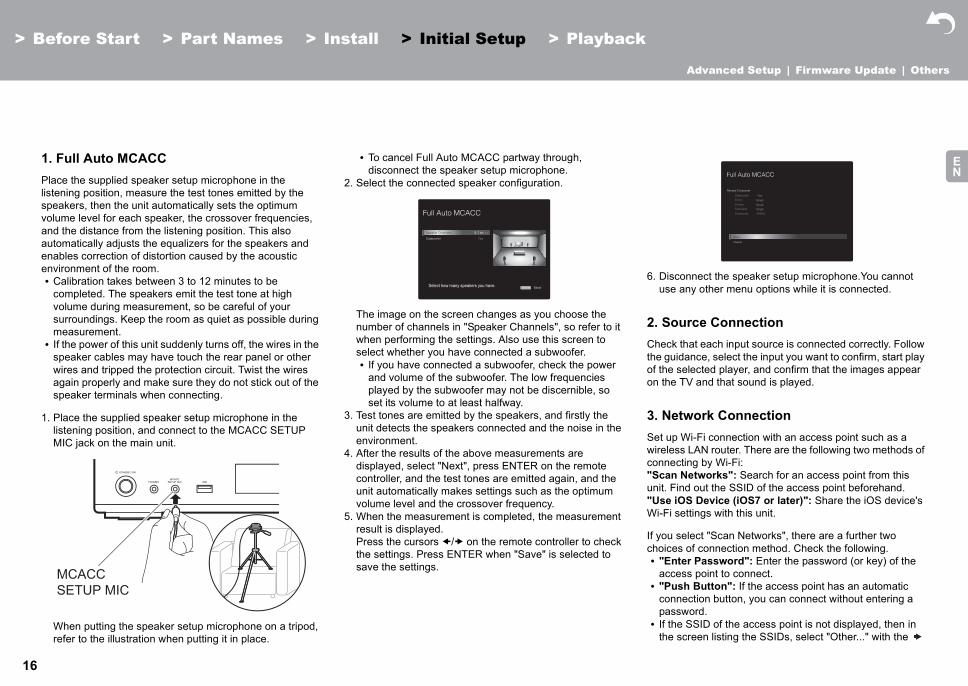
1. Full Auto MCAPlace the supplied spelistening position, measpeakers, then the unvolume level for each and the distance fromautomatically adjusts enables correction of environment of the roo0 Calibration takes be
completed. The spevolume during measurroundings. Keepmeasurement.0 If the power of this u
speaker cables mawires and tripped thagain properly and speaker terminals w
1. Place the supplied listening position, aMIC jack on the ma
When putting the sprefer to the illustrati
isconnect the speaker setup microphone.You cannot se any other menu options while it is connected.
Source Connectioneck that each input source is connected correctly. Follow guidance, select the input you want to confirm, start play he selected player, and confirm that the images appear the TV and that sound is played.
Network Connectiont up Wi-Fi connection with an access point such as a eless LAN router. There are the following two methods of necting by Wi-Fi:an Networks": Search for an access point from this
t. Find out the SSID of the access point beforehand.e iOS Device (iOS7 or later)": Share the iOS device's Fi settings with this unit.
ou select "Scan Networks", there are a further two ices of connection method. Check the following.Enter Password": Enter the password (or key) of the ccess point to connect.Push Button": If the access point has an automatic onnection button, you can connect without entering a assword.f the SSID of the access point is not displayed, then in he screen listing the SSIDs, select "Other..." with the
MCACCSETUP MIC
> Part Names > Install > Initial Setup > Playback
CCaker setup microphone in the sure the test tones emitted by the
it automatically sets the optimum speaker, the crossover frequencies, the listening position. This also the equalizers for the speakers and distortion caused by the acoustic m.tween 3 to 12 minutes to be akers emit the test tone at high surement, so be careful of your the room as quiet as possible during
nit suddenly turns off, the wires in the y have touch the rear panel or other e protection circuit. Twist the wires make sure they do not stick out of the hen connecting.
speaker setup microphone in the nd connect to the MCACC SETUP in unit.
eaker setup microphone on a tripod, on when putting it in place.
0 To cancel Full Auto MCACC partway through, disconnect the speaker setup microphone.
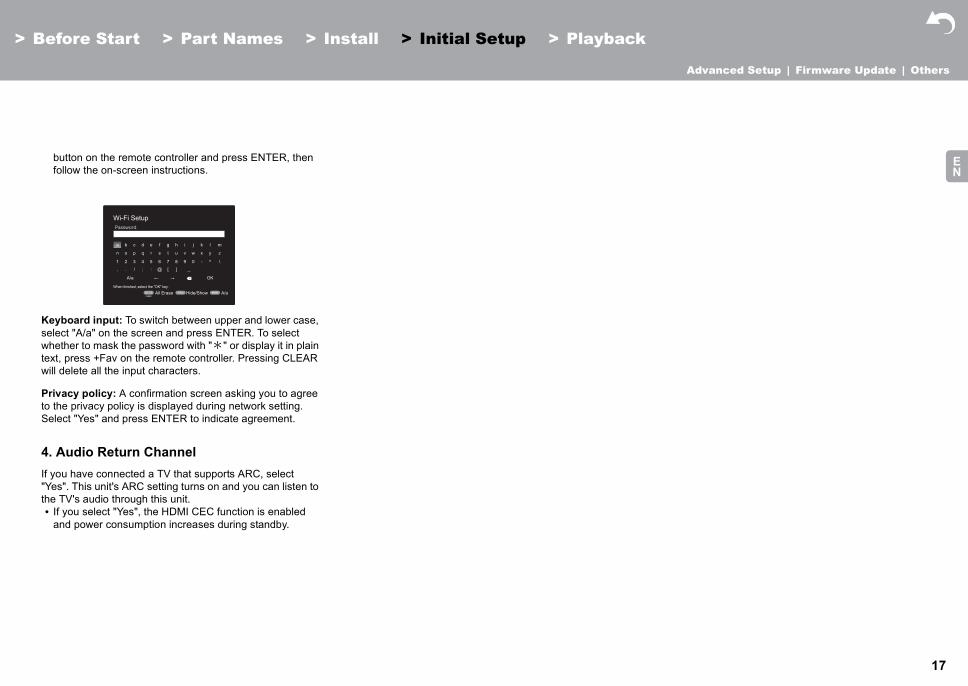
2. Select the connected speaker configuration.
The image on the screen changes as you choose the number of channels in "Speaker Channels", so refer to it when performing the settings. Also use this screen to select whether you have connected a subwoofer.0 If you have connected a subwoofer, check the power
and volume of the subwoofer. The low frequencies played by the subwoofer may not be discernible, so set its volume to at least halfway.
3. Test tones are emitted by the speakers, and firstly the unit detects the speakers connected and the noise in the environment.
4. After the results of the above measurements are displayed, select "Next", press ENTER on the remote controller, and the test tones are emitted again, and the unit automatically makes settings such as the optimum volume level and the crossover frequency.
5. When the measurement is completed, the measurement result is displayed.Press the cursors / on the remote controller to check the settings. Press ENTER when "Save" is selected to save the settings.
6. Du
2. Chtheof ton
3. Sewircon"Scuni"UsWi-
If ycho0 "
a0 "
cp0 I
t
Select how many speakers you have.
5.1 ch
17
> Before Start
Advanced Setup | Firmware Update | Others
EN
button on the remofollow the on-scree
Keyboard input: To sselect "A/a" on the scrwhether to mask the ptext, press +Fav on thwill delete all the input
Privacy policy: A conto the privacy policy isSelect "Yes" and pres
4. Audio Return If you have connected"Yes". This unit's ARCthe TV's audio through0 If you select "Yes",
and power consum
Wi-Fi Setu
When finished, sele
A/a
a b c d
n o p q
1 2 3 4
, . / ;
> Part Names > Install > Initial Setup > Playback
te controller and press ENTER, then n instructions.
witch between upper and lower case, een and press ENTER. To select assword with "*" or display it in plain e remote controller. Pressing CLEAR characters.
firmation screen asking you to agree displayed during network setting. s ENTER to indicate agreement.
Channel a TV that supports ARC, select setting turns on and you can listen to this unit.
the HDMI CEC function is enabled ption increases during standby.
p
ct the "OK" key.A/aAll Erase
OK
e f g h i j k l m
r s t u v w x y z
5 6 7 8 9 0 - ^ \
: @ [ ]
Hide/Show
18
> Before
Advanced Setup | Firmware Update | Others
EN
PlaybackAV C
a
b
Start
ompo
> Part Names > Install > Initial Setup > Playback
nent Playback
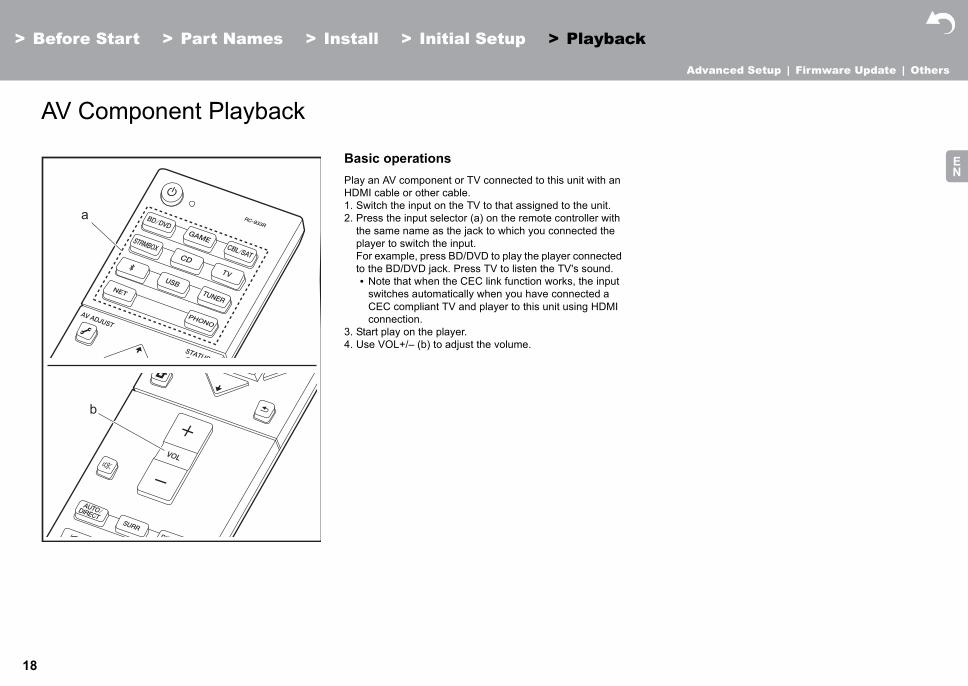
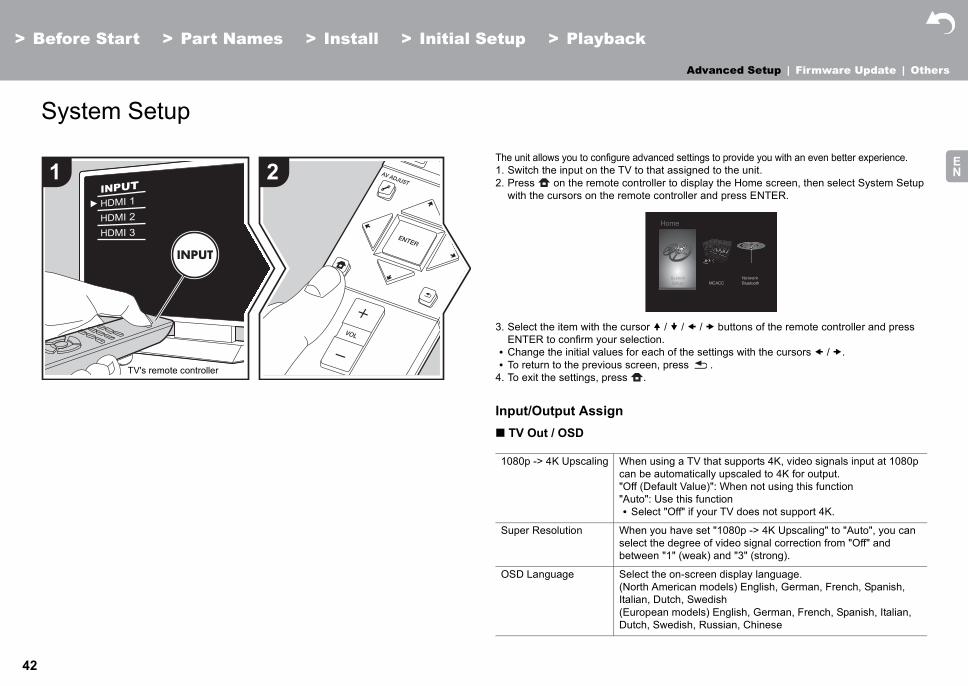
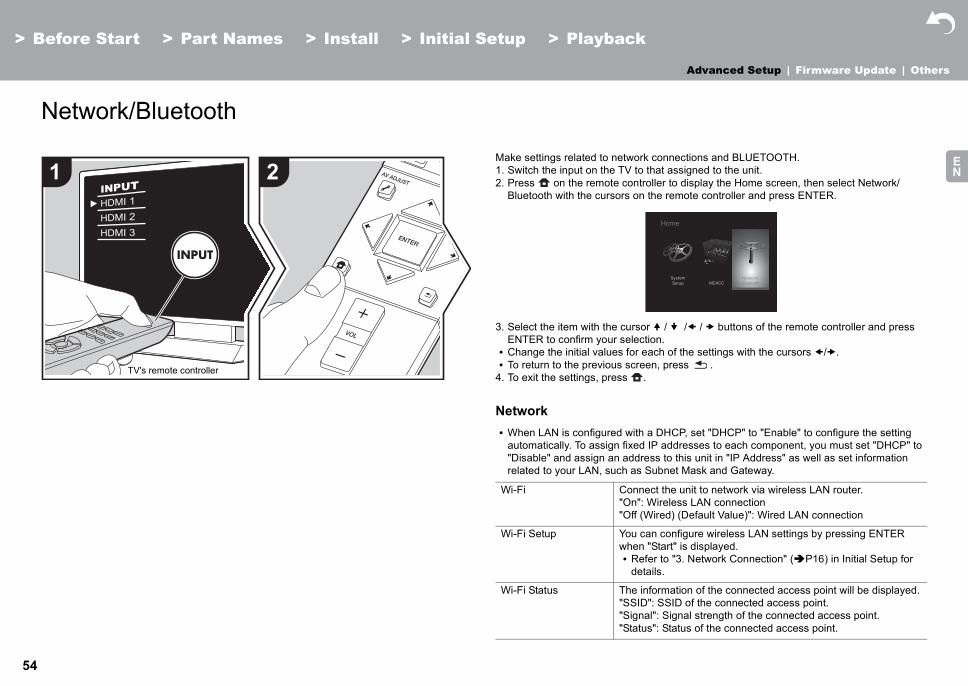
Basic operationsPlay an AV component or TV connected to this unit with an HDMI cable or other cable.1. Switch the input on the TV to that assigned to the unit.2. Press the input selector (a) on the remote controller with
the same name as the jack to which you connected the player to switch the input. For example, press BD/DVD to play the player connected to the BD/DVD jack. Press TV to listen the TV's sound.0 Note that when the CEC link function works, the input
switches automatically when you have connected a CEC compliant TV and player to this unit using HDMI connection.
3. Start play on the player.4. Use VOL+/– (b) to adjust the volume.
19
> Before
Advanced Setup | Firmware Update | Others
EN
Intern
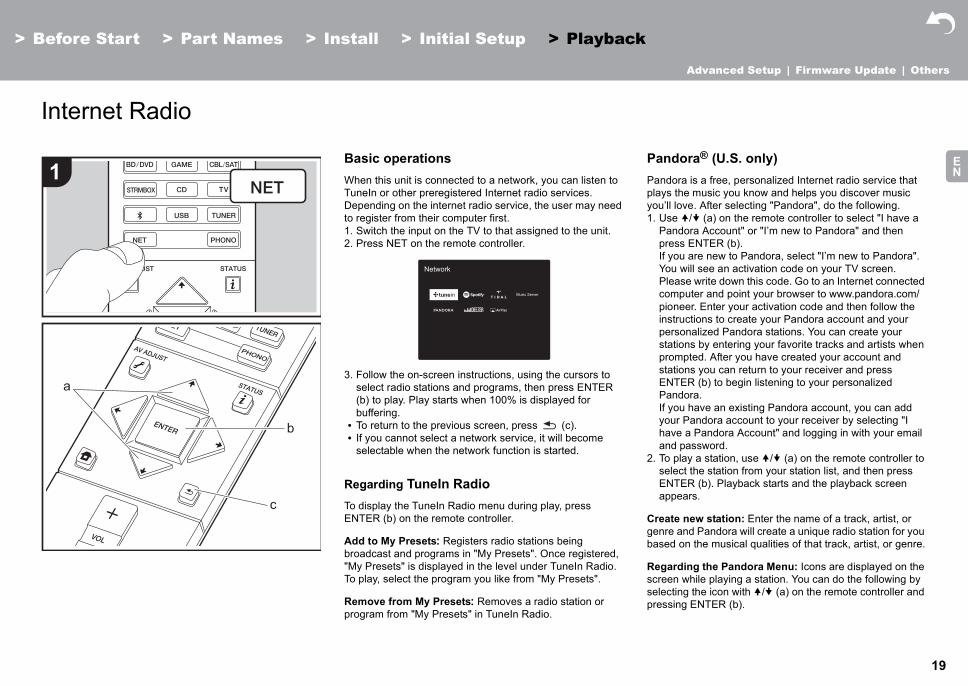
ndora® (U.S. only)ndora is a free, personalized Internet radio service that ys the music you know and helps you discover music ’ll love. After selecting "Pandora", do the following.se / (a) on the remote controller to select "I have a andora Account" or "I’m new to Pandora" and then ress ENTER (b).
f you are new to Pandora, select "I’m new to Pandora". ou will see an activation code on your TV screen. lease write down this code. Go to an Internet connected omputer and point your browser to www.pandora.com/ioneer. Enter your activation code and then follow the
nstructions to create your Pandora account and your ersonalized Pandora stations. You can create your tations by entering your favorite tracks and artists when rompted. After you have created your account and tations you can return to your receiver and press NTER (b) to begin listening to your personalized andora.
f you have an existing Pandora account, you can add our Pandora account to your receiver by selecting "I ave a Pandora Account" and logging in with your email nd password.o play a station, use / (a) on the remote controller to elect the station from your station list, and then press NTER (b). Playback starts and the playback screen ppears.
ate new station: Enter the name of a track, artist, or re and Pandora will create a unique radio station for you ed on the musical qualities of that track, artist, or genre.
garding the Pandora Menu: Icons are displayed on the een while playing a station. You can do the following by ecting the icon with / (a) on the remote controller and ssing ENTER (b).
a
1
Start
et Ra
> Part Names > Install > Initial Setup > Playback
dio
Basic operationsWhen this unit is connected to a network, you can listen to TuneIn or other preregistered Internet radio services.Depending on the internet radio service, the user may need to register from their computer first.1. Switch the input on the TV to that assigned to the unit.2. Press NET on the remote controller.
3. Follow the on-screen instructions, using the cursors to select radio stations and programs, then press ENTER (b) to play. Play starts when 100% is displayed for buffering.0 To return to the previous screen, press (c).0 If you cannot select a network service, it will become
selectable when the network function is started.
Regarding TuneIn RadioTo display the TuneIn Radio menu during play, press ENTER (b) on the remote controller.
Add to My Presets: Registers radio stations being broadcast and programs in "My Presets". Once registered, "My Presets" is displayed in the level under TuneIn Radio. To play, select the program you like from "My Presets".
Remove from My Presets: Removes a radio station or program from "My Presets" in TuneIn Radio.
PaPaplayou1. U
PpIYPcpipspsEPIyha
2. TsEa
Cregenbas
Rescrselpre
c
b
20
> Before Start
Advanced Setup | Firmware Update | Others
EN
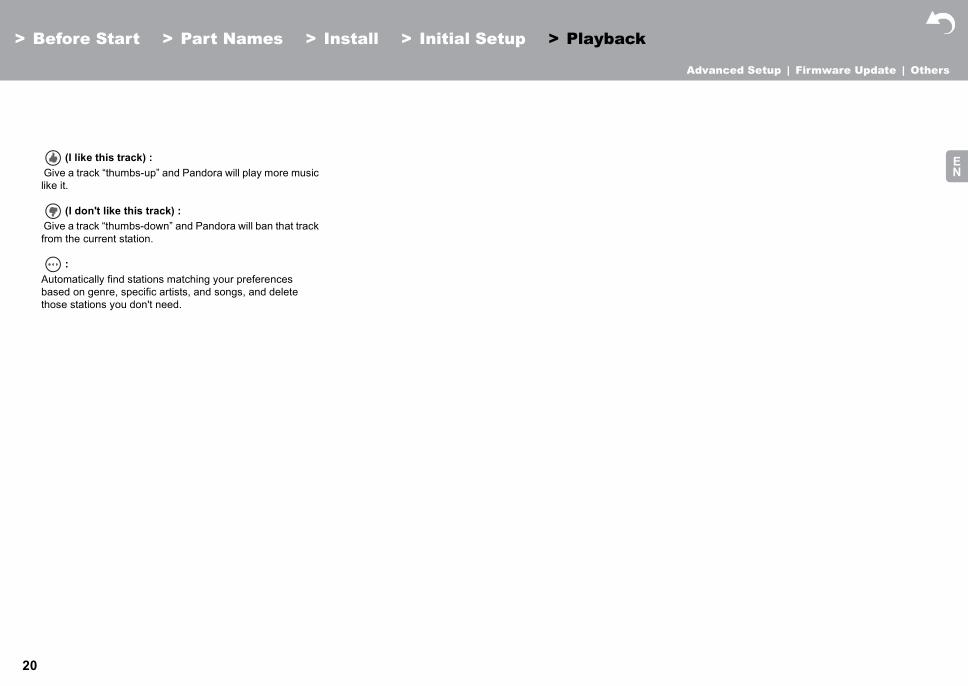
(I like this track Give a track “thumbs-like it.
(I don't like this Give a track “thumbs-from the current statio
: Automatically find statbased on genre, specthose stations you don
> Part Names > Install > Initial Setup > Playback
) :up” and Pandora will play more music
track) :down” and Pandora will ban that track n.
ions matching your preferences ific artists, and songs, and delete 't need.
21
> Before
Advanced Setup | Firmware Update | Others
EN
Spoti
1
2
3
4
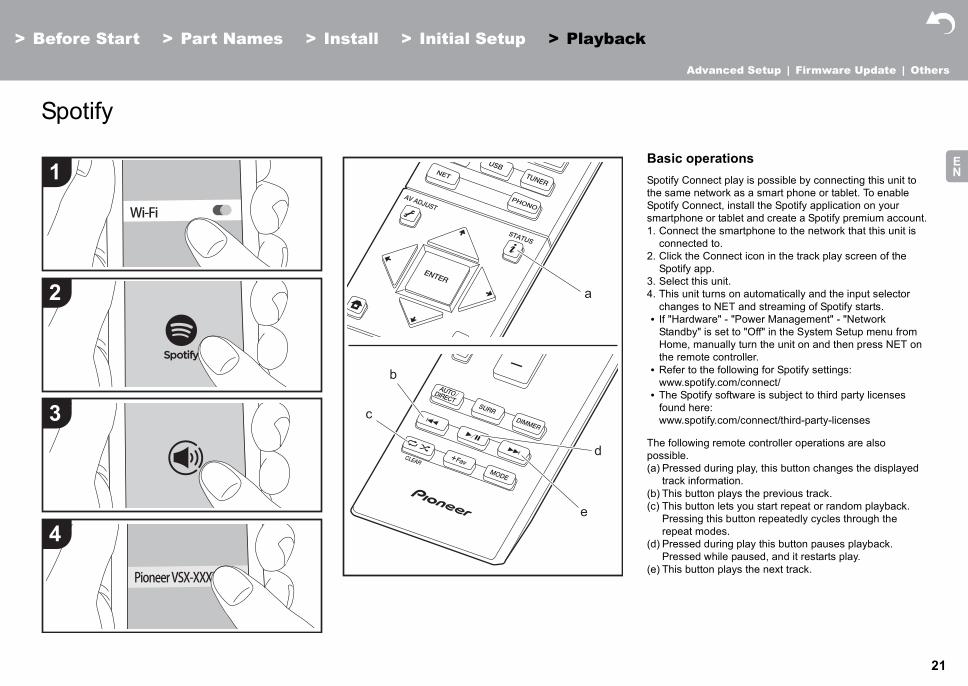
sic operationstify Connect play is possible by connecting this unit to
same network as a smart phone or tablet. To enable tify Connect, install the Spotify application on your
artphone or tablet and create a Spotify premium account.onnect the smartphone to the network that this unit is onnected to.lick the Connect icon in the track play screen of the potify app.elect this unit.his unit turns on automatically and the input selector hanges to NET and streaming of Spotify starts.f "Hardware" - "Power Management" - "Network tandby" is set to "Off" in the System Setup menu from ome, manually turn the unit on and then press NET on
he remote controller.efer to the following for Spotify settings: ww.spotify.com/connect/he Spotify software is subject to third party licenses
following remote controller operations are also sible.Pressed during play, this button changes the displayed track information.This button plays the previous track.This button lets you start repeat or random playback. Pressing this button repeatedly cycles through the repeat modes.Pressed during play this button pauses playback. Pressed while paused, and it restarts play.This button plays the next track.
Start
fy
Wi-F
Pion
eer VSX-XXXX XXXX
b
d
e
c
a
2. CS
3. S4. T
c0 I
SHt0 R
w0 T
fw
Thepos(a)
(b)(c)
(d)
(e)
> Part Names > Install > Initial Setup > Playback
i
BaSpotheSposm1. C
c
22
> Before
Advanced Setup | Firmware Update | Others
EN
Music
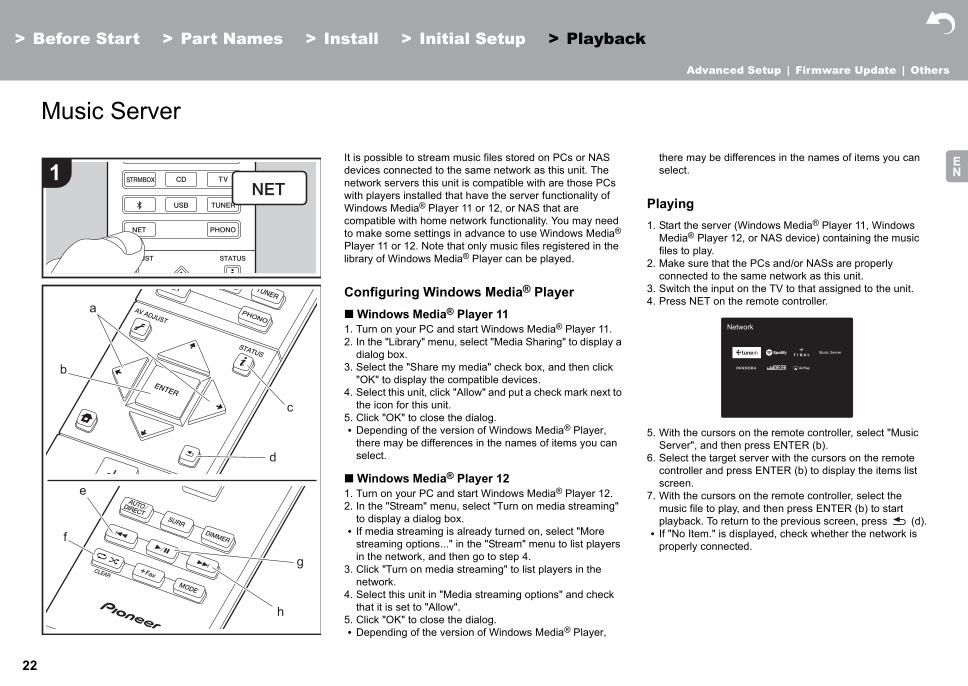
here may be differences in the names of items you can elect.
yingtart the server (Windows Media® Player 11, Windows edia® Player 12, or NAS device) containing the music
iles to play.ake sure that the PCs and/or NASs are properly
onnected to the same network as this unit.witch the input on the TV to that assigned to the unit.ress NET on the remote controller.
ith the cursors on the remote controller, select "Music erver", and then press ENTER (b).elect the target server with the cursors on the remote ontroller and press ENTER (b) to display the items list creen.ith the cursors on the remote controller, select the usic file to play, and then press ENTER (b) to start layback. To return to the previous screen, press (d).
f "No Item." is displayed, check whether the network is roperly connected.
a
b
e
f
1
Start
Serv
> Part Names > Install > Initial Setup > Playback
er
It is possible to stream music files stored on PCs or NAS devices connected to the same network as this unit. The network servers this unit is compatible with are those PCs with players installed that have the server functionality of Windows Media® Player 11 or 12, or NAS that are compatible with home network functionality. You may need to make some settings in advance to use Windows Media® Player 11 or 12. Note that only music files registered in the library of Windows Media® Player can be played.
Configuring Windows Media® Player∫ Windows Media® Player 111. Turn on your PC and start Windows Media® Player 11.2. In the "Library" menu, select "Media Sharing" to display a
dialog box.3. Select the "Share my media" check box, and then click
"OK" to display the compatible devices.4. Select this unit, click "Allow" and put a check mark next to
the icon for this unit.5. Click "OK" to close the dialog.0 Depending of the version of Windows Media® Player,
there may be differences in the names of items you can select.
∫ Windows Media® Player 121. Turn on your PC and start Windows Media® Player 12.2. In the "Stream" menu, select "Turn on media streaming"
to display a dialog box.0 If media streaming is already turned on, select "More
streaming options..." in the "Stream" menu to list players in the network, and then go to step 4.
3. Click "Turn on media streaming" to list players in the network.
4. Select this unit in "Media streaming options" and check that it is set to "Allow".
5. Click "OK" to close the dialog.0 Depending of the version of Windows Media® Player,
ts
Pla1. S
Mf
2. Mc
3. S4. P
5. WS
6. Scs
7. Wmp0 I
p
c
d
g
h
> Before Start
Advanced Setup | Firmware Update | Others
23
EN
0 Depending on the snot recognize it, or Furthermore, the unstored on servers.0 For music files on a
tracks per folder, anlevels deep.
The following remote possible.(a) When the folder or
you can change th(c) Pressed during pla
track information. Pdisplayed, this butt
(e) This button plays t(f) This button lets yo
Pressing this buttorepeat modes.
(g) Pressed during plaPressed while pau
(h) This button plays t
Controlling RemYou can use this unit tby operating the PC insupports remote playb1. Turn on your PC an2. Open the "Stream"
control of my Playestreaming" to list pl
3. Switch the input on4. Select and right-clic
Media® Player 12. Tanother server, opeLibraries" and selec
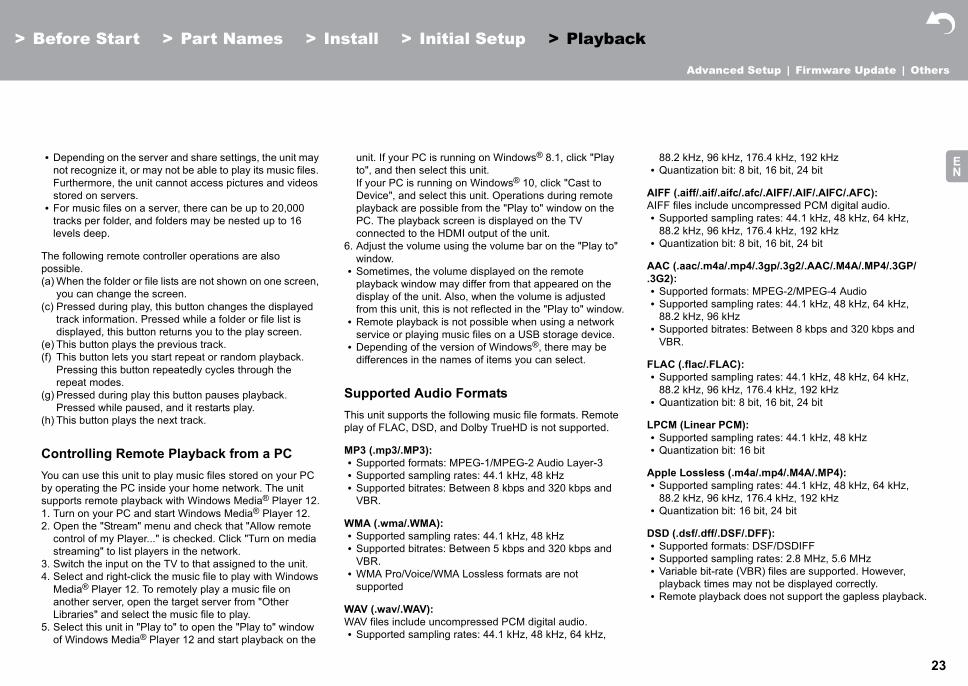
D (.dsf/.dff/.DSF/.DFF):upported formats: DSF/DSDIFFupported sampling rates: 2.8 MHz, 5.6 MHzariable bit-rate (VBR) files are supported. However, layback times may not be displayed correctly.emote playback does not support the gapless playback.
> Part Names > Install > Initial Setup > Playback
erver and share settings, the unit may may not be able to play its music files. it cannot access pictures and videos
server, there can be up to 20,000 d folders may be nested up to 16
controller operations are also
file lists are not shown on one screen, e screen.y, this button changes the displayed ressed while a folder or file list is
on returns you to the play screen.he previous track.u start repeat or random playback. n repeatedly cycles through the
y this button pauses playback. sed, and it restarts play.he next track.
ote Playback from a PCo play music files stored on your PC side your home network. The unit ack with Windows Media® Player 12.d start Windows Media® Player 12.menu and check that "Allow remote r..." is checked. Click "Turn on media ayers in the network. the TV to that assigned to the unit.k the music file to play with Windows o remotely play a music file on n the target server from "Other t the music file to play. lay to" to open the "Play to" window Player 12 and start playback on the
unit. If your PC is running on Windows® 8.1, click "Play to", and then select this unit. If your PC is running on Windows® 10, click "Cast to Device", and select this unit. Operations during remote playback are possible from the "Play to" window on the PC. The playback screen is displayed on the TV connected to the HDMI output of the unit.
6. Adjust the volume using the volume bar on the "Play to" window.0 Sometimes, the volume displayed on the remote
playback window may differ from that appeared on the display of the unit. Also, when the volume is adjusted from this unit, this is not reflected in the "Play to" window.0 Remote playback is not possible when using a network
service or playing music files on a USB storage device.0 Depending of the version of Windows®, there may be
differences in the names of items you can select.
Supported Audio FormatsThis unit supports the following music file formats. Remote play of FLAC, DSD, and Dolby TrueHD is not supported.
MP3 (.mp3/.MP3):0 Supported formats: MPEG-1/MPEG-2 Audio Layer-30 Supported sampling rates: 44.1 kHz, 48 kHz0 Supported bitrates: Between 8 kbps and 320 kbps and
VBR.
WMA (.wma/.WMA):0 Supported sampling rates: 44.1 kHz, 48 kHz0 Supported bitrates: Between 5 kbps and 320 kbps and
VBR.0 WMA Pro/Voice/WMA Lossless formats are not
supported
WAV (.wav/.WAV):WAV files include uncompressed PCM digital audio.0 Supported sampling rates: 44.1 kHz, 48 kHz, 64 kHz,
80 Q
AIFAIF0 S
80 Q
AA.3G0 S0 S
80 S
V
FL0 S
80 Q
LP0 S0 Q
Ap0 S
80 Q
DS0 S0 S0 V
p0 R
24
> Before
Advanced Setup | Firmware Update | Others
EN
USB
1
2
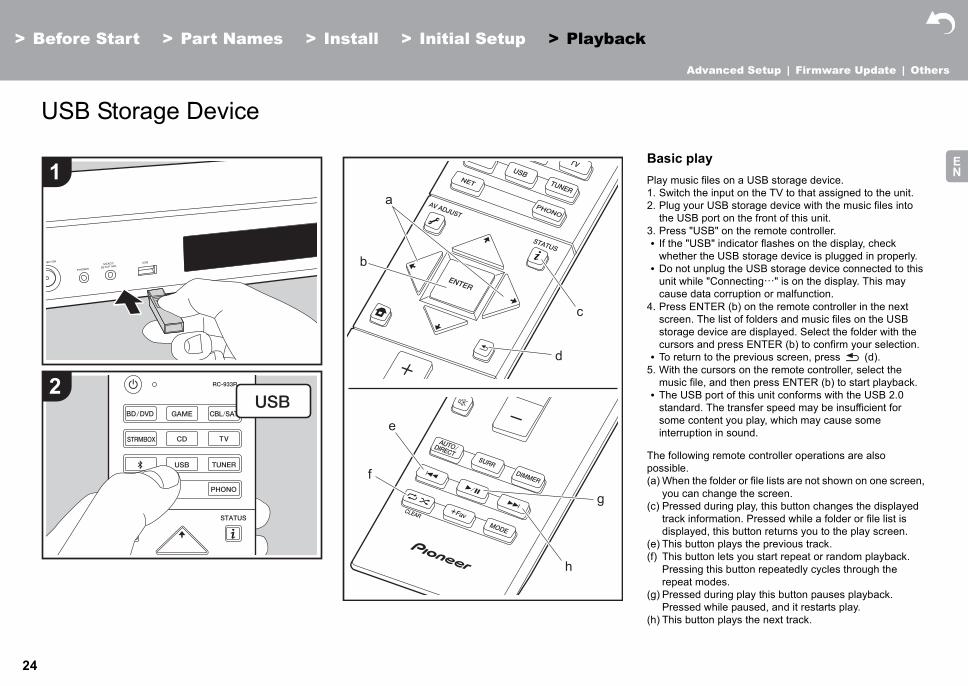
sic playy music files on a USB storage device.witch the input on the TV to that assigned to the unit.lug your USB storage device with the music files into
he USB port on the front of this unit.ress "USB" on the remote controller.
f the "USB" indicator flashes on the display, check hether the USB storage device is plugged in properly.o not unplug the USB storage device connected to this nit while "Connecting…" is on the display. This may ause data corruption or malfunction.ress ENTER (b) on the remote controller in the next creen. The list of folders and music files on the USB torage device are displayed. Select the folder with the ursors and press ENTER (b) to confirm your selection.o return to the previous screen, press (d).ith the cursors on the remote controller, select the usic file, and then press ENTER (b) to start playback.he USB port of this unit conforms with the USB 2.0 tandard. The transfer speed may be insufficient for ome content you play, which may cause some
nterruption in sound.
following remote controller operations are also sible.When the folder or file lists are not shown on one screen, you can change the screen.Pressed during play, this button changes the displayed track information. Pressed while a folder or file list is displayed, this button returns you to the play screen.This button plays the previous track.This button lets you start repeat or random playback. Pressing this button repeatedly cycles through the repeat modes.Pressed during play this button pauses playback. Pressed while paused, and it restarts play.This button plays the next track.
Start
Stora
e
g
h
f
c
b
d
w0 D
uc
4. Pssc0 T
5. Wm0 T
ssi
Thepos(a)
(c)
(e)(f)
(g)
(h)
> Part Names > Install > Initial Setup > Playback
ge Device
a
BaPla1. S2. P
t3. P0 I
> Before Start
Advanced Setup | Firmware Update | Others
25
EN
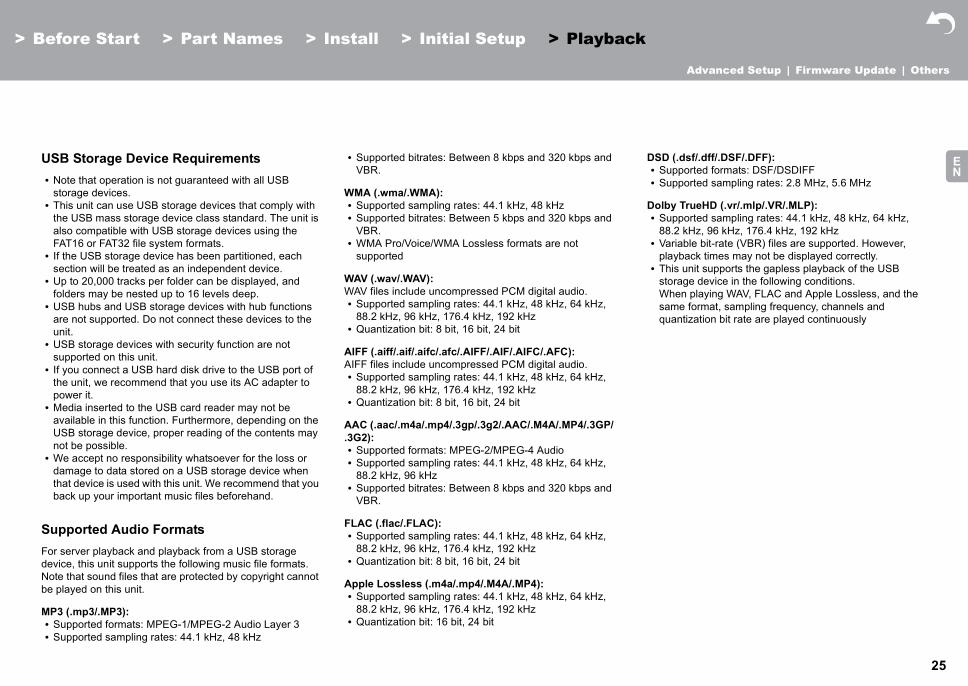
USB Storage De0 Note that operation
storage devices.0 This unit can use U
the USB mass storaalso compatible witFAT16 or FAT32 file0 If the USB storage
section will be treat0 Up to 20,000 tracks
folders may be nes0 USB hubs and USB
are not supported. unit.0 USB storage device
supported on this u0 If you connect a US
the unit, we recommpower it.0 Media inserted to th
available in this funUSB storage devicenot be possible.0 We accept no respo
damage to data stothat device is used wback up your impor
Supported AudioFor server playback adevice, this unit suppoNote that sound files tbe played on this unit.
D (.dsf/.dff/.DSF/.DFF):upported formats: DSF/DSDIFFupported sampling rates: 2.8 MHz, 5.6 MHz
lby TrueHD (.vr/.mlp/.VR/.MLP):upported sampling rates: 44.1 kHz, 48 kHz, 64 kHz, 8.2 kHz, 96 kHz, 176.4 kHz, 192 kHzariable bit-rate (VBR) files are supported. However, layback times may not be displayed correctly.his unit supports the gapless playback of the USB torage device in the following conditions.hen playing WAV, FLAC and Apple Lossless, and the
ame format, sampling frequency, channels and uantization bit rate are played continuously
> Part Names > Install > Initial Setup > Playback
vice Requirements is not guaranteed with all USB
SB storage devices that comply with ge device class standard. The unit is
h USB storage devices using the system formats.
device has been partitioned, each ed as an independent device. per folder can be displayed, and ted up to 16 levels deep. storage devices with hub functions
Do not connect these devices to the
s with security function are not nit.B hard disk drive to the USB port of end that you use its AC adapter to
e USB card reader may not be ction. Furthermore, depending on the , proper reading of the contents may
nsibility whatsoever for the loss or red on a USB storage device when ith this unit. We recommend that you
tant music files beforehand.
Formatsnd playback from a USB storage rts the following music file formats. hat are protected by copyright cannot
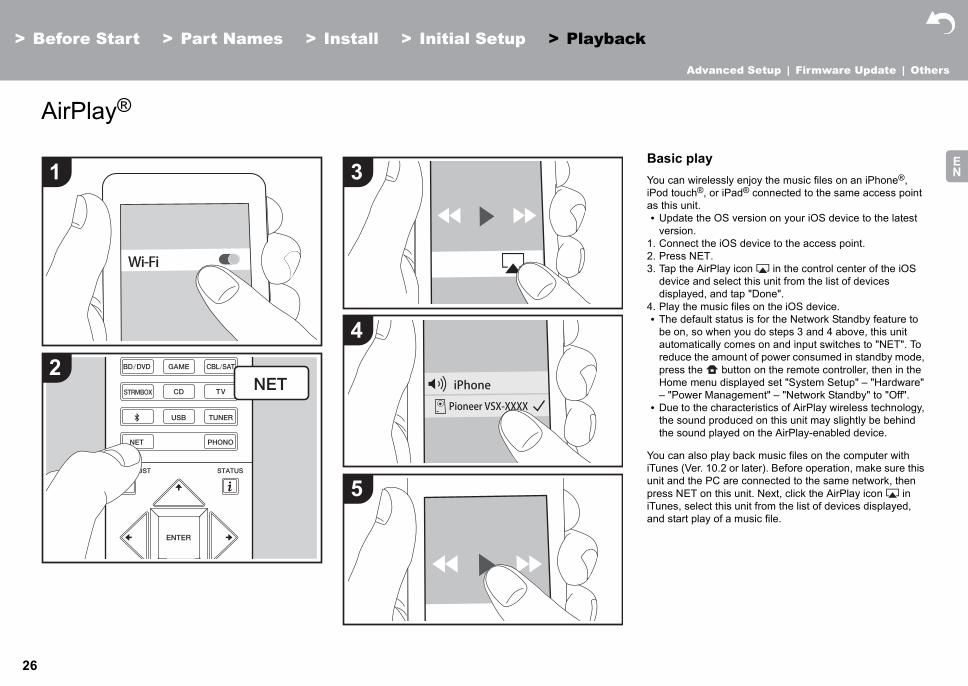
sic play can wirelessly enjoy the music files on an iPhone®, d touch®, or iPad® connected to the same access point this unit.pdate the OS version on your iOS device to the latest ersion.onnect the iOS device to the access point.ress NET.ap the AirPlay icon in the control center of the iOS evice and select this unit from the list of devices isplayed, and tap "Done".lay the music files on the iOS device.he default status is for the Network Standby feature to e on, so when you do steps 3 and 4 above, this unit utomatically comes on and input switches to "NET". To educe the amount of power consumed in standby mode, ress the button on the remote controller, then in the ome menu displayed set "System Setup" – "Hardware" "Power Management" – "Network Standby" to "Off".ue to the characteristics of AirPlay wireless technology,
he sound produced on this unit may slightly be behind he sound played on the AirPlay-enabled device.
can also play back music files on the computer with nes (Ver. 10.2 or later). Before operation, make sure this t and the PC are connected to the same network, then ss NET on this unit. Next, click the AirPlay icon in nes, select this unit from the list of devices displayed, start play of a music file.
Start
y®
Wi-F
Pioneer VSX-XXXX
iPhone
i
4
5
2. P3. T
dd
4. P0 T
barpH–0 D
tt
YouiTuunipreiTuand
> Part Names > Install > Initial Setup > Playback
3BaYouiPoas 0 U
v1. C
27
> Before
Advanced Setup | Firmware Update | Others
EN
BLUE
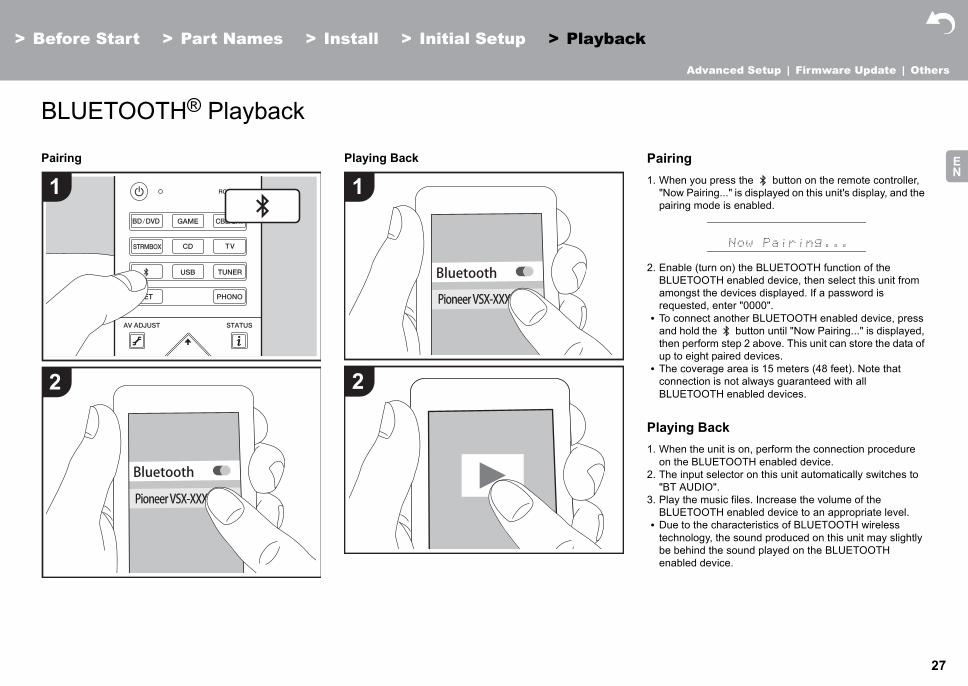
Pairing iringhen you press the button on the remote controller,
Now Pairing..." is displayed on this unit's display, and the airing mode is enabled.
nable (turn on) the BLUETOOTH function of the LUETOOTH enabled device, then select this unit from mongst the devices displayed. If a password is equested, enter "0000".o connect another BLUETOOTH enabled device, press nd hold the button until "Now Pairing..." is displayed,
hen perform step 2 above. This unit can store the data of p to eight paired devices.he coverage area is 15 meters (48 feet). Note that onnection is not always guaranteed with all LUETOOTH enabled devices.
ying Backhen the unit is on, perform the connection procedure
n the BLUETOOTH enabled device.he input selector on this unit automatically switches to BT AUDIO".lay the music files. Increase the volume of the LUETOOTH enabled device to an appropriate level.ue to the characteristics of BLUETOOTH wireless
echnology, the sound produced on this unit may slightly e behind the sound played on the BLUETOOTH nabled device.
1
2
Start
TOO
Pion
> Part Names > Install > Initial Setup > Playback
TH® Playback
Playing Back Pa1. W
"p
2. EBar0 T
atu0 T
cB
Pla1. W
o2. T
"3. P
B0 D
tbe
eer VSX-XXXX
Pioneer VSX-XXXXX
1
2
28
> Before
Advanced Setup | Firmware Update | Others
EN
Listen
quency step setting (North American models)ss the button on the remote controller to select stem Setup" – "Miscellaneous" – "Tuner" – "FM quency Step" and select the frequency step for your a. Note that when this setting is changed, all radio sets are deleted.
ing RDS (European models)
S stands for Radio Data System and is a method of smitting data in FM radio signals. In regions using RDS,
radio station name is displayed when you tune into a io station broadcasting program information. When you ss (b) on the remote controller in this state, you can the following functions.
playing text information (Radio Text)hile the name of the station is being displayed on the
isplay, press (b) on the remote controller once.adio Text (RT) broadcast by the station is displayed crolling across the display. "No Text Data" is displayed hen no text information is available.nusual characters may be displayed when the unit
eceives unsupported characters. However, this is not a alfunction. Also, if the signal from a station is weak,
nformation may not be displayed.
arch for stations by Program Typehile the name of the station is being displayed on the
isplay, press (b) on the remote controller twice.ress the cursor / buttons (a) on the remote ontroller to select the Program Type you want to find, hen press ENTER (a) to start the search.he Program Types displayed are as follows:oneews (News reports)ffairs (Current affairs)
nfo (Information)portducate (Education)
a
c
d
e
1
Start
ing to
> Part Names > Install > Initial Setup > Playback
the FM/DAB Radio
Listening to FM RadioTuning Automatically
1. Press TUNER on the remote controller repeatedly to select either "FM" on the display.
2. Press MODE (e) on the remote controller so that "AUTO" appears on the display.
3. When you press the cursor / buttons (a) on the remote controller, automatic tuning starts, and searching stops when a station is found. When tuned into a radio station, the "TUNED" indicator on the display lights. When tuned into a stereo FM station, the "FM STEREO" indicator lights.0 No sound is output while the "TUNED" indicator is off.
When FM broadcasts reception is poorRadio waves may be weak depending on the building structure and environmental conditions. In that case, perform the procedure as explained below in "Tuning Manually" to manually select the desired station.
Tuning Manually
1. Press TUNER on the remote controller repeatedly to select either "FM" on the display.
2. Press MODE (e) on the remote controller to turn off "AUTO" on the display.
3. While pressing the cursor / buttons (a) on the remote controller, select the desired radio station.0 The frequency changes by 1 step each time you press
the button. The frequency changes continuously if the button is held down and stops when the button is released. Tune by looking at the display.
To return to the auto tuning modePress MODE (e) on the remote controller again so that "AUTO" appears on the display. The unit tunes automatically into a radio station.
FrePre"SyFrearepre
Us
RDtrantheradpreuse
Dis1. W
dRsw0 U
rmi
Se1. W
d2. P
ctTNNAISE
b
> Before Start
Advanced Setup | Firmware Update | Others
29
EN
DramaCultureScience (Science aVariedPop M (Pop music)Rock M (Rock musEasy M (Middle of tLight M (Light classClassics (Serious cOther M (Other muWeatherFinanceChildren (Children'sSocial (Social affairReligionPhone InTravelLeisureJazz (Jazz music)Country (Country mNation M (National Oldies (Oldies musFolk M (Folk musicDocument (Docume0 The information dis
content being broad3. When a station is fo
display. Press ENTreceiving that statiounit continues to se0 If no stations are fo
displayed.0 Unusual characters
receives unsupportmalfunction. Also, iinformation may no
- 59: Poor reception0 - 79: Good reception0 - 100: Excellent receptionultiplex Name : Displays the name of the current ultiplex.ultiplex Number and Frequency : Displays the umber and frequency of the current multiplex.
> Part Names > Install > Initial Setup > Playback
nd technology)
ic)he road music)ics)lassics)sic)
programmes)s)
usic)music)ic))ntary)
played may sometimes not match the cast by the station.und, the station flashes on the
ER (a) while this is happening to start n. If you don't press ENTER (a), the arch for another station.und, the message "Not Found" is
may be displayed when the unit ed characters. However, this is not a f the signal from a station is weak, t be displayed.
Listening to DAB Digital Radio (VSX-S520D)1. Press TUNER on the remote controller repeatedly to
select either "DAB" on the display.0 The very first time you select DAB, the Auto Tuning
function automatically scans the DAB Band 3 for the multiplexes (i.e., stations) available in your area.
0 Once the scanning process is complete, the first station that was detected is selected.0 If a new DAB station is introduced, or you move to a
new area, press the button on the remote controller, then in the Home menu displayed set "System Setup" "Miscellaneous" – "Tuner" – "DAB Auto Scan".
2. Select the desired radio station with the cursors / buttons (a) on the remote controller.
Changing the order stations are displayedYou can sort the abailable stations alphabetically or by multiplex.1. Press MODE (e) repeatedly to set the method for sorting
the display order from the following.Alphabet (default setting) : Sort stations alphabetically.Multiplex : Sort stations by multiplex.
Displaying DAB Radio Information1. Press the button (b) repeatedly to display more
information about the selected DAB station.
DLS (Dynamic Label Segment) : When tuned to a station that's broadcasting DLS text data, the text will scroll across the display.Program Type : Displays the type of program.Bit Rate and Audio Mode : Displays the station's bit rate and audio mode (Stereo, Mono).Quality : Displays the signal quality.
068MmMn
30
> Before Start
Advanced Setup | Firmware Update | Others
EN
Presetting a RadIt allows you to registestations. Registering rtune into your radio st
1. Tune into the radio 2. Press +Fav (d) on th
number on the disp3. While the preset nu
repeatedly press thremote controller to
4. Press +Fav (d) on tthe station. When reflashing.
Selecting a Preset R1. Press TUNER on th2. Press the cursor
controller to select
Deleting a Preset Ra1. Press TUNER on th2. Press the cursor
controller to select 3. After pressing +Fav
CLEAR (c) while ththe preset number.0 When deleted, the
> Part Names > Install > Initial Setup > Playback
io Stationr up to 40 of your favorite FM/DAB
adio stations in advance allows you to ation of choice directly.
station you want to register.e remote controller so that the preset
lay flashes.mber is flashing (about 8 seconds), e cursor / buttons (a) on the select a number between 1 and 40.he remote controller again to register gistered, the preset number stops
adio Statione remote controller.
/ buttons (a) on the remote a preset number.
dio Statione remote controller.
/ buttons (a) on the remote the preset number to delete. (d) on the remote controller, press e preset number is flashing to delete
number on the display goes off.
31
> Before
Advanced Setup | Firmware Update | Others
EN
Listen
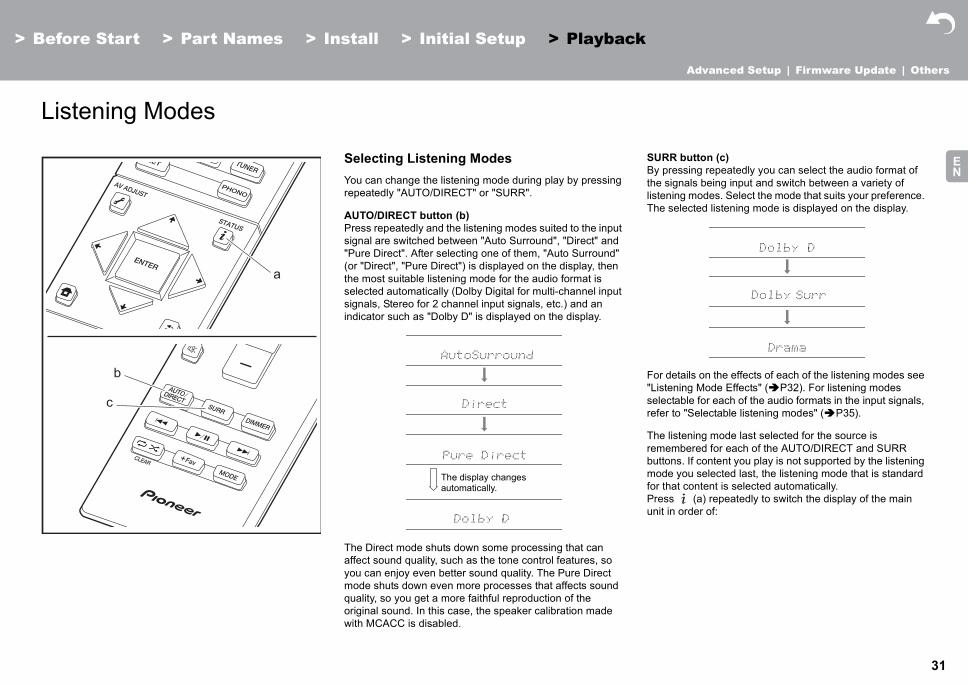
RR button (c)pressing repeatedly you can select the audio format of signals being input and switch between a variety of ening modes. Select the mode that suits your preference. selected listening mode is displayed on the display.
details on the effects of each of the listening modes see tening Mode Effects" ( P32). For listening modes
ectable for each of the audio formats in the input signals, r to "Selectable listening modes" ( P35).
listening mode last selected for the source is embered for each of the AUTO/DIRECT and SURR
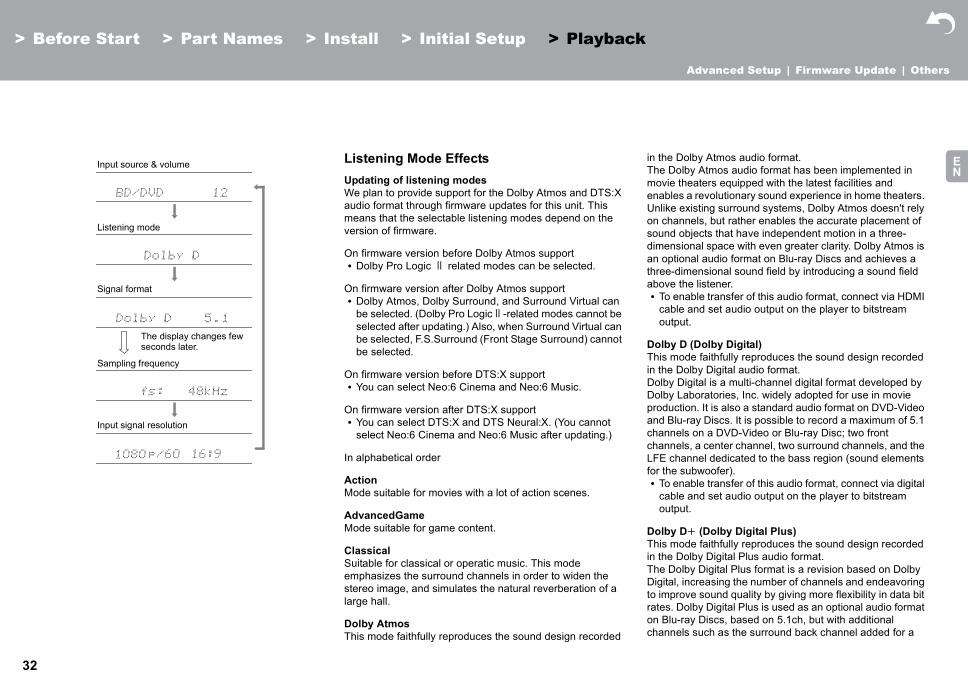
tons. If content you play is not supported by the listening de you selected last, the listening mode that is standard that content is selected automatically.ss (a) repeatedly to switch the display of the main t in order of:
Start
ing M
b
c
> Part Names > Install > Initial Setup > Playback
odes
Selecting Listening ModesYou can change the listening mode during play by pressing repeatedly "AUTO/DIRECT" or "SURR".
AUTO/DIRECT button (b)Press repeatedly and the listening modes suited to the input signal are switched between "Auto Surround", "Direct" and "Pure Direct". After selecting one of them, "Auto Surround" (or "Direct", "Pure Direct") is displayed on the display, then the most suitable listening mode for the audio format is selected automatically (Dolby Digital for multi-channel input signals, Stereo for 2 channel input signals, etc.) and an indicator such as "Dolby D" is displayed on the display.
The Direct mode shuts down some processing that can affect sound quality, such as the tone control features, so you can enjoy even better sound quality. The Pure Direct mode shuts down even more processes that affects sound quality, so you get a more faithful reproduction of the original sound. In this case, the speaker calibration made with MCACC is disabled.
SUBy thelistThe
For"Lisselrefe
Therembutmofor Preuni
a
The display changes automatically.
32
> Before Start
Advanced Setup | Firmware Update | Others
EN
he Dolby Atmos audio format. Dolby Atmos audio format has been implemented in
vie theaters equipped with the latest facilities and bles a revolutionary sound experience in home theaters.
like existing surround systems, Dolby Atmos doesn't rely channels, but rather enables the accurate placement of nd objects that have independent motion in a three-ensional space with even greater clarity. Dolby Atmos is optional audio format on Blu-ray Discs and achieves a e-dimensional sound field by introducing a sound field ve the listener.o enable transfer of this audio format, connect via HDMI able and set audio output on the player to bitstream utput.
lby D (Dolby Digital)s mode faithfully reproduces the sound design recorded he Dolby Digital audio format.lby Digital is a multi-channel digital format developed by lby Laboratories, Inc. widely adopted for use in movie duction. It is also a standard audio format on DVD-Video Blu-ray Discs. It is possible to record a maximum of 5.1 nnels on a DVD-Video or Blu-ray Disc; two front nnels, a center channel, two surround channels, and the channel dedicated to the bass region (sound elements
the subwoofer).o enable transfer of this audio format, connect via digital able and set audio output on the player to bitstream utput.
lby Di (Dolby Digital Plus)s mode faithfully reproduces the sound design recorded he Dolby Digital Plus audio format. Dolby Digital Plus format is a revision based on Dolby ital, increasing the number of channels and endeavoring mprove sound quality by giving more flexibility in data bit s. Dolby Digital Plus is used as an optional audio format
Blu-ray Discs, based on 5.1ch, but with additional nnels such as the surround back channel added for a
Input sourc
Listening m
Signal form
Sampling fr
Input signa
Ts
> Part Names > Install > Initial Setup > Playback
Listening Mode EffectsUpdating of listening modesWe plan to provide support for the Dolby Atmos and DTS:X audio format through firmware updates for this unit. This means that the selectable listening modes depend on the version of firmware.
On firmware version before Dolby Atmos support0 Dolby Pro Logic Ⅱ related modes can be selected.
On firmware version after Dolby Atmos support0 Dolby Atmos, Dolby Surround, and Surround Virtual can
be selected. (Dolby Pro LogicⅡ-related modes cannot be selected after updating.) Also, when Surround Virtual can be selected, F.S.Surround (Front Stage Surround) cannot be selected.
On firmware version before DTS:X support0 You can select Neo:6 Cinema and Neo:6 Music.
On firmware version after DTS:X support0 You can select DTS:X and DTS Neural:X. (You cannot
select Neo:6 Cinema and Neo:6 Music after updating.)
In alphabetical order
ActionMode suitable for movies with a lot of action scenes.
AdvancedGameMode suitable for game content.
ClassicalSuitable for classical or operatic music. This mode emphasizes the surround channels in order to widen the stereo image, and simulates the natural reverberation of a large hall.
Dolby AtmosThis mode faithfully reproduces the sound design recorded
in tThemoenaUnon soudiman threabo0 T
co
DoThiin tDoDoproandchachaLFEfor 0 T
co
DoThiin tTheDigto irateon cha
e & volume
ode
at
equency
l resolution
he display changes few econds later.
> Before Start
Advanced Setup | Firmware Update | Others
33
EN
maximum of 7.1ch.0 To enable transfer o
cable and set audiooutput.
Dolby PLⅡ (Dolby PThese listening modessignal to 5.1 channelsconfiguration when theBroadening the soundsound with more deptmovie sources, gameslocalization. Choose fra mode ideal for musigaming (Game).
Dolby SurroundThese listening modessignal to multiple chanconfiguration when thechannel. Along with pacompatible with playbinclude Dolby speaker
Dolby TrueHDThis mode faithfully rein the Dolby TrueHD aThe Dolby TrueHD auexpanded based on threferred to as MLP, anreproduce the master TrueHD is used as anDiscs, based on 5.1chthe surround back cha7.1ch is recorded at 9192 kHz/24bit.0 To enable transfer o
cable and set audiooutput.
roduction is achieved by recording the content at a pling rate of 96 kHz at a resolution of 24 bits.o enable transfer of this audio format, connect via digital able and set audio output on the player to bitstream utput.
S Expresss mode faithfully reproduces the sound design recorded he DTS Express audio format.S Express is used as an optional audio format on Blu-ray cs, based on 5.1ch, but with channels such as the round back channel added for a maximum of 7.1ch. It o supports low bit rates.o enable transfer of this audio format, connect via HDMI able and set audio output on the player to bitstream utput.
S-HD HR (DTS-HD High Resolution Audio)s mode faithfully reproduces the sound design recorded he DTS-HD High Resolution Audio audio format.S-HD High Resolution Audio is used as an optional io format on Blu-ray Discs, based on 5.1ch, but with itional channels such as the surround back channel ed for a maximum of 7.1ch. It can be recorded at a pling rate of 96 kHz with a resolution of 24 bits.o enable transfer of this audio format, connect via HDMI able and set audio output on the player to bitstream utput.
S-HD MSTR (DTS-HD Master Audio)s mode faithfully reproduces the sound design recorded he DTS-HD Master Audio audio format.S-HD Master Audio is used as an optional audio format Blu-ray Discs, based on 5.1ch, but with additional nnels such as the surround back channel added for a ximum of 7.1ch, recorded using lossless audio roduction technology. 96 kHz/24bit is supported with ch, and 192 kHz/24bit is supported with 5.1ch.o enable transfer of this audio format, connect via HDMI
> Part Names > Install > Initial Setup > Playback
f this audio format, connect via HDMI output on the player to bitstream
ro LogicⅡ ) allow you to expand the playback
to suit the connected speaker input signal is 2 channel. field provides you with a seamless h and realism. Along with CD and can also benefit from the vivid sound om a mode ideal for movies (Movie), c (Music), and a mode ideal for
allow you to expand the playback nels to suit the connected speaker input signal is 2 channel or 5.1 st speaker setups, this is also
ack systems for Dolby Atmos that technology.
produces the sound design recorded udio format.dio format is a reversible format e lossless compression technology d it makes it possible to faithfully audio recorded in the studio. Dolby optional audio format on Blu-ray , but with additional channels such as nnel added for a maximum of 7.1ch.
6 kHz/24bit, and 5.1ch is recorded at
f this audio format, connect via HDMI output on the player to bitstream
DramaSuitable for TV shows produced in a TV studio. This mode enhances the surround effects to the entire sound to give clarity to voices and create a realistic acoustic image.
DSDMode suitable for playing sources recorded in DSD.0 This unit supports DSD signals input through HDMI IN.
However, depending on the connected player, better sound is possible when output from the PCM output of the player.0 This listening mode cannot be selected if the output
setting on your Blu-ray Disc/DVD player is not set to DSD.
DTSThis mode faithfully reproduces the sound design recorded in the DTS audio format.The DTS audio format is a multi-channel digital format developed by DTS, Inc. This format is an optional audio format on DVD-Video and a standard on Blu-ray Discs. It enables recording of 5.1 channels; two front channels, a center channel, two surround channels, and the LFE channel dedicated to the bass region (sound elements for the subwoofer). The content is recorded with a rich volume of data, with maximum sampling rate of 48 kHz at a resolution of 24 bits and a bit rate of 1.5 Mbps.0 To enable transfer of this audio format, connect via digital
cable and set audio output on the player to bitstream output.
DTS 96/24This mode faithfully reproduces the sound design recorded in the DTS 96/24 audio format.The DTS 96/24 format is an optional audio format on DVD-Video and Blu-ray Discs. It enables recording of 5.1 channels; two front channels, a center channel, two surround channels, and the LFE channel dedicated to the bass region (sound elements for the subwoofer). Detailed
repsam0 T
co
DTThiin tDTDissurals0 T
co
DTThiin tDTaudaddaddsam0 T
co
DTThiin tDTon chamarep7.10 T
34
> Before Start
Advanced Setup | Firmware Update | Others
EN
cable and set audiooutput.
DTS Neo:6These listening modessignal to 5.1 channelsconfiguration when thefull-bandwidth on all cbetween the channelsNeo:6 Cinema which iwhich is ideal for mus
DTS Neural:XThis listening mode alsignal to suit the conninput signal is 2 chann
DTS:XThis mode faithfully rein the DTS:X audio forThe DTS:X audio formmethodology based oobject based dynamicby the precise positionexpress movement.0 To enable transfer o
cable and set audiooutput.
Ent.Show (EntertainmSuitable for rock or pomode creates a lively image, like being at a
Ext.Mono (ExtendedIn this mode, all speakso the sound you hearare within the listening
In this mode, sound lo
pluggeditable for acoustic instruments, vocals and jazz. This de emphasizes the front stereo image, giving the ression of being right in front of the stage.
> Part Names > Install > Initial Setup > Playback
output on the player to bitstream
allow you to expand the playback to suit the connected speaker input signal is 2 channel. It offers
hannels, with great independence . There are two variants for this mode: s ideal for movies and Neo:6 Music ic.
lows you to expand the playback ected speaker configuration when the els or 5.1 channels.
produces the sound design recorded mat.at is a combination of the mixing
n past channel based formats and audio mixing, and it is characterized ing of sounds and the ability to
f this audio format, connect via HDMI output on the player to bitstream
ent Show)p music. Listening to music in this sound field with a powerful acoustic club or rock concert.
Mono)ers output the same sound in mono, is the same regardless of where you room.
calization is distinct with emphasis on
bass.
Ext.Stereo (Extended Stereo)Ideal for background music, this mode fills the entire listening area with stereo sound from the front, surround, and surround back speakers.
F.S.Surround (Front Stage Surround)In this mode, you can enjoy a virtual playback of multichannel surround sound even with only two or three speakers. This works by controlling how sounds reach the listener's left and right ears.
MonoUse this mode when watching an old movie with a mono soundtrack, or use it to separately reproduce soundtracks in two different languages recorded in the left and right channels of some movies. It is also suitable for DVDs or other sources containing multiplexed audio.
Multich PCM (Multichannel PCM)Mode suitable for playing sources recorded in multichannel PCM.
Rock/PopMode suitable for rock content.
SportsMode suitable for sport content.
StereoIn this mode, sound is output from the front left and right speakers and subwoofer.
Surround VirtualThis is a surround mode using Surround Virtualizer, a technology developed by Dolby Laboratories, Inc.. It creates virtual surround channels to give you a broader sound field even when surround speakers are not connected.
UnSumoimp
> Before Start
Advanced Setup | Firmware Update | Others
35
EN
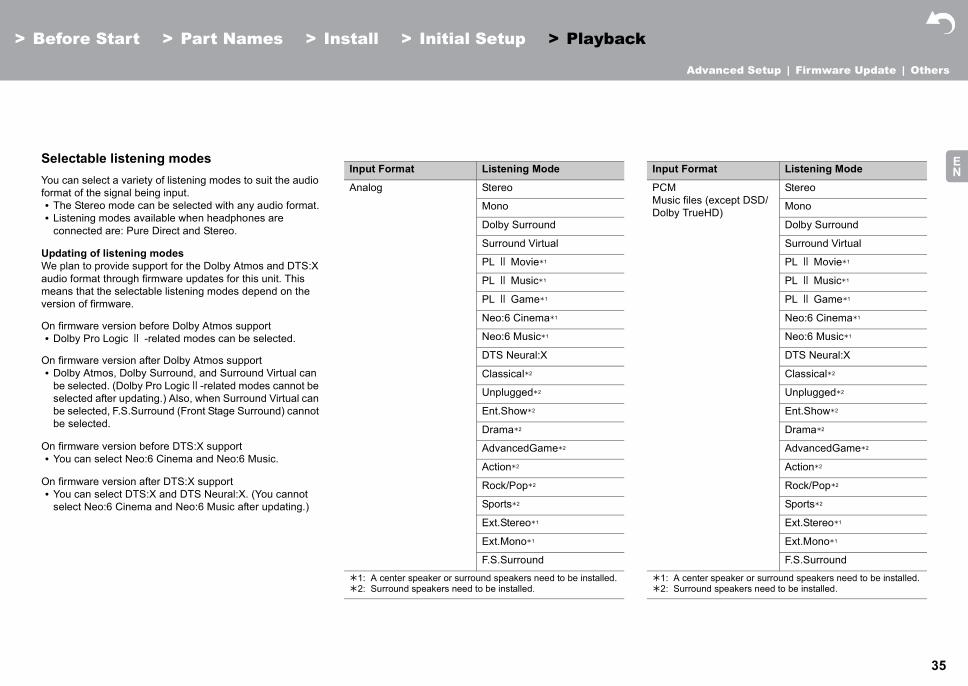
Selectable listenYou can select a varieformat of the signal be0 The Stereo mode c0 Listening modes av
connected are: Pur
Updating of listeningWe plan to provide suaudio format through fmeans that the selectaversion of firmware.
On firmware version b0 Dolby Pro LogicⅡ
On firmware version a0 Dolby Atmos, Dolby
be selected. (Dolbyselected after updabe selected, F.S.Sube selected.
On firmware version b0 You can select Neo
On firmware version a0 You can select DTS
select Neo:6 Cinem
put Format Listening Mode
Music files (except DSD/olby TrueHD)
Stereo
Mono
Dolby Surround
Surround Virtual
PLⅡ Movie 1
PLⅡ Music 1
PLⅡ Game 1
Neo:6 Cinema 1
Neo:6 Music 1
DTS Neural:X
Classical 2
Unplugged 2
Ent.Show 2
Drama 2
AdvancedGame 2
Action 2
Rock/Pop 2
Sports 2
Ext.Stereo 1
Ext.Mono 1
F.S.Surround
1: A center speaker or surround speakers need to be installed.2: Surround speakers need to be installed.
> Part Names > Install > Initial Setup > Playback
ing modesty of listening modes to suit the audio ing input.
an be selected with any audio format.ailable when headphones are e Direct and Stereo.
modespport for the Dolby Atmos and DTS:X irmware updates for this unit. This ble listening modes depend on the
efore Dolby Atmos support-related modes can be selected.
fter Dolby Atmos support Surround, and Surround Virtual can
Pro LogicⅡ-related modes cannot be ting.) Also, when Surround Virtual can rround (Front Stage Surround) cannot
efore DTS:X support:6 Cinema and Neo:6 Music.
fter DTS:X support:X and DTS Neural:X. (You cannot a and Neo:6 Music after updating.)
Input Format Listening Mode
Analog Stereo
Mono
Dolby Surround
Surround Virtual
PLⅡ Movie 1
PLⅡ Music 1
PLⅡ Game 1
Neo:6 Cinema 1
Neo:6 Music 1
DTS Neural:X
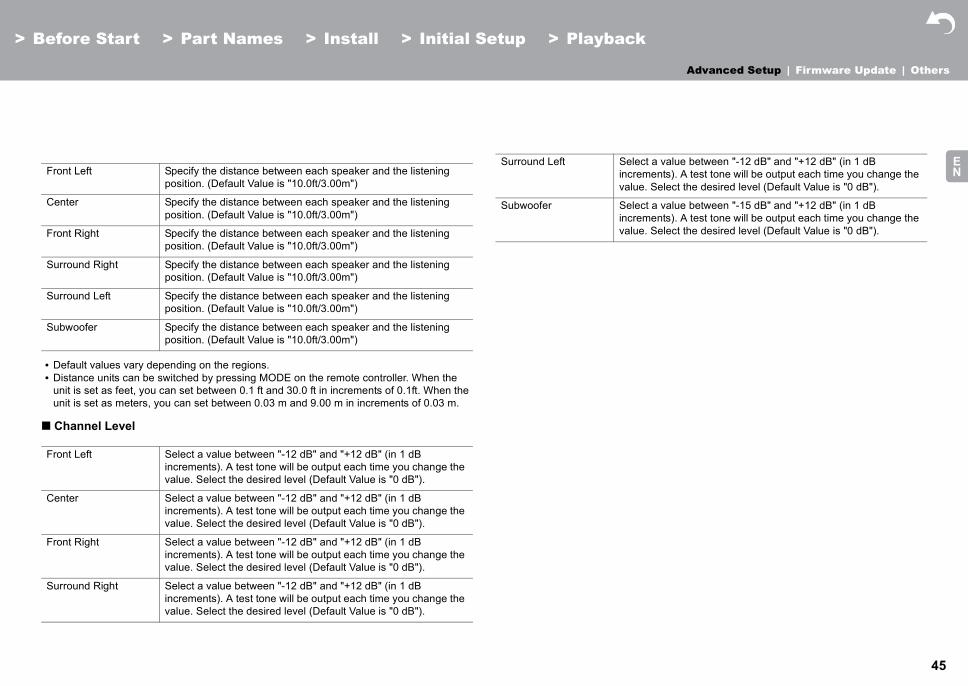
Classical 2
Unplugged 2
Ent.Show 2
Drama 2
AdvancedGame 2
Action 2
Rock/Pop 2
Sports 2
Ext.Stereo 1
Ext.Mono 1
F.S.Surround
1: A center speaker or surround speakers need to be installed.2: Surround speakers need to be installed.
In
PCMD
36
> Before Start
Advanced Setup | Firmware Update | Others
ENInput Format
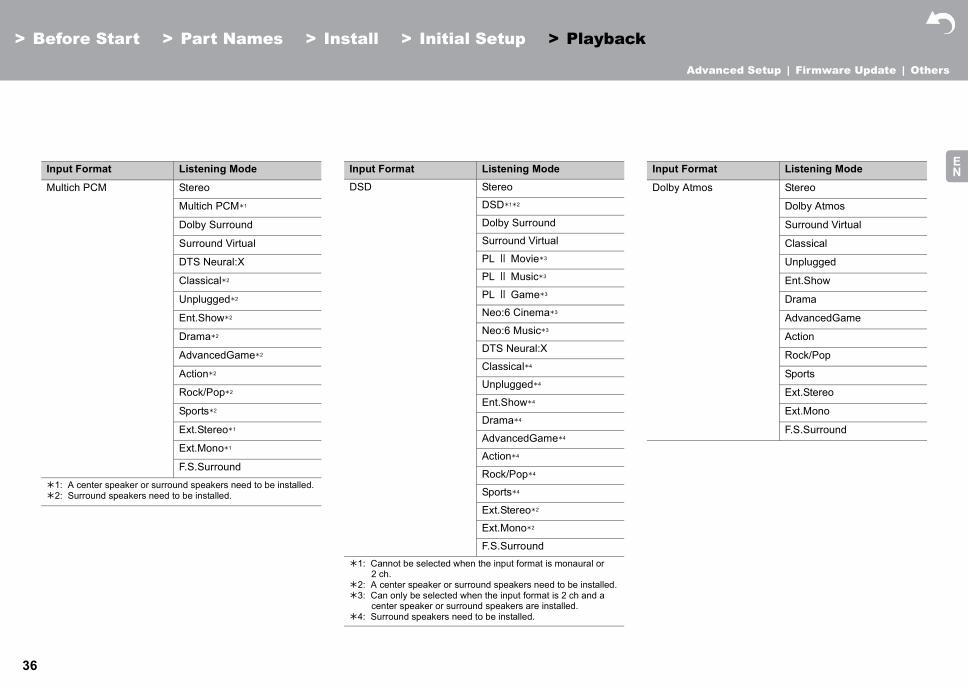
Multich PCM
1: A center speaker o2: Surround speakers
put Format Listening Mode
olby Atmos Stereo
Dolby Atmos
Surround Virtual
Classical
Unplugged
Ent.Show
Drama
AdvancedGame
Action
Rock/Pop
Sports
Ext.Stereo
Ext.Mono
F.S.Surround
> Part Names > Install > Initial Setup > Playback
Listening Mode
Stereo
Multich PCM 1
Dolby Surround
Surround Virtual
DTS Neural:X
Classical 2
Unplugged 2
Ent.Show 2
Drama 2
AdvancedGame 2
Action 2
Rock/Pop 2
Sports 2
Ext.Stereo 1
Ext.Mono 1
F.S.Surround
r surround speakers need to be installed. need to be installed.
Input Format Listening ModeDSD Stereo
DSD 1 2
Dolby Surround
Surround Virtual
PLⅡ Movie 3
PLⅡ Music 3
PLⅡ Game 3
Neo:6 Cinema 3
Neo:6 Music 3
DTS Neural:X
Classical 4
Unplugged 4
Ent.Show 4
Drama 4
AdvancedGame 4
Action 4
Rock/Pop 4
Sports 4
Ext.Stereo 2
Ext.Mono 2
F.S.Surround1: Cannot be selected when the input format is monaural or
2 ch.2: A center speaker or surround speakers need to be installed.3: Can only be selected when the input format is 2 ch and a
center speaker or surround speakers are installed.4: Surround speakers need to be installed.
In
D
> Before Start
Advanced Setup | Firmware Update | Others
37
ENInput Format
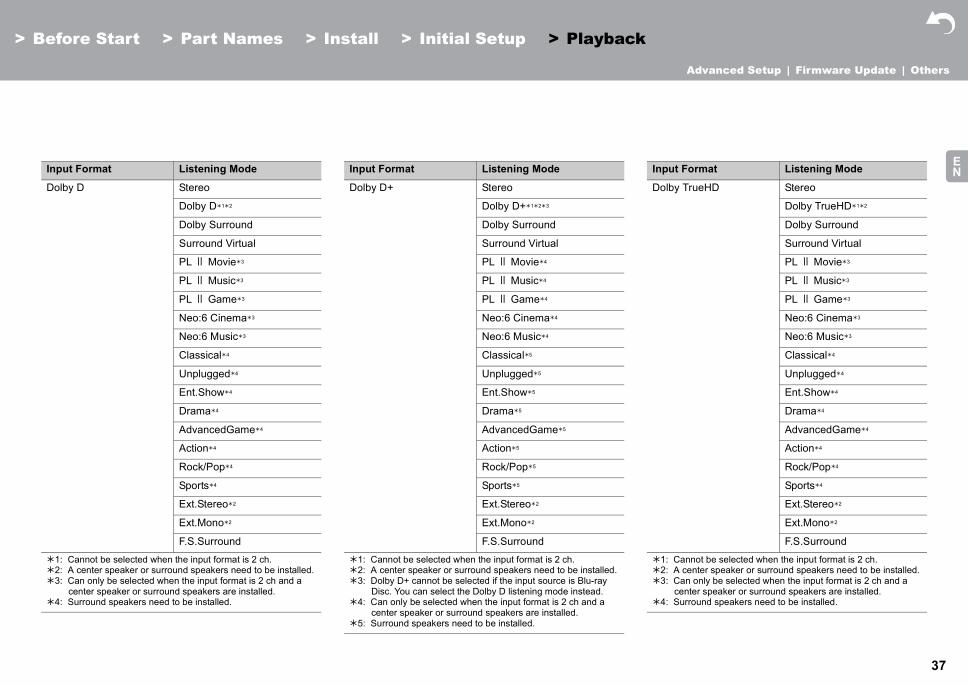
Dolby D
1: Cannot be selecte2: A center speaker o3: Can only be select
center speaker or 4: Surround speakers
put Format Listening Mode
olby TrueHD Stereo
Dolby TrueHD 1 2
Dolby Surround
Surround Virtual
PLⅡ Movie 3
PLⅡ Music 3
PLⅡ Game 3
Neo:6 Cinema 3
Neo:6 Music 3
Classical 4
Unplugged 4
Ent.Show 4
Drama 4
AdvancedGame 4
Action 4
Rock/Pop 4
Sports 4
Ext.Stereo 2
Ext.Mono 2
F.S.Surround
1: Cannot be selected when the input format is 2 ch.2: A center speaker or surround speakers need to be installed.3: Can only be selected when the input format is 2 ch and a
center speaker or surround speakers are installed.4: Surround speakers need to be installed.
> Part Names > Install > Initial Setup > Playback
Listening Mode
Stereo
Dolby D 1 2
Dolby Surround
Surround Virtual
PLⅡ Movie 3
PLⅡ Music 3
PLⅡ Game 3
Neo:6 Cinema 3
Neo:6 Music 3
Classical 4
Unplugged 4
Ent.Show 4
Drama 4
AdvancedGame 4
Action 4
Rock/Pop 4
Sports 4
Ext.Stereo 2
Ext.Mono 2
F.S.Surround
d when the input format is 2 ch.r surround speakers need to be installed.ed when the input format is 2 ch and a surround speakers are installed. need to be installed.
Input Format Listening Mode
Dolby D+ Stereo
Dolby D+ 1 2 3
Dolby Surround
Surround Virtual
PLⅡ Movie 4
PLⅡ Music 4
PLⅡ Game 4
Neo:6 Cinema 4
Neo:6 Music 4
Classical 5
Unplugged 5
Ent.Show 5
Drama 5
AdvancedGame 5
Action 5
Rock/Pop 5
Sports 5
Ext.Stereo 2
Ext.Mono 2
F.S.Surround
1: Cannot be selected when the input format is 2 ch.2: A center speaker or surround speakers need to be installed.3: Dolby D+ cannot be selected if the input source is Blu-ray
Disc. You can select the Dolby D listening mode instead.4: Can only be selected when the input format is 2 ch and a
center speaker or surround speakers are installed.5: Surround speakers need to be installed.
In
D
38
> Before Start
Advanced Setup | Firmware Update | Others
ENInput Format
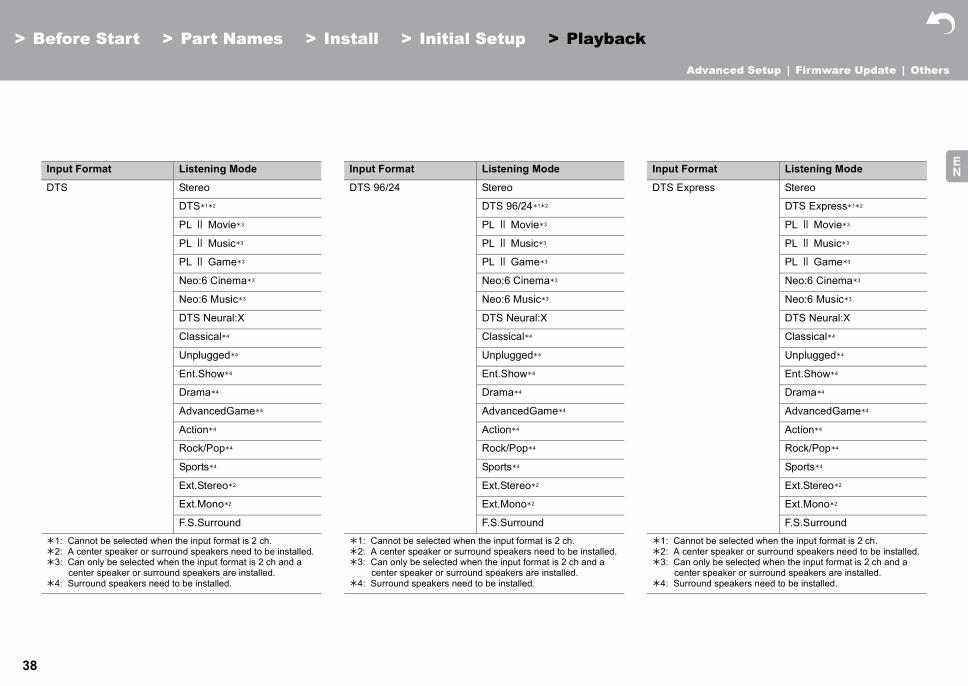
DTS
1: Cannot be selecte2: A center speaker o3: Can only be select
center speaker or 4: Surround speakers
put Format Listening Mode
TS Express Stereo
DTS Express 1 2
PLⅡ Movie 3
PLⅡ Music 3
PLⅡ Game 3
Neo:6 Cinema 3
Neo:6 Music 3
DTS Neural:X
Classical 4
Unplugged 4
Ent.Show 4
Drama 4
AdvancedGame 4
Action 4
Rock/Pop 4
Sports 4
Ext.Stereo 2
Ext.Mono 2
F.S.Surround
1: Cannot be selected when the input format is 2 ch.2: A center speaker or surround speakers need to be installed.3: Can only be selected when the input format is 2 ch and a
center speaker or surround speakers are installed.4: Surround speakers need to be installed.
> Part Names > Install > Initial Setup > Playback
Listening Mode
Stereo
DTS 1 2
PLⅡ Movie 3
PLⅡ Music 3
PLⅡ Game 3
Neo:6 Cinema 3
Neo:6 Music 3
DTS Neural:X
Classical 4
Unplugged 4
Ent.Show 4
Drama 4
AdvancedGame 4
Action 4
Rock/Pop 4
Sports 4
Ext.Stereo 2
Ext.Mono 2
F.S.Surround
d when the input format is 2 ch.r surround speakers need to be installed.ed when the input format is 2 ch and a surround speakers are installed. need to be installed.
Input Format Listening Mode
DTS 96/24 Stereo
DTS 96/24 1 2
PLⅡ Movie 3
PLⅡ Music 3
PLⅡ Game 3
Neo:6 Cinema 3
Neo:6 Music 3
DTS Neural:X
Classical 4
Unplugged 4
Ent.Show 4
Drama 4
AdvancedGame 4
Action 4
Rock/Pop 4
Sports 4
Ext.Stereo 2
Ext.Mono 2
F.S.Surround
1: Cannot be selected when the input format is 2 ch.2: A center speaker or surround speakers need to be installed.3: Can only be selected when the input format is 2 ch and a
center speaker or surround speakers are installed.4: Surround speakers need to be installed.
In
D
> Before Start
Advanced Setup | Firmware Update | Others
39
ENInput Format
DTS-HD HR
1: Cannot be selecte2: A center speaker o3: Can only be select
center speaker or 4: Surround speakers
put Format Listening Mode
TS:X Stereo
DTS:X
Classical 1
Unplugged 1
Ent.Show 1
Drama 1
AdvancedGame 1
Action 1
Rock/Pop 1
Sports 1
Ext.Stereo 2
Ext.Mono 2
F.S.Surround
1: Surround speakers need to be installed.2: A center speaker or surround speakers need to be installed.
> Part Names > Install > Initial Setup > Playback
Listening Mode
Stereo
DTS-HD HR 1 2
PLⅡ Movie 3
PLⅡ Music 3
PLⅡ Game 3
Neo:6 Cinema 3
Neo:6 Music 3
DTS Neural:X
Classical 4
Unplugged 4
Ent.Show 4
Drama 4
AdvancedGame 4
Action 4
Rock/Pop 4
Sports 4
Ext.Stereo 2
Ext.Mono 2
F.S.Surround
d when the input format is 2 ch.r surround speakers need to be installed.ed when the input format is 2 ch and a surround speakers are installed. need to be installed.
Input Format Listening Mode
DTS-HD MSTR Stereo
DTS-HD MSTR 1 2
PLⅡ Movie 3
PLⅡ Music 3
PLⅡ Game 3
Neo:6 Cinema 3
Neo:6 Music 3
DTS Neural:X
Classical 4
Unplugged 4
Ent.Show 4
Drama 4
AdvancedGame 4
Action 4
Rock/Pop 4
Sports 4
Ext.Stereo 2
Ext.Mono 2
F.S.Surround
1: Cannot be selected when the input format is 2 ch.2: A center speaker or surround speakers need to be installed.3: Can only be selected when the input format is 2 ch and a
center speaker or surround speakers are installed.4: Surround speakers need to be installed.
In
D
40
> Before
Advanced Setup | Firmware Update | Others
EN
AV A
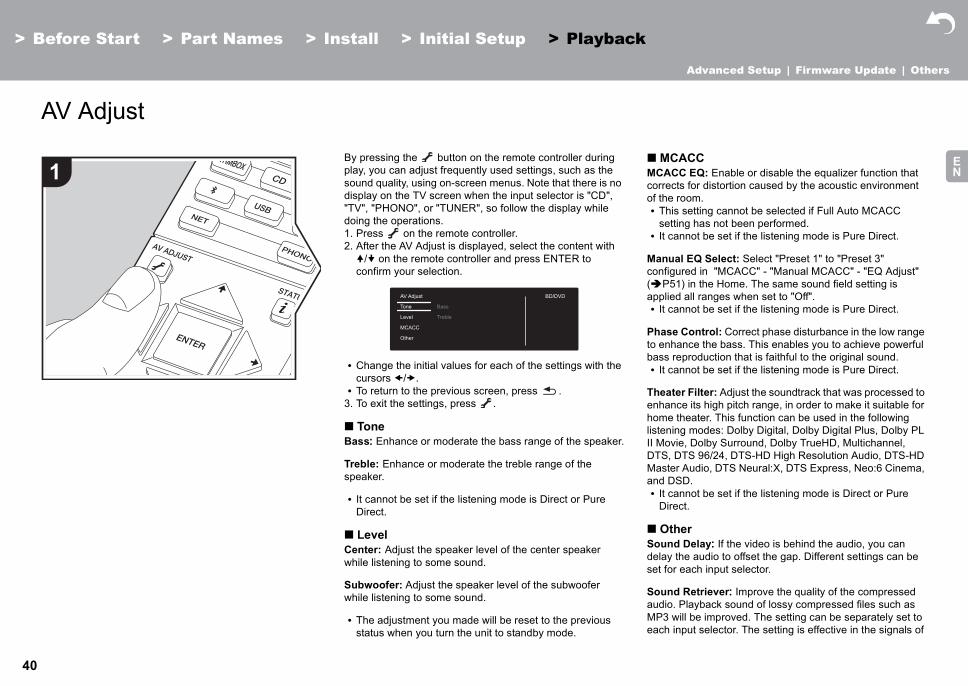
MCACCACC EQ: Enable or disable the equalizer function that rects for distortion caused by the acoustic environment he room.his setting cannot be selected if Full Auto MCACC etting has not been performed.t cannot be set if the listening mode is Pure Direct.
nual EQ Select: Select "Preset 1" to "Preset 3" figured in "MCACC" - "Manual MCACC" - "EQ Adjust" P51) in the Home. The same sound field setting is lied all ranges when set to "Off".t cannot be set if the listening mode is Pure Direct.
ase Control: Correct phase disturbance in the low range nhance the bass. This enables you to achieve powerful s reproduction that is faithful to the original sound.t cannot be set if the listening mode is Pure Direct.
eater Filter: Adjust the soundtrack that was processed to ance its high pitch range, in order to make it suitable for e theater. This function can be used in the following
S, DTS 96/24, DTS-HD High Resolution Audio, DTS-HD ster Audio, DTS Neural:X, DTS Express, Neo:6 Cinema, DSD.t cannot be set if the listening mode is Direct or Pure irect.
Otherund Delay: If the video is behind the audio, you can ay the audio to offset the gap. Different settings can be for each input selector.
und Retriever: Improve the quality of the compressed io. Playback sound of lossy compressed files such as 3 will be improved. The setting can be separately set to h input selector. The setting is effective in the signals of
1
Start
djust
> Part Names > Install > Initial Setup > Playback
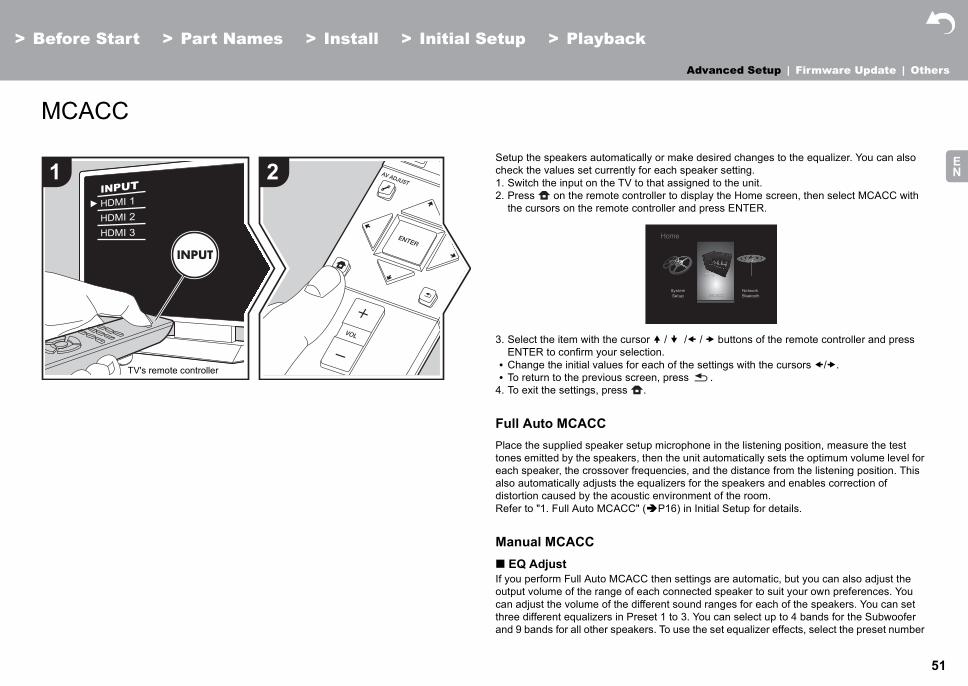
By pressing the button on the remote controller during play, you can adjust frequently used settings, such as the sound quality, using on-screen menus. Note that there is no display on the TV screen when the input selector is "CD", "TV", "PHONO", or "TUNER", so follow the display while doing the operations.1. Press on the remote controller.2. After the AV Adjust is displayed, select the content with
/ on the remote controller and press ENTER to confirm your selection.
0 Change the initial values for each of the settings with the cursors / .0 To return to the previous screen, press .3. To exit the settings, press .
∫ ToneBass: Enhance or moderate the bass range of the speaker.
Treble: Enhance or moderate the treble range of the speaker.
0 It cannot be set if the listening mode is Direct or Pure Direct.
∫ LevelCenter: Adjust the speaker level of the center speaker while listening to some sound.
Subwoofer: Adjust the speaker level of the subwoofer while listening to some sound.
0 The adjustment you made will be reset to the previous status when you turn the unit to standby mode.
∫ MCcorof t0 T
s0 I
Macon(app0 I
Phto ebas0 I
ThenhhomlistII MDTMaand0 I
D
∫ Sodelset
SoaudMPeac
BD/DVDAV Adjust
Tone
Level
MCACC
Other
Bass
Treble
> Before Start
Advanced Setup | Firmware Update | Others
41
EN
48 kHz or less. The sesignals.0 It cannot be set if th
Direct.DRC: Make small souneed to reduce the vonight. You can enjoy tseries and DTS series0 It cannot be set if th
Direct.0 The setting cannot
– If "System Setup"Loudness Manato "Off" when plaTrueHD
– When the input sother than 0 dB
Panorama: Broaden tin the Dolby Pro Logic
Dimension: Adjust thto back direction whenMusic listening mode.sound towards the frosound back.
Center Width: Adjustwhen playing in the DoSet a small number toa large number to distand right.
Dialog Control: You caudio in 1 dB steps upeasier to hear over ba0 This cannot be set 0 The effect may not
> Part Names > Install > Initial Setup > Playback
tting is not effective in the bitstream
e listening mode is Direct or Pure
nds easily heard. It is useful when you lume while watching a movie late he effect only when playing Dolby input signals.e listening mode is Direct or Pure
be used in the following cases." - "Audio Adjust" - "Dolby" - gement" ( P46) in the Home is set ying Dolby Digital Plus or Dolby
ignal is DTS and "Dialog Control" is
he sound field laterally when playing Ⅱ Music listening mode.
e depth of the sound field in the front playing in the Dolby Pro LogicⅡ
Set a small number to move the nt. Set a large number to move the
the width of the front sound field lby Pro LogicⅡMusic listening mode. concentrate sound in the middle. Set ribute the central sound out to the left
an increase the dialog portion of the to 6 dB so that you can make dialog ckground noise.for content other than DTS:X.be selectable with some content.
Center Image: Adjust the width of the front sound field when playing in the DTS Neo:6 Music listening mode. Set a small number to concentrate sound in the middle. Set a large number to distribute the central sound out to the left and right.
We plan to provide support for the Dolby Atmos and DTS:X audio format through firmware updates for this unit. This means that the selectable listening modes depend on the version of firmware.
On firmware version before Dolby Atmos support0 Panorama, Dimension, Center Width can be set.
On firmware version after Dolby Atmos support0 You cannot set Panorama, Dimension, Center Width after
updating.
On firmware version before DTS:X support0 Center Image can be set.
On firmware version after DTS:X support0 You can set Dialog Control. (You cannot set Center
Image after updating.)
42
> Before
Advanced Setup | Firmware Update | Others
EN
Advanced SetupSyste ed settings to provide you with an even better experience.
t assigned to the unit.r to display the Home screen, then select System Setup ntroller and press ENTER.
/ / / buttons of the remote controller and press . of the settings with the cursors / .
press .
1
ing a TV that supports 4K, video signals input at 1080p utomatically upscaled to 4K for output.ault Value)": When not using this functionse this function "Off" if your TV does not support 4K.
u have set "1080p -> 4K Upscaling" to "Auto", you can degree of video signal correction from "Off" and "1" (weak) and "3" (strong).
e on-screen display language.erican models) English, German, French, Spanish,
The unit allows you to configure advanc1. Switch the input on the TV to tha2. Press on the remote controlle
with the cursors on the remote co
3. Select the item with the cursor ENTER to confirm your selection0 Change the initial values for each0 To return to the previous screen,
4. To exit the settings, press .
Input/Output Assign∫ TV Out / OSD
2
emote controller
1080p -> 4K Upscaling When uscan be a"Off (Def"Auto": U0 Select
Super Resolution When yoselect thebetween
OSD Language Select th(North AmItalian, D(EuropeaDutch, S
43
> Before Start
Advanced Setup | Firmware Update | Others
EN
∫ HDMI InputYou can change input
etween the input selectors and DIGITAL IN COAXIAL/n a jack, select "-----".
M signals (stereo, mono) from a digital input are 32kHz, /16bit, 20bit, and 24bit.
etween the input selectors and AUDIO IN jacks. If you
Impose OSD
Screen Saver
BD/DVD
CBL/SAT
GAME
STRM BOX
L", "OPTICAL ": Assign a desired DIGITAL IN jack to VD input selector. (Default Value is "-----")
L", "OPTICAL ": Assign a desired DIGITAL IN jack to SAT input selector. (Default Value is "-----")
L", "OPTICAL ": Assign a desired DIGITAL IN jack to E input selector. (Default Value is "-----")
L", "OPTICAL ": Assign a desired DIGITAL IN jack to BOX input selector. (Default Value is "-----")
L", "OPTICAL ": Assign a desired DIGITAL IN jack to put selector. (Default Value is "COAXIAL")
L", "OPTICAL ": Assign a desired DIGITAL IN jack to put selector. (Default Value is "OPTICAL")
" to "AUDIO 2": Assign a desired AUDIO IN jack to the input selector. (Default Value is "AUDIO 1")
" to "AUDIO 2": Assign a desired AUDIO IN jack to the input selector. (Default Value is "AUDIO 2")
" to "AUDIO 2": Assign a desired AUDIO IN jack to the put selector. (Default Value is "-----")
" to "AUDIO 2": Assign a desired AUDIO IN jack to the X input selector. (Default Value is "-----")
" to "AUDIO 2": Assign a desired AUDIO IN jack to the selector. (Default Value is "-----")
> Part Names > Install > Initial Setup > Playback
assignment between the input selectors and HDMI IN jacks.
∫ Digital Audio InputYou can change input assignment bOPTICAL jacks. If you do not assig
0 Supported sampling rates for PC44.1kHz, 48kHz, 88.2kHz, 96kHz
∫ Analog Audio InputYou can change input assignment bdo not assign a jack, select "-----".
Set whether or not to display the information on the TV when the volume is adjusted or input is changed, for example."On (Default Value)": OSD displayed on the TV"Off": OSD not displayed on the TV0 OSD may not be displayed depending on the input signal
even if "On" is selected. If the operation screen is not displayed, change the resolution of the connected device.
Set the time to start the screen saver.Select a value from "3 minutes (Default Value)", "5 minutes", "10 minutes" and "Off".
"HDMI 1 (HDCP 2.2)" to "HDMI 4 (HDCP 2.2)": Assign a desired HDMI IN jack to the BD/DVD input selector. If you do not assign a jack, select "-----". To select an HDMI IN jack already assigned to another input selector, change the input selector setting to "-----" first. (Default Value is "HDMI 1 (HDCP 2.2)")
"HDMI 1 (HDCP 2.2)" to "HDMI 4 (HDCP 2.2)": Assign a desired HDMI IN jack to the CBL/SAT input selector. If you do not assign a jack, select "-----". To select an HDMI IN jack already assigned to another input selector, change the input selector setting to "-----" first. (Default Value is "HDMI 2 (HDCP 2.2)")
"HDMI 1 (HDCP 2.2)" to "HDMI 4 (HDCP 2.2)": Assign a desired HDMI IN jack to the GAME input selector. If you do not assign a jack, select "-----". To select an HDMI IN jack already assigned to another input selector, change the input selector setting to "-----" first. (Default Value is "HDMI 4 (HDCP 2.2)")
"HDMI 1 (HDCP 2.2)" to "HDMI 4 (HDCP 2.2)": Assign a desired HDMI IN jack to the STRM BOX input selector. If you do not assign a jack, select "-----". To select an HDMI IN jack already assigned to another input selector, change the input selector setting to "-----" first. (Default Value is "HDMI 3 (HDCP 2.2)")
BD/DVD "COAXIAthe BD/D
CBL/SAT "COAXIAthe CBL/
GAME "COAXIAthe GAM
STRM BOX "COAXIAthe STRM
CD "COAXIAthe CD in
TV "COAXIAthe TV in
BD/DVD "AUDIO 1BD/DVD
CBL/SAT "AUDIO 1CBL/SAT
GAME "AUDIO 1GAME in
STRM BOX "AUDIO 1STRM BO
CD "AUDIO 1CD input
44
> Before Start
Advanced Setup | Firmware Update | Others
EN
SpeakerYou can make changevolume level. Settingscannot be selected if hTV because "Hardwar
∫ Configuration
∫ Crossover
to the listening position.
TV
Speaker Channels
Subwoofer
Front
w range capabilities for each channel by setting either arge.efault Value)": For small speakers whose low range
es may be limitedor full-range speakers with sufficient low range
es"Front" is set to "Small", this is set to "Small".em cannot be selected even though connection is t, check that the settings in "Configuration" - "Speaker els" matches the number of connected channels.
re are speakers that have been set to "Small", set the which you would like other speakers to play bass, and z under which you would like the LFE (low frequency
play the bass.lue from "50Hz" to "200Hz" can be set. (Default Value z")
be selected only when "Configuration" - "Subwoofer" is s" and "Front" is set to "Large".
ss output by feeding bass sounds from the front left and center speakers to the subwoofer.s output will be boosteds output will not be boostedtting will not automatically be configured even if you ed Full Auto MCACC.
> Part Names > Install > Initial Setup > Playback
s to the connection environment of the speakers and change the are automatically configured if you use Full Auto MCACC. This setting eadphones are connected or audio is output from the speakers of the e" - "HDMI" - "Audio TV Out" is set to "On".
∫ DistanceSet the distance from each speaker
"AUDIO 1" to "AUDIO 2": Assign a desired AUDIO IN jack to the TV input selector. (Default Value is "-----")
Select "2.1 ch", "3.1 ch", "4.1 ch"or "5.1 ch (Default Value)" to suit the number of speaker channels connected.
Set whether a subwoofer is connected or not."Yes (Default Value)": When subwoofer is connected"No": When subwoofer is not connected
Set the low range capabilities for each channel by setting either small or large."Small (Default Value)": For small speakers whose low range capabilities may be limited"Large": For full-range speakers with sufficient low range capabilities0 If "Configuration" - "Subwoofer" is set to "No", "Front" will be
fixed to "Large" and the low pitched range of the other channels will be output from the front speakers. Refer to the instruction manual of your speakers to make the setting.
Center Set the losmall or l"Small (Dcapabiliti"Large": Fcapabiliti0 When 0 If an it
correcChann
Surround Set the losmall or l"Small (Dcapabiliti"Large": Fcapabiliti0 When 0 If an it
correcChann
Crossover When theHz underalso set Heffect) to0 The va
is "80H
Double Bass This can set to "YeBoost baright, and"On": Bas"Off": Bas0 The se
perform
45
> Before Start
Advanced Setup | Firmware Update | Others
EN
0 Default values vary0 Distance units can
unit is set as feet, yunit is set as meter
∫ Channel Level
Front Left
Center
Front Right
Surround Right
Surround Left
Subwoofer
Front Left
Center
Front Right
Surround Right
value between "-12 dB" and "+12 dB" (in 1 dB ts). A test tone will be output each time you change the lect the desired level (Default Value is "0 dB").
value between "-15 dB" and "+12 dB" (in 1 dB ts). A test tone will be output each time you change the lect the desired level (Default Value is "0 dB").
> Part Names > Install > Initial Setup > Playback
depending on the regions.be switched by pressing MODE on the remote controller. When the ou can set between 0.1 ft and 30.0 ft in increments of 0.1ft. When the s, you can set between 0.03 m and 9.00 m in increments of 0.03 m.
Specify the distance between each speaker and the listening position. (Default Value is "10.0ft/3.00m")
Specify the distance between each speaker and the listening position. (Default Value is "10.0ft/3.00m")
Specify the distance between each speaker and the listening position. (Default Value is "10.0ft/3.00m")
Specify the distance between each speaker and the listening position. (Default Value is "10.0ft/3.00m")
Specify the distance between each speaker and the listening position. (Default Value is "10.0ft/3.00m")
Specify the distance between each speaker and the listening position. (Default Value is "10.0ft/3.00m")
Select a value between "-12 dB" and "+12 dB" (in 1 dB increments). A test tone will be output each time you change the value. Select the desired level (Default Value is "0 dB").
Select a value between "-12 dB" and "+12 dB" (in 1 dB increments). A test tone will be output each time you change the value. Select the desired level (Default Value is "0 dB").
Select a value between "-12 dB" and "+12 dB" (in 1 dB increments). A test tone will be output each time you change the value. Select the desired level (Default Value is "0 dB").
Select a value between "-12 dB" and "+12 dB" (in 1 dB increments). A test tone will be output each time you change the value. Select the desired level (Default Value is "0 dB").
Surround Left Select a incremenvalue. Se
Subwoofer Select a incremenvalue. Se
46
> Before Start
Advanced Setup | Firmware Update | Others
EN
Audio Adjust∫ Dual Mono/Mon
∫ Dolby
∫ Volume
etween the devices connected to the unit. Select the
e set name will be shown on the main unit display. Select
ress TUNER on the remote controller, select FM/DAB
SB" or "BT AUDIO" input is selected.
Dual Mono
Mono Input Channel
Loudness Management
Volume Limit
Headphone Level
value between "–12 dB" and "+12 dB". Set a negative e volume of the target device is larger than the others itive value if smaller. To check the audio, start playback
nnected device. (Default Value is "0 dB")
a character or symbol with the cursors and press .
t it to input 10 or less characters.Switches between upper and lower cases. (Pressing on the remote controller also toggles between upper
wer cases)": Moves the cursor to the arrow direction.emoves a character on the left of the cursor.
nters a space.ssing CLEAR on the remote controller will remove all input characters.putting, select "OK" with the cursors and press .
put name will be saved.
> Part Names > Install > Initial Setup > Playback
o
Source∫ Input Volume AbsorberAdjust the volume level difference binput selector to configure.
∫ Name EditSet an easy name to each input. Ththe input selector to configure.
0 To name a preset radio station, pand select the preset number.0 This cannot be set if the "NET","U
Set the audio channel or language to be output when playing multiplex audio or multilingual TV broadcasts etc."Main (Default Value)": Main channel only"Sub": Sub channel only"Main / Sub": Main and sub channels will be output at the same time.0 If multiplex audio is being played, "1+1" will be displayed on
the display of this unit when on the remote controller is pressed.
Set the input channel to use for playing any 2 ch digital source such as Dolby Digital, or 2 ch analog/PCM source in the Mono listening mode."Left": Left channel only"Right": Right channel only"Left + Right (Default Value)": Left and right channels
When playing Dolby TrueHD, enable the dialog normalization function which keeps the volume of dialog at a certain level. Note that when this setting is Off, the DRC function that allows you to enjoy surround at low volumes is fixed to off when playing Dolby Digital Plus/Dolby TrueHD."On (Default Value)": Use this function"Off": Do not use this function
Set the maximum value to avoid too high volume. Select "Off (Default Value)" or a value between "30" and "49".Adjust the output level of the headphones. Select a value between "-12 dB" and "+12 dB". (Default Value is "0 dB")
Input Volume Absorber Select a value if thand a posof the co
Name Edit 1. SelectENTERRepea"A/a": MODEand lo" " "" ": R" ": E0 Pre
the 2. After in
ENTERThe in
47
> Before Start
Advanced Setup | Firmware Update | Others
EN
∫ Audio SelectSelect the priority for iselector, such as connIN jack. The setting caselector to configure.
hen "TUNER", "NET", "USB" or "BT AUDIO" input is
Audio Select
Fixed PCM
"On" enables the input selection link and other link with HDMI connected CEC compliant device. this function
ault Value)": Do not use this functionanging this setting, turn off and then on again the power nected components.ding on the TV set, a link may need to be configured on . to "On" and closing the on-screen menu displays the
of the CEC-compatible components and "CEC On" on play of this unit. consumption in standby mode may increase if "On" is epending on the TV status, the unit will enter the l standby mode.)operate MASTER VOLUME dial on the unit when this is "On" and audio is output from the TV speakers, will be output also from the speakers connected to the you want to output from only either of them, change the TV settings, or reduce the volume of the unit.rmal operation occurs when you set the setting to "On", "Off".
connecting a non-CEC compatible component, or when e not sure whether it is compatible, set the setting to
> Part Names > Install > Initial Setup > Playback
nput selection when multiple audio sources are connected to one input ections to both the "BD/DVD" HDMI IN jack and the "BD/DVD" AUDIO n be separately set to each input selector button. Select the input
Note that there are some default values you cannot change.
0 The setting cannot be changed wselected.
Hardware∫ HDMI
"ARC": When giving priority to input signal from ARC compatible TV.0 The setting can be selected only when "Hardware" - "HDMI" -
"Audio Return Channel" is set to "Auto" and also the "TV" input is selected.
"HDMI": When giving priority to input signal from HDMI IN jacks0 The setting can be selected only when the input is assigned to
the HDMI jack in the "Input/Output Assign" - "HDMI Input" setting.
"COAXIAL": When giving priority to input signal from DIGITAL IN COAXIAL jacks0 The setting can be selected only when the input is assigned to
the COAXIAL jack in the "Input/Output Assign" - "Digital Audio Input" setting.
"OPTICAL": When giving priority to input signal from DIGITAL IN OPTICAL jacks0 The setting can be selected only when the input is assigned to
the OPTICAL jack in the "Input/Output Assign" - "Digital Audio Input".
"Analog": To always output analog audio independently of the input signal0 The setting can be selected only when the input is assigned to
the AUDIO IN jack in the "Input/Output Assign" - "Analog Audio Input" setting.
(Default Value: BD/DVD: HDMI, CBL/SAT: HDMI, GAME: HDMI, STRM BOX: HDMI, CD: COAXIAL, TV: OPTICAL, PHONO: Analog)Select whether to fix input signals to PCM (except multi-channel PCM) when you have selected "HDMI", "COAXIAL", or "OPTICAL" in the "Audio Select" setting. Set this item to "On" if noise is produced or truncation occurs at the beginning of a track when playing PCM sources. Select "Off (Default Value)" normally.0 Changing "Audio Select" changes the setting to "Off".
HDMI CEC Setting tofunctions"On": Use"Off (DefWhen chof all con0 Depen
the TV0 Setting
name the dis0 Power
set. (Dnorma0 If you
settingaudio unit. Ifunit or0 If abno
set it to0 When
you ar"Off".
48
> Before Start
Advanced Setup | Firmware Update | Others
EN
HDMI Standby Through
enjoy audio through the speakers of the TV while this . this function
ault Value)": Do not use this functiontting is fixed to "Auto" if "HDMI CEC" is set to "On". If ange this setting, set "HDMI CEC" to "Off."ng mode cannot be changed while "Audio TV Out" is "On" and audio is being output through the speakers of .ding on your TV set or input signal of the component, may not output through the speakers of the TV even if tting is set to "On". In such case, audio is output from eakers of the unit.perate MASTER VOLUME dial on this unit when audio
being input through this unit for output from the TV rs, audio is output from this unit. If you do not want to
audio from the unit, change the unit or TV settings, or the volume of the unit.
enjoy sound of the HDMI connected ARC compatible gh the speakers connected to the unit.is function, set "HDMI CEC" to "On" in advance.hen enjoying the TV sound through the speakers d to the uniten not using the ARC function
ng automatically corrects any desynchronization the video and audio signals based on data from the Sync compatible TV.
ault Value)": Automatic correction will be enabled.omatic correction will be disabled.
e unit to enter standby automatically when the specified ses. Select from "30 minutes", "60 minutes", and "90 .ault Value)": Does not turn the unit to standby cally.
> Part Names > Install > Initial Setup > Playback
∫ Power Management
When this is set to anything other than "Off", you can play the video and audio of an HDMI connected player on the TV even if the unit is in standby mode. Only "Auto" and "Auto (Eco)" can be selected if "HDMI CEC" is set to "On". If you select anything else, set "HDMI CEC" to "Off". (Default Value is “Off”)0 Power consumption in standby mode increases if set to
anything other than "Off"."BD/DVD", "CBL/SAT", "GAME", "STRM BOX": For example, if you select "BD/DVD", you can play the equipment connected to the "BD/DVD" jack on the TV even if the unit is in standby mode. Select this setting if you have decided which player to use with this function."Last": You can play the video and audio of the input selected immediately prior to the unit being switched to standby on the TV."Auto", "Auto (Eco)": Select one of these settings when you have connected equipment that conforms to the CEC standard. You can play the video and audio of the input selected on the TV, irrespective of what input was selected immediately prior to the unit being switched to standby, using the CEC link function.0 To play players on the TV that do not conform to the CEC
standard, you will need to turn the unit on and switch to the relevant input.0 When using TV that complies with the CEC standard, you can
reduce the power consumption in standby mode by selecting "Auto (Eco)".
Audio TV Out You can unit is on"On": Use"Off (Def0 The se
you ch0 Listeni
set to the TV0 Depen
audio this sethe sp0 If you o
that is speakeoutputreduce
Audio Return Channel You can TV throuTo use th"Auto": Wconnecte"Off": Wh
Auto Delay This settibetween HDMI Lip"On (Def"Off": Aut
by" and "Bluetooth Wakeup" cannot be selected. It will is started.
Auto Standby
Auto Standby in HDMStandby Through
USB Power Out at Standby
Network Standby
tion wakes up the unit on standby by connecting a OTH enabled device. this function
ault Value)": Do not use this function to "On" increases the power consumption even when
it is on standby. However, the increase in power ption is kept to a minimum by automatically entering
BRID STANDBY mode, where only the essential circuit ating.tting is fixed to "Off" if "Network/Bluetooth" - oth" - "Auto Input Change" ( P56) is set to "Off".
frequency step depending on your area of residence..2 MHz (Default Value)" or "0.05 MHz".this setting is changed, all radio presets are deleted.
run the auto scan when new DAB stations are added or move house.
DRC (Dynamic Range Control) setting, you can reduce mic range of DAB digital radio so that you can still hear ts even when listening at low volume levels - ideal for to the radio late at night when you don't want to disturb
ault Value)" : DRC offLarge reduction in dynamic rangeSmall reduction in dynamic range
> Part Names > Install > Initial Setup > Playback
0 Wait for a while if "Network Standappear when the network feature
Miscellaneous∫ Tuner
This setting places the unit on standby automatically after 20 minutes of inactivity without any video or audio input.(When "USB Power Out at Standby" or "Network Standby" is on, this becomes the HYBRID STANDBY mode which reduces the increase in power consumption to a minimum.)"On": The unit will automatically enter standby mode ("ASb" will stay lit)."Off": The unit will not automatically enter standby mode.0 "Auto Standby" is displayed on the display of this unit and TV
screen 30 seconds before the Auto Standby comes on.0 Default values vary depending on the regions.
I Enable or disable "Auto Standby" while "HDMI Standby Through" is on."On": The setting will be enabled."Off": The setting will be disabled.0 This setting cannot be set to "On" if "Auto Standby" is set to
"Off".
Devices connected to the USB port are supplied with electricity even when this unit is in standby mode when this function is "On". (Default Value is "Off")0 When using this feature, power consumption increases even
when the unit is on standby, however, the increase in power consumption is kept to a minimum by automatically entering the HYBRID STANDBY mode, where only essential circuits are operating.
When this feature is turned "On (Default Value)", you can turn on the power of the unit via the network using an application that can control this unit. 0 When "Network Standby" is used, the power consumption
increases even when the unit is on standby. However, the increase in power consumption is kept to a minimum by automatically entering the HYBRID STANDBY mode, where only the essential circuit is operating.0 "Network Standby", which suppresses power consumption,
may be disabled when the network connection is lost. Use the power button on the remote controller or this unit to turn the unit on if this happens.
Bluetooth Wakeup This funcBLUETO"On": Use"Off (Def0 Setting
the unconsumthe HYis oper0 This se
"Blueto
FM Frequency Step (North American models)
Select a Select "00 When
DAB Auto Scan(VSX-S520D)
You can when you
DAB DRC(VSX-S520D)
With the the dynaquiet parlistening anyone."Off (Def"Large" : "Small" :
50
> Before Start
Advanced Setup | Firmware Update | Others
EN
∫ Firmware Updat
0 Wait for a while if "Ffeature is started.
∫ Initial SetupYou can make the Init0 Wait for a while if "I
feature is started.
∫ Lock
∫ Load Default
Update Notice
Version
Update via NET
Update via USB
Setup Parameter
Load Default
> Part Names > Install > Initial Setup > Playback
e
irmware Update" cannot be selected. It will appear when the network
ial Setup from the System Setup menu.nitial Setup" cannot be selected. It will appear when the network
Availability of a firmware update will be notified via network."Enable (Default Value)": Notify updates"Disable": Do not notify updates
The current firmware version will be displayed.
Press ENTER to select when you want to update the firmware via network.0 You will not be able to select this setting if you do not have
Internet access or there is nothing to update.
Press ENTER to select when you want to update the firmware via USB.0 You will not be able to select this setting if a USB storage
device is not connected or there is nothing to update in the USB storage device.
Lock the Setup menu to protect the settings."Locked": The menu is locked."Unlocked (Default Value)": The menu is unlocked.
Reset the unit to return the settings to the status at the time of shipment. Reset is complete when "Clear" is displayed on the display and the unit switches to standby.Your settings will also be initialized when you reset, so note down your settings before starting reset.
51
> Before
Advanced Setup | Firmware Update | Others
EN
MCA r make desired changes to the equalizer. You can also
ach speaker setting.t assigned to the unit.r to display the Home screen, then select MCACC with ller and press ENTER.
/ / / buttons of the remote controller and press . of the settings with the cursors / .
press .
icrophone in the listening position, measure the test the unit automatically sets the optimum volume level for ncies, and the distance from the listening position. This lizers for the speakers and enables correction of vironment of the room.16) in Initial Setup for details.
en settings are automatic, but you can also adjust the connected speaker to suit your own preferences. You nt sound ranges for each of the speakers. You can set 1 to 3. You can select up to 4 bands for the Subwoofer o use the set equalizer effects, select the preset number
1
Start
CC
TV's r
> Part Names > Install > Initial Setup > Playback
Setup the speakers automatically ocheck the values set currently for e1. Switch the input on the TV to tha2. Press on the remote controlle
the cursors on the remote contro
3. Select the item with the cursor ENTER to confirm your selection0 Change the initial values for each0 To return to the previous screen,
4. To exit the settings, press .
Full Auto MCACCPlace the supplied speaker setup mtones emitted by the speakers, theneach speaker, the crossover frequealso automatically adjusts the equadistortion caused by the acoustic enRefer to "1. Full Auto MCACC" ( P
Manual MCACC∫ EQ AdjustIf you perform Full Auto MCACC thoutput volume of the range of eachcan adjust the volume of the differethree different equalizers in Preset and 9 bands for all other speakers. T
2
emote controller
52
> Before Start
Advanced Setup | Firmware Update | Others
EN
in "AV Adjust" - "MCA
d depending on the input source and listening mode
nts while listening to something, press on the remote ou want to adjust in "AV Adjust" - "MCACC" - "Manual
Front Left
Center
Front Right
cting the speaker frequency from between "63 Hz" and with the cursors / , adjust the volume of that y between "-12.0 dB" and "+12.0 dB" with / . (Default 0.0 dB")em cannot be selected even though connection is t, check that the settings in "System Setup" - "Speaker" figuration" - "Speaker Channels" ( P44) matches the r of connected channels." can only be selected when this speaker is set to " in "System Setup" - "Speaker" - "Crossover" ( P44).
cting the speaker frequency from between "63 Hz" and with the cursors / , adjust the volume of that y between "-12.0 dB" and "+12.0 dB" with / . (Default 0.0 dB")em cannot be selected even though connection is t, check that the settings in "System Setup" - "Speaker" figuration" - "Speaker Channels" ( P44) matches the r of connected channels." can only be selected when this speaker is set to " in "System Setup" - "Speaker" - "Crossover" ( P44).
cting the speaker frequency from between "31 Hz" and with the cursors / , adjust the volume of that y between "-12.0 dB" and "+12.0 dB" with / . (Default 0.0 dB")nnot be selected if "No" is set in "System Setup" - er" - "Configuration" - "Subwoofer" ( P44).
> Part Names > Install > Initial Setup > Playback
CC" - "Manual EQ Select" ( P40).
0 The result may not be as expectesetting.0 If you want to make the adjustme
controller, and select the Preset yEQ Select" ( P40) first.
After selecting the speaker frequency from between "63 Hz" and "16 kHz" with the cursors / , adjust the volume of that frequency between "-12.0 dB" and "+12.0 dB" with / . (Default Value is "0.0 dB")0 If an item cannot be selected even though connection is
correct, check that the settings in "System Setup" - "Speaker" - "Configuration" - "Speaker Channels" ( P44) matches the number of connected channels.0 "63 Hz" can only be selected when this speaker is set to
"Large" in "System Setup" - "Speaker" - "Crossover" ( P44).
Surround Right After sele"16 kHz" frequencValue is "0 If an it
correc- "Connumbe0 "63 Hz
"Large
Surround Left After sele"16 kHz" frequencValue is "0 If an it
correc- "Connumbe0 "63 Hz
"Large
Subwoofer After sele"250 Hz"frequencValue is "0 This ca
"Speak
53
> Before Start
Advanced Setup | Firmware Update | Others
EN
MCACC Data ChYou can check the nuhave set for each of th
∫ Speaker SettingYou can check the nuyou have set for the lo
∫ Channel LevelYou can check the ou
∫ Speaker DistancYou can check the dis
∫ Acoustic CalibraYou can check the calwere set in "Manual M
> Part Names > Install > Initial Setup > Playback
eckmber of speaker channels connected and the content and values you e speaker settings.
mber of speaker channels connected and the large and small settings w range reproduction capabilities for each of the speakers.
tput level settings for each of the speakers.
etance from each speaker to the listening position.
tion EQibration values for the frequency characteristics of each speaker that CACC".
54
> Before
Advanced Setup | Firmware Update | Others
EN
Netw nnections and BLUETOOTH.
t assigned to the unit.r to display the Home screen, then select Network/ remote controller and press ENTER.
/ / / buttons of the remote controller and press . of the settings with the cursors / .
press .
HCP, set "DHCP" to "Enable" to configure the setting addresses to each component, you must set "DHCP" to to this unit in "IP Address" as well as set information net Mask and Gateway.
1
the unit to network via wireless LAN router.eless LAN connectiond) (Default Value)": Wired LAN connection
configure wireless LAN settings by pressing ENTER art" is displayed.to "3. Network Connection" ( P16) in Initial Setup for .
mation of the connected access point will be displayed.SID of the connected access point.Signal strength of the connected access point.Status of the connected access point.
Start
ork/B
TV's r
> Part Names > Install > Initial Setup > Playback
luetooth
Make settings related to network co1. Switch the input on the TV to tha2. Press on the remote controlle
Bluetooth with the cursors on the
3. Select the item with the cursor ENTER to confirm your selection0 Change the initial values for each0 To return to the previous screen,
4. To exit the settings, press .
Network0 When LAN is configured with a D
automatically. To assign fixed IP "Disable" and assign an addressrelated to your LAN, such as Sub
2
emote controller
Wi-Fi Connect "On": Wir"Off (Wire
Wi-Fi Setup You can when "St0 Refer
details
Wi-Fi Status The infor"SSID": S"Signal": "Status":
55
> Before Start
Advanced Setup | Firmware Update | Others
EN
ot be selected. It will appear when the network feature is
MAC Address
DHCP
IP Address
Subnet Mask
Gateway
DNS Server
Proxy URL
Proxy Port
Friendly Name
set a password of up to 31 characters so that only d users can use AirPlay.ENTER to display the Edit screen. a character or symbol with the cursors and press
.t it to input 31 or less characters.Switches between upper and lower cases. (Pressing on the remote controller also toggles between upper
wer cases.)": Moves the cursor to the arrow direction.
Removes a character on the left of the cursor.nters a space.ct whether to mask the password with " " or display it text, press +Fav on the remote controller.
ng CLEAR on the remote controller will remove all the haracters.putting, select "OK" with the cursors and press .
put password will be saved.
ns of improving the quality of our products and our company may collect information about your usage network. Select "Yes" if you agree to our collecting this on. Select "No" if you do not want us to collect this on. (Default Value is "No")set this after confirming the Privacy Policy. When you sage Data" and press ENTER, the Privacy Policy is . (The same screen is displayed once also when the network connection.) If you agree to the collection
ormation, this setting also becomes "Yes". Note that if e to the Privacy Policy but select "No" for this setting,
ation will not be collected.
check the network connection.TER when "Start" is displayed.
> Part Names > Install > Initial Setup > Playback
0 Wait for a while if "Network" cannstarted.
This is the MAC address of this unit.This value is specific to the component and cannot be changed.
"Enable (Default Value)": Auto configuration by DHCP"Disable": Manual configuration without DHCPIf selecting "Disable", you must set "IP Address", "Subnet Mask", "Gateway", and "DNS Server" manually.
Displays/Sets the IP address.
Displays/Sets the subnet mask.
Displays/Sets the gateway.
Displays/Sets the primary DNS server.
Displays/Sets the proxy server URL.
Displays/Sets the proxy server port number when you enter "Proxy URL".
Change the device name for this unit which is shown on other devices connected to the network to an easily recognized name.This is set to Pioneer VSX-S520D or Pioneer VSX-S520 at the time of purchase. (" " stand for alphanumeric characters identifying each unit)1. Press ENTER to display the Edit screen.2. Select a character or symbol with the cursors and press
ENTER.Repeat it to input 31 or less characters."A/a": Switches between upper and lower cases. (Pressing MODE on the remote controller also toggles between upper and lower cases.)" " " ": Moves the cursor to the arrow direction." ": Removes a character on the left of the cursor." ": Enters a space.0 Pressing CLEAR on the remote controller will remove all the
input characters.3. After inputting, select "OK" with the cursors and press
ENTER.The input name will be saved.
AirPlay Password You can registere1. Press 2. Select
Usage Data As a measervices,over the informatiinformatiYou can select "Udisplayedsetting upof the infyou agrethe inform
Network Check You can Press EN
56
> Before Start
Advanced Setup | Firmware Update | Others
EN
Bluetooth
not be selected. It will appear when the BLUETOOTH
Bluetooth
Auto Input Change
Auto Reconnect
Pairing Information
Device
the status of the BLUETOOTH enabled device d to the unit. Not paired Paireded": Successfully connected
> Part Names > Install > Initial Setup > Playback
0 Wait for a while if "Bluetooth" canfunction is started up.
Select whether or not to use the BLUETOOTH function."On (Default Value)": Enables connection with a BLUETOOTH enabled device by using the BLUETOOTH function. Select "On" also when making various BLUETOOTH settings."Off": When not using the BLUETOOTH functionThe input of the unit will automatically be switched to "BT AUDIO" when connection is made from a BLUETOOTH enabled device to the unit."On (Default Value)": The input will automatically become "BT AUDIO" when a BLUETOOTH enabled device is connected."Off": The function is disabled.0 If the input is not switched automatically, set to "Off" and
change the input manually.This function automatically reconnects to the BLUETOOTH enabled device connected last when you change the input to "BT AUDIO"."On (Default Value)": Use this function"Off": Do not use this function0 This may not work with some BLUETOOTH enabled devices.
You can initialize the pairing information saved on this unit.Pressing ENTER when "Clear" is displayed initializes the pairing information stored in this unit.0 This function does not initialize the pairing information on the
BLUETOOTH enabled device. When pairing the unit again with the device, be sure to clear the pairing information on the BLUETOOTH enabled device in advance. For information on how to clear the pairing information, refer to the BLUETOOTH enabled device's instruction manual.
Displays the name of the BLUETOOTH enabled device connected to the unit.0 The name is not displayed when "Status" is "Ready" and
"Pairing".
Status Displays connecte"Ready":"Pairing":"Connect
57
> Before
Advanced Setup | Firmware Update | Others
EN
Firmware UpdateFirmw
Update fThis unit hasystem sofenables usand to add For details
dating the Firmware via Networkheck that the unit is turned on, and the connection to
he Internet is secured.urn off the controller component (PC etc.) connected to
he network.top any playing Internet radio, USB storage device, or erver content.hen "System Setup" - "Hardware" - "HDMI" - "HDMI EC" in the Home is set to "On", set it to "Off".he description may differ from the on-screen display but
hat will not change the way to operate or the function.witch the input on the TV to that assigned to the unit.ress on the remote controller.
elect "System Setup" - "Miscellaneous" - "Firmware pdate" - "Update via NET" with the cursors in order,
hen press ENTER.
Start
are U
unction os functionali
tware) over a to make impfeatures. about the up
> Part Names > Install > Initial Setup > Playback
pdate
f this unitty to update the firmware (the network or by the USB port. This rovements to a variety of operations
dated play features, see here.
How to update firmwareThere are two methods for updating the firmware: via network and via USB. The update may take about 20 minutes to complete for either method: via network or via USB. Furthermore, existing settings are guaranteed regardless of the method used for update.Note that when this unit is connected to a network, you may see notifications about firmware updates on the display. To execute updating, select "Update" with the cursor buttons of the remote controller and press ENTER. "Completed!" is displayed when the update is complete.0 For the latest information on updates, visit our company’s
website. There is no need to update the firmware on this unit if there is no update available.0 Before updating, make sure that the speaker setup
microphone is not connected.0 During an update, do not
– Disconnect and reconnect any cable, USB storage device, speaker setup microphone or headphones, or perform any operation on the component such as turn off its power
– Accessing this unit from a PC or smartphone using an application
Disclaimer: The program and accompanying online documentation are furnished to you for use at your own risk.We will not be liable and you will have no remedy for damages for any claim of any kind whatsoever concerning your use of the program or the accompanying online documentation, regardless of legal theory, and whether arising in tort or contract.In no event will we be liable to you or any third party for any special, indirect, incidental, or consequential damages of any kind, including, but not limited to, compensation, reimbursement or damages on account of the loss of present or prospective profits, loss of data, or for any other reason whatsoever.
Up0 C
t0 T
t0 S
s0 W
C0 T
t1. S2. P
3. SUt
58
> Before Start
Advanced Setup | Firmware Update | Others
EN
0 If "Firmware Updselected, wait for0 You will not be ab
is nothing to upd4. Press ENTER with 0 During the updat
depending on thecheck the progrescreen will remaiand the power is0 "Completed!" is d
complete.5. Press Í STANDBY
standby mode. Thefirmware is updated0 Do not use Í on
If an error message i"*-** Error!" is disprepresents an alphanufollowing:0 -01, -10: Ethern
Ethernet cable prop0 -02, -03, -04,
16, -17, -18, -Check the following– The router is turn– This unit and theTry to disconnect athe unit and router.
nd folders varies depending on the model.opy all unzipped files and folders to the root folder of
he USB storage device.0 Make sure to copy the unzipped files.onnect the USB storage device to the USB port of this nit.0 If you connect a USB hard disk drive to the USB port of
the unit, we recommend that you use its AC adapter to power it.0 If the USB storage device has been partitioned, each
section will be treated as an independent device.witch the input on the TV to that assigned to the unit.ress on the remote controller.
elect "System Setup" - "Miscellaneous" - "Firmware pdate" - "Update via USB" with the cursors in order,
hen press ENTER.
0 If "Firmware Update" is grayed out and cannot be selected, wait for a while until it starts up.0 You will not be able to select "Update via USB" if there
is nothing to update.
SystemIn
S
System SetupInput/Output Assign
Speaker Hardware
> Part Names > Install > Initial Setup > Playback
ate" is grayed out and cannot be a while until it starts up.le to select "Update via NET" if there
ate."Update" selected to start update.e, the TV screen may go black updated program. In that case, ss on the display of this unit. The TV n black until the update is complete turned on again.isplayed when the update is
/ON on this unit to turn the unit into process is completed and your to the latest version. the remote controller.
s displayed: When an error occurs, layed on the display of this unit. ("*" meric character.) Check the
et cable not found. Connect the erly.
-05, -06, -11, -13, -14, -20, -21: Internet connection error. :ed on router are connected via the networknd then connect again the power to This may solve the problem. If you
are still unable to connect to the Internet, the DNS server or proxy server may be temporarily down. Check the service status with your ISP provider.0 Others: Disconnect then reconnect the AC power cord,
then repeat from the beginning.
Updating via USB0 Prepare a 128 MB or larger USB storage device. FAT16
or FAT32 file system format.– Media inserted in a USB card reader may not be used
for this function.– USB storage devices with security function are not
supported.– USB hubs and USB devices with hub function are not
supported. Do not connect these devices to the unit.0 Delete any data stored on the USB storage device.0 Turn off the controller component (PC etc.) connected to
the network.0 Stop any playing Internet radio, USB storage device, or
server content.0 When "System Setup" - "Hardware" - "HDMI" - "HDMI
CEC" in the Home is set to "On", set it to "Off".0 Some USB storage devices may take long to load, may
not be loaded correctly, or may not be correctly fed depending on the device or their content.0 We will not be liable whatsoever for any loss or damage
of data, or storage failure arising from the use of the USB storage device with this unit. Thank you for your understanding.0 The description may differ from the on-screen display but
that will not change the way to operate or the function.1. Connect the USB storage device to your PC.2. Download the firmware file from our company’s website
to your PC and unzip.Firmware files are named in the following way:
PIOSLM1001_S50000SASAFPSP_ .zipUnzip the file on your PC. The number of unzipped files
a3. C
t
4. Cu
5. S6. P
7. SUt
Setupput/Output Assign
peaker Hardware
59
> Before Start
Advanced Setup | Firmware Update | Others
EN
8. Press ENTER with 0 During the updat
depending on thecheck the progrescreen will remaiand the power is0 During the updat
reconnect the US0 "Completed!" is d
complete.9. Remove the USB s10.Press Í STANDBY
standby mode. Thefirmware is updated0 Do not use Í on
If an error message i"*-** Error!" is disprepresents an alphanufollowing:0 -01, -10: USB s
whether the USB stcorrectly inserted toConnect the USB ssource if it has its o0 -05, -13, -20,
in the root folder of firmware file is for adownload of the firm0 Others: Disconnec
then repeat from th
> Part Names > Install > Initial Setup > Playback
"Update" selected to start update.e, the TV screen may go black updated program. In that case, ss on the display of this unit. The TV n black until the update is complete turned on again.e, do not turn off, or disconnect then B storage device.isplayed when the update is
torage device from this unit./ON on this unit to turn the unit into process is completed and your to the latest version. the remote controller.
s displayed: When an error occurs, layed on the display of this unit. ("*" meric character.) Check the
torage device not found. Check orage device or USB cable is the USB port of this unit.torage device to an external power wn power supply.
-21: The firmware file is not present the USB storage device, or the nother model. Retry from the ware file.
t then reconnect the AC power cord, e beginning.
60
> Before
Advanced Setup | Firmware Update | Others
EN
OthersTroub
Before sProblems mor disconnethan workinprocedure.the connecaudio is nowork, discoit. When recable sincereconnectindevice.0 This unit
control fuinterfereelectricitthat this outlet, w0 We are n
(such ascaused bimportanrecorded
If operatTry restartThe issue mswitching thON on this (The settingunit doesn'connect agcomponent
Resetting default)If restarting
Audioake sure that the speaker setup microphone is not still
onnected.onfirm that the connection between the output jack on
he device and the input jack on this unit is correct.ake sure that none of the connecting cables are bent,
wisted, or damaged.f the MUTING indicator on the display flashes, press n the remote controller to cancel muting.hile headphones are connected to the PHONES jack,
o sound is output from the speakers.hen "System Setup" - "Source" - "Audio Select" -
Fixed PCM" in the Home is set to "On", no sound is layed when signals other than PCM are input. Change
he setting to Off.
eck the following if the above does not fix the problem:
ere is no sound from the TVhange the input selector on this unit to the position of
he terminal to which the TV is connected.f the TV doesn't support the ARC function, along with onnection by HDMI, connect the TV and this unit using a igital optical cable, digital coaxial cable or analog audio able.
sound from a connected playerhange the input selector on this unit to the position of
he terminal to which the player is connected.heck the digital audio output setting on the connected omponent. On some game consoles, such as those that upport DVD, the default setting is OFF.ith some DVD-Video discs, you need to select an audio
utput format from a menu.
Start
lesho
tarting thay be solvecting/connecg on the con
Try the simpted device. It output or thnnecting/conconnecting, b if wound theg, turn off an
contains a mnctions. In v
nce, noise froy may causehappens, unait at least 5 ot responsib CD rental fey the unit’s mt data, make correctly.
ion becoming the unit
ay be fixedis unit to staunit for 5 or s in the unit
t fix the probain the powes.
the unit (thi
the unit doe
> Part Names > Install > Initial Setup > Playback
oting
e procedured by simply turning the power on/off ting the power cord, which is easier nection, setting and operating le measures on both the unit and f the problem is that the video or e HDMI linked operation does not necting the HDMI cable may solve e careful not to wind the HDMI HDMI cable may not fit well. After d on the unit and the connected
icroPC for signal processing and ery rare situations, severe m an external source, or static
it to lockup. In the unlikely event plug the power cord from the wall seconds, and then plug it back in.le for reparations for damages es) due to unsuccessful recordings
alfunction. Before you record sure that the material will be
es unstable
by restarting this unit. After ndby, press and hold Í STANDBY/more seconds to restart the unit. are maintained.) If restarting the lem, try to disconnect and then r to the unit and other connected
s resets the unit settings to the
sn't fix the problem, resetting the
unit to the status at the time of shipment may solve the problem. Your settings will also be initialized when you reset, so note down your settings before doing the following.1. Press on the remote controller, select "System
Setup" - "Miscellaneous" - "Load Default" in the Home and press ENTER.
2. Select "Yes", and then press ENTER.3. The unit switches to standby and the settings are reset.
∫ PowerCannot turn on the unit0 Make sure that the power cord is properly plugged into
the wall outlet.0 Unplug the power cord from the wall outlet, wait 5
seconds or more, then plug it in again.
The unit turns off unexpectedly0 The unit automatically switches to standby when the
"System Setup" - "Hardware" - "Power Management" - "Auto Standby" setting in the Home functions.0 If "CHECK SP WIRE" appears on the display, the
speaker cables may be short-circuited. Make sure bare speaker wires are not touching each other or the back panel of the unit, then turn the unit on again.0 The protective circuit function may have been activated
because the temperature of the unit rose abnormally. If this happens, then the power will continue to turn off after you have turned the unit on again. Make sure the unit has plenty of space for ventilation around it, wait for the unit to cool down sufficiently, and then try turning it on again.
WARNING: If smoke, smell or abnormal noise is produced by the unit, unplug the power cord from the wall outlet immediately and contact the dealer or our company’s support.
∫
0 Mc0 C
t0 M
t0 I
o0 W
n0 W
"pt
Ch
Th0 C
t0 I
cdc
No0 C
t0 C
cs0 W
o
61
> Before Start
Advanced Setup | Firmware Update | Others
EN
A speaker produces0 Make sure that the p
correct, and that nometal part of speak0 Make sure that the 0 Check that the spea
correctly. ( P9) Seenvironment need tInitial Setup. ( P10 Depending on the s
much sound may beSelect another liste
The subwoofer prod0 When you play sou
information in the Lno sound.
Noise can be heard0 Using cable ties to
speaker cable, etc. so refrain from doin0 An audio cable may
repositioning your c
The beginning of audheard0 Since it takes longe
signal than it does foutput may not star
Sound suddenly red0 When the temperat
temperature for extreduced automatica
TS signal. In such cases, you may hear noise.laying DTS program material, using the pause, fast
orward, or fast reverse function on your player may roduce a short audible noise. This is not a malfunction.
Videoonfirm that the connection between the output jack on
he device and the input jack on this unit is correct.ake sure that none of the connecting cables are bent,
wisted, or damaged.hen the TV image is blurry or unclear, power code or
onnection cables of the unit may have interfered. In that ase, keep distance between TV antenna cable and ables of the unit.ake sure the switching of input screens is proper at the onitor side such as a TV.
eck the following if the above does not fix the problem:
ere is no videohange the input selector on this unit to the position of
he terminal to which the player is connected.
ere is no picture from a source connected to an HDMI terminalo display video from the connected player on the TV hile the unit is in standby, you need to enable "System etup" - "Hardware" - "HDMI" - "HDMI Standby Through"
n the Home. Refer to ( P48) for information about DMI Standby Through.heck if "Resolution Error" is displayed on this unit's isplay when video input via HDMI IN jack is not isplayed. In this case, the TV does not support the esolution of the video input from the player. Change the etting on the player.eliable operation with an HDMI-to-DVI adapter is not uaranteed. In addition, video signals from a PC are not upported.
> Part Names > Install > Initial Setup > Playback
no soundolarity of the speaker cables (_/`) is
bare wires are in contact with the er terminals.speaker cables are not shorting.ker connections have been made ttings for the speaker connection
o be made in "1. Full Auto MCACC" in 6)ource and current listening mode, not produced by the surround speakers.
ning mode to see if sound is output.
uces no soundrce material that contains no FE channel, the subwoofer produces
bundle RCA cables with power cords, may degrade the audio performance, g it. be picking up interference. Try ables.
io received via HDMI cannot be
r to identify the format of an HDMI or other digital audio signals, audio t immediately.
ucesure inside the unit exceeds a certain ended periods, the volume may be lly to protect the circuits.
∫ Listening Modes0 To enjoy digital surround playback, such as Dolby Digital,
the audio signals need to pass through a connection via HDMI cable, digital coaxial cable or digital optical cable. Audio output should be set to bitstream output on the connected Blu-ray Disc player or other device.0 Press on the remote controller several times to switch
the display of this unit to check the input format.
Check the following if the above does not fix the problem:
Cannot select a desired listening mode0 Depending on the connecting status of the speaker,
some listening modes may not be selected. ( P35)
There is no sound with Dolby TrueHD, Dolby Atmos, DTS-HD Master Audio and DTS:X.0 If you cannot output formats such as Dolby TrueHD,
Dolby Atmos, DTS-HD Master Audio or DTS:X according to the format of the source, in the Blu-ray Disc player settings try setting "BD video supplementary sound" (or re-encode, secondary sound, video additional audio, etc.) to "Off". Change the listening mode for each source after changing the setting to confirm.0 We plan to provide support for the Dolby Atmos and
DTS:X audio format through firmware updates for this unit.
About DTS signals0 With media that switches suddenly from DTS to PCM,
PCM playback may not start immediately. In such cases, you should stop your player for about 3 seconds and then resume playback.0 With some CD and LD players, you will not be able to
playback DTS material properly even though your player is connected to a digital input on the unit. This is usually because the DTS bitstream has been processed (e.g., output level, sampling rate, or frequency response changed) and the unit does not recognize it as a genuine
D0 P
fp
∫
0 Ct0 M
t0 W
ccc0 M
m
Ch
Th0 C
t
ThIN 0 T
wSiH0 C
ddrs0 R
gs
62
> Before Start
Advanced Setup | Firmware Update | Others
ENImages flicker
0 It is possible that thcompatible with theconnected the playchanging the outpumay be an improveon the TV.
Video and audio are 0 Video may be delay
settings and connepress on the rem"Sound Delay" in "A
∫ Linked operatThere is no linked opdevices, such as a T0 In the Home of the
- "HDMI" - "HDMI C0 It is also necessary
compliant device. C0 When connecting a
HDMI, set "HardwaThrough" to "Auto"
∫ FM broadcastsRadio reception is p0 Re-check the anten0 Move the antenna a
power cord.0 Move the unit away0 Passing cars and a0 Concrete walls wea0 Listen to the station0 FM reception may b
e audio quality is poor after connection with a UETOOTH enabled devicehe BLUETOOTH reception is poor. Move the LUETOOTH enabled device closer to the unit or
emove any obstacle between the BLUETOOTH enabled evice and this unit.
Network functionf you cannot select a network service, it will become electable when the network function is started. It may ake about a minute to start up.
hen NET is blinking, this unit is not properly connected o the home network.ry plugging/unplugging the power supply of this unit and
he router, and try rebooting the router.f the desired wireless LAN router is not in the access oint list, it may be set to hide SSID or the ANY onnection may be off. Change the setting and try again.
eck the following if the above does not fix the problem:
nnot access the Internet radioertain network service or contents available through the nit may not be accessible in case the service provider
erminates its service.ake sure that your modem and router are properly
onnected, and make sure they are both turned on.ake sure that the LAN side port on the router is properly
onnected to this unit.ake sure that connecting to Internet from other
omponents is possible. If connecting is not possible, urn off all components connected to the network, wait for while, and then turn on the components again.
f a specific radio station is unavailable for listening, make ure the registered URL is correct, or whether the format istributed from the radio station is supported by this unit.epending on ISP, setting the proxy server is necessary.
> Part Names > Install > Initial Setup > Playback
e resolution of the player is not TV's resolution. If you have er to this unit with an HDMI cable, try t resolution on the player. There also ment if you change the screen mode
out of synced relative to audio depending on the
ctions with your television. To adjust, ote controller, and adjust in "Other" -
V Adjust".
ioneration with CEC compliant
Vunit, set "System Setup" - "Hardware" EC" to "On". to set HDMI linking on the CEC heck the instruction manual. Sharp brand player or recorder by re" - "HDMI" - "HDMI Standby in the System Setup menu.
oor or there is a lot of noise.na connection.way from the speaker cable or the
from your TV or PC.irplanes can cause interference.ken radio signals. in mono.ecome clearer if you use the antenna
jack on the wall used for the TV.
∫ BLUETOOTH function0 Try plugging/unplugging the power of the unit and try
turning on/off the BLUETOOTH enabled device. Restarting the BLUETOOTH enabled device may be effective.0 The BLUETOOTH enabled devices must support the
A2DP profile.0 Near components such as microwave oven or cordless
phone, which use the radio wave in the 2.4GHz range, a radio wave interference may occur, which disables the use of this unit.0 If there is a metallic object near the unit, BLUETOOTH
connection may not be possible as the metal can effect on the radio waves.
Check the following if the above does not fix the problem:
Cannot connect with this unit0 Check that the BLUETOOTH function of the
BLUETOOTH enabled device is enabled.
Music playback is unavailable on the unit even after successful BLUETOOTH connection0 When the audio volume of your BLUETOOTH enabled
device is set low, the playback of audio may be unavailable. Turn up the volume on the BLUETOOTH enabled device.0 Some BLUETOOTH enabled devices may be equipped
with a Send/Receive selector switch. Select Send mode.0 Depending on the characteristics or specifications of your
BLUETOOTH enabled device, playback on this unit may not be possible.
Sound is interrupted0 There may be a problem with the BLUETOOTH enabled
device. Check the information on the internet.
ThBL0 T
Brd
∫
0 Ist0 W
t0 T
t0 I
pc
Ch
Ca0 C
ut0 M
c0 M
c0 M
cta0 I
sd0 D
63
> Before Start
Advanced Setup | Firmware Update | Others
EN
0 Make sure that the supported by your I
Cannot access the n0 This unit needs to b
the network server.0 This unit is compati
12 network servershome network func0 You may need to m
Media® Player. (0 When using a PC, o
Windows Media® P
Playback stops whilenetwork server0 Make sure the netw0 When the PC is ser
any application soft(Windows Media® P0 If the PC is downloa
playback may be in
∫ USB storage d USB storage device0 Check whether the
correctly inserted to0 Disconnect the USB
then try reconnectin0 Performance of the
USB port of the uni0 Depending on the t
be performed normthat is supported.0 USB storage device
played.
ireless LAN router (access point) and the unit in the ame room.f there is a metallic object near the unit, wireless LAN onnection may not be possible as the metal can effect n the radio wave.hen other wireless LAN devices are used near the unit,
everal issues such as interrupted playback and ommunication may occur. You can avoid these issues y changing the channel of your wireless LAN router. For
nstructions on changing channels, see the instruction anual provided with your wireless LAN router.here may not be enough bandwidth available in ireless LAN. Connect using an Ethernet cable.
Remote Controllerake sure that the batteries are installed with the correct olarity.
nstall new batteries. Do not mix different types of atteries, or old and new batteries.ake sure that this unit is not subjected to direct
unshine or inverter-type fluorescent lights. Relocate if ecessary.
f this unit is installed in a rack or cabinet with colored-lass doors or if the doors are closed, the remote ontroller may not work reliably.
Display, OSDe display doesn't lighthe display may go dim while the Dimmer is working, nd may also turn off. Press DIMMER button and change
he brightness level of the display.
Othersange noises can be heard from this unitf you have connected another unit to the same wall
> Part Names > Install > Initial Setup > Playback
used router and/or modem is SP.
etwork servere connected to the same router as
ble with Windows Media® Player 11 or or NAS that are compatible with tionality.ake some settings on Windows P22)nly music files registered in the
layer library can be played.
listening to music files on the
ork server is compatible with this unit.ving as the network server, try quitting ware other than the server software layer 12, etc.).ding or copying large files, the
terrupted.
evice is not displayedUSB storage device or USB cable is the USB port of the unit. storage device from the unit, and g.
hard disk that receive power from the t is not guaranteed.ype of format, the playback may not ally. Check the type of the file formats
s with security functions may not be
∫ Wireless LAN Network0 Try plugging/unplugging the power supply of wireless
LAN router and the unit, check the wireless LAN router power-on status, and try reboot of the wireless LAN router.
Check the following if the above does not fix the problem:
Cannot access wireless LAN network0 The wireless LAN router setting may be switched to
Manual. Return the setting to Auto.0 Try the manual set-up. The connection may succeed.0 When the wireless LAN router setting is at stealth mode
(mode to hide the SSID key) or when ANY connection is off, the SSID is not displayed. Change the setting and try again.0 Check that the setting of SSID and encryption (WEP,
etc.) is correct. Make sure the network settings of the unit is properly set.0 Connection to an SSID that includes multi-byte
characters is not supported. Name the SSID of the wireless LAN router using single-byte alphanumeric characters only and try again.
Connected to an SSID different to the SSID selected0 Some wireless LAN routers allow you to set multiple
SSIDs for one unit. If you use the automatic setting button on such a router, you may end up connecting with a different SSID from the SSID you wanted to connect to. Use the connection method requiring you to enter a password if this happens.
Playback is interrupted and communication does not work0 You may not receive radio waves due to bad radio wave
conditions. Shorten the distance from the wireless LAN access point or remove obstacles to improve visibility, and try again. Place the unit away from microwave ovens or other access points. It is recommended to place the
ws0 I
co0 W
scbim0 T
w
∫
0 Mp0 I
b0 M
sn0 I
gc
∫
Th0 T
at
∫
Str0 I
64
> Before Start
Advanced Setup | Firmware Update | Others
EN
outlet as this unit, thother unit. If the sympower cord of the othis unit and the oth
When performing Fu"Noise Error" appea0 This can be caused
unit. Check if the un
DRC function does n0 Make sure the sour
Digital Plus, Dolby T
> Part Names > Install > Initial Setup > Playback
is noise may be an effect from the ptoms improve by unplugging the
ther unit, use different wall outlets for er unit.
ll Auto MCACC, the message rs by a malfunction in your speaker it produces normal sounds.
ot workce material is Dolby Digital, Dolby rueHD, or DTS.
65
> Before
Advanced Setup | Firmware Update | Others
EN
Gene
AmplifierRated Outp
With 4 orated 50more thamilliwatts
Surround M(4 ohms,
* ReferenceDependinmay be no
Rated Outp6 ch k 8
Input Sens200 mV/6.0 mV/4
Rated RCA1 V/470
Phono Ove30 mV (M
Frequency 10 Hz - 4
Tone Contrn10 dB,n10 dB,
Signal to N80 dB (IH70 dB (IH
Speaker Im4 h - 8 h
Headphone102 h
Headphone85 mW (
Tuner SecFM Tuning
87.5 MH87.5 MH
wer SupplyC 100 - 240 V, 50/60 Hz
wer Consumption0 W.2 W (Stand-by, North American).38 W (Stand-by, European)6 W (No-sound) W (HDMI Standby Through) W (Network Standby)ensions (W k H k D)35 mm k 70 mm k 325 mm7-1/8" k 2-3/4" k 12-13/16"ight kg (8.8 lbs)
dio Formatolby TrueHD, Dolby Digital, Dolby Digital Plus, Dolby tmos (to be supported in a future update), DTS, DTS:X
to be supported in a future update), DTS-HD Master udio, DTS-HD High Resolution Audio, DTS 96/24, DTS-D Express, DSD, PCM
ximum Video Resolutionk 60 Hz (YCbCr 4:4:4)
dio InputsitalPTICAL (TV)OAXIAL (CD)
alog
Start
ral Sp
(Audio) seut Power (F
hm loads, bo watts per chn 1% total h to rated outode Output 1 kHz THD output for ea
g on the sourc sound outpuut Power (IE0 W at 4 ohmitivity and Im47 kh (LINE7 kh (PHON Output Leveh (SUBWOOrloadM 1 kHz 1%
Response0 kHz/i1 dB
ol Character 90 Hz (BAS 7.5 kHz (TRoise RatioF-A, LINE IF-A, PHON
pedance
Output Imp
Rated Outp32 h, 1 kHz,
tionFrequency Rz - 107.9 MHz - 108.0 MH
> Part Names > Install > Initial Setup > Playback
ecifications
ctionTC) (North American)th channels driven, from 1 kHz; annel minimum RMS power, with no armonic distortion from 250 put.Power (* )1%) 80 W per channelch speakers.e and the listening mode settings, there t.C) (European)s, 1 kHz, 1 ch driven of 1% THD
pedance (1 kHz 80 W/4 h) (Unbalance))O MM)l and ImpedanceFER PRE OUT)
)
, j3 dBisticsS)EBLE)
N, SP OUT)O IN, SP OUT)
edance
ut 10% THD)
angez (North American)z, RDS (European)
DAB Tuning Frequency Range (VSX-S520D)174.928 MHz - 239.200 MHz
Preset Channel40
Network SectionEthernet LAN
10BASE-T/100BASE-TXWireless LAN
IEEE 802.11 a/b/g/n standard(Wi-Fi® standard)5 GHz/2.4 GHz band
BLUETOOTH SectionCommunication system
BLUETOOTH Specification version 4.1+LEFrequency band
2.4 GHz bandModulation method
FHSS (Freq Hopping Spread Spectrum)Compatible BLUETOOTH profiles
A2DP 1.2AVRCP 1.3HOGP-Host (Client)HOGP-HID Device (Server)HID Service (HIDS)
Supported CodecsSBCAAC
Transmission range (A2DP)20 Hz - 20 kHz (Sampling frequency 44.1 kHz)
Maximum communication rangeLine of sight approx. 15 m (* )
* The actual range will vary depending on factors such as obstacles between devices, magnetic fields around a microwave oven, static electricity, cordless phone, reception sensitivity, antenna’s performance, operating system, software application, etc.
General
PoA
Po600122
Dim41
We4
HDInp
I(
OuO
SuD3A
AuDA(AH
Ma4
AuDig
OC
An
66
> Before Start
Advanced Setup | Firmware Update | Others
EN
1 (BD/DVD), 2 (CB
Audio OutputsAnalog
SUBWOOFER PRESpeaker Outputs
FRONT L/R, CENTPhones
PHONES (Front, Ø
OthersUSB: 1 (Front, Ver.Ethernet: 1Setup Mic: 1
> Part Names > Install > Initial Setup > Playback
L/SAT), PHONO (designated)
OUT
ER, SURROUND L/R, SUBWOOFER
3.5 mm)
2.0, 5 V/1 A)
67
> Before
Advanced Setup | Firmware Update | Others
EN
Abou
CompatiHDMI (Highinterface stDisc/DVD pcomponentcables haveHDMI, a sinand digital audio, and
andard for colayers, set-ts. Until now, been requirgle cable ca
audio (2-chamultichanne
functionalit comply withecification ofation becomeatures suchtor and playef the TV, anden the TV isducts that c
operation is
o Return ChRC with a sinudio and viddio from the
dby Througls from AV co
r: By connecls input from even more
: This technroadening th
n transmit 3D
> Part Names > Install > Initial Setup > Playback
I
onsultimedia Interface) is a digital nnecting TVs, projectors, Blu-ray
op boxes, and other video several separate video and audio ed to connect AV components. With n carry control signals, digital video, nnel PCM, multichannel digital l PCM).
y: By connecting devices and HDMI the CEC (Consumer Electronics the HDMI standard, a variety of e possible between devices. You as linking input switching with the rs, control volume using the remote automatically switching this unit to turned off. The unit is designed to omply with the CEC standard, and not always guaranteed with all CEC
annel): By connection a TV that gle HDMI cable, you can not only eo from this unit to the TV, but also TV to this unit.
h: Even if this unit is in standby, the mponents are transmitted to the TV.
ting devices supporting Deep Color, the devices can be reproduced on colors.
ology realizes even more realistic e color gamut.
video signals from AV components
4K: This unit supports 4K (3840 a 2160p) and 4K SMPTE (4096 a 2160p) video signals.
LipSync: This setting automatically corrects any desynchronization between the video and audio signals based on data from the HDMI LipSync compatible TV.
h-Definition Multimedia Interface, and the HDMI ed trademarks of HDMI Licensing LLC in the
es.
certification mark of Wi-Fi Alliance®.
touch are trademarks of Apple Inc., registered in
marks of Apple Inc.
ne” and “Made for iPad” mean that an electronic o connect specifically to iPod, iPhone, or iPad, ified by the developer to meet Apple s not responsible for the operation of this device d regulatory standards.
accessory with iPod, iPhone or iPad may affect
, and iPod touch with iOS 4.3.3 or later, Mac r, and PC with iTunes 10.2.2 or later.
The Bluetooth® word mark and logos are registered trademarks owned by the Bluetooth SIG, Inc.
PANDORA, the PANDORA logo, and the Pandora trade dress are trademarks or registered trademarks of Pandora Media, Inc. Used with permission.
Google Cast and the Google Cast badge are trademarks of Google inc.
This Mark Certifies that this product is compliant with the BLACKFIRE ALLIANCE Standard. Please refer to WWW.BLACKFIREALLIANCE.COM for more information.BLACKFIRETM is a Registered Trademark (No. 85,900,599) of BLACKFIRE RESEARCH CORP. All rights reserved.
FireConnectTM is technology powered by BlackFire Research.
The product with this logo is conformed to Hi-Res Audio standard defined by Japan Audio Society. This logo is used under license from Japan Audio Society.
This product is protected by certain intellectual property rights of Microsoft. Use or distribution of such technology outside of this product is prohibited without a license from Microsoft.
Windows and the Windows logo are trademarks of the Microsoft group of companies.