12
Day 3: Pedestrian Safety nrg Walks Education Pack

Day 3: Pedestrian Safety
nrg Walks Education Pack

nrg Walks is a program of the Center for Nutrition and Activity Promotion at Penn State Hershey Children’s Hospital. This work was sponsored by the Pennsylvania Department of Transportation and the U.S. Department of Transportation, Federal Highway Administration. The Center for Nutrition and Activity Promotion at Penn State Hershey Children’s Hospital would like to thank Safe Kids Pennsylvania for developing Day 3: Pedestrian Safety. Safe Kids Pennsylvania aims to promote the prevention of childhood injuries in Pennsylvania through education, collaboration, and advocacy. For more information about Safe Kids Pennsylvania, please visit www.pasafekids.org.

Day 3: Pedestrian Safety
Total Time: 35 minutes Lesson: 30 minutes Recap: 5 minutes Lesson Overview Pedestrian Safety is about walking safely in your neighborhood, at the mall, to the playground, and to or at school. Students will understand the safety of sidewalks and the dangers of streets. They will learn tips for safe walking in a variety of situations. Objectives – Youth Will:
Understand how to safely cross the street Recognize helpful signs that ensure safe crossing of streets Understand the dangers of driveways and parking lots Understand safety in and around the school bus
Standards Met This activity meets Pennsylvania Health, Safety, and Physical Education standards:
10.3.3. Recognize safe/unsafe practices in the home, school, and community Handouts
Walk Smart Traffic Signs School Bus Safety Walk Smart Word Search
Teacher Prep Make copies of handouts for each student. Note to Teachers The activity below offers a script for you to follow. You may choose to follow the script or adapt the information based on your classroom’s needs.
Let’s Get Started!
Lesson (30 minutes) Before getting started, ask students to take out their ENERGY OUT trackers and fill in their minutes of physical activity for Day 2. Say: Yesterday we talked about ENERGY OUT. We talked about walking as a way to help get one hour or 60 minutes of physical activity. Today we will learn about what it means to be a safe walker. We call this pedestrian safety. Pedestrian safety is about walking safely in your neighborhood, at the mall, to the playground, to and from the bus stop, and to school. A pedestrian is someone who is on foot or walking. Where Should You Walk? Ask: When you walk to get somewhere, like school or a friend’s house, where should you walk? (If needed, tell students that sidewalks are the safest places to walk.) Ask: Why are sidewalks the safest place to walk? Ask: What do you do if you have to walk somewhere but there are no sidewalks? (If needed, tell students that if there are no sidewalks, and you must walk, walk on the left side of the road facing traffic so drivers can see you. Wear bright colors or reflective clothing so you can be seen). Stop at the Curb Ask: What is the purpose of a curb on a sidewalk? (If needed, tell students that the curb tells you to “stop here” before crossing the street.) Ask: Why is it important to stop at the curb before crossing the street? (If needed, tell students that if you stop at the curb, drivers may be able to see you better. Drivers may not see you if you try to cross between parked cars; so always stop at the curb.) Helpful Signs Hand out the Walk Smart Traffic Signs flyer and give students a few minutes to complete it. Discuss with students what each image means for drivers and pedestrians. If needed, tell or discuss with students the following:
Image #1 is a stop sign. It tells drivers to stop before moving forward. Image # 2 is a pedestrian signal. When you see the shape of a person, it’s safe to walk. When you see the shape of a hand, that means “don’t’ walk.” Sometimes you may see the words, “Walk” and “Don’t Walk” instead. Image #3 is a pedestrian crossing sign. Look at the shape of the sign. It looks like a school building. It warns drivers that people are crossing the street to get to a school. It also tells pedestrians where it’s safe to cross the street.
Helpful Signs (cont.) Image # 4 is a traffic light. Ask: What does each color of light in a traffic light tell drivers? Image # 5 is another pedestrian sign. It warns drivers that people may be crossing the street at that location. It also tells pedestrians where it’s safe to cross the street. Image # 6 is a school zone sign. It warns drivers that they’re near a school and to slow down. When the lights are flashing, drivers must follow the speed limit on the sign. Image # 7 is a crosswalk. Crosswalks tell pedestrians where it’s safe to cross the street. Crosswalks also warn drivers that pedestrians may be crossing the street at that location. Crosswalks are a safe place for pedestrians to cross the street. The law says that vehicles must stop for pedestrians in crosswalks. Image # 8 is a no bicycling sign. It warns people that they are not allowed to ride a bicycle in that area because it’s not safe. Image #9 is a no pedestrian sign. It tells pedestrians that they are not allowed to walk in that area because it’s not safe.
Ask: Where might you see these signs? (If needed, prompt students with “near a school” and “at an intersection.”) Say: There are three places we need to be extra careful when crossing or walking into the street: at intersections, driveways and parking lots, and near school buses. Intersections Ask: What is an intersection? (If needed, tell students that an intersection is where two or more streets come together with corners.) Say: Intersections are the safest place to cross the street because vehicles have to stop at the intersection. Look Left, Right, Left Ask: How do you safely cross a street at an intersection? (If needed, prompt students with the following: (1) Stop at the curb. Look slowly and carefully; (2) Look left-right-left to make sure it’s safe to cross; (3) Continue to look and listen for cars while crossing; and (4) Always make eye contact with the driver.) Have students practice looking left and looking right. Ask: What signs did we learn about that can help you safely cross the street? (If needed, prompt with crosswalks, pedestrian signal, and traffic light.)

Parking Lots and Driveways Say: Sometimes you may have to walk across a parking lot or driveway. Parking lots are very busy and can be dangerous places for pedestrians. Drivers backing up out of a driveway or parking space can’t see children because of their height. If you can, walk with an adult so you can be seen because adults are taller. Always watch for cars backing up out of a driveway or parking spaces. Ask: How can you tell that a car is about to back up? (If needed, tell students that you might see white reverse lights on the back of the car. You might hear a beeping sound, like when a large truck backs up. Or you may hear the sound of an engine starting. Keep your eyes and ears open for these signs.) School Bus Say: Buses are very big. Did you know that there is a danger zone around the bus? Ten giant steps away from the bus are where students should stand or cross. Ask: Is it safer to cross in front of the bus or behind the bus? Why? Pass out the School Bus Safety handout. Guide students through the handout. Say: Always cross in front of the bus so the driver can see you and you can see him/her. If you take the bus, use the handrails getting on and off the bus. Tell the bus driver if something falls near or under the bus. Never reach under the bus. Remember: If you can’t see the driver’s face, you are crossing in an unsafe place. If there is time, hand out the Walk Smart Word Search for students to complete. Recap (5 minutes) Say: Today we learned about pedestrian safety. Pedestrian safety is about walking safely. When you walk, it’s important to be aware of what’s around you. Look for things in your surroundings that can help you walk safety, like crosswalks, stop signs, curbs, traffic lights, and Walk/Don’t Walk signs. Be aware of drivers. Remember that they may not be able to see you if you’re walking. The next time you go for a walk, whether to school or a friend’s house, be the safest pedestrian you can be.

Walk Smart Traffic Signs
These signs are important to walkers and drivers. Correctly identify each of the traffic images below. Write your answers in the space next to each image.
Page 1
1. 2.
3.
4. 5.
www.pedbikeimages.org/Dan Burden www.pedbikeimages.org/Dan Burden
www.pedbikeimages.org/Dan Burden
www.pedbikeimages.org/Laura Sandt
www.pedbikeimages.org/Carl Sundstrom
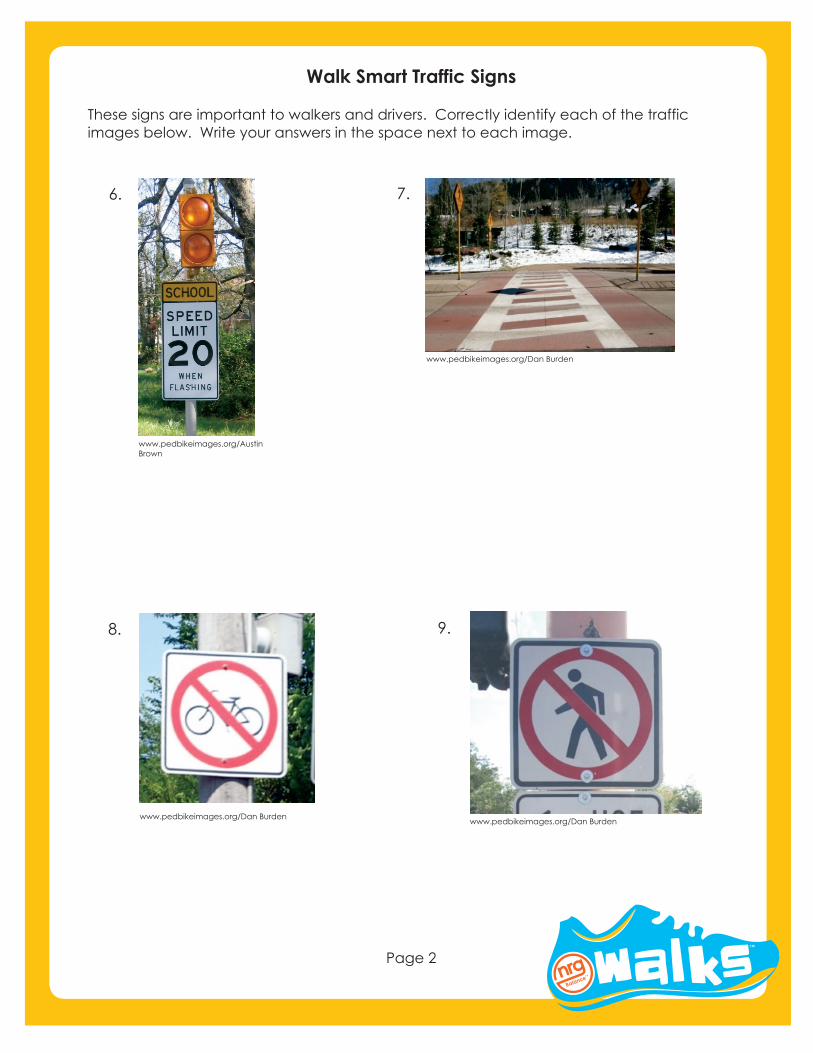
Walk Smart Traffic Signs
These signs are important to walkers and drivers. Correctly identify each of the traffic images below. Write your answers in the space next to each image.
Page 2
6. 7.
8. 9.
www.pedbikeimages.org/Dan Burden
www.pedbikeimages.org/Dan Burden
www.pedbikeimages.org/Dan Burden
www.pedbikeimages.org/Austin Brown

School Bus Safety

Walk Smart Word Search
L K C N A L V Y A W E V I R D A M R S
L O W A C J E L U B O F D S A U Q T T
S G O I R S T O P S I G N W N M R E O
E H U K R I A E T W E L B O G E W P P
R Y R V L D W F Y J P A R R E L I S L
J R Y D G E O L E L M C I T R K H P O
S V D L E W F I W T F Q G W Z L R T O
C L R H A A I T O N Y Z H G O A Q P K
H B A W J L K Q R Y A Q T E N W P G L
O J U N R K L W P I D L C K E T H K I
O K G W G F A K F T G F L O A N T R S
L K G Q G I W P M K W H O U R O L E T
B R N J R W S F N A I R T S E D E P E
U J I O I H S C E I Q T H L E R E W N
S P S D N I O I I R P R E P E L G I W
A D S K L M R F A F N E S G L F I J L
L B O C W D C F L C F L P L T E T W D
K U R N L I A A B U R A R E J H K A V
T G C V P G J R C F L E R F G I D L M
S A F E R O U T E L F B M T F R Y K Q
BE ALERT BRIGHT CLOTHES CAR CROSSING GUARD CROSSWALK DANGER ZONE DON’T WALK
DRIVEWAY LOOK, LEFT, RIGHT, LEFT PEDESTRIAN SAFE ROUTE SAFETY SCHOOL BUS SIDEWALK
STOP, LOOK, LISTEN STOP SIGN STREET TRAFFIC TRAFFIC SIGNALS WALK


![National Walking Day Subtitle or Date [INSERT COMPANY NAME]](https://static.documents.pub/doc/80x56/56649f0b5503460f94c1ec64/national-walking-day-subtitle-or-date-insert-company-name.jpg)


