W IMP sati sup WALK PORTANT! sfaction is pport@sunn KING ! Please r very impor nyhealthfitn G TR retain own rtant to us, ness.com o EAD SF USE ner’s manu , PLEASE or 1- 877 - DMILL F-T78 R MAN ual for ma DO NOT R 90SUNNY L WI 857 NUAL aintenance RETURN U Y (877-907 TH H and adju UNTIL YOU -8669). HAND stment ins U HAVE CO DRA structions. ONTACTE AIL Your D US:
Transcript
W
IMPsatisup
WALK
PORTANT!sfaction is
pport@sunn
KING
! Please rvery impor
nyhealthfitn
G TR
retain ownrtant to us,ness.com o
EADSF
USE
ner’s manu, PLEASE or 1- 877 -
DMILLF-T78R MAN
ual for maDO NOT R90SUNNY
L WI857 NUAL
aintenance RETURN UY (877-907
TH H
and adjuUNTIL YOU-8669).
HAND
stment insU HAVE CO
DRA
structions. ONTACTE
AIL
Your D US:
1
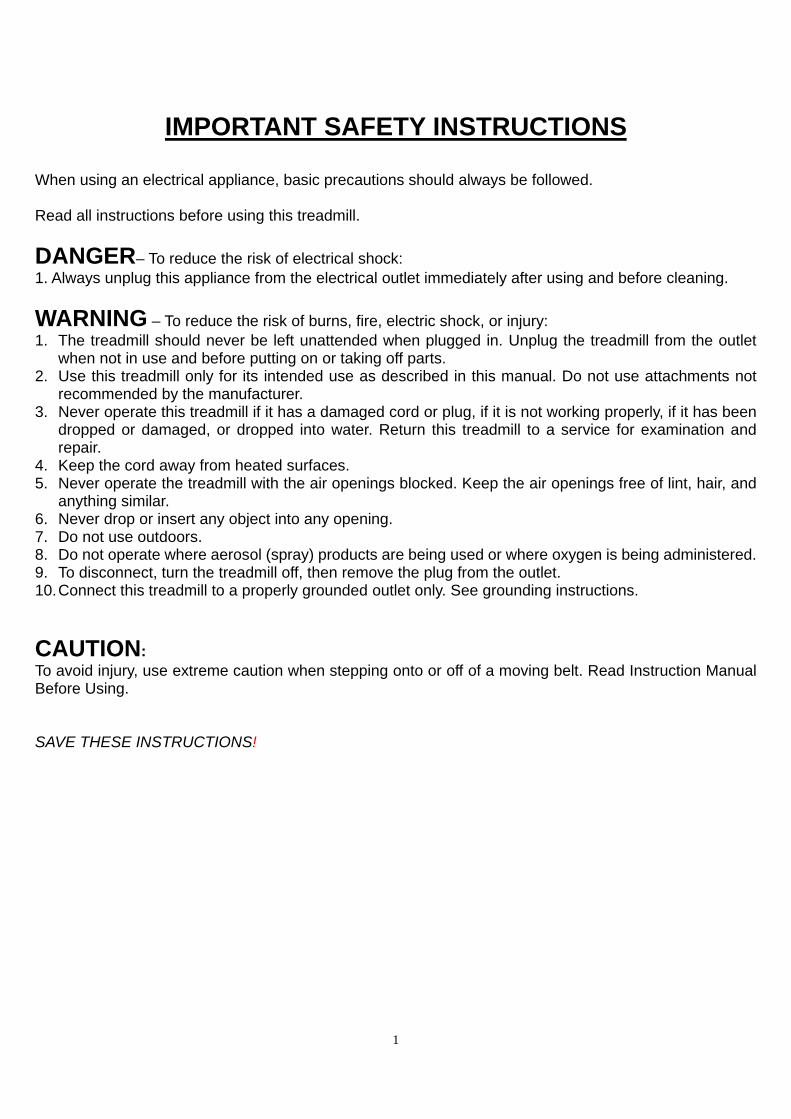
IMPORTANT SAFETY INSTRUCTIONS
When using an electrical appliance, basic precautions should always be followed. Read all instructions before using this treadmill.
DANGER– To reduce the risk of electrical shock: 1. Always unplug this appliance from the electrical outlet immediately after using and before cleaning.
WARNING – To reduce the risk of burns, fire, electric shock, or injury: 1. The treadmill should never be left unattended when plugged in. Unplug the treadmill from the outlet
when not in use and before putting on or taking off parts. 2. Use this treadmill only for its intended use as described in this manual. Do not use attachments not
recommended by the manufacturer. 3. Never operate this treadmill if it has a damaged cord or plug, if it is not working properly, if it has been
dropped or damaged, or dropped into water. Return this treadmill to a service for examination and repair.
4. Keep the cord away from heated surfaces. 5. Never operate the treadmill with the air openings blocked. Keep the air openings free of lint, hair, and
anything similar. 6. Never drop or insert any object into any opening. 7. Do not use outdoors. 8. Do not operate where aerosol (spray) products are being used or where oxygen is being administered. 9. To disconnect, turn the treadmill off, then remove the plug from the outlet. 10. Connect this treadmill to a properly grounded outlet only. See grounding instructions.
CAUTION: To avoid injury, use extreme caution when stepping onto or off of a moving belt. Read Instruction Manual Before Using. SAVE THESE INSTRUCTIONS!
2
IMPORTANT SAFETY INFORMATION We thank you for choosing our product. To ensure your safety and health, please use this equipment correctly. It is important to read this entire manual before assembling and using the equipment. Safe and effective use can only be achieved if the equipment is assembled, maintained, and used properly. It is your responsibility to ensure that all users of the equipment are informed of all warnings and precautions.
1. Before starting any exercise program, you should consult your physician to determine if you have
any medical or physical conditions that could put your health and safety at risk, or prevent you from using the equipment properly. Your physician’s advice is essential if you are taking medication that affects your heart rate, blood pressure or cholesterol level.
2. Be aware of your body’s signals. Incorrect or excessive exercise can damage your health. Stop exercising if you experience any of the following symptoms: pain, tightness in your chest, irregular heartbeat, shortness of breath, lightheadedness, dizziness, or feelings of nausea. If you do experience any of these conditions, you should consult your physician before continuing with your exercise program.
3. Keep children and pets away from the equipment. The equipment is designed for adult use only. 4. Use the equipment on a solid, flat level surface with a protective cover for your floor or carpet. To
ensure safety, the equipment should have at least 2 feet (60CM) of free space all around it. 5. Ensure that all nuts and bolts are securely tightened before using the equipment. The safety of the
equipment can only be maintained if it is regularly examined for damage and/or wear and tear. 6. Always use the equipment as indicated. If you find any defective components while assembling or
checking the equipment, or if you hear any unusual noises coming from the equipment during exercise, discontinue use of the equipment immediately and do not use until the problem has been rectified.
7. Wear suitable clothing while using the equipment. Avoid wearing loose clothing that may become entangled in the equipment.
8. Do not place fingers or objects into the moving parts of the equipment. 9. The maximum weight capacity of this unit is 295 pounds (130 KG). 10. The equipment is not suitable for therapeutic use. 11. To avoid bodily injury and/or damage to the product or property, proper lifting and moving is
required. 12. Your product is intended for use in cool, dry conditions. You should avoid storage in extreme cold,
hot or damp areas as this may lead to corrosion and other related problems. 13. This equipment is designed for indoor and home use only, it is not intended for commercial use!
1. In2. R3. C
th4. W
fr5. T
w6. A7. A
insre
8. Td
9. Tth
10. We
11. A
Thepro
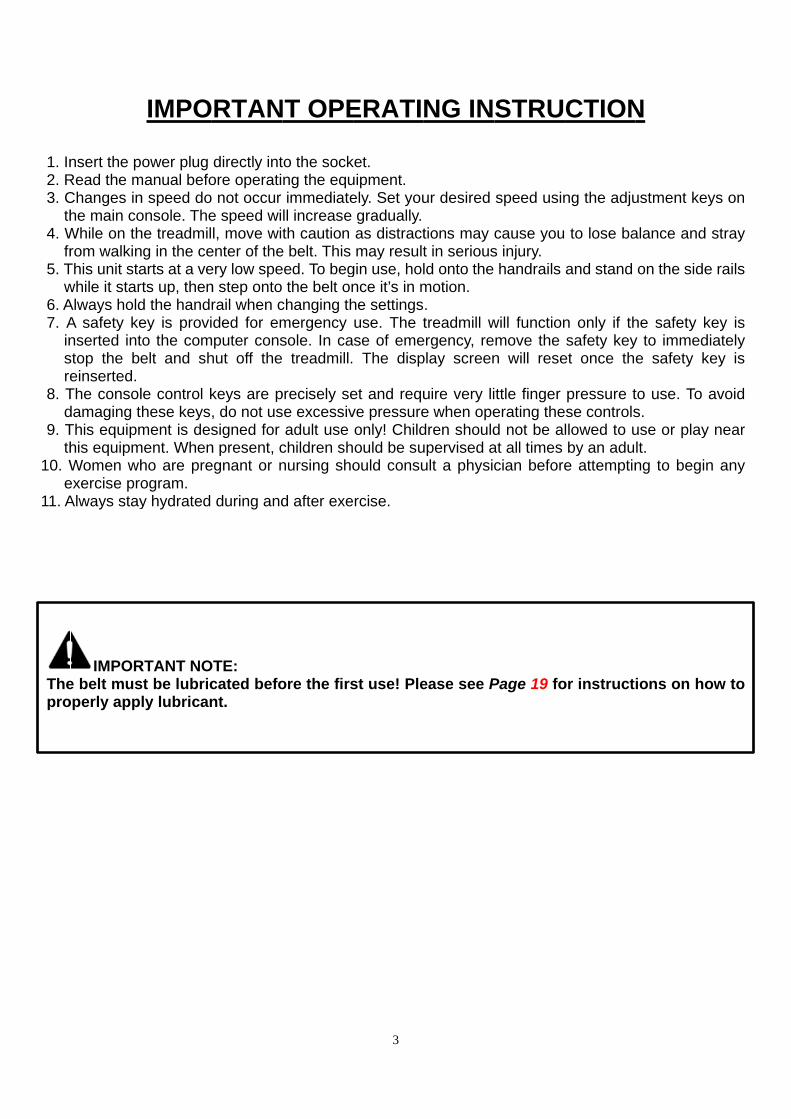
nsert the pRead the mChanges inhe main coWhile on throm walkin
This unit stawhile it starAlways holdA safety kenserted intstop the beeinserted. The consoldamaging tThis equipmhis equipmWomen wh
exercise proAlways stay
IMPORe belt musoperly app
IMPO
ower plug manual befon speed doonsole. Thehe treadmilng in the cearts at a verts up, thend the handrey is provito the comelt and sh
le control khese keysment is des
ment. Whenho are preogram. y hydrated
RTANT NOst be lubricly lubrican
RTAN
directly intore operati not occur
e speed wil, move wit
enter of theery low spen step onto rail when cded for em
mputer conshut off the
keys are p, do not ussigned for
n present, cegnant or n
during and
OTE: cated befont.
T OPE
to the sockng the equimmediatell increase th caution
e belt. Thiseed. To beg
the belt onchanging thmergency sole. In ca treadmill.
precisely sese excessiv
adult use children shnursing sho
d after exe
ore the firs
3
ERATI
ket. uipment. ely. Set yougradually.as distractmay result
gin use, holnce it’s in mhe settingsuse. The tse of eme The disp
et and requve pressureonly! Childould be suould consu
rcise.
st use! Ple
NG IN
ur desired
tions may ct in seriousld onto the motion. . treadmill w
ergency, replay screen
uire very lie when opedren shouldupervised ault a physic
ease see P
STRU
speed usin
cause yous injury. handrails
will functionmove the n will rese
ttle finger erating thed not be alat all times cian before
Page 19 fo
CTION
ng the adju
to lose ba
and stand
n only if thsafety key
et once the
pressure tse controlsllowed to uby an adue attemptin
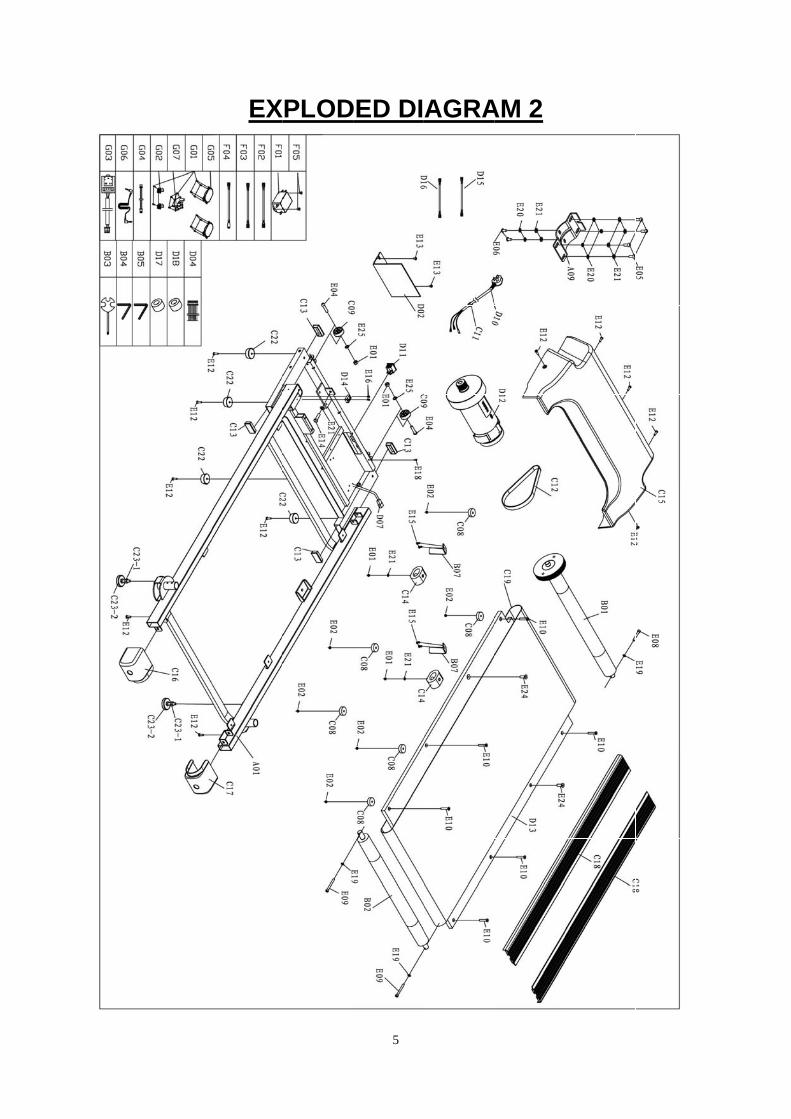
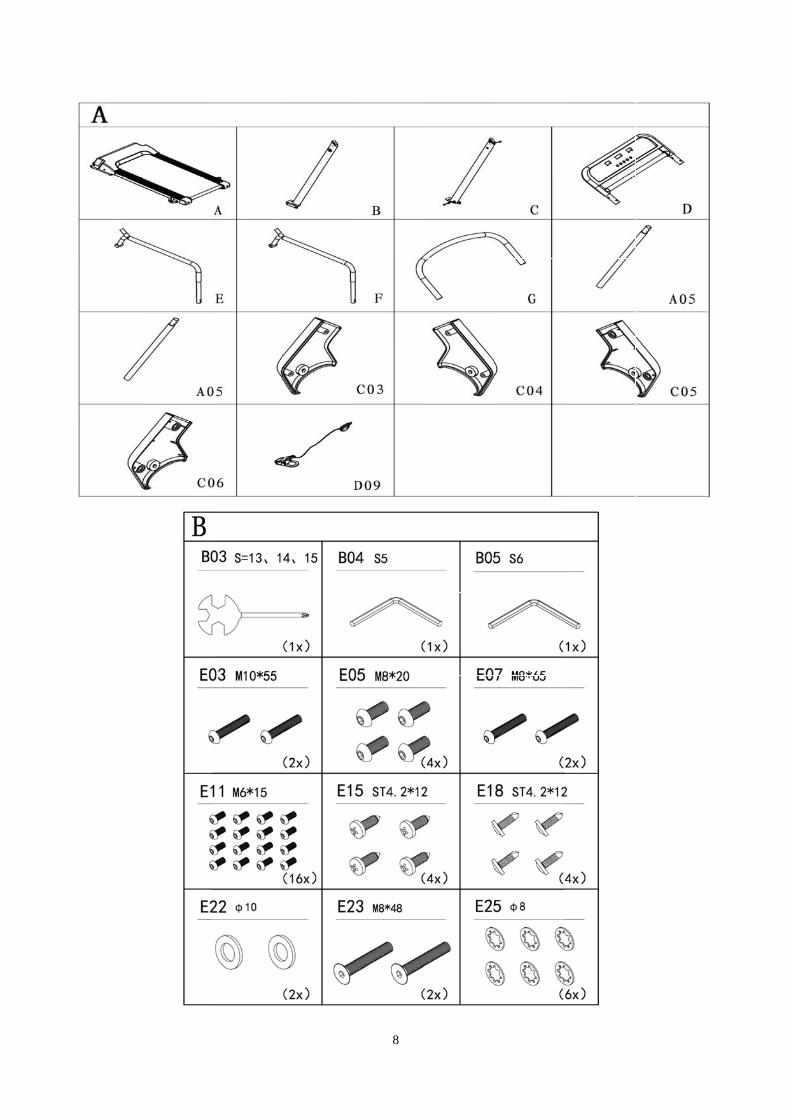
Ordering Replacement Parts (U.S. and Canadian Customers only) Please provide the following information in order for us to accurately identify the part(s) needed: The model number (found on cover of manual) The product name (found on cover of manual) The part number found on the “EXPLODED DIAGRAM” and “PARTS LIST” (found near the front of
the manual)
Please contact us at [email protected] or 1- 877 - 90SUNNY (877-907-8669).
8
C-1
9
C-2
10
C-3
11
C-44
12
C-5
13
C-6
6
14
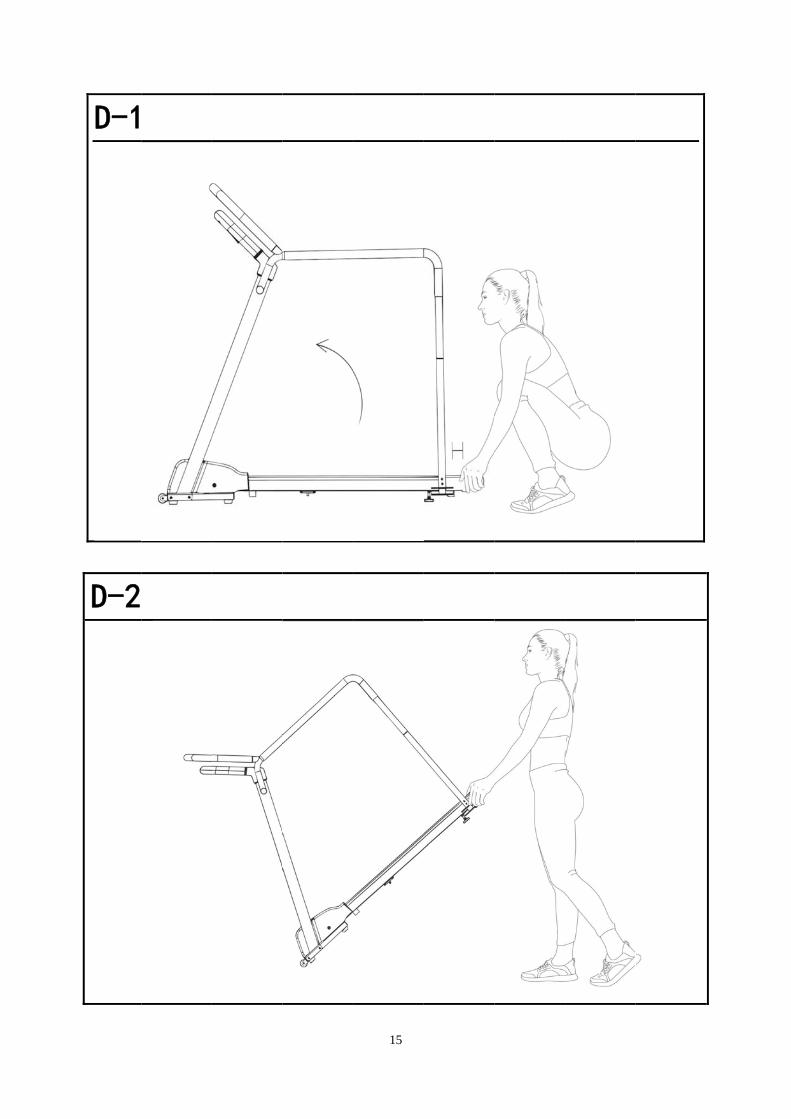
D-1
D-2
15
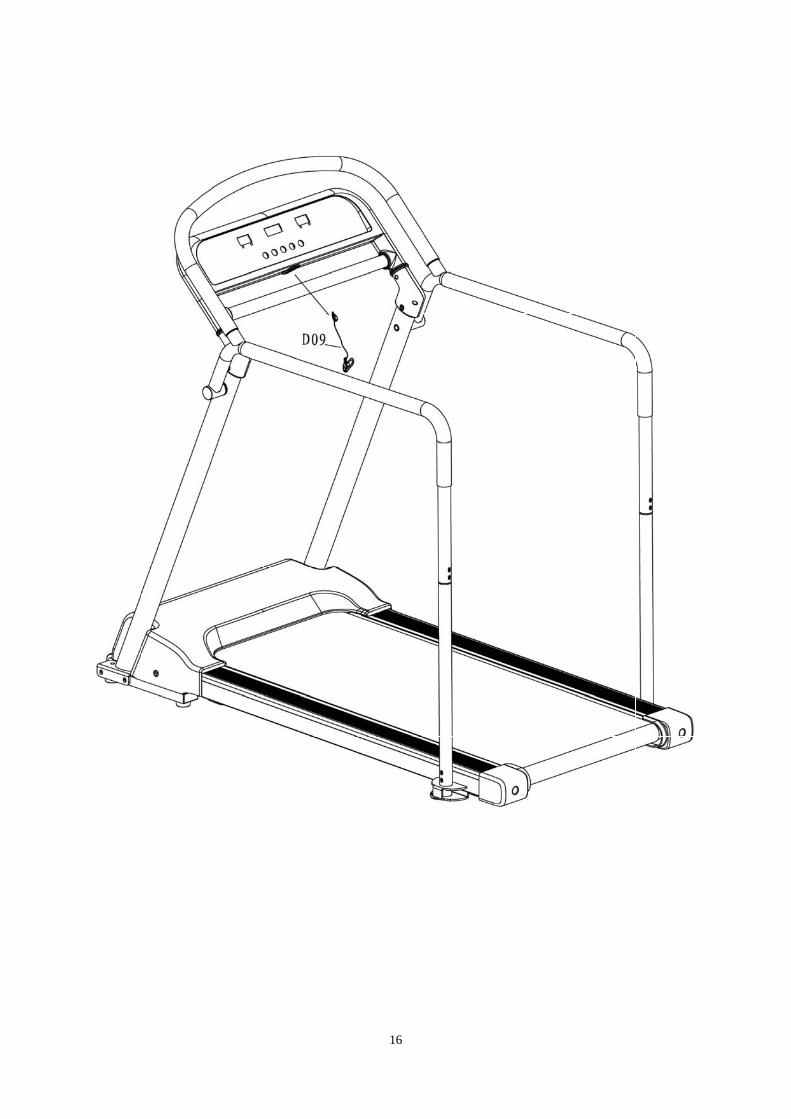
16
To anotiC23clocsits Footurn
achieve a sce that the
3-2). To dockwise. Wit
level with ot Pads (Nning it coun
HO
smooth ane treadmill o so, use Sth the Nut the surfaco. C23-2),
nter-clockw
OW TO
nd comfortais unbalan
Spanner w(No. C23-
ce that the use Span
wise. If requ
O ADJ
able experinced duringw/ Screw D-1) loosene treadmill iner w/ Scr
uired, repea
17
JUST T
ience, you g use, you Driver (No.ed, rotate tis on. Wherew Driverat this proc
THE BA
must ensushould adj
. B03) to lothe Adjusten you havr (No. B03)cess to adj
ALAN
ure that thejust the Adoosen Nuttable Footve finished) to re-tightust the rem
CE
e treadmill djustable Ft (No. C23t Pads (No adjusting ten the Nutmaining fee
is stable. Foot Pads
3-1) by turno. C23-2) uthe Adjus
t (No. C23-et.
If you
s (No. ning it until it stable -1) by
18
MAINTENANCE & CARE
General cleaning will help prolong the life and performance of your treadmill. Keep the unit clean and maintained by dusting the components on a regular basis. Clean both sides of the Running Belt (No. C19) to prevent dust from accumulating underneath. Keep your running shoes clean so that dirt from your shoes does not wear out the Running Board (No. D13) and Running Belt (No. C19). Clean the surface of the Running Belt (No. C19) with a clean, damp cloth. To better maintain the treadmill and prolong its life, it is suggested that the treadmill be powered off for 10 minutes every 2 hours and fully powered off whenever not in use. A loose Running Belt (No. C19) will result in the runner sliding off when running, while too tight of a Running Belt (No. C19) will negatively affect the motor’s performance and also create more friction between the roller and Running Belt (No. C19). The most suitable tightness for the Running Belt (No. C19) is pulled out 50-75mm from the Running Board (No. D13). CENTERING THE RUNNING BELT: Place the treadmill on level ground and set it at 6-8KPH to check if the Running Belt (No. C19) drifts.
1. If the Running Belt (No. C19) moves to the right, turn the adjusting bolt on the right side ¼ turn clockwise, then turn the left adjustment bolt ¼ turn counter-clockwise. If the Running Belt (No. C19) does not move, repeat this step until it centers. Refer to Figure A.
2. If the Running Belt (No. C19) moves to the left, turn the adjusting bolts on the left side ¼ clockwise, then turn the right adjustment bolt ¼ turn counterclockwise. If the Running Belt (No. C19) does not move, repeat this step until it centers. Refer to Figure B.
3. Over time, the Running Belt (No. C19) will loosen. To tighten the Running Belt (No. C19), turn the Left & Right side adjustment bolts one full turn clockwise. Check the tension of the Running Belt (No. C19). Continue this process until Running Belt (No. C19) is at the correct tension. Make sure to adjust both sides equally to ensure correct belt alignment. Refer to Figure C.
IMPYou RUNLubbetwBoathe
WArepa HOW1. RD13proc2. Tthe 3. Ton a4. ARunbetwC19
PORTANT u will need
NNING BEbricating thween the tard (No. DRunning B
ARNINairing the u
W TO LUBRaise the R3). Use a rcess for theThe movingequipment
To better ma regular bA loose Running Beltween the ro9) is pulled
L
NOTE: to lubricate
ELTS & TRe Runningtwo affects
D13) and RBoard (No
G: Alwayunit.
BRICATE: Running Brag to thore other sidg parts shot. Inspect a
maintain thebasis. unning Belt (No. C19oller and R out 50-75
LightMediHeav
LUBRIC
e your trea
READMILL g Board (
s the life spRunning Bo.D13), ple
ys unplug t
Belt (No. Croughly wi
de. ould turn frand tightene treadmill
lt (No. C199) will negaRunning Bemm from t
The fot user (lessum user (3
vy user (mo
CATIN
admill befor
LUBRICANo. D13) apan and fuelt (No. Case contac
he treadm
19) up on pe the lub
reely and qn bolts regu
and prolon
9) will resuatively affeelt (No. C1the Runnin
ollowing tis than 3 ho3-5 hours/ wore than 5
19
NG THE
re the first
ANT: and Runn
unction of t19) be insct us at: su
ill from the
one side abricant ove
quietly. Abnularly. ng its lifesp
ult in the ruect the mot19). The mong Board (
ime table iurs/ week)week) hours/ wee
E TREA
use.
ing Belt (the treadmpected regpport@sun
e electrical
and apply lr the Runn
normal of m
pan, it is s
unner slidintor’s peformost suitable(No. D13).
is recomm) every everyek) ever
ADMIL
No. C19) mill. It is suggularly. Shonnyhealthfi
outlet befo
ubricant toning Boar
moving pa
uggested t
ng off durinmance ande tightness
mended: ry six monthry three mory two mon
LL
is essentiaggested thould you fiitness.com
ore cleanin
o the Runnrd (No. D1
arts will affe
that mainte
ng use, whd also creas for the Ru
hs onths nths
al as the frhat the Runnd any we
m.
ng, lubricat
ning Board13). Repea
ect the saf
enance be
ile too tighate more frunning Be
riction nning ear on
ing or
d (No. at this
fety of
done
ht of a riction lt (No.
WAsafethe equ GROThisreduinstconthis
Thisin splug
DAImpwithmodelec
WA1. Ncordwhe2. N3. N4. Nnea
I
ARNINety, as welequipmen
uipment and
OUNDINGs product muce the ristalled and gnnected to product.
s product isketch A. Mg. No adap
ANGERproper connh a certifieddify the pluctrician.
ARNINNEVER usd away froeels. NEVER opeNEVER remNEVER exar pools, or
IMPOR
G: This tl as the saf
nt. Any powd/or user.
G METHODmust be grosk of electrigrounded ian outlet w
s for use oMake sure tpter should
R: nection of td electricia
ug provided
G! e a ground
om any mo
erate the trmove any cpose the t
r in any oth
RTANT
treadmill refety of othewer source
DS: ounded. Gic shock. Tin accordawhich conta
on a correchat the probe used w
the equipman if you ard with the p
d fault circoving part
readmill uscover withotreadmill toher high hu
G
T ELEC
equires a coers, pleasee above or
Grounding pThe plug mnce with aains the sa
ct circuit anoduct is conwith this pro
ment-grounre not sureproduct. If i
cuit interrupof the trea
sing a geneout first disco rain or mmidity envi
ROUNDIN
20
CTRIC
orrect powe verify thatr below thi
provides thmust be pluall local codame config
nd has a grnnected tooduct.
nding condue as to wheit will not fit
pt (GFCI) wadmill incl
erator or UPconnecting
moisture. Thironment.
NG METHO
CAL IN
er source it the powes level cou
he least resgged into a
des and ordguration as
rounding p an outlet h
uctor can rether the pt the outlet
wall outlet uding the
PS power sg AC powehis treadm
OD
FORM
in order to r source isuld cause
sistance foan approprdinances. the plug.
lug that loohaving the
result in risproduct is pt, have a pr
with this trelevation
supply. r.
mill is not d
MATIO
properly os correct be
significant
r electrical riate outletEnsure thaDo not use
oks like thesame conf
sk of electrproperly grroper outle
readmill. Rmechanism
esigned fo
N
perate. Foefore plugg damage t
current ant that is proat the prode an adapt
e plug illustfiguration a
ric shock. Crounded. Det installed
Route the pm and tran
or use outd
r your ging in to the
nd will operly duct is tor for
trated as the
Check Do not
by an
power nsport
doors,
DIS1. C2. T3. S4. S
5. S6. Mpres
7. S8. S
Yousoutimeyouapp
Remtreathe D09
Whetrea
SPLAY ACAL. / DIS:TIME: DispSPEED: DisSTART: Pre
SPEED –MODE: Press SPEED
SPEED +STOP: Pres
ur treadmillund every 1e. Please rr machine
plication, pr
move the Sadmill will sbuzzer wil
9) into the c
en the treadmill is in
ND BUTT: Displays lays runninsplays curress this bu
: Pressess this bu+/- to set t
: Pressss this butt
l needs lu10 secondsead LUBR
e. Apply thress and ho
Safety Keystop immedl beep 3 timcomputer c
admill hasthis mode,
CON
TON FUNcalories anng time. rent speedtton at any
s this buttoutton to chohe value, a
s this buttoton to eithe
LUBbrication ms and disp
RICATING The lubricatold the STO
SAFy (No. D09diately. Onmes. To staconsole an
POWs been ina the displa
NSOLE
NCTIONSnd distance
d. y time to sta
on to decreoose betwand press S
on to increaer pause or
BRICAmaintenancplay an “OITHE TREAting oil to OP button
FETY L9) from the nce the treaart the treand press the
WER Sctive for 1
ay will be tu
21
E INST
S e.
art the trea
ease the spween time, START to b
ase the sper stop the t
ATION ce every 1IL” icon on
ADMILL on the middlefor 3 seco
LOCK computer
admill reacdmill againe START b
SAVE 0 minutes
urned off. T
TRUCT
admill.
peed. distance, obegin.
eed. treadmill.
REMIN188 miles. n your consPage 20 toe of the rnds to clea
FUNCconsole w
ches a full n, insert thebutton.
FUNCs, it will enTo turn it ba
TIONS
or calories
NDER The syste
sole displao learn the running dear the rema
CTION while the tre
stop, the de magnet e
CTIONnter Powerack on, pre
workout t
em will releay to reminproper ste
eck on botainder.
eadmill is rdisplay willend of the S
r Saving Mess any but
argets. Yo
ease a bend you wheeps to lubricth sides.
running, an show “- -
Safety Key
Mode. Whiltton.
u can
eeping en it’s cating
After
nd the -“and
y (No.
le the
PFlic
Flicin u
GETGetyouby h Nexthe Thecombuttthe SAF1. Wunti2. Into ythe
POWER ONk the powe
POWER k the powese.
TTING STAt to know rself with t
holding ont
xt, attach thSafety Ke
e treadmill mfortable, ston to stoptreadmill.
FETY NOTWe recomml you beconsert the myour clothinSafety Ke
N: er switch to
OFF: er switch to
ARTED: your tread
the controlsto the hand
he clip endey (No. D0
will start slowly incre the treadm
TE: mend that yome familiamagnet endng before sey (No. D09
POW
o this symb
o this symb
EXE
dmill. Befos. Once yodrails.
d of the Sa09) into the
at the syease this smill or you
you maintaar with the td of the Safstarting you9) and the
WER O
bol to turn o
bol to turn t
ERCISE
re attemptou get on, s
afety Key (e computerystem defaspeed. Whcan remov
in a slow streadmill. fety Key (Nur workout.treadmill w
22
ON & P
on the trea
he treadmi
E INST
ting to usestand with y
(No. D09)r console. ault settinghen you arve the mag
speed at the
No. D09) in. To end yowill stop im
OWER
admill.
ill off at any
TRUCT
e the treadyour feet o
to your cloPress the
g speed. Sre finished gnetic end
e beginning
nto the comour workoumediately.
R OFF
y time, incl
TIONS
dmill, takeon the side
othes and iSTART bu
Step onto with your of the Safe
g of a sess
mputer consut, press th
uding while
S
some timrails and s
insert the mutton to sta
the belt. workout, pety Key (N
sion and ho
sole and clhe STOP b
e the tread
me to familstabilize yo
magnetic eart the treaWhen you
press the SNo. D09) to
old the han
ip the safetutton or re
mill is
liarize ourself
end of admill. u feel STOP o stop
ndrails
ty clip emove
23
TROUBLESHOOTING PROBLEM POSSIBLE CAUSE SUGGESTED ACTION
Treadmill will not start
Not plugged in.
Plug cord into the outlet.
Safety Key not inserted. Insert Safety Key.
Running belt is not centered
Running belt tension is notcorrect on the left or right side of the running board.
Tighten the adjustment bolts on the left and right side of the rear roller.
Computer is not working
Wires from the computer and bottom control board are not properly connected.
Check wire connections from the computer to the control board.
Transformer is damaged. If the transformer is damaged, contact customer service.
E01 or E13: Message failure
Wires from the computer and bottom control board are not properly connected.
Check wire connections from the computer to the control board. If the wire has been punctured or damaged, you will need to replace it. If the problem is not rectified, you may need to replace the control board.
E02: Burst clash protection
Incoming voltage is lower than 50% of the required voltage.
Check that the incoming power supply is the correct voltage.
E03: No speed sensor signal
Speed sensor signal cannot be received by the control board.
Check that the sensor wire is properly connected. If damaged, replace the wire. Check to see if the magnetic sensor is damaged, replace if necessary.
E05: Current overload protection (Self Protecting System)
The incoming voltage is too low or too high. The control board is damaged.
Restart the treadmill. Check the incoming voltage to ensure its correct. Check the control board and replace if damaged.
A moving part of the treadmill is stuck and therefore, the motor is unable to rotate properly.
Inspect moving parts of the treadmill to ensure that they are operating correctly. Check the motor. Listen for strange noise and check for a burning smell. Replace the motor if necessary.
24
NOTE: If you are unable to resolve an issue using the troubleshooting guide above, please contact Customer Service at [email protected]
Version 1.1
E06: Motor Abnormality The motor wire is not connected or the motor is damaged.
Check motor wires to see if the motor is connected. If the wire has been punctured or damaged, you will need to replace it. If the problem is not rectified, you may need to replace the motor.
E08: Control Board Abnormality
The control board is not connected.
Check the upper and middle wires to see if the control board is connected. If the wire has been punctured or damaged, you will need to replace it. If the problem is not rectified, you may need to replace the control board.
E10: Motor Abnormality
The motor is damaged, or a moving part of the treadmill is stuck, and therefore the motor is unable to rotate properly.
Inspect moving parts of the treadmill to ensure that they are operating correctly. Replace the motor if necessary.