Washington State Dental Association’s 2015 Pacific Northwest Dental Conference Presents Custom Tray, Record Base & Ollcusion Rim Fabrication Workshop Dr. Ronnie Schnell Friday, June 12, 2015 1:00 p.m. – 4:00 p.m. Official Disclaimer Neither the content of a program nor the use of the specific products in courses should be construed as indication endorsement or approval by the Pacific Northwest Dental Conference or Washington State Dental Association
Transcript
Washington State Dental Association’s 2015 Pacific Northwest Dental Conference
Presents
Custom Tray, Record Base & Ollcusion Rim Fabrication Workshop
Dr. Ronnie Schnell
Friday, June 12, 2015 1:00 p.m. – 4:00 p.m.
Official Disclaimer
Neither the content of a program nor the use of the specific products in courses should be construed as indication endorsement or approval by the
Pacific Northwest Dental Conference or Washington State Dental Association
CU CL w Windows PU outline and do on own PL outline and do on own
3. Blockout for Custom Trays (while waiting for trays above to cure):
Demo large models / Surveyor Block out CL / by eye Block out for PU/PL Tooth stops for PL
4. Custom Trays:
PU PL Demo Handles for CU/CL
5. Occlusion Rims: CU CL PU – on own PL – on own
Points to remember: Lines- draw first, model release, draw again Names on Triad and bases Rims- CONTOUR rim to ridge first then place it on record base
1
[Type a quote from the document or the summary of an interesting point. You can position the text box anywhere
Path of Insertion
2
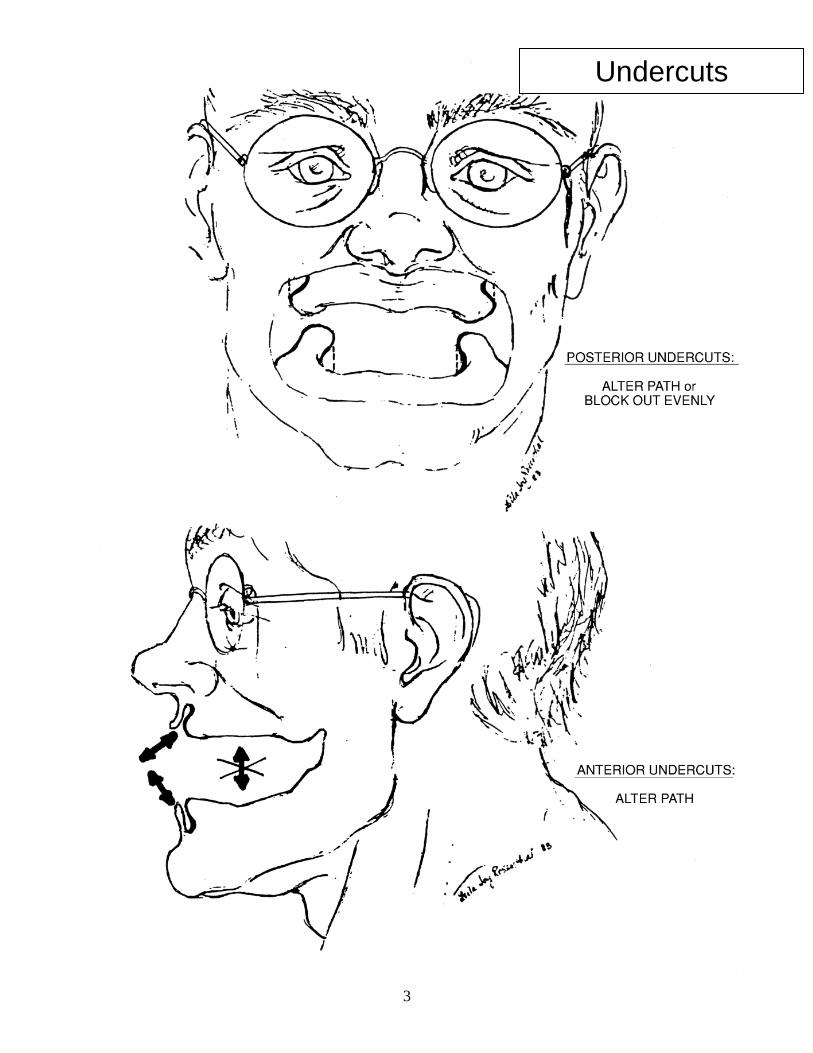
Undercuts
3
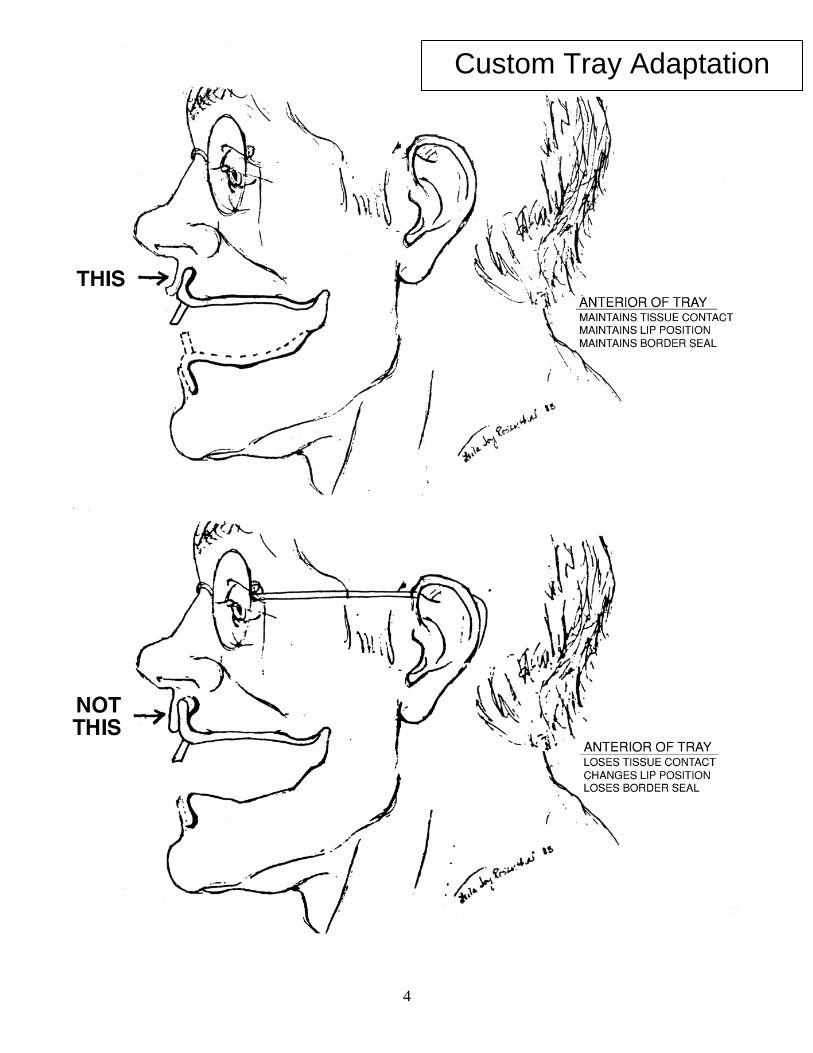
Custom Tray Adaptation
4
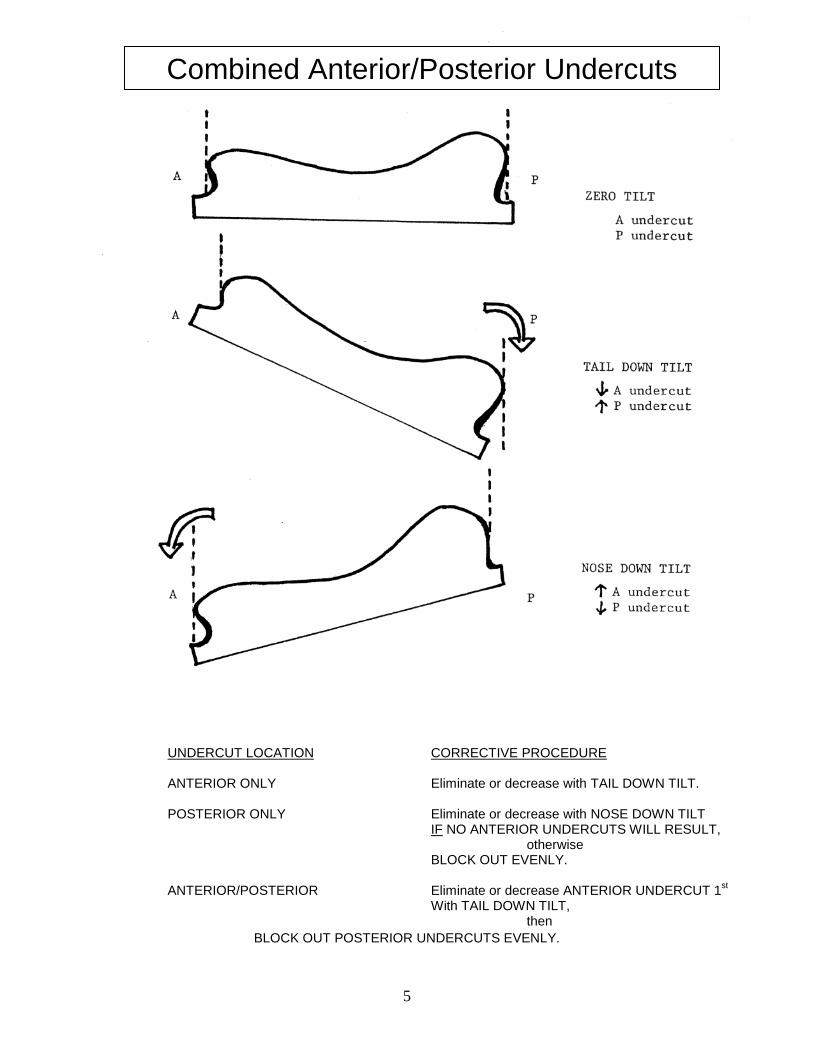
UNDERCUT LOCATION CORRECTIVE PROCEDURE ANTERIOR ONLY Eliminate or decrease with TAIL DOWN TILT. POSTERIOR ONLY Eliminate or decrease with NOSE DOWN TILT IF NO ANTERIOR UNDERCUTS WILL RESULT, otherwise BLOCK OUT EVENLY. ANTERIOR/POSTERIOR Eliminate or decrease ANTERIOR UNDERCUT 1st With TAIL DOWN TILT, then
BLOCK OUT POSTERIOR UNDERCUTS EVENLY.
Combined Anterior/Posterior Undercuts
5
Custom Tray Borders and Border Muscles
6
Border Landmarks
7
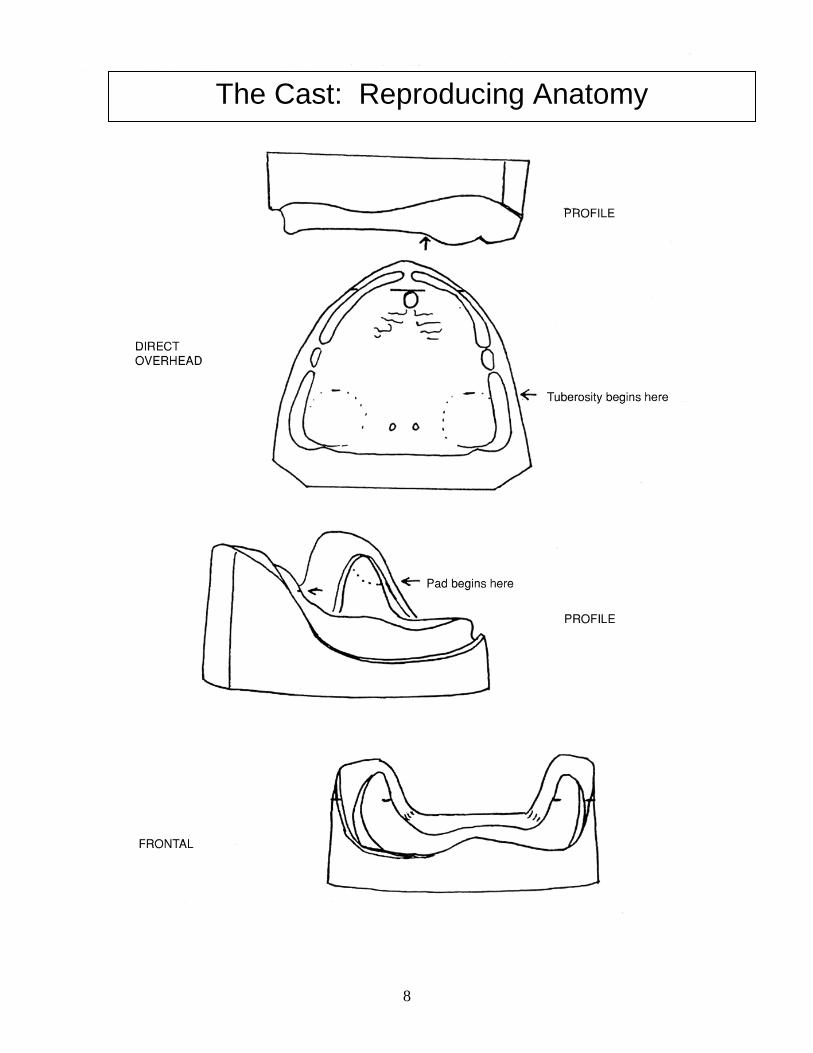
The Cast: Reproducing Anatomy
8
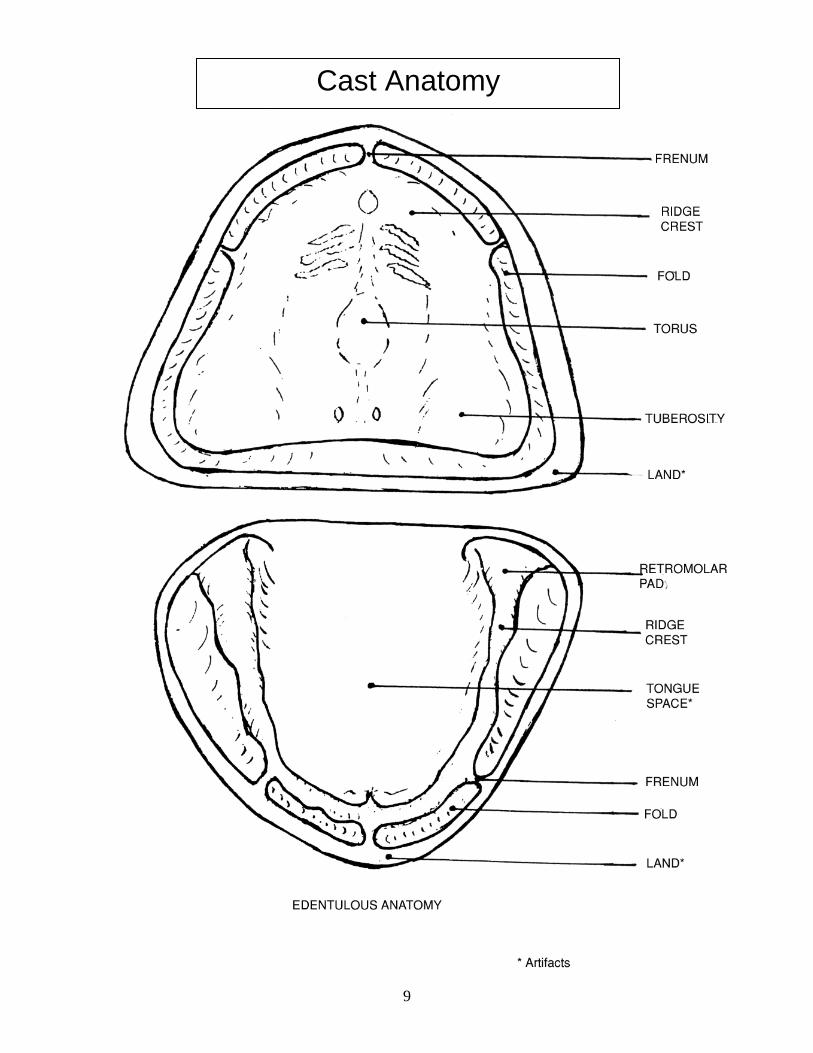
Cast Anatomy
9
Cast Anatomy Detailed
10
Triad Custom Tray Fabrication 1. Trim land of cast to eliminate land undercut (for clinic; survey cast, blockout undercuts). 2. Apply thin coat of “Model Release Agent” to cast. 3. Adapt sheet of custom tray material to preliminary cast to include folds using the Triad white tool or your fingers. (For clinical case - tray is trimmed 2-3mm short of the fold). 4. Cut excess Triad material hanging over the land using a SHARP knife or scapel and SAVE excess. 5. Create ½ X ½ inch handle from the excess and add to location of the central incisors tilting at a 45 degree angle. 6. Apply “Air Barrier Coating” over outer surface. 7. Place cast with tray on turntable inside Triad unit. 8. Flip power switch on right side to ON. 9. Close door with finger pressure on outside of bottom hinge. 10. Set timer at the bottom front of unit to 4 minutes. 11. Light should be on and turntable should begin revolving- if not, flip on switches at bottom front of unit. 12. Raise or lower turntable with knob at top of the Triad unit so that the tray is approximately 3 inches from the light. 13. Allow to cure for 4 minutes. Light will shut off automatically. Remove cast and tray from unit. 14. Remove tray from cast. Evaluate detail and fit. Proceed to next step if OK. (If repair must be made- see below). 15. Paint thin coat of “Air Barrier Coating” over entire inner surface of tray. 16. Reinsert tray without cost- TISSUE SIDE UP- into Triad unit and cure for an additional 4 minutes. 17. When light automatically shuts off- remove the cured tray and WASH OFF “Air Barrier Coating” with soap, cold water and brush at sink. Also if you have not already done so- wash off the Air Barrier Coating BRUSH (with cold water) !!! 18. Trim tray excess and rough edges at lathe with SUCTION ON. DO NOT REMOVE BURS FROM THE LATHE. 19. Store appliances on cast for at least 24 hours. NOTE: All brushes must always be stored upright on their handles & not their bristles. NOTE: Turntable MUST be kept CLEAN. Do not place a DRIPPING appliance on it as a liner may not be used - it will block the air flow. NOTE: Do not block air vents of Triad curing unit top. *NOTE ON REPAIRS: 1. Remove “Air Barrier Coating:. Apply “Bonding Agent” and allow to BENCH SET for 2 minutes. Then insert into Triad unit for 1 minute. 2. Adapt Triad material as needed. 3. Cure as recommended above (4 minutes with Air Barrier Coat on outside, then 4 minutes with “Air Barrier Coat” on inside). * Timer automatically RESETS when door opens.
11
CAUTIONS
1. To avoid uncured borders: Trim cast properly especially land height in order to allow curing light’s full access. 2. To avoid locking Triad material into undetected undercuts: Survey cast then block-out only remaining undercuts. (Undercuts can occur under land, frenal attachments, and rugae, as well as ridges.) 3. Apply Model Release Agent to cast so Triad material will separate from cast. 4. Apply Air Barrier Coating to outer surface of Triad material to cure that surface. 5. Exposing Triad material to ambient light causes hardening without curing. 6. Adjust floor position of curing unit to maximize light beam. 7. Use recommended curing times. 8. Place only one cast at a time in the curing unit to prevent shadows being cast which interferes with curing. 9. For custom tray: Position handles properly (like 2 centrals at 45˚ angle for edentulous arch, or where centrals exist in a partially dentated cast: add a small “visor” to act as a thumb stop.) 10. On custom trays: Over-bulking handle attachments on labial, palatal, or lingual interferes with muscle trimming of the lip and cheek areas and tongue movement. 11. Partially dentated case custom trays: Maxillary casts use the palate as a “stop”. Mandibular casts require “tooth stops” which are cut through the wax covering the teeth in three places as far apart as possible, never at an embrasure, and not at a rest seat site if the tray is for an impression preparatory to a cast partial. (Triad custom tray material is placed in these indentations prior to adapting the remainder over the cast). 12. To prevent potential warpage: Allow tray/baseplate to cool on the cast before removing it then paint Air Barrier Coating on the internal surface to complete the cure. 13. Wash Air Barrier Coating off the cast and the tray/baseplate to enhance attachment of other materials to them. Baseplates differ from custom trays in the following ways:
There are no handle or tooth stops. There is no wax or Triad material covering the teeth. Avoid locking material in around the necks of the teeth. Curve facial flanges toward the middle of edentulous areas for easy withdrawal.
12
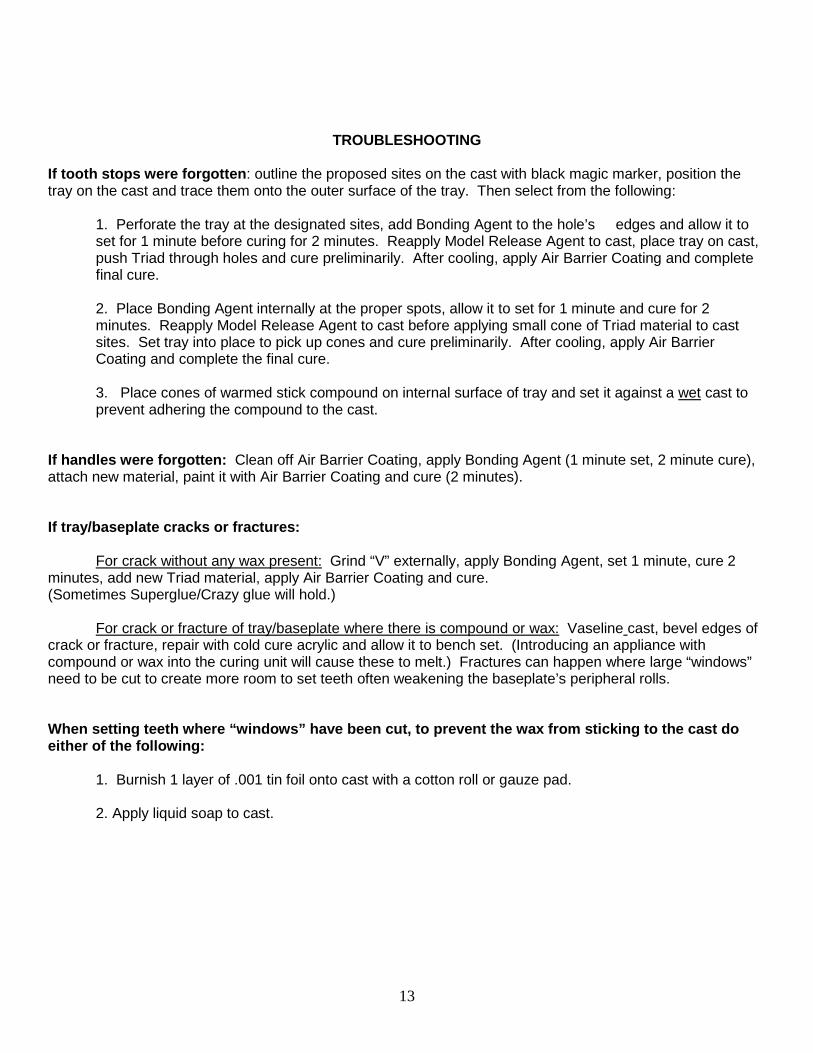
TROUBLESHOOTING If tooth stops were forgotten: outline the proposed sites on the cast with black magic marker, position the tray on the cast and trace them onto the outer surface of the tray. Then select from the following:
1. Perforate the tray at the designated sites, add Bonding Agent to the hole’s edges and allow it to set for 1 minute before curing for 2 minutes. Reapply Model Release Agent to cast, place tray on cast, push Triad through holes and cure preliminarily. After cooling, apply Air Barrier Coating and complete final cure. 2. Place Bonding Agent internally at the proper spots, allow it to set for 1 minute and cure for 2 minutes. Reapply Model Release Agent to cast before applying small cone of Triad material to cast sites. Set tray into place to pick up cones and cure preliminarily. After cooling, apply Air Barrier Coating and complete the final cure. 3. Place cones of warmed stick compound on internal surface of tray and set it against a wet cast to prevent adhering the compound to the cast.
If handles were forgotten: Clean off Air Barrier Coating, apply Bonding Agent (1 minute set, 2 minute cure), attach new material, paint it with Air Barrier Coating and cure (2 minutes). If tray/baseplate cracks or fractures: For crack without any wax present: Grind “V” externally, apply Bonding Agent, set 1 minute, cure 2 minutes, add new Triad material, apply Air Barrier Coating and cure. (Sometimes Superglue/Crazy glue will hold.) For crack or fracture of tray/baseplate where there is compound or wax: Vaseline cast, bevel edges of crack or fracture, repair with cold cure acrylic and allow it to bench set. (Introducing an appliance with compound or wax into the curing unit will cause these to melt.) Fractures can happen where large “windows” need to be cut to create more room to set teeth often weakening the baseplate’s peripheral rolls. When setting teeth where “windows” have been cut, to prevent the wax from sticking to the cast do either of the following: 1. Burnish 1 layer of .001 tin foil onto cast with a cotton roll or gauze pad. 2. Apply liquid soap to cast.
• Learn about why we use Occlusion Rims and what they can help us do.
• How to fabricate occlusion rims that will make the Intermaxillary Records visit efficient and productive!
How do we do it?
• What we already know– (experience and patient landmarks).
• The initial patient exam AND
• Carefully crafted record bases and occlusion rims
Occlusion Rims
•Locating guidelines•Making rims•Adjusting rims according to guidelines
Locating Guidelines
• Midline (from the face* see next slide)• Incisive papilla line (upper)• Anterior crest of ridge line (lower)• Posterior crest of ridge lines• Retromolar pad height lines
5/4/2015
2
Foveae palatinae
Incisive papilla
Midline is clinically determined by the face
…but sometimes this line is a fair approximation of a skeletal midline
Once determined, Facial midline should be transferred to
facial aspect of cast
Incisive papilla
Incisive papilla line
Line is transferred to land of cast using a tongue blade • Teeth # 8 and 9 are ALWAYS anterior to the Incisive Papilla with the facial surface approximately 6 mm in front of the Papilla.
• The remainder of the Maxillary Anterior teeth generally follow the shape of the arch.
• Maxillary anterior ridge bone resorption occurs from anterior towards posterior/superior.
Incisive Papilla Line - FAQs
Locating Guidelines
• Midline (from the face* see next slide)• Incisive papilla line (upper)• Anterior crest of ridge line (lower)• Posterior crest of ridge lines• Retromolar pad height lines
Anterior crest of ridge lineCentered to the lower crest of ridge
• Mandibular Anterior Teeth are centered on the crest of ridge.
• Mandiular anterior ridge bone resorption happens posterior to anterior
Anterior Crest of Ridge Line - FAQs
Locating Guidelines
• Midline (from the face* see next slide)• Incisive papilla line (upper)• Anterior crest of ridge line (lower)• Posterior crest of ridge lines (both)• Retromolar pad height lines
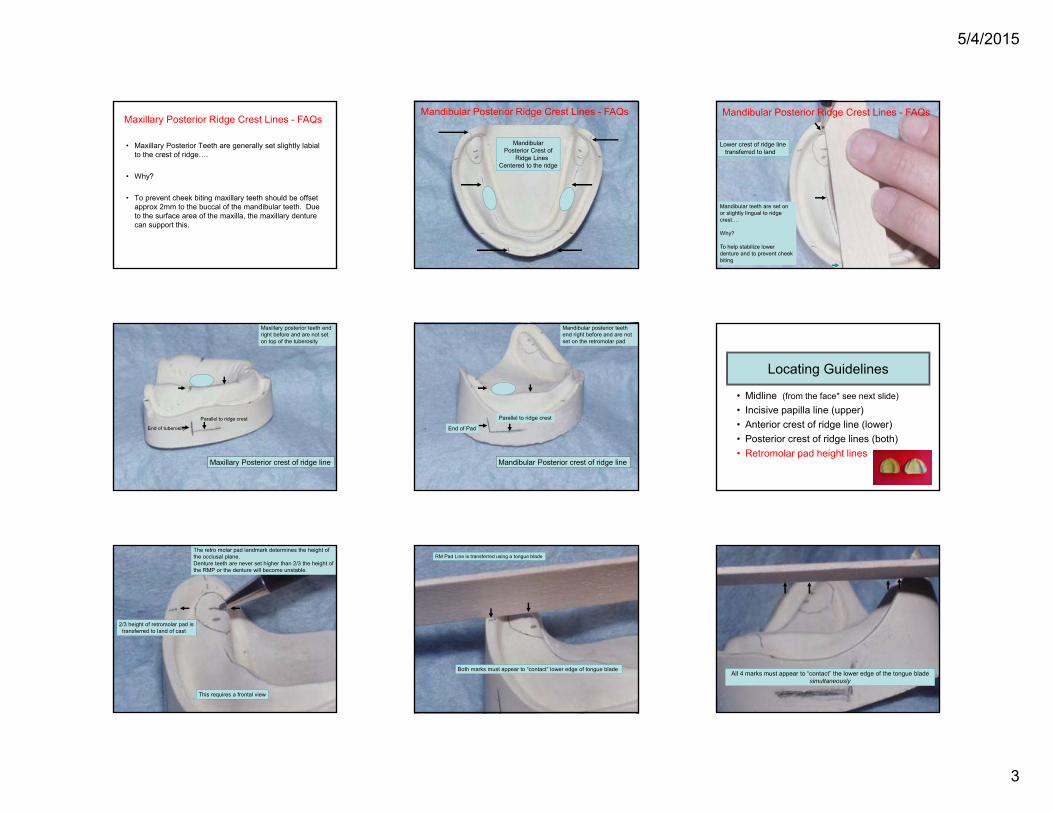
Maxillary Posterior Ridge Crest Lines - FAQs
5/4/2015
3
• Maxillary Posterior Teeth are generally set slightly labial to the crest of ridge….
• Why?
• To prevent cheek biting maxillary teeth should be offset approx 2mm to the buccal of the mandibular teeth. Due to the surface area of the maxilla, the maxillary denture can support this.
Maxillary Posterior Ridge Crest Lines - FAQs
MandibularPosterior Crest of
Ridge LinesCentered to the ridge
Mandibular Posterior Ridge Crest Lines - FAQs
Lower crest of ridge linetransferred to land
Mandibular teeth are set on or slightly lingual to ridge crest….
Why?
To help stabilize lower denture and to prevent cheek biting
Mandibular Posterior Ridge Crest Lines - FAQs
End of tuberosity
Parallel to ridge crest
Maxillary Posterior crest of ridge line
Maxillary posterior teeth end right before and are not set on top of the tuberosity
End of Pad
Parallel to ridge crest
Mandibular Posterior crest of ridge line
Mandibular posterior teeth end right before and are not set on the retromolar pad
Locating Guidelines
• Midline (from the face* see next slide)• Incisive papilla line (upper)• Anterior crest of ridge line (lower)• Posterior crest of ridge lines (both)• Retromolar pad height lines
2/3 height of retromolar pad istransferred to land of cast
This requires a frontal view
The retro molar pad landmark determines the height of the occlusal plane.Denture teeth are never set higher than 2/3 the height of the RMP or the denture will become unstable.
RM Pad Line is transferred using a tongue blade
Both marks must appear to “contact” lower edge of tongue bladeAll 4 marks must appear to “contact” the lower edge of the tongue blade
simultaneously
5/4/2015
4
Note: the RM Pad does note appear to be divided evenly in
1/3’s. That it because both pads level off at different slopes and rates.
Dividing the RM Pad into
“thirds”
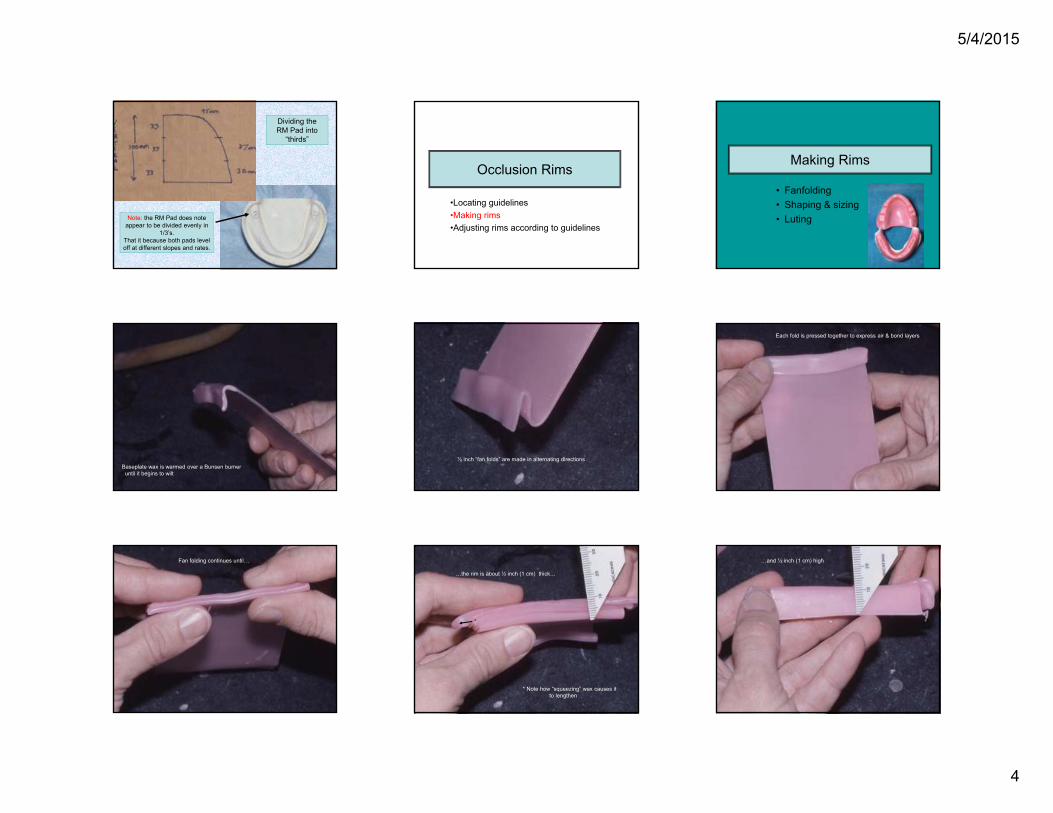
Occlusion Rims
•Locating guidelines•Making rims•Adjusting rims according to guidelines
Making Rims
• Fanfolding• Shaping & sizing• Luting
Baseplate wax is warmed over a Bunsen burneruntil it begins to wilt
½ inch “fan folds” are made in alternating directions
Each fold is pressed together to express air & bond layers
Fan folding continues until…
…the rim is about ½ inch (1 cm) thick…
* Note how “squeezing” wax causes it to lengthen
*
…and ½ inch (1 cm) high
5/4/2015
5
The excess waxis trimmed witha warm knife
The warm wax rim isshaped to conform tothe residual ridge
The “underside” is flamed with an alcohol torch
The warm rim is seated over the guidelines
Wax must liquefy & turn colorlessThis requires a “smoking hot” spatula
The wax rim is luted to the baseon buccal & lingual
Occlusion Rims
•Locating guidelines•Making rims•Adjusting rims according to guidelines
Adjusting Rims according to Guidelines
• Midline (requires patient)• Incisive papilla line (upper) – #1• Anterior crest of ridge line (lower) - #2• Posterior crest of ridge lines - #3 & 4• Retromolar pad height lines - #5
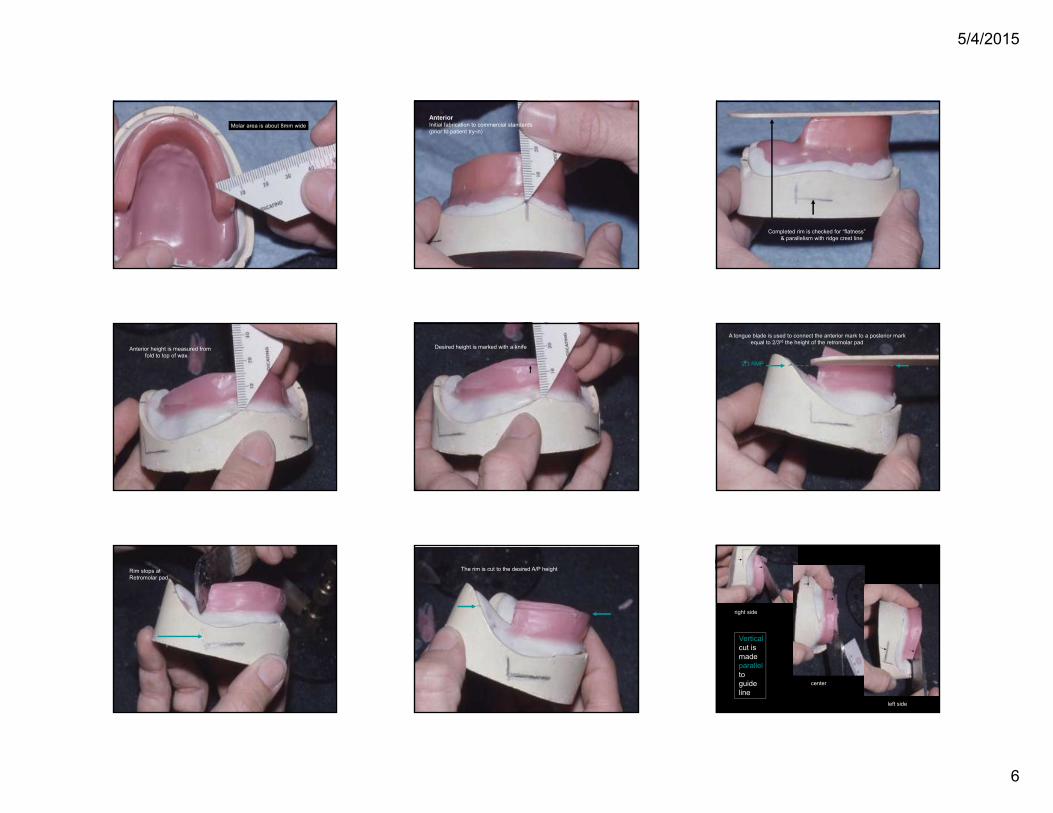
Anterior is about 4 mm wide and6 mm forward of the papilla
Bicuspid area is about 6mm wide
5/4/2015
6
Molar area is about 8mm wideAnteriorInitial fabrication to commercial standards(prior to patient try-in)
Completed rim is checked for “flatness”& parallelism with ridge crest line
Anterior height is measured fromfold to top of wax
Desired height is marked with a knife
A tongue blade is used to connect the anterior mark to a posterior markequal to 2/3rd the height of the retromolar pad
2/3 RMP
Rim stops atRetromolar pad
The rim is cut to the desired A/P height
right side
center
left side
Verticalcut ismadeparallelto guideline
5/4/2015
7
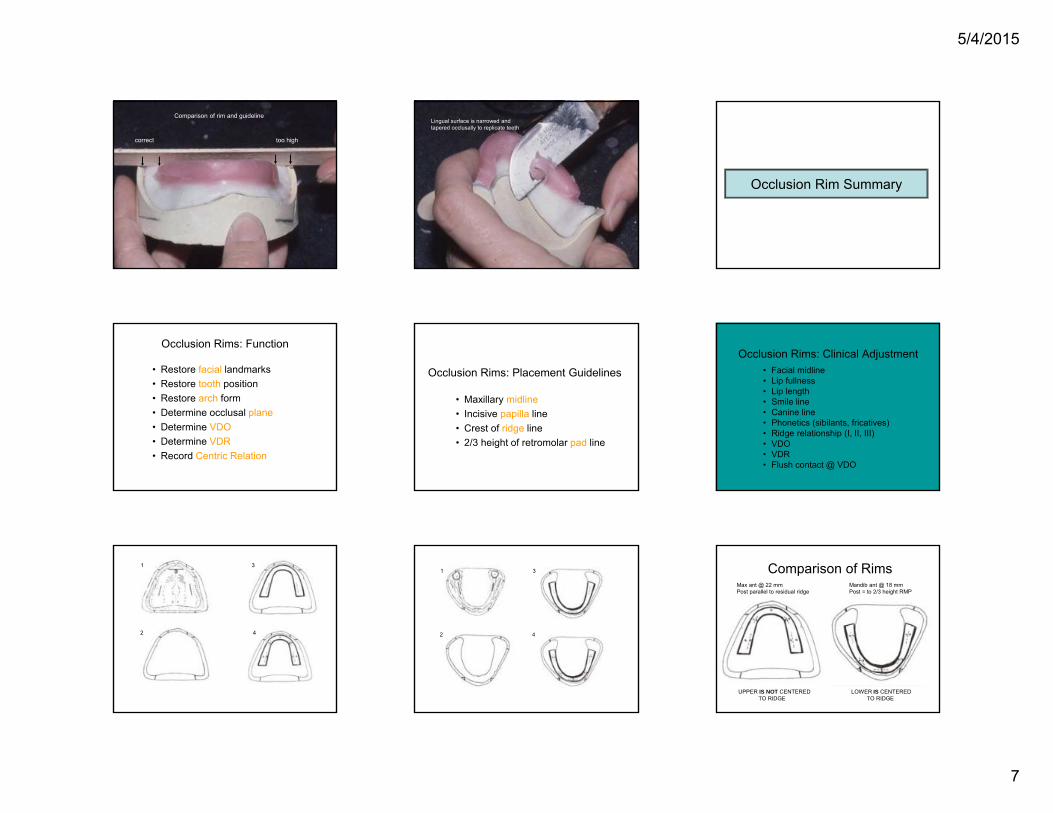
correct too high
Comparison of rim and guidelineLingual surface is narrowed and tapered occlusally to replicate teeth