16
Water-wise Landscape Rebate Manual AURORA WATER CONSERVATION LAST UPDATED FEB 2018
Water-wise Landscape Rebate Manual
AURORA WATER CONSERVATION
LAST UPDATED FEB 2018

Contents Purpose & Goals ............................................................................................................................................ 2
Program Specifics .......................................................................................................................................... 2
Requirements ............................................................................................................................................ 2
Eligibility .................................................................................................................................................... 2
Rebate Options ......................................................................................................................................... 3
Option 1: Water-wise ............................................................................................................................ 3
Option 2: Z-zone .................................................................................................................................... 3
Rebate Calculations................................................................................................................................... 3
Know Your Flow ........................................................................................................................................ 4
WWLR Application Process ........................................................................................................................... 4
Overview of Steps ..................................................................................................................................... 4
Landscape Designs .................................................................................................................................... 5
Acceptable Design ................................................................................................................................. 6
Unacceptable Design ............................................................................................................................ 7
Plant List for Design ................................................................................................................................ 10
Hardscape Requirement ......................................................................................................................... 10
Installing Your Landscape ........................................................................................................................... 11
Irrigation System Changes ...................................................................................................................... 11
Irrigation Requirements ...................................................................................................................... 11
Planting Procedures ................................................................................................................................ 12
Edging ...................................................................................................................................................... 13
First Inspection ............................................................................................................................................ 13
Mulch and Completing Installation ............................................................................................................. 14
Mulch Requirements ............................................................................................................................... 14
Mulch Preparation .................................................................................................................................. 15
Final Inspection ........................................................................................................................................... 15

Purpose & Goals The purpose of the Water-wise Landscape Rebate (WWLR) program is to incentivize the conversion of
water-guzzling turf lawns to water-wise landscapes. Water-wise landscapes are attractive, lower-
maintenance yards that will save water and withstand drought. The rebate program aims to achieve the
following goals:
Introduce the community to water-wise landscapes
Help customers make informed decisions regarding their outdoor water use and achieve their
conservation goals
Help customers in designing and installing a beautiful new yard that they can be proud of
With these goals in mind, the water-wise landscape rebate program helps customers plan, prepare and
ultimately receive financial reimbursement for their approved landscape conversions.
Program Specifics
Requirements To make this program the most effective it can be, we want to ensure that our rebate program is
targeting Aurora’s high-water lawns. Because of this, participants in the rebate program are held to the
following requirements:
1. Areas to be converted must be in good health.
2. Eligibility is based on historical water consumption and recent photos that demonstrate good
health. See Eligibility section.
3. Only front and side yards that are highly visible to the public are eligible.
4. A 500 square foot minimum size applies to all projects, unless the project is the entire front yard
or tree-lawn (i.e. the strip of grass between the sidewalk and the street).
5. All projects must receive approval prior to installation from the WWLR program manager.
6. If you belong to an HOA, you must receive approval prior to beginning the project.
7. Projects must be completed and inspected by Oct. 31 to be eligible for a rebate the same year.
8. All participants are required to also enroll in the Know Your Flow program. See Know Your Flow
section.
Eligibility Office staff determines WWLR eligibility. We look for the following items:
Current lawn is healthy with good coverage and few to no weeds. Several high quality photos to
verify this are needed.
Water bill needs to show sufficient usage during summer months for the size of applicants
property – this typically guarantees a decrease in water consumption after landscape conversion
o This is determined by comparing actual water use, collected from the water bill, to a
recommended water use (RWU), which is based on current landscape size and type (as
seen from satellite imagery).
o The property is eligible if actual use ≥ 80 percent of RWU for a majority of recent years.
Recently moved in? Contact our office at 303.739.7195 to discuss eligibility.

Rebate Options There are two different options available for participants to choose from. Both options are paid out over
time, which allows us to ensure that the new landscapes are being watered appropriately and the
conversion has had the desired reduction on outdoor water consumption. The major differences
between them are the selection limitations on plants, the maximum rebate value, and the full rebate
payout time period.
Option 1: Water-wise
Uses no- and low-water use plant material
Residential maximum rebate of $3,000
Commercial maximum rebate of $10,000 – please contact program manager
Payment schedule:
o 65 percent of rebate value paid after passing final inspection and providing all necessary
paperwork
o 35 percent of rebate value paid after one full growing season, pending realized water
savings*
Option 2: Z-zone
Uses only z-zone plants – i.e. plants that need no supplemental water after establishment. See
approved z-zone plant list
Residential maximum rebate of $4,500
Commercial maximum rebate of $15,000 – please contact program manager
Payment schedule:
o 50 percent paid after passing final inspection and providing all necessary paperwork
o 10 percent paid after first full growing season, pending realized water savings*
o 10 percent paid after second full growing season, pending realized water savings*
o 10 percent paid after third full growing season, pending realized water savings*
o 20 percent paid after fourth full growing season, pending no watering over project area
*Realized water savings demonstrated through water budget and outdoor use ≤ 110% RWU
For both rebate options, if a decrease in outdoor water consumption is not achieved for a particular
year, the rebate for that year will be forfeited. For the Z-zone option, this will not affect the ability to
receive rebate payments for subsequent years.
Rebate Calculations The WWLR will cover all material costs up to a maximum limit, depending on which program option you
choose.
Rebate will cover: plants, rocks, mulch, soil amendments, edging, etc.
Rebate will NOT cover: labor fees, delivery fees, taxes, tool rentals, irrigation materials,
construction of patios/sidewalks/driveway extensions that occur simultaneously, etc.
Please note: irrigation materials are not covered under the WWLR, but certain items (drip conversion,
rain sensors, smart weather-based controllers, etc.) might be covered under our related but separate
Irrigation Rebate program.
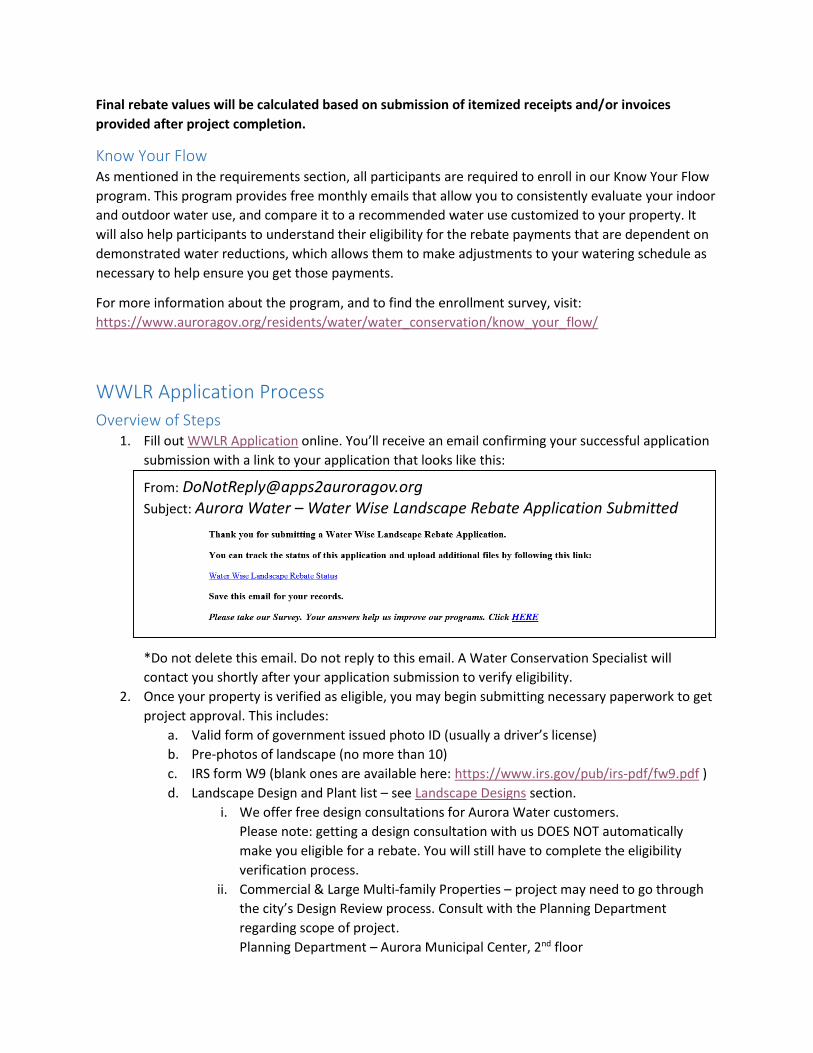
Final rebate values will be calculated based on submission of itemized receipts and/or invoices
provided after project completion.
Know Your Flow As mentioned in the requirements section, all participants are required to enroll in our Know Your Flow
program. This program provides free monthly emails that allow you to consistently evaluate your indoor
and outdoor water use, and compare it to a recommended water use customized to your property. It
will also help participants to understand their eligibility for the rebate payments that are dependent on
demonstrated water reductions, which allows them to make adjustments to your watering schedule as
necessary to help ensure you get those payments.
For more information about the program, and to find the enrollment survey, visit:
https://www.auroragov.org/residents/water/water_conservation/know_your_flow/
WWLR Application Process
Overview of Steps 1. Fill out WWLR Application online. You’ll receive an email confirming your successful application
submission with a link to your application that looks like this:
*Do not delete this email. Do not reply to this email. A Water Conservation Specialist will
contact you shortly after your application submission to verify eligibility.
2. Once your property is verified as eligible, you may begin submitting necessary paperwork to get
project approval. This includes:
a. Valid form of government issued photo ID (usually a driver’s license)
b. Pre-photos of landscape (no more than 10)
c. IRS form W9 (blank ones are available here: https://www.irs.gov/pub/irs-pdf/fw9.pdf )
d. Landscape Design and Plant list – see Landscape Designs section.
i. We offer free design consultations for Aurora Water customers.
Please note: getting a design consultation with us DOES NOT automatically
make you eligible for a rebate. You will still have to complete the eligibility
verification process.
ii. Commercial & Large Multi-family Properties – project may need to go through
the city’s Design Review process. Consult with the Planning Department
regarding scope of project.
Planning Department – Aurora Municipal Center, 2nd floor
From: [email protected]
Subject: Aurora Water – Water Wise Landscape Rebate Application Submitted

Planning Phone Number – 303.739.7000
3. Obtain any necessary approvals and permits.
4. Once everything has been approved, you may begin the installation – put in everything but the
mulch.
5. Before mulch goes down, schedule the first inspection. This gives you the opportunity to fix
anything that’s wrong before the mulch is laid.
6. After passing the first inspection, finish the installation by laying down your mulch.
7. Schedule the final inspection.
Landscape Designs All participants must have a landscape design approved by the WWLR program manager before
beginning any installation. This confirms that the project design meets both program requirements and
city code landscape requirements. You are welcome to design your own project, hire a contractor, or
seek help through our free design consultation program. Whichever option you choose though, there
are specific requirements for the design to be approved.
A ‘work of art’ is not necessary. You do not have be an artist to create a landscape design. The design
does, however, need to be clean and clearly labeled with the following requirements:
Design drawn to-scale – standard scales are 1”:8’, 1”:10’ or 1”:16’.
Plants need to be depicted at their mature sizes on design.
Design must have a legend that contains:
o Your name
o Property address
o North arrow
o Graphical scale
o Numerical scale
Design must also label:
o All plants
o Hardscape and important landscape features
o Mulch types
o Remaining turf and/or bed areas, where applicable
The following pages depict acceptable and unacceptable designs:

Acceptable Design
This design below includes all of the requirements listed in the previous section. Important parts have been identified in red.
Numeric scale Graphical scale
North arrow
Hardscape
Plant Symbols
Mulch Type
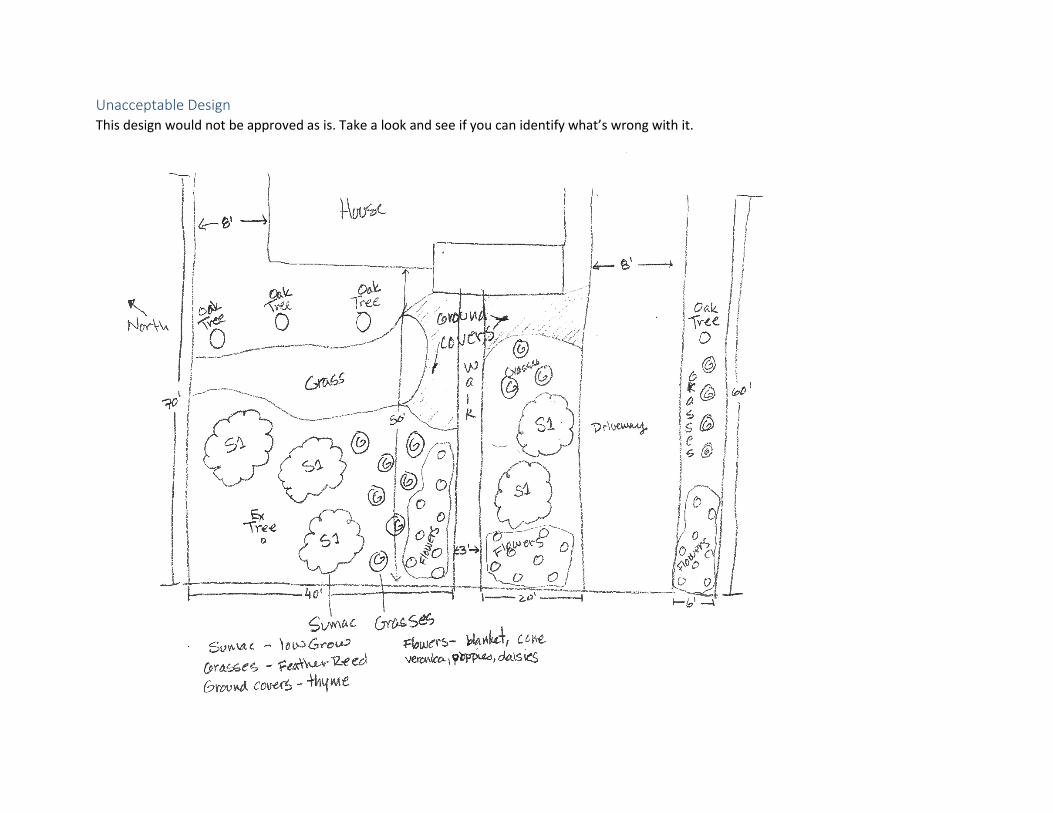
Unacceptable Design This design would not be approved as is. Take a look and see if you can identify what’s wrong with it.
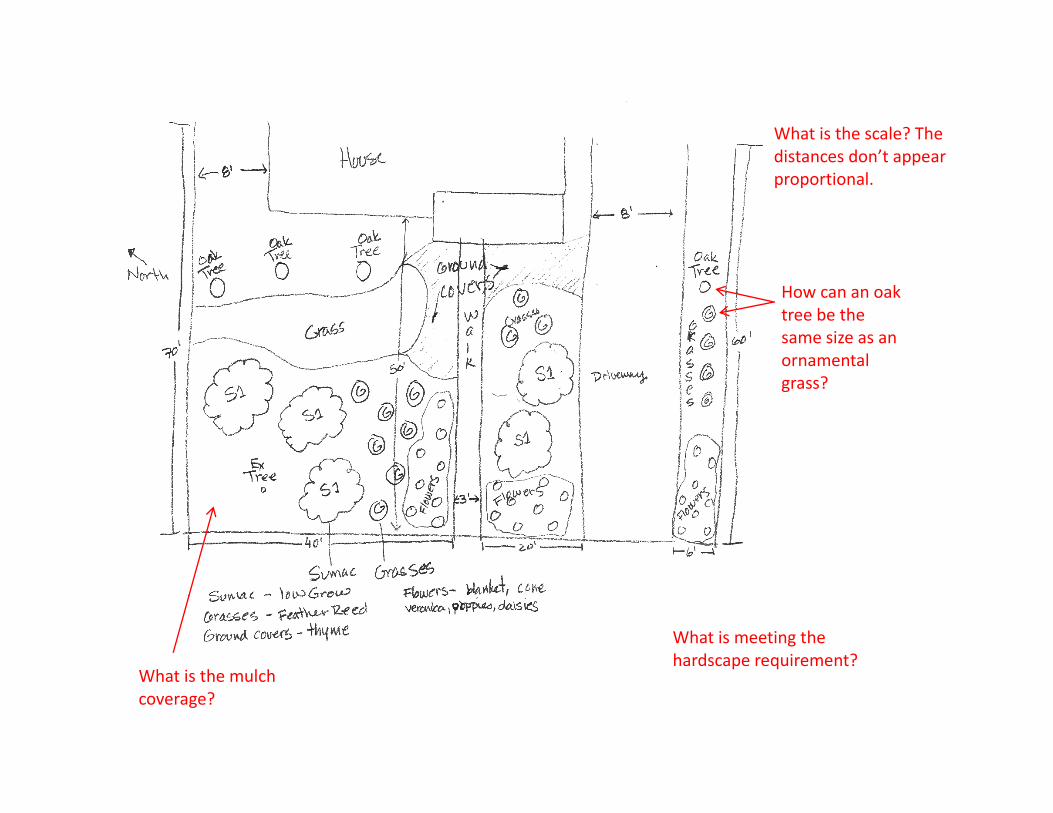
How can an oak tree be the same size as an ornamental grass?
What is the scale? The distances don’t appear proportional.
What is the mulch coverage?
What is meeting the hardscape requirement?

Here’s that same design, adjusted to meet all of the requirements. As you can see, it is to-scale, with appropriate plant sizes and clear labels.
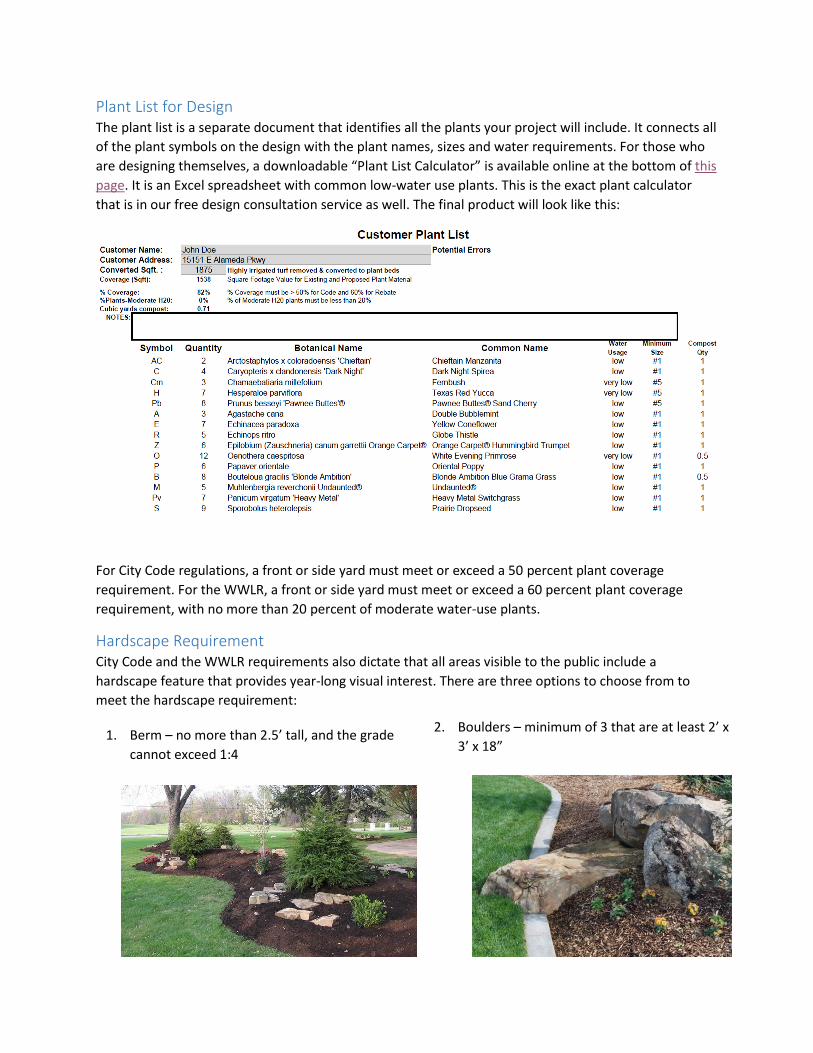
Plant List for Design The plant list is a separate document that identifies all the plants your project will include. It connects all
of the plant symbols on the design with the plant names, sizes and water requirements. For those who
are designing themselves, a downloadable “Plant List Calculator” is available online at the bottom of this
page. It is an Excel spreadsheet with common low-water use plants. This is the exact plant calculator
that is in our free design consultation service as well. The final product will look like this:
For City Code regulations, a front or side yard must meet or exceed a 50 percent plant coverage
requirement. For the WWLR, a front or side yard must meet or exceed a 60 percent plant coverage
requirement, with no more than 20 percent of moderate water-use plants.
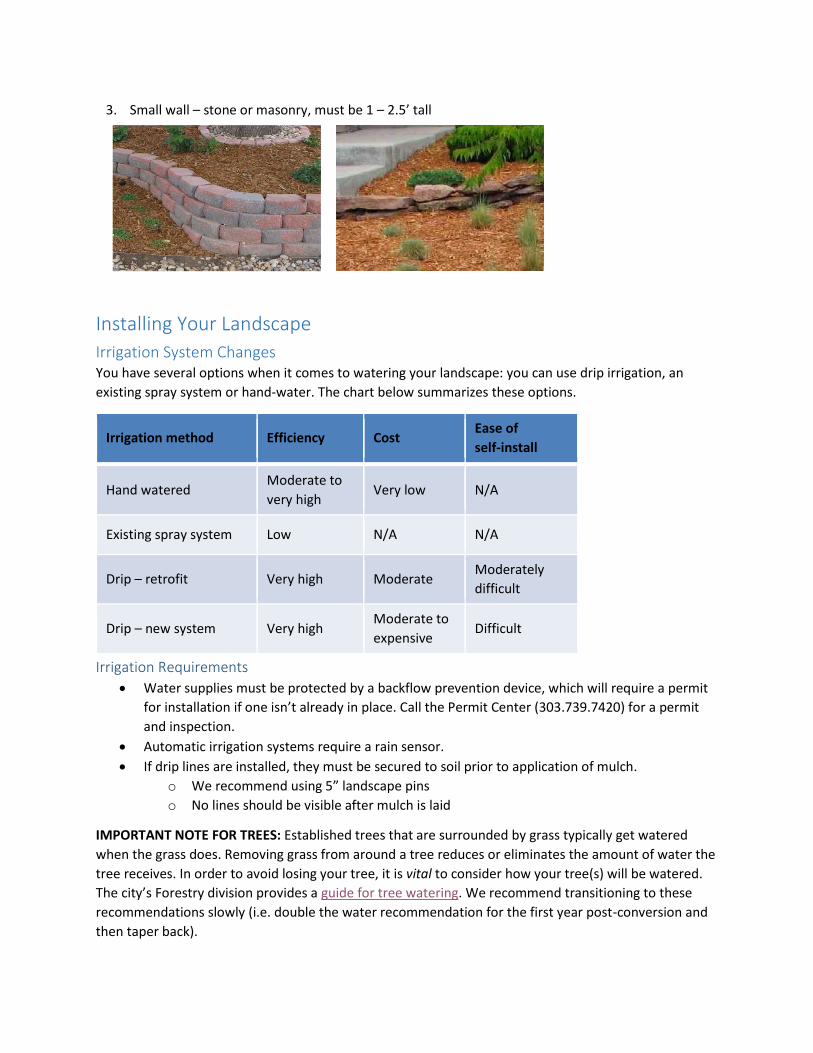
Hardscape Requirement City Code and the WWLR requirements also dictate that all areas visible to the public include a
hardscape feature that provides year-long visual interest. There are three options to choose from to
meet the hardscape requirement:
1. Berm – no more than 2.5’ tall, and the grade
cannot exceed 1:4
2. Boulders – minimum of 3 that are at least 2’ x
3’ x 18”
Installing Your Landscape
Irrigation System Changes You have several options when it comes to watering your landscape: you can use drip irrigation, an
existing spray system or hand-water. The chart below summarizes these options.
Irrigation method Efficiency Cost Ease of
self-install
Hand watered Moderate to
very high Very low N/A
Existing spray system Low N/A N/A
Drip – retrofit Very high Moderate Moderately
difficult
Drip – new system Very high Moderate to
expensive Difficult
Irrigation Requirements
Water supplies must be protected by a backflow prevention device, which will require a permit
for installation if one isn’t already in place. Call the Permit Center (303.739.7420) for a permit
and inspection.
Automatic irrigation systems require a rain sensor.
If drip lines are installed, they must be secured to soil prior to application of mulch.
o We recommend using 5” landscape pins
o No lines should be visible after mulch is laid
IMPORTANT NOTE FOR TREES: Established trees that are surrounded by grass typically get watered
when the grass does. Removing grass from around a tree reduces or eliminates the amount of water the
tree receives. In order to avoid losing your tree, it is vital to consider how your tree(s) will be watered.
The city’s Forestry division provides a guide for tree watering. We recommend transitioning to these
recommendations slowly (i.e. double the water recommendation for the first year post-conversion and
then taper back).
3. Small wall – stone or masonry, must be 1 – 2.5’ tall

Planting Procedures
1. Place plant material according to the design
plan. It is important to follow the landscape
design, but in most cases it’s not necessary to
concern yourself with being exact to the inch.
2. Dig a bowl-shaped hole twice as wide as the
plant container. For all plant types except
trees, the hole should be the depth of the
root ball. For trees, the hole should be dug a
few inches shy of the root ball depth.
3. Thoroughly mix approved compost with the
excavated soil. Composts approved for use are
Class I and Class II. Anything else must receive
prior approval.
Use only native soil when planting trees.
4. Remove plant from container.
Perennials and ornamental grasses – if the plant is root bound,
make 3 to 4 vertical cuts in the root ball with a clean, sharp knife.
Cut off any thick mass of roots at the bottom of the root ball.
Shrubs – if the plant is root bound, cuts may be made in the root
ball but only to the fibrous roots. Do not cut the larger roots, ¼”
or greater.
Trees – do not modify root ball.
Edging Edging must be used to separate planting beds from turf in order to effectively keep grass roots out of
the beds. You may also use it to separate mulch types, but this is not a requirement. The edging
requirements are:
Edging is at least 4” in height
It must be installed leaving no more than ½” out of the soil
It may not be placed on top of the soil
It should not be easily visible
First Inspection The first inspection provides an opportunity for questions to be asked and resolution to take place prior
to finishing the project. It should be scheduled after the plants, irrigation (if applicable) and hardscapes
have been installed but before the mulch goes down. The following is inspected:
Plant type/size match the plant list, and the plant locations match the design plan
Plant holes dug double wide with appropriate soil compaction around plant
Use of class I or class II compost or other approved amendment
Irrigation system (if applicable), including presence of backflow and rain sensor
Site is de-weeded and hazard free
Edging is present to separate any turf sections
Erosion control BMP’s in place where needed and public right-of-ways are clean
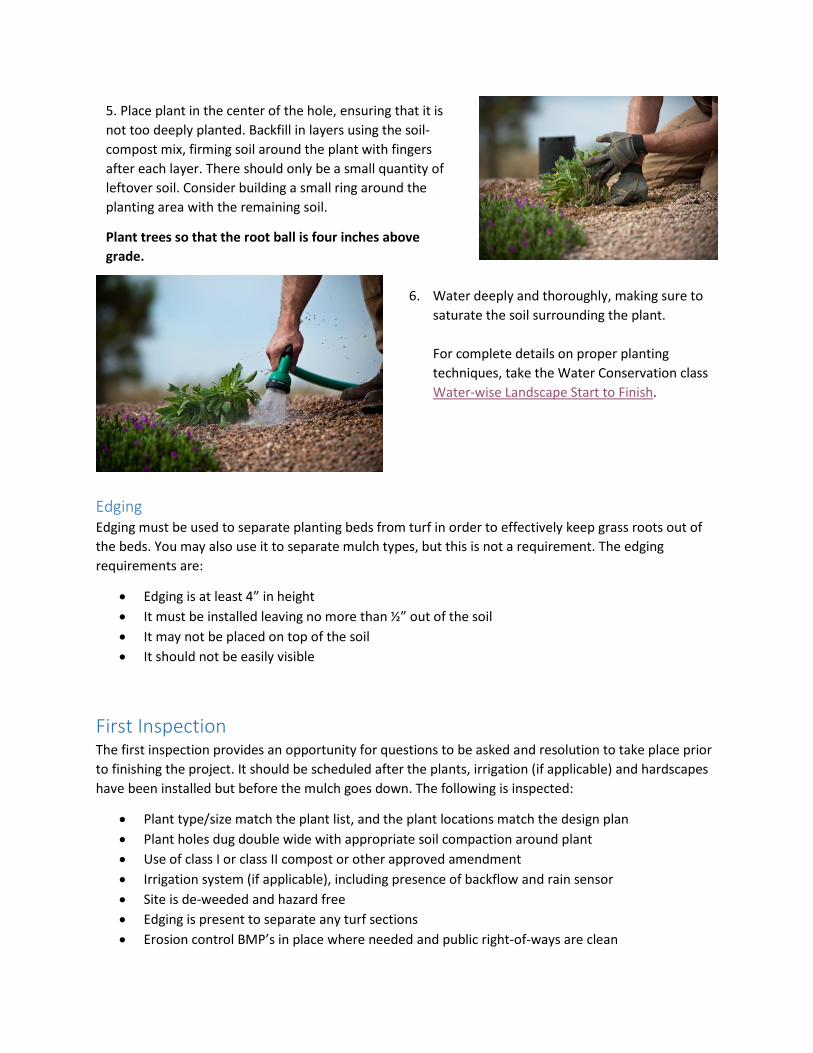
5. Place plant in the center of the hole, ensuring that it is
not too deeply planted. Backfill in layers using the soil-
compost mix, firming soil around the plant with fingers
after each layer. There should only be a small quantity of
leftover soil. Consider building a small ring around the
planting area with the remaining soil.
Plant trees so that the root ball is four inches above
grade.
6. Water deeply and thoroughly, making sure to
saturate the soil surrounding the plant.
For complete details on proper planting
techniques, take the Water Conservation class
Water-wise Landscape Start to Finish.

Mulch and Completing Installation After you’ve passed the first inspection and any known issues have been remedied, you may start laying
the mulch. Mulch is an important part of a water-wise landscape, and it helps the landscape retain soil
moisture while mitigating weed growth. Choices for mulch include: organic mulch (bark, wood) and
inorganic mulch (cobble, rock).
Here are some examples of mulch:
Golden Small Chip Shredded Bark
Dark Medium Chip 3” River Rock
Mulch Requirements Mulch must be at least 3” deep.
Weed/Landscape fabric underneath the mulch is option, though not typically recommended
around plant material because of the unnatural barrier that is created between mulch and soil.
At least two mulch types are required by City Code.
o i.e. A combination of river rock and golden small chip, or shredded bark with golden
small chip.
City code also mandates that no more than 50 percent of front and side yards can be covered
by inorganic mulch (rocks); the rest would need to be covered by organic mulch (wood).
There is no limit to the use of organic mulch.
Pea gravel may be used, but not next to pedestrian access points (sidewalks, streets, etc.).
Red mulch, lava rock and recycled mulch products such as ground rubber or crushed concrete
may NOT be used.
Be creative with colors and textures, but sensitive to neighborhood aesthetics.

Mulch Preparation Edging of any sort may NOT be used to keep mulch off the concrete. Instead, excavate soil as shown on
the following slide to provide a place for the mulch to rest.
Final Inspection The final inspection should occur after all issues found in the first inspection have been addressed and
the mulch has been laid. The following items will be inspected:
That there is at least 3” of mulch coverage over the landscape.
Landscape fabric, if used, is securely pinned, tucked and covered with mulch. None should be
visible.
Irrigation lines are all pinned and covered with mulch. None should be visible.
Edging, if used, is pushed in far enough to have minimal showing.
Site is weed-free and looks like a completed project.
After passing the final inspection, it’s just a matter of paperwork! Submit all of your receipts and the
WWLR program manager will in touch with you to finalize everything.
In most cases, if mulch is placed
directly on top of the existing grade
next to a sidewalk, it will continually
fall onto the sidewalk.
To remedy this, remove a section of soil next to
any concrete surface area. We recommend
digging 3-4” below the level of the concrete
and back 18-24”.
*Do not dig to or below bottom of concrete
This works well for inorganic
mulch, but not as well for organic
mulch. Water will likely collect
during a major rain event and
cause organic mulch to float.


