98
Wavelink TelnetCE Client Scripting Reference Guide wltn-rg-script-20050729 Revised 7/29/05

Wavelink TelnetCE Client Scripting Reference Guide
wltn-rg-script-20050729
Revised 7/29/05

Copyright © 2005 by Wavelink Corporation All rights reserved.
Wavelink Corporation 6985 South Union Park Avenue, Suite 335Midvale, Utah 84047Telephone: (801) 316-9000 Fax: (801) 255-9699Email: [email protected]: http:\\www.wavelink.com
Email: [email protected]
No part of this publication may be reproduced or used in any form, or by any electrical or mechanical means, without permission in writing from Wavelink Corporation. This includes electronic or mechanical means, such as photocopying, recording, or information storage and retrieval systems. The material in this manual is subject to change without notice.
The software is provided strictly on an “as is” basis. All software, including firmware, furnished to the user is on a licensed basis. Wavelink grants to the user a non-transferable and non-exclusive license to use each software or firmware program delivered hereunder (licensed program). Except as noted below, such license may not be assigned, sublicensed, or otherwise transferred by the user without prior written consent of Wavelink. No right to copy a licensed program in whole or in part is granted, except as permitted under copyright law. The user shall not modify, merge, or incorporate any form or portion of a licensed program with other program material, create a derivative work from a licensed program, or use a licensed program in a network without written permission from Wavelink. The user agrees to maintain Wavelink’s copyright notice on the licensed programs delivered hereunder, and to include the same on any authorized copies it makes, in whole or in part. The user agrees not to decompile, disassemble, decode, or reverse engineer any licensed program delivered to the user or any portion thereof.
Wavelink reserves the right to make changes to any software or product to improve reliability, function, or design.
The information in this document is bound by the terms of the end user license agreement.

Table of Contents i
Table of Contents
Chapter 1: Introduction 1Document Assumptions . . . . . . . . . . . . . . . . . . . . . . . . . . . . . . . . . . . . . . . . . . 1Document Conventions . . . . . . . . . . . . . . . . . . . . . . . . . . . . . . . . . . . . . . . . . . 1About TelnetCE Client Scripting . . . . . . . . . . . . . . . . . . . . . . . . . . . . . . . . . . . 2
Chapter 2: Launching the Script Editor 5Launching the Script Editor from Avalanche Manager . . . . . . . . . . . . . . . . 5
Chapter 3: Creating Scripts 7Creating Scripts Manually Using the Script Editor . . . . . . . . . . . . . . . . . . . 7
Configuring the Script Name Tab . . . . . . . . . . . . . . . . . . . . . . . . . . . . . 8Selecting the Activation Method . . . . . . . . . . . . . . . . . . . . . . . . . . . . . . 8
Select from Menu . . . . . . . . . . . . . . . . . . . . . . . . . . . . . . . . . . . . . . . 9On Key Combination . . . . . . . . . . . . . . . . . . . . . . . . . . . . . . . . . . . . 10When Session Connects . . . . . . . . . . . . . . . . . . . . . . . . . . . . . . . . . . 10On Barcode, MSR or RFID Scan . . . . . . . . . . . . . . . . . . . . . . . . . . . 11On Screen Update . . . . . . . . . . . . . . . . . . . . . . . . . . . . . . . . . . . . . . . 13
Creating the Script Code . . . . . . . . . . . . . . . . . . . . . . . . . . . . . . . . . . . . . 15Creating Variables . . . . . . . . . . . . . . . . . . . . . . . . . . . . . . . . . . . . . . . . . . 15Selecting Host Profiles . . . . . . . . . . . . . . . . . . . . . . . . . . . . . . . . . . . . . . . 17
Performing Script Capturing . . . . . . . . . . . . . . . . . . . . . . . . . . . . . . . . . . . . . . 19Editing Scripts . . . . . . . . . . . . . . . . . . . . . . . . . . . . . . . . . . . . . . . . . . . . . . . . . . 23Importing Scripts . . . . . . . . . . . . . . . . . . . . . . . . . . . . . . . . . . . . . . . . . . . . . . . . 23Saving and Exporting Scripts. . . . . . . . . . . . . . . . . . . . . . . . . . . . . . . . . . . . . . 25Deploying Scripts. . . . . . . . . . . . . . . . . . . . . . . . . . . . . . . . . . . . . . . . . . . . . . . . 27Syncing Scripts . . . . . . . . . . . . . . . . . . . . . . . . . . . . . . . . . . . . . . . . . . . . . . . . . . 27Creating a Log File. . . . . . . . . . . . . . . . . . . . . . . . . . . . . . . . . . . . . . . . . . . . . . . 28
Entering the Logging_On Action . . . . . . . . . . . . . . . . . . . . . . . . . . . . . . 28Entering the Logging_Off Action . . . . . . . . . . . . . . . . . . . . . . . . . . . . . . 29
Script Nesting . . . . . . . . . . . . . . . . . . . . . . . . . . . . . . . . . . . . . . . . . . . . . . . . . . . 29
Chapter 4: Executing Scripts 33Select from Menu . . . . . . . . . . . . . . . . . . . . . . . . . . . . . . . . . . . . . . . . . . . . . . . . 33On Key Combination. . . . . . . . . . . . . . . . . . . . . . . . . . . . . . . . . . . . . . . . . . . . . 34When Session Connects . . . . . . . . . . . . . . . . . . . . . . . . . . . . . . . . . . . . . . . . . . 35On Barcode, MSR, or RFID Scan . . . . . . . . . . . . . . . . . . . . . . . . . . . . . . . . . . . 35On Screen Update . . . . . . . . . . . . . . . . . . . . . . . . . . . . . . . . . . . . . . . . . . . . . . . 35
Chapter 5: Building an Example Script Manually 37Creating the Example Script. . . . . . . . . . . . . . . . . . . . . . . . . . . . . . . . . . . . . . . 37
Launching the Script Editor . . . . . . . . . . . . . . . . . . . . . . . . . . . . . . . . . . 38Naming the Script and Selecting the Activation Method . . . . . . . . . . 38

ii Wavelink TelnetCE Client Scripting Reference Guide
Building the Script Code . . . . . . . . . . . . . . . . . . . . . . . . . . . . . . . . . . . . . 38Verifying the Script Starts on the Correct Screen . . . . . . . . . . . . . 38Entering the User Name and Password . . . . . . . . . . . . . . . . . . . . 45Verifying the screen and navigating to a menu . . . . . . . . . . . . . . 49
Appendix A: Examples 57Example 1: Beep . . . . . . . . . . . . . . . . . . . . . . . . . . . . . . . . . . . . . . . . . . . . . . . . . 57
Example Code . . . . . . . . . . . . . . . . . . . . . . . . . . . . . . . . . . . . . . . . . . . . . . 57Notes . . . . . . . . . . . . . . . . . . . . . . . . . . . . . . . . . . . . . . . . . . . . . . . . . . . . . . 57
Example 2: Escape Sequence . . . . . . . . . . . . . . . . . . . . . . . . . . . . . . . . . . . . . . 58Example Code . . . . . . . . . . . . . . . . . . . . . . . . . . . . . . . . . . . . . . . . . . . . . . 58Notes . . . . . . . . . . . . . . . . . . . . . . . . . . . . . . . . . . . . . . . . . . . . . . . . . . . . . . 58
Example 3: Request Information . . . . . . . . . . . . . . . . . . . . . . . . . . . . . . . . . . . 59Example Code . . . . . . . . . . . . . . . . . . . . . . . . . . . . . . . . . . . . . . . . . . . . . . 59Notes . . . . . . . . . . . . . . . . . . . . . . . . . . . . . . . . . . . . . . . . . . . . . . . . . . . . . . 59
Example 4: Display Screen Button. . . . . . . . . . . . . . . . . . . . . . . . . . . . . . . . . . 59Example Code . . . . . . . . . . . . . . . . . . . . . . . . . . . . . . . . . . . . . . . . . . . . . . 59Notes . . . . . . . . . . . . . . . . . . . . . . . . . . . . . . . . . . . . . . . . . . . . . . . . . . . . . . 60
Appendix B: Actions 61No Return Values . . . . . . . . . . . . . . . . . . . . . . . . . . . . . . . . . . . . . . . . . . . . . . . . 61
Blank Line and Comment Actions . . . . . . . . . . . . . . . . . . . . . . . . . . . . . 62Blank_Line . . . . . . . . . . . . . . . . . . . . . . . . . . . . . . . . . . . . . . . . . . . . . 62Comment . . . . . . . . . . . . . . . . . . . . . . . . . . . . . . . . . . . . . . . . . . . . . . 62
Goto Support Actions . . . . . . . . . . . . . . . . . . . . . . . . . . . . . . . . . . . . . . . . 62Goto . . . . . . . . . . . . . . . . . . . . . . . . . . . . . . . . . . . . . . . . . . . . . . . . . . . 62Label . . . . . . . . . . . . . . . . . . . . . . . . . . . . . . . . . . . . . . . . . . . . . . . . . . 62
Macro Exiting . . . . . . . . . . . . . . . . . . . . . . . . . . . . . . . . . . . . . . . . . . . . . . 62Return . . . . . . . . . . . . . . . . . . . . . . . . . . . . . . . . . . . . . . . . . . . . . . . . . 62Abort . . . . . . . . . . . . . . . . . . . . . . . . . . . . . . . . . . . . . . . . . . . . . . . . . . 62Abort_All . . . . . . . . . . . . . . . . . . . . . . . . . . . . . . . . . . . . . . . . . . . . . . 62Disconnect . . . . . . . . . . . . . . . . . . . . . . . . . . . . . . . . . . . . . . . . . . . . . 62Exit_Application . . . . . . . . . . . . . . . . . . . . . . . . . . . . . . . . . . . . . . . . 62
Conditionals . . . . . . . . . . . . . . . . . . . . . . . . . . . . . . . . . . . . . . . . . . . . . . . . 63If . . . . . . . . . . . . . . . . . . . . . . . . . . . . . . . . . . . . . . . . . . . . . . . . . . . . . . 63If_Not . . . . . . . . . . . . . . . . . . . . . . . . . . . . . . . . . . . . . . . . . . . . . . . . . 63Else . . . . . . . . . . . . . . . . . . . . . . . . . . . . . . . . . . . . . . . . . . . . . . . . . . . 63End_If . . . . . . . . . . . . . . . . . . . . . . . . . . . . . . . . . . . . . . . . . . . . . . . . . 63While . . . . . . . . . . . . . . . . . . . . . . . . . . . . . . . . . . . . . . . . . . . . . . . . . . 63While_Not . . . . . . . . . . . . . . . . . . . . . . . . . . . . . . . . . . . . . . . . . . . . . 63End_While . . . . . . . . . . . . . . . . . . . . . . . . . . . . . . . . . . . . . . . . . . . . . 64Continue . . . . . . . . . . . . . . . . . . . . . . . . . . . . . . . . . . . . . . . . . . . . . . . 64Break . . . . . . . . . . . . . . . . . . . . . . . . . . . . . . . . . . . . . . . . . . . . . . . . . . 64
General Queries . . . . . . . . . . . . . . . . . . . . . . . . . . . . . . . . . . . . . . . . . . . . . 64Ask_OK . . . . . . . . . . . . . . . . . . . . . . . . . . . . . . . . . . . . . . . . . . . . . . . 64
Send Characters . . . . . . . . . . . . . . . . . . . . . . . . . . . . . . . . . . . . . . . . . . . . . 64

Table of Contents iii
Keypress_String . . . . . . . . . . . . . . . . . . . . . . . . . . . . . . . . . . . . . . . . 64Keypress_Key . . . . . . . . . . . . . . . . . . . . . . . . . . . . . . . . . . . . . . . . . . 64Scan_String . . . . . . . . . . . . . . . . . . . . . . . . . . . . . . . . . . . . . . . . . . . . 64Set_Cursor_Position . . . . . . . . . . . . . . . . . . . . . . . . . . . . . . . . . . . . . 64
Message . . . . . . . . . . . . . . . . . . . . . . . . . . . . . . . . . . . . . . . . . . . . . . . . . . . 64Message . . . . . . . . . . . . . . . . . . . . . . . . . . . . . . . . . . . . . . . . . . . . . . . 64Message_Clear . . . . . . . . . . . . . . . . . . . . . . . . . . . . . . . . . . . . . . . . . . 65
Beep . . . . . . . . . . . . . . . . . . . . . . . . . . . . . . . . . . . . . . . . . . . . . . . . . . . . . . . 65Beep . . . . . . . . . . . . . . . . . . . . . . . . . . . . . . . . . . . . . . . . . . . . . . . . . . . 65
Waiting . . . . . . . . . . . . . . . . . . . . . . . . . . . . . . . . . . . . . . . . . . . . . . . . . . . . 65Wait_For_Screen_Update . . . . . . . . . . . . . . . . . . . . . . . . . . . . . . . . 65Delay . . . . . . . . . . . . . . . . . . . . . . . . . . . . . . . . . . . . . . . . . . . . . . . . . . 65
Logging . . . . . . . . . . . . . . . . . . . . . . . . . . . . . . . . . . . . . . . . . . . . . . . . . . . . 65Logging_On . . . . . . . . . . . . . . . . . . . . . . . . . . . . . . . . . . . . . . . . . . . . 65Logging_Off . . . . . . . . . . . . . . . . . . . . . . . . . . . . . . . . . . . . . . . . . . . . 66
Call Other Macros . . . . . . . . . . . . . . . . . . . . . . . . . . . . . . . . . . . . . . . . . . . 66Call . . . . . . . . . . . . . . . . . . . . . . . . . . . . . . . . . . . . . . . . . . . . . . . . . . . 66
Screen Buttons . . . . . . . . . . . . . . . . . . . . . . . . . . . . . . . . . . . . . . . . . . . . . . 66Button_Create_Emulation . . . . . . . . . . . . . . . . . . . . . . . . . . . . . . . . 66Button_Create_View . . . . . . . . . . . . . . . . . . . . . . . . . . . . . . . . . . . . . 66Button_Remove . . . . . . . . . . . . . . . . . . . . . . . . . . . . . . . . . . . . . . . . . 67Button_Remove_All . . . . . . . . . . . . . . . . . . . . . . . . . . . . . . . . . . . . . 67
Boolean Values . . . . . . . . . . . . . . . . . . . . . . . . . . . . . . . . . . . . . . . . . . . . . . . . . . 67Boolean Assignments . . . . . . . . . . . . . . . . . . . . . . . . . . . . . . . . . . . . . . . . 67
Boolean_Set . . . . . . . . . . . . . . . . . . . . . . . . . . . . . . . . . . . . . . . . . . . . 67Boolean_Not . . . . . . . . . . . . . . . . . . . . . . . . . . . . . . . . . . . . . . . . . . . 67Boolean_And . . . . . . . . . . . . . . . . . . . . . . . . . . . . . . . . . . . . . . . . . . . 67Boolean_Or . . . . . . . . . . . . . . . . . . . . . . . . . . . . . . . . . . . . . . . . . . . . 67
Boolean Comparisons . . . . . . . . . . . . . . . . . . . . . . . . . . . . . . . . . . . . . . . . 68Boolean_Equal . . . . . . . . . . . . . . . . . . . . . . . . . . . . . . . . . . . . . . . . . . 68Boolean_Not_Equal . . . . . . . . . . . . . . . . . . . . . . . . . . . . . . . . . . . . . 68
String Comparisons . . . . . . . . . . . . . . . . . . . . . . . . . . . . . . . . . . . . . . . . . 68String_Empty . . . . . . . . . . . . . . . . . . . . . . . . . . . . . . . . . . . . . . . . . . . 68String_Less_Than . . . . . . . . . . . . . . . . . . . . . . . . . . . . . . . . . . . . . . . 68String_Less_Than_Or_Equal . . . . . . . . . . . . . . . . . . . . . . . . . . . . . . 68String_Equal . . . . . . . . . . . . . . . . . . . . . . . . . . . . . . . . . . . . . . . . . . . 68String_Greater_Than_Or_Equal . . . . . . . . . . . . . . . . . . . . . . . . . . . 69String_Greater_Than . . . . . . . . . . . . . . . . . . . . . . . . . . . . . . . . . . . . 69String_Not_Equal . . . . . . . . . . . . . . . . . . . . . . . . . . . . . . . . . . . . . . . 69
Integer Comparison . . . . . . . . . . . . . . . . . . . . . . . . . . . . . . . . . . . . . . . . . 69Number_Less_Than . . . . . . . . . . . . . . . . . . . . . . . . . . . . . . . . . . . . . 69Number_Less_Than_Or_Equal . . . . . . . . . . . . . . . . . . . . . . . . . . . . 69Number_Equal . . . . . . . . . . . . . . . . . . . . . . . . . . . . . . . . . . . . . . . . . 69Number_Greater_Than_Or_Equal . . . . . . . . . . . . . . . . . . . . . . . . . 69Number_Greater_Than . . . . . . . . . . . . . . . . . . . . . . . . . . . . . . . . . . 70Number_Not_Equal . . . . . . . . . . . . . . . . . . . . . . . . . . . . . . . . . . . . . 70

iv Wavelink TelnetCE Client Scripting Reference Guide
General Queries . . . . . . . . . . . . . . . . . . . . . . . . . . . . . . . . . . . . . . . . . . . . . 70Ask_OK_Cancel . . . . . . . . . . . . . . . . . . . . . . . . . . . . . . . . . . . . . . . . 70Ask_Yes_No . . . . . . . . . . . . . . . . . . . . . . . . . . . . . . . . . . . . . . . . . . . . 70
Search the Screen . . . . . . . . . . . . . . . . . . . . . . . . . . . . . . . . . . . . . . . . . . . . 70Search_Screen . . . . . . . . . . . . . . . . . . . . . . . . . . . . . . . . . . . . . . . . . . 70
String Values . . . . . . . . . . . . . . . . . . . . . . . . . . . . . . . . . . . . . . . . . . . . . . . . . . . . 70Get System Information . . . . . . . . . . . . . . . . . . . . . . . . . . . . . . . . . . . . . . 71
Get_MAC_Address . . . . . . . . . . . . . . . . . . . . . . . . . . . . . . . . . . . . . 71Get_IP_Address . . . . . . . . . . . . . . . . . . . . . . . . . . . . . . . . . . . . . . . . 71Get_Screen_Text . . . . . . . . . . . . . . . . . . . . . . . . . . . . . . . . . . . . . . . . 71Get_Screen_Text_Length . . . . . . . . . . . . . . . . . . . . . . . . . . . . . . . . . 71Get_Screen_Text_Columns . . . . . . . . . . . . . . . . . . . . . . . . . . . . . . . 71Get_Workstation_ID . . . . . . . . . . . . . . . . . . . . . . . . . . . . . . . . . . . . . 71
Scanner Information . . . . . . . . . . . . . . . . . . . . . . . . . . . . . . . . . . . . . . . . . 71Get_Scan_Type_Name . . . . . . . . . . . . . . . . . . . . . . . . . . . . . . . . . . . 71
ESC Sequence Support . . . . . . . . . . . . . . . . . . . . . . . . . . . . . . . . . . . . . . . 72Escape_Sequence . . . . . . . . . . . . . . . . . . . . . . . . . . . . . . . . . . . . . . . . 72
String Variable Assignments . . . . . . . . . . . . . . . . . . . . . . . . . . . . . . . . . . 72String_Set . . . . . . . . . . . . . . . . . . . . . . . . . . . . . . . . . . . . . . . . . . . . . . 72String_Combine . . . . . . . . . . . . . . . . . . . . . . . . . . . . . . . . . . . . . . . . . 72String_Left . . . . . . . . . . . . . . . . . . . . . . . . . . . . . . . . . . . . . . . . . . . . . 72String_Right . . . . . . . . . . . . . . . . . . . . . . . . . . . . . . . . . . . . . . . . . . . . 72String_Middle . . . . . . . . . . . . . . . . . . . . . . . . . . . . . . . . . . . . . . . . . . 72String_Upper . . . . . . . . . . . . . . . . . . . . . . . . . . . . . . . . . . . . . . . . . . . 72String_Lower . . . . . . . . . . . . . . . . . . . . . . . . . . . . . . . . . . . . . . . . . . . 72String_Replace . . . . . . . . . . . . . . . . . . . . . . . . . . . . . . . . . . . . . . . . . . 73String_Only_Characters . . . . . . . . . . . . . . . . . . . . . . . . . . . . . . . . . . 73String_Strip_Characters . . . . . . . . . . . . . . . . . . . . . . . . . . . . . . . . . . 73String_Trim_Spaces_Start . . . . . . . . . . . . . . . . . . . . . . . . . . . . . . . . 73String_Trim_Spaces_End . . . . . . . . . . . . . . . . . . . . . . . . . . . . . . . . . 73Number_To_String_Binary . . . . . . . . . . . . . . . . . . . . . . . . . . . . . . . 73Number_To_String_Octal . . . . . . . . . . . . . . . . . . . . . . . . . . . . . . . . 73Number_To_String_Decimal . . . . . . . . . . . . . . . . . . . . . . . . . . . . . 73Number_To_String_Hexadecimal_Lowercase . . . . . . . . . . . . . . . 73Number_To_String_Hexadecimal_Uppercase . . . . . . . . . . . . . . . 74Ask_String . . . . . . . . . . . . . . . . . . . . . . . . . . . . . . . . . . . . . . . . . . . . . 74Ask_String_Password . . . . . . . . . . . . . . . . . . . . . . . . . . . . . . . . . . . 74Ask_String_Uppercase . . . . . . . . . . . . . . . . . . . . . . . . . . . . . . . . . . . 74Ask_String_Lowercase . . . . . . . . . . . . . . . . . . . . . . . . . . . . . . . . . . . 74
Number to Character Conversion . . . . . . . . . . . . . . . . . . . . . . . . . . . . . 74Number_To_Character . . . . . . . . . . . . . . . . . . . . . . . . . . . . . . . . . . 74
Integer Values . . . . . . . . . . . . . . . . . . . . . . . . . . . . . . . . . . . . . . . . . . . . . . . . . . . 74Get System Information . . . . . . . . . . . . . . . . . . . . . . . . . . . . . . . . . . . . . . 75
Get_Screen_Columns . . . . . . . . . . . . . . . . . . . . . . . . . . . . . . . . . . . . 75Get_Screen_Rows . . . . . . . . . . . . . . . . . . . . . . . . . . . . . . . . . . . . . . . 75Get_Position_Column . . . . . . . . . . . . . . . . . . . . . . . . . . . . . . . . . . . 75

Table of Contents v
Get_Position_Row . . . . . . . . . . . . . . . . . . . . . . . . . . . . . . . . . . . . . . 75Get_Session_Number . . . . . . . . . . . . . . . . . . . . . . . . . . . . . . . . . . . . 75Get_Time . . . . . . . . . . . . . . . . . . . . . . . . . . . . . . . . . . . . . . . . . . . . . . 75Get_Time_Since_Reset . . . . . . . . . . . . . . . . . . . . . . . . . . . . . . . . . . . 75
Scanner Information . . . . . . . . . . . . . . . . . . . . . . . . . . . . . . . . . . . . . . . . . 76Get_Scan_Type_Value . . . . . . . . . . . . . . . . . . . . . . . . . . . . . . . . . . . 76
General Queries . . . . . . . . . . . . . . . . . . . . . . . . . . . . . . . . . . . . . . . . . . . . . 76String Handling . . . . . . . . . . . . . . . . . . . . . . . . . . . . . . . . . . . . . . . . . . . . . 76
String_Length . . . . . . . . . . . . . . . . . . . . . . . . . . . . . . . . . . . . . . . . . . 76String_Find_First . . . . . . . . . . . . . . . . . . . . . . . . . . . . . . . . . . . . . . . . 76String_Find_Last . . . . . . . . . . . . . . . . . . . . . . . . . . . . . . . . . . . . . . . . 76
Integer Assignments . . . . . . . . . . . . . . . . . . . . . . . . . . . . . . . . . . . . . . . . . 76Number_Set . . . . . . . . . . . . . . . . . . . . . . . . . . . . . . . . . . . . . . . . . . . . 76Number_Plus . . . . . . . . . . . . . . . . . . . . . . . . . . . . . . . . . . . . . . . . . . . 77Number_Minus . . . . . . . . . . . . . . . . . . . . . . . . . . . . . . . . . . . . . . . . . 77Number_Multiply . . . . . . . . . . . . . . . . . . . . . . . . . . . . . . . . . . . . . . . 77Number_Divide . . . . . . . . . . . . . . . . . . . . . . . . . . . . . . . . . . . . . . . . 77Number_Divide_Remainder . . . . . . . . . . . . . . . . . . . . . . . . . . . . . . 77
Convert Strings to Integers . . . . . . . . . . . . . . . . . . . . . . . . . . . . . . . . . . . 77String_To_Number_Binary . . . . . . . . . . . . . . . . . . . . . . . . . . . . . . . 77String_To_Number_Octal . . . . . . . . . . . . . . . . . . . . . . . . . . . . . . . . 77String_To_Number_Hexadecimal . . . . . . . . . . . . . . . . . . . . . . . . . 77
Ask User for Integer . . . . . . . . . . . . . . . . . . . . . . . . . . . . . . . . . . . . . . . . . 78Ask_Number . . . . . . . . . . . . . . . . . . . . . . . . . . . . . . . . . . . . . . . . . . . 78
Number/Character Conversion . . . . . . . . . . . . . . . . . . . . . . . . . . . . . . . 78Character_To_Number . . . . . . . . . . . . . . . . . . . . . . . . . . . . . . . . . . 78
Appendix C: Symbologies and Values 79
Appendix D: Wavelink Contact Information 83
Index 85

vi Wavelink TelnetCE Client Scripting Reference Guide
Chapter 1: Introduction 1
Chapter 1: IntroductionThis document provides information about creating and executing scripts using TelnetCE Client.
This section provides the following information:
• Document assumptions
• Document conventions
• An overview of scripting in TelnetCE Client
Document Assumptions
This document assumes that the reader has the following:
• Knowledge of wireless networks and wireless networking protocols.
• Knowledge of TCP/IP, including IP addressing, subnet masks, routing, BootP/DHCP, WINS, and DNS.
• Knowledge of Wavelink TelnetCE Client.
• Knowledge or rudimentary experience with programming/scripting languages.
Document Conventions
The following section contains information about text-formatting conventions in this manual.
2 Wavelink TelnetCE Client Scripting Reference Guide
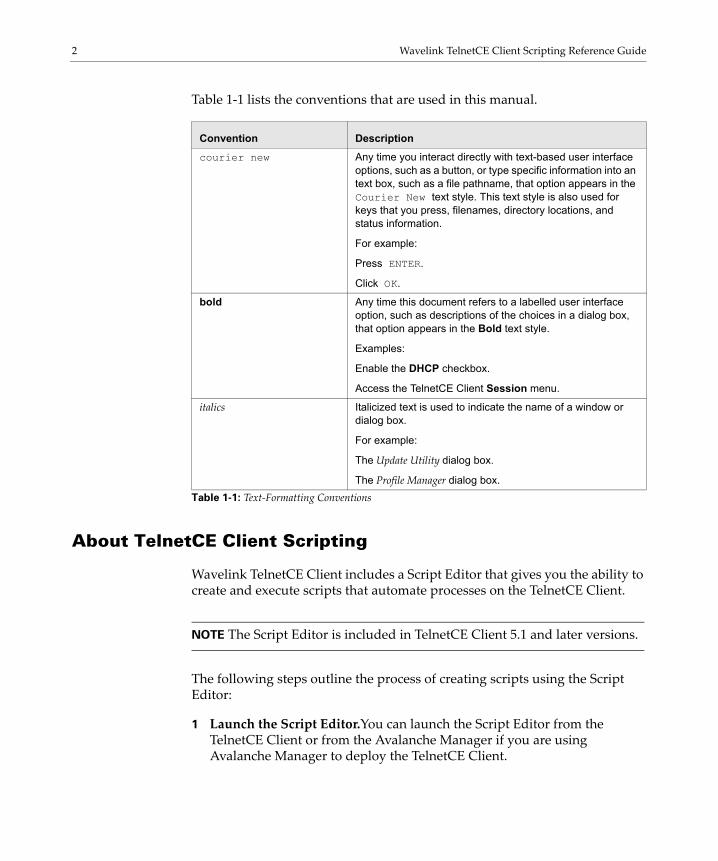
Table 1-1 lists the conventions that are used in this manual.
About TelnetCE Client Scripting
Wavelink TelnetCE Client includes a Script Editor that gives you the ability to create and execute scripts that automate processes on the TelnetCE Client.
NOTE The Script Editor is included in TelnetCE Client 5.1 and later versions.
The following steps outline the process of creating scripts using the Script Editor:
1 Launch the Script Editor.You can launch the Script Editor from the TelnetCE Client or from the Avalanche Manager if you are using Avalanche Manager to deploy the TelnetCE Client.
Convention Description
courier new Any time you interact directly with text-based user interface options, such as a button, or type specific information into an text box, such as a file pathname, that option appears in the Courier New text style. This text style is also used for keys that you press, filenames, directory locations, and status information.
For example:
Press ENTER.
Click OK.
bold Any time this document refers to a labelled user interface option, such as descriptions of the choices in a dialog box, that option appears in the Bold text style.
Examples:
Enable the DHCP checkbox.
Access the TelnetCE Client Session menu.
italics Italicized text is used to indicate the name of a window or dialog box.
For example:
The Update Utility dialog box.
The Profile Manager dialog box.Table 1-1: Text-Formatting Conventions

Chapter 1: Introduction 3
2 Create a script using the Script Editor. You can use the Script Editor to manually create the script code.
-or-
Create a script using the Script Capture option. You can turn on Screen Capture and perform the actions you want included in your script.
3 Configure an execution method for your script. You need to select from the available options the way you want to execute your script.
4 Execute your script from the TelnetCE Client. Using the activation method you selected for the script, you can activate and execute your script.
TelnetCE Client allows one active script per emulation session. While one script is running, other scripts are not allowed to run. Scripts should be designed to do their action and then immediately exit. This allows the next script to run.
Scripts can only be run while a session is connected to a host. When a connection is dropped, the script is terminated. If you switch between sessions, the script running in the first session will be suspended until that session is returned to being active.

4 Wavelink TelnetCE Client Scripting Reference Guide

Chapter 2: Launching the Script Editor 5
Chapter 2: Launching the Script EditorThis section provides information about how you launch the Script Editor.
Launching the Script Editor from Avalanche Manager
If you are using Avalanche Manager to deploy the TelnetCE Client, you can launch the Script Editor from the Avalanche Manager. Then scripts created by or imported into the Avalanche Script Editor will automatically be deployed to the remote devices.
To launch the Script Editor from Avalanche Manager:
1 Ensure the TelnetCE Client package is installed in Avalanche Manager.
2 From the Tree View in the Avalanche console, right-click the Telnet software package.
3 Select Configure Package > Script Editor (Figure 2-1).
Figure 2-1. Launching the Script Editor from Avalanche Manager
The Script Editor opens (Figure 2-2).

6 Wavelink TelnetCE Client Scripting Reference Guide
Figure 2-2. Script Editor
4 Click Add to open the Script Editor configuration dialog box (Figure 2-3).
Figure 2-3. Script Editor Configuration Dialog Box

Chapter 3: Creating Scripts 7
Chapter 3: Creating ScriptsThis section provides information on creating scripts, including:
• Creating Scripts Manually Using the Script Editor
• Performing Script Capturing
• Editing Scripts
• Importing Scripts
• Saving and Exporting Scripts
• Deploying Scripts
• Syncing Scripts
• Creating a Log File
• Script Nesting
NOTE Screen captures may differ according to device type.
Creating Scripts Manually Using the Script Editor
This section provides information on how to create scripts manually using the Script Editor and includes the following information:
• Configuring the script name
• Configuring the activation method
• Creating the script code
• Creating variables
• Selecting host profiles
Use the following steps to create a script manually:
8 Wavelink TelnetCE Client Scripting Reference Guide
1 Enter a script name and select an activation method.
2 Use the Actions tab to select actions and build the script code.
3 Use the Boolean Variables, Number Variables, or String Variables tabs to create variables as needed to complete the script (not required).
4 Use the Host Profiles tab to select host profiles that will be associated with this script.
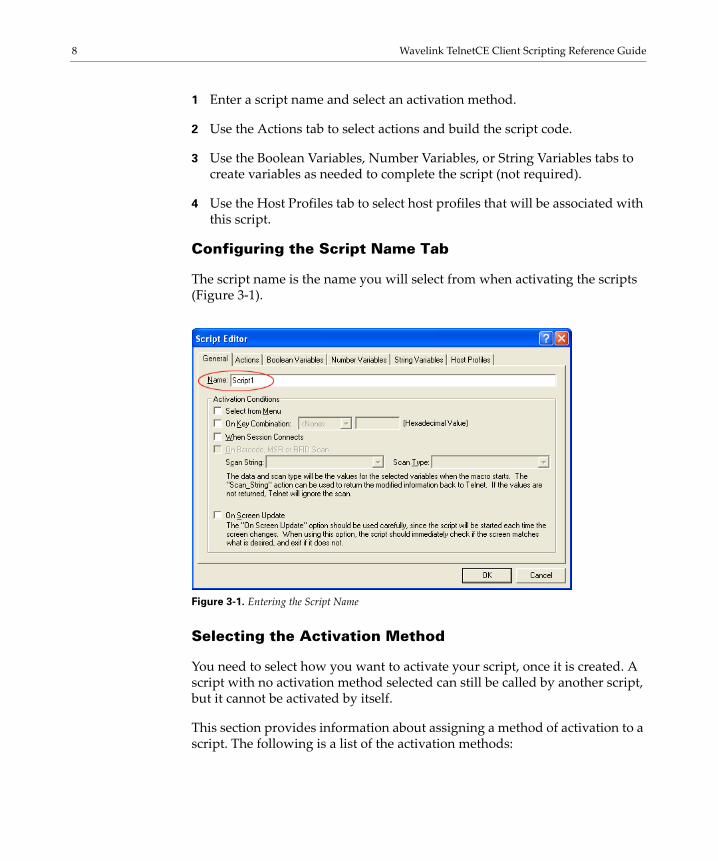
Configuring the Script Name Tab
The script name is the name you will select from when activating the scripts (Figure 3-1).
Figure 3-1. Entering the Script Name
Selecting the Activation Method
You need to select how you want to activate your script, once it is created. A script with no activation method selected can still be called by another script, but it cannot be activated by itself.
This section provides information about assigning a method of activation to a script. The following is a list of the activation methods:

Chapter 3: Creating Scripts 9
• Select from menu
• On key combination
• When session connects
• On barcode, MSR or RFID scan
• On screen update
Select from Menu
Scripts with the Select from Menu option selected can be run using the menu option in the TelnetCE Client.
To configure the Select from Menu method:
1 Select the General tab or the Activate tab in the Script Editor.
2 Enable the Select from Menu option (Figure 3-2).
Figure 3-2. Select from Menu
3 Click OK.
10 Wavelink TelnetCE Client Scripting Reference Guide
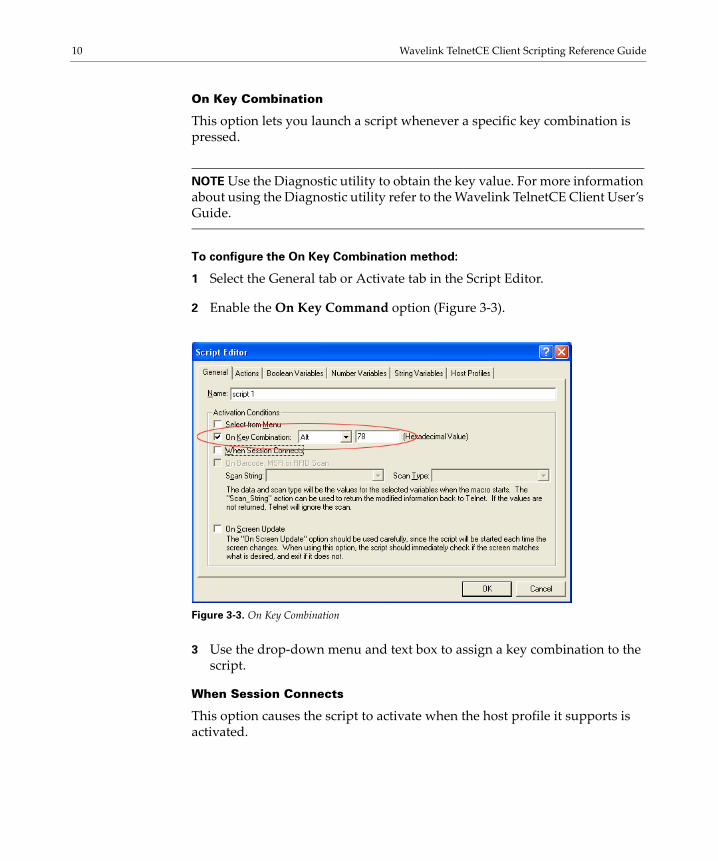
On Key Combination
This option lets you launch a script whenever a specific key combination is pressed.
NOTE Use the Diagnostic utility to obtain the key value. For more information about using the Diagnostic utility refer to the Wavelink TelnetCE Client User’s Guide.
To configure the On Key Combination method:
1 Select the General tab or Activate tab in the Script Editor.
2 Enable the On Key Command option (Figure 3-3).
Figure 3-3. On Key Combination
3 Use the drop-down menu and text box to assign a key combination to the script.
When Session Connects
This option causes the script to activate when the host profile it supports is activated.

Chapter 3: Creating Scripts 11
If you use this option, it is strongly recommended that you limit the script to the appropriate host profiles. Since the script will be activated before any information appears on the emulation screen, you will need to have your script wait for the appropriate screen to appear before it does anything. You should not have more than one script set to start when a session begins because the first script started will prevent any other scripts from running while it waits for the initial screen.
Refer to Selecting Host Profiles on page 17 for more information.
To configure the When Session Connects method:
1 Select the General tab or Activate tab in the Script Editor.
2 Enable the When Session Connects option (Figure 3-4).
Figure 3-4. When Session Connects
3 Click OK.
On Barcode, MSR or RFID Scan
If you want to perform some special processing on items scanned into the computer, the scan handler is often powerful enough to make the changes you need. The Scan Handler settings, found in the Configuration Manager, are located in Emulation Parameters > Scanner > Common > Scan

12 Wavelink TelnetCE Client Scripting Reference Guide
Handler. However if the Scan Handler is insufficient, then a script should be able to do it.
Before you can have the script activated for a scan, you must create a string variable and a number variable. The string variable allows you to get the initial scan data and the number variable allows you to get the type of scan data. Refer to Appendix C: Symbologies and Values on page 79 for the values of different symbologies. You can also use the Get_Scan_Type_Name and Get_Scan_Type_Value commands to display or handle scan types. Using the GetScanType Value means all types are specified in the editor, you can just pick the one you want to use.
Calling the Scan_String command before your script exits allows Telnet to handle the scanning data. Because you are specifying the data and type returned, the script can change either one. If the script exits without calling Scan_String, then the scanned data will disappear.
If you wanted to insert a string (which could be just one character long) after the first six characters of any barcode at least six characters long, here is a sample script you could use. ScanData is a string variable with the original barcode and NewString is a variable where we still store the new barcode. ScanType is the number variable that keeps the type of scan data received. OldLength is an integer variable. The string XXYY is what is inserted.
OldLength = String_Length( ScanData )
If( Number_Greater_Than_Or_Equal( OldLength, 6 ) )
NewString = String_Combine( String_Left( ScanData, 6 ), "XXYY" )
NewString = String_Combine( NewString, String_Right( ScanData, Number_Minus( OldLength, 6 ) ) )
Else
NewString = ScanData
End_If
Scan_String( NewString, ScanType )
Return
This example will convert any DataMatrix scan values to PDF417 scan values. The ScanData and ScanType variables described for the previous example are used again.

Chapter 3: Creating Scripts 13
If( Number_Equal( ScanType, Get_Scan_Type_Value( "DATAMATRIX" ) ) )
Scan_String( ScanData, Get_Scan_Type_Value( "PDF417" ) )
Else
Scan_String( ScanData, ScanType )
End_If
Return
To configure the On Barcode, MSR, or RFID Scan method:
1 Create the Scan_String and Scan_Type variables.
Once you create these variables, the On Barcode, MSR, or RFID Scan options becomes available.
You will need to create these variables in the String Variables and Number Variables tabs. Refer to Creating Variables on page 15 for information on creating variables.
1 Select the General tab or Activate tab in the Script Editor.
2 Enable the On Barcode, MSR, or RFID Scan option.
3 From the drop-down menu, select the Scan_String.
4 From the drop-down menu select the Scan_Type.
5 Click OK.
On Screen Update
This option will cause the script to be activated (if activation is allowed) every time the text on the emulation screen changes. This includes updates from the Telnet host or when the user presses a key and the key value is shown on the screen. It is recommended that you limit the host profiles that the script supports.
The following example generates a script that enters a command each time a particular string appears on the screen:
Label: Start:

14 Wavelink TelnetCE Client Scripting Reference Guide
If ( String_Equal( Get_Screen_Text_Columns( 1, 1, 5 ), “Ready”, 0, FALSE ) )
Keypress_String( “Proceed” )
Keypress_Key( “Enter” )
End_If
Wait_For_Screen_Update
Goto: Start
Return
If this script is set to activate when the session first connects, it will work as desired. There is one limitation. Since it is always activated, no other scripts can be activated during the emulation session. Here is an alternate implementation:
If ( String_Equal( Get_Screen_Text_Columns( 1, 1, 5 ), “Ready”, 0, FALSE ) )
Keypress_String( “Proceed” )
Keypress_Key( “Enter” )
End_If
Return
If this script is set to run each time the screen updates, then you also get the desired behavior; and, since the script is not activated all the time, other scripts can still be activated as well.
NOTE This option should be used carefully, since it can cause a script to be executed very frequently.
To configure the On Screen Update method:
1 Select the General tab or Activate tab in the Script Editor
2 Enable the On Screen Update option (Figure 3-5).

Chapter 3: Creating Scripts 15
Figure 3-5. Selecting the On Screen Update Method
3 Click OK.
Creating the Script Code
Once you have named your script and selected an activation method, you can use the Actions tab in the Script Editor to build the script.
Refer to Chapter 5: Building an Example Script Manually on page 37 for a detailed example of creating script code manually.
Creating Variables
There are three types of values recognized by scripting: booleans (TRUE or FALSE values only), numbers (integers), and strings. Every argument for every action is one of these three value types. Every action that returns a value returns one of these types. Variables provide a way to save the result of an action for use later as an argument for another command.
Variables can be created and edited under the appropriate Variable tab while editing the script. It is also possible to create new variables while editing an action.
When a script first starts, all the variables will have known values: boolean variables will be FALSE, number variables will be 0, and string variables will

16 Wavelink TelnetCE Client Scripting Reference Guide
be empty. One possible exception to this is when a script activates another script. Refer to Script Nesting on page 29 for more information.
To create a variable:
1 Determine which type of variable you want to create: boolean, number, or string.
2 From the Script Editor, select the tab that corresponds with the type of variable you want to create.
3 Click Add.
4 In the Edit Variable dialog box, enter the name of the new variable (Figure 3-6).
Figure 3-6. Adding a New Variable
5 Click OK.
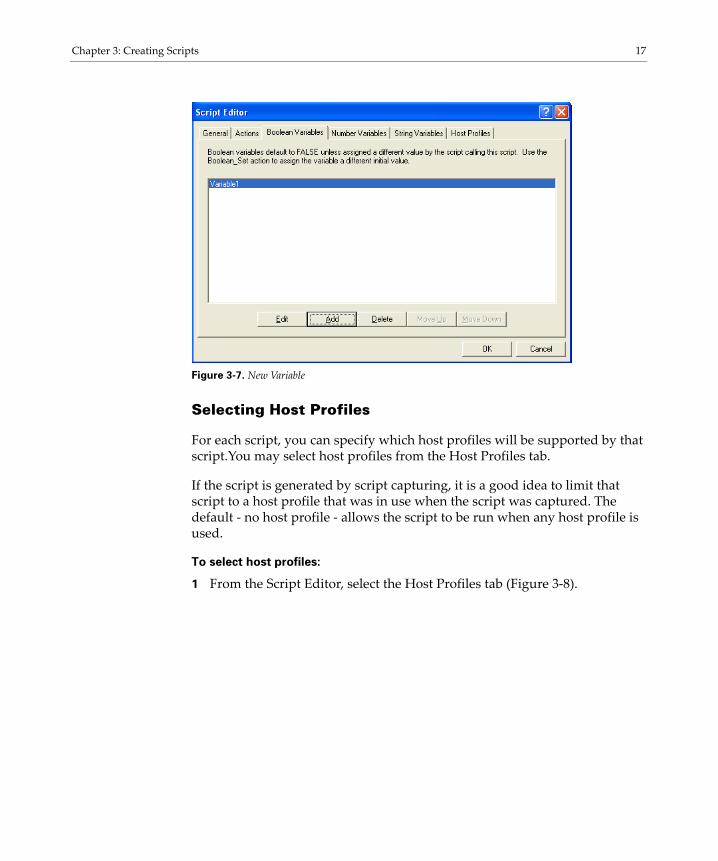
The new variable appears in the corresponding tab (Figure 3-7).
Chapter 3: Creating Scripts 17
Figure 3-7. New Variable
Selecting Host Profiles
For each script, you can specify which host profiles will be supported by that script.You may select host profiles from the Host Profiles tab.
If the script is generated by script capturing, it is a good idea to limit that script to a host profile that was in use when the script was captured. The default - no host profile - allows the script to be run when any host profile is used.
To select host profiles:
1 From the Script Editor, select the Host Profiles tab (Figure 3-8).

18 Wavelink TelnetCE Client Scripting Reference Guide
Figure 3-8. Host Profiles Tab
2 Click Add.
The Select Host dialog box opens (Figure 3-9).
Figure 3-9. Selecting Host Profiles
3 Select which host you want to use from the list of Avalanche hosts.

Chapter 3: Creating Scripts 19
NOTE If you have not created any host profiles, this dialog box will be empty.
4 Click OK.
The host appears in the Host tab (Figure 3-10).
Figure 3-10. Selected Profile in Host Profiles Tab
Performing Script Capturing
Script capturing is an easy way to generate a script that will automate doing something you can do manually. While script capturing is turned on, it will capture the key presses and mouse/pen cursor movements so they can be replayed with the script is activated.
To perform a script capture:
1 Position your mouse or cursor at the emulation screen you want to be at when the automated process starts.
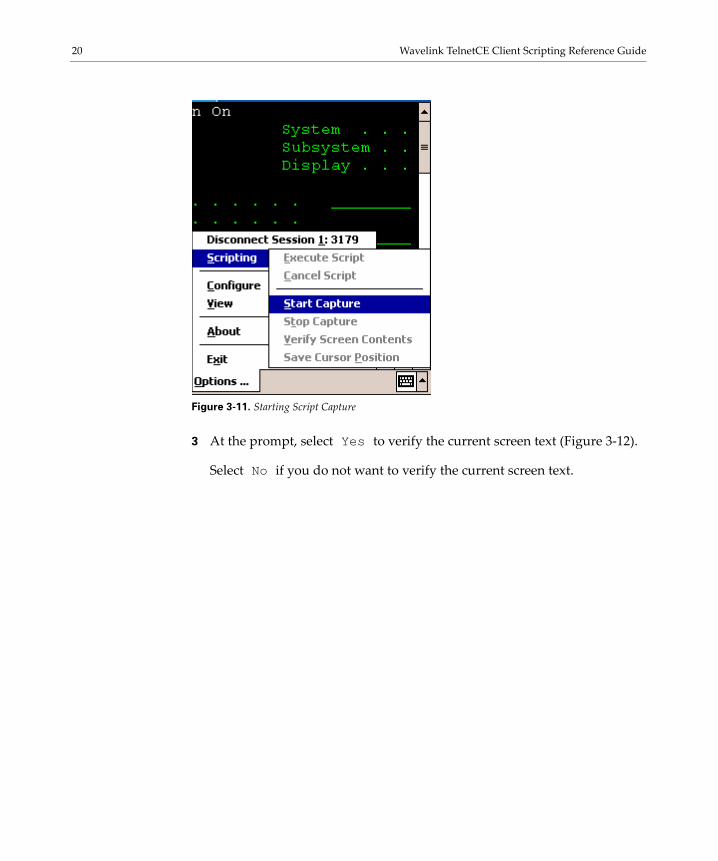
2 From the Term or Options menu, select Scripting > Start Capture (Figure 3-11).
20 Wavelink TelnetCE Client Scripting Reference Guide
Figure 3-11. Starting Script Capture
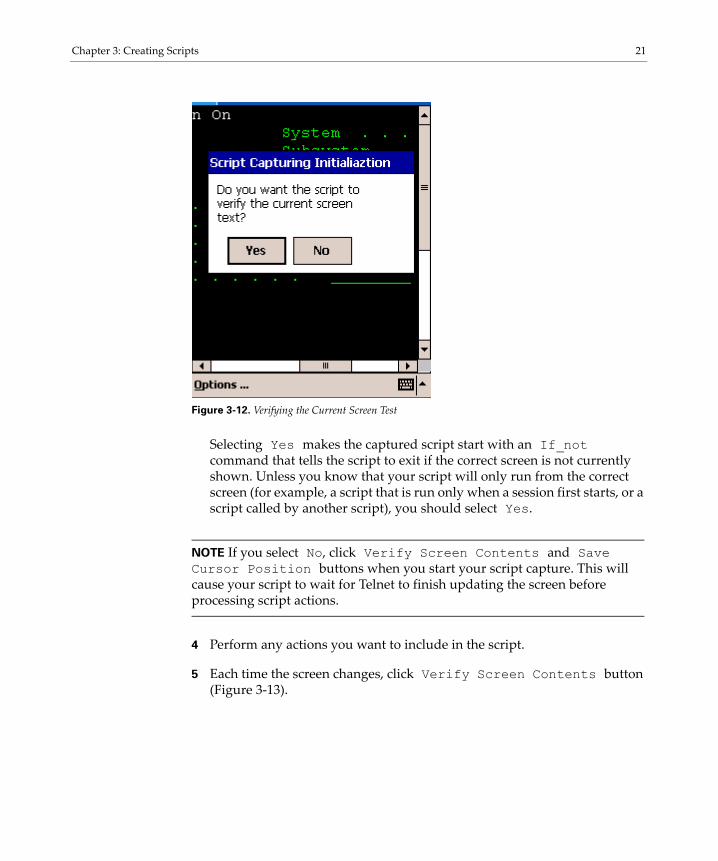
3 At the prompt, select Yes to verify the current screen text (Figure 3-12).
Select No if you do not want to verify the current screen text.
Chapter 3: Creating Scripts 21
Figure 3-12. Verifying the Current Screen Test
Selecting Yes makes the captured script start with an If_not command that tells the script to exit if the correct screen is not currently shown. Unless you know that your script will only run from the correct screen (for example, a script that is run only when a session first starts, or a script called by another script), you should select Yes.
NOTE If you select No, click Verify Screen Contents and Save Cursor Position buttons when you start your script capture. This will cause your script to wait for Telnet to finish updating the screen before processing script actions.
4 Perform any actions you want to include in the script.
5 Each time the screen changes, click Verify Screen Contents button (Figure 3-13).

22 Wavelink TelnetCE Client Scripting Reference Guide
NOTE Some devices may only display buttons labeled Screen, Cursor and Stop. The Screen button refers to the Verify Screen Contents button. The Cursor button refers to the Save Cursor Position button. The Stop button refers to the Stop Capturing button.
Figure 3-13. Verify Screen Contents and Save Cursor Position Buttons
NOTE Clicking the Verify Screen Contents button will cause the generated script to pause and wait for the screen to be updated. The pauses are necessary because the scripts can run much faster than the interaction with the Telnet host.
6 When you are finished capturing the behaviors you want in the script, click Stop Capture.
Once you have captured a script, Script Editor opens. This allows you to name the script and select an activation method. You would also use the Actions tab to add actions for any error condition that the user may encounter.

Chapter 3: Creating Scripts 23
Editing Scripts
You can edit scripts that are created manually and scripts that are generated from the script capture option.
To edit scripts:
1 Launch the Script Editor.
2 Select the script you want to edit from the Script Editor script list.
3 Click Edit.
4 Make the desired changes in the Script Editor configuration dialog box.
5 Click OK to save your changes.
Once you have completed editing the script you have two options:
• Export the script to a specified location using the Export button in the Script Editor. Refer to Saving and Exporting Scripts on page 25 for more information.
• Execute the script by launching the TelnetCE Client and performing the activation method you assigned to this script. Refer to Chapter 4: Executing Scripts on page 33 for more information.
Importing Scripts
You can use the import button in the Script Editor to import previously created scripts.
NOTE You can only import scripts that have been created using the Script Editor.
To import a script:
1 From the Script Editor, click the Import button.
The Select the Script File dialog box opens (Figure 3-14).

24 Wavelink TelnetCE Client Scripting Reference Guide
Figure 3-14. Importing a Script File
2 Navigate to and select the script file.
3 Click Open.
The name of the file is imported into the Script Editor (Figure 3-15).

Chapter 3: Creating Scripts 25
Figure 3-15. Imported Script File
Once you have imported the file, you can edit the script. Refer to Editing Scripts on page 23 for more information.
Saving and Exporting Scripts
After you finish building a script, your script is automatically saved in the Script Editor. You can also export a script and save it in a specific location on the network.
NOTE Scripts are saved as .wls files. Scripts can not be viewed outside the Script Editor and must be imported back in to the Script Editor to view or edit.
To export a script:
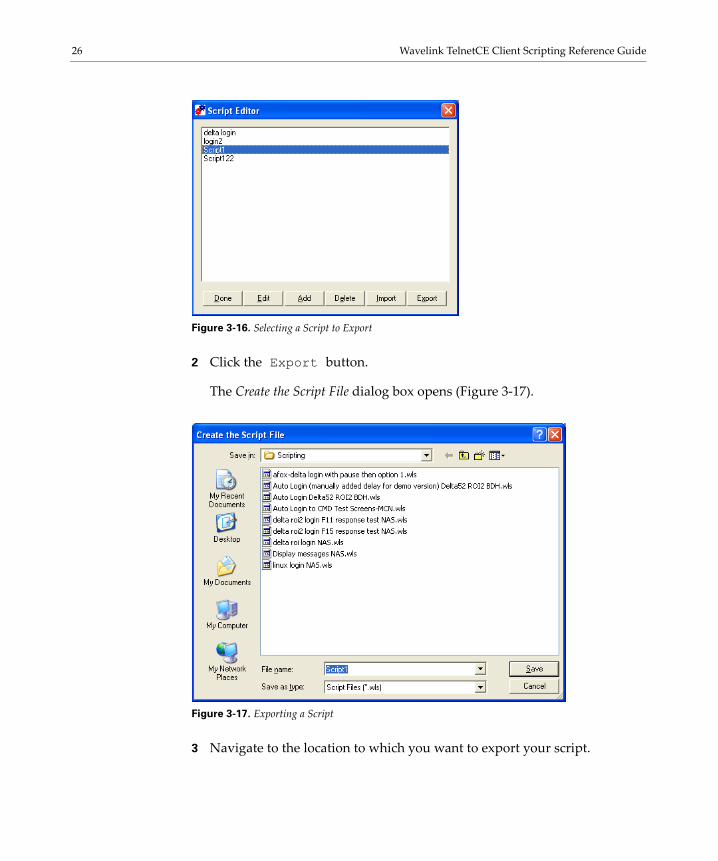
1 From the Script Editor script list, select which script you want to export (Figure 3-16).
26 Wavelink TelnetCE Client Scripting Reference Guide
Figure 3-16. Selecting a Script to Export
2 Click the Export button.
The Create the Script File dialog box opens (Figure 3-17).
Figure 3-17. Exporting a Script
3 Navigate to the location to which you want to export your script.

Chapter 3: Creating Scripts 27
4 Click Save.
To view an exported script you will need to import that script into the Script Editor. Refer to Importing Scripts on page 23 for more information.
Deploying Scripts
Scripts are deployed to the TelnetCE Client the next time the client syncs with the Avalanche Manager.
Syncing Scripts
The section provides information about syncing scripts that are edited or created on the mobile device to the Avalanche Manager.
When you create or edit a script on the mobile device, you will need to sync the script to Avalanche Manager. This imports the script into the Script Editor on Avalanche Manager and allows you to edit and modify the scripts from the Avalanche Manager.
To sync a script:
1 From the device list in Avalanche Manager, right-click on the device to which you want to sync.
2 Select Launch Session Monitor.
As you connect to session monitor, an Authorizing dialog box will open and then the Sync Script dialog box will open.
3 Click Yes to sync your scripts from the mobile device to Avalanche Manager.
The Script Editor will open and display all scripts.
If you have edited a script on the mobile device that is also saved in the Script Editor in Avalanche Manager both scripts will display in the Script Editor after syncing. The original script will retain named the original name. The script that was edited on the mobile device will have Telnet next to the original name.
28 Wavelink TelnetCE Client Scripting Reference Guide
Creating a Log File
You can create a code that generates a log file using the Logging_On and Logging_Off commands. Each action executed, with the values of its arguments, and the results of the action is written to the log file. When you configure the Logging_On action, you can set the File Path name to where the log file will be stored.
When a script is calling another script, the logging for the script calling is suspended. Logging is resumed when the called script exits and the suspended script resumes. It is possible to have a script called by another script (or a script calling itself recursively) use the same logging file.
Entering the Logging_On Action
You need to include a Logging_On action in your script code to generate a log file. Place the Logging_On action at the point you want to begin
To enter the Logging_On action:
1 From the Actions tab, click the Insert button.
2 From the Actions drop-down menu, select Logging_On.
3 Click the File Path tab.
4 In the Constant String text box, enter the file location where you want the log file stored.
5 Click the Overwrite tab.
6 Set the Override Previous option to TRUE or FALSE according to preference.
When you set the Override Previous option to FALSE, the latest log file will not replace the existing file. Instead, a separate log file will be created for each log.
When you set the Override Previous option to TRUE, the most recent log file will replace the existing log file.
Chapter 3: Creating Scripts 29
NOTE Because logging will slow the performance of Telnet, and will take up space on your devices, it is usually a bad idea to include it in end-user scripts. Set the Override Previous value be TRUE to keep the log files from getting too large.
7 Click OK.
The code is added to the Actions tab.
Entering the Logging_Off Action
If the script exits, logging will automatically be terminated, so you usually will not need the Logging_Off action. However, if you only want to log a portion of the script, you can enter a Logging_Off action to stop the logging.
To enter a Logging_Off action:
1 From the Actions tab, click the Insert button.
2 From the Actions drop-down menu, select Logging_Off.
3 Click OK.
The code will be added to the Actions tab.
Script Nesting
It is possible to have a script call another script or itself. This makes it easier to take a block of functionality and use it multiple times or to solve problems that can be described recursively.
A factorial is the product of all positive integers from 1 to the given number. For example, the factorial of 5 (usually written as 5!) = 1 x 2 x 3 x 4 x 5 = 120. Here is an example of a script that uses recursion (a script calling itself) to calculate factorials:
If( Number_Equal( ArgumentValue, 1 ) )
Comment: The factorial of 1 is 1
Return
30 Wavelink TelnetCE Client Scripting Reference Guide
End_If
If( Number_Not_Equal( ArgumentValue, 0 ) )
Comment: The factorial of X is X multiplied by the factorial of X – 1
Temp = ArgumentValue
ArgumentValue = Number_Minus( Temp, 1 )
Call: Factorial
ArgumentValue <-> ArgumentValue
ArgumentValue = Number_Multiply( Temp, ArgumentValue )
Return
End_If
ArgumentValue = Ask_Number( "Enter a number:", "Factorial Calculator", 1, 12, 0 )
Call: Factorial
ArgumentValue <-> ArgumentValue
Ask_OK( String_Combine( "The factorial is ", Number_To_String_Decimal( ArgumentValue ) ), "Result" )
Return
This script uses two integer variables, ArgumentValue and Temp.
When a script calls another script, the calling script can assign values to the called script’s variables. The factorial example script knows it is being called recursively because the ArgumentValue variable is not 0. If ArgumentValue is 0, then the script will ask for the number to calculate the factorial with. Each time the script is called, the ArgumentValue variable of the calling script is assigned the final value in the called script’s ArgumentValue variable. This keeps the results of the called script’s actions from being lost. (If the value were not returned, then there would be a “<--” instead of a “<->” in the Call action’s argument list.) When you add the action for calling a script, you need to specify which variables in the called script will be assigned a value, and what that initial value will be.

Chapter 3: Creating Scripts 31
NOTE If you wanted to be more efficient, you could create a While loop that performs the multiplications to calculate the factorial. You could also return the proper response for each factorial, since numbers higher than 12 exceed the maximum number value. However, there are some problems that are easiest to solve using recursion. The example above should give you an idea how you could go about using it.

32 Wavelink TelnetCE Client Scripting Reference Guide

Chapter 4: Executing Scripts 33
Chapter 4: Executing ScriptsWhen you create a script, you configure an activation method for that script. This section provides information about activating scripts using each of the following activation methods:
• Select from Menu
• On Key Combination
• When Session Connects
• On Barcode, MSR, or RFID Scan
• On Screen Update
For information on assigning an activation method to a script, refer to Selecting the Activation Method on page 8.
NOTE Screen captures may differ according to device type.
Select from Menu
This option allows you to activate a script from the menu.
To activate a script using the Select from Menu option:
1 Launch the TelnetCE Client.
2 From the Term menu, select Scripting > Execute Script (Figure 4-1).

34 Wavelink TelnetCE Client Scripting Reference Guide
Figure 4-1. Executing a Script from the Menu
3 If more than one script is available for the current host profile, select which script you want to use from the list.
NOTE This option will not be available while a script is running for the current session or if the session is not connected.
On Key Combination
This option lets you launch a script whenever a specified key combination is pressed (as long as it is currently possible for script to run).
To execute a script on key combination:
1 Launch the TelnetCE Client.
2 Enter the key combination you assigned to execute the script.

Chapter 4: Executing Scripts 35
When Session Connects
This option causes the script to activate when the host profile it supports is activated.
To execute when the session connects:
1 Launch the TelnetCE Client.
2 From the Term or Options menu, select Connect.
3 Select to which host you want to connect.
4 Click OK.
The script will run upon connection.
On Barcode, MSR, or RFID Scan
When this option is assigned to a script, the script will activate with each barcode, MSR, or RFID scan.
On Screen Update
This option causes the script to be activated (if activation is allowed) every time the text on the emulation screen changes. This includes updates from the Telnet host or when the user presses a key and the key value is shown on the screen.

36 Wavelink TelnetCE Client Scripting Reference Guide

Chapter 5: Building an Example Script Manually 37
Chapter 5: Building an Example Script Manually
This section provides information about creating the following example script:
Comment:Verify that this is the desired screenIf_Not(String_Equal(Get_Screen_Text_Length(1, 36, 7), “Sign On”, 0, FALSE))ReturnEnd IfSet_Cursor_Positiong(6, 53)
Message(“Starting Script” 3)
Keypress_String(“User Name”)Keypress_Key(“Down Arrow”)Keypress_String(“Password”)Keypress_Key(“Enter”)
Comment:Wait for the desired screen.
While_Not(String_Equal(Get_Screen_Text_Length(11, 1, 16), “9. FUNCTION KEYS”, 0, FALSE))Wait_For_Screen_UpdateEnd_While
Keypress_String( “9” )
Message( “String Done”, 3)Return
NOTE Screen captures may differ according to device type.
NOTE The purpose of this example is to demonstrate (step-by-step) how to create a script. Values, names and variables are used for example purposes only. These values may differ according to each device type and operating system.
Creating the Example Script
The following are the steps to create this example script:

38 Wavelink TelnetCE Client Scripting Reference Guide
1 Launch the Script Editor.
2 Name the script and select an activation method.
3 Build the script code.
Launching the Script Editor
Launch the Script Editor from the Avalanche Manager or from the TelnetCE Client.
For detailed instructions about launching the Script Editor, refer to Chapter 2: Launching the Script Editor on page 5.
Naming the Script and Selecting the Activation Method
In the General tab, name the script and select which method you want to use to activate the script once it is complete.
For detailed instructions, refer to Configuring the Script Name Tab on page 8 and Selecting the Activation Method on page 8.
Building the Script Code
Once you name your script and select an activation method, you can begin entering the code. You build the code in the Actions tab.
The steps to enter the sample code are divided into the three main sections of the sample code:
1 Verifying the script starts on the right screen.
2 Entering the user name and password.
3 Verifying the script is on a specific screen and then selecting a menu from that screen.
Verifying the Script Starts on the Correct Screen
This portion of script verifies that the script is starting on the right screen and sets the correct cursor position. If the script is not on the right screen, the script will end. Once the script verifies that it is starting on the right screen, a message displays “Starting Script.”

Chapter 5: Building an Example Script Manually 39
To build the script code:
1 From the Actions tab, click the Insert button.
The Action Editor dialog box opens.
2 From the Actions drop-down menu, select Comment.
3 Click the Comment tab and enter Verify that this is the desired screen in the Constant String text box.
NOTE The comment could be any string you want. This is just an example of what you could enter.
4 Click OK.
The code is added to the Actions tab (Figure 5-1).
Figure 5-1. Entering a Comment
5 Click the Insert button.
6 From the Actions drop-down menu, select If_Not.
7 Click the Test tab.

40 Wavelink TelnetCE Client Scripting Reference Guide
8 Enable the Action drop-down option and select String_Equal from the drop down menu.
9 Click the Edit Action Value button.
10 Click the Test 1 tab.
11 Enable the Action drop-down option and select Get_Screen_Test_Length from the drop down menu.
12 Click the Edit Action Value button.
13 Click the Row tab and enter the number 1.
14 Click the Column tab and enter the number 38.
15 Click the Maximum Length tab and enter the number 7.
16 Click OK.
17 Click the Test 2 tab and enter Sign On in the Constant String text box.
18 Click the Maximum Length tab and enter the number 0 in the Constant Number text box.
19 Click the Ignore Case tab and enable the False option.
20 Click OK until you return to the Actions tab in the Script Editor.
The code is added to the Actions tab (Figure 5-2).

Chapter 5: Building an Example Script Manually 41
Figure 5-2. Entering an IF_Not Action
21 Click the Insert button
22 From the Actions drop-down menu, select Return.
23 Click OK.
The code is added to the Actions tab (Figure 5-3).

42 Wavelink TelnetCE Client Scripting Reference Guide
Figure 5-3. Entering a Return
24 Click the Insert button.
25 From the Actions drop-down menu, select End_If.
26 Click OK.
The code is added to the Actions tab (Figure 5-4).

Chapter 5: Building an Example Script Manually 43
Figure 5-4. Entering the End_If Action
27 Click the Insert button.
28 From the Actions drop-down menu, select Set_Cursor_Position.
29 Click the Row tab and enter 6 in the Constant Number text box.
30 Click the Column tab and enter 53 in the Constant Number text box.
31 Click OK.
The code is added to the Actions tab (Figure 5-5).

44 Wavelink TelnetCE Client Scripting Reference Guide
Figure 5-5. Entering the Set_Cursor_Position Action
32 From the Action tab, click the Insert Blank button to insert a blank line in the code.
33 Click the Insert button.
34 From the Actions drop-down menu, select Message.
35 Click the Message tab and enter Starting Script in the Constant Number text box.
This code enables a message that displays “Starting Script” to appear on the screen.
36 Click the Timeout (Seconds) tab and enter the number 3 in the Constant Number text box.
37 Click OK.
The code is added to the Actions tab (Figure 5-6).

Chapter 5: Building an Example Script Manually 45
Figure 5-6. Entering the Message Code
Entering the User Name and Password
This portion of the script enters the login information.
To build the script code:
1 Click the Insert Blank button to insert a blank line in the code.
2 Click the Insert button.
3 From the Actions drop-down menu, select Keypress_String.
4 Click the Characters tab and enter User Name.
5 Click OK.
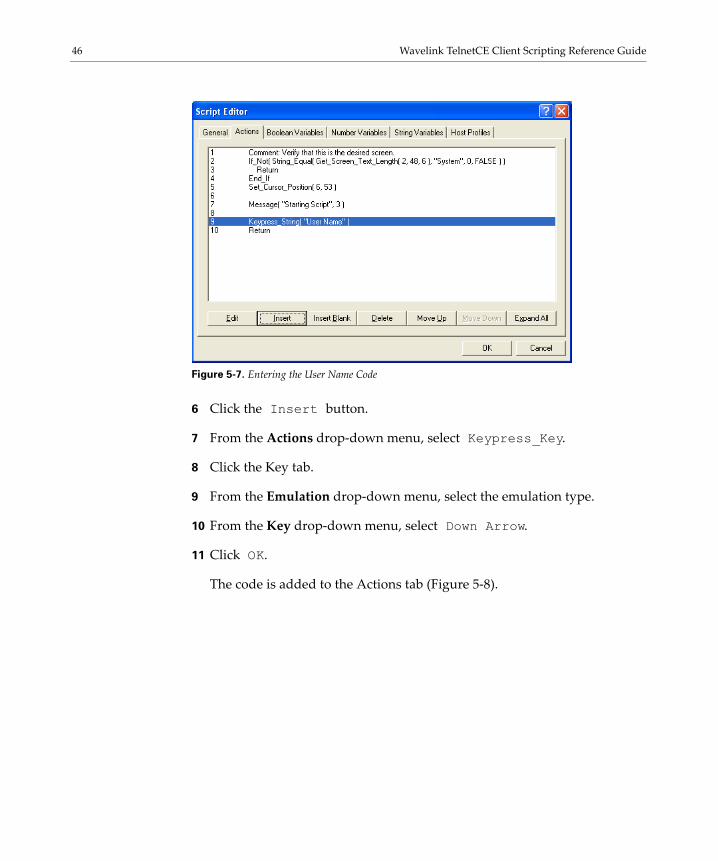
The code is added to the Actions tab (Figure 5-7).
46 Wavelink TelnetCE Client Scripting Reference Guide
Figure 5-7. Entering the User Name Code
6 Click the Insert button.
7 From the Actions drop-down menu, select Keypress_Key.
8 Click the Key tab.
9 From the Emulation drop-down menu, select the emulation type.
10 From the Key drop-down menu, select Down Arrow.
11 Click OK.
The code is added to the Actions tab (Figure 5-8).
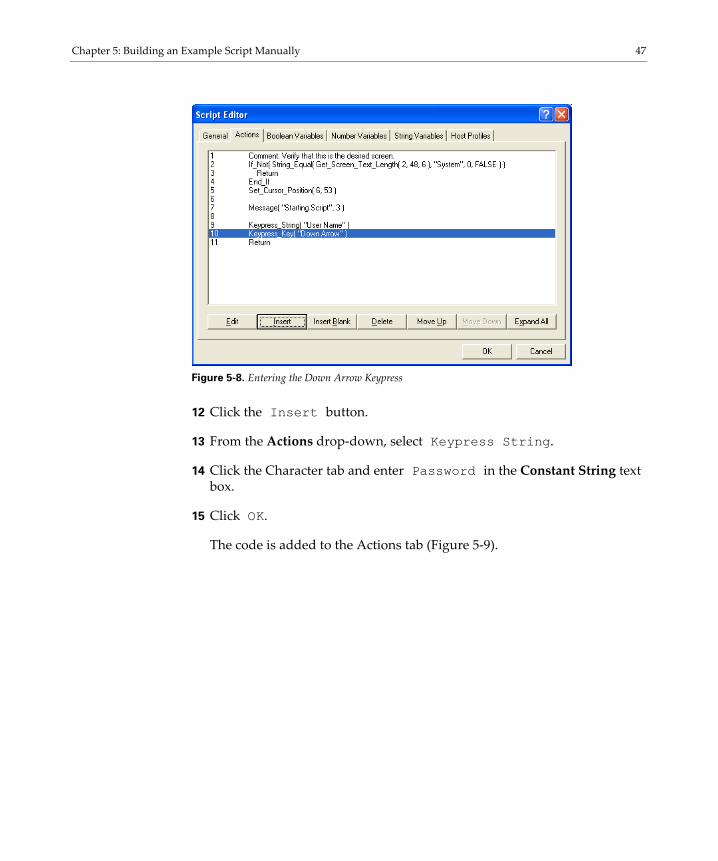
Chapter 5: Building an Example Script Manually 47
Figure 5-8. Entering the Down Arrow Keypress
12 Click the Insert button.
13 From the Actions drop-down, select Keypress String.
14 Click the Character tab and enter Password in the Constant String text box.
15 Click OK.
The code is added to the Actions tab (Figure 5-9).

48 Wavelink TelnetCE Client Scripting Reference Guide
Figure 5-9. Entering the Password Action
16 Click the Insert button.
17 From the Actions drop-down menu, select Keypress_Key.
18 Click the Key tab.
19 From the Emulation drop-down menu, select your emulation type.
20 From the Key drop-down menu, select Enter.
21 Click OK.
The code appears in the Actions tab (Figure 5-10).
Chapter 5: Building an Example Script Manually 49
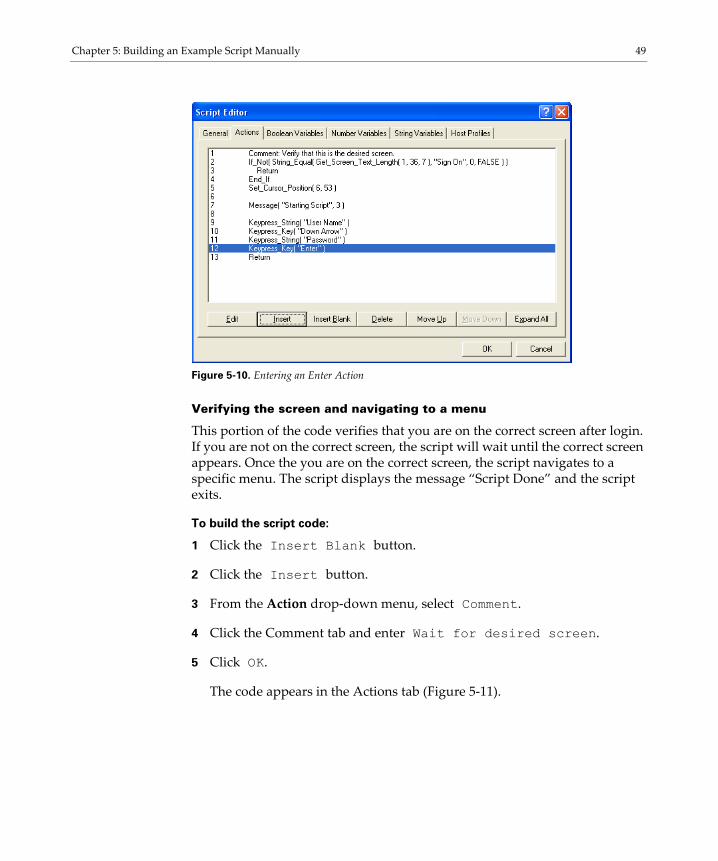
Figure 5-10. Entering an Enter Action
Verifying the screen and navigating to a menu
This portion of the code verifies that you are on the correct screen after login. If you are not on the correct screen, the script will wait until the correct screen appears. Once the you are on the correct screen, the script navigates to a specific menu. The script displays the message “Script Done” and the script exits.
To build the script code:
1 Click the Insert Blank button.
2 Click the Insert button.
3 From the Action drop-down menu, select Comment.
4 Click the Comment tab and enter Wait for desired screen.
5 Click OK.
The code appears in the Actions tab (Figure 5-11).

50 Wavelink TelnetCE Client Scripting Reference Guide
Figure 5-11. Entering the Delay Action
6 Click Insert.
7 From the Actions drop-down menu, select While_Not.
8 Click the Test tab.
9 From the Actions drop-down menu, select String_Equal.
10 Click the Edit Action Value button.
11 Click the Test 1 tab.
12 From the Action drop-down menu, select Get_String _Text_Length.
13 Click the Test 2 tab and enter 9. FUNCTION KEYS in the Constant String text box.
14 Click the Maximum Length tab and enter the number 0 in the Constant Number text box.
15 Click the Ignore Case tab and enable the FALSE option.
16 Click the Test 1 tab.
17 Click the Edit Action Value button.

Chapter 5: Building an Example Script Manually 51
18 Click the Row tab and enter the number 11 in the Constant Number text box.
19 Click the Column tab and enter the number 1 in the Constant Number text box.
20 Click the Maximum Length tab and enter the number 16 in the Constant Number text box.
21 Click OK until you return to the Action tab.
The code is added to the Action tab (Figure 5-12).
Figure 5-12. Entering a While_Not Statement
22 Click the Insert button.
23 From the Actions drop-down menu, select Wait_For_Screen_Update.
24 Click OK.
The code appears in the Actions tab (Figure 5-13).

52 Wavelink TelnetCE Client Scripting Reference Guide
Figure 5-13. Entering a Wait_For_Screen_Update Action
25 Click the Insert button.
26 From the Actions drop-down menu, select End_While.
27 Click OK.
The code appears in the Actions tab (Figure 5-14).
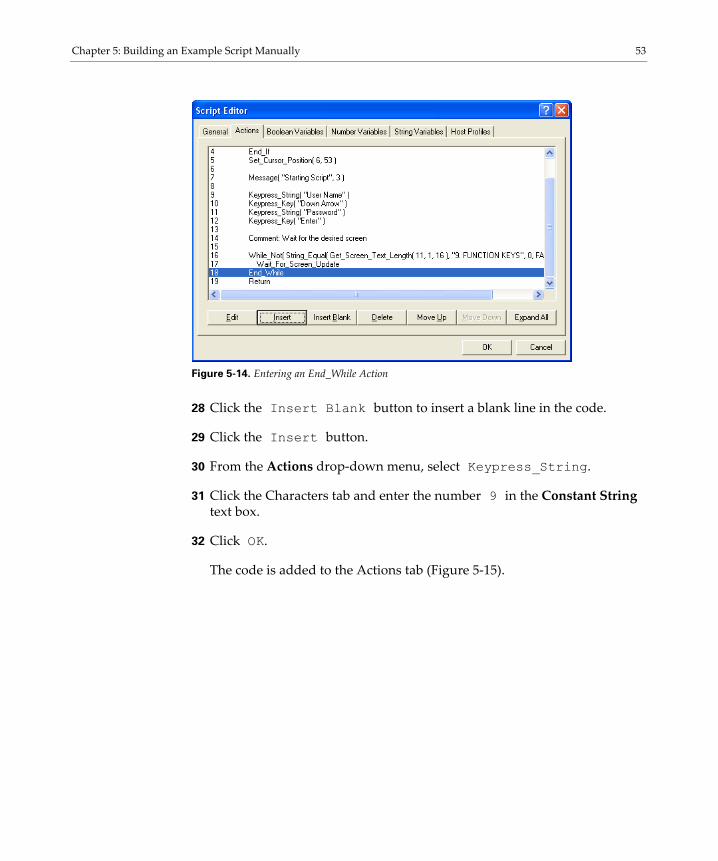
Chapter 5: Building an Example Script Manually 53
Figure 5-14. Entering an End_While Action
28 Click the Insert Blank button to insert a blank line in the code.
29 Click the Insert button.
30 From the Actions drop-down menu, select Keypress_String.
31 Click the Characters tab and enter the number 9 in the Constant String text box.
32 Click OK.
The code is added to the Actions tab (Figure 5-15).

54 Wavelink TelnetCE Client Scripting Reference Guide
Figure 5-15. Entering a Keypress Action
33 Click the Insert Blank to insert a blank line in the code.
34 Click the Insert button.
35 From the Actions drop-down menu, select Message.
36 Click the Message tab and enter Script Done in the Constant String text box.
37 Click the Time(Milliseconds) tab and enter the number 3 in the Constant Number text box.
38 Click OK.
The code is added to the Actions tab (Figure 5-16).

Chapter 5: Building an Example Script Manually 55
Figure 5-16. Entering a Message Action
The code is now complete.
39 Click OK to save the code in the Script Editor script list.
Once you have completed building the script you have two options:
• Export the script to a specified location using the Export button in the Script Editor. Refer to Saving and Exporting Scripts on page 25 for more information.
• Execute the script by launching the TelnetCE Client and performing the activation method you assigned to this script. Refer to Chapter 4: Executing Scripts on page 33 for more information.

56 Wavelink TelnetCE Client Scripting Reference Guide

Appendix A: Examples 57
Appendix A: ExamplesThis appendix provides example scripts.
Example 1: Beep
This is an example of a script that tells the device to beep is the word ALARM appears on the top five rows of the screen.
Example Code
If_Not( Search_Screen( "ALARM", 1, 5, FALSE ) )
Return
End_If
Beep( 1000, 200, 5 )
Delay( 200 )
Beep( 1500, 500, 9 )
Return
Notes
This example should be set to activate each time the screen changes. In the real world, you would want to make sure that the “ALARM” text disappears quickly after being shown. Otherwise, the alarm will go off each time the screen updates (because the user pressed a key, each character from a bar code scanned was shown on the screen, etc.).
Here is an alternate implementation that will wait for the “ALARM” text to disappear. The limitation with this version, of course, is that no other scripts will be able to run until the “ALARM” text is removed from the screen.
If_Not( Search_Screen( "ALARM", 1, 5, FALSE ) )
Return
End_If
Beep( 1000, 200, 5 )
Delay( 200 )
Beep( 1500, 500, 9 )

58 Wavelink TelnetCE Client Scripting Reference Guide
While( Search_Screen( "ALARM", 1, 5, FALSE ) )
Wait_For_Screen_Update
End_While
Return
Example 2: Escape Sequence
This is an example of using an escape sequence to turn off the Codabar symbology.
Example Code
Result = Escape_Sequence( “%8D” )
Return
Creating an Escape Sequence Script
Notes
You will need to create a string variable named “Result” for this example, since the Escape_Sequence command returns a string value.

Appendix A: Examples 59
Refer to Creating Variables on page 14 for more information on creating variables.
Example 3: Request Information
This example asks the user for some information and displays the result.
Example Code
Result = Ask_String( "Enter a string:", "Length Calculator", 0, 200, "" )
Ask_OK( String_Combine( "The string "", String_Combine( Result, String_Combine( "" is ", String_Combine( Number_To_String_Decimal( String_Length( Result ) ), " characters long." ) ) ) ), "String Length” )
Return
Notes
This example also requires a string variable named “Result”. The ASK_OK instruction uses actions inside of actions to get several layers deep. You could also use variables to break that instruction into several short instructions.
Example 4: Display Screen Button
This example displays a screen button in at the bottom-left corner of the screen offering to exit Telnet when the text “logged out” shown on screen at row 2, column 5.
Example Code
If_Not( String_Equal( Get_Screen_Text_Columns( 2, 5, 10 ), "logged out", 0, FALSE ) )
Return
End_If
Button_Create_View( "Exit", 1000, 1, 0, ButtonPressed )
While_Not( ButtonPressed )

60 Wavelink TelnetCE Client Scripting Reference Guide
If_Not(String_Equal( Get_Screen_Text_Columns( 2, 5, 10 ), "logged out", 0, FALSE ) )
Return
End_If
Wait_For_Screen_Update
End_While
Exit_Application( 0 )
Notes
This example uses a boolean variable “ButtonPressed” to know if the Screen Button was pressed. The button will be destroyed when the script exits, so we don’t need to delete it.
That the While_Not loop uses the Wait_For_Screen_Update action to detect if the “logged out” text is no longer there so that Telnet will not spend all of its time in the loop.

Appendix B: Actions 61
Appendix B: ActionsThis appendix describes each scripting action and provides information about each.
The appendix is divided into four sections according to the type of value that is returned after each action. The following is a list of the values:
• No Return Values
• Boolean Values
• String Values
• Integer Values
No Return Values
This section contains a list of actions that return no value. The following action categories are described in this section:
• Blank Line and Comment Actions
• Goto Support Actions
• Macro Exiting
• Conditionals
• General Queries
• Send Characters
• Message
• Beep
• Waiting
• Logging
• Call Other Macros

62 Wavelink TelnetCE Client Scripting Reference Guide
• Screen Buttons
Blank Line and Comment Actions
Blank_Line
Proceeds to the next instruction without taking any action.
Comment
Proceeds to the next instruction without taking any action.
Goto Support Actions
Goto
Jumps to the supplied label.
Label
Label to which a Goto can jump.
Macro Exiting
Return
Exits the script normally.
If this script was started by another script, the calling scriptʹs variables are updated and the calling script resumes.
Abort
Exits the script immediately.
If this script was started by another script, the calling scriptʹs variables are not updated and the calling script resumes.
Abort_All
Exits all scripts for the session
Disconnect
Exits all scripts for the session and disconnects the session.
Exit_Application
Shuts down the Telnet application
The Return Value is the application exit value Telnet will use when it exits.

Appendix B: Actions 63
Conditionals
If
If the Test is TRUE, continues executing until the next ʺElseʺ or ʺEndIfʺ statement. Otherwise, only executes actions (if any) between the next ʺElseʺ and ʺEndIfʺ statements.
If_Not
If the Test is FALSE, continues executing until the next ʺElseʺ or ʺEndIfʺ statement.
Otherwise, only executes actions (if any) between the next ʺElseʺ and ʺEndIfʺ statements.
Else
Start of statements to be executed if an ʺIfʺ test fails.
This command is only valid inside of an ʺIfʺ block.
End_If
End of statements to be executed for an ʺIfʺ test.
While
If the Test is TRUE, the statements after ʺWhileʺ and before the next ʺEndWhileʺ statement will be executed and the ʺWhileʺ statement will be executed again.
Otherwise, execution will proceed to the next ʺEndWhileʺ statement.
The ʺWhileʺ loop will continue to be executed until the test fails, a ʺBreakʺ command is executed, or the script exits.
While_Not
If the Test is FALSE, the statements after ʺWhileʺ and before the next ʺEndWhileʺ statement will be executed and the ʺWhileʺ statement will be executated again.
Otherwise, execution will proceed to the next ʺEndWhileʺ statement.
The ʺWhileʺ loop will continue to be executed until the test succeeds, a ʺBreakʺ command is executed, or the script exits.

64 Wavelink TelnetCE Client Scripting Reference Guide
End_While
End of statements to be executed for a ʺWhileʺ test.
Continue
Jumps back to the last ʺWhileʺ statement and re-test the test value.
This command is only valid inside of a ʺWhileʺ loop.
Break
Jumps to the first statement following the next ʺEndWhileʺ statement (exiting the loop).
This command is only valid inside of a ʺWhileʺ loop.
General Queries
Ask_OK
Displays the message in a box with an ʺOKʺ button, and waits until the user presses the button.
Send Characters
Keypress_String
Creates one or more keypresses to send the supplied string to the telnet session.
Keypress_Key
Sends a single keypress to the telnet session. This is useful for emulation keys that Keypress_String cannot handle.
Scan_String
Treats the string as scanned data of the type specified.
Set_Cursor_Position
Moves the cursor to the specified row and column.
The top-most row is 1, and the left-most column is 1.
Message
Message
Displays the message on the Telnet screen.

Appendix B: Actions 65
If the time-out value is greater than 0, the message is removed after that number of seconds elapses.
Message_Clear
Clears the message on the Telnet screen.
Beep
Beep
Causes the device to beep. A Frequency of 1000 is a good default.
The Duration is in milliseconds, so a value of 1000 would be 1 second.
The Volume is a value between 0 and 9, where 0 is the softest and 9 is the loudest.
Waiting
Wait_For_Screen_Update
Suspends the current script until the screen has been updated.
Any changes to the screen will cause the script to resume, so it is usually a good idea to put the wait command inside a ʺWhileʺ loop, and only exit the loop once you have detected the screen you want.
Delay
Suspends the current script until the specified time has passed.
The Time is in milliseconds, so a value of 1000 would be 1 second.
Logging
Logging_On
Creates a log file that records all subsequent script execution activity.
This can be useful while developing a script, but is not recommended for production use.
If ʺOverwrite Previousʺ is True, a previous log file will be overwritten.
Otherwise, the new information will be appended to the existing file.

66 Wavelink TelnetCE Client Scripting Reference Guide
Logging is only turned on for the current script. Scripts called by this script will not have logging enabled.
Logging_Off
Turns off logging for the script.
Call Other Macros
Call
Suspends the current script, and executes another script. The current script resumes when the called script exits.
Refer to Script Nesting on page 29 for more information.
Screen Buttons
Button_Create_Emulation
Creates a button with the specified text and puts the left side of it where emulation text at the supplied coordinates would be.
If the width value is 0, the button will be sized to fit the text. Each time the button is pressed, the boolean variable specified will be set to TRUE. You will need to reset the variable if you want to detect future button presses. All buttons created by the script will be removed when the script exits. The Wait_For_Screen_Update action can be used to wait for a button to be pressed.
Button_Create_View
This command is the same as Button_Create_Emulation except that the screen position is used instead of the text position allowing the button to always be visible.
For example, if Button_Create_View is used to create a button at position 1, 1, that button will always be in the upper-left corner of the telnet view screen. A Button_Create_Emulation button will be hidden if the emulation text at that location is hidden. A bottom and/or right value of 1000 represents the bottom or right side of the screen. For example, a button at position 1, 990 would start 11 columns left of the upper-right corner of the screen.

Appendix B: Actions 67
Button_Remove
Removes a button created with the Button_Create_Emulation and Button_Create_View actions with the specified text.
Button_Remove_All
Removes all buttons created with the Button_Create_Emulation and Button_Create_View action for this script.
Boolean Values
This section contains a list of actions that returns a boolean value. The following action categories are described in this section:
• Boolean Assignments
• Boolean Comparisons
• String Comparisons
• Integer Comparison
• General Queries
• Search the Screen
Boolean Assignments
Boolean_Set
Returns TRUE if the Test is TRUE, FALSE otherwise.
Boolean_Not
Returns FALSE if the Test is TRUE, TRUE otherwise.
Boolean_And
Returns TRUE if all test values are TRUE. Returns FALSE otherwise.
All tests will be evaluated each time this action is taken.
Boolean_Or
Returns TRUE if one or more test values are TRUE. Returns FALSE otherwise.

68 Wavelink TelnetCE Client Scripting Reference Guide
All tests will be evaluated each time this action is taken.
Boolean Comparisons
Boolean_Equal
Returns TRUE if both Test1 and Test2 are TRUE, or both Test1 and Test2 are FALSE. Returns FALSE otherwise.
Boolean_Not_Equal
Returns FALSE if both Test1 and Test2 are TRUE, or both Test1 and Test2 are FALSE. Returns TRUE otherwise.
String Comparisons
String_Empty
Returns TRUE if the string is 0 characters in length, FALSE otherwise.
String_Less_Than
Returns TRUE if Test1 precedes Test2 in alphabetical ordering, FALSE otherwise. If the ʺMaximum Lengthʺ value is greater than 0, any characters after the specified number of characters are ignored.
If “Ignore Case” is TRUE then upper-case and lower-case letters are considered to be equal.
String_Less_Than_Or_Equal
Returns TRUE if Test1 precedes Test2 in alphabetical ordering or they are the same string, FALSE otherwise. If the ʺMaximum Lengthʺ value is greater than 0, any characters after the specified number of characters are ignored.
If ʺIgnore Caseʺ is TRUE then upper-case and lower-case letters are considered to be equal.
String_Equal
Returns TRUE if Test1 and Test2 are the same string, FALSE otherwise. If the ʺMaximum Lengthʺ value is greater than 0, any characters after the specified number of characters are ignored.
If ʺIgnore Caseʺ is TRUE then upper-case and lower-case letters are considered to be equal.

Appendix B: Actions 69
String_Greater_Than_Or_Equal
Returns TRUE if Test1 follows Test2 in alphabetical ordering or they are the same string, FALSE otherwise.
If the ʺMaximum Lengthʺ value is greater than 0, any characters after the specified number of characters are ignored.
If ʺIgnore Caseʺ is TRUE then upper-case and lower-case letters are considered to be equal.
String_Greater_Than
Returns TRUE if Test1 follows Test2 in alphabetical ordering, FALSE otherwise. If the ʺMaximum Lengthʺ value is greater than 0, any characters after the specified number of characters are ignored.
If ʺIgnore Caseʺ is TRUE then upper-case and lower-case letters are considered to be equal.
String_Not_Equal
Returns FALSE if Test1 and Test2 are the same string, TRUE otherwise.
If the ʺMaximum Lengthʺ value is greater than 0, any characters after the specified number of characters are ignored.
If ʺIgnore Caseʺ is TRUE then upper-case and lower-case letters are considered to be equal.
Integer Comparison
Number_Less_Than
Returns TRUE if Test1 is smaller than Test2, FALSE otherwise.
Number_Less_Than_Or_Equal
Returns TRUE if Test1 is no greater than Test2, FALSE otherwise.
Number_Equal
Returns TRUE if Test1 is the same as Test2, FALSE otherwise.
Number_Greater_Than_Or_Equal
Returns TRUE if Test1 is no smaller than Test2, FALSE otherwise.

70 Wavelink TelnetCE Client Scripting Reference Guide
Number_Greater_Than
Returns TRUE if Test1 is larger than Test2, FALSE otherwise.
Number_Not_Equal
Returns FALSE if Test1 is the same as Test2, TRUE otherwise.
General Queries
Ask_OK_Cancel
Displays the message in a box with an ʺOKʺ and ʺCancelʺ button and waits until the user presses a button.
Returns TRUE if the user presses ʺOKʺ, FALSE if the user presses ʺCancelʺ.
Ask_Yes_No
Displays the message in a box with a ʺYesʺ and ʺNoʺ button and waits until the user presses a button. Returns TRUE if the user presses ̋ Yesʺ, FALSE if the user presses ʺNoʺ.
Search the Screen
Search_Screen
Searches the screen for the supplied text. Returns TRUE if the text is found, FALSE otherwise.
The rows to be searched can be specified, where 1 is the top row. If the bottom row value is less than 1, searching will continue to the bottom of the screen. If ʺIgnore Caseʺ is TRUE then upper-case and lower-case letters are considered to be equal.
String Values
This section contains a list of actions that return a string value. The following action categories are described in this section:
• Get System Information
• Scanner Information
• ESC Sequence Support

Appendix B: Actions 71
• String Variable Assignments
• Number to Character Conversion
Get System Information
Get_MAC_Address
Returns the current MAC address for the device.
Get_IP_Address
Returns the current IP Address for the device.
Get_Screen_Text
Returns the text starting at the specified screen position up to the right side of the display.
Get_Screen_Text_Length
Returns the text starting at the specified screen position up to the right side of the display. The string will be truncated if it is longer than the number of characters specified.
Get_Screen_Text_Columns
Returns the text starting at the specified screen position up to the right side of the display.
The string will not include information past the number of columns specified.
Get_Workstation_ID
Returns the current Workstation ID.
This is only valid when using IBM emulation (3270, 5250 or 5555) and a Workstation ID has been specified for the current Host Profile.
Otherwise, an empty string will be returned.
Scanner Information
Get_Scan_Type_Name
Returns the name of the supplied scan type.
An empty string is returned if the scan type is not recognized.

72 Wavelink TelnetCE Client Scripting Reference Guide
ESC Sequence Support
Escape_Sequence
Handles the supplied Wavelink Custom or Telxon ESC Sequence for all emulation types. The sequence should be all the characters that will follow the first ESC character. The string returned will be the sequence returned by the ESC sequence (without the initial ESC) or an empty string if the sequence returns nothing.
String Variable Assignments
String_Set
Returns the value of the string.
String_Combine
Returns the value of string1 concatenated with string2.
String_Left
Returns a string with just the first N characters of the input string.
If the input string is less than N characters, the entire string is returned.
String_Right
Returns a string with just the last N characters of the input string. If the input string is less than N characters, the entire string is returned.
String_Middle
Returns a string with just the middle n characters of the input string.
The string parsing starts at the position specified, with 0 being the left-most character, so a position value of 0 is the same as ʺString_Left.
If the input string is less than n characters, the entire string is returned.
String_Upper
Returns a string with all characters converted to uppercase.
String_Lower
Returns a string with all characters converted to lowercase.

Appendix B: Actions 73
String_Replace
Returns a string where all instances of ʺSubstring to Replace” have been replaced with ʺReplacement Substring”. If ʺIgnore Caseʺ is TRUE then upper-case and lower-case letters are considered to be equal.
String_Only_Characters
Returns a string where all characters in ʺString to Parse” that are not in ʺCharacters to Keepʺ have been deleted.
If ʺIgnore Caseʺ is TRUE then upper-case and lower-case letters are considered to be equal.
String_Strip_Characters
Returns a string where all characters in ʺString to Parse” that are in ʺCharacters to Stripʺ have been deleted.
If ʺIgnore Caseʺ is TRUE then upper-case and lower-case letters are considered to be equal.
String_Trim_Spaces_Start
Returns a string where all spaces and tabs at the start of the string have been deleted.
String_Trim_Spaces_End
Returns a string where all spaces and tabs at the end of the string have been deleted.
Number_To_String_Binary
Returns a string with the binary (base 2) representation of the number.
Number_To_String_Octal
Returns a string with the octal (base 8) representation of the number.
Number_To_String_Decimal
Returns a string with the decimal (base 10) representation of the number.
Number_To_String_Hexadecimal_Lowercase
Returns a string with the hexadecimal (base 16) representation of the number using lowercase characters.
74 Wavelink TelnetCE Client Scripting Reference Guide
Number_To_String_Hexadecimal_Uppercase
Returns a string with the hexadecimal (base 16) representation of the number using uppercase characters.
Ask_String
Displays a dialog asking the user for a string, and returns the string supplied by the user. The supplied default string is returned (unaltered) if the user cancels the dialog.
Ask_String_Password
Displays a dialog asking the user for a string, and returns the string supplied by the user.
The string is displayed as a password (a series of asterisks).
The supplied default string is returned (unaltered) if the user cancels the dialog.
Ask_String_Uppercase
Displays a dialog asking the user for a string, and returns the string supplied by the user. Any lowercase letters entered are converted to uppercase characters. The supplied default string is returned (unaltered) if the user cancels the dialog.
Ask_String_Lowercase
Displays a dialog asking the user for a string, and returns the string supplied by the user. Any uppercase letters entered are converted to lowercase characters. The supplied default string is returned (unaltered) if the user cancels the dialog.
Number to Character Conversion
Number_To_Character
Returns a string one character in length, where the value for that character is the supplied number. For example, a number value of 87 would return a string consisting of a ʺWʺ -- the ASCII character for value 87.
Integer Values
This section contains a list of actions that return an integer value. The following action categories are described in this section:
Appendix B: Actions 75
• Get System Information
• Scanner Information
• General Queries
• String Handling
• Integer Assignments
• Convert Strings to Integers
• Ask User for Integer
• Number/Character Conversion
Get System Information
Get_Screen_Columns
Get the number of columns on the screen. This is the total number of columns, not the number of columns visible.
Get_Screen_Rows
Get the number of rows on the screen. This is the total number of rows, not the number of rows visible.
Get_Position_Column
Get the column number the cursor is currently located on. The left-most column is 1
Get_Position_Row
Get the row number the cursor is currently located on. The top-most row is 1.
Get_Session_Number
Get the number for the session this script is executing in.
Get_Time
Returns the number of seconds that have elapsed since January 1, 2000.
Get_Time_Since_Reset
Returns the number of milliseconds that the computer has been non-suspended since the last reboot.

76 Wavelink TelnetCE Client Scripting Reference Guide
Scanner Information
Get_Scan_Type_Value
Returns the value of the supplied scan type name. A value of 0 is returned if the scan type name is not recognized.
General Queries
Ask_Yes_No_CancelDisplays the message in a box with a ʺYesʺ, ʺNoʺ and ʺCancelʺ button, and waits until the user presses a button. If the Make ʺNoʺ Default value is TRUE, then the ʺNoʺ button will be the default. Otherwise, the ʺYesʺ button will be the default.
Returns 2 if the user presses ʺYesʺ, 1 if the user presses ʺNoʺ, and 0 if the user presses ʺCancelʺ.ʺ
String Handling
String_Length
Returns the number of characters in the string.
Returns 0 is the string is empty (has no characters).
String_Find_First
Finds the first instance of the substring inside the string, and returns the position where that substring starts. The left-most position is 0, so a value of 0 would be returned if the string started with the substring. A value of -1 is returned if no instances of the substring are in the string.
String_Find_Last
Finds the last instance of the substring inside the string, and returns the position where that substring starts. The left-most position is 0, so a value of 0 would be returned if the only substring found was at the beginning of the string. A value of -1 is returned if no instances of the substring are in the string.
Integer Assignments
Number_Set
Returns the value of the number.

Appendix B: Actions 77
Number_Plus
Returns the sum of the two numbers.
Number_Minus
Returns the value when ʺNumber2ʺ is subtracted from ʺNumber1.
Number_Multiply
Returns the product of the two numbers.
Number_Divide
Returns the value when ʺNumber1ʺ is divided by ʺNumber2ʺ.
Because the numbers are integers, the remainder is ignored. For example, 7 divided by 3 would return 2.
Number_Divide_Remainder
Returns the remainder when ʺNumber1ʺ is divided by ʺNumber2ʺ. For example, 7 divided by 3 would return a remainder of 1.
Convert Strings to Integers
String_To_Number_Binary
Returns the binary (base-2) number represented by the string. Parsing the string continues until a character other than a “0” or “1” is reached.
If the string does not represent a binary number, a “0” is returned.
String_To_Number_Octal
Returns the octal (base-8) number represented by the string. Parsing the string continues until a character other than a “0”ʹ through “7” is reached. If the string does not represent an octal number, a zero is returned.
String_To_Number_DecimalReturns the decimal (base-10) number represented by the string. Parsing the string continues until a character other than a “0” through “9” is reached. If the string does not represent a decimal number, a “0” is returned.
String_To_Number_Hexadecimal
Returns the hexadecimal (base-16) number represented by the string. Parsing the string continues until a character other than a “0” through “9”, “a” through “f”, or “A” through “F” is reached. If the string does not represent a hexadecimal number, a “0” is returned.

78 Wavelink TelnetCE Client Scripting Reference Guide
Ask User for Integer
Ask_Number
Displays a dialog asking the user for a decimal number, and returns the number supplied by the user. The supplied default value is returned if the user cancels the dialog.
Number/Character Conversion
Character_To_Number
Converts the character at position Index in the string into the number value for that character. An index of 0 indicates the left-most character in the string. If the Index does not point to a character, a value of 0 is returned.

Appendix C: Symbologies and Values 79
Appendix C: Symbologies and ValuesThe following is a list of symbologies and their values:
UPCE0 = 48
UPCE1 = 49
UPCA = 50
MSI = 51
EAN8 = 52
EAN13 = 53
CODABAR = 54
CODE 39 = 55
D 2 OF 5 = 56
I 2 OF 5 = 57
CODE 11 = 58
CODE 93 = 59
CODE 128 = 60
D 2 OF 5 IATA = 62
EAN/UCC 128 = 63
PDF417 = 64
TRIOPTIC 39 = 66
COUPON CODE = 67
BOOKLAND = 68
MICROPDF = 69
CODE 32 = 70

80 Wavelink TelnetCE Client Scripting Reference Guide
MACRO PDF = 71
MAXICODE = 72
DATAMATRIX = 73
QR CODE = 74
MACRO MICROPDF = 75
RSS 14 = 76
RSS LIMITED = 77
RSS EXPANDED = 78
SIGNATURE = 82
WEBCODE = 84
CUECODE = 85
COMPOSITE = 86
TLC 39 = 88
POSTNET = 97
PLANET = 98
BRITISH POSTAL = 99
JAPAN POSTAL = 100
AUSTRALIA POSTAL = 101
DUTCH POSTAL = 102
CANADA POSTAL = 103
AZTEC = 160
AZTEC MESA = 161
CODE 49 = 162

Appendix C: Symbologies and Values 81
OCR = 163
CODABLOCK = 164
MATRIX 2 OF 5 = 165
PLESSEY = 166
CHINA POSTAL = 167
KOREA POSTAL = 168
TELEPEN = 169
CODE 16K = 170
POSICODE = 171
UPC = 241
MSR = 245
RFID = 246

82 Wavelink TelnetCE Client Scripting Reference Guide

Appendix D: Wavelink Contact Information 83
Appendix D: Wavelink Contact InformationIf you have comments or questions regarding this product, please contact Wavelink Customer Service via email or telephone.
Email: [email protected]
Phone: 425-823-0111

84 Wavelink TelnetCE Client Scripting Reference Guide
Index 85
IndexAAbort 62Abort_All 62about Telnet ClientCE scripting 2activation method 8
on barcode, MSR or RFID Scan 11on key combination 10on screen update 13select from menu 9when session connects 10
Ask User for Integer 78Ask_Number 78Ask_OK 64Ask_OK_Cancel 70Ask_String 74Ask_String_Lowercase 74Ask_String_Password 74Ask_String_Uppercase 74Ask_Yes_No 70
BBeep 65Blank Line and Comment Actions
Blank_Line 62Comment 62
Blank_Line 62Boolean Assignments
Boolean_And 67Boolean_Not 67Boolean_Or 67Boolean_Set 67
Boolean ComparisonsBoolean_Equal 68Boolean_Not_Equal 68
Boolean General QueriesAsk_OK_Cancel 70Ask_Yes_No 70
Boolean Integer Comparison
Number_Equal 69Number_Great_Than 70Number_Greater_Than _Or_Equal 69Number_Less Than 69Number_Less_Than_Or_Equal 69Number_Not_Equal 70
Boolean String ComparisonsString Empty 68String_Equal 68String_Greater_Than 69String_Greater_Than_Or_Equal 69String_Less_Than 68String_Less_Than_Or_Equal 68String_Not_Equal 69
Boolean Values 67Boolean Assignments 67Boolean Comparisons 68Boolean Integer Comparison 69General Queries 70Search the Screen 70String Comparisons 68
Boolean_And 67Boolean_Equal 68Boolean_Not 67Boolean_Not_Equal 68Boolean_Or 67Boolean_Set 67Break 64Button_Create_Emulation 66Button_Create_View 66Button_Remove 67Button_Remove_All 67
CCall Other Macros 66Comment 62Conditionals
Break 64
86 Wavelink TelnetCE Client Scripting Reference Guide
Continue 64Else 63End_If 63End_While 64If 63If_Not 63While 63While_Not 63
contact information 83Continue 64Convert Strings to Integers
String_To_Number_Binary 77String_To_Number_Octal 77String_To_Number-Hexadecimal 77
creatinglog files 28script code 15scripts 7scripts manually 7
DDisconnect 62document
assumptions 1conventions 1
Eediting scripts 23Else 63End_If 63End_While 64Escape_Sequence 72examples 57
beep 57building examplescript 37display screen button 59escape sequence 58request information 59
executing scripts 33on barcode, MSR or RFID scan 35
on key combination 34on screen update 35select from menu 33when session connects 35
Exit_Application 62exporting 25exporting scripts 25
GGeneral Queries
Ask_OK 64Get_IP_Address 71Get_MAC_Address 71Get_Position_Column 75Get_Position_Row 75Get_Screen_Columns 75Get_Screen_Rows 75Get_Screen_Text 71Get_Screen_Text_Columns 71Get_Screen_Text_Length 71Get_Session_Number 75Get_Time 75Get_Time_Since_Reset 75Get_Workstation_ID 71Goto 62Goto Support Actions 62
Goto 62Lable 62Return 62
Hhost profiles 17
IIf 63If_Not 63importing scripts 23Integer Assignments
Number_Device Remainder 77Number_Divide 77

Index 87
Number_Minus 77Number_Multiply 77Number_Plus 77Number_Set 76
Integer Character_To_Number 78Integer General Queries
String Handling 76String_Find_First 76String_Find_Last 76String_Length 76
Integer Get System InforamtionGet_Time_Since_Reset 75
Integer Get System InformationGet_Position_Column 75Get_Position_Row 75Get_Screen_Columns 75Get_Screen_Rows 75Get_Session_Number 75Get_Time 75
Integer Values 74Ask User for Integer 78Convert Strings to Integers 77General Queries 76Get System Information 75Integer Assignments 76Number/Character Conversion 78Scanner Information 76
introduction 1
KKeypress_Key 64Keypress_String 64
LLabel 62launching
from Avalanche Manager 5Script Editor 5
log file 28logging_off action 29
logging_on actiong 28Logging
Logging_Off 66Logging_On 65
Logging_Off 66Logging_On 65
MMacro Exiting
Abort 62Abort_All 62Disconnect 62Exit_Application 62
MessageMessage 64Message_Clear 65
Message_Clear 65
NNo Return Value 61, 62
Beep 65Blank Line and Comment Actions 62Call Other Macros 66Conditionals 63General Queries 64Logging 65Macro Exiting 62Message 64Screen Buttons 66Send Characters 64Waiting 65
Number/Character Conversion 78Number_Divide 77Number_Divide_Remainder 77Number_Equal 69Number_Greater_Than 70Number_Greater_Than_Or_Equal 69Number_Less_Than 69Number_Less_Than_Or_Equal 69Number_Minus 77
88 Wavelink TelnetCE Client Scripting Reference Guide
Number_Multiply 77Number_Not_Equal 70Number_Plus 77Number_Set 76Number_To_String_Binary 73Number_To_String_Decimal 73Number_To_String_Hexadecimal_Lowercase
73Number_To_String_Hexadecimal_Uppercase
74Number_To_String_Octal 73
Pperforming script capturing 19
RReturn 62
Ssaving scripts 25Scan_String 64Scanner Information
Integer Get_Scan_Type_Value 76String Get_Scan_Type_Name 71
Screen ButtonsButton_Create_Emulation 66Button_Create_View 66Button_Remove 67Button_Remove_All 67
script capturing 19script code 15scripts 25
building an example 37creating 7editing 23executing 33importing 23saving 25
Search_Screen 70selecting
activation method 8
host profiles 17Send Character
Keypress_String 64Send Characters
Keypress_Key 64Scan_String 64
Set_Cursor_Position 64String Handling 76String Number_To_Character 74String Values 70
ESC Sequence Support 72Get System Information 71Number to Character Conversion 74Scanner Information 71String Variable Assignments 72
String Variable AssignmentsAsk_String 74Ask_String_Lowercase 74Ask_String_Password 74Ask_String_Uppercase 74Number_To_String_Binary 73Number_To_String_Decimal 73Number_To_String_Hexadecimal_Lowerca
se 73Number_To_String_Hexadecimal_Upperca
se 74Number_To_String_Octal 73String_Combine 72String_Left 72String_Lower 72String_Middle 72String_Only_Characters 73String_Replace 73String_Right 72String_Set 72String_Strip Characters 73String_Trim Spaces_End 73String_Trim_Spaces_Start 73String_Upper 72
String_Combine 72

Index 89
String_Empty 68String_Equal 68String_Find_First 76String_Find_Last 76String_Greater_Than 69String_Greater_Than_Or_Equal 69String_Left 72String_Length 76String_Less_Than 68String_Less_Than_Or_Equal 68String_Lower 72String_Middle 72String_Not_Equal 69String_Only_Characters 73String_Replace 73String_Right 72String_Set 72String_Strip_Characters 73String_To_Number_Binary 77String_To_Number_Hexadecimal 77String_To_Number_Octal 77String_Trim_Spaces_End 73String_Trim_Spaces_Start 73String_Upper 72Strings Get System Information
Get_IP_Address 71Get_MAC_Address 71Get_Screen_Text 71Get_Screen_Text_Columns 71Get_Screen_Text_Length 71Get_Workstation_ID 71
Symbologies and Values 79
TTelnet ClientCE scripting 2
Vvariables 15
WWait_For_Screen_Update 65Waiting
Delay 65Wait_For_Screen_Update 65
Wavelink contact information 83While 63While_Not 63

90 Wavelink TelnetCE Client Scripting Reference Guide


