(Only for Malayisia)DIIMPOT / DIEDAR OLEH:LG ELECTRONICS (M)SDN BHD.A-08-01 LEVEL 8 ,BLOCK A ,PJ8,NO 23 ,JALAN BARAT SEKSYEN 8,46050 PETALING JAYA, SELANGOR DARUL EHSAN.INFO LINE TEL : 1 800 822 822(Customer Care Line)
(Only for Philippines)Imported by: LG Electronics Philippines Inc.15 Francisco Legaspi St. Maybunga, Pasig City 1607 Philippines
TABLE OF CONTENTS
This manual may contain images or content different from the model you purchased.
This manual is subject to revision by the manufacturer.
SAFETY PRECAUTIONS03 Using the Product
05 Storing the Product
05 Battery Safety
UNPACKING06 Components
07 Appliance Overview
ASSEMBLY08 Installing the PuriCare Filters
09 Assembling the Face Guard
10 Installing the Inner Cover
CHARGING11 Charging the Battery
11 Checking Remaining Battery Level
OPERATION13 Turning Product On and Adjusting
Fan Speed
14 Wearing and Using the Product
MAINTENANCE15 Filter Replacement
16 Maintaining the Face Guard
17 Cleaning the Product
17 Cleaning the Exhaust Unit
18 Maintaining the Ear Straps
18 Washing the Portable Pouch
TROUBLESHOOTING19 Before Calling for Service
APPENDIX20 Product Specifications
3
SAFETY PRECAUTIONS
Please make sure to read the following safety precautions as they are designed to prevent unexpected danger and damage. These safety precautions are divided into two sections, Warning statements and Caution statements.
WARNING: Failure to follow the instructions laid down in this manual may cause serious injury or death.CAUTION: Failure to follow the instructions laid down in this manual may cause minor injury or product damage.
Using the Product
WARNING •This product is an Air Purifier that protects the respirato-ry organs from harmful particulate substances such as yellow dust and fine dust. Do not use this product for other purposes.
•Do not use the product in a poorly ventilated area where oxygen is not continually supplied.
•To avoid the risk of infection, do not share the product with other users or transfer use to another person.
•Do not use or charge the product when it is wet. If the product has been submerged, stop using the product and contact an LG Electronics Customer Information Center.
•Do not use or store firearms, combustibles or inflammables near the product.
•Do not disassemble or damage the product, battery or parts. Do not use the product if the product, battery or any part has been damaged.
•Do not use disinfectants and/or sterilizers on any part of the product.
•Do not exercise strenuously while wearing the product.
• If you experience respiratory discomfort while using the prod-uct, discontinue use and consult a physician, if needed.
4
•This appliance is not intended for use by persons (includ-ing children) with reduced physical, sensory or mental capabilities, or lack of experience and knowledge, unless they have been given supervision or instruction concerning the use of the appliance by a person responsible for their safety.
•Children should be supervised to ensure that they do not play with the appliance.
•Do not operate this product while driving.
• If you detect a strange sound, a chemical or burning smell, or smoke coming from the appliance, discontinue use immediately, and contact an LG Electronics Customer Information Center.
•Repair or immediately replace all power cords that have become frayed or otherwise damaged. Do not use a cord that shows cracks or abrasion damage along its length or at either end.
•The appliance must only be supplied at safety extra low voltage corresponding to the marking on the appliance.
•Do not allow foreign substances such as water, coffee, or soft drinks to enter the product.
•Dispose of the packing materials safely so as to keep them out of the reach of children.
CAUTION •Do not use strong detergents or solvents to clean the product.
•Do not wear the product in the rain.
•Do not apply excessive impact to the product.
•Do not place obstacles around the air inlet of the product.
• If you experience skin problems while using the product, stop using it and consult a doctor.
5
Storing the Product
WARNING •Do not place the product near a car window where it is exposed to direct sunlight or on top of an electric pad or heater.
•Do not place the product near humid areas such as sau-nas, swimming pools, or bathrooms.
•Do not store the product in a place where there is a lot of salt.
Battery Safety
WARNING •This product uses an integrated battery. Do not separate or replace the battery. If the battery is faulty, the product and charging accessories should be replaced by an authorized LG service provider.
6
UNPACKING
Components
Main unit
Face guard PuriCare Filters(2EA) Inner cover(10EA)
Strap Extender Charging cable Portable pouch
7
Appliance OverviewFront View
a Filter case d Ear strap
b Power button/battery indicator light e Suction fan
c Air inlet f PuriCare filter
Rear View
a Respiratory sensor d Exhaust unit
b Air inlet e Charging unit
c Face guard f Inner Cover
8
Installing the PuriCare Filters
1 Separate the filter cases from the product.•Pull the filter cases at the spots marked in Figure 1 above to separate the
cases from the product.
2 Insert the PuriCare Filters into the filter cases with the arrow on the Puri-Care Filters facing up.
3 Align the filter cases with the grooves at the front of the product and press the cases in until they click into place.•Make sure to align the filter cases correctly before reassembling. The LG
PuriCare logo is on the right filter case.
NOTE
•Do not press the center of the PuriCare Filter too hard when installing the filter. Doing so may lead to the filter blocking the air inlet.
•Pay attention to the direction indicated by the arrow on the filter when installing the PuriCare Filter. Otherwise, product performance may be degraded.
– The horizontal or vertical direction of the PuriCare Filter does not affect product performance.
•Ensure the product is turned off before replacing the filter.•Make sure that the PuriCare Filters are installed before using the product. Do
not use the product without the filters in place.
Filter case
Left filter case Right filter case
1 2 3
ASSEMBLY
9
Assembling the Face Guard1 Slide the 2 hooks at the bottom of the face guard into the slots at the
bottom of the product and press to secure.
2 Attach the 2 metal pieces at the top of the face guard to the magnets at the top of the product.
3 Ensure that the face guard and the product are assembled correctly.
CAUTION If the face guard and the product are not assembled correctly, product performance may be affected due to air leakage.
Hook
Face guard
<Correct example> <Incorrect example>
Magnet
Hook
Slot
10
Installing the Inner Cover
1 Remove 1 inner cover from the inner cover packaging.
2 Align the inner cover with the top and bottom as shown, and insert it into the face guard.
1 2
Inner cover insertion location
Top
Bottom
CAUTIONDo not use the Air Purifier without the inner cover installed. Without the inner cover installed, moisture from your breath could enter the Air Purifier and cause it to fail.
11
Charging the BatteryThis product has a built-in battery. Charge the battery fully before using the Air Purifier by connecting the USB cable to an AC adapter.
•The battery will begin charging when the USB cable is connected from the product to an electrical outlet. The charging status indicator is located on the Power button.
Indicator light color/status Description
Green/On Charging completed
Red/On Charging in progress
Checking Remaining Battery LevelThe LED indicators on the Power button show the remaining battery level.
•When the battery level is at 15 %, the product will chime 3 times twice. – If the fan speed indicator alarm coincides with the battery alarm, the fan
speed alarm will sound first, followed by the battery alarm.•Only the charging status can be checked during charging.
CHARGING
The adapter is sold separately.
12
CAUTION•The appliance must only be supplied at safety extra low voltage corresponding
to the marking on the appliance from an AC adapter (5 V, 1.8 A).The AC adapter should be purchased separately. Using an unapproved charger may cause failure or variation in the charging time.
•This appliance contains batteries that are non-replaceable.•Charge the battery at temperatures ranging between 10 °C~ 40 °C.
Charging the battery at temperatures outside this range may reduce battery life or increase the charging time, and charging may be suspended for safety reasons.
•The recommended temperature range for operation is -20 °C ~ 50 °C. Operating outside of this range may shorten the run time and the battery life.
•Charging from the USB port in a vehicle or computer may be slower or cause product failure.
NOTE
• It takes approximately 2 hours for a full charge.•With a fully charged battery, the run time for the product is approximately 4
hours in High, 6 hours in Medium, and 8 hours in Low.•Charging times and run times may vary depending on the condition of the
battery and the product.•The run time of the product will decrease gradually over the useful life of the
battery.•The product ships with the battery not fully charged. Charge the battery fully
before using the product for the first time.
13
Turning Product On and Adjusting Fan Speed
Press the Power button to turn the product on. Change the fan speed to suit your requirements.
•Press the Power button once to turn the product on with the fan speed set to Low. Press the Power button repeatedly to adjust the fan speed from Low > Medium > High > Off.
•When the fan speed is changed, chimes sound to indicate each level. – Low (1 chime): Use while seated. – Medium (2 chimes): Use while walking at a normal rate. – High (3 chimes): Use while walking quickly. – Off (long chime)
NOTE
• If the product is not being used, it will turn off automatically after 30 seconds.
OPERATION
Power button
14
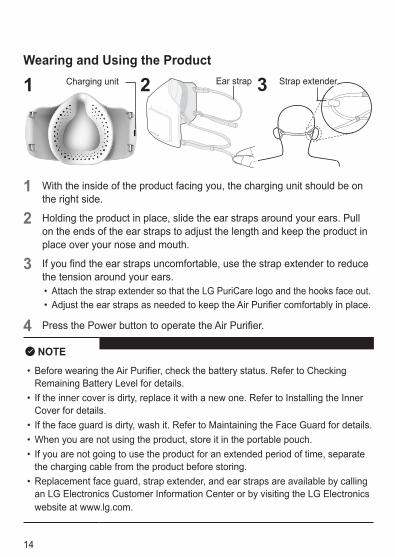
Wearing and Using the Product
1 With the inside of the product facing you, the charging unit should be on the right side.
2 Holding the product in place, slide the ear straps around your ears. Pull on the ends of the ear straps to adjust the length and keep the product in place over your nose and mouth.
3 If you find the ear straps uncomfortable, use the strap extender to reduce the tension around your ears.•Attach the strap extender so that the LG PuriCare logo and the hooks face out.•Adjust the ear straps as needed to keep the Air Purifier comfortably in place.
4 Press the Power button to operate the Air Purifier.
NOTE
•Before wearing the Air Purifier, check the battery status. Refer to Checking Remaining Battery Level for details.
• If the inner cover is dirty, replace it with a new one. Refer to Installing the Inner Cover for details.
• If the face guard is dirty, wash it. Refer to Maintaining the Face Guard for details.•When you are not using the product, store it in the portable pouch.• If you are not going to use the product for an extended period of time, separate
the charging cable from the product before storing.•Replacement face guard, strap extender, and ear straps are available by calling
an LG Electronics Customer Information Center or by visiting the LG Electronics website at www.lg.com.
1 2 3Charging unit Ear strap Strap extender
15
Filter Replacement
Component Replacement Period and Method
PuriCare Filter
Replacement period: 1 month (Based on 10 hours use per day)
Replace the filters when they become dirty. See the Installing the PuriCare Filters section.
Inner cover
Replacement period: Disposable (Varies depending on level of activity.)
Replace the inner cover when it becomes dirty. See the Installing the Inner Cover section.
NOTE
•Do not wash the filter with water. Doing so damages the filter.• The filter replacement period may vary depending on the operating environment.•Purchase new filters by calling an LG Electronics Customer Information Center
or visiting the www.lg.com website.
MAINTENANCE
16
Maintaining the Face GuardSeparating the Face Guard
Separate the face guard from the product by pulling on the top of the face guard.
Cleaning the Face Guard
1 After removing the face guard from the product, clean it with a swab or soft cloth moistened with alcohol or clean water.•Use a mild detergent if needed for stubborn soil.
2 Dry the face guard completely after cleaning and reassemble it on the Air Purifier.
CAUTIONIf the face guard becomes stained by cosmetics, wipe it with a tissue and wash it with clean water immediately after use.•Stains from some cosmetics may be difficult or impossible to remove even if the
face guard is washed immediately after use.
NOTE
•For best results, clean the face guard after each use.
17
Cleaning the Product
Use a soft, damp cloth to wipe the surface of the product clean.
Cleaning the Exhaust Unit
Wipe the exhaust unit with a cotton swab soaked with water or alcohol and then wipe it dry using a dry cotton swab.
NOTE
•For best results, clean the exhaust unit after each use.
CAUTION Do not allow water to get inside the product. Doing so could cause product failure, fire, or electric shock.
18
Maintaining the Ear StrapsReplacing the Ear Straps
1 Fold the ear straps and ear strap hooks toward the inside of the product. Lift one side of the ear strap hook up to separate the ear strap.
2 To assemble new ear straps, fold the ear strap hooks toward the inside of the product and slide the ends of the ear straps into the grooves in the ear strap hooks.
Cleaning the Ear Straps
1 If the ear straps become dirty, separate them from the product and wash them in water and a mild detergent.
2 Allow the ear straps to dry completely before reassembling.
1 2
CAUTIONDo not expose the ear straps to direct sunlight for long periods (over 72 hours) or they can become discolored.
CAUTIONWashing the portable pouch with water may damage its surface and cause defor-mation.
Washing the Portable PouchIf the portable pouch becomes dirty, have it dry cleaned.
19
TROUBLESHOOTING
Before Calling for ServiceIf a failure occurs in the product, check the following before contacting the Service Center.
Symptoms Solution
The appliance does not operate.
•The battery is discharged or needs to be replaced. See Charging the Battery.
•The ambient temperature is too high or too low. Check the ambient temperature.
Fan is noisy even on the lowest speed.
•The PuriCare Filters are clogged with dirt and need to be replaced. The filter replacement period may vary depending on the nature of particular operat-ing environments.
The appliance does not charge.
•The charger and the charging terminal are not connected. Reconnect the charger to the charging terminal.
•There is foreign material on the charging terminal. Clean off the foreign material with a soft, dry cloth.
The product turns off earlier than expected.
•The battery is not fully charged. See Charging the Battery for instructions.
Abnormal smells ema-nate from the product.
•The PuriCare Filters are dirty and need to be replaced. The frequency of filter replacement depends on the usage environment.
•The inner cover is dirty and needs to be replaced.
•The face guard needs to be cleaned.
20
Product SpecificationsAppearance and specifications may vary without notice in order to improve the quality of this product.
Product
Power5 V 1.8 A (AC adapter)Built-in rechargeable battery
Power Input 1.8 W
Dimensions (W*D*H) 156 mm × 63 mm × 110 mm
Recommended operating temperature range -20 °C ~ 50 °C
Recommended operating humidity range 5 % ~ 95 %
Battery
Capacity(Typ) 860 mAh, 3.182 Wh
(Min) 820 mAh, 3.034 Wh
Operating time (with a fully charged battery)
High Approximately 4 hours
Medium Approximately 6 hours
Low Approximately 8 hours
Charging time Approximately 2 hours
Recommended charging temperature 10 °C ~ 40 °C
•The charging and operating times of the product may vary depending on the operating status of the battery or the product.
APPENDIX
www.lg.com
Panduan Pengguna
Wearable Air Purifier
Seri AP300A
Bahasa Indonesia
Baca panduan pengguna berikut secara menyeluruh sebelum mengoper-asikan alat dan selalu simpan di tempat yang mudah ditemukan.
(Only for Indonesia) (Imported by ) Diimpor oleh : PT. LG ELECTRONICS SERVICE INDONESIA (Address) Alamat : Jalan Panglima Polim Raya Nomor 69, Kel. Melawai, Kec. Kebayoran Baru, Kota Adm. Jakarta Selatan, Prov. DKI Jakarta 12160
DAFTAR ISI
Buku panduan ini mungkin berisi gambar atau isi yang berbeda dengan model yang
Anda beli.Buku panduan ini merupakan subjek revisi oleh produsen.
TINDAKAN PENCEGAHAN UNTUK KESELAMATAN
03 Penggunaan Produk
05 Penyimpanan Produk
05 Keselamatan Baterai
MEMBUKA KEMASAN06 Komponen
07 Tinjauan Alat
PERAKITAN08 Pemasangan Filter PuriCare
09 Perakitan Pelindung Wajah
10 Memasang Penutup Bagian Dalam
PENGISIAN DAYA11 Mengisi Baterai
11 Memeriksa Level Baterai yang Tersisa
PENGOPERASIAN13 Menyalakan Produk dan Menyesuai-
kan Kecepatan Kipas
14 Mengenakan dan Menggunakan Produk
PEMELIHARAAN15 Penggantian Filter
16 Pemeliharaan Pelindung Wajah
17 Membersihkan Produk
17 Membersihkan Unit Pembuangan
18 Pemeliharaan Tali Telinga
18 Mencuci Kantong Portabel
PENYELESAIAN MASALAH
19 Sebelum Menghubungi Bagian Servis
LAMPIRAN20 Spesifikasi Produk
3
TINDAKAN PENCEGAHAN UNTUK KESELAMATAN
Mohon pastikan untuk membaca tindakan pencegahan untuk keselamatan berikut karena dirancang untuk mencegah bahaya dan kerusakan tidak terduga.
Tindakan pencegahan untuk keselamatan ini dibagi menjadi dua bagian, pember-itahuan Peringatan dan pemberitahuan Waspada.
PERINGATAN: Gagal mengikuti petunjuk yang ditulis di buku panduan ini dapat menyebabkan cedera serius atau kematian.
WASPADA: Gagal mengikuti petunjuk yang ditulis di buku panduan ini dapat menyebabkan cedera ringan atau kerusakan pada produk.
Penggunaan Produk
PERINGATAN • Produk ini adalah Pembersih Udara yang melindungi organ pernapasan dari partikulat berbahaya seperti debu tanah atau debu halus. Jangan gunakan produk ini untuk tujuan lainnya.
• Jangan menggunakan produk ini dengan ventilasi udara yang buruk di mana oksigen tidak disuplai secara terus-menerus.
•Untuk menghindari risiko infeksi, jangan menggunakan produk ini secara bersama atau memberikan ke orang lain.
• Jangan menggunakan atau mengisi daya pada produk jika ba-sah. Jika produk telah direndam, hentikan penggunaan produk dan hubungi Pusat Informasi Pelanggan LG Electronics.
• Jangan menyimpan produk di dekat senjata api, bahan mudah terbakar, atau bahan mudah meledak.
• Jangan membongkar atau merusak produk, baterai, atau bagi-anbagiannya suku cadangnya. Jangan menggunakan produk jika produk, baterai, atau sebagian dari produk telah rusak.
• Jangan menggunakan desinfektan dan/atau penyeteril pada bagian mana saja di produk ini.
• Jangan berolahraga dengan keras saat mengenakan produk ini.
• Jika Anda mengalami ketidaknyamanan saat menggunakan produk ini, hentikan penggunaan dan hubungi dokter jika diperlukan.
4
•Alat ini tidak ditujukan digunakan oleh orang (termasuk anak-anak) yang memiliki keterbatasan fisik, mental, pan-caindra atau mental, atau kekurangan pengetahuan atau pengalaman, kecuali mereka mendapatkan pengawasan atau petunjuk tentang cara penggunaan oleh orang yang bertanggung jawab atas keselamatan mereka.
•Anak-anak harus diawasi guna memastikan bahwa mereka tidak bermain dengan alat.
• Jangan mengoperasikan produk ini saat berkendara.
• Jika Anda mendeteksi suara aneh, bau bahan kimia atau terbakar, atau asap yang keluar dari alat, segera hentikan penggunaan alat, dan hubungi Pusat Informasi Pelanggan LG Electronics.
•Segera lakukan perbaikan atau ganti semua kabel daya yang putus atau rusak. Jangan menggunakan kabel yang terlihat rusak retak atau tergores di sepanjang kabel atau di bagian ujung manapun.
•Alat harus disuplai dengan tegangan listrik sangat rendah yang sesuai dengan yang tertulis pada alat.
• Jangan biarkan bahan asing seperti air, kopi, atau minu-man ringan memasuki produk.
•Buang bahan kemasan secara aman sehingga jauh dari jangkauan anakanak.
WASPADA • Jangan menggunakan detergen atau bahan pelarut untuk membersihkan produk.
• Jangan mengenakan produk di bawah hujan.
• Jangan memberikan benturan/pukulan berlebihan pada produk.
• Jangan memberikan halangan di sekitar inlet udara produk.
• Jika Anda mengalami masalah kulit saat menggunakan produk, berhenti menggunakan dan hubungi dokter.
5
Penyimpanan Produk
PERINGATAN • Jangan menyimpan produk di dekat jendela mobil yang terkena sinar matahari langsung atau di atas pemanas atau bantalan elektris.
• Jangan meletakkan produk di dekat area lembap seperti sauna, kolam renang, atau kamar mandi.
• Jangan menyimpan produk di tempat yang terdapat ban-yak garam.
Keselamatan Baterai
PERINGATAN •Produk ini menggunakan baterai yang terintegrasi. Jangan melepaskan atau mengganti baterai. Jika baterai bermasa-lah, produk dan aksesori pengisi daya harus diganti oleh Pusat Informasi Pelanggan LG Electronics.
6
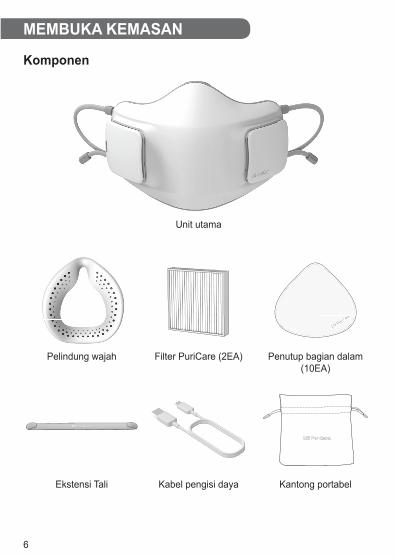
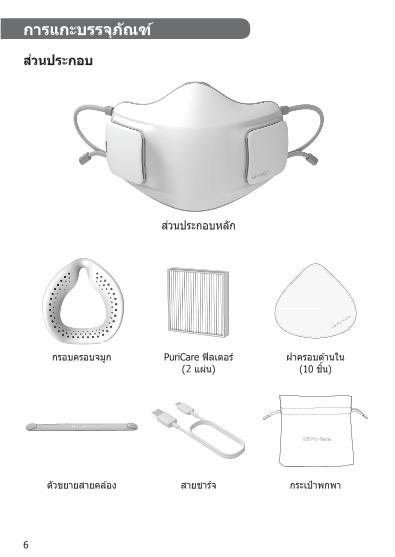
MEMBUKA KEMASAN
Komponen
Unit utama
Pelindung wajah Filter PuriCare (2EA) Penutup bagian dalam (10EA)
Ekstensi Tali Kabel pengisi daya Kantong portabel
7
Tinjauan AlatTampak Depan
a Wadah filter d Tali telinga
b Tombol daya/lampu indikator baterai e Kipas isapan
c Inlet udara f Filter PuriCare
Tampak Belakang
a Sensor pernapasan d Unit pembuangan
b Inlet udara e Unit pengisi daya
c Pelindung wajah f Penutup bagian dalam
8
Pemasangan Filter PuriCare
1 Pisahkan wadah filter dari produk.•Tarik wadah filter di titik yang ditandai di Gambar 1 di atas untuk memisah-
kan wadah filter dari produk.
2 Masukkan Filter PuriCare ke dalam wadah filter dengan tanda anak pan-ah pada Filter PuriCare menghadap ke atas.
3 Sejajarkan wadah filter dengan alur pada bagian depan produk dan tekan wadah filter ke dalam hingga berbunyi klik saat masuk di posisinya.•Pastikan untuk menyejajarkan wadah filter dengan benar sebelum merakit
ulang. Logo LG PuriCare berada di sebelah kanan wadah filter.
CATATAN• Jangan menekan bagian tengah Filter PuriCare terlalu keras saat memasang
filter. Melakukannya dapat menutupi inlet udara.•Berikan perhatian pada arah yang diindikasikan oleh anak panah pada produk
saat memasang Filter PuriCare. Jika tidak, kinerja produk akan turun. – Arah vertikal atau horizontal dari Filter PuriCare tidak mempengaruhi kinerja
produk.•Pastikan produk telah dimatikan saat penggantian filter.•Pastikan Filter PuriCare telah terpasang sebelum menggunakan produk. Jan-
gan menggunakan produk tanpa filter terpasang di tempatnya.
Wadah filter
Wadah filter kiri
Wadah filter kanan
1 2 3
PERAKITAN
9
Perakitan Pelindung Wajah1 Masukkan 2 kaitan di bagian dasar pelindung wajah ke dalam selot di bagian
dasar produk dan pasang dengan menekan untuk mengunci di posisinya.
2 Pasang 2 bagian logam di bagian atas pelindung wajah ke unit magnet pada bagian atas produk.
3 Pastikan pelindung wajah dan produk terpasang dan dirakit dengan benar.
WASPADAJika pelindung wajah dan produk tidak dirakit dengan benar, kinerja produk dapat terimbas karena kebocoran udara.
Kait
Pelindung wajah
<Contoh yang benar> <Contoh yang tidak benar>
Magnet
Kait
Selot
10
Memasang Penutup Bagian Dalam
1 Lepaskan 1 penutup bagian dalam dari kemasan penutup bagian dalam.
2 Sejajarkan penutup bagian dalam dengan bagian atas dan bawah seperti ditunjukkan, dan masukkan ke dalam pelindung wajah.
1 2
Lokasi masuk Penutup bagian dalam
Atas
Bawah
WASPADAJangan menggunakan Pembersih Udara tanpa terpasang penutup bagian dalam, kelembapan dari pernapasan dapat masuk ke Pembersih Udara dan menyebabkan kegagalan.
11
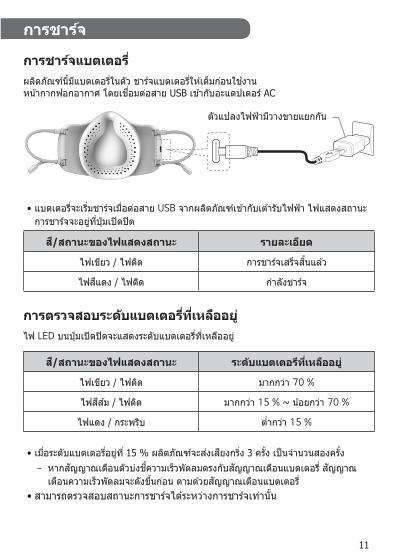
Mengisi BateraiProduk ini memiliki baterai tanam. Isi daya baterai secara penuh sebelum menggu-nakan Pembersih Udara dengan cara menyambungkan kabel USB ke adaptor AC.
•Baterai akan mulai terisi saat kabel USB tersambungkan dari produk ke stopkon-tak listrik. Indikator status pengisian berada di tombol Daya.
Warna/status lampu indikator Deskripsi
Hijau/Menyala Pengisian daya selesai
Merah/Menyala Pengisian daya berlangsung
Memeriksa Level Baterai yang TersisaIndikator LED pada tombol Daya menunjukkan level baterai yang tersisa.
Warna/status lampu indikator Level baterai yang tersisa
Hijau/Menyala Lebih dari 70 %
Oranye/Menyala Lebih dari 15 % ~ Di bawah 70 %
Merah/Berkedip Di bawah 15 %
•Saat level baterai di 15%, produk akan berdering 3 kali selama dua kali. – Jika alarm indikator kecepatan kipas bertepatan dengan alarm baterai, alarm
kecepatan kipas akan berbunyi terlebih dahulu, diikuti dengan alarm baterai.•Hanya status pengisian daya yang dapat diperiksa selama pengisian daya.
PENGISIAN DAYA
Adaptor dijual terpisah.
12
WASPADA•Alat harus disuplai dengan tegangan listrik sangat rendah dari adaptor AC yang
sesuai dengan yang tertulis pada alat (5 V, 1.8 A). Adaptor AC harus dibeli se-cara terpisah. Menggunakan pengisi daya yang tidak disetujui dapat menyebab-kan kegagalan atau variasi dalam waktu pengisian.
•Alat ini memiliki baterai yang tidak dapat diganti.• Isi daya baterai pada temperatur dengan rentang 10 °C ~ 40 °C. Pengisian
baterai pada temperatur di luar rentang tersebut dapat mengurangi masa pakai baterai atau menambah waktu pengisian, dan pengisian daya bisa dihentikan untuk alasan keselamatan.
•Rentang temperatur yang direkomendasikan untuk pengoperasian adalah -20 °C ~ 50 °C. Pengoperasian di luar rentang ini akan memperpendek masa peng-operasian dan masa pakai baterai.
•Pengisian daya dari port USB di komputer atau kendaraan mungkin akan lebih lama dan menyebabkan kegagalan produk.
CATATAN•Diperlukan waktu sekitar 2 jam untuk mengisi daya hingga penuh.•Dengan baterai yang terisi penuh, waktu pengoperasian produk sekitar 4 jam di
Tinggi, 6 jam di Menengah, dan 8 jam di Rendah.•Waktu pengisian daya dan pengoperasian mungkin berbeda tergantung pada
kondisi baterai dan produk.•Waktu pengoperasian produk akan menurun secara gradual sesuai dengan
perubahan masa pakai baterai. •Produk ini dikirimkan dengan kondisi baterai tidak terisi penuh. Isi daya baterai
hingga penuh sebelum menggunakannya untuk pertama kali.
13
Menyalakan Produk dan Menyesuaikan Kecepatan Kipas
Tekan tombol Daya untuk menyalakan produk. Atur kecepatan kipas sesuai dengan kebutuhan Anda.
•Tekan tombol Daya satu kali untuk menyalakan produk dengan kecepatan kipas rendah. Tekan tombol Daya berulang kali untuk mengatur kecepatan kipas dari Rendah > Menengah > Tinggi > Mati.
•Saat kecepatan kipas berubah, suara dering akan muncul untuk mengindikasi-kan setiap level.
– Rendah (1 dering): Gunakan saat duduk. – Menengah (2 dering): Gunakan saat berjalan dengan kecepatan normal. – Tinggi (3 dering): Gunakan saat berjalan cepat. – Mati (dering lama)
CATATAN• Jika produk tidak digunakan, produk akan mati secara otomatis dalam 30 detik.
PENGOPERASIAN
Tombol daya
14
Mengenakan dan Menggunakan Produk
1 Dengan bagian dalam produk menghadap ke arah Anda, unit pengisi daya akan berada di sebelah kanan.
2 Pegang produk pada lokasi, tarik tali telinga ke sekeliling telinga Anda. Tarik ujung tali telinga untuk menyesuaikan panjangnya dan menjaga agar produk menutupi hidung dan mulut.
3 Jika menurut Anda tali telinga tidak nyaman dipakai, gunakan ekstensi tali untuk mengurangi tingkat ketegangan di sekeliling telinga Anda.•Pasang ekstensi telinga sehingga logo LG PuriCare dan kaitnya menghadap
keluar.•Atur tali telinga seperlunya untuk menjaga Pembersih Udara tetap nyaman
di kenakan.
4 Tekan tombol daya untuk mengoperasikan Pembersih Udara.
CATATAN•Sebelum memakai Pembersih Udara, periksa status baterai. Lihat ke Memeriksa
Level Baterai yang Tersisa untuk rinciannya.• Jika penutup bagian dalam kotor, ganti dengan yang baru. Lihat ke Memasang
Penutup Bagian Dalam untuk rinciannya.• Jika pelindung wajah dalam keadaan kotor, Lihat ke Pemeliharaan Pelindung
Wajah untuk rinciannya.•Saat Anda tidak menggunakan produk, simpan di dalam kantong portabel.• Jika Anda tidak akan menggunakan produk dalam jangka waktu yang lama,
pisahkan kabel pengisi daya sebelum menyimpannya.•Penggantian pelindung wajah, ekstensi tali, dan tali telinga yang baru dengan
menelepon Pusat Informasi Pelanggan LG Electronics atau mengunjungi LG Electronics situs web www.lg.com.
1 2 3Unit pengisi daya Tali telinga Ekstensi tali
15
Penggantian Filter
Komponen Metode dan Periode Penggantian
Filter PuriCare
Periode penggantian: 1 bulan (Berdasarkan 10 jam penggunaan per hari)
Ganti filter jika sudah kotor. Lihat ke bagian Pemasangan Filter PuriCare untuk rinciannya.
Inner cover
Periode penggantian: Dapat dibuang (Bergantung pada tingkat aktivitas.)
Ganti penutup bagian dalam jika sudah kotor. Lihat ke ba-gian Memasang Penutup Bagian Dalam untuk rinciannya.
CATATAN•Jangan mencuci filter menggunakan air. Melakukannya dapat merusak filter.•Periode penggantian filter mungkin berbeda tergantung pada lingkungan
pengoperasian.•Silakan membeli filter baru dengan menelepon Pusat Informasi Pelanggan LG
Pisahkan pelindung wajah dari produk dengan menarik pada bagian atas pelindung wajah.
Cleaning the Face Guard1 Setelah melepaskan pelindung wajah dari produk, bersihkan mengguna-
kan kapas pembersih telinga atau kain lembut yang dibasahi dengan air atau alkohol.•Gunakan detergen ringan jika diperlukan untuk membersihkan kotoran yang
membandel.
2 Keringkan pelindung wajah seluruhnya setelah membersihkan dan rakit kembali ke Pembersih Udara.
WASPADAJika pelindung wajah kotor karena kosmetik, segera usap menggunakan tisu dan bersihkan dengan air setelah menggunakan.•Noda dari kosmetik mungkin sulit atau tidak bisa dihilangkan meskipun pelind-
ung wajah segera dicuci setelah digunakan.
CATATAN•Untuk hasil yang terbaik, bersihkan pelindung wajah setelah setiap penggunaan.
17
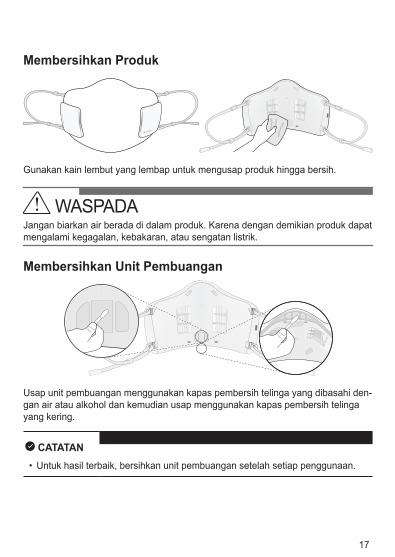
Membersihkan Produk
Gunakan kain lembut yang lembap untuk mengusap produk hingga bersih.
Membersihkan Unit Pembuangan
Usap unit pembuangan menggunakan kapas pembersih telinga yang dibasahi den-gan air atau alkohol dan kemudian usap menggunakan kapas pembersih telinga yang kering.
CATATAN•Untuk hasil terbaik, bersihkan unit pembuangan setelah setiap penggunaan.
WASPADAJangan biarkan air berada di dalam produk. Karena dengan demikian produk dapat mengalami kegagalan, kebakaran, atau sengatan listrik.
18
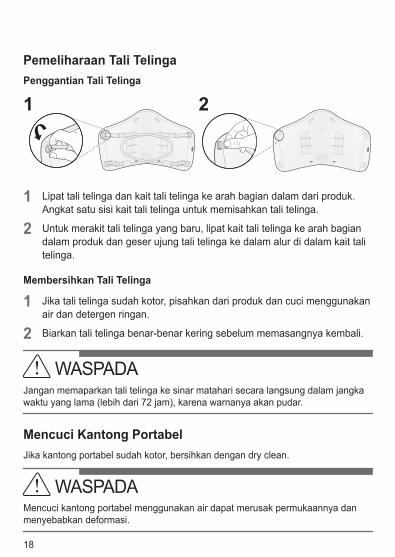
Pemeliharaan Tali TelingaPenggantian Tali Telinga
1 Lipat tali telinga dan kait tali telinga ke arah bagian dalam dari produk. Angkat satu sisi kait tali telinga untuk memisahkan tali telinga.
2 Untuk merakit tali telinga yang baru, lipat kait tali telinga ke arah bagian dalam produk dan geser ujung tali telinga ke dalam alur di dalam kait tali telinga.
Membersihkan Tali Telinga
1 Jika tali telinga sudah kotor, pisahkan dari produk dan cuci menggunakan air dan detergen ringan.
2 Biarkan tali telinga benar-benar kering sebelum memasangnya kembali.
1 2
WASPADAJangan memaparkan tali telinga ke sinar matahari secara langsung dalam jangka waktu yang lama (lebih dari 72 jam), karena warnanya akan pudar.
WASPADAMencuci kantong portabel menggunakan air dapat merusak permukaannya dan menyebabkan deformasi.
Mencuci Kantong PortabelJika kantong portabel sudah kotor, bersihkan dengan dry clean.
19
PENYELESAIAN MASALAH
Sebelum Menghubungi Bagian ServisJika kerusakan muncul pada produk, cek hal berikut sebelum menghubungi Pusat Layanan.
Gejala Solusi
Alat tidak beroperasi.
• Baterai dalam keadaan kosong atau perlu diganti. Lihat Mengisi Baterai.
• Temperatur ambien terlalu rendah atau terlalu tinggi. Periksa temperatur ambien.
Kipas bersuara berisik bahkan pada kece-
patan terendah.
• Filter PuriCare tersumbat oleh kotoran dan perlu diganti. Periode penggantian filter mungkin berbeda tergantung dari kondisi lingkungan pengoperasian tertentu.
Alat tidak dapat mengi-si daya.
• Pengisi daya dan terminal pengisi daya tidak tersam-bung. Sambungkan kembali pengisi daya ke terminal pengisian daya.
• Terdapat benda asing di atas terminal pengisian daya. Bersihkan benda asing menggunakan kain kering yang lembut.
Produk mati lebih cepat dari perkiraan.
• Baterai tidak diisi dengan penuh. Lihat Mengisi Baterai untuk petunjuknya.
Bau tidak normal keluar dari produk.
• Filter PuriCare kotor dan perlu dibersihkan. Frek-uensi penggantian filter tergantung pada lingkungan penggunaan.
• Penutup bagian dalam kotor dan perlu diganti.
• Pelindung wajah perlu dibersihkan.
20
Spesifikasi ProdukTampilan dan spesifikasi mungkin berbeda tanpa pemberitahuan terlebih dahulu untuk meningkatkan kualitas produk ini.
Product
Daya listrik 5 V 1.8 A (Adaptor AC)Baterai tertanam yang dapat diisi ulang
Power input 1.8 W
Dimensi (P*L*T) 156 mm × 63 mm × 110 mm
Rentang temperatur pengoperasian yang dire-
komendasikan-20 ℃ ~ 50 ℃
Rentang kelembapan pengoperasian yang dire-
komendasikan5 % ~ 95 %
Baterai
Kapasitas(Normal) 860 mAh, 3.182 Wh
(Min) 820 mAh, 3.034 Wh
Waktu pengoperasian (dengan baterai terisi penuh)
Tinggi Sekitar 4 jam
Menengah Sekitar 6 jam
Rendah Sekitar 8 jam
Waktu pengisian daya Sekitar 2 jam
Rekomendasi temperatur pengisian daya 10 ℃ ~ 40 ℃
•Waktu pengisian daya dan pengoperasian produk dapat berbeda tergantung pada status pengoperasian dari baterai atau produk.
อะแดปเตอร AC ทมคาแรงดนไฟตามทก�าหนดเทานน (5 V , 1.8 A) ตวแปลงไฟ หรอ อะแดปเตอร AC แยกจ�าหนาย การใชตวแปลงไฟหรออะแดปเตอรทไมตรงตามขอก�าหนดอาจจะสงผลกบการชารตไฟ อาจจะชารตไฟไมเขาหรอใชเวลานานกวาปกต