1 UGA10A Congratulations on your purchase of a BOB ® Weather Shield and/or Sun Shield. The Weather Shield’s water resistant design helps to protect your child from rain and wind while still allowing a view of the world. The Sun Shield’s specially designed mesh screen reduces the sun’s harmful rays and helps to provide a barrier to wind and flying insects. WEATHER SHIELD INSTRUCTIONS Single and Duallie ® BOB Gear ® by Britax (888) 427-4829 www.bobgear.com 4140 Pleasant Road, Fort Mill, South Carolina 29708 SUN SHIELD INSTRUCTIONS Fig. 1 Warning Tag Location Warning Tag Fig. 2 Canopy Support in Position Canopy Flap Canopy Support Fig. 4 Rear Passage Unobstructed Rear Passage Fig. 5 Weather/Sun Shield Placed Rear Vents Fig. 3 Canopy Flap in Position Hook and loop fasteners secured Fig. 6 Seam aligned to Support WARNINGS FAILURE TO FOLLOW THESE WARNINGS AND INSTALLATION INSTRUCTIONS COULD RESULT IN SERIOUS INJURY OR DEATH. • When the Weather or Sun Shield is used, the stroller rear canopy flap must be in the correct position (see Warning Tag on stroller canopy flap) and follow instructions below. This will insure proper airflow and avoid danger of suffocation. • The Weather Shield is made of a non-breathable material. To avoid danger of suffocation and excessive temperatures, follow all installation instructions. • Do not use Weather Shield when temperatures exceed 65°F/18°C. Use in higher temperatures can cause unsafe conditions inside the Weather Shield. IMPORTANT NOTES • Always make sure all vents are unobstructed. • The Weather and Sun Shields are not designed to work with optional Infant Car Seat Adapter with car seat installed. • The Sun Shield reduces the exposure to sun, heat, and insects but does not eliminate them. • Never leave children unattended in stroller, with or without Weather or Sun Shield in use. • When not in use, keep Weather or Sun Shield out of reach of children. INSTALLATION INSTRUCTIONS 1. Set Parking Brake (see your stroller Owner’s Manual). 2. Place seat(s) in fully upright position (see your stroller Owner’s Manual). 3. Position canopy fabric by following steps on warning tag, which is located on the canopy flap of your stroller as shown in Fig. 1. 4. Place canopy supports in position as shown in Fig. 2, then fold canopy flap over and secure to hook and loop fasteners on top of canopy (Fig. 3). 5. Inspect opening between seat(s) and canopy(ies) to make sure the air passage(s) are unobstructed (Fig. 4). 6. Place Weather or Sun Shield on the stroller so its rear flap drapes over the back of stroller between the handlebars (Fig. 5) and the seam above the window is aligned with the forward canopy supports (Fig. 6). 7. Stretch the Weather or Sun Shield’s elastic cords on each side under each respective shock knob as shown in Fig. 7. The elastic cords are located along each side of the Weather or Sun Shield in between the silver reflective fabric. 8. Attach the hook and loop fasteners on the black webbing and the back flap of the Weather or Sun Shield as shown in Fig. 8 (take note that hook and loop fasteners on webbing are double sided, so make sure to orient such that the webbing appropriately mates up with the the Weather or Sun Shield back flap). NOTE: Instruction 9 ONLY applies to BOB single and Duallie Sport Utility Strollers or Ironman strollers. If you do not have one of these stroller models, skip to instruction 10. 9. Ironman and Sport Utility Strollers: Locate black plastic end plugs at outboard ends of stroller. Note hole on top of each plug in Fig. 9. Locate metal stay at front of Weather or Sun Shield. Pull Weather or Sun Shield forward and insert ends of metal stay into holes on the black plastic plugs. 10. Weather Shield Only: Stretch the elastic edges and route under sides of stroller frame. See Fig. 10 for Sport Utility Stroller and Ironman proper routing example. See Fig. 11 for Revolution and Stroller Strides Stroller proper routing example. Fig. 7 Elastic Under Shock Knob Shock Knob Elastic Cord NOTE: This manual will guide you through the installation of your Weather or Sun Shield for all single or Duallie ® BOB Revolution ® , Stroller Strides ® , Sport Utility Strollers and Ironman ® strollers. Before attempting to use or attach your new Weather or Sun Shield, read these instructions completely to insure proper assembly and operation. If you are unclear on any point, contact your authorized dealer or BOB Gear by Britax Customer Service before use. This product is designed exclusively for use with above BOB single or Duallie strollers. It is not intended for use with other strollers or products. Canopy Support (under cover)
Transcript
1UGA10A
Congratulations on your purchase of a BOB® Weather Shield and/or Sun Shield. The Weather Shield’s water resistant design helps to protect your child from rain and wind while still allowing a view of the world. The Sun Shield’s specially designed mesh screen reduces the sun’s harmful rays and helps to provide a barrier to wind and flying insects.
WEATHER SHIELD INSTRUCTIONS
Single and Duallie®
BOB Gear® by Britax (888) 427-4829 www.bobgear.com4140 Pleasant Road, Fort Mill, South Carolina 29708
SUN SHIELD INSTRUCTIONS
Fig. 1 Warning Tag Location
Warning Tag
Fig. 2 Canopy Support in Position
Canopy Flap
Canopy Support
Fig. 4 Rear Passage Unobstructed
Rear Passage
Fig. 5 Weather/Sun Shield Placed
Rear Vents
Fig. 3 Canopy Flap in Position
Hook and loop fasteners secured
Fig. 6 Seam aligned to Support
WARNINGSFAILURE TO FOLLOW THESE WARNINGS AND INSTALLATION INSTRUCTIONS
COULD RESULT IN SERIOUS INJURY OR DEATH.• When the Weather or Sun Shield is used, the stroller rear canopy flap must be in the
correct position (see Warning Tag on stroller canopy flap) and follow instructions below. This will insure proper airflow and avoid danger of suffocation.
• The Weather Shield is made of a non-breathable material. To avoid danger of suffocation and excessive temperatures, follow all installation instructions.
• Do not use Weather Shield when temperatures exceed 65°F/18°C. Use in higher temperatures can cause unsafe conditions inside the Weather Shield.
IMPORTANT NOTES• Always make sure all vents are unobstructed.• The Weather and Sun Shields are not designed to work with optional Infant Car Seat
Adapter with car seat installed.• The Sun Shield reduces the exposure to sun, heat, and insects but does not eliminate
them.
• Never leave children unattended in stroller, with or without Weather or Sun Shield in use.
• When not in use, keep Weather or Sun Shield out of reach of children.
INSTALLATION INSTRUCTIONS
1. Set Parking Brake (see your stroller Owner’s Manual).
2. Place seat(s) in fully upright position (see your stroller Owner’s Manual).
3. Position canopy fabric by following steps on warning tag, which is located on the canopy flap of your stroller as shown in Fig. 1.
4. Place canopy supports in position as shown in Fig. 2, then fold canopy flap over and secure to hook and loop fasteners on top of canopy (Fig. 3).
5. Inspect opening between seat(s) and canopy(ies) to make sure the air passage(s) are unobstructed (Fig. 4).
6. Place Weather or Sun Shield on the stroller so its rear flap drapes over the back of stroller between the handlebars (Fig. 5) and the seam above the window is aligned with the forward canopy supports (Fig. 6).
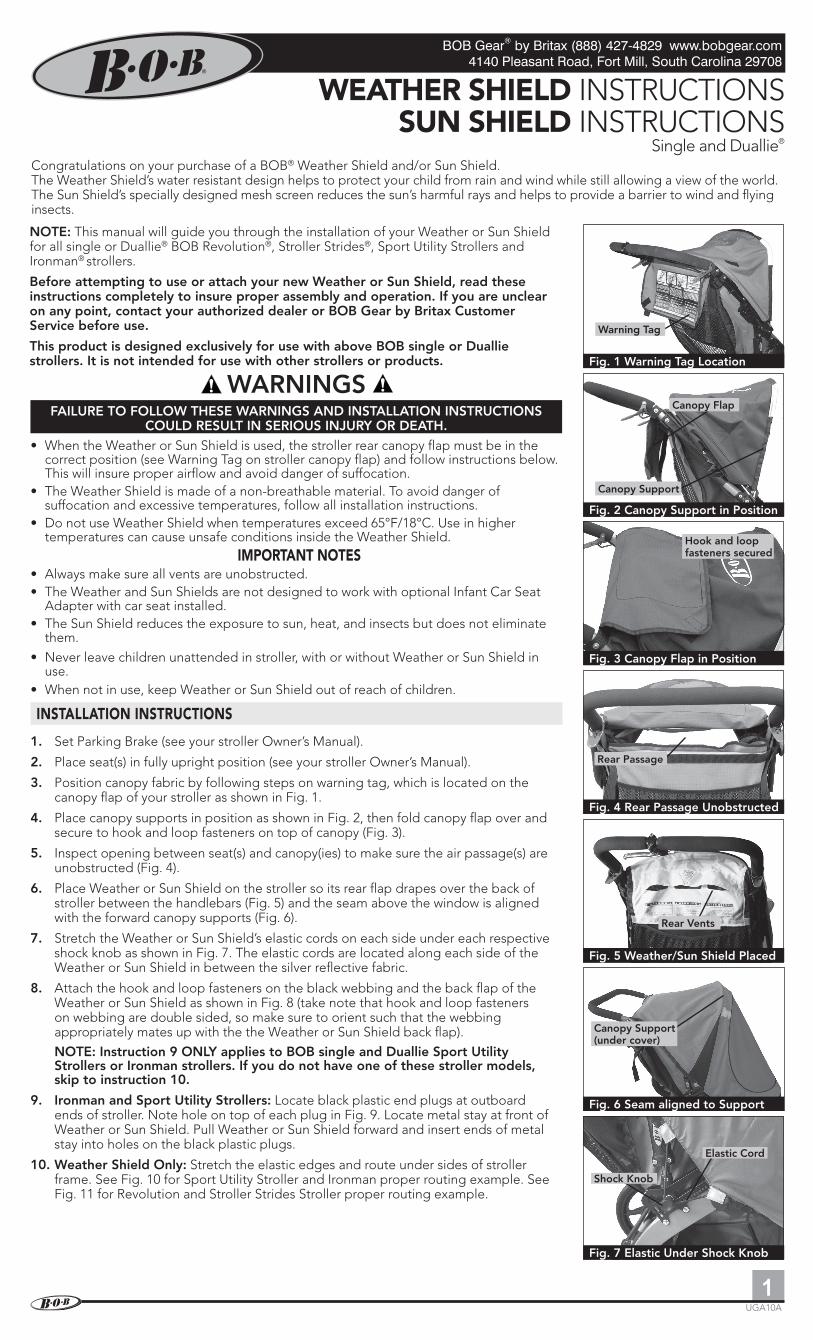
7. Stretch the Weather or Sun Shield’s elastic cords on each side under each respective shock knob as shown in Fig. 7. The elastic cords are located along each side of the Weather or Sun Shield in between the silver reflective fabric.
8. Attach the hook and loop fasteners on the black webbing and the back flap of the Weather or Sun Shield as shown in Fig. 8 (take note that hook and loop fasteners on webbing are double sided, so make sure to orient such that the webbing appropriately mates up with the the Weather or Sun Shield back flap).
NOTE: Instruction 9 ONLY applies to BOB single and Duallie Sport Utility Strollers or Ironman strollers. If you do not have one of these stroller models, skip to instruction 10.
9. Ironman and Sport Utility Strollers: Locate black plastic end plugs at outboard ends of stroller. Note hole on top of each plug in Fig. 9. Locate metal stay at front of Weather or Sun Shield. Pull Weather or Sun Shield forward and insert ends of metal stay into holes on the black plastic plugs.
10. Weather Shield Only: Stretch the elastic edges and route under sides of stroller frame. See Fig. 10 for Sport Utility Stroller and Ironman proper routing example. See Fig. 11 for Revolution and Stroller Strides Stroller proper routing example.
Fig. 7 Elastic Under Shock Knob
Shock Knob
Elastic Cord
NOTE: This manual will guide you through the installation of your Weather or Sun Shield for all single or Duallie® BOB Revolution®, Stroller Strides®, Sport Utility Strollers and Ironman® strollers.
Before attempting to use or attach your new Weather or Sun Shield, read these instructions completely to insure proper assembly and operation. If you are unclear on any point, contact your authorized dealer or BOB Gear by Britax Customer Service before use.
This product is designed exclusively for use with above BOB single or Duallie strollers. It is not intended for use with other strollers or products.
Canopy Support (under cover)
2UGA10A
11. Align rear vents on Weather Shield or mesh on Sun Shield with air passage(s) between top of seat back and canopy flap. Make sure all air passages and vents are unobstructed, you should be able to see through openings. Recline seat slightly if necessary to optimize airflow. See Fig. 5 for rear vent placement.
NOTE: The Sun Shield has a specially designed mesh front and does not require additional vents like shown on the Weather Shield in Fig. 10, 11 and 13.
12. To place child in the stroller, pull the front of the Weather or Sun Shield off the front of stroller, then lift up, stretch and roll over the forward edge of stroller canopy as shown in Fig. 12. This will temporarily hold the Weather or Sun Shield out of your way while you place the child into the seat.
13. Once your child is secured in the seat harness (refer to your stroller Owner’s Manual, Seat Harness section), unroll the Weather or Sun Shield from canopy and re-secure. Fig. 13 shows a Weather Shield correctly installed as described in steps above. Fig. 14 shows a Sun Shield correctly installed as described in steps above.
CARE INSTRUCTIONS
Hand wash cold, hang dry. Do not dry clean, iron or place in dryer.
LIMITED WARRANTY
BOB Gear by Britax takes pride in its workmanship and strives to manufacture the best products possible. Therefore, we warranty our Weather or Sun Shield against defects in material and workmanship subject to the conditions listed below. Since no product is indestructible, it does not cover defects attributable to or resulting from normal wear, abuse or alteration.
BOB Weather or Sun Shield is warranted for one year from the date of original purchase.
• Warranty is only valid for the original purchaser.
• Proof of purchase is required to exercise this warranty.
• Labor and freight charges are not included.
• Normal wear, neglect, abuse, accidents, improper use are not covered by this warranty.
• Warranty claims must be made through an authorized dealer or BOB Gear by Britax customer service.
• This warranty is limited to the repair or replacement of the defective part. BOB shall in no event be responsible for consequential or special damages.
• This limited warranty is the only express or implied warranty applicable to BOB. Any implied warranties, including warranties of merchantability and fitness shall be limited in scope and duration in accordance with this limited warranty.
Félicitations pour votre achat de la toile imperméable ou du pare-soleil BOB®. La toile imperméable est conçue pour protéger votre enfant de la pluie et du vent tout en lui permettant de voir le monde. Le filet à mailles du pare-soleil est conçu expressément pour atténuer les effets néfastes des rayons ultraviolets ainsi que pour protéger du vent et des insectes volants.
INSTRUCTIONS POUR LA TOILE IMPERMÉABLE
Poussettes simples et Duallie® (doubles)
BOB Gear® by Britax (888) 427-4829 www.bobgear.com4140 Pleasant Road, Fort Mill, South Carolina 29708
INSTRUCTIONS POUR LE PARE-SOLEIL
Fig. 1 Emplacement de l’étiquette de mise en garde
Étiquette de mise en garde
MISES EN GARDELE NON-RESPECT DES MISES EN GARDE OU DES INSTRUCTIONS D’INSTALLATION
PEUT ENTRAÎNER DES BLESSURES GRAVES OU LA MORT.• Lorsqu’on utilise la toile imperméable ou le pare-soleil, il faut placer le rabat arrière de
la toile de protection dans la bonne position (voir l’étiquette de mise en garde sur le rabat de la toile de protection de la poussette), suivant les instructions ci-dessous, de manière à assurer une bonne ventilation de l’habitacle; on évitera ainsi tout danger de suffocation.
• La toile imperméable est fabriquée avec une matière textile non perméable à l’air. Pour éviter tout danger de suffocation et de températures excessives, respectez à la lettre toutes les instructions d’installation.
• Ne pas utiliser la toile imperméable lorsque la température dépasse les 65°F ou 18°C. Si la toile est utilisée à des températures plus élevées, les conditions ambiantes à l’intérieur de la toile peuvent devenir dangereuses.
IMPORTANT NOTES• Assurez-vous toujours qu’aucune des fentes d’aération n’est obstruée.
• La toile imperméable, ainsi que le pare-soleil, n’ont pas été conçus pour fonctionner conjointement avec l’adaptateur optionnel pour siège de sécurité de bébé.
• Le pare-soleil atténue l’exposition au soleil, à la chaleur et aux insectes, mais n’élimine pas complètement ces inconvénients.
• Ne jamais laisser un enfant seul sans surveillance dans la poussette, qu’on utilise ou non la toile imperméable ou le pare-soleil.
• Lorsque vous ne vous en servez pas, veuillez garder la toile imperméable ou le pare-soleil hors de portée des enfants.
INSTRUCTIONS D’INSTALLATION
1. Enclenchez le frein de stationnement (consulter votre manuel d’utilisation de la poussette).
2. Relevez complètement le(s) siège(s) en position verticale (consulter votre manuel d’utilisation de la poussette).
3. Placez le tissu de la toile de protection dans la bonne position, en suivant les étapes décrites sur l’étiquette de mise en garde. L’étiquette de mise en garde se trouve sur le rabat de la toile de protection de votre poussette, tel qu’illustré à la figure 1.
4. Placez les supports de la toile de protection dans la position décrite à la figure 2, puis repliez le rabat de la toile de protection et fixez-le à les attaches crochet et boucle qui se trouve au-dessus de la toile de protection (Fig. 3).
5. Inspectez l’ouverture, afin de vous assurer que l’espace permettant la circulation de l’air, entre le haut du (des) dossier(s) et la (les) toile(s) de protection, n’est pas obstrué (Fig. 4).
6. Placez la toile imperméable ou le pare-soleil sur la poussette de sorte que le rabat arrière retombe sur l’arrière de la poussette entre les deux côtés du guidon (Fig. 5) et que la couture au-dessus de la fenêtre soit alignée avec l’avant du support de la toile de protection (Fig. 6).
7. Tirez sur les cordons élastiques de la toile imperméable ou pare-soleil qui se trouvent de chaque côté sous les boutons de dégagement de l’amortisseur, tel qu’illustré à la Fig. 7. Les cordons élastiques sont situés de chaque côté de la toile imperméable ou du pare-soleil, au milieu du tissu réfléchissant argenté.
8. Fixer les attaches crochet et boucle se trouvant sur la sangle noire et sur le rabat noir du tissu anti soleil ou intempéries comme indiqué à la Fig. 8 (penser que les attaches crochet et boucle de la sangle est double face s’assurer donc de l’orienter afin que la sangle repose du bon côté sur le rabat noir anti soleil ou intempéries).
REMARQUE : l’étape 9 s’applique uniquement aux poussettes BOB simples ou Duallie Sport Utility ou Ironman. Si vous ne possédez aucun de ces modèles, passez à l’étape 10.
REMARQUE : ce manuel vous guidera tout au long des étapes d’installation de votre toile imperméable ou de votre pare-soleil sur n’importe laquelle des poussettes Revolutions®, Stroller Strides®, Sport Utility et Ironman®, simples ou Duallie® (doubles), de BOB.
Avant de commencer à installer ou à utiliser votre nouvelle toile imperméable ou votre nouveau pare-soleil, veuillez lire attentivement l’ensemble des instructions d’installation et d’utilisation, afin de vous assurer que vos accessoires sont assemblés et utilisés correctement. En cas de doute, veuillez consulter votre distributeur agréé ou BOB.Ce produit est conçu exclusivement pour les poussettes simples et Duallie (doubles) de BOB ci dessus. Il n’est pas censé être utilisé avec d’autres poussettes ou produits.
Fig. 6 Couture aligné au support
Support de la toile de protection (sous la housse)
Rabat de la toile de protection
Support de la toile de protection
Fig. 2 Support de la toile de protection dans la bonne position
Attaches crochet et boucle fermé
Fig. 3 Rabat de la toile de protection dans la bonne position
Ouverture d’aération arrière
Fig. 4 Ouverture d’aération arrière non obstruée
Bouton de dégagement de l’amortisseur
Cordon élastique
Fig. 7 Élastique sous le bouton de dégagement de l’amortisseur
9. Poussettes Ironman et Sport Utility : Trouvez les chevilles en plastique noir aux extrémités extérieures de la poussette. Remarquez le trou au sommet de chaque cheville. Trouvez la baleine métallique à l’avant de la toile imperméable ou du pare-soleil Fig. 9. Tirez la toile imperméable ou le pare-soleil vers l’avant et insérez les extrémités de la baleine métallique dans les trous situés sur les chevilles en plastique noir.
10. Toile imperméable seulement : Étirez les extrémités élastiques de la toile imperméable ou du pare-soleil et faites-les passer sous le cadre de la poussette. Voir à la Fig. 10 un exemple d’installation correcte pour les poussettes Sport Utility et Ironman. Voir à la Fig. 11 un exemple d’installation correcte pour les poussettes Revolution et Stroller Strides.
11. Alignez les fentes d’aération arrière de la toile imperméable ou du filet à mailles du pare-soleil avec l’ouverture pour l’arrivée d’air située entre le haut du dossier du siège et le rabat de la toile de protection. Assurez-vous qu’aucune ouverture d’arrivée d’air et qu’aucune fente de ventilation ne soit obstruée; vous devriez voir au travers des ouvertures. Si nécessaire, inclinez légèrement le siège pour optimiser la ventilation, voir à la Fig. 5.
REMARQUE : le pare-soleil possède à l’avant un filet à mailles; il ne requiert donc pas de fentes d’aération supplémentaires comme on en voit sur l’accessoire illustré à la Fig.10, 11 et 13.
12. Pour installer l’enfant dans la poussette, retirez l’avant de la toile imperméable ou du paresoleil de l’avant de la poussette et faites-le passer par-dessus le bord avant de la toile de protection tel qu’illustré à la Fig. 12. Cela tiendra temporairement la toile imperméable ou le pare-soleil à l’écart et vous permettra de mieux installer l’enfant dans son siège.
13. Une fois que l’enfant est bien attaché au harnais de sécurité (consulter votre manuel d’utilisation, à la section sur le harnais de sécurité du siège), ramenez la toile imperméable ou le pare-soleil du dessus de la toile de protection et réinstallez-la(le) bien. La figure 13 montre la toile imperméable correctement installé, suivant les étapes décrites ci-dessus. La figure 14 montre le pare-soleil correctement installé, suivant les étapes décrites ci-dessus.
ENTRETIEN
Laver à la main à l’eau froide. Suspendre pour sécher. Pas de nettoyage à sec, ni repassage, ni séchage dans un sèche linge.
GARANTIE LIMITÉE
La compagnie BOB Gear by Britax est fière de la qualité des produits qu’elle fabrique et travaille dur afin de créer les meilleurs articles qui soient. Par conséquent, sous réserve des conditions énumérées ci-après, nous garantissons nos toiles imperméables et nos pare-soleil contre tous vices de matériaux et de fabrication. Comme aucun produit n’est indestructible, cette garantie ne couvre pas les défauts attribuables à l’usure normale, au mauvais traitement ou à la modification du produit.
Les toiles imperméables ou les pare-soleil de BOB sont garantis un an, à compter de leur date d’achat à l’état neuf.
• La garantie n’est valable que pour la personne ayant acheté l’article à l’état neuf.
• Une preuve d’achat est exigée pour se prévaloir de la présente garantie.
• Les frais d’envoi et de manutention ne sont pas compris.
• L’usure normale, la négligence, le mauvais traitement, les accidents et le mauvais usage ne sont pas couverts par la présente garantie.
• Les réclamations au titre de cette garantie doivent être faites auprès d’un distributeur agréé.
• Cette garantie se limite à la réparation ou au remplacement de la pièce défectueuse. BOB n’est aucunement responsable des dommages indirects ou particuliers.
• La présente garantie limitée est la seule garantie expresse ou tacite qui s’applique à BOB. En conformité avec cette garantie limitée, toute garantie tacite, y compris les garanties de qualité marchande et d’appropriation, devra être limitée en temps et en portée.
Fig. 11 Élastique installé correctement
Poussette Revolution/ Stroller Strides
Fente d’aération avant
Fig. 12 Toile imperméable ou pare-soleil relevé(e) au-dessus de la toile de protection
Fentes d’aération latérales
Fente d’aération avant
Fig. 13 Installation correcte de la toile imperméable
Fig. 13 Installation correcte de la toile pare-soliel
BOB Gear® by Britax (888) 427-4829 or (704) 409-1699 4140 Pleasant Road, Fort Mill, South Carolina 29708