Code Up Gradation Task “From AX 2009 – AX 2012” *Important* Before going this step hello me one time @ [email protected]************************** First of all whenever you install AX 2009 and AX 2012, you have to remember Several options during installation for marking – 1- “Ready to upgrade” option during installation of both AX versions. 2- “Office Add-ins” option during installation. 3- “Client” option during installation. 4- “Remote ******” option during installation. Folder Name : Step 1 Now, Firstly we have to work only on AX 2009 for preparing “Source System”. In AX 2009 we have to remember some options before starting “Code and Data Up gradation”. 1- In “CEU/Administration/Administration Area” go to – Setup >> Server Configuration >> Mark “Is Batch Server” option in Overview Tab. Then in “Batch Sever Groups” Add “Data Upgrade” group in Selected Groups List. Then Click on Save Button for saving your changes. 2- Then In “CEU/Basic/Basic Area” go to – Periodic >> Batch >> Processing. It will open one dialog window. In that window just select Group as “Data Update” and then click “OK”. ************************************************************************ ********** Folder Name : Step 2 Now, Go to “CEU/Administration/Administration Area” in this go to “Setup >> System >> Checklist >> Initialization Checklist”
Transcript
Code Up Gradation Task “From AX 2009 – AX 2012”
*Important*Before going this step hello me one time @
First of all whenever you install AX 2009 and AX 2012, you have to remember Several options during installation for marking –
1- “Ready to upgrade” option during installation of both AX versions.2- “Office Add-ins” option during installation.3- “Client” option during installation.4- “Remote ******” option during installation.
Folder Name : Step 1 Now, Firstly we have to work only on AX 2009 for preparing “Source System”. In AX 2009 we have to remember some options before starting “Code and Data Up gradation”. 1- In “CEU/Administration/Administration Area” go to – Setup >> Server Configuration >> Mark “Is Batch Server” option in Overview Tab.
Then in “Batch Sever Groups” Add “Data Upgrade” group in Selected Groups List. Then Click on Save Button for saving your changes.
2- Then In “CEU/Basic/Basic Area” go to – Periodic >> Batch >> Processing. It will open one dialog window. In that window just select Group as “Data Update” and then click “OK”.
Folder Name : Step 2Now, Go to “CEU/Administration/Administration Area” in this go to “Setup >> System >> Checklist >> Initialization Checklist”
Then, It will show one check list.
Now, you have to complete all task showing in this checklist :
1 : Solution : Click on this option, then it will compile your AX 2009 application.Note : It may take long time, depend on your system configuration and Data amount.
It will show one message box, Like :
Then, Click on “Yes” Button.
After Compilation it will show one window, Like :
Then, Click on 2nd option of the checklist :
Solution : In this option when you click on it then you have to provide License file. When you click on it, then it will show one window, Like :
After that, it will look like :
Now, Click on 3rd option of the checklist:
Solution : Click on this option, then it will show one window, Like :
Then, it will look like:
Now, Click on 4th Option of the check list:
Solution : Click on it, then it will show one window, Like:
Now click on OK button, and then it will look like :
Now, Click on 5th option of the checklist,
Solution : Click on this option then it will show one window, Like :
Now click on OK Button, then it will look like:
Now, Click on 2nd tab of check list:
Solution : Click on it, then it will synchronize system database.Note : It will may take long time in this process.
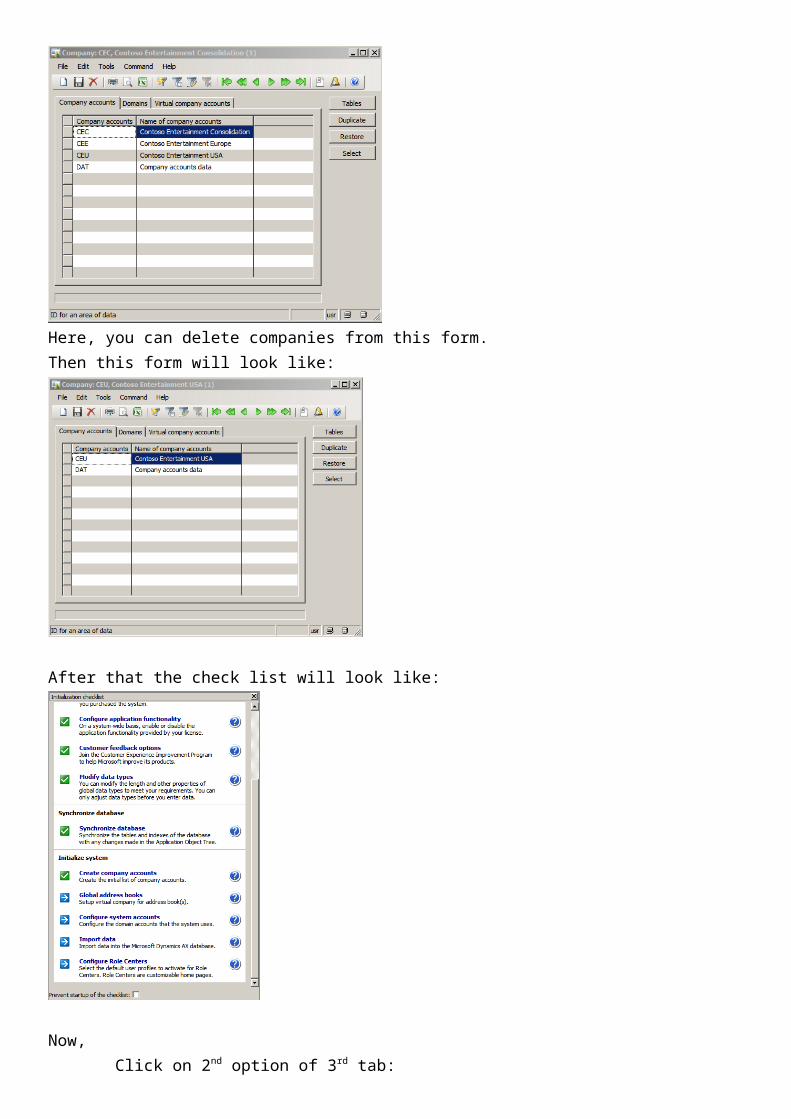
Now, Click on 3rd tab of the check list:
Solution: Click on it, then it will show one window, like :
Here, you can delete companies from this form.
Then this form will look like:
After that the check list will look like:
Now, Click on 2nd option of 3rd tab:
Solution : Click on it, then it will show one window, Like:
Then it will show one infolog, Like :
Then may be will show this message window:
Now, Click on 3rd option of 3rd tab:
Solution: Click on it, then it will open one window, Like:
In this window, just click on OK Button,Then the check list window will look like :
Now, Click on 4th option of 3rd tab of check list:
Solution : Click on it, then it will open one window, Like :
Now , Click on 5th option of 3rd tab:
Solution : Click on it then it will show one window, Like:
Now, click OK Button on this form then the checklist will look like:
End of Initialization checklist.**********************************************************************************
Starting of Code Up Gradation Process************************************
Step 1: First you have to import the preprocessing XPO named “UpgradeAX5.XPO” in installation media of AX2012.
Step 2: Remember that you have to import XPO without “Import with ID Values” option.
Step 3: Press “Ctrl+Shft+P”, it will open Project window. In this window you have to find “Ax50PreUpgradeFramework” Project in Shared option.
Then,
Step 4: Open this project and then open “SysCheckList_PreUpgrade50” Class.
Step 5: When you open this class, then it will show one window, Like:
Note : If you will not import or add Label file then the checklist window will look like:
That’s why you have to import or add label file.
When you copy all .ald files in your system, then the check list window will look like:(Location for copy .ald files = C:\Program Files\Microsoft Dynamics AX\50\Application\Appl\AX2009)
Step 6: Now you have to solve each and every check list elements in a sequence because every element depends on the previous one.
Step 1: Expand first node of Check list and then click on first option of it:
Click on Check upgrade readiness, then it will show one window, Like:
Now, In this window firstly you have to click on “Run” Button. Then the status will change from “Waiting to Ready”
After that it will show one infolog, Like:
After that it will look like:
It will take approx. 10minutes or may be more which Depends on your Data.
Now, click on “Readiness Results” then it will open 1 window, Like:
Now when you click on “Fix” Button then it will show one window in which you can see all active workflows. The window will look like:
Then in this window, click on “Cancel workflow(s)” Button available on the form. This action will change the status of workflow from “pending to cancelled”.
Repeat same step for DAT company also.
If this will not work then delete all record related with workflows.
Next Error:
Solution:
Steps you have to follow:
1- Drag and Drop all tables in the Table Collections according to the image which is given above. Then one error will deduct from total errors.
Next Error:
Solution: When you click on Details Button then it will show one message box. Like:
For this error, you have to check this record in LineRefID field of “PurchReqLine” table, then if these records found in that table then delete them else Bye Pass this error.
Note: For Bye Pass this error just click on “ValidatePurchReqLine” Method
When it will open just make one block as a comment line in that class.
Now one more error will deduct from all errors.
Next Error:
Solution : When you click on Details Button then it will show one window, Like:
Also, when you click on Fix Button then it generates 1 record in InventDim Table.
Next Error:
Solution: When you click on details button then one window will open, like:
Step 1 : You have to edit record in CompanyInfo Table in DAT company. Then one more error will deduct from all errors.
Next Error :
Solution: When you click on Details Button then it will show one window, Like:
Then, just go to the InventDimCombination, Then search “1507” in item id, then Add Invent color Id and Name fields. Like:
Next Error:
Solution: When you click on Details Button then it will show one window, Like:
Now, Just go to Basic >> Setup >> Application Integration Framework >> Endpoints
Then delete CEE Company related record.
Next Error:
Solution: When you click on Details Button then it will show one window, Like:
Also when you click on Fix Button then just create 1 record with “All companies” option.
Next Error:
Solution: When you click on Details Button then it will show one window, Like:
Now, LedgerAllocationRuleDestination Table and delete the CEE company related records from the table.
Next Error:
Solution: When you click on Details Button then it will show one window, Like:
Now, when you click on Fix Button then it will open one window:
In this window, you have to create several records with
Like:
And,
If you will not be able to add Ledger account then-
Right click on Ledger account field >> Go to main table form >> Add 1 record like:
Next Error:
Solution: When you click on Details Button then it will show one window, Like:
And of another record it will show:
Now, just go to Basic >> Setup >> Addresses >> Country/Region (Add country here) >> States (Add AE, AP and AA States here)
Solution: When you click on details button then it will show one window, Like:
Update two fields in HRMPartyEmployeeRelationship Table named “Start Date” and “Seniority Date”.
Advisory 2: Validate modified objects in user layerSolution: Bye Pass this advisory through code. Double Click on available next to this advisory in the readiness result cockpit and then find the block of code which is generating this advisory and then make that block of code as comment.
Advisory 3: Report Libraries (SSRS Report) transformationSolution: Bye Pass this advisory through code. Double Click on available next to this advisory in the readiness result cockpit and then find the block of code which is generating this advisory and then make that block of code as comment.
Advisory 4: Reports (X++ Reports) transformationSolution: Bye Pass this advisory through code. Double Click on available next to this advisory in the readiness result cockpit and then find the block of code which is generating this advisory and then make that block of code as comment.
Advisory 5: Reports (Web Reports) transformationSolution: Bye Pass this advisory through code. Double Click on available next to this advisory in the readiness result cockpit and then find the block of code which is generating this advisory and then make that block of code as comment.
Advisory 6: Perspectives transformationSolution: Bye Pass this advisory through code. Double Click on available next to this advisory in the readiness result cockpit and then find the block of code which is generating this advisory and then make that block of code as comment.
Advisory 7: AIF transformationSolution: Bye Pass this advisory through code. Double Click on available next to this advisory in the readiness result cockpit and then find the block of code which is generating this advisory and then make that block of code as comment.
Advisory 8: Performance boosting scriptSolution: Bye Pass this advisory through code. Double Click on available next to this advisory in the readiness result cockpit and then find the block of code which is generating this advisory and then make that block of code as comment.
End Of Advisories**********************************************************************
Now, click on third option of First node of check list:
Solution: When you click on this option then it will show one window, like:
Now, starting from the Second node of check list:
Step 1: Expand second node of Check list and then click on first option of it:
Solution: When you click on this option then it will show one window, Like:
Then, fill system language option.
Now click on Validate button, and then it will show one infolog, like:
then click on Set to ready for upgrade.
Then it will look like:
*******************************
Now click on second option of Second Tab of check list:
Solution: Now when you click on this option then it will show one window, like:
In this window, you have to create or assign one number sequence for one/more or all companies.
Now when you click on “Setup number sequence” then one window will open, like:
Now, in this window you just have to enter one Number Sequence Code then click on save button and then click on Apply to remaining companies.
And then click on Set to ready for upgrade.
***********************
Now click on third option of Second Tab of check list:
Solution: Now when you click on this option then it will show one window, like:
Now, click on Set to ready for upgrade button on the form.Then it will look like:
***********************
Now click on fourth option of Second Tab of check list:
Solution: Now when you click on this option then it will show one window, like:
Now click on Set to ready for upgrade Button on the form.
Then it will look like:
*****************************
Now, click on fifth option of Second Tab of check list:
Solution: Now, when you click on this option then it will show one window, like:
Now, click on Use Default Mapping then it will fill some values in this form, like;
Then click on set to ready for upgrade button.****************************************
Now click on Sixth option of Second Tab of check list:
Solution: Now, when you click on this option then it will show one window, like:
Then click on set to ready for upgrade button. After that it will look like:
**********************************
Now click on seventh option of Second Tab of check list:
Solution: Now when you click on this option then it will show one window, like:
After clicking Upgrade Validation button in Ledger account categories, it will show one window like,
Then, click on Upgrade Validation button in Dimension Focuses Tab, it will show one window like:
Then, click on Upgrade Validation button in Dimension Numbers Tab, it will show one window like:
Then, click on set to ready for upgrade button and then it will look like:
******************************
Now click on eight option of Second Tab of check list:
Solution: Now when you click on this option then it will show one infolog, like:
Now click on close button then it will look like:
Now click on ninth option of Second Tab of check list:
Solution: Now when you click on this option then it will show one window, like:
Then fill all fields as like .
Then click on Currency Code Upgrade validation button. Then it will show one window, Like:
Then close this window and click on set to ready for upgrade button, then it will look like:
*************************
Now click on tenth option of Second Tab of check list:
Solution: Now when you click on this option then it will show one window, like:
Now, click on “Dimension Group Mapping” button, and then it will show one window, like;
Now, click on OK button, it will show one more window.
Now, click on “Dimension Group” button. It will show one window, Like:
Then close this window and click on Validation Report Button.
Then click set ready for upgrade button. After that it will look like:
**************************************
Now click on eleventh option of Second Tab of check list:
Solution: Now when you click on this option then it will show one window, like:
Click synchronize items button. Then it will show these windows like:
Then, click on OK button then it will show one window like:
Then click on Product Mapping button then it will show one window like:
Then click OK button.
Then click on Product Mapping Approval.
Then maybe it will show one Error infolog, like:
Note: For solving this error, you have to synchronize the database and then repeat these steps again. Or you can change your company from CEU to DAT and then just repeat all steps. Then it will look like:
***********************************
Now click on twelfth option of Second Tab of check list:
Solution: Now when you click on this option then it will show one window, like:
Now, click on Map task group button on the form, like:
and then click on Set to ready for upgrade. Then it will look like:
***********************************
Now click on thirteen option of Second Tab of check list:
Solution: Now when you click on this option then it will show one window, like:
In this form click on Set to ready for upgrade Button. Then it will look like:
***********************************
Now click on fourteen option of Second Tab of check list:
Solution: Now when you click on this option then it will show one window, like:
Now in this form just click on Automatic Assignment Button, then Validate Button and then Set to ready for upgrade Button. Then it will look like:
***********************************
Now click on fifteen option of Second Tab of check list:
Solution: Now when you click on this option then it will show one window, like:
Here in this form, click on Validate Button and then Set to ready for upgrade Button. Then it will look like:
Note: May be If you will not be able to see the data in Unit table then change the DataAreaId from CEU to CVC.
In this image given above, just fill the Unit Class fields and then click on Validate Button. Then it will show one infolog, like:
after that click on Set to ready for upgrade, then it will look like:
***********************************
Now click on sixteen option of Second Tab of check list:
Solution: Now when you click on this option then it will show one window, like:
Note: You have to change all unit related table’s DataAreaId from CEU to CVC.
Now just click on Validate button then click on set to ready for upgrade button on the form, then it will look like:
***********************************
Now click on seventeen option of Second Tab of check list:
Solution: Now when you click on this option then it will show one window, like:
Now in this image (given above) just fill all three fields and then click on Validate button, then it will show one window, like:
After that click on Set to ready for upgrade button, then it will look like:
***********************************
Now click on eighteen option of Second Tab of check list:
Solution: Now when you click on this option then it will show one window, like:
Now in this image (given above) just fill all three fields and then click on Validate button, then it will show one window, like:
After that click on Set to ready for upgrade button, then it will look like:
***********************************
Now click on nineteen option of Second Tab of check list:
Solution: Now when you click on this option then it will show one window, like:
In this given image (Above) you have to fill data, then it will look like:
Now click on Set to ready for upgrade button. Then it will look like:
***********************************
Now click on twenty option of Second Tab of check list:
Solution: Now when you click on this option then it will show one window, like:
Now click on Set to ready for upgrade button. Then it will look like:
***********************************
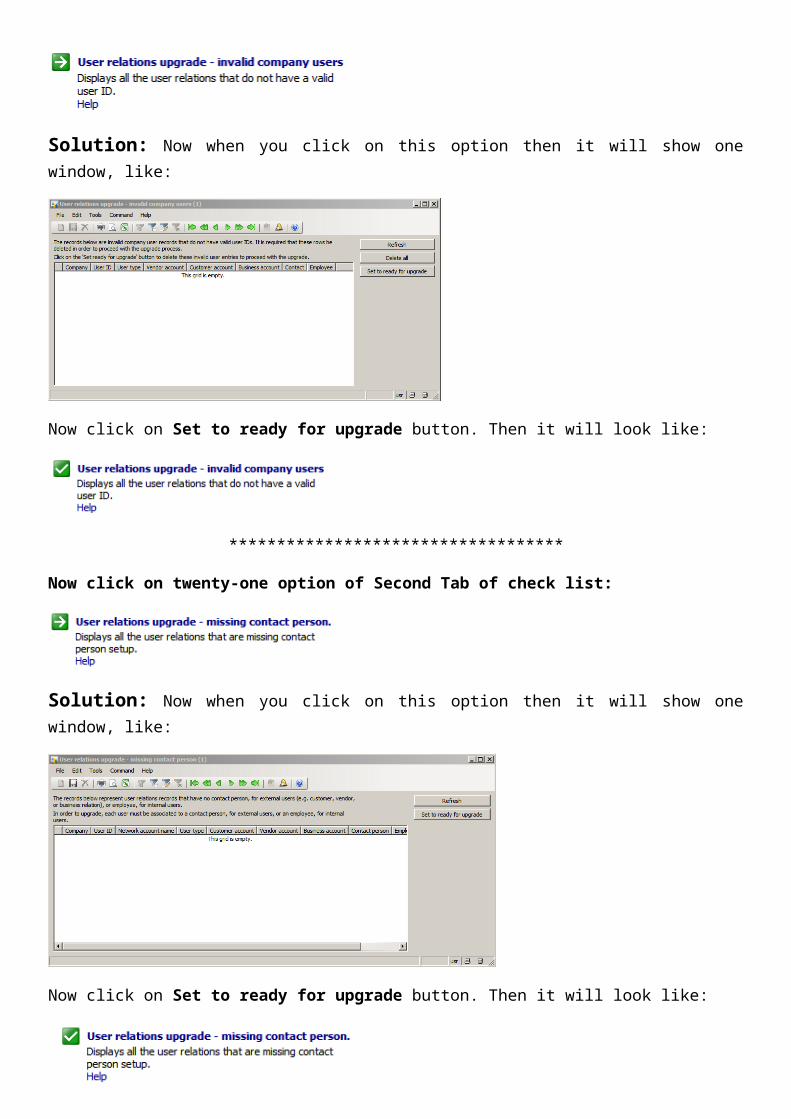
Now click on twenty-one option of Second Tab of check list:
Solution: Now when you click on this option then it will show one window, like:
Now click on Set to ready for upgrade button. Then it will look like:
***********************************
Now click on twenty-two option of Second Tab of check list:
Solution: Now when you click on this option then it will show one window, like:
Now click on Set to ready for upgrade button. Then it will look like:
***********************************
Now click on twenty-three option of Second Tab of check list:
Solution: Now when you click on this option then it will show one window, like:
Now click on Set to ready for upgrade button. Then it will look like:
Then close this windows and
Now click on ready for upgrade button. Then it will look like:
End of second node of check list.**********************************************************************
Now, starting of third node of check list:
***************************************
Now click on first option of third tab of check list:
Solution: Now when you click on this option then it will show one window, like:
Then click the run button.
After that it will show one infolog, like:
Note: May be it will take long time, Like:
Also it will also look like:
***********************************
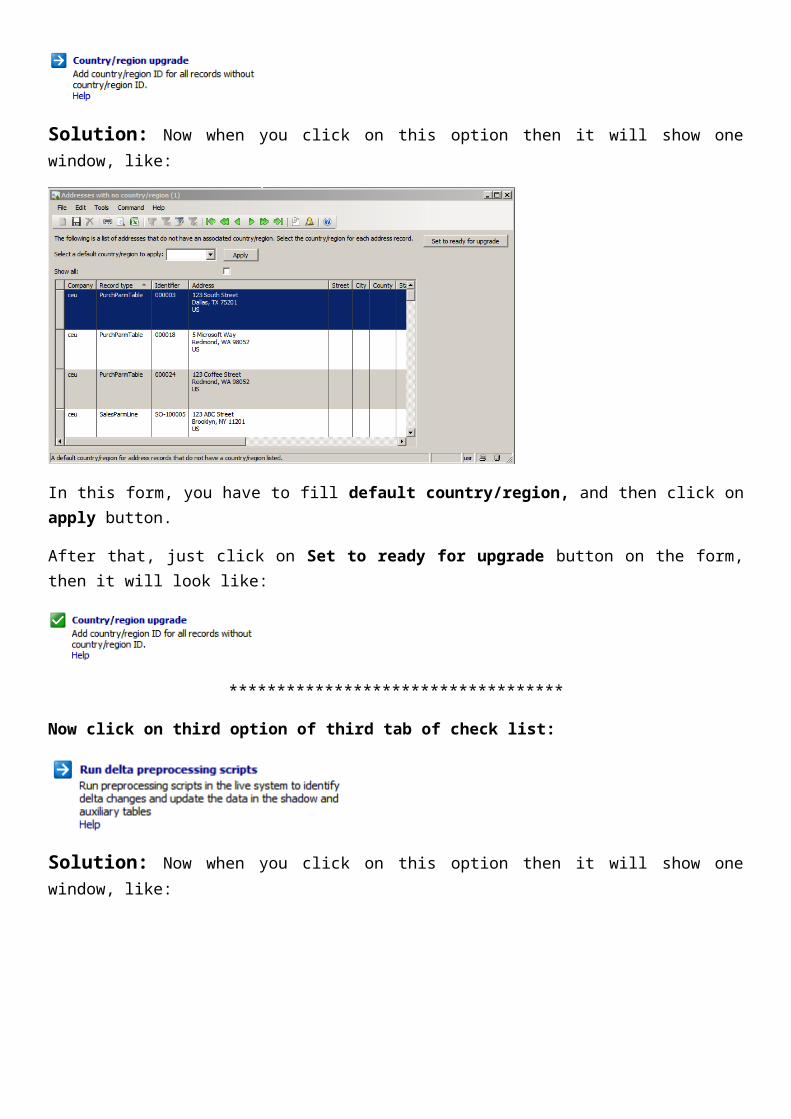
Now click on second option of third tab of check list:
Solution: Now when you click on this option then it will show one window, like:
In this form, you have to fill default country/region, and then click on apply button.
After that, just click on Set to ready for upgrade button on the form, then it will look like:
***********************************
Now click on third option of third tab of check list:
Solution: Now when you click on this option then it will show one window, like:
In this window, scripts are in waiting status. When you click on Run button then the status will change from waiting to ready.
Then it will show one infolog, like:
After this, it will look like:
End of third node of check list.**********************************************************************
Now, click on First option of Fourth node of check list:
Now click on first option of fourth tab of check list:
Solution: Now when you click on this option then it will show one window, like:
In this infolog or for this error you have to stop all running batch jobs.
Note: in this process you have to change the status of a workflow from Executing to Ended through SQL. After that just refresh the database and exit from SQL and then restart the service of AX 2009 then click on same option of check list, the status of this option will change from Ready to Finished. After that it will look like:
******************************************
Now click on second option of fourth tab of check list:
Solution: Now when you click on this option then it will show one window, like:
Now click on Run button.
Then it will show one infolog, like;
Now click on close button, then this will look like:
Now in the end, the final snap of the check list is Like:
Source System Ready for Target SystemSame all process for Target System