Part 1: Starting Google Sketchup 1. Launch Google SketchUp. 2. Choose your default settings. If you've never launched SketchUp on your computer before, you'll see the Choose Default Settings dialog box. Here's what to do if it pops up: a. Choose Perspective View (on the left). b. Choose your preferred measurement system from the Units dropdown menu. (Feet and Inches is Good) c. Click the Continue button to close the dialog box. If the Choose Default Settings dialog box doesn't appear, you have already chosen these settings. Don't worry - Just follow these steps to set things straight: a. Choose Window→Preferences b. On the left side of the System Preferences dialog box, choose Template to show the Template panel. c. Choose one of the 3D templates from the drop-down list (see fig. below). d. Close the System Preferences dialog box by clicking OK e. Open a new file by choosing File→New. 3. Close the Learning Center dialog box (which may have opened automatically when you launched SketchUp) for now. If the learning Center isn't there in the first place, skip to Step 4.
Transcript
Part 1: Starting Google Sketchup1. Launch Google SketchUp.
2. Choose your default settings.
If you've never launched SketchUp on your computer before, you'll see the Choose Default Settings dialog box. Here's what to do if it pops up:
a. Choose Perspective View (on the left).
b. Choose your preferred measurement system from the Units dropdown menu. (Feet and Inches is Good)
c. Click the Continue button to close the dialog box.
If the Choose Default Settings dialog box doesn't appear, you have already chosen these settings. Don't worry - Just follow these steps to set things straight:
a. Choose Window→Preferences
b. On the left side of the System Preferences dialog box, choose Template to show the Template panel.
c. Choose one of the 3D templates from the drop-down list (see fig. below).
d. Close the System Preferences dialog box by clicking OK
e. Open a new file by choosing File→New.
3. Close the Learning Center dialog box (which may have opened automatically when you launched SketchUp) for now. If the learning Center isn't there in the first place, skip to Step 4.
4. Make sure that you can see the Getting Started toolbar.
If it's not visible in your modeling window, choose View→Toolbars→GettingStarted to make it show up.
If this isn't the first time SketchUp has been run on your computer, you might see dialog boxes allover the place. If that's the case, just open the Window menu and make sure that everything is deselected to get rid of them.
Part 2: Making a Quick House Model
The figure below shows what your computer screen should look like at this point.You should see a row of tools across the top of your modeling window, a little man, and three colored modeling axes (red, green, and blue lines).
1. Delete the Little man on your screen.
Using the Arrow tool (the arrow on the far left of your tool bar), click the little man to select him, and then choose Edit→Delete.
2. Choose Camera→Standand→Iso.
This switches you to an isometric (3D) view of your model, which allows you to build something without having to "move around."
3. Draw a rectangle on the ground.
Use the Rectangle tool (between the pencil and the circle on your toolbar) to draw a rectangle by doing the following:
a. Click once to place one corner on the left side of your screen.
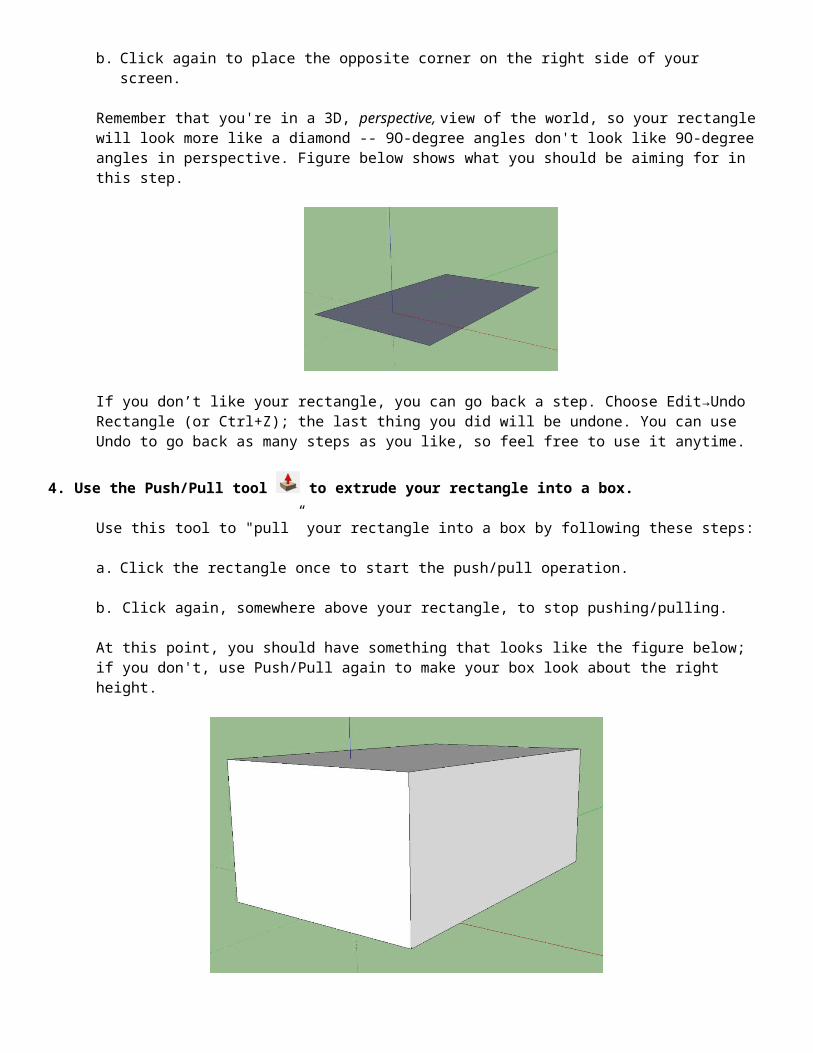
b. Click again to place the opposite corner on the right side of your screen.
Remember that you're in a 3D, perspective, view of the world, so your rectangle will look more like a diamond -- 9O-degree angles don't look like 9O-degree angles in perspective. Figure below shows what you should be aiming for in this step.
If you don’t like your rectangle, you can go back a step. Choose Edit→Undo Rectangle (or Ctrl+Z); the last thing you did will be undone. You can use Undo to go back as many steps as you like, so feel free to use it anytime.
4. Use the Push/Pull tool to extrude your rectangle into a box.
Use this tool to "pull” your rectangle into a box by following these steps:
a. Click the rectangle once to start the push/pull operation.
b. Click again, somewhere above your rectangle, to stop pushing/pulling.
At this point, you should have something that looks like the figure below; if you don't, use Push/Pull again to make your box look about the right height.
If you are happily pushing/pulling away on your box, and everything suddenly disappears, it's because you pushed/pulled the top of your box all the way to the ground. Just choose Edit→Undo and keep going.
5. Draw a couple of diagonal lines for your roof.
Use the Line tool to draw two diagonal edges (lines) that will form your peaked roof. Follow these steps:
a. Click once at the midpoint of the top of your box's front face to start your line.
You'll know you're at the midpoint when you see a small, light-blue square and the word Midpoint appears. Move slowly to make sure that you see it.
b. Click again somewhere along one of the side edges of your box's front face to end your line.
Wait until you see a red On Edge cue (just like the Midpoint one in the last step) before you click; If you don't, your new line won't end on the edge like it's supposed to.
c. Repeat the previous two steps to draw a similar (but opposite) line from the midpoint to the edge on the other side of the face.
Don't worry about making your diagonal lines symmetrical; for the purposes of this exercise, it’s not important that they are.
6. Push/pull the triangles away to leave a sloped roof.
Use the Push/Pull tool to get rid of the triangular parts of your box, leaving you with a sloped roof. Follow these steps and see the figures below:
a. Select the Push/Pull tool , then click the right triangular face once to start the push/pull operation.
b. Move your cursor to the right to “push” the triangle as far as it will go (even with the end of your box).
c. Click again (on the triangle) to end the push/pull operation and to make the triangular face disappear.
d. Still using the Push/Pull tool, double-click the left triangular face to repeat the previous push/pull operation, making that face disappear as well
a. b.
c. d.
7. Measure and draw a rectangle on your front face.
a. Select the Measure tool and click somewhere on the bottom line of the front of the house (We are going to install a door).
b. Move your mouse up towards the roof and you should see a blue line (this means you are moving along the blue axis). Without clicking your mouse, start typing 6’6” and press enter.
As you type, you will see 6’6” in the box at the bottom right of your screen. When you press enter, Sketchup automatically measures the distance from where you first clicked.
c. Select the Line tool . Click again somewhere on the bottom line of the front of the house and move your mouse up to the dashed line you just created and click again.
d. Click again at the last spot you clicked. (Sketchup should automatically put your starting point there if you are somewhere close. Move your mouse across the dashed line, type 45 and then hit enter.
Sketchup measurements default to inches. If you want your measurements in feet, you need to specify. ex. 45 = 3’ 9”
e. Still using your line tool, click the end of the line you just created, move your mouse down (so that there is a blue line), and then click at the bottom of your house. You have just created the outline for your door.
f. Select the Eraser tool . Since the dashed line is just a guide, we want to get rid of it. Click on the line (it should turn blue). When you unclick, the dashed line should disappear.
g. Select the Arrow tool and click on the inside of the door you just created. It should be highlighted with blue dots.
h. Press the delete button (or right click and erase). The door disappears and you can now see inside your house.
c. d. e.
f. g. h.
8. Creating an Arc
a. Select the Arc tool . Click the left top corner of the door. Then, click the right top corner of the door. Finally, move your mouse directly above the center of your door. You should see an arc. Click so you have a semi-circle above your door.
b. Use the Push/Pull tool to pull the arc over the entryway as seen below.
a. b.
9. Installing a Component
a. Go to Window→Component. A new window will open. Type door into the search box and press enter.
b. Choose any door you like by double clicking on the picture, and then move your mouse to your screen, the door should appear. Click once to set it down somewhere next to your house.
c. We may have to rotate our door so it is aligned to our house. Select the Rotate tool . Hover the cursor near the bottom corner of your door until the “protractor” is blue and looks to be laying flat on the ground, then click. Click the bottom corner of your door, then click again at the opposite bottom corner as illustrated in the figure below.
d. Move your mouse around your screen. Your door should rotate around your first point. When you feel the door is rotated parallel with the front of your house, click again.
e. Select the Move tool . Click the bottom right corner of your door, then click again at the bottom right corner of the opening for your door you created in #7.
Sketchup anchors the point you select with the Move tool to the location you click as your destination. It is important that wherever you click on your component, you click the same location on your destination or your object will not anchor properly.
f. If your door is too big or too small for the opening we made in #7, select the door (so it is outlined in a blue box), and hit S. Your component will now be surrounded in small green boxes. Resize your object similar to resizing a picture in a word processing document.
c. d.
e. f.
Part 3: Navigating and Orbiting
1. Choose the Orbit tool . Click somewhere on the left side of your screen and drag your cursor over to the right. Release your mouse button when you're done.
Your model spins. This is called orbiting. Orbit around some more, just to get the hang of it.
If you're orbiting, and you've dragged your cursor over as far as it will go, and you haven't orbited as much as you wanted to, just release the mouse button, move your cursor over to where it was when you started orbiting, and orbit some more by clicking and dragging. You usually can't see what you want to see with a single orbit; you need a bunch of separate “drags” to get things looking the way you want them to.
2. Orbit your model until you can see the bottom of the house.
3. Click on the bottom with the Arrow tool and press delete.
You can now see inside the house and get an idea of how Sketchup creates its lines & faces.
4. Zoom in and out if you need to by selecting the Zoom tool and dragging your cursor up and down in your modeling window.
Clicking and dragging up zooms in, and down zooms out.
5. If you need to move around in two dimensions with the Pan tool by selecting it and then clicking and dragging the Pan cursor inside your modeling window. Pan to "slide” your model around inside your modeling window without spinning it around or making it look bigger or smaller. You can pan in any direction.
6. Click the Zoom Extents tool . If you ever get lost while navigating in your design, this tool will bring you back to a view of your object from the outside.
Part 4: Adding Some Style
1. Choose Window→Materials to open the Materials dialog box. Use the dropdown box to pick a color or texture you like.
When you do, you automatically “pick up" the Paint Bucket tool and fill it with your chosen material.
2. Paint some of the faces in your model by clicking any face you want to paint with the Paint Bucket tool .
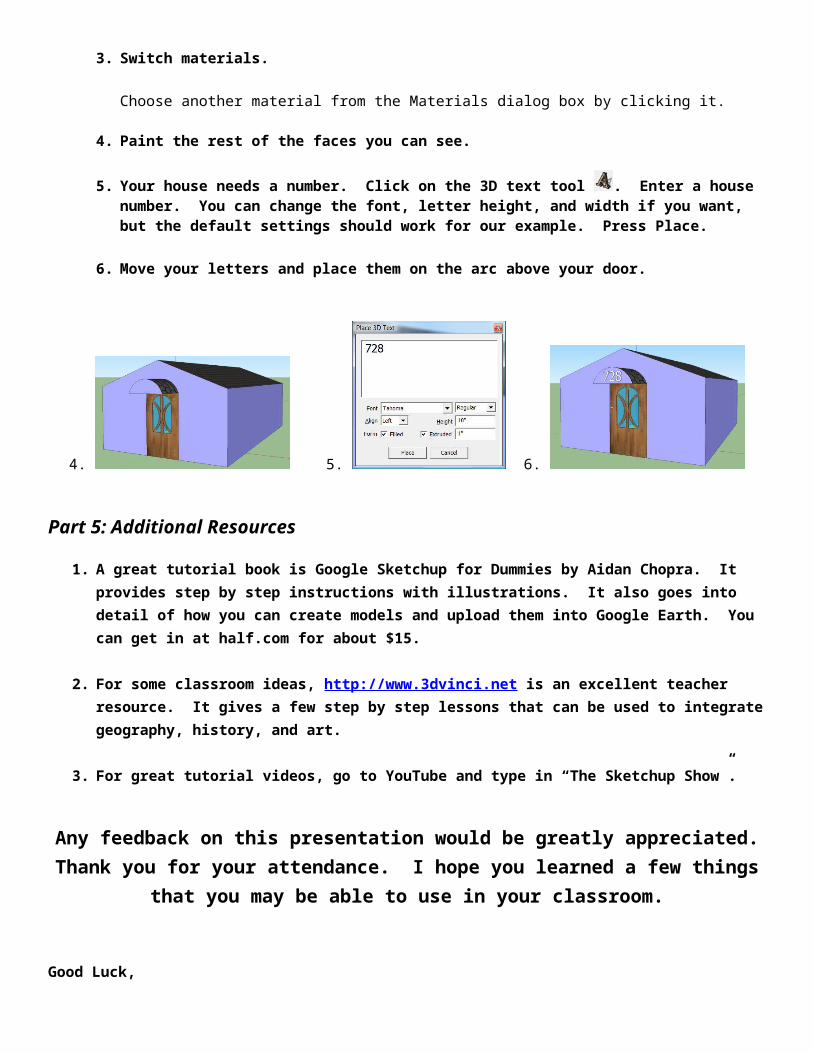
3. Switch materials.
Choose another material from the Materials dialog box by clicking it.
4. Paint the rest of the faces you can see.
5. Your house needs a number. Click on the 3D text tool . Enter a house number. You can change the font, letter height, and width if you want, but the default settings should work for our example. Press Place.
6. Move your letters and place them on the arc above your door.
4. 5. 6.
Part 5: Additional Resources1. A great tutorial book is Google Sketchup for Dummies by Aidan Chopra. It
provides step by step instructions with illustrations. It also goes into detail of how you can create models and upload them into Google Earth. You can get in at half.com for about $15.
2. For some classroom ideas, http://www.3dvinci.net is an excellent teacher resource. It gives a few step by step lessons that can be used to integrate geography, history, and art.
3. For great tutorial videos, go to YouTube and type in “The Sketchup Show”.
Any feedback on this presentation would be greatly appreciated. Thank you for your attendance. I hope you learned a few things