Deccansoft Software Services HTML Tags Tag Name Code Example Browser View <!-- comment <!--This can be viewed in the HTML part of a document--> Nothing will show <A - anchor <A HREF="http://www.yourdomain.com/">Visit Our Site</A> Visit Our Site <B> bold <B>Example</B> Example <BIG> big (text) <BIG>Example</BIG> Example <BODY> body of HTML document <BODY>The content of your HTML page</BODY> Contents of your web page <BR> line break The contents of your page<BR>The contents of your page The contents of your web page The contents of your web page <CENTER> center <CENTER>This will center your contents</CENTER> This will center your contents <DD> definition description <DL> <DT>Definition Term <DD>Definition of the term <DT>Definition Term <DD>Definition of the term </DL> Definition Term Definition of the term Definition Term Definition of the term <DL> definition list <DL> <DT>Definition Term <DD>Definition of the term <DT>Definition Term <DD>Definition of the term </DL> Definition Term Definition of the term Definition Term Definition of the term <DT> definition term <DL> <DT>Definition Term <DD>Definition of the term <DT>Definition Term <DD>Definition of the term </DL> Definition Term Definition of the term Definition Term Definition of the term <EM> emphasis This is an <EM>Example</EM> of using the emphasis tag This is an Example of using the emphasis tag <EMBED> embed object <EMBED src="yourfile.mid" width="100%" height="60" align="center"> <EMBED> embed object <EMBED src="yourfile.mid" autostart="true" hidden="false" loop="false"> <noembed><bgsound src="yourfile.mid" loop="1"></noembed> Music will begin playing when your page is loaded and will only play one time. A control panel will be displayed to enable your visitors to stop the music. <FONT> font <FONT FACE="Times New Roman">Example</FONT> Example <FONT> font <FONT FACE="Times New Roman" SIZE="4">Example</FONT> Example <FONT> font <FONT FACE="Times New Roman" SIZE="+3" COLOR="#FF0000">Example</FONT> Example
Transcript
Deccansoft Software Services HTML Tags
Tag Name Code Example Browser View
<!-- comment <!--This can be viewed in the HTML part of a document--> Nothing will show
<A - anchor <A HREF="http://www.yourdomain.com/">Visit Our Site</A> Visit Our Site
<B> bold <B>Example</B> Example
<BIG> big (text) <BIG>Example</BIG> Example
<BODY> body of HTML document
<BODY>The content of your HTML page</BODY> Contents of your web page
<BR> line break The contents of your page<BR>The contents of your page The contents of your web page The contents of your web page
<CENTER> center <CENTER>This will center your contents</CENTER> This will center your contents
<DD> definition description
<DL> <DT>Definition Term <DD>Definition of the term <DT>Definition Term <DD>Definition of the term </DL>
Definition Term Definition of the term
Definition Term Definition of the term
<DL> definition list
<DL> <DT>Definition Term <DD>Definition of the term <DT>Definition Term <DD>Definition of the term </DL>
Definition Term Definition of the term
Definition Term Definition of the term
<DT> definition term
<DL> <DT>Definition Term <DD>Definition of the term <DT>Definition Term <DD>Definition of the term </DL>
Definition Term Definition of the term
Definition Term Definition of the term
<EM> emphasis This is an <EM>Example</EM> of using the emphasis tag This is an Example of using the emphasis tag
Music will begin playing when your page is loaded and will only play one time. A control panel will be displayed to enable your visitors to stop the music.
<FONT> font <FONT FACE="Times New Roman">Example</FONT> Example
<FONT> font <FONT FACE="Times New Roman" SIZE="4">Example</FONT> Example
<FONT> font <FONT FACE="Times New Roman" SIZE="+3" COLOR="#FF0000">Example</FONT> Example
This is an example displaying the use of the paragraph tag. <P> This will create a line break and a space between lines. Example 1:<BR> <BR> <P align="left"> This is an example<BR> displaying the use<BR> of the paragraph tag.<BR> <BR> Example 2:<BR> <BR> <P align="right"> This is an example<BR> displaying the use<BR> of the paragraph tag.<BR> <BR> Example 3:<BR>
This is an example displaying the use of the paragraph tag.
This will create a line break and a space between lines. Example 1: This is an example displaying the use of the paragraph tag.
Example 2:
This is an exampledisplaying the use
of the paragraph tag.
<SMALL> small (text) <SMALL>Example</SMALL> Example
<STRONG> strong emphasis <STRONG>Example</STRONG> Example
<TABLE> table Example 1: <TABLE BORDER="4" CELLPADDING="2"
Deccansoft Software Services Html / Javascript– Classroom
1
------------------------------------------------------------------------------------------------------------------------------------------ HTML Form Demo <HTML>
<HEAD> <TITLE>Form Demo</TITLE>
</HEAD> <BODY BGCOLOR="yellow">
<FORM NAME="MyForm" ACTION="Next.html" METHOD="post"> Name: <INPUT TYPE="text" NAME="txtName"> <BR> Password: <INPUT TYPE="password" NAME="txtPassword"> <BR> Gender <BR> <INPUT TYPE="radio" NAME="rbnGender" CHECKED> Male <INPUT TYPE="radio" NAME="rbnGender">Female <BR> Hobbies <BR> <INPUT TYPE="checkbox" NAME="chkMusic" CHECKED>Music <INPUT TYPE="checkbox" NAME="chkDance">Dance <BR> Address:<br> <TEXTAREA rows="4" columns="5"></TEXTAREA><BR> How do you rate my site <SELECT>
</HTML> Javascript For LOOP <SCRIPT LANGUAGE="JavaScript"> for (var i=1;i<=10;i++) { if(i==4) continue; if(i==7) break; document.writeln(i); } </SCRIPT> Select tag <form name="Form1"> <select name="s1"> <SCRIPT LANGUAGE="Javascript"> for(i=1;i<=100;i++) document.write("<option value=" + i + ">" + i + "</option>") </script> </select> </form> JavaScript Dialogs <SCRIPT LANGUAGE="JavaScript"> document.writeln("<H1 ALIGN=center>This is Java Script</H1>"); window.alert("This is alert box"); alert(window.confirm("This is confirm box")); var a,b; a = window.prompt("Enter value of a","10"); b = window.prompt("Enter value of b","20"); var p,q; p = parseInt(a); q = parseInt(b); var c; c = p+q; window.alert("Sum is " + c);
Deccansoft Software Services Html / Javascript– Classroom
2
</SCRIPT> Validations Of Data <html> <head> <title>Validations</title> <script language="JavaScript"> function btnHit_Click() { window.alert("You have hit me"); } function txtPassword_Focus() { var name=document.MyForm.txtName.value; var len = name.length; while (len == 0) { window.alert("Enter Name"); name = window.prompt("Enter Name",""); len = name.length; document.MyForm.txtName.value=name; } } function txtEmail_Change() { var email = document.MyForm.txtEmail.value; var p1,p2,diff; p1 = email.indexOf("@"); p2 = email.indexOf("."); diff = p2 - p1; if((p1== -1) || (p2 == -1) || (diff < 1)) window.alert("Not a valid Email"); } </script> </head> <body> <form name="MyForm"> Name: <input type="text" name="txtName"> <BR> Password: <input TYPE="password" name="txtPassword" OnFocus="txtPassword_Focus()"><BR> Email : <input type="text" name="txtEmail" OnChange="txtEmail_Change()"> <input type="submit" value="Submit"> <input type="reset" value="Clear"> <input type="button" name="btnHit" value="Hit Me" OnClick="btnHit_Click()"> </form> </body> </html>
Deccansoft Software Services Html / Javascript– Classroom
o Form tag cannot be nested inside another form tag. o Input type’s button and reset and disabled elements name and value pair is not submitted to the server. o Input type = button is used only for writing client side JavaScript code. o Input type=checkbox submits name and value pair only if the checkbox is checked otherwise nothing is submitted. If
value is not provided the default value posted is “on” o To group radio buttons, same name must be given to them. And only the name-value pair of the radio button selected
will be submitted to server. o For select, name of select and value of the option selected is submitted to server. o Select tag with size attribute is rendered as Listbox otherwise its rendered as DropDownList o For Textarea, name of text area and value of textarea is submitted to server. o Input type=image behaves as submit button where as <img> tag renders static image. o A form can have more than one submit button, but only the name-value pair of the submit button used to post the
form is included with the request. o If the form has input type=”file” then its enctype=”multipart/form-data” must be set.
Deccansoft Software Services – ASP.NET Web Programming Introduction HTTP Protocol
• A Request is submitted to server using HTTP protocol • HTTP Protocol is safe for internet type of scenario and is the default protocol used by the web browsers. • HTTP is a stateless protocol. This is because it doesn’t know whether the request that has been made is part of an ongoing
correspondence or just a single message. • HTTP is a W3C specification. • HTTP communicates only in the String Format.
1. Request Line. 1. Status Line. 2. Request Header. 2. Response Headers. 3. Message Body (Posted Data). 3. Message Body.
Request Line: Method Path Protocol / Version Example: Get/Post Demo/default.htm http / 1.1 Request Header: These are the name value pairs submitted by the browser to the server .It contains the information about the browser and the OS on the client machine. Message Body is the stream of name value pairs submitted to server when the form is submitted using the method POST. CGI Environmental Variables: It’s a collection of name value pairs including request headers and information about the server in a context of a given request. <form name=”Form1” action=”demo.asp” method=”post” target=”frameName” enctype=””> <input type=”….. <input type=”submit” name=”s1” value=”Submit”> </form> When the form is submitted by clicking on the submit button it would submit the Name/ Value pair of every input elements in the form. About Get and Post Methods: GET Method:
1. All the name value pairs are submitted as a query string. 2. It’s not secured. 3. Length of the string is restricted. 4. This is the default method 5. If get method is used and if the page is refreshed it would not prompt before the request is submitted again.
POST Method: 1. Length of the string is not restricted in Post Method. 2. Post Method is secured. 3. Name-Value pairs cannot be seen in location bar of the web browser. 4. Use this method if the o/p rendered depends upon the posted data and varies based on the input provided. 5. If post method is used and if the page is refreshed it would prompt before the request is submitted again.
Status Line: Status Code / Description
1xx Informational 2xx Success 3xx Redirect 4xx Not Authorized / Not Authenticated. 5xx Server Error
o Every web server has a default directory and by default on IIS it is: c:\inetpub\wwwroot\ o From Browser: Http://servername(IP):PortNo/Directory/default.Html
What is ASP?
1
Deccansoft Software Services – ASP.NET Web Programming Introduction
2
• ASP is a server side scripting technology that enables scripts (embedded in web pages) to be executed by an Internet server • An ASP file is just the same as an HTML file • An ASP file can contain text, HTML, XML, and scripts • Scripts in an ASP file are executed on the server • An ASP file has the file extension ". asp"
How does it Work?
• When a browser requests an HTML file, the server just returns the file without doing any processing. • When a browser requests an ASP file, IIS passes the request to the ASP engine (ASP.DLL) on the server • The ASP engine reads the file, line by line, and executes the scripts in the file • Finally, the output rendered is returned to the browser as plain HTML.
ASP Objects: Request, Response, Session, Application, Server, ObjectContext & AspError.
<%……%> It contains the server side code and the code is in VBScript. The code out side the delimiter is Client side code and is as it is rendered to the client.
<% Response.Write(“hello”) %> or <%=”hello”%> are same.
o Form tag cannot be nested inside another form tag. o Input type’s button and reset and disabled elements name and value pair is not submitted to the server. o Input type = button is used only for writing client side JavaScript code. o Input type=checkbox submits name and value pair only if the checkbox is checked otherwise nothing is submitted. If value is
not provided the default value posted is “on” o To group radio buttons, same name must be given to them. And only the name-value pair of the radio button selected will be
submitted to server. o For select, name of select and value of the option selected is submitted to server. o Input type=image behaves as submit button where as <img> tag renders static image. o For Textarea, name of text area and value of textarea is submitted to server. o Select tag with size attribute is rendered as Listbox. o A form can have more than one submit button, but only the name-value pair of the submit button used to post the form is
included with the request. o If the form has input type=”file” then its enctype=”multipart/form-data” must be set.
Deccansoft Software Services – ASP.NET Introduction and Architecture ASP.NET is a framework for developing web based applications using MS.NET.
New in ASP .NET
Better language support Programmable controls Event-driven programming XML-based components User authentication, with accounts and roles Higher scalability Increased performance - Compiled code Easier configuration and deployment Not fully ASP compatible
ASP .NET Controls ASP .NET contains a large set of HTML controls. Almost all HTML elements on a page can be defined as ASP .NET control objects that can be controlled by scripts. ASP .NET also contains a new set of object oriented input controls, like programmable list boxes and validation controls. A new data grid control supports sorting, data paging, and everything you expect from a dataset control. Event Aware Controls All ASP .NET objects on a Web page can expose events that can be processed by ASP .NET code. Load, Click and Change events handled by code makes coding much simpler and much better organized.
ASP .NET Components
ASP .NET components are heavily based on XML. Like the new AD Rotator, that uses XML to store advertisement information and configuration
User Authentication ASP .NET supports forms-based user authentication, including cookie management and automatic redirecting of unauthorized logins. User Accounts and Roles ASP .NET allows for user accounts and roles, to give each user (with a given role) access to different server code and executables. High Scalability Server to server communication has been greatly enhanced, making it possible to scale an application over several servers. One example of this is the ability to run XML parsers, XSL transformations and even resource hungry session objects on other servers. Compiled Code The first request for an ASP .NET page on the server will compile the ASP .NET code and keep a cached copy in memory. The result of this is greatly increased performance. Easy Configuration Configuration of ASP .NET is done with plain text files. Configuration files can be uploaded or changed while the application is running. No need to restart the server. No more metabase or registry puzzle Easy Deployment No more server restart to deploy or replace compiled code. ASP .NET simply redirects all new requests to the new code. Compatibility ASP .NET is not fully compatible with earlier versions of ASP, so most of the old ASP code will need some changes to run under ASP .NET. To overcome this problem, ASP .NET uses a new file extension ".aspx". This will make ASP .NET applications able to run side by side with standard ASP applications on the same server. Creating a new ASP.NET application:
1
Deccansoft Software Services – ASP.NET Introduction and Architecture o File New Website File System It uses ASP.NET Development Server and for every web application a new instance of ASP.NET
Development Server Starts HTTP it uses IIS server.
Points to be noted / observed:
1. Every Webform has an extension “.aspx” 2. A Webform doesn’t have action attribute and it always submits to itself. Even if the action attributed is provided to the
Server side form it is ignored by the ASP.NET framework. 3. The default method rendered for the Webform in ASP.NET is “POST” 4. Here the UI is separated from the Business Code/ Event Handlers.
AppDomain: An AppDomain is a logical connection of one or more thread with in a process. If a thread of one App domain wants to access the thread of another app domain, it has to use inter-process communication (IPC). A process can have more than one AppDomain and each AppDomain is independent of another AppDomain. If a thread in one AppDomain crashed, only other threads of that AppDomain are affected and threads in other AppDomains would continue to run. ASPNET_WP.EXE
App Domain
Life Cycle of a WebForm: When the Web Server receives the request for the file with the extension .aspx, it forwards it to aspnet_isapi.dll which is an ISAPI application executing within the web server process. This ISAPI application is then responsible for launching the aspnet_wp.exe worker process. In the Worker process a new AppDomain is created for every web application. And for every Request a new thread is created in the AppDomain.
Compiled Persisted Executed and Output is rendered
to the browser
+
Dynamic Class created by ASP.NET framwork
Compile form of Default.aspx.cs
From. Default.aspx form a class is constructed and is compiled.
Note: From second request onwards the framework uses the persisted form for executing the request. ASP.NET now 1. Creates an instance of the WebForm class Note: For every trip made to the server i.e. for first request or even if the form is submitted the new instance the page class is created. Note: When the web form class is instantiated, the controls of the class are not yet created or instantiated hence the constructor of web form cannot be used for setting or getting control properties.
2
Deccansoft Software Services – ASP.NET Introduction and Architecture 2. Based on the server side tags (runat=”server”) the controls are instanced and based on tag attributes the control properties
are set. Server Tag Server Object Client Tag <asp: TextBox Instance of Textbox <input type = “text” …> Attributes Properties Attribute for client tag. Text = “Attribute” Value = “Attribute” So the final output rendered for <asp:TextBox runat=”server” id=”TextBox1” Text=”Demo”/> is <input type=”text” name=”TextBox1” id=”TextBox1” value=”Demo”> Note: All the Objects created (for controls and page) are ready for garbage collection once the response of the page is rendered to be web browser i.e. for every request new objects are created. public partial class _Default : System.Web.UI.Page { protected void Page_Load(object sender, EventArgs e) { if (!Page.IsPostBack) TextBox1.Text = "Load"; } protected void Page_Init(object sender, EventArgs e) { TextBox1.Text = "Init"; } protected void Button1_Click(object sender, EventArgs e) { TextBox1.ForeColor = System.Drawing.Color.Red; } protected void TextBox1_TextChanged(object sender, EventArgs e) { Response.Write("TextChanged"); } protected void Button2_Click(object sender, EventArgs e) { } } Instance of class is created and constructor is executed Init ------------------------------ Load -- -- control events PreRender
On Post Back, the control uses the name-value pair (on its behalf) submitted (new state) by the browser and __VIEWSTATE (Old State) and sets its state (restores its state as it was before rendering the page in previous response).
• Any type of initialization of the control must be done in Load (and preferably in if (!IsPostBack) ). It is not recommended to set or get control properties in Init event handler of Page because only after init event of page the control is said to be completely initialized.
• When the page is rendered, every control adds its current state to the hidden element “__VIEWSTATE”. For a response there is only one VIEWSTATE rendered in which all the controls add their current state.
• When the form is submitted after Init and before Load event, the control uses the data in the hidden element “__VIEWSTATE” and restores its complete state.
Note: For the explanation of the above feature take an example of ForeColor Property of TextBox. EnableViewState=False On a round trip we are not rendering the output of the same page / webform, the EnableViewState Property of the controls on the page can be set to false. But if done so any change in state of the control during the page life cycle is not added to the hidden element __VIEWSTATE and thus if round trip is made page the old state is not restored.
3
Deccansoft Software Services – ASP.NET Introduction and Architecture For raising events: When the form is posted every control compares its name values pair submitted with the old state in __VIEWSTATE. If it’s different the control raises an appropriate event on the server.
AutoPostBack=true, it renders the required java script to browser to programmatically post the form to the server i.e. a javascript function “__doPostBack()” is rendered and the same is mapped to its client side event of the control.
Event Handling in WebForms <%@ Page AutoEventWireup=”true” CodeFile=”Default.aspx.cs” Inherits=”_Default” %>
AutoEventWireup is set to true the events of page class are mapped to the event handlers based on the name of the event handler method i.e. (Page_ <eventname>(. . .)
o In C# preferable AutoEventWireup should be set to “true”. o In C# for event handlers of page class we can override the approximate method of the parent class i.e. instead of writing
Page_Load method as event handler we can also override OnLoad method in the class. o AutoEventWireup is not used for anything other than Page Events.
Note: Either if an event of the control is handled or if a roundtrip to server renders the output of the same WebForm “EnableViewState” property of the control must not be set to false.
The Events of the controls will fire only after the load event of the page, but the decision to raise the event or not is taken after “Init” and before “Load” event of the page.
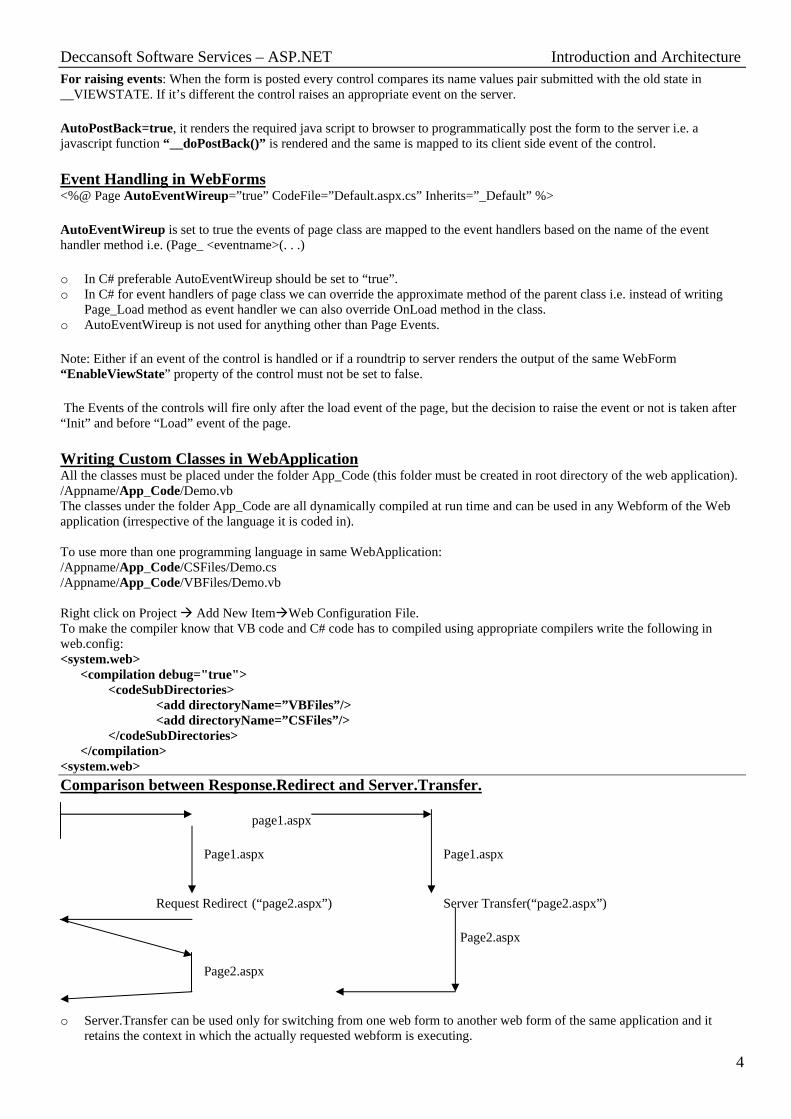
Writing Custom Classes in WebApplication All the classes must be placed under the folder App_Code (this folder must be created in root directory of the web application). /Appname/App_Code/Demo.vb The classes under the folder App_Code are all dynamically compiled at run time and can be used in any Webform of the Web application (irrespective of the language it is coded in). To use more than one programming language in same WebApplication: /Appname/App_Code/CSFiles/Demo.cs /Appname/App_Code/VBFiles/Demo.vb Right click on Project Add New Item Web Configuration File. To make the compiler know that VB code and C# code has to compiled using appropriate compilers write the following in web.config: <system.web> <compilation debug="true"> <codeSubDirectories> <add directoryName=”VBFiles”/> <add directoryName=”CSFiles”/> </codeSubDirectories> </compilation> <system.web> Comparison between Response.Redirect and Server.Transfer.
page1.aspx
Page1.aspx Page1.aspx
Request Redirect (“page2.aspx”) Server Transfer(“page2.aspx”)
Page2.aspx
Page2.aspx
o Server.Transfer can be used only for switching from one web form to another web form of the same application and it retains the context in which the actually requested webform is executing.
4
Deccansoft Software Services – ASP.NET Introduction and Architecture
5
o Redirect submits the response to the browser asking browser to send a request for the new url and thus all the context of the previous request is lost when the new url is executing.
o Redirect can be used for switching from one a webform of one webapplication to a webform in another webapplication. o On refresh, If Redirect is used it will send the request for the new page whereas if Transfer is used browser submits the
request for original page.
Deccansoft Software Services – ASP.NET Basic Controls
1
Types of Server Controls: 1. HTML Server Controls - Traditional HTML tags - System.Web.UI.HtmlControls 2. Web Server Controls - ASP.NET Controls – System.Web.UI.WebControls
HTML Controls are by default treated as text in ASP.NET. To make these elements programmable add runat="server" attribute to the HTML elements. This attribute indicates that the element should be treated as a server control. The “id” attribute is added to identify the server control. The id reference can be used to manipulate the server control at run time.
Web Server Controls: Web server controls are special ASP.NET tags understood by the ASP.NET server.
Like HTML server controls, Web server controls are also created on the server and they require a runat="server" attribute to work. However, Web server controls do not necessarily map to any existing HTML elements and they may represent more complex elements.
Label: Renders SPAN tag to the client. Properties: Text
Textbox: Can render either <input type=”text” or <input type=”password” or <textarea> tags Properties: Text, TextMode (SingleLine/MultiLine/Password), ReadOnly, MaxLength, AutoPostBack, AutoCompleteType Event: TextChanged
Button: Can render either <input type=”button” or <input type=”submit”… Properties: Text, OnClientClick, UseSubmitBehavior, CommandName, CommandArgument, CausesValidation. Events: Click, Command //Add the following <script> block to “<HEAD>” section of aspx page. <script language=”javascript” type=”text/javascript”> function CanSubmit() { return confirm(“Are You Sure?”); //Confirm shows a dialog box with OK and Cancel Button. } </script> <asp:Button onClientClick=”return CanSubmit()” UseSubmitBehavior=”true” …./> Renders <input type=”submit”….> <asp:Button onClientClick=”if (!CanSubmit()) return;” UseSubmitBehavior=”false” …./> Renders <input type=”button”….> Note: In Javascript if OnClick of Submit Button return false, the form is not submitted to server. Examlpe: <asp:Button ID="btn1 " runat="server" OnClick="btn _Click" Text="Button1" OnCommand="btn_Command" CommandName="C1" /> <asp:Button ID="btn2 " runat="server" OnClick="btn _Click" Text="Button2" OnCommand="btn_Command" CommandName="C2" /> <asp:Button ID="btn3 " runat="server" OnClick="btn _Click" Text="Button3" OnCommand="btn_Command" CommandName="C3" /> Note: All the button “Click” and “Command” events are mapped to the same Event Handlers. protected void btn _Click(object sender, EventArgs e) { Button btn = (Button) sender; //sender is reference to the control on which we have clicked. Response.Write(btn.Text); } protected void btn _Command(object sender, CommandEventArgs e) { Response.Write(e.CommandName); }
LinkButton: renders <A href=”__doPostBack(…)” …> -Used for posting the form to server. Properties: Text, OnClientClick, CommandName, CommandArgument, CausesValidation. Events: Click, Command
Deccansoft Software Services – ASP.NET Basic Controls
HyperLink: <A href=”Url”… - Used for linking to another page of the webapplication and not posting the form. Properties: Text, ImageUrl, NavigateUrl, Target, OnClientClick
CheckBox: renders <input type=”Checkbox” … Properties: Text, Checked Event: Click RadioButton: renders <input type=”radio” . Its inherited from CheckBox class. Properties: Text, Checked, GroupName (must be same for grouping the radio buttons) Event: Click ListControl: It’s a common parent for DropDownList, ListBox, CheckBoxList, RadioButtonList, BulletedList Properties: Items, SelectedIndex, SelectedItem, SelectedValue, Text, AppendDataBoundItems, DataText, AutoPostBack Methods: ClearSelection Event: SelectedIndexChanged ListItem: renders based on container tag in which it is used. Properties: Text, Value, Selected DropDownList: renders <select tag ListBox: renders <select size=”x” … Properties: Rows (maps to size attribute), SelectionMode (Single / Multiple) Method: GetSelectedIndices() as Integer() CheckboxList: renders <input type=”checkbox”… for every ListItem Properties: RepeatColumns, RepeatDirection, RepeatLayout RadioButtonList: renders <input type=”radio” … for every ListItem Properties: RepeatColumns, RepeatDirection, RepeatLayout Example: <asp:CheckBoxList ID="lst" runat="server" RepeatColumns="3" RepeatDirection="Horizontal" AutoPostBack="True" OnSelectedIndexChanged="lst_SelectedIndexChanged"/> protected void Page_Load(object sender, EventArgs e) { if (!IsPostBack) { for (int i = 0; i < 10; i++) { ListItem li = new ListItem(); li.Text = "Item" + i; //Displayed for every item li.Value = i.ToString(); //Submitted if this item is selected lst.Items.Add(li); } } } protected void lst_SelectedIndexChanged(object sender, EventArgs e) { //Response.Write(lst.SelectedValue); // For Single Selected //Form multiple items selected string str = ""; foreach (ListItem li in lst.Items) { if (li.Selected) str += li.Value + " "; } Response.Write(str);
Deccansoft Software Services – ASP.NET Basic Controls
3
} Literal Control: renders just text without any tag Properties: Text FileUpload: reders <input type=”file” ….> <form……enctype =”multipart /form data”> When the Form with Fileupload control is rendered, the enctype attribute is automatically added to the rendered client side form tag. if (FileUpload1.HasFile) { string pp = MapPath("~/UploadedFiles/" + FileUpload1.FileName); //For a given Virtual Path, MapPath return Physical Path. if (System.IO.File.Exists(pp)) { Response.Write("Already exiting..."); return; } FileUpload1.SaveAs(pp); Response.Write("Uploaded..."); //byte[] b=FileUpload1.Filebytes; //System.IO.Stream s=FileUpload1.FileContent; } Fileupload control doesnot retain its state on roundtrip. Calander: protected void Calendar1_SelectionChanged(object sender, EventArgs e) { Response.Write(Calendar1.SelectedDate.ToShortDateString()); } protected void Calendar1_DayRender(object sender, DayRenderEventArgs e) { if (e.Day.IsWeekend) e.Day.IsSelectable = false; if (e.Day.Date.DayOfWeek == DayOfWeek.Thursday) e.Cell.BackColor = System.Drawing.Color.Red; } protected void Calendar1_VisibleMonthChanged(object sender, MonthChangedEventArgs e) { Calendar1.SelectedDate = new DateTime(e.NewDate.Year, e.NewDate.Month, Calendar1.SelectedDate.Day); }
Deccansoft Software Services – ASP.NET Basic Controls
For chkMultiple set AutoPostBack to True if (rbnMove.Checked )
protected void btnAdd_Click(. . .) if (chkMultiple.Checked) { { if (rbnList1.Checked) lst1.Items.Add(txtName.Text); } else if (rbnList2.Checked) else lst2.Items.Add(txtName.Text); { } foreach (ListItem item in lst2.Items) protected void btnDelete_Click(. . .) lst1.Items.Add(lst2.SelectedValue); { if (rbnMove.Checked) if (rbnList1.Checked) lst2.Items.Clear() lst1.Items.RemoveAt(lst1.SelectedIndex); } else if (rbnList2.Checked) } lst2.Items.RemoveAt(lst2.SelectedIndex); protected void chkMultiple_CheckedChanged(. . .) } { protected void btnModify_Click(. . .) if (chkMultiple.Checked ) { { if (rbnList1.Checked) btnMoveLeft.Visible = false; lst1.SelectedItem.Text = txtName.Text; btnMoveRight. Visible = false; else if (rbnList2.Checked ) lst1. SelectionMode = ListSelectionMode.Multiple; lst2.SelectedItem.Text = txtName.Text; lst2. SelectionMode = ListSelectionMode.Multiple; } } protected void btnRemoveAll_Click(. . .) else { { if (rbnList1.Checked) btnMoveLeft. Visible = true; lst1.Items.Clear(); btnMoveRight. Visible = true; else if (rbnList2.Checked ) lst1.SelectionMode = ListSelectionMode.Single; lst2.Items.Clear(); lst2.SelectionMode = ListSelectionMode.Single; } } protected void btnMoveRight_Click(. . .) } { If Multiple is Checked then btnMoveRight and btnMoveLeft
should be hidden and when btnMoveAllRight is clicked all the selected items in the List1 should be Copied / Moved to List2. Similarly if btnMoveAllLeft is clicked then all the selected items in the List2 should be copied / moved to List1
txtName.Text = lst1.SelectedItem.Text; ListItem li = new ListItem(); li.Text = txtName.Text; lst2.Items.Add(li); if (rbnMove.Checked ) lst1.Items.RemoveAt(lst1.SelectedIndex); If Multiple is Un-Checked then btnMoveRight and
btnMoveLeft should be Visible and when btnMoveAllRight is clicked all the items in the List1 should be Copied / Moved to List2. Similarly if btnMoveAllLeft is clicked then all items in the List2 should be copied / moved to List1. If btnMoveRight is clicked then copy / move the selected item from List1 to List2 and if btnMoveLeft is clicked then copy/move selected item in List2 to List1
} protected void btnMoveLeft_Click(. . .) { txtName.Text = lst2.SelectedItem.Text; ListItem li = new ListItem(); li.Text = txtName.Text; lst1.Items.Add(li);
4
Deccansoft Software Services – ASP.NET Validation Controls
1
• With one Server Control we can have more than one validation control associated but the same validation control cannot be associated with multiple server controls.
BaseValidator: It is the parent of all the validation controls. Validation Controls inherited from BaseValidator control are, RequiredFieldValidator, RangeValidator, CompareValidator, RegularExpressionValidator, CustomValidator. Properties of BaseValidator: ControlToValidate, ErrorMessage, Text, Display (Static/Dynamic/None), SetFocusOnError, ToolTip, EnableClientScript ,ValidationGroup ValidationSummary: Is used to display the collection of error message on the page at a given location. It shows the ErrorMessage poperty of all the controls whose validation has failed. Properties: ShowMessageBox, ShowSummary: Sample: <asp:ValidationSummary ID="ValidationSummary1" runat="server" /> RequiredField Validator: To ensure that the user does not skip an entry and is used for every control in asp.net. Properties: InitialValue Sample: First Name<asp:TextBox ID="txtFirstName" runat="server"></asp:TextBox> <asp:RequiredFieldValidator ID="rfvFirstName " runat="server"
ErrorMessage="Please provide the value for First Name" ControlToValidate="txtFirstName" SetFocusOnError="True"> Text= “Required”
ErrorMessage="Please provide the value for Last Name" ControlToValidate="txtLastName" InitialValue=”Not Applicable” SetFocusOnError="True" Text= “Required”/>
</asp:RequiredFieldValidator> <asp:DropDownList ID="ddl" runat="server"> <asp:ListItem Value="-1">(Select One)</asp:ListItem> <asp:ListItem Value="1">One</asp:ListItem> <asp:ListItem Value="2">Two</asp:ListItem> <asp:ListItem Value="3">Three</asp:ListItem> </asp:DropDownList> <asp:RequiredFieldValidator ID="rfvDDl" runat="server" ControlToValidate="ddl" ErrorMessage="Please select a value in ddl" InitialValue="-1">*</asp:RequiredFieldValidator> CompareValidator: Compares a user’s entry against a constant value, against the value of another control. Property: ValueToCompare, ControlToCompare, Type, Operator Sample: Password: <asp:TextBox ID="txtPassword"runat="server"></asp:TextBox> <asp:RequiredFieldValidator ID="rfvPassword" runat="server" ControlToValidate="txtPassword" Display="Dynamic" ErrorMessage="Please provide the value for Password">
Deccansoft Software Services – ASP.NET Validation Controls
Display="Dynamic" ErrorMessage="The Password and Confirm Passoword must be same">
Text=”Must be same as Password” Operator=”Equal”
</asp:CompareValidator><br /> Date of Birth: <asp:TextBox ID="txtDOB" runat="server"></asp:TextBox> <asp:CompareValidator ID="cvDob" runat="server"
ControlToValidate="txtDob" ErrorMessage="Please provide a valid DOB" Operator="DataTypeCheck" ‘This only does Datatype check and not value comparision. Type="Date"> Text=”Invalid Date Format”
</asp:CompareValidator><br /> RangeValidator: Checks that a users entry is between lower and upper boundaries. Properties: MinimumValue, MaximumValue, Type Sample: Value <asp:TextBox ID="txtValue" runat="server"></asp:TextBox> <asp:RangeValidator ID="rvValue" runat="server"
ControlToValidate="txtValue" ErrorMessage="Please provide the value in range of 1 to 100" MaximumValue="100"
MinimumValue="1" Type="Integer">
Text=”Valid Range: 1 – 100” </asp:RangeValidator><br /> RegularExpressionValidator: It Checks the users entry matches a pattern defined by a regularexpression. Properties: ValidationExpression Sample: Email<asp:TextBox ID="txtEmail" runat="server"></asp:TextBox> <asp:RegularExpressionValidator ID="revtxtEmail" runat="server" ControlToValidate="txtEmail"
ErrorMessage="Please provide a valid e-mail id" ValidationExpression="\w+([-+.']\w+)*@\w+([-.]\w+)*\.\w+([- .]\w+)*"> Text=”Invalid e-mail id”
</asp:RegularExpressionValidator> Custom Validator: Checks the user's entry using validation logic that you write yourself. Properties: ClientValidationFunction Sample: <head> <script language=”javascript”>
function IsOdd(src,args) //src is reference to ValidationControl.
Deccansoft Software Services – ASP.NET Validation Controls
3
{ if (args.Value % 2 == 0) { args.IsValid = false; src.errormessage = args.Value + " is not an odd number" } </script> </head> OddValue: <asp:TextBox ID="txtOddValue" runat="server"></asp:TextBox> <asp:CustomValidator ID="cvOddValue" runat="server"
ErrorMessage="Please provide an Odd number" ClientValidationFunction="IsOdd" ControlToValidate="txtOddValue">
</asp:CustomValidator><br />
Additional Features Button Controls: <asp:Button ID="btnSave" runat="server" Text="Save" OnClick="btnSave_Click" /> <asp:Button ID="btnCancel" runat="server" Text="Cancel" CausesValidation="False" /><br /> If Cancel button is clicked the form is submitted to server with out doing any client side validation. In one webform (aspx page) we can have only one server side form tag. ValidationGroup Property: Is used to group all the validation control into a single group. A form can have more than one group of controls and based on the group of the button clicked, only controls in given group are validated. Example: <asp:ValidationSummary ID="ValidationSummary2" runat="server" ValidationGroup="g1"/> Name: <asp:TextBox ID="txtName" runat="server" ValidationGroup="g1"/ > <asp:RequiredFieldValidator ID="rfvName" runat="server"
ControlToValidate="txtName" ErrorMessage="Please provide the value for txtName" ValidationGroup="g1"/>
{ Page.Validate("");//Validates all the validation controls on the page ValidationSummary1.Style["display"] = "none"; //It does not display the ErrorMessages for the first time.
} else
{ ValidationSummary1.Style["display"] = "";
} } protected void btnSave_Click(object sender, EventArgs e) { if (!Page.IsValid) //validation is done on server-side, This is needed if the browser doesn’t support javascript.
return; //Write here code for taking data from controls and using for what ever purpose it might be for.
Response.Write("Saved..."); } • Page.Validators - It’s a collection of all validators in that page. • We can disable the validation control if we don’t want them to work on both client and server side (Enabled = False)
Deccansoft Software Services – ASP.NET Validation Controls
4
• The Server Controls which can be validated using Validation Controls are TextBox, FileUpload, DropDownList,ListBox etc…i.e. not all Server controls can be validated using Validation Controls.
Deccansoft Software Services – ASP.NET CrossPostBack
1
By Default every WebForm Posts the form to itself but if Buton’s PostBackUrl is set to a Url of another page then the Form is Posted to that Url instead of itself. Page1.aspx <asp:Label ID="lblDemo" runat="server"></asp:Label> <asp:TextBox ID="txtDemo" runat="server"></asp:TextBox><br /> <asp:Button ID="btnPostBack" runat="server" OnClick="btnPostBack_Click" Text="PostBack" /> <asp:Button ID="btnCrossPostBack" runat="server" OnClick="btnCrossPostBack_Click"
PostBackUrl="~/CrossPostBack/Page2.aspx" Text="Cross Post Back" /> Page1.aspx.cs public partial class CrossPostBack_Page1 : System.Web.UI.Page {
get { return txtDemo.Text; } } } Page2.aspx: <%@PreviousPageType VirtualPath=”CrossPostBackDemo/Page1.aspx”%> And the following Label to the WebForm. <asp:Label ID="lblDemo" runat="server"></asp:Label> Page2.aspx.cs public partial class CrossPostBack_Page2 : System.Web.UI.Page { protected void Page_Load(object sender, EventArgs e) { if (PreviousPage == null) //Its true if a user is directly coming to this page. Response.Redirect("Page1.aspx");
TextBox pptxtDemo = (TextBox)PreviousPage.FindControl("txtDemo"); if (pptxtDemo != null) lblDemo.Text = pptxtDemo.Text; //Or You can access the public property of previous page (DemoText) if (PreviousPage.IsCrossPagePostBack) { Response.Write("<br>This is CrossPostBack<br>"); lblDemo1.Text = PreviousPage.DemoText; //DemoText is the property added to the class Page1 } else Response.Write("<br>This is Server.Transfer<br>");
} } <%@PreviouspageType VirtualPath=”CrossPostBackDemo/Page1.aspx”%> • If the above directive is not used then the datatype of the property this.PreviousPage is “System.Web.UI.Page” but if this
directive is present in “Page2.aspx” then the datatype of “this.PreviousPage” would be the dynamic class inherited from “Page2”.
• After adding this directive to Page2.aspx, we can access the public properties declared in the class Page1 of “Page1.aspx.cs” file. This can be done using “PreviousPage” property of “Page” class. Example: PreviousPage.DemoText
• Once the above directive is used only from Page1.aspx we can come to Page2.aspx. Additional Notes: • Page.IsCrossPostBack is always false. • PreviousPage.IsCrossPostBack is true if it is CrossPostback is used and false if it is Server.Transfer is used.
Deccansoft Software Services – ASP.NET MasterPages & UserControls
1
MasterPage: • The extension of MasterPage is ‘.master’. • MasterPage cannot be directly invoked from the client because it just acts as a template for the other Content Pages. • In a MasterPage we can have content either inside ContentPlaceHolder or outside ContentPlaceHolder. Only content inside of
ContentPlaceHolder can be customized in the child pages • We can have multiple masters in one web application. • A MasterPage can have a MasterPage but studio does not support at design time so the customization of it has to be done in
Html view only. • The child page content can be placed only in content tag. • Controls of MasterPage will be programmed in the MasterPage and child page but child page control will never be
programmed in MasterPage. • A master page of one web application cannot be used in another web application. • The MasterPageFile property of a webform can be set dynamically but it should be done either in or before the Page_PreInit
event of the WebForm. Page.MasterPageFile= ”…./MasterPage.master”. • The order of execution of events Load (Page) Load (Master) LoadComplete (Master) i.e if we want to overwrite a
control property of a control already set in master page then we must do that in the LoadComplete event of the page. Example: Adding a MasterPage to the Project 1. Create a folder MasterPageDemo. 2. Add to it a new MasterPage file (MainMaster.master) 3. Add to it the controls / content as mentioned below. Step 1: MainMaster.master <form id="form1" runat="server"> Header... <br /><asp:Label ID="lblMaster"runat="server"Text="Label"></asp:Label> <br /> <asp:ContentPlaceHolder id="cphFirst" runat="server"> Text=” This is First Content Place Holder(Default)” </asp:contentplaceholder> <br /> <asp:ContentPlaceHolder ID="cphSecond" runat="server">
This is Second Content Place Holder(Default) <br /><br /> <asp:Label ID="lblContent" runat="server" Text="Label"></asp:Label> <asp:TextBox ID="txtContent" runat="server"></asp:TextBox> <asp:Button ID="btnContent"runat="server" OnClick="btnContent_Click" Text="Master Page"/>
</asp:ContentPlaceHolder> <br /> Footer... </form> Step 2: Code Page (MainMaster.master.cs) protected void Page_Load(object sender, EventArgs e) { Response.Write("Load - MasterPage<br>"); if (!IsPostBack) lblMaster.Text = "MASTER"; } protected void btnContent_Click(object sender, EventArgs e) { lblContent.Text = txtContent.Text; } public Label MasterLabel { get { return lblMaster; } } Step 3: Adding Child Page and Linking to master. Add a New WebForm (Default.aspx) (Check MasterPage Checkbox)
Deccansoft Software Services – ASP.NET MasterPages & UserControls
2
Step 4: Default.aspx
RightClick on 2nd ContentPlaceHolder and select Create Custom Content and make the required changes. <%@ Page Language="C#" MasterPageFile="MainMaster.master" AutoEventWireup="true" CodeFile="Default.aspx.cs" Inherits="MasterPagesDemo_Default" Title="Child Page" %> Note: If MasterPage is selected for a child page “MasterPageFile” attribute is added to the Page Directive of the Child page <%@ MasterType VirtualPath="~/MasterPagesDemo/MainMaster.master" %> <asp:Content ID="Content1" runat="server" ContentPlaceHolderID="cphFirst">
//Setting label text via master page property i.e MasterLabel Master.MasterLabel.Text = txtChildPage.Text ;
//The above line would work only if <%@MasterPage Directive is added to current page //Accessing control in ContentPlaceholder of Master page. Label lblContent = (Label) Master.FindControl("cphSecond").FindControl("lblContent"); lblContent.Text = txtChildPage.Text;
} Working with UserControls
Overview of UserControls: • They have the extension - .ascx • The ascx file has a Control Directive and the class is Inherited from “System.Web.UI.UserControl” • For customizing the UserControl Public properties must be added to it. These public properties in most of the
circumstances wrap around the control which is added to the UserControl. • User control does not have design time facility when used in a WebForm. • The Properties of the usercontrol can be set by setting the attributes for the tag used in WebForm.
Sample: 1. Create a folder UserControlDemo. 2. Add WebUserControl (HelloControl.ascx) 3. Add to it the controls as mentioned below in the ascx file.
Step 1: HelloControl.ascx <%@ Control Language="C#" AutoEventWireup="true" CodeFile="HelloControl.ascx.cs"
Deccansoft Software Services – ASP.NET MasterPages & UserControls
3
Step 2: HelloControls.acsx.cs: To this file add the following code. public partial class UserControlDemo_HelloControl : System.Web.UI.UserControl { //This event is raised when either FirstName or LastName is changed.
public event EventHandler RealNameChanged; protected void Page_Load(object sender, EventArgs e)
} //The Following property is used in the webform to set the Text of Label. public string Caption { get { return lblCaption.Text; } set { lblCaption.Text = value; } } //Following method acts as a event handler for TextChanged event of both txtFirstName and txtLastName textboxes. bool eventRaised; protected void NameChanged(object sender, EventArgs e) { if (!eventRaised) //If the event is not raised then raise the event. { //Following code is used for raising the event RealNameChanged. if (RealNameChanged != null) RealNameChanged(this, EventArgs.Empty); / eventRaised = true; } }
} Step 3: Add a WebForm to the Application - Default.aspx Step 4: Drag-Drop Hello UserControl on the webform. <%@ Register Src="HelloControl.ascx" TagName="HelloControl" TagPrefix="uc1" %> Step 5: Add a Button to the webform. Step 6: <uc1:HelloControl ID="hcName" runat="server" Caption=”Your Name”
Deccansoft Software Services – ASP.NET MasterPages & UserControls
4
Response.Write(hcName.RealName); Response.Write("<br>" + hcFathersName.RealName); } //Handles the RealNameChnaged event raised by the UserControl. protected void txtName_RealNameChanged(object sender,EventArgs e) { Response.Write("Name Changed"); }
Deccansoft Software Services State Management Techniques
1
Static / Shared member in WebForm Class • It can used for Sharing data between requests by any user but its scope is local to the WebForm in which it is declared. public partial class Default : System.Web.UI.Page { public static int SharedCounter; public int InstanceCounter; protected void Page_Load(object sender, EventArgs e) { SharedCounter += 1; InstanceCounter += 1; Response.Write("Press F5 and refresh the page<br>"); Response.Write("Instance Counter : " + InstanceCounter + "<br>"); Response.Write("Shared Counter : " + SharedCounter + "<br>"); } }
In this example the value of InstanceConter is always “1” because with every request a new instance of the webform is created and InstanceCounter always by default gets intialized to “0”. The value of the SharedCounter increments with every request (irrespective of the client) because all the instances of the webform share a single copy of SharedCounter because it’s a Shared/Static member of the class.
Static / Shared Members in Global Class in App_Code folder
public static class GlobalSettings { public static int Counter; public static void SomeGlobalMethod() { } }
We can write a class in App_Code folder and it can be shared by all the webforms in the web application. By making the members of the class as shared we can store data in that member in one webform and access that in another webform. The data in such variables is shared by all the clients.
ViewState
• Its of type StateBag and is used for storing state/data to be used in postback to the same webform. • ViewState being hidden element in form tag rendered , its different for different client & is submitted to server only if form is
submitted or posted. • ViewState is a collection of Key-Value pairs, where Key is of type String and Value is of type Object. But only those
objects which are marked as Serializable can be stored in ViewState. • ViewState cannot be programed on client because the value of it is encrypted before it is rendered to the browser. • If ViewState of the page is disabled (<%@Page EnableViewState=”False”) then anything added to it is not retained. //Storing Integer in PropertyBag protected void Page_Load(object sender, EventArgs e) { int n; if (ViewState["cnt"] == null) n = 0; else n = (int) ViewState["cnt"]; n++; ViewState["cnt"] = n; Response.Write(n.ToString()); } -------------------------------------------------------------------------- [Serializable()] public class Demo { public int N; }
//Storing a serializable object (Demo) in PropertyBag protected void Page_Load(object sender, EventArgs e) { Demo d; if (ViewState["do"] == null) { d = new Demo(); d.N = 1; } else { d = (Demo)ViewState["do"]; d.N++; } ViewState["do"] = d; Response.Write(d.N.ToString()); }
HiddenField 1. It can store data which is of type string and cannot store custom objects. 2. It can be programmed on the server and also on the client in Javascript.
protected void Page_Load(object sender, EventArgs e) { int n;
Deccansoft Software Services State Management Techniques
2
if (HiddenField1.value == “”) n = 0; else n = Convert.ToInt32(HiddenField1.value); n++; HiddenField1.value = n.ToString(); Response.Write(n.ToString()); }
QueryString • It is ideal for transfering of data from one page to other when using either hyperlink or Response.Redirect. • It’s a collection of Key-Value pairs and both are of datatype string. • The value of QueryString parameter must be encoded using Server.UrlEncode. In Page1.aspx: Faculty Name: <asp:TextBox ID="txtFaculty" runat="server"></asp:TextBox> <asp:Button ID="btnSubmit" runat="server" OnClick="btnSubmit_Click" Text="Submit" /><br /> <br /> <br /> <asp:HyperLink ID=" hlnkPage2" runat="server" NavigateUrl="~/StateManagement/Page2.aspx">Page2</asp:HyperLink></div> In Page_Load Event Handler
• Its an object created on server for every request from the web browser and thus its life time is same as the lifetime of the request in which code from different files in the web application including master pages, webform, user control, custom classes etc…
• If a Key-Value pair is added to the context of a request, it can be retrieved back from the context anytime during that requests lifetime.
• It can be used for managing state while switching from one page to another using Server.Transfer. • Here Key is of type string and value is of type Object P1.aspx Context.Items.Add(“k1”,”value1”) Server. Transfer (“P2.aspx”) P2.aspx
var = Context.Items [“k1”] In Page1.aspx In Button Click Context.Items.Add(“k1”,”value1”); //Add a key value pair to the context. Server.Transfer(“Page2.aspx”); In Page2.aspx In Page Load: Response.Write(Context.Items[“k1”].ToString()) //Retrieve from context the Value based on the key.
Deccansoft Software Services State Management Techniques
3
Note: Using HttpContext.Current we can get the reference to the context of the current request in any part of the web application.
HttpCookie • Cookies are used for Sharing data across webforms requested by same user/client and the data is stored on client/browser
machine. • A cookie is a name value pair generated on behalf of a particular client and saved on the client machine. • With every request the browser automatically includes all the cookies appropriate to that request.The cookie Name-Value
pairs are submitted in the form of request header called “Cookie” and they are saved on the server in the form of CGI environmental variable called as HTTP_COOKIE.
• Http_Cookie: c1=v1 & c2=v2 & c3=v3. • Cookies generated on server(added to the response) are rendered to the browser in a form of response header called
“Set_Cookie”. • Every response cookie has name, value, domain, path, expires and secure attributes.These attributes are used by browser
while deciding whether to include the cookie in the request or not. Note: Domain, Path, Expires and Secure attributes are not inlcuded with a cookie in the request. Types of Cookies: 1. Persistent Cookie: Cookies which are permanantly stored on the client machine in a file. This cookie values are shared by all
the browser instances running on that machine. 2. NonPersistent Cookie This Cookies which are temporarily stored in the browsers memory. This are not shared across
browser instance and are also called as Session Cookie. Request.Cookies is a collection of HttpCookie objects contructed for every cookie included in the request. Response.Cookies is a collection of HttpCookie objects created for every cookie to be included in the response so that these cookies can be appended to the existing list of cookies on the client machine. • Every browser resticts the size of each cookie (approx to 4KB) and also the total number of cookies (to 20) which it would
accept from a given domain. • If a cookie added to the response is already existing on the client and also if its domain and path attributes match to the new
cookie, the value of the old cookie is overwritten with the value of new cookie. • If a cookie has been created by explicitly setting its domain and path properties then while expiring / destroying that cookie,
we have to set these properties to the same value otherwise the browser would treat that as a different cookie. Default values for the properties of Cookie Value ”” Path ”/” Expires NPC (Non persistent cookie) Domain ”<Current domain of the website>” Secure False <form id="form1" runat="server"> Name: <asp:TextBox ID="txtKey" runat="server"></asp:TextBox> Value: <asp:TextBox ID="txtValue" runat="server"></asp:TextBox> <asp:CheckBox ID="chkPersistance" runat="server" Text="Persistance" /> <asp:CheckBox ID="chkSecured" runat="server" Text="Securred" /><br /> <asp:Button ID="btnSetCookie" runat="server" OnClick="btnSetCookie_Click" Text="Set Cookie" /> <asp:Button ID="btnGetCookie" runat="server" OnClick="btnGetCookie_Click" Text="Get Cookie" /> <asp:Button ID="btnDestroyCookie" runat="server" OnClick="btnDestroyCookie_Click" Text="Destroy Cookie" /> <asp:Button ID="btnGetAllCookies" runat="server" OnClick="btnGetAllCookies_Click" Text="Get All Cookies" /> Cookie Dictionary Name: <asp:TextBox ID="txtDictionaryName" runat="server"></asp:TextBox><br /> <asp:Button ID="btnAddToDictionary" runat="server" OnClick="btnAddToDictionary_Click" Text="Add To Dictionary"/ > <asp:Button ID="btnShowDictionary" runat="server" OnClick="btnShowDictionary_Click" Text="Show Dictionary" /> <asp:Label ID="lblValue" runat="server"></asp:Label> </form> protected void btnSetCookie_Click(. . .) { HttpCookie c = new HttpCookie(txtKey.Text); c.Value = txtValue.Text; c.Domain = Request.Url.DnsSafeHost c.Path = Request.ApplicationPath; if (chkPersistance.Checked) c.Expires = DateTime.MaxValue; if (chkSecured.Checked) c.Secure = true; Response.Cookies.Add(c);
protected void btnDestroyCookie_Click(. . .) { HttpCookie c = new HttpCookie(txtKey.Text); c.Expires = DateTime.Now.AddDays(-1); Response.Cookies.Add(c); }
CookieDictionary: A cookie which has many SubKey - value pairs is called as “CookieDictionary”. Note: while using CookieDictionary don’t use character “&” in its SubKey or Value. protected void btnAddToDictionary_Click(. . .) { HttpCookie cookie = Request.Cookies[txtDictionaryName.Text]; if (cookie == null) cookie = new HttpCookie(txtDictionaryName.Text); cookie.Values[txtKey.Text] = txtValue.Text; cookie.Expires = DateTime.MaxValue; Response.Cookies.Add(cookie); }
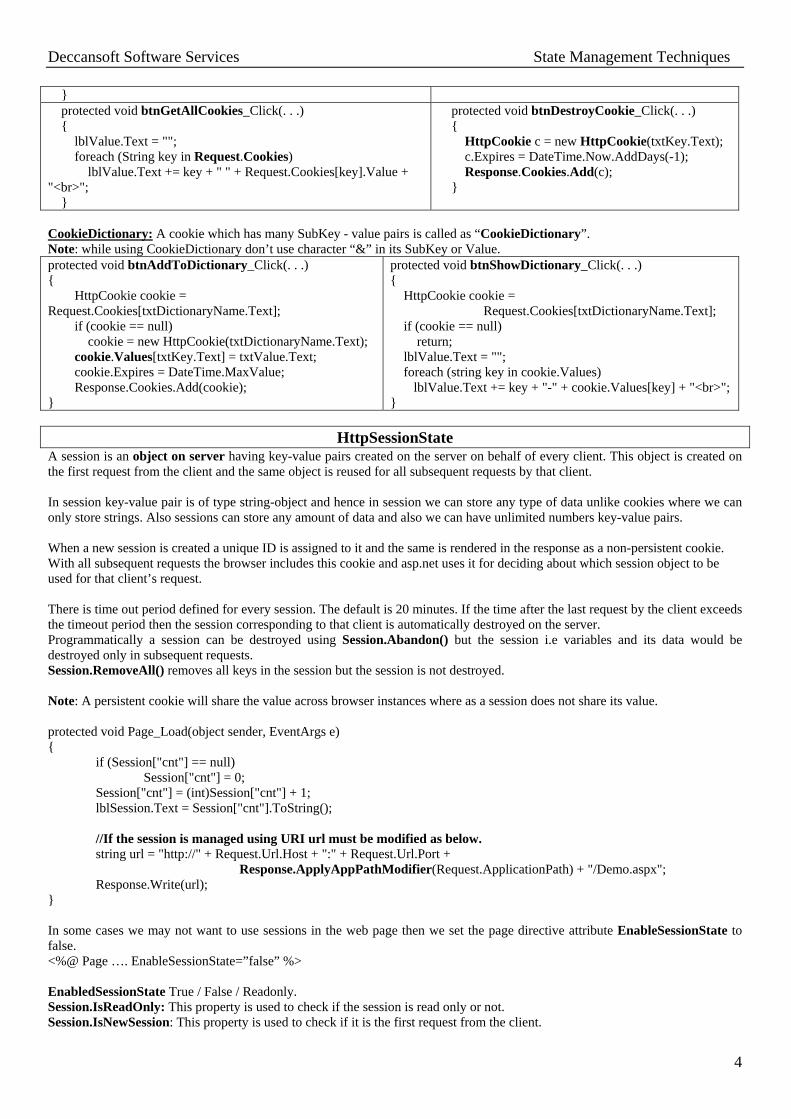
A session is an object on server having key-value pairs created on the server on behalf of every client. This object is created on the first request from the client and the same object is reused for all subsequent requests by that client. In session key-value pair is of type string-object and hence in session we can store any type of data unlike cookies where we can only store strings. Also sessions can store any amount of data and also we can have unlimited numbers key-value pairs. When a new session is created a unique ID is assigned to it and the same is rendered in the response as a non-persistent cookie. With all subsequent requests the browser includes this cookie and asp.net uses it for deciding about which session object to be used for that client’s request. There is time out period defined for every session. The default is 20 minutes. If the time after the last request by the client exceeds the timeout period then the session corresponding to that client is automatically destroyed on the server. Programmatically a session can be destroyed using Session.Abandon() but the session i.e variables and its data would be destroyed only in subsequent requests. Session.RemoveAll() removes all keys in the session but the session is not destroyed. Note: A persistent cookie will share the value across browser instances where as a session does not share its value. protected void Page_Load(object sender, EventArgs e) {
if (Session["cnt"] == null) Session["cnt"] = 0;
Session["cnt"] = (int)Session["cnt"] + 1; lblSession.Text = Session["cnt"].ToString(); //If the session is managed using URI url must be modified as below. string url = "http://" + Request.Url.Host + ":" + Request.Url.Port +
} In some cases we may not want to use sessions in the web page then we set the page directive attribute EnableSessionState to false. <%@ Page …. EnableSessionState=”false” %> EnabledSessionState True / False / Readonly. Session.IsReadOnly: This property is used to check if the session is read only or not. Session.IsNewSession: This property is used to check if it is the first request from the client.
Deccansoft Software Services State Management Techniques
5
In web.config: <SessionState timeout=”30” cookieless=”UseUri” CookieName=”Demo” mode=”InProc”
stateConnectionString=”tcpip=localhost:42424” /> WebGarden & WebFarm • If a single instance of a web application spans over the multiple instances of the webserver running on the same machine is
then it is called as WebGarden, • If a single instance of a web application spans over the multiple instances of the webserver running on the different machine
is then it is called as WebFarm, If session is used for a web application on webfarm or webgarden the sessionState mode must be set to either StateServer or SqlServer. State server is a windows service and can be started using ControlPanel AdminstrativeTools Services ASP.NET StateService.
HttpApplicationState DataType of Application is HttpApplicationState. An Application object is used for sharing name-value pairs across different web pages and is irrespective of the client requesting them. If we want to send data from one page to another i.e. for example a textbox value in page1 to a label in page2. There are two ways to go to page2.
About Web Applications / Virtual Directory An ASP.NET Web Application is collection of files Pages, HTTP Handlers, HTTP Modules and code within the scope of a physical directory or its sub directory for which a virtual directory is created. How to create a virtual directory? Start Programs AdministrativeTools Internet Information Server
Default Website Right click New Virtual Directory Then Mention the virtual directory name and physical directory name(Need not be same) There is another way to create the virtual directory i.e. Right click on the physical directory properties websharing share with Alias name. • Default Physical Directory of a website in IIS: c:\Inetpub\wwwroot • Irrespective of the location of the physical folder a virtual directory can be created in IIS. Only then the content of it can
behave as a WebApplication. • A virtual directory can be created either under root directory of the website or under another virtual directory. Physical Directory Virtual Directory C:\Inetpub\wwwroot / C:\Inetpub\wwwroot\Demo1 /Demo1 D:\DemoWebApp 1 /DemoWebApp1 D:\DemoWebApp 1\Demo1 /DemoWebApp2 Http://Servername/D1/D2 For the above path D2 is the web application provided, it represents a virtual directory. (Whose physical directory may or may not be in D1) A virtual directory can be created under another virtual directory is an independent directory / Web Application. C:\D1 /D1 ---- here D1 is virtual directory C:\D2 /D1/D2 --- here D2 Application is used.
Deccansoft Software Services State Management Techniques
6
If the same content has to be accessible from different URL’s, multiple virtual directories can be created for the selected physical directory i.e for one physical directory we can have more than one virtual directories. Note: • Physical directory and Virtual directory names need not be same. • In Asp.Net for every web application a new App-Domain is created and thus every application has its own sessions and
applications data which is not shared with web pages in other web applications. • In the above example a Session variable created in D2 cannot be accessed in D1.
HttpApplication Class / Global.asax The root directory of a web application has a special significance and certain content can be present on in that folder. It can have a special file called as “Global.asax”. ASP.Net framework uses the content in the global.asax and creates a class which is inherited from HttpApplication. During the lifetime of an application, AP.NET maintains a pool of Global.asax defined HttpApplication instances. When an application receives an http request, the ASP.Net page framework assigns one of these instances to process that request. That instance is responsible for managing the entire lifetime of the request it is assigned to and the instance an only be reused after the request has been completed when it is returned to the pool. The instance members in Global.asax cannot be used for sharing data across requests but static member can be. Global.asax can contain the event handlers of HttpApplication object and some other important methods which would execute at various points in a web application. Some important Events / Methods of HttpApplication Objects: Application_Start: When the application receives the first request and it is loaded to create the App-Domain. Application_End: When the web server is shutdown and the web applications are unloaded. Session_Start: When the first request comes from a given client and a session is created. Session_End: When the session times out or is abandon. Application_BeginRequest: Is executed just before processing of the webform for every request. Application_EndRequest: After processing the webform, before rendering the output. Application_Error: Is executed for handling any type of unhandled exception raised in any of the WebForm’s of the application and thus can be used for centralized exception handling Category.aspx protected void Page_Load(object sender, EventArgs e) {
Exception ex; ex = Content.Error.InnerException; //Context.Error return HttpException object and it would contain the reference to the actual exception in InnerException property.
if (ex is ApplicationExeption) {
//Do the logging of exception here into some file. Server.Transfer(“SiteNotWorking.aspx”); Context.ClearError(); } } protected void Application_BeginRequest(object sender,EventArgs e) {
string path = Request.Path.ToLower(); Response.Write(path + "<br>"); if (path.IndexOf("jobs.aspx") != -1) Context.RewritePath("category.aspx", "", "catId=1"); else if (path.IndexOf("development.aspx") != -1) Context.RewritePath("category.aspx", "", "catId=2"); else if (path.IndexOf("training.aspx") != -1)
Deccansoft Software Services State Management Techniques
7
Context.RewritePath("category.aspx", "", "catId=3"); } Note: We can handle Error event of the page so that for any unhandled runtime exception in that webform this event handler is executed. Only if Context.ClearError() is not executed the error propogates to Application_Error event handler in global.asax. In DemoForm.aspx protected void Page_Error(Object sender,EventArgs e) { Exception ex = Context.Error; Response.Write(ex.Message); } ////// <div><asp:Label ID="lblError" runat="server" Text=""></asp:Label> </div> Username:<asp:TextBox ID="txtUsername" runat="server"></asp:TextBox> <br /> Password:<asp:TextBox ID="txtPassword" runat="server"></asp:TextBox> <br /> <asp:CheckBox ID="chkRemember" runat="server" Text="Remember my u/p on this machine" /><br /> <asp:Button ID="btnLogin" runat="server" Text="Login" OnClick="btnLogin_Click" /> protected void Page_Load(object sender, EventArgs e) { if (!IsPostBack) { HttpCookie cookie = Request.Cookies["AuthCookie"]; if (cookie != null) Response.Redirect("~/"); } } protected void btnLogin_Click(object sender, EventArgs e) { string un = txtUsername.Text; string pwd = txtPassword.Text; if (un == pwd) { if (chkRemember.Checked) { HttpCookie cookie = new HttpCookie("AuthCookie"); cookie.Value = un; cookie.Expires = DateTime.MaxValue; Response.Cookies.Add(cookie); } Response.Redirect("~/"); } else lblError.Text = "Invalid u/p"; } <asp:LinkButton ID="lnkLogout" runat="server" OnClick="lnkLogout_Click">Logout</asp:LinkButton> //Default.aspx.cs protected void Page_Load(object sender, EventArgs e) { HttpCookie cookie = Request.Cookies["AuthCookie"]; if (cookie != null) Response.Write(cookie.Value); } protected void lnkLogout_Click(object sender, EventArgs e) { HttpCookie cookie = new HttpCookie("AuthCookie");
Deccansoft Software Services State Management Techniques
Configuration File (web.config): Web.config is an xml based configuration file containing all configuration settings for the webforms present in same directory and sub directory. It can be present in any directory of a web application it overrides and extends the configuration setting of the parent directory web.config. Note: • Because of the above behavior the directory structure of web app can be planned based on the configuration settings for
the various web forms. • A web.config contains sections, few of which must be present only in either machine.config or in web app root directory.
(Machine.config is the global configuration file which contains configuration settings for all types of .Net application running on that machine)
</customErrors> • Mode=”RemoteOnly” means redirect the request to error page only if the request comes from remote client. • Mode=”Off” for both local and remote users it renders error description and does not redirect it. • Mode=”On” for both local and remote users it redirects to the error page. When we redirect to Custom error page, the querystring parameter “aspxerrorpath” is appended to the url and its value is the url of the page which actually has an error. Note: In every webform “Error” event can be handled for a page. When ever an exception occurs it first tries to see for the error Event Handler of the page, then Error Event Handler of the application and then it goes to Custom Error. Because of the runtime Exception and the Custom errors, if the user is restricted to some page we cannot get the details about the exception which has occurred. Most of the attributes which we can set for <%@Page can also be set at application level in web.config file. <pages validateRequest="true" maintainScrollPositionOnPostBack="true" > ValidateRequest set to true will not allow tags to be posted and accepted by the page. URL Re-Writing: URL Re-Writing is a process where the path of the URL is rewritten. This is done with the help of Context.RewritePath(….). An alternate way is add UrlMapping in web.config <urlMappings>
traceMode="SortByTime" writeToDiagnosticsTrace="true" /> <%@ Page Trace=”true” TraceMode=”SortByTime” …..%> Trace.Write(“ … “) & Trace.Warn(“ … “); - Are used for writing to Trace output so that we can find the amount of time a block of code has taken. To view trace summary from browser we have to use: http://localhost/AppName/Trace.axd
Imports System.Web.Configuraion Protected Sub btnSave_Click(ByVal sender As Object, ByVal e As System.EventArgs) Handles btnSave.Click
Dim cnfg As System.Configuration.Configuration 'cnfg =Configuration.GetWebConfiguration( Request.ApplicationPath) cnfg = WebConfigurationManager.OpenWebConfiguration(Request.ApplicationPath) Dim trace As TraceSection = DirectCast(cnfg.GetSection("system.web/trace"), TraceSection) If trace IsNot Nothing Then trace.Enabled = chkEnabled.Checked Dim ids As IdentitySection = DirectCast(cnfg.GetSection("system.web/identity"), IdentitySection) If ids IsNot Nothing Then ids.Impersonate = chkImpersonate.Checked Dim au As AuthenticationSection = DirectCast(cnfg.GetSection("system.web/authentication"), AuthenticationSection) If au IsNot Nothing Then au.Mode = ddlmode.SelectedValue Dim cm As CompilationSection = DirectCast(cnfg.GetSection("system.web/compilation"), CompilationSection) If cm IsNot Nothing Then cm.Debug = chkCDebug.Checked cm.Explicit = chkcexplicit.Checked cm.Strict = chkCstrict.Checked End If Dim cs As System.Configuration.ConnectionStringsSection cs = DirectCast(cnfg.GetSection("connectionStrings"), System.Configuration.ConnectionStringsSection) If cs IsNot Nothing Then cs.ConnectionStrings(1).ConnectionString = txtCs.Text
cnfg.Save() End Sub
Deccansoft Software Services – ASP.NET Authentication and Authorization
1
Authentication: The act of determining the identity of the requesting entity is known as authentication. The user must present the credentials such as a name / password pair in order to be authenticated. Authorization: Once the request is authenticated, it must be determined whether that identity can access the given resource or not. This process is known as authorization. Types of Authentication
1. Windows 2. Forms 3. Passport
Windows Authentication When we use ASP.NET Windows’s authentication, ASP.NET attaches a Windows Principal object to the current request. By default the web browser along with the request does not include any identity of the client. In such cases web server treats such request as anonymous request. If anonymous users are allowed access authentication is not required on web server.. IIS Authenticates the user based on the underline user accounts created on the Operation System. Start Settings ControlPanel AdministrativeTools IIS(Internet Information Services) Right click on web application Properties Directory Security click on First Edit Button Types of Windows Authentication. 1. Basic Authentication 2. Integrated Windows Authentication. Integrated Authentication: • In integrated windows authentication browser by default uses the identity of currently logged in user and using the same
IIS authenticates the client. • If the default logged-in user is not authorized then the client is shown a dialog asking for a different identity credentials. • In integrated windows authentication the username and password is encrypted on client and submitted to the server. • It works on in Internet Explorer Basic Authentication: • If IIS denies access to anonymous users it generates response for anonymous request, showing a dialog on the browser
asking for identity credentials of the client. • In Basic authentication the username and password are submitted as plain text unless HTTPS is used. • It works with the web browser. Note: Either Integrated Windows Authentication should be checked or Basic Authentication should be checked. If both are checked Integrated Windows Authentication takes the precedence. Limitation: Windows authentication is good only for Intranet application because for every identity supported on the server a login as to be created on the domain of the web server. Step 1. /Web.config (Applications Root directory web.config file) <authentication mode="Windows" /> ---This section can be present only in the root directory web.config and thus for one Web Application only one type of Authentication mode can be Supported. Step 2: /SecurityDemo/Web.config <configuration>. <system.web> <authorization> - This section can be present in any directory web.config file <deny users ="?"/> ---All Anonymous users are denied access <deny roles=”BUILTIN/Administrators”/> ---All administrators are denied access <allow users=”*”/> -- Allow access to all users except anonymous and administrators. </authorization> </system.web>
Deccansoft Software Services – ASP.NET Authentication and Authorization
2
</configuration> Interpretation: All the WebForms in the “SecurityDemo” folder are not accessible to Anonymous Users and Administrators. Step3: /SecurityDemo/UserDetails.aspx protected void Page_Load(object sender, EventArgs e) {
lblIsAuthenticated.Text =User.Identity.IsAuthenticated.ToString(); lblUsername.Text = User.Identity.Name; //Name of the current user is rendered lblAuthenticationType.Text=User.Identity.AuthenticationType.ToString();
}
Forms Authentication Step 1: /Web.Config <authentication mode="Forms"> <forms name ="__AUTHCOOKIE" defaultUrl=”~/” loginUrl ="~/SecurityDemo/LoginForm.aspx" timeout=”30”> <credentials passwordFormat ="Clear"> <user name ="u1" password ="p1"/> <user name ="u2" password ="p2"/> </credentials> </forms> </authentication> Step 2 & 3: Same as in Windows Authentication. Step 4: Add to SecurityDemo folder – LoginForm.aspx /SecurityDemo/LoginForm.aspx protected void Page_Load(object sender, EventArgs e) { // A user will come to login page only if its either not authenticated or not authorized. if (Request.IsAuthenticated) //If Authenticated means that the user is not Authorized. lblError.Text = "Not Authorized"; } protected void btnSubmit_Click(object sender, EventArgs e) { string log = txtLogin.Text; string pwd = txtPassword.Text; if (FormsAuthentication.Authenticate(log, pwd)) {
FormsAuthentication.RedirectFromLoginPage(log,ChkRememberMe.Checked); /* FormsAuthentication.SetAuthCookie(log,chkRememberMe.Checked); string returl = Request.QueryString["ReturnUrl"]; if (returl == null) Response.Redirect("~/"); //The user has directly come to the login page. else Response.Redirect(returl); */ } else lblError.Text = "Invalid Login or Password"; } In forms Authentication, IIS treats every request as Anonymous request. If the request includes the cookie for authentication “__AUTHCOOKIE” then ASP.NET treats the client as authenticated otherwise it is treated as anonymous. If anonymous users are denied access and the request is not authenticated then ASP.Net redirects the users to login URL (“SecurityDemo/LoginForm.aspx”).. When the user is redirected to the login page the url of the current page is appended as query string parameter “ReturnUrl” to the Url of LoginPage
Note: A user is redirected to Login page either if not authenticated or not authorized
Deccansoft Software Services – ASP.NET Authentication and Authorization
3
If the User is Authenticated, then based on the value of authentication cookie (__AUTHCOOKIE) the user is Authorized and for this it looks in “<authorization>” section in web.config. Note: The value of User.Identity.Name is set from the value of __AUTHCOOKIE which mostly contains the username used for login.
FormsAuthentication.Authenticate(string log, string pwd) Verifies if the specified loging and password exists in the credentical section of web.config or not.
This function adds to the response of the authentication cookie, the name of the cookie is taken from forms tag in web.config and the value of the cookie is the first parameter. If the second parameter is true the cookie created is persistant cookie otherwise created a non-persistent cookie.
Does two things 1. Add the authentication cookie to the response so that for all subsequent request the client can be treated as authenticated. 2. Redirects the user to the Url as mentioned in the QueryString parameter “ReturnUrl”.
Step 5: Add Logout LinkButton to UserDetails.aspx. protected void lbtnLogout_Click(object sender, EventArgs e) { FormsAuthentication.SignOut(); //Adds cookie to the response with expire date Response.Redirect(FormsAuthentication.LoginUrl); // FormsAuthentication.RedirecttoLoginPage(); } To protect the password in web.config file (credential section) Step 6: Add Encrypt Button to UserDetails.aspx protected void btnEncrypt_Click(object sender, EventArgs e) {
Response.Write(FormsAuthentication.HashPasswordForStoringInConfigFile(txtPassword.Text, "SHA1")); } Step 7: Run the application and replace “p1”, “p2’ and “p3” in web.config with their hashed values. Step 8: Change in /web.cofig
<credentials passwordFormat ="Clear"> to <credentials passwordFormat ="SHA1"> SHA1: 160 bit encryption & MD5: 128 bit encryption – Using both we can only encrypt data as they are One Way Hash Algorithm. Role Based Security
Deccansoft Software Services – ASP.NET Authentication and Authorization
4
Step 9: Modify “/SecurityDemo/Web.config” as below <authorization> <deny users ="?"/> <deny roles="r1"/> - Deny access to all users with Role “r1”. </authorization> Step 10: Add a button with id “btnForR2” to Userdetails.aspx In /SecurityDemo/UserDetails.aspx protected void Page_Load(object sender, EventArgs e) {
btnForR2.Visible = User.IsInRole("r2"); //Checks if the current user has the role “r2” or not? } Step 11: • Roles should be assigned to the request based on identity of the authenticated user and this should be done in
“Application_AuthenticateRequest” in Global.asax Add the following to “/Global.asax” protected void Application_AuthenticateRequest(object sender, EventArgs e) { if (Request.IsAuthenticated) { string[] arRoles = new string[2];
switch (User.Identity.Name) { case “u1”: arRoles[0] = “r1”; arRoles[1] = “r3”; case “u2”: arRoles[0] = “r2”; arRoles[1] = “r3”; }
Context.User = new System.Security.Principal.GenericPrincipal(User.Identity, arRoles); // (VERY VERY IMPORTANT – Don’t forget this.
} } Using Location Tag Using <location path=”Demo.aspx”> we can specifically mention the Configuration Settings for a given WebForm <configuration> <location path="Unsecured.aspx"> <system.web> <authorization> <allow users="*"/> </authorization> </system.web> </location> </configuration> If any Configuration Seeting is enclosed within <location allowOverride=”false”> it is locked and cannot be overiden in the subdirectory Configuration file. Note: Location must be nested immediately under Configuration tag. Examples using Response Object Response.Clear(); Response.ContentType = "image/gif"; Response.WriteFile("images/demo.gif"); Response.End();
Deccansoft Software Services ASP.NET - Globalization While dealing with multilingual If some dynamic (language independent) text has to be stored in the database table the column datatypes to be taken must be either nChar, nVarchar, nText. Creation of Resource Files Local Resource File: These files must be present in the folder App_LocalResources and the filename is based on the name of WebForm with which the resource file is associated with. Steps: • Create a new folder(Globalization). To the Folder Add a new Item WebForm(Default.aspx) • To the Folder RightClick Add ASP.NET Folder App_LocalResources • To App_LocalResources RightClick Add a new Item Resource File (provide name and Value pairs) \AppName\GlobalicationDemo\Default.aspx. \AppName\GlobalicationDemo\App_LocalResources\Default.aspx.resx – Culture Neutral Resource File. \AppName\GlobalicationDemo\App_LocalResources\Default.aspx.fr.resx – French Neutral Resource File. \AppName\GlobalicationDemo\App_LocalResources\Default.aspx.fr-BE.resx – French Belgium Resource File. \AppName\GlobalicationDemo\App_LocalResources\Default.aspx.de.resx – German Neutral Resource File.
KEYS Default.aspx.resx Default.aspx.fr.resx Default.aspx.Fr-BE.resx Default.aspx.De.resx lblAddressKey.ForeColor Black Red Pink Blue lblAddressKey.Text Address1 in
Default Address1 in French Address1 in
French - Belgium Address1 in German
lblRealNameForeColorKey Black Red Pink Blue lblRealNameTextKey Deccansoft
(from Default) Deccansoft (in French)
Deccansoft (in French Belgium)
Deccansoft (in German)
In Glocal Resourse File in the folder App_GlobalResources: This is Global to all the WebForms in a given web application. It can have any name and must be present in the Root directory of the web application. • To the Application RightClick Add ASP.NET Folder App_GlobalResources • To App_GlobalResources RightClick Add a new Item Resource File (provide name and Value pairs) \AppName\App_GlobalResources\Settings.resx \AppName\App_GlobalResources\Settings.fr.resx \AppName\App_GlobalResources\Settings.fr-BE.resx \AppName\App_GlobalResources\Settings.de.resx
KEYS Settings.aspx.resx Settings.aspx.fr.resx Settings.aspx.Fr-BE.resx Settings.aspx.De.resx lblCompanyName Deccansoft (in Default) Deccansoft (in French) Deccansoft (in French
Belgium) Deccansoft (in German)
Any one of the following facilities can be used for associating the culture with the current thread / request in execution. Alternative 1 In Web.Config file: <globalization culture=”de-AT” uiCulture=”de-AT” ….> 1. If configured here the value would remain same for the entire request for all the webforms of the project. Alternative 2 • //In ASPX Page. If configured here then it has to be done for every page and the value to be mentioned must be constant or
Alternative 3 // Following function can be overridden in the webform and is specific to that webform/page only.
Protected Overrides Sub InitializeCulture() Page.UICulture = "auto" ‘or Request.UserLanguages(0) or “de-AT” or Session[“lang”].ToString() Page.Culture = "auto" ‘or Request.UserLanguages(0) or “de-AT” or Session[“lang”].ToString() End Sub
1
Deccansoft Software Services ASP.NET - Globalization
2
• If the value of Culture or UICulture is set to “auto” then the value is taken must first value of request header “User-Languages”. This header is initialized in by going to Tools Internet Options Languages.
Alternative 4 //Following should be written in Global.asax and this global to all the webforms of the application. Protected Application_BeginRequest(. . .) Dim ci As New CultureInfo(“de-AT”)
or CultureInfo(Session[“lang”].ToString()) //Assuming Session[“lang”] is already initialized. System.Threading.Thread.CurrentThread.CurrentCulture = ci System.Threading.Thread.CurrentThread.CurrentUICulture = ci End Sub Protected Sub Page_Load(. . .) Handles Me.Load lblRealName.Text = GetLocalResourceObject("lblRealNameKeyText").ToString() //To read the value programatically lblRealName.ForeColor = System.Drawing.Color.FromName(GetLocalResourceObject("lblRealNameKeyForeColor").ToString()) lblDate.Text = Now.ToString() //The value is returned based on Culture settings of Current Thread Dim amt As Decimal = 1000000.01 lblAmount.Text = amt.ToString("C") //The value is returned based on Culture settings of Current Thread End Sub We can use GetGlobalResourceObject for reading the Key – Value pair from Global resource file. Designing the WebForm so that the labels are linked to Keys in Resource Files Steps for setting the Explicit Expression: • Select the control RightClick Properties Goto Expressions • On the lefthand side select the property to be initialized, set ExpressionType to Resources • If the key has to be fetched from LocalResources File directly set ResourceKey. Otherwise, to fetch from GlobalResoucesFile
first set ClassKey with the value of GlobalResource Filename and then set ResourceKey
--------------------Explicit Expression From Local Resource File------------------ <asp:Label Text="<%$Resources:lblRealNameKeyText %>" ForeColor="<%$Resources:lblRealNameKeyForeColor %>" ID="lblRealName" runat="server"/> ------------------Explicit Expression From Global Resource File---------------</strong> <asp:Label Text="<%$ Resources:Settings, lblCompanyName %>" ID="lblCompanyName" runat="server"></asp:Label> --------------------Implicit Expression------------------- <asp:Label meta:ResourceKey="lblAddressKey" ID="lblAddress" runat="server"/> Based on the key “lblAddressKey” the ForeColor and Text properties are automatically fetched from the resouce file. -------------------Fetching Values Programatically------- <asp:Label ID="lblRealName" runat="server" Font-Bold="False"></asp:Label> --------------Culture Demos------------------- <asp:Label ID="lblDate" runat="server"></asp:Label> <asp:Label ID="lblAmount" runat="server"></asp:Label> Notes: • Based on the Culture value of the CurrentThread the Formatting functions (like Date or Currency) render their output. • Based on UICulture of the CurrentThread the framework loads the appropirate resource file for all the culture specific
lookups. • The Culture and UICulture values can be set either in Web.Config – Globalization Tag or Application_BeginRequest or in
<%Page Directive or in InitializeCulture method of page class. This is also the incresing order of their precedence. For languages like Arabic and Urdu do the following <HTML dir = “rtl” …>
Deccansoft Software Services – ASP.NET Web Caching
1
Types of Caching: Output Caching / Fragment Caching / Data Caching / Substitution Caching. Output Caching Here the response of the request is cached for a predefined period and the same is reused for all subsequent requests for the same page. CacheDemo/Cache.aspx: <%@ OutputCache Duration="10" VaryByParam="txtDemo" VaryByHeader="referrer"
VaryByCustom="Browser" Location="ServerAndClient" NoStore="true"%> <asp:Label ID="lblCurrentTime" runat="server"></asp:Label> <asp:Label ID="lblDemo" runat="server"></asp:Label> <asp:TextBox ID="txtDemo" runat="server"></asp:TextBox> <asp:Button ID="btnDemo" runat="server" Text="Demo" /> CacheDemo/Cache.aspx.cs protected void Page_Load(object sender, EventArgs e) { lblCurrentTime.Text = DateTime.Now.ToLongTimeString(); } protected void btnDemo_Click (object sender, EventArgs e) { lblDemo.Text = txtDemo.Text; } • Duration and VaryByParam are the only required attributes and others are optional • The value of “VaryByParam” can be either QueryString parameter name, Cookie Name, Form element Name or
Id of Control on the WebForm. For every value of the parameter (parameters) mentioned in VaryByParam, a different cache copy of the response is maintained on the server and reused for those values of parameters for subsequent request.
• VaryByParam can be “none” or “*” also. “*” means create separate cache copy if any parameter changes. • VaryByCustom=”Browser” For different browser types a different cache is created. • Location:
Any Cache can be located on the browser (client) or Proxy or Server None Cache is disabled everywhere Downstream Cache can be located either on browser (client) or proxy. Server Cache is located on the server Client Cache is located on the browser (client). ServerAndClient Cache on both Server and Client but not on Proxy
• NoStore=”true” page should not be cached on the client irrespective of the browser settings (By Default it is false).
Response.Cache.SetCacheability(HttpCacheability.ServerAndPrivate); Response.Cache.SetExpires(new DateTime(2007,12,31,10,20,30); //For setting the absolute Data and Time.
//Response.Cache.SetMaxAge(new TimeSpan(0, 0, 10)); //For mentioning the relative Data and Time. Response.Cache.VaryByHeaders["referrer"] = true; Response.Cache.SetValidUntilExpires(true); Response.Cache.VaryByParams["lblCurrentTime"] = true; //works only if SetValidUntilExpires is set to true
Deccansoft Software Services – ASP.NET Web Caching
2
Changes made to profile(i.e OutputCacheProfile) is automatically effected to all the webforms. Fragment Caching Here instead of caching the complete response of the page, only a small portion of it will be cached. To the Project Right click Add New item Web UserControl (CacheControl.ascx) /CacheDemo/CacheControl.ascx: (UserControl) <%@ OutputCache Duration="10" VaryByControl="none" %> Note: when the output Cache directive is being used in UserControl replace “VaryByParam” attribute with “VaryByControl” i.e for mentioning the Control Id, but for cookie / querystring / form element use “VaryByParam” /CacheDemo/CacheContol.ascx.cs protected void Page_Load(object sender, EventArgs e) { lblControl.Text = DateTime.Now.ToLongTimeString(); } Drag and drop UserControl in /CacheDemo/Cache.aspx Note: To see the effect of the Fragment caching comment OutputCache in the ASPX page. Data Caching Here instead of caching the response of the page we only cache the data used in making the response of the page. When the memory is insufficient the Items in data cache automatically expires. To the Project Right click Add New item Text File (Demo.txt) • Add a label lblDataCacheDemo to the aspx page. /CacheDemo/Cache.aspx.cs: using System.Web.Caching protected void Page_Load(object sender, EventArgs e) { if (Cache["dt"] == null) { Cache["dt"] = DateTime.Now; CacheDependency dep = new CacheDependency(MapPath("Demo.txt")); //Cache.Insert("dt", DateTime.Now, dep); //Cache.Insert("dt", DateTime.Now, dep, DateTime.Now.AddSeconds(10),
new TimeSpan(0, 0, 10)); } DateTime dt = (DateTime)Cache["dt"]; lblDataCacheDemo.Text = dt.ToLongTimeString(); Response.AddCacheItemDependency("dt"); //Response of the page immediately expires if the data item expires //Response.AddCacheItemDependencies; // Cache item is dependent on Array of data items //Response.AddCacheDependency; //Response.AddFileDependencies; // Cache item is dependent on array of files //Response.AddFileDependency; // Cache item is dependent on single file } Note: To reflect the changes made to the code while working with data cache expiration policy, rebuild the website (Build Rebuild Website) Substitution Caching Here the complete page is cached but a portion of the page is computed everytime irrespective of output of page computed or fetched from cache. In CacheDemo/Cache.aspx: Drag and Drop Substitution Control on the WebForm <asp:Substitution ID="sc" runat="server" MethodName="GetServerTime" /> /CacheDemo/Cache.aspx.cs: static string GetServerTime(HttpContext context) {
return DateTime.Now.ToLongTimeString(); } The return value of the above function is rendered in position of Substitution Control.
Deccansoft Software Services – ASP.NET Web Caching
3
Deccansoft Software Services DataBoundControls
GridView Properties: AllowPaging, AllowSorting, AlternatingRowStyle, AutoGenerateColumns, AutoGenerateDeleteButton, AutoGenerateEditButton, AutoGenerateSelectButton, BottomPagerRow, Columns, DataKeyNames, DataKeys, DataMember, DataSource, DataSourceID, EditIndex, EditRowStyle, EmptyDataRowStyle, EmptyDataTemplate, EmptyDataText, FooterRow, FooterStyle, HeaderRow, PageCount, PageIndex, PagerSettings, PagerStyle, PagerTemplate, PageSize, RowHeaderColumn, Rows, RowStyle, SelectedDataKey, SelectedIndex, SelectedRow, SelectedRowStyle, SelectedValue, ShowFooter, ShowHeader, SortDirection, SortExpression, TopPagerRow GripView Events: RowCommand, SelectedIndexChanged, SelectedIndexChanging, Sorting, Sorted, RowUpdating, RowUpdated, RowDeleted, RowDeleting, RowCreated, RowDataBounded, DataBinding, DataBound, PageIndexChanging, PageIndexChanged. Types of Columns/Fields in GridView / DetailsView / FormsView DataControlField: Its parent of all other Fields and is abstract class. Properties: ControlStyle, FooterStyle, FooterText, HeaderText, ItemStyle, ShowHeader, SortExpression, Visible BoundField: It renders Literal Control with in the cell. Properties: DataField, DataFormatString, ApplyFormatInEditMode, HtmlEncode. InsertVisible. NullDisplayText, ReadOnly Command Field: Its used only for the commands - (Select, Delete, Update, cancel, Edit, New) Properties: ShowCancelButton, ShowDeleteButton, ShowEditButton, ShowInsertButton, ShowSelectButton, ButtonType, CancelImageUrl, CancelText, CausesValidation, DeleteText, DeleteImageUrl, EditImageUrl,EditText, HeaderImageUrl, InsertImageUrl, InsertText, InsertVisible, NewImageUrl, NewText, SelectImageUrl, SelectText, UpdateImageUrl, UpdateText, ValidationGroup CheckboxField: It renders Checkbox with the cell Properties: ApplyFormatInEditMode, ControlStyle, ConvertEmptyStringToNull, DataField, DataFormatString, HtmlEncode, InsertVisible, NullDisplayText, ReadOnly, Text ButtonField: Its used for Custom commands Properties: ButtonType, CausesValidation, CommandName, DataTextField, DataTextFormatString, ImageUrl, InsertVisible, Text, ValidationGroup HyperlinkField: It is used to Navigate to another page Properties: DataNavigateUrlFields, DataNavigateUrlFormatString, DataTextField, DataTextFormatString, Target ImageField: It is used to display image of the field in the cell. Properties: AlternateText, ConvertEmptyStringToNull, DataAlternateTextField, DataAlternateTextFormatString, DataImageUrlField, DataImageUrlFormatString, InsertVisible, NullDisplayText, NullImageUrl, ReadOnly TemplateField: It is used if any of the field needs any kind of customization Properties: ItemTemplate, EditItemTemplate, InsertItemTemplate, AlternatingItemTemplate, ConvertEmptyStringToNull
EmpGridViewDemo 1. Drag and Drop SqlDataSource, right click and goto Configure DataSource and provide valid ConnectionString click on Next,
Select TableName and its Columns, Click on Advanced Button and Check Generate Insert, Delete, Update Statements (Check Optimistic Concurrency if required)
<asp:SqlDataSource ID="sdsEmp" runat="server" ConflictDetection="CompareAllValues" ConnectionString="<%$ ConnectionStrings:MSNETConnectionString1 %>" SelectCommand="SELECT [EmpId], [EmpName], [EmpSalary], [IsActive] FROM [Emp]" InsertCommand="INSERT INTO [Emp] ([EmpName], [EmpSalary], [IsActive]) VALUES (@EmpName, @EmpSalary, @IsActive)" UpdateCommand="UPDATE [Emp] SET [EmpName] = @EmpName, [EmpSalary] = @EmpSalary, [IsActive] = @IsActive WHERE [EmpId] = @original_EmpId AND [EmpName] = @original_EmpName AND [EmpSalary] = @original_EmpSalary AND [IsActive] = @original_IsActive" DeleteCommand="DELETE FROM [Emp] WHERE [EmpId] = @original_EmpId AND [EmpName] = @original_EmpName AND [EmpSalary] = @original_EmpSalary AND [IsActive] = @original_IsActive" OldValuesParameterFormatString="original_{0}"> <DeleteParameters> <asp:Parameter Name="original_EmpId" Type="Int32" />
1
Deccansoft Software Services DataBoundControls <asp:Parameter Name="original_EmpName" Type="String" /> <asp:Parameter Name="original_EmpSalary" Type="Decimal" /> <asp:Parameter Name="original_IsActive" Type="Boolean" /> </DeleteParameters> <UpdateParameters> <asp:Parameter Name="EmpName" Type="String" /> <asp:Parameter Name="EmpSalary" Type="Decimal" /> <asp:Parameter Name="IsActive" Type="Boolean" /> <asp:Parameter Name="original_EmpId" Type="Int32" /> <asp:Parameter Name="original_EmpName" Type="String" /> <asp:Parameter Name="original_EmpSalary" Type="Decimal" /> <asp:Parameter Name="original_IsActive" Type="Boolean" /> </UpdateParameters> <InsertParameters> <asp:Parameter Name="EmpName" Type="String" /> <asp:Parameter Name="EmpSalary" Type="Decimal" /> <asp:Parameter Name="EmpName" Type="String" /> <asp:Parameter Name="EmpSalary" Type="Decimal" /> <asp:Parameter Name="IsActive" Type="Boolean" /> </InsertParameters> </asp:SqlDataSource> 2. Drag and Drop GridView on the Form and set its DataSourceID Property. 3. Right Click Select Smart Tag and Check Enable Editing, Enable Selection, Enable Deleting, Enable Paging and Enable
Sorting. <asp:GridView ID="gvEmp" runat="server" AutoGenerateColumns="False" DataKeyNames="EmpId" AllowSorting="True" DataSourceID="sdsEmp" EmptyDataText="There are no data records to display." AllowPaging="True" > <Columns> <asp:CommandField ShowDeleteButton="True" ShowEditButton="True" ShowSelectButton="True" /> <asp:BoundField DataField="EmpId" HeaderText="EmpId" ReadOnly="True" SortExpression="EmpId" /> <asp:BoundField DataField="EmpName" HeaderText="EmpName" SortExpression="EmpName" /> <asp:BoundField DataField="EmpSalary" HeaderText="EmpSalary" SortExpression="EmpSalary" /> <asp:CheckBoxField DataField="IsActive" HeaderText="IsActive" SortExpression="IsActive" /> </Columns> </asp:GridView> 4. Run the WebForm and See the output. 5. Handle SelectedIndexChanged event of GridView Protected Sub gvEmp_SelectedIndexChanged(. . .) Handles gvEmp.SelectedIndexChanged ' Test the Followin line with DataKeyNames = “EmpId" Response.Write(gvEmp.SelectedValue) Response.Write(gvEmp.SelectedDataKey.Value) ‘This Writes SelectedRows EmpId to the browser. ‘Test the following line with DataKeyNames = “EmpId, EmpName" Response.Write(gvEmp.SelectedDataKey.Values("EmpName")) 'Dim ind As Integer 'ind = gvEmp.SelectedIndex 'Dim ename As String 'ename = gvEmp.DataKeys(ind)("EmpName") ‘Gets EmpName of row with index ind. 'Response.Write(ename) 'Dim gvr As GridViewRow = gvEmp.SelectedRow 'Response.Write(gvr.Cells(2).Text) ‘Gets the Text of the third cell (BoundField only) of a given Row in GridView. CheckBox chk = CType(gvr.Cells(4).Controls(0),CheckBox) Response.Write(chk.Checked.ToString()) End Sub • Commands for which handlers / functionality is predefined: Select, Delete, Edit, Update, Cancel, New, Insert • We can add custom commands to the gridview by adding ButtonField to the Columns collection.
2
Deccansoft Software Services DataBoundControls Steps for adding Custom Commands to the GridView:
• Add a ButtonField to the GridView. • Set its CommandName and Text Properties. • Handle the RowCommand event of GridView
6. Add the following line in between <Columns> tag in GridView <asp:ButtonField ButtonType="Button" CommandName="custom" HeaderText="Custom" Text="Custom" /> 7. Handle RowCommand event of GridView.
Protected Sub gvEmp_RowCommand(. . .) //Used for handling all the custom commands in the grid view. If (e.CommandName = "custom") Then Dim indRow As Integer = Convert.ToInt32(e.CommandArgument) Dim gvr As GridViewRow = gvEmp.Rows(indRow) Response.Write(gvr.Cells(1).Text) End If
or 'If (e.CommandName = "Custom") Then 'Dim empid As Integer 'Dim ind As Integer = Convert.ToInt32(e.CommandArgument); 'empid =DirectCast(gvEmp.DataKeys(ind)("EmpId"),Integer); 'Response.Write(empid); 'End If
End Sub 8. Adding HyperlinkField to the Grid. <asp:HyperLinkField DataTextField="EmpName" DataNavigateUrlFields="EmpId,EmpName" DataNavigateUrlFormatString="EmpDetails.aspx?EmpId={0}& EmpName={1}" Target="_blank" /> Note: We can set either Text (constant value)or DataTextField (DataField Name) property. 9. Image Field: It is used to display the image of the field. <asp:ImageField DataImageUrlField="EmpName" DataImageUrlFormatString="EmpImages\{0}.jpg" DataAlternateTextField="EmpName" DataAlternateTextFormatString="Name: {0}" /> 10. Add another SqlDataSource to the WebForm. This time Set a where condition. In Add Where Clause dialog set Column as
EmpId, Operator as =, Source as Control, Control Id as gvEmp and and Click on Add Button. <asp:SqlDataSource ID="dsEmpFiltered" runat="server" ConnectionString="<%$ ConnectionStrings:csMSNET %>" DeleteCommand="DELETE FROM [Emp] WHERE [EmpId] = @original_EmpId " InsertCommand="INSERT INTO [Emp] ([EmpId], [EmpName], [EmpSalary]) VALUES (@EmpId,@EmpName, @EmpSalary)" SelectCommand="SELECT [EmpId], [EmpName], [EmpSalary] FROM [Emp] WHERE ([EmpId] = @EmpId)" UpdateCommand="UPDATE [Emp] SET [EmpName] = @EmpName, [EmpSalary] = @EmpSalary
WHERE [EmpId] = @original_EmpId”> <SelectParameters> <asp:ControlParameter ControlID="gvEmp" DefaultValue="-1"
Name="EmpId" PropertyName="SelectedValue" Type="Int32" /> </SelectParameters> <DeleteParameters> <asp:Parameter Name="original_EmpId" Type="Int32" /> </DeleteParameters> <UpdateParameters> <asp:Parameter Name="EmpName" Type="String" /> <asp:Parameter Name="EmpSalary" Type="Decimal" /> <asp:Parameter Name="original_EmpId" Type="Int32" /> </UpdateParameters> <InsertParameters> <asp:Parameter Name="EmpId" Type="Int32" /> <asp:Parameter Name="EmpName" Type="String" /> <asp:Parameter Name="EmpSalary" Type="Decimal" /> </InsertParameters> </asp:SqlDataSource> 11. Add DetailsView to the WebForm and set its DataSourceId property to “dsEmpFiltered”
12. Handle ModeChanged event of DetailsView. Protected Sub dvEmp_ModeChanged(. . .) Handles dvEmp.ModeChanged If (dvEmp.CurrentMode == DetailsViewMode.ReadOnly) Then gvEmp.Enabled = true; Else gvEmp.Enabled = false; End If End Sub
13. Handle ItemInserted event of DetailsView
Protected Sub dvEmp_ItemInserted(. . .) Handles dvEmp.ItemInserted gvEmp.SelectedIndex = gvEmp.Rows.Count – 1 If (e.Exception IsNot Nothing) lblError.Text = e.Exception.Message; e.ExceptionHandled = True; End If End Sub
14. Add the following line to the SelectedIndexChanged event handler of GridView dvEmp.ChangeMode(DetailsViewMode.ReadOnly) Template Field: When ever any kind of customization is needed to a column or field, convert it into a TemplateField. Rigthclick on GridView Show Smart Tag Click on Edit Columns Select the ColumnName Click on the hyperlink(convert this field into a TemplateField) RightClick EditTemplate Select the Template RightClick on the control (which you want to customize) Click on DataBindings Select the Properties (on the left hand side) and provide the binding expression on the right hand side. Bind (Two way Binding) Fetches the data and changes made to it is reflected Eval (One way Binding) It just Fetches the data , changes made to it are not reflected 15. In DetailView convert the IsActive field to Templetefield
<asp:TemplateField HeaderText="IsActive" SortExpression="IsActive"> <ItemTemplate> <asp:Label ID="lblIsActive" runat="server" Text='<%# GetYesOrNo(Eval("IsActive")) %>'/> </ItemTemplate> <EditItemTemplate> <asp:CheckBox ID="chkIsActive" runat="server" Checked='<%# IsEmpActive(Eval("IsActive")) %>' /> </EditItemTemplate> <InsertItemTemplate> <asp:CheckBox ID="chkIsActive" runat="server" Checked='<%# Bind("IsActive") %>' /> </InsertItemTemplate> </asp:TemplateField> Protected Function IsEmpActive(ByVal active As Object) As Boolean If (IsDBNull(active)) Then Return False End If Return Cbool(active) End Function Protected Function GetYesOrNo(ByVal value as object) as String If (DBNull.Value == value) Then Return "No" ElseIf (CBool(value)) Then Return "Yes" Else Return "No" End Sub
4
Deccansoft Software Services DataBoundControls Protected Sub dvEmp_ItemUpdating(sender as Object, e as DetailsViewUpdateEventArgs) Dim chkIsActive as CheckBox =CType(dvEmp.FindControl("chkIsActive"), CheckBox) e.NewValues("IsActive") = chkIsActive.Checked End Sub
Note: e.NewValue collection should be used for setting values of those fields which are not updated using the DetailsView and the value has to be set programatically. 16. In GridView add a new TemplateColumn for Delete. Now delete button will prompt the user before the row is deleted. <asp:TemplateField> <ItemTemplate> <asp:Button CommandName="delete" runat="server" ID="btnDelete" Text='<%#Eval("EmpName") %>' OnClientClick="return confirm('Are you sure')" /> </ItemTemplate> </asp:TemplateField> Note: Any Control nested inside GridView cannot be directly used for programming 17. Steps for Calculating TotalSalary of a page:
a. In GridView Convert EmpSalary to Template Column b. For GridView(Employee ) ShowFooter is set to true c. Select the Column(EmpSalary) RightClick EditTemplate EmpSalary d. In the FooterTemplate place a label with Id lblTotalSalary e. Handle RowDataBound event of gridview f. Handle the RowDataBound event of the gridview.
Dim totalSalary as Decimal Protected Sub gvEmp_RowDataBound(sender as Object, e as GridViewRowEventArgs) If (e.Row.RowType = DataControlRowType.DataRow) Then Dim drv As DataRowView drv = CType(e.Row.DataItem, DataRowView)
totalSalary += CDec(drv("EmpSalary")) If (CDec(drv("EmpSalary")) > 10000) Then e.Row.ForeColor = System.Drawing.Color.Red End If
End Sub Protected Sub dlEmp_UpdateCommand(. . .) Handles dlEmp.UpdateCommand Dim empid As Integer, newempname As String, newempsalary As String, newisactive As Boolean empid = CInt(dlEmp.DataKeys(e.Item.ItemIndex)) Dim txtName As TextBox txtName = CType(e.Item.FindControl("txtEditEmpName"), TextBox) newempname = txtName.Text Dim txtSalary As TextBox txtSalary = CType(e.Item.FindControl("txtEditEmpSalary"), TextBox) newempsalary = txtSalary.Text Dim chkIsActive As CheckBox chkIsActive = CType(e.Item.FindControl("chkEditIsActive"), CheckBox) newisactive = chkIsActive.Checked Response.Write(empid & " " & newempname & " " & newempsalary & " " & newisactive) ‘Code to execute UPDATE Command dlEmp.EditItemIndex = -1 dlEmp.DataBind() End Sub Protected Sub dlEmp_CancelCommand(. . .) Handles dlEmp.CancelCommand dlEmp.EditItemIndex = -1 dlEmp.DataBind() End Sub Protected Sub dlEmp_DeleteCommand(. . .) Handles dlEmp.DeleteCommand Dim empid As Integer empid = CInt(dlEmp.DataKeys(e.Item.ItemIndex)) ‘Code to execute DELETE Statement dlEmp.DataBind() End Sub <asp:SqlDataSource ID="EmpDataSource" runat="server" ConnectionString = "<%$ ConnectionStrings:csMSNET %>"
Deccansoft Software Services – ASP.NET Security, Profile and WebParts
1
Steps for configuring SQL Server for Security in ASP.NET 2.0 Run the utility program aspnet_regsql.exe (from framework folder) <configuration> <connectionStrings> <add name="csTestingDB" connectionString="data source=.\SQLEXPRESS;uid=sa;pwd=dss;database=DemoWebApp"
WebParts • Add a folder (WebPartsDemo).To the folder add a Webform and Web.Config. In Web.config deny access to annonymous users. <system.web> <authorization> <deny users="?"/> </authorization> </system.web> • From Web.Config.Comments (Framework folder) copy Webparts section and paste it in applications root directory Web.config. • Change the ConnectionStringName and ProviderName, also set the defaultProvider • Delete the Transformer section from Web.Config. • Under authorization change “deny” to “allow” • In the Webform drag and drop WebPartManager, change the ID to wpManager. • Drag and Drop WebpartZone on the WebForm. • Under WebPartZone add any control Note: Every Control added is treated as one Webpart.
WebpartsDemo.aspx.vb Protected Sub Page_Load() Handles Me.Load If (Not IsPostBack) Then For Each mode As WebPartDisplayMode In wpManager.SupportedDisplayModes If (mode.IsEnabled(wpManager)) Then Dim li As New ListItem(mode.Name) ddlModes.Items.Add(li) End If Next End If End Sub Protected Sub ddlModes_SelectedIndexChanged(. . .) Handles ddlModes.SelectedIndexChanged wpManager.DisplayMode = wpManager.SupportedDisplayModes(ddlModes.SelectedValue) End Sub Protected Sub btnResetLayout_Click(. . .) Handles btnResetLayout.Click wpManager.Personalization.ResetPersonalizationState() End Sub Protected Sub Page_PreRender(. . .) Handles Me.PreRender lblCurrentScope.Text = wpManager.Personalization.Scope.ToString() End Sub Protected Sub btnToggleScope_Click(. . .) Handles btnToggleScope.Click If (wpManager.Personalization.CanEnterSharedScope) Then wpManager.Personalization.ToggleScope() End If End Sub WebpartsDemo.aspx <%@ Register Src="WPUserControl.ascx" TagName="WPUserControl" TagPrefix="uc1" %> <asp:WebPartManager ID="wpManager" runat="server"/> Current Scope: <asp:Label ID="lblCurrentScope" runat="server"></asp:Label> <asp:Button ID="btnToggleScope" runat="server" Text="Toggle Scope" />
Deccansoft Software Services – ASP.NET Security, Profile and WebParts
3
Change Current Mode:<asp:DropDownList ID="ddlModes" runat="server" AutoPostBack="True"/> ]<asp:Button ID="btnResetLayout" runat="server" Text="Reset Layout" /> <asp:WebPartZone ID="WebPartZone1" runat="server"> <ZoneTemplate> <asp:Button Title="Button" SubTitle="ST" ID="Button1" runat="server" Text="Button" /> <asp:Panel Title="Panel" ID="Panel1" runat="server" Height="50px" Width="125px"> <asp:RadioButton ID="RadioButton1" runat="server" GroupName="g1" Text="R1" /> <asp:RadioButton ID="RadioButton2" runat="server" GroupName="g1" Text="R2" /> <asp:RadioButton ID="RadioButton3" runat="server" GroupName="g1" Text="R3" /> </asp:Panel> </ZoneTemplate> </asp:WebPartZone> <asp:WebPartZone ID="WebPartZone2" runat="server"> <ZoneTemplate> <asp:DropDownList title="Dropdown" ID="DropDownList1" runat="server"/> <uc1:WPUserControl ID="WPUserControl1" runat="server" /> <!-- UserControl as WebPart --> </ZoneTemplate> </asp:WebPartZone> • PageCatalogPart is to restore all the closed WebParts which have been statically created • DeclarativeCatalogPart is for adding WebParts dynamically to the zone at runtime <asp:CatalogZone ID="CatalogZone1" runat="server"> <ZoneTemplate> <asp:DeclarativeCatalogPart ID="DeclarativeCatalogPart1" runat="server"> <WebPartsTemplate> <asp:Calendar ID="Calendar1" runat="server”></asp:Calendar> </WebPartsTemplate> </asp:DeclarativeCatalogPart> <asp:PageCatalogPart ID="PageCatalogPart1" runat="server" /> </ZoneTemplate> </asp:CatalogZone> <asp:EditorZone ID="EditorZone1" runat="server"> <ZoneTemplate> <asp:AppearanceEditorPart ID="AppearanceEditorPart1" runat="server" /> <asp:LayoutEditorPart ID="LayoutEditorPart1" runat="server" /> <asp:BehaviorEditorPart ID="BehaviorEditorPart1" runat="server" /> <asp:PropertyGridEditorPart ID="PropertyGridEditorPart1" runat="server" /> </ZoneTemplate> </asp:EditorZone> Types of Scopes: Shared Scope: Default layout for all users User Scope: Layout for a particular user In Shared Scope the layout created becomes the default layout for all users unless they change the layout for themselves in UserScope In web.config <webParts> <personalization> <authorization> <allow users="*" verbs="enterSharedScope"/> </authorization> </personalization> </webParts> <anonymousIdentification enabled="true"/>
Deccansoft Software Services – ASP.NET WebServices Distributed Computing Architecture Client Process Server Process
Proxy
Stub
Actual Object
Client
o Proxy is a Client Side representative of the Actual object. It implements the same set of interfaces as the actual object
implements. o When the client requests for an instance of a remote object, the underlying services (Framework) creates the actual
object in the server process and the proxy in the client process, the client gets the reference to the local proxy object. o Along with the actual object a “stub” object is created on server. The proxy and stub are connected with each other over
the socket and communicates with each other using a common protocol o Whenever the client calls the method of the proxy, the implementation in Proxy serializes all the parameters of the
method and transports them to Stub i.e. proxy marshals the request to stub. o On Server, Stub deserializes the request and passes the references of the objects as parameters to the actual method in
actual object. SUN (Stanford University Network – RMI (Remote Method Invocation) - JRMP(Java RMI Protocol) OMG (Object Management Group) – CORBA Common Object Request Broker Arch. -IIOP (Internet Interoperable Protocol MS (Microsoft) - DCOM (Distributed Component Object Model) - DEC – Object RPC(Distributed Computing Environment) Problem: Because the proxy and the stub are tightly coupled to each other they must use the common protocol for communication. As the protocols used by RMI, COBRA and DCOM are native protocols they lack Interoperability. WebService: A WebService is a business object running on a middle tier and providing its functionality to any type of application using “SOAP” (Simple Object Access Protocol) protocol. SOAP = XML + HTTP. SOAP is a specification by W3C. In .Net WebSevices are managed by ASP.NET Framework. They are mostly used for developing B-B (Business to Business) services/application. WSDL (Web Service Description Language): It is an XML based document containing complete information of the webservice including methods and their parameters, the URL etc... For every webservice developed the corresponding WSDL document is distributed to the clients. The clients using a native utility program generates a proxy class from a WSDL document. File New Web Site ASP.NET Web Service Rename Service.asmx to DemoService.asmx In DemoService.asmx: <%@ WebService Language="C#" CodeBehind="~/App_Code/DemoService.cs" Class="DemoService" %> Note: All the methods of a webservice class to be used by the clients on internet must be marked as “WebMethod” ( attribute). [WebMethod] public int Add(int a, int b) { return a + b; } o Every SOAP request and response are made up of SOAPEnvelope. SOAPEnvelope has SOAPHeader, SOAPBody,
SOAPFault. o SOAP always uses Http Post method and the SOAPEnvelope is submitted as MessageBody.
1
Deccansoft Software Services – ASP.NET WebServices o A Webservice developed in .Net can be used by an Http Client also. Here the method name is submitted as the PathInfo
and the parameters are posted as a string of Name-Value pairs. http:// ServerName/ApplicationName/ DemoService.asmx/ MethodName
</soap:Envelope> Note: To view the WSDL document we can use the following URL http://localhost/SepWebServices/Service.asmx?wsdl Client Application: (In New Instance of VS.NET) File New Project Windows Application In the Solution Explorer References Right Click Add Web Reference In URL (give the Url of Web Service) Click on Go Web reference name localhost (Generally name of domain on which the webservice is hosted is used) Click on Add Reference Note: When a WebService reference is added in VS.Net that is using add Web reference it automatically creates a proxy class in the current project using a utility program called as WSDL.EXE. The same can be viewed by opening the file Reference.cs. (Before this click on Show All Files in Solution Expolorer). private void btnDemo_Click(object sender, EventArgs e) { localhost.DemoService ds = new localhost.DemoService(); MessageBox.Show(ds.Add(20, 50).ToString()); } Note: Working with PassByValue and PassByReference: Unless it is pass by reference changes made to data will not be reflected on client in WebMethod.
2
Deccansoft Software Services – ASP.NET WebServices In Demoservice add WebMethod [WebMethod] public void Foo(int a, ref int b) { a++; b++; }
[WebMethod] public void Foo2( CA a1, ref CA a2) { a1.m1++; a2.m1++; }
public class CA { public int m1; }
In Client Application : Note: After making any changes to the webservice, to reflect them in client application: Right Click on NameSpace of WebService (Localhost) and Select Update Web Reference. private void btnFoo_Click(object sender, EventArgs e) { int m = 10; int n = 10; DemoService ds = new DemoService(); ds.Foo(m, ref n); MessageBox.Show(m + " " + n); }
private void btnFoo2_Click(object sender, EventArgs e) { CA ma1 = new CA(); CA ma2 = new CA(); DemoService ds = new DemoService(); ds.Foo2(ma1, ref ma2); MessageBox.Show(ma1.m1 + " " + ma2.m1); }
o If the parameter of the web method is declared as “ByVal” (pass by value) then the reference type of argument is
serialized and transported only from client to server. Hence changes made to the paremeter are not reflected in the client.
o If the parameter of the web method is declared as “ByRef” (pass by reference) then the reference type of argument is serialized and transported in both the direction i.e from client to server and server to client. Hence changes made the to parameter in the web method are also reflected in the client.
Note: In content of a WebMethod the behavior of the parameters is same for both class and structure. The behavior is like value type not reference type.
Working with SoapHeader • Because Soap depends on Http protocol the webservices are stateless objects. • SoapHeader can be used for passing certain additional data to a WebMethod. Once a SoapHeader is associated with the
proxy on the client, the proxy automatically includes the data along every method called by it on webservice. Step1: Write a class inheriting from SoapHeader public class UserInfoHeader : SoapHeader { public string username, password; } Step2: Within Webservice class declare a public variable of custom SoapHeader type public UserInfoHeader ui; Step3: Attach a SoapHeader to a WebMethod using SoapHeader attribute. SoapHeaderDirection.InOut means SoapHeader is exchanged in both the directions. Step4: In the method we can use the reference variable //[SoapHeader("ui",Direction=SoapHeaderDirection.InOut)] [SoapHeader("ui")] [WebMethod] public int Add(int a,int b) { if (ui.username != ui.password) throw new ApplicationException("UserName and Password are not correct"); return a+b; } Note: Invoke the webservice in the web browser and see how the SOAP Envelope of a given method with SOAP Header has changed. if a member of SOAP Header class is used for managing state between calls to the multiple webmethods by the client, then the direction of the SOAP Header must be given as “InOut”. Step5: In Client - Code for attaching SoapHeader to the proxy private void btnSoapHeader_Click(object sender, EventArgs e) {
3
Deccansoft Software Services – ASP.NET WebServices DemoService ds = new DemoService(); UserInfoHeader ui = new UserInfoHeader(); ui.username = "a"; ui.password = "a"; ds.UserInfoHeaderValue = ui;// attaching header to proxy MessageBox.Show(ds.Add(10, 20).ToString()); }
Asynchronous call to the WebMethod If the webmethod is called asynchronously the client application never remains unresponsive while proxy has called and is waiting for the return value of actual webservice webmethod. For every WebMethod “X” in a webservice the following are added to or generated along with the proxy class. The method X The method XAsync The event XCompleted Add the delegate XCompletedEventHandler A class XCompletedEventArgs private void btnSoapHeader_Click(object sender, EventArgs e) { DemoService ds = new DemoService(); ds.AddAsync(1, 2); //Calling the method Asynchronously ds.AddCompleted += new AddCompletedEventHandler(ds_AddCompleted); //In VB.Net: AddHandler ds.AddCompleted ,New AddCompletedEventHandler(addressof ds_AddCompleted); MessageBox.Show("Continue…"); } void ds_AddCompleted(object sender, AddCompletedEventArgs e) { //This method is called by proxy when the actual method returns. MessageBox.Show(e.Result.ToString()); } Note: For Asynchronous call to a web method, we don’t have to make any changes to the webservice or its web method.
Security in WebService WebServices supports only WindowsAuthentication because they don’t have any UserInterface and Forms / Passport Authentication requires GUI. Add a web.config to the DemoService and include the following code <system.web>
<authentication mode="Windows" /> <authorization>
<deny users="?"/> </authorization>
</system.web> In IIS for the webservice vittual directory either set Integrated Windows / Basic Authentication. [WebMethod] public string SayHello() { return "Hello" +" "+ User.Identity.Name; } In ClientApplication add the following code private void Security_Click(object sender, EventArgs e) { DemoService ds = new DemoService(); //ds.Credentials = System.Net.CredentialCache.DefaultCredentials; //Code to explicitly set the username and password in the request. System.Net.CredentialCache cc = new System.Net.CredentialCache(); System.Net.NetworkCredential nc = new System.Net.NetworkCredential(txtUsername, txtPassword.Text); cc.Add(new Uri(ds.Url), "basic", nc); cc.Add(new Uri(ds.Url), "NTLM", nc); //if NTLM doesn’t work then give “Negotiate” ds.Credentials = cc; MessageBox.Show(ds. SayHello()); }
4
Deccansoft Software Services – ASP.NET WebServices
5
System.Net.CredentialCache.DefaultCredentials includes the identity of the client using which we have logged on to the client machine.
Deccansoft Software Services – MS.NET Remoting
Case 1 Server Side 1. Create a new class library project (Hello Library) with solution name as RemotingDemo. 2. Add to the Project a remote object class i.e. a class inherited from MarshalByRefObject. 3. Every Remote object must inherit from MarshalByRefObject. Public Class HelloObject Inherits MarshalByRefObject Dim count As Integer
Public Function SayHello(ByVal name As String) As String Count += 1 Return "Hello" & name & "Count:" & count
End Function Public Sub New()
Console.WriteLine("HelloObject created") End Sub
End Class 4. To the current solution add a Console application (Server) 5. Add to it the reference System.Runtime.Remoting (using MS.NET Tab) and Hellolibrary(Using Projects Tab) Note: The Remote object is included in the classlibrary project so that the same library can be shared by server and client. On client it is used by the remoting framework for reading its type Metadata and constructing the proxy class from it. Types of Channels
• Http Channel is firewall friendly but slow • Tcp Channel is faster but not firewall friendly • Icp Channel can be used if both client and server are on same machine.
Imports System.Runtime.Remoting Imports System.Runtime.Remoting.Channels Imports system.Runtime.Remoting.Channels.Http Imports System.Runtime.Remoting.Channels.Tcp Imports HelloLibrary Class program Shared Sub Main() Dim tc As New TcpChannel(1122) Dim hc As New HttpChannel(1123) ChannelServices.RegisterChannel(tc, False) ChannelServices.RegisterChannel(hc, False) RemotingConfiguration.RegisterWellKnownServiceType(GetType(HelloObject), "HO",
WellKnownObjectMode.Singleton) Console.WriteLine("Server Started") System.Threading.Thread.CurrentThread.Join() End Sub End Class Client Side 1. Start New Studio Instance 2. Create a new Console Application. 3. Add the reference HelloLibrary(using Browse Tab) and System.Runtime.Remoting (using MS.NET tab). Imports System.Runtime.Remoting Imports System.Runtime.Remoting.Channels Imports system.Runtime.Remoting.Channels.Http Imports System.Runtime.Remoting.Channels.Tcp Imports HelloLibrary Class Program Shared Sub Main()
1
Deccansoft Software Services – MS.NET Remoting Dim tc As New TcpChannel(0) ‘if ‘0’ is passed then randomly any free port number is used. Dim hc As New HttpChannel(0) ChannelServices.RegisterChannel(tc, False) ChannelServices.RegisterChannel(hc, False) RemotingConfiguration.RegisterWellKnownClientType(GetType(HelloObject), "http://localhost:1123/HO") Dim ho As New HelloObject() Console.WriteLine(ho.SayHello("Test1")) Console.WriteLine(ho.SayHello("Test2")) End Sub End Class Notes: RemotingConfiguration.RegisterWellKnownServiceType(GetType(HelloObject), "HO",
WellKnownObjectMode.Singleton) • The above line is used to register the “HelloObject” with the remoting framework identifying itself with a unique name
“HO”. • If registered as Singleton an instance of it is created when the server receives the first method call request from the client
and the same object is used for all subsequent calls to the class is created for SingleCall a new instance is created for every method called from the client i.e object behavious as stateless.
Note: Allways run server application before running client application
Case 2: Create a Copy of Case 1 Project Client Activated Object : For every client a new instance is created on its first request and the same is used by that client for all its subsequent requests. One server can have only one ClientActivated Object and hence name is not required for it. Server Main Replace RemotingConfiguration.RegisterWellKnownServiceType ….. With RemotingConfiguration.RegisterActivatedServiceType(GetType(HelloObject)) Client Main Replace RemotingConfiguration.RegisterWellKnownClientType With RemotingConfiguration.RegisterActivatedClientType(GetType(HelloObject), "http://localhost:1122") Dim ho As New HelloObject() Console.WriteLine(ho.SayHello("Test1")) Console.WriteLine(ho.SayHello("Test2"))
Case 3: Create a Copy of Case1 for wellknown and Case 2 for Client activated Working with Configuration file Server Side ApplicationConfig File – App.Config <configuration> <system.runtime.remoting> <application> <service> <!--<wellknown type="HelloLibrary.HelloObject, HelloLibrary" objectUri="HO" mode="Singleton" />--> <activated type="HelloLibrary.HelloObject, HelloLibrary"/> </service> <channels> <channel ref="http" port="1123"/> <channel ref="tcp" port="1122"/> </channels> </application> </system.runtime.remoting> </configuration>
2
Deccansoft Software Services – MS.NET Remoting In Server Main: Replace RemotingConfiguration.RegisterActivatedServiceType With RemotingConfiguration.Configure("Server.exe.config", False) Client Side Application Config File: App.Config <configuration> <system.runtime.remoting> <application> <client url="http://localhost:1123/" > <!--<wellknown type="HelloLibrary.HelloObject, HelloLibrary" url="http://localhost:1123/HO" />--> <activated type="HelloLibrary.HelloObject, HelloLibrary" /> </client> <channels> <channel ref="http" port="0"/> <channel ref="tcp" port="0"/> </channels> </application> </system.runtime.remoting> </configuration> In Client Main: Replace RemotingConfiguration.RegisterActivatedClientType With RemotingConfiguration.Configure("Client.exe.config", False)
Case 4: Create a copy of Case 1 Replacing Class with Interface in the HelloLibrary In HelloLibrary Public Interface IHelloObject Function SayHello(ByVal name As String) As String End Interface Modify the class and move to server project: Imports HelloLibrary Public Class HelloObject Inherits MarshalByRefObject Implements IHelloObject Dim count As Integer Public Function SayHello(ByVal name As String) As String Implements IHelloObject.SayHello count += 1 Return "Hello " & name & " Count: " & count End Function Public Sub New() Console.WriteLine("Hello object created") End Sub End Class In Client application replace RemotingConfiguration.RegisterWellKnownClientType(GetType(HelloObject), "http://localhost:1123/HO") with Dim ho As IHelloObject ho=Activator.GetObject(GetType(IHelloObject), "http://localhost:1123/Ho") Remove the previous reference to classlibrary and Add the reference to the library again.
3
Deccansoft Software Services – MS.NET Remoting
4
Case 5: Create a copy of Case 1 Asynchronously Calling Remote Method 1. Based on the method to be called Asynchronously using its signature declare a delegate 2. Using the same method declare an instance of delegate 3. Declare BeginInvoke and EndInvoke Delegate Function SayHelloHandler(ByVal name As String) As String Class Client Shared Sub Main() Dim tc As New TcpChannel(0) Dim hc As New HttpChannel(0) ChannelServices.RegisterChannel(tc, False) ChannelServices.RegisterChannel(hc, False) RemotingConfiguration.RegisterWellKnownClientType(GetType(HelloObject), "http://localhost:1123/HO") Dim ho As New HelloObject() 'Following is syncronous call 'Console.WriteLine(ho.SayHello("Test")) Dim delSH As New SayHelloHandler(AddressOf ho.SayHello) Dim ar As IAsyncResult 'Following is Asyncronous call ar = delSH.BeginInvoke("Test", Nothing, Nothing) Console.WriteLine("Continue...") While (Not ar.IsCompleted) Console.WriteLine("Waiting...") ‘Can perform any other operation Threading.Thread.Sleep(100) End While Dim res As String res = delSH.EndInvoke(ar) Console.WriteLine(res) End Sub End Class Note: The code in server application does not need to be changed.
Working with CrystalReport To the Project Add a new Item DataSet To the Project Add a new Item CrystalReport (Emp.rpt) Create a Typed DataSet. Create rpt file using Typed DataSet On the WebForm drag and drop CrystalReportViewer For it create a new ReportSource with an appropriate filename Path of file should be corrected Write the following code in Page_Load Protected Sub Page_Load(ByVal sender As Object, ByVal e As System.EventArgs) Handles Me.Load Dim dta As New EmpDataSetTableAdapters.EmpTableAdapter Dim dsEmp As New EmpDataSet dta.Fill(dsEmp.Emp) Dim employeeReport As New ReportDocument employeeReport.Load(MapPath("CrystalReport1.rpt")) employeeReport.SetDataSource(dsEmp.Tables(0)) CrystalReportViewer1.ReportSource = employeeReport End Sub
Deccansoft Software Services – ASP.NET Email Code to Send Mail Programatically using System.Net.Mail; using System.Net; public enum MailFormat { Html = 1, Text = 0, } public class EmailUtil { public static void SendMail(string from, string To, string cc, string bcc, System.Net.Mail.MailPriority priority,
Defalt.aspx <html xmlns="http://www.w3.org/1999/xhtml" > <head runat="server"> <title>Ajax Demo</title> <script type="text/javascript"> function btnGetTime_onclick() { var url="GetServerDateTime.aspx" xmlHttp = GetXmlHttpObject(stateChanged) xmlHttp.open("GET", url , true) xmlHttp.send(null) } function stateChanged() { alert(xmlHttp.readyState) if (xmlHttp.readyState == 4 || xmlHttp.readyState == "complete") alert(xmlHttp.responseText) } function GetXmlHttpObject(handler) { var objXmlHttp=null if (navigator.userAgent.indexOf("MSIE")>=0) { var strName="Msxml2.XMLHTTP" if (navigator.appVersion.indexOf("MSIE 5.5")>=0) strName="Microsoft.XMLHTTP" try { objXmlHttp=new ActiveXObject(strName) objXmlHttp.onreadystatechange=handler return objXmlHttp } catch(e) { alert("Error.... " + e) return null } } if (navigator.userAgent.indexOf("Mozilla")>=0) { objXmlHttp=new XMLHttpRequest() objXmlHttp.onload=handler objXmlHttp.onerror=handler return objXmlHttp } } </script> </head> <body> <form id="form1" runat="server"> <input id="btnGetTime" type="button" value="Get Server Date & Time" onclick="return btnGetTime_onclick()" /><br /> </form> </body> </html> GetServerDateTime.aspx Partial Class GetServerDateTime Inherits System.Web.UI.Page Protected Sub Page_Load(ByVal sender As Object, ByVal e As System.EventArgs) Handles Me.Load
Deccansoft Software Services –ASP.NET AJAX
2
Response.Clear() Response.Cache.SetCacheability(HttpCacheability.NoCache) Response.Write(System.DateTime.Now.ToString()) Response.End() 'Page.MaintainScrollPositionOnPostBack = True End Sub End Class
Using AjaxPro Component.
Step 1: Download the latest Ajax.NET Professional files from www.schwarz-interactive.de Step 2: Add a reference to the AjaxPro.2.dll Step 3:Add following lines to your web.config:
<configuration> <system.web> <httpHandlers> <add verb="POST,GET" path="ajaxpro/*.ashx" type="AjaxPro.AjaxHandlerFactory, AjaxPro.2"/> </httpHandlers> </system.web> </configuration> Step 4: Now, you have to mark your .NET methods with an AjaxMethod attribute: Partial Class _Default Inherits System.Web.UI.Page <AjaxPro.AjaxMethod()> _ Public Function GetServerTime() As Date Return DateTime.Now End Function ‘To use the .NET method on the client-side JavaScript you have to register the methods, ‘this will be done to register a complete class to Ajax.NET: Protected Sub Page_Load(ByVal sender As Object, ByVal e As System.EventArgs) Handles Me.Load AjaxPro.Utility.RegisterTypeForAjax(GetType(_Default)) End Sub End Class Step 5: Add button to the aspx page. <input type=”button” OnClick="getServerTime();" Value="GetServerTime" /> Step 6: Add the following script to default.aspx page (in head section) <script language="javascript"> function getServerTime() { _Default.GetServerTime(getServerTime_callback); // asynchronous call } // This method will be called after the method has been executed and the result has been sent to the client. function getServerTime_callback(res) { alert(res.value); } </script>
<%@ OutputCache Duration="9999" VaryByParam="none" SqlDependency="MSNETDB:Emp" %> Or
For caching only the data fetched by the SqlDataSource <asp:SqlDataSource CacheDuration="Infinite" EnableCaching="true" SqlCacheDependency="MSNETDB:Empl"
Notification based Caching: Step1: Run the command for enabling the database for SQL cache dependency aspnet_regsql -S “.\sqlexpress” -E -d “MSNET” –ed Step2: In Global.asax add the following code void Application_Start(object sender, EventArgs e) {
<%@ OutputCache Duration="99999" VaryByParam="none" SqlDependency="CommandNotification" %> Note: • All Table Names and Column Names are CaseSensitive and table must be fully qualified with the owner name i.e.
dbo.Emp • In commands * should not be used, column names must be mentioned explicitly. Or For caching only the data fetched by the SqlDataSource