44
WebClient Mobile Workshop 2011 Page 1 of 44 Web Client Mobile Workshop
| Date post: | 20-Aug-2015 |
| Category: |
Technology |
| Upload: | cm-first-technologies |
| View: | 1,965 times |
| Download: | 4 times |

WebClient Mobile Workshop 2011
Page 1 of 44
Web Client Mobile Workshop

WebClient Mobile Workshop 2011
Page 2 of 44
Contents Introduction .................................................................................................................................................. 3
Software Prerequisites .............................................................................................................................. 3
3rd Party Software that must be installed separately ........................................................................... 3
Software included in workshop download ........................................................................................... 3
Optional Software ................................................................................................................................. 3
Installation ................................................................................................................................................ 3
Recommended Hardware ..................................................................................................................... 3
Installation Steps ................................................................................................................................... 3
Exercise 1 – Orientation and Hello World ..................................................................................................... 8
Configure Eclipse ....................................................................................................................................... 8
Run the default Application .................................................................................................................... 11
Troubleshooting .................................................................................................................................. 12
Inspect CA Plex Model ............................................................................................................................ 12
Create a Hello World initial menu .......................................................................................................... 12
Exercise 2 – Create a menu and a session grid ........................................................................................... 14
Exercise 3 – Create detail pages ................................................................................................................. 17
Exercise 4 – Maps and location services ..................................................................................................... 21
Exercise 5 – Videos and links ...................................................................................................................... 24
Exercise 6 – Appearance ............................................................................................................................. 28
Exercise 7 – Native App Deployment .......................................................................................................... 30
Congratulations! ......................................................................................................................................... 36
Appendix – Attach Points ............................................................................................................................ 37
Appendix - Reference .................................................................................................................................. 38
Button Appearance ................................................................................................................................. 38
Partial ui list (see sencha documentation) .............................................................................................. 38
Animations .............................................................................................................................................. 39
Appendix – Configure and Check your SQL Server Access from Eclipse ..................................................... 40

WebClient Mobile Workshop 2011
Page 3 of 44
Introduction The cm WebClient i+ Mobile product is designed to generate a first class native mobile device interface
for all Sencha Touch supported mobile platforms, including Apple, Android, BlackBerry 6, and others.
Through the use of PhoneGap, the application can also be deployed as a native app using XCode for
Apple or Eclipse for Android. This will give the developer the ability to publish WebClient mobile apps on
the Apple iTunes Store or Android Marketplace, and to make use of advanced phone hardware by the
use of JavaScript API’s.
For this workshop, you are working with a WebClient Alpha product. The beta is scheduled for June
2011.
Software Prerequisites
3rd Party Software that must be installed separately
Chrome or Safari (WebKit) Browser for desktop testing
CA Plex v6.1
SQL Server 2008
Java JDK version SE 6 Update 25 or higher
Tomcat 6.0
Software included in workshop download
WebClient 1.6.3
Sencha Touch JavaScript component library
Android SDK with Android device emulator
PhoneGap, used to deploy a native application
Optional Software
Apple iOS SDK (requires Apple Mac computer)
Installation
Recommended Hardware
Dual core processor
2GB Ram or more
5 GB free disk space
Installation Steps
Install CA Plex 6.1. Please contact CM First if you would like an evaluation copy.
Install either Google Chrome or Apple Safari current version browser
Install SQL Server Express 2008 from Microsoft: http://www.microsoft.com/express/Database/
o Important – Install with Mixed Mode Authentication

WebClient Mobile Workshop 2011
Page 4 of 44
o Important – Remember the sa password you created
o Important – Ensure that you can access the SQL Server instance from CA Plex from a
non-integrated mode ODBC connection. You may have to adjust your local firewall
setting or SQL Server port settings.
Enable TCP/IP Protocol by opening the SQL Server Configuration Manager. Ensure that
TCP/IP is enabled under every configuration tree.
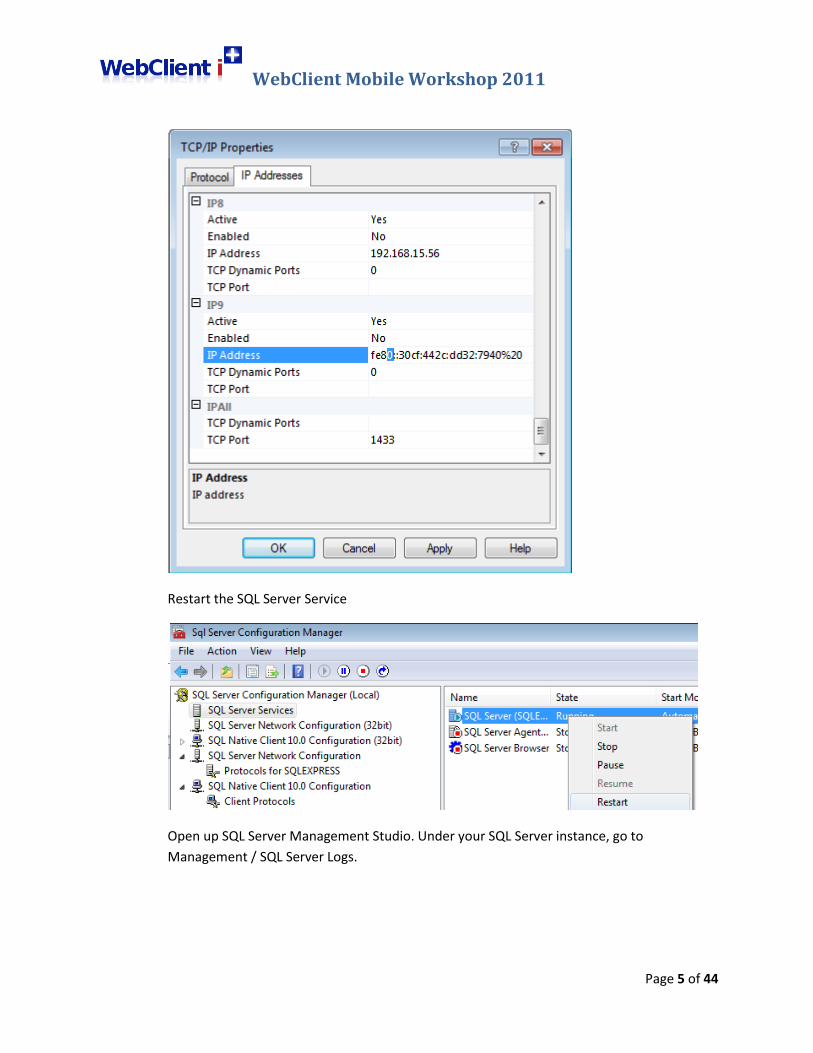
Right click on the protocol and select properties. Ensure that the IPALL setting has a blank
value in TCP Dynamic Ports and 1433 in the TCP Setting
WebClient Mobile Workshop 2011
Page 5 of 44
Restart the SQL Server Service
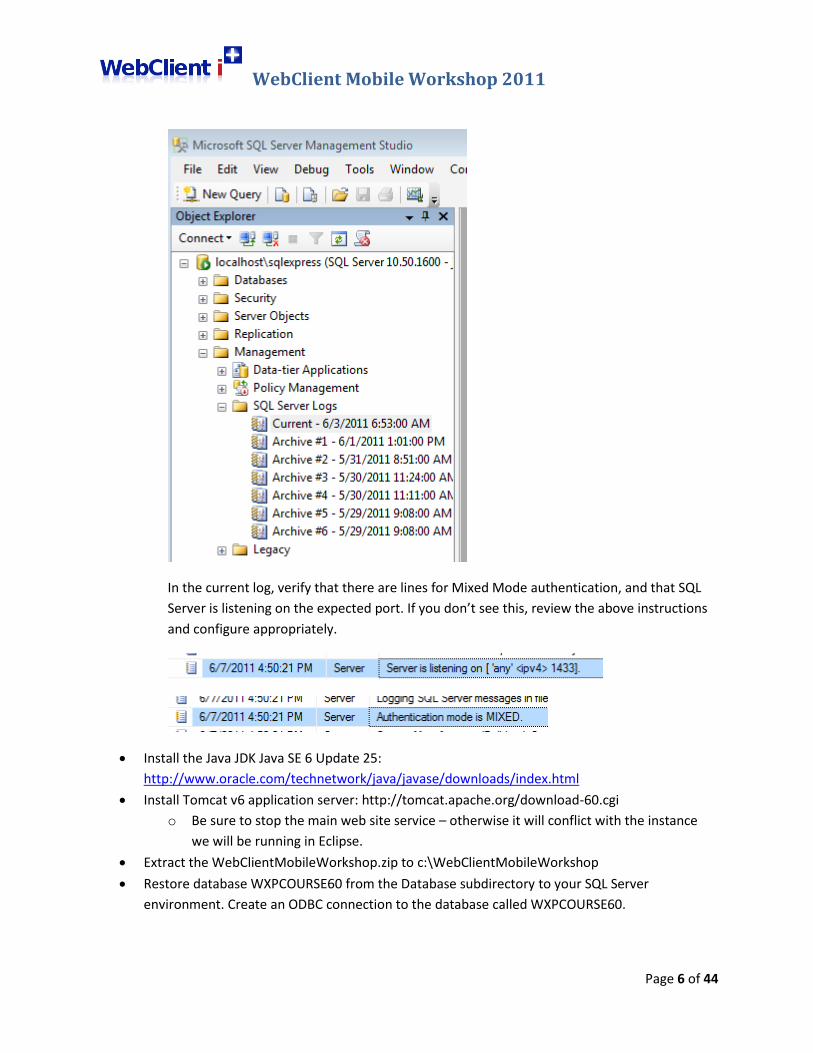
Open up SQL Server Management Studio. Under your SQL Server instance, go to
Management / SQL Server Logs.
WebClient Mobile Workshop 2011
Page 6 of 44
In the current log, verify that there are lines for Mixed Mode authentication, and that SQL
Server is listening on the expected port. If you don’t see this, review the above instructions
and configure appropriately.
Install the Java JDK Java SE 6 Update 25:
http://www.oracle.com/technetwork/java/javase/downloads/index.html
Install Tomcat v6 application server: http://tomcat.apache.org/download-60.cgi
o Be sure to stop the main web site service – otherwise it will conflict with the instance
we will be running in Eclipse.
Extract the WebClientMobileWorkshop.zip to c:\WebClientMobileWorkshop
Restore database WXPCOURSE60 from the Database subdirectory to your SQL Server
environment. Create an ODBC connection to the database called WXPCOURSE60.

WebClient Mobile Workshop 2011
Page 7 of 44
Verify you can open the CA Plex model WXPCOURSE61.mdl located in
C:\WebClientMobileWorkshop\wxpcourse60
Verify you can open Eclipse.exe from C:\WebClientMobileWorkshop\eclipse. It is convenient to
add a shortcut to eclipse from your start menu or desktop.

WebClient Mobile Workshop 2011
Page 8 of 44
Exercise 1 – Orientation and Hello World
Configure Eclipse Open Eclipse, you should see a welcome screen
Next, switch your workspace to C:\WebClientMobileWorkshop\wxpcourse60 using the File / Switch
Workspace menu option
Import the projects located in the workspace
Click on MyAndroid project and close it. We will configure this later.

WebClient Mobile Workshop 2011
Page 9 of 44
Go to the Servers tab and add an Apache Tomcat 6.0 Server.
Hit next and add the Plex2EWeb project to the server
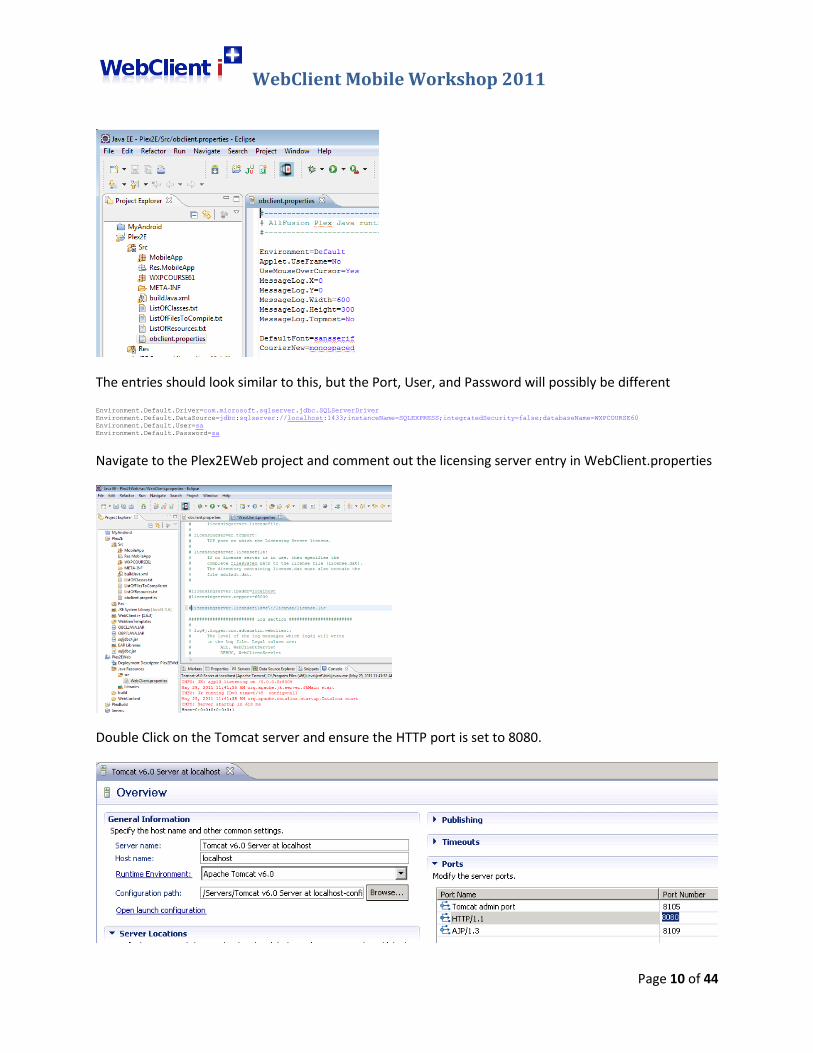
Navigate to the Plex2E project and verify / change the SQL Server connection entries in
obclient.properties
WebClient Mobile Workshop 2011
Page 10 of 44
The entries should look similar to this, but the Port, User, and Password will possibly be different
Environment.Default.Driver=com.microsoft.sqlserver.jdbc.SQLServerDriver
Environment.Default.DataSource=jdbc:sqlserver://localhost:1433;instanceName=SQLEXPRESS;integratedSecurity=false;databaseName=WXPCOURSE60
Environment.Default.User=sa
Environment.Default.Password=sa
Navigate to the Plex2EWeb project and comment out the licensing server entry in WebClient.properties
Double Click on the Tomcat server and ensure the HTTP port is set to 8080.

WebClient Mobile Workshop 2011
Page 11 of 44
Restart the Tomcat server.
Note – to run the application the Tomcat Server should be in status Started, Synchronized. If it does not
say that, restart the server to republish. In the case of erratic behavior due to incomplete publishing,
stop the Tomcat server, right click, and perform a clean operation. This will re-sync the environment to
your application.
Note: if you get a port conflict message – ensure that other instances of Tomcat or other web servers
are stopped. You can check Tomcat by the “Configure Tomcat” program shortcut.
Run the default Application
From a Google Chrome or Apple Safari Brower, open this URL:
http://localhost:8080/Plex2EWeb/wcs
Note that this page will not function in Internet Explorer
To create a shortcut to the urn, click on the wrench, go to tools and then “Create application
shortcuts…”. From there you can create an icon to launch the app directly.

WebClient Mobile Workshop 2011
Page 12 of 44
Troubleshooting
If you don’t get the above web page looks like this – verify:
url is typed in correctly – url is case sensitive
Tomcat is started – look at the servers tab in Eclipse and start the Tomcat service if necessary
Check the most recent error log located at c:\logs\webclient*.log.
o See the SQL Server connection from Eclipse section in the appendix. Verify you can
access SQL Server from a java application. Check the entries in obrun.properties
o Check the licensing entries in webclient.properties
Contact CM First support at webclientiplus.com
Inspect CA Plex Model Open the CA Plex model WXPCOURSE61.mdl located in director
C:\WebClientMobileWorkshop\wxpcourse60
First, inspect Entity ConferenceSession and the MobileSuite function scoped to it. This will be the focus
of our exercises – developing a conference agenda tool for our CA 2E/Plex conference.
Look at two abstract functions - _MobilePage and _MobileGrid. These are simple building blocks for a
mobile application. Verify the inheritance is to standard CA patterns and to standard WebClient. You
would create your own mobile standards layer in a similar fashion.
Also look at the control name properties for the buttons, grid, and search field. This technique will be
used throughout the workshop to direct the look of the mobile presentation.
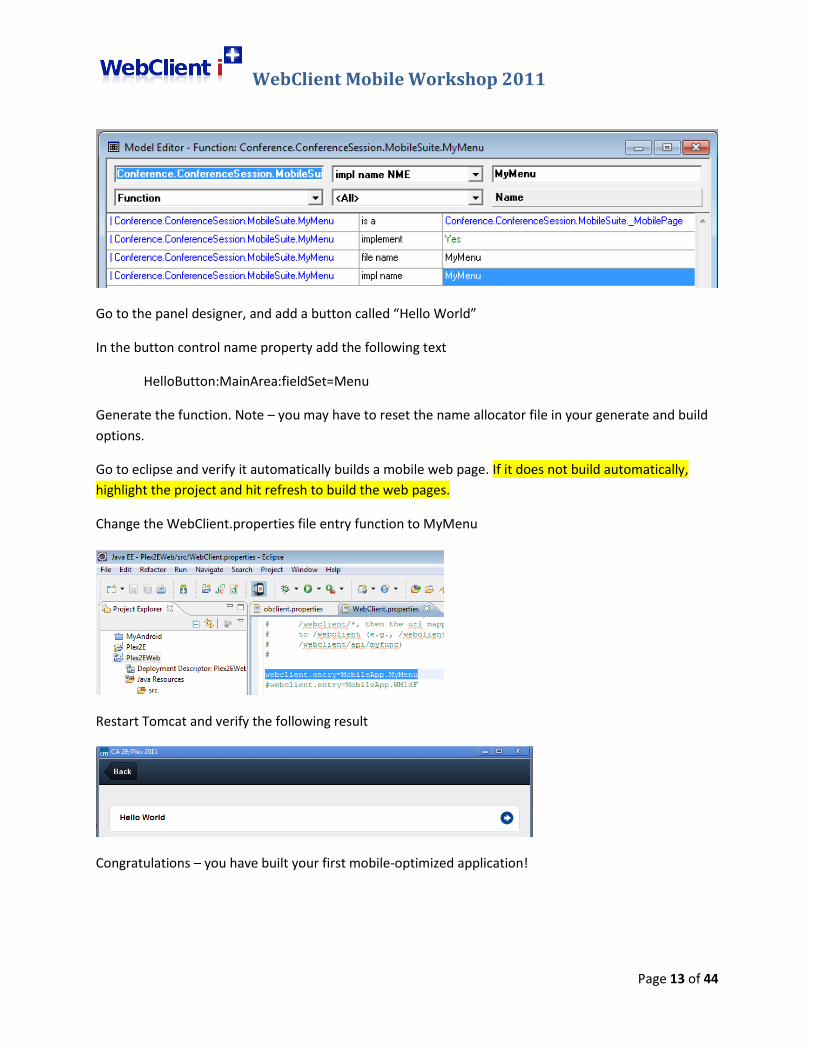
Create a Hello World initial menu Create a new function called “MyMenu” that is scoped to ConferenceSession.MobileSuite
Add the following triples
WebClient Mobile Workshop 2011
Page 13 of 44
Go to the panel designer, and add a button called “Hello World”
In the button control name property add the following text
HelloButton:MainArea:fieldSet=Menu
Generate the function. Note – you may have to reset the name allocator file in your generate and build
options.
Go to eclipse and verify it automatically builds a mobile web page. If it does not build automatically,
highlight the project and hit refresh to build the web pages.
Change the WebClient.properties file entry function to MyMenu
Restart Tomcat and verify the following result
Congratulations – you have built your first mobile-optimized application!

WebClient Mobile Workshop 2011
Page 14 of 44
Exercise 2 – Create a menu and a session grid
Next we will create two searchable grids over our session table.
First create two functions scoped to MobileSuite
SessionsByDay
SessionsByName
Enter the following triples to inherit from our pattern functions
In the action diagram, put in the following code to enable searching
Next, go into the Panel Designer and hide all fields on GridP except CSTitle for the Sessions by Name
function and all fields except CSTime and CSTitle on the Sessions by Date function
Now go into your menu function Panel Designer
Remove the Hello World Button

WebClient Mobile Workshop 2011
Page 15 of 44
Add two buttons called Sessions by Name and Sessions by Date
Create / map two events to these buttons
Go to the Action Diagrammer and add calls to your new grid functions
Generate the menu and 2 grid functions
Run your application shortcut. You will end with screens that look like this:
Next, lets experiment with grouping.
WebClient Mobile Workshop 2011
Page 16 of 44
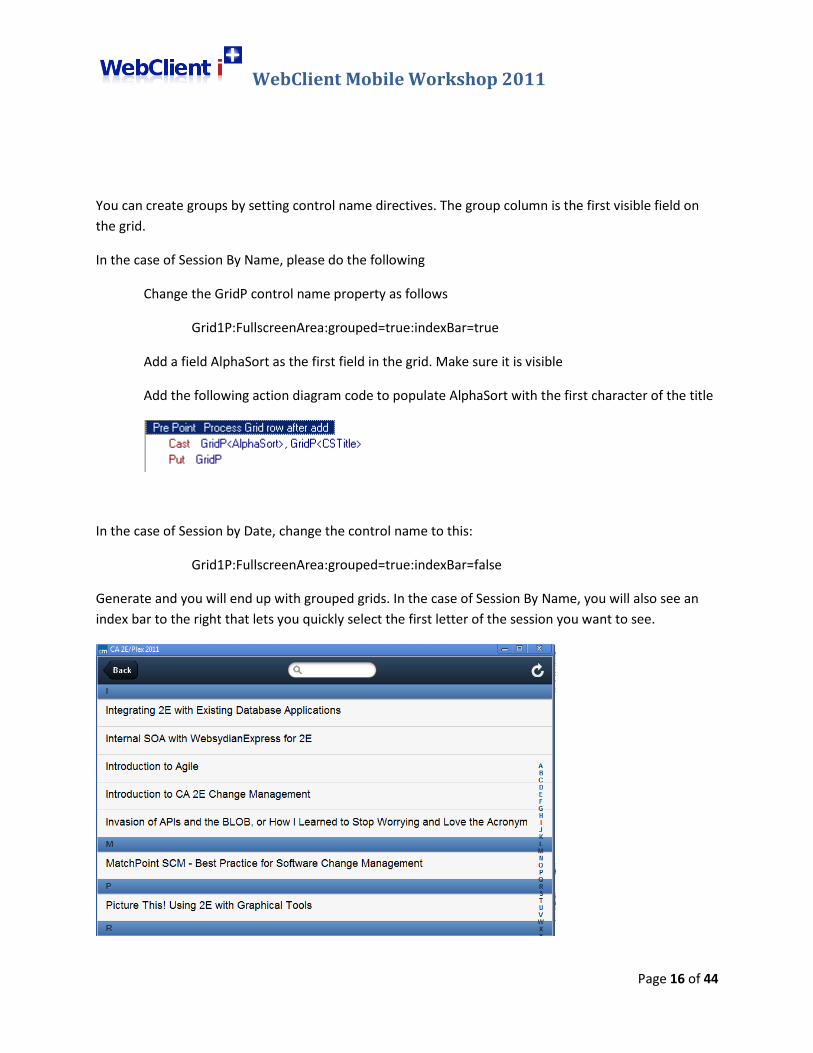
You can create groups by setting control name directives. The group column is the first visible field on
the grid.
In the case of Session By Name, please do the following
Change the GridP control name property as follows
Grid1P:FullscreenArea:grouped=true:indexBar=true
Add a field AlphaSort as the first field in the grid. Make sure it is visible
Add the following action diagram code to populate AlphaSort with the first character of the title
In the case of Session by Date, change the control name to this:
Grid1P:FullscreenArea:grouped=true:indexBar=false
Generate and you will end up with grouped grids. In the case of Session By Name, you will also see an
index bar to the right that lets you quickly select the first letter of the session you want to see.

WebClient Mobile Workshop 2011
Page 17 of 44
Exercise 3 – Create detail pages
First, lets create a new page function
Next, create a panel design that looks something like this. Hide all fields except what you see here.
Next, edit the control name properties as follows.
Save Button: SaveButton:ToolbarArea:iconCls=action:align=left:toolbarNum=1
Text fields, use the following pattern changing id: Id:MainArea:label=ID
WebClient Mobile Workshop 2011
Page 18 of 44
Date field: DateAdded:MainArea:label=Date:template=DatePicker
Note- You can also attach a fieldSet at the end: fieldSet=Basic Info, fieldSet=Advanced Info
AbstractButton: AbstractButton:MainArea:fieldSet=More
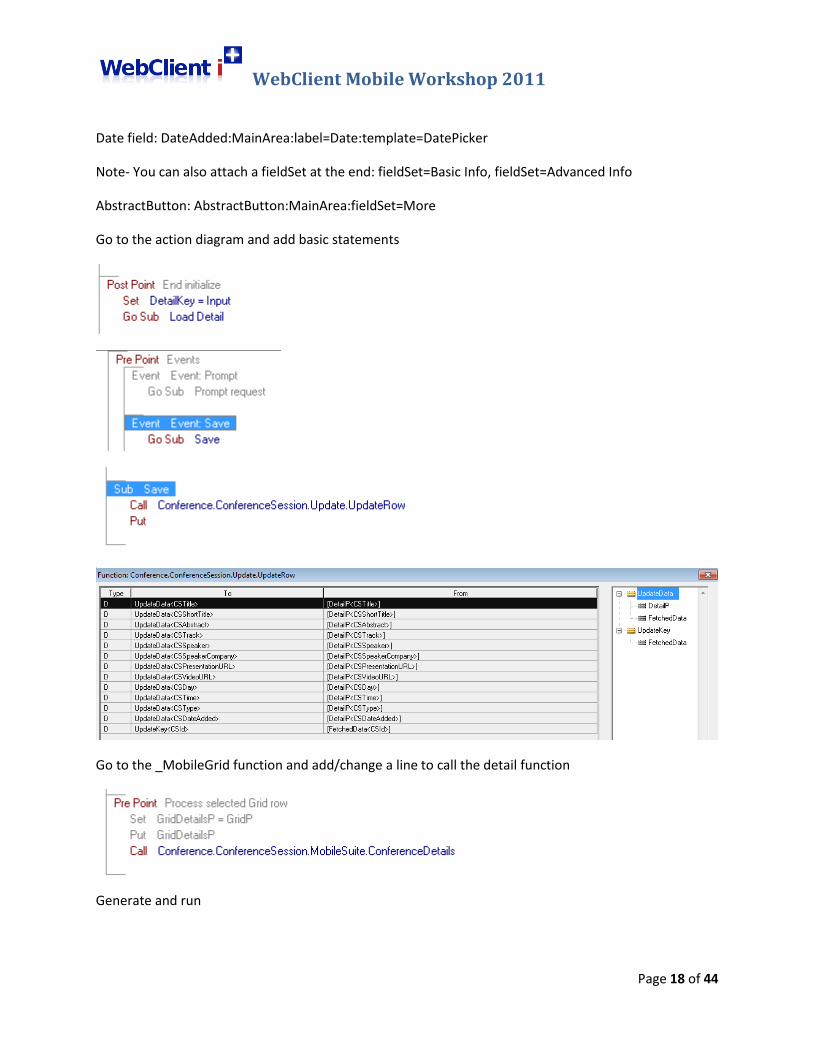
Go to the action diagram and add basic statements
Go to the _MobileGrid function and add/change a line to call the detail function
Generate and run

WebClient Mobile Workshop 2011
Page 19 of 44
Extra Credit – Implement an Abstract viewing function and tie it to the Abstract disclosure button. Use
the multiline property on the edit control.

WebClient Mobile Workshop 2011
Page 20 of 44

WebClient Mobile Workshop 2011
Page 21 of 44
Exercise 4 – Maps and location services
In this exercise we are going to create a simple map with geo markers.
First, create a function ConferenceMap to contain the map.
Second, modify the panel design to look something like this.
You will place two fields on the design to contain longitude and latitude coordinates in the form
xx.xxxxxx, yy.yyyyyy. You can use any text field or the suggested fields.
In the control name of fields use these strings:
MapCoords:FullscreenArea:template=WebMap
MapLocation:FullscreenArea:template=WebLocation
WebClient Mobile Workshop 2011
Page 22 of 44
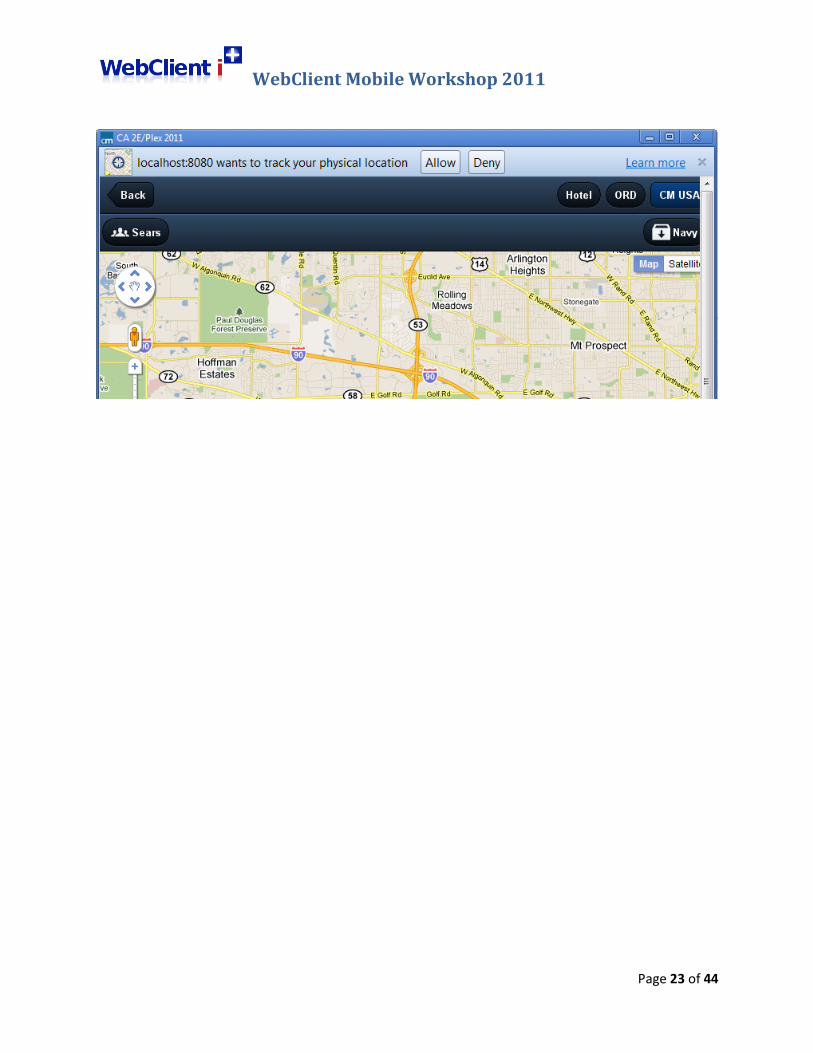
You should also create some buttons to change the location of the map viewport. You can use your own
coordinates or here are some coordinates from the local area:
Hotel: 42.030044, -88.032722
CM First Austin: 30.353611,-97.748829
0’Hare International (ORD): 41.9816486, -87.9066714
Sears Tower: 41.879595,-87.63588
Navy Pier: 41.890266,-87.610345
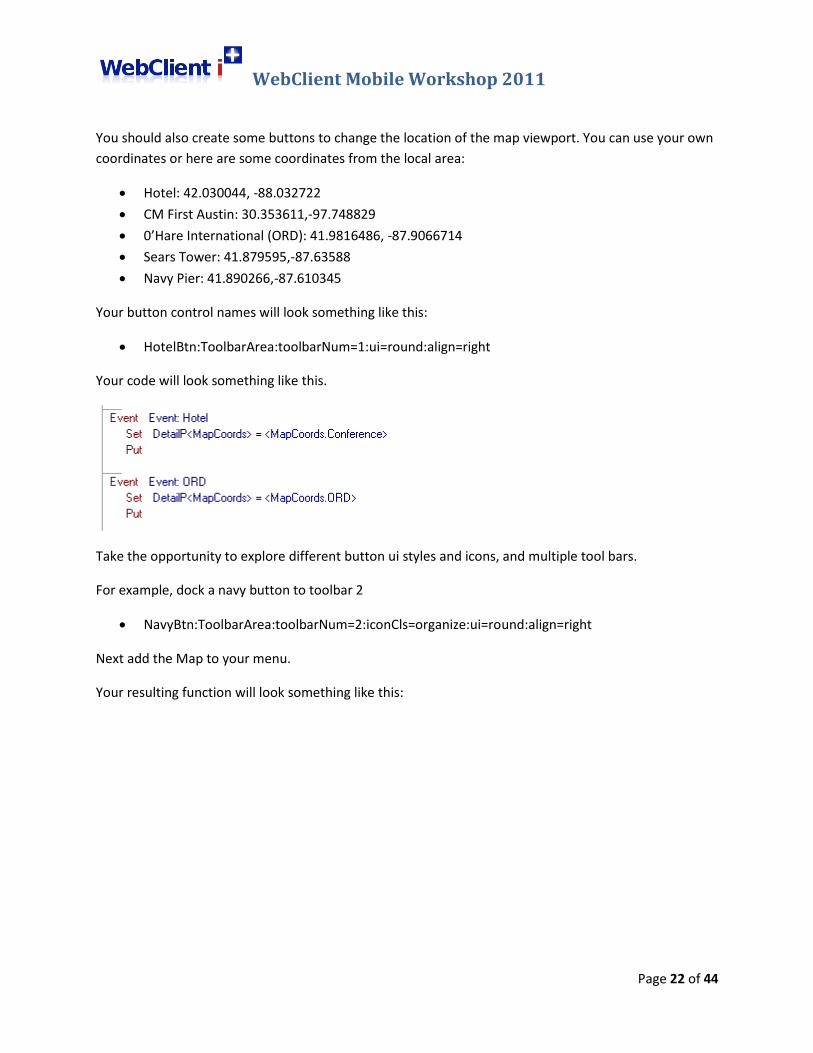
Your button control names will look something like this:
HotelBtn:ToolbarArea:toolbarNum=1:ui=round:align=right
Your code will look something like this.
Take the opportunity to explore different button ui styles and icons, and multiple tool bars.
For example, dock a navy button to toolbar 2
NavyBtn:ToolbarArea:toolbarNum=2:iconCls=organize:ui=round:align=right
Next add the Map to your menu.
Your resulting function will look something like this:
WebClient Mobile Workshop 2011
Page 23 of 44
WebClient Mobile Workshop 2011
Page 24 of 44
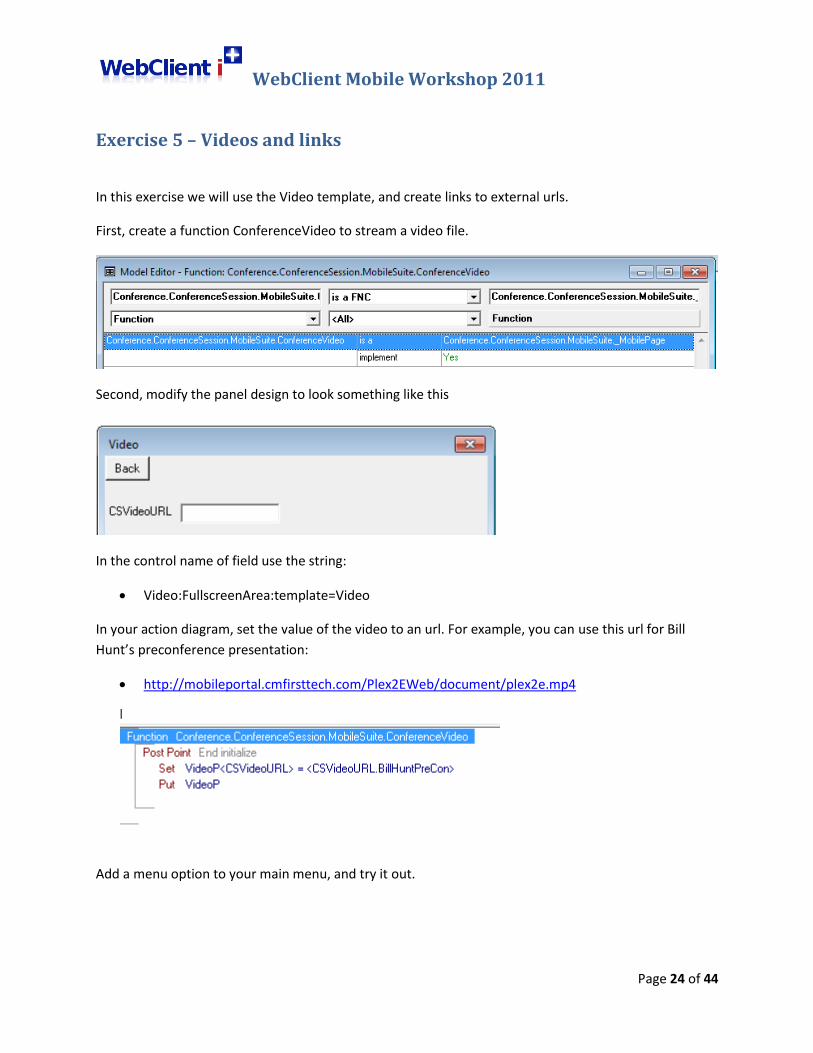
Exercise 5 – Videos and links
In this exercise we will use the Video template, and create links to external urls.
First, create a function ConferenceVideo to stream a video file.
Second, modify the panel design to look something like this
In the control name of field use the string:
Video:FullscreenArea:template=Video
In your action diagram, set the value of the video to an url. For example, you can use this url for Bill
Hunt’s preconference presentation:
http://mobileportal.cmfirsttech.com/Plex2EWeb/document/plex2e.mp4
Add a menu option to your main menu, and try it out.

WebClient Mobile Workshop 2011
Page 25 of 44
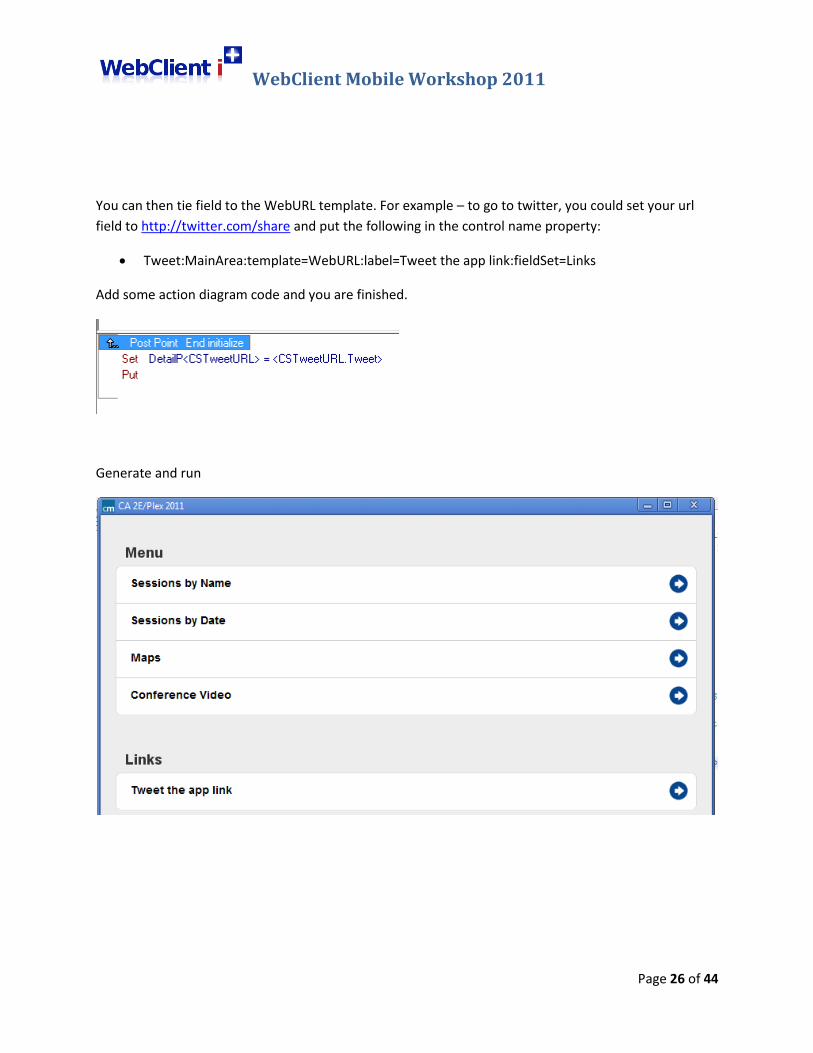
As part two of this exercise, lets create a web link to other types of web content. For example, on your
main menu perhaps you would like a link to twitter.
To do this, simply put a text field on your panel, such as your main menu.
WebClient Mobile Workshop 2011
Page 26 of 44
You can then tie field to the WebURL template. For example – to go to twitter, you could set your url
field to http://twitter.com/share and put the following in the control name property:
Tweet:MainArea:template=WebURL:label=Tweet the app link:fieldSet=Links
Add some action diagram code and you are finished.
Generate and run

WebClient Mobile Workshop 2011
Page 27 of 44

WebClient Mobile Workshop 2011
Page 28 of 44
Exercise 6 – Appearance
WebClient Mobile uses Sencha Touch / CSS3. With this you have the ability to make global changes to
the themes.
First, try changing the css file to obtain different looks.
Go to the WebClient i+ project, and navigate to WebShell-root.html. Change the sencha-touch.css line to
one of the others available (see the CSS folder)
To quickly regenerate the templates, right click on the Plex2E project and select the WebClient i+ option
to generate the web templates. This will generate all of the WebClient templates in one operation.
Here are the results of changing to android.css.
WebClient Mobile Workshop 2011
Page 29 of 44
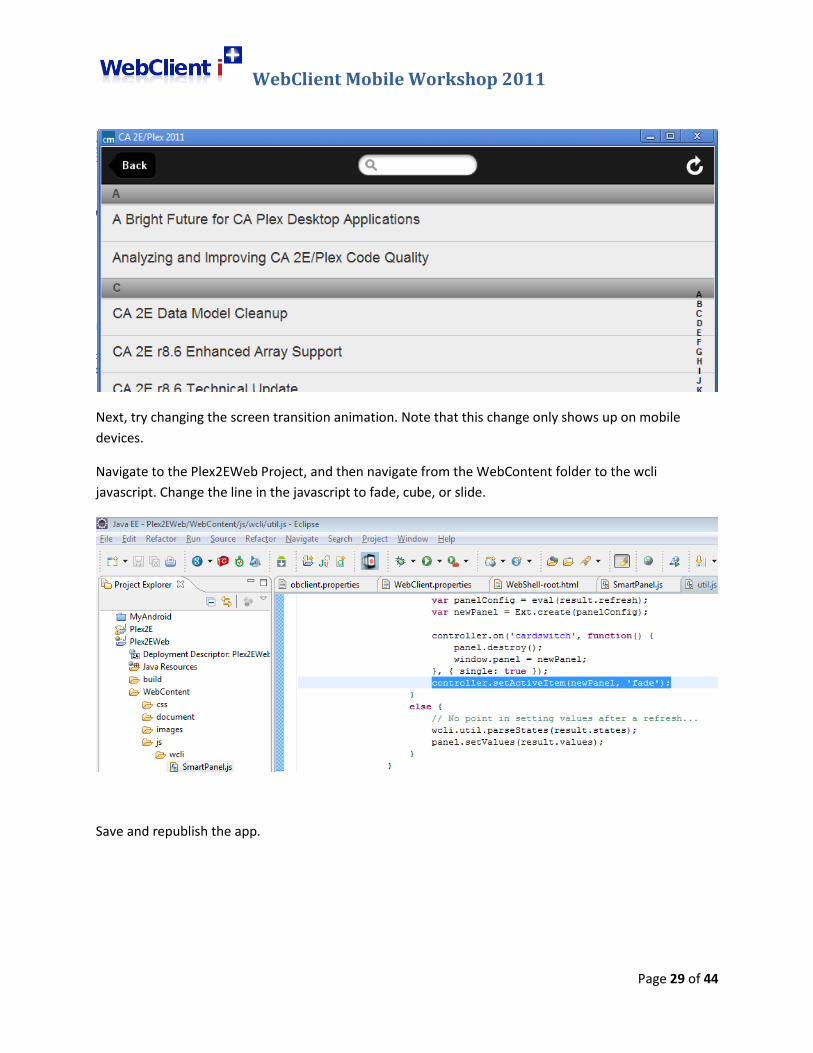
Next, try changing the screen transition animation. Note that this change only shows up on mobile
devices.
Navigate to the Plex2EWeb Project, and then navigate from the WebContent folder to the wcli
javascript. Change the line in the javascript to fade, cube, or slide.
Save and republish the app.

WebClient Mobile Workshop 2011
Page 30 of 44
Exercise 7 – Native App Deployment
In this exercise we will create a native application of the type that can be deployed to the Android
Market.
First, go to your Eclipse preferences under the window menu. Click on the Android preferences and
change the path as shown:
Click on the Android SDK and AVD Manager
Create a new Android simulation device

WebClient Mobile Workshop 2011
Page 31 of 44
C:\WebClientMobileWorkshop\Android\Plex2EWebWrapper\assets\www

WebClient Mobile Workshop 2011
Page 32 of 44
Navigate to the index.html file in your new project. Change to site to the url of your development site

WebClient Mobile Workshop 2011
Page 33 of 44
Go to run configurations and make sure your new device is selected under target
Run the application. Note that the emulator is slow. It is much faster to connect your own device for
testing – beyond the scope of this course, but not difficult.

WebClient Mobile Workshop 2011
Page 34 of 44

WebClient Mobile Workshop 2011
Page 35 of 44
Export the APK file.
If you are planning to release commercial applications, you should sign up with google and get code
signing credentials.

WebClient Mobile Workshop 2011
Page 36 of 44
Congratulations! You have completed the workshop.
If you are interested in the XCode version of PhoneGap, contact CM First for this project file.

WebClient Mobile Workshop 2011
Page 37 of 44
Appendix – Attach Points

WebClient Mobile Workshop 2011
Page 38 of 44
Appendix - Reference
Button Appearance Partial iconCls list (see sencha documentation)
action
add
arrow_down
arrow_left
arrow_right
arrow_up
compose
delete
organize
refresh
reply
search
settings
star
trash
maps
locate
home
bookmarks
download
favorites
info
more
time
user
team
Partial ui list (see sencha documentation) normal
back
round
forward
action

WebClient Mobile Workshop 2011
Page 39 of 44
Animations Slide
Fade
Cube

WebClient Mobile Workshop 2011
Page 40 of 44
Appendix – Configure and Check your SQL Server Access from Eclipse Set up and verify you can run SQL Server from your Eclipse environment.
From Eclipse, go the Window menu and choose Open Perspective. Select Other… Then select the
Database Development perspective.
Right click on Database Connections and choose new:
Choose Generic JDBC and give it a name like “MySQLServer”. Note that the SQL Server choice will not
work with SQL Server Express editions

WebClient Mobile Workshop 2011
Page 41 of 44
Choose the new driver button at the right of the combo
WebClient Mobile Workshop 2011
Page 42 of 44
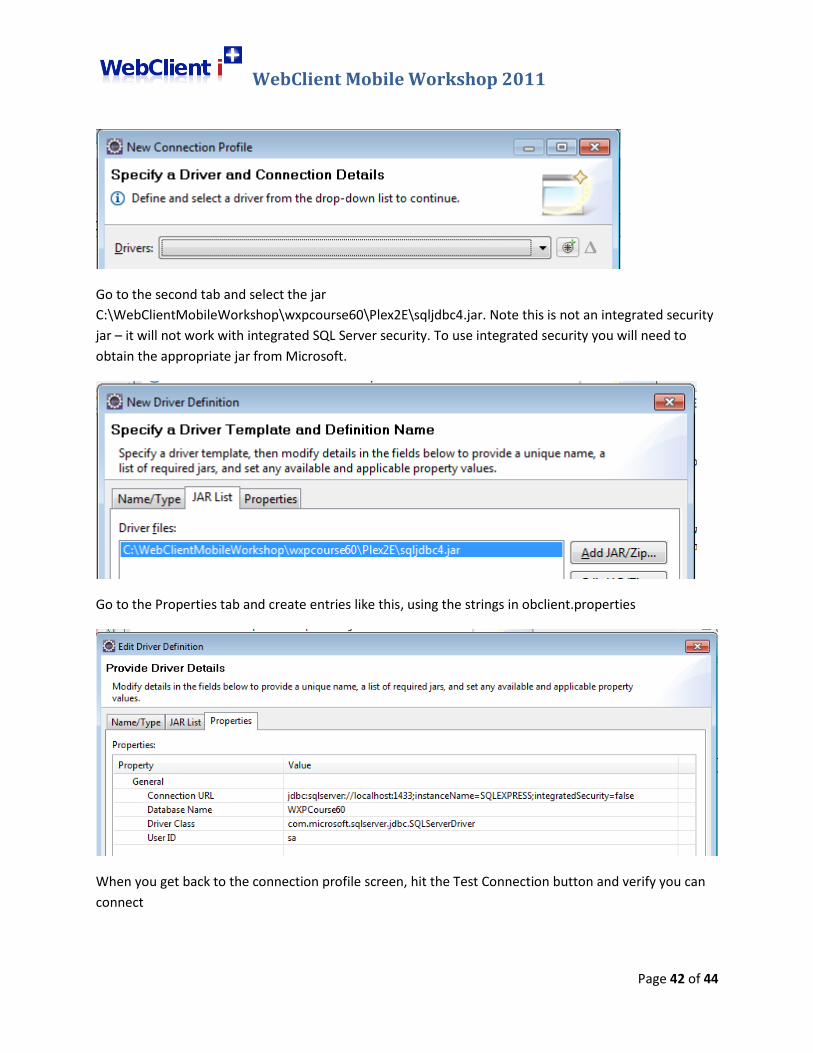
Go to the second tab and select the jar
C:\WebClientMobileWorkshop\wxpcourse60\Plex2E\sqljdbc4.jar. Note this is not an integrated security
jar – it will not work with integrated SQL Server security. To use integrated security you will need to
obtain the appropriate jar from Microsoft.
Go to the Properties tab and create entries like this, using the strings in obclient.properties
When you get back to the connection profile screen, hit the Test Connection button and verify you can
connect

WebClient Mobile Workshop 2011
Page 43 of 44
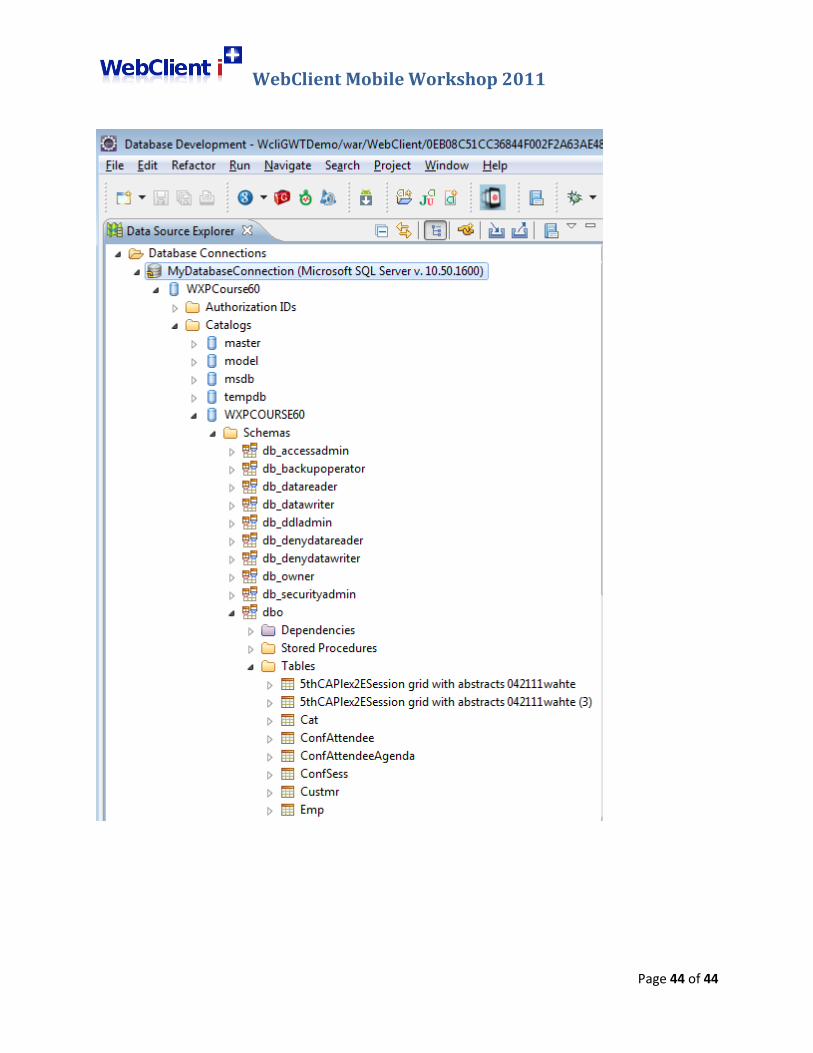
Verify you can see the schema and tables
WebClient Mobile Workshop 2011
Page 44 of 44


