WebSphere MQ Interface 7.0 For Alliance Access 7.0 Installation Guide This installation guide explains how to install and configure the WebSphere MQ Interface for Alliance Access (MQSA). The document also describes how to add and remove MQSA patches. This document is for programmers, system administrators, and support staff who implement a message-exchange interface. Familiarity with the basics of Alliance Access and WebSphere MQ is a prerequisite for readers of this document. 30 September 2011 Connectivity
This installation guide explains how to install and configure the WebSphere MQ Interface for Alliance Access (MQSA).The document also describes how to add and remove MQSA patches. This document is for programmers, system
administrators, and support staff who implement a message-exchange interface. Familiarity with the basics of AllianceAccess and WebSphere MQ is a prerequisite for readers of this document.
This document explains how to install and configure the WebSphere MQ Interface for AllianceAccess (referred to in this document simply as MQSA). It also includes information aboutupgrading MQSA, and adding and removing MQSA patches.
Read this document in conjunction with Alliance Access guides and WebSphere MQ guides,before installing or upgrading MQSA.
Intended audience
This document is intended for programmers, system administrators, and support staff who areresponsible for implementing a message-exchange interface. It is assumed that the reader ofthis document is familiar with the basics of Alliance Access and WebSphere MQ to install,configure, maintain, and operate the MQSA software.
Related documentation
This document references the following documents:
• WebSphere MQ Interface Release Letter
• WebSphere MQ Interface User Guide
• Alliance Access Installation and Administration Guide
• Alliance Workstation Installation and Administration Guide
What is WebSphere MQ Interface for Alliance Access?
The WebSphere MQ Interface for Alliance Access software application (referred to in thisdocument as MQSA) provides a reliable communication between financial applications andAlliance Access through IBM WebSphere MQ. It enables SWIFT messages to be exchangedbetween Alliance Access and other financial applications.
MQSA is a product of the Alliance Access Developers Toolkit (referred to in this document asADK). It accesses message-queuing services by using ADK functions to communicate withAlliance Access and WebSphere MQ functions.
Alliance Access and MQSA
Alliance Access enables you to build components that can be fully integrated using the ADK.MQSA is composed of two such components, SMQS and SMQA. The SMQS component runs
on the same host as the Alliance Access servers and handles the messaging between AllianceAccess and WebSphere MQ. SMQA is the GUI component and runs on Alliance Workstation.
1.2 Supported Platforms
Alliance Access
MQSA is available for Alliance Access running on the operating systems specified in theWebSphere MQ Interface Release Letter .
MQSA graphical user interface
The MQSA graphical user interface (GUI) runs on Alliance Workstation, which runs on theoperating systems specified in the WebSphere MQ Interface Release Letter .
1.3 Overview of Installation Procedure
ADK components
ADK components must be installed and registered before they can be used in the AllianceAccess environment.
The application used for installation and registration is adk_install:
• The installation part of adk_install sets the component directory structure in the AllianceAccess instance, and copies the program files to the target location on disk.
• The registration part of adk_install defines the ADK component in the Alliance Accessdatabase.
SMQS and SMQA components
Both the SMQS and the SMQA components must be installed and registered on the host onwhich the Alliance Access servers are running.
The SMQA component must also be installed (but not registered) on every Alliance Workstationon which you intend to use the MQSA GUI.
WebSphere MQ Interface 7.0 for Alliance Access 7.0
If you are upgrading MQSA, then see the WebSphere MQ Interface Release Letter for details ofvalid upgrade paths.
Note You can upgrade from MQSA 6.0 or MQSA 6.3 to MQSA 7.0 in a UNIXenvironment.
On Windows, a fresh installation of MQSA 7.0 is required.
Switching between server and client versions
It is sometimes necessary to switch between the MQSA Server and the MQSA Client versions.This is explained in "Choosing WebSphere MQ Server or WebSphere MQ Client" on page 21.
Windows and UNIX
The procedure for installing and registering a component is similar on Windows and UNIX.Therefore, this document shows screenshots from only the Windows platform - the applicationhas a similar interface on UNIX.
• The installation secret key (or cipher), provided in the WebSphere MQ Interface Release Letter
• The appropriate password:
– for UNIX, an Alliance administrator (in most cases, the administrator is all_adm)
– for Windows, a user with Administrator privileges.
• MQSA installation passwords. These are required once the component has been installedand registered. The security officers (LSO and RSO operators) must enter and approve thesepasswords from the Security Definition application. For details, see the WebSphere MQ Interface User Guide .
• An approved time window within which to perform this activity. This component operationmust be carefully scheduled because it requires exclusive access to the whole AllianceAccess environment. This means that, during the operation, no Alliance Access activity ispermitted on the system and no Alliance Access Administrator may be logged on.
Software
Make sure that the following minimum requirements are fulfilled:
• Correct Alliance Access software level (see the WebSphere MQ Interface Release Letter )
• Alliance Access is licensed with the ADK RUN TIME option (the licensing of your AllianceAccess software must contain the package string 99: TOOLKI T RUN- TI ME).
• All Alliance Access servers are stopped; no Alliance Access process running.
• WebSphere MQ (client or server) software is installed on the Alliance Access computer.
• A system dead-letter queue is defined on each queue manager being accessed by MQSA.For details of dead-letter queues, see the WebSphere MQ Interface User Guide .
• When installing MQSA, the system administrator must decide whether to use the WebSphere
MQ Server version or the WebSphere MQ Client version.
• Disk space requirements for the installation of MQSA are minimal. A maximum of 10 MB issufficient.
If you are upgrading, then delete all SMQS trace files and ensure that sufficient space is
available for the ADK installation program (adk_install) to back up the existing SMQSdirectories.
• The adk_install program uses a temporary directory during the installation. This directory istaken from either of the following values:
– the environment variable ADK_TMP if it is defined
WebSphere MQ Interface 7.0 for Alliance Access 7.0
– the environment variable TMPDI R if it is defined
– the default value / t mp on UNIX
– the default value C: \ t emp on Windows.
Back-up
Before installing MQSA, back up Alliance Access fully (database and software). See theappropriate Installation and Administration Guide for your system.
2.2 SMQS and SMQA Installation Media
Available installation media for the Alliance Access server
The installation media must first be transferred to the Alliance Access server. The followingtable identifies the relevant installation media:
Installation media for SMQS and SMQA
Platform Media Name
AIX SMQSMediumAIX-C
AIX SMQSMediumAIX-S
AIX SMQAMediumAIX
SunOS SMQSMediumSunOS-C
SunOS SMQSMediumSunOS-S
SunOS SMQAMediumSunOS
Win32 SMQSMediumWin32-C
Win32 SMQSMediumWin32-S
Win32 SMQAMediumWin32
When installing MQSA, the system administrator must decide whether to use the WebSphereMQ Server version or the WebSphere MQ Client version. The installation media name for
SMQS is suffixed by -S for the server version, and -C for the client version.
For patch media, the media name contains an indication of the patch, where <mmnn> refers tothe patch level being added, as shown in the following table:
4. In the Cipher field, type the installation secret code (provided in the WebSphere MQ Interface Release Letter ).
5. Start the installation by clicking OK .
6. Verify the success of the installation, by using the contents of the adk_install window to
track progress.
If verification fails, then see Appendix A, "Recovering from an Installation Failure" onpage 24.
7. After successful installation, clear the Input Device field and select the Register optionbutton under Services. Start the registration by clicking OK .
8. Verify the success of the registration, by using the contents of the adk_install window totrack progress.
If verification fails, then see Appendix A, "Recovering from an Installation Failure" onpage 24.
The SMQS component is now installed and registered.
Warning Do not quit the installation utility yet. You must first install the graphical application(SMQA), as described in "Installation and Registration of SMQA" on page 10.
3.3 Installation and Registration of SMQA
To install and register SMQA:
After following the procedure described in "Preparing the Alliance Access Server Host" onpage 9, take the following steps:
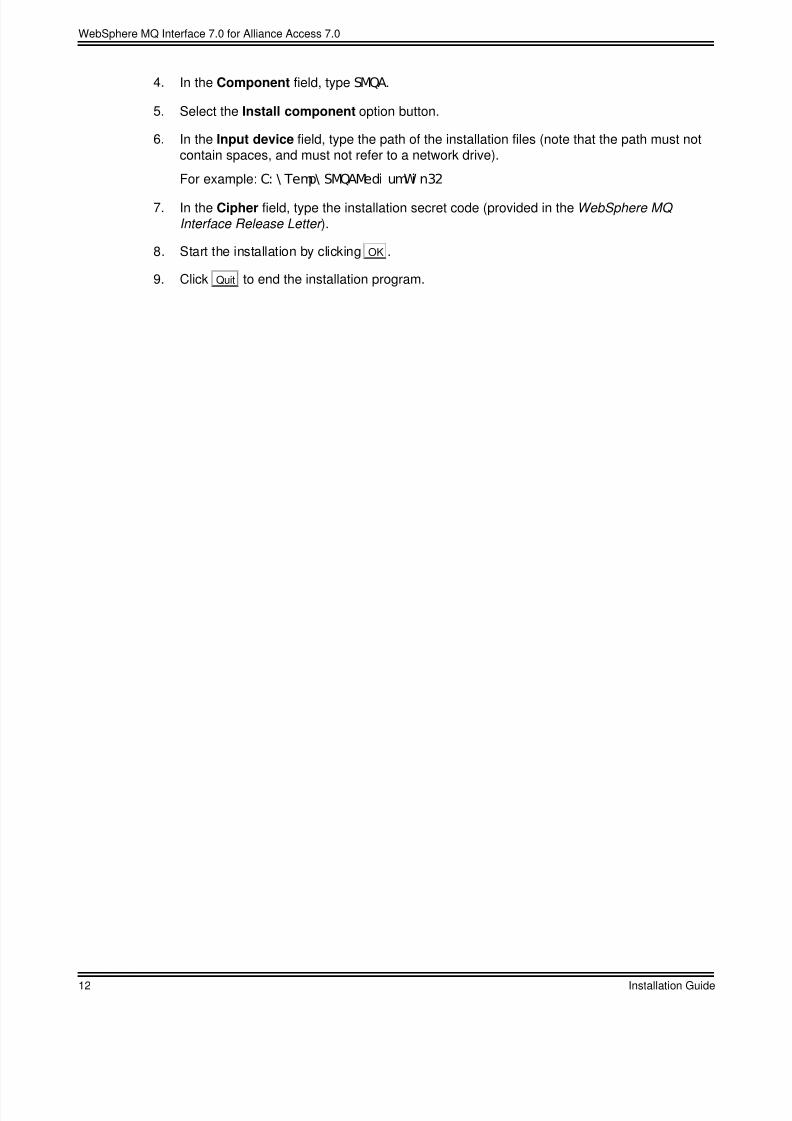
1. In the Component field, type SMQA.
2. Select the Install component option button under Software.
WebSphere MQ Interface 7.0 for Alliance Access 7.0
Right-click, select Run as... and select your administrator account.
2. In the Installation Application - Alliance window, double-click Command Prompt.
Note It is not necessary to register the installation on Alliance Workstation.
If there are different versions of Alliance Workstation on the same computer,then ensure that you have selected the correct version of the Installation
application which has the release 7.0 Command Prompt icon. For details, seethe Alliance Workstation Installation and Administration Guide , "Administration Tasks" .
3. At the command prompt, start adk_install, by entering the following commands in the ordershown:
6. In the Input device field, type the path of the installation files (note that the path must notcontain spaces, and must not refer to a network drive).
For example: C: \ Temp\ SMQAMedi umWi n32
7. In the Cipher field, type the installation secret code (provided in the WebSphere MQ Interface Release Letter ).
8. Start the installation by clicking OK .
9. Click Quit to end the installation program.
WebSphere MQ Interface 7.0 for Alliance Access 7.0
MQSA can be upgraded from the previous version of MQSA. Ensure that the MQSA softwarelevel is correct. For details of valid migration paths, see the WebSphere MQ Interface Release Letter .
The upgrade procedure deletes all the files in the SMQS and SMQA component directories, soensure that the SMQS Exit library and the SMQA configuration files are safe-stored (asexplained in the following sections).
Note The configuration files located in $ALLI ANCE_DB/ ADK_DI R/ SMQS (UNIX
platforms) or %ALLI ANCE_DB%\ ADK_DI R\ SMQS (Windows platforms) are not
affected by the upgrade.
SMQS-specific
If the SMQS exit library being used was supplied by an external vendor, then it must be safe-stored. In such cases, it is imperative that you contact the vendor to make sure that the versionof the exit library is compatible with the latest version of MQSA.
The exit library in previous releases has one of the following names, depending on the platformused:
• libSMQSExits.a (for AIX)
• libSMQSExits.so (for Oracle Solaris)
• SMQSExits.dll (for Windows)
Since release 6.2, the exit libraries are standardised across all platforms and are named asfollows:
• libSMQSExits.a (for AIX)
• libSMQSExits.so (for Oracle Solaris)
• libSMQSExits.dll (for Windows)
Note The name of the exit library on Windows has changed and must therefore be
renamed to libSMQSExits.dll if you restore a previous (externally supplied)library from earlier than release 6.2.
The location of the exit library is as follows:
• On UNIX, the library is in the $ALLI ANCE/ SMQS/ bi n/ $ARCHdirectory, where $ARCH refers
to the platform on which the Alliance Access servers are running.
• On Windows, the library is located in the %ALLI ANCE%\ SMQS\ bi n\ %ARCH%folder.
8. Verify the success of the installation, by using the contents of the adk_install window totrack progress.
If verification fails, then see Appendix A, "Recovering from an Installation Failure" onpage 24.
9. Then clear the Input device field and click the Register option button followed by OK .
10. Verify the success of the registration, by using the contents of the adk_install window totrack progress.
If verification fails, then see Appendix A, "Recovering from an Installation Failure" onpage 24.
Warning After you have successfully verified the registration, do not stop theadk_install utility. Perform the same actions to upgrade the SMQAcomponent, as explained in the following steps.
11. In the adk_install window, enter the component name (SMQA), the input device name (such
as / t mp/ SMQAMedi umAI X or C: \ t emp\ SMQAMedi umWi n32), and the cipher key (see the
WebSphere MQ Interface Release Letter ).
12. Select the Upgrade component option button, and start the installation by clicking OK .
13. Verify the success of the upgrade, by using the contents of the adk_install window to track
progress.
If verification fails, then see Appendix A, "Recovering from an Installation Failure" onpage 24.
14. Then clear the Input device field and click the Register option button followed by OK .
15. Verify the success of the registration, by using the contents of the adk_install window to
track progress.
If verification fails, then see Appendix A, "Recovering from an Installation Failure" onpage 24.
MQSA is now upgraded.
16. Click Quit to leave the adk_install utility.
4.3 SMQS Post-upgrade Activity
Restore the SMQS Exit library
After SMQS has been upgraded, it is necessary to restore the SMQS Exit library that was safe-
stored earlier to its original location ($ALLI ANCE/ SMQS/ bi n/ $ARCHon UNIX or %ALLI ANCE%\ SMQS\ bi n\ %ARCH%on Windows).
There is no SMQS component running on Alliance Workstation. The following steps must beperformed to install the SMQA component on each Alliance workstation:
1. Start the Installation application by clicking Start / Programs / Alliance Workstation / Installation.
2. In the Installation Application - Alliance window, double-click Command Prompt.
3. Start the ADK installation utility.
Enter the following commands at the Command Prompt, in the order shown:
• cd / D %ALLI ANCE%\ I NA\ bi n\ wi n32
• adk_i nst al l
4. In the adk_install window, enter the component name (SMQA), the input device name (such
as C: \ t emp\ SMQAMedi umWi n32), and the cipher key (see the WebSphere MQ Interface Release Letter ).
5. Select the Install component option button, and start the installation by clicking OK .
6. Verify the success of the installation, by using the contents of the adk_install window totrack progress.
If verification fails, then re-check all required pre-requisites and try the process again. If theinstallation still fails, then make a note of the exact failure reported and call Support forassistance.
7. Click Quit to end the installation program.
Note It is not necessary to register SMQA on Alliance Workstation.
The installation of SMQA on Alliance Workstation must be performed at the sametime as the SMQA is upgraded on the Alliance Access server. Otherwise a versionfailure occurs and SMQA cannot be started.
4.5 SMQA Post-upgrade Activity
Restore the SMQA configuration file
You must only perform this step if you upgrade from release 6.x to 7.0.
After SMQA has been installed, you must restore the SMQA configuration file that was safe-stored to the new location of the file in release 7.0.
Use the %APPDATA%to find the location of the configuration file, as follows:
%APPDATA%\ SWI FT\ SWI FTAl l i ance Wor kst at i on\ <i nst ance conf i gur at i onname>\ SMQA\ dat a
WebSphere MQ Interface 7.0 for Alliance Access 7.0
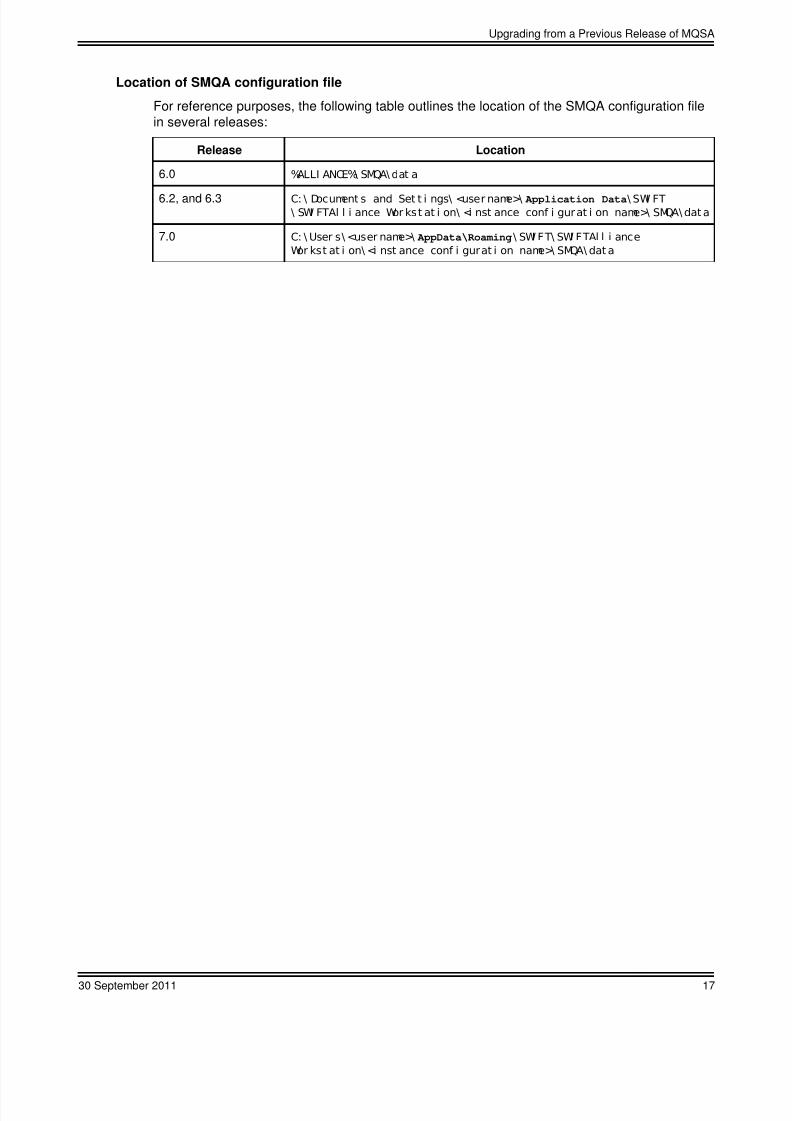
For reference purposes, the following table outlines the location of the SMQA configuration filein several releases:
Release Location
6.0 %ALLI ANCE%\ SMQA\ dat a
6.2, and 6.3 C: \ Document s and Set t i ngs\ <user name>\ Application Data\ SWI FT\ SWI FTAl l i ance Wor kst at i on\ <i nst ance conf i gurat i on name>\ SMQA\ dat a
7.0 C: \ User s\ <user name>\ AppData\Roaming\ SWI FT\ SWI FTAl l i ance
Wor kst at i on\ <i nst ance conf i gurat i on name>\ SMQA\ dat a
This section describes how to add (install) or remove an MQSA patch. The instructions in thissection are generic in that they apply to both MQSA components, SMQS and SMQA.
5.1 Adding a Patch
Validity
Adding patches to the SMQS component must be done on the Alliance Access server.
Adding patches to the SMQA component must be done on the Alliance Access server and oneach Alliance workstation that has SMQA installed.
To add a patch:
1. Remove any existing MQSA patches that are already installed.
For details, see "Removing a Patch" on page 19.
2. Copy the correct media. For details, see "Installation media for patches" on page 7
3. Start the adk_install utility, as follows:
On Windows:
a. Start the Installation application by clicking Start / Programs / Alliance Access /
Installation.
b. In the Installation Application - Alliance window, double-click Command Prompt.
c. At the command prompt, enter the following commands in the order shown:
cd / D %ALLI ANCE%\ I NA\ bi n\ wi n32
adk_i nst al l
On UNIX:
a. Log on to the system as the Alliance administrator (in most cases the administrator is
all_adm).
b. From the System Administration application, open an Xterm window.
c. Invoke the ADK installation utility, by entering the following commands in the ordershown:
cd $ALLI ANCE/ I NA/ bi n/ $ARCH. / adk_ i nst al l STANDALONE
WebSphere MQ Interface 7.0 for Alliance Access 7.0
6 Choosing WebSphere MQ Server orWebSphere MQ Client
6.1 Dynamics
Dynamics
When the requirements or configuration of WebSphere MQ change, it may be necessary tomigrate the MQSA software from a WebSphere MQ (WSMQ) Server to a WSMQ Client, or froma WSMQ Client to a WSMQ Server.
6.2 Migration from One to the Other
Migration from one to the other
Before you migrate the MQSA software, perform a complete backup of Alliance Access.
Only SMQS must be upgraded.
To migrate SMQS to a WSMQ Client or to a WSMQ Server, follow the procedure in "Upgradingfrom a Previous Release of MQSA" on page 13. This copies all the files from the ADK mediumto the Alliance Access release tree.
Note Before the migration, you must remove any SMQS patches, and re-install themonce the migration has been completed.
No registration of the component is necessary because the Alliance Accessdatabase is already up-to-date.
Choosing WebSphere MQ Server or WebSphere MQ Client
All references to the component must be removed from the Alliance Access database.
Before you remove the MQSA software, perform the following:
• Mmake a complete back-up of Alliance Access.
• Stop the SMQS component on the day before you intend to remove it, because the AllianceJournal must contain no event that has been generated by the component.
To remove the MQSA component:
1. For the Routing application, do one of the following actions:
• Activate a temporary schema.
• Create a new empty schema and activate it.
2. For each routing point, check and remove each rule that is routing to an SMQS routingpoint.
3. In the Message File application, complete and archive all instances present in the AllianceAccess database. For details, see the Alliance Access Daily Operations Guide .
4. In the System Management application, remove from the target list each instance of
SMQSFromMQSeries and SMQSToMQSeries that is used as a target by any queue. Fordetails, see the Alliance Access System Management Guide .
5. For the Security Definition application (and only if you have operators using the MQSAGUI), select the profile to which the application is granted and remove it from the list. Fordetails, see the Alliance Access Security Guide .
Note Operators assigned to this profile must be approved. For details, see theAlliance Access Security Guide .
The operators with this profile cannot be logged on to Alliance Access duringthis operation.
6. In the Event Journal application, archive all entries. For details, see the Alliance Access Daily Operations Guide .
7. Stop all affected instances of Alliance server.
8. Start the adk_install utility as described in "Preparing the Alliance Access Server Host" onpage 9.
9. Perform the following actions (for the SMQS and SMQA components):
a. Empty the Input device field.
b. Deregister the component.
c. Remove the component.
d. Delete the directory SMQS within the ADK storage directory.
WebSphere MQ Interface 7.0 for Alliance Access 7.0
A.1 Recovery ActivityRecovering from an installation failure
If the installation fails, then restore the Alliance Access back-up made before you started theinstallation process, as described in the Alliance Access Installation and Administration Guide .
WebSphere MQ Interface 7.0 for Alliance Access 7.0
You may copy this publication within your organisation. Any such copy must include these legal notices.
Confidentiality
This publication may contain SWIFT or third-party confidential information. Do not disclose this publicationoutside your organisation without the prior written consent of SWIFT.
Disclaimer
SWIFT supplies this publication for information purposes only. The information in this publication maychange from time to time. You must always refer to the latest available version on www.swift.com.
Translations
The English version of SWIFT documentation is the only official version.
Trademarks
SWIFT is the trade name of S.W.I.F.T. SCRL. The following are registered trademarks of SWIFT: SWIFT,the SWIFT logo, the Standards Forum logo, 3SKey, Innotribe, Sibos, SWIFTNet, SWIFTReady, and Accord.Other product, service, or company names in this publication are trade names, trademarks, or registeredtrademarks of their respective owners.