24
90 Day Challenge Transformation Week 5

90 Day Challenge Transformation
Week 5
© The Betty Rocker™ Inc All Rights Reserved 2
#makefatcryfitness #noexcuses #rockyourbody
90 Day Challenge Transformation
Workout ProgramWeek 5
Bree Argetsingera.k.a The Betty Rocker

© The Betty Rocker™ Inc All Rights Reserved 3
HOW TO USE YOUR WORKOUT PLANThis program is PROGRESSIVE. The workouts get more challenging each week, allowing you to build your strength, endurance, confidence and see amazing results.
One of the best parts of this program is that you can be very flexible with the amount of time you are putting into the workout. Each workout can be made into a 15, 23, or 31 minute circuit, depending on how many rounds you do.
If you are a BEGINNER, focus on absolutely crushing 2 rounds*.
*The moves may be challenging to perform for a full minute, so take any of the modifications suggested in this document. Do as much as you can of each move - for example if holding plank for a minute is too much, hold it for 0:30 or as long as you can, then rest for the remainder of that move and continue to the next move with the video. You can also pause the video anytime and take more rest.
If you are INTERMEDIATE, go for 3 rounds*.
It’s absolutely fine to pause the video and take more rest between moves, or to stop after 0:30-0:45 of a move and rest until the next move starts. Remember that pushing yourself to your maximum is what helps you build strength - you are not doing it wrong by not doing the entire minute every time. You will get the opportunity to repeat the moves and you’ll see your body adapt and get stronger!
If you are ADVANCED go for 3-4 rounds*.
Rest as needed between moves and rounds.
Open the Challenge Calendar you are planning to follow. They are organized by Beginner, Intermediate and Advanced.
If you think you are a certain fitness level and start with that calendar, you can always dial it back down one level if you find that you are extremely sore, don’t have enough energy for the next workout, or need more rest.
Vice versa, if you start with a specific calendar and find you still have energy, are not really sore or just want to try more, go for the level above.
The main difference between these calendars is how many days you will be working out —and your fitness level (and time available) will dictate how many rounds you should do.
© The Betty Rocker™ Inc All Rights Reserved 4
#makefatcryfitness #noexcuses #rockyourbody
If you are short on time, it’s ALWAYS better to rock out an intense short circuit in the time you have (even one round giving max effort) than skipping your workout. Don’t fall victim to the trap of thinking “If I can’t do the full workout, I can’t work out.” That’s a great way to get way off track with your fitness.
You will have 2 foundational workouts each week, workout A and workout B. They are listed on your calendar where you should do them along with the rounds suggested.
Workout C is a unique specialty workout each week that compliments the plan—you will add in where listed on your calendar, usually added on to the end of either Workout A or B.
You have demonstration videos to follow, as well as the pictures and written form tips in this guide.
It’s absolutely fine to include other workouts with this program, swap your workout days and rest days around as long as you are fully resting and recovering. Here’s a great article to help you with figuring out the appropriate amount of rest you need.
One of the most important thing you will be doing in this program is COMBINING your fitness with the nutrients you’re putting in your body—so pay attention to eating balanced meals, staying hydrated and getting rest while you’re following the plan!
© The Betty Rocker™ Inc All Rights Reserved 5
WEEK 5 • WORKOUT A
Workout A
• Beginner: 2-3 rounds | Intermediate: 3 rounds | Advanced: 3-4 rounds
• The moves are all demonstrated for 1:00 in the videos. However, you may modify the time length—working to the best
of your ability with each move, each round:
Beginner: 0:30 each move
Intermediate: 0:45 each move
Advanced: 1:00 each move
• Rest as needed between rounds.
• See Demo Pictures and form notes below.
Globe Jump Squat
Push Up Reach
Alternating Reverse Lunge with 4-Count Pulse
Side Plank
Triceps Dips with 1-leg Lift
Sumo Squat with Overhead Press
Single Leg Bridge Lift
© The Betty Rocker™ Inc All Rights Reserved 6
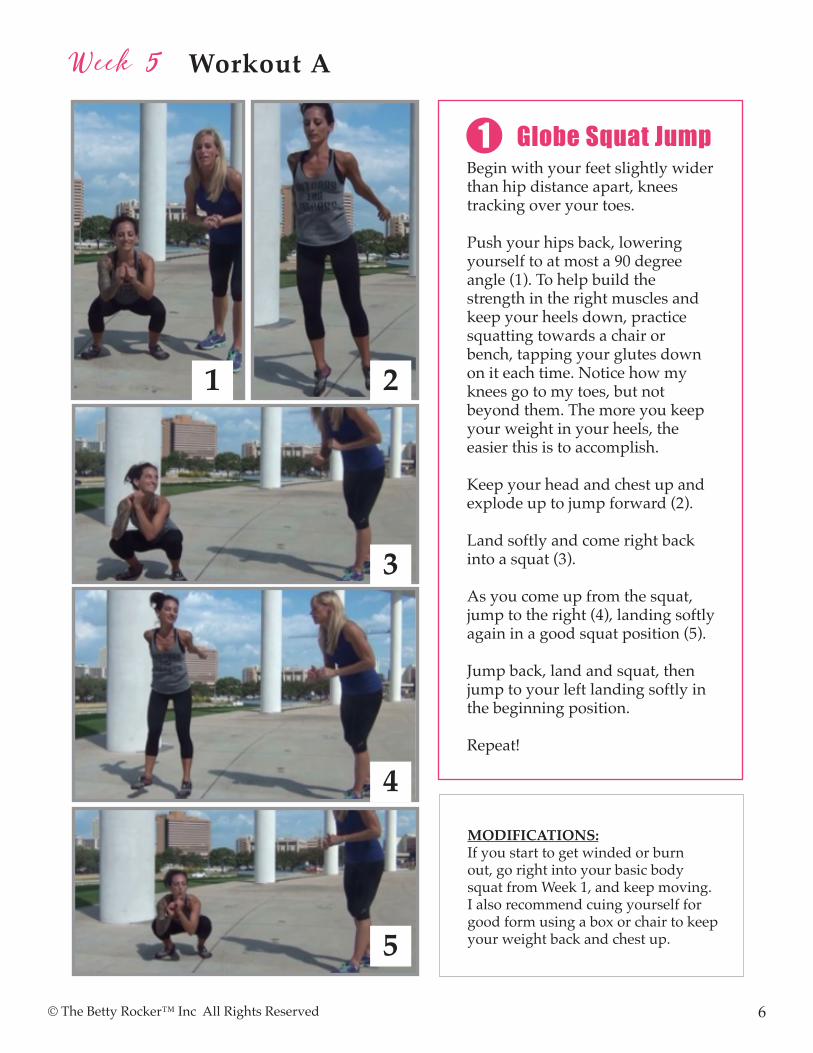
Globe Squat JumpBegin with your feet slightly widerthan hip distance apart, kneestracking over your toes.
Push your hips back, loweringyourself to at most a 90 degreeangle (1). To help build thestrength in the right muscles andkeep your heels down, practicesquatting towards a chair orbench, tapping your glutes downon it each time. Notice how myknees go to my toes, but notbeyond them. The more you keepyour weight in your heels, theeasier this is to accomplish.
Keep your head and chest up and explode up to jump forward (2). Land softly and come right back into a squat (3).
As you come up from the squat, jump to the right (4), landing softly again in a good squat position (5).
Jump back, land and squat, then jump to your left landing softly in the beginning position.
Repeat!
Week 5 Workout A
1
MODIFICATIONS:If you start to get winded or burnout, go right into your basic bodysquat from Week 1, and keep moving. I also recommend cuing yourself for good form using a box or chair to keep your weight back and chest up.
1 2
3
4
5

© The Betty Rocker™ Inc All Rights Reserved 7
Week 5 Workout A Push Up Reach This week we’re going to challenge ourselves with the push up reach. You can do these with or without abuddy.
Start in a tall plank position, with hands slightly wider than shoulders (1). Keep your shoulders directly in line with your hands for good alignment. (see mods if you’re having any trouble with your wrists).
Keep your legs straight and your core tight. Don’t let your lower back arch or sway as you lower yourselftoward the ground (2). Don’t come all the way down—just hover 2-4 inches above and then press back up to plank, engaging your chest and triceps (3).
As you press up, press firmly through your right palm and lift your left arm out straight. Place it back down on the ground and do a push up. As you come up, lift yourright arm out straight and repeat.
2
MODIFICATIONS: Drop to your knees, keeping your back straight and using the same good upper body form as described above. As you come up, do your high five or reachstraight out.
If you’re having any trouble with your wrists, you can form soft fists with your hands to align your wrists, or hold light dumbbells.
1
2
3

© The Betty Rocker™ Inc All Rights Reserved 8
#makefatcryfitness #noexcuses #rockyourbody
Week 5 Workout A
Alternating Reverse Lunge with 4-Count PulseBegin standing, with feet hip distance apart.
Take one step behind you with your left foot forward (1), dropping into reverse lunge (2).
Elevate the right/back heel. Find balance between the front foot toe and the back foot toe.
Do 4 tiny pulses up and down, pressing through your left heel.
Return to your start position and come into reverse lunge with your left foot behind you (3).
Do 4 pulses up and down (4), then switch again.
3
MODIFICATIONS:
Take a smaller step back, and don’t lunge as deeply. Pace yourself as you lift and lower.
You can also do walking lunges, or simple alternating leg lunges, as the stationary lunge aims to target one side of the glutes and quads and fatigue them before switching. Alternating will still give you a great workout, but will make it slightly easier to complete as the muscle will get a mini break between each movement.
Hold a wall or chair back for support with one hand if you’re having any trouble balancing.
1
3
2
4
© The Betty Rocker™ Inc All Rights Reserved 9
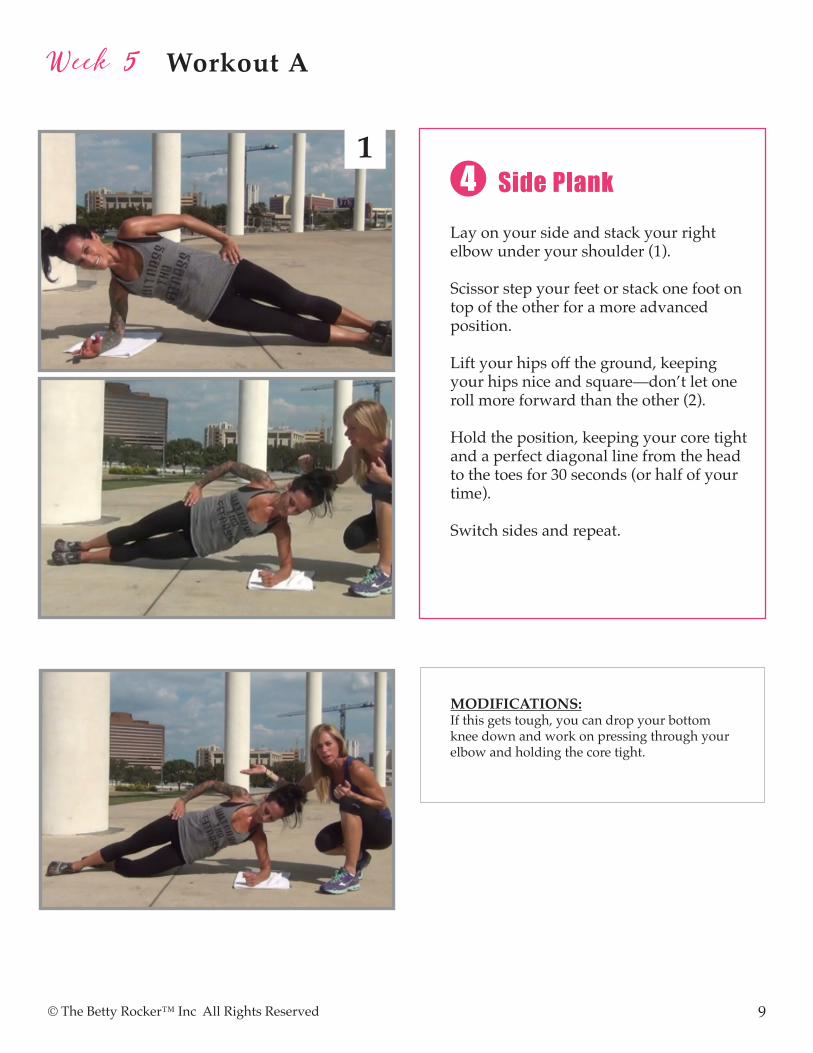
Side PlankLay on your side and stack your rightelbow under your shoulder (1).
Scissor step your feet or stack one foot ontop of the other for a more advancedposition.
Lift your hips off the ground, keeping your hips nice and square—don’t let one roll more forward than the other (2).
Hold the position, keeping your core tightand a perfect diagonal line from the headto the toes for 30 seconds (or half of yourtime).
Switch sides and repeat.
Week 5 Workout A
4
MODIFICATIONS: If this gets tough, you can drop your bottom knee down and work on pressing through your elbow and holding the core tight.
1

© The Betty Rocker™ Inc All Rights Reserved 10
#makefatcryfitness #noexcuses #rockyourbody
Week 5 Workout A
Triceps Dips with One Leg LiftFrom tabletop position, lift yourleft leg off the ground and extendit straight at a 45 degree angle (1).
Bend at the elbows and loweryour upper body down slowly—about 2 to 4 inches only depending on your shoulder &triceps strength and flexibility (2).
Press back up, keeping your hipslifted and glutes engaged. Yourelbows should remain parallel toone another—don’t let them flareout.
Keep your shoulders huggingback and your chest open.
Press through your right heel,and keep that left leg straight!
Repeat for 30 seconds (or half ofyour time) then switch to theother leg and repeat!MODIFICATIONS:
If you need a break, put both feet onthe ground and go back to the 4-pointtriceps dip from Week 2, or the#itburnsbetty dips from Week 3.
5
1
2
© The Betty Rocker™ Inc All Rights Reserved 11
#makefatcryfitness #noexcuses #rockyourbody
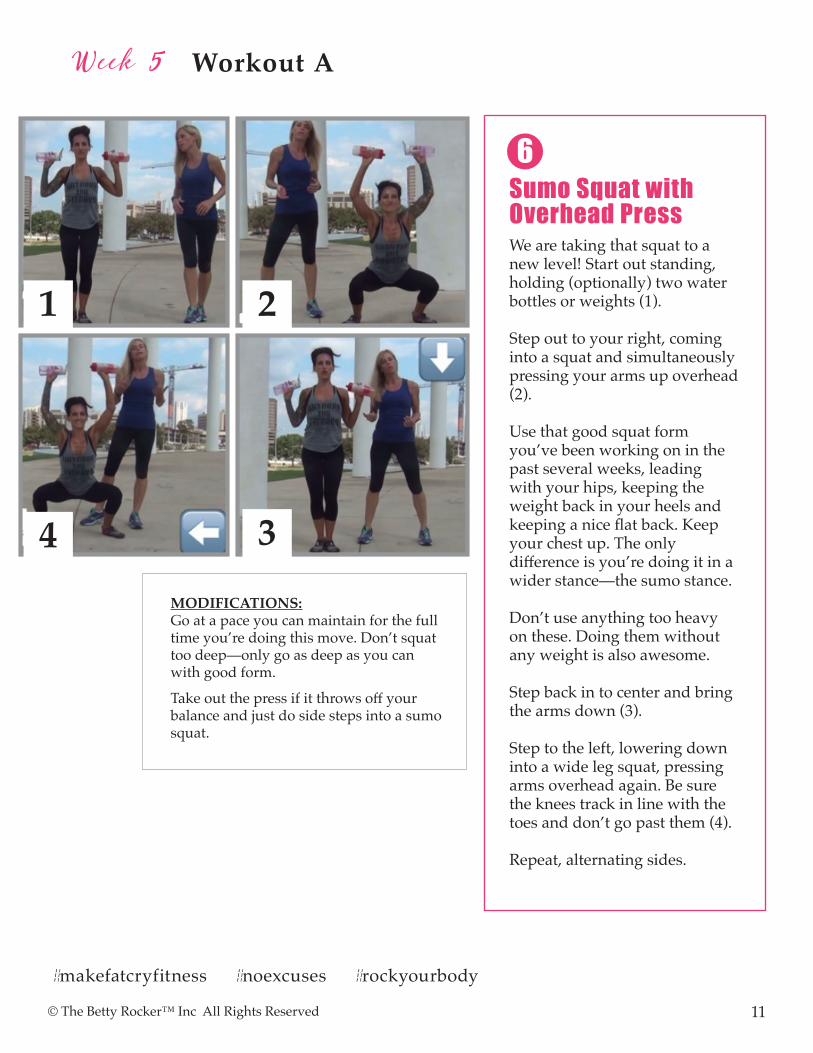
Sumo Squat with Overhead Press We are taking that squat to a new level! Start out standing, holding (optionally) two waterbottles or weights (1).
Step out to your right, coming into a squat and simultaneously pressing your arms up overhead (2).
Use that good squat form you’ve been working on in the past several weeks, leadingwith your hips, keeping the weight back in your heels and keeping a nice flat back. Keepyour chest up. The only difference is you’re doing it in a wider stance—the sumo stance.
Don’t use anything too heavy on these. Doing them without any weight is also awesome.
Step back in to center and bring the arms down (3).
Step to the left, lowering down into a wide leg squat, pressing arms overhead again. Be sure the knees track in line with the toes and don’t go past them (4).
Repeat, alternating sides.
Week 5 Workout A
6
MODIFICATIONS: Go at a pace you can maintain for the full time you’re doing this move. Don’t squat too deep—only go as deep as you can with good form.
Take out the press if it throws off your balance and just do side steps into a sumo squat.
1
4
2
3

© The Betty Rocker™ Inc All Rights Reserved 12
Single Leg Bridge LiftLay on your back with your knees bent and lift your hips up high, keeping your arms at your side but not pushing down on the floor (1).
Extend your left leg in front of you nice and straight and hold it up as you lift your hips, squeezing through your glutes and hamstrings to press up. Press through your right heel (2).
Lower and repeat for half of your time cycle, then lower and switch legs!
Week 5 Workout A
7
MODIFICATIONS: If you need a break, put both feet down and do double leg bridge lifts.
Keep working on the single leg lift!
YOU ONLY REGRET THE WORKOUTS YOU DON’T DO.
1
2
© The Betty Rocker™ Inc All Rights Reserved 13
WEEK 5 • WORKOUT B
Workout B
• Beginner: 2-3 rounds | Intermediate: 3 rounds | Advanced: 3-4 rounds
• The moves are all demonstrated for 1:00 in the videos. However, you may modify the time length—working to the best
of your ability with each move, each round:
Beginner: 0:30 each move
Intermediate: 0:45 each move
Advanced: 1:00 each move
• Rest as needed between rounds.
• See Demo Pictures and form notes below.
Squat Thrusts
Low Push Slide
Reverse Dragon Lunge with High Kick
Active Bicycles
Cross Body Mountain Climbers
Skinny Sumo
Single Leg Bridge Lift

© The Betty Rocker™ Inc All Rights Reserved 14
Week 5 Workout B Squat ThrustsFrom a standing position (1), set your weight back to your heels and drop to the ground, placing your palms down—slightly wider than shoulders (2).
Keep your gaze neutral (not down) and jump your feet back (3). Land with straight legs and your core engaged (4).
Your landing position is important —it’s a proper tall plank. Don’t allow your lower back to sag. Make sure your wrists are stacked below your shoulders. Engage your core and jump your feet back to your hands (5). Notice that your heels are firmly planted here (6).
Drop your weight back, think about positioning yourself back on your heels. I lift my toes. Keep your back straight and your chest up. This is how you want to set yourself up to jump (7).
Jump up, reaching your arms to the sky (8).
MODIFICATIONS: If you start to get tired but you want to keep doing squat thrusts, step your feet back one at a time instead of jumping them, and step them back. Do a small jump up.
You can also turn the jump up into a body squat.
Wrist issues? Try holding soft fists or light dumbbells to align your wrists. If you need a break, hold plank.
1
1
5
3
7
2
6
4
8

© The Betty Rocker™ Inc All Rights Reserved 15
Week 5 Workout B Low Push SlideImportant points with plank: Shoulders are stacked over wrists. Neck is neutral. Lower back is engaged, not arched (1).
Press back into a downward dog (2).
Without bending your arms, drop your butt towards your heels by bending just your knees (3). This is your start position for the push slide.
From this position, press your feet into the ground and bring your chest forward into the pushup position—but this week we are going to bend our arms, coming into a full low push-up (4).
From there, press back through your shoulders as you come back to the start position (5).
Try to really work with your arms as you press yourself back and forth from moves 4 + 5. If you press with your legs, you’ll feel a LOT of burn after move 1.
2
MODIFICATIONS: If the push slide is too challenging, or you need to take a break in the middle of your set, try going back and forth between moves 1 + 2 - which is pressing between plank and downward dog. Remember you can also go back to theWeek 2 push slide.
You can also just HOLD PLANK. Do this if you need a break and still have a little more to give. You are working, regardless. It’s absolutely fine to pause and come back in with any move. THE POINT is to be challenged and to get stronger :) These are tough for me too!
A final modification if plank is too much weight to put on your shoulders/wrists is to do pushups against the wall or a countertop, standing. The farther out you bring your feet, the harder it will be.
1
2
3
4
5

© The Betty Rocker™ Inc All Rights Reserved 16
Week 5 Workout B3
MODIFICATIONS: If adding the kick makes you lose your balance, take it out and just do alternating reverse lunges. Try going back to Week 1 and drive with your knee, or kick lower. If dragon/curtsy lunges bother your knees, do a regular reverse lunge, where you step back directly behind you like we did in Week 1.
If adding the kick makes you lose your balance, take it out and just do alternating reverse lunges. Try going backto the Week 2 variation and drive with your knee, or kick lower. If dragon/curtsy lunges bother your knees, doa regular reverse lunge, where you step back directly behind you like we did in Week 2 with Coach Erin.
Reverse Dragon Lunge with High KickFrom a standing position, step back with your left leg into a reverse lunge with your knee behind your right heel—also known as a “curtsy lunge” (1).
Important Points with Lunges: Make sure your front foot stays flat on the ground and your knees are always pointing the same direction as your toes. Your front knee will go just over your toe, but should not go beyond it.
From this position, press through your right (front) heel and bring your arms down, exploding up to stand on your right foot as you bring your left foot up into a high kick (2)!
Step your foot back to a reverse dragon lunge, and repeat for 30 seconds on this side. Repeat the above sequence with your right leg stepping back to the reverse lunge (3) and bringing your left foot up (4).
It can be helpful if you do this beside a wall or table to help with your balance. Just hold onto the wall or maintain a light contact with it to help you.
Don’t rush. I do a lot of unilateral movementsin my exercise program regularly and it isvery important to work on form with thesebefore speed Exercises like this challengemultiple muscles at the same time and willgive you a total body burn!
1
3
2
4

© The Betty Rocker™ Inc All Rights Reserved 17
Week 5 Workout B
Active Bicycles
Start seated, chest up, chin lifted, with your legs extended straight at a 45 degree angle. This is a boat pose, and holding this alone can be challenging!
Begin to slowly pedal your feet, bringing your left knee into your chest and your right leg extending straight (1).
Keep your chest lifted and engage through your core. Bring your right knee in, and extend your left leg out straight (2).
No need to rush these! They are CHALLENGING. Pause and hold boat briefly before returning to them when you need a break, or use one of the mods below.
4
MODIFICATIONS:
A great modification for this is the bicycle crunch. You can switch to the bicycle crunch anytime during this move, just remember with the bicycle our hands are behind our head with a contacting pressure. Do NOT pull your head up—use your torso and core to do that. Begin on your back, knees up. Keep your lower back pressed into the ground, don’t let it arch. Straighten your left leg, bringing your right knee up to meet your left elbow. Repeat on the other side.
Remember you can also go back to alternatingleg V-ups from Week 2 too!
1
2

© The Betty Rocker™ Inc All Rights Reserved 18
Week 5 Workout B
Cross Body Mountain ClimbersBeginner to IntermediateStart in a tall plank position, with your shoulders stacked over your wrists and your arms straight (1).
Keep your upper body in a straight line. Don’t let your lower back sag.
Keep your hips as low as you can as you begin to run in place, bringing your right knee up and across toward your left elbow (2).
Repeat with your left leg (3). Go at a pace you can sustain—push yourself but if you start to get tired, slow down the pace.
Find a comfortable breathing rhythm and pace.
5
MODIFICATIONS: Doing mountain climbers for a minute is tough—as you start to tire, stop running and simply alternate your knees to chest until you can give it another run burst. You can also take a brief break and hold plank.
It’s okay if your hips start to lift, but try to keep them down as much as you can for the full duration.
For your wrists, use the soft fist example from above to take a little pressure off the wrists, or hold light dumbbells.
You can also STAND and perform cross body highknees to get some core burn without being on yourwrists or shoulders at all.
1
2
3

© The Betty Rocker™ Inc All Rights Reserved 19
Week 5 Workout B Skinny SumoFrom a standing position, bring yourarms out in front of you for balance, orup to your chin like me (1).
Jump up and land softly in a sumo squat—chest is lifting (look at the pictures in the bottom collage to see how Coach Tyler and I both keep your chest up in side view), back is flat and your weight is back in your HEELS (2). Very important.
You want to make sure your knees are tracking in line with your toes, and also not going over them.
In the picture, you can see that I go deeper in my squat than Coach Tyler. I’m just more flexible. Do the right depth of a squat that is RIGHT FOR YOU that allows you to maintain proper form.
Jump up again (3), this time landing in a regular squat—feet hip distance apart (4). Your toes may turn out slightly—this is fine, just try to keep them mostly parallel.
Land softly on every jump. Keep your head up, try not to look down.
Continue to jump in and out between sumo squats and regular squats.
MODIFICATIONS: The jump is what will burn you out - so if you start to get winded, I want you to do a regular bodysquat, step out to the side and do a sumo squat. Step in and do a body squat, then step to the other sideand do another sumo squat. This will allow you to work those muscles and keep going. You can comeback into the jump again when you get your breath back.
6
1
3
2
4
© The Betty Rocker™ Inc All Rights Reserved 20
Week 5 Workout B
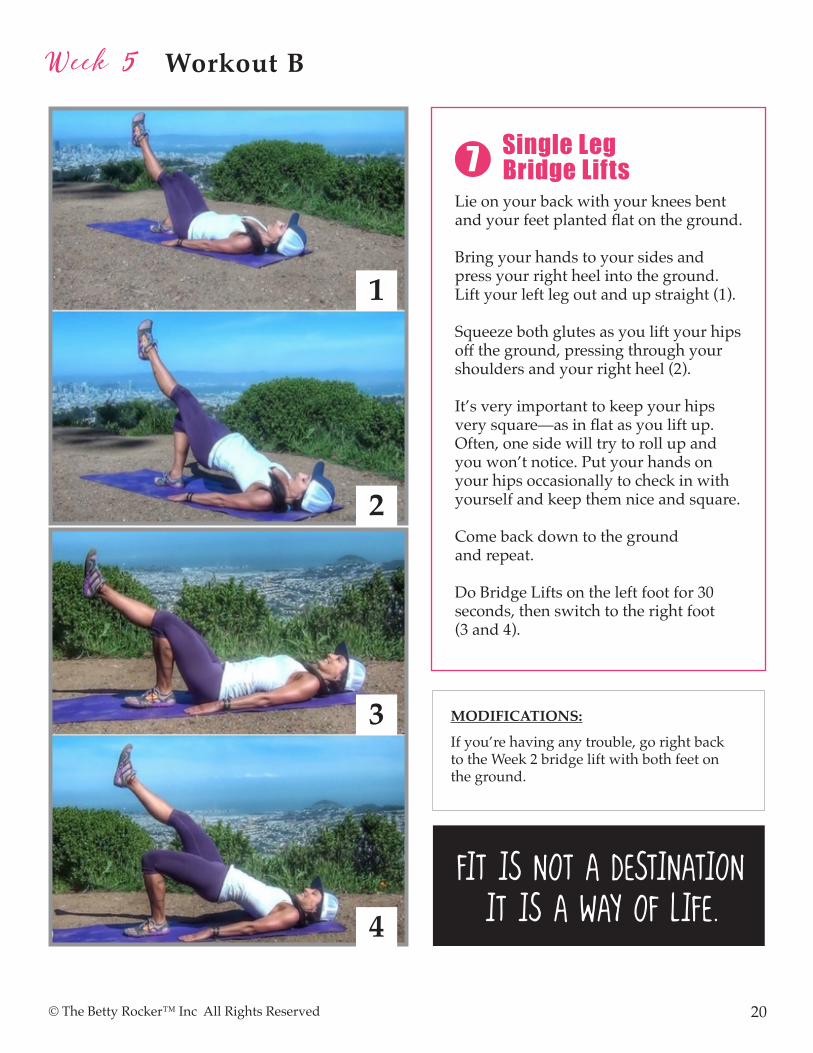
Single Leg Bridge LiftsLie on your back with your knees bent and your feet planted flat on the ground.
Bring your hands to your sides and press your right heel into the ground. Lift your left leg out and up straight (1).
Squeeze both glutes as you lift your hips off the ground, pressing through your shoulders and your right heel (2).
It’s very important to keep your hips very square—as in flat as you lift up. Often, one side will try to roll up and you won’t notice. Put your hands on your hips occasionally to check in with yourself and keep them nice and square.
Come back down to the ground and repeat.
Do Bridge Lifts on the left foot for 30 seconds, then switch to the right foot (3 and 4).
7
MODIFICATIONS:
If you’re having any trouble, go right backto the Week 2 bridge lift with both feet onthe ground.
FIT IS NOT A DESTINATION IT IS A WAY OF LIFE.
1
3
2
4
© The Betty Rocker™ Inc All Rights Reserved 21
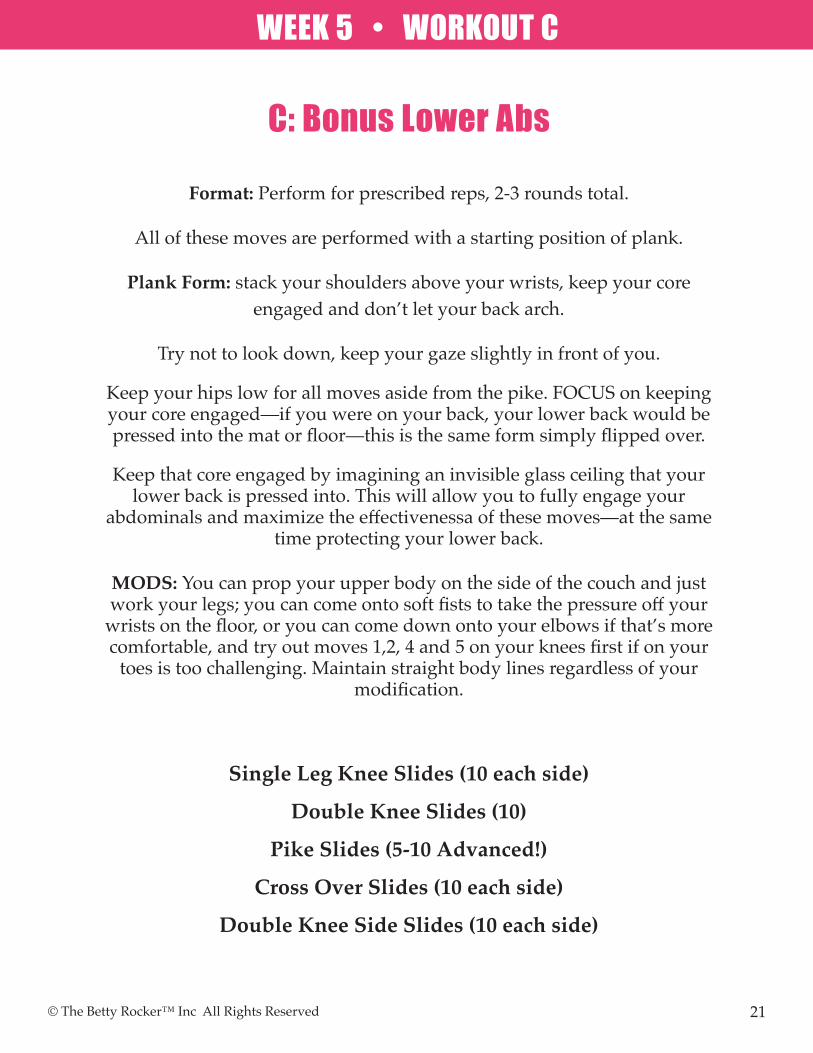
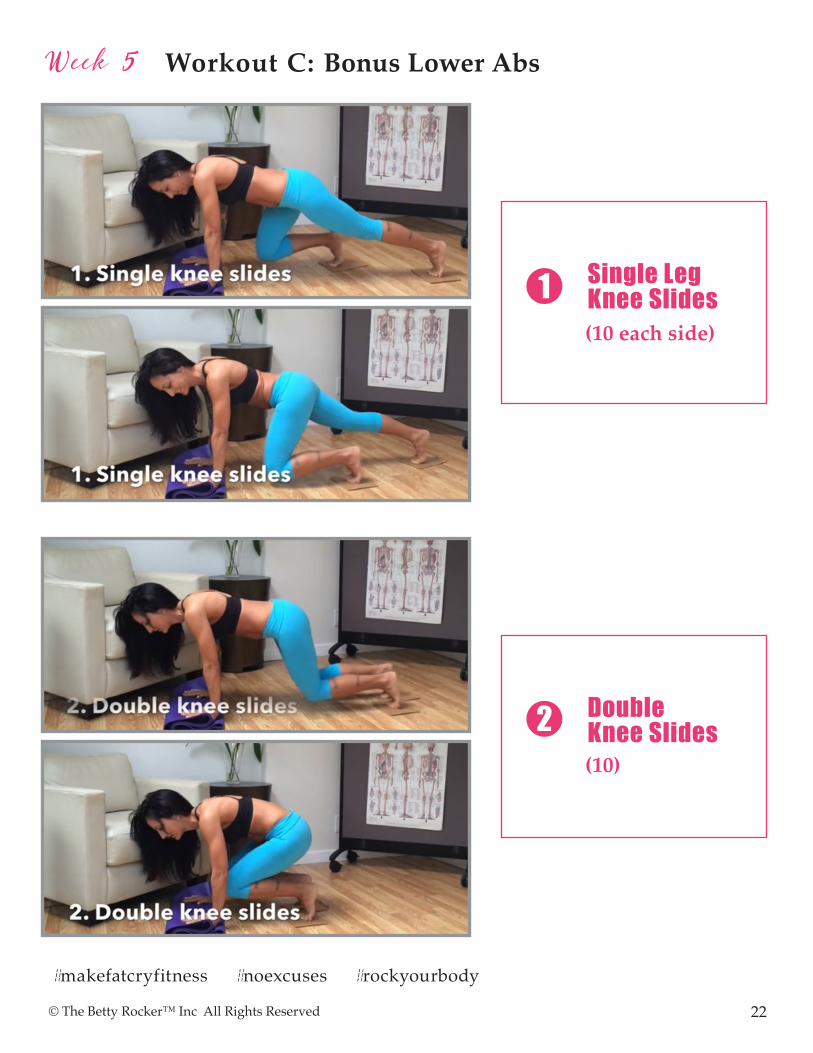
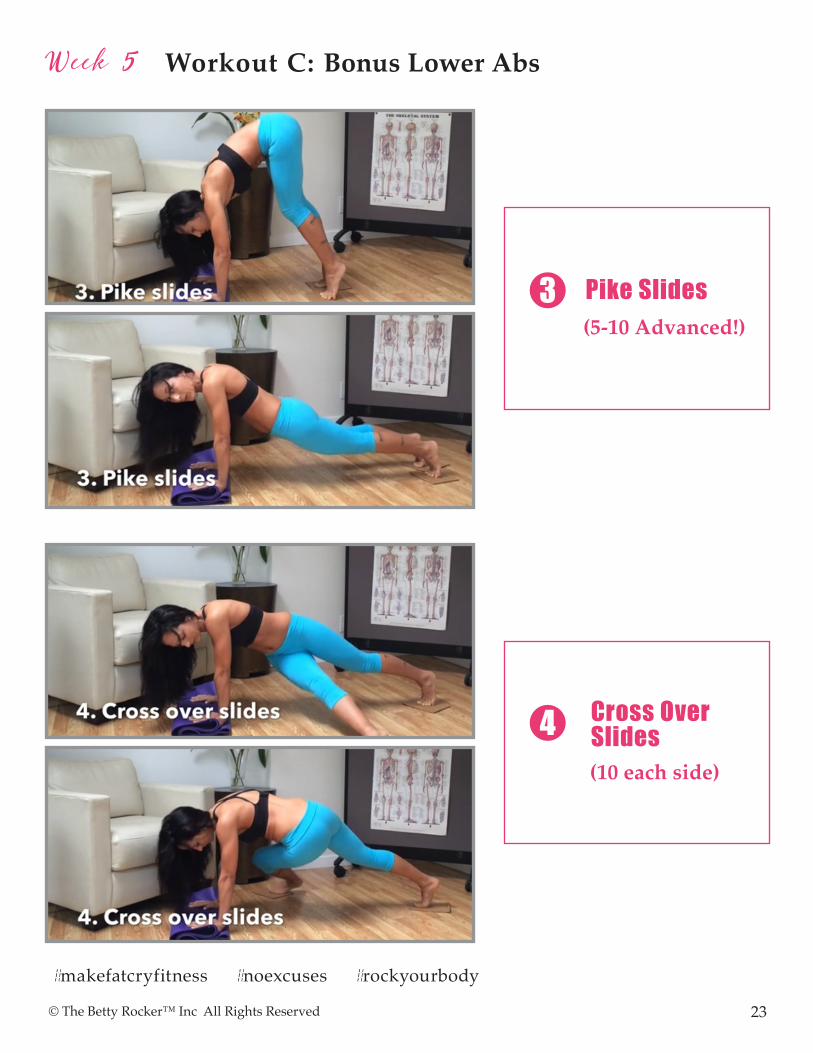
WEEK 5 • WORKOUT C
C: Bonus Lower Abs
Format: Perform for prescribed reps, 2-3 rounds total.
All of these moves are performed with a starting position of plank.
Plank Form: stack your shoulders above your wrists, keep your core engaged and don’t let your back arch.
Try not to look down, keep your gaze slightly in front of you.
Keep your hips low for all moves aside from the pike. FOCUS on keeping your core engaged—if you were on your back, your lower back would be pressed into the mat or floor—this is the same form simply flipped over.
Keep that core engaged by imagining an invisible glass ceiling that your lower back is pressed into. This will allow you to fully engage your
abdominals and maximize the effectivenessa of these moves—at the same time protecting your lower back.
MODS: You can prop your upper body on the side of the couch and just work your legs; you can come onto soft fists to take the pressure off your
wrists on the floor, or you can come down onto your elbows if that’s more comfortable, and try out moves 1,2, 4 and 5 on your knees first if on your
toes is too challenging. Maintain straight body lines regardless of your modification.
Single Leg Knee Slides (10 each side)
Double Knee Slides (10)
Pike Slides (5-10 Advanced!)
Cross Over Slides (10 each side)
Double Knee Side Slides (10 each side)
© The Betty Rocker™ Inc All Rights Reserved 22
#makefatcryfitness #noexcuses #rockyourbody
Week 5 Workout C: Bonus Lower Abs
Single Leg Knee Slides
Double Knee Slides
1
2
(10 each side)
(10)
© The Betty Rocker™ Inc All Rights Reserved 23
#makefatcryfitness #noexcuses #rockyourbody
Week 5 Workout C: Bonus Lower Abs
Pike Slides
Cross Over Slides
3
4
(5-10 Advanced!)
(10 each side)
© The Betty Rocker™ Inc All Rights Reserved 24
#makefatcryfitness #noexcuses #rockyourbody
Week 5 Workout C: Bonus Lower Abs
Double Knee Side Slides5
(10 each side)


