144
Welch Allyn ® 1500 Patient Monitor Directions for use Software version 1.4.X

Welch Allyn® 1500Patient Monitor
Directions for useSoftware version 1.4.X
ii Welch Allyn 1500 Patient Monitor
© 2013 Welch Allyn. All rights are reserved. To support the intended use of the product described in this publication, the purchaser of the product is permitted to copy this publication, for internal distribution only, from the media provided by Welch Allyn. No other use, reproduction, or distribution of this publication, or any part of it, is permitted without written permission from Welch Allyn.
Welch Allyn assumes no responsibility for any injury to anyone, or for any illegal or improper use of the product, that may result from failure to use this product in accordance with the instructions, precautions, warnings, or statement of intended use published in this manual.
Welch Allyn, Acuity, Smartcuf, FlexNet, and Flexible Monitoring are registered trademarks of Welch Allyn.
Masimo, SET, and Signal Extraction Technology are registered trademarks of Masimo Corporation
NO IMPLIED LICENSE: Possession or purchase of this device does not convey any express or implied license to use the device with unauthorized sensors or cables which would, alone, or in combination with this device, fall within the scope of one or more of the patents relating to this device.
Nellcor and Oximax are trademarks of Nellcor Puritan Bennett.
NOTICE: Purchase of this instrument confers no express or implied license under any Nellcor Puritan Bennett patent to use this instrument with any oximetry sensor that is not manufactured or licensed by Nellcor Puritan Bennett.
Microstream is a registered trademark of Oridion.
NO IMPLIED LICENSE: Possession or purchase of this device does not convey any express or implied license to use the device with unauthorized consumable CO2 sampling consumable products which would, alone, or in combination with this device, fall within the scope of one or more of the patents relating to this device and/or CO2 sampling consumable products
Software in this product is copyrighted by Welch Allyn or its vendors. All rights are reserved. The software is protected by United States of America copyright laws and international treaty provisions applicable worldwide. Under such laws, the licensee is entitled to use the copy of the software incorporated with this instrument as intended in the operation of the product in which it is embedded. The software may not be copied, decompiled, reverse-engineered, disassembled or otherwise reduced to human-perceivable form. This is not a sale of the software or any copy of the software; all right, title and ownership of the software remain with Welch Allyn or its vendors.
For information about any Welch Allyn product, call the nearest Welch Allyn representative.:
REF 105645 (CD)
Manual 2.510865 Ver. e, 2013-12
www.welchallyn.com
USA + 1 315 685 4560800 535 6663
Australia + 61 2 9638 3000800 074 793
Canada 800 561 8797 China + 86 216 327 9631
European Call Center
+ 35 3 46 906 7790 France + 33 1 60 09 33 66
Germany + 49 7477 92 71 86 Japan + 81 3 3219 0071
Latin America + 1 305 669 9003 Netherlands + 31 15 750 5000
Singapore + 65 6419 8100 South Africa + 27 11 777 7555
United Kingdom + 44 20 7365 6780 Sweden + 46 8 58 53 65 51
Manufacturer:
SCHILLER AGAltgasse 68CH-6341 Baar Switzerland
Regulatory Affairs Representative:
SCHILLER AGAltgasse 68CH-6341 Baar Switzerland
Directions for use Contents iii
Contents1 - Safety . . . . . . . . . . . . . . . . . . . . . . . . . . . . . . . . . . . . . . . . . . . . . . . . . . 1
User responsibility . . . . . . . . . . . . . . . . . . . . . . . . . . . . . . . . . . . . . . . . . . . . . . . . 1Intended use. . . . . . . . . . . . . . . . . . . . . . . . . . . . . . . . . . . . . . . . . . . . . . . . . . . . . 1Organizational measures . . . . . . . . . . . . . . . . . . . . . . . . . . . . . . . . . . . . . . . . . . . 2Safety . . . . . . . . . . . . . . . . . . . . . . . . . . . . . . . . . . . . . . . . . . . . . . . . . . . . . . . . . . 2Safety equipment . . . . . . . . . . . . . . . . . . . . . . . . . . . . . . . . . . . . . . . . . . . . . . . . . 3Alarms. . . . . . . . . . . . . . . . . . . . . . . . . . . . . . . . . . . . . . . . . . . . . . . . . . . . . . . . . . 3Operation with other devices . . . . . . . . . . . . . . . . . . . . . . . . . . . . . . . . . . . . . . . . 4Networks and internet . . . . . . . . . . . . . . . . . . . . . . . . . . . . . . . . . . . . . . . . . . . . . 4Maintenance. . . . . . . . . . . . . . . . . . . . . . . . . . . . . . . . . . . . . . . . . . . . . . . . . . . . . 5Symbols . . . . . . . . . . . . . . . . . . . . . . . . . . . . . . . . . . . . . . . . . . . . . . . . . . . . . . . . 5Additional terms . . . . . . . . . . . . . . . . . . . . . . . . . . . . . . . . . . . . . . . . . . . . . . . . . . 7
2 - Introduction. . . . . . . . . . . . . . . . . . . . . . . . . . . . . . . . . . . . . . . . . . . . . 9
Standard features . . . . . . . . . . . . . . . . . . . . . . . . . . . . . . . . . . . . . . . . . . . . . . . . . 9Options . . . . . . . . . . . . . . . . . . . . . . . . . . . . . . . . . . . . . . . . . . . . . . . . . . . . . . . . . 9The Welch Allyn® 1500 Patient Monitor . . . . . . . . . . . . . . . . . . . . . . . . . . . . . . . 10Function buttons . . . . . . . . . . . . . . . . . . . . . . . . . . . . . . . . . . . . . . . . . . . . . . . . . 12Setup menu overview. . . . . . . . . . . . . . . . . . . . . . . . . . . . . . . . . . . . . . . . . . . . . 13Display overview. . . . . . . . . . . . . . . . . . . . . . . . . . . . . . . . . . . . . . . . . . . . . . . . . 15
3 - Operation. . . . . . . . . . . . . . . . . . . . . . . . . . . . . . . . . . . . . . . . . . . . . . 17
Startup and initial preparation . . . . . . . . . . . . . . . . . . . . . . . . . . . . . . . . . . . . . . . 17Inserting recorder paper . . . . . . . . . . . . . . . . . . . . . . . . . . . . . . . . . . . . . . . . . . . 18Switching the monitor on or off . . . . . . . . . . . . . . . . . . . . . . . . . . . . . . . . . . . . . 19Initial settings . . . . . . . . . . . . . . . . . . . . . . . . . . . . . . . . . . . . . . . . . . . . . . . . . . . 20Saving the user-defined settings as default . . . . . . . . . . . . . . . . . . . . . . . . . . . . 21Power supply . . . . . . . . . . . . . . . . . . . . . . . . . . . . . . . . . . . . . . . . . . . . . . . . . . . 22Standby mode. . . . . . . . . . . . . . . . . . . . . . . . . . . . . . . . . . . . . . . . . . . . . . . . . . . 24Defining parameter fields . . . . . . . . . . . . . . . . . . . . . . . . . . . . . . . . . . . . . . . . . . 25Defining display waveforms . . . . . . . . . . . . . . . . . . . . . . . . . . . . . . . . . . . . . . . . 27Trend data . . . . . . . . . . . . . . . . . . . . . . . . . . . . . . . . . . . . . . . . . . . . . . . . . . . . . . 29Settings via a parameter field . . . . . . . . . . . . . . . . . . . . . . . . . . . . . . . . . . . . . . . 31
4 - Alarms . . . . . . . . . . . . . . . . . . . . . . . . . . . . . . . . . . . . . . . . . . . . . . . . 33
Display of alarms . . . . . . . . . . . . . . . . . . . . . . . . . . . . . . . . . . . . . . . . . . . . . . . . 33Silencing an alarm. . . . . . . . . . . . . . . . . . . . . . . . . . . . . . . . . . . . . . . . . . . . . . . . 34Suspend all alarms . . . . . . . . . . . . . . . . . . . . . . . . . . . . . . . . . . . . . . . . . . . . . . . 34Switching off all alarms. . . . . . . . . . . . . . . . . . . . . . . . . . . . . . . . . . . . . . . . . . . . 35Switching off an individual parameter alarm. . . . . . . . . . . . . . . . . . . . . . . . . . . . 36Alarm Volume . . . . . . . . . . . . . . . . . . . . . . . . . . . . . . . . . . . . . . . . . . . . . . . . . . . 36Alarm limit setting. . . . . . . . . . . . . . . . . . . . . . . . . . . . . . . . . . . . . . . . . . . . . . . . 37Physiological alarms . . . . . . . . . . . . . . . . . . . . . . . . . . . . . . . . . . . . . . . . . . . . . . 38
5 - Monitoring and Measurements . . . . . . . . . . . . . . . . . . . . . . . . . . . . 39
General . . . . . . . . . . . . . . . . . . . . . . . . . . . . . . . . . . . . . . . . . . . . . . . . . . . . . . . . 39ECG. . . . . . . . . . . . . . . . . . . . . . . . . . . . . . . . . . . . . . . . . . . . . . . . . . . . . . . . . . . 40Arrhythmia . . . . . . . . . . . . . . . . . . . . . . . . . . . . . . . . . . . . . . . . . . . . . . . . . . . . . 50ST measurement (option) . . . . . . . . . . . . . . . . . . . . . . . . . . . . . . . . . . . . . . . . . . 52Respiration rate. . . . . . . . . . . . . . . . . . . . . . . . . . . . . . . . . . . . . . . . . . . . . . . . . . 55Capnography. . . . . . . . . . . . . . . . . . . . . . . . . . . . . . . . . . . . . . . . . . . . . . . . . . . . 57NIBP monitoring . . . . . . . . . . . . . . . . . . . . . . . . . . . . . . . . . . . . . . . . . . . . . . . . . 64SpO2 monitoring . . . . . . . . . . . . . . . . . . . . . . . . . . . . . . . . . . . . . . . . . . . . . . . . . 68IBP monitoring . . . . . . . . . . . . . . . . . . . . . . . . . . . . . . . . . . . . . . . . . . . . . . . . . . 73Temperature monitoring . . . . . . . . . . . . . . . . . . . . . . . . . . . . . . . . . . . . . . . . . . . 77Cardiac output (option) . . . . . . . . . . . . . . . . . . . . . . . . . . . . . . . . . . . . . . . . . . . . 78

iv Contents Welch Allyn 1500 patient monitor
6 - Acuity Central Station . . . . . . . . . . . . . . . . . . . . . . . . . . . . . . . . . . . 91
Safety . . . . . . . . . . . . . . . . . . . . . . . . . . . . . . . . . . . . . . . . . . . . . . . . . . . . . . . . . 91Introduction. . . . . . . . . . . . . . . . . . . . . . . . . . . . . . . . . . . . . . . . . . . . . . . . . . . . . 93Connect to the Acuity Central Station . . . . . . . . . . . . . . . . . . . . . . . . . . . . . . . . 93Working with Acuity . . . . . . . . . . . . . . . . . . . . . . . . . . . . . . . . . . . . . . . . . . . . . . 94
7 - Maintenance . . . . . . . . . . . . . . . . . . . . . . . . . . . . . . . . . . . . . . . . . . . 99
Maintenance interval . . . . . . . . . . . . . . . . . . . . . . . . . . . . . . . . . . . . . . . . . . . . . 99Visual inspection . . . . . . . . . . . . . . . . . . . . . . . . . . . . . . . . . . . . . . . . . . . . . . . . 100Button check. . . . . . . . . . . . . . . . . . . . . . . . . . . . . . . . . . . . . . . . . . . . . . . . . . . 100Speaker check . . . . . . . . . . . . . . . . . . . . . . . . . . . . . . . . . . . . . . . . . . . . . . . . . 100LED check. . . . . . . . . . . . . . . . . . . . . . . . . . . . . . . . . . . . . . . . . . . . . . . . . . . . . 100Alarm check . . . . . . . . . . . . . . . . . . . . . . . . . . . . . . . . . . . . . . . . . . . . . . . . . . . 100Battery maintenance. . . . . . . . . . . . . . . . . . . . . . . . . . . . . . . . . . . . . . . . . . . . . 101Inspecting and cleaning the monitor and accessories . . . . . . . . . . . . . . . . . . . 102Inspection and checklist report. . . . . . . . . . . . . . . . . . . . . . . . . . . . . . . . . . . . . 104Replacing the fuses . . . . . . . . . . . . . . . . . . . . . . . . . . . . . . . . . . . . . . . . . . . . . 106Troubleshooting . . . . . . . . . . . . . . . . . . . . . . . . . . . . . . . . . . . . . . . . . . . . . . . . 107EMC compliance. . . . . . . . . . . . . . . . . . . . . . . . . . . . . . . . . . . . . . . . . . . . . . . . 108Mounting on a wall or stand . . . . . . . . . . . . . . . . . . . . . . . . . . . . . . . . . . . . . . . 109Recycling monitor components . . . . . . . . . . . . . . . . . . . . . . . . . . . . . . . . . . . . 109
8 - Settings . . . . . . . . . . . . . . . . . . . . . . . . . . . . . . . . . . . . . . . . . . . . . . 111
Setup menu overview. . . . . . . . . . . . . . . . . . . . . . . . . . . . . . . . . . . . . . . . . . . . 111Parameter settings . . . . . . . . . . . . . . . . . . . . . . . . . . . . . . . . . . . . . . . . . . . . . . 121
9 - Accessories . . . . . . . . . . . . . . . . . . . . . . . . . . . . . . . . . . . . . . . . . . . 123
Miscellaneous. . . . . . . . . . . . . . . . . . . . . . . . . . . . . . . . . . . . . . . . . . . . . . . . . . 123Mounting . . . . . . . . . . . . . . . . . . . . . . . . . . . . . . . . . . . . . . . . . . . . . . . . . . . . . 123Batteries . . . . . . . . . . . . . . . . . . . . . . . . . . . . . . . . . . . . . . . . . . . . . . . . . . . . . . 123Cables. . . . . . . . . . . . . . . . . . . . . . . . . . . . . . . . . . . . . . . . . . . . . . . . . . . . . . . . 124Nellcor SpO2. . . . . . . . . . . . . . . . . . . . . . . . . . . . . . . . . . . . . . . . . . . . . . . . . . . 124Masimo SpO2 . . . . . . . . . . . . . . . . . . . . . . . . . . . . . . . . . . . . . . . . . . . . . . . . . . 124ECG. . . . . . . . . . . . . . . . . . . . . . . . . . . . . . . . . . . . . . . . . . . . . . . . . . . . . . . . . . 124IBP . . . . . . . . . . . . . . . . . . . . . . . . . . . . . . . . . . . . . . . . . . . . . . . . . . . . . . . . . . 125Temperature . . . . . . . . . . . . . . . . . . . . . . . . . . . . . . . . . . . . . . . . . . . . . . . . . . . 125NIBP . . . . . . . . . . . . . . . . . . . . . . . . . . . . . . . . . . . . . . . . . . . . . . . . . . . . . . . . . 125Cardiac output. . . . . . . . . . . . . . . . . . . . . . . . . . . . . . . . . . . . . . . . . . . . . . . . . . 125
A - Technical data . . . . . . . . . . . . . . . . . . . . . . . . . . . . . . . . . . . . . . . . . 127
System data . . . . . . . . . . . . . . . . . . . . . . . . . . . . . . . . . . . . . . . . . . . . . . . . . . . 127Safety standards . . . . . . . . . . . . . . . . . . . . . . . . . . . . . . . . . . . . . . . . . . . . . . . . 130Measured values . . . . . . . . . . . . . . . . . . . . . . . . . . . . . . . . . . . . . . . . . . . . . . . 131
Index . . . . . . . . . . . . . . . . . . . . . . . . . . . . . . . . . . . . . . . . . . . . . . . . . . . 139
1
1
Safety
User responsibility• The numerical and graphical results and any interpretation given must be examined
with respect to the overall clinical condition of the patient and the general recorded data quality.
• The indications given by this equipment are not a substitute for regular checking of vital functions.
• This monitor is only to be used by those trained in its operation or repair.
• Ensure that the personnel have read and understood these operating instructions and in particular this “Safety” section.
• Damaged or missing components must be replaced immediately.
• It is the owner's responsibility that the valid regulations for safety and prevention of accidents are observed.
Intended use• The Welch Allyn® 1500 Patient Monitor patient monitoring unit is designed for the
monitoring of vital parameters such as ECG, SpO2, etCO2, non invasive blood pressure (NIBP), invasive blood pressure (IBP), temperature and respiration of a patient. Cardiac output and hemodynamic calculations are also possible.
• The device is intended to be used by qualified doctors or trained medical personnel.
• The device is not suitable for transport.
• There is no danger for patients with pacemaker.
• The device is intended for the monitoring of adult, pediatric and neonate patients.
• The device is intended for the monitoring of one patient at a time.
• The device is not designed for sterile use nor is it designed for outdoor use.
• Do not use this monitor in areas where there is any danger of explosion or in the presence of flammable gases.
• The device is classified CF. It is defibrillation protected when the original accessories are used. However, as a safety precaution when possible, remove the electrodes before defibrillation.
• This product is not designed for direct cardiac application.
• The arrhythmia module is not intended for use with neonatal patients.
• The ST-analysis module is not intended for use with neonatal patients.
�

2 Safety Welch Allyn 1500 Patient Monitor
Organizational measures• Before using the monitor, ensure that an introduction regarding the monitor functions
and the safety precautions have been provided by a medical product representative.
• Observe the operating instructions and maintenance instructions.
• These operating instructions do not override any statutory or local regulations, or procedures for the prevention of accidents and environmental protection.
SafetyWARNING Mount the monitor securely so that there is no possibility of it falling on the patient or on the floor.
WARNING If uncertain about the accuracy of any measurement, first check the patient’s vital signs by alternate means, and then make sure the monitor is functioning correctly.
WARNING Do not touch the monitor during defibrillation.
WARNING To ensure patient safety, none of the ECG electrodes including the neutral electrode, nor the patient or any person with simultaneous patient contact, must come in contact with conductive parts, even when these are grounded.
WARNING If you notice any changes that impair safety (including operating behavior) remove the monitor from service and report it to the person responsible for servicing the monitor.
WARNING Do not place any liquids on the monitor. If liquid is spilled over the monitor, immediately disconnect the monitor from the mains and dry. The monitor must be serviced before reusing.
Caution This manual, and especially these safety notes, must be read and observed.
Caution Electrical installation of the room or the building in which the monitor is to be used must comply with regulations specified by the country in which the equipment is to be used
Caution Ensure the monitor is always mounted on a Welch Allyn approved bracket or stand. The monitor is unstable when the unit is not secured to an approved Welch Allyn mounting system.
Directions for use Safety 3
Safety equipmentOperating the monitor without the correctly rated fuse, or with defective cables, constitutes a danger to patient safety. Therefore:
Alarms
Caution Do not operate the monitor if the ground connection is suspect or if the mains lead is damaged or suspected of being damaged.
Caution Damaged cables and connections must immediately be replaced.
Caution Electrical safety devices, such as fuses, must not be modified.
Caution Fuses must only be replaced with the same type and rating as the original.
WARNING Do not silence the audible alarm if patient safety could be compromised.
WARNING Always respond immediately to an equipment alert because the patient may not be monitored during certain alarm conditions.
WARNING Before each use, verify that the alarm limits are appropriate for the patient being monitored.
WARNING Check the audible alarm silence duration before temporarily silencing the audible alarms.
WARNING The leading cause of patient death or serious injury reported with the use of patient monitoring equipment is failure to respond to alarms notifying the user of an adverse change in patient condition. If you are relying on visual alarm notifications, maintain a clear line of sight and remain within 4 meters of the central station. If you are relying on audio alarm notifications, make sure that you can hear audio alarms from where you are. Set the volume as needed considering the environment and ambient noise levels. Verify that the alarm is audible to a clinician working at the maximum distance from the central station.

4 Safety Welch Allyn 1500 Patient Monitor
Operation with other devices
• Only use accessories and other parts recommended or supplied by Welch Allyn. Use of other than recommended or supplied parts may result in injury, inaccurate information or damage to the monitor.
• Accessory equipment connected to the analogue and digital interfaces must be certified according to the respective IEC standards (e.g. IEC/EN 60950 for data processing equipment and IEC/EN 60601-1 for medical equipment). Furthermore all configurations shall comply with the current version of the system standard IEC/EN 60601-1-1. Anyone who connects additional equipment to the signal input part or signal output part configures a medical system, and is therefore responsible that the system complies with the requirements of the valid version of the system standard IEC/EN 60601-1-1. If in doubt, consult the technical service department or your local representative.
• Any other equipment used with the patient must use the same common ground as the monitor.
• Precautions must be observed when using high frequency devices. Operating high frequency electro-surgical equipment in the vicinity of the monitor can produce interference in the monitor and cause incorrect measurements. Only use patient cables recommended by Welch Allyn to avoid possible signal interference during ECG acquisition.
• There is no danger when using the ECG monitor simultaneously with electrical stimulation equipment. However, during defibrillation, keep discharge paddles away from the monitor ECG lead wires, electrodes, any other monitor sensors, and other conductive parts in contact with the patient.
• If the patient cable should become defective after defibrillation, a lead-off indication is displayed and an audible alarm is issued.
• Portable communication equipment, HF two-way radios and devices marked with the symbol can affect this monitor (see “EMC compliance” on page 108).
Networks and internet• When the monitor is part of a network, (LAN, HIS, etc.), transmitting over a telephone
network or any other transmission /reception medium, or if exposed to the Internet or other networks that are not secure, appropriate security measures must be provided to protect the patient information stored.
• Patient security and security of the network is the sole responsibility of the user.
Caution Do not use the monitor in or near an MRI suite.

Directions for use Safety 5
Maintenance
SymbolsThese symbols appear in this user guide.
WARNING Danger of electric shock. Do not open the monitor case. There are no user serviceable parts inside. Servicing may only be performed by a qualified technician authorized by Welch Allyn.
WARNING Before cleaning and to isolate the mains power supply, switch the monitor off and disconnect it from the mains by removing the plug.
Caution Do not use high temperature sterilization processes (such as autoclaving). Do not use E-beam or gamma radiation sterilization.
Caution Do not use solvent or abrasive cleaners on either the monitor or cable assemblies.
Caution Do not immerse the monitor or cable assemblies in liquid.
WARNING Warning statements in this user guide identify conditions or practices that could result in personal injury.
Caution Caution statements in this user guide identify conditions or practices that could result in damage to the equipment or other property.

6 Safety Welch Allyn 1500 Patient Monitor
The following symbols appear on the monitor, or accessories.
The following symbols appear on the screen.
Symbol Definition Symbol Definition
Potential equalization (earth ground) CF symbol. This monitor is classified safe for internal and external use. However, it is only defibrillation protected when used with the original Welch Allyn patient cable!
The monitor can be recycled. Recycle the monitor and battery separately from other waste. Refer towww.welchallyn.com/weee for collection point and additional information.
Notified body of the CE certification (TÜV P.S.).
Note accompanying documents.
Altitude limits Humidity limits
Keep away from sunlight Stacking limit
Temperature limits Keep away from rain
This way up Fragile
CO2 in CO2 out
Temperature NIBP
Read and follow the instructions in the accompanying documentation.
Symbol Definition Symbol Definition
Parameter alarm off Audible Alarm off
Acuity connected Acuity not connected
Patient mode symbols; neonate, pediatric, adult
�

Directions for use Safety 7
Additional terms
Implied authorizationPossession or purchase of this monitor does not convey any express or implied license to use the monitor with replacement parts which would alone, or in combination with this monitor, fall within the scope of one or more patents relating to this monitor.
Terms of warrantyYour monitor is warranted against defects in material and manufacture for the duration of one year (from date of purchase). Excluded from this guarantee is damage caused by an accident or as a result of improper handling. The warranty entitles free replacement including labor, of the defective part. Any liability for subsequent damage is excluded. The warranty is void if unauthorized or unqualified persons attempt to make repairs.
In case of a defect, send the apparatus to your dealer or an authorized Welch Allyn service center. The manufacturer can only be held responsible for the safety, reliability, and performance of the apparatus if:
• assembly operations, extensions, readjustments, modifications, or repairs are carried out by persons authorized by the manufacturer.
• the monitor and approved attached equipment is used in accordance with the manufacturer's instructions.
Note There are no express or implied warranties which extend beyond the warranties hereinabove set forth. Welch Allyn makes no warranty of merchantability or fitness for a particular purpose with respect to the product or parts thereof.
Note This equipment has been tested and found to comply with the limits for a class A digital device, pursuant to both Part 15 of the FCC (Federal Communications Commission) rules and the radio interference regulations of the Canadian Department of Communications. These limits are designed to provide reasonable protection against harmful interference when the equipment is operated in a commercial environment. This equipment generates, uses and can radiate radio frequency energy and, if not installed and used in accordance with this instruction user guide, may cause harmful interference to radio communications. Operation of this equipment in a residential area is likely to cause harmful interference in which case the user will be required to correct the interference at his own expense.
WHEN USED IN CANADA: To prevent radio interference to the licensed service, this device is intended to be operated indoors and away from windows to provide maximum shielding. Equipment (or its transmit antenna) that is installed outdoors is subject to licensing.

8 Safety Welch Allyn 1500 Patient Monitor
2
9
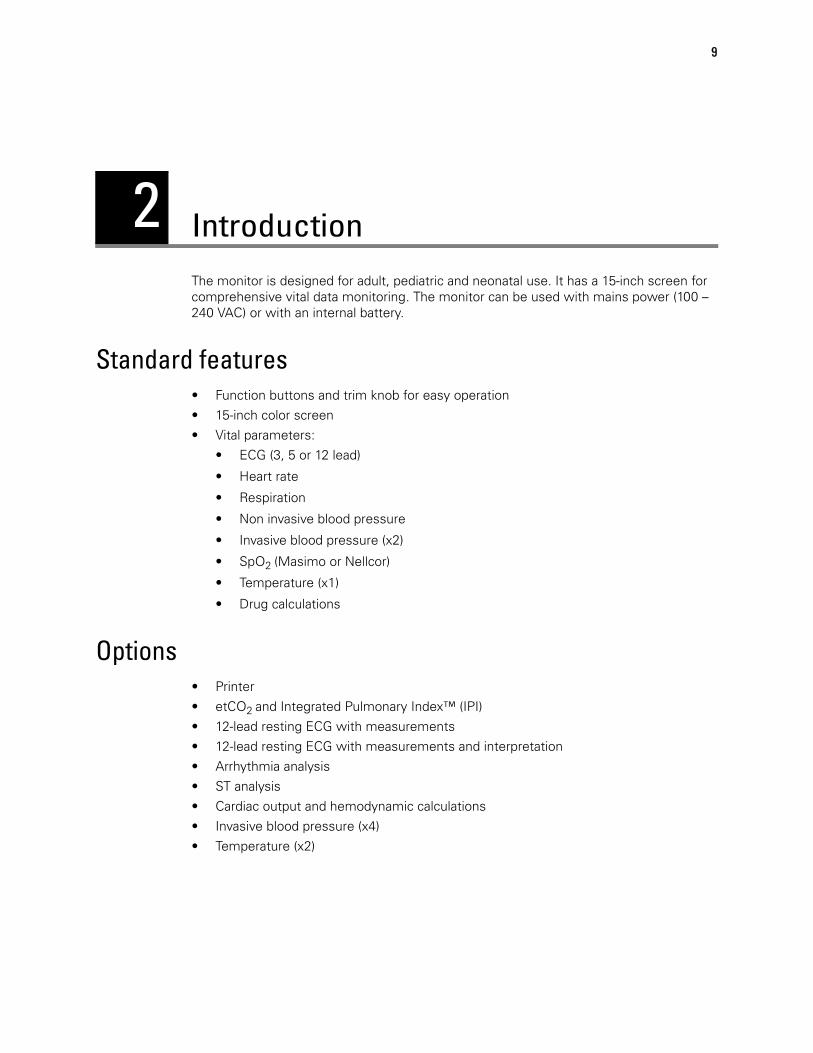
IntroductionThe monitor is designed for adult, pediatric and neonatal use. It has a 15-inch screen for comprehensive vital data monitoring. The monitor can be used with mains power (100 – 240 VAC) or with an internal battery.
Standard features• Function buttons and trim knob for easy operation• 15-inch color screen• Vital parameters:
• ECG (3, 5 or 12 lead)
• Heart rate
• Respiration
• Non invasive blood pressure
• Invasive blood pressure (x2)
• SpO2 (Masimo or Nellcor)
• Temperature (x1)
• Drug calculations
Options• Printer• etCO2 and Integrated Pulmonary Index™ (IPI)• 12-lead resting ECG with measurements• 12-lead resting ECG with measurements and interpretation• Arrhythmia analysis• ST analysis• Cardiac output and hemodynamic calculations• Invasive blood pressure (x4)• Temperature (x2)

10 Introduction Welch Allyn 1500 Patient Monitor
The Welch Allyn® 1500 Patient Monitor
Front panel
Back panel
*The nurse call can be used to give an external indication of a parameter alarm.
Visual alarm indicator
Patient connection panel
Function button panel
Trim knob
Ethernet (RJ45) connector
Potential equalization (ground)
Nurse call connector*
Mains connector(100-240 VAC) and fuse panel
Printer
USB connector(lift door)

Directions for use Introduction 11
Connection panel
Note The connection panel layout will vary according to the options installed.
Temperature 1
etCO2 sampling input
etCO2 sampling exhaust
ECG
NIBP
IBP 2
SVC(service only)
SpO2
IBP 1IBP 3
IBP 4
Temperature 2Cardiac Output

12 Introduction Welch Allyn 1500 Patient Monitor
Function buttons
Print Printout of three waveforms and all parameters. The waveforms and print settings are defined in the printer menu (see “Recorder” on page 113). Note that an auto printout can also be obtained when a limit is violated. This is also defined in system setup.
Alarm silenceSilence / resume an audible alarm, or confirmation of displayed messages. The silence time is defined in the Setup/Administrator menu (see “Administrator” on page 118).Note: It is also possible to stop the audible alarm indefinitely (see “Switching off all alarms” on page 35).
NIBP measurement intervalInterval setup for non-invasive blood pressure measurement or switch-off of the interval measurement (see “Automatic blood pressure measurement” on page 65). Saves patient information.
NIBP measurement Start or stop of the non-invasive blood pressure measurement (see “Taking a single NIBP measurement” on page 65).
Standby In standby mode patient monitoring is interrupted and the screen is blank. Monitoring is resumed when any button is pressed.
Note when the monitor is connected to Acuity Central Station, different options are given.
SetupDisplay of the Setup menu. The required menu item can be selected by turning the trim knob and pressing (see next page).
TrendDisplays trend data (see “Trend data” on page 29).
HomePressing this button closes opened dialogues and returns to the monitoring screen.Any settings that were changed in the opened dialogue screen are saved.Pressing this button is the same as selecting OK on the opened dialogue screen.
ON/OFF Press to switch the monitor on.Press and hold for 4 seconds to switch the monitor off.The LEDs below this button indicate:• Left LED - mains power is connected to the monitor.• Right LED - mains connected to the monitor and internal battery being charged.• (see “Switching the monitor on or off” on page 19).
Trim knobThe trim knob is used for navigation, value selection and value change. Use as follows:1. Turn the trim knob to the left or right to select a field or value. A white frame appears around
the field.2. Press the trim knob to open the menu of the selected parameter field or value.3. Turning the trim knob to the left or right to select the desired value.4. Press the trim knob to apply the changed value.
Directions for use Introduction 13
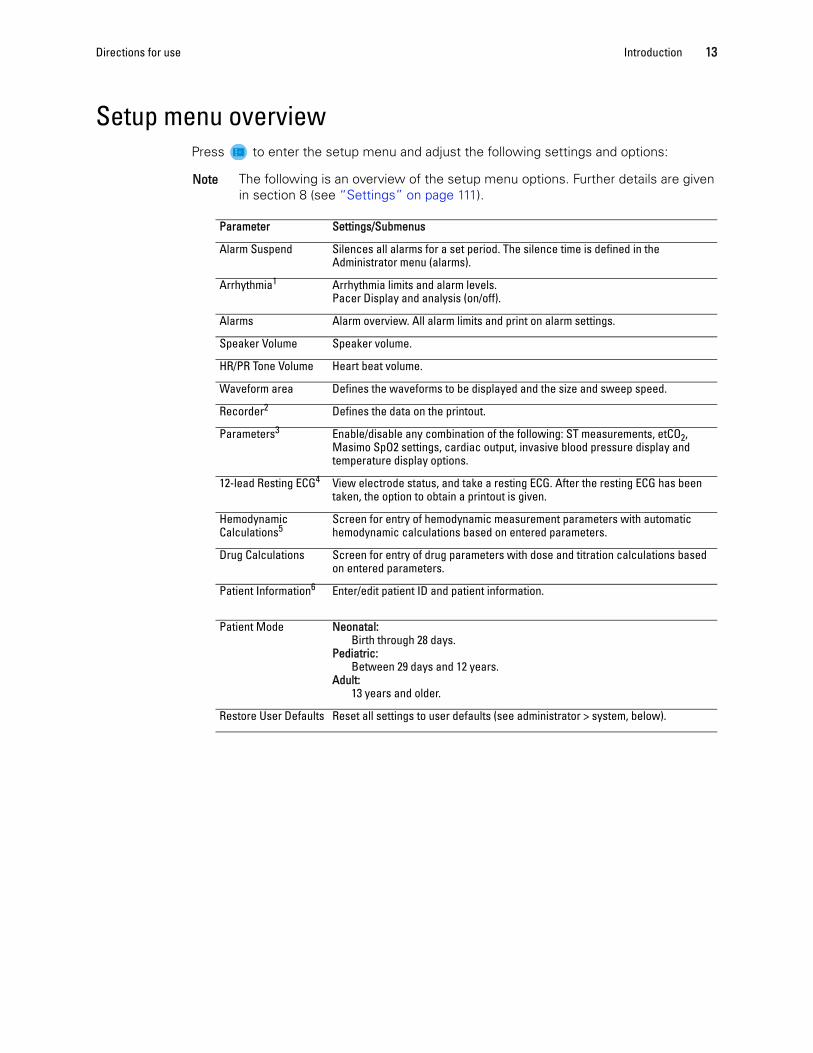
Setup menu overviewPress to enter the setup menu and adjust the following settings and options:
Note The following is an overview of the setup menu options. Further details are given in section 8 (see “Settings” on page 111).
Parameter Settings/Submenus
Alarm Suspend Silences all alarms for a set period. The silence time is defined in the Administrator menu (alarms).
Arrhythmia1 Arrhythmia limits and alarm levels.Pacer Display and analysis (on/off).
Alarms Alarm overview. All alarm limits and print on alarm settings.
Speaker Volume Speaker volume.
HR/PR Tone Volume Heart beat volume.
Waveform area Defines the waveforms to be displayed and the size and sweep speed.
Recorder2 Defines the data on the printout.
Parameters3 Enable/disable any combination of the following: ST measurements, etCO2, Masimo SpO2 settings, cardiac output, invasive blood pressure display and temperature display options.
12-lead Resting ECG4 View electrode status, and take a resting ECG. After the resting ECG has been taken, the option to obtain a printout is given.
Hemodynamic Calculations5
Screen for entry of hemodynamic measurement parameters with automatic hemodynamic calculations based on entered parameters.
Drug Calculations Screen for entry of drug parameters with dose and titration calculations based on entered parameters.
Patient Information6 Enter/edit patient ID and patient information.
Patient Mode Neonatal: Birth through 28 days.
Pediatric: Between 29 days and 12 years.
Adult: 13 years and older.
Restore User Defaults Reset all settings to user defaults (see administrator > system, below).
14 Introduction Welch Allyn 1500 Patient Monitor
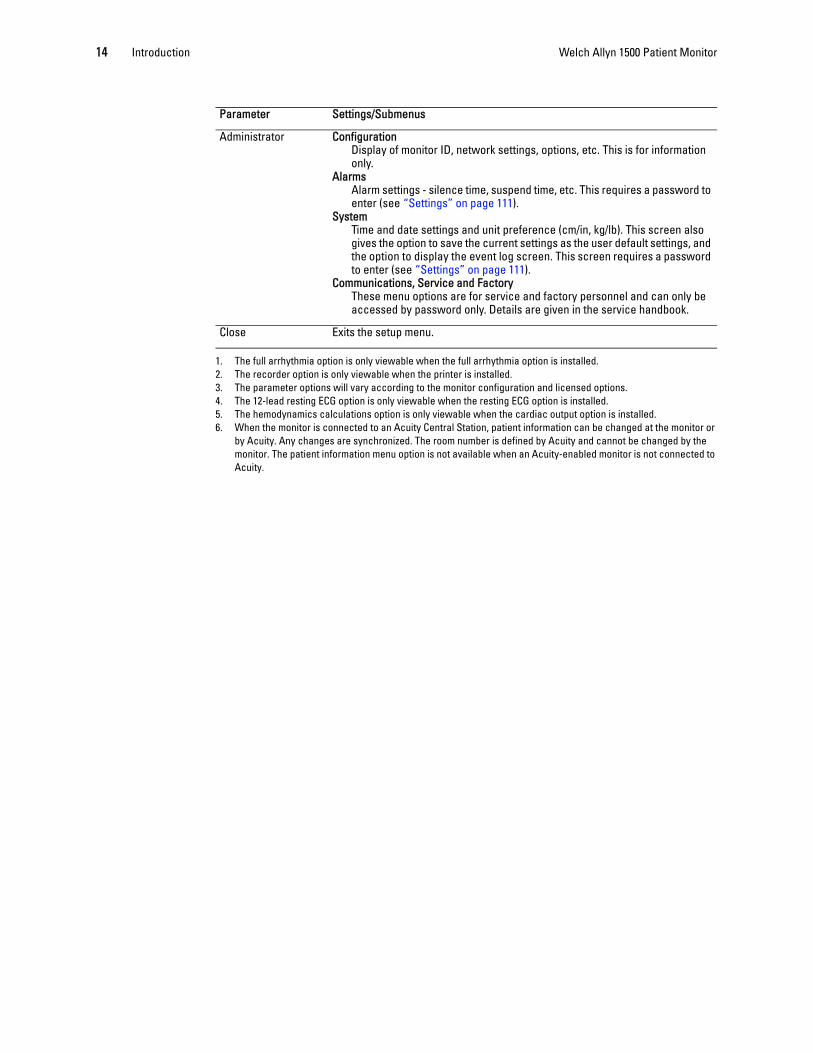
Parameter Settings/Submenus
Administrator Configuration Display of monitor ID, network settings, options, etc. This is for information only.
Alarms Alarm settings - silence time, suspend time, etc. This requires a password to enter (see “Settings” on page 111).
System Time and date settings and unit preference (cm/in, kg/lb). This screen also gives the option to save the current settings as the user default settings, and the option to display the event log screen. This screen requires a password to enter (see “Settings” on page 111).
Communications, Service and FactoryThese menu options are for service and factory personnel and can only be accessed by password only. Details are given in the service handbook.
Close Exits the setup menu.
1. The full arrhythmia option is only viewable when the full arrhythmia option is installed.2. The recorder option is only viewable when the printer is installed.3. The parameter options will vary according to the monitor configuration and licensed options.4. The 12-lead resting ECG option is only viewable when the resting ECG option is installed.5. The hemodynamics calculations option is only viewable when the cardiac output option is installed.6. When the monitor is connected to an Acuity Central Station, patient information can be changed at the monitor or
by Acuity. Any changes are synchronized. The room number is defined by Acuity and cannot be changed by the monitor. The patient information menu option is not available when an Acuity-enabled monitor is not connected to Acuity.

Directions for use Introduction 15
Display overview
Waveform fields Parameter fields
Time of last blood pressure measurement
Blood pressure
Alarm and system messages
Temperature
Information field See“Information field” following
Note The waveform display is changed in setup menu (see “Defining display waveforms” on page 27).
Note The parameter fields can be changed according to licensed options, parameter selection (see“Defining parameter fields” on page 25), and patient panel options.
16 Introduction Welch Allyn 1500 Patient Monitor
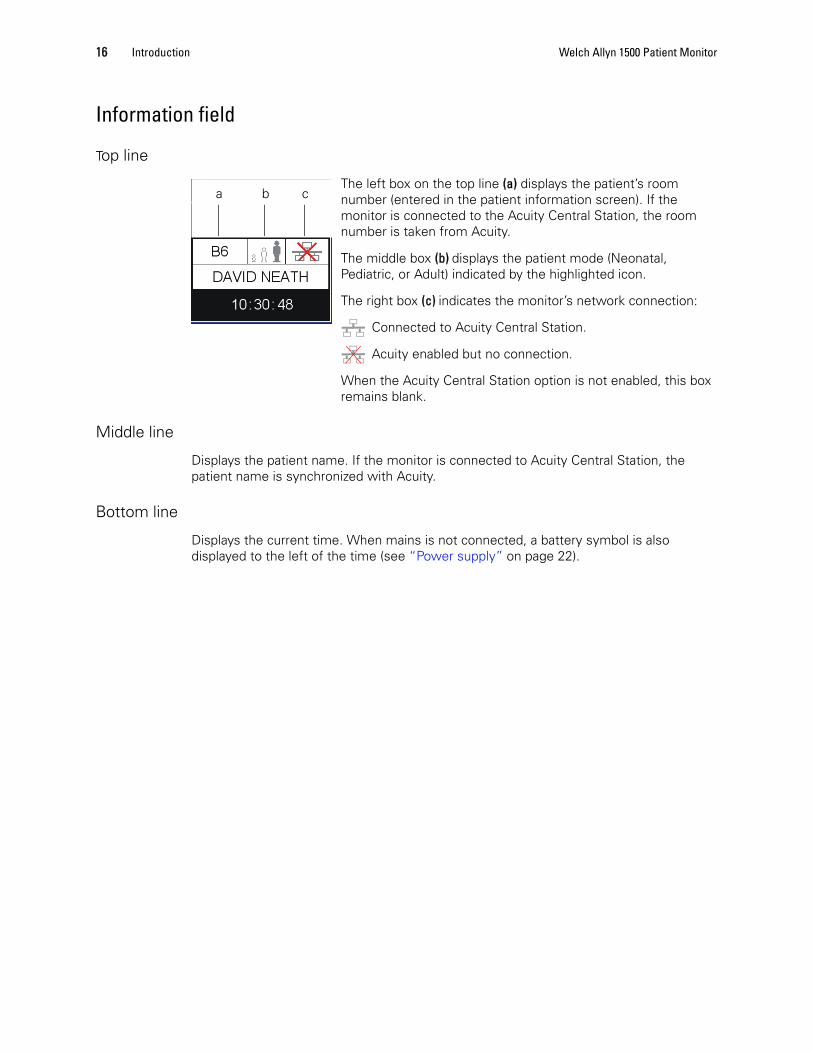
Information field
Top line
The left box on the top line (a) displays the patient’s room number (entered in the patient information screen). If the monitor is connected to the Acuity Central Station, the room number is taken from Acuity.
The middle box (b) displays the patient mode (Neonatal, Pediatric, or Adult) indicated by the highlighted icon.
The right box (c) indicates the monitor’s network connection:
Connected to Acuity Central Station.
Acuity enabled but no connection.
When the Acuity Central Station option is not enabled, this box remains blank.
Middle line
Displays the patient name. If the monitor is connected to Acuity Central Station, the patient name is synchronized with Acuity.
Bottom line
Displays the current time. When mains is not connected, a battery symbol is also displayed to the left of the time (see “Power supply” on page 22).
a b c

3
17
Operation
Startup and initial preparation
Connections
1. Connect the mains cable to the rear of the monitor (a).
2. If the monitor is to be networked (with the Acuity Central Station), connect the network cable to the ethernet connector on the rear of the monitor (b).
3. Connect the potential equalization (ground) cable to the central potential equalization lug (c).
WARNING Danger of electrical shock. Do not operate the monitor if the ground connection is suspect or if the mains lead is damaged or suspected of being damaged.
WARNING Network the monitor to an Acuity Central Station only. Connecting to other networks could damage the monitor or injure the patient. If in doubt about the network jacks or devices, consult your facility’s Biomedical Engineering Department.
Caution Ensure that the patient or any person with simultaneous patient contact does not come in contact with conductive parts of any connectors including the RJ45 connector and the USB connector when the cover is opened.
a cb

18 Operation Welch Allyn 1500 Patient Monitor
Inserting recorder paper
1. Pull the locking catch (a) to the front. The paper tray is unlocked.
2. Pull the paper tray out.
3. Insert paper and pull the beginning of the paper out. Make sure that the paper mark (b) is facing to the top.
4. Reinsert and close the tray. Be sure that the paper lies exactly between the rails (c).
Note The monitor is delivered without printing paper installed. Only use original Welch Allyn printing paper. The thermal paper is sensitive to heat, humidity, and chemical vapors. Store the paper in a cool, dry and chemical free area.
a
b
c
Directions for use Operation 19
Switching the monitor on or off
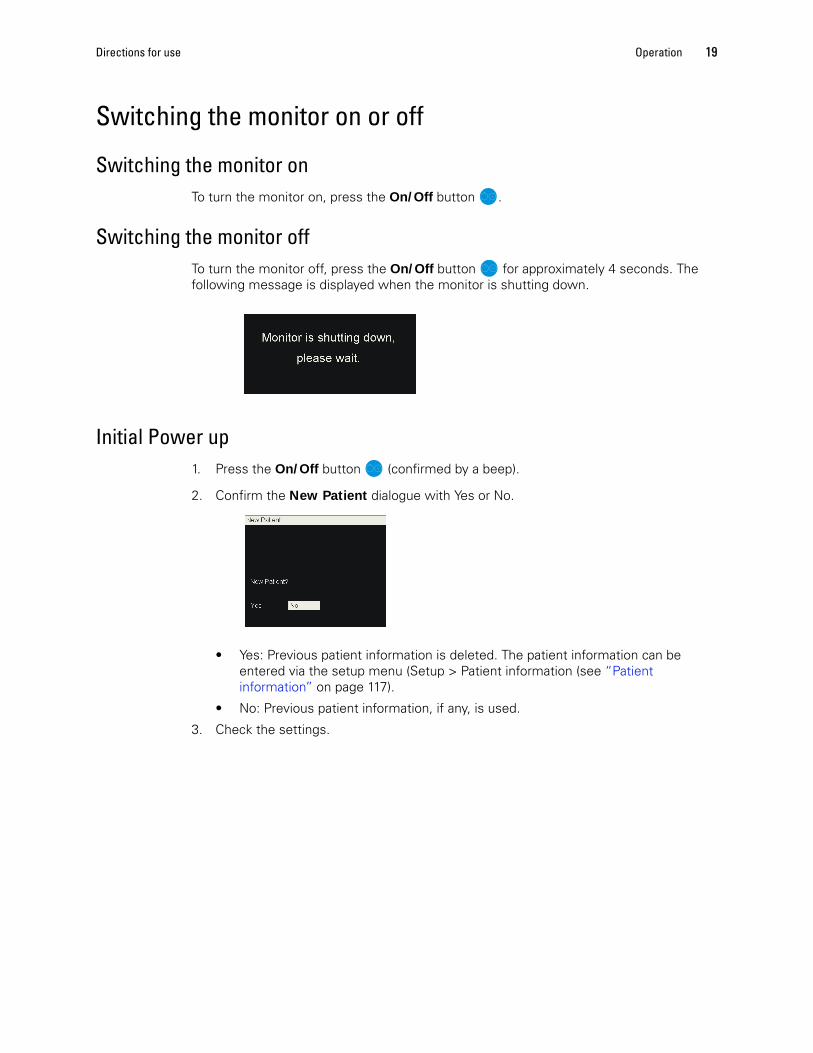
Switching the monitor onTo turn the monitor on, press the On/Off button .
Switching the monitor offTo turn the monitor off, press the On/Off button for approximately 4 seconds. The following message is displayed when the monitor is shutting down.
Initial Power up1. Press the On/Off button (confirmed by a beep).
2. Confirm the New Patient dialogue with Yes or No.
• Yes: Previous patient information is deleted. The patient information can be entered via the setup menu (Setup > Patient information (see “Patient information” on page 117).
• No: Previous patient information, if any, is used.
3. Check the settings.
20 Operation Welch Allyn 1500 Patient Monitor
Initial settings
Alarm and general settings are given in the setup menu. Initial monitor settings may include general alarm settings (alarm silence time, alarm delay time, etc.), and general monitor settings (height and weight units, time and date, etc.).
Access the setup as follows:
1. Press the Setup button .
2. Use the trim knob to select parameters and change values. Press to confirm the selection and settings.
• The alarm settings are given in the setup menu: Administrator > Alarm
• The system settings are given in the setup menu: Administrator > System
Caution Only authorized personnel, trained in the operation of this monitor, are qualified to do the setups in the following menu.
Note The alarm and the system sub-menu are password protected. The password for both of these is 49, 48, 46.
Note Details of the setup menu and the passwords are given in the settings section (see “Settings” on page 111).

Directions for use Operation 21
Saving the user-defined settings as defaultAll monitor settings, including alarms settings, are stored until the monitor is switched off. To save the user defined settings as default,
1. Press the Setup button .
2. Select Administrator > System > Save User Defaults.
3. Confirm with ok:
Restoring the user settings1. Press the Setup button .
2. Select Restore User Defaults. You are prompted to confirm:
Note The system menu is password protected. The password is 49, 48, 46.

22 Operation Welch Allyn 1500 Patient Monitor
Power supply
Mains connectedWhen the mains supply is connected, the mains LED is illuminated (a). When the mains supply is connected, and the battery is recharging both mains LED (a) and the battery LED (b) are illuminated.
For battery recharging see “Recharging the battery” on page 101.
Mains interrupted
Disconnect from the mainsTo isolate the monitor from the mains, disconnect the mains cable.
a b
Note If the mains supply is interrupted, the monitor automatically switches over to battery operation. The user settings are maintained.

Directions for use Operation 23
Battery operationTwo batteries are available for the monitor:
• Lithium-Ion battery: This type of battery will provide power for approximately two hours when fully charged.
• Lead acid battery: This type of battery will provide power for approximately one hour when fully charged.
When running on battery power the battery symbol is displayed next to the time. The battery indicator gives an approximate guide to the capacity of the battery:
When the battery capacity is close to depletion:
• the alarm message Battery low appears
• the battery symbol flashes
• an audible alarm beep is heard
• the visual alarm indicator flashes blue
• After a few minutes if the monitor is not connected to the mains supply, the message
Battery nearly depleted is displayed and a continuous beep is heard; the monitor switches off. If mains is connected during this period the monitor remains on.
Connect the monitor to the mains supply. For battery recharging, see “Recharging the battery” on page 101.
• Full = between 87.5% and 100% capacity
• 3/4 full = between 62.5% and 87.5% capacity
• Half full = between 37.5% and 62.5% capacity
• 1/4 full = between 12.5% and 37.5% capacity
• Empty = between 0% and 12.5% capacity
Visual Alarm Indicator

24 Operation Welch Allyn 1500 Patient Monitor
Standby mode
In standby mode, patient monitoring is temporarily interrupted. Confirmed patient information is saved.
1. Press the Standby button . The following screen is displayed:
2. To exit standby mode press any button. You are prompted to confirm the same patient or enter a new patient.
WARNING In standby mode, vital signs data and alarms are no longer displayed or collected.
Note Patient information that has not been confirmed is lost when standby mode is entered.
Note The standby message is continuously displayed while the unit is in standby mode.
Note After exiting standby mode, ensure that the NIBP intervals are re-armed by manually starting an NIBP measurement.
Directions for use Operation 25
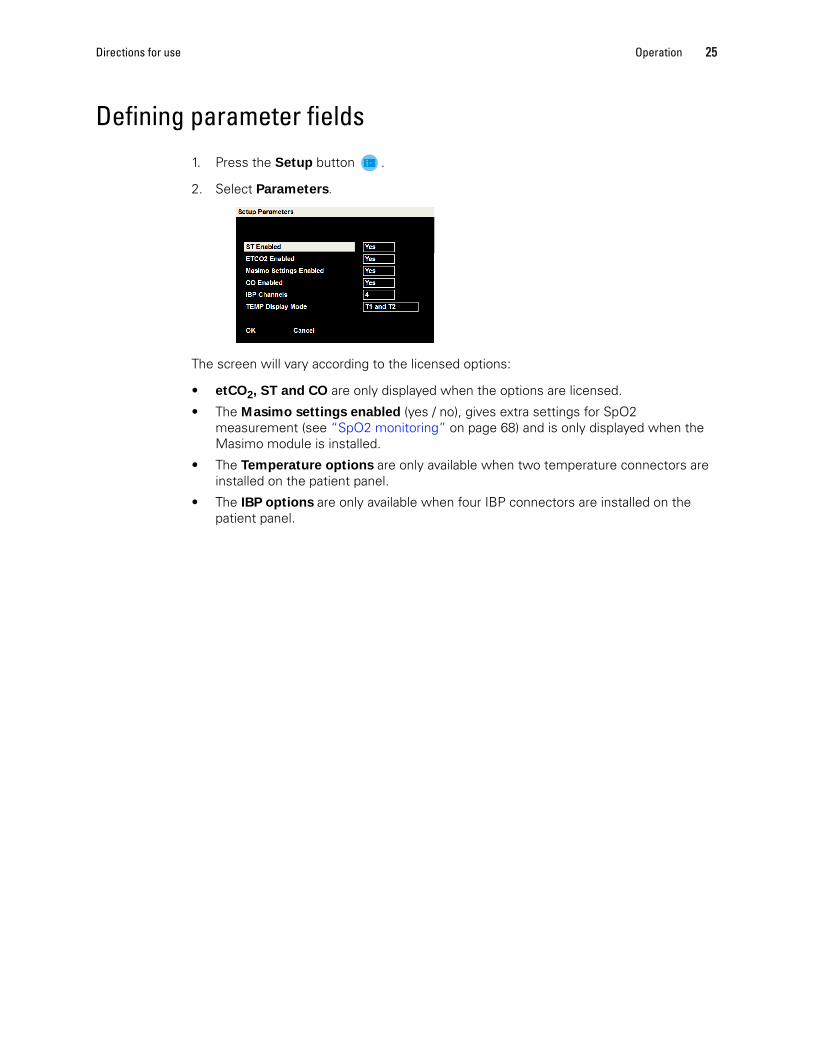
Defining parameter fields
1. Press the Setup button .
2. Select Parameters.
The screen will vary according to the licensed options:
• etCO2, ST and CO are only displayed when the options are licensed.
• The Masimo settings enabled (yes / no), gives extra settings for SpO2 measurement (see “SpO2 monitoring” on page 68) and is only displayed when the Masimo module is installed.
• The Temperature options are only available when two temperature connectors are installed on the patient panel.
• The IBP options are only available when four IBP connectors are installed on the patient panel.

26 Operation Welch Allyn 1500 Patient Monitor
Parameter field display
• When etCO2 is enabled, the CO2 parameter replaces the RR parameter below the heart rate.
• When the ST parameter is enabled, the ST parameter replaces the RR value and the RR value is moved below the ST parameter.
• When both etCO2 and ST parameters are enabled, both values are displayed below the heart rate (RR is not displayed).
• When IPI is enabled, the value is displayed below the CO2.
• When four IBP connectors are available the number of IBP measurements displayed can be set, that is, no IBP measurements displayed, two measurements displayed, or four IBP measurements displayed (see previous page).
• When two temperature connectors are available, one (T1), two (T1 and T2) or T1 plus the temperature difference can be displayed (T1 plus ΔT).
RR or when enabled, etCO2, measurement, ST measurement, or both ST and etCO2 measurements.
Two or four IBP measurements (or this area is left blank when no IBP measurement are selected).
Cardiac Output measurement (when enabled).
T1, T1 and T2, or T1 and ΔT
Directions for use Operation 27
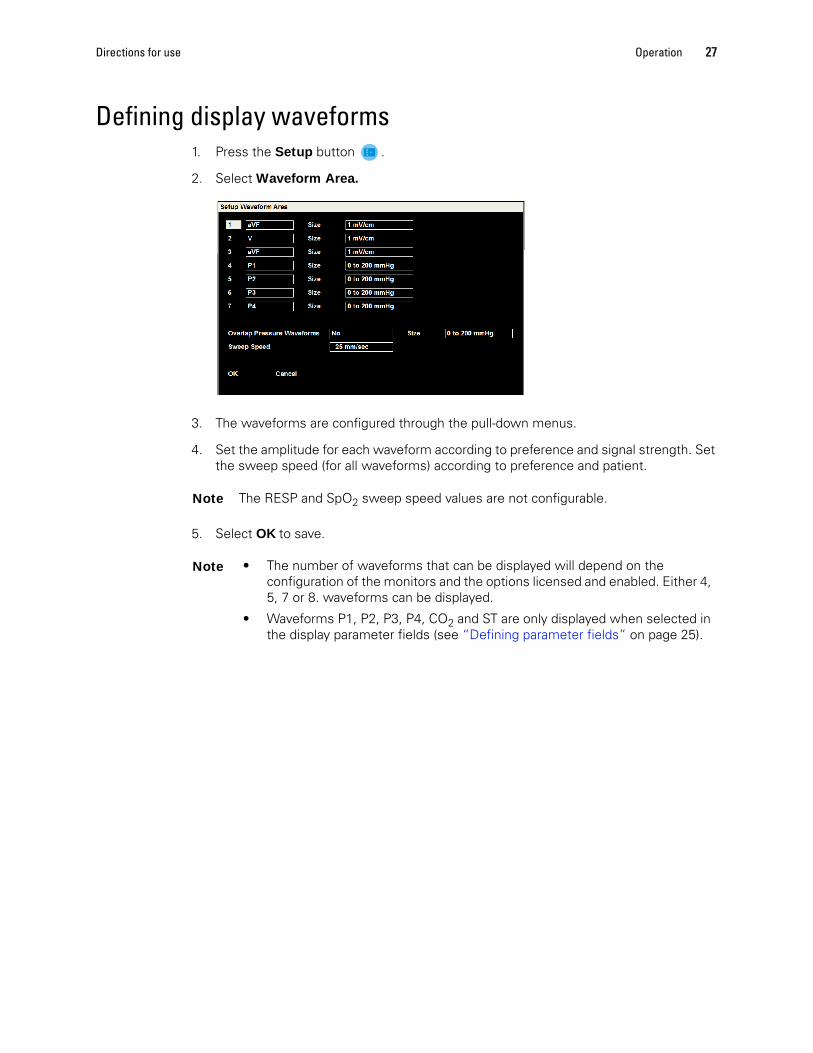
Defining display waveforms1. Press the Setup button .
2. Select Waveform Area.
3. The waveforms are configured through the pull-down menus.
4. Set the amplitude for each waveform according to preference and signal strength. Set the sweep speed (for all waveforms) according to preference and patient.
5. Select OK to save.
Note The RESP and SpO2 sweep speed values are not configurable.
Note • The number of waveforms that can be displayed will depend on the configuration of the monitors and the options licensed and enabled. Either 4, 5, 7 or 8. waveforms can be displayed.
• Waveforms P1, P2, P3, P4, CO2 and ST are only displayed when selected in the display parameter fields (see “Defining parameter fields” on page 25).
28 Operation Welch Allyn 1500 Patient Monitor
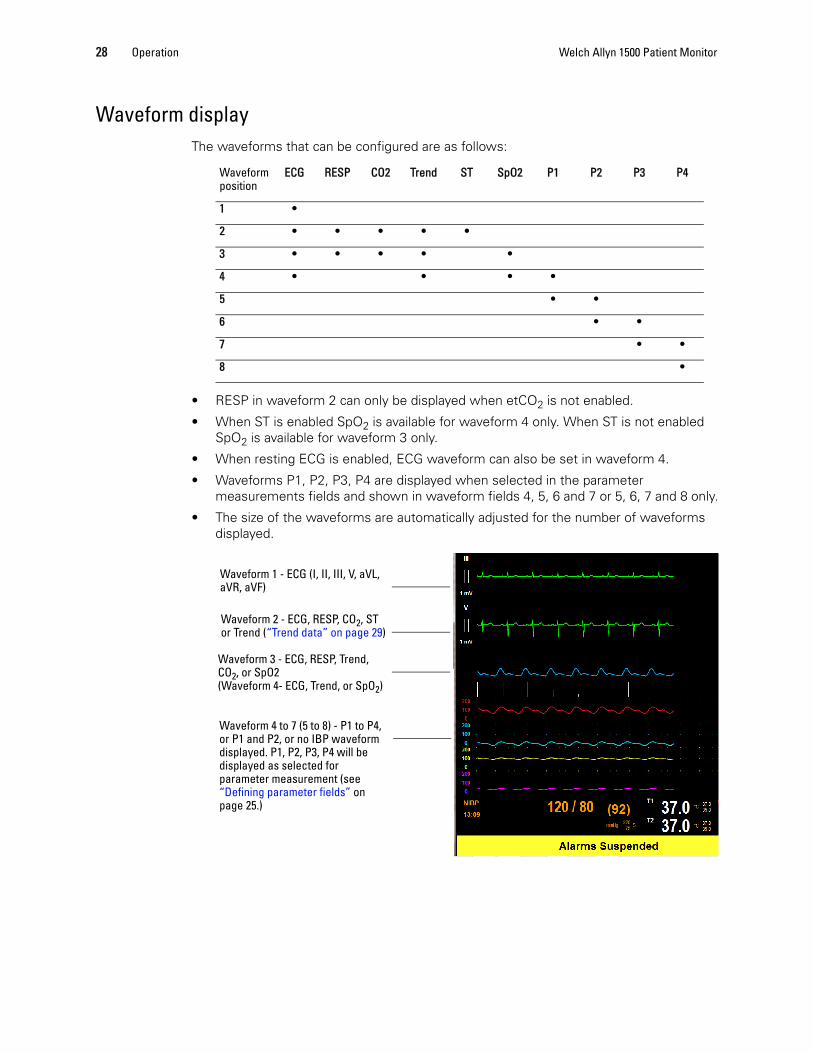
Waveform displayThe waveforms that can be configured are as follows:
• RESP in waveform 2 can only be displayed when etCO2 is not enabled.
• When ST is enabled SpO2 is available for waveform 4 only. When ST is not enabled SpO2 is available for waveform 3 only.
• When resting ECG is enabled, ECG waveform can also be set in waveform 4.
• Waveforms P1, P2, P3, P4 are displayed when selected in the parameter measurements fields and shown in waveform fields 4, 5, 6 and 7 or 5, 6, 7 and 8 only.
• The size of the waveforms are automatically adjusted for the number of waveforms displayed.
Waveform position
ECG RESP CO2 Trend ST SpO2 P1 P2 P3 P4
1 •
2 • • • • •
3 • • • • •
4 • • • •
5 • •
6 • •
7 • •
8 •
Waveform 1 - ECG (I, II, III, V, aVL, aVR, aVF)
Waveform 2 - ECG, RESP, CO2, ST or Trend (“Trend data” on page 29)
Waveform 3 - ECG, RESP, Trend, CO2, or SpO2(Waveform 4- ECG, Trend, or SpO2)
Waveform 4 to 7 (5 to 8) - P1 to P4, or P1 and P2, or no IBP waveform displayed. P1, P2, P3, P4 will be displayed as selected for parameter measurement (see “Defining parameter fields” on page 25.)
Directions for use Operation 29
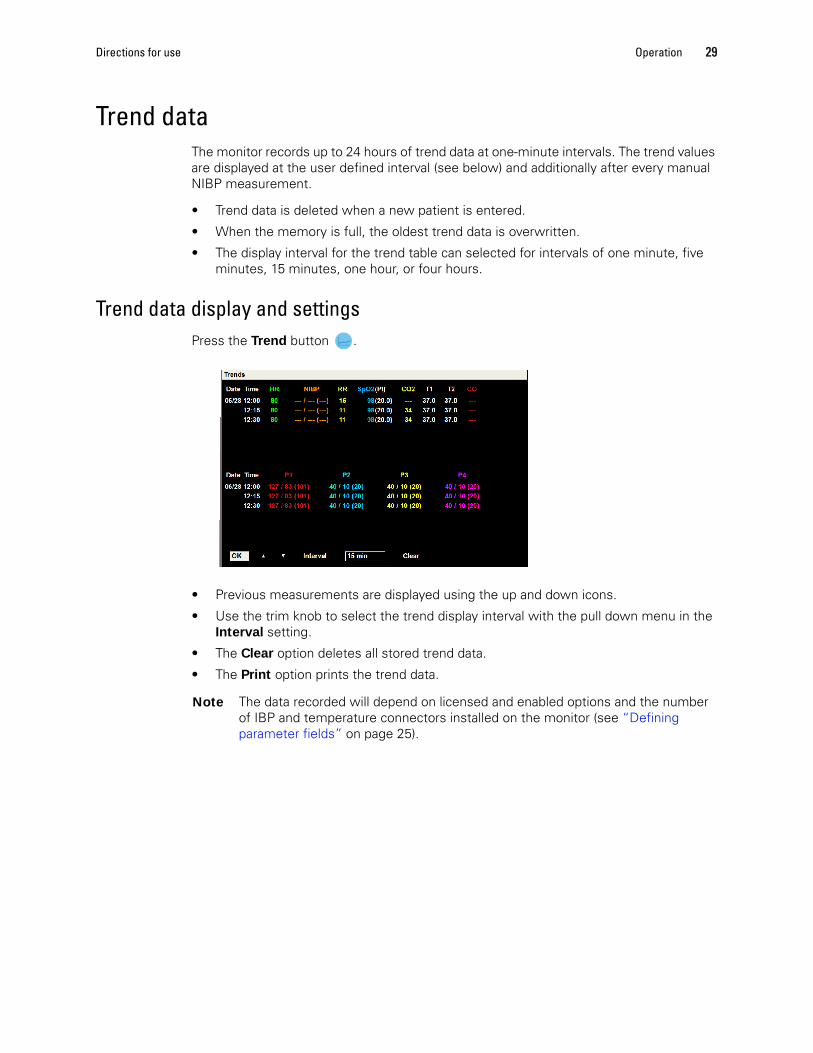
Trend dataThe monitor records up to 24 hours of trend data at one-minute intervals. The trend values are displayed at the user defined interval (see below) and additionally after every manual NIBP measurement.
• Trend data is deleted when a new patient is entered.
• When the memory is full, the oldest trend data is overwritten.
• The display interval for the trend table can selected for intervals of one minute, five minutes, 15 minutes, one hour, or four hours.
Trend data display and settingsPress the Trend button .
• Previous measurements are displayed using the up and down icons.
• Use the trim knob to select the trend display interval with the pull down menu in the Interval setting.
• The Clear option deletes all stored trend data.
• The Print option prints the trend data.
Note The data recorded will depend on licensed and enabled options and the number of IBP and temperature connectors installed on the monitor (see “Defining parameter fields” on page 25).

30 Operation Welch Allyn 1500 Patient Monitor
Displaying trend data in the measurements screenThe HR trend can also be displayed in the waveforms:
Press the Setup button . and select Waveforms. Scroll down for more options.
The trend data can be displayed in waveform 2 or 3 (or 4 if ST is enabled):
Trend data can be displayed for any of the following:
• Heart rate
• RR (see example above)
• etCO2
• fiCO2
• IPI when selected in parameter display)
• SpO2
• P1, P2, P3 P4
• NIBP
• T1
• T2 (when selected in parameter display)
• ΔT (when selected in parameter display)
• CO or CI (when selected in parameter display)
Note When the trend waveform is displayed and it is highlighted and selected with the trim knob (see next page), options appear at the bottom of the waveform (as shown on the example above) to:
• Change the interval (15 mins to 24 hours)
• Change the waveform scale
• Obtain a printout
Directions for use Operation 31
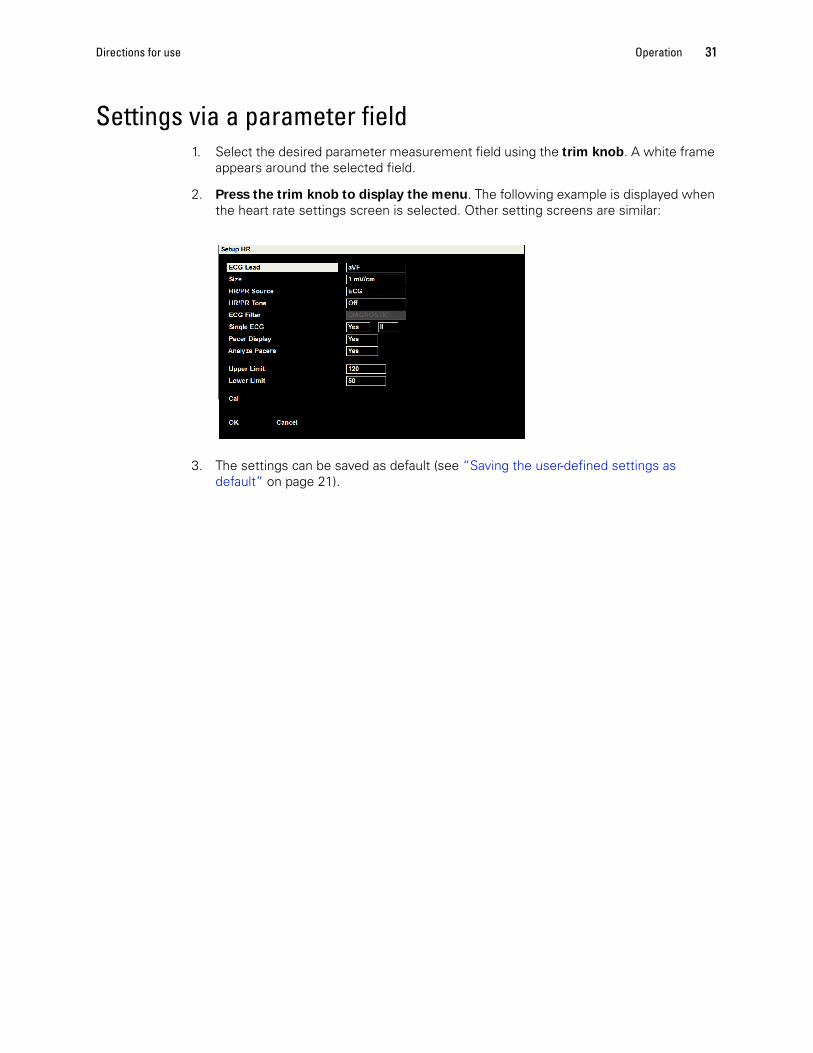
Settings via a parameter field1. Select the desired parameter measurement field using the trim knob. A white frame
appears around the selected field.
2. Press the trim knob to display the menu. The following example is displayed when the heart rate settings screen is selected. Other setting screens are similar:
3. The settings can be saved as default (see “Saving the user-defined settings as default” on page 21).

32 Operation Welch Allyn 1500 Patient Monitor
4
33
Alarms
Display of alarms
During initial powerupNo alarms are displayed if no patient is being monitored.
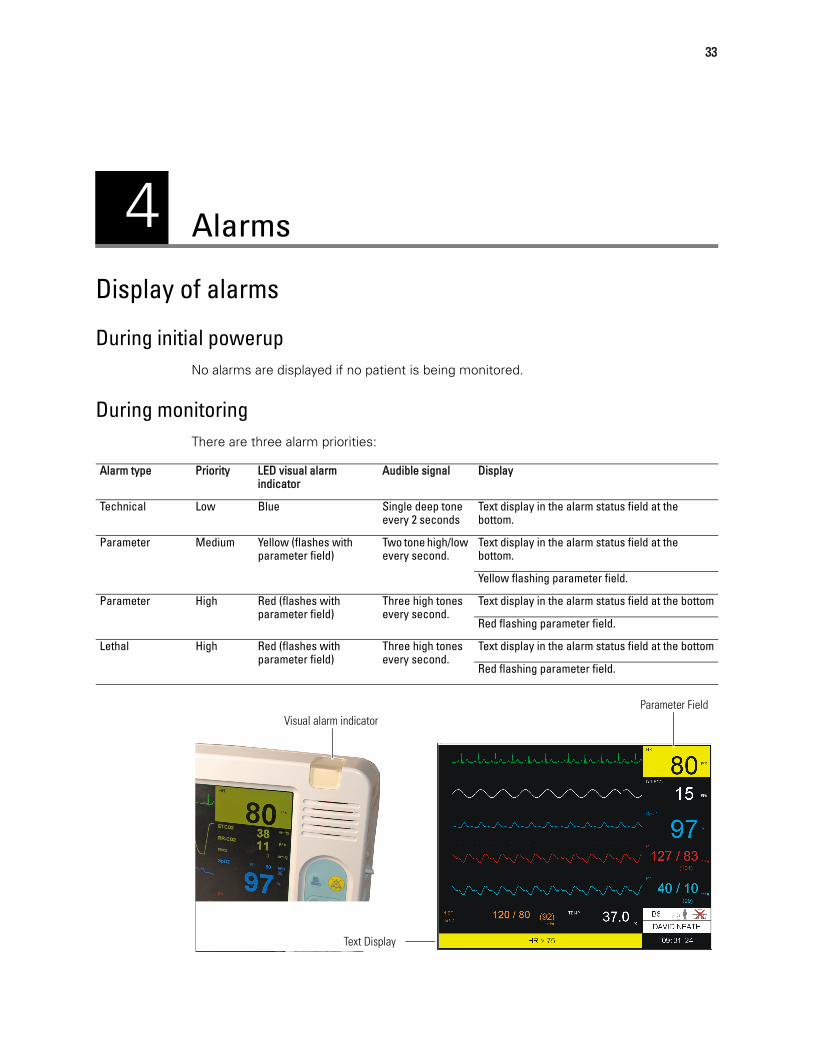
During monitoringThere are three alarm priorities:
Alarm type Priority LED visual alarm indicator
Audible signal Display
Technical Low Blue Single deep tone every 2 seconds
Text display in the alarm status field at the bottom.
Parameter Medium Yellow (flashes with parameter field)
Two tone high/low every second.
Text display in the alarm status field at the bottom.
Yellow flashing parameter field.
Parameter High Red (flashes with parameter field)
Three high tones every second.
Text display in the alarm status field at the bottom
Red flashing parameter field.
Lethal High Red (flashes with parameter field)
Three high tones every second.
Text display in the alarm status field at the bottom
Red flashing parameter field.
Visual alarm indicator
Text Display
Parameter Field
34 Alarms Welch Allyn 1500 Patient Monitor
Silencing an alarm
Acknowledging an alarm
Alarm Limit
Press the Alarm button to silence the alarm. The audible alarm is silenced for 1, 1.5 or 2 minutes. The visual parameter alarm continues to be displayed.
Press the Alarm button again to resume the alarm.
After the defined silence time, the audible alarm is reactivated. The silence time is defined in Setup > Setup Administrator> Alarms > Alarm Silence Time (see “Administrator” on page 118).
Technical Alarm
A technical alarm can be acknowledged by pressing the Alarm Silence button . This alarm is not reactivated.
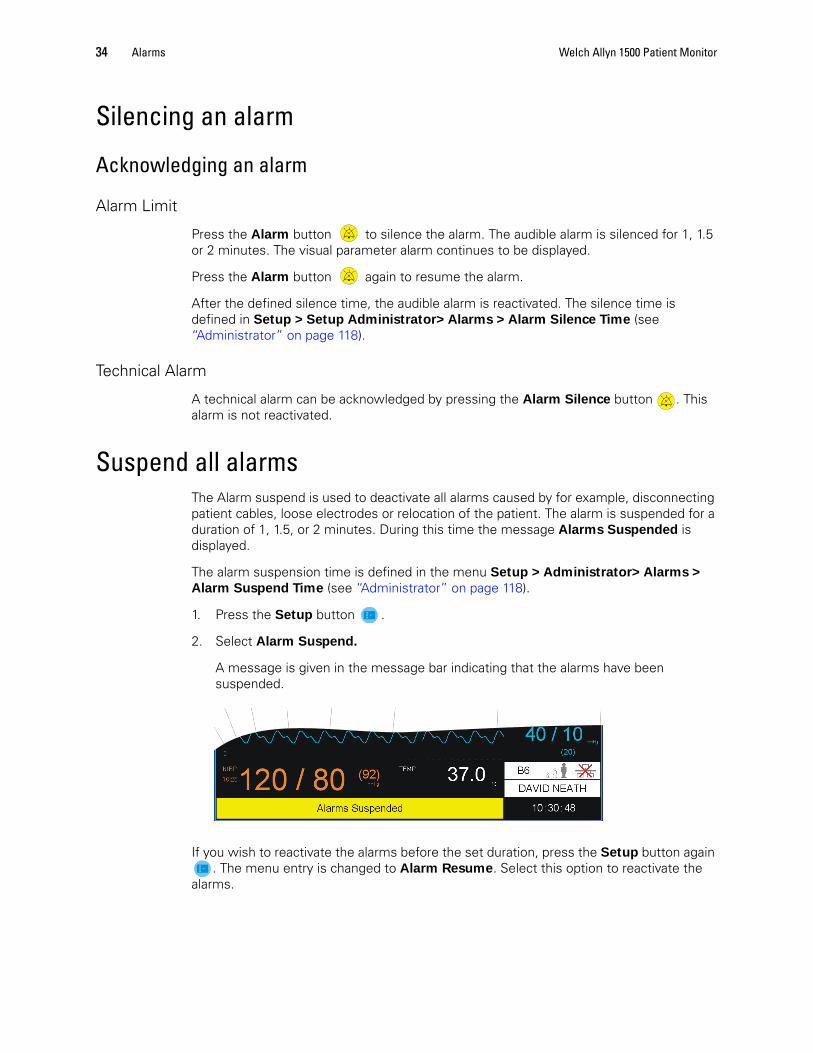
Suspend all alarmsThe Alarm suspend is used to deactivate all alarms caused by for example, disconnecting patient cables, loose electrodes or relocation of the patient. The alarm is suspended for a duration of 1, 1.5, or 2 minutes. During this time the message Alarms Suspended is displayed.
The alarm suspension time is defined in the menu Setup > Administrator> Alarms >
Alarm Suspend Time (see “Administrator” on page 118).
1. Press the Setup button .
2. Select Alarm Suspend.
A message is given in the message bar indicating that the alarms have been suspended.
If you wish to reactivate the alarms before the set duration, press the Setup button again . The menu entry is changed to Alarm Resume. Select this option to reactivate the
alarms.

Directions for use Alarms 35
Switching off all alarmsThis function allows all audible alarms to be muted for an unlimited time during surgical and clinical interactions while simultaneously monitoring the patient and recording the parameters and alarm status. During this time the visual alarms continue to be displayed and the Audio Off symbol s displayed on the monitor.
To switch off all alarms, proceed as follows:
1. Press the Setup button .
2. Enter the alarm menu Setup > Administrator> Alarms
3. Select Audio Off, and set to Yes.
The audible alarm off symbol is displayed in the message bar indicating that the audible alarms have been switched off.
To switch the alarms back on again, enter the alarm menu Setup > Administrator>
Alarms, select Audio Off, and set to No.
Audio off when the monitor is connected with Acuity
Audible and visual alarms remain unchanged at an Acuity station when Audio off (Yes) is set at the monitor.
If a communication failure or interruption between Acuity and the patient monitor is detected the audio alarm off status at the monitor is reset, the Audio Off is set to No,
and a technical alarm is displayed on monitor. The user has the option to switch off all alarms again if required.
Note The alarm password is detailed in the Administrator chapter (see “Administrator” on page 118).
Note The audio off status is also reset to the default value of No when a new patient is defined (“Standby mode” on page 24), and when the monitor is switched off. Speaker volume reverts to the preset value.
36 Alarms Welch Allyn 1500 Patient Monitor
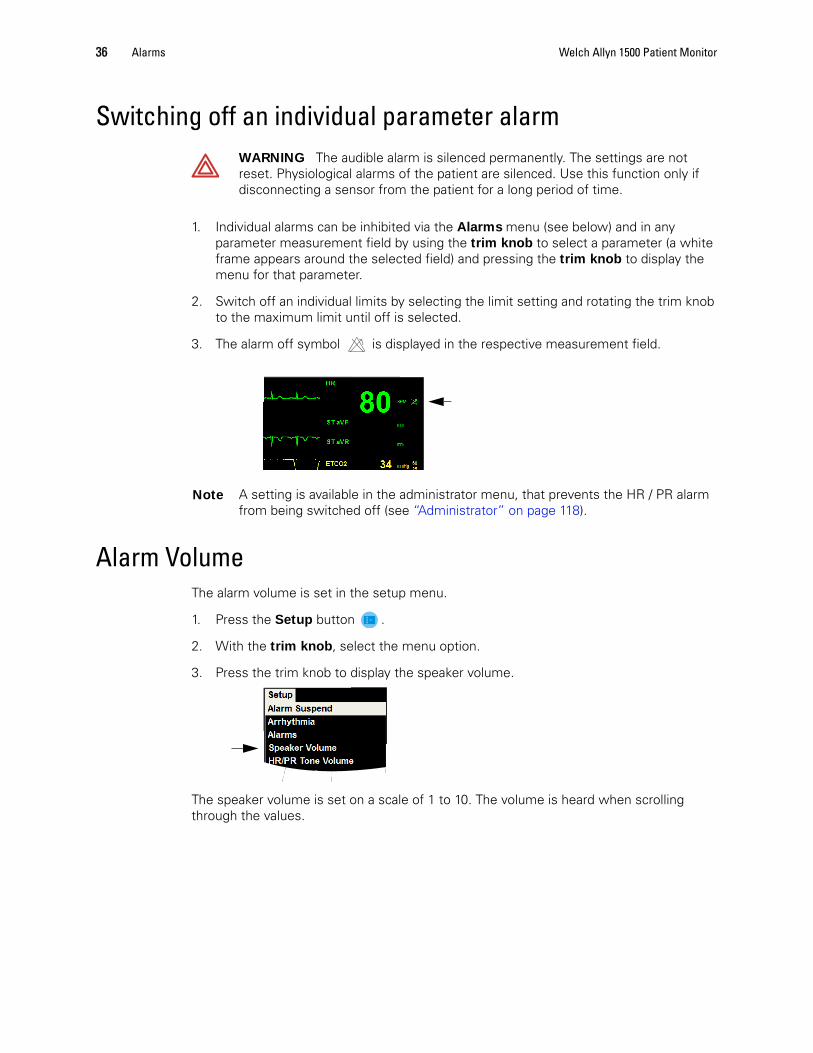
Switching off an individual parameter alarm
1. Individual alarms can be inhibited via the Alarms menu (see below) and in any parameter measurement field by using the trim knob to select a parameter (a white frame appears around the selected field) and pressing the trim knob to display the menu for that parameter.
2. Switch off an individual limits by selecting the limit setting and rotating the trim knob to the maximum limit until off is selected.
3. The alarm off symbol is displayed in the respective measurement field.
Alarm VolumeThe alarm volume is set in the setup menu.
1. Press the Setup button .
2. With the trim knob, select the menu option.
3. Press the trim knob to display the speaker volume.
The speaker volume is set on a scale of 1 to 10. The volume is heard when scrolling through the values.
WARNING The audible alarm is silenced permanently. The settings are not reset. Physiological alarms of the patient are silenced. Use this function only if disconnecting a sensor from the patient for a long period of time.
Note A setting is available in the administrator menu, that prevents the HR / PR alarm from being switched off (see “Administrator” on page 118).

Directions for use Alarms 37
Alarm limit setting
1. Press the Setup button .
2. Select the menu item Alarms.
3. Use the trim knob to scroll through the alarm settings and select the limits.
Note All alarm limits are reset to the default settings after confirming a new patient (see “Standby mode” on page 24), or switching off the monitor.
Note Individual parameter alarm limits can be set in the parameter menu (see “Monitoring and Measurements” on page 39).
Note The Alarm settings for arrhythmia are detailed in the Arrhythmia menu option in the setup menu.
Note When the monitor is connected to an Acuity Central Station, alarm limits can be changed at the monitor or at the Acuity Central Station. When confirmed, the alarm limits are synchronized for both the monitor and Acuity.

38 Alarms Welch Allyn 1500 Patient Monitor
Physiological alarmsAlarm abbreviation Description Priority
SpO2 low/high Oxygen saturation of the blood Medium
PP low/high Peripheral pulse of SpO2 Medium
RRECG low/high Respiration rate impedance Medium
Apnea limit Apnea time limit exceeded Medium
CO2 low/high Inspiratory CO2 Medium
RRCO2 low/high Capnographic respiration rate Medium
etCO2 low/high End-tidal expiratory CO2 Medium
NIBPs low/high Systolic blood pressure Medium
NIBPm low/high Mean average blood pressure Medium
NIBPd low/high Diastolic blood pressure Medium
HR low/high Heart rate Medium
Pxs Art low/high Invasive systolic blood pressure Medium
Pxm Art low/high Invasive mean blood pressure Medium
Pxd low/high Invasive diastolic blood pressure Medium
Temp low/high Temperature in degrees Fahrenheit or degrees Celsius. Medium
Note All technical alarms are low priority.

5
39
Monitoring and Measurements
General• Connect the ECG electrodes, the NIBP cuff, the SpO2 sensor, the CO2 sensor, and
the temperature sensor to the patient as required.
• As soon as the sensors are connected, the corresponding indication appears on the display.
• Check or set the alarm limits (see “Alarms” on page 33).
Caution The guidelines in this section are given as an overview only. They are not a substitute for, nor do they overrule manufacturer documentation and instructions or departmental procedures.
Note Values are only displayed when the ECG cable or at least one sensor is connected. If a sensor is disconnected, a technical alarm is issued. The measured value will no longer be displayed if the sensor is disconnected and the alarm is acknowledged.
Note This section gives a general overview of the parameters that can be measured with the monitor. It is aimed at medical professionals and no specific medical direction is given or implied; any instructions given here do not overrule local medical directives.
The individual parameter menu settings are selected with the trim knob, described previously (see “Settings via a parameter field” on page 31).
40 Monitoring and Measurements Welch Allyn 1500 Patient Monitor
ECG
Patient preparationThe quality of the ECG reading is dependent on the degree of contact resistance between the electrode and the skin. To ensure the lowest resistance consider the following actions:
1. Shave the areas where the electrodes are to be placed.
2. Use alcohol to thoroughly clean the areas where the electrodes are to be placed.
3. When applying the electrodes, make sure that there is a layer of gel between the electrode and the skin.
Connecting the ECG patient cable
WARNING In order to minimize interference and the danger of burns to the patient, only use Welch Allyn ECG cables. Keep the ECG cable as far away as possible from any electrosurgical cables. Make sure that the electrosurgical return conductor (neutral) is properly attached to the patient and that good contact is made.
Note To maintain the quality of signals during long-term monitoring, the electrodes should be replaced at least every 48 hours. Over longer periods, the electrode gel can dry out and the patient’s skin can be irritated by the gel or adhesive. When replacing electrodes, do not position the new electrodes on exactly the same locations, but a little to the side of the original positions.
Note • When an electrode falls off or the resistance of an electrode is too high, a lead-off indication is displayed and an audible alarm is issued.
• Color code: the colors shown here are according to IEC requirements. The AHA color configuration is shown in “Electrode identification and color code IEC/AHA” on page 43.
WARNING Patient harm. The monitor is type CF and protected only when approved Welch Allyn patient cables are used.
Caution Only use approved Welch Allyn patient cables. Use of other cables can damage the monitor.
�
Directions for use Monitoring and Measurements 41
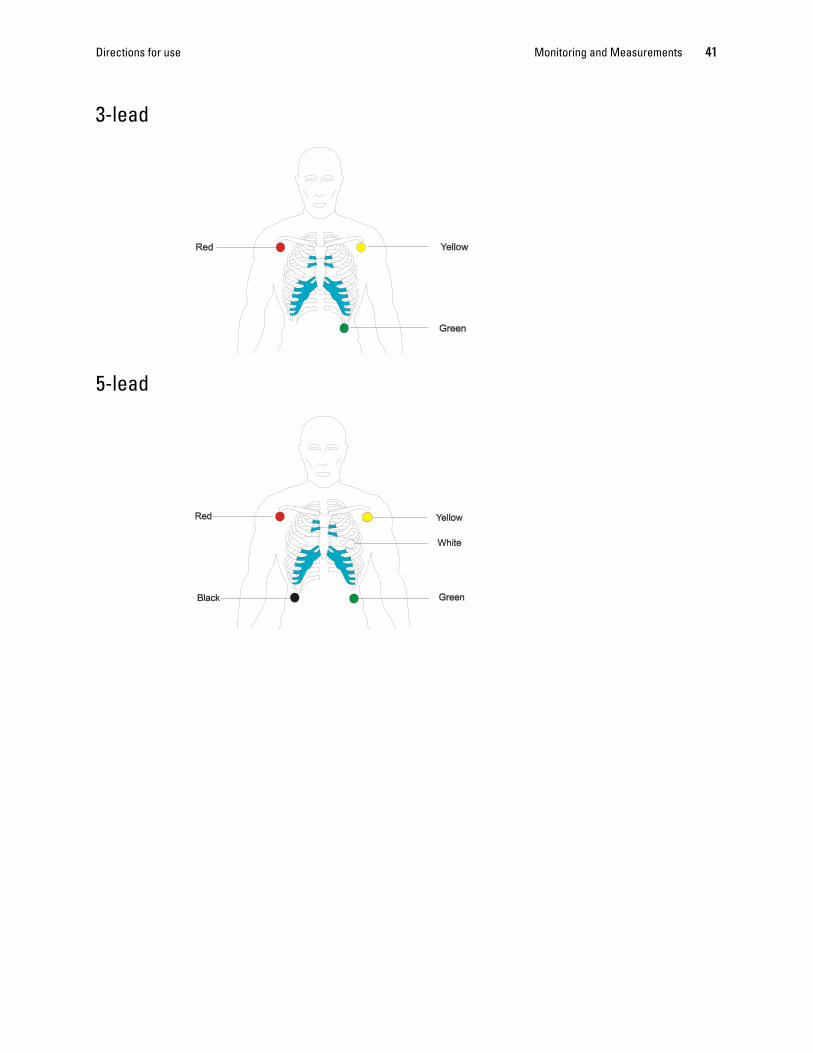
3-lead
5-lead

42 Monitoring and Measurements Welch Allyn 1500 Patient Monitor
12-lead
Note This graphic shows the IEC color configuration. The AHA (U.S.) color configuration is shown in “Electrode identification and color code IEC/AHA” on page 43.

Directions for use Monitoring and Measurements 43
Electrode identification and color code IEC/AHAThe electrode placements shown in this manual are labelled with the colors according to IEC requirements. The equivalent AHA colors are given below.
IEC (Europe) AHA (U.S.)
System Electrode identifier
Color Electrode identifier
Color
Limb R Red RA (right arm) White
L Yellow LA (left arm) Black
F Green LL (left leg) Red
Chest C1 White/Red V1 Brown/Red
C2 White/Yellow V2 Brown/Yellow
C3 White/Green V3 Brown/Green
C4 White/Brown V4 Brown/Blue
C5 White/Black V5 Brown/Orange
C6 White/Violet V6 Brown/Violet
Neutral N Black RL (right leg) Green
44 Monitoring and Measurements Welch Allyn 1500 Patient Monitor
Pacemaker monitoring
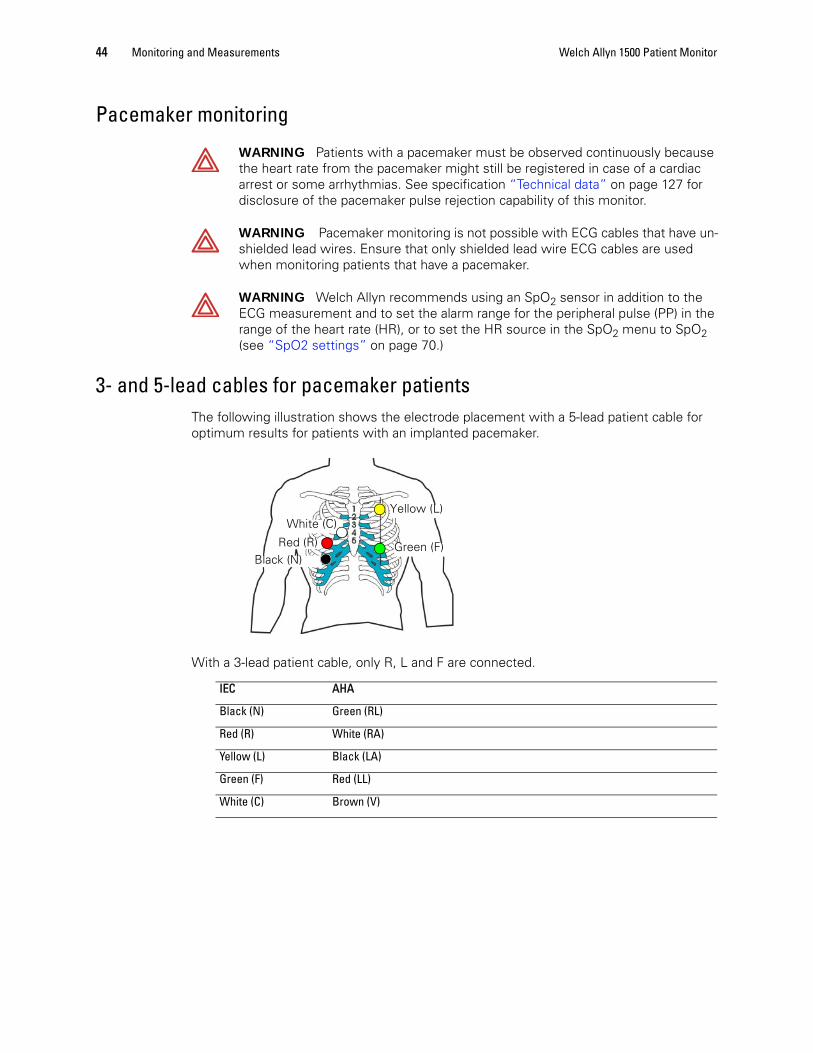
3- and 5-lead cables for pacemaker patientsThe following illustration shows the electrode placement with a 5-lead patient cable for optimum results for patients with an implanted pacemaker.
With a 3-lead patient cable, only R, L and F are connected.
WARNING Patients with a pacemaker must be observed continuously because the heart rate from the pacemaker might still be registered in case of a cardiac arrest or some arrhythmias. See specification “Technical data” on page 127 for disclosure of the pacemaker pulse rejection capability of this monitor.
WARNING Pacemaker monitoring is not possible with ECG cables that have un-shielded lead wires. Ensure that only shielded lead wire ECG cables are used when monitoring patients that have a pacemaker.
WARNING Welch Allyn recommends using an SpO2 sensor in addition to the ECG measurement and to set the alarm range for the peripheral pulse (PP) in the range of the heart rate (HR), or to set the HR source in the SpO2 menu to SpO2 (see “SpO2 settings” on page 70.)
IEC AHA
Black (N) Green (RL)
Red (R) White (RA)
Yellow (L) Black (LA)
Green (F) Red (LL)
White (C) Brown (V)
Red (R) Green (F)
Yellow (L)White (C)
Black (N)

Directions for use Monitoring and Measurements 45
Activating the pacer display1. Select the HR measurement field using the trim knob. A white frame appears around
the measurement field.
2. Press the trim knob to display the menu.
3. Scroll down to the pacer display option and select yes.
Pacemaker spikes are presented as vertical lines (a) on the ECG trace. These vertical lines represent neither magnitude nor duration of the pacemaker pulse but are purely time relative.
Note The Analyze Pacer setting is not applicable.
a a

46 Monitoring and Measurements Welch Allyn 1500 Patient Monitor
ECG displayECG traces can be displayed in waveforms 1, 2 and 3. The waveform lead and size is defined in the waveform display menu (see “Settings via a parameter field” on page 31).
1. Press the Setup button .
2. Select Waveforms.
Directions for use Monitoring and Measurements 47
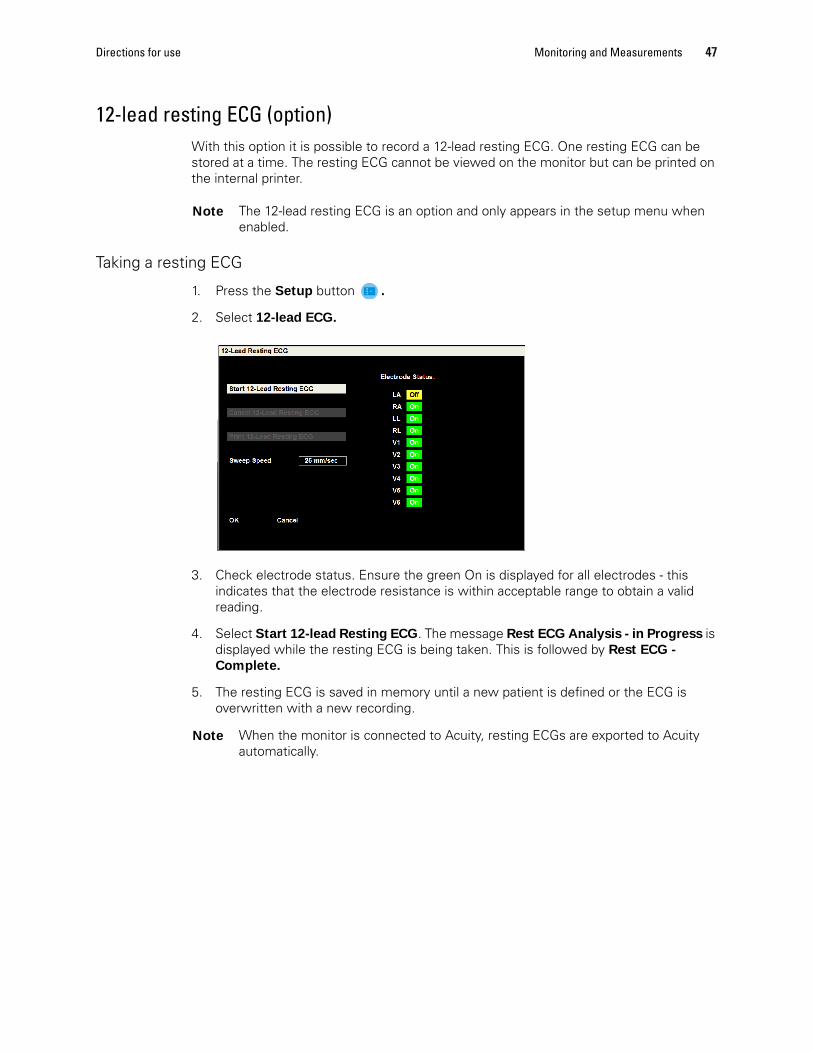
12-lead resting ECG (option)With this option it is possible to record a 12-lead resting ECG. One resting ECG can be stored at a time. The resting ECG cannot be viewed on the monitor but can be printed on the internal printer.
Taking a resting ECG
1. Press the Setup button .
2. Select 12-lead ECG.
3. Check electrode status. Ensure the green On is displayed for all electrodes - this indicates that the electrode resistance is within acceptable range to obtain a valid reading.
4. Select Start 12-lead Resting ECG. The message Rest ECG Analysis - in Progress is displayed while the resting ECG is being taken. This is followed by Rest ECG -
Complete.
5. The resting ECG is saved in memory until a new patient is defined or the ECG is overwritten with a new recording.
Note The 12-lead resting ECG is an option and only appears in the setup menu when enabled.
Note When the monitor is connected to Acuity, resting ECGs are exported to Acuity automatically.

48 Monitoring and Measurements Welch Allyn 1500 Patient Monitor
ECG menu settings
The default settings are in bold.
Note The parameter settings are selected with the trim knob. (See “Settings via a parameter field” on page 31).
Main menu Parameter Description
Setup HR ECG Lead Lead selection I, II, III, V, AVL, AVR, AVF
Size 0.5, 1, 2, 4 mV/cm
HR/PR source1
1. This can also be set in the setup SpO2 menu.
ECG, SpO2, P1
HR/PR Tone1 Off/ on2
2. If SpO2 is selected, the pitch of the beep corresponds to the SpO2 saturation. A high pitched beep indicates a high saturation.
ECG Filter Select Diagnostic or MonitorTwo predefined filter settings can be selected. These defined filter options define the cut off frequency for the Myogram, Baseline and Mains filters. The filter definitions and the corresponding filter cut-offs are defined as follows:
Baseline Myogram Mains
Diagnostic 0.05 Hz 150 Hz as set
Monitor 0.50 35 Hz as set
Single ECG Yes/No, select lead I, II, III, or V. Select this option to analyze one ECG lead.
Pacer Display Yes/No displays pacer pulses relative to time but not representative of either amplitude, duration or polarity.
Analyzer Pacer Yes/No - not applicable.
HR lower / upper limit3
3. The lower limit cannot be set to a higher value than the value set for the upper limit, and vice versa.
Range: 25 - 250 Lower limit default 50Upper limit default 120
Cal Generates a simulated 1 mV calibration impulse on the curve.
Note A setting is available in the administrator menu that prevents the HR / PR alarm (upper / lower limit) from being switched off (see “Administrator” on page 118).

Directions for use Monitoring and Measurements 49
ECG alarms and messages
Message Possible cause Suggested action
HR – asystole/ASY No QRS detected for 4 seconds. Check the patient.ECG signal lower than 0.5 mV.
HR – ventricular fibrillation/VF
No organized ventricular rhythm detected.
Check the patient.ECG signal lower than 0.5 mV.
HR – artifact Patient has moved. Calm the patient.
Bad electrode. Checking the electrode pads.
Interferences by other devices. Remove source of the interference.
HR > [upper limit]HR < [lower limit]
Heart rate higher/lower than alarm limit.
Check the patient.
HR – lead off Electrode lose/defective. Check and reapply/replace electrodes.
Patient cable defective. Replace the patient cable.

50 Monitoring and Measurements Welch Allyn 1500 Patient Monitor
Arrhythmia
Arrhythmia settings
1. Press the Setup button .
2. Select Arrhythmia.
The default settings are in bold.
Note The full arrhythmia menu is only displayed when the full arrhythmia option is licensed. When the full arrhythmia option has not been enabled, settings are made for VFib, Asystol and Vtach only.
Note The arrhythmia menu is not available when the monitor is connected to Acuity.
Main menu Parameter Description
Setup Arrhythmia VFib Alarm Level - Lethal (cannot be changed), Print on alarm Yes/No.
Asystole Alarm Level - Lethal (cannot be changed), Print on alarm Yes/No.
VTach VTach Limit 100 to 200 (125), Alarm Level - Lethal (cannot be changed), Print on alarm Yes/No.
PVC run PVC run 3 to 6 (6) Alarm Level (High, Medium, Low, Off), Print on alarm Yes/No.
VRyhthm Alarm Level (High, Medium, Low, Off), Print on alarm Yes/No.
Couplet Alarm Level (High, Medium, Low, Off), Print on alarm Yes/No.
PVC/min PVC/min 1to 30 (30) Alarm Level (High, Medium, Low, Off), Print on alarm Yes/No.
Bigeminy Alarm Level (High, Medium, Low, Off), Print on alarm Yes/No.

Directions for use Monitoring and Measurements 51
Main menu Parameter Description
Setup Arrhythmia(continued)
Trigeminy Alarm Level (High, Medium, Low, Off), Print on alarm Yes/No.
Tachycardia Tachycardia 150 to 250 (180) Alarm Level (High, Medium, Low, Off), Print on alarm Yes/No.
Bradycardia Bradycardia 20 to 100 (45) Alarm Level (High, Medium, Low, Off), Print on alarm Yes/No.
Pause Alarm Level (High, Medium, Low, Off), Print on alarm Yes/No.
Irregular (irregular rhythm) Alarm Level (High, Medium, Low, Off), Print on alarm Yes/No. This is an irregularity in the R to R interval over a series of at least 16 non-ventricular beats. The number of beats analyzed is given in options.
Non-capture (pacemaker non-capture)
Alarm Level (High, Medium, Low, Off), Print on alarm Yes/No. This is for pacemaker patients with the analyze pacers option enabled (see options below) - a beat does not directly follow a pacer.
Options Irregular Limit Yes/No, set limit between 45 and 120 (45)
Single ECG Yes/No, select lead I, II, III, or V. Select this option to analyze one ECG lead.
Pacer Display Yes/No displays pacer pulses relative to time but not representative of either amplitude, duration or polarity.
Analyze Pacers Yes/No enables non-capture (see above).
Arrhythmia OFF Sets all alarms to off except VFib, Asystole and VTach which remain set at the highest alarm level.
Presets Resets all arrhythmia settings to the default.
ST / ARR Relearn Approximately 15 - 20 complexes are used to set the parameters (duration, amplitude, etc.) for Arrhythmia analysis. Select this option to redefine the template used.

52 Monitoring and Measurements Welch Allyn 1500 Patient Monitor
ST measurement (option)The ST segment represents the period from the end of ventricular depolarization to the beginning of ventricular repolarization. The ST segment lies between the end of the QRS complex and the initial deflection of the T-wave. It is normally isoelectric.
ST Analysis is a useful diagnostic tool because it may provide an early indication of myocardial ischemia or infarction.
ST Analysis is an algorithm that analyzes the offset of the ST segment from the ECG signal of normal beats. The offset of a reference beat is measured in millivolts (mV) (or millimeters) with respect to the isoelectric level of the ECG waveform; the offset of subsequent beats is measured relative to the reference beat.
The reference beat is originally obtained by learning the patient’s normal morphology, but it can be modified by the clinician at any time using the re-learn option in the ST Analysis Setup Window (see next page). When re-learn is selected reference beat is updated to the current morphology.
The ST measurement is made at a point 60 or 80 milliseconds (ms) after the J-point (see next page).
The J-point is the point on the ST segment where the slope changes (marking the end of the QRS and the beginning of the ST segment.
Note ST re-learn is also initiated by arrhythmia re-learn.

Directions for use Monitoring and Measurements 53
ST settings
The parameter settings are selected with the trim knob, described previously (see “Settings via a parameter field” on page 31).
The default settings are in bold.
Note ST measurements can only be displayed when the full arrhythmia and ST option is licensed, and when ST is enabled in setup parameters (See “Defining parameter fields” on page 25).
Note When the monitor is connected to the Acuity Central Station, ST support is provided by Acuity and the ST option is not displayed on the monitor.
Main menu Parameter Description
Setup ST ST Relearn Reanalyzes the QRS complexes to determine base measurement levels.
ST Lead 1 Define the lead for measurement 1 (default lead II).
ST lead 2 Define the lead for measurement 2 (default lead V).
ST Measurement point Auto, 60, 80. Define the measurement point (ms after the j-point). Note: When Auto is defined, the measurement point is set to either 60 or 80 ms. This is dependent on the results of an algorithm that builds a hysteresis counter based on the patient's average heart rate - a faster heart rate is set at 60 ms.
Lower limit / upper limit Range: -10 to +10 Lower limit default -1Upper limit default +1
Alarm level Off, Low, Medium, High.
Print on alarm Yes, No.
Presets Select to return all ST settings to the defaults.

54 Monitoring and Measurements Welch Allyn 1500 Patient Monitor
ST alarm messages
Alarm Possible cause Suggested action
ST > [upper limit]ST< [lower limit]
ST is higher or lower than the alarm limit.
Check the patient.
Directions for use Monitoring and Measurements 55
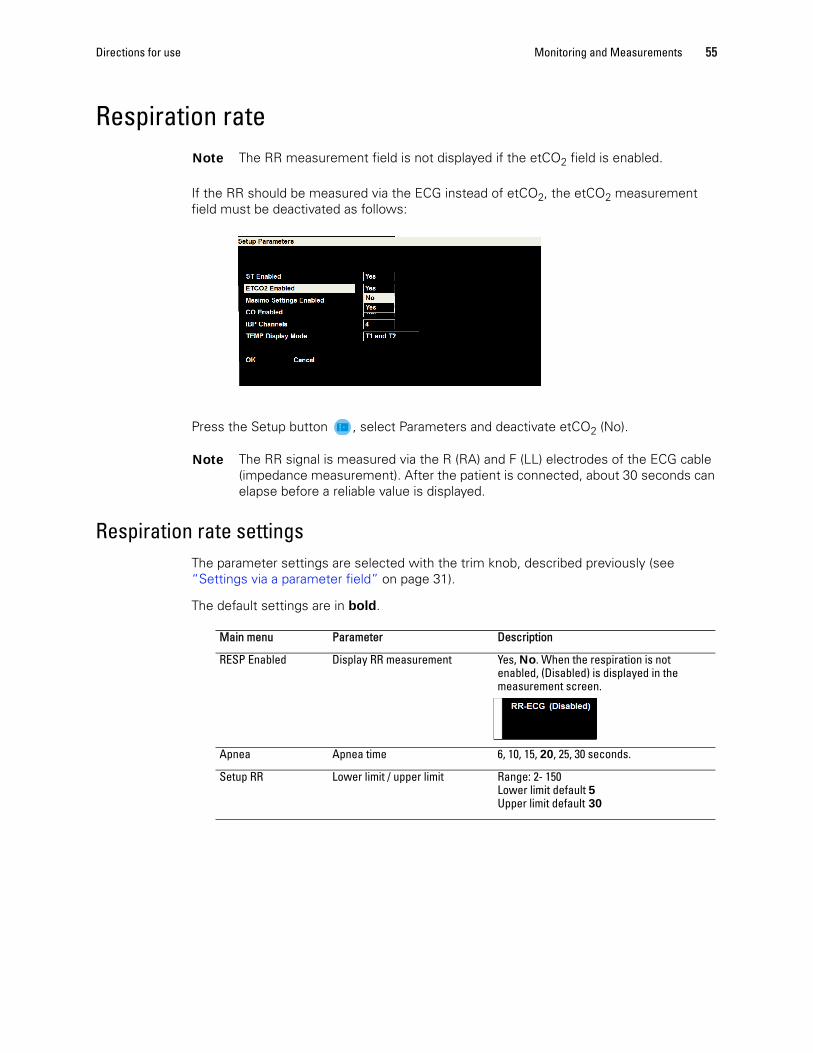
Respiration rate
If the RR should be measured via the ECG instead of etCO2, the etCO2 measurement field must be deactivated as follows:
Press the Setup button , select Parameters and deactivate etCO2 (No).
Respiration rate settingsThe parameter settings are selected with the trim knob, described previously (see “Settings via a parameter field” on page 31).
The default settings are in bold.
Note The RR measurement field is not displayed if the etCO2 field is enabled.
Note The RR signal is measured via the R (RA) and F (LL) electrodes of the ECG cable (impedance measurement). After the patient is connected, about 30 seconds can elapse before a reliable value is displayed.
Main menu Parameter Description
RESP Enabled Display RR measurement Yes, No. When the respiration is not enabled, (Disabled) is displayed in the measurement screen.
Apnea Apnea time 6, 10, 15, 20, 25, 30 seconds.
Setup RR Lower limit / upper limit Range: 2- 150 Lower limit default 5Upper limit default 30

56 Monitoring and Measurements Welch Allyn 1500 Patient Monitor
Respiration rate alarms and messages
Message Possible cause Suggested action
RR out of range (too high)
The patient's RR is too high for accurate measurement.
Check the patient.
Electrical interferences from other devices.
Remove source of the interference.
Signal disturbed due to frequent artifacts caused by bad electrode contact.
Check and reapply/replace electrodes if required.
RR lead off Electrode loose/defective. Check and reapply/replace electrodes.
RR artifact Patient has moved. Calm the patient.
Interferences by other devices. Remove source of the interference.
Bad electrode. Check/replace electrodes.
RR > [upper limit]RR < [lower limit]
RR is higher or lower than alarm limit.
Check the patient.

Directions for use Monitoring and Measurements 57
CapnographyThe capnography module is intended to provide professionally trained health care providers with continuous, non-invasive measurement and monitoring of carbon dioxide concentration of the expired and inspired breath and respiration rate. It is intended for use with neonatal, pediatric, and adult patients.
Press the Setup button , enter the menu Setup/Parameters and activate etCO2.
SafetyOnly use Welch Allyn approved accessories for etCO2 monitoring.
Note The etCO2 menu is only displayed when the etCO2 option is enabled. If the etCO2 measurement field is not displayed ensure it is enabled in the parameter settings.
Note The etCO2 menu is not available when the monitor is connected to Acuity.
WARNING Carefully route the sampling line to reduce the possibility of patient entanglement or strangulation.
WARNING The sampling line may ignite in the presence of oxygen when directly exposed to laser, electro-surgical devices, or high heat. When performing head and neck procedures involving laser, electrosurgical devices or high heat, use with caution to prevent flammability of the sampling line or surrounding surgical drapes
WARNING When using a sampling line for intubated patients with a closed suction system, do not place the airway adapter between the suction catheter and endotracheal tube. This is to ensure that the airway adapter does not interfere with the functioning of the suction catheter.
WARNING Loose or damaged connections may compromise ventilation or cause an inaccurate measurement of respiratory gases. Securely connect all components and check connections for leaks according to standard clinical procedures.
WARNING Do not cut, remove any part, bend or crush the sampling line. This could lead to erroneous readings.

58 Monitoring and Measurements Welch Allyn 1500 Patient Monitor
WARNING If too much moisture enters the sampling line (i.e., from ambient humidity or breathing of unusually humid air), and the sampling line cannot be cleared, the message Blockage appears in the message area. Replace the sampling line once the sampling line blockage message appears.
Caution In high-altitude environments, etCO2 values may be lower than values observed at sea level. When using the monitor in high altitude environments, it is advisable to consider adjusting EtCO2 alarm settings accordingly.
Caution Microstream® etCO2 sampling lines are designed for single patient use, and are not to be reprocessed. Do not attempt to clean, disinfect, sterilize or flush any part of the sampling line as this can cause damage to the monitor.
Caution Dispose of sampling lines according to standard operating procedures or local regulations for the disposal of contaminated medical waste.
Caution Before use, carefully read the Microstream etCO2 sampling lines Directions for Use.
Caution Only use Microstream etCO2 sampling lines to ensure the monitor functions properly.
Caution Dispose of Microstream etCO2 sampling lines according to standard operating procedures or local regulations for the disposal of contaminated medical waste.
Caution During nebulization or suction for Intubated patients, in order to avoid moisture buildup and sampling line occlusion, remove the sampling line luer connector from the monitor.
Caution Replace the sampling line according to hospital protocol or when a blockage is indicated by the monitor. Excessive patient secretions or a build-up of liquids in the airway tubing may occlude the sampling line, requiring more frequent replacement.
Directions for use Monitoring and Measurements 59
Preparing the Oridion sensor
Basic principles for choosing microstream CO2 sampling lines
When choosing Microstream CO2 sampling lines, the following should be considered:
• The condition of the patient (ventilated or not ventilated)
• If the patient is ventilated, whether ventilation is humidified or non-humidified
• Patient’s size and weight
• The probability that the patient will switch between oral and nasal breathing
• Duration of use
• For best results, for short term monitoring, use Microstream CO2 sampling lines with orange connectors. For long term monitoring, use Microstream CO2 sampling lines with yellow connectors.” Products that include an “H” in the name are intended for long term use.
Select the appropriate sampling line and connect it to the monitor before putting on the patient. Be sure to follow the directions for provided with the sampling line.
For further information, please contact your local representative.
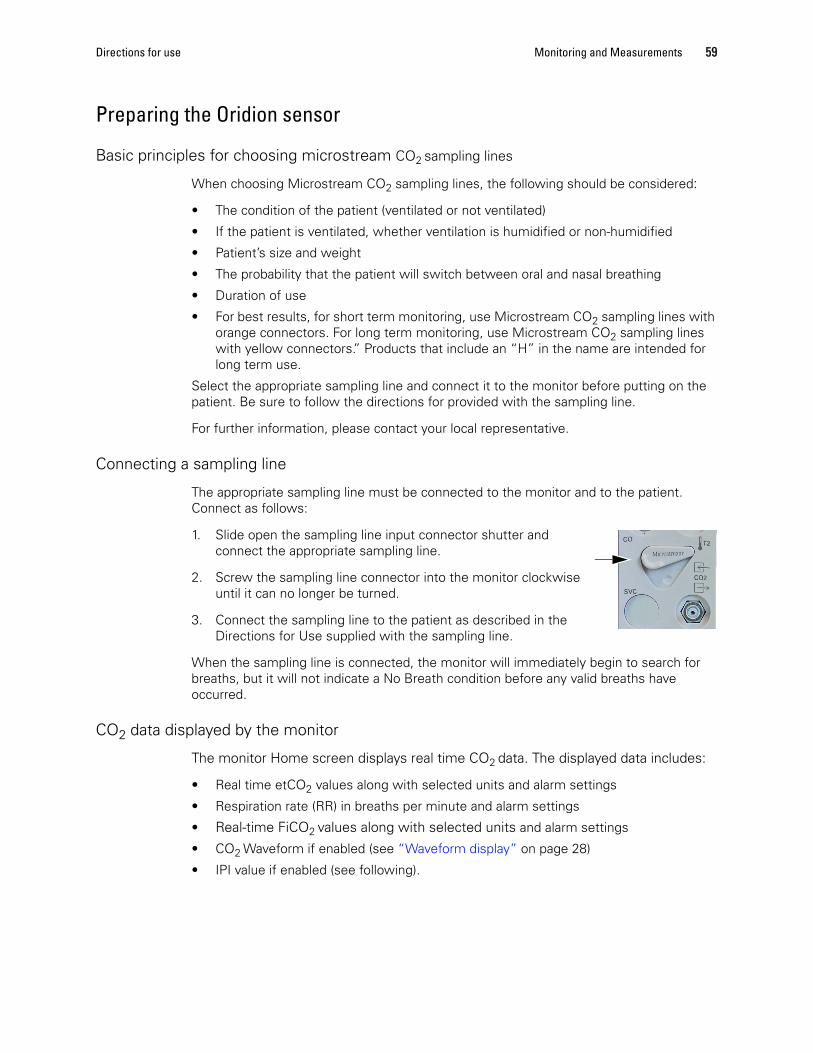
Connecting a sampling line
The appropriate sampling line must be connected to the monitor and to the patient. Connect as follows:
1. Slide open the sampling line input connector shutter and connect the appropriate sampling line.
2. Screw the sampling line connector into the monitor clockwise until it can no longer be turned.
3. Connect the sampling line to the patient as described in the Directions for Use supplied with the sampling line.
When the sampling line is connected, the monitor will immediately begin to search for breaths, but it will not indicate a No Breath condition before any valid breaths have occurred.
CO2 data displayed by the monitor
The monitor Home screen displays real time CO2 data. The displayed data includes:
• Real time etCO2 values along with selected units and alarm settings
• Respiration rate (RR) in breaths per minute and alarm settings
• Real-time FiCO2 values along with selected units and alarm settings
• CO2 Waveform if enabled (see “Waveform display” on page 28)
• IPI value if enabled (see following).
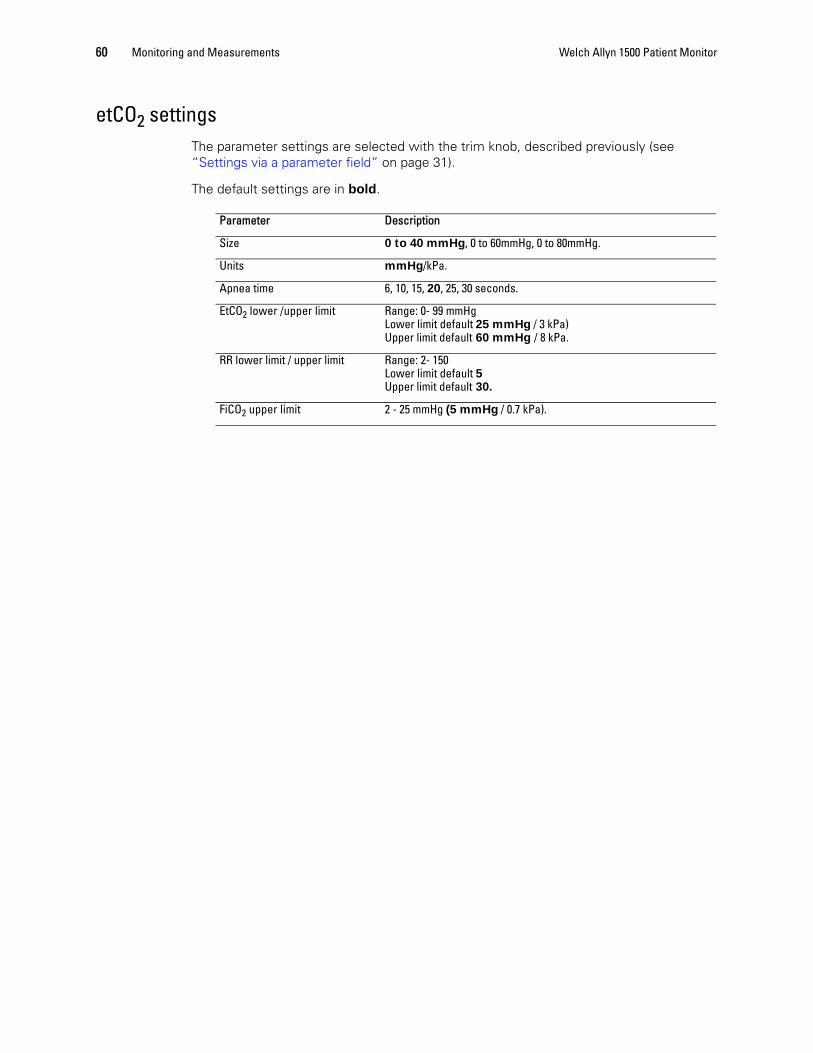
60 Monitoring and Measurements Welch Allyn 1500 Patient Monitor
etCO2 settingsThe parameter settings are selected with the trim knob, described previously (see “Settings via a parameter field” on page 31).
The default settings are in bold.
Parameter Description
Size 0 to 40 mmHg, 0 to 60mmHg, 0 to 80mmHg.
Units mmHg/kPa.
Apnea time 6, 10, 15, 20, 25, 30 seconds.
EtCO2 lower /upper limit Range: 0- 99 mmHgLower limit default 25 mmHg / 3 kPa)Upper limit default 60 mmHg / 8 kPa.
RR lower limit / upper limit Range: 2- 150 Lower limit default 5Upper limit default 30.
FiCO2 upper limit 2 - 25 mmHg (5 mmHg / 0.7 kPa).

Directions for use Monitoring and Measurements 61
Integrated Pulmonary Index (IPI) settings and measurementThe capnography module provides the clinician with an integrated pulmonary index (IPI). The IPI is based on end tidal carbon dioxide, respiration rate, oxygen saturation and heart rate. The IPI is a single index of an adult or pediatric patient's ventilatory status displayed on a scale of 1 - 10, where 10 indicates optimal pulmonary status. IPI monitoring displays a single value that represents the patient's pulmonary parameters and alerts clinicians to changes in the patient's pulmonary status.
IPI provides an uncomplicated, inclusive assessment of a patient’s ventilatory and oxygenation status. By following the trend of the IPI, a clinician can quickly assess the inter-relations of a patient’s respiratory parameters.
IPI also provides an early indication of changes in a patient’s respiratory status that may not be indicated by the values of the individual parameters.
IPI is only supported in adult and pediatric mode. When patient mode is set for neonatal, IPI cannot be enabled. Patient mode is defined in the setup menu (mode see “Patient mode” on page 117). When pediatric is set, there are three pediatric sub-modes based on age. It is important to choose the patient age group to which the current patient belongs (see below).
Since the IPI uses data from the monitoring of both CO2 and SpO2, it will only be available when both parameters are available and RR and PR are being calculated from these parameters.
IPI settings
The parameter settings are selected with the trim knob, described previously (see “Settings via a parameter field” on page 31).
The default settings are in bold.
Parameter Description
IPI Enabled1
1. IPI can only be enabled when patient mode is set to either adult or pediatric
No/yes. When enabled the measurement appears below the etCO2 measurement. The lower limit is displayed after the measurement.
Age range2
2. Age range is only applicable when the patient mode is set to pediatric. When patient mode is set to adult this option is greyed and cannot be entered.
1 to 3, 3 to 6, 6 to 12.
Lower limit 1 to 9 (default 4)

62 Monitoring and Measurements Welch Allyn 1500 Patient Monitor
Assessing the IPI value
IPI can provide an early indication of a change in ventilatory status which may not be shown by the current value of any of the four parameters individually. The IPI is designed to summarize information regarding patient status, possibly before etCO2, RR, SpO2, or PR values reach levels of clinical concern. While the IPI highlights a change in ventilatory status, the root parameters are still required to understand patient status. It is important to note that different conditions can cause similar IPI values.
The IPI trend graph displays the patient ventilatory status trend in one graph, and thus can alert you to changes in patient status. The importance of the IPI therefore, lies not only in its absolute numeric number, but also in its relationship to previous values, so that a graph can display an upward or downward trend in patient status and indicates that attention or intervention may be required.
The IPI is modeled on normal healthy patients (ASA Physical Status value of 1 according to the ASA Physical Status Classification System, as published in Relative Value Guide® - 2008 of the American Society of Anesthesiologists). Patients with ASA Physical Status values of 3 or higher are expected to have low IPI values by definition. Therefore, for patients with an ASA Physical Status value of 3 or higher, the IPI may have no added value.
The range of the IPI is 1-10; values should be understood as seen in the table below.
Index range Patient Status
10 Normal
8 - 9 Within normal range
7 Close to normal range: requires attention
5 - 6 Requires attention and may require intervention
3 - 4 Requires intervention
1 - 2 Requires immediate intervention
Note A graphical trend view of the IPI can be displayed. This is selected in waveforms (see “Displaying trend data in the measurements screen” on page 30).
If patient mode is changed, all IPI trend data is purged.
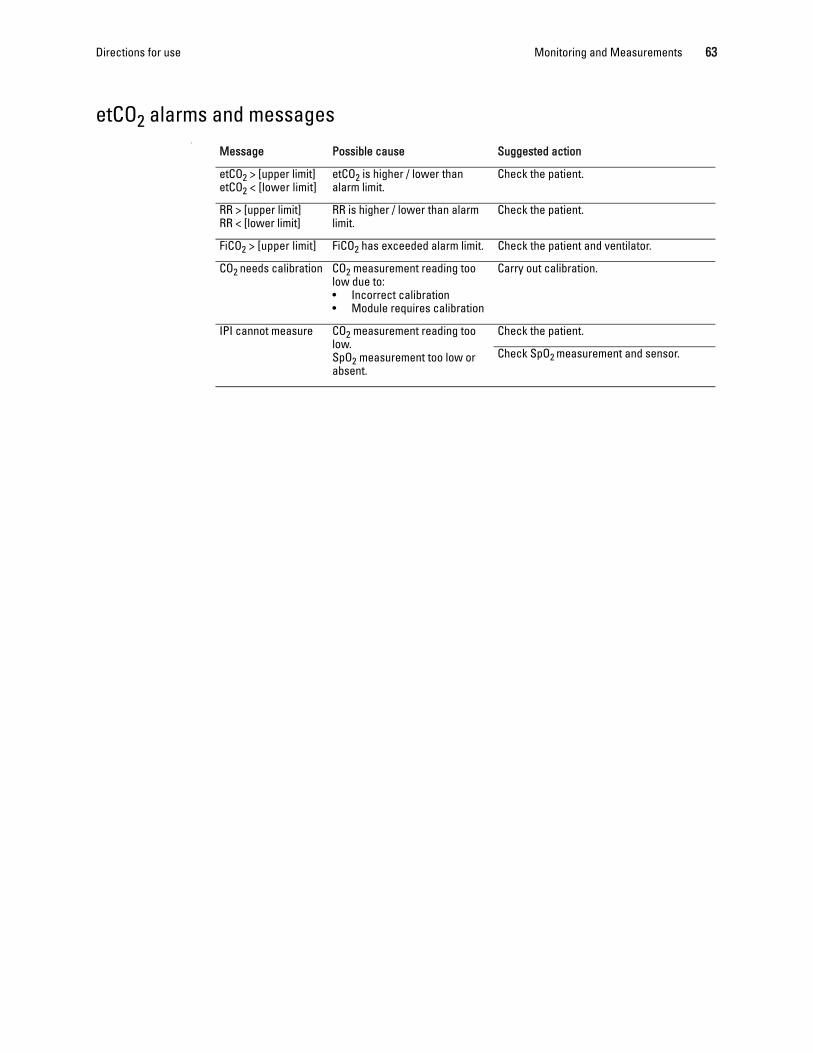
Directions for use Monitoring and Measurements 63
etCO2 alarms and messagesl
Message Possible cause Suggested action
etCO2 > [upper limit]etCO2 < [lower limit]
etCO2 is higher / lower than alarm limit.
Check the patient.
RR > [upper limit]RR < [lower limit]
RR is higher / lower than alarm limit.
Check the patient.
FiCO2 > [upper limit] FiCO2 has exceeded alarm limit. Check the patient and ventilator.
CO2 needs calibration CO2 measurement reading too low due to:• Incorrect calibration• Module requires calibration
Carry out calibration.
IPI cannot measure CO2 measurement reading too low.SpO2 measurement too low or absent.
Check the patient.
Check SpO2 measurement and sensor.

64 Monitoring and Measurements Welch Allyn 1500 Patient Monitor
NIBP monitoring
Safety
WARNING To prevent extensive pressure on the extremity, it is very important to:
• Choose the correct cuff size.• Check the initial pressure in the NIBP menu. The correct initial pressure for
adults is 160 mmHg, for pediatric patients 120 mmHg, and for neonates 90 mmHg.
WARNING In case of long-term monitoring or automatic operation, the connected body areas of the patient and the extremity to which the cuff is attached must be checked regularly for signs of ischaemia, purpuras or neuropathy.
WARNING The cuff must not be attached to a limb that is already used for interventions such as infusions or SpO2 measurement.
WARNING To prevent incorrect measurement results, make sure that the NIBP tube is not compressed.
WARNING To achieve correct arterial pressure measurement, the cuff must always be installed on the level of the right atrium.

Directions for use Monitoring and Measurements 65
Taking a single NIBP measurement1. Press the NIBP start/stop button .
2. The measurement can be stopped at any time by pressing the button again.
Automatic blood pressure measurement1. Press the NIBP measurement interval button .
2. Select the interval between 3 minutes and 60 minutes, and confirm your selection with OK.
3. The message NIBP interval – xx minutes is displayed.
4. The first measurement is started by pressing the NIBP start/stop button .
Note After exiting the standby mode, ensure that the NIBP intervals are re-armed by manually starting an NIBP measurement.
Note These settings are reset when the monitor is switched off and automatic measurement must again be defined when the monitor is switched on.
Note The monitor sets the maximum pressure as follows:
• Adults: 270 mmHg.• Pediatric: 180 mmHg.• Neonate: 150 mmHg.
The patient mode is defined in the setup menu (“Patient mode” on page 117).
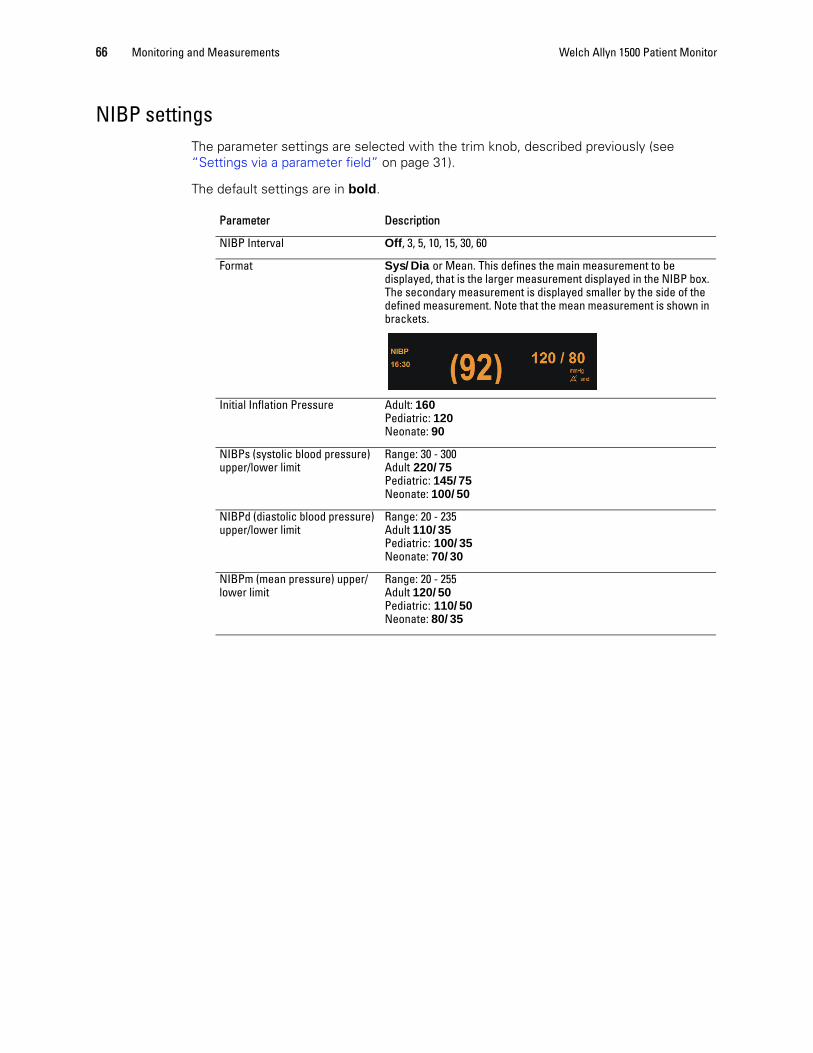
66 Monitoring and Measurements Welch Allyn 1500 Patient Monitor
NIBP settingsThe parameter settings are selected with the trim knob, described previously (see “Settings via a parameter field” on page 31).
The default settings are in bold.
Parameter Description
NIBP Interval Off, 3, 5, 10, 15, 30, 60
Format Sys/Dia or Mean. This defines the main measurement to be displayed, that is the larger measurement displayed in the NIBP box. The secondary measurement is displayed smaller by the side of the defined measurement. Note that the mean measurement is shown in brackets.
Initial Inflation Pressure Adult: 160 Pediatric: 120 Neonate: 90
NIBPs (systolic blood pressure) upper/lower limit
Range: 30 - 300Adult 220/75 Pediatric: 145/75 Neonate: 100/50
NIBPd (diastolic blood pressure) upper/lower limit
Range: 20 - 235Adult 110/35 Pediatric: 100/35 Neonate: 70/30
NIBPm (mean pressure) upper/lower limit
Range: 20 - 255Adult 120/50Pediatric: 110/50 Neonate: 80/35

Directions for use Monitoring and Measurements 67
NIBP alarms and messages
Message Possible cause Suggested action
NIBP needs service No NIBP module detected. Switch off and restart.
Replace monitor.
NIBP artifactcannot measure
Patient has moved. Calm the patient.
Max. required pressure is higher than the initial pressure of 160 mmHg.1
1. If the initial pressure is too low, the measurement is immediately restarted and the pressure is increased by 60 mmHg.
Repeat measurement. The monitor will automatically increase the initial pressure.
Cannot measure NIBP
Patient has moved. Check and calm patient.
Very unsteady pulse. Apply cuff to another extremity with less movement and steady pulse.
Air tube plugged or leaking. Check tube and cuff.
NIBP cuff leak No cuff connected, or cuff or insufficiently fitted or defective.
Check cuff position.
Check cuff for tightness.
Check if the cuff is connected to the monitor.
NIBP signal low Blocked tube; kink in the tube. Check and replace the tube if required.
Cuff not applied correctly. Reposition/check the cuff.
Pulse too low for good measurement.
Apply the cuff to another extremity where the pulse measurement is easier.
NIBP time too long Inflation time exceeded (max. 135 sec.) due to interferences because the patient has moved
Check the patient (see also message "cannot measure").
Repeat the measurement.
NIBPs < [lower limit] Systolic pressure too low. Check the patient and alarm limits.
NIBPs > [upper limit] Systolic pressure too high. Check the patient and alarm limits.
NIBPd < [lower limit] Diastolic pressure too low. Check the patient and alarm limits.
NIBPd > [upper limit] Diastolic pressure too high. Check the patient and alarm limits.
NIBPm < [lower limit] Mean pressure too low. Check the patient and alarm limits.
NIBPm > [upper limit] Mean pressure too high. Check the patient and alarm limits.

68 Monitoring and Measurements Welch Allyn 1500 Patient Monitor
SpO2 monitoringTwo SpO2 modules are available with the monitor - Masimo or Nellcor. The two modules are distinguished by the connectors. The display data and waveform are similar for both modules. The Masimo module has extra clinical settings for signal processing (see “Masimo settings” on page 71).
• Pulse oximetry enables the continuous non-invasive monitoring of the functional oxygen saturation of the arterial hemoglobin and the peripheral pulse rate.
• The display shows the continuous progress of the numeric SpO2, plethysmographic waveform and signal quality values.
• The displayed plethysmographic waveform is proportional to the pulse volume.
• The update period of the measurement readings on the display is approximately 2 seconds.
• In accordance with the relevant standards, the temporary alarm silence period can be set to a maximum of 2 minutes.
The peak wavelength and maximum optical power of the light emitted by the pulse oximeter probes can be especially useful to clinicians e.g. performing photodynamic therapy. They are as follows:
• Range of peak wavelengths: 600 nm to 900 nm.
• Maximum light power output: <15 mW.
Masimo module connector
Nellcor module connector

Directions for use Monitoring and Measurements 69
Safety
WARNING Only use sensors recommended from Welch Allyn for SpO2 measurement with the monitor. Only use Masimo sensors when the monitor has a Masimo module. Only use Nellcor sensors when the monitor has a Nellcor module. Other sensors can impact the performance and give incorrect measurement readings.
WARNING The information in this manual does not overrule any instructions given in the SpO2 sensor directions for use. Before using the sensor, carefully read the sensor directions for use.
WARNING Do not use the pulse oximeters or sensors during magnetic resonance image scanning. Induced current could potentially cause burns, and the pulse oximetry may affect the image and the accuracy of the measurements.
WARNING Do not use the pulse oximeter or sensors in or near the presence of MRI equipment or in an MRI suite.
WARNING Tissue damage can be caused by incorrect application or use of a sensor. Inspect the sensor site as described in the sensor directions for use to ensure skin integrity and correct positioning of the sensor.
WARNING Do not use damaged patient cables, damaged sensors or a sensor with exposed optical components.
WARNING Substances causing disturbances: Carboxyhemoglobin can lead to falsely high measurement readings. Colors or substances containing colors that influence the natural blood pigments can also lead to incorrect measurement readings.
WARNING Exposure to excessive illumination, such as surgical lamps (especially those with xenon light source), bilirubin lamps, fluorescent lights, infrared heating lamps or direct sunlight, can affect the performance of an SpO2 sensor. To prevent exposure to excessive illumination, ensure that the sensor is correctly applied and that it is covered with an opaque material, if required. If these measures are neglected, excessive illumination can lead to incorrect measurements.
WARNING Change the sensor's position at least every 4 hours.

70 Monitoring and Measurements Welch Allyn 1500 Patient Monitor
SpO2 settingsThe parameter settings are selected with the trim knob, described previously (see “Settings via a parameter field” on page 31).
The default settings are in bold.
Parameter Description
SpO2 alarm pause When the alarm is paused the message SpO2 Alarms Paused appears in the message line. The alarm is paused until the sensor is reinstalled.
HR/PR source1
1. This can also be set in the Setup HR menu.
ECG, SpO2, P1 (selection of the heart rate source). The source is displayed in brackets next to the HR parameter.
HR/PR tone1 Off, on2
2. If SpO2 is the HR/PR source, the pitch of the beep corresponds to the SpO2 saturation. A high-pitched beep indicates a high saturation.
SpO2 lower/upper limit Range: 50- 100 Lower limit default 50Upper limit default 100
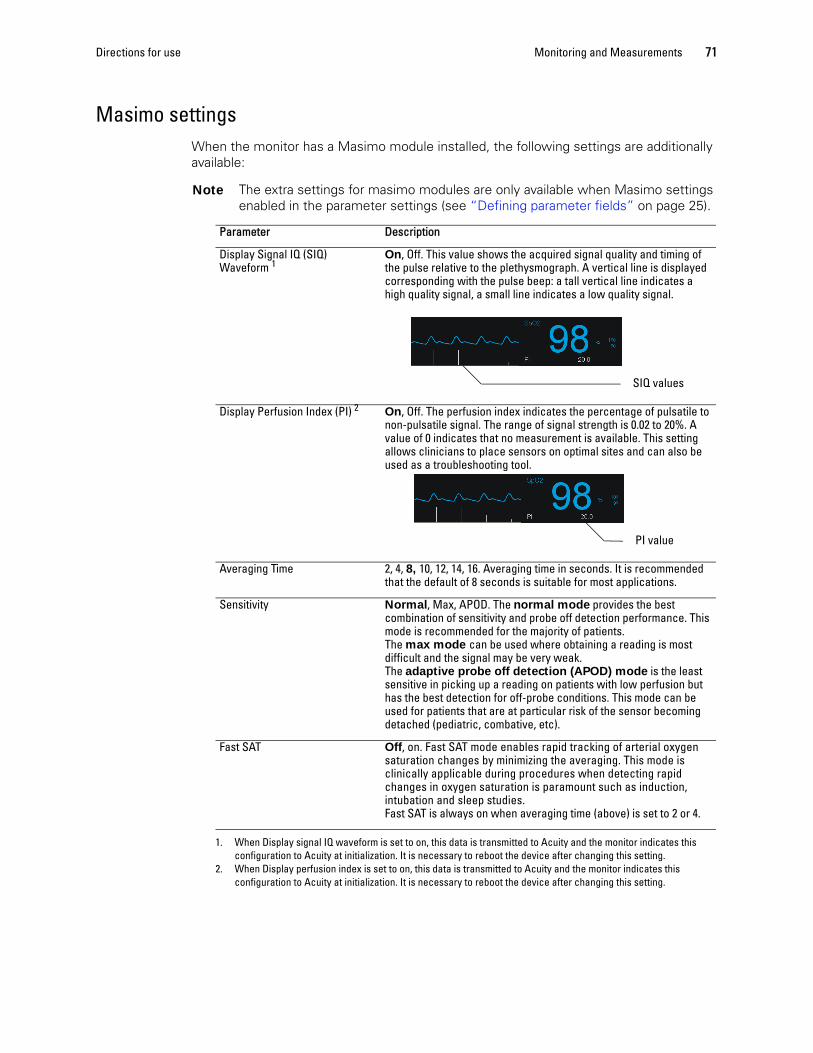
Directions for use Monitoring and Measurements 71
Masimo settingsWhen the monitor has a Masimo module installed, the following settings are additionally available:
Note The extra settings for masimo modules are only available when Masimo settings enabled in the parameter settings (see “Defining parameter fields” on page 25).
Parameter Description
Display Signal IQ (SIQ) Waveform 1
1. When Display signal IQ waveform is set to on, this data is transmitted to Acuity and the monitor indicates this configuration to Acuity at initialization. It is necessary to reboot the device after changing this setting.
On, Off. This value shows the acquired signal quality and timing of the pulse relative to the plethysmograph. A vertical line is displayed corresponding with the pulse beep: a tall vertical line indicates a high quality signal, a small line indicates a low quality signal.
Display Perfusion Index (PI) 2
2. When Display perfusion index is set to on, this data is transmitted to Acuity and the monitor indicates this configuration to Acuity at initialization. It is necessary to reboot the device after changing this setting.
On, Off. The perfusion index indicates the percentage of pulsatile to non-pulsatile signal. The range of signal strength is 0.02 to 20%. A value of 0 indicates that no measurement is available. This setting allows clinicians to place sensors on optimal sites and can also be used as a troubleshooting tool.
Averaging Time 2, 4, 8, 10, 12, 14, 16. Averaging time in seconds. It is recommended that the default of 8 seconds is suitable for most applications.
Sensitivity Normal, Max, APOD. The normal mode provides the best combination of sensitivity and probe off detection performance. This mode is recommended for the majority of patients.The max mode can be used where obtaining a reading is most difficult and the signal may be very weak. The adaptive probe off detection (APOD) mode is the least sensitive in picking up a reading on patients with low perfusion but has the best detection for off-probe conditions. This mode can be used for patients that are at particular risk of the sensor becoming detached (pediatric, combative, etc).
Fast SAT Off, on. Fast SAT mode enables rapid tracking of arterial oxygen saturation changes by minimizing the averaging. This mode is clinically applicable during procedures when detecting rapid changes in oxygen saturation is paramount such as induction, intubation and sleep studies.Fast SAT is always on when averaging time (above) is set to 2 or 4.
SIQ values
PI value
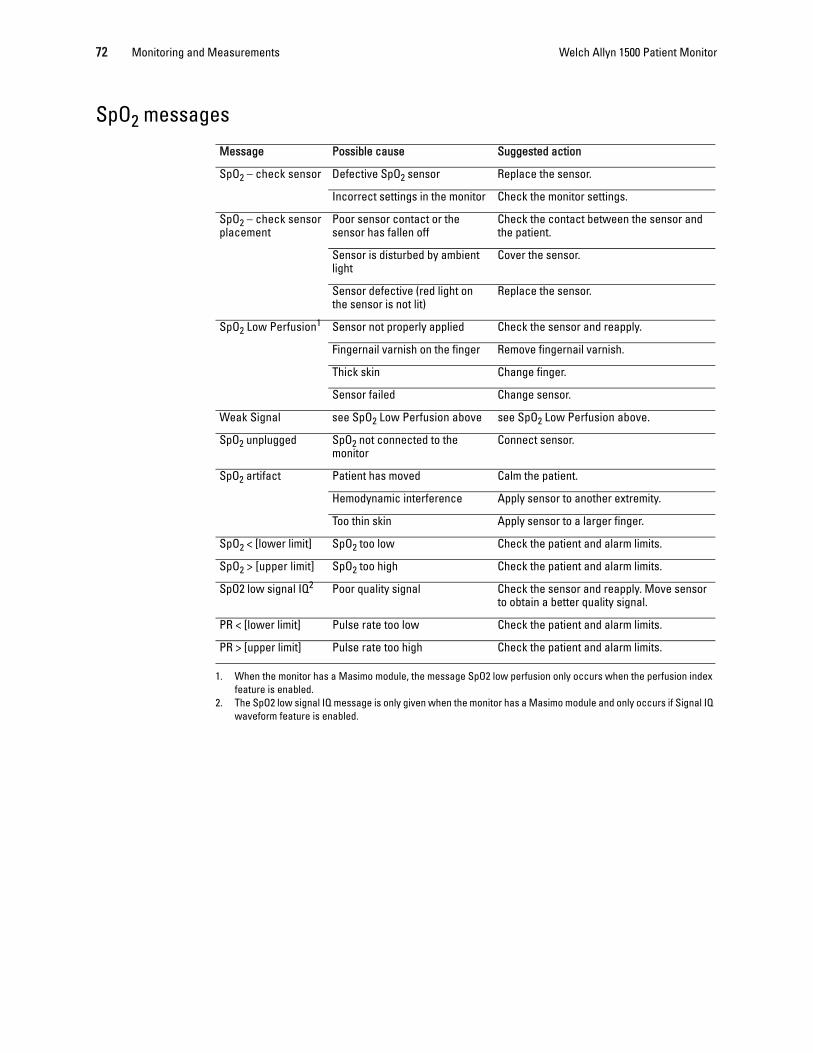
72 Monitoring and Measurements Welch Allyn 1500 Patient Monitor
SpO2 messages
Message Possible cause Suggested action
SpO2 – check sensor Defective SpO2 sensor Replace the sensor.
Incorrect settings in the monitor Check the monitor settings.
SpO2 – check sensor placement
Poor sensor contact or the sensor has fallen off
Check the contact between the sensor and the patient.
Sensor is disturbed by ambient light
Cover the sensor.
Sensor defective (red light on the sensor is not lit)
Replace the sensor.
SpO2 Low Perfusion1
1. When the monitor has a Masimo module, the message SpO2 low perfusion only occurs when the perfusion index feature is enabled.
Sensor not properly applied Check the sensor and reapply.
Fingernail varnish on the finger Remove fingernail varnish.
Thick skin Change finger.
Sensor failed Change sensor.
Weak Signal see SpO2 Low Perfusion above see SpO2 Low Perfusion above.
SpO2 unplugged SpO2 not connected to the monitor
Connect sensor.
SpO2 artifact Patient has moved Calm the patient.
Hemodynamic interference Apply sensor to another extremity.
Too thin skin Apply sensor to a larger finger.
SpO2 < [lower limit] SpO2 too low Check the patient and alarm limits.
SpO2 > [upper limit] SpO2 too high Check the patient and alarm limits.
SpO2 low signal IQ2
2. The SpO2 low signal IQ message is only given when the monitor has a Masimo module and only occurs if Signal IQ waveform feature is enabled.
Poor quality signal Check the sensor and reapply. Move sensor to obtain a better quality signal.
PR < [lower limit] Pulse rate too low Check the patient and alarm limits.
PR > [upper limit] Pulse rate too high Check the patient and alarm limits.

Directions for use Monitoring and Measurements 73
IBP monitoring
Safety
WARNING Carefully read the manufacturer's instructions before using the invasive blood pressure kit.
WARNING When applying the kit to the patient, make sure that absolutely no air penetrates the system.
WARNING To achieve correct arterial pressure measurement, the pressure sensor must be installed on the level of the right atrium.
WARNING If the pressure sensor's position is moved after calibration, this may give inaccurate values.
WARNING If an invasive catheter for blood pressure measurement is introduced into an arterial vessel, the circulation in the terminal vessels must be checked at regular intervals.
WARNING Single-use accessories must not be reused.
WARNING For patient safety, ensure that neither the sensors nor the patient or persons touching the patient, come into contact with conducting objects, even if these are grounded.
WARNING Precautions must be observed when using high frequency devices. To prevent the incorrect IBP measurements, only use sensors that are protected against high-frequency radiation.
Note The kit and operating procedure vary according to manufacturer. Please consult the manufacturer's documentation for connection.
Note For warm-up time/ready for measurement and displacement for invasive transducers, refer to the documentation of the transducer manufacturer.
Note P1 is the only connection that can determine the HR/PR source.

74 Monitoring and Measurements Welch Allyn 1500 Patient Monitor
Preparing IBP measurementRefer to the manufacturer’s directions for use for operating information for the IBP sensor.
IBP settingsThe parameter settings are selected with the trim knob, described previously (see “Settings via a parameter field” on page 31).
Note When changing the IBP label in the setup window, the upper and lower alarm limits will change to match the label (see“IBP alarm defaults” on page 75). The IBP default size (scale) will also change according to the label set.
Parameter Description
Zero Set Zero set the selected IBP1, IBP2, IBP3, IBP4
Label P1, P2, P3, P4
ART
PA
RA
LA
CVP
ICP
UA
UV
Size -10 to 20 mmHg
-10 to 60 mmHg
0 to 150 mmHg
0 to 200 mmHg
0 to 250 mmHg
0 to 300 mmHg
Format Sys/Dia or Mean. This defines the main measurement to be displayed, that is the larger measurement displayed in the IBP box. The secondary measurement is displayed smaller below the main measurement. Note that the mean measurement is shown in brackets.
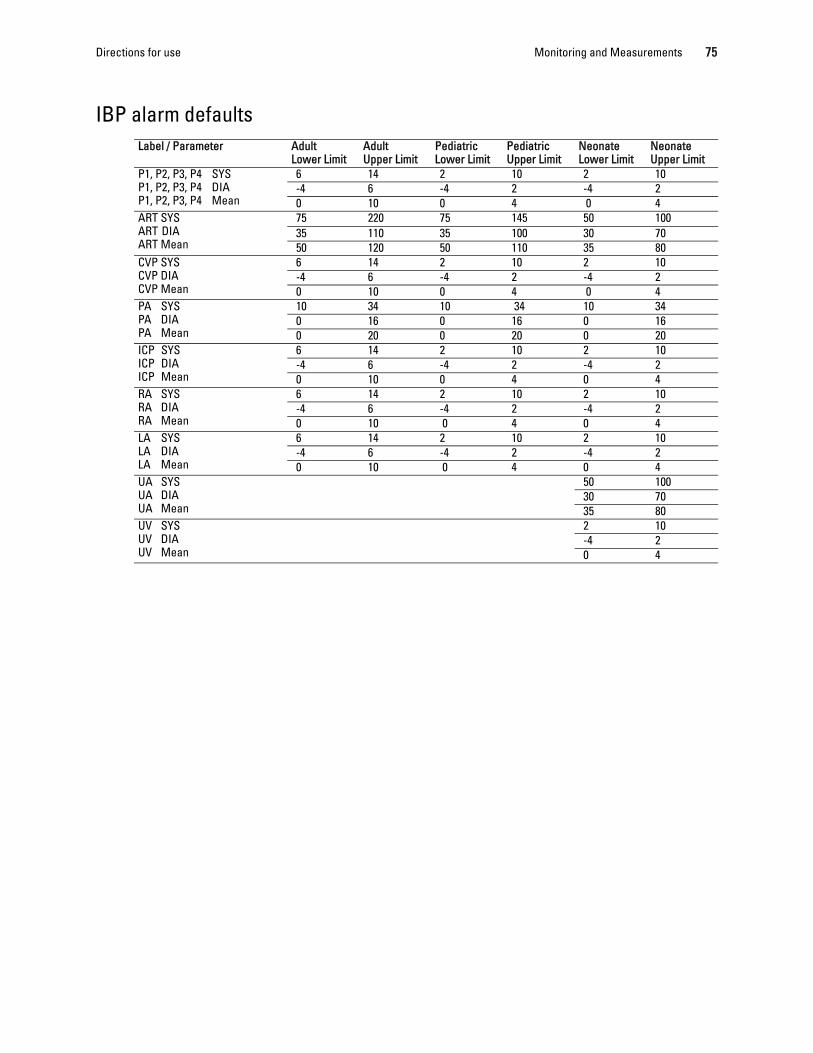
Directions for use Monitoring and Measurements 75
IBP alarm defaultsLabel / Parameter Adult
Lower LimitAdult Upper Limit
Pediatric Lower Limit
Pediatric Upper Limit
Neonate Lower Limit
Neonate Upper Limit
P1, P2, P3, P4 SYSP1, P2, P3, P4 DIAP1, P2, P3, P4 Mean
6 14 2 10 2 10 -4 6 -4 2 -4 2 0 10 0 4 0 4
ART SYSART DIAART Mean
75 220 75 145 50 10035 110 35 100 30 7050 120 50 110 35 80
CVP SYSCVP DIACVP Mean
6 14 2 10 2 10 -4 6 -4 2 -4 2 0 10 0 4 0 4
PA SYSPA DIAPA Mean
10 34 10 34 10 340 16 0 16 0 160 20 0 20 0 20
ICP SYSICP DIAICP Mean
6 14 2 10 2 10-4 6 -4 2 -4 20 10 0 4 0 4
RA SYSRA DIARA Mean
6 14 2 10 2 10 -4 6 -4 2 -4 2 0 10 0 4 0 4
LA SYSLA DIALA Mean
6 14 2 10 2 10 -4 6 -4 2 -4 2 0 10 0 4 0 4
UA SYSUA DIAUA Mean
50 10030 7035 80
UV SYSUV DIAUV Mean
2 10 -4 2 0 4
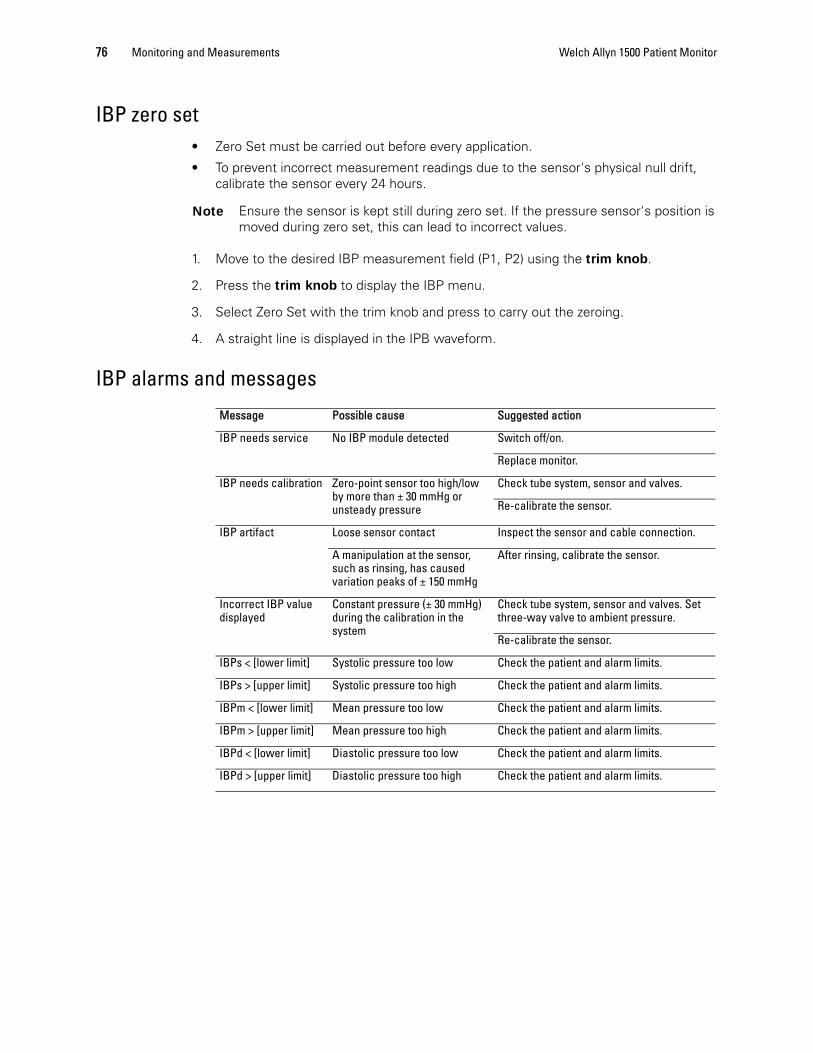
76 Monitoring and Measurements Welch Allyn 1500 Patient Monitor
IBP zero set• Zero Set must be carried out before every application.
• To prevent incorrect measurement readings due to the sensor's physical null drift, calibrate the sensor every 24 hours.
1. Move to the desired IBP measurement field (P1, P2) using the trim knob.
2. Press the trim knob to display the IBP menu.
3. Select Zero Set with the trim knob and press to carry out the zeroing.
4. A straight line is displayed in the IPB waveform.
IBP alarms and messages
Note Ensure the sensor is kept still during zero set. If the pressure sensor's position is moved during zero set, this can lead to incorrect values.
Message Possible cause Suggested action
IBP needs service No IBP module detected Switch off/on.
Replace monitor.
IBP needs calibration Zero-point sensor too high/low by more than ± 30 mmHg or unsteady pressure
Check tube system, sensor and valves.
Re-calibrate the sensor.
IBP artifact Loose sensor contact Inspect the sensor and cable connection.
A manipulation at the sensor, such as rinsing, has caused variation peaks of ± 150 mmHg
After rinsing, calibrate the sensor.
Incorrect IBP value displayed
Constant pressure (± 30 mmHg) during the calibration in the system
Check tube system, sensor and valves. Set three-way valve to ambient pressure.
Re-calibrate the sensor.
IBPs < [lower limit] Systolic pressure too low Check the patient and alarm limits.
IBPs > [upper limit] Systolic pressure too high Check the patient and alarm limits.
IBPm < [lower limit] Mean pressure too low Check the patient and alarm limits.
IBPm > [upper limit] Mean pressure too high Check the patient and alarm limits.
IBPd < [lower limit] Diastolic pressure too low Check the patient and alarm limits.
IBPd > [upper limit] Diastolic pressure too high Check the patient and alarm limits.
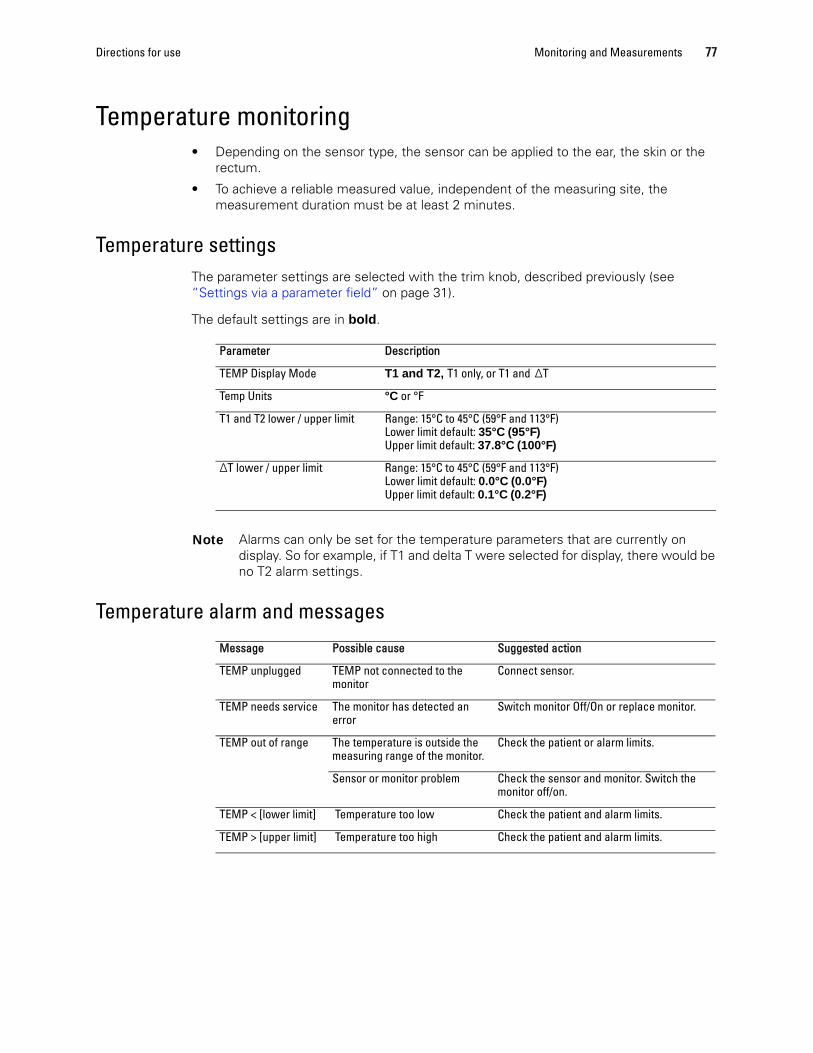
Directions for use Monitoring and Measurements 77
Temperature monitoring• Depending on the sensor type, the sensor can be applied to the ear, the skin or the
rectum.
• To achieve a reliable measured value, independent of the measuring site, the measurement duration must be at least 2 minutes.
Temperature settingsThe parameter settings are selected with the trim knob, described previously (see “Settings via a parameter field” on page 31).
The default settings are in bold.
Temperature alarm and messages
Parameter Description
TEMP Display Mode T1 and T2, T1 only, or T1 and ΔT
Temp Units °C or °F
T1 and T2 lower / upper limit Range: 15°C to 45°C (59°F and 113°F)Lower limit default: 35°C (95°F)Upper limit default: 37.8°C (100°F)
ΔT lower / upper limit Range: 15°C to 45°C (59°F and 113°F)Lower limit default: 0.0°C (0.0°F)Upper limit default: 0.1°C (0.2°F)
Note Alarms can only be set for the temperature parameters that are currently on display. So for example, if T1 and delta T were selected for display, there would be no T2 alarm settings.
Message Possible cause Suggested action
TEMP unplugged TEMP not connected to the monitor
Connect sensor.
TEMP needs service The monitor has detected an error
Switch monitor Off/On or replace monitor.
TEMP out of range The temperature is outside the measuring range of the monitor.
Check the patient or alarm limits.
Sensor or monitor problem Check the sensor and monitor. Switch the monitor off/on.
TEMP < [lower limit] Temperature too low Check the patient and alarm limits.
TEMP > [upper limit] Temperature too high Check the patient and alarm limits.

78 Monitoring and Measurements Welch Allyn 1500 Patient Monitor
Cardiac output (option)
IntroductionThe WA 1500 patient monitor uses the thermodilution method of measuring cardiac output. A pulmonary artery catheter (PAC) is inserted into the right side of the heart. The PAC is balloon tipped and is inflated to help it through the right ventricle to occlude a smaller branch of the pulmonary artery system. The balloon is deflated and the PAC injects a small amount (10ml) of cold injectate at a known temperature into the pulmonary artery. The temperature is then measured at a known distance using the same catheter.
The cardiac output can be calculated from the measured temperature curve. Low cardiac output will change the temperature slowly, and high cardiac output will change the temperature rapidly. The degree of change in temperature is directly proportional to the cardiac output.
Usually three to five repeated measures are averaged to improve accuracy.
CO UnitsCardiac output is expressed as liters / minute:
• Cardiac Output (CO) = Stroke volume × Heart rate
where: Stroke volume = End Diastolic Volume (EDV) - End Systolic Volume (ESV)Heart rate = beats per minute
The cardiac index is expressed as liters / minute / m2:
• Cardiac Index (CI) = Cardiac output/ BSA
where: BSA is Body Surface Area in square meters.

Directions for use Monitoring and Measurements 79
Safety
WARNING Carefully read the manufacturer's catheter instructions before carrying out measurements.
WARNING When an invasive catheter is introduced into an arterial vessel, the circulation in the terminal vessels must be checked at regular intervals.
WARNING When applying the kit to the patient, make sure that no air penetrates the system.
WARNING PAC use is complicated by arrhythmias, infection, pulmonary artery rupture, and right heart valve damage.
WARNING Single-use accessories must not be reused.
WARNING It is important that the CO Computation Constant (see “Cardiac output settings” on page 81) of the catheter is entered correctly to ensure accurate measurements for the specific Edwards-compatible catheter used.
Caution Only use Edwards-compatible catheters
Caution Only use Baxter/Edwards/Abbott "in-line" injectate sensors
Caution It is important that the injectate temperature is in the range specified for the computation constant.
Caution It is important that the injectate volume is the same as that specified in the computation constant.
Note The kit and operating procedure vary according to manufacturer. Please consult the manufacturer's documentation for connection.
Note For warm-up time/ready for measurement and displacement for invasive transducers, refer to the documentation of the transducer manufacturer.

80 Monitoring and Measurements Welch Allyn 1500 Patient Monitor
Approved catheters and injectate sensor type
Catheters
The monitor will work with any blood temperature sensor that is Edwards-compatible.
Injectate Sensor
The injectate sensor must be a Baxter/Edwards/Abbott "in-line" thermistor.
Preparing for cardiac output measurement
1. Press the Setup button , enter the menu Setup/Parameters and activate CO enabled (yes).
2. Connect the catheter to the CO connector on the side panel.
3. Setup the catheter according to the instructions given by the manufacturer.
Note The monitor does not support bath probe or arrow flow-through sensor.
Note The CO is only displayed when the CO option is enabled. If the CO measurement field is not displayed, ensure that it is enabled in the parameter settings.
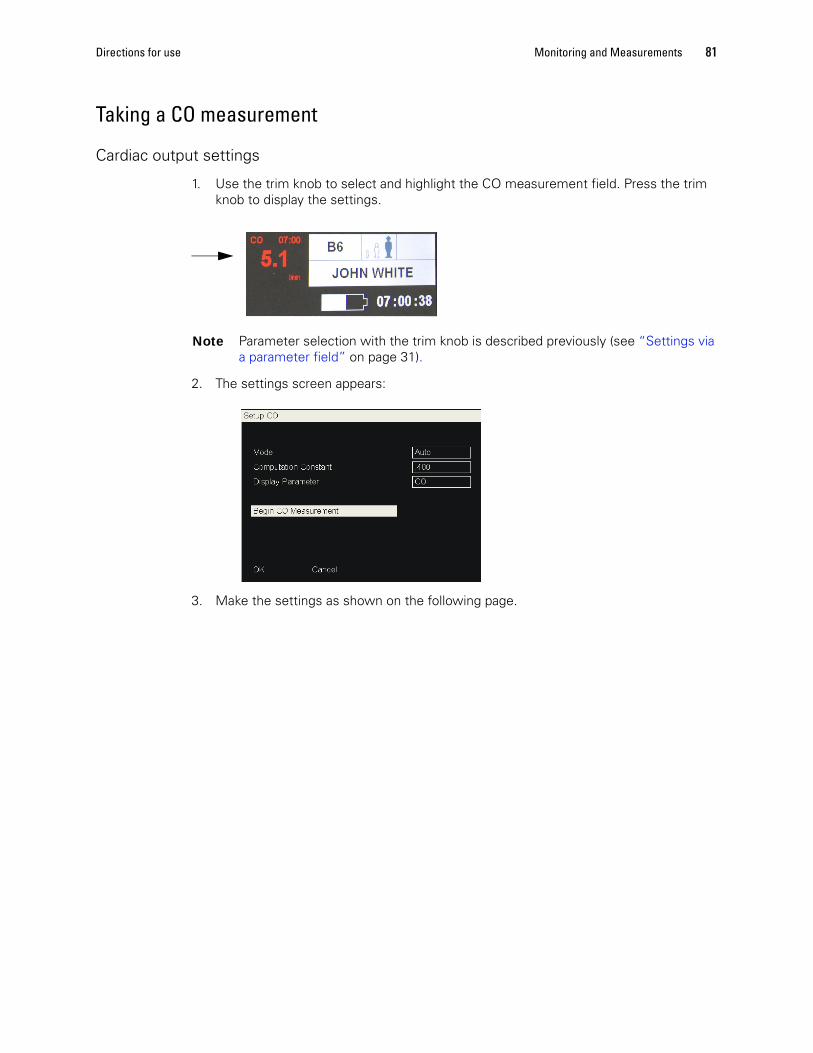
Directions for use Monitoring and Measurements 81
Taking a CO measurement
Cardiac output settings
1. Use the trim knob to select and highlight the CO measurement field. Press the trim knob to display the settings.
2. The settings screen appears:
3. Make the settings as shown on the following page.
Note Parameter selection with the trim knob is described previously (see “Settings via a parameter field” on page 31).

82 Monitoring and Measurements Welch Allyn 1500 Patient Monitor
The default settings are in bold.
Parameter Description
Mode Auto, manual. In auto mode the unit monitors the blood temperature and indicates that a measurement can be commenced only when the temperature is stable. In manual mode, the user monitors starts the measurement at any time.
Computation constant Between 000 and 999 (starting figure 400). This is a constant based on the temperature coefficient of the catheter, temperature and volume of the injectate, and catheter dimensions.
The formula used is as follows:
Where:
1.08 = density times specific heat (5% dextrose / blood)Ct = catheter thermal loss coefficient (specified by the catheter
manufacturer)60 = secondsVI = volume of the injectate1000 = conversion factor (cubic centimeters to liter)
Note: The Ct value specified by the manufacturer, will differ according the temperature of the injectate solution and separate Ct values will be stated for different temperature ranges, for example 0o to 5o, 19o to 22o , and 23o to 25o.
Since all factors are constants except the injection volume and the injection temperature, many manufactures will specify the computation constant CC for specific volumes and temperature range instead of the thermal loss coefficient Ct in their instruction leaflet. This can be entered directly.
Display parameter CO, CI. Measurement shown as cardiac output (liters per minute) or cardiac index (cardiac output / body surface area (m2)). For CI the patient data must have been entered.
Caution It is essential that the computation constant is entered correctly so that the monitor knows the volume and temperature range of the injectate, and the thermal loss of the catheter. Inaccurate results will be obtained if the computation constant is not correct.
CC = 1.08 * Ct * 60 * VI
1000

Directions for use Monitoring and Measurements 83
Taking a CO measurement
1. Insert the catheter and prepare injectate solution in accordance with the instructions provided by the manufacturer.
2. On the monitor make the settings and enter the computation constant (see previous page).
3. The blood temperature is monitored and when the temperature is stable, Ready is indicated at the top of the screen.
Note In manual mode, (see the mode parameter in“Cardiac output settings” on page 81), a start button is positioned in the lower right of the screen. The Ready
indication is given when this is selected.
Real-time blood temperature
Injectate temperature
See Note below
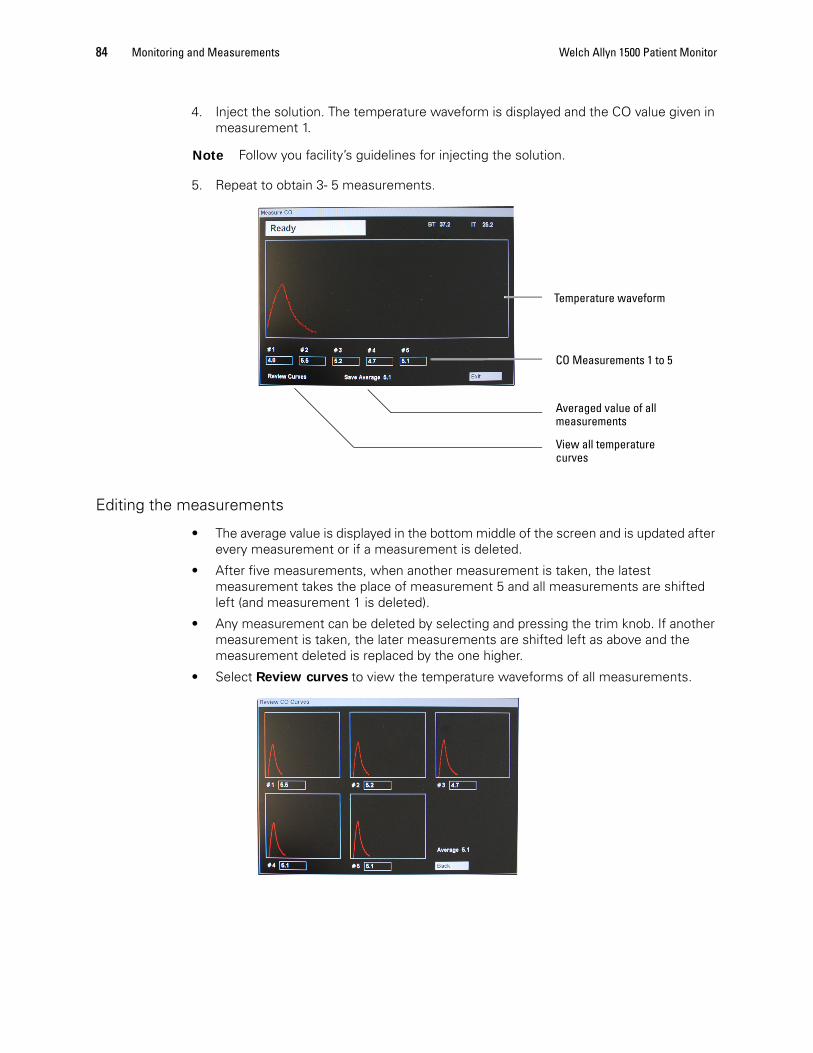
84 Monitoring and Measurements Welch Allyn 1500 Patient Monitor
4. Inject the solution. The temperature waveform is displayed and the CO value given in measurement 1.
5. Repeat to obtain 3- 5 measurements.
Editing the measurements
• The average value is displayed in the bottom middle of the screen and is updated after every measurement or if a measurement is deleted.
• After five measurements, when another measurement is taken, the latest measurement takes the place of measurement 5 and all measurements are shifted left (and measurement 1 is deleted).
• Any measurement can be deleted by selecting and pressing the trim knob. If another measurement is taken, the later measurements are shifted left as above and the measurement deleted is replaced by the one higher.
• Select Review curves to view the temperature waveforms of all measurements.
Note Follow you facility’s guidelines for injecting the solution.
Temperature waveform
CO Measurements 1 to 5
Averaged value of all measurements
View all temperature curves

Directions for use Monitoring and Measurements 85
Saving a measurement
When three or more consistent measurements have been obtained, Save Average can be selected to save the measurement. You are prompted to confirm.
When confirmed the averaged measurement is entered in the CO field at the bottom of the screen.
The time when the measurement was made appears in the top right corner and the measurement parameter (CO or CI) appears in the left corner.
The measurement remains until overwritten or a new patient is confirmed.
Note A graphical trend view of the CO can be displayed. This is selected in waveforms (see “Displaying trend data in the measurements screen” on page 30).

86 Monitoring and Measurements Welch Allyn 1500 Patient Monitor
CO messagesThe following self-clearing alert messages may be displayed during the CO measurement process:
Message Message trigger and when displayed Suggested action
BT out of range (too high orBT out of range (too low)
Blood temperature out of range (High or Low), displayed when:• detected during a CO measurement session.
• CO start has been selected for manual mode.
Verify correct catheter position.
IT out of range (too high) or IT out of range (too low)
Injectate temperature out of range (high or low), displayed when:• detected during a CO measurement session.
• detected after CO start has been selected for manual mode.
Verify that injectate volume and temperature corresponds for the catheter used and that the computation constant has been entered correctly.
Check injectate temperature.
Check injectate probe and catheterprobe connection.
CO measurement Time-out
No blood temperature change, displayed when:• CO start has been selected for manual mode
and no reading is detected in the time-out period.
Ensure the injectate is injected soon after CO start has been selected. Reselect Start.
Verify correct catheter position.
BT unplugged Blood temperature transducer unplugged, displayed when:• detected during a CO measurement session.
• detected after CO start has been selected for manual mode.
Check connections and catheter.
IT unplugged Injectate temperature transducer unplugged, displayed when:• detected during a CO measurement session.
• detected after CO start has been selected for manual mode.
Check connections.
BT check sensor Blood temperature transducer fault, displayed when:• detected during a CO measurement session.
• detected after CO start has been selected for manual mode.
Check connections.
Check catheter.
IT check sensor Injectate temperature transducer fault, displayed when:• detected during a CO measurement session.
• detected after CO start has been selected for manual mode.
Check connections.
Check injectate sensor.
CO computation constant not yet entered
Computation constant not yet entered, displayed when:• detected during a CO measurement session.
• detected after CO start has been selected for manual mode.
Enter the computation constant.

Directions for use Monitoring and Measurements 87
Hemodynamic calculations1. Press the Setup button .
2. Select Hemodynamic Calculations.
Enter the following parameters to calculate the hemodynamic calculations (see next page). As soon as the calculated values have sufficient data to for the entered parameters, the calculated values are shown.
Parameter Description
CO Cardiac Output
HR Heart rate (bpm)
ARTs Arterial pressure systolic
ARTd Arterial pressure Diastolic
ARTm Mean arterial pressure
PAs Pulmonary artery pressure systolic
PAd Pulmonary artery pressure diastolic
PAm Mean pulmonary artery pressure
CVP Central venous pressure
PAWP Pulmonary artery wedge pressure - the pressure measured by wedging the pulmonary catheter with the inflated balloon in the small pulmonary arterial branch.
Height Height in cm or inches
Weight Weight in Kg or lbs
Entered Values
Calculated Values
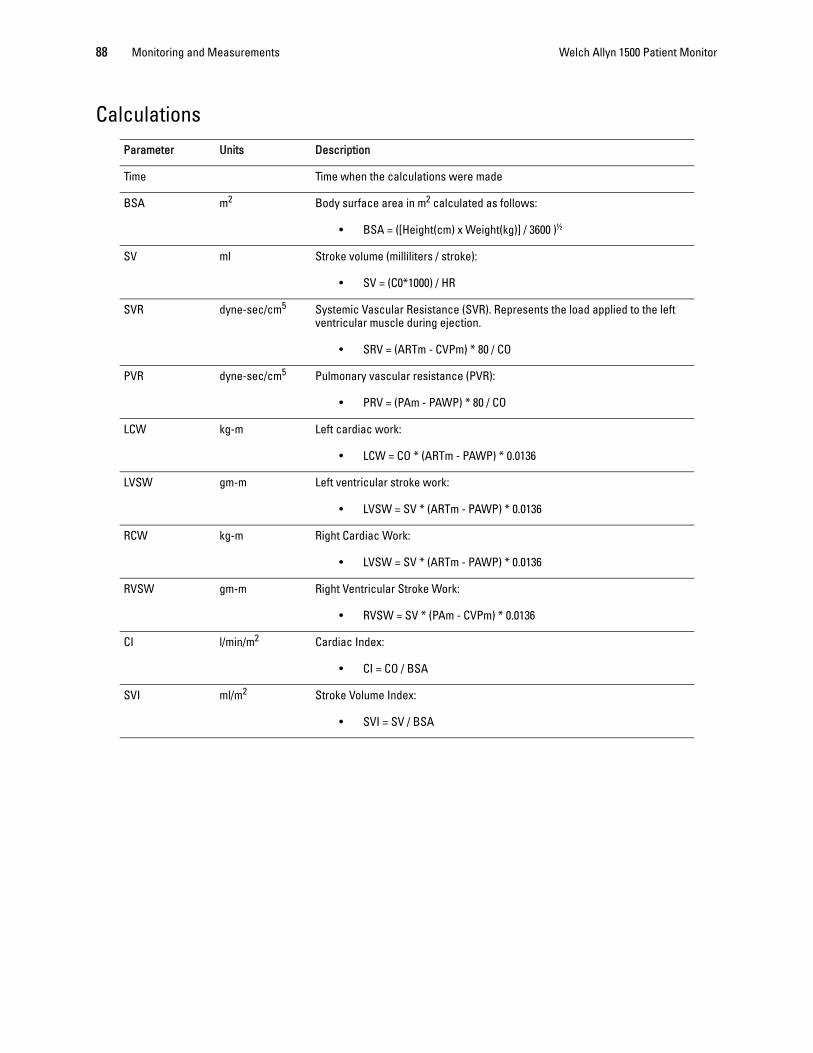
88 Monitoring and Measurements Welch Allyn 1500 Patient Monitor
CalculationsParameter Units Description
Time Time when the calculations were made
BSA m2 Body surface area in m2 calculated as follows:
• BSA = ([Height(cm) x Weight(kg)] / 3600 )½
SV ml Stroke volume (milliliters / stroke):
• SV = (C0*1000) / HR
SVR dyne-sec/cm5 Systemic Vascular Resistance (SVR). Represents the load applied to the left ventricular muscle during ejection.
• SRV = (ARTm - CVPm) * 80 / CO
PVR dyne-sec/cm5 Pulmonary vascular resistance (PVR):
• PRV = (PAm - PAWP) * 80 / CO
LCW kg-m Left cardiac work:
• LCW = CO * (ARTm - PAWP) * 0.0136
LVSW gm-m Left ventricular stroke work:
• LVSW = SV * (ARTm - PAWP) * 0.0136
RCW kg-m Right Cardiac Work:
• LVSW = SV * (ARTm - PAWP) * 0.0136
RVSW gm-m Right Ventricular Stroke Work:
• RVSW = SV * (PAm - CVPm) * 0.0136
CI l/min/m2 Cardiac Index:
• CI = CO / BSA
SVI ml/m2 Stroke Volume Index:
• SVI = SV / BSA

Directions for use Monitoring and Measurements 89
Parameter Units Description
SVRI dyne-sec/cm5/m2 Systemic Vascular Resistance Index:
• SVRI = SRV * BSA
PVRI dyne-sec/cm5/m2 Pulmonary Vascular Resistance Index:
• PVRI = PVR * BSA
LCWI kg-m/m2 Left Cardiac Work Index:
• LCWI = LCW / BSA
LVSWI gm-m/m2 Left Ventricular Stroke Work Index:
• LVSWI = LVSW / BSA
RCWI kg-m/m2 Right Cardiac Work Index:
• RCWI = RCW / BSA
RVSWI gm-m/m2 Right Ventricular Stroke Work Index:
• RCSWI = RVSW / BSA

90 Monitoring and Measurements Welch Allyn 1500 Patient Monitor
6
91
Acuity Central Station
Safety
Note Acuity connectivity is a licensable feature. To order this feature contact your Welch Allyn sales representative (see page ii). The network settings are defined by the system administrator (see the Welch Allyn 1500 patient monitor service manual).
WARNING Connect the monitor to an Acuity system only. Connecting to other networks could damage the monitor or injure the patient. If in doubt about the network jacks or devices, consult your facility’s Administrator Engineering Department.
WARNING The bedside patient monitor is the primary alarming source for the patient and the central station is a backup alarm source. The central station is only as reliable as its network and should be relied on only as a backup alarming device.
WARNING The Welch Allyn 1500 Patient Monitor provides primary alarming, including life threatening alarms. The central station provides a secondary alarm, and is only as reliable as its network. When connection to the central station is lost, the Welch Allyn 1500 Patient Monitor acts as a standalone monitor and provides the primary alarm. When connected to the central station, the monitor provides the primary alarm based on a signal from the central station.
WARNING Do not use Arrhythmia Analysis or ST Analysis on networks with heavy Class 1 services such as voice over IP (VOIP).
WARNING Central station alarms and other events can go unnoticed if clinical personnel are not present at the central station or if interruptions occur in power or system operations.
WARNING It is strongly recommended that Acuity Systems be installed with continuous power supplies and redundant means of operator surveillance, such as secondary central stations and hallway message panels. Acuity System alarms, alerts or other events can go unnoticed if clinical personnel are not present at the Acuity Central Station or if interruptions occur in power or system operations. You are responsible to provide 100 percent reliable power to the central station. The central station will only work with reliable AC power.

92 Acuity Central Station Welch Allyn 1500 Patient Monitor
Caution Make sure the Acuity network cable is not damaged. The Acuity network cable is the sole link between the monitor and the Acuity Central Station.
Caution When the monitor is not connected to the network there are no patient alarms or alerts at the Acuity Central Station.
Caution If you don’t set alarm limits, the Acuity system uses preset settings (for arrhythmia test limits), and the power up default settings for the monitor.
Caution Accessory equipment connected to the analog and digital interfaces must be certified according to the respective IEC standards (e.g., EN 60950 for data processing equipment and EN 60601-1 for medical equipment). Furthermore, all configurations shall comply with the system standard IEC 60601-1-1. Anyone connecting additional equipment to the signal input or output connectors is configuring a medical system, and is therefore responsible that the system complies with the requirements of the system standard IEC 60601-1-1. If in doubt, consult your Administrator Engineering Department.
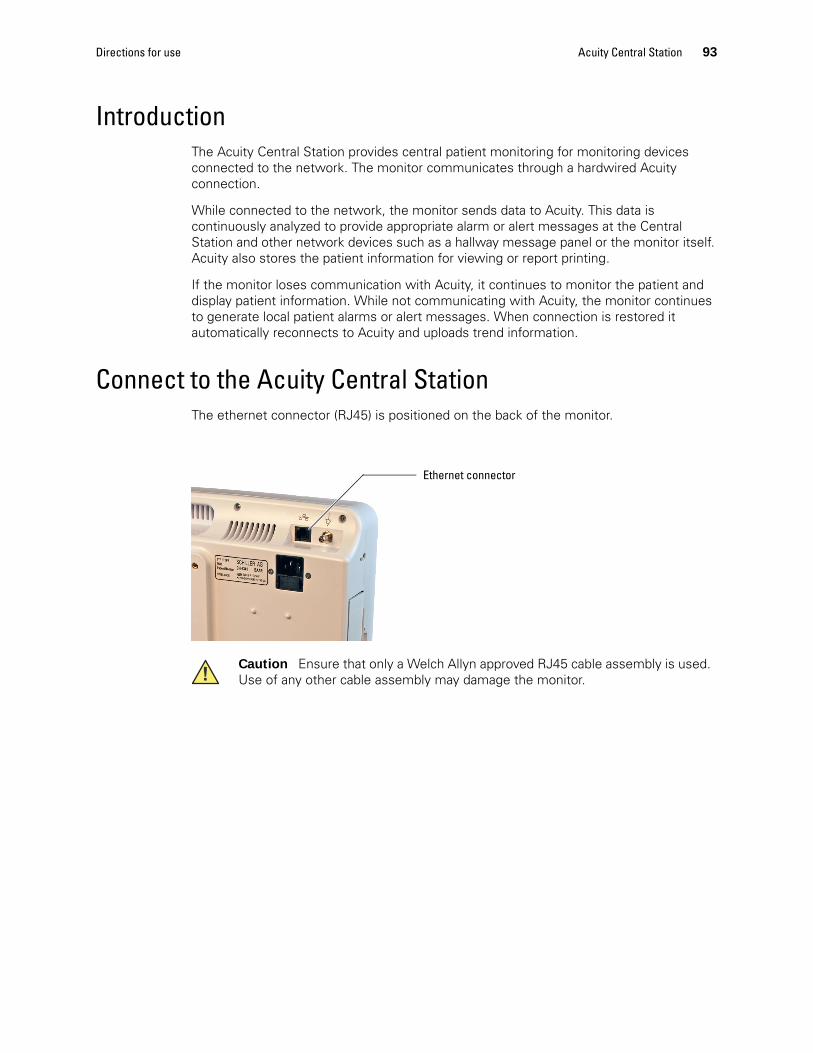
Directions for use Acuity Central Station 93
IntroductionThe Acuity Central Station provides central patient monitoring for monitoring devices connected to the network. The monitor communicates through a hardwired Acuity connection.
While connected to the network, the monitor sends data to Acuity. This data is continuously analyzed to provide appropriate alarm or alert messages at the Central Station and other network devices such as a hallway message panel or the monitor itself. Acuity also stores the patient information for viewing or report printing.
If the monitor loses communication with Acuity, it continues to monitor the patient and display patient information. While not communicating with Acuity, the monitor continues to generate local patient alarms or alert messages. When connection is restored it automatically reconnects to Acuity and uploads trend information.
Connect to the Acuity Central StationThe ethernet connector (RJ45) is positioned on the back of the monitor.
Caution Ensure that only a Welch Allyn approved RJ45 cable assembly is used. Use of any other cable assembly may damage the monitor.
Ethernet connector
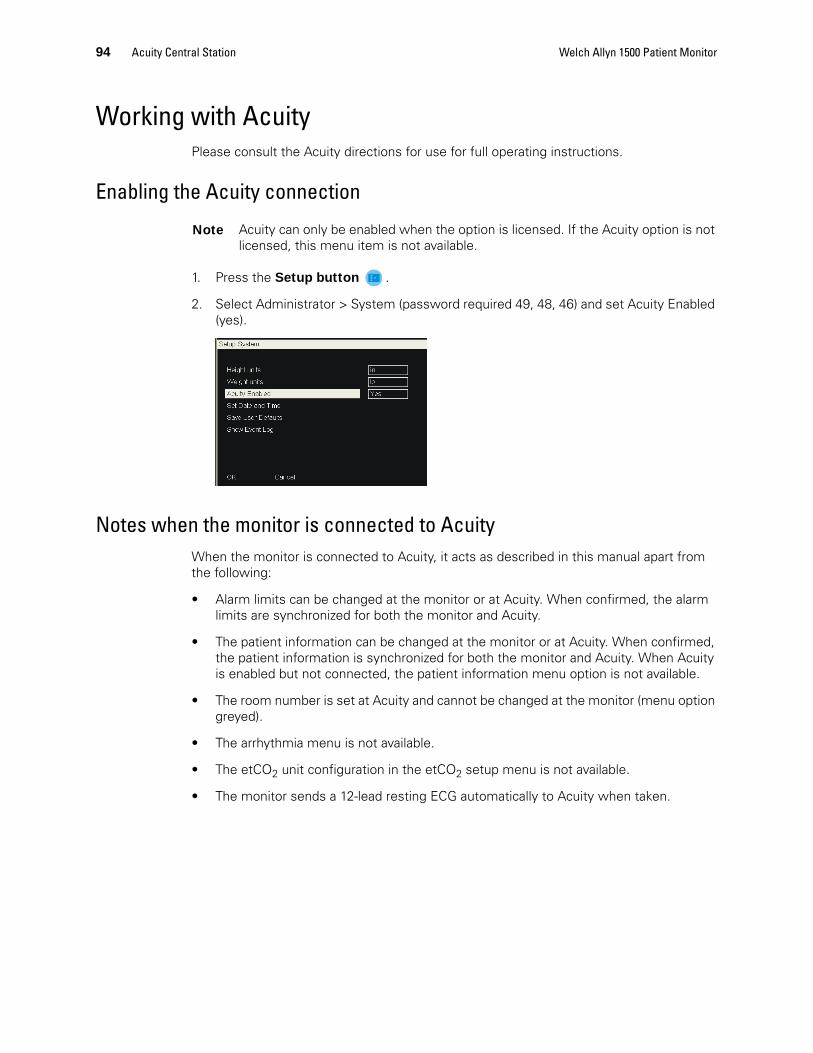
94 Acuity Central Station Welch Allyn 1500 Patient Monitor
Working with AcuityPlease consult the Acuity directions for use for full operating instructions.
Enabling the Acuity connection
1. Press the Setup button .
2. Select Administrator > System (password required 49, 48, 46) and set Acuity Enabled (yes).
Notes when the monitor is connected to AcuityWhen the monitor is connected to Acuity, it acts as described in this manual apart from the following:
• Alarm limits can be changed at the monitor or at Acuity. When confirmed, the alarm limits are synchronized for both the monitor and Acuity.
• The patient information can be changed at the monitor or at Acuity. When confirmed, the patient information is synchronized for both the monitor and Acuity. When Acuity is enabled but not connected, the patient information menu option is not available.
• The room number is set at Acuity and cannot be changed at the monitor (menu option greyed).
• The arrhythmia menu is not available.
• The etCO2 unit configuration in the etCO2 setup menu is not available.
• The monitor sends a 12-lead resting ECG automatically to Acuity when taken.
Note Acuity can only be enabled when the option is licensed. If the Acuity option is not licensed, this menu item is not available.
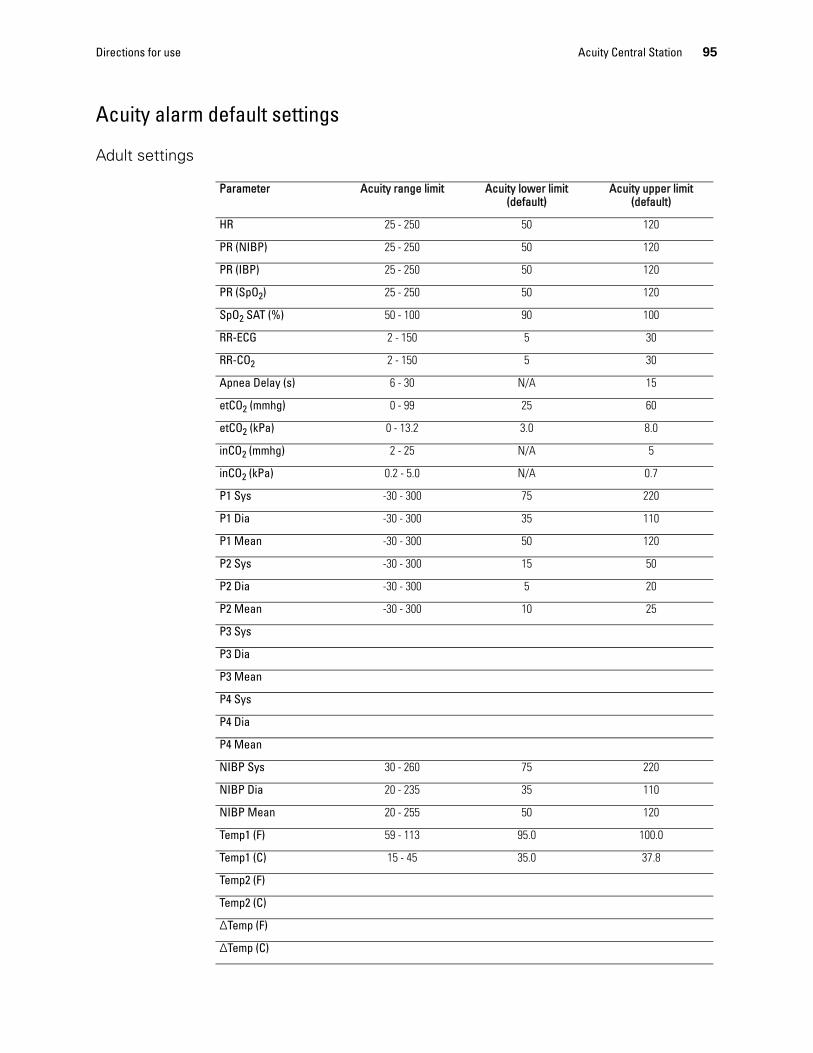
Directions for use Acuity Central Station 95
Acuity alarm default settings
Adult settings
Parameter Acuity range limit Acuity lower limit (default)
Acuity upper limit (default)
HR 25 - 250 50 120
PR (NIBP) 25 - 250 50 120
PR (IBP) 25 - 250 50 120
PR (SpO2) 25 - 250 50 120
SpO2 SAT (%) 50 - 100 90 100
RR-ECG 2 - 150 5 30
RR-CO2 2 - 150 5 30
Apnea Delay (s) 6 - 30 N/A 15
etCO2 (mmhg) 0 - 99 25 60
etCO2 (kPa) 0 - 13.2 3.0 8.0
inCO2 (mmhg) 2 - 25 N/A 5
inCO2 (kPa) 0.2 - 5.0 N/A 0.7
P1 Sys -30 - 300 75 220
P1 Dia -30 - 300 35 110
P1 Mean -30 - 300 50 120
P2 Sys -30 - 300 15 50
P2 Dia -30 - 300 5 20
P2 Mean -30 - 300 10 25
P3 Sys
P3 Dia
P3 Mean
P4 Sys
P4 Dia
P4 Mean
NIBP Sys 30 - 260 75 220
NIBP Dia 20 - 235 35 110
NIBP Mean 20 - 255 50 120
Temp1 (F) 59 - 113 95.0 100.0
Temp1 (C) 15 - 45 35.0 37.8
Temp2 (F)
Temp2 (C)
ΔTemp (F)
ΔTemp (C)
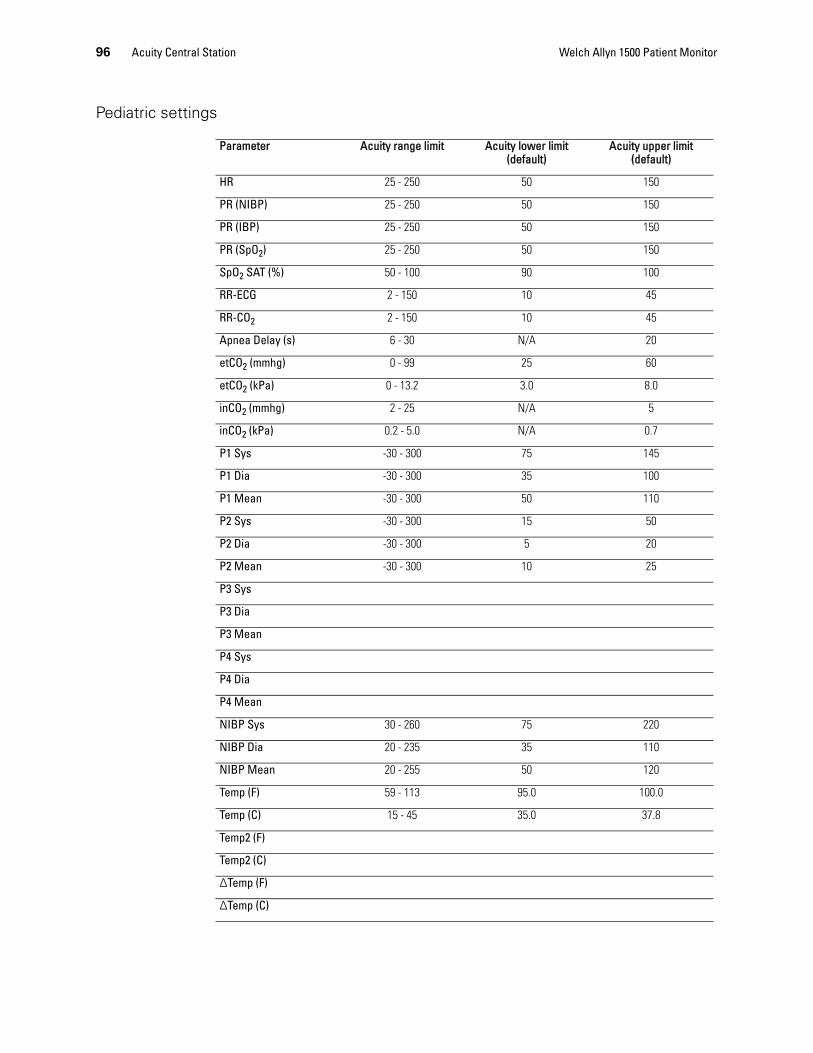
96 Acuity Central Station Welch Allyn 1500 Patient Monitor
Pediatric settings
Parameter Acuity range limit Acuity lower limit (default)
Acuity upper limit (default)
HR 25 - 250 50 150
PR (NIBP) 25 - 250 50 150
PR (IBP) 25 - 250 50 150
PR (SpO2) 25 - 250 50 150
SpO2 SAT (%) 50 - 100 90 100
RR-ECG 2 - 150 10 45
RR-CO2 2 - 150 10 45
Apnea Delay (s) 6 - 30 N/A 20
etCO2 (mmhg) 0 - 99 25 60
etCO2 (kPa) 0 - 13.2 3.0 8.0
inCO2 (mmhg) 2 - 25 N/A 5
inCO2 (kPa) 0.2 - 5.0 N/A 0.7
P1 Sys -30 - 300 75 145
P1 Dia -30 - 300 35 100
P1 Mean -30 - 300 50 110
P2 Sys -30 - 300 15 50
P2 Dia -30 - 300 5 20
P2 Mean -30 - 300 10 25
P3 Sys
P3 Dia
P3 Mean
P4 Sys
P4 Dia
P4 Mean
NIBP Sys 30 - 260 75 220
NIBP Dia 20 - 235 35 110
NIBP Mean 20 - 255 50 120
Temp (F) 59 - 113 95.0 100.0
Temp (C) 15 - 45 35.0 37.8
Temp2 (F)
Temp2 (C)
ΔTemp (F)
ΔTemp (C)
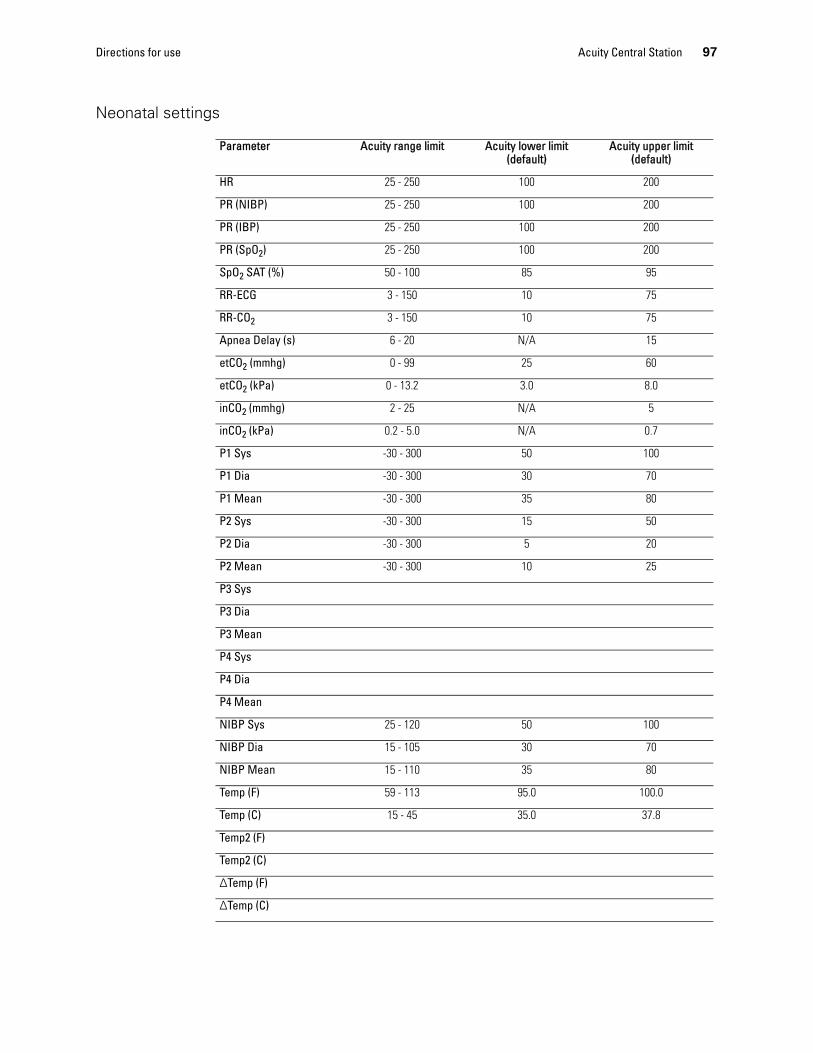
Directions for use Acuity Central Station 97
Neonatal settings
Parameter Acuity range limit Acuity lower limit (default)
Acuity upper limit (default)
HR 25 - 250 100 200
PR (NIBP) 25 - 250 100 200
PR (IBP) 25 - 250 100 200
PR (SpO2) 25 - 250 100 200
SpO2 SAT (%) 50 - 100 85 95
RR-ECG 3 - 150 10 75
RR-CO2 3 - 150 10 75
Apnea Delay (s) 6 - 20 N/A 15
etCO2 (mmhg) 0 - 99 25 60
etCO2 (kPa) 0 - 13.2 3.0 8.0
inCO2 (mmhg) 2 - 25 N/A 5
inCO2 (kPa) 0.2 - 5.0 N/A 0.7
P1 Sys -30 - 300 50 100
P1 Dia -30 - 300 30 70
P1 Mean -30 - 300 35 80
P2 Sys -30 - 300 15 50
P2 Dia -30 - 300 5 20
P2 Mean -30 - 300 10 25
P3 Sys
P3 Dia
P3 Mean
P4 Sys
P4 Dia
P4 Mean
NIBP Sys 25 - 120 50 100
NIBP Dia 15 - 105 30 70
NIBP Mean 15 - 110 35 80
Temp (F) 59 - 113 95.0 100.0
Temp (C) 15 - 45 35.0 37.8
Temp2 (F)
Temp2 (C)
ΔTemp (F)
ΔTemp (C)

98 Acuity Central Station Welch Allyn 1500 Patient Monitor
7
99
Maintenance
Maintenance intervalThis software controlled monitor has undergone a software risk analysis to minimize any hazards associated with software defects.
The regular system maintenance must include a functional test according to the manufacturer's instructions. The test results should be recorded (see “Inspection and checklist report” on page 104).
Maintenance work not described in this section, e.g. battery replacement, may only be accomplished by a qualified technician.
The following table indicates the intervals and responsibilities of the maintenance work required. Local regulations in your country may stipulate additional or different inspection intervals and tests.
Interval Maintenance Responsible
Before use Visual inspection of the monitor and cables
User
Every 6 months Visual inspection of the monitor and cables
User
Button check
Speaker check
LED check
Alarm check
Every 12 months Yearly test and test after repair according to IEC/EN 62353.
Qualified technician
CO2 Calibration1
1. The need for calibration is based upon physical component changes that occur during use. The module requires its first calibration after 1200 operating hours or one calendar year, whichever comes sooner, and then after each 4000 operating hours or once a year, whichever comes sooner. The message Calibration Due appears when the hourly limit is reached. It is advisable to calibrate in the one-year maintenance program especially if the monitor is used for intermittent, short term use typical of patient monitors.
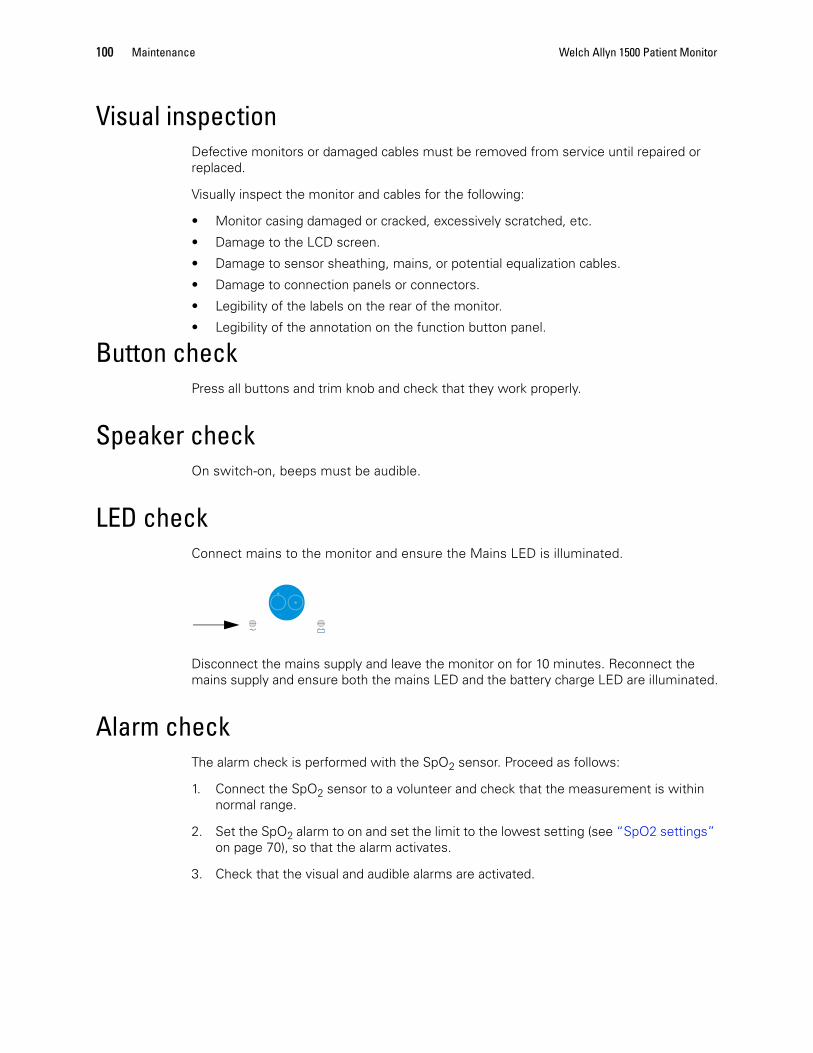
100 Maintenance Welch Allyn 1500 Patient Monitor
Visual inspectionDefective monitors or damaged cables must be removed from service until repaired or replaced.
Visually inspect the monitor and cables for the following:
• Monitor casing damaged or cracked, excessively scratched, etc.
• Damage to the LCD screen.
• Damage to sensor sheathing, mains, or potential equalization cables.
• Damage to connection panels or connectors.
• Legibility of the labels on the rear of the monitor.
• Legibility of the annotation on the function button panel.
Button checkPress all buttons and trim knob and check that they work properly.
Speaker checkOn switch-on, beeps must be audible.
LED checkConnect mains to the monitor and ensure the Mains LED is illuminated.
Disconnect the mains supply and leave the monitor on for 10 minutes. Reconnect the mains supply and ensure both the mains LED and the battery charge LED are illuminated.
Alarm checkThe alarm check is performed with the SpO2 sensor. Proceed as follows:
1. Connect the SpO2 sensor to a volunteer and check that the measurement is within normal range.
2. Set the SpO2 alarm to on and set the limit to the lowest setting (see “SpO2 settings” on page 70), so that the alarm activates.
3. Check that the visual and audible alarms are activated.

Directions for use Maintenance 101
Battery maintenanceThe battery is maintenance free during its normal life.
• No maintenance is necessary during normal operation.
• If the monitor is not used, check and recharge the batteries every three months. The battery should not be allowed to fully discharge during storage.
• Replace the battery every 2 to 5 years (depending upon application). When the running time falls substantially under two hours (lithium ion battery), or one hour (lead acid battery), replace the battery.
Recharging the batteryTotally discharged batteries require the following times to charge:
• Lead acid battery: 80% capacity - 2.8 hours, 100% capacity 3.5 hours
• Li-Ion battery: 80% capacity - 2.5 hours, 100% capacity - 6.5 hours
It is possible to use the monitor when the battery is being charged; however, the charging time of the battery will be extended.
1. Connect the monitor to the mains but do not switch it on.
2. The LEDs for both mains and battery are illuminated.
3. The battery LED is extinguished when the battery is fully charged.
Battery disposal
Batteries must be disposed of in municipally approved areas or sent back to Welch Allyn. See “Recycling monitor components” on page 109.
WARNING Explosion warning. The battery must not be burned or disposed of in domestic trash.
WARNING Flammability and chemical danger. Do not open the battery.
WARNING Protect the contacts from shorting when disposing of the battery. Apply non-conducting tape to the contacts.
102 Maintenance Welch Allyn 1500 Patient Monitor
Inspecting and cleaning the monitor and accessories
Before cleaning the monitor or any accessories, thoroughly inspect them.
• Look for any signs of damage and any improper mechanical function of buttons or connectors.
• Gently bend and flex cables, inspecting them for damage or extreme wear, exposed wires, or bent connectors.
• Confirm that all connectors engage securely.
• Ensure that all transducers and accessories are within their expiration date.
• Immediately report any sign of damage or malfunction to your service department, and remove the monitor from service.
To clean the monitor or any accessories, follow these steps:
1. Wipe the equipment with a cloth slightly moistened (not wet) with one of the approved cleaning solutions listed in “Cleaning instructions and cleaning solutions” on page 103.
2. Clean cable assemblies by gently wiping from the center of the cable. Do not allow the sheathing to be displaced.
3. Thoroughly wipe off any excess cleaning solution. Do not let the cleaning solution run into or accumulate in connector openings, latches, or crevices. If liquid gets into connectors, dry the area with warm air, and then check the equipment to confirm that it operates properly.
WARNING Do not autoclave the monitor or any accessories.
WARNING Do not immerse the monitor in liquid when cleaning. Do not immerse accessories in liquid when cleaning unless the accessory manufacturer’s cleaning instructions explicitly instruct you to do so.
WARNING Fire and electrical shock hazard. Always unplug the monitor from the electrical power outlet before inspecting or cleaning the monitor and accessories. Exposing any of these to liquids, such as cleaning solutions, while they are connected to electrical power could result in electrical shock or fire.
Caution Use only a cleaning solution recommended by Welch Allyn for this equipment. Use of any other cleaning solutions can cause damage to the equipment, including cracking and deterioration of the plastic case.
Caution Always follow the mixing/diluting instructions provided by the manufacturer of the cleaning solution.
Caution Never use any of the following solutions or similar products to clean the equipment: ethyl alcohol, ethanol, acetone, hexane, abrasive or scouring powder or material.

Directions for use Maintenance 103
Cleaning instructions and cleaning solutions
Equipment Cleaning instructions Approved cleaning solutions
Monitor1
1. The equipment can be disinfected to comply with OSHA requirements for cleaning and decontaminating spills of blood and other body fluids. (Federal OSHA blood borne pathogens standard: 29 CFR 1910.1030, 12/6/91.)
Wipe with a nearly dry cloth moistened with cleaning solution.Thoroughly wipe off any excess cleaning solution. Do not let cleaning solution run into connector openings or crevices.2
2. If liquid gets into the connectors, dry the area with warm air and then verify all monitoring functions.
70 % solution isopropyl alcohol; neutral mild detergent solution;all products designed for cleaning plastic.
ECG cable, extension cable
Consult manufacturer’s instructions. Mild detergent solution; also consult manufacturer’s instructions.
SpO2 cable, extension cable
Consult manufacturer’s instructions. Consult manufacturer’s instructions.
Other accessories Consult manufacturer’s instructions. Consult manufacturer’s instructions.

104 Maintenance Welch Allyn 1500 Patient Monitor
Inspection and checklist reportIn accordance with the maintenance interval detailed previously, the following check list should be copied and followed.
Monitor Serial Number: _________________________________
Every six months
Inspection Result Checked
General examination
Visual inspection of the monitor.
Monitor casing not broken or cracked.
Visual inspection of the LCD.
LCD screen undamaged.
Visual inspection of all cable assemblies and sensors and accessories.
Electrode cable sheathing and connectors undamaged.
No kinks, abrasion or wear in any cable assembly.
All transducers and accessories are within their expiratory date.
Plug and socket connectors.
Input/output connectors undamaged.
Button check Buttons work.
Speaker check.Switch the monitor on by pressing the On button.
Switch-on beeps sounded. The standard screen is displayed.
LED check Mains LED on when mains connected. Battery LED on when battery charging.
Alarm Check
Connect SpO2 sensor to volunteer.
Measurement within range.
Set SpO2 limit to lowest setting.
Measurement out of range and visual and audible alarm activated.
Recurrent test
Confirm the date of last factory inspections and test.
If the monitor is due for a yearly test, have a qualified technician perform the test.
Date of Inspection:
Inspector:
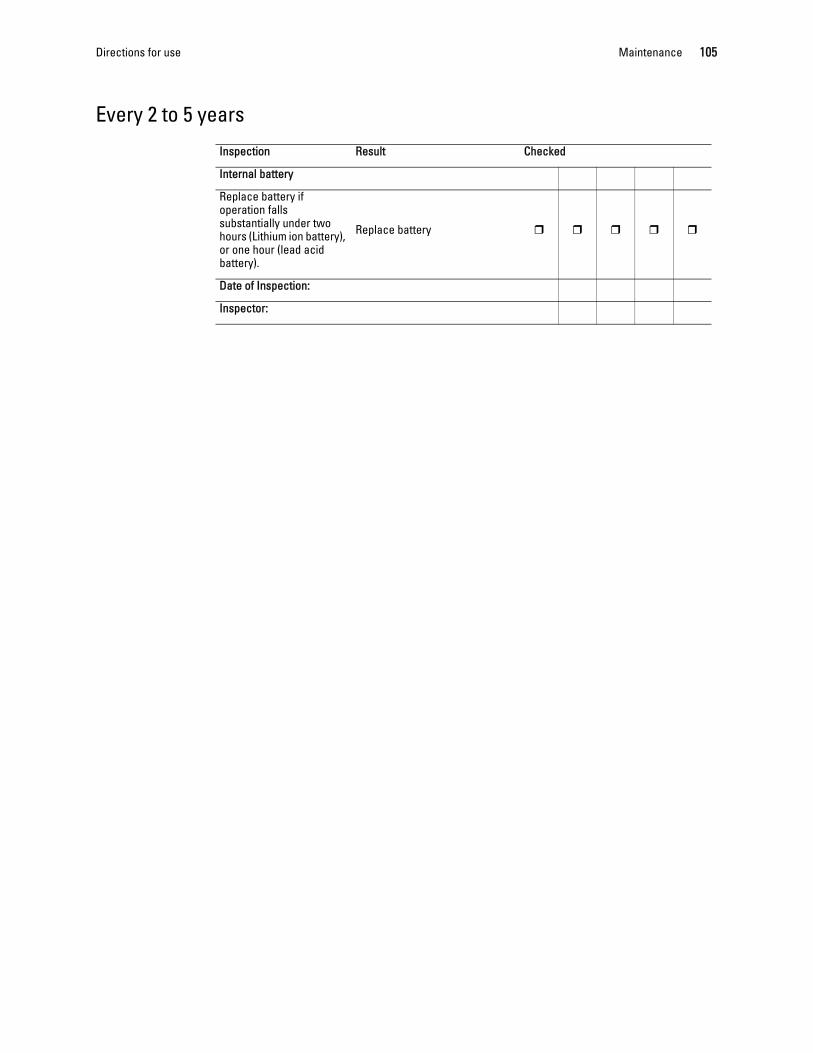
Directions for use Maintenance 105
Every 2 to 5 years
Inspection Result Checked
Internal battery
Replace battery if operation falls substantially under two hours (Lithium ion battery), or one hour (lead acid battery).
Replace battery
Date of Inspection:
Inspector:

106 Maintenance Welch Allyn 1500 Patient Monitor
Replacing the fuses
Fuse types
Changing the fuse1. Disconnect the monitor from the mains.
2. Release the fuse holder by gently squeezing the side retaining clips and remove the fuse holder.
3. Replace both fuses. Re-insert the fuse holder until the two side clips snap in place.
WARNING Disconnect the monitor from the mains before changing the fuses.
WARNING Blown fuses must only be replaced with the fuse types indicated in the below table.
Voltage range Number Fuse type WA Part No. Manufacturer Part No.
100-240 VAC 2 M 1.6A E 250V 4.210004 Schurter Inc, FSM 0034.2518
M= Medium time lagE= Enhanced breaking capacity

Directions for use Maintenance 107
Troubleshooting
General
Alarm/Condition Possible cause Suggested action
Recorder out of paper Paper tray empty Insert new paper
Check paper Paper jammed Check paper
Recorder needs service
Printer error; paper not transported correctly; wrong paper
Check printer; check paper; wrong paper; paper not inserted correctly; have printer replaced.
Battery low Battery capacity too low Connect to the mains and recharge battery.
No HR/PR tone HR/PR tone source setting Set tone source to on.
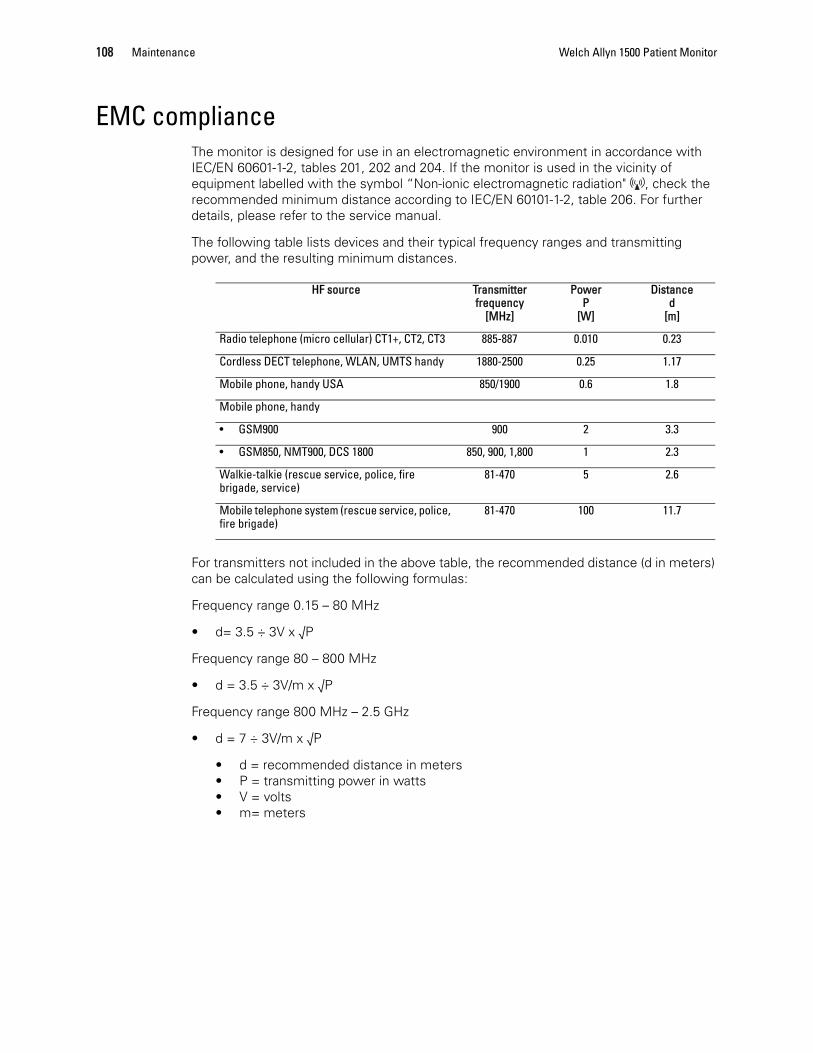
108 Maintenance Welch Allyn 1500 Patient Monitor
EMC complianceThe monitor is designed for use in an electromagnetic environment in accordance with IEC/EN 60601-1-2, tables 201, 202 and 204. If the monitor is used in the vicinity of equipment labelled with the symbol “Non-ionic electromagnetic radiation" , check the recommended minimum distance according to IEC/EN 60101-1-2, table 206. For further details, please refer to the service manual.
The following table lists devices and their typical frequency ranges and transmitting power, and the resulting minimum distances.
For transmitters not included in the above table, the recommended distance (d in meters) can be calculated using the following formulas:
Frequency range 0.15 – 80 MHz
• d= 3.5 ÷ 3V x √P
Frequency range 80 – 800 MHz
• d = 3.5 ÷ 3V/m x √P
Frequency range 800 MHz – 2.5 GHz
• d = 7 ÷ 3V/m x √P
• d = recommended distance in meters• P = transmitting power in watts• V = volts• m= meters
HF source Transmitter frequency
[MHz]
Power P
[W]
Distance d
[m]
Radio telephone (micro cellular) CT1+, CT2, CT3 885-887 0.010 0.23
Cordless DECT telephone, WLAN, UMTS handy 1880-2500 0.25 1.17
Mobile phone, handy USA 850/1900 0.6 1.8
Mobile phone, handy
• GSM900 900 2 3.3
• GSM850, NMT900, DCS 1800 850, 900, 1,800 1 2.3
Walkie-talkie (rescue service, police, fire brigade, service)
81-470 5 2.6
Mobile telephone system (rescue service, police, fire brigade)
81-470 100 11.7

Directions for use Maintenance 109
Mounting on a wall or standFollow the instructions given with the mount or stand. The mounting accessories are detailed in the Accessories section (see “Mounting” on page 123).
Recycling monitor components
This monitor must be disposed of in a municipally approved collection point or recycling center when no longer used.
If no such collection point or recycling center is available, you can return the monitor to your distributor or the manufacturer for proper disposal.
Refer to www.welchallyn.com/weee for collection points and additional information.
WARNING Always use Welch Allyn replacement parts and disposables, or products approved by Welch Allyn. Failure to do so may cause patient injury and invalidate the warranty.

110 Maintenance Welch Allyn 1500 Patient Monitor

8
111
Settings
Setup menu overviewThe setup menu contains the view, and alarm settings, along with patient information entry, patient mode, hemodynamic and drug calculations, and other general settings for the monitor. Many of these settings are also found in the individual parameter settings (see “Monitoring and Measurements” on page 39).
The Setup menu is displayed as follows:
1. Press the Setup button .
2. With the trim knob, select the menu option.
3. Press the trim knob to display the menu.
The setup menu options are as follows:
The following pages give an overview of the settings available.
Note The menu will vary for different monitor configurations and enabled options.
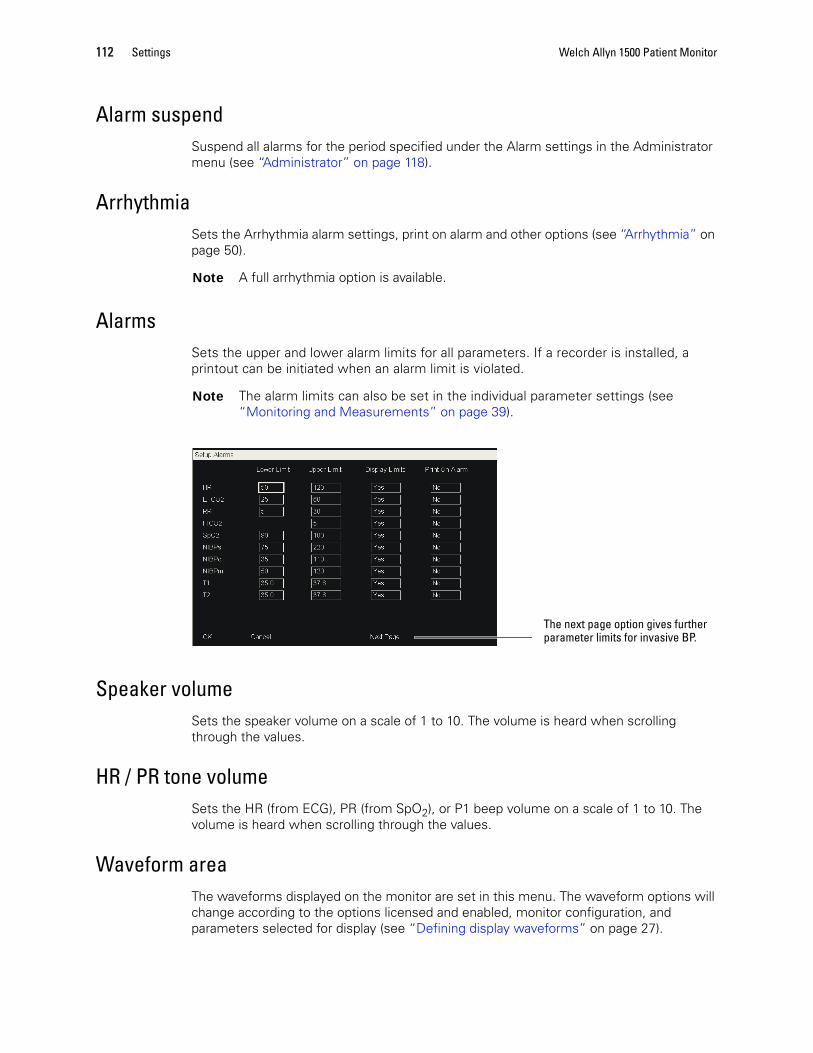
112 Settings Welch Allyn 1500 Patient Monitor
Alarm suspendSuspend all alarms for the period specified under the Alarm settings in the Administrator menu (see “Administrator” on page 118).
ArrhythmiaSets the Arrhythmia alarm settings, print on alarm and other options (see “Arrhythmia” on page 50).
AlarmsSets the upper and lower alarm limits for all parameters. If a recorder is installed, a printout can be initiated when an alarm limit is violated.
Speaker volumeSets the speaker volume on a scale of 1 to 10. The volume is heard when scrolling through the values.
HR / PR tone volumeSets the HR (from ECG), PR (from SpO2), or P1 beep volume on a scale of 1 to 10. The volume is heard when scrolling through the values.
Waveform areaThe waveforms displayed on the monitor are set in this menu. The waveform options will change according to the options licensed and enabled, monitor configuration, and parameters selected for display (see “Defining display waveforms” on page 27).
Note A full arrhythmia option is available.
Note The alarm limits can also be set in the individual parameter settings (see “Monitoring and Measurements” on page 39).
The next page option gives further parameter limits for invasive BP.

Directions for use Settings 113
Recorder
This defines the information to be printed.
The waveforms that can be printed will depend on the options enabled and the configuration of the monitor. The default settings are in bold.
* These parameters are available only when installed and enabled.
** This option is not available when CO2 is enabled.
ParametersThe parameters that can be enabled and displayed are set in this menu. The parameter options will change according to the licensed options and monitor configuration and will be any combination of the following:
• etCO2
• ST
• Masimo settings (extra settings for SpO2)
• CO (cardiac output)
• IBP channel (number of invasive BP channels (none, 2 or 4)
• Temperature display mode (T1, T1 and T2, or T1 and ΔT)
Details of the displayed parametrize are given in the operation section (see “Defining parameter fields” on page 25).
Note This is only available when the recorder option is installed.
Main menu Parameter Description
SetUp Recorder Waveform 1 ECG1, ECG2, ECG3, RESP, CO2 *, SpO2, P1, P2, P3*, P4*
Waveform 2 ECG1, ECG2, ECG3, RESP**, CO2 *, SpO2, P1, P2, P3*, P4*, OFF
Waveform 3 ECG1, ECG2, ECG3, RESP, CO2 *, SpO2, P1, P2, OFF
Recording time 5, 10, 16 Seconds
Recording Delay 0, 6, 10 Seconds. This defines the duration of data that is printed before the print key is pressed. For example, if a delay of six seconds with a recording time of 10 seconds is defined (default), six seconds of data recorded before the print key is pressed is printed, followed by the subsequent 4 seconds.

114 Settings Welch Allyn 1500 Patient Monitor
12-lead resting ECG
This option allows you to take and print a resting ECG (see “12-lead resting ECG (option)” on page 47). When the monitor is connected to Acuity, the resting ECG is uploaded automatically.
Hemodynamic calculations
This option allows you to enter parameters for hemodynamic calculations. When the relevant data is entered along with patient weight and height, the monitor can calculate the BSA of the patient and the hemodynamic factors. Details of the factors calculated and entry data is given in the monitoring section (see “Hemodynamic calculations” on page 87).
Note This menu entry is only available when the resting ECG option is enabled.
Note This menu entry is only available when the CO option is enabled.

Directions for use Settings 115
Drug calculationsThe drug calculation menu calculates the dose / rate of drug delivery for a specific patient from entered drug parameters. Entries are given for dose, rate, amount, and volume. Entry of any three enables the fourth value to be calculated.
A titration table can also be calculated and displayed when the relevant parameters are entered.
When drug calculation is selected the following screen is appears:
• Dose: Enter the total dose in:
• mcg/kg/min• mg/min• mcg/min• mg/hr• units/hr
• Rate: Enter the rate in ml/hr.
• Amount: Enter the amount in:
• mg• mcg• units
• Volume: Enter the volume ml.
• Weight: Enter the patient’s weight lbs or kg (dependent on monitor configuration).
• Calculation type: Select between Dose or Rate.
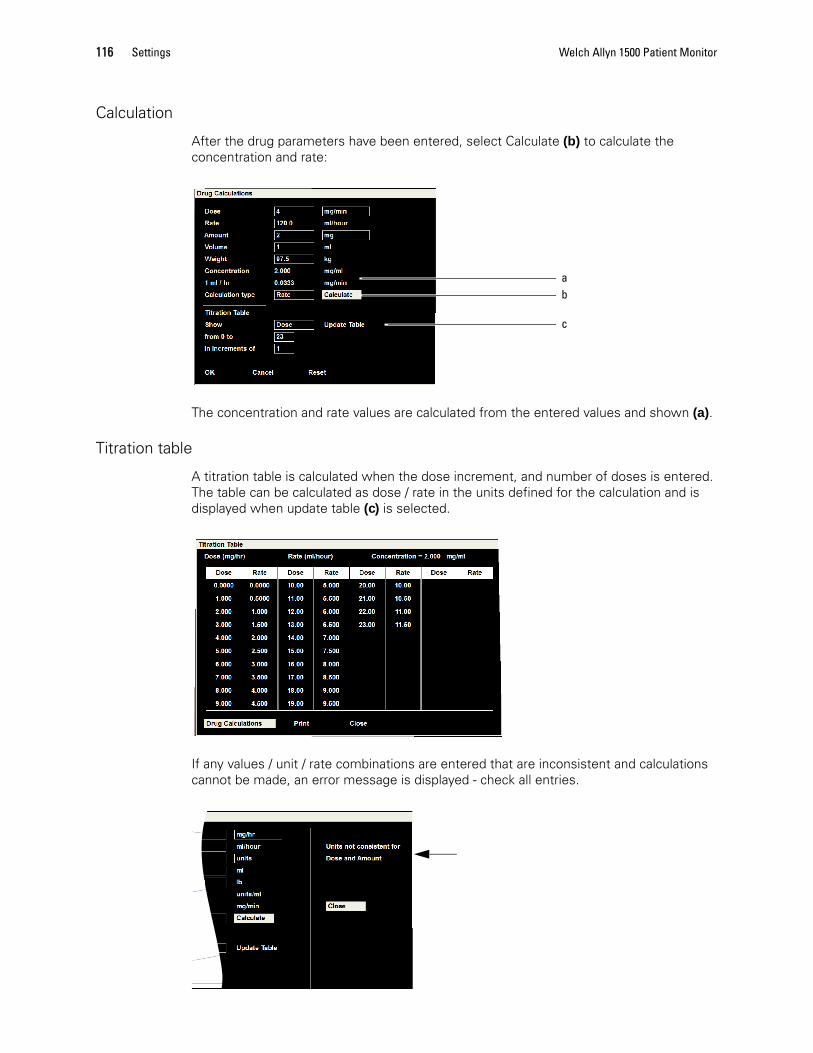
116 Settings Welch Allyn 1500 Patient Monitor
Calculation
After the drug parameters have been entered, select Calculate (b) to calculate the concentration and rate:
The concentration and rate values are calculated from the entered values and shown (a).
Titration table
A titration table is calculated when the dose increment, and number of doses is entered. The table can be calculated as dose / rate in the units defined for the calculation and is displayed when update table (c) is selected.
If any values / unit / rate combinations are entered that are inconsistent and calculations cannot be made, an error message is displayed - check all entries.
b
c
a

Directions for use Settings 117
Patient informationThis screen allows the entry of the patient name and ID, including gender, date of birth, ethnicity, height, weight, and drug categories.
Patient modeDefine the patient; select adult, pediatric, or neonatal as follows:
• Neonatal: Birth through 28 days.
• Pediatric: Between 29 days and 12 years.
• Adult: 13 years and older.
When a patient mode change is requested, a prompt screen is displayed giving the following confirmation options:
• Save patient data and continue - This will confirm the patient mode set and keep the same patient data.
Note When the monitor is connected to an Acuity Central Station, patient information can be changed at the monitor or at Acuity. Any changes are synchronized. The room number is defined at Acuity and cannot be changed at the monitor. The patient information menu option is not available when an Acuity-enabled monitor is not connected to Acuity.

118 Settings Welch Allyn 1500 Patient Monitor
• Purge patient data and continue - This will confirm the patient mode, but delete all patient data.
• Cancel (do not change patient mode) - This will not change the patient mode and will keep the current patient data.
Restore user defaultsThe saved user settings are enabled. The user-defined settings are saved in the Setup System menu (see “Saving the user-defined settings as default” on page 21).
AdministratorThe administrator and service screens provide system information and option settings.
The Administrator screens are entered from the settings menu:
Setup Menu > Administrator
Administrator sub-menus can only be accessed with a password. The passwords are divided into clinical, service and factory passwords and only clinical settings are available for the user. The other menu options on this menu are for Welch Allyn service personnel. Options are enabled in the service menu; please contact Welch Allyn. The passwords for the alarms and system sub-menus are as follows:
• Setup > Administrator > Alarms: 49, 48, 46 (Clinical Password).
• Setup> Administrator > System 49, 48, 46 (Clinical Password).
• No password is needed to view the Configuration. Other sub-menus are intended for service personnel only.
Note Integrated Pulmonary Index™ (IPI) is age specific and if enabled, all IPI trend data is deleted when the patient mode is changed. A message appears on the confirmation screen (above) to state this.

Directions for use Settings 119
The Administrator menu is as follows:
Sub menu Parameter Description
Configuration Monitor data such as serial number, software version etc. This is provided for information only and no settings can be made.
Communications This provides the communication settings for service personnel only.
Alarms (password protected - see above)
Alarm Silence Time 1, 1.5 or 2 minutes. Time for which an audible alarm is silenced.
Alarm Suspend Time 1, 1.5 or 2 minutes. Time for which all alarms are suspended.
Can disable HR / PR Alarms
Enabled/Disabled. The menu item can prevent users from being able to turn off HR or PR alarms. When the setting is "Disabled", a user cannot turn off the HR or PR alarms.
Alarm Delay On/Off. If the alarm validation is enabled, alarm limits must be exceeded for at least 6 seconds for an alarm to be issued.
Second Speaker Time 0 to 3 minutes (2 minutes). Time after which the secondary speaker is enabled. For lethal and high level alarms the secondary speaker is activated in 30 seconds.
Audio Off Yes, or No. Disables the audible alarm indefinitely until reset manually, or when a new patient is defined, or the monitor switched off.
System(password protected - see previous page)
Height units Select Inches (in) or centimeters (cm)- sets the monitor’s measurement units.
Weight units Select pounds (lbs) or kilograms (kg)- sets the monitor’s measurement units. In neonate mode the units are automatically switched to grams.
Acuity Enabled Yes/No. Connects to Acuity. Note that Acuity can only be enabled when Enable Acuity connection in the service setup is set.
Set Date and Time Entry of the year/month/day/hour/minute.
Save User Defaults With this function, values changed by the user are saved.
Show Event Log Display of the monitor event log (see “Event log screen and CO2 calibration” on page 120).
Service This provides settings, options and service information for service personnel only.
Factory This menu is for factory use only.
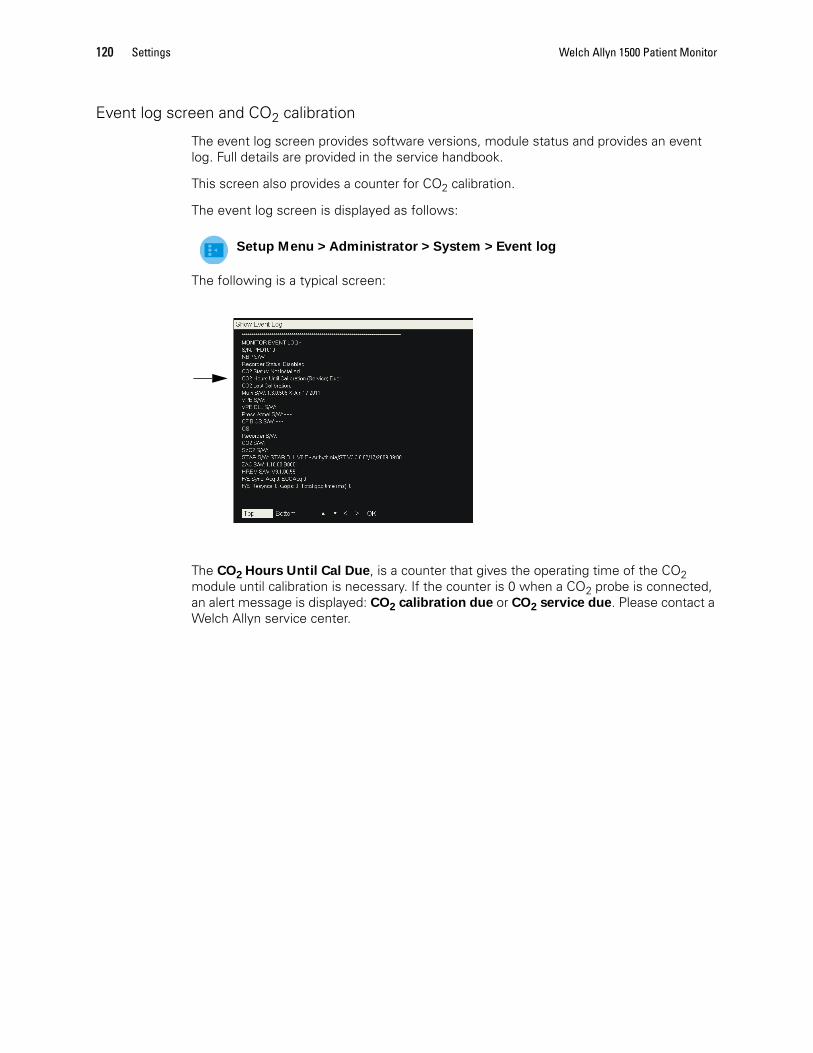
120 Settings Welch Allyn 1500 Patient Monitor
Event log screen and CO2 calibration
The event log screen provides software versions, module status and provides an event log. Full details are provided in the service handbook.
This screen also provides a counter for CO2 calibration.
The event log screen is displayed as follows:
Setup Menu > Administrator > System > Event log
The following is a typical screen:
The CO2 Hours Until Cal Due, is a counter that gives the operating time of the CO2 module until calibration is necessary. If the counter is 0 when a CO2 probe is connected, an alert message is displayed: CO2 calibration due or CO2 service due. Please contact a Welch Allyn service center.
Directions for use Settings 121
Parameter settings1. Move to the desired parameter measurement field using the trim knob. A white
frame appears around the selected measurement field.
2. The selected menu is displayed by pressing the trim knob.
The settings available and default settings are given in the Monitoring section (see “Monitoring and Measurements” on page 39).
• ECG / Heart rate / Pacemaker (see “ECG” on page 40).
• ST (see “ST measurement (option)” on page 52).
• RR / Respiration (see “Respiration rate” on page 55).
• etCO2 / Respiration (see “Capnography” on page 57)
• NIBP (see “NIBP monitoring” on page 64).
• SpO2 (see “SpO2 monitoring” on page 68).
• IBP (see “IBP monitoring” on page 73).
• Temperature (see “Temperature monitoring” on page 77).
• Cardiac output ((see “Cardiac output (option)” on page 78).

122 Settings Welch Allyn 1500 Patient Monitor
9
123
Accessories
Miscellaneous
Mounting
Batteries
WARNING Use only accessories supplied or recommended by Welch Allyn. Use accessories according to your facility’s standards and manufacturer’s recommendations. Always refer to the manufacturer’s directions for use. To order accessories, contact your local Welch Allyn representative (see page ii).
Part number Description
105074 Welch Allyn 1500 Patient Monitor multi-language directions for use (V.1.4)
103610 10-pack thermal Z-fold paper
103611 100-pack thermal Z-fold paper
Part number Description
103440 Welch Allyn 1500 Patient Monitor pivot arm wall mount
103441 Welch Allyn 1500 Patient Monitor flush to wall mount
103442 Welch Allyn 1500 Patient Monitor rollstand
103443 Welch Allyn 1500 Patient Monitor drop on Mfg. plate (included in all mounting kits)
104019 Welch Allyn 1500 Patient Monitor table mount
Part number Description
103461 Lead acid
104033 Lithium Ion
104062 International Lithium Ion

124 Accessories Welch Allyn 1500 Patient Monitor
Cables
Nellcor SpO2
Masimo SpO2
ECG
Part number Description
103460 Ground cable, 6 mm MC PLUG
715316 Ethernet cable, 3 ft
715317 Ethernet cable, 7 ft
715318 Ethernet cable, 14 ft
104384 Ethernet cable, 25 ft
103632 Mains cable, TYPE G
103633 Mains cable, TYPE E/F
103634 Mains cable, TYPE I
103635 Mains cable, TYPE J
103636 Mains cable, TYPE A
103638 Mains cable, TYPE B
Part number Description
103490 Nellcor SpO2 cable, DOC-10
008-0054-01 DS-100A DURASENSOR, reusable sensor
Part number Description
713657 Masimo SpO2 cable, LNC-10
706831 Masimo LNCS-DC1 reusable sensor
Part number Description
103801 12-Lead ECG shielded cable, AHA
103802 12-Lead ECG shielded cable, IEC
008-0316-00 3-Lead ECG cable, AHA
008-0323-00 3-Lead ECG wire set, AHA
008-0313-00 5-Lead 10 ft ECG cable with lead wires, AHA
008-0316-01 3-Lead ECG cable, IEC
008-0323-01 3-Lead ECG wire set, IEC
008-0313-01 5-Lead 10 ft ECG cable with lead wires, IEC

Directions for use Accessories 125
IBP
Temperature
NIBP
Cardiac output
Part number Description
008-0226-01 IBP cable F/MX900 & MX860
008-0233-00 IBP transducer, DISP. MX950(5)
008-0224-00 IBP domes, MX848
Part number Description
008-0230-00 Temperature sensor
Part number Description
008-0238-00 Adult/Ped NIBP hose for bladderless cuff
REUSE-11-1MQ CUFF Reusable, 11-1MQ, ADULT, 1 TUBE, MQ
REUSE-12L-1MQ
CUFF Reusable, LG AD LONG 1-TUBE MQ
REUSE-08-1MQ CUFF Reusable, SM CHILD 1-TUBE, MQ
REUSE-09-1MQ CUFF Reusable, CHILD, 1-TUBE, MQ
REUSE-10-1MQ CUFF Reusable, SM AD, 1-TUBE, MQ
REUSE-12-1MQ CUFF Reusable, LG AD, 1-TUBE, MQ
REUSE-13-1MQ CUFF Reusable, THIGH, 1-TUBE, MQ
SOFT-08-1MQ CUFF soft, SM CHILD 2-TUBE, MQ
SOFT-09-1MQ CUFF soft, CHILD, 2-TUBE, MQ
SOFT-10-1MQ CUFF soft, SM AD, 2-TUBE, MQ
SOFT-11-1MQ CUFF soft, ADULT, 2-TUBE, MQ
SOFT-12-1MQ CUFF soft, LG AD, 2-TUBE, MQ
SOFT-13-1MQ CUFF soft, THIGH, 2-TUBE, MQ
Part number Description
104443 Cardiac output sensor

126 Accessories Welch Allyn 1500 Patient Monitor
A
127
Technical data
System dataManufacturer SCHILLER AG for Welch Allyn
Monitor name Welch Allyn® 1500 Patient Monitor
Dimensions 396 x 284 x 81 mm (15.6 x 11.2 x 3.2 inches)
Weight 5.0 kg (11 lbs) (with lead acid battery)
4.5 kg (9.9 lbs) (with Li-Ion battery)
Mode of operation Continuous
Power supply Internal Charger
Voltage 100 – 240 V, 50 – 60 Hz
Power consumption max 70 VA
Typical battery operating time
With the battery fully charged, 25°C, display on, NIBP measurement every 15 minutes, and with all parameters ECG/RESP/NIBP/Temp/SpO2/IBP(x2)/CO2:
Lead Acid: approximately 1 hour
Li-Ion: approximately 2 hours
Fuses 2 x M 1.6A E 250V
Environmental conditions for operating
Temperature 10 ºC to 40 ºC (50 ºF to 104 ºF) at relative humidity of 30 to 80 % (non-condensing)
Atmospheric pressure
700 to 1060 hPa
Environmental conditions for transport and storage
Temperature -10 ºC to 50 ºC (14 ºF to 122 ºF) at relative humidity of 10 to 95 % (non-condensing)
Atmospheric pressure
572 to 1060 hPa
Monitor display Color TFT LCD
Resolution 1024 x 768 pixels
Dimensions 30.7 x 23 cm (12 x 9 ins),15 in diagonal
Speed 6.25/12.5/25 mm/s
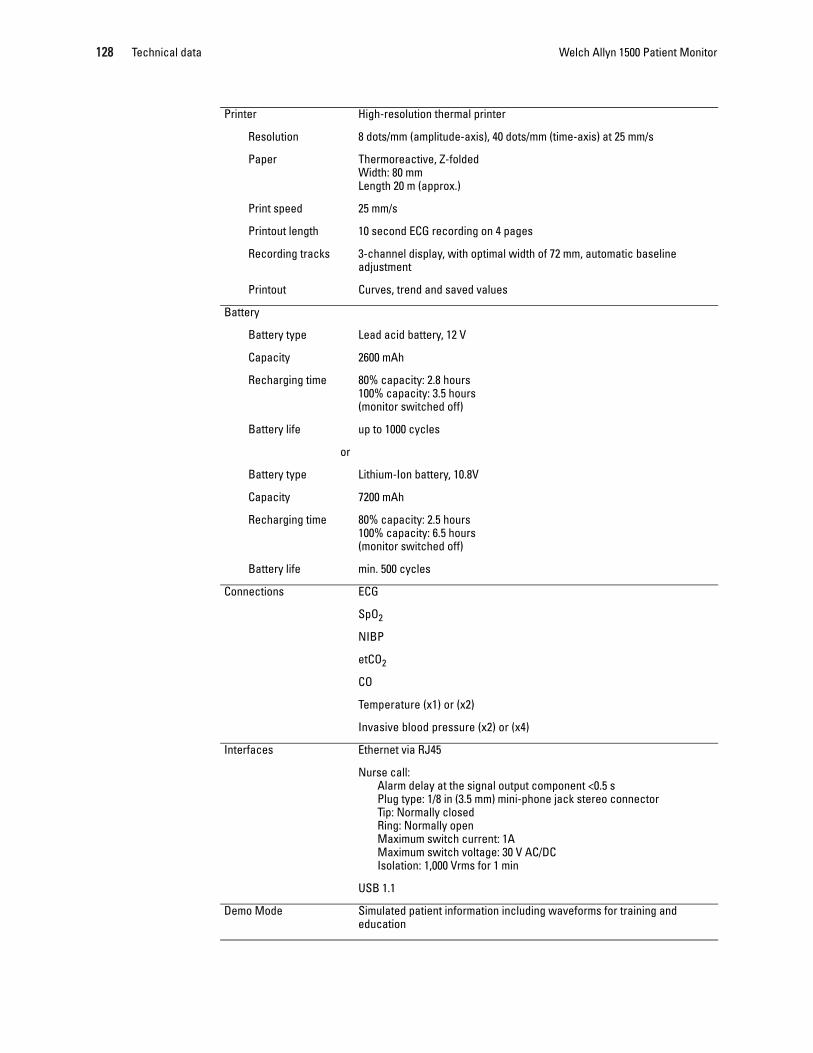
128 Technical data Welch Allyn 1500 Patient Monitor
Printer High-resolution thermal printer
Resolution 8 dots/mm (amplitude-axis), 40 dots/mm (time-axis) at 25 mm/s
Paper Thermoreactive, Z-foldedWidth: 80 mm Length 20 m (approx.)
Print speed 25 mm/s
Printout length 10 second ECG recording on 4 pages
Recording tracks 3-channel display, with optimal width of 72 mm, automatic baseline adjustment
Printout Curves, trend and saved values
Battery
Battery type Lead acid battery, 12 V
Capacity 2600 mAh
Recharging time 80% capacity: 2.8 hours100% capacity: 3.5 hours(monitor switched off)
Battery life up to 1000 cycles
or
Battery type Lithium-Ion battery, 10.8V
Capacity 7200 mAh
Recharging time 80% capacity: 2.5 hours100% capacity: 6.5 hours (monitor switched off)
Battery life min. 500 cycles
Connections ECG
SpO2
NIBP
etCO2
CO
Temperature (x1) or (x2)
Invasive blood pressure (x2) or (x4)
Interfaces Ethernet via RJ45
Nurse call:Alarm delay at the signal output component <0.5 sPlug type: 1/8 in (3.5 mm) mini-phone jack stereo connectorTip: Normally closedRing: Normally openMaximum switch current: 1AMaximum switch voltage: 30 V AC/DCIsolation: 1,000 Vrms for 1 min
USB 1.1
Demo Mode Simulated patient information including waveforms for training and education
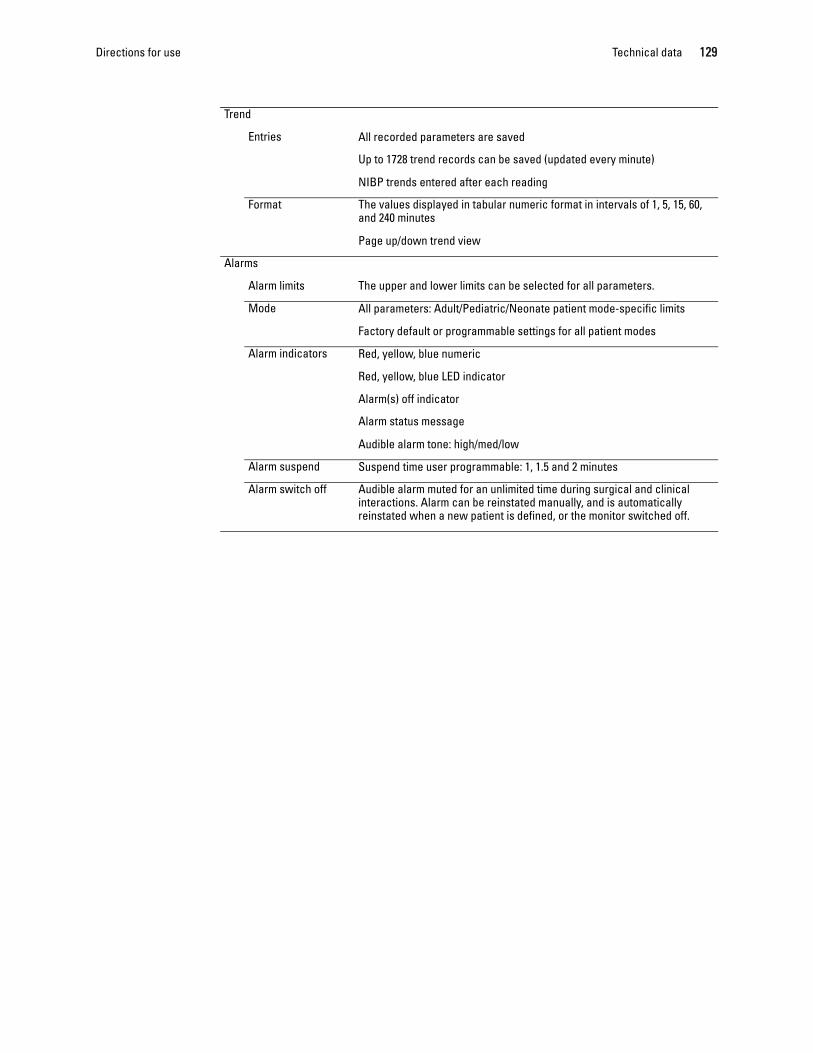
Directions for use Technical data 129
Trend
Entries All recorded parameters are saved
Up to 1728 trend records can be saved (updated every minute)
NIBP trends entered after each reading
Format The values displayed in tabular numeric format in intervals of 1, 5, 15, 60, and 240 minutes
Page up/down trend view
Alarms
Alarm limits The upper and lower limits can be selected for all parameters.
Mode All parameters: Adult/Pediatric/Neonate patient mode-specific limits
Factory default or programmable settings for all patient modes
Alarm indicators Red, yellow, blue numeric
Red, yellow, blue LED indicator
Alarm(s) off indicator
Alarm status message
Audible alarm tone: high/med/low
Alarm suspend Suspend time user programmable: 1, 1.5 and 2 minutes
Alarm switch off Audible alarm muted for an unlimited time during surgical and clinical interactions. Alarm can be reinstated manually, and is automatically reinstated when a new patient is defined, or the monitor switched off.

130 Technical data Welch Allyn 1500 Patient Monitor
Safety standards
Safety standard IEC 60601-1/A2: 1995: Delta -consideration related to IEC60601-1:2005 incl. corrections 1:2006 and 2:2007:General requirements for basic safety and essential performance. Protection Class I Type CF.
IEC 60601-1-4/A1: 1999: General requirements for collateral standard: programmable electrical medical systems.
IEC 62366: 2007: Application of usability engineering to medical devices.
IEC 60601-2-27: 2005: Particular requirements for the safety of electrocardiographic monitoring equipment..
IEC 60601-2-30: 1999:Particular requirements for the safety, including essential performance, of automatic cycling non-invasive blood pressure monitoring equipment..
IEC 60601-2-34: 2000:Particular requirements for the safety, including essential performance, of invasive blood pressure monitoring equipment.
IEC 60601-2-49: 2001:Particular requirements for the safety of multifunction patient monitoring equipment.
ISO 9919. Particular requirements for the basic safety and essential performance of pulse oximeter equipment for medical use.
ISO 21647. Particular requirements for the basic safety and essential performance of respiratory gas monitors.
Protection class Protection against electric shocks, Class I according to IEC/EN 60601-1 (with internal power).
Protection This monitor is not designed for outdoor use (IPX0).
EMC IEC/EN 60601-1-2: 2007: (class A).
Additional requirements
EN 1060-1 and EN 1060-3 (noninvasive blood pressure recorders part 1). EN12470-4 (Performance of electrical thermometers for continuous measurement).
Conformity CE according to directive 93/42/EEC class IIb.

Directions for use Technical data 131
Measured values
ECG
Patient cable 3-lead, 5-lead, 12-lead cable
Automatic 3, 5 and 12 lead detection
Lead fault detection
AAMI 6 pin and 12 pin connectors
Leads Simultaneous, synchronous recording of up to nine active electrodes giving 12 leads
Filters
Mains 50 Hz / 60 Hz / off
Bandwidth 0.05 Hz / 0.5 Hz , 35 Hz / 150 Hz
Input impedance > 2.58 MS
Heart rate range 15 to 300 beats/min
QRS tone On / Off
Protection ESU and defibrillator protected
Lead display Selectable leadsSelection of 1 to 5 simultaneous leads
Display update interval 1 second
Lead fail sense current < 0.5 :A
Tall T-wave rejection max. amplitude of the T-wave according to IEC 60601-2-27 chapter 50.102.17: 4 mV
HR averaging method The average of the last 16 beats is used, when RR interval corresponds to a HR of < 48 bpm.
The average of the last 4 beats is used, when RR interval corresponds to a HR of $48 bpm.
HR accuracy ± 5 % or ± 5 bpm (whichever is greater)
HR meter response time Change from 80 to 120 bpm: 11s
Change from 80 to 40 bpm: 11s
Response to Irregular rhythm
A1: 80/minA2: 60/min A3: 120/minA4: 90/min (according to IEC specification 60601-2-27, 6.8.2.bb)
Time to Alarm for tachycardia
B1 and B2: 3 s(according to IEC specification 60601-2-27, 6.8.2.bb)
Sensitivity According to ANSI/AAMI EC13 / IEC60601-2-27
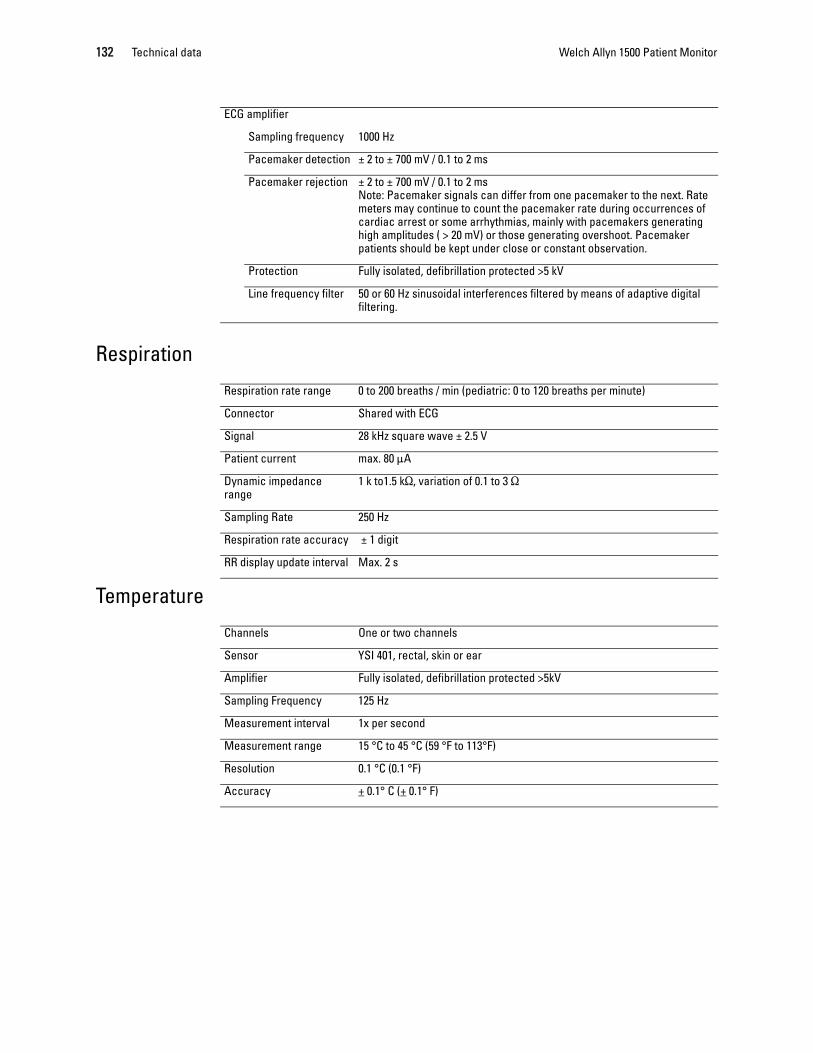
132 Technical data Welch Allyn 1500 Patient Monitor
Respiration
Temperature
ECG amplifier
Sampling frequency 1000 Hz
Pacemaker detection ± 2 to ± 700 mV / 0.1 to 2 ms
Pacemaker rejection ± 2 to ± 700 mV / 0.1 to 2 msNote: Pacemaker signals can differ from one pacemaker to the next. Rate meters may continue to count the pacemaker rate during occurrences of cardiac arrest or some arrhythmias, mainly with pacemakers generating high amplitudes ( > 20 mV) or those generating overshoot. Pacemaker patients should be kept under close or constant observation.
Protection Fully isolated, defibrillation protected >5 kV
Line frequency filter 50 or 60 Hz sinusoidal interferences filtered by means of adaptive digital filtering.
Respiration rate range 0 to 200 breaths / min (pediatric: 0 to 120 breaths per minute)
Connector Shared with ECG
Signal 28 kHz square wave ± 2.5 V
Patient current max. 80 :A
Dynamic impedance range
1 k to1.5 kS, variation of 0.1 to 3 S
Sampling Rate 250 Hz
Respiration rate accuracy ± 1 digit
RR display update interval Max. 2 s
Channels One or two channels
Sensor YSI 401, rectal, skin or ear
Amplifier Fully isolated, defibrillation protected >5kV
Sampling Frequency 125 Hz
Measurement interval 1x per second
Measurement range 15 °C to 45 °C (59 °F to 113°F)
Resolution 0.1 °C (0.1 °F)
Accuracy + 0.1° C (+ 0.1° F)

Directions for use Technical data 133
NIBP
IBP
Measurement Quick action start / stop buttonAutomatic or manual
Measuring intervals 3 to 60 minutes
Measuring method Oscillometric
Measurement range 15 to 270mmHg
Deflation rate 3 to 9 mmHg / second
Cuff Adult, Pediatric and Neonate
Pulse rate measurement range
25 to 300 bpm
Protection Overpressure protection
Channels Two channels or four channels
Measurement range -30 to 300 mmHg
Accuracy 1 mmHg or ± 1% (whichever is greater)
Sampling Frequency 500 Hz
Amplifier Fully isolated, defibrillation protected >5kV
Calibration Manual or automatic
Pulse rate measurement range
25 to 250 bpm
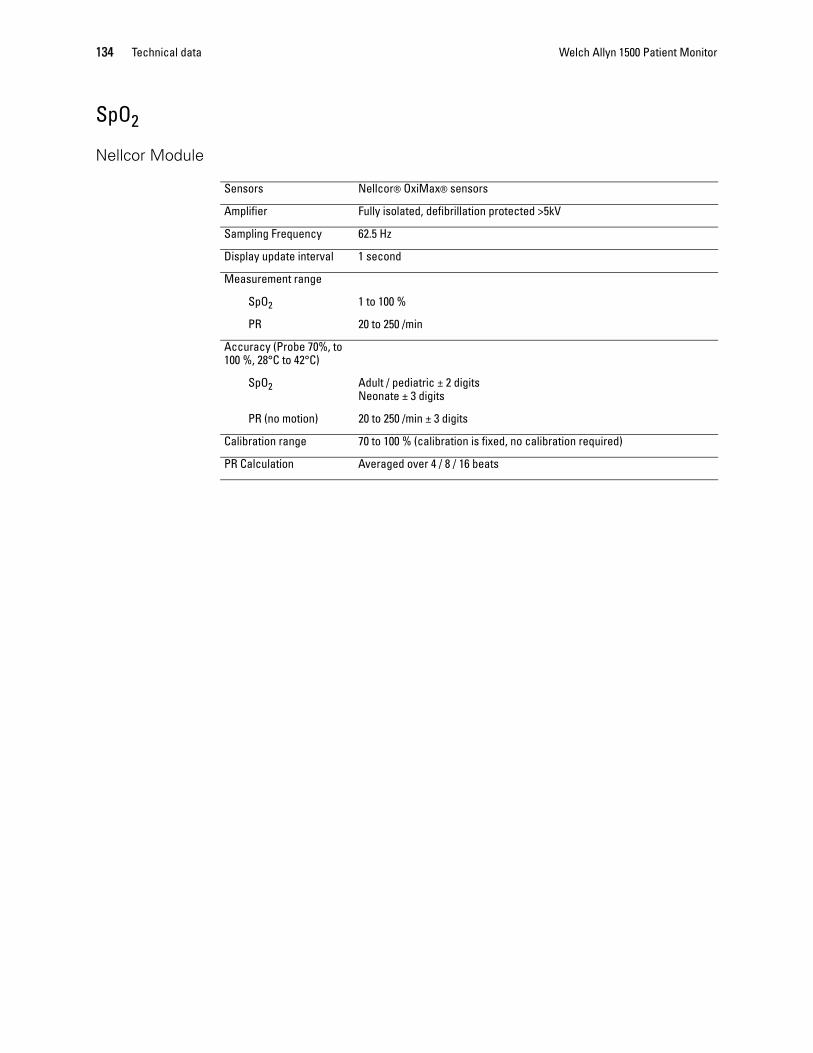
134 Technical data Welch Allyn 1500 Patient Monitor
SpO2
Nellcor Module
Sensors Nellcor® OxiMax® sensors
Amplifier Fully isolated, defibrillation protected >5kV
Sampling Frequency 62.5 Hz
Display update interval 1 second
Measurement range
SpO2 1 to 100 %
PR 20 to 250 /min
Accuracy (Probe 70%, to 100 %, 28°C to 42°C)
SpO2 Adult / pediatric ± 2 digitsNeonate ± 3 digits
PR (no motion) 20 to 250 /min ± 3 digits
Calibration range 70 to 100 % (calibration is fixed, no calibration required)
PR Calculation Averaged over 4 / 8 / 16 beats
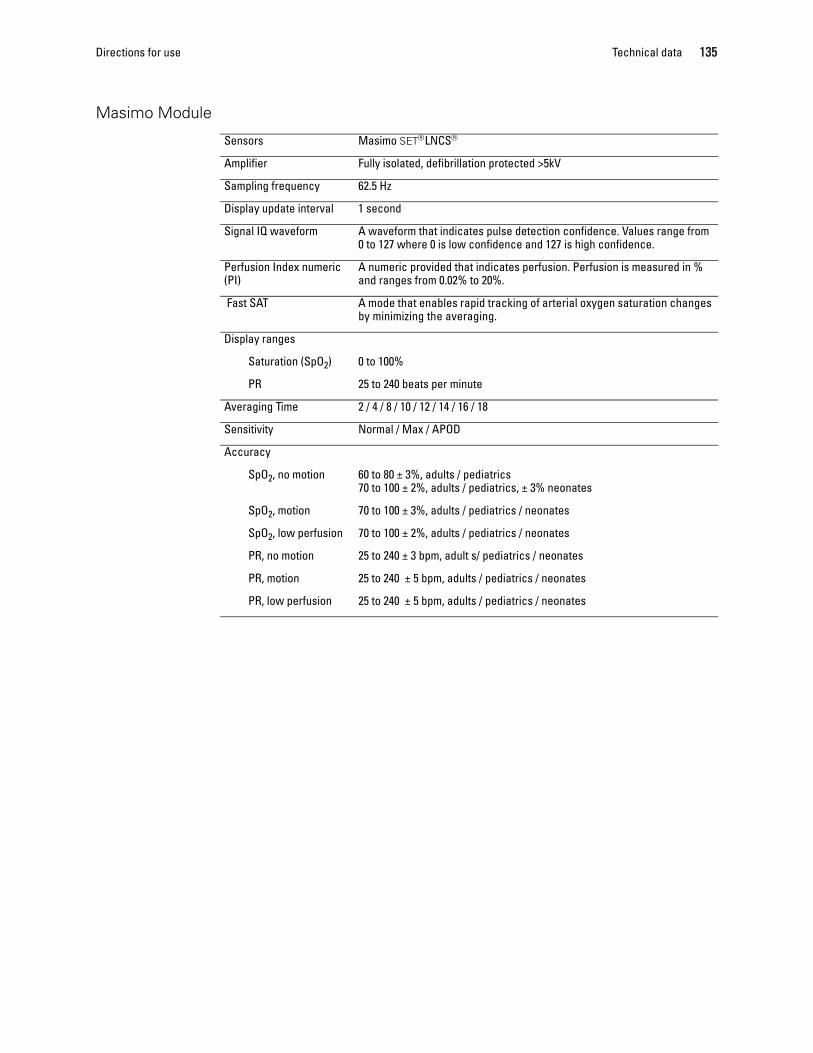
Directions for use Technical data 135
Masimo Module
Sensors Masimo SET®LNCS®
Amplifier Fully isolated, defibrillation protected >5kV
Sampling frequency 62.5 Hz
Display update interval 1 second
Signal IQ waveform A waveform that indicates pulse detection confidence. Values range from 0 to 127 where 0 is low confidence and 127 is high confidence.
Perfusion Index numeric (PI)
A numeric provided that indicates perfusion. Perfusion is measured in % and ranges from 0.02% to 20%.
Fast SAT A mode that enables rapid tracking of arterial oxygen saturation changes by minimizing the averaging.
Display ranges
Saturation (SpO2) 0 to 100%
PR 25 to 240 beats per minute
Averaging Time 2 / 4 / 8 / 10 / 12 / 14 / 16 / 18
Sensitivity Normal / Max / APOD
Accuracy
SpO2, no motion 60 to 80 ± 3%, adults / pediatrics70 to 100 ± 2%, adults / pediatrics, ± 3% neonates
SpO2, motion 70 to 100 ± 3%, adults / pediatrics / neonates
SpO2, low perfusion 70 to 100 ± 2%, adults / pediatrics / neonates
PR, no motion 25 to 240 ± 3 bpm, adult s/ pediatrics / neonates
PR, motion 25 to 240 ± 5 bpm, adults / pediatrics / neonates
PR, low perfusion 25 to 240 ± 5 bpm, adults / pediatrics / neonates

136 Technical data Welch Allyn 1500 Patient Monitor
Capnography
Module Mini Medi CO2
Measuring method Non dispersive Infrared Spectroscopy
CO2 units mmHg or kPa
CO2, etCO2, fiCO2, range 0 to 99 mmHg (CO2[mmHg] / Environment pressure) x 100 = CO2[%]
Curve Resolution 0.1 mmHg
etCO2, inCO2 Resolution 1 mmHg
CO2 Accuracy 0 to 38 mmHg: ± 2 mmHg
39 to 99 mmHg: ± 5 % of reading and 0.08 % for every 1 mmHg above 38 mmHg
Respiration Rate range 0 to 150 Resp/min
Respiration Rate Accuracy
0 to 70: ± 1 Resp/min
71 to 120: ± 2 Resp/min
121 to 150: ± 3 Resp/min
Flow rate 50 ml/min, (42.5 < flow < 65) flow measured by volume
Waveform sampling 20 samples/s
Initialization Time 40 s (typical)
System Response Time 5.6 s (typical combined response time)
Calibration Interval Initially calibrate after 1,200 operating hours, then once a year orafter 4,000 operating hours, whichever comes first. The initialcalibration should not occur before 720 hours of use. If the initialcalibration is done before 720 hours of use, the module will resetto require its next calibration after 1200 hours, instead of after4000 hours.
Note The capnography component of this product is covered by one or more of the following US patents: 6,428,483; 6,997,880; 5,300,859; 6,437,316; 7,488,229; 7,726,954 and their foreign equivalents. Additional patent applications pending.
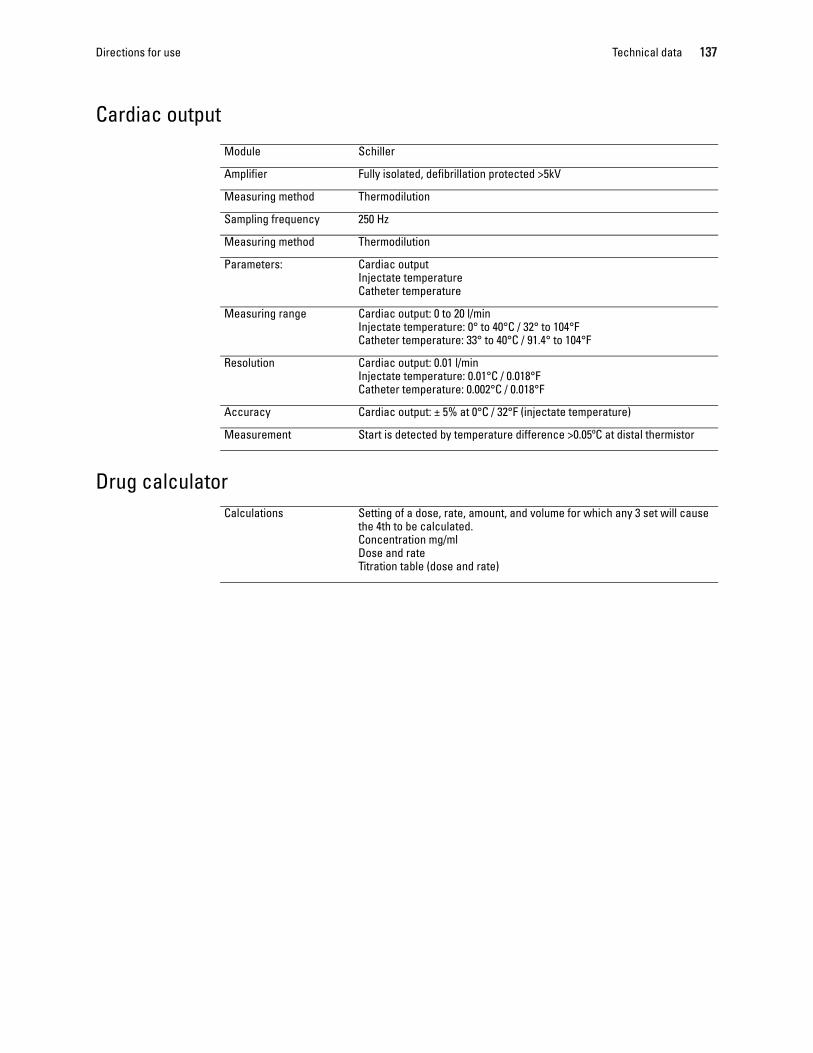
Directions for use Technical data 137
Cardiac output
Drug calculator
Module Schiller
Amplifier Fully isolated, defibrillation protected >5kV
Measuring method Thermodilution
Sampling frequency 250 Hz
Measuring method Thermodilution
Parameters: Cardiac output Injectate temperatureCatheter temperature
Measuring range Cardiac output: 0 to 20 l/min Injectate temperature: 0° to 40°C / 32° to 104°F Catheter temperature: 33° to 40°C / 91.4° to 104°F
Resolution Cardiac output: 0.01 l/min Injectate temperature: 0.01°C / 0.018°F Catheter temperature: 0.002°C / 0.018°F
Accuracy Cardiac output: ± 5% at 0°C / 32°F (injectate temperature)
Measurement Start is detected by temperature difference >0.05ºC at distal thermistor
Calculations Setting of a dose, rate, amount, and volume for which any 3 set will cause the 4th to be calculated.Concentration mg/mlDose and rateTitration table (dose and rate)

138 Technical data Welch Allyn 1500 Patient Monitor
139
Index
A
Accessories, 123Activating the pacer display, 45Acuity Central Station, 91Alarm limit setting, 37Alarms, 33Arrhythmia, 50
B
Back panel, 10Battery disposal, 101Battery Operation, 23Button test, 100
C
Cardiac Output, 78Cardiac output approved catheters and injectate sensor
type, 80Cardiac output messages, 86Cardiac output procedure, 83Cardiac output settings, 81Changing the recorder paper, 18Connection panel, 11
D
Display overview, 15
E
ECG, 40ECG alarms, 49ECG display, 46ECG menu settings, 48Electrodes identification and color code IEC/AHA, 43etCO2 settings, 60
F
Function buttons, 12
H
Hemodynamic calculations, 87
I
IBP settings, 74, 76IBP zero set, 76Inspecting and cleaning the monitor and
accessories, 102Integrated Pulmonary Index, 9, 61, 118Intended use, 1Invasive blood pressure monitoring, 73
M
Maintenance, 99Menu overview, 13Monitoring, 39
N
Networks and internet, 4NIBP, 64
O
Options, 9
P
Pacemaker monitoring, 44Patient information, 117Patient mode, 117Physiological Alarms, 38Power supply, 22

140 Index Welch Allyn 1500 Patient Monitor
R
Recharging the battery, 101Replacing the fuses, 106Respiration, 55Respiration rate alarms, 56Restoring user defaults, 118
S
Safety standards, 130Saving the user defined settings as default, 21Settings, 111Setting via a parameter field, 31Setup menu, 111Silencing an alarm, 34SpO2 monitoring, 68ST Alarms, 54Standard features, 9Standby and Discharge modes, 24Startup and initial preparation, 17ST settings, 53Suspend all alarms, 34System data, 127
T
Taking a single NIBP measurement, 65Technical data, 127Temperature monitoring, 77Terms of warranty, 7Trend Data, 29Troubleshooting, 107
U
User responsibility, 1
V
Visual inspection, 100


