37
WELCOME TO WELCOME TO
| Date post: | 16-Dec-2015 |
| Category: |
Documents |
| Upload: | giles-lynch |
| View: | 218 times |
| Download: | 2 times |

WELCOME TOWELCOME TO

Click on ProductsClick on Products

Click on online products >> Tax Professionals >> Taxbase
Suite : Website >>Read More…
Click on online products >> Tax Professionals >> Taxbase
Suite : Website >>Read More…

Click on “Register”Click on “Register”

Fill in all the registration Information and Click on
“ 30 Days Free Trial”
Fill in all the registration Information and Click on
“ 30 Days Free Trial”

On completion of registration you will
received this message, Click on Login Now button to proceed
On completion of registration you will
received this message, Click on Login Now button to proceed

A system generated email will be sent to your
email ID you have entered while registration.
A system generated email will be sent to your
email ID you have entered while registration.

Go to www.taxbasesuite.com Fill in User Name and Password and select
Login As Admin and Click on Sign In.
Go to www.taxbasesuite.com Fill in User Name and Password and select
Login As Admin and Click on Sign In.

Click on Website Icon to configure your
webpages.
Click on Website Icon to configure your
webpages.

Click on Administrator Icon.
Click on Administrator Icon.

Click on select >> Edit for editing
administrator Details as follows.
Click on select >> Edit for editing
administrator Details as follows.

Here you can update admin details such as address, phone etc.
Here you can update admin details such as address, phone etc.

Click on Choose Template option to
change your website design.
Click on Choose Template option to
change your website design.
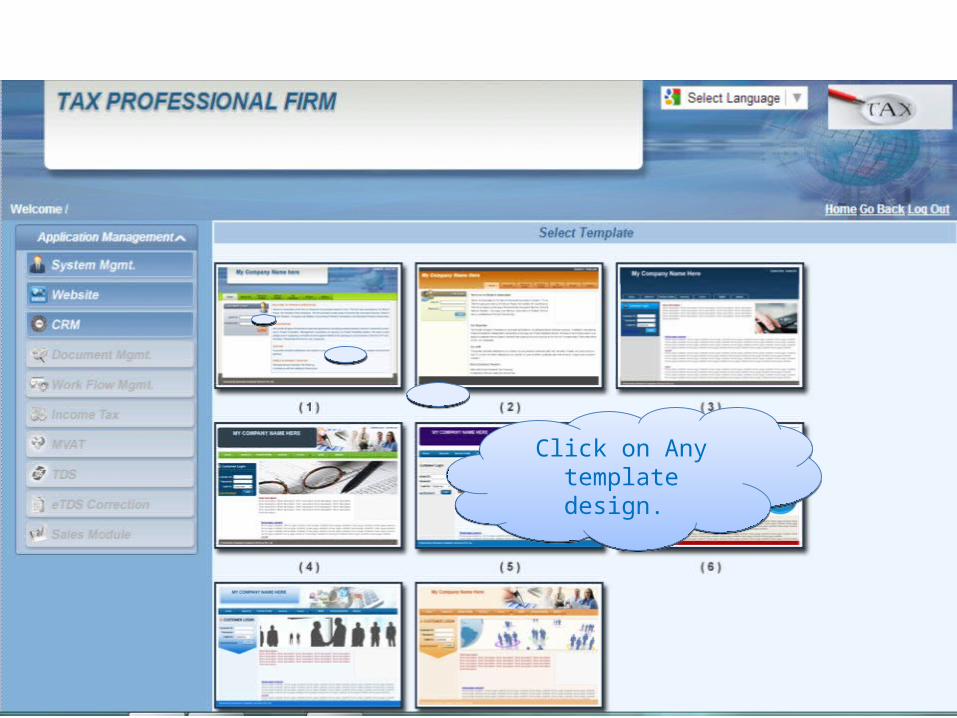
Choose Design for your website.
Choose Design for your website.
Click on Any template design.
Click on Any template design.

Now click on select this template and Close.
Now click on select this template and Close.

To configure website click on “ Manage Website”
Icon.
To configure website click on “ Manage Website”
Icon.

To manage the website content click
on “Website Contents” icon.
To manage the website content click
on “Website Contents” icon.

Each icon here represents the Webpage of your Website.
Click on it and enter the webpage contents which you
wish to show on the webpage.
Each icon here represents the Webpage of your Website.
Click on it and enter the webpage contents which you
wish to show on the webpage.
Click on Icon to enter the Webpage
Contents .
Click on Icon to enter the Webpage
Contents .

Paste, Write, Edit webpage contents
here.
Paste, Write, Edit webpage contents
here. Click on choose file to
add picture to your webpage
Click on choose file to add picture to your
webpage

Once you are done with all the webpage contents data entry, to view the website click on “
Website Preview “ Icon. Please Note Your Pop Up Blocker Should
be Disabled.
Once you are done with all the webpage contents data entry, to view the website click on “
Website Preview “ Icon. Please Note Your Pop Up Blocker Should
be Disabled.

This is your Website Preview
This is your Website Preview

With the help of website customer can send enquiry also. Click on enquiry form
to send enquiry.
With the help of website customer can send enquiry also. Click on enquiry form
to send enquiry.

All Such Enquiries are captured at Admin Log
in
All Such Enquiries are captured at Admin Log
in

An auto generated acknowledgment email
will be send to Customer by System
An auto generated acknowledgment email
will be send to Customer by System

An auto generated email will be send to
administrator by System with enquiry details. Also SMS is sent to Admin.
An auto generated email will be send to
administrator by System with enquiry details. Also SMS is sent to Admin.

The Website also provides for definition of Customer Groups & Customer
Creation along with customer Log in ID & Password through this page.
(Taxbase Customers can import the customer master data through Excel Import Export option also. )
The Website also provides for definition of Customer Groups & Customer
Creation along with customer Log in ID & Password through this page.
(Taxbase Customers can import the customer master data through Excel Import Export option also. )

Click on Group Definition icon to create New Group or edit existing
group. To create customer click on “ Customer Definition” icon.
Click on Group Definition icon to create New Group or edit existing
group. To create customer click on “ Customer Definition” icon.

Click on Group Definition icon to create New Group
or edit existing group.
Click on Group Definition icon to create New Group
or edit existing group.

While defining customers one should note following: 1.Email ID 2.Password 3.PAN No.4.IT Office Location 5.GroupThese items should be entered properly for DMS and CRM Module to function properly. One can enable the Reminders and Self services for Income Tax.
While defining customers one should note following: 1.Email ID 2.Password 3.PAN No.4.IT Office Location 5.GroupThese items should be entered properly for DMS and CRM Module to function properly. One can enable the Reminders and Self services for Income Tax.
This is used for CRM module to send
reminders to customers.
This is used for CRM module to send
reminders to customers.

Click on CRM for making settings
Click on CRM for making settings

The icons are used to configure your CRM settings such as Reminder frequency, Reports of Reminders set, Define Email Templates & Email configuration
The icons are used to configure your CRM settings such as Reminder frequency, Reports of Reminders set, Define Email Templates & Email configuration

Select any Sub area and click on edit to change your message in email Template Text Box and Save.
Select any Sub area and click on edit to change your message in email Template Text Box and Save.

In the Text Box below you can add the email message given to be sent to customers.
Note: SMS can not be editable as its contents are approved by TRAI. So that your sms can even reach to DND Nos. also.
In the Text Box below you can add the email message given to be sent to customers.
Note: SMS can not be editable as its contents are approved by TRAI. So that your sms can even reach to DND Nos. also.

Here you can change Reminder frequency for SMS , Email or Both. Also you can set the no's .of day before of reminder.
Here you can change Reminder frequency for SMS , Email or Both. Also you can set the no's .of day before of reminder.

This screen will show you reminder summery for reminders set by you.
This screen will show you reminder summery for reminders set by you.

Please click on New and then enter the email ID from which you wish to send all reminder emails. Also you need to add incoming and outgoing email servers.
Please click on New and then enter the email ID from which you wish to send all reminder emails. Also you need to add incoming and outgoing email servers.

THANK YOU !!!THANK YOU !!!


