82


1
Welcome to GradeBeam.com! Connect l Communicate l Construct
Please use this Reference Guide to aid you in learning to benefit from GradeBeam.com. There are Help links located in the upper right hand corner of each page within www.GradeBeam.com which provide additional detailed instructions for using the tools. If at any time you have questions or comments, feel free to contact us Monday through Friday via email at [email protected] or by phone at (866) 482-7669 or (312) 321-9104. Please do not hesitate to use the Suggestions link to send updated subcontractor information or enhancement ideas to GradeBeam.com Customer Support.
2
Table of Contents Getting Started
Sign in to GradeBeam.com ........................................................... 5
Change Your Password ................................................................ 5
Your Profile Information ............................................................... 6
Your Company Information ...................................................... 7-13
Adding a New User Account
How To Add a New User ............................................................ 14
Groups
How To Create New Groups ....................................................... 15
How To Add Companies to Your Groups ....................................... 20
How To Delete Companies From Your Groups ............................... 15
How To Delete Groups ............................................................... 15
Attributes
How To Create Attributes .......................................................... 16
How To Enter Values for Attributes ............................................. 16
Directory
Searching the GradeBeam.com Directory ..................................... 17
How To Do a Basic Search in the Directory ................................... 17
How To Do an Advanced Search in the Directory .......................... 18
Subcontractor Information
How To View Subcontractor Profiles ............................................. 19
How To Edit Subcontractor Information ....................................... 19
How To Add & Edit Subcontractor Contacts .................................. 19
How To Add Private Comments About a Subcontractor .................. 19
How To Add Subcontractors To Your Groups ................................ 20
How To Add a Subcontractor to GradeBeam.com ..................... 21-25

3
Creating Projects
How To Create a Project from Scratch .................................... 26-41
How To Create a Project by Copying a Project or Template ........ 42-44
Sending Invitations to Bid
How To Send Invitations to Bid .............................................. 40,44
Link to an FTP Site
How To Hyperlink Your Project To an FTP Site .............................. 45
Link to a Blueprinter
How To Link Your Project To a Printer ......................................... 46
How To Link To a Printer’s Online Planroom ................................. 46
Auto Invite
How To Use Auto Invite ....................................................... 47-48
Uploading Project Documents
How To Upload Project Documents ........................................ 49-52
How To Create Folders ......................................................... 49-50
How To See Who Has Viewed Your Documents ............................. 52
Sending Messages
How To Send Addenda, Reminders & Notices .......................... 53-58
How To Send Messages To All Subcontractors in a Project ......... 53-55
How To Send Messages To Subcontractors per UCI Codes .......... 56-58
How To Send Qualification Requests ...................................... 63-65
Sending a Document by Fax
How To Send a Posted Document by Fax ................................ 59-60
Qualifications
How To View Qualifications You Already Have Access To View .... 61-62
How To Request To View Qualifications For Subs in a Project ..... 63-64
How To Request To View an Individual Company’s Qualifications .... 65

4
Reports
Package Coverage .................................................................... 66
Call Sheet ............................................................................... 67
Call Sheet with Certifications ..................................................... 68
Projects Currently Out for Bid (Administrator only) ........................ 69
Projects Available for Bid (Subcontractor report) ........................... 70
Organization’s Group Members .................................................. 71
Export Public Organizations ....................................................... 72
Export Public Contacts .............................................................. 73
Bidding History ........................................................................ 74
Projects Currently Out for Bid .................................................... 75
Organization’s Classifieds (Administrator only) .............................. 76
Printer Information ................................................................... 77
Group Members by UCI Division ................................................. 78
Message History ...................................................................... 79
Online Document Activity .......................................................... 80
Contact Us
GradeBeam.com Customer Support ............................................ 81

5
Sign-In Open an internet web browser and enter the web address: www.gradebeam.com. Enter your Organization, Username and Password exactly as shown in your user credentials, then click the Submit button.
Change Password When you Sign-In for the first time, you will be prompted to change your password. Simply fill in the New Password box with a new password of your choice. Enter the same new password in the Verify New Password box. Then, click the Change Password button. Passwords are case sensitive and need to be at least 6 characters. NOTE: Your password is confidential and should be kept in a safe place. GradeBeam.com does not have access to your password, and therefore cannot provide it to you. In the event that you forget or lose your password, there is a ’Forgot Password?’ link on the GradeBeam.com.com home page. You can also contact GradeBeam.com at 866-482-7669 or an Administrator at your company can create a new password for you.
6
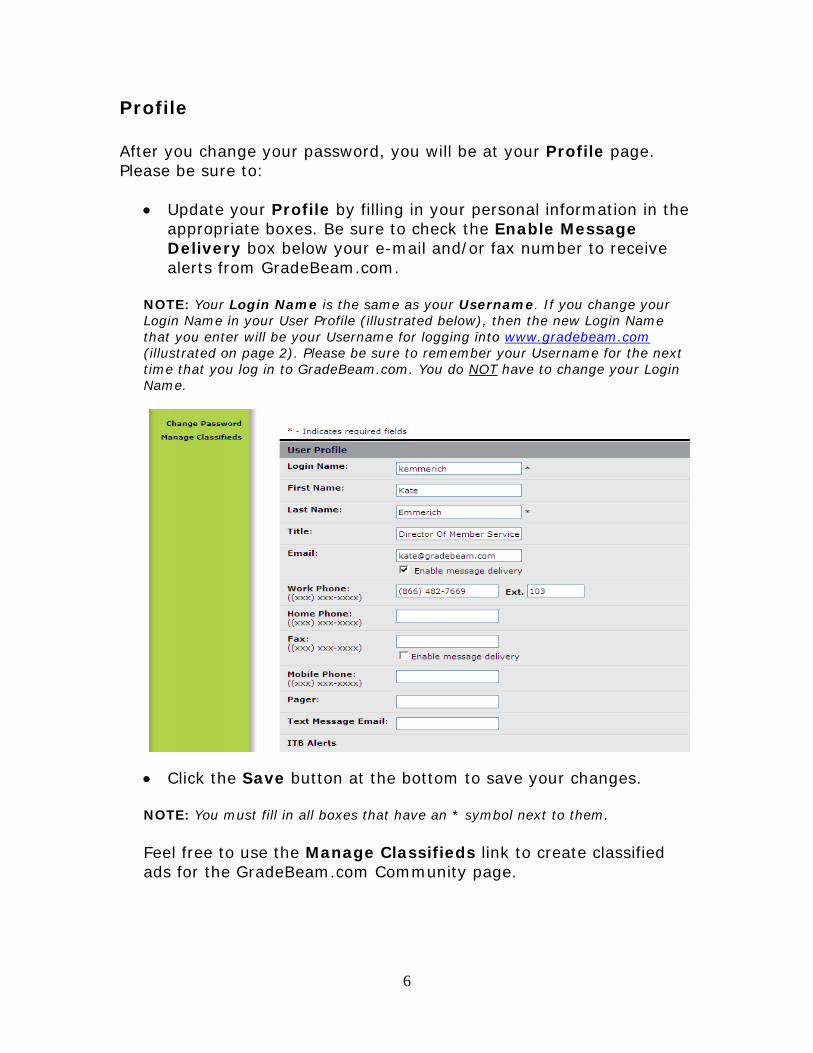
Profile After you change your password, you will be at your Profile page. Please be sure to:
• Update your Profile by filling in your personal information in the appropriate boxes. Be sure to check the Enable Message Delivery box below your e-mail and/or fax number to receive alerts from GradeBeam.com.
NOTE: Your Login Name is the same as your Username. If you change your Login Name in your User Profile (illustrated below), then the new Login Name that you enter will be your Username for logging into www.gradebeam.com (illustrated on page 2). Please be sure to remember your Username for the next time that you log in to GradeBeam.com. You do NOT have to change your Login Name.
• Click the Save button at the bottom to save your changes.
NOTE: You must fill in all boxes that have an * symbol next to them. Feel free to use the Manage Classifieds link to create classified ads for the GradeBeam.com Community page.

7
Company Click the Company link on the top navigation bar to see your company information. Only users who have administrative rights will see links on the left side of this page.
• Use the links on the left side of the page (illustrated above and
below) to view/edit your company information. These links will provide you with different pages to change your company information.
Any time that you see this pencil symbol, you can click on it to
edit the associated information.
Any time that you see this X symbol, you can click on it to delete the associated information.

8
Manage Locations – To Edit the Address, Phone or Fax for your company. Click on the edit pencil to edit.
Manage UCI Codes – These codes will display on your company profile and will also determine how your company is found in the directory.

9
Manage Counties Served – List the states and/or provinces that your company bids projects in.
Manage Work Types – List the types of projects your company bids.
10
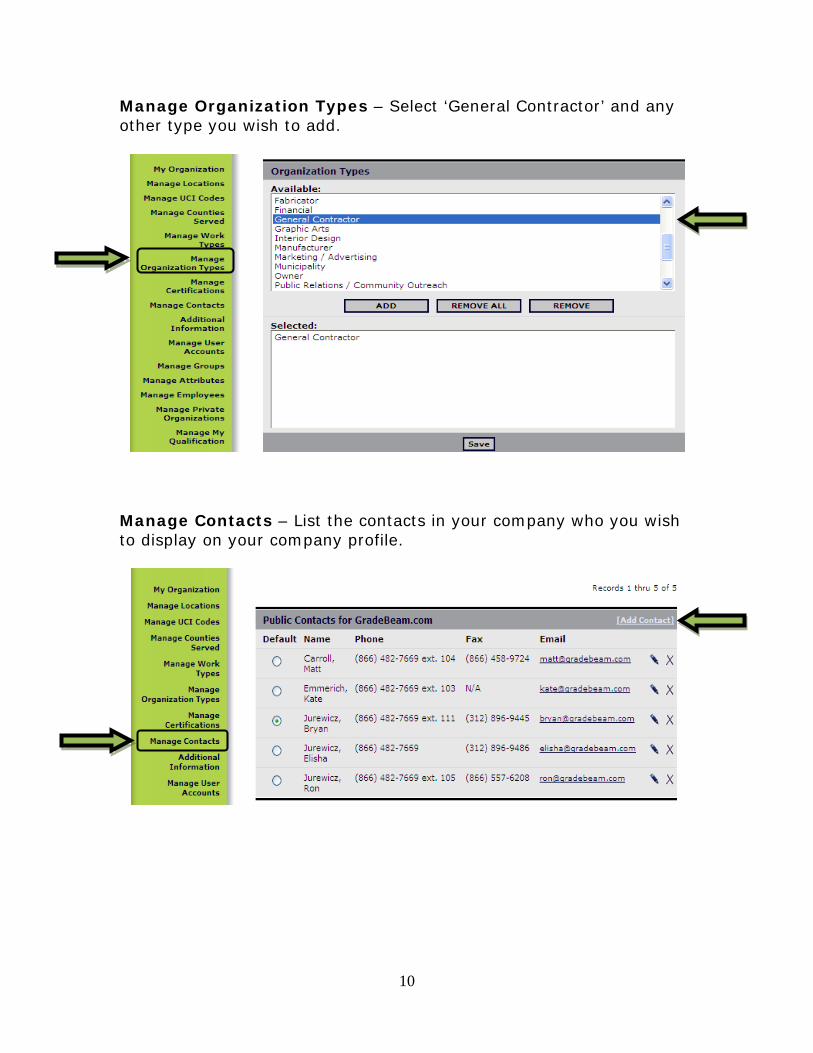
Manage Organization Types – Select ‘General Contractor’ and any other type you wish to add.
Manage Contacts – List the contacts in your company who you wish to display on your company profile.
11
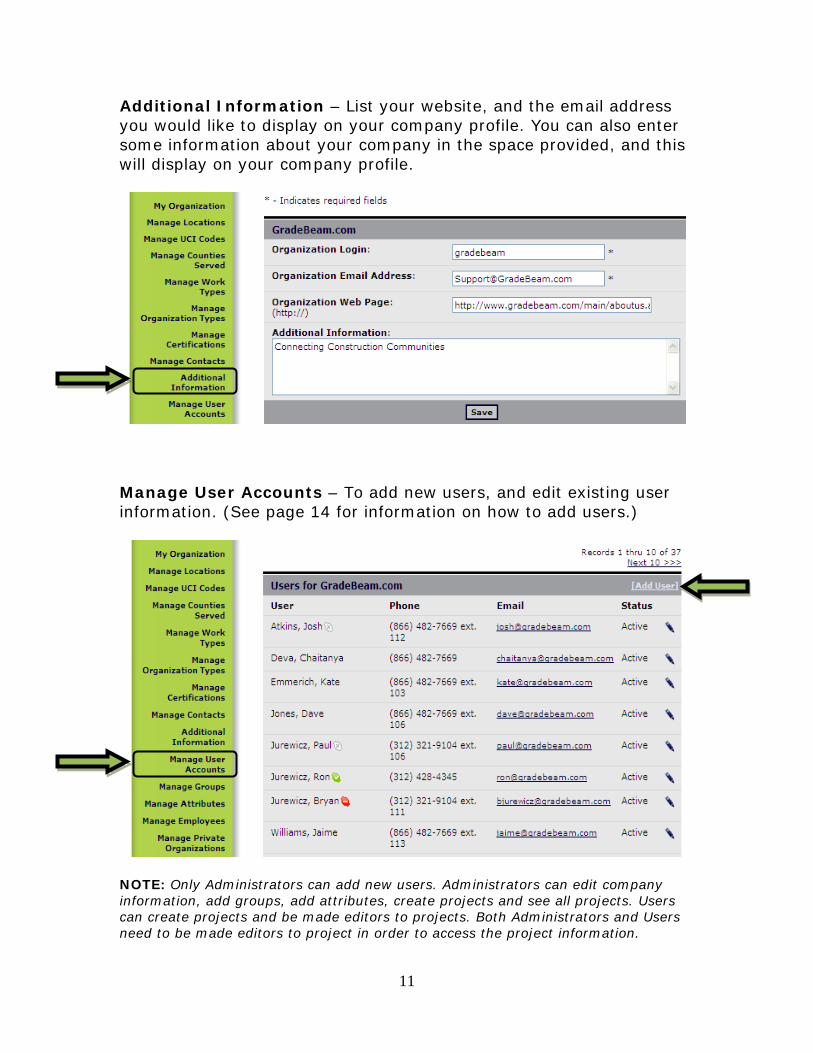
Additional Information – List your website, and the email address you would like to display on your company profile. You can also enter some information about your company in the space provided, and this will display on your company profile.
Manage User Accounts – To add new users, and edit existing user information. (See page 14 for information on how to add users.)
NOTE: Only Administrators can add new users. Administrators can edit company information, add groups, add attributes, create projects and see all projects. Users can create projects and be made editors to projects. Both Administrators and Users need to be made editors to project in order to access the project information.

12
Manage Groups – To create new groups and edit existing groups. (See page 15 for information on creating and editing groups.)
Manage Attributes – To create new attributes. (See page 16 for information on how to create attributes.)
13
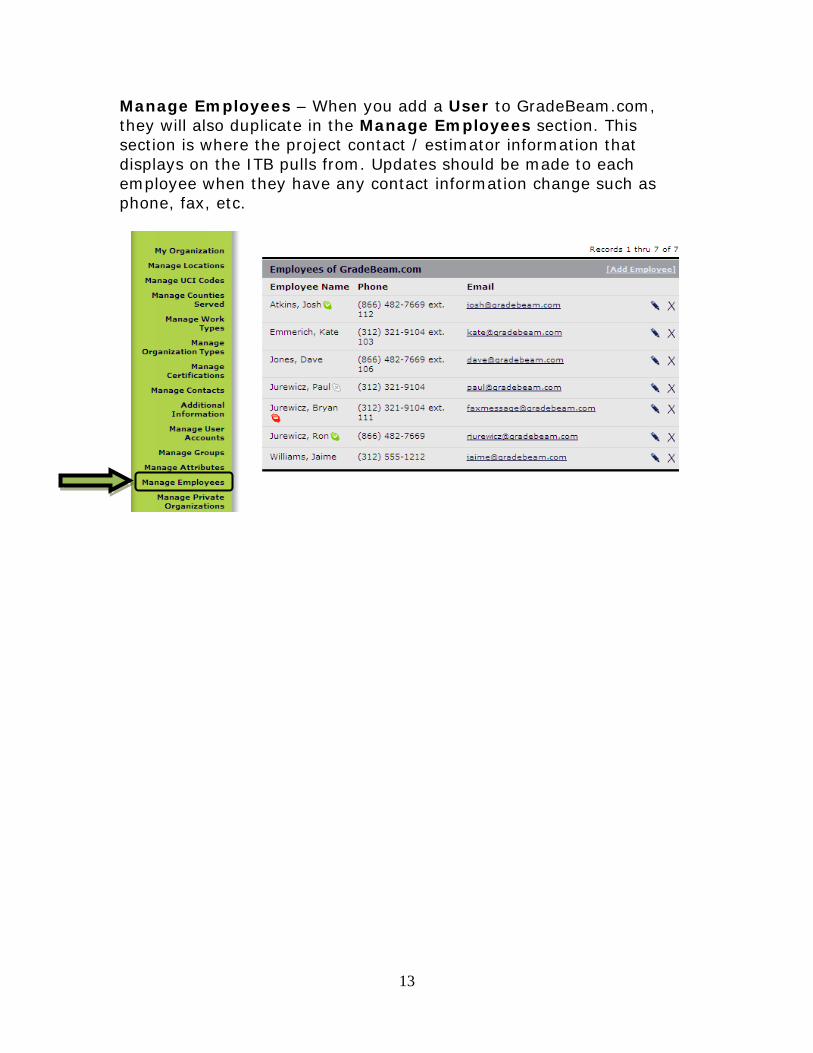
Manage Employees – When you add a User to GradeBeam.com, they will also duplicate in the Manage Employees section. This section is where the project contact / estimator information that displays on the ITB pulls from. Updates should be made to each employee when they have any contact information change such as phone, fax, etc.
14
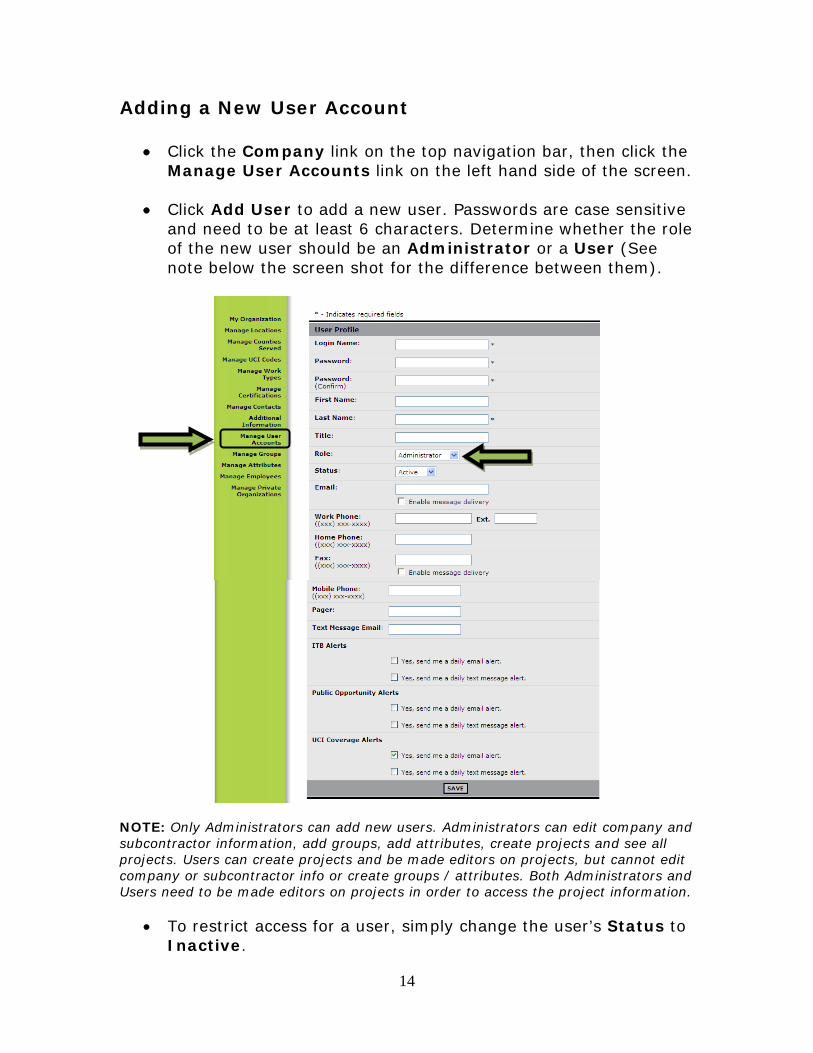
Adding a New User Account
• Click the Company link on the top navigation bar, then click the Manage User Accounts link on the left hand side of the screen.
• Click Add User to add a new user. Passwords are case sensitive
and need to be at least 6 characters. Determine whether the role of the new user should be an Administrator or a User (See note below the screen shot for the difference between them).
NOTE: Only Administrators can add new users. Administrators can edit company and subcontractor information, add groups, add attributes, create projects and see all projects. Users can create projects and be made editors on projects, but cannot edit company or subcontractor info or create groups / attributes. Both Administrators and Users need to be made editors on projects in order to access the project information.
• To restrict access for a user, simply change the user’s Status to Inactive.

15
Groups Groups can be very helpful project tools. You can create as many groups as you want, and groups are accessible when searching the Directory, and can also be used in conjunction with Auto Invite.
• To create a new group, click the Company link on the top navigation bar, then click the Manage Groups link on the left hand side of the screen. This link will open a page that will display all of the current Groups that are set up for your company.
• Click Add Group and type the name of your new group into the box and click Add Group.
NOTE: By checking the Receive Alert box, you will receive a message every time a company in the group changes any of their contact information. • Once your group is created, click on the group name, then click
Add Organization. Follow the Directory instructions on page 20 to search for companies and add them to your new group.
• To delete companies from a group, click on the group name and then click the ‘X’ on the right side of the company listing.
• To delete an entire group, click on the ‘X’ on the right side of the group listing.
16
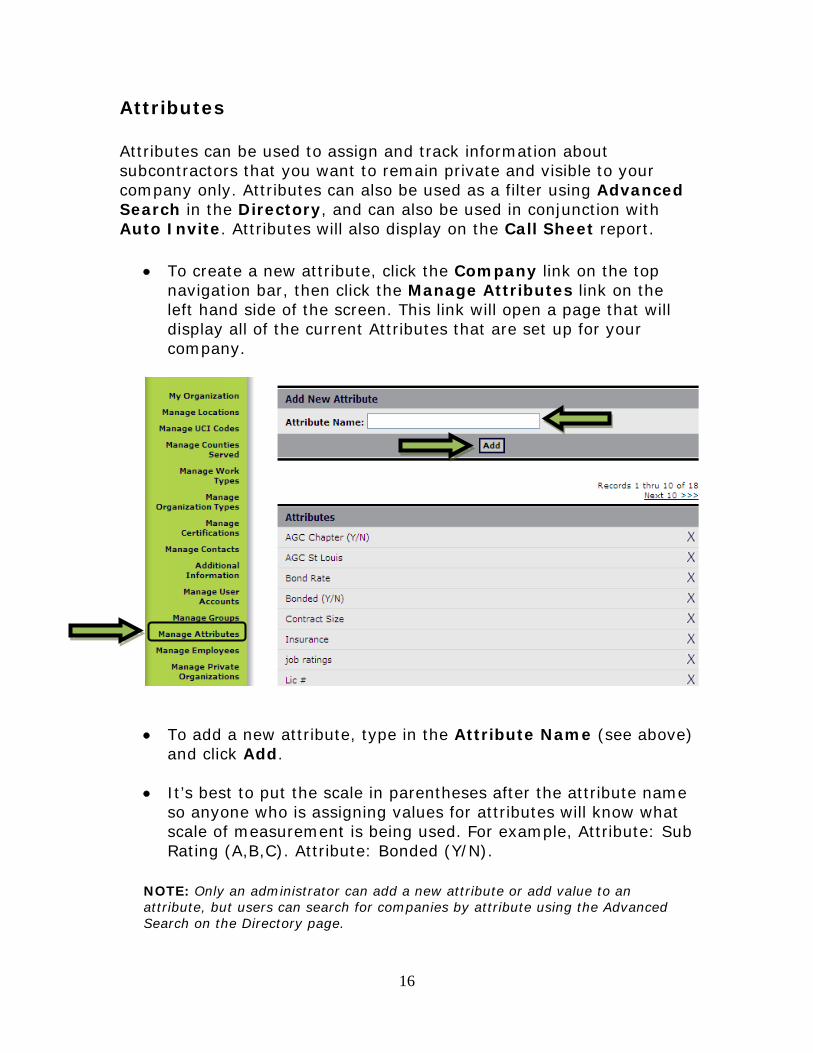
Attributes Attributes can be used to assign and track information about subcontractors that you want to remain private and visible to your company only. Attributes can also be used as a filter using Advanced Search in the Directory, and can also be used in conjunction with Auto Invite. Attributes will also display on the Call Sheet report.
• To create a new attribute, click the Company link on the top navigation bar, then click the Manage Attributes link on the left hand side of the screen. This link will open a page that will display all of the current Attributes that are set up for your company.
• To add a new attribute, type in the Attribute Name (see above) and click Add.
• It’s best to put the scale in parentheses after the attribute name
so anyone who is assigning values for attributes will know what scale of measurement is being used. For example, Attribute: Sub Rating (A,B,C). Attribute: Bonded (Y/N).
NOTE: Only an administrator can add a new attribute or add value to an attribute, but users can search for companies by attribute using the Advanced Search on the Directory page.

17
Directory You can search the GradeBeam.com Directory for subcontractors and suppliers and add them to your groups.
• Click the Directory link on the top navigation bar to go to the GradeBeam.com Directory.
• You will be on the Basic Search page.
• Select different search filters by checking the boxes next to each search option you want to filter by.
• If you want to search for subcontractors in one of your specific groups, select the group from the Group drop down.
• If you want to search the GradeBeam.com database at large,
simply do not select a group.
• Click Search once you are ready to find companies that match your search criteria. After the search is complete, the system will list companies that match your search criteria. You can click on the company names to get detailed information for these companies and view their company profile.
• To increase the number of search filters click on Advanced Search (next to Basic Search).
18
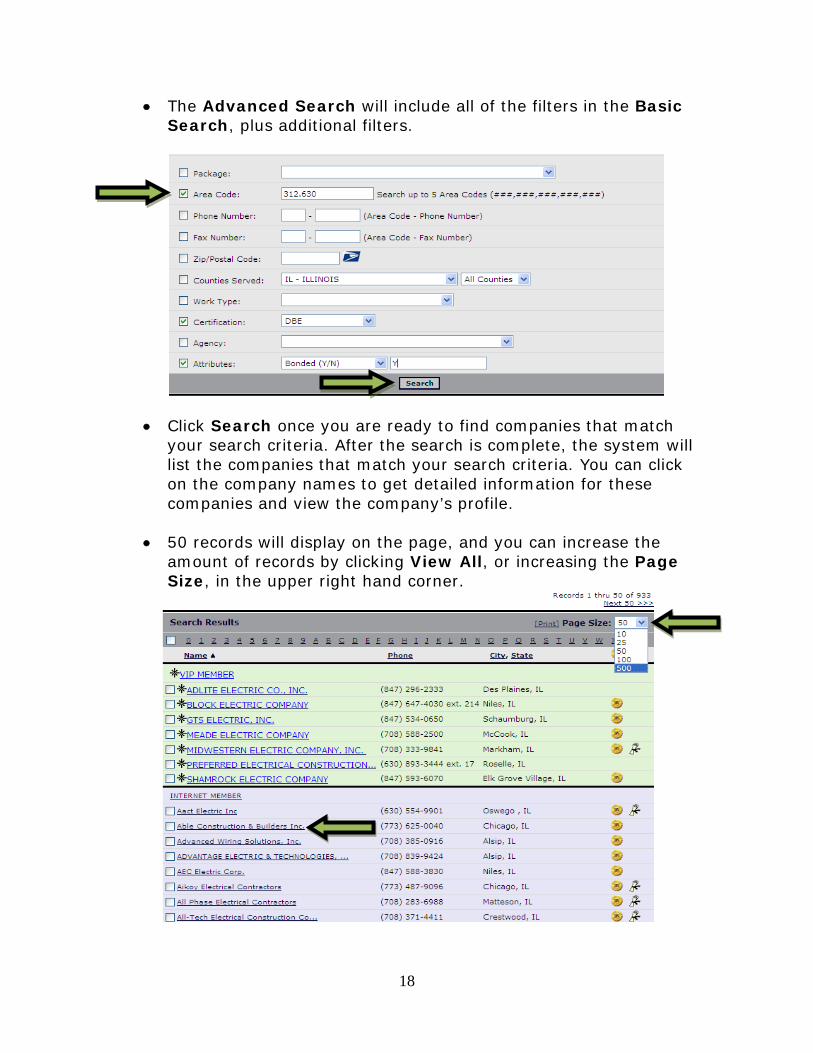
• The Advanced Search will include all of the filters in the Basic Search, plus additional filters.
• Click Search once you are ready to find companies that match your search criteria. After the search is complete, the system will list the companies that match your search criteria. You can click on the company names to get detailed information for these companies and view the company’s profile.
• 50 records will display on the page, and you can increase the amount of records by clicking View All, or increasing the Page Size, in the upper right hand corner.

19
• When you click on a company’s name, the company’s profile page will open.
• From the company’s profile page, you can edit information, add contacts, add comments that are private to your company only, and see a history of bid responses.
• To Edit information, click on the corresponding edit pencils on the left, that look like this:
• To add new contacts, click Add Contact in the lower right hand corner. You can add more than one email address on the same contact entry, if you want invitations and messages to be sent to more than one email address at the same time.
• To add private comments about the company, click Add Comment in the lower right hand corner.

20
Adding Companies To Your Groups
• To add a company to one of your Groups, check the box to the left of the company name that you wish to add to the Group. If you want to add all of the displayed companies to a group, check the box at the top underneath the words Search Results, and this will check all the boxes.
• Once all of the companies you wish to add to your Group have been checked, select the Group you want to add them to from the drop down list toward the bottom of the screen and click Add. The companies you selected will be added to the Group.
• You will see a message letting you know that the companies you selected have been added to your group.
21
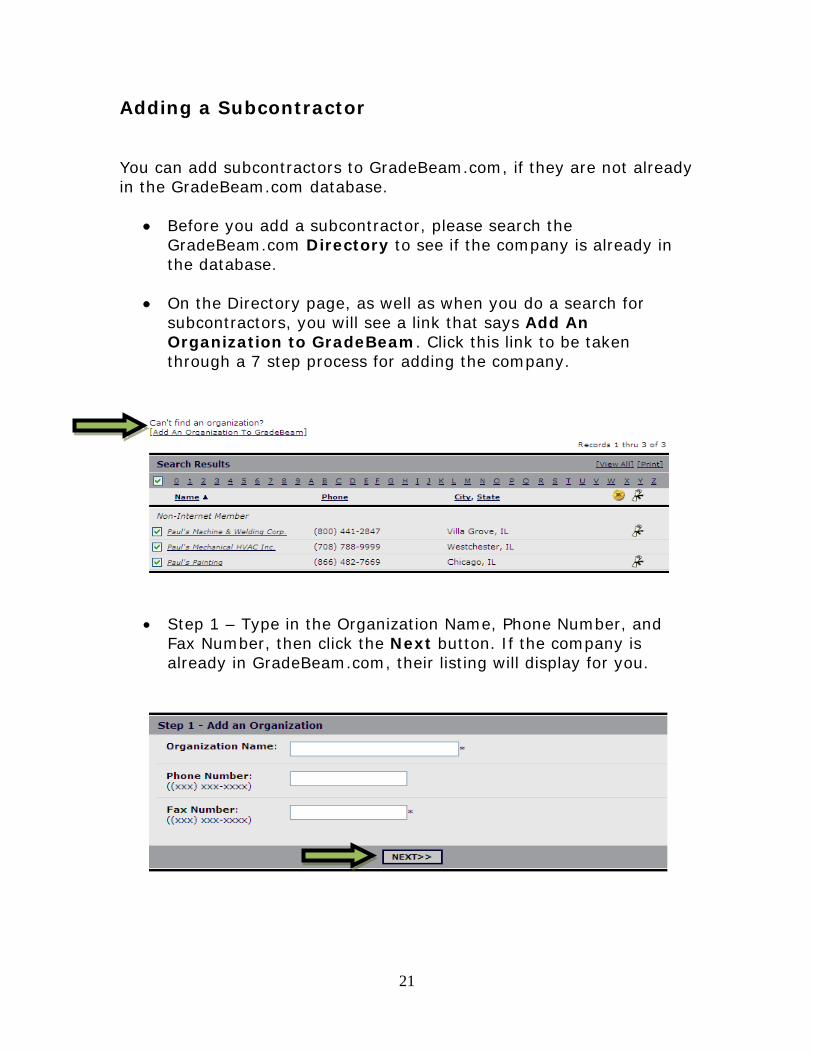
Adding a Subcontractor You can add subcontractors to GradeBeam.com, if they are not already in the GradeBeam.com database.
• Before you add a subcontractor, please search the GradeBeam.com Directory to see if the company is already in the database.
• On the Directory page, as well as when you do a search for subcontractors, you will see a link that says Add An Organization to GradeBeam. Click this link to be taken through a 7 step process for adding the company.
• Step 1 – Type in the Organization Name, Phone Number, and Fax Number, then click the Next button. If the company is already in GradeBeam.com, their listing will display for you.
22
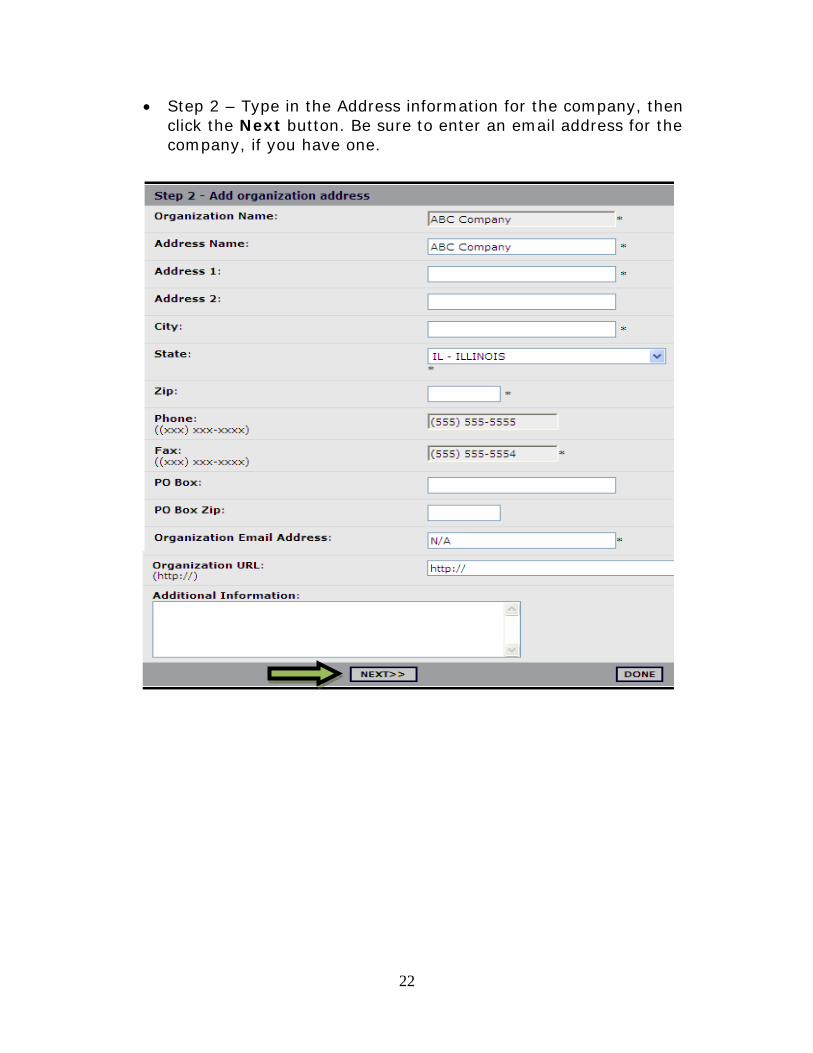
• Step 2 – Type in the Address information for the company, then click the Next button. Be sure to enter an email address for the company, if you have one.
23
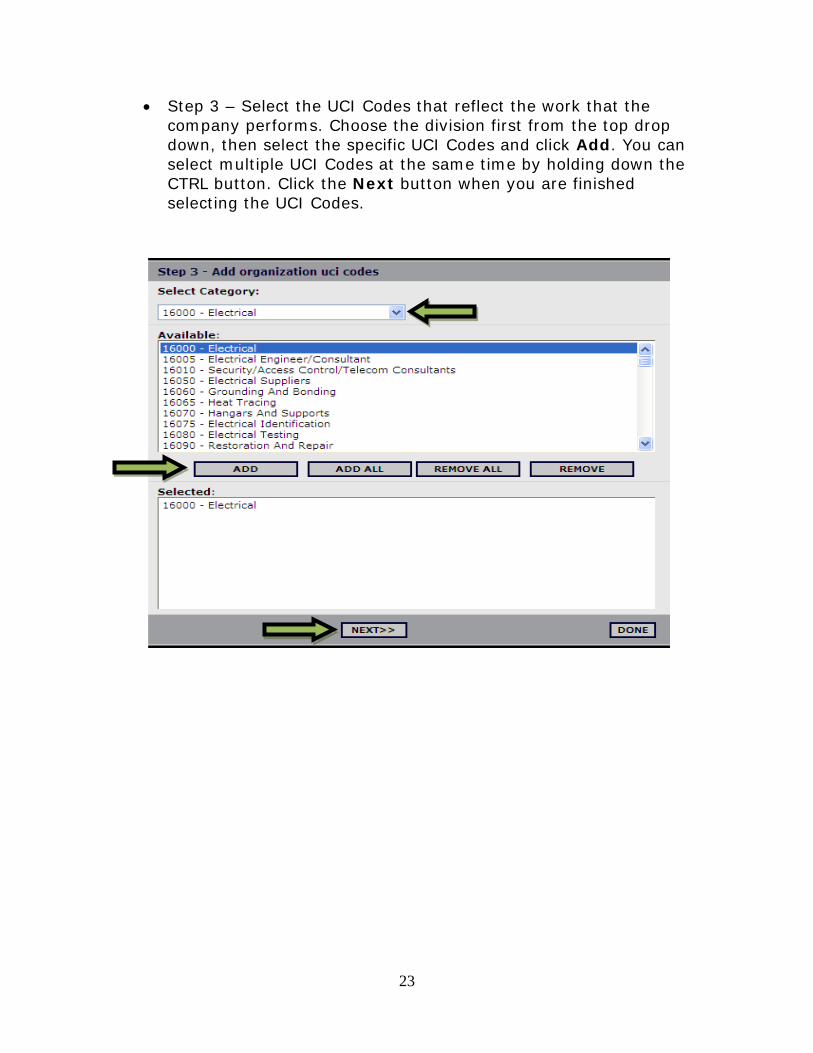
• Step 3 – Select the UCI Codes that reflect the work that the company performs. Choose the division first from the top drop down, then select the specific UCI Codes and click Add. You can select multiple UCI Codes at the same time by holding down the CTRL button. Click the Next button when you are finished selecting the UCI Codes.

24
• Step 4 – Add contact information. You can add more than one email address if you want messages to be sent to more than one person. Separate multiple email addresses with a semi-colon. Click the Next button when you are done.
• Step 5 – Select the type of organization the company is, and click Add. Then click the Next button.

25
• Step 6 – Select the groups you would like to add the company to and click Add. Then click the Next button.
• Step 7 – Select any projects or templates you would like to add the company to, and click Add. Then click the Save button.

26
Creating Projects There are two ways to create projects on GradeBeam.com. You can create a project from scratch, or you can copy a template or existing project. Creating a Project from Scratch
• Click the Workspace link to go to your Workspace page. Click the Create Project link on the left to start building your project.

27
• Step 1 of 5: Project Information—Enter the information you would like to appear on your Invitation to Bid.
• Be sure to select the Estimator/Project Contact from the drop down.
• The only time you would want to break a bid into multiple
packages is if you had a multi-phase project with different bid due dates, different subcontractors, different project documents, etc.

28
• Step 2 of 5: Project Information—Continued.
• Be sure to click the Manage Editors link to give other users access to your project. (Other Administrators/Users will not have automatic access to projects created from scratch.)
• If you want to post your project on the GradeBeam.com Public Bids page, put a check in the box that says: Make available for public viewing.

29
• Step 3 of 5: UCI Codes—Select UCI Codes for the work associated with the project. UCI Codes are selected by choosing the category from the drop down, and then selecting the UCI Codes that you need within each category.
• Multiple UCI codes can be selected at the same time by holding down the CTRL key.
30
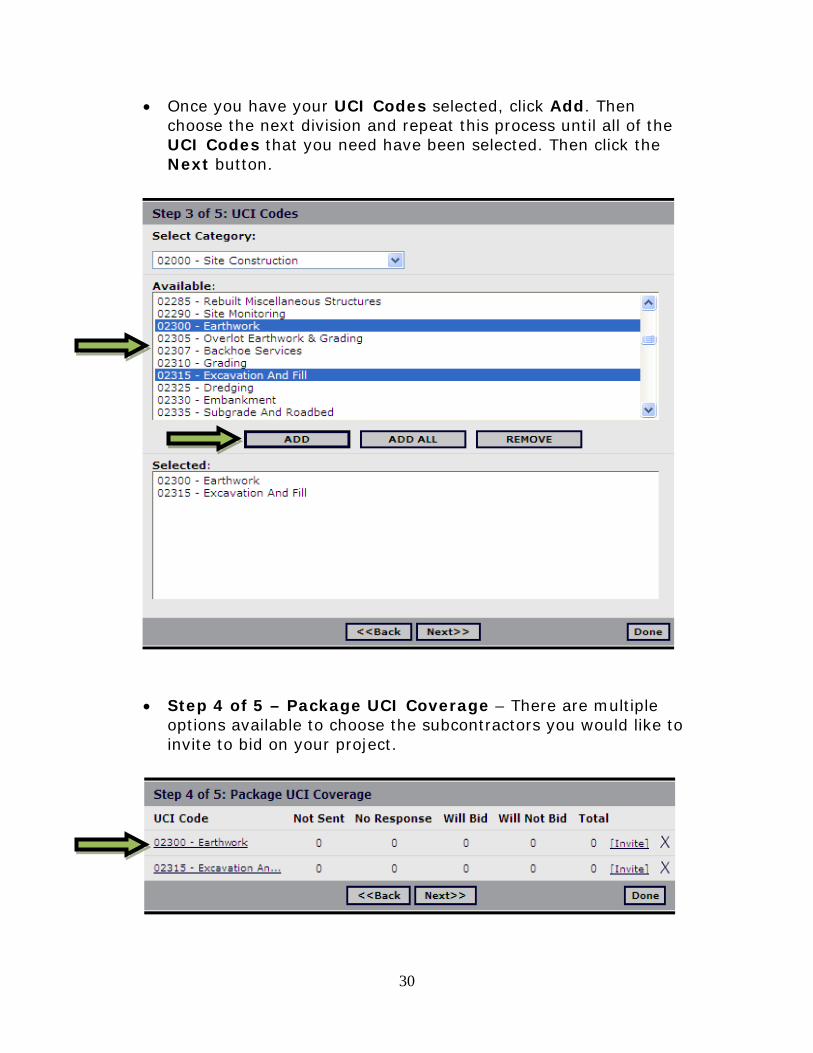
• Once you have your UCI Codes selected, click Add. Then choose the next division and repeat this process until all of the UCI Codes that you need have been selected. Then click the Next button.
• Step 4 of 5 – Package UCI Coverage – There are multiple options available to choose the subcontractors you would like to invite to bid on your project.

31
• To select subcontractors by individual UCI Code using the Directory, click on the UCI Code and then click Add Organization. This button will open the Directory search page of the GradeBeam.com website.
• You can do a Basic Search or you can do an Advanced Search
(see next page), which includes additional searching filters.
• If you wish to search the entire GradeBeam.com database, do not select a Group. If you wish to search for subcontractors within your master sub list only, select your sub list from the Group drop down. Then click the Search button.
Basic Search

32
Advanced Search

33
• Your search results will display and you can select the subcontractors you wish to invite by putting a checkmark in the box next to their names.
• If you wish to select all the subcontractors that have come up in your search results, place a checkmark in the box at the top. Please note that only 50 listings will show at a time unless you click View All or increase the Page Size.

34
• You can click on the company name to view the company’s profile.

35
• After you have selected the subcontractors you wish to invite, click the Invite to Bid button at the bottom of the page. This will create invitations, but no invitations will be sent out until you specifically choose to do so.

36
• You will see this message letting you know that your invitations are being created.
• You will see the subs you have created invitations for. Click the Next button to move on to the next UCI Code.
• Repeat the process of selecting subcontractors you wish to invite to bid on your project.
• Once you have selected subcontractors for all UCI Codes in your project, click the Next button to go to the Project Summary page.

37
• From the Project Summary page you can preview your
Invitation to Bid by clicking on the magnifying glass that looks like this:

38
• You can change the contact you wish to send the Invitation to Bid to, using the ITB Attention drop down.
• You can also choose to pay for prints and/or shipping for select subcontractors, if desired, and if you are linking to a blueprinter.
• Your Invitation to Bid will look like this:

39
• Click the Done button to return to the UCI Coverage page.
• Click on a UCI Code to view the subcontractors within.
• If you wish to delete any Invitations to Bid that have been created, you can do so by putting a check in the box to the right of their name and then clicking the Delete button at the bottom of the page.

40
• When you are ready to send your Invitations to Bid, click the Send Unsent ITBs button on the UCI Coverage page.
• You will see this pop-up asking if you are sure you want to send.
• Once your Invitations to Bid have been sent, you will see the quantity move from the Not Sent column to the No Response column.
• Not Sent: This is the number of bid invitations that have not been sent.
• No Response: This is the number of bid invitations that have been sent, but have not been responded to.
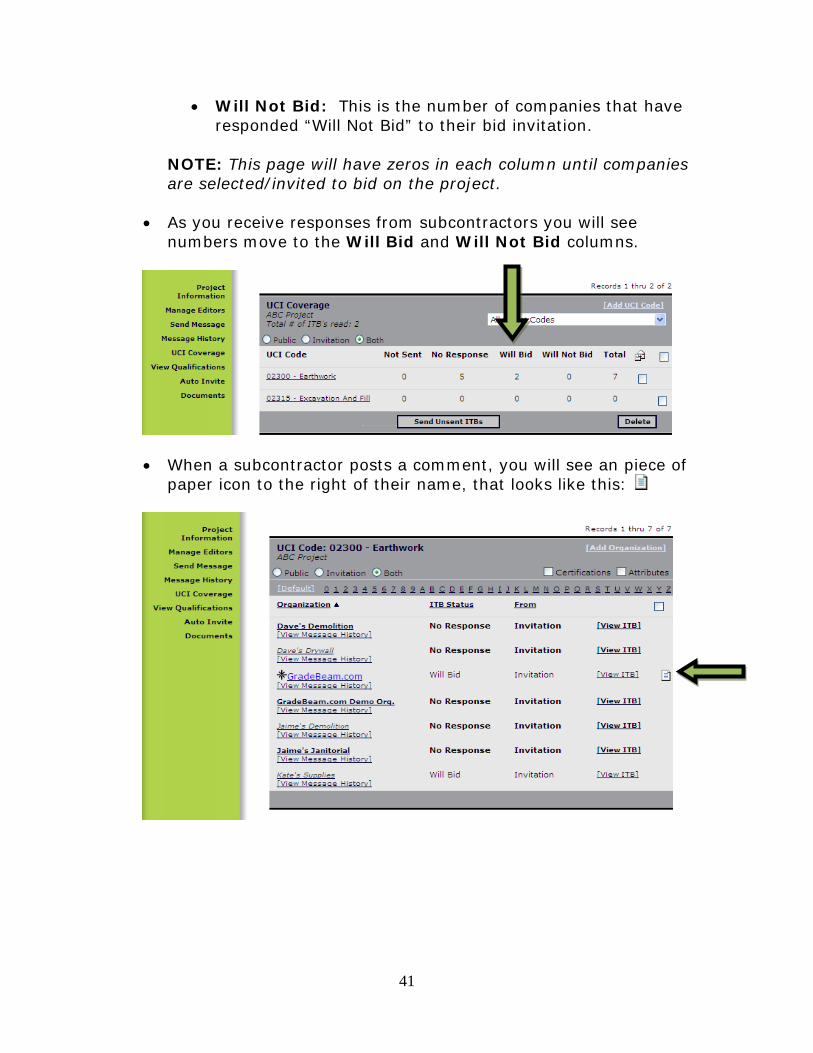
• Will Bid: This is the number of companies that have responded “Will Bid” to their bid invitation.
41
• Will Not Bid: This is the number of companies that have responded “Will Not Bid” to their bid invitation.
NOTE: This page will have zeros in each column until companies are selected/invited to bid on the project.
• As you receive responses from subcontractors you will see
numbers move to the Will Bid and Will Not Bid columns.
• When a subcontractor posts a comment, you will see an piece of paper icon to the right of their name, that looks like this:

42
Create a Project by Copying a Template or Previous Project
• To create a project by copying a previous project or template, locate the project or template you wish to copy (projects that are closed may still be copied). Click on the project or template name to open the project information screen.
• Click the Copy Project link.
• Please be patient while the project copies. It is important not to close your browser or click the back button. You will see this message as your project copies:

43
• Once the project is done copying, it will say: “Copy of Template/Project…” You can now edit the fields to turn them into your current project, including the project description. Be sure to click Save at the bottom when you are done editing.
• Click on the UCI Coverage link and delete any UCI Codes that you do not need by checking the boxes to the far right and clicking the Delete button at the bottom of the page. You can add UCI Codes by clicking the Add UCI Code link in the top right.

44
• If you wish to delete any Invitations to Bid that have been created, you can do so by putting a check in the box to the right of their name and then clicking the Delete button at the bottom of the page.
• When you are ready to send your Invitations to Bid, click the Send Unsent ITBs button on the UCI Coverage page.
NOTE: You cannot delete subs or UCI Codes for which any ITBs have been sent.

45
Linking to an FTP Site If plans are posted to an external ftp site or some other website, you can hyperlink to the external site through GradeBeam.com. When the subcontractors login to GradeBeam.com there will be a link for them to click on which will automatically take them to the website you have entered, without them having to type anything.
• On the Project Information page, go to the Printer URL section and click on the edit pencil that looks like this:
• Type the web address you would like to hyperlink to in the Modified Printer URL section. Be sure to preface ftp sites with ftp:// and www sites with http://.
• Put a check in the box for Prints Available Online.
• Enter a Username and Password if applicable.
• Enter a Date Available Online if you prefer.
• Put the ftp site or website in the Plan View Location box as
well.

46
Linking to a Printer You can link your project directly to a blueprinter if you want to make hard copy prints available for purchase. GradeBeam.com can link to any blueprinting company to notify them who needs drawings. GradeBeam.com can also connect to the printer’s planroom. If you link your project to a printer, when the subcontractors login to GradeBeam.com, they will have an option to purchase prints. If the subcontractors opt to purchase prints, a print order is sent to the printer you have selected.
• Select the printer you wish to link to from the Printer drop down.
• Be sure the printer you select already has the documents, or if you are posting the documents to GradeBeam.com, you can send the printer an Invitation to Bid and the printer can download the documents from GradeBeam.com.
• If you are linking to a printer’s plan room, be sure to check the
box for Prints Available Online and get the username and password from the printer, and enter into GradeBeam.com.
47
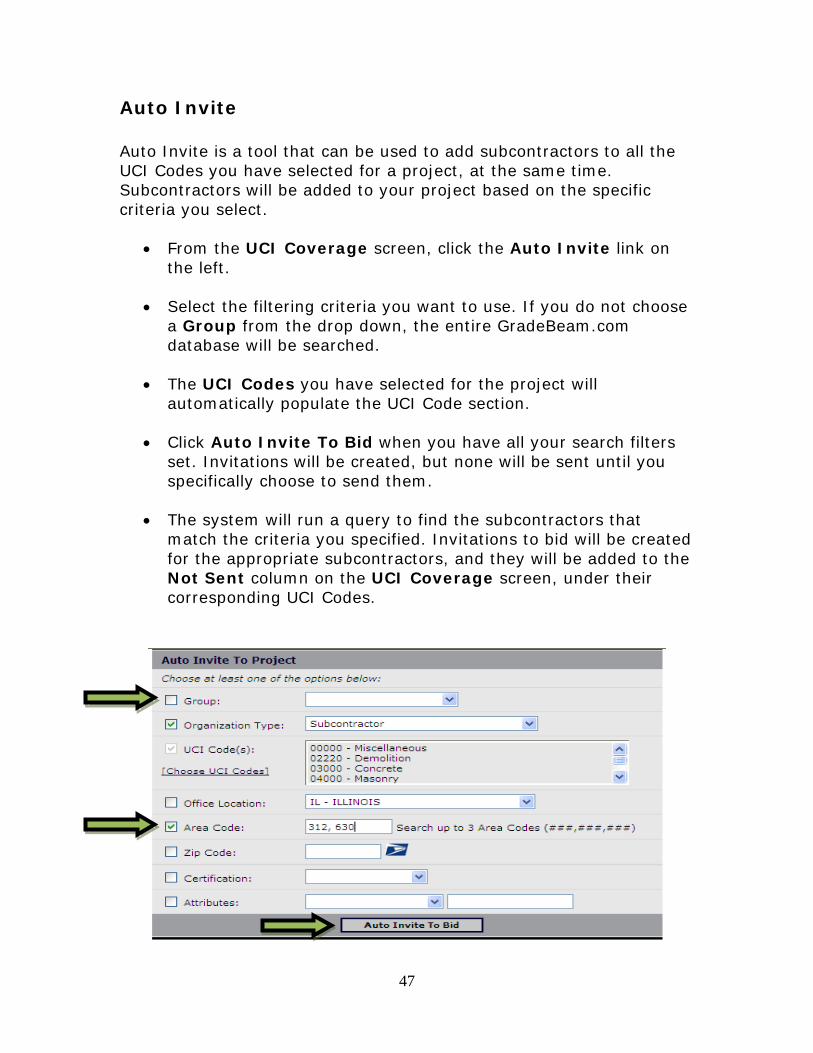
Auto Invite Auto Invite is a tool that can be used to add subcontractors to all the UCI Codes you have selected for a project, at the same time. Subcontractors will be added to your project based on the specific criteria you select.
• From the UCI Coverage screen, click the Auto Invite link on the left.
• Select the filtering criteria you want to use. If you do not choose a Group from the drop down, the entire GradeBeam.com database will be searched.
• The UCI Codes you have selected for the project will automatically populate the UCI Code section.
• Click Auto Invite To Bid when you have all your search filters set. Invitations will be created, but none will be sent until you specifically choose to send them.
• The system will run a query to find the subcontractors that match the criteria you specified. Invitations to bid will be created for the appropriate subcontractors, and they will be added to the Not Sent column on the UCI Coverage screen, under their corresponding UCI Codes.

48
• You can delete subcontractors by clicking on the corresponding UCI Code. Put a check in the box to the far right for any subcontractor you want to remove, and click the Delete button at the bottom.
• When you are ready to send your Invitations to Bid, click the Send Unsent ITBs button on the UCI Coverage page.

49
Uploading Documents You can upload project documents to GradeBeam.com and subcontractors can view, download, and print your posted documents. Folders should be created to keep documents organized and easy to find. This also makes it very fast and simple for subcontractors to view, download, and print your posted documents.
• From the UCI Coverage screen, click on the Documents link on the left.
• To create a folder, choose Create New Folder from the Documents Management drop down.

50
• Type in a name for your folder and click Create Folder. (Using CAPITAL letters is best for folder names.)
• To upload documents into a folder, click on the folder name to go into that folder. Then click the Upload Documents link.
• Double click the Browse button to select the files you wish to upload into your folder.

51
• Select the file(s) you wish to upload. Multiple files can be selected at the same time by using your Ctrl key, or your Shift key. Once you have your files selected, click Open.
• Please note that all files you upload should be on your local computer or from a CD, not from a network drive.
• The files you have chosen to upload will appear in the window on the left. Click the Upload button to upload the documents to your folder. The time it takes for documents to upload will depend on your internet connection speed and bandwidth.

52
• Once your documents are finished uploading, the screen will refresh. Close the window and you will be on your Project Information screen. Click the Documents link on the left to go back to the Documents section.
• Click on the folder name to see the documents you have uploaded.
• You can see which subcontractors have looked at your documents by clicking on the Recipients symbol that looks like this:

53
Sending Messages You can easily send messages to all the subs that are invited to bid on a project. You can also send messages to subs in a specific UCI Code(s). To send a message to all subcontractors invited to your project:
• From the UCI Coverage screen, click the Send Message link on the left.
54
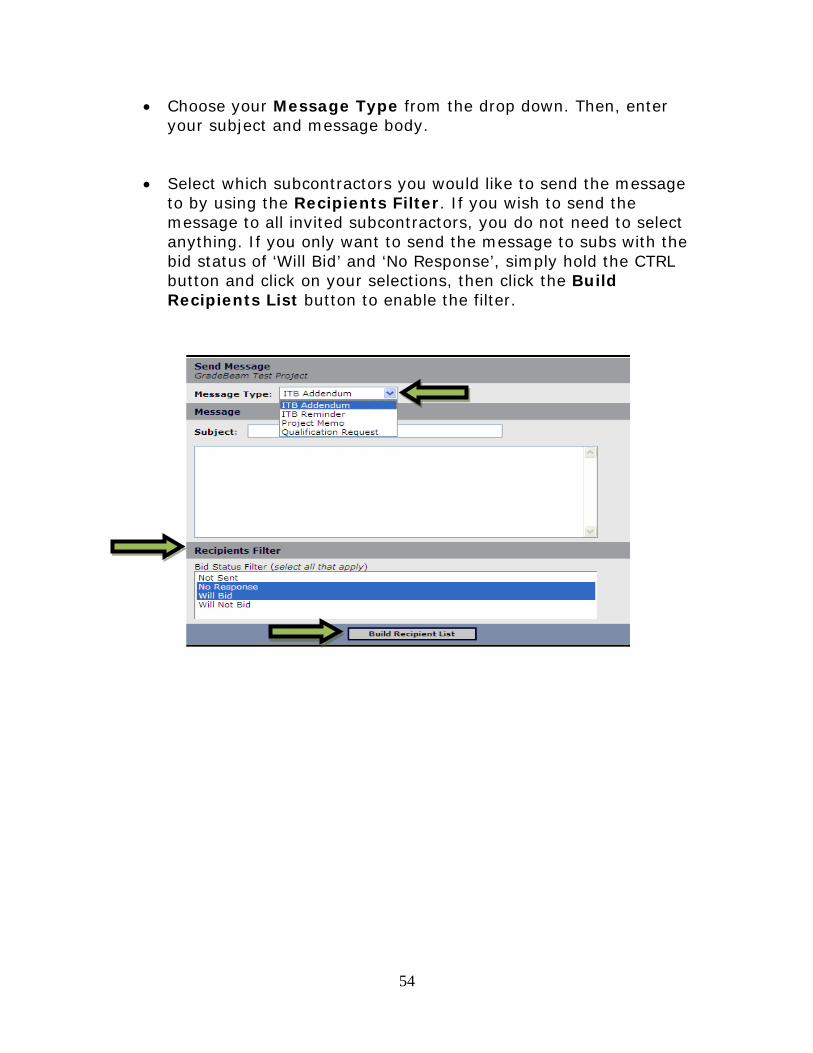
• Choose your Message Type from the drop down. Then, enter your subject and message body.
• Select which subcontractors you would like to send the message to by using the Recipients Filter. If you wish to send the message to all invited subcontractors, you do not need to select anything. If you only want to send the message to subs with the bid status of ‘Will Bid’ and ‘No Response’, simply hold the CTRL button and click on your selections, then click the Build Recipients List button to enable the filter.
55
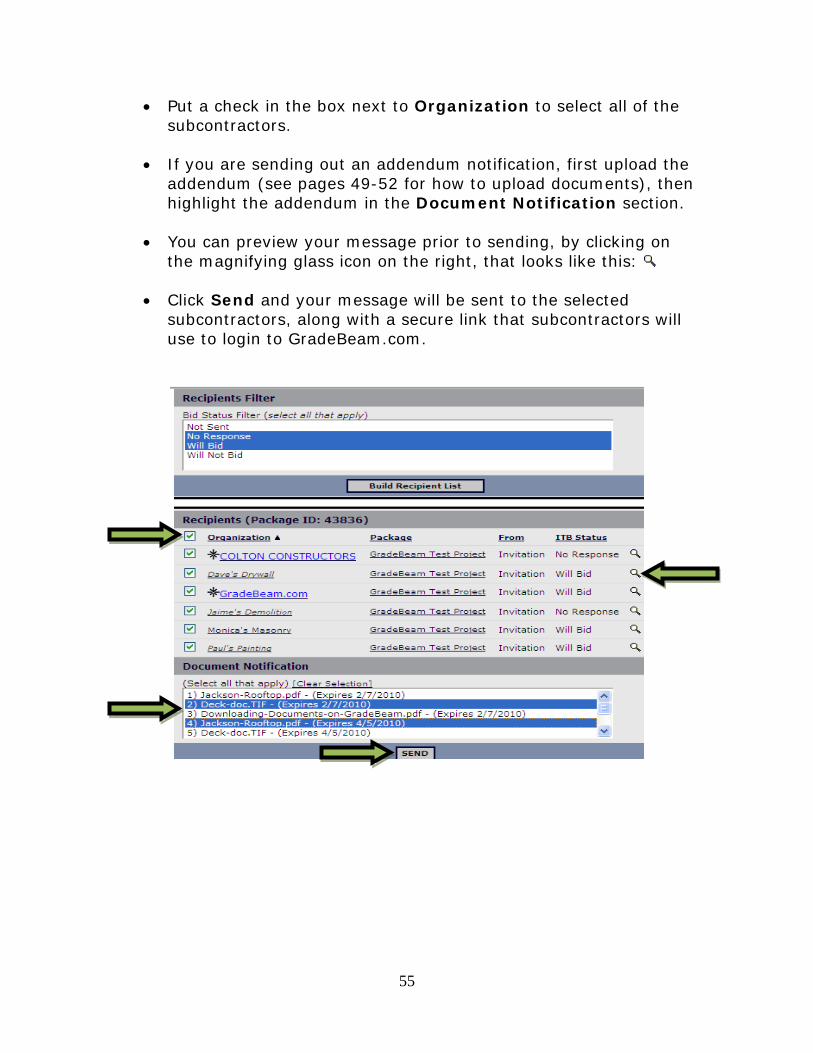
• Put a check in the box next to Organization to select all of the subcontractors.
• If you are sending out an addendum notification, first upload the addendum (see pages 49-52 for how to upload documents), then highlight the addendum in the Document Notification section.
• You can preview your message prior to sending, by clicking on
the magnifying glass icon on the right, that looks like this:
• Click Send and your message will be sent to the selected subcontractors, along with a secure link that subcontractors will use to login to GradeBeam.com.
56
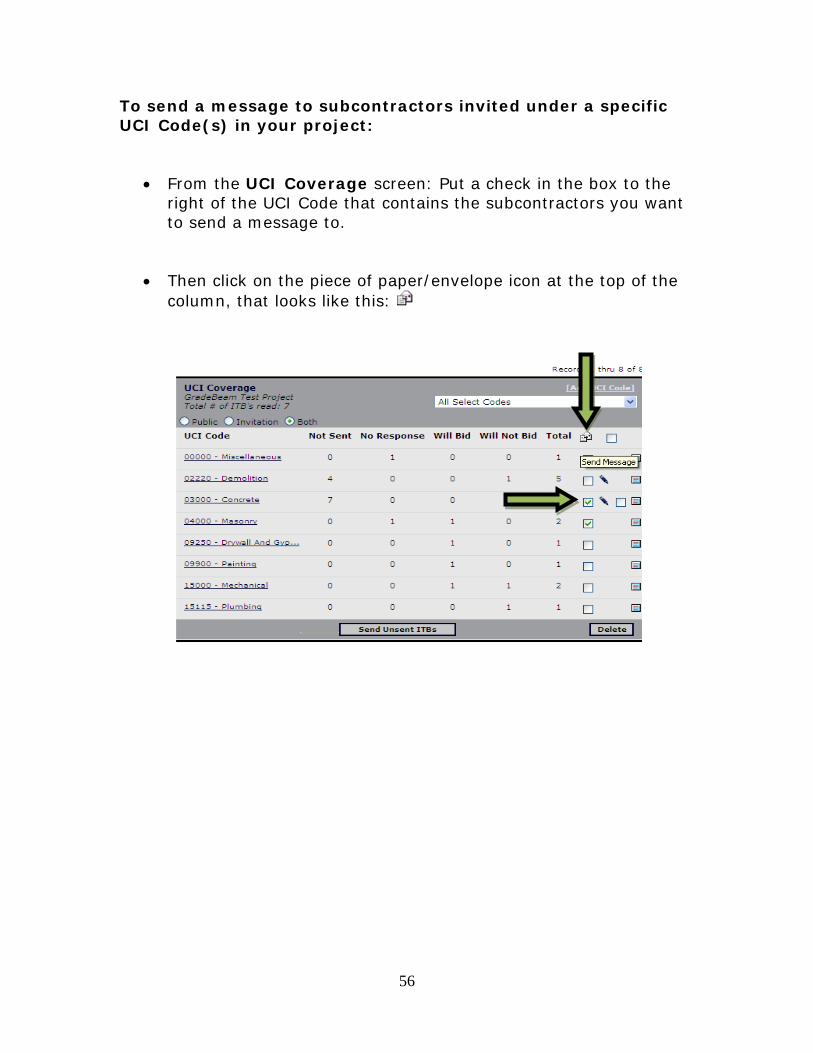
To send a message to subcontractors invited under a specific UCI Code(s) in your project:
• From the UCI Coverage screen: Put a check in the box to the right of the UCI Code that contains the subcontractors you want to send a message to.
• Then click on the piece of paper/envelope icon at the top of the column, that looks like this:
57
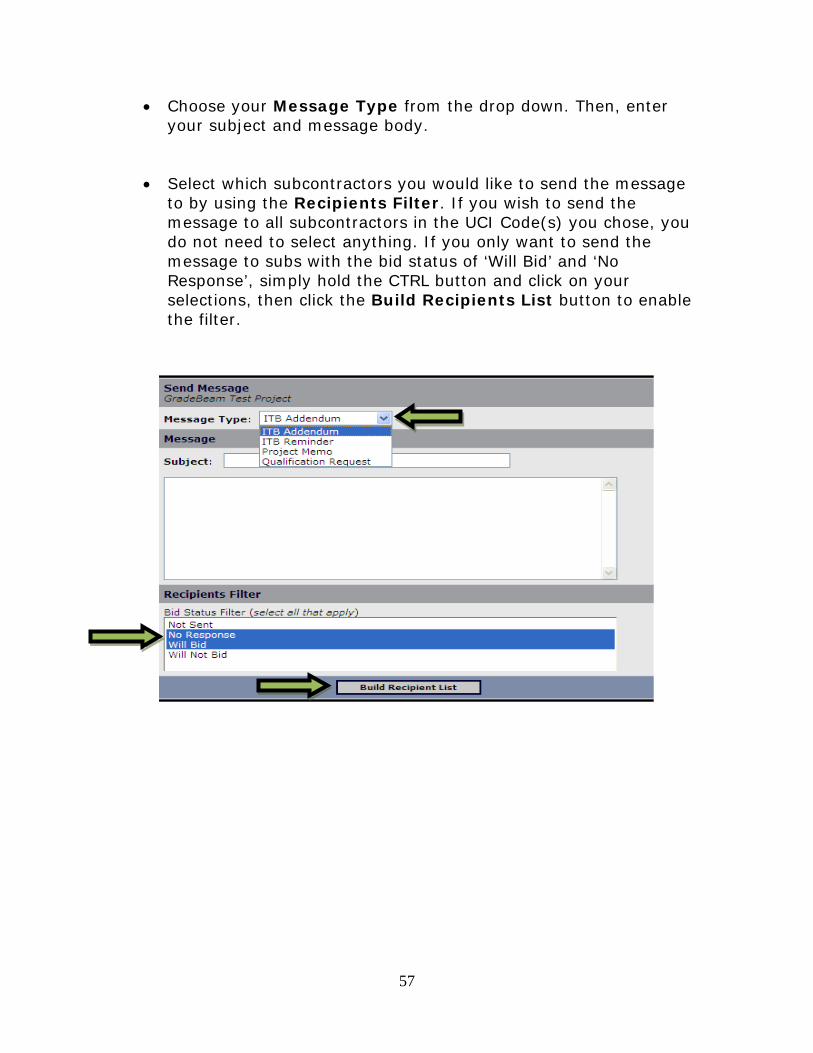
• Choose your Message Type from the drop down. Then, enter your subject and message body.
• Select which subcontractors you would like to send the message to by using the Recipients Filter. If you wish to send the message to all subcontractors in the UCI Code(s) you chose, you do not need to select anything. If you only want to send the message to subs with the bid status of ‘Will Bid’ and ‘No Response’, simply hold the CTRL button and click on your selections, then click the Build Recipients List button to enable the filter.
58
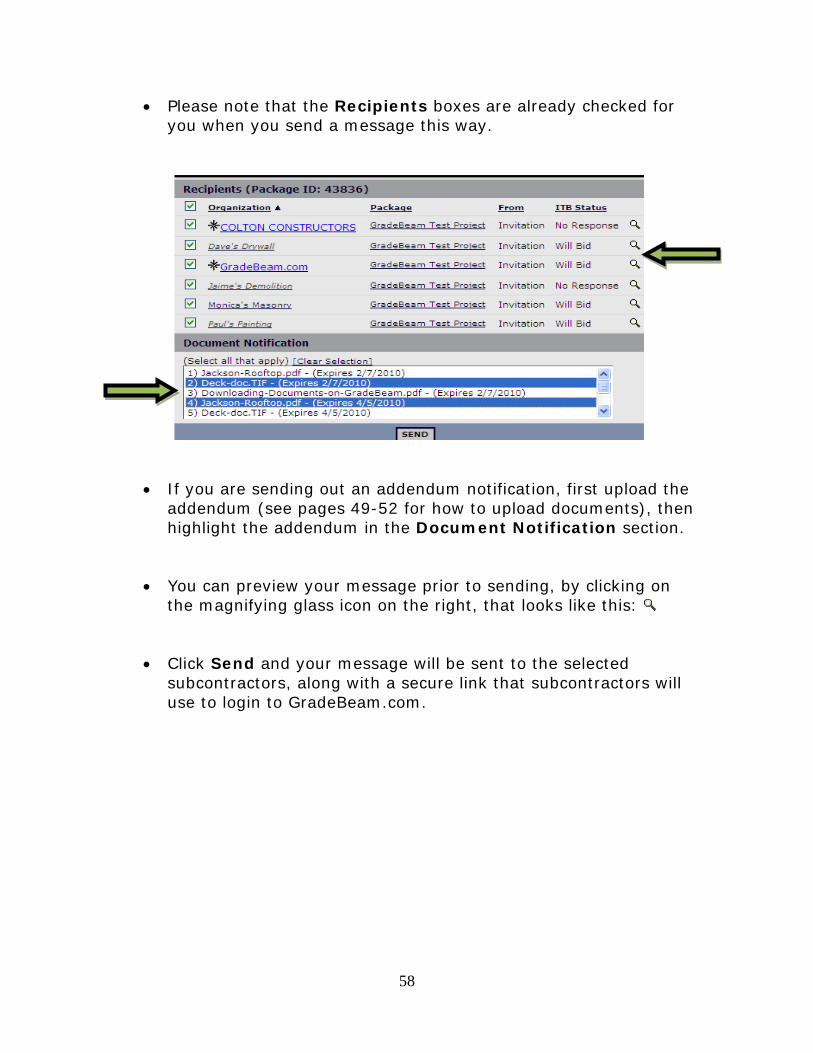
• Please note that the Recipients boxes are already checked for you when you send a message this way.
• If you are sending out an addendum notification, first upload the
addendum (see pages 49-52 for how to upload documents), then highlight the addendum in the Document Notification section.
• You can preview your message prior to sending, by clicking on the magnifying glass icon on the right, that looks like this:
• Click Send and your message will be sent to the selected subcontractors, along with a secure link that subcontractors will use to login to GradeBeam.com.
59
Sending a Document by Fax
You can send a document by fax if the document is under 2 MB.
• Click on the Documents link on the left of the Project Information screen or the UCI Coverage screen, to go to the documents section of the project.
• Upload the document you wish to fax, if you have not already done so (see pages 49-52 for how to upload documents).
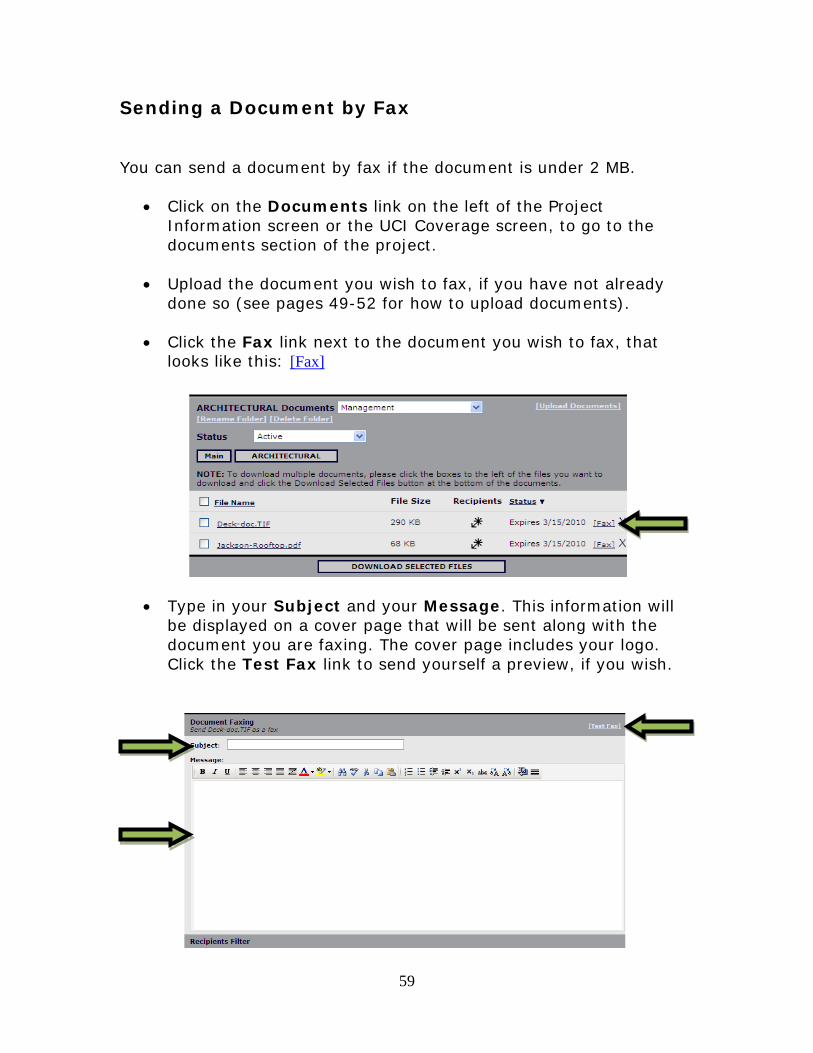
• Click the Fax link next to the document you wish to fax, that looks like this: [Fax]
• Type in your Subject and your Message. This information will be displayed on a cover page that will be sent along with the document you are faxing. The cover page includes your logo. Click the Test Fax link to send yourself a preview, if you wish.

60
• If you want to fax the document to a specific UCI Code you can do this by selecting the code(s) in the UCI Code Filter. If you want to fax the document to a specific group of bid responses, you can do this by selection in the Bid Status Filter. After you make your selections, click the Build Fax Recipient List button.
• Click the Send Document Fax button, and subcontractors with checkmarks in the box next to their company name will receive this document by fax, even if they have email addresses stored in the system.

61
Qualifications
You can request access to see the qualification information for any company listed in GradeBeam.com. Companies can also proactively grant you access to view their qualifications. You can request access to view qualification information for all companies you have invited to bid on a project, and you can also request to view individual company access. To see which companies have already granted you access to view their qualifications:
• Click the View Qualifications link from the Workspace page.
• The companies whose qualifications you already have access to view will be displayed. Click on a View Qualification link to see the qualification information for that company.

62
• There are also Reference tabs on the top that you can click on to view that information.

63
To request access to view qualification information for companies you have invited to a project:
• Click Send Message from the UCI Coverage screen.
• From the Message Type drop down, select Qualification Request.
• Type in your Subject and Message. GradeBeam.com will automatically include a secure link for each company to fill out their qualification form and grant you access.
• Select which subcontractors you would like to send the message to by using the Recipients Filter. If you wish to send the message to all invited subcontractors, you do not need to select anything. If you only want to send the message to subs with the bid status of ‘Will Bid’ and ‘No Response’, simply hold the CTRL button and click on your selections, then click the Build Recipients List button to enable the filter.

64
• Put a check in the box next to Organization to select all of the subcontractors.
• You can preview your message prior to sending, by clicking on the magnifying glass icon on the right, that looks like this:
• Click Send and your message will be sent to the selected subcontractors, along with a secure link that subcontractors will use to login to GradeBeam.com to fill out their qualification information and grant you access to view it.

65
To request access to view qualification information for an individual company:
• From a company’s Profile page click the View Qualification link in the top left corner.
• You can send an individual request to a company, asking them to fill out their qualification form and grant you access to view it.
• Type in your Comments to be sent to the company, and click the Send Request button.
• Once the company has filled out their qualification form and granted you access to view it, you will be able to see their qualifications from both the View Qualifications link on the Workspace page, as well as by clicking on the View Qualification link on the company’s Profile page.

66
Reports Click the Reports link on the top navigation bar to view, print, and download the following informational reports that are available to you as a member of GradeBeam.com: Report #1: Package Coverage: This report lists all of the UCI Codes and invitation responses for each project.
• Select the project you wish to view, from the Package drop down and click View. The report looks like this:
67
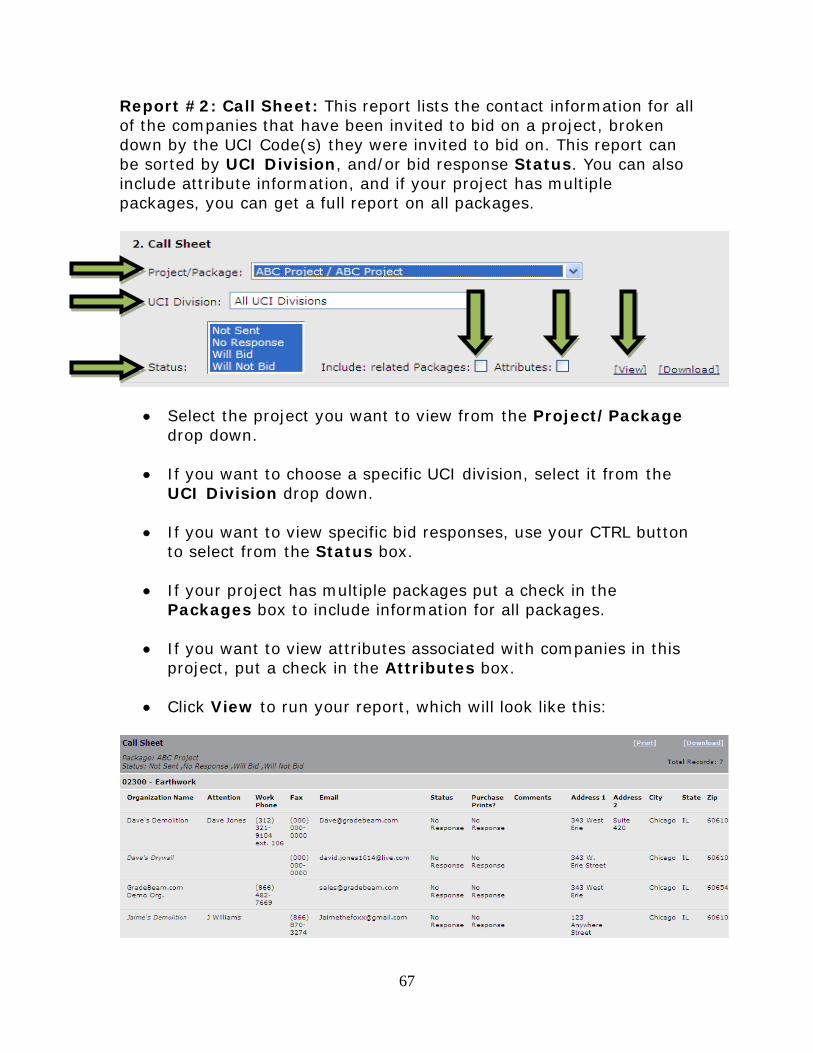
Report #2: Call Sheet: This report lists the contact information for all of the companies that have been invited to bid on a project, broken down by the UCI Code(s) they were invited to bid on. This report can be sorted by UCI Division, and/or bid response Status. You can also include attribute information, and if your project has multiple packages, you can get a full report on all packages.
• Select the project you want to view from the Project/Package drop down.
• If you want to choose a specific UCI division, select it from the UCI Division drop down.
• If you want to view specific bid responses, use your CTRL button
to select from the Status box.
• If your project has multiple packages put a check in the Packages box to include information for all packages.
• If you want to view attributes associated with companies in this
project, put a check in the Attributes box.
• Click View to run your report, which will look like this:

68
Report #3: Call Sheet with Certifications: In addition to listing contact information, this report lists certification information for all companies that have been invited to bid on a project, broken down by the UCI Code(s) they were invited to bid on. This report can be sorted by UCI Division, and/or bid response Status.
• Select the project you want to view from the Package drop down.
• If you want to choose a specific UCI division, select it from the UCI Division drop down.
• If you want to view specific bid responses, use the Status drop
down to select.
• If your project has multiple packages put a check in the Packages box to include information for all packages.
• Click View to run your report, which will look like this:

69
Report #4: Projects Currently Out for Bid: This report is only visible for administrator accounts, and is designed for organizations with multiple office locations that set up projects on the GradeBeam.com system. It lists the basic project information for all of the projects that have been set up by an organization, which can be filtered by the users who set up the projects.
• Select the organization location from the Organization drop down.
• Select the Project Contact from the drop down.
• Enter the Date Range for which you want to see project information.
• Select either open projects or closed projects from the Status
drop down.
• Click View to run your report, which will look like this:
70
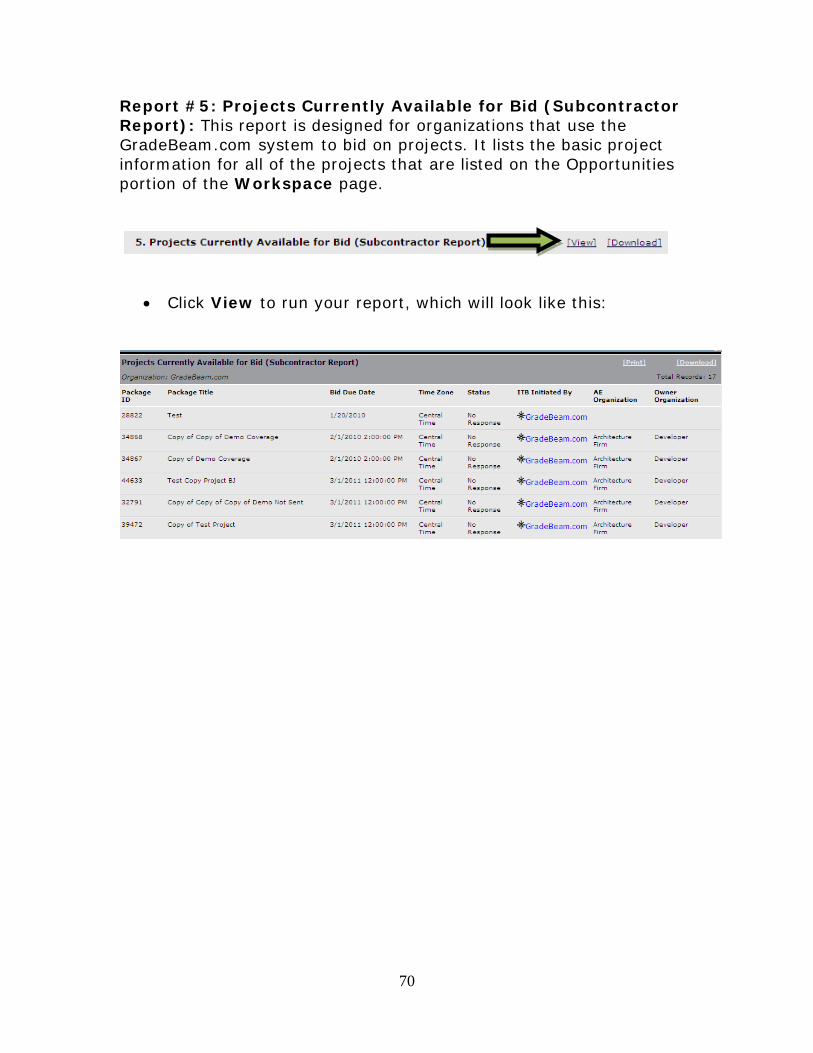
Report #5: Projects Currently Available for Bid (Subcontractor Report): This report is designed for organizations that use the GradeBeam.com system to bid on projects. It lists the basic project information for all of the projects that are listed on the Opportunities portion of the Workspace page.
• Click View to run your report, which will look like this:
71
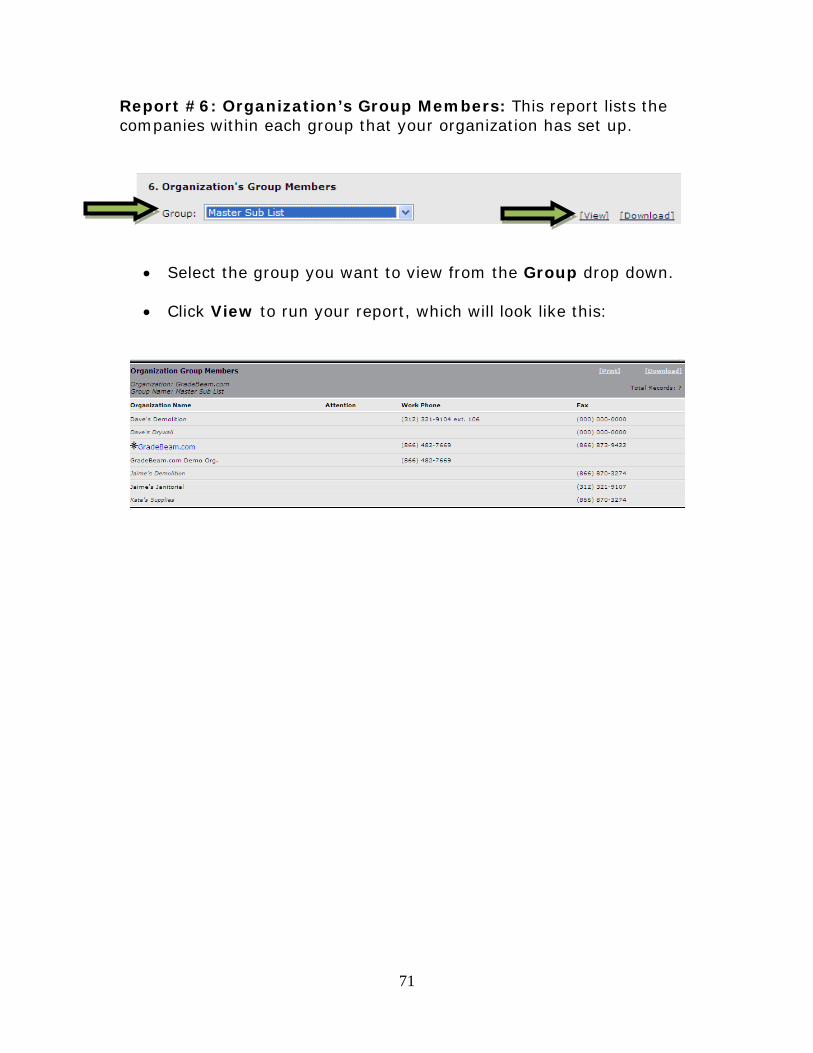
Report #6: Organization’s Group Members: This report lists the companies within each group that your organization has set up.
• Select the group you want to view from the Group drop down.
• Click View to run your report, which will look like this:
72
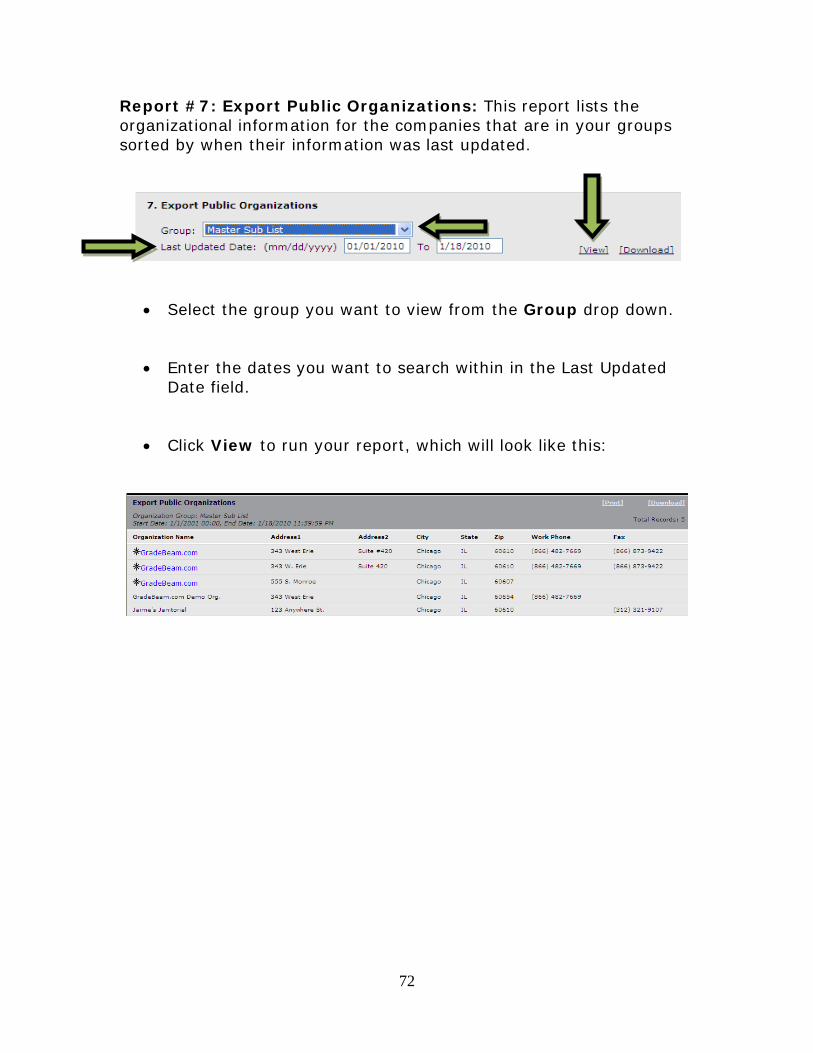
Report #7: Export Public Organizations: This report lists the organizational information for the companies that are in your groups sorted by when their information was last updated.
• Select the group you want to view from the Group drop down. • Enter the dates you want to search within in the Last Updated
Date field.
• Click View to run your report, which will look like this:

73
Report #8: Export Public Contacts: This report lists the contact information of the contacts that are listed for the companies that are in your groups, sorted by when their information was last updated.
• Chose the Group you want to view from the drop down.
• Enter the date range you want to view in the Last Updated Date section.
• Click View to run your report, which will look like this:

74
Report #9: Bidding History: This report lists the history of bidding responses that your company has given for bid invitations. Bid history can be sorted by UCI Code.
• Select the UCI Code you wish to view from the drop down.
• Click View to run your report, which will look like this:

75
Report #10: Projects Currently Out for Bid: This report lists the project information for all of the projects that your organization has set up on the GradeBeam.com system.
• Select your company from the Organization drop down.
• Choose the Project Contact whose projects you would like to view.
• Enter the Date Range for which you would like to see projects.
• Select if the projects you want to view are Open or Closed.
• Click View to run your report, which will look like this:
76
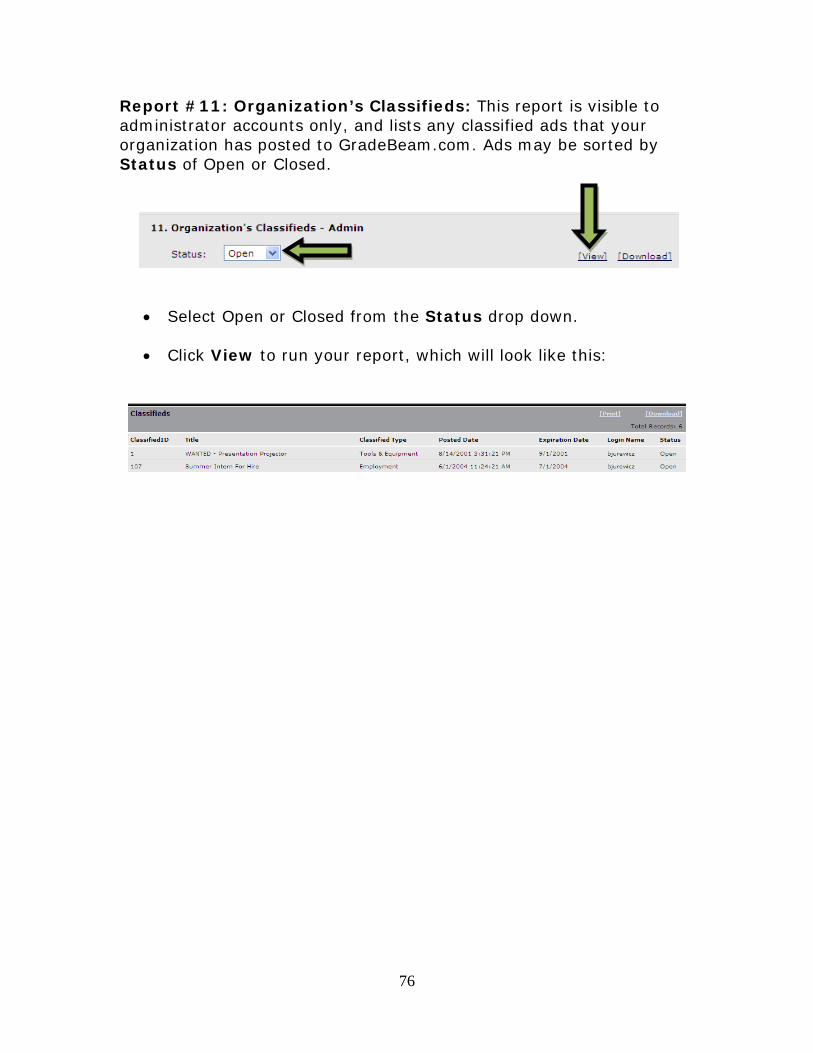
Report #11: Organization’s Classifieds: This report is visible to administrator accounts only, and lists any classified ads that your organization has posted to GradeBeam.com. Ads may be sorted by Status of Open or Closed.
• Select Open or Closed from the Status drop down.
• Click View to run your report, which will look like this:

77
Report #12: Printer Information: This report can be used to see the status of print orders for any projects that you have linked to a Blueprinter. It is broken down by UCI Code.
• Select the project you wish to view information for from the Package drop down.
• Click View to run your report, which will look like this:

78
Report #13: Group Members by UCI Division: This report lists contact information for members of a group, and can be sorted by UCI Code.
• Select the group you wish to view information for from the Group drop down.
• If desired, choose a specific UCI division from the UCI Division drop down. If you are choosing a specific UCI Division, you can put a check in the box that says per UCI Code to show all the UCI Codes within the UCI Division you have selected.
• Click View to run your report, which will look like this:

79
Report #14: Message History: This report shows chronological detail of all messages that have been sent out for each project. You can also see if messages were delivered by email or by fax, in the Recipient Delivery Location column.
• Select the project you want to view the message history for, from the Package drop down.
• Enter the Date Range for which you want to see message history.
• Click View to run your report, which will look like this:

80
Report #15: Online Document Activity: This report shows all subcontractor viewing activity for documents posted to your projects.
• Select the project you want to view from the Project/Package drop down.
• Select the document status you want to view from the Status drop down.
• Enter the Date Range you wish to see activity for.
• Click View to run your report, which will look like this:

81
Contact Us
• Contact GradeBeam.com Customer Support Monday – Friday, 8:00 AM to 5:00 PM Central Standard Time.
o Phone: 866-482-7669
o Email: [email protected]
• Click on the Suggestions link from any page to provide suggestions for the GradeBeam.com website. This link will open a separate window on your computer screen. Fill in the appropriate boxes with the information that you would like to send to GradeBeam.com. Click the Add Suggestions button when you are done entering information.
• Click on the Help link from any page in GradeBeam.com for page-specific instructions. This link will open a separate help window on your computer.


