44
Welcome to the new Sage 50 Accounts • What’s new • Easy install guide • Getting started For more support, visit the Sage 50 Accounts Help Centre: sage.co.uk/new50accounts
| Date post: | 06-Mar-2018 |
| Category: |
Documents |
| Upload: | truongkhanh |
| View: | 231 times |
| Download: | 6 times |

Welcome to the new Sage 50 Accounts
• What’s new
• Easy install guide
• Getting started
For more support, visit the Sage 50 Accounts Help Centre: sage.co.uk/new50accounts


Welcome to the new Sage 50 Accounts
Contents
New and improved features in Sage 50 Accounts 3
Quick install guide 5
Summary of navigation changes in new Sage 50 Accounts 8
Part 1 – Prepare to use Sage 50 Accounts 9
Chapter 1: Preparation 91.1 Create aMy Sage login 91.2 Check your system requirements 91.3 Log on as an administrator 101.4 Access to your server 101.5 Check your regional options 101.6 Close all open software 11
Part 2 Upgrade your existing Sage Accounts software 12
Chapter 2: Upgrade Sage 50 Accounts 122.1 Upgrade Sage 50 Accounts 122.2 Upgrade Sage 50 Accounts on a single computer 142.3 Upgrade Sage 50 Accounts on a network 162.4 Convert your data 16
Part 3 – Install a new copy of Sage 50 Accounts 17
Chapter 3: New to Sage 50 Accounts 173.1 Install Sage 50 Accounts on a single computer 173.2 Registration 193.3 Install Sage 50 Accounts on a network 203.3.1What’s the difference between a server and a client computer? 203.3.2 Install Sage 50 Accounts on a server computer 203.3.3 Share a folder on your server computer 203.3.4 Identify the server name 20
203.3.5 Install Sage 50 Accounts on a client computer 213.3.6 Connect to data on the server computer from your client computer 21
Part 4 – Using Sage 50 Accounts 22
Chapter 4: Creating your company and getting started 224.1 Enter your company details 224.2 Finding your way around the softwaremodules, menus and toolbars 244.3 Setting the processing date 26
1

Welcome to the new Sage 50 Accounts
4.4 Software configuration, settings and defaults 264.5 Create aManager password and individual user accounts 274.6What is a chart of accounts? 284.7 Enter opening balances 314.8 Backupmanager 31To open the Sage Accounts BackupManager 32
Part 5 Where to get additional help 35
Part 6 – The software licence agreement 36
Appendix - Sage Accounts Data Service 37To install the Sage Accounts Data Service 37To start the data service 38To stop the data service 38Warningmessages 39
2

Welcome to the new Sage 50 Accounts
New and improved features in Sage 50 Accounts
Sage 50 Accounts includes some great new features, many of which are a direct result of yourfeedback and requests.
New look and feelWe've listened to you and simplified the look and feel of Sage 50 Accounts. The changeswe’vemademake it easier and faster to navigate between ledgers and to find the tasks youwant to carry out. Although, we've simplified the steps to open the software features, wehaven't removed any functionality.
With the new navigation pane on the left you have one click access to all ledgers, whereveryou are in the software. We’ve also introduced a new dynamic toolbar, so that regardless ofyour window size you always see all of the tasks in each ledger in one place. The result ofthese changes is a user interface that's simple, uncluttered and customisable.
Backup managerCreating regular backups of your data is good practice and protects the integrity of your data.Until now, creating backups has been amanual routine but with the new BackupManager youcan:
l Continue to work in Sage 50 Accounts uninterrupted by scheduling regular backups at atime that suits you. You can even create these backups while users are still working inthe software.
l Check your data and back up while users are still logged in to the software.
l Manage backups for all companies through a single console.
l View users logged in to any companies.
You can only access the Backupmanager when you log on as Manager. This option isswitched on by default. To access the Backupmanager open File >Schedule back up.
Inactive accountsTo help you find your customers, suppliers and products more quickly, you can now hideinactive records from your lists. This also reduces the possibility of processing errors.Accounts can be switched between active and inactive with a new check box, providingcertain criteria aremet.
Windows selection methodYou can now choose how you want to select multiple records in a list. You can use theexisting Sage accounts method of clicking individual records, or you can use aWindows styleselectionmethod of selectingmultiple records usingmouse clicks in conjunction with the shiftand Ctrl keys.
3

Welcome to the new Sage 50 Accounts
Access rights refreshWe've simplified how you control access to the various areas of the software. It's easy to addnew users, remove users, allow or remove access tomodules in the software and copyaccess rights from one user to another.
Shortcut keysIf you prefer to use your keyboard to navigate around the software this is now possible with aseries of keyboard shortcuts. To view the shortcuts in the software, press the Alt key thenpress the key for the option you require.
Multiple user options - Sage 50 Accounts Professional onlyMore users can access Sage 50 Accounts than ever before. If you use a network version ofSage Accounts, this release supports up to 20 users processing at the same time.
Choose your colour themeYou can now personalise Sage 50 Accounts by choosing from three different colour themesare available in Sage 50 Accounts. To choose your preference, open Tools >Options >Colours and choose from Dark, Light or White.
Sage 50 Accounts with Sage Drive - access your data on the goIf you're always on the go, youmight not have time to get back to the office to check youraccounts. In this version of Sage 50 Accounts you have the option to upload your data to thecloud. Your cloud based data will sync with your local copy of your data.
Initially you have two connections to your cloud based data , one Connected Accountant andone Connected device. This means the data can be accessed from one remote site, fromhome for example, and your accountant can also access the data in the sameway.
In addition to this, you can also download Sage 50 Accounts Tracker app through which up to25 users can access the cloud based data usingmobile devices.
Depending upon your contract with Sage these features will either be available for 12monthsor on a continual basis.
4

Welcome to the new Sage 50 Accounts
Quick install guide
If you want to install this software immediately and start exploring, please follow these quickstart steps. Alternatively, for a step-by-step guide, please refer toPart 1 – Prepare to useSage 50 AccountsThis release of Sage Accounts isn't compatible withWindows XP. For more information aboutthis, please visit www.sage.co.uk/new50accounts
Sage 50 Accounts uses a data service to control the flow of data. Youmust installand run this service in the same location as your data. If your data is held on aserver that doesn't have a copy of Sage 50 Accounts, youmust install the servicefirst. For more information, please refer to theAppendix.
1. Insert your Sage 50 Accounts DVD in to the DVD drive of your computer.
2. Install software.
3. To accept the terms and conditions > select the check box >Next.
5
Welcome to the new Sage 50 Accounts
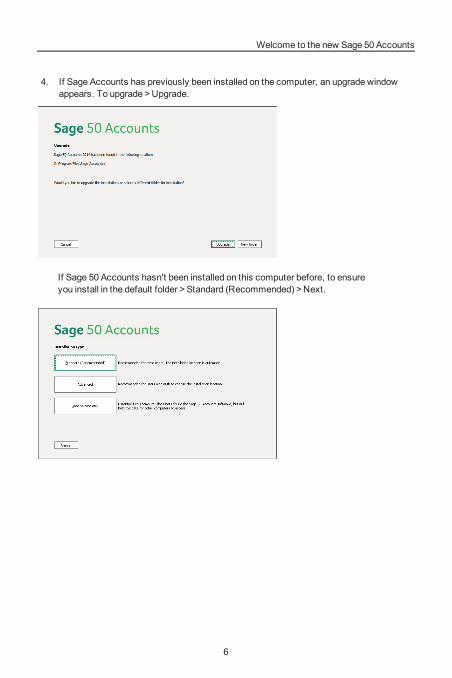
4. If Sage Accounts has previously been installed on the computer, an upgrade windowappears. To upgrade >Upgrade.
If Sage 50 Accounts hasn't been installed on this computer before, to ensureyou install in the default folder >Standard (Recommended) >Next.
6

Welcome to the new Sage 50 Accounts
5. To begin copying files to your computer >Yes, begin installation.
6. To complete the installation and launch Sage 50 Accounts > Launch Sage 50 Accounts.
You're now ready to upgrade your existing data from an earlier version, or open a newcompany.
7

Welcome to the new Sage 50 Accounts
Summary of navigation changes in new Sage 50 Accounts
We'vemade some improvements to the layout of the software to help you to find what youneed quickly. If you've used Sage 50 Accounts before , you'll find some of the familiar optionshavemoved. The table below gives a quick summary of the key changes:
Task / Option: Where to find it
Management reports - Profit andloss, balance sheet and trialbalance
Nominal codes >Profit & loss, Balance sheet or Trialbalance
Corrections - edit or correct atransaction
Transactions >Edit or Delete
Financials Financials has been renamed as Transactions
Search Search is now called Filter and we've replace themagnifying glass image with a filter image. To turn afilter on or off you can click this image.
Process maps and dashboards To switch on the process maps and dashboards,Tools >Options >View >Global Settings.
Tabs All of the ledgers are now available in one click fromthe navigation pane so we've removed the tabs.
Contra entries Customers or Suppliers
Sage Pay transactions report Transactions >Audit Trail
8

Welcome to the new Sage 50 Accounts
Part 1 – Prepare to use Sage 50 Accounts
Chapter 1: Preparation
1.1 Create a My Sage loginTomake themost of the resources available to you online, you first need to create aMy SageLogin.
To create your online account go tomy.sage.co.uk>Create a Sage login > follow the on-screen prompts.
When you’ve successfully created your My Sage account you can access a wealth of onlineresources andmanage your Sage account and preferences.
1.2 Check your system requirementsBefore you install Sage 50 Accounts it’s essential that you check that your computer meetsthe following requirements.
This release of Sage Accounts isn't compatible withWindows XP. For moreinformation about this, please visit www.sage.co.uk/new50accounts
Supported Operatingsystems
All 32 or 64-bit variants of Microsoft® Windows® 8, 7, Vista,Server 2008, Server 2012
Processor speed 2Ghz processor or equivalent
RAM (Memory) 2GBRAM, 4GBRAM for all PCs running a 64-bit operatingsystem.
Free disk space 5GB of free disk space plus additional space for data files
Network speed 1Gbps (100Mbps minimum)
Disk drive DVD drive
Internet connection Recommended download speed 2Mbps or higher. InternetExplorer 10 or later is required.
Please ensure you've installed all the latest Microsoft updates.
9

Welcome to the new Sage 50 Accounts
Other requirementsl Integrates with Microsoft Office® 2013 and 2010 (32-bit editions) or
2007 and 2003
l Screen Resolution of 1024x768
l You should configure your Antivirus software to exclude Sage files from its scanningroutines
1.3 Log on as an administratorWhen you install Sage 50 Accounts youmust log on to your computer as an administrator.
This is only necessary for the installation of the software; when using Sage 50Accounts, administrator permissions aren't required.
To check that you are logged on as an administrator1. Hold down theWindows key and press R > in the Open box, type cmd >Enter.
2. At theMS-DOS prompt type net localgroup administrators >Enter.
Under theMembers heading, if yourWindows login appears, you're anAdministrator. If your login doesn’t appear youmust log off Windows then log backon as an administrator before you install the software.
3. To close theMS-DOSwindow, type exit >Enter.
1.4 Access to your serverIf you intend to use Sage 50 Accounts in a network environment and the data will be held on aserver, youmust ensure you have access to this server before installing the new software. Ifyour IT support is handled by a third party youmay need to contact them tomake anynecessary arrangements.
1.5 Check your regional optionsYou can use Sage 50 Accounts within the United Kingdom or the Republic of Ireland. To usethe appropriate currency, date format and VAT rate, youmust check that your computer’sregion is set to the correct location for the software.
To check your regional options1. Hold down theWindows key and press R > in the Open box, type intl.cpl >Enter.
10

Welcome to the new Sage 50 Accounts
2. In the Region and Language window check the format is either English (United Kingdom)or English (Ireland). If an alternative language or country is found, choose the correctlanguage >OK.
3. After changing your region, to apply the new settings > restart your computer.
1.6 Close all open softwareBefore you start your installation please close all software on your computer.
Preparation check list
Step Completed? Yes / No
I’ve created aMy Sage login.
My computer’s operating system is supported andmeets the required specification.
I'm logged on as an administrator.
If required, I have access to the server.
My region is set to English (United Kingdom) or English(Ireland).
I've closed all open software on the computer.
11

Welcome to the new Sage 50 Accounts
Part 2 Upgrade your existing Sage Accounts software
Chapter 2: Upgrade Sage 50 Accounts
2.1 Upgrade Sage 50 Accounts
You can convert data from older versions into new Sage 50 Accounts from thefollowing versions: v16, v17, v18, v19, v20. To find your version number, openHelp >About.If you use Sage 50 Accounts 2012 or above, the version numberappears in Program Details.
If your version number is v15 or lower, contact Sage Technical Support:
l UK - 0845 111 5555.
l Republic of Ireland – 1890 88 20 60
Run the Check Data routineBefore you upgrade your old version of Sage 50 Accounts youmust check that your data filesare free from corruption. To do this, open File >Maintenance >Check Data. Any errorsreported here indicate a problem youmust fix before you can upgrade.
If errors are reported, for further advice, please visit theMy Data site at:www.sage.co.uk/mydata
If you're in the Republic of Ireland call 1890 88 20 60
If warnings and comments appear, they don’t require action at this time.
Back up your dataOnce you’ve confirmed that your data is free from errors, youmust then take two all files databackups. If there’s a problem with the conversion youmay need to restore one of thesebackups and try the conversion again. By backing up all of your data files you ensure that yourdata and any customised reports or layouts are safely stored. To back up all files, open File >Backup >AdvancedOptions tab >Select all file types to include in backup >Backup Companytab > choose an appropriate file name and location >OK.
Check your installation pathBefore you upgrade, to guarantee that your upgrade installs to the correct location, youmustknow where your software is currently located. In Sage 50 Accounts you can find this
12

Welcome to the new Sage 50 Accounts
information in Help >About >Program Details.
Sage 50 Accounts 2011 and below: Help >About >System Information >Directories.
Prepare your old version - check list
Step Completed? Yes / No
I’ve run Check Data andmy data is free from errors.
I’ve taken two all files backups of my data, and storedthem in a secure location.
I’ve taken a note of my current installation path.
13

Welcome to the new Sage 50 Accounts
2.2 Upgrade Sage 50 Accounts on a single computerIf your software is installed in the default path, you can follow the standard installation.
If you're using a 64-bit operating system, the default path is C:\Program files (x86)\Sage\Accounts.
If you're using a 32 - bit operating system, the default path is C:\ProgramFiles\Sage\Accounts
1. Insert your Sage 50 Accounts DVD into the DVD drive of your computer > Installsoftware.
2. To accept the terms and conditions > select the check box >Next.
3. Check the location is the same as the path you noted in the previous section > Upgrade.
14
Welcome to the new Sage 50 Accounts
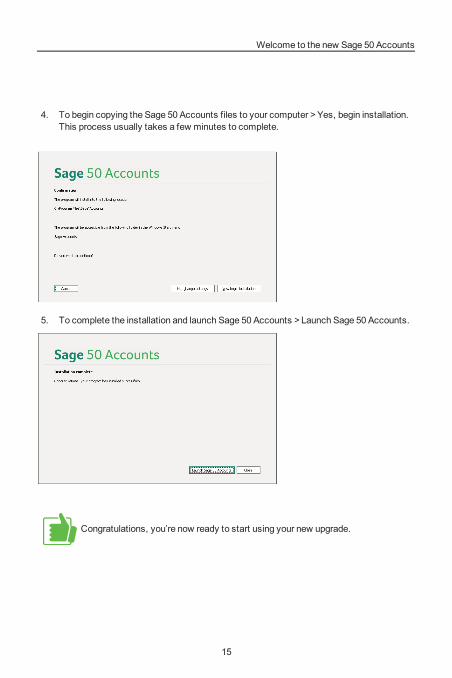
4. To begin copying the Sage 50 Accounts files to your computer >Yes, begin installation.This process usually takes a few minutes to complete.
5. To complete the installation and launch Sage 50 Accounts > Launch Sage 50 Accounts.
Congratulations, you’re now ready to start using your new upgrade.
15

Welcome to the new Sage 50 Accounts
2.3 Upgrade Sage 50 Accounts on a networkTo check which computer is the server and which is the clientThe server computer normally has both the software and the data located on the local harddrive, generally the C drive. The client computer has the software located on its local harddrive, and the data located on a network drive. Information about the program and datadirectories is available within Help >About >Program Details.
Sage 50 Accounts 2011 and below: Help >About >System Information >Directories.
Installing your Sage 50 Accounts upgrade on a server computer
Sage 50 Accounts uses a data service to control the flow of data. Youmust installand run this service in the same location as your data. If your data is held on aserver that doesn't have a copy of Sage 50 Accounts, youmust install the servicefirst. For more information, please refer to theAppendix.
If you have physical access to the server computer and it has a DVD drive, you can follow thesame process as detailed in section 2.2 Upgrade Sage 50 Accounts on a singlecomputerIf you don't have access to your server, and you need to install the software, youmay need tocontact your local IT support for assistance.
Installing your Sage 50 Accounts upgrade on a client computer
Youmust complete the upgrade procedure on all of the computers that have Sage50 Accounts installed.
To install Sage 50 Accounts on a client computer you can follow the same process as detailedin section 2.2 Upgrade Sage 50 Accounts on a single computer2.4 Convert your dataAfter you install your upgrade for Sage 50 Accounts, when you open the software for the firsttime, your data automatically goes through a conversion process. This changes the data filesfrom their old format to one compatible with your new version. The length of time needed forthis process varies depending upon the size of your data files, it's quicker on the servercomputer.
Do not interrupt or crash out of this process as it will damage your data files.
16

Welcome to the new Sage 50 Accounts
Part 3 – Install a new copy of Sage 50 Accounts
Chapter 3: New to Sage 50 Accounts
3.1 Install Sage 50 Accounts on a single computer
Before you start your installation please ensure you close all software.
1. Insert your Sage 50 Accounts DVD into the DVD drive of your computer > Installsoftware .
2. To accept the terms and conditions > select the check box >Next.
3. To ensure that you install all of the required files > Standard (Recommended) >Next.
17

Welcome to the new Sage 50 Accounts
The software will install into the path shown.
If you're using a 64-bit operating system, the default path is C:\Program files (x86)\Sage\Accounts.
If you're using a 32 - bit operating system, the default path is C:\ProgramFiles\Sage\Accounts
4. To begin the installation of Sage 50 Accounts >Yes, begin installation.This processusually takes a few minutes to complete.
5. To complete the installation and launch Sage 50 Accounts > Launch Sage 50 Accounts.
Congratulations, the installation is complete and you’re now ready to set up yournew Sage software.
18

Welcome to the new Sage 50 Accounts
3.2 RegistrationWhen you open Sage50 Accounts for the first time, the Sage 50 Accounts SoftwareRegistration window appears.
If you're in the Republic of Ireland, for further assistance, please call 1890 88 2060.
1. Enter the serial number and activation key provided with your software >Continue.
If you’re unsure of your details, to check them online >MySage >My Account >Products and services.
2. If you've entered a trial key, to register the software >Yes > complete the requestedregistration information >Register Now.
3. To continue > OK.
Congratulations, you’ve now successfully registered your software. If you need toset up a new company, please refer toPart 4.
19

Welcome to the new Sage 50 Accounts
3.3 Install Sage 50 Accounts on a network3.3.1 What’s the difference between a server and a client computer?If you install Sage 50 Accounts on a network, you need to decide which computer is going tobe the server, and which will be the clients. The server computer normally has the softwareinstalled on it and also stores the data files, the client computer has the software installed, butconnects to the server for the data.
As a general rule you should choose the computer that you'll usemost often to act as theserver because this computer must be switched on before the client computer can connect tothe data files. Alternatively, youmay have a computer in the office which is already usedspecifically as a server by other software.
3.3.2 Install Sage 50 Accounts on a server computerThe steps to install the software on your server computer are exactly the same as installingon a single computer, simply follow the steps in sectionPart 3 – Install a new copy ofSage 50 Accounts
3.3.3 Share a folder on your server computerTo link your client computer to the data on your server computer youmust first share a folderon the server, making it visible to the rest of the network.
The folder you need to share is located as follows
l C:\ProgramData\Sage\Accounts\2015
The steps to share a folder on the server computer differ depending on the operating system.In all cases the folder needs to have full control of the Share, andModify permissions on thefolder contents. If you're unsure how to do this, consult your IT administrator, theWindowshelp system, or call Sage Technical Support on 0845 11 55 55. If you're in the Republic ofIreland, call 1890 88 20 60
3.3.4 Identify the server name1. Hold down theWindows key and press R > in the Open box, type cmd >Enter.
2. At theMS-DOS prompt type hostname >Enter. Make a note of the name of the servercomputer as you’ll need this later to help you connect your client computer.
3. To close theMS-DOSwindow, type exit >Enter.
20

Welcome to the new Sage 50 Accounts
3.3.5 Install Sage 50 Accounts on a client computerThe steps to install the software on your client computer are exactly the same as installing ona stand-alone computer. Please follow the steps in section 3.1 Install Sage 50 Accountson a single computer
3.3.6 Connect to data on the server computer from your client computerHaving installed the software on your client computer, you need to connect to the data on theserver.
1. Double-click the Sage 50 Accounts shortcut on the client computer desktop.
2. Select Use a company already set-up in another installation >Next.
3. Browse or type the path to your data, for example: \\servername\shared folder namefor example - \\server1\2015 >Next > follow the remaining steps as prompted.
You’ve now installed the software and connected it to the server. You can use theSage 50 Accounts shortcut on the desktop to open the software.
Installing Sage 50 Accounts on a network check list
Step Completed? Yes / No
I’ve identifiedmy existing server computer or decidedwhich computer will bemy server, and which will bemyclient.
I’ve installed the software onmy server computer
I’ve shared the data folder onmy server computer
I’ve installed the software onmy client computer
I’ve connectedmy client computer to the Sage data onmy server computer
21

Welcome to the new Sage 50 Accounts
Part 4 – Using Sage 50 Accounts
Chapter 4: Creating your company and getting started
4.1 Enter your company detailsWhen you create your company for the first time there are a number of details that you need toenter in the ActiveSetupWizard.
Welcome – In the first window, select whether you want to:
l Set-up a new company
l Use an existing company stored on your network
l Restore data from a backup file
l Connect to the Sage Drive
Network Sharing – If you usemulti user version of Sage 50 Accounts, we recommend thatyou share your data across the network. This step prompts you to approve the network share.If you have a single user version of the software this step doesn’t appear.
This step only applies when you create a new company on the server computer.
Company Details – Enter your company name and address.
Business Type – Select the type of business that most closely matches your own, andtherefore which nominal structure you want to create. For an explanation of what a chart ofaccounts is, please refer to section 4.6 What is a chart of accounts?
You can’t change this later so it’s important that you choose the right option. Ifyou're unsure which to choose, for further advice, please consult your accountant.
22
Welcome to the new Sage 50 Accounts
Financial Year – choose themonth your current financial year starts from. To help you toconfirm your selection, the financial year start and end dates both appear.
Sage 50 Accounts allows for a 12month financial year. If your first financial year islonger than 12months, choose the startingmonth which allows for the correctfinishing point.
For example, if you have a 15month financial year from 1 January 2014 until 31March 2015 you should choose the start date of April 2013 so that the correctfinish date is 31March 2015.
VAT – Enter the VAT details for your company.
l If your company isn’t VAT registered >No, enter the current standard VAT rate >Next.
l If your company is VAT registered >Yes, enter your VAT registration number, your VATscheme, and the current standard VAT rate >Next.
It’s important that you choose the correct VAT scheme at this point as it’s difficultto change this later. If you’re unsure which VAT scheme your company uses,consult your accountant, HMRC or Revenue in the Republic of Ireland.
Currency – Choose the base currency in which your company trades, for example poundssterling or euro.
You can’t change this at a later date, so it’s vital that you choose the rightcurrency.
Manager Password – The default login for Sage 50 Accounts is Manager. With this login youhave access to all of the software features, therefore we strongly recommend that you createa password for this.
Confirm Details – You can review the choices you'vemade and ensure they’re correct. Ifyou want to change any of your choices >Back. If you’re happy with your choices, to createyour new company data files >Create.
If you havemulti user version of the software you’re prompted to log on. The default logon isManager with no password, unless you have already added a password. If you’re using asingle user version, the software opens.
Customise your company –On opening a company for the first time the Customise yourcompany window appears. If you're new to Sage 50 Account or not familiar with the software,the wizard guides you through. It guides you through the basic set up of the software. If youdon’t have time to follow it now, you can open it at any time from the Helpmenu.
23

Welcome to the new Sage 50 Accounts
4.2 Finding your way around the software modules, menus and toolbarsTo help you get used to the different options, this section explains how to navigate thesoftware,
Navigation pane
One click accessYou can use the navigation pane to get to theledger or feature you need in just one click.
CustomisationYou can customise the navigation pane to suityour needs. To customise the Navigation pane >right-click and select or clear the options asrequired.
ShortcutsFor quick keyboard access to the Navigationpane, just hold down theAlt key on yourkeyboard and press the number or letter thatappears next to themodule you require. Forexample, to open Suppliers, press Alt + 5.
24

Welcome to the new Sage 50 Accounts
Menu barLocated at the top of the desktop, themenu bar contains various options that control anumber of software functions
Some examples of key business processes which you can access via themenu bar are:
Option: What this controls
File >Back up You can use this to make a secure copy of your datafiles.
File >Schedule back up Use this feature to schedule regular automaticbackups of your data.
File >Restore You can use this to restore a copy of your data files,returning them to a state before the backup wascreated.
File >Maintenance >Check Data You can use this to check that your data is free fromcorruption. We recommend that you run thiswhenever you use the software.
File >Microsoft Integration You can use this to link Sage 50 Accounts to theMicrosoft Office suite.
Settings >Company Preferences Contains all of your company details including theaddress and VAT information.
Settings >Change Program Date Set your defaults for all transactions and invoices youenter in Sage 50 Accounts.
Tools >Options >View Customise your software in terms of the defaultdesktop and ledger views.
Tools > Internet options Enter your automatic update settings and onlineaccount information.
Tools Period End >Year End Use this option to run your year end routine at theclose of your financial year.
Help >Contents and Index Comprehensive software help files. You can alsoaccess access these at any time by pressing F1 onyour keyboard.
Help >Shortcut Keys Details of how to navigate quickly and efficientlyusing the keyboard.
25

Welcome to the new Sage 50 Accounts
4.3 Setting the processing dateWhen you’re processing in Sage 50 Accounts the date you use on every transaction is ofcritical importance to the accuracy of your data. By default, Sage 50 Accounts uses the datefrom Windows as its default date, that is, today’s date.
If you want to change the default processing date, you can do this in Settings >ChangeProgram Date.
4.4 Software configuration, settings and defaultsTo save time when creating records or entering transactions, there are a number of defaultsettings you can enter in Sage 50 Accounts.
You can access these defaults through the Settings menu and they control the followingsoftware areas:
Option: What this controls
Settings >Configuration l The default trading terms and custom fields forcustomers and suppliers.
l Finance rates
l Tax code settings.
l Product category settings.
Settings >Company Preferences l Your company address and VAT settings.
l Your accountant’s address and contact details.
l Your reporting options.
l Your Sage Pay settings if you use this softwarefeature.
Settings >Customer Defaults l The tax code, nominal code, country and termsagreed settings used when you create a newcustomer.
l The text that appears on a customer statement.
l The type of ageing used.
Settings >Supplier Defaults l The tax code, nominal code, country and termsagreed settings used when you create a newsupplier.
l The type of ageing used.
Settings >Bank Defaults l Cash register settings.
26

Welcome to the new Sage 50 Accounts
Option: What this controls
l Settings for to e-banking and bank reconciliation.
Settings >Product Defaults l The default values used when you create a newproduct record. For example, the nominal code,tax code, unit of sale and category.
l The decimal precision used for product quantityand unit price.
Settings > Invoice Defaults l The box where the cursor appears by default inan invoice and an item line.
Common questions about settings and defaultsQ - How can I select the Terms Agreed check box by default when I create a new customerrecord?A - Open Settings >Customer Defaults > select Terms Agreed >OK.
Q - How can I changemy supplier ageing periods from 30, 60, 90 and 120 days to calendarmonthly?A - Open Settings >Supplier Defaults >Ageing > select Calendar Monthly Ageing >OK.
Q - When I pay a supplier invoice, how can I see each individual invoice item line, rather thanjust the grand total?A - Open Settings >Bank Defaults > select the List Invoice/Credit by item line check box >OK.
Q - How can I see the discount amount on themain invoice window, without having to openthe individual item line?A - Open Settings > Invoice Defaults >Discounts > select the Show Discount onMainInvoice/Order Screen check box>OK.
Q - When I’m viewing a customer’s activity how can I hide all the deleted transactions?A - Open Settings >Company Preferences >Parameters > select the Exclude deletedtransactions check box >OK.
4.5 Create a Manager password and individual user accountsIt’s important that youmake your Sage data files as secure as possible.
If you didn't set up aManager password when installing the software, you can create apassword, now. To do this, open Settings >Change Password > enter the required passwordinto the New Password and Confirm New Password boxes >OK.
Remember this password as you can’t open the software without it.
27

Welcome to the new Sage 50 Accounts
If you want to create a login for individual users youmust enable this feature . To do this, openSettings >Company Preferences >Parameters > select the Access Rights check box >OK.You can then create the users in Settings >Access Rights, where you can also limit access tocertain areas of the software. Youmay, for example, want to hide the bank balances fromsome employees.
Only the person logged on as Manager can create new users andmodify the areas of thesoftware they can access.
4.6 What is a chart of accounts?Sage 50 Accounts uses the chart of accounts (COA) to group together similar nominal codesinto categories. It’s also used to determine whether a code appears on the Profit and Loss orBalance Sheet report, and governs the order and structure of these reports.
Found in Company >Nominal Ledger >Chart of Accounts, by default the chart is structuredas follows:
Balance Sheet Profit and Loss
Fixed Assets [0001 – 0999] Sales [4000 – 4999]
Current Assets [1000 – 1999] Purchases [5000 – 5999]
Current Liabilities [2000 – 2299] Direct Expenses [6000 – 6999]
Long Term Liabilities [2300 – 2999] Overheads [7000 – 8999] [9998-9999]
Capital & Reserves [3000 – 3999] Taxation [9001-9001]
Balance Sheet Profit and Loss
Each category is then divided further into a series of nominal groups. For example, Sales isdivided as follows:
Sales [4000 – 4999]
Product Sales [4000 – 4099]
Export Sales [4100 – 4199]
Sales of Assets [4200 – 4299]
Credit Charges (Late Payments) [4400 – 4499]
Other Sales [4900 – 4999]
28

Welcome to the new Sage 50 Accounts
The specific nominal codes then appear within each of these groups. For example, ProductSales contains the following nominal codes:
Product Sales [4000 – 4099]
4000 – Sales Type A
4001 – Sales Type B
4002 – Sales Type C
4009 – Discounts Allowed
4010 - Management Charges Receivable
4099 – Flat Rate – Benefit/Cost
These examples are taken from the default COA of Sole Trader.
Before you create a nominal code specific to your business youmust first consider thefollowing:
l Whether it should appear on the Profit and Loss or the Balance Sheet report.
l What category it falls into, for example Sales or Purchases.
l Can an existing code be used, with its name changed?
l Whether you need a new nominal group.
If you're not sure about the answers to any of these questions, you should consult youraccountant.
If a new nominal group is required you can add this into the chart which has 80 spacesavailable. If you want to insert a new group into a specific location, use the F7 key to insert ablank line prior to entering the new data.
29

Welcome to the new Sage 50 Accounts
Certain balance sheet nominal codes can either be an asset or a liability depending uponwhether their balance is a debit or a credit. A good example is a bank account whichmay havea positive balance or be overdrawn. Nominal codes like this are referred to as floating nominalaccounts, and they appear in a special section of the Current Assets and Current Liabilitiescategories.
To save you time, the software automatically creates the same range in both of thesecategories when you enter it.
30

Welcome to the new Sage 50 Accounts
4.7 Enter opening balancesWhen you start using Sage 50 Accounts, if your company has already been trading you’llprobably have opening balance transactions that you need to enter to represent your financialposition.
TheOpening Balances Wizard guides you through the process. To open the wizard >Tools >Opening Balances.
4.8 Backup managerTo keep your data safe it's really important that you take regular backups of your data. As longas you have backups, if your computer fails or your data becomes corrupt, you can easilyrecover lost work and avoid hours of re-entering lost information.
Anyone can forget to take a backup, and if you're on a network it's not always easy to geteveryone to log out while you back up. With the new Sage Accounts BackupManager,managing your backups is simple. You can schedule backups to run automatically so youdon't need to worry about it, and you don't need to stop processing in Sage Accounts whileyour backups are running. Check data runs automatically and you canmanage backups andcheck data results for all companies in one place.
31
Welcome to the new Sage 50 Accounts
To open the Sage Accounts Backup Manager1. Open Sage Accounts > Logon name > entermanager.
2. Password > enter your password for themanager logon > OK.
3. File > Schedule backup.
Within the Sage Accounts BackupManager you canmanage your backup schedule andprevious backup files.
4. To refresh the information in the Sage Accounts BackupManager > Refresh.
5. To save any changes > Save.
OverviewFor each company, this section summarises the following information:
Users How many users are currently logged in to the company.
Check data Whether or not check data has been run. If check data has been run,it shows if any errors, warnings or comments were found.
Scheduledbackup status
Whether the scheduled back up and check data is currently switchedon or off.
You should check this area regularly. If any errors appear you should stop processing in therelevant company and fix the errors. For more information about fixing errors, refer to theMyData at www.sage.co.uk/mydata
If your computer's hard drive has less free disk space than the amount set inSettings, the backups don't run and a warningmessage appears at the top of theOverview area.
32
Welcome to the new Sage 50 Accounts
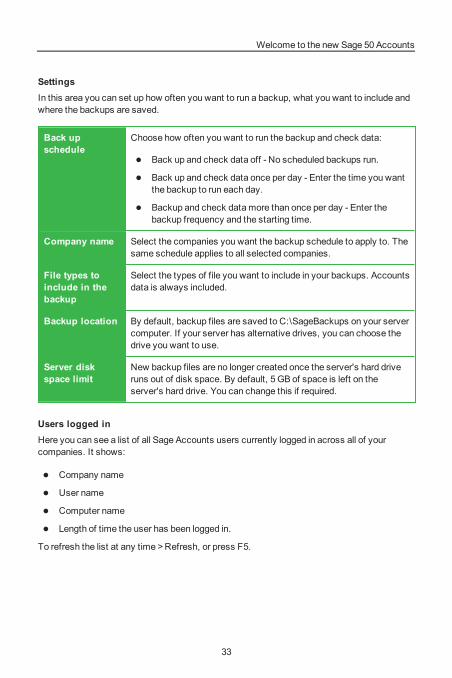
SettingsIn this area you can set up how often you want to run a backup, what you want to include andwhere the backups are saved.
Back upschedule
Choose how often you want to run the backup and check data:
l Back up and check data off - No scheduled backups run.
l Back up and check data once per day - Enter the time you wantthe backup to run each day.
l Backup and check datamore than once per day - Enter thebackup frequency and the starting time.
Company name Select the companies you want the backup schedule to apply to. Thesame schedule applies to all selected companies.
File types toinclude in thebackup
Select the types of file you want to include in your backups. Accountsdata is always included.
Backup location By default, backup files are saved to C:\SageBackups on your servercomputer. If your server has alternative drives, you can choose thedrive you want to use.
Server diskspace limit
New backup files are no longer created once the server's hard driveruns out of disk space. By default, 5 GB of space is left on theserver's hard drive. You can change this if required.
Users logged inHere you can see a list of all Sage Accounts users currently logged in across all of yourcompanies. It shows:
l Company name
l User name
l Computer name
l Length of time the user has been logged in.
To refresh the list at any time >Refresh, or press F5.
33

Welcome to the new Sage 50 Accounts
Check data resultsUse this areamanage your check data results.
Check data historyHere you can see your check data history for all companies. This includes any errors,warnings or comments detected and a status report for the data.
Filter check data historyTo help you find a particular backup, you can choose the period you want to display. Forexample, youmay only want to see backups taken in the last week.
Delete check data historyTomanually delete selected check data results:
l Check data list > for each result you want to delete, select the check box beside thename of the company >Delete selected check data results >Yes.
To automatically delete results after a set period:
l Automatically delete check data results older than > choose the relevant period.
Backup filesUse this area tomanage your backups.
Backup listHere you can see a list of completed scheduled backups.
Filter backup listTo help you find a particular backup, you can choose the period you want to display. Forexample, youmay only want to see backups taken in the last week.
Delete backup filesTomanually delete selected check data results:
l Backup files list > for each file you want to delete, select the check box beside the nameof the company >Delete selected check data results >Yes.
To automatically delete backup files after a set period:
l Automatically delete backup files older than > choose the relevant period.
34

Welcome to the new Sage 50 Accounts
Part 5 Where to get additional help
This guide is designed to give a brief overview of installing and configuring the software. If yourequire more detailed information use should use the following resources available to you:
Installation help – For further information about installing your software, please refer towww.sage.co.uk/new50accounts
The software help files – Simply press F1 in any window to get detailed help on that specificarea of the software.
Ask Sage – Available online to UKSage Cover customers, the Ask Sage database containsanswers to thousands of common questions, giving you the answers you need to run yourbusiness 24/7. To access Ask Sage, go to the following website:
l www.sage.co.uk/ask
Web chat - Chat online to an experienced technician. To open web chat, go to the HelpCentre at www.sage.co.uk/new50accounts and click Web chat.
If you're in the Republic of Ireland you can call 1890 88 20 60.
35

Welcome to the new Sage 50 Accounts
Part 6 – The software licence agreement
Your use of our software is subject to Terms and Conditions which can be accessed withinthe software and you will have to agree to as part of the installation process. If you do notagree to the terms and conditions you should not install the software or use it in any way.
A copy of the terms and conditions is also available at www.sage.co.uk/new50accounts
36

Welcome to the new Sage 50 Accounts
Appendix - Sage Accounts Data Service
The Sage Accounts Data Service runs on the computer or server where your Sage Accountsdata is held. The service acts as a gateway and controls the reading and writing of data. Usingthis service increases the robustness of the system, improves data security and helps tooptimise performance.
To ensure that your firewall doesn’t block the Sage Data Service, please ensurethe following ports are open:
Sage 50 Data control service: TCP 36290Sage 50 Data service: TCP 36289
For further help with this, please contact your IT administrator.
To install the Sage Accounts Data ServiceThe Sage Accounts Data Service automatically installs and starts when you install yoursoftware. This includes installation on single computers and network installations where thesoftware is installed on the computer or server that holds the data.
If your data is held on a server that doesn't have a copy of Sage 50 Accounts, youmust install the service separately.
To install and run the service If you have access to the server and it has a DVDdrive1. Insert your Sage Accounts DVD into the DVD drive of your computer.
2. Sage Accounts window > Install software.
3. To accept the terms and conditions > select the check box >Next >Data Service only.
4. To complete the installation, follow the on screen prompts.
To install and run the service if you don't have physical access to the server or itdoesn't have a DVD drive1. Insert your Sage Accounts DVD into the DVD drive of your computer.
2. Exit the setup routine.
3. Browse the DVD > Install folder > and locate the ClientServerSetup.exe file.
4. Copy this file to the data location on the server > run the file > follow the steps in thesection above.
37

Welcome to the new Sage 50 Accounts
To start the data serviceTheremay be occasions where you need to start the servicemanually. To do this, on theserver:
1. Open theWindows Start menu >open the Programs Menu >Sage Accounts >DataServiceManager.
2. Check that the correct Server name appears in the Server box, you can amend this ifrequired. If you're unsure of your server name, contact your IT administrator.
3. Connect >Start Service.
You can also start and stop the service like any Windows service using youroperating system. To do this, press theWindows Key +R on your keyboard > enterServices.msc > right-click Sage 50 Accounts Service >Start, Stop or Restart asrequired.
To stop the data serviceTheremay be occasions where you need to stop the servicemanually. You can do this usingthe Data ServiceManager in Sage Accounts:
1. Tools >Data ServiceManager >OK.
You can also access the Data ServiceManager from theWindows start menu > Allprograms > Sage Accounts > Data ServiceManager.
2. If required, create a backup.
3. Close Sage Accounts.
4. Check that the correct Server name appears in the Server box, you can amend this ifrequired > If you're unsure of your server name, contact your IT administrator.
5. Click Connect >make sure all users have logged out of Sage Accounts. A list of userswho are still logged in is shown at the bottom of the window.
6. Click Stop Service.
You can also start and stop the service like any Windows service using youroperating system. To do this, press theWindows Key +R on your keyboard > enterServices.msc > right-click Sage 50 Accounts Service >Start, Stop or Restart asrequired.
38

Welcome to the new Sage 50 Accounts
Warning messagesThe following warningmessages may appear in relation to the data service:
Message Unable to connect to Sage Data Service onmachine [computername]
Explanation The data servicemust be running on the computer that holds thedata. This may be your local computer or a server. This messageappears if the service isn't running.
Solution Start the service in the data location. You can start and stop theservice like any Windows service using your operating system. To dothis, press theWindows Key +R on your keyboard > enterServices.msc > right-click Sage 50 Accounts Service >Start, Stop orRestart as required.
Alternatively, open theWindows Start menu >open the ProgramsMenu >Sage Accounts >Data ServiceManager.
If your data is held on a server then you need to control the service onthe server, how you do this depends upon your how your network isset up. If your data server is a computer on the network then thesame steps apply. If your server is not immediately accessible thenyoumay need to access your server remotely.
If the service is running but the error message still appears, then youmay need to configure your firewall:
To ensure that your firewall doesn’t block the Sage Accounts DataService, please ensure the following ports are open:
l Sage 50 Data control service: TCP 36290
l Sage 50 Data service: TCP 36289
For further help with this, please contact your IT administrator.
39

Welcome to the new Sage 50 Accounts
Message Connection to the Sage Data Service has been lost. The applicationwill now exit.
Explanation The connection to the data service has been lost. This can occur ifthe service has stopped running or if there is a problem with thenetwork.
Solution l Restart the software. If themessage appears again then youshould check that the service running. To do this, press theWindows Key +R on your keyboard > enter Services.msc >andcheck the status of the Sage 50 Accounts Service. If required,to start the service, right-click Sage 50 Accounts Service andchoose Start.
If your data is held on a server then you need to control theservice on that server, how you do this depends upon your howyour network is set up. If your server is not immediatelyaccessible then youmay need to access your server remotely.
l If the service is running this suggests there is a problem withyour network or cabling and you should test this before startingSage Accounts again.
40


Sage (UK) Limited, registered in England and Wales with company number 1045967 and registered office at North Park, Newcastle upon Tyne, NE13 9AA Telephone: 0191 294 3000 Web: www.sage.co.uk/contact
© Sage (UK) Limited 2014. All rights reserved. 29550MT 06/14 6114


