WESTINGHOUSE INTEGRAL TO GAL CONVERSION KIT HATCH DOOR HANGERS AND TRACK INSTALLATION GUIDE CONVERT TO GAL TRACKS AND HANGERS WHILE RETAINING HATCH HEADERS AND DOORS DOC-0138N REV A - 08.20.20 Chicago 877.300.5830 New York 347.226.4555 Miami 877.241.9354 L.A. 877.300.5816 Toronto 888.425.2262 50 E. 153rd St. Bronx, NY 10451-2104 Ph: 718.292.9000 Fax: 718.292.2034 [email protected]www.gal.com [email protected]www.vantageelevation.com REGIONAL SERVICE CENTERS
Transcript
WESTINGHOUSE INTEGRAL TO GAL CONVERSION KITHATCH DOOR HANGERS AND TRACK
INSTALLATION GUIDE
CONVERT TO GAL TRACKS AND HANGERS WHILE RETAINING HATCH HEADERS AND DOORS
1. INTRODUCTION This kit is designed to convert an existing elevator entrance from Westinghouse Integral door/track equipment to GAL steel tracks and standard door rollers. This kit will allow the installer to retain the hatch doors and headers and install GAL equipment without the need to cut off the door hanger portion of the existing Westinghouse Integral Door.
4. GENERAL INSTALLATION AND SETUP4.1. EXISTING COMPONENT REMOVAL
• This kit requires the removal of the existing roller assembly, eccentric rollers, and top safety retainers. These components are shown in Figure 1.
• Remove the car from service, in compliance with standard safety policies.
• Position the car in such a way to where the hall tracks and rollers can be accessed from the car top.
• Loosen both Eccentric Rollers and:
– If you are reusing, allow them to rotate and lower to their lowest position.
– If replacing, completely remove the eccentric roller and fastening hardware.
• Loosen the Top Safety Retainers and:
– If you are reusing them, slide them upward to the top of the slot and retighten.
– If replacing, completely remove the eccentric roller and fastening hardware.
• Using an Allen key, loosen the Roller shaft and allow the door to lower onto the sill. Loosen both roller shafts.
• Once the door has been lowered to the sill, completely remove the Roller and fastening nut from the door. Lean the door toward the cab to pull it off and away from the track.
• DO NOT remove the gearing cables. DO NOT remove the lock mechanisms unless you are also modernizing the locks. This kit DOES NOT require their removal.
Figure 1: Existing Westinghouse Components
TOP SAFETY RETAINER
ROLLER ASSEMBLY
ECCENTRIC ROLLER
WESTINGHOUSE INTEGRAL TO GAL CONVERSION KIT
3 General Installation and Setup | DOC-0138N | G.A.L. Manufacturing Company LLC
4.2. TRACK REPLACEMENT
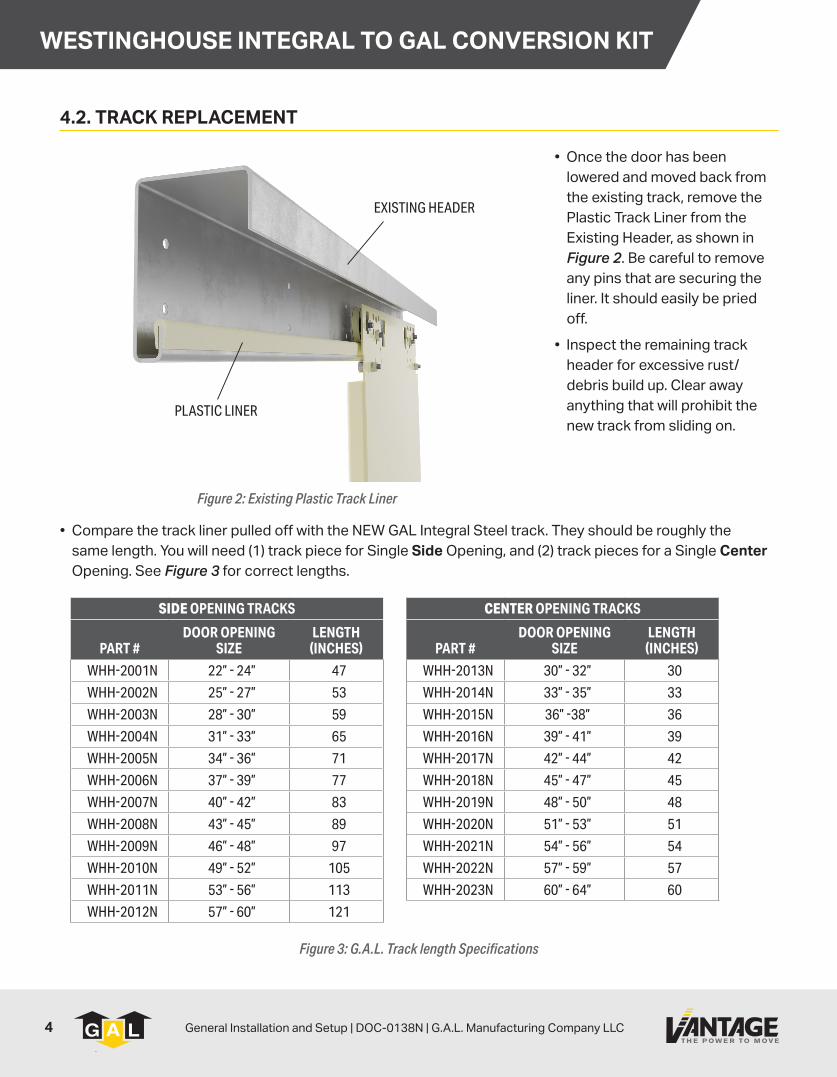
• Once the door has been lowered and moved back from the existing track, remove the Plastic Track Liner from the Existing Header, as shown in Figure 2. Be careful to remove any pins that are securing the liner. It should easily be pried off.
• Inspect the remaining track header for excessive rust/debris build up. Clear away anything that will prohibit the new track from sliding on.
• Compare the track liner pulled off with the NEW GAL Integral Steel track. They should be roughly the same length. You will need (1) track piece for Single Side Opening, and (2) track pieces for a Single Center Opening. See Figure 3 for correct lengths.
SIDE OPENING TRACKS
PART #DOOR OPENING
SIZELENGTH (INCHES)
WHH-2001N 22” - 24” 47
WHH-2002N 25” - 27” 53
WHH-2003N 28” - 30” 59
WHH-2004N 31” - 33” 65
WHH-2005N 34” - 36” 71
WHH-2006N 37” - 39” 77
WHH-2007N 40” - 42” 83
WHH-2008N 43” - 45” 89
WHH-2009N 46” - 48” 97
WHH-2010N 49” - 52” 105
WHH-2011N 53” - 56” 113
WHH-2012N 57” - 60” 121
CENTER OPENING TRACKS
PART #DOOR OPENING
SIZELENGTH (INCHES)
WHH-2013N 30” - 32” 30
WHH-2014N 33” - 35” 33
WHH-2015N 36” -38” 36
WHH-2016N 39” - 41” 39
WHH-2017N 42” - 44” 42
WHH-2018N 45” - 47” 45
WHH-2019N 48” - 50” 48
WHH-2020N 51” - 53” 51
WHH-2021N 54” - 56” 54
WHH-2022N 57” - 59” 57
WHH-2023N 60” - 64” 60
Figure 2: Existing Plastic Track Liner
Figure 3: G.A.L. Track length Specifications
EXISTING HEADER
PLASTIC LINER
WESTINGHOUSE INTEGRAL TO GAL CONVERSION KIT
4 General Installation and Setup | DOC-0138N | G.A.L. Manufacturing Company LLC
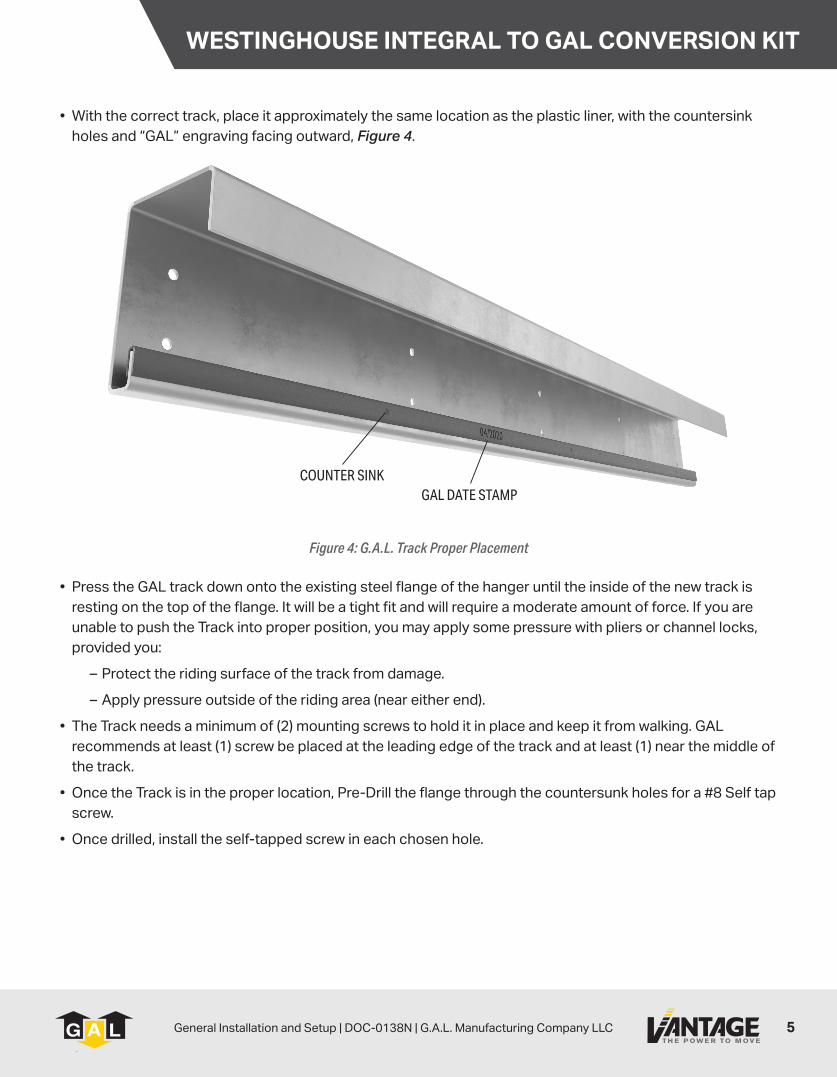
• With the correct track, place it approximately the same location as the plastic liner, with the countersink holes and “GAL” engraving facing outward, Figure 4.
• Press the GAL track down onto the existing steel flange of the hanger until the inside of the new track is resting on the top of the flange. It will be a tight fit and will require a moderate amount of force. If you are unable to push the Track into proper position, you may apply some pressure with pliers or channel locks, provided you:
– Protect the riding surface of the track from damage.
– Apply pressure outside of the riding area (near either end).
• The Track needs a minimum of (2) mounting screws to hold it in place and keep it from walking. GAL recommends at least (1) screw be placed at the leading edge of the track and at least (1) near the middle of the track.
• Once the Track is in the proper location, Pre-Drill the flange through the countersunk holes for a #8 Self tap screw.
• Once drilled, install the self-tapped screw in each chosen hole.
Figure 4: G.A.L. Track Proper Placement
COUNTER SINKGAL DATE STAMP
WESTINGHOUSE INTEGRAL TO GAL CONVERSION KIT
5 General Installation and Setup | DOC-0138N | G.A.L. Manufacturing Company LLC
4.3. ROLLER INSTALLATION
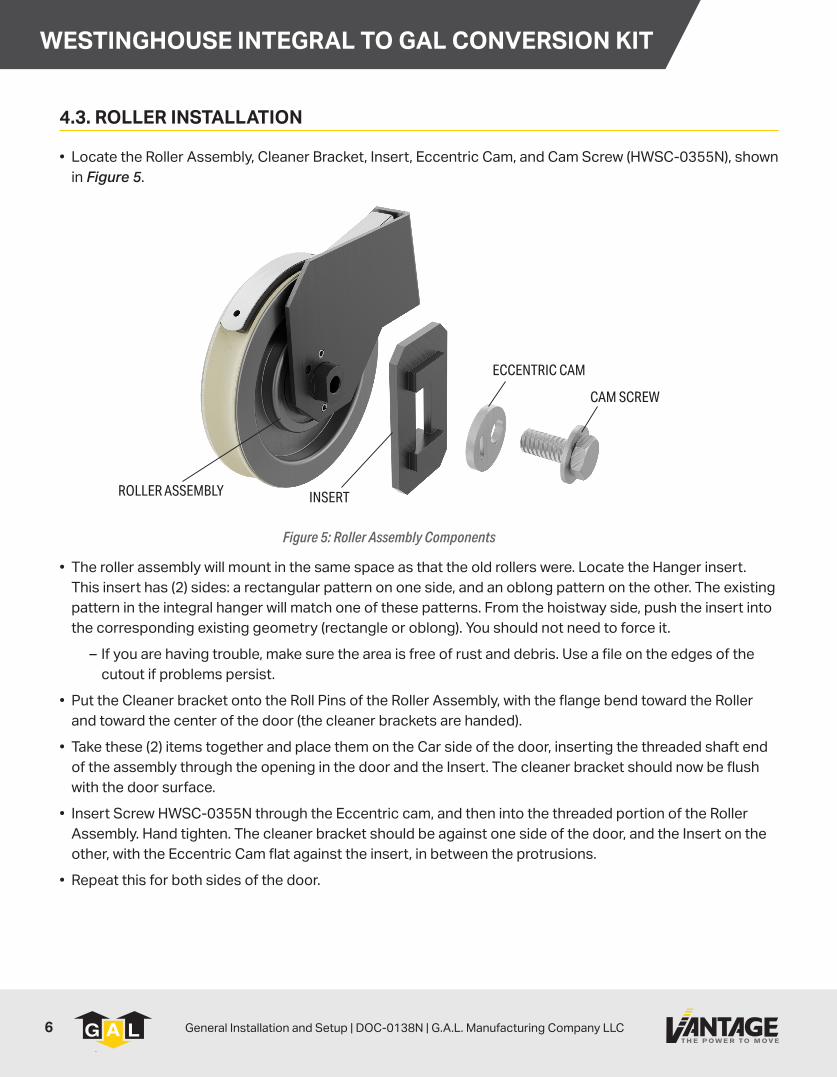
• Locate the Roller Assembly, Cleaner Bracket, Insert, Eccentric Cam, and Cam Screw (HWSC-0355N), shown in Figure 5.
• The roller assembly will mount in the same space as that the old rollers were. Locate the Hanger insert. This insert has (2) sides: a rectangular pattern on one side, and an oblong pattern on the other. The existing pattern in the integral hanger will match one of these patterns. From the hoistway side, push the insert into the corresponding existing geometry (rectangle or oblong). You should not need to force it.
– If you are having trouble, make sure the area is free of rust and debris. Use a file on the edges of the cutout if problems persist.
• Put the Cleaner bracket onto the Roll Pins of the Roller Assembly, with the flange bend toward the Roller and toward the center of the door (the cleaner brackets are handed).
• Take these (2) items together and place them on the Car side of the door, inserting the threaded shaft end of the assembly through the opening in the door and the Insert. The cleaner bracket should now be flush with the door surface.
• Insert Screw HWSC-0355N through the Eccentric cam, and then into the threaded portion of the Roller Assembly. Hand tighten. The cleaner bracket should be against one side of the door, and the Insert on the other, with the Eccentric Cam flat against the insert, in between the protrusions.
• Repeat this for both sides of the door.
Figure 5: Roller Assembly Components
ROLLER ASSEMBLY INSERT
ECCENTRIC CAM
CAM SCREW
WESTINGHOUSE INTEGRAL TO GAL CONVERSION KIT
6 General Installation and Setup | DOC-0138N | G.A.L. Manufacturing Company LLC
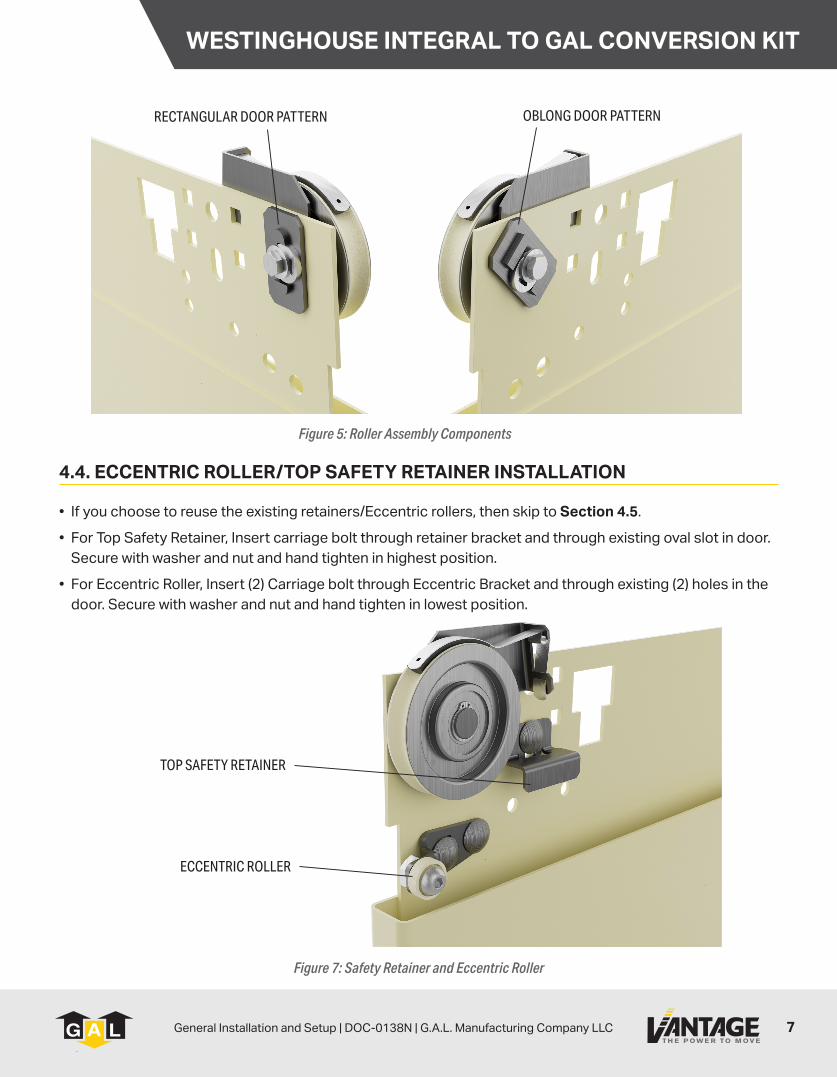
• If you choose to reuse the existing retainers/Eccentric rollers, then skip to Section 4.5.
• For Top Safety Retainer, Insert carriage bolt through retainer bracket and through existing oval slot in door. Secure with washer and nut and hand tighten in highest position.
• For Eccentric Roller, Insert (2) Carriage bolt through Eccentric Bracket and through existing (2) holes in the door. Secure with washer and nut and hand tighten in lowest position.
Figure 5: Roller Assembly Components
Figure 7: Safety Retainer and Eccentric Roller
OBLONG DOOR PATTERNRECTANGULAR DOOR PATTERN
TOP SAFETY RETAINER
ECCENTRIC ROLLER
WESTINGHOUSE INTEGRAL TO GAL CONVERSION KIT
7 General Installation and Setup | DOC-0138N | G.A.L. Manufacturing Company LLC
4.5. DOOR INSTALLATION
• Lift door and place Door rollers onto new GAL Track.
• Place a flat head screwdriver in the slot in the Leveling Cam. Turning the screwdriver will raise and lower the door. Position the door where:
– Clearance between door and sill are compliant with required Code.
– Door hangs parallel to door jambs.
• With wrench, tighten bolts in roller assembly to secure Roller Assembly in proper position. Insert cleaner into Cleaner Bracket as shown.
• For Top Safety Retainer, loosen its securing nut and slide the bracket down until edge of bracket flange is lower than the crest of the track bead. Tighten nut.
• For Eccentric Roller, push up on the roller portion until it is with 1/32” of the bottom of the track flange (the thickness of a business card). Tighten both nuts.
• Push door panel back and forth by hand to ensure it is rolling freely and properly installed. Check for any interferences with existing equipment.
5. LANDING KITS AVAILABLESINGLE SPEED, SIDE OPENING
PART # DESCRIPTION
WHH1-0001N HANGER ASSEMBLY, WH-SS, 22”-24” D.O.
WHH1-0002N HANGER ASSEMBLY, WH-SS, 25”-27” D.O.
WHH1-0003N HANGER ASSEMBLY, WH-SS, 28”-30” D.O.
WHH1-0004N HANGER ASSEMBLY, WH-SS, 31”-33” D.O.
WHH1-0005N HANGER ASSEMBLY, WH-SS, 34”-36” D.O.
WHH1-0006N HANGER ASSEMBLY, WH-SS, 37”-39” D.O.
WHH1-0007N HANGER ASSEMBLY, WH-SS, 40”-42” D.O.
WHH1-0008N HANGER ASSEMBLY, WH-SS, 43”-45” D.O.
WHH1-0009N HANGER ASSEMBLY, WH-SS, 46”-48” D.O.
WHH1-0010N HANGER ASSEMBLY, WH-SS, 49”-52” D.O.
WHH1-0011N HANGER ASSEMBLY, WH-SS, 53”-56” D.O.
WHH1-0012N HANGER ASSEMBLY, WH-SS, 57”-60” D.O.
SINGLE SPEED, CENTER OPENING
PART # DESCRIPTION
WHH3-0001N HANGER ASSEMBLY, WH-CP, 30”-32” D.O.
WHH3-0002N HANGER ASSEMBLY, WH-CP, 33”-35” D.O.
WHH3-0003N HANGER ASSEMBLY, WH-CP, 36”-38” D.O.
WHH3-0004N HANGER ASSEMBLY, WH-CP, 39”-41” D.O.
WHH3-0005N HANGER ASSEMBLY, WH-CP, 42”-44” D.O.
WHH3-0006N HANGER ASSEMBLY, WH-CP, 45”-47” D.O.
WHH3-0007N HANGER ASSEMBLY, WH-CP, 48”-50” D.O.
WHH3-0008N HANGER ASSEMBLY, WH-CP, 51”-53” D.O.
WHH3-0009N HANGER ASSEMBLY, WH-CP, 54”-56” D.O.
WHH3-0010N HANGER ASSEMBLY, WH-CP, 57”-59” D.O.
WHH3-0011N HANGER ASSEMBLY, WH-CP, 60”-64” D.O.
WESTINGHOUSE INTEGRAL TO GAL CONVERSION KIT
8 General Installation and Setup | DOC-0138N | G.A.L. Manufacturing Company LLC