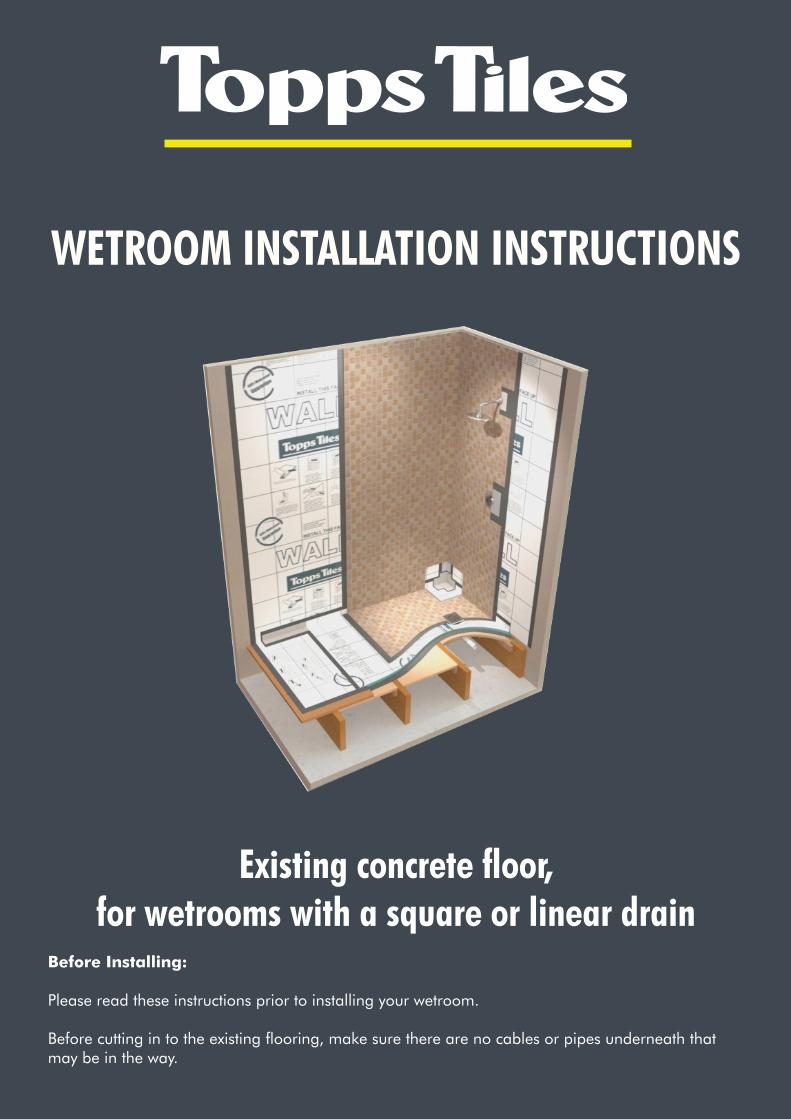
WETROOM INSTALLATION INSTRUCTIONS Existing concrete floor, for wetrooms with a square or linear drain Before Installing: Please read these instructions prior to installing your wetroom. Before cutting in to the existing flooring, make sure there are no cables or pipes underneath that may be in the way.
Transcript
WETROOM INSTALLATION INSTRUCTIONS
Existing concrete floor,for wetrooms with a square or linear drain
Before Installing:
Please read these instructions prior to installing your wetroom.
Before cutting in to the existing flooring, make sure there are no cables or pipes underneath that may be in the way.
A complete step by step guide:
You will need:
Topps Tiles Wetroom TrayTopps Tiles Square or Linear Drain TrapTopps Tiles Square or Linear GrateTopps Tiles Waterproof Wall Matting or equivalentTopps Tiles Waterproof Floor Matting or equivalentTopps Tiles Joint TapeTopps Tiles Pre-formed Internal Corners
Spirit levelTape measurePencil Sealant adhesive and gun4-6mm square notched trowelNotched trowel suitable for tilesMargin trowelMixing bucketGrout floatFlexible cement based tile adhesiveGroutFloor primer if required
Have you thought about underfloor heating?
Ask us in-store for more details on our range
Existing Concrete Floor
Step 2
Check the floor with a spirit level and level out with levelling compound if necessary.
Work out the best position and orientation for the wetroom tray. The tray can be sut down along the wall edges or spaced away from the wall using plywood or construction board to fill the gap. If using infill pieces at the perimeter, make sure the gradient of the tray is followed to avoid water pooling.
Using the tray as a template, mark the drain position and chisel the concrete away to fit the trap and waste pipe. The rubber seal of the trap should be level with the existing floor surface but the trap should not be load bearing.
Step 1
These instructions describe the method for installing the wetroom tray on top of an existing concrete floor. This type of installation allows for the surrounding floor to be boarded over with insulation/construction boards.
Check for existing pipework and cables in the concrete which may obstruct the route of the new waste pipe and identify the best orientation for the wetroom tray.
Clear the selected area, making sure the floor and walls are clean and free from dust and debris.
Step 4
Fill around the pipe and trap with concrete or expanding foam. Before the pipe and trap have set in position ensure the trap lines up with the hole in the tray and the threaded ring can be screwed through the tray in to the trap.
Step 3
Connect the trap to the waste pipe, checking it will still line up with the hole in the tray.
If using a 43mm solvent weld pipe, fit the ring and seal on to the adapter and screw them to the trap. Apply solvent to the adapter and pipe and fit together.
Check the joint is watertight as this area can’t be accessed again once the tray is in place.
Step 6
Where the tray will be going up against two walls, cut a square of matting from the corner of the tray to enable the sides to fold up and meet in the middle.
Step 5
Using a cement based tile adhesive, waterproof the walls with Homelux waterproof wall matting as per the product instructions.
The Topps Tiles wetroom system is also compatible with liquid waterproof membranes for the walls and floor.
Step 8
Board over the surrounding floor to meet the level of the 22mm tray thickness. Topps Tiles 22mm construction boards are ideal, especially if you are using electric underfloor heating.
Step 7
Prime if necessary and apply a cement based adhesive with a 4-6mm square notched trowel under the foot print of the tray, being careful not to get the adhesive down the drain hole. Press the tray firmly in place and check the 4 sides with a spirit level.
Step 10
Seal the corner with a Topps Tiles pre-formed internal corner piece and tile adhesive.
This is the ideal stage to tile the walls.
See the following relevant drain installation steps to complete the installation.
Step 9
Using a cement based tile adhesive, waterproof the floor with Topps Tiles waterproof floor matting as per the product instructions.
IMPORTANT
The floor matting must be tucked underneath the over-lapping tray matting. All edges of the tray matting should then be fixed with tile adhesive to the surrounding wall and floor matting.
Joint tape can then be used on the remaining joins between strips of floor matting and between the wall and floor matting.
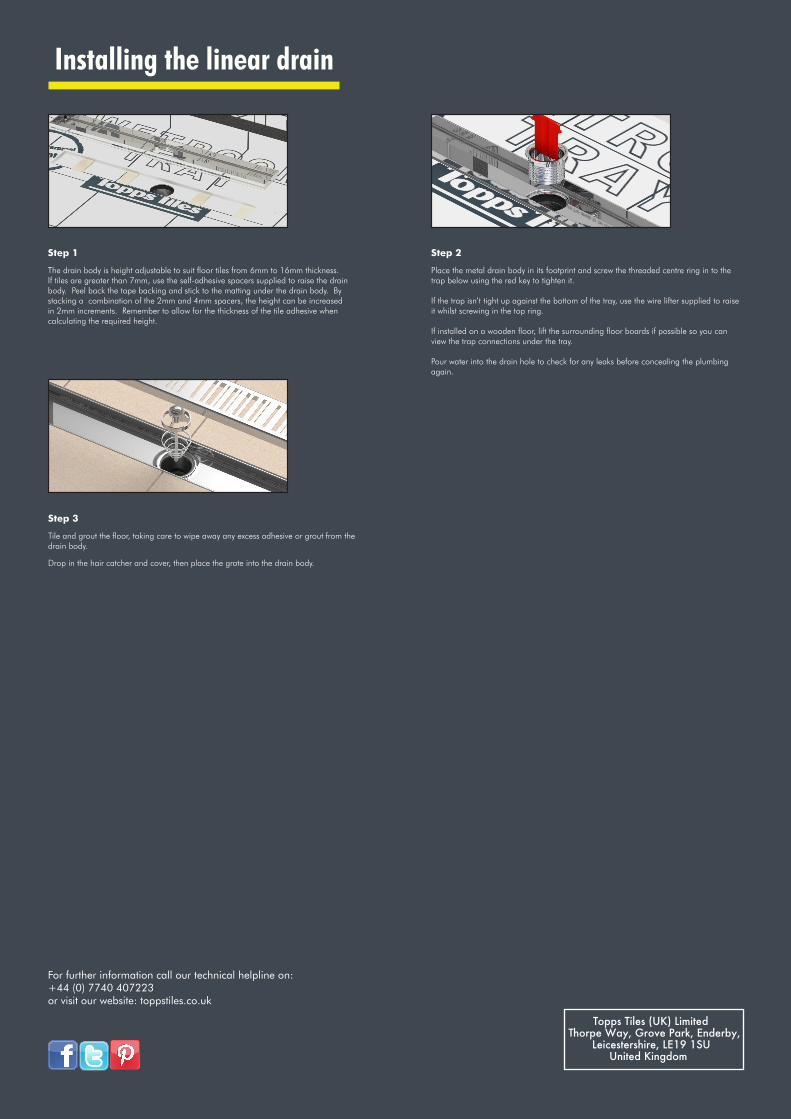
Step 2
Drop in the hair catcher and cover.
Screw in the drain body to the height of the floor tiles being used. To ensure water doesn’t pool around the drain, the metal frame should be just below the tile height after compensating for the adhesive depth under the tiles.
Step 1
Screw the threaded ring in to the trap below using the red key to tighten it. If the trap isn’t tight up against the bottom of the tray, use the wire lifter supplied to raise it whilst screwing in the top ring.
If installed on a wooden floor, lift the surrounding floor boards if possible so you can view the trap connections under the tray.
Pour water into the drain hole to check for any leaks before concealing the plumbing again.
Installing the square drain
Step 4
Tile and grout the floor, taking care to wipe away any excess adhesive or grout from the drain body.
Place the grate into the drain body.
Step 3
With the flat side of a trowel, pack tile adhesive up against the drain body to give further support and hold it in place. Ensure the drain is square to the closest wall.
Step 2
Place the metal drain body in its footprint and screw the threaded centre ring in to the trap below using the red key to tighten it.
If the trap isn’t tight up against the bottom of the tray, use the wire lifter supplied to raise it whilst screwing in the top ring.
If installed on a wooden floor, lift the surrounding floor boards if possible so you can view the trap connections under the tray.
Pour water into the drain hole to check for any leaks before concealing the plumbing again.
Step 1
The drain body is height adjustable to suit floor tiles from 6mm to 16mm thickness.If tiles are greater than 7mm, use the self-adhesive spacers supplied to raise the drain body. Peel back the tape backing and stick to the matting under the drain body. By stacking a combination of the 2mm and 4mm spacers, the height can be increased in 2mm increments. Remember to allow for the thickness of the tile adhesive when calculating the required height.
Step 3
Tile and grout the floor, taking care to wipe away any excess adhesive or grout from the drain body.
Drop in the hair catcher and cover, then place the grate into the drain body.
Installing the linear drain
For further information call our technical helpline on:+44 (0) 7740 407223or visit our website: toppstiles.co.uk
Topps Tiles (UK) LimitedThorpe Way, Grove Park, Enderby,