50
WatchGuard ® WFS to Fireware ® Pro Migration Guide WatchGuard System Manager v10.0 WatchGuard Firebox System v7.5 Revised: 01/28/2008

WatchGuard®WFS to Fireware® Pro Migration Guide
WatchGuard System Manager v10.0 WatchGuard Firebox System v7.5 Revised: 01/28/2008
Notice to Users
Information in this guide is subject to change without notice. Companies, names, and data used in examples herein are fictitious unless otherwise noted. No part of this guide may be reproduced or transmitted in any form or by any means, electronic or mechanical, for any purpose, without the express written permission of WatchGuard Technologies, Inc.
Copyright, Trademark, and Patent Information
Copyright© 1998 - 2008 WatchGuard Technologies, Inc. All rights reserved.
All trademarks or trade names mentioned herein, if any, are the property of their respective owners.
Guide Version: 10.0-352-2835-001
Complete copyright, trademark, patent, and licensing informa-tion can be found in the Reference Guide. You can find it online at: http://www.watchguard.com/help/documentation/
ii WFS to Fireware
ADDRESS:505 Fifth Avenue SouthSuite 500Seattle, WA 98104
SUPPORT: www.watchguard.com/supportU.S. and Canada +877.232.3531All Other Countries +1.206.521.3575
SALES:U.S. and Canada +1.800.734.9905All Other Countries +1.206.613.0895
ABOUT WATCHGUARDWatchGuard is a leading provider of network security solutions for small- to mid-sized enterprises worldwide, delivering integrated products and services that are robust as well as easy to buy, deploy and manage. For more information, please call (206) 613 6600 or visit www.watchguard.com.

Migration Guide iii

iv WFS to Fireware

Contents
CHAPTER
Introduction ....................................................................................................................... 1
Introducing WatchGuard System Manager v10 and Fireware v10 ......................... 1
Using Multiple Versions of Appliance Software .......................................................... 2
WatchGuard Servers ...................................................................................................... 2
Comparing WFS and Fireware ..................................................................................... 3Appliance software feature matrix ................................................................................. 3
Planning Your Migration ................................................................................................. 9
Upgrading Subscription Services ............................................................................... 10
Using this Migration Guide .......................................................................................... 10
CHAPTER Migrating from WFS v7.x (No VPN Manager) to Fireware Pro ... 11
Migrating to Fireware .................................................................................................... 11
Documenting Your Current Security Policy ............................................................... 11
Backing Up Your WFS Configuration and Firebox Image ...................................... 12Saving your configuration file ...................................................................................... 12Saving the Firebox software image ............................................................................. 12
Documenting VPN Tunnels ......................................................................................... 13
Installing Software on the Management Station ....................................................... 13
Installing Fireware on Your Firebox ............................................................................ 14Using the Quick Setup Wizard .................................................................................... 14Using fbxinstall.exe ..................................................................................................... 14
CHAPTER Migrating from WFS v7.3 or later with VPN Manager to Fireware Pro ................................................................................................................................ 17
Migrating to Fireware .................................................................................................... 17
Documenting Your Security Policy ............................................................................. 18
Backing Up Your WFS Configuration and Firebox Image ...................................... 18Saving your configuration file ...................................................................................... 18
Migration Guide v
Saving the Firebox software image ............................................................................. 19
Documenting VPN Tunnels ......................................................................................... 19
Installing Software on the Management Station ....................................................... 19
Introducing the WatchGuard Management Server .................................................. 20Management Server license ....................................................................................... 20
Migrating Your VPN Manager Data to a Management Server ............................... 21If the Firebox was a VPN Manager DVCP server ....................................................... 21If the Firebox was a Basic DVCP server ..................................................................... 21Running the Management Server Setup wizard ......................................................... 22
Installing Fireware on Your Firebox ............................................................................ 22Using the Quick Setup Wizard .................................................................................... 22Using fbxinstall.exe ..................................................................................................... 23Upgrading to WSM/Fireware v10.0 ............................................................................. 23
CHAPTER Migrating from WSM/WFS v7.x to Fireware Pro ................................... 25
Migrating to Fireware .................................................................................................... 25
Documenting Your Security Policy ............................................................................. 25
Backing Up Your WFS Configuration and Firebox Image ...................................... 26Saving your configuration file ...................................................................................... 26Saving the Firebox software image ............................................................................. 26
Documenting VPN Tunnels ......................................................................................... 27
Installing Software on the Management Station ....................................................... 27
Installing Fireware on Your Firebox ............................................................................ 28Using the Quick Setup Wizard .................................................................................... 28Using fbxinstall.exe ..................................................................................................... 29
CHAPTER Using Fireware Policy Manager ....................................................................... 31
Rebuilding Your Network Configuration with Fireware Policy Manager ............... 31Opening Policy Manager ............................................................................................. 32Working with interfaces ............................................................................................... 32Secondary networks and external alias addresses .................................................... 33DHCP Server .............................................................................................................. 34
Network Address Translation (NAT) ........................................................................... 35
Virtual Private Networking ........................................................................................... 36Mobile VPN with IPSec and Fireware ......................................................................... 36BOVPN and Fireware .................................................................................................. 36
Services .......................................................................................................................... 37Using the policy generated by the Quick Setup Wizard ............................................. 37Using the “Any” alias ................................................................................................... 37Policy Manager and Firebox management ................................................................. 37
Proxies ............................................................................................................................ 38Quick Setup Wizard and proxies ................................................................................. 38
Authentication ................................................................................................................ 39Authenticating through the Firebox ............................................................................. 40Authentication timeouts ............................................................................................... 40Using Firebox System Monitor to close authentication sessions ............................... 40
vi WatchGuard System Manager

Default Threat Protection ............................................................................................. 40Blocked Sites .............................................................................................................. 40
Migration Guide vii

viii WatchGuard System Manager
1Introduction
Introducing WatchGuard System Manager v10 and Fireware v10
WatchGuard® System Manager (WSM) v8.0 was an important software release for WatchGuard custom-ers. With the WSM v8.0 release, we introduced Fireware® appliance software.
Fireware is the next generation of security appliance software available from WatchGuard. Appliance software is the software that supplies the run-time instructions for the Firebox® to correctly operate. Management software is the software application that you install on a computer to configure, monitor, and control the Firebox. It sends instructions to the appliance software you install on the Firebox.
WatchGuard System Manager v10 supports three versions of appliance software:
• Fireware—This is the default appliance software on Firebox X Core e-Series devices. This next generation appliance software enables WatchGuard to expand the number of features available to Firebox X customers.
• Fireware Pro—This is the default appliance software on Firebox X Peak e-Series appliances. Its advanced network features include dynamic routing, High Availability, Quality of Service, policy-based routing, and server load balancing. It enables customers with complex networks to more effectively protect their networks. Fireware Pro is available as an update for previously released Firebox X Core devices.
• WatchGuard Firebox System (WFS)—This is the default appliance software on Firebox X Core appliances.
This guide is written for users who have Firebox X Core devices running WFS appliance software and want to migrate to Fireware appliance software and take advantage of the new features and function-ality available with Fireware. No automated migration tool is available at this time. Because of this, you must prepare a migration plan to match the requirements of your Firebox installation. This guide will help you prepare and deploy your migration plan.
Migration Guide 1
Using Multiple Versions of Appliance Software
Using Multiple Versions of Appliance SoftwareWhen you install WatchGuard® System Manager, it automatically installs the software tools you must have to configure and manage a Firebox® X Core or Peak with any version of appliance software that can run on your Firebox. These include:
• Fireware® Firebox System Manager and WFS Firebox System Manager
• Fireware Policy Manager and WFS Policy Manager
• Fireware HostWatch™ and WFS HostWatch
When you use WatchGuard System Manager to connect to a Firebox, it identifies which appliance soft-ware the Firebox uses. If you select a Firebox, and then click a management tool icon, WatchGuard Sys-tem Manager automatically starts the correct management tool for the version of appliance software installed on that Firebox.
For example, connect to a Firebox X5000 using the instructions found in the WatchGuard System Man-ager User Guide. Select the Firebox X5000. Click the Policy Manager icon on the WSM toolbar. Fireware Policy Manager starts and opens the configuration file.
You can install WSM v7.5 or earlier on the same management station on which you have installed WSM v10. You might want to do this because:
• You want to see WFS v7.5 and WSM 10 on the same computer so you can use WFS v7.5 as a base for your new Fireware configuration file.
• You want to continue to use VPN Manager to manage a Firebox that has not yet migrated to Fireware.
WatchGuard ServersWatchGuard has five servers in this release that do Firebox® management tasks:
• Management Server
• Log Server
• Report Server
• WebBlocker Server
• Quarantine Server
You can configure the servers from the WatchGuard® toolbar that you install with the servers. The tool-bar appears in the Windows taskbar at the bottom of your computer monitor. It is used to start, stop, and configure each server.
Management ServerWith WFS, WatchGuard enabled simple VPN configuration with the Dynamic VPN Configuration Proto-col (DVCP) and VPN Manager. With VPN Manager you could control the VPN tunnels of a distributed enterprise from one easy-to-use management interface using DVCP. In earlier versions of WSM, the DVCP server had to operate on a Firebox.
With WSM v10, the VPN Manager functionality is replaced with WatchGuard Management Server. You install the Management Server on a computer with the Windows operating system. This increases scal-ability and flexibility for the network administrator. The Management Server has the same functions as the DVCP server from previous releases of WSM. These functions are:
2 WatchGuard System Manager
Comparing WFS and Fireware
• Centralized management of VPN tunnel configurations
• Certificate authority for distributing certificates for IPSec tunnels
Log ServerThe Log Server collects log messages, event messages, alarms, and diagnostic messages from one or more Firebox devices. The log messages are now kept in XML format. This allows you to use third-party XML tools to create your own custom reports. The Log Server was formerly known as the WatchGuard Security Event Processor (WSEP).
Report ServerThe Report Server periodically consolidates data collected by your Log Servers from your Firebox devices and other WatchGuard servers, and then generates reports. After the data is on the Report Server, you can review it using the Report Manager.
WebBlocker ServerThe WebBlocker Server operates with an HTTP or HTTPS proxy policy so users cannot browse to speci-fied web sites. You set the categories of permitted web sites during Firebox configuration. The HTTP proxy and HTTPS proxy on the Firebox then use information on the WebBlocker Server to find out if a web site is in a restricted category.
Quarantine ServerThe WatchGuard Quarantine Server is a repository for email messages sent from the SMTP proxy that are suspected to be email spam or to contain a virus.
Comparing WFS and FirewareMany of the tools and features you use in WFS are also in Fireware®. Some are enhanced with more set-tings or improvements in the methods used to configure and enable them. Fireware and Fireware Pro include such features as dynamic routing, multi-WAN support, Quality of Service and Traffic Manage-ment, and a signature-based intrusion prevention system. At the same time, we did not move all WFS appliance software features into Fireware.
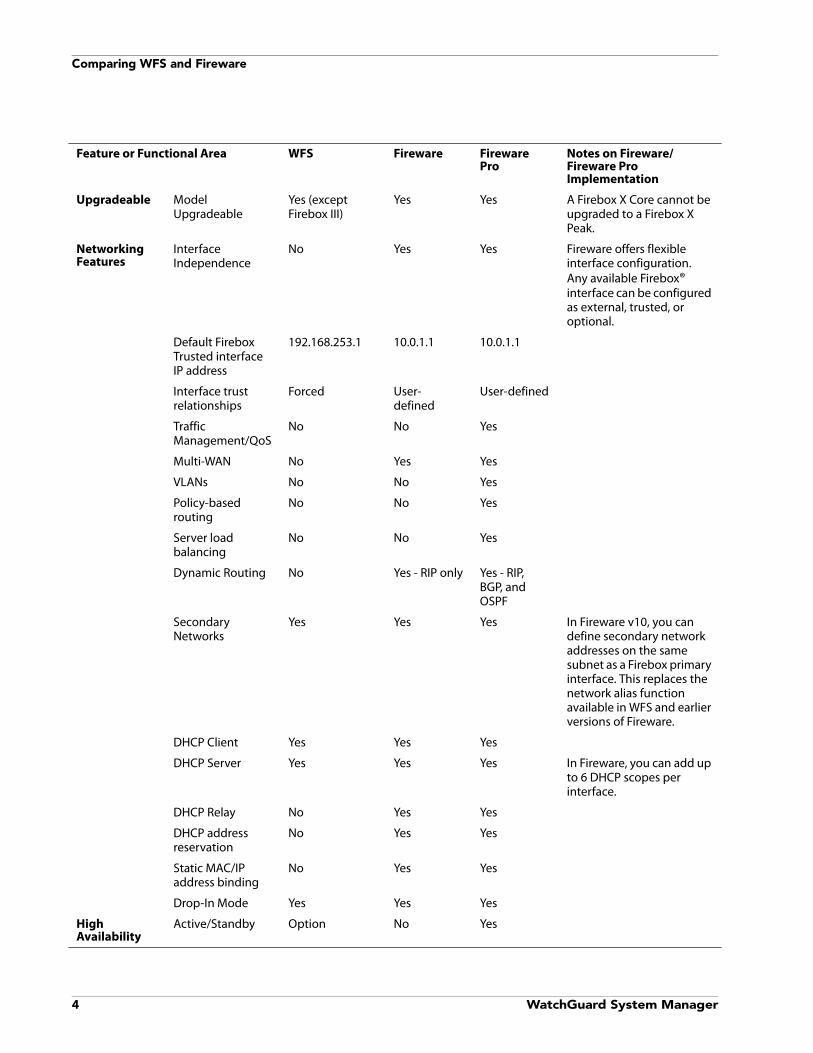
Appliance software feature matrixThere are significant differences between the WFS v7.5 appliance software and the new Fireware v10 appliance software. A summary of these differences is shown in the table below. When both appliance software packages include a feature, but the Fireware v10 implementation is different from WFS v7.5, we include more information in the last column.
Migration Guide 3
Comparing WFS and Fireware
Feature or Functional Area WFS Fireware Fireware Pro
Notes on Fireware/Fireware Pro Implementation
Upgradeable Model Upgradeable
Yes (except Firebox III)
Yes Yes A Firebox X Core cannot be upgraded to a Firebox X Peak.
Networking Features
Interface Independence
No Yes Yes Fireware offers flexible interface configuration. Any available Firebox® interface can be configured as external, trusted, or optional.
Default Firebox Trusted interface IP address
192.168.253.1 10.0.1.1 10.0.1.1
Interface trust relationships
Forced User- defined
User-defined
Traffic Management/QoS
No No Yes
Multi-WAN No Yes Yes
VLANs No No Yes
Policy-based routing
No No Yes
Server load balancing
No No Yes
Dynamic Routing No Yes - RIP only Yes - RIP, BGP, and OSPF
Secondary Networks
Yes Yes Yes In Fireware v10, you can define secondary network addresses on the same subnet as a Firebox primary interface. This replaces the network alias function available in WFS and earlier versions of Fireware.
DHCP Client Yes Yes Yes
DHCP Server Yes Yes Yes In Fireware, you can add up to 6 DHCP scopes per interface.
DHCP Relay No Yes Yes
DHCP address reservation
No Yes Yes
Static MAC/IP address binding
No Yes Yes
Drop-In Mode Yes Yes Yes
High Availability
Active/Standby Option No Yes
4 WatchGuard System Manager

Comparing WFS and Fireware
Application Layer Filtering
HTTP Inbound No Yes Yes
HTTP Outbound Yes Yes Yes Includes substantial feature enhancements, including improved pattern matching, configurable antivirus and IPS signature scanning, and support for regular expressions. Fireware does not include the abiility to redirect HTTP traffic to a caching proxy server.
WebBlocker Yes Yes Yes Support for 54 categories and uncategorized web sites.
WebBlocker for HTTPS
No Yes Yes
SMTP Inbound Yes Yes Yes Includes substantial feature enhancements, including improved pattern matching, configurable antivirus and IPS signature scanning, and support for regular expressions.
SMTP Outbound Yes Yes Yes
POP3 Inbound No Yes Yes
POP3 Outbound No Yes Yes
FTP Inbound Yes Yes Yes Includes substantial feature enhancements, including the ability to block downloads and uploads by file name, IPS signature scanning, and support for regular expressions.
FTP Outbound Yes Yes Yes
DNS Yes Yes Yes Includes substantial feature enhancements, including the ability to block DNS queries based on pattern-matching for any query name.
Transparent proxy support for VoIP
No Yes Yes Transparent H.323, SIP, and TFTP proxies to support the use of VoIP through a Firebox.
Feature or Functional Area WFS Fireware Fireware Pro
Notes on Fireware/Fireware Pro Implementation
Migration Guide 5

Comparing WFS and Fireware
Outgoing (TCP/UDP)
No Yes Yes In Fireware, this proxy detects multiple protocols and applies relevant proxy restrictions and IM/P2P application blocking.
Firewall-based default threat protection(protocol anomaly detection)
Yes Yes Yes Enhanced protocol anomaly detection including the ability to set thresholds for multiple flood-based attacks.
Signature-based IPS
No Yes Yes
Virus Detection Yes Yes Yes In Fireware, Gateway AV detects viruses in email and in non-email protocols including FTP and HTTP.
Spam Detection Yes Yes Yes In Fireware, spamBlocker is more effective and easier to use than SpamScreen.
Email Quarantine No Yes Yes Fireware can quarantine email based on spam or virus classification.
Authentication
RADIUS Yes Yes Yes
LDAP/Active Directory
No Yes Yes
Windows NT Server authentication with 2000/2003 compatibility (NTLM)
Yes No No
Firebox database Yes Yes Yes
SecurID Yes Yes Yes
VASCO DIGIPASS No Yes Yes
Cryptocard Yes No No
Single Sign-On No Yes Yes For Active Directory domains only.
Browser-based user authentication
Yes Yes Yes In Fireware, authentication is done via HTTPS and users remain authenticated after the browser is closed.
Mobile VPN Mobile VPN with PPTP
Yes Yes Yes
Mobile VPN with SSL
No Yes Yes
Feature or Functional Area WFS Fireware Fireware Pro
Notes on Fireware/Fireware Pro Implementation
6 WatchGuard System Manager

Comparing WFS and Fireware
Mobile VPN with IPSec
Yes Yes Yes Mobile VPN with IPSec client v10 supports Windows Vista.
Branch Office VPN
BOVPN (IPSec) Yes Yes Yes
AES encryption Yes Yes Yes
VPN Failover No Yes Yes
Dead Peer Detection
No Yes Yes
Management Unified management interface
No Yes Yes You can start all management tools from WatchGuard® System Manager.
Manage more than one device
Yes Yes Yes Use WatchGuard System Manager to manage one or more devices, including centralized management and monitoring of Firebox X Edge devices.
Certificate Authority
Yes Yes Yes Certificate Authority moves from the Firebox to the Management Server.
Third-party certificate support for VPNs
No No Yes
Drag-and-drop VPN setup for WatchGuard devices
Yes Yes Yes Available for these models: Firebox SOHO 6, Firebox III, Firebox X Edge, Firebox X Core and Peak, Firebox X Core and Peak e-Series
Management Server
No Yes Yes Starting with WSM v8.0. Installations of WFS v7.3 and earlier use VPN Manager instead of the WatchGuard Management Server.
Basic DVCP Yes No No If you currently use Basic DVCP, you must use the Management Server Setup wizard to migrate your tunnels to the Management Server.
Monitoring Tools
Firebox System Manager
Yes Yes Yes Fireware includes significant enhancements to Firebox System Manager.
Feature or Functional Area WFS Fireware Fireware Pro
Notes on Fireware/Fireware Pro Implementation
Migration Guide 7
Comparing WFS and Fireware
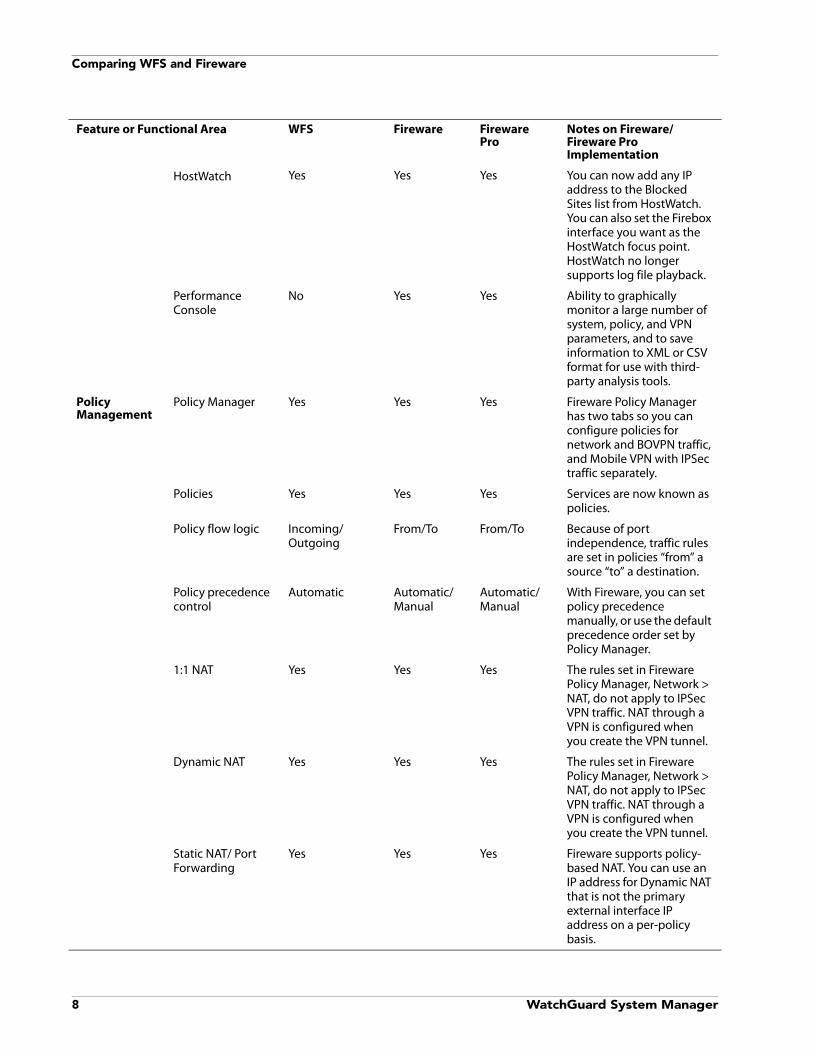
HostWatch Yes Yes Yes You can now add any IP address to the Blocked Sites list from HostWatch. You can also set the Firebox interface you want as the HostWatch focus point. HostWatch no longer supports log file playback.
Performance Console
No Yes Yes Ability to graphically monitor a large number of system, policy, and VPN parameters, and to save information to XML or CSV format for use with third-party analysis tools.
Policy Management
Policy Manager Yes Yes Yes Fireware Policy Manager has two tabs so you can configure policies for network and BOVPN traffic, and Mobile VPN with IPSec traffic separately.
Policies Yes Yes Yes Services are now known as policies.
Policy flow logic Incoming/Outgoing
From/To From/To Because of port independence, traffic rules are set in policies “from” a source “to” a destination.
Policy precedence control
Automatic Automatic/Manual
Automatic/Manual
With Fireware, you can set policy precedence manually, or use the default precedence order set by Policy Manager.
1:1 NAT Yes Yes Yes The rules set in Fireware Policy Manager, Network > NAT, do not apply to IPSec VPN traffic. NAT through a VPN is configured when you create the VPN tunnel.
Dynamic NAT Yes Yes Yes The rules set in Fireware Policy Manager, Network > NAT, do not apply to IPSec VPN traffic. NAT through a VPN is configured when you create the VPN tunnel.
Static NAT/ Port Forwarding
Yes Yes Yes Fireware supports policy-based NAT. You can use an IP address for Dynamic NAT that is not the primary external interface IP address on a per-policy basis.
Feature or Functional Area WFS Fireware Fireware Pro
Notes on Fireware/Fireware Pro Implementation
8 WatchGuard System Manager

Planning Your Migration
Planning Your MigrationNo automated process is available to migrate your Firebox® from WFS appliance software to Fireware®. You must build a new configuration file for your Firebox. This procedure can take a lot of time, but can also give you a good opportunity to examine the policies in your configuration. You may find that you have policies in your current configuration that are not necessary. Look at each policy before you add it to your Fireware configuration and consider whether the policy is sufficiently restrictive to give your network the most security.
It is a good idea to take the time to review your security policy and make sure that you implement best-practices network security in your new Firebox configuration. For more information, see
https://www.watchguard.com/docs/whitepaper/securitypolicy_wp.pdf
As with any major software migration, a well-designed plan for your migration from WFS to Fireware or Fireware Pro can decrease the effect on your users and improve your experience. This guide has detailed instructions to successfully migrate from WFS to Fireware. These include steps to:
• Document and examine your current WFS configuration
• Create backup files of your existing configuration
• Install WatchGuard® System Manager and Fireware on your management station
• Configure the Management Server and migrate your DVCP server(s)
• Install Fireware on the device
• Connect to the Firebox from WSM and open Fireware Policy Manager
- Make the changes in Fireware Policy Manager that reflect the WFS configuration
Logging Log Server Yes Yes Yes Log Server now keeps files in an SQL database for more powerful searching and reporting.
XML Log Format No Yes Yes More verbose log message content. There is a conversion tool to move log files from WFS format to XML.
LogViewer Yes Yes Yes Fireware includes significant enhancements to LogViewer, including filtering and searching.
SNMP No Yes Yes You can configure the Firebox to accept SNMP polls from an SNMP server. You can also configure the Firebox to send traps to an SNMP server.
Advanced log message options
Yes Yes Yes Fireware supplies more diagnostic logging.
Reporting Reports Yes Yes Yes
Feature or Functional Area WFS Fireware Fireware Pro
Notes on Fireware/Fireware Pro Implementation
Migration Guide 9
Upgrading Subscription Services
- Create and test VPN tunnels as necessary
• Deploy the Firebox and test the Fireware configuration
Upgrading Subscription ServicesFireware® does not support Gateway AntiVirus (GAV) for Email or SpamScreen. Instead, Fireware users have the option to purchase subscriptions to the more robust antivirus and spam blocking solutions: Gateway AntiVirus/Intrusion Prevention Service (Gateway AV/IPS) and spamBlocker.
When you upgrade to Fireware, the GAV for Email and SpamScreen features stop working. If you have a current GAV for Email or SpamScreen subscription that has not yet expired, you can purchase the new Gateway AntiVirus/IPS and spamBlocker service subscriptions at a reduced cost. Contact your reseller for more information.
All LiveSecurity® and WebBlocker subscriptions continue with no change when you upgrade.
Using this Migration GuideThis guide includes the migration procedures for three different groups of users. Carefully read the description of the groups shown below and select the group to which you belong. The migration pro-cedure for each group is given in a separate chapter of this guide.
WFS 7.x (No VPN Manager) to Fireware® ProYou have a Firebox® X Core that uses WFS 7.x. You do not use VPN Manager and have never configured a WatchGuard® Management Server. For migration instructions, go to Chapter 2.
WFS 7.3 or later and VPN Manager to Fireware ProYou have a Firebox X Core that uses WFS 7.3 or later. You use VPN Manager or Basic DVCP to configure and manage some or all of your BOVPN tunnels. For migration instructions, go to Chapter 3.
WSM/WFS 7.x to Fireware ProYou have a Firebox X Core. You use WatchGuard System Manager 9.x or WSM v10, and your Firebox is running WFS 7.x. You have a WatchGuard Management Server already configured. For migration instructions, go to Chapter 4.
Best PracticesTo reduce downtime during migration: Install WSM v10 and build your new Fireware configuration before you install Fireware on your Firebox. Make sure you read this entire guide before you continue.
10 WatchGuard System Manager

2Migrating from WFS v7.x (No VPN Manager) to Fireware Pro
This guide describes the migration procedures for three different groups of users, with separate chap-ters for each. Use this chapter to help you migrate to Fireware® if:
• You have a Firebox® X Core currently installed with WFS v7.x and
• You are not using VPN Manager along with a DVCP server to manage branch office VPN tunnels.
Migrating to FirewareTo successfully migrate to Fireware®, you must:
1 Document and analyze your current security policy.
2 Back up the WFS configuration file and image, and document the properties of any VPN tunnels you have defined.
3 Install WatchGuard® System Manager software and Fireware Pro appliance software on a management station.
4 Install Fireware on your Firebox®.
5 Build a new Fireware configuration policy using WatchGuard System Manager v10 and save it to your Firebox.
Best PracticesTo reduce downtime during migration: Install WSM v10 and build your new Fireware configuration before you install Fireware on your Firebox. Make sure you read this entire guide before you continue.
Documenting Your Current Security PolicyA good security policy is not just a firewall configuration file. It is a process that a network administrator documents and that management regularly reviews to make sure that the rules your firewall applies correctly reflect the information management and security goals of your company. Your migration is a
Migration Guide 11

Backing Up Your WFS Configuration and Firebox Image
good opportunity to examine your security policy. Because you must make a new configuration file for the Fireware® appliance software, it is a good idea to examine which policies you must have to do busi-ness. Use these guidelines:
• Each policy you open makes your network less secure
• Policies that allow traffic from the Internet to your network are more dangerous than policies that allow traffic from your network to the Internet
• Specify source and destination addresses to make a policy more secure
For more information about network security policies, seehttps://www.watchguard.com/docs/whitepaper/securitypolicy_wp.pdf
Backing Up Your WFS Configuration and Firebox ImageBefore you install WatchGuard® System Manager v10 and Fireware® appliance software, you must back up the software image on your Firebox® and the configuration file kept on your management station. If you do not back up your WFS installation, you cannot go back to WFS easily if you have problems dur-ing migration.
Saving your configuration fileYou can save the configuration file to the Firebox. You can also save it as a file on a local hard disk drive. Before you install an upgrade, we recommend that you save the configuration file to a local hard disk drive.
1 From WFS Policy Manager, select File > Save > As File.
2 Type the name of the configuration file. Click Save. We recommend that you also save this file to a network folder.The configuration file has the file extension *.cfg.
Saving the Firebox software imageA very important step in the migration is to save the Firebox software image. This puts an encrypted copy of the Firebox flash disk on your management station. To create the WFS software backup file:
1 Open Firebox System Manager. It is not necessary to connect to the Firebox.
12 WatchGuard System Manager
Documenting VPN Tunnels
2 Select Tools > Advanced > Flash Disk Management.
3 Select Make Backup of Current Image. Click Continue.A verification prompt appears. Make sure that the management station can connect to the Firebox trusted interface with the network (TCP/IP).
4 Click Continue. The Connect To Firebox dialog box appears.
5 From the Firebox drop-down list, select a Firebox or type the IP address used by the management station to connect to the Firebox. Type the configuration (read/write) passphrase. Click OK.
6 Select a file name for the Firebox backup file.The Enter Encryption Key dialog box appears.
7 Type a key to encrypt the backup file. Click OK.This makes sure that no one can get sensitive information from the backup file. Make sure that you secure this encryption key in a safe location. You cannot restore a backup file to the Firebox if you forget this encryption key.
8 When the backup is successful, an Operation Complete message appears. Click OK. It is not necessary to restart the Firebox after this procedure.
Documenting VPN TunnelsIf you have created manual branch office VPN tunnels to another WatchGuard® Firebox® or some other IPSec-compliant VPN endpoint, it is a good idea to completely remove the manual VPN tunnel configu-ration information from both VPN endpoints before you migrate to Fireware®. This is especially impor-tant if you plan to use WatchGuard System Manager and Fireware to manage your BOVPN tunnels in the future.
Make sure to document all properties of each VPN tunnel before you remove the tunnel information. You must create the branch office VPN tunnels again after you migrate to Fireware.
Installing Software on the Management StationBefore you migrate your Firebox® to Fireware® appliance software, you must first install WatchGuard® System Manager v10 and Fireware v10 on your management station. You do not have to delete WFS first. You can have both WFS and Fireware appliance software installed on your management station, as long as you install the software in two different directories.
1 Download the WatchGuard System Manager v10 and Fireware v10 software, if you do not already have it. You can download the latest software from the WatchGuard web site athttps://www.watchguard.com/archive/softwarecenter.aspMake sure that you write down the name and path of the file when you save it to your hard disk drive.
2 Open each file and use the instructions on the screens to help you through the installation. Make sure you install WSM in a different directory than WFS.The WSM installation utility includes a screen in which you select the components of the software or the upgrades to install. You can install all the components, but you cannot configure all components without the correct feature key.
3 At the end of the WSM installation wizard, you can use the Quick Setup Wizard to create a new basic configuration for your Firebox. The next section helps you through this process.
Migration Guide 13

Installing Fireware on Your Firebox
Installing Fireware on Your FireboxWhen you have created backup files of your WFS configuration file and Firebox® image and you have downloaded WSM v10 and Fireware® v10 software to your management station, you are ready to install Fireware on your Firebox. You can choose from two methods to put Fireware Pro on a Firebox that is running WFS v7.x appliance software:
• Use the Quick Setup Wizard to make a simple configuration file and save the configuration file and Fireware to the Firebox. This is the preferred method.
• Use the fbxinstall.exe command-line utility.
Using the Quick Setup WizardWe recommend that you use the Quick Setup Wizard to put Fireware Pro and a basic configuration file on the Firebox. Before you start the wizard, make sure:
• You have saved a copy of your WFS configuration file to a directory outside the WatchGuard® installation directory with the procedure described in “Saving your configuration file” on page 12.
• You have created a backup copy of the WFS image on your Firebox with the procedure described in “Saving the Firebox software image” on page 12.
• You have downloaded and installed WatchGuard System Manager v10 and Fireware v10 on your management station.
• You copied the feature key for your Firebox from the WatchGuard LiveSecurity web site. You must paste this key into a text box in the wizard. This feature key is linked to the serial number of your Firebox. To get a copy of your feature key, go tohttps://www.watchguard.com/archive/manageproducts.asp
• Your management station is on the same network as the Firebox. The wizard uses TCP discovery to find the Firebox on the network. If your network has more than one Firebox, you must select the correct Firebox from a list the wizard gives you.
To start the Quick Setup Wizard from the Windows desktop, select Start > WatchGuard System Manager 10 > Quick Setup Wizard.
The wizard asks you for this information:
• The type of Firebox you have
• Feature key for the Firebox
• External interface information for the Firebox
• Network configuration preference (routed or drop-in mode)
• Status and configuration passphrases
When the wizard is complete, you can start to build a new Fireware configuration file that matches your business needs. For more information on how to connect to the Firebox and use Fireware Policy Manager, see Chapter 5, “Using Fireware Policy Manager.”
Using fbxinstall.exeYou can also use the fbxinstall.exe utility to install Fireware Pro. Fbxinstall.exe is a command-line utility that allows you to upgrade a Firebox X Core from WFS appliance software to Fireware Pro appliance software. After this procedure is complete, you must use the Quick Setup Wizard to give the Firebox a
14 WatchGuard System Manager
Installing Fireware on Your Firebox
basic configuration. You can then modify or add to the default Fireware configuration file to meet the needs of your organization.
To install Fireware Pro on a Firebox with fbxinstall.exe:
1 Connect a serial cable between the Firebox and COM1 on your management station.
2 Connect the trusted interface of the Firebox to the Ethernet port on your management station with a cross-over cable.
3 Change the IP address on your management station to 10.0.1.2/24. Set the default gateway on your management station to 10.0.1.1.
4 Open a command prompt.
5 Type: fbxinstall 10.0.1.1/24This IP address is used to connect to the Firebox to complete the reset process, but is not actually assigned to the Firebox.
6 When the fbxinstall procedure is done, use the Quick Setup Wizard to create a new configuration file. See “Using the Quick Setup Wizard” on page 14 for more information.Remember to reset your management station IP address and default gateway back to their original state when you are done with the fbxinstall procedure.
Migration Guide 15
Installing Fireware on Your Firebox
16 WatchGuard System Manager
3Migrating from WFS v7.3 or later with VPN Manager to Fireware Pro
This guide describes the migration procedures for three different groups of users, with separate chap-ters for each. Use this chapter to help you migrate to Fireware® if:
• You have a Firebox® X Core currently installed with WFS v7.3 or later.and
• You use VPN Manager or Basic DVCP and a DVCP server to manage some or all of your branch office VPN tunnels.
Migrating to FirewareTo successfully migrate to Fireware®, you must:
• Document and analyze your security policy.
• Back up the WFS configuration file and image.
• Install WatchGuard® System Manager software and Fireware appliance software on a management station. You must upgrade to WSM/Fireware v8.3 or 9.x before you upgrade to WSM/Fireware v10.0.
• Migrate the DVCP Server on your Firebox® to a WatchGuard Management Server installed on a Windows computer.
• Install Fireware on your Firebox.
• Build a new Fireware configuration policy using WatchGuard System Manager and save it to your Firebox.
• Upgrade your WSM and Fireware installation to v10.0.
Best PracticesTo reduce downtime during migration: Install WSM v10 and build your new Fireware configuration before you install Fireware on your Firebox. Make sure you read this entire guide before you continue.
Migration Guide 17

Documenting Your Security Policy
Documenting Your Security PolicyA good security policy is not just a firewall configuration file. It is a process that a network administrator documents and that management regularly reviews to make sure that the rules your firewall applies reflect the information management and security goals of your company. Your migration is a good opportunity to examine your security policy. Because you must make a new configuration file for the Fireware® appliance software, it is a good idea to examine which policies you must have to do business. Use these guidelines:
• Each policy you add makes your network less secure
• Policies that allow traffic from the Internet to your network are more dangerous than policies that allow traffic from your network to the Internet
• Specify source and destination addresses to make a policy more secure
For more information about network security policies, seehttps://www.watchguard.com/docs/whitepaper/securitypolicy_wp.pdf
Backing Up Your WFS Configuration and Firebox ImageBefore you install WatchGuard® System Manager v10 and Fireware® appliance software, you must back up the software image on your Firebox® and the configuration file kept on your management station. If you do not back up your WFS installation, you cannot go back to WFS easily if you have problems dur-ing migration.
Saving your configuration fileYou can save the configuration file to the Firebox. You can also save it as a file on a local hard disk drive. Before you install an upgrade, we recommend that you save the configuration file to a local hard disk drive.
1 From WFS Policy Manager, select File > Save > As File.
2 Type the name of the configuration file. Click Save. We recommend that you also save this file to a network folder.The configuration file has the file extension *.cfg.
18 WatchGuard System Manager

Documenting VPN Tunnels
Saving the Firebox software imageA very important step in the migration is to save the Firebox software image. This puts an encrypted copy of the Firebox flash disk on your management station. To create the WFS software backup file:
1 Open Firebox System Manager. It is not necessary to connect to the Firebox.
2 Select Tools > Advanced > Flash Disk Management.
3 Select Make Backup of Current Image. Click Continue.A verification prompt appears. Make sure that the management station can connect to the Firebox trusted interface with the network (TCP/IP).
4 Click Continue. The Connect To Firebox dialog box appears.
5 From the Firebox drop-down list, select a Firebox or type the IP address used by the management station to connect to the Firebox. Type the configuration (read/write) passphrase. Click OK.
6 Select a file name for the Firebox backup file.The Enter Encryption Key dialog box appears.
7 Type a key to encrypt the backup file. Click OK.This makes sure that no one can get sensitive information from the backup file. Make sure that you secure this encryption key in a safe location. You cannot restore a backup file to the Firebox if you forget this encryption key.
8 When the backup is successful, an Operation Complete message appears. Click OK. It is not necessary to restart the Firebox after this procedure.
Documenting VPN TunnelsIf you have created manual branch office VPN tunnels to another WatchGuard® Firebox® or some other IPSec-compliant VPN endpoint, it is a good idea to completely remove the manual VPN tunnel configu-ration information from both VPN endpoints before you migrate to Fireware®. This is especially impor-tant if you plan to use WatchGuard System Manager and Fireware to manage your BOVPN tunnels in the future.
Make sure to document all properties of each VPN tunnel before you remove the tunnel information. You must create the branch office VPN tunnels again after you migrate to Fireware.
Installing Software on the Management StationBefore you migrate your Firebox® to Fireware® appliance software, you must install WatchGuard® System Manager v8.3 or 9.x and Fireware v8.3 or 9.x on your management station. You do not have to delete WFS first. You can have both WFS and Fireware appliance software installed on your management station, as long as you install the software in two different directories.
1 Download the WatchGuard System Manager and Fireware software, if you do not already have it. You can download the software from the WatchGuard web site athttps://www.watchguard.com/archive/softwarecenter.aspMake sure that you write down the name and path of the file when you save it to your hard disk drive.
Migration Guide 19
Introducing the WatchGuard Management Server
2 Open each file and use the instructions on the screens to help you through the installation. Make sure you install WSM in a different directory than WFS.The WSM installation utility includes a screen in which you select the components of the software or the upgrades to install. You can install all the components, but you cannot configure all components without the correct feature key.
3 You must migrate your VPN Manager configuration or any Basic DVCP tunnels to a WatchGuard Management Server before you install Fireware on the Firebox with the Quick Setup Wizard.
If you use VPN Manager on your Firebox X Core, it is important to run the Management Server Setup wizard before you put Fireware on your Firebox. When you put Fireware on your Firebox, Fireware puts an entirely new image on the Firebox flash disk. When the
new Fireware image is on the flash disk, the VPN Manager information is gone from the flash disk. You must run the Management Server Setup Wizard to pull the VPN Manager information off the Firebox before you put Fireware on your Firebox.
Introducing the WatchGuard Management ServerIn older versions of its firewall software, WatchGuard® offered simple branch office VPN configuration with VPN Manager and the Dynamic VPN Configuration Protocol (DVCP). VPN Manager controls many VPN tunnels with one easy-to-use management interface. With WatchGuard Firebox® System 7.3 and earlier, the configuration information for these managed VPN tunnels was kept on a DVCP server installed on a Firebox.
With more recent releases of WatchGuard System Manager, the DVCP server is moved off the Firebox. The functionality moves to a Windows computer and the name changes to the WatchGuard Manage-ment Server. This makes the Firebox a more scalable and flexible solution for the network administra-tor. The Management Server has the same functions as the VPN Manager server. These functions are:
• Central management of BOVPN tunnels
• Certificate Authority to make and send out certificates for IPSec VPN tunnels
When you install WSM, you can install the Management Server at the same time. It is a good idea to install the Management Server software on a computer that is behind a Firebox with a static external IP address. The Management Server does not operate correctly if it is behind a Firebox with a dynamic IP address on its external interface.
After it is installed, you can access the Management Server configuration from an icon installed in the WatchGuard toolbar. From the Management Server Configuration window, you can:
• Start and stop the Management Server
• Set Management Server passphrases
• Enter a Management Server license key
• Configure the properties of the Certificate Authority, the client certificate, and the Certificate Revocation List
Management Server licenseYou must use the VPN Manager license to configure the Management Server. You must have your VPN Manager license before you can move your VPN Manager configuration from a Firebox to a Manage-ment Server. You can use a WatchGuard System Manager license to increase the total number of devices managed by the Management Server. For more information, see the Management Server sec-
20 WatchGuard System Manager

Migrating Your VPN Manager Data to a Management Server
tion of the product FAQs at www.watchguard.com/support/faqs/fireware/
Migrating Your VPN Manager Data to a Management ServerWatchGuard® System Manager v8.3 or higher supplies a wizard that migrates your WFS VPN Manager configuration to the new WatchGuard Management Server. This wizard is known as the Management Server Setup wizard and is launched from the WatchGuard toolbar on the Windows taskbar.
This wizard moves your DVCP server from your Firebox® to a Windows computer that you designate as your Management Server. It also converts the Firebox you were using as a DVCP server into a gateway Firebox that protects the Management Server from the Internet. Finally, it converts any basic DVCP tun-nels connected to the gateway Firebox into regular tunnels. Basic DVCP tunnels are not supported in WSM v10.
The wizard does these actions:
• Gets a master encryption key to encrypt the configuration and passphrase files of the Management Server
• Gets a passphrase to connect to the DVCP server from the management station
• Gets the IP address and configuration passphrase for the Firebox that was used as a DVCP server
• Connects to the Firebox
• Gets the VPN Manager configuration file from the Firebox
• Uses this configuration file to find whether the Firebox was a basic DVCP server or an advanced DVCP server
• Changes the “wg_dvcp” and “wg_ca” services of the gateway Firebox, and uses NAT (network address translation) to send traffic to the new Management Server on the management station
• Saves the changes to the Firebox
• Starts the Management Server
If the Firebox was a VPN Manager DVCP serverIf the Firebox was a VPN Manager DVCP server, the wizard does these actions:
• Uses the configuration properties of the DVCP server to configure the CA on the Management Server
• Gets the DVCP configuration file (dvcp.cfg) from the Firebox
• Uses the DVCP configuration file to set the Management Server license key, policy templates, security templates, and DVCP clients
• Removes the DVCP server from the Firebox
• Removes the DVCP server configuration properties from the Firebox configuration file
After migration is complete, your managed VPN tunnels continue to operate correctly.
If the Firebox was a Basic DVCP serverThe Management Server Setup wizard does not migrate all Basic DVCP VPN tunnels configured on the Firebox. It converts only the VPN tunnels that use the gateway Firebox as one of the endpoints. Basic DVCP tunnels are not supported in WSM v10.
Migration Guide 21

Installing Fireware on Your Firebox
If you have Basic DVCP VPN tunnels that do not have the DVCP server Firebox as one of the VPN end-points, you must:
• Document the properties of the basic VPN tunnel.
• Remove the VPN tunnel information on the Basic DVCP server, and then restart the Basic DVCP Client.
You can then use the Management Server Setup wizard to migrate to a new Management Server and use the Quick Setup Wizard (described later in this chapter) to create a new configuration file for your Firebox. Then you must add the VPN endpoints to your Management Server configuration as managed devices and create the VPN tunnels again.
You must have a license available for each advanced VPN tunnel you create. This was not required when you used Basic DVCP and you may have to purchase additional licenses.
Running the Management Server Setup wizard1 From the Windows desktop, double-click the Management Server icon in the WatchGuard
toolbar.
2 Select Start Service.
If the Management Server has not been configured, then the Management Server Setup wizard starts automatically.
Installing Fireware on Your FireboxWhen you have created backup files of your WFS configuration file and Firebox® image and you have downloaded WSM and Fireware® software to your management station, you are ready to install Fire-ware on your Firebox. You can choose from two methods to put Fireware Pro on a Firebox that is run-ning WFS 7.x appliance software:
• Use the Quick Setup Wizard to make a simple configuration file and save the configuration file and Fireware to the Firebox. This is the preferred method.
• Use the fbxinstall.exe command-line utility.
Using the Quick Setup WizardWe recommend that you use the Quick Setup Wizard to put Fireware Pro and a basic configuration file on the Firebox. Before you start the wizard, make sure:
• You have saved a copy of your WFS configuration file to a directory outside the WatchGuard® installation directory with the procedure described in “Saving your configuration file” on page 18.
• You have created a backup copy of the WFS image on your Firebox with the procedure described in “Saving the Firebox software image” on page 19.
• You have downloaded and installed WatchGuard System Manager and Fireware on your management station.
22 WatchGuard System Manager

Installing Fireware on Your Firebox
• You copied the feature key for your Firebox from the WatchGuard LiveSecurity® web site. You must paste this key into a text box in the wizard. This feature key is linked to the serial number of your Firebox. To get a copy of your feature key, go tohttps://www.watchguard.com/archive/manageproducts.asp
• Your management station is on the same network as the Firebox. The wizard uses TCP discovery to find the Firebox on the network. If your network has more than one Firebox, you must select the correct Firebox from a list the wizard gives you.
To start the Quick Setup Wizard from the Windows desktop, select Start > WatchGuard System Manager > Quick Setup Wizard
The wizard asks you for this information:
• The type of Firebox you have
• Feature key for the Firebox
• External interface information for the Firebox
• Network configuration preference (routed or drop-in mode)
• Status and configuration passphrases
When the wizard is complete, you can start to build a new Fireware configuration file that matches your business needs. For more information on how to connect to the Firebox and use Fireware Policy Manager, see Chapter 5, “Using Fireware Policy Manager.”
Using fbxinstall.exeYou can also use the fbxinstall.exe utility to install Fireware Pro. Fbxinstall.exe is a command-line utility that allows you to upgrade a Firebox X Core from WFS appliance software to Fireware Pro appliance software. After this procedure is complete, you must use the Quick Setup Wizard to give the Firebox a basic configuration. You can then modify and add to the default Fireware configuration file to meet the needs of your organization.
To install Fireware Pro on a Firebox with fbxinstall.exe:
1 Connect a serial cable between the Firebox and COM1 on your management station.
2 Connect the trusted interface of the Firebox to the Ethernet port on your management station with a cross-over cable.
3 Change the IP address on your management station to 10.0.1.2/24. Set the default gateway on your management station to 10.0.1.1.
4 Open a command prompt.
5 Type: fbxinstall 10.0.1.1/24This IP address is used to connect to the Firebox to finish the reset process, but is not actually assigned to the Firebox.
6 When the fbxinstall procedure is done, use the Quick Setup Wizard to create a new configuration file. See “Using the Quick Setup Wizard” on page 22 for more information.Remember to reset your management station IP address and default gateway back to their original state when you are done with the fbxinstall procedure.
Upgrading to WSM/Fireware v10.0After you upgrade to WSM/Fireware v8.3 or 9.x, you can download and install WSM/Fireware v10.0. Use the WSM/Fireware v10.0 release notes for instructions on how to complete the upgrade.
Migration Guide 23

Installing Fireware on Your Firebox
24 WatchGuard System Manager

4Migrating from WSM/WFS v7.x to Fireware Pro
This guide describes the migration procedures for three different groups of users, with separate chap-ters for each. Use this chapter to help you migrate to Fireware® if:
• You use WatchGuard® System Manager v9.x or v10 and have a Firebox® X Core currently installed with WFSv 7.xand
• You have a WatchGuard Management Server already installed and running, or do not use a Management Server at all.
Migrating to FirewareTo successfully migrate to Fireware®, you must:
• Document and analyze your security policy.
• Back up the WFS configuration file and image.
• Install the latest WatchGuard® System Manager software (if necessary) and Fireware appliance software on a management station.
• Install Fireware on your Firebox®.
• Build a new Fireware configuration policy using WatchGuard System Manager v10 and save it to your Firebox.
Best PracticesTo reduce downtime during migration: Install WSM v10 and build your new Fireware configuration before you install Fireware on your Firebox. Make sure you read this entire guide before you continue.
Documenting Your Security PolicyA good security policy is not just a firewall configuration file. It is a process that a network administrator documents and that management regularly reviews to make sure that the rules your firewall applies correctly reflect the information management and security goals of your company. Your migration is a good opportunity to examine your security policy. Because you must make a new configuration file for
Migration Guide 25

Backing Up Your WFS Configuration and Firebox Image
the Fireware® appliance software, it is a good idea to examine which policies you must have to do busi-ness. Use these guidelines:
• Each policy you open makes your network less secure
• Policies that allow traffic from the Internet to your network are more dangerous than policies that allow traffic from your network to the Internet
• Specify source and destination addresses to make a policy more secure
For more information about network security policies, seehttps://www.watchguard.com/docs/whitepaper/securitypolicy_wp.pdf
Backing Up Your WFS Configuration and Firebox ImageBefore you install WatchGuard® System Manager v10 and Fireware® appliance software, you must back up the software image on your Firebox® and the configuration file kept on your management station. If you do not back up your WFS installation, you cannot go back to WFS easily if you have problems dur-ing migration.
Saving your configuration fileYou can save the configuration file to the Firebox. You can also save it as a file on a local hard disk drive. Before you install an upgrade, we recommend that you save the configuration file to a local hard disk drive.
1 From WFS Policy Manager, select File > Save > As File.
2 Type the name of the configuration file. Click Save. We recommend that you also save this file to a network folder.The configuration file has the file extension *.cfg.
Saving the Firebox software imageA very important step in the migration is to save the Firebox software image. This puts an encrypted copy of the Firebox flash disk on your management station. To create the WFS software backup file:
1 Open Firebox System Manager. It is not necessary to connect to the Firebox.
2 Select Tools > Advanced > Flash Disk Management.
26 WatchGuard System Manager
Documenting VPN Tunnels
3 Select Make Backup of Current Image. Click Continue.A verification prompt appears. Make sure that the management station can connect to the Firebox Trusted interface with the network (TCP/IP).
4 Click Continue. The Connect To Firebox dialog box appears.
5 From the Firebox drop-down list, select a Firebox or type the IP address used by the management station to connect to the Firebox. Type the configuration (read/write) passphrase. Click OK.
6 Select a file name for the Firebox backup file.The Enter Encryption Key dialog box appears.
7 Type a key to encrypt the backup file. Click OK.This makes sure that no one can get sensitive information from the backup file. Make sure that you secure this encryption key in a safe location. You cannot restore a backup file to the Firebox if you forget this encryption key.
8 When the backup is successful, an Operation Complete message appears. Click OK. It is not necessary to restart the Firebox after this procedure.
Documenting VPN TunnelsBefore you install Fireware® appliance software on your Firebox®, you must document any manual and managed BOVPN tunnel information.
If you have manual BOVPN tunnelsIf you have manual branch office VPN tunnels that you have created to another WatchGuard® Firebox or some other IPSec-compliant VPN endpoint, it is a good idea to completely remove the manual VPN tunnel configuration information from both VPN endpoints before you migrate to Fireware. This is especially important if you plan to use WatchGuard System Manager and Fireware to manage your BOVPN tunnels in the future. Make sure to document all properties of each VPN tunnel before you remove the tunnel information. You must create the branch office VPN tunnels again after you migrate to Fireware.
If you have managed BOVPN tunnelsIf you have managed BOVPN tunnels with configuration information kept on your current Management Server, all your tunnel information is lost when you migrate to Fireware. Before you install Fireware on your Firebox, make sure you remove all managed VPN tunnels. After you install Fireware, you must add the managed devices again and create new VPN tunnels using drag-and-drop.
Installing Software on the Management StationBefore you migrate your Firebox® to Fireware® appliance software, you must first install WatchGuard® System Manager v10 and Fireware v10 on your management station. You do not have to delete WFS first. You can have both WFS and Fireware appliance software installed on your management station, as long as you install the software in two different directories.
1 Download the WatchGuard System Manager v10 and Fireware v10 software, if you do not already have it. You can download the latest software from the WatchGuard web site at https://www.watchguard.com/archive/softwarecenter.aspMake sure that you write down the name and path of the file when you save it to your hard disk drive.
Migration Guide 27
Installing Fireware on Your Firebox
2 Open each file and use the instructions on the screens to help you through the installation. Make sure you install WSM in a different directory than WFS.The WSM installation utility includes a screen in which you select the components of the software or the upgrades to install. You can install all the components, but you cannot configure all components without the correct feature key.
3 At the end of the WSM installation wizard, a check box appears that you can select to start the Quick Setup Wizard. The next section helps you through this process.
Installing Fireware on Your FireboxWhen you have created backup files of your WFS configuration file and Firebox® image and you have downloaded WSM v10 and Fireware® v10 software to your management station, you are ready to install Fireware on your Firebox. You can choose from two methods to put Fireware Pro on a Firebox that is running WFS 7.x appliance software:
• Use the Quick Setup Wizard to make a simple configuration file and save the configuration file and Fireware to the Firebox. This is the preferred method.
• Use the fbxinstall.exe command-line utility.
Using the Quick Setup WizardWe recommend that you use the Quick Setup Wizard to put Fireware Pro and a basic configuration file on the Firebox. Before you start the wizard, make sure:
• You have saved a copy of your WFS configuration file to a directory outside the WatchGuard® installation directory with the procedure described in “Saving your configuration file” on page 26.
• You have created a backup copy of the WFS image on your Firebox with the procedure described in “Saving the Firebox software image” on page 26.
• You have downloaded and installed WatchGuard System Manager v10 and Fireware v10 on your management station.
• You copied the feature key for your Firebox from the WatchGuard LiveSecurity® web site. You must paste this key into a text box in the wizard. This feature key is linked to the serial number of your Firebox. To get a copy of your feature key, go tohttps://www.watchguard.com/archive/manageproducts.asp
• Your management station is on the same network as the Firebox. The wizard uses TCP discovery to find the Firebox on the network. If your network has more than one Firebox, you must select the correct Firebox from a list the wizard gives you.
To start the Quick Setup Wizard from the Windows desktop, select Start > WatchGuard System Manager 10 > Quick Setup Wizard
The wizard asks you for this information:
• The type of Firebox you have
• Feature key for the Firebox
• External interface information for the Firebox
• Network configuration preference (routed or drop-in mode)
• Status and configuration passphrases
28 WatchGuard System Manager

Installing Fireware on Your Firebox
When the wizard is complete, you can start to build a new Fireware configuration file that matches your business needs. For more information on how to connect to the Firebox and use Fireware Policy Man-ager, see Chapter 5, “Using Fireware Policy Manager.”
Using fbxinstall.exeYou can also use the fbxinstall.exe utility to install Fireware Pro. Fbxinstall.exe is a command-line utility that allows you to upgrade a Firebox X Core from WFS appliance software to Fireware Pro appliance software. After this procedure is complete, you must use the Quick Setup Wizard to give the Firebox a basic configuration. You can then add to the Fireware configuration file to meet the needs of your orga-nization.
To install Fireware Pro on a Firebox with fbxinstall.exe:
1 Connect a serial cable between the Firebox and COM1 on your management station.
2 Connect the trusted interface of the Firebox to the Ethernet port on your management station with a cross-over cable.
3 Change the IP address on your management station to 10.0.1.2/24. Set the default gateway on your management station to 10.0.1.1.
4 Open a command prompt.
5 Type: fbxinstall 10.0.1.1/24This IP address is used to connect to the Firebox to complete the reset process, but is not actually assigned to the Firebox.
6 When the fbxinstall procedure is done, use the Quick Setup Wizard to create a new configuration file. See “Using the Quick Setup Wizard” on page 28 for more information.Remember to reset your management station IP address and default gateway back to their original state when you are done with the fbxinstall procedure.
Migration Guide 29

Installing Fireware on Your Firebox
30 WatchGuard System Manager

5Using Fireware Policy Manager
At this time, no configuration tool that automatically converts a WFS 7.x configuration file to a Fire-ware/Fireware® Pro configuration file is available. The two appliance software versions are very differ-ent. You must start with the configuration file you saved at the end of the Fireware Quick Setup Wizard.
One method to quickly make your Fireware configuration file is to open the new Fireware file in one window. At the same time, open the WFS configuration file in a second window. Put the two windows on the Windows desktop so that you can see them at the same time. You might want to resize each window so that they are tiled horizontally.
Rebuilding Your Network Configuration with Fireware Policy Manager
When you complete the Fireware® Quick Setup Wizard, you have a very basic configuration that allows you to install the WatchGuard® Firebox® on your network. We recommend that the first thing you do after you install the Firebox is to connect to it with Policy Manager and add any additional configura-tion information necessary for your Firebox to operate correctly on your network.
This type of configuration information can include:
WFS 7.3 Policy Manager Fireware Policy Manager
Migration Guide 31

Rebuilding Your Network Configuration with Fireware Policy Manager
• Adding secondary networks
• Adding network and host routes
• Setting up DHCP
• Configuring NAT
With Fireware, you also have the option to configure additional external interfaces. This feature is known as multi-WAN and is described in the WatchGuard System Manager User Guide.
In this section, we show you some of the user interface changes that you see when you configure net-work properties for your Firebox.
Opening Policy ManagerTo open Policy Manager, you first want to open WatchGuard System Manager and connect to your Firebox:
1 From your Windows Start menu, select All Programs > WatchGuard System Manager 10 > WatchGuard System Manager.
2 Select File > Connect to Device or the Connect to Device icon.
3 Type the IP address and status passphrase for your Firebox.
4 Right-click on the Firebox name in WSM and select Policy Manager or select the Policy Manager icon.
Fireware Policy Manager launches and shows the configuration file for your Firebox.
Working with interfacesWhen you select Network > Configuration, you can see that the user interface is now more flexible in how each physical interface is mapped to a particular interface type, such as trusted, optional, or exter-
32 WatchGuard System Manager
Rebuilding Your Network Configuration with Fireware Policy Manager
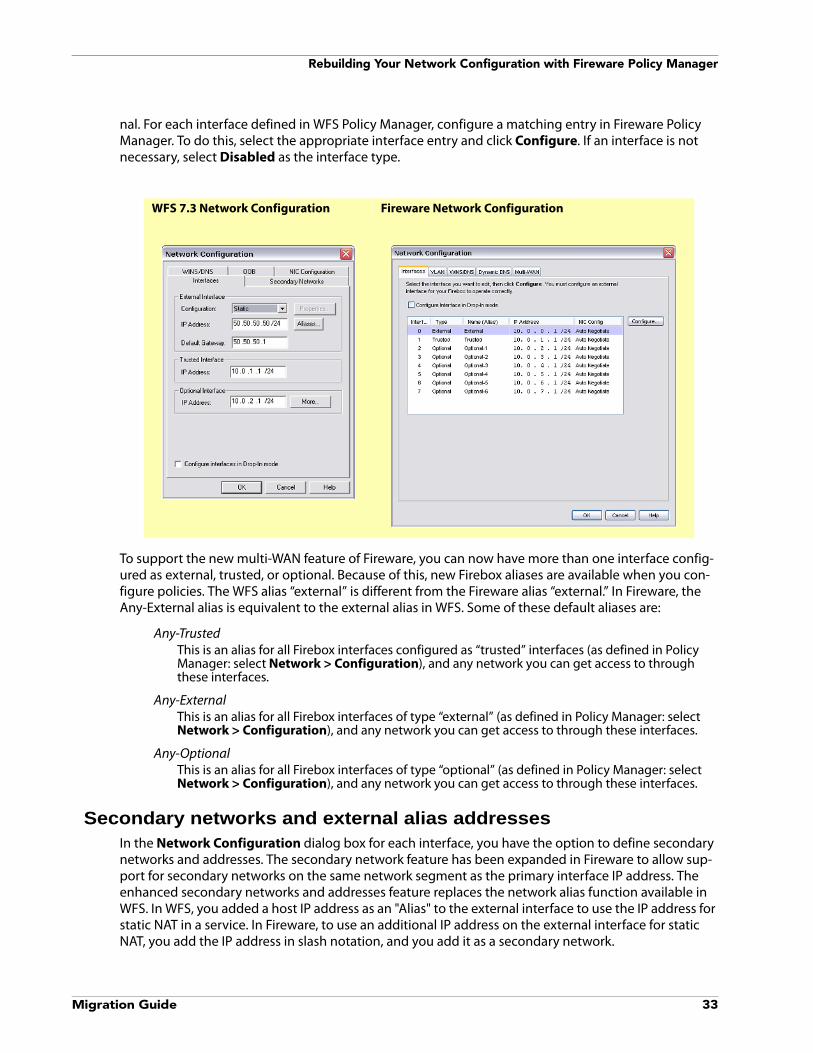
nal. For each interface defined in WFS Policy Manager, configure a matching entry in Fireware Policy Manager. To do this, select the appropriate interface entry and click Configure. If an interface is not necessary, select Disabled as the interface type.
To support the new multi-WAN feature of Fireware, you can now have more than one interface config-ured as external, trusted, or optional. Because of this, new Firebox aliases are available when you con-figure policies. The WFS alias “external” is different from the Fireware alias “external.” In Fireware, the Any-External alias is equivalent to the external alias in WFS. Some of these default aliases are:
Any-TrustedThis is an alias for all Firebox interfaces configured as “trusted” interfaces (as defined in Policy Manager: select Network > Configuration), and any network you can get access to through these interfaces.
Any-ExternalThis is an alias for all Firebox interfaces of type “external” (as defined in Policy Manager: select Network > Configuration), and any network you can get access to through these interfaces.
Any-OptionalThis is an alias for all Firebox interfaces of type “optional” (as defined in Policy Manager: select Network > Configuration), and any network you can get access to through these interfaces.
Secondary networks and external alias addressesIn the Network Configuration dialog box for each interface, you have the option to define secondary networks and addresses. The secondary network feature has been expanded in Fireware to allow sup-port for secondary networks on the same network segment as the primary interface IP address. The enhanced secondary networks and addresses feature replaces the network alias function available in WFS. In WFS, you added a host IP address as an "Alias" to the external interface to use the IP address for static NAT in a service. In Fireware, to use an additional IP address on the external interface for static NAT, you add the IP address in slash notation, and you add it as a secondary network.
WFS 7.3 Network Configuration Fireware Network Configuration
Migration Guide 33

Rebuilding Your Network Configuration with Fireware Policy Manager
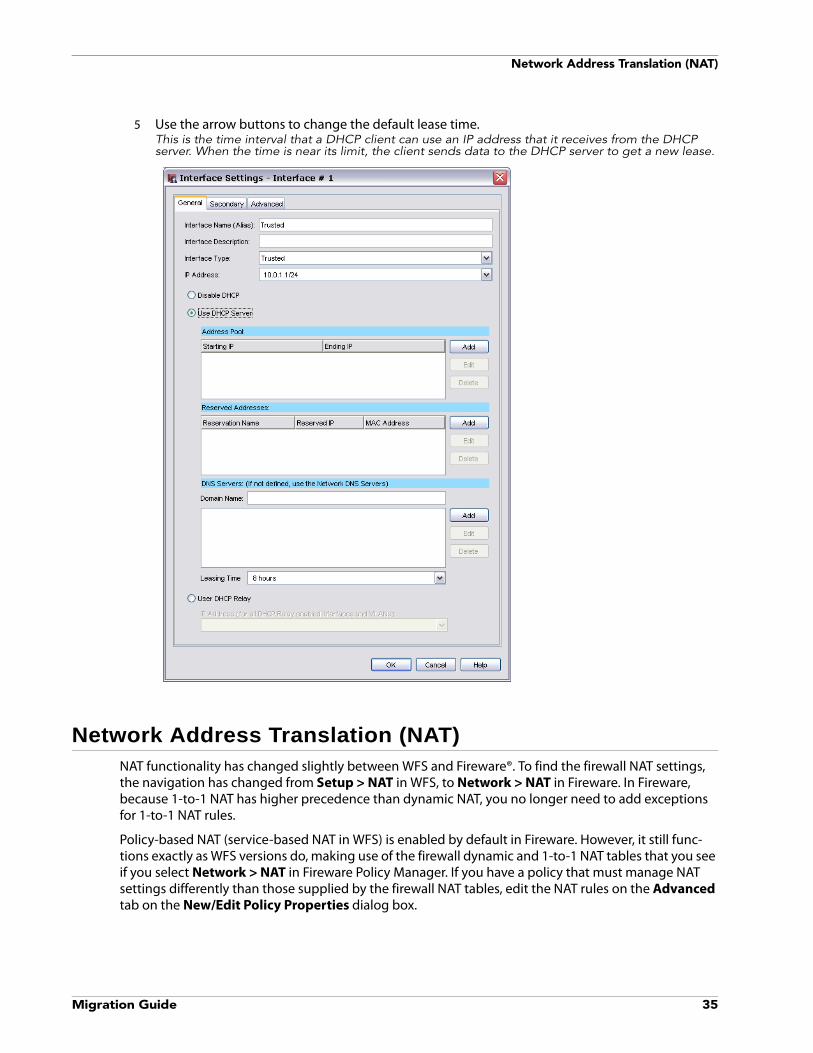
DHCP ServerThe procedure to configure DHCP server functionality on a Firebox with Fireware is different from WFS. You must configure DHCP server functionality on each trusted or optional interface you want to define as a DHCP server. You can configure up to six DHCP scopes per interface. You can also configure the DHCP server with reserved MAC addresses and set a different DNS server for the Firebox to give with DHCP-assigned IP addresses.
1 From Fireware Policy Manager, select Network > Configuration.
2 Select any trusted or optional interface and click Configure.
3 Select the DHCP Server radio button.
4 To add an IP address range, click Add and type the first and last IP addresses.You can configure a maximum of six address ranges.
34 WatchGuard System Manager
Network Address Translation (NAT)
5 Use the arrow buttons to change the default lease time.This is the time interval that a DHCP client can use an IP address that it receives from the DHCP server. When the time is near its limit, the client sends data to the DHCP server to get a new lease.
Network Address Translation (NAT)NAT functionality has changed slightly between WFS and Fireware®. To find the firewall NAT settings, the navigation has changed from Setup > NAT in WFS, to Network > NAT in Fireware. In Fireware, because 1-to-1 NAT has higher precedence than dynamic NAT, you no longer need to add exceptions for 1-to-1 NAT rules.
Policy-based NAT (service-based NAT in WFS) is enabled by default in Fireware. However, it still func-tions exactly as WFS versions do, making use of the firewall dynamic and 1-to-1 NAT tables that you see if you select Network > NAT in Fireware Policy Manager. If you have a policy that must manage NAT settings differently than those supplied by the firewall NAT tables, edit the NAT rules on the Advanced tab on the New/Edit Policy Properties dialog box.
Migration Guide 35

Virtual Private Networking
Virtual Private NetworkingYou can see all firewall and BOVPN policies on the main tab of Fireware® Policy Manager. You can iden-tify BOVPN policies when you assign the policies a different color with the new policy highlighting fea-ture available in View > Policy Highlighting. Policies for Mobile VPN with IPSec appear on the Mobile VPN with IPSec tab.
Mobile VPN with IPSec and Fireware Both WFS and Fireware appliance software use the same Mobile VPN with IPSec client software. There are two primary differences between the Mobile VPN implementation of WFS and Fireware:
• In WFS, you could create Mobile VPN profiles for individual users or for groups. In Fireware, you must configure group accounts that enable extended authentication. You then send the same .wgx file to all users in that group. You cannot configure a .wgx file for a single user.
• In Fireware Policy Manager, you can allow Mobile VPN users to get access to the Internet through the Firebox by using a setting in the Mobile VPN wizard. You do not have to configure rules for this manually as you did in WFS Policy Manager.
BOVPN and FirewareIf you use NAT through a branch office VPN tunnel, it is important to understand that the NAT settings you apply to your firewall policy on the Policy Manager Firewall tab do not apply to any VPN tunnels. If you want to use NAT through a VPN tunnel, you must configure NAT when you configure the VPN tun-nel. For more information about the use of NAT in a BOVPN tunnel, see the Branch Office VPN section of the product FAQs available at:
36 WatchGuard System Manager

Services
www.watchguard.com/support/faqs/fireware/
In Fireware, the routing policies configured in a BOVPN tunnel are known as “Local-Remote Pairs.”
ServicesIn Fireware® you configure services with a very different procedure from WFS. The largest change is that there are no Incoming and Outgoing tabs in the definitions. Also, services are now known as poli-cies.
Each policy icon has a tab to configure the familiar From and To traffic settings, a tab to see and man-age the properties of the policy, and an Advanced tab. When you migrate a WFS service to Fireware Policy Manager, you must create at least one policy for the information shown in the WFS Incoming tab and one for the Outgoing tab. This change is necessary only when the current WFS connection set-ting is either Enabled and Allowed or Enabled and Denied with log messages enabled for denied packets.
The direction of the traffic the policy controls is decided by the network or host address information you enter in the policy. For example, a policy that allows traffic from Trusted to External is similar to a WFS service icon with the Outgoing tab set to allow traffic from Trusted to External. This increases flex-ibility, especially when you have more than one type of physical interface in use. However, it also gives the potential to misuse the Any service when you complete the From and To entries.
Using the policy generated by the Quick Setup WizardThe Firebox® configuration file created when you use the Fireware Quick Setup Wizard is different in several ways from the default configuration file created with WFS. In Fireware, you can set policy prece-dence automatically or manually. If you change your Policy Manager to show in detailed mode (Policy Manager > View > Details), the policies are shown in order of precedence. You can move poli-cies up or down in the view to change their precedence, or select View > Auto-Order Mode to change the order automatically.
Using the “Any” aliasThe “Any” alias refers to all traffic sent from any source to any destination. You must restrict the use of the “Any” alias in your policies as much as you can. When you manage the migration, apply the “Any” alias only when no other policy will operate correctly. For example, when you migrate a WFS service that allows incoming from Any to Any, migrate it to a Fireware policy that allows from External to Fire-box (maybe with a NAT entry specified to port forward the connections to a trusted server).
Policy Manager and Firebox managementWatchGuard® System Manager v10 includes the ability to create and manage VPN tunnels, similar to the features of VPN Manager in WFS. It also includes a feature that allows you to centrally configure and manage a large number of Firebox X Edge devices from a central location. If you manage other Firebox devices with a Management Server protected by a WatchGuard Firebox, make sure that the configura-tion of your gateway Firebox includes these provisions:
• If you manage Firebox SOHO or Firebox X Edge devices, make sure your gateway Firebox includes the WG-SmallOffice-Mgmt policy, configured to apply static NAT and allow traffic from the Any-External alias to the IP address of your Management Server. You make your
Migration Guide 37

Proxies
configuration more secure if you replace the Any-External alias with the external IP addresses of any managed devices.
• If you manage Firebox III, Firebox X Core, or Firebox X Peak devices, make sure your gateway Firebox includes the WG-Mgmt-Server policy, configured to apply static NAT and allow traffic from the Any-External alias to the IP address of your Management Server. You make your configuration more secure if you replace the Any-External alias with the external IP addresses of any managed devices.
ProxiesProxy configuration for Fireware® has many more features and greater flexibility than WFS. Because of this, very few direct correlation points exist between what is configured in WFS Policy Manager and where a feature appears in Fireware Policy Manager. The most important thing to understand is that the proxies in Fireware are all configured with similar procedures. After you understand the procedures, they supply a powerful tool to protect resources comprehensively and intelligently. For more informa-tion about configuring proxies in Fireware, see the WatchGuard® System Manager User Guide, “Proxy Pol-icies” chapter.
The configuration properties for the proxies in Fireware are now separate from the policies. It is possi-ble to create proxy configurations, known as a proxy action, that you can share among multiple poli-cies. Fireware includes default configurations for the different proxy policies. You cannot change these default configurations. To edit a configuration, or action, you use a clone feature that allows you to cre-ate a new action based on an existing action.
The default proxy actions are named to represent the situations in which they are used to protect resources. For example, Fireware has an HTTP Client proxy action and an HTTP Server proxy action. The HTTP-Client proxy action was created to protect HTTP clients. In other words, it is most likely used on a policy applied to outbound traffic. The HTTP-Server proxy action was created to protect a web server. It is most likely used on a policy that allows access to a web server from external users.
To open proxy actions in Fireware Policy Manager, select Setup > Actions > Proxies.
Each proxy action has a Turn on logging for reports check box. If you do not select this check box, you do not get detailed report data in Report Manager.
Quick Setup Wizard and proxiesWhen you used the Quick Setup Wizard in WFS, an “Outgoing” service was automatically added to your Firebox® configuration. This service allowed outgoing TCP and UDP connections by default and did not apply any proxies to this traffic.
38 WatchGuard System Manager

Authentication
The Fireware Quick Setup Wizard does not enable any proxies by default. If you want to enable a proxy, you must add a proxy policy and apply a proxy action to the policy.
AuthenticationWith Fireware®, the list of supported authentication servers has changed significantly. Windows native mode (NT) and CRYPTOCard authentication are not supported in Fireware. If you used WFS NT Server authentication, you can now use Active Directory or RADIUS authentication if you have a Windows 2000/2003 domain.
Supported authentication methods include:
FireboxThere are no changes in Firebox® authentication.
RADIUS ServerYou must make sure your RADIUS server supports both PAP and MSCHAPv2. Fireware uses PAP when authenticating any firewall or MUVPN user. It uses MSCHAPv2 when authenticating a PPTP user (if PPTP is configured to use RADIUS).
VASCO DIGIPASSTo configure the Firebox to work with VASCO DIGIPASS, you use the same user interface as that used to configure RADIUS authentication.
SecurID ServerThere are no changes in SecurID authentication.
LDAP With Fireware, you can use an LDAP (Lightweight Directory Access Protocol) authentication server to authenticate your users to the Firebox.
Active DirectoryWith Fireware, you can use an Active Directory authentication server to authenticate your users to the Firebox. If you use Active Directory, you also have the option to enable Single Sign-On.
WSM 7.x Firewall Authentication Fireware Authentication Servers
Migration Guide 39

Default Threat Protection
Authenticating through the FireboxThe Java applet used for firewall authentication in WFS is not used in Fireware Pro/Fireware. Instead, a web page is available at the same URL if you use https instead of http.
In WFS, your users authenticated with the URL that looked like: http://10.1.1.1:4100
In Fireware, your users must type:
https://IP address of a Firebox interface:4100/ or https://Host name of the Firebox:4100
Authentication timeoutsIn WFS, when an authenticated user closed the web browser window in which they authenticated, the authenticated session stopped. In Fireware, if the user closes the web browser window in which they authenticated, the user stays authenticated until the authentication timeout occurs. This timeout is controlled in Policy Manager > Setup > Authentication > Authentication Settings.
Using Firebox System Monitor to close authentication sessionsYou can see a list of all users currently authenticated on the Firebox® on the Firebox System Manager > Authentication List tab. You can also remove an authenticated user from the list. To do this, right-click their user name and then stop their authenticated session.
Default Threat ProtectionMany of the same options are available in Fireware® as were available in WFS Policy Manager. However, by default, log messages for broadcast traffic are turned on. To turn this off, add a policy that matches the traffic and disable log messages in that policy.
The Auto-block source of packets not handled option is disabled by default. If you enable this option, you must be very careful or you could block many external sites that you do not want to block.
Fireware uses a new algorithm to block SYN flood attacks that is based on threshold limits instead of validation.
Blocked SitesFireware's blocked sites support has changed. The Blocked Sites list can now apply to all interfaces. Be very careful to not add entries here that could also include any real networks accessible from the Fire-box such as trusted, optional, external, or other routed networks. If it is necessary to include these (such as by way of a supernet), make sure to add a Blocked Sites Exceptions entry for the networks or hosts that are safe.
Fireware automatically adds sites to the Blocked Sites list on any interface.
Migrating WFS blocked sites to FirewareFireware blocks sites on all interfaces. WFS blocks sites only on the external interface. Therefore you cannot copy the default Blocked Sites list from a WFS configuration to a Fireware configuration. A default WFS configuration includes the private subnets (10.0.0.0/8, 192.168.0.0/16, 172.16.0.0/16) on the Blocked Sites list. If you copy this configuration to Fireware, all internal subnets are blocked on all interfaces, which could cause a Denial of Service (DoS) and effectively disable the trusted network.
40 WatchGuard System Manager

Default Threat Protection
Using HostWatch to block sitesYou can now add sites to the Blocked Sites list from the HostWatch™ user interface. Right-click on a connection in the connections list and select the site to block.
Migration Guide 41

Default Threat Protection
42 WatchGuard System Manager


