RDX® QuikStor™ External USB WHAT’S IN THE BOX? USB 3.0 DC Input Voltage and Rated Input Current 12VDC/0.5A Power Ratings Thank you for selecting Tandberg Data AccuGuard data protection software. Key Benefits: • Powerful Data Deduplication • Quick Point-in-Time Recovery • Fast File-Level Searching • Microsoft Exchange Protection • Microsoft SQLProtection • Simple User Interface Tandberg Data AccuGuard™ License Activation 433985 Rev C 1 2 3 4 USB Cable Power Supply with Seven Power Sockets AccuGuard License Activation Card Note: AccuGuard software is only included with select RDX products Warranty Card 1. 2. 3. 4. Visit the Support section of the Tandberg Data web site (www.tandbergdata.com) for more information, including product warranty and registration, knowledge base articles, user documentation, and technical support. For More Information for USB 3.0 The following power ratings represent typical-use performance. 1 9 8 7 6 5 4 3 2 Visit www.tandbergdata.com/login Account Sign In Sign in or create an account Enter the Promo Code RDX10 License Agreement Click to agree Enter the Authorization Code LA C# ## ## ## Download AccuGuard Software Click the download link on the bottom License Key Receive your key via email Activate Software Click the appropriate link on the right Update RDX Utility and Firmware Click the download link on the bottom
Transcript
RDX® QuikStor™ External USB
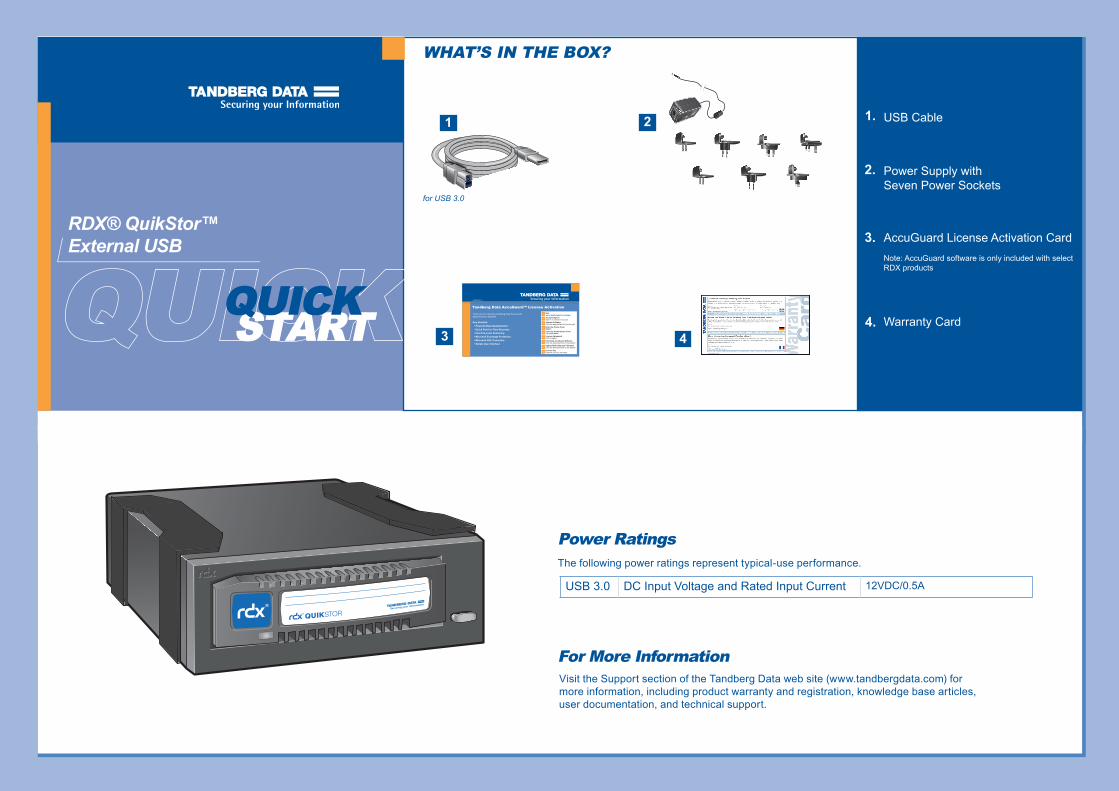
WHAT’S IN THE BOX?
USB 3.0 DC Input Voltage and Rated Input Current 12VDC/0.5A
Power Ratings
Thank you for selecting Tandberg Data AccuGuard data protection software.
Key Benefits: • Powerful Data Deduplication • Quick Point-in-Time Recovery • Fast File-Level Searching • Microsoft Exchange Protection • Microsoft SQL Protection • Simple User Interface
Tandberg Data AccuGuard™ License Activation
433985 Rev C
1 2
3 4
USB Cable
Power Supply with Seven Power Sockets
AccuGuard License Activation CardNote: AccuGuard software is only included with select RDX products
Warranty Card
1.
2.
3.
4.
Visit the Support section of the Tandberg Data web site (www.tandbergdata.com) for more information, including product warranty and registration, knowledge base articles, user documentation, and technical support.
For More Information
for USB 3.0
The following power ratings represent typical-use performance.
1
9
8
7
6
5
4
3
2
Visitwww.tandbergdata.com/loginAccount Sign InSign in or create an account
Enter the Promo CodeRDX10
License AgreementClick to agree
Enter the Authorization CodeLA C# ## ## ##
Download AccuGuard SoftwareClick the download link on the bottom
License KeyReceive your key via email
Activate SoftwareClick the appropriate link on the right
Update RDX Utility and FirmwareClick the download link on the bottom
2
3
START HERE
Install RDX Utility
Connect Data and Power Cables
Load RDX Cartridge
Note:
The RDX Utility installs only on Windows.
Write Protect
Keyed Corner
•
Connect the USB cable to the RDX drive and to the host computer.
•
Attach the power socket that is appropriate for your region to the power supply.
•
Connect the power cable to the drive, and plug it into a power outlet.
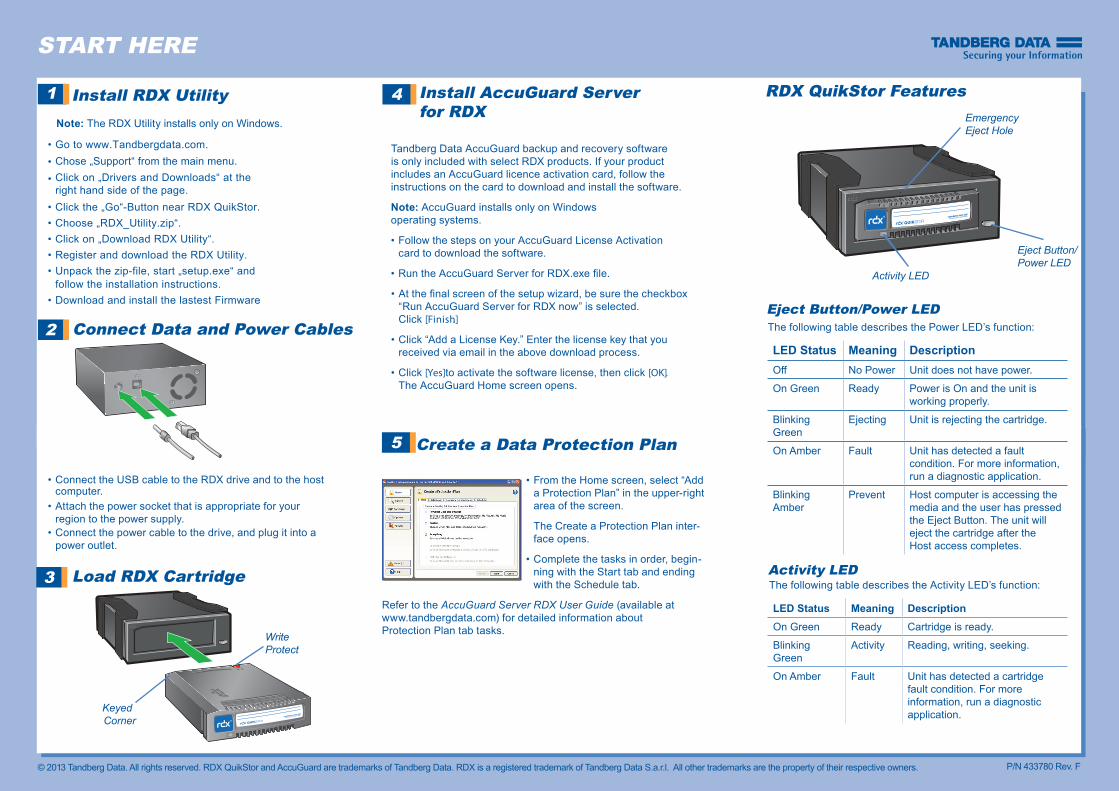
RDX QuikStor Features
LED Status Meaning DescriptionOn Green Ready Cartridge is ready.
Blinking Green
Activity Reading, writing, seeking.
On Amber Fault Unit has detected a cartridge fault condition. For more information, run a diagnostic application.
Eject Button/Power LEDThe following table describes the Power LED’s function:
LED Status Meaning DescriptionOff No Power Unit does not have power.
On Green Ready Power is On and the unit is working properly.
Blinking Green
Ejecting Unit is rejecting the cartridge.
On Amber Fault Unit has detected a fault condition. For more information, run a diagnostic application.
Blinking Amber
Prevent Host computer is accessing the media and the user has pressed the Eject Button. The unit will eject the cartridge after the Host access completes.
The following table describes the Activity LED’s function:Activity LED
Eject Button/Power LED
Activity LED
Emergency Eject Hole
4 Install AccuGuard Server for RDX
Tandberg Data AccuGuard backup and recovery software is only included with select RDX products. If your product includes an AccuGuard licence activation card, follow the instructions on the card to download and install the software.
Note: AccuGuard installs only on Windows operating systems.
• Follow the steps on your AccuGuard License Activation card to download the software.
• Run the AccuGuard Server for RDX.exe
• At the screen of the setup wizard, be sure the checkbox “Run AccuGuard Server for RDX now” is selected. Click [Finish].
• Click “Add a License Key.” Enter the license key that you received via email in the above download process.
• Click [Yes] to activate the software license, then click [OK]. The AccuGuard Home screen opens.
Create a Data Protection Plan5
• From the Home screen, select “Add a Protection Plan” in the upper-right area of the screen.
The Create a Protection Plan inter-face opens.
• Complete the tasks in order, begin-ning with the Start tab and ending with the Schedule tab.
Refer to the AccuGuard Server RDX User Guide (available at www.tandbergdata.com) for detailed information about Protection Plan tab tasks.
• Go to www.Tandbergdata.com.• Chose „Support“ from the main menu.• Click on „Drivers and Downloads“ at the
right hand side of the page.• Click the „Go“-Button near RDX QuikStor.• Choose „RDX_Utility.zip“.• Click on „Download RDX Utility“.• Register and download the RDX Utility.• Unpack the zip-file, start „setup.exe“ and