44
WindO/I-NV2 Utility Downloader Instruction Manual B-947(5)
| Date post: | 10-Apr-2018 |
| Category: |
Documents |
| Upload: | truongphuc |
| View: | 231 times |
| Download: | 7 times |

WindO/I-NV2 Utility Downloader
Instruction Manual
B-947(5)

Introduction This instruction manual explains the operation and handling of the “WindO/I-NV2 Utility Downloader”. Before using the software, read this manual thoroughly to familiarize yourself with this product's function and performance, and to ensure correct operation.
Publication history June 2005: First Edition March 2006: Second Edition May 2006: Third Edition October 2006: Fourth Edition March 2007: Fifth Edition

Contents
Contents ................................................................................................................................... 1 1 Function of Downloader ...................................................................................................... 1 2 Hardware Requirements ...................................................................................................... 2 3 Setup...................................................................................................................................... 3
3-1 Installing ................................................................................................................ 3 3-2 Uninstalling ........................................................................................................... 3
4 Restrictions ........................................................................................................................... 4 5 Screen Configurations ......................................................................................................... 5 6 Operations............................................................................................................................. 6
6-1 Starting Downloader.............................................................................................. 6 6-2 Communication setting.......................................................................................... 6 6-3 Downloading Project File....................................................................................... 7 6-4 Uploading Project Data ......................................................................................... 9 6-5 Uploading Log Data............................................................................................. 10 6-6 Initializing Log Data.............................................................................................11 6-7 CF Card Maintenance.......................................................................................... 12 6-8 Change Picture Data ........................................................................................... 15 6-9 Change Text Data ................................................................................................ 17 6-10 Read Device Data............................................................................................... 20 6-11 Write Device Data .............................................................................................. 21 6-12 System Information ........................................................................................... 22 6-13 Displaying Version Information ........................................................................ 23
7 Formatting Log Data........................................................................................................... 24 7-1 Alarm Log Data.................................................................................................... 24 7-2 Logging Data........................................................................................................ 27
8 Download Options.............................................................................................................. 30 9 Utilizing from Another Software........................................................................................ 32
9-1 Function ............................................................................................................... 34 9-2 Use in Another Software...................................................................................... 36
9-2-1 Using from Run… ......................................................................................... 36 9-2-2 Using from Power Point................................................................................ 37 9-2-3 Using from Excel ........................................................................................... 39

1
1 Function of Downloader The Downloader, which can operate separately from WindO/I-NV2, enables the user to communicate with the MICRO/I easily, regardless of whether the user knows its operation or not. In addition, the Downloader can communicate with one or more MICRO/Is, handling multiple data.
Downloader has following functions.
• Downloads/Uploads project data to the MICRO/I with a quick operation. • Uploads log data - Alarm Log Data and Logging data - saved in the MICRO/I to the personal
computer in the CSV file format. • Initializes log data - Alarm Log Data and Logging data - saved in the MICRO/I. • Downloads Recipe Data/Project Data to the CF card. • Uploads and initializes data files in the CF card. • Formats the CF card. • Displays the system information. • Change Picture Data and Text Data. • Read/Write the specified Device Data.
PC
Downloader
MICRO/I
CF card
Internal memory
Uploading log data
Uploading data files
Downloading/Uploading project data Initializing log data
Downloading recipe data/project dataInitializing data files Formatting the CF card
Downloading/Uploading Text data
Reading/Writing Device data
Picture Browser
Text Browser
Downloading/Uploading Picture data

2
2 Hardware Requirements
The hardware requirements are as follows. Item Specifications OS Windows95 (OSR2 or later)/98/Me/NT4.0/2000/XP/Vista(except 64 bit
Edition) To use USB interface HG device, the OS should be Windows98/Me/NT4.0/2000/XP, and USB1.1 should be available. Windows XP/Vista 64 bit Edition is not supported. Only Administrator is available in Windows Vista.
Computer PC-AT or compatible CPU Pentium 200MHz or higher Memory 64MB Minimum Hard Disk 50MB minimum free space Graphics SVGA (800*600 resolutions) minimum Users Windows NT4.0/2000/XP: Power Users account and up
Windows Vista: Administrators account

3
3 Setup
3-1 Installing
Use the following operations to install the Downloader.
● When installing Downloader and WindO/I-NV2 at same time 1. Insert the WindO/I-NV2 setup CD into the CD-ROM drive. 2. When the WindO/I-NV2 setup launcher does not start automatically, select Run... from
Start menu and type “d:/nv2lanch”. Here the “d” means the drive name for the CD-ROM drive. Then press OK button.
3. Select the language you want to install from setup languages and then click OK button. 4. Select Downloader in the Select Features dialog box with the wizard proceeding. The
default box is checked. 5. Then follow the instructions on the screen.
● When installing Downloader only.
1. Insert the WindO/I-NV2 setup CD into the CD-ROM drive. 2. Select Run... from Start menu and type “d:/Downloader/setup/setup”. Here the “d”
means the drive name for the CD-ROM drive. Then press OK button. 3. Then follow the instructions on the screen.
3-2 Uninstalling
Use the following operations to uninstall the Downloader. ● When uninstalling only Downloader after installing WindO/I-NV2 and
Downloader at same time. 1. Insert the WindO/I-NV2 setup CD into the CD-ROM drive. 2. When the WindO/I-NV2 setup launcher does not start automatically, select Run... from
Start menu and type “d:/nv2lanch”. Here the “d” means the drive name for the CD-ROM drive. Then press OK button.
3. Click Install WindO/I-NV2 from the setup launcher. 4. Disable the selection for Downloader on the Select Functions dialog of the
WindO/I-NV2 installer. 5. Then follow the instructions on the screen.
● When installing Downloader only.
1. Select Control Panel - Add or Remove Programs to uninstall the Downloader.

4
4 Restrictions
The Downloader has following restrictions of use.
● Required software version for WindO/I-NV2 and MICRO/I The Downloader has following restrictions due to the version of the WindO/I-NV2 or the version of the runtime software for the MICRO/I. The download of the” Project Data for Downloader”: WindO/I-NV2 version 2.82 or later The download of the “Project Data for CF card”: WindO/I-NV2 version 2.50 or later The upload: All WindO/I-NV2s
(On the condition that the upload of project data requires the runtime software version 2.00 or later)
The initialization: All WindO/I-NV2s The CF card maintenance: Runtime software version 1.80 or later
(On the condition that the download of the running recipe/project data requires the runtime software version 2.00 or later)
Change Picture Data and Text Data: WindO/INV2 version 3.30 or later Read/Write the specified Device Data: WindO/INV2 version 3.30 or later The system information: All WindO/I-NV2s
(On the condition that the CF card information requires the version 1.80 or later.)
● Formatting Log Data The Downloader make the format of log data - such as “Alarm Log Data” and “Logging Data” uploaded by the Downloader – into the CSV file format along with the other format saved in the CF card.
For more information, see “7 Formatting Log Data”.

5
5 Screen Configurations The screen configuration of the Downloader is as follows.
Main window Functions as the work area of the Downloader Menu bar Selects each functions Status bar Displays status of selecting menu.
Main window Menu bar
Status bar

6
6 Operations The following steps explain how to use the Downloader.
6-1 Starting Downloader To start the Downloader, select Programs - WindOI-NV2 - Downloader from the start menu.
6-2 Communication setting Use the following operations to make the communication setting between the MICRO/I and the personal computer.
1. Select Options - Communication Settings… from the menu bar. 2. Select the communication target.
When selecting HG1F/2F/2S/3F/4F, the Downloader communicates with the one HG (Master HG). When selecting O/I Link Slaves, the Downloader communicates with slaves, that is, multiple MICRO/Is. CF Card is available to only “Change Picture Data” or “Change Text Data”.
3. Select the port. COM:
Enable you to select the port of use from COM 1 to COM 256, and to set the baud rate.
Ethernet: Enable you to set Time out (min) value in minutes.
Ethernet (via Web Server Unit) The IDEC Web Server Unit is the RS232C/Ethernet converter.
By connecting the Web Server Unit to the maintenance port (serial 2 port), it is possible to perform the communication via Ethernet. Baud Rate is for the setting between Web Server Unit and MICRO/I and Time Out is for the setting between PC and Web Server Unit. For details of the Web Server Unit, refer to the manual of the unit.

7
6-3 Downloading Project File The Downloader can download the project data made for the Downloader on the WindO/I-NV2, or the project data made for the CF card, to the MICRO/I. Most of all, the “Projects Data for Downloader” (*.z##”) can be easily downloaded to the MICRO/I with a quick operation. (##: 1f, 2f, 2s, 3f, 4f) In addition, the Downloader can download the runtime software or the optional font at same time, depending on the type of the “Project Data for Downloader”.
➪ For more information on how to configure the downloading, see “8 Download Options”. Use the following operations to download the project. ● Downloading Project File (The following example is when selecting HG1F/2F/2S/3F/4F for Communication with, and COM Port or USB for Port.)
1. Select Download - Project Data for Downloader from the menu bar. 2. Select the project data file for the Downloader on the Open dialog box and then click
Open button.
3. Click Yes button to authorize the confirmation message for the download. 4. The Downloader begins to download and displays the progress indicator. The
communication conditions in this instance are the one you set in Options - Communication Settings....
5. After finishing the download, click Close button. ● Downloading “Project Data for Downloader” with Quick Operation
1. Double-click the project data file for the Downloader on the explorer. The Downloader starts automatically and begins to communicate with the MICRO/I.
➪ The communication conditions in this instance are the one created at time of the communication setting of this project data on the WindO/I-NV2. 2. Click Yes button to authorize the confirmation message for the download. 3. The Downloader begins to download and displays the progress. 4. Click Close button after finishing the download.

8
● Downloading “Project Data for CF Card” 1. Select Download – Project Data for CF Card from the menu bar. 2. Select the access folder for the download from the Select CF Card Access Folder dialog
box. Then click OK button.
3. Click Yes button to authorize the confirmation massage for the download. 4. The Downloader displays the progress indicator for the download. The communication
conditions in this instance are the one you set on Options - Communication Settings.... 5. Click Close button after finishing the download.
► When you set the password to the user name to which the Administrator Group is allocated
in the communicating MICRO/I, the Downloader displays the Enter Password dialog box. Enter the password to this user name. Entering the correct password made the Downloader continue to download. However, it is not necessary to select the user name, when the runtime software version is 1.90 or earlier.
Procedure differences according to the communication setting Applicable operating procedures at the beginning of the communication depend on the setting. When selecting HG1F/2F/2S/3F/4F for Communicate with, and Ethernet for Port
1. The Downloader opens the Target IP Address dialog box. 2. Click OK button to specify the target IP address. 3. The Downloader begins to download.
When selecting O/I Link Slaves for Communicate with
1. The Downloader opens the Target Slaves dialog box. 2. Select target slaves and click OK button.
➪ Only when selecting Ethernet for Port, the Downloader displays the Master IP
Address and “...” button on the edit box. Specify the target IP address here. 3. The Downloader begins to download.

9
6-4 Uploading Project Data The Downloader can upload the project data in the MICRO/I with the font data, the runtime software, and the recipe data in the CF card at the same time. Use the following operations to upload the project data. (The following example is when selecting HG1F/2F/2S/3F/4F for Communication with, and COM Port or USB for Port)
1. Select Upload - Project Data from the menu bar. 2. The Downloader displays the Upload Project Data dialog box. Check the box of data
you want to upload at the same time. 3. Specify the folder to save the uploading project data. Then click OK button. 4. The Downloader begins to upload and displays the progress indicator. 5. When finishing the upload, click Close button.
► When uploading the project data only, upload without opening the box. ► When you set the password to the user name to which the Administrator Group is allocated
in the communicating MICRO/I, the Downloader displays the Enter Password dialog box. Enter the password to this user name. Entering the correct password made the Downloader continue to upload.
► The project uploaded by the Downloader is the “Project Data for Downloader” so that you cannot edit this file from Open Project… in the WindO/I-NV2. If you want to open and edit this file in the WindO/I-NV2, select Online - Downloader - Open Project Data for Downloader from the menu.

10
6-5 Uploading Log Data The Downloader can upload logging data and alarm log data stored in the memory of the MICRO/I at same time or separately. When selecting O/I Link Slaves and Ethernet, the Downloader can upload log data stored in one or more MICRO/I units at same time. Use the following operations to upload the log data. ● Uploading All Log Data (The following example is when selecting HG1F/2F/2S/3F/4F for Communication with, and COM Port or USB for Port)
1. Select Upload - All Log Data… from the menu bar. 2. The Select Path dialog box appears. Specify the folder in which the uploaded data files
are saved. Then click OK button.
3. The Downloader begins to upload and displays the progress indicator. 4. When finishing the upload, click Close button.
► When you set the password to the user name to which the Reader Group is allocated in the
communicating MICRO/I, the Downloader displays the Enter Password dialog box. Enter the password to this user name or to the user name to which the Administrator Group or the Operator Group is allocated. Entering the correct password made the Downloader continue to upload. However, it is not necessary to enter the user name, when the runtime software version is 1.90 or earlier.
► When uploading either alarm log data or logging data, select Upload - Alarm Log Data… or Upload - Logging Data… from the menu bar in the step 1. Further steps are the same as above.
Procedure differences according to the communication setting Applicable operating procedures at the beginning of the communication depend on the setting. When selecting HG1F/2F/2S/3F/4F for Communicate with, and Ethernet for Port
1. The Downloader opens the Target IP Address dialog box. 2. Specify the target IP address and then click OK button.

11
3. The Downloader begins to upload. 4. The Downloader saves uploaded data into the folder after which the IP address
number is named. When selecting O/I Link Slaves for Communicate with
1. The Downloader opens the Target Slaves dialog box. 2. Select the target slaves, and then click OK button.
➪ Only when selecting Ethernet for Port, the Downloader displays Master IP Address and “...” button on the edit box. Specify the target IP address here 3. The Downloader begins to upload. 4. The Downloader saves uploaded data in the folder after which the slave number is
named.
6-6 Initializing Log Data The Downloader can initialize logging data and alarm data stored in the memory of the MICRO/I at same time or separately. When selecting O/I Link Slaves and Ethernet, the Downloader can initialize log data stored in one or more MICRO/I units at same time. Use the following operations to initialize log data. ● Initializing All Log Data (The following example is when selecting HG1F/2F/2S/3F/4F for Communication with, and COM Port or USB for Port.)
1. Select Initialize - All Log Data… from the menu bar. 2. Click Yes button to authorize the confirmation message for the initialization.
3. The Downloader begins to initialize and displays the progress indicator. 4. After finishing the initialization, click Close button.
► When initializing either alarm log data or logging data, select Alarm log data... or Logging
Data… individually from Initialize in the menu bar in the step 1. Further steps are the same

12
as above. ► When you set the password to the user name to which the Administrator Group is allocated
in the communicating MICRO/I, the Downloader displays the Enter Password dialog box. Enter the password to this user name. Entering the correct password made the Downloader continue to initialize. However, it is not necessary to select the user name, when the runtime software version is 1.90 or earlier.
Procedure differences according to the communication setting Applicable operating procedures at the beginning of the communication depend on the setting. When selecting HG1F/2F/2S/3F/4F for Communicate with, and Ethernet for Port
1. The Downloader opens the Target IP Address dialog box. 2. Specify the target IP address, and then click OK button. 3. The Downloader begins to initialize.
When selecting O/I Slave Link for Communicate with
1. The Downloader opens the Target Slaves dialog box. 2. Select the target slave and then click OK button.
➪ Only when selecting Ethernet for Port, the Downloader displays the Master IP Address and “...” button on the edit box. Specify the target IP address here. 3. The Downloader begins to initialize.
6-7 CF Card Maintenance The Downloader can do maintenance for the data in the CF card inserted into the MICRO/I. When selecting O/I Link Slaves and Ethernet, the Downloader can do maintenance for the CF card inserted in one or more MICRO/I units at same time. The Downloader do maintenance targeting the data in the CF access folder set on the working project in the MICRO/I. The maintenance consists of following six items. • The download of project data
The Downloader downloads project data to the CF card. • The download of recipe data
The Downloader downloads recipe data (RCP###.CSV) into the recipe folder in the CF card.
• The download of recipe data while running The Downloader downloads recipe data without stopping the MICRO/I’s operation.
• The upload The Downloader uploads log data, logging data, recipe data and screen hard copy data in the CF card to anywhere in the personal computer.
• The initialization The Downloader initializes (deletes) log data, logging data, recipe data, screen hard copy data, and project data in the CF card.
• The formatting The Downloader formats the CF card.
Use the following operations to do maintenance for the CF card. (The following example is when selecting HG1F/2F/2S/3F/4F for Communicate with, and COM Port or USB for Port.)

13
● Downloading Project Data 1. Select CF Card Maintenance - Download Project Data from the menu bar. 2. The Downloader displays the Open dialog box. Select project data to download and click
Open button. 3. Click OK button to authorize the confirmation message. 4. The Downloader begins to download and displays the progress indicator. 5. After finishing the download, click Close button.
► When you set the password to the user name to which the Operator Group is allocated in
the communicating MICRO/I, the Downloader displays the Enter Password dialog box. Enter the password to this user name or to the user name to which the Administrator Group is allocated. Entering the correct password made the Downloader continue to download.
► When you download the Project Data to CF Card, the Project Data must contain runtime software and optional font. Select the Project Data which contains runtime software and optional font to download.
● Downloading Recipe Data 1. Select CF Card Maintenance - Download Recipe Data… from the menu bar. 2. The Downloader displays the Open dialog box. Select the recipe data file for the
download and click Open button. 3. Click OK button to authorize the confirmation message. 4. The Downloader begins to download and displays the progress indicator. 5. After finishing the download, click Close button.
► When you set the password to the user name to which the Administrator Group is allocated
in the communicating MICRO/I, the Downloader displays the Enter Password dialog box. Enter the password to this user name. Entering the correct password made the Downloader continue to initialize. However, it is not necessary to select the user name, when the runtime software version is 1.90 or earlier.
● Downloading Recipe Data while Running
1. Select CF Card Maintenance - Download Recipe Data while running from the menu
bar. 2. Further steps are the same as the download.
► When you set the password to the user name to which the Operator Group is allocated in
the communicating MICRO/I, the Downloader displays the Enter Password dialog box. Enter the password to this user name or to the user name to which the Administrator Group is allocated. Entering the correct password made the Downloader continue to download.
► When you set O/I Link Slaves to Communication with in the Communication Settings, you can not download recipe data while running.
● Uploading Data in CF Card
1. Select CF Card Maintenance – Upload… from the menu bar. 2. The Downloader displays the Upload from the CF card dialog box. Check the box of
data you want to upload. 3. Click “...” button to select the folder for saving the uploaded data file. Then click OK
button. 4. Click Yes button to authorize the confirmation message for uploading. 5. The Downloader begins to upload and displays the progress indicator. 6. After finishing the upload, click Close button.
► When you set the password to the user name to which the Reader Group is allocated in the
communicating MICRO/I, the Downloader displays the Enter Password dialog box.

14
Enter the password to this user name or to the user name to which the Administrator Group or the Operator Group is allocated. Entering the correct password made the Downloader continue to upload. However, it is not necessary to enter the user name, when the runtime software version is 1.90 or earlier.
● Initializing Data in CF Card
1. Select CF Card Maintenance – Initialize… from the menu bar. 2. The Downloader displays the Initialize CF card dialog box. Check the box of data you
want to delete and then click OK button. 3. Click Yes button to authorize the confirmation message for initializing. 4. The Downloader begins to initialize and displays the progress indicator. 5. After finishing the initialization, click Close button.
► When you set the password to the user name to which the Administrator Group is allocated
in the communicating MICRO/I, the Downloader displays the Enter Password dialog box. Enter the password to this user name. Entering the correct password made the Downloader continue to initialize. However, it is not necessary to select the user name, when the runtime software version is 1.90 or earlier.
● Formatting CF Card
1. Select CF Card Maintenance - Format from the menu bar. 2. Click Yes button to authorize the confirmation message for formatting. 3. The Downloader begins to format and displays the progress indicator. 4. After finishing the format, click Close button.
► When setting the password to the project in the MICRO/I, the Downloader displays the
Enter Password dialog box. After entering the password, click OK button. ► When you set the password to the user name to which the Administrator Group is allocated
in the communicating MICRO/I, the Downloader displays the Enter Password dialog box. Enter the password to this user name. Entering the correct password made the Downloader continue to format. However, it is not necessary to select the user name, when the runtime software version is 1.90 or earlier.
Procedure differences according to the communication setting Applicable operating procedures at the beginning of the communication depend on the setting. When selecting HG1F/2F/2S/3F/4F for Communication with, and Ethernet for Port.
1. The Downloader opens the Target IP Address dialog box. 2. Specify the target IP address and click OK button. 3. The Downloader begins to communicate.
When selecting O/I Link Slaves for Communication with
1. The Downloader opens the Target Slaves dialog box. 2. Select target slaves and click OK button.
➪ Only when selecting Ethernet for Port, the Downloader displays the Master IP Address and “...” button on the edit box. Specify Target IP Address here.
3. The Downloader begins to communicate.

15
6-8 Change Picture Data The Downloader can change only Picture Data with opening project data for Downloader or uploading the Picture Data from MICRO/I. The change of Picture Data is done with Picture Browser. When Picture file of the same name as the already registered Picture is imported, the image is overwritten. The importable Picture file is BMP, WMF, DXF, JPEG and ICO. Use the following operations to change Picture Data. ● Change Picture in Project Data for Downloader (The following example is when selecting HG1F/2F/2S/3F/4F for Communication with, and COM Port or USB for Port.)
1. Select Options – Change Picture Data – Picture in Project Data for Downloader from the menu bar.
2. Select the project data file for the Downloader on the Open dialog box and then click Open button.
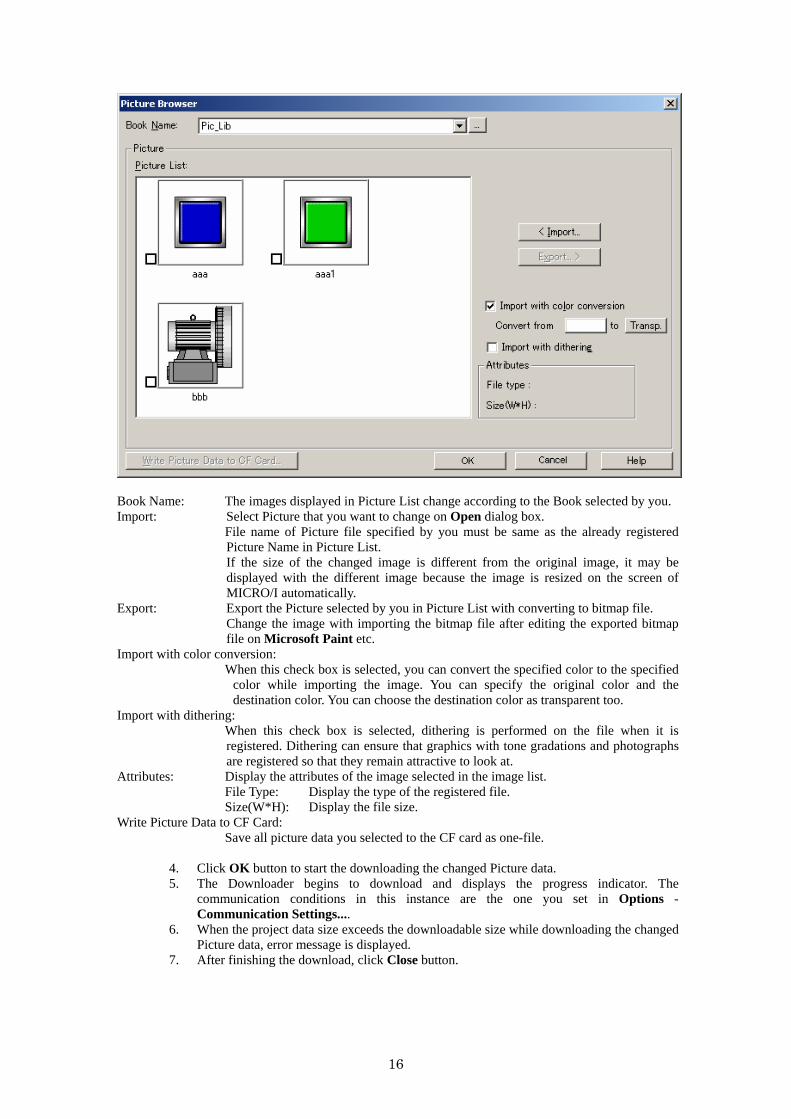
3. Change Picture Data on the opened Picture Browser.
16
Book Name: The images displayed in Picture List change according to the Book selected by you. Import: Select Picture that you want to change on Open dialog box.
File name of Picture file specified by you must be same as the already registered Picture Name in Picture List.
If the size of the changed image is different from the original image, it may be displayed with the different image because the image is resized on the screen of MICRO/I automatically.
Export: Export the Picture selected by you in Picture List with converting to bitmap file. Change the image with importing the bitmap file after editing the exported bitmap
file on Microsoft Paint etc. Import with color conversion:
When this check box is selected, you can convert the specified color to the specified color while importing the image. You can specify the original color and the destination color. You can choose the destination color as transparent too.
Import with dithering: When this check box is selected, dithering is performed on the file when it is registered. Dithering can ensure that graphics with tone gradations and photographs are registered so that they remain attractive to look at.
Attributes: Display the attributes of the image selected in the image list. File Type: Display the type of the registered file. Size(W*H): Display the file size. Write Picture Data to CF Card:
Save all picture data you selected to the CF card as one-file.
4. Click OK button to start the downloading the changed Picture data. 5. The Downloader begins to download and displays the progress indicator. The
communication conditions in this instance are the one you set in Options - Communication Settings....
6. When the project data size exceeds the downloadable size while downloading the changed Picture data, error message is displayed.
7. After finishing the download, click Close button.

17
● Change Picture uploaded from HG (The following example is when selecting HG1F/2F/2S/3F/4F for Communication with, and COM Port or USB for Port.)
1. Select Options – Change Picture Data – Picture uploaded from HG from the menu bar.
2. Select the project data file for the Downloader on the Open dialog box and then click Open button.
3. The Downloader begins to upload and displays the progress indicator. 4. After finishing the upload, you can change Picture on the opened Picture Browser. For
Picture Browser, refer to “Change Picture in Project Data for Downloader”. 5. Click OK button to start the downloading the changed Picture data. 6. The Downloader begins to download and displays the progress indicator. The
communication conditions in this instance are the one you set in Options - Communication Settings....
7. When the project data size exceeds the downloadable size while downloading the changed Picture data, error message is displayed.
8. After finishing the download, click Close button. ► When you set the password to the user name to which the Administrator Group is allocated
in the communicating MICRO/I, the Downloader displays the Enter Password dialog box. Enter the password to this user name. Entering the correct password made the Downloader continue to next step.
Procedure differences according to the communication setting Applicable operating procedures at the beginning of the communication depend on the setting. When selecting HG1F/2F/2S/3F/4F for Communicate with, and Ethernet for Port
1. The Downloader opens the Target IP Address dialog box. 2. Click OK button to specify the target IP address. 3. The Downloader begins the communication.
When selecting O/I Link Slaves for Communicate with
4. The Downloader opens the Target Slaves dialog box. 5. Select target slaves and click OK button.
➪ Only when selecting Ethernet for Port, the Downloader displays the Master IP
Address and “...” button on the edit box. Specify the target IP address here. 6. The Downloader begins to download.
6-9 Change Text Data The Downloader can change only Text Data with opening project data for Downloader or uploading the Text Data from MICRO/I. The change of Text Data is done with Text Browser. You can change Text Data with clicking Edit button after changing the text of the already registered Text ID. Use the following operations to change Text Data. ● Change Text in Project Data for Downloader (The following example is when selecting HG1F/2F/2S/3F/4F for Communication with, and COM Port or USB for Port.)

18
1. Select Options – Change Text Data – Text in Project Data for Downloader from the menu bar.
2. Select the project data file for the Downloader on the Open dialog box and then click Open button.
3. Change Text Data on the opened Text Browser.
Text ID: The ID of the selected text in Text Message List is displayed. Text Group: The texts displayed in Text Message List change according to the Text Group
selected by you. Text Attribute: You can change not only Text but also Font or Text Color. Input characters of text up to 3750. To input a special character or symbol, click the
[>>] button to invoke Unicode Input dialog box in Windows NT/2000/XP/Vista. Text Message List: Display the registered Text in Text Browser. In the case of multiple lines of text,
“¥n” represents a carriage return. Edit: Change the text of Text ID selected in Text Message List to Font, Text Color and
Text displayed in Text Attribute. Find: Searches for a specified text string in the Text Message List. Replace: Replaces a specified text string in the Text Message List. Import: You can change current text settings by importing text settings list. When you change Text, recommend to export the text registered in Text Browser
then change the exported text then import the changed text. The file extension for the Text Setting List file is *.txt and *.csv. The Text Setting List file includes the Text ID, font, text but only the font and text are read. While reading, font name should be matched font list name. Using Unicode format, you can handle multiple languages with Unicode applicable applications, like Excel or editors. Unicode format is available on Windows NT/2000/XP/Vista.
Export: You can export the current text settings list to the file. You can write the content set using the Text Browser to a CSV-format file (delimiter

19
is comma or semicolon) or tab delimited Unicode text. The file extension is *.csv or *.txt. Using Unicode format, you can see or edit multiple languages with Unicode applicable applications, like Excel or editors. Unicode format is available on Windows NT/2000/XP/Vista.
4. Click OK button to start the downloading the changed Text data. 5. The Downloader begins to download and displays the progress indicator. The
communication conditions in this instance are the one you set in Options - Communication Settings....
6. When the project data size exceeds the downloadable size while downloading the changed Text data, error message is displayed.
7. After finishing the download, click Close button. ● Change Text uploaded from HG (The following example is when selecting HG1F/2F/2S/3F/4F for Communication with, and COM Port or USB for Port.)
1. Select Options – Change Text Data – Text uploaded from HG from the menu bar. 2. Select the project data file for the Downloader on the Open dialog box and then click
Open button. 3. The Downloader begins to upload and displays the progress indicator. 4. After finishing the upload, you can change Text on the opened Text Browser. For Text
Browser, refer to “Change Text in Project Data for Downloader”. 5. Click OK button to start the downloading the changed Text data. 6. The Downloader begins to download and displays the progress indicator. The
communication conditions in this instance are the one you set in Options - Communication Settings....
7. When the project data size exceeds the downloadable size while downloading the changed Text data, error message is displayed.
8. After finishing the download, click Close button. ► When you set the password to the user name to which the Administrator Group is allocated
in the communicating MICRO/I, the Downloader displays the Enter Password dialog box. Enter the password to this user name. Entering the correct password made the Downloader continue to next step.
Procedure differences according to the communication setting Applicable operating procedures at the beginning of the communication depend on the setting. When selecting HG1F/2F/2S/3F/4F for Communicate with, and Ethernet for Port
1. The Downloader opens the Target IP Address dialog box. 2. Click OK button to specify the target IP address. 3. The Downloader begins the communication.
When selecting O/I Link Slaves for Communicate with
4. The Downloader opens the Target Slaves dialog box. 5. Select target slaves and click OK button.
➪ Only when selecting Ethernet for Port, the Downloader displays the Master IP
Address and “...” button on the edit box. Specify the target IP address here. 6. The Downloader begins to download.

20
6-10 Read Device Data The Downloader can read the data stored in the specified Device Address and can save the data with CSV file format. Use the following operations to read Device Data. (The following example is when selecting HG1F/2F/2S/3F/4F for Communication with, and COM Port or USB for Port)
1. Select Option – Read Device Data… from the menu bar. 2. The Device Data Settings dialog box appears. Specify the header address of Device
Address and the number of data which you want to read. Then click OK button.
3. The Save dialog box appears. Specify the folder in which the read data files are saved. Then click OK button.
4. The Downloader begins to read Device Data and displays the progress indicator. 5. When finishing the reading, click Close button. The read data is saved with CSV file
format. ► When you set the password to the user name to which the Reader Group is allocated in the
communicating MICRO/I, the Downloader displays the Enter Password dialog box. Enter the password to this user name or to the user name to which the Administrator Group or the Operator Group is allocated. Entering the correct password made the Downloader continue to read Device Data.
Procedure differences according to the communication setting Applicable operating procedures at the beginning of the communication depend on the setting. When selecting HG1F/2F/2S/3F/4F for Communicate with, and Ethernet for Port
1. The Downloader opens the Target IP Address dialog box. 2. Specify the target IP address and then click OK button. 3. The Downloader begins to read Device Data. 4. The Downloader saves the read data into the folder after which the IP address
number is named. When selecting O/I Link Slaves for Communicate with Not support

21
6-11 Write Device Data The Downloader can write the data saved in CSV file to the specified Device Address. Use the following operations to write Device Data. (The following example is when selecting HG1F/2F/2S/3F/4F for Communication with, and COM Port or USB for Port)
1. Select Option – Write Device Data… from the menu bar. 2. The Device Data Settings dialog box appears. Specify the header address of Device
Address and the number of data which you want to write. If you want to reset MICRO/I after writing Device Data, check the box of Reset HG after writing the data. Then click OK button.
3. The Open dialog box appears. Specify the file which Device Data is saved. Then click Open button.
4. The Downloader begins to write Device Data and displays the progress indicator. 5. When finishing the writing, click Close button. 6. When Reset HG after writing the data check box is ON, MICRO/I is reset after writing
the data. When the check box is OFF, it isn’t reset. ► When you set the password to the user name to which the Operator Group is allocated in
the communicating MICRO/I, the Downloader displays the Enter Password dialog box. Enter the password to this user name or to the user name to which the Administrator Group is allocated. Entering the correct password made the Downloader continue to write Device Data.
Procedure differences according to the communication setting Applicable operating procedures at the beginning of the communication depend on the setting. When selecting HG1F/2F/2S/3F/4F for Communicate with, and Ethernet for Port
1. The Downloader opens the Target IP Address dialog box. 2. Specify the target IP address and then click OK button. 3. The Downloader begins to write Device Data.
When selecting O/I Link Slaves for Communicate with Not support

22
6-12 System Information The system information enables you to confirm the runtime software information in the MICRO/I and the project information now downloading. Use the following operation to confirm the system information. (The following example is when selecting HG1F/2F/2S/3F/4F for Communication with, and COM Port or USB for Port.)
1. Select Options - Target Information from the menu bar. 2. The Downloader begins to communicate in no time and displays the project information.
► At this time, clicking Target Font Information enable you to confirm the optional font information
now downloaded in the MICRO/I. ► At this time, clicking Target CF Card Information enable you to confirm the status of the CF card
inserted into the MICRO/I. Procedure differences according to the communication setting Applicable operating procedures at the beginning of the communication depend on the setting. When selecting HG1F/2F/2S/3F/4F for Communicate with, and Ethernet for Port.
1. The Downloader opens the Target IP Address dialog box. 2. Specify the target IP address, and then click OK button. 3. The Downloader begins to communicate.
When selecting O/I Link Slaves for Communication with
23
1. The Downloader opens the Target Slaves dialog box. 2. Select target slaves and click OK button.
➪ Only when selecting Ethernet for Port, the Downloader displays Master IP Address and “...” button on the edit box. Specify Target IP Address here. 3. The Downloader begins to communicate.
6-13 Displaying Version Information Use the following procedure to display the version information for the Downloader.
1. Select Help - About from the menu bar. 2. The Downloader displays the About Downloader dialog box.

24
7 Formatting Log Data Uploading log data - alarm log data and logging data - enable you to save the CSV file into the specified folder. The format of each log data file is as follows.
7-1 Alarm Log Data The Downloader creates the file name as “ALMHT.CSV”. The file format is as follows. <When uploading from the runtime version 1.4>
Row 1st column 2nd column 3rd column 4th column 5th column 0 Project Name Project Name1) 1 File Type Alarm Log Data 2 3 Ch.No. Massage Occurrence Time Recovery Time Confirmation
Time 4
or more Ch.No.2) Massage 2) Occurrence
Time2) Recovery Time2)
Confirmation Time2)
1) The project name now downloading into the MICRO/I is written. 2) Alarm log data memorized in the MICRO/I are written.
<Data Example> “ Project Name”, “Sample Project”, “ File Type”,” Alarm Log Data”, “Ch.No.”, “ Massage”, “Occurrence Time”, “Recovery Time”, ” Confirmation Time”, “ 1-0”, ”Message1-0”, ” 03/08/05 17:03”, ” 08/05 17:03”, ”08/05 17:03”, “ 2-7”, ”Message2-7”, ” 03/08/05 17:03”, ” 08/05 17:03”, ”08/05 17:03”,
・ ・ ・

25
<When uploading from the version from 1.5x to 1.6x> Row 1st column 2nd column 3rd column 4th column 5th column 6th column
0 Project Name Project Name1)
Runtime Version
1 File Type Alarm Log data
2 3 Ch.No. Massage Occurrence
Time Recovery Time
Confirmation Time
Font Name
4 or
more
Ch.No.2) Massage2) Occurrence Time2)
Recovery Time2)
Confirmation Time2)
Font Name2)
1) The project name now downloading in the MICRO/I is written. 2) Alarm log data memorized in the MICRO/I are written.
<Data Example> “ Project Name”, “Sample Project”, ”V1.5xxx” “ File Type”, ” Alarm Log Data” “Ch.No.”, “ Massage”, “Occurrence Time”, “Recovery Time”, “Confirmation Time”, “Font Name” “ 1-0”, ”Message1-0”, ” 03/08/05 17:03”, ” 08/05 17:03”, ”08/05 17:03”, ”Japanese” “ 2-7”, ”Message2-7”, ” 03/08/05 17:03”, ” 08/05 17:03”, ”08/05 17:03”, ”Chinese”
・ ・ ・
Caution: The “Font Name” at the sixth column is to display the massage truly in the
corresponding language. Caution: When the numbers of lines are multiple, the Downloader displays only the first line.

26
<When uploading from the runtime software version 1.7x or later>
Row 1st column 2nd column 3rd column 4th column 5th column 6th column 0 Project Name Project
Name1) Runtime Version
Project Language
1 File Type Alarm Log Data
2 3 Ch.No. Massage Occurrence
Time Recovery Time
Confirmation Time
Font Name
4 or more
Ch.No.2) Massage 2) Occurrence Time2)
Recovery Time2)
Confirmation Time2)
Font Name2)
1) The project name now downloading in the MICRO/I is written. 2) Alarm log data memorized in the MICRO/I are written.
<Data Example> “Project Name”, “Sample Project”, ”V1.7xxx”, ”European” “ File Type”, ” Alarm Log Data” “Ch.No.”, “ Massage”, “Occurrence Time”, ” Recovery Time”, ” Confirmation Time”, ” Font Name” “ 1-0”, ”Message1-0”, ” 03/08/05 17:03”, ” 08/05 17:03”, ”08/05 17:03”, ”Japanese” “ 2-7”, ”Message2-7”, ” 03/08/05 17:03”, ” 08/05 17:03”, ”08/05 17:03”, ”Chinese”
・ ・ ・
Caution: The “Font Name” at the sixth column is used to display the massage truly in the
corresponding language.

27
7-2 Logging Data The Downloader creates the file name as “LOG##.CSV”. The symbol of “##” is correspond to the Device Log No. from 01 to 20 set in Logging Settings.... <When uploading from the runtime software version from 1.4x to 1.6x>
Row 1st column 2nd column 0 Project Name Project Name1) 1 File Type Logging Data 2 3 Device Log No. Device Log No.2) 4 Source Source3) 5 Sampling Method Sampling method4)
Device Device5) 6 Time (sec) Time (sec) 6) 7 8 Data Sampling Time 9
or more Data7) Sampling Time7)
1) The project name now downloading in the MICRO/I is written. 2) The Device Log No. set in Logging Settings... is written. 3) The Source set in Logging Settings... is written. 4) The sampling method set in Logging Settings... is written. 5) When selecting “Event Bit” or “Event Word” in the sampling method setting, the device set in
Logging Settings... are written. 6) When setting the sampling method to the fixed period, the period set in Logging Settings... is
written. 7) Logging data memorized in the MICRO/I are written
<Data Example> “Project Name”, ” Sample Project “, “File Type”, “Logging time”, “Device Log No.”, ”1”, “Source”, ”LSD 00000010”, “Sampling method”, “Event Word”, “Device”, ”LSD 00000011”, “Data”, “Sampling Time”, 495, ” 03/08/08 08:37:04”, 1033, ” 03/08/08 08:37:05”,
・ ・ ・
<When uploading from version 1.7x>
Row 1st column 2nd column 3rd column 4th column 0 Project Name Project Name1) Runtime version Project Language 1 File Type Logging Data 2 3 Device Log No. Device Log No.2) 4 Source Source3) 5 Sampling method Sampling method4)

28
Device Device5) 6 Time (sec) Time (sec) 6) 7 8 Data Time (sec) 9
or more Data7) Time (sec) 7)
1) The project name downloaded in the MICRO/I is written. 2) The Device Log No. set in Logging Settings... is written. 3) The source set in Logging Settings... is written. 4) The sampling method set in Logging Settings... is written. 5) When the sampling method is “Event Bit” or “Event Word,” the device set in Logging Settings...
is written. 6) When setting the sampling method to the fixed period, the period set in Logging Settings... is
written. 7) Logging data memorized in the MICRO/I are written.
<Data Example> “ Project Name “, ” Sample Project “, ”V1.7xxx”, ”European” “ File Type “, ” Logging Data “, “ Device Log No. “, ”1”, “Source”, ”LSD 00000010”, “ Sampling method “, ”Event Word”, “ Device “, “LSD 00000011”, “Data”, ” Sampling Time”, 495, ” 03/08/08 08:37:04”, 1033, ” 03/08/08 08:37:05”,
・ ・ ・

29
<When uploading from the version 1.8 or later> Row 1st column 2nd column 3rd column 4th column
0 Project Name Project Name 1) Runtime Version Project Language
1 File Type Logging Data 2
3 Logging No. Logging No. 2) 4 Source Source3) 5 Sampling method Sampling
method 4)
Device Device 5) 6 Time (sec) Time (sec) 6) 7 Title Font Title Font 7) 8 9 Sampling Time Data Title ・・・ ・・・
10 or
more
Sampling Time 8) Data 8) ・・・ ・・・
1) The project name downloaded in the MICRO/I is written. 2) The Device Log No. set in Logging Settings... is written. 3) The source set in Logging Settings... is written. 4) The sampling method set in Logging Settings... is written. 5) When Sampling method is “Event Bit” or “Event Word”, the device set in Logging Settings... is
written. 6) When setting the sampling method to the fixed period, the period set in Logging Settings... is
written. 7) The font name of the data title specified in the project is written. The Downloader displays the
data title at the ninth column in this language. 8) The device value of each channel specified in the project is written.
<Data Example> “Project Name”,” Sample Project “,”V1.8xxx”,”European” “File Type”, ”Logging Data”, “Logging No.”, ”1”, “Source”, ”LSD 00000010”, “Sampling method”, “Event Word”, “Device”, ”LSD 00000011”, “Title Font”, “Japanese”, “Sampling Time”, ”Data1”, ”Data2”, ・・・ ,” Data128” , “ 03/08/08 08:37:04”,495 , 505 , ・・・ , 1045 , “ 03/08/08 08:37:05”,1033 , 1068 , ・・・ , 5043 ,
・ ・ ・

30
8 Download Options It is explained here how to download the runtime software and the optional font at the same time in downloading the project. These settings are done when making project data for the Downloader not in the Downloader but in the WindO/I-NV2. Use the following operations to set download options. (The following example is when selecting HG1F/2F/2S/3F/4F for Communication with, and COM Port or USB for Port.)
1. Select Online - Save AS Project Data for Downloader… from the menu of the WindO/I-NV2.
2. Click Options... on the Download dialog box. 3. After displaying the Download Option dialog box, select the information you want to
add. 4. When downloading the runtime software, check the box of Download Runtime system. 5. When downloading the optional font, check the box of Download optional fonts. Then
check the box of font you want to download. ➪ At this time, if the Downloader can communicate with the MICRO/I, clicking Target Font
Information enables you to confirm the font information in the MICRO/I. 6. Clicking OK button will terminate the setting. However, if you check the box in the step
4., the Downloader displays the confirmation message whether you want to download the runtime software compulsorily or not. At this time, select Yes button.
7. Clicking Download button enables you to open the Save As Project Data for Downloader dialog box. Then specify the place or the folder to save the data and click Save button.
8. Click Yes button to authorize the confirmation message for formatting. 9. The Downloader begins to format and displays the progress indicator. 10. After finishing the format, click Close button.
Procedure differences according to the communication setting Applicable operating procedures at the beginning of the communication depend on the setting. When selecting the HG1F/2F/2S/3F/4F for the Communication with, and Ethernet for Port.
1. The Downloader opens the Target IP Address dialog box. 2. Specify the target IP address and then click OK button. 3. The Downloader begins to download.
When selecting O/I Link Slaves for Communication with
1. The Downloader opens the Target Slaves dialog box. 2. Select the target slaves and then click OK button.
➪ Only when selecting Ethernet for Port, the Downloader displays the Master IP Address and “…” button on the edit box. Specify the target IP address here. 3. The Downloader begins to download.
Caution: When turning the box of Download Runtime system off, the Downloader does not
download the runtime software. On this account, if the version of following two software is not equal, you cannot download the project. 1. The runtime software loaded in the WindO/I-NV2 on which the project is
made 2. The runtime software downloaded to the MICRO/I for which the download is
targeted. Caution: When turning the check box of Download optional fonts on, and the check box of
each font options off, the Downloader deletes the turn-off fonts after downloading the project.

31
Caution: When you download the Project Data to CF Card,the Project data must contain runtime software and oiptional font. When you make a Project Data to download,check the box of Download Runtime system and Download optional fonts.

32
9 Utilizing from Another Software The Downloader enables you to utilize the function of the Downloader from another software. Executing the executable file for the Downloader through command line, attaching the parameter corresponding to each Downloader’s function, enables you to perform various types of Downloader’s functions. Command line combines two or more command and makes Downloader function. The format of the command line is as follows.
"Downloader.exe" ¥### ¥$$$ “%%%” &&& @@@ It explains each function here. Operation mode
“Downloader.exe” ¥### ¥$$$ “%%%” &&& @@@ It is an Operation type when the Downloader executes commands . The command line has two types of modes Types Parameter Normal mode ¥normal The Downloader executes commands showing only the dialog boxes
of each functions or massages instead of the main window. Silent mode ¥silent The Downloader executes only commands without any showing of
dialog boxes and messages. At this time, the Downloader records massages or statuses shown through the normal commanding procedure to the log file, and creates as a file in the folder in which the Downloader is installed. The Downloader overwrites this log file whenever communicating. After completing the communication, complete.flg file is yielded. You can identify the completion of the communication with the file. But this file is deleted automatically.
This parameter setting is indispensable ¥ must be put in front of [normal] or [silent]. Function
“Downloader.exe” ¥### ¥$$$ “%%%” &&& @@@ Executes Downloader’s menu functions For more information on each parameter , see the 9-1 functions. File name
“Downloader.exe” ¥### ¥$$$ “%%%” &&& @@@ Specifies the data file name or the folder for the download or the upload. Specify the file name or the destination folder position by the absolute path. Encloses the absolute path in double quotation(" ") of normal-width. Function Parameter When download “C:¥USERDATA¥SamplePloject.z3f” Specify the file name When upload “C:¥USERDATA¥uploaddata” Specify the destination folder
Operation mode
Function
File name
Communication target
Password

33
for upload The folder name or folder path inside “” is one example.
The parameter is unnecessary to specify the download file name or upload destination folder. In this case, before communicating ,a dialog box that specifies a file name or specifies upload destination folder is opened. It is indispensable the parameter in the silent mode. When you download the Recipe data, this parameter enables you to specify multiple files. Separates each file with space. Each file must be separated by a space of normal-width. Also you can specify files using the wild card - *.CSV , this enables you to download all file that exists in specified folder at a time . Communication target
“Downloader.exe” ¥### ¥$$$ “%%%” &&& @@@ Specifies the target IP addresses and slave numbers. The parameter depends on Communication port as follows. Communication target
Communication port
Parameter
COM USB
Unnecessary The parameter is unnecessary. MICRO/I
Ethernet 192.168.1.15 Specify the target IP address Multiple targets are available.
Ethernet (via Web Server Unit)
192.168.1.1. 2101 Specify the target IP address and Port No. Multiple targets are available.
COM USB
Slave1 Slave14 Slave15 Specify the target Slave No. Multiple targets are available.
O/I Link
Ethernet Slave5 192.22.3.3 Slave10 22.125.1.1
Specify the target Slave No. and IP address. Multiple targets are available.
Ethernet (via Web Server Unit)
Slave2 192.168.1.1.2101 Specify the target Slave No., IP address and Port No. (Space is unnecessary between IP address and Port No.) Multiple targets are available.
CF Card CF The parameter is one example. When Communication target is multiple, separate the parameter by a space of normal-width. The parameter is unnecessary to specify the IP address and the slaves of target communication at any time in the dialog box it is indispensable the parameter in the silent mode. Password
“Downloader.exe” ¥### ¥$$$ “%%%” &&& @@@ When the connecting MICRO/I has a password setting, the Downloader checks the input password for the parameter automatically. Parameter Password pass-@@@
(@@@: password) Multiple passwords can be input. When multiple passwords are specified, separates the parameter by a space of normal-width.
When password is set to MICRO/I and the parameter is not set ,the Enter Password dialog box is opened. When the parameter is not correct, the Enter Password dialog box is opened. This is operation at a normal mode. The log of the error remains in the log file at the silent mode. It is indispensable the parameter in the silent mode.

34
9-1 Function It explains the parameter of the Function in detail. “Downloader.exe” ¥### ¥$$$ “%%%” &&& @@@ Download Function Parameter Project Data for Downloader ¥download -P Project Data for CF Card ¥download -C Upload Function Parameter Project Data ¥upload -P Project Data and Font Data ¥upload -PF Project Data and Runtime ¥upload -PR Project Data and Recipe Data in CF Card ¥upload -P -R Project Data and Picture Data in CF Card ¥upload -P -C Multiple Data Project Data, Font Data and Runtime ¥upload -PRF
Project Data, Runtime and Recipe Data ¥upload -PR -R Project Data, Runtime, Recipe Data and Picture Data
¥upload -PR -R -C
All Log Data ¥upload -ALL Alarm Log Data ¥upload -A Logging Data ¥upload -L Example: “Downloader.exe” ¥normal ¥upload -PF “C¥Administrator¥Downloader¥SampleProgram” “Downloader.exe” ¥silent ¥upload -A “C¥Administrator¥Uploaddata” 192.233.5.15 “Downloader.exe” ¥silent ¥upload -A “C¥Administrator¥Uploaddata” Slave2 pass-1234 Initialization Function Parameter All Log Data ¥initialize -ALL Alarm Log Data ¥initialize -A Logging Data ¥initialize -L In this Function, there is no parameter to specify File Name. CF Card Maintenance Function Parameter Download Download Project Data ¥cf_download -P Download Recipe Data ¥cf_download -R Download Recipe Data while running ¥cf_download -U When “Communication with” is O/I Link Slaves in Communication Settings, you can not download recipe data while running. If you execute this command, it will be failed while communicating. Upload Alarm Log Data ¥cf_upload -A Logging Data ¥cf_upload -L Recipe Data ¥cf_upload -R Screen Hardcopy Data ¥cf_upload -S All Data ¥cf_upload -ALL

35
Multiple Data Alarm Log Data and Recipe Data ¥cf_upload -A-R Initialize Alarm Log Data ¥cf_initialize -A Logging Data ¥cf_initialize -L Recipe Data ¥cf_initialize -R Screen Hardcopy Data ¥cf_initialize -S Project Data ¥cf_initialize -P All Data ¥cf_initialize -ALL Multiple Data Logging Data and Recipe Data ¥cf_initialize -L-R Format ¥cf_format In Initialize function, there is no parameter to specify File name. Example: “Downloader.exe” ¥normal ¥cf_download -R “C:¥HGDATA01¥RECIPE¥RCP001.CSV RCP0012.CSV RCP0017.CSV” “Downloader.exe” ¥normal ¥cf_download -R “C:¥HGDATA01¥RECIPE¥*.CSV” 192.168.22.3 “Downloader.exe” ¥normal ¥cf_initialize -L-R Slave1 192.168.22.3 pass-ab12 Option Function Parameter Change Picture Data
Picture in Project Data for Downloader ¥change_picture –P Picture uploaded from HG ¥change_picture - U
Change Text Data Text in Project Data for Downloader ¥change_text –P Text uploaded from HG ¥change_text - U
Read Device Data ¥read_[DDD]_NNN DDD: Device Address NNN: Number of Data
Write Device data ¥write_[DDD]_NNN –R DDD: Device Address NNN: Number of Data -R: When don’t reset MICRO/I, this parameter isn’t required.
System Settings “Downloader.exe” ¥target &&& Communication Settings “Downloader.exe” ¥settings Example: “Downloader.exe” ¥normal ¥change_picture –U “Downloader.exe” ¥normal ¥change_text -P “C:¥WINDOINV2¥Project1.z2f” 192.168.22.3 “Downloader.exe” ¥normal ¥read_[LDR 20]_30 “C:¥WINDOINV2¥ReadData.csv” Slave1 192.168.22.3 pass-ab12
36
9-2 Use in Another Software It explains concrete use in another software. Software often used
Run… Power Point Excel
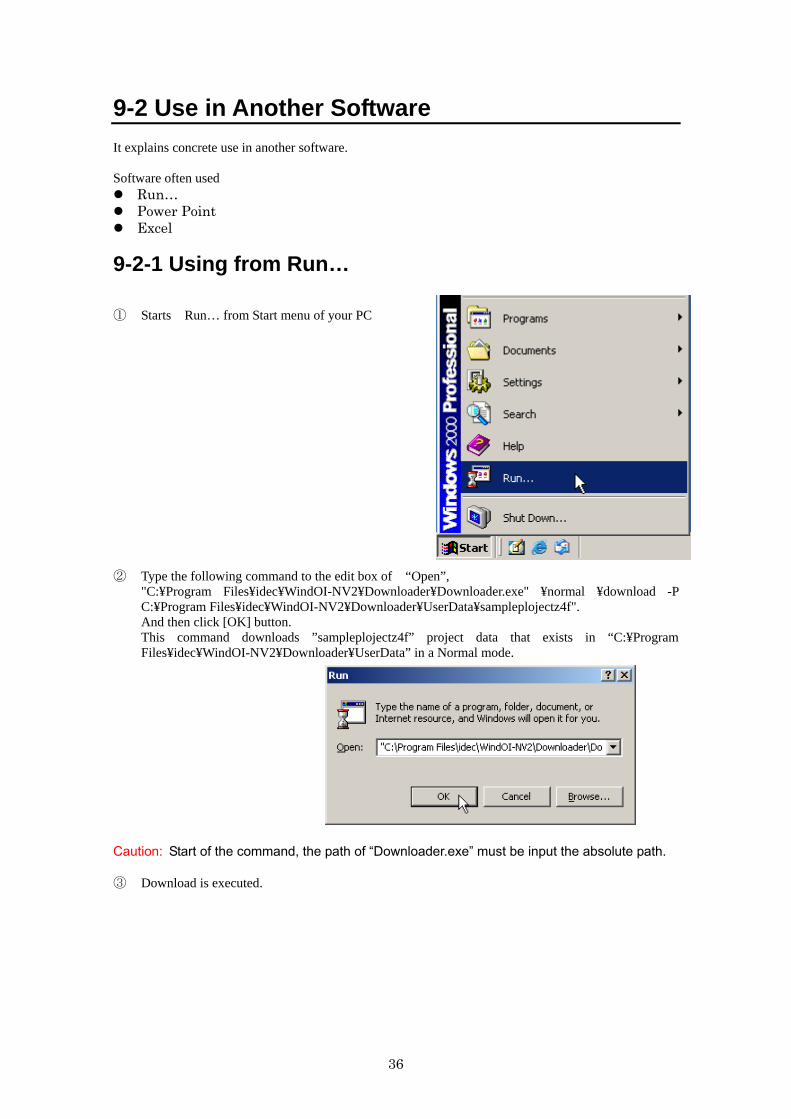
9-2-1 Using from Run… ① Starts Run… from Start menu of your PC ② Type the following command to the edit box of “Open”,
"C:¥Program Files¥idec¥WindOI-NV2¥Downloader¥Downloader.exe" ¥normal ¥download -P C:¥Program Files¥idec¥WindOI-NV2¥Downloader¥UserData¥sampleplojectz4f". And then click [OK] button. This command downloads ”sampleplojectz4f” project data that exists in “C:¥Program Files¥idec¥WindOI-NV2¥Downloader¥UserData” in a Normal mode.
Caution: Start of the command, the path of “Downloader.exe” must be input the absolute path. ③ Download is executed.

37
9-2-2 Using from Power Point In Power Point, the command is executed by mouse clicking or passing over the character with mouse. ① Start Power Point ② Create new slide. ③ Select [Insert]-[Text Box] from the menu bar,
and put a text box on the slide.
④ Type “Download” to the text box. ⑤ Select [Action Settings…] of Context menu.
Then [Action Settings] dialog box opens.

38
⑥ Check [Run Program…] radio button and input the command to its edit box. (In this example, Mouse Click is trigger condition.)
⑦ Select [Slide Show]-[View Show] from the menu bar. ⑧ Click the character in slide show screen, and then command is executed.

39
9-2-3 Using from Excel In Excel, the command is executed with Macro for Visual Basic. ① Starting Excel. ② Select [View]-[Toolbars]-[Control Toolbox]
from the menu bar. →[Control Toolbox] toolbar is displayed.
③ Select [Command Button], and then put a button on the screen.
④ Double clicking the[Command Button1]
→Then Code window of Visual Basic opens. ► [Shell] function is used to starting another software( in here, it is Downloader) from Visual
Basic.
(In here,vbNormalForcus is used for windowstyle.)
Shell (pathname [, windwstyle] )

40
⑤ Type the following code in procedure of [Private Sub CommandButton1_Click()]
⑥ Click upper right [×]button of Code window or select [File]-[Close and Return to Microsoft
Excel]from the menu bar. ⑦ When [CommandButton1] is selected, click [Properties] button in the tool bar.
→then Properties window opens.
Private Sub CommandButton1_Click() ' Open Communication Settings dialog box. Shell "C:¥Program Files¥idec¥WindOI-NV2¥Downloader¥Downloader.exe ¥settings", vbNormalFocus End Sub

41
⑧ Close the window after changing [Command Button1] of [Caption] to [Communication Settings]
⑨ Click [Exit Design Mode] button. ⑩ Click [Communication Settings] button, then the command is executed and Communication Settings
dialog opens.


