Windows 10 Networking Lab Dr. Tom Hicks 1 | P a g e If this lab is an Individual assignment, you must do all coded programs on your own. You may ask others for help on the language syntax, but you must organize and present your own logical solution to the problem. No lab is complete until the student submits the signed pledge form associated with that lab. I realize that no coded programs will be graded until I turn in the sign & pledge form associated with that program; any late penalties will continue to compound until the pledge form is submitted. If this lab is a team assignment, both team members may share logic as they program side by side on their own computers. Each person must type all of his/her own code as part of the learning process. Team assignments are never to be “You do this portion and I’ll do that portion” or “You do this lab and I’ll do the next lab”. Some of the lab assignments will have short answer questions. These short answer questions will be spot checked and graded for completion, but not checked for accuracy. Once these labs are graded and returned, I encourage you to form a study team comprised of members of this class who have also successfully completed this lab for credit; once the labs have been graded and returned, you may compare your answers with this team if and only if they have successfully completed the lab. I/We realize that the penalty for turning in work that is not my own, or assisting others in doing so, can range from an "F" in the class to dismissal from Trinity University. I realize that it is a violation of academic integrity to share any portion of this lab with any students (outside my prof & my 3342 study team)! Print Name _________________________________________ Time Required = ______.____ Hrs. Signature _______________________________________________________________ (pledged) Windows 10 Networking Lab Install & Configure Windows 10 Individual Lab 30 Points Print Only First 4 Pages Answer The Following Questions As You Work Through This Lab You are to install Windows 10 on your Networking Workstation. Do not print the entire lab. Keep a sheet of scrap paper near by you are to do everything demonstrated (or asked) as you work through this lab keep track on the scrap paper so that you do not skip any of the steps. YOU WILL BE ASKED ORAL QUESTIONS ABOUT THIS LAB THE DAY DUE. 1] __________ [initial/Pledge] I have configured my system CMOS virtualization. 2] __________ [initial/Pledge] I have installed Windows 10 on my networking computer. 3] __________ [initial/Pledge] I have created folder C:\Software. 4] __________ [initial/Pledge] I have installed Firefox on my windows 10 system. It works. 5] __________ [initial/Pledge] I have installed Google Chrome on my windows 10 system. It works. 6] __________ [initial/Pledge] I my windows 10 activated. 7] __________ [initial/Pledge] I have placed icons Computer, User’s Files, Network, Control Panel, 7 Recycle Bin on my desktop. 8] __________ [initial/Pledge] I have signed in and out at least once.
Transcript
Windows 10 Networking Lab Dr. Tom Hicks 1 | P a g e
If this lab is an Individual assignment, you must do all coded programs on your own. You may ask others for help on the language syntax, but you must
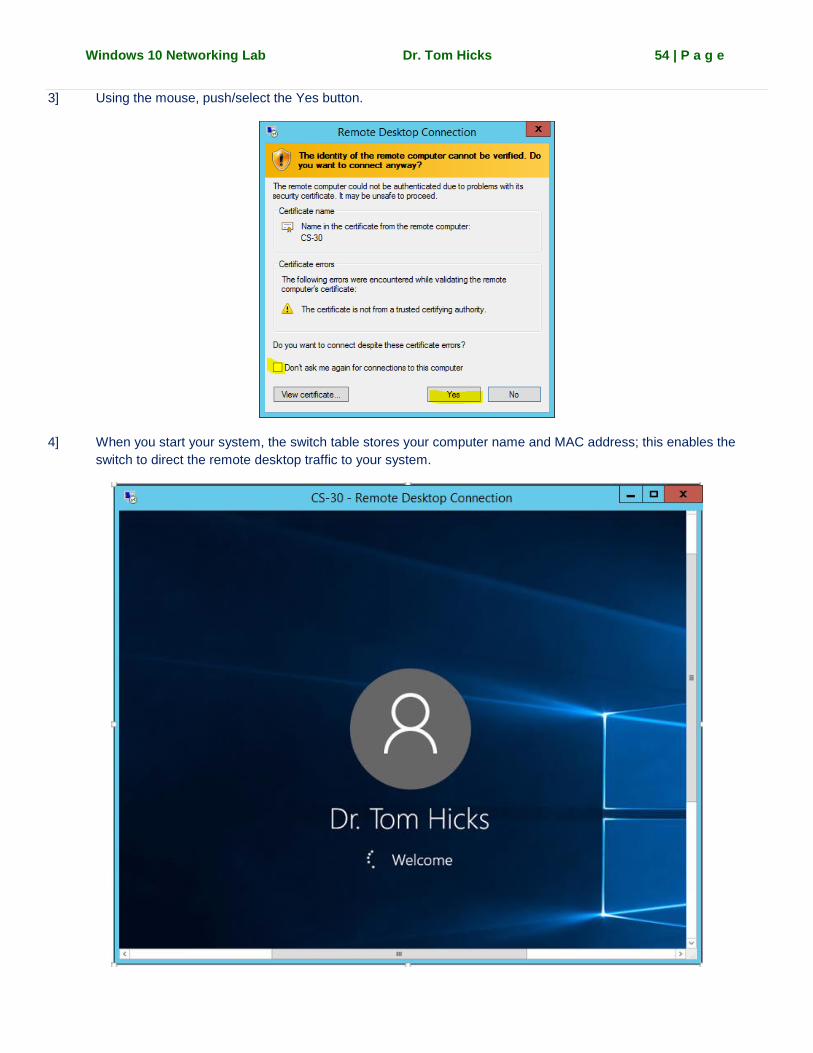
organize and present your own logical solution to the problem. No lab is complete until the student submits the signed pledge form associated with that
lab. I realize that no coded programs will be graded until I turn in the sign & pledge form associated with that program; any late penalties will continue to
compound until the pledge form is submitted.
If this lab is a team assignment, both team members may share logic as they program side by side on their own computers. Each person must type all of
his/her own code as part of the learning process. Team assignments are never to be “You do this portion and I’ll do that portion” or “You do this lab and
I’ll do the next lab”.
Some of the lab assignments will have short answer questions. These short answer questions will be spot checked and graded for completion, but not
checked for accuracy. Once these labs are graded and returned, I encourage you to form a study team comprised of members of this class who have
also successfully completed this lab for credit; once the labs have been graded and returned, you may compare your answers with this team if and only
if they have successfully completed the lab.
I/We realize that the penalty for turning in work that is not my own, or assisting others in doing so, can range from an "F" in the class to dismissal from
Trinity University. I realize that it is a violation of academic integrity to share any portion of this lab with any students (outside my prof & my 3342 study
team)!
Print Name _________________________________________ Time Required = ______.____ Hrs.
Windows 10 Networking Lab Dr. Tom Hicks 5 | P a g e
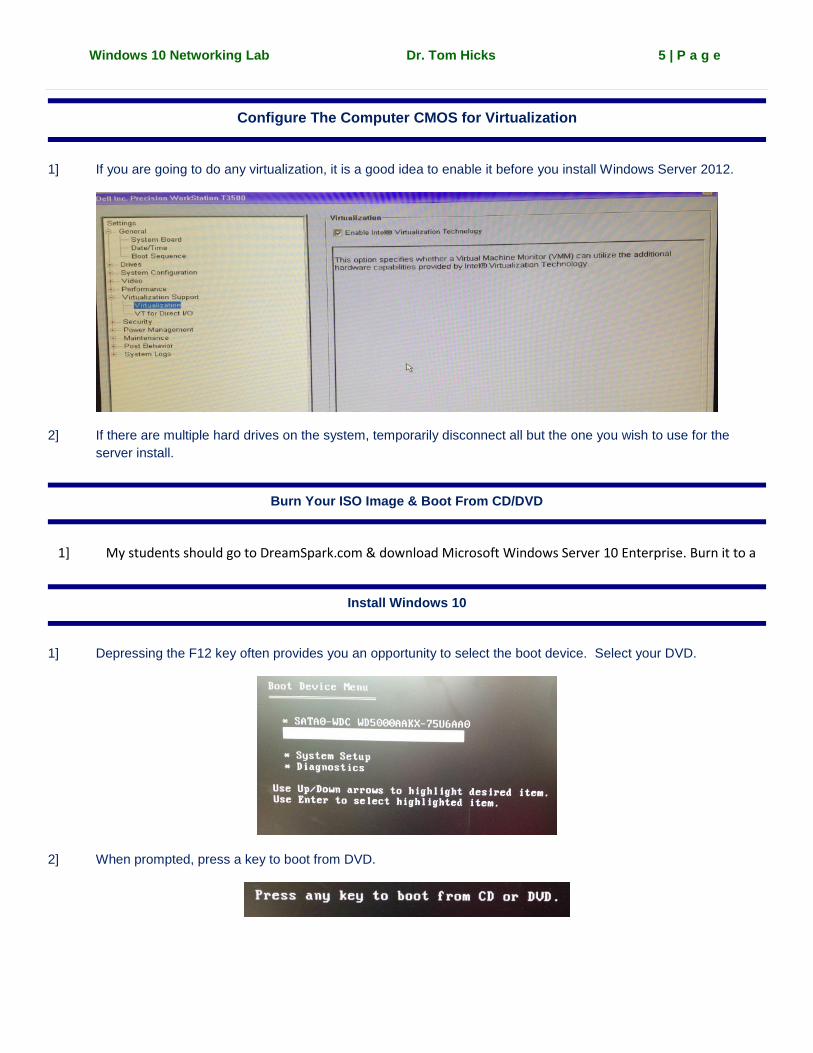
Configure The Computer CMOS for Virtualization
1] If you are going to do any virtualization, it is a good idea to enable it before you install Windows Server 2012.
2] If there are multiple hard drives on the system, temporarily disconnect all but the one you wish to use for the
server install.
Burn Your ISO Image & Boot From CD/DVD
1] My students should go to DreamSpark.com & download Microsoft Windows Server 10 Enterprise. Burn it to a
Install Windows 10
1] Depressing the F12 key often provides you an opportunity to select the boot device. Select your DVD.
2] When prompted, press a key to boot from DVD.
Windows 10 Networking Lab Dr. Tom Hicks 6 | P a g e
3] Using the mouse, push/select the Next button.
4] Using the mouse, push/select the Install Now button.
Windows 10 Networking Lab Dr. Tom Hicks 7 | P a g e
5] Accept the terms. Using the mouse, push/select the Next button.
6] Select the Custom Install button..
Windows 10 Networking Lab Dr. Tom Hicks 8 | P a g e
7] Delete all existing partitions. Using the mouse, push/select the New button.
8] Use the entire drive. Using the mouse, push/select the Apply button.
Windows 10 Networking Lab Dr. Tom Hicks 9 | P a g e
9] Using the mouse, push/select the Ok button.
10] Using the mouse, push/select the Format button.
Windows 10 Networking Lab Dr. Tom Hicks 10 | P a g e
11] Using the mouse, push/select the Ok button.
12] Using the mouse, push/select the Next button.
Windows 10 Networking Lab Dr. Tom Hicks 11 | P a g e
13] The install will take a few minutes here.
14] A reboot will occur.
Windows 10 Networking Lab Dr. Tom Hicks 12 | P a g e
15] Using the mouse, push the Use Express Settings button.
16] Select Join a Domain. Using the mouse, push the Continue button.
Windows 10 Networking Lab Dr. Tom Hicks 13 | P a g e
Set The Password
1] Select & enter the administrative password; keep good secure records. Using the mouse, push/select the Next
button.
2] It will take a couple minutes to create your profile.
Windows 10 Networking Lab Dr. Tom Hicks 14 | P a g e
Create Folder/Directory Software
1] Create folder Software at the root of drive C. Use this Folder to store software you install on your system.
Install Firefox
1] Install Firefox on your windows 10 system. I have placed the source code in folder C:\Software\Firefox.
Windows 10 Networking Lab Dr. Tom Hicks 15 | P a g e
Install Google Chrome
1] Install Chrome on your windows 10 system. I have placed the source code in folder C:\Software\Chrome
Windows 10 Networking Lab Dr. Tom Hicks 16 | P a g e
See Me To Activate Windows
1] If Windows 10 is not on your Dream Spark Account, you will have to see me to enter the Activation code.
Windows 10 Networking Lab Dr. Tom Hicks 17 | P a g e
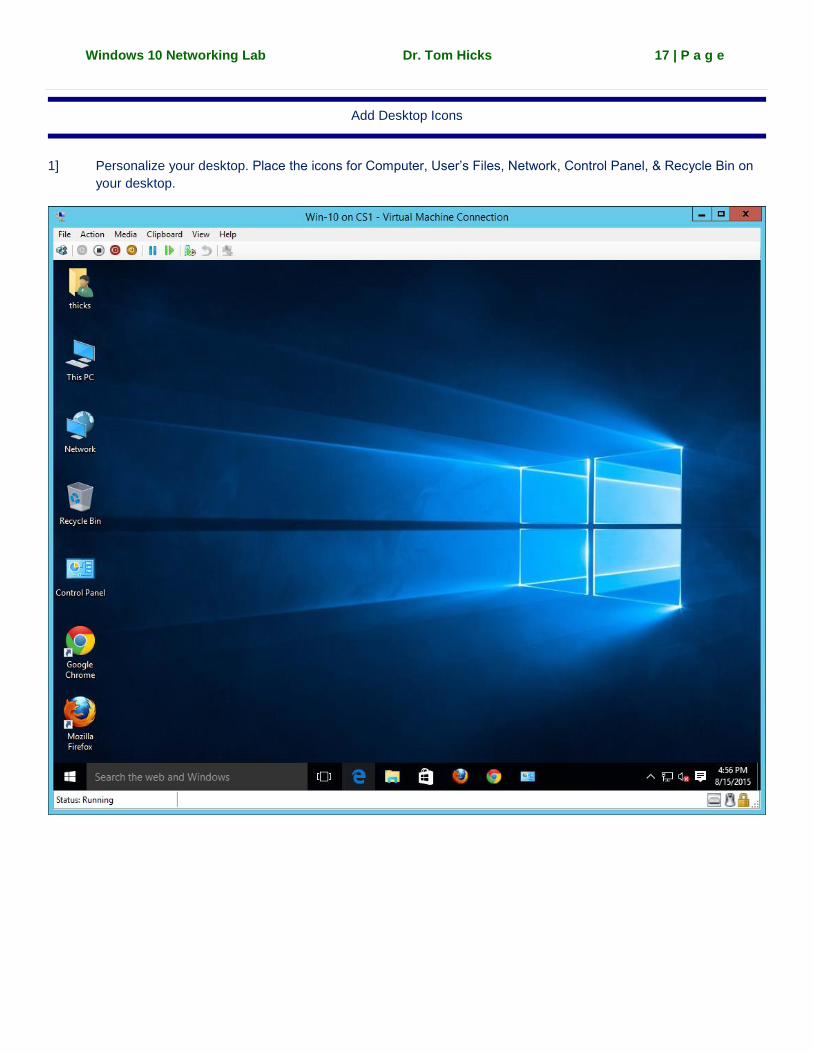
Add Desktop Icons
1] Personalize your desktop. Place the icons for Computer, User’s Files, Network, Control Panel, & Recycle Bin on
your desktop.
Windows 10 Networking Lab Dr. Tom Hicks 18 | P a g e
How To Log Out – Shutdown - Restart
1] Right-mouse click on the windows button at the bottom left of the desktop Select Shut down or sign
out Select Sign out, Shut down, or Restart (as is appropriate).
2] Practice Signing In & Out at least once.
Windows Shortcut Key
1] The windows key is located at the bottom left of many keyboards..
Windows 10 Networking Lab Dr. Tom Hicks 19 | P a g e
Windows Shortcut For Run
1] Hold down the Window Key & Push the R TRY IT! My students in the networking
course should try the following:
2] They will have to enter their credentials.
Windows 10 Networking Lab Dr. Tom Hicks 20 | P a g e
3] My students should get together with me if they are unable to get to their class drop box. Your drop box will
contain a “To Be Graded Folder’ put your assignments in this folder when they are ready for grading. Always
have a backup. Your drop box will also contain a “Work In Progress” folder put incomplete assignments in this
folder.
Search The Web & Windows Feature I
1] You should be able to use this window to launch hundreds of windows tools by typing in part, or all, or a
command. For example, enter Run.
Windows 10 Networking Lab Dr. Tom Hicks 21 | P a g e
2] One, or many possible commands may be seen above the window. Once you identify the command – from the list
– you may
A] Touch the command to run it
B] Right mouse click on the command and select the option to Pin it to your start menu
C] Right mouse click on the command to Pin it to your taskbar
6] Pin the Run command to your taskbar.
Search The Web & Windows Feature
1] There is a quick search box in the left side of the task bar at the bottom.
Windows 10 Networking Lab Dr. Tom Hicks 22 | P a g e
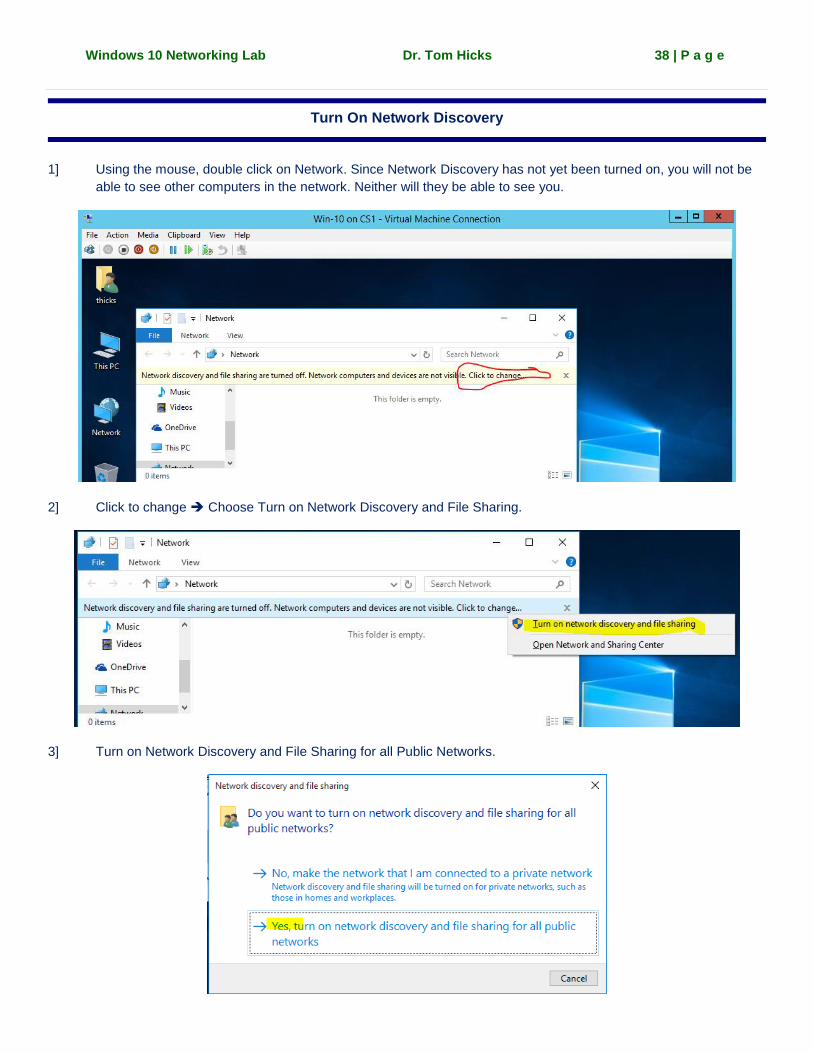
2] Enter your class folder in the window; \\mars.cs.trinity.edu\3342
3] If the networking is correct, you should be able to log in and navigate to this window.
Windows 10 Networking Lab Dr. Tom Hicks 23 | P a g e
Windows Shortcut For Settings
1] Hold down Windows Key & Push the I TRY IT!
Listing of Windows Shortcut Keys
Windows Key + C - Opens Charms bar Windows Key + Ctrl + Tab - Cycles through apps Windows Key + Shift + Tab - Cycles through apps in reverse order Windows Key + D - Switch to desktop (from start screen) Windows Key + E - Opens file explorer Windows Key + F - Search (files and folders) Windows Key + H - Share Windows Key + I - Settings Windows Key + K - Devices Windows Key + M - Minimizes current windows on desktop Windows Key + O - Sets device orientation Windows Key + Pause - System properties Windows Key + PgDown- Moves current app to right monitor Windows Key + PgUp- Moves current app to left monitor Windows Key + PrtScr - Save screenshot Windows Key + Q - Global search Windows Key + R - Run command Windows Key + spacebar - Switch keyboard/input language Windows Key + TAB - Provides list of running programs Windows Key + U - Ease of access center Windows Key + V - Cycles notifications Windows Key + Shift + V - Cycles notifications in reverse order Windows Key + Y - Shows desktop screen Windows Key + W - System settings search
Windows 10 Networking Lab Dr. Tom Hicks 24 | P a g e
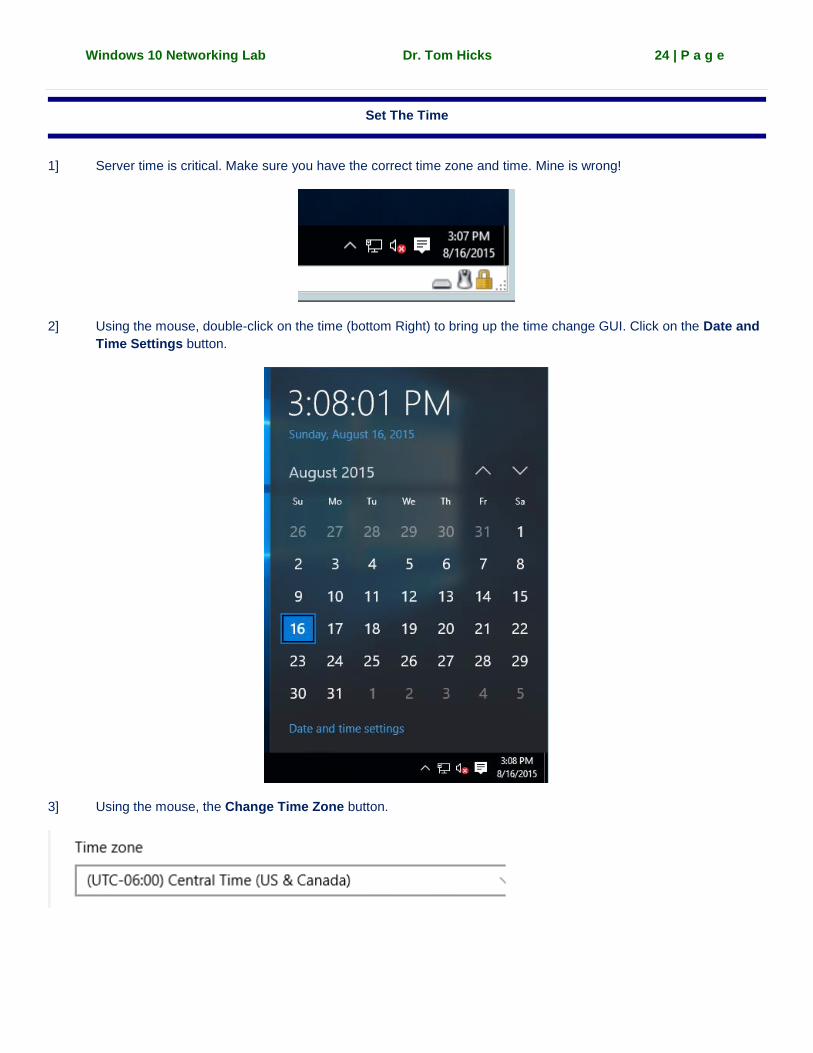
Set The Time
1] Server time is critical. Make sure you have the correct time zone and time. Mine is wrong!
2] Using the mouse, double-click on the time (bottom Right) to bring up the time change GUI. Click on the Date and
Time Settings button.
3] Using the mouse, the Change Time Zone button.
Windows 10 Networking Lab Dr. Tom Hicks 25 | P a g e
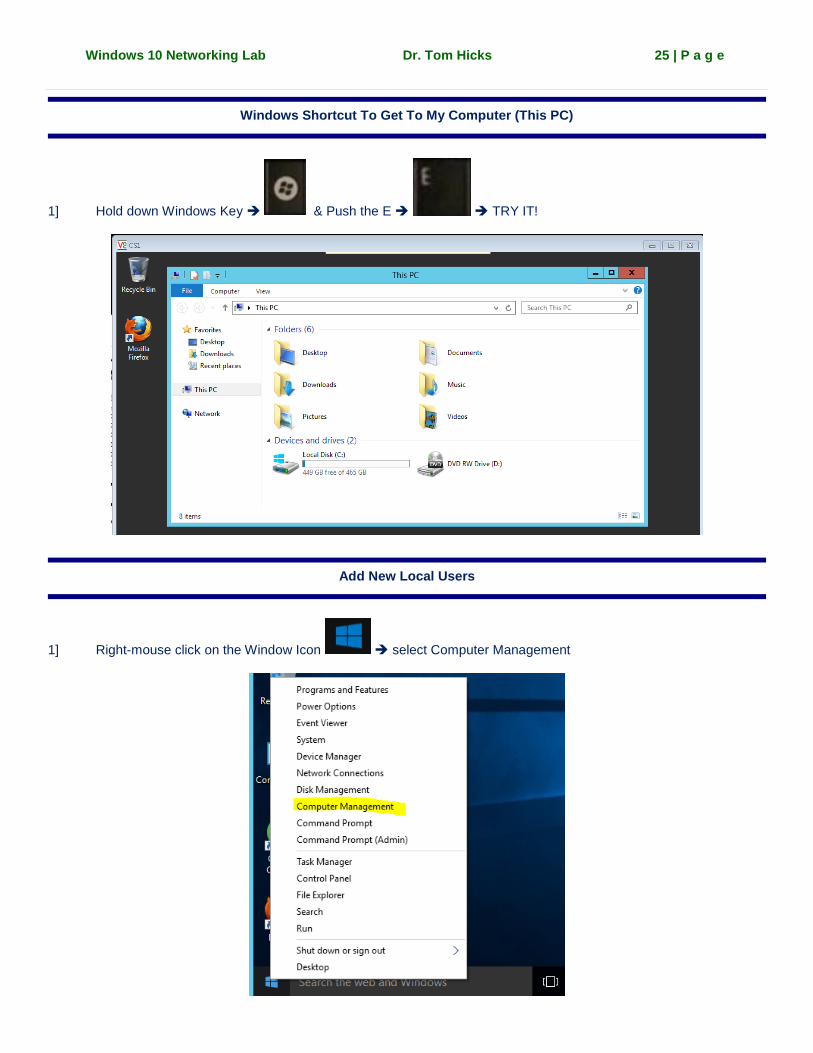
Windows Shortcut To Get To My Computer (This PC)
1] Hold down Windows Key & Push the E TRY IT!
Add New Local Users
1] Right-mouse click on the Window Icon select Computer Management
Windows 10 Networking Lab Dr. Tom Hicks 26 | P a g e
or click on the Computer Management App.
3] Expand the Local Users &Groups (left panel). Right mouse click on Users Select New User.
4] Add thicks as one of your users; make the password trinity. Add accounts for each of your team members;
let them enter their passwords. Be sure that you have a FullName and Description for each account.
Windows 10 Networking Lab Dr. Tom Hicks 27 | P a g e
5] You can see my users below. You should have included the FullName and Description for all of your users.
Give Administrative Privileges To thicks and Each Of Your Team Members
1] Expand the Groups tab (left). Double-Click Administrators. Give administrative privileges as directed.
Windows 10 Networking Lab Dr. Tom Hicks 28 | P a g e
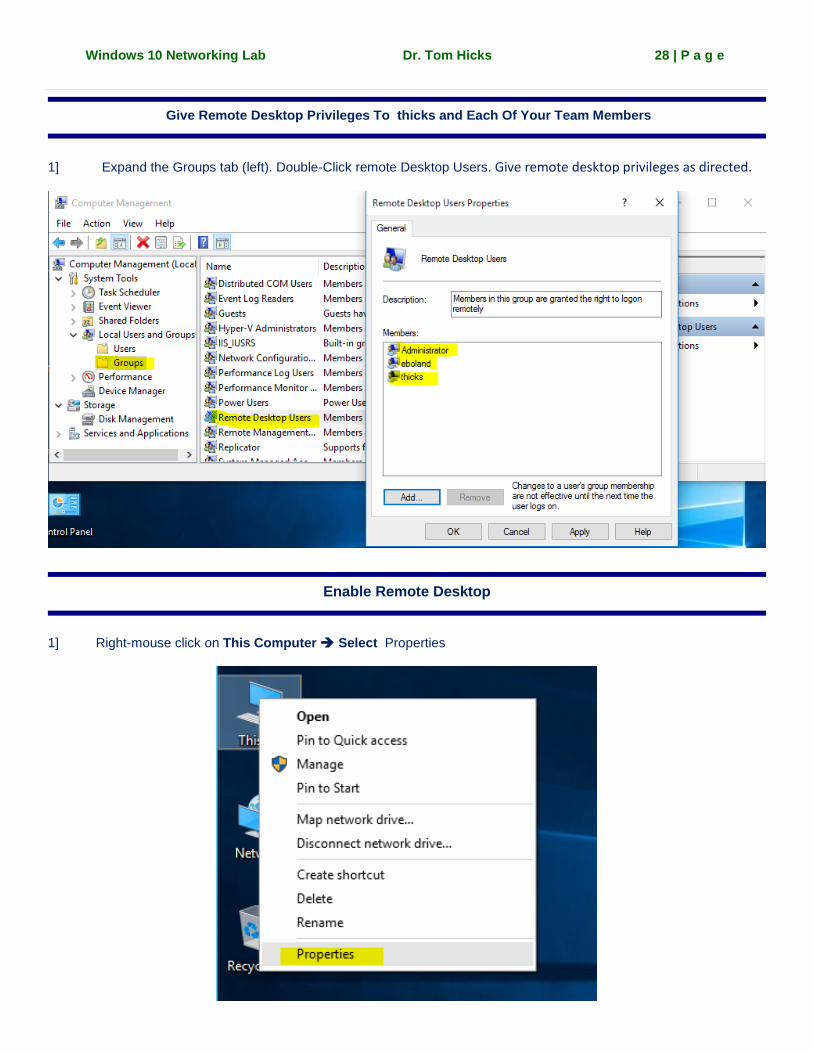
Give Remote Desktop Privileges To thicks and Each Of Your Team Members
1] Expand the Groups tab (left). Double-Click remote Desktop Users. Give remote desktop privileges as directed.
Enable Remote Desktop
1] Right-mouse click on This Computer Select Properties
Windows 10 Networking Lab Dr. Tom Hicks 29 | P a g e
2] Using the mouse, click on the Remote Settings button.
3] Allow Remote Users to connect. Push the Select Users button.
Windows 10 Networking Lab Dr. Tom Hicks 30 | P a g e
4] Add all of your administrative users. Push the OK button.
Identify Your Current Network Configuration
1] Bring up a command window. Enter ipconfig /all
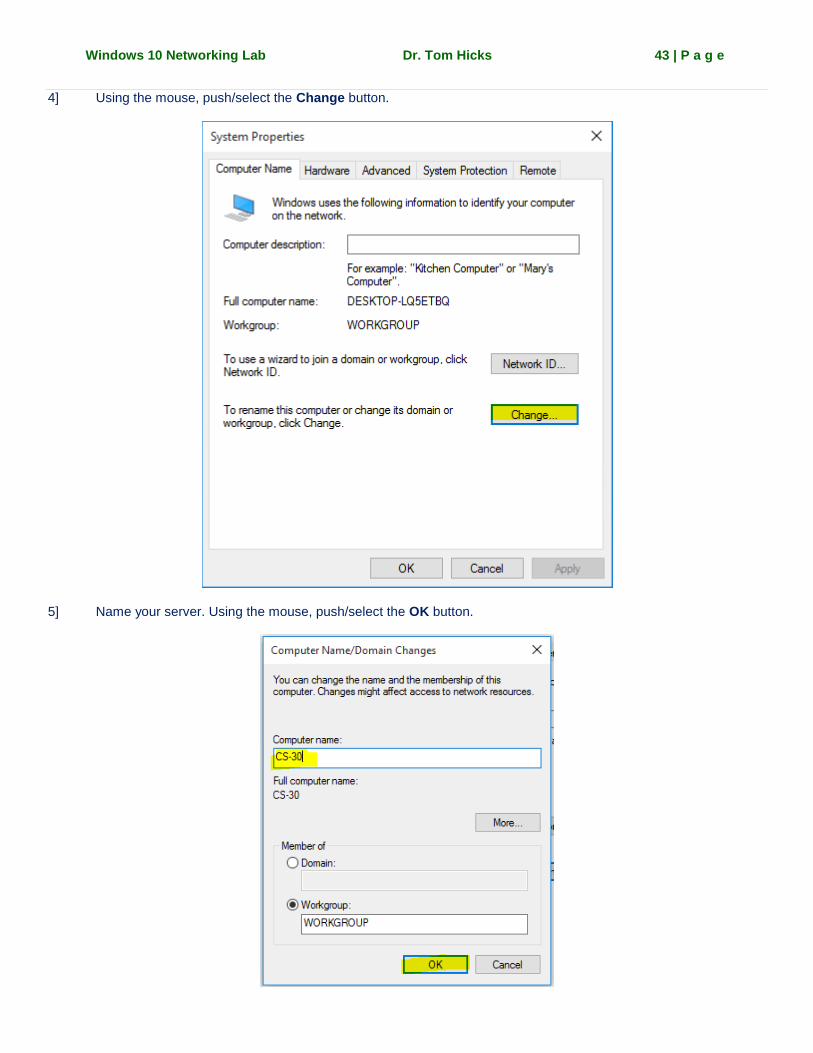
2] Note the crazy Host Name assigned to your computer during the installation process. When a computer is
connected to a network, the computer name and MAC Address of the NIC card is passed to switches and routers
on the network. A more meaningful name for your computer will make network maintenance easier and more
efficient.
3] The next few pages contain switch names and IP addresses we shall use all semester. Team 1 is to call their
Windows 10 network computers Z1W1, Z1W2, Z1W3, Z1W4, Z1W5. Your team shall use them in order and decide
who gets what names.
4] Team 2 is to call their Windows 10 network computers Z2W1, Z2W2, Z2W3, Z2W4, Z2W5
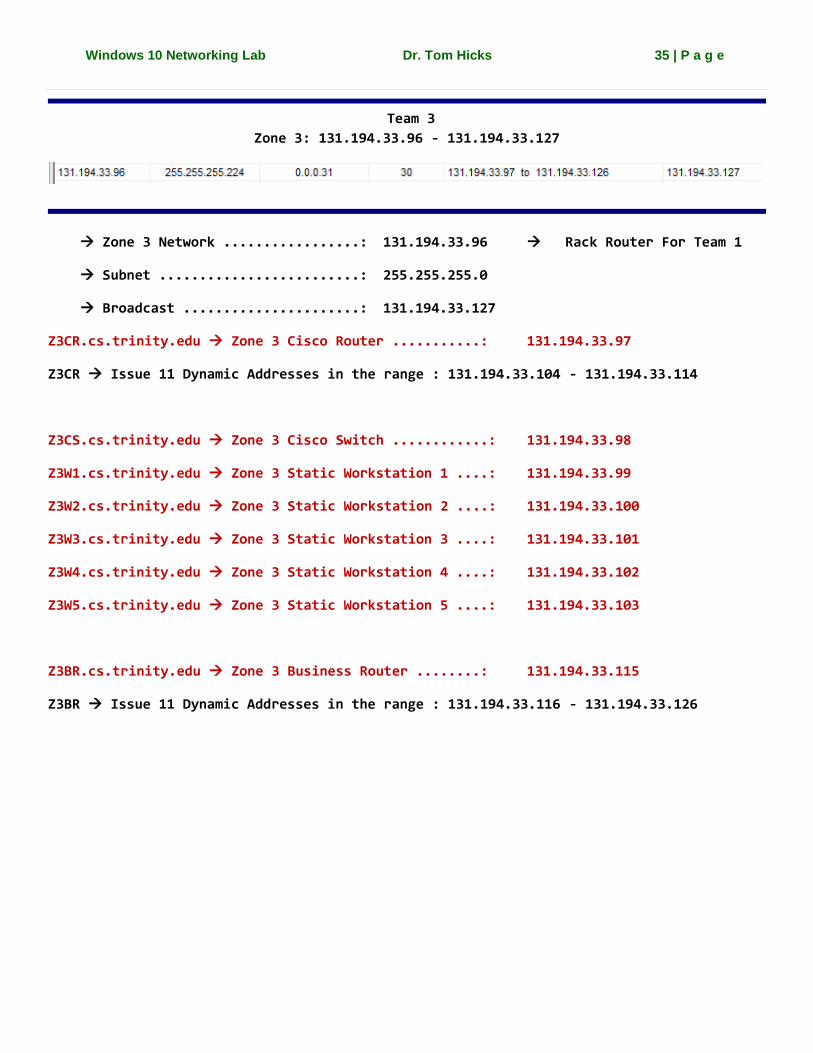
5] Team 3 is to call their Windows 10 network computers Z3W1, Z3W2, Z3W3, Z3W4, Z3W5
6] Team 4 is to call their Windows 10 network computers Z4W1, Z4W2, Z4W3, Z4W4, Z4W5
7] Make a note of the information for your team.
Windows 10 Networking Lab Dr. Tom Hicks 31 | P a g e
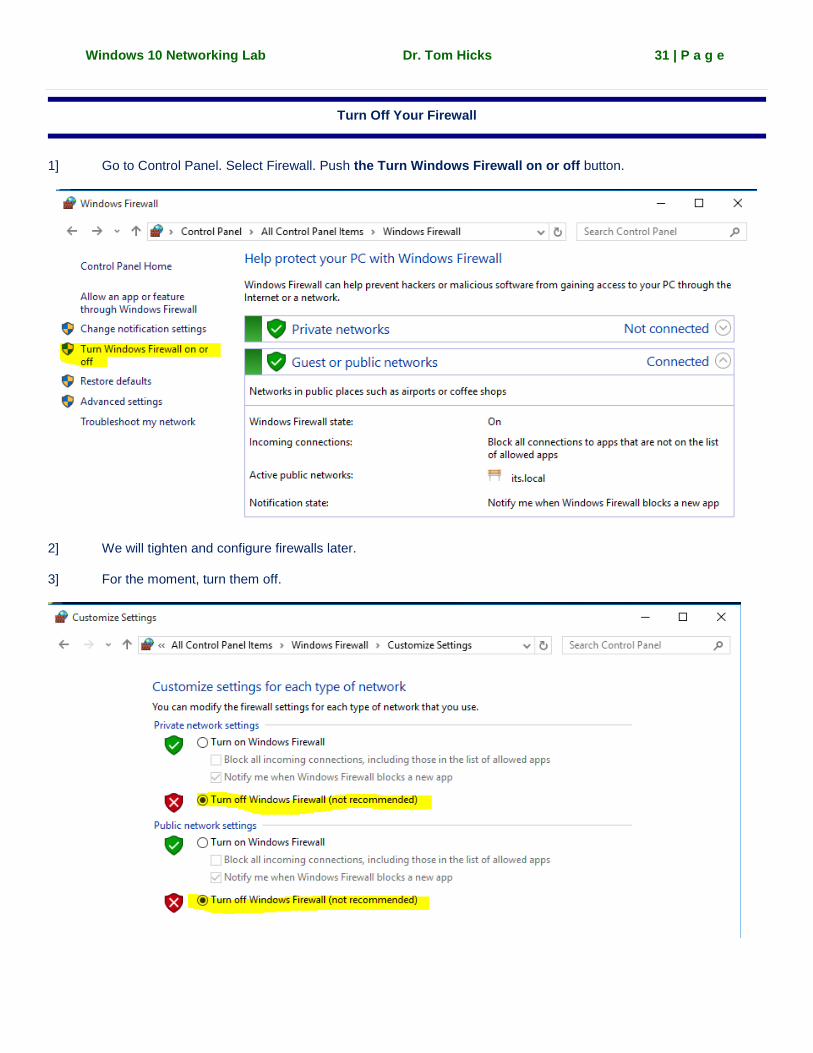
Turn Off Your Firewall
1] Go to Control Panel. Select Firewall. Push the Turn Windows Firewall on or off button.
2] We will tighten and configure firewalls later.
3] For the moment, turn them off.
Windows 10 Networking Lab Dr. Tom Hicks 32 | P a g e