for Android Windows Desktop and Conduit Quick Start Guide HanDBase® is a Registered Trademark of DDH Software, Inc. All information contained in this manual and all software applications mentioned in this manual are Copyright 1997-2012 DDH Software, Inc.
Transcript
for Android
Windows Desktop and
Conduit Quick Start Guide
HanDBase® is a Registered Trademark of DDH Software, Inc. All information contained in this manual and all software applications mentioned in this manual are Copyright 1997-2012 DDH
Software, Inc.
Introduction
What is HanDBase?HanDBase is a mobile relational database application for handheld PDAs and Smartphones. The functionality of the application differs depending on the platform, but on all platforms it enables you to view and edit databases on your mobile device while you are on the go. You can also use optional desktop components to convert data from another format into HanDBase so you can bring your existing data with you.
HanDBase databases are often called applets, as they are more than just simple documents. In combination with the HanDBase application, many database designs create or replace fully functional programs.
How Do I Contact DDH Software?If you need to contact DDH Software, here’s how:
Mailing Address:DDH Software, Inc13833 Wellington Tr Suite E4-425Wellington, FL 33414
System RequirementsMobile PhoneAndroid device running OS 1.6 or higher1 MB of available memory for the HanDBase application, memory card with available storage for databases.
Desktop MachineAny windows computer running Windows XP or newer. Wifi connection to same hotspot as Android device is connected to, or on older devices, a USB port to attach Android Device or a memory card slot to mount device's memory card.
This Quick Start Guide for HanDBase for Android Windows Desktop and Conduits will help you discover the basics of using the desktop components with HanDBase on your Android device. It discusses the basic installation and functionality of HanDBase Desktop and the HanDBase Android Sync Conduits.
Installing HanDBase to your Android phone
HanDBase for Android is sold separately and exclusively via Google Market. Thus, you will need to purchase this solution separately. A link to the product on the Google Market is available on our website: http://www.ddhsoftware.com/Android
There is a separate set of documentation that explains how to install and use the Android application, please see the documentation on our site for the complete manual:
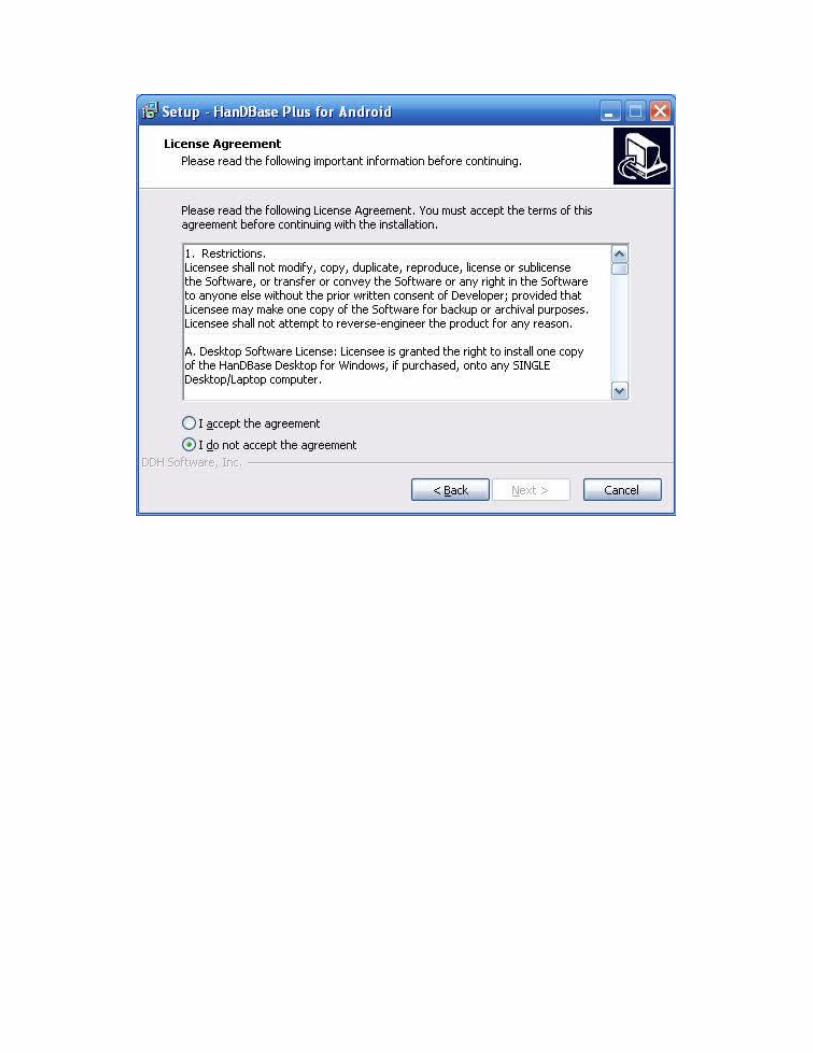
2. After pressing next, you will have the option to read through the license agreement. Please make sure to read through this and if you accept, check the radio button labeled “I accept the agreement”.
3. After accepting and pressing next, you will have the option to choose the path where to install to. If at all possible, please keep the default location and press next.
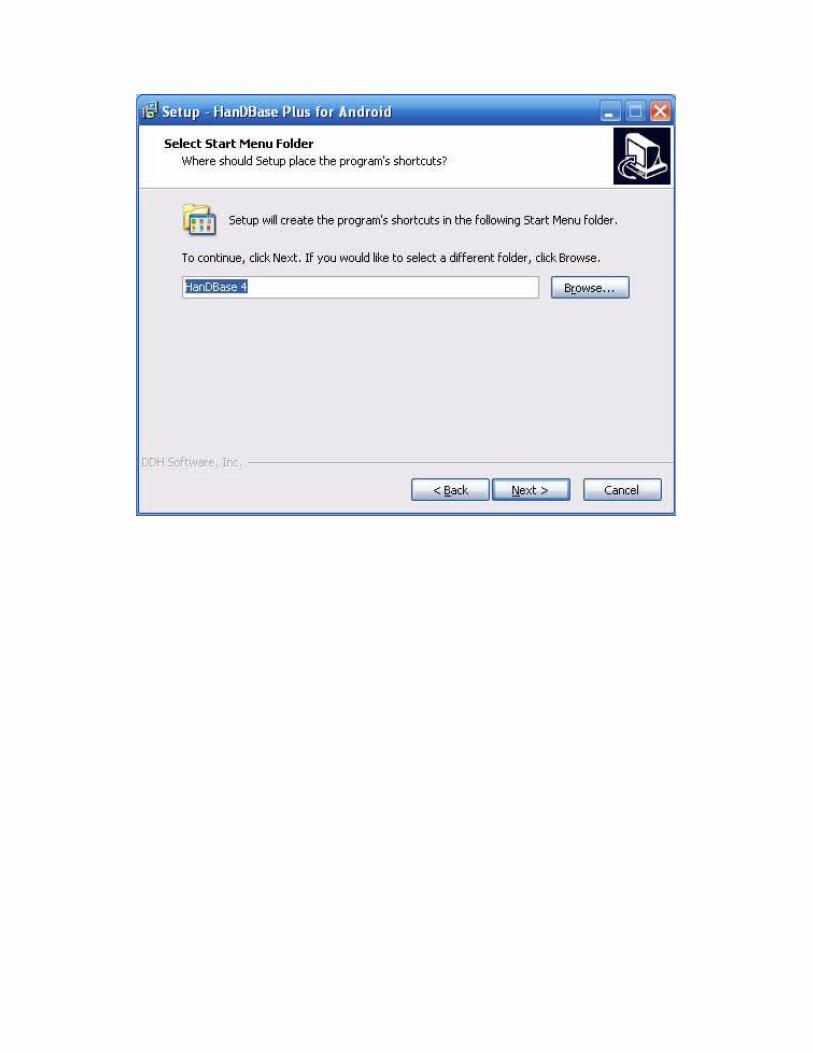
4. Here you can choose the name of the Folder that will show under the Start Menu, All Programs screen:
5. After selecting next, you can choose whether to create an icon on your desktop for the HanDBase Desktop program. Check if you desire and press next.
6. The following screen is a confirmation of the settings you have chosen. If all looks OK, press next
7. Now the files will be installed to the location you specified.
8. You may be prompted to install plugins to your desktop. These plugins are really settings for making conversions of databases to other applications like Microsoft Access. Choose which if any you would like to appear in the File Menu under the HanDBase Desktop and click add to move them from the left side of the screen to the right side. Click OK when finished.
9. If installing the registered version, you will likely be prompted for your license key. Enter it as you see it on the order confirmation or the DDH Software web site and press OK.
10. This is a very important step as now the HanDBase Desktop Components have been installed, but you still need to do several things to synchronize with your Android device.
Creating a Partnership between HanDBase Desktop and your Android device
To create a partnership, the installer will launch the HanDBase Android Conduit.
Here you will see a list of Android User partnerships currently created on your desktop. This list may be blank the first time you run it. To create a partnership, select Setup New User:
The first step is to choose how you will connect to this device. There are three options:1. Connect via USB Cable to the device. This method requires the Android device to
support mapping the drive of it's external memory card to your computer when mounted via USB. This feature used to be available on all Android devices, but as of Android 3.0, it is not always included and by Android v4.0 it is mostly not supported any longer. If you have a device with Android running less than 3.0, you can surely use this option. If you have 3.0 or newer, you'll have to check to see if it supports mass storage mode and not MTP. Otherwise, use the second option to connect via wifi. One other caveat of this mode, when you sync via the cable, you have to be sure that HanDBase is not running on the device.
2. Connect over Wifi to the device. This method requires you to have your Android device and your computer hooked up to the same access point or Hotspot. (The computer can have a wired connection or Wifi connection to that access point, but it has to be the same access point as the Android device is connected to via Wifi). Advantages of this mode are compatibility with nearly every Android device and OS version, no need for a cable, and that you don't have to close HanDBase to synchronize.
3. If your device has an external memory card, you can remove it and mount it in your computer (if it has an attachment to accept the memory card). Then you can run a sync while the card is mounted, dismount and return to your device.
Syncing Via USB cable or Memory Card mountedYou will be asked to follow a series of simple steps. The first explains the process of connecting your device to the computer so that the memory card is mounted as a local drive on your computer. Complete these steps and hit next:
Syncing Via WiFi
When syncing via Wifi, HanDBase for Android first needs to be in Desktop Connect Mode. This mode is available via a Sync/Connect icon (two curved arrows) located at the top right of the
Choose Database Screen:
Once selected, assuming you are connected to a wifi hotspot/access point, you'll be given an address to enter in on the desktop side:
Enter this when prompted on the desktop:
Assuming your device and your desktop are both connected to the same access point, the desktop will now connect to the Android device and establish the partnership.
Naming Your Device Partnership (For All Sync Connection Types)
The next step involves typing in a name for your device. This could be your name, the name of your Android model, or whatever you'd like. However, it must be a unique name as this is going to be used to uniquely identify this device's partnership and databases within the program. Enter your device name and click Next.
If the program is successful in communicating with your device, you will receive the following confirmation. Make sure to click next.
Now the initial synchronization will begin. This may take a few seconds as it copies the sample databases from your device to the desktop:
Assuming all is successful, you’ll receive the following prompt. You can select Finish or you can first check the box to make adjustments to the Sync Settings if you wish to override the sync settings for any particular databases.
At this point, your configuration is complete and you’re now able to begin using HanDBase on your Android device or access the databases from the desktop.
Please note: in the future, you can manage your Android syncing and your user partnerships via the HanDBase Desktop:
Simply click Configure and then Android Users from the menu.
HanDBase Android Synchronization Settings
Back on the desktop, the option to configure Android users also gives a button to edit the sync settings for that user. To do this, select a user and then choose Edit Sync Settings. You will be shown a screen like this:
On this screen you will be able to select a User, see all the databases set to sync, and have the ability to change sync settings for any particular databases. The entry labeled [DEFAULT] is where you determine the default settings for synchronization. This is how any new database that is being synced will behave as well as any that have the ‘Use Default Settings for this Database’ option checked. Each database synced will be given the option to override the default settings. When doing so, the options are:Number of Backups to keep of this Database- Each time you sync, a backup of the current files are stored in the Backup folder under the installation path for the Android conduit. The default path for this is My Documents\handbase4 and in this folder are one or more folders with the user names of the partnerships created. Within each partnership folder there is a sub-folder called Backup. By default HanDBase will keep the last 10 syncs worth of backups for each database, but you can override that with this setting.Select Sync Mode – this selection chooses how the database will be synced. The default mode is ‘Synchronize this database’. This means that changes made on the desktop and the device both will be synced together with new and updated records reflected on both desktop and smartphone. Other options include ‘Desktop Data overwrites Android’ which means that the database on the desktop will always overwrite the one on the device (useful for published lists, etc), ‘Android Data Overwrites Desktop’. There is also an option to ‘Do Nothing’ or skip a database. This is useful if the database you have doesn’t need to be backed up on the sync each time. The option ‘One Way Sync: Desktop records to Android only’ will do a true synchronization but only the Android device will contain the results of this, and the option ‘One Way Sync: Android records to Desktop only’ behaves just the opposite.
Delete Records from Desktop after Sync – After syncing the data, Delete the records from the desktop.Delete Records from Android after Sync – after syncing the data, Delete the records from the smartphone.
Last but not least, a database can be shared with other Android users set up on this desktop PC. To do so, check the option, ‘Share this database with other Android Users’. You can choose to share with all users or just some Android users and check the boxes of those you wish to share with
From the settings screen, you can also select a database that isn’t already on the Android device to be shared. To do so, select the option ‘Create New Shared Database’. You will be asked for the path of a HanDBase database that you wish to share. Browse to the database and click Open:
From here, you can configure the sync settings for this shared database just like any other.
HanDBase Professional and HanDBase Enterprise additional settings
The HanDBase Professional version includes a special conduit to sync to Microsoft Access databases. The HanDBase Enterprise version includes a special conduit to sync to other ODBC sources. When using either of these two versions, you will be shown an extra choice in your conduit settings:
Checking this box will enable the Settings button to the right. These settings are identical to the settings used by other platforms in Sync Exchange. Please see the Sync Exchange documentation for more details on setting up a database to sync with Access or ODBC data sources.
Using the HanDBase Desktop
Using the HanDBase desktop, you can create, view, and edit your databases. The scope of this is not covered in this quick start guide but is detailed in the HanDBase Desktop manual. Here are a few quick pointers for using with your Android device.
Opening a Database File
To open a database file, choose File Open. You can select by User (showing not just Android HanDBase users, but those on other HanDBase handheld platforms as well, such as iPhone, Palm OS, Windows Mobile Classic/Professional (Pocket PC), BlackBerry and Windows Mobile Standard (Smartphone)) and see all the files synced for that user. Or you can select Browse and
search anywhere on your computer for files.
Using the HanDBase Desktop to install a database to your device
To install a database to your device, simply open it up in the HanDBase Desktop and choose File, Install to Handheld/Smartphone:
You will be prompted with a list of users available to install to. Select the user and press OK to queue this file to install to your device. The next time you synchronize, this file will be installed to your Android device (or whatever device you are using).
Where Do I Find Out More?
All of the HanDBase Documentation is available online at:
This manual is in PDF (Adobe Reader) format and contains instructions for many of the components available in the HanDBase product catalog. This includes the desktop application, which is not a part of the Android Release, and the other handheld (Palm OS and Windows Mobile) applications. By consulting this, it’s easy to learn the in’s and out’s of the various field types, as well as see the information in this user guide discussed in more detail.
In addition, the DDH Software support site contains different tutorials: step-by-step instructions guiding you to create some simple, yet useful databases. You will also find tips and tricks and answers to frequently asked questions (FAQs) on the web site: