13
Windows IoT Core Application Management Created by Rick Lesniak Last updated on 2016-08-18 05:17:08 PM UTC

Windows IoT Core Application ManagementCreated by Rick Lesniak
Last updated on 2016-08-18 05:17:08 PM UTC

2348
101112
13
Guide Contents
Guide ContentsOverviewPowerShell: Getting StartedPowerShell: OverviewHeadless Apps at StartupHeaded Apps at Startup
Wait – what happened to the original Windows IoT Core GUI?
Help! BlinkyHeadless or BlinkyHeaded don’t appear in the list of apps!
© Adafruit Industries https://learn.adafruit.com/windows-iot-application-management Page 2 of 13

OverviewIn this tutorial, we introduce a new Windows tool, called PowerShell. We'll be using PowerShell to configure ourBlinky apps to automatically run at system startup.
© Adafruit Industries https://learn.adafruit.com/windows-iot-application-management Page 3 of 13

PowerShell: Getting StartedWindows PowerShell is a command-line utility that runs on your Windows 10 computer, and allows you toexecute commands on a Windows IoT device, like a Raspberry Pi.
PowerShell has lots of uses, but we’ll focus on setting applications to run at startup in Windows IoT.
PowerShell should appear in the All Apps submenu of your Start menu, as Windows PowerShell
Make sure you run PowerShell as “Administrator”. To do this, right-click on the PowerShell icon and select Run
as Administrator from the popup.
If you can’t find it there, you can type Windows PowerShell into the Cortana box (lower left of your screen) to haveWindows find it for you.
© Adafruit Industries https://learn.adafruit.com/windows-iot-application-management Page 4 of 13
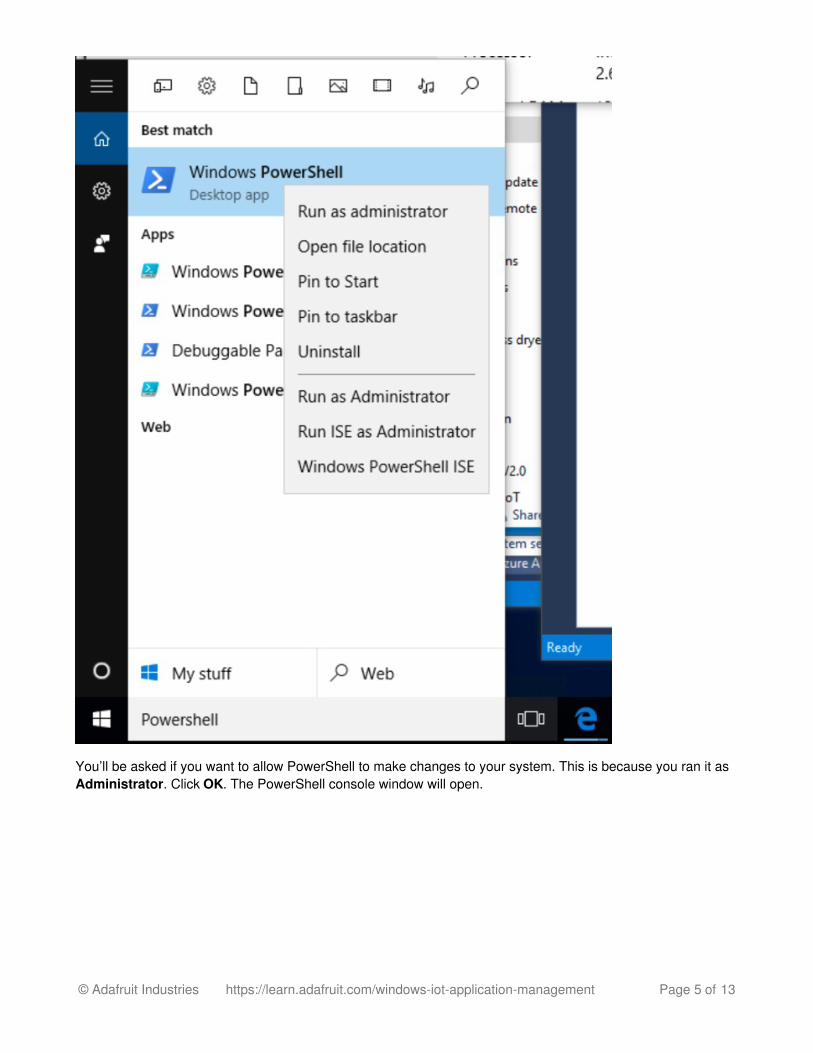
You’ll be asked if you want to allow PowerShell to make changes to your system. This is because you ran it asAdministrator. Click OK. The PowerShell console window will open.
© Adafruit Industries https://learn.adafruit.com/windows-iot-application-management Page 5 of 13

Initially, PowerShell is open you the windows\system32 directory on your computer. So, the first step we need to dois to connect PowerShell to your Windows IoT device.
PowerShell needs the WinRM service to be running on your computer. On the PowerShell command line, type
net start WinRM
The next step is to establish a “trusted” relationship between your computer and the Windows IoT device. Thisis done with the Set_Item command:
Set-Item WSMan:\localhost\Client\TrustedHosts –Value <machine-name or IP address>
Substitute the name of your IoT device, or use its IP address. Both are available on the standard Windows IoTstart screen. Our Raspberry Pi still has the default name of minwinpc:
Windows will ask you to confirm that you want to modify the list of trusted computers. Reply ‘Y’ to confirm:
With that out of the way, we can start a command line session on the Raspberry Pi. The command looks likethis
Enter-PSSession -ComputerName <machine-name or IP Address> -Credential <machine-name or IP Address or localhost>\Administrator
Again, substitute the name or IP address of your Raspberry Pi. Mine is still minwinpc:
© Adafruit Industries https://learn.adafruit.com/windows-iot-application-management Page 6 of 13

When you execute the Enter_PSSession command, an authentication window will pop up. Enter the Windows IoTpassword for your Raspberry Pi. The default password is p@ssw0rd.
Enter your password and click OK. It may take a minute or so for the command to complete. When it does,you’ll see a new command-line prompt, showing that you are in a Documents directory. You are now ready toexecute PowerShell commands on your Windows IoT Core Raspberry Pi:
© Adafruit Industries https://learn.adafruit.com/windows-iot-application-management Page 7 of 13

PowerShell: OverviewWe’ll be using PowerShell to set our startup applications, but it can do a lot more. See this page for a summaryof the Windows IoT PowerShell commands
Microsoft PowerShell Command Line Pagehttp://adafru.it/pse
Meanwhile, let’s get started by listing the apps installed on the Windows IoT Raspberry Pi. In PowerShell, enterthe command
IotStartup list
This shows us that we have several Headed apps and a few Headless apps as well. The Headless apps includethe BlinkyHeadless app, and a Dotstar app we’ve been working on for a future project tutorial.
In general, the application names are kind of dense looking. Lots of characters and numbers. You can prettymuch ignore the clutter, because PowerShell can do pattern matching. So, instead of laboriously typing theentire app name into a command, you can just type part of it. For instance, we can enter the command
IoTStartup list Blinky
and PowerShell will just list the apps that match:
In this tutorial, we’re interested in setting startup apps. We can list the currently registered startup apps with theIoTStartup startup command
IoTStartup startup
The default headed startup app is IoTCoreDefaultApp. This is the app that put up the information screen on
© Adafruit Industries https://learn.adafruit.com/windows-iot-application-management Page 8 of 13

HDMI when you first booted your Pi. ZWaveHeadlessAdapterApp implements Z-Wave, a wirelesscommunications protocol designed to allow devices in the home (lighting, appliances, etc.) to communicate withone another for home automation (see here: https://developer.microsoft.com/en-us/windows/iot/samples/zwavetutorial (http://adafru.it/pFA))
In the next section, we’ll register BlinkyHeadless as a startup app.
© Adafruit Industries https://learn.adafruit.com/windows-iot-application-management Page 9 of 13

Headless Apps at StartupIf you haven’t yet gone through the BlinkyHeadless tutorial, now is a good time to do so.
You should have BlinkyHeadless running from Visual Studio. That means that the app is already “deployed” onthe Raspberry Pi.
If you don’t see BlinkyHeadless in the list of apps, click herehttp://adafru.it/psf
In PowerShell, enter the command
IoTStartup add headless BlinkyHeadless
Now, restart your pi from PowerShell. The easy way to do this is to enter the command
shutdown /r /t 0
Your Pi will perform an orderly shutdown, and will then reboot. This may take a few minutes, but you should seeyour LED start blinking when the restart is complete.
You can have as mny headless startup apps as you like.
© Adafruit Industries https://learn.adafruit.com/windows-iot-application-management Page 10 of 13

Headed Apps at StartupThe procedure for setting a headed app to run at startup is virtually identical to the procedure for setting up aheadless app.
In the previous section, we rebooted the Pi, and (hopefully) the LED started blinking.
Have a look at the IoT Dashboard. When the restart is complete, you should see your Pi reappear in the Mydevices list. From the dashboard, open the Device Portal and navigate to the Apps page. You should seeBlinkyHeadless in the list of Running apps.
Since we’re going to replace BlinkyHeadless with BlinkyHeaded, find BlinkyHeadless in the list of running appsand click the X’ next to its name to stop it.
(We have to remove BlinkyHeadless because it uses the same GPIO pin as BlinkyHeaded. You can't run two appsthat access the same pin!)
Now, make sure BlinkyHeaded runs correctly from Visual Studio (at the time of this writing there was adeployment bug in Visual Studio that happened when the Pi was restarted. The workaround is to close andreopen Visual Studio after the restart is complete).
Go back to PowerShell on your Windows computer. Since you rebooted, you’ll have to reconnect PowerShell tothe Pi.
Re-enter the Set_Item command (which establishes a trusted relationship between the computer and the Pi).You’ll be asked for your user name and password again. Then re-issue the Enter-PSSession command.
Both of these commands were explained in the PowerShell section of this tutorial, so refer back to that if you’veforgotten them.
PowerShell should now be reconnected to your Pi. Enter the IoTStartup startup command to see thatBlinkyHeadless is in the list of startup apps:
The next step is to remove BlinkyHeadless as a startup app, and replace it with BlinkyHeaded.
Enter the following command to remove BlinkyHeadless from the startup list
IotStartup remove headless BlinkyHeadless
And enter the following command to add BlinkyHeaded to the startup list
IotStartup add headed BlinkyHeaded
If you don’t see BlinkyHeaded in the list of apps, click here
© Adafruit Industries https://learn.adafruit.com/windows-iot-application-management Page 11 of 13

http://adafru.it/psf
Let’s review: We stopped BlinkyHeadless, we removed BlinkyHeadless from the list of startup apps, and weadded BlinkyHeaded to the list of startup apps. Enter the restart command in PowerShell.
You should already have an HDMI monitor attached to the Pi, from when you first developed BlinkyHeaded.Restart the Pi with the shutdown /r /t 0 command. When the boot completes, you should see the BlinkyHeadedGUI on the monitor, and the LED should be blinking.
Wait – what happened to the original Windows IoT Core GUI?
When you set BlinkyHeaded as the startup headed app, you replaced the default headed startup app. Therecan be only one headed startup app. But you can go back to the original app. It’s called IoTCoreDefaultApp,and you can set that back to be the headed startup app in PowerShell.
In this example, we issued the IoTStartup startup command to list the current startup apps. Then we issuedthe command IoTStartup add headed IoTCoreDefaultApp to set the headed startup app back to the default.Issuing the IoTStartup startup command again shows the change:
© Adafruit Industries https://learn.adafruit.com/windows-iot-application-management Page 12 of 13

Help! BlinkyHeadless or BlinkyHeaded don’t appearin the list of apps!You may run into a situation where PowerShell doesn’t list an app matching the name BlinkyHeadless orBlinkyHeaded. In my system, for example, there is no app named BlinkyHeaded. So, we’ll use BlinkyHeaded asan example in this section. Substitute BlinkyHeadless in this section if that’s the one you’re having trouble with.
Here’s where the dense, encoded-looking application names come into play.
When you run BlinkyHeaded from Visual Studio, you’ll see BlinkyHeaded in the list of running apps on theDevice Portal Apps page:
See that “Remove” button in the App Manager, next to the list of installed apps? Unless you are very sure whatyou are doing, don’t use that button. You could inadvertently remove an important app, forcing you to re-imageyour Windows IoT system!
You can see BlinkyHeaded in the running apps list, but it doesn’t seem to appear in the list of installed apps.Well, actually, it does appear in the list of installed apps, but the name is encoded. In the picture, look at the“Package Full Name”, all the way to the right of the BlinkyHeaded line. You’ll see that the package full namestarts with 692c8bff… . Now look at the list of installed apps. You’ll see that the first app in that list also startswith 692c8bff…. It’s the BlinkyHeaded app in disguise!
Your BlinkyHeaded app will have a different full package name. Use that in PowerShell to set the Headedstartup app. I’ll use 692c8bff here – but you should use the first few characters of your Blinky app’s packagename
IoTStartup add headed 692c8bff
It’s possible that you wont have this problem on your system. But if you do, you can apply this solution to theproblem.
© Adafruit Industries Last Updated: 2016-08-18 05:17:07 PM UTC Page 13 of 13


