40
1000/1500 Series User’s Guide RADiO

1 0 0 0 / 1 5 0 0 S e r i e s
User’s Guide
RADiO

PB
WiNRADiO User’s Guide
Published by
WiNRADiO CommunicationsPO Box 6118, St Kilda Road, Melbourne 3004, Australia
Copyright © 1998 by WiNRADiO Communications
All rights reserved.
No part of this book may be reproduced or transmitted in any form or by any means without thewritten permission of the publisher.
Trademarks
WiNRADiO is a registered trademark of WiNRADiO Communications.
VisiTune, WiNRADiO Digital Suite, and associated logos are trademarks of WiNRADiO Communica-tions.
All other brand and product names are trademarks or registered trademarks of their respectiveowners.
Patents
WiNRADiO technologyand Visitune are protected by pending international patent applications.
Documentation and Layout: Barry Naujok and Peter Nesbit
Printed in Australia

iii
FCC Notice
The WiNRADiO card has been tested and found to comply with the limits for a Class B digitaldevice, pursuant to Part 15 of the FCC Rules. These limits are designed to provide reasonableprotection against harmful interference in a residential installation. This equipment generates, usesand can radiate radio frequency energy and, if not installed and used in accordance with theinstructions, may cause harmful interference to radio communications. However, there is no guar-antee that interference will not occur in a particular installation. If this equipment does causeharmful interference to radio or television reception, which can be determined by turning the equip-ment off and on, the user is encouraged to try to correct the interference by one or more of thefollowing measures:
· Reorient or relocate the receiving antenna· Increase the separation between the equipment and the receiver· Connect the computer into a different outlet so that the two devices are on different branch
circuits· Consult an authorised dealer or an experienced radio/TV technician for help
Caution
To comply with the limits for the Class B digital device, pursuant to Part 15 of the FCC rules, theWiNRADiO card must be installed in computer equipment certified to comply with the Class B limits.Only peripherals certified to comply with the Class B limits may be attached to the computer con-taining the WiNRADiO receiver. All cables used to connect the computer and peripherals must beshielded and grounded. Operation with non-certified peripherals may result in interference toradio and TV reception.
Modifications
Any changes or modifications to WiNRADiO not expressly approved in this book could void theuser’s authority to operate this equipment.
Limitation of Liability and Remedies
The information published in this book has been compiled from several sources. While everyeffort has been made to ensure its accuracy, neither the authors nor the publisher can guaranteethat all information is entirely correct or up-to-date. Furthermore, neither the authors nor thepublisher can take any responsibility for the use of this information or any consequences arisingtherefrom.
WiNRADiO Communications shall have no liability for any damages due to lost profits, loss ofuse or anticipated benefits, or other incidental, special or punitive damages arising from the useof, or the inability to use, the WiNRADiO receiver, whether arising out of contract, negligence,tort or under any warranty, even if WiNRADiO Communications has been advised of the possibil-ity of such damages. In no event shall WiNRADiO Communications’ liability for damages ex-ceed the amount paid for this product. WiNRADiO Communications neither assumes norauthorises anyone to assume for it any other liabilities.
Warning
In certain countries or states it is illegal to listen to certain frequencies, such as police or cellu-lar telephones. We cannot accept any responsibility for the consequences of your non-compli-ance with government regulations. If you are in doubt about the regulations in your country orstate, please contact your nearest radio communications regulatory authority.


v
Table Of Contents
Introduction ............................................................................... 1
Installation .................................................................................. 3System Requirements.............................................................................................. 3
1000i/1500i Hardware Installation ......................................................................... 3Jumper Settings ................................................................................................... 4
1000e/1500e Hardware Installation ........................................................................ 5
Software Installation ................................................................................................ 5I/O Configuration ................................................................................................. 6Uninstalling WiNRADiO ..................................................................................... 6
Troubleshooting ....................................................................................................... 6Installation Problems ........................................................................................... 6Sensitivity Problems ............................................................................................ 8Intermodulation Problems .................................................................................... 8
Using WiNRADiO ....................................................................... 9Basic Controls ......................................................................................................... 9
Frequency Readout ............................................................................................. 9Tuning Knob ..................................................................................................... 10Modes ............................................................................................................... 10Volume ............................................................................................................... 11Signal Level Meter ............................................................................................. 11Squelch .............................................................................................................. 11Attenuator ......................................................................................................... 12
Stepping ................................................................................................................. 12Fixed Stepping ................................................................................................... 12Auto-Stepping ................................................................................................... 13Memory Stepping .............................................................................................. 14Duplex Stepping ................................................................................................ 14
Memory .................................................................................................................. 14Storing a Frequency into Memory ..................................................................... 15Recalling a Frequency from Memory ................................................................. 15Editing Memory ................................................................................................. 16Saving and Loading Memory Files .................................................................... 17New Memory File ............................................................................................... 17

PB
WiNRADiO User’s Guide
Scanning ................................................................................................................ 17Immediate Scanning ........................................................................................... 18Frequency Range Scanning ............................................................................... 18Memory Scan ..................................................................................................... 19Scanner Options ................................................................................................ 19Exclusions .......................................................................................................... 20
Miscellaneous ........................................................................................................ 20Mute .................................................................................................................. 20IF Shift and BFO Offset ..................................................................................... 20Indicators ........................................................................................................... 21Power Switch ..................................................................................................... 21Date and Time Displays ..................................................................................... 21Window Properties ............................................................................................ 22General Options ................................................................................................. 24
Spectrum Scope ..................................................................................................... 24Spectrum Sweeping ........................................................................................... 24VisiTune™ ......................................................................................................... 25Saving and Loading Files .................................................................................. 26Options .............................................................................................................. 26
Developer Information ........................................................................................... 27
Add-on Options ...................................................................................................... 27WiNRADiO World Station Database Manager .................................................. 27WiNRADiO Digital Suite ................................................................................... 28
1
Introduction
The award-winning and immensely popular WiNRADiO receivers are the world'sfirst commercially available wide-band communications receivers, which combineadvanced receiver technology and the computing power of a PC, to set newhigh standards in radio communications.
The WR-1000/1500 series receivers offer cost-effective solutions to a widevariety of receiving requirements. They are available in two versions: as ISAcards for internal PC mounting, and as compact external units mounted in anattractive shielded case for portable and desk-top use.
The internal versions conserve valuable desk-top space, and avoid the needfor external cables and power supplies. They also have the advantage of notrequiring any additional interface ports, as all communication with the PC is viathe internal PC bus. Multi-channel operation is simple to achieve, as up toeight WiNRADiO internal receivers can be used simultaneously in the one PC.
The external versions can be controlled through an RS-232 serial interface, orthe optional plug-and-play PCMCIA interface. The PCMCIA interface allowsquick and simple connection to any laptop PC, providing complete portabilityfor vehicle or field use. The external versions can be powered by the plug-pack(supplied), or from the optional WR-PPS battery pack with inbuilt charger.
The external models also include a direct discriminator output, for optimumreception of packet and other digitally modulated signals.
As a new user, you are invited to join the WiNRADiO User Club. As a clubmember, you will receive our WiNRADiO Newsletter free of charge, and beinformed about any new products or software upgrades.
To register, please use the Web site closest to your location:
North America www.winradio.com/home/register.htm
Europe www.winradio.co.uk/home/register.htm
Australia/Asia www.winradio.net.au/home/register.htm
Comments and suggestions are welcome, and can also be made from thesesites.
Be sure to visit our Web site from time to time, and watch for new softwareupgrades and options as they become available.
Thank you for purchasing WiNRADiO, and we wish you many hours of listeningpleasure!

3
Installation
The WiNRADiO internal version package contains the following items:• WiNRADiO receiver card
The WiNRADiO external version package contains the following items:• WiNRADiO receiver unit• RS-232 cable• Power adaptor• PC Card Adaptor option (if ordered)• Portable Power Source option (if ordered)
Both packages include the following items:• WiNRADiO software installation disk• Indoor test antenna• This User’s Guide• The manufacturer’s warranty information• Any software option (such as the WiNRADiO Digital Suite or Database
Manager), if ordered
Note that you must supply your own antenna for optimum reception.
In order for your WiNRADiO receiver to function, your IBM PC compatiblecomputer must meet the minimum system requirements specified below.
System Requirements
Minimum RecommendedProcessor: 386 Pentium or higherRAM: 4 MB 16 MB or moreDisplay VGA SVGA: at least 800x600, 256 coloursOS: Windows 3.1 Windows 95 or NT 4
Spare serial port or PCMCIA socket for the external model, or a spare ISA slotfor the internal model.
1000i/1500i Hardware Installation1. If your computer is on, shut down the computer first, turn it off and
disconnect the power cord.2. Remove the computer cover.3. If other expansion cards are fitted, check their address assignments. If
necessary, change any of the jumpers on the WiNRADiO receiver card toavoid conflicts. (The default I/O port 180 should normally work, howeverif you need to change any jumpers, see the following section about ‘JumperSettings’.)

PB
WiNRADiO User’s Guide
4. Choose an empty 16-bit expansion slot, preferably with an empty slotimmediately to the right (assuming you are facing the computer front).
5. Important: Before inserting the WiNRADiO card, touch the computermetalwork with your hand (to drain any static charge from your body), andalso touch the metal bracket on the WiNRADiO card.
6. Carefully insert the card into the vacant slot, and push until it is firmlyseated. Screw the metal bracket at the end of the card to the computer case(this must be done to minimise ground-conducted interference).
7. Replace the computer case and reconnect the power cord.8. Plug a speaker or headphones into the audio jack at the rear of the card.
Alternatively, if you have a sound card and wish to route WiNRADiOthrough it, you can plug an audio ‘patch’ cable from the audio jack to the‘Line In’ jack on your sound card. Note that a 3.5mm stereo plug must beused, otherwise you will hear no audio from the receiver. A suitable patchcable is included with the WiNRADiO Digital Suite option.
9. Connect the antenna to the BNC jack at the rear of the card and extend theantenna up and as far away from the computer as possible.
Jumper Settings
The WiNRADiO receiver card is provided with jumpers which select the desiredI/O port address. The jumper may need to be changed from the factory defaultsettings to avoid conflicts with other cards already installed in the computer.
There are eight possible I/O addresses which the WiNRADiO card can use:180, 188, 190, 198, 1A0, 1A8, 1B0 and 1B8 (all specified in hexadecimal).
If more than one WiNRADiO card is to be installed in the computer (up to 8depending on available address lines), each card must be assigned a uniqueI/O address.
I/O Address Jumpers
5
Installation
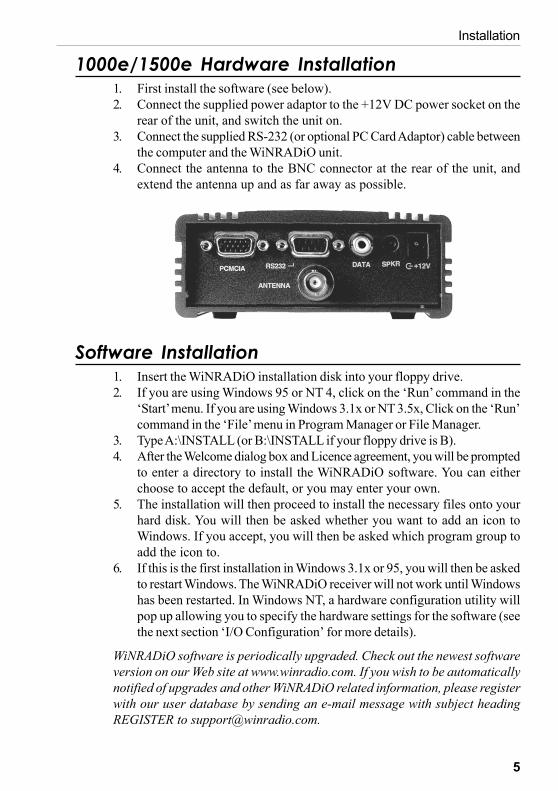
1000e/1500e Hardware Installation1. First install the software (see below).2. Connect the supplied power adaptor to the +12V DC power socket on the
rear of the unit, and switch the unit on.3. Connect the supplied RS-232 (or optional PC Card Adaptor) cable between
the computer and the WiNRADiO unit.4. Connect the antenna to the BNC connector at the rear of the unit, and
extend the antenna up and as far away as possible.
Software Installation1. Insert the WiNRADiO installation disk into your floppy drive.2. If you are using Windows 95 or NT 4, click on the ‘Run’ command in the
‘Start’ menu. If you are using Windows 3.1x or NT 3.5x, Click on the ‘Run’command in the ‘File’ menu in Program Manager or File Manager.
3. Type A:\INSTALL (or B:\INSTALL if your floppy drive is B).4. After the Welcome dialog box and Licence agreement, you will be prompted
to enter a directory to install the WiNRADiO software. You can eitherchoose to accept the default, or you may enter your own.
5. The installation will then proceed to install the necessary files onto yourhard disk. You will then be asked whether you want to add an icon toWindows. If you accept, you will then be asked which program group toadd the icon to.
6. If this is the first installation in Windows 3.1x or 95, you will then be askedto restart Windows. The WiNRADiO receiver will not work until Windowshas been restarted. In Windows NT, a hardware configuration utility willpop up allowing you to specify the hardware settings for the software (seethe next section ‘I/O Configuration’ for more details).
WiNRADiO software is periodically upgraded. Check out the newest softwareversion on our Web site at www.winradio.com. If you wish to be automaticallynotified of upgrades and other WiNRADiO related information, please registerwith our user database by sending an e-mail message with subject headingREGISTER to [email protected].

PB
WiNRADiO User’s Guide
I/O Configuration
To inform the software of the internal hardware configuration, a Control Panelapplet is used. Open Control Panel and double-click on the WiNRADiO icon. Adialog box will appear, which allows you to specify the hardware configurationfor the software. As can be seen, up to 8 internal cards can be configured, andfor each card installed, a suitable I/O address must be nominated. ExternalWiNRADiO models will automatically be assigned the next available number.
In most situations, you can use the ‘AutoDetect’ feature, which will allow the softwareto find all the cards and settings for each.Only rare circumstances stop the auto-detection from working.
If there are any problems with the settings(such as an address conflict), you will benotified of the problem.
In Windows 3.1x and 95, after you click on OK and any setting has beenchanged, you will be prompted to restart Windows for the new settings to takeeffect. In Windows NT, the new settings take effect immediately withoutrestarting.
Uninstalling WiNRADiO
In Windows 95 and NT 4, start up Control Panel and double-click on the ‘Add/Remove Programs’ icon. Select ‘WiNRADiO’ from the list and click on the‘Add/Remove’ button.
In Windows 3.1x and NT 3.5x, double-click on the ‘Uninstall WiNRADiO’ iconin the program group that contains the WiNRADiO icon.
All software and changes to any configuration files will be removed from yourhard disk.
Troubleshooting
Installation Problems
If you try to start-up your WiNRADiO receiver for the first time and you arepresented with a dialog box stating that the WiNRADiO receiver card couldnot be found, you most likely have a configuration problem.

7
Installation
If you are using an internal WiNRADiO model, open the WiNRADiOconfiguration utility from Control Panel by double-clicking on it. Click on ‘AutoDetect’. If no WiNRADiO card can be found, then you probably have a hardwareaddress conflict. Shut down the computer, and try other jumper settings asdescribed earlier in this chapter. Start up the computer and try auto-detectingagain.
If you are using an external WiNRADiO model, make sure it is plugged in andthe power is turned on (the red LED on the front panel should be illuminated).
If you are using the WiNRADiO software and find that the Spectrum Scope isobscuring the panel, try to reposition the main WiNRADiO control panel windowby changing it from full-screen to a window, and positioning it in the top areaof the screen. Shrink the size vertically so there is a thin border around thepanel, as shown below. This should make your WiNRADiO receiver easier touse.
If you are finding that shortcut keys are not responding (including the tab andcursor keys), try clicking on the appropriate window with the mouse to activatethe window. If you have more than one dialog box open at the same time, tryclosing them until only one is left open.

8
WiNRADiO User’s Guide
Sensitivity Problems
The WiNRADiO receiver is very sensitive, so low sensitivity problems areusually due to noise induced into the antenna by the PC monitor, less commonlythe PC, or some other external source. If the noise is strong enough, it canoverload the receiver which responds by automatically reducing sensitivityusing its AGC (Automatic Gain Control) mechanism. This problem is morecommon on low frequencies (under 30MHz). As a result, the reception canbecome noisy and the receiver appear to be ‘deaf’.
This can happen if the antenna is poorly located, for instance if it is too closeto the PC monitor, or used inside a building with steel-reinforced concretewalls. Try repositioning the antenna, or placing ferrite cores over its shieldedlead close to the receiver, to break the transmission of interference back to theantenna.
Another remedy which is often effective is to place an RF (radio frequency)filter between the PC mains lead and the wall power outlet, to reduce interferencecaused by earth loops.
If these measures fail to produce the desired noise reduction , and if you areusing an internal receiver model, try moving the receiver card to a different slotinside the PC, as far as possible from other potentially noisy cards, especiallythe video card, and the power supply.
Video monitors are also major sources of interference, and there are significantdifferences between brands in this respect. You can establish the noisecontribution of your monitor by switching it off. If the noise diminishessubstantially, check that the monitor lead is fitted with a ferrite suppressorbead (the rectangular or cylindrical moulding on the lead). If not, fit a suppressor,or acquire a quieter monitor.
Intermodulation Problems
Your WiNRADiO receiver has been designed to be very sensitive in order forit to work with the moderately small antennas which are preferable for VHF/UHF. In areas with strong local broadcast stations, the WiNRADiO receiverfront-end may overload and, as a result, intermodulation products may appearin the received band. By pressing the Local button on the control panel, theinterference products will disappear.
It is advisable to use the Local setting if you are operating the receiver withlarger outdoor antennas, especially on broadcast bands. For long-distanceshortwave reception, a considerable improvement can be obtained by using atuned antenna and preselector.

9
Using WiNRADiO
When you first start WiNRADiO, you are presented with a radio receiverinterface. The image below shows the main parts of the control panel.
The following few sections document each of the parts in detail.
Basic Controls
Frequency Readout
The frequency readout showsthe current receiver frequency.
Below this is another displaywhich shows one of thefollowing: the callsign and/or acomment relating to the currenttuned frequency, taken from the frequency memory (entered by the user), orthe description of the current band. The band description is user-definableunder ‘Auto-stepping’ in the Configure menu.
To enter a frequency, simply type the desired frequency using the keyboard.As soon as you press a number or the decimal point, the frequency readout willenter the edit mode, allowing you to enter the frequency. The old frequency isautomatically overwritten. If you want to edit the existing frequency, click onthe readout with the left mouse button to highlight the current frequency,position the cursor as desired, reclick the left mouse button, make the desiredchanges, then press the Enter key. To change the frequency unit (kHz, MHz orGHz), press k, m or g respectively while the display is highlighted or in editmode.

10
WiNRADiO User’s Guide
To tune the receiver to the new frequency, press the Enter key. To cancel andreturn the previous display, press the Escape key.
In each mode, the frequency readout only displays the most significant digitswhich affect tuning and reception. On the WR-1500 series receivers, the displayresolution is as follows: 1 Hz in CW, LSB and USB, 10 Hz in FMN, 100 Hz in AMand 1 kHz in FMW. On the WR-1000 series receivers, all modes except FMWhave a display resolution of 100Hz (1 kHz in FMW).
In FMW, the lowest tunable frequency is 30 MHz. If you attempt to tune to afrequency below 30 MHz, the receiver will automatically change the mode toAM, and disable the FMW button.
Tuning Knob
The tuning knob adjusts the frequency by the smallestsuitable increment for the current mode. In LSB, USBand CW (WR-1500 series only) it is 10 Hz; SSB (WR-1000 series only) is 100 Hz; AM is 100 Hz; FMN is500 Hz, and FMW is 50 kHz.
To use the knob, position the mouse cursor over thetop half of the knob, and the cursor will look likethis: . To decrease the frequency, click the left mousebutton. To increase the frequency, click the right mouse button. On the bottomhalf, the cursor will flip vertically ( ). The mouse buttons will now operate inreverse, with the left increasing and the right decreasing the frequency.
To tune the receiver from the keyboard, press the up/down cursor keys toincrease and decrease the frequency respectively.
For faster tuning, use the Shift or Control keys simultaneously with the mouseor keyboard tuning commands to multiply the frequency step by 10 or 100times respectively.
To reduce the step size to 1 Hz for more accurate tuning of LSB, USB or CW(WR-1500 series only), use the Alt key simultaneously with the mouse orkeyboard tuning commands.
Modes
WiNRADiO WR-1000 series supports fourdifferent reception modes (AM, FMN, FMW andSSB), while the WR-1500 series supports sixdifferent reception modes (CW, LSB, USB, AM,FMN and FMW).

11
Using WiNRADiO
These modes are abbreviations of Continuous Wave (CW), Lower Side Band(LSB), Upper Side Band (USB), Amplitude Modulation (AM), FrequencyModulation Narrow-band (FMN), FM Wide-band (FMW) and Single Side Band(SSB).
To select the desired mode, click on the appropriate mode button or use thekeyboard shortcuts: A for AM, W for FMW, N for FMN, C for CW, L for LSB,U for USB and B for SSB.
Volume
The volume control is located on the right handside of the panel. The volume can range from 0(no sound) to 31 (full volume).
There are several ways to adjust the volume. Using the mouse, you can increaseor decrease it by clicking on the up/down volume control arrows respectively,or you can click on the scroll button between the two arrows and drag thevolume up or down.
Using the keyboard, you can press V and enter the volume, or you can use theleft and right cursor keys to decrease and increase the volume respectively.
Signal Level Meter
The signal level meter, located under the volumecontrol, shows the received signal strength. Itrepresents the strength by a bar graph, andshows the equivalent numerical strength on the right side of the display.
The value represents the approximate signal level in dB above the receivernoise floor.
The signal level is also used to control squelch and scanning.
Squelch
The squelch controls the audio output and scanner threshold.
In normal operation, if the signal level drops below the squelch threshold, theaudio output is muted after a time delay specified under ‘Configure - GeneralOptions’. If the signal rises above the squelch threshold, the audio is restoredimmediately.
The squelch indicator, at the bottom of the panel, shows whether the currentsignal level is above or below the squelch threshold. If it is above the threshold,the display is green, otherwise it is red.

12
WiNRADiO User’s Guide
The squelch threshold also controls scanning. When scanning, the receiverwill pause or stop if it receives a signal above the squelch threshold, otherwiseit will continue scanning until such a signal is found.
If you wish, you can have different squelch thresholds for normal receptionand scanning. To activate this feature, go to ‘Configure - General Options’ andselect ‘Separate squelch for scanning’. The receiver will then accept differentsquelch thresholds on the front panel, and in the ‘Scanner - Setup’ dialog box(described later).
Attenuator
The attenuator controls the level of the RF signal entering thereceiver front-end. If a signal is too strong, it may overload thereceiver and cause distortion. To combat this problem, the RFsignal can be attenuated by 18 dB by clicking on the ‘Local’button or by pressing the O key.
If the attenuator is active and the signals are too weak, click the ‘DX’ button orpress the D key to turn the attenuator off.
Stepping
Four stepping modes are available: fixed, auto, memory, andduplex. To select between fixed, auto and memory stepping,click on the ‘Select’ button or press the T key until the desiredstepping mode appears. Duplex stepping is activatedseparately, as described below.
To step through frequencies, click on the up/down buttonslocated next to the frequency readout, or press the Page Up/Page Down keysto step up/down respectively.
The stepping modes are described below in more detail.
Fixed Stepping
Where stations operate on fixed channels (e.g. AM or FM broadcast band,mobile radio, CB), it is usually more convenient to change the frequency insteps corresponding to the channel separation.
You can specify the desired step size for each mode from a minimum equal tothe frequency resolution of the display, up to a maximum of 10 MHz. To enterthe step size, either click on the step display with the mouse, or press the F key;then enter the desired step size and press Enter (or Escape to cancel the entry).Note that LSB/USB share the same step size.

13
Using WiNRADiO
If you change the mode, the step size will be changed to the size previouslyentered for that mode.
Note that all modes retain the frequency to the nearest 1 Hz even though theextra digits might not be visible. For example if you change from LSB to FMWand back, the actual frequency is not rounded off, but remains the same. Thisensures that accidental mode changes do not cause the exact current frequencyto be lost.
Auto-Stepping
Auto-stepping is an enhanced form of fixed stepping, in which the step sizedepends on the receiver frequency. This facility can also automatically set themode and squelch threshold according to frequency.
Before this feature can be used, it is necessary to set up one or more steppingranges. To do this, first select ‘Auto-stepping’ from the ‘Configure’ menu. Adialog box will appear, allowing you to establish the auto-stepping ranges.
To add a range, click on the ‘Add’ button. Another dialog box will appear,allowing you to specify the lower and upper frequency limits, the desired stepsize for that range, the mode, squelch level, and a text description. The mode,squelch level and description are optional.
You can also edit, delete and move the ranges in the list. If ranges overlap,those at the top of the list will have higher priority over those lower in the list.You can move ranges higher or lower in the list by clicking on them and draggingthem to the desired location.
If the receiver is not in a specified range, it will default to the fixed step size. Ifyou enter a different value in the step display, it will change to that step. If thereceiver is subsequently tuned to a defined auto-step range, the step size forthat range will be automatically recalled and will replace the fixed step.

14
WiNRADiO User’s Guide
Whenever the receiver is tuned to a defined auto-step range, the display belowthe main frequency readout will show the text description for that rangeregardless of whether auto-stepping is active or not. If the current frequencycoincides with a frequency previously stored in memory (see below), the memorycomment will take precedence over the text description.
Memory Stepping
Memory stepping allows the user to step directly between frequenciespreviously stored in a memory file. In this mode, the callsign of the currentmemory entry is shown in the step display.
If the user types in a frequency which does not correspond to a memoryfrequency, the receiver will tune to this frequency without problem. If the userthen steps the frequency up or down, the receiver will find the memory frequencyclosest to the current frequency in the same direction, and tune to it.
At least one frequency must be stored in memory for memory stepping to work.If the memory is empty, memory stepping will not function.
Duplex Stepping
Duplex stepping simplifies listening to fullduplex transmissions, which usually havewidely different transmit and receivefrequencies. It can also be used to stepbetween other widely spaced transmissions,which have the same mode.
To set the frequency separation, select ‘Duplex Separation’ from the ‘Configure’menu. Any separation can be entered, up to the maximum tuning range of thereceiver.
To step up or down by an amount equal to this separation, press the Home orEnd keys respectively. If the user attempts to step outside the frequency limitsof the receiver, the command will be ignored.
Memory
WiNRADiO has the ability to store up to 1000 frequencies in amemory file, and the total number of memory files is limitedonly by hard disk capacity.
Each entry is assigned the following: a number from 0 to 999,the frequency, mode, group number(s), callsign and comment.

15
Using WiNRADiO
If the receiver is tuned to a frequency stored in the memory, the associatedcallsign and comment is displayed in the area below the main frequency readout.
Storing a Frequency into Memory
To store a frequency into memory, first tuneto that frequency and select the appropriatemode (if you wish the mode to be stored).
Click on the ‘S’ button (store to memory) orpress the S key.
A dialog box will pop up allowing you to enterother details about the frequency. The initialmemory number is the first empty memoryentry, starting at zero. You can also specify agroup number (or more), callsign andcomment.
If you select a memory number which isalready used, you will be asked to confirm overwriting the existing frequency.
Recalling a Frequency from Memory
There are several ways to recall a frequency from memory:• Use a hotkey;• Type a number into the memory number display;• Type a number while holding down the Control key;• Use the memory recall/view dialog box;• Use memory stepping.

16
WiNRADiO User’s Guide
Hotkey
The quickest way to recall a frequency is to assign a function hotkey to it whenyou initially store the frequency. Any function key from F2 to F12 can be used.Note that F1 cannot be used, as it is reserved for help.
If desired, existing memories can be edited to add a function hotkey (see below).
To recall a frequency using a hotkey, simply press the appropriate function key(F2 to F12), and it will be recalled instantly. This assumes that a frequency haspreviously been assigned to that key, of course.
Control-Number
To recall any memory, hold down the Control key down while typing the numberof the memory. Alternatively you can click on the memory display, enter thenumber, and then press Enter to recall it.
Memory Recall/View
The final alternative is to click on the ‘R’ button or press the R key, upon whicha memory recall dialog box will pop up allowing you to view and recall anyfrequency from a list. You can limit the list to a subset of frequencies byspecifying a search string, group number or selected modes. Then click on‘Find’, upon which only those frequencies which match the search criteria willbe shown.
To tune the receiver to a list entry and keep the memory viewer open, single-click on it with the left mouse button. To tune the receiver and close the viewer,double click on it. To tune the receiver to thefrequency it was tuned to before opening thememory viewer, click on ‘Previous’.
Editing Memory
To edit an existing memory entry, first click onthe ‘R’ button or press the R key. Select thememory to edit from the list, then click on‘Edit’.
You are able to modify every setting, includingthe frequency, except for the actual memorynumber.
To edit the next memory entry, click on the‘Next’ button.

17
Using WiNRADiO
Saving and Loading Memory Files
WiNRADiO stores 1000 frequencies in each memory file. You can choose whichfile is currently active, and you can also save the file under a different name.
When you start your WiNRADiO receiver for the first time, it creates a memoryfile called winradio.wrm. Every time you close your WiNRADiO session, thememory is automatically saved to the active file. To perform an immediate save,select ‘File - Memory file - Save’.
To open another memory file, select ‘File - Memory file - Open’. Before the newfile is opened, and if the current memory file has been modified during thecurrent session, you will be asked if you want to save the changes or not. Next,a dialog box will appear which allows you to open a different memory file (orreopen the same one discarding any changes since it was last opened). Theselected file will now become the active memory file.
To rename the current active file and save it under a different name, select‘Save as’ from the same submenu. A similar dialog box will appear, where youcan specify the new filename and/or path.
New Memory File
To clear all frequencies and start a new file, select ‘File – Memory file – New...’.Before the new file is opened, and if the current memory file has been modifiedduring the current session, you will be asked if you want to save the changesor not. A dialog box will then appear, prompting you to enter the name of thenew file.
Scanning
WiNRADiO provides a variety of scanningfunctions and options, to allow you to optimisethe way you search for stations. The followingsections describe the available scanningmethods and associated options.
Immediate Scanning
Immediate scanning is the quickest and simplest way to search for stations. Toactivate this, first set the desired stepping mode and step size if necessary,then click on the immediate scan up or scan down button. The receiver willthen start scanning up or down from the current frequency, according to theselected step size.

18
WiNRADiO User’s Guide
If the receivers encounters a signal which has the same or higher strength thanthe current squelch threshold, it will either pause or stop, depending on theselected scanning options (see below).
To access immediate scanning from the keyboard, use the Insertor Delete keys to scan up or down respectively. To cancelimmediate scanning, press the Escape key.
Frequency Range Scanning
Frequency range scanning (called ‘range scanning’ from now on) allows youto specify multiple scanning ranges in a list. Each range is defined by the startand stop frequency, step size, mode and squelch setting. Changes to the listare automatically stored on the hard disk when the list box is closed.
To perform a range scan, you can eitherspecify a range in the ‘Frequency Range’area (and there must be no entriesselected in the list below), or else selectone or more ranges in the list below; thenclick on ‘Scan’ to commence scanning.
To access range scanning from thekeyboard, press the G key.
To write active frequencies to memory, select ‘Store to memory’ in the‘AutoStore’ group, and specify a range of memory numbers for the scanner towrite to. You can also assign a group number for the particular scan. If youwish to manually confirm frequencies before they are written, check the ‘Confirm’box. If you wish to store frequencies that already exist in the memory, check the‘Store duplicate frequencies’ box.
Memory Scan
To scan frequencies stored in memory click on the ‘Memory’ button or pressthe M key, to open the memory scandialog box.
You can select the range of memorynumbers to scan, and also restrict theentries by specifying only certainmodes and a group number.
You can also select priority scan, inwhich the scanner tunes to thepriority frequency every second step.

19
Using WiNRADiO
Scanner Options
There are several options that canbe set for the scanner to suit yourneeds. You can specify how thescanner operates when it pausesat a signal and how fast it scans.
When the scanner finds a signal,it has two basic options: pause orstop. If ‘pause’ is specified, youcan force the scanner to continue,stop, exclude or wait.
If you leave it waiting, there are four different options to allow it to continueautomatically:
• When the signal disappears (drops below the squelch level)• After a fixed period of time (regardless of the signal level)• When the signal disappears during a fixed period of time or after the
fixed period of time (whichever comes first)• After a signal disappears for at least a fixed period of time.
The fixed period of time is specified by the ‘Delay time’.
The scan rate specifies the maximum number of frequencies per second thescanner will check, but could be slower than specified if you have other programsrunning.
Your WiNRADiO software offers have two separate squelch settings: one foraudio and one for scanning. This option is specified under ‘Configure - GeneralOptions’ in the ‘Configure’ menu. If this feature is enabled, another control isvisible at the bottom of the dialog box. It allows you to specify the scannersquelch while the audio squelch remains controlled from the main panel.
Exclusions
To avoid the scanner stopping at unwanted frequencies, your WiNRADiOsoftware can maintain a frequency exclusion list. The exclusion list contains alist of frequency ranges which are skipped by the scanner.
During a scan, you have the option of adding frequencies to the exclusion listby clicking on the ‘Exclude’ button (this option is enabled by checking ‘Enableexcluding while scanning’ at the bottom of the ‘Scanning Exclusions’ dialogbox). The range that is excluded depends on the mode. In CW, LSB and USBmodes, the default range excluded is ±999 Hz, AM is ±1.999 kHz, FMN is±6.249 kHz and FMW is ±49.999 kHz of the current receiver frequency. If you

20
WiNRADiO User’s Guide
want to change any of these defaultvalues after they have been added,select the exclusion from the list andclick on the ‘Edit’ button.
You can also manually add exclusionsby clicking on the ‘Add’ button, editor delete existing ranges. There is nopriority system; if the frequency iswithin any range in the list, it will beignored by the scanner.
Miscellaneous
Mute
The mute button controls the audio output of your WiNRADiO receiver. If it ison, the output is muted (switched off). To activate (or deactivate) the mutecontrol, click on it or press Ctrl+U.
IF Shift and BFO Offset
On the 1500 in CW, LSB and USB modes, a control isenabled at the top-left corner of the panel to allow you toadjust the ‘IF Shift’ of the receiver. This controls thequality of the audio reception of an SSB transmission.The IF can be shifted up to 2000 Hz above or below thenormal location.
On the 1000 in SSB mode, the BFO Offset control allows the receiving frequencyto be set in precise 5 Hz steps, to ensure accurate reception of SSB and CWtransmissions. An offset of up to 3000 Hz above or below the current frequencycan be set.
To use the control, click on the display and enter the frequency in Hz. To setthe frequency from the keyboard, press I or Ctrl+B and enter the frequency. Toquickly reset the display to 0, press the Reset button or the ‘star’ key on thenumeric keypad.
To adjust the frequency incrementally, click on the up/down buttons next tothe display with the mouse, or use the + and - keys on the numeric keypad. Youcan also use the slider button located in between the up/down buttons as

21
Using WiNRADiO
described in the ‘Volume Control’ section. You may find it convenient to reversethe + and - keys (see ‘Configure - General Options’).
Indicators
The three LED-like indicators indicate various states ofyour WiNRADiO receiever.
The squelch indicator, ‘Sqlch’, is green when the squelch is inactive (the audiooutput is open), and red when it is active or about to activate (depending onthe ‘Squelch delay’ time specified under ‘Configure - General Options’).
The ‘PLL’ indicator shows the lock status of the receiver’s Phase Lock Loop.When operating normally, the indicator is green. If something goes wrong, itwill turn red indicating that the receiver cannot tune into a specific frequency.
The ‘Power’ indicator indicates that the receiver is powered up.
Power Switch
The power switch controls the radio receiver’s power. When it is off, the actualreceiver circuitry is powered down.
Date and Time Displays
The date and time displays show the current localtime and UTC standard time. The actual formatof the displays is controlled by ‘RegionalSettings’ in the Control Panel (or ‘International’in Windows 3.1 and NT 3.5) and to a lesser degree in the ‘Date and Time’ dialogactivated from the ‘Configure’ menu.
The time difference between the local timeand UTC is set under ‘Date/Time’ in theControl Panel in Windows 95 and NT,while in Windows 3.1 you have tomanually specify it in the ‘Date and Time’configuration dialog box.
If you are in a country with 12-hour time,you can specify whether to show the localtime in 12 or 24-hour format and whetherto show UTC in 24-hour format.
If you are in a country with 24-hour time, you have no option to show the timein the 12-hour format.

22
WiNRADiO User’s Guide
Window Properties
There are several features that allow the customisation of your WiNRADiOinterface. These include:
• size of the window• position of the panel in the window if the window is smaller than the
panel• background colour• whether it is always on top of all other windows• whether the title and menu bars are hidden for a smaller window
The first two are basic Windows features. The window that contains the receiverpanel can be positioned anywhere in the Windows desktop and can be sized tobe as big or as small as you want. When the window is smaller than the actualpanel, scroll bars will appear to allow you to access hidden parts of the panel(see the next page for an example of a small window).
Background Colour
To adjust the background colour, select ‘Background Colour’ from the‘Configure’ menu. A dialog box will appear that allows you to specify thecolour you want for your background.
You can select one of several predefined colours, visually select a colour usingthe colour box (hue v saturation) and the ‘luminance’, or enter the colourspecifying actual RGB or HSL values.
Click on ‘Apply’ to see the colour before closing the dialog box.

23
Using WiNRADiO
Always On Top
This facility allows the WiNRADiO window to remain always visible, evenwhen using other programs (such as a word processor). To enable theWiNRADiO window to do this, select ‘Always on top’ from the ‘Configure’menu. A check mark will appear next to this menu command. To undo thisoption, select the menu command again, and the check mark will be removedand WiNRADiO will act like other normal windows.
Hide Title Bar
The ability to hide the title barand menu allows you to reducethe overall size of the window.To activate this feature, select‘Hide title bar’ in the ‘Configure’menu.
This feature is especially useful in conjunction with the‘Always On Top’ feature to allow a small window to sit ontop of all windows. For example, you could just show thecurrent frequency as shown here.
To access the menu commands, click on the little buttonthat is visible in the top-left corner of the window. To movethe window around the screen, click-and-drag on anyinactive part of the WiNRADiO panel or background. Toshow the title bar and menu, select the ‘Hide title bar’command in the ‘View’ menu.
General Options
Other configurable options for WiNRADiOhave been grouped into a common dialog boxcalled ‘General Options’ which is accessedfrom the ‘Configure’ menu.
The Frequency readout offset specifies avalue that is added to the displayed frequency.It is useful if you are receiving a transmissionthrough a down-converter (to receivefrequencies higher than upper limit of thereceiver).
The other options are self-explanatory, if you need more explanation about aparticular feature, refer to the on-line help.

24
WiNRADiO User’s Guide
Spectrum Scope
The ‘Spectrum Scope’ is a utility to display and store the signal level across afrequency range. After a frequency sweep has been performed, you can tuneto any frequency on the display. To tune to a frequency or peak on the display,click on it. You can hold down the mouse button and drag the cursor across thedisplay quickly tuning to any frequency on the display (this facility will bedescribed in greater detail under chapter heading ‘VisiTune’). You can evenconfigure it to tune another receiver card into the selected frequency. Double-clicking finds and tunes to the closest peak.
Spectrum Sweeping
To perform a spectrum sweep, you have two methods of specifying thefrequency range. You can either specify it by the start and stop frequencies, orby the centre frequency and the width of the sweep. To specify a sweep method,see the following section on ‘Options’.
Next, you specify the step size depending on the resolution and speed youwant. The resolution bandwidth (RBW) also has an effect on the step size. Fora slower, higher detail sweep, select a small step size, and in contrast, for aquick, coarse sweep, select a large step size. For example, if you are using the17 kHz RBW, step sizes below 10 kHz are not useful; all signals would becaptured at 10 kHz. A 5 kHz step is suitable for a fairly detailed sweep using anRBW of 6 kHz. If you select a step size larger than the RBW, it is possible thatsignals will be missed that are located between two stepped frequencies.
Once you have specified the parameters, click on the ‘Sweep’ button to performa sweep.
To stop a sweep prematurely, click on the ‘Stop’ button (which is the ‘Sweep’button with a different caption). If you stop, clicking on the sweep buttonagain will start a new sweep from the start (but the previous sweep will bepreserved until a parameter is changed).
Alternatively, you can click on the ‘Pause’ button to pause the sweeping andclick on it again to let the scope resume from the frequency it was paused at.

25
Using WiNRADiO
VisiTune™
A unique feature of the WiNRADiO Spectrum Scope makes it possible tosmoothly tune the receiver by dragging the mouse against a spectrumbackground. This feature is called ‘VisiTune’.
When you click on a spectrum sweep with the left mouse button, the receiverwill tune to the frequency where the mouse is located (the frequency is displayedin the top-left corner of the scope window). If you hold the mouse button downand drag it left or right, the receiver will immediately respond to your movements,allowing you to directly inspect transmissions visible on the spectrum sweep.
If you double-click at a point on the display, WiNRADiO will search for thehighest peak nearest the cursor depending on the slope of the sweep at thecursor. It will check the level at either side of the frequency where you double-clicked. It will then follow the slope that rises towards a peak until it reaches apeak. It you click at a valley, it will search both sides for the highest peak.Clicking on a flat part will not start a search for a peak.
To make VisiTune more useful, you can configure the spectrum scope to useanother receiver for sweeping. If you have another WiNRADiO card installed,this allows you to let the spectrum scope to continually sweep the band youare interested in and at the same time tune and listen to any frequency in thesweep. See the ‘Options’ section for more information on configuring thisfeature.
These tuning methods can be accessed from the context menu, invoked byclicking with the right mouse button on the display. You can choose ‘Tune tocurrent frequency’ and ‘Tune to current peak’ to tune the same as above.Alternatively, you can select ‘Tune to maximum peak’ and ‘Tune to averagepeak’ to tune to a peak on those calculated sweeps respectively.
You can also explicitly select a receiver to tune the frequency to, other than thedefault. If you have two or more WiNRADiO receivers you can tune one ofthese other receivers to the frequency or frequency peak. Click on the appropriatereceiver under ‘Tune other receiver to freq’.
Finally, if you have only one receiver, you might wish to enable the ‘Manualrefresh’ feature under ‘Options’. When enabled, the background spectrumgraph will be updated while you are navigating around it with the left-handmouse button held down (note that, with the fast hand movements over a largefrequency range, the receiver’s settling time might not allow accurate updatingof the displayed spectrum).
26
WiNRADiO User’s Guide
Saving and Loading Files
Every sweep is recorded until a new sweep is performed with differentparameters. To save sweep data, click on the ‘File’ button and select ‘Save’from the pop up menu. Enter a file name in the dialog that appears and click onOK to save the file.
To load a previously saved file, click on ‘Load’ from the ‘File’ menu. Select thefile and click on OK. Any previous sweep data will be immediately cleared.
Options
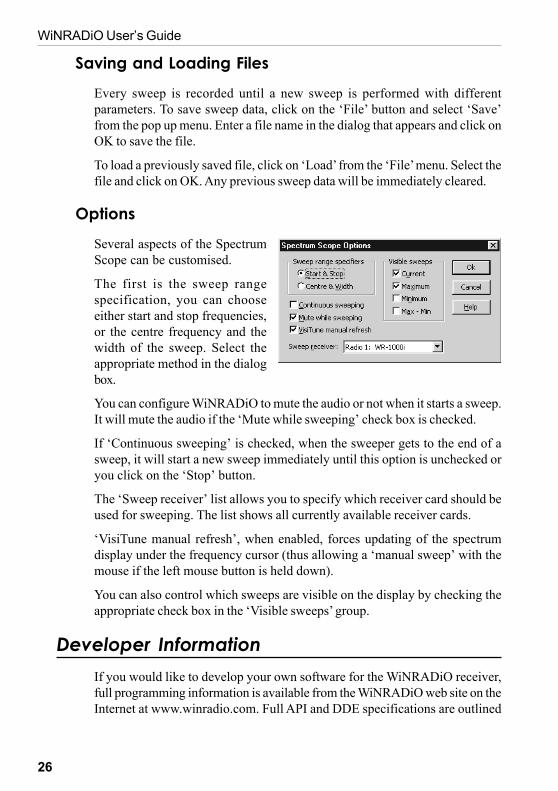
Several aspects of the SpectrumScope can be customised.
The first is the sweep rangespecification, you can chooseeither start and stop frequencies,or the centre frequency and thewidth of the sweep. Select theappropriate method in the dialogbox.
You can configure WiNRADiO to mute the audio or not when it starts a sweep.It will mute the audio if the ‘Mute while sweeping’ check box is checked.
If ‘Continuous sweeping’ is checked, when the sweeper gets to the end of asweep, it will start a new sweep immediately until this option is unchecked oryou click on the ‘Stop’ button.
The ‘Sweep receiver’ list allows you to specify which receiver card should beused for sweeping. The list shows all currently available receiver cards.
‘VisiTune manual refresh’, when enabled, forces updating of the spectrumdisplay under the frequency cursor (thus allowing a ‘manual sweep’ with themouse if the left mouse button is held down).
You can also control which sweeps are visible on the display by checking theappropriate check box in the ‘Visible sweeps’ group.
Developer Information
If you would like to develop your own software for the WiNRADiO receiver,full programming information is available from the WiNRADiO web site on theInternet at www.winradio.com. Full API and DDE specifications are outlined

27
Using WiNRADiO
including source and examples that can be downloaded for C++, Delphi andVisual Basic programmers.
Add-on Options
Two interesting options you might wish to consider are the WiNRADiO WorldStation Database Manager and the WiNRADiO Digital Suite.
WiNRADiO World Station Database Manager
The WiNRADiO World Station Database Manager is a fully integrated optionwhich adds powerful frequency database facilities to your WiNRADiO receiver,making it possible to keep track of hundreds of thousands frequencies.
Upon installation, the Database Manager will appear as a new menu entry inthe WiNRADiO receiver software, and can be invoked from there. The programcan be used in two different ways: to identify the station the receiver is currentlytuned to, or to tune the receiver to a frequency from within the database.
The database can also be searched using a large variety of search keys andcriteria, for example frequencies, countries, mode, power etc. For example, ifyou wish to list all AM broadcast stations in USA, the database will happilyoblige: all you need to do to tune the receiver is click on a database record.Database search results can be saved in a file for later retrieval.
New database records can be added, edited or deleted. Comprehensive importingfacilities also make it possible to import existing frequency lists from othersources in a variety of formats.
In addition to Frequency, Mode, Location, Country, Callsign and a Commenteach database record can also contain Power, Class and Geographical Co-ordinates of each station.

28
WiNRADiO User’s Guide
The display is user-configurable allowing you to choose items for display andthe space allocated to them. Displayed records can be sorted according to avariety of criteria. A powerful import facility makes it possible to import frequencylists from other sources.
The WiNRADiO World Station Database Manager comes with a ready-madedatabase of hundreds of thousands stations worldwide.
WiNRADiO Digital Suite
The WiNRADiO Digital Suite is an optional software package, a collection ofdigital signal processing modules, fully integrated with any type of WiNRADiOreceivers. Together, they represent a breakthrough in reception of digitallycoded radio communications - never before has such a comprehensive collectionbeen made available at such a low cost and so elegantly integrated with a PC-based radio receiver.
The WiNRADiO Digital Suite expands the power of your WiNRADiO receiverwith numerous digital processing facilities, including:
• WEFAX (Satellite Weather Fax)• HF Fax• Packet Radio• Aircraft Addressing and Reporting System (ACARS)• Dual-Tone Multi-Frequency signalling (DTMF)• Continuous Tone Coded Squelch System (CTCSS)• Signal Classifier• Audio Oscilloscope and Spectrum Analyser• Squelch-controlled Audio Recorder and Playback
Upon installation, the WiNRADiO Digital Suite will appear as a new menuentry in the WiNRADiO receiver software, and all the above modules can beinvoked from there.
The WiNRADiO Digital Suite represents a substantial enhancement for yourWiNRADiO and should be worth considering - receive satellite images, aircraftcommunications and other interesting digital communications on your PC!
For more information about these and other available options, to download ademo and to order, use a Web site closest to your location:
• North America: www.winradio.com• Europe: www.winradio.co.uk• Australia/Asia: www.winradio.net.au
We hope you will enjoy your WiNRADiO and look forward to remain in touch– please don’t forget to email us to register for your free WiNRADiO Newsletter.Please let us know about your impressions of WiNRADiO. Any comments and

29
Using WiNRADiO
suggestions will be most welcome and will help us to make our product betterfor you!
Weather fax satellite image


