20
Wired Cycle Computer Instruction Manual

Wired Cycle ComputerInstruction Manual
Contents:
1. Supply
2. Assembly / Instructions
3. Keys & Functions
4. Modes
5. LCD Display
6. Basic Operations
7. Wheel Size
8. General Settings
9. Reset
10. Battery Replacement
11. Care & Maintenance
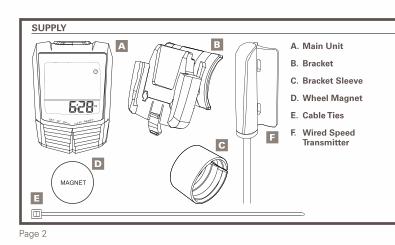
SUPPLY
Page 2
MAGNET
A. Main Unit
B. Bracket
C. Bracket Sleeve
D. Wheel Magnet
E. Cable Ties
F. Wired Speed Transmitter

ASSEMBLY / INSTALLATION: Transmitter
Page 3
1. Using the cable ties, loosely mount the speed transmitter to the fork blade. Ensure that this is on the same side of the bike as the handlebar bracket.
2. Screw the magnet loosely onto the wheel spoke, ensure it is on the same side as the transmitter.

ASSEMBLY / INSTALLATION: Wheel Magnet / Angle
Page 4
3. Adjust the position of the magnet and sensor, the magnet must pass through the sensor zone, the maximum clearance distance between them is 5mm. If the magnet and sensor are not close enough the computer will not pick up a reading.
4. Once the wheel magnet and transmitter are aligned properly, securely tighten both in place and trim off the excess cable ties.
5. Lead the wire to the handlebars along the outer cable of the brakes.
6. CAUTION: Adjust the wire length so that it does not pull when the handlebars are moved.
SENSOR
MAGNET
FORK

ASSEMBLY / INSTALLATION: Main Unit
Page 5.
1. Place unit on bracket.2. Slide down until the “click”
sound appears.

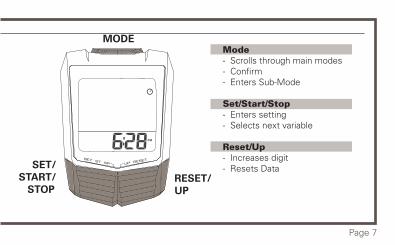
KEYS & FUNCTIONS
Page 6
Page 7

Page 8
LCD DISPLAY
Mode IndicatorMarks which mode you are currently on.
Pace ArrowThe arrows indicate if your current speed is above, below or neutral to your average speed.
Speed WindowDisplays current speed and is always visible in any mode.
Km/h & MphDisplays speed and distance in Miles or Kilometers.
Clock ModeDisplays current time.
Low BatteryIndicates the batteries are low.
LCD DISPLAY
Page 9
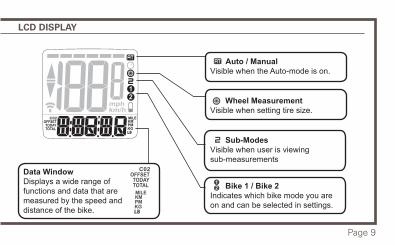
Data WindowDisplays a wide range of functions and data that are measured by the speed and distance of the bike.
Auto / Manual Visible when the Auto-mode is on.
Sub-ModesVisible when user is viewing sub-measurements
Wheel MeasurementVisible when setting tire size.
Bike 1 / Bike 2Indicates which bike mode you are on and can be selected in settings.

Page 10
BASIC OPERATIONS: Getting Started
Getting StartedWhen the computer is turned on whenever the battery is re-installed, the following start up settings will automatically begin.
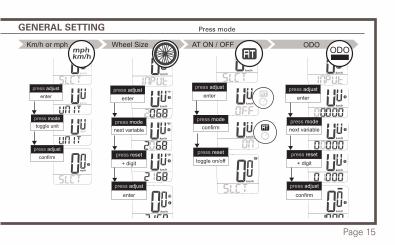
Wheel Size km/h or mph Clock
See pages 18-19 (GENERAL SETTINGS) for setting sequences. Follow the icons on top. Once the setting is done the standby screen will be visible. From here you can start your
steps on pages 18-19.
* Setting will be skipped to the default time display when in-active for 30 seconds.

LCD Display
Page 11
Start/Stopping Measurements
When Auto-mode is on, the computer detects the wheel spinning and starts measurement automatically in sync with the bicycle. Start/Stopping measurement with the SET/START/STOP key will be disabled.
When Auto-mode is off, the computer starts/stops the measurement manually with the SET/START/STOP key.
SET/START/STOP
* For turning on/off Auto-mode, refer to page 18 (GENERAL SETTINGS).
Page 12
BASIC OPERATIONS: Power-Saving
Power-Saving Mode Sleep Mode
Set/Start/Stop
Mode
Power-Saving
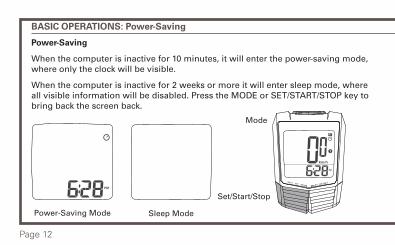
When the computer is inactive for 10 minutes, it will enter the power-saving mode, where only the clock will be visible.
When the computer is inactive for 2 weeks or more it will enter sleep mode, where all visible information will be disabled. Press the MODE or SET/START/STOP key to bring back the screen back.

WHEEL SIZE: Measuring the Circumference
Page 13
Measure
Ground
Front Axle
(radius) mm x 6.28=WS
Roll forward once
Wheel Circumference

press adjust
press mode
press adjust
enter
toggle 1 or 2
confirm
press adjust
press mode
press adjust
enter
toggle 12/24
enter time
press mode
press mode
press reset
next variable
next variable
+ digit
press adjust
confirm
Clock Bike 1 or 2Hold adjustenter setting
any mode
Adjust
Mode
ResetPAGE 17
Page 14
GENERAL SETTING
GENERAL SETTING
Page 15
confirm
press adjust
press mode
press reset
enter
toggle on/off
press adjust
press mode
press reset
enter
next variable
+ digit
press adjust
confirm
press adjust
press mode
press reset
enter
next variable
+ digit
press adjust
enter
press adjust
press mode
press adjust
enter
toggle unit
confirm
ODOKm/h or mph Wheel Size AT ON / OFF ODO

Page 16
RESET
INDIVIDUAL RESET:
Hold the RESET key for 2 seconds will reset the data for a specific mode.
* CO2 and ODO will not reset.
Hold the RESET key for 2 seconds
Reset individual data
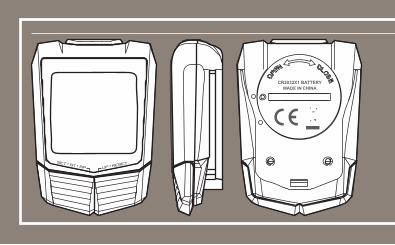
BATTERY REPLACEMENT
Page 17
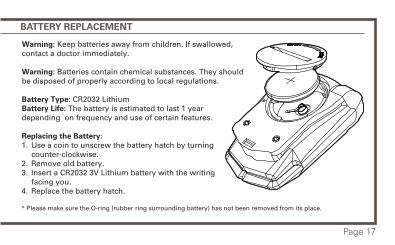
Warning: Keep batteries away from children. If swallowed, contact a doctor immediately.
Warning: Batteries contain chemical substances. They should be disposed of properly according to local regulations.
Battery Type: CR2032 LithiumBattery Life: The battery is estimated to last 1 year depending on frequency and use of certain features.
Replacing the Battery:1. Use a coin to unscrew the battery hatch by turning
counter-clockwise.2. Remove old battery.3. Insert a CR2032 3V Lithium battery with the writing
facing you.4. Replace the battery hatch.
* Please make sure the O-ring (rubber ring surrounding battery) has not been removed from its place.

CARE & MAINTENANCE
- Never attempt to disassemble the cycle computer.
- Protect your cycle computer from extreme heat, shocks and long time exposure to direct sunlight.
- Wipe with a lightly moistened cloth. Apply mild soap to the area if there are stubborn stains or marks. Do not expose your cycle computer to strong chemicals such as gasoline, clean solvents, acetone, and alcohol, insect repellents, as they may damage the unit’s seal, case and finish.
- Store your cycle computer in a dry place when not in use.
- Avoid allowing the cycle computer to come into direct contact with hair liquids, colognes, sun block, creams and other toiletries which can cause deterioration of the plastic parts. Whenever the cycle computer comes into contact with these or other toiletries, wipe it off immediately with dry, soft cloth.
PAC02381
Made in China


