305
Brought to you by ownSky!
| Date post: | 28-Nov-2014 |
| Category: |
Documents |
| Upload: | yuhariz-aldyan |
| View: | 106 times |
| Download: | 1 times |
Brought to you by ownSky!
Table of Contents
Wireless J2ME™ Platform Programming
By Vartan Piroumian
Publisher : Prentice Hall PTR
Pub Date : March 25, 2002
ISBN : 0-13-044914-8
Pages : 400
In Wireless J2ME Platform Programming, one of the leading wireless application consultants at Sun has written a step-by-step guide to successful wireless development with the J2ME platform. Vartan Piroumian illuminates every key feature of the J2ME platform, and the entire development process: planning, design, architecture, coding, user interface development, compilation, debugging, execution, provisioning, gateway integration, internationalization, application provisioning, and more.

ii
Table of Content Table of Content ........................................................................................................ii Copyright ..................................................................................................................iv
RESTRICTED RIGHTS LEGEND ...................................................................iv TRADEMARKS...................................................................................................iv Credits ..................................................................................................................iv Dedication.............................................................................................................v
Foreword ....................................................................................................................v Preface.......................................................................................................................vi Acknowledgments....................................................................................................vii Introduction............................................................................................................ viii
Book Content and Organization.......................................................................ix Audience ...............................................................................................................x Conventions Used In This Book ......................................................................xi Where to Download J2ME ................................................................................xi Where to Find the Code Examples From This Book ....................................xi
Chapter 1. Introduction to the Java 2 Micro Edition (J2ME) Platform .....................1 Defining a Java Platform for Pervasive Devices ............................................1 Configurations and Profiles ...............................................................................3 Device Application Management Systems....................................................11 Chapter Summary .............................................................................................12
Chapter 2. The MIDP Application Development Process .......................................13 Designing and Coding ......................................................................................14 Compilation ........................................................................................................15 Preverification ....................................................................................................16 Packaging...........................................................................................................17 Deployment and Execution..............................................................................21 Using the J2ME Wireless Toolkit ....................................................................21 Chapter Summary .............................................................................................31
Chapter 3. MIDP Application Program Structure....................................................32 The Application Execution Lifecycle...............................................................32 MIDlet Program Structure ................................................................................36 The MIDlet State Model ...................................................................................38 The MIDP UI Component Model.....................................................................40 System Properties.............................................................................................44 Application Properties.......................................................................................46 Chapter Summary .............................................................................................48
Chapter 4. The MIDP High-Level API....................................................................49 Command Processing ......................................................................................49 Command-Processing Scenario .....................................................................50 Screen Navigation .............................................................................................60 Command Organization ...................................................................................61 Chapter Summary .............................................................................................67
Chapter 5. The MIDP UI Components ....................................................................68 MIDP UI Component Hierarchy ......................................................................68 Screens and Screen Elements .......................................................................69 Screen Navigation .............................................................................................80 More Item Components....................................................................................82
iii
Chapter Summary ...........................................................................................100 Chapter 6. The MIDP Low-Level API ..................................................................102
Command and Event Handling .....................................................................103 Graphics Drawing............................................................................................109 Chapter Summary ...........................................................................................139
Chapter 7. Persistent Storage Support in MIDP ....................................................140 Device Support for Persistent Storage ........................................................140 RMS Data Storage Model ..............................................................................140 Records.............................................................................................................142 An Example Application .................................................................................142 Chapter Summary ...........................................................................................158
Chapter 8. MIDP Networking and Communications.............................................159 The MIDP Networking Model ........................................................................159 Generic Connection Framework Classes and Interfaces .........................162 Differences between J2ME and J2SE Networking ....................................200 Chapter Summary ...........................................................................................201
Chapter 9. Internationalization...............................................................................203 Concepts...........................................................................................................203 Internationalization Support in MIDP ...........................................................206 Designing an I18N Solution for a MIDP Application ..................................209 Chapter Summary ...........................................................................................251
Chapter 10. Application Provisioning....................................................................253 Concepts...........................................................................................................253 The Provisioning Process ..............................................................................256 Preparing Applications for Provisioning Systems ......................................262 Chapter Summary ...........................................................................................264
Chapter 11. The Wireless Internet Environment ...................................................265 Background, Terminology, and Concepts ...................................................265 The Wireless Application Environment ........................................................267 Wireless Applications......................................................................................269 Application Architecture .................................................................................272 Chapter Summary ...........................................................................................280
Appendix A. References ........................................................................................281 Glossary .................................................................................................................282

Copyright © 2002 Sun Microsystems, Inc.—
Printed in the United States of America.
901 San Antonio Road, Palo Alto, California
94303 U.S.A.
All rights reserved. This product and related documentation are protected by copyright and distributed under licenses restricting its use, copying, distribution, and decompilation. No part of this product or related documentation may be reproduced in any form by any means without prior written authorization of Sun and its licensors, if any.
RESTRICTED RIGHTS LEGEND
Use, duplication, or disclosure by the United States Government is subject to the restrictions set forth in DFARS 252.227-7013 (c)(1)(ii) and FAR 52.227-19.
The products described may be protected by one or more U.S. patents, foreign patents, or pending applications.
TRADEMARKS
Sun, Sun Microsystems, the Sun logo, Java, and all Java-based trademarks are trademarks or registered trademarks of Sun Microsystems, Inc. in the U.S. and other countries.
The publisher offers discounts on this book when ordered in bulk quantities. For more information, contact Corporate Sales Department, Prentice Hall PTR , One Lake Street, Upper Saddle River, NJ 07458. Phone: 800-382-3419; FAX: 201- 236-7141. E-mail: [email protected].
Credits
Editorial/production supervision: Carol Wheelan
Cover design director: Jerry Votta
Cover designer: Anthony Gemmellaro
Cover illustration: Karen Strelecki
Manufacturing manager: Alexis R. Heydt-Long
Marketing manager: Debby vanDijk
Acquisitions editor: Gregory G. Doench
Associate editor: Eileen Clark
Editorial assistant: Brandt Kenna
v
Sun Microsystems Press Publisher: Michael Llwyd Alread
10 9 8 7 6 5 4 3 2 1
Sun Microsystems Press
A Prentice Hall Title
Dedication
To Maans, Mom, Weesa, and Feem
To my parents, for the vastness, intensity, and quality of their love; for their unending commitment and responsibility as parents; for their sacrifice and dedication to providing the best possible environment, education, and life for their children; and for their guidance and the lessons and memories that last a lifetime.
And to my brother and sister, my utmost respect for their values, intelligence, love, support, faith, and loyalty.
Without them, nothing else really seems meaningful in this life.
Foreword When we announced Java 2 Micro Edition (J2ME) a few years ago, we believed that Java had an important role to play in handheld devices. Some were skeptical that Java would be small enough for such limited devices.
But no longer. Java for the small device is a success. J2ME has emerged strongly in the wireless market. Java's portability and extensibility have brought about rapid adoption in this market. Tens of millions of Java-enabled phones have already been sold, with adoption accelerating and much growth to come.
The success of Java beyond desktop computers is significant to developers. Java literacy is now more important than ever, as Java is used more and more to program a whole range of new computing devices—not only wireless handsets but also personal digital assistants, set-top boxes, cameras, automobiles, home control, and more types of devices not yet dreamed of. J2ME will be in many if not most of these devices; an understanding of J2ME and development of J2ME applications will increase the proficiency and effectiveness of any software developer.
This book is an excellent introduction to J2ME. Its tutorial structure promotes rapid learning and hands-on experience. It's especially interesting to see how the small device constraints on input, display, memory, and CPU all require skills different from those needed for the desktop environment. Common practices from the minicomputer and earlier eras are applicable once again.
We hope you enjoy this book and enjoy J2ME. Have fun!
Bill Joy, Mike Clary Sun Microsystems, Inc. San Francisco, January 2002

vi
Preface Undoubtedly, you already know that the Java 2 Micro Edition (J2ME) platform defines an environment that supports Java on so-called pervasive devices such as TV set-top boxes and on personal mobile devices such as PDAs, mobile phones, and pagers. This book teaches you how to design and develop Java applications for the J2ME platform.
Several motivations precipitated the creation of this book. First, I felt the need for a good book that cultivates a solid technical foundation for professional J2ME programmers by building upon concepts and idioms. I believe that such a book would be particularly useful in light of the explosive growth of the wireless computing paradigm. Wireless environments offer their own challenges to application developers because of their user interfaces, resource constraints, underlying wireless network characteristics, and the interface between the wireless and fixed network infrastructures. Concepts help organize this complexity. Moreover, concepts apply to all platforms.
I'm a firm believer that the best learning occurs when one first acquires a conceptual foundation and then complements it with practical application of concepts through pertinent techniques. In software, a platform's concepts and abstractions form the foundation needed to enable the developer to employ techniques and utilize toolkit idioms. This set of pragmatics comprises the core tools in the software engineer's arsenal. The engineer is then able to use a toolkit the way its designers intended it to be used. This discipline leads to better code.
With a view toward inculcating such discipline, this book is tutorial in nature and takes a somewhat pedagogical approach to the introduction of J2ME. Topics are presented in a logical progression, in the order in which one needs to understand concepts to design real applications from scratch. Each chapter builds upon those that precede it. Examples reflect the concepts and application of programming idioms.
This practical approach helps you understand what you need to do and why you need to do it. Armed with the knowledge of how things work, you can successfully design and build complex professional J2ME applications in the absence of suitable examples from reference manuals. Although reference manuals are valuable for demonstrating the mechanical manipulation of APIs on a small scale, they have greater difficulty demonstrating the foundation of concepts that are central to the design and organization of large-scale applications. Nor can they anticipate the design challenges you'll encounter in an arbitrarily complex, real-world application. The two approaches—reference and tutorial—are complementary, but I believe that conceptual learning is the first step.
The popularity and presence of wireless communications has been increasing steadily over the past few years. Worldwide omnipresence of third-generation systems that include Java is imminent. Personal devices that host practical applications will become available to the masses. Java in general, and J2ME in particular, have been influential in advancing the availability of a standard platform that supports the construction and deployment of nontrivial applications on personal mobile devices.
As technology advances in often unpredictable ways, the nature of future systems is uncertain at best. Platforms might merge, diverge, or become obsolete as new breakthroughs usher laboratory technology into the engineering mainstream. One thing is certain, though: The concepts underlying the engineering are more constant than the engineering details themselves.
Momentum is always influential in the world of technology. Because Java and J2ME define a worthwhile computing model, the longevity of J2ME is assured despite the constantly evolving

vii
technology in the industry. A solid foundation will enable you to navigate the changing landscape successfully.
I hope you enjoy this book and your entry into a computing arena that is as much just plain fun as it is dynamic. And I hope you will find this book useful as you begin your journey through the world of mobile computing.
Vartan Piroumian Palo Alto, California January 2002
Acknowledgments As always, many people other than the author participate in the creation and success of a book from genesis through distribution to the bookshelves. First and foremost, I would like to thank Rachel Borden of Sun Microsystems, to whom I first spoke about this project and who was instrumental in selling it to Prentice Hall. I would also like to thank Michael Alread of Sun for his efforts as continuing liaison with Prentice Hall.
It was a pleasure to work with all of the Prentice Hall staff—Eileen Clark, Gail Cocker, Greg Doench, and Debby vanDijk. Not only did they conduct themselves professionally but they also maintained open and productive lines of communication, coordination, and support throughout the project. I am looking forward to continuing to work with them in the future. I also would like to thank Sybil Ihrig of Helios Productions for her excellent work in the copyediting, page composition, and production stages. I always marvel at how good copyeditors can make authors seem eloquent.
Special thanks go to my colleagues from the Sun Santa Clara Java Center. Manisha Umbarje helped unearth localization resources for chapter 9. Marina Fisher helped by providing the Russian translations. Thanks to Rita Abrahamian and also to my mother, Edith Piroumian, for their help with the Armenian translations and for not scolding me for not being able to do it myself. I also would like to thank Brendan McCarthy, chief methodologist of the Sun Java Centers worldwide, for his input on chapter 11. Brendan is the principal author of Sun Microsystems' SunTone Architectural Methodology, and his input was invaluable in helping me explain a difficult topic clearly.
I also would like to give wholehearted thanks to Ms. Emiko Koyama for her timely Japanese translations. As usual, Koyama-san responded willingly and cheerfully to produce accurate translations in the ridiculously short time in which she had to work. My thanks also go out to Ms. Junko Sunamura for her quick response in providing some additional Japanese translations.
I also would like to express my sincere appreciation to some friends for graciously helping with the Chinese translations and allowing me to interrupt their family reunion during the Christmas and New Year seasons. Special thanks go out to Ms. Renee Tan for her guidance on how to efficiently navigate through more than forty thousand Chinese ideographs and eighty thousand unified Han ideographs and syllabaries, and for teaching me the finer points of radical indexing and six different ideographic organizational schemes. Likewise, special thanks go out to Mr. Sheng Song Tan for his help with Chinese and Japanese translations, and to Ms. Frances Han for her help with the simplified Chinese translations and pinyin indexing.
Mike Moumoutjis of CrispWireless in New York City gets special mention, not only for his standing offer to treat me to a sumptuous Greek dinner in New York, but also for introducing me to Pat Pyette, who took on the role of technical reviewer for this book. Pat is an accomplished
viii
J2ME developer and one of the two original founders of KVMWorld.com. Pat graciously took on this book project amidst his desperately busy schedule that includes running his consulting company, periMind Corporation (one of the founding companies of the Micro Java Network) as well as writing for the Micro Java Network. I thank Pat for his professionalism, sharp eye, meticulous attention to detail, and encouraging comments. Pat took the time to carefully examine each line of text and source code. His comments in every chapter have been invaluable in helping me improve the quality and usefulness of this book.
Gary Adams of Sun was kind enough to patiently answer all my questions about the subtleties of working in constrained resource environments. Of course, I can't forget John Rizzo of the Vodafone Global Platform Group in California for his insight and useful feedback on chapter 10. Not only have I enjoyed working with John professionally for the past year—I've also enjoyed his inimitable style.
I would like to sincerely thank my manager, Alex Wong of the Sun Santa Clara Java Center, for not only supporting me during this project but also for continuing to encourage me to pursue the project. Likewise, I would like to thank Jeffrey Johnson, manager of the Western Region Java Centers at Sun, and Stu Stern, Worldwide manager for the Sun Java Centers, for their support, and for their belief in the value of this book for our practice and for Sun.
Finally, I would like to thank Mike Clary of the Java Software division of Sun Microsystems and Bill Joy of Sun Microsystems for writing the foreword to this book. These gentlemen were the originators of the concept of the J2ME platform. I thank them for their support and for their willingness to be a part of this book project.
Introduction This book teaches you how to develop software for the Sun Microsystems J2ME platform. It follows a tutorial-style approach; it's not a reference manual. The aim is to give you a solid foundation in concepts and techniques that will enable you to venture off and develop quality applications independently.
Consistent with this approach, this book doesn't provide endless pages of API documentation; I leave that offering to the Sun Microsystems Java Software Web site, which maintains the latest and most accurate API documentation. The reader might find it useful, therefore, to have access to the official Java Software J2ME API documentation while reading this book, which can be found at http://java.sun.com/j2me/docs. You can either download the full API documentation or read it online. Additionally, Prentice Hall publishes as part of its Java series a J2ME reference manual that complements this book.
Also absent by design from this book are specific details of J2ME development tools offered by third-party vendors. In concert with the book's tutorial approach, I only introduce you to the Sun Microsystems J2ME Wireless Toolkit, which is the reference development toolkit for J2ME. It's available free of charge from Sun Microsystems at the Java Developer Connection Web site, which you must access by logging in. Follow the developer connection link from http://java.sun.com/. In this way, you can become familiar with a J2ME development environment and emulator and build and test real applications.
Device manufacturers often provide development tools of their own that are similar to Sun's J2ME Wireless Toolkit. Additionally, other third party software companies offer J2ME development tools. This book doesn't discuss those tools because they don't add anything to the concepts or pragmatics of how to design and develop J2ME applications.
ix
This book also defines and discusses wireless application provisioning systems and covers application deployment and provisioning from a conceptual perspective, without becoming mired in the details of specific vendor offerings of provisioning server software. The notion of application deployment is more visible—and more critical—with J2ME than with other platforms such as J2SE. In fact, understanding deployment issues is a crucial element of the J2ME application development process.
Finally, I expose the reader to ideas surrounding application architecture. As we rely more heavily on computing devices that are continually becoming more pervasive, it becomes increasingly important for developers to think about reliability, performance, scalability, security, manageability, and so forth. This book gives you an introduction to these concepts and to the notion that developers must think about these characteristics from the outset.
Although this book introduces elements comprising the breadth of the J2ME platform, it focuses on the CLDC and MIDP, which support personal, mobile, and independent devices—those with intermittent network connectivity, such as mobile phones. Programming examples and API discussions address this subset of the J2ME platform. The reason for this choice is that, as a J2ME developer, you will most likely be called upon to develop applications for this class of devices.
Book Content and Organization
The book is organized as follows:
• Chapter 1: Introduction to the Java 2 Micro Edition (J2ME) Platform • Chapter 2: The MIDP Application Development Process • Chapter 3: MIDP Application Program Structure • Chapter 4: The MIDP High-Level API • Chapter 5: The MIDP UI Components • Chapter 6: The MIDP Low-Level API • Chapter 7: Persistent Storage Support in MIDP • Chapter 8: MIDP Networking and Communications • Chapter 9: Internationalization • Chapter 10: Application Provisioning • Chapter 11: The Wireless Internet Environment
Chapter 1 introduces you to the J2ME computing platform. It defines much of the J2ME terminology and gives you a general orientation to the concepts that surround the design and organization of the J2ME platform.
Chapter 2 describes the J2ME application development process. You learn how to create, compile, prepare, execute, and debug J2ME applications. This chapter doesn't cover the toolkit or APIs. Coverage of those items begins in Chapter 3.
Chapter 3 describes the J2ME MIDP platform from the software developer's point of view. Here you learn the organization of the APIs and the basic programming abstractions and models defined by the MIDP platform.
Chapter 4 continues where Chapter 3 left off. It covers the MIDP high-level API, which encompasses the bulk of the UI components defined by the MIDP. You learn how to manipulate the various UI components and also how to do event handling, called command processing in MIDP terminology.
x
Chapter 5 covers the MIDP user interface (UI) components. After learning the basic abstractions defined by the MIDP in Chapter 4, you're ready to learn how to use the components that are built upon those abstractions.
Chapter 6 covers the MIDP low-level API, which is implemented by the balance of the MIDP UI components not covered in Chapter 5.
Chapter 7 covers the persistent storage mechanisms available to you using the MIDP.
Chapter 8 is dedicated to networking and communications. Here you learn how to use the networking and distributed processing services and functionality defined by the CLDC and MIDP. You will also acquire some insight on the decisions for design and support of connectivity services in J2ME.
Chapter 9 gives you an introduction to internationalization. This is a topic of considerable breadth and depth that requires more than even a single, dedicated volume. Here, you'll learn about some of the issues that you'll encounter while building real-world MIDP applications. This chapter covers the extent of the internationalization support in the CLDC and MIDP and shows some examples of how to employ their features. You'll also learn how to configure your device environment to support internationalization and localization.
Chapter 10 covers application management and provisioning systems. Conceptual familiarity with these systems is important to the J2ME application developer, particularly MIDP developers, because these systems affect your interaction with application and content providers, wireless network carriers, and even end users.
Chapter 11 discusses the wireless Internet environment. It discusses the integration between wireless and fixed networks, the wireless Internet from the application developer's perspective, and the context in which applications execute. You'll get an introduction to wireless Internet gateways, Internet portal interfaces, and wireless application interfaces and services—all things that you're likely to encounter as a wireless application developer. This chapter also introduces basic architectural concepts and how they influence the J2ME application developer.
Audience
This book is intended for Java developers. It's suitable for professional software developers and advanced students alike. More precisely, this book expects the reader to be fluent with the Java programming language but doesn't assume programming experience with particular APIs beyond the core Java APIs. Notwithstanding a lack of experience in any particular area of Java programming beyond fluency with the language, it's helpful if readers have at least an understanding of the concepts and vernacular that surrounds various Java technologies, such as those terms related to virtual machines, garbage collection, class loading, class verification, native code interfaces, just-in-time compilation, AWT, RMI, JDK, JRE, and so forth.
I also assume, however, that the reader has a decent background in object-oriented programming. For this reason, I don't explain object-oriented concepts when they arise during the process of discussing the J2ME APIs, classes, programming idioms, and so forth.
Of course, the more experience the reader has, the better. Throughout the book, various references are made to AWT and Swing. A significant part of MIDP programming involves manipulating user-interface components. The reader with knowledge of AWT or Swing toolkit abstractions can quickly glean useful insights into the organization and abstractions of the MIDP's UI

xi
programming model. Notwithstanding the benefits of AWT and Swing experience, you don't need to have any previous background in Java UI development.
Conventions Used In This Book
Table I.1 shows the typographical conventions used throughout this book. Table I.2 lists the conventions used for all source code included in this book.
Table I.1. Typographical Conventions Description of Data Typography Used Java source code, computer-generated text Fixed width Courier font First use of a new term Palatino italic font Regular prose Palatino regular font
Table I.2. Source Code Conventions Used Throughout This Book Type of Data Example Print Java method names, variable names: initial lowercase first word, initial capital letter for subsequent words
protected int variableNamepublic void lookAtThisMethodName()
Java class names: initial capital letter for all words public class AllWordsFirstCapital
Where to Download J2ME
You can download the J2ME Wireless Toolkit and full API documentation by following the links to the Java Developer Connection from http://java.sun.com/. There, you'll find full API documentation for CDC, the Foundation Profile and the CLDC/MIDP, as well as the toolkit for all platforms such as Solaris, Linux, Windows NT, and Windows 2000.
Where to Find the Code Examples From This Book
All the code examples that you encounter in this book can be found on the Prentice Hall Web site at http://www.phptr.com/piroumian
1
Chapter 1. Introduction to the Java 2 Micro Edition (J2ME) Platform
• Defining a Java Platform for Pervasive Devices • Configurations and Profiles • Device Application Management Systems
Sun Microsystems has defined three Java platforms, each of which addresses the needs of different computing environments:
• Java 2 Standard Edition (J2SE) • Java 2 Enterprise Edition (J2EE) • Java 2 Micro Edition (J2ME)
The inception of the J2ME platform arose from the need to define a computing platform that could accommodate consumer electronics and embedded devices. These devices are sometimes referred to collectively as pervasive devices.
The creators of the J2ME platform delineated pervasive devices into two distinct categories:
• Personal, mobile information devices that are capable of intermittent networked communications—mobile phones, two-way pagers, personal digital assistants (PDAs), and organizers
• Shared-connection information devices connected by fixed, uninterrupted network connection—set-top boxes, Internet TVs, Internet-enabled screen phones, high-end communicators, and car entertainment/navigation systems
The first category describes devices that have a special purpose or are limited in function; they are not general-purpose computing machines. The second category describes devices that generally have greater capability for user interface (UI) facilities. Of course, devices with superior UI facilities typically have more computing power. Practically speaking, computing power is the primary attribute that distinguishes these two categories of devices. Nevertheless, this delineation is somewhat fuzzy, because technology continues to enable more and more power to be placed in smaller and smaller devices.
Like computing power, connectivity—the availability of media such as wireless networks—also affects the kinds of functionality and services that pervasive devices can support. The challenge—and the primary goal—for J2ME is to specify a platform that can support a reasonable set of services for a broad spectrum of devices that have a wide range of different capabilities.
The creators of J2ME identify modular design as the key mechanism that enables support for multiple types of devices. The J2ME designers use configurations and profiles to make J2ME modular.
Defining a Java Platform for Pervasive Devices
Configurations and profiles are the main elements that comprise J2ME's modular design. These two elements enable support for the plethora of devices that J2ME supports.
2
A J2ME configuration defines a minimum Java platform for a family of devices. Members of a given family all have similar requirements for memory and processing power. A configuration is really a specification that identifies the system-level facilities available, such as a set of Java language features, the characteristics and features of the virtual machine present, and the minimum Java libraries that are supported. Software developers can expect a certain level of system support to be available for a family of devices that uses a particular configuration.
A configuration also specifies a minimum set of features for a category of devices. Device manufacturers implement profiles to provide a real platform for a family of devices that have the capabilities that a given configuration specifies.
The other J2ME building block, the profile, specifies the application-level interface for a particular class of devices. A profile implementation consists of a set of Java class libraries that provide this application-level interface. Thus, a profile theoretically could specify all kinds of functionality and services.
This is not the intention of its creators, however. The creators of J2ME intend that a profile should address the needs of a specific device category or vertical market pertaining to that device category. The idea is not to place a plethora of unrelated application-level features in a profile. Rather, the main goal is to guarantee interoperability—which doesn't necessarily imply compatibility between different manufacturers' implementations—between all devices of the same category or vertical market family to define a standard platform for Java application development.
For example, a profile might support a network communication facility for the popular Short Message Service (SMS) standard widely used by mobile phones. Because the SMS standard is a ubiquitous feature of mobile telephony, it makes sense to define this service in a profile that targets mobile phones, rather than to build it into a configuration.
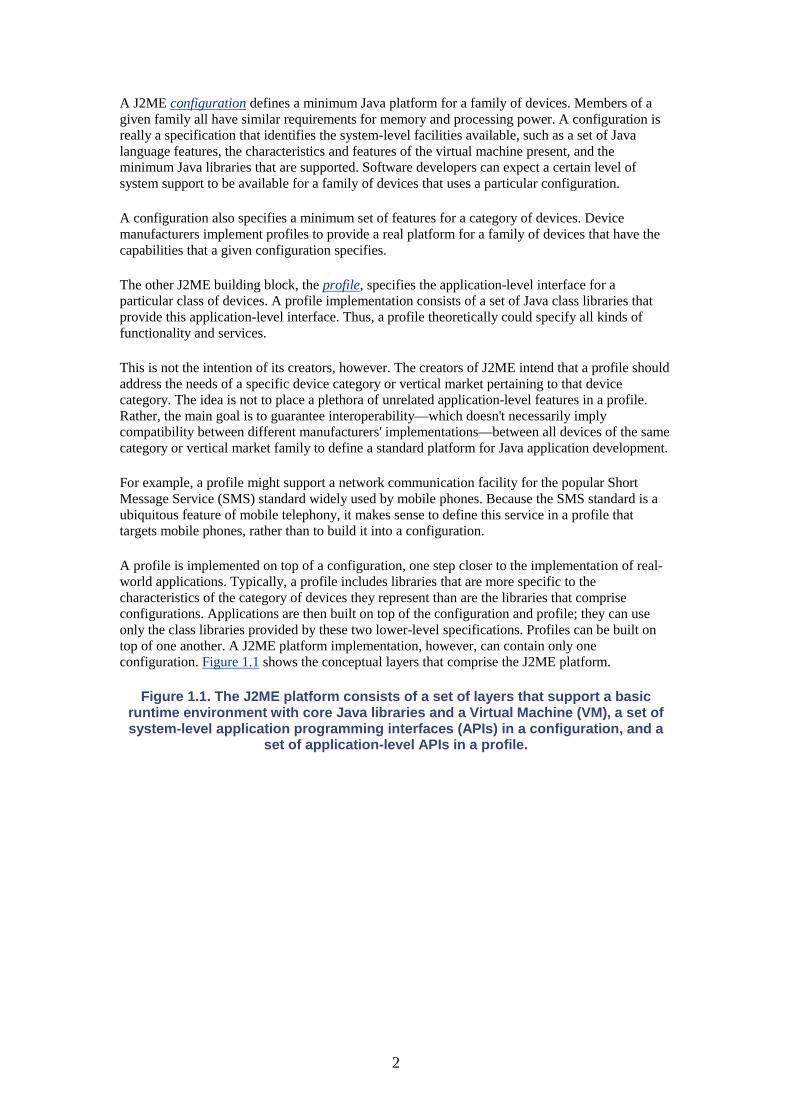
A profile is implemented on top of a configuration, one step closer to the implementation of real-world applications. Typically, a profile includes libraries that are more specific to the characteristics of the category of devices they represent than are the libraries that comprise configurations. Applications are then built on top of the configuration and profile; they can use only the class libraries provided by these two lower-level specifications. Profiles can be built on top of one another. A J2ME platform implementation, however, can contain only one configuration. Figure 1.1 shows the conceptual layers that comprise the J2ME platform.
Figure 1.1. The J2ME platform consists of a set of layers that support a basic runtime environment with core Java libraries and a Virtual Machine (VM), a set of system-level application programming interfaces (APIs) in a configuration, and a
set of application-level APIs in a profile.
3
So far, these notions of configurations, profiles, and platform definitions are somewhat abstract. The next section gives you a more concrete description of the characteristics of actual environments.
Configurations and Profiles
A configuration specifies three basic elements:
• a set of Java programming language features • a set of Java virtual machine features • a set of supported Java libraries and application programming interfaces (APIs)
The creators of J2ME have defined only two configurations to avoid a fragmented landscape of incompatible platforms. The two configurations that exist currently represent the two categories of pervasive devices you saw earlier in this chapter, namely:
• personal, intermittently connected mobile devices— supported by the Connected, Limited Device Configuration (CLDC)
• constantly connected network devices— supported by the Connected Device Configuration (CDC)
Theoretically, a configuration could specify the very same support as the J2SE platform libraries. This is unlikely in the real world because, as you now know, J2ME is targeted at devices that are far less powerful than desktop computers.
Configuration specifications require that all Java classes adapted from J2SE be the same as or a proper subset of the original J2SE class. That is, a class cannot add methods not found in the J2SE version. Configurations can include additional classes in their specifications; however, configurations themselves are not necessarily proper subsets of J2SE. Both configurations that have been defined to date add classes not present in J2SE in order to address device attributes and constraints.

4
The Connected Device Configuration (CDC)
The Connected Device Configuration (CDC) intends to capture just the essential capabilities of each kind of device in the category of devices it targets, namely, devices with 2 MB or more of total memory, including both RAM and ROM.
As you saw in Figure 1.1, a configuration specifies both the set of Java VM features that are supported and a set of class libraries. The CDC specifies the use of the full Java 2 platform VM, which, in this context, is called the Compact Virtual Machine (CVM).
The CVM. Although the CVM supports the same features as the J2SE VM, it is designed for consumer and embedded devices. This means that the standard J2SE VM has been reengineered to suit the constraints of limited-resource devices. The features of the resulting offspring CVM are:
• advanced memory system • small average garbage collection pause times • full separation of VM from memory system • modularized garbage collectors • generational garbage collection
In particular, the CVM has been engineered to offer the following features:
• portability • fast synchronization • execution of Java classes out of read-only memory (ROM) • native thread support • small class footprint • provision of interfaces to and support for real-time operating system (RTOS) services • mapping Java threads directly to native threads • support for all Java 2, v1.3 VM features and libraries: security, weak references, Java
Native Interface (JNI), Remote Method Invocation (RMI), Java Virtual Machine Debugging Interface (JVMDI)
CDC Class Libraries. The CDC specifies a minimal set of class libraries and APIs. It supports the following standard Java packages:
• java.lang— Java VM system classes • java.util— underlying Java utilities • java.net— Universal Datagram Protocol (UDP) datagram and input/output (I/O) • java.io— Java file I/O • java.text— very minimal support for internationalization (I18N—see chapter 9) • java.security— minimal fine-grain security and encryption for object serialization
As you can see, these APIs do not include the full set of Java 2 software development kit (SDK) packages. In some cases, these packages and classes are subsets of the Java 2 SDK packages and classes. Resource constraints dictate removal of the remainder of the J2SE classes and APIs. Also, all deprecated J2SE APIs are removed. Table 1.1 lists the full set of packages supported by the CDC.
Table 1.1. CDC Packages CDC Package Name Description java.io Standard I/O classes and interfaces java.lang VM classes

5
java.lang.ref Reference classes java.lang.reflect Reflection classes and interfaces java.math Math package java.net Networking classes and interfaces java.security Security classes and interfaces java.security.cert Security certificate classes java.text Text package java.util Standard utility classes java.util.jar Java Archive (JAR) utility classes java.util.zip ZIP utility classes javax.microedition.io CDC generic connection framework classes and interfaces
The Foundation Profile. A configuration, together with a profile, creates a J2ME runtime environment. The system-level features and services supported by a configuration are more or less hidden from the application developer. In reality, the application developer is prohibited from accessing them directly. If this were not the case, the application would not be considered J2ME compliant.
From the programmer's perspective, a profile is required to do "useful" work. A profile defines the layer that contains the APIs that the programmer usually manipulates. The J2ME creators initially defined one CDC profile, the Foundation Profile, which is based on the J2SE v1.3 release. It was designed by standard committee through the Java Community Process, by an expert group of companies in the consumer electronics industry. The Foundation Profile contains the J2SE packages listed in Table 1.2.
The list of packages above looks exactly like the list that comprises the CDC. In fact, they are the same. To say that the Foundation Profile contains these packages really means that they are available to the Foundation Profile. The intention is that the Foundation Profile be used with the CDC. The delineation between the profile and the configuration is a conceptual one, not a physical one.
Notice that the whole java.awt Abstract Window Toolkit (AWT) and javax.swing Swing package hierarchies that define the J2SE graphical user interface (GUI) APIs are absent from the supported packages. If an application needs a GUI, an additional profile would be required. Profiles can be built on top of one another. An implementation of the J2ME platform, however, can contain only one configuration.
The lack of GUI support in the Foundation Profile has less impact for the family of shared, constantly connected network devices such as TV set-top boxes than it does for personal, mobile devices, which are served by the second J2ME configuration, the CLDC.
In general, the decision to include or omit features and libraries from a configuration or profile is based on their footprints, static and dynamic resource requirements, and security requirements.
Table 1.2. Foundation Profile Packages Foundation Profile Package Name Description java.lang Rounds out full java.lang.* J2SE package support for the
Java language (Compiler, UnknownError) java.util Adds full zip support and other J2SE utilities
(java.util.Timer) java.net Adds TCP/IP Socket and HTTP connections
6
java.io Rounds out full java.io.* J2SE package support for Java language input/output (Reader and Writer classes)
java.text Rounds out full java.text.* J2SE package support for internationalization (I18N): Annotation, Collator, Iterator
java.security Adds code signing and certificates
Personal Profile. The Personal Profile specification was created through the Java Community Process, resulting in JSR-62. The Personal Profile provides an environment with full AWT support. The intention of its creators is to provide a platform suitable for Web applets. It also provides a J2ME migration path for Personal Java applications.
Personal Profile version 1.0 requires an implementation of the Foundation Profile version 1.0. It is a superset of the Personal Basis Profile version 1.0. Personal Profile is a subset of the J2SE version 1.3.1 platform, however, which makes Personal Profile applications upward compatible with J2SE version 1.3.1.
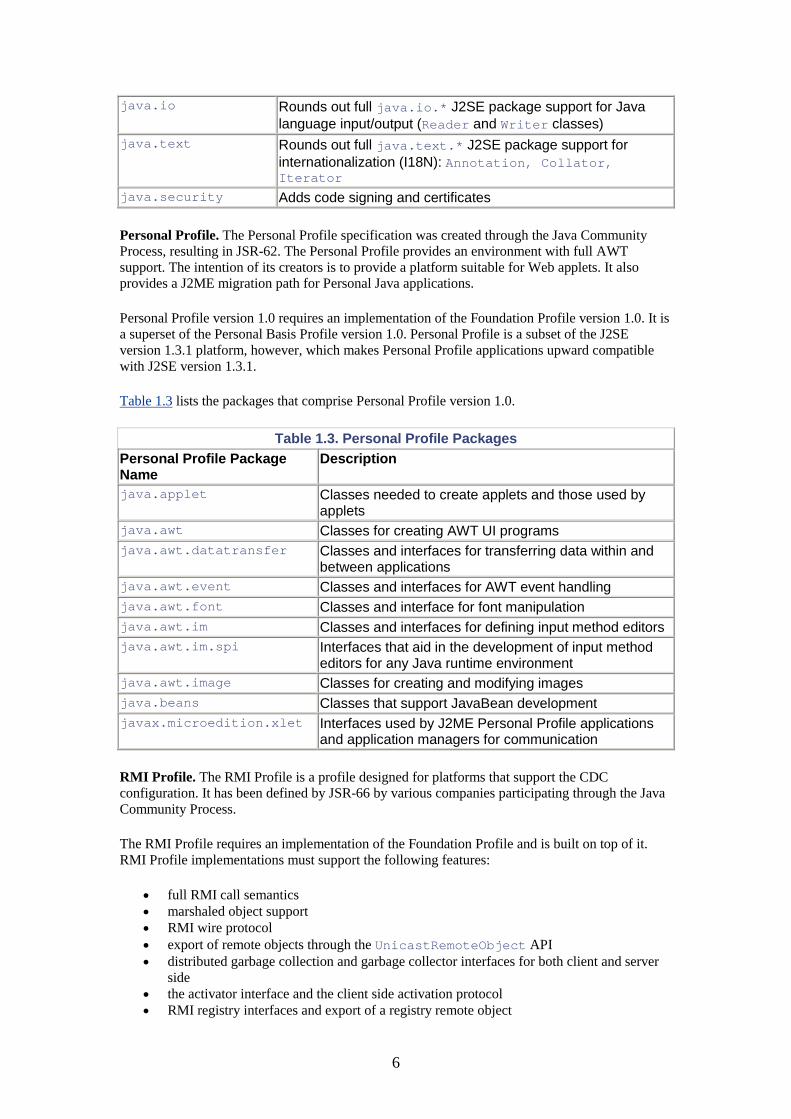
Table 1.3 lists the packages that comprise Personal Profile version 1.0.
Table 1.3. Personal Profile Packages Personal Profile Package Name
Description
java.applet Classes needed to create applets and those used by applets
java.awt Classes for creating AWT UI programs java.awt.datatransfer Classes and interfaces for transferring data within and
between applications java.awt.event Classes and interfaces for AWT event handling java.awt.font Classes and interface for font manipulation java.awt.im Classes and interfaces for defining input method editors java.awt.im.spi Interfaces that aid in the development of input method
editors for any Java runtime environment java.awt.image Classes for creating and modifying images java.beans Classes that support JavaBean development javax.microedition.xlet Interfaces used by J2ME Personal Profile applications
and application managers for communication
RMI Profile. The RMI Profile is a profile designed for platforms that support the CDC configuration. It has been defined by JSR-66 by various companies participating through the Java Community Process.
The RMI Profile requires an implementation of the Foundation Profile and is built on top of it. RMI Profile implementations must support the following features:
• full RMI call semantics • marshaled object support • RMI wire protocol • export of remote objects through the UnicastRemoteObject API • distributed garbage collection and garbage collector interfaces for both client and server
side • the activator interface and the client side activation protocol • RMI registry interfaces and export of a registry remote object
7
The RMI profile supports a subset of the J2SE v1.3 RMI API. The following interfaces and features are part of the J2SE v1.3 RMI specification and public API, but support for these interfaces and functionality is omitted from the RMI profile specification because of limitations on device processing power, network performance, and throughput:
• RMI through firewalls and proxies • RMI multiplexing protocol • implementation model for an "activatable" remote object • deprecated methods, classes, and interfaces • support for the RMI v1.1 skeleton/stub protocol • stub and skeleton compiler
Support for the following J2SE RMI v1.3 properties is omitted:
• java.rmi.server.disableHttp • java.rmi.activation.port • java.rmi.loader.packagePrefix • java.rmi.registry.packagePrefix • java.rmi.server.packagePrefix
Connected, Limited Device Configuration (CLDC)
The second of the two J2ME configurations, the Connected, Limited Device Configuration (CLDC), supports personal, mobile devices, which constitute a significantly less powerful class of devices than the one that the CDC supports. The CLDC specification identifies devices in this category as having the following characteristics:
• 160 to 512 KB total memory available for the Java platform • 16-bit or 32-bit processor • low power consumption, often battery powered • intermittent network connectivity (often wireless) with potentially limited bandwidth
The goal of the CLDC is to define a standard Java platform for these devices. Because of the wide variety of system software on various personal devices, the CLDC makes minimum assumptions about the environment in which it exists. For example, one OS might support multiple concurrent processes, another might or might not support a file system, and so forth.
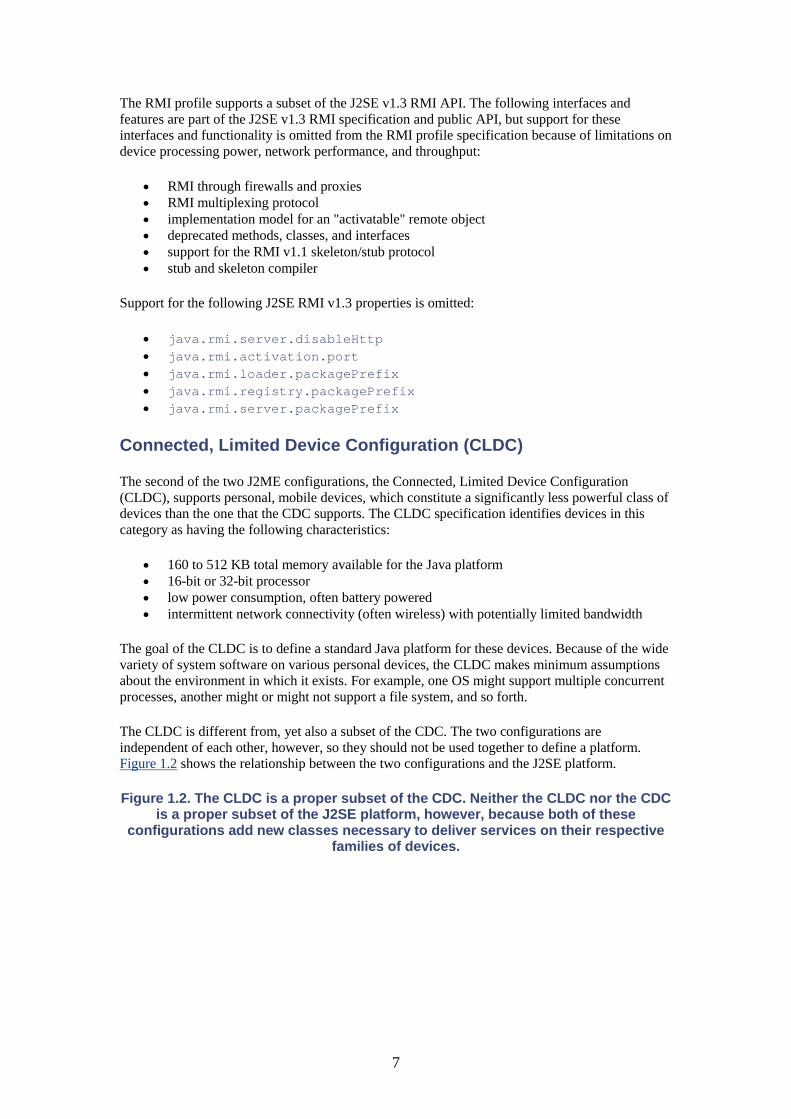
The CLDC is different from, yet also a subset of the CDC. The two configurations are independent of each other, however, so they should not be used together to define a platform. Figure 1.2 shows the relationship between the two configurations and the J2SE platform.
Figure 1.2. The CLDC is a proper subset of the CDC. Neither the CLDC nor the CDC is a proper subset of the J2SE platform, however, because both of these
configurations add new classes necessary to deliver services on their respective families of devices.

8
Like the CDC, the CLDC specifies the level of support of the Java programming language required, the required functional support of a compliant Java VM, and the set of class libraries required.
Java Language Support. The CLDC specification omits support for the following features of the Java language:
• floating point calculations • object finalization • the java.lang.Error class hierarchy in its entirety
Of course, these features involve the VM as well and are discussed in chapter 5 of the CLDC specification ("Adherence to Java Virtual Machine Specification"). I address them here, however, because they have a language-level presence that affects programmers.
The lack of floating point support is the main language-level difference between a Java virtual machine that supports CLDC and a standard J2SE VM that is visible to programmers. This means that programs intended to run on the CLDC cannot use floating point literals, types, or values. You can't use the float built-in type, and the java.lang.Float class has been removed from CLDC libraries. This feature is not present because of the lack of floating-point hardware or software on most mobile devices.
Object finalization is also absent. This means that the Object.finalize() method has been removed from the CLDC libraries.
The java.lang.Error exception hierarchy has also been removed from the CLDC libraries and is therefore not available to applications. The primary reason that error handling is absent is memory constraints on mobile devices. This typically doesn't create any disadvantages for applications development; after all, applications are not supposed to recover from error conditions. And the resource cost of implementing error handling is expensive, beyond the capabilities of today's mobile devices. Moreover, error recovery is device-specific on embedded devices like mobile phones. In consequence, it doesn't make sense to stipulate the recovery mechanism that devices should use. This mechanism may well be outside the scope of an embedded VM.
9
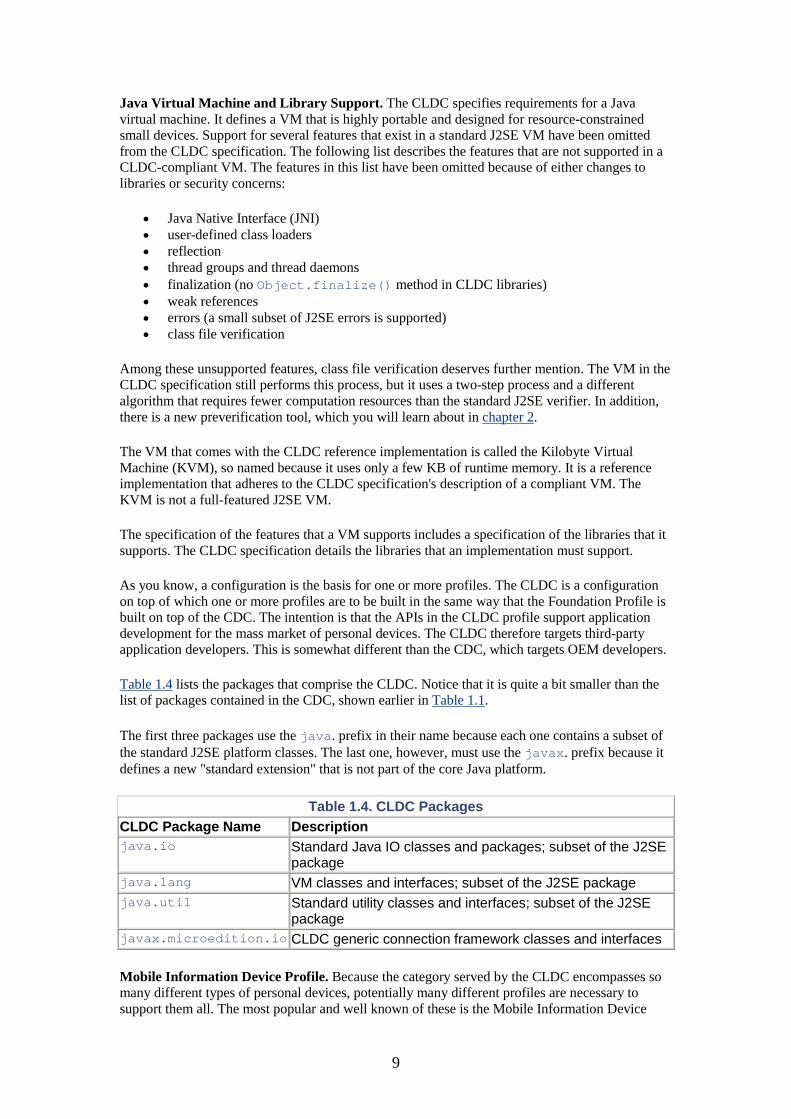
Java Virtual Machine and Library Support. The CLDC specifies requirements for a Java virtual machine. It defines a VM that is highly portable and designed for resource-constrained small devices. Support for several features that exist in a standard J2SE VM have been omitted from the CLDC specification. The following list describes the features that are not supported in a CLDC-compliant VM. The features in this list have been omitted because of either changes to libraries or security concerns:
• Java Native Interface (JNI) • user-defined class loaders • reflection • thread groups and thread daemons • finalization (no Object.finalize() method in CLDC libraries) • weak references • errors (a small subset of J2SE errors is supported) • class file verification
Among these unsupported features, class file verification deserves further mention. The VM in the CLDC specification still performs this process, but it uses a two-step process and a different algorithm that requires fewer computation resources than the standard J2SE verifier. In addition, there is a new preverification tool, which you will learn about in chapter 2.
The VM that comes with the CLDC reference implementation is called the Kilobyte Virtual Machine (KVM), so named because it uses only a few KB of runtime memory. It is a reference implementation that adheres to the CLDC specification's description of a compliant VM. The KVM is not a full-featured J2SE VM.
The specification of the features that a VM supports includes a specification of the libraries that it supports. The CLDC specification details the libraries that an implementation must support.
As you know, a configuration is the basis for one or more profiles. The CLDC is a configuration on top of which one or more profiles are to be built in the same way that the Foundation Profile is built on top of the CDC. The intention is that the APIs in the CLDC profile support application development for the mass market of personal devices. The CLDC therefore targets third-party application developers. This is somewhat different than the CDC, which targets OEM developers.
Table 1.4 lists the packages that comprise the CLDC. Notice that it is quite a bit smaller than the list of packages contained in the CDC, shown earlier in Table 1.1.
The first three packages use the java. prefix in their name because each one contains a subset of the standard J2SE platform classes. The last one, however, must use the javax. prefix because it defines a new "standard extension" that is not part of the core Java platform.
Table 1.4. CLDC Packages CLDC Package Name Description java.io Standard Java IO classes and packages; subset of the J2SE
package java.lang VM classes and interfaces; subset of the J2SE package java.util Standard utility classes and interfaces; subset of the J2SE
package javax.microedition.io CLDC generic connection framework classes and interfaces
Mobile Information Device Profile. Because the category served by the CLDC encompasses so many different types of personal devices, potentially many different profiles are necessary to support them all. The most popular and well known of these is the Mobile Information Device

10
Profile (MIDP), sometimes called the MID Profile. The MIDP layers atop the CLDC and defines a set of user interface (UI) APIs designed for contemporary wireless devices.
Following in the tradition of Java parlance, MIDP applications are called MIDlets. A MIDlet is a Java application that uses the MIDP profile and the CLDC configuration. This book concentrates on teaching you how to write MIDlets, because the vast majority of J2ME programmers will encounter the CLDC/MIDP platform far more often than other J2ME platforms. And, from a practical standpoint, the MIDP is the only profile currently available.
Another profile, the PDA Profile, is currently in its definition stage. PDAs also belong to the general category of mobile information devices. The PDA profile might never be implemented, however, because it's questionable whether it offers enough differences and enhancements to the MIDP specification to warrant its development. The PDA Profile also poses portability challenges for developers.
The MIDP specification, like the CDC's Foundation Profile, was produced by an expert group, in this case, the Mobile Information Device Profile Expert Group, which is an international forum that includes representatives from several companies in the mobile device arena. The MIDP targets mobile information devices (MIDs), such as mobile phones, two-way pagers, and so forth, which have roughly the following characteristics:
• screen size of approximately (at least) 96x54 pixels • display depth of 1 bit • one- or two-handed keyboard, touchscreen input device • 128 KB nonvolatile memory for MIDP components • 8 KB nonvolatile memory for application-persistent data • 32 KB volatile runtime memory for Java heap • two-way wireless connectivity
Because the range of MID capabilities is so broad, the MIDP established a goal to address the least common denominator of device capabilities. The MIDP, therefore, specifies the following APIs:
• application (MIDP application semantics and control) • user interface • persistent storage • networking • timers
Table 1.5 lists the packages that comprise the MIDP.
Table 1.5. MIDP Packages MIDP Package Name Description javax.microedition.lcdui UI classes and interfaces javax.microedition.rms Record management system (RMS) supporting
persistent device storage javax.microedition.midlet MIDP application definition support class types javax.microedition.io MIDP generic connection framework classes and
interfaces java.io Standard Java IO classes and interfaces java.lang VM classes and interfaces

11
java.util Standard utility classes and interfaces
You'll learn more about the programming details of the APIs in Table 1.5 in chapters 3 through 9.
A MIDP implementation must consist of the packages and classes specified in the MIDP specification. Additionally, it can have implementation-dependent classes for accessing native system software and hardware.
Figure 1.3 juxtaposes the CDC and CLDC platform stacks. There is nothing inherent in either the CDC or CLDC that prohibits a manufacturer from porting either platform to a given family of devices. Nevertheless, the platform stacks—specifically, the configuration and profile features—have been specified to address practical limitations of the different families of hardware devices.
Figure 1.3. The CDC targets fixed-connection, shared, stationary devices. The CLDC targets personal, mobile, limited-connection devices.
Device Application Management Systems
All J2ME applications—MIDlets and others—are real Java applications that run under the control of a Java VM. But what controls the Java VM, for instance on a mobile phone? There's no command shell from which you can invoke your favorite Java applications like you do on your workstation. Starting, stopping, and managing the execution of J2ME applications is controlled by application management software (AMS) that resides on the device. In fact, the AMS controls the entire application lifecycle, from installation, upgrade and version management, to removal of application software.
The device manufacturer typically provides the AMS software. This is the most logical scenario because AMS software must work in conjunction with the device's native system software, which, presumably, the manufacturer knows best. Nevertheless, third parties can also develop AMS systems for specific devices. AMS software could be written, for example, in Java or in some native language such as C.
Understanding the issues surrounding application management is important for the J2ME developer. Chapter 10 discusses application management. You must be aware of the ramifications of your choices regarding packaging, licensing, charging for use, and so forth, and how these decisions will affect the usability and viability of your software.

12
Chapter Summary
The J2ME platform addresses two classes of pervasive computing devices. The first class consists of stationary devices with fixed network connections such as TV set-top boxes. The second consists of personal, mobile devices with intermittent network connectivity, such as PDAs, mobile phones, and so on.
Different combinations of J2ME configurations and profiles support these two classes of devices. The CDC configuration and Foundation Profile support the former class of devices, and the CLDC configuration and MIDP profile support the latter.
A configuration attempts to provide interfaces for system-level services. A profile attempts to provide standard interfaces for application-level services. The configuration enables the profile, providing the necessary medium and mechanisms.
Devices must have some AMS to "bootstrap" the process of provisioning J2ME applications on devices. The device manufacturer usually provides the AMS.
13
Chapter 2. The MIDP Application Development Process
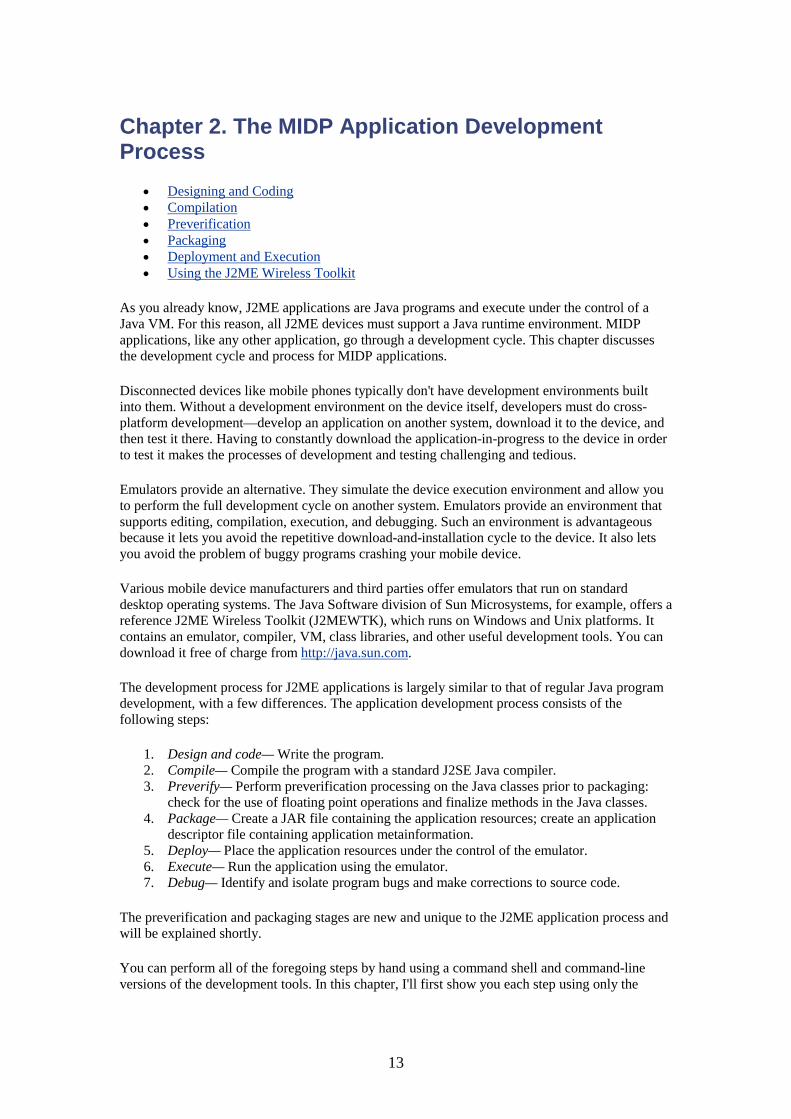
• Designing and Coding • Compilation • Preverification • Packaging • Deployment and Execution • Using the J2ME Wireless Toolkit
As you already know, J2ME applications are Java programs and execute under the control of a Java VM. For this reason, all J2ME devices must support a Java runtime environment. MIDP applications, like any other application, go through a development cycle. This chapter discusses the development cycle and process for MIDP applications.
Disconnected devices like mobile phones typically don't have development environments built into them. Without a development environment on the device itself, developers must do cross-platform development—develop an application on another system, download it to the device, and then test it there. Having to constantly download the application-in-progress to the device in order to test it makes the processes of development and testing challenging and tedious.
Emulators provide an alternative. They simulate the device execution environment and allow you to perform the full development cycle on another system. Emulators provide an environment that supports editing, compilation, execution, and debugging. Such an environment is advantageous because it lets you avoid the repetitive download-and-installation cycle to the device. It also lets you avoid the problem of buggy programs crashing your mobile device.
Various mobile device manufacturers and third parties offer emulators that run on standard desktop operating systems. The Java Software division of Sun Microsystems, for example, offers a reference J2ME Wireless Toolkit (J2MEWTK), which runs on Windows and Unix platforms. It contains an emulator, compiler, VM, class libraries, and other useful development tools. You can download it free of charge from http://java.sun.com.
The development process for J2ME applications is largely similar to that of regular Java program development, with a few differences. The application development process consists of the following steps:
1. Design and code— Write the program. 2. Compile— Compile the program with a standard J2SE Java compiler. 3. Preverify— Perform preverification processing on the Java classes prior to packaging:
check for the use of floating point operations and finalize methods in the Java classes. 4. Package— Create a JAR file containing the application resources; create an application
descriptor file containing application metainformation. 5. Deploy— Place the application resources under the control of the emulator. 6. Execute— Run the application using the emulator. 7. Debug— Identify and isolate program bugs and make corrections to source code.
The preverification and packaging stages are new and unique to the J2ME application process and will be explained shortly.
You can perform all of the foregoing steps by hand using a command shell and command-line versions of the development tools. In this chapter, I'll first show you each step using only the

14
command-line tools so you can understand how the process works conceptually. Thereafter, I'll use the Java Software reference J2ME Wireless Toolkit emulator.
Incidentally, the command-line examples shown in this book use the Unix shell syntax supported by the GNU project's bash shell. With a few syntax changes, the examples are still relevant for a Microsoft Windows MS-DOS prompt shell.
I don't discuss the source code here, because the focus of this chapter is to see how to take a perfectly valid CLDC/MIDP application through the whole application development cycle. In chapter 3, I'll start to analyze code to show you the toolkit abstractions and programming model and to explain the essential parts of the application.
The GNU project has produced literally hundreds of Unix style utilities and applications. They have been ported to run on a variety of OS platforms, including Windows. These tools include everything from Unix utilities, shells, compilers, linkers, and source code control tools, to applications such as PostScript viewers, the Emacs text editor, and sophisticated image processing applications, just to name a few.
The GNU resources are maintained under the auspices of the Free Software Foundation (FSF). You can find information about the GNU project and the Free Software Foundation at the Free Software Foundation Web site, http://www.fsf.org.
Designing and Coding
Before you can begin an actual development cycle, you must first create the directory structure that will support the development of your MIDlet suite. A MIDlet suite is a collection of MIDlets that share common application resources. You'll learn further details about these shared MIDlet resources in later chapters of this book.
I first create a directory called HelloWorld, which is the name of our first example application, under the apps/ directory of the wireless toolkit installation. This directory is the root of your new project. A project is an organized aggregation of resources—source code, resource files, compiled files—specific to one or more related applications.
The project root directory contains the subdirectories shown in the following sample code:
$ pwd /cygdrive/c/J2mewtk/apps/HelloWorld $ ls -F bin/ classes/ res/ src/ tmpclasses/
There is a reason for using this precise directory structure, which I will explain later when you learn how to use the Wireless Toolkit Emulator. However, even if you don't plan to use the J2ME Wireless Toolkit, this organizational structure is a reasonable one to start with. Table 2.1 explains the contents and purpose of these directories.
I won't discuss actual application design here, because that topic is beyond the scope of this chapter. The goal here is not to discuss how to design Java applications or even MIDP applications. Subsequent chapters, however, will talk about organization of MIDP applications.

15
Table 2.1. Subdirectories of Projects Created by the J2ME Wireless Toolkit Subdirectory Name
Directory Contents
bin Application files: .jar file, .jad file, MANIFEST.MF classes Compiled and preverified .class files res Application resource files, such as .png formatted image files in
PNG format src Application source files tmpclasses Compiled, unverified .class files
Compilation
The next step in the actual development cycle after creating your program is to compile the program source. Before you attempt compilation, make sure your shell environment's command path list includes the path to the directory that contains the J2ME utilities on your system.
The general form of the compilation line is
$ javac –d <tmpclasses dir> -bootclasspath <midpapi.zip location> \ <location of Java source file(s)>
The –d directive tells the compiler the directory in which to write the unverified compiled classes. The -bootclasspath directive indicates the location of the midpapi.zip file, which comes with Java Software's J2ME Wireless Toolkit and contains all the MIDP classes you need to write J2ME applications. Development environments from commercial vendors also include this file. The -bootclasspath directive also tells the compiler to override any CLASSPATH specification you might have set in your shell environment. Note that this must be a relative pathname, relative to the project's root directory. Finally, you specify the path names of the Java source files you are compiling.
To compile the HelloWorld MIDlet suite from the apps/HelloWorld/ directory, use the following command:
$ javac -d tmpclasses \ -bootclasspath ../../lib/midpapi.zip src/HelloWorld.java $
The –d directive tells the compiler to write the unverified compiled classes to the tmpclasses directory under the HelloWorld/ directory. The -bootclasspath directive specifies a pathname relative to the current directory. Finally, the last argument specifies the relative pathname of the HelloWorld.java source file.
You learned in chapter 1 that the MIDP and CLDC libraries define the complete platform for building MIDP applications. In consequence, you don't need to include the path of any J2SE installation in your environment's CLASSPATH when compiling your applications. In fact, you can't include it. If you do, you'll get compilation errors because the compiler will find conflicting definitions between the J2SE and J2ME libraries.
After compiling your files, the tmpclasses directory contains the unverified .class files:
$ ls -l tmpclasses/
16
total 0 -rw-r--r-- 1 vartan None 922 HelloWorld.class $
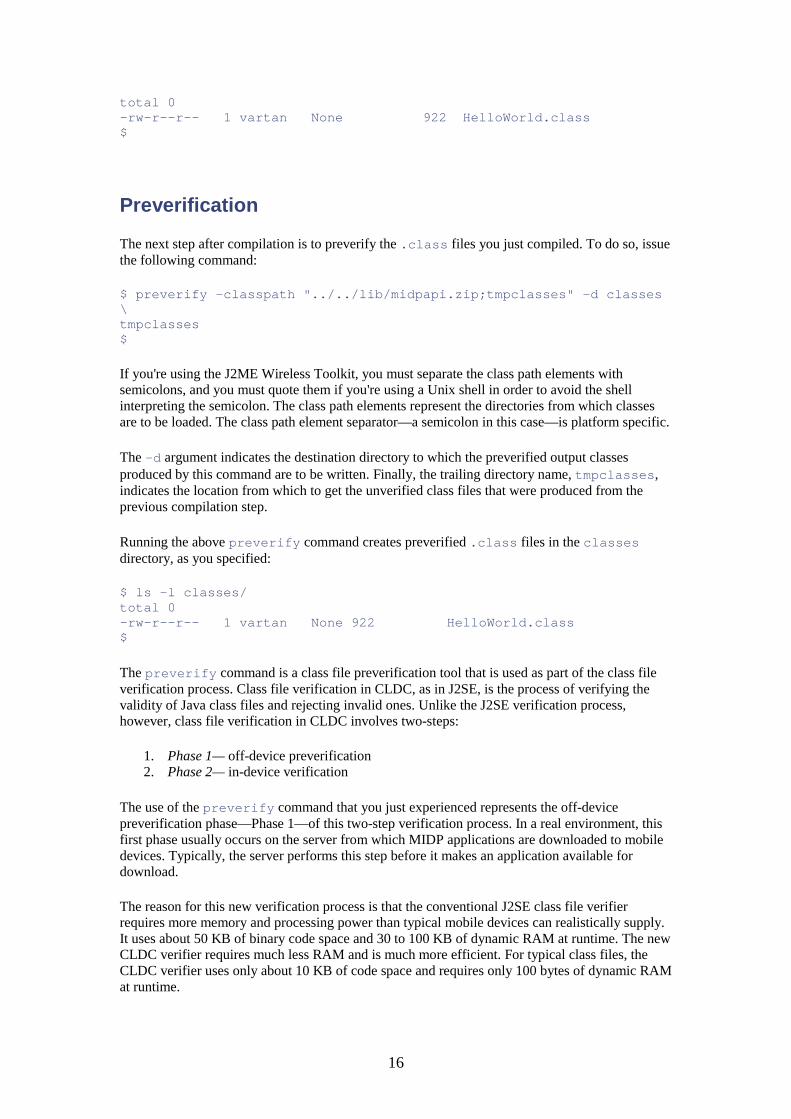
Preverification
The next step after compilation is to preverify the .class files you just compiled. To do so, issue the following command:
$ preverify -classpath "../../lib/midpapi.zip;tmpclasses" -d classes \ tmpclasses $
If you're using the J2ME Wireless Toolkit, you must separate the class path elements with semicolons, and you must quote them if you're using a Unix shell in order to avoid the shell interpreting the semicolon. The class path elements represent the directories from which classes are to be loaded. The class path element separator—a semicolon in this case—is platform specific.
The -d argument indicates the destination directory to which the preverified output classes produced by this command are to be written. Finally, the trailing directory name, tmpclasses, indicates the location from which to get the unverified class files that were produced from the previous compilation step.
Running the above preverify command creates preverified .class files in the classes directory, as you specified:
$ ls -l classes/ total 0 -rw-r--r-- 1 vartan None 922 HelloWorld.class $
The preverify command is a class file preverification tool that is used as part of the class file verification process. Class file verification in CLDC, as in J2SE, is the process of verifying the validity of Java class files and rejecting invalid ones. Unlike the J2SE verification process, however, class file verification in CLDC involves two-steps:
1. Phase 1— off-device preverification 2. Phase 2— in-device verification
The use of the preverify command that you just experienced represents the off-device preverification phase—Phase 1—of this two-step verification process. In a real environment, this first phase usually occurs on the server from which MIDP applications are downloaded to mobile devices. Typically, the server performs this step before it makes an application available for download.
The reason for this new verification process is that the conventional J2SE class file verifier requires more memory and processing power than typical mobile devices can realistically supply. It uses about 50 KB of binary code space and 30 to 100 KB of dynamic RAM at runtime. The new CLDC verifier requires much less RAM and is much more efficient. For typical class files, the CLDC verifier uses only about 10 KB of code space and requires only 100 bytes of dynamic RAM at runtime.
17
The new verifier can achieve these efficiency gains because of the new algorithm it uses. This new algorithm, however, requires the presence of special attributes in each Java class file. The preverifier writes these new attributes to each Java class file. The verifier then uses the attributes generated by the preverifier. The new class files are about 5 percent larger than their unmodified versions.
The preverifier performs two tasks:
• It makes all subroutine calls "inline," replacing each call to methods that contain the byte codes jsr, jsr_w, ret, and wide ret with semantically equivalent code that doesn't contain these instructions.
• It inserts stack map attributes into what is otherwise a normally formatted Java class file.
These new class files are still valid J2SE class files. That is, the new stack map attributes are simply ignored by the J2SE verifier. The inclusion of stack map attributes has been implemented with the extensible attribute mechanism, which is supported by the Java class file format defined by the standard Java virtual machine. This means that CLDC class files are upwardly compatible with the J2SE virtual machine.
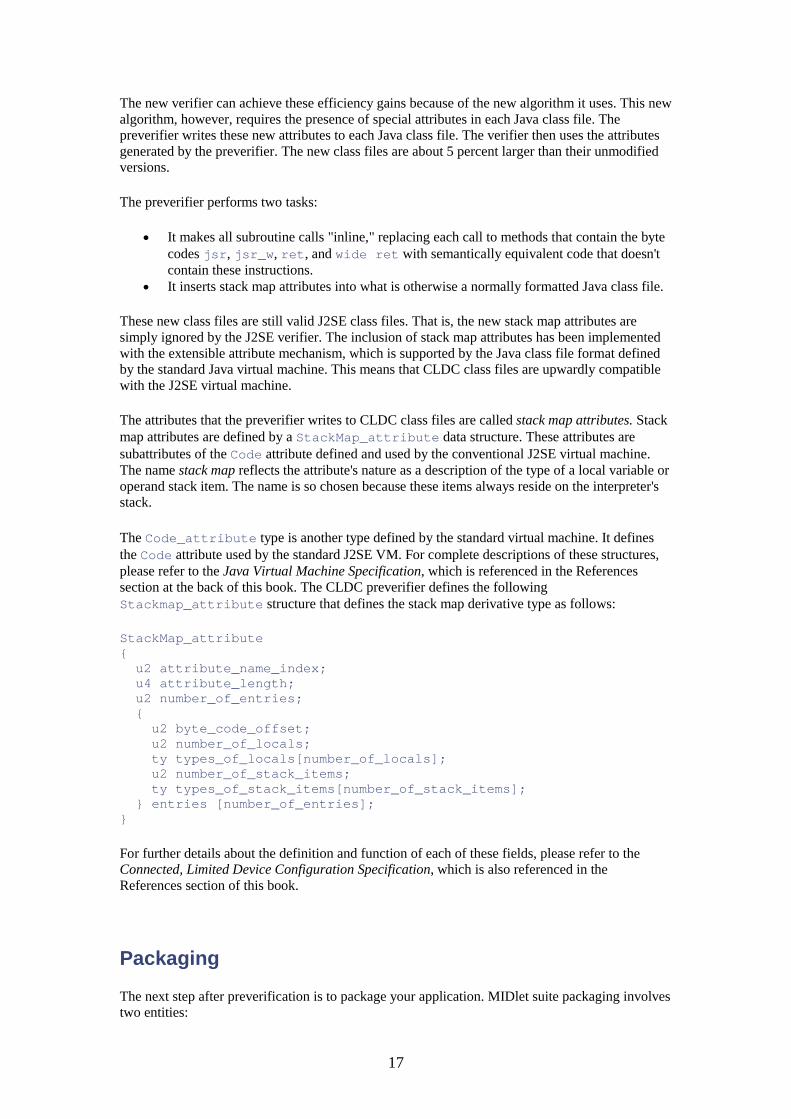
The attributes that the preverifier writes to CLDC class files are called stack map attributes. Stack map attributes are defined by a StackMap_attribute data structure. These attributes are subattributes of the Code attribute defined and used by the conventional J2SE virtual machine. The name stack map reflects the attribute's nature as a description of the type of a local variable or operand stack item. The name is so chosen because these items always reside on the interpreter's stack.
The Code_attribute type is another type defined by the standard virtual machine. It defines the Code attribute used by the standard J2SE VM. For complete descriptions of these structures, please refer to the Java Virtual Machine Specification, which is referenced in the References section at the back of this book. The CLDC preverifier defines the following Stackmap_attribute structure that defines the stack map derivative type as follows:
StackMap_attribute { u2 attribute_name_index; u4 attribute_length; u2 number_of_entries; { u2 byte_code_offset; u2 number_of_locals; ty types_of_locals[number_of_locals]; u2 number_of_stack_items; ty types_of_stack_items[number_of_stack_items]; } entries [number_of_entries]; }
For further details about the definition and function of each of these fields, please refer to the Connected, Limited Device Configuration Specification, which is also referenced in the References section of this book.
Packaging
The next step after preverification is to package your application. MIDlet suite packaging involves two entities:
18
• a Java archive file of the MIDlet files • an optional application descriptor file
Although you can choose to optionally package J2SE applications for deployment, the MIDP specification requires that you package MIDlet suites using the Java archive (JAR) utility. In fact, the MIDP specification requires that all MIDlet suites be delivered to devices in a compressed JAR file format. Normally, servers that support delivery of MIDlet suites to devices store MIDlet suite files in compressed JAR format. Either the server or the entity that uploads the file to the server creates the compressed JAR file.
A JAR archive of a MIDlet suite can contain several types of files, as the following list indicates:
• a manifest file that describes the contents of the JAR file • Java class files that comprise the MIDlets in the archive's MIDlet suite • application resource files used by the MIDlets in the MIDlet suite
The JAR manifest file contains attributes that describe the contents of the JAR file itself. Its presence in the JAR file is optional.
Another optional description file, called an application descriptor file, contains information about the MIDlet suite. This file is sometimes called a Java application descriptor (JAD) file. Each MIDlet suite can optionally have an associated application descriptor file.
The application descriptor file is used for two purposes. The device application management software (AMS) uses the information in this file primarily to verify that the MIDlets in the JAR file are appropriate for the device before it downloads the full JAR file. The AMS also uses the information to manage the MIDlet. The device's AMS is responsible for installing and uninstalling MIDlet suites. It also provides MIDlets with the runtime environment required by the MIDP specification. Finally, the AMS manages MIDlet execution, namely, the starting, stopping, and destruction of all MIDlets.
Finally, the MIDlets themselves can extract from the JAD file configuration specific attributes that represent MIDlet parameters. The application resource file is the primary mechanism for deploying MIDP application configurations.
Creating the JAR Manifest File
If you choose to supply a manifest file with your MIDlet suite JAR, you need to create it before you create the JAR archive itself. You can create this file with any text editor. Afterwards, create the JAR file using the standard J2SE JAR utility. The JAR utility is included as part of the Wireless Toolkit utilities.
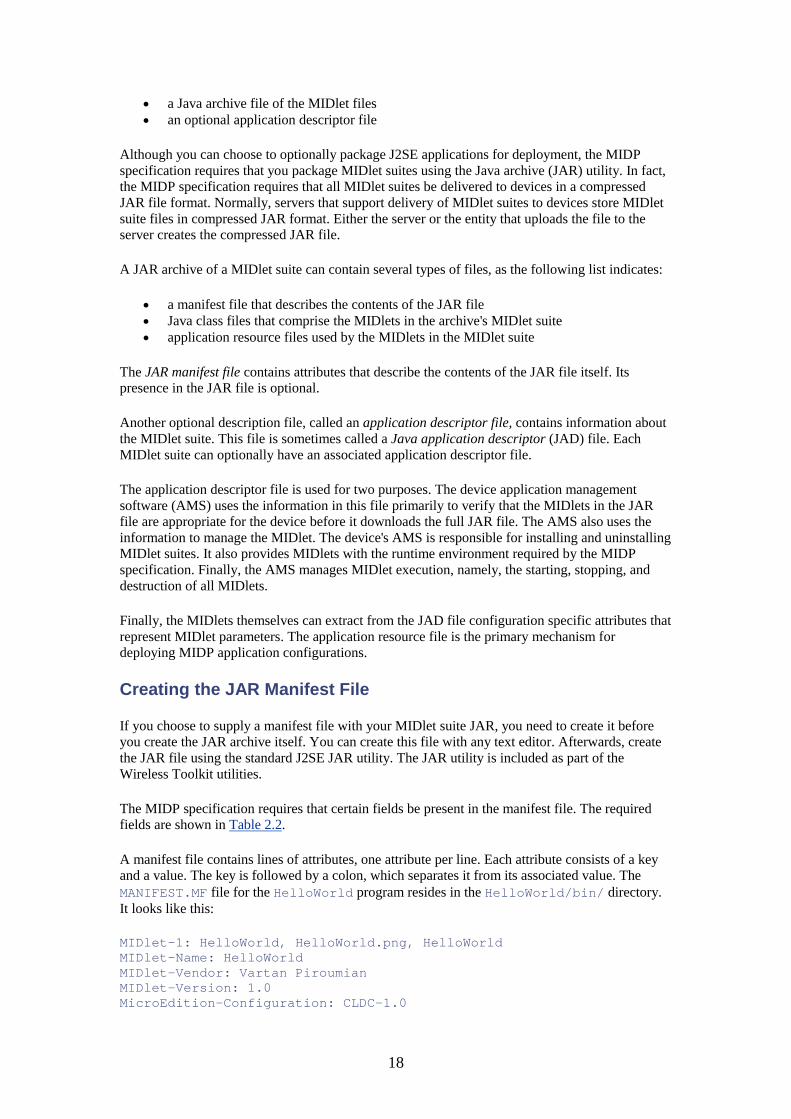
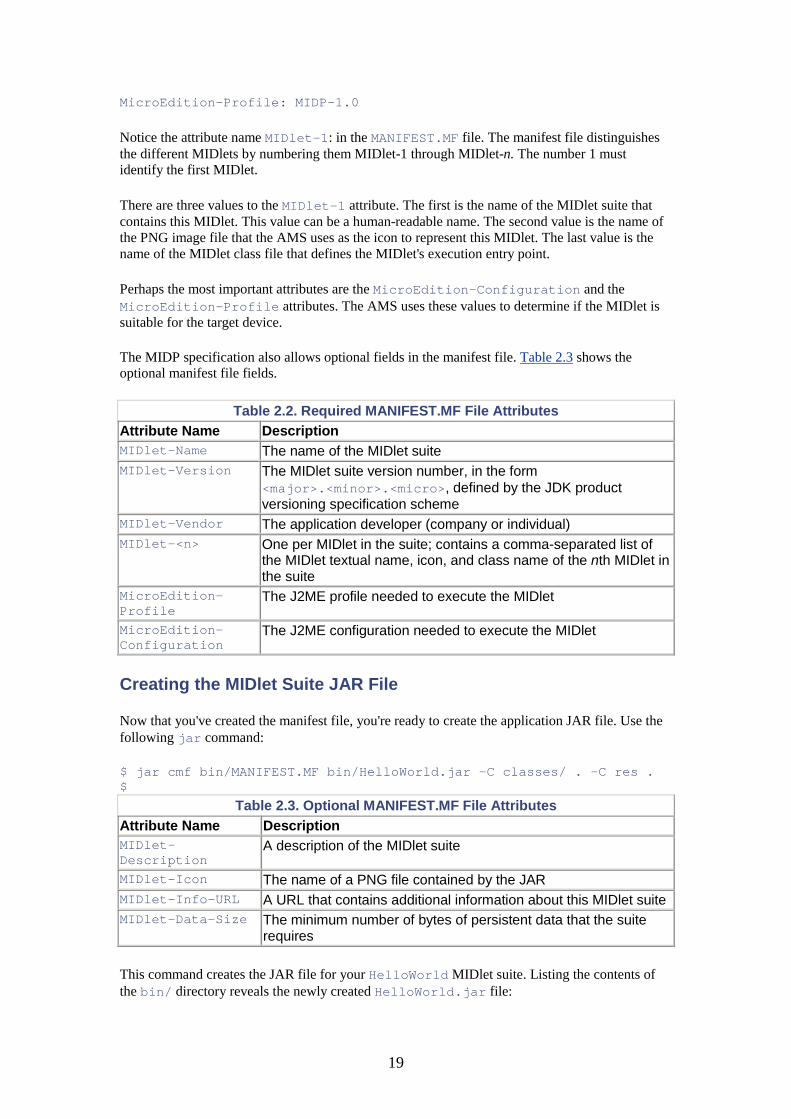
The MIDP specification requires that certain fields be present in the manifest file. The required fields are shown in Table 2.2.
A manifest file contains lines of attributes, one attribute per line. Each attribute consists of a key and a value. The key is followed by a colon, which separates it from its associated value. The MANIFEST.MF file for the HelloWorld program resides in the HelloWorld/bin/ directory. It looks like this:
MIDlet-1: HelloWorld, HelloWorld.png, HelloWorld MIDlet-Name: HelloWorld MIDlet-Vendor: Vartan Piroumian MIDlet-Version: 1.0 MicroEdition-Configuration: CLDC-1.0
19
MicroEdition-Profile: MIDP-1.0
Notice the attribute name MIDlet-1: in the MANIFEST.MF file. The manifest file distinguishes the different MIDlets by numbering them MIDlet-1 through MIDlet-n. The number 1 must identify the first MIDlet.
There are three values to the MIDlet-1 attribute. The first is the name of the MIDlet suite that contains this MIDlet. This value can be a human-readable name. The second value is the name of the PNG image file that the AMS uses as the icon to represent this MIDlet. The last value is the name of the MIDlet class file that defines the MIDlet's execution entry point.
Perhaps the most important attributes are the MicroEdition-Configuration and the MicroEdition-Profile attributes. The AMS uses these values to determine if the MIDlet is suitable for the target device.
The MIDP specification also allows optional fields in the manifest file. Table 2.3 shows the optional manifest file fields.
Table 2.2. Required MANIFEST.MF File Attributes Attribute Name Description MIDlet-Name The name of the MIDlet suite MIDlet-Version The MIDlet suite version number, in the form
<major>.<minor>.<micro>, defined by the JDK product versioning specification scheme
MIDlet-Vendor The application developer (company or individual) MIDlet-<n> One per MIDlet in the suite; contains a comma-separated list of
the MIDlet textual name, icon, and class name of the nth MIDlet in the suite
MicroEdition-Profile
The J2ME profile needed to execute the MIDlet
MicroEdition-Configuration
The J2ME configuration needed to execute the MIDlet
Creating the MIDlet Suite JAR File
Now that you've created the manifest file, you're ready to create the application JAR file. Use the following jar command:
$ jar cmf bin/MANIFEST.MF bin/HelloWorld.jar -C classes/ . -C res . $
Table 2.3. Optional MANIFEST.MF File Attributes Attribute Name Description MIDlet-Description
A description of the MIDlet suite
MIDlet-Icon The name of a PNG file contained by the JAR MIDlet-Info-URL A URL that contains additional information about this MIDlet suite MIDlet-Data-Size The minimum number of bytes of persistent data that the suite
requires
This command creates the JAR file for your HelloWorld MIDlet suite. Listing the contents of the bin/ directory reveals the newly created HelloWorld.jar file:

20
$ ls -l bin total 2 -rw-r--r-- 1 vartan None 1393 HelloWorld.jar -rw-r--r-- 1 vartan None 193 MANIFEST.MF $
Listing the contents of the JAR file you just created produces the following output:
$ jar tf bin/HelloWorld.jar META-INF/ META-INF/MANIFEST.MF classes/./ classes/./HelloWorld.class HelloWorld.png $
As you can see, the manifest file is included in the JAR file. The JAR file contains the single .class file for our HelloWorld application. It also contains a .png portable network graphics format file that is intended to be a suitable choice for use as the application's icon. The MANIFEST.MF file, of course, was created by hand as described previously.
Creating the MIDlet Suite Application Descriptor File
The application management software on a device such as a mobile phone uses the JAD file to obtain information needed to manage resources during MIDlet execution. The application descriptor file is optional, but useful nonetheless. You can use any text editor to create it, but you must give the file a .jad extension. To avoid confusion, I recommend giving it a name that represents the whole MIDlet suite.
Table 2.4. Required Application Descriptor File Attributes Attribute Name Description MIDlet-Jar-URL The URL of the MIDlet suite JAR file MIDlet-Jar-Size The size (in bytes) of the JAR file MIDlet-Name The name of the MIDlet suite MIDlet-Vendor The application developer (for example, a company or individual
name) MIDlet-Version The MIDlet suite version number, in the form
<major>.<minor>.<micro>, defined by the JDK product versioning specification scheme
MicroEdition-Configuration
The J2ME configuration required to execute MIDlets in this suite
MicroEdition-Profile
The J2ME profile required to execute MIDlets in this suite
Table 2.5. Optional Application Descriptor File Attributes
Attribute Name Description MIDlet-Data-Size The minimum number of bytes of persistent data that the suite
requires MIDlet-Delete-Confirm
Indicates whether AMS should request user confirmation before deleting a MIDlet
MIDlet-Description A description of the MIDlet suite MIDlet-Icon The name of a PNG file contained by the JAR
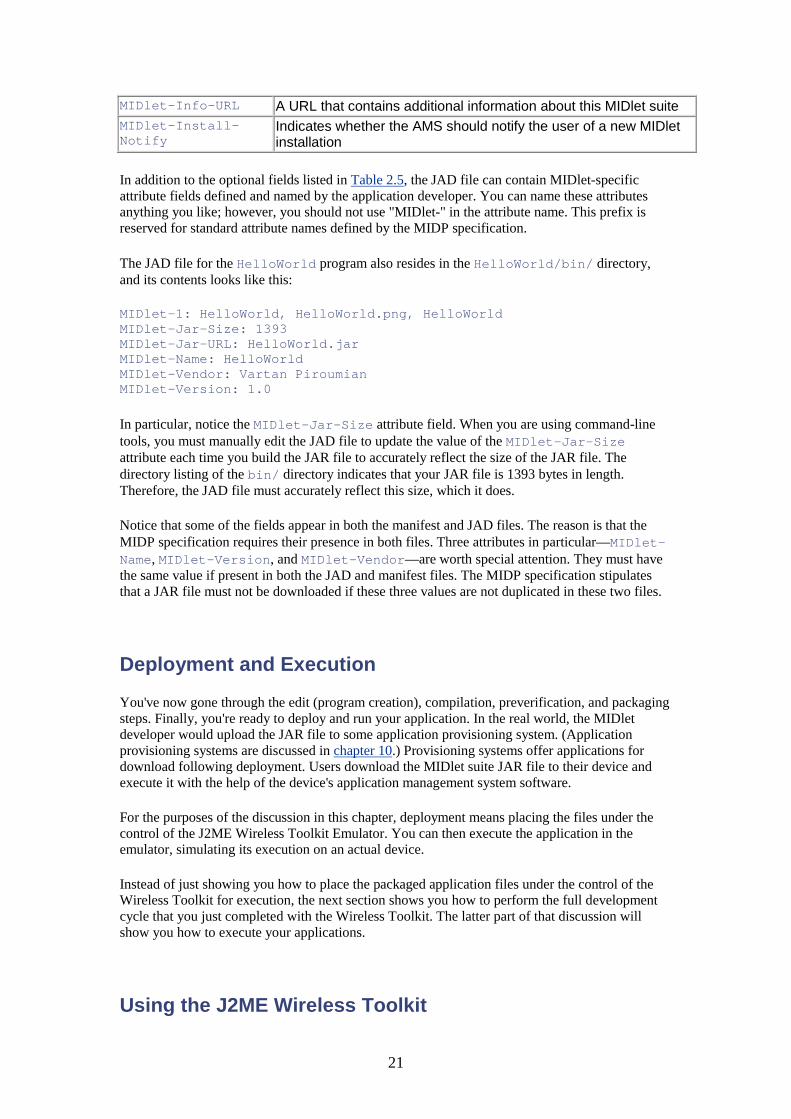
21
MIDlet-Info-URL A URL that contains additional information about this MIDlet suite MIDlet-Install-Notify
Indicates whether the AMS should notify the user of a new MIDlet installation
In addition to the optional fields listed in Table 2.5, the JAD file can contain MIDlet-specific attribute fields defined and named by the application developer. You can name these attributes anything you like; however, you should not use "MIDlet-" in the attribute name. This prefix is reserved for standard attribute names defined by the MIDP specification.
The JAD file for the HelloWorld program also resides in the HelloWorld/bin/ directory, and its contents looks like this:
MIDlet-1: HelloWorld, HelloWorld.png, HelloWorld MIDlet-Jar-Size: 1393 MIDlet-Jar-URL: HelloWorld.jar MIDlet-Name: HelloWorld MIDlet-Vendor: Vartan Piroumian MIDlet-Version: 1.0
In particular, notice the MIDlet-Jar-Size attribute field. When you are using command-line tools, you must manually edit the JAD file to update the value of the MIDlet-Jar-Size attribute each time you build the JAR file to accurately reflect the size of the JAR file. The directory listing of the bin/ directory indicates that your JAR file is 1393 bytes in length. Therefore, the JAD file must accurately reflect this size, which it does.
Notice that some of the fields appear in both the manifest and JAD files. The reason is that the MIDP specification requires their presence in both files. Three attributes in particular—MIDlet-Name, MIDlet-Version, and MIDlet-Vendor—are worth special attention. They must have the same value if present in both the JAD and manifest files. The MIDP specification stipulates that a JAR file must not be downloaded if these three values are not duplicated in these two files.
Deployment and Execution
You've now gone through the edit (program creation), compilation, preverification, and packaging steps. Finally, you're ready to deploy and run your application. In the real world, the MIDlet developer would upload the JAR file to some application provisioning system. (Application provisioning systems are discussed in chapter 10.) Provisioning systems offer applications for download following deployment. Users download the MIDlet suite JAR file to their device and execute it with the help of the device's application management system software.
For the purposes of the discussion in this chapter, deployment means placing the files under the control of the J2ME Wireless Toolkit Emulator. You can then execute the application in the emulator, simulating its execution on an actual device.
Instead of just showing you how to place the packaged application files under the control of the Wireless Toolkit for execution, the next section shows you how to perform the full development cycle that you just completed with the Wireless Toolkit. The latter part of that discussion will show you how to execute your applications.
Using the J2ME Wireless Toolkit

22
This section shows you how to use the J2ME Wireless Toolkit from Sun's Java Software division to perform all the steps of the development cycle that you did manually. You can download the J2ME Wireless Toolkit free of charge from the Java Software Web site at Sun Microsystems, http://java.sun.com. Download the version appropriate for your OS platform, and follow the installation instructions provided with the download.
Creating a Project
The Wireless Toolkit features and functions are based on projects. A project represents the development of a suite of one or more MIDlets. Completion of the project development cycle results in the creation of application JAR and JAD files and a manifest file that describes the JAR file.
The KToolbar is the main utility of the Wireless Toolkit. Figure 2.1 shows the KToolbar main window. Notice that, upon startup, it prompts you to create a new project or open an existing one and reuse the source code that you've already seen referenced in the command-line examples.
Figure 2.1. The KToolbar is the main window from which you access all of the Wireless Toolkit's functions.
The first step, then, is to create a new project. I'm going to create a HelloWorld project and reuse the source code that you've already seen. Figure 2.2 shows the window that pops up when you select New Project… from the KToolbar menu bar.
Figure 2.2. To create a new project, you must define at least one MIDlet. You must supply the project name and the name of the main Java class for the first MIDlet.
After you enter and submit the project name and MIDlet class name, the window shown in Figure 2.3 appears. This window prompts you for required information about your project, which will be used to create the JAR manifest and JAD files. Notice that the Required tab is always shown initially when this window appears. The attributes you see correspond to those in Table 2.4, the required application descriptor attributes. You can modify the default information, for example, the MIDlet-Vendor or MIDlet-Jar-URL attributes.
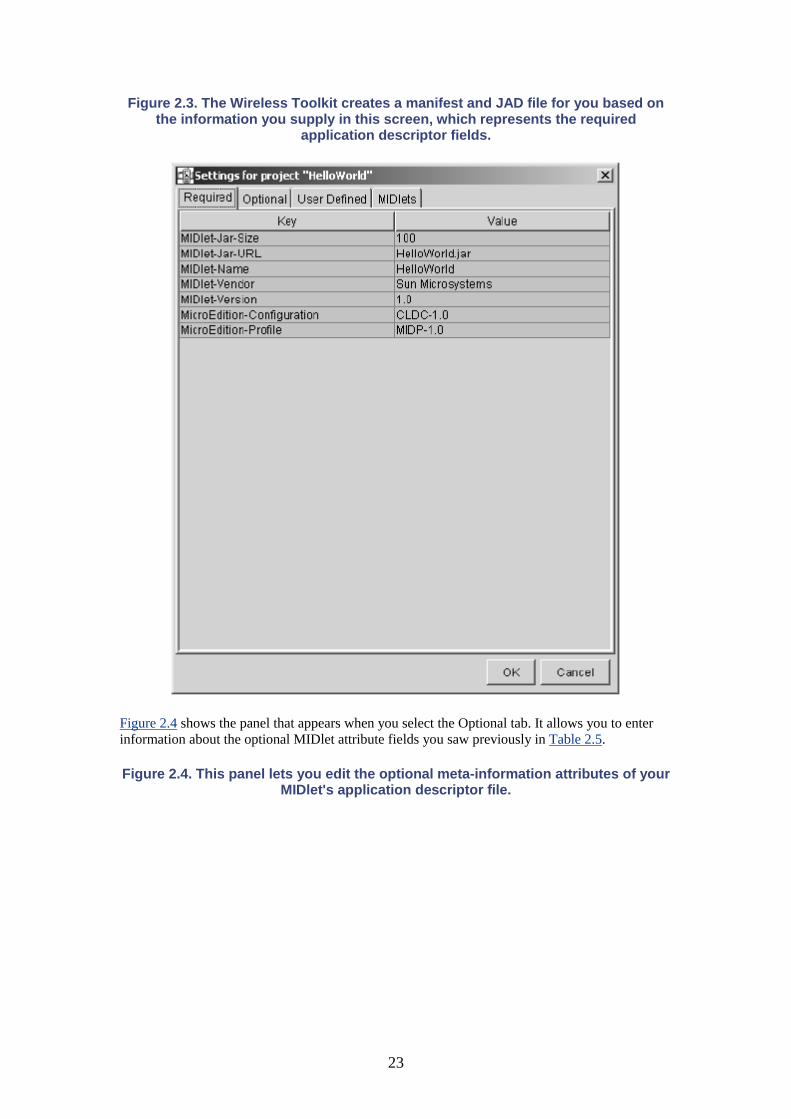
23
Figure 2.3. The Wireless Toolkit creates a manifest and JAD file for you based on the information you supply in this screen, which represents the required
application descriptor fields.
Figure 2.4 shows the panel that appears when you select the Optional tab. It allows you to enter information about the optional MIDlet attribute fields you saw previously in Table 2.5.
Figure 2.4. This panel lets you edit the optional meta-information attributes of your MIDlet's application descriptor file.
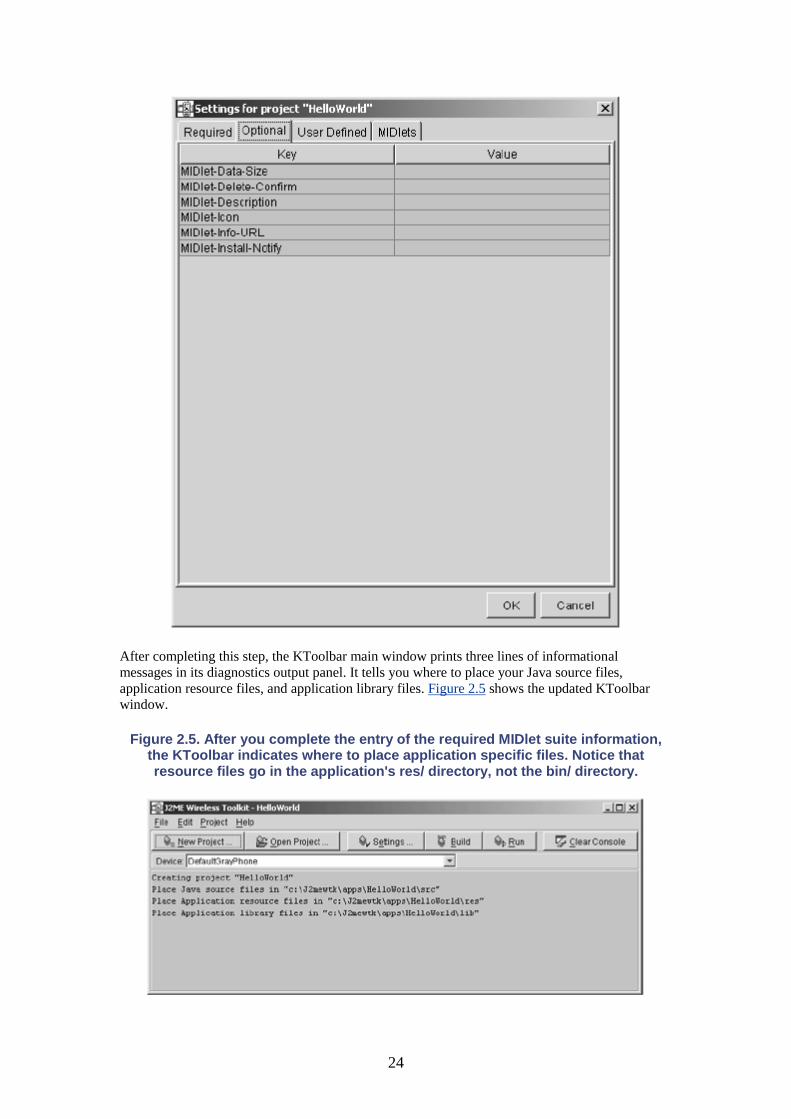
24
After completing this step, the KToolbar main window prints three lines of informational messages in its diagnostics output panel. It tells you where to place your Java source files, application resource files, and application library files. Figure 2.5 shows the updated KToolbar window.
Figure 2.5. After you complete the entry of the required MIDlet suite information, the KToolbar indicates where to place application specific files. Notice that resource files go in the application's res/ directory, not the bin/ directory.

25
Version 1.0.3 of the J2MEWTK adds a User Defined tab to the main Settings panel. You can see this User Defined tab in Figures 2.3 and 2.4. Figure 2.6 shows the User Defined panel that appears when you click the User Defined tab.
Figure 2.6. Application developers can define attributes that are specific to one or more MIDlets in the MIDlet suite.
The panel shown in Figure 2.6 lets you define application attributes. Notice that the panel provides an Add button, which lets you add additional attributes. Chapter 9 contains some examples that show you how to add custom attributes using the Wireless Toolkit and how to use the attributes in your applications.
If you look again at Figures 2.3 and 2.4, you'll see that the Required and Optional panels don't let you add any attributes to them. You can only edit the values of the attributes that are already present. You can't add a required field, because these are standardized. The set of optional fields is also standardized, even though their presence is optional.
After you've finished this initial MIDlet suite definition cycle, you can always edit the values of any of the MIDlet attributes. Select the Settings button on the KToolbar menu bar. When you do, the window in Figure 2.3 appears again. Make the desired changes and click OK.
Placing Source Code in the Project
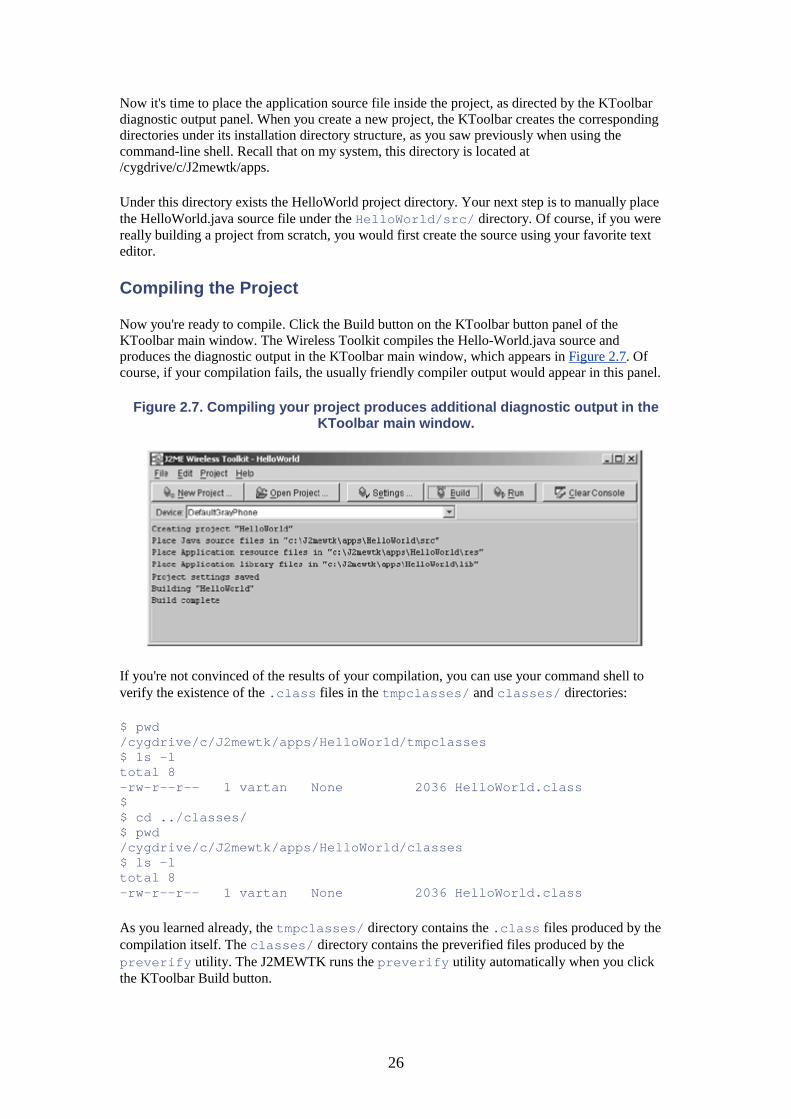
26
Now it's time to place the application source file inside the project, as directed by the KToolbar diagnostic output panel. When you create a new project, the KToolbar creates the corresponding directories under its installation directory structure, as you saw previously when using the command-line shell. Recall that on my system, this directory is located at /cygdrive/c/J2mewtk/apps.
Under this directory exists the HelloWorld project directory. Your next step is to manually place the HelloWorld.java source file under the HelloWorld/src/ directory. Of course, if you were really building a project from scratch, you would first create the source using your favorite text editor.
Compiling the Project
Now you're ready to compile. Click the Build button on the KToolbar button panel of the KToolbar main window. The Wireless Toolkit compiles the Hello-World.java source and produces the diagnostic output in the KToolbar main window, which appears in Figure 2.7. Of course, if your compilation fails, the usually friendly compiler output would appear in this panel.
Figure 2.7. Compiling your project produces additional diagnostic output in the KToolbar main window.
If you're not convinced of the results of your compilation, you can use your command shell to verify the existence of the .class files in the tmpclasses/ and classes/ directories:
$ pwd /cygdrive/c/J2mewtk/apps/HelloWorld/tmpclasses $ ls -l total 8 -rw-r--r-- 1 vartan None 2036 HelloWorld.class $ $ cd ../classes/ $ pwd /cygdrive/c/J2mewtk/apps/HelloWorld/classes $ ls -l total 8 -rw-r--r-- 1 vartan None 2036 HelloWorld.class
As you learned already, the tmpclasses/ directory contains the .class files produced by the compilation itself. The classes/ directory contains the preverified files produced by the preverify utility. The J2MEWTK runs the preverify utility automatically when you click the KToolbar Build button.

27
Packaging the Project
After you compile, you must package the application as you did using the command-line tools. There is no Package button on the KToolbar button panel. Instead, pull down the Project menu on the KToolbar menu bar, and select the Package menu item as shown in Figure 2.8.
Figure 2.8. Select the Package menu option to package your application. This step produces the application JAD and JAR files.
Figure 2.9 shows the diagnostic output produced when you've completed the packaging step. Notice that it indicates that the Wireless Toolkit has produced a HelloWorld.jar and a HelloWorld.jad file.
Figure 2.9. The packaging step actually compiles the application before packaging it. The diagnostics output reflects the execution of the compilation and packaging
steps.
Once again, you can verify the existence of these files by manually listing the contents of the project's bin/ directory:
$ pwd /cygdrive/c/J2mewtk/apps/HelloWorld/bin $ ls -l total 3 -rw-r--r-- 1 vartan None 282 HelloWorld.jad -rw-r--r-- 1 vartan None 6960 HelloWorld.jar -rw-r--r-- 1 vartan None 297 MANIFEST.MF $
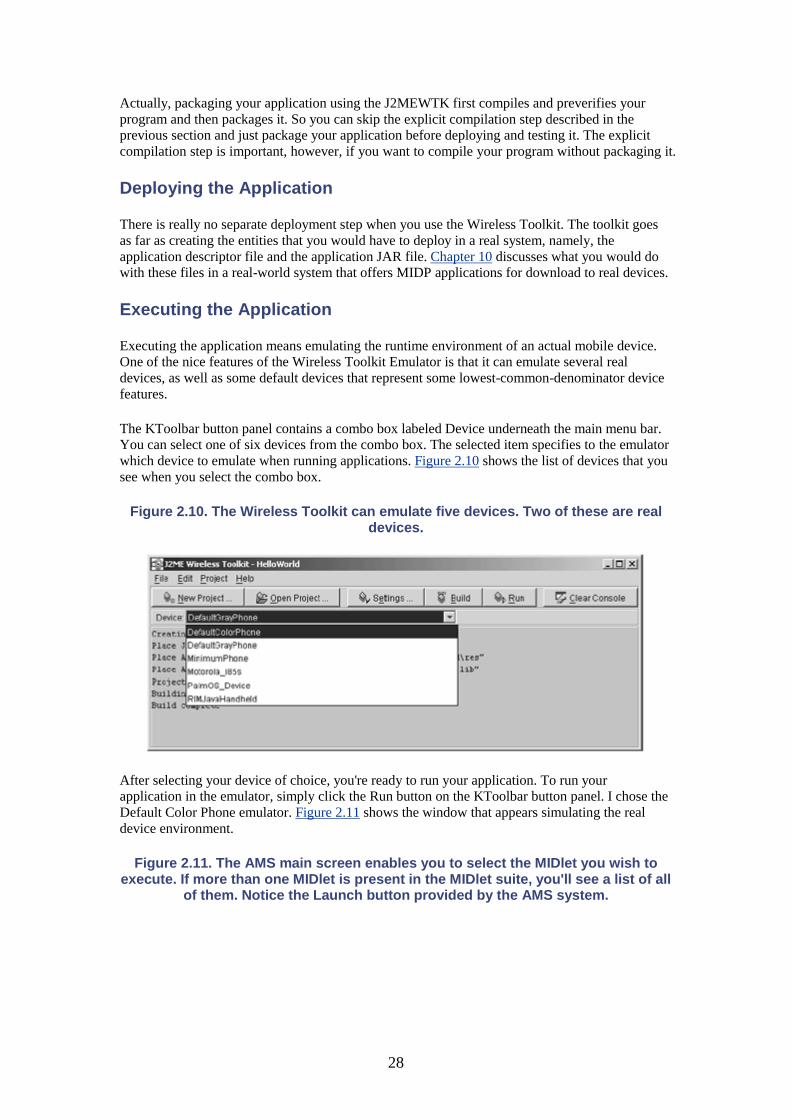
28
Actually, packaging your application using the J2MEWTK first compiles and preverifies your program and then packages it. So you can skip the explicit compilation step described in the previous section and just package your application before deploying and testing it. The explicit compilation step is important, however, if you want to compile your program without packaging it.
Deploying the Application
There is really no separate deployment step when you use the Wireless Toolkit. The toolkit goes as far as creating the entities that you would have to deploy in a real system, namely, the application descriptor file and the application JAR file. Chapter 10 discusses what you would do with these files in a real-world system that offers MIDP applications for download to real devices.
Executing the Application
Executing the application means emulating the runtime environment of an actual mobile device. One of the nice features of the Wireless Toolkit Emulator is that it can emulate several real devices, as well as some default devices that represent some lowest-common-denominator device features.
The KToolbar button panel contains a combo box labeled Device underneath the main menu bar. You can select one of six devices from the combo box. The selected item specifies to the emulator which device to emulate when running applications. Figure 2.10 shows the list of devices that you see when you select the combo box.
Figure 2.10. The Wireless Toolkit can emulate five devices. Two of these are real devices.
After selecting your device of choice, you're ready to run your application. To run your application in the emulator, simply click the Run button on the KToolbar button panel. I chose the Default Color Phone emulator. Figure 2.11 shows the window that appears simulating the real device environment.
Figure 2.11. The AMS main screen enables you to select the MIDlet you wish to execute. If more than one MIDlet is present in the MIDlet suite, you'll see a list of all
of them. Notice the Launch button provided by the AMS system.
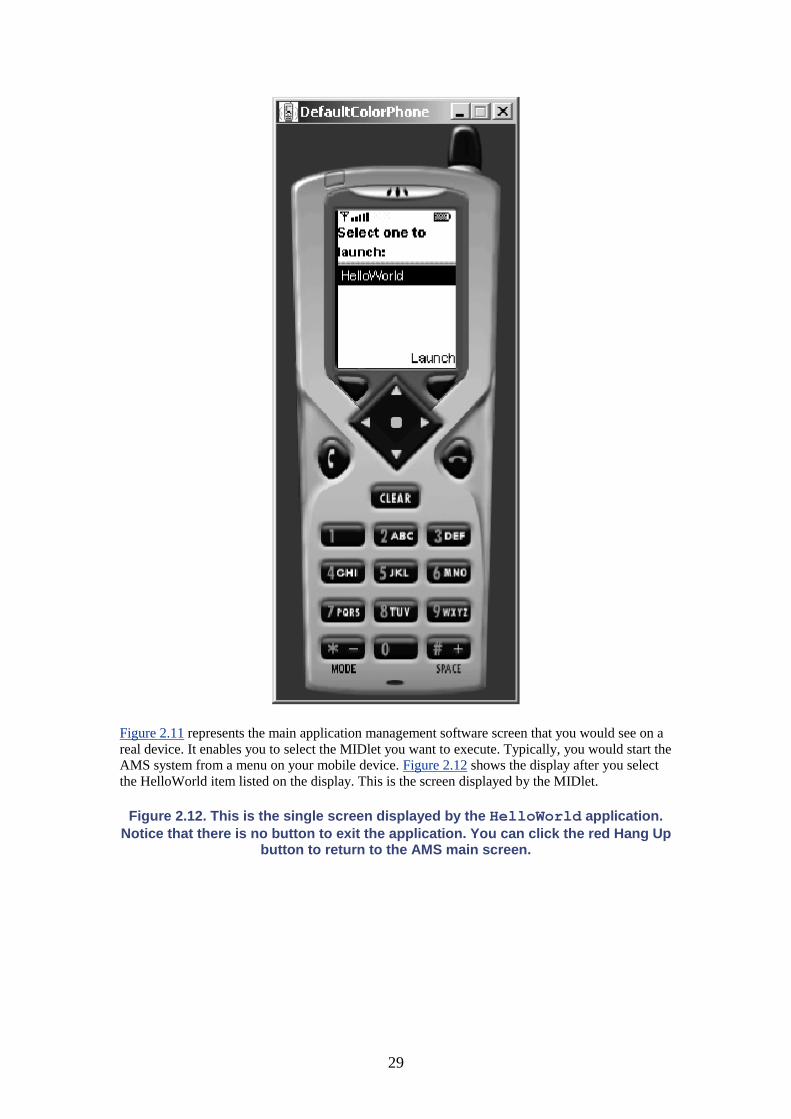
29
Figure 2.11 represents the main application management software screen that you would see on a real device. It enables you to select the MIDlet you want to execute. Typically, you would start the AMS system from a menu on your mobile device. Figure 2.12 shows the display after you select the HelloWorld item listed on the display. This is the screen displayed by the MIDlet.
Figure 2.12. This is the single screen displayed by the HelloWorld application. Notice that there is no button to exit the application. You can click the red Hang Up
button to return to the AMS main screen.

30
Figure 2.12 is the same figure as Figure 3.1 in chapter 3. Chapter 3 discusses the HelloWorld application source code and its variants in detail. In this chapter, I discuss only the application development process.
Figure 2.13 shows the J2MEWTK emulator main window after you complete emulation of the HelloWorld MIDlet. Notice that it produces some diagnostics information about the emulation process.
Figure 2.13. The emulator writes diagnostics output to the console.
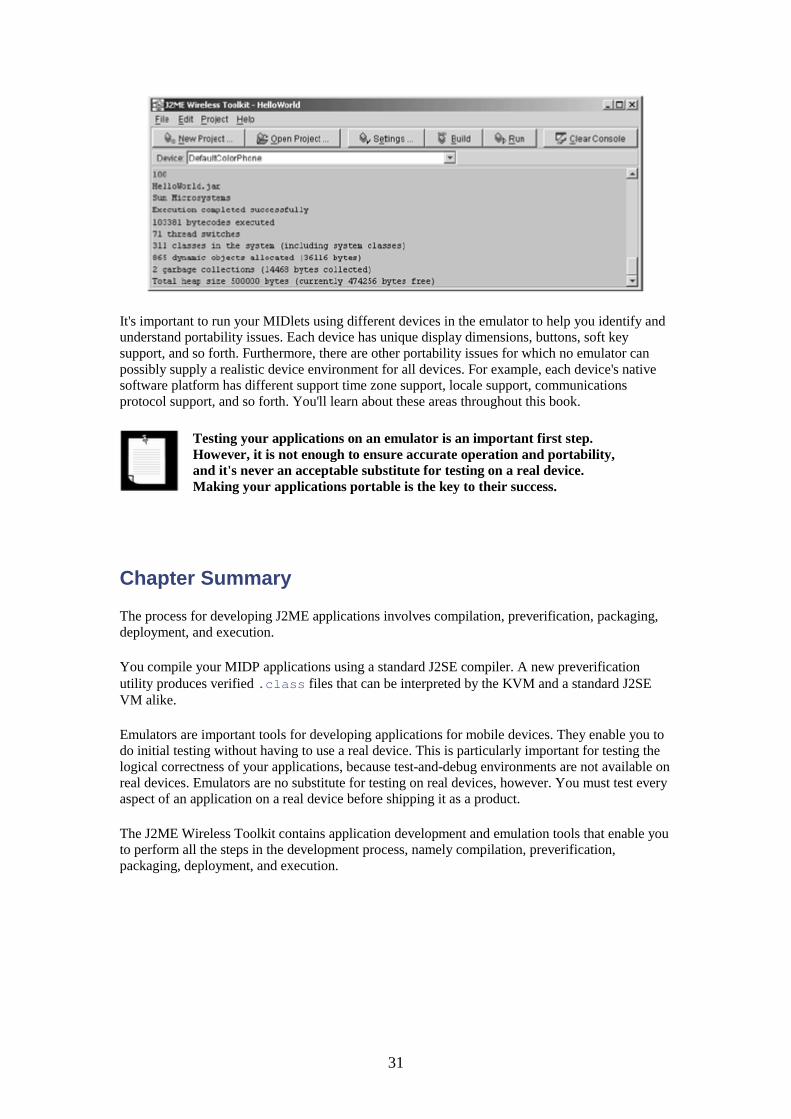
31
It's important to run your MIDlets using different devices in the emulator to help you identify and understand portability issues. Each device has unique display dimensions, buttons, soft key support, and so forth. Furthermore, there are other portability issues for which no emulator can possibly supply a realistic device environment for all devices. For example, each device's native software platform has different support time zone support, locale support, communications protocol support, and so forth. You'll learn about these areas throughout this book.
Testing your applications on an emulator is an important first step. However, it is not enough to ensure accurate operation and portability, and it's never an acceptable substitute for testing on a real device. Making your applications portable is the key to their success.
Chapter Summary
The process for developing J2ME applications involves compilation, preverification, packaging, deployment, and execution.
You compile your MIDP applications using a standard J2SE compiler. A new preverification utility produces verified .class files that can be interpreted by the KVM and a standard J2SE VM alike.
Emulators are important tools for developing applications for mobile devices. They enable you to do initial testing without having to use a real device. This is particularly important for testing the logical correctness of your applications, because test-and-debug environments are not available on real devices. Emulators are no substitute for testing on real devices, however. You must test every aspect of an application on a real device before shipping it as a product.
The J2ME Wireless Toolkit contains application development and emulation tools that enable you to perform all the steps in the development process, namely compilation, preverification, packaging, deployment, and execution.

32
Chapter 3. MIDP Application Program Structure • The Application Execution Lifecycle • MIDlet Program Structure • The MIDlet State Model • The MIDP UI Component Model • System Properties • Application Properties
In this chapter, you'll learn about the basic abstractions and programming model that the MIDP defines. It's necessary to understand the basic MIDP programming model in order to write MIDP applications. You must also understand the abstractions defined by the user interface (UI) components in order to build user interfaces using the MIDP. Before looking at source code, however, you must first understand the MIDlet execution lifecycle.
The Application Execution Lifecycle
Here's an example of the steps involved in executing an application:
1. Start the emulator. You'll see a window appear that simulates the device interface. If you're using the J2MEWTK v1.0.2, you'll notice that the emulator simply executes the HelloWorld application because it's the only application present in the suite. Figure 3.1 shows the main screen of this MIDl etexecution. With the J2MEWTK v1.0.3, however, you'll see a selection list of all MIDlets, even if there is only one.
Figure 3.1. This MIDlet run uses the default color phone supplied with the toolkit. Notice the MIDlet title.

33
2. Add a second version of the program, called HelloWorld2, to the MIDlet suite. You can begin this process by pressing the Settings… button on the toolkit main window, which you saw back in Figure 2.5 in chapter 2. First write the source code, and then place it in the project's src/ directory. Add it to the MIDlet suite by selecting the MIDlets tab of the screen that displays the project settings screen. Figure 3.2 shows the configuration screen after adding the new MIDlet.
Figure 3.2. Add new MIDlets to a suite using the MIDlets tab of the Settings window.

34
3. Now, build the project and then execute it. This time you see the display shown in Figure 3.3. Notice that now you see a menu that displays the names of both MIDlets contained in the MIDlet suite. Because there is more than one MIDlet to execute, the AMS must display a menu and allow you to select the one you wish to run. Of course, the emulator takes on the role of a real device's AMS here.
Figure 3.3. When more than one MIDlet is available, the AMS displays a menu showing you all of them. The AMS, not your application, creates the
Launch button. You must click it to invoke the selected MIDlet.
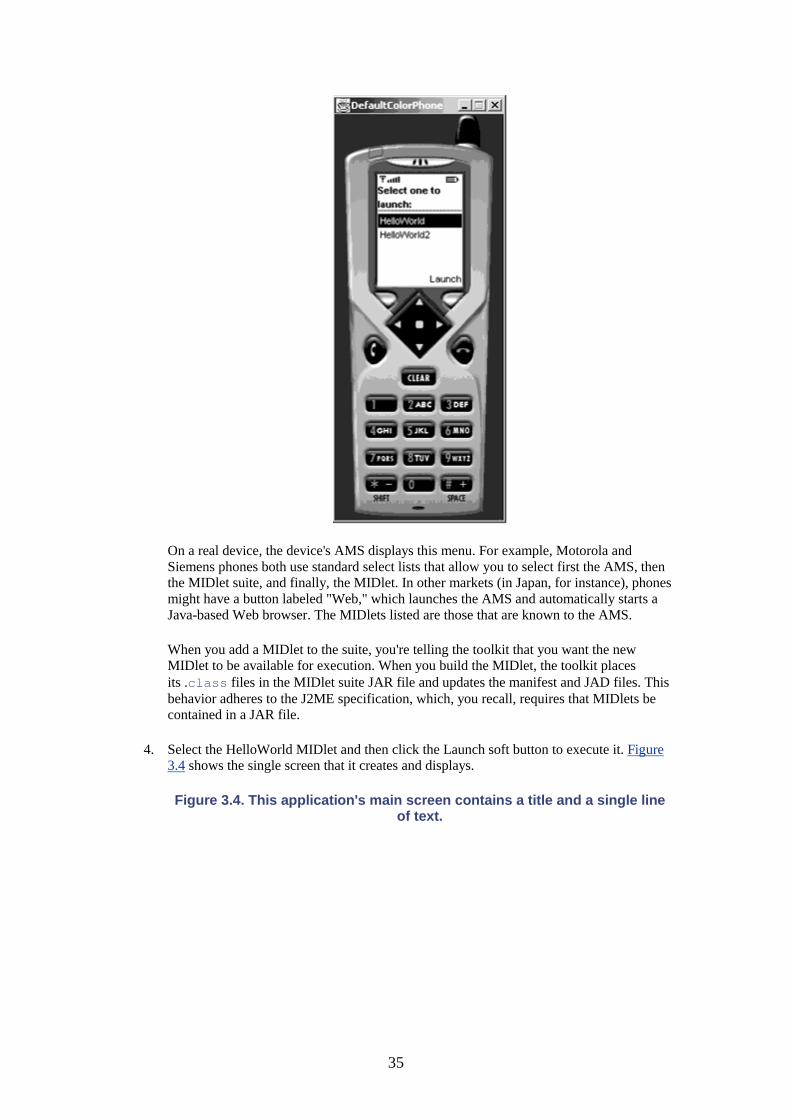
35
On a real device, the device's AMS displays this menu. For example, Motorola and Siemens phones both use standard select lists that allow you to select first the AMS, then the MIDlet suite, and finally, the MIDlet. In other markets (in Japan, for instance), phones might have a button labeled "Web," which launches the AMS and automatically starts a Java-based Web browser. The MIDlets listed are those that are known to the AMS.
When you add a MIDlet to the suite, you're telling the toolkit that you want the new MIDlet to be available for execution. When you build the MIDlet, the toolkit places its .class files in the MIDlet suite JAR file and updates the manifest and JAD files. This behavior adheres to the J2ME specification, which, you recall, requires that MIDlets be contained in a JAR file.
4. Select the HelloWorld MIDlet and then click the Launch soft button to execute it. Figure 3.4 shows the single screen that it creates and displays.
Figure 3.4. This application's main screen contains a title and a single line of text.

36
5. Click (press) the red handset button ("hang up") on the emulator and you are returned to the AMS main screen. Closing the emulator window ends the emulation. You've now completed the whole application execution lifecycle. Later in this chapter, you'll learn more about the details of the MIDlet lifecycle and the MIDlet state model.
MIDlet Program Structure
Now that you understand the application execution lifecycle, it's time to look at the source code of a simple MIDlet. You might have already surmised that I'm going to start by showing you the simplest MIDlet—the MIDP version of the inveterate "Hello World" program. Listing 3.1 shows the source code for the first version of the HelloWorld MIDlet.
Listing 3.1 This is the MIDP version of the familiar HelloWorld program.
import javax.microedition.lcdui.Display; import javax.microedition.lcdui.Displayable; import javax.microedition.lcdui.Form; import javax.microedition.midlet.MIDlet; /** Creates the "Hello world" program in J2ME MIDP. Note that the class must be public so that the device application management software can instantiate it. */ public class HelloWorld extends MIDlet

37
{ // The Displayable. This component is displayed on the // screen. private Form form; // The Display. This object manages all Displayable // components. private Display display; // A public no-arg constructor is necessary, even though // the system calls startApp()! The AMS calls the // class's no-arg constructor to instantiate the class. // Either create a public no-arg constructor, or declare // no constructors, and let the compiler create a public // no-arg constructor. // public HelloWorld() { super(); } public void destroyApp(boolean destroy) { form = null; notifyDestroyed(); } public void pauseApp() { } public void startApp() { // Create a Displayable widget. form = new Form("Hello, World"); // Add a string to the form. String msg = "My first MIDlet!"; form.append(msg); // This app simply displays the single form created // above. display = Display.getDisplay(this); display.setCurrent(form); } }
First, notice that this application defines a class called HelloWorld, which extends javax.microedition.midlet.MIDlet. All MIDlets must extend this class.
The HelloWorld class is the primary class of your application. For this reason, it must be declared public. Moreover, you must declare a public no-argument constructor, or ensure that there are no constructors, in which case the compiler will define a no-argument constructor for you. Readers who are familiar with Java applets will recognize the similarity between the applet and MIDlet lifecycle control models.

38
When you select HelloWorld from the AMS main screen, the AMS launches your application and instantiates the HelloWorld class. Technically, it starts the VM (or ensures that one is running) and instructs it to instantiate your class. The VM calls the no-argument constructor on the instance.
The AMS then calls the startApp() method. In Listing 3.1, the startApp(), pauseApp(), and destroyApp() methods override abstract declarations from the MIDlet class. Notice that all the initialization code goes in the startApp() method rather than in the constructor. You certainly can put some initialization code in your constructor; it will be executed before the call to startApp(). However, the startApp() method is always called as the entry point for your MIDlet.
What about a main() method? The Java language definition requires all Java applications to have a main() method with the following signature:
public static void main(String [] args)
If J2ME applications are real Java applications, as I've claimed previously, then there must be a main method somewhere that is the real entry point used by the VM to start the process of executing the application. In fact, there is such a method. It's part of the MIDP implementation (not the application), and, typically, the AMS software calls it. The AMS handles application invocation requests, for instance, by spawning a thread for each MIDlet startup request and controlling the MIDlet from that thread. Actual details are implementation dependent. In Sun's J2ME Wireless Toolkit, the class com.sun.midp.Main defines the main() method.
The startApp() method creates an object called a form and passes a string to the constructor that represents the form's title. A form is an instance of the class javax.microedition.lcdui.Form, which is a kind of screen that you can see on your display. It's so named because it functions somewhat like an HTML form—it contains one or more visual items, such as strings.
Next, the startApp() method creates a regular String object and adds it to the form. It then gets a reference to an object called a display, and it sets the form object as the currently displayed entity of the display.
After all this code executes, you see the screen in Figure 3.4. When you click or press the handset button that tells the device to hang up, the AMS invokes destroyApp(), which simply eliminates all references to the form object previously created. It's now subject to garbage collection. The AMS then terminates the MIDlet.
You're responsible for properly disposing of objects created by your MIDlets. In this contrived case, it shouldn't matter whether or not you set the reference to the form variable to null, because the MIDlet terminates. But in general, you need to properly manage the references to your program's objects, just as you would in any Java program.
The MIDlet State Model
MIDlets transition to different states during their lifetime. The MIDP specification defines the MIDlet state transition model. Table 3.1 lists the possible MIDlet states and their respective descriptions.
Figure 3.5 shows a state transition diagram that represents these MIDlet states and the events that cause transition from one state to another. The startApp(), pauseApp(), and destroyApp()
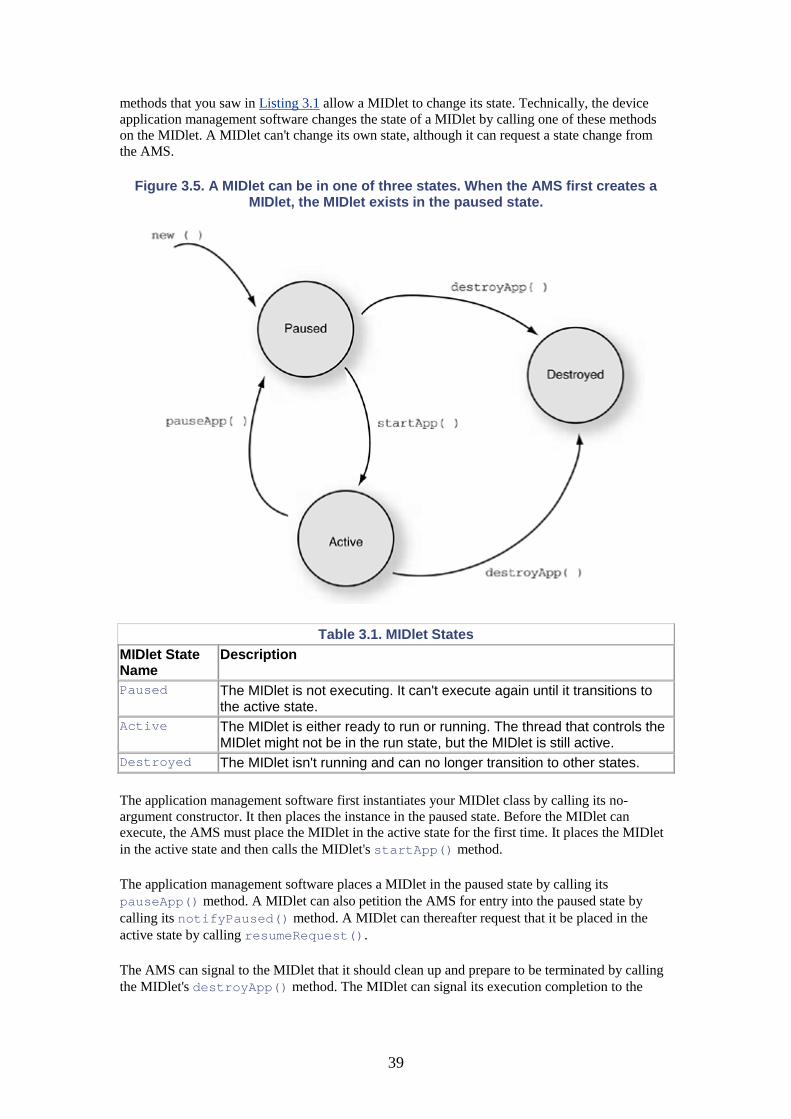
39
methods that you saw in Listing 3.1 allow a MIDlet to change its state. Technically, the device application management software changes the state of a MIDlet by calling one of these methods on the MIDlet. A MIDlet can't change its own state, although it can request a state change from the AMS.
Figure 3.5. A MIDlet can be in one of three states. When the AMS first creates a MIDlet, the MIDlet exists in the paused state.
Table 3.1. MIDlet States MIDlet State Name
Description
Paused The MIDlet is not executing. It can't execute again until it transitions to the active state.
Active The MIDlet is either ready to run or running. The thread that controls the MIDlet might not be in the run state, but the MIDlet is still active.
Destroyed The MIDlet isn't running and can no longer transition to other states.
The application management software first instantiates your MIDlet class by calling its no-argument constructor. It then places the instance in the paused state. Before the MIDlet can execute, the AMS must place the MIDlet in the active state for the first time. It places the MIDlet in the active state and then calls the MIDlet's startApp() method.
The application management software places a MIDlet in the paused state by calling its pauseApp() method. A MIDlet can also petition the AMS for entry into the paused state by calling its notifyPaused() method. A MIDlet can thereafter request that it be placed in the active state by calling resumeRequest().
The AMS can signal to the MIDlet that it should clean up and prepare to be terminated by calling the MIDlet's destroyApp() method. The MIDlet can signal its execution completion to the

40
AMS by calling notifyDestroyed(). Table 3.2 lists the methods in the javax.microedition.midlet.MIDlet class that control the MIDlet state.
Table 3.2. MIDlet Class Methods That Control MIDlet State MIDlet Class Method Name Description protected abstract void destroyApp()
The AMS signals the MIDlet to terminate. The MIDlet enters the destroyed state.
void notifyDestroyed() The MIDlet requests to enter the destroyed state. void notifyPaused() The MIDlet requests to be inactive and enter the
paused state. protected abstract void pauseApp()
The AMS signals the MIDlet to stop; the MIDlet will enter the paused state.
void resumeRequest() The MIDlet requests to re-enter the active state. protected abstract void startApp()
The AMS signals the MIDlet that it is active.
Notice that the program in Listing 3.1 doesn't call System.exit(). MIDP applications differ from J2SE applications in the way they terminate. To terminate your MIDlet, you only need to call the MIDlet's notifyDestroyed() method. This signals the AMS that your MIDlet is done executing. The AMS destroys the MIDlet instance and all of its objects. The VM still executes, however.
You want the VM to continue executing so other MIDlets can run. A call to System.exit() signals the VM to terminate. This behavior is undesirable in MIDP applications. Your applications should not terminate the VM; in fact, they can't. If your application calls System.exit(), a java.lang.SecurityException will always be thrown. You'll see a trace back that looks something like the following:
java.lang.SecurityException: MIDP lifecycle does notsupport system exit. at java.lang.Runtime.exit(+9) at java.lang.System.exit(+7) at HelloWorld3$MyCommandListener.commandAction(+15) at javax.microedition.lcdui.Display$DisplayAccessor. commandAction(+99) at com.sun.kvem.midp.lcdui.EmulEventHandler$EventLoop.run(+430)
There are two main reasons why a MIDlet should not shut down the VM. First, other applications may be running; terminating the VM would destroy them. Second, you never start up the VM; therefore, you should not shut it down. The AMS controls the VM. It starts it and terminates it when it detects it's not needed, or if it needs to manage system resources.
The MIDP UI Component Model
The MIDP UI components are defined in the javax.microedition.lcdui package. This package name will probably change in a future release because its name is too closely tied to a particular type of physical display device. The MIDP UI components comprise the majority of classes in this package. Understanding the organization of these UI components is essential to building MIDP applications.
41
Listing 3.1 offers the first demonstration of the use of some of these components. The last two lines of the startApp() method highlight the crux of the MIDP UI programming model and demonstrate how the primary UI component classes interact:
display = Display.getDisplay(this); display.setCurrent(form);
The first of the two lines just shown obtains a reference to a Display object. The Display object is a Java object that represents the physical display of the device's screen. The next line says, "Make this form the currently displayed entity."
A form is one kind of displayable component that can have a visual representation. A displayable component in MIDP is a top-level UI component. Top-level components can be independently displayed by a MIDlet. That is, they don't need to be contained inside any other component—in fact, they can't be. A MIDP application can display only one top-level component at any given time.
For AWT and Swing programmers, a MIDP top-level component is equivalent to a java.awt.Frame or java.awt.Window in the Swing and AWT toolkits. The MIDP implementation manages top-level components in the same way that the native window system manages a Window in a J2SE platform implementation.
When the AMS launches a MIDlet, it does the following:
• It instantiates the Display class. • It associates the Display instance with your MIDlet instance.
Your program never creates the Display object; the MIDP implementation does. Your MIDlet creates only the UI components—instances of the concrete subclasses of Displayable or Item that will be displayed on the screen throughout your MIDlet's lifetime. You tell the Display object when to display your displayable components by calling the Display.setCurrent() method.
Three primary objects interact here: your MIDlet instance, the Display instance created by the AMS, and the Displayable component that you want to appear on the screen. Figure 3.6 shows a UML diagram of the relationship between these objects.
Figure 3.6. MIDP implementations create only one Display object per MIDlet. Your MIDlet is an instance of your main class that extends the MIDlet class. It can
create many Displayable objects, however.

42
The important concepts are the following:
• A Display object manages the physical display. • A Display can display Displayable objects. • You must obtain a reference to the Display object associated with your MIDlet by the
MIDP implementation. • Only one Displayable object can be displayed at any given time.
An inheritance diagram is a wonderful tool to help one organize one's understanding of a programming model and the relationships between the classes. Figure 3.7 shows an inheritance diagram of all the classes in the javax.microedition.lcdui package.
Figure 3.7. The inheritance diagram of the MIDP UI components shows the relationships between a MIDlet, its associated Display object, and its
Displayable objects. Unless otherwise qualified, all classes belong to the javax.microedition.lcdui package.
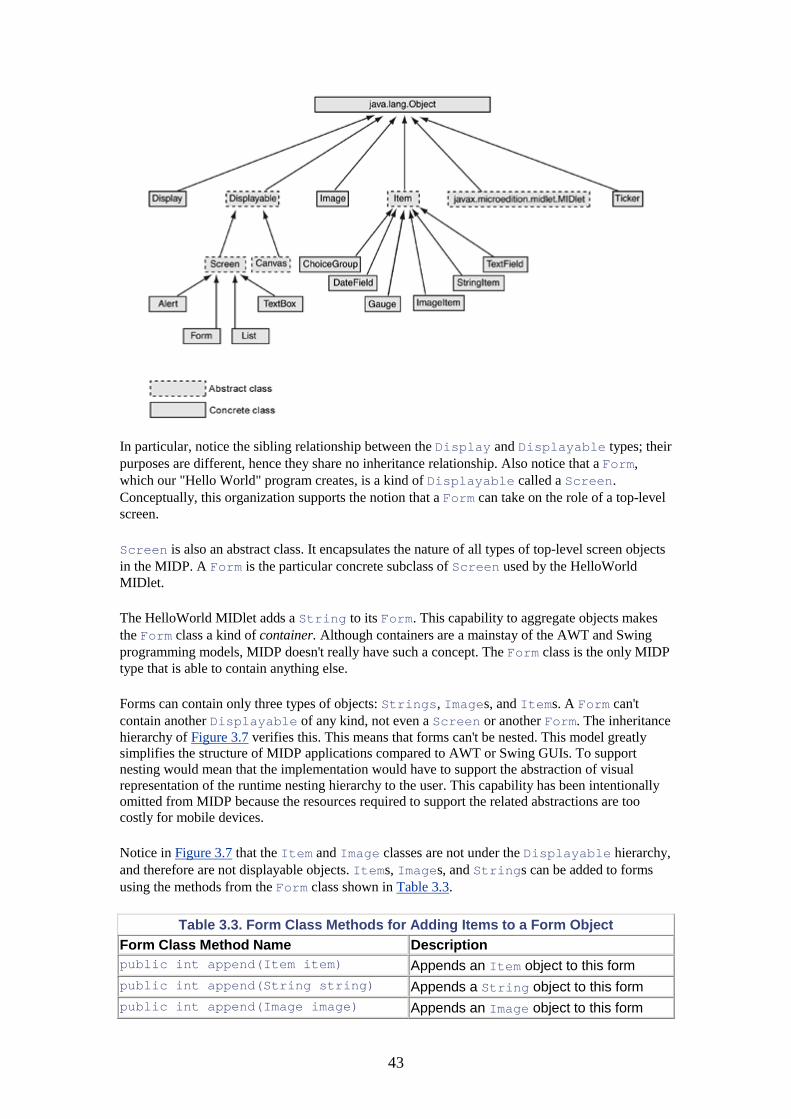
43
In particular, notice the sibling relationship between the Display and Displayable types; their purposes are different, hence they share no inheritance relationship. Also notice that a Form, which our "Hello World" program creates, is a kind of Displayable called a Screen. Conceptually, this organization supports the notion that a Form can take on the role of a top-level screen.
Screen is also an abstract class. It encapsulates the nature of all types of top-level screen objects in the MIDP. A Form is the particular concrete subclass of Screen used by the HelloWorld MIDlet.
The HelloWorld MIDlet adds a String to its Form. This capability to aggregate objects makes the Form class a kind of container. Although containers are a mainstay of the AWT and Swing programming models, MIDP doesn't really have such a concept. The Form class is the only MIDP type that is able to contain anything else.
Forms can contain only three types of objects: Strings, Images, and Items. A Form can't contain another Displayable of any kind, not even a Screen or another Form. The inheritance hierarchy of Figure 3.7 verifies this. This means that forms can't be nested. This model greatly simplifies the structure of MIDP applications compared to AWT or Swing GUIs. To support nesting would mean that the implementation would have to support the abstraction of visual representation of the runtime nesting hierarchy to the user. This capability has been intentionally omitted from MIDP because the resources required to support the related abstractions are too costly for mobile devices.
Notice in Figure 3.7 that the Item and Image classes are not under the Displayable hierarchy, and therefore are not displayable objects. Items, Images, and Strings can be added to forms using the methods from the Form class shown in Table 3.3.
Table 3.3. Form Class Methods for Adding Items to a Form Object Form Class Method Name Description public int append(Item item) Appends an Item object to this form public int append(String string) Appends a String object to this form public int append(Image image) Appends an Image object to this form
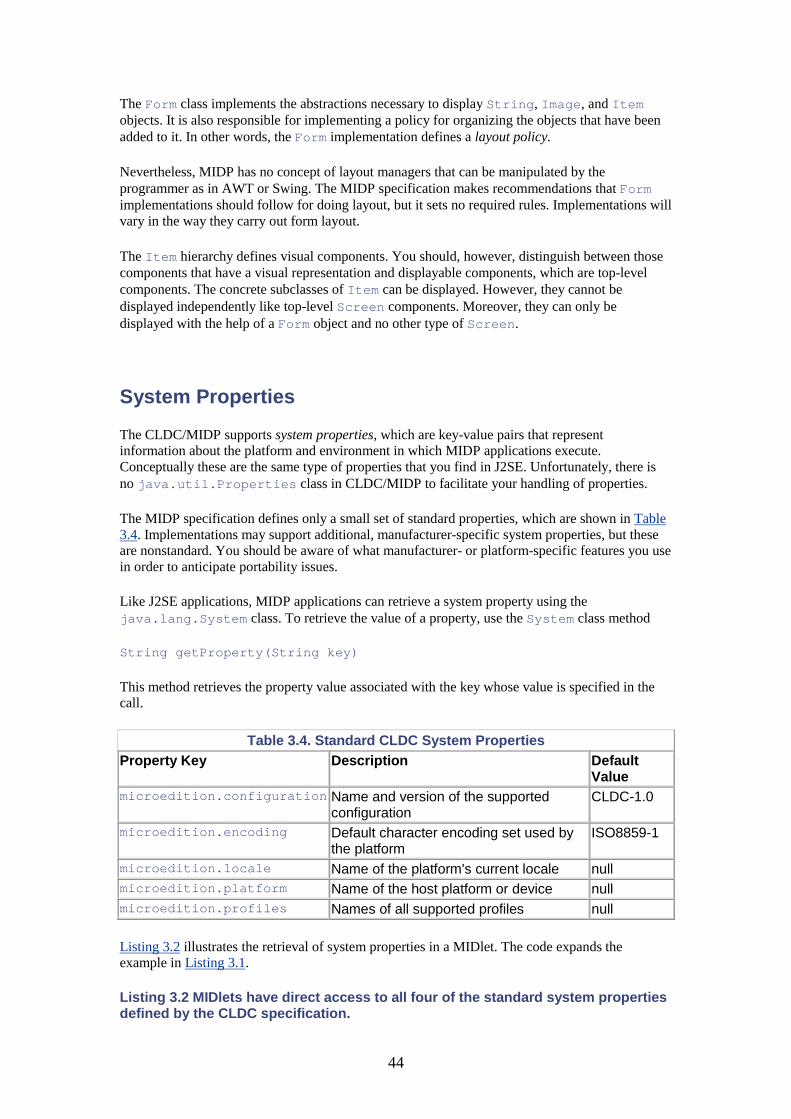
44
The Form class implements the abstractions necessary to display String, Image, and Item objects. It is also responsible for implementing a policy for organizing the objects that have been added to it. In other words, the Form implementation defines a layout policy.
Nevertheless, MIDP has no concept of layout managers that can be manipulated by the programmer as in AWT or Swing. The MIDP specification makes recommendations that Form implementations should follow for doing layout, but it sets no required rules. Implementations will vary in the way they carry out form layout.
The Item hierarchy defines visual components. You should, however, distinguish between those components that have a visual representation and displayable components, which are top-level components. The concrete subclasses of Item can be displayed. However, they cannot be displayed independently like top-level Screen components. Moreover, they can only be displayed with the help of a Form object and no other type of Screen.
System Properties
The CLDC/MIDP supports system properties, which are key-value pairs that represent information about the platform and environment in which MIDP applications execute. Conceptually these are the same type of properties that you find in J2SE. Unfortunately, there is no java.util.Properties class in CLDC/MIDP to facilitate your handling of properties.
The MIDP specification defines only a small set of standard properties, which are shown in Table 3.4. Implementations may support additional, manufacturer-specific system properties, but these are nonstandard. You should be aware of what manufacturer- or platform-specific features you use in order to anticipate portability issues.
Like J2SE applications, MIDP applications can retrieve a system property using the java.lang.System class. To retrieve the value of a property, use the System class method
String getProperty(String key)
This method retrieves the property value associated with the key whose value is specified in the call.
Table 3.4. Standard CLDC System Properties Property Key Description Default
Value microedition.configuration Name and version of the supported
configuration CLDC-1.0
microedition.encoding Default character encoding set used by the platform
ISO8859-1
microedition.locale Name of the platform's current locale null microedition.platform Name of the host platform or device null microedition.profiles Names of all supported profiles null
Listing 3.2 illustrates the retrieval of system properties in a MIDlet. The code expands the example in Listing 3.1.
Listing 3.2 MIDlets have direct access to all four of the standard system properties defined by the CLDC specification.
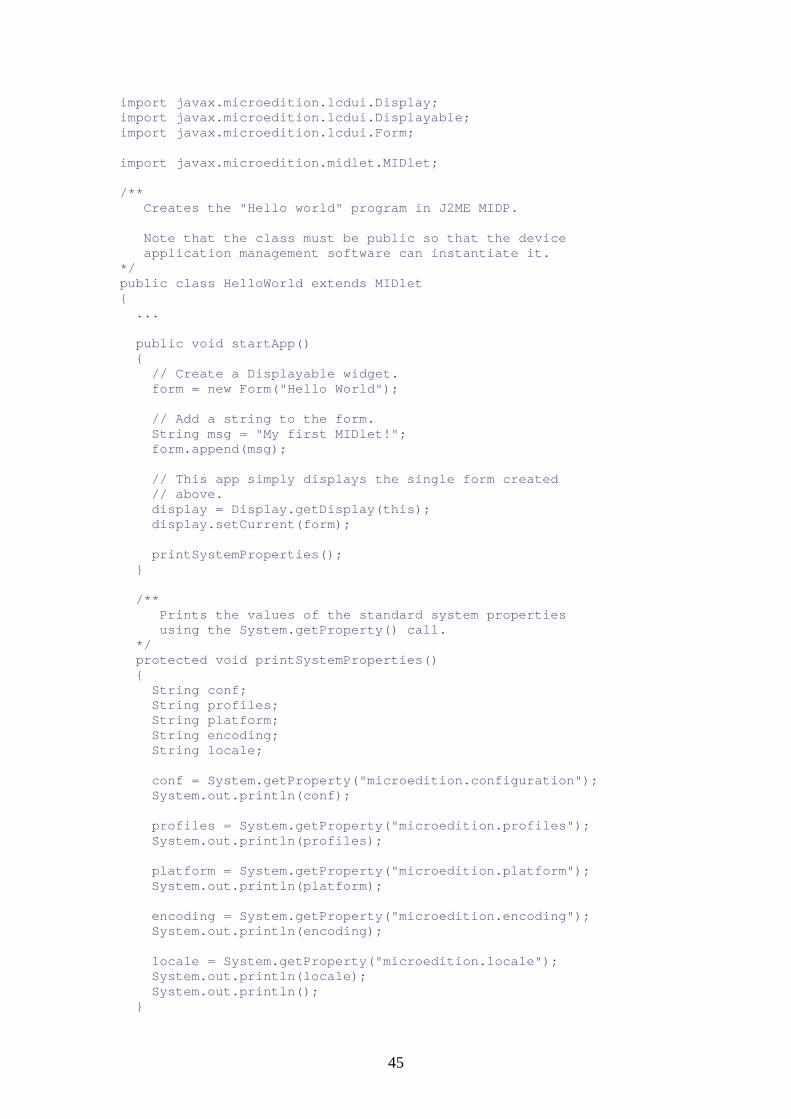
45
import javax.microedition.lcdui.Display; import javax.microedition.lcdui.Displayable; import javax.microedition.lcdui.Form; import javax.microedition.midlet.MIDlet; /** Creates the "Hello world" program in J2ME MIDP. Note that the class must be public so that the device application management software can instantiate it. */ public class HelloWorld extends MIDlet { ... public void startApp() { // Create a Displayable widget. form = new Form("Hello World"); // Add a string to the form. String msg = "My first MIDlet!"; form.append(msg); // This app simply displays the single form created // above. display = Display.getDisplay(this); display.setCurrent(form); printSystemProperties(); } /** Prints the values of the standard system properties using the System.getProperty() call. */ protected void printSystemProperties() { String conf; String profiles; String platform; String encoding; String locale; conf = System.getProperty("microedition.configuration"); System.out.println(conf); profiles = System.getProperty("microedition.profiles"); System.out.println(profiles); platform = System.getProperty("microedition.platform"); System.out.println(platform); encoding = System.getProperty("microedition.encoding"); System.out.println(encoding); locale = System.getProperty("microedition.locale"); System.out.println(locale); System.out.println(); }
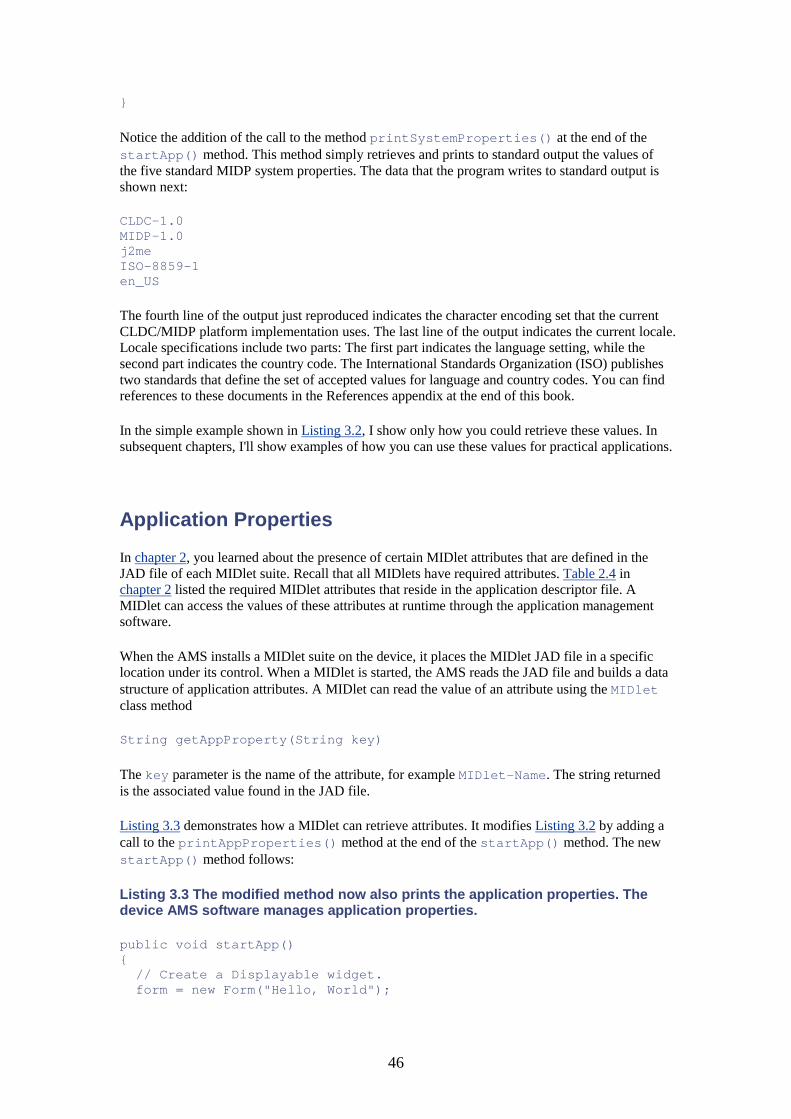
46
}
Notice the addition of the call to the method printSystemProperties() at the end of the startApp() method. This method simply retrieves and prints to standard output the values of the five standard MIDP system properties. The data that the program writes to standard output is shown next:
CLDC-1.0 MIDP-1.0 j2me ISO-8859-1 en_US
The fourth line of the output just reproduced indicates the character encoding set that the current CLDC/MIDP platform implementation uses. The last line of the output indicates the current locale. Locale specifications include two parts: The first part indicates the language setting, while the second part indicates the country code. The International Standards Organization (ISO) publishes two standards that define the set of accepted values for language and country codes. You can find references to these documents in the References appendix at the end of this book.
In the simple example shown in Listing 3.2, I show only how you could retrieve these values. In subsequent chapters, I'll show examples of how you can use these values for practical applications.
Application Properties
In chapter 2, you learned about the presence of certain MIDlet attributes that are defined in the JAD file of each MIDlet suite. Recall that all MIDlets have required attributes. Table 2.4 in chapter 2 listed the required MIDlet attributes that reside in the application descriptor file. A MIDlet can access the values of these attributes at runtime through the application management software.
When the AMS installs a MIDlet suite on the device, it places the MIDlet JAD file in a specific location under its control. When a MIDlet is started, the AMS reads the JAD file and builds a data structure of application attributes. A MIDlet can read the value of an attribute using the MIDlet class method
String getAppProperty(String key)
The key parameter is the name of the attribute, for example MIDlet-Name. The string returned is the associated value found in the JAD file.
Listing 3.3 demonstrates how a MIDlet can retrieve attributes. It modifies Listing 3.2 by adding a call to the printAppProperties() method at the end of the startApp() method. The new startApp() method follows:
Listing 3.3 The modified method now also prints the application properties. The device AMS software manages application properties.
public void startApp() { // Create a Displayable widget. form = new Form("Hello, World");
47
// Add a string to the form. String msg = "My first MIDlet!"; form.append(msg); // This app simply displays the single form created // above. display = Display.getDisplay(this); display.setCurrent(form); printSystemProperties(); printAppProperties(); }
The method shown in Listing 3.3 prints the values of the standard MIDlet application properties to standard output. Listing 3.4 shows the printAppProperties() method.
Listing 3.4 MIDlet attributes, or properties, are different from system properties. You can define an unlimited number of optional MIDlet attributes in addition to the predefined, required ones.
/** Prints application properties using the MIDlet.getAppProperty() call. */ protected void printAppProperties() { System.out.println(getAppProperty("MIDlet-Name")); System.out.println(getAppProperty("MIDlet-Jar-Size")); System.out.println(getAppProperty("MIDlet-Jar-URL")); System.out.println(getAppProperty("MIDlet-Vendor")); }
This latest version of the HelloWorld program now prints the following lines to standard output, which you should see in your Wireless Toolkit main console window. The printAppProperties() method prints the last four lines of output.
CLDC-1.0 MIDP-1.0 j2me ISO-8859-1 en_US HelloWorld 6781 HelloWorld.jar Vartan Piroumian
The four attributes accessed in Listing 3.4 are standard applications properties available to all MIDlets. Recall from chapter 2, however, that some additional required MIDlet attributes are defined in Table 2.4. Also, the MIDP specification defines several optional application attributes; Table 2.5 in chapter 2 lists these optional attributes. Your applications have access to all of them through the mechanism demonstrated in Listings 3.3 and 3.4.
Additionally, MIDlets can define optional, application-specific attributes. You can define as many application-specific properties as you like. Your application would then access them using the MIDlet.getAppProperty() method demonstrated in Listings 3.3 and 3.4. This capability is a kind of configuration or customization mechanism for MIDlets. You'll see some examples of custom attribute definition and use in chapter 9.

48
Chapter Summary
In this chapter you've learned about the basic organization and structure of MIDP applications. The center of the MIDP programming model is the MIDlet.
The main components of a MIDlet's structure are the MIDlet instance, a Display instance, and one or more Displayable widgets, which are UI components.
MIDlet objects are associated with a Display object. MIDlets create Displayable widgets, which are UI components, and request that they be displayed on the device's screen. The display manages the device's screen and the visibility of the UI widgets.
The abstract Screen class is the first of two main types that categorize all Displayable objects. The Screen class is the central display abstraction. The Form class is a concrete subclass of Screen. Only one Screen is visible at any moment in a MIDlet's life.
All MIDlets have associated properties and attributes. Properties are standard system properties defined by the CLDC specification. They pertain to the platform and are maintained and managed by the application management system. Attributes are associated with MIDlets. There are required attributes that are available to all MIDlets, and there are optional attributes. Additionally, there are application-specific attributes that can be defined by the MIDlet author. Attributes exist in the application JAD file and are managed by the device AMS software during runtime.
49
Chapter 4. The MIDP High-Level API • Command Processing • Command-Processing Scenario • Screen Navigation • Command Organization
At this point, you know how to organize the UI of a basic MIDP application. In any MIDlet more complicated than the first contrived example you saw, you have to define multiple screens. The application moves from screen to screen in response to user input from the keypad, soft keys, or function buttons of a typical mobile device.
To build more complex applications, you need to learn how the MIDP accommodates user input and does event processing. This chapter covers the MIDP's high-level API, which defines the abstractions that accommodate handling high-level application events.
The high-level API is the first of two APIs for MIDP UI components. The other is the low-level API, which you'll learn about in chapter 5. The term high-level refers to the API's high level of granularity that is provided to the programmer in two areas:
• ability to manipulate the look and feel of UI widgets • granularity of information about events and event handling
All the UI components under the Screen class hierarchy implement the high-level API. These widgets don't give you the ability to change their look-and-feel. As for events, the information available to the application is at a high level of abstraction. Applications don't have access to concrete input devices. For example, using the Screen abstraction, applications don't have access to information about what physical keys the user presses.
The high-level API is designed for business applications that must be portable across many devices. Therefore, the MIDP implementation abstracts the details of things like the implementation to hardware.
Command Processing
The MIDP high-level API supports event processing through the use of commands. A command represents a user action—for instance, something the user does on screen such as pressing a function button. An event is the occurrence of an action. Events can represent the invocation of a command in response to a user action.
A command captures the semantic information or representation of a user action or event. It does not, however, define the behavior that results from the action or event. The application defines the processing—the behavior, if you will—that results from the occurrence of some command.
The Command class in the javax.microedition.lcdui package describes commands. This class encapsulates three pieces of information:
• label • priority • command type
50
The label is a String suitable for display such that it can represent to the user the semantics of the command. The priority is an int that indicates the importance of a command relative to other commands. The command type is an internal representation of the intended use of the command. The current specification defines the command types listed in Table 4.1.
Table 4.1. Command Types Command Type Constant
Description
public static int BACK
Return to the logically previous screen
public static int CANCEL
A standard negative answer to a dialog query
public static int EXIT
Indication to exit the application
public static int HELP
A request for on-line help
public static int ITEM
The application hints to the implementation that the command relates to a specific item on the screen, possibly the currently selected item
public static int OK
A standard positive answer to a dialog query
public static int SCREEN
An application-defined command related to the currently displayed screen
public static int STOP
Stop some currently executing operation
Command-Processing Scenario
The scenario for command processing in the MIDP is conceptually similar to other GUI toolkits. A command listener is an object that receives notifications of the occurrence of commands. Command listeners register to receive notification of commands.
Some external action, such as the user press of a button, results in the MIDP implementation detecting the event and associating it with the currently displayed screen. It encapsulates the event in a Command object. A registered command listener receives notification of the event. The listener then takes some action that represents the behavior of the command.
Commands can only be associated with Displayable widgets. That is, you can add or remove Command objects to and from a Displayable object using the following methods in the Displayable class:
public void addCommand(Command cmd) public void removeCommand(Command cmd)
A command listener object must register with a Displayable to receive command notifications by calling the following method on the Displayable object:
void setCommandListener(CommandListener cl)
Only one command listener is allowed per Displayable. The MIDP implementation delivers commands only to the current Displayable. This restriction has to do with the realistic
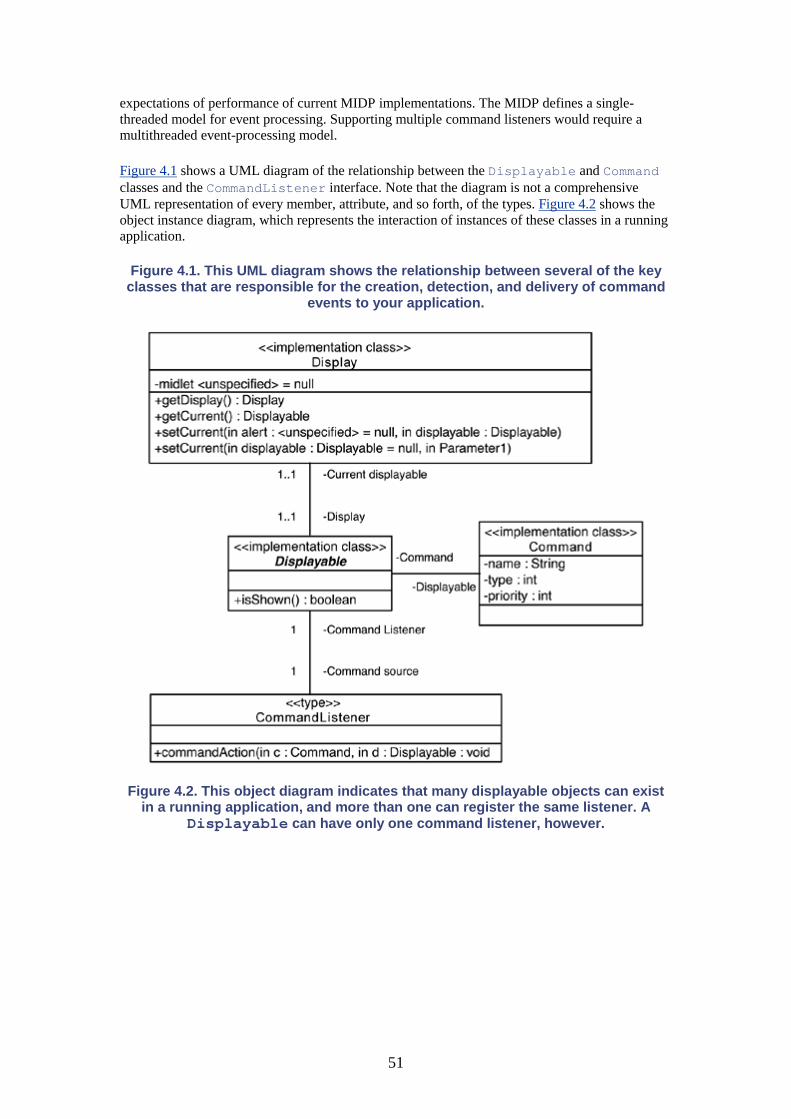
51
expectations of performance of current MIDP implementations. The MIDP defines a single-threaded model for event processing. Supporting multiple command listeners would require a multithreaded event-processing model.
Figure 4.1 shows a UML diagram of the relationship between the Displayable and Command classes and the CommandListener interface. Note that the diagram is not a comprehensive UML representation of every member, attribute, and so forth, of the types. Figure 4.2 shows the object instance diagram, which represents the interaction of instances of these classes in a running application.
Figure 4.1. This UML diagram shows the relationship between several of the key classes that are responsible for the creation, detection, and delivery of command
events to your application.
Figure 4.2. This object diagram indicates that many displayable objects can exist in a running application, and more than one can register the same listener. A
Displayable can have only one command listener, however.

52
Unlike the Swing toolkit, the MIDP has no general event listener model. The high-level API has only one type of command listener, called, not surprisingly, javax.microedition.lcdui.CommandListener.
Listing 4.1 shows the second version of the HelloWorld MIDlet. It adds a soft button to its main screen and installs a command listener to listen for the occurrence of the user pressing the soft button. The MIDlet responds by displaying another kind of screen called an alert, which is the MIDP equivalent of a pop-up dialog box.
Listing 4.1 The HelloWorld2 program adds command processing.
import javax.microedition.midlet.MIDlet; import javax.microedition.lcdui.Alert; import javax.microedition.lcdui.AlertType; import javax.microedition.lcdui.Command; import javax.microedition.lcdui.CommandListener; import javax.microedition.lcdui.Display; import javax.microedition.lcdui.Displayable; import javax.microedition.lcdui.Form; /** The second version of the HelloWorld application. This version adds a command to a Displayable component and sets a command listener to listen for command activation and take some action in response to it. This example demonstrates how the Displayable defines the semantics of the command execution. */ public class HelloWorld2 extends MIDlet {
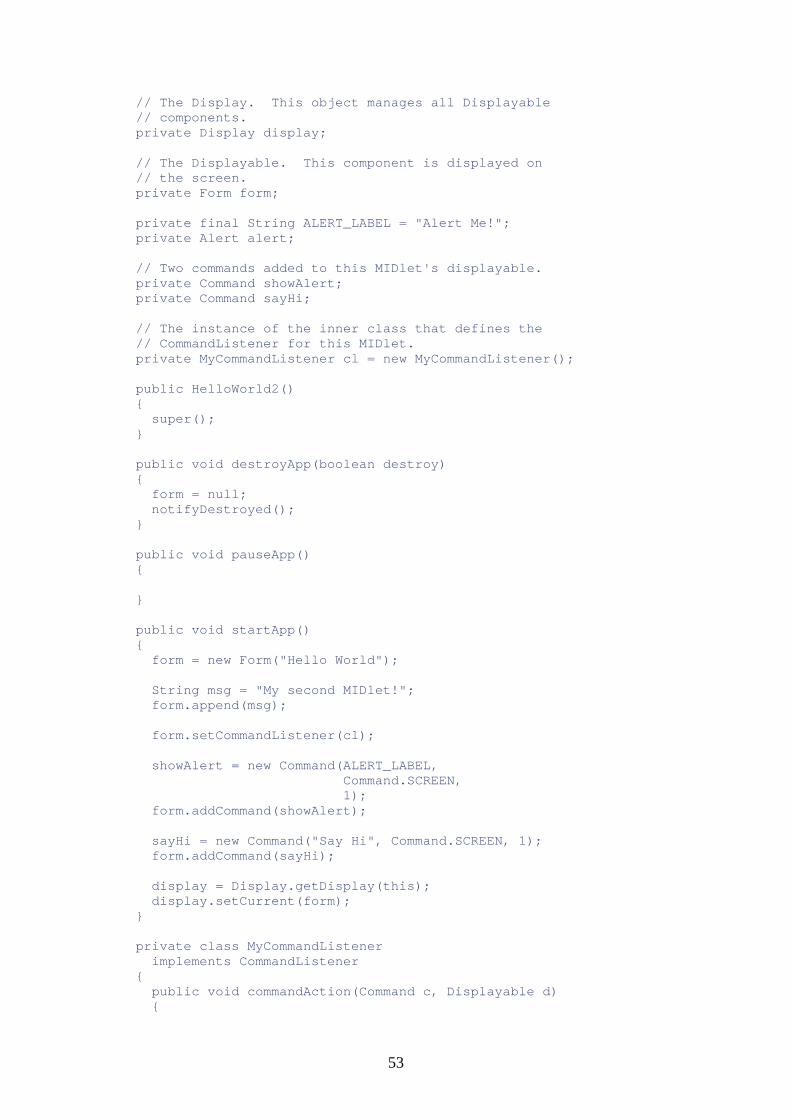
53
// The Display. This object manages all Displayable // components. private Display display; // The Displayable. This component is displayed on // the screen. private Form form; private final String ALERT_LABEL = "Alert Me!"; private Alert alert; // Two commands added to this MIDlet's displayable. private Command showAlert; private Command sayHi; // The instance of the inner class that defines the // CommandListener for this MIDlet. private MyCommandListener cl = new MyCommandListener(); public HelloWorld2() { super(); } public void destroyApp(boolean destroy) { form = null; notifyDestroyed(); } public void pauseApp() { } public void startApp() { form = new Form("Hello World"); String msg = "My second MIDlet!"; form.append(msg); form.setCommandListener(cl); showAlert = new Command(ALERT_LABEL, Command.SCREEN, 1); form.addCommand(showAlert); sayHi = new Command("Say Hi", Command.SCREEN, 1); form.addCommand(sayHi); display = Display.getDisplay(this); display.setCurrent(form); } private class MyCommandListener implements CommandListener { public void commandAction(Command c, Displayable d) {
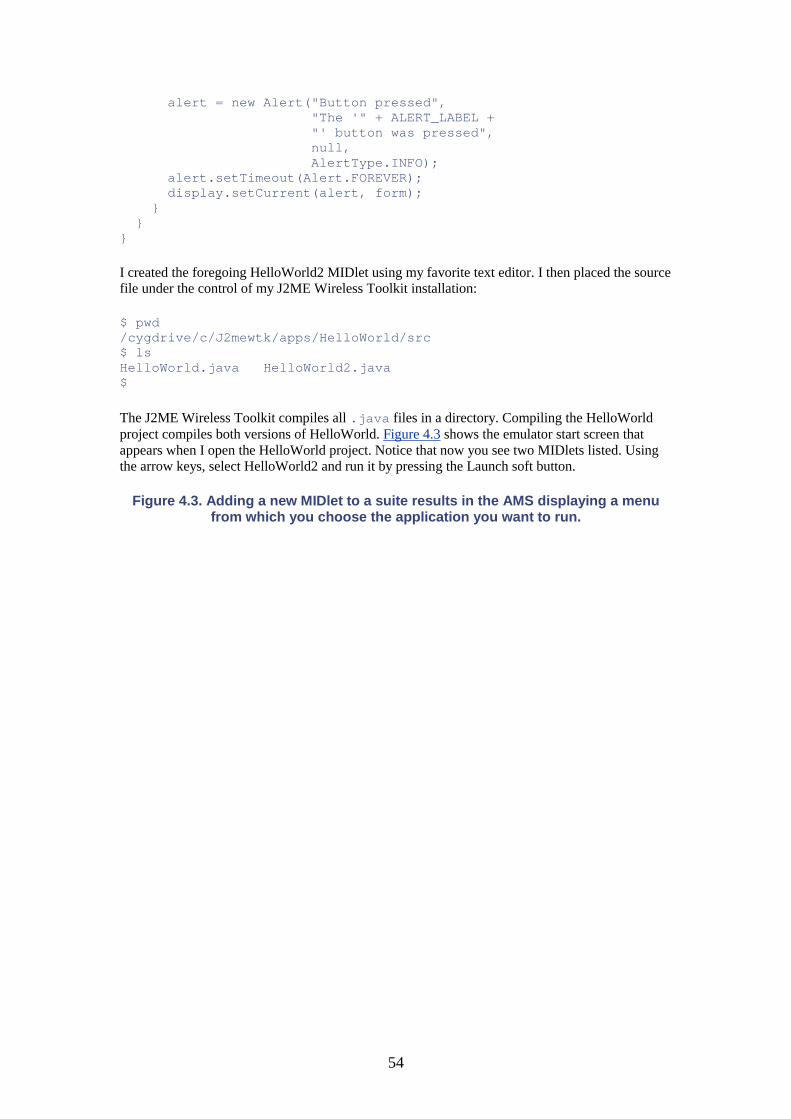
54
alert = new Alert("Button pressed", "The '" + ALERT_LABEL + "' button was pressed", null, AlertType.INFO); alert.setTimeout(Alert.FOREVER); display.setCurrent(alert, form); } } }
I created the foregoing HelloWorld2 MIDlet using my favorite text editor. I then placed the source file under the control of my J2ME Wireless Toolkit installation:
$ pwd /cygdrive/c/J2mewtk/apps/HelloWorld/src $ ls HelloWorld.java HelloWorld2.java $
The J2ME Wireless Toolkit compiles all .java files in a directory. Compiling the HelloWorld project compiles both versions of HelloWorld. Figure 4.3 shows the emulator start screen that appears when I open the HelloWorld project. Notice that now you see two MIDlets listed. Using the arrow keys, select HelloWorld2 and run it by pressing the Launch soft button.
Figure 4.3. Adding a new MIDlet to a suite results in the AMS displaying a menu from which you choose the application you want to run.
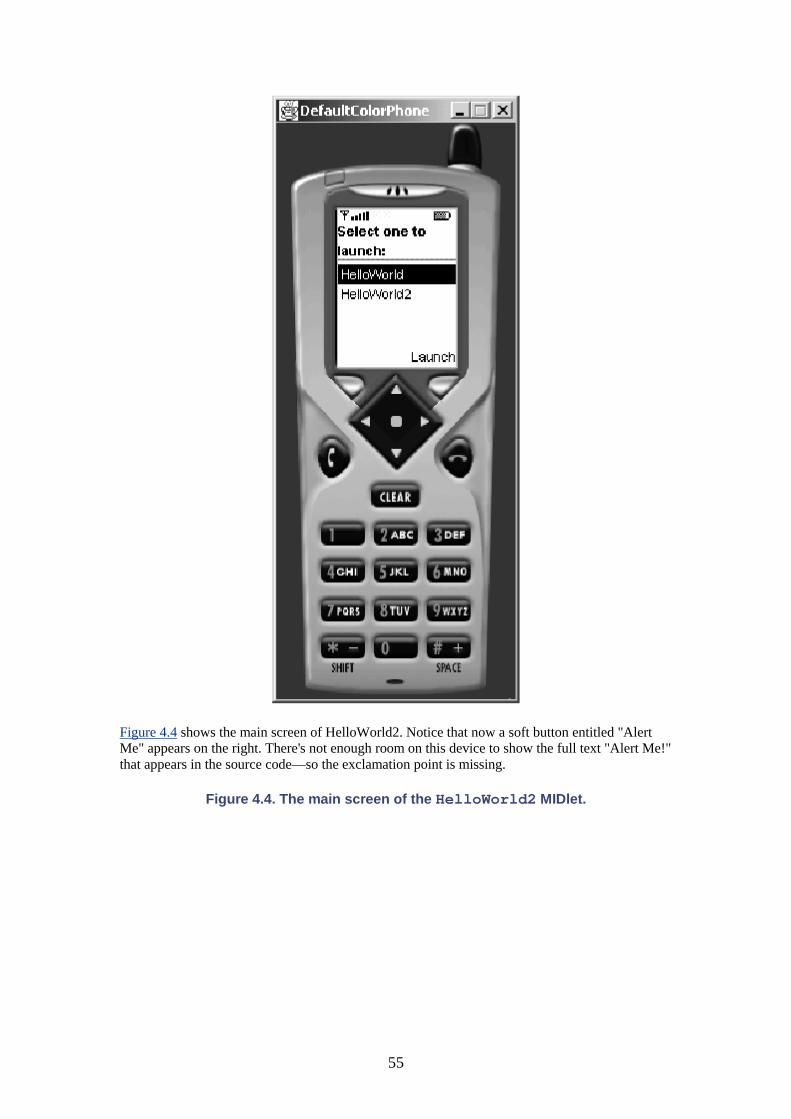
55
Figure 4.4 shows the main screen of HelloWorld2. Notice that now a soft button entitled "Alert Me" appears on the right. There's not enough room on this device to show the full text "Alert Me!" that appears in the source code—so the exclamation point is missing.
Figure 4.4. The main screen of the HelloWorld2 MIDlet.
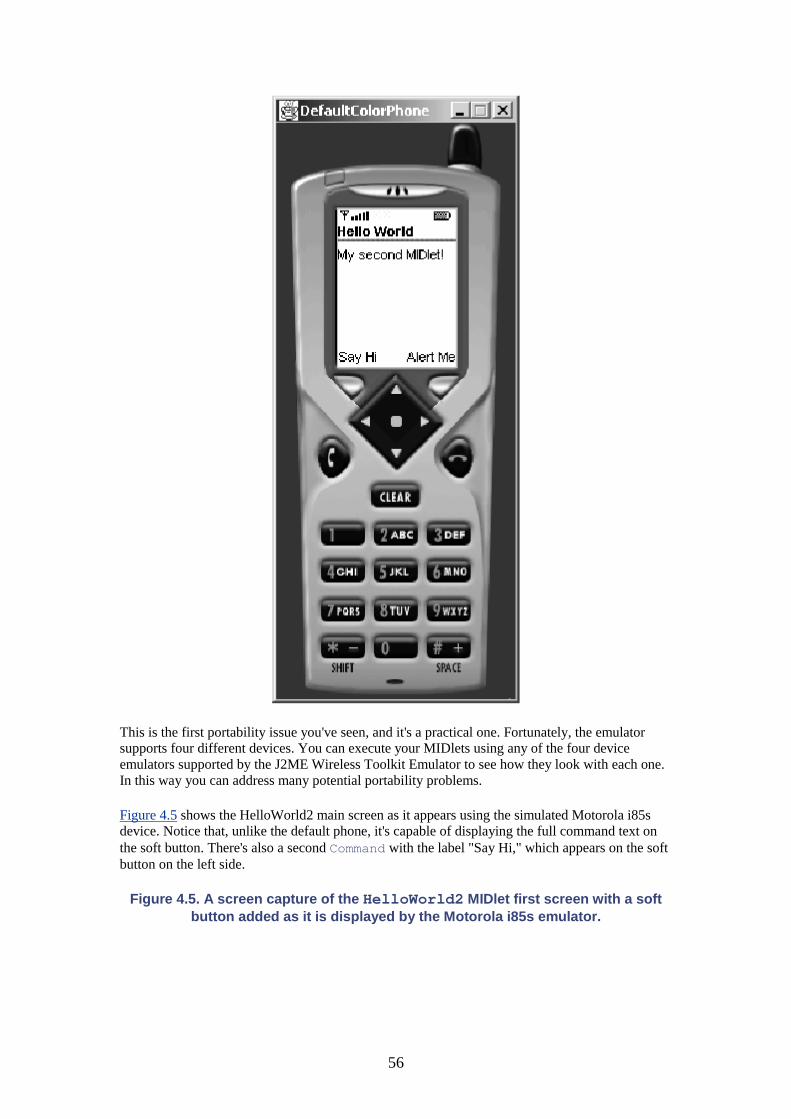
56
This is the first portability issue you've seen, and it's a practical one. Fortunately, the emulator supports four different devices. You can execute your MIDlets using any of the four device emulators supported by the J2ME Wireless Toolkit Emulator to see how they look with each one. In this way you can address many potential portability problems.
Figure 4.5 shows the HelloWorld2 main screen as it appears using the simulated Motorola i85s device. Notice that, unlike the default phone, it's capable of displaying the full command text on the soft button. There's also a second Command with the label "Say Hi," which appears on the soft button on the left side.
Figure 4.5. A screen capture of the HelloWorld2 MIDlet first screen with a soft button added as it is displayed by the Motorola i85s emulator.

57
Pressing the "Alert Me!" soft button displays the alert screen shown in Figure 4.6. The action of displaying this screen is the behavior that HelloWorld2 defined for the command associated with the soft button selection.
Figure 4.6. Pressing the "Alert Me!" soft button displays this alert. Alerts are a type of displayable screen.

58
Looking at the HelloWorld2 source code, you see that, except for a few variable declarations, the logic that creates this command processing capability is located in the startApp() method. The application creates a CommandListener instance. HelloWorld2 defines an inner class, MyCommandListener, to handle the listener duties. It implements the CommandListener interface.
You don't have to do it this way. You could, for example, subclass the Form class and have it implement CommandListener. Your subclass is a Form, which is a kind of Screen, and it is therefore able to receive command invocation notifications.
Defining CommandListener as an interface enables the use of this second approach. Every type of Screen already has a parent class, and therefore cannot inherit from a second parent. The use of Java interfaces is particularly useful here.
59
After instantiating MyCommandListener, the instance is registered on the Form. Next, the application creates a Command object whose title is the "Alert Me!" label you saw in the emulator. This command is then added to the form. When the user presses the "Alert Me!" soft button on the running MIDlet, the implementation "sends" the notification to the listener, the instance of MyCommandListener, by invoking its commandAction() method. The commandAction() method then creates the Alert object and displays it.
There are a few important conceptual points about this example. Notice that I created the Command but didn't associate it with any specific keypad key, button, or soft button on the device. In fact, when using the high-level API, your application has no way of obtaining information about what physical key is pressed. The implementation assigns the Command to a specific key—in this case the soft button on the right side of the device display.
Activate the "Say Hi" soft button located on the left hand side in the HelloWorld2 MIDlet, and you'll see that it results in the same behavior as if you had pressed the "Alert Me!" button; the same Alert is displayed. Of course, this behavior is wrong, because the Alert indicates that the "Alert Me!" button was activated.
Because of the high-level API's abstraction of the association between keys and commands, you cannot assign a listener to a specific key. Because there can be more than one command per screen, you must use another technique to enable your command listener to identify the source of the command and to ensure that the intended actions execute in response to events.
The listener is registered with, and receives notification from, the Displayable, not from the source of the event (such as the keypad button). A listener must therefore identify and "select" the command in which it's interested, from among all the possible Commands associated with the current screen.
You, the programmer, must ensure that you properly associate the behavior of any listeners with the correct Commands. You must use the information available in the Command object to explicitly identify the Command.
To correct the bug in the last version of the program, I rewrite the commandAction() method in the MyCommandListener class as follows in Listing 4.2.
Listing 4.2 The command listener now distinguishes between commands by examining their labels.
public void commandAction(Command c, Displayable d) { if (c == showAlert) { alert = new Alert("Button pressed", "The '" + ALERT_LABEL + "' button was pressed", null, AlertType.INFO); } else if (c == sayHi) { alert = new Alert("Button pressed", "The " + "'Say Hi' button was pressed", null, AlertType.INFO); }
60
alert.setTimeout(Alert.FOREVER); display.setCurrent(alert, form); }
There is still only one CommandListener for the Screen—there can be only one. Its commandAction() method is called in response to either button press. But now it checks the Command object context of the notification and displays a different alert accordingly.
Screen Navigation
The HelloWorld2 example demonstrates the central abstraction of the MIDP, the Screen. You've undoubtedly noticed already that you can only display one Displayable—one Screen—at a time. When the application needed to display the Alert, it had to replace the main screen.
The reason for this single-screen abstraction is the limitation of device screen resources. Unlike desktop GUI toolkits, such as J2SE's Swing toolkit, you don't have the luxury of layered windows, pop-ups, dialog boxes, and so forth. Although not impossible to implement these abstractions, the memory and CPU requirements are prohibitive for today's mobile devices. Furthermore, the low-resolution, low-powered, small-area LCD displays characteristic of most mobile devices is not well suited to these abstractions. Even PDA displays have marginally acceptable characteristics for layered windows, pop-ups, and so forth. However, quite possibly within one year from now these devices will have significantly more capability, on the order of a 50 MHz CPU and 32Mbytes of RAM.
There is a simple screen navigation idiom that goes along with this screen display abstraction. When you want to display a new screen, simply set that screen to be the current displayable. To do this, you request your MIDlet's Display object to display the Screen. Remember that in chapter 2 you learned that each MIDlet is assigned a unique Display object by the MIDP implementation upon startup. You never create the Display object, but you can obtain a reference to it by making the following call with a reference to your MIDlet as the argument:
Display.getDisplay(midlet);
Next, you simply make the method call shown next, with the argument that references the Displayable you want to display:
display.setCurrent(nextDisplayable)
You can find these two lines of code in the startApp() method of both versions of the HelloWorld application.
Designing the navigation and flow of your MIDlet involves the following steps:
1. Design the screens. 2. Create the commands that you need for each screen. 3. Assign commands to screens.
For each command of each screen, determine the next screen to display subsequent to the execution of each command.
An important attribute of successful MIDP applications is clear, intuitive navigation between screens. User task analysis is the topic of a whole book in itself and beyond the scope of this book.
61
The most important concept, however, is to think from the user's perspective. Keep it simple. Don't confuse your users by jumping around so the user can't follow the navigation. It's too easy for a user to get lost when viewing a small screen, without the larger context of where he or she is in relation to the overall application. And never design your screens to accommodate the internal organization of your application, its data structures, classes, and so forth. On the contrary, let the design of your application follow the screen layout, design, navigation, sequencing, and so forth.
Command Organization
Looking more closely at the example in the previous section, you might surmise that you really have no control over where the Command labels appear on the soft buttons either. After all, I didn't specify left or right soft button for the placement of either Command. The HelloWorld2 application added an "Alert Me!" and a "Say Hi" button, in that order. The first appeared on the right soft key, the second on the left.
In fact, the implementation controls the placement of Command labels on your Displayable objects according to some implementation-dependent policy. You can see the different policies by playing with the various emulators in the wireless toolkit. You can see that the Motorola emulator places buttons differently than the default gray phone and default color phone emulators.
The next version of our HelloWorld program, HelloWorld3, adds a third command to the main screen. Instead of listing the whole MIDlet again, I'll just show the parts that change from the previous example.
In the class scope, HelloWorld3 defines three Command objects:
/** The third version of the HelloWorld application. This version builds upon HelloWorld2 by adding several commands to a Displayable component. The demonstration here is that the CommandListener must determine which command was activated on the Screen. Also, you can see how the implementation orders commands on the soft buttons and how it creates a menu and orders the commands on the menu according to command type. */ public class HelloWorld3 extends MIDlet { ... Command showAlert= new Command("Alert Me!", Command.SCREEN, 1);; Command sayHi = new Command("Say Hi", Command.SCREEN, 1);; Command cancel = new Command("Cancel", Command.CANCEL, 1); public HelloWorld3() { super(); } ... }
In the startApp() method, these Command objects are added to the main screen as follows:

62
form.addCommand(showAlert); form.addCommand(sayHi); form.addCommand(cancel);
Building and running this new version in the J2ME Wireless Toolkit Emulator yields the main screen shown in Figure 4.7.
Figure 4.7. The implementation adds the "Menu" soft button when it detects more than two commands added to the current Displayable.
First, notice in Figure 4.7 that you see a label "Menu" on the right soft button when you run this latest MIDlet using the default gray phone emulator. There's certainly no notion of a menu anywhere in the program code.
The devices have only two soft buttons, but we added three commands to our main screen. The implementation detects this and creates a menu that holds the second, and third commands, and so on. Figure 4.8 shows the display after you select the "Menu" button.
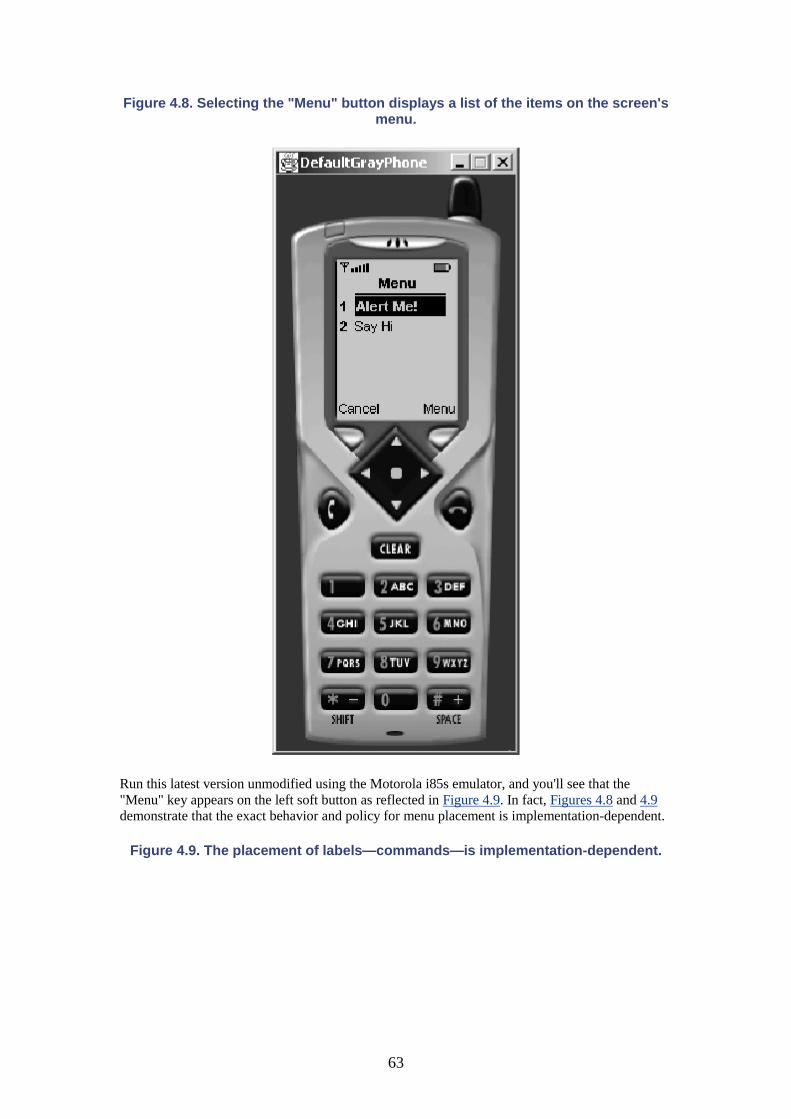
63
Figure 4.8. Selecting the "Menu" button displays a list of the items on the screen's menu.
Run this latest version unmodified using the Motorola i85s emulator, and you'll see that the "Menu" key appears on the left soft button as reflected in Figure 4.9. In fact, Figures 4.8 and 4.9 demonstrate that the exact behavior and policy for menu placement is implementation-dependent.
Figure 4.9. The placement of labels—commands—is implementation-dependent.

64
Command Ordering
You might be wondering why the "Cancel" command was placed on the soft button even though it was added last to the screen. Intuitively, you might think that it should be added last on the menu. You might think that, surely, the "Alert Me!" button, which was added first, should be on the soft button.
The explanation for this apparent anomaly is that commands are organized according to their type. Remember from our earlier discussion in this chapter that one of the three pieces of information that define a Command is its type. The Command class defines constants that represent the valid types. You saw these constants listed in Table 4.1.
Now, I'll add the following Command objects to the HelloWorld3 example. At the class level, I define the following new commands:

65
... public class HelloWorld3 extends MIDlet { ... private Command exit = new Command("Exit", Command.EXIT, 2); private Command help = new Command("Help", Command.HELP, 3); private Command item = new Command("Item", Command.ITEM, 4); private Command ok = new Command("OK", Command.OK, 5); private Command screen = new Command("Screen", Command.SCREEN, 6); private Command stop = new Command("Stop", Command.STOP, 7); ... }
Notice that each of the commands has a different type. These differences will enable you to see how the implementation places commands on a screen according to their type.
In the startApp() method, I add these new command objects to the main screen. The new version of startApp() looks like this:
public void startApp() { // Create a Displayable widget. form = new Form("Hello World"); // Add a string widget to the form. String msg = "My first MIDlet!"; form.append(msg); // Add a MyCommandListener to the Form to listen for // the "Back" key press event, which should make an // Alert dialog pop up. form.setCommandListener(cl); form.addCommand(showAlert); form.addCommand(sayHi); form.addCommand(cancel); form.addCommand(exit); form.addCommand(help); form.addCommand(item); form.addCommand(ok); form.addCommand(screen); form.addCommand(stop); // This app simply displays the single form created // above.
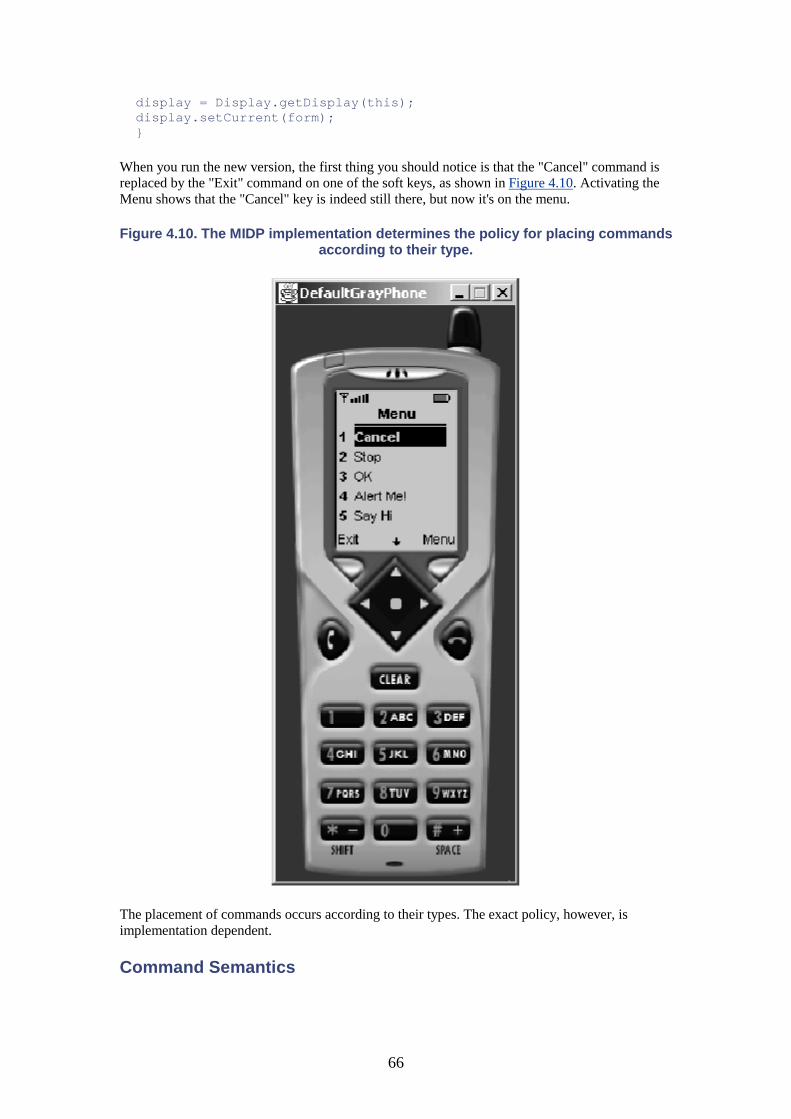
66
display = Display.getDisplay(this); display.setCurrent(form); }
When you run the new version, the first thing you should notice is that the "Cancel" command is replaced by the "Exit" command on one of the soft keys, as shown in Figure 4.10. Activating the Menu shows that the "Cancel" key is indeed still there, but now it's on the menu.
Figure 4.10. The MIDP implementation determines the policy for placing commands according to their type.
The placement of commands occurs according to their types. The exact policy, however, is implementation dependent.
Command Semantics

67
Look again at the "Exit" command. The Command object is defined with a label that says "Exit." But this doesn't make it an "exit" command! I specified its type to be Command.EXIT in the constructor call. This specification of its type attribute makes it an "Exit" command. If I made its type, say, Command.SCREEN, it would not appear on the soft key. You can try this for yourself.
The implementation chooses a command placement policy that attempts to maximize the usability of the device. Presumably, it's a good idea to make the "Exit" key readily available because that's a key that's used to navigate between screens. This concept underscores the point made earlier that user-friendly screen navigation is at its most important on devices with small screens and more constrained user input mechanisms.
Finally, a few words should be said about command priority. Note that the organization of commands—that is, placement according to their type, is very different from prioritization of event delivery. The placement scheme has nothing to do with the Command priority attribute, one of the three attributes of Command objects. The command priority dictates the priority that the implementation gives to commands when ordering their delivery to the listener.
I defined different priorities for each command in the HelloWorld3 example. You can convince yourself that the priority has no effect on the command placement. If you experiment with the menu a bit, you'll be able to figure out the command placement policy of the implementation for each device supported by the emulator. You can also modify the command priorities in the source code and see how it affects their placement.
In reality, the prioritization of commands is not that important when you're dealing with the MIDP high-level API. Nevertheless, it's important to be aware of the concept. Typically, the user will be able to do only one thing at a time, so there will be no "race" to deliver higher-priority events to the application.
Chapter Summary
In this chapter you learned about the MIDP high-level API. The high-level API abstracts details about the implementation of the following:
• rendering UI widgets • event processing
MIDlets that use the high-level API cannot change the look and feel of widgets. And they cannot get information about the actual device keys or buttons pressed that cause a command to fire.
Commands capture only semantic information about an "event." The command doesn't represent the behavior or action that occurs in response to an event, however. Command listeners define the behavior of commands by defining the processing that takes place as a result of a command firing by the implementation.
The exact policy for the placement of command labels on the screen is implementation dependent. The MIDP specifies that the placement of commands on a menu be done according to the command type.
Command priority dictates the order in which commands are fired and sent to the command listener.
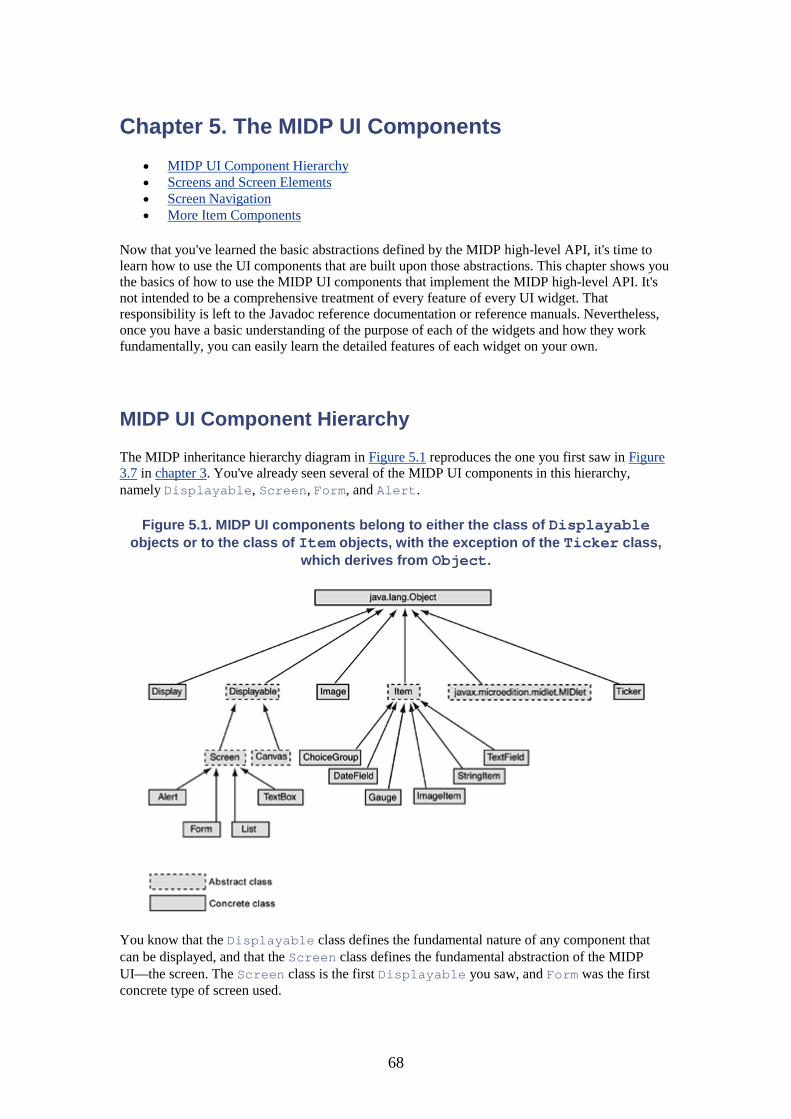
68
Chapter 5. The MIDP UI Components • MIDP UI Component Hierarchy • Screens and Screen Elements • Screen Navigation • More Item Components
Now that you've learned the basic abstractions defined by the MIDP high-level API, it's time to learn how to use the UI components that are built upon those abstractions. This chapter shows you the basics of how to use the MIDP UI components that implement the MIDP high-level API. It's not intended to be a comprehensive treatment of every feature of every UI widget. That responsibility is left to the Javadoc reference documentation or reference manuals. Nevertheless, once you have a basic understanding of the purpose of each of the widgets and how they work fundamentally, you can easily learn the detailed features of each widget on your own.
MIDP UI Component Hierarchy
The MIDP inheritance hierarchy diagram in Figure 5.1 reproduces the one you first saw in Figure 3.7 in chapter 3. You've already seen several of the MIDP UI components in this hierarchy, namely Displayable, Screen, Form, and Alert.
Figure 5.1. MIDP UI components belong to either the class of Displayable objects or to the class of Item objects, with the exception of the Ticker class,
which derives from Object.
You know that the Displayable class defines the fundamental nature of any component that can be displayed, and that the Screen class defines the fundamental abstraction of the MIDP UI—the screen. The Screen class is the first Displayable you saw, and Form was the first concrete type of screen used.
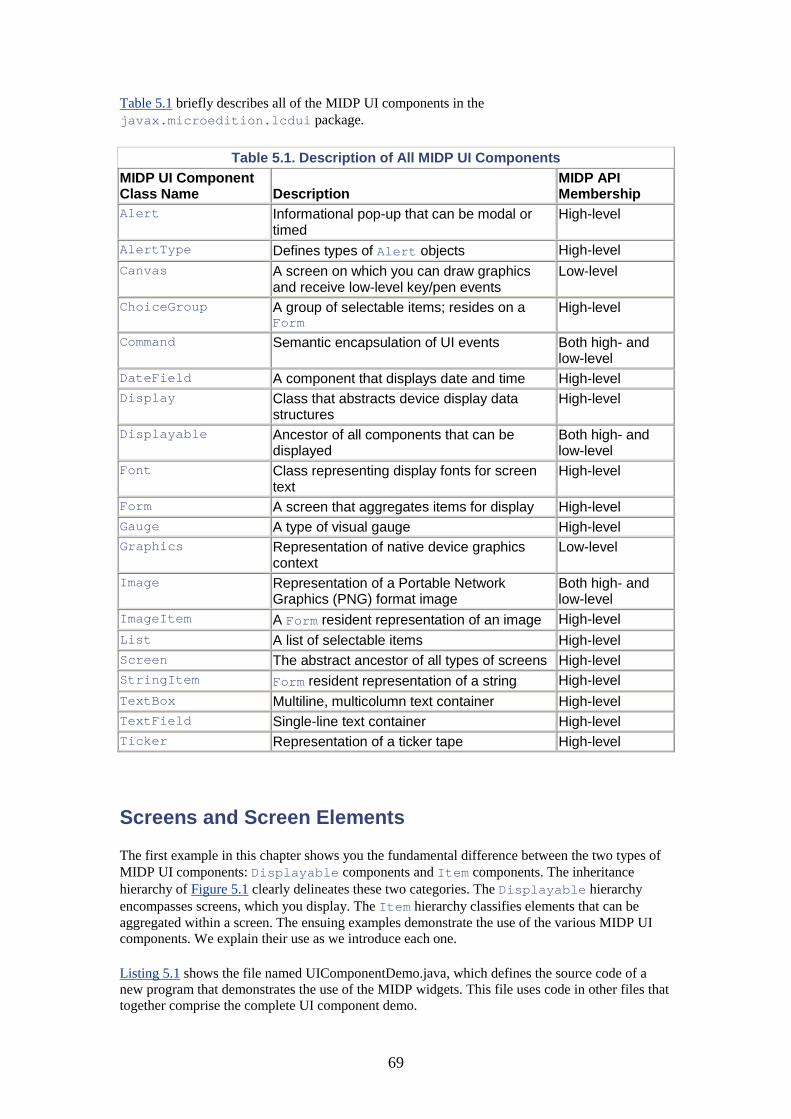
69
Table 5.1 briefly describes all of the MIDP UI components in the javax.microedition.lcdui package.
Table 5.1. Description of All MIDP UI Components MIDP UI Component Class Name Description
MIDP API Membership
Alert Informational pop-up that can be modal or timed
High-level
AlertType Defines types of Alert objects High-level Canvas A screen on which you can draw graphics
and receive low-level key/pen events Low-level
ChoiceGroup A group of selectable items; resides on a Form
High-level
Command Semantic encapsulation of UI events Both high- and low-level
DateField A component that displays date and time High-level Display Class that abstracts device display data
structures High-level
Displayable Ancestor of all components that can be displayed
Both high- and low-level
Font Class representing display fonts for screen text
High-level
Form A screen that aggregates items for display High-level Gauge A type of visual gauge High-level Graphics Representation of native device graphics
context Low-level
Image Representation of a Portable Network Graphics (PNG) format image
Both high- and low-level
ImageItem A Form resident representation of an image High-level List A list of selectable items High-level Screen The abstract ancestor of all types of screens High-level StringItem Form resident representation of a string High-level TextBox Multiline, multicolumn text container High-level TextField Single-line text container High-level Ticker Representation of a ticker tape High-level
Screens and Screen Elements
The first example in this chapter shows you the fundamental difference between the two types of MIDP UI components: Displayable components and Item components. The inheritance hierarchy of Figure 5.1 clearly delineates these two categories. The Displayable hierarchy encompasses screens, which you display. The Item hierarchy classifies elements that can be aggregated within a screen. The ensuing examples demonstrate the use of the various MIDP UI components. We explain their use as we introduce each one.
Listing 5.1 shows the file named UIComponentDemo.java, which defines the source code of a new program that demonstrates the use of the MIDP widgets. This file uses code in other files that together comprise the complete UI component demo.
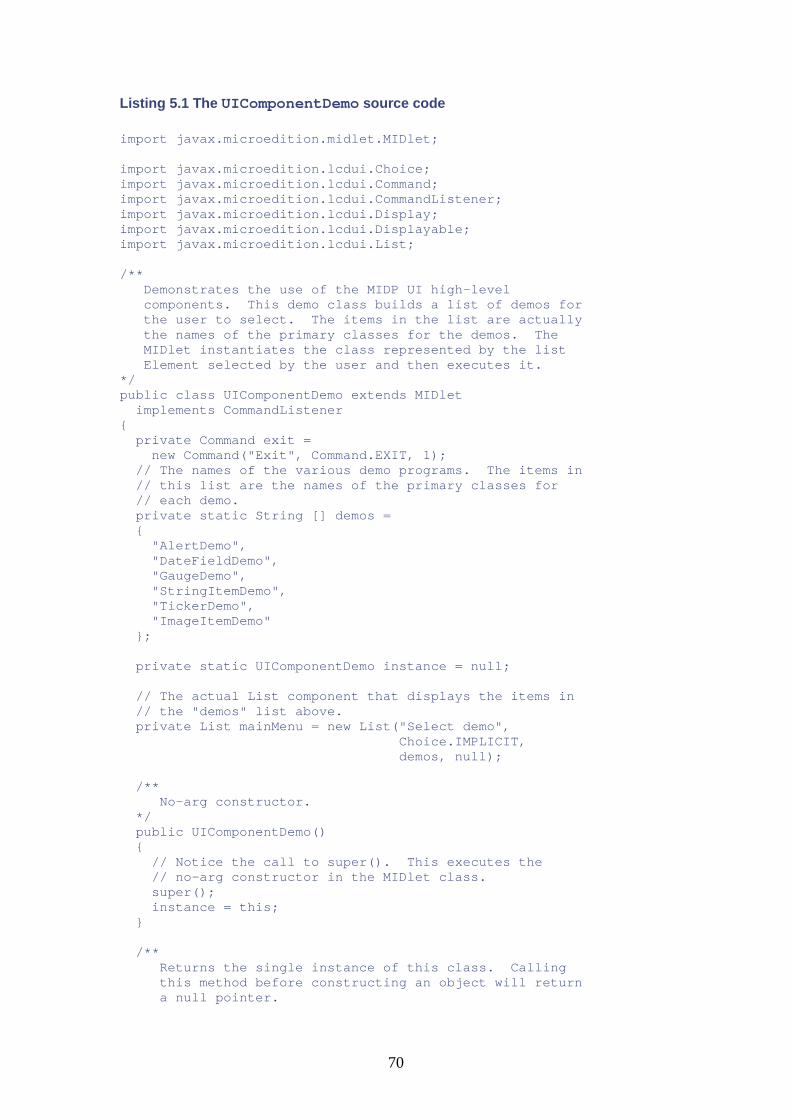
70
Listing 5.1 The UIComponentDemo source code
import javax.microedition.midlet.MIDlet; import javax.microedition.lcdui.Choice; import javax.microedition.lcdui.Command; import javax.microedition.lcdui.CommandListener; import javax.microedition.lcdui.Display; import javax.microedition.lcdui.Displayable; import javax.microedition.lcdui.List; /** Demonstrates the use of the MIDP UI high-level components. This demo class builds a list of demos for the user to select. The items in the list are actually the names of the primary classes for the demos. The MIDlet instantiates the class represented by the list Element selected by the user and then executes it. */ public class UIComponentDemo extends MIDlet implements CommandListener { private Command exit = new Command("Exit", Command.EXIT, 1); // The names of the various demo programs. The items in // this list are the names of the primary classes for // each demo. private static String [] demos = { "AlertDemo", "DateFieldDemo", "GaugeDemo", "StringItemDemo", "TickerDemo", "ImageItemDemo" }; private static UIComponentDemo instance = null; // The actual List component that displays the items in // the "demos" list above. private List mainMenu = new List("Select demo", Choice.IMPLICIT, demos, null); /** No-arg constructor. */ public UIComponentDemo() { // Notice the call to super(). This executes the // no-arg constructor in the MIDlet class. super(); instance = this; } /** Returns the single instance of this class. Calling this method before constructing an object will return a null pointer.
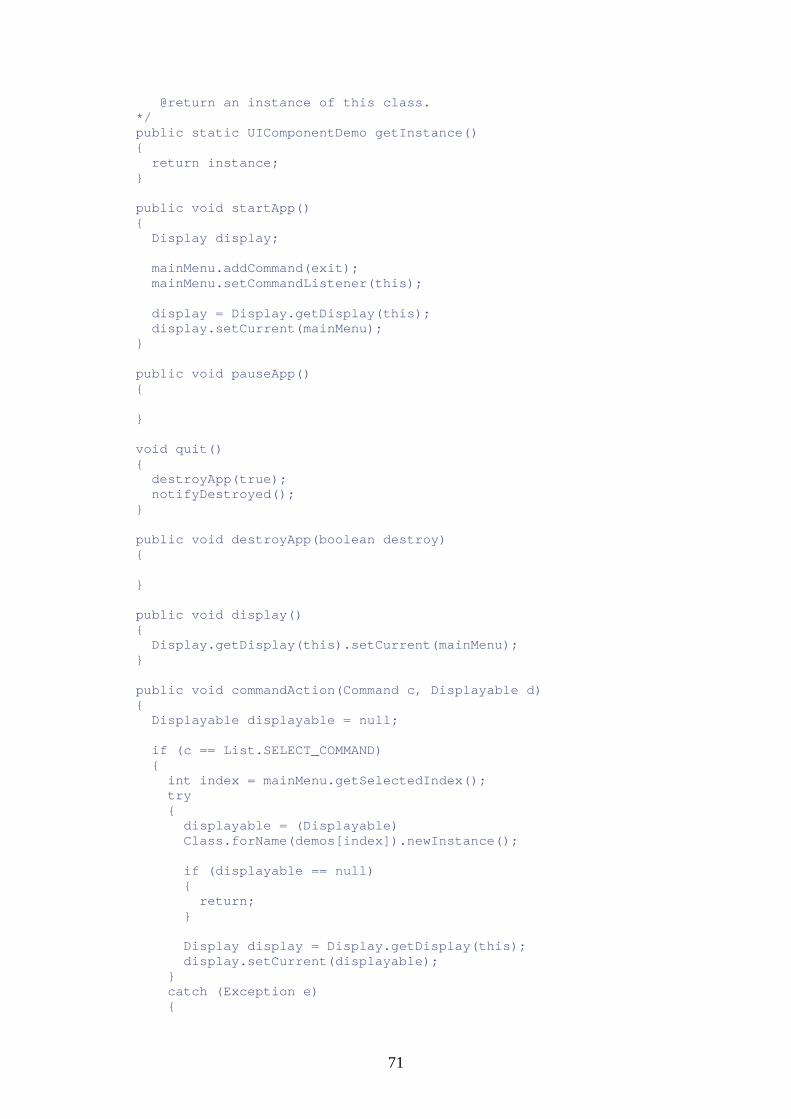
71
@return an instance of this class. */ public static UIComponentDemo getInstance() { return instance; } public void startApp() { Display display; mainMenu.addCommand(exit); mainMenu.setCommandListener(this); display = Display.getDisplay(this); display.setCurrent(mainMenu); } public void pauseApp() { } void quit() { destroyApp(true); notifyDestroyed(); } public void destroyApp(boolean destroy) { } public void display() { Display.getDisplay(this).setCurrent(mainMenu); } public void commandAction(Command c, Displayable d) { Displayable displayable = null; if (c == List.SELECT_COMMAND) { int index = mainMenu.getSelectedIndex(); try { displayable = (Displayable) Class.forName(demos[index]).newInstance(); if (displayable == null) { return; } Display display = Display.getDisplay(this); display.setCurrent(displayable); } catch (Exception e) {
72
System.out.println("Got exception here!!!"); e.printStackTrace(); return; } } else if (c == exit) { quit(); } } }
The code in Listing 5.1 is the first example because it builds upon the use of a kind of screen object. The screen is at the heart of the organizational foundation of all MIDlets.
Listing 5.1 defines a MIDlet. Its top-level screen is a List component that displays a list of choices representing the different widgets that the program demonstrates. Figure 5.2 shows the top-level list of the demo applications you can run. This main screen is an instance of List.
Figure 5.2. View of the UIComponentDemo main screen. The items are the names of the main classes for each demo.

73
Notice the downward-pointing arrow on the screen. It indicates that more elements exist for which there is not enough room on the screen. If you scroll down far enough, the downward-pointing arrow disappears, and an upward-pointing arrow appears instead. These arrows are placed on the screen by the List component implementation.
A List is a kind of Screen, which, of course, is a Displayable, and it fits into a familiar overall application structure. You can see in Listing 5.1 that the List instance is the current displayable; as such, it's the object that receives command invocation events. The MIDlet itself is the listener for those events, registering itself to be the CommandListener for those events. It implements the CommandListener interface and also defines a commandAction() method.
An alternate way to define listeners is to make the component itself a listener for events that occur on it. To accomplish this, however, you would have to subclass the component class, in this case creating a subclass of List. I choose the former approach and use the standard List class without subclassing.

74
Figure 5.2 displays a list of UI component demo programs. The names you see are the names of the main classes for each demo. Selecting one executes that demo. Of course, you must first compile the demo programs before attempting to run them. Otherwise, you'll get a ClassNotFoundException error.
If you're using the J2ME Wireless Toolkit, you only need to place your source files in the UIComponents/src/ directory of the project. Then, build the project. The Wireless Toolkit will compile all source files in the src/ directory. It will run the preverifier and finally place the .class files in the project's classes/ directory. At that point, you can execute the demos listed on the main MIDlet screen.
In the next example, I'll first compile and make available the AlertDemo program, the first item in the list. To run the compiled demo, simply select AlertDemo from the list shown in Figure 5.2. Repeat these build and execute steps for each of the other demos.
Figure 5.3 shows the screen that displays when you select the AlertDemo item in the top-level list of demos. This screen displays another set of elements—a set of alert types—using another MIDP component called ChoiceGroup. The screen containing the alert types is created by the code in the AlertDemo.java file, shown in Listing 5.2. Selecting one of the items on this screen creates and displays an instance of that type of Alert component.
Figure 5.3. The main screen of the alert demo is a form that aggregates a ChoiceGroup and a TextField.
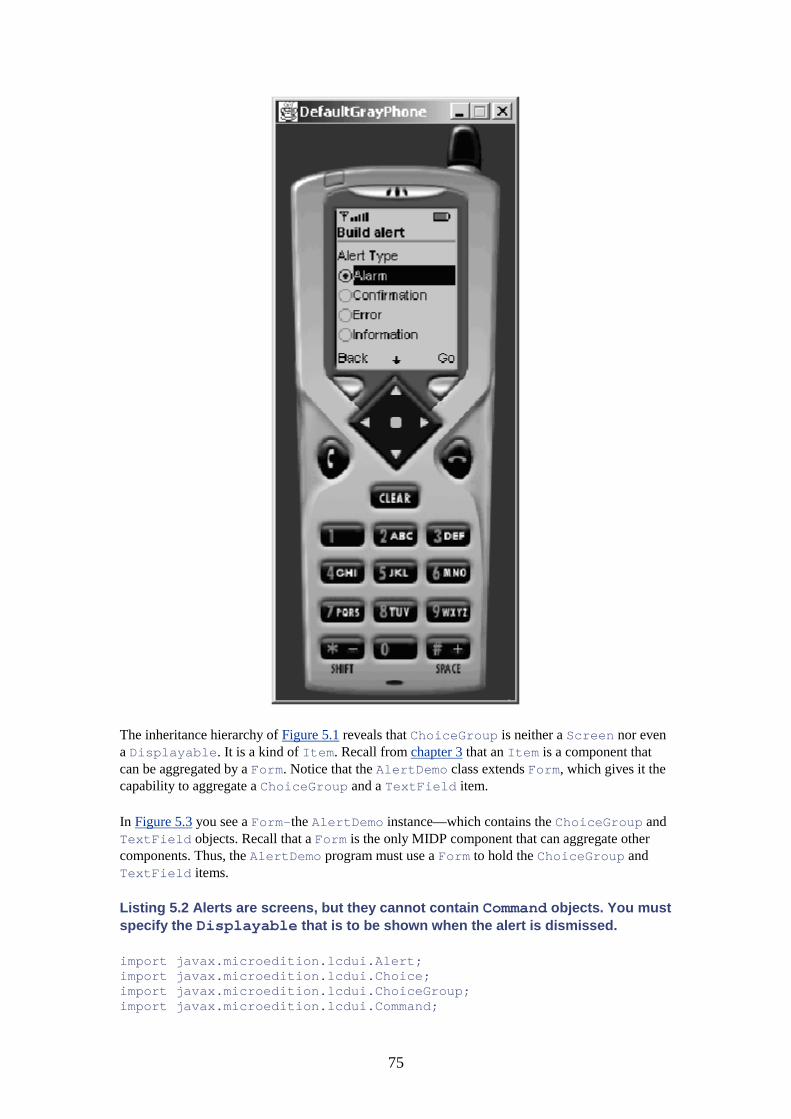
75
The inheritance hierarchy of Figure 5.1 reveals that ChoiceGroup is neither a Screen nor even a Displayable. It is a kind of Item. Recall from chapter 3 that an Item is a component that can be aggregated by a Form. Notice that the AlertDemo class extends Form, which gives it the capability to aggregate a ChoiceGroup and a TextField item.
In Figure 5.3 you see a Form—the AlertDemo instance—which contains the ChoiceGroup and TextField objects. Recall that a Form is the only MIDP component that can aggregate other components. Thus, the AlertDemo program must use a Form to hold the ChoiceGroup and TextField items.
Listing 5.2 Alerts are screens, but they cannot contain Command objects. You must specify the Displayable that is to be shown when the alert is dismissed.
import javax.microedition.lcdui.Alert; import javax.microedition.lcdui.Choice; import javax.microedition.lcdui.ChoiceGroup; import javax.microedition.lcdui.Command;
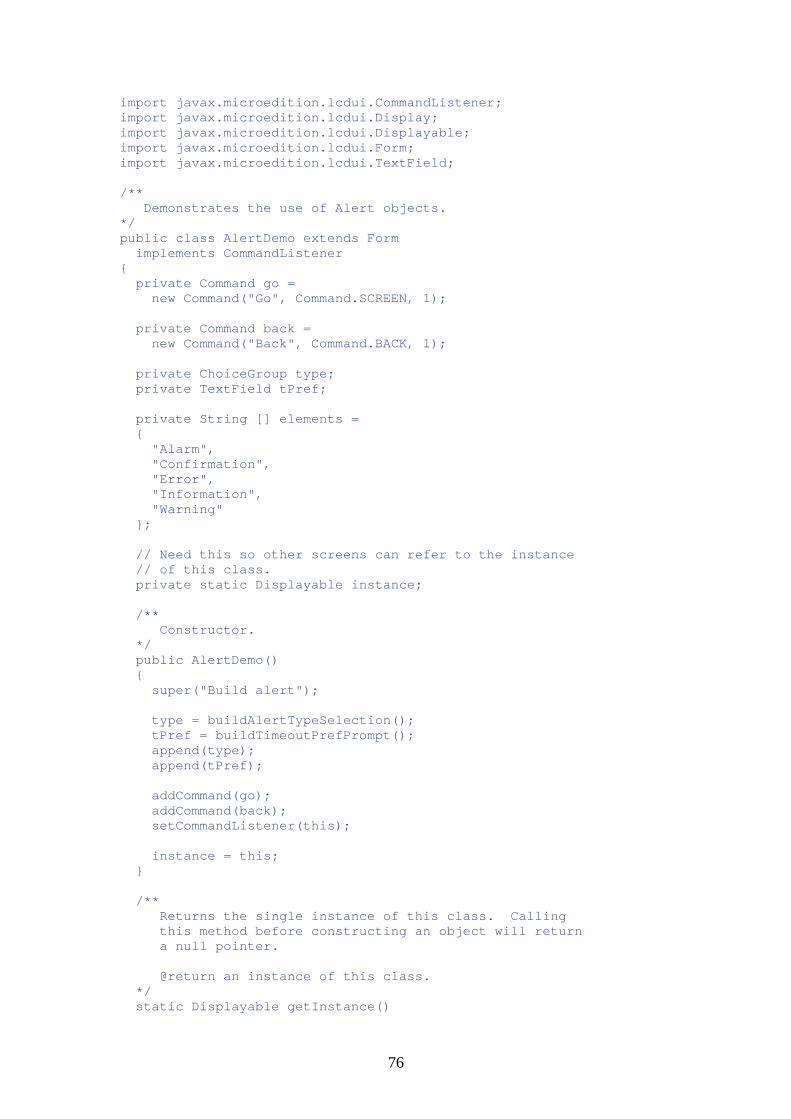
76
import javax.microedition.lcdui.CommandListener; import javax.microedition.lcdui.Display; import javax.microedition.lcdui.Displayable; import javax.microedition.lcdui.Form; import javax.microedition.lcdui.TextField; /** Demonstrates the use of Alert objects. */ public class AlertDemo extends Form implements CommandListener { private Command go = new Command("Go", Command.SCREEN, 1); private Command back = new Command("Back", Command.BACK, 1); private ChoiceGroup type; private TextField tPref; private String [] elements = { "Alarm", "Confirmation", "Error", "Information", "Warning" }; // Need this so other screens can refer to the instance // of this class. private static Displayable instance; /** Constructor. */ public AlertDemo() { super("Build alert"); type = buildAlertTypeSelection(); tPref = buildTimeoutPrefPrompt(); append(type); append(tPref); addCommand(go); addCommand(back); setCommandListener(this); instance = this; } /** Returns the single instance of this class. Calling this method before constructing an object will return a null pointer. @return an instance of this class. */ static Displayable getInstance()

77
{ return instance; } private ChoiceGroup buildAlertTypeSelection() { // Doesn't work if this is Choice.IMPLICIT. See the // Choice documentation. The type IMPLICIT is valid // for List objects only. return new ChoiceGroup("Alert Type", Choice.EXCLUSIVE, elements, null); } private TextField buildTimeoutPrefPrompt() { String MAX_TIMEOUT_VALUE = "5"; int MAX_SIZE = 8; return new TextField("Timeout (sec.)", MAX_TIMEOUT_VALUE, MAX_SIZE, TextField.NUMERIC); } public void commandAction(Command c, Displayable d) { UIComponentDemo demo = UIComponentDemo.getInstance(); Display display = Display.getDisplay(demo); int timeSec; int timeMillis; if (c == go) { // Alerts don't accept application defined // Commands. String title = elements[type.getSelectedIndex()]; Alert alert = new Alert(title); alert.setString("A '" + title + "' alert"); timeSec = Integer.parseInt(tPref.getString()); timeMillis = timeSec * 1000; if (timeMillis <= 0) { timeMillis = Alert.FOREVER; } alert.setTimeout(timeMillis); display.setCurrent(alert, AlertDemo.getInstance()); } if (c == back) { UIComponentDemo.getInstance().display(); } } }
As you play with this application, notice that you can scroll the List up and down, highlighting different elements of the List, but no programmatic selection event occurs. Similarly, on the Build Alert screen, you can scroll and repeatedly select the elements of the ChoiceGroup without activating any action.
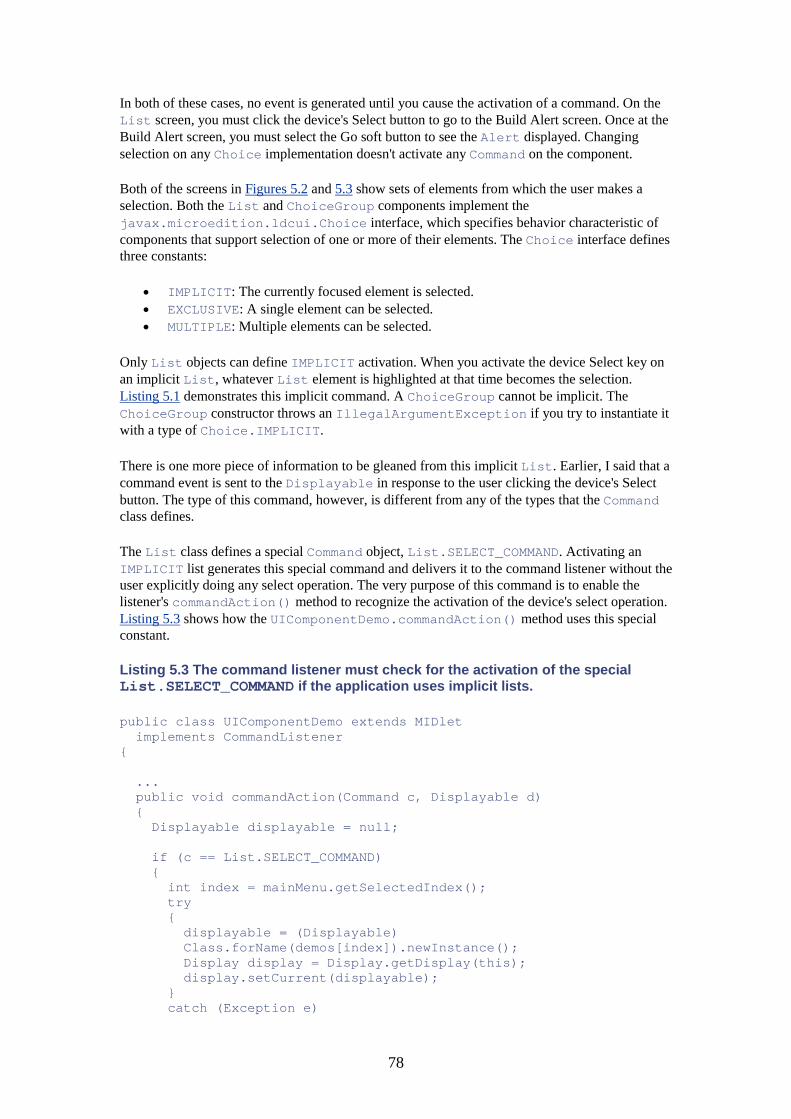
78
In both of these cases, no event is generated until you cause the activation of a command. On the List screen, you must click the device's Select button to go to the Build Alert screen. Once at the Build Alert screen, you must select the Go soft button to see the Alert displayed. Changing selection on any Choice implementation doesn't activate any Command on the component.
Both of the screens in Figures 5.2 and 5.3 show sets of elements from which the user makes a selection. Both the List and ChoiceGroup components implement the javax.microedition.ldcui.Choice interface, which specifies behavior characteristic of components that support selection of one or more of their elements. The Choice interface defines three constants:
• IMPLICIT: The currently focused element is selected. • EXCLUSIVE: A single element can be selected. • MULTIPLE: Multiple elements can be selected.
Only List objects can define IMPLICIT activation. When you activate the device Select key on an implicit List, whatever List element is highlighted at that time becomes the selection. Listing 5.1 demonstrates this implicit command. A ChoiceGroup cannot be implicit. The ChoiceGroup constructor throws an IllegalArgumentException if you try to instantiate it with a type of Choice.IMPLICIT.
There is one more piece of information to be gleaned from this implicit List. Earlier, I said that a command event is sent to the Displayable in response to the user clicking the device's Select button. The type of this command, however, is different from any of the types that the Command class defines.
The List class defines a special Command object, List.SELECT_COMMAND. Activating an IMPLICIT list generates this special command and delivers it to the command listener without the user explicitly doing any select operation. The very purpose of this command is to enable the listener's commandAction() method to recognize the activation of the device's select operation. Listing 5.3 shows how the UIComponentDemo.commandAction() method uses this special constant.
Listing 5.3 The command listener must check for the activation of the special List.SELECT_COMMAND if the application uses implicit lists.
public class UIComponentDemo extends MIDlet implements CommandListener { ... public void commandAction(Command c, Displayable d) { Displayable displayable = null; if (c == List.SELECT_COMMAND) { int index = mainMenu.getSelectedIndex(); try { displayable = (Displayable) Class.forName(demos[index]).newInstance(); Display display = Display.getDisplay(this); display.setCurrent(displayable); } catch (Exception e)

79
{ e.printStackTrace(); return; } } else { return; } }
The EXCLUSIVE and MULTIPLE selection types are self-explanatory. MIDP implementations render the selection indication icons differently for exclusive and multiple lists. Exclusive selection lists have a circle to the left of the element text, similar to radio buttons in AWT and Swing applications, and an interior dot indicates the selected element. Multiple selection lists render the component with a square to the left of the element text, similar to check boxes in AWT and Swing applications.
You've already seen an example of an Alert in chapter 3, and here you see it again. The commandAction() method of the AlertDemo class creates five different alerts based on the data that the user inputs in the Build Alert screen of Figure 5.3.
The Alert class constructor takes an argument of AlertType, which indicates the type of alert variant to create. The AlertType class defines five constants that represent the possible types of alerts, shown in Table 5.2.
Table 5.2. AlertType Class Constants That Represent Possible Types of Alert Objects
AlertType Class Constant
Description
ALARM An alert that indicates the occurrence of an alarm event CONFIRMATION A dialog box that asks for user confirmation of an action ERROR A dialog box that notifies the user of an error INFO A dialog box that presents an informational message to the
user WARNING A dialog box that indicates a warning condition
The type of the alert doesn't change the look of the alert. The purpose of the alert types is to enable the programmer to more easily differentiate different alert objects. It also gives the implementation a choice of rendering discrete alert types differently.
An alert's type doesn't enforce its behavior. You saw a similar organization with Command objects in the HelloWorld applications. Simply assigning a certain type to a Command didn't change its behavior in any way. It's up to you as the programmer to enforce consistency in the way you treat similar types of Command and Alert objects.
If you run the example, you'll notice that the alert screens have no commands associated with them; in fact, they cannot. You'll also notice that the alert screens disappear after 5 seconds and revert to the Build Alert screen. The reason is that the program sets a 5-second default duration for all alerts.
Alert timeout values must be greater than 0. Setting a value less than 0 will result in an IllegalArgumentException. You set the timeout of an alert using the
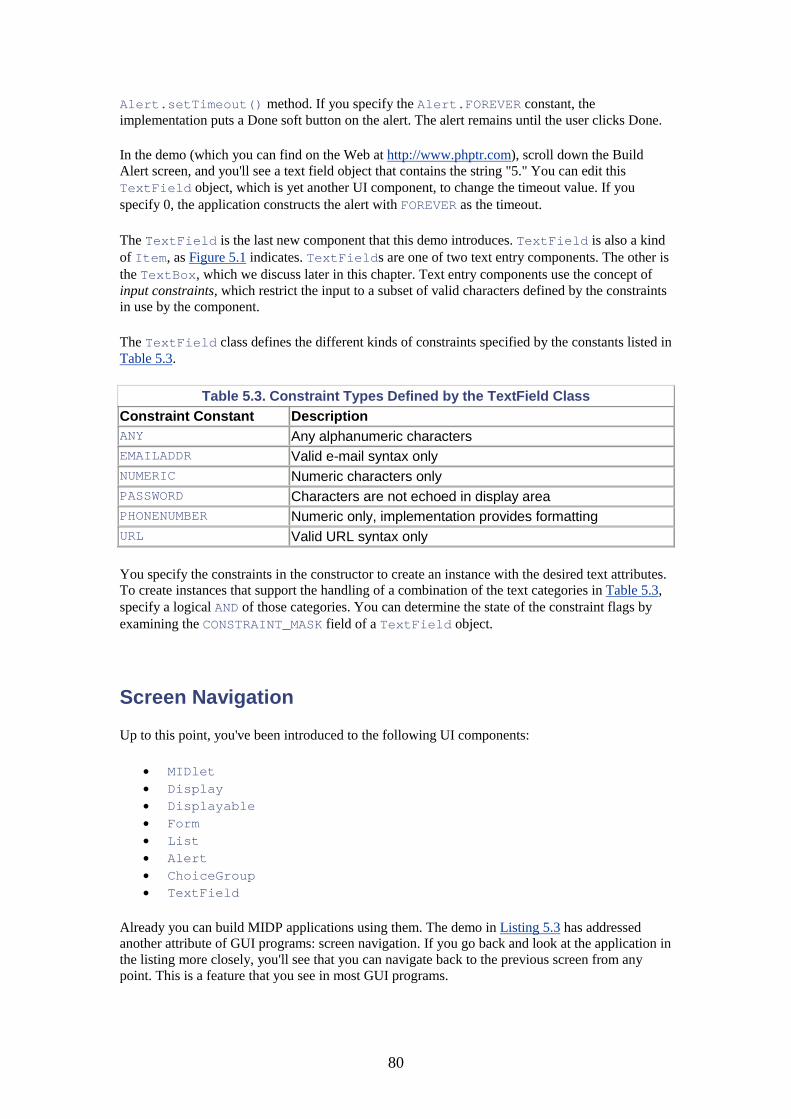
80
Alert.setTimeout() method. If you specify the Alert.FOREVER constant, the implementation puts a Done soft button on the alert. The alert remains until the user clicks Done.
In the demo (which you can find on the Web at http://www.phptr.com), scroll down the Build Alert screen, and you'll see a text field object that contains the string "5." You can edit this TextField object, which is yet another UI component, to change the timeout value. If you specify 0, the application constructs the alert with FOREVER as the timeout.
The TextField is the last new component that this demo introduces. TextField is also a kind of Item, as Figure 5.1 indicates. TextFields are one of two text entry components. The other is the TextBox, which we discuss later in this chapter. Text entry components use the concept of input constraints, which restrict the input to a subset of valid characters defined by the constraints in use by the component.
The TextField class defines the different kinds of constraints specified by the constants listed in Table 5.3.
Table 5.3. Constraint Types Defined by the TextField Class Constraint Constant Description ANY Any alphanumeric characters EMAILADDR Valid e-mail syntax only NUMERIC Numeric characters only PASSWORD Characters are not echoed in display area PHONENUMBER Numeric only, implementation provides formatting URL Valid URL syntax only
You specify the constraints in the constructor to create an instance with the desired text attributes. To create instances that support the handling of a combination of the text categories in Table 5.3, specify a logical AND of those categories. You can determine the state of the constraint flags by examining the CONSTRAINT_MASK field of a TextField object.
Screen Navigation
Up to this point, you've been introduced to the following UI components:
• MIDlet • Display • Displayable • Form • List • Alert • ChoiceGroup • TextField
Already you can build MIDP applications using them. The demo in Listing 5.3 has addressed another attribute of GUI programs: screen navigation. If you go back and look at the application in the listing more closely, you'll see that you can navigate back to the previous screen from any point. This is a feature that you see in most GUI programs.
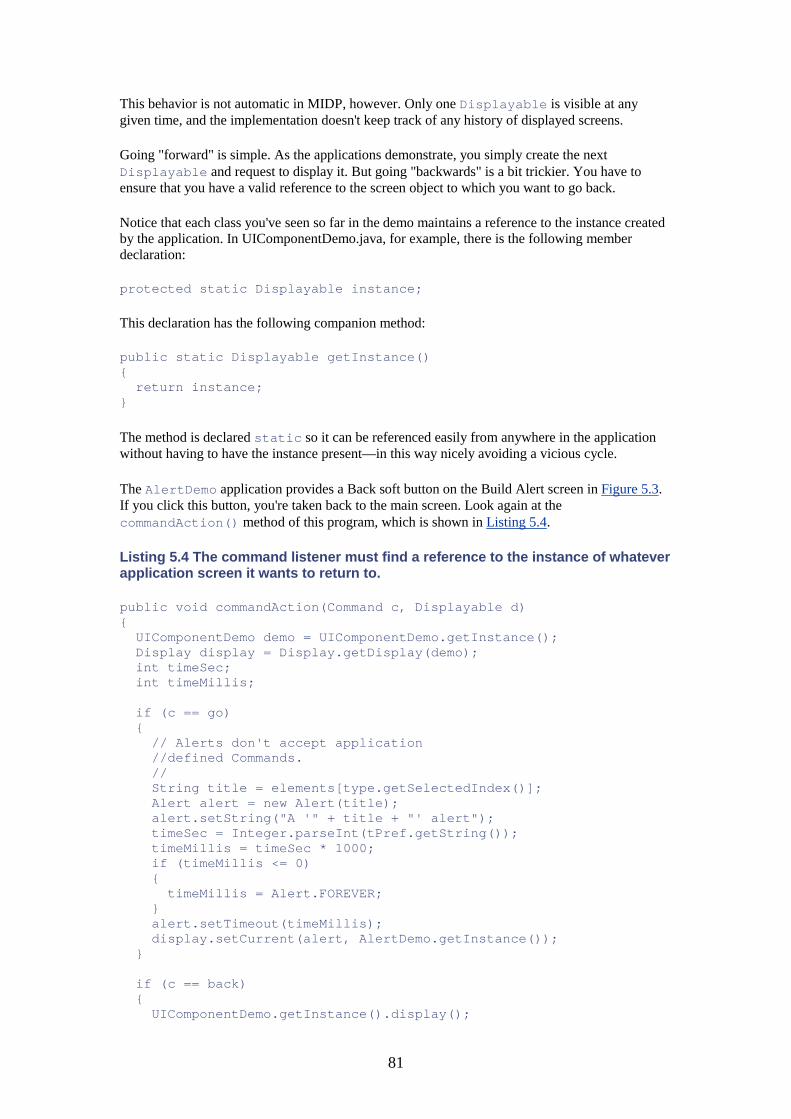
81
This behavior is not automatic in MIDP, however. Only one Displayable is visible at any given time, and the implementation doesn't keep track of any history of displayed screens.
Going "forward" is simple. As the applications demonstrate, you simply create the next Displayable and request to display it. But going "backwards" is a bit trickier. You have to ensure that you have a valid reference to the screen object to which you want to go back.
Notice that each class you've seen so far in the demo maintains a reference to the instance created by the application. In UIComponentDemo.java, for example, there is the following member declaration:
protected static Displayable instance;
This declaration has the following companion method:
public static Displayable getInstance() { return instance; }
The method is declared static so it can be referenced easily from anywhere in the application without having to have the instance present—in this way nicely avoiding a vicious cycle.
The AlertDemo application provides a Back soft button on the Build Alert screen in Figure 5.3. If you click this button, you're taken back to the main screen. Look again at the commandAction() method of this program, which is shown in Listing 5.4.
Listing 5.4 The command listener must find a reference to the instance of whatever application screen it wants to return to.
public void commandAction(Command c, Displayable d) { UIComponentDemo demo = UIComponentDemo.getInstance(); Display display = Display.getDisplay(demo); int timeSec; int timeMillis; if (c == go) { // Alerts don't accept application //defined Commands. // String title = elements[type.getSelectedIndex()]; Alert alert = new Alert(title); alert.setString("A '" + title + "' alert"); timeSec = Integer.parseInt(tPref.getString()); timeMillis = timeSec * 1000; if (timeMillis <= 0) { timeMillis = Alert.FOREVER; } alert.setTimeout(timeMillis); display.setCurrent(alert, AlertDemo.getInstance()); } if (c == back) { UIComponentDemo.getInstance().display();
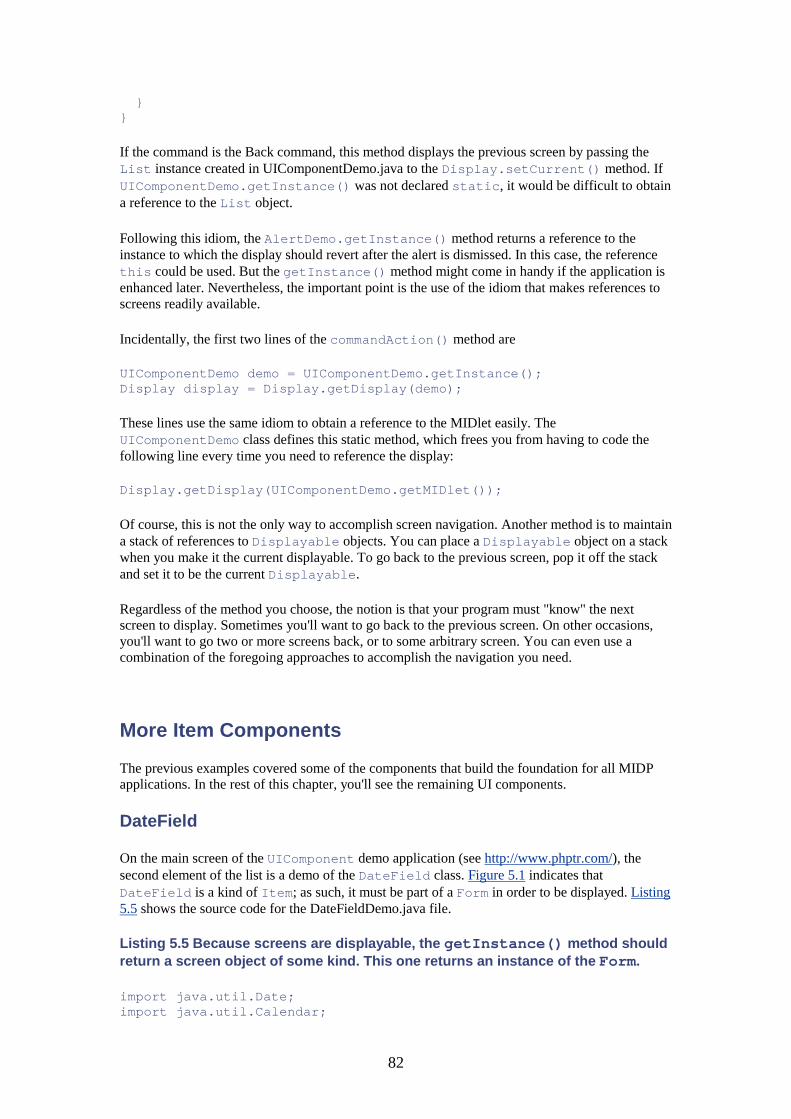
82
} }
If the command is the Back command, this method displays the previous screen by passing the List instance created in UIComponentDemo.java to the Display.setCurrent() method. If UIComponentDemo.getInstance() was not declared static, it would be difficult to obtain a reference to the List object.
Following this idiom, the AlertDemo.getInstance() method returns a reference to the instance to which the display should revert after the alert is dismissed. In this case, the reference this could be used. But the getInstance() method might come in handy if the application is enhanced later. Nevertheless, the important point is the use of the idiom that makes references to screens readily available.
Incidentally, the first two lines of the commandAction() method are
UIComponentDemo demo = UIComponentDemo.getInstance(); Display display = Display.getDisplay(demo);
These lines use the same idiom to obtain a reference to the MIDlet easily. The UIComponentDemo class defines this static method, which frees you from having to code the following line every time you need to reference the display:
Display.getDisplay(UIComponentDemo.getMIDlet());
Of course, this is not the only way to accomplish screen navigation. Another method is to maintain a stack of references to Displayable objects. You can place a Displayable object on a stack when you make it the current displayable. To go back to the previous screen, pop it off the stack and set it to be the current Displayable.
Regardless of the method you choose, the notion is that your program must "know" the next screen to display. Sometimes you'll want to go back to the previous screen. On other occasions, you'll want to go two or more screens back, or to some arbitrary screen. You can even use a combination of the foregoing approaches to accomplish the navigation you need.
More Item Components
The previous examples covered some of the components that build the foundation for all MIDP applications. In the rest of this chapter, you'll see the remaining UI components.
DateField
On the main screen of the UIComponent demo application (see http://www.phptr.com/), the second element of the list is a demo of the DateField class. Figure 5.1 indicates that DateField is a kind of Item; as such, it must be part of a Form in order to be displayed. Listing 5.5 shows the source code for the DateFieldDemo.java file.
Listing 5.5 Because screens are displayable, the getInstance() method should return a screen object of some kind. This one returns an instance of the Form.
import java.util.Date; import java.util.Calendar;
83
import java.util.TimeZone; import javax.microedition.lcdui.Command; import javax.microedition.lcdui.CommandListener; import javax.microedition.lcdui.DateField; import javax.microedition.lcdui.Displayable; import javax.microedition.lcdui.Form; /** Demonstrates the use of the MIDP UI DateField class. @see javax.microedition.lcdui.DateField */ public class DateFieldDemo extends Form implements CommandListener { private Command back = new Command("Back", Command.BACK, 1); private static Displayable instance; private DateField date = new DateField("Date/Time in GMT", DateField.DATE_TIME, TimeZone.getDefault()); /** Constructor. */ public DateFieldDemo() { super("DateField Demo"); Calendar cal = Calendar.getInstance(); date.setDate(cal.getTime()); append(date); addCommand(back); setCommandListener(this); instance = this; } /** Returns the single instance of this class. Calling this method before constructing an object will return a null pointer. @return an instance of this class. */ public static Displayable getInstance() { return instance; } public void commandAction(Command c, Displayable d) { if (c == back) { UIComponentDemo.getInstance().display(); }
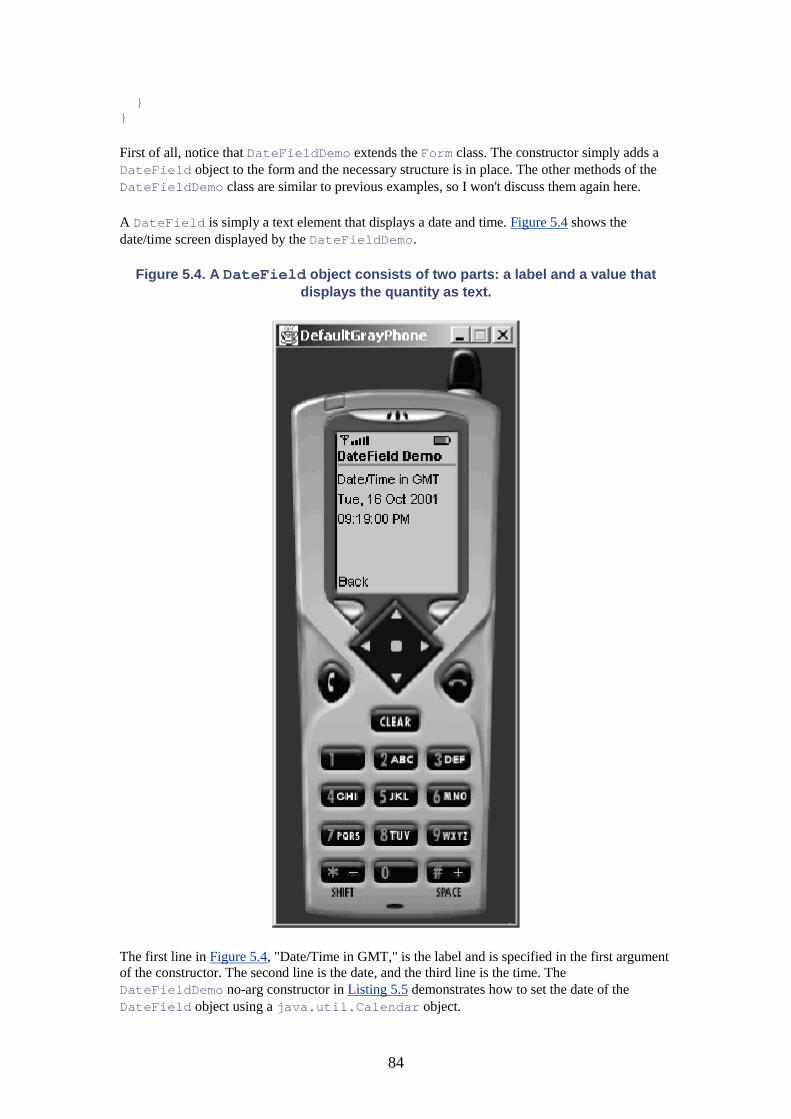
84
} }
First of all, notice that DateFieldDemo extends the Form class. The constructor simply adds a DateField object to the form and the necessary structure is in place. The other methods of the DateFieldDemo class are similar to previous examples, so I won't discuss them again here.
A DateField is simply a text element that displays a date and time. Figure 5.4 shows the date/time screen displayed by the DateFieldDemo.
Figure 5.4. A DateField object consists of two parts: a label and a value that displays the quantity as text.
The first line in Figure 5.4, "Date/Time in GMT," is the label and is specified in the first argument of the constructor. The second line is the date, and the third line is the time. The DateFieldDemo no-arg constructor in Listing 5.5 demonstrates how to set the date of the DateField object using a java.util.Calendar object.

85
This example displays the date and time because the constructor call specifies the display of both quantities. The DateField class defines three constants (listed in Table 5.4), which let you control what information is displayed.
Table 5.4. DateField Constants for Controlling the Date/Time Information DisplayedDateField Constant Description public static int DATE Display date only public static int DATE_TIME Display date and time public static int TIME Display time only
The third DateField constructor argument in Listing 5.5 is the time zone specification, which is a java.util.TimeZone object. Beware of the fact that the MIDP specification requires implementations to support only one time zone. You should be aware of what time zones your implementation supports. It's quite possible that most MIDP implementations will only support one time zone.
A DateField constructor call can specify a time zone that is not supported by your MIDP implementation. If the time zone you specify in the constructor is not supported by your MIDP implementation, your program will still execute without error or warning, but the DateField object's time zone will represent whatever time zone is supported by the implementation, not the one you requested. And the time displayed on screen will reflect the time zone used by the DateField object instead of the time zone you specified in the constructor call.
DateField objects are editable. To edit them,
1. First, select the date field shown in Figure 5.4. 2. Click the device emulator's Select button. You'll see the display change to the one shown
in Figure 5.5.
Figure 5.5. The DateField object implements the interface by which you edit its date and time values.

86
3. Scroll up and down to highlight the year, month, or day, and change each as desired.
Notice that the implementation has placed a Back soft button and a Save soft button on the display. This interface presentation is typical of all editable components.
When you finish editing and revert to the previous screen, the displayed date and time will have changed.
On the main DateFieldDemo screen in Figure 5.4, you could alternatively have scrolled to the time field and clicked select. The display would then show the screen in Figure 5.6.
Figure 5.6. The implementation presents this UI to allow you to edit the time value.
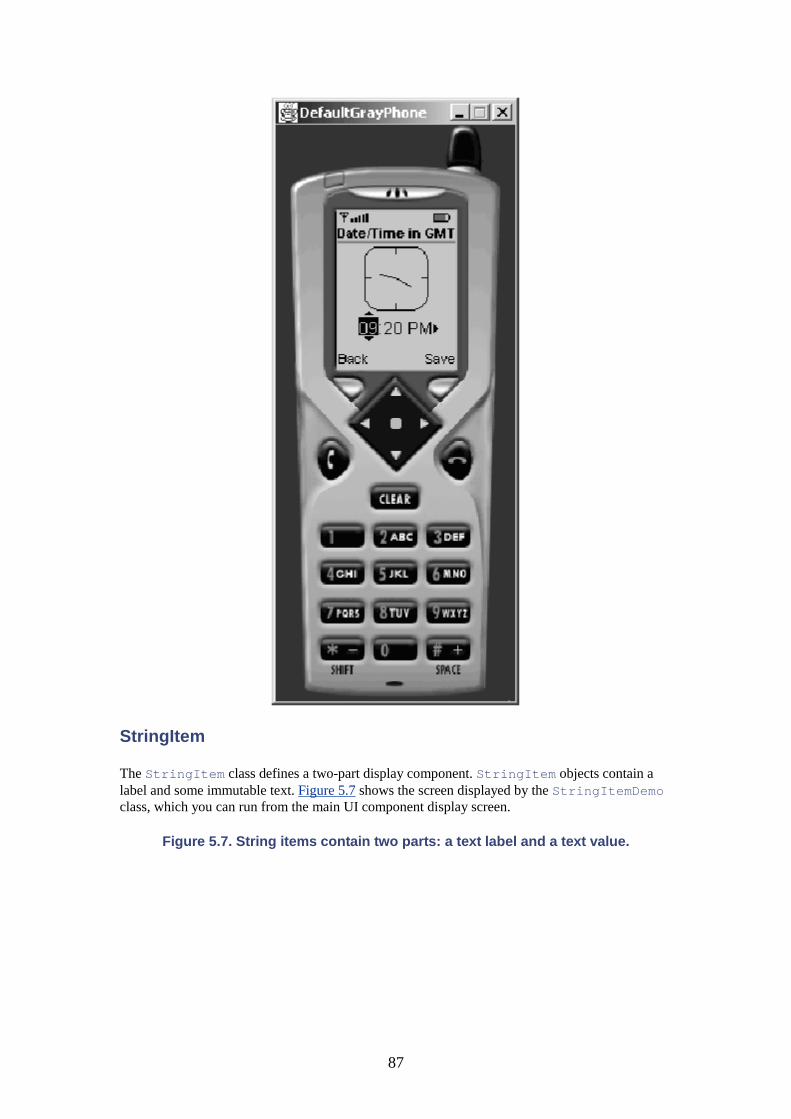
87
StringItem
The StringItem class defines a two-part display component. StringItem objects contain a label and some immutable text. Figure 5.7 shows the screen displayed by the StringItemDemo class, which you can run from the main UI component display screen.
Figure 5.7. String items contain two parts: a text label and a text value.

88
Listing 5.6 shows the pertinent parts of the StringItemDemo code. You can correlate the text in the constructor's two argument parameters with the text on the display. This is a very simple UI component.
Listing 5.6 String items are forms.
import javax.microedition.lcdui.Command; import javax.microedition.lcdui.CommandListener; import javax.microedition.lcdui.Displayable; import javax.microedition.lcdui.Form; import javax.microedition.lcdui.StringItem; /** This class demonstrates use of the StringItem MIDP UI class. @see javax.microedition.lcdui.StringItem */ public class StringItemDemo extends Form
89
implements CommandListener { private Command back = new Command("Back", Command.BACK, 1); private static Displayable instance; private StringItem si = new StringItem("StringItem's title", "Immutable item text"); /** Constructor. */ public StringItemDemo() { super("StringItem Demo"); append(si); addCommand(back); setCommandListener(this); instance = this; } ... }
StringItem objects give you a convenient way to associate a label with a value. You can put a String in a Form instead of using a StringItem object, but the StringItem has the advantage that its implementation ensures that the label and value strings remain together on the display.
Gauge
The Gauge class is also derived from Item. Running the GaugeDemo from the main screen creates the display shown in Figure 5.8.
Figure 5.8. There are interactive and noninteractive gauges. You can modify the value of an interactive gauge.

90
The example shown in Figure 5.8 places four items on a Form: two gauges and a String label for each one. The labels identify the two different types of gauges defined by the Gauge class: interactive and noninteractive. The implementation renders the two types of gauges differently so the user can distinguish their type.
The user can set the value of an interactive gauge. Simply scroll the display to highlight the first gauge. It takes on a solid rendering when highlighted and is grayed out when not highlighted. Using the left and right arrow buttons that appear at the bottom of the screen, you can modify the gauge's value. Like the vertical arrows you've seen already, these horizontal arrows are created and managed by the implementation.
Notice that you have to click the arrow keys several times before you see an increase or decrease in the number of bars that are filled in. The reason is the limited screen resolution that the gauge is able to display. If the overall range of values that the gauge represents is too great, the gauge implementation must map several values to each vertical bar that appears on the gauge's display.
The bottom arrow on the screen indicates that you can scroll down the display further. In the example shown in Figure 5.8, the screen isn't large enough to show the full height of the second

91
gauge. Scrolling the display to the bottom will display the whole of the noninteractive gauge. After you've scrolled down, notice that now there are no left and right arrows, because the value of noninteractive gauges cannot be changed.
It's important to distinguish between the ability to interact with a gauge and the ability to modify its value. Both types of gauges can be modified programmatically.
The abbreviated source code in Listing 5.7 shows how to set the maximum and initial values of a Gauge in the constructor.
Listing 5.7 The four parameters required to specify a gauge are its mode, human readable title, initial value, and maximum value.
import javax.microedition.lcdui.Command; import javax.microedition.lcdui.CommandListener; import javax.microedition.lcdui.Displayable; import javax.microedition.lcdui.Form; import javax.microedition.lcdui.Gauge; /** This class demonstrates the use of the Gauge MIDP UI class. @see javax.microedition.lcdui.Gauge */ public class GaugeDemo extends Form implements CommandListener { ... private String gauge1Label = new String("Interactive gauge"); private Gauge interactiveGauge = new Gauge("Interactive", true, 50, 15); private String gauge2Label = new String("Non-interactive"); private Gauge staticGauge = new Gauge("Static", false, 50, 25); /** Constructor. */ public GaugeDemo() { super("Gauge Demo"); append(gauge1Label); append(interactiveGauge); append(gauge2Label); append(staticGauge); addCommand(back); setCommandListener(this); instance = this; } ... }

92
Unlike the demo, a real application would presumably also change the gauge value during its lifetime, using the following methods in the Gauge class:
public void setValue(int value) public int getValue()
Ticker
A ticker is an object that provides scrolling text across the top of the display. The TickerDemo in Listing 5.8 produces the display shown in Figure 5.9.
Figure 5.9. The ticker is placed on the display, not on the screen. The implementation defines an area for the ticker independent from any screen,
allowing it to be shared by multiple screens.
A Ticker is associated with the display, not with the screen. You place a Ticker on a screen using the Screen.setTicker(Ticker t) method, as shown in the code in Listing 5.8.
93
Listing 5.8 Ticker demo source code
import javax.microedition.lcdui.Command; import javax.microedition.lcdui.CommandListener; import javax.microedition.lcdui.Display; import javax.microedition.lcdui.Displayable; import javax.microedition.lcdui.Ticker; import javax.microedition.lcdui.Form; /** This class demonstrates use of the Ticker MIDP UI component class. @see javax.microedition.lcdui.Gauge */ public class TickerDemo extends Form implements CommandListener { private String str = "This text keeps scrolling until the demo stops..."; private Ticker ticker = new Ticker(str); private Command back = new Command("Back", Command.BACK, 1); private static Displayable instance; /** Constructor. */ public TickerDemo() { super("Ticker demo"); instance = this; addCommand(back); setTicker(ticker); setCommandListener(this); } ... }
You can associate the same Ticker object with multiple screens, however. The implementation renders the Ticker on some constant portion of the display, in this case at the top of the display.
Looking at Figure 5.1 again, you'll notice that Ticker is not an Item. Its derivation directly from java.lang.Object gives you a clue as to why a Ticker can be tied to the display and not to a screen. It doesn't need to be derived from Item, because it really is not something that is placed in a Form.
ImageItem
Several MIDP UI components support the display of images. Figure 5.10 shows an image displayed on a form. Listing 5.9 shows the source code for the program that displays Figure 5.10.
Figure 5.10. Several MIDP UI components support the display of an image. Here, a form contains an ImageItem component, which displays an image.
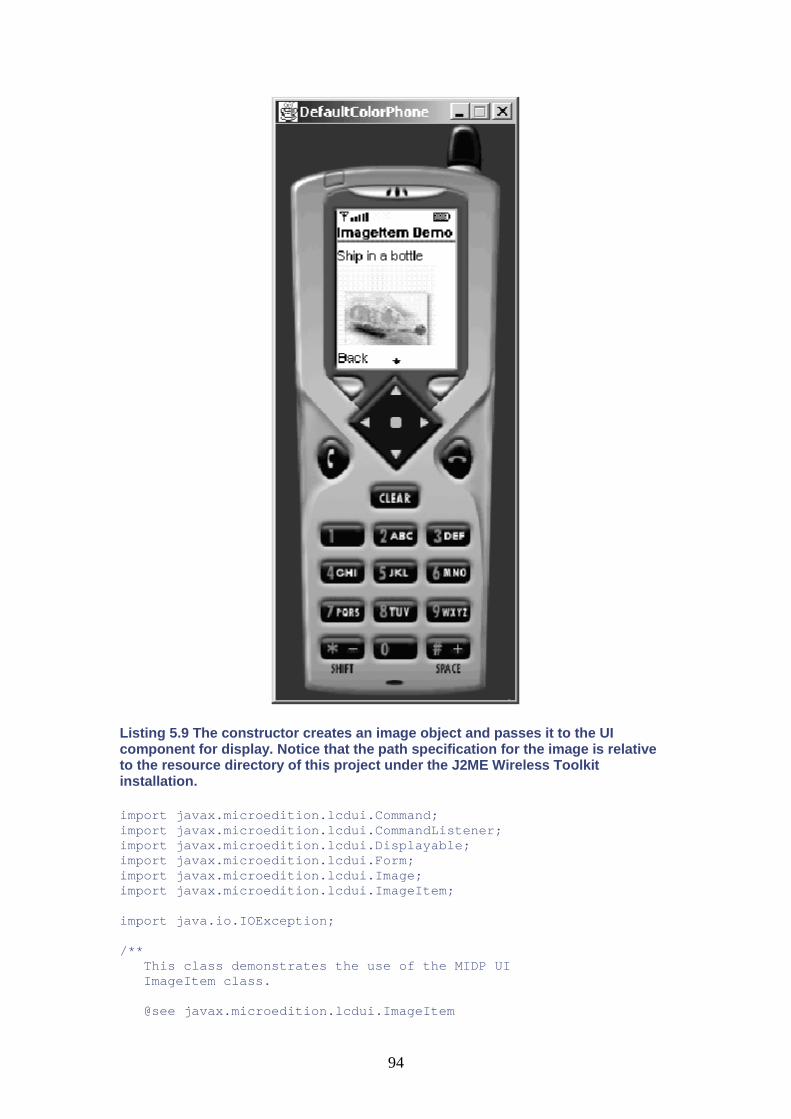
94
Listing 5.9 The constructor creates an image object and passes it to the UI component for display. Notice that the path specification for the image is relative to the resource directory of this project under the J2ME Wireless Toolkit installation.
import javax.microedition.lcdui.Command; import javax.microedition.lcdui.CommandListener; import javax.microedition.lcdui.Displayable; import javax.microedition.lcdui.Form; import javax.microedition.lcdui.Image; import javax.microedition.lcdui.ImageItem; import java.io.IOException; /** This class demonstrates the use of the MIDP UI ImageItem class. @see javax.microedition.lcdui.ImageItem
95
*/ public class ImageItemDemo extends Form implements CommandListener { ... private ImageItem imageItem; /** Constructor. @throws IOException if the specified image resource cannot be found. */ public ImageItemDemo() throws IOException { super("ImageItem Demo"); String path = "/bottle80x80.png"; Image image = Image.createImage(path); imageItem = new ImageItem("Ship in a bottle", image, ImageItem.LAYOUT_CENTER, "Image not found"); append(imageItem); addCommand(back); setCommandListener(this); instance = this; } ... }
Listing 5.9 demonstrates the use of the ImageItem MIDP UI component class. An ImageItem is a subclass of Item, so it must be placed in a Form as demonstrated by the listing.
Before you can display an image, you must first create an image object. The javax.microedition.lcdui.Image class defines images. To instantiate Image, specify the path name of an image file. Image files must be stored in the Portable Network Graphics (PNG) format. J2ME supports the manipulation of images in this format only.
Notice in Listing 5.9 that the path name of the image file is relative to the res/ directory of the UIComponents project directory. The res/ directory contains all resource files, including image files. If you place your images elsewhere, they will not be found, and your program will throw an IOException when it tries to open the file.
In Listing 5.9, the constructor builds an ImageItem using the Image object just created. The constructor parameters are the title string that displays above the image, the image object, the image placement directive, and a text string to be displayed in case the image can't be displayed for some reason.
The ImageItem class is the only class that provides layout control for images, but several other MIDP UI components use images, too. Table 5.5 lists the full set of MIDP UI components that use images.
Table 5.5. MIDP UI Components That Use Images MIDP UI Component Class Description

96
Alert Image displayed along with text ChoiceGroup Image displayed to the left of each element's text List Image displayed to left of item text ImageItem Provides layout control for the image object itself
The ChoiceGroup and List classes can display images as part of the representation of each of their elements. The API for these classes is fairly straightforward, so I won't show examples of each here. The same idiom of building the image object and passing it to the component applies for all the MIDP UI components that use images.
One More Screen Type
You've seen all the MIDP components except one: the TextBox. Unlike a TextField, a TextBox is a multiline, editable text area. Look at the handy inheritance hierarchy of Figure 5.1 once more, and you'll see that TextBox is a kind of Screen, not an Item.
Because a TextBox is a Displayable, you must create a MIDlet object to demonstrate its use; you can't place it in another Screen or Form, as you can with the components derived from Item. Figure 5.11 shows the TextBoxDemo screen.
Figure 5.11. The TextBoxDemo screen
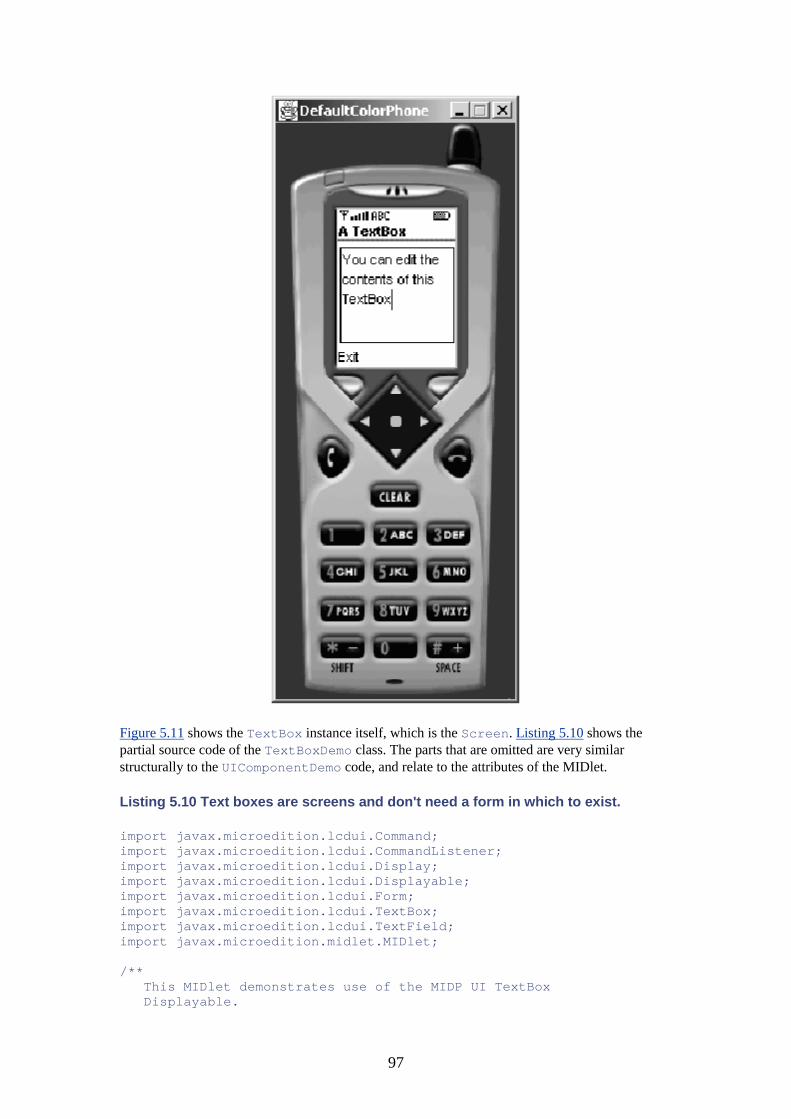
97
Figure 5.11 shows the TextBox instance itself, which is the Screen. Listing 5.10 shows the partial source code of the TextBoxDemo class. The parts that are omitted are very similar structurally to the UIComponentDemo code, and relate to the attributes of the MIDlet.
Listing 5.10 Text boxes are screens and don't need a form in which to exist.
import javax.microedition.lcdui.Command; import javax.microedition.lcdui.CommandListener; import javax.microedition.lcdui.Display; import javax.microedition.lcdui.Displayable; import javax.microedition.lcdui.Form; import javax.microedition.lcdui.TextBox; import javax.microedition.lcdui.TextField; import javax.microedition.midlet.MIDlet; /** This MIDlet demonstrates use of the MIDP UI TextBox Displayable.

98
@see javax.microedition.lcdui.TextBox */ public class TextBoxDemo extends MIDlet implements CommandListener { private Command quit = new Command("Exit", Command.EXIT, 1); private static TextBoxDemo instance; // The TextBox UI component. private TextBox textBox; // The maximum number of characters that the TextBox can // hold. private int MAX_SIZE = 100; // The TextBox's initial text. private String initialText = "You can edit the contents of this TextBox"; /** Constructor. */ public TextBoxDemo() { super(); instance = this; } public void pauseApp() { } public void destroyApp(boolean destroy) { textBox = null; initialText = null; instance = null; } void quit() { destroyApp(true); notifyDestroyed(); } public void startApp() { textBox = new TextBox("A TextBox", initialText, MAX_SIZE, TextField.ANY); textBox.addCommand(quit); textBox.setCommandListener(this); display(); }
99
/** Returns the single instance of this class. Calling this method before constructing an object will return a null pointer. @return an instance of this class. */ public static TextBoxDemo getInstance() { return instance; } public void display() { Display.getDisplay(this).setCurrent(textBox); } public void commandAction(Command c, Displayable d) { if (c == quit) { quit(); } } }
You can see from the constructor that a TextBox is similar to a TextField, except that it's a multiline text area. The arguments are the title, the initial text, the maximum number of characters that it can hold, and the input constraints. The constraints are exactly the same constraints used by the TextField class.
Figure 5.11 displays the initial text used to create the TextBox instance. Just as with other editable objects, you simply select the TextBox using the emulator's Select button and then edit the contents. You can navigate using the four arrow keys, erase characters using the Clear key, and input using either the keypad keys or your computer keypad when you're using an emulator. Of course, the program can also manipulate the content using a rich API that supports inserting, deleting, setting the maximum size, setting constraints, and so forth. Figure 5.12 shows the screen after selecting the text box for editing.
Figure 5.12. The precise interface presented for editing a text box is implementation-dependent.
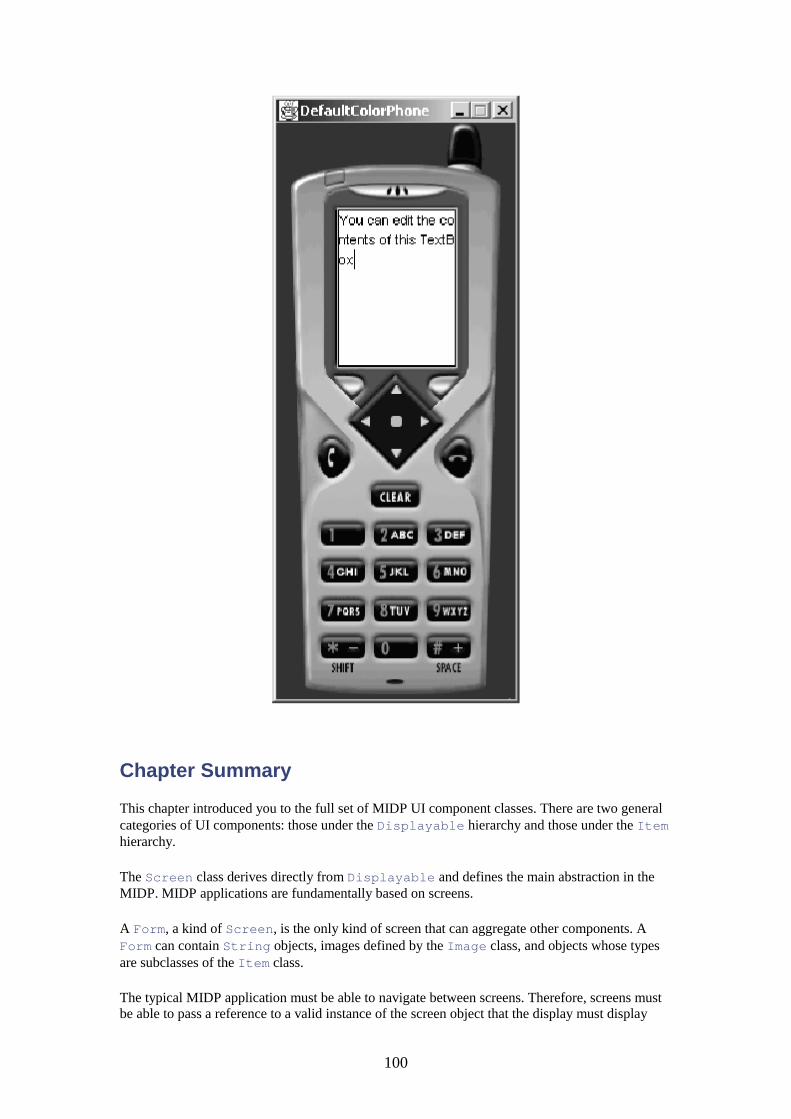
100
Chapter Summary
This chapter introduced you to the full set of MIDP UI component classes. There are two general categories of UI components: those under the Displayable hierarchy and those under the Item hierarchy.
The Screen class derives directly from Displayable and defines the main abstraction in the MIDP. MIDP applications are fundamentally based on screens.
A Form, a kind of Screen, is the only kind of screen that can aggregate other components. A Form can contain String objects, images defined by the Image class, and objects whose types are subclasses of the Item class.
The typical MIDP application must be able to navigate between screens. Therefore, screens must be able to pass a reference to a valid instance of the screen object that the display must display
101
next. The standard idiom is to provide a static method that returns such a reference in each class that defines a screen.
Chapter 3 presented overall program structure and programming metaphors. Chapter 4 covered the MIDP high-level API. This chapter complemented it with an introduction to all the MIDP components that implement the high-level API.
The next chapter introduces you to the MIDP low-level API.

102
Chapter 6. The MIDP Low-Level API • Command and Event Handling • Graphics Drawing
This chapter teaches you how to use the MIDP low-level API, which is the second of two MIDP UI component APIs. You learned about the other API, the MIDP high-level API, in chapter 4. The low-level API makes it possible for you to do two things that you can't do with the high-level API:
• Obtain low-level information about events (such as key stroke information), that is delivered to your component.
• Define the look of the your UI component.
Two classes comprise the definition of the low-level API:
• javax.microedition.lcdui.Canvas • javax.microedition.lcdui.Graphics
Figure 6.1 reproduces a subset of the MIDP inheritance hierarchy diagram in Figure 5.1 in chapter 5. You can see that the Canvas class derives from Displayable.
Figure 6.1. Canvas objects are displayable, but because they aren't screens, they don't share any of the elements of the screen abstraction present in the MIDP high-
level UI components.
Because the Canvas class isn't a type of Screen, however, it shares none of the abstractions defined by the Screen hierarchy—adding a title or a ticker isn't possible, for example.
The Canvas class is abstract. To use it, you must subclass it. Your concrete subclass defines a new component with command and event handling behavior and, with the help of the Graphics

103
class, it defines its own look. The subclass provides event handling and rendering capabilities that are different from the ones that screen components enable.
Command and Event Handling
With a Canvas component, you can add and remove high-level commands and set a single command listener to a canvas, just as you can with other displayable components. A Canvas can also implement CommandListener and register itself as its own listener.
In addition to handling high-level commands, however, the Canvas class also handles low-level commands. Canvas components themselves are the source of low-level key and pointer events, which are generated by user key actions and pointer movement on the device. They are also their own low-level event listeners. The Canvas class defines the interface for low-level event handling as part of its own API; there is no other listener interface to implement.
The MIDP implementation passes information about a low-level event to the Canvas object by calling an appropriate method on the canvas object. Table 6.1 lists the possible methods.
Table 6.1. Low-level API Event Notification Methods Method Name Description protected void keyPressed(int KeyCode) A key was pressed and released. protected void keyReleased(int KeyCode) A key was released. protected void keyRepeated(int KeyCode) A key was pressed repeatedly. protected void pointerPressed(int x, int y)
A pointer was pressed.
protected void pointerDragged(int x, int y)
A pointer was dragged.
protected void pointerReleased(int x, int y)
A pointer was released.
protected abstract void paint(Graphics g)
The repaint request of the Canvas occurred.
To perform low-level event handling, your concrete Canvas subclass must override one or more of the methods in Table 6.1. By not overriding the Canvas class's empty definitions, you're ignoring events and foregoing the ability to handle them. In addition, your Canvas subclass must define the paint() method, which is declared abstract in Canvas.
Listings 6.1 and 6.2 demonstrate simple command and event handling on a Canvas. The code in Listing 6.1 is the MIDlet code for the demo, much of which looks familiar. The code in Listing 6.2, however, constructs a Canvas subclass, the Displayable that the code in Listing 6.1 places on screen.
Listing 6.1 The CanvasDemo1 demo requires a MIDlet like any other MIDP application.
import javax.microedition.midlet.MIDlet; import javax.microedition.lcdui.Display; /** Defines the MIDlet that displays a blank Canvas on the
104
device's display. The Canvas displayed is an instance of the Canvas1 class. @see Canvas1 */ public class CanvasDemo1 extends MIDlet { // Holds a reference to the instance of this class. private static CanvasDemo1 midlet; // Holds a reference to the Canvas that the user sees on // the display. private static Canvas1 instance; private Display display; private Canvas1 canvas; /** No-arg constructor. Calls the MIDlet class no-arg constructor. */ public CanvasDemo1() { super(); display = Display.getDisplay(this); instance = canvas; midlet = this; } /** Returns a reference to the MIDlet associated with this displayable. @returns the MIDlet which displays this object. */ public static CanvasDemo1 getMIDlet() { return midlet; } public void startApp() { canvas = new Canvas1(); display.setCurrent(canvas); } public void pauseApp() { } public void destroyApp(boolean destroy) { instance = null; canvas = null; } void quit() { destroyApp(true); notifyDestroyed();
105
} }
Listing 6.2 To use a Canvas, you must create a subclass of Canvas.
import javax.microedition.lcdui.Canvas; import javax.microedition.lcdui.Command; import javax.microedition.lcdui.CommandListener; import javax.microedition.lcdui.Display; import javax.microedition.lcdui.Displayable; import javax.microedition.lcdui.Graphics; /** Defines a subclass of Canvas that is displayed by the CanvasDemo1 MIDlet. This Canvas has a single "Exit" command so the user can terminate the demo. @see CanvasDemo1 */ public class Canvas1 extends Canvas implements CommandListener { private Command exit = new Command("Exit", Command.EXIT, 1); /** No-arg constructor. */ public Canvas1() { // Note the call to super(), which is the Canvas // no-arg constructor! This is very important. // Without a call to super() your Canvas instances // will not be able to behave like a real Canvas. // They won't display properly, they won't paint // properly, and they won't be able to process events. super(); addCommand(exit); setCommandListener(this); printCanvasInfo(); } /** Paints the look of the Canvas that the user sees. In this case, it "paints" nothing. Therefore, this Canvas has no visual representation because there is nothing painted on the screen by this method. */ public void paint(Graphics g) { } public void commandAction(Command c, Displayable d) { if (c == exit) CanvasDemo1.getMIDlet().quit(); } /**

106
Defines the processing to be done in response to a key release event occuring on this Canvas. This method overrides the same method in Canvas. */ public void keyReleased(int keyCode) { printKeyEventInfo(keyCode); } /** Defines some event handling for key events. This method simply prints to standard output some diagnostic information about key events on the Canvas. */ protected void printKeyEventInfo(int keyCode) { System.out.println("Key code = " + keyCode); System.out.println("Key name = " + getKeyName(keyCode)); System.out.println("Game action = " + getGameAction(keyCode)); } /** Prints diagnostic information about the Canvas object attributes and capabilities. */ protected void printCanvasInfo() { System.out.println("Device height = " + getHeight()); System.out.println("Device width = " + getWidth()); System.out.println("Pointer events = " + hasPointerEvents()); System.out.println("Pointer motion events = " + hasPointerMotionEvents()); System.out.println("Repeat events = " + hasRepeatEvents()); } }
To convince yourself that high-level command processing still works on a Canvas, run the MIDlet shown in Listing 6.2. You will see that the display, shown in Figure 6.2, presents an Exit soft button, which, when activated, terminates the MIDlet.
Figure 6.2. Canvases can still do command processing. They can be the source of command events, which the implementation delivers to a registered command
listener.

107
Key Events
The Canvas1 class overrides the keyReleased() method in Canvas. Because the object registers itself as an event listener, it receives key events in response to user key actions.
Clicking any keypad key results in the generation of two key events: a key-pressed event and a key-released event. This program prints information about the key-released key. The information about a key event includes a key name, a key code, and possibly associated game action identification.
A key name is a String that represents the human-readable representation of the key; it's usually similar to (if not the same as) the text physically printed on the device's key. A key code is an integer whose value uniquely represents each key. For standard ITU-T keys, namely, 0 through 9, *, and #, the key code is the Unicode value of the character.
Programs should use the Canvas class's predefined constants instead of the Unicode value of the keystroke to check which key was pressed. This approach makes your programs more portable. The Canvas class defines a constant for each of the key codes, shown in Table 6.2.
Table 6.2. Canvas Class Constants Representing ITU-T Keys Canvas Class Constant Description public static final int KEY_NUM0 Represents keypad 0 key public static final int KEY_NUM1 Represents keypad 1 key
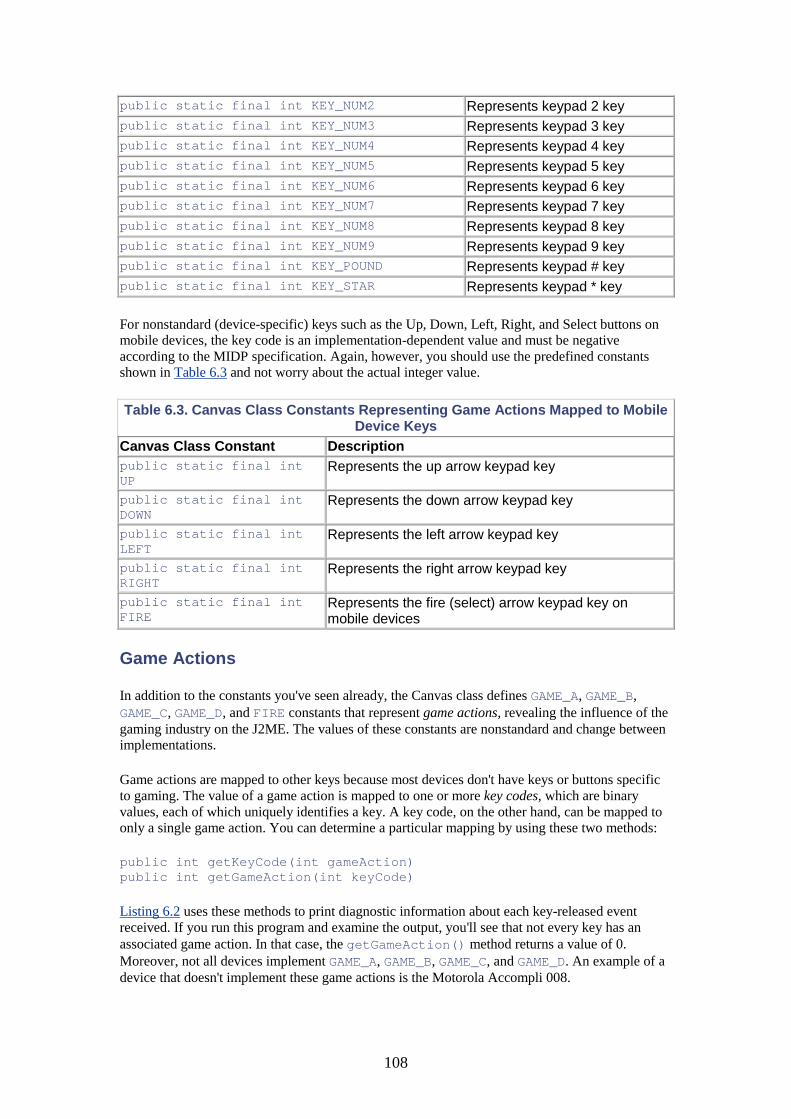
108
public static final int KEY_NUM2 Represents keypad 2 key public static final int KEY_NUM3 Represents keypad 3 key public static final int KEY_NUM4 Represents keypad 4 key public static final int KEY_NUM5 Represents keypad 5 key public static final int KEY_NUM6 Represents keypad 6 key public static final int KEY_NUM7 Represents keypad 7 key public static final int KEY_NUM8 Represents keypad 8 key public static final int KEY_NUM9 Represents keypad 9 key public static final int KEY_POUND Represents keypad # key public static final int KEY_STAR Represents keypad * key
For nonstandard (device-specific) keys such as the Up, Down, Left, Right, and Select buttons on mobile devices, the key code is an implementation-dependent value and must be negative according to the MIDP specification. Again, however, you should use the predefined constants shown in Table 6.3 and not worry about the actual integer value.
Table 6.3. Canvas Class Constants Representing Game Actions Mapped to Mobile Device Keys
Canvas Class Constant Description public static final int UP
Represents the up arrow keypad key
public static final int DOWN
Represents the down arrow keypad key
public static final int LEFT
Represents the left arrow keypad key
public static final int RIGHT
Represents the right arrow keypad key
public static final int FIRE
Represents the fire (select) arrow keypad key on mobile devices
Game Actions
In addition to the constants you've seen already, the Canvas class defines GAME_A, GAME_B, GAME_C, GAME_D, and FIRE constants that represent game actions, revealing the influence of the gaming industry on the J2ME. The values of these constants are nonstandard and change between implementations.
Game actions are mapped to other keys because most devices don't have keys or buttons specific to gaming. The value of a game action is mapped to one or more key codes, which are binary values, each of which uniquely identifies a key. A key code, on the other hand, can be mapped to only a single game action. You can determine a particular mapping by using these two methods:
public int getKeyCode(int gameAction) public int getGameAction(int keyCode)
Listing 6.2 uses these methods to print diagnostic information about each key-released event received. If you run this program and examine the output, you'll see that not every key has an associated game action. In that case, the getGameAction() method returns a value of 0. Moreover, not all devices implement GAME_A, GAME_B, GAME_C, and GAME_D. An example of a device that doesn't implement these game actions is the Motorola Accompli 008.

109
Graphics Drawing
Undoubtedly, you noticed that the canvas in Figure 6.2 was blank except for the Exit soft button. The reason is that the Canvas1 class doesn't define its visual representation. All concrete subclasses of Canvas must define their look in order to render any visual attributes. They must enlist the help of the javax.microedition.lcdui.Graphics class to do so. The very purpose of the Graphics class is to support drawing on canvases.
The Graphics Model
The Graphics class defines low-level graphics drawing capabilities. If you've already done AWT or Swing development, this class will look very familiar. In fact, its features and API are almost identical to, albeit a subset of, those in the J2SE Graphics class.
The Graphics class defines a model that enables applications to draw—or paint in Java parlance—basic two-dimensional shapes on a Canvas. Defining the method
public void paint(Graphics g)
does painting in your Canvas subclass, overriding the one declared protected abstract in Canvas. The Canvas1 class has an empty paint(Graphics g) definition, which explains why it doesn't create any visual representation.
Every concrete Canvas subclass has access to a Graphics object. This Graphics object is a copy of the device's native graphics context and abstracts the device's implementation-dependent graphics context, which is part of the device's native operating system software.
The Graphics object that you manipulate is created by the Canvas implementation upon initialization of the Canvas object. This is one major reason why you must ensure that your Canvas subclass constructor calls super()! The implementation passes the graphics object to your canvas when it calls your class's paint(Graphics g) method.
The Graphics Class
The Graphics class supports the following abstractions:
• drawing and filling of two-dimensional geometric shapes • color selection for the graphics pen • selection of font for text drawing • clipping • translation of the Graphics coordinate system
Devices differ in their support for attributes like color. Therefore, the Display class provides the methods
public int isColor() public int numColors()
so that you can discern information about a given device's support for color and the number of colors provided, or support the number of levels of gray scale for noncolor devices.
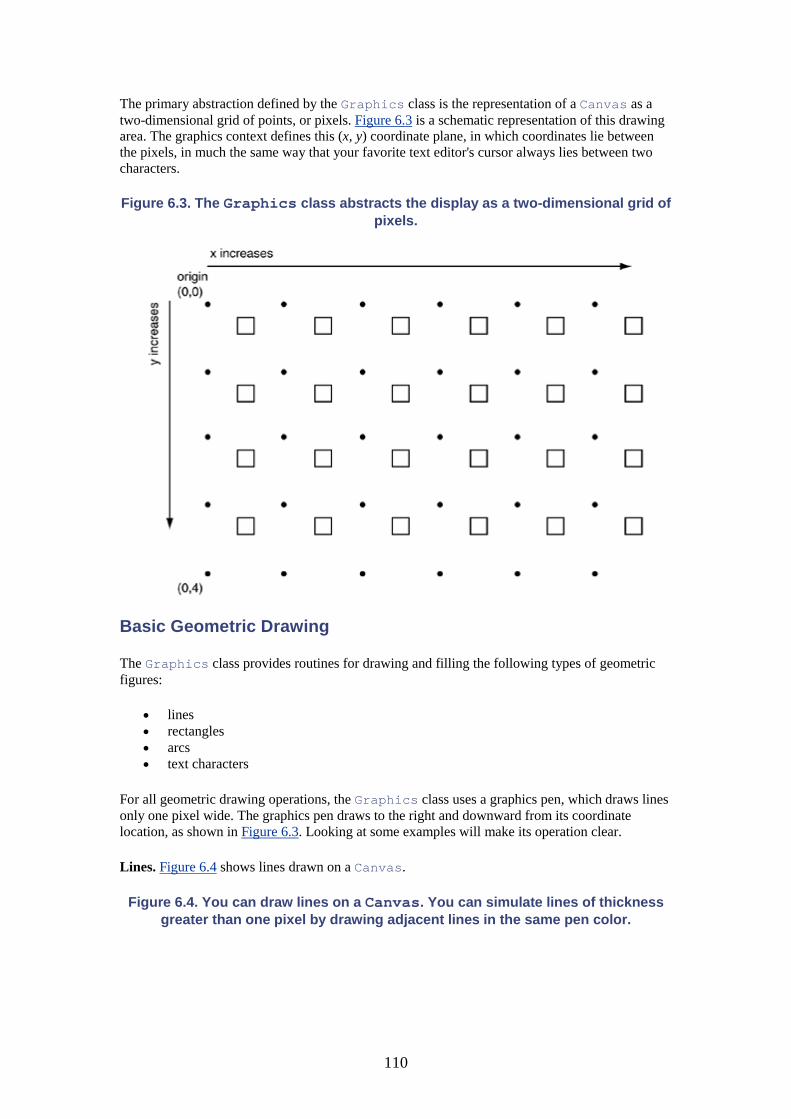
110
The primary abstraction defined by the Graphics class is the representation of a Canvas as a two-dimensional grid of points, or pixels. Figure 6.3 is a schematic representation of this drawing area. The graphics context defines this (x, y) coordinate plane, in which coordinates lie between the pixels, in much the same way that your favorite text editor's cursor always lies between two characters.
Figure 6.3. The Graphics class abstracts the display as a two-dimensional grid of pixels.
Basic Geometric Drawing
The Graphics class provides routines for drawing and filling the following types of geometric figures:
• lines • rectangles • arcs • text characters
For all geometric drawing operations, the Graphics class uses a graphics pen, which draws lines only one pixel wide. The graphics pen draws to the right and downward from its coordinate location, as shown in Figure 6.3. Looking at some examples will make its operation clear.
Lines. Figure 6.4 shows lines drawn on a Canvas.
Figure 6.4. You can draw lines on a Canvas. You can simulate lines of thickness greater than one pixel by drawing adjacent lines in the same pen color.

111
Listing 6.3 shows the source code that produces Figure 6.4, but I've omitted the MIDlet code that displays it. You can find the complete source at http://www.phptr.com/. For the rest of the examples in this chapter, assume that the displayable classes you see here are created and displayed by a MIDlet in a similar fashion to examples you've seen in previous chapters. From this point onward, I'll show only new code.
Listing 6.3 The demo defines a paint() method, which ensures that some visual representation appears on the device's display.
import javax.microedition.lcdui.Canvas; import javax.microedition.lcdui.Command; import javax.microedition.lcdui.CommandListener; import javax.microedition.lcdui.Display; import javax.microedition.lcdui.Displayable; import javax.microedition.lcdui.Graphics; import javax.microedition.lcdui.Command; /**
112
Draws a series of lines to demonstrate the different types and styles of lines that can be drawn with the Graphics class. @see javax.microedition.lcdui.Graphics */ public class LineDemo extends Canvas implements CommandListener { // A constant that represents the color white. private static final int WHITE = 0xFF << 16 | 0xFF << 8 | 0xFF; private Command back = new Command("Back", Command.BACK, 1); private GraphicsDemo gDemo = GraphicsDemo.getInstance(); private Display display = Display.getDisplay(gDemo); /** No-arg constructor. */ public LineDemo() { super(); addCommand(back); setCommandListener(this); display.setCurrent(this); } /** Paints the clip rectangle white, effectively erasing whatever was displayed on the Canvas previously. */ protected void paintClipRect(Graphics g) { int clipX = g.getClipX(); int clipY = g.getClipY(); int clipH = g.getClipHeight(); int clipW = g.getClipWidth(); int color = g.getColor(); g.setColor(WHITE); g.fillRect(clipX, clipY, clipW, clipH); g.setColor(color); } /** Paints the look of this Canvas subclass. */ public void paint(Graphics g) { paintClipRect(g); int width = getWidth(); int height = getHeight(); g.drawLine(20, 10, width - 20, height - 34); g.drawLine(20, 11, width - 20, height - 33); g.drawLine(20, 12, width - 20, height - 32);
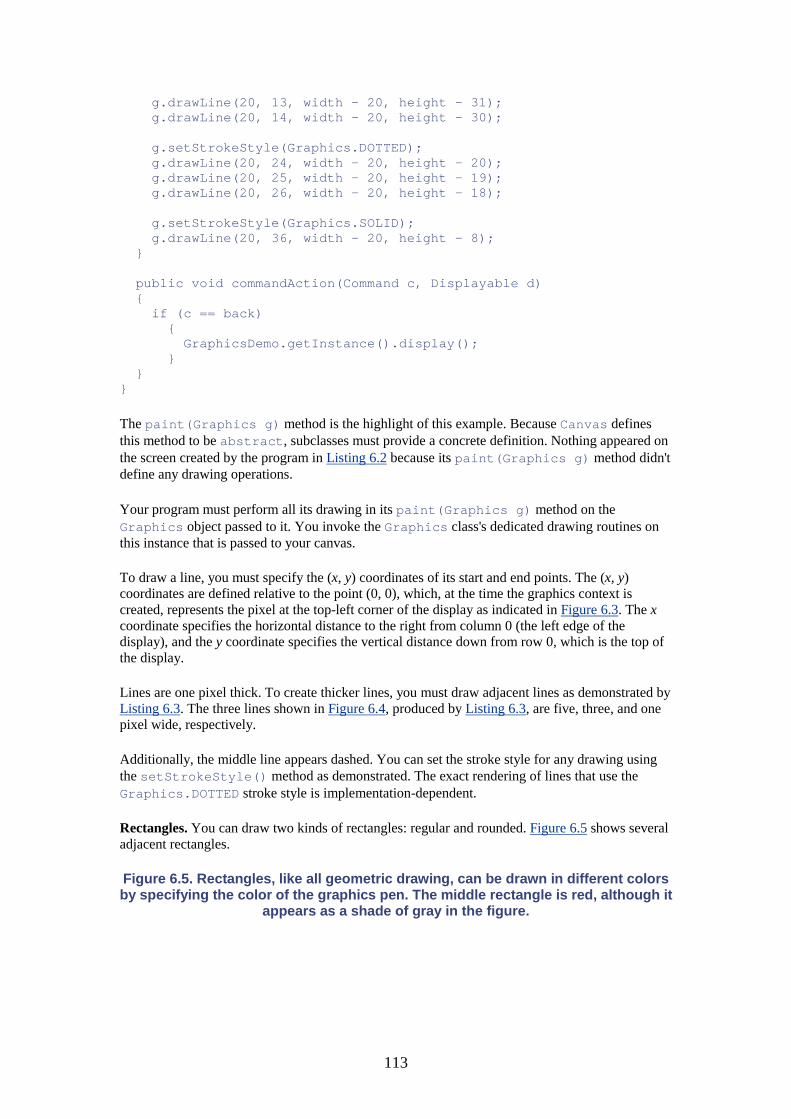
113
g.drawLine(20, 13, width - 20, height - 31); g.drawLine(20, 14, width - 20, height - 30); g.setStrokeStyle(Graphics.DOTTED); g.drawLine(20, 24, width - 20, height - 20); g.drawLine(20, 25, width - 20, height - 19); g.drawLine(20, 26, width - 20, height - 18); g.setStrokeStyle(Graphics.SOLID); g.drawLine(20, 36, width - 20, height - 8); } public void commandAction(Command c, Displayable d) { if (c == back) { GraphicsDemo.getInstance().display(); } } }
The paint(Graphics g) method is the highlight of this example. Because Canvas defines this method to be abstract, subclasses must provide a concrete definition. Nothing appeared on the screen created by the program in Listing 6.2 because its paint(Graphics g) method didn't define any drawing operations.
Your program must perform all its drawing in its paint(Graphics g) method on the Graphics object passed to it. You invoke the Graphics class's dedicated drawing routines on this instance that is passed to your canvas.
To draw a line, you must specify the (x, y) coordinates of its start and end points. The (x, y) coordinates are defined relative to the point (0, 0), which, at the time the graphics context is created, represents the pixel at the top-left corner of the display as indicated in Figure 6.3. The x coordinate specifies the horizontal distance to the right from column 0 (the left edge of the display), and the y coordinate specifies the vertical distance down from row 0, which is the top of the display.
Lines are one pixel thick. To create thicker lines, you must draw adjacent lines as demonstrated by Listing 6.3. The three lines shown in Figure 6.4, produced by Listing 6.3, are five, three, and one pixel wide, respectively.
Additionally, the middle line appears dashed. You can set the stroke style for any drawing using the setStrokeStyle() method as demonstrated. The exact rendering of lines that use the Graphics.DOTTED stroke style is implementation-dependent.
Rectangles. You can draw two kinds of rectangles: regular and rounded. Figure 6.5 shows several adjacent rectangles.
Figure 6.5. Rectangles, like all geometric drawing, can be drawn in different colors by specifying the color of the graphics pen. The middle rectangle is red, although it
appears as a shade of gray in the figure.
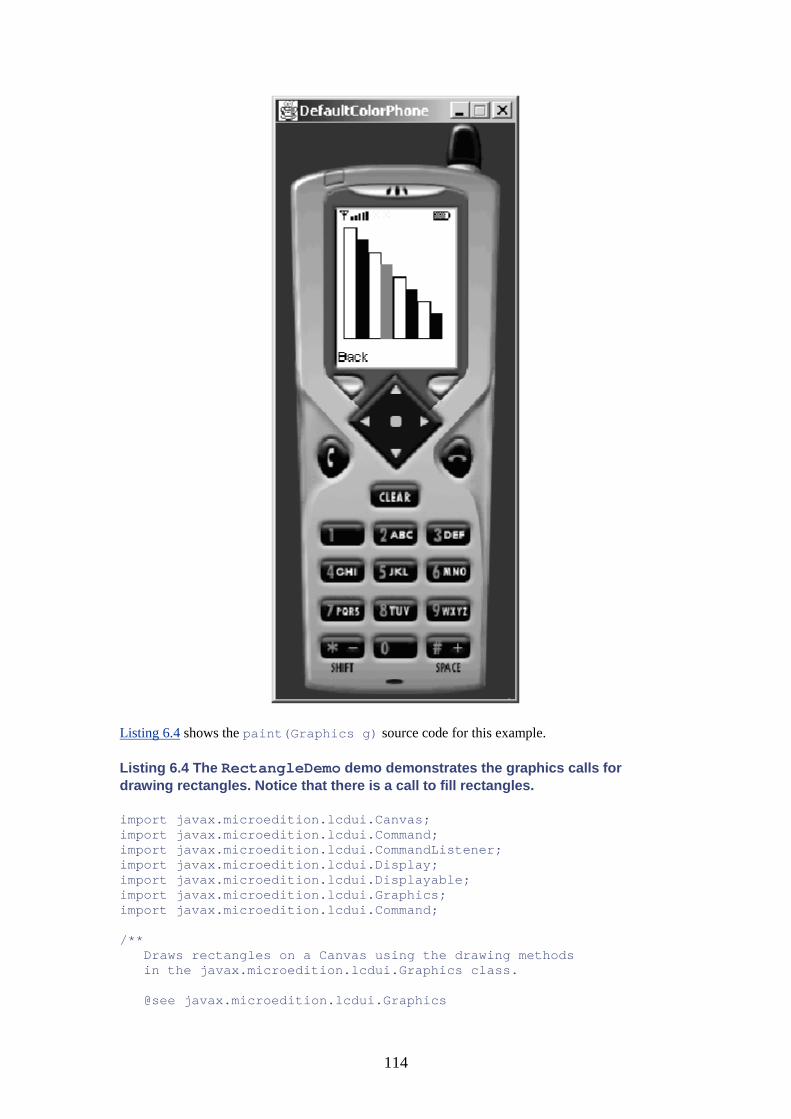
114
Listing 6.4 shows the paint(Graphics g) source code for this example.
Listing 6.4 The RectangleDemo demo demonstrates the graphics calls for drawing rectangles. Notice that there is a call to fill rectangles.
import javax.microedition.lcdui.Canvas; import javax.microedition.lcdui.Command; import javax.microedition.lcdui.CommandListener; import javax.microedition.lcdui.Display; import javax.microedition.lcdui.Displayable; import javax.microedition.lcdui.Graphics; import javax.microedition.lcdui.Command; /** Draws rectangles on a Canvas using the drawing methods in the javax.microedition.lcdui.Graphics class. @see javax.microedition.lcdui.Graphics
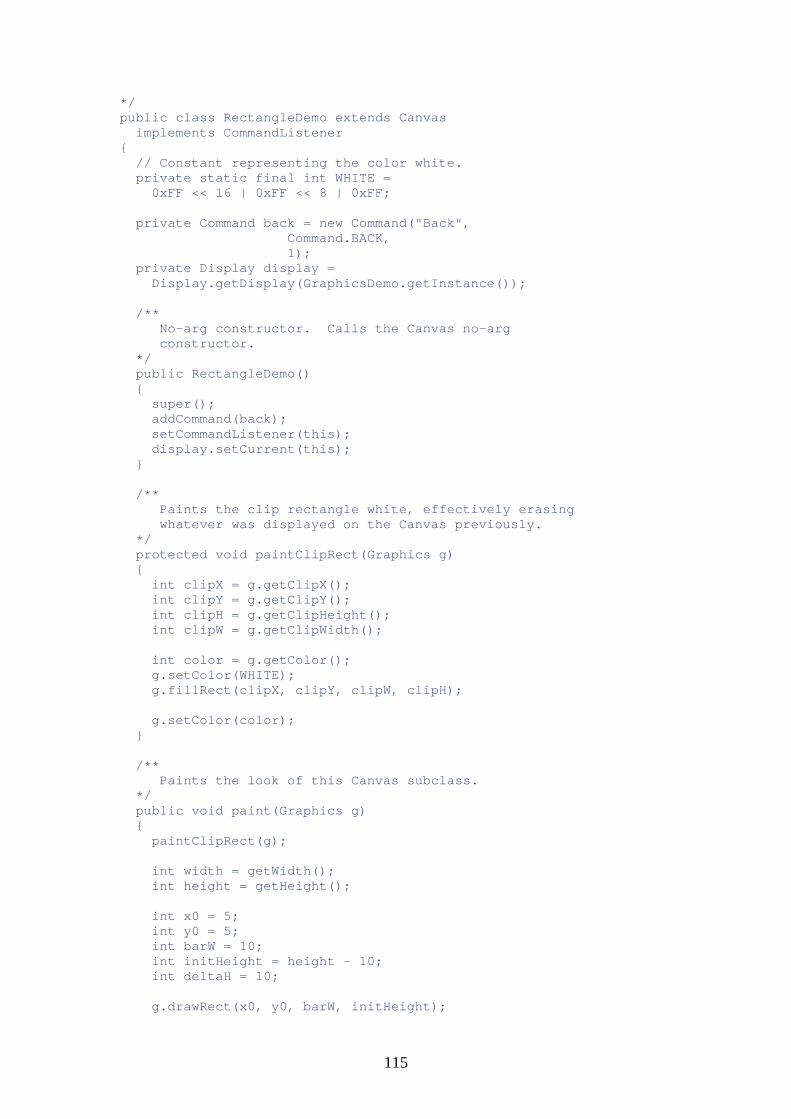
115
*/ public class RectangleDemo extends Canvas implements CommandListener { // Constant representing the color white. private static final int WHITE = 0xFF << 16 | 0xFF << 8 | 0xFF; private Command back = new Command("Back", Command.BACK, 1); private Display display = Display.getDisplay(GraphicsDemo.getInstance()); /** No-arg constructor. Calls the Canvas no-arg constructor. */ public RectangleDemo() { super(); addCommand(back); setCommandListener(this); display.setCurrent(this); } /** Paints the clip rectangle white, effectively erasing whatever was displayed on the Canvas previously. */ protected void paintClipRect(Graphics g) { int clipX = g.getClipX(); int clipY = g.getClipY(); int clipH = g.getClipHeight(); int clipW = g.getClipWidth(); int color = g.getColor(); g.setColor(WHITE); g.fillRect(clipX, clipY, clipW, clipH); g.setColor(color); } /** Paints the look of this Canvas subclass. */ public void paint(Graphics g) { paintClipRect(g); int width = getWidth(); int height = getHeight(); int x0 = 5; int y0 = 5; int barW = 10; int initHeight = height - 10; int deltaH = 10; g.drawRect(x0, y0, barW, initHeight);

116
g.fillRect(x0 + barW, y0 + deltaH, barW, initHeight - deltaH + 1); g.drawRect(x0 + barW * 2, y0 + deltaH * 2, barW, initHeight - deltaH * 2); g.setColor(255, 00, 00); g.fillRect(x0 + barW * 3, y0 + deltaH * 3, barW, initHeight - deltaH * 3 + 1); g.setColor(0, 0, 0); g.drawRect(x0 + barW * 4, y0 + deltaH * 4, barW, initHeight - deltaH * 4); g.fillRect(x0 + barW * 5, y0 + deltaH * 5, barW, initHeight - deltaH * 5 + 1); g.drawRect(x0 + barW * 6, y0 + deltaH * 6, barW, initHeight - deltaH * 6); g.fillRect(x0 + barW * 7, y0 + deltaH * 7, barW, initHeight - deltaH * 7 + 1); } public void commandAction(Command c, Displayable d) { if (c == back) { GraphicsDemo.getInstance().display(); } } }
Arcs. The Graphics class also supports the drawing of arcs. To draw an arc, you must specify six parameters. These parameters are the four quantities that define the arc's bounding rectangle, its start angle, and its end angle. The bounding rectangle is defined by the same four parameters required for rectangles.
The drawing routine traces the arc along a path from the start angle to the end angle in a counterclockwise direction. Angle 0 degrees is along the positive x-axis of the coordinate plane. Figure 6.6 shows two arcs drawn by the paint(Graphics g) method in Listing 6.5.
Figure 6.6. Like other geometric figures, arcs can be drawn in outline mode or fill mode.

117
Listing 6.5 Arcs can be drawn in outline or in filled form, like rectangles.
import javax.microedition.lcdui.*; /** Demonstrates the drawing of arcs using the Graphics class. @see javax.microedition.lcdui.Graphics */ public class ArcDemo extends Canvas implements CommandListener { ... public void paint(Graphics g) { paintClipRect(g); int width = getWidth();

118
int height = getHeight(); g.drawArc(5, 5, 80, 40, 90, 300); g.fillArc(5, 60, 80, 40, 0, 250); } ... }
Notice that the second arc is filled and that it was created using the fillArc() method instead of the drawArc() method.
Text. The Graphics class also supports "drawing" character text on a Canvas. The three methods in Table 6.4 are Canvas class methods that support text placement on a Canvas.
These methods calculate an imaginary bounding rectangle, which defines the boundary of the area the text occupies, around the text to be drawn, shown in Figure 6.7. The dimensions of this rectangle depend on the length of the string and the font used for rendering.
Figure 6.7. Text is "drawn" within the bounds of an imaginary bounding rectangle, which is calculated by the text-drawing routines.
The (x, y) arguments in the methods just shown represent the position at which the bounding rectangle should be placed. The anchor parameter specifies the anchor point of the bounding rectangle. An anchor point identifies which one of six possible points on the perimeter of the text's bounding rectangle should be placed at the (x, y) position.
Table 6.4. Canvas Class Methods That Support Drawing Text on a Canvas Canvas Text Drawing Method Name
Description
public void drawString(String str, int x, int y, int anchor)
Draws the characters that comprise the string argument, with the specified anchor point at the position indicated by the (x, y) coordinates.
public void drawSubstring(String str, int offset, int len, int x, int y, int anchor)
Draws the characters that comprise the substring defined by the starting point and offset, with the specified anchor point at the position indicated by the (x, y) coordinates.
public void drawChar(Char char, int x, int y, int anchor)
Draws the character with the specified anchor point at the position indicated by the (x, y) coordinates.
119
Figure 6.7 shows the six anchor points for positioning a text string's bounding rectangle. The value of the anchor point is really a choice for the weighting of the point on the bounding rectangle. Two attributes comprise an anchor point's weighting: a horizontal and a vertical weighting policy. Table 6.5 defines the Graphics class constants that represent them. They are defined public static final int.
The Graphics class defines these constants for valid horizontal weighting values and also defines the values for valid vertical weighting values.
Table 6.5. Graphics Constants for Specifying an Anchor-Weighting Policy Anchor Constant Description static int LEFT Position the left edge at coordinate x. static int HCENTER Position the horizontal center at coordinate x. static int RIGHT Position the right edge at coordinate x. static int TOP Position the top at coordinate y. static int BASELINE
Position the text baseline at coordinate y.
static int BOTTOM Position the bottom of the bounding rectangle at coordinate y. static int VCENTER For images only; position the image's vertical center at
coordinate y.
Figure 6.8 shows some text drawn on a Canvas, and Listing 6.6 shows the paint(Graphics g) method of the source code that displays it.
Figure 6.8. To draw text, specify the location of its anchor point. Draw vertical text by positioning and drawing each character of the text.

120
Listing 6.6 To draw text, specify the anchor point and the weighting of the anchor point. You can also specify the font of the text to be drawn.
import javax.microedition.lcdui.Canvas; import javax.microedition.lcdui.Command; import javax.microedition.lcdui.CommandListener; import javax.microedition.lcdui.Display; import javax.microedition.lcdui.Displayable; import javax.microedition.lcdui.Font; import javax.microedition.lcdui.Graphics; /** Displays some text "drawn" on a Canvas. Demonstrates the use of the Graphics text drawing routines. @see javax.microedition.lcdui.Graphics */ public class TextDemo extends Canvas implements CommandListener
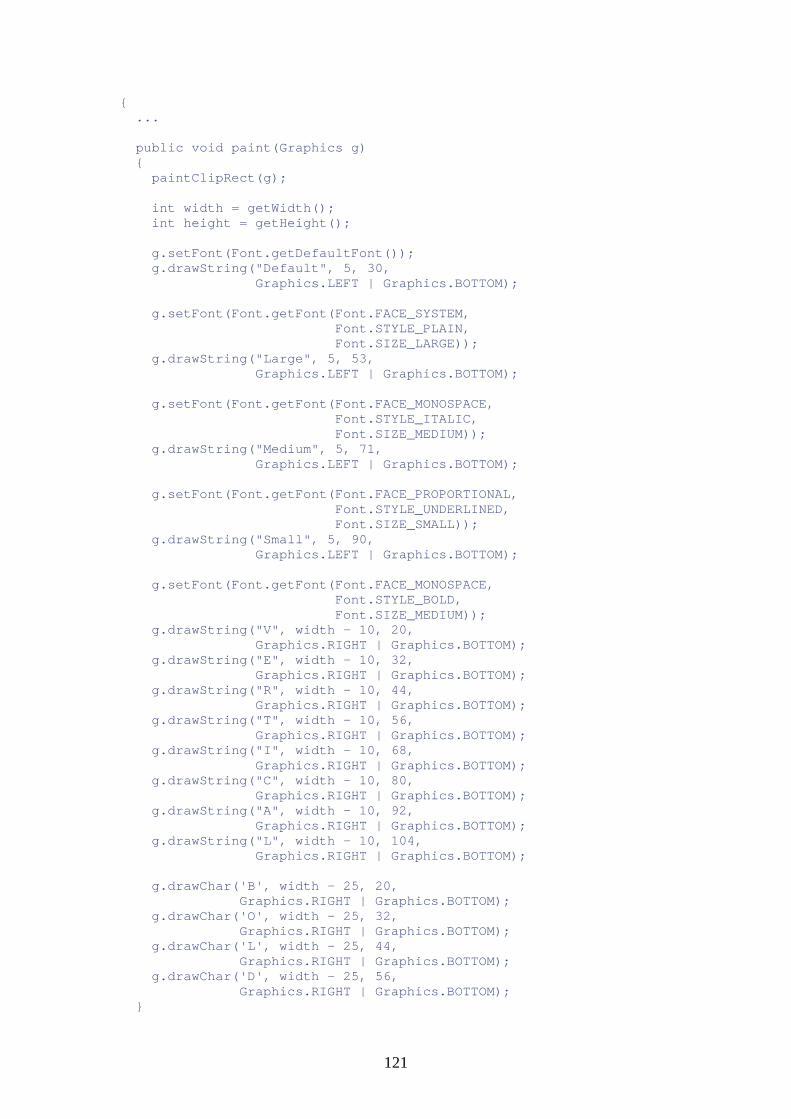
121
{ ... public void paint(Graphics g) { paintClipRect(g); int width = getWidth(); int height = getHeight(); g.setFont(Font.getDefaultFont()); g.drawString("Default", 5, 30, Graphics.LEFT | Graphics.BOTTOM); g.setFont(Font.getFont(Font.FACE_SYSTEM, Font.STYLE_PLAIN, Font.SIZE_LARGE)); g.drawString("Large", 5, 53, Graphics.LEFT | Graphics.BOTTOM); g.setFont(Font.getFont(Font.FACE_MONOSPACE, Font.STYLE_ITALIC, Font.SIZE_MEDIUM)); g.drawString("Medium", 5, 71, Graphics.LEFT | Graphics.BOTTOM); g.setFont(Font.getFont(Font.FACE_PROPORTIONAL, Font.STYLE_UNDERLINED, Font.SIZE_SMALL)); g.drawString("Small", 5, 90, Graphics.LEFT | Graphics.BOTTOM); g.setFont(Font.getFont(Font.FACE_MONOSPACE, Font.STYLE_BOLD, Font.SIZE_MEDIUM)); g.drawString("V", width - 10, 20, Graphics.RIGHT | Graphics.BOTTOM); g.drawString("E", width - 10, 32, Graphics.RIGHT | Graphics.BOTTOM); g.drawString("R", width - 10, 44, Graphics.RIGHT | Graphics.BOTTOM); g.drawString("T", width - 10, 56, Graphics.RIGHT | Graphics.BOTTOM); g.drawString("I", width - 10, 68, Graphics.RIGHT | Graphics.BOTTOM); g.drawString("C", width - 10, 80, Graphics.RIGHT | Graphics.BOTTOM); g.drawString("A", width - 10, 92, Graphics.RIGHT | Graphics.BOTTOM); g.drawString("L", width - 10, 104, Graphics.RIGHT | Graphics.BOTTOM); g.drawChar('B', width - 25, 20, Graphics.RIGHT | Graphics.BOTTOM); g.drawChar('O', width - 25, 32, Graphics.RIGHT | Graphics.BOTTOM); g.drawChar('L', width - 25, 44, Graphics.RIGHT | Graphics.BOTTOM); g.drawChar('D', width - 25, 56, Graphics.RIGHT | Graphics.BOTTOM); }

122
... }
This demo chooses to space the text strings "Default," "Large," "Medium," and "Small" by positioning the baselines of the bounding rectangles. The text is also "left-justified." Notice that the logical OR of the horizontal and vertical anchor policies (LEFT | BOTTOM) specify the anchor position.
The two strings "BOLD" and "VERTICAL" are drawn vertically simply by positioning individual characters using the drawChar() method. They are offset from the right edge of the display. Using the RIGHT anchor policy, the code calculates the position of the right edge of the bounding rectangles by subtracting some number of pixels from the display's rightmost pixel coordinate.
The Graphics API also defines another constant, VCENTER, that is valid only for specifying the vertical anchor policy for positioning images. It is invalid for text. VCENTER stipulates that the vertical center of the image should be placed at the (x, y) coordinate point. You'll learn about image manipulation later in this chapter.
Fonts. You can select a font for any text you draw on a Canvas, as demonstrated in Listing 6.6. You select a font by specifying three font attributes: the face, style, and size. The javax.microedition.lcdui.Font class defines handy constants for each of these three categories, shown in Table 6.6.
Table 6.6. Graphics Constants That Define Font Attributes Attribute Constant Description static int FACE_MONOSPACE Face attribute value static int FACE_PROPORTIONAL Face attribute value static int FACE_SYSTEM Face attribute value static int STYLE_BOLD Style attribute value static int STYLE_ITALIC Style attribute value static int STYLE_PLAIN Style attribute value static int STYLE_UNDERLINED Style attribute value static int SIZE_SMALL Size attribute value static int SIZE_MEDIUM Size attribute value static int SIZE_LARGE Size attribute value
You should note that the MIDP specification doesn't require implementations to provide all of these sizes, styles, and faces. The font that is returned will be the closest match to the requested font that the implementation can manage.
Unlike in AWT and Swing, you don't have the luxury of a whole suite of fonts and a myriad number of font sizes. Furthermore, because the Font class is declared final and has no public constructors, you can't subclass it to define new fonts. The MIDP designers made the choice to limit available fonts based on device constraints.
You need to obtain a reference to a valid Font object in order to pass it to the Graphics.setFont() method. You can get a Font object only by calling either of the two static factory methods
Font.getFont(int face, int style, int size) Font.getDefaultFont()
123
The font specified will be used for all subsequent drawing operations until you change it again. In Listing 6.6, the graphic's font is changed before drawing the different text strings or characters to achieve the desired effect.
Clipping
When your application calls the Display.setCurrent() method, it's requesting that the implementation display your Displayable. For canvas objects, the implementation makes your component the current displayable and calls your class's paint(Graphics g) method. The implementation generates an internal paint event that is delivered to the current displayable. This is the reason that the paint() method is listed in Table 6.1 as part of the event handling API defined by Canvas.
At the time of display, some subset of the display's pixels might be invalid or damaged. An invalid, or damaged, pixel is one that's visible as a result of a previous paint operation but should not be rendered as part of the current paint operation. The display could have been damaged by another MIDlet or even by an "external" application—for example, by a native messaging application that updates the display to indicate the receipt of an SMS message by your mobile phone.
Before drawing itself, your Canvas is responsible for erasing any pixels that appear on the screen that should not be part of its look. You repair the screen by refreshing invalid pixels.
You undoubtedly noticed the presence of a paintClipRect(Graphics g) method in Listing 6.3. Listing 6.7 repeats this method. It's the first code called by each application's paint(Graphics g) method. Its purpose is to erase all of the pixels that were drawn by a previous paint operation.
Listing 6.7 You must erase all invalid pixels before painting your component. Use the clip rectangle of your component's graphics object to determine the rectangular area that contains all of the damaged pixels.
protected void paintClipRect(Graphics g) { int clipX = g.getClipX(); int clipY = g.getClipY(); int clipH = g.getClipHeight(); int clipW = g.getClipWidth(); int color = g.getColor(); g.setColor(WHITE); g.fillRect(clipX, clipY, clipW, clipH); g.setColor(color); }
The crux of this method is its use of the Graphics object's clip rectangle. The clip rectangle is the rectangular region that contains all of the screen's invalid pixels. A clip rectangle is defined by its (x, y) offset from the Graphics object's origin and by its width and height.
You can obtain the clip rectangle by calling the Graphics methods
int getClipHeight() int getClipWidth() int getClipX() int getClipY()
124
When your paint(Graphics g) method is called, the clip rectangle will always represent an area that contains all of the display's damaged pixels. In cases like the examples in this chapter, where you're replacing the display of a screen with a new one, the clip rectangle will represent the whole display area of the device.
The easiest way to "erase" the invalid pixels is to redraw every pixel in the clip rectangle using the screen's background color, thus ensuring that you erase all damaged pixels. Then, you perform the drawing operations that define your Canvas using another color.
Notice in Listing 6.7 that the method gets and saves the display's current color, which represents the pen color used for all drawing operations. The default color is usually black in most implementations. The code then sets the current color to white (which is typically the background color) and fills the clip rectangle with white pixels, effectively "erasing" all the damaged pixels. Finally, the code restores the original color of the Graphics object. Subsequent drawing operations will render pixels in some color other than white on a white background.
There are cases in which the clip rectangle might represent some subset of the display. In such cases, only some subset of the display has been damaged. Your application could choose simply to repaint the whole display, but it doesn't have to. It could just as well repaint the damaged area alone.
The damaged area that needs repairing will be the intersection of the area used by your Canvas and the clip rectangle. You can determine which of your display's pixels fall within that region by intersecting the clip rectangle with the area that you know your Canvas uses for its display. The method
void clipRect(int x, int y, int width, int height)
sets the clip rectangle to be the intersection of the current clip rectangle and the rectangle specified by the arguments—the region your Canvas uses. Your application can then calculate which of its pixels fall within this new clip rectangle and repaint them.
The clipRect() call always produces a smaller clip rectangle. You can also set the clip rectangle to any size using the call
setClip(int x, int y, int width, int height)
Your Canvas needs to repaint only the pixels that fall within the intersected region, because the clip rectangle guarantees to encompass all damaged pixels. Of course, calculating this subset could be more work than simply repainting the whole Canvas. But painting only the clip rectangle is useful for applications that use complex or time-consuming processing to calculate which pixels to paint.
Another common use for clipping is game development. A typical application is a case in which you want to move a sprite, which is a small image or icon. Using the clipped region as demonstrated in Listing 6.7, you paint the background of the area where the sprite is currently located, and then you paint the sprite in its new position.
Actually, on a real device that doesn't support double buffering, the implementation in Listing 6.7 might produce quite noticeable and disturbing flashing of the screen when it's updated. You probably won't notice any flashing if you're using an emulator, however, because of the speed of your computer. The "Double Buffering" section later in this chapter shows you how to fix this problem.
125
Drawing is the process of changing the state of the Graphics object. Rendering is the process of displaying the drawn pixels on the screen.
You can never render outside the clip rectangle. Coordinates passed to drawing routines are always interpreted relative to the origin of the clip rectangle. Drawing operations that fall outside the boundaries of the clip rectangle have no effect on rendering; they don't appear on screen. Negative values for x and y coordinates address pixels outside of the clip rectangle.
Although you can never render outside the clip rectangle, you can draw anywhere, even outside the clip rectangle. You can even draw outside the bounds of the Graphics object. One implication is that you can implement panning or scrolling of an image by changing the x and y coordinates of its origin when drawing it.
Translation
As you already know, the point (x, y) specifies to a drawing function a location relative to the point (0, 0). The point (0, 0) is the origin of the Graphics. When you first obtain a reference to your canvas Graphics, its origin, the point (0, 0), always represents the top-left corner of the device's display (the destination).
To translate the origin of a Graphics means to reposition its origin. After translation, the origin of the Graphics represents some point other than the top-left pixel on the destination. You translate the origin of a Graphics using the method
void translate(int x, int y)
The arguments are the coordinates of the point that becomes the new origin of the Graphics object. The point (0, 0) now refers to this new origin. All drawing operations are now relative to this new origin. Figure 6.9 shows the display created by the code in Listing 6.8. It simply draws a filled square on the Canvas.
Figure 6.9. When your Canvas is first created, the origin of its Graphics object, (0, 0), always refers to the top-left pixel in the device's display (the destination).
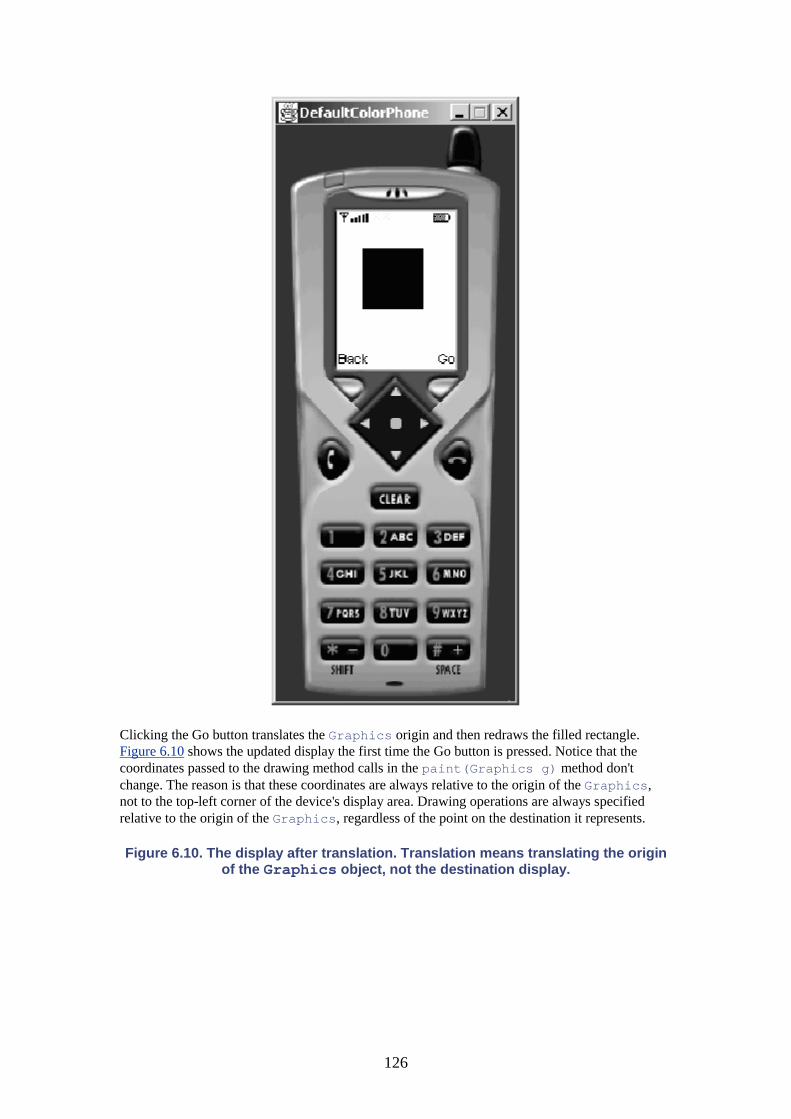
126
Clicking the Go button translates the Graphics origin and then redraws the filled rectangle. Figure 6.10 shows the updated display the first time the Go button is pressed. Notice that the coordinates passed to the drawing method calls in the paint(Graphics g) method don't change. The reason is that these coordinates are always relative to the origin of the Graphics, not to the top-left corner of the device's display area. Drawing operations are always specified relative to the origin of the Graphics, regardless of the point on the destination it represents.
Figure 6.10. The display after translation. Translation means translating the origin of the Graphics object, not the destination display.
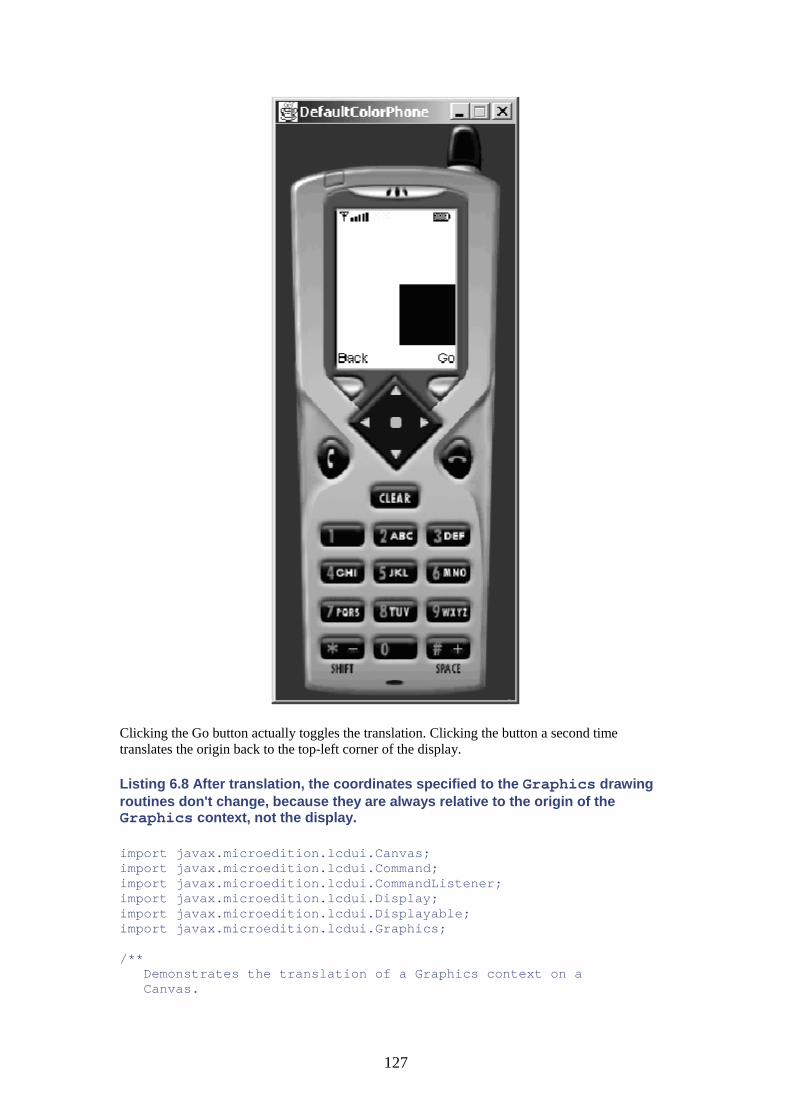
127
Clicking the Go button actually toggles the translation. Clicking the button a second time translates the origin back to the top-left corner of the display.
Listing 6.8 After translation, the coordinates specified to the Graphics drawing routines don't change, because they are always relative to the origin of the Graphics context, not the display.
import javax.microedition.lcdui.Canvas; import javax.microedition.lcdui.Command; import javax.microedition.lcdui.CommandListener; import javax.microedition.lcdui.Display; import javax.microedition.lcdui.Displayable; import javax.microedition.lcdui.Graphics; /** Demonstrates the translation of a Graphics context on a Canvas.

128
@see javax.microedition.lcdui.Graphics */ public class TranslationDemo extends Canvas implements CommandListener { private final int WHITE = 0xFF << 16 | 0xFF << 8 | 0xFF; private GraphicsDemo gDemo = GraphicsDemo.getInstance(); private Display display = Display.getDisplay(gDemo); private static Command back = new Command("Back", Command.BACK, 1); private static Command go = new Command("Go", Command.SCREEN, 1); private static final int ORIGINAL_STATE = 1; private static final int TRANSLATED_STATE = -1; // The x coordinate of the initial drawing. private int x = 20; // The y coordinate of the initial drawing. private int y = 20; // The translation amount in the x direction. private int deltaX = 30; // The translation amount in the y direction. private int deltaY = 30; // State variable that tells the program if the drawing // on-screen is in the original position or the // translated position. private int state = ORIGINAL_STATE; /** Constructor. */ public TranslationDemo() { super(); addCommand(back); addCommand(go); setCommandListener(this); display.setCurrent(this); } protected void paintClipRect(Graphics g) { int clipX = g.getClipX(); int clipY = g.getClipY(); int clipH = g.getClipHeight(); int clipW = g.getClipWidth(); int color = g.getColor(); g.setColor(WHITE); g.fillRect(clipX, clipY, clipW, clipH);
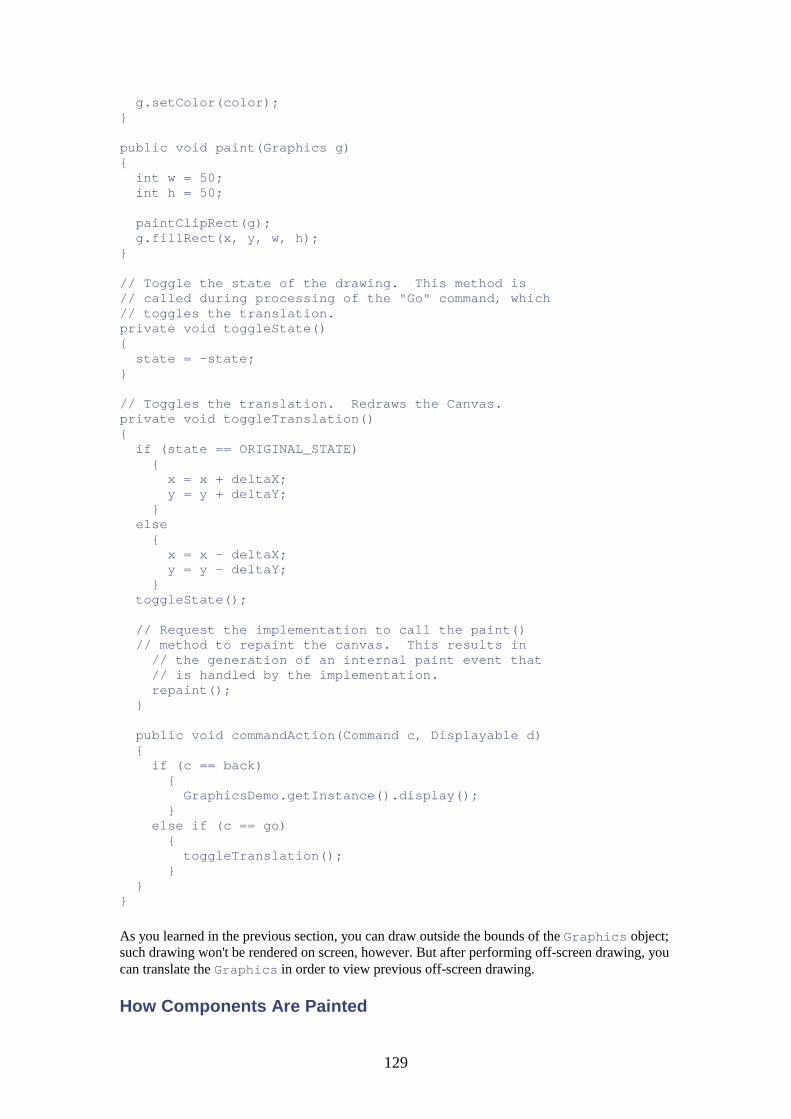
129
g.setColor(color); } public void paint(Graphics g) { int w = 50; int h = 50; paintClipRect(g); g.fillRect(x, y, w, h); } // Toggle the state of the drawing. This method is // called during processing of the "Go" command, which // toggles the translation. private void toggleState() { state = -state; } // Toggles the translation. Redraws the Canvas. private void toggleTranslation() { if (state == ORIGINAL_STATE) { x = x + deltaX; y = y + deltaY; } else { x = x - deltaX; y = y - deltaY; } toggleState(); // Request the implementation to call the paint() // method to repaint the canvas. This results in // the generation of an internal paint event that // is handled by the implementation. repaint(); } public void commandAction(Command c, Displayable d) { if (c == back) { GraphicsDemo.getInstance().display(); } else if (c == go) { toggleTranslation(); } } }
As you learned in the previous section, you can draw outside the bounds of the Graphics object; such drawing won't be rendered on screen, however. But after performing off-screen drawing, you can translate the Graphics in order to view previous off-screen drawing.
How Components Are Painted

130
You may have noticed that the toggleTranslation() method in Listing 6.8 calls Canvas.repaint(). This call requests that the implementation repaint the display.
The Canvas.repaint() call results in an internal implementation event that represents the refresh request. The implementation handles the event internally. It schedules a call to the canvas's paint() method, which is executed by the implementation, not by your program.
A Canvas needs to be painted to render all the bits drawn in its context, or to repair damaged pixels. You should never call paint() directly, however. Whenever you wish to redraw your Canvas, you should issue a call to repaint(). Alternatively, you can call the following overloaded version that is also defined in the Canvas class:
void repaint(int x, int y, int width, int height)
This version requests a repaint of the rectangular region defined by the parameters in the call.
Notice that you still must repair the damaged pixels before you issue a call to repaint the Canvas. This requirement is different from the requirements of AWT or Swing applications. In AWT and Swing, a call to repaint() does two things: It first calls update() and then calls paint(Graphics g). The call to update() causes the implementation to erase the Panel, Canvas, or JComponent. There is no such call in MIDP, so you must repair the damaged pixels yourself. Notice in Listing 6.8 that the paint(Graphics g) method still calls the paintClipRect(Graphics g) method.
Double Buffering
The term double buffering refers to a technique for buffering a graphics context before displaying it. The idiom requires that you use two graphics contexts—or buffers—hence its name.
You first draw graphics in a secondary graphics context, and later copy its contents to the graphics context that represents the device's display. This secondary graphics context is called an off-screen buffer. An off-screen buffer is one that doesn't render to the display.
The motivation for this technique is performance. Drawing operations can result in frequent updates to the display, causing the user to perceive display flicker. To avoid flicker, you first perform your drawing to an off-screen graphics context, then copy the whole off-screen graphics context to the original device graphics. A copy operation is usually faster than the multitude of drawing operations required of even a relatively complex canvas, so it can be done with almost no perceptible flicker.
Listing 6.9 demonstrates the use of double buffering. It performs some simple drawing functions in an off-screen buffer, then copies the contents of that buffer to the primary graphics context that represents the device's display. Although the drawing routines in this example are relatively simple, a real-life application might perform much more complicated drawing, truly warranting the need for double buffering.
Listing 6.9 Double buffering uses two graphics contexts. The only way to obtain a second graphics context in MIDP is through the Image class.
import javax.microedition.lcdui.Canvas; import javax.microedition.lcdui.Command;
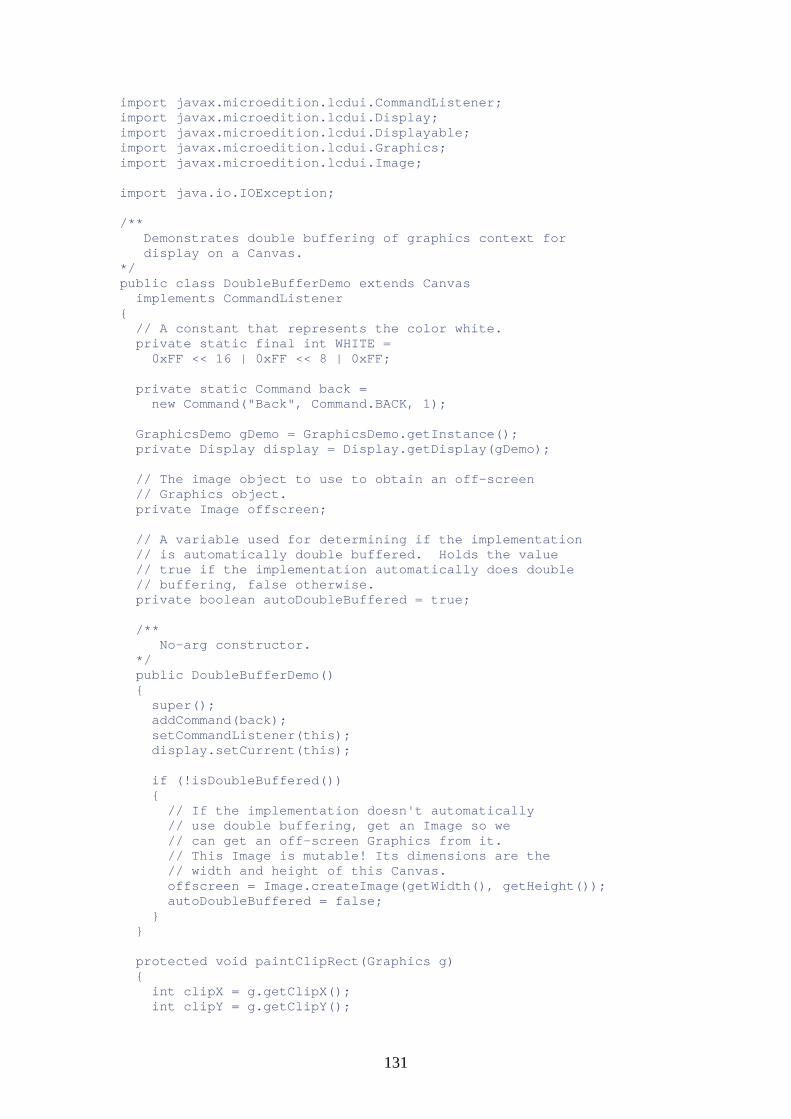
131
import javax.microedition.lcdui.CommandListener; import javax.microedition.lcdui.Display; import javax.microedition.lcdui.Displayable; import javax.microedition.lcdui.Graphics; import javax.microedition.lcdui.Image; import java.io.IOException; /** Demonstrates double buffering of graphics context for display on a Canvas. */ public class DoubleBufferDemo extends Canvas implements CommandListener { // A constant that represents the color white. private static final int WHITE = 0xFF << 16 | 0xFF << 8 | 0xFF; private static Command back = new Command("Back", Command.BACK, 1); GraphicsDemo gDemo = GraphicsDemo.getInstance(); private Display display = Display.getDisplay(gDemo); // The image object to use to obtain an off-screen // Graphics object. private Image offscreen; // A variable used for determining if the implementation // is automatically double buffered. Holds the value // true if the implementation automatically does double // buffering, false otherwise. private boolean autoDoubleBuffered = true; /** No-arg constructor. */ public DoubleBufferDemo() { super(); addCommand(back); setCommandListener(this); display.setCurrent(this); if (!isDoubleBuffered()) { // If the implementation doesn't automatically // use double buffering, get an Image so we // can get an off-screen Graphics from it. // This Image is mutable! Its dimensions are the // width and height of this Canvas. offscreen = Image.createImage(getWidth(), getHeight()); autoDoubleBuffered = false; } } protected void paintClipRect(Graphics g) { int clipX = g.getClipX(); int clipY = g.getClipY();
132
int clipH = g.getClipHeight(); int clipW = g.getClipWidth(); int color = g.getColor(); g.setColor(WHITE); g.fillRect(clipX, clipY, clipW, clipH); g.setColor(color); } public void paint(Graphics g) { Graphics originalG = null; int width = getWidth(); int height = getHeight(); if (!autoDoubleBuffered) { // Save original graphics context and get a new // off-screen Graphics from the utility Image. originalG = g; g = offscreen.getGraphics(); // Clear the clip rectangle using the new Graphics // object. This way we're using double buffering // to clear the Canvas, thereby avoiding // flickering. Clearing the Canvas is drawing // like all other drawing operations. paintClipRect(g); } else { // Clear the Canvas with the original graphics // because the implementation does double // buffering automatically. paintClipRect(g); } for (int x = 0, y = 0; (x < width / 2); x = x + 2) { g.drawRect(x, y, (width - x) - x, (height - y) - y); y++; y++; } // Drawing the image actually copies the contents of // the image's off-screen Graphics context to the // device's Graphics context. if (!autoDoubleBuffered) { originalG.drawImage(offscreen, 0, 0, Graphics.TOP | Graphics.LEFT); } } public void commandAction(Command c, Displayable d) { if (c == back) { GraphicsDemo.getInstance().display(); } }
133
}
The constructor contains the first code related to double buffering. The statement below, taken from the DoubleBufferDemo no-argument constructor, determines whether the implementation automatically supports double buffering.
if (!isDoubleBuffered()) { offscreen = Image.createImage(getWidth(), getHeight()); autoDoubleBuffered = false; }
If the implementation does support double buffering, the application doesn't need to execute it. The Canvas.isDoubleBuffered() method tells you whether the implementation does double buffering implicitly. Notice the construction of the Image object. This call to Image.createImage() produces a mutable Image object. The application needs a mutable Image because it will perform its drawing in the Image object's Graphics context, which is the off-screen buffer we need. This is the only way to obtain an additional Graphics in MIDP.
The paint() method contains the rest of the double-buffering code. If there is no automatic double buffering, the application must perform it. This requires a second graphics context. The following fragment from the paint() method demonstrates the idiom.
public void paint(Graphics g) { ... if (!autoDoubleBuffered) { originalG = g; g = offscreen.getGraphics(); } else { paintClipRect(g); } ... }
A temporary variable saves a reference to the original Graphics object, which represents the device's graphics context. The new graphics context is obtained through the Image object constructed earlier. This Graphics is associated with the Image. This sequence of events is represented schematically in Figure 6.11.
Figure 6.11. The left side represents the state upon first entering the paint method. The right side represents the state after the off-screen Graphics context
is obtained. A reference saves the original Graphics context. The color coding indicates that the off-screen Graphics context is associated with the image
object.
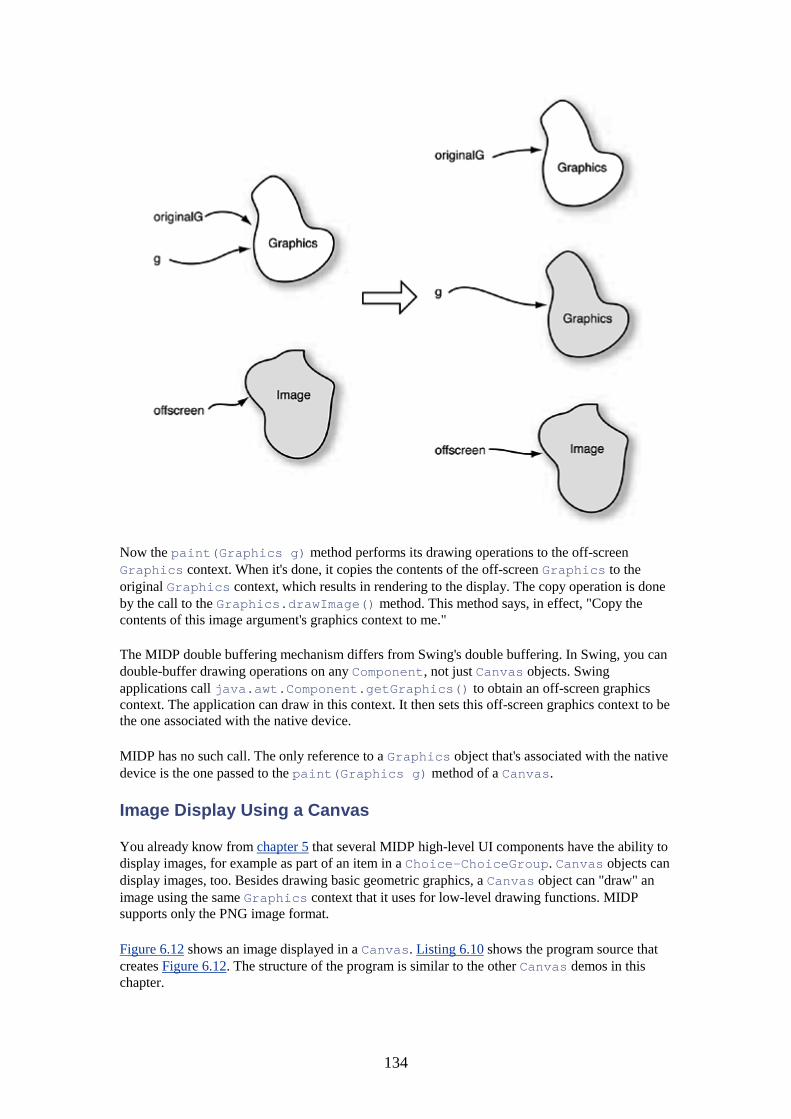
134
Now the paint(Graphics g) method performs its drawing operations to the off-screen Graphics context. When it's done, it copies the contents of the off-screen Graphics to the original Graphics context, which results in rendering to the display. The copy operation is done by the call to the Graphics.drawImage() method. This method says, in effect, "Copy the contents of this image argument's graphics context to me."
The MIDP double buffering mechanism differs from Swing's double buffering. In Swing, you can double-buffer drawing operations on any Component, not just Canvas objects. Swing applications call java.awt.Component.getGraphics() to obtain an off-screen graphics context. The application can draw in this context. It then sets this off-screen graphics context to be the one associated with the native device.
MIDP has no such call. The only reference to a Graphics object that's associated with the native device is the one passed to the paint(Graphics g) method of a Canvas.
Image Display Using a Canvas
You already know from chapter 5 that several MIDP high-level UI components have the ability to display images, for example as part of an item in a Choice-ChoiceGroup. Canvas objects can display images, too. Besides drawing basic geometric graphics, a Canvas object can "draw" an image using the same Graphics context that it uses for low-level drawing functions. MIDP supports only the PNG image format.
Figure 6.12 shows an image displayed in a Canvas. Listing 6.10 shows the program source that creates Figure 6.12. The structure of the program is similar to the other Canvas demos in this chapter.

135
Figure 6.12. A Canvas can display an image by "drawing" the image, which actually draws the image into the image object's Graphics context.
Listing 6.10 To display an image, a Canvas simply "draws" the image object using the image-drawing routine of its Graphics object.
import javax.microedition.lcdui.Canvas; import javax.microedition.lcdui.Command; import javax.microedition.lcdui.CommandListener; import javax.microedition.lcdui.Display; import javax.microedition.lcdui.Displayable; import javax.microedition.lcdui.Graphics; import javax.microedition.lcdui.Image; import java.io.IOException; /** Demonstrates double buffering of images on a Canvas.

136
Images are automatically double buffered. This program demonstrates that you don't have to do anything to get double buffered behavior when displaying images. However, you still have to double buffer the operation that paints the background of the Canvas before painting the image. */ public class DoubleBufferImageDemo extends Canvas implements CommandListener { // A constant that represents the color white. private static final int WHITE = 0xFF << 16 | 0xFF << 8 | 0xFF; private static Command back = new Command("Back", Command.BACK, 1); private GraphicsDemo gDemo = GraphicsDemo.getInstance(); private Display display = Display.getDisplay(gDemo); // A reference to the Image this object displays. Image image; // A variable used for determining if the implementation // is automatically double buffered. Holds the value // "true" if the implementation automatically does // double buffering, "false" otherwise. private boolean autoDoubleBuffered = true; /** No-arg constructor. */ public DoubleBufferImageDemo() { super(); if (!isDoubleBuffered()) { autoDoubleBuffered = false; } // Create the PNG image. The image is "drawn" in an // immutable Image object, which has its own // off-screen Graphics. We create the image here in // the constructor, instead of in the paint() method, // so that it's created only once. try { image = Image.createImage("/bottle80x80.png"); } catch (IOException ioe) { System.out.println(ioe.getMessage()); ioe.printStackTrace(); } addCommand(back); setCommandListener(this); display.setCurrent(this); } protected void paintClipRect(Graphics g) {

137
int clipX = g.getClipX(); int clipY = g.getClipY(); int clipH = g.getClipHeight(); int clipW = g.getClipWidth(); int color = g.getColor(); g.setColor(WHITE); g.fillRect(clipX, clipY, clipW, clipH); g.setColor(color); } /** Paints an image on this object's visible Canvas. */ public void paint(Graphics g) { Graphics originalG = null; int width = getWidth(); int height = getHeight(); if (image == null) { return; } // We still need to double buffer the drawing // operations that clear the Canvas graphics. if (!autoDoubleBuffered) { // Save the original graphics context and use the // off-screen Graphics from the Image to clear the // clip rectangle. originalG = g; g = image.getGraphics(); paintClipRect(g); } else { // Paint the background with the original Graphics // passed in. paintClipRect(g); } // We don't need to double buffer the call to display // the Image. This method call draws the image in the // Image object's off-screen Graphics, then copies its // contents to the device Graphics context implicitly. g.drawImage(image, 0, 0, Graphics.TOP | Graphics.LEFT); } public void commandAction(Command c, Displayable d) { if (c == back) { GraphicsDemo.getInstance().display(); } } }
138
The procedure is rather straightforward. You must first create the image object as you did when passing an image to a MIDP high-level UI component. The program calls Image.createImage(String name) to create an Image object. This method locates the image file whose path name is specified relative to the res/ directory of the project.
You then pass the image to the Graphics object, specifying the anchor point and the (x, y) location of that anchor point. Next, the program simply calls the Graphics.drawImage() method to display the image. The Graphics object is the one that the MIDP implementation passes to the application's paint(Graphics g) method. It represents the device's physical graphics context. That is, executing the Graphics.drawImage() on the Graphics context passed to your Canvas.paint(Graphics g) method results in rendering to the device's display.
The Image class has four overloaded versions of the createImage() method. Table 6.7 shows all four versions. You've already seen the third version; it's the only one that produces a mutable image object. You needed this to write to an Image object's off-screen Graphics context.
The other versions produce immutable Image objects. Each version enables you to construct an image from a different source. The first version creates an image from raw binary data. The second creates an image from another image object. The fourth version loads an image from the MIDlet suite JAR file. The string argument specifies the name of the resource file in the JAR file.
Table 6-7. Image Class Methods for Creating Image Objects Image Method Name Description static Image createImage(byte[] imageData, int imageOffset, int imageLength)
Creates an immutable image from the specified image data, taking image data starting at the specified offset and length.
static Image createImage(Image source)
Creates an immutable copy of the specified image.
static Image createImage(int width, int height)
Creates a new mutable image with the specified width and height.
static Image createImage(String name)
Creates an immutable image object from the image with the resource path specified in the MIDlet suite's JAR file.
Listing 6.10 demonstrates the display of an actual PNG image. Besides drawing real images—pictures stored as PNG formatted images—you can draw any "image" that you can create with the low-level graphics drawing routines provided in the Graphics class. You can draw geometric shapes or individual pixels, fill portions of the display, and so forth, to create the image—the picture—you want.
Double Buffering Images. Images are double-buffered implicitly. Therefore, you never have to do the double buffering yourself. The example in Listing 6.10 reveals the reason.
The paint() method creates an Image object from a resource file that represents the PNG image to display. But this Image object already has an associated Graphics context, which is an off-screen Graphics. Therefore, when the paint() method executes the following statement, it's copying the contents of the Image object's Graphics context—the actual bits that comprise the image—to the display graphics context:
g.drawImage(image, 0, 0, Graphics.TOP | Graphics.LEFT);
139
Thus, double buffering of images occurs automatically.
Although the drawing of the actual image is automatically double buffered, the clearing of the clip rectangle—that is, the drawing of the Canvas background—is not. Look closely at the paint(Graphics g) method in Listing 6.10, and you'll see that it still checks to see whether the implementation does automatic double buffering. If it doesn't, the paint(Graphics g) method uses an off-screen graphics context to clear the clip rectangle.
This code is slightly different than Listing 6.9; there's no explicit reference to an off-screen Graphics in the code. The reason is that the Image object already supplies the off-screen graphics. The paint(Graphics g) method can simply use it as the off-screen Graphics needed to clear the clip rectangle.
Chapter Summary
Two classes in the javax.microedition.lcdui package make up the definition of the MIDP low-level API: the Graphics class and the Canvas class. The MIDP low-level API enables your application to obtain information about low-level events that aren't available to the high-level API components. Canvas objects can obtain information on keystroke events and pointer motion events. Canvas objects are Displayable objects. For this reason, they can still perform command processing like other Displayable components.
To use the low-level API, you must create a subclass of Canvas. You must then define a paint(Graphics g) method in your subclass in order to produce the visible look of its instances. The subclass's paint(Graphics g) method defines its visible look.
The paint(Graphics g) method draws the Canvas component's look using a graphics context, defined by the Graphics class. The Graphics class supports drawing and filling basic geometric shapes such as lines, arcs, rectangles, text and so forth. It also supports drawing in color. Other features supported are font selection for text drawing and clipping and translation of the Graphics origin.
Canvas objects can also display images with the help of the Graphics class functionality. Applications load images from files, which must be stored in PNG format.
Double buffering is a technique that improves drawing performance on resource-constrained devices. Applications use two graphics contexts. The application first draws into an off-screen buffer and then copies the contents of this buffer to the graphics context associated with the device display, rendering the look of the Canvas component. Image drawing is double buffered automatically.
140
Chapter 7. Persistent Storage Support in MIDP • Device Support for Persistent Storage • RMS Data Storage Model • Records • An Example Application
Real world applications produce data that needs to be saved, or persisted, and used subsequently by the same or another program. This chapter teaches you how to use the MIDP persistence API.
The MIDP supports persistence of application data through its Record Management System (RMS). The javax.microedition.rms package defines the persistence APIs that comprise this package.
Device Support for Persistent Storage
Each MIDP-compliant device maintains a dedicated area of device memory for persistent application data storage. MIDlet data stored here persists across multiple invocations of the applications that use it. Both the physical location and the size of the data store are device dependent.
The RMS API abstracts the device-dependent details of the storage area and access to those details, and it provides a uniform mechanism to create, destroy, and modify data. This ensures portability of MIDlets to different devices.
RMS Data Storage Model
The RMS supports the creation and management of multiple record stores, shown in Figure 7.1. A record store is a database whose central abstraction is the record. Each record store consists of zero or more records. A record store name is case sensitive and can consist of a maximum of 32 Unicode characters. A record store is created by a MIDlet.
Figure 7.1. The RMS consists of one or more record stores, each containing zero or more records that are arrays of bytes.

141
MIDlets within the same MIDlet suite can share one another's record stores. A MIDlet suite defines a name space for record stores; a record store must have a unique name within a MIDlet suite. The same name can be used in different MIDlet suites, however.
MIDlets can list the names of all the record stores available to them. They can also determine the amount of free space available for storing data.
Incidentally, you should be aware that when all MIDlets in a MIDlet suite are removed from a device, the device AMS removes all record stores in the MIDlet suite namespace. All persistent data will be lost. For this reason, you should consider designing applications to include a warning or confirmation that requires users to acknowledge that they understand the potential loss of data when they remove applications. Applications might also include a mechanism to back up the records in a data store to another location. This might require server side support, a topic which I will discuss in chapter 11.
The RMS defines the following conceptual operations on an individual record store:
• Add a record. • Delete a record. • Change a record. • Look up (retrieve) a record. • Enumerate all records.
Records are uniquely identified by a record ID, which is the only primary key type supported. The type of all record ids is the Java built-in type int. The RMS has no support for features—such as tables, rows, columns, data types, and so forth—that are present in relational databases.
142
Records
A record is a byte array of type byte []. The RMS doesn't support the definition or formatting of fields within a record. Your application must define the data elements within a record and their format.
The reader of a record, therefore, must be aware of the format that was used to write the record. Because a record is simply a byte array, applications must convert data from arbitrary types to bytes when writing records, and they must convert from bytes to those types upon reading the data.
An Example Application
The rest of this chapter covers the details of the RMS by following an example that uses the core features of the RMS. The example is a simple address book that stores names and phone numbers.
Much of the example deals with creating the organization and structure of the MIDP application. Most of the actual RMS operations are confined to one class. From this example, you can see how to include the use of persistence in an application that you are likely to find on a real mobile device.
Of course, you can obtain and execute the source code in this chapter to get a feeling for how the application progresses through the various screens. I'll leave that to you instead of showing you captures of all the screens.
The following files comprise this address book example:
• AddScreen.java • AddressBook.java • AddressBookMain.java • DeleteAllConfirmationScreen.java • PersistenceDemo.java • RecordList.java • SearchResultScreen.java • SearchScreen.java
The full listings of these files can be found on the Prentice-Hall Web site at http://www.phptr.com. The PersistenceDemo.java file defines the MIDlet that presents a menu containing the address book application. The AddressBookMain.java file defines the entry point of the address book application.
Listing 7.1 shows the full source code of the AddressBook.java class. This class abstracts the details of the RMS API calls from the rest of the MIDlet. When the MIDlet is initialized, it creates an instance of the AddressBook class, which, in turn, opens the record store whose name is address-book.
Listing 7.1 The AddressBook class abstracts the application's access to the record store.
import javax.microedition.rms.RecordComparator; import javax.microedition.rms.RecordEnumeration; import javax.microedition.rms.RecordFilter; import javax.microedition.rms.RecordStore;

143
import javax.microedition.rms.RecordStoreException; import javax.microedition.rms.RecordStoreNotOpenException; import java.io.ByteArrayInputStream; import java.io.ByteArrayOutputStream; import java.io.DataInputStream; import java.io.DataOutputStream; import java.io.IOException; /** This class implements a simple address book for demonstration purposes. It stores records consisting of a String name and a String phone number field. This class defines two inner classes, one record comparator and one record filter for use in retrieving records. */ public class AddressBook { private static final String RECORD_STORE_NAME = "address-book"; private RecordStore recordStore; public AddressBook() throws RecordStoreException { super(); recordStore = RecordStore.openRecordStore(RECORD_STORE_NAME, true); } void close() throws RecordStoreException { try { recordStore.closeRecordStore(); } catch (RecordStoreNotOpenException rsno) { } } /** Gets the record store used by this object. @return a reference to the RecordStore used by this object. */ public RecordStore getRecordStore() { return recordStore; } /** Adds the specified record to this address book's record store. @param name the name of the entry being added. @param phone the phone number for the entry being added. @throws RecordStoreException if there is a problem adding the record. */
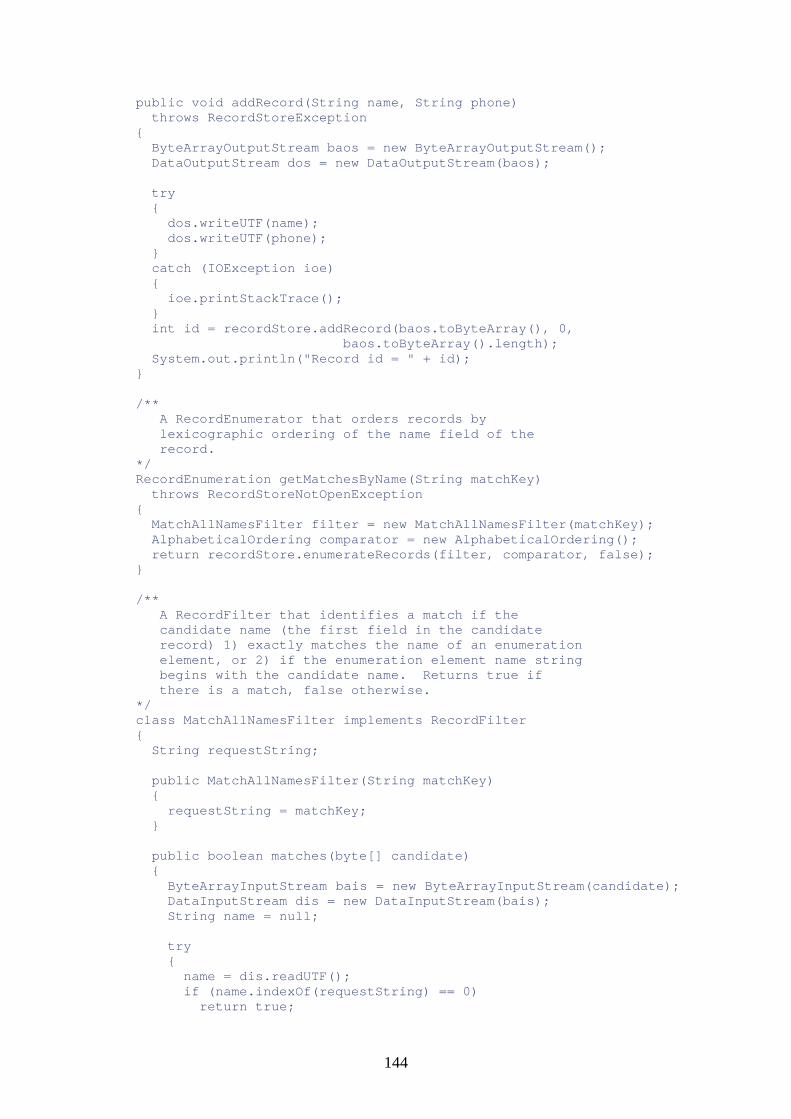
144
public void addRecord(String name, String phone) throws RecordStoreException { ByteArrayOutputStream baos = new ByteArrayOutputStream(); DataOutputStream dos = new DataOutputStream(baos); try { dos.writeUTF(name); dos.writeUTF(phone); } catch (IOException ioe) { ioe.printStackTrace(); } int id = recordStore.addRecord(baos.toByteArray(), 0, baos.toByteArray().length); System.out.println("Record id = " + id); } /** A RecordEnumerator that orders records by lexicographic ordering of the name field of the record. */ RecordEnumeration getMatchesByName(String matchKey) throws RecordStoreNotOpenException { MatchAllNamesFilter filter = new MatchAllNamesFilter(matchKey); AlphabeticalOrdering comparator = new AlphabeticalOrdering(); return recordStore.enumerateRecords(filter, comparator, false); } /** A RecordFilter that identifies a match if the candidate name (the first field in the candidate record) 1) exactly matches the name of an enumeration element, or 2) if the enumeration element name string begins with the candidate name. Returns true if there is a match, false otherwise. */ class MatchAllNamesFilter implements RecordFilter { String requestString; public MatchAllNamesFilter(String matchKey) { requestString = matchKey; } public boolean matches(byte[] candidate) { ByteArrayInputStream bais = new ByteArrayInputStream(candidate); DataInputStream dis = new DataInputStream(bais); String name = null; try { name = dis.readUTF(); if (name.indexOf(requestString) == 0) return true;
145
else return false; } catch (IOException ioe) { ioe.printStackTrace(); } return true; } } /** This inner class implements a RecordComparator whose policy it is to do alphabetic ordering. */ class AlphabeticalOrdering implements RecordComparator { /** Constructor. */ public AlphabeticalOrdering() { } public int compare(byte[] rec1, byte[] rec2) { ByteArrayInputStream bais1 = new ByteArrayInputStream(rec1); DataInputStream dis1 = new DataInputStream(bais1); ByteArrayInputStream bais2 = new ByteArrayInputStream(rec2); DataInputStream dis2 = new DataInputStream(bais2); String name1 = null; String name2 = null; try { name1 = dis1.readUTF(); name2 = dis2.readUTF(); } catch (IOException ioe) { ioe.printStackTrace(); } if (name1 == null || name2 == null) return 0; int result = name1.compareTo(name2); if (result < 0) return RecordComparator.PRECEDES; else if (result == 0) return RecordComparator.EQUIVALENT; else return RecordComparator.FOLLOWS; } } /** Deletes all records in the data store. With current implementations, a faster way to delete all records may be to remove the data store and recreate it,
146
rather than deleting each record one at a time! */ void deleteAllRecords() { try { RecordEnumeration re = recordStore.enumerateRecords(null, null, false); while (re.hasNextElement()) { int id = re.nextRecordId(); recordStore.deleteRecord(id); } } catch (RecordStoreException rse) { rse.printStackTrace(); } } /** Gets the statistics of the record store used by this address book. @return a String of statistics data. */ public String getStatistics() { int numRecords = 0; int space = 0; StringBuffer stats = new StringBuffer("Records: "); try { numRecords = recordStore.getNumRecords(); space = recordStore.getSizeAvailable(); } catch (RecordStoreException rse) { rse.printStackTrace(); } stats.append(String.valueOf(numRecords)); stats.append("\n\n"); stats.append("Available bytes: "); stats.append(String.valueOf(space)); return stats.toString(); } }
Notice that the AddressBook class defines a member of type RecordStore. This is the instance of the actual record store used by the application. The RecordStore class is the only publicly defined class in the RMS package. It defines the record store abstraction.
The AddressBook constructor throws RecordStoreException because the openRecordStore() method can throw three exceptions that derive from it. The javax.microedition.rms package defines five exceptions. Figure 7.2 shows the inheritance hierarchy that contains the RMS exception types.
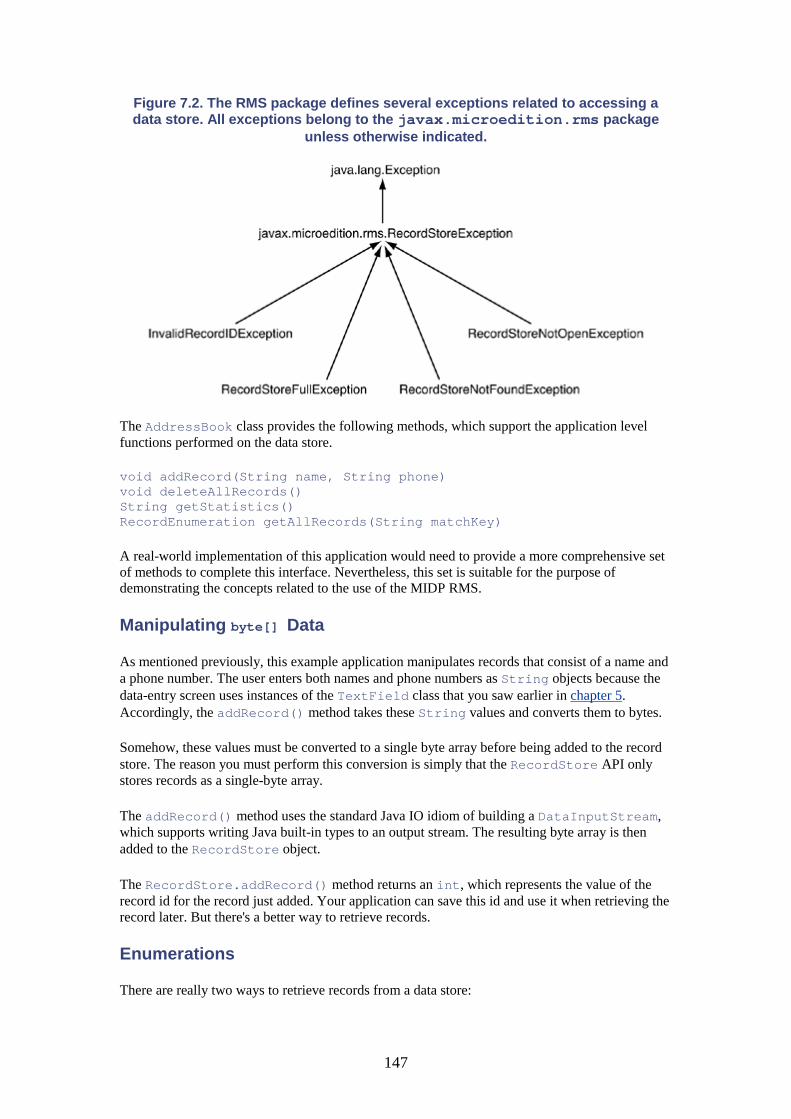
147
Figure 7.2. The RMS package defines several exceptions related to accessing a data store. All exceptions belong to the javax.microedition.rms package
unless otherwise indicated.
The AddressBook class provides the following methods, which support the application level functions performed on the data store.
void addRecord(String name, String phone) void deleteAllRecords() String getStatistics() RecordEnumeration getAllRecords(String matchKey)
A real-world implementation of this application would need to provide a more comprehensive set of methods to complete this interface. Nevertheless, this set is suitable for the purpose of demonstrating the concepts related to the use of the MIDP RMS.
Manipulating byte[] Data
As mentioned previously, this example application manipulates records that consist of a name and a phone number. The user enters both names and phone numbers as String objects because the data-entry screen uses instances of the TextField class that you saw earlier in chapter 5. Accordingly, the addRecord() method takes these String values and converts them to bytes.
Somehow, these values must be converted to a single byte array before being added to the record store. The reason you must perform this conversion is simply that the RecordStore API only stores records as a single-byte array.
The addRecord() method uses the standard Java IO idiom of building a DataInputStream, which supports writing Java built-in types to an output stream. The resulting byte array is then added to the RecordStore object.
The RecordStore.addRecord() method returns an int, which represents the value of the record id for the record just added. Your application can save this id and use it when retrieving the record later. But there's a better way to retrieve records.
Enumerations
There are really two ways to retrieve records from a data store:
148
• Retrieve an individual record using its unique record id. • Retrieve an enumeration of the records and pick the one or ones in which you're
interested.
To retrieve a specific record, you can use the following method of the RecordStore class:
byte[] getRecord(int recordId)
This method obviously requires that you know the unique id for the record you want. Unfortunately, this means you probably have to keep the id handy somewhere after it has been returned to you by the addRecord() method. This is not always convenient or practical for large numbers of records.
An easier way to find records in which you're interested is to use enumerations, which are supported by the RecordStore class. An enumeration is a convenient way to retrieve records when you don't know the ids of the records you want. You can create an enumeration of the records in the record store, and then examine them, selecting the one or ones you want.
The RecordStore class defines the method
RecordEnumeration enumerateRecords(RecordFilter filter, RecordComparator comparator, boolean keepUpdated)
which returns an enumeration of the records in a record store. Listing 7.2 shows the RecordList.java source. This class builds and displays a list of all records in the address book. Notice that it doesn't specify any record ids in order to fetch the records.
Listing 7.2 Enumerations enable you to access records without knowing their record IDs.
import javax.microedition.midlet.MIDlet; import javax.microedition.lcdui.Alert; import javax.microedition.lcdui.AlertType; import javax.microedition.lcdui.Command; import javax.microedition.lcdui.CommandListener; import javax.microedition.lcdui.Display; import javax.microedition.lcdui.Displayable; import javax.microedition.lcdui.List; import javax.microedition.rms.RecordEnumeration; import javax.microedition.rms.RecordStore; import javax.microedition.rms.RecordStoreException; import java.io.ByteArrayInputStream; import java.io.DataInputStream; import java.io.IOException; /** This class is a UI component that displays a list of records found in the record store. It uses the AddressBook object defined by the MIDlet class for this MIDlet application. @see AddressBook
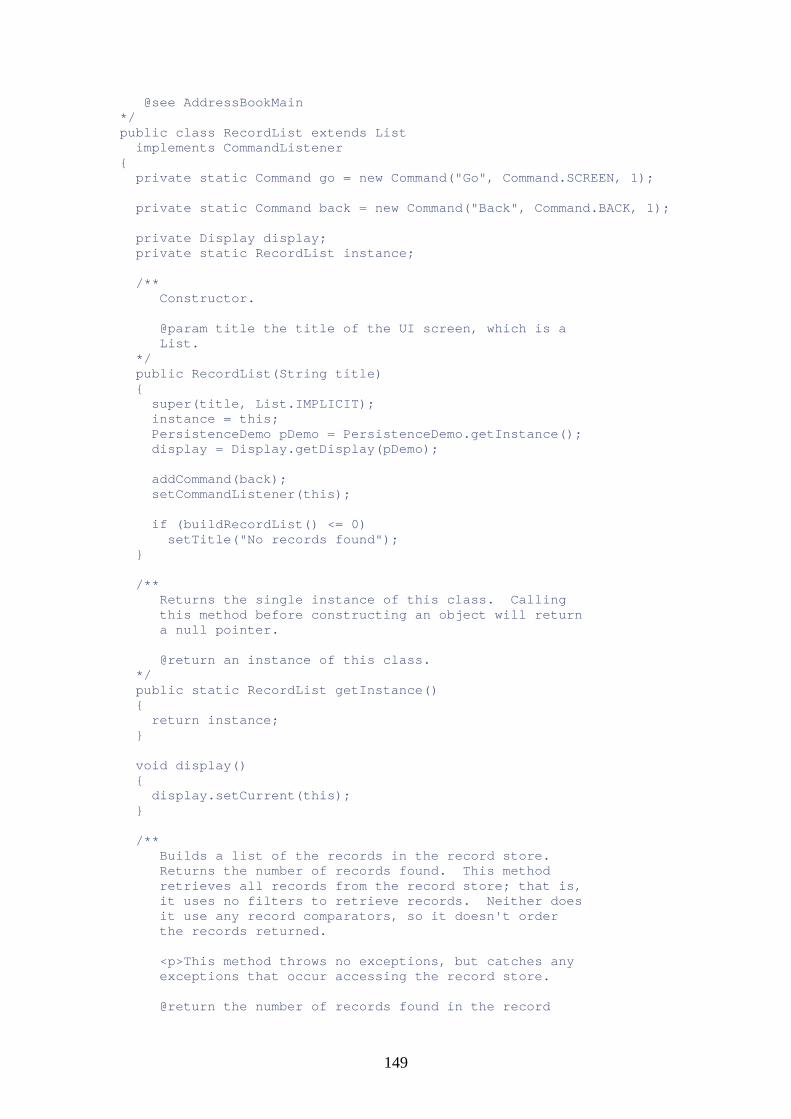
149
@see AddressBookMain */ public class RecordList extends List implements CommandListener { private static Command go = new Command("Go", Command.SCREEN, 1); private static Command back = new Command("Back", Command.BACK, 1); private Display display; private static RecordList instance; /** Constructor. @param title the title of the UI screen, which is a List. */ public RecordList(String title) { super(title, List.IMPLICIT); instance = this; PersistenceDemo pDemo = PersistenceDemo.getInstance(); display = Display.getDisplay(pDemo); addCommand(back); setCommandListener(this); if (buildRecordList() <= 0) setTitle("No records found"); } /** Returns the single instance of this class. Calling this method before constructing an object will return a null pointer. @return an instance of this class. */ public static RecordList getInstance() { return instance; } void display() { display.setCurrent(this); } /** Builds a list of the records in the record store. Returns the number of records found. This method retrieves all records from the record store; that is, it uses no filters to retrieve records. Neither does it use any record comparators, so it doesn't order the records returned. <p>This method throws no exceptions, but catches any exceptions that occur accessing the record store. @return the number of records found in the record

150
store, or 0 if no records are found. */ int buildRecordList() { AddressBook addressBook = AddressBookMain.getInstance().getAddressBook(); RecordStore recordStore = addressBook.getRecordStore(); int numRecords = 0; try { RecordEnumeration re; re = recordStore.enumerateRecords(null, null, false); if (re.numRecords() > 0) { ByteArrayInputStream bais = null; DataInputStream dis = null; String name = null; while (re.hasNextElement()) { byte[] record = re.nextRecord(); bais = new ByteArrayInputStream(record); dis = new DataInputStream(bais); String strRec = new String(record); name = dis.readUTF(); append(name, null); numRecords++; } } else { Alert a = new Alert("No records", "No records found in record store", null, AlertType.CONFIRMATION); a.setTimeout(Alert.FOREVER); display.setCurrent(a, AddressBookMain.getInstance()); } } catch (RecordStoreException re) { re.printStackTrace(); Alert a = new Alert("Error retrieving record", "Error retrieving record.", null, AlertType.CONFIRMATION); a.setTimeout(Alert.FOREVER); display.setCurrent(a, this); } catch (IOException ioe) { ioe.printStackTrace(); } finally { return numRecords;
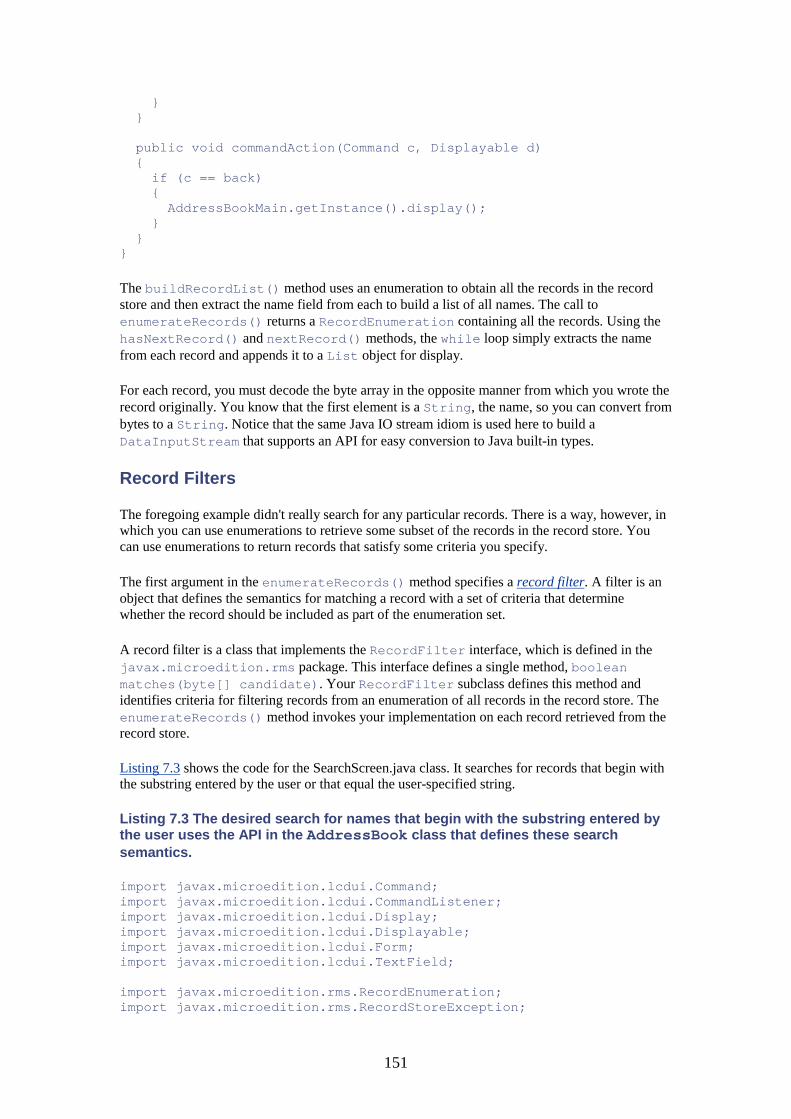
151
} } public void commandAction(Command c, Displayable d) { if (c == back) { AddressBookMain.getInstance().display(); } } }
The buildRecordList() method uses an enumeration to obtain all the records in the record store and then extract the name field from each to build a list of all names. The call to enumerateRecords() returns a RecordEnumeration containing all the records. Using the hasNextRecord() and nextRecord() methods, the while loop simply extracts the name from each record and appends it to a List object for display.
For each record, you must decode the byte array in the opposite manner from which you wrote the record originally. You know that the first element is a String, the name, so you can convert from bytes to a String. Notice that the same Java IO stream idiom is used here to build a DataInputStream that supports an API for easy conversion to Java built-in types.
Record Filters
The foregoing example didn't really search for any particular records. There is a way, however, in which you can use enumerations to retrieve some subset of the records in the record store. You can use enumerations to return records that satisfy some criteria you specify.
The first argument in the enumerateRecords() method specifies a record filter. A filter is an object that defines the semantics for matching a record with a set of criteria that determine whether the record should be included as part of the enumeration set.
A record filter is a class that implements the RecordFilter interface, which is defined in the javax.microedition.rms package. This interface defines a single method, boolean matches(byte[] candidate). Your RecordFilter subclass defines this method and identifies criteria for filtering records from an enumeration of all records in the record store. The enumerateRecords() method invokes your implementation on each record retrieved from the record store.
Listing 7.3 shows the code for the SearchScreen.java class. It searches for records that begin with the substring entered by the user or that equal the user-specified string.
Listing 7.3 The desired search for names that begin with the substring entered by the user uses the API in the AddressBook class that defines these search semantics.
import javax.microedition.lcdui.Command; import javax.microedition.lcdui.CommandListener; import javax.microedition.lcdui.Display; import javax.microedition.lcdui.Displayable; import javax.microedition.lcdui.Form; import javax.microedition.lcdui.TextField; import javax.microedition.rms.RecordEnumeration; import javax.microedition.rms.RecordStoreException;
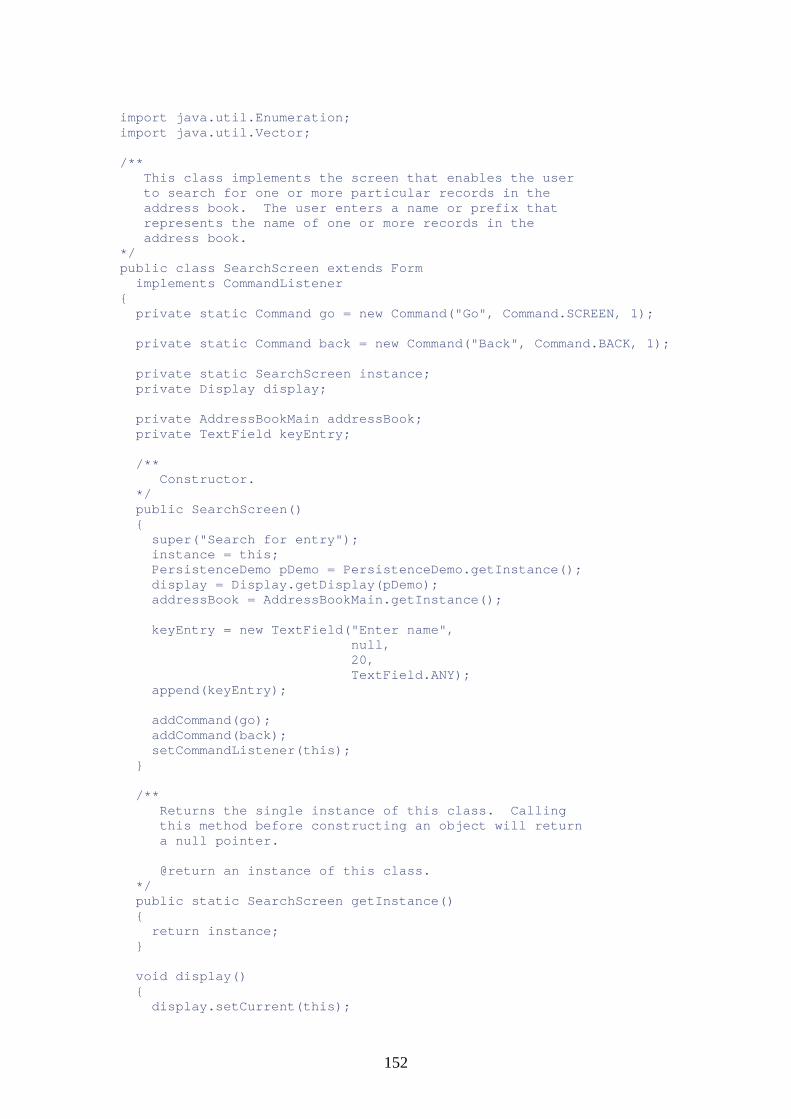
152
import java.util.Enumeration; import java.util.Vector; /** This class implements the screen that enables the user to search for one or more particular records in the address book. The user enters a name or prefix that represents the name of one or more records in the address book. */ public class SearchScreen extends Form implements CommandListener { private static Command go = new Command("Go", Command.SCREEN, 1); private static Command back = new Command("Back", Command.BACK, 1); private static SearchScreen instance; private Display display; private AddressBookMain addressBook; private TextField keyEntry; /** Constructor. */ public SearchScreen() { super("Search for entry"); instance = this; PersistenceDemo pDemo = PersistenceDemo.getInstance(); display = Display.getDisplay(pDemo); addressBook = AddressBookMain.getInstance(); keyEntry = new TextField("Enter name", null, 20, TextField.ANY); append(keyEntry); addCommand(go); addCommand(back); setCommandListener(this); } /** Returns the single instance of this class. Calling this method before constructing an object will return a null pointer. @return an instance of this class. */ public static SearchScreen getInstance() { return instance; } void display() { display.setCurrent(this);
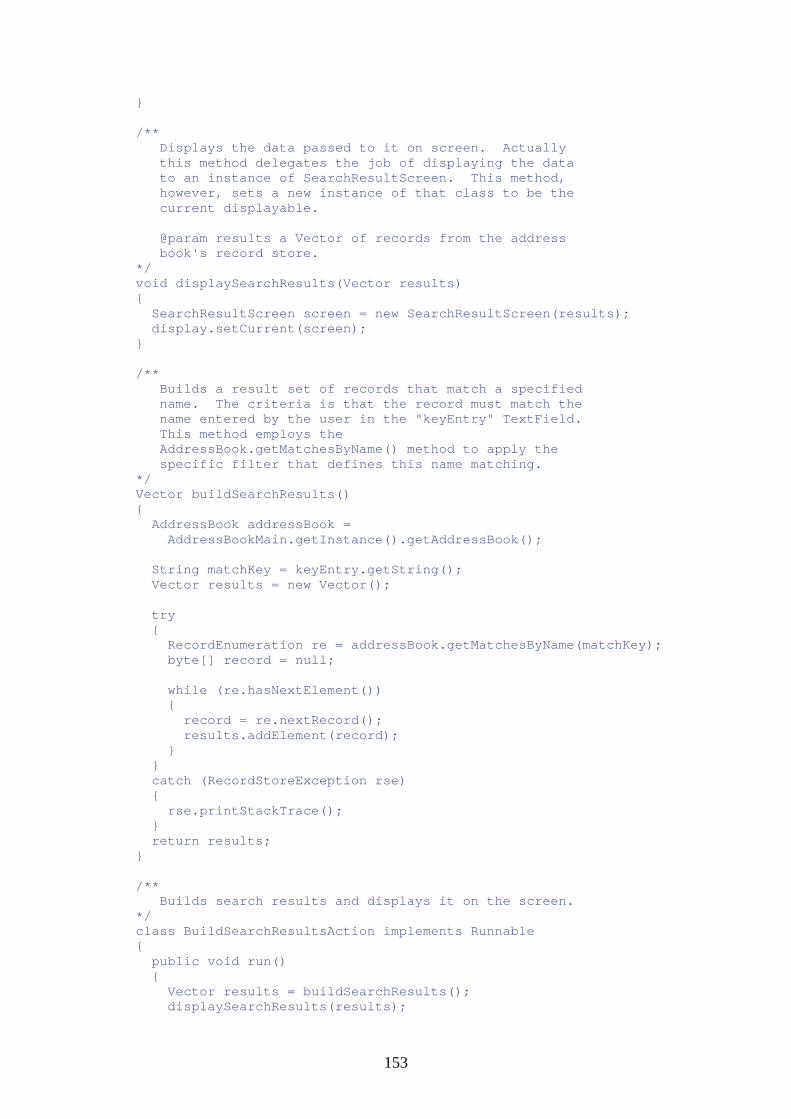
153
} /** Displays the data passed to it on screen. Actually this method delegates the job of displaying the data to an instance of SearchResultScreen. This method, however, sets a new instance of that class to be the current displayable. @param results a Vector of records from the address book's record store. */ void displaySearchResults(Vector results) { SearchResultScreen screen = new SearchResultScreen(results); display.setCurrent(screen); } /** Builds a result set of records that match a specified name. The criteria is that the record must match the name entered by the user in the "keyEntry" TextField. This method employs the AddressBook.getMatchesByName() method to apply the specific filter that defines this name matching. */ Vector buildSearchResults() { AddressBook addressBook = AddressBookMain.getInstance().getAddressBook(); String matchKey = keyEntry.getString(); Vector results = new Vector(); try { RecordEnumeration re = addressBook.getMatchesByName(matchKey); byte[] record = null; while (re.hasNextElement()) { record = re.nextRecord(); results.addElement(record); } } catch (RecordStoreException rse) { rse.printStackTrace(); } return results; } /** Builds search results and displays it on the screen. */ class BuildSearchResultsAction implements Runnable { public void run() { Vector results = buildSearchResults(); displaySearchResults(results);

154
} } public void commandAction(Command c, Displayable d) { if (c == go) { Runnable action = new BuildSearchResultsAction(); action.run(); } else if (c == back) { AddressBookMain.getInstance().display(); } } }
The buildSearchResults() method in the SearchScreen class obtains an enumeration of records by calling the getMatchesByName(String matchKey) method in the AddressBook class. This method filters the records to return only those in which the name field begins with the matchKey.
The getMatchesByName() method accomplishes this filtering by passing a record filter as the first argument to the enumerateRecords() method. The instance of MatchAllNamesFilter defines the semantics of the filter, namely, to find all records that begin with the substring matchKey.
The enumerateRecords() method applies the following method of the filter object to each record in the record store:
boolean matches(byte[] candidate)
If the result is true, it includes that record in the enumeration set. Conceptually, this is similar to defining an SQL query in a relational database system. The RecordFilter object defines the search criteria.
Notice in Listing 7.2 that the RecordFilter argument was null. This is how the RecordList class can return all records in the enumeration; there is no filter to apply.
You can define multiple filters to support searching on different criteria. Following the design of Listing 7.4, you could define multiple inner classes that implement RecordFilter and use the inner class appropriate to the search at hand.
Record Comparators
You undoubtedly noticed that the second argument passed to enumerate-Records() in the previous examples was null. This second parameter is a placeholder for a record comparator. A record comparator is an object that compares two records to determine their ordering, or sorting. Comparators provide applications with the capability to perform some kind of sorting.
Like filters, comparators define the semantics of the comparison function. A record comparator is an implementation of the RecordComparator interface, which defines the single method
int compare(byte[] record1, byte[] record2)

155
A comparator also defines three constants, explained in Table 7.1, that your implementation should use as valid return values for this method.
The idiom for using comparators is the same as that for record filters. You define a class that implements the javax.microedition.rms.RecordComparator interface. You pass an instance of it to the enumerateRecords() call. Records retrieved from the data store are compared with one another, two at a time, and then are ordered according to the results of the comparison. You can thus retrieve records from the enumeration in the order defined by the comparator.
Listing 7.4 demonstrates the use of a record comparator. It defines a new inner class of the AddressBook class you saw in Listing 7.1. The new inner class AlphabeticalOrdering implements RecordComparator. Its comparison method extracts the name field from each of its byte array parameters and compares them lexicographically.
Table 7.1. RecordComparator Constants Constant Description public static int EQUIVALENT
Two records are equivalent according to the comparison semantics.
public static int FOLLOWS
Record 1 is "greater than" record 2 according to comparison semantics.
public static int PRECEDES
Record 1 is "less than" record 2 according to comparison semantics.
Listing 7.4 This record comparator defines semantics for ordering records based on the lexicographic ordering of the value of their name fields.
/** This inner class implements a RecordComparator whose policy it is to do alphabetic ordering. */ class AlphabeticalOrdering implements RecordComparator { /** No-arg constructor. */ public AlphabeticalOrdering() { super(); } public int compare(byte[] rec1, byte[] rec2) { ByteArrayInputStream bais1 = new ByteArrayInputStream(rec1); DataInputStream dis1 = new DataInputStream(bais1); ByteArrayInputStream bais2 = new ByteArrayInputStream(rec2); DataInputStream dis2 = new DataInputStream(bais2); String name1 = null; String name2 = null; try { name1 = dis1.readUTF(); name2 = dis2.readUTF(); } catch (IOException ioe)
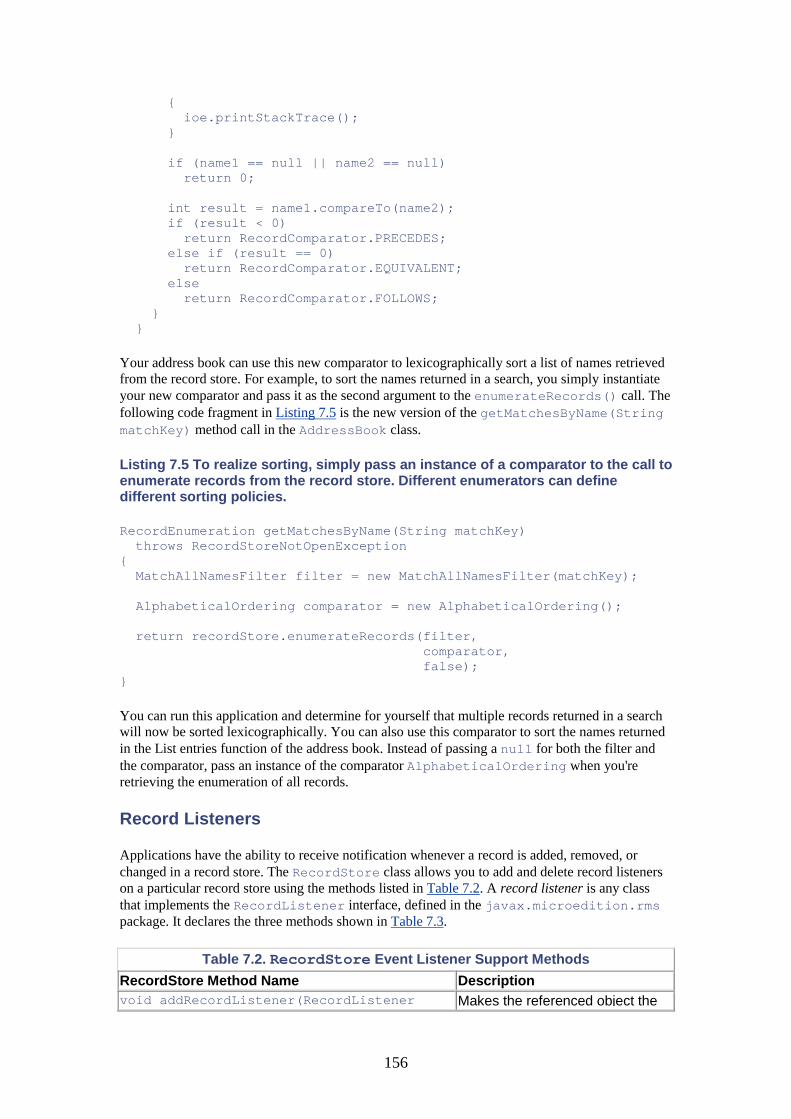
156
{ ioe.printStackTrace(); } if (name1 == null || name2 == null) return 0; int result = name1.compareTo(name2); if (result < 0) return RecordComparator.PRECEDES; else if (result == 0) return RecordComparator.EQUIVALENT; else return RecordComparator.FOLLOWS; } }
Your address book can use this new comparator to lexicographically sort a list of names retrieved from the record store. For example, to sort the names returned in a search, you simply instantiate your new comparator and pass it as the second argument to the enumerateRecords() call. The following code fragment in Listing 7.5 is the new version of the getMatchesByName(String matchKey) method call in the AddressBook class.
Listing 7.5 To realize sorting, simply pass an instance of a comparator to the call to enumerate records from the record store. Different enumerators can define different sorting policies.
RecordEnumeration getMatchesByName(String matchKey) throws RecordStoreNotOpenException { MatchAllNamesFilter filter = new MatchAllNamesFilter(matchKey); AlphabeticalOrdering comparator = new AlphabeticalOrdering(); return recordStore.enumerateRecords(filter, comparator, false); }
You can run this application and determine for yourself that multiple records returned in a search will now be sorted lexicographically. You can also use this comparator to sort the names returned in the List entries function of the address book. Instead of passing a null for both the filter and the comparator, pass an instance of the comparator AlphabeticalOrdering when you're retrieving the enumeration of all records.
Record Listeners
Applications have the ability to receive notification whenever a record is added, removed, or changed in a record store. The RecordStore class allows you to add and delete record listeners on a particular record store using the methods listed in Table 7.2. A record listener is any class that implements the RecordListener interface, defined in the javax.microedition.rms package. It declares the three methods shown in Table 7.3.
Table 7.2. RecordStore Event Listener Support Methods RecordStore Method Name Description void addRecordListener(RecordListener Makes the referenced object the
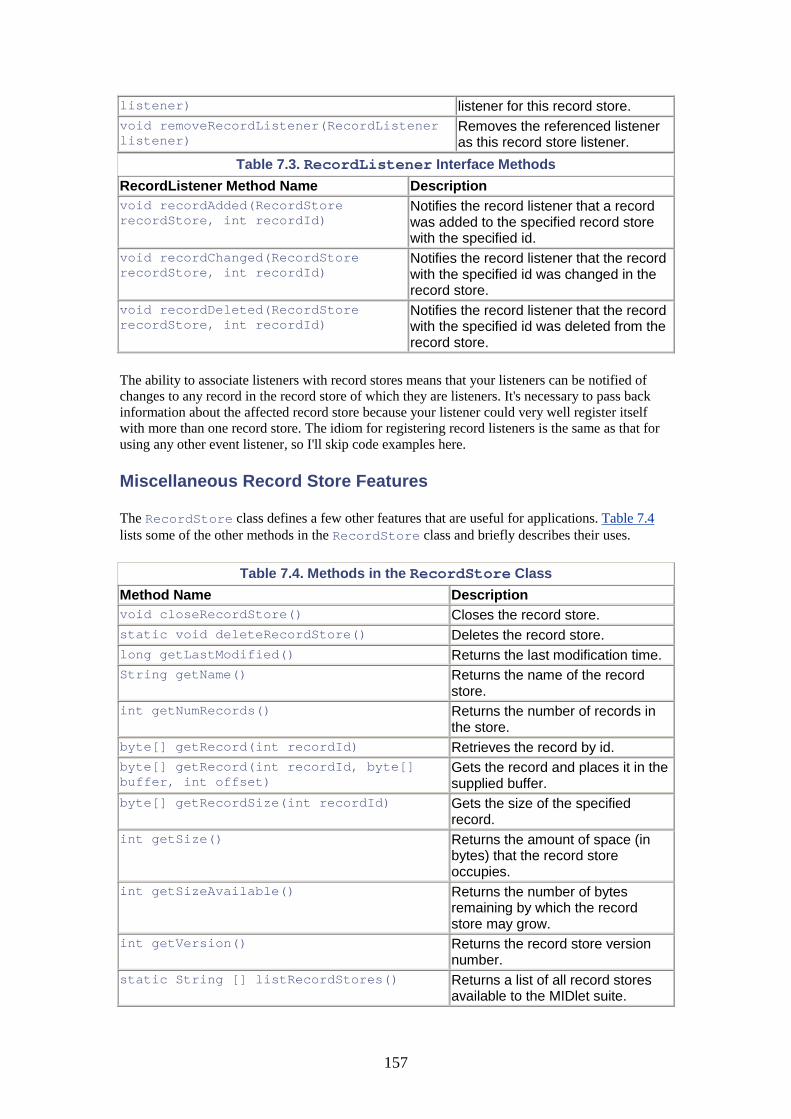
157
listener) listener for this record store. void removeRecordListener(RecordListener listener)
Removes the referenced listener as this record store listener.
Table 7.3. RecordListener Interface Methods RecordListener Method Name Description void recordAdded(RecordStore recordStore, int recordId)
Notifies the record listener that a record was added to the specified record store with the specified id.
void recordChanged(RecordStore recordStore, int recordId)
Notifies the record listener that the record with the specified id was changed in the record store.
void recordDeleted(RecordStore recordStore, int recordId)
Notifies the record listener that the record with the specified id was deleted from the record store.
The ability to associate listeners with record stores means that your listeners can be notified of changes to any record in the record store of which they are listeners. It's necessary to pass back information about the affected record store because your listener could very well register itself with more than one record store. The idiom for registering record listeners is the same as that for using any other event listener, so I'll skip code examples here.
Miscellaneous Record Store Features
The RecordStore class defines a few other features that are useful for applications. Table 7.4 lists some of the other methods in the RecordStore class and briefly describes their uses.
Table 7.4. Methods in the RecordStore Class Method Name Description void closeRecordStore() Closes the record store. static void deleteRecordStore() Deletes the record store. long getLastModified() Returns the last modification time. String getName() Returns the name of the record
store. int getNumRecords() Returns the number of records in
the store. byte[] getRecord(int recordId) Retrieves the record by id. byte[] getRecord(int recordId, byte[] buffer, int offset)
Gets the record and places it in the supplied buffer.
byte[] getRecordSize(int recordId) Gets the size of the specified record.
int getSize() Returns the amount of space (in bytes) that the record store occupies.
int getSizeAvailable() Returns the number of bytes remaining by which the record store may grow.
int getVersion() Returns the record store version number.
static String [] listRecordStores() Returns a list of all record stores available to the MIDlet suite.
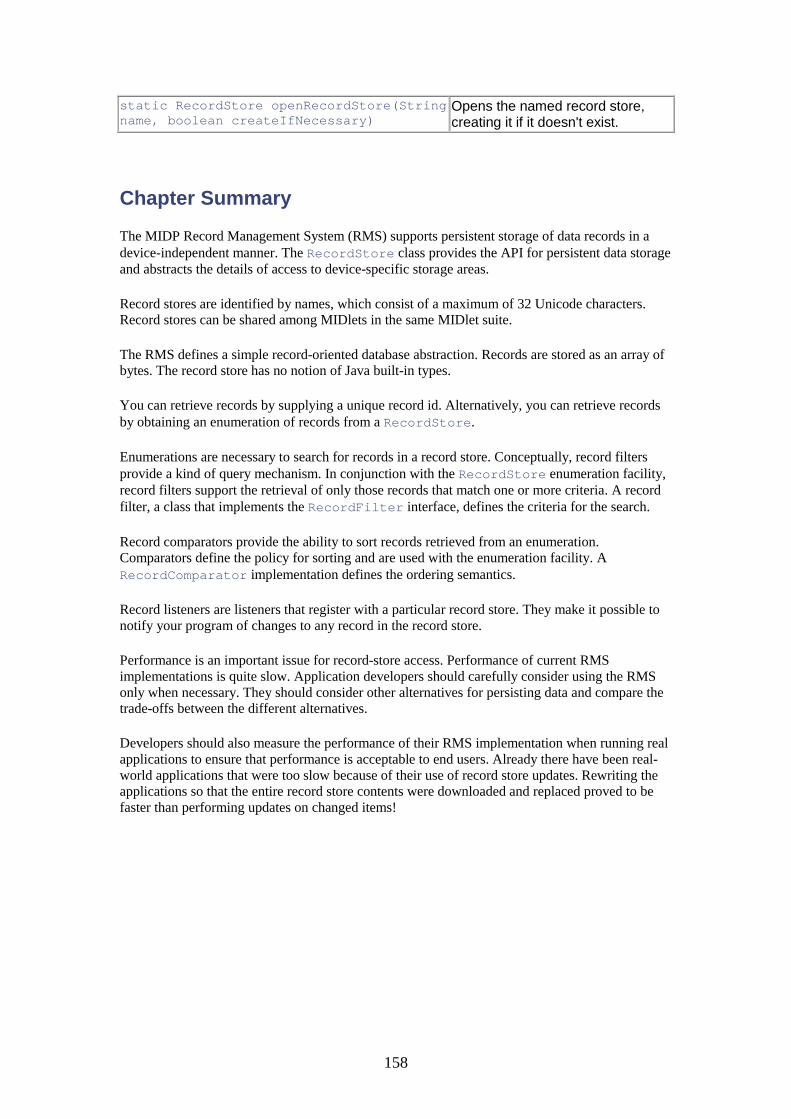
158
static RecordStore openRecordStore(String name, boolean createIfNecessary)
Opens the named record store, creating it if it doesn't exist.
Chapter Summary
The MIDP Record Management System (RMS) supports persistent storage of data records in a device-independent manner. The RecordStore class provides the API for persistent data storage and abstracts the details of access to device-specific storage areas.
Record stores are identified by names, which consist of a maximum of 32 Unicode characters. Record stores can be shared among MIDlets in the same MIDlet suite.
The RMS defines a simple record-oriented database abstraction. Records are stored as an array of bytes. The record store has no notion of Java built-in types.
You can retrieve records by supplying a unique record id. Alternatively, you can retrieve records by obtaining an enumeration of records from a RecordStore.
Enumerations are necessary to search for records in a record store. Conceptually, record filters provide a kind of query mechanism. In conjunction with the RecordStore enumeration facility, record filters support the retrieval of only those records that match one or more criteria. A record filter, a class that implements the RecordFilter interface, defines the criteria for the search.
Record comparators provide the ability to sort records retrieved from an enumeration. Comparators define the policy for sorting and are used with the enumeration facility. A RecordComparator implementation defines the ordering semantics.
Record listeners are listeners that register with a particular record store. They make it possible to notify your program of changes to any record in the record store.
Performance is an important issue for record-store access. Performance of current RMS implementations is quite slow. Application developers should carefully consider using the RMS only when necessary. They should consider other alternatives for persisting data and compare the trade-offs between the different alternatives.
Developers should also measure the performance of their RMS implementation when running real applications to ensure that performance is acceptable to end users. Already there have been real-world applications that were too slow because of their use of record store updates. Rewriting the applications so that the entire record store contents were downloaded and replaced proved to be faster than performing updates on changed items!

159
Chapter 8. MIDP Networking and Communications • The MIDP Networking Model • Generic Connection Framework Classes and Interfaces • Differences between J2ME and J2SE Networking
At this point, you know how to write stand-alone MIDP applications that can, among other things, interact with the user and persist data. The next step is to learn how to write networked applications. After all, the J2ME platform supports pervasive computing, and the CLDC/MIDP in particular supports personal mobile communications devices. Connectivity is an important part of mobile computing with MIDP and is the subject of this chapter.
Before delving into code examples, it's important to have some exposure to the concepts that apply to MIDP networking. Examples will follow the discussion of these important concepts.
The MIDP Networking Model
In MIDP, as in J2SE, IO streams are the primary mechanism available to applications to read and write streams of data. Both J2SE and J2ME have a java.io package that contains these stream classes. Additionally, the MIDP defines the javax.microedition.io package, which supports networking and communications for MIDP applications. This package is in contrast to the J2SE java.net package, which defines networking support on that platform.
MIDP applications use the javax.microedition.io types to create and manipulate various kinds of network connections. They then read from these connections and write to them using the types in the MIDP java.io package, which contains a subset of the classes and interfaces in the J2SE java.io package.
Perhaps the single most important goal of MIDP networking is to abstract the heterogeneous nature, complexity, and implementation details of the plethora of different wireless network environments. Achieving this goal requires insulating application developers from exposure to the characteristics of the network.
The MIDP Generic Connection Framework
The MIDP generic connection framework defines an infrastructure that abstracts the details of specific networking mechanisms, protocols, and their implementations from the application. In the generic connection model, an application makes a request to a connector to return a connection to the target resource. To make a connection, you use a generically formed address to specify the target network resource. The form of the address is the same, regardless of the type of connection desired.
The connector represents the actual connection returned as a generic connection. That is, it characterizes the connection as one that has the lowest common denominator of attributes and behavior of all connection types.
Applications make all such connection requests through the same connector, regardless of the type of connection desired. The connector abstracts the details of setting up a specific type of connection. The connector provides only a single interface for obtaining access to network resources, regardless of the nature of the resource or the protocol used for the communication. The
160
term generic connection thus refers to the generic mechanism used to obtain access to resources, not to the content or type of the established connection.
In the MIDP generic connection model, you identify the resource and get a connection to it in one step. This contrasts with the J2SE model, where the application must involve two objects: one that represents the target resource itself, with the other object being the stream or connection to it.
For instance, to access a URL in J2SE, an application constructs a java.net.URL object, which represents the actual URL resource. Using this object, the application then explicitly opens a connection to the URL resource, which yields a URLConnection object. This object represents the actual connection between the application and the resource and provides the medium through which the application accesses the contents of the resource. Now, the application can obtain an input stream from the connection that delivers the content of the resource.
The URL class knows how to access the physical resource. The connection object, on the other hand, knows nothing about locating and opening a URL, but it does know how to interface to a URL object. You, as the programmer, must understand what object to use to access the URL and what connection or stream interfaces to it.
In general, the J2SE model requires the programmer to build a stream that's compatible with the type of resource being accessed—a URL, file, a network socket, a datagram, and so forth. The J2SE model doesn't abstract these details from the application.
In the MIDP model, streams behave the same as in the J2SE model; they still don't know anything about the actual physical network resource. They simply know how to manipulate the content given to them when they were instantiated. The connector, however, hides from the application the details of interfacing the stream with the actual network resource.
There are two main advantages to the generic connection framework model. First, it abstracts the details of connection establishment from the application. Second, this abstraction makes the framework extensible. By using a standard, extensible mechanism for referencing network resources, MIDP platform implementations can be enhanced to support additional protocols while maintaining a single mechanism for applications to access all kinds of resources. Moreover, application logic remains independent of networking mechanisms.
To use the generic connection framework, MIDP applications specify the network resource they want to access by using a universal resource identifier (URI), which follows the Internet standard URI syntax defined by RFC 2396. A URI supports a canonical syntax for identifying resources on the Internet. The generic form of a URI is
<scheme>://<address>;<parameters>
Part of a URI is its scheme field, which represents the protocol to be used for the connection. RFC 2396 supports a plethora of valid schemes, such as file, datagram, socket, serversocket, http, ftp, and so forth.
The CLDC doesn't specify support for any of these. The reason is that the CLDC specification doesn't allow customizations. Therefore, all CLDC implementations must support the same features. MIDP implementations, however, can implement as many customizations as desired. The MIDP specification does require that implementations at least support the HTTP 1.1 protocol, however. Several factors influence the availability of protocol support in MIDP implementations:
• Performance limitations in wireless networks, connection establishment time, bandwidth, and latency constrain the types of networking communications that are feasible when compared with fixed networks.
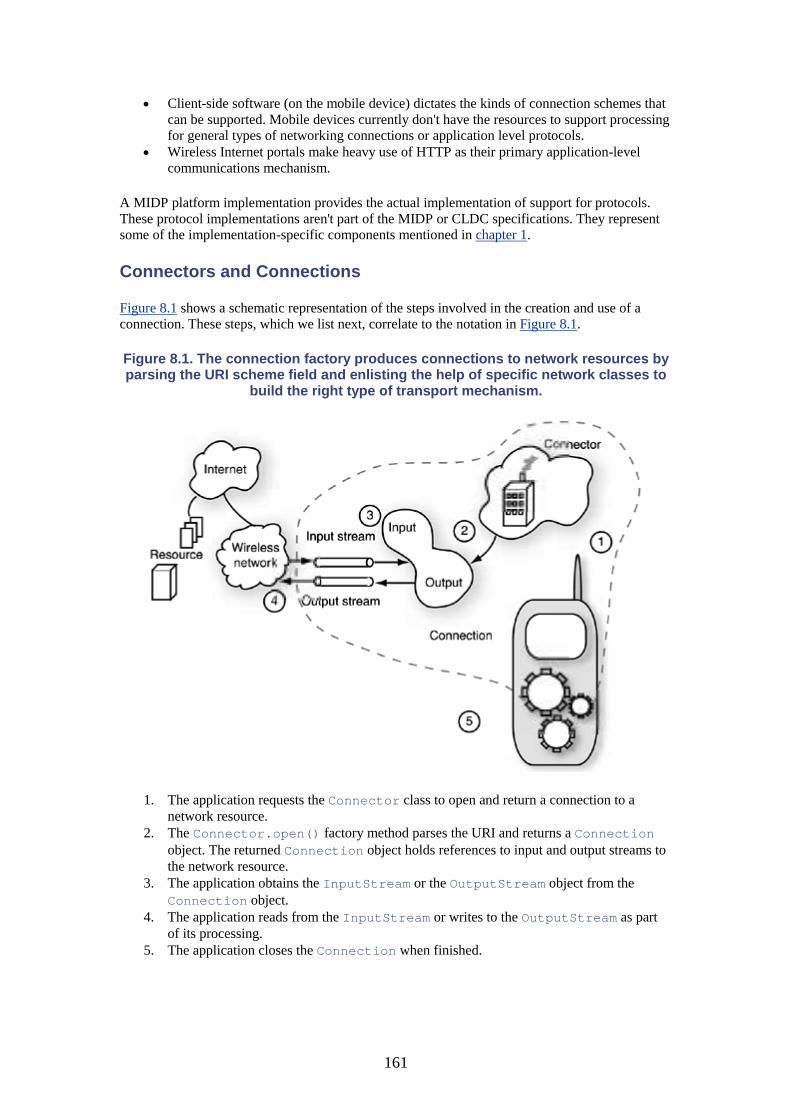
161
• Client-side software (on the mobile device) dictates the kinds of connection schemes that can be supported. Mobile devices currently don't have the resources to support processing for general types of networking connections or application level protocols.
• Wireless Internet portals make heavy use of HTTP as their primary application-level communications mechanism.
A MIDP platform implementation provides the actual implementation of support for protocols. These protocol implementations aren't part of the MIDP or CLDC specifications. They represent some of the implementation-specific components mentioned in chapter 1.
Connectors and Connections
Figure 8.1 shows a schematic representation of the steps involved in the creation and use of a connection. These steps, which we list next, correlate to the notation in Figure 8.1.
Figure 8.1. The connection factory produces connections to network resources by parsing the URI scheme field and enlisting the help of specific network classes to
build the right type of transport mechanism.
1. The application requests the Connector class to open and return a connection to a network resource.
2. The Connector.open() factory method parses the URI and returns a Connection object. The returned Connection object holds references to input and output streams to the network resource.
3. The application obtains the InputStream or the OutputStream object from the Connection object.
4. The application reads from the InputStream or writes to the OutputStream as part of its processing.
5. The application closes the Connection when finished.
162
A connection object contains an input stream and an output stream for reading and writing to the resource, respectively. Figure 8.1 represents schematically the relationships between the connection and its two streams.
Once you have the connection, you use its two streams to interact with the network resource. There are two aspects to communicating with a network resource:
• parsing the protocol message • parsing the message payload—the message content
For example, if the client establishes an HTTP connection, the client must parse HTTP protocol syntax and semantics of the response message returned by the server. The HTTP message transports some kind of content, and the client must also be able to parse the content appropriately. If, for example, the message content is HTML data, the client must properly parse HTML content. If the application doesn't know the format of the data delivered by the input stream, it cannot correctly interpret either the syntax or semantics of the stream content.
The MIDP generic connection framework defines a hierarchy of connection types that capture the nature of different kinds of stream connections. That is, the different types represent different protocols used by connections. Using the appropriate connection type makes it easier to parse and manipulate different kinds of content. For example, HTTP connections are a mainstay of MIDP networking communications. The generic connection framework defines a connection type whose interface supports constructing HTTP requests and parsing HTTP responses.
Generic Connection Framework Classes and Interfaces
The javax.microedition.io package defines one class and a collection of interfaces that represent different types of content connections. The Connector class is the single concrete entity in the MIDP generic connection framework. You must use it to obtain actual connections to resources. It really contains a factory method that creates various types of connections to support different protocols.
A hierarchy of interfaces in the generic connection framework defines the abstractions that characterize the different kinds of connections supported by the connection factory. These interfaces provide methods that make it easier for applications to manipulate common types of connections.
Figure 8.2 shows the inheritance hierarchy of the MIDP interfaces that are part of the generic connection framework.
Figure 8.2. The connection types each support a specific level of abstraction, which is reflected by the methods in each interface. Capability increases, and
abstraction decreases, as you move further down the hierarchy. All interfaces are in the javax.microedition.io package.
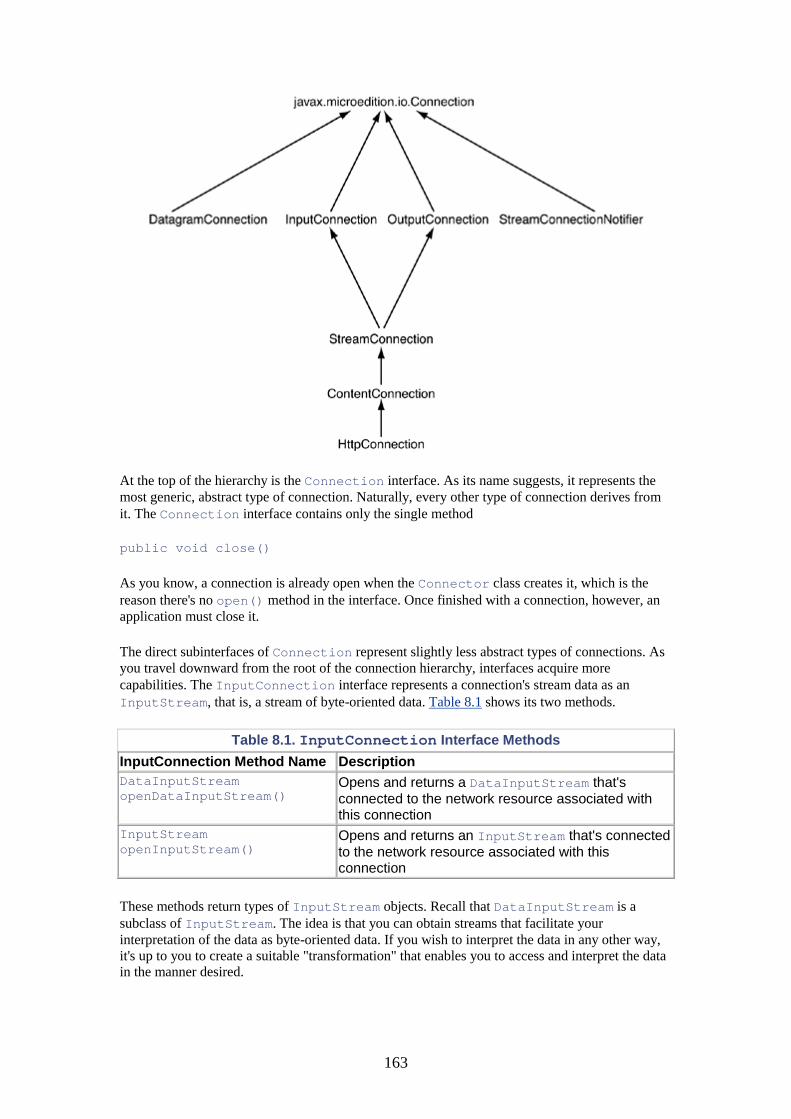
163
At the top of the hierarchy is the Connection interface. As its name suggests, it represents the most generic, abstract type of connection. Naturally, every other type of connection derives from it. The Connection interface contains only the single method
public void close()
As you know, a connection is already open when the Connector class creates it, which is the reason there's no open() method in the interface. Once finished with a connection, however, an application must close it.
The direct subinterfaces of Connection represent slightly less abstract types of connections. As you travel downward from the root of the connection hierarchy, interfaces acquire more capabilities. The InputConnection interface represents a connection's stream data as an InputStream, that is, a stream of byte-oriented data. Table 8.1 shows its two methods.
Table 8.1. InputConnection Interface Methods InputConnection Method Name Description DataInputStream openDataInputStream()
Opens and returns a DataInputStream that's connected to the network resource associated with this connection
InputStream openInputStream()
Opens and returns an InputStream that's connected to the network resource associated with this connection
These methods return types of InputStream objects. Recall that DataInputStream is a subclass of InputStream. The idea is that you can obtain streams that facilitate your interpretation of the data as byte-oriented data. If you wish to interpret the data in any other way, it's up to you to create a suitable "transformation" that enables you to access and interpret the data in the manner desired.
164
The OutputConnection interface is another subinterface of Connection. It deals with output streams and also characterizes the content of its streams as byte-oriented data. Its methods are shown in Table 8.2. You should use this interface when writing byte-oriented data to a destination resource.
Using these two interfaces, then, you can treat the input stream or output stream of data to or from the resource as a sequence of raw bytes, parsing it using the methods in the DataInput or DataOutput interfaces. Of course, you must know the format of the data sent by the device, or the format expected by the device, respectively. In other words, there's no abstraction of the data that removes the need for you to know the syntax and semantics of the data in an InputConnection or OutputConnection.
Table 8.2. OutputConnection Interface Methods OutputConnection Method Name Description DataOutputStream openDataOutputStream()
Opens and returns a DataOutputStream that's connected to the network resource associated with this connection
OutputStream openOutputStream()
Opens and returns an OutputStream that's connected to the network resource associated with this connection
Stream Connections
The StreamConnection interface directly extends both the InputConnection and OutputConnection interfaces. It inherits the methods from these two interfaces, described previously in Tables 8.1 and 8.2.
The StreamConnection interface represents a connection as a stream of data in the most abstract sense of the word—as a sequence of bytes. It's an empty interface; it doesn't add any behavior to either of its two super-interfaces. Nevertheless, its presence in the hierarchy does serve a purpose beyond the InputConnection and OutputConnection interfaces. It serves as a placeholder that represents any type of connection whose data can be treated as a stream of bytes.
The StreamConnection interface abstracts the details of the connection mechanism—the protocol used in an implementation of a particular type of connection, and its syntax and semantics. For example, the J2ME Wireless Toolkit supplies two implementations of StreamConnection—one for connecting to communication ports and the other for connecting to Unix-style client sockets. The StreamConnection interface characterizes both of these types of connections as raw streams of bytes with no stipulation of protocol syntax or semantics. The implementations, however, are quite different indeed. In this section, you'll see how to set up a connection to a communication port. Later, you'll see how to set up a socket connection.
Connections to communication ports, like all other connections, must be constructed by passing a URI to Connector.open(). You must specify the address of the communication port you wish to open. The scheme field must have the value comm, which identifies the connection as a stream connection for communication ports. The full form of the address is:
address := <scheme>:<unit>;<parameters> scheme := "comm" unit := <integer representing comm port to open> parameters := <device-specific configuration parameters>
For example, you could open a connection to a communications port with the following statement:
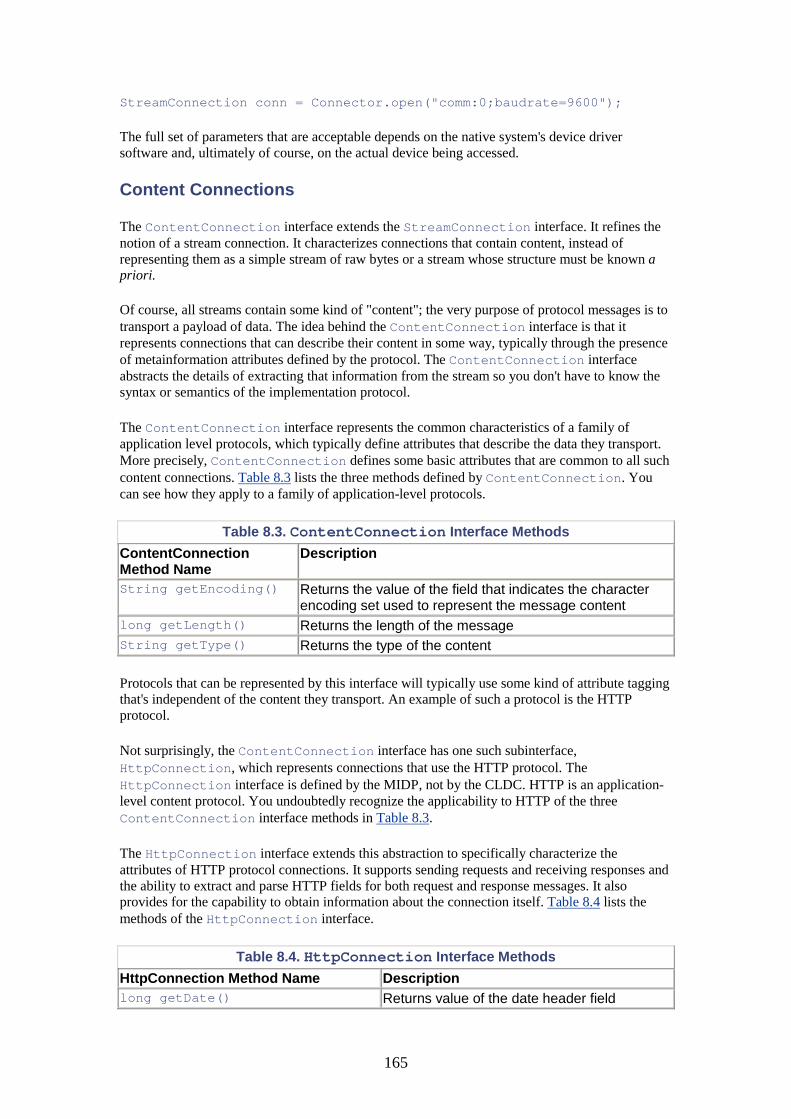
165
StreamConnection conn = Connector.open("comm:0;baudrate=9600");
The full set of parameters that are acceptable depends on the native system's device driver software and, ultimately of course, on the actual device being accessed.
Content Connections
The ContentConnection interface extends the StreamConnection interface. It refines the notion of a stream connection. It characterizes connections that contain content, instead of representing them as a simple stream of raw bytes or a stream whose structure must be known a priori.
Of course, all streams contain some kind of "content"; the very purpose of protocol messages is to transport a payload of data. The idea behind the ContentConnection interface is that it represents connections that can describe their content in some way, typically through the presence of metainformation attributes defined by the protocol. The ContentConnection interface abstracts the details of extracting that information from the stream so you don't have to know the syntax or semantics of the implementation protocol.
The ContentConnection interface represents the common characteristics of a family of application level protocols, which typically define attributes that describe the data they transport. More precisely, ContentConnection defines some basic attributes that are common to all such content connections. Table 8.3 lists the three methods defined by ContentConnection. You can see how they apply to a family of application-level protocols.
Table 8.3. ContentConnection Interface Methods ContentConnection Method Name
Description
String getEncoding() Returns the value of the field that indicates the character encoding set used to represent the message content
long getLength() Returns the length of the message String getType() Returns the type of the content
Protocols that can be represented by this interface will typically use some kind of attribute tagging that's independent of the content they transport. An example of such a protocol is the HTTP protocol.
Not surprisingly, the ContentConnection interface has one such subinterface, HttpConnection, which represents connections that use the HTTP protocol. The HttpConnection interface is defined by the MIDP, not by the CLDC. HTTP is an application-level content protocol. You undoubtedly recognize the applicability to HTTP of the three ContentConnection interface methods in Table 8.3.
The HttpConnection interface extends this abstraction to specifically characterize the attributes of HTTP protocol connections. It supports sending requests and receiving responses and the ability to extract and parse HTTP fields for both request and response messages. It also provides for the capability to obtain information about the connection itself. Table 8.4 lists the methods of the HttpConnection interface.
Table 8.4. HttpConnection Interface Methods HttpConnection Method Name Description long getDate() Returns value of the date header field
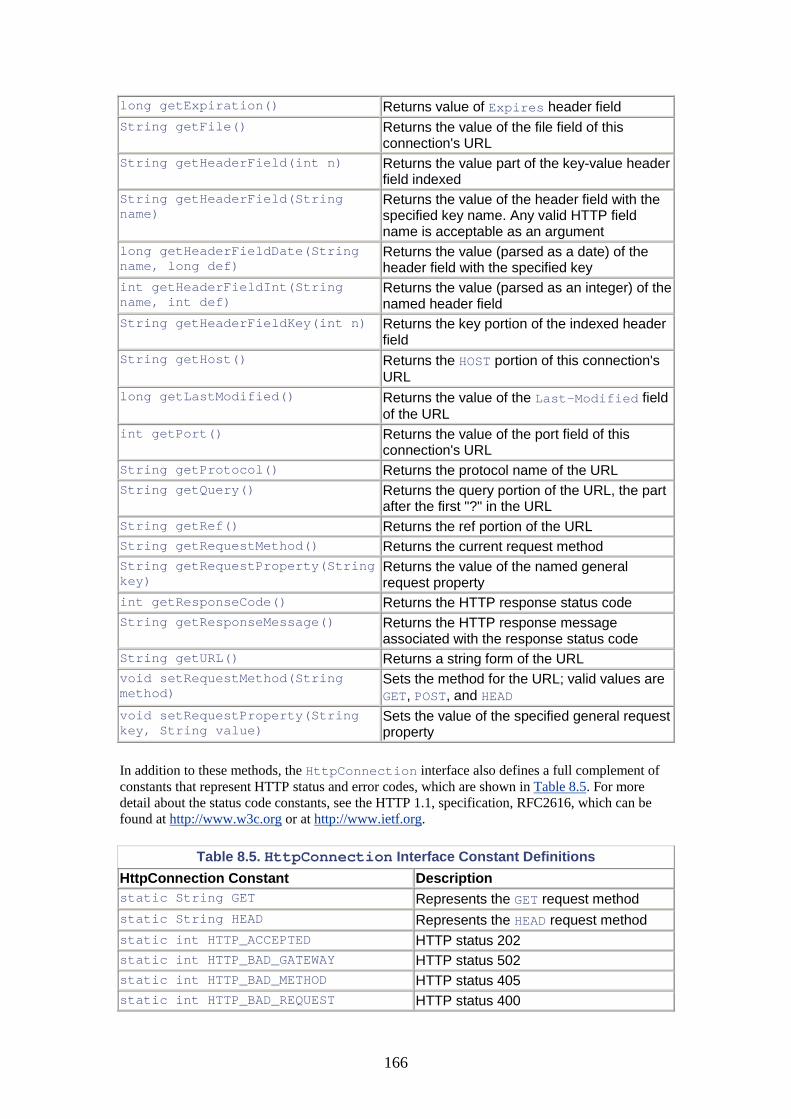
166
long getExpiration() Returns value of Expires header field String getFile() Returns the value of the file field of this
connection's URL String getHeaderField(int n) Returns the value part of the key-value header
field indexed String getHeaderField(String name)
Returns the value of the header field with the specified key name. Any valid HTTP field name is acceptable as an argument
long getHeaderFieldDate(String name, long def)
Returns the value (parsed as a date) of the header field with the specified key
int getHeaderFieldInt(String name, int def)
Returns the value (parsed as an integer) of the named header field
String getHeaderFieldKey(int n) Returns the key portion of the indexed header field
String getHost() Returns the HOST portion of this connection's URL
long getLastModified() Returns the value of the Last-Modified field of the URL
int getPort() Returns the value of the port field of this connection's URL
String getProtocol() Returns the protocol name of the URL String getQuery() Returns the query portion of the URL, the part
after the first "?" in the URL String getRef() Returns the ref portion of the URL String getRequestMethod() Returns the current request method String getRequestProperty(String key)
Returns the value of the named general request property
int getResponseCode() Returns the HTTP response status code String getResponseMessage() Returns the HTTP response message
associated with the response status code String getURL() Returns a string form of the URL void setRequestMethod(String method)
Sets the method for the URL; valid values are GET, POST, and HEAD
void setRequestProperty(String key, String value)
Sets the value of the specified general request property
In addition to these methods, the HttpConnection interface also defines a full complement of constants that represent HTTP status and error codes, which are shown in Table 8.5. For more detail about the status code constants, see the HTTP 1.1, specification, RFC2616, which can be found at http://www.w3c.org or at http://www.ietf.org.
Table 8.5. HttpConnection Interface Constant Definitions HttpConnection Constant Description static String GET Represents the GET request method static String HEAD Represents the HEAD request method static int HTTP_ACCEPTED HTTP status 202 static int HTTP_BAD_GATEWAY HTTP status 502 static int HTTP_BAD_METHOD HTTP status 405 static int HTTP_BAD_REQUEST HTTP status 400
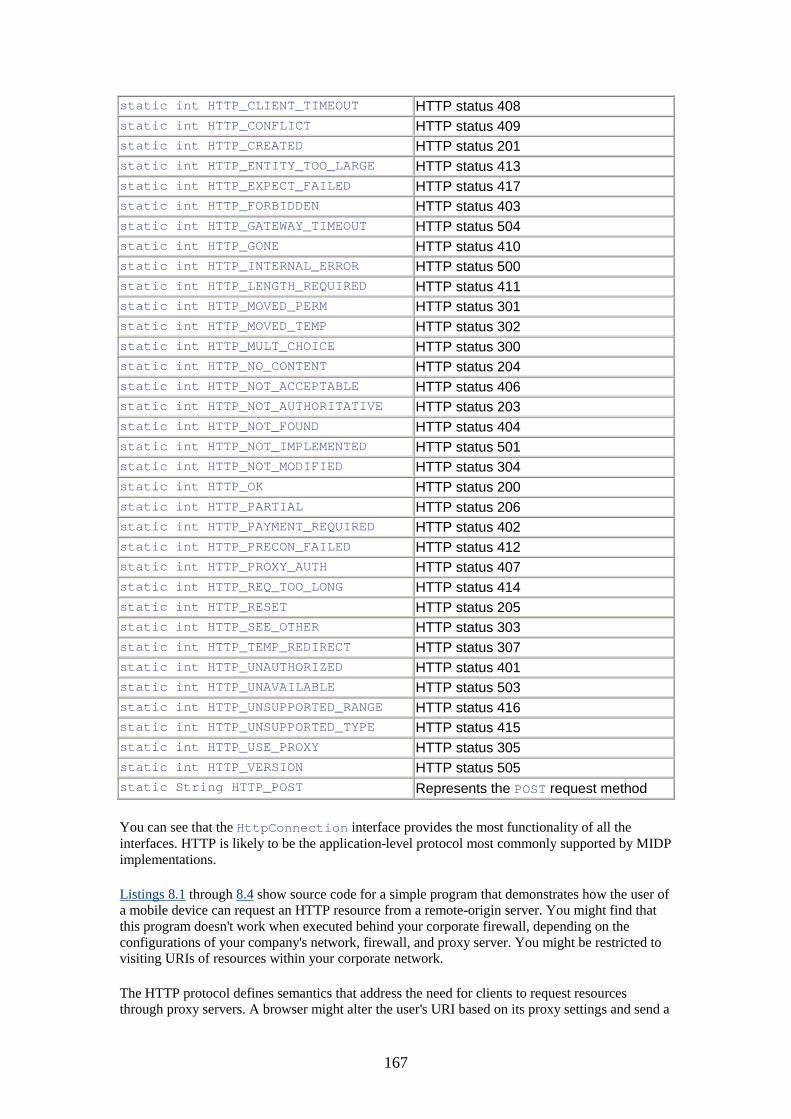
167
static int HTTP_CLIENT_TIMEOUT HTTP status 408 static int HTTP_CONFLICT HTTP status 409 static int HTTP_CREATED HTTP status 201 static int HTTP_ENTITY_TOO_LARGE HTTP status 413 static int HTTP_EXPECT_FAILED HTTP status 417 static int HTTP_FORBIDDEN HTTP status 403 static int HTTP_GATEWAY_TIMEOUT HTTP status 504 static int HTTP_GONE HTTP status 410 static int HTTP_INTERNAL_ERROR HTTP status 500 static int HTTP_LENGTH_REQUIRED HTTP status 411 static int HTTP_MOVED_PERM HTTP status 301 static int HTTP_MOVED_TEMP HTTP status 302 static int HTTP_MULT_CHOICE HTTP status 300 static int HTTP_NO_CONTENT HTTP status 204 static int HTTP_NOT_ACCEPTABLE HTTP status 406 static int HTTP_NOT_AUTHORITATIVE HTTP status 203 static int HTTP_NOT_FOUND HTTP status 404 static int HTTP_NOT_IMPLEMENTED HTTP status 501 static int HTTP_NOT_MODIFIED HTTP status 304 static int HTTP_OK HTTP status 200 static int HTTP_PARTIAL HTTP status 206 static int HTTP_PAYMENT_REQUIRED HTTP status 402 static int HTTP_PRECON_FAILED HTTP status 412 static int HTTP_PROXY_AUTH HTTP status 407 static int HTTP_REQ_TOO_LONG HTTP status 414 static int HTTP_RESET HTTP status 205 static int HTTP_SEE_OTHER HTTP status 303 static int HTTP_TEMP_REDIRECT HTTP status 307 static int HTTP_UNAUTHORIZED HTTP status 401 static int HTTP_UNAVAILABLE HTTP status 503 static int HTTP_UNSUPPORTED_RANGE HTTP status 416 static int HTTP_UNSUPPORTED_TYPE HTTP status 415 static int HTTP_USE_PROXY HTTP status 305 static int HTTP_VERSION HTTP status 505 static String HTTP_POST Represents the POST request method
You can see that the HttpConnection interface provides the most functionality of all the interfaces. HTTP is likely to be the application-level protocol most commonly supported by MIDP implementations.
Listings 8.1 through 8.4 show source code for a simple program that demonstrates how the user of a mobile device can request an HTTP resource from a remote-origin server. You might find that this program doesn't work when executed behind your corporate firewall, depending on the configurations of your company's network, firewall, and proxy server. You might be restricted to visiting URIs of resources within your corporate network.
The HTTP protocol defines semantics that address the need for clients to request resources through proxy servers. A browser might alter the user's URI based on its proxy settings and send a

168
modified request to the proxy server, which forwards it to the origin server. The program doesn't make such alterations to URIs and, therefore, it might not pass a URI as expected by your proxy server. Unless you know how the browser modifies URIs, you might have a difficult time accessing a URI that's external to your company network. The result will be that the program in Listing 8.1 will throw an IOException.
The program in Listing 8.1 displays only the metainformation about requested resources and doesn't display the resource itself. It only requests the header information for each resource by using the HTTP HEAD method. To write a program that displays arbitrary content would be tantamount to writing a full browser, which is obviously beyond the scope of this book. Fortunately, several companies do offer HTTP browsers that run on MIDP devices, so you don't have to.
Listing 8.1 The ConnectionDemo program defines the MIDlet that displays HTTP protocol metainformation, namely the value of HTTP header fields. The program uses a HEAD command to obtain only the metainformation instead of the whole page.
import javax.microedition.midlet.MIDlet; import javax.microedition.lcdui.Display; /** This class defines the MIDlet for a demo that prompts the user for a URI, then makes an HTTP connection to an origin server and fetches a resource. The program uses a Form object to enable the user to enter the URI. */ public class ConnectionDemo extends MIDlet { private static ConnectionDemo instance; private URIEntry urlForm; public ConnectionDemo() { super(); instance = this; } /** Returns the single instance of this class. Calling this method before constructing an object will return a null pointer. @return an instance of this class. */ public static ConnectionDemo getInstance() { return instance; } public void startApp() { Display display; URIEntry urlForm = URIEntry.getInstance(); display = Display.getDisplay(this); display.setCurrent(urlForm);
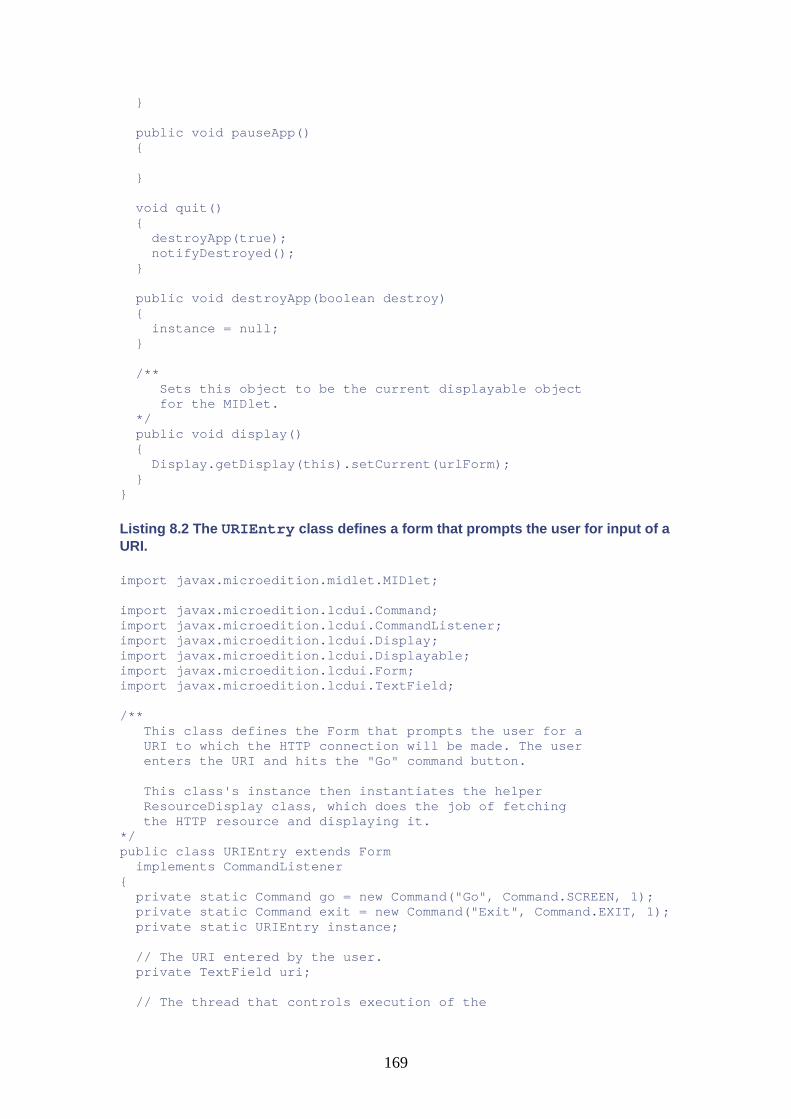
169
} public void pauseApp() { } void quit() { destroyApp(true); notifyDestroyed(); } public void destroyApp(boolean destroy) { instance = null; } /** Sets this object to be the current displayable object for the MIDlet. */ public void display() { Display.getDisplay(this).setCurrent(urlForm); } }
Listing 8.2 The URIEntry class defines a form that prompts the user for input of a URI.
import javax.microedition.midlet.MIDlet; import javax.microedition.lcdui.Command; import javax.microedition.lcdui.CommandListener; import javax.microedition.lcdui.Display; import javax.microedition.lcdui.Displayable; import javax.microedition.lcdui.Form; import javax.microedition.lcdui.TextField; /** This class defines the Form that prompts the user for a URI to which the HTTP connection will be made. The user enters the URI and hits the "Go" command button. This class's instance then instantiates the helper ResourceDisplay class, which does the job of fetching the HTTP resource and displaying it. */ public class URIEntry extends Form implements CommandListener { private static Command go = new Command("Go", Command.SCREEN, 1); private static Command exit = new Command("Exit", Command.EXIT, 1); private static URIEntry instance; // The URI entered by the user. private TextField uri; // The thread that controls execution of the
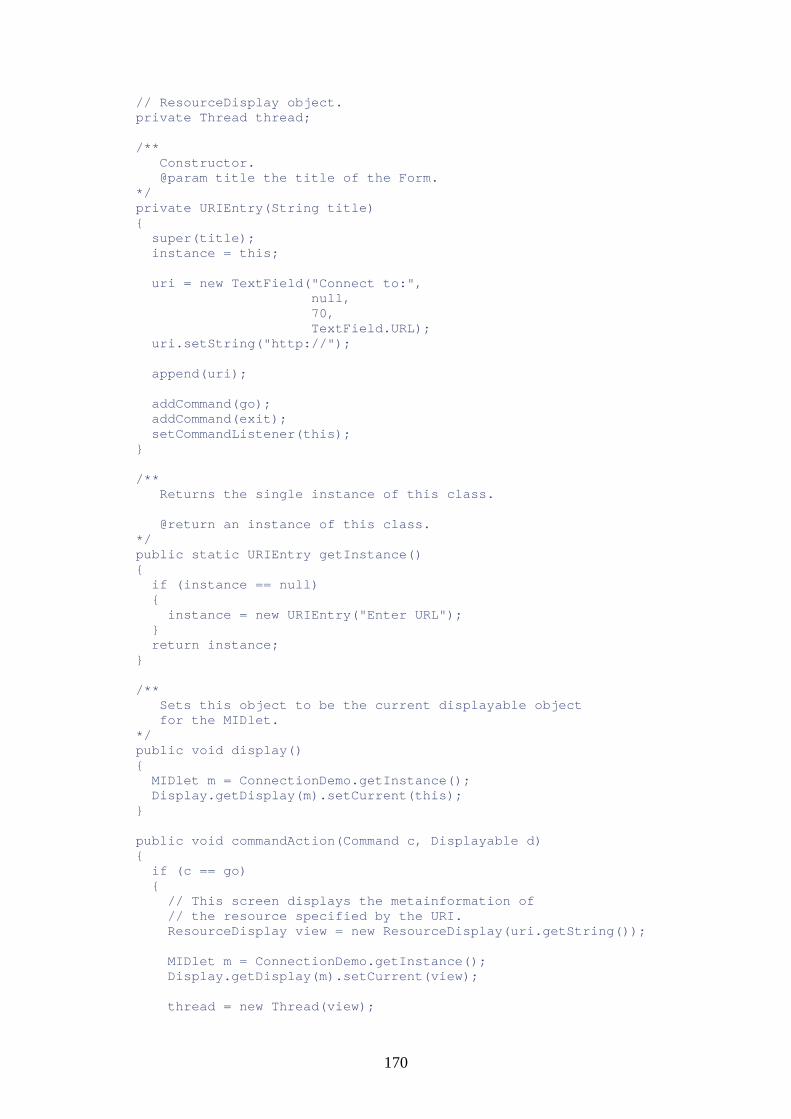
170
// ResourceDisplay object. private Thread thread; /** Constructor. @param title the title of the Form. */ private URIEntry(String title) { super(title); instance = this; uri = new TextField("Connect to:", null, 70, TextField.URL); uri.setString("http://"); append(uri); addCommand(go); addCommand(exit); setCommandListener(this); } /** Returns the single instance of this class. @return an instance of this class. */ public static URIEntry getInstance() { if (instance == null) { instance = new URIEntry("Enter URL"); } return instance; } /** Sets this object to be the current displayable object for the MIDlet. */ public void display() { MIDlet m = ConnectionDemo.getInstance(); Display.getDisplay(m).setCurrent(this); } public void commandAction(Command c, Displayable d) { if (c == go) { // This screen displays the metainformation of // the resource specified by the URI. ResourceDisplay view = new ResourceDisplay(uri.getString()); MIDlet m = ConnectionDemo.getInstance(); Display.getDisplay(m).setCurrent(view); thread = new Thread(view);
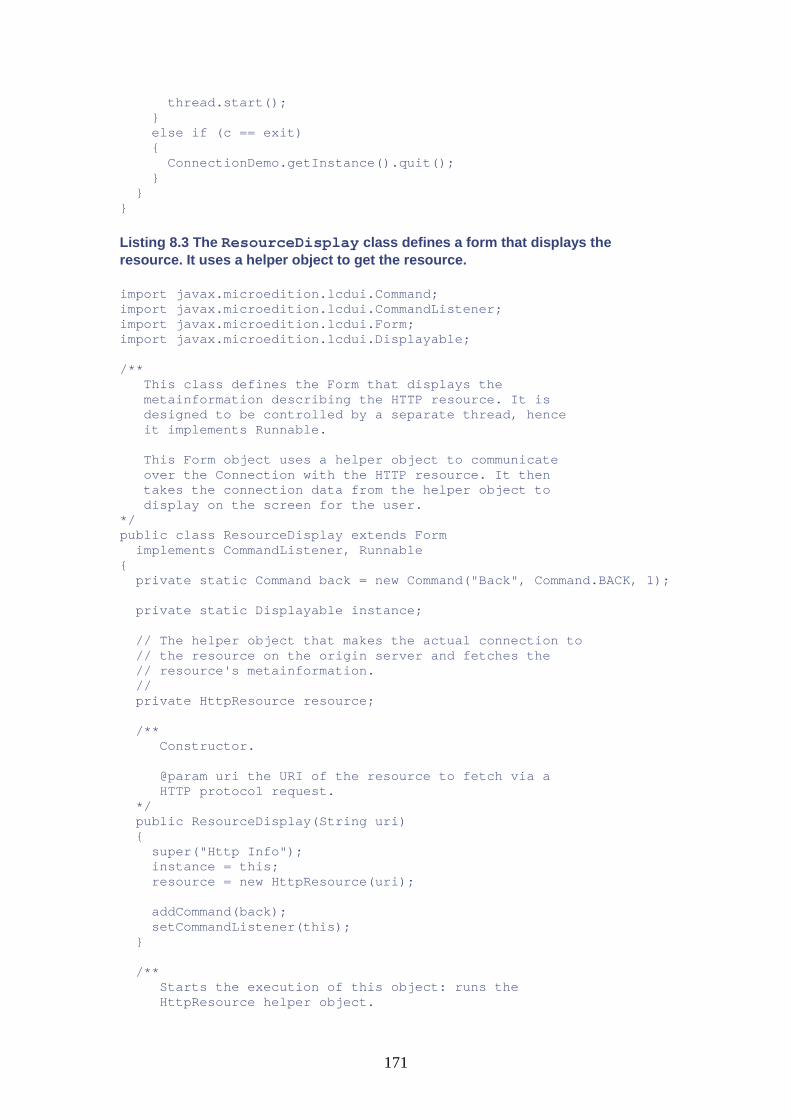
171
thread.start(); } else if (c == exit) { ConnectionDemo.getInstance().quit(); } } }
Listing 8.3 The ResourceDisplay class defines a form that displays the resource. It uses a helper object to get the resource.
import javax.microedition.lcdui.Command; import javax.microedition.lcdui.CommandListener; import javax.microedition.lcdui.Form; import javax.microedition.lcdui.Displayable; /** This class defines the Form that displays the metainformation describing the HTTP resource. It is designed to be controlled by a separate thread, hence it implements Runnable. This Form object uses a helper object to communicate over the Connection with the HTTP resource. It then takes the connection data from the helper object to display on the screen for the user. */ public class ResourceDisplay extends Form implements CommandListener, Runnable { private static Command back = new Command("Back", Command.BACK, 1); private static Displayable instance; // The helper object that makes the actual connection to // the resource on the origin server and fetches the // resource's metainformation. // private HttpResource resource; /** Constructor. @param uri the URI of the resource to fetch via a HTTP protocol request. */ public ResourceDisplay(String uri) { super("Http Info"); instance = this; resource = new HttpResource(uri); addCommand(back); setCommandListener(this); } /** Starts the execution of this object: runs the HttpResource helper object.
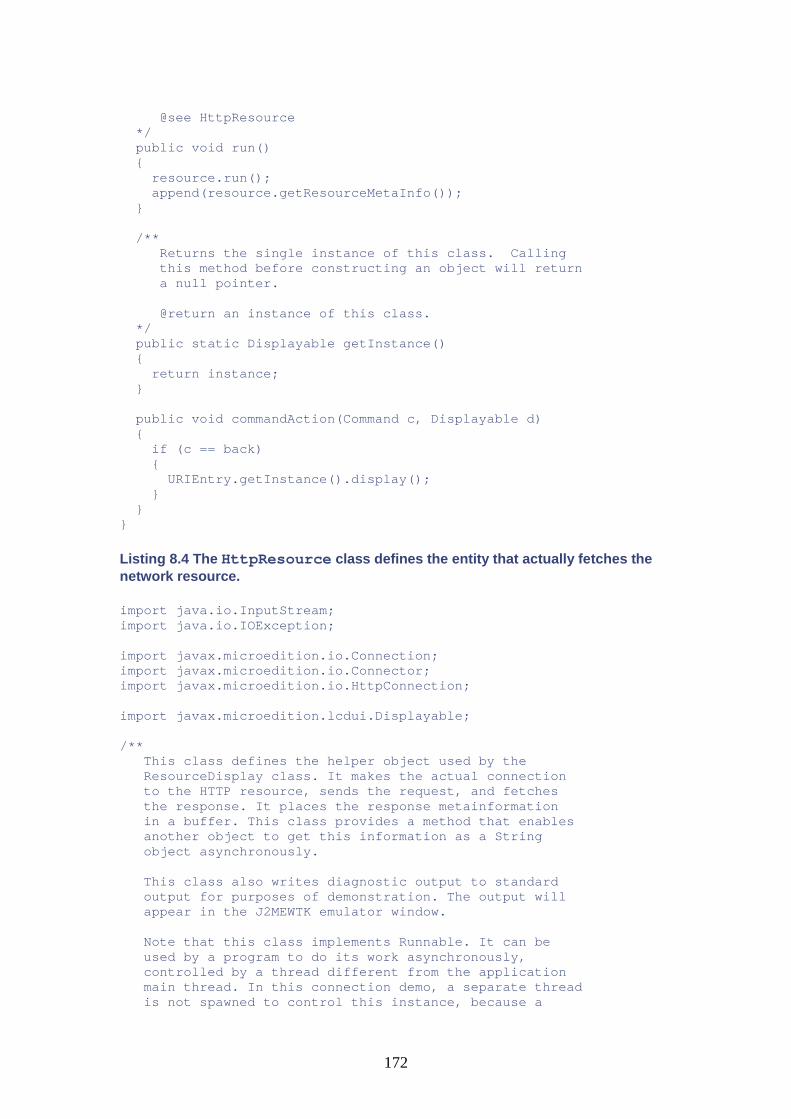
172
@see HttpResource */ public void run() { resource.run(); append(resource.getResourceMetaInfo()); } /** Returns the single instance of this class. Calling this method before constructing an object will return a null pointer. @return an instance of this class. */ public static Displayable getInstance() { return instance; } public void commandAction(Command c, Displayable d) { if (c == back) { URIEntry.getInstance().display(); } } }
Listing 8.4 The HttpResource class defines the entity that actually fetches the network resource.
import java.io.InputStream; import java.io.IOException; import javax.microedition.io.Connection; import javax.microedition.io.Connector; import javax.microedition.io.HttpConnection; import javax.microedition.lcdui.Displayable; /** This class defines the helper object used by the ResourceDisplay class. It makes the actual connection to the HTTP resource, sends the request, and fetches the response. It places the response metainformation in a buffer. This class provides a method that enables another object to get this information as a String object asynchronously. This class also writes diagnostic output to standard output for purposes of demonstration. The output will appear in the J2MEWTK emulator window. Note that this class implements Runnable. It can be used by a program to do its work asynchronously, controlled by a thread different from the application main thread. In this connection demo, a separate thread is not spawned to control this instance, because a
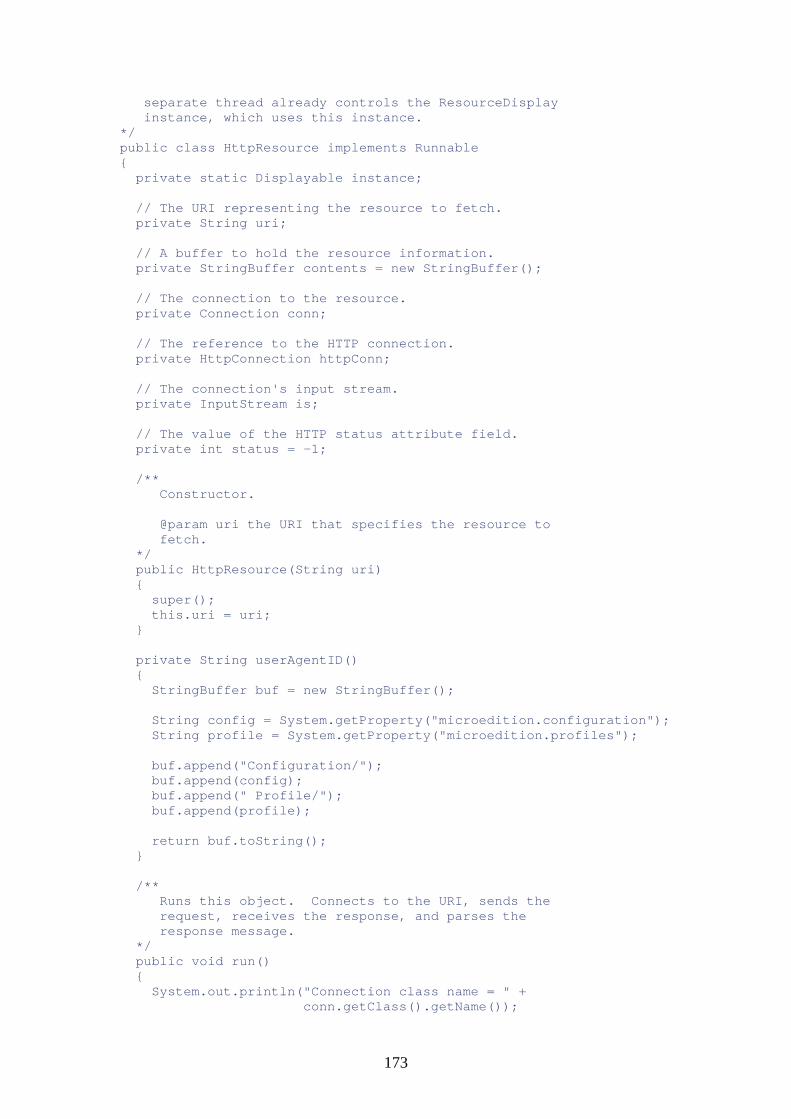
173
separate thread already controls the ResourceDisplay instance, which uses this instance. */ public class HttpResource implements Runnable { private static Displayable instance; // The URI representing the resource to fetch. private String uri; // A buffer to hold the resource information. private StringBuffer contents = new StringBuffer(); // The connection to the resource. private Connection conn; // The reference to the HTTP connection. private HttpConnection httpConn; // The connection's input stream. private InputStream is; // The value of the HTTP status attribute field. private int status = -1; /** Constructor. @param uri the URI that specifies the resource to fetch. */ public HttpResource(String uri) { super(); this.uri = uri; } private String userAgentID() { StringBuffer buf = new StringBuffer(); String config = System.getProperty("microedition.configuration"); String profile = System.getProperty("microedition.profiles"); buf.append("Configuration/"); buf.append(config); buf.append(" Profile/"); buf.append(profile); return buf.toString(); } /** Runs this object. Connects to the URI, sends the request, receives the response, and parses the response message. */ public void run() { System.out.println("Connection class name = " + conn.getClass().getName());

174
connect(); parse(); System.out.println(getResourceMetaInfo()); try { conn.close(); } catch (IOException ioe) { System.out.println(ioe.getMessage()); ioe.printStackTrace(); } } /** Connects to the origin server, which hosts the URI. If an exception occurs during connection, this method catches it and gives no indication of the error except to write diagnostics to standard output. */ protected void connect() { try { while (true) { // Connection is in the "setup" state. conn = Connector.open(uri); httpConn = (HttpConnection) conn; httpConn.setRequestProperty("method", HttpConnection.HEAD); httpConn.setRequestProperty("User-Agent", userAgentID()); // Connection is in the "connected" state. if (resourceRelocated()) { uri = httpConn.getHeaderField("location"); // Connection in "closed" state after the // call to close(). conn.close(); } else { break; } } if (serverError()) { conn.close(); return; } // Connection is in the "connected" state. is = httpConn.openInputStream(); System.out.println("Input stream class name = " + is.getClass().getName()); int responseCode = httpConn.getResponseCode(); printResponseCode(responseCode);

175
} catch (IOException ioe) { contents.append(ioe.getMessage()); System.out.println(ioe.getMessage()); ioe.printStackTrace(); } } private boolean resourceRelocated() { boolean relocated = false; try { status = httpConn.getResponseCode(); if (status == HttpConnection.HTTP_MOVED_TEMP || status == HttpConnection.HTTP_MOVED_PERM || status == HttpConnection.HTTP_TEMP_REDIRECT) { relocated = true; } } catch (IOException ioe) { System.out.println(ioe.getMessage()); ioe.printStackTrace(); } return relocated; } private boolean serverError() { boolean error = false; try { status = httpConn.getResponseCode(); if ((status == HttpConnection.HTTP_NOT_IMPLEMENTED) || (status == HttpConnection.HTTP_VERSION) || (status == HttpConnection.HTTP_INTERNAL_ERROR) || (status == HttpConnection.HTTP_GATEWAY_TIMEOUT) || (status == HttpConnection.HTTP_BAD_GATEWAY)) { error = true; } } catch (IOException ioe) { error = true; System.out.println(ioe.getMessage()); ioe.printStackTrace(); } return error; } private void parse() { if (httpConn == null) return;

176
String protocol = httpConn.getProtocol(); contents.append("Protocol: " + protocol + "\n"); String type = httpConn.getType(); contents.append("Type: " + type + "\n"); String encoding = httpConn.getEncoding(); contents.append("Encoding: " + encoding + "\n"); long length = httpConn.getLength(); contents.append("Length: " + length + "\n"); String uri = httpConn.getURL(); contents.append("URL: " + uri + "\n"); String host = httpConn.getHost(); contents.append("Host: " + host + "\n"); String query = httpConn.getQuery(); contents.append("Query: " + query + "\n"); String requestMethod = httpConn.getRequestMethod(); contents.append("Method: " + requestMethod + "\n"); } private void printResponseCode(int code) { System.out.print("Response code : "); switch (code) { case HttpConnection.HTTP_ACCEPTED: System.out.println("HTTP_ACCEPTED"); break; case HttpConnection.HTTP_BAD_GATEWAY: System.out.println("HTTP_BAD_GATEWAY"); break; case HttpConnection.HTTP_BAD_METHOD: System.out.println("HTTP_BAD_METHOD"); break; case HttpConnection.HTTP_BAD_REQUEST: System.out.println("HTTP_BAD_REQUEST"); break; case HttpConnection.HTTP_CONFLICT: System.out.println("HTTP_CONFLICT"); break; case HttpConnection.HTTP_CREATED: System.out.println("HTTP_CREATED"); break; case HttpConnection.HTTP_FORBIDDEN: System.out.println("HTTP_BAD_FORBIDDEN"); break; case HttpConnection.HTTP_GATEWAY_TIMEOUT: System.out.println("HTTP_GATEWAY_TIMEOUT"); break; case HttpConnection.HTTP_GONE: System.out.println("HTTP_GONE"); break; case HttpConnection.HTTP_NO_CONTENT: System.out.println("HTTP_NO_CONTENT"); break; case HttpConnection.HTTP_NOT_ACCEPTABLE:

177
System.out.println("HTTP_NOT_ACCEPTABLE"); break; case HttpConnection.HTTP_NOT_FOUND: System.out.println("HTTP_NOT_FOUND"); break; case HttpConnection.HTTP_OK: System.out.println("HTTP_OK"); break; case HttpConnection.HTTP_PROXY_AUTH: System.out.println("HTTP_PROXY_AUTH"); break; case HttpConnection.HTTP_UNAVAILABLE: System.out.println("HTTP_UNAVAILABLE"); break; case HttpConnection.HTTP_VERSION: System.out.println("HTTP_VERSION"); break; default: System.out.println(); } } /** Gets the resource metainformation. @returns the metainformation returned by the origin server in its response message. */ public String getResourceMetaInfo() { return contents.toString(); } }
Four classes comprise the example in Listings 8.1 through 8.4:
• ConnectionDemo— defines the MIDlet for this demo. It displays an instance of URIEntry.
• URIEntry— defines the form that prompts the user to enter a URI that the program fetches.
• ResourceDisplay— defines the form that displays the metainformation for the resource fetched.
• HttpResource— defines the helper class used by the ResourceDisplay class to do the actual fetching of the user-specified resource.
The ConnectionDemo class defines the MIDlet. It displays a form (defined by the URIEntry class) that prompts the user for a URI. The HttpResource class handles the processes of connection setup, sending the request, and receiving and parsing the response. The ResourceDisplay class displays the results. The HttpResource class contains the bulk of the interesting code—that is, the networking code. The program instantiates this class once for each connection made.
The program operates as follows. The user enters a URI in the text field of the URIEntry object. The URIEntry object instantiates the ResourceDisplay class upon receiving a go command input from the user, which means, "Go and fetch the resource specified." This takes place in the main event-handling thread. The URIEntry object then creates a separate thread to control the rest of the execution of the ResourceDisplay instance.
178
The ResourceDisplay instance creates an instance of the HttpResource class to do the actual work of fetching the resource. This work occurs asynchronously in the newly created thread. The new thread controls the following steps:
• creating the HttpResource instance • creating the connection to the origin server • receiving the server's response containing the resource • parsing the returned resource • displaying the resource data
All these steps could be time consuming. If they were executed by the event processing thread that delivered the command to the application, the MIDP implementation would have to wait until the foregoing steps finished before it could do anything else.
This use of threads is an important idiom. The goal is for applications to avoid doing lengthy command processing in a commandAction() method. This includes processing that could block for unacceptably long periods of time, such as waiting for a response from an HTTP server. It's important for every CommandListener to return from its commandAction() method "as soon as possible." For instance, in the program in Listing 8.1, the Connector.open() call blocks until it receives a response or until it times out. The default timeout is about 15 seconds in the J2MEWTK emulator. This is probably too long a time for the MIDP implementation to be blocked from doing any event processing.
The HttpResource class defines an API that supports fetching resources on a separate thread. It implements Runnable and defines its processing within the run() method. In our example, this capability is not really used, because the second thread begins execution with the run() method of the ResourceDisplay class, which then calls the HttpRespource.run() method. The HttpResource class could be used in another application, however, and its implementation of Runnable reflects its support for multithreaded execution.
Connection Objects. As you know, the various interfaces in the generic connection framework represent different types of connections. It's the concrete implementations of these interfaces, however, that really give a connection its characteristics and capabilities. This is a good time to take a closer look at the implementations behind these interfaces.
I've been referring to the Connector class as a connection factory. More precisely, the Connector.open() method implements the factory method design pattern. For more information on this and other design patterns, see Design Patterns by Gamma et al., cited in the References section at the end of this book. You pass the Connector class the generically formed address of some resource to which you want to establish a connection. This URI specifies the scheme—the type of connection desired—but otherwise abstracts the protocol-specific details of the connection. The factory passes back an object whose class implements the protocol represented by the scheme field of the connection request.
This object's class implements the interface that characterizes the type of connection established. The type of the implementing class is abstracted because you refer to the object using a reference to the interface type. For instance, the connection object returned in Listing 8.4 implements the HttpConnection interface. Look at the following lines of code from the HttpResource.connect() method.
Connection conn; HttpConnection httpConn; ... conn = Connector.open(uri); httpConn = (HttpConnection) conn;

179
...
The first statement returns the connection object. The URI specifies the http scheme. The actual connection object is more than just a Connection; it's an HttpConnection. Therefore you can safely downcast the reference to one whose type is HttpConnection. You can do this because the factory method returned an object whose class implements HttpConnection, not just Connection. This is a different object from the one that would be returned for other values of the scheme field in the Connector.open() call.
The first statement of the following excerpt from the HttpResource.run() method prints the fully qualified name of the concrete class that implements the HttpConnection interface:
public void run () { System.out.println("Connection class name = " + conn.getClass().getName()); connect(); parse(); ... }
If you run this program on Sun's J2ME Wireless Toolkit emulator, you see that the following output identifies the name of the class that's part of Sun's J2ME reference implementation, which is used by the J2ME Wireless Toolkit emulator:
com.sun.midp.io.j2me.http.Protocol
If you run the program in Listings 8.1 through 8.4 on another manufacturer's emulator, you'll see a different class name. It will identify that manufacturer's implementation of the HttpConnection interface. All of the protocol-specific classes are implementation dependent.
HTTP Connection State Model. HTTP connections exist in one of three states during their lifetimes. This state model reflects the request-response nature of the HTTP protocol. The three states are:
• Setup— The connection object is created, but there's no connection to the origin server yet. • Connected— The connection has been made to the server, request parameters have been
sent to the server, and the connection object awaits the server's response. • Closed— The connection has been closed. Subsequent calls to the connection's methods
will throw an IOException.
Figure 8.3 shows the state transition diagram for HTTP connection objects. The connection object exists in the setup state when it's instantiated. At this point, the actual request string has not been constructed. To construct the request, you must set the HTTP method and the request headers. These values are set using the methods in Table 8.6. Before the connection can enter the connected state—before it can send the request to the server and get a response—it must set the HTTP request parameters, that is, it construct the request message. Invoking these methods, however, doesn't cause any state transition.
Figure 8.3. HttpConnection objects transition to three different states during their existence.
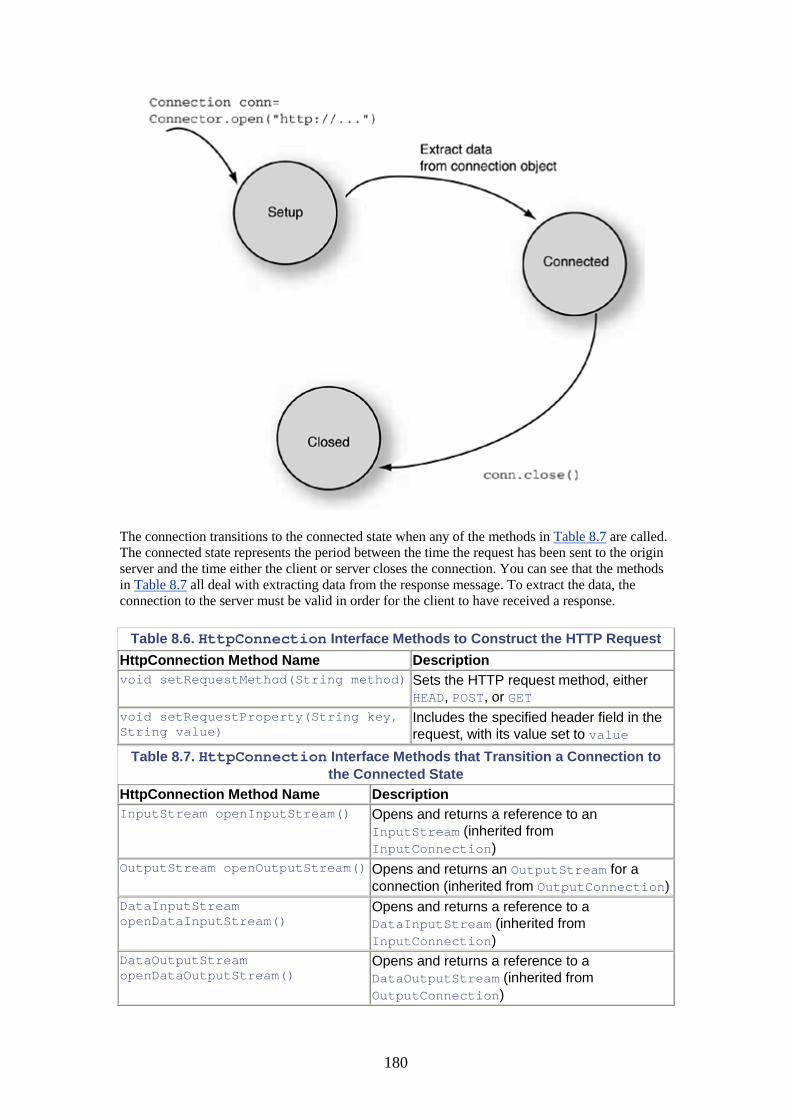
180
The connection transitions to the connected state when any of the methods in Table 8.7 are called. The connected state represents the period between the time the request has been sent to the origin server and the time either the client or server closes the connection. You can see that the methods in Table 8.7 all deal with extracting data from the response message. To extract the data, the connection to the server must be valid in order for the client to have received a response.
Table 8.6. HttpConnection Interface Methods to Construct the HTTP Request HttpConnection Method Name Description void setRequestMethod(String method) Sets the HTTP request method, either
HEAD, POST, or GET void setRequestProperty(String key, String value)
Includes the specified header field in the request, with its value set to value
Table 8.7. HttpConnection Interface Methods that Transition a Connection to the Connected State
HttpConnection Method Name Description InputStream openInputStream() Opens and returns a reference to an
InputStream (inherited from InputConnection)
OutputStream openOutputStream() Opens and returns an OutputStream for a connection (inherited from OutputConnection)
DataInputStream openDataInputStream()
Opens and returns a reference to a DataInputStream (inherited from InputConnection)
DataOutputStream openDataOutputStream()
Opens and returns a reference to a DataOutputStream (inherited from OutputConnection)

181
long getDate() Gets the value of date header field String getEncoding() Gets the string that describes the encoding of
the content in the response (inherited from ContentConnection)
long getExpiration() Gets the value of the expires header field String getHeaderField(String name)
Gets the value of the specified header field
long getHeaderFieldDate(String name, long def)
Gets the value of the specified header field. The value is parsed as a number
String getHeaderFieldInt(String name, int def)
Gets the value of the specified header field. The value is parsed as a number
String getHeaderFieldKey(int n) Gets the specified header field. The argument represents the index of the header field
long getLastModified() Gets the value of the last-modified header field
long getLength() Retrieves the length of the header field int getResponseCode() Gets the status code of the HTTP response String getResponseMessage() Gets the HTTP response message String getType() Gets the type of content provided by the server
(inherited from ContentConnection)
Once a connection is in the connected state, you can only extract data from it or close it. You can invoke the methods in Table 8.7 and 8.9. The methods in Table 8.8 all extract various parts of the HTTP response, with the exception of the close() method, which closes the connection.
Once a connection is in the connected state, you can no longer invoke the methods in Table 8.6. You can't reset request parameters, which means you can't reuse a connection object to access multiple URIs. You're forced to instantiate a new connection by passing a new URI to the Connector.open() call. Incidentally, either the client can close the connection after receiving the response, or the origin server can close the connection after sending the response.
Table 8.8. HttpConnection Interface Methods Called in the Connected State HttpConnection Method Name Description void close() Closes this connection (inherited from interface
Connection) String getFile() Gets the <file> field of the URL of this
connection String getHost() Gets the <host> field of the URL of this
connection int getPort() Gets the <port> field of the URL of this
connection String getProtocol() Gets the <protocol> field of the URL of this
connection String getQuery() Gets the query string of the URL of this
connection String getRequestMethod() Gets the current request method (GET, POST,
and so forth) String getRequestProperty(String key)
Gets the value of the named general request property of this connection
String getRef() Gets the <ref> field of the URL of this
182
connection String getURL() Gets the complete URL of this connection as a
string value
Notice in Listing 8.4 that the order in which header fields are inserted into request messages or extracted from the server's response message is irrelevant. The connection class handles the abstraction of creating well-formed HTTP messages and parsing HTTP responses.
Using Content Connections. The power behind using standard content connection mechanisms is that no proprietary engineering is required to create either an access mechanism or an agreed-upon format for message payloads. This standardization is the motivation behind supporting an HTTP connection mechanism in MIDP. HTTP is the most ubiquitous standard application-level protocol in use on the Internet today. It gives you the ability to access a large variety of network services because it supports the transport of arbitrary data through its use of a MIME-like tagging mechanism.
HTTP connections can transport many different kinds of content, such as HTML and XML. Additionally, HTTP can be used as a wrapper to tunnel other application-level protocol data. You thus have a convenient data-transfer mechanism for client-server applications.
HTTP is widely used by servers as the mechanism to deliver a plethora of services. Services can be implemented using any one of a variety of technologies independently from their use of HTTP as the delivery mechanism. Services can be implemented using Java servlets, Java Server Pages (JSP), Perl scripts, CGI, and so forth.
The servlet model is particularly powerful, because servlets are written in Java and easily interface with other Java enterprise technologies, and they easily interface to client technologies. Additionally, servlet systems scale well, are hosted by standard Web servers, and can easily construct output in various formats. In chapter 11, you'll learn how wireless Internet portals use these technologies to build services for mobile devices.
Datagram Connections and Datagrams
The javax.microedition.io.DatagramConnection interface directly extends Connection. Its position in the inheritance hierarchy diagram in Figure 8.2, as well as its name, suggests that datagram connections are indeed connections, albeit different from either stream- or content-oriented connections. In fact, the DatagramConnection interface characterizes connections that send and receive datagrams through the use of a datagram protocol.
In the world of inter-networking, the term datagram protocol implies a lightweight, stateless protocol. But this distinction itself doesn't really help explain its position in the generic connection framework hierarchy. A better perspective, perhaps, is to distinguish between application-layer protocols and lower-layer protocols.
The term datagram protocol implies a protocol that sits at a lower layer in the OSI model than do application layer protocols. Datagram protocols transport datagrams, which are sometimes called packets. These protocols typically route datagram messages from one machine to another based solely on information contained within the datagram. Multiple packets sent from one machine to another might be routed differently and might arrive in any order at the destination. Packet delivery is generally not guaranteed.
The Internet Universal Datagram Protocol (UDP) is one concrete example of a datagram protocol. In fact, it's the protocol supported by some MIDP implementations. It's built directly upon the network layer Internet Protocol (IP). Remember that according to the MIDP specification, HTTP
183
1.1 is the only protocol that implementations must support; all others are optional. Developers should keep this in mind with regard to application portability.
Use of the UDP protocol gives MIDP applications another standard mechanism to communicate with well-defined network services. In chapter 11, you'll learn about some circumstances in which the use of datagram protocols is preferred over higher-level protocols.
UDP lacks many of the features that come with transport layer protocols like TCP, such as option negotiation for connections, packet reassembly, end-to-end flow control, windowing, error recovery, fragmentation, and guaranteed delivery. It relinquishes these features in favor of very efficient, fast delivery. MIDP applications can use datagram connections where they need fast, stateless connections and where guaranteed delivery isn't required.
Table 8.9 lists the methods of the DatagramConnection interface. You can see that it's a relatively simple interface. This simplicity reflects the low-level nature of the underlying implementation protocol. Compare this to the HttpConnection interface, whose methods reflect the relatively more complex nature of HTTP protocol messages, and which use MIME type message fields to define message semantics. Unlike application-layer protocols such as HTTP, datagram protocols don't define attributes that reflect the nature of the payloads they transport.
Table 8.9. DatagramConnection Interface Methods DatagramConnection Method Name Description int getMaximumLength() Returns the maximum allowed datagram length;
determined by the underlying protocol implementation
int getNominalLength() Returns the nominal length of a datagram Datagram newDatagram(byte[] buf, int size)
Constructs a new datagram object, taking the data from the specified array
Datagram newDatagram(byte[] buf, int size, String addr)
Constructs a new datagram object with the specified array data and with the specified destination address
Datagram newDatagram(int size) Constructs a new datagram object Datagram newDatagram (int size, String addr)
Constructs a new datagram object with the specified address
void receive(Datagram dgram) Receives a datagram and takes its data to populate the given datagram argument
void send(Datagram dgram) Sends the specified datagram
To use a datagram connection a client application performs the following steps:
1. It constructs a DatagramConnection object. 2. It obtains a Datagram object from the DatagramConnection object. 3. It then populates the Datagram object with the data that comprises the payload to be sent
to the receiver. 4. It requests the connection to send the datagram. 5. It requests the connection to receive a response datagram.
To construct a datagram connection, you still need to use the Connector class. You indicate your desire to obtain a datagram connection by supplying the string datagram for the scheme field of the URI that you pass to one of the three forms of the Connector.open() method. The complete syntax for datagram addresses is as follows:
address := <protocol>://<target>
184
protocol := "datagram" target := [<host>]:<port> host := <valid DNS host name or number> port := <valid system port number>
The specification of the host field is optional. If you omit the host field, the connection represents a server connection—the implementation assumes that the entity requesting the connection is a server. Servers don't initiate message transmission, so no host name is needed to specify a destination. A server connection waits for a client to send a datagram to it. The server extracts the address of the sender from the datagram it receives and uses it as the address for its response. An example of a server connection specification is
datagram://:513
If the host field is specified, the connection is opened as a client connection. The implementation assumes that the requestor is a client that's initiating a connection because it wishes to send a datagram to the addressed host. An example of a client connection specifying a known host is
datagram://server.foo.com:513
Once the connection is established, your application can use it to send and receive datagrams. The javax.microedition.io.Datagram interface defines datagrams, which are the message units sent and received by datagram protocols. The DatagramConnection object sends and receives Datagram objects. Notice that the methods in Table 8.9 contain several references to the Datagram type.
Table 8.10 lists the methods in the Datagram interface. Notice that they only reflect the following concepts:
• address— represents the address of the sender or receiver • payload— the datagram treats the data as a single opaque entity with no interpretation of
its form, structure or type
These are the minimum pieces of information that all packets require. All datagrams must set these two pieces of information in order to be sent successfully.
The Datagram interface lacks information about the syntax or semantics of payloads. The reason is simply that datagrams define no syntax or semantics for the data they carry. Datagrams simply treat their payloads as sequences of bytes. A datagram's payload is defined simply as a byte [].
A datagram can contain any information. A datagram service defines the format and content of its datagrams. Sender and receiver must construct datagrams in such a way that they adhere to these definitions. That is, the byte[] must be written correctly by the sender and parsed correctly by the receiver.
The Datagram interface extends the DataInput and DataOutput interfaces in the java.io package. This derivation ensures that it has a convenient interface for reading and writing binary data into and out of a datagram. Figure 8.4 shows the derivation hierarchy of the Datagram interface. Table 8.11 lists the methods of the DataInput interface, and Table 8.12 lists the methods of the DataOutput interface. These interfaces are the same as the ones in the J2SE java.io package.
Figure 8.4. A datagram characterizes generic data. The methods in this hierarchy of interfaces support only the lowest abstraction that enables the manipulation of
built-in data types. There's no abstraction of protocol-specific fields.

185
Table 8.10. Datagram Interface Methods Datagram Interface Method Name Description String getAddress() Returns the address in this datagram byte[] getData() Returns the buffer containing the datagram
payload int getLength() Returns the length of the datagram's
payload int getOffset() Returns the offset of the read/write pointer
in the payload buffer void reset() Resets the position of the read/write
pointer in the payload buffer void setAddress(Datagram reference) Sets the address of this datagram to be
that of the specified datagram void setAddress(String addr) Sets the address to that specified by the
string void setData (byte[] buffer, int offset, int len)
Sets the payload of this datagram
void setLength(int len) Sets the length of the datagram's payload Table 8.11. DataInput Interface Methods
DataInput Method Name Description boolean readBoolean() Reads a boolean value from the input stream byte readByte() Reads one byte from the input stream char readChar() Reads a character from the input stream void readFully(byte[] b) Reads bytes from the input stream until the
specified array is full void readFully(byte[] b, int off, int len)
Reads the specified number of bytes into the specified buffer, starting at the offset indicated
int readInt() Reads an int value from the input stream long readLong() Reads a long value from the input stream short readShort() Reads two input bytes and returns a short value int readUnsignedByte() Reads one byte, zero extended, from the stream int readUnsignedShort() Reads two input bytes and returns an int value String readUTF() Reads in a UTF-8 encoded string of characters int skipBytes(int n) Skips over n bytes from the input stream

186
In addition to agreeing on format, sender and receiver must be able to locate each other. Each service has a binding to a standard port. This binding ensures that a client knows how to establish a connection to a server that provides the desired service.
Table 8.12. DataOutput Interface Methods DataOutput Method Name Description void writeByte(byte[] b) Writes all bytes to the output stream void write (byte[] b, int off, int len)
Writes the specified number of bytes to the output stream, starting at the offset
void write(int b) Writes the low-order byte to the output stream void writeBoolean(boolean v) Writes a boolean value void writeByte(int v) Writes the low-order byte of the int void writeChar(int c) Writes the two low-order bytes to the output void writeChars(String s) Writes every character as Unicode to the output void writeInt(int v) Writes an int (four bytes) to the output stream void writeLong(long v) Writes the long value (four bytes) to the output void writeShort(int v) Writes the int as two bytes to the output stream void writeUTF(String s) Writes each character in Java-modified UTF format,
preceded by two bytes indicating the length in bytes
For example, if a MIDP application wants to communicate with a standard Unix Network Time Protocol (NTP) daemon, it would construct a connection that uses the NTP daemon's standard port number, which is 123. The MIDP client application must format the payloads in its request datagrams to adhere to the NTP definition. It must also be able to parse the response sent back by the server.
MIDP differs somewhat from the J2SE platform in its support for datagram connections. J2SE has the java.net package. For instance, its DatagramPacket class defines a datagram. The DatagramSocket class implements a datagram protocol over a socket connection.
These classes don't exist in CLDC/MIDP. In fact, there's no java.net package available in CLDC/MIDP. On the other hand, the CDC contains a robust java.net package that contains these classes.
Listing 8.5 demonstrates the above concepts. It represents a datagram client that connects to a particular datagram service. The important steps that the program performs are as follows:
1. It obtains a new DatagramConnection object. 2. It gets a Datagram object from the DatagramConnection. 3. It populates the Datagram with the properly formatted semantic information that
comprises the request. (As the developer, ensure that the length of the datagram doesn't exceed the maximum length allowed by the protocol.)
4. It receives a Datagram response from the DatagramConnection. This call blocks until a datagram is received or the call times out.
5. It processes the data in the datagram. 6. It repeats the cycle for ongoing communications.
The program in Listing 8.5 doesn't actually implement Step 3. Doing so would require constructing a properly formatted message as expected by the service to which the client is connecting. Also, the "processing" of Step 5 simply involves printing the server's response to standard output. In a real application, the client would use the datagram information in some way for local processing.

187
Listing 8.5 Datagrams are sent and received by a datagram connection. This program parses the payload of a received datagram and displays it on screen.
import javax.microedition.midlet.MIDlet; import javax.microedition.lcdui.Display; import javax.microedition.lcdui.Command; import javax.microedition.lcdui.CommandListener; import javax.microedition.lcdui.Displayable; import javax.microedition.lcdui.TextBox; import javax.microedition.lcdui.TextField; import javax.microedition.io.Connector; import javax.microedition.io.Datagram; import javax.microedition.io.DatagramConnection; import java.io.IOException; /** This class implements a datagram client that connects to a Network Time Protocol (NTP) server on the NTP standard port 123. The client is designed to be controlled by a separate thread, hence it implements Runnable. An application can do communications asynchronously from its UI management. Note that this file represents only a skeleton of a complete client. The full semantics of the NTP service messages are not shown here. The purpose is simply to demonstrate the structure of a client using MIDP datagrams. */ public class DatagramTest extends MIDlet implements CommandListener, Runnable { private static final int BUF_SIZE = 1024; private static Command exit = new Command("Exit", Command.EXIT, 1); private static DatagramTest instance; private Display display; private TextBox dgramText; // A datagram connection. private DatagramConnection conn; // A datagram which holds sent and received data. private Datagram dgram; // The address of the Network Time Protocol (NTP) daemon // process on a particular server. NTP uses the UDP // protocol. private String address = "datagram://sr1-usca28-07:123"; /** No-arg Constructor. */ public DatagramTest() {

188
super(); instance = this; } /** Constructor. Note no validity checks are made on the parameter. If it is malformed, an exception will be thrown when the connection is attempted. @param service the URI of the datagram service to which to connect. */ public DatagramTest(String service) { this(); address = service; } /** Returns the single instance of this class. Calling this method before constructing an object will return a null pointer. @return an instance of this class. */ public static DatagramTest getInstance() { return instance; } public void startApp() { display = Display.getDisplay(this); dgramText = new TextBox("Datagram contents", null, 2048, TextField.ANY); dgramText.setCommandListener(this); display.setCurrent(dgramText); run(); } /** Runs the datagram client. Opens a connection to the datagram service. Populates a datagram object and sends it. Receives the response synchronously, and writes the bytes to standard output for demonstration purposes. Catches any connection related excceptions silently. */ public void run() { try { int maxLength; // Open a client connection. conn = (DatagramConnection)Connector.open(address); maxLength = conn.getMaximumLength(); dgram = conn.newDatagram(maxLength);
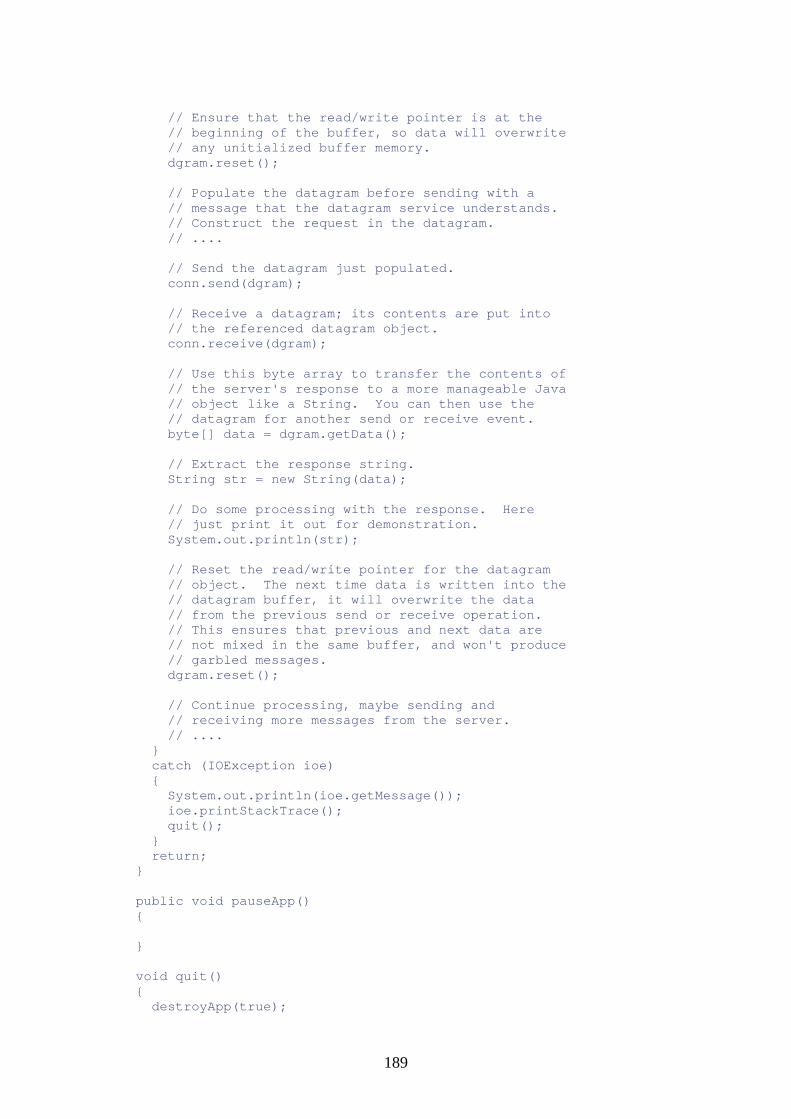
189
// Ensure that the read/write pointer is at the // beginning of the buffer, so data will overwrite // any unitialized buffer memory. dgram.reset(); // Populate the datagram before sending with a // message that the datagram service understands. // Construct the request in the datagram. // .... // Send the datagram just populated. conn.send(dgram); // Receive a datagram; its contents are put into // the referenced datagram object. conn.receive(dgram); // Use this byte array to transfer the contents of // the server's response to a more manageable Java // object like a String. You can then use the // datagram for another send or receive event. byte[] data = dgram.getData(); // Extract the response string. String str = new String(data); // Do some processing with the response. Here // just print it out for demonstration. System.out.println(str); // Reset the read/write pointer for the datagram // object. The next time data is written into the // datagram buffer, it will overwrite the data // from the previous send or receive operation. // This ensures that previous and next data are // not mixed in the same buffer, and won't produce // garbled messages. dgram.reset(); // Continue processing, maybe sending and // receiving more messages from the server. // .... } catch (IOException ioe) { System.out.println(ioe.getMessage()); ioe.printStackTrace(); quit(); } return; } public void pauseApp() { } void quit() { destroyApp(true);

190
notifyDestroyed(); } public void destroyApp(boolean destroy) { try { conn.close(); } catch (IOException ioe) { ioe.printStackTrace(); } } public void display() { Display.getDisplay(this).setCurrent(dgramText); } public void commandAction(Command c, Displayable d) { if (c == exit) { quit(); } } }
Notice that any Datagram objects by default contain the same address as the DatagramConnection object that constructs them. You can change the address of a datagram using the methods in the Datagram interface.
The application must supply a Datagram object to send or receive a datagram. To send a datagram, the application populates the datagram object with data that constitutes the message to be sent to the server. When an application receives a datagram, its connection object populates the datagram object with the data it receives from the sender.
You can use the same datagram object to send and receive multiple messages. To do so, you must ensure that you don't mix data from different messages. Before reusing a datagram object to send or receive a new message, use the Datagram.reset() method to reset the read/write buffer pointer.
A Datagram object has a buffer that stores the bytes that comprise the message being sent or received. If you reuse a Datagram object, the bytes that were placed in the buffer from the previous send or receive operation are still there. Calling reset() sets the read/write offset pointer to point to the beginning of this buffer and sets the length to zero. Thus, you're effectively overwriting any previous data, ensuring that you are not mixing bytes from two separate messages.
Socket Connections
Socket connections are the last type of connection explicitly represented by the MIDP networking infrastructure. MIDP implementations that support sockets implement traditional Unix style sockets. It's worth mentioning once more that implementations aren't required to support any connection mechanism other than HTTP 1.1. Many won't support socket connections.
191
The StreamConnectionNotifier interface represents a well-known server socket. The StreamConnection interface that you saw previously represents a client socket.
A socket is a circuit oriented networking mechanism at the transport layer that usually implements the TCP/IP pair of protocols in fixed internetwork environments. A socket server is an application-level piece of software that provides a connection-oriented networking service through the use of sockets.
Sockets impose absolutely no structure on the payloads they carry. Like datagrams, they simply transport sequences of bytes. The service defines the format, syntax, and semantics of the transported data that comprise messages. Clients must adhere to these definitions in order to use a service.
Socket connections have state at the transport layer. Supporting state is natural when sockets are implemented using TCP connections. TCP is a connection oriented transport-layer protocol designed to persist across multiple transmissions of data between client and server.
It's not imperative, however, that sockets be implemented using TCP/IP. Nevertheless, because TCP/IP is the Internet standard transport- and network-layer protocol pair, systems that implement sockets using other mechanisms must interface to Internet hosts through the use of a gateway. This requirement holds true in both fixed and wireless network environments.
Currently, TCP/IP is unsupported in many wireless networks. Nevertheless, wireless networks can still support socket connections. They can obey the socket interface and create the same connection-oriented abstraction as TCP/IP using other protocols—even proprietary ones. If the carrier uses a non-standard protocol stack, however, they'll have a gateway that interfaces their wireless network to the outside world.
Application-layer protocols may be defined on top of transport-layer protocols if needed. The application-layer protocol implementation uses whatever transport mechanism is available. For example, HTTP is an application-layer protocol.
MIDP application designers can choose to build an application-layer protocol directly on top of a socket mechanism if one is supported. If sockets aren't supported, the application-layer protocol messages can be tunneled using HTTP. The application-layer protocol is responsible for defining its own state, which is different from the transport-layer protocol state.
Socket Connection Model. Socket connections are established like other types of connections; clients use the Connector.open() method and specify the URI of a socket-based service to which they want to connect. The connection model is slightly different on the server side, however, because of the connection-oriented nature of sockets. This model is necessary for servers to be able to accommodate multiple, simultaneous client connections.
There's a standard idiom that you must use in order to work with server sockets. It's the same as the Unix-style socket connection model. The following steps outline the connection scenario:
1. A server daemon establishes a connection that's bound to a well-known socket—a server socket whose port and service have been previously established and advertised.
2. The server daemon listens for client connection requests on this connection. 3. A client makes a connection request to the server daemon and awaits a response. 4. The daemon accepts the connection request and creates a new connection to the client; the
server binds the connection to a new socket. The server creates a new application object that will communicate with the client over the new connection and spawns a thread to control this entity.
5. The client connection request returns. The client application now has a connection object whose end point is the new socket created by the server.
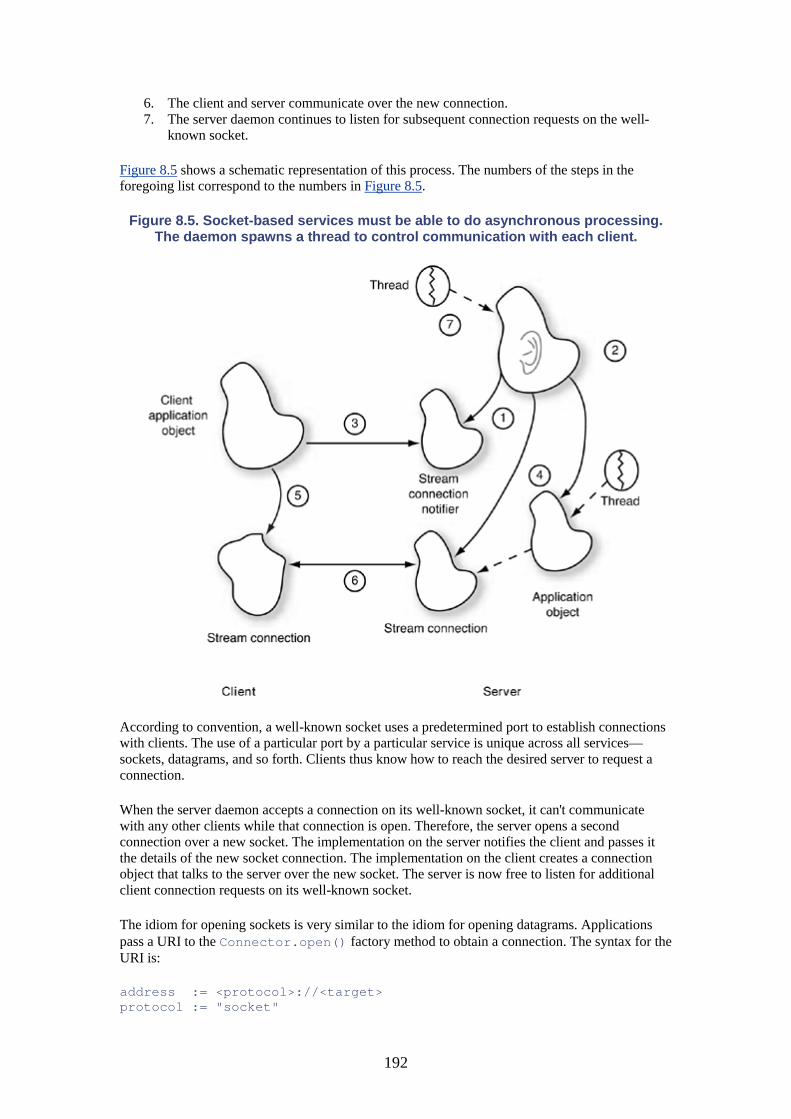
192
6. The client and server communicate over the new connection. 7. The server daemon continues to listen for subsequent connection requests on the well-
known socket.
Figure 8.5 shows a schematic representation of this process. The numbers of the steps in the foregoing list correspond to the numbers in Figure 8.5.
Figure 8.5. Socket-based services must be able to do asynchronous processing. The daemon spawns a thread to control communication with each client.
According to convention, a well-known socket uses a predetermined port to establish connections with clients. The use of a particular port by a particular service is unique across all services—sockets, datagrams, and so forth. Clients thus know how to reach the desired server to request a connection.
When the server daemon accepts a connection on its well-known socket, it can't communicate with any other clients while that connection is open. Therefore, the server opens a second connection over a new socket. The implementation on the server notifies the client and passes it the details of the new socket connection. The implementation on the client creates a connection object that talks to the server over the new socket. The server is now free to listen for additional client connection requests on its well-known socket.
The idiom for opening sockets is very similar to the idiom for opening datagrams. Applications pass a URI to the Connector.open() factory method to obtain a connection. The syntax for the URI is:
address := <protocol>://<target> protocol := "socket"

193
target := [<host>]:<port> host := <valid DNS host name or number> port := <valid system port number>
Once again, the presence or absence of the hostname in the URI dictates whether the connection is a server or client connection. A server daemon first opens a connection on its well-known socket, as shown in the following example:
StreamConnectionNotifier wellKnown = Connector.open("socket://:98765");
The MIDP specification also allows the use of the serversocket scheme for server connections. This latter scheme may be advantageous because the explicit use of serversocket in a piece of code makes it more obvious to someone reading the code that a server connection is being established. The following line of code demonstrates the use of the serversocket scheme:
StreamConnectionNotifier wellKnown = Connector.open("serversocket://:98765");
The StreamConnectionNotifier class is the MIDP equivalent of the J2SE platform's java.net.ServerSocket class. A StreamConnectionNotifier is essentially a server socket.
Both of the above statements return a connection object that represents a connection to the well-known socket. The server then listens on this connection for connection requests from clients, with a statement like the following:
StreamConnection clientConn = wellKnown.acceptAndOpen();
This statement blocks until the arrival of a client connection request. Upon arrival of a client connection request, the acceptAndOpen() method processes the request before returning control. To process the connection request, it
1. accepts the connection request 2. creates a new connection object 3. binds the connection to an unused socket 4. notifies the client of the new socket connection
These steps explain the name StreamConnectionNotifier. The server daemon is "notified" of a connection request when the blocking acceptAndOpen() call returns. And, it notifies the client to listen on the new socket it establishes for the client-server communication. Table 8.13 lists the StreamConnectionNotifier interface's single method.
Table 8.13. StreamConnectionNotifier Interface Methods StreamConnectionNotifier Method
Description
StreamConnection acceptAndOpen()
Returns a new stream object bound to a new socket and connected to the requesting client
Clients request a connection to a well-known socket by issuing a client connection request in the standard manner. For example, the following statement represents a client connection request:
StreamConnection conn = Connector.open("socket://server.foo.com:98765");
194
Clients must include the name of the server hosting the service; the port number represents the server's well-known socket. Clients that want to connect to a service on the local machine can use the localhost designation for the server, as shown in the following call:
StreamConnection conn = Connector.open("socket://localhost:98765");
Both the server's StreamConnectionNotifier.acceptAndOpen() call and the client's Connector.open() call create a StreamConnection object. You've already seen the StreamConnection class in the context of our discussion of communication ports.
You might be wondering why the generic connection framework uses the StreamConnection interface to represent socket connections as well as connections to communications ports. The reason is that this generic name, as the name itself suggests, aptly represents both types of connections as streams of bytes. Furthermore, it can represent any other type of stream-oriented connection, even if it uses a different protocol.
Nothing about the StreamConnection interface stipulates what kinds of protocols it can represent. The interface abstracts the protocol implementation details from the application. Applications are not aware of the platform-specific classes that implement the interfaces. Although actual implementations of a generic connection framework interface may vary, they must support the intended behavior and semantics of the interface.
It's important to mention that not all implementations support server sockets. And, of those that do, several currently don't work correctly. If server socket support isn't available on your implementation but you must use sockets for some reason, you'll have to devise a scheme by which a client can still connect to a "server." The server won't be able to support a well-known socket model; it will have to define a different model that still allows clients to have a means of establishing a connection.
Listings 8.6 through 8.8 demonstrate a set of classes that constitute a framework for socket communications in MIDP. The intention is that these classes be used by an application that needs socket communications. These examples comprise no more than a framework that builds the basic framework of the socket communications support. They're not intended to be a functioning application.
Certain issues have been ignored in this code. For instance, the networking service itself is undefined; there's no definition of the application-level protocol message syntax or semantics. Additionally, the code doesn't address the cleanup of worker threads on the server side. The classes that comprise this example are:
• ServerSocket— Defines the server daemon that listens on a well-known socket for client connection requests.
• ServerAgent— Defines the entity that the daemon instantiates once for each client request. Each instance communicates with a client. This class defines the actual service.
• ClientSocket— Represents a client.
Listing 8.6 A server spawns a new thread to produce a server-side entity that communicates with each client. The client and server must define the semantics of their messages.
import javax.microedition.io.Connector; import javax.microedition.io.StreamConnection; import javax.microedition.io.StreamConnectionNotifier; import java.io.IOException;
195
/** This class implements a service that listens for client connection requests on a well-known socket. It opens a connection on a predefined port number. It then blocks on this port, waiting for a client connection request. When a request arrives, it accepts the request, and opens a new socket connection. These two steps result in the implementation notifying the client implementation of the new socket connection. This server then spawns a component, and hands it the new connection object. The component runs in a separate thread. The component is now free to communicate with the client asynchronously from the server's continued operation. */ public class ServerSocket implements Runnable { // The default port on which the well-known // socket is established. public static final String DEFAULT_PORT = "9876"; // The port on which the well-known socket is // established. protected String wellKnownPort; // The URI this server uses to open its well-known // socket. protected String uri; // Connection for the well-known socket. protected StreamConnectionNotifier wellKnownConn; // A socket connection that connects a client. protected StreamConnection clientConn; /** Constructor for subclasses. */ protected ServerSocket() { super(); } /** Constructor. @param port the well-known port on which to establish this object as a listener. */ public ServerSocket(String port) { this(); if (port == null) { wellKnownPort = DEFAULT_PORT; } else {

196
wellKnownPort = port; } setURI(port); } protected void setURI(String port) { StringBuffer buf = new StringBuffer("socket://:"); buf.append(port); uri = buf.toString(); } /** Run this server. This method should be called explicitly after constructing this object. It starts listening for client requests on the well-known socket. It is up to the caller to start this execution in a separate thread. */ public void run() { while (true) { try { // Open a well-known socket connection for // this "service". wellKnownConn = (StreamConnectionNotifier)Connector.open(uri); // Listen for connection requests. This call // blocks until a connection request is // received. clientConn = wellKnownConn.acceptAndOpen(); // Instantiate a server agent, the object that // presents the service to the client. Each // instance communicates with one client. // Spawn a thread to communicate with the // client making the connection request. ServerAgent agent = new ServerAgent(clientConn); Thread thread = new Thread(agent); } catch (IOException ioe) { System.out.println(ioe.getMessage()); ioe.printStackTrace(); break; } } } }
Listing 8.7 A server agent is an object that communicates with a client independently from the server daemon. It runs in its own thread, allowing other instances to simultaneously communicate with their clients.
import javax.microedition.io.StreamConnection; /**

197
This class defines the component that the server creates to communicate with a client. It acts like an "agent" on behalf of the server so that the server is free to listen only for new connection requests. Instances of this class are indeed part of the server. */ public class ServerAgent implements Runnable { private StreamConnection conn; /** Constructor. @param c the connection object that represents the connection to the client. The ServerSocket class creates this object and passes it to this constructor. */ public ServerAgent(StreamConnection c) { super(); conn = c; } /** Executes this server agent. Starts the dialog with the client. This method should be called explicitly after this object is created. */ public void run() { // Communicates with the client. Implements // the behavior that defines this service. } }
Listing 8.8 A client has a dedicated connection to a server agent. The state model for the communications, as well as the syntax and semantics of the communications, are defined by the server but must be obeyed by clients.
import javax.microedition.midlet.MIDlet; import javax.microedition.io.StreamConnection; import javax.microedition.io.Connector; import java.io.IOException; /** This class implements a client that connects to a server. To instantiate this class you must specify the server (DNS host name) and the well-known port of the desired service. */ public class ClientSocket implements Runnable { public static final String PROTOCOL = "socket"; // The port of the server's well-known socket. private String serverPort; // The host name of the server to which to connect. private String serverHostName;
198
// The URI to the well-known server socket. private String serverURI; // A connection to the server. private StreamConnection streamConn; protected ClientSocket() { super(); } /** Public constructor. You must specify the DNS name of the server and the service's port number. @param server the DNS name of the machine to which you want to connect. @param port the port number on server to which to connect. */ public ClientSocket(String server, String port) throws IOException { this(); serverHostName = server; serverPort = port; serverURI = buildServerURI(); open(); } /** Constructor. @param uri the fully formed URI of the service to which you make a connection request. @throws InvalidArgumentException of the URI is malformed. */ public ClientSocket(String uri) throws IOException { this(); serverURI = uri; } /** Opens the connection. After this object is created, the connection to the server is not yet open. You must open it explicitly. This makes the usage model for clients more flexible. @throws IOException if the connection can't be opened for some reason. */ public void open() throws IOException { streamConn = (StreamConnection)

199
Connector.open(serverURI); } /** Closes the connection to the server. */ public void close() { try { streamConn.close(); } catch (IOException ioe) { ioe.printStackTrace(); } } /** Executes the client communication. Starts the client sending of requests to the server. This method should be called after the open() method establishes the connection. */ public void run() { // Start communicating with the server. // Send requests, read responses, .... } private String buildServerURI() { StringBuffer uri = new StringBuffer(PROTOCOL); uri.append("://"); uri.append(serverHostName); uri.append(":"); uri.append(serverPort); return uri.toString(); } }
Using Socket Connections in MIDP Applications. Certainly the fact that the StreamConnectionNotifier interface is defined as part of the MIDP IO package suggests that it should be used by applications running on MIDP devices. This means that a MIDlet would maintain an open connection to a well-known socket for clients to use. The clients, however, may reside elsewhere.
Actually, clients should be remote from the server. The intention of a server socket on a mobile device is to handle inbound connection requests from remote clients. Using sockets for communication on the same device is particularly inefficient. Although it's possible, better models exist.
A remote client can run on another mobile device or on a remote host computer. Potentially, either of these types of clients could be in the same network as the device that hosts the server socket, or they can reside externally to the carrier's network. The characteristics of the carrier's network in
200
which your application is running will determine the set of clients that can reach your mobile device.
Carrier networks use some network-layer protocol as part of their network's protocol stack. Each device has a unique network address while it's connected to the network. In order for clients to reach your device—and your server socket—they must be able to determine your device's network address. A carrier's network configuration and implementation might not expose the addresses of connected mobile devices internally or externally, thereby making it impossible for clients to reach the desired mobile device.
Many carrier networks use some kind of dynamic network address assignment for mobile devices. If this were the case, the address of a mobile device would have to be determined dynamically by clients wishing to connect. If no lookup mechanism is provided, clients won't be able to request connections to the device.
Regardless of whether mobile device addresses are static or dynamic, the carrier network may employ some kind of network address translation (NAT) scheme to modify or transform the address of the mobile device. The motivation for using a NAT scheme could be address space limitations or security. Certain network protocols may not have enough address space to handle the sheer numbers of network devices. If this is the case, and if the carrier wishes to expose network addresses of its devices, it would have to provide some kind of registry for a dynamic address mapping and lookup mechanism. Otherwise, your server application won't be reachable.
For security reasons, carriers might not want to expose the addresses of their users' mobile devices to the outside world. If such is the case, your application might be reachable only by applications running on the carrier's host systems. Moreover, access might be restricted to privileged applications, even within the carrier's network. And even within the network, each device would have to have a way of advertising its network address for other devices to reach it. In most current-generation wireless networks, mobile devices aren't aware of each other's presence or address. This could change with 3G networks, which will be more prevalent in a few years' time.
3G wireless networks are moving toward adoption of IPv6 as their network layer protocol. With IPv6, there are plenty of addresses available to assign a unique IP address to every mobile device in the world. If each device has a unique static IP address, any application that knows your device's address can connect to a well-known port on your device.
Once again, however, security and configuration policies exercised by carriers might affect the actual capabilities available to applications.
Differences between J2ME and J2SE Networking
The previous sections in this chapter described the full set of networking capabilities in the MIDP. The MIDP java.io package defines all these capabilities. There's no MIDP java.net package as there is in J2SE.
You should also be aware that the MIDP java.io package supports a subset of the familiar J2SE byte- and character-oriented input and output stream classes. In particular, BufferedReader, LineNumberReader, and StringReader classes of the J2SE java.io package are missing from the MIDP java.io package.
Although a basic circuit-based, socket-oriented infrastructure exists in MIDP implementations, MIDP still lacks support for several distributed-communications mechanisms that are available on the J2SE platform. The following application-level facilities are missing from the MIDP:

201
• RMI requires too much processing for mobile devices to support at this time. • Jini requires RMI; therefore, it's not present. • JavaSpaces doesn't exist in J2ME. • CORBA middleware doesn't exist in J2ME.
You'll see in chapter 11 that the absence of these mechanisms isn't necessarily a hindrance. The primary reason for omitting them involves the processing power of personal mobile devices; however, the technology that wireless Internet portals use to construct external interfaces to their services gives MIDP devices adequate communications capabilities for today's applications.
As you're well aware, this book focuses on the MIDP of the J2ME platform. Nevertheless, it's useful to say just a few words about the CDC and networking. The CDC offers more support for networking and communications than the CLDC/MIDP does. For instance, standards committees have defined an RMI profile. Other profile definitions are being developed. If you really need these capabilities, you should consider the target devices that need your application and whether the CDC or the CLDC is the more appropriate configuration for your application.
It's quite possible that within a few years' time, personal mobile devices will become powerful enough to support other profiles, such as an RMI profile. But this situation could be several years away, and you shouldn't design with that expectation today.
Chapter Summary
The MIDP supports networking through its javax.microedition.io package. It provides support for basic connectionless and connection-oriented communication protocols.
The crux of the design of the MIDP networking package is the notion of a generic connection framework. It defines a generic mechanism for applications to make network connections. Moreover, it abstracts the differences in setting up and using different kinds of connections that involve different protocols.
This framework enables application code to be written independently of the specific kind of connection used. This independence is important in pervasive environments where the nature of underlying networks can affect the application services available.
A connection factory class, Connector, abstracts the details of requesting and obtaining different kinds of connections that use different underlying communications protocols. Using the connection factory, applications request access to network resources. Resources are delivered to applications through connections that use the communications protocol specified in the connection request.
A hierarchy of connection types represents the different types of connections that an application can create. The definitions of the various interfaces of these connection types reflect the protocols used by the various types of connections. They also reflect the intended semantics for the type of connection.
There are four basic categories of connections. Stream connections support connections to communications ports, application-level connections to HTTP services, and basic Unix-style socket connections. Datagram connections support connections to datagram services.
The MIDP lacks support for other application-level protocols, such as RMI, CORBA, or Jini. The reason is that personal mobile devices lack the required processing power to support these distributed-processing mechanisms.

202
New profiles that are being built on top of the CDC provide capabilities such as RMI. MIDP designers should carefully consider what communications capabilities they need for each application and design their application infrastructure around the capabilities available.
203
Chapter 9. Internationalization • Concepts • Internationalization Support in MIDP • Designing an I18N Solution for a MIDP Application
The MIDP application developer needs to consider an international community of users. People all over the world are using mobile devices every day, and the expansive reach of mobile telephones is ever increasing. The challenge is to engineer MIDP applications that can meet the needs of users worldwide in terms of linguistic, geographical, and cultural constraints. The practice of developing software that addresses these global issues is called internationalization. Learning how to develop internationalized MIDP applications is the subject of this chapter.
This chapter doesn't discuss the general internationalization solution for arbitrary computing platforms—not even the general solution for the Java platform. Nor is it a conceptual introduction to the full breadth or depth of the subject of internationalization, which is an area in which one could focus an entire career. The topic of internationalization consists of a vast and comprehensive set of computer practices, and even a modest treatment of this topic lies far beyond the scope of this chapter or book. Rather, this chapter covers only the areas of internationalization supported by the MIDP. You'll learn how to use the MIDP APIs that support internationalization. You'll also learn about the areas for which no explicit support exists and how you can design around the limitations of the tools available to you.
Concepts
Internationalization is the practice of generically enabling software to adhere to a geographical, linguistic, and cultural context defined by the runtime environment. The term internationalization is sometimes abbreviated "i18n" because 18 letters are elided from the word between the letters 'i' and 'n'.
Locales and Localization
A locale represents a particular geographical, linguistic, and cultural context. It describes a context in which an internationalized application runs. The term localization refers to the practice of enabling an application to work in a specific locale context. The word localization is sometimes abbreviated to "l10n" because 10 characters are elided between the letters 'l' and 'n'. A developer localizes an application for one or more locales after internationalizing it.
Language is usually the primary distinguishing factor for locales. Differences in the usage of language encompass characteristics such as spelling, capitalization, punctuation, idiomatic expressions, and even writing. In reality, geographic context normally delineates regions that use language differently; language usage is usually associated with a particular geographical context. For this reason, a language and a geographic context are the two primary pieces of information that describe a locale. For instance, France, Switzerland, and Canada represent three geographic areas in which the French language is used differently. China and Taiwan represent different locales in which Mandarin Chinese is spoken and written differently, and where differences in idiomatic expressions exist.
A locale's geographic context can represent an area smaller than a country, such as a province, region, or even an area as small as a city. For example, Hong Kong and Guang Zhou, which are both cities in China, speak the Cantonese dialect of Chinese quite differently and also write
204
Chinese ideographs differently. Similar differences exist for many languages, including the use of English and Spanish throughout the world.
A locale provides a context for more than just language information. A locale also implies the use of a specific time zone, specific ways in which date, time, and number values are formatted, and the use of a particular calendar (Gregorian, lunar, and so forth).
Localizing an application for a particular locale involves supplying the data required for the program to function correctly in that locale. Localized data includes translations of text seen by users, specific collation policies, selection of a specific date and time format, use of the correct numeric and monetary formats, and so forth.
A multilingual application is one that can operate using multiple locale contexts simultaneously. For instance, a program might display text in one language but display dates and times formatted according to the policy of another locale. And monetary and numeric values could be displayed according to the policies of a third locale.
In reality, there are many other details required to create a fully internationalized and localized UI. A comprehensive effort would include addressing cultural conventions—for example, avoiding the use of offensive icons, using colors that represent mnemonics that the local user understands, and so forth. Many of these issues deal with design, however. Designing i18n solutions is beyond the scope of this chapter. There are no specific mechanisms in i18n APIs that address many of these issues. Creating high-quality internationalized designs is an art, as are many other areas in software engineering.
Character Encoding Sets
A character encoding set is a mapping between each element of a written language and the binary encoding that uniquely represents it. An individual association that represents a language element and its binary encoding is called a code point. To properly present text to users—in a manner appropriate for the user's locale—requires applications to work with a character encoding set that can correctly represent the language associated with the application's runtime locale.
ASCII is an example of a character encoding set. Because the ASCII character encoding set accommodates only the English alphabet, we need other character encoding sets—sometimes called charsets—to accommodate other languages. As you know, Java uses the Unicode character encoding set internally to represent all character data. Data read by a program may or may not be represented in Unicode. If it isn't, the data must be converted before being imported into the application.
In addition to correctly representing data internally with character encoding sets, applications must present data correctly to the user. This requires the use of a font that represents the elements of the language in use. The computing platform has the responsibility of providing font support to applications. The platform creates mappings between character encoding sets and fonts so applications don't have to do it. These mappings define associations between code points and glyphs. A glyph is an object rendered visibly that represents a language element, such as a letter or ideograph.
Aspects of Internationalization
Internationalization involves many aspects of application development. Practically speaking, the primary goal behind all of these facets of development is to engineer a user interface—and its supporting infrastructure—that presents all UI information in a comprehensible way to local users. At a minimum, this effort involves supporting the following aspects of an application's execution:
205
• Messaging— presentation of all visible text (message text, error text, UI component titles, prompts, and so forth) in the language of the appropriate runtime locale context.
• Formatting policy— use of the correct locale-specific formats for all date, time, and numeric quantities.
• Calendar and time zone policy— use of the correct calendar for the application's runtime locale.
• String collation policy— use of an appropriate policy for string collation based on the locale's language.
• General UI features, locale-sensitive images, icons, and colors— using images and colors that represent meaningful mnemonics to local users.
To support the foregoing features, an internationalized application must perform some dynamic configuration and information retrieval. Typically, an application will determine its locale context dynamically upon startup. Then, it will configure all the necessary runtime components—such as calendar objects, string collators, format objects and messaging components—that it needs to conform to the locale context requirements.
Messaging. Messaging is the presentation of all text data to the user in a language appropriate for the application's runtime locale context. It's the most visible area of i18n. Messaging involves the execution of the following steps at runtime:
• determination of the device locale environment • loading of the application's localized resources • dynamic lookup and retrieval of localized resources for UI display • display of localized resources
Messaging is the area that best highlights the close relationship between i18n and l10n. To make an i18n implementation usable, an application must be localized. For each locale supported, the l10n process must produce a set of translated message strings that the application can access at runtime.
String Collation. String collation, also known as lexicographic sorting, is different from messaging. Nevertheless, the two areas are related in the sense that collation functions manipulate message text—text that the user sees.
Different languages define different rules for collation. A string collation facility must use a mechanism that understands the collation rules for the strings' language context. Practically, this includes an understanding of the details of the underlying character encoding set.
Applications do string collation with no knowledge of the source of the string text. That is, a collation function doesn't retrieve collated strings from some repository of localized text. Instead, the program collates strings that have already been retrieved from a localized repository. Collation functions don't need to know the original location of the string. They only need a language context and a properly encoded string.
Date, Time, Numeric, and Monetary Value Formatting. Different locales use different formats for writing dates, times, and numbers. For instance, in Europe, people write dates, times and numbers differently from people in the United States. A French user writes date, time, and numeric quantities using the following forms.
25 décembre 2002 2002/12/25 25/12/2002 08.30 14.45

206
20.000,45 (twenty thousand, and forty-five hundredths)
In the United States, however, these same quantities would normally be written as follows.
December 25, 2002 12/25/2002 8:30 am 2:45 pm 20,000.45 (twenty thousand, and forty-five hundredths)
An internationalized program needs to format and display dates, times, and numbers appropriately for the runtime locale. Programs don't fetch these formatted quantities from some database; they calculate them dynamically in the same way that strings are collated dynamically.
Calendar and Time Zone Support. Calendars, although related to dates and times, define different characteristics and functionality. The difference is that calendars perform calculations that involve dates and times, whereas date and time objects support the formatting and display of those quantities.
Internationalization Support in MIDP
Realistically, an i18n solution on any platform is somewhat constrained by the resources and API mechanisms available to applications. The ease with which a programmer can implement i18n support—and the comprehensiveness of that support—depends largely on the level of explicit support for the major areas of i18n development. The MIDP platform provides the following elements in support of i18n development:
• Calendar, Date, and TimeZone classes: java.util package • system properties: microedition.encoding, microedition.locale • conversion between character encoding sets: java.io package • user-defined MIDlet suite attributes: application descriptor file (JAD file) • retrieval of resources (files) from the MIDlet suite JAR file:
Class.getResourceAsStream(String resourceName)
The MIDP java.util package contains three classes that are related to i18n, namely Calendar, Date, and TimeZone. These classes, however, are not themselves internationalized. That is, their concrete implementations don't support operations in multiple locales. For example, Calendar doesn't perform calculations according to a particular locale's calendar. The Date class doesn't do locale-sensitive date and time formatting. Neither do they present localized resources themselves. These classes do, however, present basic definitions that can be subclassed.
The Calendar and TimeZone classes are abstract. MIDP implementations must provide at least one concrete subclass for each of them. Although not internationalized, their implementations will be compatible with the locale supported by the MIDP implementation. For instance, in the United States, an implementation would most likely support a Gregorian calendar.
The majority of MIDP implementations support only one locale. In fact, the MIDP specification only requires an implementation to support a single locale and only requires implementations to support the Greenwich Mean Time (GMT) time zone.
207
The MIDP specification only requires that implementations support one locale. MIDP implementations currently don't define adequate support for internationalization and localization, which require too many resources.
Realistically, application developers who hope to deliver applications to multiple platforms must build support for locales other than the one supported by the manufacturer's implementation. To support true i18n and l10n, developers must build application level APIs that support multiple time zones, calendars, and so forth.
Manufacturers may provide some of this support in the form of native APIs and Java libraries that sit on top of their MIDP implementation. Developers must be aware of the level of i18n and l10n support provided, if any, and they must plan their application design accordingly.
Support for a single time zone and a single calendar implementation might suffice in the majority of cases. Manufacturers may, however, provide additional calendar and time zone resources for an implementation. The motivation for this kind of additional support would be to support multilingual computing.
Device manufacturers typically support the locale associated with the device's target market. An implementation that supports only one locale need not be internationalized. Although this approach may work in the majority of markets for now, things could change. Single locale support does not support multilingual computing. Applications may need to do messaging in one locale, monetary formatting in another, and so forth.
Readers who are familiar with i18n support on the J2SE platform will notice that the MIDP has a comparatively distinct lack of comprehensive i18n support (see the J2SE java.text package). The reason, once again, is the constrained environment of mobile devices. The MIDP has no java.text package. In fact, MIDP has no API support for i18n features such as resource bundles, message formatting, number formatting, locale-sensitive date and time formatting, and so forth. The MIDP is also missing the new i18n features in version 1.4 of the JDK java.text package, such as collation, bidirectional text support, annotations, attributes, and so forth.
I18N Frameworks
Basically, the crux of all i18n designs is the mechanism that enables applications to retrieve the right version of localized resources at runtime. Unlike J2SE, the MIDP has no real API or classes that support general retrieval of localized resources. There's no ResourceBundle class or any of its subclasses. MIDP applications must create their own mechanisms for l10n resource definition and retrieval. Realistically, the most viable approaches are:
• Retrieve l10n resources from the JAD file. • Retrieve l10n resources from a text file that's part of the application JAR file. • Retrieve l10n resources from a Java class file, such as an application-defined, J2SE-style
resource bundle mechanism.
Each of the three sample designs in the "Designing an I18N Solution for a MIDP Application" section of this chapter uses one of these mechanisms as the center of its design.
Messaging

208
Unfortunately, the MIDP also lacks explicit support for messaging. Unlike J2SE, the MIDP offers no messaging API, and there's no MessageFormat class. In designing a messaging solution for MIDP applications, designers should consider the following issues:
• location of the localized data • mechanism for accessing the localized data • format of the localized data and character encoding set used • footprint of localized resources • runtime performance • localization process issues such as management of development resources, maintenance,
and so forth • real wireless network environments, application provisioning environments, and
deployment issues
String Collation
The MIDP has no support for string collation. If your applications need to perform lexicographic sorting of any kind, you'll have to design and implement your own mechanism to do it. Although this support exists in J2SE, the classes consume too many resources for a MIDP device environment at the present time.
Date, Time, and Numeric Formatting
The MIDP provides no support for formatting date, time, numeric, or monetary values. The MIDP has none of the J2SE platform classes that support this formatting; there are no DateFormat, NumberFormat, and DecimalFormat classes. Manufacturers may provide implementation-specific classes to support these formatting capabilities, however.
The MIDP defines Date and TimeZone classes in its java.util package, but these classes aren't really internationalized. That is, their interfaces don't define any capabilities that address locale-sensitive processing.
The Date class simply represents a specific instance of time in Coordinated Universal Time (UTC). There's no MIDP support for conversion of a Date quantity to represent a time value in any other time zone, or to format time values for display to users. This behavior is consistent with the J2SE platform's definition of Date objects. The J2SE platform, however, has related classes (such as DateFormat) that can format date quantities in a locale-sensitive manner. The MIDP has no such support classes.
The MIDP supports time zones with its java.util.TimeZone class. This class is abstract. Your MIDP implementation will provide at least one concrete subclass that represents the GMT time zone. The MIDP specification only requires support for the GMT time zone; however, your implementation might support others as well.
The TimeZone.getDefault() method returns a TimeZone object that represents the default time zone for the host on which your application is running. Be aware that it might define the GMT time zone, even if that's not the time zone in which your host application operates.
The TimeZone.getTimeZone(String id) method returns a TimeZone object for the three-letter time zone argument specified in the call. Be forewarned that the object returned might not represent the time zone you requested because the implementation might not support it. Clearly, it's important that you, the application developer, be aware of which time zones your platform support.
209
Calendar and Time Zone Support
Again, unlike the J2SE platform, the MIDP has only limited calendar support. The java.util.Calendar class is abstract. Therefore, every MIDP platform will provide at least one concrete implementation. Most likely, it won't be internationalized.
The platform's concrete Calendar subclass will most likely implement one particular calendar, such as a Gregorian or lunar calendar. This might or might not be an appropriate calendar for the locale contexts in which you deploy your applications. The Calendar.getInstance(TimeZone zone) method returns a Calendar object that uses the specified time zone and the platform's default locale. Note that this factory method doesn't make Calendar a fully internationalized class. It still doesn't return an appropriate calendar based on the locale context. For example, if you specify Chinese Standard Time, you won't get an object that represents a lunar calendar as used in China with all MIDP implementations. This means that you need to be aware of what calendar is supported by your platform and whether it's congruent with the implementation's supported locale.
Designing an I18N Solution for a MIDP Application
This section presents three approaches to designing i18n and l10n support for MIDP applications. These approaches have been chosen based on the APIs available in MIDP that can provide some level of i18n support, or that are included in MIDP with the intention of addressing i18n.
Using MIDlet Attributes to Define L10N Resources
As you know, you can place user-defined attributes in your application's JAD file. This means that you can use the JAD file to define MIDlet attributes that represent the localized resources used by your application.
In this approach, programs no longer embed resources (for example a text string) in the application. Instead, programs place resources in the JAD file. The program looks up a resource by retrieving the value of some attribute. The programmer defines attribute names so that they contain a component that represents a locale context. In this way, programs can retrieve the version of the resource that's compatible with their runtime locale context.
To demonstrate this approach, I'll reuse the HelloWorld demo from chapter 3. The application is renamed I18NDemo to distinguish it from the original version.
Listing 9.1 shows the application descriptor file used by the I18NDemo program. Several new attributes have been added to the JAD file. They represent text strings that the user sees during application execution. Notice that there are two versions of each of these strings: one English and one French. This file supports execution of the application in English and French language contexts.
Listing 9.1 The JAD file contains one attribute per application string per locale supported.
I18NDemo-alert-en_US: Alert I18NDemo-alert-fr_FR: Alerte I18NDemo-alert_text-en_US: The button was pressed I18NDemo-alert_text-fr_FR: Le bouton a été pressé I18NDemo-alert_title-en_US: Button Pressed I18NDemo-alert_title-fr_FR: Bouton a été Pressé

210
I18NDemo-cancel-en_US: Cancel I18NDemo-cancel-fr_FR: Quitter I18NDemo-exit-en_US: Exit I18NDemo-exit-fr_FR: Sortie I18NDemo-greeting-en_US: Another MIDlet! I18NDemo-greeting-fr_FR: Un autre MIDlet! I18NDemo-help-en_US: Help I18NDemo-help-fr_FR: Aider I18NDemo-item-en_US: Item I18NDemo-item-fr_FR: Item I18NDemo-menu-en_US: Menu I18NDemo-menu-fr_Fr: Menu I18NDemo-ok-en_US: OK I18NDemo-ok-fr_FR: OK I18NDemo-sayhi-en_US: Say hi I18NDemo-sayhi-fr_FR: Dis bonjour I18NDemo-screen-en_US: Screen I18NDemo-screen-fr_FR: Ecran I18NDemo-stop-en_US: Stop I18NDemo-stop-fr_FR: Arreter I18NDemo-title-en_US: Hello, World I18NDemo-title-fr_FR: Allô, tout le Monde MIDlet-1: I18N Demo 1, i18n.png, I18NDemo MIDlet-Info-URL: MIDlet-Jar-Size: 19101 MIDlet-Jar-URL: i18n.jar MIDlet-Name: i18n MIDlet-Vendor: Vartan Piroumian MIDlet-Version: 1.0
The attribute names in the JAD file in Listing 9.1 take the following form.
<MIDlet name>-<key>-<locale designation>
For example, the following two attributes define the MIDlet title in English and French.
I18NDemo-title-en_US: Hello, World I18NDemo-title-fr_FR: Allô, tout le Monde
Listing 9.2 and Listing 9.3 show the two files that comprise the application source code. They define and implement the attribute lookup scheme reflected by the attribute names in the JAD file. The program retrieves the version of an attribute associated with the locale context in which the application is running.
The i18n design stipulates use of this naming scheme in order for the application to be able to find l10n resources in the JAD file. This example demonstrates how the design of the i18n solution involves the configuration of l10n resources and the naming of attributes.
Listing 9.2 The modified HelloWorld class is called I18NDemo. It uses a lookup scheme to retrieve the correct version of application string attributes based on locale.
1 import javax.microedition.midlet.MIDlet; 2 3 import javax.microedition.lcdui.Display; 4 import javax.microedition.lcdui.Displayable; 5 import javax.microedition.lcdui.Form; 6
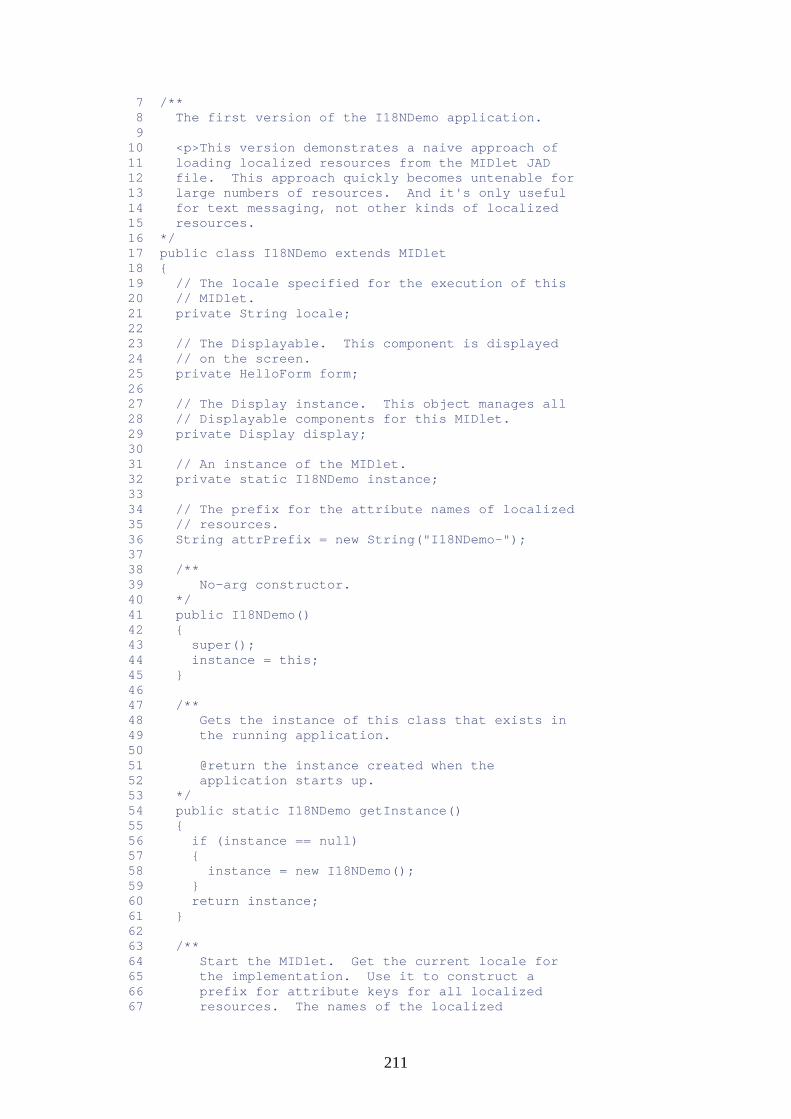
211
7 /** 8 The first version of the I18NDemo application. 9 10 <p>This version demonstrates a naive approach of 11 loading localized resources from the MIDlet JAD 12 file. This approach quickly becomes untenable for 13 large numbers of resources. And it's only useful 14 for text messaging, not other kinds of localized 15 resources. 16 */ 17 public class I18NDemo extends MIDlet 18 { 19 // The locale specified for the execution of this 20 // MIDlet. 21 private String locale; 22 23 // The Displayable. This component is displayed 24 // on the screen. 25 private HelloForm form; 26 27 // The Display instance. This object manages all 28 // Displayable components for this MIDlet. 29 private Display display; 30 31 // An instance of the MIDlet. 32 private static I18NDemo instance; 33 34 // The prefix for the attribute names of localized 35 // resources. 36 String attrPrefix = new String("I18NDemo-"); 37 38 /** 39 No-arg constructor. 40 */ 41 public I18NDemo() 42 { 43 super(); 44 instance = this; 45 } 46 47 /** 48 Gets the instance of this class that exists in 49 the running application. 50 51 @return the instance created when the 52 application starts up. 53 */ 54 public static I18NDemo getInstance() 55 { 56 if (instance == null) 57 { 58 instance = new I18NDemo(); 59 } 60 return instance; 61 } 62 63 /** 64 Start the MIDlet. Get the current locale for 65 the implementation. Use it to construct a 66 prefix for attribute keys for all localized 67 resources. The names of the localized
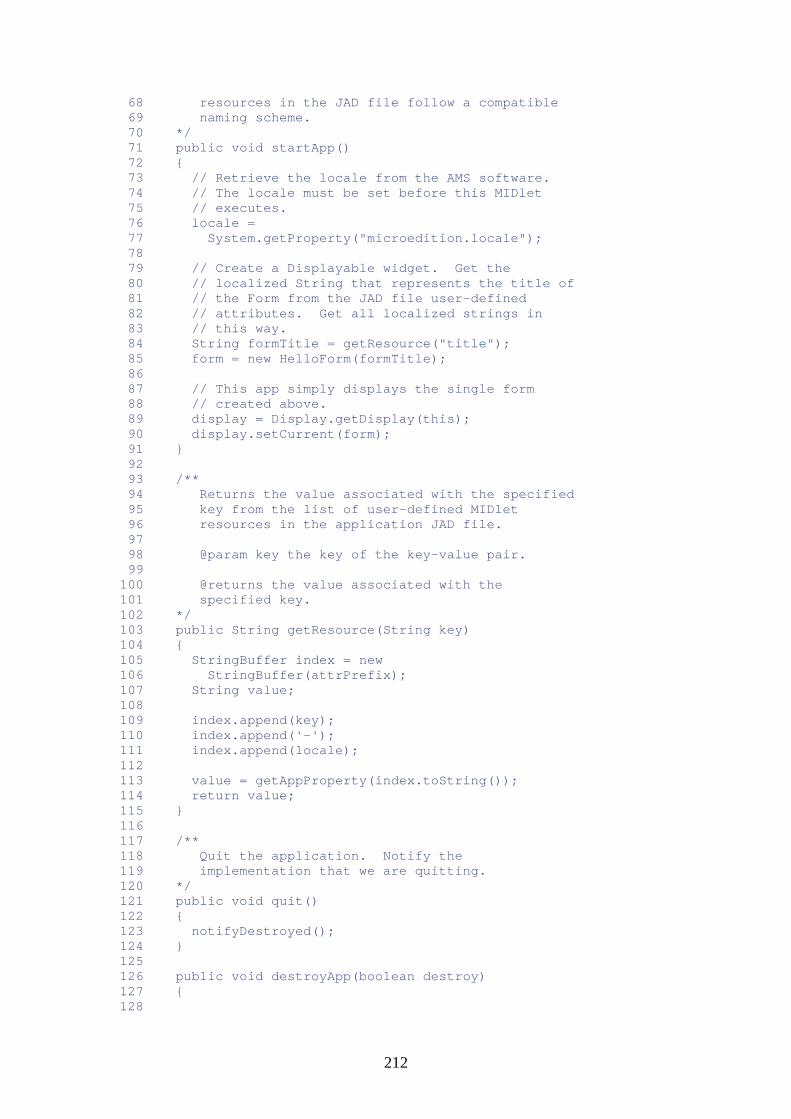
212
68 resources in the JAD file follow a compatible 69 naming scheme. 70 */ 71 public void startApp() 72 { 73 // Retrieve the locale from the AMS software. 74 // The locale must be set before this MIDlet 75 // executes. 76 locale = 77 System.getProperty("microedition.locale"); 78 79 // Create a Displayable widget. Get the 80 // localized String that represents the title of 81 // the Form from the JAD file user-defined 82 // attributes. Get all localized strings in 83 // this way. 84 String formTitle = getResource("title"); 85 form = new HelloForm(formTitle); 86 87 // This app simply displays the single form 88 // created above. 89 display = Display.getDisplay(this); 90 display.setCurrent(form); 91 } 92 93 /** 94 Returns the value associated with the specified 95 key from the list of user-defined MIDlet 96 resources in the application JAD file. 97 98 @param key the key of the key-value pair. 99 100 @returns the value associated with the 101 specified key. 102 */ 103 public String getResource(String key) 104 { 105 StringBuffer index = new 106 StringBuffer(attrPrefix); 107 String value; 108 109 index.append(key); 110 index.append('-'); 111 index.append(locale); 112 113 value = getAppProperty(index.toString()); 114 return value; 115 } 116 117 /** 118 Quit the application. Notify the 119 implementation that we are quitting. 120 */ 121 public void quit() 122 { 123 notifyDestroyed(); 124 } 125 126 public void destroyApp(boolean destroy) 127 { 128

213
129 } 130 131 public void pauseApp() 132 { 133 134 } 135 }
Listing 9.3 The HelloForm class defines the form object and uses the same scheme as the main MIDlet class.
1 import javax.microedition.midlet.MIDlet; 2 3 import javax.microedition.lcdui.Alert; 4 import javax.microedition.lcdui.AlertType; 5 import javax.microedition.lcdui.Command; 6 import javax.microedition.lcdui.CommandListener; 7 import javax.microedition.lcdui.Display; 8 import javax.microedition.lcdui.Displayable; 9 import javax.microedition.lcdui.Form; 10 11 /** 12 This class defines a Form that displays some 13 simple text and a menu of commands. The purpose 14 of this class is to demonstrate i18n and l10n of 15 the user visible attributes. The class retrieves 16 l10n resources from the application management 17 software. 18 */ 19 public class HelloForm extends Form 20 { 21 // The default title of this Form. 22 private static final String DEFAULT_TITLE = 23 "Hello, World"; 24 25 // The command listener that handles command 26 // events on this Form. 27 private MyCommandListener cl = new 28 MyCommandListener(); 29 30 // The display instance associated with this 31 // MIDlet. 32 Display display; 33 34 // A reference to this object's associated MIDlet 35 // object. 36 I18NDemo midlet; 37 38 // An alert displayed in response to the 39 // activation of some of this Form's commands. 40 Alert alert; 41 42 // The commands that are placed on this form. 43 private Command showAlert; 44 private Command sayHi; 45 private Command cancel; 46 private Command exit; 47 private Command help; 48 private Command item; 49 private Command ok;
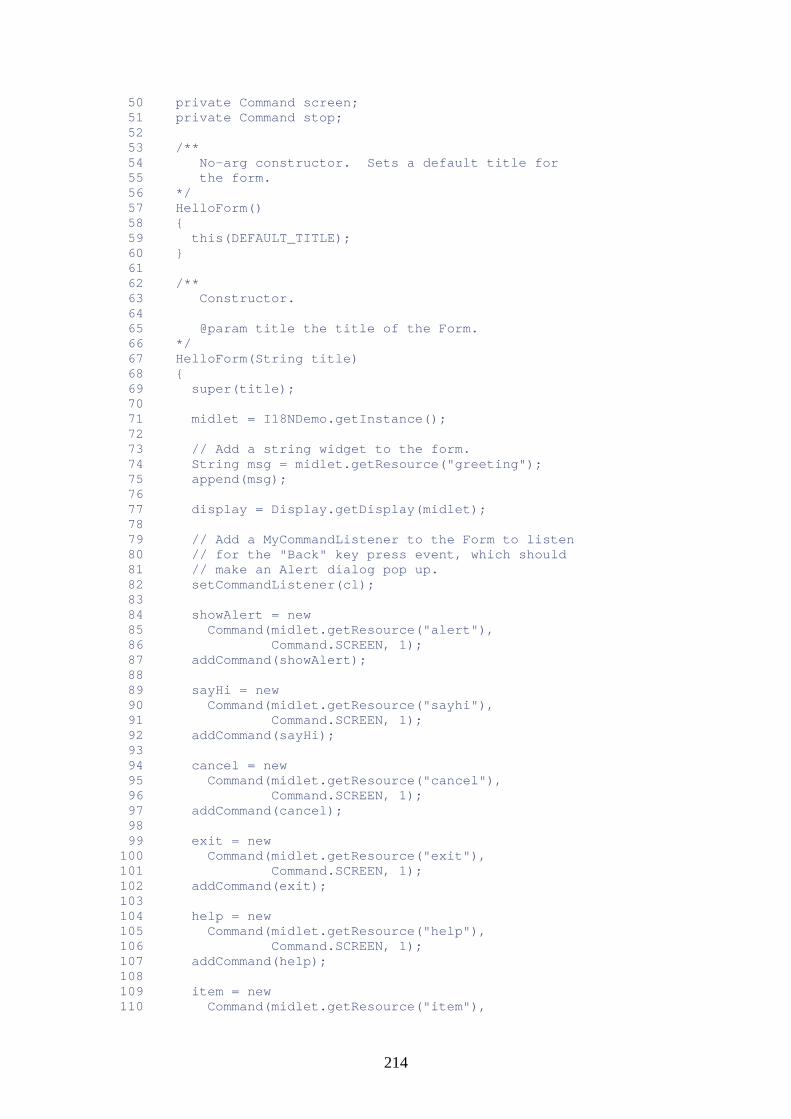
214
50 private Command screen; 51 private Command stop; 52 53 /** 54 No-arg constructor. Sets a default title for 55 the form. 56 */ 57 HelloForm() 58 { 59 this(DEFAULT_TITLE); 60 } 61 62 /** 63 Constructor. 64 65 @param title the title of the Form. 66 */ 67 HelloForm(String title) 68 { 69 super(title); 70 71 midlet = I18NDemo.getInstance(); 72 73 // Add a string widget to the form. 74 String msg = midlet.getResource("greeting"); 75 append(msg); 76 77 display = Display.getDisplay(midlet); 78 79 // Add a MyCommandListener to the Form to listen 80 // for the "Back" key press event, which should 81 // make an Alert dialog pop up. 82 setCommandListener(cl); 83 84 showAlert = new 85 Command(midlet.getResource("alert"), 86 Command.SCREEN, 1); 87 addCommand(showAlert); 88 89 sayHi = new 90 Command(midlet.getResource("sayhi"), 91 Command.SCREEN, 1); 92 addCommand(sayHi); 93 94 cancel = new 95 Command(midlet.getResource("cancel"), 96 Command.SCREEN, 1); 97 addCommand(cancel); 98 99 exit = new 100 Command(midlet.getResource("exit"), 101 Command.SCREEN, 1); 102 addCommand(exit); 103 104 help = new 105 Command(midlet.getResource("help"), 106 Command.SCREEN, 1); 107 addCommand(help); 108 109 item = new 110 Command(midlet.getResource("item"),

215
111 Command.SCREEN, 1); 112 addCommand(item); 113 114 ok = new 115 Command(midlet.getResource("ok"), 116 Command.SCREEN, 1); 117 addCommand(ok); 118 119 screen = new 120 Command(midlet.getResource("screen"), 121 Command.SCREEN, 1); 122 addCommand(screen); 123 124 stop = new 125 Command(midlet.getResource("stop"), 126 Command.SCREEN, 1); 127 addCommand(stop); 128 } 129 130 // This class simply listens for any command 131 // activation. The HelloForm instance sets an 132 // instance of this class as its command listener. 133 // The object instance doesn't check the command 134 // information, but simply displays a modal Alert 135 // indicating a soft button was activated by the 136 // user. 137 private class MyCommandListener 138 implements CommandListener 139 { 140 public void commandAction(Command c, 141 Displayable d) 142 { 143 String title = 144 midlet.getResource("alert_title"); 145 String msg = null; 146 147 if (c == showAlert) 148 { 149 msg = midlet.getResource("alert_text"); 150 alert = new Alert(title, 151 msg, 152 null, AlertType.INFO); 153 alert.setTimeout(Alert.FOREVER); 154 display.setCurrent(alert, HelloForm.this); 155 } 156 else if (c == sayHi) 157 { 158 alert = new Alert("Button pressed", 159 msg, 160 null, AlertType.INFO); 161 alert.setTimeout(Alert.FOREVER); 162 display.setCurrent(alert, HelloForm.this); 163 } 164 165 if (c == exit) 166 { 167 I18NDemo.getInstance().destroyApp(true); 168 } 169 } 170 } 171 }
216
The crux of the i18n design is the lookup scheme used to find localized strings in the JAD file. The application-defined getResource(String key) method, defined in lines 103 to 115, really defines—and implements—the lookup scheme. To find a resource, the getResource(String key) method constructs the attribute name and then looks up the attribute.
For example, the following two statements in lines 84 and 85 of Listing 9.2 fetch the title string of the Form used in the application.
String formTitle = getResource("title"); form = new HelloForm(formTitle);
The method constructs the full attribute name by concatenating three strings: the I18NDemo- attribute prefix for this application, the resource attribute identifier without any locale variant information, and the locale designation. The string title parameter is the resource attribute identifier, not the form's title.
In line 36 of Listing 9.2, the MIDlet defines the attribute prefix I18NDemo-. The startApp() method retrieves information about the application's runtime locale context from the microedition.locale system property and saves it as an instance attribute.
The HelloForm object uses the value returned by the getResource() call as its title. The HelloForm class in Listing 9.3 repeats this scenario. It simply calls getResource()to look up the localized values of all text that the user sees throughout the execution of the application.
Because MIDP implementations will most likely support only one locale, it might be better for applications to "hard-code" the locale reference to be the one that you know your device supports, instead of retrieving the locale information from the system properties.
An alternative approach is to build multiple versions of the application's JAD file so that each version contains attributes for one locale. Ship the correct version of the JAD for the required locale context. Of course, you need to determine the locale context, which could be the locale in which the phone would be used, or simply the locale preference of the user.
Listing 9.2 uses the microedition.locale system property to retrieve the locale in order to emphasize the concept of dynamically determining locale context and associating resources with locale contexts. Delineating resources for different locales can help elucidate your design and make your software more maintainable.
Keep in mind that in the future, as devices become more powerful, MIDP implementations may very well support multiple locales. If that happens, the approach used in Listing 9.2 is preferable.
Looking at the getResource() method in lines 103 to 115 in Listing 9.2, you see that it uses the MIDlet.getAppProperty() method to retrieve resources from the application descriptor file and the manifest file. If an attribute exists in both files with exactly the same key name, then the value is retrieved from the application descriptor file, and the value in the manifest file is ignored. If no attribute is found, or if no value is found for the key, the value null is returned. If the supplied key is not found, a NullPointerException is thrown.
217
The attribute values in the JAD (or manifest) file must be encoded using a character encoding set that supports the target language. There are two ways to do this:
• Encode the attribute values with a character encoding set designed for the locale's language. The character encoding set could be one that accommodates more than just the target language, such as UTF-8.
• Encode the attribute values using Unicode escape sequences, for example \u4EA9. The file is still comprised of only ASCII characters, but the Unicode escape sequences can represent any character of any written language.
Listing 9.2 includes support for the English and French locales. The ISO8859-1 character encoding set can represent the English and French alphabets. If you desire to localize this application for languages not supported by the ISO8859 family (Chinese, for example), you'd have to encode the attribute values using an appropriate multibyte character encoding set.
If you choose to take the first approach just given (encoding using a character encoding set designed for the locale's language), you'd need to find a text editor that supports input methods for Chinese and writes characters in an appropriate encoding. Alternately, you could use the second approach and input Java Unicode escape sequences for each character. Simply find the Unicode code point for each character in your string. This approach works because the java.lang.String class knows how to create string objects from Unicode escape sequences. Your application can then read the attribute values and construct Java String objects from them.
You can define the attribute names using the J2MEWTK Settings panel. Because the WTK doesn't support the entry of non-ASCII text, however, you can't define non-English localized text for attribute values. To enter non-English characters, you'll have to use a text editor to enter the characters in the JAD file directly. You can use one that supports input method editors (IME) for the target language, or enter Unicode escape sequences.
Although this i18n and l10n design seems to work just fine, it has several problems. First of all, the example you just saw addressed only string resources. You need to do a bit more work to support the localization of other types of resources such as calendars, date and time formatters, or even images and colors.
To support non-string l10n resources—for instance, a locale-sensitive number formatter—you could set the attribute value to the name of the class that implements your formatter. For example, you could define an attribute as follows.
I18NDemo-number_format-fr_FR: NumberFormat_FR
You retrieve the attribute value and then instantiate this class. The following snippet of code shows one way your MIDlet class could do this.
... try { String name = getAppProperty("I18NDemo-number_format-fr_FR"); // "name" now equals "NumberFormat_FR" Class c = Class.forName(name); NumberFormat_FR nf = (NumberFormat_FR) c.newInstance(); } catch (InstantiationException ie) { ...
218
} catch (IllegalAccessException iae) { ... } catch (ClassNotFoundException cnfe) { ... } ...
Of course, you must supply the MIDP-compliant Java class file with your application JAR file in order for this scheme to work.
Another drawback of this use of application descriptors is that it abuses the JAD and manifest files for application-specific features. You might think that this is simply a philosophical point, but it relates to performance. To read the JAD or manifest files, you must enlist the help of the AMS. A single call involves several components of the implementation. The JAD file isn't really designed for this kind of frequent access. You might notice performance degradation when trying to read a large file of l10n resources—or any other type of application-defined resources, for that matter.
Additionally, this single JAD file must accommodate all MIDlets in the MIDlet suite, making it even bigger. For anything but a simple demonstration program, the JAD file becomes unwieldy as the number of attributes increases.
Another problem is the room for manual error. A developer manually localizing the JAD file can easily make subtle typographical errors in naming attributes. And the JAD file doesn't support the insertion of comments that might help humans understand an attribute's use in the application.
Using Application Text Files to Define L10N Resources
A second i18n approach uses application-specific text files that contain localized attributes. An application using this scheme might, for example, define one file of localized attributes for each locale. The naming scheme could follow a locale designation, for insta283nce en_US.txt for English, fr_FR.txt for French, ja_JP.txt for Japan, and so forth. Listing 9.4 shows one example of such a file containing name-value pairs of localized strings.
Listing 9.4 The name of this file is fr_FR.txt. It consists of French-language versions of application strings.
alert: Alerte alert_title: Bouton Pressé alert_text: Le bouton a été pressé cancel: Quitter exit: Sortie greeting: Mon troisième MIDlet! help: Aider item: Item menu: Menu ok: OK sayhi: Dis bonjour screen: Ecran stop: Arreter title: Allô, tout le Monde
219
This approach is essentially the same as the previous one, except that now you must create and maintain the resource file. Any resource files that you create must be part of the application JAR. Recall that the MIDP specification prohibits direct access to files on the native platform.
Before going any further, it's important to reiterate that this scheme, like the first one, represents a naïve approach to building a comprehensive i18n solution. Nevertheless, these schemes are presented so you understand the benefits and tradeoffs of using different schemes and understand how to use the various platform facilities and APIs available to you.
Listing 9.5 and Listing 9.6 contains code that implements one possible design that uses text resource files. This code reads files formatted like the one shown in Listing 9.4.
Listing 9.5 The I18NDemo2 class uses streams to read text resource files. The getResource() implementation now reflects the new design for retrieving resources from files in the application JAR.
1 import javax.microedition.midlet.MIDlet; 2 3 import javax.microedition.lcdui.Display; 4 import javax.microedition.lcdui.Displayable; 5 import javax.microedition.lcdui.Form; 6 7 import java.io.DataInputStream; 8 import java.io.InputStream; 9 import java.io.InputStreamReader; 10 import java.io.EOFException; 11 import java.io.IOException; 12 import java.io.Reader; 13 import java.io.UTFDataFormatException; 14 import java.io.UnsupportedEncodingException; 15 16 import java.util.Hashtable; 17 18 /** 19 The second version of the I18NDemo application. 20 21 <p>This version also demonstrates a naive way to 22 define localized resources. It reads a file 23 that's part of the application JAR file (not the 24 JAD file) to load localized resources. The file 25 consists of a set of key-value pairs, one per 26 line, that represent localized strings. The 27 MIDlet must then parse the file contents and build 28 an internal hash table for lookup. 29 30 <p>This approach requires too much processing of 31 the stream that contains the file contents of the 32 localized resources. Furthermore, this approach 33 is not amenable to localized resources that are 34 not strings. 35 */ 36 public class I18NDemo2 extends MIDlet 37 { 38 // The file that contains the resources for the 39 // active locale. 40 private String resourceFile; 41 42 // The locale specified for the execution of this 43 // MIDlet.
220
44 private String locale; 45 46 // The default character encoding set used by the 47 // platform. 48 private String encoding; 49 50 // The HashTable that contains the localized 51 // resources. 52 private Hashtable resources = new Hashtable(); 53 54 // The Displayable. This component is displayed 55 // on the screen. 56 private HelloForm2 form; 57 58 // The Display instance. This object manages all 59 // Displayable components for this MIDlet. 60 private Display display; 61 62 // An instance of the MIDlet. 63 private static I18NDemo2 instance; 64 65 /** 66 No-arg constructor. 67 */ 68 public I18NDemo2() 69 { 70 super(); 71 instance = this; 72 } 73 74 /** 75 Gets the instance of this class that exists in 76 the running application. 77 78 @return the instance created when the 79 application starts up. 80 */ 81 public static I18NDemo2 getInstance() 82 { 83 return instance; 84 } 85 86 /** 87 Start the MIDlet. Get the current locale name. 88 Use it to build the name of a file that 89 contains localized resources for the locale. 90 The resource file is located in the application 91 JAR file. 92 */ 93 public void startApp() 94 { 95 // Retrieve the locale from the AMS software. 96 // The locale must be set before this MIDlet 97 // executes. 98 locale = 99 System.getProperty("microedition.locale"); 100 101 // The names of the l10n resource files follow 102 // the form: <language>_<country>.txt. 103 // Construct the file name string and pass it to 104 // the method that opens the file and retrieves

221
105 // the contents. 106 resourceFile = locale + ".txt"; 107 int status = loadResources(resourceFile); 108 109 if (status < 0) 110 { 111 quit(); 112 return; 113 } 114 115 // Create a Displayable widget. Get the 116 // localized String that represents the title of 117 // the Form. 118 String formTitle = getResource("title"); 119 form = new HelloForm2(formTitle); 120 121 // This app simply displays the single form 122 // created above. 123 display = Display.getDisplay(this); 124 display.setCurrent(form); 125 } 126 127 /** 128 Loads the user-defined application resources 129 from the specified file. The file is part of 130 the application JAR file on a real device. The 131 J2MEWTK stores the file in the application JAR 132 fine in the application's bin/ directory. 133 134 @param file the name of the user-defined 135 application resource file. 136 */ 137 private int loadResources(String file) 138 { 139 Class c = getClass(); 140 141 if (file == null) 142 { 143 return -1 ; 144 } 145 InputStream is = null; 146 is = c.getResourceAsStream(file); 147 if (is == null) 148 { 149 return -1; 150 } 151 Reader reader = new InputStreamReader(is); 152 processStream(reader); 153 return 0; 154 } 155 156 /** 157 158 */ 159 private void processStream(Reader stream) 160 { 161 if (stream == null) 162 { 163 return; 164 } 165 StringBuffer key = new StringBuffer();;
222
166 StringBuffer value = new StringBuffer();; 167 while (true) 168 { 169 // Read a line. It's assumed that each line 170 // contains a single key and value, 171 // separated by a colon. If -1 we've 172 // reached the end of the file. 173 key.delete(0, key.length()); 174 value.delete(0, value.length()); 175 int status = readLine(key, value, stream); 176 if (status == -1) 177 { 178 break; 179 } 180 181 // Put this resource in the hash table of 182 // application resources. 183 resources.put(key, value); 184 } 185 } 186 187 /** 188 Reads and processes the next non-blank line 189 from the stream. The format of the line is 190 expected to be <key>[ \t]*:[ \t]*<value>, where 191 <key> and <value> are tokens consisting of 192 alphanumeric or punctuation characters, but no 193 white space orcontrol characters. 194 */ 195 private int readLine(StringBuffer key, 196 StringBuffer value, 197 Reader stream) 198 { 199 if (key == null || value == null || 200 stream == null) 201 { 202 return -1; 203 } 204 205 try 206 { 207 char c; 208 while (true) 209 { 210 // Skip new line characters. 211 while (true) 212 { 213 c = (char) stream.read(); 214 if (c == '\n') 215 { 216 continue; 217 } 218 break; 219 } 220 221 if (!isWhiteSpace(c) && !isDelimeter(c)) 222 { 223 key.append(c); 224 } 225 226 // Skip any leading white space.
223
227 while (true) 228 { 229 c = (char) stream.read(); 230 if (isWhiteSpace(c)) 231 { 232 continue; 233 } 234 break; 235 } 236 237 if (!isWhiteSpace(c) && !isDelimeter(c)) 238 { 239 key.append(c); 240 } 241 242 // Read key. 243 while (true) 244 { 245 c = (char) stream.read(); 246 if (isWhiteSpace(c) || isDelimeter(c)) 247 { 248 break; 249 } 250 else 251 { 252 key.append(c); 253 } 254 } 255 256 // Skip delimeter and any leading or 257 // trailing white space. 258 while (true) 259 { 260 c = (char) stream.read(); 261 if (isWhiteSpace(c) || isDelimeter(c)) 262 { 263 continue; 264 } 265 value.append(c); 266 break; 267 } 268 269 // Read the rest of the value token. 270 while (true) 271 { 272 c = (char) stream.read(); 273 if (c == '\n') 274 { 275 break; 276 } 277 else 278 { 279 value.append(c); 280 } 281 } 282 break; 283 } 284 } 285 catch (IOException ioe) 286 { 287 ioe.printStackTrace();

224
288 return -1; 289 } 290 return 0; 291 } 292 293 /** 294 295 */ 296 private boolean isWhiteSpace(char c) 297 { 298 if (c == ' ' || c == '\t') 299 { 300 return true; 301 } 302 else 303 { 304 return false; 305 } 306 } 307 308 /** 309 310 */ 311 private boolean isDelimeter(char c) 312 { 313 if (c == ':') 314 { 315 return true; 316 } 317 return false; 318 } 319 320 /** 321 Returns the value associated with the specified 322 key from the bundle of application resources. 323 324 @param key the key of the key-value pair. 325 326 @returns the value associated with the 327 specified key. 328 */ 329 private String getResource(String key) 330 { 331 if (resources == null) 332 { 333 return null; 334 } 335 return (String) resources.get(key); 336 } 337 338 /** 339 Quit execution. Requests the implementation to 340 terminate this MIDlet. 341 */ 342 public void quit() 343 { 344 notifyDestroyed(); 345 } 346 347 public void destroyApp(boolean destroy) 348 {
225
349 350 } 351 352 public void pauseApp() 353 { 354 355 } 356 }
Listing 9.6 The HelloForm2 class now uses the I18NDemo2.getResource() API to retrieve l10n resources.
1 import javax.microedition.midlet.MIDlet; 2 3 import javax.microedition.lcdui.Alert; 4 import javax.microedition.lcdui.AlertType; 5 import javax.microedition.lcdui.Command; 6 import javax.microedition.lcdui.CommandListener; 7 import javax.microedition.lcdui.Display; 8 import javax.microedition.lcdui.Displayable; 9 import javax.microedition.lcdui.Form; 10 11 /** 12 This class defines a Form that displays some 13 simple text and a menu of commands. The purpose 14 of this class is to demonstrate i18n and l10n of 15 the user-visible attributes. It works with the 16 I18NDemo2 class. 17 */ 18 public class HelloForm2 extends Form 19 { 20 // The default title of this Form. 21 private static final String DEFAULT_TITLE = 22 "Hello, World"; 23 24 // The command listener that handles command 25 // events on this Form. 26 private MyCommandListener cl = new 27 MyCommandListener(); 28 29 // The display instance associated with this 30 // MIDlet. 31 Display display; 32 33 // A reference to this object's associated MIDlet 34 // object. 35 I18NDemo midlet; 36 37 // An alert displayed in response to the 38 // activation of some of this Form's commands. 39 Alert alert; 40 41 private Command showAlert; 42 private Command sayHi; 43 private Command cancel; 44 private Command exit; 45 private Command help; 46 private Command item; 47 private Command ok; 48 private Command screen;
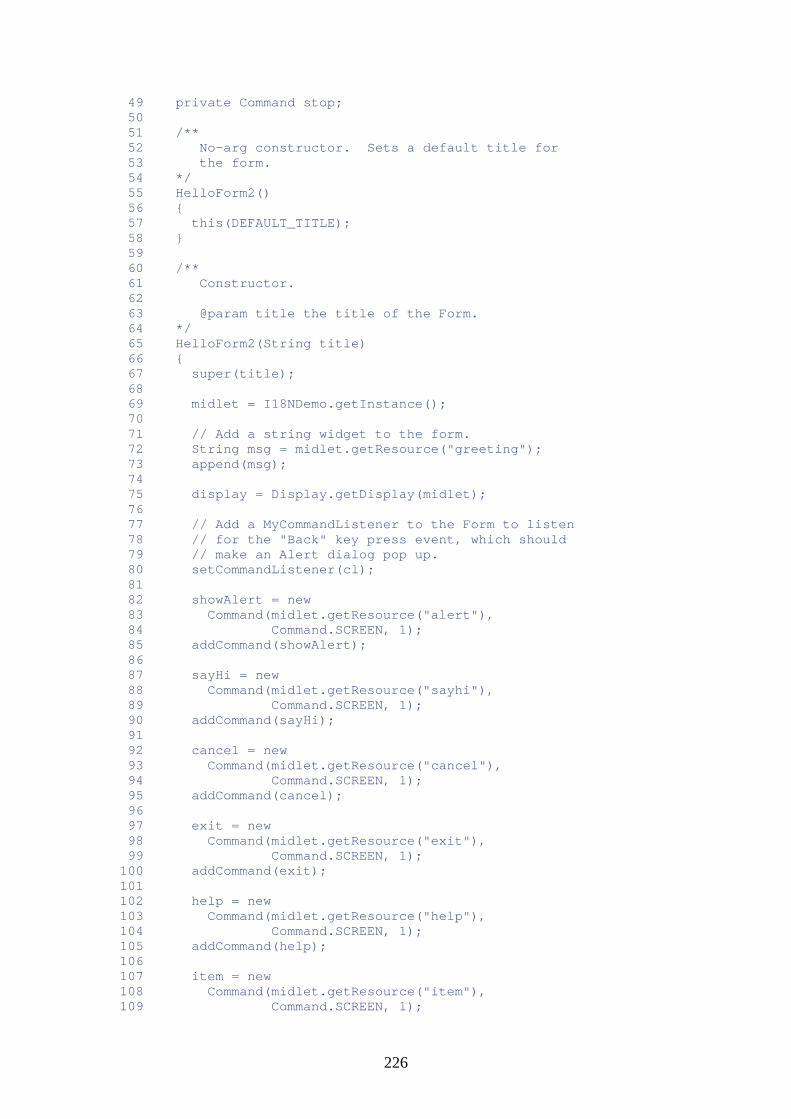
226
49 private Command stop; 50 51 /** 52 No-arg constructor. Sets a default title for 53 the form. 54 */ 55 HelloForm2() 56 { 57 this(DEFAULT_TITLE); 58 } 59 60 /** 61 Constructor. 62 63 @param title the title of the Form. 64 */ 65 HelloForm2(String title) 66 { 67 super(title); 68 69 midlet = I18NDemo.getInstance(); 70 71 // Add a string widget to the form. 72 String msg = midlet.getResource("greeting"); 73 append(msg); 74 75 display = Display.getDisplay(midlet); 76 77 // Add a MyCommandListener to the Form to listen 78 // for the "Back" key press event, which should 79 // make an Alert dialog pop up. 80 setCommandListener(cl); 81 82 showAlert = new 83 Command(midlet.getResource("alert"), 84 Command.SCREEN, 1); 85 addCommand(showAlert); 86 87 sayHi = new 88 Command(midlet.getResource("sayhi"), 89 Command.SCREEN, 1); 90 addCommand(sayHi); 91 92 cancel = new 93 Command(midlet.getResource("cancel"), 94 Command.SCREEN, 1); 95 addCommand(cancel); 96 97 exit = new 98 Command(midlet.getResource("exit"), 99 Command.SCREEN, 1); 100 addCommand(exit); 101 102 help = new 103 Command(midlet.getResource("help"), 104 Command.SCREEN, 1); 105 addCommand(help); 106 107 item = new 108 Command(midlet.getResource("item"), 109 Command.SCREEN, 1);
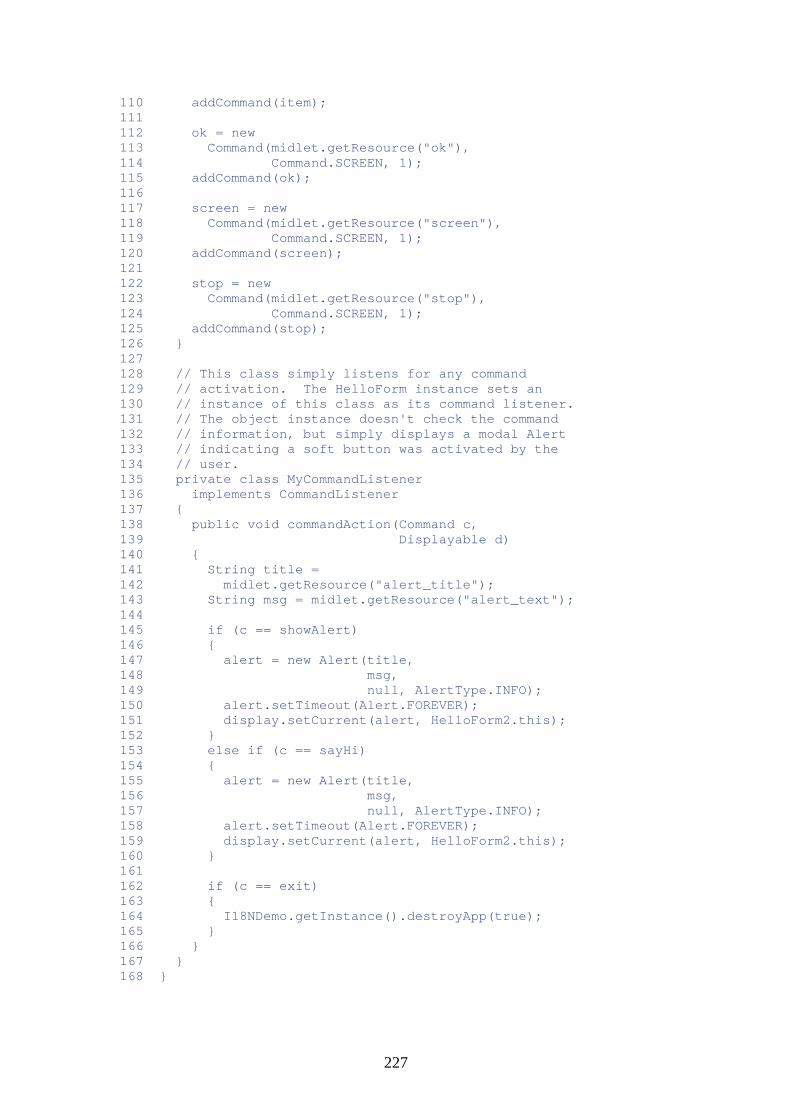
227
110 addCommand(item); 111 112 ok = new 113 Command(midlet.getResource("ok"), 114 Command.SCREEN, 1); 115 addCommand(ok); 116 117 screen = new 118 Command(midlet.getResource("screen"), 119 Command.SCREEN, 1); 120 addCommand(screen); 121 122 stop = new 123 Command(midlet.getResource("stop"), 124 Command.SCREEN, 1); 125 addCommand(stop); 126 } 127 128 // This class simply listens for any command 129 // activation. The HelloForm instance sets an 130 // instance of this class as its command listener. 131 // The object instance doesn't check the command 132 // information, but simply displays a modal Alert 133 // indicating a soft button was activated by the 134 // user. 135 private class MyCommandListener 136 implements CommandListener 137 { 138 public void commandAction(Command c, 139 Displayable d) 140 { 141 String title = 142 midlet.getResource("alert_title"); 143 String msg = midlet.getResource("alert_text"); 144 145 if (c == showAlert) 146 { 147 alert = new Alert(title, 148 msg, 149 null, AlertType.INFO); 150 alert.setTimeout(Alert.FOREVER); 151 display.setCurrent(alert, HelloForm2.this); 152 } 153 else if (c == sayHi) 154 { 155 alert = new Alert(title, 156 msg, 157 null, AlertType.INFO); 158 alert.setTimeout(Alert.FOREVER); 159 display.setCurrent(alert, HelloForm2.this); 160 } 161 162 if (c == exit) 163 { 164 I18NDemo.getInstance().destroyApp(true); 165 } 166 } 167 } 168 }

228
The most problematic aspect of this approach is that you, the developer, must create the infrastructure that enables your applications to read and parse the resource files. Also, the application must build the internal data structures that hold the localized resources read from the files. The most challenging aspect of building this infrastructure is providing adequate stream handling, particularly stream handling in support of reading string attribute values. The MIDlet.getAppProperty() method used in the previous JAD file-based scheme abstracted the details of the stream processing. But in this scheme, you must do all the work yourself.
The Class.getResourceAsStream(String name) method is the only way that a MIDlet can read a file from the application JAR. The name parameter represents the file name with no path information. This method returns a java.io.InputStream object, which is a byte-oriented stream.
You must convert this byte stream to a character stream in order to read string attribute values into your program. The only practical way to convert byte streams to character streams is to use the java.io.InputStreamReader class. You instantiate this class by passing your InputStream object to the InputStreamReader constructor. In lines 137 to 154 of Listing 9.5, the application-defined loadResources() method builds the character stream.
To convert from bytes to characters, you need to know the character encoding of the resource file you're reading. Listing 9.5 converts from ISO8859-1 encoding (used by the en_US.txt file) to Unicode. When reading character data into a program, the destination encoding is always Unicode. Java always represents characters and strings internally using Unicode.
The first form of the InputStreamReader constructor in Table 9.1, used in Listing 9.5, converts to Unicode from the default character encoding for the platform. If your resource file uses an encoding other than the platform's default, you must use the second InputStreamReader constructor, which takes an argument that specifies the encoding of the stream you're reading.
An important i18n and l10n design consideration is the choice of character encoding set for your resource files. String attribute values are localized and need to be encoded in a character set that supports the localization language. Attribute keys aren't localized, however, and they can be written using ASCII. Your choice of encoding should consider the following:
• Attribute keys and values should be encoded using the same character encoding set. • All resource files for all locales should use the same character encoding set.
It's best to use a single character encoding set for the whole file. Otherwise, you need to build two character-oriented streams: one to parse the attribute keys and one to parse the values. This arrangement adds an unnecessary level of complexity to your stream processing.
Similarly, if you use a different character encoding set for the resources of each locale, your application must build its character streams differently for each locale. It would have to have some way to determine the resource-file encoding in order to build an appropriate character stream. It's much simpler to use the same character encoding set for all locales.
The two practical choices for character encoding sets are UTF-8 and Java Unicode escape sequences. UTF-8 is a variable width code that retains the ASCII character encoding definitions. It accommodates all characters in all languages. Unfortunately, the MIDP stream classes don't have any convenient methods like J2SE's DataInputStream.readUTF() for reading UTF strings. So, you'd still have to do your own stream parsing. The other complication is that now, you'd have to write your resource files in the UTF-8 format. Therefore, you'd need to have text editors and other tools that support construction of UTF-8 encoded files.
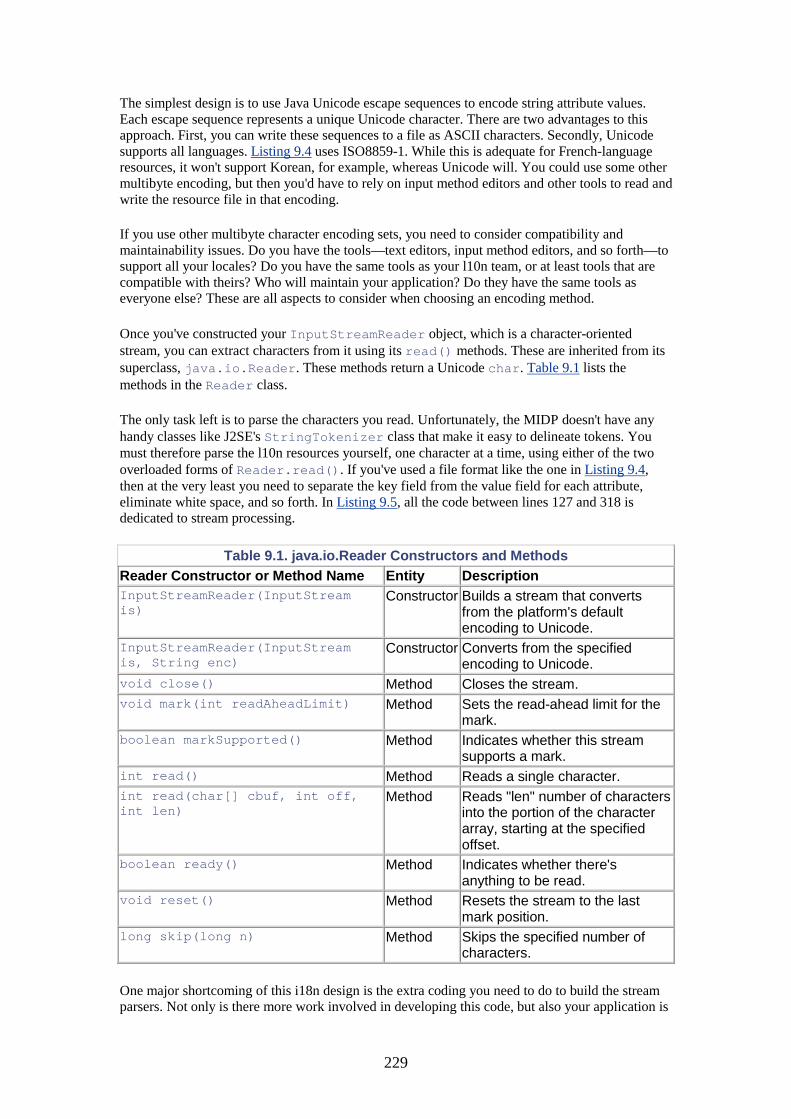
229
The simplest design is to use Java Unicode escape sequences to encode string attribute values. Each escape sequence represents a unique Unicode character. There are two advantages to this approach. First, you can write these sequences to a file as ASCII characters. Secondly, Unicode supports all languages. Listing 9.4 uses ISO8859-1. While this is adequate for French-language resources, it won't support Korean, for example, whereas Unicode will. You could use some other multibyte encoding, but then you'd have to rely on input method editors and other tools to read and write the resource file in that encoding.
If you use other multibyte character encoding sets, you need to consider compatibility and maintainability issues. Do you have the tools—text editors, input method editors, and so forth—to support all your locales? Do you have the same tools as your l10n team, or at least tools that are compatible with theirs? Who will maintain your application? Do they have the same tools as everyone else? These are all aspects to consider when choosing an encoding method.
Once you've constructed your InputStreamReader object, which is a character-oriented stream, you can extract characters from it using its read() methods. These are inherited from its superclass, java.io.Reader. These methods return a Unicode char. Table 9.1 lists the methods in the Reader class.
The only task left is to parse the characters you read. Unfortunately, the MIDP doesn't have any handy classes like J2SE's StringTokenizer class that make it easy to delineate tokens. You must therefore parse the l10n resources yourself, one character at a time, using either of the two overloaded forms of Reader.read(). If you've used a file format like the one in Listing 9.4, then at the very least you need to separate the key field from the value field for each attribute, eliminate white space, and so forth. In Listing 9.5, all the code between lines 127 and 318 is dedicated to stream processing.
Table 9.1. java.io.Reader Constructors and Methods Reader Constructor or Method Name Entity Description InputStreamReader(InputStream is)
Constructor Builds a stream that converts from the platform's default encoding to Unicode.
InputStreamReader(InputStream is, String enc)
Constructor Converts from the specified encoding to Unicode.
void close() Method Closes the stream. void mark(int readAheadLimit) Method Sets the read-ahead limit for the
mark. boolean markSupported() Method Indicates whether this stream
supports a mark. int read() Method Reads a single character. int read(char[] cbuf, int off, int len)
Method Reads "len" number of characters into the portion of the character array, starting at the specified offset.
boolean ready() Method Indicates whether there's anything to be read.
void reset() Method Resets the stream to the last mark position.
long skip(long n) Method Skips the specified number of characters.
One major shortcoming of this i18n design is the extra coding you need to do to build the stream parsers. Not only is there more work involved in developing this code, but also your application is

230
constrained by the runtime environment. File IO can consume a lot of runtime resources and yield only marginally acceptable performance. This is an important consideration for MIDP applications.
In addition, you need to consider the need to create a portable library of IO processing classes that you can reuse for other applications. It would be a waste of development to have to reimplement this infrastructure over and over again.
Beyond these shortcomings, this second approach is largely similar to the first one that used the JAD file to store l10n resources. Like the JAD file approach, this approach can accommodate nonstring resources by defining attributes whose values are the names of locale-sensitive classes.
Using Java Class Files to Define I18N Resources
In this third approach, applications define Java classes that contain localized resources. Each class contains resources for one locale. The files are compiled and packaged as part of the application JAR. At runtime, the localized resources are then accessed by instantiating the appropriate class.
This design follows that of the J2SE resource bundle hierarchy. The J2SE java.util.ResourceBundle and java.util.ListResourceBundle classes are abstract classes that define a framework for building aggregations of arbitrary locale-sensitive Java objects. The objects can be any Java objects.
This i18n design approach defines its own version of the ResourceBundle and ListResourceBundle J2SE classes. Listings 9.7 and 9.8 show their implementations, which define, respectively, proper subsets of the J2SE platform's Resource-Bundle and ListResourceBundle classes. Although these implementations are proprietary, the method signatures are the same as for their J2SE counterparts.
Listing 9.7 The ResourceBundle class defines a framework for aggregating resources without implying details about the abstraction required to do the aggregation.
import java.util.Hashtable; /** This class defines the base class for defining localized application resources. It implements a subset of the J2SE java.util.ResourceBundle class, but adheres to the interface defined by that class. */ public abstract class ResourceBundle { /** The "parent" resources. If a resource is not found in this bundle, the parent bundle is searched. */ protected ResourceBundle parent; /** No-arg constructor. */ public ResourceBundle() { super(); } /**
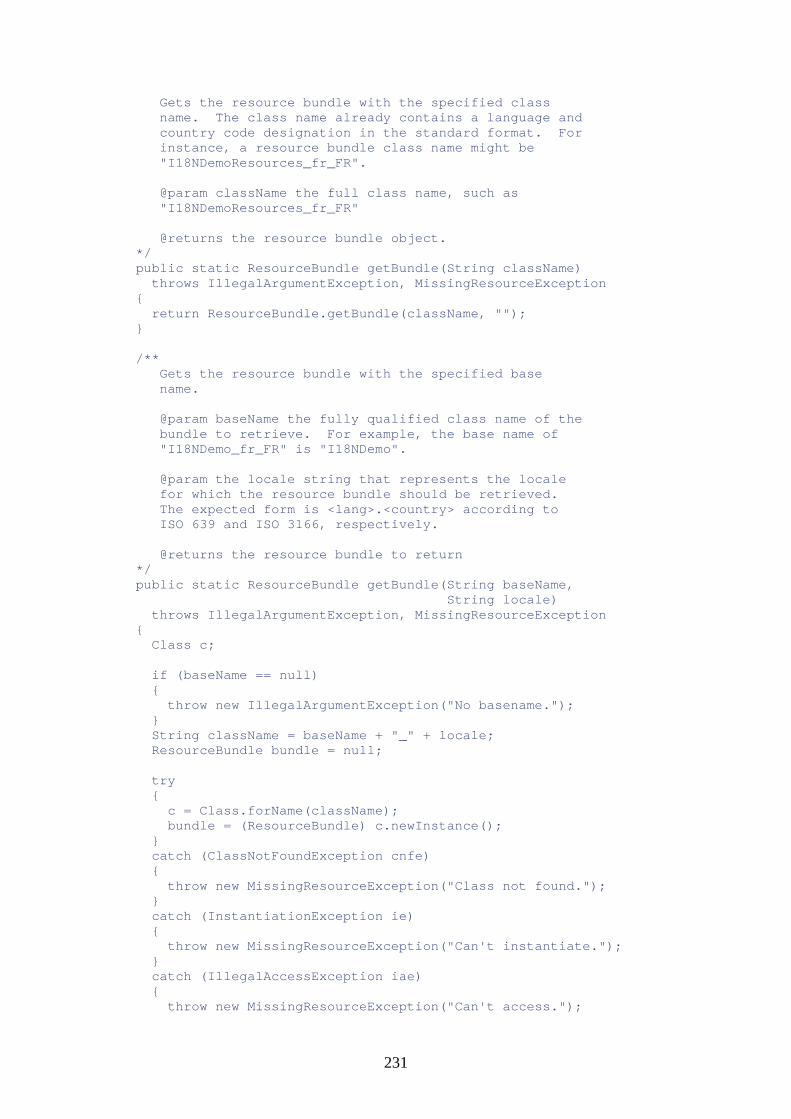
231
Gets the resource bundle with the specified class name. The class name already contains a language and country code designation in the standard format. For instance, a resource bundle class name might be "I18NDemoResources_fr_FR". @param className the full class name, such as "I18NDemoResources_fr_FR" @returns the resource bundle object. */ public static ResourceBundle getBundle(String className) throws IllegalArgumentException, MissingResourceException { return ResourceBundle.getBundle(className, ""); } /** Gets the resource bundle with the specified base name. @param baseName the fully qualified class name of the bundle to retrieve. For example, the base name of "I18NDemo_fr_FR" is "I18NDemo". @param the locale string that represents the locale for which the resource bundle should be retrieved. The expected form is <lang>.<country> according to ISO 639 and ISO 3166, respectively. @returns the resource bundle to return */ public static ResourceBundle getBundle(String baseName, String locale) throws IllegalArgumentException, MissingResourceException { Class c; if (baseName == null) { throw new IllegalArgumentException("No basename."); } String className = baseName + "_" + locale; ResourceBundle bundle = null; try { c = Class.forName(className); bundle = (ResourceBundle) c.newInstance(); } catch (ClassNotFoundException cnfe) { throw new MissingResourceException("Class not found."); } catch (InstantiationException ie) { throw new MissingResourceException("Can't instantiate."); } catch (IllegalAccessException iae) { throw new MissingResourceException("Can't access.");

232
} return bundle; } /** Retrieves the object with the specified key. If the key is not found, the parent bundle is searched. @param key the object key @return the object with the specified key */ public final Object getObject(String key) throws MissingResourceException { Object obj; if (key == null) { throw new NullPointerException(); } obj = handleGetObject(key); if (obj == null && parent != null) { obj = parent.getObject(key); } if (obj == null) { throw new MissingResourceException(); } return obj; } /** Searches this resource bundle for the object with the specified key. @param key the lookup key for the desired object. @return the object with the specified key */ protected abstract Object handleGetObject(String key); }
Listing 9.8 The ListResourceBundle class uses a "list" (in reality, a two-dimensional object array) to aggregate resources.
/** This class defines a resource bundle as a convenient array of resources. It mimics the class of the same name defined by the J2SE platform, java.util.ListResourceBundle. <p>This class is abstract. Applications are forced to subclass it and define concrete classes that contain localized resources. <p>Concrete application specific subclasses should be named so that the name contains the language and

233
country designation according to the ISO 639 and ISO 3166 standards for languages and country codes, respectively. */ public abstract class ListResourceBundle extends ResourceBundle { /** No-arg constructor. */ public ListResourceBundle() { super(); } // The array of resources in key-value format. private static final Object[][] contents = null; /** Gets the array of resources. @returns the two-dimensional array of key-value pairs that this bundle defines. */ public abstract Object[][] getContents(); /** Gets the object that represents the value associated with the specified key. @param key the key of the key-value pair. @returns the object that represents the value of a key-value pair. */ public final Object handleGetObject(String key) { Object value = null; if (key == null) { return null; } Object[][] pairs = getContents(); for (int i = 0; i < pairs.length; i++) { if (key.equals(pairs[i][0])) { value = (pairs[i][1]); } } return value; } }
The intention of this design is that application developers will create subclasses of ListResourceBundle. Each subclass represents an aggregation of localized resources for a specific locale. Listing 9.9 shows a concrete subclass of ListRe sourceBundle that provides application resources localized for English. Note how the name of the class reflects the locale supported. Not only does this naming scheme make it easy to manage the class during development—it also makes it easy to locate and load the class at runtime.
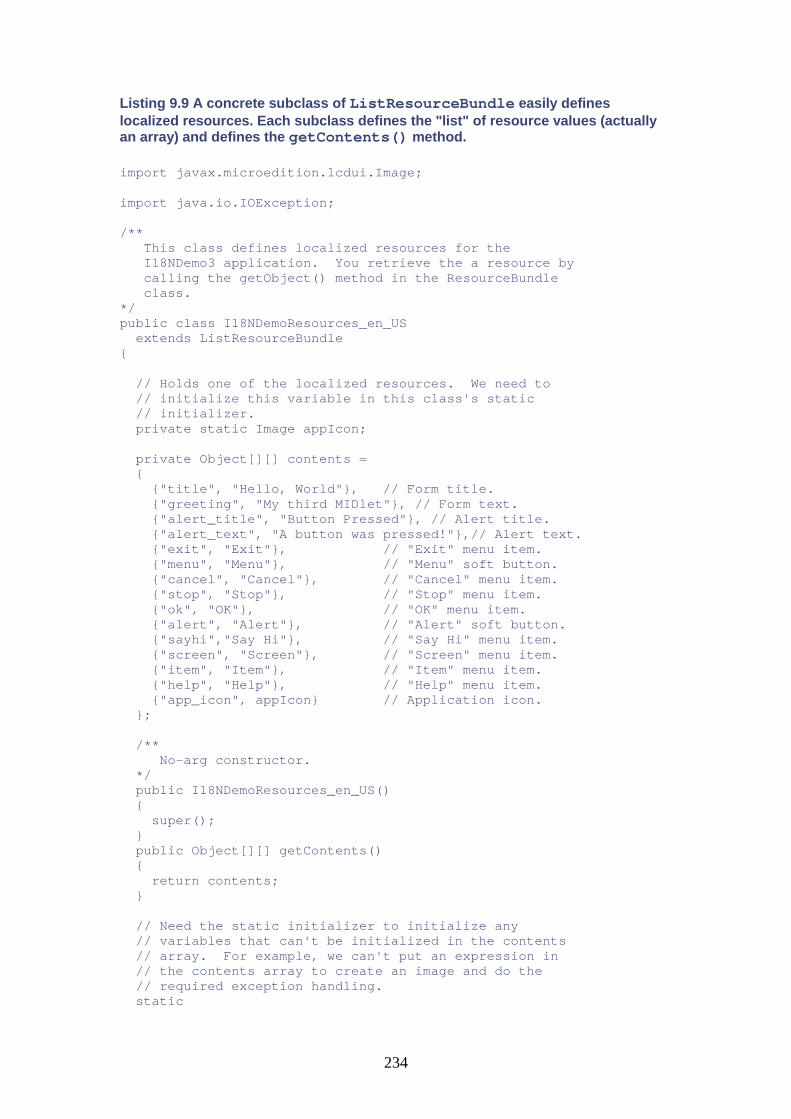
234
Listing 9.9 A concrete subclass of ListResourceBundle easily defines localized resources. Each subclass defines the "list" of resource values (actually an array) and defines the getContents() method.
import javax.microedition.lcdui.Image; import java.io.IOException; /** This class defines localized resources for the I18NDemo3 application. You retrieve the a resource by calling the getObject() method in the ResourceBundle class. */ public class I18NDemoResources_en_US extends ListResourceBundle { // Holds one of the localized resources. We need to // initialize this variable in this class's static // initializer. private static Image appIcon; private Object[][] contents = { {"title", "Hello, World"}, // Form title. {"greeting", "My third MIDlet"}, // Form text. {"alert_title", "Button Pressed"}, // Alert title. {"alert_text", "A button was pressed!"},// Alert text. {"exit", "Exit"}, // "Exit" menu item. {"menu", "Menu"}, // "Menu" soft button. {"cancel", "Cancel"}, // "Cancel" menu item. {"stop", "Stop"}, // "Stop" menu item. {"ok", "OK"}, // "OK" menu item. {"alert", "Alert"}, // "Alert" soft button. {"sayhi","Say Hi"}, // "Say Hi" menu item. {"screen", "Screen"}, // "Screen" menu item. {"item", "Item"}, // "Item" menu item. {"help", "Help"}, // "Help" menu item. {"app_icon", appIcon} // Application icon. }; /** No-arg constructor. */ public I18NDemoResources_en_US() { super(); } public Object[][] getContents() { return contents; } // Need the static initializer to initialize any // variables that can't be initialized in the contents // array. For example, we can't put an expression in // the contents array to create an image and do the // required exception handling. static
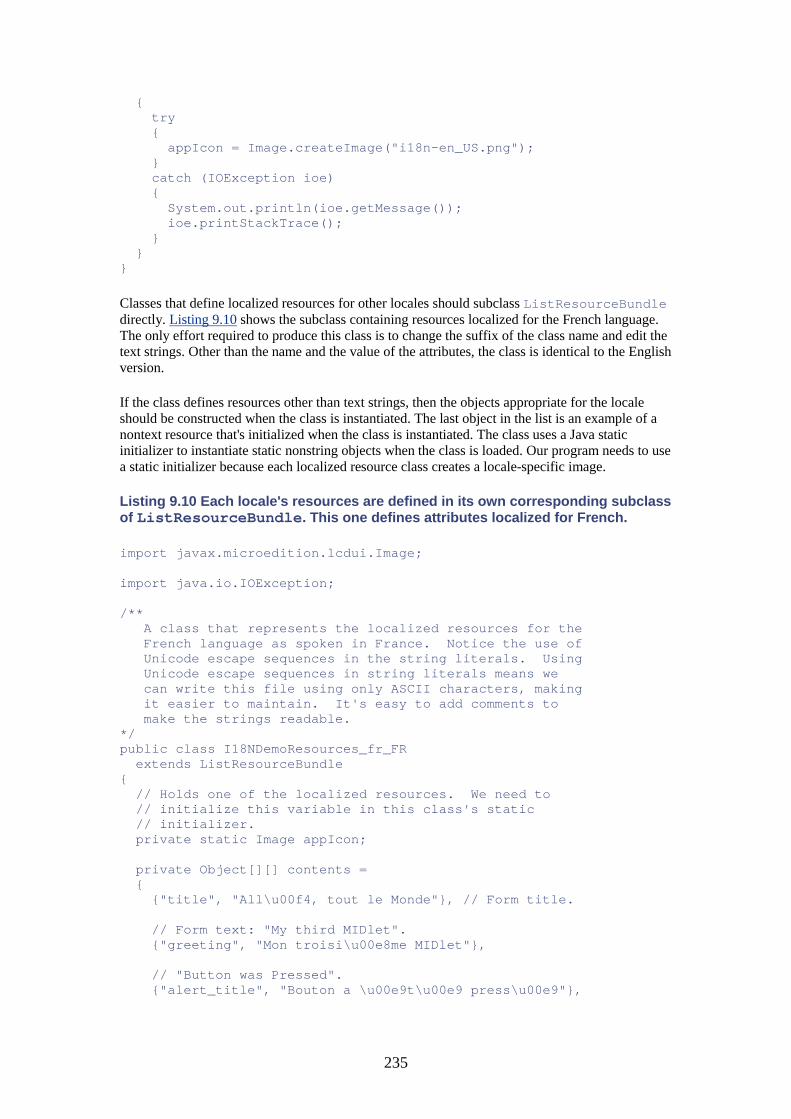
235
{ try { appIcon = Image.createImage("i18n-en_US.png"); } catch (IOException ioe) { System.out.println(ioe.getMessage()); ioe.printStackTrace(); } } }
Classes that define localized resources for other locales should subclass ListResourceBundle directly. Listing 9.10 shows the subclass containing resources localized for the French language. The only effort required to produce this class is to change the suffix of the class name and edit the text strings. Other than the name and the value of the attributes, the class is identical to the English version.
If the class defines resources other than text strings, then the objects appropriate for the locale should be constructed when the class is instantiated. The last object in the list is an example of a nontext resource that's initialized when the class is instantiated. The class uses a Java static initializer to instantiate static nonstring objects when the class is loaded. Our program needs to use a static initializer because each localized resource class creates a locale-specific image.
Listing 9.10 Each locale's resources are defined in its own corresponding subclass of ListResourceBundle. This one defines attributes localized for French.
import javax.microedition.lcdui.Image; import java.io.IOException; /** A class that represents the localized resources for the French language as spoken in France. Notice the use of Unicode escape sequences in the string literals. Using Unicode escape sequences in string literals means we can write this file using only ASCII characters, making it easier to maintain. It's easy to add comments to make the strings readable. */ public class I18NDemoResources_fr_FR extends ListResourceBundle { // Holds one of the localized resources. We need to // initialize this variable in this class's static // initializer. private static Image appIcon; private Object[][] contents = { {"title", "All\u00f4, tout le Monde"}, // Form title. // Form text: "My third MIDlet". {"greeting", "Mon troisi\u00e8me MIDlet"}, // "Button was Pressed". {"alert_title", "Bouton a \u00e9t\u00e9 press\u00e9"},

236
// "The button was pressed". {"alert_text", "Le bouton a \u00e9t\u00e9 press\u00e9!"}, {"exit", "Sortie"}, // "Exit" menu item. {"menu", "Menu"}, // "Menu" soft button. {"cancel", "Quitter"}, // "Cancel" menu item. {"stop", "Arreter"}, // "Stop" menu item. {"ok", "OK"}, // "OK" menu item. {"alert", "Alerte"}, // "Alert" soft button. {"sayhi","Dis bonjour"}, // "Say Hi" menu item. {"screen", "Ecran"}, // "Screen" menu item. {"item", "Item"}, // "Item" menu item. {"help", "Aider"}, // "Help" menu item. {"app_icon", appIcon} // Application icon. }; /** No-arg constructor. */ public I18NDemoResources_fr_FR() { super(); } /** Gets the contents of the resource bundle. @returns the array of key-value pairs. */ public Object[][] getContents() { return contents; } // Notice that the static initializer instantiates the // Image class with a different image that that used by // the en_US locale. static { try { appIcon = Image.createImage("i18n-fr_FR.png"); } catch (IOException ioe) { System.out.println(ioe.getMessage()); ioe.printStackTrace(); } } }
Listing 9.11 shows the I18NDemo3 program that uses this set of resource bundle classes. The startApp() method of this MIDlet instantiates the correct resource bundle class. It builds the name of the class by concatenating the base name of the family of localized resource files, I18NDemoResources, with the runtime locale designation. With only a few statements, the application has access to all l10n resources.
Listing 9.11 The I18NDemo3 class instantiates the correct resource bundle class for its runtime locale context. Resources of any Java type are easily accessed from the bundle.
import javax.microedition.midlet.MIDlet;

237
import javax.microedition.lcdui.Display; import javax.microedition.lcdui.Displayable; import javax.microedition.lcdui.Form; import java.util.Hashtable; /** The third version of the I18NDemo application. <p>This version of I18NDemo uses a resource bundle to define localized resources. The application determines the platform's current locale, and attempts to load the associated bundle containing the correct localized resources. If it can't find those resources, it loads the U.S. English resources, represented by the en_US language and country designation. <p>This approach is the most desirable. Localized resources other than strings can easily be supported. */ public class I18NDemo3 extends MIDlet { // The locale specified for the execution of this // MIDlet. private String locale; // The resource bundle that holds the localized // resources for the execution of this application. private static ResourceBundle bundle; // The Displayable. This component is displayed on the // screen. private HelloForm3 form; // The Display instance. This object manages all // Displayable components for this MIDlet. private Display display; // An instance of the MIDlet. private static I18NDemo3 instance; /** No-arg constructor. */ public I18NDemo3() { super(); instance = this; } /** Gets the instance of this class that exists in the running application. @return the instance created when the application starts up. */ public static I18NDemo3 getInstance() { if (instance == null) {
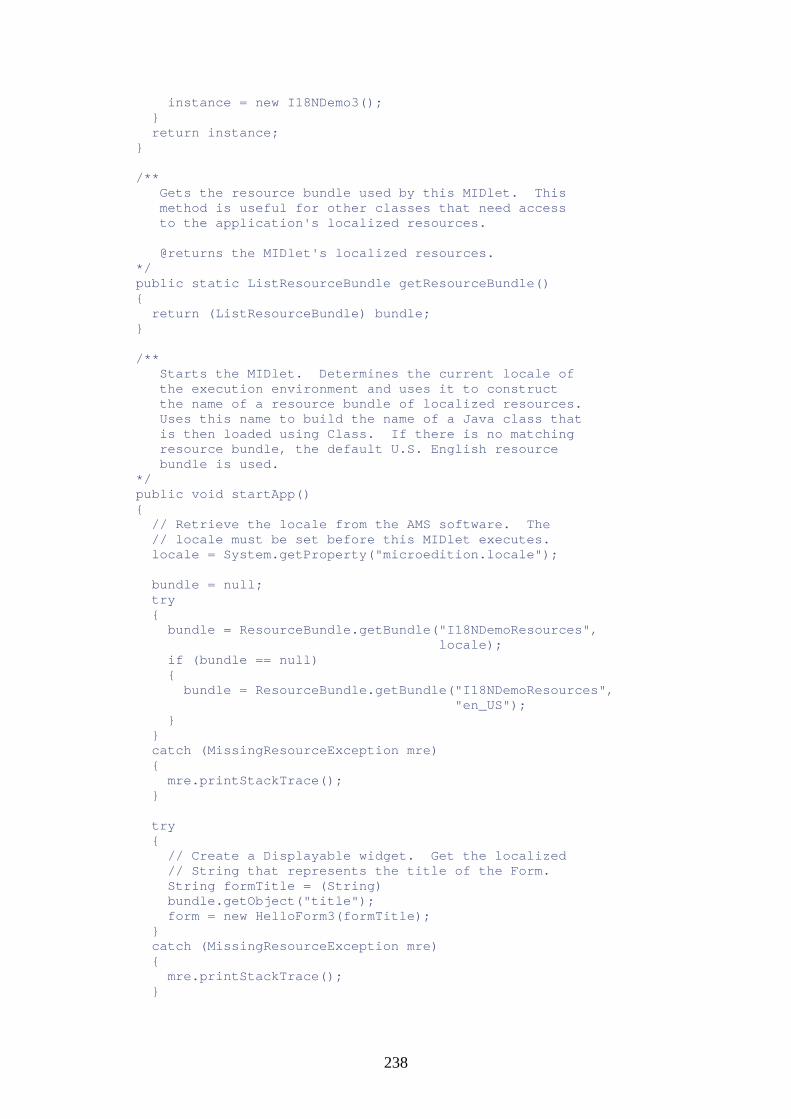
238
instance = new I18NDemo3(); } return instance; } /** Gets the resource bundle used by this MIDlet. This method is useful for other classes that need access to the application's localized resources. @returns the MIDlet's localized resources. */ public static ListResourceBundle getResourceBundle() { return (ListResourceBundle) bundle; } /** Starts the MIDlet. Determines the current locale of the execution environment and uses it to construct the name of a resource bundle of localized resources. Uses this name to build the name of a Java class that is then loaded using Class. If there is no matching resource bundle, the default U.S. English resource bundle is used. */ public void startApp() { // Retrieve the locale from the AMS software. The // locale must be set before this MIDlet executes. locale = System.getProperty("microedition.locale"); bundle = null; try { bundle = ResourceBundle.getBundle("I18NDemoResources", locale); if (bundle == null) { bundle = ResourceBundle.getBundle("I18NDemoResources", "en_US"); } } catch (MissingResourceException mre) { mre.printStackTrace(); } try { // Create a Displayable widget. Get the localized // String that represents the title of the Form. String formTitle = (String) bundle.getObject("title"); form = new HelloForm3(formTitle); } catch (MissingResourceException mre) { mre.printStackTrace(); }

239
// This app simply displays the single form created // above. display = Display.getDisplay(this); display.setCurrent(form); } /** Returns the value associated with the specified key from the list of user-defined MIDlet resources in the application JAD file. @param key the key of the key-value pair. @returns the value associated with the specified key. */ public Object getResource(String key) { Object resource = null; try { resource = bundle.getObject(key); } catch (MissingResourceException mre) { } return resource; } /** Quit the MIDlet. Notify the implementation that it can destroy all application resources. The implementation will call destroyApp(). */ public void quit() { notifyDestroyed(); } public void destroyApp(boolean destroy) { } public void pauseApp() { } }
Figure 9.1 shows the main screen produced by the I18NDemo3 program when it runs in the en_US locale. The program dynamically retrieves the localized resources defined in Listing 9.9. Figure 9.2 shows the menu screen of the same application running in the fr_FR locale, which uses the localized resources defined in Listing 9.10. The I18NDemo3 application code doesn't change at all. It simply determines the locale context dynamically upon initialization and loads the appropriate resource bundle.
Figure 9.1. All of the text seen by the user is localized. The program retrieves localized English language resources using the same mechanism as it does for
every other locale.
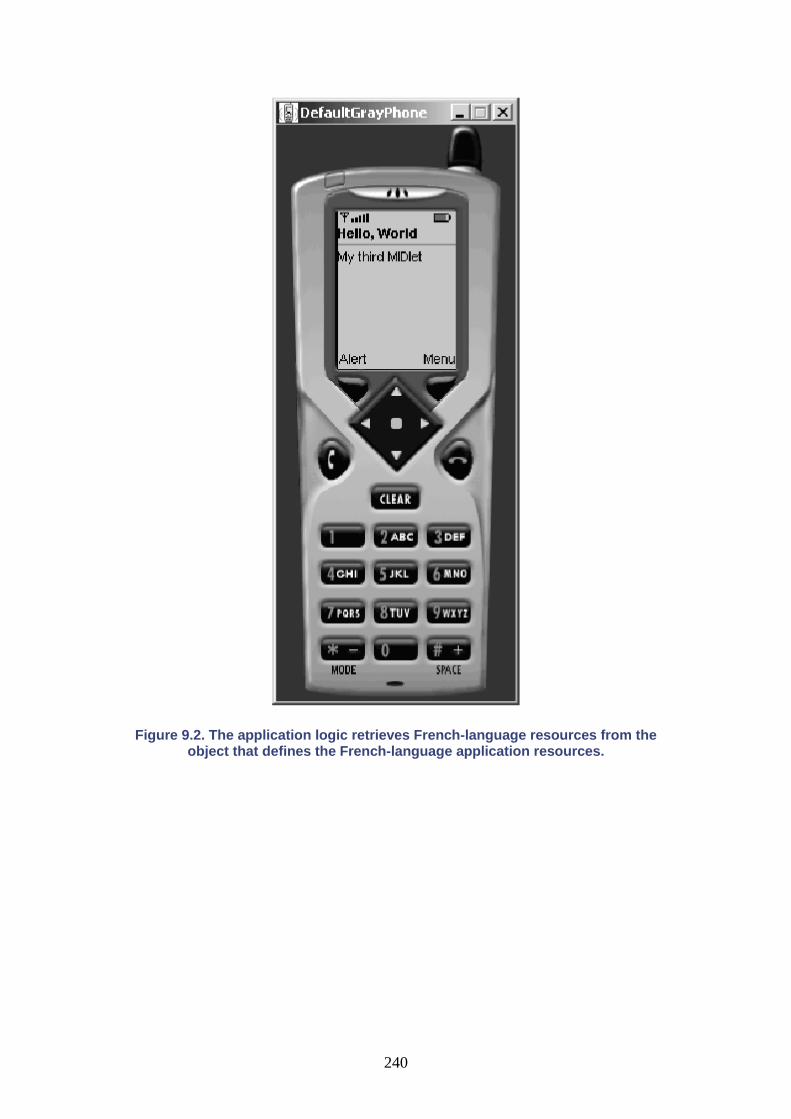
240
Figure 9.2. The application logic retrieves French-language resources from the object that defines the French-language application resources.
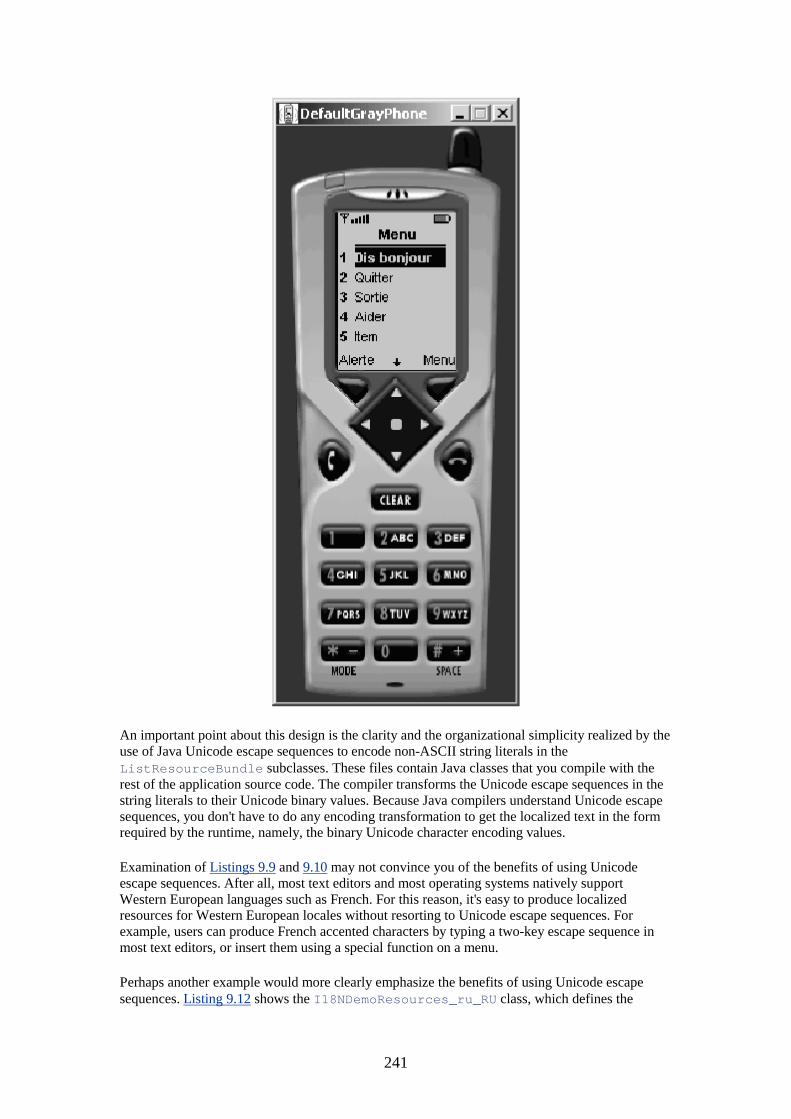
241
An important point about this design is the clarity and the organizational simplicity realized by the use of Java Unicode escape sequences to encode non-ASCII string literals in the ListResourceBundle subclasses. These files contain Java classes that you compile with the rest of the application source code. The compiler transforms the Unicode escape sequences in the string literals to their Unicode binary values. Because Java compilers understand Unicode escape sequences, you don't have to do any encoding transformation to get the localized text in the form required by the runtime, namely, the binary Unicode character encoding values.
Examination of Listings 9.9 and 9.10 may not convince you of the benefits of using Unicode escape sequences. After all, most text editors and most operating systems natively support Western European languages such as French. For this reason, it's easy to produce localized resources for Western European locales without resorting to Unicode escape sequences. For example, users can produce French accented characters by typing a two-key escape sequence in most text editors, or insert them using a special function on a menu.
Perhaps another example would more clearly emphasize the benefits of using Unicode escape sequences. Listing 9.12 shows the I18NDemoResources_ru_RU class, which defines the

242
localized resources for the Russian language. Figure 9.3 shows the appearance of the screen in Figure 9.2 when the locale is ru_RU, which represents the Russian language. Entering Russian characters using a Western language system is more complicated than entering French characters. The structure of the I18NDemoResources_ru_RU class, however—and the tools required to construct it—didn't have to change to support the use of the Cyrillic alphabet.
Figure 9.3. Java Unicode escape sequences easily support all written languages. Using a simple text editor, you can create localized resources for languages that
aren't represented on your computer keyboard.
Listing 9.12 The Russian localized resource class file also contains Unicode escape sequences that enable you to represent Cyrillic characters without the use of any special text editors or tools.
import javax.microedition.lcdui.Image; import java.io.IOException;
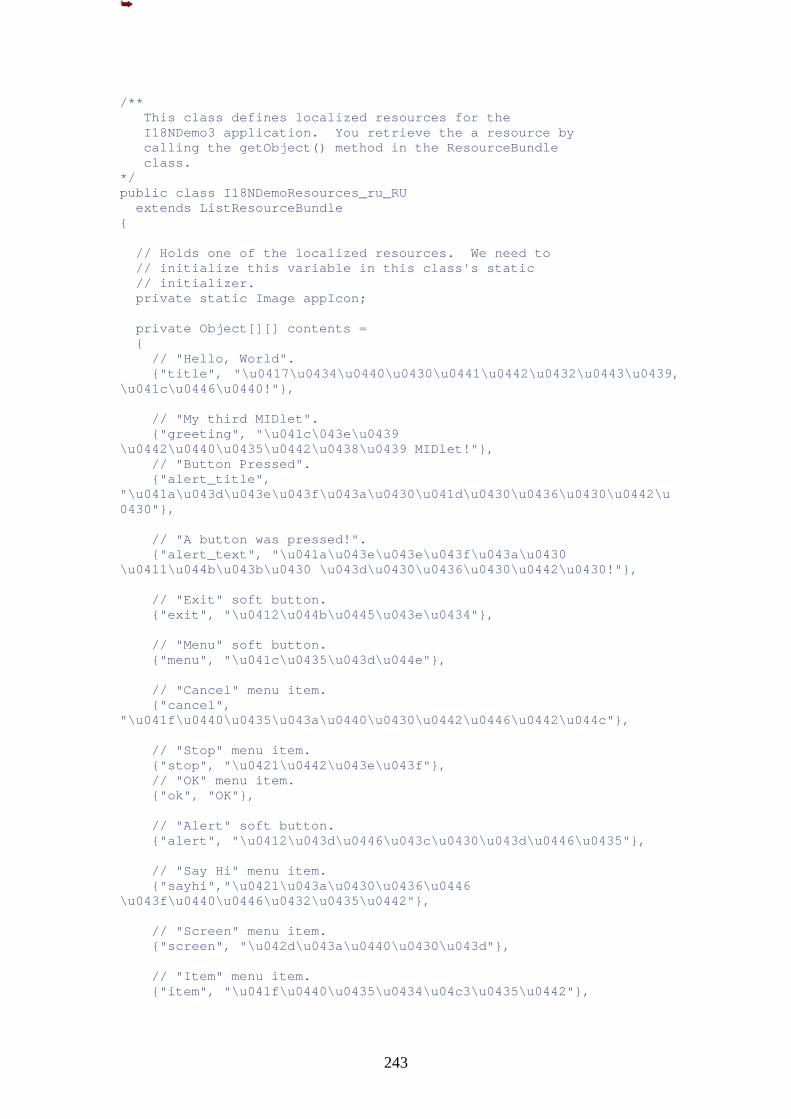
243
/** This class defines localized resources for the I18NDemo3 application. You retrieve the a resource by calling the getObject() method in the ResourceBundle class. */ public class I18NDemoResources_ru_RU extends ListResourceBundle { // Holds one of the localized resources. We need to // initialize this variable in this class's static // initializer. private static Image appIcon; private Object[][] contents = { // "Hello, World". {"title", "\u0417\u0434\u0440\u0430\u0441\u0442\u0432\u0443\u0439, \u041c\u0446\u0440!"}, // "My third MIDlet". {"greeting", "\u041c\043e\u0439 \u0442\u0440\u0435\u0442\u0438\u0439 MIDlet!"}, // "Button Pressed". {"alert_title", "\u041a\u043d\u043e\u043f\u043a\u0430\u041d\u0430\u0436\u0430\u0442\u0430"}, // "A button was pressed!". {"alert_text", "\u041a\u043e\u043e\u043f\u043a\u0430 \u0411\u044b\u043b\u0430 \u043d\u0430\u0436\u0430\u0442\u0430!"}, // "Exit" soft button. {"exit", "\u0412\u044b\u0445\u043e\u0434"}, // "Menu" soft button. {"menu", "\u041c\u0435\u043d\u044e"}, // "Cancel" menu item. {"cancel", "\u041f\u0440\u0435\u043a\u0440\u0430\u0442\u0446\u0442\u044c"}, // "Stop" menu item. {"stop", "\u0421\u0442\u043e\u043f"}, // "OK" menu item. {"ok", "OK"}, // "Alert" soft button. {"alert", "\u0412\u043d\u0446\u043c\u0430\u043d\u0446\u0435"}, // "Say Hi" menu item. {"sayhi","\u0421\u043a\u0430\u0436\u0446 \u043f\u0440\u0446\u0432\u0435\u0442"}, // "Screen" menu item. {"screen", "\u042d\u043a\u0440\u0430\u043d"}, // "Item" menu item. {"item", "\u041f\u0440\u0435\u0434\u04c3\u0435\u0442"},

244
// "Help" menu item. {"help", "\u041f\u043e\u043c\u043e\u0449\u044c"}, // Application icon. {"app_icon", appIcon} }; /** No-arg constructor. */ public I18NDemoResources_ru_RU() { super(); } public Object[][] getContents() { return contents; } // Need the static initializer to initialize any // variables that can't be initialized in the contents // array. For example, we can't put an expression in // the contents array to create an image and do the // required exception handling. static { try { appIcon = Image.createImage("i18n-ru_RU.png"); } catch (IOException ioe) { System.out.println(ioe.getMessage()); ioe.printStackTrace(); } } }
If you're still not convinced, look at Listing 9.13, which shows the same application resources localized for Japanese. Figure 9.4 shows one of the application screens in Japanese. The I18NDemoResources_ja_JP class was created with the same ASCII-based text editor. Japanese characters can't be entered from a conventional text editor without the support of an IME. And, if you do use an IME, you must ensure that it uses Unicode to write the string literals to the file. Otherwise, your application would have to do a character-encoding transformation.
Figure 9.4. Japanese-localized resources are treated the same way as those of other languages. Of course, your system must have the appropriate fonts to
display these characters.
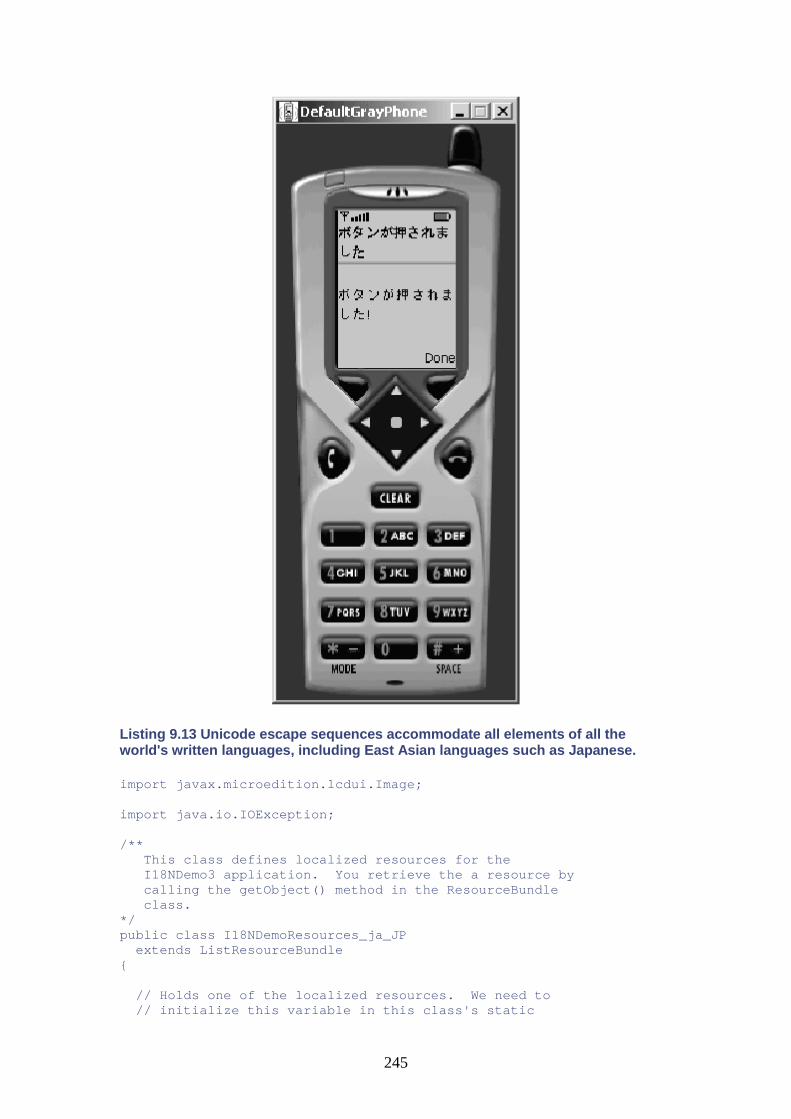
245
Listing 9.13 Unicode escape sequences accommodate all elements of all the world's written languages, including East Asian languages such as Japanese.
import javax.microedition.lcdui.Image; import java.io.IOException; /** This class defines localized resources for the I18NDemo3 application. You retrieve the a resource by calling the getObject() method in the ResourceBundle class. */ public class I18NDemoResources_ja_JP extends ListResourceBundle { // Holds one of the localized resources. We need to // initialize this variable in this class's static

246
// initializer. private static Image appIcon; private Object[][] contents = { // "Hello, World" {"title", "\u24f64\u3055\u3093, \u3053\u3093\u306b\u3061\u306f"}, // "My third MIDlet". {"greeting", "\u79c1\u306e 3 \u3063\u3081\u306e MIDlet"}, // "Button Pressed". {"alert_title", "\u30dc\u30bf\u30f3\u304c\u62bc\u3055\u308c\u307e\u3057\u305f"}, // "A button was pressed." {"alert_text", "\u30dc\u30bf\u30f3\u304c\u62bc\u3055\u308c\u307e\u3057\u305f!"}, // "Exit" menu item. {"exit", "\u51fa\53e3"}, // "Menu" soft button. {"menu", "\u30e1\u30cb\u30e6\u30fc"}, // "Cancel" menu item. {"cancel", "\u30ad\u30e4\u30f3\u30bb\u30eb"}, // "Stop" menu item. {"stop", "\u505c\u6b62"}, // "OK" menu item. {"ok", "OK"}, // "Alert" soft button. {"alert", "Alert"}, // "Say Hi" menu item. {"sayhi","\u30cf\u30a4"}, // "Screen" menu item. {"screen", "\u30b9\u30af\u30ea\u30f3"}, // "Item" menu item. {"item", "\u9805\u76ee"}, // "Help" menu item. {"help", "\u308d"}, // Application icon. {"app_icon", appIcon} }; /** No-arg constructor. */ public I18NDemoResources_ja_JP() { super(); }
247
public Object[][] getContents() { return contents; } // Need the static initializer to initialize any // variables that can't be initialized in the contents // array. For example, we can't put an expression in // the contents array to create an image and do the // required exception handling. static { try { appIcon = Image.createImage("i18n-ja_JP.png"); } catch (IOException ioe) { System.out.println(ioe.getMessage()); ioe.printStackTrace(); } } }
Listing 9.14 shows the I18NDemoResources_zh_CH.java file, which defines localized resources for simplified Chinese. Figure 9.5 shows another screen from the I18NDemo3 application, this time displaying simplified Chinese characters.
Figure 9.5. This screen displays text localized for simplified Chinese. Although Japanese Kanji writing uses Chinese ideographs, different fonts represent the two
languages. You must ensure that you have fonts for both locales.
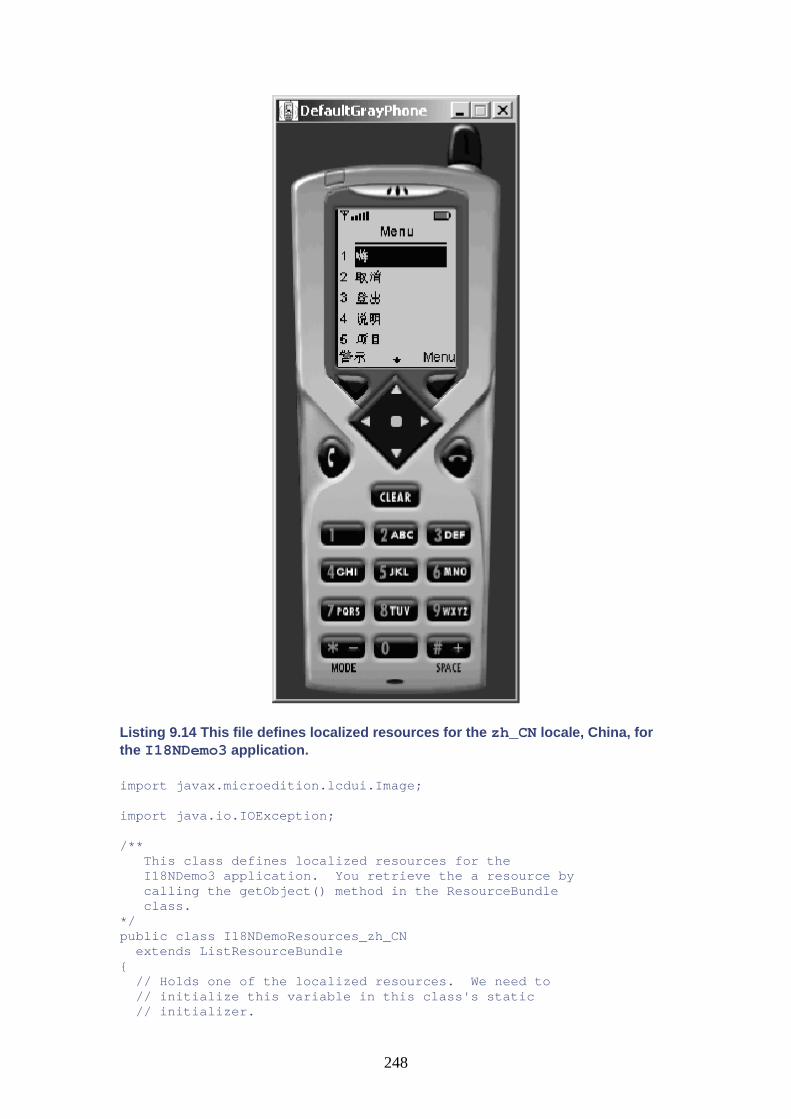
248
Listing 9.14 This file defines localized resources for the zh_CN locale, China, for the I18NDemo3 application.
import javax.microedition.lcdui.Image; import java.io.IOException; /** This class defines localized resources for the I18NDemo3 application. You retrieve the a resource by calling the getObject() method in the ResourceBundle class. */ public class I18NDemoResources_zh_CN extends ListResourceBundle { // Holds one of the localized resources. We need to // initialize this variable in this class's static // initializer.
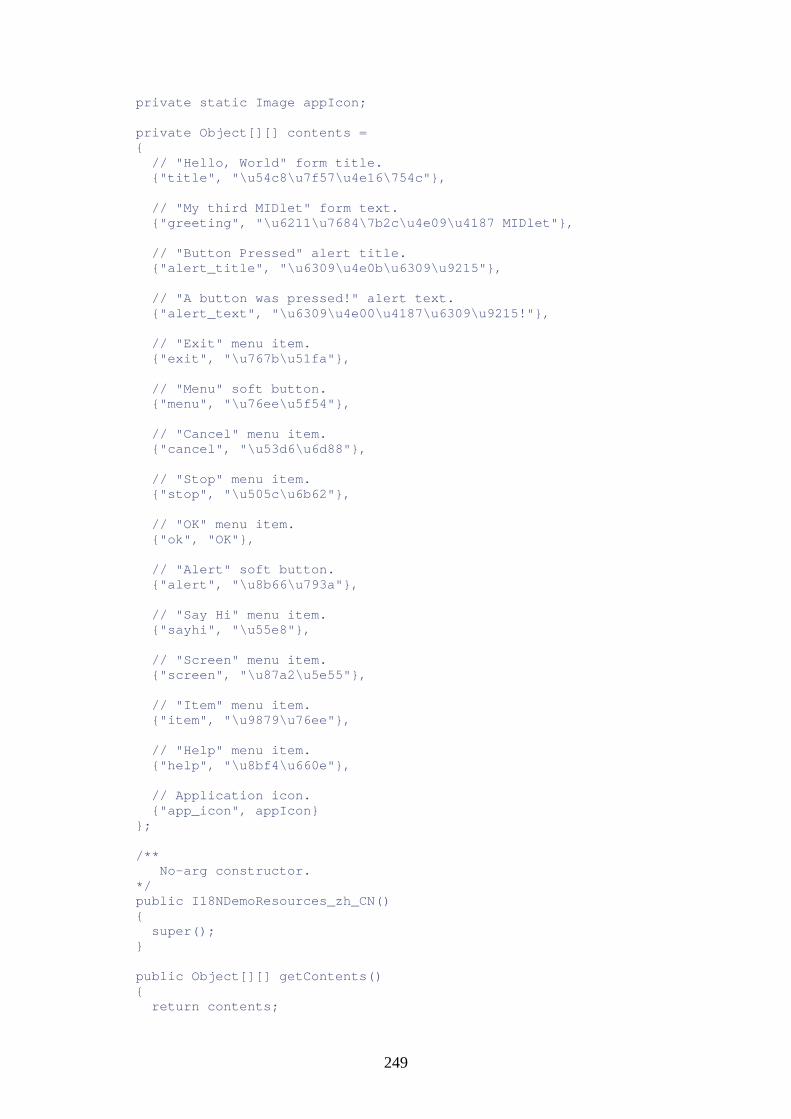
249
private static Image appIcon; private Object[][] contents = { // "Hello, World" form title. {"title", "\u54c8\u7f57\u4e16\754c"}, // "My third MIDlet" form text. {"greeting", "\u6211\u7684\7b2c\u4e09\u4187 MIDlet"}, // "Button Pressed" alert title. {"alert_title", "\u6309\u4e0b\u6309\u9215"}, // "A button was pressed!" alert text. {"alert_text", "\u6309\u4e00\u4187\u6309\u9215!"}, // "Exit" menu item. {"exit", "\u767b\u51fa"}, // "Menu" soft button. {"menu", "\u76ee\u5f54"}, // "Cancel" menu item. {"cancel", "\u53d6\u6d88"}, // "Stop" menu item. {"stop", "\u505c\u6b62"}, // "OK" menu item. {"ok", "OK"}, // "Alert" soft button. {"alert", "\u8b66\u793a"}, // "Say Hi" menu item. {"sayhi", "\u55e8"}, // "Screen" menu item. {"screen", "\u87a2\u5e55"}, // "Item" menu item. {"item", "\u9879\u76ee"}, // "Help" menu item. {"help", "\u8bf4\u660e"}, // Application icon. {"app_icon", appIcon} }; /** No-arg constructor. */ public I18NDemoResources_zh_CN() { super(); } public Object[][] getContents() { return contents;
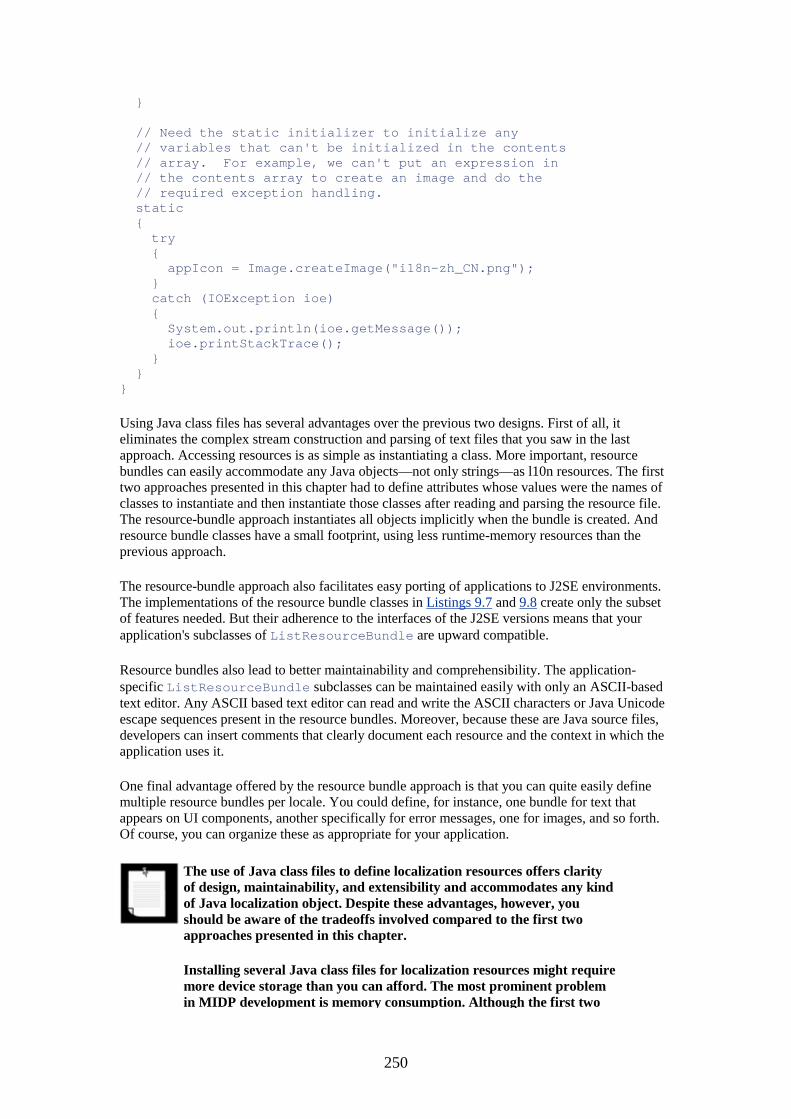
250
} // Need the static initializer to initialize any // variables that can't be initialized in the contents // array. For example, we can't put an expression in // the contents array to create an image and do the // required exception handling. static { try { appIcon = Image.createImage("i18n-zh_CN.png"); } catch (IOException ioe) { System.out.println(ioe.getMessage()); ioe.printStackTrace(); } } }
Using Java class files has several advantages over the previous two designs. First of all, it eliminates the complex stream construction and parsing of text files that you saw in the last approach. Accessing resources is as simple as instantiating a class. More important, resource bundles can easily accommodate any Java objects—not only strings—as l10n resources. The first two approaches presented in this chapter had to define attributes whose values were the names of classes to instantiate and then instantiate those classes after reading and parsing the resource file. The resource-bundle approach instantiates all objects implicitly when the bundle is created. And resource bundle classes have a small footprint, using less runtime-memory resources than the previous approach.
The resource-bundle approach also facilitates easy porting of applications to J2SE environments. The implementations of the resource bundle classes in Listings 9.7 and 9.8 create only the subset of features needed. But their adherence to the interfaces of the J2SE versions means that your application's subclasses of ListResourceBundle are upward compatible.
Resource bundles also lead to better maintainability and comprehensibility. The application-specific ListResourceBundle subclasses can be maintained easily with only an ASCII-based text editor. Any ASCII based text editor can read and write the ASCII characters or Java Unicode escape sequences present in the resource bundles. Moreover, because these are Java source files, developers can insert comments that clearly document each resource and the context in which the application uses it.
One final advantage offered by the resource bundle approach is that you can quite easily define multiple resource bundles per locale. You could define, for instance, one bundle for text that appears on UI components, another specifically for error messages, one for images, and so forth. Of course, you can organize these as appropriate for your application.
The use of Java class files to define localization resources offers clarity of design, maintainability, and extensibility and accommodates any kind of Java localization object. Despite these advantages, however, you should be aware of the tradeoffs involved compared to the first two approaches presented in this chapter.
Installing several Java class files for localization resources might require more device storage than you can afford. The most prominent problem in MIDP development is memory consumption. Although the first two
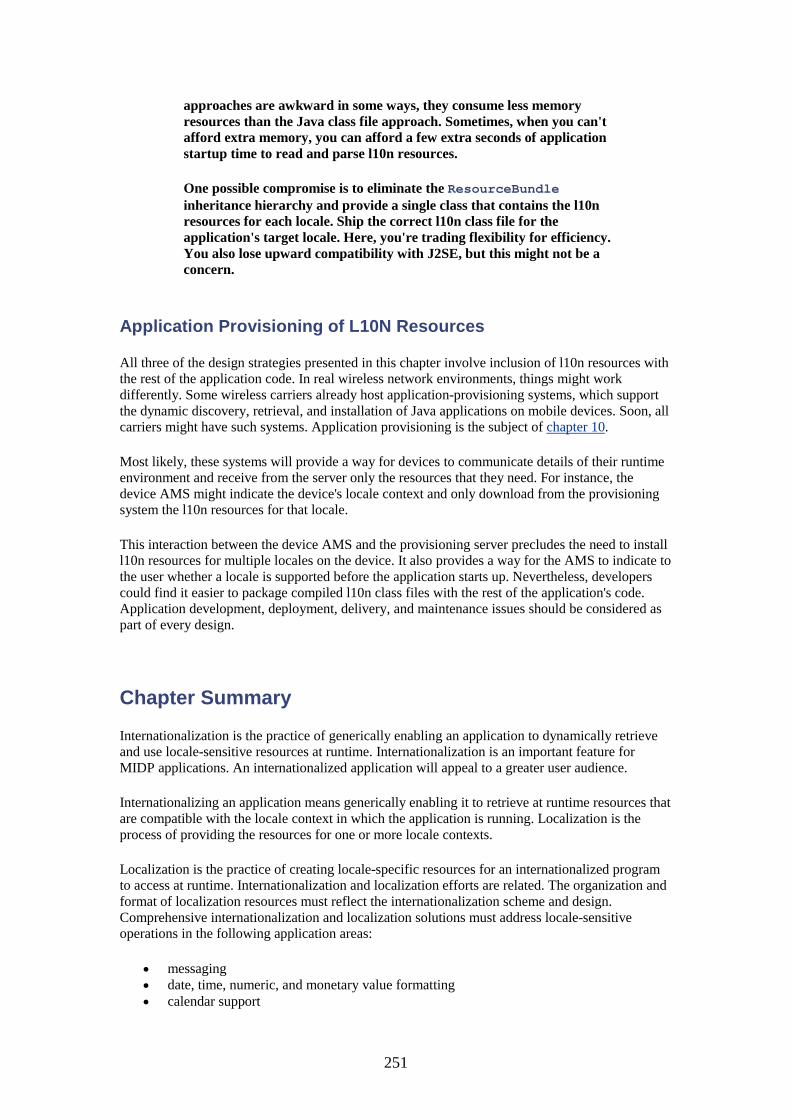
251
approaches are awkward in some ways, they consume less memory resources than the Java class file approach. Sometimes, when you can't afford extra memory, you can afford a few extra seconds of application startup time to read and parse l10n resources.
One possible compromise is to eliminate the ResourceBundle inheritance hierarchy and provide a single class that contains the l10n resources for each locale. Ship the correct l10n class file for the application's target locale. Here, you're trading flexibility for efficiency. You also lose upward compatibility with J2SE, but this might not be a concern.
Application Provisioning of L10N Resources
All three of the design strategies presented in this chapter involve inclusion of l10n resources with the rest of the application code. In real wireless network environments, things might work differently. Some wireless carriers already host application-provisioning systems, which support the dynamic discovery, retrieval, and installation of Java applications on mobile devices. Soon, all carriers might have such systems. Application provisioning is the subject of chapter 10.
Most likely, these systems will provide a way for devices to communicate details of their runtime environment and receive from the server only the resources that they need. For instance, the device AMS might indicate the device's locale context and only download from the provisioning system the l10n resources for that locale.
This interaction between the device AMS and the provisioning server precludes the need to install l10n resources for multiple locales on the device. It also provides a way for the AMS to indicate to the user whether a locale is supported before the application starts up. Nevertheless, developers could find it easier to package compiled l10n class files with the rest of the application's code. Application development, deployment, delivery, and maintenance issues should be considered as part of every design.
Chapter Summary
Internationalization is the practice of generically enabling an application to dynamically retrieve and use locale-sensitive resources at runtime. Internationalization is an important feature for MIDP applications. An internationalized application will appeal to a greater user audience.
Internationalizing an application means generically enabling it to retrieve at runtime resources that are compatible with the locale context in which the application is running. Localization is the process of providing the resources for one or more locale contexts.
Localization is the practice of creating locale-specific resources for an internationalized program to access at runtime. Internationalization and localization efforts are related. The organization and format of localization resources must reflect the internationalization scheme and design. Comprehensive internationalization and localization solutions must address locale-sensitive operations in the following application areas:
• messaging • date, time, numeric, and monetary value formatting • calendar support

252
• locale-sensitive icons, images, and colors
The capabilities available in the MIDP platform influence the choice of i18n design and affect the feasibility of implementing certain designs for MIDP applications. The MIDP platform provides the following three main mechanisms that can be used for building i18n capabilities:
• user defined MIDlet suite attributes: application descriptor file • support for retrieval of resources (files) from the MIDlet suite JAR file:
Class.getResourceAsStream(String resourceName) • conversion between character-encoding sets: java.io package
MIDP application designers must also consider performance, maintainability, and deployment actors when designing i18n and l10n solutions.
253
Chapter 10. Application Provisioning • Concepts • The Provisioning Process • Preparing Applications for Provisioning Systems
So far, you've learned how to develop MIDP applications and execute them using an emulator. In the real world, however, you need to deploy your applications to real mobile devices. Mobile devices need the capability to support installation of applications by users. The process that supports this kind of dynamic application installation on pervasive devices is called application provisioning. The systems that support the provisioning process are called application-provisioning systems or simply provisioning systems.
In the context of this chapter and book, the term provisioning refers to the delivery of software applications to mobile devices. For wireless carriers and operating companies (commonly called OpCos), provisioning has a very different meaning, namely, the setting of device and station identification module (SIM) attributes for voice, data, and other traditional services.
This chapter gives you an introduction to application-provisioning systems. Its purpose is to introduce developers to the concepts surrounding application provisioning and to discuss the issues involved in preparing applications for deployment to provisioning systems.
This chapter doesn't teach you how to design or build an application-provisioning system. Provisioning systems are complex enterprise applications, and a discussion of their design or construction is beyond the scope of this book.
Concepts
Manufacturers typically preinstall the software that you see on mobile devices before the devices leave the factory. But it will become less and less feasible for manufacturers to preinstall all this software in the factory. Devices won't have enough memory resources to store the increasing number and variety of applications that users will demand. Furthermore, the preinstalled applications can never satisfy the requirements of all users. Therefore, users need the ability to initiate the installation of software on their mobile devices as they do with personal computers. This ability enables users to change the set of applications they have at any given time, uninstalling some applications and installing new ones to circumvent limitations in device storage capacity.
In order to provision applications to their devices, users need the ability to discover, select, purchase, download, and install applications using their mobile devices. Because mobile devices don't necessarily have the ability to connect to any network or other device through means other than the air interface supported by the wireless network, carriers must support installation of MIDP applications over-the-air (OTA). At the time of this writing, OTA provisioning is the cornerstone of application provisioning for mobile devices.
Currently, however, many wireless devices are starting to appear that enable download of applications through some mechanism other than OTA, such as through the use of infrared ports, tethering, flash memory modules, and so forth. Nevertheless, it's possible that some mobile devices will continue to have only wireless connectivity through the wireless network's air interface for some time yet.

254
Wireless carriers and other service providers who support application provisioning for their users provide the provisioning systems with which their users communicate. These provisioning systems support OTA provisioning for mobile devices in conjunction with the carrier's wireless network and wireless Internet gateway (WIG). Figure 10.1 shows one possible logical schematic diagram that reflects the role of a provisioning system in the carrier's network infrastructure.
Figure 10.1. An application-provisioning system interfaces to the carrier's wireless Internet gateway in order to be able to communicate with the mobile devices it
serves.
OTA provisioning requires the establishment of a "phone call"—or a data connection in data networks such as 2.5G or 3G networks—to connect the mobile device, which is the client, to the provisioning server. On the server side, the provisioning manager conceptually represents the primary component of the provisioning system that manages the various stages of the provisioning process. These stages include dynamic discovery, presentation of content descriptions, brokering, delivery, transaction commit, and billing.
On the device, user agent software communicates with the provisioning manager. User agent software must be compatible with the communication mechanism defined by the provisioning manager. Two possible schemes are Wireless Application Protocol (WAP) discovery with HTTP delivery and WAP discovery with WAP segmentation and reassembly (SAR). Wireless carriers in certain markets, particularly in Japan, are building infrastructures that support TCP/IP to the handset. These infrastructures will support HTML (XHTML) delivery to the handset by HTTP transport, replacing WAP. As this model becomes more prevalent in 2.5G and 3G network implementations, provisioning manager interfaces will change accordingly.
Device AMS can be built to have the capability to act as the user agent software, or at least to interface closely with the device's micro browser. Alternatively, devices contain dedicated discovery application (DA) software, whose job it is to identify MIDlet suites for user download. Among other responsibilities, DA software must be able to place provisioned applications in a location accessible by the AMS. The term Java application manager (JAM) is used to describe the AMS for systems that specifically support Java application provisioning.
The user agent software on client devices must work in collaboration with the provisioning system in order to be able to communicate using well-defined interfaces over a commonly accessible communication mechanism. Typically, wireless networks use HTTP over some transport protocol
255
to enable application level communications with mobile devices. In fact, the Over The Air User Initiated Provisioning Recommended Practice, Addendum to the Mobile Information Device Profile document requires that OTA provisioning support the HTTP protocol. HTTP is the only protocol that must be supported. You can find this specification at http://java.sun.com/products/midp/. Incidentally, it's likely that the recommendations in this document will become part of the MIDP-NG (next generation) specification.
The motivation for application provisioning is threefold:
• to automate the process of determining the compatibility of applications for the environments to which they are downloaded,
• to enable the delivery of applications to devices, and • to support a micro-billing model, which is an attractive way for MIDP application
developers to sell their content.
Although provisioning systems and device user agent software help automate the provisioning process, users must perform the steps that require human intelligence, such as specifying search criteria for locating applications, selecting applications, initiating and approving the purchase of software, and approving the download of software.
The provisioning process centers on an exchange of information between client and server. User agent software on the client accesses information about the client environment and communicates it to the provisioning manager. The provisioning manager software presents information about registered applications to the mobile device. It obtains this information from its repository of registered applications. The provisioning system accesses application-specific information, such as the information defined in the application JAD or manifest files. Together, client and server exchange information, negotiate rights, privileges, and capabilities, and collaborate to deliver applications to the mobile device. Provisioning managers that are controlled by OpCos also have access to user information such as user profiles and preferences.
Applications can be standalone client applications, distributed applications, or client-server applications that require a client piece and a server piece (a network service component). For instance, an application might consist of a component that executes on the mobile device and communicates to a server that runs on a server in the carrier's network or in the service provider's network (a corporate customer's network, for example). The application descriptor could stipulate that the server component should be installed before any client components can be provisioned to devices. The provisioning system can determine whether the network environment is capable of supporting the application requirements. Other issues include determining how and when server components should be instantiated or initialized or whether the network can support continuous availability of the components.
Provisioning applications also involves considerations of application lifetime and reversal of the provisioning process. Some applications might stipulate that they can be executed a fixed number of times by the user or that they can be used for a certain amount of time. This could be applicable to trial software or to certain types of software licenses. Applications might stipulate that they should not be persisted on devices, but rather downloaded each time from the provisioning server. The server can check for expiration of the terms of usage for particular users or even for particular devices.
The provisioning process might involve the selective removal of applications to make room for new applications. Support for this feature requires negotiation between the device's user agent software and the provisioning manager software. Application removal would require user notification.
256
Several commercial vendors currently offer application-provisioning systems. Many of their features are designed specifically to support the provisioning of J2ME applications. That is, many of their features address the challenges of provisioning in wireless environments.
The Provisioning Process
Practically speaking, the provisioning process involves two major phases:
• application registration • provisioning registered applications to devices
The first step, registration, makes an application available to be provisioned. The second step, provisioning of registered applications, consists of all the steps that are required to realize the installation of an application on a mobile device. The tasks that comprise the second phase are sometimes grouped into the following three categories:
• discovery— application search • brokering— presentation of application information to users, software license negotiation,
purchase verification, nonrepudiation of purchase • download— use authentication, application download, installation of an application on a
device, installation verification, removal of installed applications, installation of server-side resources, billing transactions
In the remainder of this section, however, I'll simply introduce the individual tasks without reference to these three categories.
Application Registration
Before applications can be provisioned to devices, they must be registered with the provisioning system. A registered application is one that's known to the provisioning system and can be delivered to devices.
The individual or organization that develops an application typically initiates the application registration process. Before a developer can register an application, however, he or she must typically register as an authorized user of the carrier's provisioning system or as a member of the carrier's developer program. The provisioning system might support developer registration through the Web using an HTML-based Web interface. Subsequent to user registration, the developer can upload applications.
Typically, provisioning systems support two main mechanisms for managing registered applications. Using the first approach, the developer uploads the application JAR file, JAD file, and manifest file as specified by the provisioning system. The provisioning system physically maintains these items in its repository. Using the second approach, the developer simply registers a URL and a JAD file (or the metadata needed to build the JAD file) that indicates the location from which the provisioning manager can retrieve the application as needed during provisioning. The developer or even a third party may physically maintain the application JAR file.
Not all provisioning systems will support both the ability to internally persist JAR files and the ability to reference external JARs. As a developer, you should consider which schemes are acceptable and which ones conform to the usage scenarios that you envision for your applications. Nontechnical issues arise—such as legal issues about
257
ensuring security against unauthorized access to your application—which might contain valuable intellectual property or service-level agreements (SLAs) with the customer or carrier.
It's the developer's responsibility to supply all information in the form required by the provisioning system. At registration time, the developer must provide all information that will be needed during the provisioning process. At the very least, you'll need to provide the application JAD and manifest files, which contain information about the application's platform, device, and runtime resource requirements. Additionally, the provisioning system may support the upload of one or more proprietary files for the purpose of providing additional information about the application. For instance, you might be able to supply an XML file that describes your preferences for licensing, purchase fees, approved methods of purchase, and so forth. It's possible, of course, to define attributes in the application JAD file that describe these areas. This is a good example that demonstrates why developers must understand the capabilities of the provisioning system or systems they use.
Application Search
Application search is the process by which users discover applications of interest. It's the first step in the provisioning process that involves the end user. Most provisioning systems will typically provide some WML interface (or XHTML) for users to discover applications through their mobile devices. Mobile devices that are designed for OTA download have an HTTP-based micro browser that, most likely, will be integrated to some degree with the device's user agent software.
The actual user experience with the provisioning system varies according to specific product characteristics and behavior. Some provisioning systems also provide HTML interfaces that are oriented to PCs. Users can do all the discovery and brokering using their PCs and use their mobile device only to perform the download.
As you learned in the previous section, one of the main goals of provisioning is to facilitate the discovery of applications that are compatible with the mobile device environment. The provisioning manager compares device environment attributes with application suite attributes. It can ensure that incompatible applications are never downloaded to a device. The mobile device environment consists of the following four contexts in determining compatibility between applications and device environments:
• user context • device context • J2ME platform environment context • application requirements
The provisioning process must consider the rights and privileges of the mobile device user. Users may be classified according to various categories that define their privileges, such as service plan or account status. Not all users necessarily have the same privileges. The result is that not all users may be able to browse all applications registered with the server. Many of these classifications are nontechnical in nature.
Consideration of the device context, however, is more critical to the proper technical functioning of applications. Provisioning systems require information about the device context, for instance, how much memory storage it has, its runtime resources, and so forth. For example, if the device doesn't have enough overall memory to store the application suite, the provisioning manager should prohibit its download. If there's not enough available memory, the AMS (JAM) will notify the users that they must make room for the application by deleting some other content.

258
Consideration of the device context is related to the application context. Applications have certain minimum requirements for their execution. For example, an application might require a certain screen size and resolution or color capability to run effectively. It fmight require certain manufacturer-specific libraries, minimum levels of runtime memory, a certain minimum RMS data store size, and so forth.
Consideration of the J2ME environment that an application requires is as important as a consideration of the native device environment. Applications probably require that the device support a certain version of the MIDP and CLDC. Usually, this will be the MIDP and CLDC under which the application was developed.
Whatever the particular characteristics of the client environment, they're transmitted to the provisioning server to be used as search parameters. The provisioning system maps these characteristics to the search categories it supports. Provisioning systems vary in their sophistication and in their ability to use certain search categories.
Search results represent a filtered subset of the applications registered with the provisioning system. They should contain only those applications that are compatible with the client context. At the very least, provisioning systems will limit search results according to user, device, and J2ME platform criteria. Some provisioning systems might also support more advanced search behavior, such as the ability to correlate a device's location information with applications that are suitable for that location in terms of functions, localization, and so forth.
Information about the client environment is usually sent as HTTP headers in the HTTP request from the device's browser to the provisioning manager. The user agent and browser communicate to construct the HTTP request that interfaces to the provisioning server's search function.
In less-automated provisioning systems, users might need to enter values for search categories in their device's browser. The provisioning system might provide an HTML interface that allows users to specify search characteristics.
In more-automated systems, the provisioning system retrieves user preference information from the carrier's network. The user agent can forward the mobile station identification number (MSISDN or MSN) to the provisioning server. If the provisioning server supports integration with external systems such as directory servers, it can obtain user information from the carrier's directory server. In order for this approach to work, the carrier must provide users with the ability to enter their search preferences for provisioning in their user records.
The greater the level of automation, the more efficient the search process becomes, and the less likely it is to produce errors. These are important considerations for both carriers and users. Manual browsing is time consuming and prone to error. It's probably safe to say that manual navigation and surfing through WML (or XHTML in upcoming systems) pages requires long connection times. This incurs high airtime charges for circuit-switched networks (2G networks) and high packet transfer charges for packet-switched networks (2.5G and 3G networks), which is undesirable for users. It also occupies bandwidth, which is undesirable for carriers.
As part of the search process, the provisioning system lists search results for the user. The system may organize the results by group, device type, J2ME platform supported, type of software license, software purchase price, or some other categorization. Some systems may support multilevel sorting so that users can rank applications and specify the organization of search results according to multiple criteria.
259
In general, it's important that application developers be aware of the features supported by the provisioning system. Familiarity with provisioning-system capabilities enables developers to take advantage of the system's features.
Application search is a good example of the benefits. For example, if the developer can provide metainformation for the search categories and types of searches supported by the provisioning software, users will have more success and accuracy in locating suitable applications. The amount of exposure an application receives might positively affect its commercial success.
Familiarity with provisioning system features and capabilities enables developers to prepare their application descriptor files and metainformation for more effective and fruitful use with the provisioning system.
Compatibility Verification
Compatibility verification is the process of verifying the compatibility of an application for a client in terms of the device, user, and J2ME platform contexts. All provisioning systems should prevent the download or even the discovery of incompatible applications.
The provisioning manager can check an application's compatibility with the target device by comparing device and application metainformation. All provisioning systems should prohibit the download of application suites that are incompatible with the target device environment.
In fact, the compatibility verification issue is one reason why the MicroEdition-Configuration and MicroEdition-Profile attributes are required JAD file attributes. The provisioning system uses this information in its search for compatible applications.
Purchase Verification and Non-Repudiation
Purchase verification is the process of ensuring that users are charged for the acquisition of software that requires a purchase fee, and that they are charged only for software they acquire. Non-repudiation encompasses the processes of verifying that the user did indeed choose to acquire the software for which he or she is charged and accurately repudiating any attempts by the user to deny the occurrence of transactions.
Provisioning systems execute these steps before they generate a billing event. They must support purchase verification and non-repudiation in order to support integrity of financial and commercial transactions. All provisioning systems should support secure communications for monetary transactions, transmission of purchase information, and information about non-repudiation.
User Authentication
User authentication is simply the process of verifying, through the user agent, that a user is who he or she claims to be. User authentication requires that the user agent forward information about the user to the provisioning manager. Typically, the user agent forwards this information in the form of HTTP headers in the device browser's HTTP request to the provisioning manager. The request will most likely use the HTTP user-agent header request field to identify the user agent as well.

260
There are some wireless systems that don't store much user information on mobile devices. In such cases, the server must associate user information with the device information—the device's MSN, for instance. As discussed previously, provisioning systems can interface with other carrier systems, such as authentication servers, Lightweight Directory Access Protocol (LDAP) servers, or wireless Internet gateway (WIG) servers to acquire the balance of the required user information.
Application Software License Negotiation
The software license negotiation process involves the presentation of licensing terms to the user and the user's acknowledgement of his or her acceptance of the terms. This step occurs before application download. This step might be a good candidate for execution on a PC instead of on a mobile device.
Applications that stipulate the requirement to purchase a license must provide all the information required for the license negotiation process. This information must be available to the provisioning system. Application-specific information, such as the type of license, the licensing terms, and so forth, can be included in the application JAD file.
Application Download
Application download is the process of physically sending an application to a mobile device. Typically, this process uses an HTTP download mechanism and the device's browser to download the software.
Advanced systems will support the ability for the user to control downloads. One example of user control is the ability for the user to restart an interrupted download. An interruption in download can occur, for example, if the call or data connection is dropped. At the time of this writing, the best we can hope for is that the device cleans up partial downloads.
Some systems support only the ability for the user to restart the download from the beginning. Even in this case, the user should not have to go through the complete discovery, authentication, and purchase cycle. The provisioning system should maintain enough state information to let the user proceed directly to the download step.
More advanced systems will enable the user to restart download from the point at which interruption occurred. This feature is desirable because it saves air time and bandwidth usage. Advanced provisioning systems also support both nonsecure (HTTP) and secure (HTTPS/SSL) application downloads.
Application Installation and Installation Verification
Application installation is the process of installing software that already resides on the device. When an application is downloaded, the browser must have some interface to the device AMS, which is the component that stores the application on the device. The AMS is responsible for installing software. The user, however, initiates software installation through interaction with the AMS. The AMS stores applications in a device-specific location, which is different from the MIDP RMS that you learned about in chapter 7.
The CLDC specification doesn't require that the device AMS store MIDP applications, because not all mobile devices support a persistent storage mechanism such as a file system. An alternative mechanism would be for the AMS to support download of the class files required from the provisioning system to execute an application. The JVM can simply load the Java class files upon downloading them, execute the application, and then discard the class files when the installation process is complete.
261
Applications may consist of server-side components and resources, such as server daemons, databases, and so forth. In such cases, application installation should involve the installation of these server-side components as well as the client-side components. Not all provisioning systems will support this capability.
Application descriptor information should contain information about how and when server-side components should be installed. For example, the application descriptor should indicate whether server side components should be installed at first use of a client application or at the time of first download of the client-side resources. Today, the reality is that server-side components have to be installed, configured, and well tested prior to any attempts by clients to access them.
Installation verification involves informing the provisioning manager of a successful installation. Installation notification is important because users are typically billed after they install an application. The MIDlet-Install-Notify attribute provides a way for application developers to specify the URL to which an HTTP POST command should be sent upon successful installation. Developers can define this attribute's value. Sometimes, provisioning software will define the value, because the provisioning manager best knows the URL it defines to track installations.
Successful installation implies successful download. Once installation is complete, users can execute the application. Therefore, it's appropriate to charge the user for the software once installation is confirmed. Of course, some applications might charge users after first use, regardless of when the application was downloaded. It's important to note here that the device—not, for the most part, the application—should do this kind of verification.
Upon notification, the provisioning system can generate a billing event. Note that installation verification is different from purchase verification.
Billing Event Generation
Users incur charges for the use of services. A bill is a list or total of charges that's presented to the customer. A billing event is a notification that represents the occurrence of a charge.
A successful download can represent a chargeable event for software that requires purchase for a fee. Upon the completion and verification of a successful download of an application by a user, the provisioning system generates a billing event. The billing event is forwarded to a billing system. The billing system is usually an independent system operated by the carrier to which the provisioning system interfaces.
Provisioning systems support different models in support of billing. The various models generate different types of billing event information that represent different charging schemes. The following list presents some possible charging schemes:
• pay per download of application • pay per installation • pay per launch of application • pay for a certain amount of use • pay for a certain number of times of use
As a developer, you should consider what charging schemes you prefer—and which ones the market will bear. Your application descriptor information should reflect your preferences for billing and charging in the information you supply during application registration.
Provisioning systems use a variety of schemes to forward billing event information to billing systems. One scheme is to forward each event as it occurs. Another method is to collect groups of

262
billing events and forward them as a batch to be batch processed by the billing system. Batching of events can done periodically in the same way that service providers normally do billing.
Application Update
Application update is the process of updating an application that already resides on a device with a newer version of the application. The Over the Air User Initiated Provisioning appendix of the MIDP specification requires OTA provisioning systems to support the update of applications already installed on devices. You'll find a reference to this document in the References section at the back of this book.
Device user agent software and provisioning manager software make use of the required MIDlet-Version application JAD file attribute to negotiate application update. Additionally, the application descriptor must uniquely identify the MIDlet suite to be downloaded so that the device can determine whether it should perform an upgrade or a new installation. Developers should ensure that they supply accurate MIDlet version information and MIDlet suite identification information.
Application Removal
From the point of view of the provisioning manager, application removal is the process of receiving notification that an application has been removed from a device. The device AMS takes care of actually removing application suites from the device.
Developers need not consider server notification of application removal. This process involves only the user agent and the server. Developers should, however, consider the needs of application removal on the client when preparing an application's JAD file. The MIDlet-Delete-Confirm attribute is an optional JAD file attribute. Its purpose is to provide a text message for the AMS to present to the user to confirm deletion of the associated MIDlet suite.
Provisioning managers that receive and maintain information about application removal can offer more flexible provisioning scenarios. For instance, a user might wish to remove an application on a device to free up memory for another application. The user might wish to keep the license for the first application, however. If the provisioning manager tracks this information, it can bypass the license acquisition, payment, and verification steps the next time the user downloads the original application.
Preparing Applications for Provisioning Systems
Designing applications for use with provisioning systems amounts to providing all the required application files and ensuring that they contain the information needed throughout the provisioning process. The primary task involved in this preparation is the proper creation of the application descriptor (JAD) and application JAR files.
The JAD file is the primary mechanism for providing application-specific information to both client and server. A JAD file may accompany each application JAR file. The provisioning system extracts and uses information from this file during various stages of the provisioning process. The JAD file can be kept as part of the application JAR file, or it can be maintained separately for easy retrieval. One major advantage of supplying a JAD file externally from the JAR file is that the provisioning manager can obtain application attributes without opening the JAR file. Table 10.1 lists all the MIDlet attributes that are related to provisioning.
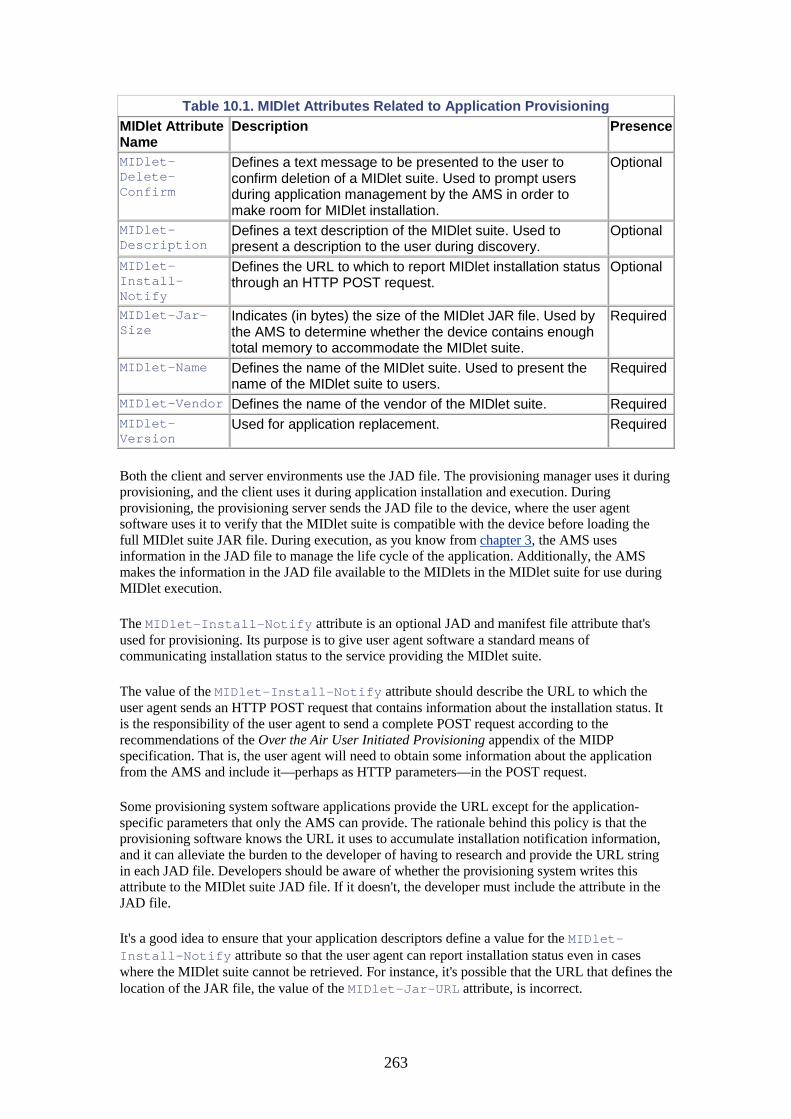
263
Table 10.1. MIDlet Attributes Related to Application Provisioning MIDlet Attribute Name
Description Presence
MIDlet-Delete-Confirm
Defines a text message to be presented to the user to confirm deletion of a MIDlet suite. Used to prompt users during application management by the AMS in order to make room for MIDlet installation.
Optional
MIDlet-Description
Defines a text description of the MIDlet suite. Used to present a description to the user during discovery.
Optional
MIDlet-Install-Notify
Defines the URL to which to report MIDlet installation status through an HTTP POST request.
Optional
MIDlet-Jar-Size
Indicates (in bytes) the size of the MIDlet JAR file. Used by the AMS to determine whether the device contains enough total memory to accommodate the MIDlet suite.
Required
MIDlet-Name Defines the name of the MIDlet suite. Used to present the name of the MIDlet suite to users.
Required
MIDlet-Vendor Defines the name of the vendor of the MIDlet suite. Required MIDlet-Version
Used for application replacement. Required
Both the client and server environments use the JAD file. The provisioning manager uses it during provisioning, and the client uses it during application installation and execution. During provisioning, the provisioning server sends the JAD file to the device, where the user agent software uses it to verify that the MIDlet suite is compatible with the device before loading the full MIDlet suite JAR file. During execution, as you know from chapter 3, the AMS uses information in the JAD file to manage the life cycle of the application. Additionally, the AMS makes the information in the JAD file available to the MIDlets in the MIDlet suite for use during MIDlet execution.
The MIDlet-Install-Notify attribute is an optional JAD and manifest file attribute that's used for provisioning. Its purpose is to give user agent software a standard means of communicating installation status to the service providing the MIDlet suite.
The value of the MIDlet-Install-Notify attribute should describe the URL to which the user agent sends an HTTP POST request that contains information about the installation status. It is the responsibility of the user agent to send a complete POST request according to the recommendations of the Over the Air User Initiated Provisioning appendix of the MIDP specification. That is, the user agent will need to obtain some information about the application from the AMS and include it—perhaps as HTTP parameters—in the POST request.
Some provisioning system software applications provide the URL except for the application-specific parameters that only the AMS can provide. The rationale behind this policy is that the provisioning software knows the URL it uses to accumulate installation notification information, and it can alleviate the burden to the developer of having to research and provide the URL string in each JAD file. Developers should be aware of whether the provisioning system writes this attribute to the MIDlet suite JAD file. If it doesn't, the developer must include the attribute in the JAD file.
It's a good idea to ensure that your application descriptors define a value for the MIDlet-Install-Notify attribute so that the user agent can report installation status even in cases where the MIDlet suite cannot be retrieved. For instance, it's possible that the URL that defines the location of the JAR file, the value of the MIDlet-Jar-URL attribute, is incorrect.
264
Chapter Summary
Application provisioning is the process of delivering application software to devices. Provisioning isn't exclusive to wireless networks, J2ME, or even Java applications. Nevertheless, provisioning systems have become an important component of J2ME application deployment support, particularly in support of OTA provisioning for MIDP applications.
The provisioning process involves many steps that include the registration of applications with a provisioning system and the discovery, selection, purchase, download, installation, and verification of software. The purpose of provisioning systems is to facilitate these steps and to automate the process as much as possible to provide more sophisticated capabilities and error free operation.
Because provisioning systems automate much of the provisioning process, they're well suited to wireless networks. They alleviate many of the difficulties and automate many of the steps involved in provisioning applications to devices with limited user interfaces over wireless connections.
Provisioning systems are complex enterprise applications that are usually integrated into a wireless carrier's network. They provide provisioning services to wireless subscribers. A key consideration for application developers is the preparation of their MIDP applications for use with the provisioning systems hosted by the carriers with which their applications will be registered. Understanding the interfaces, features, and capabilities of the provisioning system with which you'll interact is important. As an application developer, you must be able to provide all the information needed by the provisioning system so that you can derive the greatest advantage from it.
Provisioning systems support many other features that haven't been discussed in this chapter. Many of these features are transparent to the application developer, in the sense that the developer doesn't have to do anything to accommodate these aspects of provisioning system operation. Many of them don't affect the application proper. Or, they simply address functions that are independent of application development, configuration, or deployment issues.

265
Chapter 11. The Wireless Internet Environment • Background, Terminology, and Concepts • The Wireless Application Environment • Wireless Applications • Application Architecture
At this point, you know how to write MIDP applications and how to deploy them, with the help of provisioning systems, in real wireless environments. Chapter 10 alluded to the wireless Internet environment that hosts MIDP applications. In order to write effective commercial applications, developers need to understand the wireless Internet environment—what it is, how it works, its relationship to the wireless network, what support it has for applications, and the constraints it imposes on application development.
This chapter discusses the wireless Internet environment from the point of view of the application developer. The main goal of this chapter is to give application developers an introduction to the kinds of applications and services that wireless carriers are able to host today and how they do it. This chapter helps developers understand the transport mechanisms and interfaces available in wireless Internet environments, their constraints and limitations, and how these elements influence application design and development.
This chapter does not talk about the design of wireless networks and their infrastructures, or about the design or operation of wireless Internet gateway systems. Although it's useful for application developers to understand the abstractions of wireless network infrastructures—protocol stacks that enable support for Internet protocols, markup transcoding systems, protocol converters, and flow control systems—that enable support for wireless Internet applications, that topic is beyond the scope of this chapter.
Background, Terminology, and Concepts
The terms wireless Web and wireless Internet refer to an environment in which wireless devices can access the World Wide Web and the Internet. These terms are somewhat abstract in that they don't convey information about the architecture or physical nature of the medium. The wireless Internet, like the Internet, is an internetwork, an interconnection of networks. Unlike the Internet, however, it's an internetwork of both wireless and fixed networks.
Wireless networks are connected to fixed networks—and to the Internet—through a wireless Internet gateway (WIG), a gateway consisting of hardware and software that join a carrier's wireless network to its own fixed intranet. Wireless Internet gateways usually consist of proprietary hardware and software that enable communications with proprietary mobile switching centers (MSC). Together, all these components implement specific types of wireless communications systems. For example, many of the mobile handset manufacturers offer their own WIGs. These work only with certain wireless communications systems and with certain base stations and handsets.
Figure 11.1 shows a logical schematic diagram that represents the relationships between wireless network components, WIGs, and carrier intranets. A WIG gives a wireless network—and wireless devices—access to the Internet by way of the wireless carrier's fixed intranet. A wireless carrier's intranet interfaces to other fixed networks or internetworks, which gives it access to the Internet.
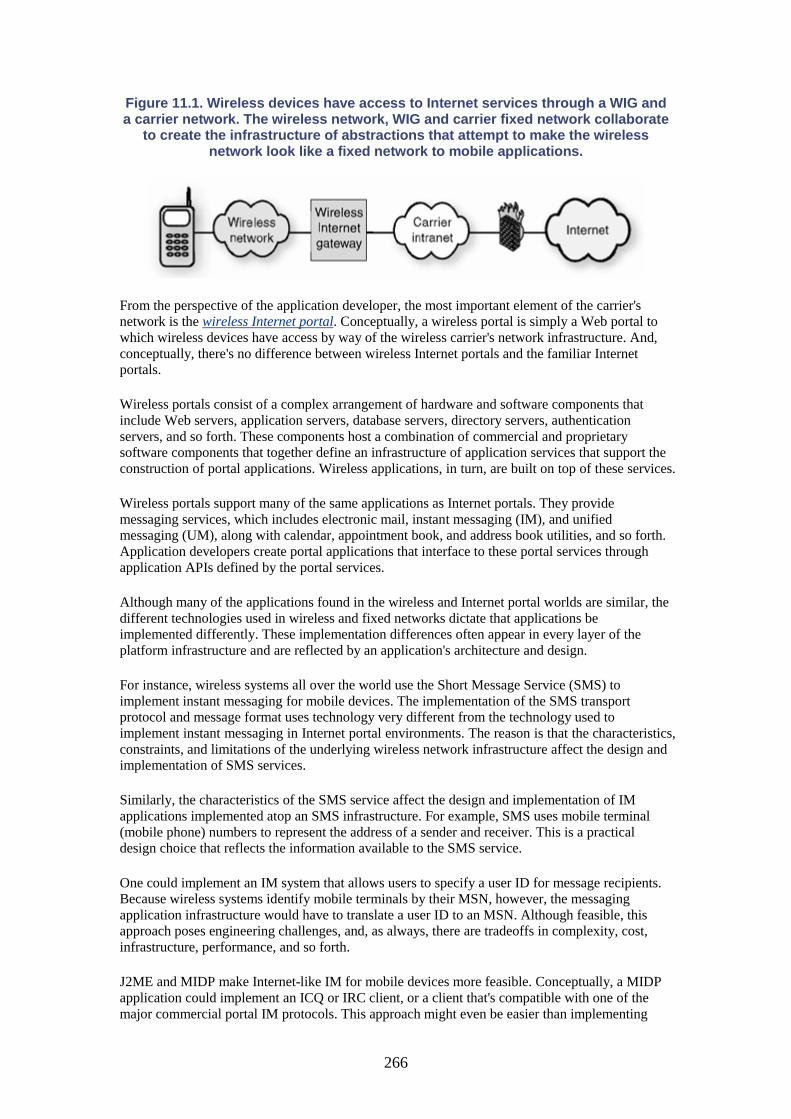
266
Figure 11.1. Wireless devices have access to Internet services through a WIG and a carrier network. The wireless network, WIG and carrier fixed network collaborate
to create the infrastructure of abstractions that attempt to make the wireless network look like a fixed network to mobile applications.
From the perspective of the application developer, the most important element of the carrier's network is the wireless Internet portal. Conceptually, a wireless portal is simply a Web portal to which wireless devices have access by way of the wireless carrier's network infrastructure. And, conceptually, there's no difference between wireless Internet portals and the familiar Internet portals.
Wireless portals consist of a complex arrangement of hardware and software components that include Web servers, application servers, database servers, directory servers, authentication servers, and so forth. These components host a combination of commercial and proprietary software components that together define an infrastructure of application services that support the construction of portal applications. Wireless applications, in turn, are built on top of these services.
Wireless portals support many of the same applications as Internet portals. They provide messaging services, which includes electronic mail, instant messaging (IM), and unified messaging (UM), along with calendar, appointment book, and address book utilities, and so forth. Application developers create portal applications that interface to these portal services through application APIs defined by the portal services.
Although many of the applications found in the wireless and Internet portal worlds are similar, the different technologies used in wireless and fixed networks dictate that applications be implemented differently. These implementation differences often appear in every layer of the platform infrastructure and are reflected by an application's architecture and design.
For instance, wireless systems all over the world use the Short Message Service (SMS) to implement instant messaging for mobile devices. The implementation of the SMS transport protocol and message format uses technology very different from the technology used to implement instant messaging in Internet portal environments. The reason is that the characteristics, constraints, and limitations of the underlying wireless network infrastructure affect the design and implementation of SMS services.
Similarly, the characteristics of the SMS service affect the design and implementation of IM applications implemented atop an SMS infrastructure. For example, SMS uses mobile terminal (mobile phone) numbers to represent the address of a sender and receiver. This is a practical design choice that reflects the information available to the SMS service.
One could implement an IM system that allows users to specify a user ID for message recipients. Because wireless systems identify mobile terminals by their MSN, however, the messaging application infrastructure would have to translate a user ID to an MSN. Although feasible, this approach poses engineering challenges, and, as always, there are tradeoffs in complexity, cost, infrastructure, performance, and so forth.
J2ME and MIDP make Internet-like IM for mobile devices more feasible. Conceptually, a MIDP application could implement an ICQ or IRC client, or a client that's compatible with one of the major commercial portal IM protocols. This approach might even be easier than implementing

267
traditional mobile IM (SMS), because SMS APIs are available only through proprietary platform extensions.
Another example of how the underlying technology affects application design is the limit on the length of SMS messages. The SMS protocol limits messages to 128 bytes. Applications can abstract this limitation by dividing longer messages into multiple 128-byte messages. The recipient's user agent reassembles the messages. At least one wireless carrier in Japan offers SMS messaging in which messages can exceed 128 bytes. Several layers of abstraction are required to implement this capability.
The use of the wireless application protocol (WAP) in wireless Internet environments is another example. The definition of the WAP protocol, and all the lower protocol layers that support WAP, reflect the constraints and challenges of transporting data in first-generation wireless networks. The WAP protocol was designed to transport wireless markup language (WML) content. Systems that implement this service have highly integrated platform layers. To support other combinations, such as the transport of HTML over WAP would require the construction of additional platform services or application infrastructure. The application design would have to consider the handset platform capabilities, transport mechanisms, performance, and so forth.
The concept of a virtual portal exemplifies this notion. A virtual wireless portal is a portal that's not physically associated with a wireless network. That is, it's just an Internet portal that supports services compatible with wireless device technology and to which wireless devices have access through the medium created by the carrier's connectivity to the Internet. Wireless devices with wireless Internet connectivity can access any Internet portal, barring the presence of policy restrictions imposed by the wireless carrier. Designers of portal applications that reside on Internet portals will most likely encounter limitations in terms of the devices and environments for which they're applicable. For instance, a wireless user whose system supports only WML over WAP won't be able to use an application that produces HTML presentation.
Developers of mobile applications must understand the context of the mobile environment. Constraints and limitations imposed by its technology and characteristics affect the types of applications and designs that are feasible. The designer should consider how compatible each design is with the services, APIs, interfaces, and transport mechanisms available on the wireless Internet platform.
The Wireless Application Environment
At the application layer, external interfaces, APIs, and transport mechanisms provide one kind of description of a system. This is the perspective that interests application developers who must know how to access and how to interface to system software services.
Other perspectives describe other parts of a system. For instance, systems have state models, transaction processing models, and so forth that cannot be adequately described by a diagram such as Figure 11.1. At some point in the application design process, application developers need to understand these characteristics of the systems to which they interface.
Figure 11.2 is a logical schematic diagram that shows some typical system level components found in wireless Internet systems. The diagram shows some of the most commonly used transport mechanisms that interconnect components. The purpose of this diagram is to give developers some perspective on the types of environments that support wireless applications.
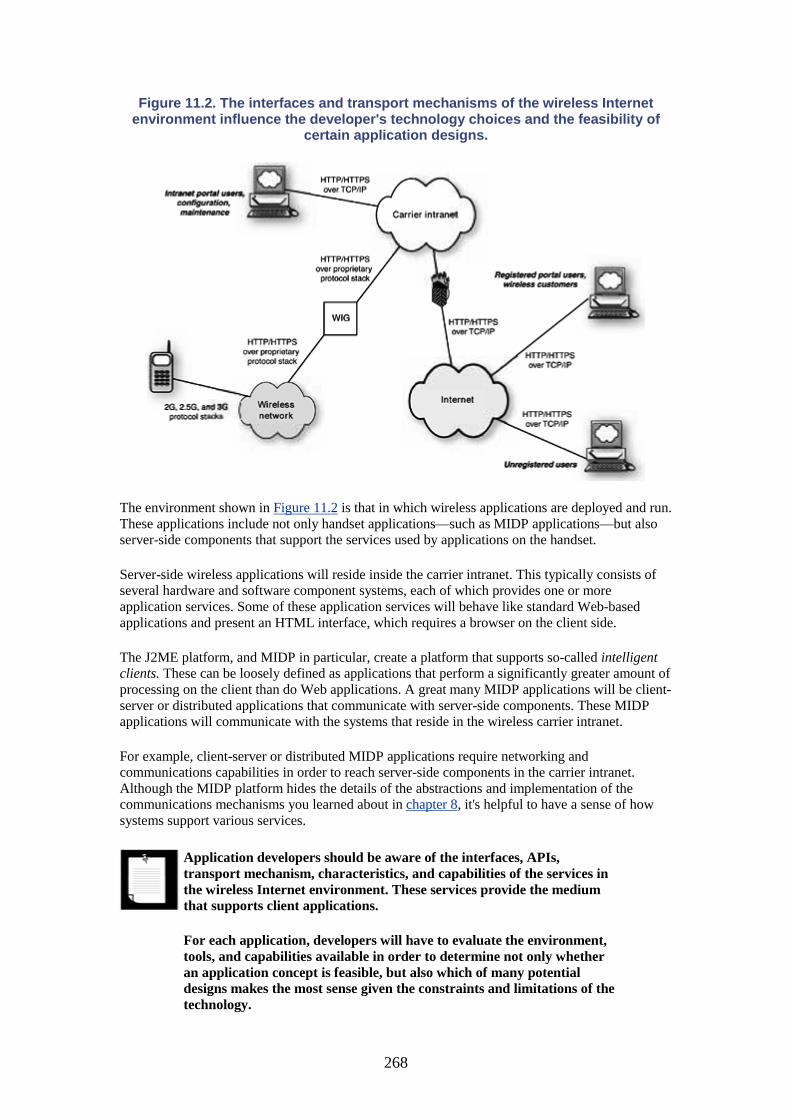
268
Figure 11.2. The interfaces and transport mechanisms of the wireless Internet environment influence the developer's technology choices and the feasibility of
certain application designs.
The environment shown in Figure 11.2 is that in which wireless applications are deployed and run. These applications include not only handset applications—such as MIDP applications—but also server-side components that support the services used by applications on the handset.
Server-side wireless applications will reside inside the carrier intranet. This typically consists of several hardware and software component systems, each of which provides one or more application services. Some of these application services will behave like standard Web-based applications and present an HTML interface, which requires a browser on the client side.
The J2ME platform, and MIDP in particular, create a platform that supports so-called intelligent clients. These can be loosely defined as applications that perform a significantly greater amount of processing on the client than do Web applications. A great many MIDP applications will be client-server or distributed applications that communicate with server-side components. These MIDP applications will communicate with the systems that reside in the wireless carrier intranet.
For example, client-server or distributed MIDP applications require networking and communications capabilities in order to reach server-side components in the carrier intranet. Although the MIDP platform hides the details of the abstractions and implementation of the communications mechanisms you learned about in chapter 8, it's helpful to have a sense of how systems support various services.
Application developers should be aware of the interfaces, APIs, transport mechanism, characteristics, and capabilities of the services in the wireless Internet environment. These services provide the medium that supports client applications.
For each application, developers will have to evaluate the environment, tools, and capabilities available in order to determine not only whether an application concept is feasible, but also which of many potential designs makes the most sense given the constraints and limitations of the technology.
269
Several of the conceptual design approaches discussed in this section aren't realistic in the wireless Internet and J2ME platform environments available at the time of this writing. Nevertheless, the discussions herein reflect the impetus in the wireless Internet arena, so application of these concepts will be feasible with next-generation systems.
Most of the Internet has standardized on HTTP as the primary transport mechanism at the session layer. Application-layer protocols are tunneled using HTTP in order to address security issues. Figure 11.2 reflects this architecture between the intranet, Internet, and user entities.
The wireless network, however, poses some unique challenges. Wireless networks use complicated proprietary protocol stacks that represent solutions to the practical challenges of implementing internetworking over wireless interfaces. These proprietary stacks have evolved as wireless systems have advanced and are moving towards support of TCP/IP to the handset in third-generation (3G) systems. Nevertheless, the layers underneath the network layer are still quite different from the layers found in fixed internetworks.
More interesting to MIDP developers is the protocol stack above the transport layer; two major stacks exist. The first uses the wireless application protocol (WAP), which is heavily entrenched in many contemporary wireless Web systems. For practical engineering reasons, WAP transports content formatted in the wireless markup language (WML). The second approach, which is likely to be adopted in 3G systems, transports XHTML/XML markup over HTTP. Additionally, application layer protocols can be tunneled using HTTP.
Wireless Applications
This section briefly describes the types of applications and application services that are commonly available in wireless Internet portals. We won't discuss the design of these services here because they can involve complex architectures that require Web servers, application servers, and other system-level components. Instead, the purpose of this section is to give an introductory conceptual description of the wireless application environment and to help developers begin to think about how to design applications for this environment.
Notice that Figure 11.2 doesn't present a view that is granular enough to show the systems inside the carrier intranet that provide individual software services. The reason is that the component systems that wireless carriers use to provide messaging, personalization, personal information management services, and so forth are often complex, proprietary third-party software systems. The interfaces and APIs to these systems are proprietary, and a description of commercial products is beyond the scope of this chapter and book.
Messaging
Conceptually, there are roughly three types of messaging in wireless environments:
• instant messaging • electronic mail • unified messaging

270
The precise definitions of these types of messaging are somewhat vague because they depend on characteristics of particular implementations. For instance, how "instant" is instant messaging? Nevertheless, there are generally accepted interpretations of these terms.
In wireless environments, instant messaging usually means SMS messaging, because SMS bearer systems are typically used to implement the IM service. Message addresses consist of MSNs. SMS bearers provide instant messaging to the extent that messages are sent "immediately." Of course, whether messages get there immediately depends on system congestion, flow control, bandwidth constraints, and so forth, which can result in delays that are greater than those experienced with fixed network instant messaging technologies.
Electronic mail (e-mail) is the transmission of arbitrary-length messages using a store-and-forward model. The term e-mail implies the use of the familiar Internet e-mail addressing scheme, an example of which follows:
The exact capabilities of e-mail systems in wireless networks depend on implementation. For instance, not all implementations can support delivery of arbitrary-length messages. If e-mail is delivered over a standard SMS bearer system, messages are limited to 128 bytes. In Japan, for example, two of the major wireless carriers support e-mail to mobile devices with lengths of up to several kilobytes. These systems use a proprietary bearer system that's completely independent of SMS.
Unified messaging is the concept of a single mechanism that unifies other messaging systems and gives users a single access point for all messaging services. A unified messaging system might have a user interface for both Web-based access and wireless device access. Commercial vendors offer unified messaging systems, which usually include an API for application interfaces. For instance, a MIDP application could interface to the system through its external API and present a unified view of SMS and e-mail to the user. This scenario works only on phones that support it. The notion is that a unified messaging system abstracts the details of interfacing to individual messaging systems such as e-mail servers or SMS servers.
Personal Information Management Applications
Personal information management (PIM) applications include applications such as calendars with event reminder capabilities, address book, note management, and so forth. These are all standard utilities on Internet portal sites. The challenge in wireless environments is supporting the user interface for these applications.
Mobile devices currently don't quite have the level of power and resources required to support a desktop computer-like platform with a powerful Web browser. Nor do wireless networks have the throughput to support the massive amounts of information produced by Web interfaces such as those used in Internet portals.
The Internet mail application protocol (IMAP) and post office protocol (POP) are the two most prevalent protocols supported by mail servers. Wireless networks will either support these protocols to the handset or implement proprietary ones.
Calendar services typically define their own APIs and interfaces, which accommodate both Web-based access and application-based access. Some systems define a single HTML-over-HTTP interface. A client-based calendar application that uses a server-based calendar server would have to construct the HTTP requests according to the API defined by the server. Calendar notification might use SMS to send reminders to clients. MIDP applications, for example, would have to have some way of interfacing to the native messaging software on the handset. At the time of this writing, the MIDP specification doesn't address interfaces to the native system software. It's
271
expected that the MIDP-NG (next generation) specification will address native device interfaces to MIDP applications.
Personalization
Personalization is the support for the specification of attributes that define the context of an authorized system user. The user context includes the specification of preferences for the following categories:
• presentation preference information— preferences for how information is presented to the user
• user profile information— user contact information, financial or commercial information, service plan information, user experience
• application configuration information— configuration information required to interface to application services, for example, user name and password
Most systems use third-party personalization engines. Like most Web-based software, most personalization services will support an HTML-over-HTTP API.
Location-Based Services
Location-based services are application services that use information about the geographic location of the client and produce results relevant to that location information. Location-based services aren't the exclusive domain of mobile devices and applications, although there's a major industry effort to support sophisticated location-based services for mobile devices. Location services can be provided to Internet based Web clients as well as to mobile clients.
The concept of location-based services is to provide to the client information that's relevant to the client's location. For example, application services might want to display advertisements for businesses that are in the proximity of the user. The process involves determining the correct location context, processing location specific information, and presenting results to the user.
Location services can reference static location preference information or calculate location information dynamically. For example, user profile and preference information might contain a user's preference for location context. This information might indicate the user's preference for the location context to be used by location-based services, regardless of the user's actual location. Most mobile applications, however, will determine the mobile device's location dynamically.
Currently there are several different approaches being developed to provide geolocation information to location based services:
• Global positioning system (GPS)— Mobile devices contain full GPS receivers. • Network-based geolocation— Geolocation technology and processing reside solely in the
wireless network. • Assisted GPS— Handset and network collaborate to provide complete location
information.
In GPS-based systems, the device application software obtains information about the device's location from the GPS receiver on the mobile device. This scheme requires that MIDP applications have some way of interfacing to the native software in order to gain access to location information and forward it to server-side application components.
The location information produced by network-based systems is less accurate than the information produced by GPS systems. In network-based systems, the wireless network alone determines the mobile device's position. The mobile switching center (MSC) must contain software that can
272
forward this information to application services. Because the MSC is typically transparent to applications, the carrier must create the integration between the MSC and the application services. That is, these systems must be designed in conjunction with each other.
Assisted GPS systems involve partial GPS receivers on the mobile device, dedicated assisted GPS servers in the carrier intranet, and integration with MSCs. Like network-based systems, the carrier must provide this infrastructure and define the interface mechanism to application services.
The kinds of MIDP applications that MIDP developers can reasonably create will depend on the types and geolocation services available. Moreover, developers need to evaluate the tradeoffs of each of the foregoing three approaches to providing location-based information. Each has its strengths and weaknesses, and each will affect the kinds of features that can be supported realistically. Notwithstanding the differences between the various types of geolocation systems, MIDP developers will have to use whatever scheme is supported.
Application Architecture
Application architecture is both an art and a science. As such, there are many definitions of application architecture, all of which are defended vehemently by their proponents. A reasonable definition is the one provided by The Software Engineering Institute of Carnegie-Mellon University (http://www.sei.cmu.edu):
Application architecture is the structure or structures of the application, which comprise software components, the externally visible properties of these components, and the relationships among them. Application architecture represents the earliest design decisions and produces the earliest design artifacts that address performance, modifiability, reliability, security, and user experience.
Booch, Rumbaugh, and Jacobsen give a classical definition of architecture in their book The UML Modeling Language User Guide, which appears on the next page.
An architecture is the set of significant decisions about the organization of a software system, the selection of the structural elements and their interfaces by which the system is composed, together with their behavior as specified in the collaborations among those elements, the composition of these structural and behavioral elements into progressively larger subsystems, and the architectural style that guides this organization—these elements and their interfaces, their collaborations, and their composition.
Architecture produces artifacts that describe a system. An important aspect of architecture is that it involves the application of processes that result in the creation of these artifacts. An architectural methodology (AM) is a collection of practices that guide the application of a set of processes. The software engineering community has defined many methodologies, each of which reflects its own philosophy, processes, and artifacts. One such architectural methodology is the SunTone AM, which was developed at Sun Microsystems and is an extension of the Rational Unified Process (RUP).
This section most certainly doesn't give adequate treatment to the full scope of what architecture is, how to do architecture, to architectural process, or to any architectural methodology such as the SunTone AM. Describing the practice of architecture, its artifacts, processes, and related methodologies is far beyond the scope or purpose of this book.
Rather, the purpose of this section is to introduce you to the concepts that surround application architecture and to proselytize the importance of performing architecture as the first step in creating commercial-quality applications. Now that you have competency in the set of pragmatics
273
needed to develop J2ME applications, you need to take a broader perspective of the issues involved in building robust, commercial-quality applications that can withstand the requirements of a real-world wireless environment. Attention to architecture will most certainly increase the J2ME application designer's ability to design robust applications that meet the requirements of the wireless environment.
MIDP applications use the services that comprise the wireless Internet portal. Even though MIDP developers might not be involved in the design and construction of the portal services, it's important that they project an architectural perspective on the wireless Internet platform in order to quantify the capabilities, characteristics, and qualities of those services. The MIDP developer needs to view MIDP applications as one part of the system that consists of the mobile device and all other wireless Internet components.
MIDP developers might even be involved in the design of the server side components. Awareness and understanding of architecture will enable developers to build better services, which in turn make more successful MIDP applications possible.
Architecture is a complex topic, and it's the subject of many dedicated books. The purpose of this section on architecture is only to introduce the concept of architecture to you if you aren't familiar with it. For those of you who are already familiar with architecture, the goals are to stimulate you to project an architect's perspective onto the wireless Internet environment and to encourage you to think about the architectural challenges to creating robust, commercial MIDP applications for the wireless Internet. I encourage you to appreciate the importance of doing architecture and to form the habit of performing architecture as the first step in the design of any application.
Architectural Frameworks
An architectural framework is a basic conceptual structure that supports the definition of an architectural model. Actual architectural methodologies define their own frameworks, which support the definition of the elements of the methodology, namely those that describe the architectural processes, the definition of views of a system, and the artifacts that represent the concrete definition of a system design.
The SunTone AM offers a framework whose main principles include:
• use case focused— emphasizes starting with requirements gathering • iterative— evolving the system by iterating through a development cycle that includes all
phases of development • driven by systemic qualities— addressing systemic qualities in all phases of development • architecture-centric— adhering to sound architectural principles • pattern based— applying patterns, which are proven solutions to well-known problems, to
solve design challenges
What follows is a brief introduction to these principles with the aim of motivating you to perform architecture as the first step in the development process. By quantifying the description of a system through architecture, architects and designers can produce higher-quality systems that have greater fidelity to the originally stated system requirements. Architecture helps designers build more robust, reliable, functional systems, which have more value to developers and users alike.
A complete description or discussion of even one of these principles is beyond the scope of this book. A brief discussion nonetheless serves to introduce you to the concepts surrounding these
274
architectural principles and gives you, the J2ME application designer, ideas about how to begin to take advantage of the art and science of architecture. For an excellent introduction to architecture and the SunTone AM, see the reference to Dot-Com & Beyond in the References section at the back of this book.
The first element of the SunTone AM framework, the use case, is a description of a system requirement. Use cases capture and document system requirements in human-readable form. I cannot overstate the importance of ensuring that a design addresses the requirements of a system. The requirements-gathering process is an activity complementary to architecture. There are several good books that explain use cases in depth, such as Alistair Cockburn's Writing Effective Use Cases, which is referenced in the References section at the back of this book.
It's usually not possible to capture all system requirements adequately in the first attempt. For this reason, the SunTone AM stresses the importance of doing iterative requirements gathering. As the concept of a system evolves with the experience of designers, marketing personnel, and others, requirements evolve or become more clearly elucidated, and their descriptions can be made more precise.
The principle of iterative development applies to every step of the development process, not just to requirements gathering. Iterative development refers to the concept of performing multiple iterations of the whole development cycle. The reason for including all steps in the iterative development process is simply that it's difficult to implement anything correctly the first time. The development cycle includes all of the following steps:
1. Requirements gathering— identifying new requirements and refining existing requirements
2. Architecture— describing the design of the system 3. Design— for example, object-oriented analysis and design 4. Implementing— building a working system with some incremental set of functionalities 5. Testing— testing the functionality built in this iteration 6. Debugging— finding, isolating, and fixing bugs
The SunTone AM organizes these steps in repeatable iterations, each time refining their implementation until all requirements are satisfied. For example, in an effort to design an IMAP-based mail client for the MIDP platform, a developer might realize that a particular architecture isn't easy to implement because of limitations in the available libraries. The developer realizes this after going through an initial cycle of the above development steps. After finishing an initial prototype, it's clear that some of the logic is difficult to implement.
A second iteration begins with a new requirements-gathering effort. The developer (or architect) reexamines the requirements to refine everyone's understanding of them, or to determine whether some features are really needed, or whether the scenarios that define the usage model for certain features can be redefined. What follows next is a second effort at architecture, design, prototyping, and so forth through all the steps of the process.
The crux of the development process is the determination, at the end of each cycle, of whether the system adequately meets the stated requirements. If not, another iteration is necessary. The power of iterative development is the ability it gives developers to produce systems that meet requirements in the most efficient way possible.
The key to this efficiency is the notion of prototyping small pieces of the system's overall functionality in each iteration. This philosophy contrasts with the traditional "waterfall" approach to software development. For example, in the development of our MIDP mail client, the first iteration should address the creation of the basic features whose presence is required for all other features, such as user login and fetching of mail headers and messages. If testing reveals that this basic infrastructure doesn't work, developers learn of it early in the process and can correct it
275
before venturing further and building additional features on a broken foundation. Furthermore, this approach avoids complex integration of a mass of features at the end of a single development cycle, at which time it's exponentially more difficult to isolate and fix the cause of a problem.
Systemic Qualities
The determination of whether a prototype adheres to a stated set of requirements is central to any architectural methodology or development effort. Identifying a comprehensive set of requirements, therefore, is an important part of any development effort. The following list contains two categories of requirements:
• Functional requirements describe the application functionality and its logical operation. • Nonfunctional requirements describe the systemic characteristics or qualities of the
system
The second category in this list represents requirements that quantify a system's level of performance, scalability, security, maintainability, availability, and so forth. This section focuses on describing the elements that comprise this second category of nonfunctional requirements.
One of the cornerstones of the SunTone AM that distinguishes it from other methodologies is its emphasis on systemic qualities. An important criterion in judging a good architecture from a questionable one is the determination of how well it supports the systemic qualities dictated by the requirements. Of course, to produce a comprehensive architecture, the architect must still look at the system from all perspectives.
The SunTone AM defines three dimensions—tiers, layers, and systemic qualities—each of which represents a unique perspective of a system. These dimensions support the decomposition of a system into orthogonal views that reflect the system's adherence to different categories of requirements.
This chapter doesn't discuss the concepts of tiers and layers; such a discussion would drift too far into a treatment of what is architecture and how to do it and is more appropriate in teaching how to architect multitiered systems. Much of this chapter deals with the notion of understanding architectural principles in order to project concepts onto real systems and understand their characteristics.
This chapter focuses on the concepts surrounding systemic qualities because it's the one that's most often overlooked, and because it addresses systemic qualities that are critical to the achievement of performance, security, and massive scale in wireless Internet environments.
In the context of system architecture, systemic qualities include the following categories:
• user-level qualities— usability, accessibility • service-level qualities— performance, reliability, availability • strategic-level qualities— scalability, flexibility • system-level qualities— security, manageability, maintainability
Designing with consideration of systemic qualities is vitally important to the success of any system. Your MIDP mail client might behave perfectly from the logical and functional perspectives, but if it yields unacceptable performance, it becomes unusable.
276
A central principle of the SunTone AM is the importance of addressing systemic qualities from the outset of your architecture and design efforts. It's unrealistic to expect to be able to alter or reengineer your applications at the end of their development cycle to address systemic qualities. Industry statistics support the notion that most efforts that address systemic qualities as an afterthought will fail.
User-Level Qualities. User-level qualities include usability and accessibility. Usability is the measure of how intuitive and natural it is to use an application. User interfaces should be designed so that they accommodate the user. The engineering that supports the UI should take secondary priority. This issue will most likely arise in MIDP applications, because the MIDP UI poses a challenge to developers creating commercial user interfaces. Developers might have to make compromises on features after experimenting with how easy it is to support intuitive, usable interfaces.
Accessibility is the measure of how accessible—how easy—it is for all people to use an application, including those who have visual impairment or disabilities. The MIDP environment doesn't address accessibility for people with disabilities like the AWT or Swing environments do.
In the context of the limited input and display capabilities of MIDP devices, accessibility also implies the characteristics of application design that ensure intuitive and facile user interfaces. At the absolute least, developers can at least consider aspects that might make displays more readable, such as font, font size, and so forth.
Service-Level Qualities. Service-level qualities include performance, reliability and availability. Performance is the measure of characteristics such as responsiveness, latency, and throughput. For MIDP developers, performance on the client is important. But latency and throughput of network communications is also an important issue for distributed and client-server applications. For example, it would be difficult indeed to write a multiplayer action game on MIDP today because of network latency.
Reliability is the measure of the probability that a system will continue to perform at a stipulated level. Application reliability is closely related to the reliability of the platform components upon which an application is built. For instance, the reliability of a MIDP client application depends in part on the reliability of a connection to a server.
Availability is a measure of whether a service (provided by an application) can be reached. Availability is related to reliability. The distinction between reliability and availability is that reliability refers to individual components, whereas availability describes the degree to which a service is reachable. For example, one of several components that provide redundancy can fail, yet the service can remain available.
Although availability isn't really an issue for standalone MIDP applications, it does affect distributed MIDP applications that use server-side components. You can't really build a highly available MIDP application if it uses network services that aren't highly available. This is a good example of why the MIDP developer must project an architectural view on all aspects of the wireless Internet environment, even if he or she doesn't architect or design the network services that MIDP applications use.
Strategic-Level Qualities. Strategic-level qualities include scalability and flexibility. Scalability is the measure of the degree to which the application can accommodate an increase in simultaneous users while maintaining the same level of performance. Scalability of server-side components affects MIDP clients. Developers of MIDP applications that request data from a server-side component need to consider what access model best mitigates the negative forces of high volumes of users. For example, it might be possible for a MIDP client to request more data

277
per request and make fewer requests. Performance degradation might not be evident for small volumes of users, but when the application is deployed to large wireless environments, performance degradation could be drastic.
Flexibility is the measure of how easily an application can accommodate or incorporate new or modified services. For example, the designer of our MIDP mail client might want to anticipate the need to connect to both POP3 or IMAP mail servers. This consideration might warrant the implementation of a design pattern that hides the details of the connection mechanism from most of the application, making it easy to add support for new application-level mail protocols.
Another example is the flexibility with which a client can parse new application-level protocols or data formats received from services. Providers of wireless Internet services might redesign their services periodically. The flexibility of your MIDP application can save you much time and effort so that you can avoid redesigning your application to accommodate changes in network services and server-side components. Looking at the wireless Internet service with an architect's eye will enable you to anticipate these kinds of problems.
System-Level Qualities. System-level qualities include security, manageability, and maintainability. Security is the measure of how well an application denies intrusion and prevents damage by unauthorized users.
Application security is also an important issue for all applications. MIDP applications may be password protected, for example. Application-level security also includes protecting against unauthorized access to application data. A password saver application on a mobile device, for example, would have to ensure that the passwords weren't accessible to the average person or to someone who steals your phone. The device AMS may also support a security mechanism that protects the complete mobile device from unauthorized use of all applications.
MIDP applications, however, must also consider the need for security in a distributed environment. This includes interfacing with secure services, of course. But it also includes issues such as which Internet sites users can access or which devices Internet users can access.
Understanding the security constraints of the wireless environment imposed by the carrier could affect the choice of features in your MIDP application. Moreover, it can also affect how you choose to deploy your application. For instance, many carriers might allow provisioning of MIDP applications from partner sites only, to avoid the problem of their users downloading malicious applications from unofficial locations, which have no liability for damage to users' devices or to the network.
Manageability is the measure of how easy it is to manage and monitor the system and detect operational characteristics that could indicate service failures. The designer of a service needs to consider how to architect a system to support manageability. The MIDP application developer, however, needs to understand and consider how an application fits the service's manageability model. For example, how does a mail client time out in the event that the mail server is not one hundred percent available?
Maintainability is the measure of how easy it is to maintain a system. This quality permeates all aspects of the design of a system or even of a MIDP application. You must consider not only the maintainability of the MIDP application itself but also the effects of maintenance of server side components on the MIDP client.
Systemic qualities affect MIDP applications in a variety of ways. First, MIDP applications—those that reside on mobile devices—need to consider how well they address systemic qualities.
278
Second, MIDP clients might work in conjunction with a server-side service that resides somewhere on the wireless Internet. The same developer might design both client and server components. Developers should apply comprehensive architectural principles to the design of these server-side components. The wireless Internet platform environment is a critical environment for architecture because of its requirements for massive scalability, performance, security, and so forth.
Finally, MIDP clients must be aware of the systemic qualities of any service they use. Even if the attributes of these services are beyond the control of the MIDP developer, it's important to understand their limitations and how they affect the functional and systemic qualities of the MIDP application.
Architectural Considerations for the Wireless Internet
A comprehensive architectural effort must consider every aspect of the system. From the perspective of the J2ME designer, the system context is not just the J2ME platform but also the whole wireless Internet environment, including the Internet portal and wireless network environments.
In particular, MIDP developers should be aware of how systemic qualities of the Internet portal environment and the wireless network environment affect MIDP application design. While it's clear how the presence of APIs, application-level protocols, markup languages, data formats and so forth affect the functional design of a system, it's less apparent how the systemic qualities of these environments affect the design of MIDP applications. Even though the architecture and design of Internet portals and portal services is beyond the realm of the MIDP developer—and part of the domain of the Internet architect—the characteristics of those systems affect the designs of MIDP applications and should be understood by the MIDP developer.
The crux of the purpose of this section is to precipitate your awareness of the architectural view of the wireless Internet environment: how it differs from fixed internetwork environments and how it affects the design of J2ME applications. Keep in mind, however, that the topics I discuss here by no means comprise a comprehensive list of architectural issues.
The issues highlighted here focus on the effect that the characteristics of wireless Internet environments have on an architecture's systemic qualities. Although it's dangerous to prioritize the importance of systemic qualities without specific requirements, it's probably safe to say that, in general, performance, scalability, availability and security are at the forefront of the architect's thoughts as much as, if not more than, the other systemic qualities. These systemic qualities in particular highlight some of the differences between wireless Internet and fixed Internet environments.
For example, distributed MIDP applications make requests to send and receive data over a wireless connection. Although the many layers of the wireless network protocol stack and the MIDP generic connection framework abstract the architectural details of the wireless network from your application, the network's performance characteristics influence your application design.
The two main categories of wireless networks are circuit-switched and packet-switched networks. Circuit-switched networks incur longer connection establishment times than packet-based networks. Longer connection establishment times induce delays in establishing data communications, which affects latency and throughput. Theoretically, MIDP applications should probably be designed to request more data per connection and to limit the number of connections
279
made to remote servers, particularly in circuit-switched networks. Actual performance measurements available at the time of this writing, however, indicate that the relatively new packet-based networks are not yet tuned well enough to reduce latency and increase throughput as much as originally anticipated. For this reason, it's generally a good idea to limit the overall number of connection requests.
Greater performance may also be achieved through the use of datagrams for certain networking communications. If the application requirements can accommodate it, the use of UDP instead of HTTP or sockets (if the MIDP implementation even supports sockets, that is) might result in much better network performance, because UDP implementations don't create connections at the transport layer.
Another issue is the cost of a data connection in wireless networks. Circuit-switched networks charge by connection time. Packet networks charge by the number of bytes transmitted and received. The type of network on which your MIDP application runs, and the design you choose for your application's communications, could affect the cost to the end user. Additionally, the type of network might affect network scalability, congestion, and throughput.
In circuit-switched networks, you might want to close connections whenever possible to avoid monopolizing bandwidth when not in use. Of course, you must reconcile the tradeoffs between the costs incurred by keeping connections open with the overhead and the latency induced by frequently opening and closing connections.
Data retrieval is another issue that affects performance. You can't do anything about the performance of a data layer deep in the portal architecture. However, you can mitigate the effects of frequent requests for data. Obtaining more data with each request and caching it locally on the device, either in memory or in the RMS, might yield better performance. And, as I've already discussed, this strategy might also yield better performance in the wireless network.
Performance is also an issue on the MIDP platform itself. MIDP applications should consider their model for local data access. This is an example of the benefit of prototyping an application before embarking on a full implementation. You may find that you get better performance by caching RMS records in memory than by accessing the RMS for each read or write. Some MIDP implementations have proven to perform better by deleting the whole record store, recreating it, and then writing all the records at once instead of writing individual records.
Scalability is closely related to performance. You should consider whether a design that supports high performance also supports massive scalability. MIDP applications should be prototyped and tested for massive scale, because wireless Internet applications could well experience large numbers of simultaneous users. Depending on your application and the Internet environment to which your applications have access, it might be possible to access decentralized Internet services, thereby mitigating the effects of a bottleneck caused by accessing a single server.
The support for location-based services is another area that can affect the design of handset applications. As you learned earlier, wireless Internet environments may host one of three types of geolocation technologies upon which location based services are built. GPS-based systems aren't quite available in real networks yet. At the time of this writing, network-based services are the most prevalent. Assisted GPS systems are still experimental but show promise. Your application design will be influenced to a large degree by the system support available. Regardless of the technology, however, you might be able to choose design alternatives that yield better performance and scalability. The point is to be aware of the need to view the overall system—not just the device-resident software—according to the criteria defined by systemic qualities.
Security is also an important systemic quality. Wireless networks, like corporate networks, face serious challenges to maintaining secure environments. Like most corporate networks, they use
280
schemes such as dynamic address configuration, network address translation, firewalls, and so forth to hide the details of network addresses and services from outside entities.
Another reason for the implementation of these schemes is the limitation of network address space. Wireless networks frequently translate IP addresses to proprietary address schemes in order to accommodate the large volume of handsets. In order to support peer-to-peer data communications between handsets, the wireless network would have to provide a scheme to forward handset addresses based on some form of internal addressing. A centralized service model could impact performance and scalability.
These are some of the reasons why wireless networks have a data-networking environment that's more constrained than fixed internetwork environments. MIDP developers should consider the limitations of the network when designing applications. With the adoption of IPv6, there will be enough addresses to give each handset a static IP address. Notwithstanding, security, performance, and scalability will remain important issues.
Chapter Summary
The wireless Internet environment consists of mobile devices, the wireless network, gateways, and internetworks that connect the wireless network to the Internet. The power of the wireless Internet is that it enables mobile devices to access Web based and other Internet-based applications. The wireless network environment creates the abstractions that hide the differences between the wireless network and the Internet from applications.
Wireless devices have access to many of the same categories of applications as constantly connected, fixed devices such as personal computers. Additionally, certain applications, such as dynamic location-based services, are particularly popular in the mobile arena.
The Java-based technology of the J2ME platform significantly enhances the ability of mobile devices to benefit from Internet-based applications. It aids in hiding the differences in technology and services between the wireless network and the Internet from applications.
Real-world constraints and technological limitations, however, require that Internet-based Web software specifically accommodate the wireless Internet, that is, address the technologies used for wireless device access. As technology progresses, however, the wireless Internet will support abstractions that eliminate the need for special Web-based software that supports mobile devices differently from constantly connected devices such as personal computers.
Architecture is a set of concepts and practices that support the design and description of a system. Architectural methodology is the discipline of applying architectural concepts and practices. The SunTone Architectural Methodology is an extension of the Rational Unified Process.
Architectural methodology complements requirements gathering. The architect must reconcile an architecture with the stated requirements of a system. The SunTone Architectural Methodology emphasizes the importance of quantifying the nonfunctional or systemic qualities of a system and using them to determine the system's adherence to its stated requirements.
The J2ME developer should consider performing an architectural analysis as the first step in application design and development. Architecture can help a developer describe the software he or she is building and also understand how best to interface with wireless Internet services by understanding the architecture of the wireless Internet systems.
281
Appendix A. References Arnold, Ken and James Gosling. The Java Programming Language, 2nd ed.. Reading, MA: Addison Wesley Longman, 1998.
Booch, Grady, James Rumbaugh and Ivar Jacobson. The Unified Modeling Language User Guide. Reading, MA: Addison Wesley Longman, 1999.
Cockburn, Alistair. Writing Effective Use Cases. Reading, MA: Addison Wesley Longman, 2000.
Djuknic, Goran M. and Robert E. Richton. "Geolocation and Assisted GPS." IEEE Computer, February 2001, pp. 123-125.
Gamma, Eric, Richard Helm, Ralph Johnson and John Vlissides. Design Patterns, Elements of Reusable Object-Oriented Software. Reading, MA: Addison-Wesley, 1995.
Internet Engineering Task Force. HTTP Authentication: Basic and Digest Access Authentication. RFC 2617: Network working group, The Internet Society, June 1999.
——— Hypertext Transfer Protocol—HTTP/1.1. RFC 2616: Network working group, The Internet Society, June 1999.
——— Multipurpose Internet Mail Extensions (MIME) Part One: Format of Internet Message Bodies. RFC 2045: Network working group, The Internet Society, November 1996.
——— Uniform Resource Identifiers (URI): Generic Syntax. RFC 2396: Network working group, The Internet Society, August 1998.
International Organization for Standardization. ISO-3166 Codes (Countries). Geneva, Switzerland: http://www.unicode.org/unicode/onlinedat/countries.html.
——— ISO-639 Code for the Representation of Names of Languages. Geneva, Switzerland: http://www.unicode.org/unicode/onlinedat/languages.html.
Jacobsen, I., Grady Booch and James Rumbaugh. The Unified Software Development Process. Reading, MA: Addison-Wesley-Longman, 1999.
Krutchen, P. The Rational Unified Process, An Introduction, 2nd ed. Reading, MA: Addison-Wesley Longman, 2000.
Lindholm, Tim and Frank Yellin. The Java Virtual Machine Specification. Reading, MA: Addison-Wesley Longman, 1997.
Padlipsky M. A. The Elements of Networking Style. Englewood Cliffs, New Jersey: Prentice-Hall, 1985.
Piroumian, Vartan. Java GUI Development. Indianapolis, IN: Macmillan, 1999.
——— "Internationalization Support in Java." IEEE Micro, May/June 1997, pp. 20-29.
Sun Professional Services. Dot-Com & Beyond. Upper Saddle River, NJ: Sun Microsystems Press/Prentice-Hall, 2001.

282
——— Applications for Mobile Information Devices: Helpful Hints for Application Developers using the Mobile Information Device Profile, A White Paper. Palo Alto, CA: Sun Microsystems, 2000.
——— Connected Device Configuration (CDC) and the Foundation Profile, Technical White Paper. Palo Alto, CA: Sun Microsystems, 2001.
——— Connected Limited Device Configuration, Specification Version 1.0, Java 2 Platform Micro Edition. Palo Alto, CA: Sun Microsystems, 1999-2000.
——— Java 2 Micro Edition, Wireless Toolkit User's Guide, Release 1.0. Palo Alto, CA: Sun Microsystems, November 2000.
——— Java 2 Platform Micro Edition (J2ME) Technology for Creating Mobile Devices, A White Paper. Sun Microsystems: Palo Alto, CA, 2000.
——— Java Archive Utility Reference Manual. http://java.sun.com/products/jdk/1.2/docs/guide/jar/index.html.
——— Mobile Information Device Profile (JSR-37), JCP Specification, Java 2 Platform, Micro Edition, Version 1.0a. Palo Alto, CA: Sun Microsystems, 1999-2000.
——— Over the Air User Initiated Provisioning Recommended Practice, Addendum to the Mobile Information Device Profile, Version 1.0. Palo Alto, CA: Sun Microsystems, April 12, 2001
Sunshine, Carl A., ed. Computer Network Architectures and Protocols. 2nd ed. New York: Plenum Press, 1989.
Tanenbaum, Andrew S. Computer Networks, 2nd ed. Englewood Cliffs, NJ: Prentice-Hall, 1989.
Varshney, Upkar. "Recent Advances in Wireless Networking." IEEE Computer, June 2000, pp. 100-103.
Glossary 2G
The second generation of wireless network technology. 2G networks use circuit-switching technology.
2.5G
The generation of wireless network technology that follows 2G. 2.5G networks don't replace 2G networks but rather provide packet data services to compliment 2G networks.
3G

283
The third generation of wireless network technology. 3G networks; completely packet-switched.
Abstract Window Toolkit (AWT)
Defines graphical user interface (GUI) programming facilities for Java programs.
application architecture
A description of the interfaces, collaborations, and composition of the structural elements of a software system.
application management system
Pervasive device software that controls the execution of applications on the mobile device.
application provisioning
In the context of J2ME, the discovery, brokering. and delivery of applications to pervasive devices.
architectural framework
A conceptual structure that supports the definition of an architectural model.
attribute
A piece of information that defines a characteristic of a MIDlet. Attributes consist of a name-value pair. The name identifies the attribute key, and the value contains the information.
brokering
The category of application provisioning that consists of presentation of application information, license negotiation, and purchase verification.
character encoding set

284
A mapping between written language characters and bit patterns, which are sometimes abbreviated as charset.
code point
The assignment of an element of a written natural language to a particular bit pattern.
collation
Lexicographic sorting in the context of rules that represent a particular locale context.
command
A representation of a user action. The MIDP defines a class whose object instances represent user interactions with the application.
compatibility verification
The process of determining the compatibility of a software application with a pervasive device computing environment.
Common Object Request Broker Architecture (CORBA)
An industry standard for cross-platform, cross-language distributed computing. The Object Management Group (OMG) oversees its continuing definition and evolution.
compact virtual machine (CVM)
A Java virtual machine that supports the same features as the J2SE virtual machine but is designed for consumer and embedded devices.
configuration
A specification of a minimum Java platform that consists of a common set of Java virtual machine features, Java language features, and APIs for a family of devices.
Connected Device Configuration (CDC)
A J2ME configuration that supports constantly connected pervasive devices.
285
Connected, Limited Device Configuration (CLDC)
A J2ME configuration that supports personal, intermittently connected pervasive devices.
datagram
An application protocol unit of data that is transmitted through the use of the UDP protocol in the Internet environment.
design pattern
In the context of computer software, a design solution to a well-known or frequently encountered problem.
discovery
The process of searching for applications during application provisioning.
discovery application
An application that resides on a mobile device and supports the provisioning of applications to the device. This application is different from the AMS, which enables the installation of software once it's on the device.
double buffering
A graphics programming technique in which two graphics buffers are used to draw graphics. The program first writes to an off-screen graphics object, then transfers the contents of the off-screen graphics object to the screen graphics object.
event listener
A Java class defined by MIDP applications whose instances listen for program events. The MIDP implementation calls a method in the listener object to notify it of the occurrence of an event.
eXtensible Hypertext Markup Language (XHTML)
286
A presentation markup language that will eventually replace HTML and reformats HTML 4.0 as a proper XML application.
eXtensible Markup Language (XML)
The standard metainformation markup language used on the World Wide Web.
foundation profile
A profile designed to implement the CDC.
generic connection framework
A set of MIDP interfaces and one class that support networking for MIDP applications. It abstracts the details of establishing any particular kind of networking connection.
global positioning system (GPS)
A system of geostationary satellites that transmit geographic location information to receivers.
high-level API
The MIDP user-interface application API that abstracts details of toolkit event handling from the application.
Hypertext markup language (HTML)
The standard presentation markup language used on the World Wide Web.
Hyptertext transfer protocol (HTTP)
A session-layer protocol that is the standard protocol of the World Wide Web.
instant messaging (IM)
The delivery of messages as soon as possible. This scheme contrasts the store-and-forward scheme used by electronic mail systems.
287
internationalization
The tasks associated with enabling a computer program to operate in multiple language, geographic, and cultural contexts.
Internet mail application protocol (IMAP)
A standard application-layer protocol for access to mail between mail clients and servers.
Internet protocol (IP)
The Internet standard network-layer protocol.
International Standards Organization (ISO)
A European body that oversees the creation and adoption of international standards.
ISO8859-1
An international standard character-encoding set for encoding Western European languages using one byte per character.
Java 2 Micro Edition (J2ME)
One of three platforms defined by Sun Microsystems; supports pervasive computing devices.
Java application manager
An AMS that specifically supports the control of Java applications on pervasive devices.
Java Native Interface (JNI)
A Java API that supports calls to native functions outside the Java virtual machine.
Java Server Page (JSP)
288
A kind of Java servlet. The Java Server Pages technology defines an API that separates the user interface presentation of a servlet from the servlet's functional logic.
Kilobyte Virtual Machine (KVM)
A Java virtual machine designed for use with the CLDC. It supports a subset of the standard Java virtual machine features.
Lightweight Directory Access Protocol (LDAP)
An industry standard for associating users with attributes in a conceptual directory format.
listener See [event listener]
locale
The definition of a set of one or more language, geographic, and cultural contexts.
localization
The task of preparing the resources that enable an internationalized program to operate in a particular language, geographic, and cultural context.
location-based services
The use of geolocation information by applications to provide information relevant to the client's geographic location.
low-level API
The MIDP application user interface API that gives applications control over low-level toolkit events such as key events.
MIDlet
A MIDP application, namely, one that requires the MIDP platform to run.
MIDlet suite

289
A group of MIDlets that share application resources. All MIDlets in a suite must be packaged together for delivery to a MIDP device.
Mobile Indepdendent Device Profile (MIDP)
A J2ME profile that implements the CLDC.
mobile station identification and service definition number (MSISDN)
Like an MSN, the phone number of a mobile phone.
mobile station number (MSN)
The phone number of a mobile phone.
multilingual
In the context of internationalized software, a program that can operate in multiple locale contexts simultaneously.
network address translation (NAT)
A scheme by which IP addresses are translated to a different IP address in order to hide the original address from external systems. NAT supports security and address space issues.
over-the-air
A term that refers to the use of a wireless network. This term is specifically used to represent application provisioning to mobile devices using a wireless connection.
personalization
Services that support customization of the user's preferences for services, configuration of applications and presentation, account information, and so forth.
personal profile
A J2ME profile designed to implement the CDC.
290
Post Office Protocol (POP)
A standard application protocol between mail clients and servers.
profile
A specification of the application-level interface for a particular class of devices. A profile implements a J2ME configuration.
Personal Digital Assistant Profile (PDAP)
A J2ME profile designed to implement the CLDC.
property
An attribute that describes some characteristic of the Java runtime environment on mobile devices.
rational unified process (RUP)
A software development methodology developed by Rational Software.
record comparator
A Java class defined by MIDP applications to implement a comparison function to compare two records from a MIDP RMS record store.
record filter
A Java class defined by MIDP applications to implement a filter for records from an MIDP RMS record store according to some criterion. The filter returns only records that match the criterion.
Record Management System (RMS)
A simple persistent storage mechanism for application data. It supports multiple data stores, each of which can contain multiple records.

291
Remote Method Invocation (RMI)
A Java API that supports distributed object-oriented computing in Java.
short message service (SMS)
A wireless network service that supports the transmission of text messages of no more than 128 bytes to and from mobile devices.
socket
A traditional Unix operating system networking mechanism that implements TCP/IP network connections between clients.
Swing toolkit
A GUI extension built atop the AWT.
systemic qualities
The characteristics of a system that relate to its nonfunctional behavior, such as performance, scalability, security, availability, manageability, and so forth.
Transmission Control Protocol (TCP)
The Internet standard transport layer protocol.
Universal Datagram Protocol (UDP)
A standard Internet networking protocol that supports the transmission of datagrams without establishing a transport layer connection.
Unicode
An international standard character-encoding set that attempts to use a canonical 16-bit encoding format to encode every language element of all the world's written languages.
unified messaging
292
The integration of various messaging services that hides the details of access of any of the schemes.
use case
A conceptual tool that supports the description and documentation of application requirements.
UTF-8
An international standard, variable-width, character-encoding set that is frequently used for encoding text data for transmission between applications.
virtual wireless portal
A portal that provides services to wireless users but is not physically related to the wireless carrier's network, (that is, not part of the carrier's intranet).
widget
A computer-vernacular slang term that refers to some kind of software component, often (but not exclusively) a user-interface component of some kind.
Wireless Application Protocol (WAP)
The protocol used in first-generation wireless Internet systems.
wireless Internet
The combination of the wireless network infrastructure and its interface to the Internet that creates the environment giving mobile devices access to Internet resources.
wireless Internet gateway (WIG)
A combined hardware and software system that bridges the wireless and fixed network environments.
wireless Internet portal
293
An Internet portal that addresses the delivery of services and content to mobile devices but is otherwise conceptually not different from fixed Internet portals.
Wireless Markup Language (WML)
A presentation markup language used in first-generation wireless Internet systems to format Web pages for mobile devices.
wireless Web
The combination of the wireless network infrastructure and the Internet that gives mobile devices to the World Wide Web.
XML application
An implementation of XML that represents an instance of an XML extension markup language.


