TQBH0382-5 (E) Operating Instructions Wireless Manager ME6.4 Wireless Manager mobile edition 6.4 Windows Thank you for purchasing this Panasonic product. Before using this software, please read the instructions carefully.
Transcript
TQBH0382-5 (E)
Operating InstructionsWireless Manager ME6.4Wireless Manager mobile edition 6.4
Windows
Thank you for purchasing this Panasonic product.Before using this software, please read the instructions carefully.
Notifications and requests regarding use................................................. 5
Using the software ......................................................................................6
Introduction
Checking your computer ............................................................................ 9Necessary environment for computers to be connected ...................................................... 9System requirements ......................................................................................................... 10
Installing/uninstalling the software ......................................................... 11Installing the software ........................................................................................................ 11Uninstalling the software .................................................................................................... 12
Using the software without installing ...................................................... 13
Connecting the computer to the devices ................................................ 15
If the account does not have administrator privileges .......................... 15
Checking the device .................................................................................. 16
Use with the [SIMPLE], [S-DIRECT], [S-MAP], [1], [2], [3], and [4] settings .......................................................................................................24
Use with the [USER] setting ..................................................................... 26
Use with the [M-DIRECT] setting .............................................................. 29
Use with a wired LAN connection ............................................................ 31
Using the USB display function ............................................................... 34
Use with searched IP addresses .............................................................. 36
When a password has been set for a device .......................................... 38
When a device is equipped with Content Manager ................................ 38
Selecting the Devices
3
Intr
oduc
tion
Registering devices and groups .............................................................. 41<Register Projectors> screen ............................................................................................ 41
Specifying areas for transmission ........................................................... 49
Setting the options ....................................................................................50
Live mode ...................................................................................................52
Multi live mode ...........................................................................................544-screen multi style ............................................................................................................ 564-screen index style ........................................................................................................... 5716-screen index style ......................................................................................................... 58Setting the sender’s names ............................................................................................... 59
Moderator mode ........................................................................................60
Multi-device live mode .............................................................................. 61
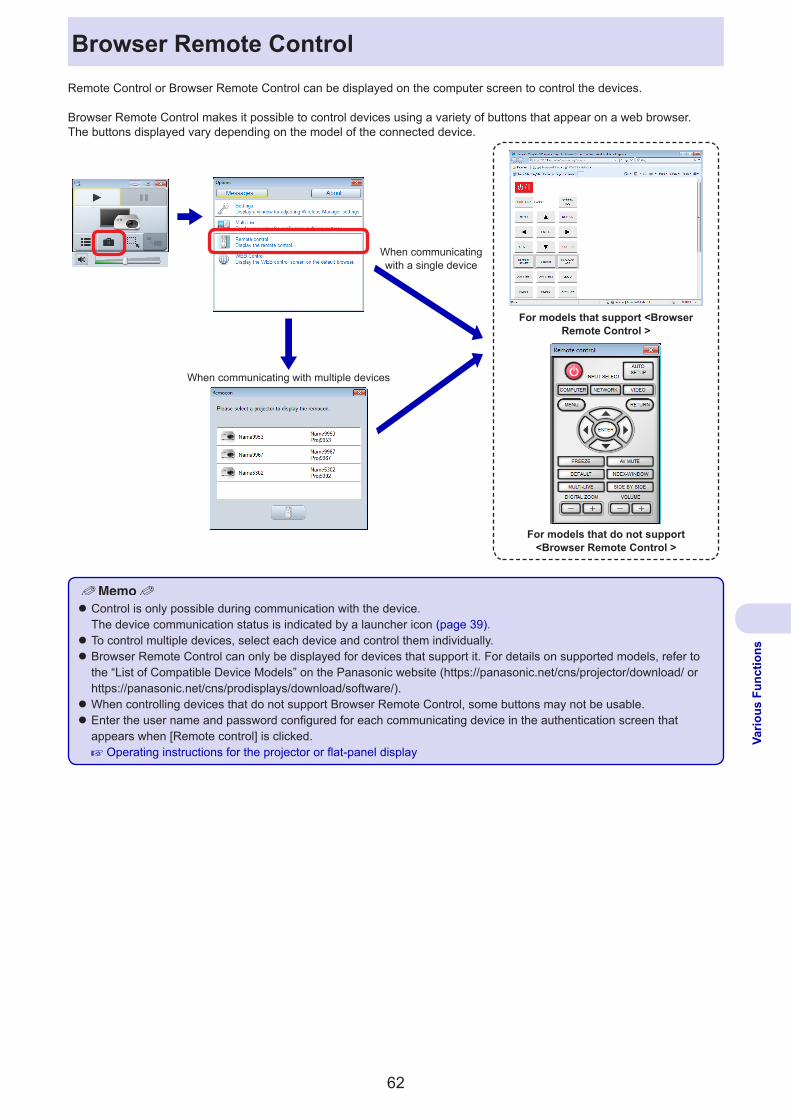
Browser Remote Control .......................................................................... 62
WEB control ...............................................................................................63
Operating the launcher ............................................................................. 39Launcher ............................................................................................................................ 39Adjusting the volume .......................................................................................................... 40Quitting the software .......................................................................................................... 40
Displaying Images
4
Intr
oduc
tion
Software Licensing AgreementUse of this Software is governed by the terms defined in this “Software Licensing Agreement”.By using the software, users are deemed to have agreed to the terms of the “Software Licensing Agreement”.
zArticle 1 LicenseThe users obtain the license of the software (i.e. the information recorded or contained in CD-ROM, operating instructions or others), but the copyright or intellectual property right of the software does not transfer to the users.
zArticle 2 Use by a Third PartyLicensee may not transfer or allow any third party, to use or copy the Software, whether free of charge or not.
zArticle 3 Restrictions on Copying the SoftwareLicensee may make a single copy of the Software in whole or in part solely for backup purposes.
zArticle 4 ComputerLicensee may install and use the Software on more than one computer owned or managed by Licensee.
zArticle 5 Reverse Engineering, Decompiling or DisassemblyLicensee may not reverse engineer, decompile or disassemble the Software. Panasonic shall not be bound by warranty for any defects in the Software caused by Licensee’s reverse engineering, decompiling or disassembly of the Software.Furthermore, Panasonic or its distributors or dealers will not be responsible for any damage to the Licensee caused by Licensee’s reverse engineering, decompiling or disassembly of the Software.
zArticle 6 After-sales ServiceIf you have a problem with the software, please contact the customer support center by telephone.Panasonic shall undertake to notify Licensee of whether the problem is a known error in the program (“bug”), or whether the way in which the Software is to be used should be modified.Furthermore, the Software is subject to revision without prior notice.
zArticle 7 IndemnificationPanasonic’s liability with respect to this Software is limited to the conditions defined in Article 6 herein. Panasonic or any of its distributors or dealers shall not be liable for any damage suffered by Licensee, either directly or through claims from a third party, arising from or in connection with Licensee’s use of the Software.Furthermore, Panasonic Corporation does not guarantee the successful operation of the software unless it is used with Panasonic displays (projectors and flat-panel displays).
zArticle 8 Export ControlLicensee agrees not to export or re-export the Software to any county other than the country of purchase of the device in any form without the appropriate export licenses under the regulations of the country where Licensee resides or of any other country as may be required by such export or re-export.
Please note the following. z Panasonic Corporation hereby disclaims all liability for any damages or losses, whether suffered directly or indirectly, which have been caused by the use of or by trouble occurring in the displays (projectors or flat-panel displays). z Panasonic cannot be held liable for damages arising from data corruption or loss as a result of using the displays (projectors or flat-panel displays). z The illustrations and screen displays given in this manual may differ from what is actually displayed. z In general, screenshots from Windows 7 are used to describe operations in this manual. z The specifications of this software are subject to change without notice.
5
Intr
oduc
tion
Notifications and requests regarding use z Request Regarding Security
When using this software, security breaches of the type described below are conceivable.
y Leakage of your private information via the software y Illegal operation of the software by a malicious third-party y Harm to or cessation of operation of the software by a malicious third-party
Take steps to ensure that the displays (projectors and flat-panel displays) and computer used are secured and protected.
y Make sure the password is as hard to guess as possible. y Change the password periodically. y Panasonic Corporation and its affiliated companies never directly ask customers for their password.
Do not give out your password even if directly asked by a third-party representing themselves as Panasonic Corporation. y Use the product in a network that is kept secure by firewall and other settings. y Establish a password for the computer that will be used in order to restrict the users who can log on.
Security-related precautions to be followed when using wireless LAN products
The advantage of a wireless LAN is that information can be exchanged between a computer or other such equipment and an access point using radio waves as long as you are within range for radio transmissions.On the other hand, because the radio waves can travel through obstacles (such as walls) and are available everywhere within a given range, problems of the type listed below may occur if security-related settings are not made.
y A malicious third-party may intentionally intercept and monitor transmitted data including the content of e-mail and personal information such as your ID, password, and/or credit card numbers.
y A malicious third-party may access your personal or corporate network without authorization and engage in the following types of behavior. Retrieve personal and/or secret information (information leak) Spread false information by impersonating a particular person (spoofing) Overwrite intercepted communications and issue false data (tampering) Spread harmful software such as a computer virus and crash your data and/or system (system crash)
Since most wireless LAN adapters or access points are equipped with security features to take care of these problems, you can reduce the possibility of these problems occurring when using this product by making the appropriate security settings for the wireless LAN device.
Some wireless LAN devices may not be set for security immediately after purchase. To decrease the possibility of occurrence of security problems, before using any wireless LAN devices, be absolutely sure to make all security-related settings according to the instructions given in the operation manuals supplied with them.Depending on the specifications of the wireless LAN, a malicious third-party may be able to break security settings by special means.If you cannot perform security settings yourself when using wireless LAN, please contact the Panasonic projector support center.
Panasonic asks customers to thoroughly understand the risk of using this software without making security settings, and recommends that the customer make security settings at their own discretion and responsibility.
Wireless Manager mobile edition 6.4 (referred to as “Wireless Manager ME 6.4” in this document) uses the following software programs.A portion of this software is based in part on the work of the Independent JPEG Group.
z The illustrations and screens in this document may differ from the actual ones. z In this document and software, “device” refers to Panasonic displays (projectors and flat-panel displays). z Although the software's operation screens display functions, such as <Find Projectors>, the “projectors” include Panasonic displays (projectors and flat-panel displays).
6
Intr
oduc
tion
Using the softwareUsing the software allows you to display computer images on the other devices with ease.The basic steps before displaying the images are as follows.
� Preparations
1 Turn on the device.
2 Select the network settings menu.For projectors:Press the <Panasonic APP> or <NETWORK/USB> button on the remote control (or the <INPUT SELECT> button on the projector).For flat-panel displays:Press the <INPUT> button on the remote control, and select [Panasonic APPLICATION].
3 Check the network ID of the device. “Checking the device” (page 16)
4 Install the software on the computer. “Installing the software” (page 11) Network ID indicator
(projector image example)
� Starting the software5 Start the software.
“Starting the software” (page 18)When using multiple devices or specifying the IP address directly to perform connection, see (page 18), click the [Search further...] button, and perform operations in the <Find Projectors> screen (page 21).
� Selecting the devices6 Click the device that matches the network ID from step 3.
“<Simple connection> screen” (page 19)
� Displaying images7 Click in the launcher.
The images on the computer screen are displayed via the device. “Launcher” (page 39)
z Various software limitations may apply depending on the device used.For the latest information, refer to the “List of Compatible Device Models” on the Panasonic website (https://panasonic.net/cns/projector/download/ or https://panasonic.net/cns/prodisplays/download/software/).Alternatively, if you have the CD-ROM for this software that was supplied with your projector or flat-panel display, refer to the “List of Compatible Device Models” in the CD-ROM’s application launcher.
7
Intr
oduc
tion
Using the software (cont.)
Attention z When using the device’s wireless LAN connection function, the 2.4 GHz or 5 GHz band frequencies are used.For details on precautions when using wireless LAN connections and the channels you can use for wireless LAN, refer to the operating instructions for the projector or flat-panel display.
� < Live mode> Page 52
In this mode, the images from a single computer can be displayed on a single device.Depending on the model, split-screen display will occur automatically based on the number of connected users.
� < Multi live mode> Page 54In this mode, the images from multiple computers can be displayed on a single device.This function can only be used on supported models. For details, refer to the “List of Compatible Device Models”.
z 4-screen multi styleUsed for presentations involving multiple computers.
z 4-screen index styleThis style is convenient in cases where you wish to focus attention on one of four presentations displayed simultaneously.
z 16-screen index styleThis style is convenient in cases where you wish to display a large number of presentations as a list.
8
Intr
oduc
tion
Using the software (cont.)
� < Moderator mode> Page 60
In this mode, a moderator can use the remote control or the WEB Control screen to select which terminal to display in full screen via the device.This function can only be used on supported models. For details, refer to the “List of Compatible Device Models”.
� < Multi-device live mode> Page 61
In this mode, the images from a single computer can be displayed on multiple devices (up to 8).
� < Browser Remote Control> Page 62The “Browser Remote Control” makes it possible to control devices using a variety of buttons that appear on a web browser.Models that support Browser Remote Control: Operations identical to those on the device’s remote control can be
performed via your computer’s web browser.Models that do not support Browser Remote Control: The device can be operated via a simplified remote control screen.
� < WEB control> Page 63The device can be controlled using the computer’s web browser.
� < Content Manager> Page 64Content Manager can be opened directly from this software for devices that are equipped with Content Manager.
9
Prep
arat
ions
Checking your computer
� Necessary environment for computers to be connected z First, check your computer to see whether or not it has a wired LAN or a built-in wireless LAN function. z Before connecting the device to the computer, be sure to check the following settings. z Operation is not guaranteed for all wireless LAN adapters and built-in wireless LAN adapters.
�Wireless LANCheck 1 Wireless LAN settings
z Is your wireless LAN adapter properly recognized? z Is the wireless LAN adapter switched on? z Install the wireless LAN adapter driver beforehand.For details on how to install the driver, refer to the instructions accompanying the wireless LAN adapter.
Check 2 Settings for the logged on user z Can you log on with the administrator’s privileges?
Check 3 Computer settings z When security (firewall) software and utilities for wireless LAN adapter are installed, these may prevent connection of the device. z Is Network Bridge enabled? “Frequently Asked Questions” (page 70) z Has the firewall for blocking unsolicited programs been turned off or shut down? “Frequently Asked Questions” (page 71)
�Wired LANCheck 1 For wired LAN
z Is the cable properly connected? z The specifications for cables vary depending on the system configurations. Confirm the device settings and the cable specifications.
Check 2 Wired LAN settings z Is your wired LAN adapter properly recognized? z Is your wired LAN adapter switched on? z Install the wired LAN adapter driver beforehand.For details on how to install the driver, refer to the instructions accompanying the wired LAN adapter.
Check 3 Computer settings z When security (firewall) software is installed, it may prevent connection of the device. z Is Network Bridge enabled? “Frequently Asked Questions” (page 70) z Has the firewall for blocking unsolicited programs been turned off or shut down? “Frequently Asked Questions” (page 71)
10
Prep
arat
ions
Checking your computer (cont.)
� System requirementsTo use this software, the computer must satisfy the following requirements.
OS: Microsoft Windows 7 Ultimate 32/64 bit, Professional 32/64 bit, Home Premium 32/64 bit Up to SP1 supportedMicrosoft Windows 8.1 Windows 8.1 32/64 bit, Windows 8.1 Pro 32/64 bitMicrosoft Windows 10 Windows 10 Home 32/64 bit, Windows 10 Pro 32/64 bitThe Japanese, English and Chinese versions of the above operating systems are supported.
Web browser: For the WEB Control function, Browser Remote Control function, moderator mode, and Content Manager function: Internet Explorer 11.0
CPU: Intel Core 2 Duo or higher processor or compatible processor installedIntel Core i5 or higher recommended for image display
Memory: 1024 MB or moreHard disk: At least 100 MB free space
(Extra free space is required to save the device information.)LAN environment: For wired LAN connections: LAN connector (10BASE-T, 100BASE-TX, or 1000BASE-T)
requiredFor wireless LAN connections: Wireless LAN adapter (IEEE802.11b/g/n/a standard
compliance) requiredMonitor screen: High Color (16 bits) or upDesktop area: 1024 dots × 768 dots or more
2048 dots × 1536 dots or less
z Note that operation is not guaranteed when used with system environments other than the above or on homemade computers. z When using a computer operating in a wireless WAN, some functions may not be available. z When connecting under the IEEE802.11n standard, the wireless LAN adapter, device, and access point used must all support the 11n standard. z Be sure to stop image display before switching the graphics function on a computer equipped with a switchable graphics function.
Operation is not guaranteed for all computers that meet the above conditions.
11
Prep
arat
ions
Installing/uninstalling the software
� Installing the software
z When installing [Wireless Manager ME 6.*]*1 on a computer on which the software is already installed, the existing version of [Wireless Manager ME 6.*]*1 will be uninstalled*2. z The illustrations and screens used in this document may differ from actual appearances.
1 Start the installer and perform the installation according to the on-screen instructions.<When performing the installation using the CD-ROM supplied with the device>For projectors: z When you insert the CD-ROM containing the software into the CD drive, the application launcher starts automatically. If the launcher does not start, double-click “Launcher.exe” in the CD-ROM. z Click [Wireless Manager ME 6.*]*1. z A screen with the [Install] and [Use without installing] selection options appears. z Click [Install].
For flat-panel displays: z Insert the supplied CD-ROM into the CD drive, and double-click “WirelessManager” “Win” “Setup.exe” in the CD-ROM.
z If the auto play screen appears, select [Run Launcher.exe]. (For projectors) z Install the software using an account with administrator privileges.
<When performing installation using the file downloaded from the website> z Click [Wireless Manager ME 6.*]*1, and download the installation file to the computer as instructed. z For details on the installation procedure after download, refer to the information on the website.
2 When installation is completed, a shortcut icon is created on the desktop.
Wireess Manager mobile edition 6.* *1
z For the latest version of the software, refer to the support information on the Panasonic website (https://panasonic.net/cns/projector/download/ or https://panasonic.net/cns/prodisplays/download/software/). z *1 The “*” represents various version numbers. z *2 The list of devices registered with this software is also deleted. If you want to retain the registration list, use the export/import function. (See page 47, page 48.)
12
Prep
arat
ions
Installing/uninstalling the software (cont.)
3 When the completion screen appears after installation is completed, click the [Finish] button.
� Uninstalling the softwarePerform*2 as follows.
z For Windows 7Select [Start] [Control Panel] [Programs and Features] [Wireless Manager mobile edition 6.*]*1, and click [Uninstall]. z For Windows 8.1Press the Windows logo + X keys on the keyboard, select [Control Panel] [Uninstall a program] [Wireless Manager mobile edition 6.*]*1, and click [Uninstall]. z For Windows 10Enter and select “Apps & features” in the search box in the taskbar, select [Wireless Manager mobile edition 6.*]*1, and click [Uninstall].
z *1 The “*” represents various version numbers. z *2 The list of devices registered with this software is also deleted. If you want to retain the registration list, use the export/import function. (See page 47, page 48.)
13
Prep
arat
ions
Using the software without installingThe software can be used even when it has not been installed.In addition, by copying the software onto a USB memory device or other media, it can even be used on a computer on which it cannot be installed.
z If the software is used without installing it, no sound will be output.
�When the software CD-ROM is supplied with the projector
1 Insert the CD-ROM containing the software into the CD drive.The application launcher starts automatically. z If the launcher does not start, double-click “Launcher.exe” in the CD-ROM. z If the auto play screen appears, select [Run Launcher.exe].
2 Click [Wireless Manager ME 6.*]*1.A screen with the [Install] and [Use without installing] selection options appears.
z *1 The “*” represents various version numbers.
3 Click [Use without installing].
� To use the software immediately � To copy the software to media before use
4 Click [Other Media Source Startup, Make Copy Here].
5 Select the storage destination, and click [OK].The program on the CD-ROM is copied to the selected storage destination.
6 Close the application launcher.Return to the initial screen of the application launcher, and click [Close].The application launcher closes.
7 Double-click “WMStart.exe” in the storage destination.The software starts up.
14
Prep
arat
ions
Using the software without installing (cont.)
�When using the file downloaded from the website z Click [Wireless Manager ME 6.*]*1, and download the file that allows use of the software without installation to the computer as instructed. z For details on how to use the downloaded files, refer to the information on the website.
z If you selected removable media as the storage destination, insert the removable media into the computer to which the device will be connected, and make sure it is recognized. The software may start automatically depending on the removable media. z *1 The “*” represents various version numbers.
15
Prep
arat
ions
Connecting the computer to the devicesThere are 9 ways to connect the computer to the devices.
Use with the [SIMPLE] settingThis is used for easy wireless communication between the device and a terminal (computer, tablet, smartphone, or other mobile device). Page 24
Use with the [S-DIRECT] settingThis is used for easy wireless communication between the device and a computer. Page 24
Use with the [S-MAP] settingThis is used for a device model that does not support [S-DIRECT]. Page 24
Use with the [1] to [4] settingsThis is used for a device model that does not support [S-DIRECT] or [S-MAP].This is also used when using multiple devices at the same time. Page 24
Use with the [M-DIRECT] settingThis is used when specifying a particular network and security key to communicate with the device. Page 29
Use with the [USER] settingThis is used when using an existing network or access point for communication.This is also used when using multiple devices at the same time. Page 26
Use with a wired LAN connectionThis is used when the device and computer are connected using a LAN cable.This is also used when using multiple devices at the same time. Page 31
Using the USB display functionThis is used when the device and computer are connected using a USB cable. Page 34
Use with searched IP addressesThis is used when communicating with the device using the IP address search function. Page 36
If the account does not have administrator privilegesIf you logged onto the computer using an account without administrator privileges, devices whose wireless LAN connection setting is set to [SIMPLE], [S-DIRECT], [S-MAP], [1], [2], [3], or [4] cannot be used. z Depending on the device, the wireless LAN connection setting may be referred to as the network number.
Devices that can be used “Use with the [USER] setting” (page 26) “Use with the [M-DIRECT] setting” (page 29) “Use with a wired LAN connection” (page 31) “Using the USB display function” (page 34) “Use with searched IP addresses” (page 36)
z The network settings of the computer must be established using an account with administrator privileges. z Administrator privileges are required to install this software. z Administrator privileges are required to install the USB display driver after the software has started up.
16
Prep
arat
ions
Checking the device
� Device powerTurn on the device.
� Setting the input z For projectors
Press the <Panasonic APP> or <NETWORK/USB> button on the remote control (or the <INPUT SELECT> button on the projector), and switch the input to [Panasonic APPLICATION] or [NETWORK].
A standby screen is displayed in the image projected by the projector.
z For flat-panel displays Press the <INPUT> button on the remote control, and select [Panasonic APPLICATION]. A standby screen is displayed on the flat-panel display.
� Device checkCheck the device’s wireless LAN connection setting, projector name or display name, and network ID.The locations where this information is displayed may vary depending on the device model.
z For devices that display the standby screen (projector image example)
The standby screen may not appear even for devices that display the screen if another user is already displaying an image, if multi live mode (page 54) is being used in the 4-screen or 16-screen index style, or if moderator mode (page 60) is enabled.For projectors, you can check the network ID by pressing the AUTOSETUP button.For flat-panel displays, you can check the network ID by selecting [Network status] in [Network settings].
y Example of standby screen display.
Wireless LAN connecton setting
Projector name or display name
Network ID
z For devices that do not display the standby screen (projector image example)
y Example of input guidance display.
Wireless LAN connecton setting
Network IDProjector name
INPUT NETWORKSIGNAL NAME XGA-A1MEMORY NO A1WIRELESS LAN S-DIRECTPROJECTOR NAME NAME1234NETWORK ID Proj1234
Wireless LAN connecton setting
Network ID
Projector name
Network ID
Wireless LAN connecton setting
Projector name
17
Prep
arat
ions
Wireless LAN connecton setting
Network IDProjector name
Wireless LAN connecton setting
Network IDProjector name
z If the input guidance does not appear, press the <MENU> button on the projector, and in the menu that is displayed, select [DISPLAY OPTION] [INPUT GUIDE] [ON] or [DETAILED].
� Checking the network statusThe network setting information can be checked using the device’s menu. z Press the <MENU> button on the projector, and in the menu that is displayed, select [NETWORK] [NETWORK STATUS] to check the detailed network setting information. z Press the <SETUP> button on the flat-panel display's remote control, and in the menu that is displayed, select [Network settings] [Network status] to check the detailed network setting information. z To easily connect to the computer with a wireless LAN, the [SIMPLE] or [S-DIRECT] setting is useful.
“Use with the [SIMPLE], [S-DIRECT], [S-MAP], [1], [2], [3], and [4] settings” (page 24)
z The method for configuring the wireless LAN network settings differs depending on the projector or flat-panel display.
Operating instructions for the projector or flat-panel display (wireless LAN settings)
Checking the device (cont.)
18
Star
ting
the
Softw
are
Starting the softwareTo start the software that has been installed:
Double-click Wireless Manager mobile edition 6.* *1
on the desktop.
When the software starts, the <Simple connection> screen and launcher appear.
z For Windows 7The software can also be started up by selecting [ Start] [All programs] [ Panasonic] [ Wireless Manager mobile edition 6.*]*1.
z For Windows 8.1The software can also be started by pressing the Windows logo + Q keys on the keyboard, searching for “Wireless
Manager mobileedition” in the search charm of the app that opens, and then selecting [ Wireless Manager mobile
edition 6.*]*1.
z For Windows 10The software can also be started up by selecting [ Start] [All Apps] [ Panasonic] [ Wireless Manager mobile edition 6.*]*1.
Switch the search screen according to the device being used and the wireless LAN connection settings.
� Using the <Simple connection> screen � Using the <Find Projectors> screen z When using the [SIMPLE], [S-DIRECT], [S-MAP], [USER], and [M-DIRECT] settings with a single device
z When using the [SIMPLE], [S-DIRECT], [S-MAP], [USER], [1] to [4], and [M-DIRECT] settings with a single device z When using the [USER] and [1] to [4] settings with multiple devices z When using the [USER] and [M-DIRECT] settings with an IP search
� ProcedureMake the connection using the <Simple connection> screen (page 19).
� ProcedureClick [Search further...] in the <Simple connection> screen and work from the <Find projectors> screen (page 21) .
When using the [USER] and [M-DIRECT] settings, you must make network settings on the computer according to the device’s wireless LAN settings (pages 26 - 30).
z A message appears if a firewall is detected when the software starts. “Messages” (page 65) z When the [A simple connection screen is displayed at startup] checkbox is selected in the option settings, the <Simple connection> screen is displayed when the software starts.“Setting the options” (page 50) z If the [A simple connection screen is displayed at startup] checkbox is not selected in the option settings and not a single device has been registered, the <Register Projectors> screen will appear when the software starts.“Setting the options” (page 50) z *1 The “*” represents various version numbers.
19
Star
ting
the
Softw
are
� <Simple connection> screenYou can display a computer screen via the device quickly through simple operations in the screen that appears after the software starts. You can also create shortcut files for connecting to the device or displaying images via the device.
Displays the <Find Projectors> screen.
Displays the <Check Network ID> screen.
1
2
3
1 Network IDConsists of “Proj” followed by a 4-digit number used for identifying the device. “Checking the device” (page 16)
2 Update buttonRefresh the device search results.
3 Shortcut file creation buttonCreate a shortcut file for the respective device in the specified folder. You can create the following two types of shortcuts. z Creating shortcut files for connection
Double-clicking this icon automatically connects to the device that was selected during creation.
z Creating shortcut icons for display
Double-clicking this icon automatically displays images via the device that was selected during creation.
� <Check Network ID> screenThis screen shows the network ID verification method.To open the <Check Network ID> screen, click [What is a Network ID?] in the <Simple connection> screen.
Indicates the display location of the network ID fordevices that do not display a standby screen.
Closes this screen.
Starting the software (cont.)
20
Star
ting
the
Softw
are
Starting the software (cont.)
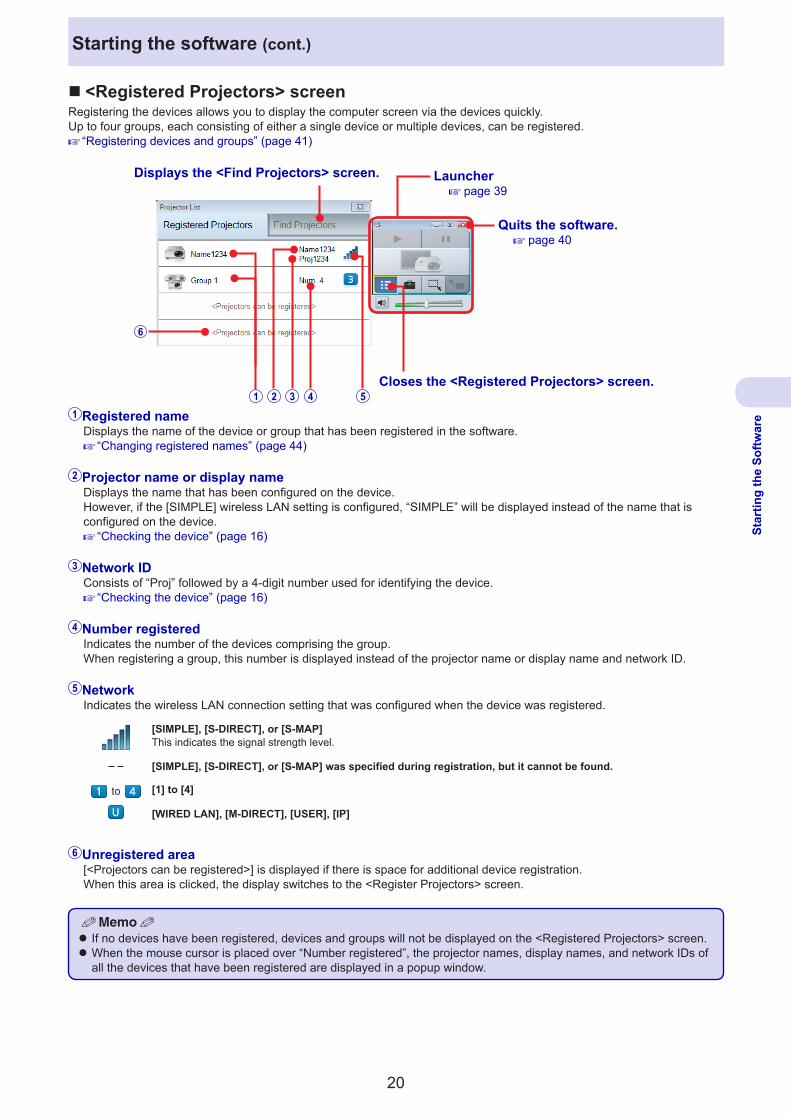
� <Registered Projectors> screenRegistering the devices allows you to display the computer screen via the devices quickly.Up to four groups, each consisting of either a single device or multiple devices, can be registered. “Registering devices and groups” (page 41)
2
6
5
Launcher page 39
Displays the <Find Projectors> screen.
Quits the software. page 40
Closes the <Registered Projectors> screen.41 3
1 Registered nameDisplays the name of the device or group that has been registered in the software. “Changing registered names” (page 44)
2 Projector name or display nameDisplays the name that has been configured on the device.However, if the [SIMPLE] wireless LAN setting is configured, “SIMPLE” will be displayed instead of the name that is configured on the device. “Checking the device” (page 16)
3 Network IDConsists of “Proj” followed by a 4-digit number used for identifying the device. “Checking the device” (page 16)
4 Number registeredIndicates the number of the devices comprising the group.When registering a group, this number is displayed instead of the projector name or display name and network ID.
5 NetworkIndicates the wireless LAN connection setting that was configured when the device was registered.
[SIMPLE], [S-DIRECT], or [S-MAP]This indicates the signal strength level.
– – [SIMPLE], [S-DIRECT], or [S-MAP] was specified during registration, but it cannot be found.
to [1] to [4]
[WIRED LAN], [M-DIRECT], [USER], [IP]
6 Unregistered area[<Projectors can be registered>] is displayed if there is space for additional device registration.When this area is clicked, the display switches to the <Register Projectors> screen.
z If no devices have been registered, devices and groups will not be displayed on the <Registered Projectors> screen. z When the mouse cursor is placed over “Number registered”, the projector names, display names, and network IDs of all the devices that have been registered are displayed in a popup window.
21
Star
ting
the
Softw
are
Starting the software (cont.)
� <Find Projectors> screen
9
8
10
7
Closes the <Find Projectors> screen.
Displays the <Registered Projectors> screen.
Selected device
7 Update buttonRefresh the device search results.
8 [Number of projectors] buttonsClick the or button to switch the number of the devices to be used at the same time.When is selected, cannot be clicked in the [Change Search] buttons.
9 [Change Search] buttonsClick these buttons to search for and display devices that match the corresponding wireless LAN connection setting.Check the wireless LAN connection setting of the device to be used, and click the corresponding button to switch to it.
Button Devices searched
[SIMPLE] [S-DIRECT]
[S-MAP]
This searches for devices whose wireless LAN connection has been set to [SIMPLE], [S-DIRECT], or [S-MAP].This is useful when you want use a device immediately without even configuring the computer’s network.It is not possible to display the images via multiple devices simultaneously. “Use with the [SIMPLE], [S-DIRECT], [S-MAP], [1], [2], [3], and [4] settings” (page 24)
[USER][M-DIRECT]
[WIRED LAN]
This searches for devices whose wireless LAN connection has been set to [USER] or [M-DIRECT], or for devices connected via wired LAN. “Use with the [USER] setting” (page 26) “Use with the [M-DIRECT] setting” (page 29) “Use with a wired LAN connection” (page 31) “Using the USB display function” (page 34)
to These search for devices whose wireless LAN connection has been set to [1] to [4]. “Use with the [SIMPLE], [S-DIRECT], [S-MAP], [1], [2], [3], and [4] settings” (page 24)
This searches for devices using a specified IP address. “Use with searched IP addresses” (page 36)
22
Star
ting
the
Softw
are
Starting the software (cont.)
10 [Use] buttonClick this button to enable display of the images via the selected device.
z If you logged onto the computer using an account without administrator privileges, devices whose wireless LAN connection setting is set to [SIMPLE], [S-DIRECT], [S-MAP], [1], [2], [3], or [4] cannot be used. z WEP (Wired Equivalent Privacy) is not applied to wireless LAN connection [1]. WEP is applied to wireless LAN connections [2] to [4], so set the device’s wireless LAN connection to [2] to [4] when more security is required. z Even when [ENCRYPTION] is set to [NONE] on a device whose wireless LAN connection is [1] or [USER], AES encryption has been implemented for all the wireless LAN connections ahead of time, so important video and audio data is protected. z To select a device, a wireless LAN connection identical to that set on the device must be selected using the [Change Search] buttons. To check the wireless LAN connection setting of a device, check the device’s network menu or check the standby screen. “Checking the device” (page 16)
23
Sele
ctin
g th
e D
evic
es
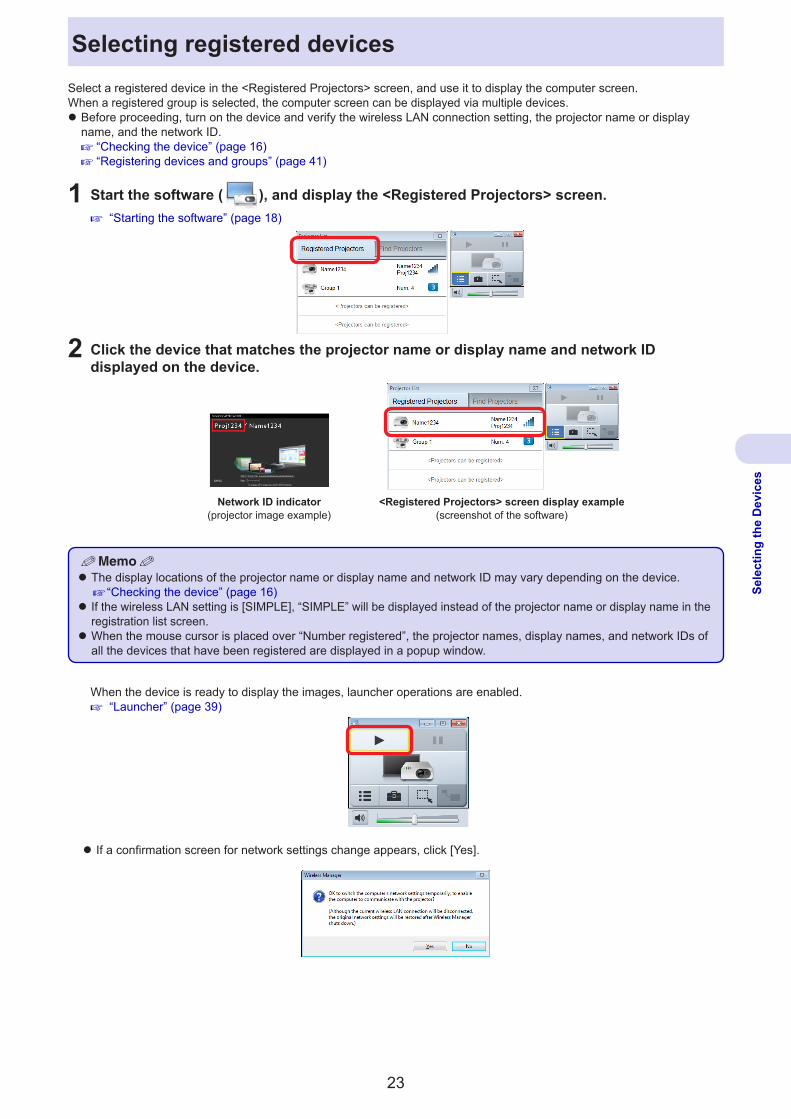
Selecting registered devicesSelect a registered device in the <Registered Projectors> screen, and use it to display the computer screen.When a registered group is selected, the computer screen can be displayed via multiple devices. z Before proceeding, turn on the device and verify the wireless LAN connection setting, the projector name or display name, and the network ID. “Checking the device” (page 16) “Registering devices and groups” (page 41)
1 Start the software ( ), and display the <Registered Projectors> screen. “Starting the software” (page 18)
2 Click the device that matches the projector name or display name and network ID displayed on the device.
Network ID indicator(projector image example)
<Registered Projectors> screen display example(screenshot of the software)
z The display locations of the projector name or display name and network ID may vary depending on the device. “Checking the device” (page 16) z If the wireless LAN setting is [SIMPLE], “SIMPLE” will be displayed instead of the projector name or display name in the registration list screen. z When the mouse cursor is placed over “Number registered”, the projector names, display names, and network IDs of all the devices that have been registered are displayed in a popup window.
When the device is ready to display the images, launcher operations are enabled. “Launcher” (page 39)
z If a confirmation screen for network settings change appears, click [Yes].
24
Sele
ctin
g th
e D
evic
es
Use with the [SIMPLE], [S-DIRECT], [S-MAP], [1], [2], [3], and [4] settingsSelect the device to use from among the devices whose wireless LAN connection is set to [SIMPLE], [S-DIRECT], [S-MAP], [1], [2], [3], or [4]. z The [SIMPLE], [S-DIRECT], and [S-MAP] settings are useful for easy connection to the computer via wireless LAN. You can select the device from the <Simple connection> screen. z Before proceeding, turn on the device and verify the wireless LAN connection setting, the projector name or display name, and the network ID. “Checking the device” (page 16)
1 Start the software ( ), and display the <Simple connection> screen. “Starting the software” (page 18)When selecting from the <Simple connection> screen with the [SIMPLE], [S-DIRECT], or [S-MAP] setting
When selecting from the <Find projectors> screen with the [SIMPLE], [S-DIRECT], [S-MAP], [1], [2], [3], or [4] setting
Click the device in the list that matches the network ID displayed on the device.When the device is ready to display the images, launcher operations are enabled.Steps 2 and beyond of the procedure can be skipped.
Click [Search further...] to display the <Find projectors> screen.
Afterwards, proceed to step 2 of the procedure.
2 Click the or button for [Number of projectors] based on the number of devices to be used, and click the [Change Search] button that corresponds to the wireless LAN connection setting displayed on the device.If the wireless LAN connection setting is [SIMPLE], [S-DIRECT], or [S-MAP], click . If it is [1], [2], [3] or [4], click the button with the same number. z When the <Find Projectors> screen is displayed, is selected. z When is selected, cannot be selected.
Network ID indicator(projector image example)
<Find Projectors> screen display example(screenshot of the software)
25
Sele
ctin
g th
e D
evic
es
Use with the [SIMPLE], [S-DIRECT], [S-MAP], [1], [2], [3], and [4] settings (cont.)
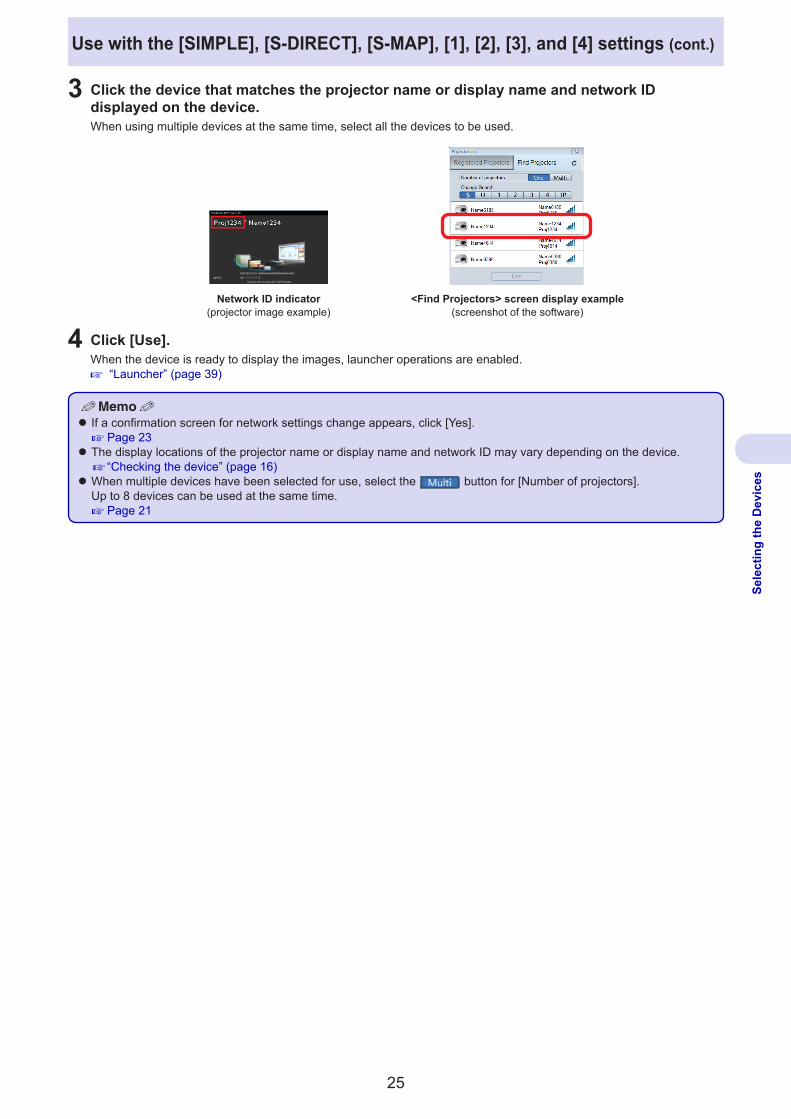
3 Click the device that matches the projector name or display name and network ID displayed on the device.When using multiple devices at the same time, select all the devices to be used.
<Find Projectors> screen display example(screenshot of the software)
Network ID indicator(projector image example)
4 Click [Use].When the device is ready to display the images, launcher operations are enabled. “Launcher” (page 39)
z If a confirmation screen for network settings change appears, click [Yes]. Page 23 z The display locations of the projector name or display name and network ID may vary depending on the device. “Checking the device” (page 16) z When multiple devices have been selected for use, select the button for [Number of projectors].Up to 8 devices can be used at the same time.
Page 21
26
Sele
ctin
g th
e D
evic
es
Use with the [USER] settingSelect the device whose wireless LAN connection is set to [USER], [USER1], [USER2], or [USER3].
z Before proceeding, turn on the device and verify the projector name or display name and the network ID. “Checking the device” (page 16)
� Device settings
1 Configure the network settings for the device.1 Select the network menu.
For projectors: On the projector menu screen, select [Network] [WIRELESS LAN] [USER] (or [USER1], [USER2], or
[USER3]). For flat-panel displays: Press the [SET UP] button on the remote control, and select [Network status] [Wireless LAN] [USER1] (or
[USER2] or [USER3]).2 Set the network.
Operating instructions for the projector or flat-panel display [USER] setting: When the SSID search screen appears, select the SSID to which you want to connect. Authentication/encryption settings are required when an SSID marked with a lock icon is selected. [USER1], [USER2], and [USER3] settings: When the network information entry screen appears, enter the information of the SSID to which you want to
connect.For an AD HOC connection (“Glossary” page 67)(connection using the factory default settings)SSID *1DHCP OffIP address 192.168.11.100Subnet mask 255.255.255.0Default gateway 192.168.11.1Mode AD HOCAuthentication OpenEncryption NoneChannel 11
For a connection via an access point (DHCP)(“Glossary” page 67)SSID Enter the name of the access point
to be connected.DHCP OnMode INFRASTRUCTUREAuthentication
Enter settings to match the access point to be connected.Encryption
Channel
*1 For projectors: Panasonic Projector For flat-panel displays: Panasonic Display
z Before selecting any other settings, check them with the network administrator.
� Computer settings
2 Configure the network settings for the computer according to the device's settings.If the device's settings are still in their factory default state, set the computer's DHCP function to “On”. z Before setting the computer’s network settings, check them with the network administrator.
27
Sele
ctin
g th
e D
evic
es
Use with the [USER] setting (cont.)
3 Connect the computer to the network that has been set for the devices.Click in the notification area (bottom right of the Windows screen), and select the name that matches the SSID configured for the device.
z If the network cannot be found, refer to the operating instructions of the wireless LAN adapter. z If the wireless LAN connection cannot be established via the access point even though the device settings have been established correctly, contact the manufacturer of the access point.
� Selecting devices
4 Start the software ( ), and display the <Simple connection> screen. “Starting the software” (page 18)When using one device with the <Simple connection> screen
When using one or more devices with the <Find projectors> screen
Click the device in the list that matches the network ID displayed on the device.When the device is ready to display the images, launcher operations are enabled.Steps 5 and beyond of the procedure can be skipped.
Click [Search further...] to display the <Find projectors> screen.
Afterwards, proceed to step 5 of the procedure.
5 Click the or button for [Number of projectors] based on the number of devices to be used, and click the button for [Change Search].
28
Sele
ctin
g th
e D
evic
es
Use with the [USER] setting (cont.)
6 Click the device that matches the projector name or display name and network ID displayed on the device.When using multiple devices at the same time, select all the devices to be used.
Network ID indicator(projector image example)
<Find Projectors> screen display example(screenshot of the software)
z If the device cannot be found even though the network settings have been configured correctly, see “Use with searched IP addresses” (page 36).
7 Click [Use].When the device is ready to display the images, launcher operations are enabled. “Launcher” (page 39)
z Before setting the computer’s network settings, consult the network administrator. z The display locations of the projector name or display name and network ID may vary depending on the device. “Checking the device” (page 16) z When multiple devices have been selected for use, select the button for [Number of projectors].Up to 8 devices can be used at the same time.
Page 21
29
Sele
ctin
g th
e D
evic
es
Use with the [M-DIRECT] settingThe devices and computer are connected directly in infrastructure mode.(An access point is not required.) “Infrastructure Mode” (page 67)
z Before proceeding, turn on the device and verify the projector name or display name and the network ID. “Checking the device” (page 16)
� Device settings
1 Configure the network settings for the device.1 Select the network menu.
For projectors: On the menu screen, select [NETWORK] [WIRELESS LAN] [M-DIRECT]. For flat-panel displays: Press the [SET UP] button on the remote control, and select [Network status] [Wireless LAN] [M-DIRECT].2 Set the network.
Operating instructions for the projector or flat-panel display
Factory settingsSSID M-DIRECT + last 4 digits of network IDIP address 192.168.12.100Subnet mask 255.255.255.0Channel 1Key M-DIRECT + last 4 digits of network ID
Example: “M-DIRECT1234”
Attention z Before selecting any other settings, consult the network administrator. z If the [Key] setting is left in its factory default state, there is a risk of information being leaked by a third party. Be absolutely sure to change it.
� Computer settings
2 Configure the network settings for the computer according to the device's settings.If the device's settings are still in their factory default state, set the computer's DHCP function to “On”. z Before setting the computer’s network settings, check them with the network administrator.
3 Connect the computer to the network that has been set for the devices.Click in the notification area (bottom right of the Windows screen), and select the name that matches the SSID configured for the device.
30
Sele
ctin
g th
e D
evic
es
Use with the [M-DIRECT] setting (cont.)
� Selecting devices
4 Start the software ( ), and display the <Simple connection> screen. “Starting the software” (page 18)When using one device with the <Simple connection> screen
When using one device with the <Find projectors> screen
Click the device in the list that matches the network ID displayed on the device.When the device is ready to display the images, launcher operations are enabled.Steps 5 and beyond of the procedure can be skipped.
Click [Search further...] to display the <Find projectors> screen.
Afterwards, proceed to step 5 of the procedure.
5 Click the button for [Number of projectors], and click the button for [Change Search].
6 Click the device that matches the projector name or display name and network ID displayed on the device.When using multiple devices at the same time, select all the devices to be used.
Network ID indicator(projector image example)
<Find Projectors> screen display example(screenshot of the software)
z If the device cannot be found even though the network settings have been configured correctly, see “Use with searched IP addresses” (page 36).
7 Click [Use].When the device is ready to display the images, launcher operations are enabled. “Launcher” (page 39)
z Before setting the computer’s network settings, consult the network administrator. z The display locations of the projector name or display name and network ID may vary depending on the device. “Checking the device” (page 16)
31
Sele
ctin
g th
e D
evic
es
Use with a wired LAN connectionConnect the devices and computer using a wired LAN. z Before proceeding, turn on the device and verify the projector name or display name and the network ID. “Checking the device” (page 16)
� Device settings1 Configure the network settings for the device.
1 Select the network menu. For projectors: On the menu screen, select [NETWORK] [WIRED LAN]. For flat-panel displays: Press the [SET UP] button on the remote control, and select [Network status] [Wired LAN].2 Set the network.
Operating instructions for the projector or flat-panel displayFactory settingsDHCP OffIP address 192.168.10.100Subnet mask 255.255.255.0Default gateway 192.168.10.1
� Computer settings
2 Change the TCP/IP setting.For Windows 71 Select [Start] [Control Panel] [Network and Internet] [Network and
Sharing Center] [Change adapter settings].2 Right-click the connection to be changed, and click [Properties].3 Click the [Networking] tab.4 Click [Internet Protocol Version 4 (TCP/IPv4)] under [This connection uses the
following items], and click [Properties].
For Windows 8.1 1 Press the Windows logo + X keys on the keyboard, and select [Control Panel]
[Network and Internet] [Network and Sharing Center] [Change adapter settings].
2 Right-click the connection to be changed, and click [Properties].3 Click the [Networking] tab.4 Click [Internet Protocol Version 4 (TCP/IPv4)] under [This connection uses the
following items], and click [Properties].
For Windows 101 Enter “control panel” in the search box of the taskbar, and open the Control Panel. Select[Network&Internet]→[NetworkandSharingCenter]→[Changeadaptersettings].2 Right-click the connection to be changed, and click [Properties].3 Click the [Networking] tab.4 Click [Internet Protocol Version 4 (TCP/IPv4)] under [This connection uses the following items], and click
[Properties].
3 Configure the network settings for the computer according to the device's settings.Click [Use the following IP address], and input the values in the [IP address], [Subnet mask] and [Default gateway] boxes. z Before setting the computer’s network settings, check them with the network administrator.
When connecting to a device whose network settings are set to factory defaultsIP address 192.168.10.101Subnet mask 255.255.255.0Default gateway 192.168.10.1
32
Sele
ctin
g th
e D
evic
es
Use with a wired LAN connection (cont.)
� Selecting devices
4 Start the software ( ), and display the <Simple connection> screen. “Starting the software” (page 18)When using one device with the <Simple connection> screen
When using one or more devices with the <Find projectors> screen
Click the device in the list that matches the network ID displayed on the device.When the device is ready to display the images, launcher operations are enabled.Steps 5 and beyond of the procedure can be skipped.
Click [Search further...] to display the <Find projectors> screen.
Afterwards, proceed to step 5 of the procedure.
5 Click the or button for [Number of projectors] based on the number of devices to be used, and click the button for [Change Search].
6 Click the device that matches the projector name or display name and network ID displayed on the device.When using multiple devices at the same time, select all the devices to be used.
<Find Projectors> screen display example(screenshot of the software)
Network ID indicator(projector image example)
z If the device cannot be found even though the network settings have been configured correctly, see “Use with searched IP addresses” (page 36).
33
Sele
ctin
g th
e D
evic
es
Use with a wired LAN connection (cont.)
7 Click [Use].When the device is ready to display the images, launcher operations are enabled. “Launcher” (page 39)
z Before setting the computer’s network settings, consult the network administrator. z The display locations of the projector name or display name and network ID may vary depending on the device. “Checking the device” (page 16) z When multiple devices have been selected for use, select the button for [Number of projectors].Up to 8 devices can be used at the same time.
Page 21
34
Sele
ctin
g th
e D
evic
es
Using the USB display functionThe USB display function allows you to connect the computer to the device via a USB cable and output the computer’s display and audio to the device.This function is not available on Windows 10.
1 Turn on the power of the device and computer.
2 Enable the USB display function. z For the PT-VZ575N/PT-VW535N/PT-VX605N, PT-VZ585N/PT-VW545N/PT-VX615N, PT-VW345N/PT-VX415N, or PT-VW355N/PT-VX425N:This step can be skipped. Proceed to step 3. z For devices other than the PT-VZ575N/PT-VW535N/PT-VX605N, PT-VZ585N/PT-VW545N/PT-VX615N, PT-VW345N/PT-VX415N, or PT-VW355N/PT-VX425N:On the setting menu of the device, set [USB terminal] to [Display].
Operating instructions for the projector or flat-panel display
3 Connect the device and computer with the USB cable.The software starts up automatically, and image display begins.
z This function only operates with devices equipped with the USB display function. The functions that are available will vary depending on the device. For details on supported functions, refer to the “List of Compatible Device Models” on the Panasonic website (https://panasonic.net/cns/projector/download/ or https://panasonic.net/cns/prodisplays/download/software/). Alternatively, if you have the CD-ROM for this software that was supplied your device, refer to the “List of Compatible Device Models” in the CD-ROM’s application launcher. z If the USB cable was disconnected during image display, wait at least 10 seconds before reconnecting it. z Connect the USB cable directly to the USB port on the computer. Proper operation may not be possible if it is connected via a USB hub, for example. z When connecting to a different USB port on the computer, the “Found New Hardware Wizard” is displayed again, and the connection settings must be configured again. z When using Windows 8.1, the “Found New Hardware Wizard” may not start automatically.In such cases, select [Device Manager] [Other devices] [RNDIS/Ethernet Gadget], and then install the USB display driver manually.
zIf the <Found New Hardware Wizard> screen appears when the USB cable is connected
�When the software CD-ROM is supplied with the device
1 Insert the supplied CD-ROM into the CD-ROM drive. z USB display drivers can also be downloaded from the website (https://panasonic.net/cns/projector/download/).
2 Click [Browse my computer for driver software].
35
Sele
ctin
g th
e D
evic
es
Using the USB display function (cont.)
3 Click [Browse] for [Search for driver software in this location], select the “USBDriver” folder of the CD-ROM in the [Browse For Folder] screen, and click [OK]. z The “USBDriver” folder is in the “\WirelessManager\WMSetup” folder on the CD-ROM.
4 When the wizard screen returns, click [Next].
5 When the <Windows security> screen appears, click [Install this driver software anyway].
6 Click [Close].
�When using the file downloaded from the website z Click [USB driver], and follow the instructions to download the file for installation on the computer. z For details on the installation procedure after downloading, refer to the information on the website.
z USB display drivers can also be downloaded from the Panasonic website (https://panasonic.net/cns/projector/download/).
36
Sele
ctin
g th
e D
evic
es
Use with searched IP addressesThis searches for devices whose IP addresses are entered directly. z The device and computer must already be connected to a network on which communication is enabled.For details, check with the network administrator. z Before proceeding, turn on the device and display the standby screen. “Checking the device” (page 16)
1 Start the software ( ), and display the <Simple connection> screen. “Starting the software” (page 18)
Click [Search further...] to display the <Find projectors> screen.
2 Click the or button for [Number of projectors] based on the number of devices to be used, and click the button for [Change Search].
�When communicating with one device
3 Enter the IP address of the device to be used, and click .
37
Sele
ctin
g th
e D
evic
es
Use with searched IP addresses (cont.)
4 After verifying the projector name or display name and network ID of the device that was found, click [Use].When the device is ready to display the images, launcher operations are enabled. “Launcher” (page 39)
<Find Projectors> screen display example(screenshot of the software)
Network ID indicator(projector image example)
z The display locations of the projector name or display name and network ID may vary depending on the device. “Checking the device” (page 16)
�When communicating with multiple devices
3 Click [Add], enter the IP addresses of all the devices to be used, and click . z To delete an entered IP address, select the IP address to be deleted, and click [Remove].
4 After verifying the projector names or display names and network IDs of the devices that were found, click [Use].When the devices are ready to display the images, launcher operations are enabled. “Launcher” (page 39)
<Find Projectors> screen display example(screenshot of the software)
Network ID indicator(projector image example)
z The display locations of the projector name or display name and network ID may vary depending on the device. “Checking the device” (page 16) z When multiple devices have been selected for use, select the button for [Number of projectors].Up to 8 devices can be used at the same time. Page 21
38
Sele
ctin
g th
e D
evic
es
When a password has been set for a deviceWhen connecting to a device for which a network password has been set, the <Enter Password> screen will appear.Enter the network password configured for the device, and click [OK].
z When [Cancel] is clicked in the <Enter Password> screen, the screen preceding the device selection screen returns.For details on how to set the password, refer to the operating instructions for the device. z If there is multiple devices that require password entry, the <Enter Password> screen is displayed for each device.Check the network ID, and enter the appropriate password.
When a device is equipped with Content ManagerWhen connecting to a device equipped with Content Manager, the following screen will appear.
[Use]Connect to the device and enable image display.
[Confirm the connection]Make the indicator on the device to which you are attempting to connect blink.
[View Content Manager]Display Content Manager using the computer’s web browser.
[Quit operation]Return to the device selection screen.
z You can check the status of signage playback and signage settings using Content Manager.For details on the signage playback and signage settings function, refer to the operating instructions for the device.
39
Dis
play
ing
Imag
es
Operating the launcherWhen you start the software, the launcher apears with the <Simple connection> screen.A variety of operations, including device operations (starting and stopping image display), volume adjustment, and display of other screens, can be performed using the launcher.The buttons used to control image display are enabled when communication with the device is enabled.
� Launcher
7
6
1
10
8
5
4
2
3
9
1 Start or stop image display.This changes to (stop) during image display.
2 Pause image display.This can only be used during image display.When used, the displayed image freezes.
3 Indicates the status of device communication via an icon.When communicating with a single device, the icon for one device is displayed.
Image display not possible No communication due to lack of device selection.
Image display possible Devices are selected and communication is established.
Image display in progress Images are being displayed via devices and communication is established.
4 Minimize the launcher display.5 Quit the software. Page 40
6 Display the <Simple connection>, <Registered Projectors>, or <Find Projectors> screen.This displays a device selection screen. The screen that was initially used to select the devices for image display will be displayed.
7 Display the <Option> screen. Page 50
8 Display the <Selective Area> screen. Page 49
9 Enlarge or shrink the displayed imageThis can only be used live mode images are being displayed via a compatible device. Page 52
10 Adjust the volume. (Not displayed under default settings.) Page 40
z The launcher may appear in the image display. Minimize the launcher to hide its display. z The launcher position can be changed by dragging it with the mouse. z When the launcher display is minimized and placed on the taskbar, it can be displayed again by clicking on the taskbar. z When [Start projection when a projector is selected] (page 50) is enabled, image display will start when connection with the device is established, and does not need to be clicked. z Video portions may not play back depending on the video playback application used.
40
Dis
play
ing
Imag
es
Operating the launcher (cont.)
z When you use the launcher to start a device that is in standby mode, the device turns on and starts image display.
Attention z When turning on a projector, be sure there is no one in the vicinity of the projector to avoid shining the projector’s light into a person’s eyes.
z Do not register power content to the timetable unless precautions have been taken during installation to ensure that the projector’s light does not shine into the eyes of nearby people should projection start suddenly.
� Adjusting the volumez Adjust in the launcher.
This adjusts the volume of the output audio.
� If the volume adjustment icon is not displayed
Click in the launcher to open the <Option> screen, select [Settings], and select the [Produce audio along with video during projection] checkbox. “Setting the options” (page 50)
z This cannot be used if the software is not installed. z This cannot be used when communicating with multiple devices simultaneously. z As a specialized playback device is used for audio playback when the software is running, the computer's audio can only be output from the device during image display.When the software is exited, the original Windows playback device is restored.
� Quitting the softwarez Click in the launcher.
z If the [A simple connection screen is displayed at startup] checkbox is not selected in the option settings and not a single device has been registered, the device that was used last will be automatically registered. If you were using multiple devices in such cases, the devices will be automatically registered as a group.The same device(s) can be selected again later from the <Registered Projectors> screen, allowing you to start image display quickly. “Selecting registered devices” (page 23)
41
Reg
iste
ring
and
Editi
ng th
e D
evic
es
Registering devices and groupsUp to four groups, each consisting of one or more devices, can be registered in the <Registered Projectors> screen.By registering a device, the computer's display screen can be displayed via the device with a single click.
When [<Projectors can be registered>] on the <Registered Projectors> screen is clicked, the <Register Projectors> screen is displayed.
� <Register Projectors> screen
Indicates the selected device.
2
1
4 5
3
1 [Number registered] buttonsSelect whether to register one device or multiple devices as a group.
This searches for devices whose wireless LAN connection has been set to [SIMPLE], [S-DIRECT], or [S-MAP].It is not possible to display the images via multiple devices simultaneously.
This searches for devices whose wireless LAN connection has been set to [USER] or [M-DIRECT], or for devices connected via wired LAN.
to These search for devices whose wireless LAN connection has been set to [1] to [4].
This searches for devices using a specified IP address.
3 Update buttonRefresh the device search results.
4 [Register] buttonRegister the selected device, and return to the <Registered Projectors> screen. Page 20
5 [Cancel] buttonReturn to the <Registered Projectors> screen. Page 20
42
Reg
iste
ring
and
Editi
ng th
e D
evic
es
Registering devices and groups (cont.)
This section describes the procedure for registering devices and groups.
1 Start the software ( ), and display the <Registered Projectors> screen.
2 Click [<Projectors can be registered>] to display the <Register Projectors> screen.
3 Click the or button for [Number registered] based on the number of devices to be registered, and click the [Change Search] button that corresponds to the wireless LAN connection setting displayed on the device.If the wireless LAN connection setting is [SIMPLE], [S-DIRECT], or [S-MAP], click .For details on other wireless LAN connection settings, refer to “Devices searched”under “[Change Search] buttons” (page 21). z When the <Register Projectors> screen is displayed, is selected. z When is selected, cannot be selected.
Network ID indicator(projector image example)
<Register Projectors> screen display example(screenshot of the software)
4 Click the device that matches the projector name or display name and network ID displayed on the device.
Network ID indicator(projector image example)
<Register Projectors> screen display example(screenshot of the software)
43
Reg
iste
ring
and
Editi
ng th
e D
evic
es
Registering devices and groups (cont.)
5 Click [Register].The registered device appears on the <Registered Projectors> screen.
<Registered Projectors> screen display example(screenshot of the software)
<Register Projectors> screen display example(screenshot of the software)
z The display locations of the projector name or display name and network ID may vary depending on the device. “Checking the device” (page 16) z If the [SIMPLE] wireless LAN setting is configured, “SIMPLE” will be displayed as the registered name instead of the name that is configured on the device. For other wireless LAN settings, the projector name or display name will be used as the registered name.To change the registered name, see “Changing registered names” (page 44). z When registering multiple devices as a group, select the button for [Number registered], and select and register all the devices to be used. z When registering multiple devices as a group, the wireless LAN connection setting of each device must be the same.
44
Reg
iste
ring
and
Editi
ng th
e D
evic
es
Changing registered namesThe devices and groups registered in the <Registered Projectors> screen can be renamed.
1 On the <Registered Projectors> screen, right-click the name of the device or group to be changed.
2 Click [Change registered name].
3 Enter the new name, and click [OK].
z Up to 16 characters can be entered. z The following characters cannot be used. ¥/:*?″<>|
45
Reg
iste
ring
and
Editi
ng th
e D
evic
es
Removing registered devices and groupsThe devices and groups registered in the <Registered Projectors> screen can be removed.
1 On the <Registered Projectors> screen, right-click the name of the device or group to be removed.
2 Click [Remove from the list].
3 When the removal confirmation message appears, click [Yes].
46
Reg
iste
ring
and
Editi
ng th
e D
evic
es
Changing registered devices and groupsThe devices and groups registered in the <Registered Projectors> screen can be changed.
1 On the <Registered Projectors> screen, right-click the name of the device or group to be changed.
2 Click [Change registered details].
3 Search for the other device. “Registering devices and groups” (page 41)
4 When the change confirmation message appears, click [Yes].
47
Reg
iste
ring
and
Editi
ng th
e D
evic
es
Exporting registration listsThe registration list information can be exported to a file.This is useful for transferring the list information to another computer.
1 Right-click within the <Registered Projectors> screen.
When the export destination selectiong screen appears, select the export destination folder and click [Finish]. z If a filename is not specified, it will be automatically set as “pj_index.xml”.
48
Reg
iste
ring
and
Editi
ng th
e D
evic
es
Importing registration listsA registration list that was exported by another computer can be imported.This is useful for transferring list information that was created on another computer.
1 Right-click within the <Registered Projectors> screen.
When the input source selection screen appears, select the file (.xml) to be imported and click [Finish].
5 When the import confirmation message appears, click [Yes].
49
Vario
us F
unct
ions
Specifying areas for transmissionAreas that display important information within the computer screen can be specified using the area specification window, and only those areas will appear in image displays.
1 Click in the launcher.The area specification window appears.
2 Specify the area to be transmitted using the area specification window.The area specification window can be manipulated using standard window moving and resizing operations.
3 Click in the launcher.The area within the area specification window is displayed.
� Exiting area specificationz Click at the top right of the area specification window.
50
Vario
us F
unct
ions
Setting the optionsSettings such as those used during image display can be changed using the option function.
Click (Option) in the launcher to open the <Option> screen.
� Projection settings � [Project at high picture quality (affects performance)]Display images in high quality.However, the priority on image quality may reduce the display speed.To prioritize image display speed, clear the checkbox.
� [Produce audio along with video during projection]Output audio from the device during image display.To disable audio output, clear the checkbox. z This cannot be used if the software is not installed. z This cannot be used when communicating with multiple devices simultaneously.
� [Disable screen saver during projection]Disable the computer’s screen saver function during image display. z As password protected screen savers will be disabled, be careful when stepping away from your computer.
� [Start projection when a projector is selected]Start image display automatically when a device is selected in the <Registered Projectors> screen or <Find Projectors> screen.This eliminates the need to click in the launcher.
� Other settings � [A simple connection screen is displayed at startup]Display the <Simple connection> screen at software startup when this is selected,and the <Register Projectors> or <Find Projectors> screen when this is cleared. z When this checkbox is cleared and no devices have been registered, the <Register Projectors> screen appears. Turn on the device to be used, and follow the instructions on the screen to register the device with the software.
z To end operation without registering the devices, click [Cancel].
51
Vario
us F
unct
ions
� [Wireless LAN Adapter]Select the wireless LAN adapter to use for communication with the device here.Use this to specify the adapter to prioritize for use when there are multiple wireless LAN adapters, for example.
� [Display firewall confirmation message at startup]Display a message confirming operation of the firewall at software startup.To disable repeated confirmation message display, clear the checkbox.
� [Display confirmation message for wireless LAN adapter utility]Display a message confirming operation of the wireless LAN adapter utility when the network connection is switched.To disable repeated confirmation message display, clear the checkbox.
Setting the options (cont.)
52
Vario
us F
unct
ions
Live modeUsing live mode allows you to display the screen image from a single computer on other devices.On device models that support moderator mode, screen images from up to four computers can also be displayed in split display depending on the number of connected individuals. This mode is ideal for presentations in front of small groups during a meeting, for example.
� Device models that support moderator modeScreen images from up to four computers can be displayed in full-screen or split-screen display.
1 Change the setting on the device.Set [MENU] [NETWORK/USB] [Panasonic APPLICATION] [Moderator Mode] to [OFF].
2 Click in the launcher.A split-screen display based on the number of connected computers will appear.
z Switching to full-screen displayClick in the launcher of one of the computers during split-screen display to display that computer's screen in full screen. z Switching to split-screen displayClick in the launcher of the computer being displayed in full screen to return to split-screen display. z Switching from one computer's screen to another computer's screenClick in the launcher of one of the computers while another computer's screen is being displayed in full screen to switch the full-screen display to the that of the new computer.
Full-screen of first device
Start display of second device
Split screen
of first device
of second device
of second device
of first device
Full-screen of first device
Full-screen of second device
53
Vario
us F
unct
ions
Live mode (cont.)
z When another computer's screen is being displayed in full screen, clicking in the launcher may not switch the full-screen display. In such cases, configure the following settings for the device.Set [MENU] [NETWORK/USB] [Panasonic APPLICATION] [CUT IN] to [ON].
� Device models that do not support moderator modeScreen images from a single computer can be displayed in full screen.
The device operation will differ depending on its setting. z When [MENU] [NETWORK/USB] [LIVE MODE CUT IN] is set to [ON]
When display is started on another computer, the full-screen display switches to the screen image of that computer. z When [MENU] [NETWORK/USB] [LIVE MODE CUT IN] is set to [OFF]
When display is started from another computer, the full-screen display of the current computer's screen remains.
54
Vario
us F
unct
ions
Multi live modeWhen using the multi live mode, images can be displayed by multiple individuals from multiple computers via a single device.This function comes in handy when holding meetings attended by participants using a multiple number of computers.
Conduct presentations using up to four computers
<4-screen multi style> page 56
Displays up to four computer screen images simultaneously.As each computer screen can be viewed at the same time, this style is ideal for meetings in which all the individuals participate.
Presenters control the presentation using up to four computers
<4-screen index style> page 57
Displays thumbnails of the four computer screens, and allows the computer screen that has been selected using the remote control to be displayed in full screen.The presenter has full control of the displayed images and can provide appropriate real-time commentary during the presentation.
Large-scale presentation style for university seminars or academic conferences
<16-screen index style> page 58
Displays thumbnails of 16 computer screens.This style is ideal for displaying a large number of computer screens in a matrix during university seminars, academic conferences, or group study sessions, for example.
55
Vario
us F
unct
ions
Multi live mode (cont.)
� Switching the live styles zSwitching styles using the device's menuSelect [MULTI-LIVE] in the device’s [Network] menu, and press the <ENTER> button. Operating instructions for the projector or flat-panel display
MULTI-LIVE
MULTI-LIVEMULTI-LIVE
4-screen multi style 4-screen index style
16-screen index style
zSwitching styles using the softwareSelect the style on the software’s <Multi Live> screen.
z When the device starts up, it resumes in the style was being used the last time the device was turned off. z When there is no communication with any device, all operations in the <Multi Live> screen are disabled, except for “Setting the sender’s names” (page 59).The device communication status is indicated by a launcher icon (page 39). z <Multi Live> screen operations are disabled during communication with multiple devices. z To exit the multi live mode, select [Full screen style] for [Choose live style], and click [Apply]. z If the style is switched from the 16-screen index style to the 4-screen multi style while communicating with five or more computers, communication with the fifth and subsequent computers will be severed. z Live style selection is not possible during full-screen image display from the device.Stop image display via the device before selecting the live style. z This function can only be used on supported models. For details, refer to the “List of Compatible Device Models”.
56
Vario
us F
unct
ions
Multi live mode (cont.)
� 4-screen multi styleScreen images from up to four computers are displayed at the same time from a single device.
1 Click in the launcher, and click [Multi Live] on the <Option> screen. “Switching styles using the software” (page 55)
2 Select [4-screen multi style] for [Choose live style], and click [Apply].
3 Click the icon for the desired image display position. z Select where on the screen the images are to be displayed.
1
3
2
4
4 Click in the launcher.The images on the computer screen are displayed via the device. z Switching the image display positionTo change the image display position, click the desired icon under [Position of display on projection screen]. z Exiting the 4-screen multi styleTo exit the 4-screen multi style, select [Full screen style] for [Choose live style], and click [Apply].
z If a position in which a computer's screen image is already displayed is selected for another computer's the image display, the image display will switch to that of the later computer. z 4-screen multi style can only be selected when full-screen live is in progress or when the other terminals are using 4-screen multi style.
57
Vario
us F
unct
ions
Multi live mode (cont.)
� 4-screen index styleScreen images from up to four computers are displayed simultaneously from a single device via index screens and a large screen.
1 Click in the launcher, and click [Multi Live] on the <Option> screen. “Switching styles using the software” (page 55)
2 Select [4-screen index style] for [Choose live style], and click [Apply].
3 Click the number of the desired image display position. z Select where on the index screen (sub screen) the image is to be displayed.
1 2 3 4
1
2
3
4
4 Click in the launcher.The images on the computer screen are displayed via the device. z Switching the image display positionTo change the image display position, click the desired icon under [Position of display on projection screen]. z Switching to full-screen displayTo display an image in full screen, click under [Choose projector for enlargement] to select the index screen to be enlarged (i.e., move the yellow frame), and click .Click again to display the image in full screen.To return to the index screen, click again.
z Exiting the 4-screen index styleTo exit the 4-screen index style, select [Full screen style] for [Choose live style], and click [Apply].
z When other computers are displaying images in the 4-screen index style, images can only be displayed in unused index screens (sub screens). z The menus on the device side and the remote control (page 62) can also be used to switch between full-screen display and index screen display. z Some device models have (page navigation) buttons on their remote controls, but these buttons cannot be used to select target index screens (i.e., move the yellow frame). Operating instructions for the projector or flat-panel display
58
Vario
us F
unct
ions
Multi live mode (cont.)
� 16-screen index styleScreen images from up to 16 computers are displayed at the same time from a single device.
1 Click in the launcher, and click [Multi Live] on the <Option> screen. “Switching styles using the software” (page 55)
2 Select [16-screen index style] for [Choose live style], and click [Apply].
3 Click in the launcher.The images on the computer screen are automatically displayed in one of the vacant index screens (sub screens).The image display position cannot be selected. z Switching to full-screen displayTo display an image in full screen, click under [Choose projector for enlargement] to select the index screen to be enlarged (i.e., move the yellow frame), and click .Click again to return to the index screen.
Index screen Full screen
z Exiting the 16-screen index styleTo exit the 16-screen index style, select [Full screen style] for [Choose live style], and click [Apply].
z When other computers are displaying images in the 16-screen index style, images can only be displayed in unused index screens (sub screens). z The menus on the device side and the remote control (page 62) can also be used to switch between full-screen display and index screen display. z Some device models have (page navigation) buttons on their remote controls, but these buttons cannot be used to select target index screens (i.e., move the yellow frame). Operating instructions for the projector or flat-panel display z Depending on the model, the maximum number of terminals that can be connected via wireless LAN is ten when wireless LAN is set to [SIMPLE], [S-DIRECT], or [M-DIRECT].
59
Vario
us F
unct
ions
Multi live mode (cont.)
� Setting the sender’s namesThe names of the senders can be displayed on the images displayed in the multi live mode.
1 Select the [Project the name on the screen] checkbox on the <Multi Live> screen.
2 Enter the name of the sender, and click [Apply]. z Enter up to 8 alphanumeric characters.
z When the 4-screen index style or 16-screen index style is used, the sender’s name will be displayed, even if the [Project the name on the screen] check mark is removed.
60
Vario
us F
unct
ions
Moderator modeIn this mode, a moderator can use the remote control or the WEB Control screen to select which terminal to display in full screen via the device.The screen images from a single computer can be selected/deselected from among up to 16 computers for full-screen display via the device in this useful mode.
� Selecting the computer screen to be displayed
1 Set [MENU] [NETWORK/USB] [Panasonic APPLICATION] [Moderator Mode] to [ON] on the device.
2 Click in the launcher, and click [Moderator Mode] on the <Option> screen.The web browser opens, and an authentication dialog box appears.
3 Enter the moderator user name and password configured on the device, and click [OK].The [Panasonic APPLICATION - Moderator Mode] page appears.
4 Click the sender name button of the computer to be displayed.The selected computer screen is displayed via the device in full screen.The color of the sender name button for the computer displayed in full screen changes at this time. If you click the sender name button for the computer displayed in full screen again, the screen displaying multiple computer screens returns.
z This function can only be used on supported models. For details, refer to the “List of Compatible Device Models”. z [Moderator Mode] will only appear in the <Option> screen during communication with devices that support moderator mode. z The supported web browsers and information displayed in the web browser may differ depending on the model of the communicating device. Operating instructions for the projector or flat-panel display z When the wireless LAN is set to [SIMPLE] or [M-DIRECT], the maximum number of computers that can be connected via wireless LAN and the maximum number of images that can be displayed are ten. z The default settings for the moderator user name and password entered in the web browser screen that appears when you click [Moderator Mode] are as follows. However, the password differs depending on the model of the device being used, so refer to the operating instructions for the device.User name: moderatorPassword: panasonic (or “@Pansonic”) z The moderator user name and password can be changed by using an account with administrator privileges to log on, and clicking the [PASSWORD CHANGE] in the WEB Control screen. z The web browser screen that appears after clicking [Moderator Mode] can be operated as a user with WEB Control administrator privileges, but we recommend operation by a designated moderator mode user. z [Moderator Mode] cannot be used when communicating with multiple devices.
61
Vario
us F
unct
ions
Multi-device live modeIn this mode, the images from a single computer can be displayed on multiple devices (up to 8).To use multi-device live mode, the wireless LAN connection for the devices must be set to [USER]. “Use with the [USER] setting” (page 26)
1 Connect the devices and computer to the same network. For details on configuring network settings, see steps 1 to 3 in the “Use with the [USER] setting” (page 26) section.
2 Start the software ( ), and select the multiple devices.
Select [Use].Select the devices to be used to display images.
Select [Multi].Select [Search further...].
3 Click in the launcher.
z Up to 8 devices can be selected. z To use multi-device live mode with devices that support moderator mode, [MENU] [NETWORK/USB] [Panasonic APPLICATION] [Moderator Mode] must be set to [OFF] on the device. z To use multi-device live mode with devices that do not support moderator mode, the multi live mode must be set to 4-screen multi style. “Multi live mode” (page 54)
62
Vario
us F
unct
ions
Browser Remote ControlRemote Control or Browser Remote Control can be displayed on the computer screen to control the devices.
Browser Remote Control makes it possible to control devices using a variety of buttons that appear on a web browser.The buttons displayed vary depending on the model of the connected device.
When communicating with multiple devices
When communicating with a single device
For models that support <Browser Remote Control >
For models that do not support <Browser Remote Control >
z Control is only possible during communication with the device.The device communication status is indicated by a launcher icon (page 39). z To control multiple devices, select each device and control them individually. z Browser Remote Control can only be displayed for devices that support it. For details on supported models, refer to the “List of Compatible Device Models” on the Panasonic website (https://panasonic.net/cns/projector/download/ or https://panasonic.net/cns/prodisplays/download/software/). z When controlling devices that do not support Browser Remote Control, some buttons may not be usable. z Enter the user name and password configured for each communicating device in the authentication screen that appears when [Remote control] is clicked. Operating instructions for the projector or flat-panel display
63
Vario
us F
unct
ions
WEB controlThe computer’s web browser can be used to control the device. Operating instructions for the projector or flat-panel display or Network Operations z If communication with multiple devices is established, select the device to be operated, and click [WEB Control].
When communicating with multiple devices
When communicating with a single device
z Control is only possible during communication with the device.The device communication status is indicated by a launcher icon (page 39). z The information displayed in the web browser may differ depending on the model of the communicating device. z Enter the user name and password configured for each communicating device in the authentication screen that appears when [WEB Control] is clicked. Operating instructions for the projector or flat-panel display
64
Vario
us F
unct
ions
Content ManagerThe computer’s web browser can be used to display Content Manager.
Operating instructions for the projector or flat-panel display z If communication with multiple devices is established, select the device for which to display Content Manager, and click [Content Manager].
When communicating with multiple devices
When communicating with a single device
z [Content Manager] will only appear in the <Option> screen when communicating with a device equipped with Content Manager. z The supported web browsers and information displayed in the web browser may differ depending on the model of the communicating device.
Operating instructions for the projector or flat-panel display
Version informationThe version information of the software can be displayed.
65
Vario
us F
unct
ions
MessagesIf [Messages] is clicked when a device cannot be found or cannot be used, for example, hints for solving the problem will be displayed. z If there are multiple pages of displayed content, click and to scroll through the pages.
zClick [Try Solution].If operation of a firewall or the wireless LAN adapter utility is detected, the [Try Solution] button appears on the <Messages> screen.Click [Try Solution] to display the <Implementation of a measure> screen, and click [Yes] after viewing the details.
z When the “Message for you” balloon is displayed in the launcher, the <Messages> screen can be displayed directly by clicking the balloon.
Message / measure Page
[Firewall]Detection message:
A firewall was found.To search for devices and to connect, the firewall must be unblocked or stopped temporarily.
Measure:When a connection place is not found, please cancel the block by a firewall.When you cope with it with this software, please process by pushing the <Try Solution> button.
73, 73
Remarks:Click [Try Solution], and follow the instructions.To check the Windows firewall setting, display the Windows Control Panel, select [System and Security] [Allow a program through Windows Firewall], and check that the software has been registered.
66
Vario
us F
unct
ions
Message / measure Page
[Wireless LAN Utility]Detection message:
Wireless LAN adapter utility was found.Measure:
To search for device and connect, the firewall must be disabled temporarily.When you cope with it with this software, please process by pushing the <Try Solution> button. 74
Remarks:Click [Try Solution], and follow the instructions.The wireless settings may have been changed by the utility of the wireless LAN adapter being used.Exit the utility, and then re-establish the connection.
Detection message:A network bridge is constituted.
Measure:When a device is not found, please cancel the block by a “network bridge.” 70,71
Remarks:If you do not expect ever to use Network Bridge and see no need for it, delete it from your system.
Detection message:The computer is logged on with an account without administrator authority.
Measure:Please restart Wireless Manager after Network Connection has been setup.Administrator authority is required to change the network setting (IP address, etc.) to complete Network Connection.
69Remarks:
If you logged onto the computer using an account without administrator privileges or using a guest account, simple wireless connection (devices whose wireless LAN connection setting is set to [SIMPLE], [S-DIRECT], [S-MAP], or [1] to [4]) cannot be used.If connection using wireless LAN is necessary, use a device whose wireless LAN connection setting is set to [USER] or [M-DIRECT].
Detection message:Please perform the following checks, when the device cannot be found.
Measure:[Device setup]y Is the power on for the device?y Is the Network capability on?y Is wireless LAN connection set to your desired setting?[Computer setup]y Is Wireless capability on?y Is the Firewall application causing a network block?y Is wireless enabled?
—
Remarks:y Turn on the power of the device.y Set to the status in which the device network can be used.y For the computer using the software, select the same network settings as those of the device.y Set the wireless switch of the computer to ON.y Enable the wireless/wired LAN adapter.y Release the block established by the firewall installed in the computer.
Messages (cont.)
67
App
endi
ces
Glossary
Word Explanation
Access point This is a device which serves as a transmitter and receiver of radio signals when a computer and network are connected using a wireless LAN.When a computer is connected to an access point, it can communicate through the network connected to the access point.
AccountUser account
This refers to the registered name used to identify the individual (user) who uses the computer, and it may be “administrator” or “standard user”. It may not be possible for a standard user to use some functions or software applications.
Account with administrator privileges
This account enables changes affecting other users to be made.When performing an operation for which the (shield) is displayed, a window is displayed asking the administrator to confirm that no problems will arise even if the operation is performed.
AD HOC This is the mode in which computers communicate with each other directly, rather than via access points.
AES Abbreviation for “Advanced Encryption Standard”.The standard prevents the decryption of the encryption keys by continually changing the keys even during communication for greater security.Since the hardware performs the encryption processing, the access point must also support AES.Next generation standard cryptography standardized by the National Institute of Standards and Technology (NIST).
Default Gateway Default Gateway enables a connection with other network, by adjusting bilateral differences such as communication protocols. If no gateway is specified for the IP address of access destination, data will be sent to the host set as the default gateway.
DHCP Abbreviation for “Dynamic Host Configuration Protocol”.This function automatically assigns IP addresses to the connected equipment.If a device with the DHCP server function is present within a LAN, it automatically assigns IP addresses to the connected equipment.
Encryption This refers to converting data into a form which is not understandable to other people.Decisions are made in advance on the rules (algorithms) and keys (network keys) for converting the data between the sender and receiver, and the data converted (encrypted) by the sender is restored to its original form (decrypted) by the receiver.Important exchanges can be made without their being read by other parties.
Firewall This is a security system designed to protect computers from unauthorized access via a network (such as the internet).Unauthorized access is prevented by restricting the data exchanged between the network and computer, and allowing only authorized data to pass through to the computer.
Hub This device brings together cables of the same type in order to relay information.USB hubs and network hubs are examples.
Infrastructure Mode In this mode, communication passes through an access point.
IP address Internet Protocol (IP) is a protocol for distributing data, and the address corresponding to the data distribution destination is called the IP address.The same IP address cannot be used within the same LAN.
LAN Abbreviation for “Local Area Network”.This is a network with a relatively narrow range such as inside a company.
Logoff This action clears the status (logon) in which it is possible to access a network or computer system.It is also called ‘logout’.
Logon This action establishes the status in which a network or computer system can be accessed.It is also called ‘login’.
68
App
endi
ces
Word Explanation
MAC address This is the intrinsic ID number that is allocated to each network adapter.Every network adapter in the world is given its own number, and it is based on this number that data is sent and received between adapters.This address is expressed by combining an intrinsic number controlled and allocated by IEEE to each manufacturer with a number which the manufacturer allocates to each of its adapters.
MPEG This refers to a group of technology standards aimed at efficiently compressing digital moving images.One such standard is MPEG2 which has an excellent image quality and is used for DVD-Video and other video formats.Another standard is MPEG1 which has a lower compression rate than MPEG2, and is used by video CDs. Yet another standard is MPEG4 for distributing images with a low image quality and high compression rate over telephone lines and other lines with a low communication speed.
Open System/OPEN This is an authentication of wireless signals employing a public key encryption system.
Protocol This is a common convention or rule required for data communication between computers.In order to enable data exchanges between different computers, it is necessary to have at both ends the same convention or rule governing such aspects as the timing at which the data is sent and received, and the format used for information which is to be sent and received. For instance, many different kinds of software communicate data over the internet using a protocol called TCP/IP (Transmission Control Protocol/Internet Protocol).
SSID Abbreviation for “Service Set ID”.The SSID identification code must be set to distinguish equipment included in a wireless LAN that uses access points from equipment not included in that LAN.This may appear as the “ESSID” or the “network name” for wireless LAN adapters made by some manufacturers.
Subnetmask This limits the range of the IP addresses assigned to computers in order to divide the network into a number of sections during TCP/IP connection.The value used to divide the network at this time is called the subnet mask.
WEP Abbreviation for “Wired Equivalent Privacy”.This is a method for encrypting communication data. The encryption key is created and notified only to the communicating user, so the communication data cannot be decrypted by a third party.
Wireless LAN This is a network which uses signals to communicate wirelessly.It obviates the need for a LAN cable connection since the data is sent and received using a common wireless frequency.SSID or WEP can be used to ensure that the transfer of information remains secure.
Glossary (cont.)
69
App
endi
ces
Frequently Asked Questions
� Wireless LAN connection cannot be established between the devices and the computer.
z Has the software been started up?The software must be started on the computer to enable wireless transmission of images to devices. z Have the correct network settings been configured?When selecting a device whose wireless LAN connection setting is [USER] or [M-DIRECT], check whether the correct network settings have been configured for the device and the computer. z Click of the software (launcher), and click [Messages].Details on the measures to be taken are displayed, so follow the instructions. z Connection failure may occur in some cases immediately after turning on the device or immediately after switching the input.Wait at least 1 minute before performing connection.
� The user does not have administrator privileges.
If you logged onto the computer using an account without administrator privileges or a guest account, it is not possible to select devices using the method described in “Use with the [SIMPLE], [S-DIRECT], [S-MAP], [1], [2], [3], and [4] settings” (page 24).If connection using wireless LAN is necessary, select devices using the [USER] or [M-DIRECT] wireless LAN connection setting.
� The “Cannot find LAN adapter” error is displayed.
z Is the wireless LAN adapter enabled?If the wireless LAN adapter is disabled, enable it.For some PCs with an internal wireless LAN, the wireless LAN may have been turned off due to a hardware switch or the software settings. If it is turned off, turn it on before starting the software.(Bluetooth may take priority on computers that are also equipped with Bluetooth, so switch the priority to wireless LAN.)Refer to the operating instructions for your computer for information about turning it on/off.
z Is your wireless LAN adapter properly recognized on the network?Wireless LAN adapters may not be correctly recognized by the computer in some cases.Check whether the adapter is recognized correctly in [Device Manager].If [?] appears for [Network Adapter] in [Device Manager], installation may not have completed properly.We recommend referring to the operating instructions for your wireless LAN adapter and reinstalling the driver.
To display [Device Manager]:Windows 7
Select [Start] [Control Panel] [System and Security] [System] to display [View basic information about your computer].Click [Device Manager].
Windows 8.1Press the Windows logo + X keys on the keyboard, and select [Control Panel] [System and Security] [System] to display [View basic information about your computer].Click [Device Manager].
Windows 10Enter “control panel” in the search box of the taskbar, and open the Control Panel.Select [System and Security] [System] to display [View basic information about your computer].Click [Device Manager].
z “Use with the [SIMPLE], [S-DIRECT], [S-MAP], [1], [2], [3], and [4] settings” (page 24) is sometimes enabled as a result of updating the driver of the wireless LAN adapter.For details on driver updates, consult the manufacturer of your driver.
70
App
endi
ces
� “Detection message: A network bridge is constituted.” is displayed.
z Is Network Bridge enabled?Wireless LAN connection is disabled when Network Bridge is enabled. If you do not expect ever to use Network Bridge, delete it from your system.For details, check with the network administrator.
To verify whether Network Bridge exists:Windows 7Select [Start] [Control Panel] [Network and Internet], and click [Network and Sharing Center].Click [Change adapter settings] in the <Network and Sharing Center> screen.Verify that [Network Bridge] appears in the <Network connection> screen.To change the settings, perform one of the following procedures.
Change the Network Bridge settings: 1. Select [Start] [Control Panel] [Network and Internet], and click [Network and Sharing Center]. 2. Select [Change adapter settings] in the <Network and Sharing Center> screen. 3. Right-click [Network Bridge], and click [Properties]. 4. Click [Continue] in the [User Account Control] dialog box. 5. Remove the check mark from [Wireless Network Connection] in the <Network Bridge Properties> screen. (If there is no check mark, proceed to step 6). 6. Click [Internet Protocol Version 4 (TCP/IPv4)] [Properties] in the <Network Bridge Properties> screen. 7. Click the [Alternate Configuration] tab in the <Internet Protocol Version 4 (TCP/IPv4) Properties> screen. 8. Select [User Configuration], and set the [IP address] and [Subnetmask] as follows. IP address: 10. 10. 11. 101 Subnetmask: 255. 255. 0. 0 (If the above IP address is being used in a LAN environment, set the IP address in a range from 10.0.0.0 to
10.255.255.255.) 9. Click [OK] [Close]. 10. Close the <Manage Network Connections> screen. 11. Close the <Network and Sharing Center> screen.
Delete Network Bridge: 1. Select [Start] [Control Panel] [Network and Internet], and click [Network and Sharing Center]. 2. Select [Change adapter settings] in the <Network and Sharing Center> screen. 3. Right-click [Network Bridge], and click [Delete]. 4. Click [Yes] in the [Confirm Connection Delete] dialog box. 5. Click [Continue] in the [User Account Control] dialog box.
Frequently Asked Questions (cont.)
71
App
endi
ces
Frequently Asked Questions (cont.)
� “Detection message: A network bridge is constituted.” is displayed. (cont.)
Windows 8.1 Press the Windows logo + X keys on the keyboard, and select [Control Panel] [Network and Internet], and click [Network and Sharing Center].Click [Change adapter settings] in the <Network and Sharing Center> screen.Verify that [Network Bridge] appears in the <Network connection> screen.To change the settings, perform one of the following procedures.
Change the Network Bridge settings: 1. Press the Windows logo + X keys on the keyboard, and select [Control Panel] [Network and Internet], and
click [Network and Sharing Center]. 2. Select [Change adapter settings] in the <Network and Sharing Center> screen. 3. Right-click [Network Bridge], and click [Properties]. 4. Click [Continue] in the [User Account Control] dialog box. 5. Remove the check mark from [Wireless Network Connection] in the <Network Bridge Properties> screen. (If there is no check mark, proceed to step 6). 6. Click [Internet Protocol Version 4 (TCP/IPv4)] [Properties] in the <Network Bridge Properties> screen. 7. Click the [Alternate Configuration] tab in the <Internet Protocol Version 4 (TCP/IPv4) Properties> screen. 8. Select [User Configuration], and set the [IP address] and [Subnetmask] as follows. IP address: 10. 10. 11. 101 Subnetmask: 255. 255. 0. 0 (If the above IP address is being used in a LAN environment, set the IP address in a range from 10.0.0.0 to
10.255.255.255.) 9. Click [OK] [Close]. 10. Close the <Manage Network Connections> screen. 11. Close the <Network and Sharing Center> screen.
Delete Network Bridge: 1. Press the Windows logo + X keys on the keyboard, and select [Control Panel] [Network and Internet], and
click [Network and Sharing Center]. 2. Select [Change adapter settings] in the <Network and Sharing Center> screen. 3. Right-click [Network Bridge], and click [Delete]. 4. Click [Yes] in the [Confirm Connection Delete] dialog box. 5. Click [Continue] in the [User Account Control] dialog box.
72
App
endi
ces
Frequently Asked Questions (cont.)
� “Detection message: A network bridge is constituted.” is displayed. (cont.)
Windows 10Enter “control panel” in the search box of the taskbar, and open the Control Panel.Select [Network and Internet], and click [Network and Sharing Center].Click [Change adapter settings] in the <Network and Sharing Center> screen.Verify that [Network Bridge] appears in the <Network connection> screen.To change the settings, perform one of the following procedures.
Change the Network Bridge settings: 1. Enter “control panel” in the search box of the taskbar, and open the Control Panel. Select [Network and Internet],
and click [Network and Sharing Center]. 2. Select [Change adapter settings] in the <Network and Sharing Center> screen. 3. Right-click [Network Bridge], and click [Properties]. 4. Click [Continue] in the [User Account Control] dialog box. 5. Remove the check mark from [Wireless Network Connection] in the <Network Bridge Properties> screen. (If there is no check mark, proceed to step 6). 6. Click [Internet Protocol Version 4 (TCP/IPv4)] [Properties] in the <Network Bridge Properties> screen. 7. Click the [Alternate Configuration] tab in the <Internet Protocol Version 4 (TCP/IPv4) Properties> screen. 8. Select [User Configuration], and set the [IP address] and [Subnetmask] as follows. IP address: 10. 10. 11. 101 Subnetmask: 255. 255. 0. 0 (If the above IP address is being used in a LAN environment, set the IP address in a range from 10.0.0.0 to
10.255.255.255.) 9. Click [OK] [Close]. 10. Close the <Manage Network Connections> screen. 11. Close the <Network and Sharing Center> screen.
Delete Network Bridge: 1. Enter “control panel” in the search box of the taskbar, and open the Control Panel. Select [Network and Internet],
and click [Network and Sharing Center]. 2. Select [Change adapter settings] in the <Network and Sharing Center> screen. 3. Right-click [Network Bridge], and click [Delete]. 4. Click [Yes] in the [Confirm Connection Delete] dialog box. 5. Click [Continue] in the [User Account Control] dialog box.
� The <Implementation of a measure> screen is displayed when the software starts up.
z Is the name of a firewall displayed under “Detected application”?When a currently operating firewall has been detected, the name of the firewall is displayed under “Detected application”.To release the block, click [Yes] to unblock or shut down the firewall.When the software is exited, the application that was shut down is automatically restored to its original status.
If a check mark is not placed next to “This operation is always checked”, the measure is taken automatically at the next and subsequent startups of the software.
To display the confirmation message again, select (Option) in the launcher [Settings], and select [Display firewall confirmation message at startup].
73
App
endi
ces
Frequently Asked Questions (cont.)
� Windows firewall has been detected.
Click [Yes] on the <Implementation of a measure> screen.The measure is implemented automatically.To configure the settings manually, perform one of the following procedures based on your operating system.
Windows 7Is the software registered in [Allow a program through Windows Firewall]?
To register: 1. Select [Start] [Control Panel]. 2. Click [System and Security] in the <Control Panel> screen. 3. Click [Allow a program through Windows Firewall] in the <System and Security> screen. 4. Click [Change settings] , and change to the allow registration mode. 5. Click [Allow another program], select [Wireless Manager mobile edition 6.*]*1, and click [Add]. 6. Confirm that the software has been added to the [Allowed programs and features] list. Confirm that check marks are placed next to Home/Work(Private) and Public. 7. Click [OK] in the <Allow programs to communicate through Windows Firewall> screen. The software will be registered as an application on the Windows firewall exception list.
z *1 The “*” represents various version numbers.
Windows 8.1 Is this software registered in [Allow an app through Windows Firewall]?
To register: 1. Press the Windows logo + X keys on the keyboard, and click [Control Panel]. 2. Click [System and Security] in the <Control Panel> screen. 3. Click [Allow an app through Windows Firewall] in the <System and Security> screen. 4. Click [Change settings] , and change to the allow registration mode. 5. Click [Allow another app], select [Wireless Manager mobile edition 6.*]*1, and click [Add]. 6. Confirm that the software has been added to the [Allowed programs and features] list. Confirm that check marks are placed next to Private and Public. 7. Click [OK] in the <Allowed apps> screen. The software will be registered as an application on the Windows firewall exception list.
z *1 The “*” represents various version numbers.
Windows 10Is this software registered in [Allow an app through Windows Firewall]?
To register: 1. Enter “control panel” in the search box of the taskbar, and open the Control Panel. 2. Click [System and Security] in the <Control Panel> screen. 3. Click [Allow an app through Windows Firewall] in the <System and Security> screen. 4. Click [Change settings] , and change to the allow registration mode. 5. Click [Allow another app], select [Wireless Manager mobile edition 6.*]*1, and click [Add]. 6. Confirm that the software has been added to the [Allowed programs and features] list. Confirm that check marks are placed next to Private and Public. 7. Click [OK] in the <Allowed apps> screen. The software will be registered as an application on the Windows firewall exception list.
z *1 The “*” represents various version numbers.
� Another firewall has been detected.
Are any firewall-containing applications installed?If an application with a firewall function has been installed, it may not be possible to communicate with devices.(Even if the application is not running, the firewall function may still operate simply because the application has been installed.)In such cases, firewall settings must be changed in order to allow connection to the wireless network.For details on the firewall settings, refer to the operating instructions for the application.
74
App
endi
ces
� “Detection message: Wireless LAN adapter utility was found.” is displayed.
If a wireless LAN adapter utility is operating, the utility name is displayed.In order to communicate with devices, this wireless LAN adapter utility must be turned off.If the [Try Solution] button is displayed, the utility can be turned off using the software.
To implement measures:When the [Try Solution] button is clicked, the <Implementation of a measure> screen appears, and the name of the detected utility is displayed.To turn off the wireless LAN adapter utility, click [Yes].When the software is exited, the turned-off wireless LAN adapter utility is automatically returned to its original status.
If a check mark is not placed next to [This operation is always checked], the measure will be implemented automatically starting when the network is selected next.
To display the confirmation message again, select (Option) in the launcher [Settings], and select [Display confirmation message for wireless LAN adapter utility].
� The wireless LAN or wired LAN connection is lost.
If image display is suspended or communication is cut off, select the device again in the device list.If communication with the device is still not possible, turn off the device, and in the case of a projector, wait until it has cooled down (i.e., until the main unit’s power monitor changes from orange to red) before turning off the main unit’s main power switch (if it has one).If it does not have a switch, disconnect the power cable.Turn the power back on, and then select the device again from the software.( page 23)
� Communication is cut off in multi live mode.
When communicating with the device using a computer equipped with Intel Centrino mobile technology (wireless LAN), multi live mode may be canceled depending on the adapter version.
� Making a wireless LAN connection while using the Internet.
z In a wireless LAN environment in which Internet connection is possible, incorporating the device into this wireless LAN environment allows you to connect to the Internet and communicate with the device via wireless LAN at the same time. ( page 26) z If you have an Internet connection via wired LAN, simultaneous wireless use of the device is possible with the wired Internet connection.
� IEEE802.11g / IEEE802.11n connection is not possible.
z In environments with wireless LAN adapters that support both IEEE802.11b and IEEE802.11g, the connection may be established via IEEE802.11b. z In some operating environments, the connection may be established via IEEE802.11b, depending on the location, radio signal conditions, distance, or other factors. z Some wireless LAN adapters only support AD HOC connections via IEEE802.11b. z IEEE802.11n can be used only when the [SIMPLE], [S-DIRECT], [M-DIRECT], wireless module (Part No.: ET-WM200), and infrastructure connection (with access point for 802.11n) are used.The [SIMPLE], [S-DIRECT], [M-DIRECT], and wireless module can be used only on certain device models.If you have the CD-ROM for this software that was supplied with your device, refer to the “List of Compatible Device Models” in the CD-ROM’s application launcher for details on supported functions.Alternatively, refer to the “List of Compatible Device Models” on the Panasonic website (https://panasonic.net/cns/projector/download/ or https://panasonic.net/cns/prodisplays/download/software/).
Frequently Asked Questions (cont.)
75
App
endi
ces
� Image display is slow or animation is not displayed smoothly.
z Is the computer CPU speed slow?( Page 10) Displaying images and playing animations depend largely on the performance of the computer’s CPU. z Adverse effects may occur if there is any wireless communication in the vicinity. z If (Option) in the launcher [Settings] [Project at high picture quality (affects performance)] is selected, the screen display speed may become slower.( Page 50) z The speed may be slower when any other applications are running concurrently. z Did you start Microsoft PowerPoint or Windows Media Player before starting this software?The above applications should only be started after you have started this software. z If the software has been started using an account without administrator privileges, the speed may decrease significantly. z Display may be slow when moving images are played.
� DVD, MPEG2, or Blu-ray Disc content cannot be played on the computer.
z The following restrictions apply when the software is running.y DVD, MPEG2, and Blu-ray disc videos cannot be played back.y If a 3D-type application was used, application performance may be reduced, images may not be displayed, and proper
operation may not be possible.
z Quit the software, and try using a computer cable or HDMI cable connection.(Depending on the video player used, video playback may not be possible.)
� There is a time lag between operations on the computer and their resulting image display.
z The software imports the computer screen, compresses the data, and transmits it to devices. In addition, the received data is extracted on the device before it is displayed.Due to this processing time and factors in the wireless LAN environment, some delays will occur. Different computers may also produce varying lag times.
� The live style cannot be changed.
z The live style cannot be changed on models that support moderator mode. z Select (Option) in the launcher [Multi Live], select the live style in [Choose live style], and click [Apply] to switch the style.( Page 55) z When you click [Multi Live] on the remote control, the style is switched.( Page 62) z Switching is also possible by selecting [MULTI-LIVE] from the [Network] menu of the device, and then pressing the <ENTER> button. z The live style cannot be changed during full-screen image display. Stop the image display before changing the live style.
� The computer's audio is not heard from the device during image display.
z Was a media player (e.g., Windows Media Player, Real Player, Quick Time) running before the software was started?The above applications should only be started after you have started displaying images with this software. z This cannot be used when communicating with multiple devices simultaneously. z Select (Option) in the launcher [Settings], and check whether a check mark has been placed next to [Produce audio along with video during projection].( Page 50)
Frequently Asked Questions (cont.)
76
App
endi
ces
� The computer's audio is not heard from the device during image display. (cont.)
Windows 7 1. With image display using the software already started, select [Start] [Control Panel] [Hardware and Sound],
and click [Sound]. 2. Confirm whether “Panasonic Projector Audio Device” is set to “Default Device”. 3. If it is not set to “Default Device”, select “Panasonic Projector Audio Device”, and click [Set Default]. 4. Click [OK] in the <Sound> screen. y The default device setting returns to its original state after quitting the software.
z If the problem persists even after performing the above, try quitting and restarting the software.
� The software’s colors are not displayed properly and the characters are hard to read.
z Select (Option) in the launcher [Settings], and check whether a check mark has been placed next to [Project at high picture quality (affects performance)]. ( Page 50) z Set the screen colors to 16 bits or more.Windows 7 1. Select [Control Panel] [Appearance and Personalization] [Adjust screen resolution] [Advanced Settings]. 2. Click the [Monitor] tab, and set [Color] to [16 bits] or more.
� The screen saver is not displayed properly during image display.
z Some screen savers may not be displayed properly. z Select (Option) in the launcher [Settings], and place a check mark next to [Disable screen saver during projection] so that the screen saver is not displayed. ( Page 50)
� The sound breaks up during image display when Windows Media Player 11 is used in Windows 7.
z When Windows Media Player 11 is to be used, close as many other applications as possible.If there are still dropouts in the audio, try using a different audio player.
� “Windows Aero” is disabled.
“Windows Aero” is disabled while the software is running.
� When attempting to display images from a searched device, the device does not turn on.
z If the [STANDBY MODE] setting is set to [ECO] or [NETWORK] on a PT-VW345N, PT-VX415N, or other device model, that device may not turn on during for image display.In such cases, set [STANDBY MODE] to [NORMAL].
Frequently Asked Questions (cont.)
77
App
endi
ces
� The wireless LAN connection setting, projector name or display name, and network ID are not displayed. � A device cannot be found.
z When using a PT-VZ575N / PT-VW535N / PT-VX605N, PT-VW345N / PT-VX415N, or PT-VW355N / PT-VX425N, the wireless LAN connection setting, projector name or display name, and network ID may not appear or may not be found, depending on the device settings. Perform the following in such cases.If [MENU] [NETWORK] [CONNECTION LOCK] is set to [OFF], press the <Panasonic APP> or <NETWORK/USB> button on the remote control (or the input selection button on the device) to change the input to [Panasonic APPLICATION]. If [MENU] [NETWORK] [CONNECTION LOCK] is set to [MEMORY VIEWER], [Miracast(TM)], or [MIRRORING], set [CONNECTION LOCK] to [Panasonic APPLICATION].
� A device cannot be found in a Windows 8.1 / Windows 10 environment.
z It may not be possible to find a device depending on the computer used.If a device cannot be found, select the following settings for that device.
When using a PT-VZ575N / PT-VW535N / PT-VX605N, PT-VZ585N / PT-VW545N / PT-VX615N, PT-VW345N / PT-VX415N, PT-VW435N / PT-VX505N, or PT-VW355N / PT-VX425N: Operate using the [SIMPLE], [S-DIRECT] or [M-DIRECT] setting. ( Page 24 and 29)
When using any other device that supports wireless LAN: Operate using the [USER] (infrastructure mode) setting which uses access points. ( Page 26)
� Network settings are not restored after using Wireless Manager.
z If the software shuts down abnormally due to the computer freezing, for example, the process for restoring the network will not be performed properly. In such cases, restart Wireless Manager again.
z For additional information, refer to the FAQ section of the Panasonic website (https://panasonic.net/cns/projector/download/ or https://panasonic.net/cns/prodisplays/download/software/).
Frequently Asked Questions (cont.)
Trademarks z Microsoft, Windows, and Windows Media are trademarks or registered trademarks of Microsoft Corporation in the United States and/or other countries. z Intel, Intel Centrino, Intel Core2 Duo, and Intel Core i5 are trademarks or registered trademarks of Intel Corporation or its subsidiaries in the United States and/or other countries. z Miracast™ is trademark of the Wi-Fi Alliance. z Other company names, product names or other names noted in this manual are trademarks or registered trademarks of the respective companies. Note that ® and TM marks are not indicated in the text of this manual.
Notes: z Unauthorized use or reproduction of part or all of this software and manuals is strictly prohibited. z Panasonic cannot be held liable for any effects resulting from the use of this software and manuals. z Panasonic reserves the right to revise the software specifications and manual contents without notice.