4 This rules expansion article deals solely with the siege rules and they are, of course, unofficial house rules. This is because, as always with unofficial house rules, they have not been fully tested to perfection as would be preferable. So if you find any holes, bugs or things that just don’t work, then by all means tell us as perfection is the goal and that can only be achieved with input from the gaming public in general. The rules are divided into three main sections. The first section contains rules designed to plug gaps in the siege rules from the Warmaster rulebook and should be treated as add-on rules or replacement rules where noted (for instance, the revised battering rules). The second section contains new rules for siege equipment. Whilst the third section offers lists of availability and cost for the different types of siege equipment and how to include them in those games. There are also a few siege scenarios at the end of the article written by Chris Bobridge and myself. We hope at a later date to expand beyond these initial three scenarios, to develop a fully fledged siege campaign system which will include many options for both the defender and attacker. For now however, there are just these three linked scenarios which form a ‘linear’ campaign in themselves. General Siege Rules First of all regarding Break points. In all siege scenarios Break points for both armies are ignored. The game will only end when either one of the generals dies, or when the turn limit for the scenario expires. Occasionally, a scenario will state otherwise, in this instance the specific scenario rules take precedence over this. Secondly, regarding min/max levels and army points values. When deciding to play a siege game always use the attacking army as the basis for deciding how large a game you will play, then half this total for determining how many points the defender may spend on troops. For example, if the attacker has 3,000 points, then the defender has up to 1,500 points. Obviously, it is a good idea to stick to full thousands for the size of the attacking army (ie. 1,000 points, 2,000 points, 3,000 points, and so on), for simplicities sake if nothing else. Additionally, the defending army always rounds up its max level to the next highest level of min/max if it is not a round figure. For example, a 1,000 points defending force would use the standard min/max levels for a 1,000 points army, whilst a 1,500 points or 1,250 points defending army would use the min levels for a 1000 points army, but the max levels of a 2000 points army. This represents the higher number of well trained troops, artillery and equipment that you tend to find in most fortifications. This will again always be the case in any siege scenario, unless the specific scenario rules state otherwise. When rules refer to a wall, it is referring to a 40mm wall section. When it refers to a tower, it generally includes the entirety of the tower as defined in the Warmaster rulebook as well as the rules that follow. And, in addition, it is generally a good idea to define all gateway wall sections as towers, otherwise there would be almost no point in trying to knock the gate itself down. This however is more of a suggestion than a hard and fast rule, as it may not be appropriate for all fortification models. However, you should always make sure that both players are fully aware as to how the gateway will be treated before play starts, ie, as a tower or as a wall section. INTO THE BREACH! Expanded Siege Rules & Scenarios By David Simpson, with invaluable assistance from Chris Bobridge and Steve Hambrook
Transcript
4
This rules expansion article deals solely withthe siege rules and they are, of course,unofficial house rules. This is because, asalways with unofficial house rules, they havenot been fully tested to perfection as wouldbe preferable. So if you find any holes, bugsor things that just don’t work, then by allmeans tell us as perfection is the goal andthat can only be achieved with input fromthe gaming public in general.
The rules are divided into three mainsections. The first section contains rulesdesigned to plug gaps in the siege rules fromthe Warmaster rulebook and should betreated as add-on rules or replacement ruleswhere noted (for instance, the revisedbattering rules). The second sectioncontains new rules for siege equipment.Whilst the third section offers lists ofavailability and cost for the different types ofsiege equipment and how to include themin those games.
There are also a few siege scenarios at the endof the article written by Chris Bobridge andmyself. We hope at a later date to expandbeyond these initial three scenarios, todevelop a fully fledged siege campaign systemwhich will include many options for both thedefender and attacker. For now however,there are just these three linked scenarioswhich form a ‘linear’ campaign in themselves.
General Siege RulesFirst of all regarding Break points. In allsiege scenarios Break points for both armiesare ignored. The game will only end wheneither one of the generals dies, or when theturn limit for the scenario expires.Occasionally, a scenario will state otherwise,in this instance the specific scenario rulestake precedence over this.
Secondly, regarding min/max levels andarmy points values. When deciding to playa siege game always use the attacking armyas the basis for deciding how large a gameyou will play, then half this total fordetermining how many points thedefender may spend on troops. Forexample, if the attacker has 3,000 points,then the defender has up to 1,500 points.Obviously, it is a good idea to stick to fullthousands for the size of the attackingarmy (ie. 1,000 points, 2,000 points, 3,000points, and so on), for simplicities sake ifnothing else.
Additionally, the defending army alwaysrounds up its max level to the next highestlevel of min/max if it is not a round figure.For example, a 1,000 points defending forcewould use the standard min/max levels for a1,000 points army, whilst a 1,500 points or1,250 points defending army would use themin levels for a 1000 points army, but themax levels of a 2000 points army. Thisrepresents the higher number of welltrained troops, artillery and equipment thatyou tend to find in most fortifications. Thiswill again always be the case in any siegescenario, unless the specific scenario rulesstate otherwise.
When rules refer to a wall, it is referring toa 40mm wall section. When it refers to atower, it generally includes the entirety ofthe tower as defined in the Warmasterrulebook as well as the rules that follow.And, in addition, it is generally a goodidea to define all gateway wall sections astowers, otherwise there would be almostno point in trying to knock the gate itselfdown. This however is more of asuggestion than a hard and fast rule, as itmay not be appropriate for all fortificationmodels. However, you should alwaysmake sure that both players are fullyaware as to how the gateway will betreated before play starts, ie, as a tower oras a wall section.
INTO THE BREACH!Expanded Siege Rules & Scenarios
By David Simpson, with invaluable assistance from Chris Bobridge and Steve Hambrook
5
Into The Breach!
TOWERSThe towers of afortification are usuallythe most importantelement of anydefensive structure.They are very tough toknock down andincredibly difficult toassault, whilst providingan ideal position for thedefender to pourmissile fire onto theattacking army. Thefollowing rules shouldbe considered a bolt-onaddition to the rulespresented in the Siegerules section of theWarmaster rulebook,rather than as acomplete replacement.For example, the rulesfor knocking downtowers still stand.
For part of a fortification to count as a towerit must have a base area of at least 40x40mm,any less and it counts as a wall section(unless incredibly tall). Being a tower makesa structure much stronger and resilient toattack, thus a tower not only benefits fromthe extra damage that it can sustain over anormal wall section (as detailed in theWarmaster rulebook), but it may only everbe assaulted from either the courtyard of thefortress that it forms part of or from theramparts of adjacent wall sections. This isbecause a tower is generally much too highto assault with even the longest ladders ortallest siege towers, so the only way in isthrough the doors that the defenders use onadjacent ramparts and in the courtyard ofthe fortification.
When assaulting a tower in this way only onestand may attack each facing of the tower(usually only one or two are eligible in thisway). These must be from different units andthe defender may also only defend with onestand per facing (although they must defendwith one stand on multiple facings if thereare insufficient defending stands). Defendingstands never count as being flanked.
In addition to this the defending standsalways count as fortified. This means that anattacking unit will only ever get the baseattacks of a stand against defending units ina tower, hitting on 6s all the time. In
addition to this the defender never retreats,thus there is no pursuit bonus. Likewise aswith attacking a wall, there is no support.
To put it quite simply, you have to wipe outall the units in a tower before you canoccupy it. A very difficult task indeed!
Free-standing lone towers only have onefacing that can be attacked in this way.Whichever facing this is must be declaredby the defender before the start of thebattle. This facing is assumed to be the onewith the door in, whether it is on groundlevel, high up with a removable ladder, orwith some other means of assault. If this iseasily visible on the model itself, then this isall the better.
The number of stands that a tower can holdis determined by its base area. This is quitestraight forward, you can fit upto double theamount of stands that would otherwise fitonto the base area of the tower. For example,a 40x40mm based tower has the same basearea as two stands, therefore four stands willfit into a tower of this size. This representsunits not only being positioned on the roofof the tower, but all throughout its height,probably stationed at gun ports or arrow slitsif they are armed with missile weapons.
Missile units in towers count as having a 360o
fire arc. This means that they will all have totarget the closest eligible enemy unit to thetower if they wish to fire their missile weapons.
An assault on a lone tower
Into The Breach!
In addition to this, all missile units in atower may stand and fire at units that attackany facing of the tower that they occupy, Theonly stands that cannot do this are those thatare already engaged in combat with anotherunit that has charged the tower. As you cansee attacking an undamaged tower full ofmissile troops is more than slightly suicidalin most cases!
Other than this, all the normal rulesregarding attacking fortifications stand. Forexample, if by some miracle the attackingtroops do manage to wipe out all thedefenders in a tower, then they do notreceive any advance charge move. The onlyoption available to them is to consolidatetheir position and occupy the tower.
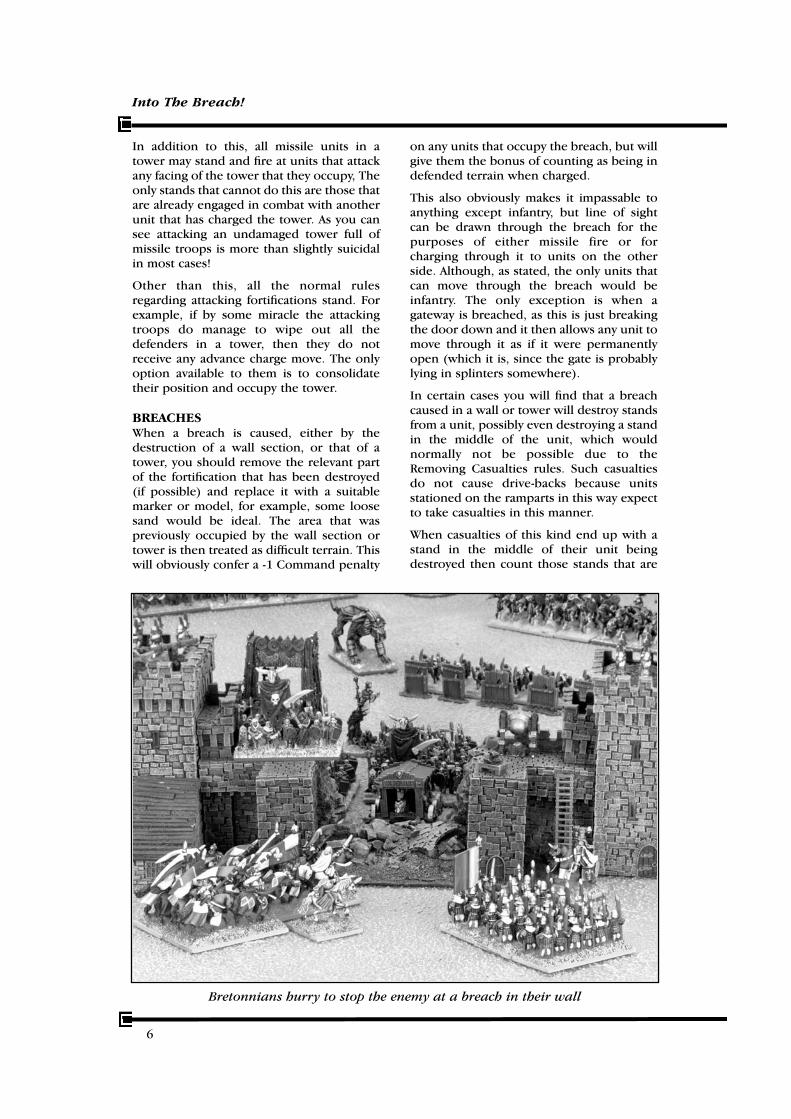
BREACHESWhen a breach is caused, either by thedestruction of a wall section, or that of atower, you should remove the relevant partof the fortification that has been destroyed(if possible) and replace it with a suitablemarker or model, for example, some loosesand would be ideal. The area that waspreviously occupied by the wall section ortower is then treated as difficult terrain. Thiswill obviously confer a -1 Command penalty
on any units that occupy the breach, but willgive them the bonus of counting as being indefended terrain when charged.
This also obviously makes it impassable toanything except infantry, but line of sightcan be drawn through the breach for thepurposes of either missile fire or forcharging through it to units on the otherside. Although, as stated, the only units thatcan move through the breach would beinfantry. The only exception is when agateway is breached, as this is just breakingthe door down and it then allows any unit tomove through it as if it were permanentlyopen (which it is, since the gate is probablylying in splinters somewhere).
In certain cases you will find that a breachcaused in a wall or tower will destroy standsfrom a unit, possibly even destroying a standin the middle of the unit, which wouldnormally not be possible due to theRemoving Casualties rules. Such casualtiesdo not cause drive-backs because unitsstationed on the ramparts in this way expectto take casualties in this manner.
When casualties of this kind end up with astand in the middle of their unit beingdestroyed then count those stands that are
6
Bretonnians hurry to stop the enemy at a breach in their wall
7
Into The Breach!
left intact as independent unitsuntil the end of the Combatphase in that turn. In the caseof units with more than threestands (such as Empire unitswith attached skirmishers), anystands still in contact withother stands from the sameunit count as a unit. In the caseof a four stand unit it wouldgive you a one stand unit and atwo stand unit.
At the end of the Combat phasethese ‘split’ units must reformjust as if they had beeninvolved in a combat.Nominate one stand to reformaround and place the rest ofthe stands from the unit intocontact with that stand. Youmay rotate the nominatedstand if you wish, but in mostinstances there will be no callfor this.
TROOPS ON RAMPARTSWhilst not strictly speaking a new rule to covera hole I thought that adding something aboutthis was appropriate. Basically, vertical distanceis ignored as far as unit formation is concerned,however troops in such a formation count asbeing in an irregular formation.
You will find that the main reason for doingthis will be to force the attacker to spread hisattacks over several units, thus reducing thechances of losing whole stands. Anotherreason to adopt this kind of formationwould be to plug gaps left in wall sections bybreaches, as explained above.
BATTERINGThe following provides a slight modificationto the battering rules and a little clarificationabout when you can fire artillery at walls,towers or gateways.
Firstly, you cannot fire at wall sections ortowers that are in the process of either beingassaulted, or battered by your troops – ie, ifyou have any troops on a wall section, in atower, assaulting a wall section, assaulting atower or battering a tower, wall section orgateway. These are effectively counted as
being in hand-to-hand combat, as are anyenemy units on the same wall section ortower, which does of course make themineligible as targets for missile fire.
Regarding battering by battering rams andlog rams (rules for which later on). This nowcounts as a first combat round for the unitthat is using the battering ram in the Combatphase. Which means that if the batteringmanages to successfully cause a breach thenthis counts as destroying your enemy in thefirst round of combat. This will allow theunit to abandon their battering ram or logram and make an advance charge throughthe breach of up to 20cm.
Another clarification is that battering cannotbe done during your opponent’s Combatphase. Once a turn is quite enough thankyou very much! This also means that thebattering units are only eligible to be shot atby conventional missile fire in thedefender’s turn – they can only be targetedby boiling oil attacks in the attacker’s turn,just prior to the battering attempt.
In addition to this, any units with at leastone stand on the wall section or tower thatis being battered, may stand and fire at thebattering unit instead of using boiling oil. Ifthis causes the loss of a stand or thedestruction of the battering ram, then thebattering attempt is abandoned.
Empire troops assaulting a castle wall
Into The Breach!
To summarise, attacking a wall section,tower or gateway in any way, whether thatbe to assault or to batter it, effectively bringsthe attacking units into combat with thetroops on the ramparts of the particularpiece of the fortification. However, when theattacking unit is battering the fortification,the defender can only attack the batteringtroops (or battering ram) with S&S missilefire, or boiling oil attacks.
Units attacking units in a breach are notdrawn into combat with any units onadjacent standing wall sections. The reverseis also the case, in that troops assaulting awall section do not count as attacking troopsin adjoining breaches.
This is one instance where corner-to-cornercontact does not count. In addition, thismeans that units attacking breaches or wallsections in this way only have to spread outand maximise contact with adjacent troopsthat are also in a breach or on a wall section(whichever may be the case).
An example of thius would be if you have threewall sections, with an end-most sectionbreached. Now if all the sections are occupiedand a unit attacks the stand that occupies thebreached section, then the stands in theattacking unit could be placed behind oneanother, so that only one stand makes contact.However, if the stand in the breached sectionis part of the unit that is also on the adjacentwall section, thenthe attacking unitwill have to assaultthat wall sectionand maybe the wallsection at the otherend of the wall inquestion if it hass u f f i c i e n tmovement to doso.
A unit assaulting themiddle wall section,then it must alsoassault the other intactwall section as corner-to-corner contact doescount for wall sectionsof the same status (ie,breached or intact).However, it would notbe obliged to alsoattack the stand in thebreached section,unless it is from thesame unit as one of
the stands on the wall section that has beeninitially assaulted.
You can if you wish attack or assault all ofthe wall sections in question if the chargingstands have enough movement. But this isnot compulsory, apart from in the sort ofsituations outlined above.
FLYERS ATTACKING FORTIFICATIONSWhilst flyers may attack fortified targets inthe same way as infantry, hitting on 6s andwith no charge bonus. They may neveroccupy fortifications and thus if they win around of combat against troops infortifications, they may not pursue them fora second round of combat and may eitherstand their ground, or fall back. Thedefenders, however, do still have to retreat.This may cause them to abandon theirdefensive position anyway.
However, flyers are unique in that they arethe only units that can actually attack unitsstationed in a tower without having to do sofrom the courtyard or adjoining ramparts.The normal rules for attacking towers stillapply though, so the defenders will notretreat and all the missile troops will be ableto stand and fire at the attacking flyers.
It does of course go without saying thatwhen flyers try to assault fortifications,then boiling oil attacks cannot be usedagainst them.
8
Infantry pushing a battering ram
Archers protected by mantlets
9
Into The Breach!
New Siege EquipmentEARTHWORKSThese are defensive works built by bothdefending and attacking forces in a siegeand sometimes in other situations as well.These are usually hastily constructed out ofearth (hence the name earthworks), logbarricades, upturned carts, barrels andgenerally whatever comes to hand.
In scenarios where it allows you to takeearthworks the following rules are used.Each section of earthworks purchasedcosts 15 points and is 40mm long and10mm wide, half the size of a standardWarmaster base.
Unless otherwise specified in a particularscenario, earthworks are always deployedbefore the armies set up in the relevantdeployment zones, starting with thedefender deploying all his earthworks first,or dice off to decide if for some reason thereis no defined attacker and defender.Earthworks can be arranged together inwhatever formation is desired by thepurchasing player, a few examples areshown here.
Earthworks count as a linear feature thatconfers fortified status against missile fire forany infantry or artillery deployed directlybehind them, or defended status against anyclose combat attacks directed against anyinfantry or artillery units placed directlybehind them. Obviously, this only counts onthe initial charge, as defended status cannotbe claimed in pursuit combat.
As you may have noticed earthworks servetwo functions for the defending player. Firstthey provide a front line of defence,something to soak up some of the enemy’spower before he hits the fortress wallsthemselves. They also provide very good‘speed bumps’, slowing down andsometimes channelling the advance of siegeengines such as siege towers and batteringrams. However there is a way for the attackerto remove them.
To remove earthworks to make way for yoursiege towers and battering rams, a unit ofinfantry (and only infantry) must be adjacentto the earthworks at the beginning of theCombat phase and not already be engagedin combat. Then each stand in contact withan earthwork section gets its basic attacksagainst the earthwork (no charge bonuses,as what the troops are doing is getting their
entrenching tools out). Any 6s that arerolled will destroy the earthwork that isattacked in this way. It is important that youdeclare exactly which earthwork sectionseach stand is attacking, as each 40x10mmsection is effectively counted as a separateunit for these purposes.
LOG RAMSLog rams are effectively Battering rams butwithout the added protection of anarmoured covering to shield the batteringunit. Log rams can be brought to bear muchmore rapidly than a Battering ram can be.The main disadvantage is, of course, the lackof protection, especially against boiling oilpoured on the battering unit by troops onthe ramparts above, or stand and fire fromthese units.
Attacking infantry units may be equippedwith Log rams. A unit that is equipped withLog rams may only make one move per turn,although it may abandon its Log rams at anypoint and is then unrestricted by this. Also,when equipped with Log rams a unit maynot cross or move through any terrain whichis classed as difficult for movementpurposes, such as forests or earthworks.
If a unit equipped with Log rams is drivenback by enemy shooting or magic, then itcarries its Log rams with it unless forced toenter difficult terrain.
When a unit with a Log ram makes contactwith a fortress wall it will commencebattering in much the same way as aBattering ram. However, if as a result of aboiling oil attack or stand and fire from unitson the walls enough hits are inflicted toremove a whole stand then the batteringattempt fails as per the rules for usingboiling oil (treat it as if the defender hadrolled a 6 on the Boiling Oil table).
Orc mob with log ram
Into The Breach!
LADDERSAlthough in the main rulebook it states thatall attacking units are assumed to be carryingsufficient ladders and grappling hooks forfree here we have expanded upon this.Infantry units may only assault the walls of asfortress with a siege tower or by usingladders. It costs +5 points to equip each ofthe stands in a unit with ladders. Note: Unitsalready equipped with other siegeequipment, ie, siege towers, log rams,battering rams, mantlets, etc, cannot also beequipped with ladders – this means that thebesieging general will have to consider whereand how he will launch his wall assaults.
Siege Equipment ListsThere are two distinct siege equipment lists;the siege equipment list and the siegeartillery equipment list. These lists work inthe same way, but access to them isdependant upon the specific restrictions of aparticular scenario. The scenario specialrules will specify exactly which lists may beused by which side.
Where siege equipment is allowed, any suchequipment is always purchasedindependently of the army list and isdeployed either as a unit in the case of somesiege engines or siege artillery; with anassigned unit for such things as batteringrams, log rams or siege towers; onto thewalls themselves such things as boiling oil;
or in the deployment zones with such thingsas earthworks.
Unless stated specifically in the particularsiege scenario that you are fighting, theamount of siege equipment available to eachside will be 25% of the relevant army total,rounding up to the nearest five points. Inaddition to this, only half of this may be spenton the siege artillery list, if this is actuallymade available to that army in the scenario.
For example, a 2,000 points army isattacking in a siege game. This means thatthe attacker may choose up to 2,000 pointsfrom whatever army list he is using, with thestandard 2 x min/max. In addition to this theplayer may also field up to 500 points ofsiege equipment chosen from whicheversiege equipment lists are made available inthat scenario. If this includes the siegeartillery list, then only 250 points of this 500points may be used to buy siege equipmentfrom the siege artillery list.
Conversely, the defending forces wouldconsist of 1,000 points of troops, chosenfrom whatever army list is being used, usingthe 1 x min/max. In addition to this therewould be 250 points of siege equipmentchosen from whichever siege equipmentlists the scenario specifies as available to thedefending army.
Exactly what siege equipment can be takenwill depend on what siege equipment is
10
High Elves assault a Bretonnian fortress with ladders
SIEGE ARTILLERY LIST
SIEGE EQUIPMENT LIST
11
Into The Breach!
allowed in the scenario. Earthworks areavailable to both the attacker and thedefender, as are siege engines.
Regardless of what equipment lists areavailable in a particular scenario they allhave to be bought out of the same siegeequipment allocation for an army. So usingthe first example of the defending forcewith a 250 points siege equipmentallocation, if they had access to both theearthworks and the siege defender’sequipment lists then they may spend up to250 points on either or both of these lists.The same is obviously true for attackers.The only difference will be whatequipment is available and almost certainlythe total points allocation, since attacking
armies will almost always be larger thandefending ones.
The only other rule to bear in mind whenusing these equipment lists is that you maynever spend points from your army totalon siege equipment, or for that matterspend points from the siege equipmentallocation on units for your army. If youdon’t have enough siege equipment to usethe total equipment allocation then thosepoints are wasted.
All equipment is available to all armies of allraces in Warmaster for siege battles, with theonly exception being Bombards which maynot be used by Elves of any kindred, orBretonnians.
Type
Att
ack
Hit
s
Arm
our
Com
mand
Unit
Siz
e
Poin
ts
Min
/Max
Earthwork Fieldwork – – Special – 40x10mm 15 –/– –
Boiling Oil M – – Special – 1 5 –/– *1or Rock Dropper
Log Rams M – – Special – 1 5 –/– *2
Ladders M – – Special – 1 5 –/– *2
Sow M – 3 3+ – 1 5 –/– *2
Mantlets M – – Special – – 10 –/– *2
Siege Tower M – 3 3+ – 1 10 –/– *2
Battering Ram M – 3 3+ – 1 10 –/– *2
SPECIAL RULES*1 Defenders Only – Only the defenders in a siege may use these.
*2 Attackers Only – Only the attackers in a siege may use these.
Speci
al
Type
Att
ack
Hit
s
Arm
our
Com
mand
Unit
Siz
e
Poin
ts
Min
/Max
Mangonel Artillery 0/4 3 0 – 1 80 –/1
Bombard Artillery 0/4 3 0 – 1 90 –/1 *1
Trebuchet Artillery 0/6 4 0 – 1 120 –/1
SPECIAL RULES*1 Bounce – Shots from a Bombard bounce like cannons. May not be used by Elves of anykindred, or Bretonnians.
Speci
al
Into The Breach!
Siege Scenarios1. RACE FOR THE WATCH TOWER
The self-proclaimed Count Braken, leader ofone of the many small princedoms of theBorder Princes, owed much of his success tothe chance discovery of a vast hoard of goldand gems. These riches were discovered inan old Goblin-infested, ruined fort in thefoothills of the Vaults mountain range.
Since that chance discovery the Count hasused his new found wealth to rebuild thefort, employing the latest (if expensive)techniques straight from Tilea. He also usedhis money to expand his princedom andsoon trade was flourishing.
Little did the Count realise that a clan ofDwarfs living in the Vault Mountains werethe descendants of those who lived in thefortress in ancient times. Soon tales of theCount’s success fell upon Dwarf ears. TheCount was outraged when gruff Dwarfenvoys arrived at his court demanding thatthe riches he had liberated by handed overto them. The Dwarfs were thrown out of theCount’s court empty-handed and vowingrevenge. Before long the dispossessedDwarf clan had mobilised and weremarching upon the Count’s castle.
When the Count heard of the Dwarfs on themarch he quite sensibly sent out a scoutingforce. The commander of the scouts decidedto occupy an old watch tower on the border
of the Count’s domain so that they couldrelay information when the Dwarf army hadbeen spotted. When the scouts had nearlyreached the old watch tower they wereshocked at how quickly the Dwarfs hadmarched from their mountain dwelling. Therace was on for the scouts to reach the watchtower in time to light the beacon and warnthe Count at Braken Keep.
This battle was fought between the vanguardelements of the Dwarf army, commanded bythe Dwarf Lord Grimbold and the scoutingforce sent out from Braken Keep under thecommand of Hauptman Anders.
Despite the fact that this scenario is a siegerelated one, none of the siege rules actuallyapply to it as it is not strictly speaking a siegescenario, merely the prelude to a siege.Therefore the Dwarfs have no siegeequipment built yet but may assault Empiretroops within the tower as described earlier.
Historically, the forces consisted of 1,000 points of Empire troops and 1,500points of Dwarfs. However you can, ofcourse, use any armies that you wish and anypoints values that you like, so long as theattacker has 50% more troops than the other.
12
EMPIRE ARMY
Woods
Woods
Watchtower80cm
DWARF ARMY
MAP 1 – RACE FOR THE WATCH TOWER
13
Into The Breach!
The aim of this battle is for the Empireplayer to get a unit to a terrain feature in themiddle of the table which represents thewatch tower and hold it for an entire turn, atwhich point the game will end with a victoryfor the Empire general. To count asoccupying the watch tower, there must be aunit of at least two stands inside the terrainfeature throughout two consecutive playerturns. What this means is that an Empireunit must enter the watch tower in one turn.Then it must remain within the watch towerthroughout the entirety of the followingDwarf turn and the following Empire turn.
If the Empire army withdraws prior to this,either due to reaching its break point, orthrough the death of its general. Then theDwarfs automatically win the game. If theDwarfs withdraw through reaching theirbreak point or the death of their general,then the Empire automatically wins.
There is no turn limit for this scenario, inaddition to this Victory points are completelyignored in this scenario. The only thing thatmatters is who breaks first, or if the Empirearmy manages to hold onto the watch towerfor two consecutive turns, which results inthe beacon being lit and the warning to thedefenders of Braken Keep being sent.
The deployment zones, table set-up anddeployment of the armies are the same as fora normal battle. Both sides set up indeployment zones 80cm from each other,with the army with the most units deployingthe first unit and then players alternatedeploying units. Of course if you wish to setup the armies using any form of hidden set-up, this is fine.
The only special thing about the table set-upin this battle is that there should be somekind of scenery piece placed in the exactcentre of the battlefield to represent thewatch tower. In addition, no terrain shouldbe setup within 20cm of the watchtower, torepresent the relatively clear ground thatyou would find around such a structure.
2. A RIDE FOR HELPCount Braken soon became aware of theDwarf army, either from spotting the litbeacon on the horizon days ago, orbecause of the large army of Dwarfs thatsurrounded his keep and were toilingaway at building defensive earthworks.Knowing the Dwarfs’ excellent reputationfor conducting sieges the Count realisedthat he would need some help and fast!He would have to get a messengerthrough the Dwarf lines and request helpfrom his neighbours.
Upon choosing a relatively weak spot in theDwarf lines, the Count decided to sendsome of his bravest cavalry led by his ownson, Gert Braken, for aid. They would, ofcourse, have to burst through the Dwarflines and run the gauntlet of missile andartillery fire to escape – not a simple task!
Despite the fact that this is a siege relatedscenario, it uses the normal game rulesrather than the additional siege rules,with one exception.
Into The Breach!
If the Dwarfs won the previous scenario,they receive additional points to spendsolely on the earthworks siege equipmentlist. These earthworks may be deployedwithin the Dwarf deployment zone prior tothe setup of any troops. This ought to cometo 100 points of earthworks and representsthe extra time the Dwarfs would have toprepare their siege-works.
This battle is fought between the Dwarfvanguard army and a small Empire cavalryforce. The Dwarf army is 1,000 points.Whilst the Empire army consists of threeunits of Knights and an Empire General,with no other equipment or troopsavailable.
You can, of course, use armies other thanthose in the scenario. However, if you do sothen the army that replaces the Empire armymust consist of a General and between oneand three units of cavalry, all of which mustbe bought out of 450 points (unless you areusing a Dwarf army, in which case this mustbe Rangers). You may not purchase anymagic items.
The table set-up and deployment are thesame as for a standard battle. In otherwords, deploy terrain by whatever methodyou desire, then deploy the two armies indeployment zones 80cm apart from eachother, starting with the Dwarf playerdeploying all of his army first, then theEmpire player deploying his small force.
The victory conditions for the scenario arequite simple. The Empire player must get atleast three stands and his general off thetable via the Dwarf ’s table edge, or break theDwarf army. Any other result ends up with avictory for the Dwarfs.
3. SIEGE OF BRAKEN KEEPThe Dwarf throng of Lord Grimbold hadprepared their defences and after a fewprobing attacks to test the Keep’s defenderswere now in a position to mount a full scaleassault. The brave men of the Empire hadwaited inside the castle watching the Dwarfsconstruct siege weapons and rams for theirfinal assault on the castle. Count Braken wastrapped inside his castle without knowingwhether any help would come.
This is the final and most important attackon Braken Keep, therefore it is all ornothing. The Dwarfs will stop at nothing tocapture the walls, and the men of theEmpire will sell their lives dearly to defendthe castle.
The most important piece of terrain on thetable is of course the fortress itself, which ifyou have a large enough table should beplaced in the centre. If not then along one ofthe table edges. Ideally you should have sixwall sections (of 40mm length) and a towerper full 500 points of the defending army,plus the gateway. This will give you areasonable balance between having enough
walls that thedefender has to bestretched a bit inholding them all andnot having too muchthat the defender willfind it impossible tomount an effectivedefence. Other thanthis set up terrain asyou see fit, with thethe exception thatthere should be noterrain within 30cmof the fortress walls.You may place a few fields, roadshedgerows and theodd isolated smallbuilding if you like,but these ought to bekept to an absoluteminimum.
14
EMPIREDEPLOYMENT
ZONE
Braken Keep
80cm
DWARF DEPLOYMENT ZONE
MAP 2 – SIEGE OF BRAKEN KEEP
15
Into The Breach!
This battle was fought between a Dwarfarmy of 2,000 points and an Empire army of1,000 points (you can of course use differentpoints values, but the proportion mustremain the same – in siege the attackershould outnumber the defender by at leasttwo-to-one). The battle could easily befought between any two armies.
The two armies may choose siegeequipment with a value of up to 25% of theirmain list. This is in addition to the armiesthat have been chosen as normal, as per theusual rules for siege battles as detailedelsewhere in this issue of Warmag.
The attacker may buy siege equipment fromthe Attacker Siege Equipment list, the SiegeMachine Equipment list, the Siege Artillerylist and the Earthworks list.
The defender may buy siege equipmentfrom the Defender Siege Equipment list andthe Earthworks list. Before the armies setup, place any necessary earthworks, ordefender’s siege equipment within therelevant deployment zones. This is done inan alternate way, starting with the defenderplacing his first earthwork or piece ofdefender equipment first (such as boilingoil, for example).
Once this has been done, the two armies areset up. First of all the defender places all ofhis units within his deployment zone, whichall the area inside and including thefortifications and up to 15cm outside of thefortress walls.
Then, once the defender has deployed all hisunits, the attacker places all of his units andsiege equipment within his deployment zone,which consists of all the area 60cm outsideof the defender’s deployment zone.
The battle starts with the attacker takingthe first turn. The battle also lasts for arandom number ofturns, break points areignored (however thedeath of a general isnot).
At the end of each turnstarting on Turn six,roll a D6, adding theturn number to theresult. If the total is 11or more, then the gameends immediately.
However if you playedthe previous scenario
– A Ride for Help – this may be modifiedslightly. If the Empire player won thisscenario, by getting the message through,then start rolling for the end of the game onTurn five instead of Turn six, as thereinforcements to lift the siege will arrivesooner.
The winner is determined by using Victorypoints, but do not count Victory points forcasualties. Rather, allocate Victory points forcontrolled sections of the castle, as shownbelow.
Section Points
Wall 50Tower 150Gateway 100Courtyard 200
Control of each section is determined bywho has the greatest number of stands inthe area. If the number is equal, no Victorypoints are allocated for that section.
Destroyed walls, towers and gateways earnno Victory points for either side. In additionto this if an army general dies before or onTurn six, then that side automatically loses.If a general dies after Turn six, then use theVictory Points table above and ignorecasualties for victory calculation. Whicheverside has more Victory points is deemed tohave won, there are no draws in a siege.