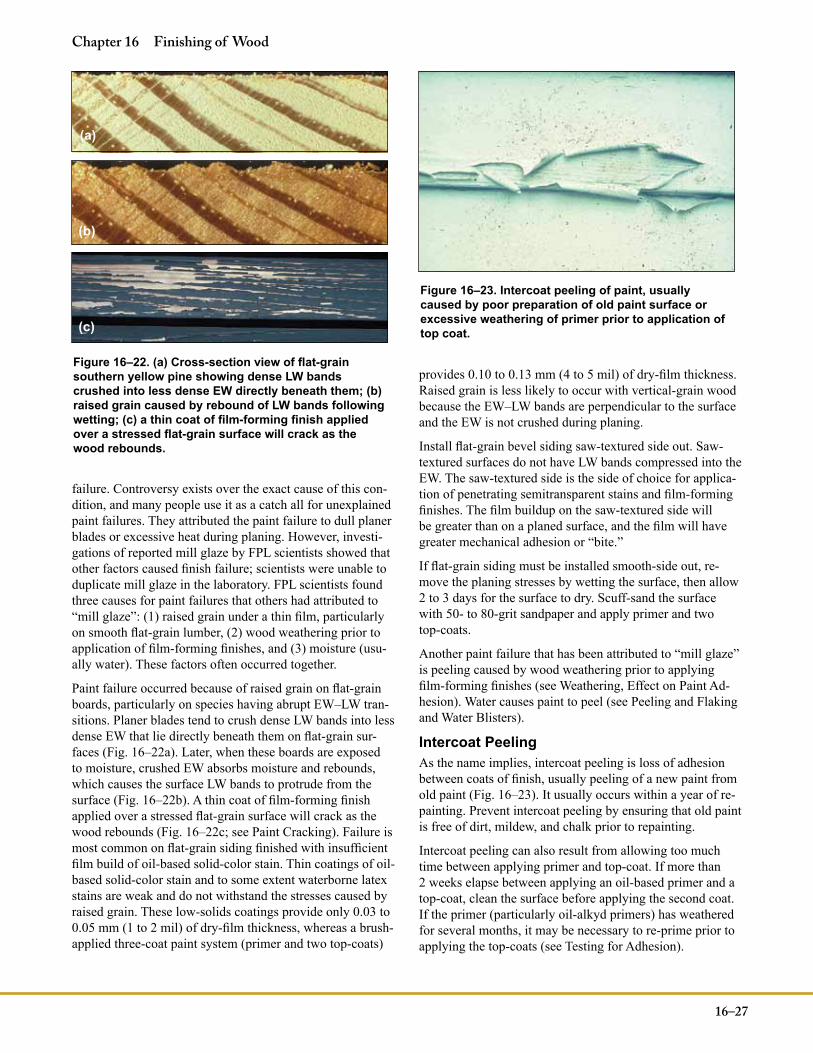
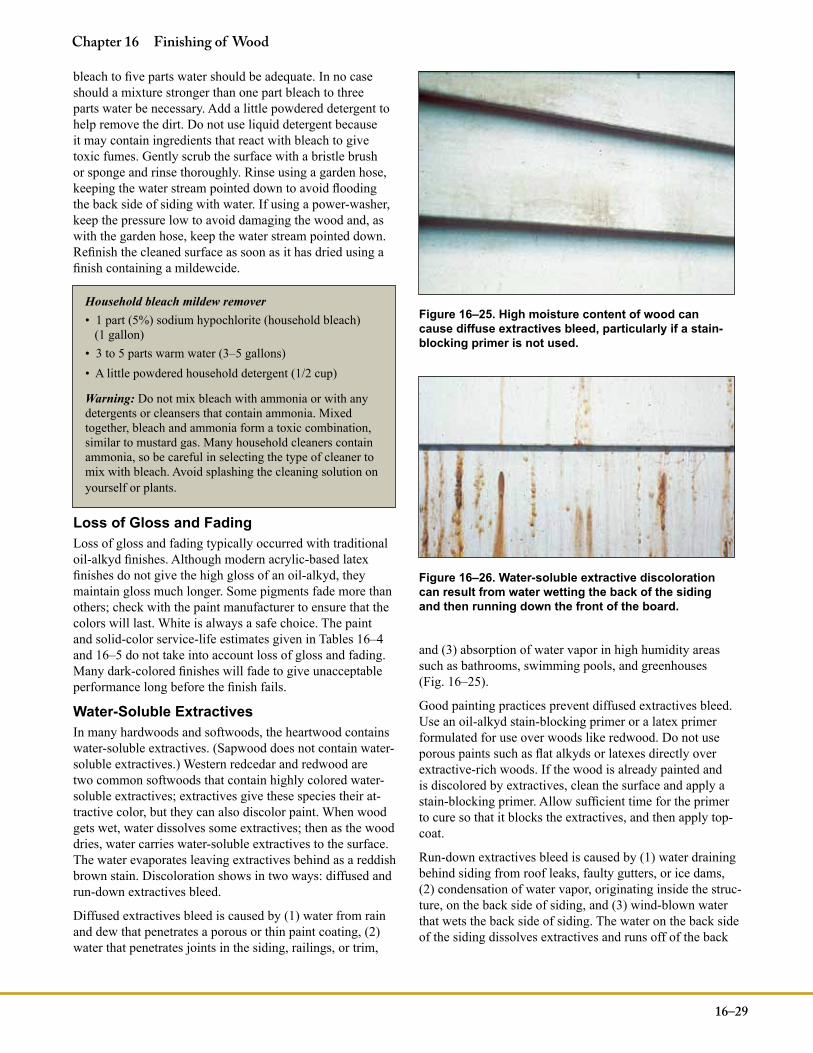
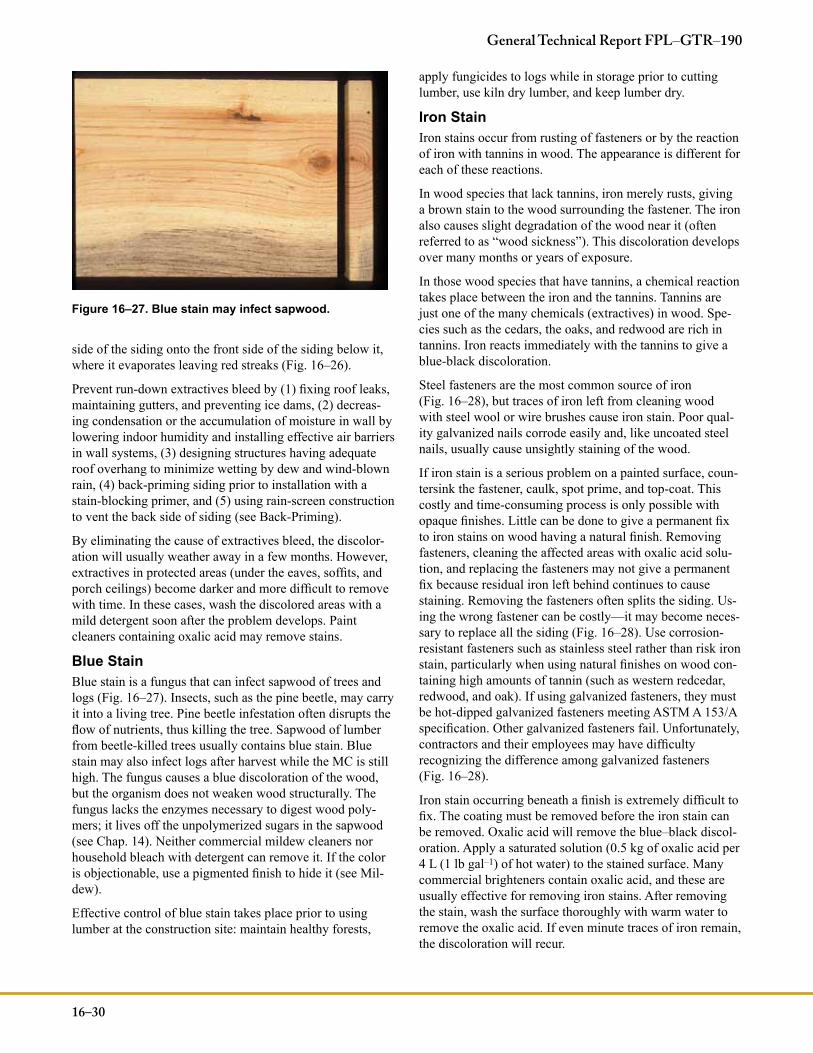
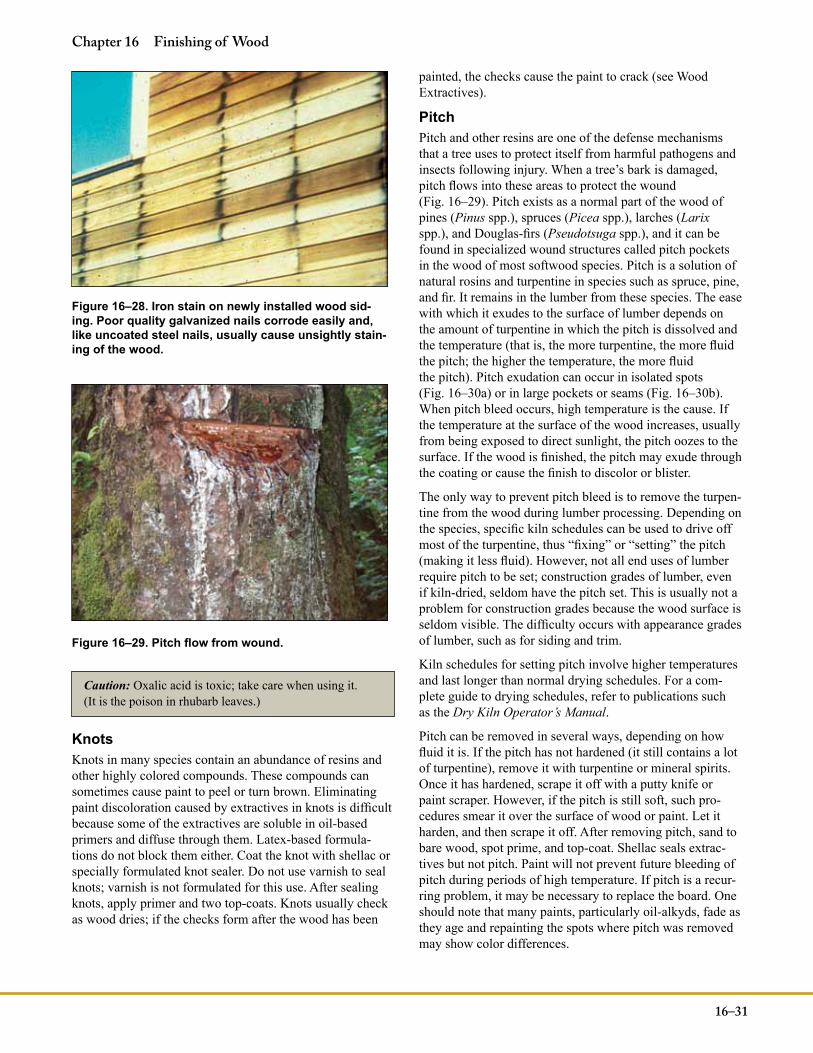
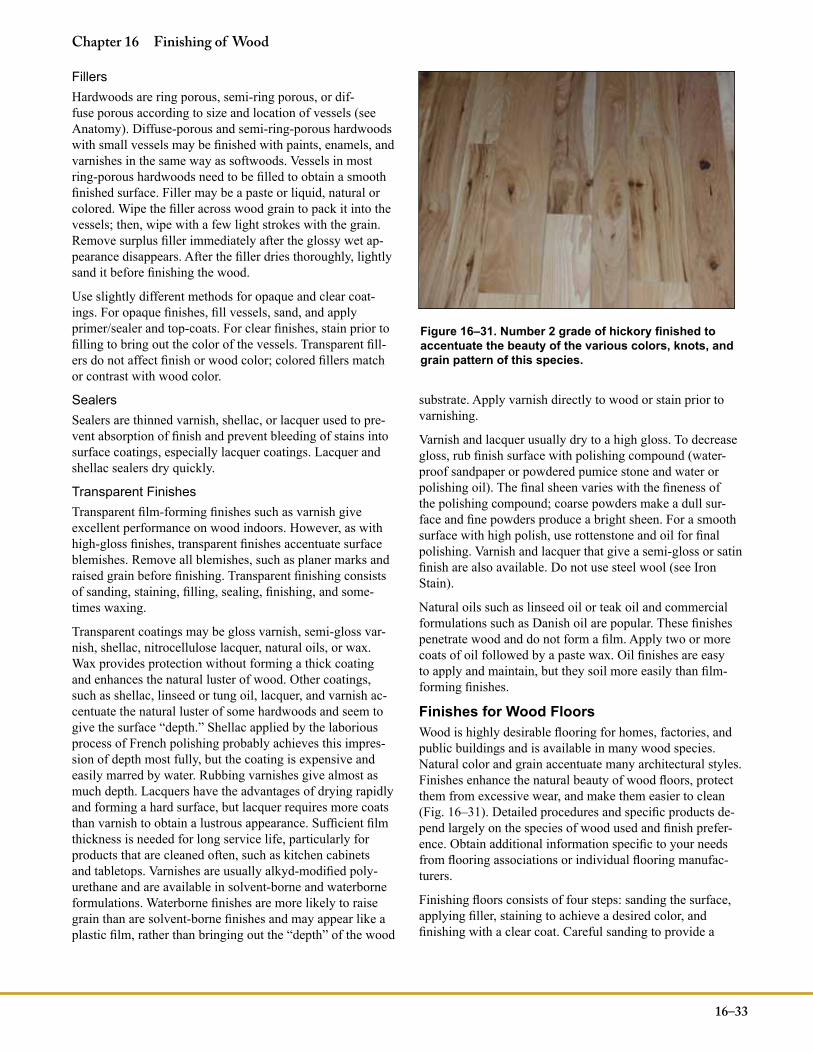
CHAPTER 16 Finishing of Wood R. Sam Williams, Supervisory Research Chemist (Retired) 16–1 Contents Factors Affecting Finish Performance 16–2 Wood Surface Properties 16–2 Wood Products 16–8 Weathering 16–11 Decay and Insects 16–13 Control of Water and Water Vapor 16–13 Compliance of VOC Finishes with Pollution Regulations 16–15 Exterior Wood Finishes 16–16 Weathered Wood as Natural Finish 16–16 Penetrating Wood Finishes 16–16 Film-Forming Finishes 16–21 Application of Finishes, Special Uses 16–24 Porches, Decks, Deck Railings, and Fences 16–24 Treated Wood 16–24 Marine Uses 16–24 Boats 16–25 Panel Products 16–25 Fire-Retardant Coatings 16–25 Back-Priming 16–25 Factory Finishing 16–25 Finish Failure or Discoloration 16–25 Paint Cracking (parallel to grain) 16–26 Peeling and Flaking 16–26 Cross-Grain Cracking 16–26 Water Blisters 16–26 Mill Glaze 16–26 Intercoat Peeling 16–27 Chalking 16–28 Mildew 16–28 Loss of Gloss and Fading 16–29 Water Soluble Extractives 16–29 Blue Stain 16–30 Iron Stain 16–30 Knots 16–31 Pitch 16–31 Finishing Interior Wood 16–32 Type of Finish and Wood Fillers 16–32 Finishes for Wood Floors 16–33 Finishes for Items Used for Food 16–34 Wood Cleaners and Brighteners 16–34 Paint Strippers 16–35 Mechanical Methods 16–35 Chemical Methods 16–36 Lead-Based Paint 16–36 Literature Cited 16–37 Additional References 16–37 Wood finishes (paint, varnish, and stain, for example) give a desired appearance, protect wood surfaces, and provide a cleanable surface. Many people consider appearance most important when choosing finishes for wood (lumber and wood composites). However, from a technical aspect, protection is most important for wood used outdoors, and providing a cleanable surface is most important for wood used indoors. When selecting a finish, one should consider appearance, protection, and cleanability and also how bulk and surface properties of wood affect finish application and performance (how long a finish lasts—its service life). Wood properties such as density (specific gravity), growth rate, heartwood–sapwood, earlywood–latewood, grain angle, vessels, and texture vary within and across wood spe- cies. Wood composites, such as plywood, fiberboard, and oriented strandboard (OSB), have different properties. Of the 18,000 to 25,000 known wood species (exact number varies depending on the grouping of species), approximately 50 are commercial species used in the United States and Canada. Chapters 2–4 give their properties. Of these com- mercial species, researchers report finishing characteristics for only a few species common to North America, Europe, Japan, and the tropics. However, if one understands how wood properties, finish, and environmental conditions inter- act, it should be possible to estimate finish performance for most wood species. Performance depends on choosing an appropriate finish for wood, considering the use conditions, and applying finishes correctly in sufficient amount. For long service life, choose wood products and finishes appropriate for environments where they are used. Indoor use places less stress on finishes than outdoor use. A climate having severe seasonal changes (U.S. Upper Midwest, for example) places greater stress on finishes then does a mild climate (such as the Pacific North- west). Guidelines in this chapter explain how to obtain long service life for contemporary finishes on lumber and wood com- posites used in the United States and Canada. The chapter begins with a review of wood properties important for wood finishing and describes effects of water and weathering on wood and finishes. This background establishes a basis for describing finishes for wood, their application, and common types of finish failures (and ways to avoid them). Publica- tions listed at the end of this chapter provide additional information.
Transcript
CHAPTER 16
Finishing of WoodR Sam Williams Supervisory Research Chemist (Retired)
16ndash1
Contents Factors Affecting Finish Performance 16ndash2 Wood Surface Properties 16ndash2 Wood Products 16ndash8 Weathering 16ndash11 Decay and Insects 16ndash13 Control of Water and Water Vapor 16ndash13 Compliance of VOC Finishes with Pollution Regulations 16ndash15Exterior Wood Finishes 16ndash16 Weathered Wood as Natural Finish 16ndash16 Penetrating Wood Finishes 16ndash16 Film-Forming Finishes 16ndash21Application of Finishes Special Uses 16ndash24 Porches Decks Deck Railings and Fences 16ndash24 Treated Wood 16ndash24 Marine Uses 16ndash24 Boats 16ndash25 Panel Products 16ndash25 Fire-Retardant Coatings 16ndash25 Back-Priming 16ndash25 Factory Finishing 16ndash25Finish Failure or Discoloration 16ndash25 Paint Cracking (parallel to grain) 16ndash26 Peeling and Flaking 16ndash26 Cross-Grain Cracking 16ndash26 Water Blisters 16ndash26 Mill Glaze 16ndash26 Intercoat Peeling 16ndash27 Chalking 16ndash28 Mildew 16ndash28 Loss of Gloss and Fading 16ndash29 Water Soluble Extractives 16ndash29 Blue Stain 16ndash30 Iron Stain 16ndash30 Knots 16ndash31 Pitch 16ndash31Finishing Interior Wood 16ndash32 Type of Finish and Wood Fillers 16ndash32 Finishes for Wood Floors 16ndash33 Finishes for Items Used for Food 16ndash34Wood Cleaners and Brighteners 16ndash34Paint Strippers 16ndash35 Mechanical Methods 16ndash35 Chemical Methods 16ndash36Lead-Based Paint 16ndash36Literature Cited 16ndash37Additional References 16ndash37
Wood finishes (paint varnish and stain for example) give a desired appearance protect wood surfaces and provide a cleanable surface Many people consider appearance most important when choosing finishes for wood (lumber and wood composites) However from a technical aspect protection is most important for wood used outdoors and providing a cleanable surface is most important for wood used indoors When selecting a finish one should consider appearance protection and cleanability and also how bulk and surface properties of wood affect finish application and performance (how long a finish lastsmdashits service life)
Wood properties such as density (specific gravity) growth rate heartwoodndashsapwood earlywoodndashlatewood grain angle vessels and texture vary within and across wood spe-cies Wood composites such as plywood fiberboard and oriented strandboard (OSB) have different properties Of the 18000 to 25000 known wood species (exact number varies depending on the grouping of species) approximately 50 are commercial species used in the United States and Canada Chapters 2ndash4 give their properties Of these com-mercial species researchers report finishing characteristics for only a few species common to North America Europe Japan and the tropics However if one understands how wood properties finish and environmental conditions inter-act it should be possible to estimate finish performance for most wood species
Performance depends on choosing an appropriate finish for wood considering the use conditions and applying finishes correctly in sufficient amount For long service life choose wood products and finishes appropriate for environments where they are used Indoor use places less stress on finishes than outdoor use A climate having severe seasonal changes (US Upper Midwest for example) places greater stress on finishes then does a mild climate (such as the Pacific North-west)
Guidelines in this chapter explain how to obtain long service life for contemporary finishes on lumber and wood com-posites used in the United States and Canada The chapter begins with a review of wood properties important for wood finishing and describes effects of water and weathering on wood and finishes This background establishes a basis for describing finishes for wood their application and common types of finish failures (and ways to avoid them) Publica-tions listed at the end of this chapter provide additional information
16ndash2
Factors Affecting Finish PerformanceWood surface properties type of wood product and weather affect finish performance
AnatomyWood species (thus its anatomy) is the primary factor that determines surface properties of woodmdashproperties that af-fect adhesion and performance of finishes Wood anatomy determines whether a wood species is a hardwood or soft-wood not the density (specific gravity) or its hardness Finish performance is affected by
bull density (overall density earlywood (EW)ndashlatewood (LW) density difference and how abruptly density changes at the EWndashLW boundary)
bull thickness of LW bandsbull ray cells (number and placement)bull vessels (size and location)bull extractives content andbull growth rate (some species grow faster than others
and environment affects growth rate within a specific species)
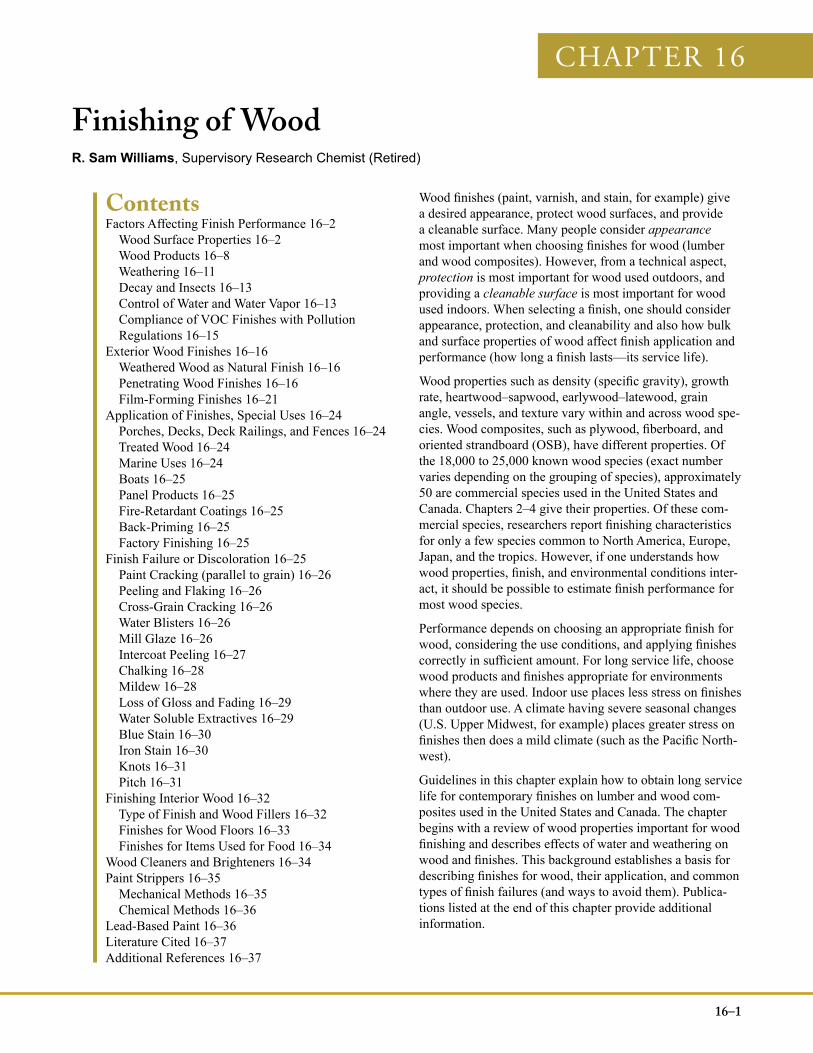
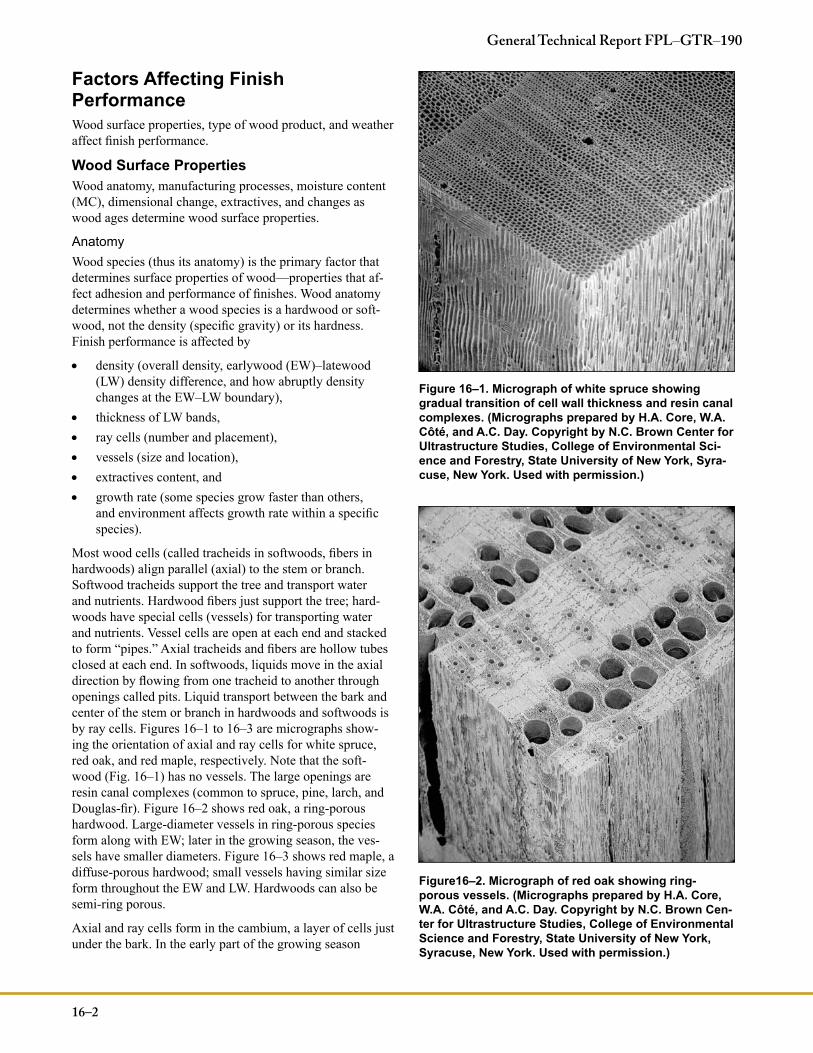
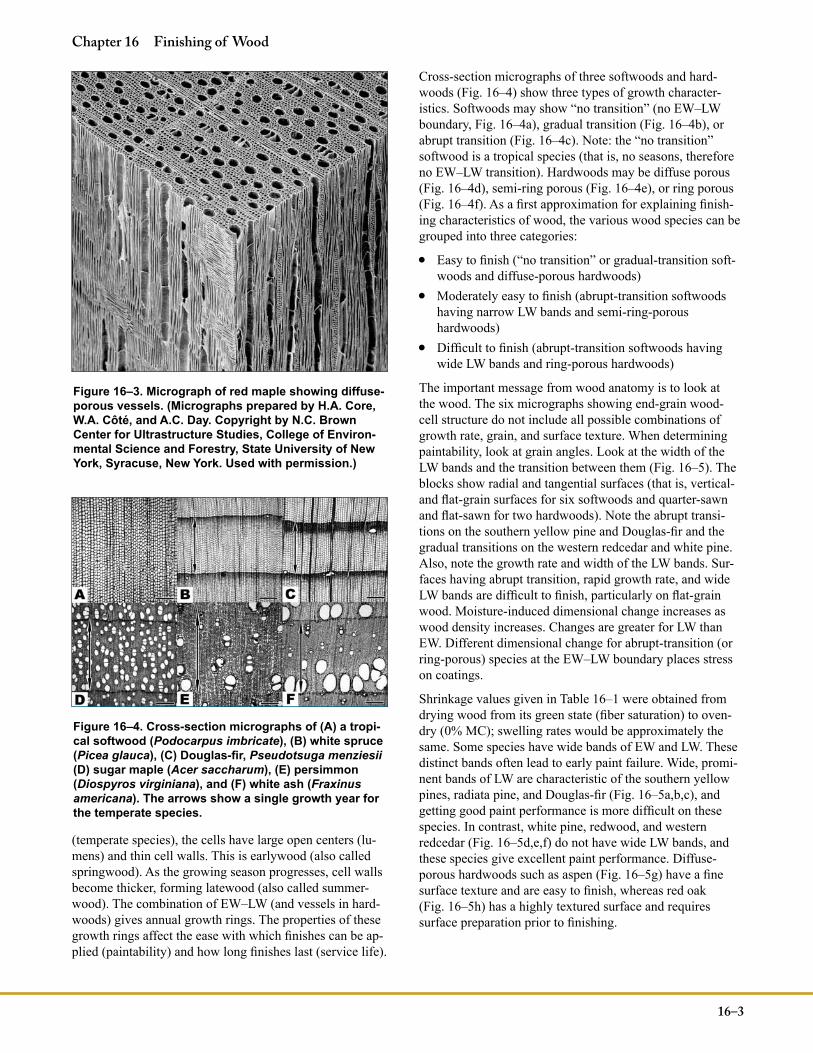
Most wood cells (called tracheids in softwoods fibers in hardwoods) align parallel (axial) to the stem or branch Softwood tracheids support the tree and transport water and nutrients Hardwood fibers just support the tree hard-woods have special cells (vessels) for transporting water and nutrients Vessel cells are open at each end and stacked to form ldquopipesrdquo Axial tracheids and fibers are hollow tubes closed at each end In softwoods liquids move in the axial direction by flowing from one tracheid to another through openings called pits Liquid transport between the bark and center of the stem or branch in hardwoods and softwoods is by ray cells Figures 16ndash1 to 16ndash3 are micrographs show-ing the orientation of axial and ray cells for white spruce red oak and red maple respectively Note that the soft-wood (Fig 16ndash1) has no vessels The large openings are resin canal complexes (common to spruce pine larch and Douglas-fir) Figure 16ndash2 shows red oak a ring-porous hardwood Large-diameter vessels in ring-porous species form along with EW later in the growing season the ves-sels have smaller diameters Figure 16ndash3 shows red maple a diffuse-porous hardwood small vessels having similar size form throughout the EW and LW Hardwoods can also be semi-ring porous
Axial and ray cells form in the cambium a layer of cells just under the bark In the early part of the growing season
General Technical Report FPLndashGTRndash190
Figure 16ndash1 Micrograph of white spruce showing gradual transition of cell wall thickness and resin canal complexes (Micrographs prepared by HA Core WA Cocircteacute and AC Day Copyright by NC Brown Center for Ultrastructure Studies College of Environmental Sci-ence and Forestry State University of New York Syra-cuse New York Used with permission)
Figure16ndash2 Micrograph of red oak showing ring-porous vessels (Micrographs prepared by HA Core WA Cocircteacute and AC Day Copyright by NC Brown Cen-ter for Ultrastructure Studies College of Environmental Science and Forestry State University of New York Syracuse New York Used with permission)
16ndash3
Chapter 16 Finishing of Wood
(temperate species) the cells have large open centers (lu-mens) and thin cell walls This is earlywood (also called springwood) As the growing season progresses cell walls become thicker forming latewood (also called summer-wood) The combination of EWndashLW (and vessels in hard-woods) gives annual growth rings The properties of these growth rings affect the ease with which finishes can be ap-plied (paintability) and how long finishes last (service life)
Cross-section micrographs of three softwoods and hard-woods (Fig 16ndash4) show three types of growth character-istics Softwoods may show ldquono transitionrdquo (no EWndashLW boundary Fig 16ndash4a) gradual transition (Fig 16ndash4b) or abrupt transition (Fig 16ndash4c) Note the ldquono transitionrdquo softwood is a tropical species (that is no seasons therefore no EWndashLW transition) Hardwoods may be diffuse porous (Fig 16ndash4d) semi-ring porous (Fig 16ndash4e) or ring porous (Fig 16ndash4f) As a first approximation for explaining finish-ing characteristics of wood the various wood species can be grouped into three categories
bull Easy to finish (ldquono transitionrdquo or gradual-transition soft-woods and diffuse-porous hardwoods)
bull Moderately easy to finish (abrupt-transition softwoods having narrow LW bands and semi-ring-porous hardwoods)
bull Difficult to finish (abrupt-transition softwoods having wide LW bands and ring-porous hardwoods)
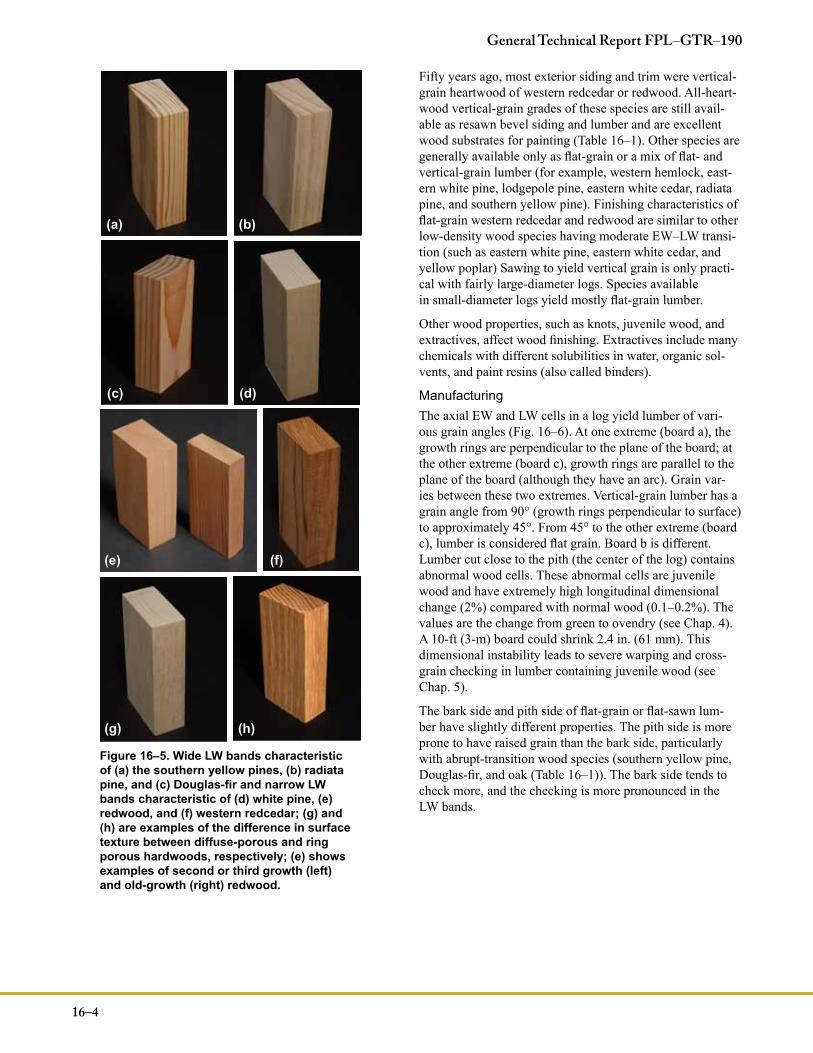
The important message from wood anatomy is to look at the wood The six micrographs showing end-grain wood-cell structure do not include all possible combinations of growth rate grain and surface texture When determining paintability look at grain angles Look at the width of the LW bands and the transition between them (Fig 16ndash5) The blocks show radial and tangential surfaces (that is vertical- and flat-grain surfaces for six softwoods and quarter-sawn and flat-sawn for two hardwoods) Note the abrupt transi-tions on the southern yellow pine and Douglas-fir and the gradual transitions on the western redcedar and white pine Also note the growth rate and width of the LW bands Sur-faces having abrupt transition rapid growth rate and wide LW bands are difficult to finish particularly on flat-grain wood Moisture-induced dimensional change increases as wood density increases Changes are greater for LW than EW Different dimensional change for abrupt-transition (or ring-porous) species at the EWndashLW boundary places stress on coatings
Shrinkage values given in Table 16ndash1 were obtained from drying wood from its green state (fiber saturation) to oven-dry (0 MC) swelling rates would be approximately the same Some species have wide bands of EW and LW These distinct bands often lead to early paint failure Wide promi-nent bands of LW are characteristic of the southern yellow pines radiata pine and Douglas-fir (Fig 16ndash5abc) and getting good paint performance is more difficult on these species In contrast white pine redwood and western redcedar (Fig 16ndash5def) do not have wide LW bands and these species give excellent paint performance Diffuse-porous hardwoods such as aspen (Fig 16ndash5g) have a fine surface texture and are easy to finish whereas red oak (Fig 16ndash5h) has a highly textured surface and requires surface preparation prior to finishing
Figure 16ndash3 Micrograph of red maple showing diffuse-porous vessels (Micrographs prepared by HA Core WA Cocircteacute and AC Day Copyright by NC Brown Center for Ultrastructure Studies College of Environ-mental Science and Forestry State University of New York Syracuse New York Used with permission)
Figure 16ndash4 Cross-section micrographs of (A) a tropi-cal softwood (Podocarpus imbricate) (B) white spruce (Picea glauca) (C) Douglas-fir Pseudotsuga menziesii (D) sugar maple (Acer saccharum) (E) persimmon (Diospyros virginiana) and (F) white ash (Fraxinus americana) The arrows show a single growth year for the temperate species
16ndash4
Fifty years ago most exterior siding and trim were vertical-grain heartwood of western redcedar or redwood All-heart-wood vertical-grain grades of these species are still avail-able as resawn bevel siding and lumber and are excellent wood substrates for painting (Table 16ndash1) Other species are generally available only as flat-grain or a mix of flat- and vertical-grain lumber (for example western hemlock east-ern white pine lodgepole pine eastern white cedar radiata pine and southern yellow pine) Finishing characteristics of flat-grain western redcedar and redwood are similar to other low-density wood species having moderate EWndashLW transi-tion (such as eastern white pine eastern white cedar and yellow poplar) Sawing to yield vertical grain is only practi-cal with fairly large-diameter logs Species available in small-diameter logs yield mostly flat-grain lumber
Other wood properties such as knots juvenile wood and extractives affect wood finishing Extractives include many chemicals with different solubilities in water organic sol-vents and paint resins (also called binders)
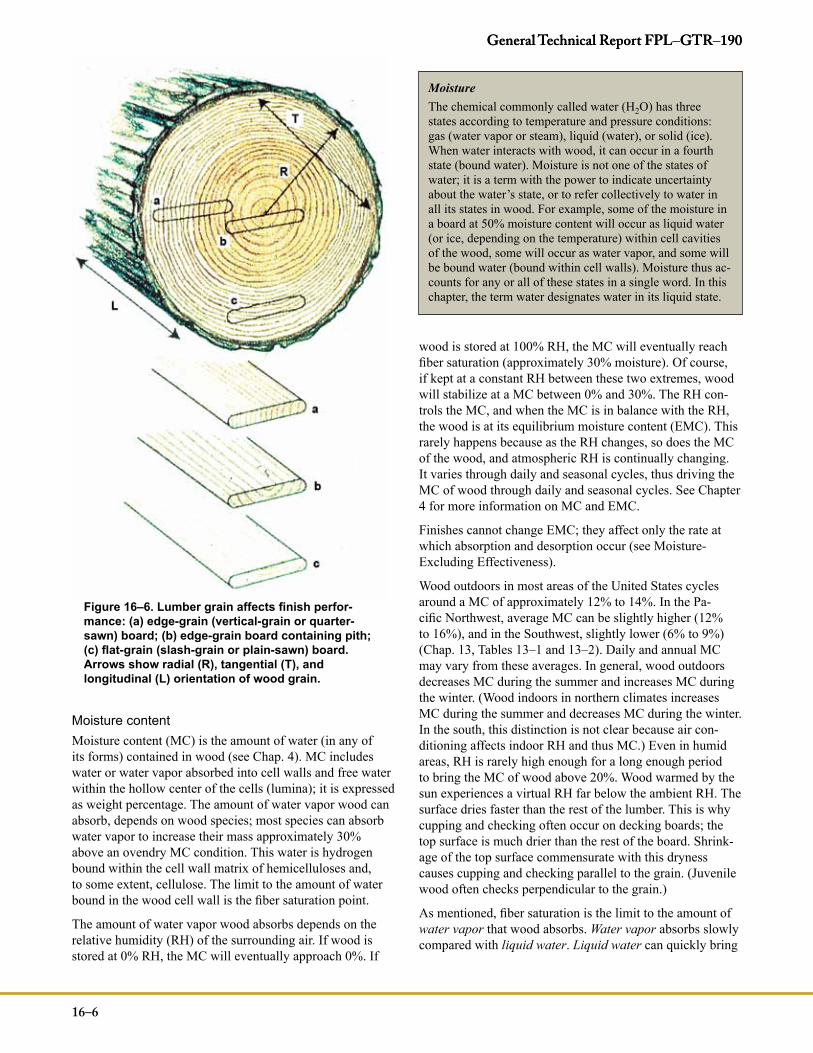
ManufacturingThe axial EW and LW cells in a log yield lumber of vari-ous grain angles (Fig 16ndash6) At one extreme (board a) the growth rings are perpendicular to the plane of the board at the other extreme (board c) growth rings are parallel to the plane of the board (although they have an arc) Grain var-ies between these two extremes Vertical-grain lumber has a grain angle from 90deg (growth rings perpendicular to surface) to approximately 45deg From 45deg to the other extreme (board c) lumber is considered flat grain Board b is different Lumber cut close to the pith (the center of the log) contains abnormal wood cells These abnormal cells are juvenile wood and have extremely high longitudinal dimensional change (2) compared with normal wood (01ndash02) The values are the change from green to ovendry (see Chap 4) A 10-ft (3-m) board could shrink 24 in (61 mm) This dimensional instability leads to severe warping and cross-grain checking in lumber containing juvenile wood (see Chap 5)
The bark side and pith side of flat-grain or flat-sawn lum-ber have slightly different properties The pith side is more prone to have raised grain than the bark side particularly with abrupt-transition wood species (southern yellow pine Douglas-fir and oak (Table 16ndash1)) The bark side tends to check more and the checking is more pronounced in the LW bands
General Technical Report FPLndashGTRndash190
(a) (b)
(c) (d)
(e) (f)
(g) (h)
Figure 16ndash5 Wide LW bands characteristic of (a) the southern yellow pines (b) radiata pine and (c) Douglas-fir and narrow LW bands characteristic of (d) white pine (e) redwood and (f) western redcedar (g) and (h) are examples of the difference in surface texture between diffuse-porous and ring porous hardwoods respectively (e) shows examples of second or third growth (left) and old-growth (right) redwood
16ndash5
Chapter 16 Finishing of Wood
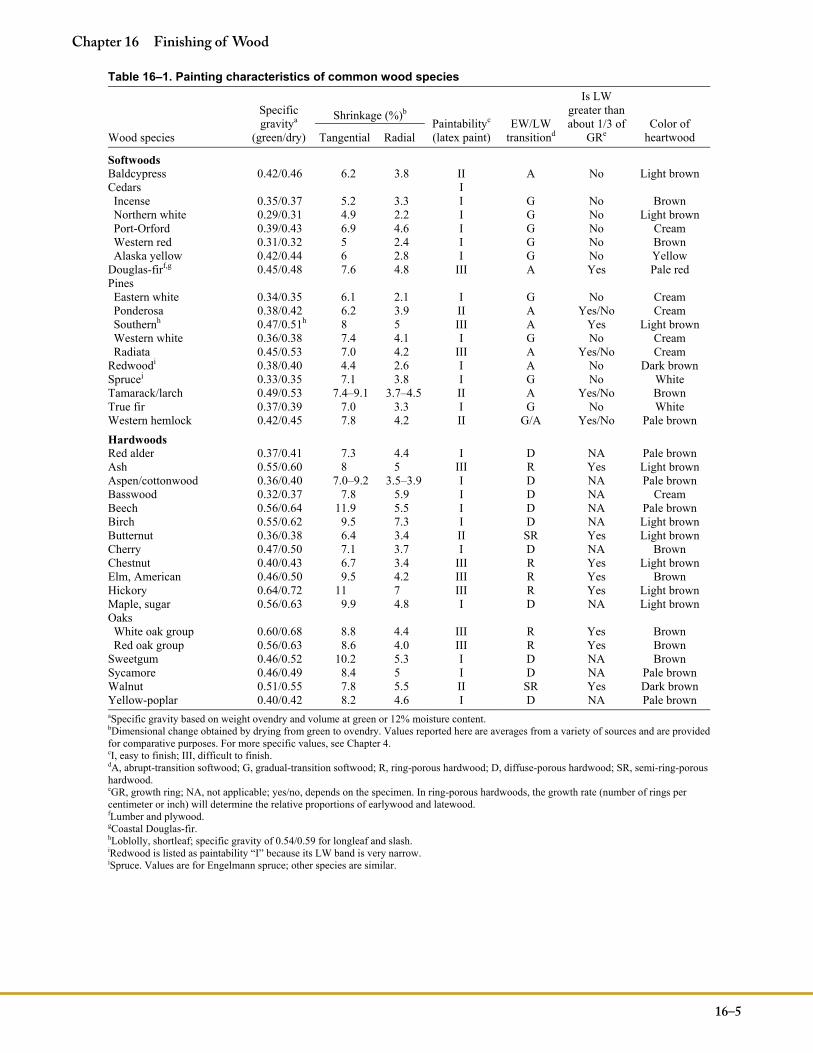
Table 16ndash1 Painting characteristics of common wood species
Wood species
Specific gravitya
(greendry)
Shrinkage ()b
Paintabilityc
(latex paint) EWLW
transitiond
Is LW greater than about 13 of
GReColor of
heartwood Tangential Radial
Softwoods Baldcypress 042046 62 38 II A No Light brown Cedars I Incense 035037 52 33 I G No Brown Northern white 029031 49 22 I G No Light brown Port-Orford 039043 69 46 I G No Cream Western red 031032 5 24 I G No Brown Alaska yellow 042044 6 28 I G No Yellow
Douglas-firfg 045048 76 48 III A Yes Pale red Pines Eastern white 034035 61 21 I G No Cream Ponderosa 038042 62 39 II A YesNo Cream Southernh 047051h 8 5 III A Yes Light brown Western white 036038 74 41 I G No Cream Radiata 045053 70 42 III A YesNo Cream
Redwoodi 038040 44 26 I A No Dark brown Sprucej 033035 71 38 I G No White Tamaracklarch 049053 74ndash91 37ndash45 II A YesNo Brown True fir 037039 70 33 I G No White Western hemlock 042045 78 42 II GA YesNo Pale brown Hardwoods Red alder 037041 73 44 I D NA Pale brown Ash 055060 8 5 III R Yes Light brown Aspencottonwood 036040 70ndash92 35ndash39 I D NA Pale brown Basswood 032037 78 59 I D NA Cream Beech 056064 119 55 I D NA Pale brown Birch 055062 95 73 I D NA Light brown Butternut 036038 64 34 II SR Yes Light brown Cherry 047050 71 37 I D NA Brown Chestnut 040043 67 34 III R Yes Light brown Elm American 046050 95 42 III R Yes Brown Hickory 064072 11 7 III R Yes Light brown Maple sugar 056063 99 48 I D NA Light brown Oaks White oak group 060068 88 44 III R Yes Brown Red oak group 056063 86 40 III R Yes Brown
Sweetgum 046052 102 53 I D NA Brown Sycamore 046049 84 5 I D NA Pale brown Walnut 051055 78 55 II SR Yes Dark brown Yellow-poplar 040042 82 46 I D NA Pale brown aSpecific gravity based on weight ovendry and volume at green or 12 moisture contentbDimensional change obtained by drying from green to ovendry Values reported here are averages from a variety of sources and are provided for comparative purposes For more specific values see Chapter 4 cI easy to finish III difficult to finish dA abrupt-transition softwood G gradual-transition softwood R ring-porous hardwood D diffuse-porous hardwood SR semi-ring-porous hardwood eGR growth ring NA not applicable yesno depends on the specimen In ring-porous hardwoods the growth rate (number of rings per centimeter or inch) will determine the relative proportions of earlywood and latewood fLumber and plywood gCoastal Douglas-fir hLoblolly shortleaf specific gravity of 054059 for longleaf and slash iRedwood is listed as paintability ldquoIrdquo because its LW band is very narrow jSpruce Values are for Engelmann spruce other species are similar
Moisture contentMoisture content (MC) is the amount of water (in any of its forms) contained in wood (see Chap 4) MC includes water or water vapor absorbed into cell walls and free water within the hollow center of the cells (lumina) it is expressed as weight percentage The amount of water vapor wood can absorb depends on wood species most species can absorb water vapor to increase their mass approximately 30 above an ovendry MC condition This water is hydrogen bound within the cell wall matrix of hemicelluloses and to some extent cellulose The limit to the amount of water bound in the wood cell wall is the fiber saturation point
The amount of water vapor wood absorbs depends on the relative humidity (RH) of the surrounding air If wood is stored at 0 RH the MC will eventually approach 0 If
wood is stored at 100 RH the MC will eventually reach fiber saturation (approximately 30 moisture) Of course if kept at a constant RH between these two extremes wood will stabilize at a MC between 0 and 30 The RH con-trols the MC and when the MC is in balance with the RH the wood is at its equilibrium moisture content (EMC) This rarely happens because as the RH changes so does the MC of the wood and atmospheric RH is continually changing It varies through daily and seasonal cycles thus driving the MC of wood through daily and seasonal cycles See Chapter 4 for more information on MC and EMC
Finishes cannot change EMC they affect only the rate at which absorption and desorption occur (see Moisture- Excluding Effectiveness)
Wood outdoors in most areas of the United States cycles around a MC of approximately 12 to 14 In the Pa-cific Northwest average MC can be slightly higher (12 to 16) and in the Southwest slightly lower (6 to 9) (Chap 13 Tables 13ndash1 and 13ndash2) Daily and annual MC may vary from these averages In general wood outdoors decreases MC during the summer and increases MC during the winter (Wood indoors in northern climates increases MC during the summer and decreases MC during the winter In the south this distinction is not clear because air con-ditioning affects indoor RH and thus MC) Even in humid areas RH is rarely high enough for a long enough period to bring the MC of wood above 20 Wood warmed by the sun experiences a virtual RH far below the ambient RH The surface dries faster than the rest of the lumber This is why cupping and checking often occur on decking boards the top surface is much drier than the rest of the board Shrink-age of the top surface commensurate with this dryness causes cupping and checking parallel to the grain (Juvenile wood often checks perpendicular to the grain)
As mentioned fiber saturation is the limit to the amount of water vapor that wood absorbs Water vapor absorbs slowly compared with liquid water Liquid water can quickly bring
General Technical Report FPLndashGTRndash190
16ndash6
General Technical Report FPLndashGTRndash190
Figure 16ndash6 Lumber grain affects finish perfor-mance (a) edge-grain (vertical-grain or quarter-sawn) board (b) edge-grain board containing pith (c) flat-grain (slash-grain or plain-sawn) board Arrows show radial (R) tangential (T) and longitudinal (L) orientation of wood grain
MoistureThe chemical commonly called water (H2O) has three states according to temperature and pressure conditions gas (water vapor or steam) liquid (water) or solid (ice) When water interacts with wood it can occur in a fourth state (bound water) Moisture is not one of the states of water it is a term with the power to indicate uncertainty about the waterrsquos state or to refer collectively to water in all its states in wood For example some of the moisture in a board at 50 moisture content will occur as liquid water (or ice depending on the temperature) within cell cavities of the wood some will occur as water vapor and some will be bound water (bound within cell walls) Moisture thus ac-counts for any or all of these states in a single word In this chapter the term water designates water in its liquid state
wood to fiber saturation and it is the only way to bring the MC of wood above fiber saturation As wood continues to absorb liquid water above its fiber saturation point the wa-ter is stored in the lumen when water replaces all the air in the lumen the wood is waterlogged and its MC can be as high as 200
Wood can get wet many ways (such as windblown rain leaks condensation dew and melting ice and snow) The result is always the samemdashpoor performance of wood and finish Water is usually involved if finishes perform poorly on wood Even if other factors initially cause poor perfor-mance water accelerates degradation Fortunately the MC of lumber can be controlled However all too often this critical factor is neglected during construction and finishing
Paint wood when its average MC is about that expected to prevail during its service life (approximately 12 for most of the United States and Canada) Painting wood after it acclimates to a MC commensurate with the environment minimizes stress on film-forming finishes The MC and thus the dimensions of the piece will still fluctuate somewhat depending on the cyclic changes in atmospheric RH but the dimensional change should not be excessive Therefore film-forming finishes (such as paints) are not stressed and should not fail by cracking
Most siding and trim is kiln dried to less than 20 MC before shipment and if it has been kept dry during ship-ment and storage at the construction site it should be close to EMC by the time it is finished If wood gets wet during shipping or storage or at the construction site a MC of less than 20 is not likely If wet wood is used it will dry in service and shrinkage may cause warping twisting and checking If the MC of wood exceeds 20 when the wood is painted the risk of blistering and peeling is increased Moreover water-soluble extractives in species such as redwood and western redcedar may discolor paint
Plywood particleboard hardboard and other wood compos-ites change MC during manufacture Frequently the MC of these materials is not known and may vary depending on the manufacturing process As with other wood products condi-tion wood composites prior to finishing
Dimensional ChangeDimensional change depends on wood species and varies within a particular species Average shrinkage values ob-tained by drying wood from its green state to ovendry vary from 24 for radial western redcedar to 119 for tangen-tial beech (Table 16ndash1) Dimension in service does not vary to this extent because the MC seldom goes below 6 (Chap 13 Table 13ndash1) A film-forming finish would likely decrease this range but only if the end grain is sealed unsealed end grain increases MC of painted wood (see Moisture Exclud-ing Effectiveness)
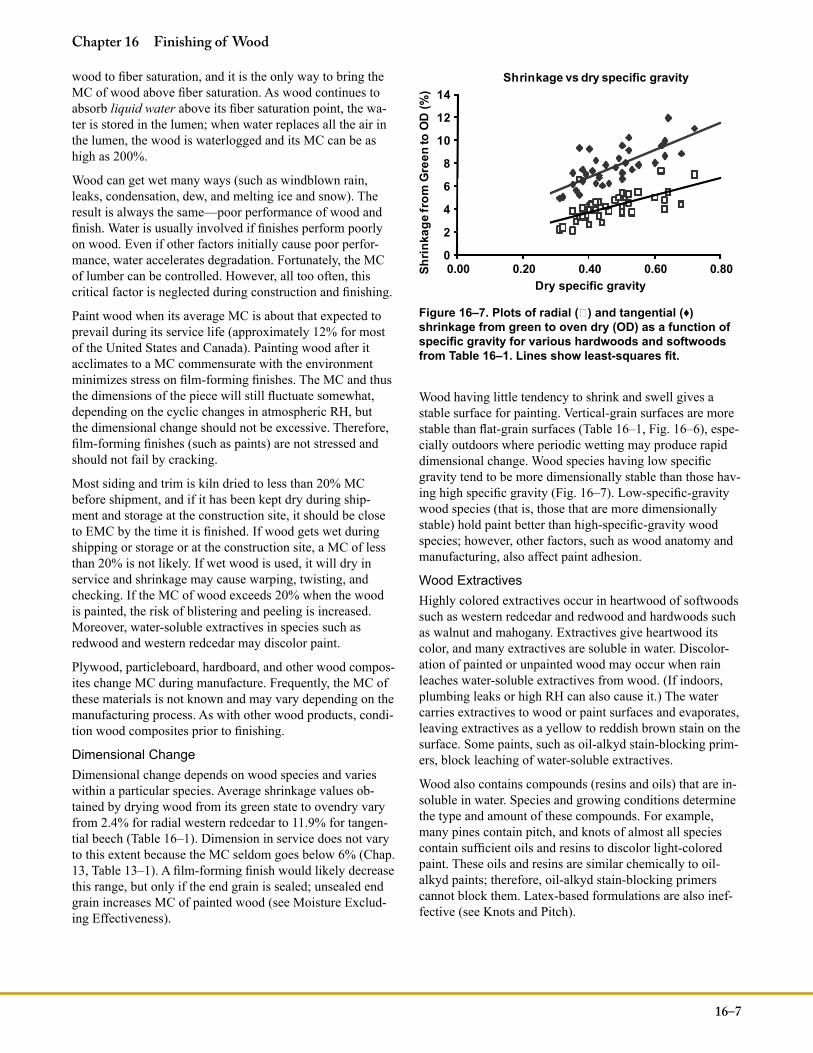
Wood having little tendency to shrink and swell gives a stable surface for painting Vertical-grain surfaces are more stable than flat-grain surfaces (Table 16ndash1 Fig 16ndash6) espe-cially outdoors where periodic wetting may produce rapid dimensional change Wood species having low specific gravity tend to be more dimensionally stable than those hav-ing high specific gravity (Fig 16ndash7) Low-specific-gravity wood species (that is those that are more dimensionally stable) hold paint better than high-specific-gravity wood species however other factors such as wood anatomy and manufacturing also affect paint adhesion
Wood ExtractivesHighly colored extractives occur in heartwood of softwoods such as western redcedar and redwood and hardwoods such as walnut and mahogany Extractives give heartwood its color and many extractives are soluble in water Discolor-ation of painted or unpainted wood may occur when rain leaches water-soluble extractives from wood (If indoors plumbing leaks or high RH can also cause it) The water carries extractives to wood or paint surfaces and evaporates leaving extractives as a yellow to reddish brown stain on the surface Some paints such as oil-alkyd stain-blocking prim-ers block leaching of water-soluble extractives
Wood also contains compounds (resins and oils) that are in-soluble in water Species and growing conditions determine the type and amount of these compounds For example many pines contain pitch and knots of almost all species contain sufficient oils and resins to discolor light-colored paint These oils and resins are similar chemically to oil-alkyd paints therefore oil-alkyd stain-blocking primers cannot block them Latex-based formulations are also inef-fective (see Knots and Pitch)
16ndash7
Chapter 16 Finishing of Wood
0
2
4
6
8
10
12
14
000 020 040 060 080Dry specific gravity
Shrinkage vs dry specific gravity
Shri
nkag
e fr
om G
reen
to O
D (
)
Figure 16ndash7 Plots of radial () and tangential (diams) shrinkage from green to oven dry (OD) as a function of specific gravity for various hardwoods and softwoods from Table 16ndash1 Lines show least-squares fit
Shellac (a natural product made from the secretion of lac-producing insects such as Kerria lacca) and specially formulated synthetic finishes block extractives bleed from knots Use shellac or synthetic knot sealers only over knots and paint over them to protect them from water Blocking diffusion of extractives from knots is difficult and no easy fix is available other than the extra step of sealing knots before priming By doing this extra step you can minimize discoloration of white paint on knotty pinemdashbut it is not easy If you want white use knot-free wood Difficulty seal-ing knots is the main reason manufacturers cut out the knots to make fingerjointededge-glued lumber
Another option for knots is to use them to accentuate the wood Use a stain to bring out the color and make the knots a part of the desired appearance
Wood ProductsSix types of wood products are commonly used on the exte-rior of structures (1) lumber (2) plywood (3) fingerjointed wood (4) reconstituted wood products (such as hardboard and oriented strandboard (OSB)) (5) woodndashplastic com-posites and (6) preservative- or fire-retardant-treated wood Each product has unique characteristics that affect applica-tion and performance of finishes
LumberLumber (such as siding trim and decking) for exterior use is available in many species and products and several publi-cations describe grades
bull ldquoStandard Grading Rules for West Coast Lumberrdquo West Coast Lumber Inspection Bureau Portland Oregon
bull ldquoStandard Grading Rules for Canadian Lumberrdquo Na-tional Lumber Grades Authority New Westminster British Columbia
bull ldquoWestern Lumber Grading Rulesrdquo Western Wood Prod-ucts Association Portland Oregon
bull ldquoStandard Grading Rules for Northeastern Lumberrdquo Northeastern Lumber Manufacturers Association Cum-berland Maine
bull ldquoStandard Grading Rulesrdquo Northern Softwood Lumber Bureau Cumberland Maine
bull ldquoStandard Specifications for Grades of California Red-wood Lumberrdquo Redwood Inspection Service Pleasant Hill California
bull ldquoStandard Grading Rules for Southern Pine Lumberrdquo Southern Pine Inspection Bureau Pensacola Florida
These publications are the basis for selecting wood to meet codes They give specifications for appearance grades (such as siding and trim) and for structural lumber (such as fram-ing and decking) Western redcedar and redwood are the only species available in vertical-grain grades and saw-textured surfaces (Table 16ndash1) Southern yellow pine and Douglas-fir plywood are available in saw-textured surfaces
Unless specified as vertical grain the grade contains mostly flat-grain lumber Lumber used for board and batten drop or shiplap siding is frequently flat grain Bevel siding is commonly produced in several grades The highest grade of redwood and western redcedar bevel siding is vertical grain and all heartwood Other grades of redwood and western redcedar may be flat vertical or mixed grain and may not be all heartwood Grade is important because species grain orientation and surface texture affect paint-holding charac-teristics
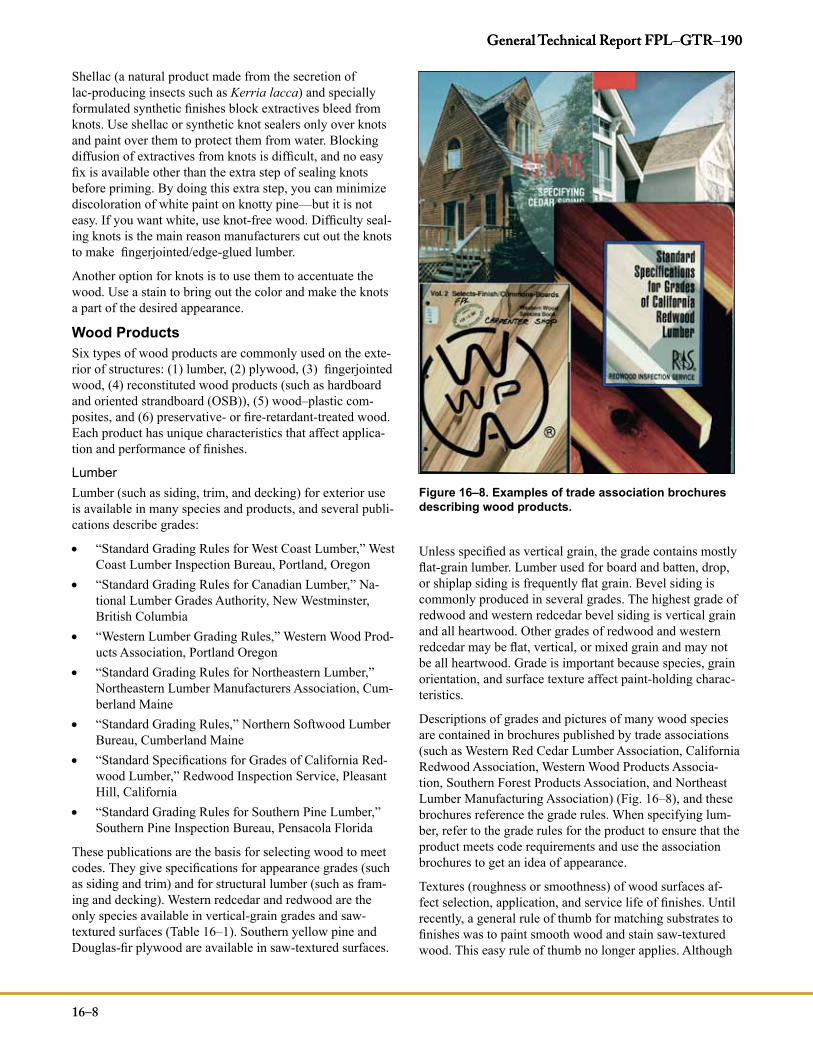
Descriptions of grades and pictures of many wood species are contained in brochures published by trade associations (such as Western Red Cedar Lumber Association California Redwood Association Western Wood Products Associa-tion Southern Forest Products Association and Northeast Lumber Manufacturing Association) (Fig 16ndash8) and these brochures reference the grade rules When specifying lum-ber refer to the grade rules for the product to ensure that the product meets code requirements and use the association brochures to get an idea of appearance
Textures (roughness or smoothness) of wood surfaces af-fect selection application and service life of finishes Until recently a general rule of thumb for matching substrates to finishes was to paint smooth wood and stain saw-textured wood This easy rule of thumb no longer applies Although
General Technical Report FPLndashGTRndash190
16ndash8
General Technical Report FPLndashGTRndash190
Figure 16ndash8 Examples of trade association brochures describing wood products
penetrating finishes such as solvent-borne oil-based semi-transparent stains last longer on saw-textured wood than on smooth-planed wood many film-forming finishes such as opaque stains and paints also last longer on saw-textured wood than on smooth-planed wood Finishes adhere better film buildup is thicker and service life of the finish is longer on saw-textured surfaces than smooth-planed surfaces par-ticularly for flat-grain lumber
PlywoodAs with lumber species grain orientation and surface tex-ture affect finishing of plywood Manufacturers of softwood plywood use a lathe to peel logs to give flat-grain veneer Peeling causes small checks parallel to grain When the face veneer is laid up to form the plywood panel the side of the veneer having lathe checks is placed interior to give a surface free of checks However after plywood is placed
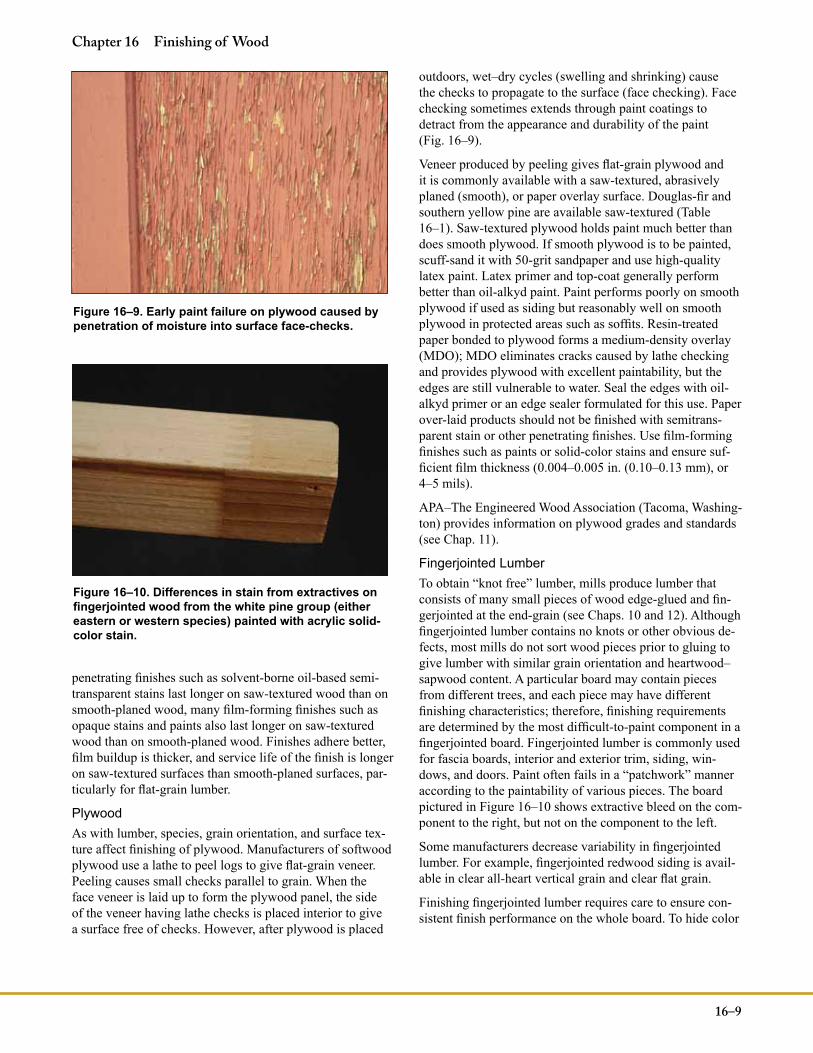
outdoors wetndashdry cycles (swelling and shrinking) cause the checks to propagate to the surface (face checking) Face checking sometimes extends through paint coatings to detract from the appearance and durability of the paint (Fig 16ndash9)
Veneer produced by peeling gives flat-grain plywood and it is commonly available with a saw-textured abrasively planed (smooth) or paper overlay surface Douglas-fir and southern yellow pine are available saw-textured (Table 16ndash1) Saw-textured plywood holds paint much better than does smooth plywood If smooth plywood is to be painted scuff-sand it with 50-grit sandpaper and use high-quality latex paint Latex primer and top-coat generally perform better than oil-alkyd paint Paint performs poorly on smooth plywood if used as siding but reasonably well on smooth plywood in protected areas such as soffits Resin-treated paper bonded to plywood forms a medium-density overlay (MDO) MDO eliminates cracks caused by lathe checking and provides plywood with excellent paintability but the edges are still vulnerable to water Seal the edges with oil-alkyd primer or an edge sealer formulated for this use Paper over-laid products should not be finished with semitrans-parent stain or other penetrating finishes Use film-forming finishes such as paints or solid-color stains and ensure suf-ficient film thickness (0004ndash0005 in (010ndash013 mm) or 4ndash5 mils)
APAndashThe Engineered Wood Association (Tacoma Washing-ton) provides information on plywood grades and standards (see Chap 11)
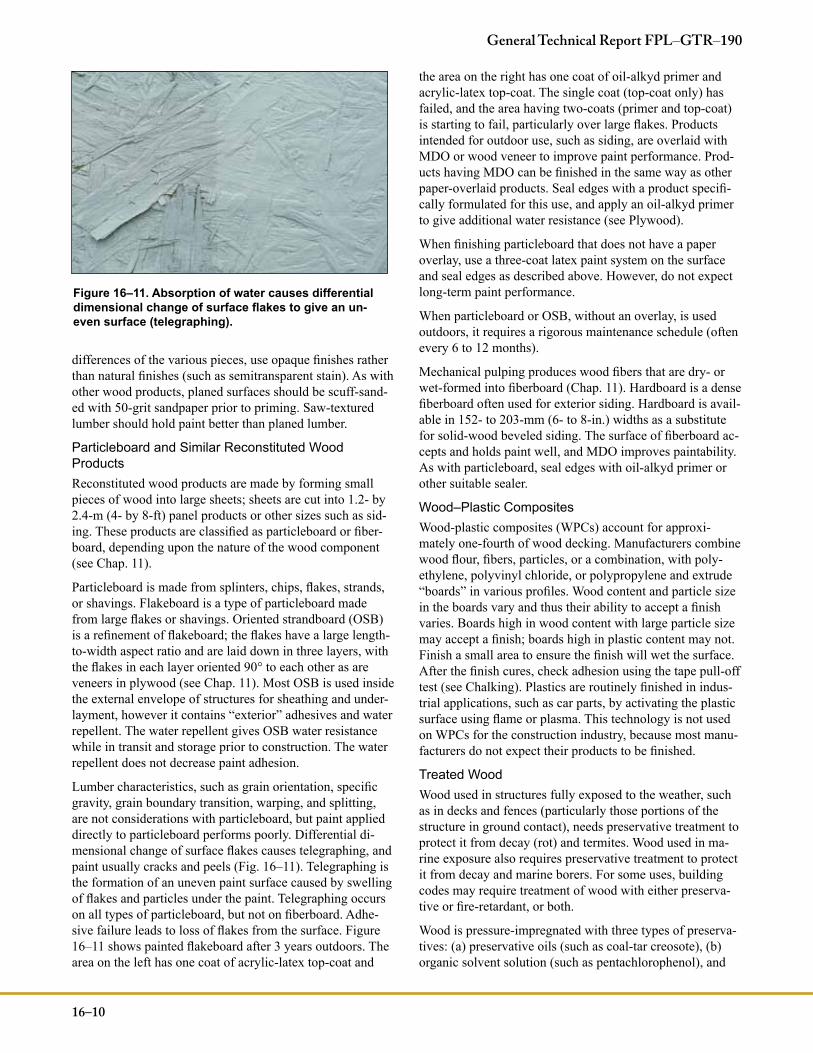
Fingerjointed LumberTo obtain ldquoknot freerdquo lumber mills produce lumber that consists of many small pieces of wood edge-glued and fin-gerjointed at the end-grain (see Chaps 10 and 12) Although fingerjointed lumber contains no knots or other obvious de-fects most mills do not sort wood pieces prior to gluing to give lumber with similar grain orientation and heartwoodndashsapwood content A particular board may contain pieces from different trees and each piece may have different finishing characteristics therefore finishing requirements are determined by the most difficult-to-paint component in a fingerjointed board Fingerjointed lumber is commonly used for fascia boards interior and exterior trim siding win-dows and doors Paint often fails in a ldquopatchworkrdquo manner according to the paintability of various pieces The board pictured in Figure 16ndash10 shows extractive bleed on the com-ponent to the right but not on the component to the left
Some manufacturers decrease variability in fingerjointed lumber For example fingerjointed redwood siding is avail-able in clear all-heart vertical grain and clear flat grain
Finishing fingerjointed lumber requires care to ensure con-sistent finish performance on the whole board To hide color
16ndash9
Chapter 16 Finishing of Wood
Figure 16ndash9 Early paint failure on plywood caused by penetration of moisture into surface face-checks
Figure 16ndash10 Differences in stain from extractives on fingerjointed wood from the white pine group (either eastern or western species) painted with acrylic solid-color stain
differences of the various pieces use opaque finishes rather than natural finishes (such as semitransparent stain) As with other wood products planed surfaces should be scuff-sand-ed with 50-grit sandpaper prior to priming Saw-textured lumber should hold paint better than planed lumber
Particleboard and Similar Reconstituted Wood ProductsReconstituted wood products are made by forming small pieces of wood into large sheets sheets are cut into 12- by 24-m (4- by 8-ft) panel products or other sizes such as sid-ing These products are classified as particleboard or fiber-board depending upon the nature of the wood component (see Chap 11)
Particleboard is made from splinters chips flakes strands or shavings Flakeboard is a type of particleboard made from large flakes or shavings Oriented strandboard (OSB) is a refinement of flakeboard the flakes have a large length-to-width aspect ratio and are laid down in three layers with the flakes in each layer oriented 90deg to each other as are veneers in plywood (see Chap 11) Most OSB is used inside the external envelope of structures for sheathing and under-layment however it contains ldquoexteriorrdquo adhesives and water repellent The water repellent gives OSB water resistance while in transit and storage prior to construction The water repellent does not decrease paint adhesion
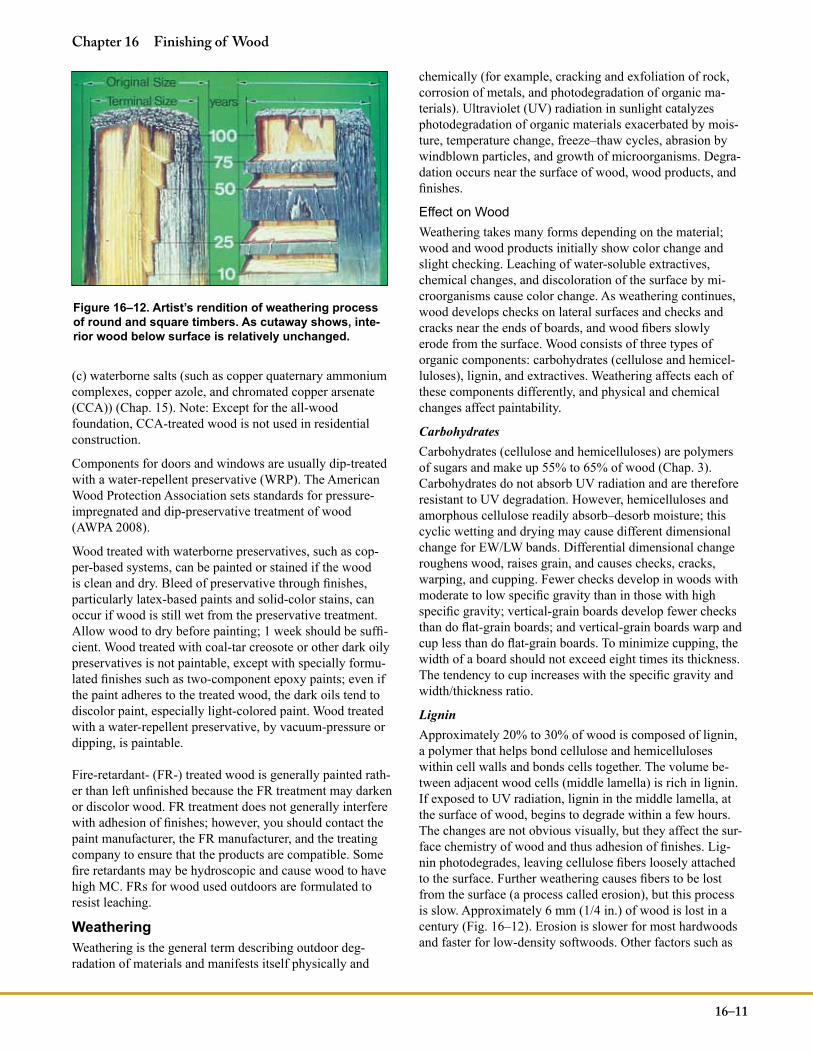
Lumber characteristics such as grain orientation specific gravity grain boundary transition warping and splitting are not considerations with particleboard but paint applied directly to particleboard performs poorly Differential di-mensional change of surface flakes causes telegraphing and paint usually cracks and peels (Fig 16ndash11) Telegraphing is the formation of an uneven paint surface caused by swelling of flakes and particles under the paint Telegraphing occurs on all types of particleboard but not on fiberboard Adhe-sive failure leads to loss of flakes from the surface Figure 16ndash11 shows painted flakeboard after 3 years outdoors The area on the left has one coat of acrylic-latex top-coat and
the area on the right has one coat of oil-alkyd primer and acrylic-latex top-coat The single coat (top-coat only) has failed and the area having two-coats (primer and top-coat) is starting to fail particularly over large flakes Products intended for outdoor use such as siding are overlaid with MDO or wood veneer to improve paint performance Prod-ucts having MDO can be finished in the same way as other paper-overlaid products Seal edges with a product specifi-cally formulated for this use and apply an oil-alkyd primer to give additional water resistance (see Plywood)
When finishing particleboard that does not have a paper overlay use a three-coat latex paint system on the surface and seal edges as described above However do not expect long-term paint performance
When particleboard or OSB without an overlay is used outdoors it requires a rigorous maintenance schedule (often every 6 to 12 months)
Mechanical pulping produces wood fibers that are dry- or wet-formed into fiberboard (Chap 11) Hardboard is a dense fiberboard often used for exterior siding Hardboard is avail-able in 152- to 203-mm (6- to 8-in) widths as a substitute for solid-wood beveled siding The surface of fiberboard ac-cepts and holds paint well and MDO improves paintability As with particleboard seal edges with oil-alkyd primer or other suitable sealer
WoodndashPlastic CompositesWood-plastic composites (WPCs) account for approxi-mately one-fourth of wood decking Manufacturers combine wood flour fibers particles or a combination with poly-ethylene polyvinyl chloride or polypropylene and extrude ldquoboardsrdquo in various profiles Wood content and particle size in the boards vary and thus their ability to accept a finish varies Boards high in wood content with large particle size may accept a finish boards high in plastic content may not Finish a small area to ensure the finish will wet the surface After the finish cures check adhesion using the tape pull-off test (see Chalking) Plastics are routinely finished in indus-trial applications such as car parts by activating the plastic surface using flame or plasma This technology is not used on WPCs for the construction industry because most manu-facturers do not expect their products to be finished
Treated WoodWood used in structures fully exposed to the weather such as in decks and fences (particularly those portions of the structure in ground contact) needs preservative treatment to protect it from decay (rot) and termites Wood used in ma-rine exposure also requires preservative treatment to protect it from decay and marine borers For some uses building codes may require treatment of wood with either preserva-tive or fire-retardant or both
Wood is pressure-impregnated with three types of preserva-tives (a) preservative oils (such as coal-tar creosote) (b) organic solvent solution (such as pentachlorophenol) and
16ndash10
General Technical Report FPLndashGTRndash190
Figure 16ndash11 Absorption of water causes differential dimensional change of surface flakes to give an un-even surface (telegraphing)
(c) waterborne salts (such as copper quaternary ammonium complexes copper azole and chromated copper arsenate (CCA)) (Chap 15) Note Except for the all-wood foundation CCA-treated wood is not used in residential construction
Components for doors and windows are usually dip-treated with a water-repellent preservative (WRP) The American Wood Protection Association sets standards for pressure- impregnated and dip-preservative treatment of wood (AWPA 2008)
Wood treated with waterborne preservatives such as cop-per-based systems can be painted or stained if the wood is clean and dry Bleed of preservative through finishes particularly latex-based paints and solid-color stains can occur if wood is still wet from the preservative treatment Allow wood to dry before painting 1 week should be suffi-cient Wood treated with coal-tar creosote or other dark oily preservatives is not paintable except with specially formu-lated finishes such as two-component epoxy paints even if the paint adheres to the treated wood the dark oils tend to discolor paint especially light-colored paint Wood treated with a water-repellent preservative by vacuum-pressure or dipping is paintable
Fire-retardant- (FR-) treated wood is generally painted rath-er than left unfinished because the FR treatment may darken or discolor wood FR treatment does not generally interfere with adhesion of finishes however you should contact the paint manufacturer the FR manufacturer and the treating company to ensure that the products are compatible Some fire retardants may be hydroscopic and cause wood to have high MC FRs for wood used outdoors are formulated to resist leaching
WeatheringWeathering is the general term describing outdoor deg-radation of materials and manifests itself physically and
chemically (for example cracking and exfoliation of rock corrosion of metals and photodegradation of organic ma-terials) Ultraviolet (UV) radiation in sunlight catalyzes photodegradation of organic materials exacerbated by mois-ture temperature change freezendashthaw cycles abrasion by windblown particles and growth of microorganisms Degra-dation occurs near the surface of wood wood products and finishes
Effect on WoodWeathering takes many forms depending on the material wood and wood products initially show color change and slight checking Leaching of water-soluble extractives chemical changes and discoloration of the surface by mi-croorganisms cause color change As weathering continues wood develops checks on lateral surfaces and checks and cracks near the ends of boards and wood fibers slowly erode from the surface Wood consists of three types of organic components carbohydrates (cellulose and hemicel-luloses) lignin and extractives Weathering affects each of these components differently and physical and chemical changes affect paintability
CarbohydratesCarbohydrates (cellulose and hemicelluloses) are polymers of sugars and make up 55 to 65 of wood (Chap 3) Carbohydrates do not absorb UV radiation and are therefore resistant to UV degradation However hemicelluloses and amorphous cellulose readily absorbndashdesorb moisture this cyclic wetting and drying may cause different dimensional change for EWLW bands Differential dimensional change roughens wood raises grain and causes checks cracks warping and cupping Fewer checks develop in woods with moderate to low specific gravity than in those with high specific gravity vertical-grain boards develop fewer checks than do flat-grain boards and vertical-grain boards warp and cup less than do flat-grain boards To minimize cupping the width of a board should not exceed eight times its thickness The tendency to cup increases with the specific gravity and widththickness ratio
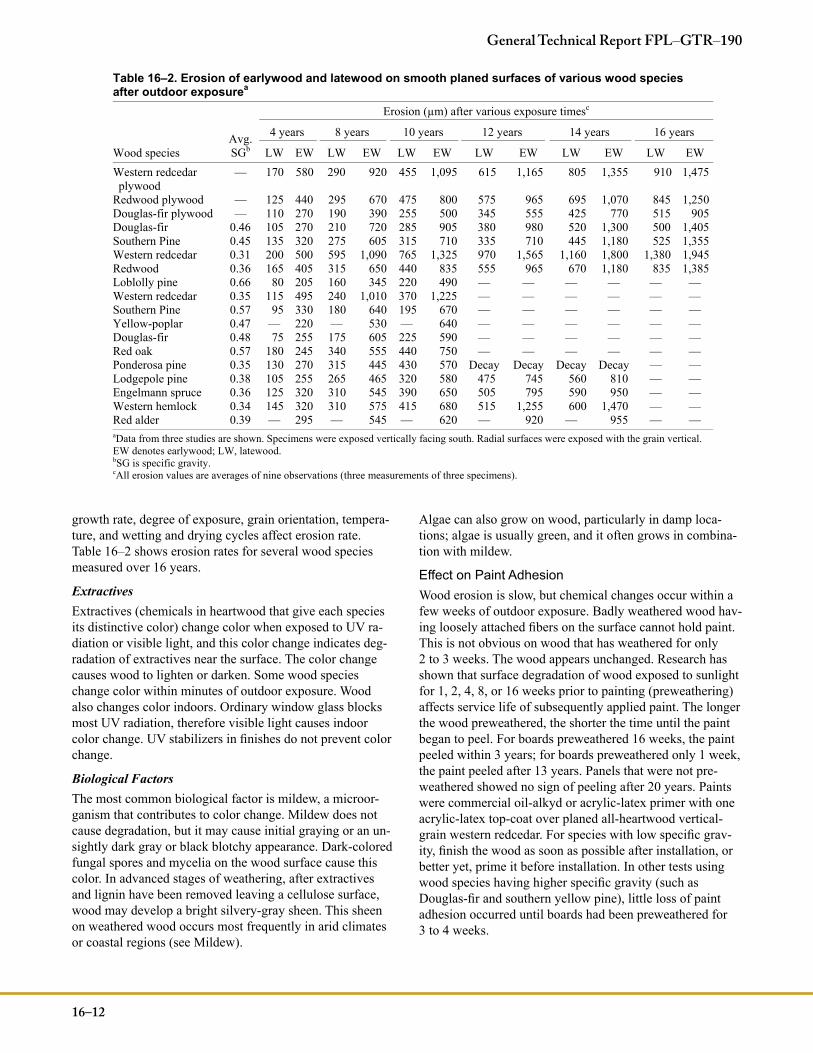
LigninApproximately 20 to 30 of wood is composed of lignin a polymer that helps bond cellulose and hemicelluloses within cell walls and bonds cells together The volume be-tween adjacent wood cells (middle lamella) is rich in lignin If exposed to UV radiation lignin in the middle lamella at the surface of wood begins to degrade within a few hours The changes are not obvious visually but they affect the sur-face chemistry of wood and thus adhesion of finishes Lig-nin photodegrades leaving cellulose fibers loosely attached to the surface Further weathering causes fibers to be lost from the surface (a process called erosion) but this process is slow Approximately 6 mm (14 in) of wood is lost in a century (Fig 16ndash12) Erosion is slower for most hardwoods and faster for low-density softwoods Other factors such as
16ndash11
Chapter 16 Finishing of Wood
Figure 16ndash12 Artistrsquos rendition of weathering process of round and square timbers As cutaway shows inte-rior wood below surface is relatively unchanged
growth rate degree of exposure grain orientation tempera-ture and wetting and drying cycles affect erosion rate Table 16ndash2 shows erosion rates for several wood species measured over 16 years
ExtractivesExtractives (chemicals in heartwood that give each species its distinctive color) change color when exposed to UV ra-diation or visible light and this color change indicates deg-radation of extractives near the surface The color change causes wood to lighten or darken Some wood species change color within minutes of outdoor exposure Wood also changes color indoors Ordinary window glass blocks most UV radiation therefore visible light causes indoor color change UV stabilizers in finishes do not prevent color change
Biological FactorsThe most common biological factor is mildew a microor-ganism that contributes to color change Mildew does not cause degradation but it may cause initial graying or an un-sightly dark gray or black blotchy appearance Dark-colored fungal spores and mycelia on the wood surface cause this color In advanced stages of weathering after extractives and lignin have been removed leaving a cellulose surface wood may develop a bright silvery-gray sheen This sheen on weathered wood occurs most frequently in arid climates or coastal regions (see Mildew)
Algae can also grow on wood particularly in damp loca-tions algae is usually green and it often grows in combina-tion with mildew
Effect on Paint AdhesionWood erosion is slow but chemical changes occur within a few weeks of outdoor exposure Badly weathered wood hav-ing loosely attached fibers on the surface cannot hold paint This is not obvious on wood that has weathered for only 2 to 3 weeks The wood appears unchanged Research has shown that surface degradation of wood exposed to sunlight for 1 2 4 8 or 16 weeks prior to painting (preweathering) affects service life of subsequently applied paint The longer the wood preweathered the shorter the time until the paint began to peel For boards preweathered 16 weeks the paint peeled within 3 years for boards preweathered only 1 week the paint peeled after 13 years Panels that were not pre-weathered showed no sign of peeling after 20 years Paints were commercial oil-alkyd or acrylic-latex primer with one acrylic-latex top-coat over planed all-heartwood vertical-grain western redcedar For species with low specific grav-ity finish the wood as soon as possible after installation or better yet prime it before installation In other tests using wood species having higher specific gravity (such as Douglas-fir and southern yellow pine) little loss of paint adhesion occurred until boards had been preweathered for 3 to 4 weeks
16ndash12
General Technical Report FPLndashGTRndash190
Table 16ndash2 Erosion of earlywood and latewood on smooth planed surfaces of various wood species after outdoor exposurea
Erosion (microm) after various exposure timesc
AvgSGb
4 years 8 years 10 years 12 years 14 years 16 years
Wood species LW EW LW EW LW EW LW EW LW EW LW EW Western redcedar plywood
Effect on Wood FinishesFinish resins (ingredients that form films or penetrate wood) are organic polymers and as with lignin in wood UV radia-tion degrades the polymer causing slow erosion Erosion rate depends on the resistance of the polymer to UV radia-tion Paints and stains based on latex polymers are more resistant to UV radiation than those based on oil-alkyds UV radiation does not usually degrade paint pigments therefore as resin degrades pigments loosen and erode from the sur-face Degraded resin and loose pigments give film-forming finishes a chalky appearance Pigment erodes from oil-based semitransparent stains to expose wood
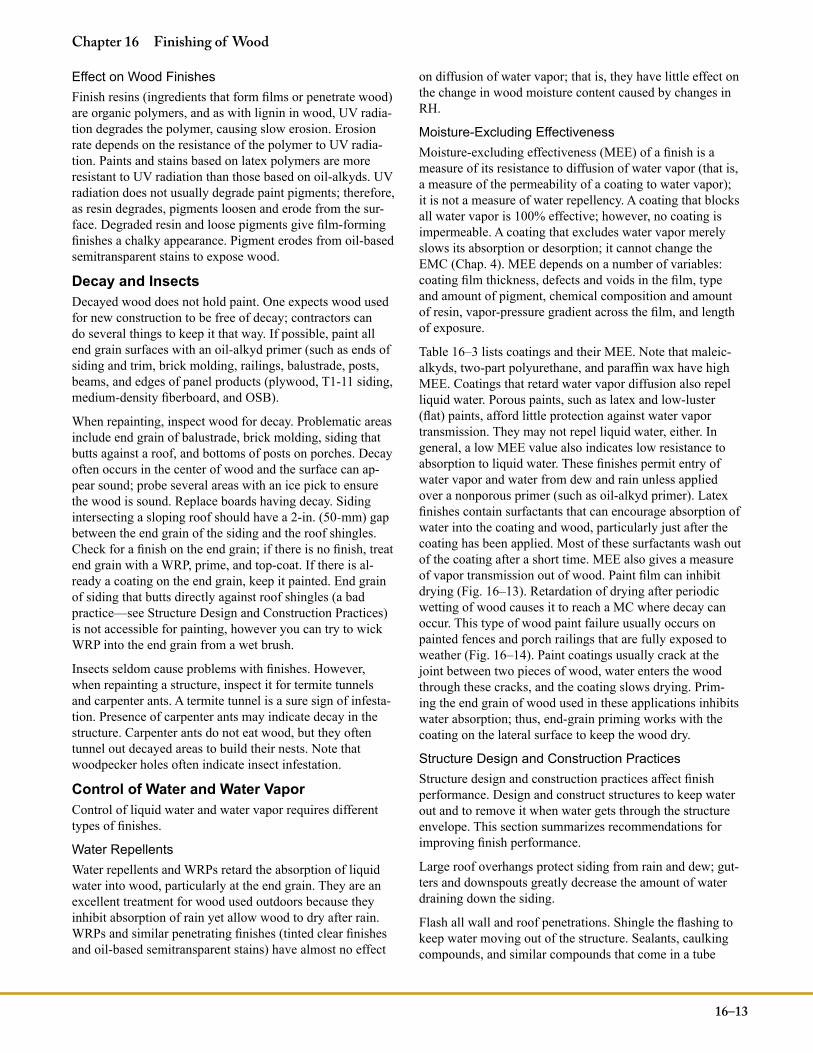
Decay and InsectsDecayed wood does not hold paint One expects wood used for new construction to be free of decay contractors can do several things to keep it that way If possible paint all end grain surfaces with an oil-alkyd primer (such as ends of siding and trim brick molding railings balustrade posts beams and edges of panel products (plywood T1-11 siding medium-density fiberboard and OSB)
When repainting inspect wood for decay Problematic areas include end grain of balustrade brick molding siding that butts against a roof and bottoms of posts on porches Decay often occurs in the center of wood and the surface can ap-pear sound probe several areas with an ice pick to ensure the wood is sound Replace boards having decay Siding intersecting a sloping roof should have a 2-in (50-mm) gap between the end grain of the siding and the roof shingles Check for a finish on the end grain if there is no finish treat end grain with a WRP prime and top-coat If there is al-ready a coating on the end grain keep it painted End grain of siding that butts directly against roof shingles (a bad practicemdashsee Structure Design and Construction Practices) is not accessible for painting however you can try to wick WRP into the end grain from a wet brush
Insects seldom cause problems with finishes However when repainting a structure inspect it for termite tunnels and carpenter ants A termite tunnel is a sure sign of infesta-tion Presence of carpenter ants may indicate decay in the structure Carpenter ants do not eat wood but they often tunnel out decayed areas to build their nests Note that woodpecker holes often indicate insect infestation
Control of Water and Water VaporControl of liquid water and water vapor requires different types of finishes
Water RepellentsWater repellents and WRPs retard the absorption of liquid water into wood particularly at the end grain They are an excellent treatment for wood used outdoors because they inhibit absorption of rain yet allow wood to dry after rain WRPs and similar penetrating finishes (tinted clear finishes and oil-based semitransparent stains) have almost no effect
on diffusion of water vapor that is they have little effect on the change in wood moisture content caused by changes in RH
Moisture-Excluding EffectivenessMoisture-excluding effectiveness (MEE) of a finish is a measure of its resistance to diffusion of water vapor (that is a measure of the permeability of a coating to water vapor) it is not a measure of water repellency A coating that blocks all water vapor is 100 effective however no coating is impermeable A coating that excludes water vapor merely slows its absorption or desorption it cannot change the EMC (Chap 4) MEE depends on a number of variables coating film thickness defects and voids in the film type and amount of pigment chemical composition and amount of resin vapor-pressure gradient across the film and length of exposure
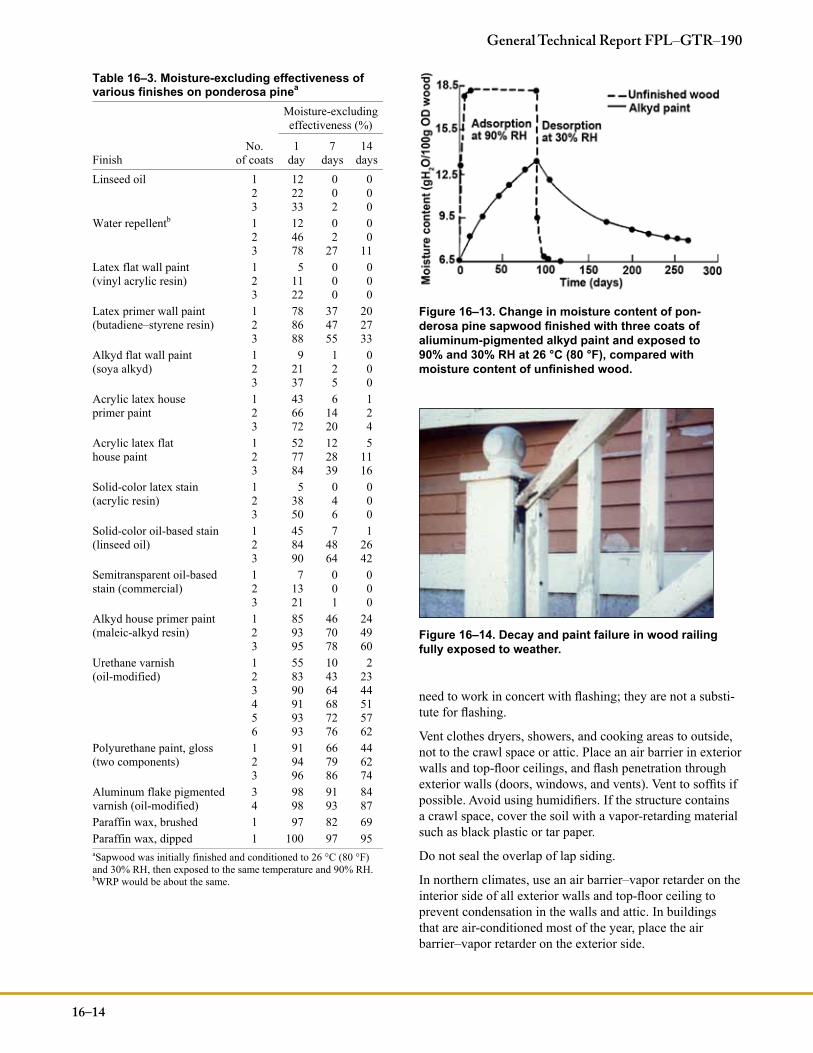
Table 16ndash3 lists coatings and their MEE Note that maleic-alkyds two-part polyurethane and paraffin wax have high MEE Coatings that retard water vapor diffusion also repel liquid water Porous paints such as latex and low-luster (flat) paints afford little protection against water vapor transmission They may not repel liquid water either In general a low MEE value also indicates low resistance to absorption to liquid water These finishes permit entry of water vapor and water from dew and rain unless applied over a nonporous primer (such as oil-alkyd primer) Latex finishes contain surfactants that can encourage absorption of water into the coating and wood particularly just after the coating has been applied Most of these surfactants wash out of the coating after a short time MEE also gives a measure of vapor transmission out of wood Paint film can inhibit drying (Fig 16ndash13) Retardation of drying after periodic wetting of wood causes it to reach a MC where decay can occur This type of wood paint failure usually occurs on painted fences and porch railings that are fully exposed to weather (Fig 16ndash14) Paint coatings usually crack at the joint between two pieces of wood water enters the wood through these cracks and the coating slows drying Prim-ing the end grain of wood used in these applications inhibits water absorption thus end-grain priming works with the coating on the lateral surface to keep the wood dry
Structure Design and Construction PracticesStructure design and construction practices affect finish performance Design and construct structures to keep water out and to remove it when water gets through the structure envelope This section summarizes recommendations for improving finish performance
Large roof overhangs protect siding from rain and dew gut-ters and downspouts greatly decrease the amount of water draining down the siding
Flash all wall and roof penetrations Shingle the flashing to keep water moving out of the structure Sealants caulking compounds and similar compounds that come in a tube
16ndash13
Chapter 16 Finishing of Wood
need to work in concert with flashing they are not a substi-tute for flashing
Vent clothes dryers showers and cooking areas to outside not to the crawl space or attic Place an air barrier in exterior walls and top-floor ceilings and flash penetration through exterior walls (doors windows and vents) Vent to soffits if possible Avoid using humidifiers If the structure contains a crawl space cover the soil with a vapor-retarding material such as black plastic or tar paper
Do not seal the overlap of lap siding
In northern climates use an air barrierndashvapor retarder on the interior side of all exterior walls and top-floor ceiling to prevent condensation in the walls and attic In buildings that are air-conditioned most of the year place the air barrierndashvapor retarder on the exterior side
16ndash14
General Technical Report FPLndashGTRndash190
Table 16ndash3 Moisture-excluding effectiveness of various finishes on ponderosa pinea
Figure 16ndash14 Decay and paint failure in wood railing fully exposed to weather
Figure 16ndash13 Change in moisture content of pon-derosa pine sapwood finished with three coats of aliuminum-pigmented alkyd paint and exposed to 90 and 30 RH at 26 degC (80 degF) compared with moisture content of unfinished wood
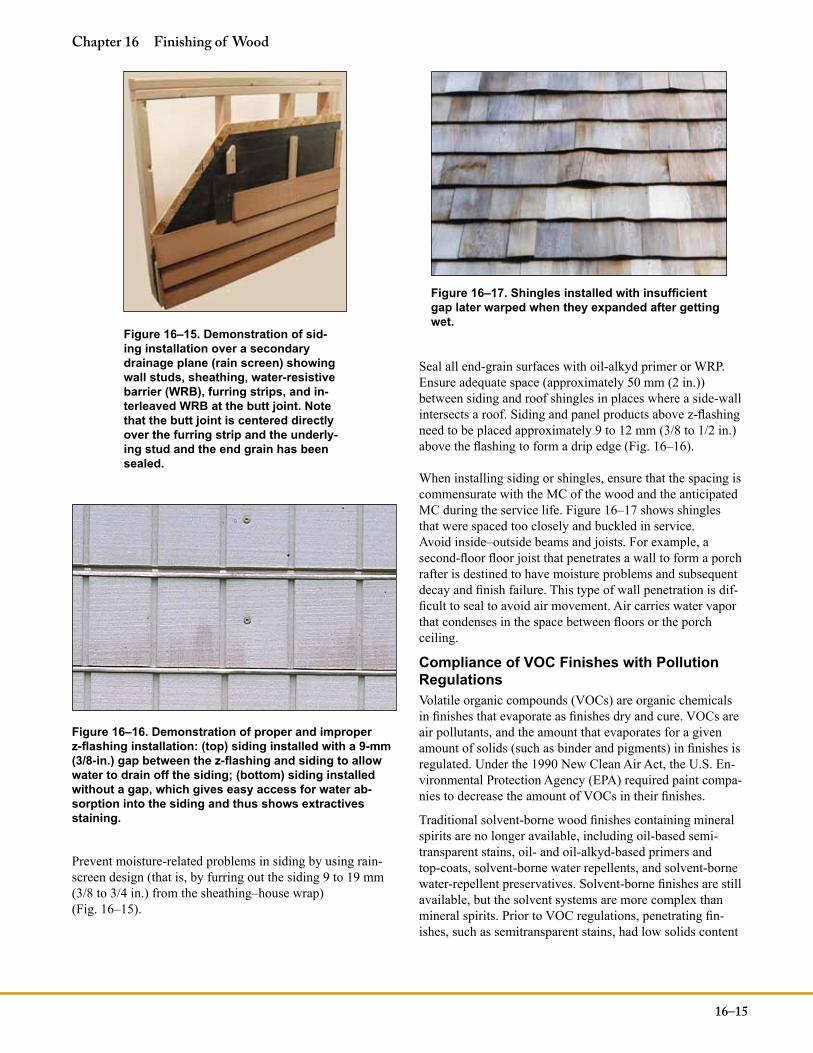
Prevent moisture-related problems in siding by using rain-screen design (that is by furring out the siding 9 to 19 mm (38 to 34 in) from the sheathingndashhouse wrap) (Fig 16ndash15)
Seal all end-grain surfaces with oil-alkyd primer or WRP Ensure adequate space (approximately 50 mm (2 in)) between siding and roof shingles in places where a side-wall intersects a roof Siding and panel products above z-flashing need to be placed approximately 9 to 12 mm (38 to 12 in) above the flashing to form a drip edge (Fig 16ndash16)
When installing siding or shingles ensure that the spacing is commensurate with the MC of the wood and the anticipated MC during the service life Figure 16ndash17 shows shingles that were spaced too closely and buckled in serviceAvoid insidendashoutside beams and joists For example a second-floor floor joist that penetrates a wall to form a porch rafter is destined to have moisture problems and subsequent decay and finish failure This type of wall penetration is dif-ficult to seal to avoid air movement Air carries water vapor that condenses in the space between floors or the porch ceiling
Compliance of VOC Finishes with Pollution RegulationsVolatile organic compounds (VOCs) are organic chemicals in finishes that evaporate as finishes dry and cure VOCs are air pollutants and the amount that evaporates for a given amount of solids (such as binder and pigments) in finishes is regulated Under the 1990 New Clean Air Act the US En-vironmental Protection Agency (EPA) required paint compa-nies to decrease the amount of VOCs in their finishes
Traditional solvent-borne wood finishes containing mineral spirits are no longer available including oil-based semi-transparent stains oil- and oil-alkyd-based primers and top-coats solvent-borne water repellents and solvent-borne water-repellent preservatives Solvent-borne finishes are still available but the solvent systems are more complex than mineral spirits Prior to VOC regulations penetrating fin-ishes such as semitransparent stains had low solids content
16ndash15
Chapter 16 Finishing of Wood
Figure 16ndash15 Demonstration of sid-ing installation over a secondary drainage plane (rain screen) showing wall studs sheathing water-resistive barrier (WRB) furring strips and in-terleaved WRB at the butt joint Note that the butt joint is centered directly over the furring strip and the underly-ing stud and the end grain has been sealed
Figure 16ndash16 Demonstration of proper and improper z-flashing installation (top) siding installed with a 9-mm (38-in) gap between the z-flashing and siding to allow water to drain off the siding (bottom) siding installed without a gap which gives easy access for water ab-sorption into the siding and thus shows extractives staining
Figure 16ndash17 Shingles installed with insufficient gap later warped when they expanded after getting wet
(pigment oils and polymers) Reformulated finishes may contain more solids new types of solvents and co-solvents or other nontraditional additives These high-solids formula-tions are prone to form films rather than penetrate wood
The paint industry also reformulated latex-based finishes to meet stringent requirements for water-based paints
Exterior Wood FinishesExterior finishes either penetrate wood cell walls or form films on the surface Penetrating finishes give a more ldquonaturalrdquo look to the wood than film-forming finishesmdashthat is they allow some of the character of wood to show through the finish In general the more natural a finish the less durable it is This section also discusses weathered wood as a ldquofinishrdquo
Weathered Wood as Natural FinishLeaving wood to weather to a natural finish may seem like an inexpensive low-maintenance alternative to finishing but this approach leads to problems Wood surfaces erode some wood species decay lumber is more prone to split and check and in most climates in North America exterior wood develops blotchy mildew growth To avoid decay wood must be all heartwood from a decay-resistant spe-cies such as redwood or western redcedar and be vertical grain to decrease the potential for splitting raised grain and cupping Only limited areas have a climate conducive to achieving a driftwood-gray appearance as wood weathers naturally the climate along the coast of New England seems conducive to developing the silvery-gray weathered patina that some people desire Even when the climatic conditions favor the development of silvery-gray patina it takes several years to achieve this appearance Protected areas under the eaves will not weather as fast as areas that are not protected
which leads to a different appearance at the top and bottom of a wall
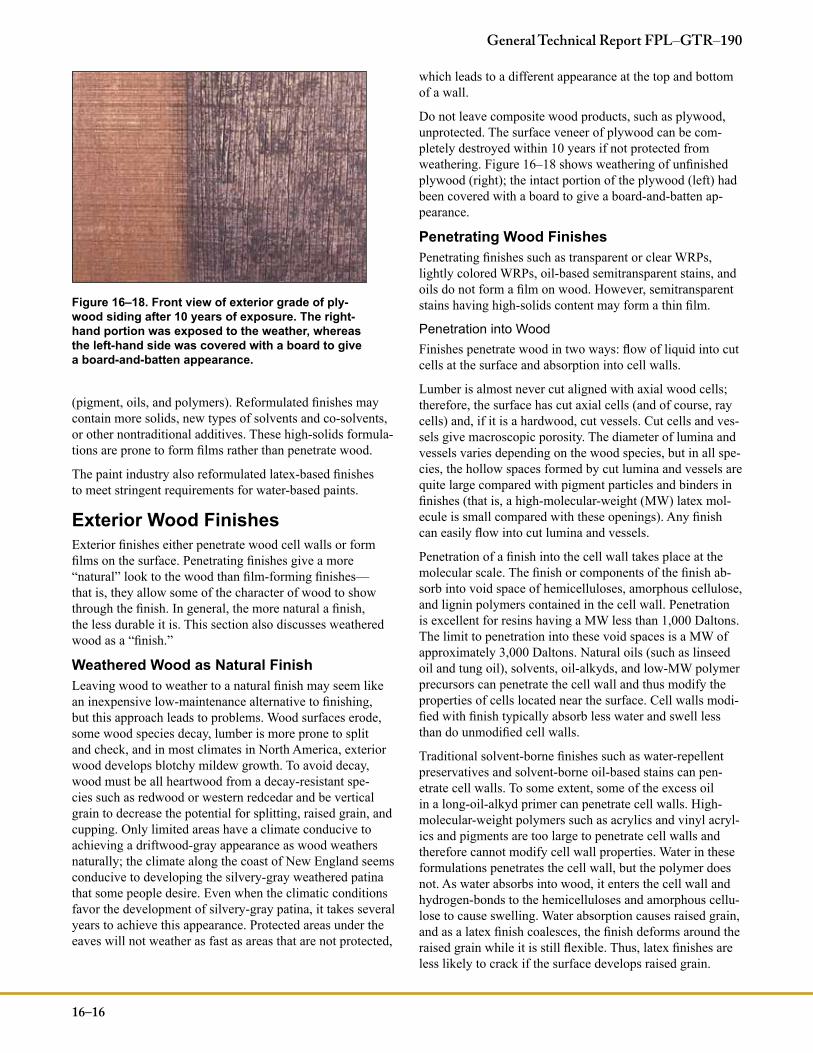
Do not leave composite wood products such as plywood unprotected The surface veneer of plywood can be com-pletely destroyed within 10 years if not protected from weathering Figure 16ndash18 shows weathering of unfinished plywood (right) the intact portion of the plywood (left) had been covered with a board to give a board-and-batten ap-pearance
Penetrating Wood FinishesPenetrating finishes such as transparent or clear WRPs lightly colored WRPs oil-based semitransparent stains and oils do not form a film on wood However semitransparent stains having high-solids content may form a thin film
Penetration into WoodFinishes penetrate wood in two ways flow of liquid into cut cells at the surface and absorption into cell walls
Lumber is almost never cut aligned with axial wood cells therefore the surface has cut axial cells (and of course ray cells) and if it is a hardwood cut vessels Cut cells and ves-sels give macroscopic porosity The diameter of lumina and vessels varies depending on the wood species but in all spe-cies the hollow spaces formed by cut lumina and vessels are quite large compared with pigment particles and binders in finishes (that is a high-molecular-weight (MW) latex mol-ecule is small compared with these openings) Any finish can easily flow into cut lumina and vessels
Penetration of a finish into the cell wall takes place at the molecular scale The finish or components of the finish ab-sorb into void space of hemicelluloses amorphous cellulose and lignin polymers contained in the cell wall Penetration is excellent for resins having a MW less than 1000 Daltons The limit to penetration into these void spaces is a MW of approximately 3000 Daltons Natural oils (such as linseed oil and tung oil) solvents oil-alkyds and low-MW polymer precursors can penetrate the cell wall and thus modify the properties of cells located near the surface Cell walls modi-fied with finish typically absorb less water and swell less than do unmodified cell walls
Traditional solvent-borne finishes such as water-repellent preservatives and solvent-borne oil-based stains can pen-etrate cell walls To some extent some of the excess oil in a long-oil-alkyd primer can penetrate cell walls High-molecular-weight polymers such as acrylics and vinyl acryl-ics and pigments are too large to penetrate cell walls and therefore cannot modify cell wall properties Water in these formulations penetrates the cell wall but the polymer does not As water absorbs into wood it enters the cell wall and hydrogen-bonds to the hemicelluloses and amorphous cellu-lose to cause swelling Water absorption causes raised grain and as a latex finish coalesces the finish deforms around the raised grain while it is still flexible Thus latex finishes are less likely to crack if the surface develops raised grain
16ndash16
General Technical Report FPLndashGTRndash190
Figure 16ndash18 Front view of exterior grade of ply-wood siding after 10 years of exposure The right-hand portion was exposed to the weather whereas the left-hand side was covered with a board to give a board-and-batten appearance
Penetrating Clear and Lightly Colored (Tinted) FinishesPenetrating transparent clear finishes have no pigments and the generic names for them are water repellents (WRs) or water-repellent preservatives (WRPs) A typical WR formu-lation contains 10 resin or drying oil 1 to 3 wax or other water repellent and solvent WRPs contain a fungicide such as 3-iodo-2-propynyl butyl carbamate (IPBC) They were traditionally formulated using turpentine or mineral spirits but now paint companies formulate them using VOC-compliant solvent and waterborne systems to comply with VOC regulations
WRPs give wood a bright golden-tan color close to the original appearance of the wood and are the first step in
protection from weathered wood as a finish WRPs decrease checking prevent water staining and help control mildew growth The first application of these finishes to smooth-planed lumber lasts approximately one year on exposed lat-eral wood surfaces subsequent applications may last longer because weathered boards absorb more finish WRPs absorb readily into end grain and can last for years to retard water absorption into end grain WRPs last longer if applied to saw-textured wood
Few companies manufacture traditional clear WRs and WRPs almost all WR and WRP formulations are lightly pigmented and contain other additives to extend their ser-vice life (Table 16ndash4) Lightly pigmented finishes perform well on decks Water- and solvent-borne formulations are available waterborne formulations may be a water emulsion
16ndash17
Chapter 16 Finishing of Wood
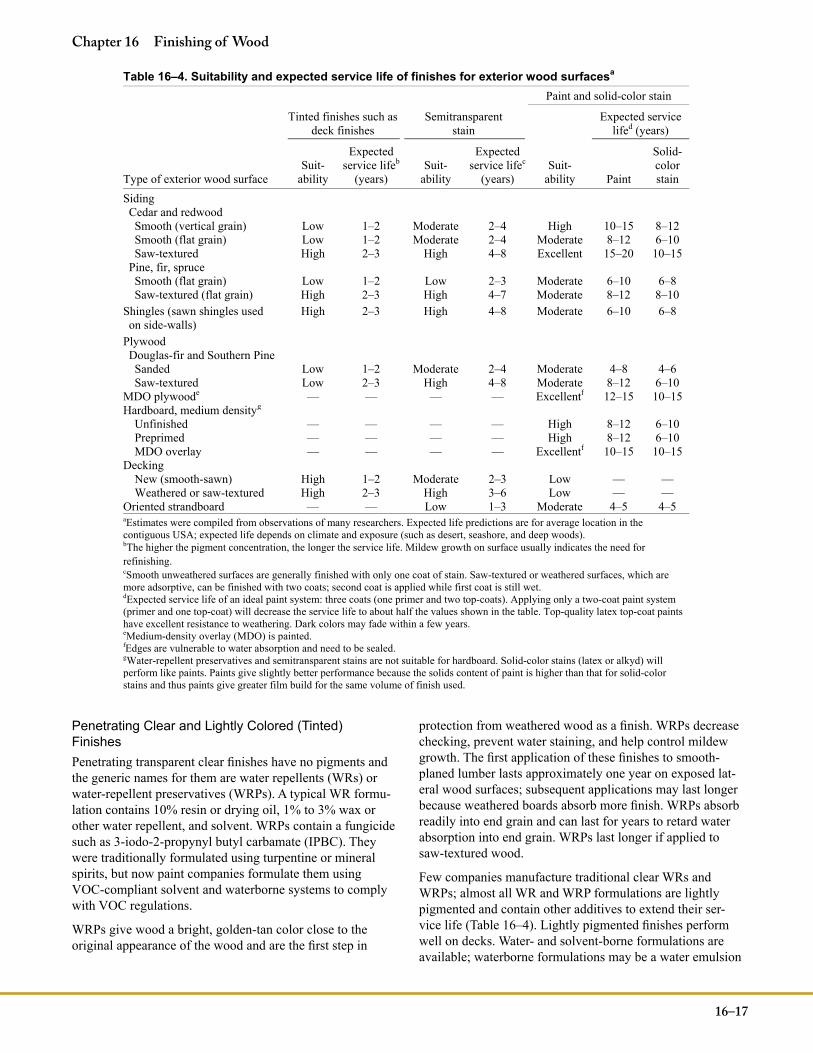
Table 16ndash4 Suitability and expected service life of finishes for exterior wood surfacesa
Paint and solid-color stain
Tinted finishes such asdeck finishes
Semitransparent stain
Expected servicelifed (years)
Type of exterior wood surface Suit-
ability
Expectedservice lifeb
(years) Suit-
ability
Expectedservice lifec
(years) Suit-
ability Paint
Solid-colorstain
Siding Cedar and redwood Smooth (vertical grain) Low 1ndash2 Moderate 2ndash4 High 10ndash15 8ndash12 Smooth (flat grain) Low 1ndash2 Moderate 2ndash4 Moderate 8ndash12 6ndash10 Saw-textured High 2ndash3 High 4ndash8 Excellent 15ndash20 10ndash15
Pine fir spruce Smooth (flat grain) Low 1ndash2 Low 2ndash3 Moderate 6ndash10 6ndash8 Saw-textured (flat grain) High 2ndash3 High 4ndash7 Moderate 8ndash12 8ndash10
Shingles (sawn shingles used on side-walls)
High 2ndash3 High 4ndash8 Moderate 6ndash10 6ndash8
Plywood Douglas-fir and Southern Pine Sanded Low 1ndash2 Moderate 2ndash4 Moderate 4ndash8 4ndash6 Saw-textured Low 2ndash3 High 4ndash8 Moderate 8ndash12 6ndash10
Decking New (smooth-sawn) High 1ndash2 Moderate 2ndash3 Low mdash mdash Weathered or saw-textured High 2ndash3 High 3ndash6 Low mdash mdash
Oriented strandboard mdash mdash Low 1ndash3 Moderate 4ndash5 4ndash5 aEstimates were compiled from observations of many researchers Expected life predictions are for average location in the contiguous USA expected life depends on climate and exposure (such as desert seashore and deep woods) bThe higher the pigment concentration the longer the service life Mildew growth on surface usually indicates the need for refinishing cSmooth unweathered surfaces are generally finished with only one coat of stain Saw-textured or weathered surfaces which are more adsorptive can be finished with two coats second coat is applied while first coat is still wet dExpected service life of an ideal paint system three coats (one primer and two top-coats) Applying only a two-coat paint system (primer and one top-coat) will decrease the service life to about half the values shown in the table Top-quality latex top-coat paints have excellent resistance to weathering Dark colors may fade within a few years eMedium-density overlay (MDO) is painted fEdges are vulnerable to water absorption and need to be sealed gWater-repellent preservatives and semitransparent stains are not suitable for hardboard Solid-color stains (latex or alkyd) willperform like paints Paints give slightly better performance because the solids content of paint is higher than that for solid-color stains and thus paints give greater film build for the same volume of finish used
of synthetic polymers Synthetic polymers do not penetrate the cell wall but form a thin film seal the surface and pro-vide water repellency Finely ground pigment gives color and partially blocks UV radiation Pigment UV stabilizers and other additives give these finishes a service life of 2 to 3 years but they lack sufficient pigment to inhibit UV degradation of the wood As with clear WRPs they usually contain a preservative to retard mildew growth
Caution Fungicides in WRPs and semitransparent stains are toxic and may be herbicides use caution to avoid skin contact and breathing vapors and protect plants and the soil around them from accidental contamination
Prior to changes in finish formulation because of VOC regu-lation paint companies formulated solvent-borne WRPs for use as a pretreatment prior to priming At this time finding a WRP formulated for this use is difficult In fact paint manu-factures seldom honor a finish warranty if customers apply a WRP prior to using their finish particularly if a different paint company made the WRP In spite of decades of re-search showing the benefits of WRP treatment of wood prior to priming they are seldom used Information on WRPs as a wood treatment prior to priming is included in this chap-ter in case a paint manufacturer markets a WRP specially formulated for this use in the future They are particularly effective for improving the service life of paint on difficult-to-paint wood species and decay-prone areas (Fig 16ndash19) Currently available WRPs can be used for sealing end grain
Protect wood and wood-based products from water and sunlight prior to delivery and while stored at the construc-tion site Avoid contaminating them with dirt oil or other contaminants Finish wood as soon as possible after installing it
of lumber edges of plywood and back-priming and are dis-cussed in several sections of this chapter
Penetrating finishes that use paraffin oil as the solvent are also available These formulations penetrate wood and the oil helps improve water repellency Paraffin oil is not a vola-tile solvent therefore these finishes comply with air qual-ity requirements They are usually a good value because virtually all of what comes in the can ends up in the wood The service life is approximately 1 year but they are easy to apply If an excessive amount is applied the wood surface may remain oily for a few weeks Do not use them as a pre-treatment prior to applying other finishes
Application New Construction
For new construction the most effective method for apply-ing a WR or WRP is to dip the entire board into the finish (Table 16ndash5) If finish is roller or spray applied back brush following application to work the finish into the wood Fin-ish the back side of siding particularly for highly colored wood species (see Back-Priming)
When wood is finished following installation apply lib-eral amounts of WRP to all end grain areas edges of panel products and other areas vulnerable to water such as the bottoms of doors and window frames Coverage is approxi-mately 61 m2 Lndash1 (250 ft2 galndash1) on a smooth surface or 37 m2 Lndash1 (150 ft2 galndash1) on a saw-textured surface Smooth wood will usually accept only a single coat a second coat will not penetrate the wood WRP treatment lasts longer on saw-textured surfaces than on smooth surfaces because more finish penetrates the wood As a natural finish the life expectancy of a WRP is only 1 to 2 years depending upon the wood and exposure However reapplication is easy particularly on decks and fences
Refinishing
Clear and lightly colored finishes (penetrating natural fin-ishes such as WRPs and lightly pigmented deck finishes) do not peel they fade and if pigmented the pigments erode As clear finishes weather they lose their water repellency turn gray and develop mildew Lightly pigmented finishes lose color If not blackened by mildew they can often be prepared for refinishing by removing dirt with a stiff-bristle brush If discolored by mildew wash the wood with com-mercial mildew cleaner or dilute liquid household bleach and detergent prior to refinishing (see Mildew)
16ndash18
General Technical Report FPLndashGTRndash190
Figure 16ndash19 Effect of water-repellent preservative treatment after 5 years of outdoor exposure A win-dow sash and frame treated with a water-repellent pre-servative and then painted B window sash and frame not treated before painting
Refinish exterior wood when the old finish has worn thin and no longer protects the wood If all factors are working in concert (good structure design to shed water effective flashing paintable wood surface and end grain sealed) paint degradation is benign weathering of paint to expose the primer or in the case of a penetrating finish to expose the wood surface In these cases there is rarely much surface preparation other than mild washing prior to re-finishing Mildew growth is not paint degradation but an appearance problem remove it with a commercial cleaner or bleachndashdetergent solution If factors are not working in concert paint may crack and peel
Oil-Based Semitransparent StainsOil-based semitransparent stains have more pigment than tinted WRPs and the pigment gives more protection to wood Stains usually contain a WR and fungicide Addi-tional pigment maintains color and increases finish service life but pigments give stain a less natural appearance than lightly colored finishes because they partially hide wood grain and color Pigment content in semitransparent stains can vary thus providing a range of UV protection and color Most people prefer colors that accentuate the natural color of the wood
Oil or oil-alkyd resin in oil-based semitransparent stains can flow into cut lumina at the wood surface carrying pigment with it Some resin penetrates the cell wall the rest re-mains on the surface and bonds the pigments to the surface
Semitransparent stains are porous and do not form surface films like paints and solid-color stains therefore they will not blister or peel even in the presence of excessive water Service life varies considerably depending on substrate and amount of pigment (Table 16ndash4)
Resin and paint manufacturers have tried to achieve the properties of solvent-borne semitransparent stains using wa-terborne formulations These finishes achieve a semitrans-parent appearance by forming a thin coating on the wood
Recently paint companies have developed ldquosemipenetrat-ingrdquo stains Semipenetrating stains partially penetrate the cell wall and form a surface film This finish is similar to a high-solids oil-based semitransparent stain
Application New ConstructionSemitransparent stains perform well on saw-textured sur-faces If used on smooth wood expect approximately half the service life compared with saw-textured surfaces (Table 16ndash4) They are an excellent finish for weathered wood
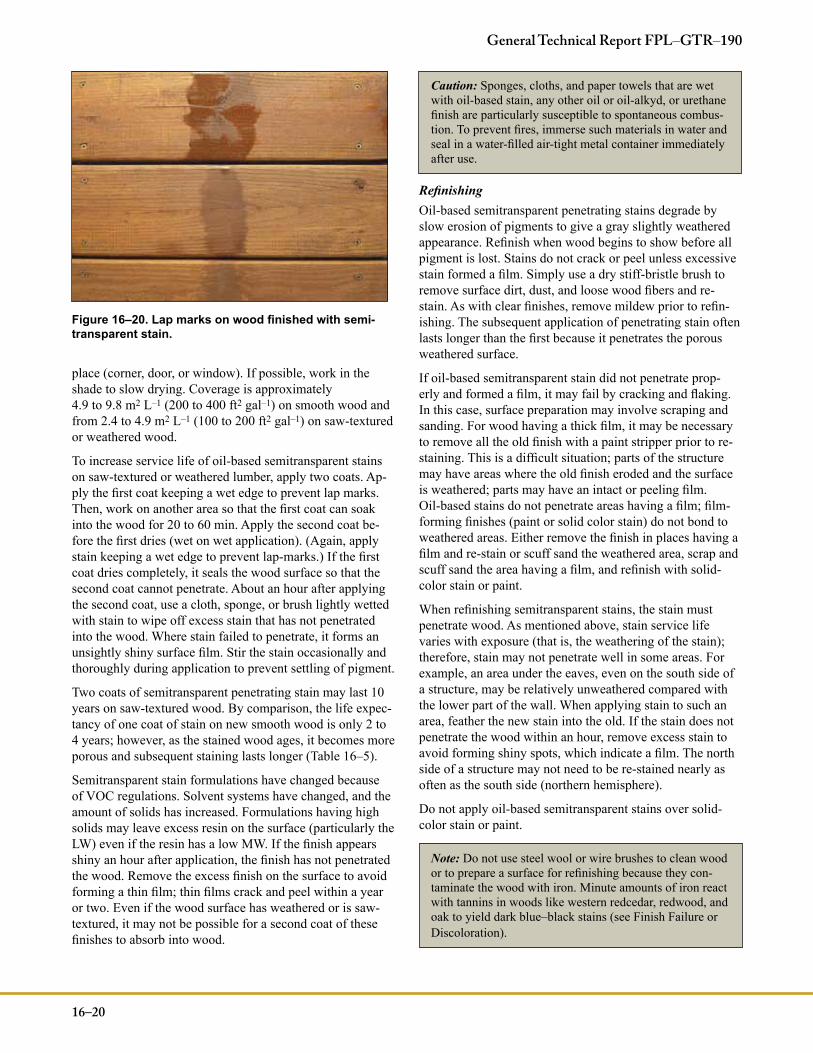
To get consistent application and good penetration of stain brush-apply oil-based semitransparent penetrating stains The finish is too fluid to use a roller and spraying leads to an uneven appearance and lap-marks Brushing works the finish into the wood and evens out the application to mini-mize lap marks Lap-marks form when application of a stain overlaps a previously stained area (Fig 16ndash20) Prevent lap-marks by staining two or three boards at a time and keep-ing a wet edge This method prevents the front edge of the stained area from drying before reaching a logical stopping
16ndash19
Chapter 16 Finishing of Wood
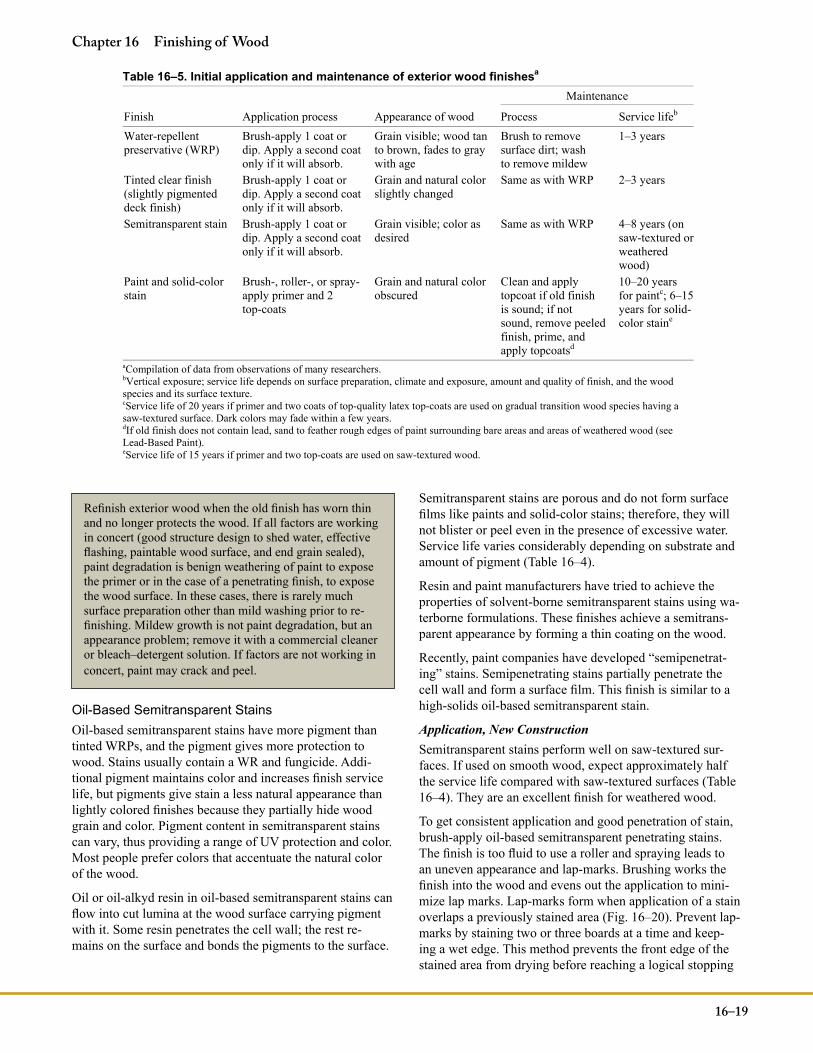
Table 16ndash5 Initial application and maintenance of exterior wood finishesa
Maintenance
Finish Application process Appearance of wood Process Service lifeb
Water-repellent preservative (WRP)
Brush-apply 1 coat or dip Apply a second coat only if it will absorb
Grain visible wood tan to brown fades to gray with age
Brush to remove surface dirt wash to remove mildew
Brush-apply 1 coat or dip Apply a second coat only if it will absorb
Grain and natural color slightly changed
Same as with WRP 2ndash3 years
Semitransparent stain Brush-apply 1 coat or dip Apply a second coat only if it will absorb
Grain visible color as desired
Same as with WRP 4ndash8 years (on saw-textured or weathered wood)
Paint and solid-color stain
Brush- roller- or spray- apply primer and 2 top-coats
Grain and natural color obscured
Clean and apply topcoat if old finish is sound if not sound remove peeled finish prime and apply topcoatsd
10ndash20 years for paintc 6ndash15years for solid-color staine
aCompilation of data from observations of many researchers bVertical exposure service life depends on surface preparation climate and exposure amount and quality of finish and the woodspecies and its surface texture cService life of 20 years if primer and two coats of top-quality latex top-coats are used on gradual transition wood species having a saw-textured surface Dark colors may fade within a few years dIf old finish does not contain lead sand to feather rough edges of paint surrounding bare areas and areas of weathered wood (seeLead-Based Paint) eService life of 15 years if primer and two top-coats are used on saw-textured wood
place (corner door or window) If possible work in the shade to slow drying Coverage is approximately 49 to 98 m2 Lndash1 (200 to 400 ft2 galndash1) on smooth wood and from 24 to 49 m2 Lndash1 (100 to 200 ft2 galndash1) on saw-textured or weathered wood
To increase service life of oil-based semitransparent stains on saw-textured or weathered lumber apply two coats Ap-ply the first coat keeping a wet edge to prevent lap marks Then work on another area so that the first coat can soak into the wood for 20 to 60 min Apply the second coat be-fore the first dries (wet on wet application) (Again apply stain keeping a wet edge to prevent lap-marks) If the first coat dries completely it seals the wood surface so that the second coat cannot penetrate About an hour after applying the second coat use a cloth sponge or brush lightly wetted with stain to wipe off excess stain that has not penetrated into the wood Where stain failed to penetrate it forms an unsightly shiny surface film Stir the stain occasionally and thoroughly during application to prevent settling of pigment
Two coats of semitransparent penetrating stain may last 10 years on saw-textured wood By comparison the life expec-tancy of one coat of stain on new smooth wood is only 2 to 4 years however as the stained wood ages it becomes more porous and subsequent staining lasts longer (Table 16ndash5)
Semitransparent stain formulations have changed because of VOC regulations Solvent systems have changed and the amount of solids has increased Formulations having high solids may leave excess resin on the surface (particularly the LW) even if the resin has a low MW If the finish appears shiny an hour after application the finish has not penetrated the wood Remove the excess finish on the surface to avoid forming a thin film thin films crack and peel within a year or two Even if the wood surface has weathered or is saw-textured it may not be possible for a second coat of these finishes to absorb into wood
Caution Sponges cloths and paper towels that are wet with oil-based stain any other oil or oil-alkyd or urethane finish are particularly susceptible to spontaneous combus-tion To prevent fires immerse such materials in water and seal in a water-filled air-tight metal container immediately after use
RefinishingOil-based semitransparent penetrating stains degrade by slow erosion of pigments to give a gray slightly weathered appearance Refinish when wood begins to show before all pigment is lost Stains do not crack or peel unless excessive stain formed a film Simply use a dry stiff-bristle brush to remove surface dirt dust and loose wood fibers and re-stain As with clear finishes remove mildew prior to refin-ishing The subsequent application of penetrating stain often lasts longer than the first because it penetrates the porous weathered surface
If oil-based semitransparent stain did not penetrate prop-erly and formed a film it may fail by cracking and flaking In this case surface preparation may involve scraping and sanding For wood having a thick film it may be necessary to remove all the old finish with a paint stripper prior to re-staining This is a difficult situation parts of the structure may have areas where the old finish eroded and the surface is weathered parts may have an intact or peeling film Oil-based stains do not penetrate areas having a film film-forming finishes (paint or solid color stain) do not bond to weathered areas Either remove the finish in places having a film and re-stain or scuff sand the weathered area scrap and scuff sand the area having a film and refinish with solid-color stain or paint
When refinishing semitransparent stains the stain must penetrate wood As mentioned above stain service life varies with exposure (that is the weathering of the stain) therefore stain may not penetrate well in some areas For example an area under the eaves even on the south side of a structure may be relatively unweathered compared with the lower part of the wall When applying stain to such an area feather the new stain into the old If the stain does not penetrate the wood within an hour remove excess stain to avoid forming shiny spots which indicate a film The north side of a structure may not need to be re-stained nearly as often as the south side (northern hemisphere)
Do not apply oil-based semitransparent stains over solid-color stain or paint
Note Do not use steel wool or wire brushes to clean wood or to prepare a surface for refinishing because they con-taminate the wood with iron Minute amounts of iron react with tannins in woods like western redcedar redwood and oak to yield dark bluendashblack stains (see Finish Failure or Discoloration)
16ndash20
General Technical Report FPLndashGTRndash190
Figure 16ndash20 Lap marks on wood finished with semi-transparent stain
OilsDrying oils such as linseed and tung are appropriate natural finishes for indoor use and are fine for indoor furniture and other interior uses not subjected to water or high humidity Oils perform poorly outdoors because they are natural prod-ucts and therefore provide food for mildew When used on highly colored woods such as redwood or the cedars they tend to increase mildew growth Even if formulated with a mildewcide they may not give adequate performance out-doors The original ldquoMadison Formulardquo for a semitranspar-ent stain could be formulated with up to 60 linseed oil and it contained 5 pentachlorophenol as a mildewcide Even with this mildewcide it was prone to develop mildew
Film-Forming FinishesIn a range of least to most protection from UV radiation and photochemical degradation of wood film-forming finishes are ranked as follows clear varnish pigmented varnish waterborne latex semitransparent stains solid-color stains and paints
Clear VarnishClear varnish is a transparent film-forming finish that en-hances the natural beauty and figure of wood In a book originally published in 1904 AH Sabin listed 16 types of varnish (architectural cabinet carriage marine and piano to name just a few) (Sabin 1927) These varnishes were a solution of natural resins linseed or tung oil or both and turpentine In a recent publication Wicks and others (2007) describe modern varnishes as urethane-modified alkyds Spar varnish (a combination of novolac phenolics resin and tung and linseed oils) is also available Urethane-based var-nishes have good abrasion resistance and perform well on furniture floors and interior woodwork However varnish lacks exterior permanence unless protected from direct sun-light varnishes in direct sunlight generally require refinish-ing every l to 2 years Varnishes embrittle by exposure to sunlight and develop severe cracking and peeling They last longer in protected areas such as soffits doors protected by porches or the north side of structures however even in protected areas apply a minimum of three coats Staining the wood (oil-based semitransparent stain) prior to applying varnish improves its service life the pigments in the stain decrease the photodegradation of the wood thus maintain-ing varnish adhesion Varnish is a high-maintenance finish and is not generally used on the exterior of structures
Clear varnish usually fails by a combination of cracking and UV degradation of the wood at the woodndashvarnish interface This can be identified by examining the back of a chip of varnish and finding wood fiber attached Refinishing usually requires scraping sanding or power-washing the finish off and then reapplying the finish
Pigmented VarnishFinish manufacturers have modified clear varnish to im-prove exterior performance by adding finely ground inor-
ganic pigments (nanopigments) These pigments partially block UV radiation yet allow much of the visible light to pass through the finishmdashthat is they appear transparent The particle size of these pigments is similar to the wavelength of UV radiation (300ndash400 nm) and much like dust in the at-mosphere that blocks UV radiation and blue wavelengths of visible light to make the sun appear red during a sunset pig-ments block UV radiation to protect wood These products perform better than traditional clear varnishes However as with clear varnishes pigmented varnish gives excellent performance in protected areas The varnish is less prone to peel degradation initially occurs on the film surface as crazing Refinishing before the crazing develops into cracks restores the appearance Eventually however the buildup of coats will block visible light and the wood will appear dark
Varnish can give years of service on outdoor furniture if the furniture is covered with an opaque waterproof cover when not in use The cover protects the varnished wood from UV degradation and discourages birds from roosting on the furniture Several coats of varnish eliminate splin-ters allow the beauty of the wood to show and give a cleanable surface
Waterborne Latex Semitransparent StainsWaterborne latex semitransparent stains (introduced in the section on Oil-Based Semitransparent Stains) are discussed here because they form films These finishes are usually an acrylic or modified acrylic and have high MW the polymers are too large to penetrate the cell wall Considerable confu-sion remains concerning penetration of these finishes As mentioned previously penetration of a finish into cut lumina on the wood surface is not penetration into wood Filling the lumen does not modify the wood cells near the surface Latex semitransparent stains give the look of an oil-based semitransparent stain by forming a thin film
Whereas oil-based semitransparent stains slowly erode la-tex semitransparent stains tend to crack and flake The film buildup is not sufficient to give performance needed for a film-forming finish If applied in sufficient coats to give more than a few years performance they give the appear-ance of a solid-color stain Some formulations are modified with oil-alkyds The oil penetrates the surface thus improv-ing the performance of the finish Paint companies continue to improve these formulations check with paint suppliers for the latest information on new products
Application New ConstructionLatex-based semitransparent stains should be brush-applied As with oil-based semitransparent stains they are suscep-tible to forming lap marks Apply the second coat within 2 weeks after the first has dried Latex-based stains last longer on saw-textured wood
16ndash21
Chapter 16 Finishing of Wood
RefinishingScrape areas where the stain has flaked wash if necessary and refinish As with oil-based semitransparent stains to avoid an uneven appearance it may be necessary to feather the new finish into the old in areas where the old stain is still in good condition Waterborne latex stains form a thin film and may not adhere well to weathered wood
Solid-Color StainsSolid-color stains are opaque finishes (also called hiding heavy-bodied or blocking stains) that come in many colors and are made with a higher concentration of resin and pig-ment than are semitransparent penetrating stains therefore solid-color stains obscure the natural color and grain of wood They are available in latex-based (usually acrylic or modified acrylic polymers) and oil-based formulations Oil and latex solid-color stains are similar to paints they form a film
ApplicationApply solid-color stains by brush sprayer or roller If using a sprayer or roller back-brush to even out the application and work the finish into the surface particularly on saw-textured wood One coat of solid-color stain is not adequate for smooth wood apply a sufficient number of coats to give a 010ndash013-mm (0004ndash0005-in or 4ndash5-mil) dry film thickness If applied in a single coat to smooth wood they tend to crack and flake the film lacks sufficient cohesive strength to accommodate moisture-driven changes in dimen-sion of the substrate Two coats of solid-color stain applied over a quality latex or oil primer should give service life similar to that of a good paint system on smooth-planed wood Some manufacturers recommend using the first coat of a solid-color stain as a primer but primer paint might be better particularly for wood containing extractives (such as cedar and redwood) On saw-textured wood sufficient film thickness may be possible with a single coat but primer and one top-coat will usually give 15 to 20 years service life Solid-color stains lack abrasion resistance and manufactur-ers do not generally recommended them for horizontal wood surfaces such as decks
RefinishingSolid-color stains can usually be applied over paint See the following section (Paint) for additional information on refin-ishing If the old finish has cracked or peeled remove it and scuff-sand the wood prior to refinishing
PaintPaint appears somewhere on almost all buildings For ex-ample brick- vinyl- and aluminum-sided buildings often have painted wood trim Paints are highly pigmented film-forming coatings and give the most protection against UV radiation Paints protect wood surfaces from weathering conceal some surface defects provide a cleanable surface offer many colors and give high gloss (high gloss is not
possible with stains) Paint is the only finish that can give a bright white appearance Paint retards penetration of moisture decreases discoloration by wood extractives and retards checking and warping of wood However paint is not a preservative It will not prevent decay if conditions are favorable for fungal growth
Paint is available in two general types solvent-borne oil- alkyds and waterborne latexes (usually acrylic or vinyl acrylic polymers)
Oil-based paint is a mixture of finely ground inorganic pig-ment in a resin (binder) with additives to speed curing im-prove application and give mildew resistance The simplest resin is a drying oil such as linseed oil Modern oil-based paints have the drying oil combined with a poly functional alcohol to form an oil-alkyd Oil-alkyds for wood have ex-cess oil (that is long-oil-alkyds) making them more flexible than short-oil-alkyds (that is having a shortage of oil) Oil-alkyds form a film by reacting with oxygen in the air to give a cross-linked polymeric network Prior to regulation of the amount of organic solvent in oil-alkyds they contained tur-pentine or mineral spirits Modern oil-alkyds have complex solvent systems to meet VOC requirements
Latex-based paint is also a mixture of finely ground pigment in a resin The resin is a synthetic polymer and it coalesces to form a film these polymers do not react with oxygen The main solvent is water with other solvents to keep the poly-mer flexible while it coalesces Acrylics and vinyl acrylics are typical resins in wood finishes
Oil-alkyd or latex primers link wood to top-coats and pro-vide a base for all succeeding top-coats (initial top-coats and refinishing) Primers seal the surface to prevent extractives bleed provide adhesion between the wood and top-coats and give color base to even out differences in wood color and top-coat color Primers flow into void spaces at the wood surface to improve top-coat adhesion and block ex-tractives in species such as redwood and western redcedar At this time oil-alkyd primers block extractives better than do latex primers but paint manufacturers continue to im-prove latex primers Oil-alkyd primers block water absorp-tion into end grain and to a limited extent can penetrate wood cell walls thus modifying the surface and improving its dimensional stability Latex primers do not penetrate cell walls but merely flow into cut cells and vessels Latex prim-ers do not seal the end grain as well as oil-alkyd primers do Latex primers are more flexible and stay more flexible thus they are less likely to crack as they age Latex primers are porous and thus permeable to water and water vapor oil-alkyd paints are less permeable to water and water vapor (Table 16ndash3)
Latex top-coats can be applied over oil-alkyd primers Latex paints formulated with acrylic resins are resistant to weath-ering they maintain their gloss better than oil-alkyd paints Oil-alkyd top-coats tend to lose gloss within a year or two
16ndash22
General Technical Report FPLndashGTRndash190
and are prone to embrittle over time Latex paints (primers and top-coats) permit water cleanup oil-alkyd paints require organic solvents for cleanup Sufficient dry film thickness on smooth-planed surfaces obscures wood grain and texture on saw-textured surfaces some surface texture remains
Application New ConstructionOn smooth-planed wood apply a primer and two top-coats to achieve a 010ndash013-mm (4ndash5-mil) dry film thickness on saw-textured wood primer and one top-coat may suffice As with solid-color stains apply paints with brush roller or sprayer If using a roller or sprayer back-brush to get an even coating and ensure the finish wets the surface Apply the first coat of film-forming finishes (paint latex semitrans-parent stains and solid-color stains) within 2 weeks after installing smooth-planed exterior wood products timely application ensures good paint adhesion Improve film adhe-sion to smooth-planed flat-grain products particularly those species having abrupt grain transition by wetting the wood to raise the grain and scuff sanding (lightly sanding with 50ndash80 grit sandpaper) after it dries
For woods with water-soluble extractives such as redwood and western redcedar primers block extractives bleed into the top-coat Use a primer that is labeled to ldquoblock extrac-tives bleedrdquo usually an oil-alkyd-based paint Some manu-facturers also formulate stain-blocking acrylic-latex primers Allow latex stain-blocking primer to dry for at least 24 to 48 h before applying the first top-coat If the primer has not fully coalesced extractives may bleed into the top-coat For species such as pine that do not tend to have extractives bleed a quality primer is still necessary to give a good base for top-coats Follow the application rates recommended by the manufacturer to achieve sufficient film thickness A uni-form primer coating having sufficient thickness distributes wood swelling stresses and thus helps prevent premature paint failure Primer should cover approximately 61 to 74 m2 Lndash1 (250 to 300 ft2 galndash1) on smooth unfinished wood coverage is considerably less on saw-textured wood
Apply two coats of acrylic latex paint over the primer If ap-plying two top-coats to the entire structure is not practical consider two top-coats for fully exposed areas on the south and west sides and a single top-coat on other areas Two top-coats over a properly applied primer should last more than 10 years on smooth wood (Tables 16ndash4 and 16ndash5) and many three-coat paint systems in test at FPL have lasted 20 years To avoid peeling between paint coats paint manufacturers recommend applying the first top-coat within 2 weeks after the primer and the second top-coat within 2 weeks of the first If more than 2 weeks elapse between paint coats it may be necessary to wash the paint with mild detergent and rinse thoroughly If the primer has been exposed for several months it may need to be primed again prior to applying the top-coats However some primer may not weather as quick-ly and some top-coats may adhere well to weathered primer check with manufacturers for information on their products
Avoid applying oil-alkyd paint to a hot surface in direct sunlight and to a cool surface that the sun will heat within a few hours The heat causes the surface of the coating to dry trapping solvent in the film The trapped solvent forms a ldquotemperature blisterrdquo which usually occurs within a day or two after painting They do not contain water Do not cool the surface by spraying with water
Apply latex-based waterborne paints when the temperature is at least 10 degC (50 degF) and expected to remain above this temperature for 24 h (The dew point is a good estimate of nighttime low temperature) Most latex paints do not co-alesce properly if the temperature drops below 10 degC (50 degF) Oil-alkyd paint may be applied when the tempera-ture is at least 4 degC (40 degF) Check with paint manufacturers on the temperature requirements because some paints can be applied at lower temperatures than these As with oil-alkyd paints avoid painting hot surfaces in direct sunlight Prior to applying latex paints the surface can be cooled with wa-ter spray and allowed to dry
Avoid painting late in the afternoon if heavy dew is expect-ed during the night Water absorption into partially cured oil-alkyds or partially coalesced latexes can cause wrinkling fading loss of gloss and streaking
RefinishingIn the absence of catastrophic failure such as cracking flak-ing and peeling solid-color stains and paints slowly erode A three-coat finish system (010ndash013 mm thick) may last 20 years on saw-textured wood When the top-coats begin to wear thin exposing the primer reapply one or two new top-coats One coat may be adequate if the old paint surface is in good condition Surface preparation merely involves washing the surface to remove mildew dirt and chalk Paint erodes at different rates depending on the exposure to sunlight therefore different sides of a structure do not need to be painted on the same schedule Paint on the north side lasts twice as long as that on the south side (northern hemisphere) When repainting coverage should be approxi-mately 98 m2 Lndash1 (400 ft2 galndash1)
Clean areas that are protected from sun and rain such as porches soffits and walls protected by overhangs These ar-eas tend to collect dirt that decreases adhesion of new paint Repainting protected areas every other time the structure is painted usually gives adequate performance
Do not paint too often If paint is sound but discolored with mildew wash it It does not need repainting Frequent repainting may form an excessively thick film thick oil-based paint is likely to crack across the grain of the wood (see Cross-Grain Cracking) Latex paints seldom develop cross-grain cracking because they are more flexible than are oil-based paints Since latex paints have replaced oil-based top-coats for most exterior applications cross-grain crack-ing is rare except for latex paint applied over thick oil-based
16ndash23
Chapter 16 Finishing of Wood
paint However too many coats of latex paint can eventually lead to adhesion failure of the primer
In situations where catastrophic failure has occurred refin-ishing paint and solid-color stains may require extensive surface preparation First scrape off all loose paint In the absence of lead-based paint sand areas of exposed wood with 50- to 80-grit sandpaper to remove the weathered sur-face and to feather the abrupt paint edge Wash the remain-ing old paint using a commercial cleaner or a dilute house-hold bleach and detergent solution to remove dirt and mil-dew and rinse thoroughly (see Mildew) Prime the areas of exposed wood then top-coat If the old paint has excessive chalking it may be necessary to re-prime (see Chalking)
Note Do not sand lead-based paint Use special precau-tions if the old paint contains lead (see Lead-Based Paint)
Table 16ndash4 summarizes the suitability and expected life of commonly used exterior finishes on several wood species and wood-based products The information in these tables gives general guidelines Many factors affect paintability of wood and service life of wood finishes Table 16ndash5 summa-rizes the properties treatment and maintenance of exterior finishes
Application of Finishes Special UsesPorches Decks Deck Railings and FencesPorches get wet from windblown rain therefore apply a WRP or primer to end grain of flooring railings posts and balustrade prior to or during construction Primers and top-coats for porch floors are formulated to resist abrasion
Decks are usually finished with penetrating clears lightly pigmented clears or semitransparent stains These finishes need more frequent application than does paint but do not need extensive surface preparation because they seldom fail by cracking and peeling Limit the application of semitrans-parent stain to what the surface can absorb The best appli-cation method is by brush roller and spray application may put too much stain on horizontal surfaces Unless specially formulated for use on decks solid-color stains should not be used on decks or porches because they lack abrasion resis-tance and they tend to fail by peeling
Like decks fences are fully exposed to the weather and some parts (such as posts) are in contact with the ground therefore wood decay and termite attack are potential prob-lems Use lumber pressure-treated with preservatives or naturally durable wood species for all posts and other fence components that are in ground contact When designing and constructing fences and railings for decks and porches ar-chitects and contractors need to consider protecting exposed end-grain of components to resist water absorption
Film-forming finishes on fences and railings trap moisture if the end grain is not sealed during construction Figure 16ndash14 shows a railing 8 years after construction Water flowed down the railing and absorbed into the end grain and the paint kept the wood from drying If railings are to be painted seal the end grain or use pressure-treated wood particularly where decay of wood is a safety hazard (railings on decks and porches high off the ground)
Concerning the service life of naturally durable wood spe-cies compared with wood pressure-treated with preserva-tives there are no absolute ldquorulesrdquo However for in-ground contact uses and structural components of decks and porches (beams joist and railings) pressure-treated wood is proba-bly better and may be a code requirement in some areas The service lives of naturally durable and preservative-treated woods are quite comparable in aboveground exposures such as decking boards In selecting wood for porches decks and fences whether preservative treated or a naturally durable species consider the exposure conditions design of the structure properties of the wood and the finish to be usedWood weathering can be as much a factor in long-term service life of decks and fences as decay Protect naturally durable wood species and preservative-treated wood with a finish Periodic treatment with a penetrating sealer such as a WRP or lightly pigmented deck finish will decrease check-ing and splitting Pigmented finishes retard weathering
Treated WoodCopper-based preservatives (copper azole ammoniacal cop-per quat (ACQ) ammoniacal copper zinc arsenate (ACZA) chromated copper arsenate (CCA)) creosote and penta-chlorophenol are common factory-applied preservatives Of these wood treated with copper azole and ACQ is often used to construct porches decks and fences The treatment has little effect on finishing once the wood has dried species and grain orientation affect finishing more than preservative treatment does Waterborne treatments containing copper may maintain a brown color for approximately 2 years Some copper-based preservatives may have a water repel-lent included in the treatment to give the treated wood better resistance to weathering Even if the manufacturer treated the wood with water repellent maintain it with a finish to extend its service life People often replace decking because of weathering not decay
Creosote and pentachlorophenol are generally used for industrial and commercial applications where applying a finish is not considered practical Creosote is oily and wood treated with creosote does not accept a finish Pentachloro-phenol is often formulated in heavy oil Wood treated with preservatives formulated in oil will not accept a finish
Marine UsesThe marine environment is particularly harsh on wood because of wind-blown salt spray abrasion by sand and direct and reflected UV radiation Any of the types of finish discussed previously can be used in marine environments
16ndash24
General Technical Report FPLndashGTRndash190
WRPs tinted clears and oil-based semitransparent stains give some protection however a paint system gives the best protection against photochemical degradation If possible finish wood with a WRP prior to painting Consult paint manufacturers for products formulated for marine use
Note Any wood in contact with water must be pressure treated to specifications for marine use Chromated cop-per arsenate (CCA) is still used in marine environments and the chromium in the formulation improves the perfor-mance of stains and paints
BoatsVarnish enhances the appearance and protects wood trim on boats (hence the name spar varnish) but it is exposed to more sunlight and water than on structures Therefore it needs regular and frequent refinishing Paint manufactur-ers recommend three to six coats for best performance Applying oil-based semitransparent stain to wood prior to varnishing increases the service life of the varnish but the stain obscures some of the color of the wood Keeping the appearance of wood trim bright and new is labor intensive but often well worth the effort
Finish hulls with marine paint (two-part epoxy- or urethane-paint) Protect areas below the water line with antifouling paint Consult manufacturers for information on these products
Panel ProductsThe edges of panel products such as plywood OSB and fi-berboard are vulnerable to absorption of water To minimize edge swelling and subsequent finish peeling seal the edges of these products with a WRP oil-alkyd primer or sealer formulated for this use The type of edge sealer depends on the surface finish Prior to staining (oil-based semitranspar-ent stain) seal with the stain or a WRP prior to painting (paint or solid-color stain) seal with an oil-alkyd primer
Plywood siding products may have a saw-textured surface (such as T1ndash11 siding) or a paper overlay (MDO) Saw-tex-tured surfaces may be finished with oil-based semitranspar-ent stain solid-color stain or paint Paint gives the longest service Paper overlay products will not accept a penetrating finish (such as oil-based semitransparent stain) finish with paint or solid-color stain
During pressing of OSB and fiberboard panels for exterior use manufactures usually include MDO The panels are cut to give lap siding The MDO protects the surface from moisture and gives a good surface for film-forming finishes However as with plywood the edges and areas around fas-teners are vulnerable to water absorption and need to be sealed
Fire-Retardant CoatingsFire-retardant finishes have low surface flammability and when exposed to fire they ldquointumescerdquo to form an expanded
low-density film The expanded film insulates the wood from heat and retards combustion The finishes have addi-tives to promote wood decomposition to charcoal and water rather than flammable vapors
Back-PrimingBack-priming is applying primer or WRP to the back side of wood (usually siding) before installing it Back-priming with stain-blocking primer retards extractives staining par-ticularly run-down extractives bleed It decreases absorption of water thus improving dimensional stability Siding is less likely to cup an important consideration for flat-grain wood Improved dimensional stability decreases stress on the fin-ish thus decreasing paint cracking
At the time siding is back-primed seal end grain with oil-alkyd primer This process has an even greater effect in stop-ping water absorption than back-priming Primed end-grain eliminates paint failure near the ends of boards Prime ends cut during installation
Factory FinishingFactory priming hardboard siding has been a standard indus-try practice for many years and recently factory-finished (primer and top-coats) siding trim and decking have become common Factory finishing offers several advan-tages avoids finishing during inappropriate weather gives consistent film thickness contributes to timely completion of structures and decreases overall cost Factory finishing is advantageous in northern climates where exterior finish-ing is impossible during the winter Controlled application ensures consistent 010 to 013 mm (4 to 5 mil) dry film thickness Siding is normally primed on all sides including the end grain When installing factory-finished siding prime following cross-cuts Controlled conditions enable many factory finishers to guarantee their products against crack-ing peeling and blistering for 15 years
Finish Failure or DiscolorationProperly applied to a compatible substrate on a well-de-signed and constructed structure finishes rarely fail prema-turely In the absence of finish failure (cracking and peeling) or discoloration (extractives bleed iron stain and mildew growth) finishes undergo a slow erosion lasting several yearsmdasheven decades This section is about ldquowhen things go wrongrdquo
The most common causes of premature failure of film-form-ing finish (paint and solid-color stains) are water weathering of wood prior to painting inadequate surface preparation and insufficient film thickness Structure design wood spe-cies and grain angle can also affect performance Topics covered in this section are paint cracking (parallel to grain) cross grain cracking peeling intercoat peeling chalking mill-glaze mildew blue stain iron stain and brown stain over knots
16ndash25
Chapter 16 Finishing of Wood
Exterior paint is subject to wetting from rain dew and frost Equally serious is ldquounseen moisturerdquo (water vapor) that moves from inside to outside structures in cold climates and from outside to inside of air-conditioned buildings in hot climates Effective air and vapor barriers can minimize wa-ter vapor movement (see Chapter 13)
Paint Cracking (parallel to grain)Cracking parallel to grain occurs on smooth flat-grain lum-ber particularly with wood species having abrupt transition between EW and LW bands (such as southern yellow pine Douglas-fir and oak) LW bands are compressed into EW during planing Normal rebound of LW bands after wood is in service causes films to crack along the EWndashLW bound-ary Other contributing factors are coatings having insuf-ficient thickness and lacking flexibility If the cracking is not too severe scuff sand and apply one or two top-coats to give additional film-build
Peeling and FlakingPeeling and flaking (adhesion failure between wood and the primer) can have several causes water wood weathering and dimensional change of thick LW bands on flat grain of high-density wood species Flaking often follows cracking small cracks in paint caused by raised grain allow water to enter Flaking is similar to peeling small pieces of finish peel from the surface usually along an EWndashLW boundary Flaking often occurs with cracking parallel to grain and is attributed to thin films It can occur with thinly applied film-forming finishes and with oil-based semitransparent stains if they do not absorb properly Water is the main cause but other factors can also cause it
Water speeds the failure by other causes One cause is weathering of wood prior to primer application Protect wood from the weather prior to installation and paint it as soon as possible after installing it Leaving smooth-planed lumber exposed to the weather for as little as 2 weeks de-creases its paint-holding properties If wood was exposed more than 2 weeks scuff sand it prior to painting In fact scuff sanding is always a good idea on planed lumber The wide bands of LW on flat-grain surfaces hold paint poorly If possible flat-grain boards should be installed ldquobark-siderdquo out to minimize raised grain particularly with wood species having abrupt EWLW transition Paint applied to weathered wood often fails over large areas and can be easily diag-nosed by inspecting the back side of the peeled paint Wood fibers are attached to the film clearly showing the grain of the wood
Priming end grain with oil-alkyd paint eliminates peeling at the ends of boards Saw-texture greatly improves finish adhesion to all species and grain angles Paint and solid-color stains adhere quite well to difficult-to-paint wood species such as flat-grain southern yellow pine Douglas-fir and radiata pine if applied to saw-textured surfaces
Cross-Grain CrackingModern waterborne latex finishes seldom fail by cross-grain cracking If latex finishes crack across the grain dimen-sional instability of wood under the finish causes it For ex-ample cross-grain checking of juvenile wood causes paint to crack In this case replace the board and repaint
If juvenile wood is not to blame cross-grain cracking usu-ally occurs on structures having thick layers of oil-alkyd paint If the wood is not the cause of paint failure remove the old paint and apply new finish to the bare wood Old paint probably contains lead (see Lead-Based Paint)
Water BlistersWater Blisters (also called moisture blisters) are bubble-like deformation of paint films (Fig 16ndash21) As the name im-plies these blisters usually contain water when they form Water blisters form between the wood substrate and the first coat of paint After the blisters appear they may dry out and collapse Small blisters may disappear completely and large ones may leave rough spots in severe cases the paint peels Oil-alkyd paint recently applied to wet wood is most likely to blister Old paint films are too rigid to swell and form blisters they usually crack and peel Water blisters are not common on latex paint systems
Minimizing water absorption into wood is the only way to prevent water blisters Water blisters may occur on sid-ing and trim where rain enters through improperly flashed doors windows and vents they are common near unsealed end grain of siding and trim Water from ice dams and overflow from blocked gutters can also cause water blisters Movement of water vapor from the inside of a structure to siding and trim may also cause water blisters Plumbing leaks humidifiers and shower spray are sources of inside water Minimizing water absorption also prevents decay (rot) warping and checking of wood
Mill GlazeSince the mid-1980s a condition known as ldquomill glazerdquo (also called planerrsquos glaze) has been reported to cause paint
16ndash26
General Technical Report FPLndashGTRndash190
Figure 16ndash21 Water blisters (also called moisture blis-ters) caused bubble-like deformation of paint film
failure Controversy exists over the exact cause of this con-dition and many people use it as a catch all for unexplained paint failures They attributed the paint failure to dull planer blades or excessive heat during planing However investi-gations of reported mill glaze by FPL scientists showed that other factors caused finish failure scientists were unable to duplicate mill glaze in the laboratory FPL scientists found three causes for paint failures that others had attributed to ldquomill glazerdquo (1) raised grain under a thin film particularly on smooth flat-grain lumber (2) wood weathering prior to application of film-forming finishes and (3) moisture (usu-ally water) These factors often occurred together
Paint failure occurred because of raised grain on flat-grain boards particularly on species having abrupt EWndashLW tran-sitions Planer blades tend to crush dense LW bands into less dense EW that lie directly beneath them on flat-grain sur-faces (Fig 16ndash22a) Later when these boards are exposed to moisture crushed EW absorbs moisture and rebounds which causes the surface LW bands to protrude from the surface (Fig 16ndash22b) A thin coat of film-forming finish applied over a stressed flat-grain surface will crack as the wood rebounds (Fig 16ndash22c see Paint Cracking) Failure is most common on flat-grain siding finished with insufficient film build of oil-based solid-color stain Thin coatings of oil-based solid-color stain and to some extent waterborne latex stains are weak and do not withstand the stresses caused by raised grain These low-solids coatings provide only 003 to 005 mm (1 to 2 mil) of dry-film thickness whereas a brush-applied three-coat paint system (primer and two top-coats)
provides 010 to 013 mm (4 to 5 mil) of dry-film thickness Raised grain is less likely to occur with vertical-grain wood because the EWndashLW bands are perpendicular to the surface and the EW is not crushed during planing
Install flat-grain bevel siding saw-textured side out Saw-textured surfaces do not have LW bands compressed into the EW The saw-textured side is the side of choice for applica-tion of penetrating semitransparent stains and film-forming finishes The film buildup on the saw-textured side will be greater than on a planed surface and the film will have greater mechanical adhesion or ldquobiterdquo
If flat-grain siding must be installed smooth-side out re-move the planing stresses by wetting the surface then allow 2 to 3 days for the surface to dry Scuff-sand the surface with 50- to 80-grit sandpaper and apply primer and two top-coats
Another paint failure that has been attributed to ldquomill glazerdquo is peeling caused by wood weathering prior to applying film-forming finishes (see Weathering Effect on Paint Ad-hesion) Water causes paint to peel (see Peeling and Flaking and Water Blisters)
Intercoat PeelingAs the name implies intercoat peeling is loss of adhesion between coats of finish usually peeling of a new paint from old paint (Fig 16ndash23) It usually occurs within a year of re-painting Prevent intercoat peeling by ensuring that old paint is free of dirt mildew and chalk prior to repainting
Intercoat peeling can also result from allowing too much time between applying primer and top-coat If more than 2 weeks elapse between applying an oil-based primer and a top-coat clean the surface before applying the second coat If the primer (particularly oil-alkyd primers) has weathered for several months it may be necessary to re-prime prior to applying the top-coats (see Testing for Adhesion)
16ndash27
Chapter 16 Finishing of Wood
(a)
(b)
(c)
Figure 16ndash22 (a) Cross-section view of flat-grain southern yellow pine showing dense LW bands crushed into less dense EW directly beneath them (b) raised grain caused by rebound of LW bands following wetting (c) a thin coat of film-forming finish applied over a stressed flat-grain surface will crack as the wood rebounds
Figure 16ndash23 Intercoat peeling of paint usually caused by poor preparation of old paint surface or excessive weathering of primer prior to application of top coat
ChalkingWeathering of paint causes chalking chalk is a residue of degraded resin and pigments These degradation products form a fine powder Some chalking is desirable because it allows the paint to self-clean However chalking is ob-jectionable when the degradation products (especially the pigments) wash down a surface having a different color or when it causes premature paint failure through excessive erosion Most paints chalk to some extent but chalking is minimal with modern latex paints
Latex paint or solid-color stain can be applied over existing paint if the old paint is clean and sound (chalk free) Prior to refinishing a chalky surface scrub it thoroughly with a de-tergent solution to remove degraded finish residue and dirt Rinse thoroughly before repainting To check for excessive chalking lightly rub the paint surface with a dark (for light-colored paint) or white (for dark-colored paint) cloth The amount of pigment removed by the cloth is a good indica-tion of chalking If the surface is still chalky after cleaning it may need to be primed prior to repainting Otherwise the new paint may peel Before repainting surfaces conduct a simple test (see Testing for Adhesion)
Testing for AdhesionAfter preparing old paint for repainting repaint a small in-conspicuous area and allow it to dry at least overnight To test for adhesion firmly press one end of an adhesive ban-dage onto the repainted surface Remove the bandage with a snapping action If the tape is free of paint the new paint is well-bonded to the old surface and does not need prim-ing or additional cleaning If the new latex paint adheres to the tape the old surface is too chalky and needs additional cleaning or priming with an oil-alkyd primer If both the new latex paint and the old paint coat adhere to the tape the old paint is not well bonded to the wood and must be removed before repainting You should test several areas of the structure to determine the extent of poor paint bonds before stripping all the paint
MildewIn the absence of catastrophic paint failures described above mildew is probably the most common problem with finishes Mildew is the term for fungi that infect wood (Fig 16ndash24a) and painted wood (Fig 16ndash24b) These mi-croorganisms can live on any surface that supplies a food source from either within the material or from air or liquids that contact the surface Although the organisms cannot decay wood they can metabolize some of the extractives in wood and natural oils (such as linseed oil) in finishes They usually discolor wood or finishes with black deposits and often grow in combination with algae (usually green discol-oration)
Mildew may be found anywhere on a building and is com-mon on walls behind trees or shrubs where air movement is restricted and walls stay damp Mildew may also be associ-ated with dew patterns of structures Dew forms on parts of structures that cool rapidly such as eaves soffits and ceil-ings of carports and porches The dew provides a source of water for mildew
Mildew can be distinguished from dirt by examining it with a 10times magnifying glass (such as a jewelerrsquos eye loupe) In the growing stage when the surface is damp or wet the fun-gus has threadlike growth In the dormant stage when the surface is dry the fungus has numerous egg-shaped spores by contrast granular particles of dirt appear irregular in size and shape A simple test for the presence of mildew on wood or paint is to apply a drop or two of liquid household bleach (5 sodium hypochlorite) to the discolored area The dark color of mildew will usually bleach out in 1 to 2 min Surface discoloration that does not bleach is probably dirt extractives bleed or iron stain Mildew can grow through a surface coating or under a clear finish In these cases it may be difficult to test for or to clean the mildew the finish pro-tects the mildew from the cleaning solution
To remove mildew use a commercial cleaner or a dilute solution of household bleach with detergent If using house-hold bleach use as dilute a solution as possible One part
16ndash28
General Technical Report FPLndashGTRndash190
(a)
(b)
Figure 16ndash24 Mildew is most common in shaded moist or protected areas (a) on wood and (b) on paint-ed wood
bleach to five parts water should be adequate In no case should a mixture stronger than one part bleach to three parts water be necessary Add a little powdered detergent to help remove the dirt Do not use liquid detergent because it may contain ingredients that react with bleach to give toxic fumes Gently scrub the surface with a bristle brush or sponge and rinse thoroughly Rinse using a garden hose keeping the water stream pointed down to avoid flooding the back side of siding with water If using a power-washer keep the pressure low to avoid damaging the wood and as with the garden hose keep the water stream pointed down Refinish the cleaned surface as soon as it has dried using a finish containing a mildewcide
Household bleach mildew removerbull 1 part (5) sodium hypochlorite (household bleach) (1 gallon)bull 3 to 5 parts warm water (3ndash5 gallons)bull A little powdered household detergent (12 cup)
Warning Do not mix bleach with ammonia or with any detergents or cleansers that contain ammonia Mixed together bleach and ammonia form a toxic combination similar to mustard gas Many household cleaners contain ammonia so be careful in selecting the type of cleaner to mix with bleach Avoid splashing the cleaning solution on yourself or plants
Loss of Gloss and FadingLoss of gloss and fading typically occurred with traditional oil-alkyd finishes Although modern acrylic-based latex finishes do not give the high gloss of an oil-alkyd they maintain gloss much longer Some pigments fade more than others check with the paint manufacturer to ensure that the colors will last White is always a safe choice The paint and solid-color service-life estimates given in Tables 16ndash4 and 16ndash5 do not take into account loss of gloss and fading Many dark-colored finishes will fade to give unacceptable performance long before the finish fails
Water-Soluble ExtractivesIn many hardwoods and softwoods the heartwood contains water-soluble extractives (Sapwood does not contain water-soluble extractives) Western redcedar and redwood are two common softwoods that contain highly colored water-soluble extractives extractives give these species their at-tractive color but they can also discolor paint When wood gets wet water dissolves some extractives then as the wood dries water carries water-soluble extractives to the surface The water evaporates leaving extractives behind as a reddish brown stain Discoloration shows in two ways diffused and run-down extractives bleed
Diffused extractives bleed is caused by (1) water from rain and dew that penetrates a porous or thin paint coating (2) water that penetrates joints in the siding railings or trim
and (3) absorption of water vapor in high humidity areas such as bathrooms swimming pools and greenhouses (Fig 16ndash25)
Good painting practices prevent diffused extractives bleed Use an oil-alkyd stain-blocking primer or a latex primer formulated for use over woods like redwood Do not use porous paints such as flat alkyds or latexes directly over extractive-rich woods If the wood is already painted and is discolored by extractives clean the surface and apply a stain-blocking primer Allow sufficient time for the primer to cure so that it blocks the extractives and then apply top-coat
Run-down extractives bleed is caused by (1) water draining behind siding from roof leaks faulty gutters or ice dams (2) condensation of water vapor originating inside the struc-ture on the back side of siding and (3) wind-blown water that wets the back side of siding The water on the back side of the siding dissolves extractives and runs off of the back
16ndash29
Chapter 16 Finishing of Wood
Figure 16ndash25 High moisture content of wood can cause diffuse extractives bleed particularly if a stain-blocking primer is not used
Figure 16ndash26 Water-soluble extractive discoloration can result from water wetting the back of the siding and then running down the front of the board
side of the siding onto the front side of the siding below it where it evaporates leaving red streaks (Fig 16ndash26)
Prevent run-down extractives bleed by (1) fixing roof leaks maintaining gutters and preventing ice dams (2) decreas-ing condensation or the accumulation of moisture in wall by lowering indoor humidity and installing effective air barriers in wall systems (3) designing structures having adequate roof overhang to minimize wetting by dew and wind-blown rain (4) back-priming siding prior to installation with a stain-blocking primer and (5) using rain-screen construction to vent the back side of siding (see Back-Priming)
By eliminating the cause of extractives bleed the discolor-ation will usually weather away in a few months However extractives in protected areas (under the eaves soffits and porch ceilings) become darker and more difficult to remove with time In these cases wash the discolored areas with a mild detergent soon after the problem develops Paint cleaners containing oxalic acid may remove stains
Blue StainBlue stain is a fungus that can infect sapwood of trees and logs (Fig 16ndash27) Insects such as the pine beetle may carry it into a living tree Pine beetle infestation often disrupts the flow of nutrients thus killing the tree Sapwood of lumber from beetle-killed trees usually contains blue stain Blue stain may also infect logs after harvest while the MC is still high The fungus causes a blue discoloration of the wood but the organism does not weaken wood structurally The fungus lacks the enzymes necessary to digest wood poly-mers it lives off the unpolymerized sugars in the sapwood (see Chap 14) Neither commercial mildew cleaners nor household bleach with detergent can remove it If the color is objectionable use a pigmented finish to hide it (see Mil-dew)
Effective control of blue stain takes place prior to using lumber at the construction site maintain healthy forests
apply fungicides to logs while in storage prior to cutting lumber use kiln dry lumber and keep lumber dry
Iron StainIron stains occur from rusting of fasteners or by the reaction of iron with tannins in wood The appearance is different for each of these reactions
In wood species that lack tannins iron merely rusts giving a brown stain to the wood surrounding the fastener The iron also causes slight degradation of the wood near it (often referred to as ldquowood sicknessrdquo) This discoloration develops over many months or years of exposure
In those wood species that have tannins a chemical reaction takes place between the iron and the tannins Tannins are just one of the many chemicals (extractives) in wood Spe-cies such as the cedars the oaks and redwood are rich in tannins Iron reacts immediately with the tannins to give a blue-black discoloration
Steel fasteners are the most common source of iron (Fig 16ndash28) but traces of iron left from cleaning wood with steel wool or wire brushes cause iron stain Poor qual-ity galvanized nails corrode easily and like uncoated steel nails usually cause unsightly staining of the wood
If iron stain is a serious problem on a painted surface coun-tersink the fastener caulk spot prime and top-coat This costly and time-consuming process is only possible with opaque finishes Little can be done to give a permanent fix to iron stains on wood having a natural finish Removing fasteners cleaning the affected areas with oxalic acid solu-tion and replacing the fasteners may not give a permanent fix because residual iron left behind continues to cause staining Removing the fasteners often splits the siding Us-ing the wrong fastener can be costlymdashit may become neces-sary to replace all the siding (Fig 16ndash28) Use corrosion-resistant fasteners such as stainless steel rather than risk iron stain particularly when using natural finishes on wood con-taining high amounts of tannin (such as western redcedar redwood and oak) If using galvanized fasteners they must be hot-dipped galvanized fasteners meeting ASTM A 153A specification Other galvanized fasteners fail Unfortunately contractors and their employees may have difficulty recognizing the difference among galvanized fasteners (Fig 16ndash28)
Iron stain occurring beneath a finish is extremely difficult to fix The coating must be removed before the iron stain can be removed Oxalic acid will remove the bluendashblack discol-oration Apply a saturated solution (05 kg of oxalic acid per 4 L (1 lb galndash1) of hot water) to the stained surface Many commercial brighteners contain oxalic acid and these are usually effective for removing iron stains After removing the stain wash the surface thoroughly with warm water to remove the oxalic acid If even minute traces of iron remain the discoloration will recur
16ndash30
General Technical Report FPLndashGTRndash190
Figure 16ndash27 Blue stain may infect sapwood
Caution Oxalic acid is toxic take care when using it (It is the poison in rhubarb leaves)
KnotsKnots in many species contain an abundance of resins and other highly colored compounds These compounds can sometimes cause paint to peel or turn brown Eliminating paint discoloration caused by extractives in knots is difficult because some of the extractives are soluble in oil-based primers and diffuse through them Latex-based formula-tions do not block them either Coat the knot with shellac or specially formulated knot sealer Do not use varnish to seal knots varnish is not formulated for this use After sealing knots apply primer and two top-coats Knots usually check as wood dries if the checks form after the wood has been
painted the checks cause the paint to crack (see Wood Extractives)
PitchPitch and other resins are one of the defense mechanisms that a tree uses to protect itself from harmful pathogens and insects following injury When a treersquos bark is damaged pitch flows into these areas to protect the wound (Fig 16ndash29) Pitch exists as a normal part of the wood of pines (Pinus spp) spruces (Picea spp) larches (Larix spp) and Douglas-firs (Pseudotsuga spp) and it can be found in specialized wound structures called pitch pockets in the wood of most softwood species Pitch is a solution of natural rosins and turpentine in species such as spruce pine and fir It remains in the lumber from these species The ease with which it exudes to the surface of lumber depends on the amount of turpentine in which the pitch is dissolved and the temperature (that is the more turpentine the more fluid the pitch the higher the temperature the more fluid the pitch) Pitch exudation can occur in isolated spots (Fig 16ndash30a) or in large pockets or seams (Fig 16ndash30b) When pitch bleed occurs high temperature is the cause If the temperature at the surface of the wood increases usually from being exposed to direct sunlight the pitch oozes to the surface If the wood is finished the pitch may exude through the coating or cause the finish to discolor or blister
The only way to prevent pitch bleed is to remove the turpen-tine from the wood during lumber processing Depending on the species specific kiln schedules can be used to drive off most of the turpentine thus ldquofixingrdquo or ldquosettingrdquo the pitch (making it less fluid) However not all end uses of lumber require pitch to be set construction grades of lumber even if kiln-dried seldom have the pitch set This is usually not a problem for construction grades because the wood surface is seldom visible The difficulty occurs with appearance grades of lumber such as for siding and trim
Kiln schedules for setting pitch involve higher temperatures and last longer than normal drying schedules For a com-plete guide to drying schedules refer to publications such as the Dry Kiln Operatorrsquos Manual
Pitch can be removed in several ways depending on how fluid it is If the pitch has not hardened (it still contains a lot of turpentine) remove it with turpentine or mineral spirits Once it has hardened scrape it off with a putty knife or paint scraper However if the pitch is still soft such pro-cedures smear it over the surface of wood or paint Let it harden and then scrape it off After removing pitch sand to bare wood spot prime and top-coat Shellac seals extrac-tives but not pitch Paint will not prevent future bleeding of pitch during periods of high temperature If pitch is a recur-ring problem it may be necessary to replace the board One should note that many paints particularly oil-alkyds fade as they age and repainting the spots where pitch was removed may show color differences
16ndash31
Chapter 16 Finishing of Wood
Figure 16ndash28 Iron stain on newly installed wood sid-ing Poor quality galvanized nails corrode easily and like uncoated steel nails usually cause unsightly stain-ing of the wood
Figure 16ndash29 Pitch flow from wound
Finishing Interior WoodMany finishes and finishing methods are used indoors because of the breadth of wood products and usesmdashfrom wood floors to cutting boards This section includes general information on a few common products used for interior wood finishing and brief subsections on finishing wood floors and kitchen utensils Many finishing methods exist for just furniture Factory finishing of furniture is often propri-etary and may involve more than a dozen steps Methods for furniture finishing are not included in this chapter but most public libraries contain books on furniture finishing Product literature for furniture finishes often contains recommenda-tions for application Interior wood products require less protection against water and UV radiation than do exterior wood products and finishes usually last for decades How-ever interior wood products have more exacting standards for appearance and cleanability than do exterior wood products
As with wood used outdoors wood changes color as it ages indoors whether unfinished or finished In general dark wood gets lighter and light wood gets darker Color change is natural aging of newly cut wood and is caused by visible light not UV radiation associated with outdoor weather-ing If removing a picture from paneling shows a color difference (shadowing by the picture) correct it by leaving the wood exposed to light The color will usually even out within several months To avoid shadowing keep all paint-ings and other wall coverings off paneling until most color change has occurred (usually 2 to 3 months depending on the light intensity)
Fingerjointed lumber has become common for interior trim Pieces of wood for fingerjointed lumber often come from different trees having different amounts of extractives These extractives can discolor finishes particularly in humid environments such bathrooms and kitchens (Fig 16ndash10) When painting fingerjointed lumber use a stain-blocking primer to minimize discoloration In new buildings allow wood adequate time to reach EMC before finishing
Types of Finish and Wood FillersOpaque FinishesInterior woodwork especially wood trim requires smooth surfaces consistent color and a lasting sheen Therefore enamels high-gloss or semi-gloss are preferable to flat paints However the higher the gloss the more the finish accentuates imperfections such as planer marks hammer marks and raised grain Raised grain is troublesome on flat-grain surfaces having abrupt EWndashLW transitions because planing crushes LW bands into the EW later when the MC changes the EW swells causing raised grain To obtain a smooth finish sponge unfinished wood with water to raise the grain allow it to dry thoroughly sand remove surface dust with a tack cloth and finish
StainsStains accentuate wood grain by absorbing differently into EW LW knots vessels and flaws Stains color EW more than LW reversing the natural color gradation For uniform color apply a penetrating sealer (ldquowash coatrdquo) before apply-ing stain It impedes stain absorption into the EW Interior stains are often natural or synthetic dyes dissolved in water or organic solvent Water-soluble stains give depth to a fin-ish dry slowly raise the grain and require sanding Solvent-borne stains dry quickly do not raise the grain and need little or no sanding A combination of solvent- and water-borne stains or dyes can give the finish color ldquodepthrdquo
If stain absorbs into wood unevenly causing a blotchy ap-pearance blue-stain fungi or bacteria probably infected the tree prior to cutting for lumber Blue stain on lumber is easy to see However bacteria-infected areas have no color and wood appears normal Infected areas absorb excessive amounts of stain quickly giving wood an uneven blotchy appearance The infection occurs across grain boundaries This problem is not very common but should it occur it cannot be fixed once the stain is applied If wood is to be used for furniture or fine woodwork it might be a good idea to check lumber before using it by applying a stain or dena-tured alcohol to identify infected areas (Schofield (2008) describes diagnosing blotching and treating boards prior to staining) Discard pieces on which stain appears blotchy apply a wash coat to decrease absorption or use them where they will not show Sealing the lumber with dewaxed shel-lac prior to staining may help commercial sealers are also available
16ndash32
General Technical Report FPLndashGTRndash190
(a)
(b)
Figure 16ndash30 (a) Pitch exudation from an isolated spot (b) pitch exudation from a large pocket or seam
FillersHardwoods are ring porous semi-ring porous or dif-fuse porous according to size and location of vessels (see Anatomy) Diffuse-porous and semi-ring-porous hardwoods with small vessels may be finished with paints enamels and varnishes in the same way as softwoods Vessels in most ring-porous hardwoods need to be filled to obtain a smooth finished surface Filler may be a paste or liquid natural or colored Wipe the filler across wood grain to pack it into the vessels then wipe with a few light strokes with the grain Remove surplus filler immediately after the glossy wet ap-pearance disappears After the filler dries thoroughly lightly sand it before finishing the wood
Use slightly different methods for opaque and clear coat-ings For opaque finishes fill vessels sand and apply primersealer and top-coats For clear finishes stain prior to filling to bring out the color of the vessels Transparent fill-ers do not affect finish or wood color colored fillers match or contrast with wood color
SealersSealers are thinned varnish shellac or lacquer used to pre-vent absorption of finish and prevent bleeding of stains into surface coatings especially lacquer coatings Lacquer and shellac sealers dry quickly
Transparent FinishesTransparent film-forming finishes such as varnish give excellent performance on wood indoors However as with high-gloss finishes transparent finishes accentuate surface blemishes Remove all blemishes such as planer marks and raised grain before finishing Transparent finishing consists of sanding staining filling sealing finishing and some-times waxing
Transparent coatings may be gloss varnish semi-gloss var-nish shellac nitrocellulose lacquer natural oils or wax Wax provides protection without forming a thick coating and enhances the natural luster of wood Other coatings such as shellac linseed or tung oil lacquer and varnish ac-centuate the natural luster of some hardwoods and seem to give the surface ldquodepthrdquo Shellac applied by the laborious process of French polishing probably achieves this impres-sion of depth most fully but the coating is expensive and easily marred by water Rubbing varnishes give almost as much depth Lacquers have the advantages of drying rapidly and forming a hard surface but lacquer requires more coats than varnish to obtain a lustrous appearance Sufficient film thickness is needed for long service life particularly for products that are cleaned often such as kitchen cabinets and tabletops Varnishes are usually alkyd-modified poly-urethane and are available in solvent-borne and waterborne formulations Waterborne finishes are more likely to raise grain than are solvent-borne finishes and may appear like a plastic film rather than bringing out the ldquodepthrdquo of the wood
16ndash33
Chapter 16 Finishing of Wood
Figure 16ndash31 Number 2 grade of hickory finished to accentuate the beauty of the various colors knots and grain pattern of this species
substrate Apply varnish directly to wood or stain prior to varnishing
Varnish and lacquer usually dry to a high gloss To decrease gloss rub finish surface with polishing compound (water-proof sandpaper or powdered pumice stone and water or polishing oil) The final sheen varies with the fineness of the polishing compound coarse powders make a dull sur-face and fine powders produce a bright sheen For a smooth surface with high polish use rottenstone and oil for final polishing Varnish and lacquer that give a semi-gloss or satin finish are also available Do not use steel wool (see Iron Stain)
Natural oils such as linseed oil or teak oil and commercial formulations such as Danish oil are popular These finishes penetrate wood and do not form a film Apply two or more coats of oil followed by a paste wax Oil finishes are easy to apply and maintain but they soil more easily than film-forming finishes
Finishes for Wood FloorsWood is highly desirable flooring for homes factories and public buildings and is available in many wood species Natural color and grain accentuate many architectural styles Finishes enhance the natural beauty of wood floors protect them from excessive wear and make them easier to clean (Fig 16ndash31) Detailed procedures and specific products de-pend largely on the species of wood used and finish prefer-ence Obtain additional information specific to your needs from flooring associations or individual flooring manufac-turers
Finishing floors consists of four steps sanding the surface applying filler staining to achieve a desired color and finishing with a clear coat Careful sanding to provide a
smooth surface is essential for a good appearance because the finish accentuates any irregularities or roughness in the surface A smooth surface requires sanding in several steps with progressively finer sandpaper usually with a machine unless the area is small After sanding remove all dust Never use steel wool on floors because minute steel particles left in wood cause iron stains Filler is necessary for wood with large pores such as red oak to obtain a smooth glossy appearance (Table 16ndash1) Stain to obtain a uniform color or to accent the grain pattern Stain should be an oil-based or non-grain-raising type Stains penetrate wood only slightly therefore protect the stained surface with a clear coating Refinish the clear top-coats as needed to prevent wearing through to the stained wood Staining worn spots in a way that will match the color of the surrounding area is difficult
Whether the wood is stained or not sealers or varnishes give a clear finish for wood floors Floor varnish is usually alkyd-modified polyurethane Sealers are usually thinned varnish and penetrate the surface without forming a coating of ap-preciable thickness Prolong the service life of floor finishes by keeping them waxed Paste wax generally provides better appearance and lasts longer than liquid wax Re-waxing or resealing and waxing of high traffic areas are relatively sim-ple maintenance procedures as long as the stained surface of the wood has not been worn
Finishes for Items Used for FoodThe durability and beauty of wood make it an attractive material for bowls butcher blocks and other items used to serve or prepare food A finish helps keep wood dry which makes it less prone to harbor bacteria check or crack Fin-ishes that repel water decrease the effects of brief periods of wetting (washing) Finished wood is easier to clean than unfinished wood
Types of FinishSealers and Drying OilsSealers and drying oils penetrate wood and cure (dry) to form a barrier to liquid water Many commercial sealers are similar to thinned varnish (eg polyurethane or alkyd-mod-ified polyurethane) Drying oils such as tung linseed and walnut can also be used as sealers Sealers and drying oils give a surface that is easy to clean and resistant to scratch-ing Sealers are easy to apply and cure quickly Drying oils may require several weeks to cure
Nondrying OilsNondrying oils (vegetable and mineral oils) penetrate wood but do not cure As with sealers and drying oils they im-prove water resistance Vegetable oils (such as olive corn peanut and safflower) are food for microorganisms such as mildew or bacteria Vegetable oils can become rancid and may impart undesirable odors or flavors to food Mineral (or paraffin) oil is a nondrying oil from petroleum Mineral oil is not a natural product therefore it is not prone to mildew or to harbor bacteria
16ndash34
General Technical Report FPLndashGTRndash190
Varnish and LacquerFinishes that form a film such as varnish or lacquer give a smooth cleanable surface These finishes resist staining and should perform well if you minimize their exposure to wa-ter avoid placing them in a dishwasher However eventu-ally the finish may crack chip and peel
Paraffin WaxParaffin wax is similar to paraffin oil but is solid at room temperature Paraffin wax is one of the simplest ways to fin-ish wood utensils especially countertops butcher blocks and cutting boards
Food Service ItemsFood service items such as salad bowls and eating utensils need a finish that is easy to clean and resistant to abrasion water acids and stains Varnishes lacquers penetrating wood sealers and drying oils can be used however varnish-es and lacquers are easiest to keep clean and most resistant to absorption of stains
Note Whatever finish is chosen for wood utensils used to store handle or eat food be sure the finish is safe and not toxic Also be sure the finish you select is recommended for use with food or is described as food grade For information on the safety and toxicity of any finish check the label con-tact the manufacturer or the Food and Drug Administration or check with your local extension home economics expert or county agent
Butcher Blocks and Cutting BoardsThe simplest finish for wood butcher blocks and cutting boards is melted paraffin wax (the type used for home can-ning) Melt wax using hot plate or other low-temperature heat sourcemdashdo not use an open flame Brush melted wax on the wood Use an iron to melt excess wax that has solidi-fied on the surface so that it absorbs into the wood or just scrape off the excess wax Refinishing is simple and easy Other penetrating finishes (sealers drying and nondrying oils) may be used for butcher blocks and cutting boards but as mentioned in the subsection on eating utensils veg-etable oils may become rancid Film-forming finishes such as varnish or lacquer perform poorly on butcher blocks and cutting boards
Wood Cleaners and BrightenersThe popularity of wood decks and the desire to keep them looking bright and new has led to a proliferation of commer-cial cleaners and brighteners The active ingredient in many of these products is sodium percarbonate (2Na2CO33H2O2) Sodium percarbonate is bleach however it is oxygen bleach rather than chlorine bleach such as laundry bleachmdashsodium hypochlorite and calcium hypochlorite Oxygen bleaches remove mildew and have been reported to be less likely to damage wood surfaces than ldquochlorinerdquo bleaches particu-larly with low-density woods like western redcedar Alaska
yellow-cedar and redwood However it is difficult to com-pare the advantages and disadvantages of the two types of cleaner (oxygen versus chlorine) because of the wide range of active ingredient concentrations in the cleaners additives in the cleaners and various wood substrates that have been used for evaluating the cleaners Some commercial products contain household bleach Commercial cleaners usually have a surfactant or detergent to enhance the cleansing action
At the other extreme from the reported gentle bleaching ac-tion of sodium percarbonate are those cleaners containing sodium hydroxide Sodium hydroxide is a strongly alkaline chemical that pulps wood and is used in some paint strip-pers These cleaners may be necessary where mildew is imbedded in a surface finish however they should be used only as a last resort
Manufacturers of some cleaners and brighteners report that their products restore color to wood Cleaning wood does not add color Removing mildew reveals the original color Brightening the wood may make it appear as if it has more color Weathered wood has a silvery gray appearance be-cause weathering removes colored components from the surface If you want to restore color stain the wood Some commercial cleaners pulp the wood surface and subsequent power washing removes the pulped surface In this case the color is ldquorestoredrdquo because the surface of the wood was re-moved Sanding would give the same result
Some brighteners contain oxalic acid Oxalic acid removes extractives bleed and iron stains but it is not effective for removing mildew
Paint StrippersRemoving paint and other film-forming finishes from wood is a time-consuming and often difficult process Finish removal is necessary if a finish has extensive cracking or peeling (see Finish Failure or Discoloration) It may be nec-essary to remove paint containing lead however if the paint is still sound and it is not illegal to leave it on the structure paint over the lead-based paint to seal in the lead (see Lead-Based Paint)
Methods described here can remove finishes from furniture however companies that specialize in stripping furniture usually immerse the furniture in a vat of paint stripper then clean and brighten the wood
Mechanical and chemical are general types of stripping methods Consult product literature for additional informa-tion on appropriate uses and safety precautions Regardless of the method used to strip paint sand the wood prior to applying new finish
Note Dust caused by mechanical stripping methods and fumes given off by chemical strippers are usually toxic Use effective safety equipment including a respirator even if the paint does not contain lead (see Lead-Based Paint) Dust masks sold in hardware stores do not block chemical fumes and are not very effective against dust
Mechanical MethodsScraping sanding wet or dry sandblasting spraying with pressurized water (power washing) and using electrically heated pads hot air guns and blowtorches are mechanical methods for removing finishes
Scraping is effective for removing loosely bonded paint or paint that has already partially peeled from small areas of the structure If possible sand weathered surfaces and feather edges of paint still bonded to wood Do not sand if the old paint contains lead (see Lead-Based Paint)
If paint has partially debonded on large areas of a structure contractors usually remove the finish by power washing This methods work well for paint that is loosely bonded If paint is tightly bonded complete removal can be difficult without severely damaging wood The pressure needed to debond tightly bound paint from wood can easily cause deep erosion of wood If high pressure is necessary to remove paint the paint probably does not need to be removed prior to refinishing Power washing erodes less dense EW more than dense LW leaving behind ridges of LW which are dif-ficult to repaint Power washing is less damaging to wood than is wet or dry sandblasting particularly if low pres-sure is used If more aggressive mechanical methods are required wet sandblasting can remove even tightly-bonded paint Dry sandblasting is not suitable for removing paint from wood because it severely erodes wood along with the paint and it tends to glaze the surface Power washing and wet and dry sandblasting are not suitable for paint con-taining lead
Power sanders and similar devices are available for com-plete paint removal Some devices are suitable for removing paint that contains lead they have attachments for contain-ing the dust Equipment that has a series of blades similar to a power hand-planer is less likely to ldquogum uprdquo with paint than equipment that merely sands the surface Planers and sanders cannot be used unless the fasteners are countersunk Consult the manufacturersrsquo technical data sheets for detailed information to determine the suitability of their equipment for your needs and to meet government regulations on lead-containing paint
Paint can be softened using electrically heated pads hot air guns or blow torches then removed by scraping it from the wood Heated pads and hot air guns are slow methods and cause little damage to the wood Blowtorches have been
16ndash35
Chapter 16 Finishing of Wood
used to remove paint but they are extremely hazardous the flame can easily ignite flammable materials beneath the siding through gaps in the siding These materials may smolder undetected for hours before bursting into flame and causing loss of the structure Heated pads hot air guns and blowtorches are not suitable for paint containing lead These methods volatilize lead at their operating tempera-tures Lead fumes are released at approximately 371 degC (700 degF)
Note Removing paint from wood with a blowtorch is not recommended
Chemical MethodsEfficient paint removal may involve mechanical and chemi-cal methods Stripping paint chemically has the following steps apply paint stripper wait scrap off the softened paint neutralize the stripper (if necessary) wash the wood and sand the surface to remove wood damaged by the strip-per and raised grain caused by washing Chemical paint strippers although tedious to use are sometimes the most reasonable choice Some are extremely strong chemicals that quickly remove paint but are dangerous to use Others remove the paint slowly but are safer With the exception of alkali paint stripper how safe a product is and how fast it removes paint seem to be inversely correlated
Solvent-Based StrippersFast-working paint strippers usually contain methylene chloride a possible carcinogen that can burn eyes and skin Eye and skin protection and a supplied-air respirator are essential when using this paint stripper Paint strippers hav-ing methylene chloride can remove paint in as little as 10 min Some paint strippers are formulated using other strong solvents because of concerns with methylene chloride the same safety precautions should be used with these formula-tions as with those containing methylene chloride Consult product literature and strictly observe safety precautions
Alkali-Based StrippersAs an alternative to strong solvents some paint strippers contain strong bases (alkali) As with solvent-based paint strippers alkali-based strippers require eye and skin protec-tion Follow manufacturersrsquo recommendations concerning use of a respirator Although alkali-based paint strippers soften paint rather slowly they are strong chemicals and can severely damage wood Strong alkali pulps the wood sur-face After paint removal neutralize the surface with mild acid Unfortunately balancing the acid and base concentra-tions is difficult If excess alkali remains in the wood it may degrade the wood and subsequent paint coating Excess acid can also damage wood Alkali strippers are often left on painted wood a full day or overnight and are usually cov-ered to slow evaporation These covered types of products have the advantage of containing the paint stripper and paint quite well an important consideration when removing paint
containing lead Do not let alkali chemicals dry on the surface particularly on those finishes containing lead The dry chemicals contain lead dust
Note Alkali-based strippers require extra care to ensure that the wood is neutralized and that residual salts are washed from the wood The surface usually needs to be sanded before repainting to remove raised grain
ldquoSaferdquo Paint StrippersSeveral manufactures have marketed ldquosaferdquo paint strippers These strippers work slower than those having methylene chloride The active ingredient in such paint strippers is usually proprietary Concerning safety follow the manufac-turerrsquos recommendations
Avoidance of ProblemsAvoid finish failure subsequent to removing the old finish by using methods that do not damage wood The best way to remove paint may involve a combination of methods For example use power washing to remove as much loosely bound paint as possible Then use a chemical paint stripper on tightly-bonded paint Avoid using excessive amounts of chemical stripper Applying too much stripper or leaving it on painted wood too long can damage wood Use less paint stripper and reapply it rather than trying to remove all the paint with one application and risk damaging wood
The range of wood species and finishes and the possibil-ity of finishes containing lead complicates paint removal Companies may optimize paint stripper formulation with-out considering the effects on wood Removing paint from wood is only half the task Getting a paintable surface is the other half Companies that formulate paint strippers should consider this other half Those who use paint strippers need to understand the added burden of surface preparation
Disposal of Old PaintNo matter what method you use to remove paint be care-ful in disposing of old paint particularly paint that contains lead Lead paint is hazardous waste follow all regulations national and local during the removal storage and disposal of all paint especially paint containing lead (see Lead-Based Paint)
Lead-Based PaintLead-based paint was widely used in residential structures in the United States until the early 1940s and its use contin-ued to some extent for the exterior of dwellings until 1976 In 1971 Congress passed the Lead-Based Paint Poisoning Prevention Act and in 1976 the Consumer Product Safety Commission (CPSC) issued a ruling under this Act that lim-ited the lead content of paint used in residential dwellings toys and furniture to 006 Prior to any paint restoration on structures built prior to 1976 (and probably a good idea on any structure) check paint for lead Check for lead using a solution of 6 to 8 sodium sulfide in water or using a
16ndash36
General Technical Report FPLndashGTRndash190
test kit Test kits should be available in most paint and hard-ware stores Be certain to check all paint layers because the older ones are more likely to contain lead
Lead-based paint is still manufactured for applications not covered by the CPSC ruling such as paint for metal prod-ucts particularly those made of steel Occasionally such lead-based paint inadvertently gets into the hands of con-sumers Imported products may also contain lead paint Studies have shown that ingestion of even minute amounts of lead can have serious effects on health lead causes hy-pertension fetal injury damage to the brain kidneys and red blood cells partial loss of hearing impairment of mental development growth retardation and inhibited metabolism of vitamin D The American Academy of Pediatrics regards lead as one of the foremost toxicological dangers to children
Lead-based paint on the exterior of structures weathers to give flakes and powder The degraded paint particles accu-mulate in the soil near the structure Lead-based paint used on interior surfaces can also degrade to produce lead-con-taining dust Sanding coatings prior to repainting generates lead dust Sanding the exterior of a structure without proper equipment can cause lead contamination inside the structure
Methods used to remove lead paint can themselves gener-ate lead dust This is particularly true when unacceptable methods and work practices are used Poorly performed abatement can be worse than no abatement Micron-sized lead dust particles can remain airborne for substantial peri-ods and cannot be completely removed by standard cleaning methods When working on old painted surfaces assume that one or more of the paint coats contain lead Take pre-cautions accordingly
Check with the US Department of Health and Urban De-velopment (HUD) US Environmental Protection Agency (EPA) and American Coatings Association for the latest regulations and guidelines for remediating lead-based paint (wwwhudgovofficeslead) (wwwepagovlead) (wwwpaintorgissuesleadcfm)
Caution Remodeling or refinishing projects that require disturbing removing or demolishing portions of struc-tures coated with lead-based paint pose serious health risk The consumer should seek information advice and perhaps professional assistance for addressing these risks Contact HUD for the latest information on the removal of lead-based paints Debris coated with lead-based paint is hazardous waste and must be disposed of in accordance with federal and local regulations
Literature CitedAWPA 2008 Book of standards Birmingham AL Ameri-can Wood Protection Association
Sabin AH 1927 Technology of paint and varnish 3rd ed London John Wiley amp Sons
Schofield M 2008 Fine wood working Newtown CT The Taunton Press SeptemberOctober (Issue 200) 52ndash58
Wicks ZW Jr Jones FN Pappas SP Wicks DA 2007 Organic Coatings Science and Technology 3rd ed Hoboken NJ John Wiley amp Sons
Additional ReferencesAPA 1979 Stains and paints on plywood Pamphlet B407B Tacoma WA American Plywood Association
Arnold M Feist WC Williams RS 1992 Effect of weathering of new wood on the subsequent performance of semitransparent stains Forest Products Journal 42(3) 10ndash14
ASTM 2003 Standard specification for zinc coating (hot-dip) on iron and steel hardware A 153A 153Mndash01a West Conshohocken PA ASTM International 1(6)
Black JM Mraz EA 1974 Inorganic surface treatments for weather-resistant natural finishes Res Pap FPLndash232 Madison WI US Department of Agriculture Forest Service Forest Products Laboratory 44 p
Bussjaeger S Daisey G Simmons R Spindel S Williams S 1999 Mildew and mildew control for wood surfaces JCT Coatings Tech 71(890) 67ndash69
Cassens DL Feist WC 1980a Wood finishing finishing exterior plywood hardboard and particle board North Cen-tral Region Extension Pub 132 West Lafayette IN Purdue University Cooperative Extension Service
Cassens DL Feist WC 1980b Wood finishing paint failure problems and their cure North Central Region Ex-tension Pub 133 West Lafayette IN Purdue University Cooperative Extension Service
Cassens DL Feist WC 1980c Wood finishing discol-oration of house paintmdashcauses and cures North Central Region Extension Pub 134 West Lafayette IN Purdue University Cooperative Extension Service
Cassens DL Feist WC 1980d Wood finishing selection and application of exterior finishes for wood North Central Region Extension Pub 135 West Lafayette IN Purdue University Cooperative Extension Service
Cassens DL Feist WC 1980e Wood finishing finishing and maintaining wood floors North Central Region Exten-sion Pub 136 West Lafayette IN Purdue University Cooperative Extension Service
Daniels T Hirsch M McClelland K Ross A Williams RS 2004 Clear exterior finishes finding the balance between aesthetics and durability JCT Coatings Tech 1(9) 42ndash48
Feist WC 1979 Protection of wood surfaces with chro-mium trioxide Res Pap FPLndash339 Madison WI US
16ndash37
Chapter 16 Finishing of Wood
Department of Agriculture Forest Service Forest Products Laboratory 11 p
Feist WC 1982b Weathering of wood in structural uses In Meyer RW Kellogg RM eds Structural use of wood in adverse environments New York Van Nostrand Reinhold Company 156ndash178
Feist WC 1990 Outdoor wood weathering and protec-tion In Rowell R ed Archaeological wood properties chemistry and preservation Advanced in Chemistry Series No 225 Washington DC American Chemical Society 263ndash298 Chapter 11
Feist WC 1996 Finishing exterior wood Federation Series on Coatings Technology Blue Bell PA Federation of Soci-eties for Coatings Technology
Feist WC Hon DNndashS 1984 Chemistry of weathering and protection In Rowell RM ed The chemistry of solid wood Advances in Chemistry Series No 207 Washington DC American Chemical Society 401ndash451 Chapter 11
Feist WC Mraz EA 1980 Performance of mildewcides in a semitransparent stain wood finish Forest Products Jour-nal 30(5) 43ndash46
Feist WC Ross AS 1995 Performance and durability of finishes on previously coated CCA-treated wood Forest Products Journal 45(9) 29ndash36
Feist WC Williams RS 1991 Weathering durability of chromium treated Southern Pine Forest Products Journal 41(1) 8 14
Gorman TM Feist WC 1989 Chronicle of 65 years of wood finishing research of the Forest Products Laboratory Gen Tech Rep FPLndashGTRndash60 Madison WI US Depart-ment of Agriculture Forest Service Forest Products Labora-tory
Jourdain C Dwyer J Kersall K Mall D Springate R Williams S 1999 Changing nature of wood productsmdashwhat does it mean for coatings and finish performance JCT Coatings Tech 71(890) 61ndash66
Kalnins MA Feist WC 1993 Increase in wettability of wood with weathering Forest Products Journal 43(2) 55ndash57
Kiguchi M Evans PD Ekstedt J Williams RS Ka-toaka Y 2001 Improvement of the durability of clear coat-ings by grafting of UV-absorbers on to wood Surface Coatings International Part B Coatings Transactions 84(B4) 263ndash270
Mall DD Bonura T Bussjaeger S Carll C Panila D Williams RS 2004 Frequently asked questions wood and coatings applications JCT Coatings Tech 1(3) 36ndash49
McDonald KA Falk RH Williams RS Winandy JE 1996 Wood decks materials construction and finishing Madison WI Forest Products Society 94 p
Miller RB Wiedenhoeft AC Williams RS Stockman W Green F 2003 Characteristics of ten tropical hard-woods from certified forests in Bolivia part II natural durability to decay fungi Wood and Fiber Science 35(3) 429ndash433
Niemiec SS Brown TD 1988 Care and maintenance of wood shingle and shake roofs Corvallis OR Oregon State University Extension Service EC 1271 (September)
Richter K Feist WC Knaebe MT 1995 The effect of surface roughness on the performance of finishes Part 1 Roughness characterization and stain performance Forest Products Journal 45(78) 91ndash97
Ross A Daisey G Jourdain C Williams RS 1998 Cleaners and restorers for wood decks The Paint Dealer (April) 30ndash33
Ross AS Feist WC 1993 The effects of CCA-treated wood on the performance of surface finishes American Paint and Coatings Journal 78(9) 41ndash54
Ross AS Bussjaeger RC Feist WC 1992 Professional finishing of CCA-pressure-treated wood American Painting Contractor 69(7) 107ndash114
Sell J Feist WC 1986 Role of density in the erosion of wood during weathering Forest Products Journal 36(3) 57ndash60
Simpson WT ed 1991 Dry kiln operatorrsquos manual Agric Handb 188 Madison WI US Department of Agriculture Forest Service Forest Products Laboratory 274 p
Tichy RJ 1997 Interior wood finishing industrial use guide Madison WI Forest Products Society 113 p
USDA 1998 Rehabilitation of wood-frame houses Agric Handb 804 Washington DC US Department of Agricul-ture Forest Service 240 p
WDMA 1999 Industry standard for water-repellent pre-servative treatment for millwork IS4ndash99 Des Plaines IL Window and Door Manufacturerrsquos Association
Williams RS 1986 Effects of acid rain on painted wood surfaces importance of the substrate In Baboian R ed Materials degradation caused by acid rain ACS Symposium Series 318 Washington DC American Chemical Society 310ndash331
Williams RS 1990a Acidic deposition state of science and technology In Effects of acidic deposition on materials
16ndash38
General Technical Report FPLndashGTRndash190
Report 19 National Acid Precipitation Assessment Program 19165 19202 Vol 3
Williams RS 1990b Effects of acidic deposition on paint-ed wood In Effects of acidic deposition on materials State of Science and State of Technology Report 19 National Acid Precipitation Assessment Program 19165ndash19202 Vol 3
Williams RS 1991 Effects of acidic deposition on painted wood a review JCT Coatings Tech 63(800) 53 73
Williams RS 2005 Weathering of wood In Rowell RM ed Handbook of Wood Chemistry and Wood Composites Boca Raton CRC Press Chapter 7
Williams RS Feist WC 1993a Durability of paint or solid-color stain applied to preweathered wood Forest Products Journal 43(1) 8ndash14
Williams RS Feist WC 1993b Effect of weathering of wood prior to finishing on paint bond strength and durabil-ity In Proceedings of the Polymeric Materials Science and Engineering Division Denver CO American Chemical Society Spring Meeting 1993 March 29 April 2
Williams RS Feist WC 1994 Effect of preweathering surface roughness and wood species on the performance of paint and stains JCT Coatings Tech 66(828) 109ndash121
Williams RS Feist WC 1999 Selection and application of exterior stains for wood Gen Tech Rep FPLndashGTRndash106 Madison WI US Department of Agriculture Forest Ser-vice Forest Products Laboratory 1ndash9
Williams RS Feist WC 1999 Water repellent and water repellent preservative finishes for wood Gen Tech Rep FPLndashGTRndash109 Madison WI US Department of Agricul-ture Forest Service Forest Products Laboratory 1ndash12
Williams RS Feist WC 2001 Duration of wood pre-weathering effect on the service life of subsequently ap-plied paint JCT Coatings Tech 73(930) 65ndash72
Williams RS Feist WC 2004 The service life of semitransparent stain solid color stain and latex paint on yellow-poplar and sweetgum plywood and the effect of these finishes on wood durability Forest Products Journal 54(78) 96ndash101
Williams RS Knaebe M 2000 Restoration of severely weathered wood JCT Coatings Tech 72(902) 43ndash51
Williams RS Knaebe MT Feist WC 1996 Finishes for exterior wood Madison WI Forest Products Society
Williams RS Miller RB Gangstad J 2001 Charac-teristics of ten tropical hardwoods from certified forests in Bolivia part I weathering characteristics and dimensional stability Wood and Fiber Science 33(4) 618ndash626
Williams RS Plantinga PL Feist WC 1990 Photo-degradation of wood affects paint adhesion Forest Products Journal 40(1) 45ndash49
Williams RS Sotos P Feist WC 1999 Evaluation of several paint systems on severely weathered wood JCT Coatings Tech 71(895) 97ndash102
Williams RS Winandy JE Feist WC 1987a Adhe-sion of paint to weathered wood Forest Products Journal 37(1112) 29ndash31
Williams RS Winandy JE Feist WC 1987b Paint adhesion to weathered wood JCT Coatings Tech 59(749) 43ndash49
Williams RS Winandy JE Feist WC 2002 Correla-tion of adhesive strength with service life of paint applied to weathered wood Paper 161 In Proceedings 9th durability of building materials and components conference Brisbane Australia 17ndash20 March
Williams RS Jourdain C Daisey G Springate RW 2000 Wood properties affecting finish service life JCT Coatings Tech 72(902) 35ndash42
Williams RS Knaebe MT Evans JW Feist WC 2001 Erosion rates of wood during natural weathering part III effect of exposure angle on erosion rates Wood and Fi-ber Science 33(1) 50ndash57
Williams RS Knaebe MT Sotos PG Feist WC 2001 Erosion rates of wood during natural weathering part I ef-fect of grain angle and surface texture Wood and Fiber Sci-ence 33(1) 33ndash42
Williams RS Lacher S Halpin C White C 2005 Evaluating weather factors and material response during outdoor exposure to determine accelerated test protocols for predicting service life In Martin JW Ryntz RA Dickie RA eds Service Life Prediction Challenging the Status Quo Federation of Societies for Coatings Technology Pro-ceedings 3rd international symposium on service life pre-diction Sedona AZ 2004 February 1ndash6
Williams RS Ross AS Sotos P Cheeks CN 2001 Water-repellent preservative treatment of brick molding prior to factory priming improves paint service life In Proceedings of the annual meeting of the American Wood Preserverrsquos Association (Vol 97) 65ndash67
16ndash39
Chapter 16 Finishing of Wood
16ndash2
Factors Affecting Finish PerformanceWood surface properties type of wood product and weather affect finish performance
AnatomyWood species (thus its anatomy) is the primary factor that determines surface properties of woodmdashproperties that af-fect adhesion and performance of finishes Wood anatomy determines whether a wood species is a hardwood or soft-wood not the density (specific gravity) or its hardness Finish performance is affected by
bull density (overall density earlywood (EW)ndashlatewood (LW) density difference and how abruptly density changes at the EWndashLW boundary)
bull thickness of LW bandsbull ray cells (number and placement)bull vessels (size and location)bull extractives content andbull growth rate (some species grow faster than others
and environment affects growth rate within a specific species)
Most wood cells (called tracheids in softwoods fibers in hardwoods) align parallel (axial) to the stem or branch Softwood tracheids support the tree and transport water and nutrients Hardwood fibers just support the tree hard-woods have special cells (vessels) for transporting water and nutrients Vessel cells are open at each end and stacked to form ldquopipesrdquo Axial tracheids and fibers are hollow tubes closed at each end In softwoods liquids move in the axial direction by flowing from one tracheid to another through openings called pits Liquid transport between the bark and center of the stem or branch in hardwoods and softwoods is by ray cells Figures 16ndash1 to 16ndash3 are micrographs show-ing the orientation of axial and ray cells for white spruce red oak and red maple respectively Note that the soft-wood (Fig 16ndash1) has no vessels The large openings are resin canal complexes (common to spruce pine larch and Douglas-fir) Figure 16ndash2 shows red oak a ring-porous hardwood Large-diameter vessels in ring-porous species form along with EW later in the growing season the ves-sels have smaller diameters Figure 16ndash3 shows red maple a diffuse-porous hardwood small vessels having similar size form throughout the EW and LW Hardwoods can also be semi-ring porous
Axial and ray cells form in the cambium a layer of cells just under the bark In the early part of the growing season
General Technical Report FPLndashGTRndash190
Figure 16ndash1 Micrograph of white spruce showing gradual transition of cell wall thickness and resin canal complexes (Micrographs prepared by HA Core WA Cocircteacute and AC Day Copyright by NC Brown Center for Ultrastructure Studies College of Environmental Sci-ence and Forestry State University of New York Syra-cuse New York Used with permission)
Figure16ndash2 Micrograph of red oak showing ring-porous vessels (Micrographs prepared by HA Core WA Cocircteacute and AC Day Copyright by NC Brown Cen-ter for Ultrastructure Studies College of Environmental Science and Forestry State University of New York Syracuse New York Used with permission)
16ndash3
Chapter 16 Finishing of Wood
(temperate species) the cells have large open centers (lu-mens) and thin cell walls This is earlywood (also called springwood) As the growing season progresses cell walls become thicker forming latewood (also called summer-wood) The combination of EWndashLW (and vessels in hard-woods) gives annual growth rings The properties of these growth rings affect the ease with which finishes can be ap-plied (paintability) and how long finishes last (service life)
Cross-section micrographs of three softwoods and hard-woods (Fig 16ndash4) show three types of growth character-istics Softwoods may show ldquono transitionrdquo (no EWndashLW boundary Fig 16ndash4a) gradual transition (Fig 16ndash4b) or abrupt transition (Fig 16ndash4c) Note the ldquono transitionrdquo softwood is a tropical species (that is no seasons therefore no EWndashLW transition) Hardwoods may be diffuse porous (Fig 16ndash4d) semi-ring porous (Fig 16ndash4e) or ring porous (Fig 16ndash4f) As a first approximation for explaining finish-ing characteristics of wood the various wood species can be grouped into three categories
bull Easy to finish (ldquono transitionrdquo or gradual-transition soft-woods and diffuse-porous hardwoods)
bull Moderately easy to finish (abrupt-transition softwoods having narrow LW bands and semi-ring-porous hardwoods)
bull Difficult to finish (abrupt-transition softwoods having wide LW bands and ring-porous hardwoods)
The important message from wood anatomy is to look at the wood The six micrographs showing end-grain wood-cell structure do not include all possible combinations of growth rate grain and surface texture When determining paintability look at grain angles Look at the width of the LW bands and the transition between them (Fig 16ndash5) The blocks show radial and tangential surfaces (that is vertical- and flat-grain surfaces for six softwoods and quarter-sawn and flat-sawn for two hardwoods) Note the abrupt transi-tions on the southern yellow pine and Douglas-fir and the gradual transitions on the western redcedar and white pine Also note the growth rate and width of the LW bands Sur-faces having abrupt transition rapid growth rate and wide LW bands are difficult to finish particularly on flat-grain wood Moisture-induced dimensional change increases as wood density increases Changes are greater for LW than EW Different dimensional change for abrupt-transition (or ring-porous) species at the EWndashLW boundary places stress on coatings
Shrinkage values given in Table 16ndash1 were obtained from drying wood from its green state (fiber saturation) to oven-dry (0 MC) swelling rates would be approximately the same Some species have wide bands of EW and LW These distinct bands often lead to early paint failure Wide promi-nent bands of LW are characteristic of the southern yellow pines radiata pine and Douglas-fir (Fig 16ndash5abc) and getting good paint performance is more difficult on these species In contrast white pine redwood and western redcedar (Fig 16ndash5def) do not have wide LW bands and these species give excellent paint performance Diffuse-porous hardwoods such as aspen (Fig 16ndash5g) have a fine surface texture and are easy to finish whereas red oak (Fig 16ndash5h) has a highly textured surface and requires surface preparation prior to finishing
Figure 16ndash3 Micrograph of red maple showing diffuse-porous vessels (Micrographs prepared by HA Core WA Cocircteacute and AC Day Copyright by NC Brown Center for Ultrastructure Studies College of Environ-mental Science and Forestry State University of New York Syracuse New York Used with permission)
Figure 16ndash4 Cross-section micrographs of (A) a tropi-cal softwood (Podocarpus imbricate) (B) white spruce (Picea glauca) (C) Douglas-fir Pseudotsuga menziesii (D) sugar maple (Acer saccharum) (E) persimmon (Diospyros virginiana) and (F) white ash (Fraxinus americana) The arrows show a single growth year for the temperate species
16ndash4
Fifty years ago most exterior siding and trim were vertical-grain heartwood of western redcedar or redwood All-heart-wood vertical-grain grades of these species are still avail-able as resawn bevel siding and lumber and are excellent wood substrates for painting (Table 16ndash1) Other species are generally available only as flat-grain or a mix of flat- and vertical-grain lumber (for example western hemlock east-ern white pine lodgepole pine eastern white cedar radiata pine and southern yellow pine) Finishing characteristics of flat-grain western redcedar and redwood are similar to other low-density wood species having moderate EWndashLW transi-tion (such as eastern white pine eastern white cedar and yellow poplar) Sawing to yield vertical grain is only practi-cal with fairly large-diameter logs Species available in small-diameter logs yield mostly flat-grain lumber
Other wood properties such as knots juvenile wood and extractives affect wood finishing Extractives include many chemicals with different solubilities in water organic sol-vents and paint resins (also called binders)
ManufacturingThe axial EW and LW cells in a log yield lumber of vari-ous grain angles (Fig 16ndash6) At one extreme (board a) the growth rings are perpendicular to the plane of the board at the other extreme (board c) growth rings are parallel to the plane of the board (although they have an arc) Grain var-ies between these two extremes Vertical-grain lumber has a grain angle from 90deg (growth rings perpendicular to surface) to approximately 45deg From 45deg to the other extreme (board c) lumber is considered flat grain Board b is different Lumber cut close to the pith (the center of the log) contains abnormal wood cells These abnormal cells are juvenile wood and have extremely high longitudinal dimensional change (2) compared with normal wood (01ndash02) The values are the change from green to ovendry (see Chap 4) A 10-ft (3-m) board could shrink 24 in (61 mm) This dimensional instability leads to severe warping and cross-grain checking in lumber containing juvenile wood (see Chap 5)
The bark side and pith side of flat-grain or flat-sawn lum-ber have slightly different properties The pith side is more prone to have raised grain than the bark side particularly with abrupt-transition wood species (southern yellow pine Douglas-fir and oak (Table 16ndash1)) The bark side tends to check more and the checking is more pronounced in the LW bands
General Technical Report FPLndashGTRndash190
(a) (b)
(c) (d)
(e) (f)
(g) (h)
Figure 16ndash5 Wide LW bands characteristic of (a) the southern yellow pines (b) radiata pine and (c) Douglas-fir and narrow LW bands characteristic of (d) white pine (e) redwood and (f) western redcedar (g) and (h) are examples of the difference in surface texture between diffuse-porous and ring porous hardwoods respectively (e) shows examples of second or third growth (left) and old-growth (right) redwood
16ndash5
Chapter 16 Finishing of Wood
Table 16ndash1 Painting characteristics of common wood species
Wood species
Specific gravitya
(greendry)
Shrinkage ()b
Paintabilityc
(latex paint) EWLW
transitiond
Is LW greater than about 13 of
GReColor of
heartwood Tangential Radial
Softwoods Baldcypress 042046 62 38 II A No Light brown Cedars I Incense 035037 52 33 I G No Brown Northern white 029031 49 22 I G No Light brown Port-Orford 039043 69 46 I G No Cream Western red 031032 5 24 I G No Brown Alaska yellow 042044 6 28 I G No Yellow
Douglas-firfg 045048 76 48 III A Yes Pale red Pines Eastern white 034035 61 21 I G No Cream Ponderosa 038042 62 39 II A YesNo Cream Southernh 047051h 8 5 III A Yes Light brown Western white 036038 74 41 I G No Cream Radiata 045053 70 42 III A YesNo Cream
Redwoodi 038040 44 26 I A No Dark brown Sprucej 033035 71 38 I G No White Tamaracklarch 049053 74ndash91 37ndash45 II A YesNo Brown True fir 037039 70 33 I G No White Western hemlock 042045 78 42 II GA YesNo Pale brown Hardwoods Red alder 037041 73 44 I D NA Pale brown Ash 055060 8 5 III R Yes Light brown Aspencottonwood 036040 70ndash92 35ndash39 I D NA Pale brown Basswood 032037 78 59 I D NA Cream Beech 056064 119 55 I D NA Pale brown Birch 055062 95 73 I D NA Light brown Butternut 036038 64 34 II SR Yes Light brown Cherry 047050 71 37 I D NA Brown Chestnut 040043 67 34 III R Yes Light brown Elm American 046050 95 42 III R Yes Brown Hickory 064072 11 7 III R Yes Light brown Maple sugar 056063 99 48 I D NA Light brown Oaks White oak group 060068 88 44 III R Yes Brown Red oak group 056063 86 40 III R Yes Brown
Sweetgum 046052 102 53 I D NA Brown Sycamore 046049 84 5 I D NA Pale brown Walnut 051055 78 55 II SR Yes Dark brown Yellow-poplar 040042 82 46 I D NA Pale brown aSpecific gravity based on weight ovendry and volume at green or 12 moisture contentbDimensional change obtained by drying from green to ovendry Values reported here are averages from a variety of sources and are provided for comparative purposes For more specific values see Chapter 4 cI easy to finish III difficult to finish dA abrupt-transition softwood G gradual-transition softwood R ring-porous hardwood D diffuse-porous hardwood SR semi-ring-porous hardwood eGR growth ring NA not applicable yesno depends on the specimen In ring-porous hardwoods the growth rate (number of rings per centimeter or inch) will determine the relative proportions of earlywood and latewood fLumber and plywood gCoastal Douglas-fir hLoblolly shortleaf specific gravity of 054059 for longleaf and slash iRedwood is listed as paintability ldquoIrdquo because its LW band is very narrow jSpruce Values are for Engelmann spruce other species are similar
Moisture contentMoisture content (MC) is the amount of water (in any of its forms) contained in wood (see Chap 4) MC includes water or water vapor absorbed into cell walls and free water within the hollow center of the cells (lumina) it is expressed as weight percentage The amount of water vapor wood can absorb depends on wood species most species can absorb water vapor to increase their mass approximately 30 above an ovendry MC condition This water is hydrogen bound within the cell wall matrix of hemicelluloses and to some extent cellulose The limit to the amount of water bound in the wood cell wall is the fiber saturation point
The amount of water vapor wood absorbs depends on the relative humidity (RH) of the surrounding air If wood is stored at 0 RH the MC will eventually approach 0 If
wood is stored at 100 RH the MC will eventually reach fiber saturation (approximately 30 moisture) Of course if kept at a constant RH between these two extremes wood will stabilize at a MC between 0 and 30 The RH con-trols the MC and when the MC is in balance with the RH the wood is at its equilibrium moisture content (EMC) This rarely happens because as the RH changes so does the MC of the wood and atmospheric RH is continually changing It varies through daily and seasonal cycles thus driving the MC of wood through daily and seasonal cycles See Chapter 4 for more information on MC and EMC
Finishes cannot change EMC they affect only the rate at which absorption and desorption occur (see Moisture- Excluding Effectiveness)
Wood outdoors in most areas of the United States cycles around a MC of approximately 12 to 14 In the Pa-cific Northwest average MC can be slightly higher (12 to 16) and in the Southwest slightly lower (6 to 9) (Chap 13 Tables 13ndash1 and 13ndash2) Daily and annual MC may vary from these averages In general wood outdoors decreases MC during the summer and increases MC during the winter (Wood indoors in northern climates increases MC during the summer and decreases MC during the winter In the south this distinction is not clear because air con-ditioning affects indoor RH and thus MC) Even in humid areas RH is rarely high enough for a long enough period to bring the MC of wood above 20 Wood warmed by the sun experiences a virtual RH far below the ambient RH The surface dries faster than the rest of the lumber This is why cupping and checking often occur on decking boards the top surface is much drier than the rest of the board Shrink-age of the top surface commensurate with this dryness causes cupping and checking parallel to the grain (Juvenile wood often checks perpendicular to the grain)
As mentioned fiber saturation is the limit to the amount of water vapor that wood absorbs Water vapor absorbs slowly compared with liquid water Liquid water can quickly bring
General Technical Report FPLndashGTRndash190
16ndash6
General Technical Report FPLndashGTRndash190
Figure 16ndash6 Lumber grain affects finish perfor-mance (a) edge-grain (vertical-grain or quarter-sawn) board (b) edge-grain board containing pith (c) flat-grain (slash-grain or plain-sawn) board Arrows show radial (R) tangential (T) and longitudinal (L) orientation of wood grain
MoistureThe chemical commonly called water (H2O) has three states according to temperature and pressure conditions gas (water vapor or steam) liquid (water) or solid (ice) When water interacts with wood it can occur in a fourth state (bound water) Moisture is not one of the states of water it is a term with the power to indicate uncertainty about the waterrsquos state or to refer collectively to water in all its states in wood For example some of the moisture in a board at 50 moisture content will occur as liquid water (or ice depending on the temperature) within cell cavities of the wood some will occur as water vapor and some will be bound water (bound within cell walls) Moisture thus ac-counts for any or all of these states in a single word In this chapter the term water designates water in its liquid state
wood to fiber saturation and it is the only way to bring the MC of wood above fiber saturation As wood continues to absorb liquid water above its fiber saturation point the wa-ter is stored in the lumen when water replaces all the air in the lumen the wood is waterlogged and its MC can be as high as 200
Wood can get wet many ways (such as windblown rain leaks condensation dew and melting ice and snow) The result is always the samemdashpoor performance of wood and finish Water is usually involved if finishes perform poorly on wood Even if other factors initially cause poor perfor-mance water accelerates degradation Fortunately the MC of lumber can be controlled However all too often this critical factor is neglected during construction and finishing
Paint wood when its average MC is about that expected to prevail during its service life (approximately 12 for most of the United States and Canada) Painting wood after it acclimates to a MC commensurate with the environment minimizes stress on film-forming finishes The MC and thus the dimensions of the piece will still fluctuate somewhat depending on the cyclic changes in atmospheric RH but the dimensional change should not be excessive Therefore film-forming finishes (such as paints) are not stressed and should not fail by cracking
Most siding and trim is kiln dried to less than 20 MC before shipment and if it has been kept dry during ship-ment and storage at the construction site it should be close to EMC by the time it is finished If wood gets wet during shipping or storage or at the construction site a MC of less than 20 is not likely If wet wood is used it will dry in service and shrinkage may cause warping twisting and checking If the MC of wood exceeds 20 when the wood is painted the risk of blistering and peeling is increased Moreover water-soluble extractives in species such as redwood and western redcedar may discolor paint
Plywood particleboard hardboard and other wood compos-ites change MC during manufacture Frequently the MC of these materials is not known and may vary depending on the manufacturing process As with other wood products condi-tion wood composites prior to finishing
Dimensional ChangeDimensional change depends on wood species and varies within a particular species Average shrinkage values ob-tained by drying wood from its green state to ovendry vary from 24 for radial western redcedar to 119 for tangen-tial beech (Table 16ndash1) Dimension in service does not vary to this extent because the MC seldom goes below 6 (Chap 13 Table 13ndash1) A film-forming finish would likely decrease this range but only if the end grain is sealed unsealed end grain increases MC of painted wood (see Moisture Exclud-ing Effectiveness)
Wood having little tendency to shrink and swell gives a stable surface for painting Vertical-grain surfaces are more stable than flat-grain surfaces (Table 16ndash1 Fig 16ndash6) espe-cially outdoors where periodic wetting may produce rapid dimensional change Wood species having low specific gravity tend to be more dimensionally stable than those hav-ing high specific gravity (Fig 16ndash7) Low-specific-gravity wood species (that is those that are more dimensionally stable) hold paint better than high-specific-gravity wood species however other factors such as wood anatomy and manufacturing also affect paint adhesion
Wood ExtractivesHighly colored extractives occur in heartwood of softwoods such as western redcedar and redwood and hardwoods such as walnut and mahogany Extractives give heartwood its color and many extractives are soluble in water Discolor-ation of painted or unpainted wood may occur when rain leaches water-soluble extractives from wood (If indoors plumbing leaks or high RH can also cause it) The water carries extractives to wood or paint surfaces and evaporates leaving extractives as a yellow to reddish brown stain on the surface Some paints such as oil-alkyd stain-blocking prim-ers block leaching of water-soluble extractives
Wood also contains compounds (resins and oils) that are in-soluble in water Species and growing conditions determine the type and amount of these compounds For example many pines contain pitch and knots of almost all species contain sufficient oils and resins to discolor light-colored paint These oils and resins are similar chemically to oil-alkyd paints therefore oil-alkyd stain-blocking primers cannot block them Latex-based formulations are also inef-fective (see Knots and Pitch)
16ndash7
Chapter 16 Finishing of Wood
0
2
4
6
8
10
12
14
000 020 040 060 080Dry specific gravity
Shrinkage vs dry specific gravity
Shri
nkag
e fr
om G
reen
to O
D (
)
Figure 16ndash7 Plots of radial () and tangential (diams) shrinkage from green to oven dry (OD) as a function of specific gravity for various hardwoods and softwoods from Table 16ndash1 Lines show least-squares fit
Shellac (a natural product made from the secretion of lac-producing insects such as Kerria lacca) and specially formulated synthetic finishes block extractives bleed from knots Use shellac or synthetic knot sealers only over knots and paint over them to protect them from water Blocking diffusion of extractives from knots is difficult and no easy fix is available other than the extra step of sealing knots before priming By doing this extra step you can minimize discoloration of white paint on knotty pinemdashbut it is not easy If you want white use knot-free wood Difficulty seal-ing knots is the main reason manufacturers cut out the knots to make fingerjointededge-glued lumber
Another option for knots is to use them to accentuate the wood Use a stain to bring out the color and make the knots a part of the desired appearance
Wood ProductsSix types of wood products are commonly used on the exte-rior of structures (1) lumber (2) plywood (3) fingerjointed wood (4) reconstituted wood products (such as hardboard and oriented strandboard (OSB)) (5) woodndashplastic com-posites and (6) preservative- or fire-retardant-treated wood Each product has unique characteristics that affect applica-tion and performance of finishes
LumberLumber (such as siding trim and decking) for exterior use is available in many species and products and several publi-cations describe grades
bull ldquoStandard Grading Rules for West Coast Lumberrdquo West Coast Lumber Inspection Bureau Portland Oregon
bull ldquoStandard Grading Rules for Canadian Lumberrdquo Na-tional Lumber Grades Authority New Westminster British Columbia
bull ldquoWestern Lumber Grading Rulesrdquo Western Wood Prod-ucts Association Portland Oregon
bull ldquoStandard Grading Rules for Northeastern Lumberrdquo Northeastern Lumber Manufacturers Association Cum-berland Maine
bull ldquoStandard Grading Rulesrdquo Northern Softwood Lumber Bureau Cumberland Maine
bull ldquoStandard Specifications for Grades of California Red-wood Lumberrdquo Redwood Inspection Service Pleasant Hill California
bull ldquoStandard Grading Rules for Southern Pine Lumberrdquo Southern Pine Inspection Bureau Pensacola Florida
These publications are the basis for selecting wood to meet codes They give specifications for appearance grades (such as siding and trim) and for structural lumber (such as fram-ing and decking) Western redcedar and redwood are the only species available in vertical-grain grades and saw-textured surfaces (Table 16ndash1) Southern yellow pine and Douglas-fir plywood are available in saw-textured surfaces
Unless specified as vertical grain the grade contains mostly flat-grain lumber Lumber used for board and batten drop or shiplap siding is frequently flat grain Bevel siding is commonly produced in several grades The highest grade of redwood and western redcedar bevel siding is vertical grain and all heartwood Other grades of redwood and western redcedar may be flat vertical or mixed grain and may not be all heartwood Grade is important because species grain orientation and surface texture affect paint-holding charac-teristics
Descriptions of grades and pictures of many wood species are contained in brochures published by trade associations (such as Western Red Cedar Lumber Association California Redwood Association Western Wood Products Associa-tion Southern Forest Products Association and Northeast Lumber Manufacturing Association) (Fig 16ndash8) and these brochures reference the grade rules When specifying lum-ber refer to the grade rules for the product to ensure that the product meets code requirements and use the association brochures to get an idea of appearance
Textures (roughness or smoothness) of wood surfaces af-fect selection application and service life of finishes Until recently a general rule of thumb for matching substrates to finishes was to paint smooth wood and stain saw-textured wood This easy rule of thumb no longer applies Although
General Technical Report FPLndashGTRndash190
16ndash8
General Technical Report FPLndashGTRndash190
Figure 16ndash8 Examples of trade association brochures describing wood products
penetrating finishes such as solvent-borne oil-based semi-transparent stains last longer on saw-textured wood than on smooth-planed wood many film-forming finishes such as opaque stains and paints also last longer on saw-textured wood than on smooth-planed wood Finishes adhere better film buildup is thicker and service life of the finish is longer on saw-textured surfaces than smooth-planed surfaces par-ticularly for flat-grain lumber
PlywoodAs with lumber species grain orientation and surface tex-ture affect finishing of plywood Manufacturers of softwood plywood use a lathe to peel logs to give flat-grain veneer Peeling causes small checks parallel to grain When the face veneer is laid up to form the plywood panel the side of the veneer having lathe checks is placed interior to give a surface free of checks However after plywood is placed
outdoors wetndashdry cycles (swelling and shrinking) cause the checks to propagate to the surface (face checking) Face checking sometimes extends through paint coatings to detract from the appearance and durability of the paint (Fig 16ndash9)
Veneer produced by peeling gives flat-grain plywood and it is commonly available with a saw-textured abrasively planed (smooth) or paper overlay surface Douglas-fir and southern yellow pine are available saw-textured (Table 16ndash1) Saw-textured plywood holds paint much better than does smooth plywood If smooth plywood is to be painted scuff-sand it with 50-grit sandpaper and use high-quality latex paint Latex primer and top-coat generally perform better than oil-alkyd paint Paint performs poorly on smooth plywood if used as siding but reasonably well on smooth plywood in protected areas such as soffits Resin-treated paper bonded to plywood forms a medium-density overlay (MDO) MDO eliminates cracks caused by lathe checking and provides plywood with excellent paintability but the edges are still vulnerable to water Seal the edges with oil-alkyd primer or an edge sealer formulated for this use Paper over-laid products should not be finished with semitrans-parent stain or other penetrating finishes Use film-forming finishes such as paints or solid-color stains and ensure suf-ficient film thickness (0004ndash0005 in (010ndash013 mm) or 4ndash5 mils)
APAndashThe Engineered Wood Association (Tacoma Washing-ton) provides information on plywood grades and standards (see Chap 11)
Fingerjointed LumberTo obtain ldquoknot freerdquo lumber mills produce lumber that consists of many small pieces of wood edge-glued and fin-gerjointed at the end-grain (see Chaps 10 and 12) Although fingerjointed lumber contains no knots or other obvious de-fects most mills do not sort wood pieces prior to gluing to give lumber with similar grain orientation and heartwoodndashsapwood content A particular board may contain pieces from different trees and each piece may have different finishing characteristics therefore finishing requirements are determined by the most difficult-to-paint component in a fingerjointed board Fingerjointed lumber is commonly used for fascia boards interior and exterior trim siding win-dows and doors Paint often fails in a ldquopatchworkrdquo manner according to the paintability of various pieces The board pictured in Figure 16ndash10 shows extractive bleed on the com-ponent to the right but not on the component to the left
Some manufacturers decrease variability in fingerjointed lumber For example fingerjointed redwood siding is avail-able in clear all-heart vertical grain and clear flat grain
Finishing fingerjointed lumber requires care to ensure con-sistent finish performance on the whole board To hide color
16ndash9
Chapter 16 Finishing of Wood
Figure 16ndash9 Early paint failure on plywood caused by penetration of moisture into surface face-checks
Figure 16ndash10 Differences in stain from extractives on fingerjointed wood from the white pine group (either eastern or western species) painted with acrylic solid-color stain
differences of the various pieces use opaque finishes rather than natural finishes (such as semitransparent stain) As with other wood products planed surfaces should be scuff-sand-ed with 50-grit sandpaper prior to priming Saw-textured lumber should hold paint better than planed lumber
Particleboard and Similar Reconstituted Wood ProductsReconstituted wood products are made by forming small pieces of wood into large sheets sheets are cut into 12- by 24-m (4- by 8-ft) panel products or other sizes such as sid-ing These products are classified as particleboard or fiber-board depending upon the nature of the wood component (see Chap 11)
Particleboard is made from splinters chips flakes strands or shavings Flakeboard is a type of particleboard made from large flakes or shavings Oriented strandboard (OSB) is a refinement of flakeboard the flakes have a large length-to-width aspect ratio and are laid down in three layers with the flakes in each layer oriented 90deg to each other as are veneers in plywood (see Chap 11) Most OSB is used inside the external envelope of structures for sheathing and under-layment however it contains ldquoexteriorrdquo adhesives and water repellent The water repellent gives OSB water resistance while in transit and storage prior to construction The water repellent does not decrease paint adhesion
Lumber characteristics such as grain orientation specific gravity grain boundary transition warping and splitting are not considerations with particleboard but paint applied directly to particleboard performs poorly Differential di-mensional change of surface flakes causes telegraphing and paint usually cracks and peels (Fig 16ndash11) Telegraphing is the formation of an uneven paint surface caused by swelling of flakes and particles under the paint Telegraphing occurs on all types of particleboard but not on fiberboard Adhe-sive failure leads to loss of flakes from the surface Figure 16ndash11 shows painted flakeboard after 3 years outdoors The area on the left has one coat of acrylic-latex top-coat and
the area on the right has one coat of oil-alkyd primer and acrylic-latex top-coat The single coat (top-coat only) has failed and the area having two-coats (primer and top-coat) is starting to fail particularly over large flakes Products intended for outdoor use such as siding are overlaid with MDO or wood veneer to improve paint performance Prod-ucts having MDO can be finished in the same way as other paper-overlaid products Seal edges with a product specifi-cally formulated for this use and apply an oil-alkyd primer to give additional water resistance (see Plywood)
When finishing particleboard that does not have a paper overlay use a three-coat latex paint system on the surface and seal edges as described above However do not expect long-term paint performance
When particleboard or OSB without an overlay is used outdoors it requires a rigorous maintenance schedule (often every 6 to 12 months)
Mechanical pulping produces wood fibers that are dry- or wet-formed into fiberboard (Chap 11) Hardboard is a dense fiberboard often used for exterior siding Hardboard is avail-able in 152- to 203-mm (6- to 8-in) widths as a substitute for solid-wood beveled siding The surface of fiberboard ac-cepts and holds paint well and MDO improves paintability As with particleboard seal edges with oil-alkyd primer or other suitable sealer
WoodndashPlastic CompositesWood-plastic composites (WPCs) account for approxi-mately one-fourth of wood decking Manufacturers combine wood flour fibers particles or a combination with poly-ethylene polyvinyl chloride or polypropylene and extrude ldquoboardsrdquo in various profiles Wood content and particle size in the boards vary and thus their ability to accept a finish varies Boards high in wood content with large particle size may accept a finish boards high in plastic content may not Finish a small area to ensure the finish will wet the surface After the finish cures check adhesion using the tape pull-off test (see Chalking) Plastics are routinely finished in indus-trial applications such as car parts by activating the plastic surface using flame or plasma This technology is not used on WPCs for the construction industry because most manu-facturers do not expect their products to be finished
Treated WoodWood used in structures fully exposed to the weather such as in decks and fences (particularly those portions of the structure in ground contact) needs preservative treatment to protect it from decay (rot) and termites Wood used in ma-rine exposure also requires preservative treatment to protect it from decay and marine borers For some uses building codes may require treatment of wood with either preserva-tive or fire-retardant or both
Wood is pressure-impregnated with three types of preserva-tives (a) preservative oils (such as coal-tar creosote) (b) organic solvent solution (such as pentachlorophenol) and
16ndash10
General Technical Report FPLndashGTRndash190
Figure 16ndash11 Absorption of water causes differential dimensional change of surface flakes to give an un-even surface (telegraphing)
(c) waterborne salts (such as copper quaternary ammonium complexes copper azole and chromated copper arsenate (CCA)) (Chap 15) Note Except for the all-wood foundation CCA-treated wood is not used in residential construction
Components for doors and windows are usually dip-treated with a water-repellent preservative (WRP) The American Wood Protection Association sets standards for pressure- impregnated and dip-preservative treatment of wood (AWPA 2008)
Wood treated with waterborne preservatives such as cop-per-based systems can be painted or stained if the wood is clean and dry Bleed of preservative through finishes particularly latex-based paints and solid-color stains can occur if wood is still wet from the preservative treatment Allow wood to dry before painting 1 week should be suffi-cient Wood treated with coal-tar creosote or other dark oily preservatives is not paintable except with specially formu-lated finishes such as two-component epoxy paints even if the paint adheres to the treated wood the dark oils tend to discolor paint especially light-colored paint Wood treated with a water-repellent preservative by vacuum-pressure or dipping is paintable
Fire-retardant- (FR-) treated wood is generally painted rath-er than left unfinished because the FR treatment may darken or discolor wood FR treatment does not generally interfere with adhesion of finishes however you should contact the paint manufacturer the FR manufacturer and the treating company to ensure that the products are compatible Some fire retardants may be hydroscopic and cause wood to have high MC FRs for wood used outdoors are formulated to resist leaching
WeatheringWeathering is the general term describing outdoor deg-radation of materials and manifests itself physically and
chemically (for example cracking and exfoliation of rock corrosion of metals and photodegradation of organic ma-terials) Ultraviolet (UV) radiation in sunlight catalyzes photodegradation of organic materials exacerbated by mois-ture temperature change freezendashthaw cycles abrasion by windblown particles and growth of microorganisms Degra-dation occurs near the surface of wood wood products and finishes
Effect on WoodWeathering takes many forms depending on the material wood and wood products initially show color change and slight checking Leaching of water-soluble extractives chemical changes and discoloration of the surface by mi-croorganisms cause color change As weathering continues wood develops checks on lateral surfaces and checks and cracks near the ends of boards and wood fibers slowly erode from the surface Wood consists of three types of organic components carbohydrates (cellulose and hemicel-luloses) lignin and extractives Weathering affects each of these components differently and physical and chemical changes affect paintability
CarbohydratesCarbohydrates (cellulose and hemicelluloses) are polymers of sugars and make up 55 to 65 of wood (Chap 3) Carbohydrates do not absorb UV radiation and are therefore resistant to UV degradation However hemicelluloses and amorphous cellulose readily absorbndashdesorb moisture this cyclic wetting and drying may cause different dimensional change for EWLW bands Differential dimensional change roughens wood raises grain and causes checks cracks warping and cupping Fewer checks develop in woods with moderate to low specific gravity than in those with high specific gravity vertical-grain boards develop fewer checks than do flat-grain boards and vertical-grain boards warp and cup less than do flat-grain boards To minimize cupping the width of a board should not exceed eight times its thickness The tendency to cup increases with the specific gravity and widththickness ratio
LigninApproximately 20 to 30 of wood is composed of lignin a polymer that helps bond cellulose and hemicelluloses within cell walls and bonds cells together The volume be-tween adjacent wood cells (middle lamella) is rich in lignin If exposed to UV radiation lignin in the middle lamella at the surface of wood begins to degrade within a few hours The changes are not obvious visually but they affect the sur-face chemistry of wood and thus adhesion of finishes Lig-nin photodegrades leaving cellulose fibers loosely attached to the surface Further weathering causes fibers to be lost from the surface (a process called erosion) but this process is slow Approximately 6 mm (14 in) of wood is lost in a century (Fig 16ndash12) Erosion is slower for most hardwoods and faster for low-density softwoods Other factors such as
16ndash11
Chapter 16 Finishing of Wood
Figure 16ndash12 Artistrsquos rendition of weathering process of round and square timbers As cutaway shows inte-rior wood below surface is relatively unchanged
growth rate degree of exposure grain orientation tempera-ture and wetting and drying cycles affect erosion rate Table 16ndash2 shows erosion rates for several wood species measured over 16 years
ExtractivesExtractives (chemicals in heartwood that give each species its distinctive color) change color when exposed to UV ra-diation or visible light and this color change indicates deg-radation of extractives near the surface The color change causes wood to lighten or darken Some wood species change color within minutes of outdoor exposure Wood also changes color indoors Ordinary window glass blocks most UV radiation therefore visible light causes indoor color change UV stabilizers in finishes do not prevent color change
Biological FactorsThe most common biological factor is mildew a microor-ganism that contributes to color change Mildew does not cause degradation but it may cause initial graying or an un-sightly dark gray or black blotchy appearance Dark-colored fungal spores and mycelia on the wood surface cause this color In advanced stages of weathering after extractives and lignin have been removed leaving a cellulose surface wood may develop a bright silvery-gray sheen This sheen on weathered wood occurs most frequently in arid climates or coastal regions (see Mildew)
Algae can also grow on wood particularly in damp loca-tions algae is usually green and it often grows in combina-tion with mildew
Effect on Paint AdhesionWood erosion is slow but chemical changes occur within a few weeks of outdoor exposure Badly weathered wood hav-ing loosely attached fibers on the surface cannot hold paint This is not obvious on wood that has weathered for only 2 to 3 weeks The wood appears unchanged Research has shown that surface degradation of wood exposed to sunlight for 1 2 4 8 or 16 weeks prior to painting (preweathering) affects service life of subsequently applied paint The longer the wood preweathered the shorter the time until the paint began to peel For boards preweathered 16 weeks the paint peeled within 3 years for boards preweathered only 1 week the paint peeled after 13 years Panels that were not pre-weathered showed no sign of peeling after 20 years Paints were commercial oil-alkyd or acrylic-latex primer with one acrylic-latex top-coat over planed all-heartwood vertical-grain western redcedar For species with low specific grav-ity finish the wood as soon as possible after installation or better yet prime it before installation In other tests using wood species having higher specific gravity (such as Douglas-fir and southern yellow pine) little loss of paint adhesion occurred until boards had been preweathered for 3 to 4 weeks
16ndash12
General Technical Report FPLndashGTRndash190
Table 16ndash2 Erosion of earlywood and latewood on smooth planed surfaces of various wood species after outdoor exposurea
Erosion (microm) after various exposure timesc
AvgSGb
4 years 8 years 10 years 12 years 14 years 16 years
Wood species LW EW LW EW LW EW LW EW LW EW LW EW Western redcedar plywood
Effect on Wood FinishesFinish resins (ingredients that form films or penetrate wood) are organic polymers and as with lignin in wood UV radia-tion degrades the polymer causing slow erosion Erosion rate depends on the resistance of the polymer to UV radia-tion Paints and stains based on latex polymers are more resistant to UV radiation than those based on oil-alkyds UV radiation does not usually degrade paint pigments therefore as resin degrades pigments loosen and erode from the sur-face Degraded resin and loose pigments give film-forming finishes a chalky appearance Pigment erodes from oil-based semitransparent stains to expose wood
Decay and InsectsDecayed wood does not hold paint One expects wood used for new construction to be free of decay contractors can do several things to keep it that way If possible paint all end grain surfaces with an oil-alkyd primer (such as ends of siding and trim brick molding railings balustrade posts beams and edges of panel products (plywood T1-11 siding medium-density fiberboard and OSB)
When repainting inspect wood for decay Problematic areas include end grain of balustrade brick molding siding that butts against a roof and bottoms of posts on porches Decay often occurs in the center of wood and the surface can ap-pear sound probe several areas with an ice pick to ensure the wood is sound Replace boards having decay Siding intersecting a sloping roof should have a 2-in (50-mm) gap between the end grain of the siding and the roof shingles Check for a finish on the end grain if there is no finish treat end grain with a WRP prime and top-coat If there is al-ready a coating on the end grain keep it painted End grain of siding that butts directly against roof shingles (a bad practicemdashsee Structure Design and Construction Practices) is not accessible for painting however you can try to wick WRP into the end grain from a wet brush
Insects seldom cause problems with finishes However when repainting a structure inspect it for termite tunnels and carpenter ants A termite tunnel is a sure sign of infesta-tion Presence of carpenter ants may indicate decay in the structure Carpenter ants do not eat wood but they often tunnel out decayed areas to build their nests Note that woodpecker holes often indicate insect infestation
Control of Water and Water VaporControl of liquid water and water vapor requires different types of finishes
Water RepellentsWater repellents and WRPs retard the absorption of liquid water into wood particularly at the end grain They are an excellent treatment for wood used outdoors because they inhibit absorption of rain yet allow wood to dry after rain WRPs and similar penetrating finishes (tinted clear finishes and oil-based semitransparent stains) have almost no effect
on diffusion of water vapor that is they have little effect on the change in wood moisture content caused by changes in RH
Moisture-Excluding EffectivenessMoisture-excluding effectiveness (MEE) of a finish is a measure of its resistance to diffusion of water vapor (that is a measure of the permeability of a coating to water vapor) it is not a measure of water repellency A coating that blocks all water vapor is 100 effective however no coating is impermeable A coating that excludes water vapor merely slows its absorption or desorption it cannot change the EMC (Chap 4) MEE depends on a number of variables coating film thickness defects and voids in the film type and amount of pigment chemical composition and amount of resin vapor-pressure gradient across the film and length of exposure
Table 16ndash3 lists coatings and their MEE Note that maleic-alkyds two-part polyurethane and paraffin wax have high MEE Coatings that retard water vapor diffusion also repel liquid water Porous paints such as latex and low-luster (flat) paints afford little protection against water vapor transmission They may not repel liquid water either In general a low MEE value also indicates low resistance to absorption to liquid water These finishes permit entry of water vapor and water from dew and rain unless applied over a nonporous primer (such as oil-alkyd primer) Latex finishes contain surfactants that can encourage absorption of water into the coating and wood particularly just after the coating has been applied Most of these surfactants wash out of the coating after a short time MEE also gives a measure of vapor transmission out of wood Paint film can inhibit drying (Fig 16ndash13) Retardation of drying after periodic wetting of wood causes it to reach a MC where decay can occur This type of wood paint failure usually occurs on painted fences and porch railings that are fully exposed to weather (Fig 16ndash14) Paint coatings usually crack at the joint between two pieces of wood water enters the wood through these cracks and the coating slows drying Prim-ing the end grain of wood used in these applications inhibits water absorption thus end-grain priming works with the coating on the lateral surface to keep the wood dry
Structure Design and Construction PracticesStructure design and construction practices affect finish performance Design and construct structures to keep water out and to remove it when water gets through the structure envelope This section summarizes recommendations for improving finish performance
Large roof overhangs protect siding from rain and dew gut-ters and downspouts greatly decrease the amount of water draining down the siding
Flash all wall and roof penetrations Shingle the flashing to keep water moving out of the structure Sealants caulking compounds and similar compounds that come in a tube
16ndash13
Chapter 16 Finishing of Wood
need to work in concert with flashing they are not a substi-tute for flashing
Vent clothes dryers showers and cooking areas to outside not to the crawl space or attic Place an air barrier in exterior walls and top-floor ceilings and flash penetration through exterior walls (doors windows and vents) Vent to soffits if possible Avoid using humidifiers If the structure contains a crawl space cover the soil with a vapor-retarding material such as black plastic or tar paper
Do not seal the overlap of lap siding
In northern climates use an air barrierndashvapor retarder on the interior side of all exterior walls and top-floor ceiling to prevent condensation in the walls and attic In buildings that are air-conditioned most of the year place the air barrierndashvapor retarder on the exterior side
16ndash14
General Technical Report FPLndashGTRndash190
Table 16ndash3 Moisture-excluding effectiveness of various finishes on ponderosa pinea
Figure 16ndash14 Decay and paint failure in wood railing fully exposed to weather
Figure 16ndash13 Change in moisture content of pon-derosa pine sapwood finished with three coats of aliuminum-pigmented alkyd paint and exposed to 90 and 30 RH at 26 degC (80 degF) compared with moisture content of unfinished wood
Prevent moisture-related problems in siding by using rain-screen design (that is by furring out the siding 9 to 19 mm (38 to 34 in) from the sheathingndashhouse wrap) (Fig 16ndash15)
Seal all end-grain surfaces with oil-alkyd primer or WRP Ensure adequate space (approximately 50 mm (2 in)) between siding and roof shingles in places where a side-wall intersects a roof Siding and panel products above z-flashing need to be placed approximately 9 to 12 mm (38 to 12 in) above the flashing to form a drip edge (Fig 16ndash16)
When installing siding or shingles ensure that the spacing is commensurate with the MC of the wood and the anticipated MC during the service life Figure 16ndash17 shows shingles that were spaced too closely and buckled in serviceAvoid insidendashoutside beams and joists For example a second-floor floor joist that penetrates a wall to form a porch rafter is destined to have moisture problems and subsequent decay and finish failure This type of wall penetration is dif-ficult to seal to avoid air movement Air carries water vapor that condenses in the space between floors or the porch ceiling
Compliance of VOC Finishes with Pollution RegulationsVolatile organic compounds (VOCs) are organic chemicals in finishes that evaporate as finishes dry and cure VOCs are air pollutants and the amount that evaporates for a given amount of solids (such as binder and pigments) in finishes is regulated Under the 1990 New Clean Air Act the US En-vironmental Protection Agency (EPA) required paint compa-nies to decrease the amount of VOCs in their finishes
Traditional solvent-borne wood finishes containing mineral spirits are no longer available including oil-based semi-transparent stains oil- and oil-alkyd-based primers and top-coats solvent-borne water repellents and solvent-borne water-repellent preservatives Solvent-borne finishes are still available but the solvent systems are more complex than mineral spirits Prior to VOC regulations penetrating fin-ishes such as semitransparent stains had low solids content
16ndash15
Chapter 16 Finishing of Wood
Figure 16ndash15 Demonstration of sid-ing installation over a secondary drainage plane (rain screen) showing wall studs sheathing water-resistive barrier (WRB) furring strips and in-terleaved WRB at the butt joint Note that the butt joint is centered directly over the furring strip and the underly-ing stud and the end grain has been sealed
Figure 16ndash16 Demonstration of proper and improper z-flashing installation (top) siding installed with a 9-mm (38-in) gap between the z-flashing and siding to allow water to drain off the siding (bottom) siding installed without a gap which gives easy access for water ab-sorption into the siding and thus shows extractives staining
Figure 16ndash17 Shingles installed with insufficient gap later warped when they expanded after getting wet
(pigment oils and polymers) Reformulated finishes may contain more solids new types of solvents and co-solvents or other nontraditional additives These high-solids formula-tions are prone to form films rather than penetrate wood
The paint industry also reformulated latex-based finishes to meet stringent requirements for water-based paints
Exterior Wood FinishesExterior finishes either penetrate wood cell walls or form films on the surface Penetrating finishes give a more ldquonaturalrdquo look to the wood than film-forming finishesmdashthat is they allow some of the character of wood to show through the finish In general the more natural a finish the less durable it is This section also discusses weathered wood as a ldquofinishrdquo
Weathered Wood as Natural FinishLeaving wood to weather to a natural finish may seem like an inexpensive low-maintenance alternative to finishing but this approach leads to problems Wood surfaces erode some wood species decay lumber is more prone to split and check and in most climates in North America exterior wood develops blotchy mildew growth To avoid decay wood must be all heartwood from a decay-resistant spe-cies such as redwood or western redcedar and be vertical grain to decrease the potential for splitting raised grain and cupping Only limited areas have a climate conducive to achieving a driftwood-gray appearance as wood weathers naturally the climate along the coast of New England seems conducive to developing the silvery-gray weathered patina that some people desire Even when the climatic conditions favor the development of silvery-gray patina it takes several years to achieve this appearance Protected areas under the eaves will not weather as fast as areas that are not protected
which leads to a different appearance at the top and bottom of a wall
Do not leave composite wood products such as plywood unprotected The surface veneer of plywood can be com-pletely destroyed within 10 years if not protected from weathering Figure 16ndash18 shows weathering of unfinished plywood (right) the intact portion of the plywood (left) had been covered with a board to give a board-and-batten ap-pearance
Penetrating Wood FinishesPenetrating finishes such as transparent or clear WRPs lightly colored WRPs oil-based semitransparent stains and oils do not form a film on wood However semitransparent stains having high-solids content may form a thin film
Penetration into WoodFinishes penetrate wood in two ways flow of liquid into cut cells at the surface and absorption into cell walls
Lumber is almost never cut aligned with axial wood cells therefore the surface has cut axial cells (and of course ray cells) and if it is a hardwood cut vessels Cut cells and ves-sels give macroscopic porosity The diameter of lumina and vessels varies depending on the wood species but in all spe-cies the hollow spaces formed by cut lumina and vessels are quite large compared with pigment particles and binders in finishes (that is a high-molecular-weight (MW) latex mol-ecule is small compared with these openings) Any finish can easily flow into cut lumina and vessels
Penetration of a finish into the cell wall takes place at the molecular scale The finish or components of the finish ab-sorb into void space of hemicelluloses amorphous cellulose and lignin polymers contained in the cell wall Penetration is excellent for resins having a MW less than 1000 Daltons The limit to penetration into these void spaces is a MW of approximately 3000 Daltons Natural oils (such as linseed oil and tung oil) solvents oil-alkyds and low-MW polymer precursors can penetrate the cell wall and thus modify the properties of cells located near the surface Cell walls modi-fied with finish typically absorb less water and swell less than do unmodified cell walls
Traditional solvent-borne finishes such as water-repellent preservatives and solvent-borne oil-based stains can pen-etrate cell walls To some extent some of the excess oil in a long-oil-alkyd primer can penetrate cell walls High-molecular-weight polymers such as acrylics and vinyl acryl-ics and pigments are too large to penetrate cell walls and therefore cannot modify cell wall properties Water in these formulations penetrates the cell wall but the polymer does not As water absorbs into wood it enters the cell wall and hydrogen-bonds to the hemicelluloses and amorphous cellu-lose to cause swelling Water absorption causes raised grain and as a latex finish coalesces the finish deforms around the raised grain while it is still flexible Thus latex finishes are less likely to crack if the surface develops raised grain
16ndash16
General Technical Report FPLndashGTRndash190
Figure 16ndash18 Front view of exterior grade of ply-wood siding after 10 years of exposure The right-hand portion was exposed to the weather whereas the left-hand side was covered with a board to give a board-and-batten appearance
Penetrating Clear and Lightly Colored (Tinted) FinishesPenetrating transparent clear finishes have no pigments and the generic names for them are water repellents (WRs) or water-repellent preservatives (WRPs) A typical WR formu-lation contains 10 resin or drying oil 1 to 3 wax or other water repellent and solvent WRPs contain a fungicide such as 3-iodo-2-propynyl butyl carbamate (IPBC) They were traditionally formulated using turpentine or mineral spirits but now paint companies formulate them using VOC-compliant solvent and waterborne systems to comply with VOC regulations
WRPs give wood a bright golden-tan color close to the original appearance of the wood and are the first step in
protection from weathered wood as a finish WRPs decrease checking prevent water staining and help control mildew growth The first application of these finishes to smooth-planed lumber lasts approximately one year on exposed lat-eral wood surfaces subsequent applications may last longer because weathered boards absorb more finish WRPs absorb readily into end grain and can last for years to retard water absorption into end grain WRPs last longer if applied to saw-textured wood
Few companies manufacture traditional clear WRs and WRPs almost all WR and WRP formulations are lightly pigmented and contain other additives to extend their ser-vice life (Table 16ndash4) Lightly pigmented finishes perform well on decks Water- and solvent-borne formulations are available waterborne formulations may be a water emulsion
16ndash17
Chapter 16 Finishing of Wood
Table 16ndash4 Suitability and expected service life of finishes for exterior wood surfacesa
Paint and solid-color stain
Tinted finishes such asdeck finishes
Semitransparent stain
Expected servicelifed (years)
Type of exterior wood surface Suit-
ability
Expectedservice lifeb
(years) Suit-
ability
Expectedservice lifec
(years) Suit-
ability Paint
Solid-colorstain
Siding Cedar and redwood Smooth (vertical grain) Low 1ndash2 Moderate 2ndash4 High 10ndash15 8ndash12 Smooth (flat grain) Low 1ndash2 Moderate 2ndash4 Moderate 8ndash12 6ndash10 Saw-textured High 2ndash3 High 4ndash8 Excellent 15ndash20 10ndash15
Pine fir spruce Smooth (flat grain) Low 1ndash2 Low 2ndash3 Moderate 6ndash10 6ndash8 Saw-textured (flat grain) High 2ndash3 High 4ndash7 Moderate 8ndash12 8ndash10
Shingles (sawn shingles used on side-walls)
High 2ndash3 High 4ndash8 Moderate 6ndash10 6ndash8
Plywood Douglas-fir and Southern Pine Sanded Low 1ndash2 Moderate 2ndash4 Moderate 4ndash8 4ndash6 Saw-textured Low 2ndash3 High 4ndash8 Moderate 8ndash12 6ndash10
Decking New (smooth-sawn) High 1ndash2 Moderate 2ndash3 Low mdash mdash Weathered or saw-textured High 2ndash3 High 3ndash6 Low mdash mdash
Oriented strandboard mdash mdash Low 1ndash3 Moderate 4ndash5 4ndash5 aEstimates were compiled from observations of many researchers Expected life predictions are for average location in the contiguous USA expected life depends on climate and exposure (such as desert seashore and deep woods) bThe higher the pigment concentration the longer the service life Mildew growth on surface usually indicates the need for refinishing cSmooth unweathered surfaces are generally finished with only one coat of stain Saw-textured or weathered surfaces which are more adsorptive can be finished with two coats second coat is applied while first coat is still wet dExpected service life of an ideal paint system three coats (one primer and two top-coats) Applying only a two-coat paint system (primer and one top-coat) will decrease the service life to about half the values shown in the table Top-quality latex top-coat paints have excellent resistance to weathering Dark colors may fade within a few years eMedium-density overlay (MDO) is painted fEdges are vulnerable to water absorption and need to be sealed gWater-repellent preservatives and semitransparent stains are not suitable for hardboard Solid-color stains (latex or alkyd) willperform like paints Paints give slightly better performance because the solids content of paint is higher than that for solid-color stains and thus paints give greater film build for the same volume of finish used
of synthetic polymers Synthetic polymers do not penetrate the cell wall but form a thin film seal the surface and pro-vide water repellency Finely ground pigment gives color and partially blocks UV radiation Pigment UV stabilizers and other additives give these finishes a service life of 2 to 3 years but they lack sufficient pigment to inhibit UV degradation of the wood As with clear WRPs they usually contain a preservative to retard mildew growth
Caution Fungicides in WRPs and semitransparent stains are toxic and may be herbicides use caution to avoid skin contact and breathing vapors and protect plants and the soil around them from accidental contamination
Prior to changes in finish formulation because of VOC regu-lation paint companies formulated solvent-borne WRPs for use as a pretreatment prior to priming At this time finding a WRP formulated for this use is difficult In fact paint manu-factures seldom honor a finish warranty if customers apply a WRP prior to using their finish particularly if a different paint company made the WRP In spite of decades of re-search showing the benefits of WRP treatment of wood prior to priming they are seldom used Information on WRPs as a wood treatment prior to priming is included in this chap-ter in case a paint manufacturer markets a WRP specially formulated for this use in the future They are particularly effective for improving the service life of paint on difficult-to-paint wood species and decay-prone areas (Fig 16ndash19) Currently available WRPs can be used for sealing end grain
Protect wood and wood-based products from water and sunlight prior to delivery and while stored at the construc-tion site Avoid contaminating them with dirt oil or other contaminants Finish wood as soon as possible after installing it
of lumber edges of plywood and back-priming and are dis-cussed in several sections of this chapter
Penetrating finishes that use paraffin oil as the solvent are also available These formulations penetrate wood and the oil helps improve water repellency Paraffin oil is not a vola-tile solvent therefore these finishes comply with air qual-ity requirements They are usually a good value because virtually all of what comes in the can ends up in the wood The service life is approximately 1 year but they are easy to apply If an excessive amount is applied the wood surface may remain oily for a few weeks Do not use them as a pre-treatment prior to applying other finishes
Application New Construction
For new construction the most effective method for apply-ing a WR or WRP is to dip the entire board into the finish (Table 16ndash5) If finish is roller or spray applied back brush following application to work the finish into the wood Fin-ish the back side of siding particularly for highly colored wood species (see Back-Priming)
When wood is finished following installation apply lib-eral amounts of WRP to all end grain areas edges of panel products and other areas vulnerable to water such as the bottoms of doors and window frames Coverage is approxi-mately 61 m2 Lndash1 (250 ft2 galndash1) on a smooth surface or 37 m2 Lndash1 (150 ft2 galndash1) on a saw-textured surface Smooth wood will usually accept only a single coat a second coat will not penetrate the wood WRP treatment lasts longer on saw-textured surfaces than on smooth surfaces because more finish penetrates the wood As a natural finish the life expectancy of a WRP is only 1 to 2 years depending upon the wood and exposure However reapplication is easy particularly on decks and fences
Refinishing
Clear and lightly colored finishes (penetrating natural fin-ishes such as WRPs and lightly pigmented deck finishes) do not peel they fade and if pigmented the pigments erode As clear finishes weather they lose their water repellency turn gray and develop mildew Lightly pigmented finishes lose color If not blackened by mildew they can often be prepared for refinishing by removing dirt with a stiff-bristle brush If discolored by mildew wash the wood with com-mercial mildew cleaner or dilute liquid household bleach and detergent prior to refinishing (see Mildew)
16ndash18
General Technical Report FPLndashGTRndash190
Figure 16ndash19 Effect of water-repellent preservative treatment after 5 years of outdoor exposure A win-dow sash and frame treated with a water-repellent pre-servative and then painted B window sash and frame not treated before painting
Refinish exterior wood when the old finish has worn thin and no longer protects the wood If all factors are working in concert (good structure design to shed water effective flashing paintable wood surface and end grain sealed) paint degradation is benign weathering of paint to expose the primer or in the case of a penetrating finish to expose the wood surface In these cases there is rarely much surface preparation other than mild washing prior to re-finishing Mildew growth is not paint degradation but an appearance problem remove it with a commercial cleaner or bleachndashdetergent solution If factors are not working in concert paint may crack and peel
Oil-Based Semitransparent StainsOil-based semitransparent stains have more pigment than tinted WRPs and the pigment gives more protection to wood Stains usually contain a WR and fungicide Addi-tional pigment maintains color and increases finish service life but pigments give stain a less natural appearance than lightly colored finishes because they partially hide wood grain and color Pigment content in semitransparent stains can vary thus providing a range of UV protection and color Most people prefer colors that accentuate the natural color of the wood
Oil or oil-alkyd resin in oil-based semitransparent stains can flow into cut lumina at the wood surface carrying pigment with it Some resin penetrates the cell wall the rest re-mains on the surface and bonds the pigments to the surface
Semitransparent stains are porous and do not form surface films like paints and solid-color stains therefore they will not blister or peel even in the presence of excessive water Service life varies considerably depending on substrate and amount of pigment (Table 16ndash4)
Resin and paint manufacturers have tried to achieve the properties of solvent-borne semitransparent stains using wa-terborne formulations These finishes achieve a semitrans-parent appearance by forming a thin coating on the wood
Recently paint companies have developed ldquosemipenetrat-ingrdquo stains Semipenetrating stains partially penetrate the cell wall and form a surface film This finish is similar to a high-solids oil-based semitransparent stain
Application New ConstructionSemitransparent stains perform well on saw-textured sur-faces If used on smooth wood expect approximately half the service life compared with saw-textured surfaces (Table 16ndash4) They are an excellent finish for weathered wood
To get consistent application and good penetration of stain brush-apply oil-based semitransparent penetrating stains The finish is too fluid to use a roller and spraying leads to an uneven appearance and lap-marks Brushing works the finish into the wood and evens out the application to mini-mize lap marks Lap-marks form when application of a stain overlaps a previously stained area (Fig 16ndash20) Prevent lap-marks by staining two or three boards at a time and keep-ing a wet edge This method prevents the front edge of the stained area from drying before reaching a logical stopping
16ndash19
Chapter 16 Finishing of Wood
Table 16ndash5 Initial application and maintenance of exterior wood finishesa
Maintenance
Finish Application process Appearance of wood Process Service lifeb
Water-repellent preservative (WRP)
Brush-apply 1 coat or dip Apply a second coat only if it will absorb
Grain visible wood tan to brown fades to gray with age
Brush to remove surface dirt wash to remove mildew
Brush-apply 1 coat or dip Apply a second coat only if it will absorb
Grain and natural color slightly changed
Same as with WRP 2ndash3 years
Semitransparent stain Brush-apply 1 coat or dip Apply a second coat only if it will absorb
Grain visible color as desired
Same as with WRP 4ndash8 years (on saw-textured or weathered wood)
Paint and solid-color stain
Brush- roller- or spray- apply primer and 2 top-coats
Grain and natural color obscured
Clean and apply topcoat if old finish is sound if not sound remove peeled finish prime and apply topcoatsd
10ndash20 years for paintc 6ndash15years for solid-color staine
aCompilation of data from observations of many researchers bVertical exposure service life depends on surface preparation climate and exposure amount and quality of finish and the woodspecies and its surface texture cService life of 20 years if primer and two coats of top-quality latex top-coats are used on gradual transition wood species having a saw-textured surface Dark colors may fade within a few years dIf old finish does not contain lead sand to feather rough edges of paint surrounding bare areas and areas of weathered wood (seeLead-Based Paint) eService life of 15 years if primer and two top-coats are used on saw-textured wood
place (corner door or window) If possible work in the shade to slow drying Coverage is approximately 49 to 98 m2 Lndash1 (200 to 400 ft2 galndash1) on smooth wood and from 24 to 49 m2 Lndash1 (100 to 200 ft2 galndash1) on saw-textured or weathered wood
To increase service life of oil-based semitransparent stains on saw-textured or weathered lumber apply two coats Ap-ply the first coat keeping a wet edge to prevent lap marks Then work on another area so that the first coat can soak into the wood for 20 to 60 min Apply the second coat be-fore the first dries (wet on wet application) (Again apply stain keeping a wet edge to prevent lap-marks) If the first coat dries completely it seals the wood surface so that the second coat cannot penetrate About an hour after applying the second coat use a cloth sponge or brush lightly wetted with stain to wipe off excess stain that has not penetrated into the wood Where stain failed to penetrate it forms an unsightly shiny surface film Stir the stain occasionally and thoroughly during application to prevent settling of pigment
Two coats of semitransparent penetrating stain may last 10 years on saw-textured wood By comparison the life expec-tancy of one coat of stain on new smooth wood is only 2 to 4 years however as the stained wood ages it becomes more porous and subsequent staining lasts longer (Table 16ndash5)
Semitransparent stain formulations have changed because of VOC regulations Solvent systems have changed and the amount of solids has increased Formulations having high solids may leave excess resin on the surface (particularly the LW) even if the resin has a low MW If the finish appears shiny an hour after application the finish has not penetrated the wood Remove the excess finish on the surface to avoid forming a thin film thin films crack and peel within a year or two Even if the wood surface has weathered or is saw-textured it may not be possible for a second coat of these finishes to absorb into wood
Caution Sponges cloths and paper towels that are wet with oil-based stain any other oil or oil-alkyd or urethane finish are particularly susceptible to spontaneous combus-tion To prevent fires immerse such materials in water and seal in a water-filled air-tight metal container immediately after use
RefinishingOil-based semitransparent penetrating stains degrade by slow erosion of pigments to give a gray slightly weathered appearance Refinish when wood begins to show before all pigment is lost Stains do not crack or peel unless excessive stain formed a film Simply use a dry stiff-bristle brush to remove surface dirt dust and loose wood fibers and re-stain As with clear finishes remove mildew prior to refin-ishing The subsequent application of penetrating stain often lasts longer than the first because it penetrates the porous weathered surface
If oil-based semitransparent stain did not penetrate prop-erly and formed a film it may fail by cracking and flaking In this case surface preparation may involve scraping and sanding For wood having a thick film it may be necessary to remove all the old finish with a paint stripper prior to re-staining This is a difficult situation parts of the structure may have areas where the old finish eroded and the surface is weathered parts may have an intact or peeling film Oil-based stains do not penetrate areas having a film film-forming finishes (paint or solid color stain) do not bond to weathered areas Either remove the finish in places having a film and re-stain or scuff sand the weathered area scrap and scuff sand the area having a film and refinish with solid-color stain or paint
When refinishing semitransparent stains the stain must penetrate wood As mentioned above stain service life varies with exposure (that is the weathering of the stain) therefore stain may not penetrate well in some areas For example an area under the eaves even on the south side of a structure may be relatively unweathered compared with the lower part of the wall When applying stain to such an area feather the new stain into the old If the stain does not penetrate the wood within an hour remove excess stain to avoid forming shiny spots which indicate a film The north side of a structure may not need to be re-stained nearly as often as the south side (northern hemisphere)
Do not apply oil-based semitransparent stains over solid-color stain or paint
Note Do not use steel wool or wire brushes to clean wood or to prepare a surface for refinishing because they con-taminate the wood with iron Minute amounts of iron react with tannins in woods like western redcedar redwood and oak to yield dark bluendashblack stains (see Finish Failure or Discoloration)
16ndash20
General Technical Report FPLndashGTRndash190
Figure 16ndash20 Lap marks on wood finished with semi-transparent stain
OilsDrying oils such as linseed and tung are appropriate natural finishes for indoor use and are fine for indoor furniture and other interior uses not subjected to water or high humidity Oils perform poorly outdoors because they are natural prod-ucts and therefore provide food for mildew When used on highly colored woods such as redwood or the cedars they tend to increase mildew growth Even if formulated with a mildewcide they may not give adequate performance out-doors The original ldquoMadison Formulardquo for a semitranspar-ent stain could be formulated with up to 60 linseed oil and it contained 5 pentachlorophenol as a mildewcide Even with this mildewcide it was prone to develop mildew
Film-Forming FinishesIn a range of least to most protection from UV radiation and photochemical degradation of wood film-forming finishes are ranked as follows clear varnish pigmented varnish waterborne latex semitransparent stains solid-color stains and paints
Clear VarnishClear varnish is a transparent film-forming finish that en-hances the natural beauty and figure of wood In a book originally published in 1904 AH Sabin listed 16 types of varnish (architectural cabinet carriage marine and piano to name just a few) (Sabin 1927) These varnishes were a solution of natural resins linseed or tung oil or both and turpentine In a recent publication Wicks and others (2007) describe modern varnishes as urethane-modified alkyds Spar varnish (a combination of novolac phenolics resin and tung and linseed oils) is also available Urethane-based var-nishes have good abrasion resistance and perform well on furniture floors and interior woodwork However varnish lacks exterior permanence unless protected from direct sun-light varnishes in direct sunlight generally require refinish-ing every l to 2 years Varnishes embrittle by exposure to sunlight and develop severe cracking and peeling They last longer in protected areas such as soffits doors protected by porches or the north side of structures however even in protected areas apply a minimum of three coats Staining the wood (oil-based semitransparent stain) prior to applying varnish improves its service life the pigments in the stain decrease the photodegradation of the wood thus maintain-ing varnish adhesion Varnish is a high-maintenance finish and is not generally used on the exterior of structures
Clear varnish usually fails by a combination of cracking and UV degradation of the wood at the woodndashvarnish interface This can be identified by examining the back of a chip of varnish and finding wood fiber attached Refinishing usually requires scraping sanding or power-washing the finish off and then reapplying the finish
Pigmented VarnishFinish manufacturers have modified clear varnish to im-prove exterior performance by adding finely ground inor-
ganic pigments (nanopigments) These pigments partially block UV radiation yet allow much of the visible light to pass through the finishmdashthat is they appear transparent The particle size of these pigments is similar to the wavelength of UV radiation (300ndash400 nm) and much like dust in the at-mosphere that blocks UV radiation and blue wavelengths of visible light to make the sun appear red during a sunset pig-ments block UV radiation to protect wood These products perform better than traditional clear varnishes However as with clear varnishes pigmented varnish gives excellent performance in protected areas The varnish is less prone to peel degradation initially occurs on the film surface as crazing Refinishing before the crazing develops into cracks restores the appearance Eventually however the buildup of coats will block visible light and the wood will appear dark
Varnish can give years of service on outdoor furniture if the furniture is covered with an opaque waterproof cover when not in use The cover protects the varnished wood from UV degradation and discourages birds from roosting on the furniture Several coats of varnish eliminate splin-ters allow the beauty of the wood to show and give a cleanable surface
Waterborne Latex Semitransparent StainsWaterborne latex semitransparent stains (introduced in the section on Oil-Based Semitransparent Stains) are discussed here because they form films These finishes are usually an acrylic or modified acrylic and have high MW the polymers are too large to penetrate the cell wall Considerable confu-sion remains concerning penetration of these finishes As mentioned previously penetration of a finish into cut lumina on the wood surface is not penetration into wood Filling the lumen does not modify the wood cells near the surface Latex semitransparent stains give the look of an oil-based semitransparent stain by forming a thin film
Whereas oil-based semitransparent stains slowly erode la-tex semitransparent stains tend to crack and flake The film buildup is not sufficient to give performance needed for a film-forming finish If applied in sufficient coats to give more than a few years performance they give the appear-ance of a solid-color stain Some formulations are modified with oil-alkyds The oil penetrates the surface thus improv-ing the performance of the finish Paint companies continue to improve these formulations check with paint suppliers for the latest information on new products
Application New ConstructionLatex-based semitransparent stains should be brush-applied As with oil-based semitransparent stains they are suscep-tible to forming lap marks Apply the second coat within 2 weeks after the first has dried Latex-based stains last longer on saw-textured wood
16ndash21
Chapter 16 Finishing of Wood
RefinishingScrape areas where the stain has flaked wash if necessary and refinish As with oil-based semitransparent stains to avoid an uneven appearance it may be necessary to feather the new finish into the old in areas where the old stain is still in good condition Waterborne latex stains form a thin film and may not adhere well to weathered wood
Solid-Color StainsSolid-color stains are opaque finishes (also called hiding heavy-bodied or blocking stains) that come in many colors and are made with a higher concentration of resin and pig-ment than are semitransparent penetrating stains therefore solid-color stains obscure the natural color and grain of wood They are available in latex-based (usually acrylic or modified acrylic polymers) and oil-based formulations Oil and latex solid-color stains are similar to paints they form a film
ApplicationApply solid-color stains by brush sprayer or roller If using a sprayer or roller back-brush to even out the application and work the finish into the surface particularly on saw-textured wood One coat of solid-color stain is not adequate for smooth wood apply a sufficient number of coats to give a 010ndash013-mm (0004ndash0005-in or 4ndash5-mil) dry film thickness If applied in a single coat to smooth wood they tend to crack and flake the film lacks sufficient cohesive strength to accommodate moisture-driven changes in dimen-sion of the substrate Two coats of solid-color stain applied over a quality latex or oil primer should give service life similar to that of a good paint system on smooth-planed wood Some manufacturers recommend using the first coat of a solid-color stain as a primer but primer paint might be better particularly for wood containing extractives (such as cedar and redwood) On saw-textured wood sufficient film thickness may be possible with a single coat but primer and one top-coat will usually give 15 to 20 years service life Solid-color stains lack abrasion resistance and manufactur-ers do not generally recommended them for horizontal wood surfaces such as decks
RefinishingSolid-color stains can usually be applied over paint See the following section (Paint) for additional information on refin-ishing If the old finish has cracked or peeled remove it and scuff-sand the wood prior to refinishing
PaintPaint appears somewhere on almost all buildings For ex-ample brick- vinyl- and aluminum-sided buildings often have painted wood trim Paints are highly pigmented film-forming coatings and give the most protection against UV radiation Paints protect wood surfaces from weathering conceal some surface defects provide a cleanable surface offer many colors and give high gloss (high gloss is not
possible with stains) Paint is the only finish that can give a bright white appearance Paint retards penetration of moisture decreases discoloration by wood extractives and retards checking and warping of wood However paint is not a preservative It will not prevent decay if conditions are favorable for fungal growth
Paint is available in two general types solvent-borne oil- alkyds and waterborne latexes (usually acrylic or vinyl acrylic polymers)
Oil-based paint is a mixture of finely ground inorganic pig-ment in a resin (binder) with additives to speed curing im-prove application and give mildew resistance The simplest resin is a drying oil such as linseed oil Modern oil-based paints have the drying oil combined with a poly functional alcohol to form an oil-alkyd Oil-alkyds for wood have ex-cess oil (that is long-oil-alkyds) making them more flexible than short-oil-alkyds (that is having a shortage of oil) Oil-alkyds form a film by reacting with oxygen in the air to give a cross-linked polymeric network Prior to regulation of the amount of organic solvent in oil-alkyds they contained tur-pentine or mineral spirits Modern oil-alkyds have complex solvent systems to meet VOC requirements
Latex-based paint is also a mixture of finely ground pigment in a resin The resin is a synthetic polymer and it coalesces to form a film these polymers do not react with oxygen The main solvent is water with other solvents to keep the poly-mer flexible while it coalesces Acrylics and vinyl acrylics are typical resins in wood finishes
Oil-alkyd or latex primers link wood to top-coats and pro-vide a base for all succeeding top-coats (initial top-coats and refinishing) Primers seal the surface to prevent extractives bleed provide adhesion between the wood and top-coats and give color base to even out differences in wood color and top-coat color Primers flow into void spaces at the wood surface to improve top-coat adhesion and block ex-tractives in species such as redwood and western redcedar At this time oil-alkyd primers block extractives better than do latex primers but paint manufacturers continue to im-prove latex primers Oil-alkyd primers block water absorp-tion into end grain and to a limited extent can penetrate wood cell walls thus modifying the surface and improving its dimensional stability Latex primers do not penetrate cell walls but merely flow into cut cells and vessels Latex prim-ers do not seal the end grain as well as oil-alkyd primers do Latex primers are more flexible and stay more flexible thus they are less likely to crack as they age Latex primers are porous and thus permeable to water and water vapor oil-alkyd paints are less permeable to water and water vapor (Table 16ndash3)
Latex top-coats can be applied over oil-alkyd primers Latex paints formulated with acrylic resins are resistant to weath-ering they maintain their gloss better than oil-alkyd paints Oil-alkyd top-coats tend to lose gloss within a year or two
16ndash22
General Technical Report FPLndashGTRndash190
and are prone to embrittle over time Latex paints (primers and top-coats) permit water cleanup oil-alkyd paints require organic solvents for cleanup Sufficient dry film thickness on smooth-planed surfaces obscures wood grain and texture on saw-textured surfaces some surface texture remains
Application New ConstructionOn smooth-planed wood apply a primer and two top-coats to achieve a 010ndash013-mm (4ndash5-mil) dry film thickness on saw-textured wood primer and one top-coat may suffice As with solid-color stains apply paints with brush roller or sprayer If using a roller or sprayer back-brush to get an even coating and ensure the finish wets the surface Apply the first coat of film-forming finishes (paint latex semitrans-parent stains and solid-color stains) within 2 weeks after installing smooth-planed exterior wood products timely application ensures good paint adhesion Improve film adhe-sion to smooth-planed flat-grain products particularly those species having abrupt grain transition by wetting the wood to raise the grain and scuff sanding (lightly sanding with 50ndash80 grit sandpaper) after it dries
For woods with water-soluble extractives such as redwood and western redcedar primers block extractives bleed into the top-coat Use a primer that is labeled to ldquoblock extrac-tives bleedrdquo usually an oil-alkyd-based paint Some manu-facturers also formulate stain-blocking acrylic-latex primers Allow latex stain-blocking primer to dry for at least 24 to 48 h before applying the first top-coat If the primer has not fully coalesced extractives may bleed into the top-coat For species such as pine that do not tend to have extractives bleed a quality primer is still necessary to give a good base for top-coats Follow the application rates recommended by the manufacturer to achieve sufficient film thickness A uni-form primer coating having sufficient thickness distributes wood swelling stresses and thus helps prevent premature paint failure Primer should cover approximately 61 to 74 m2 Lndash1 (250 to 300 ft2 galndash1) on smooth unfinished wood coverage is considerably less on saw-textured wood
Apply two coats of acrylic latex paint over the primer If ap-plying two top-coats to the entire structure is not practical consider two top-coats for fully exposed areas on the south and west sides and a single top-coat on other areas Two top-coats over a properly applied primer should last more than 10 years on smooth wood (Tables 16ndash4 and 16ndash5) and many three-coat paint systems in test at FPL have lasted 20 years To avoid peeling between paint coats paint manufacturers recommend applying the first top-coat within 2 weeks after the primer and the second top-coat within 2 weeks of the first If more than 2 weeks elapse between paint coats it may be necessary to wash the paint with mild detergent and rinse thoroughly If the primer has been exposed for several months it may need to be primed again prior to applying the top-coats However some primer may not weather as quick-ly and some top-coats may adhere well to weathered primer check with manufacturers for information on their products
Avoid applying oil-alkyd paint to a hot surface in direct sunlight and to a cool surface that the sun will heat within a few hours The heat causes the surface of the coating to dry trapping solvent in the film The trapped solvent forms a ldquotemperature blisterrdquo which usually occurs within a day or two after painting They do not contain water Do not cool the surface by spraying with water
Apply latex-based waterborne paints when the temperature is at least 10 degC (50 degF) and expected to remain above this temperature for 24 h (The dew point is a good estimate of nighttime low temperature) Most latex paints do not co-alesce properly if the temperature drops below 10 degC (50 degF) Oil-alkyd paint may be applied when the tempera-ture is at least 4 degC (40 degF) Check with paint manufacturers on the temperature requirements because some paints can be applied at lower temperatures than these As with oil-alkyd paints avoid painting hot surfaces in direct sunlight Prior to applying latex paints the surface can be cooled with wa-ter spray and allowed to dry
Avoid painting late in the afternoon if heavy dew is expect-ed during the night Water absorption into partially cured oil-alkyds or partially coalesced latexes can cause wrinkling fading loss of gloss and streaking
RefinishingIn the absence of catastrophic failure such as cracking flak-ing and peeling solid-color stains and paints slowly erode A three-coat finish system (010ndash013 mm thick) may last 20 years on saw-textured wood When the top-coats begin to wear thin exposing the primer reapply one or two new top-coats One coat may be adequate if the old paint surface is in good condition Surface preparation merely involves washing the surface to remove mildew dirt and chalk Paint erodes at different rates depending on the exposure to sunlight therefore different sides of a structure do not need to be painted on the same schedule Paint on the north side lasts twice as long as that on the south side (northern hemisphere) When repainting coverage should be approxi-mately 98 m2 Lndash1 (400 ft2 galndash1)
Clean areas that are protected from sun and rain such as porches soffits and walls protected by overhangs These ar-eas tend to collect dirt that decreases adhesion of new paint Repainting protected areas every other time the structure is painted usually gives adequate performance
Do not paint too often If paint is sound but discolored with mildew wash it It does not need repainting Frequent repainting may form an excessively thick film thick oil-based paint is likely to crack across the grain of the wood (see Cross-Grain Cracking) Latex paints seldom develop cross-grain cracking because they are more flexible than are oil-based paints Since latex paints have replaced oil-based top-coats for most exterior applications cross-grain crack-ing is rare except for latex paint applied over thick oil-based
16ndash23
Chapter 16 Finishing of Wood
paint However too many coats of latex paint can eventually lead to adhesion failure of the primer
In situations where catastrophic failure has occurred refin-ishing paint and solid-color stains may require extensive surface preparation First scrape off all loose paint In the absence of lead-based paint sand areas of exposed wood with 50- to 80-grit sandpaper to remove the weathered sur-face and to feather the abrupt paint edge Wash the remain-ing old paint using a commercial cleaner or a dilute house-hold bleach and detergent solution to remove dirt and mil-dew and rinse thoroughly (see Mildew) Prime the areas of exposed wood then top-coat If the old paint has excessive chalking it may be necessary to re-prime (see Chalking)
Note Do not sand lead-based paint Use special precau-tions if the old paint contains lead (see Lead-Based Paint)
Table 16ndash4 summarizes the suitability and expected life of commonly used exterior finishes on several wood species and wood-based products The information in these tables gives general guidelines Many factors affect paintability of wood and service life of wood finishes Table 16ndash5 summa-rizes the properties treatment and maintenance of exterior finishes
Application of Finishes Special UsesPorches Decks Deck Railings and FencesPorches get wet from windblown rain therefore apply a WRP or primer to end grain of flooring railings posts and balustrade prior to or during construction Primers and top-coats for porch floors are formulated to resist abrasion
Decks are usually finished with penetrating clears lightly pigmented clears or semitransparent stains These finishes need more frequent application than does paint but do not need extensive surface preparation because they seldom fail by cracking and peeling Limit the application of semitrans-parent stain to what the surface can absorb The best appli-cation method is by brush roller and spray application may put too much stain on horizontal surfaces Unless specially formulated for use on decks solid-color stains should not be used on decks or porches because they lack abrasion resis-tance and they tend to fail by peeling
Like decks fences are fully exposed to the weather and some parts (such as posts) are in contact with the ground therefore wood decay and termite attack are potential prob-lems Use lumber pressure-treated with preservatives or naturally durable wood species for all posts and other fence components that are in ground contact When designing and constructing fences and railings for decks and porches ar-chitects and contractors need to consider protecting exposed end-grain of components to resist water absorption
Film-forming finishes on fences and railings trap moisture if the end grain is not sealed during construction Figure 16ndash14 shows a railing 8 years after construction Water flowed down the railing and absorbed into the end grain and the paint kept the wood from drying If railings are to be painted seal the end grain or use pressure-treated wood particularly where decay of wood is a safety hazard (railings on decks and porches high off the ground)
Concerning the service life of naturally durable wood spe-cies compared with wood pressure-treated with preserva-tives there are no absolute ldquorulesrdquo However for in-ground contact uses and structural components of decks and porches (beams joist and railings) pressure-treated wood is proba-bly better and may be a code requirement in some areas The service lives of naturally durable and preservative-treated woods are quite comparable in aboveground exposures such as decking boards In selecting wood for porches decks and fences whether preservative treated or a naturally durable species consider the exposure conditions design of the structure properties of the wood and the finish to be usedWood weathering can be as much a factor in long-term service life of decks and fences as decay Protect naturally durable wood species and preservative-treated wood with a finish Periodic treatment with a penetrating sealer such as a WRP or lightly pigmented deck finish will decrease check-ing and splitting Pigmented finishes retard weathering
Treated WoodCopper-based preservatives (copper azole ammoniacal cop-per quat (ACQ) ammoniacal copper zinc arsenate (ACZA) chromated copper arsenate (CCA)) creosote and penta-chlorophenol are common factory-applied preservatives Of these wood treated with copper azole and ACQ is often used to construct porches decks and fences The treatment has little effect on finishing once the wood has dried species and grain orientation affect finishing more than preservative treatment does Waterborne treatments containing copper may maintain a brown color for approximately 2 years Some copper-based preservatives may have a water repel-lent included in the treatment to give the treated wood better resistance to weathering Even if the manufacturer treated the wood with water repellent maintain it with a finish to extend its service life People often replace decking because of weathering not decay
Creosote and pentachlorophenol are generally used for industrial and commercial applications where applying a finish is not considered practical Creosote is oily and wood treated with creosote does not accept a finish Pentachloro-phenol is often formulated in heavy oil Wood treated with preservatives formulated in oil will not accept a finish
Marine UsesThe marine environment is particularly harsh on wood because of wind-blown salt spray abrasion by sand and direct and reflected UV radiation Any of the types of finish discussed previously can be used in marine environments
16ndash24
General Technical Report FPLndashGTRndash190
WRPs tinted clears and oil-based semitransparent stains give some protection however a paint system gives the best protection against photochemical degradation If possible finish wood with a WRP prior to painting Consult paint manufacturers for products formulated for marine use
Note Any wood in contact with water must be pressure treated to specifications for marine use Chromated cop-per arsenate (CCA) is still used in marine environments and the chromium in the formulation improves the perfor-mance of stains and paints
BoatsVarnish enhances the appearance and protects wood trim on boats (hence the name spar varnish) but it is exposed to more sunlight and water than on structures Therefore it needs regular and frequent refinishing Paint manufactur-ers recommend three to six coats for best performance Applying oil-based semitransparent stain to wood prior to varnishing increases the service life of the varnish but the stain obscures some of the color of the wood Keeping the appearance of wood trim bright and new is labor intensive but often well worth the effort
Finish hulls with marine paint (two-part epoxy- or urethane-paint) Protect areas below the water line with antifouling paint Consult manufacturers for information on these products
Panel ProductsThe edges of panel products such as plywood OSB and fi-berboard are vulnerable to absorption of water To minimize edge swelling and subsequent finish peeling seal the edges of these products with a WRP oil-alkyd primer or sealer formulated for this use The type of edge sealer depends on the surface finish Prior to staining (oil-based semitranspar-ent stain) seal with the stain or a WRP prior to painting (paint or solid-color stain) seal with an oil-alkyd primer
Plywood siding products may have a saw-textured surface (such as T1ndash11 siding) or a paper overlay (MDO) Saw-tex-tured surfaces may be finished with oil-based semitranspar-ent stain solid-color stain or paint Paint gives the longest service Paper overlay products will not accept a penetrating finish (such as oil-based semitransparent stain) finish with paint or solid-color stain
During pressing of OSB and fiberboard panels for exterior use manufactures usually include MDO The panels are cut to give lap siding The MDO protects the surface from moisture and gives a good surface for film-forming finishes However as with plywood the edges and areas around fas-teners are vulnerable to water absorption and need to be sealed
Fire-Retardant CoatingsFire-retardant finishes have low surface flammability and when exposed to fire they ldquointumescerdquo to form an expanded
low-density film The expanded film insulates the wood from heat and retards combustion The finishes have addi-tives to promote wood decomposition to charcoal and water rather than flammable vapors
Back-PrimingBack-priming is applying primer or WRP to the back side of wood (usually siding) before installing it Back-priming with stain-blocking primer retards extractives staining par-ticularly run-down extractives bleed It decreases absorption of water thus improving dimensional stability Siding is less likely to cup an important consideration for flat-grain wood Improved dimensional stability decreases stress on the fin-ish thus decreasing paint cracking
At the time siding is back-primed seal end grain with oil-alkyd primer This process has an even greater effect in stop-ping water absorption than back-priming Primed end-grain eliminates paint failure near the ends of boards Prime ends cut during installation
Factory FinishingFactory priming hardboard siding has been a standard indus-try practice for many years and recently factory-finished (primer and top-coats) siding trim and decking have become common Factory finishing offers several advan-tages avoids finishing during inappropriate weather gives consistent film thickness contributes to timely completion of structures and decreases overall cost Factory finishing is advantageous in northern climates where exterior finish-ing is impossible during the winter Controlled application ensures consistent 010 to 013 mm (4 to 5 mil) dry film thickness Siding is normally primed on all sides including the end grain When installing factory-finished siding prime following cross-cuts Controlled conditions enable many factory finishers to guarantee their products against crack-ing peeling and blistering for 15 years
Finish Failure or DiscolorationProperly applied to a compatible substrate on a well-de-signed and constructed structure finishes rarely fail prema-turely In the absence of finish failure (cracking and peeling) or discoloration (extractives bleed iron stain and mildew growth) finishes undergo a slow erosion lasting several yearsmdasheven decades This section is about ldquowhen things go wrongrdquo
The most common causes of premature failure of film-form-ing finish (paint and solid-color stains) are water weathering of wood prior to painting inadequate surface preparation and insufficient film thickness Structure design wood spe-cies and grain angle can also affect performance Topics covered in this section are paint cracking (parallel to grain) cross grain cracking peeling intercoat peeling chalking mill-glaze mildew blue stain iron stain and brown stain over knots
16ndash25
Chapter 16 Finishing of Wood
Exterior paint is subject to wetting from rain dew and frost Equally serious is ldquounseen moisturerdquo (water vapor) that moves from inside to outside structures in cold climates and from outside to inside of air-conditioned buildings in hot climates Effective air and vapor barriers can minimize wa-ter vapor movement (see Chapter 13)
Paint Cracking (parallel to grain)Cracking parallel to grain occurs on smooth flat-grain lum-ber particularly with wood species having abrupt transition between EW and LW bands (such as southern yellow pine Douglas-fir and oak) LW bands are compressed into EW during planing Normal rebound of LW bands after wood is in service causes films to crack along the EWndashLW bound-ary Other contributing factors are coatings having insuf-ficient thickness and lacking flexibility If the cracking is not too severe scuff sand and apply one or two top-coats to give additional film-build
Peeling and FlakingPeeling and flaking (adhesion failure between wood and the primer) can have several causes water wood weathering and dimensional change of thick LW bands on flat grain of high-density wood species Flaking often follows cracking small cracks in paint caused by raised grain allow water to enter Flaking is similar to peeling small pieces of finish peel from the surface usually along an EWndashLW boundary Flaking often occurs with cracking parallel to grain and is attributed to thin films It can occur with thinly applied film-forming finishes and with oil-based semitransparent stains if they do not absorb properly Water is the main cause but other factors can also cause it
Water speeds the failure by other causes One cause is weathering of wood prior to primer application Protect wood from the weather prior to installation and paint it as soon as possible after installing it Leaving smooth-planed lumber exposed to the weather for as little as 2 weeks de-creases its paint-holding properties If wood was exposed more than 2 weeks scuff sand it prior to painting In fact scuff sanding is always a good idea on planed lumber The wide bands of LW on flat-grain surfaces hold paint poorly If possible flat-grain boards should be installed ldquobark-siderdquo out to minimize raised grain particularly with wood species having abrupt EWLW transition Paint applied to weathered wood often fails over large areas and can be easily diag-nosed by inspecting the back side of the peeled paint Wood fibers are attached to the film clearly showing the grain of the wood
Priming end grain with oil-alkyd paint eliminates peeling at the ends of boards Saw-texture greatly improves finish adhesion to all species and grain angles Paint and solid-color stains adhere quite well to difficult-to-paint wood species such as flat-grain southern yellow pine Douglas-fir and radiata pine if applied to saw-textured surfaces
Cross-Grain CrackingModern waterborne latex finishes seldom fail by cross-grain cracking If latex finishes crack across the grain dimen-sional instability of wood under the finish causes it For ex-ample cross-grain checking of juvenile wood causes paint to crack In this case replace the board and repaint
If juvenile wood is not to blame cross-grain cracking usu-ally occurs on structures having thick layers of oil-alkyd paint If the wood is not the cause of paint failure remove the old paint and apply new finish to the bare wood Old paint probably contains lead (see Lead-Based Paint)
Water BlistersWater Blisters (also called moisture blisters) are bubble-like deformation of paint films (Fig 16ndash21) As the name im-plies these blisters usually contain water when they form Water blisters form between the wood substrate and the first coat of paint After the blisters appear they may dry out and collapse Small blisters may disappear completely and large ones may leave rough spots in severe cases the paint peels Oil-alkyd paint recently applied to wet wood is most likely to blister Old paint films are too rigid to swell and form blisters they usually crack and peel Water blisters are not common on latex paint systems
Minimizing water absorption into wood is the only way to prevent water blisters Water blisters may occur on sid-ing and trim where rain enters through improperly flashed doors windows and vents they are common near unsealed end grain of siding and trim Water from ice dams and overflow from blocked gutters can also cause water blisters Movement of water vapor from the inside of a structure to siding and trim may also cause water blisters Plumbing leaks humidifiers and shower spray are sources of inside water Minimizing water absorption also prevents decay (rot) warping and checking of wood
Mill GlazeSince the mid-1980s a condition known as ldquomill glazerdquo (also called planerrsquos glaze) has been reported to cause paint
16ndash26
General Technical Report FPLndashGTRndash190
Figure 16ndash21 Water blisters (also called moisture blis-ters) caused bubble-like deformation of paint film
failure Controversy exists over the exact cause of this con-dition and many people use it as a catch all for unexplained paint failures They attributed the paint failure to dull planer blades or excessive heat during planing However investi-gations of reported mill glaze by FPL scientists showed that other factors caused finish failure scientists were unable to duplicate mill glaze in the laboratory FPL scientists found three causes for paint failures that others had attributed to ldquomill glazerdquo (1) raised grain under a thin film particularly on smooth flat-grain lumber (2) wood weathering prior to application of film-forming finishes and (3) moisture (usu-ally water) These factors often occurred together
Paint failure occurred because of raised grain on flat-grain boards particularly on species having abrupt EWndashLW tran-sitions Planer blades tend to crush dense LW bands into less dense EW that lie directly beneath them on flat-grain sur-faces (Fig 16ndash22a) Later when these boards are exposed to moisture crushed EW absorbs moisture and rebounds which causes the surface LW bands to protrude from the surface (Fig 16ndash22b) A thin coat of film-forming finish applied over a stressed flat-grain surface will crack as the wood rebounds (Fig 16ndash22c see Paint Cracking) Failure is most common on flat-grain siding finished with insufficient film build of oil-based solid-color stain Thin coatings of oil-based solid-color stain and to some extent waterborne latex stains are weak and do not withstand the stresses caused by raised grain These low-solids coatings provide only 003 to 005 mm (1 to 2 mil) of dry-film thickness whereas a brush-applied three-coat paint system (primer and two top-coats)
provides 010 to 013 mm (4 to 5 mil) of dry-film thickness Raised grain is less likely to occur with vertical-grain wood because the EWndashLW bands are perpendicular to the surface and the EW is not crushed during planing
Install flat-grain bevel siding saw-textured side out Saw-textured surfaces do not have LW bands compressed into the EW The saw-textured side is the side of choice for applica-tion of penetrating semitransparent stains and film-forming finishes The film buildup on the saw-textured side will be greater than on a planed surface and the film will have greater mechanical adhesion or ldquobiterdquo
If flat-grain siding must be installed smooth-side out re-move the planing stresses by wetting the surface then allow 2 to 3 days for the surface to dry Scuff-sand the surface with 50- to 80-grit sandpaper and apply primer and two top-coats
Another paint failure that has been attributed to ldquomill glazerdquo is peeling caused by wood weathering prior to applying film-forming finishes (see Weathering Effect on Paint Ad-hesion) Water causes paint to peel (see Peeling and Flaking and Water Blisters)
Intercoat PeelingAs the name implies intercoat peeling is loss of adhesion between coats of finish usually peeling of a new paint from old paint (Fig 16ndash23) It usually occurs within a year of re-painting Prevent intercoat peeling by ensuring that old paint is free of dirt mildew and chalk prior to repainting
Intercoat peeling can also result from allowing too much time between applying primer and top-coat If more than 2 weeks elapse between applying an oil-based primer and a top-coat clean the surface before applying the second coat If the primer (particularly oil-alkyd primers) has weathered for several months it may be necessary to re-prime prior to applying the top-coats (see Testing for Adhesion)
16ndash27
Chapter 16 Finishing of Wood
(a)
(b)
(c)
Figure 16ndash22 (a) Cross-section view of flat-grain southern yellow pine showing dense LW bands crushed into less dense EW directly beneath them (b) raised grain caused by rebound of LW bands following wetting (c) a thin coat of film-forming finish applied over a stressed flat-grain surface will crack as the wood rebounds
Figure 16ndash23 Intercoat peeling of paint usually caused by poor preparation of old paint surface or excessive weathering of primer prior to application of top coat
ChalkingWeathering of paint causes chalking chalk is a residue of degraded resin and pigments These degradation products form a fine powder Some chalking is desirable because it allows the paint to self-clean However chalking is ob-jectionable when the degradation products (especially the pigments) wash down a surface having a different color or when it causes premature paint failure through excessive erosion Most paints chalk to some extent but chalking is minimal with modern latex paints
Latex paint or solid-color stain can be applied over existing paint if the old paint is clean and sound (chalk free) Prior to refinishing a chalky surface scrub it thoroughly with a de-tergent solution to remove degraded finish residue and dirt Rinse thoroughly before repainting To check for excessive chalking lightly rub the paint surface with a dark (for light-colored paint) or white (for dark-colored paint) cloth The amount of pigment removed by the cloth is a good indica-tion of chalking If the surface is still chalky after cleaning it may need to be primed prior to repainting Otherwise the new paint may peel Before repainting surfaces conduct a simple test (see Testing for Adhesion)
Testing for AdhesionAfter preparing old paint for repainting repaint a small in-conspicuous area and allow it to dry at least overnight To test for adhesion firmly press one end of an adhesive ban-dage onto the repainted surface Remove the bandage with a snapping action If the tape is free of paint the new paint is well-bonded to the old surface and does not need prim-ing or additional cleaning If the new latex paint adheres to the tape the old surface is too chalky and needs additional cleaning or priming with an oil-alkyd primer If both the new latex paint and the old paint coat adhere to the tape the old paint is not well bonded to the wood and must be removed before repainting You should test several areas of the structure to determine the extent of poor paint bonds before stripping all the paint
MildewIn the absence of catastrophic paint failures described above mildew is probably the most common problem with finishes Mildew is the term for fungi that infect wood (Fig 16ndash24a) and painted wood (Fig 16ndash24b) These mi-croorganisms can live on any surface that supplies a food source from either within the material or from air or liquids that contact the surface Although the organisms cannot decay wood they can metabolize some of the extractives in wood and natural oils (such as linseed oil) in finishes They usually discolor wood or finishes with black deposits and often grow in combination with algae (usually green discol-oration)
Mildew may be found anywhere on a building and is com-mon on walls behind trees or shrubs where air movement is restricted and walls stay damp Mildew may also be associ-ated with dew patterns of structures Dew forms on parts of structures that cool rapidly such as eaves soffits and ceil-ings of carports and porches The dew provides a source of water for mildew
Mildew can be distinguished from dirt by examining it with a 10times magnifying glass (such as a jewelerrsquos eye loupe) In the growing stage when the surface is damp or wet the fun-gus has threadlike growth In the dormant stage when the surface is dry the fungus has numerous egg-shaped spores by contrast granular particles of dirt appear irregular in size and shape A simple test for the presence of mildew on wood or paint is to apply a drop or two of liquid household bleach (5 sodium hypochlorite) to the discolored area The dark color of mildew will usually bleach out in 1 to 2 min Surface discoloration that does not bleach is probably dirt extractives bleed or iron stain Mildew can grow through a surface coating or under a clear finish In these cases it may be difficult to test for or to clean the mildew the finish pro-tects the mildew from the cleaning solution
To remove mildew use a commercial cleaner or a dilute solution of household bleach with detergent If using house-hold bleach use as dilute a solution as possible One part
16ndash28
General Technical Report FPLndashGTRndash190
(a)
(b)
Figure 16ndash24 Mildew is most common in shaded moist or protected areas (a) on wood and (b) on paint-ed wood
bleach to five parts water should be adequate In no case should a mixture stronger than one part bleach to three parts water be necessary Add a little powdered detergent to help remove the dirt Do not use liquid detergent because it may contain ingredients that react with bleach to give toxic fumes Gently scrub the surface with a bristle brush or sponge and rinse thoroughly Rinse using a garden hose keeping the water stream pointed down to avoid flooding the back side of siding with water If using a power-washer keep the pressure low to avoid damaging the wood and as with the garden hose keep the water stream pointed down Refinish the cleaned surface as soon as it has dried using a finish containing a mildewcide
Household bleach mildew removerbull 1 part (5) sodium hypochlorite (household bleach) (1 gallon)bull 3 to 5 parts warm water (3ndash5 gallons)bull A little powdered household detergent (12 cup)
Warning Do not mix bleach with ammonia or with any detergents or cleansers that contain ammonia Mixed together bleach and ammonia form a toxic combination similar to mustard gas Many household cleaners contain ammonia so be careful in selecting the type of cleaner to mix with bleach Avoid splashing the cleaning solution on yourself or plants
Loss of Gloss and FadingLoss of gloss and fading typically occurred with traditional oil-alkyd finishes Although modern acrylic-based latex finishes do not give the high gloss of an oil-alkyd they maintain gloss much longer Some pigments fade more than others check with the paint manufacturer to ensure that the colors will last White is always a safe choice The paint and solid-color service-life estimates given in Tables 16ndash4 and 16ndash5 do not take into account loss of gloss and fading Many dark-colored finishes will fade to give unacceptable performance long before the finish fails
Water-Soluble ExtractivesIn many hardwoods and softwoods the heartwood contains water-soluble extractives (Sapwood does not contain water-soluble extractives) Western redcedar and redwood are two common softwoods that contain highly colored water-soluble extractives extractives give these species their at-tractive color but they can also discolor paint When wood gets wet water dissolves some extractives then as the wood dries water carries water-soluble extractives to the surface The water evaporates leaving extractives behind as a reddish brown stain Discoloration shows in two ways diffused and run-down extractives bleed
Diffused extractives bleed is caused by (1) water from rain and dew that penetrates a porous or thin paint coating (2) water that penetrates joints in the siding railings or trim
and (3) absorption of water vapor in high humidity areas such as bathrooms swimming pools and greenhouses (Fig 16ndash25)
Good painting practices prevent diffused extractives bleed Use an oil-alkyd stain-blocking primer or a latex primer formulated for use over woods like redwood Do not use porous paints such as flat alkyds or latexes directly over extractive-rich woods If the wood is already painted and is discolored by extractives clean the surface and apply a stain-blocking primer Allow sufficient time for the primer to cure so that it blocks the extractives and then apply top-coat
Run-down extractives bleed is caused by (1) water draining behind siding from roof leaks faulty gutters or ice dams (2) condensation of water vapor originating inside the struc-ture on the back side of siding and (3) wind-blown water that wets the back side of siding The water on the back side of the siding dissolves extractives and runs off of the back
16ndash29
Chapter 16 Finishing of Wood
Figure 16ndash25 High moisture content of wood can cause diffuse extractives bleed particularly if a stain-blocking primer is not used
Figure 16ndash26 Water-soluble extractive discoloration can result from water wetting the back of the siding and then running down the front of the board
side of the siding onto the front side of the siding below it where it evaporates leaving red streaks (Fig 16ndash26)
Prevent run-down extractives bleed by (1) fixing roof leaks maintaining gutters and preventing ice dams (2) decreas-ing condensation or the accumulation of moisture in wall by lowering indoor humidity and installing effective air barriers in wall systems (3) designing structures having adequate roof overhang to minimize wetting by dew and wind-blown rain (4) back-priming siding prior to installation with a stain-blocking primer and (5) using rain-screen construction to vent the back side of siding (see Back-Priming)
By eliminating the cause of extractives bleed the discolor-ation will usually weather away in a few months However extractives in protected areas (under the eaves soffits and porch ceilings) become darker and more difficult to remove with time In these cases wash the discolored areas with a mild detergent soon after the problem develops Paint cleaners containing oxalic acid may remove stains
Blue StainBlue stain is a fungus that can infect sapwood of trees and logs (Fig 16ndash27) Insects such as the pine beetle may carry it into a living tree Pine beetle infestation often disrupts the flow of nutrients thus killing the tree Sapwood of lumber from beetle-killed trees usually contains blue stain Blue stain may also infect logs after harvest while the MC is still high The fungus causes a blue discoloration of the wood but the organism does not weaken wood structurally The fungus lacks the enzymes necessary to digest wood poly-mers it lives off the unpolymerized sugars in the sapwood (see Chap 14) Neither commercial mildew cleaners nor household bleach with detergent can remove it If the color is objectionable use a pigmented finish to hide it (see Mil-dew)
Effective control of blue stain takes place prior to using lumber at the construction site maintain healthy forests
apply fungicides to logs while in storage prior to cutting lumber use kiln dry lumber and keep lumber dry
Iron StainIron stains occur from rusting of fasteners or by the reaction of iron with tannins in wood The appearance is different for each of these reactions
In wood species that lack tannins iron merely rusts giving a brown stain to the wood surrounding the fastener The iron also causes slight degradation of the wood near it (often referred to as ldquowood sicknessrdquo) This discoloration develops over many months or years of exposure
In those wood species that have tannins a chemical reaction takes place between the iron and the tannins Tannins are just one of the many chemicals (extractives) in wood Spe-cies such as the cedars the oaks and redwood are rich in tannins Iron reacts immediately with the tannins to give a blue-black discoloration
Steel fasteners are the most common source of iron (Fig 16ndash28) but traces of iron left from cleaning wood with steel wool or wire brushes cause iron stain Poor qual-ity galvanized nails corrode easily and like uncoated steel nails usually cause unsightly staining of the wood
If iron stain is a serious problem on a painted surface coun-tersink the fastener caulk spot prime and top-coat This costly and time-consuming process is only possible with opaque finishes Little can be done to give a permanent fix to iron stains on wood having a natural finish Removing fasteners cleaning the affected areas with oxalic acid solu-tion and replacing the fasteners may not give a permanent fix because residual iron left behind continues to cause staining Removing the fasteners often splits the siding Us-ing the wrong fastener can be costlymdashit may become neces-sary to replace all the siding (Fig 16ndash28) Use corrosion-resistant fasteners such as stainless steel rather than risk iron stain particularly when using natural finishes on wood con-taining high amounts of tannin (such as western redcedar redwood and oak) If using galvanized fasteners they must be hot-dipped galvanized fasteners meeting ASTM A 153A specification Other galvanized fasteners fail Unfortunately contractors and their employees may have difficulty recognizing the difference among galvanized fasteners (Fig 16ndash28)
Iron stain occurring beneath a finish is extremely difficult to fix The coating must be removed before the iron stain can be removed Oxalic acid will remove the bluendashblack discol-oration Apply a saturated solution (05 kg of oxalic acid per 4 L (1 lb galndash1) of hot water) to the stained surface Many commercial brighteners contain oxalic acid and these are usually effective for removing iron stains After removing the stain wash the surface thoroughly with warm water to remove the oxalic acid If even minute traces of iron remain the discoloration will recur
16ndash30
General Technical Report FPLndashGTRndash190
Figure 16ndash27 Blue stain may infect sapwood
Caution Oxalic acid is toxic take care when using it (It is the poison in rhubarb leaves)
KnotsKnots in many species contain an abundance of resins and other highly colored compounds These compounds can sometimes cause paint to peel or turn brown Eliminating paint discoloration caused by extractives in knots is difficult because some of the extractives are soluble in oil-based primers and diffuse through them Latex-based formula-tions do not block them either Coat the knot with shellac or specially formulated knot sealer Do not use varnish to seal knots varnish is not formulated for this use After sealing knots apply primer and two top-coats Knots usually check as wood dries if the checks form after the wood has been
painted the checks cause the paint to crack (see Wood Extractives)
PitchPitch and other resins are one of the defense mechanisms that a tree uses to protect itself from harmful pathogens and insects following injury When a treersquos bark is damaged pitch flows into these areas to protect the wound (Fig 16ndash29) Pitch exists as a normal part of the wood of pines (Pinus spp) spruces (Picea spp) larches (Larix spp) and Douglas-firs (Pseudotsuga spp) and it can be found in specialized wound structures called pitch pockets in the wood of most softwood species Pitch is a solution of natural rosins and turpentine in species such as spruce pine and fir It remains in the lumber from these species The ease with which it exudes to the surface of lumber depends on the amount of turpentine in which the pitch is dissolved and the temperature (that is the more turpentine the more fluid the pitch the higher the temperature the more fluid the pitch) Pitch exudation can occur in isolated spots (Fig 16ndash30a) or in large pockets or seams (Fig 16ndash30b) When pitch bleed occurs high temperature is the cause If the temperature at the surface of the wood increases usually from being exposed to direct sunlight the pitch oozes to the surface If the wood is finished the pitch may exude through the coating or cause the finish to discolor or blister
The only way to prevent pitch bleed is to remove the turpen-tine from the wood during lumber processing Depending on the species specific kiln schedules can be used to drive off most of the turpentine thus ldquofixingrdquo or ldquosettingrdquo the pitch (making it less fluid) However not all end uses of lumber require pitch to be set construction grades of lumber even if kiln-dried seldom have the pitch set This is usually not a problem for construction grades because the wood surface is seldom visible The difficulty occurs with appearance grades of lumber such as for siding and trim
Kiln schedules for setting pitch involve higher temperatures and last longer than normal drying schedules For a com-plete guide to drying schedules refer to publications such as the Dry Kiln Operatorrsquos Manual
Pitch can be removed in several ways depending on how fluid it is If the pitch has not hardened (it still contains a lot of turpentine) remove it with turpentine or mineral spirits Once it has hardened scrape it off with a putty knife or paint scraper However if the pitch is still soft such pro-cedures smear it over the surface of wood or paint Let it harden and then scrape it off After removing pitch sand to bare wood spot prime and top-coat Shellac seals extrac-tives but not pitch Paint will not prevent future bleeding of pitch during periods of high temperature If pitch is a recur-ring problem it may be necessary to replace the board One should note that many paints particularly oil-alkyds fade as they age and repainting the spots where pitch was removed may show color differences
16ndash31
Chapter 16 Finishing of Wood
Figure 16ndash28 Iron stain on newly installed wood sid-ing Poor quality galvanized nails corrode easily and like uncoated steel nails usually cause unsightly stain-ing of the wood
Figure 16ndash29 Pitch flow from wound
Finishing Interior WoodMany finishes and finishing methods are used indoors because of the breadth of wood products and usesmdashfrom wood floors to cutting boards This section includes general information on a few common products used for interior wood finishing and brief subsections on finishing wood floors and kitchen utensils Many finishing methods exist for just furniture Factory finishing of furniture is often propri-etary and may involve more than a dozen steps Methods for furniture finishing are not included in this chapter but most public libraries contain books on furniture finishing Product literature for furniture finishes often contains recommenda-tions for application Interior wood products require less protection against water and UV radiation than do exterior wood products and finishes usually last for decades How-ever interior wood products have more exacting standards for appearance and cleanability than do exterior wood products
As with wood used outdoors wood changes color as it ages indoors whether unfinished or finished In general dark wood gets lighter and light wood gets darker Color change is natural aging of newly cut wood and is caused by visible light not UV radiation associated with outdoor weather-ing If removing a picture from paneling shows a color difference (shadowing by the picture) correct it by leaving the wood exposed to light The color will usually even out within several months To avoid shadowing keep all paint-ings and other wall coverings off paneling until most color change has occurred (usually 2 to 3 months depending on the light intensity)
Fingerjointed lumber has become common for interior trim Pieces of wood for fingerjointed lumber often come from different trees having different amounts of extractives These extractives can discolor finishes particularly in humid environments such bathrooms and kitchens (Fig 16ndash10) When painting fingerjointed lumber use a stain-blocking primer to minimize discoloration In new buildings allow wood adequate time to reach EMC before finishing
Types of Finish and Wood FillersOpaque FinishesInterior woodwork especially wood trim requires smooth surfaces consistent color and a lasting sheen Therefore enamels high-gloss or semi-gloss are preferable to flat paints However the higher the gloss the more the finish accentuates imperfections such as planer marks hammer marks and raised grain Raised grain is troublesome on flat-grain surfaces having abrupt EWndashLW transitions because planing crushes LW bands into the EW later when the MC changes the EW swells causing raised grain To obtain a smooth finish sponge unfinished wood with water to raise the grain allow it to dry thoroughly sand remove surface dust with a tack cloth and finish
StainsStains accentuate wood grain by absorbing differently into EW LW knots vessels and flaws Stains color EW more than LW reversing the natural color gradation For uniform color apply a penetrating sealer (ldquowash coatrdquo) before apply-ing stain It impedes stain absorption into the EW Interior stains are often natural or synthetic dyes dissolved in water or organic solvent Water-soluble stains give depth to a fin-ish dry slowly raise the grain and require sanding Solvent-borne stains dry quickly do not raise the grain and need little or no sanding A combination of solvent- and water-borne stains or dyes can give the finish color ldquodepthrdquo
If stain absorbs into wood unevenly causing a blotchy ap-pearance blue-stain fungi or bacteria probably infected the tree prior to cutting for lumber Blue stain on lumber is easy to see However bacteria-infected areas have no color and wood appears normal Infected areas absorb excessive amounts of stain quickly giving wood an uneven blotchy appearance The infection occurs across grain boundaries This problem is not very common but should it occur it cannot be fixed once the stain is applied If wood is to be used for furniture or fine woodwork it might be a good idea to check lumber before using it by applying a stain or dena-tured alcohol to identify infected areas (Schofield (2008) describes diagnosing blotching and treating boards prior to staining) Discard pieces on which stain appears blotchy apply a wash coat to decrease absorption or use them where they will not show Sealing the lumber with dewaxed shel-lac prior to staining may help commercial sealers are also available
16ndash32
General Technical Report FPLndashGTRndash190
(a)
(b)
Figure 16ndash30 (a) Pitch exudation from an isolated spot (b) pitch exudation from a large pocket or seam
FillersHardwoods are ring porous semi-ring porous or dif-fuse porous according to size and location of vessels (see Anatomy) Diffuse-porous and semi-ring-porous hardwoods with small vessels may be finished with paints enamels and varnishes in the same way as softwoods Vessels in most ring-porous hardwoods need to be filled to obtain a smooth finished surface Filler may be a paste or liquid natural or colored Wipe the filler across wood grain to pack it into the vessels then wipe with a few light strokes with the grain Remove surplus filler immediately after the glossy wet ap-pearance disappears After the filler dries thoroughly lightly sand it before finishing the wood
Use slightly different methods for opaque and clear coat-ings For opaque finishes fill vessels sand and apply primersealer and top-coats For clear finishes stain prior to filling to bring out the color of the vessels Transparent fill-ers do not affect finish or wood color colored fillers match or contrast with wood color
SealersSealers are thinned varnish shellac or lacquer used to pre-vent absorption of finish and prevent bleeding of stains into surface coatings especially lacquer coatings Lacquer and shellac sealers dry quickly
Transparent FinishesTransparent film-forming finishes such as varnish give excellent performance on wood indoors However as with high-gloss finishes transparent finishes accentuate surface blemishes Remove all blemishes such as planer marks and raised grain before finishing Transparent finishing consists of sanding staining filling sealing finishing and some-times waxing
Transparent coatings may be gloss varnish semi-gloss var-nish shellac nitrocellulose lacquer natural oils or wax Wax provides protection without forming a thick coating and enhances the natural luster of wood Other coatings such as shellac linseed or tung oil lacquer and varnish ac-centuate the natural luster of some hardwoods and seem to give the surface ldquodepthrdquo Shellac applied by the laborious process of French polishing probably achieves this impres-sion of depth most fully but the coating is expensive and easily marred by water Rubbing varnishes give almost as much depth Lacquers have the advantages of drying rapidly and forming a hard surface but lacquer requires more coats than varnish to obtain a lustrous appearance Sufficient film thickness is needed for long service life particularly for products that are cleaned often such as kitchen cabinets and tabletops Varnishes are usually alkyd-modified poly-urethane and are available in solvent-borne and waterborne formulations Waterborne finishes are more likely to raise grain than are solvent-borne finishes and may appear like a plastic film rather than bringing out the ldquodepthrdquo of the wood
16ndash33
Chapter 16 Finishing of Wood
Figure 16ndash31 Number 2 grade of hickory finished to accentuate the beauty of the various colors knots and grain pattern of this species
substrate Apply varnish directly to wood or stain prior to varnishing
Varnish and lacquer usually dry to a high gloss To decrease gloss rub finish surface with polishing compound (water-proof sandpaper or powdered pumice stone and water or polishing oil) The final sheen varies with the fineness of the polishing compound coarse powders make a dull sur-face and fine powders produce a bright sheen For a smooth surface with high polish use rottenstone and oil for final polishing Varnish and lacquer that give a semi-gloss or satin finish are also available Do not use steel wool (see Iron Stain)
Natural oils such as linseed oil or teak oil and commercial formulations such as Danish oil are popular These finishes penetrate wood and do not form a film Apply two or more coats of oil followed by a paste wax Oil finishes are easy to apply and maintain but they soil more easily than film-forming finishes
Finishes for Wood FloorsWood is highly desirable flooring for homes factories and public buildings and is available in many wood species Natural color and grain accentuate many architectural styles Finishes enhance the natural beauty of wood floors protect them from excessive wear and make them easier to clean (Fig 16ndash31) Detailed procedures and specific products de-pend largely on the species of wood used and finish prefer-ence Obtain additional information specific to your needs from flooring associations or individual flooring manufac-turers
Finishing floors consists of four steps sanding the surface applying filler staining to achieve a desired color and finishing with a clear coat Careful sanding to provide a
smooth surface is essential for a good appearance because the finish accentuates any irregularities or roughness in the surface A smooth surface requires sanding in several steps with progressively finer sandpaper usually with a machine unless the area is small After sanding remove all dust Never use steel wool on floors because minute steel particles left in wood cause iron stains Filler is necessary for wood with large pores such as red oak to obtain a smooth glossy appearance (Table 16ndash1) Stain to obtain a uniform color or to accent the grain pattern Stain should be an oil-based or non-grain-raising type Stains penetrate wood only slightly therefore protect the stained surface with a clear coating Refinish the clear top-coats as needed to prevent wearing through to the stained wood Staining worn spots in a way that will match the color of the surrounding area is difficult
Whether the wood is stained or not sealers or varnishes give a clear finish for wood floors Floor varnish is usually alkyd-modified polyurethane Sealers are usually thinned varnish and penetrate the surface without forming a coating of ap-preciable thickness Prolong the service life of floor finishes by keeping them waxed Paste wax generally provides better appearance and lasts longer than liquid wax Re-waxing or resealing and waxing of high traffic areas are relatively sim-ple maintenance procedures as long as the stained surface of the wood has not been worn
Finishes for Items Used for FoodThe durability and beauty of wood make it an attractive material for bowls butcher blocks and other items used to serve or prepare food A finish helps keep wood dry which makes it less prone to harbor bacteria check or crack Fin-ishes that repel water decrease the effects of brief periods of wetting (washing) Finished wood is easier to clean than unfinished wood
Types of FinishSealers and Drying OilsSealers and drying oils penetrate wood and cure (dry) to form a barrier to liquid water Many commercial sealers are similar to thinned varnish (eg polyurethane or alkyd-mod-ified polyurethane) Drying oils such as tung linseed and walnut can also be used as sealers Sealers and drying oils give a surface that is easy to clean and resistant to scratch-ing Sealers are easy to apply and cure quickly Drying oils may require several weeks to cure
Nondrying OilsNondrying oils (vegetable and mineral oils) penetrate wood but do not cure As with sealers and drying oils they im-prove water resistance Vegetable oils (such as olive corn peanut and safflower) are food for microorganisms such as mildew or bacteria Vegetable oils can become rancid and may impart undesirable odors or flavors to food Mineral (or paraffin) oil is a nondrying oil from petroleum Mineral oil is not a natural product therefore it is not prone to mildew or to harbor bacteria
16ndash34
General Technical Report FPLndashGTRndash190
Varnish and LacquerFinishes that form a film such as varnish or lacquer give a smooth cleanable surface These finishes resist staining and should perform well if you minimize their exposure to wa-ter avoid placing them in a dishwasher However eventu-ally the finish may crack chip and peel
Paraffin WaxParaffin wax is similar to paraffin oil but is solid at room temperature Paraffin wax is one of the simplest ways to fin-ish wood utensils especially countertops butcher blocks and cutting boards
Food Service ItemsFood service items such as salad bowls and eating utensils need a finish that is easy to clean and resistant to abrasion water acids and stains Varnishes lacquers penetrating wood sealers and drying oils can be used however varnish-es and lacquers are easiest to keep clean and most resistant to absorption of stains
Note Whatever finish is chosen for wood utensils used to store handle or eat food be sure the finish is safe and not toxic Also be sure the finish you select is recommended for use with food or is described as food grade For information on the safety and toxicity of any finish check the label con-tact the manufacturer or the Food and Drug Administration or check with your local extension home economics expert or county agent
Butcher Blocks and Cutting BoardsThe simplest finish for wood butcher blocks and cutting boards is melted paraffin wax (the type used for home can-ning) Melt wax using hot plate or other low-temperature heat sourcemdashdo not use an open flame Brush melted wax on the wood Use an iron to melt excess wax that has solidi-fied on the surface so that it absorbs into the wood or just scrape off the excess wax Refinishing is simple and easy Other penetrating finishes (sealers drying and nondrying oils) may be used for butcher blocks and cutting boards but as mentioned in the subsection on eating utensils veg-etable oils may become rancid Film-forming finishes such as varnish or lacquer perform poorly on butcher blocks and cutting boards
Wood Cleaners and BrightenersThe popularity of wood decks and the desire to keep them looking bright and new has led to a proliferation of commer-cial cleaners and brighteners The active ingredient in many of these products is sodium percarbonate (2Na2CO33H2O2) Sodium percarbonate is bleach however it is oxygen bleach rather than chlorine bleach such as laundry bleachmdashsodium hypochlorite and calcium hypochlorite Oxygen bleaches remove mildew and have been reported to be less likely to damage wood surfaces than ldquochlorinerdquo bleaches particu-larly with low-density woods like western redcedar Alaska
yellow-cedar and redwood However it is difficult to com-pare the advantages and disadvantages of the two types of cleaner (oxygen versus chlorine) because of the wide range of active ingredient concentrations in the cleaners additives in the cleaners and various wood substrates that have been used for evaluating the cleaners Some commercial products contain household bleach Commercial cleaners usually have a surfactant or detergent to enhance the cleansing action
At the other extreme from the reported gentle bleaching ac-tion of sodium percarbonate are those cleaners containing sodium hydroxide Sodium hydroxide is a strongly alkaline chemical that pulps wood and is used in some paint strip-pers These cleaners may be necessary where mildew is imbedded in a surface finish however they should be used only as a last resort
Manufacturers of some cleaners and brighteners report that their products restore color to wood Cleaning wood does not add color Removing mildew reveals the original color Brightening the wood may make it appear as if it has more color Weathered wood has a silvery gray appearance be-cause weathering removes colored components from the surface If you want to restore color stain the wood Some commercial cleaners pulp the wood surface and subsequent power washing removes the pulped surface In this case the color is ldquorestoredrdquo because the surface of the wood was re-moved Sanding would give the same result
Some brighteners contain oxalic acid Oxalic acid removes extractives bleed and iron stains but it is not effective for removing mildew
Paint StrippersRemoving paint and other film-forming finishes from wood is a time-consuming and often difficult process Finish removal is necessary if a finish has extensive cracking or peeling (see Finish Failure or Discoloration) It may be nec-essary to remove paint containing lead however if the paint is still sound and it is not illegal to leave it on the structure paint over the lead-based paint to seal in the lead (see Lead-Based Paint)
Methods described here can remove finishes from furniture however companies that specialize in stripping furniture usually immerse the furniture in a vat of paint stripper then clean and brighten the wood
Mechanical and chemical are general types of stripping methods Consult product literature for additional informa-tion on appropriate uses and safety precautions Regardless of the method used to strip paint sand the wood prior to applying new finish
Note Dust caused by mechanical stripping methods and fumes given off by chemical strippers are usually toxic Use effective safety equipment including a respirator even if the paint does not contain lead (see Lead-Based Paint) Dust masks sold in hardware stores do not block chemical fumes and are not very effective against dust
Mechanical MethodsScraping sanding wet or dry sandblasting spraying with pressurized water (power washing) and using electrically heated pads hot air guns and blowtorches are mechanical methods for removing finishes
Scraping is effective for removing loosely bonded paint or paint that has already partially peeled from small areas of the structure If possible sand weathered surfaces and feather edges of paint still bonded to wood Do not sand if the old paint contains lead (see Lead-Based Paint)
If paint has partially debonded on large areas of a structure contractors usually remove the finish by power washing This methods work well for paint that is loosely bonded If paint is tightly bonded complete removal can be difficult without severely damaging wood The pressure needed to debond tightly bound paint from wood can easily cause deep erosion of wood If high pressure is necessary to remove paint the paint probably does not need to be removed prior to refinishing Power washing erodes less dense EW more than dense LW leaving behind ridges of LW which are dif-ficult to repaint Power washing is less damaging to wood than is wet or dry sandblasting particularly if low pres-sure is used If more aggressive mechanical methods are required wet sandblasting can remove even tightly-bonded paint Dry sandblasting is not suitable for removing paint from wood because it severely erodes wood along with the paint and it tends to glaze the surface Power washing and wet and dry sandblasting are not suitable for paint con-taining lead
Power sanders and similar devices are available for com-plete paint removal Some devices are suitable for removing paint that contains lead they have attachments for contain-ing the dust Equipment that has a series of blades similar to a power hand-planer is less likely to ldquogum uprdquo with paint than equipment that merely sands the surface Planers and sanders cannot be used unless the fasteners are countersunk Consult the manufacturersrsquo technical data sheets for detailed information to determine the suitability of their equipment for your needs and to meet government regulations on lead-containing paint
Paint can be softened using electrically heated pads hot air guns or blow torches then removed by scraping it from the wood Heated pads and hot air guns are slow methods and cause little damage to the wood Blowtorches have been
16ndash35
Chapter 16 Finishing of Wood
used to remove paint but they are extremely hazardous the flame can easily ignite flammable materials beneath the siding through gaps in the siding These materials may smolder undetected for hours before bursting into flame and causing loss of the structure Heated pads hot air guns and blowtorches are not suitable for paint containing lead These methods volatilize lead at their operating tempera-tures Lead fumes are released at approximately 371 degC (700 degF)
Note Removing paint from wood with a blowtorch is not recommended
Chemical MethodsEfficient paint removal may involve mechanical and chemi-cal methods Stripping paint chemically has the following steps apply paint stripper wait scrap off the softened paint neutralize the stripper (if necessary) wash the wood and sand the surface to remove wood damaged by the strip-per and raised grain caused by washing Chemical paint strippers although tedious to use are sometimes the most reasonable choice Some are extremely strong chemicals that quickly remove paint but are dangerous to use Others remove the paint slowly but are safer With the exception of alkali paint stripper how safe a product is and how fast it removes paint seem to be inversely correlated
Solvent-Based StrippersFast-working paint strippers usually contain methylene chloride a possible carcinogen that can burn eyes and skin Eye and skin protection and a supplied-air respirator are essential when using this paint stripper Paint strippers hav-ing methylene chloride can remove paint in as little as 10 min Some paint strippers are formulated using other strong solvents because of concerns with methylene chloride the same safety precautions should be used with these formula-tions as with those containing methylene chloride Consult product literature and strictly observe safety precautions
Alkali-Based StrippersAs an alternative to strong solvents some paint strippers contain strong bases (alkali) As with solvent-based paint strippers alkali-based strippers require eye and skin protec-tion Follow manufacturersrsquo recommendations concerning use of a respirator Although alkali-based paint strippers soften paint rather slowly they are strong chemicals and can severely damage wood Strong alkali pulps the wood sur-face After paint removal neutralize the surface with mild acid Unfortunately balancing the acid and base concentra-tions is difficult If excess alkali remains in the wood it may degrade the wood and subsequent paint coating Excess acid can also damage wood Alkali strippers are often left on painted wood a full day or overnight and are usually cov-ered to slow evaporation These covered types of products have the advantage of containing the paint stripper and paint quite well an important consideration when removing paint
containing lead Do not let alkali chemicals dry on the surface particularly on those finishes containing lead The dry chemicals contain lead dust
Note Alkali-based strippers require extra care to ensure that the wood is neutralized and that residual salts are washed from the wood The surface usually needs to be sanded before repainting to remove raised grain
ldquoSaferdquo Paint StrippersSeveral manufactures have marketed ldquosaferdquo paint strippers These strippers work slower than those having methylene chloride The active ingredient in such paint strippers is usually proprietary Concerning safety follow the manufac-turerrsquos recommendations
Avoidance of ProblemsAvoid finish failure subsequent to removing the old finish by using methods that do not damage wood The best way to remove paint may involve a combination of methods For example use power washing to remove as much loosely bound paint as possible Then use a chemical paint stripper on tightly-bonded paint Avoid using excessive amounts of chemical stripper Applying too much stripper or leaving it on painted wood too long can damage wood Use less paint stripper and reapply it rather than trying to remove all the paint with one application and risk damaging wood
The range of wood species and finishes and the possibil-ity of finishes containing lead complicates paint removal Companies may optimize paint stripper formulation with-out considering the effects on wood Removing paint from wood is only half the task Getting a paintable surface is the other half Companies that formulate paint strippers should consider this other half Those who use paint strippers need to understand the added burden of surface preparation
Disposal of Old PaintNo matter what method you use to remove paint be care-ful in disposing of old paint particularly paint that contains lead Lead paint is hazardous waste follow all regulations national and local during the removal storage and disposal of all paint especially paint containing lead (see Lead-Based Paint)
Lead-Based PaintLead-based paint was widely used in residential structures in the United States until the early 1940s and its use contin-ued to some extent for the exterior of dwellings until 1976 In 1971 Congress passed the Lead-Based Paint Poisoning Prevention Act and in 1976 the Consumer Product Safety Commission (CPSC) issued a ruling under this Act that lim-ited the lead content of paint used in residential dwellings toys and furniture to 006 Prior to any paint restoration on structures built prior to 1976 (and probably a good idea on any structure) check paint for lead Check for lead using a solution of 6 to 8 sodium sulfide in water or using a
16ndash36
General Technical Report FPLndashGTRndash190
test kit Test kits should be available in most paint and hard-ware stores Be certain to check all paint layers because the older ones are more likely to contain lead
Lead-based paint is still manufactured for applications not covered by the CPSC ruling such as paint for metal prod-ucts particularly those made of steel Occasionally such lead-based paint inadvertently gets into the hands of con-sumers Imported products may also contain lead paint Studies have shown that ingestion of even minute amounts of lead can have serious effects on health lead causes hy-pertension fetal injury damage to the brain kidneys and red blood cells partial loss of hearing impairment of mental development growth retardation and inhibited metabolism of vitamin D The American Academy of Pediatrics regards lead as one of the foremost toxicological dangers to children
Lead-based paint on the exterior of structures weathers to give flakes and powder The degraded paint particles accu-mulate in the soil near the structure Lead-based paint used on interior surfaces can also degrade to produce lead-con-taining dust Sanding coatings prior to repainting generates lead dust Sanding the exterior of a structure without proper equipment can cause lead contamination inside the structure
Methods used to remove lead paint can themselves gener-ate lead dust This is particularly true when unacceptable methods and work practices are used Poorly performed abatement can be worse than no abatement Micron-sized lead dust particles can remain airborne for substantial peri-ods and cannot be completely removed by standard cleaning methods When working on old painted surfaces assume that one or more of the paint coats contain lead Take pre-cautions accordingly
Check with the US Department of Health and Urban De-velopment (HUD) US Environmental Protection Agency (EPA) and American Coatings Association for the latest regulations and guidelines for remediating lead-based paint (wwwhudgovofficeslead) (wwwepagovlead) (wwwpaintorgissuesleadcfm)
Caution Remodeling or refinishing projects that require disturbing removing or demolishing portions of struc-tures coated with lead-based paint pose serious health risk The consumer should seek information advice and perhaps professional assistance for addressing these risks Contact HUD for the latest information on the removal of lead-based paints Debris coated with lead-based paint is hazardous waste and must be disposed of in accordance with federal and local regulations
Literature CitedAWPA 2008 Book of standards Birmingham AL Ameri-can Wood Protection Association
Sabin AH 1927 Technology of paint and varnish 3rd ed London John Wiley amp Sons
Schofield M 2008 Fine wood working Newtown CT The Taunton Press SeptemberOctober (Issue 200) 52ndash58
Wicks ZW Jr Jones FN Pappas SP Wicks DA 2007 Organic Coatings Science and Technology 3rd ed Hoboken NJ John Wiley amp Sons
Additional ReferencesAPA 1979 Stains and paints on plywood Pamphlet B407B Tacoma WA American Plywood Association
Arnold M Feist WC Williams RS 1992 Effect of weathering of new wood on the subsequent performance of semitransparent stains Forest Products Journal 42(3) 10ndash14
ASTM 2003 Standard specification for zinc coating (hot-dip) on iron and steel hardware A 153A 153Mndash01a West Conshohocken PA ASTM International 1(6)
Black JM Mraz EA 1974 Inorganic surface treatments for weather-resistant natural finishes Res Pap FPLndash232 Madison WI US Department of Agriculture Forest Service Forest Products Laboratory 44 p
Bussjaeger S Daisey G Simmons R Spindel S Williams S 1999 Mildew and mildew control for wood surfaces JCT Coatings Tech 71(890) 67ndash69
Cassens DL Feist WC 1980a Wood finishing finishing exterior plywood hardboard and particle board North Cen-tral Region Extension Pub 132 West Lafayette IN Purdue University Cooperative Extension Service
Cassens DL Feist WC 1980b Wood finishing paint failure problems and their cure North Central Region Ex-tension Pub 133 West Lafayette IN Purdue University Cooperative Extension Service
Cassens DL Feist WC 1980c Wood finishing discol-oration of house paintmdashcauses and cures North Central Region Extension Pub 134 West Lafayette IN Purdue University Cooperative Extension Service
Cassens DL Feist WC 1980d Wood finishing selection and application of exterior finishes for wood North Central Region Extension Pub 135 West Lafayette IN Purdue University Cooperative Extension Service
Cassens DL Feist WC 1980e Wood finishing finishing and maintaining wood floors North Central Region Exten-sion Pub 136 West Lafayette IN Purdue University Cooperative Extension Service
Daniels T Hirsch M McClelland K Ross A Williams RS 2004 Clear exterior finishes finding the balance between aesthetics and durability JCT Coatings Tech 1(9) 42ndash48
Feist WC 1979 Protection of wood surfaces with chro-mium trioxide Res Pap FPLndash339 Madison WI US
16ndash37
Chapter 16 Finishing of Wood
Department of Agriculture Forest Service Forest Products Laboratory 11 p
Feist WC 1982b Weathering of wood in structural uses In Meyer RW Kellogg RM eds Structural use of wood in adverse environments New York Van Nostrand Reinhold Company 156ndash178
Feist WC 1990 Outdoor wood weathering and protec-tion In Rowell R ed Archaeological wood properties chemistry and preservation Advanced in Chemistry Series No 225 Washington DC American Chemical Society 263ndash298 Chapter 11
Feist WC 1996 Finishing exterior wood Federation Series on Coatings Technology Blue Bell PA Federation of Soci-eties for Coatings Technology
Feist WC Hon DNndashS 1984 Chemistry of weathering and protection In Rowell RM ed The chemistry of solid wood Advances in Chemistry Series No 207 Washington DC American Chemical Society 401ndash451 Chapter 11
Feist WC Mraz EA 1980 Performance of mildewcides in a semitransparent stain wood finish Forest Products Jour-nal 30(5) 43ndash46
Feist WC Ross AS 1995 Performance and durability of finishes on previously coated CCA-treated wood Forest Products Journal 45(9) 29ndash36
Feist WC Williams RS 1991 Weathering durability of chromium treated Southern Pine Forest Products Journal 41(1) 8 14
Gorman TM Feist WC 1989 Chronicle of 65 years of wood finishing research of the Forest Products Laboratory Gen Tech Rep FPLndashGTRndash60 Madison WI US Depart-ment of Agriculture Forest Service Forest Products Labora-tory
Jourdain C Dwyer J Kersall K Mall D Springate R Williams S 1999 Changing nature of wood productsmdashwhat does it mean for coatings and finish performance JCT Coatings Tech 71(890) 61ndash66
Kalnins MA Feist WC 1993 Increase in wettability of wood with weathering Forest Products Journal 43(2) 55ndash57
Kiguchi M Evans PD Ekstedt J Williams RS Ka-toaka Y 2001 Improvement of the durability of clear coat-ings by grafting of UV-absorbers on to wood Surface Coatings International Part B Coatings Transactions 84(B4) 263ndash270
Mall DD Bonura T Bussjaeger S Carll C Panila D Williams RS 2004 Frequently asked questions wood and coatings applications JCT Coatings Tech 1(3) 36ndash49
McDonald KA Falk RH Williams RS Winandy JE 1996 Wood decks materials construction and finishing Madison WI Forest Products Society 94 p
Miller RB Wiedenhoeft AC Williams RS Stockman W Green F 2003 Characteristics of ten tropical hard-woods from certified forests in Bolivia part II natural durability to decay fungi Wood and Fiber Science 35(3) 429ndash433
Niemiec SS Brown TD 1988 Care and maintenance of wood shingle and shake roofs Corvallis OR Oregon State University Extension Service EC 1271 (September)
Richter K Feist WC Knaebe MT 1995 The effect of surface roughness on the performance of finishes Part 1 Roughness characterization and stain performance Forest Products Journal 45(78) 91ndash97
Ross A Daisey G Jourdain C Williams RS 1998 Cleaners and restorers for wood decks The Paint Dealer (April) 30ndash33
Ross AS Feist WC 1993 The effects of CCA-treated wood on the performance of surface finishes American Paint and Coatings Journal 78(9) 41ndash54
Ross AS Bussjaeger RC Feist WC 1992 Professional finishing of CCA-pressure-treated wood American Painting Contractor 69(7) 107ndash114
Sell J Feist WC 1986 Role of density in the erosion of wood during weathering Forest Products Journal 36(3) 57ndash60
Simpson WT ed 1991 Dry kiln operatorrsquos manual Agric Handb 188 Madison WI US Department of Agriculture Forest Service Forest Products Laboratory 274 p
Tichy RJ 1997 Interior wood finishing industrial use guide Madison WI Forest Products Society 113 p
USDA 1998 Rehabilitation of wood-frame houses Agric Handb 804 Washington DC US Department of Agricul-ture Forest Service 240 p
WDMA 1999 Industry standard for water-repellent pre-servative treatment for millwork IS4ndash99 Des Plaines IL Window and Door Manufacturerrsquos Association
Williams RS 1986 Effects of acid rain on painted wood surfaces importance of the substrate In Baboian R ed Materials degradation caused by acid rain ACS Symposium Series 318 Washington DC American Chemical Society 310ndash331
Williams RS 1990a Acidic deposition state of science and technology In Effects of acidic deposition on materials
16ndash38
General Technical Report FPLndashGTRndash190
Report 19 National Acid Precipitation Assessment Program 19165 19202 Vol 3
Williams RS 1990b Effects of acidic deposition on paint-ed wood In Effects of acidic deposition on materials State of Science and State of Technology Report 19 National Acid Precipitation Assessment Program 19165ndash19202 Vol 3
Williams RS 1991 Effects of acidic deposition on painted wood a review JCT Coatings Tech 63(800) 53 73
Williams RS 2005 Weathering of wood In Rowell RM ed Handbook of Wood Chemistry and Wood Composites Boca Raton CRC Press Chapter 7
Williams RS Feist WC 1993a Durability of paint or solid-color stain applied to preweathered wood Forest Products Journal 43(1) 8ndash14
Williams RS Feist WC 1993b Effect of weathering of wood prior to finishing on paint bond strength and durabil-ity In Proceedings of the Polymeric Materials Science and Engineering Division Denver CO American Chemical Society Spring Meeting 1993 March 29 April 2
Williams RS Feist WC 1994 Effect of preweathering surface roughness and wood species on the performance of paint and stains JCT Coatings Tech 66(828) 109ndash121
Williams RS Feist WC 1999 Selection and application of exterior stains for wood Gen Tech Rep FPLndashGTRndash106 Madison WI US Department of Agriculture Forest Ser-vice Forest Products Laboratory 1ndash9
Williams RS Feist WC 1999 Water repellent and water repellent preservative finishes for wood Gen Tech Rep FPLndashGTRndash109 Madison WI US Department of Agricul-ture Forest Service Forest Products Laboratory 1ndash12
Williams RS Feist WC 2001 Duration of wood pre-weathering effect on the service life of subsequently ap-plied paint JCT Coatings Tech 73(930) 65ndash72
Williams RS Feist WC 2004 The service life of semitransparent stain solid color stain and latex paint on yellow-poplar and sweetgum plywood and the effect of these finishes on wood durability Forest Products Journal 54(78) 96ndash101
Williams RS Knaebe M 2000 Restoration of severely weathered wood JCT Coatings Tech 72(902) 43ndash51
Williams RS Knaebe MT Feist WC 1996 Finishes for exterior wood Madison WI Forest Products Society
Williams RS Miller RB Gangstad J 2001 Charac-teristics of ten tropical hardwoods from certified forests in Bolivia part I weathering characteristics and dimensional stability Wood and Fiber Science 33(4) 618ndash626
Williams RS Plantinga PL Feist WC 1990 Photo-degradation of wood affects paint adhesion Forest Products Journal 40(1) 45ndash49
Williams RS Sotos P Feist WC 1999 Evaluation of several paint systems on severely weathered wood JCT Coatings Tech 71(895) 97ndash102
Williams RS Winandy JE Feist WC 1987a Adhe-sion of paint to weathered wood Forest Products Journal 37(1112) 29ndash31
Williams RS Winandy JE Feist WC 1987b Paint adhesion to weathered wood JCT Coatings Tech 59(749) 43ndash49
Williams RS Winandy JE Feist WC 2002 Correla-tion of adhesive strength with service life of paint applied to weathered wood Paper 161 In Proceedings 9th durability of building materials and components conference Brisbane Australia 17ndash20 March
Williams RS Jourdain C Daisey G Springate RW 2000 Wood properties affecting finish service life JCT Coatings Tech 72(902) 35ndash42
Williams RS Knaebe MT Evans JW Feist WC 2001 Erosion rates of wood during natural weathering part III effect of exposure angle on erosion rates Wood and Fi-ber Science 33(1) 50ndash57
Williams RS Knaebe MT Sotos PG Feist WC 2001 Erosion rates of wood during natural weathering part I ef-fect of grain angle and surface texture Wood and Fiber Sci-ence 33(1) 33ndash42
Williams RS Lacher S Halpin C White C 2005 Evaluating weather factors and material response during outdoor exposure to determine accelerated test protocols for predicting service life In Martin JW Ryntz RA Dickie RA eds Service Life Prediction Challenging the Status Quo Federation of Societies for Coatings Technology Pro-ceedings 3rd international symposium on service life pre-diction Sedona AZ 2004 February 1ndash6
Williams RS Ross AS Sotos P Cheeks CN 2001 Water-repellent preservative treatment of brick molding prior to factory priming improves paint service life In Proceedings of the annual meeting of the American Wood Preserverrsquos Association (Vol 97) 65ndash67
16ndash39
Chapter 16 Finishing of Wood
Report 19 National Acid Precipitation Assessment Program 19165 19202 Vol 3
Williams RS 1990b Effects of acidic deposition on paint-ed wood In Effects of acidic deposition on materials State of Science and State of Technology Report 19 National Acid Precipitation Assessment Program 19165ndash19202 Vol 3
Williams RS 1991 Effects of acidic deposition on painted wood a review JCT Coatings Tech 63(800) 53 73
Williams RS 2005 Weathering of wood In Rowell RM ed Handbook of Wood Chemistry and Wood Composites Boca Raton CRC Press Chapter 7
Williams RS Feist WC 1993a Durability of paint or solid-color stain applied to preweathered wood Forest Products Journal 43(1) 8ndash14
Williams RS Feist WC 1993b Effect of weathering of wood prior to finishing on paint bond strength and durabil-ity In Proceedings of the Polymeric Materials Science and Engineering Division Denver CO American Chemical Society Spring Meeting 1993 March 29 April 2
Williams RS Feist WC 1994 Effect of preweathering surface roughness and wood species on the performance of paint and stains JCT Coatings Tech 66(828) 109ndash121
Williams RS Feist WC 1999 Selection and application of exterior stains for wood Gen Tech Rep FPLndashGTRndash106 Madison WI US Department of Agriculture Forest Ser-vice Forest Products Laboratory 1ndash9
Williams RS Feist WC 1999 Water repellent and water repellent preservative finishes for wood Gen Tech Rep FPLndashGTRndash109 Madison WI US Department of Agricul-ture Forest Service Forest Products Laboratory 1ndash12
Williams RS Feist WC 2001 Duration of wood pre-weathering effect on the service life of subsequently ap-plied paint JCT Coatings Tech 73(930) 65ndash72
Williams RS Feist WC 2004 The service life of semitransparent stain solid color stain and latex paint on yellow-poplar and sweetgum plywood and the effect of these finishes on wood durability Forest Products Journal 54(78) 96ndash101
Williams RS Knaebe M 2000 Restoration of severely weathered wood JCT Coatings Tech 72(902) 43ndash51
Williams RS Knaebe MT Feist WC 1996 Finishes for exterior wood Madison WI Forest Products Society
Williams RS Miller RB Gangstad J 2001 Charac-teristics of ten tropical hardwoods from certified forests in Bolivia part I weathering characteristics and dimensional stability Wood and Fiber Science 33(4) 618ndash626
Williams RS Plantinga PL Feist WC 1990 Photo-degradation of wood affects paint adhesion Forest Products Journal 40(1) 45ndash49
Williams RS Sotos P Feist WC 1999 Evaluation of several paint systems on severely weathered wood JCT Coatings Tech 71(895) 97ndash102
Williams RS Winandy JE Feist WC 1987a Adhe-sion of paint to weathered wood Forest Products Journal 37(1112) 29ndash31
Williams RS Winandy JE Feist WC 1987b Paint adhesion to weathered wood JCT Coatings Tech 59(749) 43ndash49
Williams RS Winandy JE Feist WC 2002 Correla-tion of adhesive strength with service life of paint applied to weathered wood Paper 161 In Proceedings 9th durability of building materials and components conference Brisbane Australia 17ndash20 March
Williams RS Jourdain C Daisey G Springate RW 2000 Wood properties affecting finish service life JCT Coatings Tech 72(902) 35ndash42
Williams RS Knaebe MT Evans JW Feist WC 2001 Erosion rates of wood during natural weathering part III effect of exposure angle on erosion rates Wood and Fi-ber Science 33(1) 50ndash57
Williams RS Knaebe MT Sotos PG Feist WC 2001 Erosion rates of wood during natural weathering part I ef-fect of grain angle and surface texture Wood and Fiber Sci-ence 33(1) 33ndash42
Williams RS Lacher S Halpin C White C 2005 Evaluating weather factors and material response during outdoor exposure to determine accelerated test protocols for predicting service life In Martin JW Ryntz RA Dickie RA eds Service Life Prediction Challenging the Status Quo Federation of Societies for Coatings Technology Pro-ceedings 3rd international symposium on service life pre-diction Sedona AZ 2004 February 1ndash6
Williams RS Ross AS Sotos P Cheeks CN 2001 Water-repellent preservative treatment of brick molding prior to factory priming improves paint service life In Proceedings of the annual meeting of the American Wood Preserverrsquos Association (Vol 97) 65ndash67