Tsk_Ld_04_Process_Request Page 1 of 30 Work Instruction Task Lead - Process Request Purpose This work instruction is used to outline the process conducted by the Task Lead who conducts the detailed review. The steps include: Review, add, edit, or delete contents on each screen Enter the Project Description and Basis of Request Enter the 7 elements of community information Enter letter information Prerequisites The Review Data Received activity is complete All data and fees were received and recorded Navigation Via Menu Path Log in to the MIP Workbench Work Items and Claim Process Request
Transcript
Tsk_Ld_04_Process_Request Page 1 of 30
Work Instruction
Task Lead - Process Request
Purpose
This work instruction is used to outline the process conducted by the Task Lead who conducts the detailed review. The steps include:
Review, add, edit, or delete contents on each screen
Enter the Project Description and Basis of Request
Enter the 7 elements of community information
Enter letter information
Prerequisites The Review Data Received activity is complete
All data and fees were received and recorded
Navigation Via Menu Path Log in to the MIP Workbench Work Items
and
Claim Process Request
Tsk_Ld_04_Process_Request Page 2 of 30
Work Steps
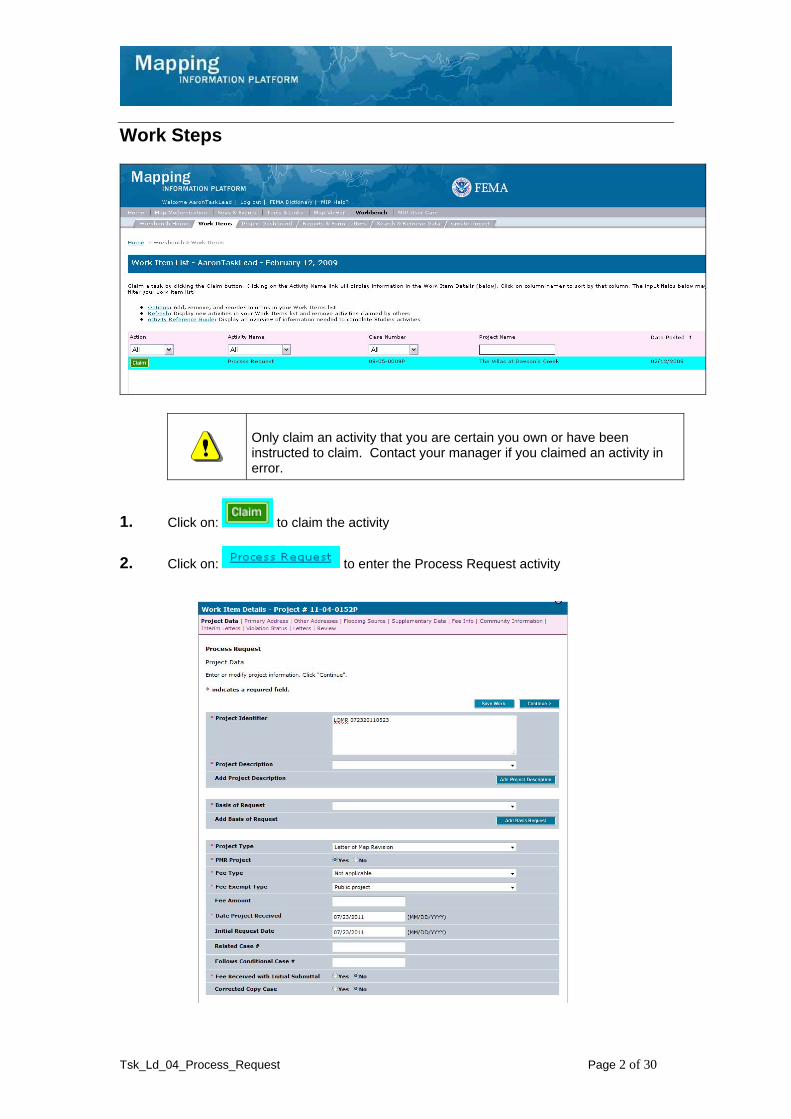
Only claim an activity that you are certain you own or have been instructed to claim. Contact your manager if you claimed an activity in error.
1. Click on: to claim the activity
2. Click on: to enter the Process Request activity
Tsk_Ld_04_Process_Request Page 3 of 30
At any point, click the ? to access helpful hints and definitions for information on this screen.
This screen is primarily the same as it appears in the Review Data Received activity. The only features added are the Project Description and Basis of Request fields. The values input for each of these areas will be generated on the determination document. Additionally, selections made in these drop downs will automatically populate appropriate corresponding paragraphs within the Determination Document (such as the paragraph for fill placement and operation and maintenance of structures).
Select Levee if the request involves a levee, as this is used for tracking purposes. If Other is selected, it must be replaced with specific language on the Determination Document.
3. Click the Project Description dropdown box and select the appropriate option
The Add Project Description button must be clicked in order to save the information after each entry or data will not be saved.
4. Click on: to add the entry to the table
5. If applicable, enter additional project descriptions the same way.
Select Alluvial Fan Analysis if the request involves an alluvial fan, Update if the case is to correct a recently effective DFIRM or FIS Report, and Floodway if the revision involves a change to a floodway or establishment of a new floodway. These selections are used for tracking purposes.
6. Click the Basis of Request dropdown box and select the appropriate option
The Add Basis Request button must be clicked in order to save the information after each entry prior or data will not be saved.
7. Click on: to add the entry to the table
8. If applicable, enter additional basis of request the same way.
Tsk_Ld_04_Process_Request Page 4 of 30
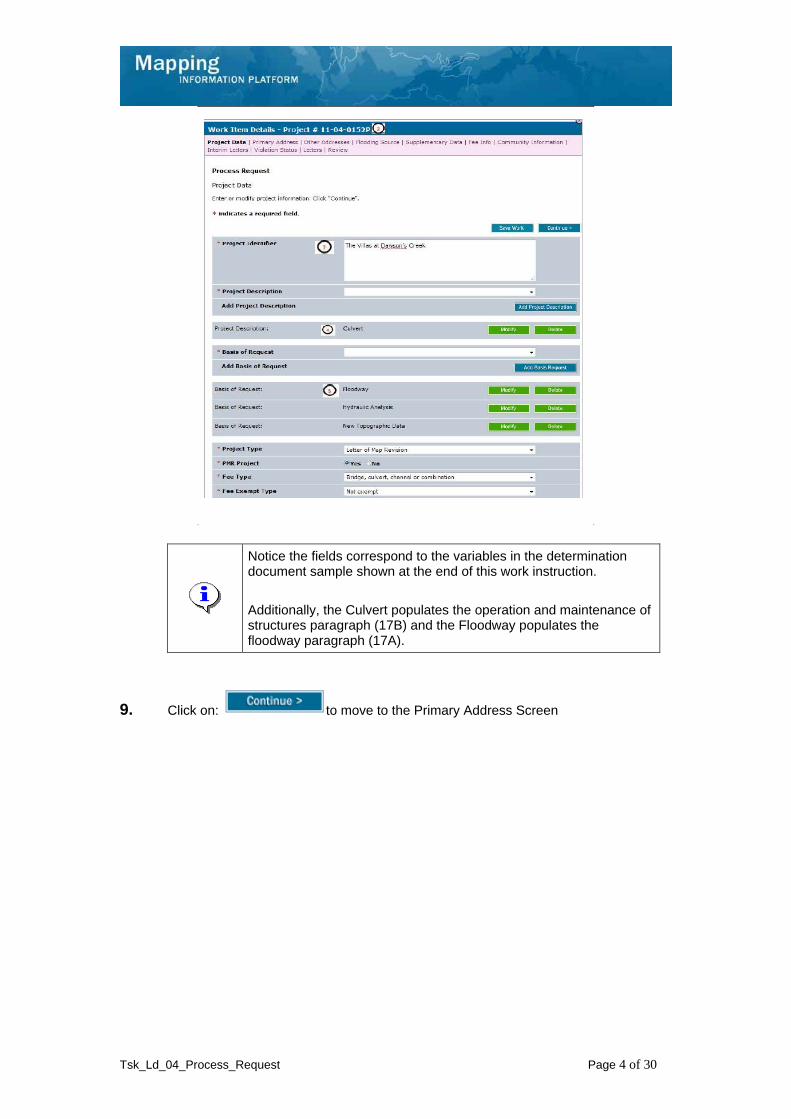
Notice the fields correspond to the variables in the determination document sample shown at the end of this work instruction.
Additionally, the Culvert populates the operation and maintenance of structures paragraph (17B) and the Floodway populates the floodway paragraph (17A).
9. Click on: to move to the Primary Address Screen
Tsk_Ld_04_Process_Request Page 5 of 30
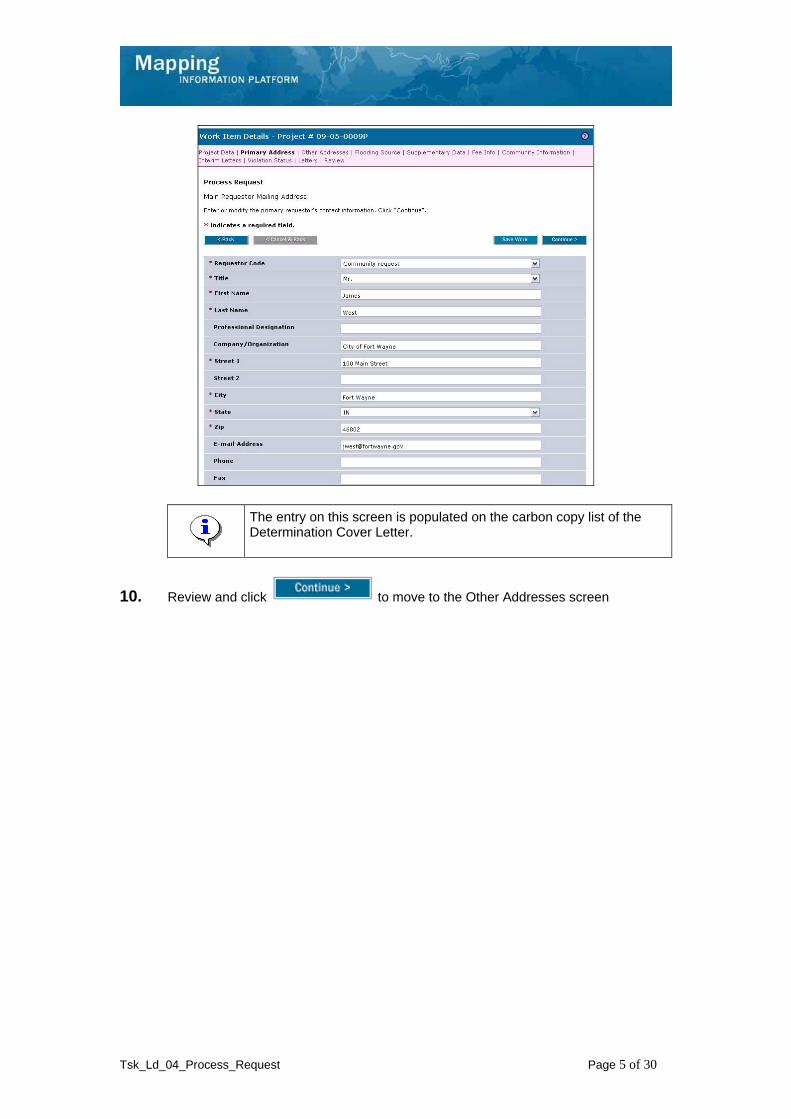
The entry on this screen is populated on the carbon copy list of the Determination Cover Letter.
10. Review and click to move to the Other Addresses screen
Tsk_Ld_04_Process_Request Page 6 of 30
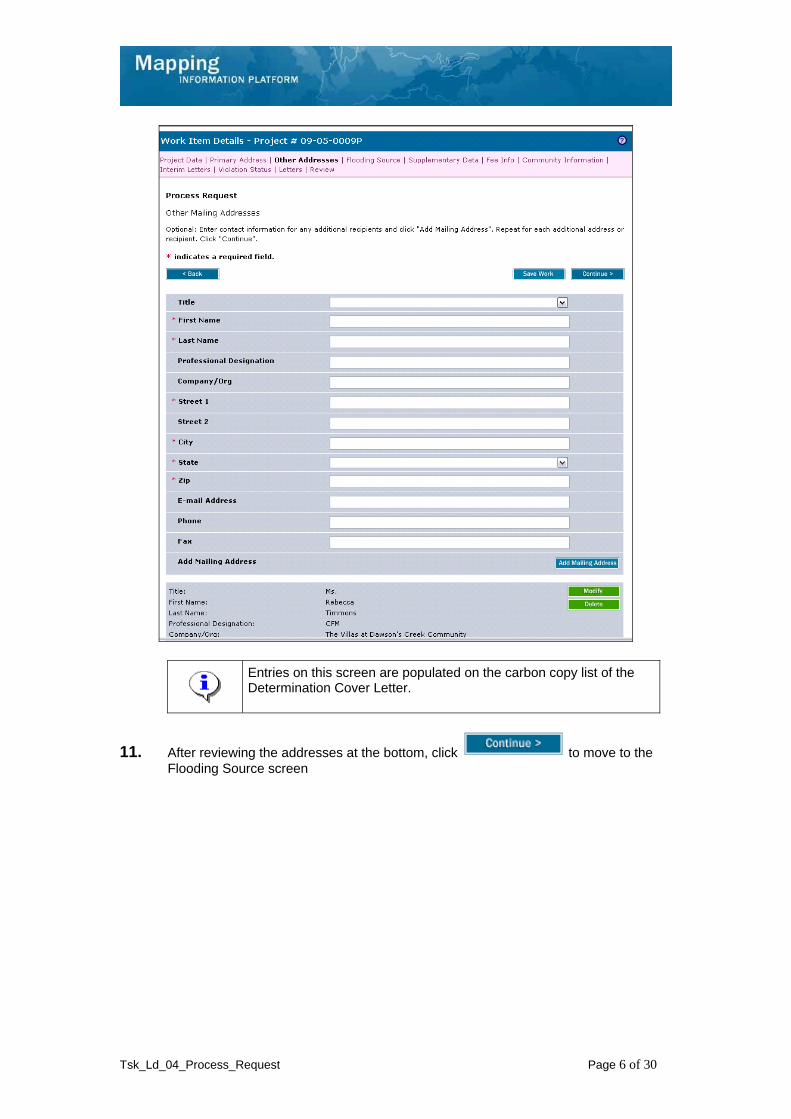
Entries on this screen are populated on the carbon copy list of the Determination Cover Letter.
11. After reviewing the addresses at the bottom, click to move to the Flooding Source screen
Tsk_Ld_04_Process_Request Page 7 of 30
The flooding source(s) information may have been entered by the Project Administrator when the project was created. The Task Lead should verify that the flooding source name was entered exactly as it appears on the FIRM, and modify if necessary. All flooding sources affecting the revision should be entered. If applicable, enter an additional Flooding Source and click the Add Flood Source button to add another field to the table.
12. Review and click to move to the Supplementary Data screen
Tsk_Ld_04_Process_Request Page 8 of 30
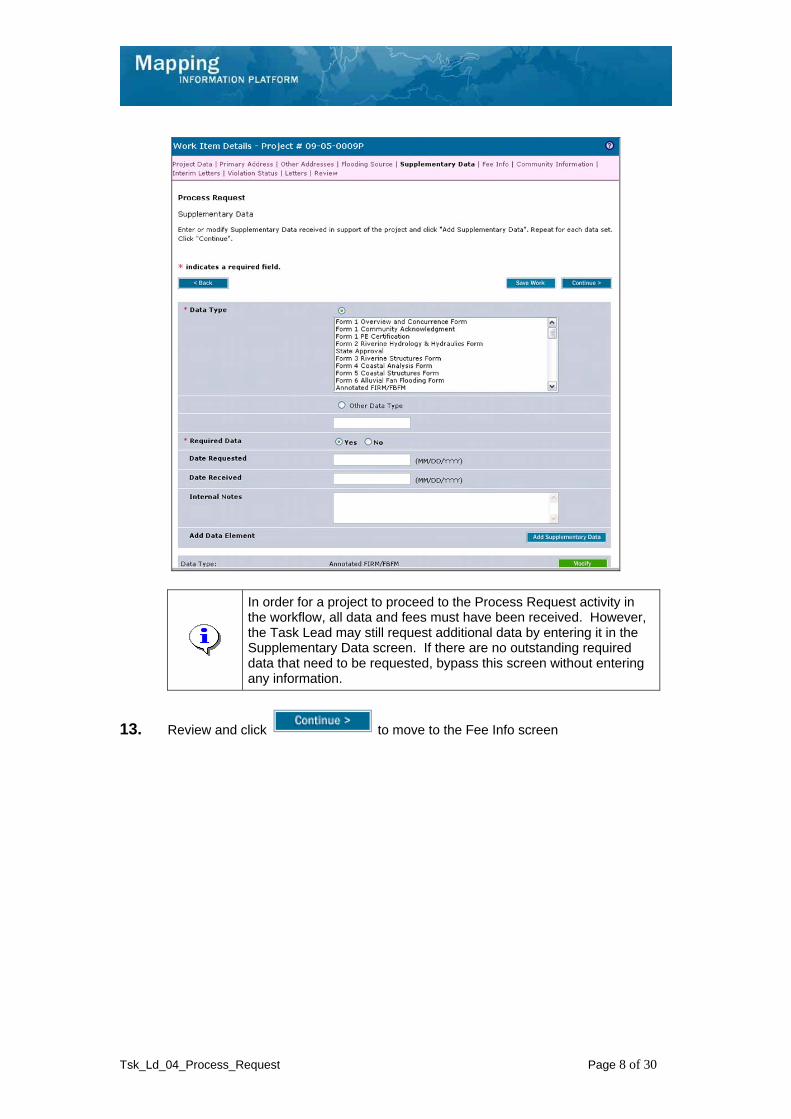
In order for a project to proceed to the Process Request activity in the workflow, all data and fees must have been received. However, the Task Lead may still request additional data by entering it in the Supplementary Data screen. If there are no outstanding required data that need to be requested, bypass this screen without entering any information.
13. Review and click to move to the Fee Info screen
Tsk_Ld_04_Process_Request Page 9 of 30
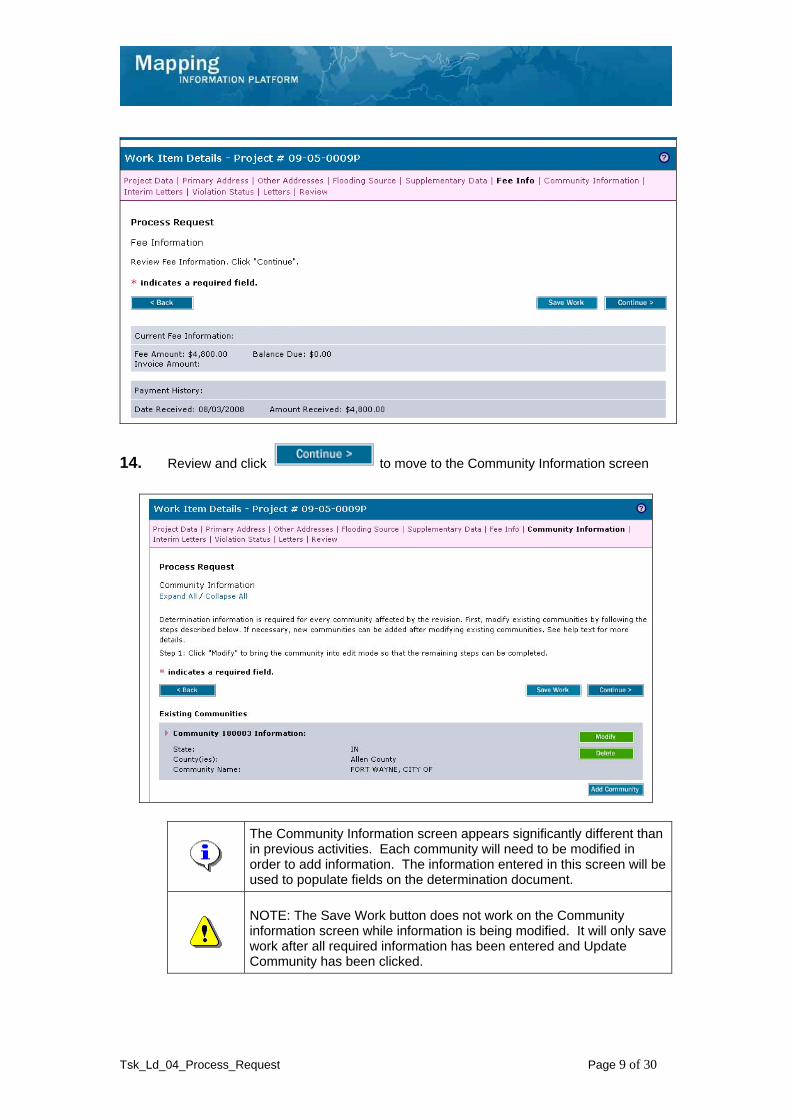
14. Review and click to move to the Community Information screen
The Community Information screen appears significantly different than in previous activities. Each community will need to be modified in order to add information. The information entered in this screen will be used to populate fields on the determination document.
NOTE: The Save Work button does not work on the Community information screen while information is being modified. It will only save work after all required information has been entered and Update Community has been clicked.
Tsk_Ld_04_Process_Request Page 10 of 30
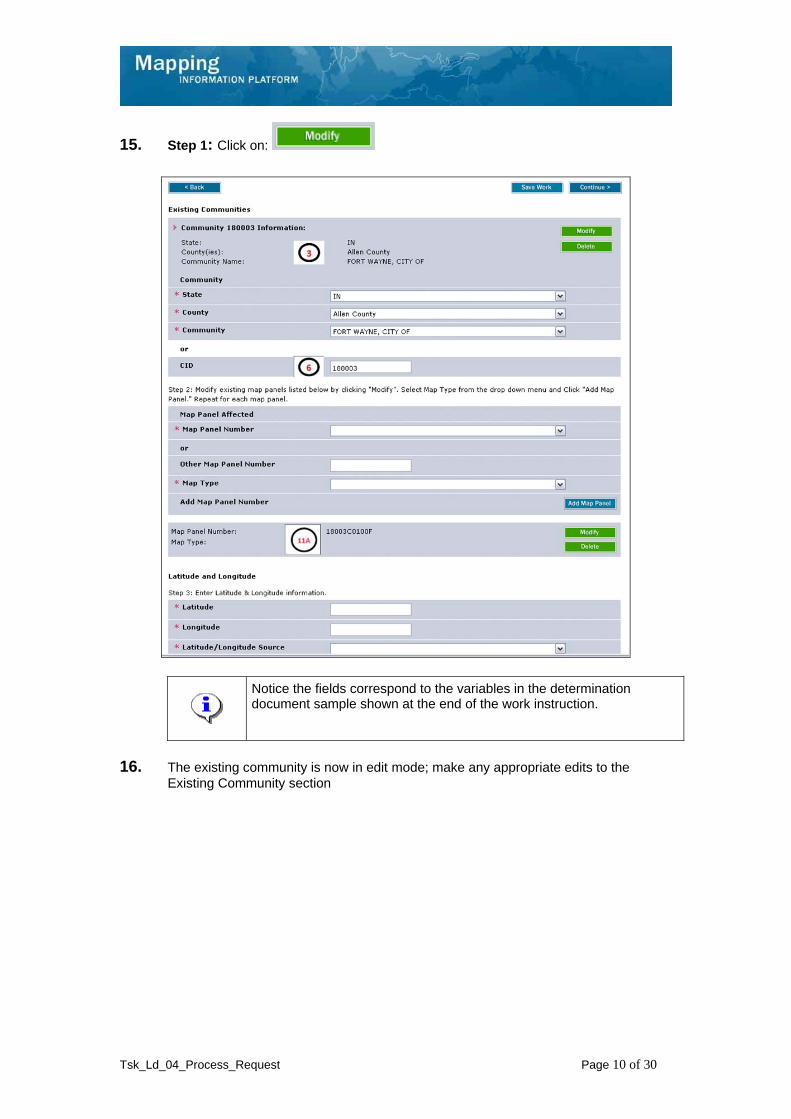
15. Step 1: Click on:
Notice the fields correspond to the variables in the determination document sample shown at the end of the work instruction.
16. The existing community is now in edit mode; make any appropriate edits to theExisting Community section
Tsk_Ld_04_Process_Request Page 11 of 30
Proceed to Step 2: Map Panel Affected
17. Click on: to add a Map Type to each existing map panel.
Tsk_Ld_04_Process_Request Page 12 of 30
Map Type Options:
FIRM - Flood Insurance Rate Map
FHBM - Flood Hazard Boundary Map
FBFM - Flood Boundary and Floodway Map
18. Click the Map Type dropdown box and select the appropriate option
The Add Map Panel button must be clicked in order to save the information after each entry or data will not be saved.
19. Click on: to add the entry to the table
Tsk_Ld_04_Process_Request Page 13 of 30
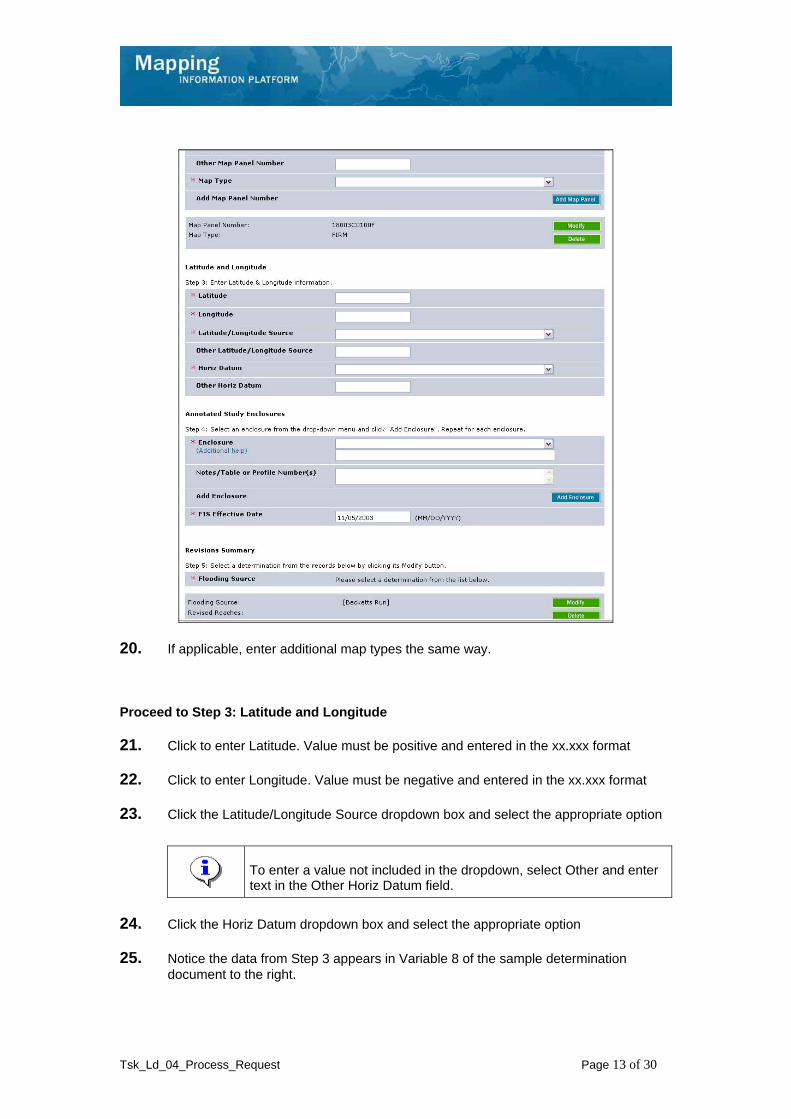
20. If applicable, enter additional map types the same way.
Proceed to Step 3: Latitude and Longitude
21. Click to enter Latitude. Value must be positive and entered in the xx.xxx format
22. Click to enter Longitude. Value must be negative and entered in the xx.xxx format
23. Click the Latitude/Longitude Source dropdown box and select the appropriate option
To enter a value not included in the dropdown, select Other and enter text in the Other Horiz Datum field.
24. Click the Horiz Datum dropdown box and select the appropriate option
25. Notice the data from Step 3 appears in Variable 8 of the sample determination document to the right.
Tsk_Ld_04_Process_Request Page 14 of 30
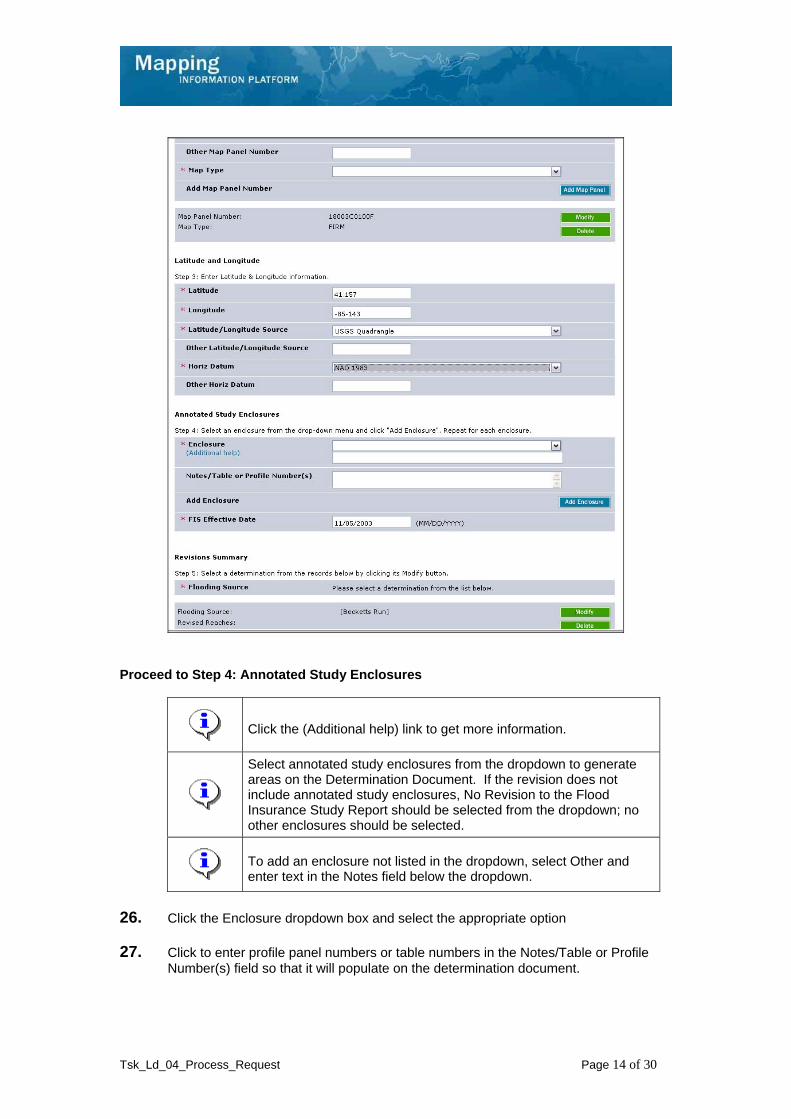
Proceed to Step 4: Annotated Study Enclosures
Click the (Additional help) link to get more information.
Select annotated study enclosures from the dropdown to generate areas on the Determination Document. If the revision does not include annotated study enclosures, No Revision to the Flood Insurance Study Report should be selected from the dropdown; no other enclosures should be selected.
To add an enclosure not listed in the dropdown, select Other and enter text in the Notes field below the dropdown.
26. Click the Enclosure dropdown box and select the appropriate option
27. Click to enter profile panel numbers or table numbers in the Notes/Table or Profile Number(s) field so that it will populate on the determination document.
Tsk_Ld_04_Process_Request Page 15 of 30
The Add Enclosure button must be clicked in order to save the information after each entry or data will not be saved.
28. Click on: to add the entry to the table
The entries inn the table correspond to Variable 11B of the sample determination document.
29. If applicable, enter additional enclosures the same way.
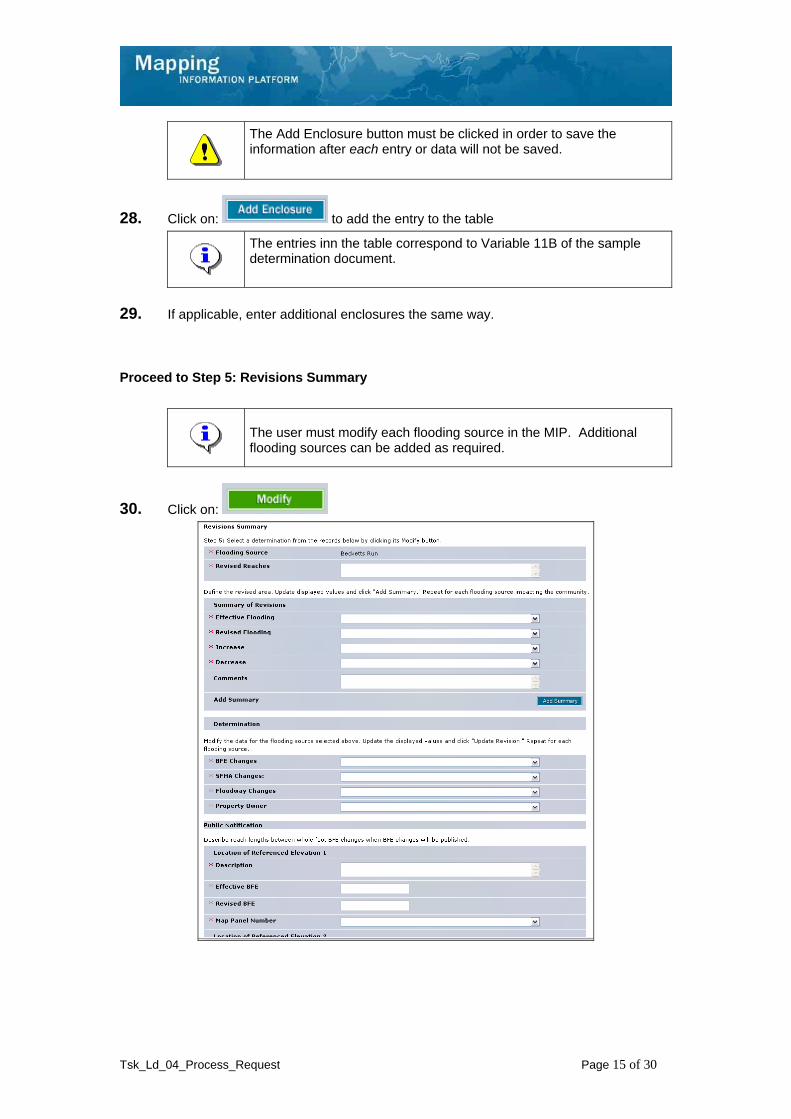
Proceed to Step 5: Revisions Summary
The user must modify each flooding source in the MIP. Additional flooding sources can be added as required.
30. Click on:
Tsk_Ld_04_Process_Request Page 16 of 30
Enter the extent of the revision along the flooding source for the entire revision (not community specific). This populates Variable 9 on the Determination Document.
31. Click to enter Revised Reaches. See the help text for examples.
32. Click the Effective Flooding dropdown box and select the appropriate option
33. Click the Revised Flooding dropdown box and select the appropriate option
34. Click the Increase dropdown box and select the appropriate option
35. Click the Decrease dropdown box and select the appropriate option
The Add Summary button must be clicked in order to save the information after each entry or data will not be saved.
36. Click on: to add the entry to the table
37. If applicable, enter additional summaries the same way.
Proceed to enter values for BFE Changes, SFHA Changes, Floodway Changes, and Property Owner Notification. These values determine the Letter Code (i.e. 102-D, 102-I-A-C, etc.) on the determination document. These values also determine the appropriate Paragraph 20 to be automatically populated on the last page of the determination document under the Public Notification section.
38. Click the BFE Changes dropdown box and select the appropriate option
39. Click the SFHA Changes dropdown box and select the appropriate option
40. Click the Floodway Changes dropdown box and select the appropriate option
41. Click the Property Owner dropdown box and select the appropriate option
Tsk_Ld_04_Process_Request Page 17 of 30
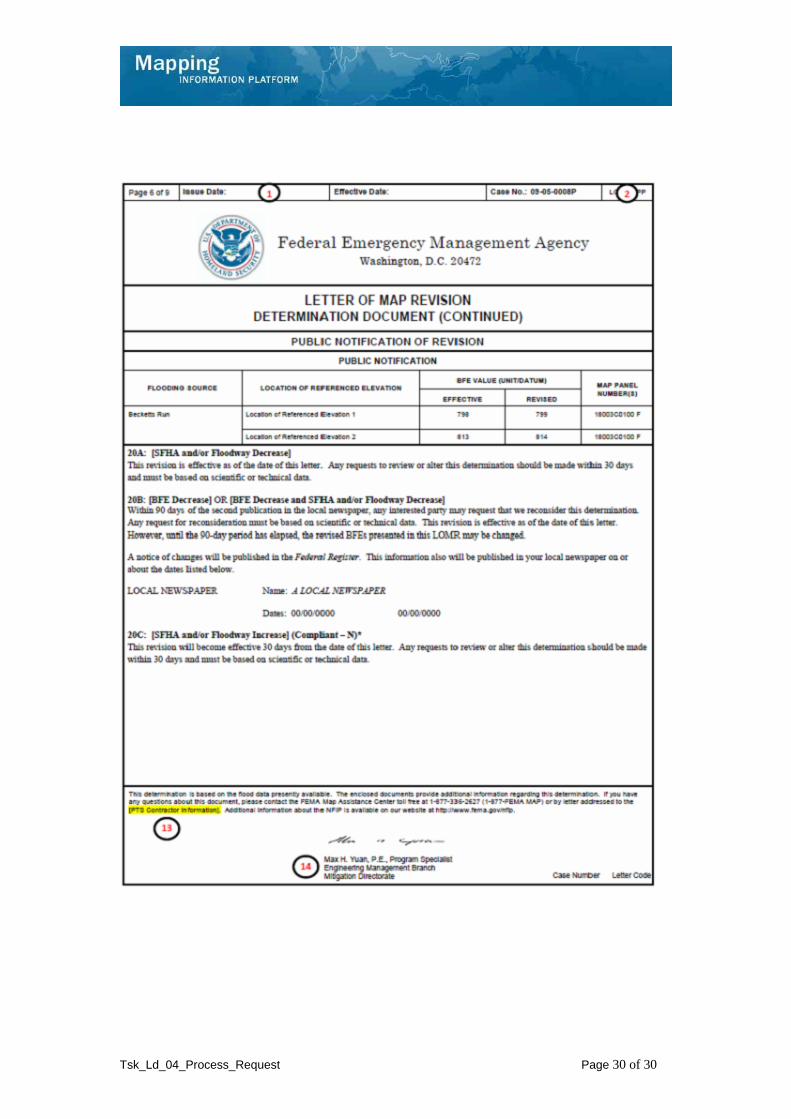
In the Public Notification section, enter values for Location of Referenced Elevation 1 (upstream BFE Location) and Location of Referenced Elevation 2 (downstream BFE Location). These locations are used for public notification of BFE changes.
A sample determination document with these fields filled in is available for reference at the end of this work instruction.
Data is required in the Public Notification section if any value other than Not Applicable or No Change was selected from the BFE Changes dropdown above.
42. Click to enter Description
If BFE changes are not applicable or do not change, only fill out the Unit/Datum and the BFE value fields.
43. Click to enter Effective BFE
Tsk_Ld_04_Process_Request Page 18 of 30
44. Click to enter Revised BFE
45. Click the Map Panel Number dropdown box and select the appropriate option
46. Click to enter Description
47. Click to enter Effective BFE
48. Click to enter Revised BFE
49. Click the Map Panel Number dropdown box and select the appropriate option
If the appropriate Unit/Datum is not in the dropdown list, select Other and enter information in the subsequent field.
50. Click the Unit/Datum dropdown box and select the appropriate option
If the appropriate BFE Value is not in the dropdown list, select Other and enter information in the subsequent field.
51. Click the BFE Value dropdown box to select the appropriate option
The Public Notification information appears in Variable 20 on the last page of the determination document.
A sample determination document with these fields filled in is available for reference at the end of this work instruction.
52. Click on: to save the entry to the table
53. If additional Flooding Sources existed, the follow the same steps to update the information.
Tsk_Ld_04_Process_Request Page 19 of 30
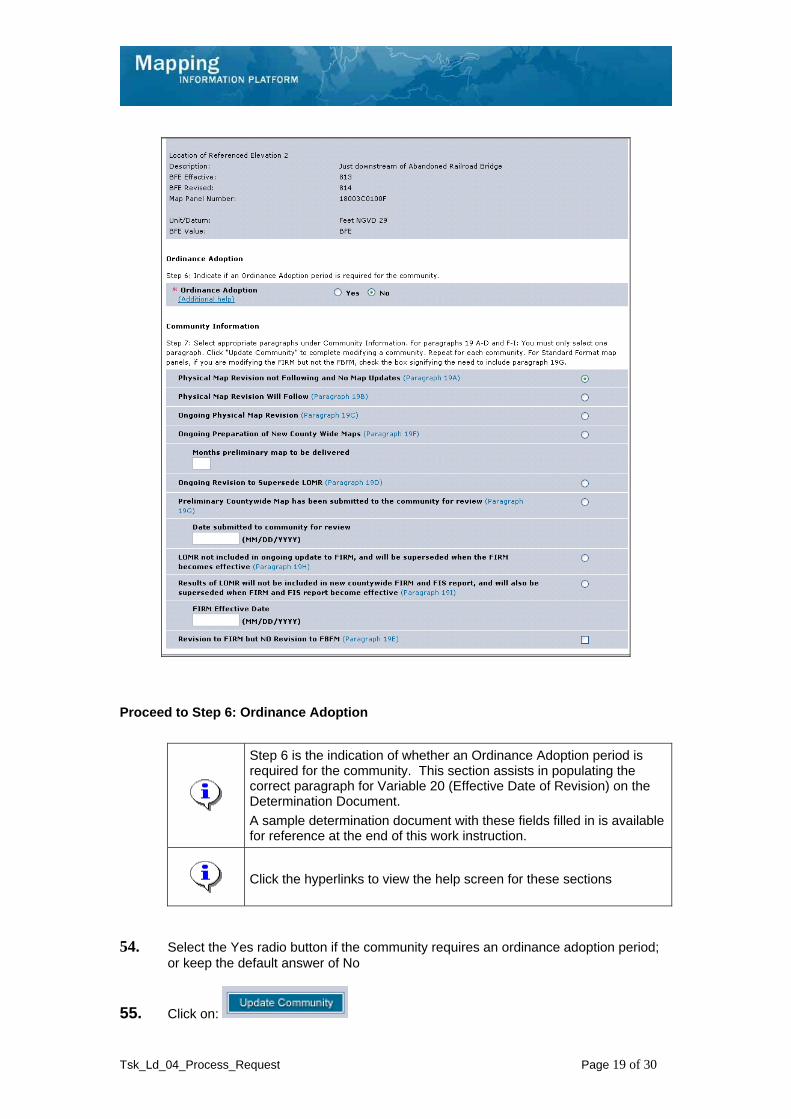
Proceed to Step 6: Ordinance Adoption
Step 6 is the indication of whether an Ordinance Adoption period is required for the community. This section assists in populating the correct paragraph for Variable 20 (Effective Date of Revision) on the Determination Document.
A sample determination document with these fields filled in is available for reference at the end of this work instruction.
Click the hyperlinks to view the help screen for these sections
54. Select the Yes radio button if the community requires an ordinance adoption period;
or keep the default answer of No
55. Click on:
Tsk_Ld_04_Process_Request Page 20 of 30
Proceed to Step 7: Community Information
For paragraphs 19 A-D and F-I: You must only select one paragraph.
Note the hyperlinks also provide help text information on this section.
56. Select appropriate paragraphs under Community Information.
57. Click on: to update the community table
58. If applicable, click Modify for any additional communities to complete the same 7 steps.
At this point, save the work and go to Reports and Form Letters to print the Revisions Cover Letter and Revisions Determination Document.
59. Click the Reports & Form Letters tab
Tsk_Ld_04_Process_Request Page 21 of 30
60. Click the Select Report Category dropdown box and select Form Letters
61. Click the Select Report Name dropdown box and select Revision Cover Letter
62. Click to enter Project Number
If the Task Lead has multiple communities, enter the Community ID to print a report for each community.
63. Click on:
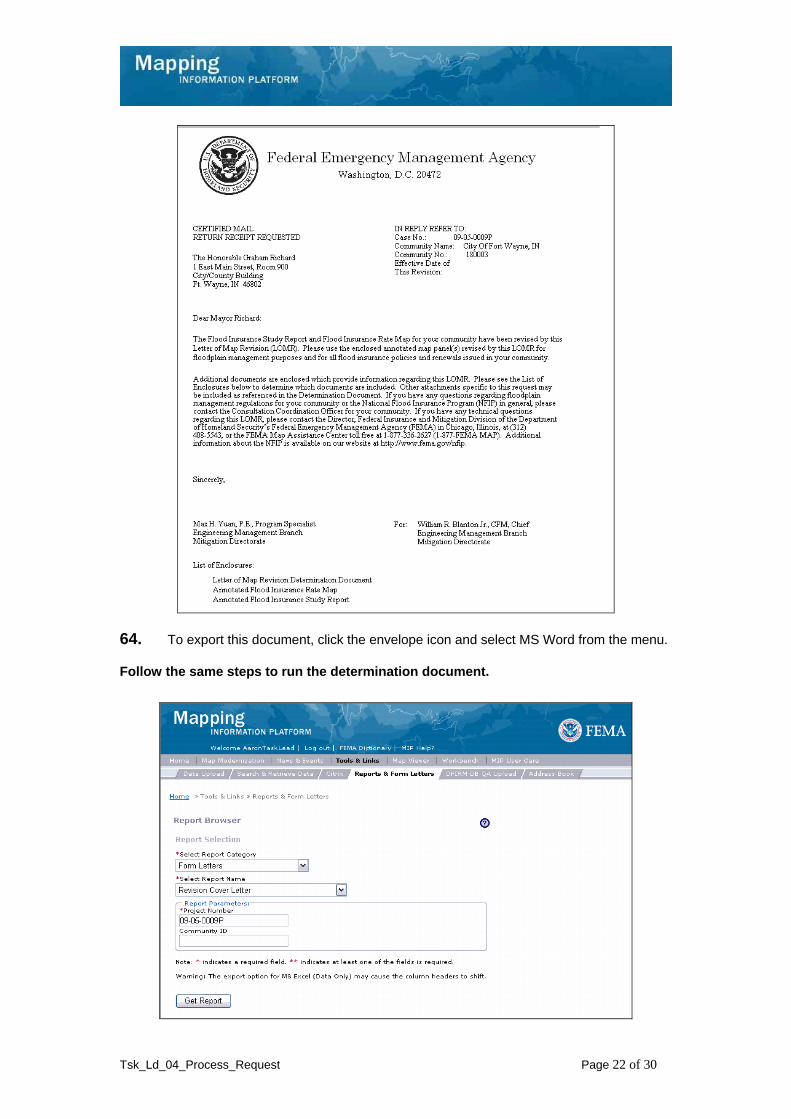
A new window opens with the document.
Tsk_Ld_04_Process_Request Page 22 of 30
64. To export this document, click the envelope icon and select MS Word from the menu.
Follow the same steps to run the determination document.
Tsk_Ld_04_Process_Request Page 23 of 30
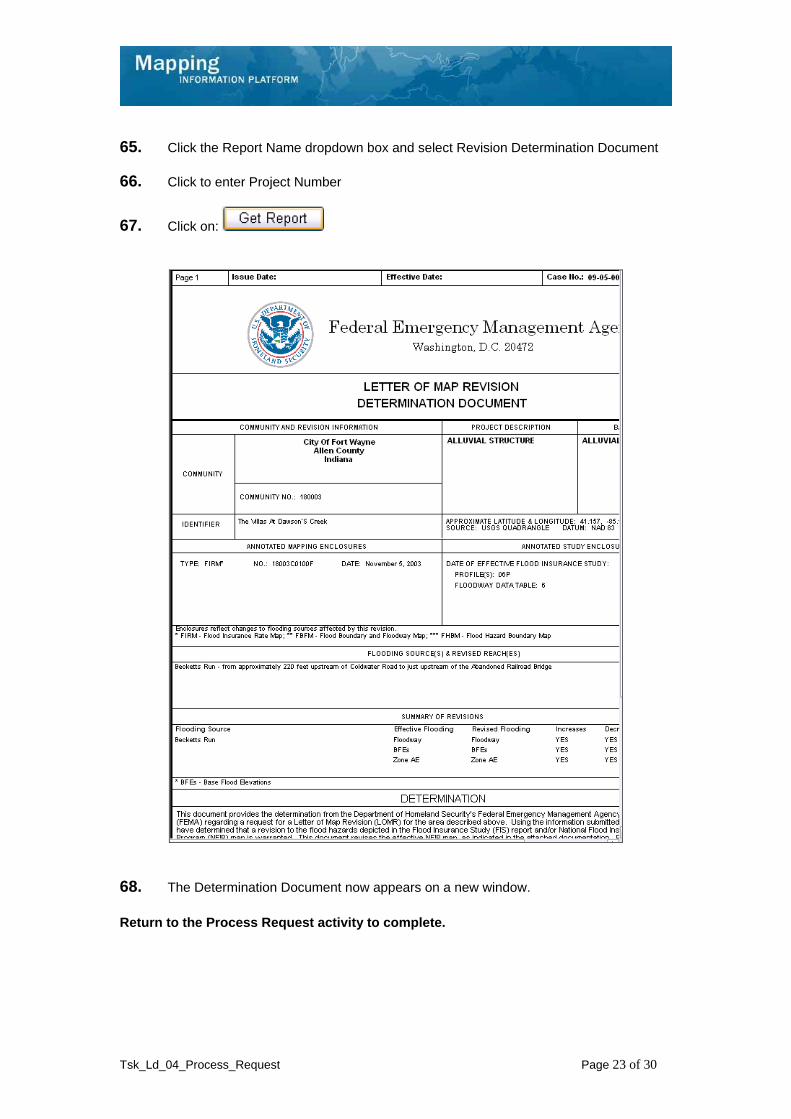
65. Click the Report Name dropdown box and select Revision Determination Document
66. Click to enter Project Number
67. Click on:
68. The Determination Document now appears on a new window.
Return to the Process Request activity to complete.
Tsk_Ld_04_Process_Request Page 24 of 30
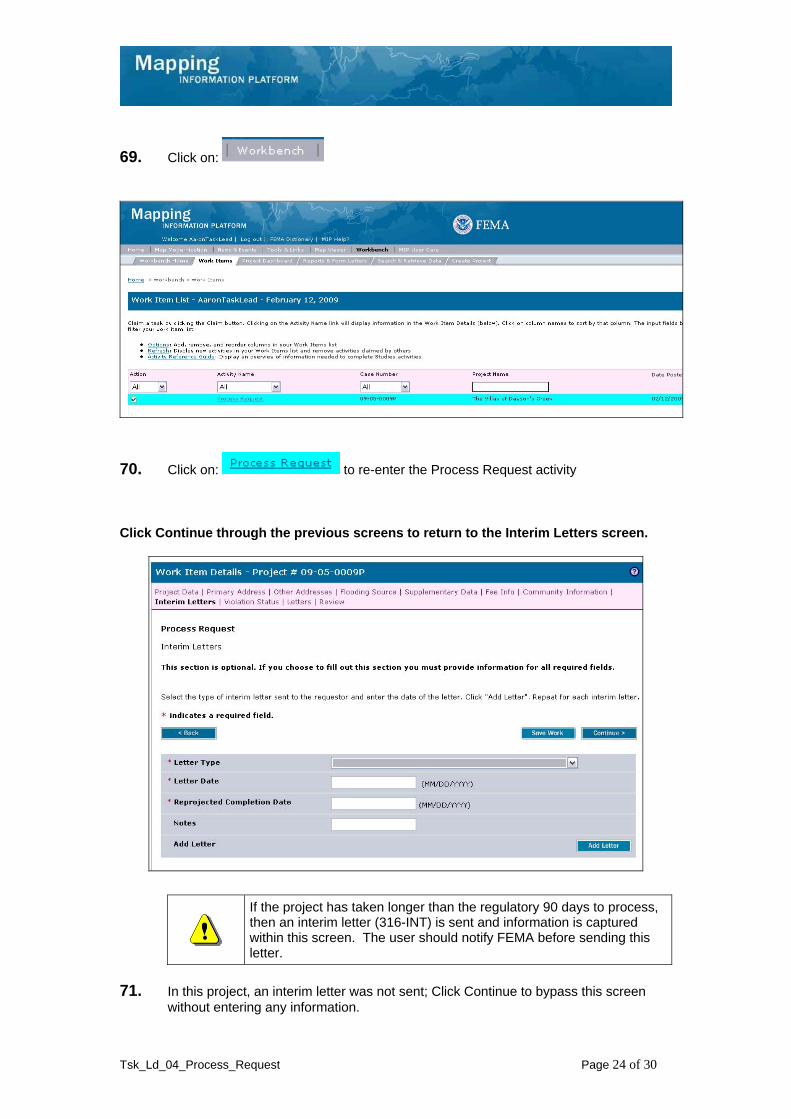
69. Click on:
70. Click on: to re-enter the Process Request activity
Click Continue through the previous screens to return to the Interim Letters screen.
If the project has taken longer than the regulatory 90 days to process, then an interim letter (316-INT) is sent and information is captured within this screen. The user should notify FEMA before sending this letter.
71. In this project, an interim letter was not sent; Click Continue to bypass this screen without entering any information.
Tsk_Ld_04_Process_Request Page 25 of 30
This screen can be bypassed with the default value of No violation selected in the drop down.
If the project has a violation, select the violation type from the dropdown box.
72. Click on: to move to the Letters screen
If no additional data was requested in the Supplementary Data module and determination information was entered in the Community Information module, then Determination letter to FEMA should be selected as the Letter Type within this module.
Tsk_Ld_04_Process_Request Page 26 of 30
Letter Types:
Request Additional Data - Corresponds to a 316-AD. Letter to requester for CLOMR and LOMR; requests additional information to process request
Request Additional Data Due to Incomplete Data - Corresponds to a 316-AD/INC. Letter to requester for CLOMR and LOMR; informs requester that additional data submitted are incomplete and restates remaining required items
Request Additional Fee - Corresponds to a 316-FEE. Letter to requester for non-fee-exempt request for CLOMR and LOMR; acknowledges receipt of request and informs requester of additional fee required to process request
Determination Letter to FEMA - Corresponds to a LOMR or CLOMR.
Violation Letter to FEMA - Corresponds to Violation Transmittal. Transmittal form used to send violation memo to community and letter to FEMA for signature.
Special Response Letter to FEMA - Corresponds to a BADL or other Special Response Letter. Best Available Data Letter (BADL) issued when technical data is reviewed and accepted, but LOMR/PMR cannot be issued; technical data may be used by community for floodplain management purposes.
Denial Letter to FEMA - A special letter used when the requested changes are not incorporated by a LOMR or when proposed changes as part of a CLOMR do not meet NFIP Regulations and are not accepted by FEMA
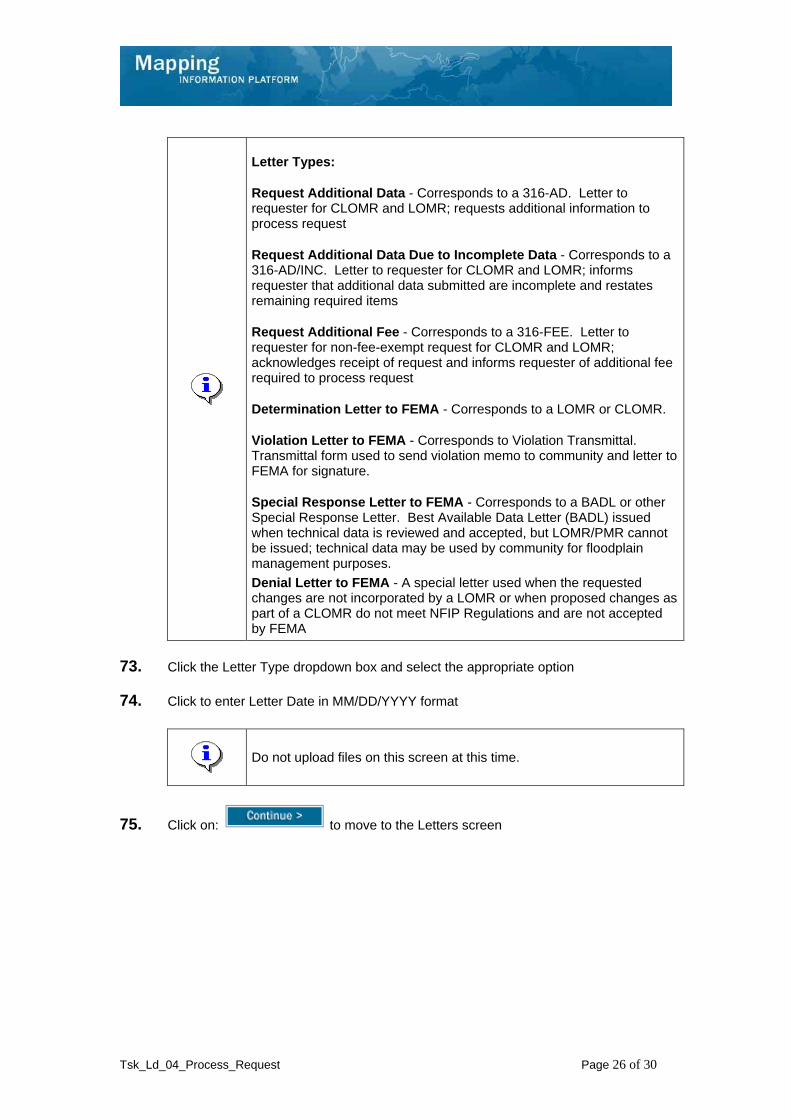
73. Click the Letter Type dropdown box and select the appropriate option
74. Click to enter Letter Date in MM/DD/YYYY format
Do not upload files on this screen at this time.
75. Click on: to move to the Letters screen
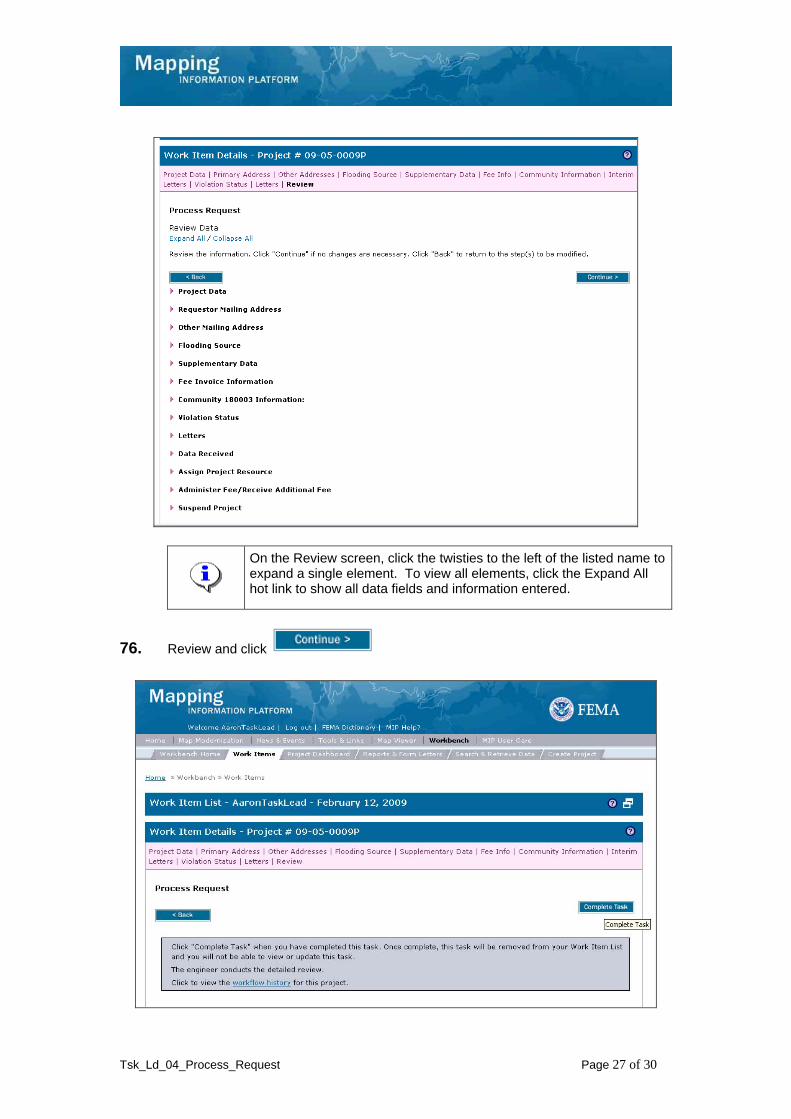
Tsk_Ld_04_Process_Request Page 27 of 30
On the Review screen, click the twisties to the left of the listed name to expand a single element. To view all elements, click the Expand All hot link to show all data fields and information entered.
76. Review and click
Tsk_Ld_04_Process_Request Page 28 of 30
Once you click Complete Task you cannot return to this task. Confirm all information is correct before clicking the Complete Task button. Click the Back button to make any changes to previous screens.
77. Click on: to complete activity
Results
The activity is now complete. The next activity is Audit Determination conducted by the Audit Lead. Other possible activities, depending on whether additional data or fees were requested, are Receive Additional Data for the Task Lead or Receive Additional Fee for the Fee Administrator.
Last updated: February 2015
Tsk_Ld_04_Process_Request Page 29 of 30
Example pages from a Determination Document. This screen includes the sections of the determination document, as referenced in the steps above.