Workbook for Beginning Digital SLR Photography Presented by Silicon Valley Images Instructor: Paul Dileanis, Photographer www.svimages.com Content copyright 2012 Paul Dileanis – All rights reserved. Not to be reproduced without written consent from the author.
Transcript
Workbook for
Beginning Digital SLR Photography Presented by Silicon Valley Images
Instructor: Paul Dileanis, Photographer www.svimages.com
Content copyright 2012 Paul Dileanis – All rights reserved. Not to be reproduced without written consent from the author.
“You don't take a photograph, you makeit.” Ansel Adams
“It [photography] is my one recreation and I think it should be done well.” - Lewis Carroll, Author of “Alice in Wonderland”
Photography today is a demanding field requiring an artistic eye, a solid understanding of photographic technique and the flexibility to adapt to the challenges of digital photography. The basics of photography haven’t changed since the first permanent image was created in 1826. We are still using a light tight box containing a light sensitive material with a lens and other means to control the exposure. The challenge we have today is all of the added features, some well thought out and some added at the behest of marketing departments. Many of the tasks, such as color and calibration, we once relegated to the engineers at Kodak and to our processing labs with little or no control over the final image. Today your camera is a portable computer with the ability to alter many image characteristics in the camera itself. You have the choice of shooting in the factory default settings or exercising more precise control over the color, exposure and other parameters. This workbook and the accompanying exercises will help familiarize you with the most important controls and features of your DSLR. By understanding how these controls work and learning the basics of photography you will be well on the way to learning how your camera “sees”. This knowledge will help you improve your photography and aid in developing your photographic vision. Paul Dileanis Silicon Valley Images
Page 1
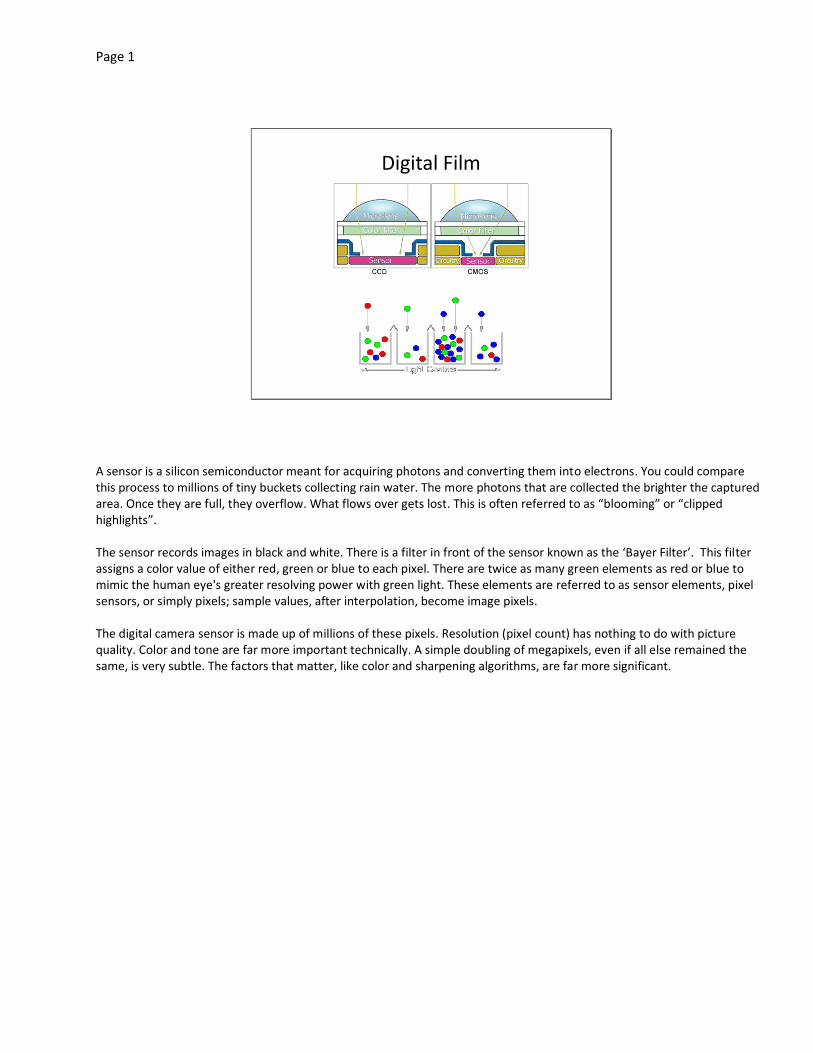
Digital Film
A sensor is a silicon semiconductor meant for acquiring photons and converting them into electrons. You could compare this process to millions of tiny buckets collecting rain water. The more photons that are collected the brighter the captured area. Once they are full, they overflow. What flows over gets lost. This is often referred to as “blooming” or “clipped highlights”. The sensor records images in black and white. There is a filter in front of the sensor known as the ‘Bayer Filter’. This filter assigns a color value of either red, green or blue to each pixel. There are twice as many green elements as red or blue to mimic the human eye's greater resolving power with green light. These elements are referred to as sensor elements, pixel sensors, or simply pixels; sample values, after interpolation, become image pixels. The digital camera sensor is made up of millions of these pixels. Resolution (pixel count) has nothing to do with picture quality. Color and tone are far more important technically. A simple doubling of megapixels, even if all else remained the same, is very subtle. The factors that matter, like color and sharpening algorithms, are far more significant.
Page 2
File Types & Sizes
2 Primary File Types
– JPEG
• Most commonly available and used
• Easiest to process
– RAW
• Most post-production control
• Requires conversion to jpeg to use
JPEG (Joint Photographic Experts Group) Your camera is set, by default, to save photographs using the JPEG file format. The JPEG file format is useful for making prints, e-mailing, and for websites. JPEG files are compressed. Contrast, color, saturation and sharpening information is thrown away to make the file smaller. You can select different levels of quality, based on how much compression is implemented.
Highest quality (Fine 1:4) – Best quality
Medium quality (Normal 1:8)
Low Quality (Basic 1:16) RAW - Contains the raw data as it comes off the sensor before in-camera processing. The advantages to shooting RAW are:
Flexible White Balance
High Bit (color) Depth
Dynamic Range
Exposure Compensation
Enhanced Sharpening
Exercise:
1. Locate the image quality settings on your camera. 2. What choices are available to you? 3. Set your camera on the highest quality jpeg setting (Large/Fine).
Tip: Always keep your camera on the highest quality setting it supports. You might not be considering making
large prints of your work right now, but what if you took a once in a lifetime photograph that you wanted to
proudly display in the largest size possible? It is much easier and efficient to downsize an image than to make
it larger.
Page 3
White Balance
At its simplest - the reason we adjust white balance is to get the colors in your images as accurate as possible.
Light SourcesColor Temperature in
K
Clear Blue Sky 10,000 to 15,000
Overcast Sky 6,000 to 8,000
Noon Sun and Clear
Sky 6,500
Midday Sun
Electronic Flash 5,400 to 6,000
Sunrise, Sunset 3,500
Household Lighting 2,500 to 3,000
Candle Flame 1,200 to 1,500
Understanding digital white balance can help you avoid color casts created by your camera's AWB, thereby improving your photos under a wider range of lighting conditions. When learning photography it is important to be aware of the color of light. Through a process known as chromatic adaptation the human eye automatically adjusts to the color quality of light. When our eyes see an object such as a white wall or white piece of paper the brain automatically assigns it the value of white. Like our eyes, a digital camera needs to find a reference point which represents white. It will then calculate all the other colors based on this white point. For instance, if a halogen light illuminates a white wall, the wall will have a yellow cast in your photograph, when in fact it should be white. So if the camera knows the wall is supposed to be white, it will then determine all the other colors in the scene accordingly. White balance is expressed in terms of color temperature. Low color temperature implies warmer (more yellow/red) light while high color temperature implies a colder (more blue) light. AWB (automatic white balance) is the default setting and the one you should use most of the time. Daylight, shade, cloud, flash and tungsten are all fixed settings that you can use under the appropriate lighting conditions. Have a look at the chart to understand what they do. Basically they are like the old filters that users of film would screw onto the front of their lenses to compensate for different color temperatures. The advantage of using these fixed settings as opposed to the AWB is that a predominance of one color in your scene will not cause the camera to give a false reading.
Exercise: 1. Locate the White Balance settings on your camera. 2. Take a photograph of a white card using each of the following settings: AWB, daylight, shade, cloudy, tungsten and
fluorescent. Note the color shift from image to image. 3. Photograph the same scene with the camera set at AWB with and without a colored filter in front of the lens.
Repeat the same photograph with the camera set in the daylight white balance setting with and without the colored filter. Compare the images. How does AWB affect the filtered image?
Tip: If you photograph a sunset using the AWB setting, the camera will decrease the intensity of the oranges and reds in the photograph. Set the white balance on the sun icon (daylight) to retain the color of sunsets. Tip: Try photographing a night landscape just after dusk with different white balance settings. A daylight setting at night will give the photo warm tones if most of your light source comes from tungsten lights. For street lights and other common scenic light sources, try a tungsten or fluorescent setting for a more natural look to the light. Mixed light sources (a sunset sky with fluorescent lights in the foreground, for example) can give some really interesting looks to your shot.
Page 4
Picture Style/Control
Canon
Nikon
Camera manufacturers provide a number of preset picture styles enabling you to take pictures in the color tones best suited to each subject.
Choose a picture style just as you would a film type to create exactly the image you want.
If you shoot jpeg it is important to set the picture style in advance. Choose neutral for the most post process control.
Neutral - Delivers images that are closest to the actual original scene. Neutral reproduces the subject’s unique colors and gradations with maximum authenticity. Landscape - Subjects are recorded in rich detail, giving the greatest latitude for image processing. Using this mode enhances the vibrancy and liveliness of landscapes, nature and even city street scenes. Standard - Gives you standard, balanced images with no inconsistencies in the strength of the subject’s sharpening, contrast, brightness, saturation and coloration. Portrait - Imparts a more natural look to skin. Skin tones project a real sense of depth as if shot with professional-quality film with a clear, authentic finish. Monochrome - Gives you monochromatic shading, such as black-and-white or sepia.
Exercise:
1. Locate the Picture Styles/Picture Control or equivalent function on your camera. 2. Take a photograph of the same scene in each of the different modes. Print out or compare each of
these images on your computer. 3. Take a photograph of a person in the standard setting and in the portrait setting. Print out or compare
each of these images on your computer. 4. Take a photograph of a scene in the monochrome mode. Locate the detail settings and increase the
contrast. Decrease the contrast setting and repeat. What effect does this have on the histogram? Tip: The details (contrast, saturation, sharpness and hue) of each of these settings can be changed in most DSLR cameras.
If you prefer more sharpness, less contrast and a warmer image you can change the factory settings to create your own custom picture styles.
Page 5
Exposure Modes
• Auto, Program and Manual
• Give you creative control over how the image is captured
• Can be found on the control dials of some cameras or accessed through a menu on others
• Scene modes have factory optimized settings for different subjects and scenes (landscape, portrait, macro, sports, etc.)
The exposure mode dial is the creative heart of your camera. These modes allow the user to control functions such as exposure compensation, ISO, flash mode or white balance.
Letter Does This
M You have to set both the lens opening and the shutter speed.
A or Av You set the lens opening, and the camera sets the shutter speed.
S or Tv You set the shutter speed, and the camera sets the lens opening.
P (Program) The cameras sets both the lens opening and the shutter speed.
Auto (Often green colored word or icon)
The Auto exposure mode sets every setting on the camera to factory defaults, and then selects both the lens opening and shutter speed.
Icons on the Dial - Scene modes have factory optimized settings for different subjects and lighting conditions.
Icon Good For
Face Portrait mode widens the aperture to throw the background out of focus. The camera may recognize and focus on a human face. Defaults to the portrait picture style for better skin tones.
Mountain Landscape mode uses a small aperture to gain depth of field. Defaults to the landscape picture style for more saturated blues and greens along with higher contrast to give your images more punch.
Flower Close-ups or Macro; Optimizes camera settings for use with a macro lens.
Jogger Action or sport mode increases ISO and uses a fast shutter speed to capture action.
Figure with a crescent moon or a star
Night portrait mode uses an exposure long enough to capture background detail, with fill-in flash to illuminate a nearby subject.
Other scene modes found on many cameras include fireworks, snow, natural light, night landscape, beach and video
mode.
Page 6
Sensitivity or ISO
• ISO is the number that
indicates how sensitive the
sensor is to light
•A low ISO produces the most detailed images. Use outdoors, in brightly lit environments or with a tripod. •Use ISO 400 to 800 for extra sensitivity with little image degradation •Use ISO 1600 and above for low light photography without flash or for stopping action. (Very high image noise). How to Chose ISO When choosing the ISO setting I generally ask myself the following four questions:
1. Light - Is the subject well lit? If yes, use a low ISO setting for best quality. 2. Tripod - Will I be using a tripod? Use a low ISO with a tripod for best image quality in low light. 3. Moving - Is my subject moving or stationary? Using a higher ISO allows for a faster shutter speed to freeze the
action. 4. Grain – How much will noise or lack of detail affect the final image? A sharp image with noise will be more
acceptable than a blurred image with no noise. Exercise:
1. Locate the ISO settings on your camera. What is the lowest ISO your camera is capable of? What is the highest ISO?
2. With your camera in the program (P) mode take a photograph using the following ISO settings: 100, 400, 1600, and 3200. While you are taking the photographs pay attention to the aperture and shutter speed settings. What changes do you notice as the ISO is increased?
3. Review your images. Can you see a difference in the quality of the images? Look for noise in the shadow areas of the image. You may need to view these later on your computer’s monitor to really see the differences.
Page 7
Aperture Priority (Av)
When using aperture priority mode, you select the aperture and the camera will automatically select the
shutter speed to maintain proper exposure.
Use this mode when you want to control depth of field
Digital SLR cameras have a aperture-priority mode setting (A or Av). With the aperture-priority exposure mode, you select the lens opening, and the camera selects the shutter speed. The aperture or f-stop of a photographic lens can be adjusted to control the amount of light reaching the film or image sensor. In combination with variation of shutter speed, the aperture size will regulate the image sensor's degree of exposure to light. Typically, a fast shutter speed will require a larger aperture to ensure sufficient light exposure, and a slow shutter speed will require a smaller aperture to avoid excessive exposure. In addition to controlling the exposure, the aperture is a valuable composition tool since it can control depth-of-field.
Depth-of-field refers to the range of distance that appears acceptably sharp. It varies depending on camera type, aperture, lens and focusing distance. When you focus on your subject that is where the focus is the sharpest. However, there is a zone in front and behind the subject that's acceptably sharp. This acceptably sharp zone is the depth-of-field. By choosing the lens opening, you are in control of choosing the optimum setting. Set the lens opening to its maximum aperture (smallest f number such as f/3.5 or f/5.6) on your lens for least depth-of-field. If there's enough light, set the lens opening to its minimum opening (largest f number such as f/22 or f/29) for the most depth-of-field. Warning: Keep an eye on the shutter speed when you use the aperture priority mode. Low ISO and/or small apertures (such as f/22) will sometimes result in slow shutter speeds requiring either use of a tripod or increasing the ISO sufficiently to allow hand holding the camera. Definition – Bokeh: In photography bokeh means the blur or the aesthetic quality of the blur in out-of-focus areas of an image. Bokeh has been defined as "the way the lens renders out-of-focus points of light". Differences in lens aberrations and aperture shape cause some lens designs to blur the image in a way that is pleasing to the eye, while others produce blurring that is unpleasant or distracting—"good" and "bad" bokeh, respectively. Bokeh occurs for parts of the scene that lie outside the depth of field. Photographers sometimes deliberately use a shallow focus technique to create images with prominent out-of-focus regions. The term comes from the Japanese word boke which means "blur" or "haze“.
Page 8
Exercise: Depth of Field (DOF) This exercise will help you understand how to use the aperture priority mode (Av) on your camera to achieve the desired DOF. A tripod is recommended for this exercise. Set your camera to Av and do the following;
1. Find a scene with interesting subjects at many distances from you. Photograph the scene with different apertures (in the Av mode the camera will keep the photo exposed correctly by changing shutter speed). Look to see the difference in the depth of field in each image.
2. Find a small subject that stands against a background a few meters away, like a flower. Try adjusting the aperture to isolate the subject from the background with depth of field.
3. Find a view. Try and photograph a vista with something in the foreground, such as a rock at a lookout. Try and adjust the aperture to keep the whole photo in focus.
TIP: If you're creating portraits, and you want to blur the backgrounds even more, use a 50mm f/1.4 or a 50mm f/1.8 lens. These lenses are commonly referred to as “Portrait” lenses because of the natural perspective and ability to control depth-of-field for selective focus.
Lens Focal Length = 35mm Focus Distance = 10 feet
Aperture (f-stop) Near Focus Distance Far Focus Distance Hyperfocal distance
4 8.45 12.4 53
5.6 7.93 13.7 37.5
8 7.30 16.1 26.6
11 6.56 21.4 18.8
16 5.73 40.2 13.3
22 4.87 Infinity∞ 9.46
50 MM Lens 200 MM Lens
Page 9
Shutter Speed
•Shutter speed is the amount of time or duration that the shutter remains open to allow light to fall on the sensor
•A fast shutter speed will freeze the action
•A slow shutter speed can be used to intentionally blur motion
With shutter priority the user selects the shutter speed and the camera determines the correct aperture. Use this mode when you want to control motion by freezing action or to blur moving objects in order to create a sense of motion. Shutter priority with longer exposures is chosen to create an impression of motion. For example, a waterfall will appear blurred and fuzzy. If the camera is panned with a moving subject, the background will appear blurred. When photographing sports or high-speed phenomena, shutter priority with short exposures can ensure that the motion is effectively frozen in the resulting image. Keep in mind that as the camera chooses different apertures it will impact the Depth of Field in your image. This means if you choose a fast shutter speed to freeze your fast moving object that it’ll have a narrower DOF. WARNING: You will not always be able to use the speed you want. In low light, even the widest lens aperture may only allow a shutter speed of 1/30sec or 1/60sec. If you try to set a faster speed, the lens aperture value in the viewfinder will start to blink, warning that the image will be underexposed. TIP: A shutter speed of 1/60 of a second or longer requires the use of a camera support or Image Stabilization. Exercise: Learning to avoid camera shake and to control motion are critical skills. The following exercises will help you understand how to use the Shutter priority (Sv or Tv) function on your camera. Start by setting your camera to the shutter priority mode and the ISO to 200 then do the following: 1. (No tripod) Choose a static subject, turn off the image stabilization and set the shutter speed to 1/100 sec. (the camera
will automatically adjust the f-stop in this mode to keep the image exposed correctly). Take your first photo. Check the image to make sure it is sharp and there is no camera movement. Next take several more images changing the shutter speed to 1/50, 1/25, 1/15 and 1/8. Compare your images. As the shutter speed gets slower look for camera movement (blur) in the images. Now repeat the exercise with the image stabilization turned on. With the IS are you able to handhold the camera at a slower shutter speed with no image blur?
2. (Tripod optional) Find a moving or active subject. Beginning with 1/25 second exposure take a series of images increasing the shutter speed 2x with each exposure (1/25, 1/50/, 1/100/, 1/200 etc.) until you are able to freeze the action.
3. (Tripod required) Find a subject such as a small waterfall, fountain or even leaves on a windy day. Set the camera on a tripod, focus on the subject and experiment with slow shutter speeds to achieve motion blur. Start with a shutter speed of 1/200 second (or higher if you like), then decrease the shutter speed by half (1/200, 1/100, 1/50, 1/25 etc.) with each consecutive exposure. To achieve slow shutter speeds of ½ second or longer you may need to lower the ISO to 100 or less, choose a subject in the shade , or use a neutral density filter.
Page 10
THE EXPOSURE TRIANGLEHow light is captured is determined by the
combination of ISO, Aperture and Shutter Speed:
1. ISO - The sensitivity level of the digital sensor.
2. APERTURE - The amount of light coming in through the lens.
3. SHUTTER SPEED - The length of time the sensor is exposed to the light coming in through the lens.
What is exposure? Exposure refers to how bright or dark your photo is due to the amount of light that is recorded by your camera sensor. A properly exposed photo should (normally) resemble the brightness of the original scene. A poorly exposed photo will either be too dark or too bright and may contain areas that are so dark or bright that they contain no detail (know as blown out). So how can we control the exposure of a photo? That is where the exposure triangle comes in. What is the exposure triangle? The exposure triangle is a useful way of describing the relationship between the three aspects of exposure. Each corner of the triangle represents one of the three variables: aperture, shutter speed and ISO. Adjusting just one of these will make the photo darker or brighter and will change the appearance of the photo based on what you have changed. For example, using a longer shutter speed will introduce motion blur to your photo but also make the photo brighter (increased exposure) due to more light hitting the sensor. The easiest way to understand it is to see the picture. F stops and EV A stop, also referred to as EV (Exposure Value) is a term that photographers use to describe a quantity of light. Plus one EV doubles the amount of light in an exposure and minus one EV cuts the amount of light in the exposure by half. You can adjust the amount of light recorded using any of the corners of the exposure triangle. ISO 100 will record 1 stop (EV) less light than ISO 200, a shutter speed of 1/125 will record 1 stop (EV) more light than 1/250 and finally an aperture of f/5.6 will record one stop (EV) less light than f/4. What this means is that you can achieve the same brightness of photo with different combinations of settings 1/60, f/11, ISO 200 and 1/1000, f/2.8, ISO 200 will both achieve the same brightness of photo but the depth of field will be different as will the ability to stop motion.
Exercise: Exposure The purpose of this exercise is to familiarize you with the relationship between ISO, Aperture (f-stop) and shutter speed. Equivalent exposures – Set the camera to the “manual” mode. Set the ISO to 100. Use the built in meter to set the aperture and shutter speed for the correct exposure. Once you have the exposure set correctly (check your histogram) make the following changes and adjust the exposure to achieve an equivalent exposure to the first. Check your new exposure against the meter and the histogram: 4. Change the ISO to 400, change the aperture (f-stop) to adjust the exposure. 5. Change the ISO to 800, change the shutter speed to achieve the equivalent exposure. 6. Change the ISO to 200, change both the aperture and the shutter speed to achieve the equivalent exposure.
Page 11
Camera meters are color blind. They see everything in shades of grey – from black to white and every shade in between. Halfway between white and black is middle grey. Middle grey reflects 18% of light.
Matrix (evaluative) Metering - Is a complex metering system whereby a scene is split up into a series of zones. Overall exposure is based on evaluating each zone individually and taking an average of the total light readings. After
the light is measured, the camera determines the best exposure. Matrix metering is effective for scenes and subjects that have even lighting.
Center-Weighted Metering - Exposure metering is averaged over the entire frame with emphasis placed on the central area. Center-weighted metering is used when it is important to have the central portion of the scene
properly exposed.
Spot Metering - Spot metering covers just under four percent of the viewfinder area. It takes a precise exposure reading only at the very center of the frame and disregards the rest. A spot meter is used when there are extremes
in the brightness of a scene (high contrast scenes), such as when a subject is back lit or has bright light on it and the background is dark.
Partial Metering - Partial metering is similar to spot metering but covers a larger area of the viewfinder, about 13.5 percent. It is useful for taking portrait photos when the subject is back lit. Partial metering is also often used when a
scene has bright or dark areas around the edges of a subject. Underexposure is minimized by metering on the main subject in a scene.
The Auto Exposure Lock (AEL) freezes the camera’s exposure settings so that if the subject is moved within the frame the camera’s auto exposure won’t change the aperture or shutter speed values. There are many situations where this may be of value to a photographer. For example, a photographer taking a portrait may want to place the subject off center. By locking the exposure (along with the focus) the image can be recomposed and the exposure won’t shift if the background is lighter or darker.
Exercise: 1. Set the camera to the ‘P’ (program) mode. Select ISO 200 and take a photograph of a white card and one of a
black card. Fill the entire frame with the card and try not to get any shadows on it. Compare the images. Does the white appear white? Does the black appear black?
2. Next overlap the 2 cards and make an exposure that is half white and half black. Look at the image. Does the white appear white? Does the black appear black?
3. Pose a subject against a light or dark background. Set the camera in the program mode, turn off the auto focus and select the Evaluative (matrix) metering mode. Focus on the subject and recompose, placing the subject off center in the frame and take a photograph. Now, set the camera meter to partial or spot. Locate the AEL feature on your camera. Place the center focusing point over the subject and lock the exposure. Focus on the subject and recompose, placing the subject off center in the frame and take a photograph. Compare the 2 images.
Page 12
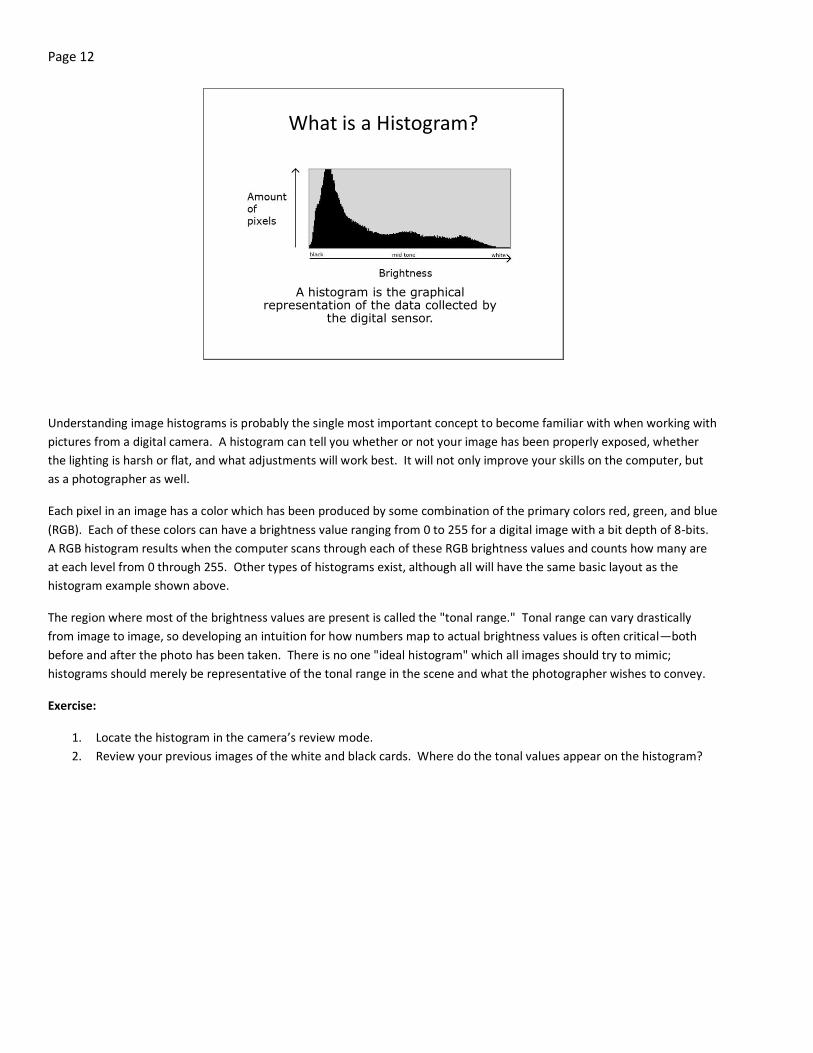
What is a Histogram?
A histogram is the graphical representation of the data collected by
the digital sensor.
Understanding image histograms is probably the single most important concept to become familiar with when working with
pictures from a digital camera. A histogram can tell you whether or not your image has been properly exposed, whether
the lighting is harsh or flat, and what adjustments will work best. It will not only improve your skills on the computer, but
as a photographer as well.
Each pixel in an image has a color which has been produced by some combination of the primary colors red, green, and blue
(RGB). Each of these colors can have a brightness value ranging from 0 to 255 for a digital image with a bit depth of 8-bits.
A RGB histogram results when the computer scans through each of these RGB brightness values and counts how many are
at each level from 0 through 255. Other types of histograms exist, although all will have the same basic layout as the
histogram example shown above.
The region where most of the brightness values are present is called the "tonal range." Tonal range can vary drastically
from image to image, so developing an intuition for how numbers map to actual brightness values is often critical—both
before and after the photo has been taken. There is no one "ideal histogram" which all images should try to mimic;
histograms should merely be representative of the tonal range in the scene and what the photographer wishes to convey.
Exercise:
1. Locate the histogram in the camera’s review mode.
2. Review your previous images of the white and black cards. Where do the tonal values appear on the histogram?
Page 13
Metering Tools
-1 EV
under exposed
0 EV correct +1 EV
over exposed
Exposure Compensation
Allows you to make your image brighter or darker
Most digital cameras are better at reproducing low key scenes since they prevent any region from becoming so bright that
it turns into solid white, regardless of how dark the rest of the image might become as a result. High key scenes, on the
other hand, often produce images which are significantly underexposed. Fortunately, underexposure is usually more
forgiving than overexposure (although this compromises your signal to noise ratio). Detail can never be recovered when a
region becomes so overexposed that it becomes solid white. When this occurs the highlights are said to be "clipped" or
"blown.“
Before the photo has been taken, it is useful to assess whether or not your subject matter qualifies as high or low key. Since cameras measure reflected as opposed to incident light, they are unable to assess the absolute brightness of their subject. As a result, many cameras contain sophisticated algorithms which try to circumvent this limitation, and estimate how bright an image should be. These estimates frequently result in an image whose average brightness is placed in the midtones. However, high and low key scenes frequently require the photographer to manually adjust the exposure, relative to what the camera would do automatically. A good rule of thumb is that you will need to manually adjust the exposure whenever you want the average brightness in your image to appear brighter or darker than the midtones.
Bracketing – It is often useful to bracket your exposures by taking one image with exposure compensation set to ‘0’, one
image with the exposure compensation set to ‘+1’ and another with the Exposure compensation set to ‘-1’. You can then
evaluate the images later on your computer and decide which image represents the scene you were trying to capture.
Many cameras have a feature called auto exposure bracketing. In this mode your camera will automatically take 3, 5 or 7
images at different exposures by holding the shutter release down.
Exercise: 1. Retake the images of the White card with the exposure compensation set to +2. Does the card now appear more
white? What happens to the histogram?
2. Retake the image of the black card with the exposure compensation set to -2. Does the card now appear black?
What happens to the histogram in this image?
3. Use the exposure compensation on your camera to make three exposures of a single scene. The first should be at
the 0 setting, the second at the -2 setting and the third at the +2 setting. What affect does this have on the
histogram?
4. With the camera set in program or aperture priority take a photograph of a backlit subject with no exposure
compensation. Set the exposure compensation to +1 and retake the photograph. How does this affect the
histogram? What change do you notice in the shadows? What about the highlights?
5. Locate the auto exposure bracketing (AEB or Bkt) mode on your camera. How many images will your camera
allow? Take a series of images in this mode. Remember to turn this mode off when you are finished.
Page 14
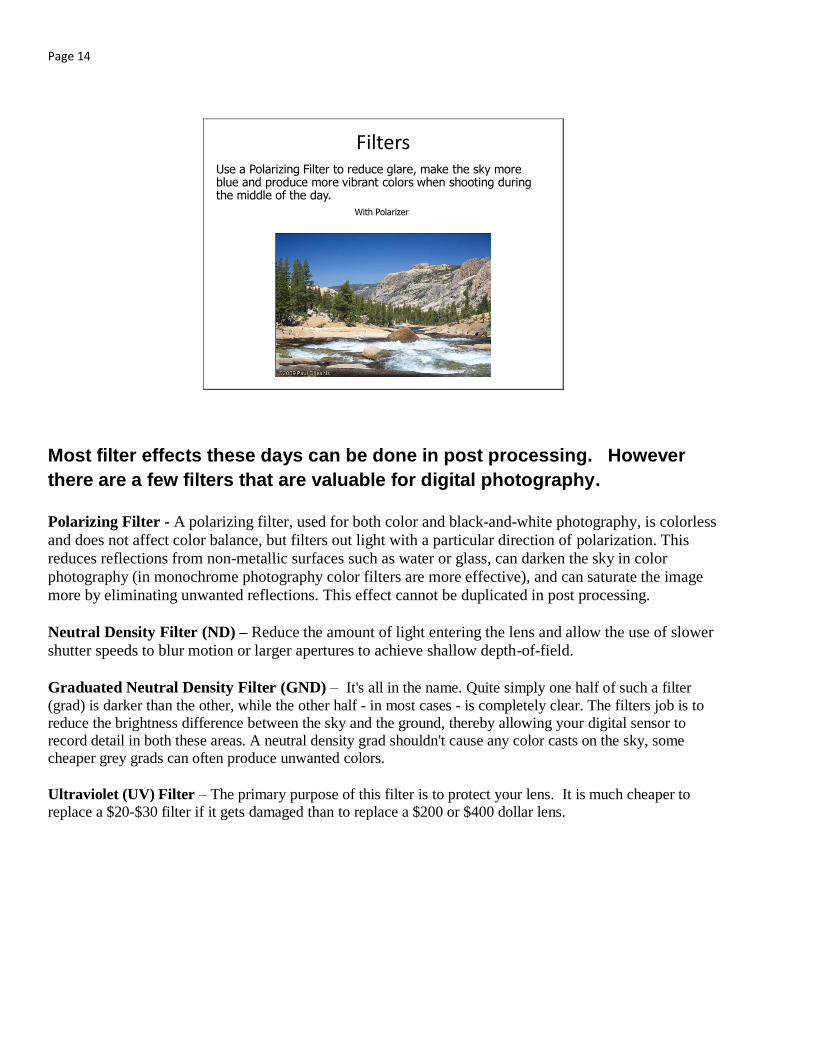
FiltersUse a Polarizing Filter to reduce glare, make the sky more blue and produce more vibrant colors when shooting during the middle of the day.
With Polarizer
Most filter effects these days can be done in post processing. However
there are a few filters that are valuable for digital photography.
Polarizing Filter - A polarizing filter, used for both color and black-and-white photography, is colorless
and does not affect color balance, but filters out light with a particular direction of polarization. This
reduces reflections from non-metallic surfaces such as water or glass, can darken the sky in color
photography (in monochrome photography color filters are more effective), and can saturate the image
more by eliminating unwanted reflections. This effect cannot be duplicated in post processing.
Neutral Density Filter (ND) – Reduce the amount of light entering the lens and allow the use of slower
shutter speeds to blur motion or larger apertures to achieve shallow depth-of-field.
Graduated Neutral Density Filter (GND) – It's all in the name. Quite simply one half of such a filter
(grad) is darker than the other, while the other half - in most cases - is completely clear. The filters job is to
reduce the brightness difference between the sky and the ground, thereby allowing your digital sensor to
record detail in both these areas. A neutral density grad shouldn't cause any color casts on the sky, some
cheaper grey grads can often produce unwanted colors.
Ultraviolet (UV) Filter – The primary purpose of this filter is to protect your lens. It is much cheaper to
replace a $20-$30 filter if it gets damaged than to replace a $200 or $400 dollar lens.
Page 15
Composition
A photographic composition is the arrangement of visual elements and as such is the product of a
photographer's vision
When you take a photograph you do so for a reason. Consciously or unconsciously you have chosen a subject or a point of interest. Using various principles of composition allows you to organize everything within the frame so:
Your intended subject is emphasized.
You attract the viewer’s attention.
You keep them interested in the photograph. The following are some guidelines for improving the composition of your photographs:
1. Rule of thirds - Divide the frame into 9 equal parts with 2 evenly spaced horizontal lines and 2 evenly
spaced vertical lines. Place important and/or strong elements, such as your subject and the horizon
along these lines and/or at the intersection of the lines.
2. Framing - Framing your subject in a doorway, window, branches or other available element is another
way to center your viewer’s attention on the subject and create balance.
3. Leading Lines - Lines direct attention and lead the viewer’s eyes through the image to the subject or
other important elements. Straight lines lead the eyes faster than curved lines because they are more
direct. Curved lines are more flowing and graceful and will lead the viewer’s eyes more slowly around
the composition.
4. Balance - Balance implies that the visual elements within the frame have a sense of weight. Large
objects generally weigh more than small objects and dark objects weigh more than light colored objects.
The position of the elements is also critical. We unconsciously assume the center of a picture
corresponds to a fulcrum. A heavy weight on one side can be balanced by a lighter weight on the other
side if the lighter weight is located at a greater distance from the fulcrum. Another way to achieve
balance is through symmetry. Reflections of the landscape in still water are an example of almost
perfect symmetry. Reflections can take on an abstract quality that resembles a Rorschach inkblot used in
a psychological testing.
5. Simplicity - Simplicity is often the key to making a strong composition because it can help draw attention
to your subject.
Page 16
See as the camera sees…
Photographs are a 2-dimensional, still medium, and the camera cannot capture all of the tones your eyes can see
Mastering Composition: Student Exercises Rule of thirds, framing, lines, and balance all work to draw the viewer’s attention to your subject in an interesting way. Create a photograph using each of the composition elements mentioned below:
1. Rule of thirds 2. Framing 3. Leading Lines 4. Balance 5. Simplicity
Try combining more than one of the above elements in your image to create a more dynamic photograph. Remember to ask yourself the following while you are composing the image:
1. Why do I want to photograph what I see? 2. What is my subject or main point of interest? 3. How can I emphasize it? 4. Are there leading lines in the composition, and where do they lead my eyes? 5. Are there distracting elements at the edges or in the foreground and background? 6. What is the brightest point within the frame, and where is the most contrast? 7. How can I control exposure to emphasize the subject or mood of the image?