Page 1
Lesson A3–16
Working with Galvanized Pipe
Unit A. Mechanical Systems and Technology
Problem Area 3. Construction Systems
Lesson 16. Working with Galvanized Pipe
New Mexico Content Standard:
Pathway Strand: Power, Structural and Technical Systems
Standard: VIII: Plan, implement, manage, and/or provide support services to facility
design and construction; equipment design, manufacture, repair, and service; and agri-
cultural technology.
Benchmark: VIII-B: Follow architectural and mechanical plans to construct building and
facilities.
Performance Standard: 1. Identify and select appropriate building materials. 2. Install
plumbing equipment and fixtures.
Student Learning Objectives. Instruction in this lesson should result in students
achieving the following objectives:
1. Describe how to select and purchase fittings and pipe.
2. Describe how to measure, mark, cut, ream, thread, and join pipe.
New Mexico Agricultural Mechanics and Technology Lesson Plan Library
Unit A. Problem Area 3. Lesson 16. Page 1.
Page 2
List of Resources. The following resources may be useful in teaching this lesson:
Recommended Resources. One of the following resources should be selected to accompany the
lesson:
Black & Decker. The Complete Guide to Home Plumbing. Minnetonka, Minnesota:Creative Publishing, 1998.
Burkybile, Carl. Designing, Installing, Maintaining, and Repairing Plumbing Systems.University of Illinois: Information Technology & Communication Systems(U3056).
Herren, Ray V., and Elmer L. Cooper. Agricultural Mechanics Fundamentals &Applications. Albany, New York: Delmar Publishers, 2002. (Textbook, Chapter35)
Hogan, Elizabeth L. Basic Plumbing Illustrated. Menlo Park, California: Sunset Pub-lishing Corp., 1992.
Phipps, Lloyd J., et al. Introduction to Agricultural Mechanics, Second Edition. UpperSaddle River, New Jersey: Prentice Hall Interstate, 2004. (Textbook, Chapter 16)
Other Resources. The following resources will be useful to students and teachers:
Burke, Stanley R., and T.J. Wakeman. Modern Agricultural Mechanics. Danville,
Illinois: Interstate Publishers, Inc., 1992. (Textbook, Chapter 16)
List of Equipment, Tools, Supplies, and Facilities
Writing surface
Overhead projector
Transparencies from attached masters
Copies of student lab sheet
Galvanized pipe and fittings
Terms. The following terms are presented in this lesson (shown in bold italics):
Coupling
Drainage fittings
Galvanized pipe
Pipe cap
Pipe elbows
Pipe nipples
Pipe plug
Pipe tees
Power hacksaw
Pressure fittings
Reaming
New Mexico Agricultural Mechanics and Technology Lesson Plan Library
Unit A. Problem Area 3. Lesson 16. Page 2.
Page 3
Reducing bushing
Reducing tee
Street ells
Union
Wheel type pipe cutter
Interest Approach. Use an interest approach that will prepare the students for the les-
son. Teachers often develop approaches for their unique class and student situations. A possible
approach is included here.
Show galvanized pipe and fittings along with the tools needed to measure, mark, cut, thread, and join the
pipe. Determine the skill level of your students in these areas. Use the experienced students to assist in
teaching the skills to the other students.
Summary of Content and Teaching Strategies
Objective 1: Describe how to select and purchase fittings and pipe.
Anticipated Problem: What galvanized pipe and fittings are available?
I. Steel and wrought iron are terms used interchangeably to refer to either black or galvanized
pipe. Galvanized pipe is a zinc coated pipe that can be used for water supply and DWV lines
and is less likely to rust and corrode than black pipe. Black pipe is recommended for oil, air,
and gas lines.
A. Steel pipe is sold in three grades: standard, extra strong, and double extra strong. Stan-
dard weight, suitable for most plumbing, comes in 21 foot lengths. The size of the pipe is
designated by its inside diameter. The actual inside diameter of a pipe, however, is
slightly larger than its nominal or designated size. For example, ¾ inch pipe measures
slightly more than ¾ inch in diameter. The most common sizes of iron pipe are 3/8, ½, ¾,
1, 1¼, 1½, and 2 inches.
B. Iron pipe is joined by using threaded fittings. The fittings are sized by the size pipe that
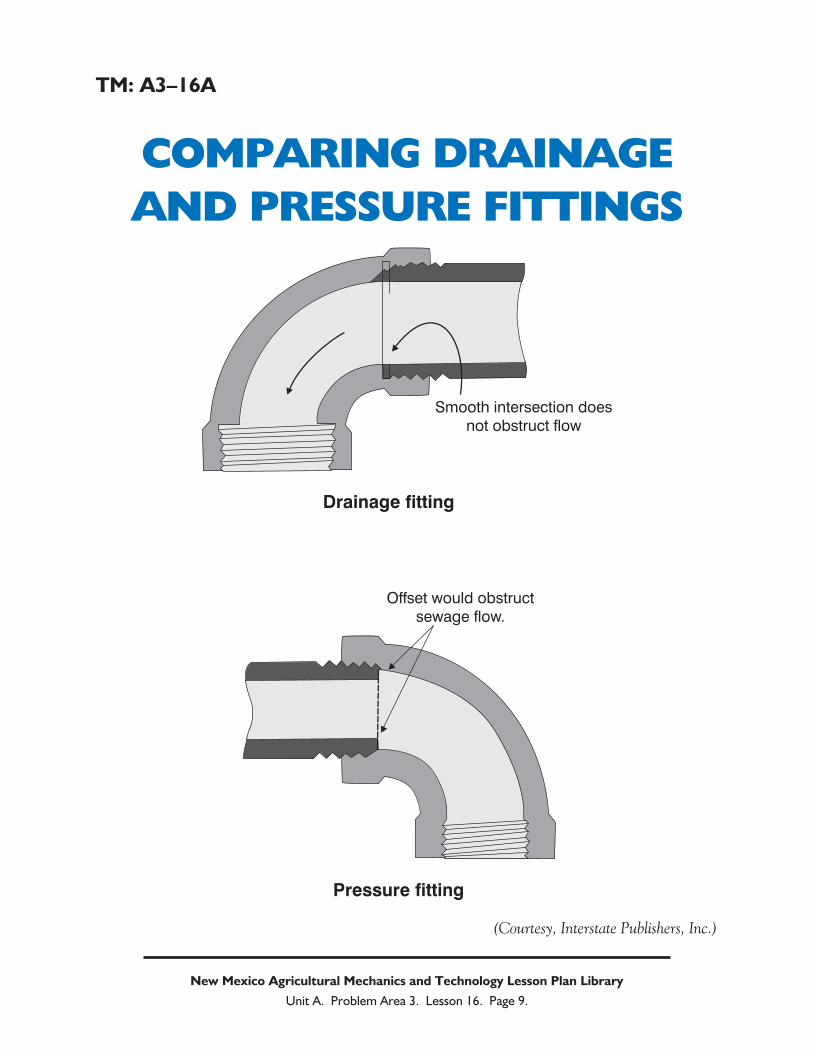
they fit on. Drainage fittings leave a smooth, unobstructed flow and can be used for air,
gas, and water, as well as drainage lines. Pressure fittings create an offset so they are suit-
able for air, gas, and water, but not for drainage lines since they tend to clog. Pipe fittings
come in a variety of shapes and sizes. Pipe nipples are short pieces of pipe threaded on
both ends. A coupling is used to join two pieces of pipe together that you do not intend
to disassemble. A union is a fitting that joins two pieces of pipe but can be unscrewed at
any time. Pipe elbows, either 45 or 90 degree, have a piece of pipe threaded into both
ends. Street ells, either 45 or 90 degree, have a piece of pipe threaded into one end and
another fitting screwed onto the outside of the other end. Pipe tees allow three pieces of
pipe to be threaded into them. A reducing tee allows a change in size from the input pipe
to the output pipe. A pipe cap screws onto the outside of a pipe while a pipe plug screws
New Mexico Agricultural Mechanics and Technology Lesson Plan Library
Unit A. Problem Area 3. Lesson 16. Page 3.
Page 4
into a fitting. A reducing bushing used in connection with a fitting allows you to change
sizes of pipe from the input to the output side. Other fittings such as the floor flange and
pipe cross are available for special uses.
Use readings in the recommended textbooks to help students in understanding this topic. Show samples of
galvanized pipe, pipe nipples, and pipe fittings. Use the samples and TM: A3–16A and TM: A3–16B to
learn identify the materials.
Objective 2: Describe how to measure, mark, cut, ream, thread, and join pipe.
Anticipated Problem: How is galvanized pipe measured, marked, cut, reamed, threaded, and
joined?
II. Careful planning will result in fewer joints, fewer fittings, less expense, and less work.
Remember that the size of a pipe fitting is determined by the size of pipe it will fit. Also
remember that the size of wrought iron pipe is determined by measuring the inside diameter.
A. When measuring pipe length before cutting, take the total length needed, minus the
length of the fittings, plus the distance the pipe is to be screwed into the standard fit-
tings.
B. Pencil or chalk marks on steel pipe should be considered only rough, temporary marks,
because they may be rubbed off easily. Use a three-cornered file or scratch awl to make a
permanent mark on the pipe prior to cutting.
C. To cut the pipe, first secure the pipe in a pipe vise. The pipe may be cut with a hand
hacksaw. Moderate pressure should be applied on the blade while using long, moderately
slow strokes. Release the pressure on the backstroke. Select a hacksaw blade that has
two or more teeth in contact with the pipe at all times (18, 24, or 32 teeth per inch).
Keep the blade stretched tight in the saw frame and take care to keep the saw cutting
square with the pipe.
D. A power hacksaw is not only easier to use than a hand hacksaw, but also more likely to
result in square cuts. Power hacksaws offer the advantage of a built-in vise to secure the
pipe while it is being cut.
E. A wheel type pipe cutter, probably the best way to cut pipe, has two guide wheels and
one cutting wheel that is tightened against the pipe as the cutter is rotated around the
pipe. Continue tightening as the cutter is rotated until the pipe is cut in two. The pipe
cutter leaves a smoother end on the pipe than a hacksaw does, but forms a burr inside
that must be reamed out.
F. Reaming is the process of removing raised places or burrs from the inside of a pipe that
reduces the inside diameter of the pipe. Reamers are available to be used with a brace, as
a T-handle reamer, or as a ratchet reamer.
G. To thread pipe, first grind a slight taper on the end of the pipe and then clamp the pipe
securely in a vise. Place the correct size pipe guide and die into the pipe threader. Posi-
tion the threader on the pipe, guide end first. Apply uniform pressure and turn the
threader slowly. As soon as the threader begins to cut into the pipe, apply thread cutting
New Mexico Agricultural Mechanics and Technology Lesson Plan Library
Unit A. Problem Area 3. Lesson 16. Page 4.
Page 5
oil. Do not turn the die back and forth when cutting threads or the threads may be
chipped. Continue to turn the threader onto the pipe until about one thread projects
through the die. Before removing the pipe threader, tap the cuttings from the die or blow
them out with compressed air.
H. Now that threading is completed, the pipe and fittings can be joined. To prevent leaks,
use a pipe compound or Teflon tape on the pipe threads. Pipe compound may be pur-
chased as a pipe stick or as a paste in a can with a brush attached to the lid. Thick paint
might be suitable for permanent installation. Pipe compound or Teflon tape would be
better choices when the pipework might need to be disassembled later. Once the joint
sealer is applied, screw the pipe and fitting together by hand. When you can no longer
turn them by hand, use two pipe wrenches, one to hold the pipe and one to turn the fit-
ting to finish the job.
Have students read the suggested chapters in the recommended textbooks. They contain good introductory
information on the content associated with this objective. Use TM: A3–16C to illustrate the measuring,
marking, cutting, reaming, and threading of galvanized pipe. Demonstrate the techniques and have the
students use LS: A3–16A to do the skills.
Review/Summary. Review the galvanized pipe fittings. Review the measuring, marking,
cutting, reaming, threading, and joining of galvanized steel pipe using the transparencies.
Application. Using LS: A3–16A: Measure, mark, cut, ream, thread, and join galvanized
pipe.
Evaluation. Take the written test and evaluate the skills demonstrated on the lab sheet
exercises.
Answers to Sample Test:
Part One: Matching
1 = d, 2 = g, 3 = c, 4 = k, 5 = h, 6 = e, 7 = j, 8 = f, 9 = b, 10 = i, 11 = a, 12 = l
Part Two: Completion
1. triangular file, scratch awl
2. hacksaw
3. wheel type pipe cutter, reamed
4. guide
5. one
6. inside
7. rust or corrode
New Mexico Agricultural Mechanics and Technology Lesson Plan Library
Unit A. Problem Area 3. Lesson 16. Page 5.
Page 6
Part Three: Short Answer
1. Determine the total length needed. Subtract the length of the two fittings and add the
length of the pipe that will thread into the fittings.
2. Seal pipe threads with pipe compound, Teflon tape, and thick paint.
New Mexico Agricultural Mechanics and Technology Lesson Plan Library
Unit A. Problem Area 3. Lesson 16. Page 6.
Page 7
Sample Test Name_____________________________________
Test
Lesson A3–16: Working with Galvanized Pipe
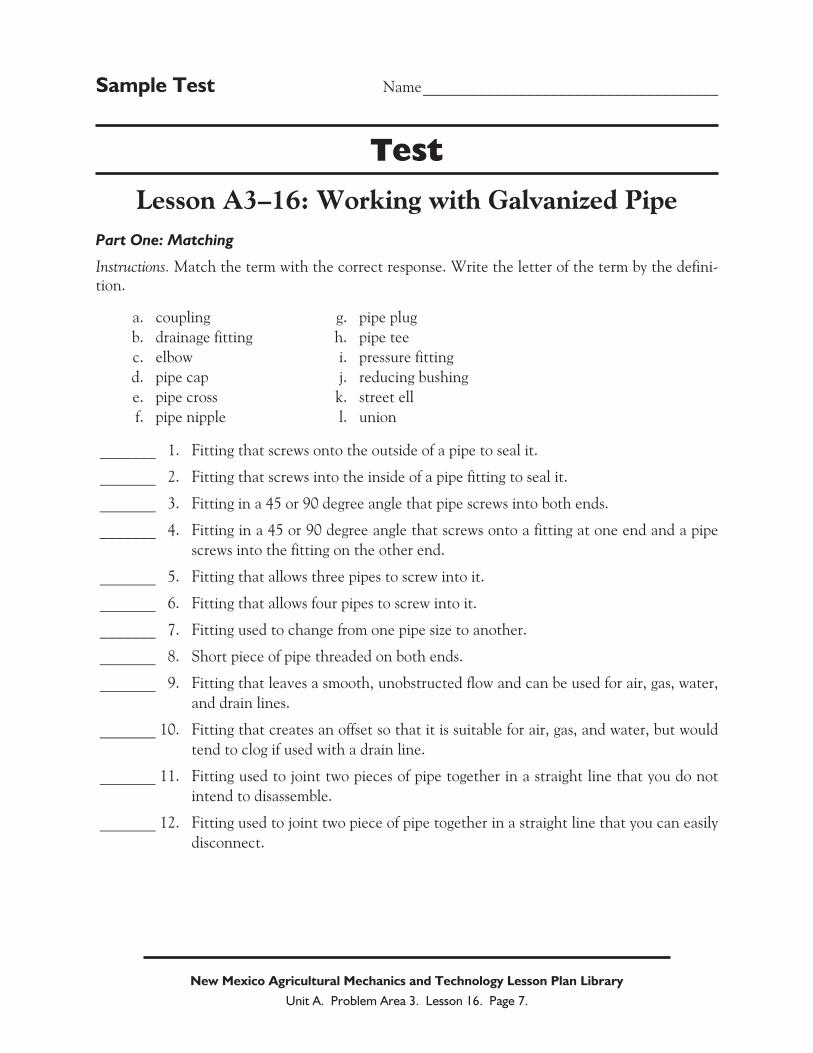
Part One: Matching
Instructions. Match the term with the correct response. Write the letter of the term by the defini-tion.
a. coupling g. pipe plug
b. drainage fitting h. pipe tee
c. elbow i. pressure fitting
d. pipe cap j. reducing bushing
e. pipe cross k. street ell
f. pipe nipple l. union
_______ 1. Fitting that screws onto the outside of a pipe to seal it.
_______ 2. Fitting that screws into the inside of a pipe fitting to seal it.
_______ 3. Fitting in a 45 or 90 degree angle that pipe screws into both ends.
_______ 4. Fitting in a 45 or 90 degree angle that screws onto a fitting at one end and a pipe
screws into the fitting on the other end.
_______ 5. Fitting that allows three pipes to screw into it.
_______ 6. Fitting that allows four pipes to screw into it.
_______ 7. Fitting used to change from one pipe size to another.
_______ 8. Short piece of pipe threaded on both ends.
_______ 9. Fitting that leaves a smooth, unobstructed flow and can be used for air, gas, water,
and drain lines.
_______ 10. Fitting that creates an offset so that it is suitable for air, gas, and water, but would
tend to clog if used with a drain line.
_______ 11. Fitting used to joint two pieces of pipe together in a straight line that you do not
intend to disassemble.
_______ 12. Fitting used to joint two piece of pipe together in a straight line that you can easily
disconnect.
New Mexico Agricultural Mechanics and Technology Lesson Plan Library
Unit A. Problem Area 3. Lesson 16. Page 7.
Page 8
Part Two: Completion
Instructions. Provide the word or words to complete the following statements.
1. Mark pipe with a __________ ___________ or ____________ _________________.
2. Using a power _________________ to cut pipe has the advantage of a built-in vise.
3. Cutting with a __________ ___________ __________ leaves a burr on the inside that must
be ____________________ out.
4. To thread pipe, place the threader ____________ end first onto the pipe.
5. When threading pipe, thread until _________ thread comes through the threader.
6. The size of galvanized steel pipe is by the ___________ (inside or outside) diameter of the
pipe.
7. Galvanized, rather than black pipe, should be used for water lines because it is less likely to
___________________.
Part Three: Short Answer
Instructions. Provide information to answer the following questions.
1. Describe how the correct length to cut a piece of pipe with two fittings screwed onto it
would be determined: (use the back of this test sheet)
2. What materials could be used on threads to seal pipe fittings?
New Mexico Agricultural Mechanics and Technology Lesson Plan Library
Unit A. Problem Area 3. Lesson 16. Page 8.
Page 9
TM: A3–16A
COMPARING DRAINAGE
AND PRESSURE FITTINGS
New Mexico Agricultural Mechanics and Technology Lesson Plan Library
Unit A. Problem Area 3. Lesson 16. Page 9.
Smooth intersection does
not obstruct flow
Drainage fitting
Offset would obstruct
sewage flow.
Pressure fitting
(Courtesy, Interstate Publishers, Inc.)
Page 10
TM: A3–16B
COMMON GALVANIZED
PIPE FITTINGS
New Mexico Agricultural Mechanics and Technology Lesson Plan Library
Unit A. Problem Area 3. Lesson 16. Page 10.
Union
Nipples
long
short close
Bushing Plug
Cap
Straight Tee 90° Street Elbow Straight Cross
Coupling90° Elbow
45° Elbow
(Courtesy, Interstate Publishers, Inc.)
Page 11
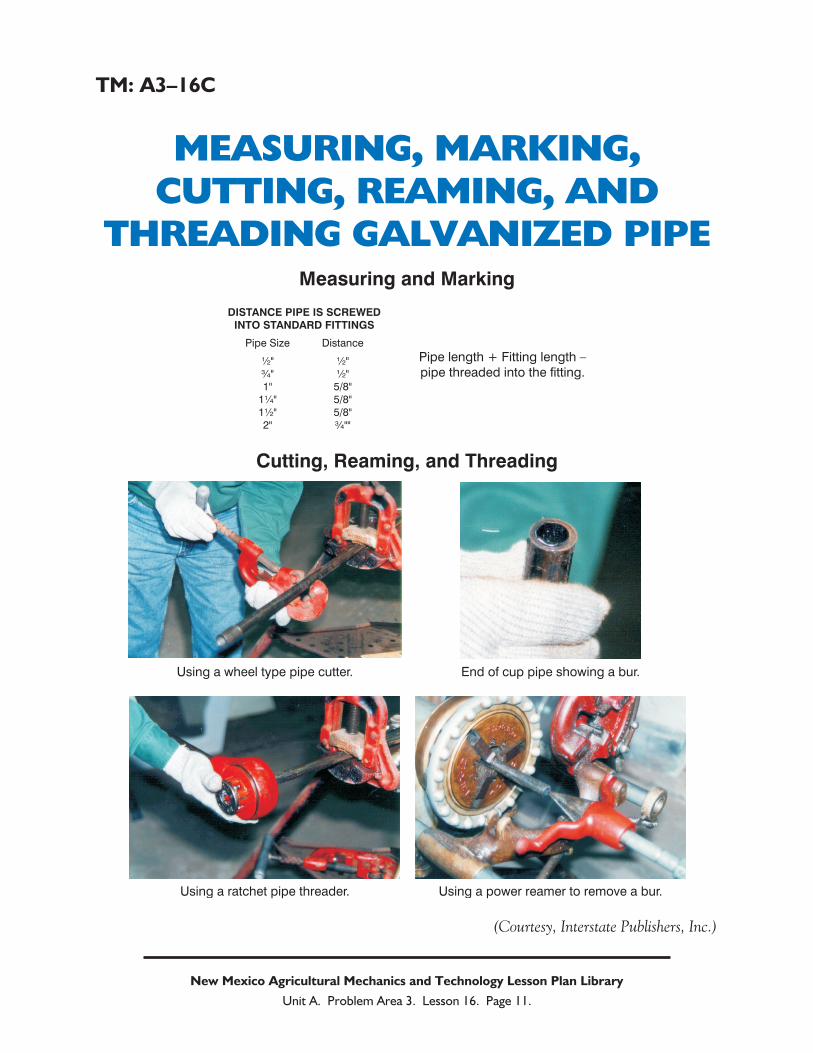
TM: A3–16C
MEASURING, MARKING,CUTTING, REAMING, AND
THREADING GALVANIZED PIPE
New Mexico Agricultural Mechanics and Technology Lesson Plan Library
Unit A. Problem Area 3. Lesson 16. Page 11.
Using a wheel type pipe cutter.
Using a power reamer to remove a bur.Using a ratchet pipe threader.
End of cup pipe showing a bur.
Pipe length + Fitting length –
pipe threaded into the fitting.
Measuring and Marking
Cutting, Reaming, and Threading
DISTANCE PIPE IS SCREWEDINTO STANDARD FITTINGS
Pipe Size
½"
¾"
1"
1¼"
1½"
2"
Distance
½"
½"
5/8"
5/8"
5/8"
¾""
(Courtesy, Interstate Publishers, Inc.)
Page 12
LS: A3–16A Name_____________________________________
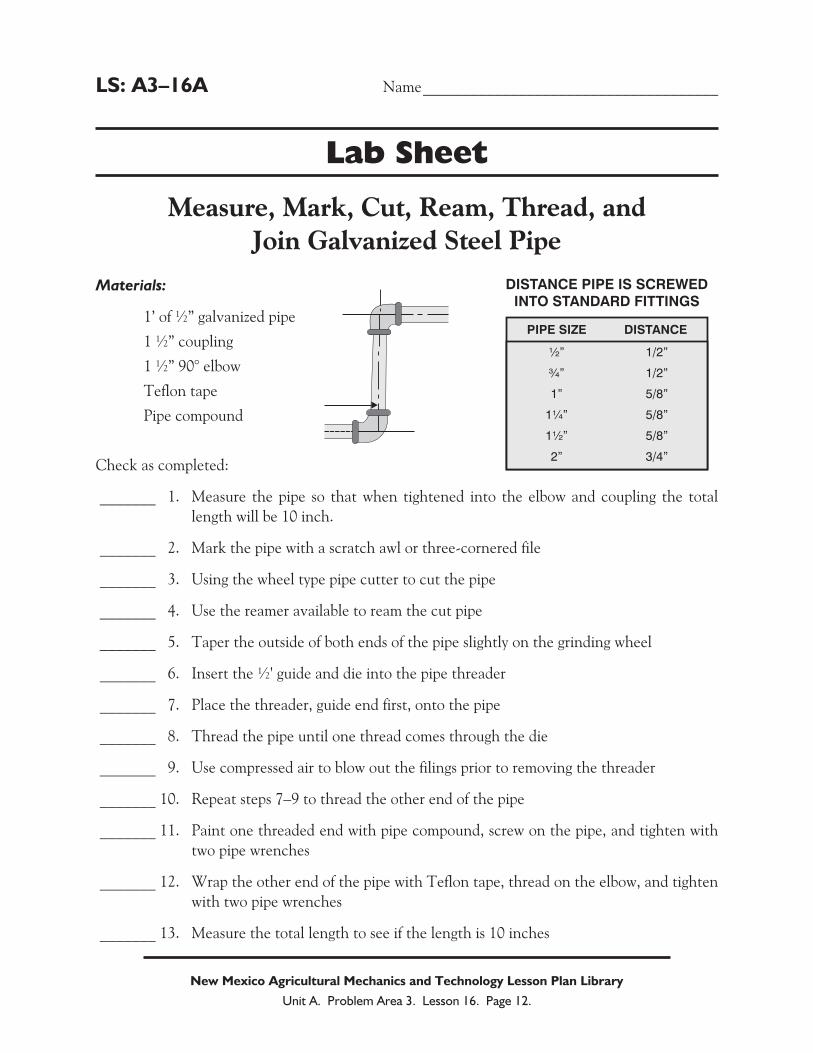
Lab Sheet
Measure, Mark, Cut, Ream, Thread, and
Join Galvanized Steel Pipe
Materials:
1’ of ½” galvanized pipe
1 ½” coupling
1 ½” 90° elbow
Teflon tape
Pipe compound
Check as completed:
_______ 1. Measure the pipe so that when tightened into the elbow and coupling the total
length will be 10 inch.
_______ 2. Mark the pipe with a scratch awl or three-cornered file
_______ 3. Using the wheel type pipe cutter to cut the pipe
_______ 4. Use the reamer available to ream the cut pipe
_______ 5. Taper the outside of both ends of the pipe slightly on the grinding wheel
_______ 6. Insert the ½' guide and die into the pipe threader
_______ 7. Place the threader, guide end first, onto the pipe
_______ 8. Thread the pipe until one thread comes through the die
_______ 9. Use compressed air to blow out the filings prior to removing the threader
_______ 10. Repeat steps 7–9 to thread the other end of the pipe
_______ 11. Paint one threaded end with pipe compound, screw on the pipe, and tighten with
two pipe wrenches
_______ 12. Wrap the other end of the pipe with Teflon tape, thread on the elbow, and tighten
with two pipe wrenches
_______ 13. Measure the total length to see if the length is 10 inches
New Mexico Agricultural Mechanics and Technology Lesson Plan Library
Unit A. Problem Area 3. Lesson 16. Page 12.
DISTANCE PIPE IS SCREWEDINTO STANDARD FITTINGS
PIPE SIZE
½”
¾”
1”
1¼”
1½”
2”
1/2”
1/2”
5/8”
5/8”
5/8”
3/4”
DISTANCE